

Page 1
Use & Care
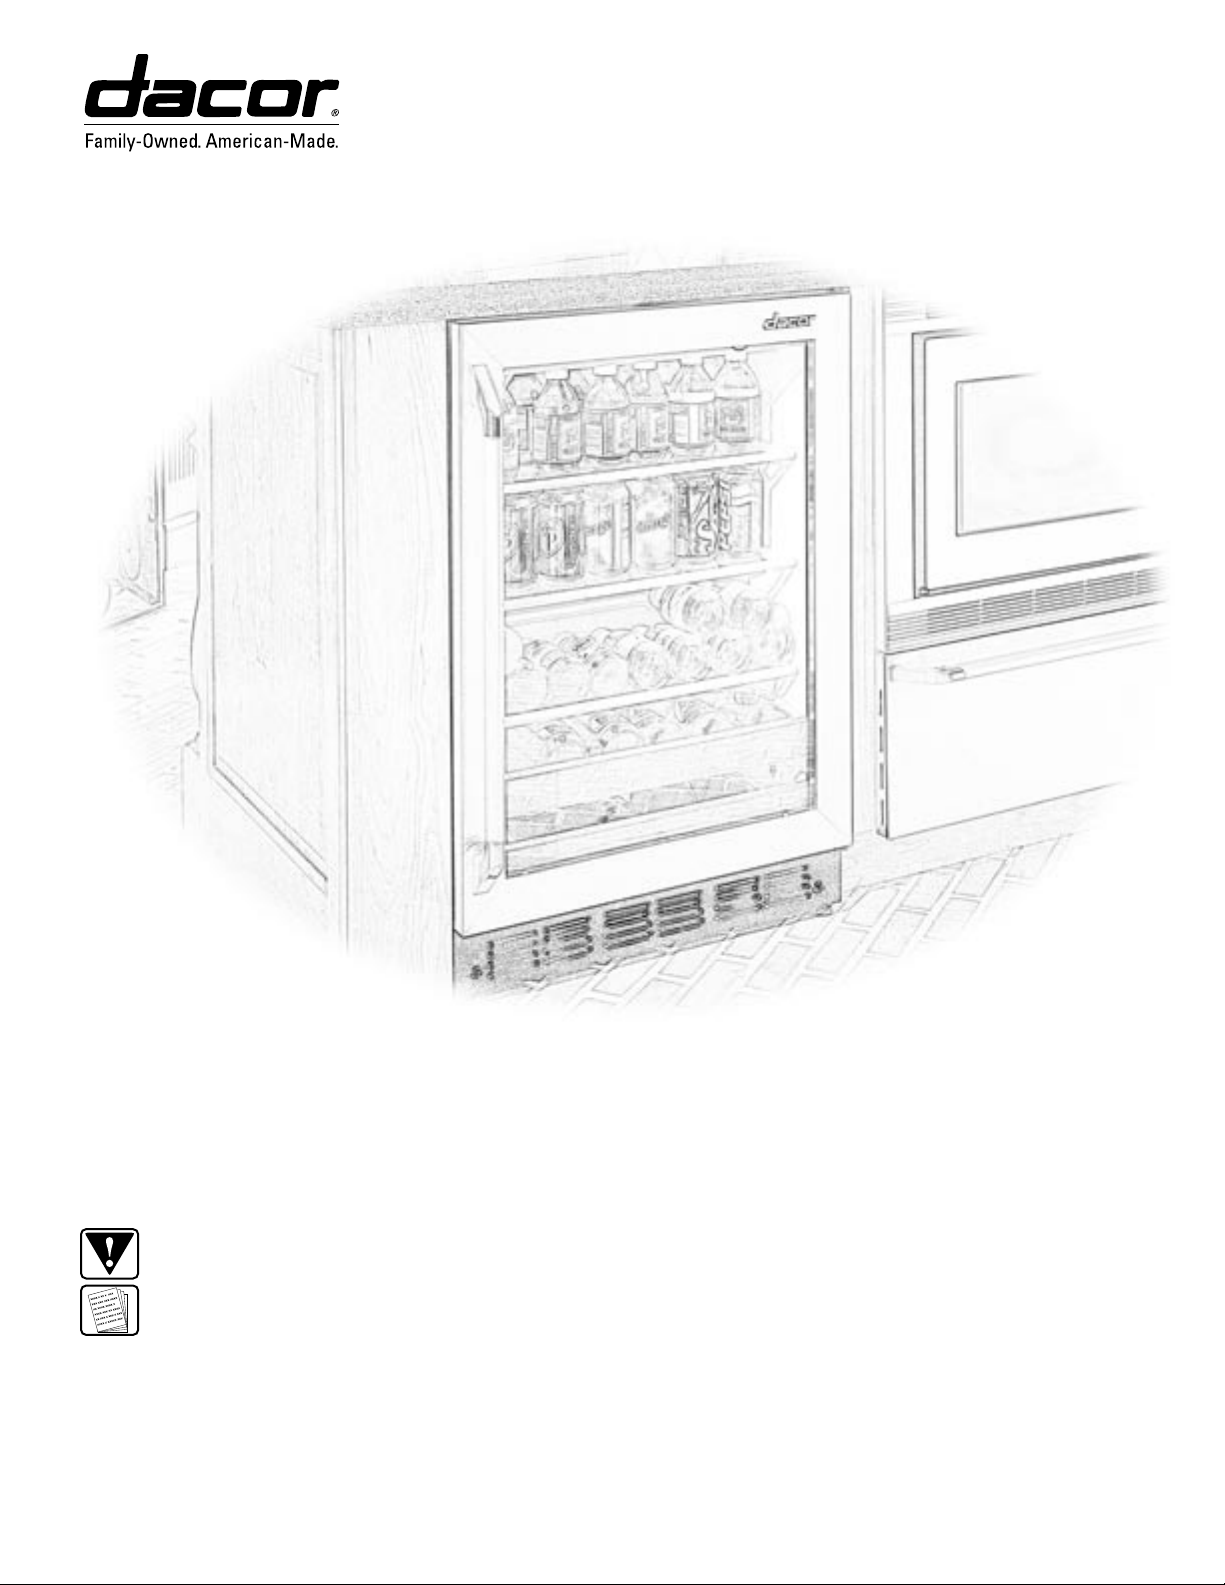
Wine Steward/Beverage Cooler
SAFETY IS EVERYONE’S RESPONSIBILITY. ALL DACOR APPLIANCES ARE DESIGNED
AND CONSTRUCTED TO GIVE YOU MANY YEARS OF SAFE OPERATION. THE
OPERATION WILL BE FURTHER ENHANCED IF PROPER CARE AND JUDGEMENT ARE
EXERCISED IN THE USE AND MAINTENANCE OF THIS APPLIANCE.
WARNINGS:
Must be followed carefully to avoid personal injury or damage.
NOTES:
Contains helpful hints and tips.
Please Read Before Using Your Appliance
Part No. 65422 Rev. A
IMPORTANT INFORMATION
• Operating Instructions
• Care and Cleaning Instructions
• Safety Tips
Place Serial Number Label Here
Page 2
Dear DACOR Consumer,
Congratulations! You have purchased the very latest in kitchen appliances. Your new DACOR product offers features,
styling and performance not found in any other appliance.
Please read this manual before operating your new appliance. It
is imperative that you read the IMPORTANT
INSTRUCTIONS section and become familiar with the controls and procedures to understand the full potential of this
product.
All DACOR appliances are designed and manufactured to meet the highest quality standards. Each unit is thoroughly
tested. Should you have a problem, however, please first check the PROBLEM SOLVING section in this manual. This
section contains a checklist of possible problems and solutions that may save you the time and expense of an
unnecessary service call.
If you cannot readily find the solution to the problem, please contact your nearest DACOR Authorized Service
Representative. In the unlikely event they are unable to solve your problem to your satisfaction, please contact
DACOR Customer Service.
Web site: www.dacor.com
For a Dealer/Service: (800) 772-7778
Corporate Phone: (800) 793-0093
Fax: (626) 441-9632
Business Hours: 7:30 A.M. to 4:00 P.M. Pacific Time
DACOR Customer Service
1440 Bridge Gate Dr.
Diamond Bar, CA 91765
Thank you for selecting DACOR for your home. We are dedicated to you and ensure that this appliance in your home
will bring years of outstanding performance for your family and fr
iends.
Sincerely,
S. Michael Joseph
Chairman/CEO
i
ncere
l
y,
S
.
Micha
e
l
Jose
ph
Page 3
TABLE OF CONTENTS .................................... 1
Purpose of this Manual ................................ 1
Product Registration .................................... 1
IMPORTANT INSTRUCTIONS ......................... 1
What To Do .................................................. 1
Risk of Child Entrapment ............................. 1
Refrigerants ................................................. 1
APPLIANCE OPERATION ............................. 2-3
Temperature Control .................................... 3
Interior Light and Switch .............................. 2
Glass Shelves .............................................. 2
Removing Full Extension Drawers ............... 2
Wood Drawer Fronts .................................... 3
Loading Tips and Suggestions ..................... 4
CARE AND CLEANING .................................... 3
Cabinet ......................................................... 3
Glass Door ................................................... 3
Door Gasket ................................................. 3
Cleaning the Inside ...................................... 3
Drain Hole .................................................... 3
Light Bulb Replacement ............................... 3
In the Event of a Power Failure .................... 3
Gasket .......................................................... 3
PROBLEM SOLVING ..................................... 4-5
Troubleshooting ........................................4-5
Product Maintenance ................................... 5
If You Need Service ..................................... 5
PRODUCT WARRANTY ................................... 8
What Is Covered .......................................... 8
What Is Not Covered .................................... 8
What to Do
1. Begin by ensuring proper installation and
grounding of the appliance by a qualified
technician according to the accompanying
Installation Instructions. Have the installer
show you where the fuse or junction box is
located so that you know how and where to
turn off power.
2. Ensure that the appliance is used only by
those individuals who are able to operate it
properly.
3. Use the appliance only for tasks expected
at home as outlined in this manual.
4. Properly clean and maintain the appliance
as recommended in this manual.
5. Clean only those parts listed in this manual.
Risk of Child Entrapment
WARNING:
Child entrapment and suffocation are not
problems of the past. Junked or abandoned
refrigeration products are still dangerous…even
if they will sit for “just a few days.” If you are
getting rid of your old appliance, please follow
these instructions to help prevent accidents.
Before You Throw Away Your Old
Refrigeration Product:
• Take off the door.
• Leave the shelves in place so that
children may not easily climb inside.
Refrigerants
All refrigeration products contain refrigerants,
which under federal law must be removed prior
to product disposal.
If you are getting rid of an old refrigeration
product, check with the company handling the
disposal about what to do.
Purpose of This Manual
This Use & Care Manual is designed to enable
you to properly operate and maintain your new
Dacor appliance. Please keep this manual
handy for easy access and quick reference.
Additional information may be requested by
e-mailing, writing or phoning the DACOR
Customer Service Department. The address
and phone number of this department are listed
on the inside front cover of this manual.
Product Registration
Please enter the information requested in the spaces provided below. This information will be required in the unlikely event that a service call
becomes necessary:
Model No. Serial No.
Date Purchased Date Installed
Purchased From
Address
If you received a damaged product,
immediately contact your dealer or builder.
Do not install or use a damaged appliance.
Phone
1
Page 4
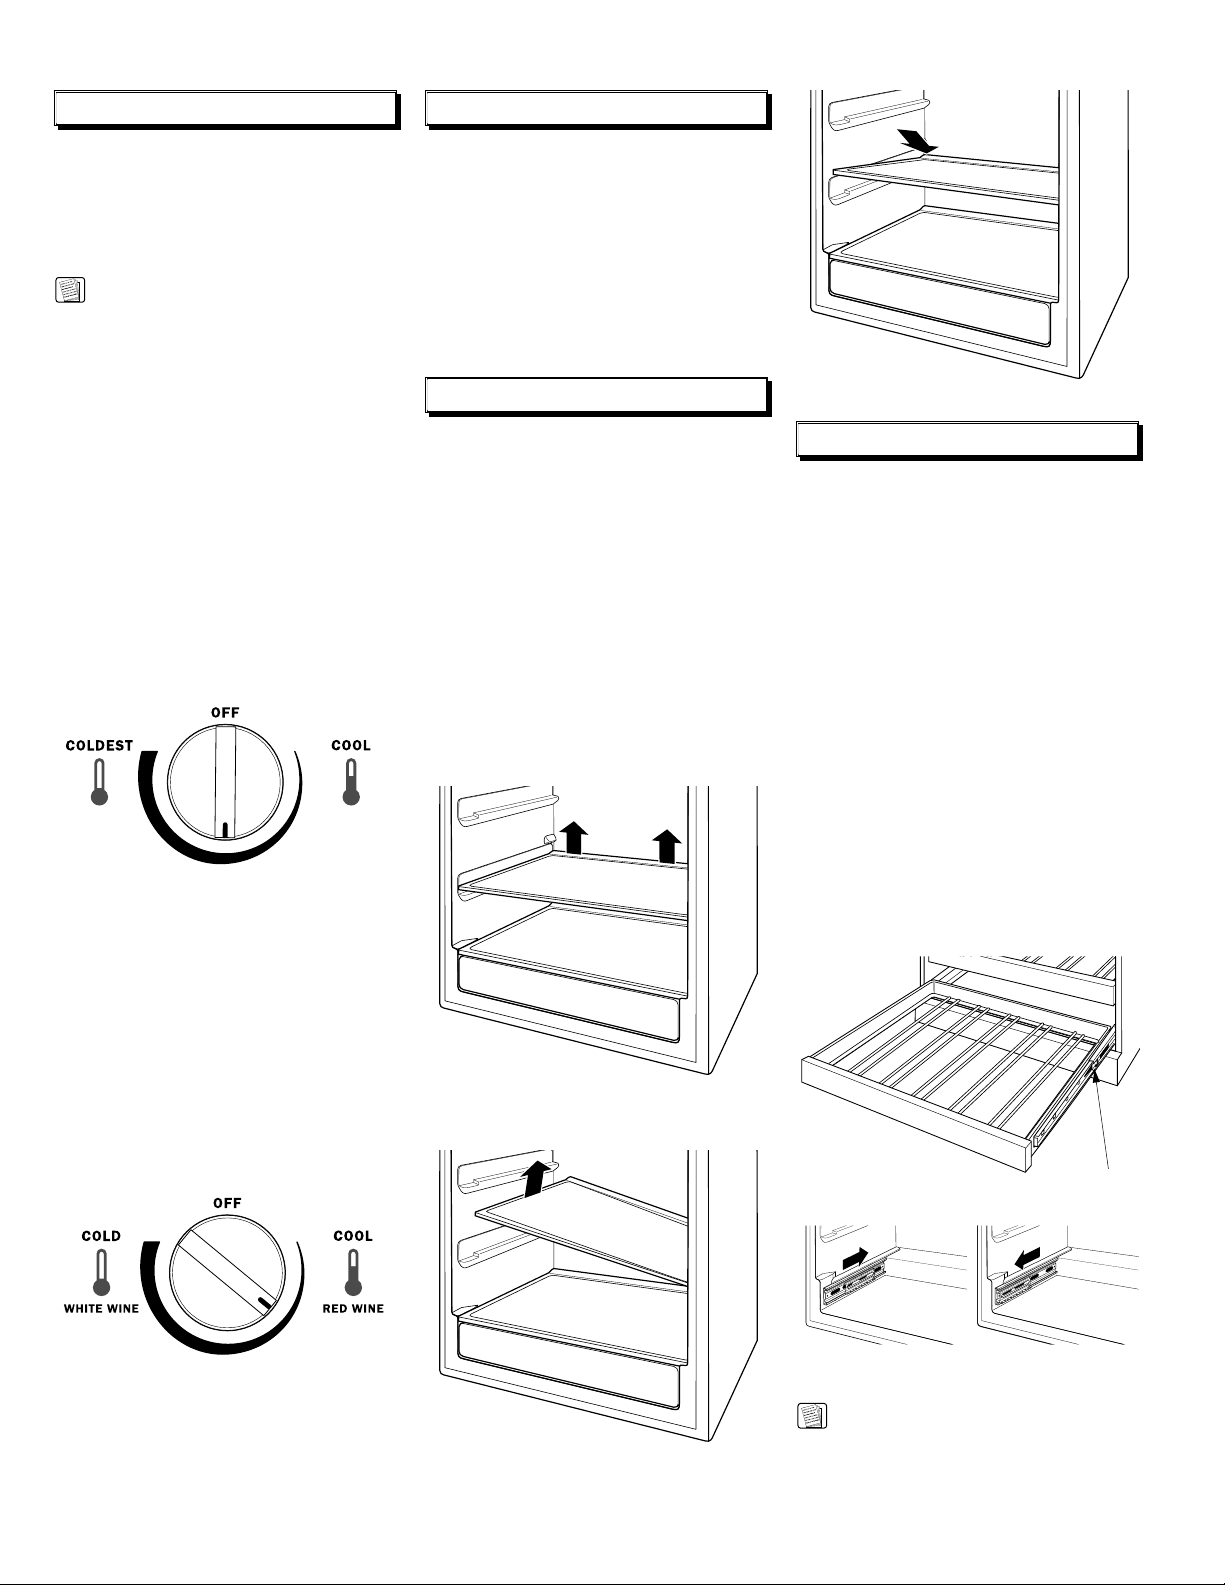
Temperature Control Interior Light and Switch
Tab (push tab down on right
drawer guide, pull tab up on
left drawer guide)
Pull small slide sub assembly
completely forward
To replace, push drawer slide
arm back into unit
The operating temperatures of the appliance
range from the low forties to the mid fifties.
Do not install the appliance where the
temperature will go below 55°F (13°C) or above
90°F (32°C).
NOTES:
As with any refrigeration product, there is a
slight temperature variance at different locations
within the cabinet.
Temperatures at the bottom of the cabinet will
be cooler than temperatures at the top of the
cabinet.
Position your wine inventory accordingly (i.e.
white wines in the cooler zones and red in the
warmer zones).
When the temperature is adjusted, allow 24
hours for the unit to stabilize.
Beverage Cooler
To set the control, turn it to the midpoint setting
(approximately 45ºF). Once the beverage cooler
is loaded, allow at least 24 hours before making
any adjustments to the initial setting.
The interior light makes it easy to view your
wine/beverage labels and enhances the display
of your collection.
When the switch is in the OFF position, the
light comes on only when the door is opened.
When the switch is in the ON position, the light
remains on continuously for your maximum
viewing pleasure. For best viewing do not store
a bottle on the top shelf directly under the light.
Remember to turn off the light when it is no
longer needed.
Glass Shelves
Tempered glass shelves in the beverage cooler
unit are removable for easy cleaning or for
storing larger items.
To remove a shelf, open the door completely to
avoid potential damage to the gasket. Lift up on
the back of the shelf slightly. Tilt the shelf to one
side at an angle while pulling forward.
To replace a shelf, open the door completely
to avoid potential damage to the gasket. Tilt the
shelf to one side at an angle and slide toward
the back wall, placing one side onto the shelf
support. Place the other side onto the opposite
shelf support. Ensure rear locking tabs are
engaged. When installed properly, the shelf will
not slide forward when gently pulled.
Place in slots when replacing the shelf
Removing Full Extension Drawers
The bottom full extension drawers pull out so
bottles can conveniently be added or removed.
The upper full extension slide can be removed
for magnums or larger bottles.
To remove:
1. Pull the full extension drawer out to the STOP
position.
2. Push the tab on right drawer guide down
while pulling the tab on left guide up, and pull
the drawer out.
To replace:
1. Push the drawer slide arm back into the unit.
Beverage Cooler Temperature Controls
Wine Steward
The RED WINE setting will provide a storage
temperature of approximately 55ºF (13ºC),
which is optimum for the storage for red wine.
The WHITE WINE setting will provide a storage
temperature of approximately 45ºF (7ºC), which
is optimum for white wine.
To set the control, turn it to the RED WINE
setting. Once the bottles are loaded, allow at
least 24 hours before making any adjustments
to the initial setting.
Wine Cooler Temperature Controls
2. Pull the small slide sub assembly completely
forward.
3. Insert the sides of the drawer back into the
guides.
4. Push until the tabs lock into place.
To remove, lift up on the back of the shelf
Tilt the shelf at an angle while removing or replacing
2
NOTE:
Make sure the tabs on the full extension drawer
guides are fully engaged before loading any
bottles. Pull the drawers out all the way to the
STOP position and push back in several times
to make sure locking tabs are properly engaged.
Page 5

Wood Drawer Fronts
Drain hole
Care and Cleaning
Light Bulb Replacement
The full extension drawer fronts on the beverage
cooler are unfinished maple wood. During use,
oil from hands may accumulate and stain the
wood.
• The drawer fronts may be stained and
sealed to match adjacent cabinetry. The
tinted glass will make the stained wood
appear darker. A true color match can be
seen only when the door is opened.
• Apply the stain and sealer according to
the manufacturer’s instructions. To avoid
unpleasant odor, keep the door open to
ventilate and allow the stain/sealer to dry
completely before using the product.
NOTE:
Natural wood may vary slightly in grain and
color.
Loading Tips and Suggestions
WARNING:
Do not allow children to climb, stand or hang on
the beverage cooler shelves or full extension
drawers. They could seriously injure themselves
and possibly cause damage to the beverage
cooler.
NOTE:
This unit is for storing beverages only and not
intended for the storage of perishable foods.
The bottom two full extension drawers hold six
bottles each and are loaded with necks facing
the rear. Tall bottles should not be loaded on the
bottom drawer because they may prevent the
door from closing.
The top five full extension drawers (EWC model
only) each hold eight bottles, two deep with the
necks alternating front to back or nine bottles,
alternating with necks pointing inward.
• The bottles on the top full extension
drawer, directly under the light, will be
exposed to a slightly higher temperature
when the light is on. Position your wines
accordingly and remember to turn off the
light when it is no longer needed.
• Keep wines that you plan to use for
everyday drinking and entertaining
on the front half of the full extension
drawers where labels are completely
visible. Place wines for aging or longer
term storage in the rear.
WARNING:
Unplug the appliance before cleaning.
Cabinet
The exterior surfaces can be washed with mild
soap and water. Rinse thoroughly with clear
water. Never use abrasive scouring powders.
Glass Door
Use a glass cleaner or mild soap and water and
a soft cloth to clean the glass door. Do not use
any abrasive powders.
Door Gasket
The vinyl gasket may be cleaned with mild soap
and water, a baking soda solution or a mild
scouring powder. Rinse well.
After cleaning the door gasket, apply a thin layer
of paraffin wax or petroleum jelly to the door
gasket at the hinge side. This helps keep the
gasket from sticking and bending out of shape.
Cleaning the Inside
Turn the appliance OFF or unplug the unit
before cleaning. Use a slightly damp cloth or
sponge when cleaning around switches, lights
or controls.
Use warm water and baking soda solution—
about a tablespoon (15 ml) of baking soda to
a quart (1 liter) of water. This both cleans and
neutralizes odors. Thoroughly rinse and wipe
dry.
Other parts of the appliance—including the
door gaskets, full extension drawers and glass
shelves—can be cleaned the same way.
Avoid cleaning cold glass shelves with hot water
because the extreme temperature difference
may cause them to break. Handle glass shelves
carefully. Rough handling of tempered glass can
cause it to shatter.
Drain Hole
Periodically check the drain hole and channel for
any debris. If the drain is blocked, condensation
will not drain properly.
To check and clean the drain hole, remove
the bottom two glass shelves. Sweep a damp
cloth along the channel in the back of the
beverage cooler. Use a finger to sweep away
any debris from the drain hole.
Unplug the beverage cooler before replacing the
light bulb.
To remove the light shield, push in the tab on
the left side of the shield and lower it. Replace
with a 15 watt appliance bulb.
In the Event of a Power Failure
If the power fails, open the door as infrequently
as possible to maintain the temperature.
Do not store or use gasoline or other flammable
vapors and liquids in the vicinity of this or any
other appliance.
3
Page 6

Troubleshooting
Unnecessary service calls may be expensive, frustrating and time consuming. Before you call for service, please review the potential problems, possible
causes and remedies shown in the table below.
Problem
1. Appliance Does Not Operate
2. Vibration or Rattling (Slight vibration is normal).
3. Motor Operates for Long Periods or Cycles On and Off Frequently
4. Compartment Too Warm
Possible Cause
Appliance may be in defrost cycle when motor does not operate for
about 30 minutes.
If interior light is not on, appliance may not be plugged in at wall outlet.
Push the plug completely into the wall outlet.
The fuse is blown/circuit breaker is tripped. Replace fuse or reset the
breaker.
Adjust the leveling legs as shown in the Installation Instructions.
Normal when appliance is first plugged in. Wait 24 hours for the
appliance to completely cool down.
Often occurs when large amounts of beverages are placed in appliance.
This is normal.
Door left open or package holding door open.
Hot weather or frequent door openings. This is normal.
Temperature control set at the coldest setting. See Temperature Control.
Allow 24 hours for temperature to change.
Temperature control not set cold enough. See Temperature Control.
Allow 24 hours for temperature to change.
Warm weather or frequent door openings.
5. Appliance Has Odor
6. Door Not Closing Properly
7. Moisture Forms on Outside of Appliance
8. Frost or Moisture Collects Inside
9. Interior Light Does Not Work
Door left open for long time.
Package may be holding door open.
Interior needs cleaning. See Care and Cleaning.
Keep open box of baking soda in appliance; replace every 3 months.
Door gasket is sticking or folding over. Apply petroleum jelly or paraffin
wax to the face of the gasket.
The door is hitting an internal component inside the appliance. Adjust
interior components to prevent interference.
Not unusual during periods of high humidity. If bothersome, wipe surface
dry; otherwise. moisture will evaporate in time.
Door left open or package holding door open.
Too frequent or too long door openings.
In humid weather, air carries moisture into appliance when door is
opened. Unit will dissipate moisture in time. If bothersome, wipe surface
dry.
Temperature control set at coldest setting.
No power at outlet.
Light bulb needs replacing. See Care and Cleaning.
Troubleshooting Guide
4
Page 7

Troubleshooting
Problem
10. Hot Air From Bottom of Appliance
11. Appliance Never Shuts Off But Temperatures Are OK
Product Maintenance
No maintenance, other than the CARE AND
CLEANING INSTRUCTIONS identified in this
Use & Care Manual, should be attempted
by the owner/operator. All other maintenance
and service must be performed by a qualified
appliance technician.
If You Need Service…
First, review the recommended checks listed in
the preceding Troubleshooting Guide. Then,
be certain that the appliance has been installed
properly and is being operated correctly.
Familiarize yourself with the warranty terms and
conditions listed in the PRODUCT WARRANTY
section.
If the above checks have been completed and
the problem has not yet been remedied, call your
local authorized DACOR service representative.
Your dealer can normally provide the name
and telephone number of the nearest service
company.
DACOR works diligently to ensure your
satisfaction when service is necessary. However,
if you are not completely satisfied with the
service provided, contact the company that
performed the service and express why you are
not pleased. Normally, they will be willing and
able to resolve the problem.
If the service agency is not able to respond
effectively, call or write the DACOR Customer
Service Department. The phone number and
address of this department are listed on the
inside front cover of this manual. Please include
your telephone number if you choose to write.
We will then do our utmost to assure your
happiness and satisfaction.
What Is Covered
CERTIFICATE OF WARRANTIES
DACOR APPLAINCE
WITHIN THE FIFTY STATES OF THE
U.S.A., THE DISTRICT OF COLUMBIA AND
CANADA*:
FULL ONE-YEAR WARRANTY
If your DACOR product fails to function within
one year of the original date of purchase, due
to a defect in material or workmanship, DACOR
will remedy the defect without charge to you
or subsequent users. The owner must provide
proof of purchase, upon request, and have the
appliance accessible for service.
* Warranty is null and void if non-CSA approved
product is transported from the U.S.
OUTSIDE THE FIFTY STATES OF THE U.S.A.,
THE DISTRICT OF COLUMBIA AND CANADA:
LIMITED FIRST YEAR WARRANTY
If your DACOR product fails to function within
one year of the original date of purchase, due
to a defect in material or workmanship, DACOR
will furnish a new part, F.O.B. factory, to replace
the defective part. All delivery, installation
and labor costs are the responsibility of the
purchaser. The owner must provide proof of
purchase, upon request, and have the appliance
accessible for service.
What Is Not Covered
Possible Cause
Normal air flow cooling motor. In the refrigeration process, it is normal
that heat be expelled in the area under the appliance. Some floor
coverings are sensitive and will discolor at these safe and normal
temperatures.
Adaptive defrost keeps compressor running during door openings. This
is normal. The appliance will cycle off after the door remains closed for
two hours.
Normal operation in extreme temperatures.
Troubleshooting Guide
THE DISTRICT OF COLUMBIA AND CANADA,
ALL IMPLIED WARRANTIES, INCLUDING BUT
NOT LIMITED TO, ANY IMPLIED WARRANTY
OF MERCHANTABILITY OR FITNESS FOR
A PARTICULAR USE OR PURPOSE, ARE
LIMITED IN DURATION TO ONE YEAR FROM
THE DATE OF ORIGINAL PURCHASE. IN
NO EVENT SHALL DACOR BE LIABLE FOR
INCIDENTAL EXPENSE OR CONSEQUENTIAL
DAMAGES. NO WARRANTIES, EXPRESS OR
IMPLIED, ARE MADE TO ANY BUYER FOR
RESALE.
Some states do not allow limitations on how
long an implied warranty lasts, or do not allow
the exclusion or limitation of inconsequential
damages, so the above limitations or exclusions
may not apply to you. This warranty gives you
specific legal rights, and you may also have
other rights that vary from state to state.
• Service calls to educate the customer in
the proper use and care of the product.
• Failure of the product when used for
commercial, business, rental or any
application other than for residential
consumer use.
• Replacement of house fuses or fuse
boxes, or resetting of circuit breakers.
• Damage to the product caused by
accident, fire, flood or other acts of God.
• Breakage, discoloration or damage
to glass, metal surfaces, plastic
components, trim, paint, or other
cosmetic finish, caused by improper
usage or care, abuse, or neglect.
THE REMEDIES PROVIDED FOR IN THE
ABOVE EXPRESS WARRANTIES ARE
THE SOLE AND EXCLUSIVE REMEDIES.
THEREFORE, NO OTHER EXPRESS
WARRANTIES ARE MADE, AND OUTSIDE
THE FIFTY STATES OF THE UNITED STATES,
5
Page 8

Notes7Notes
6
Page 9

Page 10

Notes
8
Page 11

NO POSTAGE
NECESSARY
IF MAILED
IN THE
UNITED STATES
ATTN: WARRANTY PROCESSING DEPT
DACOR
1440 BRIDGEGATE DR STE 200
PO BOX 6532
DIAMOND BAR CA 91765-9861
BUSINESS REPLY MAIL
PERMIT NO. 4507
POSTAGE WILL BE PAID BY ADDRESSEE
FIRST-CLASS MAIL DIAMOND BAR CA
fold here
Page 12

Please visit www.dacor.com to activate your warranty online.
WARRANTY INFORMATION
IMPORTANT:
Your warranty for this product CANNOT BE ACTIVATED until this form has been returned to Dacor. If you have
purchased more than one Dacor product, Please return all forms in one envelope.
Please rest assured that under no conditions will Dacor sell your name or any of the information on this form for mailing list purposes. We
are very grateful that you have chosen Dacor products for your home and do not consider the sale of such information to be a proper way
of expressing our gratitude!
(Please Print or Type)
Owner’s Name:
Last First Middle
Street:
City: State: Zip:
Purchase Date: Email: Telephone:
Dealer:
City: State: Zip:
Your willingness to take a few seconds to fill in the section below will be sincerely appreciated. Thank you.
1. How were you first exposed to Dacor products? (Please check one only.)
A. T.V. Cooking Show F Builder
B. Magazine G. Architect/Designer
C. Appliance Dealer Showroom H. Another Dacor Owner
D. Kitchen Dealer Showroom I. Model Home
E. Home Show J. Other
cut herecut here
2. Where did you buy your Dacor appliances?
A. Appliance Dealer D. Builder
B. Kitchen Dealer E. Other
C. Builder Supplier
3. For what purpose was the product purchased?
A. Replacement only C. New Home
B. Part of a Remodeled D. Other
4. What is your household income?
A. Under $75,000 D. $150,000 – $200,000
B. $75,000 – $100,000 E. $200,000 – $250,000
C. $100,000 – $150,000 E. Over $250,000
5. For what purpose was the product purchased?
A. Cooktop C. Dishwasher
B. Oven D. Refrigerator
6. Would you buy or recommend another Dacor product?
Yes No
Comments:
Thank you very much for your assistance. The information you have provided will be extremely valuable in helping us plan for the future
and giving you the support you deserve.
Web Site: www.dacor.com
For a Dealer/Service: (800) 772-7778
Corporate Phone: (800) 793-0093
Place Serial Number Label Here
 Loading...