

Page 1
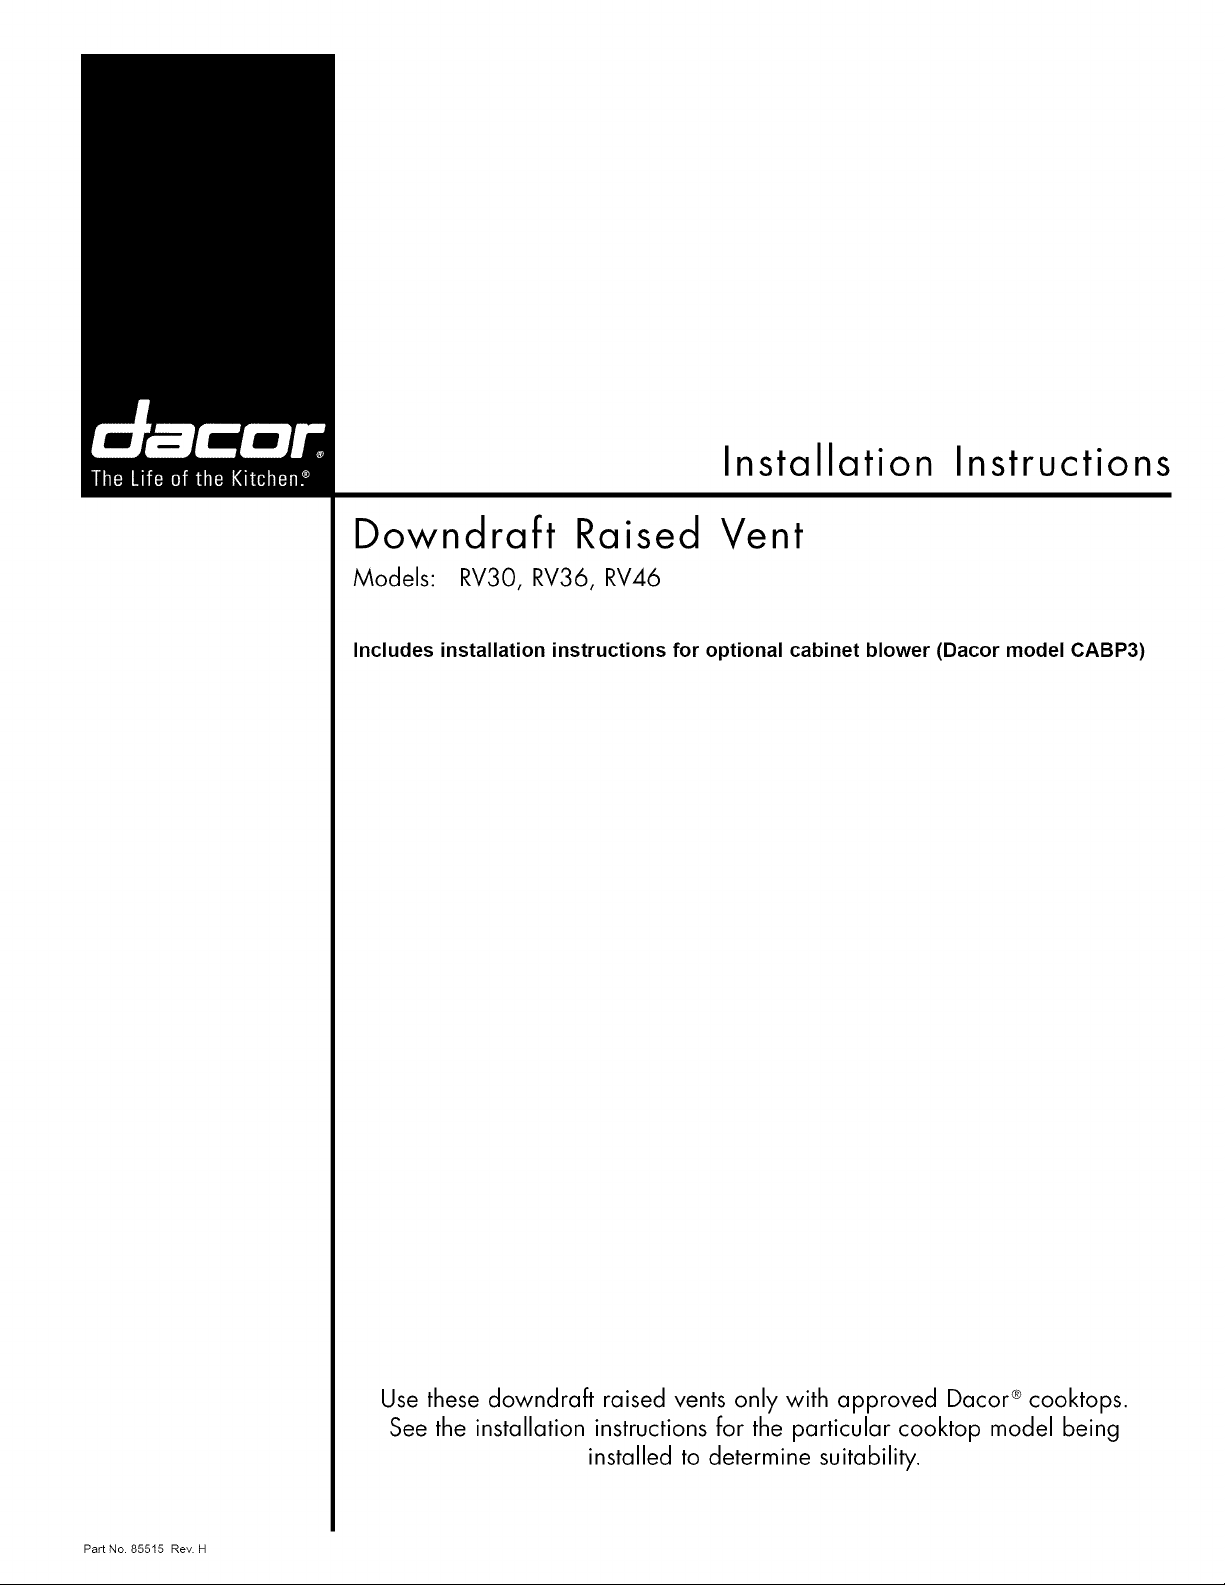
Installation Instructions
Downdraft Raised Vent
Models: RV30, RV36, RV46
Includes installation instructions for optional cabinet blower (Dacor model CABP3)
Part No. 85515 Rev. H
Use these downdraft raised vents only with approved Dacor ®cooktops.
See the installation instructions for the particular cooktop model being
installed to determine suitability.
Page 2
Important Safety Instructions .......................................... 1
Important Information About Safety Instructions .............. 1
Safety Symbols and Labels ............................................. 1
General Safety Precautions ............................................. 2
Product Specifications ..................................................... 3
Product Dimensions ......................................................... 3
Installation Specifications ................................................ 4
Electrical Specifications ................................................... 4
Planning the Installation ................................................... 4
Planning the Duct Work ................................................... 7
Installation Instructions .................................................. 10
Parts List ........................................................................ 10
Installation Preparation .................................................. 10
Installing the Vent in the Cutout ...................................... 11
Electrical Installation ...................................................... 12
Final Installation ............................................................. 14
Verifying Proper Operation ............................................. 14
Installation Checklist ...................................................... 14
Technical Data ................................................................. 15
RV Raised Vent Wiring Diagram .................................... 15
CABP3 Cabinet Blower Ratings ..................................... 15
Important:
• Installer: In the interest of safety and to minimize problems, read these installation instructions completely and care-
fully before you begin the installation process. Leave these installation instructions with the customer.
• Customer: Keep these installation instructions for future reference and the local building inspector's use.
If You Need Help...
If you have questions or problems with installation, contact
your Dacor dealer or the Dacor Customer Service Team.
For repairs to Dacor appliances under warranty call the
Dacor Distinctive Service line. Whenever you call, have the
model and serial number of the appliance ready. The model
and serial number are printed on the product data label on
the front of the unit. The product data label also specifies
the power supply requirements.
Dacor Customer Service
Phone: (800) 793-0093 (U.S.A. and Canada)
Monday - Friday 6:00 A.M.to 5:00 P.M.Pacific Time
Web site: www.Dacor.com
Dacor Distinctive Service (repairs under warranty only)
Phone: (877) 337-3226 (U.S.A. and Canada)
Monday - Friday 6:00 A.M.to 4:00 P.M.Pacific Time
Tested in accordance with the latest edition of ANSI Z 21.1 standard for household gas
cooking appliances, ANSI/UL 858 household electrical ranges, CAN/CSA-C22.2 NO. 64 Standard for Household
Electric Cooking and Liquid Heating Appliances, and UL 507 electric fans.
Model Identification"
RV30 = 30-inch wide raised vent
RV36 = 36-inch wide raised vent
RV46 = 46-inch wide raised vent
All specifications subject to change without notice. Dacor assumes no liability for changes to specifications.
© 2007 Dacor, all rights reserved.
Page 3
Important Information About
Safety Instructions
Safety Symbols and Labels
The Important Safety Instructions and warnings in
these instructions are not meant to cover all possible
problems and conditions that can occur. Use common
sense and caution when installing, maintaining or oper-
ating this or any other appliance.
• Always contact the Dacor Customer Service Team
about problems and conditions that you don't under-
stand. See Customer Service Information on page 2.
DANGER
IMPORTANT:Do not st0re or use combustible
flammable or explosive VaporS and liqUids (such as
gasoline) inside or in the vicinity of this or any other
appliance: Also keep items that could explode, such
as aerosol cans, away from the cooktop. Do not store
flammable or explosive materials in adjacent cabinets or
areas.
WARNING
WARNING "TO REDUCE THE RISK OF FIRE,
ELECTRIC SHOCK, OR INJURY TO PERSONS,
a) Installation work and electrical wiring must be
done by qualified person(s) in accordance with all
appl Cable codes and standaids, including fire-rated
constructionl
b) Sufficient airis neede d for proper combustion and
exhausting of gases through the flue(chimney) of fuel
burning equ pment to prevent back drafting l F011ow
the heating equipment manufacturer's guide ine and
safety standards such as those published by the
National Fire PrOtection Association (NFPA) and the
American Society for Heating, Refrigeration and Air
Conditi0nJng Engineers (ASHME), and the local
code authorities.
C) When cutting or drilling into Wall or ceilingl don0t
damage electrical wiring and other hidden utilities
d) Ducted fans must always be vented to the outdoors."
DANGER
Immediate hazards that WILL resu t n severe Pers0n a
injury or death ........................... I
WARNING
Hazards or Unsafe practices that COULD result in severe
personal injury or death.
CAUTION I
Hazards or unsafe practices that COULD result in minor
personal injury or property damage: I
WARNING
WARNING - TO REDUCE THE RISK OF FIRE,
ELECTRIC SHOCK, OR INJURY TO PERSONS,
OBSERVE THE FOLLOWING:
a)
Use this unit only in the manner intended by the
manufacturer. If you have questions, contact the
manufacturer.
b)
Before servicing or cleaning unit, switch power off
at service panel and lock the service disconnecting
means to prevent power from being switched on
accidentally. When the service disconnecting means
cannot be locked, securely fasten a prominent
warning device, such as a tag, to the service panel.
WARNING
To reduce the risk of a range top grease fire:
a) Never leave surface units unattended at high
settings. Boil-overs cause smoking and greasy
spillovers that may ignite. Heat oils slowly on low or
medium settings.
b)
Always turn hood ON when cooking at high heat or
when flambCing food (i.e. Crepes Suzette, Cherries
Jubilee, Peppercorn Beef Flambe').
c)
Clean ventilating fans frequently. Grease should not
be allowed to accumulate on fan or filter.
d) Use proper pan size. Always use cookware
appropriate for the size of the surface element.
READ AND SAVE THESE INSTRUCTIONS
_mCD_ 1
Page 4
General Safety Precautions
To reduce the risk of fire, electric shock, serious injury or death when using your appliance, follow basic safety precau-
tions, including the following:
WARNING
, Do n0t install or operate a damaged app iance. If you
receive a damaged appliancel contact your dealer
or bui!der, Do not install or operate th s unit if it has
been damaged; droppedl has damaged electrical
wiring or is not Working properly.
• Observe all governing codes and ordinances during
planning and insta!lation, Contact your local building
dePartment for further information.
' InStall or 0cate this appliance on y in accordance
with these installation instructions the Dac0r c0oktop
installation instructi0ns and the remote or in-line
b!ower instal!ation instructions: Improper installation
adjustment , alteration, service or maintenance can
cause serious personal injury or property damage.
i' For general ventilating use onlYl DO not use to
exhaust hazardous or explosive material s and
vapors.
This' appliance isn0t equipped With its own blowerl
For proper operation it must be installed with an
externally moUnted blower, use 0nly one of the mod,
dis specifiedl Only one blower shall be installed.
' use this raised Vent 0nly for its intended purpose as
outlined in the use and care manual. This appliance
is not intended for €ommercial usel
' Keep all packaging mater dis away from Children:
Plastic bags can cause suffocation:
Before installing or servicing the raised vent discon,
nect the power plug from the electrical outleL
• To reduce the risk of electri c shock or fire connect
onlY one of the specified blowers,
WARNING
• The installer must show the customer the location
of the electrical outlet so that the customer knows
where and how to disconnect power.
• Read the use and care manual completely before
operating this appliance.
• Do not tamper with the controls.
• Never allow the filters or vent openings to become
blocked or clogged. Do not allow foreign objects,
such as cigarettes or napkins, to be sucked into the
vent holes.
• Clean the filters and all grease-laden surfaces often
to prevent grease fires and maintain performance.
Clean this appliance only as specified in the use and
care manual.
• The customer should not install, repair or replace
any part of this unit unless specifically recommended
in the literature accompanying it. A qualified service
technician should perform all other service. Contact
the Dacor Customer Service Team for examination,
repair or adjustment.
• Do not leave children or pets alone or unattended in
the area around the cooktop when it is in use. Never
allow children to sit or stand on an appliance. Do not
let children play with the cooktop or the raised vent.
Do not store items of interest to children above or
around the appliance.
• Do not store items of interest to children above or
around the cooktop.
• Do not set or rest any objects, including cookware,
on top of the vent top cap. Do not interfere with the
movement of the vent intake in any way.
2 _mC_
Page 5
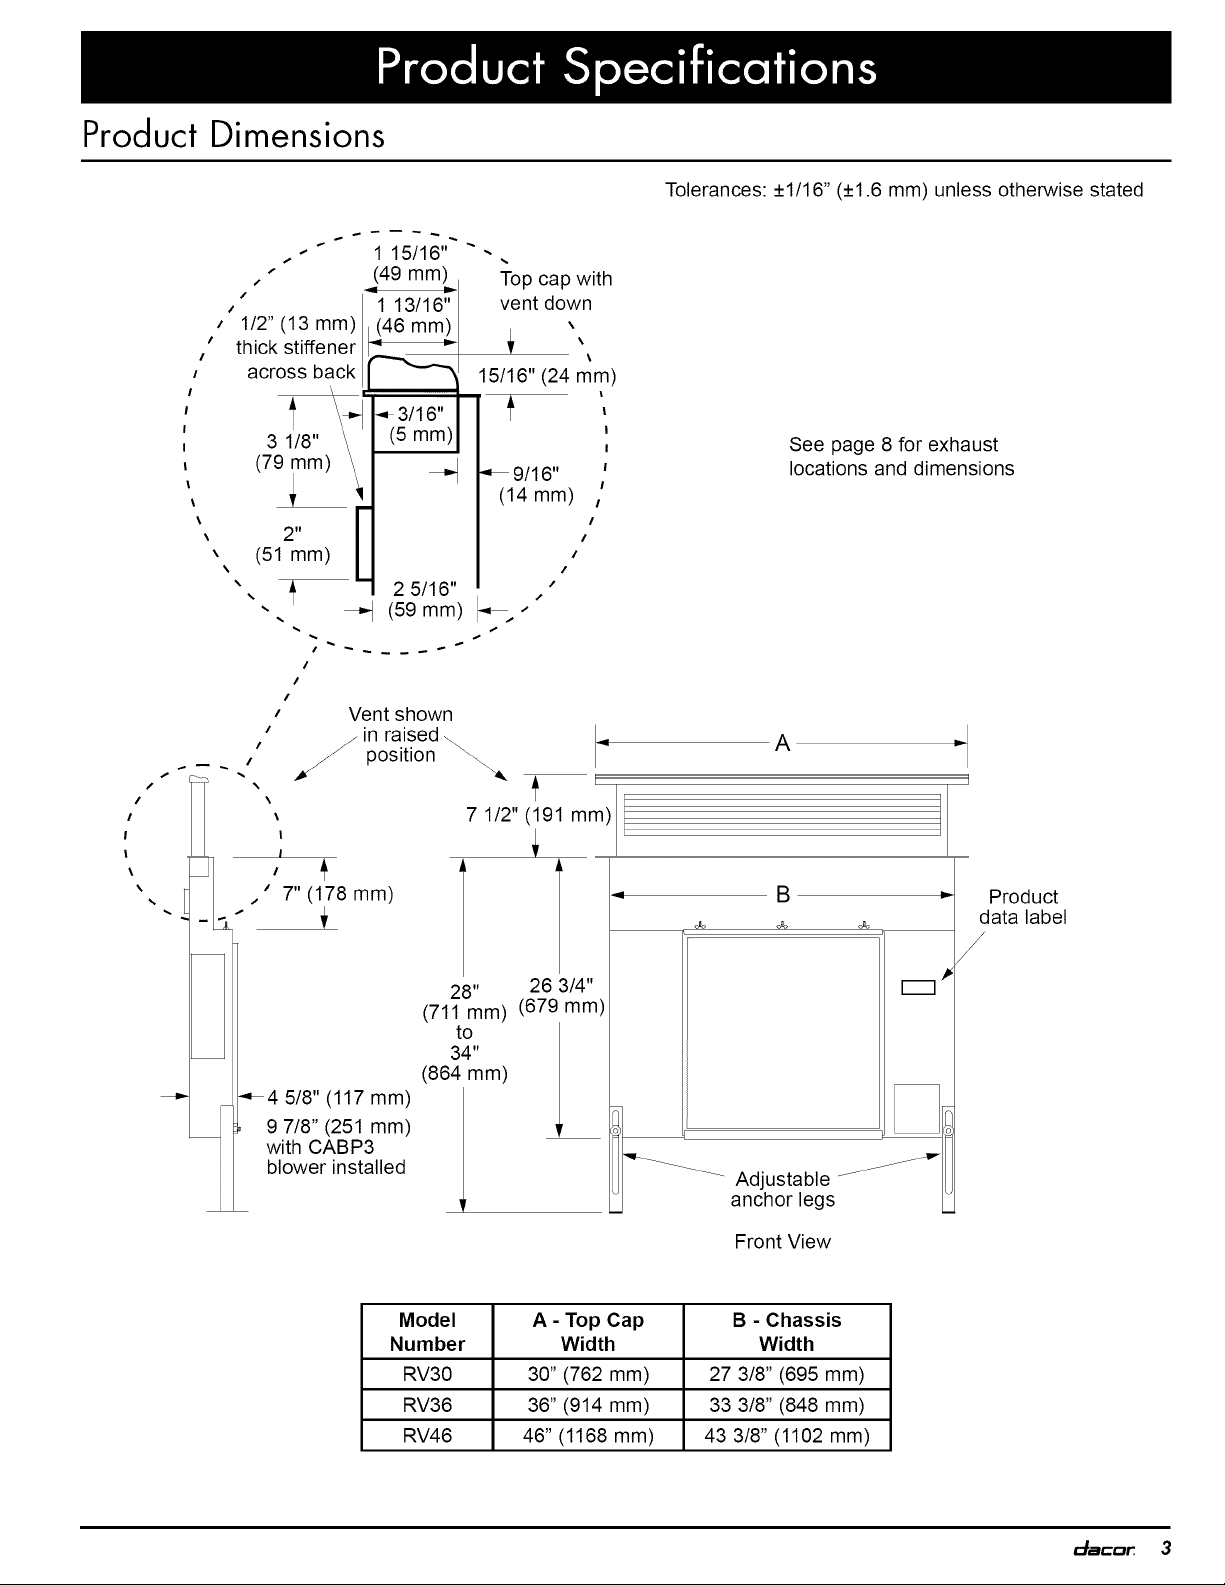
Product Dimensions
Tolerances: +1/16" (+1.6 mm) unless otherwise stated
"" 1 15116"'"
%
Top cap with
_ <1 13/16"
"" 111 (49 mm)
/
1/2" mm) (46 mm)
I
thick stiffener < --
I
across back
\
I _3/16"
3 1/8" \ (5 mm)
(79 _nm) \
2"
(51 mm)
_ 2 5/16"
%
vent down
,
\
15/16" (24 mm)
_9/16" I
(14 mm) _
/
/
/
/
1
I
!
I
See page 8 for exhaust
locations and dimensions
I
J", _ (59 mm)
/
/
/
/
/
/
.s
........ %
/
/
I
t
\
= I
%
\
\
|
/
,,_ 7" (178 mm)
Vent shown
in raised \
_ position _..
/
28" 26 3/4"
(711 mm) (679 mm)
34"
(864 mm)
7 1/2" (191 mm) I
to
A
B
Ib
i
Product
data label
/
/
/
4 5/811(117 mm)
] _ 97/8 (251mm)
with CABP3
1 blower installed
Adjustable ....
anchor legs
Front View
Model A - Top Cap B - Chassis
Number Width Width
RV30 30" (762 mm) 27 3/8" (695 mm)
RV36 36" (914 mm) 33 3/8" (848 mm)
RV46 46" (1168 mm) 43 3/8" (1102 mm)
_mCD_ 3
Page 6
Electrical Specifications
Planning the
Installation
WARNING
The electriC service for the raised vent should be installed
only by a licensed electrician.
It is the owner's responsibility to ensure that the electrical
connection of this appliance is performed by a qualified
electrician. The electrical installation, including minimum
supply wire size and grounding, must be in accordance
with the National Electric code ANSI/NFPA 70- 2002* (or
latest revision) and local codes and ordinances.
*A copy of this standard may be obtained from:
National Fire Protection Association
1 Batterymarch Park
Quincy, Massachusetts 02269-9101
Electrical Supply Requirements
Power must be supplied by a separate, grounded, single
phase circuit protected by a properly sized circuit breaker
or time delay fuse and rated at 120 Vac, 60 Hz, 15Amps.
• The above specifications are for reference only. If the
power supply requirements shown above do not agree
with those listed on the product data label, use the rat-
ings on the label.
• The suggested location of the junction box supplying
power to the unit is to the bottom right of the unit, pro-
viding local codes permit.
• Install 3 conductor wiring/conduit with minimum cur-
rent carrying capacity of 8 Amps to supply power to the
blower from the raised vent when turned on. See the
following pages for further details.
When installing a remote or in-line blower run the wir-
ing/conduit parallel to the duct work and connect it to
the blower and raised vent on the ends. There are two
7/8" access holes in the bottom of the raised vent for
connecting the wiring to the blower and connecting the
vent to the power supply junction box.
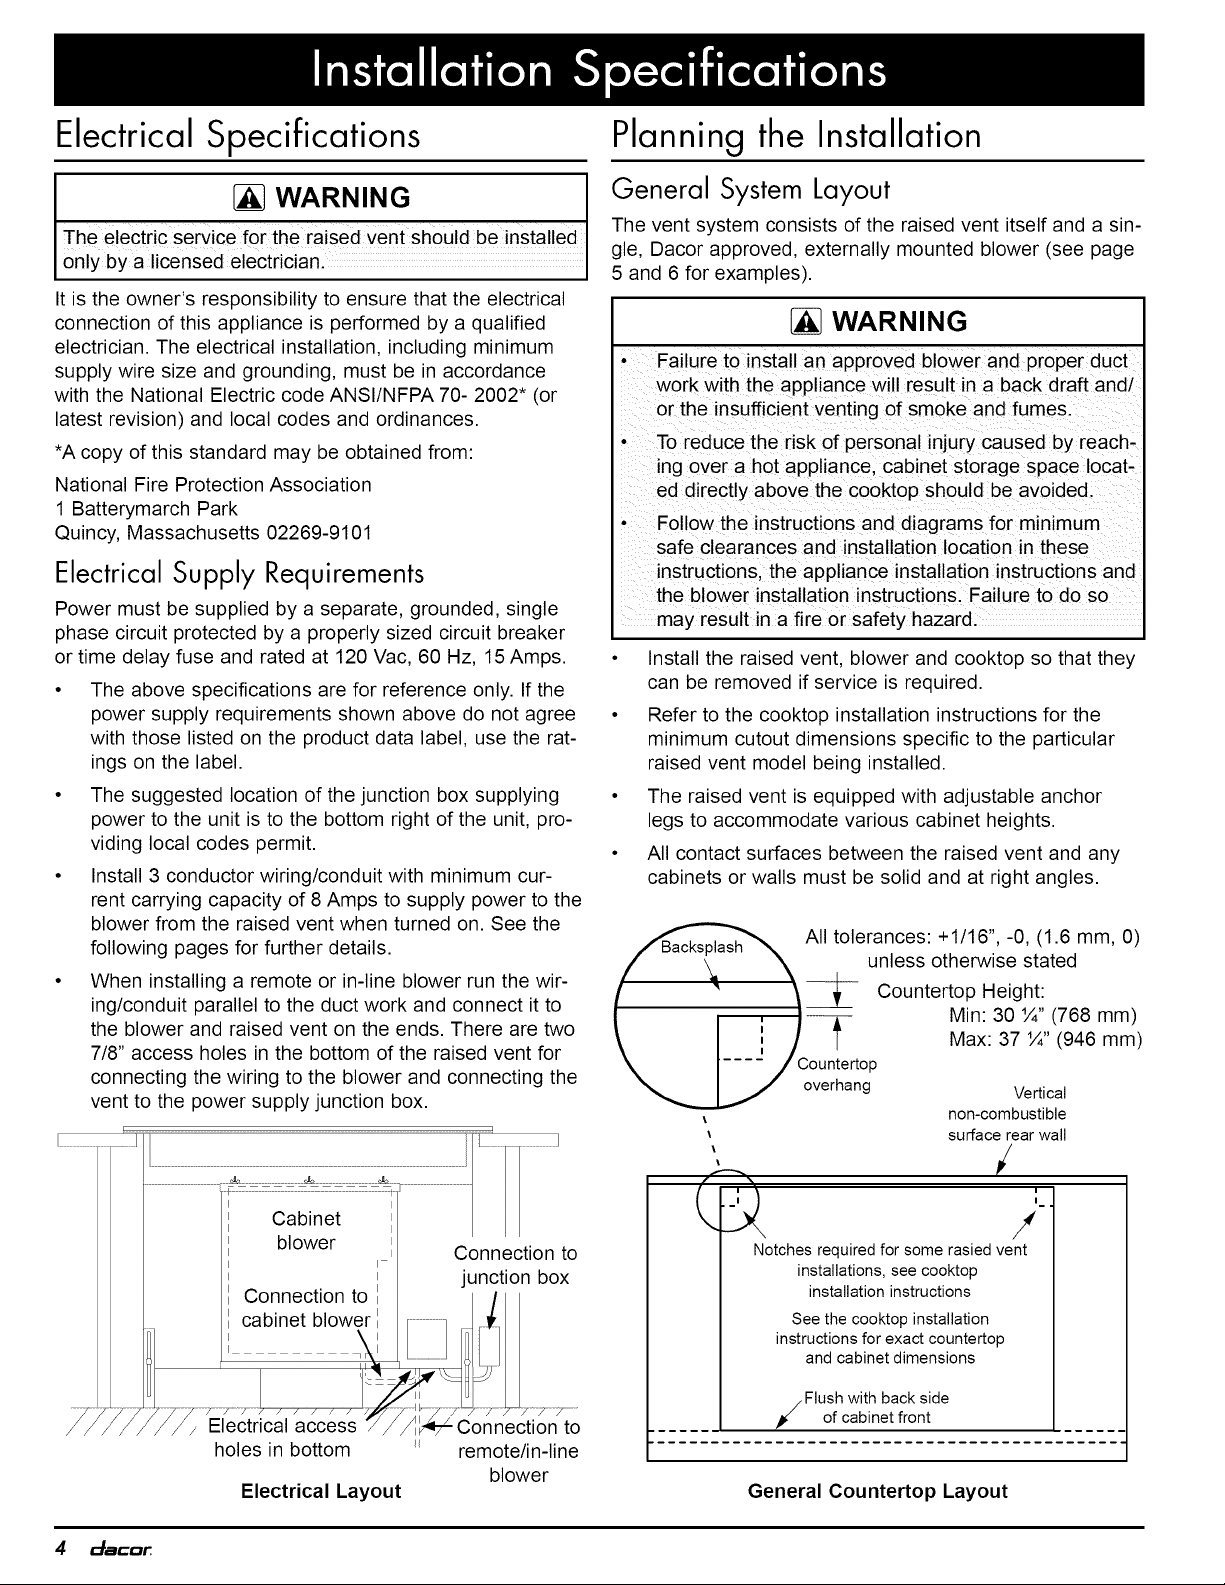
!..........................
General System Layout
The vent system consists of the raised vent itself and a sin-
gle, Dacor approved, externally mounted blower (see page
5 and 6 for examples).
WARNING
• Failure to install an approved blower and proper duct
work with the appliance will result in a back draft and/
or the insufficient venting of smoke and fumes.
• To reduce the risk of personal injury caused by reach-
ing over a hot appliance, cabinet storage space locat-
ed directly above the cooktop should be avoided.
Follow the instructions and diagrams for minimum
safe clearances and installation location in these
instructions, the appliance installation instructions and
the blower installation instructions. Failure to do so
may result in a fire or safety hazard.
• Install the raised vent, blower and cooktop so that they
can be removed if service is required.
• Refer to the cooktop installation instructions for the
minimum cutout dimensions specific to the particular
raised vent model being installed.
The raised vent is equipped with adjustable anchor
legs to accommodate various cabinet heights.
All contact surfaces between the raised vent and any
cabinets or walls must be solid and at right angles.
AII tolerances: +1/16",-0, (1.6 mm, 0)
unless otherwise stated
_ Countertop Height:
Min: 30 %",,(768 mm)
\ I i / | Max: 37 '/4 (946 mm)
\ I.... / Countertop
_,_...._.,i / °verhang
non-combustible
surface rear wall
Vertical
i
%
L:2
Notches required for some rasied vent
installations, see cooktop
installation instructions
See the cooktop installation
instructions for exact countertop
and cabinet dimensions
i
i
/
4 _mC_
holes in bottom
Electrical Layout
Flush with back side
of cabinet front
remote/in-line
blower
General Countertop Layout
Page 7

The raised vent exhaust may be configured to vent
through the bottom or through one of the sides. Allow
room for the exhaust duct coming out of the unit.
See Planning the Duct Work (page 7) for additional
details.
The maximum allowable duct run must be taken
into consideration when determining the layout. See
Planning the Duct Work for further details.
• Access from the front of the cabinet to the underside of
the cooktop, the vent system and the electrical and gas
supplies for the cooktop and vent must be provided for
inspection and service, Any drawers or shelves placed
below the cooktop and in front of the vent must be easy
to remove for access to the cooktop, vent and utilities,
• For installation with gas cooktops, a 90-degree elbow
must be connected to the cooktop gas inlet (see dia-
gram at right) to avoid interference with the raised
vent's front panel,
REMP16 series
remote blower
3 1/4" X 10"
to 10" round
transition and 45 °
adjustable elbow
Raised vent with
90° elbow
Gas line with
regulator
attached
cabinet blower
mounted to front
Cabinet blower
Example of Gas Line Routing for Gas Cooktop
Installations - Side View
Floor
Cooktop
board
Backsplash
]
Wiring/conduit that supplies power
to remote blower (see Electrical
Installation, page 10)
Duct work
between raised
vent and remote
blower
Raised vent
configured for
bottom exhaust
Cooktop
Cabinet blower ,_
3 1/4" X 10"
90° elbow
Floor
Duct directly through rear
Backsplash
/
Raised vent
]
Wall
Wall cap
12" Min.
(305 mm)
-F
wall to wall cap
Example of Layout with
Remote Blower, Roof Exhaust
Example of Layout with
Cabinet Blower, Exhaust Through Wall
_mCD_ 5
Page 8

General System Layout (Continued)
Cabinet back
/
Cooktop
Raised vent
Raised vent
configured for
bottom exhaust
Outside wall
Wall cap on
outside wall
Wiring,
from raised vent
to in-line blower
3 1/4" X 10" to
round transition
Floor
/
Duct work Duct work
ILHSF series
in-line blower
Example of Layout with In-line Blower, Duct Work
Under Floor, Wall Exhaust
6 _mC_
Page 9

Planning the Duct Work
WARNING
• To reduce the risk of fire and to properly exhaust air, be sure to duct air outside the house or building. Do not vent
exhaust air into spaces within walls or ceilings or into attics, crawl spaces or garages.
• Tape all duct joints securely to prevent combustion by-products, smoke or odors from entering the home. Doing so
will also improve system efficiency.
° TO REDUCE THE RISK OF FIRE, USE ONLY METAL DUCT WORK.
• DO NOT install more than one blower. Even small differences between blower air flow rates can greatly reduce the
air draw by the raised vent.
You must install one of the Dacor blower models listed
below for proper operation. For ILHSF or REMP series
blowers, see the blower installation instructions. For model
CABP3, see the instructions later in this manual. Only one
blower shall be installed.
APPROVED DACOR BLOWERS FOR USE WITH
RV SERIES RAISED VENTS
Model Number Rating
CABP3 600 CFM*
ILHSF8 600 CFM**
ILHSF10 1100 CFM**
REMP3 600 CFM**
REMP16 1000 CFM**
Nominal rating at zero inches static pressure, see the
CABP3 Cabinet Blower Data on page 15 for actual rating.
** Nominal rating at zero inches static pressure. See the
blower installation instructions for actual blower rating.
• The raised vent can be configured to exhaust through
the bottom or either side:
On installations using the ILHSF or REMP series
blowers, the cover plate on the appropriate
side or on the bottom is removed to expose the
exhaust. See page 8 for locations and dimensions.
Configure the raised vent for bottom exhaust and
use an elbow to vent through the rear cabinet wall.
On installations using the CABP3 blower, the blow-
er assembly is mounted to the front of the raised
vent with the exhaust pointing in the desire direc-
tion. See page 8. Point the exhaust down and use
an elbow to vent through the rear cabinet wall.
When planning new duct work, always look for the
shortest, most direct route to the outside. See pages
5 and 6 for examples. Calculate the maximum duct
length (see page 9) to determine if the planned duct
route will work with the blower selected.
• You can increase the duct size over the duct run if
desired. To prevent a back draft, never decrease the
duct size over the run.
• Do not rely on duct tape alone to seal duct joints.
Fasten all connections with sheet metal screws and
tape all joints with certified silver tape or duct tape.
• Use sheet metal screws as required to support the duct
weight.
• To prevent back-drafts, a damper at the duct outlet may
also be required.
• Make sure duct work does not interfere with floor joists
or wall studs.
• With concrete slab construction, "box-in" the duct work
and blower wiring to prevent collapsing or other dam-
age when the wet concrete is poured.
• Cross-drafts or air currents from adjacent open win-
dows or doors, heating/air conditioning outlets, ceiling
fans and recessed ceiling lights reduce vent efficiency.
Duct Work Design Tips
• Wherever possible, reduce the number of transitions
and turns to as few sharp angles as possible. Two
staggered 45 ° angles are better than one 90 °. Keep
turns as far away from the hood exhaust as possible,
with as much space between each bend as possible.
• For best performance, use round duct instead of rect-
angular when possible, especially when elbows are
required.
• If multiple elbows are used, try to keep a minimum of
24" of straight duct between them. Avoid "S" or "back to
back" configurations of adjacent elbows.
• Do not use flexible metal duct.
On bottom exhaust installations you may cut a hole in
the floor to allow the duct work to pass through.
All duct work materials (including screws and duct tape)
must be purchased separately by the customer.
_mCD_ 7
Page 10
Q
14 3/8"
O_
Raised vent_C L
C°unterttP_center line I_
CL _ Duct connection
A
center line
_2-///-/_l
315;/i,i. )
®
(48 mm)
Front View
®
*Back of unit lines
up with back of "
cutout 1 7/8" * (48 mm) ,_ Bottom View
(_ Side Exhaust Locations (3 1/4" X 10")
(_) Bottom Exhaust Location (3 1/4" X 10")
(3) Vertical center line of bottom exhaust lines up with vertical
center line of chassis
(_ Internal cabinet blower mounting location
Exhaust Locations and Dimensions
for Remote or In-line Blower Configurations
(ILHSF and REMP series blowers)
A
I
¢
25 5/8"
(651 mm)
3 1/4X 10 _l_--
Duct connection
Front Exhaust Dimensions
CABP3 Blower - Bottom Exhaust
Countertop
Raised vent_C L
center line
I 11 5/8"
:oX, ou oo
D
.... I I
k cooktop
_--I t _._8 3/8" (213 mm) k'_
ElI I / / frombackofRV _,]
I_1I I / | cutout to center line
H I I i | of CABP3 exhaust
NI I I /in anyorientation N
11I I I / (bottom, orside ['_
HIll l l exahust_
M N
___ ,1_J _ configutation ['_
H | lj .",/" with rear or bottom k_
H /D_ -i ..f _,' duct routing [q
bl........ _--i" , Pr
I\\\\\\\\\\\\\\\\\\\\\\\\\\\1
bl i_ ,
L"I ;2 : ,_
N ,:D , N
NI I n I N
LI '. '. ht
Exhaust Locations and Side Dimensions
for CABP3 Cabinet blower
..t-" i
' ;
l l
i
Bottom exhaust
Front Exhaust Dimensions
CABP3 Blower - Right Exhaust
Countertop
T - connection
-,,, Raised vent
center line
__
( iection t I -" 3 l//ucXt 10
Du:te:t:r_l _lne
Front Exhaust Dimensions
CABP3 Blower- Left Exhaust
Model A B C
RV30
RV36
RV46 5" (127 mm) 9" (229 mm) 9" (229 mm)
2" (51 mm) 6" (152 mm) 12" (205 mm)
8 _mC_
Page 11
Calculating the Maximum Duct Run Length
• Do not use duct work that is smaller in cross-sectional
area than the required duct sizes in the table to the
right.
• For best performance, keep the duct run as short as
possible and never exceed the maximums stated at the
right.
The maximum straight duct length for the raised vent
system depends on the model of blower used with the
vent system and the number of elbows and transitions
used. The Equivalent Number of Feet for each elbow
and transition (see table) must be subtracted from the
maximum straight length to compensate for wind resis-
tance. To determine the maximum allowable length of
the duct work, subtract all of the equivalent lengths of
the elbows and transitions from the Blower Maximum
Duct Straight Length.
For example, for a raised vent system using 3 1/4" X
10" rectangular duct, two (2) 3 1/4" X 10" 90° elbows, a
3 1/4" X 10" rectangular to 10" round transition with a
REMP16 remote blower:
• From the Blower Maximum Duct Straight Length
table, the maximum length without transitions and
elbows is 60 feet.
• The equivalent length of each 90° elbow is 15 feet.
• The equivalent length of 45° elbow is 2 feet.
• The equivalent length of the transition is 4 feet.
• The total equivalent length of the above components is:
15 feet + 15 feet + 4 feet + 2 feet = 36 feet.
• The maximum amount of straight duct that can be used
with a REMP16 and the above components is: 60 feet -
34 feet = 24 feet.
Equivalent Number of Feet -
Duct Elbows and Transitions
45° elbow 3 ¼"X 10
8 Inch 45° elbow
45° elbow 3 %"X 10
10 Inch 90° elbow
90° elbow 3 ¼"X 10
8 Inch 90 ° flat elbow
90° elbow
10 Inch
3 feet 7 feet
2 feet 15 feet
7 feet 20 feet
3 %"X 10
5 feet to 8" round 4 feet
transition
90° 3 %"X 10 3 %"X 10
to 8" round 25 feet to 10" round 4 feet
transition transition
Roof cap* ** Wall cap with **
damper*
Not applicable for REMP series blowers.
** The equivalent lengths of roof and wall caps vary with
model and configuration. For equivalent length, contact the
manufacturer or a qualified HVAC specialist.
Blower
Used 8 Inch Duct 10 Inch Duct
CABP3
ILHSF8
Blower Maximum Duct Straight Length
3 ¼" X 10"
Duct
50 feet 40 feet 40 feet
(15.2 meters) (12.2 meters) (12.2 meters)
60 feet 50 feet 50 feet
(18.3 meters) (15.2 meters) (15.2 meters)
ILHSF10
REMP3
REMP16
70 feet 80 feet 70 feet
(21.3 meters) (24.4 meters) (21.3 meters)
60 feet 50 feet 50 feet
(18.3 meters) (15.2 meters) (15.2 meters)
70 feet 80 feet 70 feet
(21.3 meters) (24.4 meters) (21.3 meters)
_mCD_ 9
Page 12

PartsList 2.
• Product literature
• Vent cover
• Anchoring legs
• 2 wood screws, #14 x 2 1/2 (PN 83047)
• 3 wire nuts
• 2 sheet metal screws, #10 x 1/2 (PN 83022)
• 3 ¼" X 10 duct mounting flange
• 2 keps nuts, 1/4-20 (PN 83049)
• 2 flat washers, 1/4-20 (PN 83203)
• Insulation foam
Installation Preparation
[_ WARNING
If the electrical service does not meet the Electrical
Specifications on page 4, do not proceed with the
installation. Call a licensed electrician to install an
electrical circuit that meets the specifications.
• Install the vent only in a vertical orientation. Do not
mount the vent on a slant or angle.
Do not enlarge or modify the exhaust knock outs or
cut an exhaust hole in a location on the chassis other
than those shown. Doing so may cause an increase
in noise and decrease performance.
Loosely attach the anchoring legs to the studs on the
left and right sides of the raised vent using the provided
keps nuts and washers.
I
Front of
5. Slide the bottom flange of the vent cover into the bot-
6. Cover the opening on the front of the unit by pushing
Locate the 3 ¼" X 10 duct mounting flange included
with the unit. Attach it to the open exhaust hole using
the two (2) screws removed in step 1, with the flange
facing outward.
I
ml .
Exhaust Flange Installation (bottom shown)
,
Locate the vent cover included with the unit. Also locate
the supplied foam tape. Peel the backing off the tape
and attach it to the right and left flanges on the inside
of the vent cover.
,
Remove and retain the three (3) wing nuts from the top
retainer bracket on the front of the unit. Remove the
bracket.
tom retainer bracket with the wiring diagram facing out.
the vent cover against it.
,
Make sure that the foam tape on the cover creates a
good seal on the right and left sides of the opening.
IMPORTANT: To prevent interference with the internal
moving parts, make sure the cover is properly centered
over the opening.
,
Reinstall the top retainer bracket over the top of the
vent cover flange. Secure it in place with the three (3)
wing nuts removed in step 4.
' t '
Exhaust flange
raisedv_n
_ Adj_strlb_esJJJ_" I
Installation Preparation for Raised Vent with
ILHSFor REMPSeries Blower:
NOTE: For units using the CABP3 cabinet blower, skip to
Installing the Vent in the Cutout on the next page.
,
Remove and retain the two (2) screws on the cover
plate over the exhaust that will be used (bottom or
side). Discard the cover plate that was removed, but
leave the two other cover plates in place.
_1
ml I.m
Bottom' , i'
! !
cover
Exhaust Cover Removal (bottom shown)
10 c_acar
Top retainer
bracket
Bottom retainer
bracket
Vent Cover Installation
right/left
flanges
/
L.
Page 13

Installing the Vent in the Cutout
NOTE: The raised vent installs in the back of the cutout,
separate from the cooktop. It is installed prior to final instal-
lation of the cooktop.
ILHSF or REMP Series Blower Installation
If using a ILHSF or REMP series blower, install it according
to the blower installation instructions.
Cabinet Blower Installation
Installing the Raised Vent
1. Cut a hole in the cabinet to allow the duct work to pass
through to the floor or wall for the planned duct system
layout. Use the dimensions on pages 3 and 8 to deter-
mine the hole center line locations.
Rear corner of cutout
(back of raised vent)
plumbed down
If using cabinet blower (model CABP3):
1. Locate the foam tape supplied with the raised vent.
Place the blower on the floor in the orientation it will be
mounted on the front of the raised vent. Peel the back-
ing off the tape and attach it to the right and left flanges
of the blower base plate.
,
Remove and retain the three (3) wing nuts from the top
retainer bracket on the front of the unit. Remove the
bracket.
,
Slide the bottom flange of the blower base plate into
the bottom of the retaining bracket with the blower
exhaust in the desired orientation.
,
Cover the opening on the front of the unit by pushing
the blower against it. Make sure that the foam tape on
both sides of the base plate creates a good seal on the
right and left side of the opening. Center the blower
base plate horizontally over the opening on the front of
the raised vent. IMPORTANT: To prevent interference
with the internal moving parts, make sure the blower
assembly is properly centered over the opening.
,
Reinstall the top vent retainer bracket over the blower
base plate flange. Secure it in place with the three (3)
wing nuts removed in step 2.
Possible Duct Hole Locations
,
Gently slide the vent into the rear of the countertop cut-
out with the electrical access panel toward the front.
,
Adjust the anchoring leg height so that the end caps
are gently resting on the counter, then tighten the hex
nuts.
,
Secure the anchoring legs to the cabinet floor with the
supplied wood screws.
Top of vent resting
on countertop
Anchor leg
\
i
I
Floor
Front of raised
vent
(shown configured
for use with ILHSF
or REMP series
blower)
J
t t
i
Electrical access
)anel
Top retainer
bracket
oAttach foam
to right/left
flanges
Insert bottom
flange into
bottom
retainer
bracket
Bottom retainer
bracket
Cabinet Blower Installation
ctacor 11
Page 14

Duct Work Installation
• Install the duct work from the raised vent to the point
where it exits the building according to the installation
Specifications. Use sheet metal screws and duct tape
to connect and seal all of the pieces. Support the duct
weight as necessary to ensure sealed joints.
• On installations using a ILHSF or REMP series blower,
run the three conductor wiring required to power the
blower parallel to the duct work from the raised vent to
the blower. The wiring must meet the electrical speci-
fications on page 4 and local codes and ordinances.
Connect it as specified below.
Electrical Installation
WARNING
• ELECTRIC SHOCK HAZARD - Turn off power at the
circuit breaker panel or fuse box prior to connecting
the unit to the electrical circuit.
Do not ground the appliance with the neutral (white)
house supply wire. A separate ground wire must be
utilized.
• Failure to complete electrical connections properly
may result in an electric shock hazard or a damaged
or non-functional system. Follow the wiring diagrams
carefully to ensure a proper installation. Do not
change the factory wired terminal connections inside
the electrical access panel for the raised vent or the
blower.
,
On installations using an cabinet blower (CABP3):
• Remove the electrical access cover from the front
of the blower.
• Cut a piece of wire/conduit long enough to reach
from the power terminals inside the raised vent
to the power terminals inside the CABP3 blower,
via the electrical access holes on both units. The
location of the access hole on the CABP3 varies
depending on the blower orientation.
,
Connect the wiring/conduit that supplies power to the
remote/in-line blower or cabinet blower (as applicable)
as shown in Wiring Diagram B on the facing page.
,
Replace the electrical access panel on the raised vent.
7.
Connect the blower power supply wiring from the raised
vent to the blower:
On installations using a ILHSF or REMP series
blower, connect the wiring according to the blower
installation instructions.
On installations using an cabinet blower, (CABP3)
connect the wiring according to Wiring Diagram A
on the facing page. Replace the blower electrical
access cover. Make sure all terminal connections,
including the factory wired connections, are tight.
• To avoid an electric shock hazard and to prevent
damage route all wiring away from hot surfaces.
1. Make sure power to the junction box that will sup-
ply power to the raised vent is turned off at the circuit
breaker or fuse box.
2. Remove the screws from the front of the raised vent
electrical access cover and remove it.
,
Connect the raised vent to the junction box accord-
ing to Wiring Diagram B on the facing page and local
codes and ordinances. Make sure all terminal connec-
tions, including the factory wired connections, are tight.
12 c_acar
Page 15

Raised vent electrical connections -
see Wiring Diagram B
I ,
Power supply wiring from raised
vent to CABP3 blower
Electrical Wiring - Cabinet Blower Installations
(CABP3)
Connect wires/conduit
according to remote or in-line
blower installation instructions
Raised vent
electrical
connections -
see Wiring
Diagram B
\
REMP series
blower shown
Junction
box
Black = L2
White = N2
Green - Gnd
to Blower Output
terminals on raised vent
Wiring Diagram A - Electrical Connections for
CABP3 Blower
Raised vent
electrical terminals
Blower power from
Blower Output
terminals on raised
vent to blower
(all types)
Black = L2
White = N2
Green - Gnd _--
_To blower _
Raised vent
electrical panel
Floor
Power supply wiring from raised
vent to remote or in-line blower
Electrical Wiring - Remote or In-line Blower
Installations (ILHSF or REMP series)
To circuit breaker
panel or fuse box
Junction
box
WHITE
-- GREEN
BLACK
Wire nut,
3 places
Connect wires to
Power Input terminals
on raised vent
Electrical wiring
from raised vent
to junction box
Black = L1
White = N1
Green - Gnd
Wiring Diagram B - Raised Vent Electrical Connections
da_ar 13
Page 16

Final Installation Installation Checklist
Install the cooktop according to its installation instructions.
Set the cooktop into the countertop opening so that the
back edge of the cooktop overlaps the leading edge of the
vent.
Verifying Proper Operation
WARNING
' Read the raised Vent use and care manual complete-
/ before operation.
; Make sure the filters are installed prior t0 operating
the raised venL Refer to the use and care manual for
filter installation instructions.
,
Turn on power to the raised vent at the circuit breaker
panel or fuse box.
,
Press the UP/DOWN button once to
raise the vent to its operating position.
Once in the up position, the blower
should come on and the vent should
begin to draw in air.
,
Push the OFF, LOW, MEDIUM and
HIGH buttons in turn to make sure the speed changes
or the blower turns off.
UP/DOWN
In the interes t of safety, perform the f01!0wing checklist to I
make sure the unit has been properly installed: Proper .....
insta at On s the respons b ty of the Consumerl
[]
Are the anchor legs extended down to make contact
with the floor and tightened into place? Are the anchor
legs fastened to the floor? Is the unit level?
[]
Is the duct work completely installed? Are all joints
attached with sheet metal screws and wrapped with
duct tape?
[]
Is the Input Power for the raised vent connected to the
junction box? Are all terminals tight?
[]
Is the blower power input connected to the Output
Power terminals on the raised vent? Are all terminals
tight?
[]
Is the wiring routed away from the hot surfaces of the
cooktop.
[]
Are the vent filters installed according to the use and
care manual?
[] Has proper operation been verified?
WARNING I
Dm qD
OFF LOW MED HIGH
4. Press the UP/DOWN button once to lower the vent.
,
Make sure that the top cap on the raised vent intake
does not catch on the back edge of the cooktop when
the intake is lowered. If interference occurs, adjust the
position of the cooktop to prevent damage.
If the raised vent is not operational after installation:
Make sure that power is being supplied to the raised
vent and to the blower (via the raised vent).
If the vent will not raise properly or makes a scrap-
ing sound, remove the vent cover or cabinet blower
and check for obstructions interfering with the raising
mechanism. Replace the vent cover or cabinet blower
and make sure it is properly centered over the opening
on the front of the raised vent.
If the raised vent still does not function after performing the
above checks, do not attempt to repair it yourself. Contact
Dacor Distinctive Service at (877) 337-3226. Have the
model and serial numbers from the product data labels for
the raised vent and the blower available when you call.
Dacor is not responsible for the cost of correcting problems
caused by a faulty installation.
[] Has the warranty been activated on-line or the warranty
card been filled out completely and mailed?
14 =/acar
Page 17

RVRaised Vent Wiring Diagram
TO PUSH
LOWER UPPER
LIMIT SWITCH LIMIT SWITCH
BUTTON CIRCUIT
BOARD
POWER CONTROL
CIRCUITBOARD
I I
o_
z
BLU
GRN/YEL
BLK
WHT
CHASSIS
GROUND
CABP3
Cabinet Blower Ratings
CABP3 Cabinet blower Airflow*
Nominal 600 CFM
Actual 585.6 CFM
At zero inches static pressure
Electrical Rating: 4 Amps. @ 120 Vac, 60 Hz.
For ILHSF or REMP series blower ratings, see the blower
installation instructions.
L2 N2 L1 N1_
0 0 0 0
[__J L__J
BLOWER POWER
OUTPUT INPUT
GND GNDI
o oj
I__.1
GROUND
CABP3 Blower Performance
5.0
4.0
O
@
¢-
0
3.0
t'--
I
2.0
m
1.0
o
O9
0
1O0 200 300 400 500
600
Airflow CFM (Cubic feet/minute)
c/mcar 15
Page 18

16 c_mcar
Page 19

The Life of the Kitchen?
® Family Owned
Dacor • 600 Anton Blvd. Suite 1000 Costa Mesa, CA 92626 • Phone: (800) 793-0093 • Fax: (626)403-3130 • www.Dacor.com
American Made
 Loading...