

Dacor MORD320 Use And Care Manual
The Life of the Kitchen2
" U SE AND CARE MANUAL
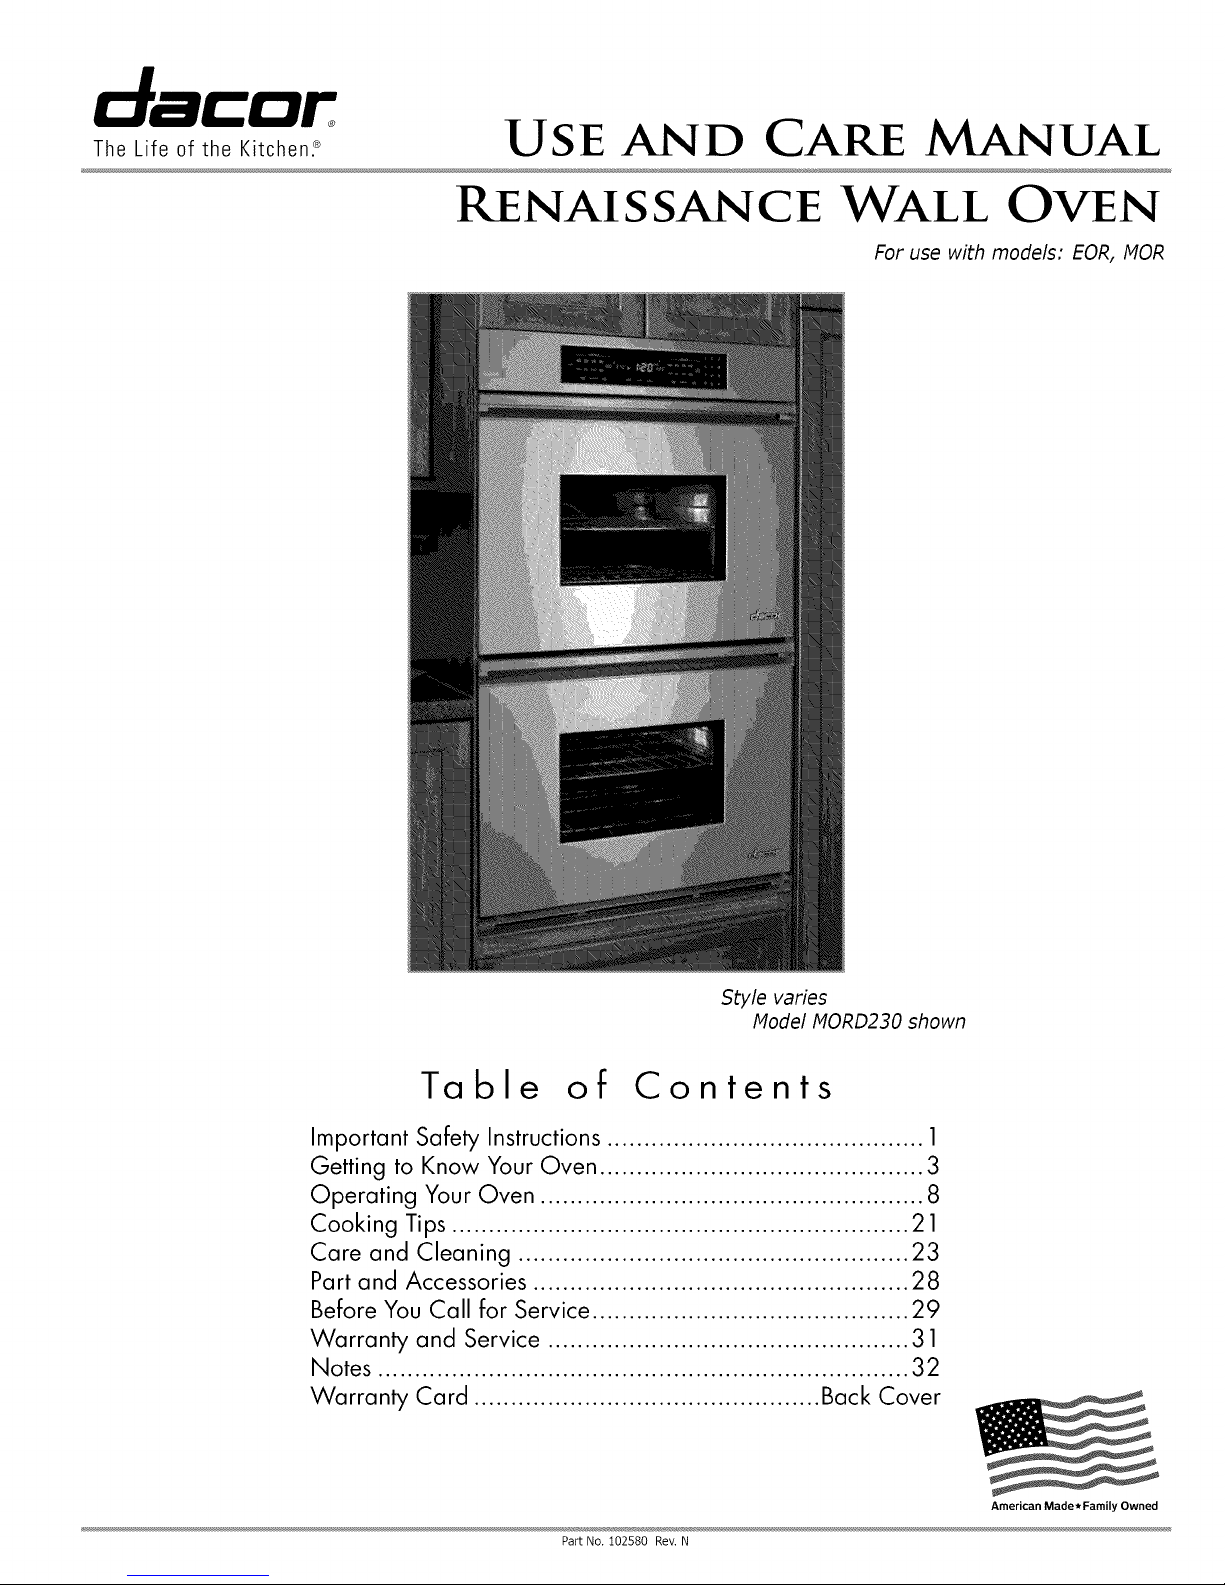
RENAISSANCE WALL OVEN
For use with models: EOR, MOR
Important Safety Instructions ........................................... 1
Getting to Know Your Oven ............................................ 3
Operating Your Oven .................................................... 8
Cooking Tips .............................................................. 21
Care and Cleaning ..................................................... 23
Part and Accessories ................................................... 28
Before You Call for Service ........................................... 29
Warranty and Service ................................................. 31
Notes ........................................................................ 32
Warranty Card ............................................... Back Cover
Style varies
Model MORD230 shown
Table of Contents
American Made*Family Owned
Part No. 102580 Rev. N
To Our Valued Customer:
Congratulations on your purchase of the very latest in Dacor _products! Our unique combination of features, style and
performance make us The Life of the Kitchen ", and a great addition to your home.
In order to familiarize yourself with the controls, functions, and full potential of your new Distinctive Appliance, we
suggest that you thoroughly read this use and care manual, beginning with the Important Safety Instructions
section.
All Dacor appliances are designed and manufactured with quality and pride, while working within the framework of our
company value. Should you ever experience a problem with your product, please first check the Before You Call for
Service section of this manual for guidance. It provides useful suggestions and remedies prior to calling for service.
Valuable customer input helps us to continuously improve our products and services, so please feel free to contact
our Customer Service Team for assistance with any of your product support needs.
Dacor Customer Service Team
600 Anton Blvd. Suite 1000
Costa Mesa, CA 92626
Telephone:
Fax:
Hours of Operation:
Web Site:
Thank you for choosing Dacor for your home. We are a company built by families for families and we are dedicated
to serving yours. We are confident that your new Dacor product wil! deliver a high level of performance and
enjoyment for many years to come.
Sincerely,
(800) 793-0093
(626) 403-3130
Monday through Friday
6:00 A.Mto 5:00 P.M.Pacific Time
www.Dacor.com
The Dacor Customer Service Team
© 2007 Dacor, all rights res_r_,,_,_
! i ¸:¸¸¸¸¸¸¸:¸¸¸¸¸¸¸¸¸¸¸¸¸¸¸¸%/::::1ITI¸¸¸¸¸¸
INSTALLER: LEAVETHESE INSTRUCTIONS WITH THE
APPLIANCE.
CUSTOMER: READ THISUSE AND CARE MANUAL COMPLETELY
BEFORE USING THISAPPLIANCE.SAVE IT FOR FUTURE REFER-
ENCE,ITCONTAINS IMPORTANT USE AND CARE INFORMATION.
KEEPYOUR SALES RECEIPTOR CANCELED CHECK INA SAFE
PLACE,PROOF OF ORIGINALPURCHASE DATE ISREQUIRED FOR
WARRANTY SERVICE,
For service and warranty information see page 31.
Ifyou have any questions, other than warranty questions,
call:
Dacor Customer Service
(800) 793-0093 (U,S,A, and Canada)
Monday -- Friday 6:00 A,M,to 5:00 P,M,Pacific Time
Web site: www,Dacoccom
Have the complete model and serial number for your
appliance available, The numbers are found on the appli-
ance data plate, located inside the grill, below the control
panel, Open the door to expose the grill, On double ovens,
the plate is located behind the top grill, Write these num-
bers below for future reference,
Important Information About
Safety Instructions
The Important Safety Instructions and warnings in
this manual cannot cover all possible problems and condi-
tions that can occur. Use common sense and caution when
installing, maintaining or operating this appliance.
Always contact the Dacor Customer Service Team about
problems or conditions that you don't understand.
Safety Symbols and Labels
[_ WARNING
t Hazardsor unsafe actions that COULD result insevere Persona!
Model number
Serial number
Date of purchase
View data plate
Since Dacor continuously improves the quality and perfor-
mance of our products, we may need to make changes to
the appliance without updating this manual.
Visit www.Dacor.com to download the latest version of
this manual.
[_ DANGER
IMPORTANT:To avoid the possibi!ityof explosion or fire, donot
Storeoruse combustible, f!ammab!eor explosive vaporsand
liquids (such as gasoline)inside orin the Vicinity of this orany
other appliance.Keep itemsthat could explode, such as aerosol
cans awayfrom the burners and oven. Donot store flammableor
explosivematerials in adjacent cabinets or areas.
[_ WARNING
WARNING ' NEVER cover any slots, holesor passagesin the
oven bottomor cover an entire rack with materialssuchas
aluminum foil. Doingso blocks air flow throughtheoven causing
a fire hazard.
READ AND SAVE THESE INSTRUCTIONS
1

General Safety Precautions
To reduce the risk of fire, electric shock, serious injury or death when using your oven, follow basic safety precautions,
including the following:
WARNING
• Ifyou receive adamaged product, immediately contact
your dealer or builder.Do not install or usea damaged
appliance.
• Makesure that the oven has been properlyinstalled
and grounded bya qualified installeraccordingto the
accompanying installation instructions. Have the installer
show you the locationof the fuse orjunction box so that
you know where and howto turn off powerto the oven.
• Do notinstall, repair or replaceany part of the oven unless
specifically recommendedin the literature accompanying
it.A qualified servicetechnician should performall other
service.
• Beforeperformingany type of service, make sure that
the electrical powerto the oven is turned off at the circuit
breakeror fuse box.
• Only use the oven for cooking tasks expectedof a home
appliance as outlinedin this manual. This oven is not
intendedfor commercial use.
• DONOT TOUCHTHE SURFACESOF THE OVEN
DURINGOR IMMEDIATELYAFTERUSE.
• Makesure individuals who usethe oven are able to operate
it properly.
• Neverallowanyone, includingchildren to sit, stand or climb
on any part of the oven includingthe door.Doing so may
cause tipping, damage, serious injuryor death
• Do notleave children alone or unattendedin the area
around the oven. Do notallow childrento playwith the
controls, pull on the handle(s) or touch other parts of the
oven.
• Do notstore items of interest to childrenabovethe oven.
Children could be burned or injuredwhile climbingon the
appliance.
• Do nottamper with the controls.
• To preventthe unit from tippingforward and to provide
a stable installation, make surethe oven issecured to
the cabinet according to the accompanying installation
instructions.
• Do notheat unopenedfood containerssuch as baby food
jars and cans Pressurebuild upmay causethe container
to burst and cause injury.
• Do notuse water on greasefires.A violent steam explosion
may result. Smother any flameswith a lid, cookiesheet
or flat tray. Use baking soda or a foam extinguisherto
extinguishflaming grease. Be careful to avoid getting
burned.
WARNING
• Keepflammable items, suchas paper,cardboard, plastic
and cloth away from and out of the oven. Do not allow pot
holdersto touch hot surfaces.
• Do notwear loose or hangingapparel while usingthe oven.
Do notallow clothing to come intocontact withthe interior
ofthe oven and surrounding areas duringand immediately
after use.
• Donot use towels or bulkycloth as pot holders.
• Do not usethe ovenfor storage.
• Cleanand maintainthe oven regularly as instructed in this
manual. Keepthe entireovenfree of greasethat could
catchfire.
• Do nottouch the outside surfacesofthe ovenduring the
self clean cycle. They will be hot.
• Usecookwareonly for its intendedpurpose. Checkthe
manufacturer'srecommendationsbefore useto determine
if a utensil is suitable for use_nan oven. Certaintypes of
glass,ceramic and earthenware are not suitablefor use in
the oven. Personal injury or damage may resultfrom the
improperuse of cookware.
• Exercisecaution when opening the oven door.Let hot air or
steamescape before looking or reaching inside.
• Useextremecaution ifadding water to food in the oven.
The steam can cause seriousburns or scalds.
• Useonly dry pot holders when removingfood and
cookwarefrom the oven. Wet pot holderscancause steam
burns.
• Foryour safety, do not usethe oven to cook without the
convectionfilter(s) installed.When thefilter is not installed,
the spinning fan bladesat the back of the ovenare
exposed.
• Do notallow food to sit in the ovenfor morethan one hour
beforeor after cooking. Eatingspoiledfood can result in
food poisoning.
• Do not leaveobjects, such as aluminumfoil, the meat
probe or cookie sheets on the bottomof the oven. Do not
allowthe broil elements on the ceiling of the oven chamber
to be covered up. Do not line the ovenwith aluminum foil or
other materials.Doing so may cause the oven or the items
in it to overheat, creatinga fire hazardor causingproperty
damage.
• Non-stickcoatings when heated,can be harmful to birds.
Removebirdsto a separate, well-ventilatedroom during
cooking.
2
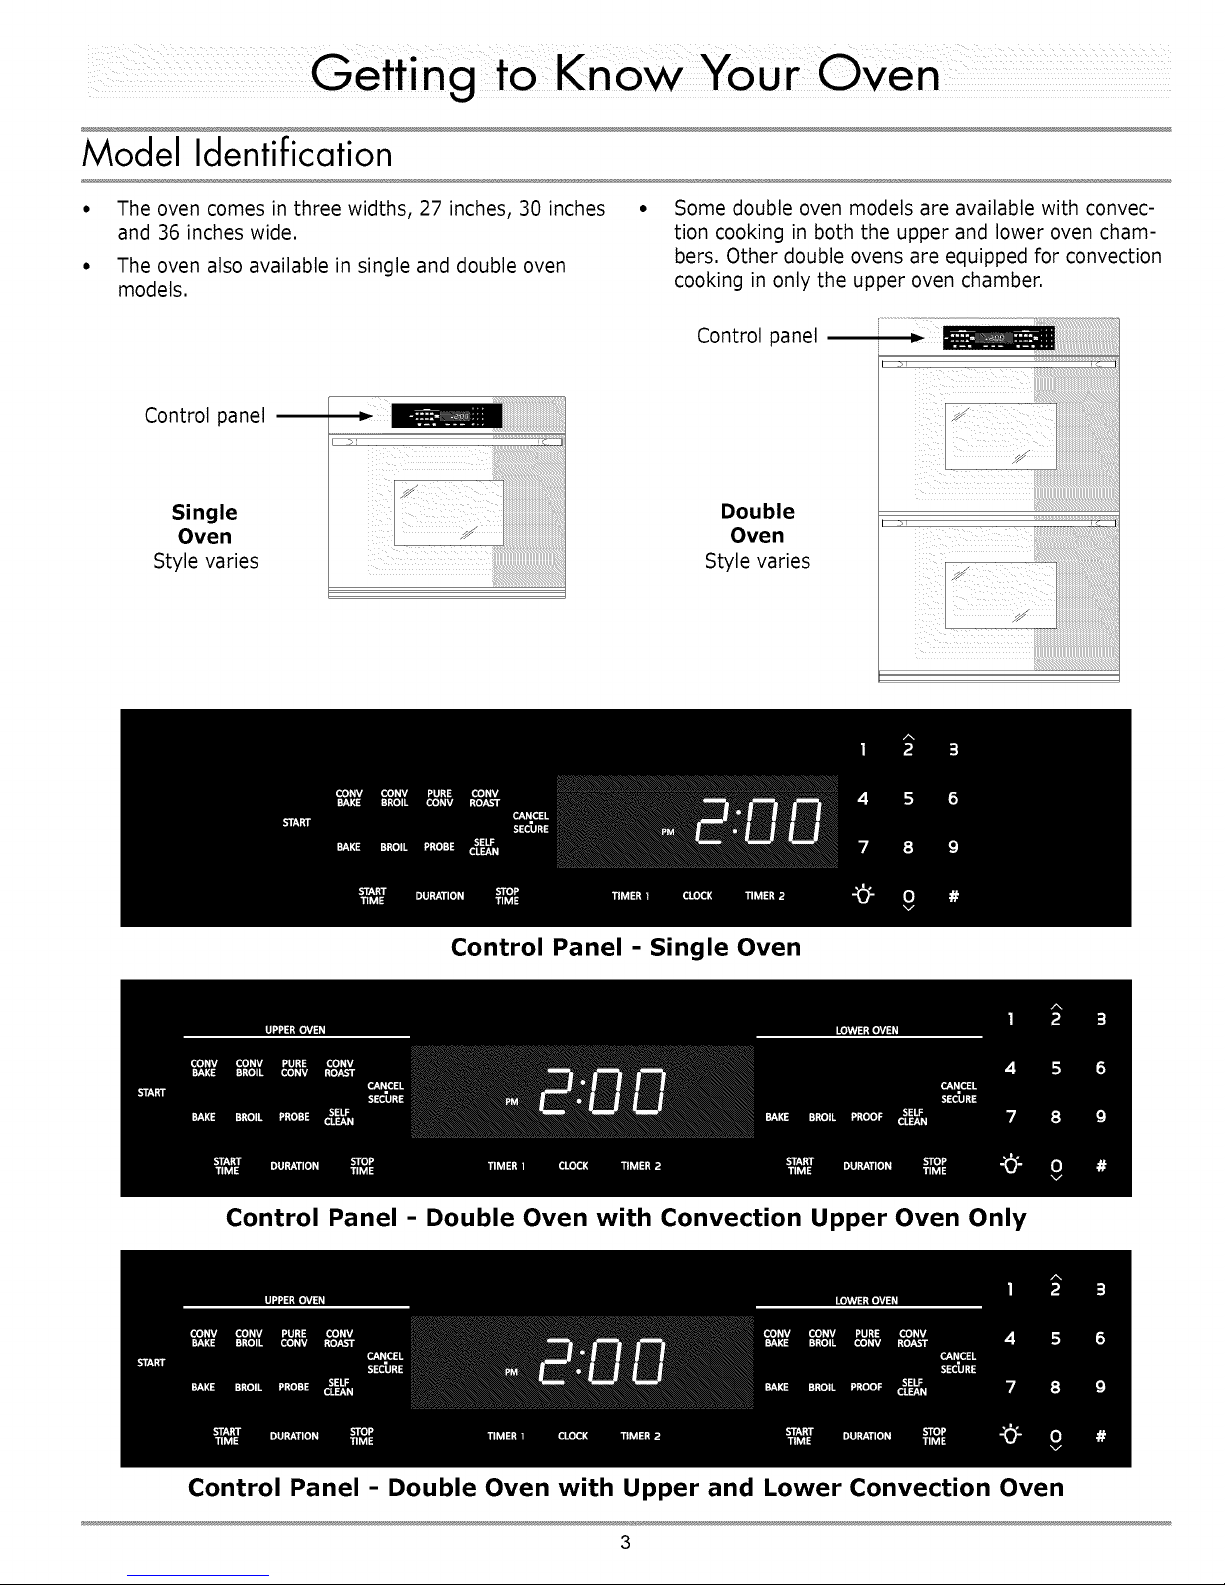
Model Identification
The oven comes in three widths, 27 inches, 30 inches
and 36 inches wide.
The oven also available in single and double oven
models.
Control panel
Single
Oven
Style varies
Some double oven models are available with convec-
tion cooking in both the upper and lower oven cham-
bers. Other double ovens are equipped for convection
cooking in only the upper oven chamber.
Control panel
Double
Oven
Style varies
Control Panel - Single Oven
Control Panel - Double Oven with Convection Upper Oven Only
Control Panel - Double Oven with Upper and Lower Convection Oven
3
Partsof the Oven
[] Control panel Your oven's control panel consists of keys and a display. Use the control panel to
control all the oven's features (sometimes called modes.)
[] Air intake/Exhaust slots The oven draws air in through the intake slots to cool its internal parts. The air
comes out through the exhaust slot at the bottom of the oven. Do not block or
cover the air intake or exhaust slots.
[] Meat probe connector When you use the meat probe, insert the skewer into the meat and plug the other
end into this connector. See the Using the Meat Probe section on page 17 for
proper operation. On double ovens, only the upper oven is equipped with a meat
probe connector.
[] Oven lights There are two oven lights inside the oven chamber so that you can easily see the
food inside. Press the light key on the control panel to turn them on. The bulbs are
12 volt, 20 watt, halogen.
[] Rack supports There are six sets of rack supports inside each oven chamber. They support the
adjustable oven racks. They are numbered from the bottom up.
[] Door gasket The door gasket prevents heat from escaping when the door is closed.
[] Self clean latch The self clean latch automatically locks the oven door during the self clean cycle.
The door latches for your safety. There are very high temperatures inside the oven
during the self clean cycle.
[] Broil elements The broil elements are located on the ceiling of the oven chamber. On some
models, they are hidden behind a glass panel. They are the source of top heat.
[] Convection fan* The convection fan blows heated air into the oven chamber during the convection
cooking process. The convection filter covers it.
[] Convection element* The convection element heats the air that is blown into the oven chamber by the
convection fan during the convection cooking process. The convection filter covers
it.
[] Convection filter* The convection filter covers the convection fan. It helps prevent the transfer of
taste from one food to another when you are cooking a whole meal. It also keeps
the oven cleaner and covers the moving fan blades for safety purposes.
[] Oven rack Your oven comes with one GlJdeRackTM oven rack and a set of standard racks. The
total number of racks depends on the model.
[] Bake elements Hidden below the glass panel on the floor of the oven chamber are the bake ele-
ments. They are the source of bottom heat.
* Some double ovens are not equipped for convection cooking in the lower oven. These models do not have a convec-
tion fan, element and filter in the bottom oven chamber.
4
JI
III
II
5
Control Panel Layout
[] START key When you use the various features (or modes) on your oven, select the cook-
ing mode first, then press the START key. Also, use the START key to start the
timers.
[] Cooking mode keypad Select the type of cooking you want to perform by pressing one of the cooking
mode keys. Also includes the SELF CLEAN and PROBE keys, and on double ovens,
the PROOF key. Double ovens have two cooking mode keypads, one for the upper
oven and one for the lower.
[] CANCEL • SECURE key
[] Display The control panel display provides various types of information about the oven,
[] Number keypad When you want to set the temperature, cook time or the time, use the number
[] Delay timed cooking Use these keys to set the oven to turn on or off automatically at a later time. On
keys double ovens, there is a set of delay timed cooking keys for each oven. See page
[] TIMER keys Use the TIMER 1 and TIMER 2 keys to time an event. The two timers operate
[] CLOCK key Use this key to set the clock.
[] Light key Located on the number keypad. If you need to turn the oven lights on or off, press
[] Sabbath key (#) Use this key to start Sabbath mode. See page 20 for details.
Use this key to turn off your oven. This key sets all temperature settings back to
zero and turns off any features (except the timer) that are currently in use. It also
activates the lock-out feature. On double ovens, there is a CANCEL • SECURE key
for each oven.
including the current time (once the clock is set), the current cook settings and the
cooking temperature. See below for the symbols that appear on the display
keypad.
15 for instructions.
separately from each other. You can use them even if the oven is not in use. They
do not turn the oven on or off. See page 15 for instructions.
the light key.
Display Symbols
(,€,€,€, €,€,€,€,
Convection Bake Broil Roast
8 0
Meat Door lock Timer Self clean
probe (self clean)
(]) Q
Timer numbers
6
Control Panel - Single Oven
Control Panel - Double Oven with Convection Upper Oven Only
Control Panel - Double Oven with Upper and Lower Convection Oven
7

Control Panel Settings Setting the Temperature Scale
You can select the temperature scale (Fahrenheit or Cel-
Setting the Time
1. Press the CLOCK key. The colon between the minutes
and seconds on the time display will begin to flash.
2. Enter the current time on the number keypad before
the colon stops flashing. For example: For 12:08,
press 1-2-0-8 on the keypad. Pressing the # key
changes the AM-PM indicator.
3. Press START.
IMPORTANT
• The clockcannot be set duringdelay timed cooking,if one
of thetimers isin use or ifself clean orSabbathmodeis
active.
' After a powerfai!urelthe timeon thedisplay mayflashi
indicatingthat the time may be €orrect
i' After pressingthe clockkey,You mustenter the time and
press START soon afte_ard, If Youwait longerthan six
seconds between pressingkeys, the display w !!go backto
sius) the oven uses to display the cooking temperature.
The oven is preset at the factory to Fahrenheit.
To change the temperature scale:
1. Press and hold the BROIL key (under UPPER OVEN
on double ovens) for six seconds.
2. The display will indicate the temperature scale the
control panel is currently set to, "F" or "C'.
3. Press the # key to change the temperature scale. To
leave the setting as is, do not touch any keys.
4. Press CANCEL • SECURE. The control panel will go
back to the regular clock display, set to the new tem-
perature scale.
Before You Cook...
• Dacor recommends turning the oven on for one hour
at 500°F to burn off any residual oils used during the
manufacturing process. Any of these oils left on the
inner parts can cause an undesirable smell the first
few times the oven is used.
24/12 Hour Clock (Military Time)
The oven is set to 12-hour (non-military) time at the fac-
tory. 24 hour time is also known as military time.
1:36 PM = 13:36 military time.
If you want to switch the clock to 24 hour
time or switch from military back to regular
time:
1. Press and hold the clock key for six seconds. The
display will indicate the mode the clock is currently set
to, 12 Hr or 24 Hr,
2. Press the # key to change the clock mode. To leave
the setting as is, do not touch any keys.
3. Press CANCEL • SECURE to return to the main dis-
play. If you have set the clock to 24 hour time, the
keypad will allow you to enter military time when set-
ting the clock.
• When you use your oven to bake or roast, it preheats
automatically, The preheat cycle rapidly brings the
oven chamber up to the proper cooking temperature,
It takes several minutes to preheat the oven, Preheat
time depends on the temperature settings, The time
may be longer depending on the type of electrical
supply in your community, There is no preheat cycle
for any of the broil modes,
• After you pull food out of the oven, it will continue to
cook, This process is called "carry-over," The larger
the portion of food, the longer it will cook, It is best to
let the meat rest after it comes out of the oven for 10
to 15 minutes before carving, Doing so will allow the
meat to retain its juices and make it easier to carve,
8
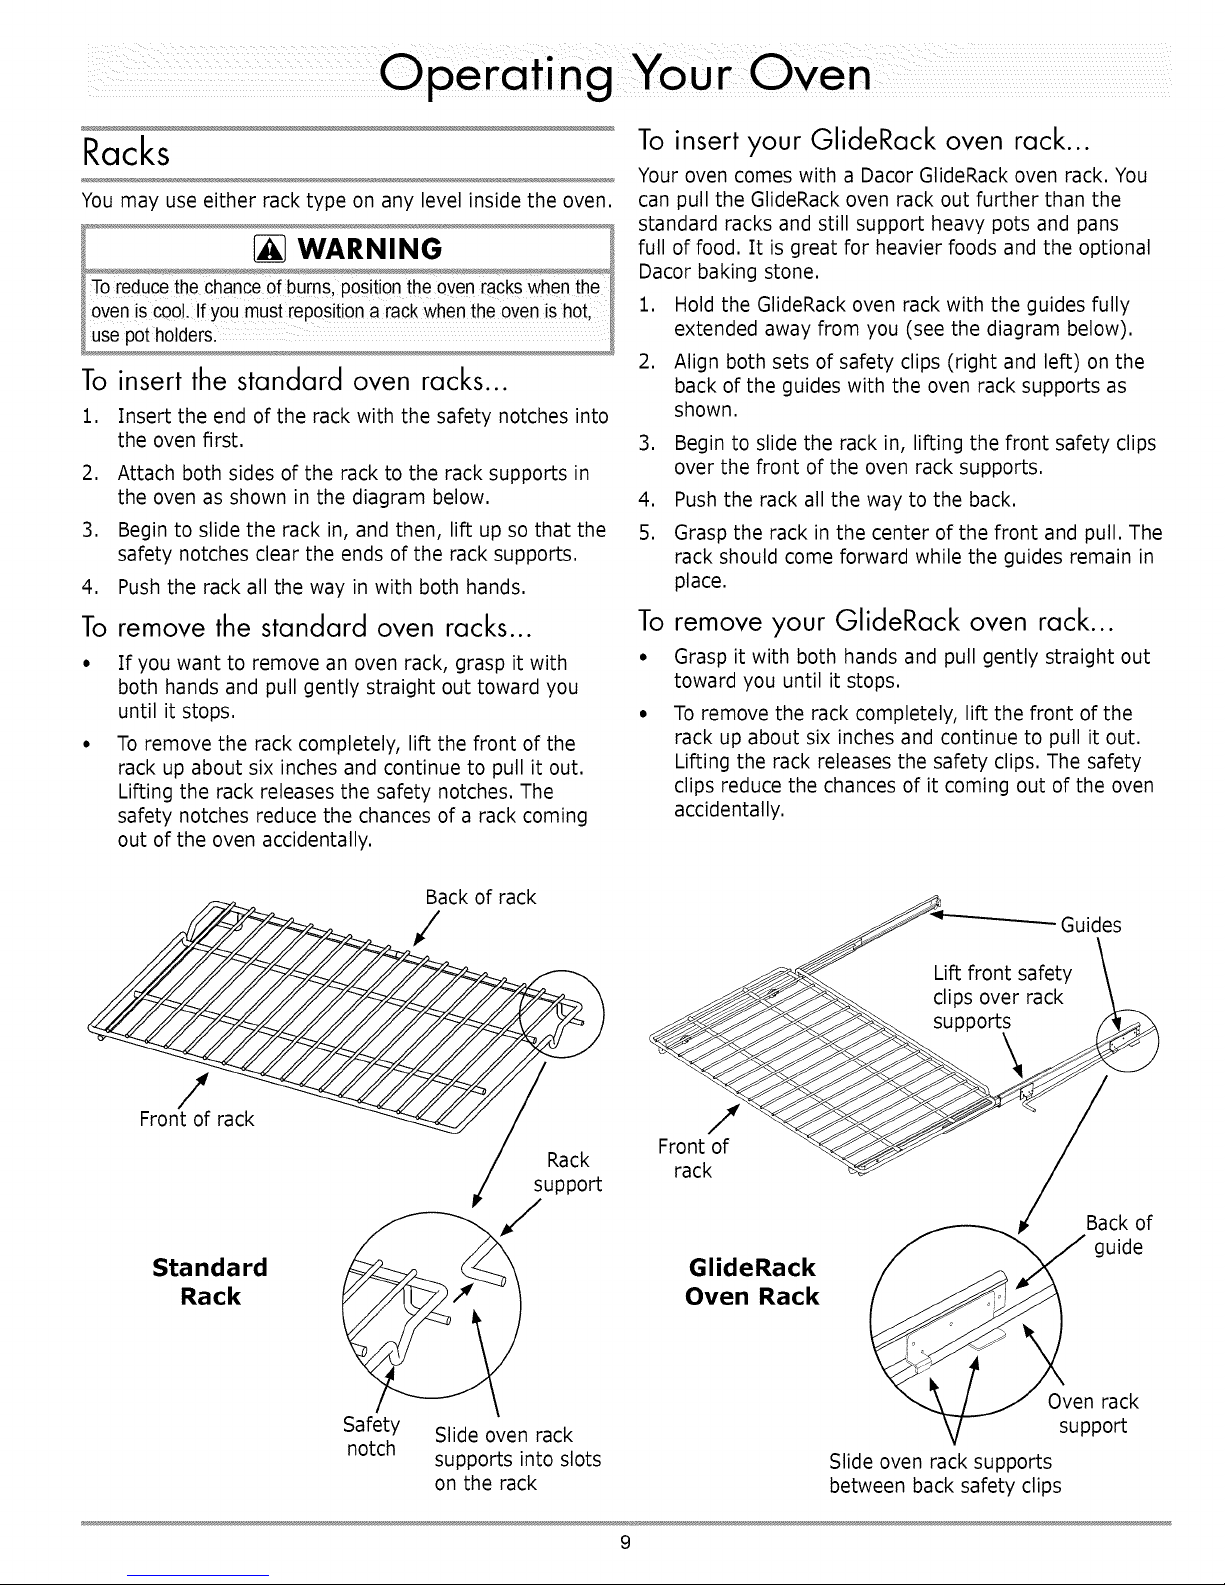
Racks
You may use either rack type on any level inside the oven.
To insert the standard oven racks...
1. Insert the end of the rack with the safety notches into
the oven first.
2. Attach both sides of the rack to the rack supports in
the oven as shown in the diagram below.
3. Begin to slide the rack in, and then, lift up so that the
safety notches clear the ends of the rack supports.
4. Push the rack all the way in with both hands.
To insert your GlideRack oven rack...
Your oven comes with a Dacor GlideRack oven rack. You
can pull the GlideRack oven rack out further than the
standard racks and still support heavy pots and pans
full of food. It is great for heavier foods and the optional
Dacor baking stone.
1. Hold the GlideRack oven rack with the guides fully
extended away from you (see the diagram below).
2. Align both sets of safety clips (right and left) on the
back of the guides with the oven rack supports as
shown.
3. Begin to slide the rack in, lifting the front safety clips
over the front of the oven rack supports.
4. Push the rack all the way to the back.
5. Grasp the rack in the center of the front and pull. The
rack should come forward while the guides remain in
place.
To remove the standard oven racks...
If you want to remove an oven rack, grasp it with
both hands and pull gently straight out toward you
until it stops.
To remove the rack completely, lift the front of the
rack up about six inches and continue to pull it out.
Lifting the rack releases the safety notches. The
safety notches reduce the chances of a rack coming
out of the oven accidentally.
Back of rack
/
/
Front of rack
Rack
support
To remove your GlideRack oven rack...
• Grasp it with both hands and pull gently straight out
toward you until it stops.
• To remove the rack completely, lift the front of the
rack up about six inches and continue to pull it out.
Lifting the rack releases the safety clips. The safety
clips reduce the chances of it coming out of the oven
accidentally.
Guides
Front of
rack
Standard
Rack
Safety Slide oven rack
notch
supports into slots
on the rack
Back of
Oven Rack
GlideRack _ guide
Oven rack
support
Slide oven rack supports
between back safety clips
g
 Loading...