

Page 1

36 Inch Refrigerator
Model: EF36BNNF
Installation Instructions
Part No. 106177 Rev. F/W10334850
Francis - Voir Page 9
Page 2

Table of ConTenTs
Refrigerator Safety ....................................................................... 1
Proper Disposal of Your Refrigerator.........................................1
Design Specifications .................................................................. 2
Product Dimensions ..................................................................2
Installation Specifications ........................................................... 2
Tools and Parts ..........................................................................2
Location Requirements .............................................................. 2
Cabinet Layout ..........................................................................3
Water Supply Requirements ......................................................3
Electrical Requirements ............................................................. 3
IMPORTANT:
• If you receive a damaged product, immediately contact your dealer or builder. Do not install or use a damaged appliance.
• Installer: Leave these installation instructions with the homeowner.
• Homeowner: Keep these installation instructions for future reference. Save these installation instructions for the local electrical
inspector’s use.
Installation Instructions ............................................................... 4
Unpack the Refrigerator ............................................................4
Move Refrigerator into House ...................................................4
Door and Drawer Front Removal ..............................................4
Reinstalling the Door(s) ............................................................. 5
Connecting the Water Supply ....................................................6
Plug in Refrigerator....................................................................7
Move Unit to Final Position........................................................7
Leveling .....................................................................................7
Handle Installation ..................................................................... 7
Complete Installation ................................................................. 8
Water System Preparation ........................................................8
CusTomer serviCe informaTion
If you have questions or problems with installation, contact your
Dacor ® dealer or the Dacor Customer Service Team. For repairs
to Dacor appliances under warranty, call the Dacor Distinctive
Service line. Whenever you call, have the model and serial
number of the appliance ready. These numbers are found on a
label located on the inside wall of the refrigerator compartment.
Dacor Customer Service:
Phone: (800) 793-0093 ex. 2813 (U.S.A. and Canada)
Monday — Friday 6:00 a.m. to 5:00 p.m. Pacific Time
Web site: www.dacor.com
Dacor Distinctive Service (repairs under warranty only):
Phone: (800) 793-0093 ex. 2822 (U.S.A. and Canada)
Monday — Friday 6:00
a.m. to 5:00 p.m. Pacific Time
All specifications subject to change without notice.
Dacor assumes no liability for changes to specifications.
© 2009 Dacor, all rights reserved.
Page 3

refrigeraTor safeTy
WARNING
Tip Over Hazard
Refrigerator is top heavy and tips easily when not
completely installed.
Keep doors taped closed until refrigerator is
completely installed.
Use two or more people to move and install
refrigerator.
Failure to do so can result in death or serious injury.
Your safety and the safety of others are very important.
We have provided many important safety messages in this manual and on your appliance. Always read and obey all safety
messages.
This is the safety alert symbol.
This symbol alerts you to potential hazards that can kill or hurt you and others.
All safety messages will follow the safety alert symbol and either the word “DANGER” or “WARNING.”
These words mean:
You can be killed or seriously injured if you don't immediately
DANGER
WARNING
All safety messages will tell you what the potential hazard is, tell you how to reduce the chance of injury, and tell you what can
happen if the instructions are not followed.
IMPORTANT SAFETY INSTRUCTIONS
WARNING:
Plug into a grounded 3 prong outlet.
Do not remove ground prong.
Do not use an adapter.
Do not use an extension cord.
Disconnect power before servicing.
Replace all parts and panels before operating.
Remove doors from your old refrigerator.
To reduce the risk of fire, electric shock, or injury when using your refrigerator, follow these basic precautions:
SAVE THESE INSTRUCTIONS
follow instructions.
can be killed or seriously injured if you don't
You
instructions.
Use nonflammable cleaner.
Keep flammable materials and vapors, such as gasoline,
away from refrigerator.
Use two or more people to move and install refrigerator.
Disconnect power before installing ice maker (on ice maker
kit ready models only).
Use a sturdy glass when dispensing ice (on some models).
follow
ProPer DisPosal of your refrigeraTor
WARNING
Suffocation Hazard
Remove doors from your old refrigerator.
Failure to do so can result in death or brain damage.
IMPORTANT: Child entrapment and suffocation are not problems
of the past. Junked or abandoned refrigerators are still dangerous,
even if they sit out for “just a few days.” If you are getting rid of
your old refrigerator, please follow the instructions below to help
prevent accidents.
Before you throw away your old refrigerator or freezer:
• Take off the doors.
• Leave the shelves in place so
children may not easily climb
inside.
1
Page 4
Design sPeCifiCaTions
ProDuCT Dimensions
• The depth from the front of the door (w/o door handles) to the
back of the refrigerator chassis is 27” (68.6 cm).
• The depth of the cabinet less the door is 24 1/4” (61.6 cm).
• The power cord is 60” (152.4 cm) long.
• The height from the top of the refrigerator to the floor with the
leveling legs in the down position is 69 15/16”
(177.6 cm), 71 7/8” (182.6 cm) with the optional top trim kit
(Part # AFG36).
insTallaTion sPeCifiCaTions
Tools anD ParTs
Make sure that you have the necessary tools and materials
available for a proper installation:
• Phillips screwdriver set
• Slotted screwdriver set
• 1/4” (6 mm) copper tubing for the water line. Provide sufficient
length to allow for a minimum of a 24” (61.0 cm) diameter
service loop.
• Compression nut and compression sleeve to connect to
the water supply valve. A compression nut and sleeve are
included with the refrigerator to connect the refrigerator side
of the line.
• Copper tubing cutter
• Level - 2’ (0.6 m) and 4’ (1.2 m) recommended
• Appliance dolly able to support 700 lbs (317 kg) and
adequate manpower to handle the weight of the appliance
• Nut driver set or socket set
• Crescent wrench
• Cordless drill and assorted drill bits
• Plywood or cardboard to protect finished flooring
• Appropriate materials to cover and protect the home and its
furnishings during installation
• The height from the top of the refrigerator to the floor with the
leveling legs in the fully extended position is 70 9/16”
(179.2 cm) at the front of the unit, 72 1/2” (184.2 cm) with the
optional top trim kit (Part # AFG36).
• The refrigerator width from edge to edge is 35 5/8” (90.5 cm).
loCaTion requiremenTs
Your Dacor refrigerator can be recessed in an opening between
cabinets or installed at the end of a cabinet run using a side panel
to enclose the refrigerator.
WARNING
Explosion Hazard
Keep flammable materials and vapors, such as
gasoline, away from refrigerator.
Failure to do so can result in death, explosion, or fire.
IMPORTANT:
• Observe all governing codes and ordinances.
• To ensure proper ventilation for your refrigerator, allow for
1/2” (1.3 cm) space on each side and at the top. Allow for a
1” (2.5 cm) space behind the refrigerator.
• Do not install the refrigerator in a location where the
temperature will fall below 55°F (13°C).
• Allow a minimum of 2 1/2” (6.4 cm) space between the side
of the refrigerator and an oven or range.
• The floor must be able to support the refrigerator’s weight of
more than 330 lbs (150 kg), the door panels and the contents
of the refrigerator.
• The area to the left and the right of the appliance must
permit both doors to open to a minimum of 90°. Allow space
between the side of the refrigerator doors and a corner wall
for the handle and/or custom door panels.
2
Page 5
insTallaTion sPeCifiCaTions
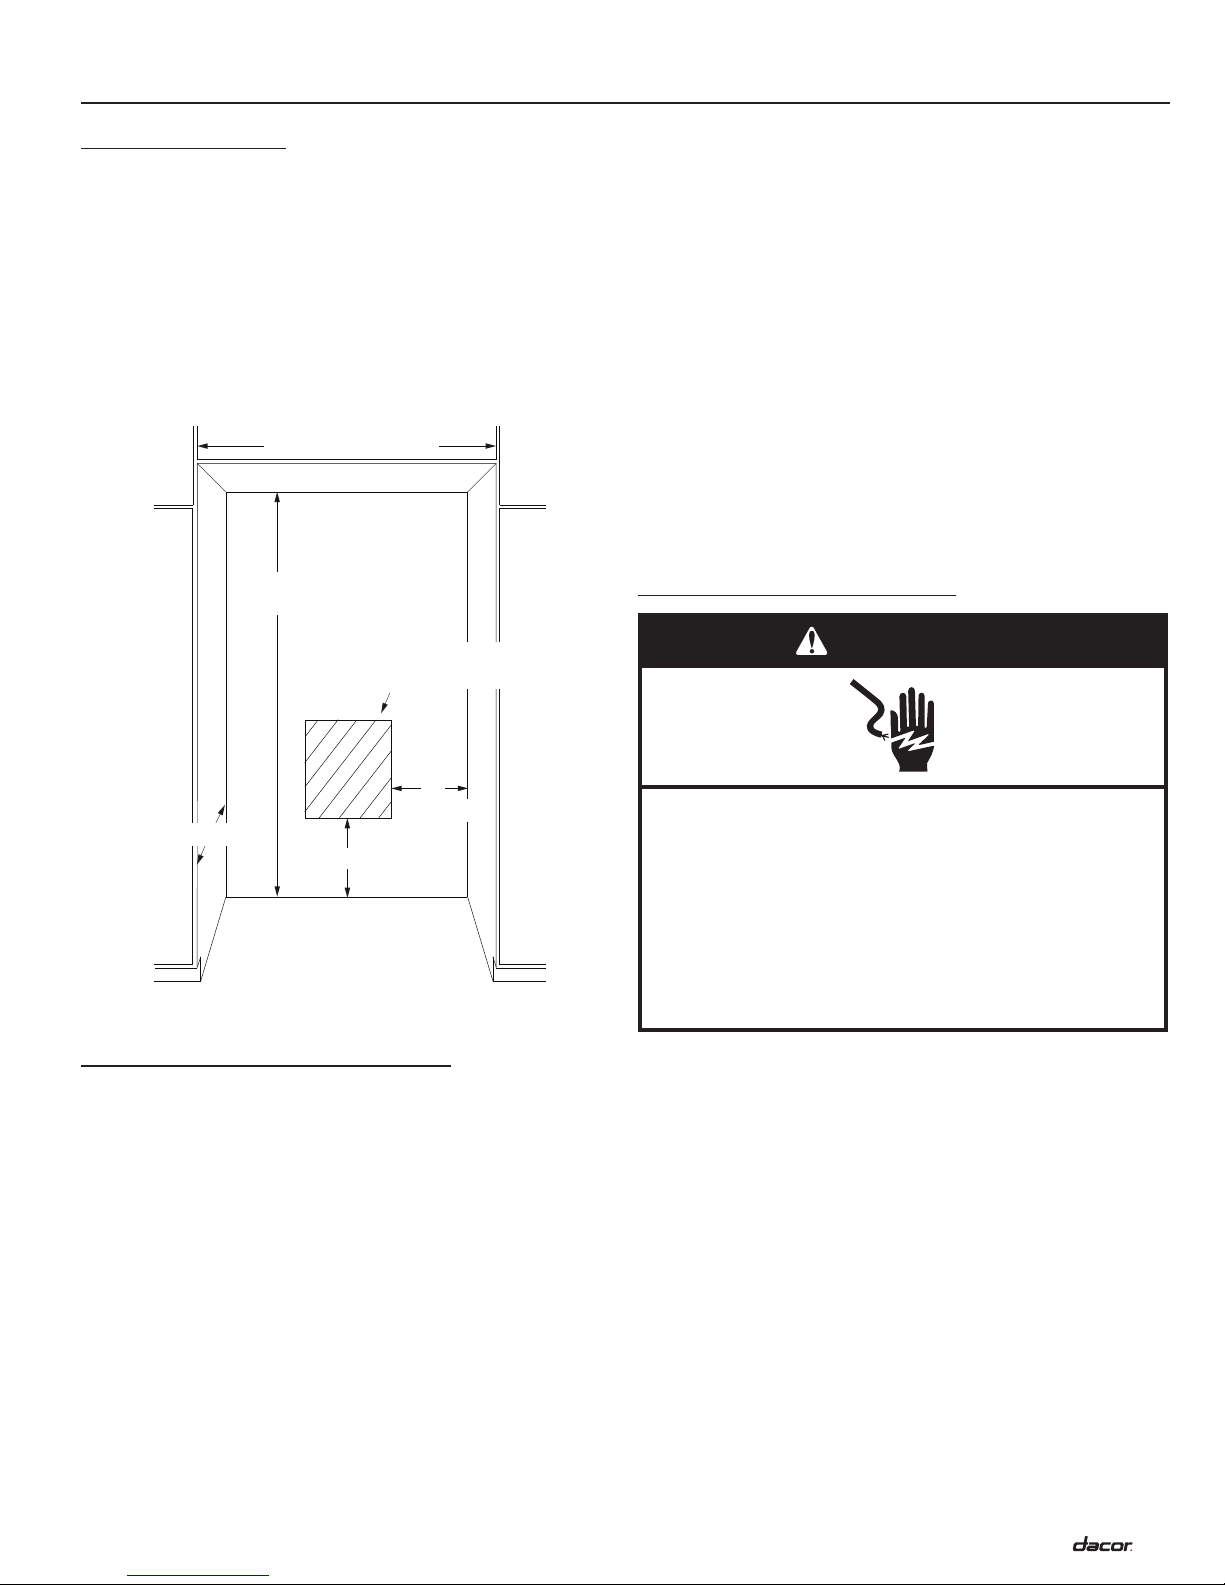
CabineT layouT
• Locate the refrigerator so that it may easily be pulled out from
the wall if service becomes necessary.
• A grounded three prong non-GFCI electrical outlet must
be provided and should be in a location that allows the
refrigerator to be connected without an extension cord. See
Electrical Requirements for additional information.
• The plumbing for the water line can come through the floor
flush to or from the back wall. Install the water valve in a
location that allows it to be turned off without moving the
refrigerator out in the event the refrigerator or water line
requires service.
36 5/8” min. (93.0 cm)
70 1/2” min.*
(179.1 cm)
Suggested electrical location
approximate dimensions
Reverse osmosis water supply
IMPORTANT: The pressure of the water supply coming out of
a reverse osmosis system going to the water inlet valve of the
refrigerator needs to be between 35 and 120 psi (241 and
827 kPa).
If a reverse osmosis water filtration system is connected to your
cold water supply, the water pressure to the reverse osmosis
system needs to be a minimum of 40 to 60 psi (276 to 414 kPa).
If the water pressure to the reverse osmosis system is less than
40 to 60 psi (276 to 414 kPa):
• Check to see whether the sediment filter in the reverse
osmosis system is blocked. Replace the filter if necessary.
• Allow the storage tank on the reverse osmosis system to refill
after heavy usage.
• If your refrigerator has a water filter, it may further reduce
the water pressure when used in conjunction with a reverse
osmosis system. Remove the water filter. See the use and
care manual.
eleCTriCal requiremenTs
WARNING
12”
(30.5 cm)
24” (61.0 cm)
12” (30.5 cm)
*Add 1 3/4” (4.4 cm) for the optional top gril kit (AFG36).
WaTer suPPly requiremenTs
• All installations must meet local plumbing code requirements.
• A cold water supply with water pressure of between 35 and
120 psi (241 and 827 kPa) is required to operate the water
dispenser and ice maker. If you have questions about your
water pressure, call a licensed, qualified plumber.
• Install a shut off valve between the refrigerator and water
supply. Use 1/4” copper tubing with a compression nut and
compression sleeve and check for leaks. Allow a minimum of
24” (61.0 cm) diameter service loop of copper tubing outside
the wall or floor for easy connection to the water supply.
Install copper tubing only in areas where the household
temperatures will remain above freezing.
• Do not use a piecing type or 3/16” (5 mm) saddle valve which
will reduce water flow and clog more easily.
If you have questions about your water pressure, call a licensed,
qualified plumber.
Electrical Shock Hazard
Plug into a grounded 3 prong outlet.
Do not remove ground prong.
Do not use an adapter.
Do not use an extension cord.
Failure to follow these instructions can result in death,
fire, or electrical shock.
A 115 Volt, 60 Hz. AC only 15 or 20 Amp. fused, grounded
electrical supply is required. It is recommended that a separate
circuit serving only your refrigerator be provided. Use an outlet
that cannot be turned off by a switch. Do not use an extension
cord.
3
Page 6
insTallaTion insTruCTions
IMPORTANT: Read all directions before you begin.
unPaCk The refrigeraTor
WARNING
Tip Over Hazard
Refrigerator is top heavy and tips easily when not
completely installed.
Keep doors taped closed until refrigerator is
completely installed.
Use two or more people to move and install
refrigerator.
Failure to do so can result in death or serious injury.
IMPORTANT:
• Do not remove the film on the outside until the refrigerator is
in its operating position.
• Remove tape and glue residue from surfaces before turning
on the refrigerator. Rub a small amount of liquid dish soap
over the adhesive with your fingers. Wipe with warm water
and dry.
• Do not use sharp instruments, rubbing alcohol, flammable
fluids or abrasive cleaners to remove tape or glue. These
products can damage the surface of your refrigerator. For
more information, see Important Safety Instructions.
• Dispose of/recycle all packaging materials.
• After you remove all of the packaging materials, clean the
inside of your refrigerator before using it. See Care and
Cleaning in the use and care manual.
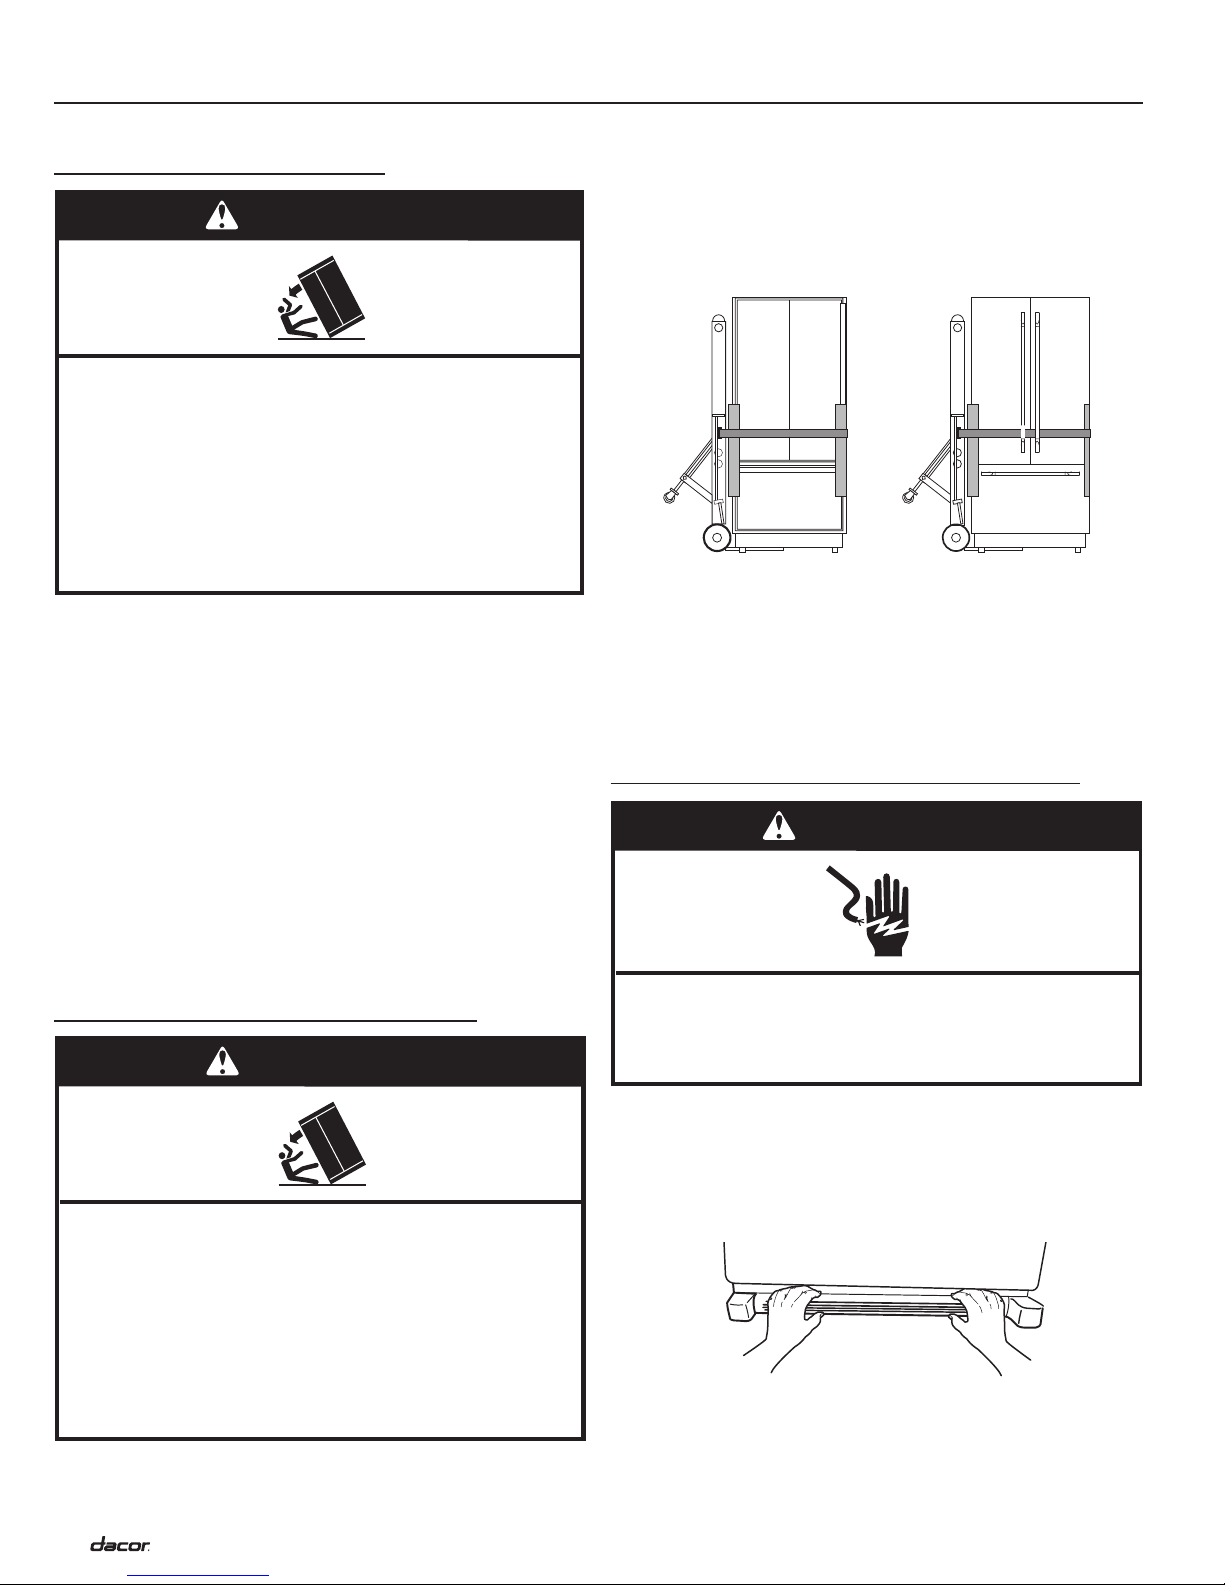
move refrigeraTor inTo house
WARNING
1. Place an appliance dolly under the left side of the refrigerator
as shown. Be sure to avoid damaging the side trims and
handles. Place the corner posts from the packing materials
over the trims and handles as appropriate. Slowly tighten the
strap.
NOTE: Pass the dolly strap under the handles for EF36 and
PF36 series models.
2. Place pieces of the shipping carton on the floor when rolling
the dolly and refrigerator into the house. Move the refrigerator
close to the opening.
3. Place cardboard or plywood under refrigerator.
4. Stand the refrigerator up. First, place the left bottom edge of
the refrigerator on the floor, stand the refrigerator upright and
then lower the right-hand side of the refrigerator to the floor.
Door anD DraWer fronT removal
WARNING
Electrical Shock Hazard
Disconnect power before removing doors.
Failure to do so can result in death or electrical shock.
Tip Over Hazard
Refrigerator is top heavy and tips easily when not
completely installed.
Keep doors taped closed until refrigerator is
completely installed.
Use two or more people to move and install
refrigerator.
Failure to do so can result in death or serious injury.
4
Some installations require door and drawer front removal before
transporting the refrigerator through doorways to the location
where it will be used.
1. Unplug the power cord from the power source.
2. Remove the toe grille.
Page 7
insTallaTion insTruCTions
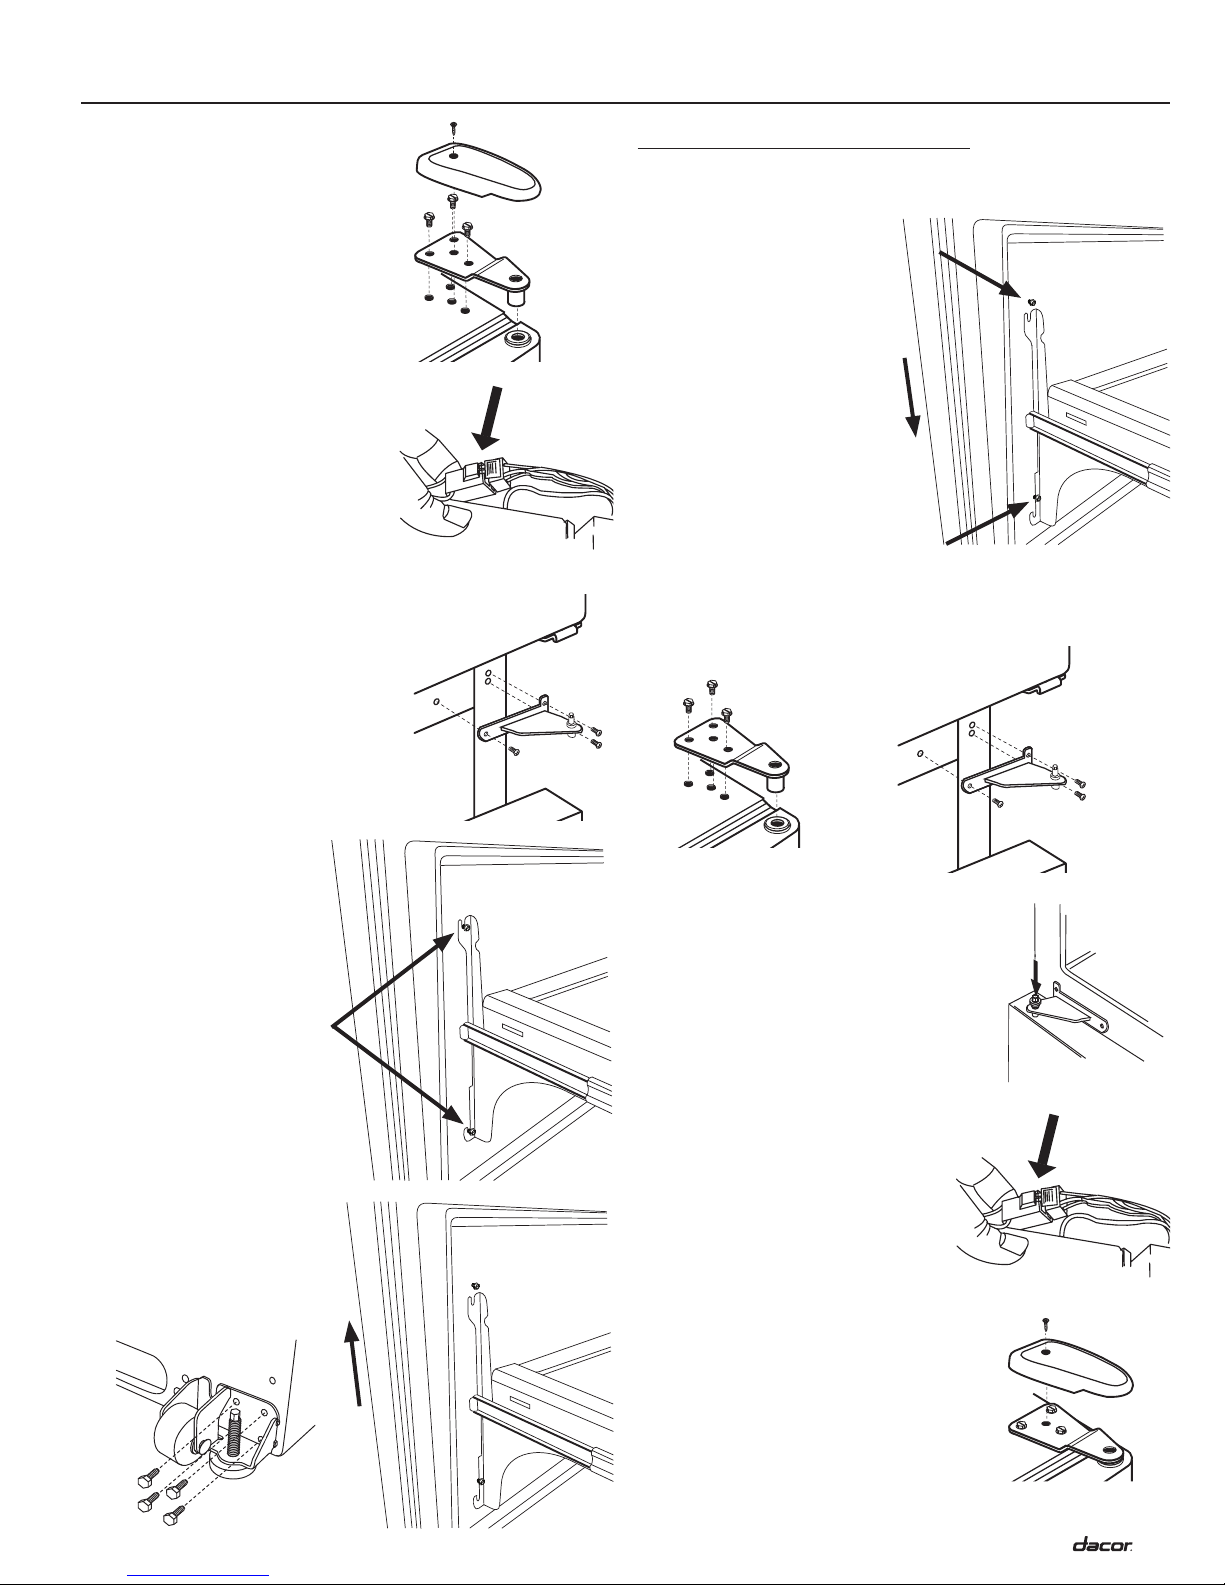
3. Remove the top hinge cover from
the refrigerator door by removing
the Phillips screw. Retain the
screw and cover for later use.
Hinge style may vary.
4. Unscrew the 5/16” hex head
screws from the top hinge.
Remove the hinge and retain it
and all screws for later use.
5. On 3 door (french door) models,
disconnect the wiring plug located
on top of the left top hinge by
wedging a flat-blade screwdriver
between the two sections.
6. Lift the refrigerator door(s) from
the center hinge pin.
7. Remove the Phillips screws that
hold the center hinge in place.
Remove the hinge and retain it
and all screws for later use.
Hinge cover
Top hinge
Wiring plug
Center
hinge
reinsTalling The Door(s)
After the moving the refrigerator to the location where it will be
used, reinstall the door(s) and freezer drawer front.
1. Replace the rollers.
2. Slide the screws on the
back of the drawer front
into the slots in the drawer
brackets on both sides.
You may need to move
the bottom of the bracket
around slightly to get the
slot to line up with the
screw.
3. Tighten the four front panel
screws completely. Do not
over-tighten.
4. Install the top hinge loosely using the existing 5/16” hex head
screws.
5. Install the center hinge using the existing Phillips screws.
Top hinge
Center hinge
8. Pull the freezer drawer
completely open.
9. Loosen the four (4)
screws attaching the
drawer brackets to the
drawer front as shown.
NOTE:
Loosen the
screws only three to four
turns. Do not remove the
screws from the drawer
front.
10. Lift the drawer front
upward and off the
screws.
11. Unscrew the hex head
screws from the rollers
and remove.
6. Place the hinge side of the refrigerator
door on the center hinge pin.
7. While holding the refrigerator door
upright, tighten down the top hinge
with a 5/16” hex head driver.
8. On 3 door (french door) models,
reconnect the wiring plug located
on top of the left top hinge.
9. Replace the top hinge cover using
the existing Phillips screw.
Hinge pin
Wiring plug
Hinge cover
5
Page 8
insTallaTion insTruCTions
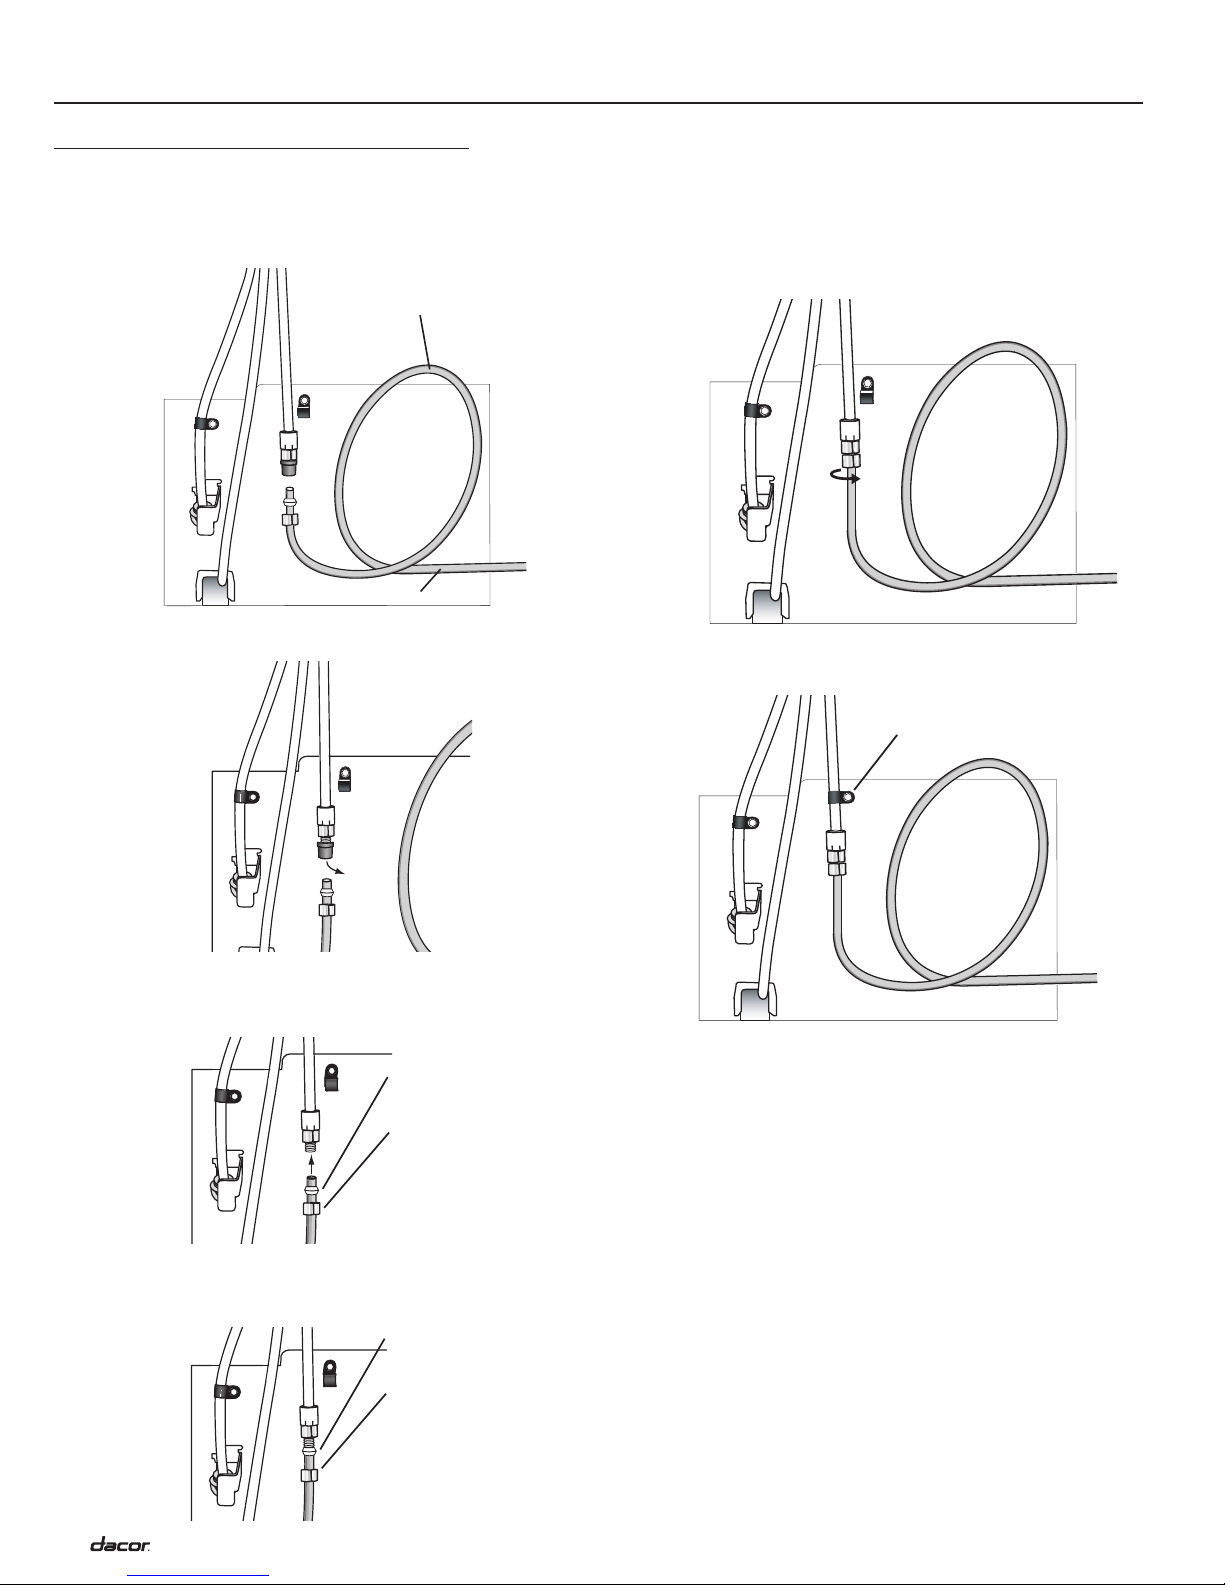
ConneCTing The WaTer suPPly
1. Unplug the refrigerator from the electrical outlet.
2. Create a service loop with copper tubing (minimum 2 foot
/61 cm diameter). Avoid kinks in the copper tubing when
bending it into a service loop. Do not use plastic tubing.
Min. 2’ diameter
(not to scale)
Copper tubing
3. Remove the plastic cap from water valve inlet port.
6. Slide the brass nut over the sleeve and screw it into the inlet
port.
7. Place an adjustable wrench on the nut attached to the plastic
waterline. Maintain position.
8. Using a second adjustable wrench, turn the lower nut
counterclockwise and fully tighten it while holding the upper
nut in place. Do not overtighten.
9. Pull on the tubing to confirm the connection is secure.
Connect the tubing to the frame with the water tubing clamp.
4. Place the brass nut and sleeve on the end of the copper tube
as illustrated. The nut and sleeve are provided in the use and
care packet. Do not use an old sleeve.
Compression
sleeve
Compression
nut
5. Place the end of the copper tubing into the water valve inlet
port. Shape the tubing slightly. Do not kink the tubing so that
it feeds straight into the inlet port.
Compression
sleeve
Compression
nut
“P” clamp
10. Turn on the water supply. Check for leaks and correct if
necessary. Continue to observe the water supply connection
for two to three hours prior to moving the refrigerator to its
permanent location. Monitor the water connection for 24
hours. Correct leaks if necessary.
6
Page 9

insTallaTion insTruCTions
Plug in refrigeraTor
WARNING
Electrical Shock Hazard
Plug into a grounded 3 prong outlet.
Do not remove ground prong.
Do not use an adapter.
Do not use an extension cord.
Failure to follow these instructions can result in death,
fire, or electrical shock.
Plug the refrigerator into a
grounded three prong outlet.
leveling
WARNING
Tip Over Hazard
Refrigerator is top heavy and tips easily when not
completely installed.
Keep doors taped closed until refrigerator is
completely installed.
Use two or more people to move and install
refrigerator.
Failure to do so can result in death or serious injury.
1. Remove the base grille. Grasp the grille firmly an pull it
toward you.
move uniT To final PosiTion
WARNING
Tip Over Hazard
Refrigerator is top heavy and tips easily when not
completely installed.
Keep doors taped closed until refrigerator is
completely installed.
Use two or more people to move and install
refrigerator.
Failure to do so can result in death or serious injury.
IMPORTANT: To avoid floor damage, make sure the levelers are
raised (not touching the floor) and the refrigerator is on the rollers
before moving.
1. Place cardboard or plywood under the refrigerator. Remove
the dolly.
2. Move the refrigerator straight back, evenly into the opening.
Be sure that the refrigerator side trims are not interfering with
the door opening. Also, be sure that the water tubing is not
kinked and the power supply cord is on top of the refrigerator.
2. Having someone push against the top of the refrigerator
takes some weight off the leveling screws. Doing so makes it
easier to turn the screws.
• To raise, turn the
leveling screw
clockwise.
• To lower, turn the
leveling screw counterclockwise.
3. Open the door again to
make sure that it closes as
easily as you like. If not,
tilt the refrigerator slightly
more to the rear by turning
both adjustments screws clockwise. It may take several more
turns, and you should turn both adjustment screws the same
amount.
4. Replace the base grill.
hanDle insTallaTion
• Some units do not come with the handle installed to allow
the customer to choose the handle style. Optional handle kits
are also available. See the use and care manual for a list of
available handle kits.
• The installation instructions for the handle are included with
the kit.
7
Page 10

insTallaTion insTruCTions
ComPleTe insTallaTion
1. Turn the water supply line valve to the open position.
2. Wait a few minutes. Check the water line connections for
leaks.
3. Remove all boxes, parts packages and packing materials
from the interior of the refrigerator.
4. Remove the film and cardboard from the grille and doors or
door frame, depending on your model.
5. Install the shelves and bins in the refrigerator and freezer
compartments.
6. The controls are preset at the factory to the midpoint setting.
Check that the compressor is operating properly and that all
the lights are working.
7. Flush the water system before use. See Water System
Preparation.
To get the most efficient use from your new refrigerator, read your
use and care manual. Keep these installation instructions and the
use and care manual near the refrigerator for easy reference.
WaTer sysTem PreParaTion
Please read before using the water system.
Immediately after installation, follow the steps below to make sure
that the water system is properly cleaned.
NOTICE: Flush four (4) gallons of water through the water filter
cartridge before use. Allow 24 hours for the refrigerator to cool
down and chill water.
3. Make sure the ice bin is in
place and the ice maker
arm is down.
4. After the freezer section
reaches between 0° to 2°F
(-18° to -17° C), the ice
maker fills with water and
begins operating. You will
have a complete harvest
of ice approximately every
three hours.
5. Allow approximately 24
hours after installation to
receive the first harvest of ice.
6. Discard ice created within the first 12 hours of operation to
assure the system is flushed of impurities.
Do not use with water that is microbiologically unsafe or of
unknown quality without adequate disinfection before or after
the system. Systems certified for cyst reduction may be used on
disinfected waters that may contain filterable cysts.
1. Install the water filter. The water filter is located in the upper
right hand corner of the fresh food compartment. Remove
the blue bypass cap and retain it for later use. Remove the
sealing label from the end of the filter and insert it into the
filter head. Rotate it gently clockwise until it stops. Snap the
filter cover closed.
2. Hold a sturdy container under the water spout and press the
dispenser button. Flush the water system by dispensing and
discarding 4 gallons (15 L) of water. Cleaning the system will
take approximately 5 minutes and will help clear air from the
line. Additional flushing may be required in some households.
As air is cleared from the system, water may spurt out of the
dispenser.
8
Page 11

Instructions d’installation
Réfrigérateur de 36 pouces
Modèle : EF36BNNF
Pièce n° 106177 Rev. F/W10334850
Page 12

Table Des maTières
Sécurité du réfrigérateur ........................................................... 11
Mise au rebut du réfrigérateur – méthode appropriée ............ 11
Caractéristiques physiques ......................................................12
Dimensions du produit ............................................................. 12
Prescriptions d’installation .......................................................12
Outils et pièces ........................................................................ 12
Conditions requises pour l’emplacement ................................12
Implantation de l’armoire ......................................................... 13
Conditions requises pour l’alimentation en eau ......................13
Spécifications électriques ........................................................ 13
IMPORTANT:
• Si le produit reçu est endommagé, contactez immédiatement votre revendeur ou votre constructeur. Ne pas installer ou utiliser un
appareil ménager endommagé.
• Installateur: Laisser ces instructions d’installation au propriétaire.
• Propriétaire: Conserver ces instructions d’installation pour vous y reporter en cas de besoin. Conserver ces instructions
d’installation à l’intention du contrôleur d’installations électriques local.
Instructions d’installation .......................................................... 14
Déballage du réfrigérateur ....................................................... 14
Faire entrer le réfrigérateur dans le domicile ..........................14
Enlèvement de la porte et de la façade du tiroir .....................14
Remontage des portes ............................................................ 15
Raccordement de l’arrivée d’eau .............................................16
Branchement du réfrigérateur..................................................17
Déplacement de l’appareil jusqu’à son emplacement définitif 17
Mise à niveau ..........................................................................17
Montage des poignées ............................................................ 17
Achever l’installation ................................................................ 18
Préparation du système d’eau ................................................. 18
informaTion Pour le serviCe à la ClienTèle
Pour tout problème ou question concernant l’installation, contacter
le marchand Dacor ® ou l’équipe de service à la clientèle Dacor.
Pour toute réparation sur les appareils ménagers Dacor sous
garantie, contacter la ligne de réparations réservée aux produits
Dacor. Lors de la prise de contact, vous devrez communiquer
le nom du modèle et le numéro de série de l’appareil. Ces
numéros se trouvent sur une plaque situés sur la paroi interne du
compartiment de réfrigération.
Équipe de service à la clientèle Dacor
Téléphone : (800) 793-0093 ex. 2813 (É.-U. et Canada)
Du lundi au vendredi, de 6 h à 17 h, heure du Pacifique
Site Web : www.dacor.com
Ligne de réparations réservée aux produits Dacor
(réparations sous garantie uniquement)
Téléphone : (800) 793-0093 ex. 2822 (É.-U. et Canada)
Du lundi au vendredi, de 6 h à 17 h, heure du Pacifique
Les spécifications figurant dans ce manuel sont susceptibles d’être modifiées sans préavis.
DACOR n’assumera aucune responsabilité en cas de modification de ces spécifications.
© 2009 Dacor, tous droits réservés
Page 13

séCuriTé Du réfrigéraTeur
AVERTISSEMENT
Risque de basculement
Le réfrigérateur est lourd au sommet et bascule
facilement lorsqu'il n'est pas complètement installé.
Garder les portes fermées avec un ruban adhésif
jusqu'à l'installation complète du réfrigérateur.
Utiliser deux ou plus de personnes pour déplacer et
installer le réfrigérateur.
Le non-respect de ces instructions peut causer un
décès ou une blessure grave.
Votre sécurité et celle des autres est très importante.
Nous donnons de nombreux messages de sécurité importants dans ce manuel et sur votre appareil ménager. Assurez-vous de
toujours lire tous les messages de sécurité et de vous y conformer.
Voici le symbole d’alerte de sécurité.
Ce symbole d’alerte de sécurité vous signale les dangers potentiels de décès et de blessures graves à vous
et à d’autres.
Tous les messages de sécurité suivront le symbole d’alerte de sécurité et le mot “DANGER” ou
“AVERTISSEMENT”. Ces mots signifient :
Risque possible de décès ou de blessure grave si vous ne
DANGER
AVERTISSEMENT
Tous les messages de sécurité vous diront quel est le danger potentiel et vous disent comment réduire le risque de blessure et
ce qui peut se produire en cas de non-respect des instructions.
IMPORTANTES INSTRUCTIONS DE SÉCURITÉ
AVERTISSEMENT :
réfrigérateur, prendre quelques précautions fondamentales, y compris les suivantes :
Brancher l'appareil sur une prise à 3 alvéoles reliée à la terre.
Ne pas enlever la broche de liaison à la terre.
Ne pas utiliser un adaptateur.
Ne pas utiliser un câble de rallonge.
Débrancher la source de courant électrique avant l'entretien.
Replacer pièces et panneaux avant de faire la remise en marche.
Enlever les portes de votre vieux réfrigérateur.
Utiliser un produit de nettoyage ininflammable.
Pour réduire les risques d'incendie, de choc électrique ou des blessures lors de l'utilisation du
CONSERVEZ CES INSTRUCTIONS
suivez pas immédiatement les instructions.
Risque possible de décès ou de blessure grave si vous
ne suivez pas les instructions.
Garder les matériaux et les vapeurs inflammables, telle
que l'essence, loin du réfrigérateur.
Utiliser deux ou plus de personnes pour déplacer et
installer le réfrigérateur.
Débrancher le réfrigérateur avant l'installation de la
machine à glaçons (seulement pour modèles prêts à
recevoir une machine à glaçons).
Utiliser un verre robuste pour prendre des glaçons (sur
certains modèles).
mise au rebuT Du réfrigéraTeur –
méThoDe aPProPriée
AVERTISSEMENT
Risque de suffoquer
Enlever les portes de votre vieux réfrigérateur.
Le non-respect de cette instruction peut causer
un décès ou des lésions cérébrales.
IMPORTANT : Les décès d’enfants piégés par asphyxie sont
toujours d’actualité. Les réfrigérateurs entreposés à ciel ouvert ou
abandonnés restent dangereux, même s’ils ne sont là « que pour
quelques jours ». Pour se débarrasser d’un réfrigérateur usagé,
suivre les instructions ci-dessous pour
réduire le risque d’accident.
Avant de jeter un réfrigérateur ou un
congélateur usagé :
• Démonter les portes.
• Laisser les étagères en place pour que
les enfants ne puissent pas monter
facilement à l’intérieur.
11
Page 14

CaraCTérisTiques Physiques
Dimensions Du ProDuiT
• La profondeur depuis l’avant de la porte (sans poignées)
jusqu’à l’arrière du châssis du réfrigérateur est de 27”
(686 mm).
• La profondeur de l’armoire sans la porte est de 24 1/4”
(61,6 cm).
• La longueur du cordon d’alimentation est de 60” (152,4 cm).
PresCriPTions D’insTallaTion
ouTils eT PièCes
Vérifiez que vous disposez de tous les outils et matériaux
nécessaires à une installation correcte.
• Jeu de tournevis Phillips
• Jeu de tournevis plats
• Tube de cuivre de 1/4” (6 mm) pour la canalisation d’eau.
Prévoir une longueur suffisante pour une boucle de service
de diamètre minimal de 24” (61,0 cm).
• Écrou et virole de compression à raccorder au robinet
d’arrivée d’eau. Un écrou et une virole de compression sont
fournis avec le réfrigérateur pour le raccordement de la
canalisation côté réfrigérateur.
• Coupe-tubes cuivre
• Niveau: longueur 2’ (0,6 m) et 4’ (1,2 m) recommandée
• Châssis roulant capable de supporter 700 lbs (317 kg) et
nombre de personnes suffisant pour manier le poids du
réfrigérateur
• Jeu de douilles
• Clé à molette
• Perceuse sans fil et jeu de forets
• Contreplaqué ou carton
• Matériaux appropriés pour couvrir et protéger le domicile et
son mobilier pendant l’installation
• La hauteur depuis le haut du réfrigérateur jusqu’au sol, pieds
de mise à niveau en position basse, est de 69 15/16”
(177,6 cm). La hauteur depuis le haut du réfrigérateur
jusqu’au sol, pieds de mise à niveau en position basse et
l’ensemble de garniture supérieure facultative (pièce n°
AFG36) est de 71 7/8” (182,6 cm).
• La hauteur depuis le haut du réfrigérateur jusqu’au sol, pieds
de mise à niveau allongés au maximum, est de 70 9/16”
(179,2 cm) à l’avant. La hauteur depuis le haut du
réfrigérateur jusqu’au sol, pieds de mise à niveau allongés au
maximum et l’ensemble de garniture supérieure facultative
(pièce n° AFG36) est de 72 1/2” (184,2 cm).
ConDiTions requises Pour
l’emPlaCemenT
Votre réfrigérateur Dacor peut être encastré dans un espace situé
entre deux meubles de cuisine ou installé à la fin d’une série de
meubles à l’aide d’un panneau latéral qui confine le réfrigérateur.
AVERTISSEMENT
Risque d'explosion
Garder les matériaux et les vapeurs inflammables, telle
que l'essence, loin du réfrigérateur.
Le non-respect de cette instruction peut causer
un décès, une explosion ou un incendie.
IMPORTANT:
• Respecter tous les codes et règlements en vigueur.
• Pour obtenir une aération appropriée pour votre réfrigérateur,
laisser un espace de 1/2” (1,3 cm) de chaque côté et au
sommet. Laisser un espace de 1” (2,5 cm) à l’arrière du
réfrigérateur.
• Ne pas installer le réfrigérateur dans un endroit où la
température baissera au-dessous de 55°F (13°C).
• Laisser un espace d’au moins 2 1/2” (6,4 cm) entre le flanc
du réfrigérateur et un four ou une cuisinière.
• Le sol doit être capable de supporter le poids du réfrigérateur,
supérieur à 330 lbs (150 kg), des portes et du contenu du
réfrigérateur.
• L’espace à gauche et à droite du réfrigérateur doit permettre
l’ouverture des deux portes jusqu’à un angle minimal de 90°.
Laisser de l’espace entre le côté des portes du réfrigérateur
et un mur d’angle pour la poignée et/ou les panneaux de
porte personnalisés.
12
Page 15

PresCriPTions D’insTallaTion
imPlanTaTion De l’armoire
• Installer le réfrigérateur de façon à pouvoir le dégager
facilement du mur pour entretien ou réparation.
• Une prise électrique non GFCI avec borne de terre doit
être prévue dans un endroit permettant le raccordement du
réfrigérateur sans rallonge. Voir “Spécifications électriques”
pour plus d’informations.
• La plomberie de la canalisation d’eau peut venir du sol ou du
mur arrière. Installer le robinet d’arrivée d’eau dans un endroit
permettant de le fermer sans déplacer le réfrigérateur en cas
d’intervention sur le réfrigérateur ou la canalisation d’eau.
36 5/8” min. (93,0 cm)
70 1/2” min.*
(179,1 cm)
Emplacement suggéré
du racordement électrique
dimensions approximatives
• Ne pas utiliser de robinet à étrier de type à injection ou de
3/16” (5 mm), susceptible de réduire le débit d’eau et de
s’obstruer plus facilement.
Si vous avez des questions au sujet de la pression de votre eau,
appelez un plombier qualifié agréé.
Alimentation en eau par osmose inverse
IMPORTANT: La pression de l’alimentation en eau entre
le système d’osmose inverse et la valve d’arrivée d’eau du
réfrigérateur doit être comprise entre 35 et 120 lb/po² (241 et
827 kPa).
Si un système de purification de l’eau par osmose inverse est
raccordé à votre alimentation en eau froide, la pression de l’eau
au système doit être au minimum de 40 à 60 lb/po² (276 à
414 kPa).
Si la pression de l’eau au système d’osmose inverse est inférieure
à 40-60 lb/po² (276 à 414 kPa)
• Vérifier que le filtre à sédiment du système d’osmose inverse
n’est pas bloqué. Le remplacer si nécessaire.
• Laisser le réservoir du système d’osmose inverse se remplir
après une utilisation intense.
• Si votre réfrigérateur est doté d’un filtre à eau, celui-ci peut
réduire encore plus la pression de l’eau lorsqu’il est utilisé
avec un système d’osmose inverse. Retirer le filtre à eau.
Voir le guide d’utilisation.
12”
(30,5 cm)
24” (61,0 cm)
12” (30,5 cm)
*Ajouter 1 3/4" (4,4 cm) pour l’ensemble de
grille supérieure facultative (AFG36).
ConDiTions requises Pour
l’alimenTaTion en eau
• Toutes les installations doivent respecter les prescriptions des
codes de plomberie locaux.
• Une alimentation en eau froide avec une pression entre
35 et 120 lb/po² (241 et 827 kPa) est nécessaire pour faire
fonctionner le distributeur d’eau et la machine à glaçons. Si
vous avez des questions au sujet de la pression de votre
eau, appeler un plombier qualifié agréé.
• Installer un robinet d’arrêt entre le réfrigérateur et l’arrivée
d’eau. Utiliser un tube en cuivre de 1/4” avec un écrou et une
virole de compression et vérifier l’absence de fuites. Laisser
une boucle de service d’un diamètre minimal de 24”
(61,0 cm) en tube de cuivre à l’extérieur du mur ou du sol
pour faciliter le raccordement à l’arrivée d’eau. Installer les
tubes en cuivre seulement à des endroits où la température
se maintient au-dessus du point de congélation.
sPéCifiCaTions éleCTriques
AVERTISSEMENT
Risque de choc électrique
Brancher sur une prise à 3 alvéoles reliée à la terre.
Ne pas enlever la broche de liaison à la terre.
Ne pas utiliser un adaptateur.
Ne pas utiliser un câble de rallonge.
Le non-respect de ces instructions peut causer
un décès, un incendie ou un choc électrique.
Une source d’alimentation de 115 V, 60 Hz, type 15 ou 20 A CA
seulement, protégée par des fusibles et adéquatement mise à
la terre est nécessaire. Il est recommandé d’utiliser un circuit
distinct pour alimenter uniquement le réfrigérateur. Utiliser une
prise murale qui ne peut pas être mise hors circuit à l’aide d’un
commutateur. Ne pas utiliser de câble de rallonge.
13
Page 16

insTruCTions D’insTallaTion
IMPORTANT : Lire toutes les instructions avant de commencer.
Déballage Du réfrigéraTeur
AVERTISSEMENT
Risque de basculement
Le réfrigérateur est lourd au sommet et bascule
facilement lorsqu'il n'est pas complètement installé.
Garder les portes fermées avec un ruban adhésif
jusqu'à l'installation complète du réfrigérateur.
Utiliser deux ou plus de personnes pour déplacer et
installer le réfrigérateur.
Le non-respect de ces instructions peut causer un
décès ou une blessure grave.
IMPORTANT :
• Ne pas ôter la pellicule extérieure avant que le réfrigérateur
ne soit à la position de service.
• Sur toutes les surfaces, enlever le ruban adhésif et tout
résidu d’adhésif avant la mise en marche du réfrigérateur.
Avec les doigts, frotter le résidu d’adhésif avec un peu de
savon à vaisselle liquide; essuyer avec de l’eau chaude et
sécher.
• Pour enlever le ruban adhésif ou résidu d’adhésif, ne pas
utiliser d’instrument acéré, ni d’alcool à friction, de fluides
inflammables ou de produits de nettoyage abrasifs; ces
produits peuvent endommager la surface du réfrigérateur.
• Jeter ou recycler tous les matériaux d’emballage.
• Après avoir retiré tous les matériaux d’emballage, nettoyer
l’intérieur du réfrigérateur avant de l’utiliser. Voir le guide
d’utilisation.
1. Introduire le chariot de manutention sous le côté gauche
du réfrigérateur, tel qu’illustré. Éviter d’endommager les
garnitures latérales et les poignées. À cette fin, placer
les cornières de l’emballage par-dessus les garnitures et
poignées. Serrer lentement la sangle.
REMARQUE : Pour un appareil de la série EF36 et PF36,
faire passer la sangle du chariot sous la poignée.
2. Placer des bouts de carton d’expédition sur le plancher
lorsqu’on utilise un chariot pour faire entrer le réfrigérateur
dans le domicile. Approcher le réfrigérateur près de la cavité
d’encastrement.
3. Placer une feuille de carton ou de contreplaqué sous le
réfrigérateur.
4. Mettre le réfrigérateur en position verticale. Placer d’abord le
bord inférieur gauche du réfrigérateur sur le plancher, puis
mettre le réfrigérateur debout et abaisser ensuite le côté droit
du réfrigérateur sur le plancher.
enlèvemenT De la PorTe eT De la façaDe
Du Tiroir
AVERTISSEMENT
faire enTrer le réfrigéraTeur Dans
le DomiCile
AVERTISSEMENT
Risque de basculement
Le réfrigérateur est lourd au sommet et bascule
facilement lorsqu'il n'est pas complètement installé.
Garder les portes fermées avec un ruban adhésif
jusqu'à l'installation complète du réfrigérateur.
Utiliser deux ou plus de personnes pour déplacer et
installer le réfrigérateur.
Le non-respect de ces instructions peut causer un
décès ou une blessure grave.
14
Risque de choc électrique
Déconnecter la source de courant électrique avant
d'enlever les portes.
Le non-respect de cette instruction peut causer
un décès ou un choc électrique.
Certaines installations imposent de démonter la porte (ou les
portes) et la façade du tiroir avant de transporter le réfrigérateur
à travers les encadrements de porte jusqu’à son emplacement
d’utilisation.
1. Débrancher le cordon d’alimentation de la prise secteur.
2. Démonter la grille
de base.
Page 17

insTruCTions D’insTallaTion
3. Démonter le cache de charnière
supérieure de la porte du
réfrigérateur en dévissant la vis
Phillips. Conserver la vis et le
cache pour le remontage.
4. Dévisser les vis à tête hexagonale
de 5/16” de la charnière
supérieure. Enlever la charnière
et la conserver, accompagnée de
toutes ses vis, pour le remontage.
Le style de charnière peut varier.
5. Sur les modèles à 3 portes
(double battant), débrancher la
fiche de câblage située en haut de
la charnière supérieure gauche en
insérant un tournevis à lame plate
entre les deux pièces.
6. Extraire la ou les portes de
réfrigérateur du pivot de la
charnière centrale.
7. Dévisser les vis Phillips qui
maintiennent la charnière
centrale. Enlever la charnière et
la conserver, accompagnée de
toutes ses vis, pour le remontage.
Cache de
charnière
Charnière
supérieure
Fiche de
câblage
Charnière
centrale
remonTage Des PorTes
Après avoir déplacé le réfrigérateur jusqu’à son emplacement
d’utilisation, remonter la ou les portes et la façade du tiroir de
congélation.
1. Réinstaller les roulettes.
2. Glisser les vis à l’arrière
de la façade du tiroir dans
les fentes des deux côtés
des supports de tiroir. Il
peut s’avérer nécessaire
de déplacer légèrement
le bas du support pour
aligner la fente avec la vis.
3. Serrer complètement les
quatre vis de la façade.
Ne pas serrer trop fort.
4. Visser sans serrer la charnière supérieure à l’aide des vis à
tête hexagonale de 5/16” précédemment dévissées.
5. Visser la charnière centrale à l’aide des vis Phillips
précédemment dévissées.
Charnière
supérieure
Charnière
centrale
8. Ouvrir complètement
le tiroir de congélation.
9. Desserrer les
quatre (4) vis qui
maintiennent les
supports du tiroir à
la façade du tiroir,
comme illustré.
REMARQUE :
Desserrer les vis de
trois ou quatre tours
seulement. Ne pas les
dévisser complètement
de la façade du tiroir.
10. Lever la façade du
tiroir pour l’extraire
des vis.
11. Dévisser les vis à
tête hexagonale de
les roulettes
et enlever.
6. Placer la porte du réfrigérateur, du côté
portant la charnière, sur le pivot de la
charnière centrale.
7. Tout en maintenant la porte du
réfrigérateur à la verticale, fixer la
charnière supérieure à l’aide d’un
tournevis à douille hexagonale de
5/16”.
8. Sur les modèles à 3 portes
(double battant), rebrancher la
fiche de câblage située en haut de
la charnière supérieure gauche.
9. Replacer le cache de charnière
à l’aide de la vis Phillips
précédemment dévissée.
Pivot de
charnière
Fiche de
câblage
Cache de
charnière
15
Page 18

insTruCTions D’insTallaTion
raCCorDemenT De l’arrivée D’eau
1. Débrancher le réfrigérateur de la prise électrique.
2. Créer une boucle de service avec du tube en cuivre (d’un
diamètre minimal de 2’ [61 cm]). Éviter de plier le tube en
cuivre en le courbant en une boucle de service. Ne pas
utiliser de tube plastique.
Diamètre minimal de 2
(pas à l’échelle)
Tube en cuivre
3. Retirer le capuchon en plastique de l’orifice d’entrée du
robinet d’eau.
6. Glisser l’écrou en laiton par-dessus l’olive et le visser sur
l’orifice d’entrée.
7. Placer une clé à ouverture réglable sur l’écrou fixé sur la
canalisation d’eau en plastique. Maintenir la clé en place.
8. À l’aide d’une deuxième clé à ouverture réglable, visser
l’écrou inférieur dans le sens inverse des aiguilles d’une
montre et le serrer complètement, tout en maintenant l’écrou
supérieur immobile. Ne pas serrer trop fort.
9. Tirer sur le tube pour vérifier que le raccordement est correct.
Fixer le tube au châssis à l’aide de la patte de fixation du
tube d’eau.
4. Placer l’écrou et l’olive en laiton à l’extrémité du tube en
cuivre comme illustré. L’écrou et l’olive se trouvent dans le
sachet d’utilisation et d’entretien. Ne pas se servir d’une olive
déjà utilisée.
Bague de
compression
Écrou de
compression
5. Placer l’extrémité du tube en cuivre dans l’orifice d’entrée
du robinet d’eau. Adapter légèrement le tube. Ne pas plier le
tube, de façon à joindre directement l’orifice d’entrée.
Bague de
compression
Écrou de
compression
Bride d’arrimage “P”
10. Ouvrir l’arrivée d’eau. Vérifier l’absence de fuite et rectifier
le cas échéant. Vérifier régulièrement le raccordement
de l’arrivée d’eau pendant deux ou trois heures avant
de déplacer le réfrigérateur à son emplacement définitif.
Surveiller le raccordement d’eau pendant 24 heures. Réparer
les fuites si nécessaire.
16
Page 19

insTruCTions D’insTallaTion
branChemenT Du réfrigéraTeur
AVERTISSEMENT
Risque de choc électrique
Brancher sur une prise à 3 alvéoles reliée à la terre.
Ne pas enlever la broche de liaison à la terre.
Ne pas utiliser un adaptateur.
Ne pas utiliser un câble de rallonge.
Le non-respect de ces instructions peut causer
un décès, un incendie ou un choc électrique.
Brancher le réfrigérateur à une prise avec
borne de terre.
mise à niveau
AVERTISSEMENT
Risque de basculement
Le réfrigérateur est lourd au sommet et bascule
facilement lorsqu'il n'est pas complètement installé.
Garder les portes fermées avec un ruban adhésif
jusqu'à l'installation complète du réfrigérateur.
Utiliser deux ou plus de personnes pour déplacer et
installer le réfrigérateur.
Le non-respect de ces instructions peut causer un
décès ou une blessure grave.
1. Démonter la grille de base. Saisir fermement la grille et la
tirer vers soi.
DéPlaCemenT De l’aPPareil jusqu’à son
emPlaCemenT DéfiniTif
AVERTISSEMENT
Risque de basculement
Le réfrigérateur est lourd au sommet et bascule
facilement lorsqu'il n'est pas complètement installé.
Garder les portes fermées avec un ruban adhésif
jusqu'à l'installation complète du réfrigérateur.
Utiliser deux ou plus de personnes pour déplacer et
installer le réfrigérateur.
Le non-respect de ces instructions peut causer un
décès ou une blessure grave.
IMPORTANT : Pour éviter d’endommager le plancher, avant de
déplacer le réfrigérateur, vérifier que les pieds sont soulevés
(aucun contact avec le plancher) et que le réfrigérateur repose sur
ses roulettes.
1. Placer une feuille de carton ou de contreplaqué sous le
réfrigérateur.
2. Pousser le réfrigérateur tout droit dans la cavité
d’encastrement. Veiller à ce que les garnitures latérales du
réfrigérateur n’interfèrent pas avec l’ouverture de la porte.
S’assurer également que la canalisation d’arrivée d’eau n’est
pas déformée et que le cordon de courant électrique se
trouve sur le dessus du réfrigérateur.
2. Si une autre personne pousse le haut du réfrigérateur, le
poids devient moins lourd sur les vis de réglage de l’aplomb,
ce qui rend plus facile l’ajustement des vis.
• Pour soulever, tourner la vis
de réglage de l’aplomb dans le
sens horaire.
• Pour abaisser, tourner la vis
de réglage de l’aplomb dans le
sens antihoraire.
3. Ouvrir la porte à nouveau pour
vérifier qu’elle se ferme aussi
facilement que souhaité. Si tel n’est pas le cas, incliner le
réfrigérateur un peu plus vers l’arrière en tournant les deux
vis de réglage dans le sens des aiguilles d’une montre.
Plusieurs tours peuvent s’avérer nécessaires, les deux vis de
réglage devant être tournées autant l’une que l’autre.
4. Replacer la grille de base.
monTage Des Poignées
• Certains modèles sont livrés avec les poignées non montées
pour laisser le client en choisir le style. Des jeux de poignées
en option sont disponibles. Se reporter au manuel d’utilisation
et d’entretien pour consulter la liste des jeux de poignées
disponibles.
• Les instructions d’installation des poignées sont incluses avec
le jeu de poignées.
17
Page 20

insTruCTions D’insTallaTion
aChever l’insTallaTion
1. Tourner le robinet de la canalisation d’eau à la position
ouvert.
2. Attendre quelques minutes. Vérifier les raccords de la
canalisation d’eau pour voir s’il y a des fuites.
3. Retirer toutes les boîtes, tous les paquets de pièces et tous
les matériaux d’emballage de l’intérieur du réfrigérateur.
4. Ôter la pellicule et le carton de la grille et des portes ou du
châssis de la porte, selon le modèle.
5. Installer les tablettes et bacs dans les compartiments de
réfrigération et de congélation.
6. Les commandes sont préréglées à l’usine au réglage moyen.
S’assurer que le compresseur fonctionne bien et que toutes
les lumières sont en bon état de marche.
7. Purger le système d’eau avant l’utilisation. Voir Préparation
du circuit d’eau.
Pour une utilisation optimale de votre nouveau réfrigérateur, lire
le guide d’utilisation et d’entretien. Conserver les instructions
d’installation et le guide d’utilisation et d’entretien près du
réfrigérateur pour pouvoir s’y référer facilement.
PréParaTion Du sysTème D’eau
Veuillez lire avant d’utiliser le système d’eau.
Immédiatement après l’installation, suivre les étapes ci-dessous
pour vous assurer que le système d’eau est bien nettoyé.
AVIS : Vider quatre (4) gallons d’eau par la cartouche du filtre à
eau avant utilisation. Accorder 24 heures pour que le réfrigérateur
se refroidisse et rafraîchisse l’eau.
3. Vérifier que le bac à glaçons
est bien en place et que
le bras de la machine est
baissé.
4. Une fois que la section de
congélation a atteint entre
0° et 2°F (-18° à -17°C),
la machine à glaçons se
remplit d’eau et commence
à fonctionner. Vous aurez
une distribution de glaçons
complète environ toutes les
trois heures.
5. Attendre environ 24 heures après l’installation pour obtenir la
première distribution de glaçons.
6. Jeter les glaçons produits lors des 12 premières heures de
fonctionnement pour s’assurer que le système est nettoyé
des impuretés.
Ne pas utiliser pour le filtrage d’une eau microbiologiquement
polluée ou de qualité inconnue en l’absence d’un dispositif de
désinfection adéquat avant ou après le système. Les systèmes
certifiés pour la réduction de kyste peuvent être utilisés pour
l’eau désinfectée qui peut contenir des kystes filtrables.
1. Installer le filtre d’eau. Le filtre à eau est situé dans le coin
supérieur droit du compartiment de réfrigération. Retirer le
bouchon bleu et le mettre de côté pour utilisation ultérieure.
Retirer l’étiquette d’étanchéité du bout du filtre et insérer
celui-ci dans la tête de filtre. Faire tourner lentement dans le
sens horaire jusqu’à l’arrêt du filtre. Fermer le couvercle du
filtre.
2. Maintenir un récipient
robuste sous le bec verseur
et appuyer sur la touche du
distributeur. Rincer le
circuit : puiser et jeter 4
gallons (15 L) d’eau. Le
processus de nettoyage
du circuit prendra
approximativement 5 minutes
et facilitera l’évacuation
de l’air de la canalisation.
Pour certains domiciles, un
processus de rinçage/purge
supplémentaire peut être
nécessaires. Alors que l’air s’évacue du système, de l’eau
peut s’échapper du distributeur.
18
Page 21

noTes
19
Page 22

noTes
20
Page 23

Page 24

Dacor●14425ClarkAvenue,CityofIndustry,CA91745●Phone:(800)793-0093●Fax:(626)403-3130●www.dacor.com
 Loading...