

Page 1
Modernist Gas Cooktop
0M954/DTG36M955
DTG3
User Manual
Part No. 112170 Rev B
Page 2

Contents
Before you begin
About this manual
Important note to the installer
Important note to the consumer
Important note to the servicer
Regulatory Notice
Important safety instructions
Read all instructions before using this appliance
Symbols used in this manual
State of California Proposition 65 warning (US only)
Commonwealth of Massachusetts
General safety
Fire safety
Gas safety
Electrical and grounding safety
Installation safety
Location safety
Cooktop safety
5
5
5
5
5
6
8
8
8
8
8
9
10
10
11
12
13
14
Overview
Layout
What’s included
Using the cooktop burners
Ignition
Cookware
Installing the grates
Using the iQ Connect feature
Using the hood control feature
English2
16
16
18
19
19
21
23
24
26
Page 3

Care and maintenance
Cleaning the cooktop surface
Stainless steel surfaces
Control knobs
Burner grates and components
Burner caps and heads
Burner bases
Electrodes
Grates
Burner head and cap replacement
28
28
28
29
30
31
32
33
34
34
Troubleshooting
Checkpoints
Warranty and Service
Getting Help
Warranty
Open Source Announcement
37
37
38
38
38
41
English 3
Page 4

To Our Valued Customer:
Congratulations on your purchase of the very latest in Dacor® products! Our unique
combination of features, style, and performance make us a great addition to your home.
To familiarize yourself with the controls, functions and full potential of your new Dacor
cooktop, read this manual thoroughly, starting at the Before you begin section (pg. 5).
Dacor appliances are designed and manufactured with quality and pride, while working
within the framework of our company values. Should you ever have an issue with your
cooktop, first check the Troubleshooting section (pg. 37) for guidance. It gives
suggestions and remedies that may pre-empt a call for service.
Valuable customer input helps us continually improve our products and services, so feel
free to contact our Customer Assurance Team for assistance with all your productsupport needs.
Dacor Customer Assurance Team
14425 Clark Avenue
City of Industry, CA 91745
Telephone:
Fax:
Hours of Operation:
Website:
Thanks for choosing Dacor for your home. We are a company built by families for
families, and we are dedicated to serving yours. We are confident that your new Dacor
cooktop will deliver a top-level performance and enjoyment for decades to come.
Sincerely,
(800) 793-0093
(626) 403-3130
Mon – Fri, 5:00 A.M. to 5:00 P.M. Pacific Time
www.dacor.com/customer-care/contact-us
The Dacor Customer Assurance Team
English4
Page 5

Before you begin
About this manual
READ THESE INSTRUCTIONS THOROUGHLY.
Important note to the installer
• Remove all packing materials from the cooktop compartments before connecting the
electric and gas supply to the cooktop.
• Observe all governing codes and ordinances.
• Be sure to leave these instructions with the consumer.
Important note to the consumer
Keep these instructions with your user manual for future reference.
•
As with any heat-generating appliance, certain safety precautions should be followed
• Do not service the cooktop, unless as specifically directed in this manual; all other
service should be done by a qualified technician.
.
Important note to the servicer
The electrical diagram is attached inside the burner box.
English 5
Page 6

Regulatory Notice
1. FCC Notice
CAUTION
FCC CAUTION: Any modifications not expressly approved by the party responsible for
compliance could void th
complies with Part 15 of FCC Rules. Operation is subject to these two conditions:
1) This device may not cause harmful interference, and
2) This device must accept any interference received including interference that
causes undesired operation.
For products sold in the US and Canada, only channels 1–11 are available. You cannot
select any other channels.
FCC STATEMENT:
This equipment has been tested and found to comply within the limits for a Class B
digital device, pursuant to part 15 of the FCC Rules. These limits are designed to
provide reasonable protection against harmful interference in a residential installation.
This equipment generates, uses, and can radiate radio-frequency energy, and, if not
installed and used as instructed, may cause harmful interference to radio reception;
however, interference still may occur in a particular installation. If this equipment
causes harmful interference to radio or television reception (which can be determined
by turning the equipment off and on), the user is encouraged to try to correct the
interference by one or more of the following measures:
• Reorienting or relocating the receiving antenna
• Increasing the separation between the equipment and receiver
• Connecting the equipment to an outlet that is on a different circuit than the radio or TV
• Consulting the dealer or an experienced radio/TV technician for help.
e user’s authority to operate the equipment. This device
FCC RADIATION EXPOSURE STATEMENT
This equipment complies with FCC radiation exposure limits set forth for an uncontrolled
environm
(20 cm) between the radiator and your body. This device and its antenna(s) must not be
co-located or operated in conjunction with any other antenna or transmitter.
2.2. IC Noti
The term “IC” before the radio certification number only signifies that Industry Canada
technical specifications were met. Operation is subject to thes two conditions: (1) this
device may not cause interference, and (2) this device must accept any interference,
including that which may cause undesired operation of the device.
This Class B digital apparatus complies with Canadian ICES-003. For products sold in the
US and Canada, only channels 1–11 are available. You cannot select any other channels.
6 English
ent. This equipment should be installed and operated so there is at least 8 in.
Page 7

IC RADIATION EXPOSURE STATEMENT
This equipment complies with IC RSS-102 radiation exposure limits set forth for an
uncontrolled environment. This equipment should be installed and operated so there are
at least 8 in. (20 cm) between the radiator and your body. This device and its antenna(s)
must not be co-located or operated in conjunction with any other antenna or
transmitter.
General safety instructions
This unit has been tested and complies with the limits for a class B digital device,
pursuant to Part 18 of the FCC rules. These limits are designed to provide reasonable
protection against harmful interference in a residential installation. This unit generates,
uses, and can radiate radio frequency energy, and, if not installed and used as instructed,
may cause harmful interference to radio communications.
However, interference may still occur in a particular installation. If this unit causes
harmful interference to radio/television reception (which can be determined by turning
the unit off and on), the user is encouraged to try correcting the interference by one or
more of these measures:
• Reorienting or relocating the receiving antennae.
• Increasing the distance between the unit and receiver.
• Connecting the equipment to an outlet that is on a different circuit than the radio/TV.
English 7
Page 8
Important safety instructions
Read all instructions before using this appliance
• All electrical and gas equipment with moving parts can be dangerous. Be sure to read
the Important Safety Information in this manual. The instructions must be followed to
minimize the risk of property damage, injury, or death.
• Keep this manual in a handy place so you can refer to it as needed.
Symbols used in this manual
WARNING
Hazards or unsafe practices that may result in severe personal injury or death.
CAUTION
Hazards or unsafe practices that may result in electric shock, personal injury, or property
damage.
NOTE
Useful tips and instructions
These warning icons and symbols are intended to prevent property damage and personal
injury. Follow them explicitly.
State of California Proposition 65 warning (US only)
WARNING : This product contains chemicals known to the State of California to cause
cancer and birth defects or other reproductive harm.
Gas appliances can cause low-level exposure to Proposition 65 listed substances (including
benzene, carbon monoxide, formaldehyde, and soot) resulting from the incomplete
combustion of LP or natural gas.
Commonwealth of Massachusetts
This product must be installed by a licensed plumber or gas fitter qualified or licensed by
the State of Massachusetts. When using ball-type gas shut-off valves, you must use the Thandle type. Multiple flexible gas lines must not be connected in series.
8 English
Page 9
General safety
WARNING
To reduce the risk of fire, electric shock, personal injury, or death, observe these
precautions:
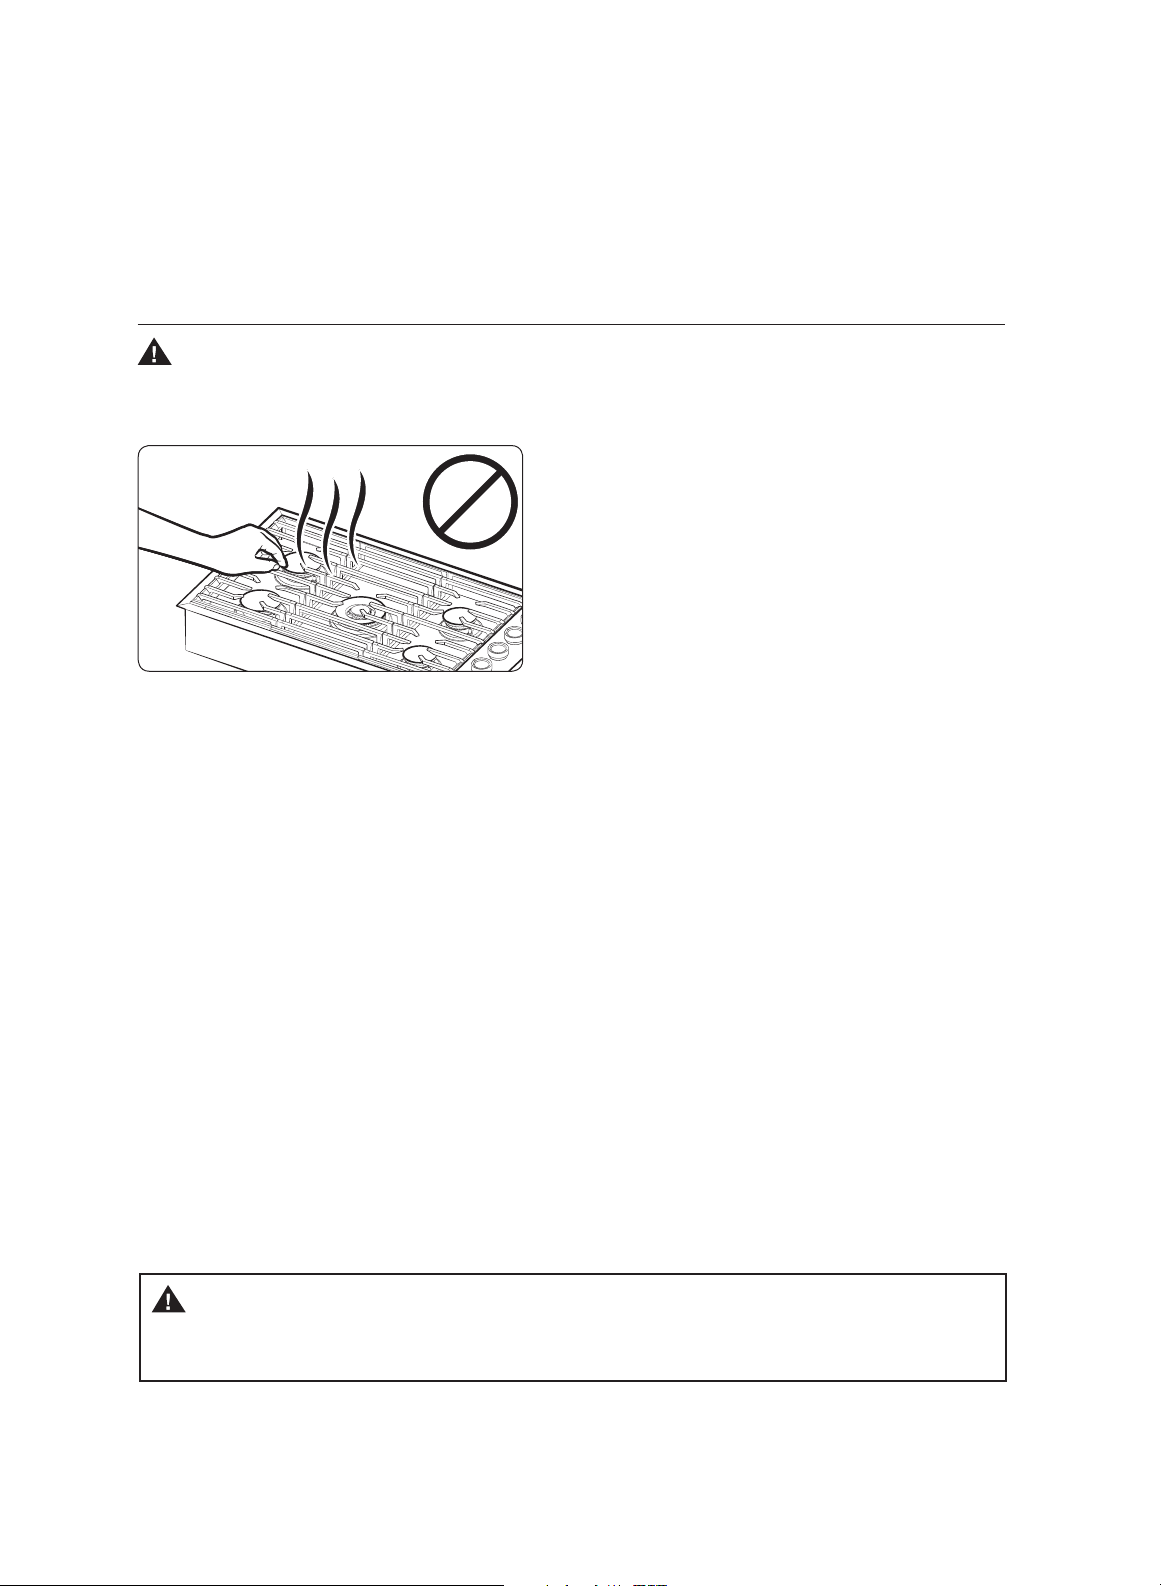
• Do not touch any surface, component,
or mechanism of the cooktop during or
immediately after cooking.
• Learn where and how to shut off the
valve that feeds gas to the cooktop.
•
Ensure the cooktop’s hold-down brackets are installed per the Installation Instructions.
• Do not let children sit/stand on the cooktop or play with any of its parts. Do not leave
children unattended in the kitchen when the cooktop is in use.
• Remove all packaging before operating the cooktop to keep this material from
catching fire. Keep all packaging away from children. Properly dispose of packaging as
soon as th
• Do not keep objects of interest to children on or around the cooktop.
• Do not operate the cooktop if it is damaged, if it malfunctions, or is missing parts.
• Do not use the cooktop as a space heater.
• Use only dry pot holders.
• Do not use the cooktop to heat sealed food containers.
• Unplug the cooktop before service/maintenance.
• To avoid fires/explosions. ensure no under-counter storage (e.g., dishtowels, paper,
cleaning supplies or packaged/canned food) contacts the cooktop chassis.
• To prevent gas leaks or inferior function, take care not to smash or kink the gas line.
• Air curtains or other overhead hoods that blow onto the cooktop shall not be used
with a gas cooktop unless both are designed and tested according to the Standard for
Domestic Gas Ranges, ANSI Z21.1 • CSA1.1, and listed by an independent testing
laboratory for combination use.
e cooktop is unpacked.
WARNING
NEVER use this appliance as a space heater to heat or warm the room. Doing so may
result in carbon monoxide poisoning and overheating of the oven.
English 9
Page 10
Important safety instructions
Fire safety
WARNING
To reduce risk of fire, electric shock, personal injury, or death:
• Do not store/place/use combustible materials (e.g., paper, plastic, pot holders, linens,
gasoline, alcohol) near the cooktop.
• Do not wear loose fitting or hanging garments while using the cooktop.
• To avoid grease buildup, regularly clean the vents.
• Do not let pot holders or other flammable material touch a heating element. Do not use
a towel or other bulky cloth item as a pot holder.
• Do not douse a grease fire with water. Instead, turn off the heat source, and smother
the fire with a tight-fitting lid, or use a multi-purpose, dry-chemical or foam
extinguisher.
• Do not heat unopened food containers. The buildup of pressure may cause the
container to burst and result in injury.
• Always check if the burners are combusting normally. Overheating may cause a fire,
and incomplete combustion may cause carbon-monoxide poisoning.
Gas safety
WARNING
To reduce risk of fire, electric shock, personal injury, or death observe these precautions:
Checking for gas leaks
Leak-test the cooktop per the manufacturer’s instructions. Do not use a flame to check
for gas leaks. Use a brush to spread a soap-and-water solution around the area you are
checking. If there is a gas leak, small bubbles will appear in the solution.
If you smell gas:
• Close the valve and do not use the cooktop.
• Do not light a match, candle, or cigarette.
• Do not turn on any appliances.
• Do not touch an electrical switch or plug in a power cord.
• Do not use any phone in your building.
• Evacuate the building.
• From a neighbor's phone, immediately call your gas supplier, and follow their
directions. (If you cannot reach your gas supplier, call the fire department.)
10 English
Page 11

Important safety instructions
Electrical and grounding safety
WARNING
To reduce risk of fire, electric shock, personal injury, or death:
• Plug the power cord into a grounded, 3-prong outlet.
• Do not remove the grounding prong.
• Do not use an adapter or extension cord.
• Do not use a damaged plug, cord, or loose power outlet.
• Do not modify the plug, cord, or outlet.
• Do not put a fuse in a neutral or ground circuit.
• Use a dedicated 120-volt, 60-Hz, 15-amp, AC, fused electrical circuit. A time-delay fuse
or circuit breaker is recommended. Plug only the cooktop into this circuit.
•
Do not connect the ground wire to plastic plumbing lines, gas lines, or hot-water pipes.
• This cooktop must be grounded. If the cooktop malfunctions, grounding reduces ri
of electric sh
has a grounding plug, wh
installed and grounded per local regulations.
grounded, h
• If codes allow for a separate ground wire, you should have a qualified electrician
determine this wire’s proper path.
• Electrical service to the cooktop must conform to local codes, or in their absence, to
the National Electrical code/NFPA No. 70 – Latest Revision (for the U.S.) or the
Canadian Electrical Code CSA C22.1 or Latest Revisions.
• The owner shall ensure that the proper electrical service is provided for the cooktop.
ock by providing a safe path for th
ich must be firmly plugged into an outlet that is properly
t checked by a licensed electrician.
ave i
e current. This cooktop’s power cord
If you are unsure the outlet is properly
sk
English 11
Page 12

Installation safety
WARNING
To reduce risk of fire, electric shock, personal injury, or death:
• The cooktop should be installed and properly grounded by a qualified installer, per the
Installation Instructions.
• Do not service/modify/replace the cooktop or any part of it unless specifically
directed in this manual. All other service should be done by a qualified technician.
• Use only new, flexible connectors when installing the cooktop.
• Make sure the cooktop’s hold-down brackets are properly installed. (See the
Installation Instructions for detai
• Remove
• After unpacking the cooktop,
(Cautiously handle the heavy grates and griddles.)
• Ensure no parts came loose during shipping.
• Ensure the cooktop is installed/adjusted according to local regulations by a qualified
service technician or installer for the type of gas (natural or LP) you will use. For the
cooktop to use LP gas, the installer must replace the 5 surface burner orifices with the
provided LP orifice set, and reverse the GPR adapter. The agency performing this work
shall be responsible for the gas conversion.
•
Installation of this cooktop must conform to local codes or, in their absence , with the
National Fuel Gas Code, ANSI Z223.1/NFPA.54, latest edition. In Canada, installation
must conform to the current Natural Gas and Propane Installation Code, CAN/CGAB149.1, or the current Propane Installation Code, CAN/CGA-B149.2, and with local codes
as applicable. T his cooktop has been design-certified by ETL according to ANSI Z21.1,
latest edition, and Canadian Gas Association according to CAN/CGA-1.1, latest edition.
• Ensure the middle valve has adequate capacity and is unclogged.
all tape and packaging materials.
rem
ls.)
ove
all accessories from
inside and around it.
12 English
Page 13

Important safety instructions
Location safety
WARNING
To reduce risk of fire, electric shock, personal injury, or death:
• The cooktop is for indoor household use only and should not be exposed to weather/
water/wind/drafts.
• The cooktop must be installed within easy reach of a grounded, 3-prong outlet.
• On windows near the cooktop, do not hang blinds or long curtains that could be blown
over/onto the cooktop.
• To operate properly, the cooktop needs sufficient space below and all around the
chassis for its vents to exhaust heat and fumes.
• Ensure the wall coverings around the cooktop can withstand heat up to 194 °F (90 °C).
• Do not store items above the cooktop. If cabinet storage above the cooktop is needed,
allow at least 30 in. (76.2 cm) from the cooking surface to the bottom of the cabinets.
English 13
Page 14

Cooktop safety
WARNING
To reduce risk of fire, electric shock, personal injury, or death:
• Select cookware that is designed for cooktops and is large enough to cover the
grates. Burner flames should not extend beyond the bottom of the cookware.
• Turn off all burners that are not in use.
• Do not line the grates or any part of the cooktop with aluminum foil.
• Do not leave burners unattended on medium or high heat settings.
• Before igniting, ensure all burner caps are properly seated and all burners are level.
• Use the LITE (flame icon) position to ignite a burner, then verify the burner did ignite.
If ignition fails, turn the burner OFF, and wait a few minutes for the gas to dissipate.
• When you set a burner to simmer, turn the knob slowly. Ensure the flame stays on.
• Place only cookware on the cooktop.
• Foods should only be flamed under an active ventilation hood.
• Turn off a burner before removing the cookware.
• Remove cookware immediately after cooking.
• Ensure all cooktop burners are off and all surfaces have cooled before removing the
grates and disassembling the burners.
• After cleaning the burner spreader, dry it completely before re-assembling it.
• Do not pour water or other liquids into the cooktop during cleaning.
• Do not use cookware that is substantially larger than the grate.
• Turn cookware handles away from active burners and the cooktop front edge.
• Stand at a safe distance from the cookware when frying.
• Heat frying oil slowly, and monitor the oil as it heats. For high-heat frying, do not
leave the oil unattended.
• If combining fats or oils for frying, mix them before heating.
• Use a deep-fry thermometer when possible to avoid heating the oil beyond its smoke
point. (Know the smoke point of the oil you use.)
• Use minimal oil when frying. Thaw food before frying, and do not fry food that is
overly cold or that is clumped with ice.
14 English
Page 15

Important safety instructions
• Always let oil/fat cool to room temperature before moving the cookware.
• To avoid delayed-eruptive boiling, let hot oil/fat stand at least 20 seconds after
turning off the burner so the temperature can stabilize. In case of scalding:
1. Immerse the scalded area in cool water for at least 10 minutes.
2. Do not apply any creams, oils, or lotions.
3. Cover the scalded area with a clean, dry cloth.
• During a power failure or if the ignition system malfunctions, do not use matches/
lighters to ignite the burners.
• Do not operate small appliances on the cooktop. Electromagnetic forces from these
appliances may cause the cooktop to malfunction.
CAUTION
If the cooktop is installed above an oven, do not use the cooktop while the oven’s selfcleaning function is on.
CAUTION
Make sure you put cookware on the grate
so that the overall cookware size does not
exceed the grate.
Pots must be put within the grate
English 15
Page 16

Overview
Layout
30” Model: DTG30M954
01
02
LR
RR
04
03
07
05
36” Model: DTG36M955
01
LR
05
LF
LF
02
Center
RF
RR
RF
06
08
04
03
07
06
16 English
08
Page 17

Overview
30” Model: DTG30M954
01 Left Rear
Rapid burner 13000 BTU
03 Right Front / Rear
Semi rapid burner 9500 BTU
05 Grate (2 pcs) 06 Surface burner knobs (4 pcs)
07 iQ Connect button (below knob) 08 Bluetooth button (below knob)
02 Left Front
Dual burner 18500 BTU
04 iQ Connect module
36” Model: DTG36M955
01 Left Front / Rear
Rapid burner 13000 BTU
03 Right Front / Rear
Semi rapid burner 9500 BTU
05 Grate (3 pcs) 06 Surface burner knobs (5 pcs)
07 iQ Connect button (below knob) 08 Bluetooth button (below knob)
02 Center
Dual burner 18500 BTU
04 iQ Connect module
Each burner has a knob by which to ignite the burner (flame icon) and set the flame level
from LO to HI. The burner indicators are above each knob and show which burner the
knob controls. The table provides each burner’s cooking purpose:
Burner Purpose Food type Characteristics
Power
Rapid
Semi rapid
Simmer 30” / 36” Low simmering
30” LF
36” Center
30” LR
36” LF, LR
30”
RF, RR
36”
General heating/
Low simmering
Quick heating General
General heating/
Low simmering
Boiling food,
tomato sauce
General food,
casseroles
Chocolate,
casseroles, sauces
Maximum output
General-purpose
cooking
General-purpose
cooking
Delicate food
that requires
low heat for
extended cook
times
English 17
Page 18

What’s included
30” Model: DTG30M954
Surface burner grates (2)* Surface burners and brass caps
(4)
porcelain caps(4)
36” Model: DTG36M955
Surface burner grates (3)* Surface burners and brass caps
(5)
NOTE
porcelain caps(5)
If you need an accessory marked with an asterisk(*), you can buy it from Dacor Customer
Assurance (1-800-793-0093)
18 English
Page 19

Using the cooktop burners
Ignition
CAUTION
The knob LED indicates if a burner knob has been turned on. It does not indicate if the
burner flame is on. Check for an actual flame, although the knob LED is on or off.
Make sure all cooktop burners are properly
installed. To light a burner:
1. Push in the control knob, and turn it to
the Lite (flame icon) position. The knob
LED turns on and a “click-click-click...”
sound indicates the electronic ignition
system is working properly.
2. A
fter the burner ignites, turn the knob
to the desired cooking level.
NOTE
When the inner/outer flame is on HI, the outer flame gets smaller as you turn the knob
from HI to LO. To control the inner flame, push and turn the knob again at the point that it
starts to control the inner flame.
English 19
Page 20

Manual ignition
During a power failure, you can ignite burners manually. Use caution when doing this.
1. Hold a long, gas-grill lighter to a burner.
2. Push in, and turn the control knob to Lite, then click the lighter to ignite the burner.
3. Turn the knob to the desired cooking level.
Automatic re-ignition
If the flame goes out unexpectedly, it will automatically re-ignite.
WARNING
• Set the cook level so the flame does not extend beyond the bottom of the cookware.
•
When setting a burner to Simmer, turn the knob slowly, and see that the flame stays lit.
• A burner-knob’s LED only means the burner is on. After turning on a burner, always
verify that the flame ignites.
• Turn off the burner before removing the cookware.
• All burners should be off when not in use.
• Verify that all burners are off before going to bed or leaving the house.
• If the burner ignites, but the LED does not come on, call a qualified technician.
•
If the knob LED comes on, but the burner does not ignite, turn off the burner instantly.
• Do not leave a burner on indefinitely without cookware over it. Without cookware to
absorb the heat, the grate finish may flake off.
• Do not touch or set a pot holder, cloth, or other such item on the grate unless there is
no flame and the grate has cooled sufficiently.
20 English
Page 21

Using the cooktop burners
Cookware
Requirements
• Flat bottom and straight sides
• Tight-fitting lid
• Well-balanced, with the pot/pan having the bulk of the weight.
Material characteristics
Material Heat conduction Comment
Aluminum Excellent
Copper Excellent Discolors easily
Stainless steel Slow
Cast-iron Poor Reatains heat very well
Enamelware -
Some foods may darken the aluminum. However,
anodized aluminum resists staining and pitting.
Uneven cooking performance but is durable, easy
to clean, and resists staining.
Heating traits depend on the base material.
Glass Slow
Heatproof
Glass-ceramic
Very slowly
Use only glass cookware that is specified for
cooktop cooking or oven use.
Can be used for either surface or oven cooking.
Check cookware manufacturer’s directions to be
sure it can be used on a gas cooktop.
English 21
Page 22

Size limitations
10 inches
or more
10 inches
or more
6 inches or
less
Do not place a pan or pot with a bottom
diameter of about 10 inches or more on
the RF or LF burner.
CAUTION
To avoid tipping, do not set cookware
with a bottom diameter of 6 in. or less
on the center grate. Use the rear burners
for this small-size cookware.
(DTG36M955F model only.)
• Always turn cookware handles to the side or rear, and not over a burner or front edge
of the countertop. This minimizes the risk of burns, spills, and ignition of flammable
materials from accidental contact with the cookware.
• If using glass cookware, make sure it is designed for cooktop cooking.
• Never leave plastic items (which can melt or ignite) on the cooktop. Heating a sealed
plastic container causes pressure to build, which may lead the container to explode.
• Make sure you hold the handle of a wok or a small one-handled pot while cooking.
CAUTION
22 English
Page 23

Using the cooktop burners
Installing the grates
NOTE
The grates have specific locations. For best results stability, and longevity, place the
grates as instructed. (Each center opening goes directly over the corresponding burner.)
The back of the right grate is notched to help you orient the grates correctly.
To correctly place the grates:
1. Carefully set the legs of the right or left grate into the corresponding dimples on the
cooktop. (It does not matter if the left or right is changed, but the blocked part of
the grate should face the side.)
2. Carefully lower the legs of the other grate(s) into the corresponding dimples.
NOTE
Side grates are interchangeable. Characters on the front indicate whether the grate is used
on the left or right side. Character L is for left and R is for right.
English 23
Page 24

Using the iQ Connect feature
The cooktop has a built-in Wi-Fi module that you can use to sync the cooktop with the
Dacor iQ Kitchen app. This app lets you:
• Monitor the operating status and the power level settings of the cooktop elements.
• Check and change the timer settings.
The Dacor iQ Kitchen app may not work well if Wi-Fi communications are compromised
(e.g., blocked by oth
er electronic appliances or outside electrical interference) or if the
cooktop is installed where the signal is weak (e.g., far from the Wi-Fi source).
Connecting the
Before y
ou c
emotely c
an r
cooktop
ontrol t
he cooktop, it must be paired with the Dacor iQ
Kitchen app.
1. Download and open the Dacor iQ Kitchen App on your smart device.
2. Follow the app’s on-screen instructions, then press-hold the iQ Connect button for 3
seconds.
NOTE
• The iQ Connect LED indicator stops blinking but remains on, indicating the connection
was successful.
• If the iQ Connect LED does not appear, follow the app’s instructions to reconnect with
the cooktop.
24 English
Page 25

Using the cooktop burners
NOTE
The cooktop’s iQ Connect button is under the LR control knob. To access this button,
grasp the LR knob, and pull up.
iQ Connect LED Indicator
iQ Connect button
To monitor the cooktop remotely
1. Make sure the iQ Connect LED indicator appears. If it does not appear, press the iQ
Connect button, after which the cooktop can be monitored remotely with a connected
remote device.
2. Select the cooktop icon on the iQ Connect App to open the cooktop monitor app.
iQ Connect on/off
If you set the iQ Connect to Off, mobile devices cannot connect to the cooktop.
To turn on iQ Connect:
1. Pull the LR control knob straight up to remove it from the cooktop.
2. Press the iQ Connect button.
NOTE
The iQ Connect LED indicator appears and remains on as long as iQ Connect is active.
3. Re-insert the LR control knob.
English 25
Page 26

NOTE
• The cooktop continues operating even if the Wi-Fi connection is lost.
• iQ Connect will not work properly if the Wi-Fi Connection is unstable.
• See the iQ Connect app’s user manual for details. You can also visit www.dacor.com
where you can view the iQ Connect web manual.
Using the hood control feature
NOTE
The cooktop features a Bluetooth device that connects a Dacor hood-control cooktop to
certain hood models.
In this table, both cooktops will work with any of the hood models.
Hood-Control Cooktop Hood
DHD30M967W*
Model
To connect a hood-control cooktop with a hood:
DTG30M954
DTG36M955
DHD36M987W*
DHD48M987W*
DHD36M967I*
DHD48M967I*
1. Download and run the Dacor iQ Connect app on your smartphone, then complete the
iQ Connect procedure to connect to the cooktop.
2. Follow the Bluetooth directions of the hood-control model, and activate the Bluetooth
connection.
3. Press the Bluetooth icon on the hood-control panel. The icon LED blinks.
4. Press the Bluetooth button on the cooktop. Pairing begins. When finished, the
Bluetooth LED indicator glows steadily.
5. Follow the directions in the cooktop user manual and in the app’s guide to control the
hood.
26 English
Page 27

NOTE
The Bluetooth button is under the RF control knob. To access the button, grasp the
RF knob, and pull it up and off.
Bluetooth button
Bluetooth on/off
Press the Bluetooth icon on the hood control panel.
NOTE
• The hood’s Bluetooth LED appears as long as Bluetooth is enabled.
• If the connection fails, the Dacor iQ Kitchen app cannot monitor/control the hood.
• You can use a Bluetooth connection to pair and sync the cooktop and hood. Follow the
Bluetooth connection steps on pgs. 24-6.
• Bluetooth will not work properly if the connection is unstable.
• See the Dacor iQ kitchen app manual for details.
English 27
Page 28

Care and maintenance
WARNING
Turn off power, and wait for all surfaces to cool before cleaning any part of the cooktop.
Cleaning the cooktop surface
You should clean up spills immediately.
1. Turn off all burners.
2. When the grates cool, remove them.
3. Clean the cooktop with a soft cloth.
4. Check and wipe up any spills under the
burner gaps and heads.
5. Reassemble the burners, and reset the
grates.
Stainless steel surfaces
1. Remove spills, spots, and grease stains with a soft, wet cloth.
2. Apply an approved stainless steel cleanser to a cloth or paper towel.
3. Clean a small area at a time, rubbing with the grain of the metal.
4. Dry the surface with a soft, dry cloth.
C AUTION
• Do not use items (e.g., steel-wool pad, sharp scraper, abrasive cleaner, caustic lye/
sodium hydroxide) that can mar the steel and damage components.
• Do not remove the cooktop drip tray to clean it. The gas lines leading to the burner
manifolds can be damaged, possibly causing a fire or malfunction.
• Do not pour water i
systems, creating an electric shock hazard or high levels of carbon monoxide (CO)
from corroded gas valves/ports.
• Do not spray cleanser in the manifold holes. The ignition system must not get wet.
nto the cooktop. The water could drip into the gas and electrical
28 English
Page 29

Care and maintenance
01
02
Control knobs
Turn off all burner knobs.
01 Grasp a knob and pull up to remove.
02 Spill protector. Do not remove.
1. Pull the knobs off their valve stems.
2. Clean the knobs in warm, soapy water,
then rinse and dry them thoroughly.
3. Clean the stainless-steel surfaces with
stainless-steel cleaner.
4. Re-attach the knobs (in the OFF
position) on their valve stems.
CAUTION
•
Do not clean the knobs in a dishwasher.
• Do not spray cleansers on the control
panel. Moisture entering the electric
circuits may cause electric shock or
product damage.
English 29
Page 30

Burner grates and components
Turn off all surface burners and make sure they have all cooled down.
1. Remove the burner grates.
2. Remove the burner caps.
3. Remove the burner heads from the
valve manifolds.
4. Clean the grates and burner parts in
2
3
1
warm, soapy water.(Do not use steelwool or abrasive cleaners.)
5. Rinse and dry grates and burner
components thoroughly.
6. Reassemble the burner heads
(inserting a starter electrode through
the hole in each head).
NOTE
See pgs. 34-5 for reassembly details.
7. Reassemble the other burner parts,
ensuring the caps lie flat on the heads.
8. Re-install the grates in their
7
6
8
respective positions.
9. Turn on each burner to verify proper
function, then turn off the burner.
30 English
Page 31

Care and maintenance
Burner caps and heads
NOTE
Before removing the burner caps and heads, note their size and location, and replace
them as before.
Wash burner caps and burner heads in hot, soapy water, and rinse with clean water.
You may scour with a plastic scouring pad to remove burned-on residue. Use a sewing
needle or twist tie to unclog the small holes in the burner head, if needed.
CAUTION
• Do not wash any burner parts in a dishwasher.
• Do not use steel wool or scouring powders to clean the burners.
NOTE
• Discoloration of brass burner parts
over time does not affect performance.
• After cleaning, check that all burner
Brass burner head
Brass burner cap
ports are unclogged.
• You may swap the original burner caps
for porcelain caps if desired.
• To remove burned-on grease, soak the
brass cap in a solution of 1 cup water
and either 1 tablespoon of white
vinegar or lemon juice. Do not use a
metal brush to clean brass parts.
English 31
Page 32

NOTE
• The included dual burner head is not
a substitute. One is for LP gas and the
other is for LN gas. Use appropriate gas
type.
- Dual burner head for LP gas is
packed with a plastic bag.
- The letter “For LP” or “For NG” is
engraved on the dual burner head.
For NG
For LP
• LP burner head also can be found by
the number of holes.
- The burner head with 14 holes in a
quadrant is for LP gas use.
- The burner head with 12 holes in a
quadrant is for LN gas use.
Burner bases
CAUTION
The burner bases are not removable.
Do not let water into the burner bases and brass gas orifices. Wipe the bases with
a
damp cloth, being careful not to mar or deform the bases. Dry the bases completely
before using the cooktop.
32 English
Page 33

Care and maintenance
Electrodes
CAUTION
Do not attempt to remove the electrode from the cooktop or burner bases.
01
02
01 Metal part: Clean this metal part
02 White ceramic part: Do not clean this
white ceramic part with an emery
board
You should never be cooking while you’re
cleaning the cooktop.
Make sure the white ceramic electrodes
are clean and dry. Clean the metal portion
with a soft cloth. Do not clean the igniters
with water.
Before reassembling the surface burners,
push down gently on each of the white
ceramic electrodes to make sure they are
pressed against the burner bases.
NOTE
Do not attempt to remove the electrode
from the cooktop.
English 33
Page 34

Grates
CAUTION
Do not clean the grates in a dishwasher. They will be damaged.
Wash the grates regularly and after
spillovers. To clean the grates, wait until
they cool sufficiently, then remove and
wash them in hot, soapy water. Rinse the
grates with clean water, and dry them
thoroughly. Reposition the grates
securely as instructed on pg. 23.
Burner head and cap replacement
Dual Burner head / caps
1. Orient the burner head so the electrode
opening aligns with the electrode itself.
34 English
2. Install the burner head so the electrode
passes through its opening in the head.
Verify that the burner head lies flat on
the cooktop.
Page 35

Care and maintenance
Round Burner head / caps
3. Match the burner caps to the burners
by size, and then re-install the caps on
the burner heads.
CAUTION
Each cap fits on a specific burner head.
Verify that each cap is installed and lies
flat on the correct head.
1.
Put the burner heads on the bases as
shown at left. The bottom of the burner
head fits inside the top of the base.
2. Turn the head until it drops into place.
Wiggle each head to verify it is seated
properly.
3. Place the burner caps (brass or
porcelain) atop the burner rings. The
ridge around the bottom of each cap
fits around the top of the ring.
CAUTION
Verify that all burner parts properly
seated. If any are askew, disassemble
reassemble them properly.
English 35
Page 36

NOTE
After installing the burners, verify that they will work properly.
Improperly installed components will result in poor ignition or uneven flames.
36 English
Page 37

Troubleshooting
If the cooktop malfunctions, before calling for service, review the tables in this section for
a possible resolution of the issue.
Checkpoints
Gas safety
Problem Possible cause Action
You smell gas.
Burner knob is on, but there is
no flame.
Turn the burner knob to OFF.
There is a gas leak.
• Evacuate the room/building/area.
• From a neighbor's home, immediately
call your gas supplier, and follow their
directions.
• If you cannot reach your gas supplier,
call the fire department.
Surface burner
Problem Possible causes Action
All burners do not
light.
Surface burners do
not light.
The cooktop is unplugged. Make sure the power cord is plugged into
a live, grounded outlet.
Blown fuse; tripped circuit
breaker
Gas supply not properly
connected or turned on
Control knob not set
properly.
• Burner caps not seated.
• Burner base misaligned.
Replace the fuse or reset the circuit
breaker.
See the Installation Instructions.
Push in the control knob and turn it to the
Lite position.
• Clean the electrodes.
• Put burner cap on burner head.
• Align burner base.
A burner clicks
during operation.
The burners do
not burn evenly.
Very large or yellow
burner flames
The control knob has been left
in the Lite position.
Burner components are not
assembled correctly.
Burners are dirty. • Clean the burner components.
The wrong burner orifice is
installed.
After burner ignites, turn control knob to
desired setting; if issue persists,
se
te
rvice
Review pages 34-36.
• Review pages 30-33.
Check burner orifice size; if you have wrong
orifice (LP gas instead of natural gas, vice
versa) swith to correct orifice (pg. 32).
chnician
.
contact
English 37
Page 38

Warranty and Service
Getting Help
Before you request service:
1. Review the Troubleshooting section of this manual (pg. 37).
2. Familiarize yourself with the cooktop’s warranty terms and conditions.
3.
If none of the previous suggestions resolves your issue, call Dacor Customer Assurance.
Phone: (800) 793-0093 x2813 (USA, Canada)
Hours of Operation: Mon – Fri, 5:00 am to 5:00 pm Pacific Time
Website: www.dacor.com/customer-care/contact-us
Warranty
What Is Covered
CERTIFICATE OF WARRANTIES: DACOR APPLIANCES
WITHIN THE 50 STATES OF THE USA, THE DISTRICT OF COLUMBIA, AND CANADA*:
FULL 2-YEAR WARRANTY
This warranty applies only to the Dacor Modernist appliance sold to the original
purchaser, from the date of the original retail purchase, or the closing date for new
construction, whichever period is longer. The warranty is valid on Modernist products
purchased new from a Dacor Authorized Dealer or other Dacor-authorized seller.
If, within 2 years of the original purchase date, your Dacor Modernist appliance
malfunctions due to material or manufacturing defect, Dacor will restore the appliance
to its proper function at no cost to you.
All cosmetic damage (e.g., scratches on stainless steel, paint/porcelain blemishes, etc.) to
the appliance or included accessories must be reported to Dacor within 60 days of the
original purchase date to qualify for warranty coverage.
*Warranty is null and void if non-ETL- or non-CUL-approved appliance is transported from the USA.
38 English
Page 39

LIMITATIONS OF COVERAGE
Service is provided by a Dacor-designated service company during regular business
hours. These providers are independent entities and are not agents of Dacor.
Dealer displays and model-home display units with a production date greater than 5
years, products sold “As-Is,” and units installed for non-residential use (including but not
limited to: religious organizations, fire stations, bed and breakfasts, and spas) carry a
1-year parts warranty only. All delivery, installation, labor costs, and other service fees
shall be paid by the purchaser.
The warranty is null and void for products that are altered, defaced, or lacking serial
numbers and tags.
The owner must provide proof of purchase or closing statement for new construction
upon request. All Dacor products must be accessible for service.
OUTSIDE THE FIFTY STATES OF THE U.S.A., THE DISTRICT OF COLUMBIA AND CANADA:
LIMITED FIRST-YEAR WARRANTY
If your Dacor product malfunctions within one year of the original purchase date, due to
material or manufacturing defect, Dacor will furnish a new part, FOB factory to replace the
defective part.
All delivery, installation, labor costs, and other service fees shall be paid by the purchaser.
What Is Not Covered
• Slight color variations because of differences in painted parts, kitchen lighting,
appliance location, etc.
• Service calls to educate the owner on the cooktop’s proper use and care.
• Service fees for travel to islands and remote areas (including but not limited to:
ferries, toll roads, or other travel expenses).
• Consequential or incidental damage (including but not limited to: food or medicine
loss, lost work time, or restaurant meals).
• Appliance malfunction when used for any other than non-commercial, residential
operation.
• Consumable parts (e.g., filters, light bulbs).
• Appliance failure due to improper installation.
• Replacement of house fuses, fuse boxes or resetting of circuit breakers.
• Damage due to accident, fire, flood, power outages, or other so-called “acts of God.”
• Damage to surrounding property (countertops, cabinetry, floors, ceilings, etc.).
• Breakage, discoloration, or damage to glass, metal surfaces, plastic components, trim,
paint or other cosmetic finish caused by improper usage, care, abuse, or neglect.
English 39
Page 40

Warranty and Service
Out of Warranty
If a service issue occurs beyond the standard warranty period, call anyway. Dacor reviews
each issue and customer concern independently to provide the best possible outcome for
the customer.
THE REMEDIES PROVIDED IN THE ABOVE EXPRESS WARRANTIES ARE THE SOLE AND
EXCLUSIVE REMEDIES. NO OTHER EXPRESS WARRANTIES ARE MADE, AND OUTSIDE
THE 50 UNITED STATES, THE DISTRICT OF COLUMBIA, AND CANADA, ALL IMPLIED
WARRANTIES (INCLUDING BUT NOT LIMITED TO: ANY IMPLIED WARRANTY OF
MERCHANTABILITY OR FITNESS FOR A PARTICULAR USE OR PURPOSE, ARE LIMITED TO
1 YEAR FROM THE ORIGINAL PURCHASE DATE. NEVER SHALL DACOR BE LIABLE FOR
INCIDENTAL EXPENSE OR CONSEQUENTIAL DAMAGES. SHOULD DACOR PREVAIL IN ANY
LAWSUIT, DACOR SHALL BE ENTITLED TO REIMBURSEMENT OF ALL COSTS AND EXPENSES
(INCLUDING ATTORNEY FEES), FROM THE DACOR CUSTOMER. NO WARRANTIES, EXPRESS
OR IMPLIED, ARE MADE TO ANY BUYER FOR RESALE.
Some states do not place limitations on the duration of implied warranties, or do not
exclude/limit inconsequential damages; therefore, the above exclusions/limitations may
not apply to owner. This warranty gives the owner specific legal rights, and the owner
may have other rights depending on the state of residence.
40 English
Page 41

Open-Source Announcement
The software included in this product contains open-source software. You may obtain
the complete corresponding source code for 3 years after the last shipment of this
product by sending em
You may also obtain the complete corresponding source code via CD-ROM for a small fee.
The URL, http://opensource.samsung.com/opensource/OVEN_HKM_TZ/seq/0 leads to
the download page of the source code made available and open-source license info
related to this product. This offer is valid to anyone in receipt of this info.
ailing: oss.request@samsung.com.
English 41
Page 42

Dear Valued Customer,
Thank you for purchasing a Dacor Modernist cooktop. We hope it empowers your
passion for cooking!
We include a set of brass burner caps to enhance the elegance of your cooktop.
Because these caps discolor with use due to the influence of heat on the brass, we
also include a set of black porcelain burner caps that you can use instead of the brass
if you are concerned about the discoloration, which is not covered by our warranty.
You may order new burner caps from us as needed.
We truly hope you enjoy many years of great cooking with your Modernist cooktop. If
we can be of service, please contact us at 800-793-0093 x2813.
Sincerely,
The Dacor Customer Assurance Team
Page 43

Please visit www.Dacor.com to activate your warranty online.
WARRANTY INFORMATION
cut herecut here
IMPORTANT:
Your warranty will not begin until you activate it online or return this form to Dacor. If you have purchased more
than one Dacor product, please return all forms in one envelope, or activate the warranty for each product online.
Please rest assured that under no conditions will Dacor sell your name or any of the information on this form for
mailing list purposes. We are very grateful that you have chosen Dacor products for your home and we do not
consider the sale of such information to be a proper way of expressing our gratitude!
Owner’s Name:
Street:
City: State: Zip:
Purchase Date: Email: Telephone:
Dealer:
City: State: Zip:
Your willingness to take a few seconds to fill in the section below will be sincerely appreciated. Thank you.
1. How were you first exposed to Dacor products? (Please check one only.)
A. T.V. Cooking Show F. Builder
B. Magazine G. Architect/Designer
C. Appliance Dealer Showroom H. Another Dacor Owner
D. Kitchen Dealer Showroom I. Model Home
E. Home Show J. Other
Last (Please Print or Type) First Middle
2. Where did you buy your Dacor appliances?
A. Appliance Dealer D. Builder
B. Kitchen Dealer E. Other
C. Builder Supplier
3. For what purpose was the product purchased?
A. Replacement
B. Part of a Remodel D. Other
only
C. New Home
4. What is your household income?
A. Under $75,000 D. $150,000 – $200,000
B. $75,000 – $100,000 E. $200,000 – $250,000
C. $100,000 – $150,000 F. Over $250,000
5. What are the brands of appliances that you have in your kitchen?
A. Cooktop C. Dishwasher
B. Oven D. Refrigerator
6. Would you buy or recommend another Dacor product?
Yes No
Comments:
Thank you very much for your assistance. The information you
have provided will be extremely valuable in helping us plan for the
future and giving you the support you deserve.
Website: www.Dacor.com
Phone: 1+800+793-0093
Place Serial Number Label Here
Page 44

Dacor ∙ 14425 Clark Avenue, City of Industry, CA 91745 ∙ Phone: (800) 793-0093 ∙ Fax: (626) 403-3130 ∙ www.dacor.com
DG68-00927A-01
 Loading...