

Page 1
Built-In Wine Cellar
DRW24980RAP/LAP
User Manual
Page 2

Contents
Contents
Important Information 5
Before You Begin 5
Safety Information 6
Important Safety Symbols and Precautions: 7
State of California Proposition 65 Warning (US only) 7
Severe Warning Signs for Transportation and Site 7
Critical Installation Warnings 8
Installation Cautions 10
Critical Usage Warnings 11
Usage Cautions 14
Cleaning Cautions 15
Critical Disposal Warnings 16
Intended Use 16
What’s Included 17
Inside Parts, Storage, and Shelving 17
Operations 19
Control Panel 19
SmartThings 24
Special Features 27
Wine Rack Assemble & Disassemble 32
Replacement 36
Care and Maintenance 38
Cleaning 38
Troubleshooting 39
General 39
Abnormal Sounds 40
Auto Door Open (ADO) 42
SmartThings 43
English2
Page 3

Warranty and Service 44
Customer Service 44
Warranty 44
Regulatory Notice 48
FCC Notice 48
IC Notice 49
Open Source Announcement 50
Contents
English 3
Page 4

To Our Valued Customer:
Congratulations on your purchase of the very latest in Dacor® products! Our unique
combination of features, style and performance make us a great addition to your home.
In order to familiarize yourself with the controls, functions and full potential of your new
Dacor appliance, read this use and care manual thoroughly, beginning with the Important
Safety Instructions section.
All Dacor appliances are designed and manufactured with quality and pride, while working
within the framework of our company value. Should you ever experience a problem with
your product, please first check the Troubleshooting section of this manual for guidance. It
provides useful suggestions and remedies prior to calling for service.
Valuable customer input helps us to continuously improve our products and services, so
please feel free to contact our Customer Assurance Team for assistance with any of your
product support needs.
Dacor Customer Assurance Team
14425 Clark Avenue
City of Industry, CA 91745
Telephone: 833-35-ELITE (833-353-5483) USA, Canada
Fax: (626) 403-3130
Hours of Operation: Monday through Friday 5:00 A.M. to 5:00 P.M. Pacific Time
Website: www.dacor.com/customer-care/contact-us
Thank you for choosing Dacor for your home. We are a company built by families for
families, and we are dedicated to serving yours. We are confident that your new Dacor
product will deliver a high level of performance and enjoyment for many years to come.
Sincerely,
English4
Page 5
Important Information
Before You Begin
Installer
• Leave these Use and Care instructions
with the appliance.
Important Information
Consumer
• Please read this Use and Care Manual
completely before using your wine
cellar. Save it for future reference.
• The overall design and/or accessories
may differ with the model.
Retain your sales receipt or canceled check. Proof of original purchase date is required for
warranty service.
Have the complete model and serial number identification of your appliance ready.
These numbers are found on the label located inside of the wine cellar wall. Record these
numbers below for easy access.
Model Number
Serial Number
Date of Purchase
Since we continually improve the quality
changes to the appliance without updating this manual. Visit www.dacor.com to download
the latest version of this manual.
Dacor Assurance Team
Phone: 833-35-ELITE (833-353-5483) USA, Canada
Monday through Friday 5:00 A.M. to 5:00 P.M. Pacific Time
Website: www.dacor.com/customer-care/contact-us
and performance of our products, we may make
English 5
Page 6
Safety Information
і
• Before using your new Dacor wine cellar, please read this manual thoroughly to ensure
that you know how to operate the features and functions that your new appliance
offers safely and efficiently.
• This appliance is not intended for use by persons (including children) with reduced
physical, sensory or mental capabilities, or lack of experience and knowledge, unless
they have been given supervision or instruction concerning use of the appliance by a
person responsible for their safety. Children should be supervised to ensure that they
do not play with the appliance.
• Because the following instructions cover various models, the characteristics of your
wine cellar may differ slightly from the wine cellar described in this manual.
• It is hazardous for anyone other than an
Safety Information
appliance.
• Refrigerant squirting out of the pipes could ignite or cause an eye injury. When
refrigerant leaks from the pipe, avoid any naked flames and move anything flammable
away from the product and ventilate the room immediately.
- Failing to do so may result in fire or explosion.
WARNING
• R-600a is used as a refrigerant. This product contains flammable gas (Refrigerant
R-600a), contact your local authority in regard to safe disposal of this product.
• In order to avoid the creation of a flammable gas-air mixture if a leak in the
refrigerating circuit occurs, the size of the room in which the appliance may be sited
depends on the amount of refrigerant used. The room must be 35.3 ft³ in size for every
8g of R-600a refrigerant inside the appliance.
• The installation location should not be exposed to direct sunlight and not placed near
any electric appliance or heat source, e.g. stove, oven,
• If you use two products side by side, for safety reason, be sure to use certifiedproducts
in explosive gas atmospheres.
• Never start up an appliance showing any signs of damage. If in doubt, consult your
dealer.
uthori
ed Service Person to service this
ʀͱͱϩͱΧradiator, etc.
Warning; Risk of fire / flammable materials
English6
Page 7

Important Safety Symbols and Precautions:
Please follow all safety instructions in this manual. This manual uses the following safety
symbols.
WARNING
Hazards or unsafe practices that may result in severe personal injury, property damage,
and/or death.
CAUTION
Hazards or unsafe practices that may result in severe personal injury and/or property
damage.
NOTE
Useful information that helps users understand or benefit from the wine cellar.
These warning signs are here to prevent injury to you and others.
Please follow them carefully.
After reading this section, keep it in a safe place for future reference.
State of California Proposition 65 Warning (US only)
WARNING: Cancer and Reproductive Harm - www.P65Warnings.ca.gov.
Severe Warning Signs for Transportation and Site
WARNING
• When transporting and installing the appliance,care should be taken to ensure that no
parts of the refrigerating circuit are damaged.
- Refrigerant leaking from the pipe work could ignite or cause an eye injury. If a leak
is detected, avoid any naked flames or potential sources of ignition and air the room
in which the appliance is standing for several minutes.
- This appliance contains a small amount of isobutane refrigerant (R-600a), a natural
gas with high environmental compatibility but also flammable.
Safety Information
English 7
Page 8

Safety Information
Critical Installation Warnings
WARNING
• Do not install the wine cellar in a damp location or place where it may come in contact
with water.
- Deteriorated insulation on electrical parts may cause an electric shock or fire.
• Do not place this wine cellar in direct sunlight or expose it to heat from stoves, room
heaters, or other appliances.
• Do not plug several appliances into the same power strip. The wine cellar should
Safety Information
always be plugged into its own individual electrical outlet which has a voltage rating
that matches the voltage listed on the wine cellar’s rating plate.
- This provides the best performance and also prevents overloading of house wiring
circuits, which could overheat the wires and cause a fire hazard.
• If the wall socket is loose, do not insert the power plug.
- There is a risk of electric shock or fire.
• Do not use a power cord that has cracks or abrasion damage along its length or at
either end.
• Do not bend the power cord excessively or place heavy objects on it.
• Do not pull or excessively bend the power cord.
• Do not twist or tie the power cord.
• Do not hook the power cord over a metal object, insert the power cord between
objects, or push the power cord into the space behind the appliance.
• Never unplug your wine cellar by pulling on the power cord. Always grip the plug
firmly and pull straight out from the outlet.
- Damage to the cord may cause a short-circuit, fire, and/or electric shock.
• Do not store explosive substances such as aerosol cans with a flammable propellant in
this appliance.
• Do not install this appliance near flammable material.
• Do not install this appliance in a location where gas may leak.
- This may result in an electric shock or fire.
• This wine cellar must be properly located and installed in accordance with the
instructions in this manual before you use it.
• Connect the power plug in the proper position with the cord hanging down.
- If you connect the power plug upside down, the wire can get cut off and cause a fire
or electric shock.
• Make sure that the power plug is not crushed or damaged by the back of the wine
cellar.
English8
Page 9

• Keep the packing materials out of
reach of children.
- There is a risk of death from suffocation if a child puts the packing materials on his
or her head.
• The appliance must be positioned so that the plug is accessible after installation.
- Failing to do so may result in an electric shock or fire due to electric leakage.
• Do not install this appliance in a humid, oily or dusty location, or in a location exposed
to direct sunlight or to water (rain drops).
• If large amounts of dust or water enter the wine cellar, turn off the power switch and
contact your Dacor service center.
- Otherwise there is a risk of fire.
• You need to remove all the protective plastic film before you initially plug the product
in.
• Children should be supervised to ensure that they do not play with the snap rings used
for door adjustment.
- There is risk of death by suffocation if a child swallows a snap ring. Keep the snap
rings out of children’s reach.
• The wine cellar must be safely grounded.
- Always make sure that you have grounded the wine cellar before attempting to
investigate or repair any part of the appliance. Power leakages can cause severe
electric shock.
• Never use gas pipes, telephone lines, or other potential lightning attractors as an
electrical ground.
- You must ground the wine cellar to prevent any power leakages or electric shocks
caused by current leakage from the wine cellar.
- This may result in an electric shock, fire, explosion, or problems with the product.
- Improper use of the grounding plug can result in a risk of electric shock. If it is
necessary to use an extension cord, use only a 3-wire extension cord that has a
3-blade grounding plug and a 3-slot receptacle that will accept the plug on the
appliance. The marked rating of the extension cord should be AC 115-120 V, 10
A, or more. If a grounding adapter is used, make sure the receptacle box is fully
grounded.
• Plug the power plug into the wall socket firmly. Do not use a damaged power plug,
damaged power cord, or loose wall socket.
Safety Information
- This may result in an electric shock or fire.
• If the power cord is damaged, have it replaced immediately by the manufacturer or
one of its service agents.
English 9
Page 10

Safety Information
• Only a qualified technician or service company should be allowed to change the fuse in
the wine cellar.
- Failing to do so may result in an electric shock or personal injury.
• The wall socket must be easily accessible so that the appliance can be quickly
disconnected from the wall socket in an emergency.
• It must be outside the area of the rear of the appliance.
• When positioning the appliance, ensure the power cord is not trapped or damaged.
• Do not locate multiple socket-outlets or power supplies at the rear of the appliance.
• Keep ventilation openings, in the appliance enclosure or in the built-in structure, clear
Safety Information
of obstruction.
Installation Cautions
CAUTION
• Allow sufficient space around the wine cellar and install it on a flat surface.
- Keep the ventilation space in the appliance enclosure or mounting structure clear of
obstructions.
• After you have installed the wine cellar and turned it on, allow the appliance to stand
for 2 hours before loading it with wine.
• It is strongly recommended you have a qualified technician or service company install
the wine cellar.
- Failing to do so may result in an electric shock, fire, explosion, problems with the
product, or injury.
English10
Page 11

Critical Usage Warnings
WARNING
• Do not insert the power plug into a wall socket with wet hands.
- This may result in an electric shock.
• Do not store articles on the top of the appliance.
- When you open or close the door, the articles may fall and cause personal injury
and/or material damage.
• Do not insert hands, feet or metal objects (such as utensils, etc.) into the bottom or the
back of the wine cellar.
- This may result in an electric shock or injury.
- Any sharp edges may cause a personal injury.
• Do not put a container filled with water on the wine cellar.
- If spilled, there is a risk of fire or electric shock.
• Do not keep volatile flammable objects or substances (benzene, thinner, propanegas,
alcohol, ether, LP gas, and other such products) in the wine cellar.
- This wine cellar is for storing wine only.
- This may result in fire or explosion.
• Children should be supervised to ensure that they do not play with the appliance.
- Keep fingers out of “pinch point” areas. Clearances between the doors and cabinet
are necessarily small. Be careful when you open the doors if children are in the area.
• Do not let children hang on the door. A serious injury may occur.
• Do not let children go inside the wine cellar. They could become trapped.
• Do not insert your hands into the area under the appliance.
Safety Information
- Any sharp edges may cause personal injury.
• Do not store pharmaceutical products, scientific materials, or temperature sensitive
products in the wine cellar.
- Products that require strict temperature controls must not be stored in the wine
cellar.
• Do not place or use electrical appliances inside the wine cellar, unless they are of a
type recommended by the manufacturer.
• If you smell smoke, turn off the power switch immediately, and then contact your
Dacor service center.
• If large amounts of dust or water enter the wine cellar, disconnect the power plug and
contact your Dacor service center.
- Otherwise there is a risk of fire.
• Do not leave the door of the wine cellar open while the wine cellar is unattended and
do not let children enter the wine cellar.
- It can cause death from suffocation by entrapment or personal injury.
English 11
Page 12

Safety Information
• Do not overfill the wine cellar with wine.
- When you open the door, an item may fall out and cause personal injury or material
damage.
• Do not spray volatile material such as insecticide onto the surface of the appliance.
- As well as being harmful to humans, it may also result in an electric shock, fire, or
problems with the product.
• Do not use or place any substances sensitive to temperature such as flammable sprays,
flammable objects, dry ice, medicine, or chemicals near or inside the wine cellar.
• Do not use a hair dryer to dry the inside of the wine cellar. Do not place a lighted
Safety Information
candle in the wine cellar to remove bad odors.
- This may result in an electric shock or fire.
• Do not use mechanical devices or any other means to accelerate the defrosting process,
other than those recommended by the manufacturer.
• Do not damage the refrigerant circuit.
• If a gas leak is detected, avoid any naked flames or potential sources of ignition, and
air the room in which the appliance is standing for several minutes.
- Do not touch the appliance or power cord.
- Do not use a ventilating fan.
- A spark may result in an explosion or fire.
• Use only the LED lamps provided by the manufacturer or its service agents.
• Do not attempt to repair, disassemble, or modify the wine cellar yourself.
- Unauthorized modifications can cause safety problems. To reverse an unauthorized
modification, we will charge the full cost of parts and labor.
• Do not use any fuse (such as cooper, steel wire, etc.) other than a standard fuse.
• If your wine cellar needs to be repaired or reinstalled, contact your nearest service
center.
- Failing to do so may result in an electric shock, fire, problems with the product, or
injury.
• If the interior or exterior LED lamp has gone out, contact your nearest Dacor service
center.
• If the wine cellar emits a burning smell or smoke, unplug the wine cellar immediately
and contact a Dacor service center.
- Failing to do so may result in an electric or fire hazards.
• Pull the power plug out of the socket before changing the interior lamps of the wine
cellar.
- Otherwise, there is a risk of electric shock.
• If you experience difficulty changing a non-LED light, contact a Dacor service center.
English12
Page 13

• If the product is equipped with LED lamps, do not disassemble the lamp covers and
LED lamps yourself.
- Contact a Dacor service center.
• Plug the power plug into the wall socket firmly.
• Do not use a damaged power plug, damaged power cord, or loose wall socket.
- This may result in an electric shock or fire.
• Do not expose the interior accessories, such as wine racks, bottle presenters, and shelf
to direct sunlight for long.
Safety Information
English 13
Page 14

Safety Information
Usage Cautions
CAUTION
• To get the best performance from the product:
- Do not place wine too close to the vents at the rear of the wine cellar as this can
obstruct free air circulation in the wine cellar compartment.
• Service warranty and modification.
- Any changes or modifications performed by a 3rd party on this finished appliance
are not covered under Dacor warranty service, nor is Dacor responsible for safety
Safety Information
• Do not block the air vents inside the wine cellar.
• If the wine cellar is disconnected from the power supply, you should wait for at least
• If large amounts of water enter the wine cellar, turn off the power switch and contact a
• Do not strike or apply excessive force to any glass surface.
issues that result from 3rd party modifications.
- If the air vents are blocked, especially with a plastic bag, the wine cellar can be over
cooled.
five minutes before plugging it back in.
Dacor service center.
- Broken glass may result in a personal injury and/or property damage.
• If the wine cellar is flooded, shut off the power to the wine cellar and contact your
nearest Dacor service center.
- There is a risk of electric shock or fire.
English14
Page 15

Cleaning Cautions
CAUTION
• Do not spray water directly on the inside or outside the wine cellar.
- There is a risk of fire or electric shock.
• Do not use a hair dryer to dry the inside of the wine cellar.
• Do not place a lighted candle in the wine cellar to remove bad odors.
- This may result in an electric shock or fire.
• Do not spray cleaning products directly on the display.
- Printed letters on the display may come off.
• If any foreign substance such as water has entered the appliance, unplug the power
and contact your nearest service center.
- Failing to do so may result in an electric shock or fire.
• Use a clean, dry cloth to remove any foreign matter or dust from the power plug
blades. Do not use a wet or damp cloth when cleaning the plug.
- Otherwise, there is a risk of fire or electric shock.
• Do not clean the appliance by spraying water directly onto it.
• Do not use benzene, thinner, or Clorox (bleach) to clean the wine cellar.
- They may damage the surface of the appliance and may cause a fire.
• Before cleaning or performing maintenance, unplug the appliance from the wall socket.
Safety Information
- Failing to do so may result in an electric shock or fire.
English 15
Page 16

Safety Information
Critical Disposal Warnings
WARNING
• DANGER : Risk of child entrapment. Before you throw away your old wine cellar:
- Take off the doors and door latch.
- Leave the shelves in place so that children may not easily climb inside.
- Children trapped inside a wine cellar can hurt themselves or suffocate to death.
• Please dispose of the packaging material from this product in an environmentally
friendly manner.
Safety Information
• Ensure that none of the pipes on the back of the wine cellar are damaged prior to
disposal.
• R-600a is used as a refrigerant. This product contains flammable gas (Refrigerant
R-600a), contact your local authority in regard to safe disposal of this product.
• Cyclopentane is used in the insulation. The gases in the insulation material require
a special disposal procedure. Please contact your local authorities in regard to the
environmentally safe disposal of this product.
• Keep all packaging materials well out of the reach of children, as packaging materials
can be dangerous to children.
- If a child places a bag over his or her head, the child could suffocate.
Intended Use
• staff kitchen areas in shops, offices and other working environments;
• farm houses and by clients in hotels, motels and other residential type environments;
• bed and breakfast type environments;
• catering and similar non-retail applications.
• This appliance is intended for use at an elevation of no more than 2000 meters above
sea level.
English16
Page 17
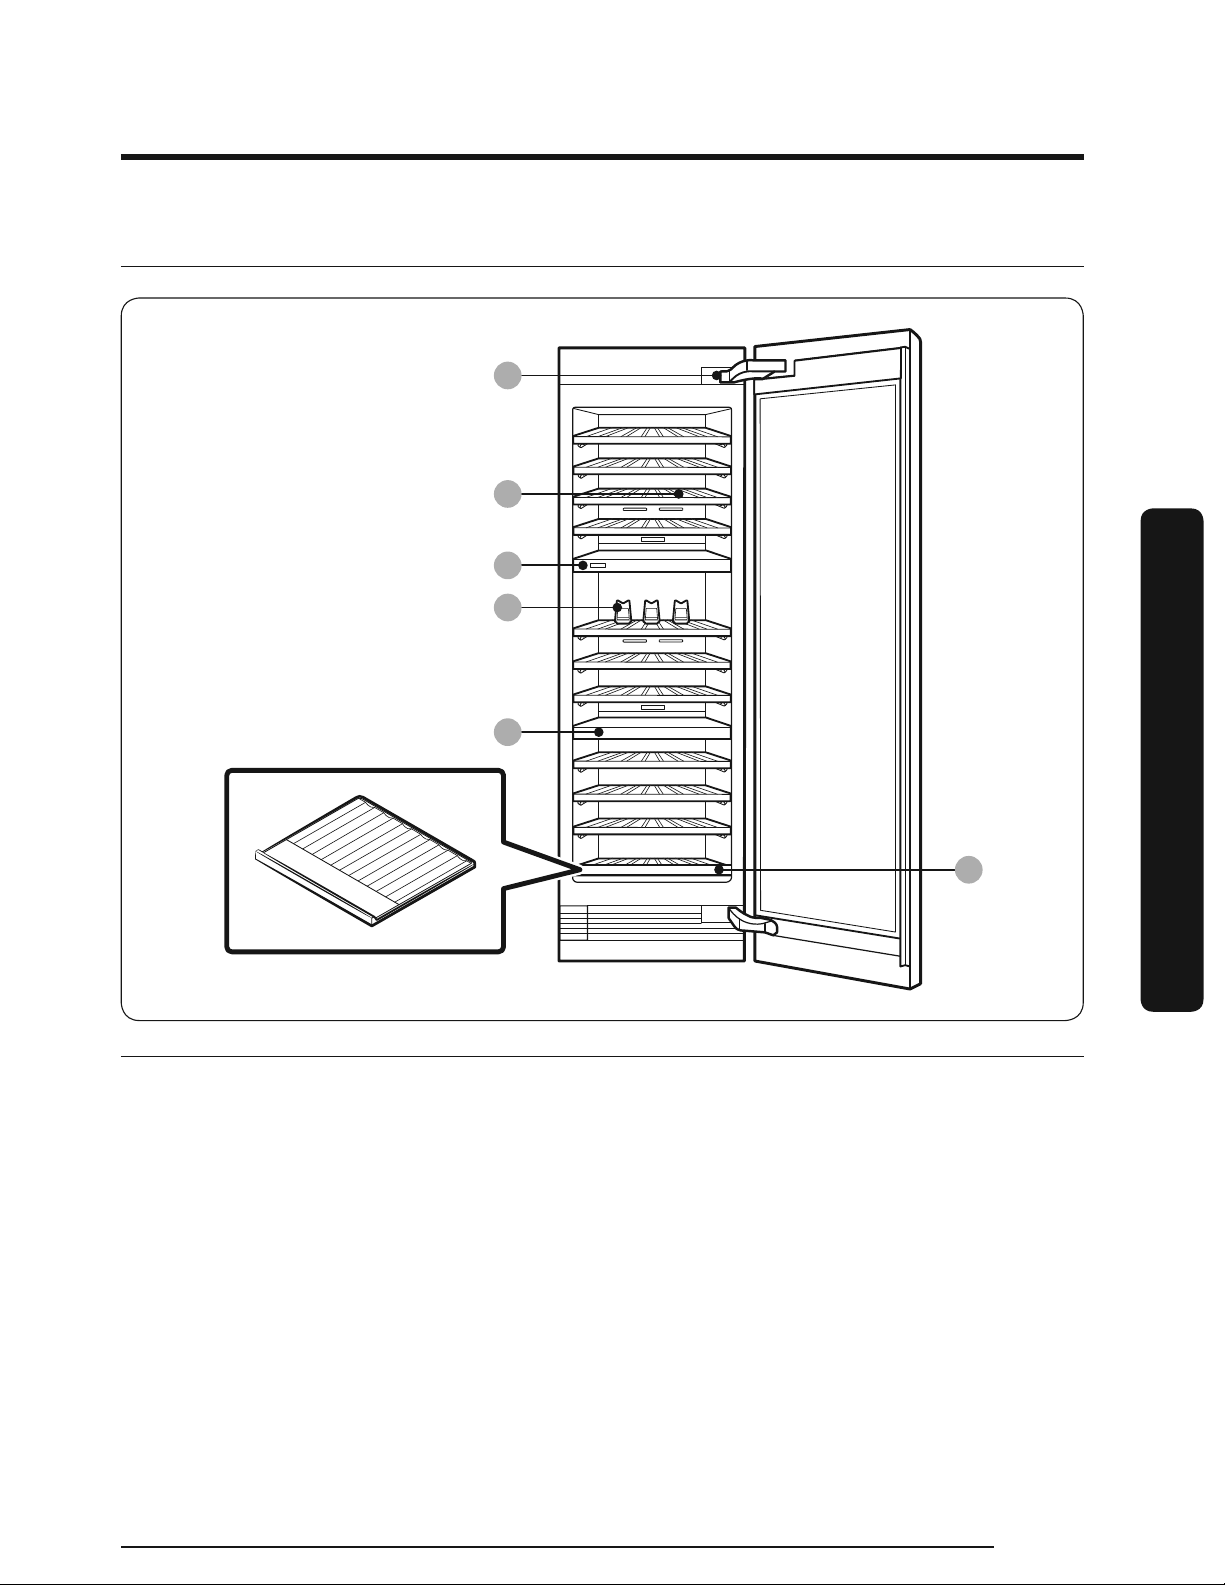
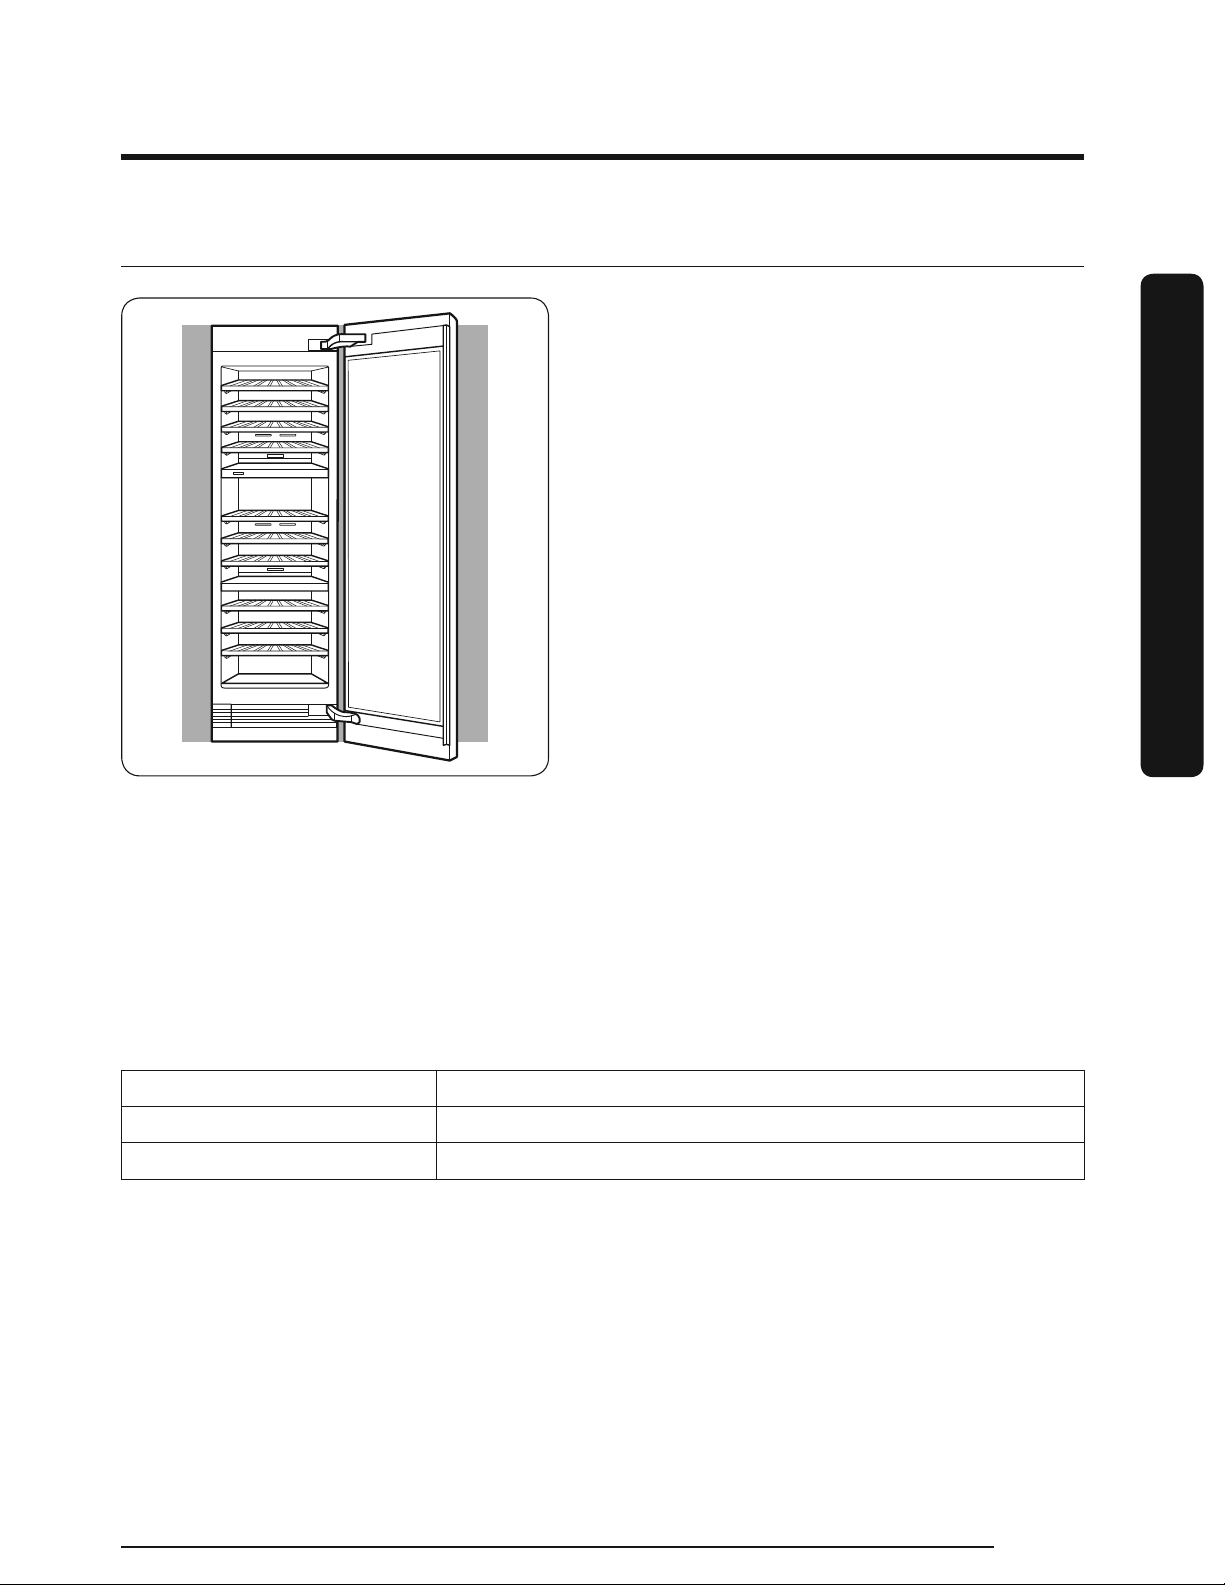
What’s Included
02
03
03
04
01
05
Inside Parts, Storage, and Shelving
What’s Included
01 Power switch, Auto Door Open switch 02 Wine Racks
03 Control Panel & Compartment Wall 04 Bottle Presenter
05 Bottom Wine Shelf
English 17
Page 18
What’s Included
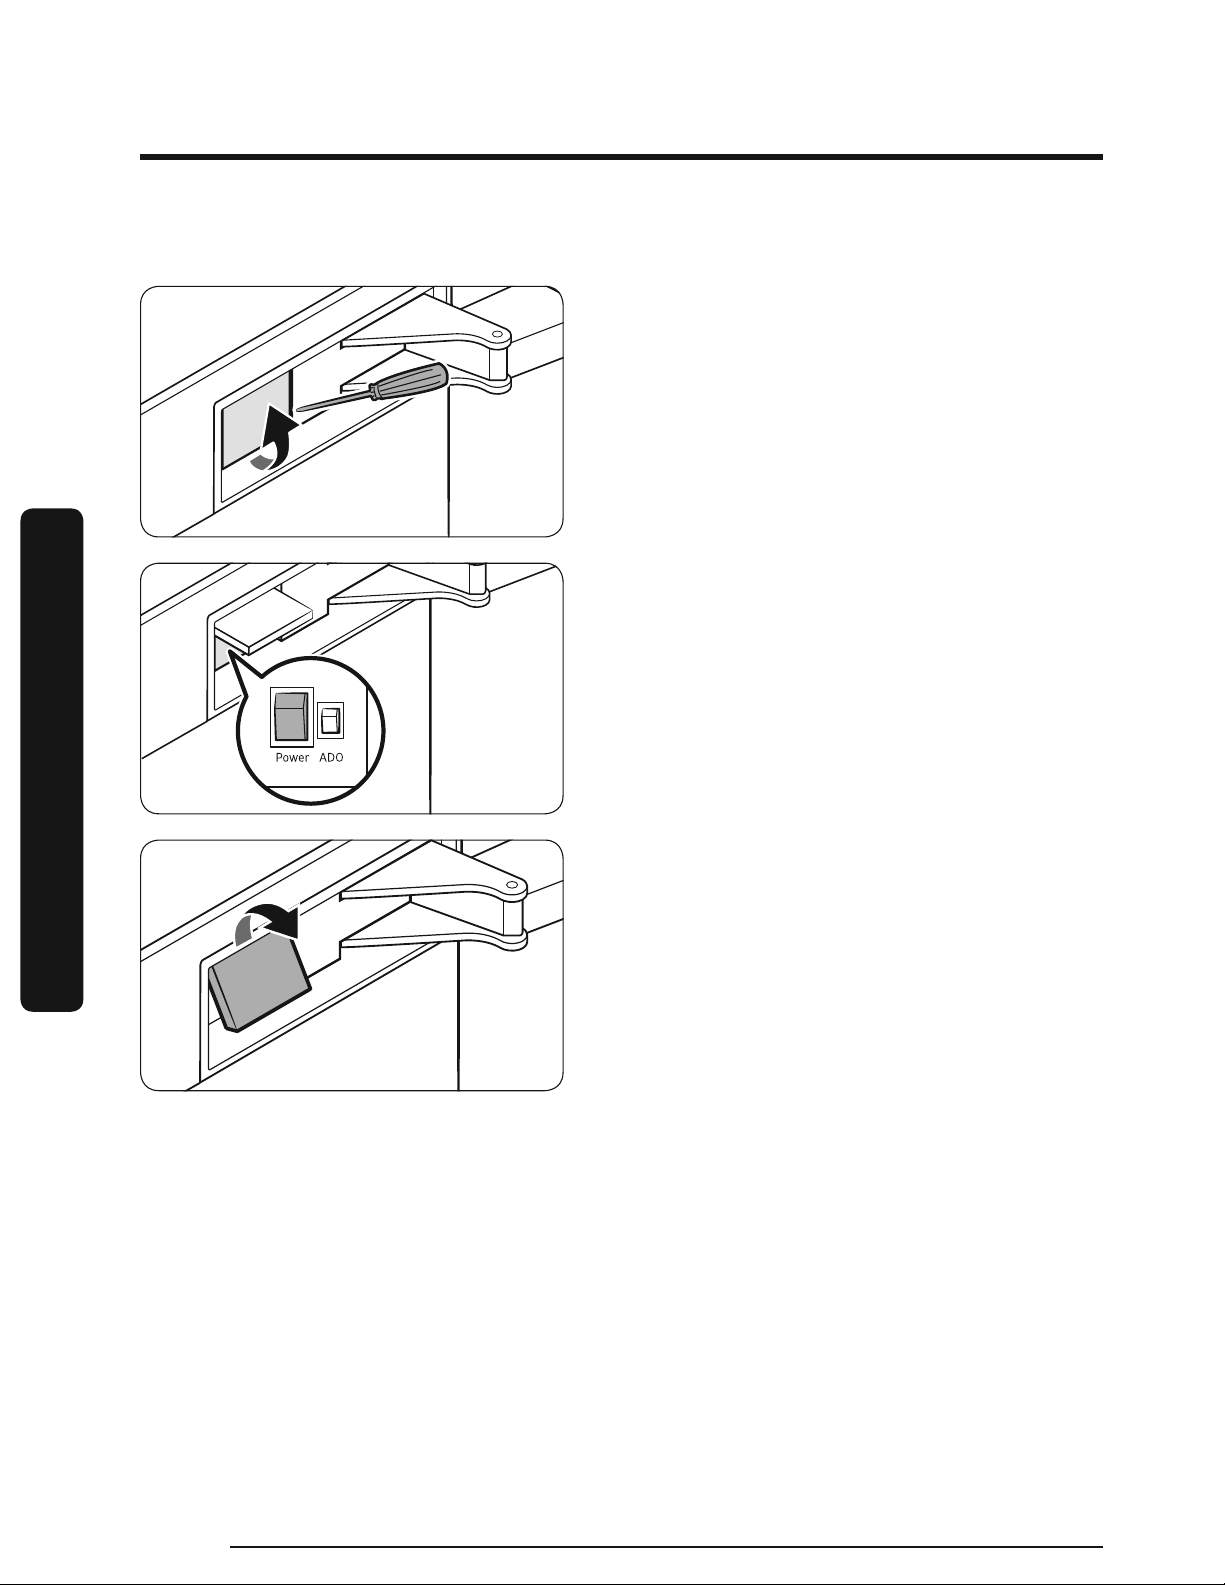
Switch box
What’s Included
• Use a flat head screwdriver to open the
switch box cover.
• The black one is the Power switch while
the Auto Door Open switch is red next
to it.
• Close the switch box cover.
English18
Page 19
Operations
01 02 14 03 14 15 04 05 06 07 08 09 10 11 15 12 13 14
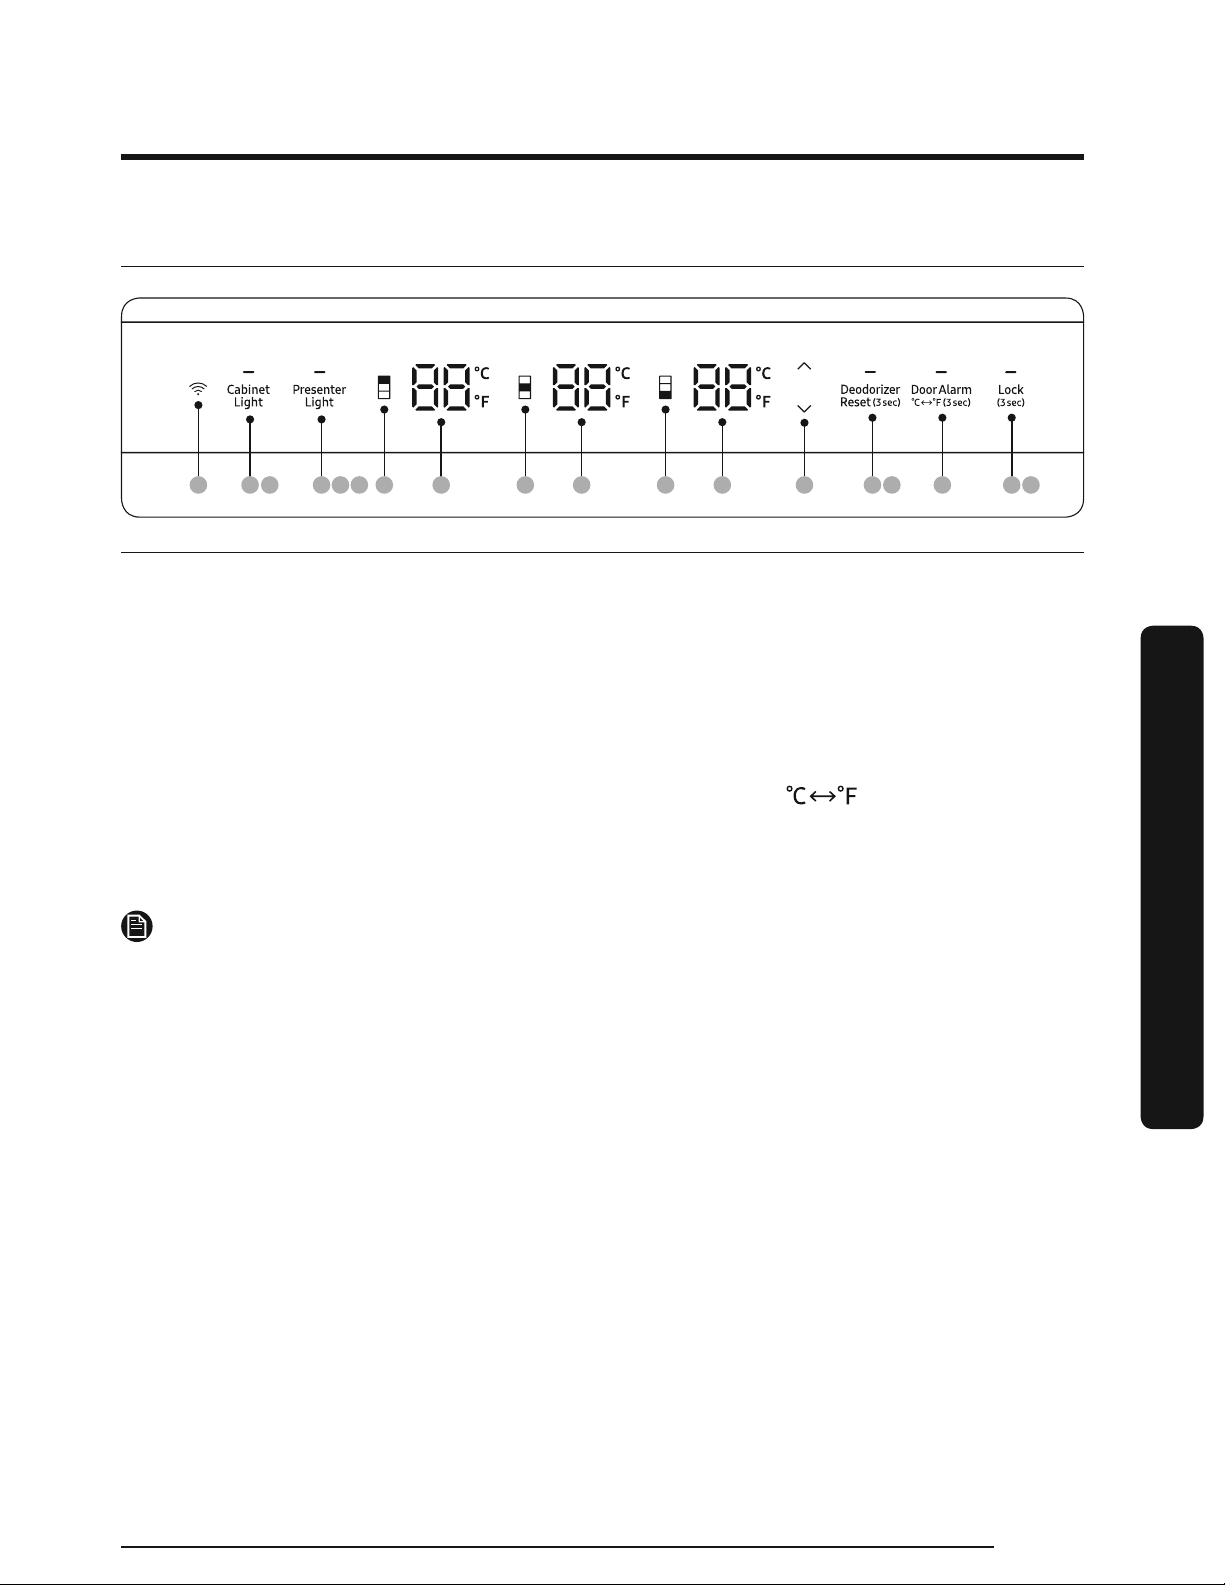
Control Panel
01 Network Connection 02 Cabinet Light
03 Presenter Light 04 Upper Zone Select
05 Upper Zone Temp. 06 Middle Zone Select
07 Middle Zone Temp. 08 Lower Zone Select
09 Lower Zone Temp. 10 Temp. Control
11 Deodorizer Reset (3 sec)
13 Lock (3 sec) 14 Cooling Off
15 Sabbath Mode
NOTE
• When you change the temperature on the panel, the panel displays the current
temperature and the temperature on the display will gradually change according to
the internal temperature until it reaches the desired temperature. Note that it will take
time for the wine cellar to reach the new temperature. This is normal. You do not need
to set the desired temperature just because the display does not show your desired
temperature.
• If no button is input for 10 seconds after Lock is deactivated, the display will turn off
except for the Lock button, all the zone select buttons, and all the zone temp. displays.
• If the control panel has moisture or liquid on its surface, it may fail. Wipe the moisture
or liquid using a dry cloth, and then try again.
• When the door is closed, all the zone select buttons and zone temp. displays turns off,
and then the entire display will turn off after 10 minutes.
12 Door Alarm /
(3 sec)
Operations
English 19
Page 20

Operations
01 Network Connection
You can control and monitor your wine cellar through the SmartThings app. For more
information, see the SmartThings section.
• Recommended encryption systems include WPA/TKIP and WPA2/AES. Any newer or
• Wireless networks may be affected by the surrounding wireless communication
• If your Internet service provider has registered the MAC address of your PC or modem
• The firewall settings of your network system may prevent your Dacor wine cellar from
• To configure the wireless access point (AP) settings, see the user manual of the AP.
• Dacor wine cellars support both Wi-Fi 2.4 GHz with IEEE 802.11 b/g/n and Soft-AP
• Unauthorized Wi-Fi wireless routers may fail to connect to applicable Dacor wine
Operations
• Recommended to have Wi-Fi Router or Access Point with in 50 feet of appliance.
NOTE
unstandardized Wi-Fi authentication protocols are not supported.
environment.
for identification, your Dacor wine cellar may fail to connect to the Internet. If this
happens, contact your Internet service provider for technical assistance.
accessing the Internet. Contact your Internet service provider for technical assistance. If
this symptom continues, contact a local Dacor service center or retailer.
protocols (IEEE 802.11 n is recommended).
cellars.
02 Cabnet Lght
Press to adjust the cabinet light. You can choose from 4 different levels (Off, 1-3).
NOTE
The cabinet light is set to level 3 (brightest) as factory default.
03 Presenter Lght
Press to adjust the presenter light. You can choose from 4 different
levels (Off, 1-3).
Presenter Light
NOTE
The presenter light is set to off as factory default.
04 Upper Zone Select
Upper Zone Select
Press this button, and then use the Temp. Control buttons to adjust
the upper zone temperature between 40 °F ~ 65 °F (4 °C ~ 18 °C).
English20
Page 21
05 Upper Zone Temp.
Displays the temperature of the upper zone.
Upper Zone Temp.
The set temperature will be displayed when you adjust the upper
zone temperature.
06 Middle Zone Select
Middle Zone Select
Press this button, and then use the Temp. Control buttons to adjust
the middle zone temperature between 40 °F ~ 65 °F (4 °C ~ 18 °C).
07 Middle Zone Temp.
Displays the temperature of the middle zone.
Middle Zone Temp.
The set temperature will be displayed when you adjust the middle
zone temperature.
08 Lower Zone Select
Lower Zone Select
Press this button, and then use the Temp. Control buttons to adjust
the lower zone temperature between 40 °F ~ 65 °F (4 °C ~ 18 °C).
09 Lower Zone Temp.
Displays the temperature of the lower zone.
Lower Zone Temp.
The set temperature will be displayed when you adjust the lower
zone temperature.
Operations
10 Temp. Control
Temp. Control
Press
selected zone.
You can adjust the temperature between 0 °F ~ 65 °F (4 °C ~ 18 °C)
in 1 °F (1 °C) unit.
If you press and hold the button for more than 2 seconds, the
temperature will increase or decrease until you release the button.
If you press these buttons without selecting the zone (upper,
middle, or lower), temperature does not change and all the zone
select buttons will blink.
or to increase or decrease the set temperature of the
NOTE
English 21
Page 22
Operations
11 Deodorizer Reset (3 sec)
After about 18 months of using the original deodorizer filter, the
Filter indicator blinks red to remind you that the filter needs to
Deodorizer Reset
12 Door Alarm / (3 sec)
Door Alarm
be replaced. If this happens, replace the filter, and press and hold
Deodorizer Reset for 3 seconds. The filter lifecycle will be reset and
the Filter indicator turns off.
You can enable or disable the door alarm by pressing Door Alarm.
When Door Alarm is enabled and a door is left open for more than
2 minutes, the alarm will sound and the alarm indicator will blink.
The Door Alarm function is enabled by factory default.
You can use the Door Alarm button to switch the temperature scale
between Celsius and Fahrenheit.
Operations
If the door is left open for more than 10 minutes, the LED lamps will turn off.
13 Lock (3 sec)
Lock
NOTE
To switch the temperature scale, press and hold
3 seconds.
To prevent accidental setting changes, press and hold Lock for 3
seconds. Main panel will be disabled and the Lock indicator (
turn on.
If you press any button while Lock is on, the indicator will blink.
If you press and hold the button again for more than 3 seconds, Lock
will be deactivated. However, Lock will be reactivated if no button is
input for the next 1 minute.
Door Alarm for
) will
English22
Page 23

14 Cooling Off
Cooling Off mode (also called Demo mode) is designed for use by retailers when they are
displaying wine cellar on a retail floor.
In Cooling Off mode, the fan motor and lights operate normally, but the compressors do
not run so the wine cellar does not get cold.
• To enter Cooling Off mode, press and hold
simultaneously for 5 seconds. The fridge chime sounds and the temperature display
shows “oF”.
• To exit Cooling Off mode, press and hold
simultaneously for 5 seconds again. The fridge chime sounds and the temperature
display shows the current temperature.
NOTE
If the Lock indicator turns on, you must first deactivate Lock.
Cabinet Light, Presenter Light, and Lock
Cabinet Light, Presenter Light, and Lock
15 Sabbath mode
The Sabbath mode stays active for 85 hours once it is activated. After that, it will be
deactivated automatically.
• To activate, press and hold
seconds. Then the wine cellar operates in Sabbath mode where the buttons, the display,
and the room lamps are all under control.
• To deactivate, press and hold the buttons again for 5 seconds.
Presenter Light and Deodorizer Reset simultaneously for 5
Operations
NOTE
• If the Lock indicator turns on, you must first deactivate Lock.
• Even after the wine cellar powers off and restarts, the Sabbath mode remains active.
To exit, you must deactivate the Sabbath mode.
English 23
Page 24

Operations
SmartThings
Installation
Visit the Google Play Store, Galaxy Apps, or Apple App Store and search for “SmartThings”.
Download and install the SmartThings app provided by Samsung Electronics to your smart
device.
• The SmartThings app is designed for Android 6.0 (Marshmallow) or later, iOS 10.0
• For improved performance, the SmartThings app is subject to change without notice or
• Recommended encryption systems include WPA/TKIP and WPA2/AES. Any newer or
• Wireless networks may be affected by the surrounding wireless communication
• If your Internet service provider has registered the MAC address of your PC or modem
Operations
• The firewall settings of your network system may prevent your Samsung Smart Wine
• To configure the wireless access point (AP) settings, see the user manual of the AP
• Samsung Smart Wine Cellar support both Wi-Fi 2.4 GHz with IEEE 802.11 b/g/n and
• Unauthorized Wi-Fi wireless routers may fail to connect to applicable Samsung Smart
NOTE
or later, iPhone 6 or later, and is optimized for Samsung smartphones (Galaxy S and
Galaxy Note series).
discontinued support according to the manufacturer’s policy.
non-standard Wi-Fi authentication protocols are not supported.
environment.
for identification, your Samsung Smart Wine Cellar may fail to connect to the Internet.
If this happens, contact your Internet service provider for technical assistance.
Cellar from accessing the Internet. Contact your Internet service provider for technical
assistance. If this symptom continues, contact a local Samsung service center or
retailer.
(router).
Soft-AP protocols. (IEEE 802.11 n is recommended.)
Wine Cellar.
Samsung account
You are required to register with a Samsung account to use the app. If you don’t have a
Samsung account, follow the app’s onscreen instructions to create a free Samsung account.
English24
Page 25

Getting started
1. Turn on the device you want to connect, open the SmartThings app on your phone, and
then follow the instructions below.
2. If a pop-up appears saying that a new device has been found, tap ADD NOW.
3. If a pop-up doesn’t appear, tap the + button, and then select the device you want to
connect from the list of available devices.
4. If your device isn’t in the list of available devices, tap Supported Devices, select the
device type (wine cellar), and then select the specific device model.
5. Follow the instructions in the app to set up your device. Once setup is complete, your
wine cellar will appear as a “card” on your Devices screen.
Wine cellar app
Integrated control
You can monitor and control your Wine Cellar at home and on the go.
• Tap the Wine Cellar icon on the SmartThings Dashboard or tap the Devices icon at the
bottom of the Dashboard, and then tap the Wine Cellar “card” to open the Wine Cellar
page.
• Check the operation status or notifications related to your Wine Cellar, and then change
options or settings if necessary.
Operations
NOTE
Some options or settings of the wine cellar may not be available for remote control.
English 25
Page 26
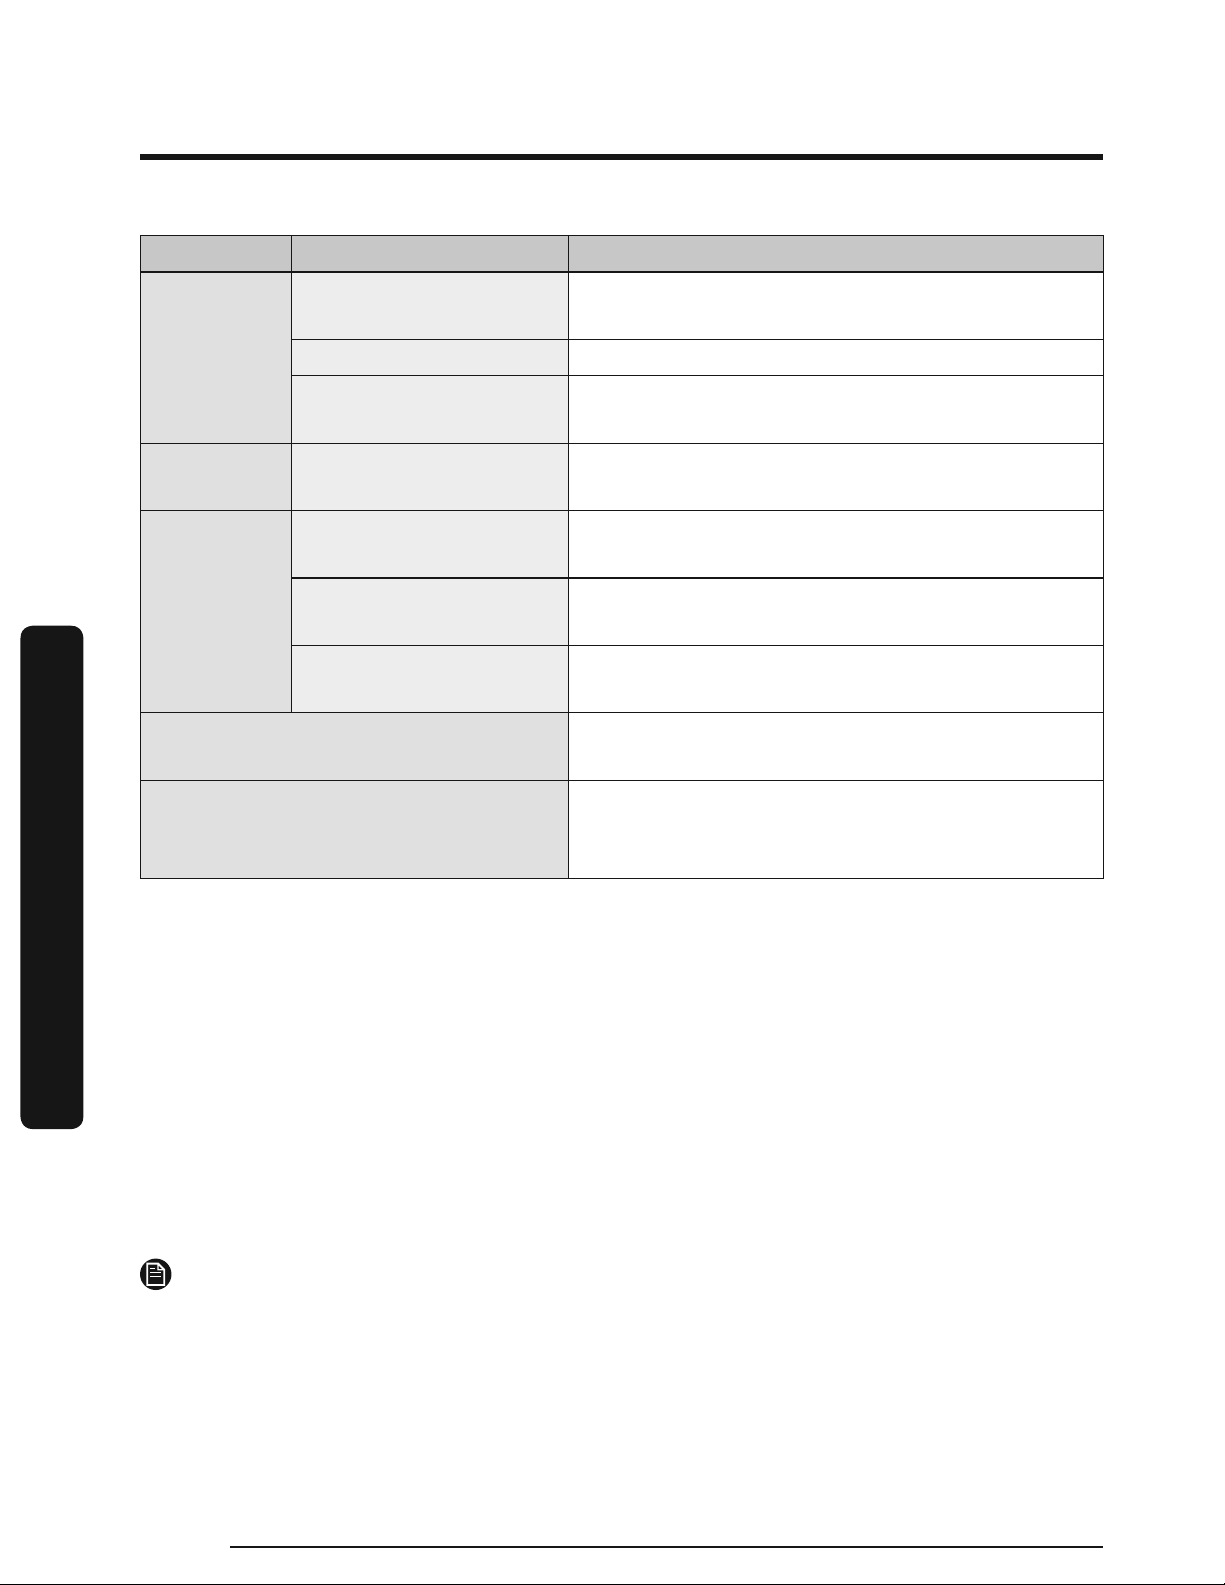
Operations
Category Item Description
Monitoring
Functions Temperature
Alarms
Wine inventory
Operations
HomeCare Wizard
Temperature
Self Check Detects abnormal operations of the wine cellar.
Energy monitoring
Abnormally high
temperature
Door opening
Deodorizer filter
replacement
Displays the current temperature setting of the
winecellar.
Checks the accumulated power consumption of
the winecellar for the last 180 days.
You can change temperature settings and check
the current settings.
This alarm is triggered when the temperature of
the wine cellar abnormal.
This alarm is triggered if the fridge is left open
for a specific time.
This alarm reminds you that the deodorizer
filter must be replaced.
You can add, edit, and sort your wine
information.
Provides history of “door opening” for the last
7 days, “filter replacement time guide”, and the
diagnosis information of the product.
To check the MAC address
1. In this mode, the MAC address appears on the temperature panel sequentially for
1 minute.
Press and hold both
display blinks. Then, press
beeps.
2. For example, if the MAC address is “11-22-33-44-55-66”, the temperature panel
displays the address for 1 minute in this sequence: “--” “11” “22” “33” “44”
“55” “66” “--”.
After the 1 minute, the MAC address disappears and the temperature panel returns to
the normal state.
NOTE
The temperature panel displays “-- / --” for an unknown MAC address or if a Wi-Fi
connection is not established or is lost.
Cabinet Light and Door Alarm for 6 seconds. The temperature
Door Alarm to display the MAC address. The wine cellar
English26
Page 27
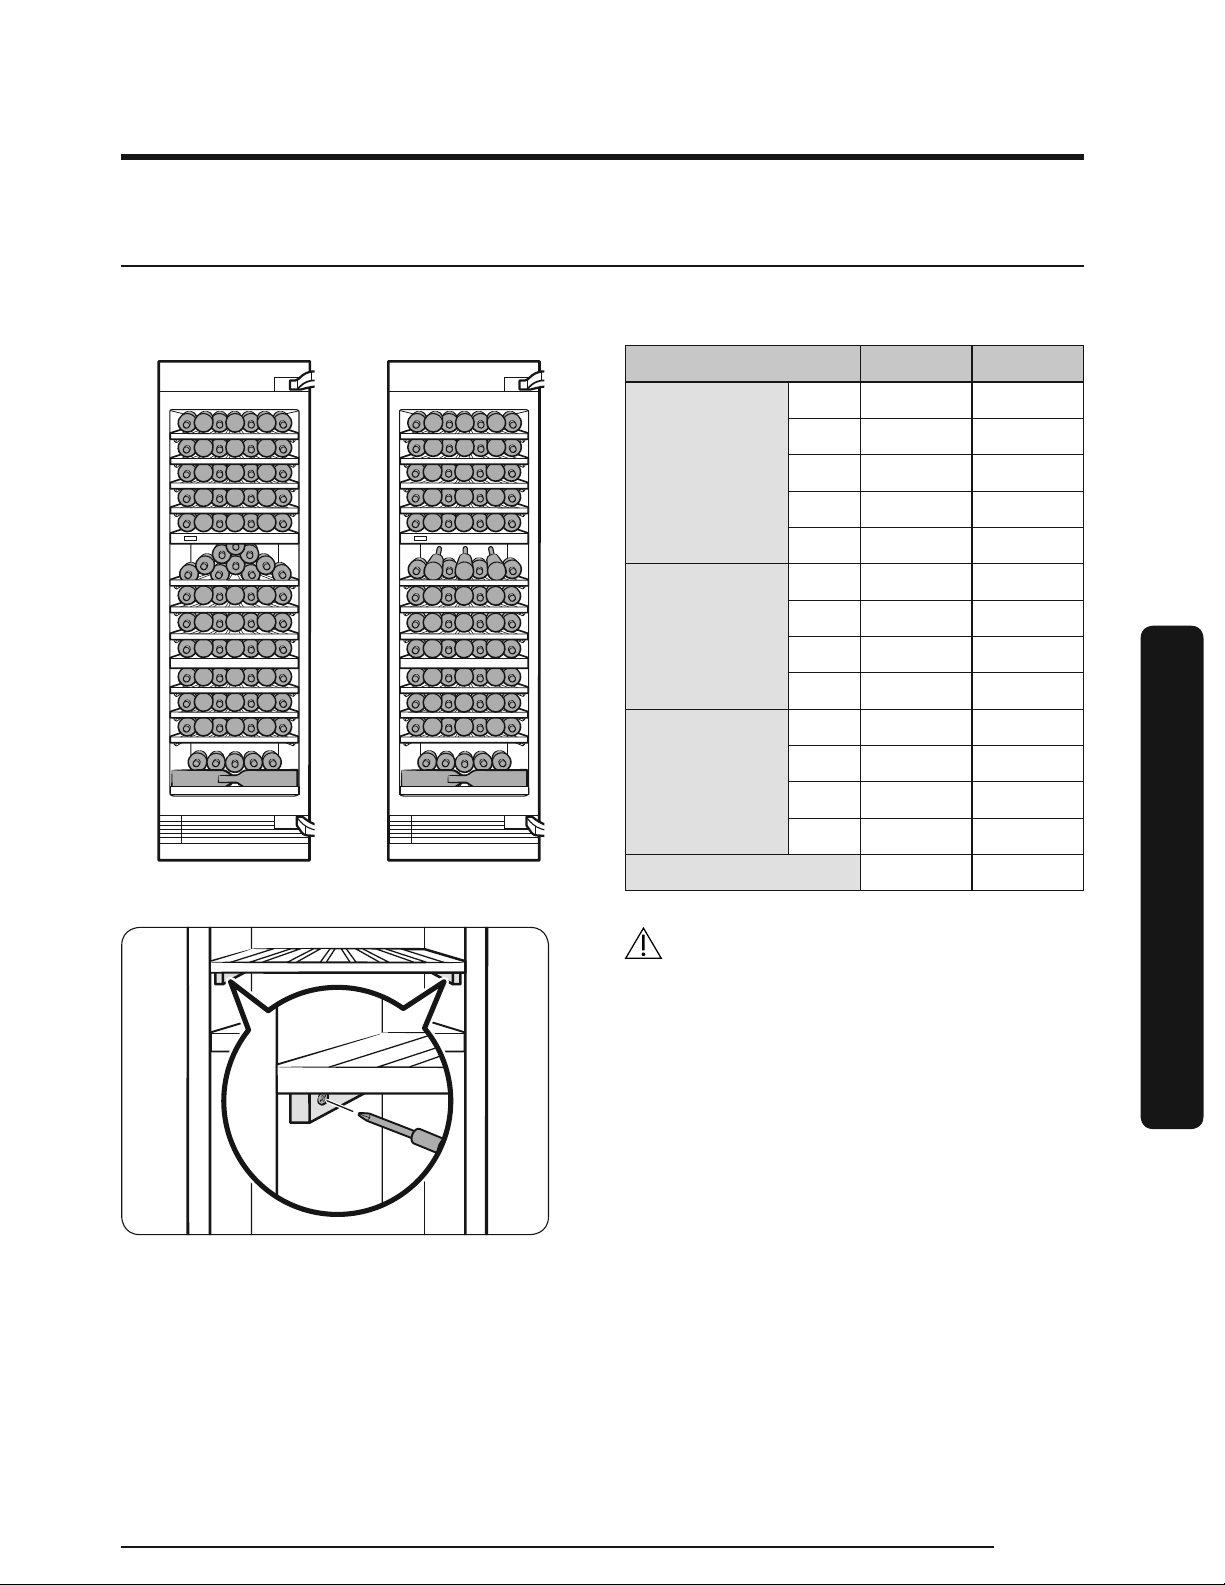
Special Features
Load capacity
Load capacity Type A Type B
17 7
27 7
Type A Type B
Upper zone
Middle zone
Lower zone
Total 100 97
37 7
47 7
57 7
110 7
27 7
37 7
47 7
17 7
27 7
37 7
413 13
CAUTION
If you are using the bottle presenters on
the top rack of the middle zone (as shown
in Type B of the figure), make sure to fix
the rack with a screw driver.
Operations
English 27
Page 28
Operations
Ռ
BBBB
A A A
Operations
A
F
D
C
E
B
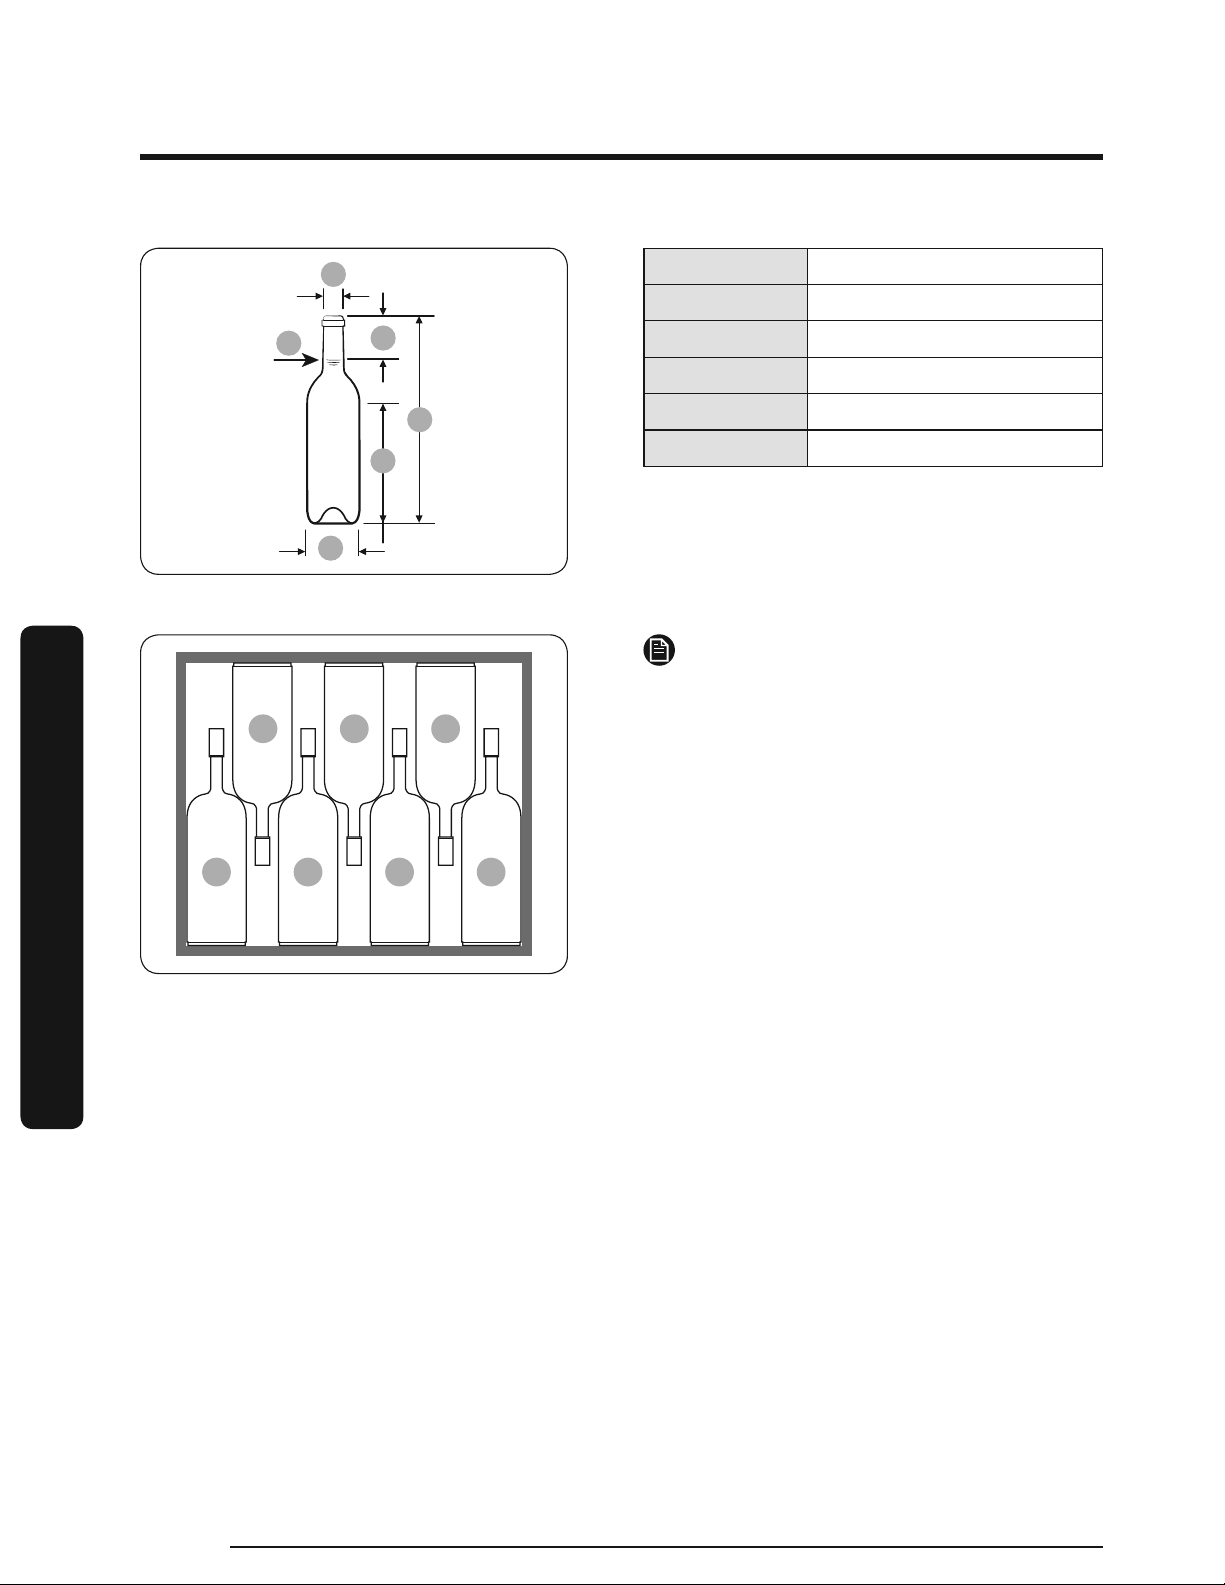
Standard bottle size
A
Ռ
3/32" (Ø 27.5)
Ø
B Ø3" (Ø 76.1)
C 21
D 6
E 12
27
/32" (300.5)
1
/4" (63)
15
/32" (158.5)
F 25.4 fl oz (75.0 cl)
NOTE
If you want to store standard bottles and
long bottles on the same rack, place 4 long
bottles and 3 standard bottles as shown in
the figure.
A: Standard bottle / B: Long bottle
English28
Page 29
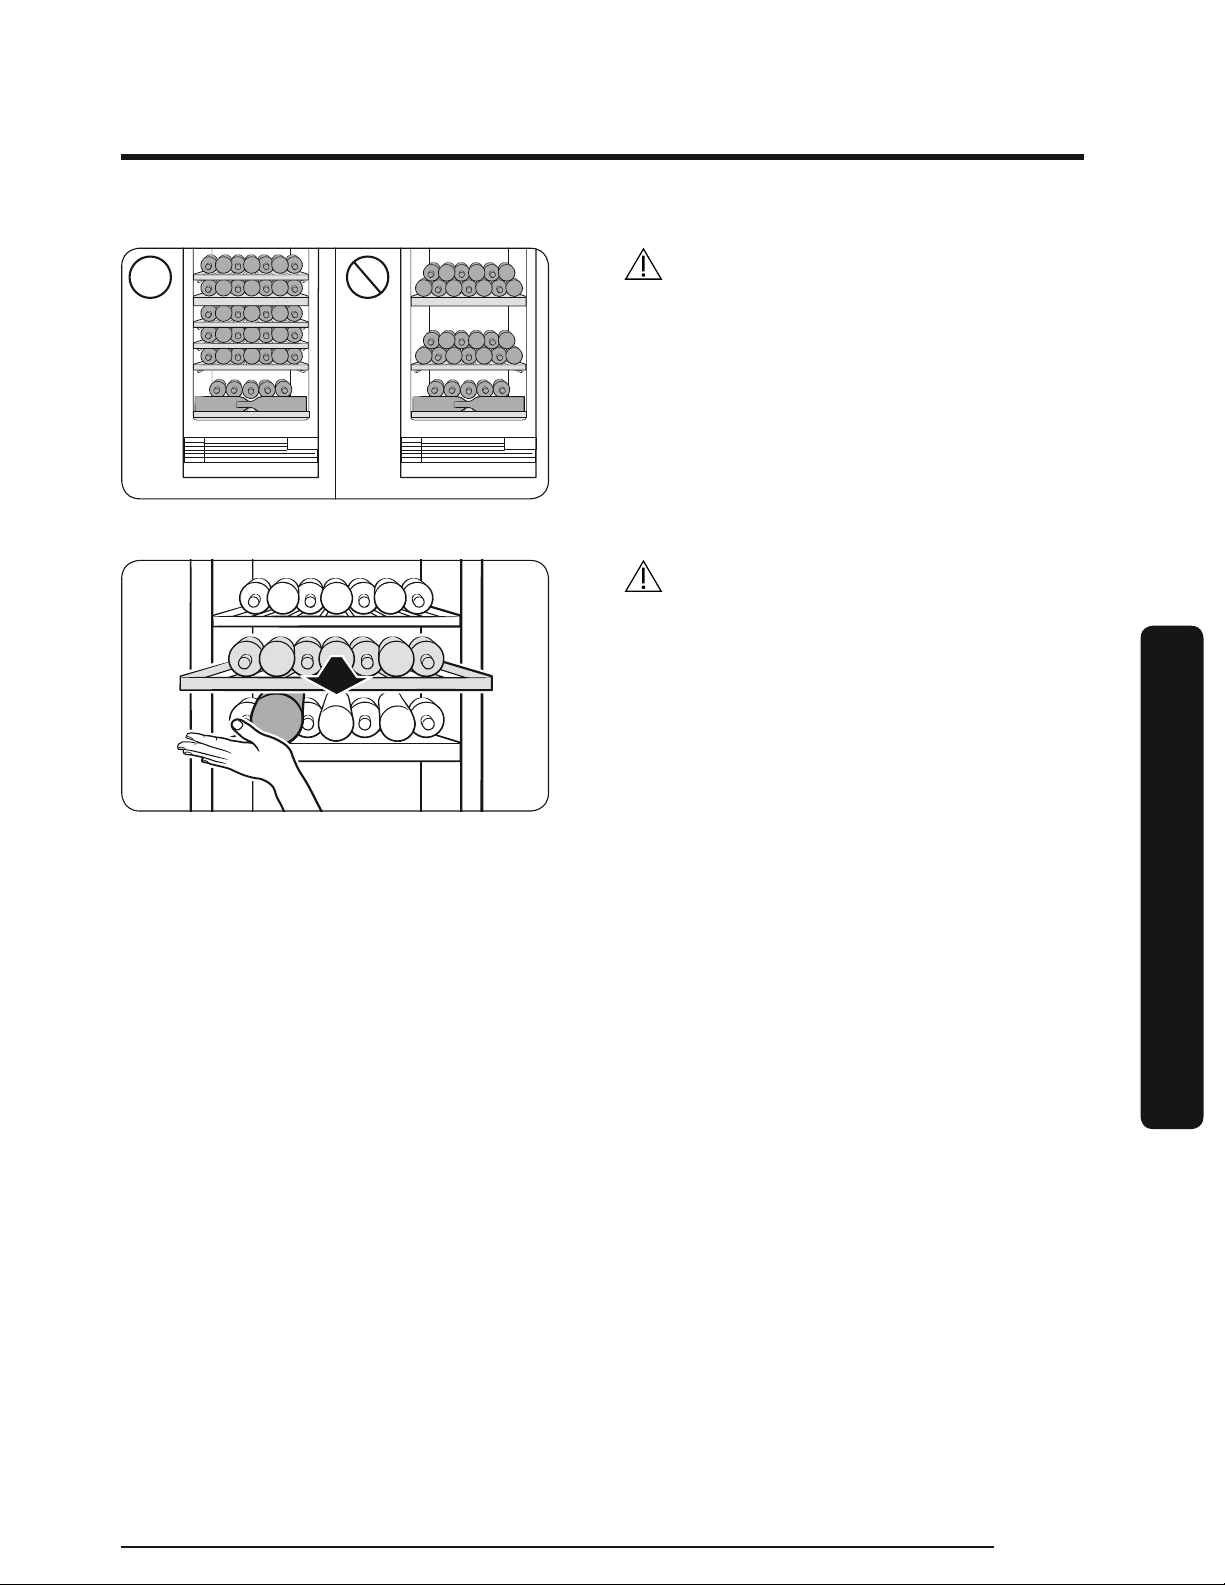
CAUTION
Stack wine bottles only on the bottom rack
of the bottom zone (maximum two rows)
and the top rack of the middle zone. (To
stack bottles on the top rack of the middle
zone, see TYPE A of the figure on the page
27.)
Do not pull out the bottom shelf when
bottles are loaded.
CAUTION
If you stored bottles that are bigger than
ϩ˵ʪstandard size on the иʪθɇʀϑ or
bottom wine shelf (bottom part of each
zone), protect the bottles when you pull
out the rack directly above it to prevent
them from falling.
Operations
English 29
Page 30
Operations
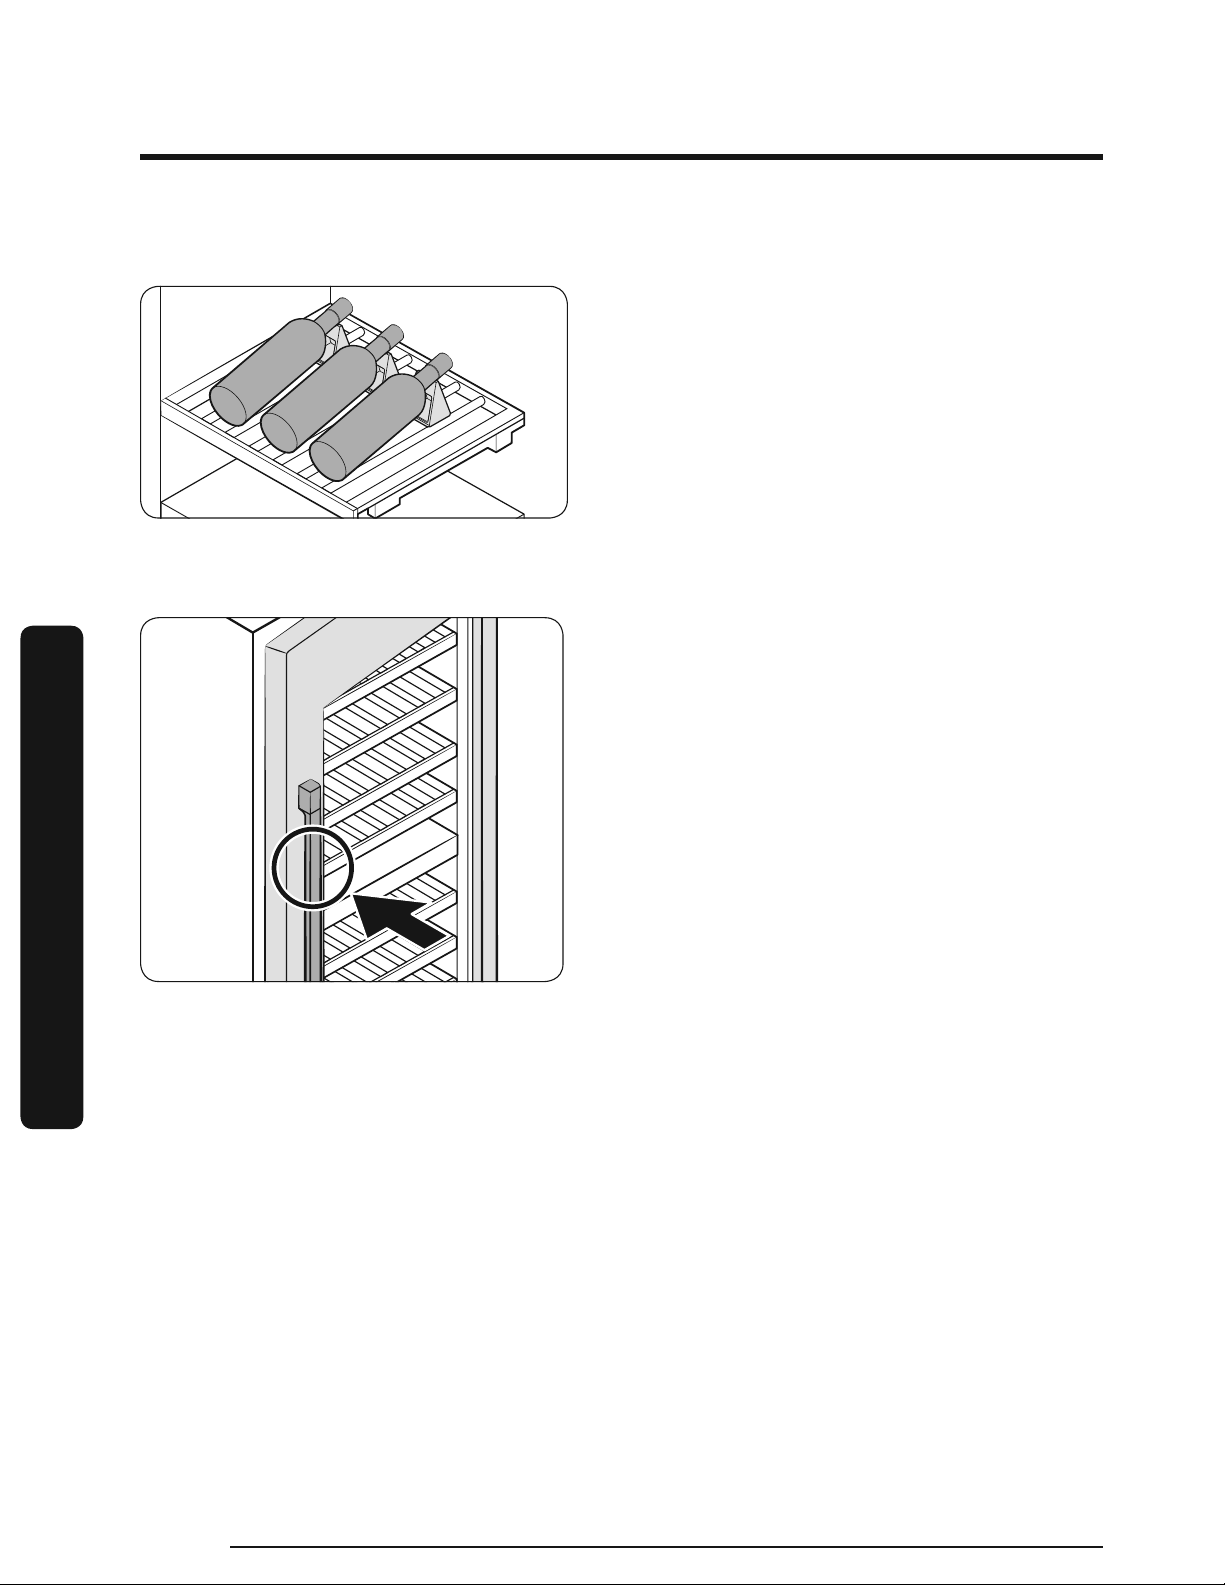
Bottle presenters
Auto Door Open system
You can display up to 3 wine bottles using
the provided bottle presenters (as shown
in the figure).
Operations
The auto door open system
effortless opening of the door with the
help of
To open the door with mechanical
assistance, simply push the door handle.
Touching or snapping does not trigger the
auto door open system.
Closing the door early during the auto
door
You can adjust the pressure sensitivity. To
maximize the sensitivity, press and hold
Cabinet Light and Deodorizer Reset
simultaneously for 3 seconds. The display
shows “
To set the pressure sensitivity back to
default, press and hold the buttons again
for 3 seconds. The display will show “
ɇmechanical device.
ͱΧʪsystem could cause kit damage.
01” for 3 seconds.
ɇͱиϑ˙ͱθ
00”.
English30
Page 31

NOTE
• By default, the system is turned on.
• The system is not triggered
immediately after the door is closed.
Allow 2 seconds and try again. This is
not a system failure.
• When the door opens by the system, it
remains open for 2 seconds and closes
automatically.
CAUTION
Do not ˙ͱθʀʪ the doorɵɇʀwhile it is open˝. It may cause ɇmechanical failure of
the system.
• The effort to push the door differs
ʒʪΧʪʒ˝ͱͱΧʪθɇϩ˝ conditions. It increases right
after the door isclosed or
pressure inside.
• When wine cellars are installed in
by closing the door of the adjacent wine cellar. It may happen when the door is closed
hard or when the wine cellars are not fixed tight
˙the refrigeration cycle is turned on ʀɇЇϑ˝ɇʪ˝ɇϩЭʪ
ɇpair, it is possible that the system can be triggered
ϩͱthe cabinet.
Operations
English 31
Page 32

Operations
˵ͱʒʪθϑ
Wine Rack Assemble & Disassemble
Assemblng the wne rack
Operations
1. Remove the rail
2. Hold the front part of the wine rack and
the rail, and then push the wine rack so
that the hook on the back of the rail is
inserted into the hole on the back of the
wine rack as shown in the figure.
NOTE
Make sure the hooks on the both rails are
properly inserted into the rack.
.
English32
Page 33

3. Fix the front part of the wine rack by
placing the rack on the front of the rail
so that two pins on the top and side of
the rack is inserted into the holes on
the front part of the rack as shown in
the figure.
NOTE
Make sure the pins on the both rails are
properly inserted into the holes on the
rack.
Operations
English 33
Page 34

Operations
bottle presenters
3 ea
4. Place 3 bottle presenters on the wine
rack of the Presentation Zone.
Operations
• Make sure the appliance is level. If the appliance is not level, the wine rack may slide in
• Make sure the wine rack is firmly fixed.
5. Slide in the wine rack until you hear a
clicking sound.
WARNING
or out.
English34
Page 35

Disassembling the wine rack
1. Pull the wine rack.
2. Gently spread the racks and lift the
front part to release from the pins.
Operations
3. Pull the wine rack to remove.
English 35
Page 36

Operations
Replacement
Deodorizer filter
• The overall design and/or accessories
may differ with the model.
Operations
To remove, take out the wine rack first
to reveal the filter on the rear wall. Hold
down the tabs of the filter to unlock and
remove.
To insert, insert the rear of the filter
first, and then push the front to lock into
position.
NOTE
The lifecycle of the deodorizer filter is 18 months, which differs depending on the use
conditions. You can purchase a new filter at a local Dacor service center.
English36
Page 37

LED Lights
To replace the LED lights on the wine cellar, contact a local service agent. Contact Dacor
Customer Service at (800) 793-0093.
WARNING
The LED lights are not user-serviceable. Do not attempt to replace an LED light yourself.
This can cause electric shock.
Operations
English 37
Page 38

Care and Maintenance
Cleaning
WARNING
• Do not use benzene, thinner, or home/car detergent such as Clorox™ for cleaning. They
may damage the surface of the wine cellar and cause a fire.
• Do not spray water onto the wine cellar. This may cause electric shock.
Regularly use a dry cloth to remove all foreign substances such as dust or water from the
power plug terminals and contact points.
1. Power off the wine cellar.
2. Use a moistened, soft, lint-free cloth or paper towel to clean the wine cellar’s interior
and exterior.
3. When done, use a dry cloth or paper towel to dry well.
4. Power on the wine cellar.
Care and Maintenance
English38
Page 39

Troubleshooting
Before calling for service, review the checkpoints below. Any service calls regarding
normal situations (No Defect Cases) will be charged to users.
General
Temperature
Symptom Possible causes Solution
Wine cellar does not
operate.
Wine cellar
temperature is warm.
Wine cellar is overcooling.
Odors
Symptom Possible causes Solution
Wine cellar has odors.
• Power cord is not plugged
in properly.
• Temperature control is not
set correctly.
• Wine cellar is located near
a heat source or direct
sunlight.
• The wine cellar is
overloaded. Wine is
blocking the wine cellar
vents.
• Temperature control is not
set correctly.
• It might be the natural oak
smell from the wooden
wine rack.
• Properly plug in the power
cord.
• Set the temperature lower.
• Keep the wine cellar away
from direct sunlight or a
heat source.
• Do not overload the wine
cellar. Do not allow wine to
block ventilation.
• Set the temperature higher.
• Clean the wine cellar and
open the door for a while.
• The lifecycle of the
deodorizer filter is
18 months, which differs
depending on the use of
conditions.
Troubleshooting
Condensation
Symptom Possible causes Solution
Condensation forms
on the interior walls.
• If door is left open, moisture
enters the wine cellar.
• Remove the moisture and
do not
long time.
ʪɇЭʪ the door for a
English 39
Page 40

Troubleshooting
Abnormal Sounds
Before calling for service, review the checkpoints below. Any service calls related to
normal sounds will be charged to the user.
These sounds are normal.
• When starting or ending an operation, the wine cellar may make sounds similar to a car
engine starting. As the operation stabilizes, the sounds will decrease.
• While the fan is operating, these sounds may occur. When the wine cellar reaches the
set temperature, no fan sound should occur.
Troubleshooting
Clicking! or
Chirping!
SSSRRR! Whir!
Buzzing!
• During a defrost cycle, water may drip on the defrost heater, causing sizzling sounds.
HiSS!
English40
Page 41

• As the wine cellar cools refrigerant gas moves through sealed pipes, causing bubbling
sounds.
Bubbling!
• As the wine cellar temperature increases or decreases, plastic parts contract and
expand, creating
when electronic parts are working.
• Due to pressure equalizing when opening and closing the wine cellar door, whooshing
sounds may occur.
ʀθɇʀ˝noises. These noises occur during the defrosting cycle or
Cracking!
Troubleshooting
English 41
Page 42

Troubleshooting
Auto Door Open (ADO)
Symptom Action
• Turn on Auto Door Open switch. (factory setting is turn off)
Auto Door Open(ADO)
is not working.
• Auto Door Open system will not work if it was opened less
than 1 minute ago. Allow one minute, before attempting to
open again.
When closing the
door, the other
door opens (Pair
installation).
Troubleshooting
• When closing the door of one wine cellar, the door of the
other wine cellar (installed in a pair) may be opened. This
occurs if the door sensor of the other wine cellar is triggered,
and is not a system failure. The opened door will be closed in
a moment by the Auto Close system.
English42
Page 43

SmartThings
иʪʀʪɇθ
иʪʀʪɇθ
Symptom Action
Could not find
“SmartThings” in the
app market.
The SmartThings app
fails to operate.
The SmartThings app
is installed but is
n
ot connected to my
wine cellar.
Could not log into the
app.
• The SmartThings app is designed for Android 6.0
(Marshmallow) or later, iOS 10.0 or later, iPhone 6 or later,
and is optimized for Samsung smartphones (Galaxy S and
Galaxy Note series).
• The SmartThings app is available for applicable models only.
• You must log into your Samsung account to use the app.
• Make sure that your router is operating normally.
• Make sure that the Smart Home Adapter is inserted properly.
• If the Wi-Fi icon on the
indicates that no network connection has been established
yet. In this case, use the SmartThings app to connect and
register your
your home.
• You must log into your Samsung account to use the app.
• If you don’t have a Samsung account, follow the app’s
onscreen instructions to create one.
ǮʪAʪɇθ to the access point (AP/Router) in
ǮʪAʪɇθϑdisplay is off, this
An information
message appears
when I try to register
my
и
The SmartThings
app is successfully
connected to my
not run.
but does
• Network connection may fail due to the distance from
your access point (AP) or electrical interference from the
surrounding environment. Wait a moment and try again.
•
Exit and restart the SmartThings app or disconnect and
reconnect the router.
• Remove the Smart Home Adapter, and reconnect it properly.
Then, try again.
Troubleshooting
English 43
Page 44

Warranty and Service
Ɵʪɇ
ťθͱʒЇʀϩÃ˙ͱθɇϩͱͱиʪʒ˝ʪɵɇϑʪʒɇʀͱθʀͱ
Customer Service
Before you request help or schedule service:
Ռ Try the solutions offered in the Problem—Solution table in the "Troubleshooting"
section.
Ս Become familiar with the warranty terms and conditions of your product.
Վ If none of these tips or suggestions resolves your problem, call our Customer Assurance
ϩʪɇat the number below.
Dacor’s Customer Assurance
For warranty repairs or questions in the US and Canada
Phone: 833-35-ELITE (833-353-5483) USA, Canada
For non-warranty repairs or questions in the US and Canada
Phone: (800) 793-0093, extension 2813
Contact us through our website at:
www.dacor.com/customer-care/contact-us
ť
is available 5:00 A.M. to 5:00 P.M. Pacific Time.
Warranty
What is Covered
CERTIFICATE OF WARRANTY ON
DACOR WINE CELLAR
WITHIN THE FIFTY STATES OF THE U.S.A., THE DISTRICT OF COLUMBIA AND CANADA:
FULL TWO-YEAR WARRANTY
Warranty and Service
The warranty applies to only the Dacor appliance that was sold to the first-use purchaser.
Warranty is also valid on products purchased brand new from a Dacor Authorized Dealer
or other seller authorized by Dacor.
Starting from the date of original retail purchase receipt or closing date for new
construction, whichever period is longer.
• 60-day Cosmetic
• 2-Year Full Warranty
• 6-Year Sealed System Warranty: Parts/Labor
• 12-Year Sealed System Warranty: Parts only
• 15-Year Compressor Warranty: Parts only
English44
Page 45

Except as noted above, consumable parts such as filters and light bulbs are not covered
and are the responsibility of the purchaser.
LIMITED WARRANTY
In three to six years after the date of purchase, when this wine cellar is used and
maintained according to the instructions or care guide that came with the product, Dacor
will pay for factory specified parts and repair labor costs to correct defects in materials
or workmanship in the sealed refrigeration system. These parts are: the compressor,
evaporator, condenser, dryer and connecting tubing.
In seven to twelve years after the date of purchase, when this wine cellar is used and
maintained according to the instructions or care guide that came with the product, Dacor
will pay for factory specified parts for the following components to correct defects in
materials or workmanship in the sealed refrigeration system that existed when this major
appliance was purchased: the compressor, evaporator, condenser, dryer and connecting
tubing.
In thirteen to fifteen years after the date of purchase, when this wine cellar is used and
maintained according to the instructions or care guide that came with the product, Dacor
will pay for factory specified parts for the compressor to correct defects in materials or
workmanship that existed when this major appliance was purchased.
LIMITATIONS OF COVERAGE
Service will be provided by a Dacor designated service company during regular business
hours. Please note service providers are independent entities and are not agents of Dacor.
Dealer displays and model home displays with a production date longer than 5 years,
products sold “As-Is,” and products installed for non-residential use, which include but not
limited to religious organizations, fire stations, bed and breakfast, and spas, carry a oneyear parts warranty only. All delivery, installation, labor costs, and other service fees are
the responsibility of the purchaser.
The owner must provide proof-of-purchase or a closing statement for new construction
upon request. All Dacor products must be accessible for service. All cosmetic damage (such
as scratches on stainless steel, paint/ porcelain blemishes, etc.) to the product or included
accessories must be reported to Dacor within 60 days of the original purchase date to
qualify for warranty coverage.
Warranty will be null and void on product that has altered, defaced, or missing serial
numbers and tags.
Warranty is null and void if non-CSA approved product is transported from the U.S.A.
Warranty and Service
English 45
Page 46

Warranty and Service
OUTSIDE THE FIFTY STATES OF THE U.S.A., THE DISTRICT OF COLUMBIA, AND CANADA:
LIMITED FIRST YEAR WARRANTY
If your Dacor product fails to function within one year of the original date of purchase
due to a defect in material or workmanship, Dacor will furnish a new part, F.O.B. factory to
replace the defective part.
All delivery, installation, labor costs, and other service fees are the responsibility of the
purchaser.
What is Not Covered
• Slight color variations may be noticed because of differences in painted parts, kitchen
lighting, product placement, and other factors; this warranty does not apply to color
variation.
• Service calls to educate the customer on proper use and care of the product.
• Service fees for travel to islands and remote areas, which include but are not limited to,
ferries, toll roads, or other travel expenses.
• Consequential or incidental damage, including but not limited to: food or medicine loss,
time away from work, or restaurant meals.
• Failure of the product when used for commercial, business, rental, or any application
other than for residential consumer use.
• Failure of the product caused by improper product installation.
• Replacement of house fuses, fuse boxes, or resetting of circuit breakers.
• Damage to the product caused by accident, fire, flood, power interruption, power
surges, or acts of God.
• Liability or responsibility for damage to surrounding property including cabinetry,
floors, ceilings and other structures or objects around the product.
• Breakage, discoloration or damage to glass, metal surfaces, plastic components, trim,
paint, or other cosmetic finish caused by improper usage, care, abuse, or neglect.
Warranty and Service
Out-of-Warranty
Should you experience a service issue beyond the standard warranty period, please
contact us.
Dacor reviews each issue and customer concern to provide the best possible solution
based on the circumstances.
English46
Page 47

THE REMEDIES PROVIDED IN THE ABOVE EXPRESS WARRANTIES ARE THE SOLE AND
EXCLUSIVE REMEDIES. THEREFORE, NO OTHER EXPRESS WARRANTIES ARE MADE, AND
OUTSIDE THE FIFTY STATES OF THE UNITED STATES, THE DISTRICT OF COLUMBIA AND
CANADA, ALL IMPLIED WARRANTIES, INCLUDING BUT NOT LIMITED TO, ANY IMPLIED
WARRANTY OF MERCHANTABILITY OR FITNESS FOR A PARTICULAR USE OR PURPOSE,
ARE LIMITED IN DURATION TO ONE YEAR FROM THE DATE OF ORIGINAL PURCHASE. IN
NO EVENT SHALL DACOR BE LIABLE FOR INCIDENTAL EXPENSE OR CONSEQUENTIAL
DAMAGES. IN THE EVENT DACOR PREVAILS IN ANY LAWSUIT, DACOR SHALL BE ENTITLED
TO REIMBURSEMENT OF ALL COSTS AND EXPENSES, INCLUDING ATTORNEY’S FEES, FROM
THE DACOR CUSTOMER. NO WARRANTIES, EXPRESS OR IMPLIED, ARE MADE TO ANY
BUYER FOR RESALE.
Some states do not allow limitations on how long an implied warranty lasts, or do not
allow the exclusion or limitation of inconsequential damages, therefore the above
limitations or exclusions may not apply to you. This warranty gives you specific legal
rights, and you may also have other rights that vary from state-to-state.
English 47
Warranty and Service
Page 48

Regulatory Notice
FCC Notice
FCC CAUTION:
Any changes or modifications not expressly approved by the party responsible for
compliance could void the user’s authority to operate the equipment.
Contains Transmitter Module FCC ID: A3LCWAM210S
This device complies with Part 15 of FCC Rules. Operation is Subject to the following two
conditions:
(1) This device may not cause harmful interference, and
(2) This device must accept any interference received including interference that cause
undesired operation.
For products available in the US and Canadian markets, only channels 1~11 are available.
You cannot select other channels.
FCC STATEMENT:
This equipment has been tested and found to comply within the limits for a Class B
digital device, pursuant to part 15 of the FCC Rules. These limits are designed to provide
reasonable protection against harmful interference in a residential installation.
This equipment generates, uses, and can radiate radio frequency energy and, if not
installed and used in accordance with the instructions, may cause harmful interference
to radio communications. However, there is no guarantee that interference will not occur
in a particular installation. If this equipment does cause harmful interference to radio or
television reception, which can be determined by turning the equipment off and on, the
user is encouraged to try to correct the interference by one or more of the following
measures:
• Reorient or relocate the receiving antenna
• Increase the separation between the equipment and receiver
• Connect the equipment to an outlet that is on a different circuit than the receiver.
• Consult the dealer or an experienced radio/TV technician for help.
FCC RADIATION EXPOSURE STATEMENT:
This equipment complies with FCC radiation exposure limits set forth for an uncontrolled
environment.
This equipment should be installed and operated so there is at least 8 inches (20 cm)
between the radiator and your body. This device and it’s antennas must not be co-located
or operated in conjunction with any other antenna or transmitter except in accordance
with FCC multi-transmitter product procedures.
English48
Page 49

IC Notice
Contains Transmitter Module IC: 649E-CWAM210S
The term “IC” before the radio certification number only signifies that Industry Canada
technical specifications were met. Operation is subject to the following two conditions : (1)
this device may not cause interference, and (2) this device must accept any interference,
including interference that may cause undesired operation of the device.
This Class B digital apparatus complies with Canadian ICES-003.
Cet appareil numérique de la classe B est conforme á la norme NMB-003 du Canada.
For products available in the US and Canadian markets, only channels 1~11 are available.
You cannot select other channels.
IC RADIATION EXPOSURE STATEMENT:
This equipment complies with IC RSS-102 radiation exposure limits set forth for an
uncontrolled environment. This equipment should be installed and operated so there is at
least 8 inches (20 cm) between the radiator and your body. This device and it’s antennas
must not be co-located or operated in conjunction with any other antenna or transmitter
except in accordance with FCC multi-transmitter product procedures.
SAVE THESE INSTRUCTION
English 49
Page 50

Open Source Announcement
The software included in this product contains open source software. You may obtain the
complete corresponding source code for a period of three years after the last shipment of
this product by sending an email to mailto:oss.request@samsung.com.
It is also possible to obtain the complete corresponding source code in a physical medium
such as a CD-ROM; a minimal charge will be required.
The following URL http://opensource.samsung.com/opensource/SMART_AT_051/seq/0
leads to the download page of the source code made available and open source license
information as related to this product. This offer is valid to anyone in receipt of this
information.
English50
Page 51

Memo
Page 52

DA68-03607F-01
Dacor ∙ 14425 Clark Avenue, City of Industry, CA 91745 ∙ Phone: (800) 793-0093 ∙ Fax: (626) 403-3130 ∙ www.dacor.com
Page 53

Cave à vins intégrée
DRW24*
Guide d’utilisation
Page 54

Table des matières
Table des matières
Informations importantes 5
Avant de commencer 5
Consignes de sécurité 6
Consignes et symboles de sécurité importants : 7
Avertissement de la proposition 65 de l'État de Californie (États-Unis uniquement) 7
Symboles d'avertissement importants concernant le transport et le lieu d'installation de l'appareil 7
Avertissements importants concernant l'installation 8
Installation en toute sécurité 10
Avertissements importants concernant l'utilisation 11
Utilisation en toute sécurité 14
Nettoyage en toute sécurité 15
Avertissements importants concernant la mise au rebut 16
Usage prévu 16
Pièces incluses 17
Pièces internes, stockage et rayonnage 17
Opérations 19
Panneau de commande 19
SmartThings 24
Fonctions spéciales 27
Montage et démontage du casier à bouteilles 32
Remplacement 36
Nettoyage et entretien 38
Nettoyage 38
Dépannage 39
Généralités 39
Bruits anormaux 40
Ouverture automatique de la porte (OAP) 42
SmartThings 43
Français2
Page 55

Garantie et service 44
Service client 44
Garantie 44
Avis d'application de la réglementation 48
Norme FCC 48
Norme IC 49
Annonce de logiciel open source 50
Table des matières
Français 3
Page 56

Chers clients,
Félicitations pour votre achat des produits Dacor® les plus récents ! Notre combinaison unique de
caractéristiques, de style et de performances nous a permis de créer The Life of the Kitchen™, un
produit essentiel pour votre foyer.
Afin de vous familiariser avec les commandes, les fonctions et tout le potentiel de votre nouvel appareil
Dacor, lisez attentivement ce manuel d'utilisation et d'entretien en commençant par la section des
Consignes importantes de sécurité.
Tous les appareils Dacor sont conçus et fabriqués avec qualité et fierté dans le respect de nos valeurs
d'entreprise. Si vous rencontrez un problème avec votre produit, veuillez d'abord consulter la section
Dépannage de ce manuel pour obtenir de l'aide. Il vous donnera des suggestions et des solutions avant
de contacter le service d'assistance.
Les retours précieux de nos clients nous aident à améliorer sans cesse nos produits et services.
N'hésitez pas à contacter notre équipe d'assistance après-vente pour obtenir de l'aide avec l'appareil en
cas de besoin.
Équipe d'assurance après-vente Dacor
14425 Clark Avenue
City of Industry, CA 91745
Téléphone : 833-35-ELITE (833-353-5483) États-Unis, Canada
Fax : (626) 403-3130
Horaires d'ouverture : Du lundi au vendredi, de 05 h 00 à 17 h 00 (heure du Pacifique)
Site web : www.dacor.com/customer-care/contact-us
Merci d'avoir choisi Dacor pour votre foyer. Nous sommes une entreprise créée par des familles pour
des familles et nous nous mettons au service de la vôtre. Nous sommes convaincus que votre nouveau
produit Dacor vous apportera plaisir et hautes performances pendant de nombreuses années.
Sincères salutations,
Français4
Page 57

Informations importantes
Avant de commencer
Installateur
• Conservez ces consignes d'utilisation et
d'entretien avec votre appareil.
Consommateur
• Veuillez lire ce manuel d'utilisation et
d'entretien dans son intégralité avant
d'utiliser votre cave à vins. Gardez-le pour le
consulter ultérieurement.
Informations importantes
• La conception générale et/ou les accessoires
peuvent varier d'un modèle à un autre.
Conservez votre reçu de vente ou un chèque annulé. Une preuve d'achat originale indiquant la date
d'achat est requise pour le service de garantie.
Veillez à avoir à porter de main les numéros de modèle et de série de votre appareil.
Vous trouverez ces numéros sur l'étiquette située à l'intérieur de la paroi de la cave à vins. Notez ces
numéros ci-dessous pour plus de praticité.
Numéro de modèle
Numéro de série
Date d'achat
Nous améliorons de façon continue la qualité et les performances de nos produits. Nous pouvons donc
apporter des modifications sur l'appareil sans mettre à jour ce manuel. Visitez le site www.dacor.com
pour télécharger la dernière version de ce manuel.
Service client Dacor
Téléphone : 5833-35-ELITE (833-353-5483) États-Unis, Canada
Du lundi au vendredi, de 05 h 00 à 17 h 00 (heure du Pacifique)
Site Web : www.dacor.com/customer-care/contact-us
Français 5
Page 58

Consignes de sécurité
• Avant d'utiliser votre nouvelle cave à vins Dacor, veuillez lire attentivement ce manuel afin de vous
assurer que vous savez comment utiliser de manière sûre et efficace ses différentes fonctions et
fonctionnalités.
• Cet appareil n'est pas conçu pour être utilisé par des personnes (y compris des enfants) manquant
d'expérience et de connaissances, ou dont les capacités physiques, sensorielles ou mentales
sont réduites, sauf si celles-ci sont sous la surveillance ou ont reçu les instructions d'utilisation
appropriées de la personne responsable de leur sécurité. Il est nécessaire de surveiller les enfants
pour s'assurer qu'ils ne jouent pas avec l'appareil.
• Les instructions suivantes concernent plusieurs modèles; il est donc possible que les caractéristiques
de votre cave à vins soient légèrement différentes de celles spécifiées dans ce guide.
• Il est dangereux pour quiconque qui n'est pas un agent de maintenance autorisé d'entretenir cet
Consignes de sécurité
appareil.
• Le gaz réfrigérant qui pourrait s'échapper des tuyaux risquerait de s'enflammer ou de provoquer
des lésions oculaires. En cas de fuite de réfrigérant, n'approchez pas de flamme nue, éloignez tout
objet inflammable de l'appareil et aérez immédiatement la pièce.
- Le non-respect de cette consigne risquerait de provoquer un incendie ou une explosion.
AVERTISSEMENT
• Le gaz réfrigérant utilisé est le R-600a. Ce produit contient du gaz inflammable (gaz réfrigérant
R-600a) ; veuillez communiquer avec les autorités locales pour obtenir des renseignements sur la
mise au rebut en toute sécurité de votre appareil.
• Afin d'éviter la création d'un mélange gaz-air inflammable lorsqu'une fuite se produit dans le circuit
frigorifique, la taille de la pièce où l'appareil peut être placé doit être déterminée en fonction de la
quantité de gaz réfrigérant utilisée. La pièce doit avoir un volume de 35,3 pi³ pour chaque 8 g de
gaz réfrigérant R-600a à l'intérieur de l'appareil.
• L'emplacement choisi pour l'installation ne doit pas être exposé à la lumière directe du soleil et
ne doit pas être placé à proximité d'une source de chaleur ou d'un autre appareil électrique, par
exemple d'une cuisinière, d'un four, d'une plaque chauffante ou encore d'un radiateur.
• Pour des raisons de sécurité, si vous utilisez deux produits côte à côte, assurez-vous d'utiliser des
produits certifiés dans les atmosphères contenant des gaz explosifs.
• Ne démarrez jamais un appareil qui présente des signes d'endommagement. En cas de doutes,
communiquez avec votre revendeur.
Avertissement : risque d'incendie / matériaux inflammables
Français6
Page 59

Consignes et symboles de sécurité importants :
Veuillez suivre toutes les instructions relatives à la sécurité fournies dans le présent manuel. Le présent
manuel utilise les symboles de sécurité suivants.
AVERTISSEMENT
Risques ou manipulations dangereuses susceptibles d'entraîner des blessures graves, des dégâts
matériels et/ou la mort.
ATTENTION
Risques ou manipulations dangereuses susceptibles d'entraîner des blessures graves et/ou des dégâts
matériels.
REMARQUE
Informations utiles qui aident l'utilisateur à comprendre ou utiliser la cave à vins.
Ces symboles d'avertissement ont pour but d'éviter tout risque de blessure.
Respectez-les en toutes circonstances.
Lisez attentivement la présente section et conservez le guide en lieu sûr afin de pouvoir le consulter
ultérieurement.
Avertissement de la proposition 65 de l'État de Californie (États-Unis uniquement)
AVERTISSEMENT : Cancer et effets nocifs sur la reproduction - www.P65Warnings.ca.gov.
Symboles d'avertissement importants concernant le transport et le lieu d'installation
de l'appareil
AVERTISSEMENT
Consignes de sécurité
• Veillez à ce qu'aucune pièce du circuit frigorifique ne soit endommagée pendant le transport ou
l'installation de l'appareil.
- Risque d'incendie ou de lésions oculaires en cas de fuite de réfrigérant. En cas de fuite,
n'approchez pas de flamme nue ou de source d'inflammation potentielle et aérez la pièce
pendant plusieurs minutes.
- Cet appareil contient une faible quantité de réfrigérant isobutane (R-600a), un gaz naturel
présentant une compatibilité écologique élevée, mais qui est aussi inflammable.
Français 7
Page 60

Consignes de sécurité
Avertissements importants concernant l'installation
AVERTISSEMENT
• N'installez pas la cave à vins dans un lieu humide ou dans un lieu où il est susceptible d'être en
contact avec de l'eau.
- Une détérioration de l'isolation sur des composants électriques est susceptible de provoquer un
choc électrique ou un incendie.
• N'installez pas la cave à vins dans un endroit exposé à la lumière directe du soleil ou à proximité
d'une cuisinière, d'un appareil de chauffage ou d'autres appareils.
Consignes de sécurité
• Ne branchez pas plusieurs appareils dans la même multiprise. La cave à vins doit toujours être
branché dans une prise de courant indépendante dotée d'une tension nominale correspondant à
celle figurant sur la plaque signalétique de la cave à vins.
- Ceci permet de bénéficier de performances optimales mais également d'éviter une surcharge des
circuits électriques de la maison, ce qui pourrait entraîner une surchauffe des fils et présenter un
risque d'incendie.
• Ne branchez pas la fiche d'alimentation dans une prise murale mal fixée.
- Cela risquerait d'entraîner un choc électrique ou un incendie.
• N'utilisez pas de cordon dont la gaine est craquelée ou endommagée à quelque endroit ou à l'une de
ses extrémités.
• Ne pliez pas le cordon d'alimentation à l'excès et ne posez pas d'objets lourds dessus.
• Ne tirez pas ou ne pliez pas excessivement le cordon d'alimentation.
• Ne tordez pas ou ne nouez pas le cordon d'alimentation.
• N'accrochez pas le cordon d'alimentation sur un objet métallique, n'insérez pas le cordon
d'alimentation entre des objets, ou n'enfoncez pas le cordon d'alimentation dans l'espace situé
derrière l'appareil.
• Ne débranchez jamais la cave à vins en tirant sur le cordon d'alimentation. Maintenez toujours
fermement la fiche pour la débrancher de la prise de courant.
- Tout dommage causé au cordon est susceptible d'entraîner un court-circuit, un incendie et/ou un
choc électrique.
• Dans cet appareil, ne stockez pas de substances explosives telles que des aérosols avec un
propulseur inflammable.
• N'installez pas cet appareil près d'une source de chaleur ni d'un matériau inflammable.
• N'installez pas cet appareil dans un endroit où des fuites de gaz sont susceptibles de se produire.
- Un choc électrique ou un incendie pourraient en résulter.
• Cette cave à vins doit être correctement située et installée conformément aux instructions du
présent guide avant d'être utilisée.
• Branchez la fiche d'alimentation de façon à ce que le cordon pende vers le bas.
- Si vous branchez la fiche d'alimentation à l'envers, le fil est susceptible de se rompre et de
provoquer un incendie ou un choc électrique.
Français8
Page 61

• Assurez-vous que la fiche d'alimentation n'est pas écrasée ou endommagée par le dos de la cave à
vins.
• Gardez les matériaux d'emballage hors de portée des enfants.
- Il y a un risque d'asphyxie si un enfant place les matériaux d'emballage sur sa tête.
• L'appareil doit être positionné de façon à ce que la fiche reste accessible après l'installation.
- Le non-respect de cette consigne risquerait de provoquer un choc électrique ou un incendie en
raison de fuites électriques.
• N'installez pas cet appareil dans un lieu humide, huileux ou poussiéreux, ni dans un endroit exposé
directement au soleil ou à l'eau (gouttes de pluie).
- Une détérioration de l'isolation sur des composants électriques est susceptible de provoquer un
choc électrique ou un incendie.
• Si de grandes quantités de poussière ou d'eau entrent dans la cave à vins, mettez l'appareil hors
tension et prenez contact avec votre centre de service Dacor.
- Sinon, il pourrait y avoir un risque d'incendie.
• Vous devez retirer toutes les pellicules protectrices en plastique avant de brancher l'appareil pour la
première fois.
• Les enfants doivent être sous surveillance afin de s'assurer qu'ils ne jouent pas avec les circlips
utilisés pour l'ajustement de la porte ou avec les brides du tuyau d'eau.
- Il existe un risque de mort par suffocation si un enfant avale un circlip ou une bride du tuyau
d'eau. Tenez les circlips et les brides du tuyau d'eau hors de portée des enfants.
• La cave à vins doit être correctement mise à la terre.
- Veillez toujours à ce que la cave à vins soit branchée à la terre avant de vérifier ou de réparer
n'importe quelle partie de l'appareil. Les fuites électriques peuvent provoquer des chocs
électriques graves.
• N'utilisez jamais de conduites de gaz, de fils téléphoniques ou d'autres éléments susceptibles
d'attirer la foudre pour relier l'appareil à la terre.
- La cave à vins doit être mise à la terre afin d'éviter les dissipations d'énergie ou les chocs
électriques provoqués par les fuites de courant de l'appareil.
- Le non-respect de cette consigne risque d'entraîner un choc électrique, un incendie, une
explosion ou un dysfonctionnement de l'appareil.
- Toute utilisation non conforme de la fiche de mise à la terre peut présenter un risque de choc
électrique. Si l'utilisation d'une rallonge s'avère nécessaire, utilisez uniquement une rallonge
à trois fils munie d’une fiche de mise à la terre à trois broches que vous brancherez dans une
prise à trois alvéoles compatible avec la fiche de l'appareil. Les caractéristiques électriques de la
rallonge doivent être de 115-120 V c.a. et 10 A minimum. Si un adaptateur de mise à la terre est
utilisé, vérifiez que la boîte de prise de courant est entièrement mise à la terre.
• Branchez fermement la fiche dans la prise murale. N'utilisez pas de fiche d'alimentation
endommagée, de cordon d'alimentation endommagé ou de prise murale mal fixée.
Consignes de sécurité
- Un choc électrique ou un incendie pourraient en résulter.
Français 9
Page 62

Consignes de sécurité
• Si le cordon d'alimentation est endommagé, demandez son remplacement immédiat par le fabricant
ou ses fournisseurs de service.
• Seul un technicien qualifié ou une société de service doit être autorisé(e) à changer le fusible dans
la cave à vins.
- Le non-respect de cette consigne risquerait de provoquer un choc électrique ou des blessures
corporelles.
• La prise murale doit être facilement accessible afin de pouvoir rapidement débrancher l'appareil en
cas d'urgence.
• Elle ne doit pas se situer derrière l'appareil.
Consignes de sécurité
• Lors du positionnement de l'appareil, assurez-vous que le cordon d'alimentation n'est pas coincé ou
endommagé.
• Ne placez pas plusieurs rallonges électriques ou sources d'alimentation portables à l'arrière de
l'appareil.
• N'obstruez pas les orifices de ventilation à l'intérieur du caisson de l'appareil ou à l'intérieur de la
structure encastrée.
Installation en toute sécurité
ATTENTION
• Laissez un espace suffisant autour de la cave à vins et installez celle-ci sur une surface plane.
- N'obstruez pas l'espace de ventilation à l'intérieur du réfrigérateur ou de son caisson.
• Après avoir installé et mis sous tension votre cave à vins, laissez l'appareil au repos pendant
2 heures avant de le remplir d'aliments.
• Il est vivement recommandé de faire appel à un technicien qualifié ou à une entreprise de
dépannage pour installer la cave à vins.
- Le non-respect de cette consigne risque d'entraîner un dysfonctionnement, un choc électrique,
un incendie, une explosion ou des blessures corporelles.
Français10
Page 63

Avertissements importants concernant l'utilisation
AVERTISSEMENT
• Ne branchez pas la prise d'alimentation si vous avez les mains mouillées.
- Cela pourrait causer un choc électrique.
• N'entreposez pas d'objets sur le dessus de l'appareil.
- Lors de l'ouverture ou de la fermeture de la porte, les objets pourraient tomber et provoquer des
blessures corporelles et/ou des dommages matériels.
• Ne placez pas vos mains, vos pieds, ni des objets métalliques (baguettes métalliques, etc.) sous la
cave à vins ou à l'arrière de celle-ci.
- Un choc électrique ou des blessures corporelles pourraient en résulter.
- Les bords coupants sont susceptibles de provoquer des blessures corporelles.
• Ne placez pas de récipient rempli d'eau sur la cave à vins.
- En cas de renversement, cela pourrait entraîner un incendie ou un choc électrique.
• Ne stockez pas d'objets ou de substances volatiles ou inflammables (benzène, diluant, propane,
alcool, éther, gaz liquéfié et toute autre substance similaire) dans la cave à vins.
- La cave à vins a été conçue exclusivement pour le rangement de vins.
- Cela pourrait entraîner un incendie ou une explosion.
• Il est nécessaire de surveiller les enfants pour s'assurer qu'ils ne jouent pas avec l'appareil.
Consignes de sécurité
- Maintenez les doigts éloignés des zones contenant des « points de pincement » ; Le jeu entre les
portes et l'armoire doit nécessairement être faible. Soyez attentif lorsque vous ouvrez les portes
si des enfants se trouvent à proximité.
• Ne laissez pas les enfants se suspendre à la porte de l'appareil. Ils risqueraient de se blesser.
• Ne laissez pas les enfants entrer dans la cave à vins. Ils risqueraient de rester emprisonnés.
• Ne placez pas vos mains sous l'appareil.
- Les bords coupants sont susceptibles de provoquer des blessures corporelles.
• Ne rangez pas de produits pharmaceutiques, chimiques ou sensibles aux températures dans la cave
à vins.
- Les produits nécessitant un contrôle strict de la température ne doivent pas être entreposés dans
la cave à vins.
• Ne placez pas et n'utilisez pas d'appareils électriques à l'intérieur de la cave à vins sauf s'il s'agit
d'un type recommandé par le fabricant.
• Si l'appareil dégage de la fumée, mettez-le immédiatement hors tension puis prenez contact avec
votre centre de service Dacor.
• Si de grandes quantités de poussière ou d'eau entrent dans la cave à vins, débranchez la fiche et
prenez contact avec votre centre de service Dacor.
- Sinon, il pourrait y avoir un risque d'incendie.
Français 11
Page 64

Consignes de sécurité
• Ne laissez pas les portes de la cave à vins ouvertes lorsque l'appareil n'est pas sous surveillance et
ne laissez pas les enfants se glisser à l'intérieur de l'appareil.
- Ils pourraient s'étouffer ou se blesser.
• Ne remplissez pas trop la cave à vins.
- Lors de l'ouverture de la porte, un article pourrait tomber et provoquer des blessures corporelles
ou des dommages matériels.
• Ne vaporisez pas de substance volatile telle qu'un insecticide sur la surface de l'appareil.
- Ces produits peuvent s'avérer dangereux pour la santé et risquent en outre de provoquer un
choc électrique, un incendie ou un dysfonctionnement de l'appareil.
Consignes de sécurité
• N'utilisez pas ni n'entreposez pas de substances thermosensibles (ex. : pulvérisateurs ou objets
inflammables, glace sèche, médicaments ou produits chimiques) à proximité ou à l'intérieur de la
cave à vins.
• N'utilisez pas de séchoir à cheveux pour sécher l'intérieur de la cave à vins. Ne placez pas de bougie
allumée à l'intérieur de la cave à vins pour en éliminer les mauvaises odeurs.
- Un choc électrique ou un incendie pourraient en résulter.
• N'utilisez pas d'appareil mécanique ni de dispositif susceptible d'accélérer le processus de
décongélation, autres que ceux recommandés par le fabricant.
• N'endommagez pas le circuit de réfrigération.
• Si une fuite de gaz est détectée, évitez toute flamme nue ou source potentielle d'inflammation et
aérez pendant plusieurs minutes la pièce dans laquelle se trouve l'appareil.
- Ne touchez pas à l'appareil ou au cordon d'alimentation.
- N'utilisez pas de ventilateur.
- Une étincelle risquerait de provoquer une explosion ou un incendie.
• Utilisez uniquement les ampoules DEL fournies par le fabricant ou son réparateur autorisé.
• Ne tentez pas de réparer, démonter ou modifier la cave à vins vous-même.
- Des modifications non autorisées peuvent générer des problèmes de sécurité. Pour annuler une
modification non autorisée, nous facturons le coût total des pièces et de la main d'œuvre.
• N'utilisez aucun fusible (tel que du cuivre, un fil d'acier, etc.) autre qu'un fusible standard.
• Si votre cave à vins doit être réparée ou réinstallée, communiquez avec le centre de service le plus
près.
- Le non-respect de cette consigne risque d'entraîner un dysfonctionnement, un choc électrique,
un incendie ou des blessures corporelles.
• Veuillez contacter votre centre de service Dacor le plus proche lorsque l'ampoule DEL intérieure ou
extérieure est grillée.
• Si la cave à vins dégage une odeur de brûlé ou de la fumée, débranchez-la immédiatement et
prenez contact avec un centre de service Dacor.
- Le non-respect de cette consigne risquerait de provoquer un incendie ou un choc électrique.
• Débranchez la cave à vins avant de remplacer les ampoules intérieures.
- Sinon, il pourrait y avoir un risque de choc électrique.
Français12
Page 65

• Communiquez avec votre centre de service Dacor si vous éprouvez des difficultés à remplacer une
ampoule (qui n'est pas une DEL).
• Si l'appareil est équipé d'ampoules DEL, ne démontez pas vous-même les caches des lampes et les
ampoules.
- Contactez un centre de service Dacor.
• Branchez fermement la fiche dans la prise murale.
• N'utilisez pas de fiche d'alimentation endommagée, de cordon d'alimentation endommagé ou de
prise murale mal fixée.
- Un choc électrique ou un incendie pourraient en résulter.
• N'exposez pas les accessoires internes, tels que les casiers à bouteilles, les présentoirs pour
bouteilles et les clayettes, à la lumière directe du soleil pendant une période prolongée.
Consignes de sécurité
Français 13
Page 66

Consignes de sécurité
Utilisation en toute sécurité
ATTENTION
• Pour un fonctionnement optimal de l'appareil :
- Ne placez pas d'aliments trop près des orifices de ventilation à l'arrière de la cave à vins car ils
pourraient empêcher la libre circulation de l'air dans le compartiment de la cave à vins.
• Garantie de réparation et modification.
- Les changements et modifications apportés à cet appareil par un tiers ne sont pas couverts par
le service de garantie Dacor. Dacor ne peut être tenue responsable des problèmes de sécurité
Consignes de sécurité
• N'obstruez pas les orifices de ventilation à l'intérieur de la cave à vins.
• Si la cave à vins est débranchée de la prise d'alimentation, patientez au moins cinq minutes avant
• Si de grandes quantités d'eau entrent dans la cave à vins, mettez l'appareil hors tension et prenez
• Ne frappez pas une surface en verre ou n'y appliquez pas une force excessive.
résultant des modifications apportées par un tiers.
- Si les ventilations d'air sont obstruées, notamment par un sac en plastique, la cave à vins risque
de trop refroidir.
de la rebrancher.
contact avec un centre de service Dacor.
- Du verre brisé pourrait entraîner des blessures corporelles et/ou des dommages.
• Si la cave à vins est inondée, coupez l'alimentation de cette dernière et prenez contact avec votre
centre de service Dacor le plus proche.
- Un choc électrique ou un incendie pourraient en résulter.
Français14
Page 67

Nettoyage en toute sécurité
ATTENTION
• Ne vaporisez pas directement de l'eau à l'intérieur ou à l'extérieur de la cave à vins.
- Risque d'incendie ou de choc électrique.
• N'utilisez pas de séchoir à cheveux pour sécher l'intérieur de la cave à vins.
• Ne placez pas de bougie allumée à l'intérieur de la cave à vins pour en éliminer les mauvaises
odeurs.
- Un choc électrique ou un incendie pourraient en résulter.
• Ne vaporisez pas de produit de nettoyage directement sur l'écran.
- Les caractères imprimés risqueraient de s'effacer.
• Si un corps étranger tel que de l'eau a pénétré dans l'appareil, débranchez ce dernier et
communiquez avec le centre de service le plus près.
- Le non-respect de cette consigne risquerait de provoquer un incendie ou un choc électrique.
• Utilisez un chiffon propre et sec pour éliminer toute poussière ou corps étranger des lames de la
fiche d'alimentation. N'utilisez pas de chiffon mouillé ou humide lors du nettoyage de la prise.
- Sinon, il pourrait y avoir un risque d'incendie ou de choc électrique.
• Ne nettoyez pas l'appareil en vaporisant de l'eau directement sur celui-ci.
• N’utilisez pas de benzène, de diluant ou d'eau de Javel (Clorox) pour le nettoyage de la cave à vins.
Consignes de sécurité
- Ces produits risquent d'endommager la surface de l'appareil et de provoquer un incendie.
• Ne mettez jamais les doigts ni d'objets dans la sortie du distributeur.
- Cela peut provoquer des blessures corporelles ou des dommages matériels.
• Débranchez l'appareil de la prise murale avant de le nettoyer et d'en faire l'entretien.
- Le non-respect de cette consigne risquerait de provoquer un incendie ou un choc électrique.
Français 15
Page 68

Consignes de sécurité
Avertissements importants concernant la mise au rebut
AVERTISSEMENT
• DANGER : Les enfants risqueraient de se retrouver enfermés. Avant de jeter votre vieille cave à
vins :
- Retirez les portes et le loquet de la porte.
- Ne retirez pas les clayettes afin que les enfants ne puissent pas facilement monter à l'intérieur
de l'appareil.
- Les enfants qui se retrouvent coincés à l'intérieur peuvent se blesser ou suffoquer et en mourir.
Consignes de sécurité
• Jetez le matériel d'emballage de cet appareil dans le respect de l'environnement.
• Assurez-vous qu'aucun des tuyaux situés à l'arrière de la cave à vins n'est endommagé avant sa
mise au rebut.
• Le gaz réfrigérant utilisé est le R-600a. Ce produit contient du gaz inflammable (gaz réfrigérant
R-600a) ; veuillez communiquer avec les autorités locales pour obtenir des renseignements sur la
mise au rebut en toute sécurité de votre appareil.
• Du cyclopentane est utilisé comme isolant. Les gaz utilisés pour l'isolation nécessitent une procédure
d'élimination spéciale. Pour obtenir des renseignements sur la façon écologique de mettre ce produit
au rebut, veuillez communiquer avec les autorités locales.
• Conservez les matériaux d'emballage hors de portée des enfants, car ils présentent un danger pour
ces derniers.
- Un enfant pourrait suffoquer s'il met sa tête dans un sac.
Usage prévu
• zones de cuisine du personnel dans les magasins, bureaux et autres environnements de travail;
• fermes et clients d'hôtels, motels et autres environnements de type résidentiel;
• environnements de type « chambres d'hôtes »;
• applications de restauration et collectives similaires.
• Cet appareil est destiné à un usage à une altitude n'excédant pas 2 000 mètres au-dessus du niveau
de la mer.
Français16
Page 69

Pièces incluses
02
03
03
04
01
05
Pièces internes, stockage et rayonnage
Pièces incluses
01 Commutateur d'alimentation, Commutateur
d'ouverture automatique de la porte
03 Panneau de commande et paroi du
compartiment
05 Clayette inférieure
02 Casier à bouteilles
04 Présentoir pour bouteille
Français 17
Page 70

Pièces incluses
Boîte de distribution
Pièces incluses
• Utilisez un tournevis à tête plate pour ouvrir
le cache de la boîte de distribution.
• Celui en noir est le commutateur
d'alimentation ; le commutateur d'ouverture
automatique de la porte est celui en rouge
situé à côté.
• Fermez le cache de la boîte de distribution.
Français18
Page 71

Opérations
01 02 14 03 14 15 04 05 06 07 08 09 10 11 15 12 13 14
Panneau de commande
01 Connexion au réseau 02 Cabinet Light (Éclairage de la caisse)
03 Presenter Light (Éclairage du présentoir) 04 Sélection de la zone supérieure
05 Température de la zone supérieure 06 Sélection de la zone intermédiaire
07 Température de la zone intermédiaire 08 Sélection de la zone inférieure
09 Température de la zone inférieure 10 Contrôle de la température
11 Deodorizer Reset (3 sec) (Réinitialisation du
désodorisant (3 s))
13 Lock (3 sec) (Verrouillage (3 s)) 14 Sans refroidissement
15 Mode Sabbat
REMARQUE
• Lorsque vous changez la température sur le panneau, ce dernier affiche la température actuelle et
la température affichée à l'écran évolue progressivement en fonction de la température interne,
jusqu'à ce qu'elle atteigne la température souhaitée. Notez que cela prendra du temps à la cave
à vins pour atteindre la nouvelle température. Ceci est tout à fait normal. Vous n'avez pas besoin
de régler la température souhaitée simplement du fait que l'écran n'affiche pas la température
souhaitée.
• Si aucun bouton n'est actionné pendant 10 secondes après avoir désactivé la fonction Verrouillage,
l'écran s'éteint, à l'exception du bouton Lock (Verrouillage), de tous les boutons de sélection de zone
et de toutes les températures des zones.
• Si le panneau de commande présente de l'humidité et du liquide sur sa surface, il risque de
dysfonctionner. Essuyez l'humidité ou le liquide à l'aide d'un chiffon sec puis réessayez.
• Lorsque la porte est fermée, tous les boutons de sélection de zone et la température de la zone
s'éteignent, puis la totalité de l'écran s'éteint après 10 minutes.
12 Door Alarm /
/ (3 s))
(3 sec) (Alarme de porte
Opérations
Français 19
Page 72

Opérations
Opérations
01 Connexion au réseau
Vous pouvez contrôler et surveiller votre cave à vins via l'application SmartThings. Pour plus
d'informations, reportez-vous à la section SmartThings.
REMARQUE
• Les systèmes de codage recommandés incluent WPA/TKIP et WPA2/AES. Tous les protocoles
d'authentification pour connexion Wi-Fi plus récents ou non standardisés ne sont pas pris en charge.
• Les réseaux sans fil peuvent être affectés par l'environnement de communication sans fil autour.
• Si votre fournisseur de services Internet a enregistré l'adresse MAC de votre ordinateur ou de votre
modem à des fins d'identification, il est possible que votre cave à vins Dacor ne parvienne pas à
se connecter à Internet. Si tel est le cas, prenez contact avec votre fournisseur de services Internet
pour bénéficier d'une assistance technique.
• Les paramètres du pare-feu de votre système de réseau peuvent empêcher votre cave à vins Dacor
d'accéder à Internet. Prenez contact avec votre fournisseur de services Internet pour bénéficier
d'une assistance technique. Si ce symptôme persiste, prenez contact avec un centre de service ou un
détaillant Dacor local.
• Pour configurer les paramètres du point d'accès sans fil, reportez-vous au manuel d'utilisation du
point d'accès.
• Les cave à vins intelligentes Dacor prennent en charge la connexion Wi-Fi 2,4 GHz avec IEEE 802.11
b/g/n, ainsi que les protocoles Soft-AP (IEEE 802.11 n est recommandé).
• Les routeurs Wi-Fi sans fil non autorisés peuvent ne pas parvenir à se connecter aux caves à vins
intelligents Dacor applicables.
02 Cabinet Light (Éclairage de la caisse)
Actionnez ce bouton pour régler l'éclairage de la caisse. Vous pouvez choisir parmi 4 niveaux différents
(désactivé, puis de 1 à 3).
REMARQUE
L'éclairage de la caisse est réglé sur le niveau 3 (le plus lumineux) par défaut.
03 Presenter Light (Éclairage du présentoir)
Actionnez ce bouton pour régler l'éclairage du présentoir. Vous pouvez choisir
Presenter Light
(Éclairage du
présentoir)
parmi 4 niveaux différents (désactivé, puis de 1 à 3).
REMARQUE
L'éclairage du présentoir est désactivé par défaut.
04 Sélection de la zone supérieure
Sélection de la zone
supérieure
Appuyez sur ce bouton, puis utilisez les boutons Contrôle de la température pour
régler la température de la zone supérieure entre 40 °F ~ 65 °F (4 °C ~ 18 °C).
Français20
Page 73

05 Température de la zone supérieure
Température de la
zone supérieure
Affiche la température de la zone supérieure.
La température définie est affichée lorsque vous réglez la température de la
zone supérieure.
06 Sélection de la zone intermédiaire
Sélection de la zone
intermédiaire
Appuyez sur ce bouton, puis utilisez les boutons Contrôle de la température
pour régler la température de la zone intermédiaire entre 40 °F ~ 65 °F
(4 °C ~ 18 °C).
07 Température de la zone intermédiaire
Température de la
zone intermédiaire
Affiche la température de la zone intermédiaire.
La température définie est affichée lorsque vous réglez la température de la
zone intermédiaire.
08 Sélection de la zone inférieure
Sélection de la zone
inférieure
Appuyez sur ce bouton, puis utilisez les boutons Contrôle de la température pour
régler la température de la zone inférieure entre 40 °F ~ 65 °F (4 °C ~ 18 °C).
Opérations
09 Température de la zone inférieure
Température de la
zone inférieure
Affiche la température de la zone inférieure.
La température définie est affichée lorsque vous réglez la température de la
zone inférieure.
10 Contrôle de la température
Appuyez sur
la zone sélectionnée.
Vous pouvez régler la température entre 0 °F et 65 °F (4 °C et 18 °C) par
incréments de 1 °F (1 °C).
Contrôle de la
température
Si vous appuyez et maintenez enfoncé le bouton pendant plus de 2 secondes,
la température augmente ou diminue jusqu'à ce que vous relâchez le bouton.
REMARQUE
Si vous appuyez sur ces boutons sans sélectionner la zone (supérieure,
intermédiaire ou inférieure), la température ne change pas et tous les boutons
de sélection de zone clignotent.
ou pour augmenter ou réduire la température définie de
Français 21
Page 74

Opérations
11 Deodorizer Reset (3 sec) (Réinitialisation du désodorisant (3 s))
Après environ 18 mois d'utilisation du filtre d'origine du désodorisant, le
Deodorizer Reset
(Réinitialisation du
désodorisant)
12 Door Alarm / (3 sec) (Alarme de porte / (3 s))
Door Alarm (Alarme
de la porte)
voyant Filtre clignote en rouge pour vous rappeler que le filtre doit être
remplacé. Si tel est le cas, remplacez le filtre puis maintenez le bouton
Deodorizer Reset (Réinitialisation du désodorisant) enfoncé pendant
3 secondes. Le cycle de vie du filtre est réinitialisé et le voyant Filtre s'éteint.
Vous pouvez activer ou désactiver l'alarme de la porte en appuyant sur le
bouton
porte est activée et si la porte est laissée ouverte pendant plus de 2 minutes,
l'alarme retentit et le voyant d'alarme clignote. La fonction Alarme de la porte
est activée par défaut en usine.
Vous pouvez utiliser le bouton Door Alarm (Alarme de la porte) pour alterner
d'échelle de température entre Celsius et Fahrenheit.
Door Alarm (Alarme de la porte). Lorsque la fonction Alarme de la
Opérations
Pour alterner l'échelle de température, maintenez le bouton
(Alarme de la porte) enfoncé pendant 3 secondes.
REMARQUE
Si la porte est laissée ouverte pendant plus de 10 minutes, les ampoules à DEL s'éteignent.
Door Alarm
13 Lock (3 sec) (Verrouillage (3 s))
Pour éviter tout changement accidentel de paramètres, maintenez le bouton
Lock (Verrouillage) enfoncé pendant 3 secondes. Le panneau principal est
Lock
(Verrouillage)
désactivé et le voyant Verrouillage (
Si vous appuyez sur un bouton lorsque la fonction Verrouillage est activée,
l'indicateur clignote.
Si vous appuyez à nouveau sur ce bouton en le maintenant enfoncé pendant plus
de 3 secondes, la fonction Verrouillage sera désactivée. Toutefois, la fonction
Verrouillage se réactive si aucun bouton n'est actionné dans la minute qui suit.
) s'allume.
Français22
Page 75

14 Sans refroidissement
Le mode Sans refroidissement (également appelé mode Démo) est destiné aux vendeurs qui mettent les
caves à vin en démonstration dans leur magasin.
En mode Sans refroidissement, seuls le moteur du ventilateur et les voyants fonctionnent
normalement ; les compresseurs sont désactivés pour que la cave à vin ne produise pas de froid.
• Pour passer en mode Sans refroidissement, maintenez les boutons
caisse)
pendant 5 secondes. Le réfrigérateur émet un signal sonore et le message « oF » apparaît sur l'écran
de la température.
• Pour quitter le mode Sans refroidissement, maintenez les boutons Cabinet Light (Éclairage de la
caisse)
pendant 5 secondes de nouveau. Le réfrigérateur émet un signal sonore et la température actuelle
apparaît sur l'écran de la température.
Si le voyant Verrouillage s'allume, vous devez d'abord désactiver la fonction Verrouillage.
, Presenter Light (Éclairage du présentoir) et Lock (Verrouillage) simultanément enfoncés
, Presenter Light (Éclairage du présentoir) et Lock (Verrouillage) simultanément enfoncés
REMARQUE
Cabinet Light (Éclairage de la
15 Mode Sabbat
Le mode Sabbat reste actif durant les 85 heures suivant son activation. Passé ce délai, il sera
automatiquement désactivé.
• Pour activer le mode Sabbat, appuyez simultanément sur les boutons
du présentoir) et Deodorizer Reset (Réinitialisation du désodorisant) en les maintenant enfoncés
pendant 5 secondes. La cave à vins passe ensuite en mode Sabbat, dans lequel les boutons, l'écran
et les voyants des compartiments sont tous sous contrôle.
• Pour désactiver la fonction, appuyez à nouveau sur ces boutons pendant 5 secondes.
Presenter Light (Éclairage
Opérations
REMARQUE
• Si le voyant Verrouillage s'allume, vous devez d'abord désactiver la fonction Verrouillage.
• Même après le redémarrage de la cave à vins, le mode Sabbat reste actif. Pour quitter ce mode,
vous devez d'abord le désactiver.
Français 23
Page 76

Opérations
Opérations
SmartThings
Installation
Rendez-vous sur Google Play Store, Galaxy Apps ou Apple App Store et recherchez « SmartThings ».
Téléchargez et installez l'application SmartThings fournie par Samsung Electronics sur votre
périphérique intelligent.
REMARQUE
• L'application SmartThings est conçue pour Android 6.0 (Marshmallow) ou une version supérieure,
pour iOS 10.0 ou une version supérieure et pour iPhone 6 ou une version supérieure. De plus, elle
est optimisée pour les smartphones Samsung (séries Galaxy S et Galaxy Note).
• Pour bénéficier de meilleures performances, l'application SmartThings est soumise à modifications
sans préavis ou à une interruption de la prise en charge en fonction de la politique du fabricant.
• Les systèmes de codage recommandés incluent WPA/TKIP et WPA2/AES. Tous les protocoles
d'authentification pour connexion Wi-Fi plus récents ou non standardisés ne sont pas pris en charge.
• Les réseaux sans fil peuvent être affectés par l'environnement de communication sans fil autour.
• Si votre fournisseur de services Internet a enregistré l'adresse MAC de votre ordinateur ou de votre
modem à des fins d'identification, il est possible que votre cave à vins intelligente Samsung ne
parvienne pas à se connecter à Internet. Si tel est le cas, prenez contact avec votre fournisseur de
services Internet pour bénéficier d'une assistance technique.
• Les paramètres du pare-feu de votre système de réseau peuvent empêcher votre cave à vins
intelligente Samsung d'accéder à Internet. Prenez contact avec votre fournisseur de services
Internet pour bénéficier d'une assistance technique. Si ce symptôme persiste, prenez contact avec un
centre de service ou un détaillant Samsung local.
• Pour configurer les paramètres du point d'accès sans fil, reportez-vous au manuel d'utilisation du
point d'accès (routeur).
• La cave à vins intelligente Samsung prend en charge la connexion Wi-Fi 2,4 GHz avec IEEE 802.11
b/g/n, ainsi que les protocoles Soft-AP. (IEEE 802.11 n est recommandé).
• Les routeurs Wi-Fi sans fil non autorisés peuvent ne pas parvenir à se connecter à la cave à vins
intelligente Samsung applicable.
Compte Samsung
Vous devez créer un compte Samsung pour pouvoir utiliser l'application. Si vous n'avez pas de compte
Samsung, suivez les instructions de l'application affichées à l'écran pour créer un compte Samsung gratuit.
Français24
Page 77

Pour commencer
1. Allumez le périphérique que vous souhaitez connecter, ouvrez l'application SmartThings sur votre
téléphone, puis suivez les instructions ci-dessous.
2. Si une fenêtre contextuelle apparaît en indiquant qu'un nouveau périphérique a été détecté,
appuyez sur ADD NOW (AJOUTER MAINTENANT).
3. En l'absence de fenêtre contextuelle, appuyez doucement sur le bouton +, puis sélectionnez le
périphérique que vous souhaitez connecter dans la liste des périphériques disponibles.
4. Si votre périphérique ne figure pas dans la liste des périphériques disponibles, appuyez doucement
sur Supported Devices (Périphériques pris en charge), sélectionnez le type de périphérique (cave à
vins), puis sélectionnez le modèle de périphérique spécifique.
5. Suivez les instructions affichées sur l'application pour configurer votre périphérique. Une fois la
configuration terminée, votre cave à vins apparaît sous forme de « carte » sur votre écran Devices
(Périphériques).
Application de la cave à vins
Commande intégrée
Vous pouvez surveiller et contrôler votre cave à vins chez vous, de même qu'en déplacement.
• Appuyez doucement sur l'icône de la cave à vins sur le tableau de bord SmartThings ou appuyez
doucement sur l'icône Devices (Périphériques) en bas du tableau de bord, puis appuyez doucement
sur la « carte » du réfrigérateur pour ouvrir la page Wine Cellar (Cave à vins).
• Vérifiez l'état de fonctionnement ou les notifications relatives à votre cave à vins et modifiez des
options ou des réglages si nécessaire.
Opérations
REMARQUE
Certaines options ou certains réglages de la cave à vins peuvent ne pas être disponibles pour la
commande à distance.
Français 25
Page 78

Opérations
Catégorie Élément Description
Opérations
Température
Surveillance
Fonctions Température
Alarmes
Inventaire de bouteilles de vin
Assistant HomeCare
Auto-vérification Détecte les dysfonctionnements de la cave à vins.
Surveillance de l'énergie
Température anormalement
élevée
Ouverture de la porte
Remplacement du filtre du
désodorisant
Affiche le réglage actuel de la température de la cave à
vins.
Vérifie la consommation cumulée de la cave à vins des
180 derniers jours.
Vous pouvez modifier les paramètres de température et
vérifier les paramètres actuels.
Cette alarme se déclenche lorsque la température de la
cave à vins est anormale.
Cette alarme se déclenche si la porte du réfrigérateur est
laissée ouverte pendant une durée spécifique.
Cette alarme vous rappelle que le filtre du désodorisant
doit être remplacé.
Vous pouvez ajouter, modifier et trier les informations
relatives à vos bouteilles de vin.
Cet assistant permet d'afficher l'historique des ouvertures
de porte des 7 derniers jours, le guide du temps de
remplacement du filtre, et les informations de diagnostic
du produit.
Vérifier l'adresse MAC
1. Dans ce mode, l'adresse MAC apparaît sur le panneau de température de manière séquentielle
pendant 1 minute.
Maintenez les boutons
enfoncés pendant 6 secondes. L'écran de température clignote. Ensuite, appuyez sur le bouton Door
Alarm (Alarme de porte) pour afficher l'adresse MAC. La cave à vins émet un signal sonore.
2. Par exemple, si l'adresse MAC est « 11-22-33-44-55-66 », le panneau de température affiche
l'adresse pendant 1 minute dans cet ordre : “--” « 11 » « 22 » « 33 » « 44 » « 55 »
« 66 » « -- ».
Après 1 minute, l'adresse MAC disparaît et le panneau de température revient à l'état normal.
REMARQUE
Le panneau de température affiche « -- / -- » pour une adresse MAC inconnue ou si la connexion Wi-Fi
n'est pas établie ou est perdue.
Cabinet Light (Éclairage de la caisse) et Door Alarm (Alarme de porte)
Français26
Page 79

Fonctions spéciales
Capacité de charge
Capacité de charge Type A Type B
17 7
27 7
Zone
supérieure
37 7
47 7
57 7
110 7
Type A Type B
Zone
intermédiaire
Zone inférieure
Total 100 97
27 7
37 7
47 7
17 7
27 7
37 7
413 13
ATTENTION
Si vous utilisez des présentoirs pour bouteilles
sur le casier supérieur de la zone intermédiaire
(comme illustré sur le Type B de l'image), assurezvous de fixer le casier à l'aide d'un tournevis.
Opérations
Français 27
Page 80

Opérations
BBBB
A A A
Opérations
A
F
D
C
E
B
Taille standard de bouteille
A Ø3 3/32" (Ø 27,5)
B Ø3" (Ø 76,1)
C 21
D 6
E 12
27
/32" (300,5)
1
/4" (63)
15
/32" (158,5)
F 25,4 fl oz (75,0 cl)
REMARQUE
Si vous souhaitez ranger des bouteilles de taille
standard et des boutelles longues sur le même
casier, placez 4 bouteilles longues et 3 bouteilles
de taille standard, comme illustré sur l'image.
A : bouteille standard / B : bouteille longue
Français28
Page 81

ATTENTION
Empilez les bouteilles de vin sur la grille
inférieure de la zone inférieure (maximum deux
rangées) et sur la grille supérieure de la zone
intermédiaire. (Pour empiler des bouteilles sur
la grille supérieure de la zone intermédiaire,
reportez-vous au TYPE A de la figure en page 27.)
Ne tirez pas la clayette inférieure lorsque des
bouteilles sont présentes dessus.
ATTENTION
Si vous rangez des bouteilles d'une taille
supérieure à la taille standard sur la paroi du
compartiment ou sur la clayette inférieure
(partie inférieure de chaque zone), protégez
les bouteilles lorsque vous tirez le casier
directement au-dessus d'elle pour éviter toute
chute de bouteille.
Opérations
Français 29
Page 82

Opérations
Présentoirs pour bouteilles
Système d'ouverture automatique de la porte
Vous pouvez présenter 3 bouteilles de vin
maximum à l'aide des présentoirs pour bouteilles
fournis (tel qu'illustré sur l'image).
Le système d'ouverture automatique de la porte
permet d'ouvrir la porte sans efforts avec l'aide
d'un dispositif mécanique.
Opérations
Pour ouvrir la porte avec une assistance
mécanique, poussez simplement la poignée de la
porte.
Ensuite, la porte s'ouvre automatiquement.
Si vous touchez ou tapez simplement la porte,
cela ne déclenche pas le système d'ouverture
automatique de la porte.
Si la porte est fermée trop tôt lors du système de
porte automatique, le kit peut être endommagé.
Vous pouvez régler la sensibilité de la
pression. Pour optimiser la sensibilité, appuyez
simultanément sur les boutons
(Éclairage de la caisse) et Deodorizer Reset
(Réinitialisation du désodorisant) en les
maintenant enfoncés pendant 3 secondes. L'écran
affiche «
Pour définir la valeur par défaut de la sensibilité
de la pression, appuyez de nouveau sur ces
boutons et maintenez-les enfoncés pendant
3 secondes. L'écran affiche « 00 ».
01 » pendant 3 secondes.
Cabinet Light
Français30
Page 83

REMARQUE
• Par défaut, le système est activé.
• Le système ne se déclenche pas tout de suite
après la fermeture de la porte. Attendez
2 secondes puis réessayez. Il ne s'agit pas
d'un dysfonctionnement du système.
• Lorsque la porte s'ouvre à l'aide du système,
elle reste ouverte pendant 2 secondes puis se
ferme automatiquement.
ATTENTION
Ne repoussez pas la porte lorsqu'elle est ouverte. Cela risque de provoquer un dysfonctionnement
mécanique du système.
• L'effort de pression à appliquer sur la porte diffère selon les conditions. La pression doit être plus
forte juste après que la porte ait été fermée ou lorsque le cycle de réfrigération est activé par la
pression d'aspiration à l'intérieur.
• Lorsque des caves à vin sont installées en duo, il est possible que le système soit déclenché par la
fermeture de la porte de la cave à vin adjacente. Cela peut se produire lorsque la porte est claquée
ou lorsque les caves à vin ne sont pas soigneusement fixées au meuble.
Opérations
Français 31
Page 84

Opérations
Montage et démontage du casier à bouteilles
Montage du casier à bouteilles
1. Retirez le système de fixation du rail.
2. Saisissez la partie avant du casier à bouteilles
et le rail, puis poussez le casier à bouteilles
de sorte à insérer le crochet à l'arrière du
rail dans le trou situé à l'arrière du casier à
bouteilles, comme illustré sur la figure.
Opérations
REMARQUE
Assurez-vous d'insérer correctement les crochets
des deux rails dans le casier.
Français32
Page 85

3. Fixez la partie avant du casier à bouteilles
en plaçant le casier à l'avant du rail et en
insérant les deux clips sur le dessus et sur le
côté du rail dans les trous situés sur le devant
du casier, comme illustré sur la figure.
REMARQUE
Assurez-vous d'insérer correctement les clips des
deux rails dans les trous situés sur le casier.
Opérations
Français 33
Page 86

Opérations
présentoirs pour
bouteilles, 3 unités
4. Placez 3 présentoirs pour bouteilles sur le
casier à bouteilles de la zone de présentation.
Opérations
5. Faites glisser le casier à bouteilles ves
l'intérieur jusqu'à ce que vous entendiez un
déclic.
AVERTISSEMENT
• Vérifiez que l'appareil est de niveau. Si l'appareil n'est pas de niveau, le casier à bouteilles pourrait
glisser vers l'intérieur ou vers l'extérieur.
• Assurez-vous que le casier à bouteilles est fermement fixé.
Français34
Page 87

Démontage du casier à bouteilles
1. Retirez le casier à bouteilles.
2. Écartez légèrement les rails et soulevez la
partie avant du casier pour le libérer des
clips.
Opérations
3. Tirez le casier à bouteilles pour le retirer.
Français 35
Page 88

Opérations
Remplacement
Filtre du désodorisant
• La conception générale et/ou les accessoires
peuvent varier d'un modèle à un autre.
Opérations
Pour le retirer, enlevez d'abord le casier à
bouteilles pour accéder au filtre sur la paroi
arrière. Pressez les languettes du filtre pour le
déverrouiller et le retirer.
Pour insérer le filtre, insérez d'abord la partie
arrière du filtre, puis poussez la partie avant
pour verrouiller la position.
REMARQUE
Le cycle de vie du filtre du désodorisant est de 18 mois (peut varier selon les conditions d'utilisation).
Vous pouvez acheter un nouveau filtre dans un centre de service Dacor local.
Français36
Page 89

Éclairage par DEL
Pour remplacer les DEL de la cave à vins, contactez un fournisseur de service local. Contact Service
client Dacor au (800) 793-0093.
AVERTISSEMENT
Les DEL ne peuvent pas être remplacées par l'utilisateur. N'essayez pas de remplacer une DEL par vousmême. Cette opération peut causer une électrocution.
Opérations
Français 37
Page 90

Nettoyage et entretien
Nettoyage
AVERTISSEMENT
• Ne nettoyez pas le réfrigérateur avec du benzène, du diluant ou du nettoyant domestique/pour
voiture comme Clorox™. Ces produits risquent d'endommager la surface de la cave à vin et de
provoquer un incendie.
• Évitez de vaporiser de l'eau directement sur la cave à vin. Cela est susceptible de provoquer un choc
électrique.
Retirez régulièrement toutes les substances étrangères telles que la poussière ou l'eau des fiches de la
prise électrique et des points de contact à l'aide d'un chiffon sec.
1. Mettez la cave à vins hors tension.
2. Mouillez légèrement un chiffon doux non pelucheux ou une serviette en papier pour nettoyer
l'intérieur et l'extérieur de la cave à vins.
3. Ensuite, utilisez un chiffon sec ou une serviette en papier pour bien sécher les surfaces.
Nettoyage et entretien
4. Mettez la cave à vins sous tension.
Français38
Page 91

Dépannage
Avant de contacter le service d'assistance, vérifiez les points ci-dessous. Tout appel d'assistance
concernant des situations normales (pas de défaillances) sera facturé aux utilisateurs.
Généralités
Température
Symptôme Causes possibles Solution
La cave à vins ne
fonctionne pas.
La température de la
cave à vins est élevée.
La cave à vins refroidit
trop.
Odeurs
Symptôme Causes possibles Solution
La cave à vins dégage
des odeurs.
• Le cordon d'alimentation est mal
branché.
• Le contrôle de la température
n'est pas réglé correctement.
• La cave à vins se trouve à
proximité d'une source de
chaleur ou est en contact direct
avec les rayons du soleil.
• La cave à vins est surchargée.
Les bouteilles bloquent les
orifices d'aération de la cave à
vins.
• Le contrôle de la température
n'est pas réglé correctement.
• Il peut s'agir de l'odeur de chêne
naturel provenant du casier à
bouteilles en bois.
• Branchez correctement le
cordon d'alimentation.
• Abaissez la température.
• Éloignez votre cave à vins de la
lumière directe du soleil et de
toute source de chaleur.
• Ne surchargez pas la cave à
vins. Veillez à ce que les orifices
d'aération ne soient pas bloqués
par des bouteilles.
• Augmentez la température.
• Nettoyez la cave à vins et
laissez la porte ouverte
quelques minutes.
• Le cycle de vie du filtre du
désodorisant est de 18 mois.
Cette période peut varier selon
les conditions d'utilisation.
Dépannage
Condensation
Symptôme Causes possibles Solution
De la condensation se
forme sur les parois
intérieures.
• Si la porte reste ouverte, de
l'humidité entre dans la cave à
vins.
• Éliminez l'humidité et n'ouvrez
pas la porte pendant une
période prolongée.
Français 39
Page 92

Dépannage
Bruits anormaux
Avant de contacter le service d'assistance, vérifiez les points ci-dessous. Tout appel d'assistance
concernant des sons normaux sera facturé aux utilisateurs.
Ces bruits sont normaux.
• Lorsque vous démarrez ou arrêtez une opération, la cave à vins peut émettre un son similaire à celui d'un
moteur de voiture au démarrage. Ces bruits s'atténueront au fur et à mesure que l'opération se stabilise.
Cliquetis ou
Gazouillis
• Ces bruits peuvent être émis lorsque le ventilateur est en fonctionnement. Lorsque la cave à vins a atteint
la température réglée, le ventilateur ne doit émettre aucun son.
Bourdonnement Bruissement
Dépannage
Vrombissement
• Lors d'un cycle de dégivrage, de l'eau peut s'écouler sur le chauffage de dégivrage et provoquer un
grésillement.
Sifflement
Français40
Page 93

• Lorsque la cave à vins refroidit ou congèle, du gaz réfrigérant se déplace à travers les conduites et
peut provoquer un bruit de bouillonnement.
Bouillonnement
• Lorsque la température de la cave à vins augmente ou diminue, les pièces en plastique se
contractent et s'étirent, ce qui peut créer des bruits de cognement. Ces bruits se manifestent lors du
cycle de dégivrage ou lorsque les pièces électroniques sont en fonctionnement.
Craquement
• L'égalisation de la pression au moment de l'ouverture et de la fermeture de la porte de la cave à
vins peut produire des bruits de souffle.
Français 41
Dépannage
Page 94

Dépannage
Ouverture automatique de la porte (OAP)
Symptôme Action
• Activez le commutateur d'ouverture automatique de la porte. (le
L'ouverture automatique
de la porte (OAP) ne
fonctionne pas.
réglage d'usine est la désactivation)
• Le système d'ouverture automatique de la porte ne fonctionne pas si
la porte a été ouverte il y a moins d'une minute. Attendez une minute
avant de réessayer de l'ouvrir.
Lors de la fermeture de
la porte, l'autre porte
s'ouvre (installation en
duo).
Dépannage
• Lorsque vous fermez la porte de l'une des caves à vins, la porte de
l'autre cave à vins (installation par paire) risque de s'ouvrir. Cela se
produit si le capteur de la porte de l'autre cave à vins se déclenche.
Il ne s'agit pas d'une défaillance du système. La porte ouverte sera
refermé dans un moment par le système de fermeture automatique.
Français42
Page 95

SmartThings
Symptôme Action
L'application
« SmartThings » est
introuvable sur le marché
des applications.
L'application SmartThings
ne fonctionne pas.
L'application SmartThings
est installée mais n'est
pas connectée à mon
réfrigérateur.
Connexion à l'application
impossible.
• L'application SmartThings est conçue pour Android 6.0 (Marshmallow)
• L'application SmartThings est disponible pour les modèles applicables
• L'ancienne application Samsung Smart Refrigerator ne peut pas se
• Vous devez vous connecter à votre compte Samsung pour pouvoir
• Assurez-vous que votre routeur fonctionne normalement.
• Assurez-vous que le Smart Home Adapter est correctement inséré.
• Si l'icône de connexion Wi-Fi est éteinte sur l'écran du réfrigérateur,
• Vous devez vous connecter à votre compte Samsung pour pouvoir
• Si vous n'avez pas de compte Samsung, suivez les instructions de
ou une version supérieure, pour iOS 10.0 ou une version supérieure et
pour iPhone 6 ou une version supérieure. De plus, elle est optimisée
pour les smartphones Samsung (séries Galaxy S et Galaxy Note).
uniquement.
connecter à des modèles SmartThings.
utiliser l'application.
cela indique qu'aucune connexion au réseau n'a encore été établie.
Dans ce cas, utilisez l'application SmartThings pour connecter et
enregistrer votre réfrigérateur au point d'accès (PA/routeur) de votre
maison.
utiliser l'application.
l'application affichées à l'écran pour en créer un.
Un message
d'information apparaît
lorsque j'essaie
d'enregistrer mon
réfrigérateur.
L'application SmartThings
est bien connectée à mon
réfrigérateur mais ne
fonctionne pas.
• La connexion au réseau peut échouer en raison de la distance par
• Quittez puis relancez l'application SmartThings ou déconnectez et
• Retirez le Smart Home Adapter puis reconnectez-le correctement. Puis,
Dépannage
rapport au point d'accès (PA) ou d'interférences électriques provenant
de l'environnement. Attendez un moment puis réessayez.
reconnectez le routeur.
réessayez.
Français 43
Page 96

Garantie et service
Service client
Avant de demander de l'aide ou de programmer une réparation :
1. Essayez les solutions proposées dans le tableau Problème-Solution de la section « Dépannage ».
2. Prenez connaissance des conditions de garantie de votre produit.
3. Si aucun de ces conseils ou suggestions ne vous permet de résoudre votre problème, contactez
notre centre d'assurance après-vente au numéro ci-dessous.
Le centre d'assurance après-vente de Dacor est joignable de 05 h 00 à 17 h 00 (heure du Pacifique).
Pour des questions ou des réparations sous garantie et pour le service différencié Dacor (DDS) aux
États-Unis et au Canada
Téléphone : 833-35-ELITE (833-353-5483) États-Unis, Canada
Pour des questions ou des réparations hors garantie aux États-Unis et au Canada
Téléphone : (800) 793-0093, poste 2813
Contactez-nous via notre site Web accessible à l'adresse suivante :
www.dacor.com/customer-care/contact-us
Garantie
Que couvre-t-elle ?
CERTIFICAT DE GARANTIE POUR
CAVE À VINS DACOR
DANS LES CINQUANTE ÉTATS DES ÉTATS-UNIS, DANS LE DISTRICT DE COLUMBIA ET AU CANADA :
PLEINE GARANTIE DE DEUX ANS
La garantie ne s'applique que pour l'appareil Dacor vendu au premier utilisateur acheteur.
Garantie et service
La garantie est également valable pour les produits achetés neufs auprès d'un distributeur homologué
Dacor ou tout autre distributeur autorisé par Dacor.
À compter de la date figurant sur le reçu d'achat original ou de la date de règlement pour les nouvelles
constructions, quelle que soit la période la plus longue.
• Garantie minimale de 60 jours
• Pleine garantie de 2 ans
• Garantie du système hermétique de 6 ans : Pièces/main d'œuvre
• Garantie du système hermétique de 12 ans : Pièces uniquement
• Garantie de 15 ans pour le compresseur : Pièces uniquement
Français44
Page 97

À l'exception des éléments précités, les pièces consommables, telles que les filtres et les ampoules, ne
sont pas couvertes et sont donc sous la responsabilité de l'acheteur.
GARANTIE LIMITÉE
Trois à six ans après la date d'achat, lorsque cette cave à vins est utilisée et entretenue selon
les instructions ou le guide d'entretien associés au produit, Dacor prendra à sa charge les pièces
spécifiques d'usine et les frais de main d'œuvre pour les réparations pour corriger les défauts présents
dans le matériel ou l'exécution du système de réfrigération hermétique. Les pièces concernées sont les
suivantes : compresseur, évaporateur, condensateur, déshydrateur et tuyau de raccordement.
Sept à douze ans après la date d'achat, lorsque cette cave à vins est utilisée et entretenue selon
les instructions ou le guide d'entretien associés au produit, Dacor prendra à sa charge les pièces
spécifiques d'usine pour les composants suivants pour corriger les défauts présents dans le matériel
ou l'exécution du système de réfrigération hermétique présents au moment de l'achat : compresseur,
évaporateur, condensateur, déshydrateur et tuyau de raccordement.
Treize à quinze ans après la date d'achat, lorsque cette cave à vins est utilisée et entretenue
conformément aux instructions ou au guide d'entretien associés au produit, Dacor prendra à sa charge
les pièces spécifiées d'usine pour le compresseur pour corriger les défauts de pièces et main d'œuvre
qui existaient lorsque cet appareil principal a été acheté.
LIMITATIONS DE LA COUVERTURE
L'assistance sera fournie par une entreprise de service désignée par Dacor pendant les heures
d'ouverture normales. Veuillez noter que les prestataires de service sont des entités indépendantes et
ne sont pas des agents de Dacor.
Les appareils d'exposition en magasin et installés en maison-témoin ayant une date de production
remontant à plus de 5 ans, les produits vendus « sans garantie » ainsi que les produits installés pour
une utilisation non résidentielle, incluant sans s'y limiter, les organisations religieuses, les casernes de
pompiers, les chambres d'hôtes et les centres de remise en forme, disposent d'une garantie de pièces
d'un an uniquement. Toute livraison, installation, tout frais de main d'œuvre et autre frais de service
sera à la charge de l'acheteur.
Le propriétaire doit fournir un justificatif d'achat ou un relevé de clôture pour les nouvelles
constructions sur demande. Tous les produits Dacor doivent être accessibles à des fins de service. Tout
dommage superficiel (tel que des rayures sur l'acier inoxydable, des imperfections sur la porcelaine/
peinture, etc.) constaté sur le produit ou les accessoires fournis doit être signalé à Dacor dans un délai
de 60 jours à compter à compter de la date d'achat originale pour être couvert par la garantie.
La garantie sera nulle et non avenue sur les produits altérés, déformés ou en cas d'étiquettes et de
numéros de série manquants.
Garantie et service
La garantie est nulle et non avenue si des produits non homologués CSA sont importés des États-Unis.
Français 45
Page 98

Garantie et service
EN DEHORS DES CINQUANTE ÉTATS DES ÉTATS-UNIS, DU DISTRICT DE COLUMBIA ET DU CANADA :
GARANTIE LIMITÉE À UN AN
Si votre produit Dacor ne fonctionne pas durant la première année suivant la date originale d'achat en
raison d'un défaut de matériel ou d'exécution, Dacor fournira une nouvelle pièce d'usine franco à bord
pour remplacer la pièce défectueuse.
Toute livraison, installation, tout frais de main d'œuvre et autre frais de service sera à la charge de
l'acheteur.
Que ne couvre-t-elle pas ?
• De légères variations de couleurs peuvent être constatées entre les pièces peintes, l'éclairage de la
cuisine, le placement de produit, et autres facteurs ; cette garantie ne s'applique pas aux variations
de couleurs.
• Les appels d'assistance pour conseiller le client sur la bonne utilisation et le bon entretien des
produits.
• Les frais de service concernant un transport à destination d'îles ou de zones isolées, incluant sans
s'y limiter les ferrys, les autoroutes à péage ou autres frais de transport.
• Les dommages généraux ou accessoires, incluant sans s'y limiter : perte d'aliments ou de
médicaments, temps hors travail, repas en restaurants.
• Défaillance du produit en utilisation commerciale, en entreprise, en location, ou toute application
autre qu'une utilisation client résidentielle.
• Défaillance du produit provoquée par une mauvaise installation du produit.
• Remplacement des fusibles, boîtiers à fusibles ou réinitialisation des disjoncteurs.
• Les dommages sur les produits causés par accident, par un départ de feu, une inondation, une
coupure de courant, une saute de puissance ou cas de force majeure.
• Responsabilité établie pour des dommages sur l'environnement immédiat incluant le mobilier, les
sols, les plafonds et autres structures ou objets situés autour du produit.
• Cassure, décoloration ou dommage sur le verre, les surfaces métalliques, les composants plastiques,
la peinture ou les finitions causés par un(e) mauvais(e) utilisation, entretien, abus ou négligence.
Garantie et service
Français46
Page 99

Hors garantie
Si vous rencontrez un problème de service au-delà de la période standard de garantie, veuillez nous
contacter.
Dacor examine chaque problème et question de ses clients pour leur fournir la meilleure solution
possible selon les circonstances.
LES SOLUTIONS FOURNIES DANS LES GARANTIES EXPRESSES CI-DESSUS CONSTITUENT LES SOLUTIONS
UNIQUES ET EXCLUSIVES. AINSI, AUCUNE AUTRE GARANTIE EXPRESSE N'EST FAITE, ET EN DEHORS
DES CINQUANTE ÉTATS DES ÉTATS-UNIS, DU DISTRICT DE COLUMBIA ET DU CANADA, TOUTE GARANTIE
IMPLICITE, INCLUANT SANS S'Y LIMITER TOUTE GARANTIE IMPLICITE DE COMMERCIALISATION ET
D'ADAPTATION À UN USAGE OU À DES FINS PARTICULIERS, EST LIMITÉE À UNE DURÉE D'UN AN À
COMPTER DE LA DATE ORIGINALE D'ACHAT. EN AUCUN CAS DACOR NE SERA TENUE RESPONSABLE DE
FRAIS ACCESSOIRES OU DE DOMMAGES INDIRECTS. DANS LE CAS OÙ DACOR INTENTERAIT UNE ACTION
EN JUSTICE, DACOR POURRA DEMANDER LE REMBOURSEMENT DE TOUS LES FRAIS ET DÉPENSES,
INCLUANT LES FRAIS D'AVOCAT, AU CLIENT DACOR. AUCUNE GARANTIE, EXPRESSE OU IMPLICITE, N'EST
FAITE À UN QUELCONQUE ACHETEUR POUR LA REVENTE.
Certains états n’autorisent pas les limitations de durée de garantie implicite, ou l’exclusion ou la
limitation des dommages accidentels ou indirects. Dans pareil cas, les limitations ou exclusions
spécifiées ci-dessus ne s’appliquent pas. Cette garantie vous confère des droits légaux spécifiques ;
vous pouvez également avoir d'autres droits qui varient d'un État à l'autre.
Français 47
Garantie et service
Page 100

Avis d'application de la réglementation
Norme FCC
MISE EN GARDE DE LA FCC :
Tout changement ou modification, non expressément approuvé par la partie responsable de la
conformité, peut annuler l'autorisation de l'utilisateur à utiliser cet équipement.
Contient un Module émetteur FCC ID : A3LCWAM210S
Cet appareil est conforme aux exigences de la partie 15 du règlement de la FCC. Son utilisation est
assujettie aux deux conditions suivantes :
(1) Cet appareil ne doit pas causer de brouillages préjudiciables, et
(2) Cet appareil doit absorber tout type d'interférence, y compris les interférences pouvant causer un
fonctionnement non désiré.
Pour les produits offerts sur les marchés des États-Unis et du Canada, seuls les canaux 1 à 11 peuvent
être utilisés.
Vous ne pouvez pas sélectionner d'autres canaux.
DÉCLARATION DE LA FCC :
Cet appareil a été testé et classé dans la catégorie des appareils numériques de classe B conformément
avec la partie 15 du règlement de la FCC. Ces limites sont conçues pour fournir une protection
raisonnable contre les interférences nuisibles dans une installation domestique.
Cet appareil génère, utilise et émet des fréquences radioélectriques et peut, en cas d'installation ou
d'utilisation non conforme aux instructions, engendrer des interférences nuisibles au niveau des
communications radio. Cependant, il se peut que des interférences se produisent dans une installation
particulière. En cas d'interférences avec la réception radiophonique ou télévisuelle, qui peuvent être
vérifiées en mettant l'équipement hors, puis sous tension, l'utilisateur peut tenter de résoudre le
problème de l'une des façons suivantes :
• Réorienter ou repositionner l'antenne de réception
• Augmenter l'espacement entre l'équipement et le récepteur
• Brancher l'équipement à une prise se trouvant sur un circuit différent de celui auquel le récepteur
est branché.
• Consulter le fournisseur ou un technicien en radio et télévision expérimenté pour obtenir de l'aide
DÉCLARATION DE LA FCC SUR L'EXPOSITION AUX IRRADIATIONS :
Cet équipement répond aux limites de la FCC sur l'exposition aux rayonnements établies pour un
environnement non contrôlé.
Cet équipement doit être installé et utilisé à une distance minimale de 8 pouces (20 cm) entre le
radiateur et votre corps. Cet appareil et ses antennes ne doivent pas être co-localisés ou fonctionner en
conjonction avec toute autre antenne ou émetteur, sauf s'il/elle est conforme aux procédures relatives
aux produits à émetteurs multiples de la FCC.
Français48
 Loading...