

Page 1
Use and Care Manual
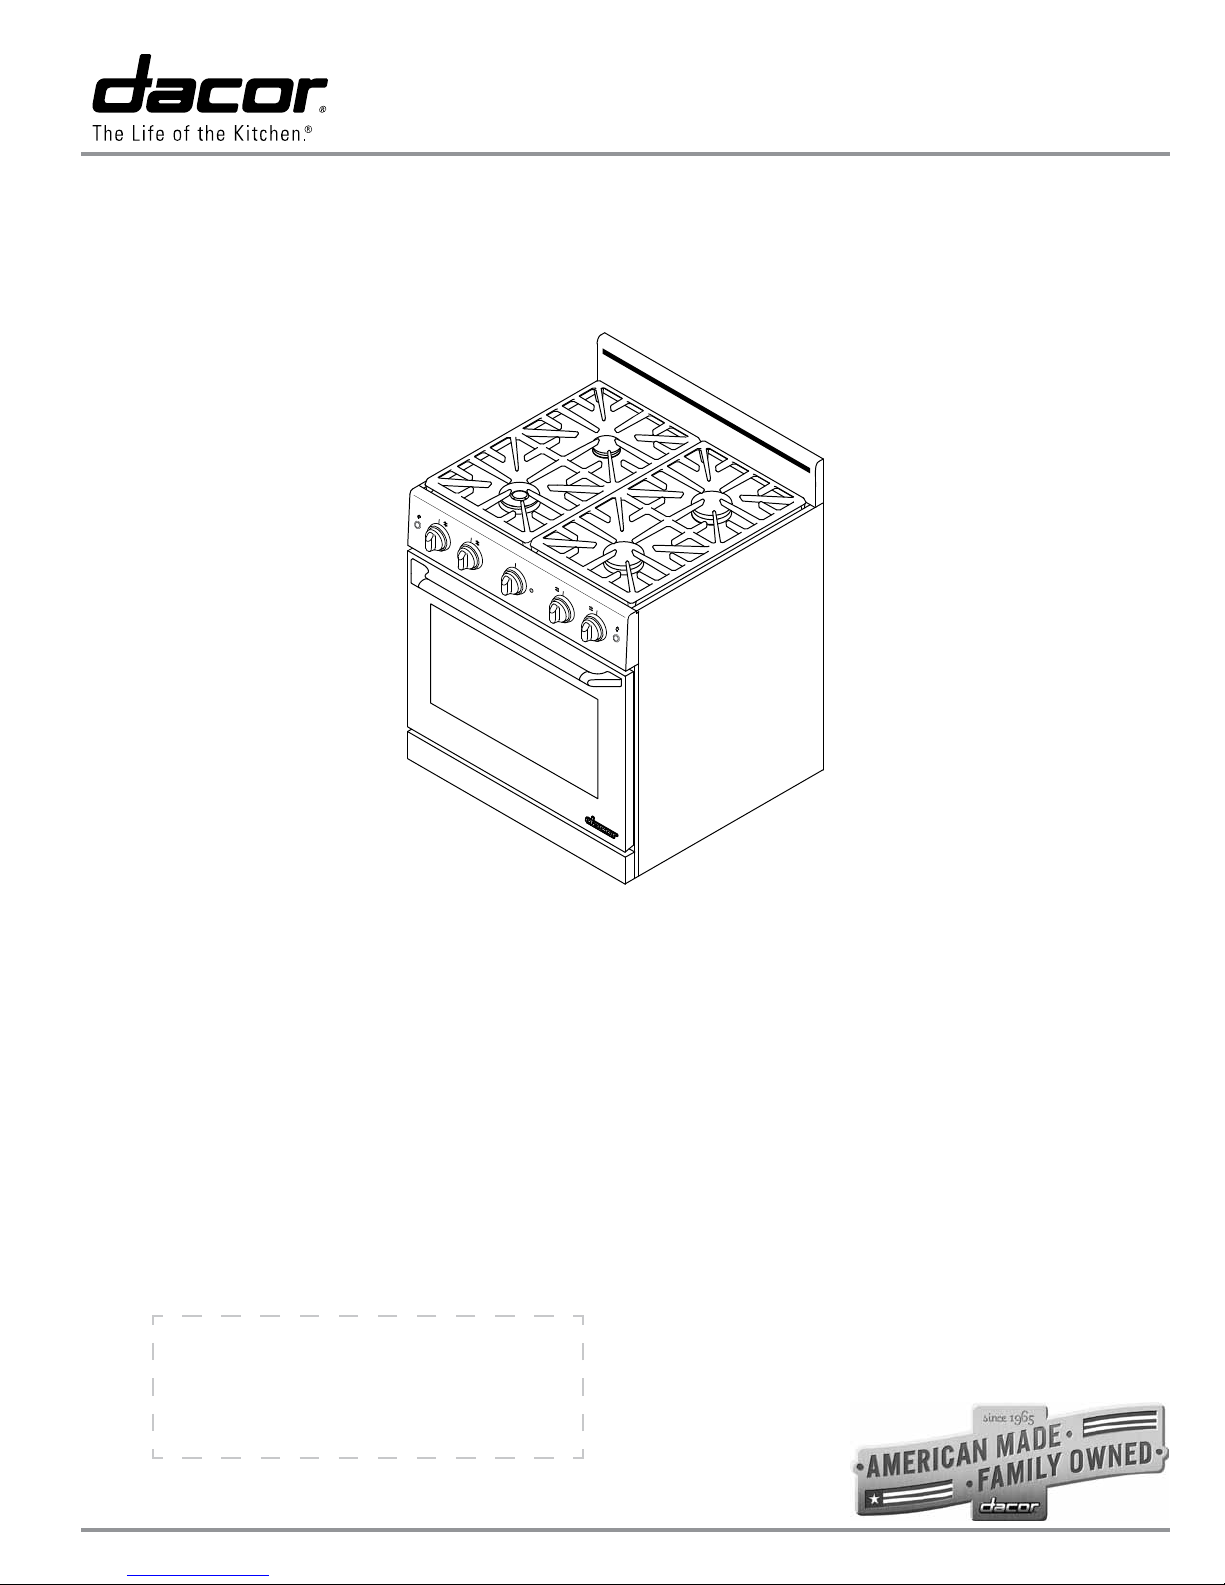
Distinctive™ 30-Inch Gas Range
For use with models DR30GS, DR30GFS, DR30GIS and DR30GIFS
Style varies, model DR30GS shown
Table of Contents
Important Safety Instructions ................................................ 1
Getting to Know Your Range ............................................... 4
Setting Up Your Range ........................................................ 6
Operating Your Range ........................................................ 8
Care and Cleaning .......................................................... 14
Before You Call for Service ................................................ 18
Parts and Accessories ....................................................... 19
Warranty and Service ...................................................... 20
Warranty Card .................................................... Back Cover
Part No. 105909 Rev. A
Page 2
© 2012 Dacor, all rights reserved
Page 3
Important Safety Instructions
Installer: Leave these instructions with the unit.
Consumer: Read this use and care manual com-
pletely before using this appliance. Save it for future
reference.
For service and warranty information, see
page 20.
If you have any questions, call:
Dacor Customer Service
(800) 793-0093 (U.S.A. and Canada)
Monday — Friday 6:00 a.m. to 5:00 p.m. Pacific Time
Web site: www.dacor.com
Have the model and serial number ready. See page
5 for serial number location. Write the serial
number and purchase date below for reference.
Model number ______________________________
Serial number ______________________________
Date of purchase____________________________
Since Dacor continually improves the quality and
performance of our products, we may make changes
to the appliance without updating this manual. Visit
www.dacor.com to download the latest version of
this manual.
WARNING
WARNING: If the information in this manual is not
followed exactly, a fire or explosion may result
causing property damage, personal injury or death.
-
– Do not store or use gasoline or other flammable
vapors and liquids in the vicinity of this or any other
appliance. Also keep items that could explode, such
as aerosol cans, away from the burners and the
oven. Do not store flammable or explosive materials
in adjacent cabinets or areas.
– WHAT TO DO IF YOU SMELL GAS
• Do not try to light any appliance.
• Do not touch any electrical switch.
• Do not use any phone in your building.
• Immediately call your gas supplier from a
neighbor’s phone. Follow the gas supplier’s
instructions.
• If you cannot reach your gas supplier, call the fire
department.
– Installation and service must be performed by a
qualified installer, service agency or the gas supplier.
Important Information About
Safety Instructions
The Important Safety Instructions and warnings in this manual are not meant to cover all possible problems and situations that can occur. Use
common sense and caution when installing, maintaining or operating this or any other appliance.
Always contact Dacor Customer Service about problems or situations that you do not understand.
Safety Symbols and Labels
DANGER
Immediate hazards that WILL result in severe personal
injury or death.
WARNING
Hazards or unsafe practices that COULD result in severe
personal injury or death.
CAUTION
Hazards or unsafe practices that COULD result in minor
personal injury or property damage.
READ AND SAVE THESE
INSTRUCTIONS
WARNING
NEVER use this appliance as a space heater to heat or
warm the room. Doing so may result in carbon monoxide
poisoning and overheating of the appliance.
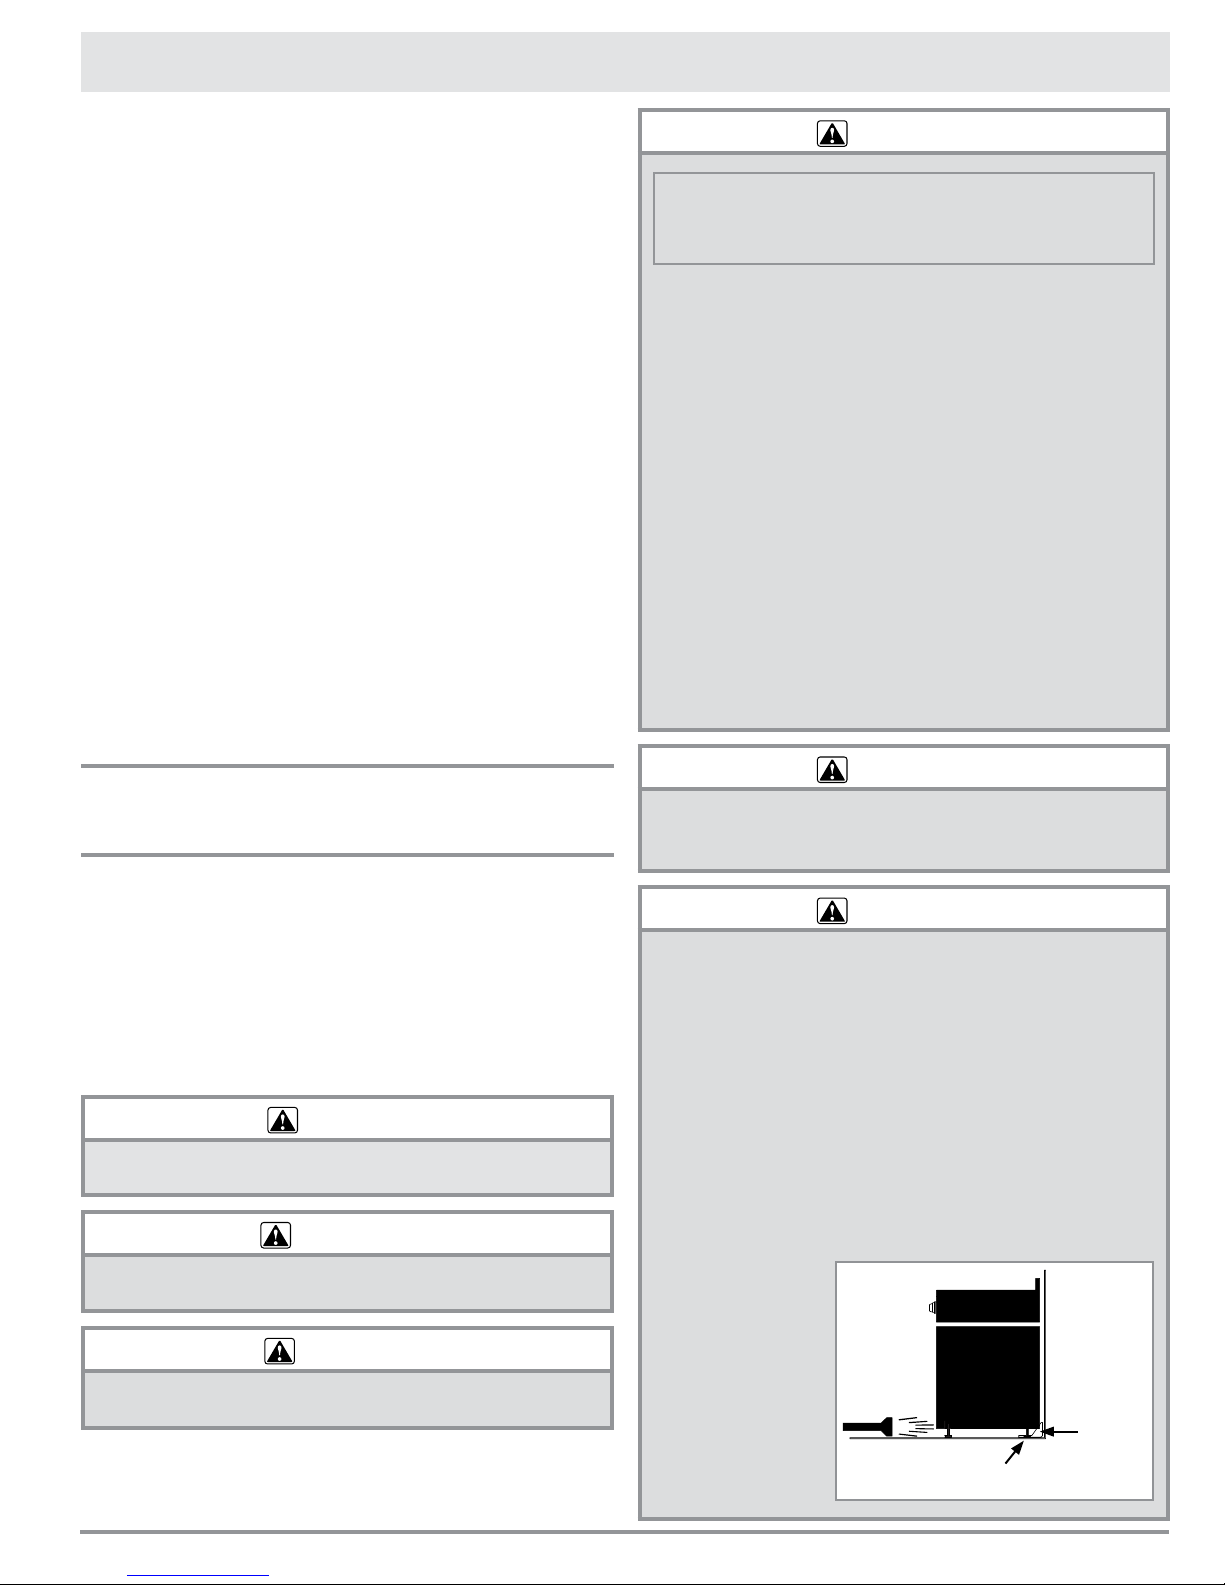
WARNING
Tip-over hazard:
• A child or adult can tip the range and be killed.
• Verify that the anti-tip bracket has been properly
attached to the floor or wall as directed in the
installation instructions. Using a flashlight, verify
that the range’s rear leg is engaged with the anti-tip
bracket as shown below.
• After moving the range, be sure to re-engage the rear
leg with the floor or wall mounted anti-tip bracket as
shown below.
• Do not operate the range without the rear leg engaged
with the anti-tip bracket.
• Failure to follow
these instructions
can result in
death or serious
burns to children
and adults.
Rear leg
Anti-tip
bracket
1
Page 4
Important Safety Instructions
General Safety Precautions
To reduce the risk of fire, electric shock, serious injury or death when using your range, follow basic safety
precautions, including the following:
WARNING
• If you receive a damaged product, immediately
contact your dealer or builder. Do not install or use a
damaged appliance.
• Have the installer show you the location of the gas
shut off valve and the electrical outlet so that you
know where and how to turn off the gas supply and
disconnect power to the range.
• Do not install, repair or replace any part of the range
unless specifically recommended in the literature
accompanying it. A qualified service technician should
perform all other service.
• Before performing any type of service, make sure that
the gas supply is off and the power cord to the range
is disconnected.
• Only use this range for cooking tasks expected of a
home appliance as outlined in this manual. This range
is not intended for commercial use. This appliance is
certified only for indoor use.
• DO NOT TOUCH THE SURFACES OF THE RANGE
DURING OR IMMEDIATELY AFTER USE. After use,
make sure these surfaces have had sufficient time to
cool before touching them.
• NEVER block or cover any slots, holes or passages
anywhere inside the oven or on the outside of the
range. Doing so blocks airflow through the oven and
cooktop and may cause carbon monoxide poisoning
or fire. Keep all slots clear of grease and grime.
• In the interest of safety, keep the oven door shut
unless inserting or removing food from the oven or
when cleaning it.
• Do not attempt to use this appliance in the event of a
power failure. If a power failure occurs while operating
the cooktop, turn all control knobs to the OFF position.
• Make sure individuals who use the range are able to
operate it properly.
• Do not use the oven for storage.
• Never allow anyone, including children to sit, stand or
climb on any part of the range. Doing so may cause
damage, serious injury or death. Do not leave children
alone or unattended in the area around the range. Do
not allow children to play with the controls, pull on the
handle or touch other parts of the range.
• Do not store items of interest to children on top of or
above the range. Children could be burned or injured
while climbing on the appliance.
• Do not tamper with the controls. Do not adjust or alter
any part of the range unless specifically instructed to
do so in these instructions.
WARNING
• Do not hang flammable or heat sensitive objects over
the range.
• Do not cover the burners and grates with anything
except properly selected utensils. Decorative covers
may cause a fire hazard or damage to the cooktop
if a burner is accidentally turned on with the cover in
place.
• Do not heat unopened food containers such as baby
food jars and cans. Pressure build up may cause the
container to burst and cause injury.
• Keep flammable items, such as paper, cardboard,
plastic and cloth away from the burners and other
hot surfaces. Do not allow pot holders to touch hot
surfaces or gas burners.
• Do not wear loose or hanging apparel while using
the range. Do not allow clothing to come into contact
with the range and surrounding areas during and
immediately after use.
• Use only dry pot holders when removing food and
cookware from the cooktop or oven. Wet pot holders
can cause steam burns.
• If the range is near a window, do not use long curtains
as window treatment. The curtains could blow over
the cooktop and create a fire hazard.
• To avoid the possibility of fire, do not leave the range
unattended when in use.
• Clean the range thoroughly before operating it for the
first time.
• Clean and maintain the range regularly as instructed
in the Care and Cleaning section of this manual.
Keep the entire range, ventilation filters and range
hoods free of grease that could catch fire.
• Use cookware only for its intended purpose. Check
the manufacture’s recommendations before use to
determine if a utensil is suitable for use with a range.
Certain types of glass, ceramic and earthenware
are not suitable for use with a range. Personal injury
or damage may result from the improper use of
cookware.
• Select cookware carefully. Use utensils of the proper
size, material and construction for the particular type
of cooking being done. Utensils need to be large
enough to contain the desired quantity of food without
boil-overs or spill-overs. Choose pans with easy to
hold handles that will stay cool while cooking. Do not
use utensils with loose handles. Avoid using pans that
are too heavy to lift safely.
2
Page 5
Important Safety Instructions
WARNING
• Make sure that all the cooktop parts are dry before
lighting a burner.
• Do not use towels or bulky cloth as pot holders.
• Use extreme caution if adding water to food on a hot
cooktop or oven. The steam can cause serious burns
or scalds.
• Turn the knobs to the OFF position prior to removing
them from the valve stems.
• Exercise caution when opening the oven door. Let hot
air or steam escape before looking or reaching into
the oven.
• The cooktop should never be operated without the
knobs or trim rings in place.
• Do not allow food to sit in the oven for more than one
hour before or after cooking. Eating spoiled food can
result in food poisoning.
• Non-stick coatings, when heated, can be harmful to
birds. Remove birds to a separate, well-ventilated
room during cooking.
• Always ensure that the light fixture lens cover is in
place when using the oven. The lens cover protects
the light bulb from breakage caused by high oven
temperatures or mechanical shock.
• Do not operate the range without the backguard
attached. A fire hazard may result.
• For your safety, do not use the oven to cook without
the convection filter installed. When the filter is not
installed, the spinning fan blades at the back of the
oven are exposed.
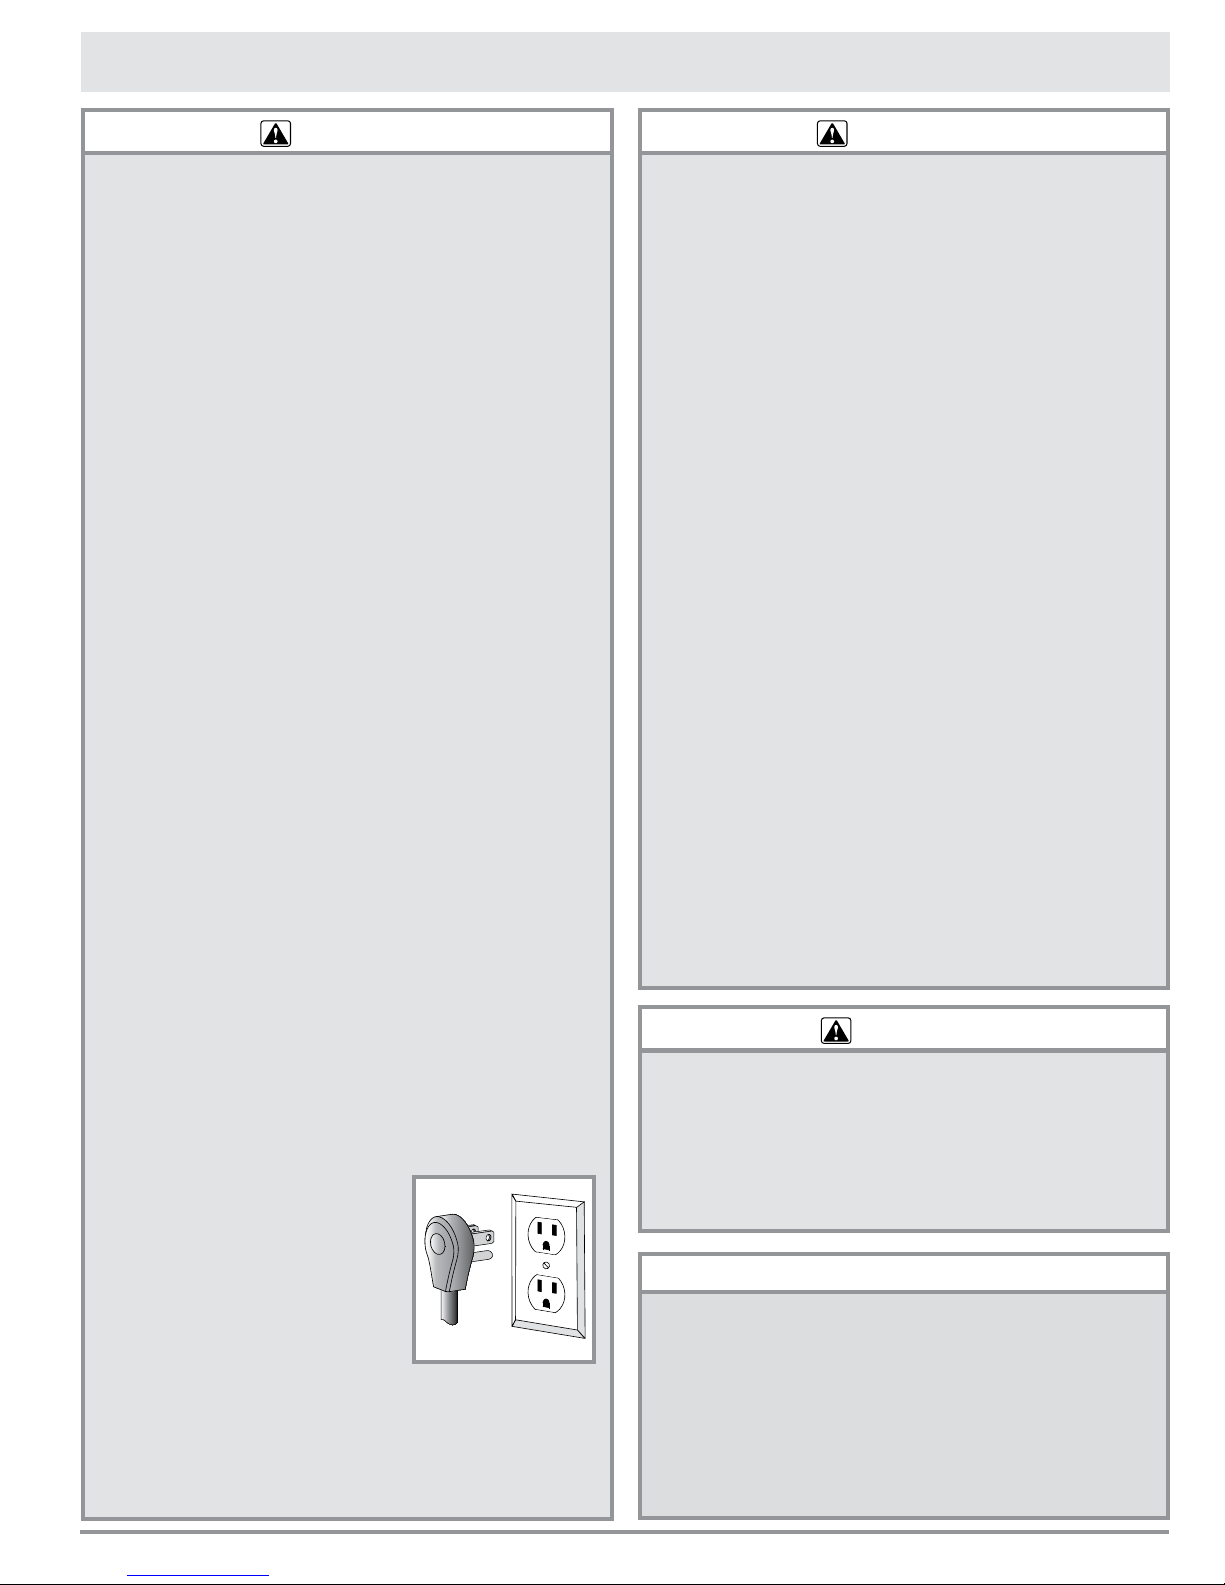
• This appliance is equipped with a three-prong
grounding plug for your protection against possible
electric shock hazards. If only a two-prong outlet is
available, it is the customer’s responsibility to have
it replaced with a dedicated, grounded three-prong
electrical outlet by a licensed electrician. Do not
under any circumstances:
◊ Cut or remove the third (ground) prong from the
power cord.
◊ Use an adapter plug.
◊ Use an extension cord.
◊ Use a power cord that is
frayed or damaged.
◊ Plug the cooktop into an
electrical outlet with a ground
fault interrupter (GFI).
WARNING
• When deep fat frying:
◊ Be certain that the pan is large enough to contain
the desired volume of food without overflow caused
by the bubbling of the fat. Never leave a deep fat
fryer unattended.
◊ Avoid frying moist or frost-covered foods. Foods
with high water content may cause spattering or
spilling of the hot fat.
◊ Heat fat slowly, and stir together any combination
of oils and fats prior to applying heat. Utilize a deep
fat frying thermometer to avoid heating the fat to
temperatures above the flash point.
TO REDUCE THE RISK OF INJURY TO PERSONS IN
THE EVENT OF A RANGE TOP GREASE FIRE:
a. SMOTHER FLAMES with a close-fitting lid, cookie
sheet or metal tray, then turn off the burner. BE
CAREFUL TO PREVENT BURNS. If the flames do
not go out immediately, EVACUATE AND CALL THE
FIRE DEPARTMENT.
b. NEVER PICK UP A FLAMING PAN - you may be
burned.
c. DO NOT USE WATER, including wet dish cloths or
towels - a violent steam explosion may result.
d. Use a fire extinguisher ONLY if:
◊ You have a Class ABC extinguisher, and you
already know how to operate it.
◊ The fire is small and contained in the area where it
started.
◊ The fire department is being called.
◊ You can fight the fire with your back to an exit.
CAUTION
• Do not allow acids (citrus juices, tomato sauces, etc.)
to remain on the range’s surfaces. The finish may
stain.
• Never use the cooktop surface as a cutting board.
• Do not expose plastic knobs to direct flame, hot
utensils or other sources of heat.
CALIFORNIA PROPOSITION 65 WARNING
The burning of gas cooking fuel generates some
by-products that are on the list of substances which
are known by the State of California to cause cancer or
reproductive harm. California law requires businesses
to warn customers of potential exposure to such
substances. To minimize exposure to these substances,
always operate this unit according to the use and care
manual, ensuring you provide good ventilation when
cooking with gas.
3
Page 6
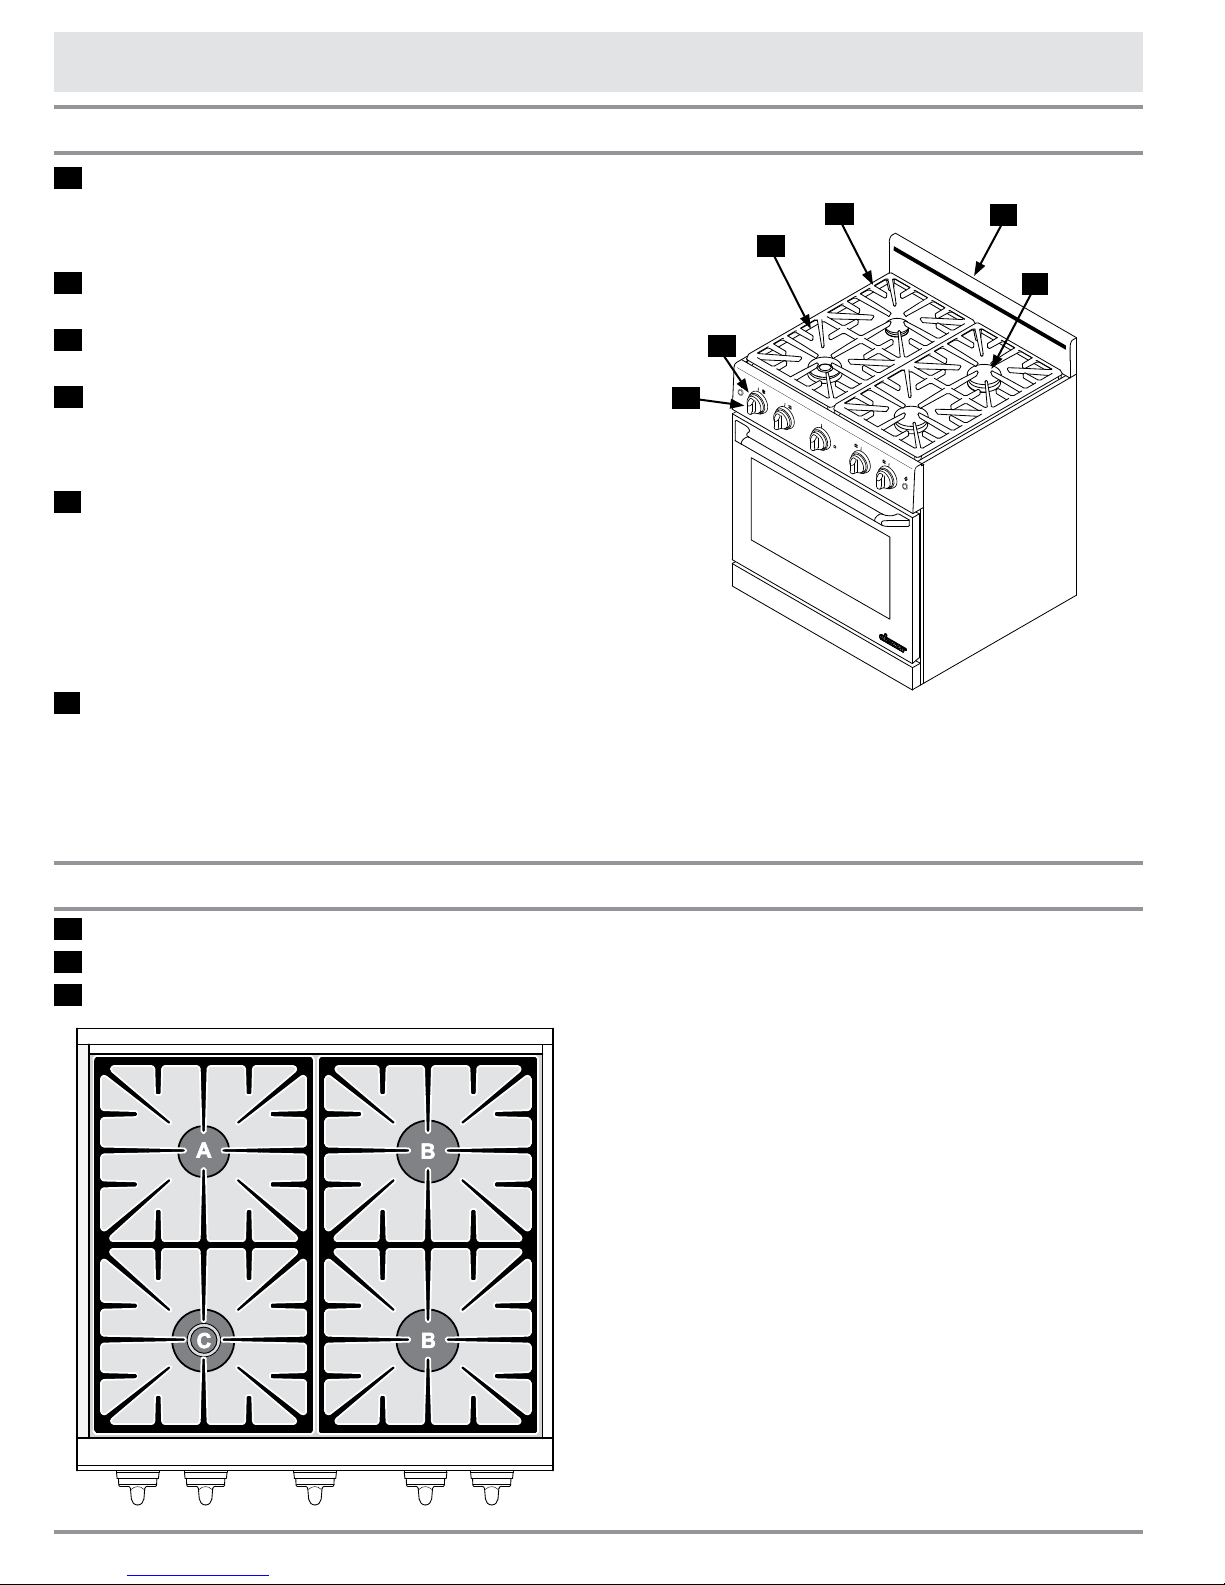
Getting to Know Your Range
Parts of the Cooktop
A BURNER CONTROL KNOBS: Use the knobs
to turn on the burners and adjust the flame size.
The indicator next to each knob illuminates when a
burner is on. The center knob operates the oven.
B TRIM RINGS: Located behind each knob, they
prevent liquids from getting into the internal parts.
C SPILL TRAY: The spill tray catches any food
that falls through the cooktop grates.
D GRATES: The porcelain coated cast iron grates
support the cooking utensils during cooking. They
are removable to allow the area below and around
the burners to be cleaned easily.
E BACKGUARD: Models DR30GS and DR30GFS
come standard with a six inch backguard installed.
Models DR30GIS and DR30GIFS come standard with
a low profile (1 3/4” inch) backguard. The backguard protects the wall from the effects of heat and
splattering grease. Optional kits are available to
change the size of the backguard for freestanding
installations. See the Accessories section.
F BURNERS: See below for the size and loca-
tion of the different burners. The range generates a
spark to light the burner when you turn the knob to
the HIGH position.
D
C
B
A
Model DR30GS
shown
Model DR30G (freestanding model) is equipped with
full size stainless steel side panels. Model DR30GI
is equipped with three inch deep side panels. It is
designed for installation in a recessed cabinet or
island.
E
F
Burner Locations and Features
A 1300 to 9500 BTU standard burner
B 1700 to 15000 BTU standard burner
C 800 to 18000 BTU SimmerSear burner
Special Cooktop Features
Perma-Flame™: The Perma-Flame instant re-ignition feature automatically re-lights a burner quickly
if it goes out. With Perma-Flame, your cooking
experience is uninterrupted because the flame is reignited at the same level as when it went out.
Smart Flame™: Smart Flame technology reduces
the temperature under the fingers of the porcelaincoated cast iron grates. Smart-Flame extends grate
life and protects the finish.
SimmerSear™: The SimmerSear burner is
equipped with Dacor’s exclusive precision burner
control system. It allows you to cook with a wide
range of heat settings, from simmer to sear.
4
Page 7
1
2
3
4
5
7
6
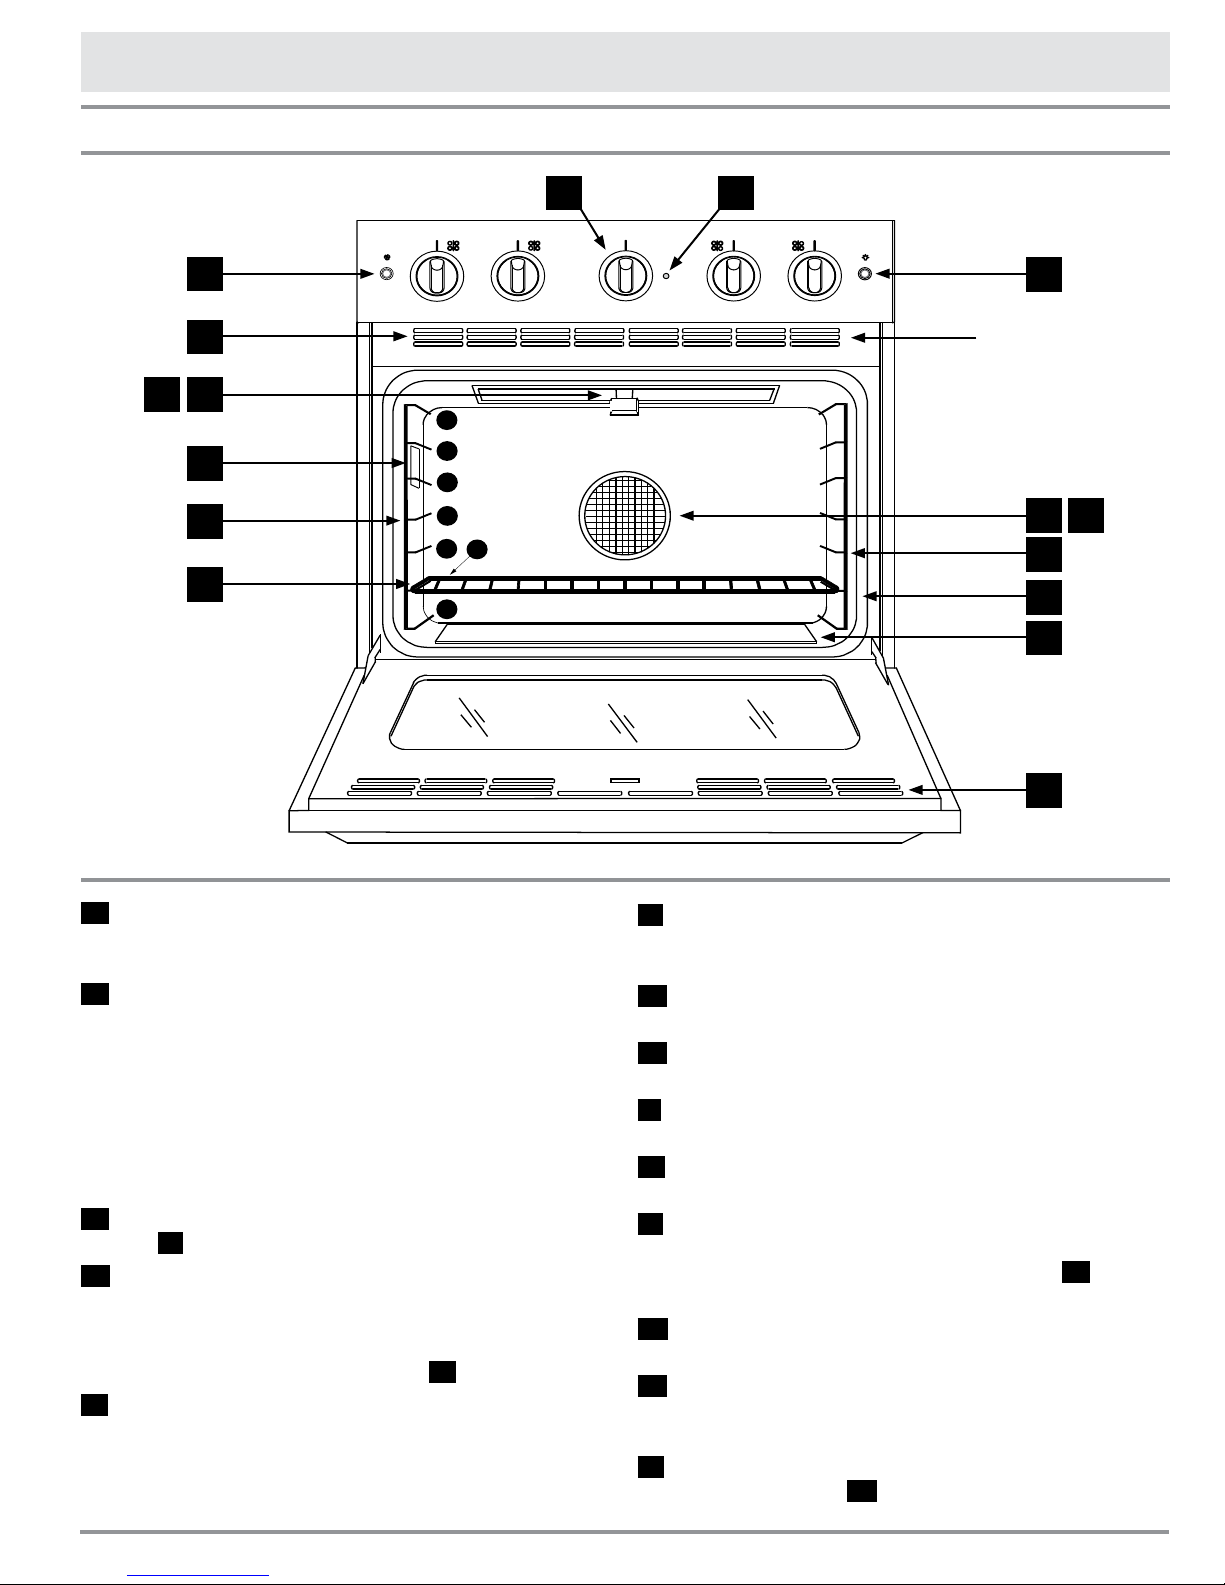
Parts of the Oven
Getting to Know Your Range
A B
P
NM
K
C
J
Model and serial
number label (view
through right side of
grate with flashlight)
L
F
D E
F
G
H
J
A OVEN CONTROL KNOB: Use the oven control
knob to turn on the oven. One knob is used to control both the bake and broil burners.
B OVEN ON INDICATOR LIGHT: The oven ON
indicator light illuminates when the oven is on. The
light cycles on and off during normal use indicating
that the oven’s burner control system is maintaining a constant temperature. NOTE: When the power
plug is first connected, reconnected or after a power
outage, this light flashes on and off for about ten
seconds while the range’s circuitry starts up. The
range is ready to use when the light stops flashing.
C OVEN LIGHT BUTTON: Push in to turn OVEN
LIGHT L on and off.
D CONVECTION FAN: The convection fan is
located behind the convection filter. It circulates
heated air through the oven chamber during the
convection cooking process. Turn it on and off using
the CONVECTION FAN BUTTON P .
E CONVECTION FILTER: The convection filter
covers the convection fan. It reduces the transfer of
taste from one food to another when you are cooking a whole meal. It also keeps the oven cleaner and
covers the moving fan blades for safety purposes.
F RACK SUPPORTS: There are seven rack posi-
tions inside the oven chamber. The rack positions
are numbered from the bottom counting up.
G DOOR GASKET: The door gasket prevents heat
from escaping when the door is closed.
H BAKE BURNER: Located below the floor of the
oven. It is the source of bottom heat.
J INTAKE/EXHAUST VENTS: The range draws air
through the vents, cooling its internal parts.
K OVEN RACKS: Your oven comes with two
chrome-plated GlideRack™ oven racks.
L OVEN LIGHT: The oven light is located behind
the left oven rack supports. The light turns on or off
only when you push the LIGHT BUTTON C . The
bulb is 120 Vac, 20 Watt, halogen.
M BROIL BURNER: The broil burner is the source
of top heat. It is mounted in the oven ceiling.
N HOT SURFACE IGNITER: The igniter lights the
broil burner when broiling. It normally glows orange
from time to time during broil operation.
P CONVECTION FAN BUTTON: Turns on the
CONVECTION FAN D .
5
Page 8
Setting Up Your Range
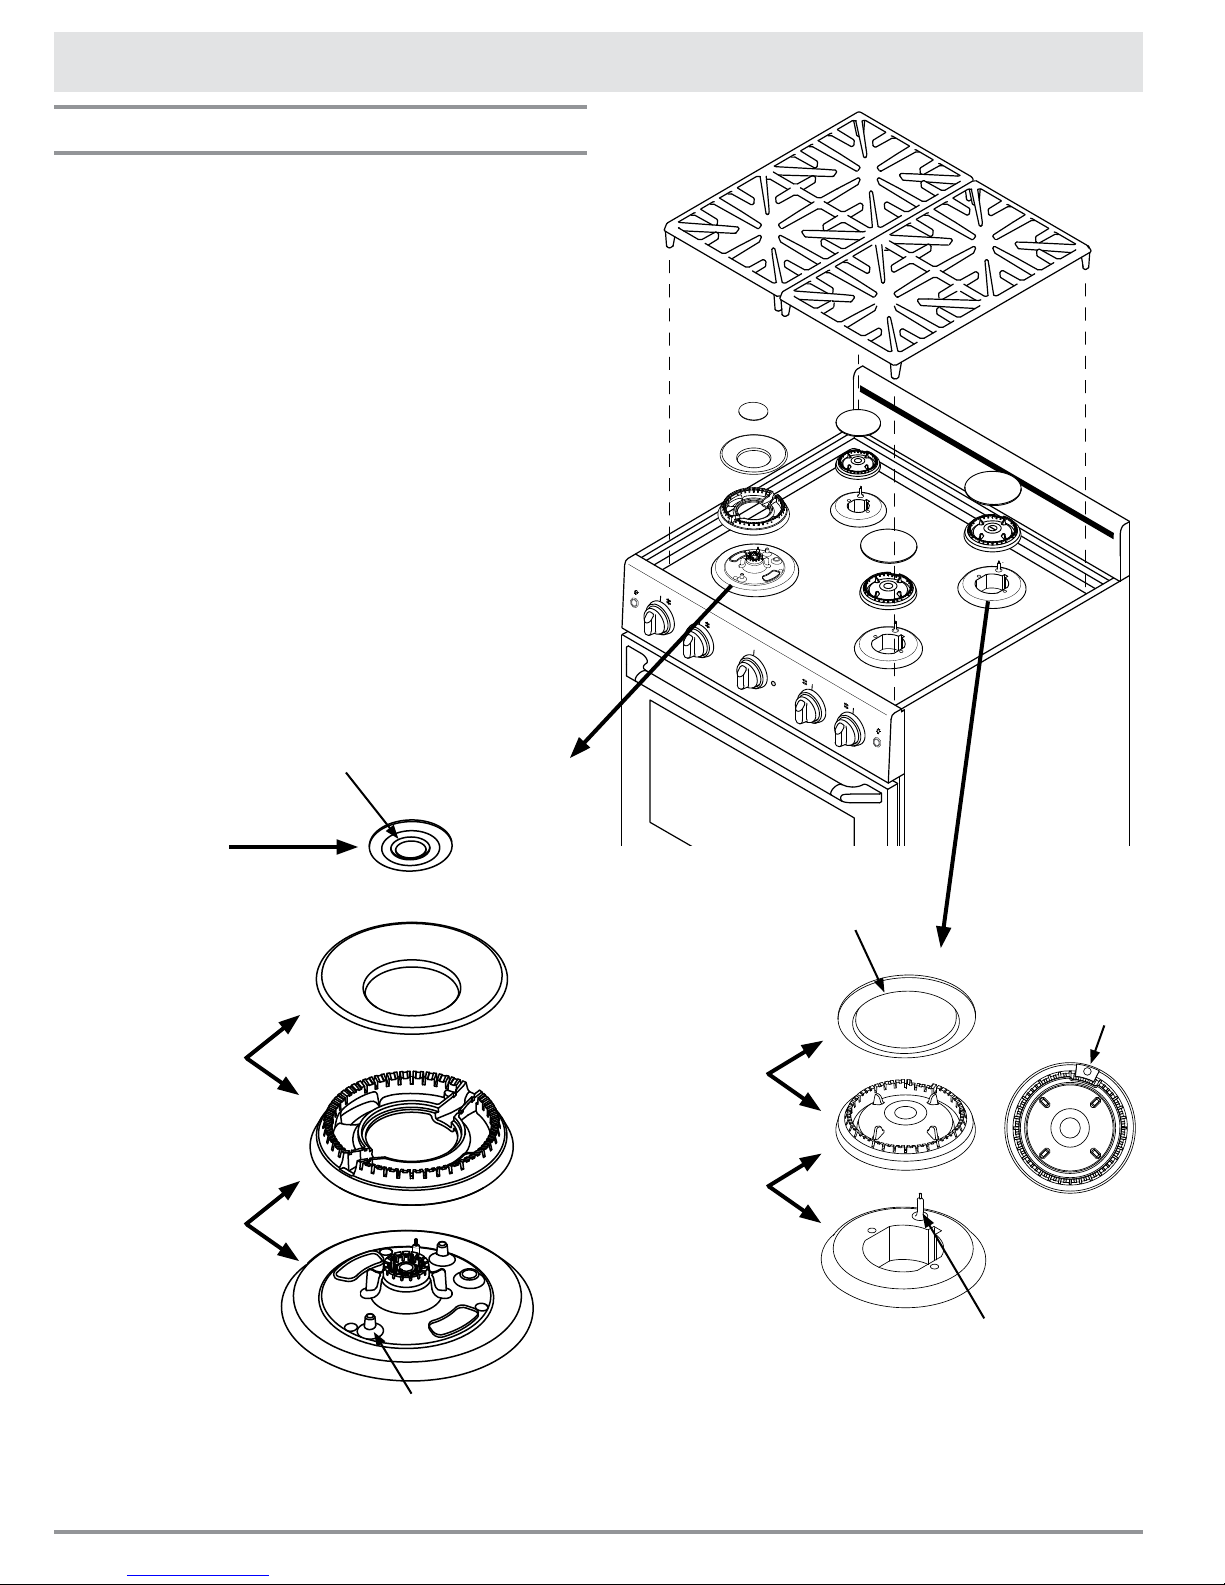
Cooktop Assembly
The burner rings spread the flame evenly around
the burner cap. All burner parts must be properly
seated for proper burner lighting and operation.
To assemble the burners:
1. Remove the burner rings, burner caps and
grates from their shipping packages.
2. Install the burners as shown below. Gently twist
each piece back and forth after installation to
make sure it is properly seated. A small gap
below the burner ring is normal when installed
properly.
3. Gently set the grates on top of the spill tray. Put
the legs of each grate inside the corresponding
dimples.
Ridge on bottom
STEP 3: Set inner
SimmerSear burner
cap on center of
SimmerSear burner
base. Line up ridge
on bottom of cap
with pins on center of
burner base.
STEP 2: Set outer
SimmerSear burner
cap on SimmerSear
burner ring. Make sure
it is centered on top.
STEP 1: Install
SimmerSear burner
ring on SimmerSear
burner base. Line
up indentations on
bottom of burner ring
with pins on top of
burner base.
Inner burner cap
Outer burner cap
Burner ring
Pin on burner base
Ridge on bottom
of burner cap
STEP 2: Install all
standard burner
caps. Ridge on
bottom of caps
must surround
top of ring.
STEP 1: Install
standard burner
rings on standard
burner bases. Put
holes on edge of
each ring over
the igniter. Center
tabs on bottom of
each ring in hole
in center of each
base.
Igniter hole
Burner ring -
top view
Igniter on burner base
SimmerSear Burner Assembly
(left front burner only)
Standard Burner Assembly
(left rear, right front, right rear burners)
6
Page 9
Setting Up Your Range
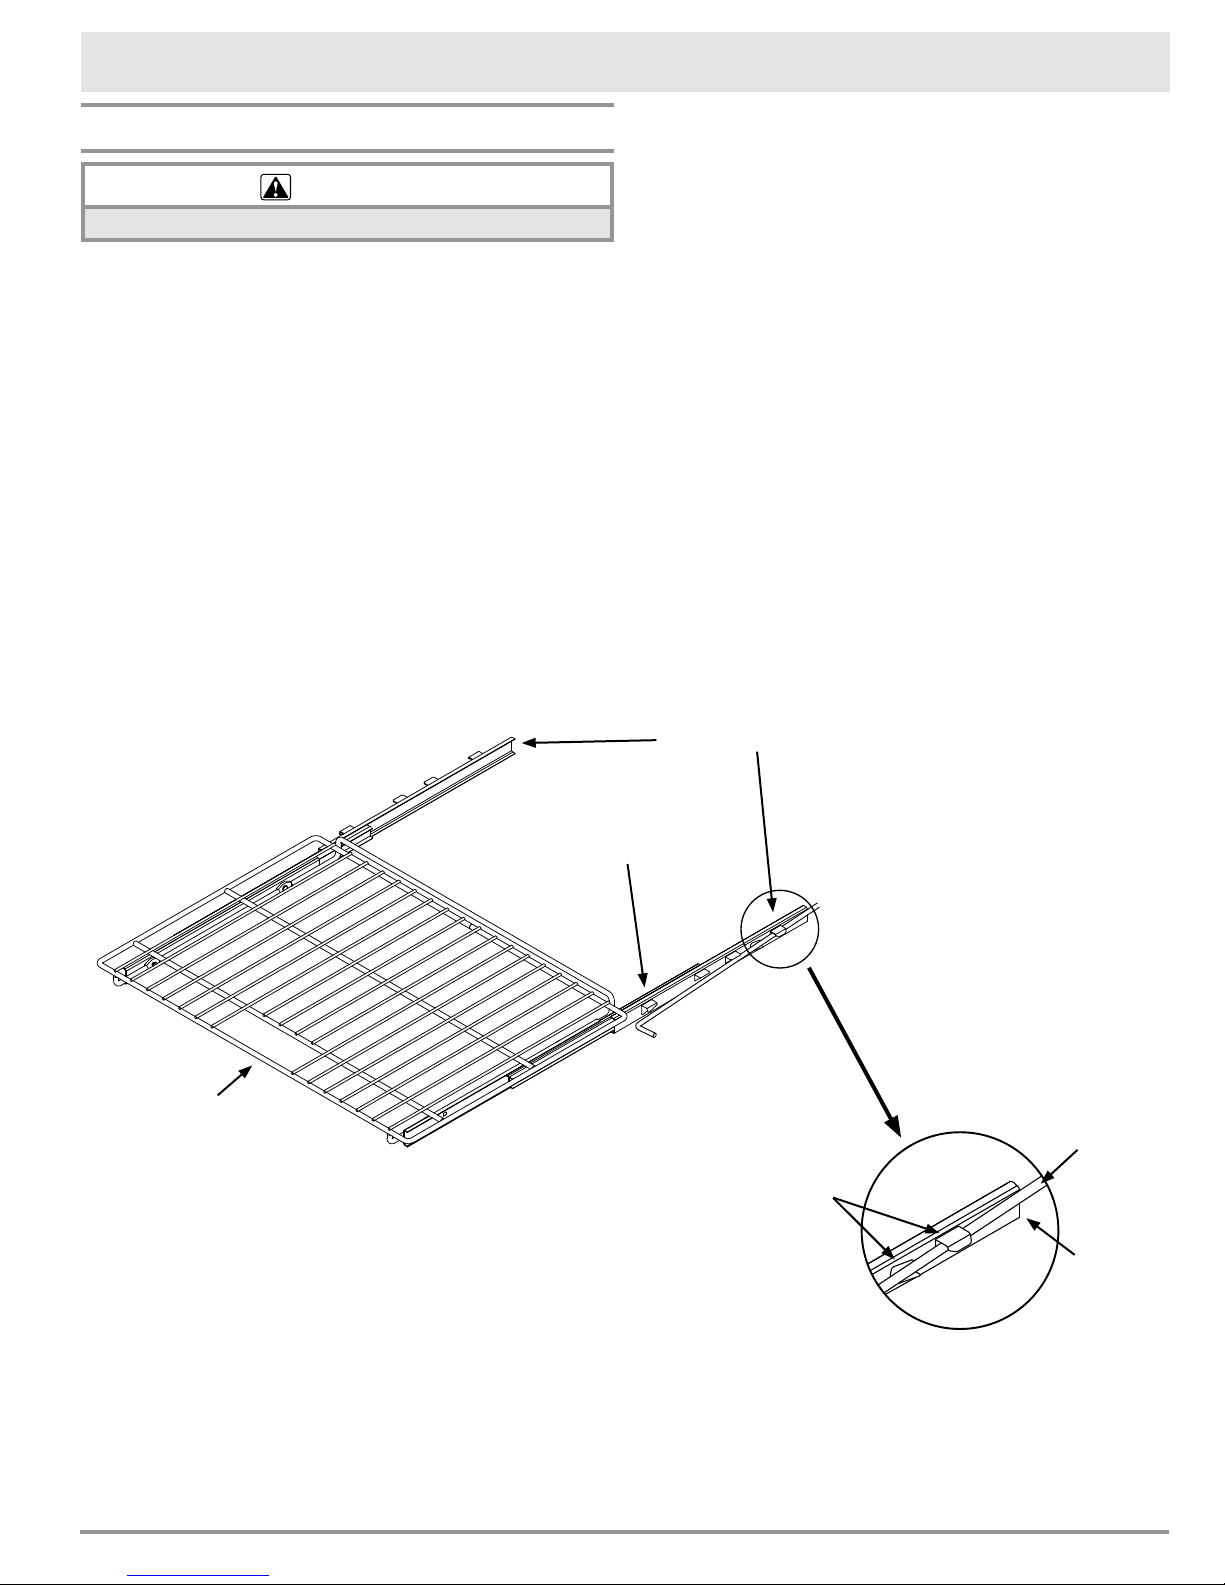
Installing the Oven Racks
WARNING
The oven racks become hot when the oven is in use.
Your oven comes with Dacor’s deluxe GlideRack
oven racks. You can pull then out further than other
types of oven racks and still support heavy pots and
pans full of food. They are great for heavier foods
and the optional Dacor baking stone.
To install an oven rack:
1. Align both sets of safety clips (right and left) on
the back of the rack guides with the oven rack
supports as shown below. NOTE: The diagram
below shows installation with the rack guides
extended but, the rack may be installed with
or without the guides extended, whichever is
easier.
2. Begin to slide the rack in, lifting the front safety
clips over the front of the oven rack supports.
3. Push the rack all the way in.
4. Grasp the rack in the center of the front and
pull. The rack should come forward while the
guides remain in place.
To remove an oven rack:
• Grasp the rack with both hands and pull it gently
straight out toward you until it stops.
• Lift up until the front safety clips just clear the
front of the rack supports on the oven. Continue
to pull out. Moving the end of the rack back and
forth slightly, left to right, as you pull, will make
it easier to remove.
Front of rack
Lift front safety clips
over rack supports
Rack guides
Slide oven rack
supports between
back safety clips
Rack
support
Back of
guide
GlideRack Oven Rack Installation
7
Page 10

Operating Your Range
Cooktop Operation
WARNING
• To avoid the chance of fire, explosion or carbon monoxide poisoning, do not attempt to use your range without the
burners completely and properly assembled (see page 6). The burner rings must be properly seated for proper
burner lighting and operation.
• To avoid burns and scalding, always turn pan handles to a position where they cannot be easily hit. Also, handles
should not extend over adjacent burners. Always set utensils gently onto the grates and center them so that they are
well-balanced.
• Do not drag cookware across the grates. Sliding may damage the finish. Lift utensils to reposition them. Do not drop
them on the grate.
• Cookware with rough bottoms can cause permanent damage to the coated surfaces on the grates.
• To avoid burns or fire hazard, reduce the flame level
if it extends beyond the bottom of the utensil. A flame
that extends up the sides of the utensil is potentially
dangerous.
• In the interest of safety, always light the burner before
putting the cooking utensil on the grate. Turn the
burner knob to the OFF position before removing the
utensil. Always check all the burner knobs to make
sure the range is OFF when you are finished cooking.
• Do not turn the knob farther than the HIGH position until lit. Doing so may result in a burst of flame that could cause
burns or damage to the surrounding area.
• Do not touch any part of any of the burners while the igniters are sparking. An electric shock could result.
• Never light the burners with a match or other open flame.
• If the gas does not ignite after four seconds or if the flame goes out and gas escapes, turn the knob to the OFF
position. Open a window and allow at least five minutes for the gas to dissipate. Repeat the lighting procedure.
Selecting the Cookware
For overall safety and best performance, select the
correct cooking utensil for the food being cooked.
Improperly selected cooking utensils will not cook
evenly or efficiently.
Use cookware that:
• Has flat, smooth bottoms.
• Is well balanced.
• Has tight fitting lids to keep heat, odors and
steam in.
IMPORTANT: Avoid spills as much as possible.
The porcelain surfaces of the grates, spill trays and
burner caps are acid-resistant but not acid-proof.
Some foods can cause permanent damage if allowed
to remain on porcelain surfaces.
Things to Know Before Using the Cooktop
• A normal flame is steady and blue in color. For-
eign material in the gas line, especially in new
construction, may cause an orange flame during
initial operation. This color will disappear with
further use. Small yellow tips on the ends of the
flames are normal when using LP gas.
• See page 4 for the heat ranges of the differ-
ent burners.
• Food cooks just as quickly at a gentle boil as it
does at a vigorous, rolling boil. Maintaining a
higher boil than necessary wastes energy and
cooks moisture, food flavor and nutrients out of
the food.
• Use a low or medium flame when cooking with
utensils that are poor conductors of heat, such
as glass, ceramic or cast iron. Reduce the flame
until it covers approximately 1/3 of the utensil
diameter. Doing so will ensure even heating and
reduce the likelihood of burning or scorching the
food.
• Dacor’s SimmerSear feature allows you precision
control of the flame on the SimmerSear burner,
from low to high heat.
8
Page 11

Operating Your Range
Lighting a Burner
Each burner control knob has a small diagram next to it with an indicator light to tell
you which burner it operates.
1. Push in on the knob and turn it counter-clockwise to the HIGH position. The indicator light
will illuminate and the burner igniters will spark
(a clicking sound) repeatedly until the burner
lights. The burner should light within four seconds. The flame should burn evenly around the
perimeter of the burner, except underneath each
grate support finger, where the flame height is
reduced by Dacor’s Smart Flame feature.
If the gas does not ignite after four seconds or
if the flame goes out and gas escapes, turn the
knob to the OFF position. Open a window and
allow at least two minutes for the gas to dissipate. Repeat the lighting procedure.
If a burner still does not ignite, the igniters
continue to spark or if the flame is not spread
evenly around the burner cap, see the Before
You Call for Service section on page 18.
2. Place the cooking utensil on the grate.
3. Adjust the flame to the level necessary to perform the desired cooking process.
IMPORTANT: When the cooktop is cool, the igniters may continue to spark if the control knob is set
to the low position. The igniters will stop sparking
when the burner is warm. The tendency to spark
when cold can be reduced by operating the burner
at a higher flame setting for about 60 seconds. After
60 seconds, lower the flame to cook. The burner
will also warm up faster if a utensil is placed on the
grate. The igniters will also spark automatically if
the flame is distorted by a draft or by the household
ventilation system. Eliminate any drafts or reduce
the ventilation blower speed to reduce this type of
problem.
Burner knob symbols
OFF
HIGH LOW
9
Page 12

Operating Your Range
Burning-in the Oven
When the oven comes from the factory, residue for
certain materials used in the manufacturing process
are left on the parts of the oven. These residues
should be “burned off” before the oven is used for
the first time.
To burn off the residues in the oven:
1. Since birds or other small pets may be sensitive
to the odors during first operation, remove them
to another part of the house and close the door.
2. Open windows and turn on the range hood to
allow the odors and smoke to escape.
3. Turn the oven to the BROIL setting for 10 minutes. It is normal for odors and smoke to come
out of the vent slot on the backguard during this
process.
4. After ten minutes, turn the oven control knob
downto350˚F.Leavetheovenat350˚Ffor30
minutes.
5. After 30 minutes, turn off the oven. Close the
windows and turn off the range hood when the
odors and smoke finish clearing.
Basic Oven Operation
You may use your oven to cook in one of the
following modes:
Bake: The bake process uses the bottom oven
burner to provide conventional baking heat.
Temperaturesmaybesetfrom125˚Fto500˚F.
Use the standard bake mode for single rack
baking.
Convection Bake: The convection bake process
uses the standard bake burner in combination
with the convection fan to circulate heated air
evenly throughout the oven chamber. Tempera-
turesmaybesetfrom125˚Fto500˚F.Thistype
of baking is good for single rack baking in a deep
pan, multiple rack baking and roasting.
WARNING
In broil and convection broil modes, high temperatures
(up to 555˚F) are present inside the oven. To avoid the
possibility of burns or fire:
• Broil only with the oven door completely shut.
• Do not place food closer than 4 inches from the broil
burner.
• Keep all other objects (for example potholders) away
from the broil burner.
• After turning the oven knob to BROIL, immediately
place the food in the oven and shut the door
completely.
Broiling is a quick cooking process (20 minutes
maximum). The range is designed for consumer use
conditions only. Do not use it to broil continuously for
more than 45 minutes at a time. After 45 minutes in
broil mode, turn the oven off and allow it to cool for 30
minutes before broiling again. Leaving the oven in the
broil modes for long periods of time may trip the oven’s
thermal protection circuit, requiring a service call to reset
it.
IMPORTANT:
• Before starting the oven, position the oven
rack(s) at the proper height(s). If the oven is
warm, use potholders for safety.
• Condensation may appear on the oven window
or the backguard during the first 10 minutes of
operation. This condition is normal.
To Bake:
1. Turn the oven control (center) knob on the control panel to the desired baking temperature. Do
not turn the knob all the way to the BROIL setting. The oven ON indicator light will illuminate
to indicate the oven is on. Within 60 seconds,
the bake burner will ignite.
Oven burner light on control panel
Broil: The gas burner on the oven ceiling sup-
plies the heat from the top for broiling. This process is good for grilling smaller cuts of meat and
toasting breads. Broiling is always performed
with the oven door completely shut.
Convection Broil: The convection broil process
uses the gas burner on the oven ceiling in combination with the convection fan for better heat
distribution. Convection broil is good for items
that do not need to be flipped such as thinner
cuts of meat, fish and garlic bread. Convection
broiling is always performed with the oven door
completely shut.
2. For best results, do not place food inside the
oven until the oven has preheated to the set
temperature. When pre-heated to the set temperature, the oven ON indicator light will begin
to turn on and off every few seconds, because
the set temperature has been reached and the
oven is maintaining it.
10
Page 13

Operating Your Range
To Convection Bake:
1. Pre-heat the oven according to the Bake
instructions on the facing page.
2. When pre-heated, place the food in the oven.
3. Close the oven door and push the convection
fan button to turn it on. NOTE: Push the button
again to turn the fan off when you are done
cooking.
To Broil:
1. Adjust the rack position based on the food thickness. Dacor recommends rack levels 4 or 5.
2. Turn the oven control (center) knob on the control panel to the BROIL setting. The oven ON
indicator light will illuminate to indicate the oven
is on. Within 60 seconds, the burner (on the ceiling) will ignite. While the broil burner is on, the
bake burner is off.
Baking Tips
Tips for All Baking Modes
• Do not open the oven door frequently during
baking. Look through the door window to check
the progress of baking whenever possible.
• Use a timer to time baking functions.
3. Immediately place the food inside the oven and
shut the door completely.
IMPORTANT:
• Always use a broiler pan and grill to provide
drainage for excess fat and grease. Doing so will
reduce spatter, smoke and flare-ups.
• The igniter for the broil burner on the ceiling
of the oven will glow orange periodically during
normal broil operation.
To Convection Broil:
1. Set the oven to broil according to the Broil
instructions at the left.
2. Immediately place the food inside the oven and
shut the door completely.
3. Push in on the CONVECTION FAN button on
the right side of the control panel to turn on the
convection fan (push in again to turn off).
• Wait until the shortest recommended baking
time before checking food. For cakes, a wooden
pick placed in the center should come clean
when the food is done.
• Measure ingredients carefully and follow tested
recipes for best baking results.
COMMON PROBLEMS WHEN USING STANDARD BAKE MODE
Problem May Be Caused By What to Do
Cookies burn on the
bottom.
Cookies are too brown on
top.
Cakes burn on the sides or
are not done in the center.
Cakes crack on top. Oven temperature too high. Reduce oven temperature.
Cakes are not level. Oven and/or oven rack not
Pies burn around the edges
or are not done in the
center.
Oven door opened too often. Set timer to shortest recommended
cooking time and check food when timer
beeps. Use door window to check food.
Incorrect rack position used. Change rack position.
Dark, heat absorbing cookie
sheets used.
Rack position being used is too
high.
Food placed in oven during
preheat.
Oven temperature too high. Reduce oven temperature.
Dark, heat absorbing cake pans
used.
level.
Oven temperature too high. Reduce oven temperature.
Dark, heat absorbing pans
used.
Oven and/or rack overcrowded.
Use shiny, reflective cookie sheets.
Change rack position.
Wait until oven is preheated.
Use shiny, reflective cake pans.
Level oven and rack as needed.
Use shiny, reflective pans.
Reduce number of pans.
11
Page 14

Operating Your Range
Baking Tips (cont.)
Convection Bake Tips
• As a general rule, convection bake will allow
preparation of most foods at reduced temperatures for shorter periods of time, while also
producing superior results.
• Typically you can reduce the standard tempera-
tureby25˚Fandcookfor10%lesstime.Baked
goods will have golden-brown crusts with flaky
textures, and meats will have crispy exteriors
with succulent juices sealed inside.
• To convert conventional bake recipes to convec-
tionrecipes,reducethetemperatureby25˚F
andthecookingtimebyapproximately10%.
• Some recipes, especially those that are home-
made, may require adjustment and testing when
converting from standard to convection modes.
If unsure how to convert a recipe, begin by
preparing the recipe in bake mode. After achieving acceptable results, follow the convection
guidelines above. If the food is not prepared to
your satisfaction during the first convection trial,
adjust only one recipe variable at a time (such
as cooking time, rack position or temperature)
and repeat the convection test. If necessary,
continue adjusting one recipe variable at a time
until you achieve satisfactory results.
About Convection Baking...
The Dacor convection cooking system distributes the
heated air evenly to ensure uniform results. It also
channels the air evenly into the oven, eliminating
any hot or cool spots.
AIR FLOW
Bakeware Tips
• Dacor’s optional full-sized cookie sheets maxi-
mize baking capabilities by utilizing the most
usable rack space. See the Accessories section
for ordering information.
• Use the pan size and type recommended by the
recipe to ensure best results.
• Cakes, quick breads, muffins and cookies should
be baked in shiny, reflective pans for light,
golden crusts.
• Medium gauge aluminum sheets with low sides
should be used when preparing cookies, biscuits
and cream puffs.
• Bake most frozen foods in their original foil con-
tainers placed on a flat cookie sheet. Follow the
package recommendations.
• When using glass bakeware, reduce the recipe
temperatureby25˚F,exceptwhenbakingpies
or yeast breads.
• Follow the standard recipe baking time for pies
and yeast breads.
• Avoid the use of old, darkened pans.
• Warped, dented, stainless steel and tin-coated
pans heat unevenly and will not give uniform
baking results.
• Place pans carefully on the oven racks. Turn
pans on the racks so that the long sides run left
to right, parallel to the door.
Food Placement
You can utilize more oven capacity due to the uniform air circulation provided by convection cooking.
Many foods, such as pizzas, cakes, cookies, biscuits,
muffins, rolls and frozen convenience foods can be
successfully prepared on either two or three racks*
at the same time. Also, complete meals can be prepared by using multiple racks. See below for specific
recommendations.
*The range comes with two racks. Additional racks
are available from your dacor dealer, see page 20.
• Typically, when baking on two racks with your
oven, use rack positions #3 and #5 (counting
from the bottom up). When baking on three
racks, use rack positions #2, #4 and #6.
• When adapting a single rack recipe to multiple
rack baking, it may be necessary to add to the
baking time. This is due to the extra amount of
food in the oven.
• Turn pans on the racks so that the long sides run
left to right, as you face them.
• Heavier roasting pans and dishes will cook better
on rack position #1.
12
Page 15

Operating Your Range
• When using a optional baking stone, use rack
position #3 for best results.
Broiling Tips
Broiling is a quick and flavorful way to prepare many
foods, including steaks, chicken, chops, hamburgers
and fish.
It is normal and necessary for some smoke to be
present to give the food a broiled flavor.
• Dacor recommends that you set a timer to time
the broiling process.
• Start with a room temperature broiler pan for
even cooking.
• Use tongs or a spatula to turn and remove
meats. Never pierce meat with a fork because
the natural juices will escape.
• Broil food on the first side for a little more than
half of the recommended time, then season and
turn. Season the second side just before removing the food from the oven.
• To prevent sticking, lightly grease the broiler
grill. Excess grease will result in heavy smoke.
For easier cleaning, remove the broiler pan and
grill when the food is removed.
Roasting Tips
• Dacor’s optional roasting pan works particularly
well and two of them will fit side by side in your
oven.
• For roasting, Dacor’s optional “V” shaped rack
and broil/roast pan works best to allow air circulation around the food.
• If using a cooking bag, foil tent or other cover,
use convection bake mode. Adjust the recipe
time and temperature as well.
• When using a meat thermometer, insert the
probe halfway into the center of the thickest
portion of the meat. For poultry, insert the thermometer probe between the body and leg into
the thickest part of the inner thigh. To ensure
an accurate reading, the tip of the probe should
not touch bone, fat or gristle. Check the meat
temperature 2/3 of the way through the recommended roasting time. After reading the meat
thermometer once, insert it 1/2 inch further into
the meat, then take a second reading. If the
second temperature registers below the first,
continue cooking the meat.
• Allow roasts to stand 15 to 20 minutes after
roasting in order to make carving easier.
• Roasting times always vary according to the
size, shape and quality of meats and poultry.
Less tender cuts of meat are best prepared in
bake mode and may require moist cooking techniques. Follow your favorite cookbook recipes.
High Altitude Cooking
Due to the lower atmospheric pressure at higher
altitudes, foods tend to take longer to cook. Therefore, recipe adjustments should be made in some
cases. In general, no recipe adjustment is necessary for yeast-risen baked goods, although allowing
the dough or batter to rise twice before the final
pan rising develops a better flavor. Try making the
adjustments below for successful recipes. Take note
of the changes that work best and mark your recipes accordingly. You may also consult a cookbook on
high altitude cooking for specific recommendations.
Baking
Powder
Altitude
(feet)
for each
teaspoon
decrease
by:
3000 5-10% 10-25% 5-10%
5000 10% 10% 20%
7000 25% 20% 20-25%
Sugar
for each
teaspoon
decrease
by:
Liquid, for
each cup
add:
13
Page 16

Care and Cleaning
Cleaning
WARNING
• Clean only the parts of the range listed in this manual.
Clean them only in the manner specified.
• To avoid dangerous fumes or damage to your range’s
surfaces and accessories, use only the types of
cleaning solutions specified in this manual.
• To avoid electrical shock or burns, turn off the burners
and oven and make sure that all parts are cool before
cleaning. DO NOT turn the burners on during cleaning.
• Do not use a steam cleaner to clean the range. Steam
could penetrate the electrical components and cause a
short circuit.
• To reduce the chance of electric shock, disconnect
the range power cord from the electrical outlet before
cleaning.
• Do not try to remove heavy spills with a sharp object
such as a knife or metal spatula. Sharp objects may
scratch your range’s surfaces.
• To prevent damage, do not use abrasive or corrosive
cleaners or applicators such as steel wool or scouring
pads on any part of the range unless instructed to do
so. Use only a sponge, soft cloth, fibrous or plastic
brush or nylon cleaning pad for cleaning the surfaces
of your range.
• Ensure that the anti-tip bracket is engaged after the
range is moved out for cleaning. Use a flashlight to
look underneath the range and verify that the anti-tip
bracket covers the rear leg when the range is moved
back into place.
Anti-tip bracket
Rear leg
IMPORTANT: The cooktop is exposed to extremely
high temperatures. The grates are under high
stress when hot utensils are placed on them. Also,
the range parts are occasionally exposed to acidic
food spill-overs. These severe operating conditions
cause the porcelain enamel parts on your range to
undergo a change in appearance over time. If you
care for and clean these parts carefully, you will
slow down, but not eliminate, the aging process.
To keep the range looking and operating its best,
clean it after every use. Also, wipe up spills that
occur while cooking quickly. Be careful not to touch
any hot areas.
If you allow spills to sit on hot burner parts, they
will burn on and be very difficult to clean. Certain
types of food, such as tomatoes, citrus juices, vinegar, alcohol and milk can damage the finishes if
you allow them to stand for any length of time.
Cooktop Disassembly and Cleaning
1. Disconnect the power cord.
2. When the range is cool, remove the grates from
the top of the cooktop.
3. Disassemble the burners: Lift the burner caps
and burner rings off of the burner bases.
Grates and Spill Trays
IMPORTANT: DO NOT use any of the cleaners
listed below to clean the burners and igniters. See
the facing page for burner and igniter cleaning
instructions.
The grates and spill tray are coated with a porcelain
finish.
• For everyday cleaning, use a soft cloth or nonabrasive pad with warm soapy water to clean all
of the porcelain parts.
• If necessary, tough stains may be removed by
applying full-strength sprays such as Simple
Green™, Ajax™ All-Purpose Cleaner or Formula
409™. To minimize wear, use the mildest cleaner
needed to get the surface clean.
• For extremely stubborn stains, you may use a
mildly abrasive cleaner or applicator, such as
Soft Scrub™, Bon Ami™, S.O.S.® pads or other
soap-filled steel wool pads. Use these clean-
ers with extreme care and only on occasion. Aggressive or extensive use of these
types of abrasives will damage the finish. Finish
damage due to the use of abrasives is not
covered under your warranty.
14
Page 17

Care and Cleaning
Cleaning the Burners and Igniters
WARNING
Use care while cleaning the igniters. The porcelain is
fragile and can crack or break.
IMPORTANT: The igniters will not work properly
if the burner rings, burner bases or igniters are not
clean. Dirty or wet igniters may not spark at all.
After disassembling the burners, check for any dirt
or grime deposited on the individual parts, including
the igniters.
1. Using a firm toothbrush, clean completely
around the metal top and porcelain base of each
igniter. Use care while cleaning because the porcelain is fragile and can crack or break. Do not
use water to clean the igniters. If necessary, use
a small amount of rubbing alcohol to help dissolve grime.
2. Examine the burner rings. Remove anything
stuck in the holes with a straightened paper
clip, wire or needle. Be careful not to scratch or
damage it. Do not distort the shape of the holes.
3. Clean all the burner rings, with window cleaner
or rubbing alcohol. Use a cleaning brush with
plastic bristles or a firm tooth brush. When done,
rinse the parts well with clean water. Dry all the
parts thoroughly before re-assembling them.
4. Clean the burner caps with a solution of mild
detergent and hot water.
5. Reassemble the cooktop in the reverse order
(see page 6 for detailed instructions). Make
sure you line up the notches on the burner rings.
6. Re-connect the power cord and test the burners
after reassembling them. If the flame is uneven,
be sure that all the burner parts are properly
positioned, then check for any remaining dirt or
grime on the burner parts or igniter. If erratic
clicking is still present, make sure the igniter is
completely dry. If the unit still exhibits problems
after drying, call your local Dacor authorized
service agent.
Inner burner cap
Outer burner cap
Burner ring
Igniter
Burner base
SimmerSear Burner
(left front burner only)
Burner cap
Burner ring
Igniter
Burner base
Standard Burner
(right front, right rear, left rear burners)
15
Page 18

Care and Cleaning
Cleaning (cont.)
Knobs and Trim Rings
WARNING
• Do not operate the cooktop without the knobs and spill
protector rings in place.
• Do not soak the knobs and spill protector rings in water
or place them in the dishwasher.
• Do not expose plastic knobs to direct flame, hot
utensils or other sources of heat.
Wash the knobs regularly with a solution of warm
soapy water. Dacor recommends hand dishwashing
liquid. To clean:
1. Disconnect power and turn the knobs to the OFF
position.
2. Grasp each knob and pull straight back, off of
the valve shaft.
3. Clean the outside edges of the trim rings while
the knobs are removed. Wipe them with a soft
damp rag.
4. To replace the knobs,
align the “D-shaped”
opening on the back
of the knob with the
end of the valve shaft.
Carefully push the
knob on until it stops.
The largest knob with
numbers on it is the
oven knob and goes
on the center valve
stem. The SimmerSear
burner knob has the high flame icon and the
simmer (low) icon spaced further apart than the
other three burner knobs. Place it on the valve
stem that is second from the left.
5. Reconnect the power cord.
Door Glass
Clean all glass surfaces with a solution of mild
detergent and hot water. Use a mild glass cleaner to
remove fingerprints or smears. Dry completely with
a soft, lint-free cloth.
Stainless Steel Surfaces
The control panel, the outside surface of the oven
door, the area around the outside of the cooktop and the side panels are covered with stainless
steel. Clean these surfaces with the provided Dacor
Stainless Steel Cleaner. Rinse and dry with a soft,
lint-free cloth. Always wipe stainless steel surfaces
with the grain. A small amount of baby oil may be
applied to stainless steel tops to restore lustre.
Chrome Surfaces
Clean chrome surfaces the same way as stainless
steel surfaces (see column one).
Porcelain Surfaces
The oven interior, the inner side of the oven door
and the spill tray are finished in porcelain enamel.
Clean porcelain surfaces with a solution of mild
detergent and hot water. Rinse and dry with a soft
cloth. Do not use abrasives or commercial oven
cleaners.
Oven Racks
The GlideRack oven racks are chrome-plated. For
everyday cleaning, apply a solution of detergent and
hot water. To clean heavy soil, use the rough side
of a sponge or a scouring pad with plenty of water,
or use a solution of 1 cup ammonia to 2 gallons of
water.
Broil Burner
WARNING
To prevent damage to the broil burner and broil burner
igniter, do not spray it with any type of cleaner or
attempt to scrub them in any manner. These parts
are self-cleaning and do not require any type of
maintenance.
To burn off any grime build-up on the broil burner
and igniter, close the oven door and turn the oven
control knob to the BROIL position for about ten
minutes. After ten minutes turn the oven off.
Door Gasket (Seal)
Clean the door gasket by dabbing it with a solution
of water and mild soap. Do not scrub it or it will
become damaged.
Door Gasket (Seal)
Clean the door gasket by dabbing it with a solution
of water and mild soap. Do not scrub it or it will
become damaged.
Convection Filter
WARNING
For your safety and proper oven performance, re-install
the filter before using the oven to cook. If you don’t,
the spinning fan blades at the back of the oven will be
exposed.
The convection filter is located in the back of each
oven chamber. Clean the filter regularly. If you allow
it to become clogged, the oven’s convection cooking
modes will not work properly.
16
Page 19

Care and Cleaning
1
2
3
4
5
7
6
Removing your oven’s convection filter...
When the oven is cool, put your fingers around the
edges of the filter and gently push up.
To clean the filter...
Soak it in hot, soapy water. Rinse well. You may also
place it in a dishwasher on the top rack. Dry the
filter before re-installing it.
Installing your oven’s convection filter...
Carefully hook the metal clips on the back of the
filter on the slots on both sides of the fan hole. Be
careful not to scratch the porcelain surfaces with the
back of the filter.
Light bulb replacement is considered a homeowner
maintenance operation. If the light does not work,
before replacing it, please consult the Problem
Solution Guide on page 18.
1. Replace the light bulb only with Dacor part
number 107112. See page 20 for ordering
information. IMPORTANT: Do not touch the
replacement halogen light bulb with your fingers.
Halogen bulbs are sensitive to the oils from your
hand. The oils from your hand will stick to the
bulb and may cause it to burn out faster than
normal.
2. Disconnect the range power cord from the electrical outlet.
3. Hold your hand under the lens for support and
gently pry it loose using a spatula or table knife.
Pull the lens cover straight out.
Light
fixture
Bulb
Clips
Slots
Replacing the Oven Light
WARNING
• To prevent an electrical shock hazard and/or personal
injury, make sure that power to the range has been
disconnected and that the light fixture is cool before
replacing the light bulb.
• Always ensure that the lens cover is in place when
using the oven. The lens cover protects the bulb
from breakage caused by high oven temperatures or
mechanical shock.
• Replacing the lens cover without lining up the cutout
with the light socket will damage the light fixture.
• Do not use a screwdriver to remove the lens.
Light
socket
Lens cutout
Lens
4. Grasp the old bulb and pull it straight out of the
socket.
5. Using a glove, insert the new bulb into the
socket.
6. As you reinstall the lens cover, line up the cutout
on the inside rim with the light socket. Gently
press it into its original position.
7. Reconnect the power cord.
17
Page 20

Before You Call for Service
Problem May Be Caused By What to Do
Nothing works. Range not connected to electri-
cal power.
Power is off. Turn on power at circuit breaker or fuse
Power outage. Contact power company.
Igniters do not spark. Power not supplied to unit. See Nothing Works above.
Wet or dirty igniter(s). Clean and dry igniters and burner assem-
No flame. Igniter(s) not working (no click-
ing sound).
Wet or dirty igniter(s). Clean and dry according to Care and
Gas is turned off. Make sure the gas supply valve is in the
Gas supply interrupted. Contact gas company.
Burner goes out at low setting.
Flame is distorted, yellow or
very large.
Igniters continue to spark
(click) after flame ignites.
Orange glow on ceiling of
oven when broiling.
Low gas pressure. Contact gas company to have pressure
Air intake holes obstructed. Check to make sure none of the air vents
Burner parts are dirty or
clogged.
Burner parts are not properly
positioned.
Range set up to use a different
type of gas (natural or LP) or
set up for different altitude.
Gas regulator is not installed or
faulty.
Burner is cold. Burners may continue to spark for up to
Flame distorted by air draft. Minimize any air drafts around the cook-
Wet or dirty igniter(s). Clean and dry according to Care and
Burner parts wet or dirty. Clean and dry according to Care and
Burner parts not properly positioned.
Power supply polarity is
reversed or not properly
grounded.
Normal operation. The broil burner hot surface igniter glows
Check to make sure range power plug is
connected to electrical outlet.
box for electrical outlet range is connected to. Check for tripped breaker or
blown fuse.
blies according to Care and Cleaning
section.
See Igniters do not spark above.
Cleaning section.
“ON” position.
tested.
or slots on range are obstructed.
Clean and dry according to Care and
Cleaning section.
Make sure burner is assembled according
to the Setting Up Your Range section.
Have a qualified service technician check
to make sure that the range is set up for
the type of gas and the correct altitude.
Have a qualified service technician check
the gas regulator.
60 seconds when cold and set to low. See
Operating Your Range section for more
information on how to minimize.
top. Close nearby windows.
Cleaning section.
Cleaning section.
Make sure burner is assembled according
to the Setting Up Your Range section.
Have a licensed electrician check the electrical outlet.
orange off and on when the oven knob is
set to broil.
18
Page 21

Before You Call for Service
Problem May Be Caused By What to Do
Oven will not heat when
turned on.
Oven light will not work. Light bulb is burned out. See Care and Cleaning section.
Oven light will not turn off.
Orange glow inside oven.
Oven ON indicator light
goes on and off repeatedly.
Foods over-cook. Incorrect cooking time, tem-
Foods under-cook. Incorrect cooking time, tem-
Condensation on oven door
window
Strange odor when oven is
on.
No power to range. See Nothing Works on facing page.
Gas is turned off. Make sure the gas supply valve is in the
“ON” position.
Gas supply interrupted. Contact gas company.
Broil burner hot surface igniter
is on.
Normal operation. The oven ON indicator light illuminates
perature.
perature
Cold weather. During cold weather it is normal for
Residue in oven. During manufacturing, certain residues
The broil burner hot surface igniter glows
orange (off and on) during broil. Normal
operation.
when the oven is on. The oven burner
control system turns the oven off and on
to maintain the temperature set by the
oven control knob.
Adjust time, temperature or rack position.
Adjust time, temperature or rack position.
condensation to appear on the oven door
window during the first 10 minutes of
operation.
can be left on oven surfaces. Oven needs
to be “Burned In.” See page 7.
19
Page 22

Parts and Accessories
Description Dacor Part Number
Wok ring AWR4
Cooktop griddle AGDG14
Large capacity roast/broil pan with “V” shaped rack AORPVR
Cooktop grill AGRG14
Standard broil pan and broil pan grill AER30BP
Pizza baking stone ABS16
Cookie sheets (3 per carton) ACS303
Gliderack oven rack 701464*
Low profile (1 3/4”) backguard kit AER30GLBG
3” backguard kit AERB30G03**
6” backguard kit AERB30G06**
9” backguard kit AERB30G09**
14” grate (2 used per unit) 101524
Halogen light bulb (120 Volt, 20 Watt) 107112
Dacor Stainless Steel Cleaner A302
*Part number shown is for warranty/repair replacement. To order additional racks for non-repair purposes,
order part number ARGO30H.
**Compatible with models DR30GS and DR30GFS only.
To order parts and accessories, contact your Dacor dealer or visit www.everythingdacor.com.
Warranty and Service
Getting Help
Before you request service:
1. Review the Before You Call For Service section of this manual (page 18).
2. Use the helpful tips found in our Problem Solution Guide.
3. Become familiar with the warranty terms and conditions of your product.
4. If none of these tips or suggestions resolves your problem, call our Customer Service center
at the number below.
Dacor’s Customer Service center is available 6:00
For warranty repairs or questions and for Dacor Distinctive Service (DDS) in the US and Canada
Phone: (800) 793-0093, extension 2822
For non-warranty repairs or questions in the US and Canada
Phone: (800) 793-0093, extension 2813
Contact us through our web site at:
www.dacor.com/contact-us
a.m. – 5:00 p.m. Pacific Time
20
Page 23

Warranty and Service
Warranty
What Is Covered
CERTIFICATE OF WARRANTIES:
DACOR RANGES
WITHIN THE FIFTY STATES OF THE U.S.A., THE
DISTRICT OF COLUMBIA AND CANADA*:
FULL ONE-YEAR WARRANTY
The warranty applies only to the Dacor appliance sold to
the first use purchaser, starting from the date of original retail purchase or closing date for new construction,
whichever period is longer. Warranty is valid on products
purchased brand new from a Dacor Authorized Dealer, or
other seller authorized by Dacor.
If your Dacor product fails to function within one year of
the original date of purchase, due to a defect in material
or workmanship, Dacor will remedy it without charge to
you.
All cosmetic damage (such as scratches on stainless steel,
paint/porcelain blemishes, etc.) to the product or included
accessories must be reported to Dacor within 60 days of
the original purchase date to qualify for warranty coverage.
Consumable parts such as filters and light bulbs are not
covered and are the responsibility of the purchaser.
LIMITATIONS OF COVERAGE
Service will be provided by a Dacor designated service
company during regular business hours. Please note service providers are independent entities and are not agents
of Dacor.
Dealer display and model home display products with a
production date greater than 5 years, products sold “As
Is,” and products installed for non-residential use, which
include but are not limited to religious organizations, fire
stations, bed and breakfast and spas carry a one year
parts warranty only. All delivery, installation, labor costs,
and other service fees are the responsibility of the purchaser.
Warranty will be null and void on product that has altered,
defaced or missing serial numbers and tags.
The owner must provide proof of purchase or closing
statement for new construction upon request. All Dacor
products must be accessible for service.
*Warranty is null and void if non-ETL or non-CUL
approved product is transported from the U.S.A.
OUTSIDE THE FIFTY STATES OF THE U.S.A.,
THE DISTRICT OF COLUMBIA AND CANADA:
LIMITED FIRST YEAR WARRANTY
If your Dacor product fails to function within one year of
the original date of purchase due to a defect in material or
workmanship, Dacor will furnish a new part, F.O.B. factory
to replace the defective part.
All delivery, installation, labor costs and other service fees
are the responsibility of the purchaser.
What Is Not Covered
• Slight color variations may be noticed because of dif-
ferences in painted parts, kitchen lighting, product
placement and other factors; this warranty does not
apply to color variation.
• Service calls to educate the customer on proper use
and care of the product.
• Service fees for travel to islands and remote areas,
which include but are not limited to, ferries, toll roads
or other travel expenses.
• Consequential or incidental damage, including but not
limited to food or medicine loss, time away from work
or restaurant meals.
• Failure of the product when used for commercial,
business, rental or any application other than for residential consumer use.
• Failure of the product caused by improper product
installation.
• Replacement of house fuses, fuse boxes or resetting
of circuit breakers.
• Damage to the product caused by accident, fire, flood,
power interruption, power surges or other acts of God.
• Liability or responsibility for damage to surrounding
property including cabinetry, floors, ceilings and other
structures or objects around the product.
• Breakage, discoloration or damage to glass, metal
surfaces, plastic components, trim, paint or other cosmetic finish caused by improper usage, care, abuse,
or neglect.
Out of Warranty
Should you experience a service issue beyond the standard warranty period, please contact us. Dacor reviews
each issue and customer concern to provide the best possible solution based on the circumstances.
THE REMEDIES PROVIDED IN THE ABOVE EXPRESS WARRANTIES ARE THE SOLE AND EXCLUSIVE REMEDIES.
THEREFORE, NO OTHER EXPRESS WARRANTIES ARE
MADE, AND OUTSIDE THE FIFTY STATES OF THE UNITED
STATES, THE DISTRICT OF COLUMBIA AND CANADA, ALL
IMPLIED WARRANTIES, INCLUDING BUT NOT LIMITED
TO, ANY IMPLIED WARRANTY OF MERCHANTABILITY OR
FITNESS FOR A PARTICULAR USE OR PURPOSE, ARE
LIMITED IN DURATION TO ONE YEAR FROM THE DATE OF
ORIGINAL PURCHASE. IN NO EVENT SHALL DACOR BE
LIABLE FOR INCIDENTAL EXPENSE OR CONSEQUENTIAL
DAMAGES. IN THE EVENT DACOR PREVAILS IN ANY LAWSUIT, DACOR SHALL BE ENTITLED TO REIMBURSEMENT
OF ALL COSTS AND EXPENSES, INCLUDING ATTORNEY’S
FEES, FROM THE DACOR CUSTOMER. NO WARRANTIES,
EXPRESS OR IMPLIED, ARE MADE TO ANY BUYER FOR
RESALE.
Some states do not allow limitations on how long an
implied warranty lasts, or do not allow the exclusion or
limitation of inconsequential damages, therefore the
above limitations or exclusions may not apply to you. This
warranty gives you specific legal rights, and you may also
have other rights that vary from state to state.
21
Page 24

Notes
22
Page 25

Notes
23
Page 26

Notes
24
Page 27

fold here
BUSINESS REPLY MAIL
FIRST-CLASS MAIL CITY OF INDUSTRY CAPERMIT NO 1600
POSTAGE WILL BE PAID BY ADDRESSEE
DACOR
ATTN WARRANTY PROCESSING DEPT
PO BOX 90070
NO POSTAGE
NECESSARY
IF MAILED
IN THE
UNITED STATES
CITY OF INDUSTRY CA 91715-9907
Page 28

First Middle
Please visit www.dacor.com to activate your warranty online.
WARRANTY INFORMATION
IMPORTANT:
Your warranty will not be activated until you activate it online or return this form to Dacor. If you have purchased more
than one Dacor product, please return all forms in one envelope or activate the warranty for each product online.
Please rest assured that under no conditions will Dacor sell your name or any of the information on this form for mailing list purposes. We
are very grateful that you have chosen Dacor products for your home and do not consider the sale of such information to be a proper way
of expressing our gratitude!
Owner’s Name:
(Please Print or Type)
Street:
Last
City: State: Zip:
Purchase Date: Email: Telephone:
Dealer:
City: State: Zip:
Your willingness to take a few seconds to fill in the section below will be sincerely appreciated. Thank you.
1. How were you first exposed to Dacor products? (Please check one only.)
A. T.V. Cooking Show F Builder
B. Magazine G. Architect/Designer
C. Appliance Dealer Showroom H. Another Dacor Owner
D. Kitchen Dealer Showroom I. Model Home
E. Home Show J. Other
2. Where did you buy your Dacor appliances?
A. Appliance Dealer D. Builder
B. Kitchen Dealer E. Other
C. Builder Supplier
3. For what purpose was the product purchased?
A. Replacement only C. New Home
B. Part of a Remodel D. Other
cut here cut here
4. What is your household income?
A. Under $75,000 D. $150,000 – $200,000
B. $75,000 – $100,000 E. $200,000 – $250,000
C. $100,000 – $150,000 F. Over $250,000
5. What other brands of appliances do you have in your kitchen?
A. Cooktop C. Dishwasher
B. Oven D. Refrigerator
6. Would you buy or recommend another Dacor product?
Yes No
Comments:
Thank you very much for your assistance. The information you have
provided will be extremely valuable in helping us plan for the future
and giving you the support you deserve.
Web site: www.dacor.com
Corporate phone: (800) 793-0093
 Loading...