

Dacor 0B36, 0BS36, 0B52, 0BS52 Use And Care Manual
The Life of the Kitchen2
EPICURE ® OUTDOOR GRILL
U SE AND CARE MANUAL
Models: 0B36, 0BS36, 0B52, 0BS52, OBSB162
Important Safety Instructions ................................ 1
Getting to Know Your Outdoor Grill ......................... 4
Setting Up Your Outdoor Grill ................................. 6
Operating Your Outdoor Grill .................................. 8
Care and Cleaning ............................................... 17
Parts and Accessories ........................................... 22
Before You Call for Service .................................... 23
Warranty and Service ........................................... 24
Warranty Card ........................................ Back Cover
Tested in accordance with the latest edition of ANSI Z21.58 2006 • CSA 1.6-2006 Standard for Outdoor
Cooking Gas Appliances. In Canada" Installations must be in accordance with the current CAN/CG
A-B149.1. Natural Gas Installation Code CAN/CG A-B149.2. Propane Installation Code and/or local code.
@
Style varies, model 0B52 shown.
Table of Contents
Part No. 102033 Rev. H
To Our Valued Customer:
Congratulations on your purchase of the very latest in Dacor * products! Our unique combination of features, style and
performance make us The Life of the Kitchen =, and a great addition to your home.
In order to familiarize yourself with the controls, functions, and full potential of your new Distinctive Appliance, we
suggest that you thoroughly read this use and care manual, beginning with the Important Safety Instructions
section.
All Dacor appliances are designed and manufactured with quality and pride, while working within the framework of our
company value. Should you ever experience a problem with your product, please first check the Before You Call for
Service section of this manual for guidance. It provides useful suggestions and remedies prior to calling for service.
Valuable customer input helps us to continuously improve our products and services, so please feel free to contact
our Customer Service Team for assistance with any of your product support needs.
Dacor Customer Service Team
1440 Bridge Gate Drive
Diamond Bar, CA 91765
Telephone:
Fax:
Hours of Operation:
Web Site:
Thank you for choosing Dacor for your home. We are a company built by families for families and we are dedicated
to serving yours. We are confident that your new Dacor product will deliver a high level of performance and
enjoyment for many years to come.
Sincerely,
(800) 793-0093
(626) 403-3130
Monday through Friday
6:00 A.M. to 5:00 P.M. Pacific Time
www.Dacor.com
The Dacor Customer Service Team
© 2007 Dacor. all rights resen,_,_
INSTALLER: LEAVETHESE INSTRUCTIONSWITH THE
APPLIANCE.
CUSTOMER: READ THIS USE AND CARE MANUAL COMPLETELY
BEFORE USING THIS APPLIANCE.SAVE IT FOR FUTURE REFER-
ENCE.ITCONTAINS IMPORTANT USE AND CARE INFORMATION.
KEEPYOUR SALES RECEIPTOR CANCELED CHECK IN A SAFE
PLACE,PROOF OF ORIGINALPURCHASE DATE IS REQUIRED FOR
WARRANTY SERVICE,
For service and warranty information see page 24.
If you have any questions (other than warranty ques-
tions), call:
Dacor Customer Service
Phone: (800) 793-0093 (U.S.A. and Canada)
Monday -- Friday 6:00 A.M.to 5:00 P.M.Pacific Time
Web site: www.Dacor.com
Have the complete model and serial number for your
appliance available when you call. The numbers are found
on the product data label, located on the back of the unit.
Write these numbers below for future reference.
Model Number
Serial Number
[_ DANGER
1. Shutoff gas to the appliance,
Extinguish any open flame:
3i Open the canopy,
41 !f the odor continues, keep awaY from the appliance
and immediately call your gas supplier or your fire
department, ........
_ WARNING
Date of Purchase
Since Dacor continuously improves the quality and perfor-
mance of our products, we may need to make changes to
the appliance without updating this manual.
Important Information About
Safety Instructions
The Important Safety Instructions and warnings in
this manual cannot cover all possible problems and condi-
tions that can occur. Use common sense and caution when
installing, maintaining or operating this appliance.
Always contact the Dacor Customer Service Team about
problems or conditions that you don't understand.
Safety Symbols and Labels
WARNING
the appliance, Doing so blocks airflow and may cause
carbon mono×ide poisoning' Aluminum foil
also trap heat, causing a fire hazard.
CALIFORNIA
PROPOSITION 65 WARNING
The burning of gas cooking fuel generates some
by-products that are on the list of substances which
are known by the State of California to cause cancer or
reproductive harm, California law requires businesses
to warn customers of potential exposure to such
substances To minimize exposure to these substances;
always operate this unit according to the use and care
manual, ensuring you provide good ventilation when
cooking with gas,
READ AND SAVE THESE
INSTRUCTIONS
1

Im nstructi ons
General Safety Precautions
To reduce the risk of fire, electric shock, serious injury or death, follow basic safety precautions, including the
following:
2

WARNING WARNING
CAUTION
3
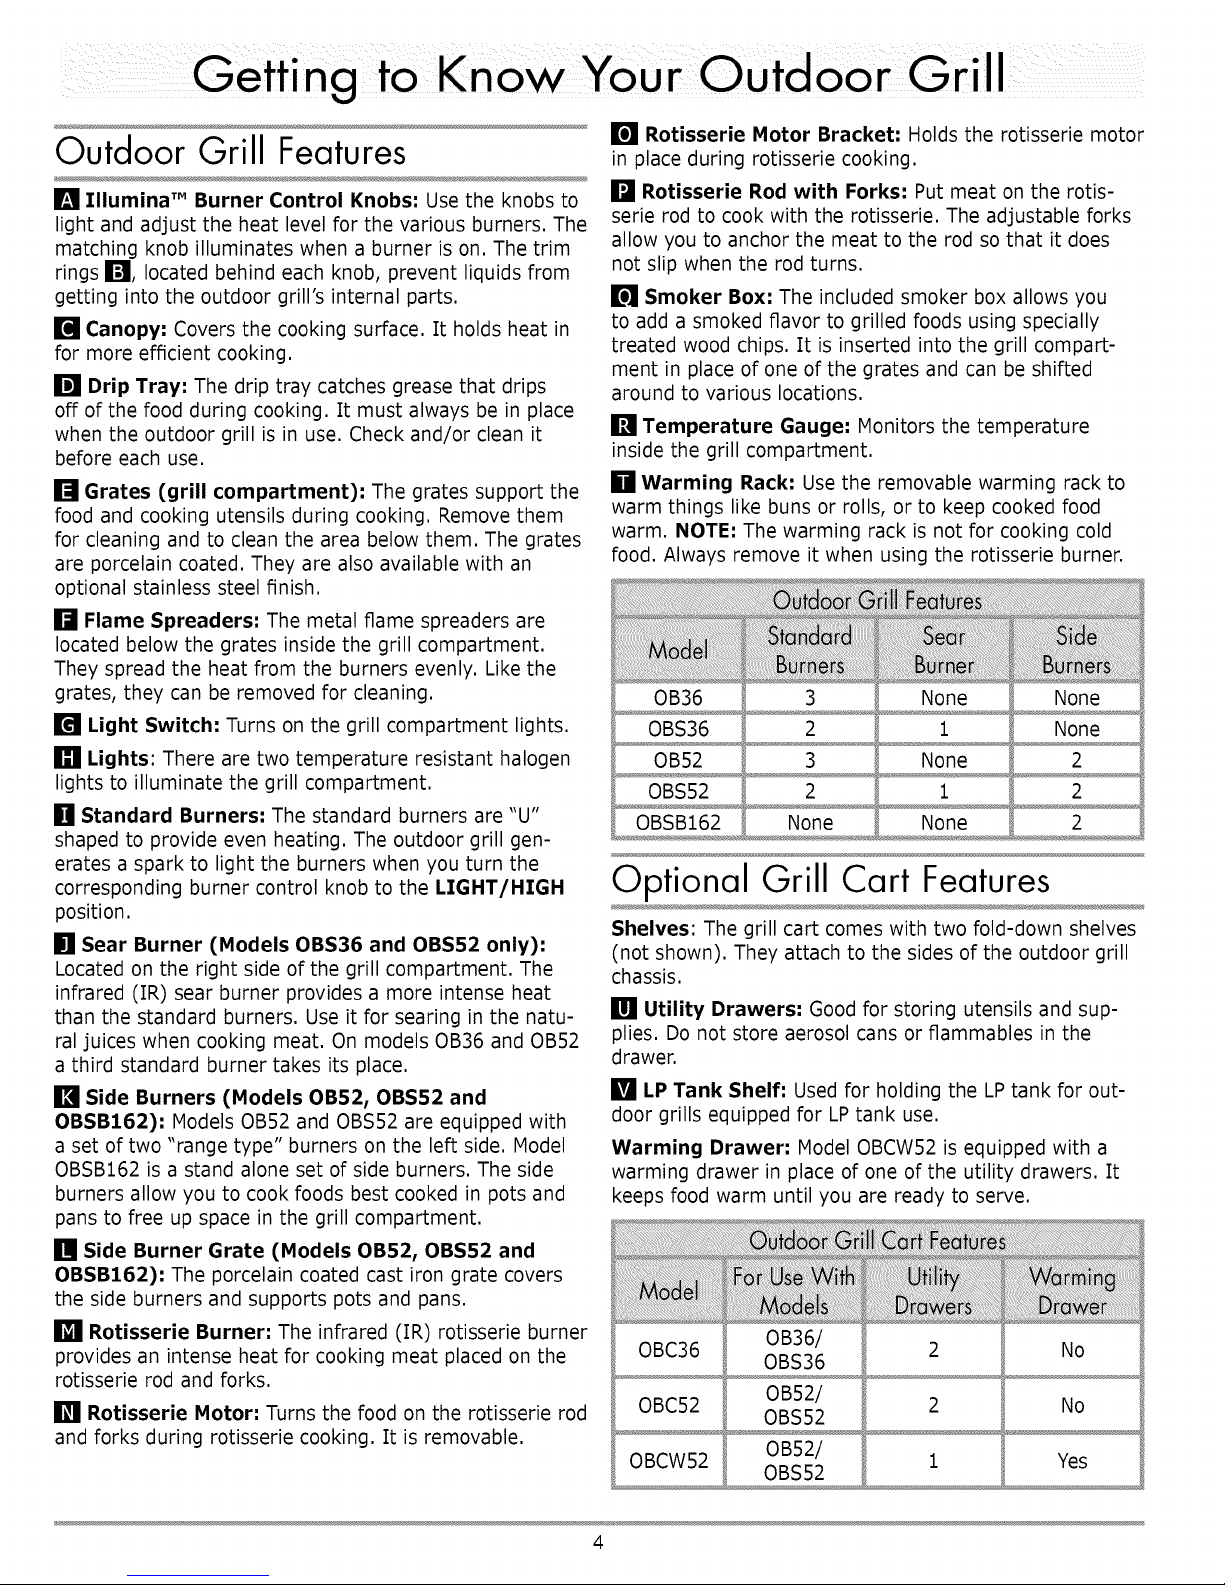
Outdoor Grill Features
[] Illumina'" Burner Control Knobs: Use the knobs to
light and adjust the heat level for the various burners. The
matching knob illuminates when a burner is on. The trim
rings I_!, located behind each knob, prevent liquids from
getting into the outdoor grill's internal parts.
[] Canopy: Covers the cooking surface. It holds heat in
for more efficient cooking.
[] Drip Tray: The drip tray catches grease that drips
off of the food during cooking. It must always be in place
when the outdoor grill is in use. Check and/or clean it
before each use.
[] Grates (grill compartment): The grates support the
food and cooking utensils during cooking. Remove them
for cleaning and to clean the area below them. The grates
are porcelain coated. They are also available with an
optional stainless steel finish.
[] Flame Spreaders: The metal flame spreaders are
located below the grates inside the grill compartment.
They spread the heat from the burners evenly. Like the
grates, they can be removed for cleaning.
[] Light Switch: Turns on the grill compartment lights.
[] Lights: There are two temperature resistant halogen
lights to illuminate the grill compartment.
[] Standard Burners: The standard burners are "U"
shaped to provide even heating. The outdoor grill gen-
erates a spark to light the burners when you turn the
corresponding burner control knob to the LIGHT/HIGH
position.
[] Sear Burner (Hodels 0BS36 and 0BS52 only):
Located on the right side of the grill compartment. The
infrared (IR) sear burner provides a more intense heat
than the standard burners. Use it for searing in the natu-
ral juices when cooking meat. On models OB36 and OB52
a third standard burner takes its place.
[] Side Burners (Hodels 0B52, 0BS52 and
OBSB162): Models 0B52 and 0BS52 are equipped with
a set of two "range type" burners on the left side. Model
OBSB162 is a stand alone set of side burners. The side
burners allow you to cook foods best cooked in pots and
pans to free up space in the grill compartment.
[] Side Burner Grate (Hodels 0B52, 0BS52 and
OBSB162): The porcelain coated cast iron grate covers
the side burners and supports pots and pans.
[] Rotisserie Burner: The infrared (IR) rotisserie burner
provides an intense heat for cooking meat placed on the
rotisserie rod and forks.
[] Rotisserie Motor: Turns the food on the rotisserie rod
and forks during rotisserie cooking. It is removable.
[] Rotisserie Hotor Bracket: Holds the rotisserie motor
in place during rotisserie cooking.
[] Rotisserie Rod with Forks: Put meat on the rotis-
serie rod to cook with the rotisserie. The adjustable forks
allow you to anchor the meat to the rod so that it does
not slip when the rod turns.
Smoker Box: The included smoker box allows you
to add a smoked f]avor to grilled foods using specially
treated wood chips. It is inserted into the grill compart-
ment in place of one of the grates and can be shifted
around to various locations.
[] Temperature Gauge: Monitors the temperature
inside the grill compartment.
[] Warming Rack: Use the removable warming rack to
warm things like buns or rolls, or to keep cooked food
warm. NOTE: The warming rack is not for cooking cold
food. Always remove it when using the rotisserie burner.
OB36 3 None None
OBS36 2 1 None
OB52 3 None 2
0BS52 2 1 2
None None 2
Optional Grill Cart Features
Shelves: The grill cart comes with two fold-down shelves
(not shown). They attach to the sides of the outdoor grill
chassis.
[] Utility Drawers: Good for storing utensils and sup-
plies. Do not store aerosol cans or flammables in the
drawer.
[] LP Tank Shelf: Used for holding the LP tank for out-
door grills equipped for LP tank use.
Warming Drawer: Model OBCW52 is equipped with a
warming drawer in place of one of the utility drawers. It
keeps food warm until you are ready to serve.
0BC36
0BC52
OBCW52
0B36/
0BS36
0B52/
0BS52
0B52/
0BS52
2
2
1
No
No
Yes
4
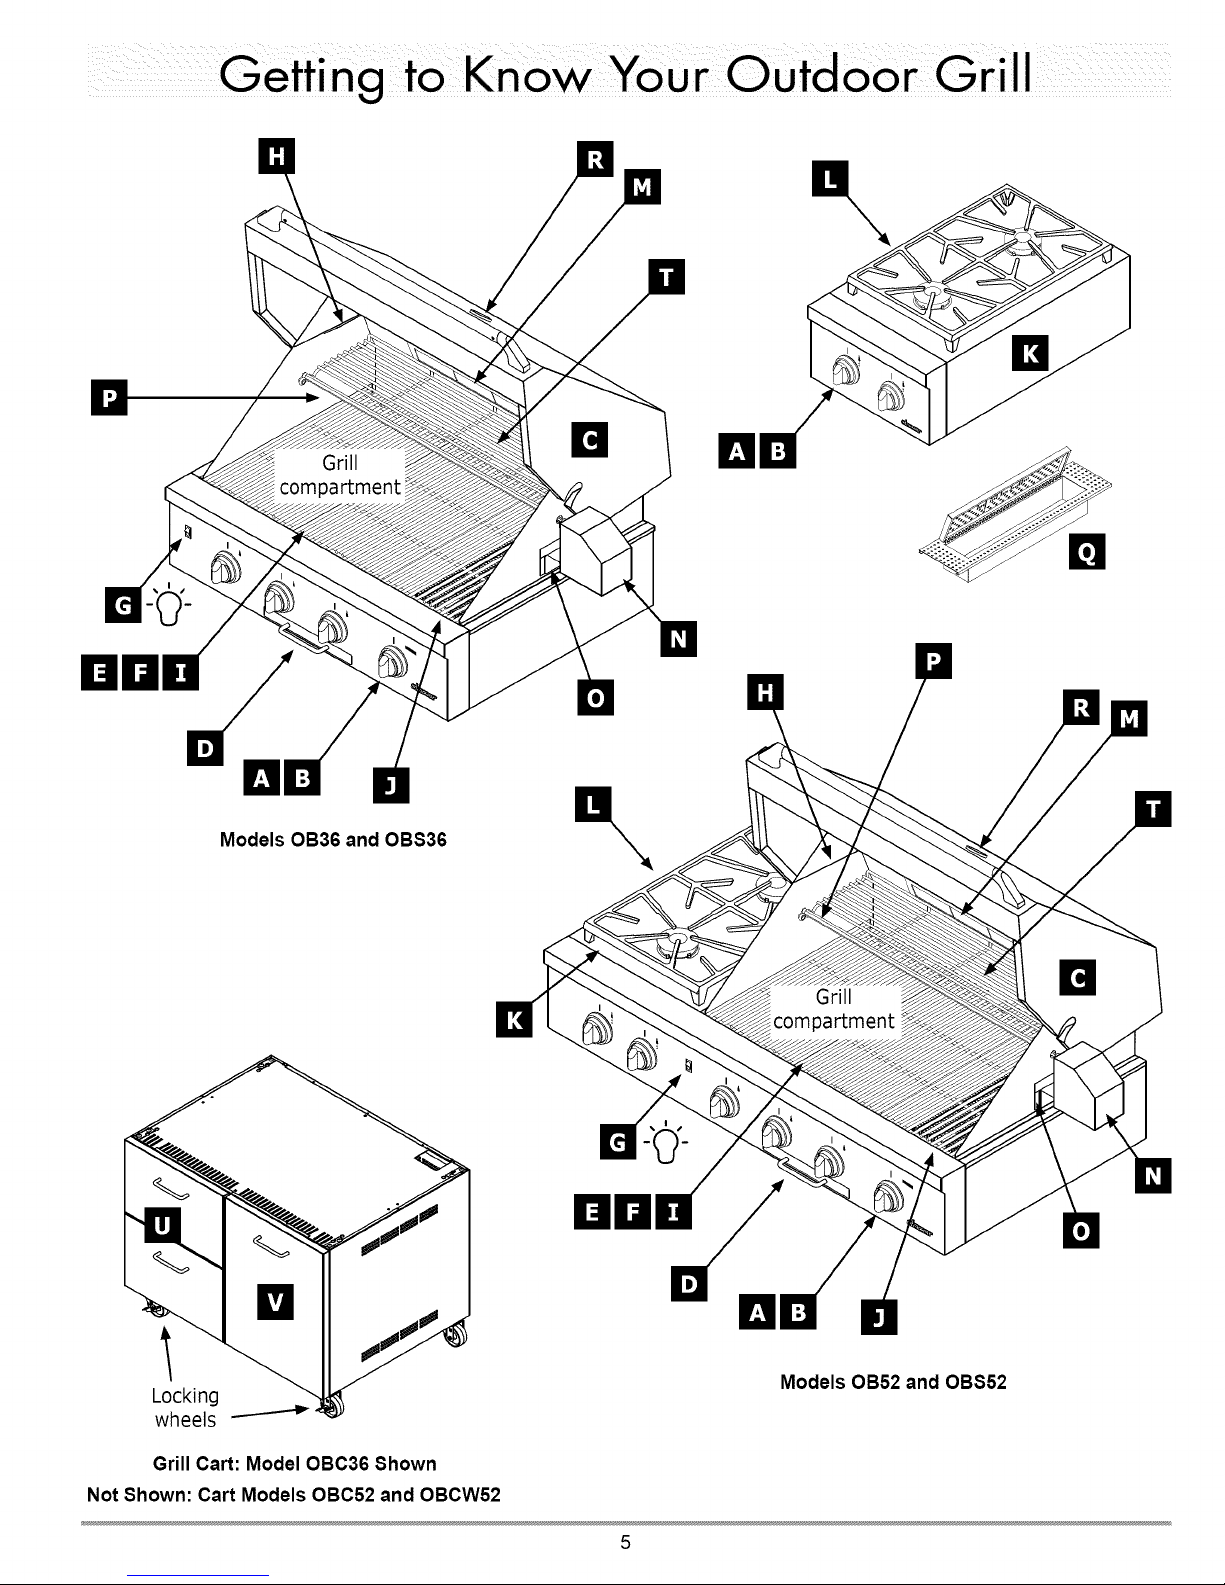
Grill
compartment
Models OB36 and OBS36
Grill
compartment
12
Grill Cart: Model OBC36 Shown
Not Shown: Cart Models OBC52 and OBCW52
Models OB52 and OBS52
5
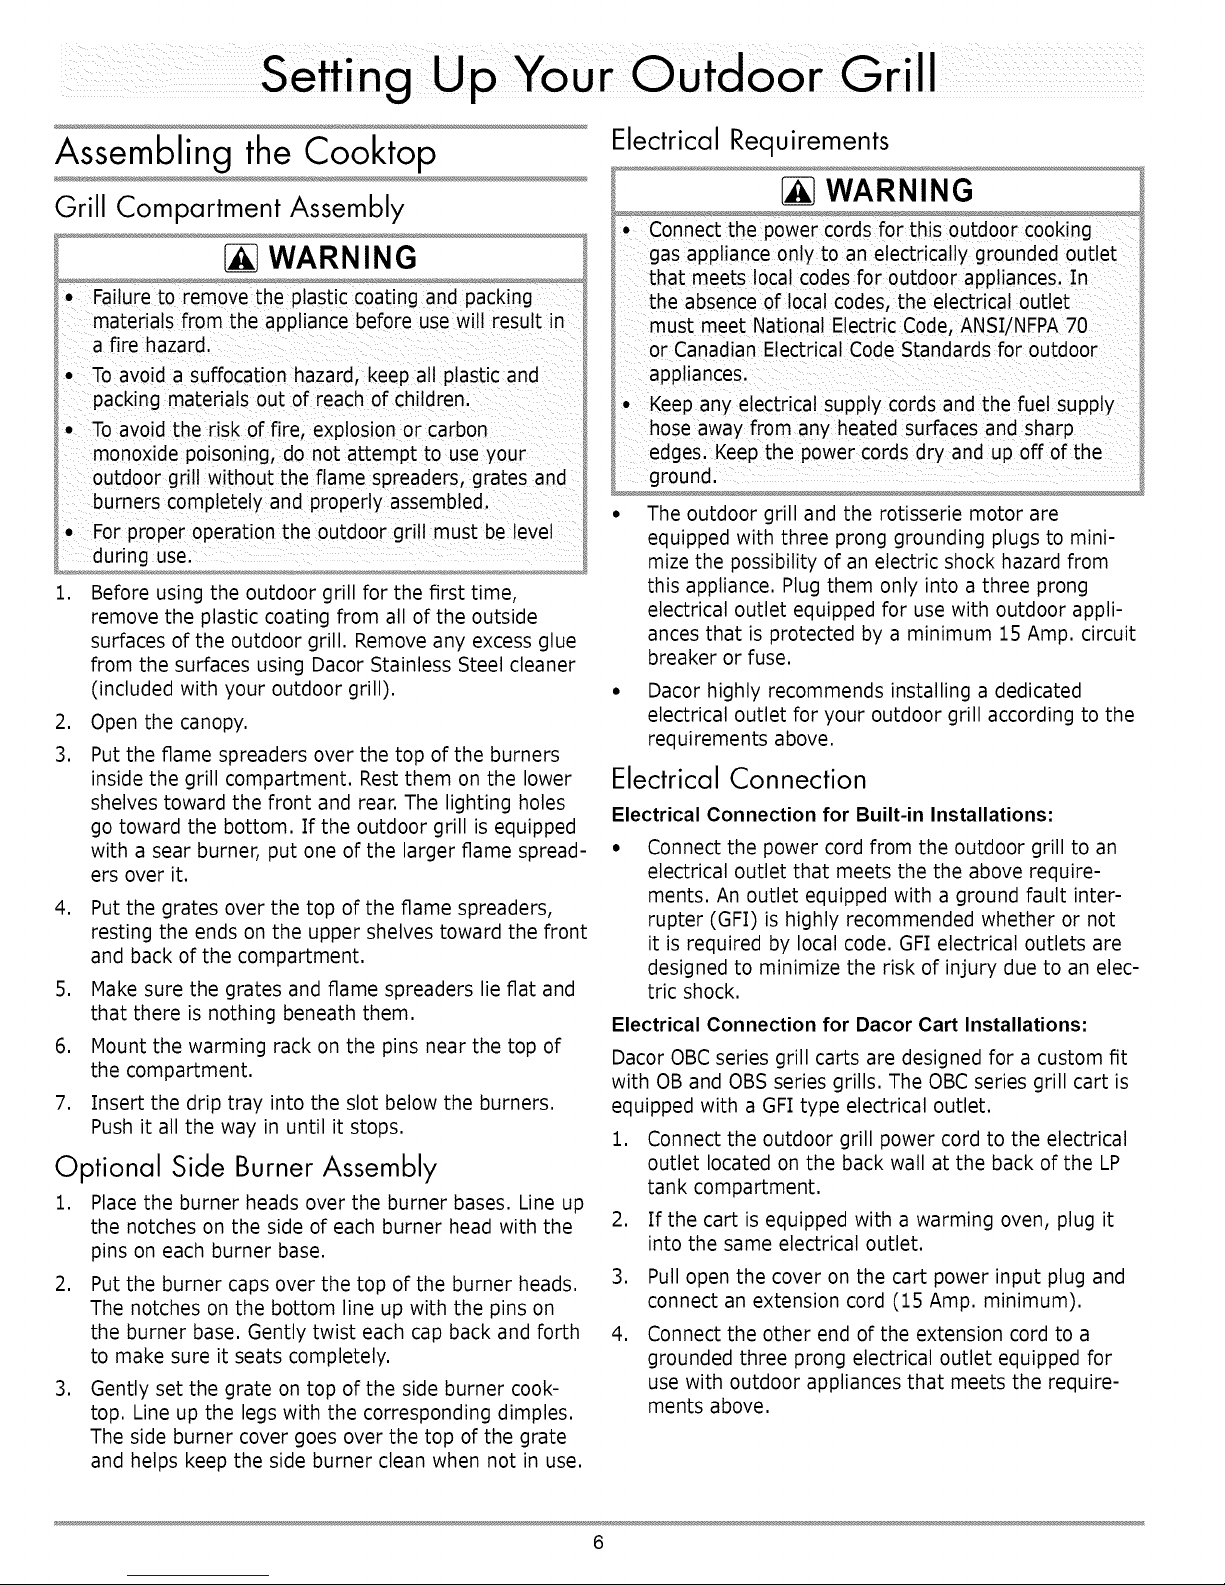
Assembling the Cooktop
Grill Compartment Assembly
WARNING
• Failure to remove the plastic coating and packing
materials from the appliance before use will result in
a fire hazard.
• To avoid a suffocation hazard, keep all plastic and
packing materials out of reach of children.
• To avoid the risk of fire, explosion or carbon
monoxide poisoning, do not attempt to use your
outdoor grill without the flame spreaders, grates and
burners completely and properly assembled.
• For proper operation the outdoor grill must be level
during use.
1. Before using the outdoor grill for the first time,
remove the plastic coating from all of the outside
surfaces of the outdoor grill. Remove any excess glue
from the surfaces using Dacor Stainless Steel cleaner
(included with your outdoor grill). •
2. Open the canopy.
3. Put the flame spreaders over the top of the burners
inside the grill compartment. Rest them on the lower
shelves toward the front and rear. The lighting holes
go toward the bottom. If the outdoor grill is equipped
with a sear burner, put one of the larger flame spread- •
ers over it.
4. Put the grates over the top of the flame spreaders,
resting the ends on the upper shelves toward the front
and back of the compartment.
5. Make sure the grates and flame spreaders lie fiat and
that there is nothing beneath them.
6. Mount the warming rack on the pins near the top of
the compartment.
7. Insert the drip tray into the slot below the burners.
Push it all the way in until it stops.
Optional Side Burner Assembly
1. Place the burner heads over the burner bases. Line up
the notches on the side of each burner head with the
pins on each burner base,
2, Put the burner caps over the top of the burner heads,
The notches on the bottom line up with the pins on
the burner base, Gently twist each cap back and forth
to make sure it seats completely,
3, Gently set the grate on top of the side burner cook-
top, Line up the legs with the corresponding dimples,
The side burner cover goes over the top of the grate
and helps keep the side burner clean when not in use,
Electrical Requirements
WARNING
• Connect the power cords for this outdoor cooking
gas appliance only to an electrically grounded outlet
that meets local codes for outdoor appliances. In
the absence of local codes, the electrical outlet
must meet National Electric Code, ANSI/NFPA 70
or Canadian Electrical Code Standards for outdoor
appliances.
• Keep any electrical supply cords and the fuel supply
hose away from any heated surfaces and sharp
edges. Keep the power cords dry and up off of the
ground.
The outdoor grill and the rotisserie motor are
equipped with three prong grounding plugs to mini-
mize the possibility of an electric shock hazard from
this appliance. Plug them only into a three prong
electrical outlet equipped for use with outdoor appli-
ances that is protected by a minimum 15 Amp. circuit
breaker or fuse.
Dacor highly recommends installing a dedicated
electrical outlet for your outdoor grill according to the
requirements above.
Electrical Connection
Electrical Connection for Built-in Installations:
Connect the power cord from the outdoor grill to an
electrical outlet that meets the the above require-
ments. An outlet equipped with a ground fault inter-
rupter (GFI) is highly recommended whether or not
it is required by local code. GFI electrical outlets are
designed to minimize the risk of injury due to an elec-
tric shock.
Electrical Connection for Dacor Cart Installations:
Dacor OBC series grill carts are designed for a custom fit
with OB and OBS series grills. The OBC series grill cart is
equipped with a GFI type electrical outlet.
1. Connect the outdoor grill power cord to the electrical
outlet located on the back wall at the back of the LP
tank compartment.
2. If the cart is equipped with a warming oven, plug it
into the same electrical outlet.
3. Pull open the cover on the cart power input plug and
connect an extension cord (15 Amp. minimum).
4. Connect the other end of the extension cord to a
grounded three prong electrical outlet equipped for
use with outdoor appliances that meets the require-
ments above.
6
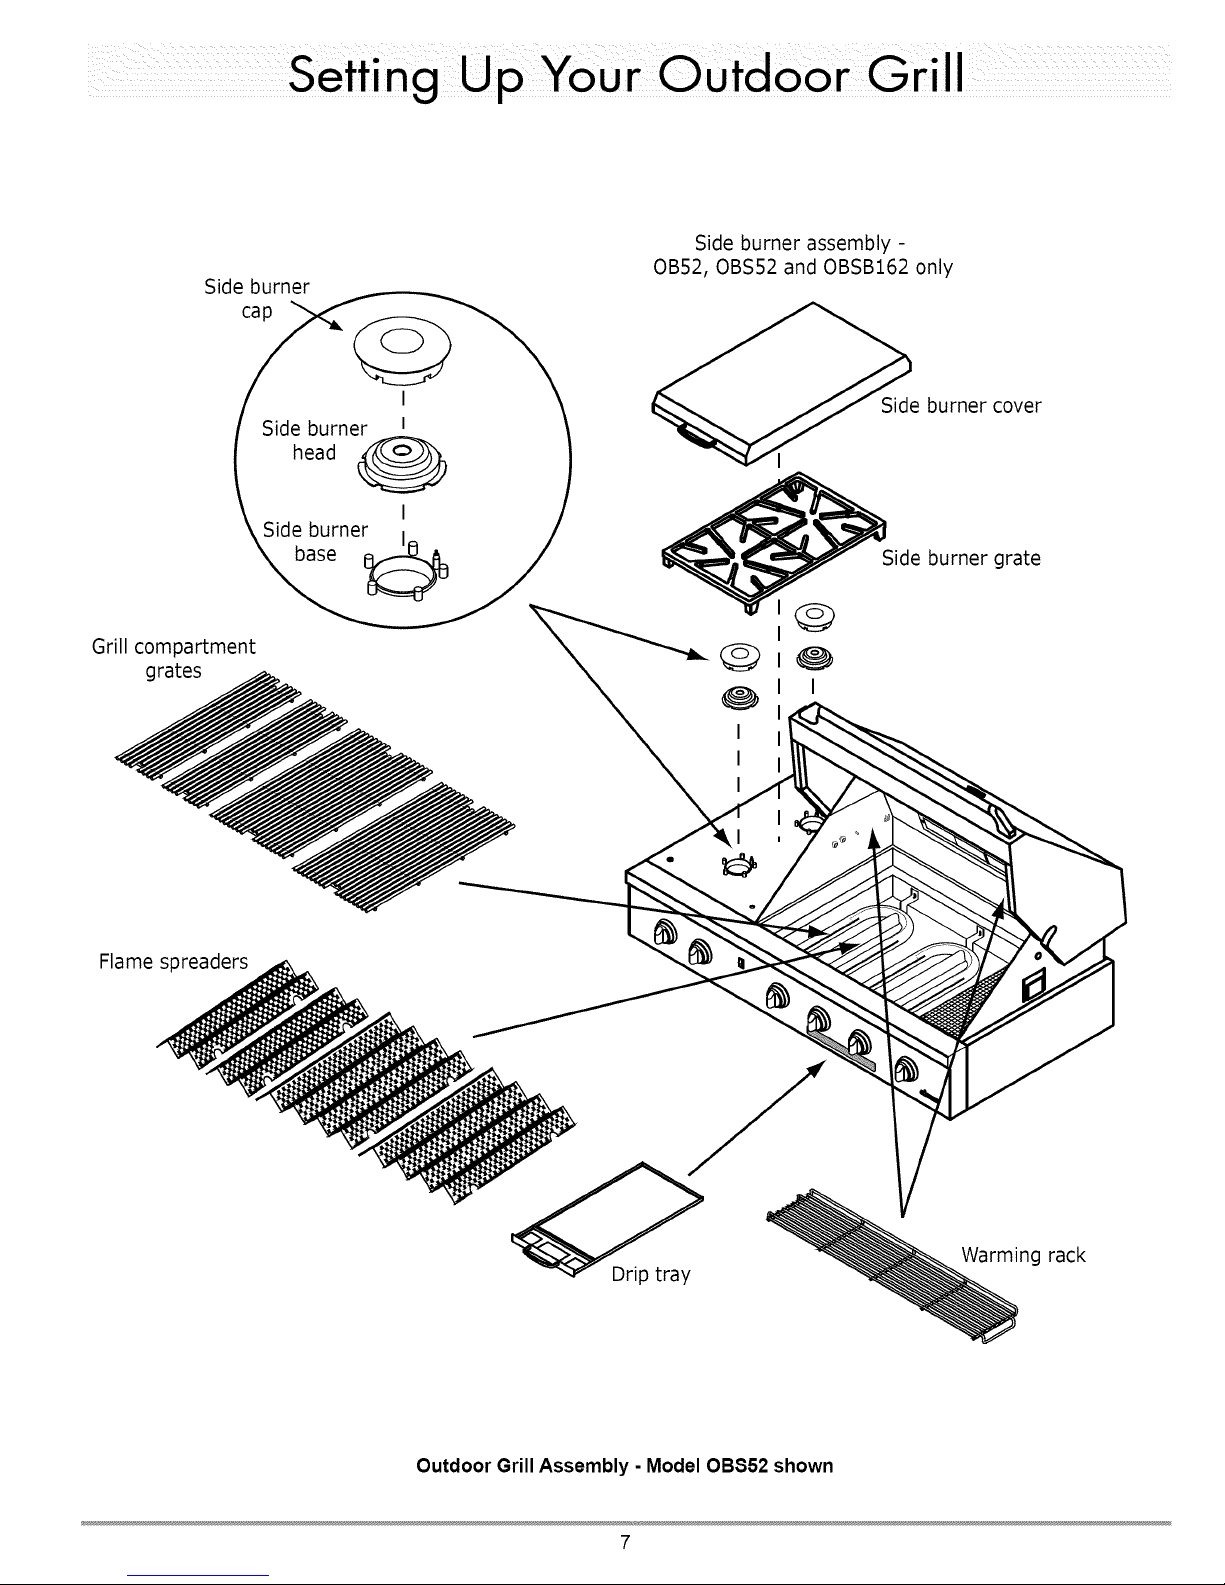
Sideburner
Grill compartment
grates
Side burner assembly -
OB52, OBS52 and OBSB162 only
Side burner cover
[ Side burner I
/ head@ )
Side burner grate
Flame spreaders
Warming rack
Drip tray
Outdoor Grill Assembly - Model OB852 shown
7
 Loading...