

DèLonghi GSI501A User Operating Instructions Manual
GSI501A
gas cooker
Before operating this cooker,
please read these instructions carefully
Users Operating Instructions
GB

2
Dear Customer
Thank you for choosing one of our appliances which has been carefully designed and
built by our specialist staff and thoroughly tested to satisfy your cooking requirement.
We suggest that you read this Instruction Booklet so that you will understand fully how
to operate the appliances.
Please keep the booklet handy. You may wish to refer to it at a later date.
De Longhi

3
Contents
Model GSI501A
Page Number
Features and technical data . . . . . . . . . . . . . . . . . . . . . . . . . . . . . . . . . . . . . . . . . 4
How to use the hob burners . . . . . . . . . . . . . . . . . . . . . . . . . . . . . . . . . . . . . . . . 5
Hob burners . . . . . . . . . . . . . . . . . . . . . . . . . . . . . . . . . . . . . . . . . . . . . . . . . . 5
Lighting of the hob burners . . . . . . . . . . . . . . . . . . . . . . . . . . . . . . . . . . . . . . 5
Choice of the burner . . . . . . . . . . . . . . . . . . . . . . . . . . . . . . . . . . . . . . . . . . . 6
How to use the gas oven . . . . . . . . . . . . . . . . . . . . . . . . . . . . . . . . . . . . . . . . . . . 7
Lighting the oven gas burner . . . . . . . . . . . . . . . . . . . . . . . . . . . . . . . . . . . . . 7
Oven thermostat . . . . . . . . . . . . . . . . . . . . . . . . . . . . . . . . . . . . . . . . . . . . . . . 7
Oven cooking temperatures table . . . . . . . . . . . . . . . . . . . . . . . . . . . . . . . . . 8
How to use the grill . . . . . . . . . . . . . . . . . . . . . . . . . . . . . . . . . . . . . . . . . . . . . . . . 9
Lighting the grill burner . . . . . . . . . . . . . . . . . . . . . . . . . . . . . . . . . . . . . . . . . . 9
Important notes . . . . . . . . . . . . . . . . . . . . . . . . . . . . . . . . . . . . . . . . . . . . . . . . . . 10
After sales service . . . . . . . . . . . . . . . . . . . . . . . . . . . . . . . . . . . . . . . . . . . . . . . . 10
Do’s and do not’s . . . . . . . . . . . . . . . . . . . . . . . . . . . . . . . . . . . . . . . . . . . . . . . . 11
Care and maintenance . . . . . . . . . . . . . . . . . . . . . . . . . . . . . . . . . . . . . . . . . . . . . 12
For the installer
Location . . . . . . . . . . . . . . . . . . . . . . . . . . . . . . . . . . . . . . . . . . . . . . . . . . . . . . . . 14
Stability bracket . . . . . . . . . . . . . . . . . . . . . . . . . . . . . . . . . . . . . . . . . . . . . . . . . . 15
Provision for ventilation . . . . . . . . . . . . . . . . . . . . . . . . . . . . . . . . . . . . . . . . . . . . 16
Gas installation . . . . . . . . . . . . . . . . . . . . . . . . . . . . . . . . . . . . . . . . . . . . . . . . . . . 17
Conversion to LPG . . . . . . . . . . . . . . . . . . . . . . . . . . . . . . . . . . . . . . . . . . . . . . . . 19
1 - Injectors replacement of top burners . . . . . . . . . . . . . . . . . . . . . . . . . . . . . . 19
2 - Adjusting of primary air of the top burners . . . . . . . . . . . . . . . . . . . . . . . . . . 19
3 - Adjusting of the minimum of the top burners . . . . . . . . . . . . . . . . . . . . . . . . 20
Table for the choice of the injectors . . . . . . . . . . . . . . . . . . . . . . . . . . . . . . . 21
4 - Replacement of the oven burner injector . . . . . . . . . . . . . . . . . . . . . . . . . . . 22
5 - Replacement of the grill burner injector . . . . . . . . . . . . . . . . . . . . . . . . . . . . 22
6 - Primary air of the oven burner . . . . . . . . . . . . . . . . . . . . . . . . . . . . . . . . . . . . 23
7 - Primary air of the grill burner . . . . . . . . . . . . . . . . . . . . . . . . . . . . . . . . . . . . . 23
8 - Regulating of the oven minum . . . . . . . . . . . . . . . . . . . . . . . . . . . . . . . . . . . . 24
Lubrication of the gas taps . . . . . . . . . . . . . . . . . . . . . . . . . . . . . . . . . . . . . . . . . 25
Electrical installation . . . . . . . . . . . . . . . . . . . . . . . . . . . . . . . . . . . . . . . . . . . . . . 26
4
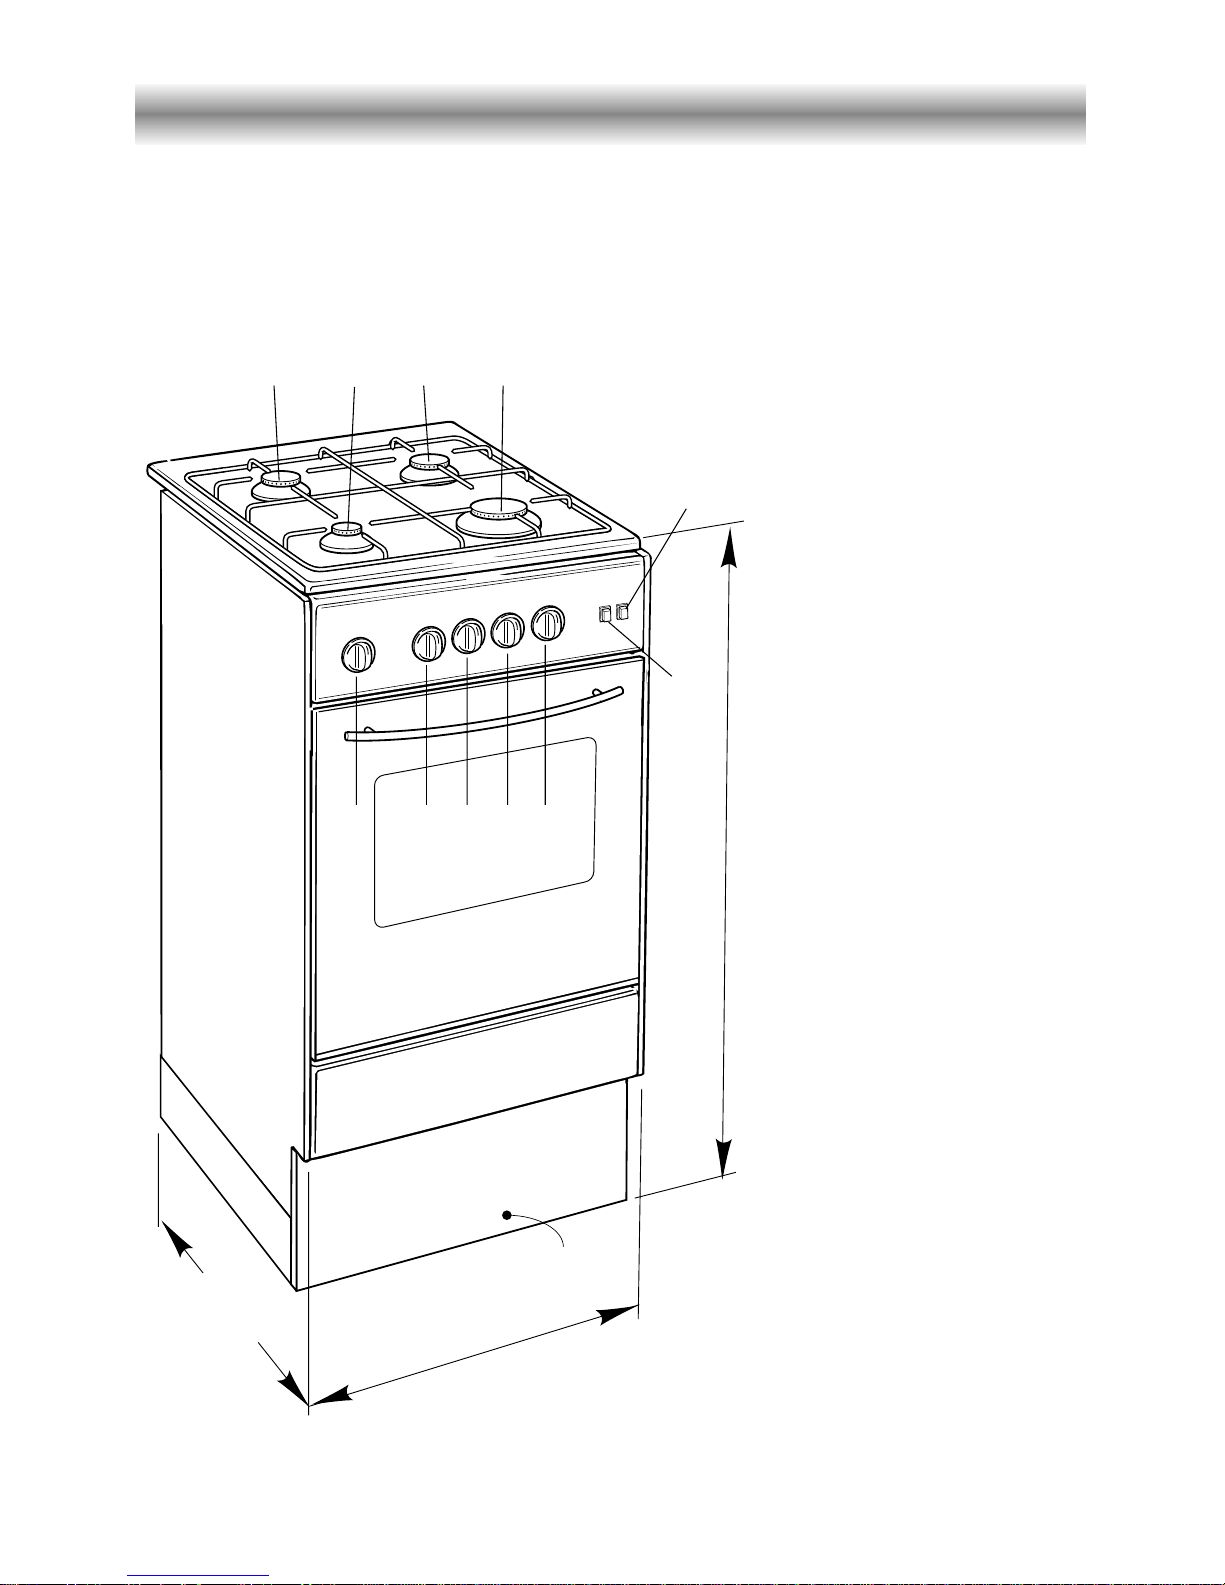
Features and technical data
Gas burners (Fig. 1)
1. Auxiliary burner (A)
1.00 kW
2. Semi-rapid burner (SR)
1.90 kW
3. Semi-rapid burner (SR)
1.90 kW
4. Rapid burner (R)
2.95 kW
Gas oven
– Gas burner - 3.25 kW
– Grill burner - 2.35 kW
– Usable oven volume
43 dm
3
Control panel (Fig. 1)
5. Front left burner (1)
control knob
6. Rear left burner (2)
control knob
7. Rear right burner (3)
control knob
8. Front right burner (4)
control knob
9. Oven/Grill control knob
11. Hob burners ignition pushbutton
12. Oven light switch
Fig. 1
500 mm
500 mm
PLINTH
900 mm
2134
5 6 7 89
11
12
5
How to use the hob burners
The hob is made of steel coated with
vitreous enamel to provide a durable
and attractive surface.
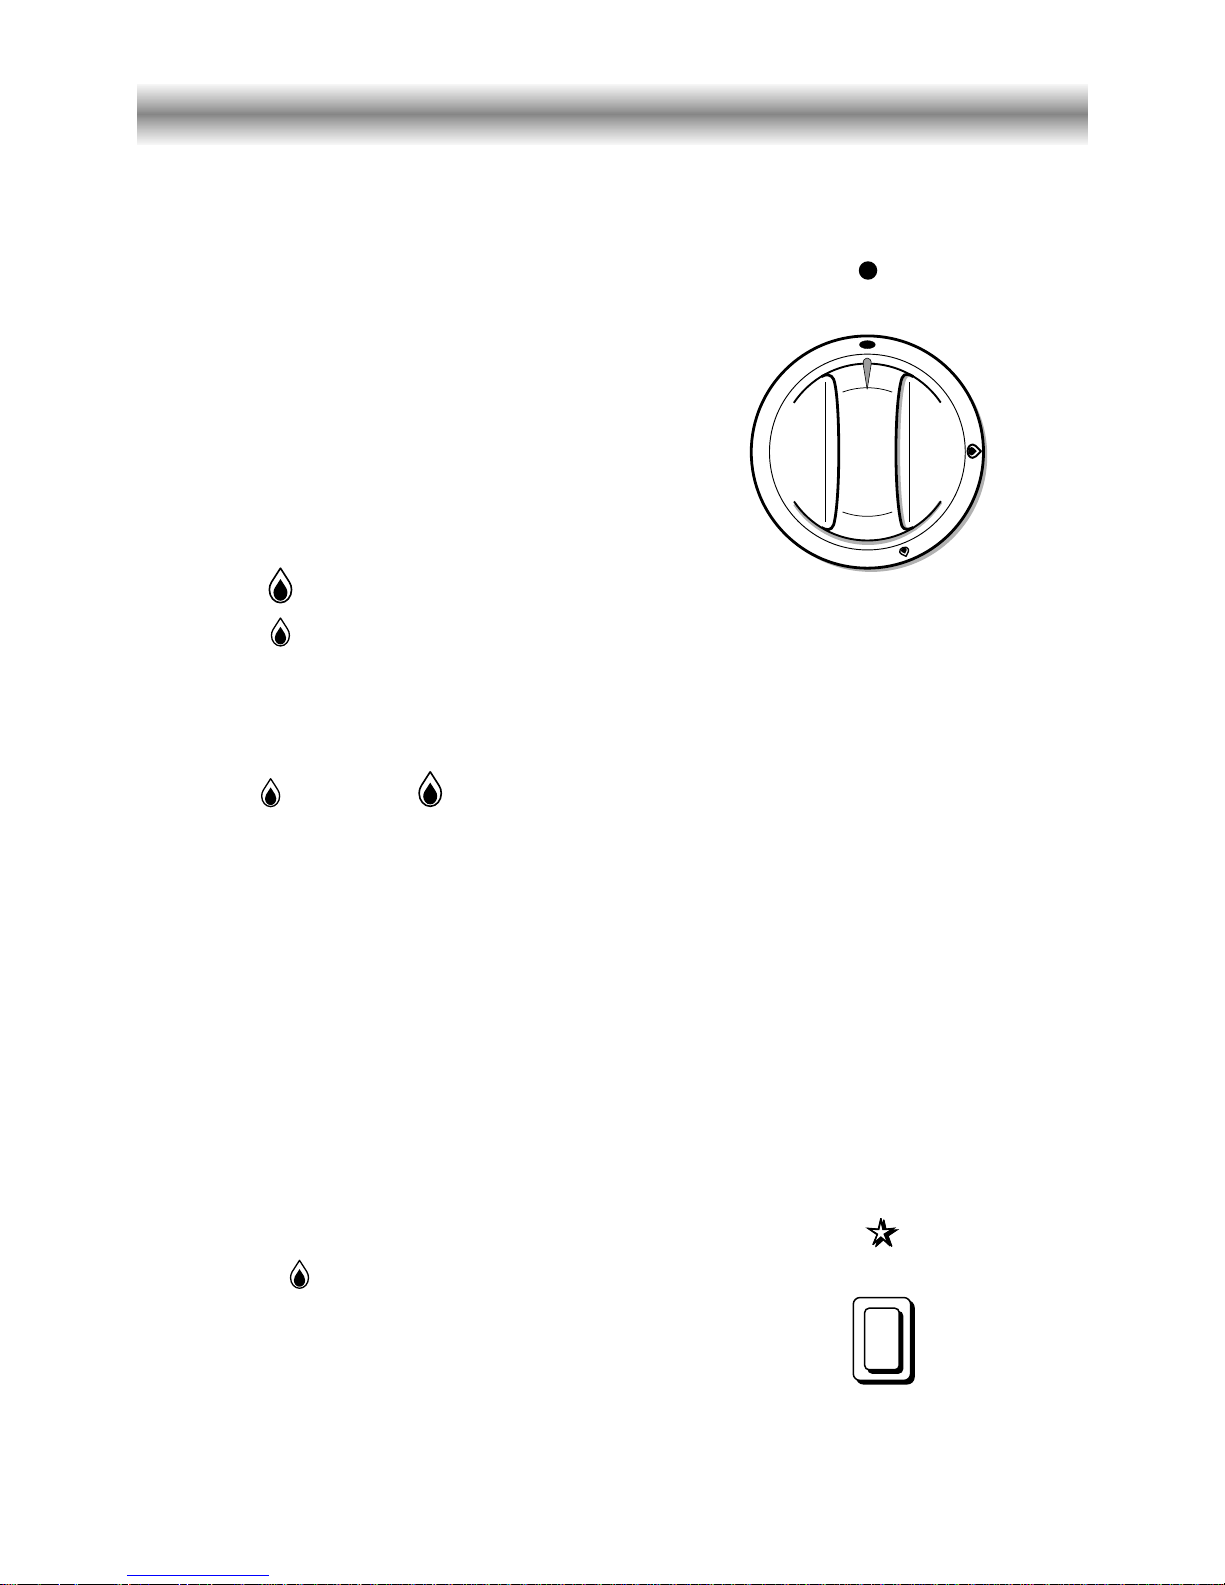
Hob burners
Each hob burner is controlled by a
separate gas tap operated by a control
knob (fig. 2) which has 3 positions
marked on the knob, these are:
– Symbol ● : tap closed (burner off)
– Symbol : High (maximum)
– Symbol : Low (minimum)
Lighting of the hob burners
Push the ignition push-button 3 (marked with the
symbol
★
) and push in and turn the appropriate
control knob in an anti-clockwise direction until
the maximum position (marked with the large
flame symbol ) is reached, after the burner
lights, adjust the flame to the setting you require.
Push in and turn the knob anti-clockwise to the selected position.
Low High
To turn the burner off, fully rotate the knob clockwise to the off position: ●.
The maximum setting of the control tap is for boiling, the minimum setting is for slow
cooking and simmering.
All working positions must be chosen between the maximum and minimum setting,
never between the maximum setting and the “OFF” position.
Fig. 2
Fig. 3
6
Burners Pan diameter
Auxiliary 16 cm
Semi-rapid 16 ÷ 22 cm
Rapid 22 ÷ 26 cm
Fig. 4
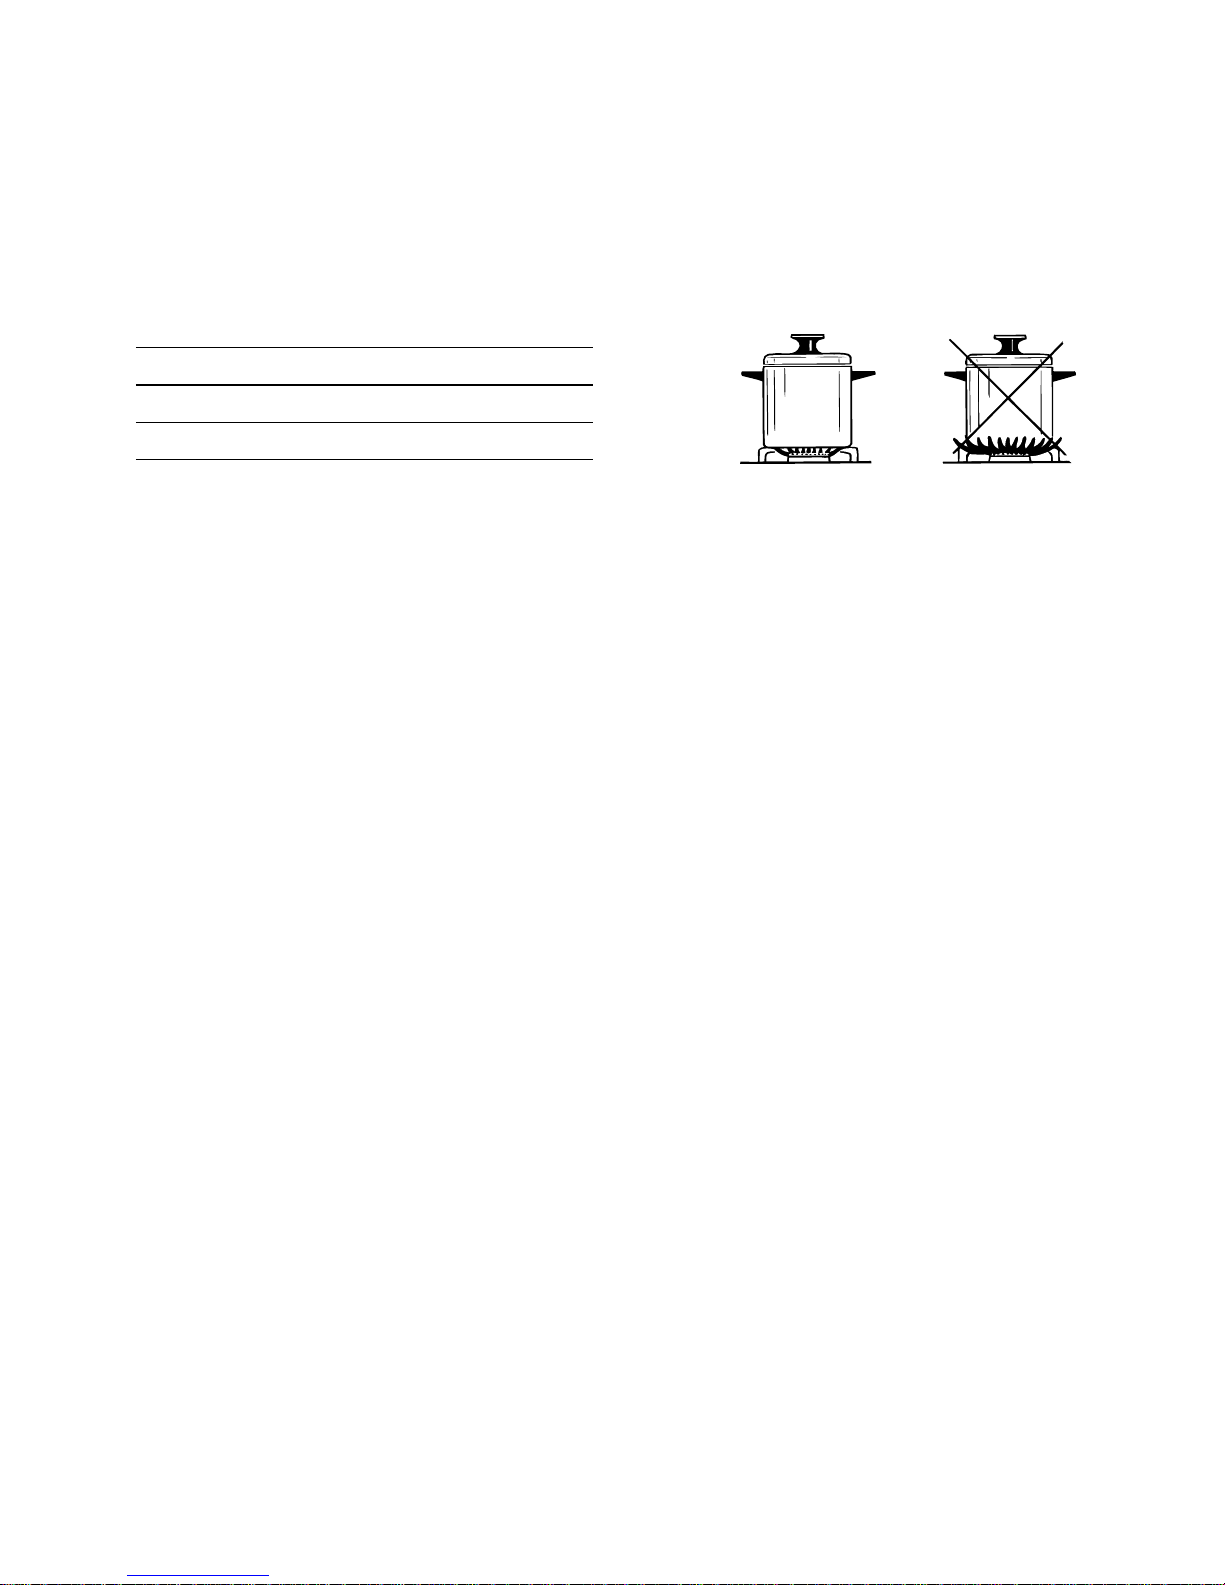
Choice of burner
The burner must be chosen according to the diameter of the pans and energy required.
The hotplate has been designed with safety in mind, however normal care in use should
be observed.
Do take care to avoid burns and scalds when reaching across the hotplate.
Pans with flat bases are more stable than those which are warped.
Saucepans with handles which are excessively heavy, in relationship to the weight of the
pan, are safer as they are less likely to tip.
Pans which are positioned centrally on burners are more stable than those which are
offset.
It is far safer to position the pan handles in such a way that they cannot be accidentally
knocked.
When deep fat frying fill the pan only one third full of oil.
DO NOT cover the pan with a lid and DO NOT leave the pan unattended.
In the infortunate event of a fire, leave the pan where it is and turn off all controls.
Place a damp cloth or correct fitting lid over the pan to smother the flames.
DO NOT use water on the fire.
Leave the pan to cool for at least 30 minutes.
7
How to use the gas oven
Fig. 5
Lighting the oven gas burner
The thermostat allows the automatic control of the temperature.
The gas delivery to the oven burner is controlled by a two way thermostatic tap (oven
and grill burners) with flame-failure device.
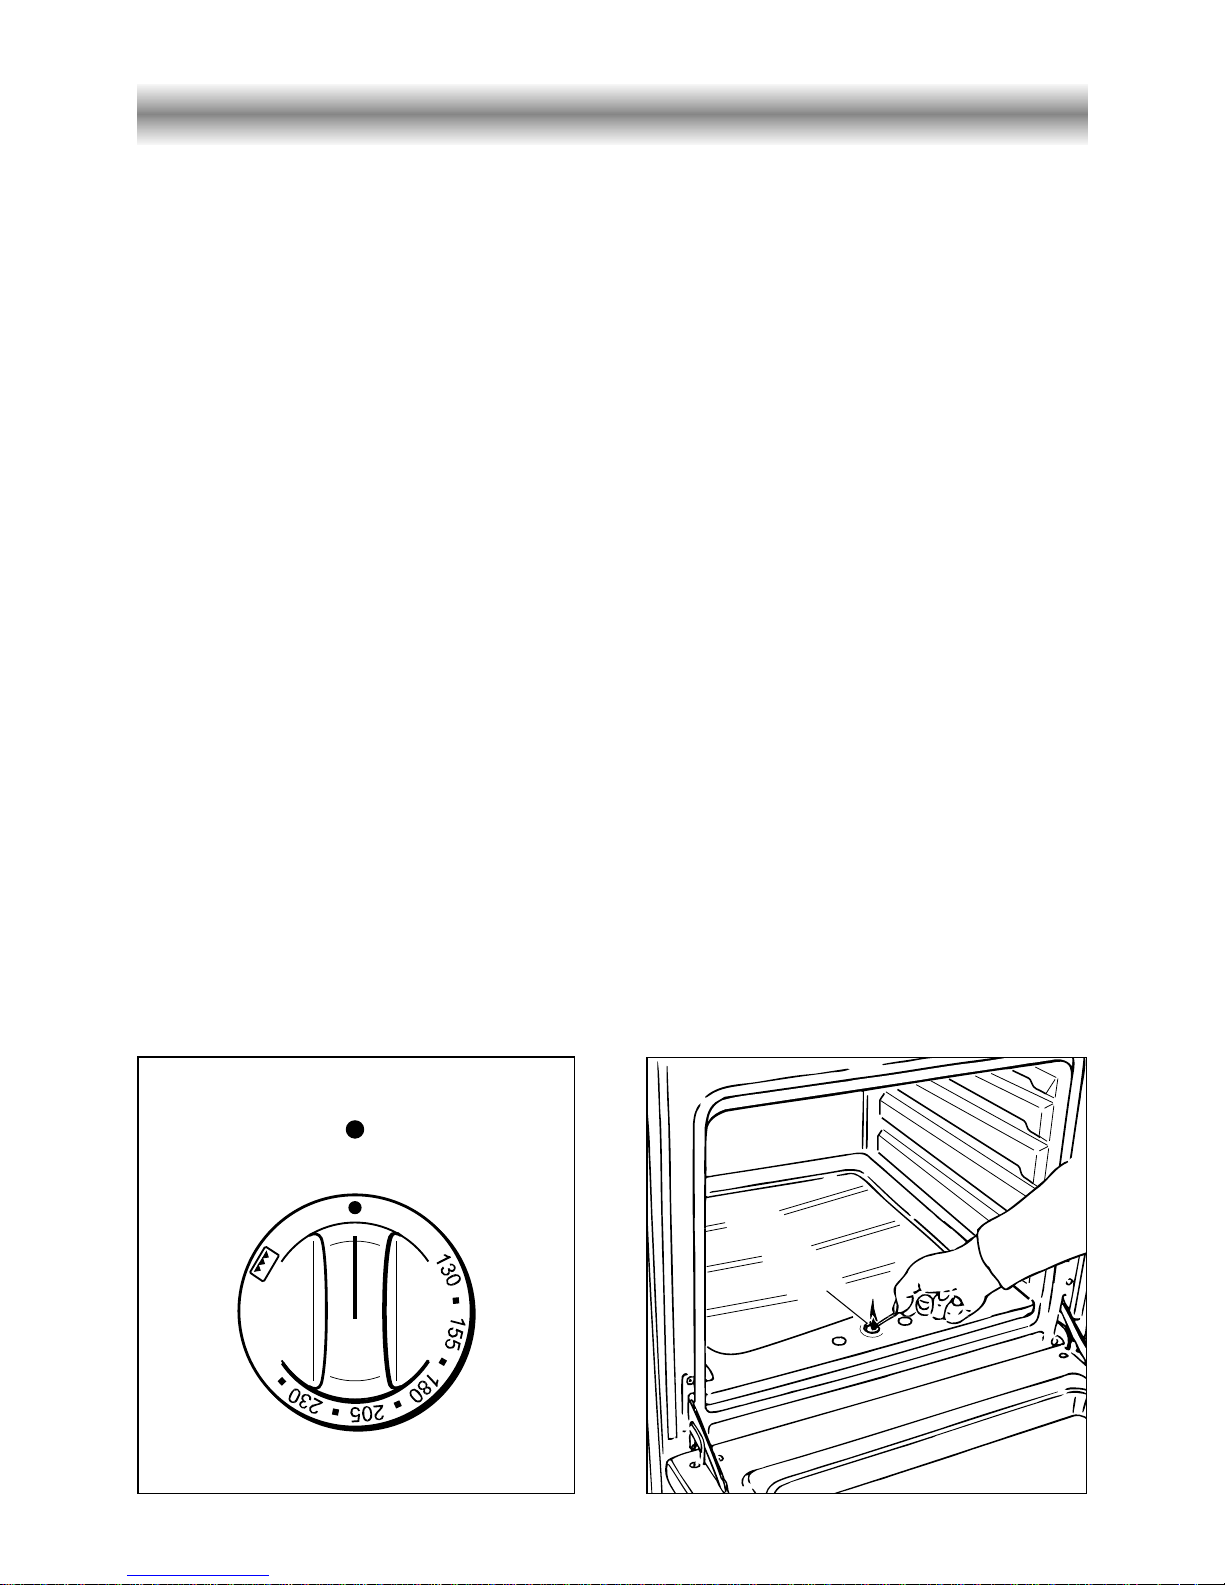
To light the oven burner operate as follow:
- Open the oven door and apply a lighted mach or taper to hole “A” in the oven base
plate (fig. 6)
- Push and turn the oven knob anti-clockwise to position 230.
- Once the oven burner is lit, wait for about 15 seconds before releasing the knob (time
of priming of the valve) and then close the oven door slowly.
Turn the oven knob to the position for the required temperature (see the thermostat
grade table).
Should the flame of the burner estinguish for any reason, the safety valve will cut
off automatically the gas flow to the tap. To re-start operation, take the knob to
“off” position and repeat operations as above explained.
Oven thermostat
The thermostatic control tap knob (fig. 5) is marked with numbers from 130 to 230,
these correspond to the oven temperature, in addition the “OFF” position is shown by
the symbol ●.
To choose the required oven temperature (check with the “Oven cooking guide”), turn
the control knob until the number, required is level with the line mark on the control
panel (facia).
Fig. 6
A
8
Oven cooking temperatures
MARK
APPROX. HEAT OF TYPE OF DISH TO COOK
TEMP. OVEN
130 130°C Very cool Meringue cakes,
oven slow cooking items
- 140°C Cool or Milk puddings, very rich fruit
slow oven cakes, i.e., Christmas
155 155°C Cool or Stews, casseroles, braising,
slow oven rich fruit cakes, i.e., Dundee
- 165°C Warm oven Biscuits, rich plain cakes
i.e., Madeira. Low temp. roasting
180 180°C Moderate Plain cakes, Victoria
oven sandwich, raised meat pies
- 190°C Fairly hot Small cakes, savoury flans,
oven fish
205 205°C Hot oven Plain cakes and buns, swiss rolls,
fruit pies. High temp. roasting
- 215°C Moderately Bread and bread rolls etc., scones,
hot oven flaky and rough puff pastry,
yorkshire pudding
230 230 Very hot Sausage rolls, mince pies, puff
oven pastry, pizza
Browning ready cooked dishes
Oven light
The oven is equipped with a oven light which is operated by the switch on the control
panel.
9
How to use the grill
Lighting the grill burner
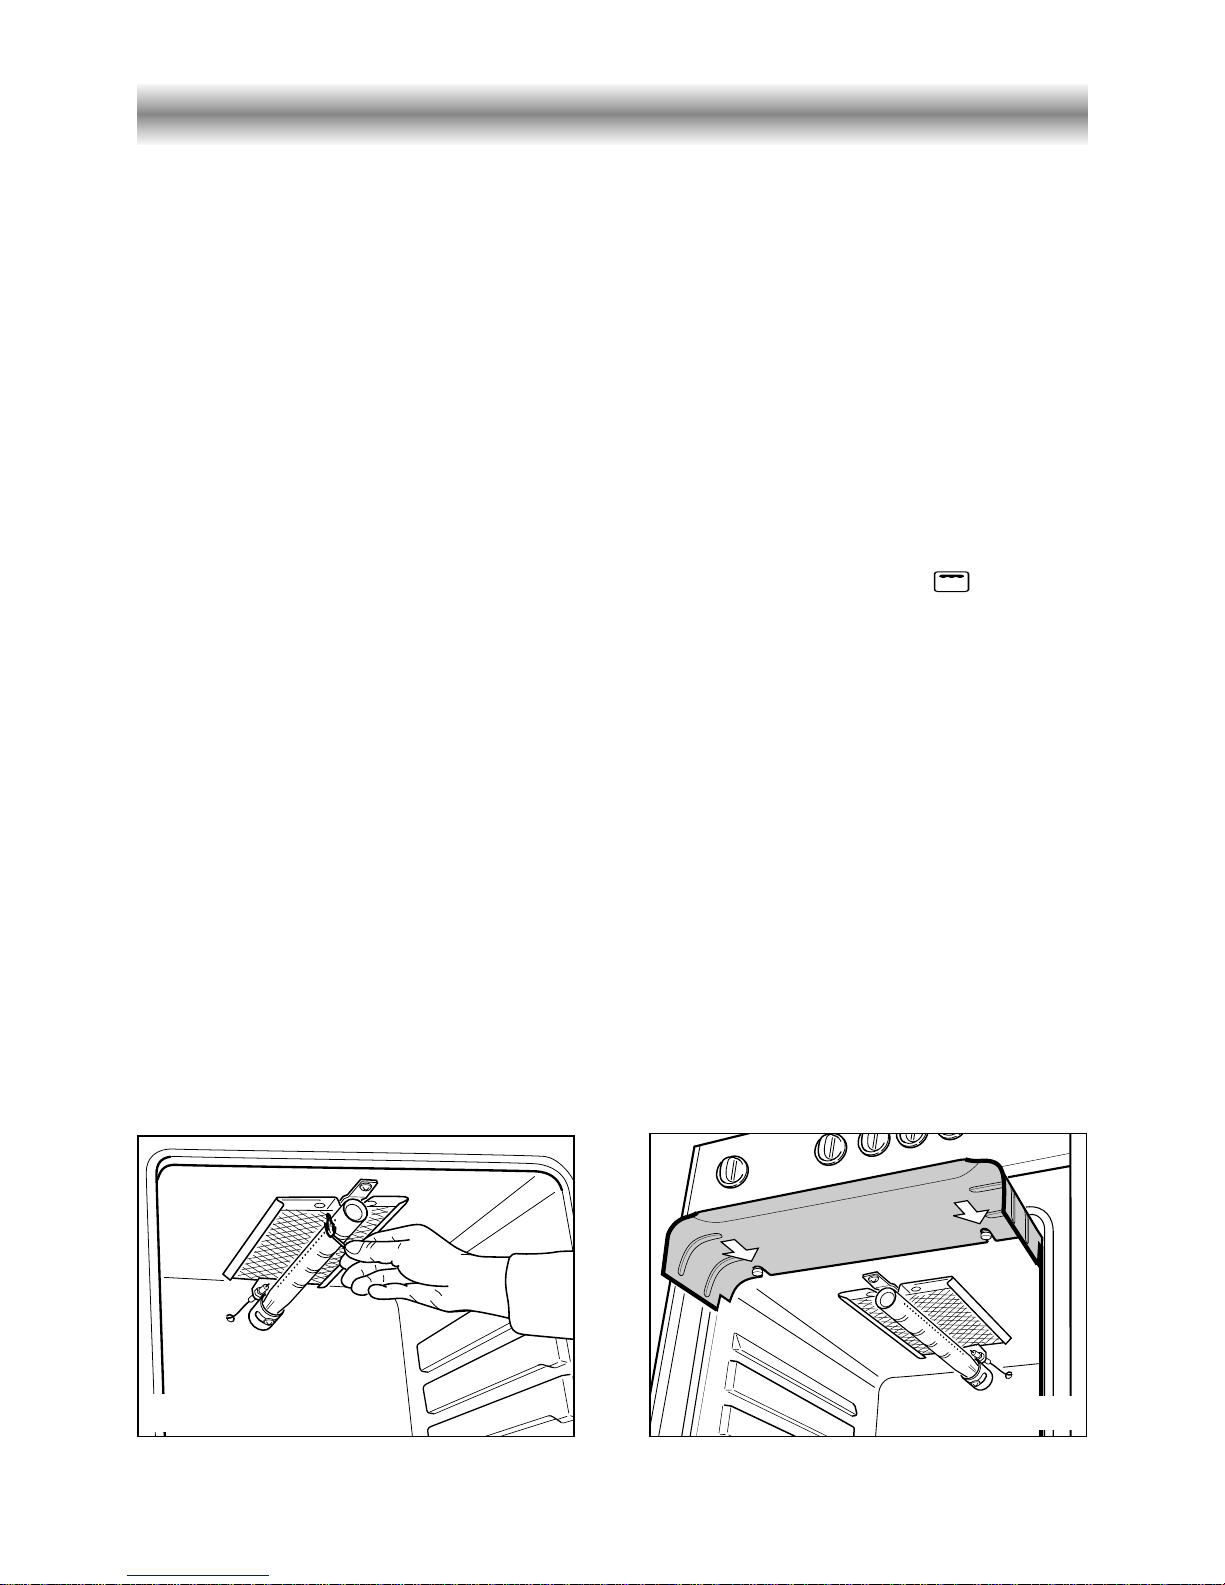
Do not grill with oven door closed.
Always fit the heat shield supplied with the cooker under the front panel before
commencing operations (Fig. 8).
WARNING. The heat shield and the oven door reaches a very high temperature
whilst in use. Keep children away and allow to cool before removing.
The grill burner generates the infra-red rays for grilling.
To light the grill burner operate as follow:
- Open the oven door and apply a lighted match or taper to the grill burner (fig. 7)
- Push and turn the grill/oven knob clockwise until you match the symbol with the
control panel reference line.
- Once the grill burner is lit, wait for about 15 seconds before releasing the knob (time
of priming of the valve) and than set the oven door in half-closed position.
Should the flame of the burner estinguish for any reason, the safety valve will cut
off automatically the gas flow to the tap. To re-start operation, take the knob to
“off” position and repeat operations as above explained.
Fig. 7
Notes:
– The grill burner has only one setting, that is full-on
– It is important that the heat shield is fitted the correct way up, as shown in the figure 8.
IMPORTANT WARNING
For best results when using the grill, place the shelf on the second level and when using the
grill pan handle avoid contact with the heat shield which will be
HOT during use
Fig. 8
 Loading...