

Page 1

User Manual
SHUTTLE
TM
www.cywee.com
Page 2

Welcome. Thank you for
purchasing your
Air Shuttle.
Page 3

Table of Contents
Chapter 1: Getting Started With Air Shuttle
Introduction
Package Contents
Compatible Devices
Chapter 2: Connecting Your Air Shuttle
Set Up
Usage
Chapter 3: Troubleshooting Your Air Shuttle
Charging Instructions
Maintenance
Technical Specifications
Troubleshooting
Safety Information
Contact Us
06
06
06
10
12
14
14
15
16
16
19
Page 4

1
Getting Started
With Air Shuttle
Page 5
Introduction
CyWee Air ShuttleTM is a plug-and-play device that enables
users to stream media content from their Apple devices to a
TV without the need for cables and wires. Extremely portable,
the Air Shuttle can be transported from the home to the road
for entertainment, business, and many other applications.
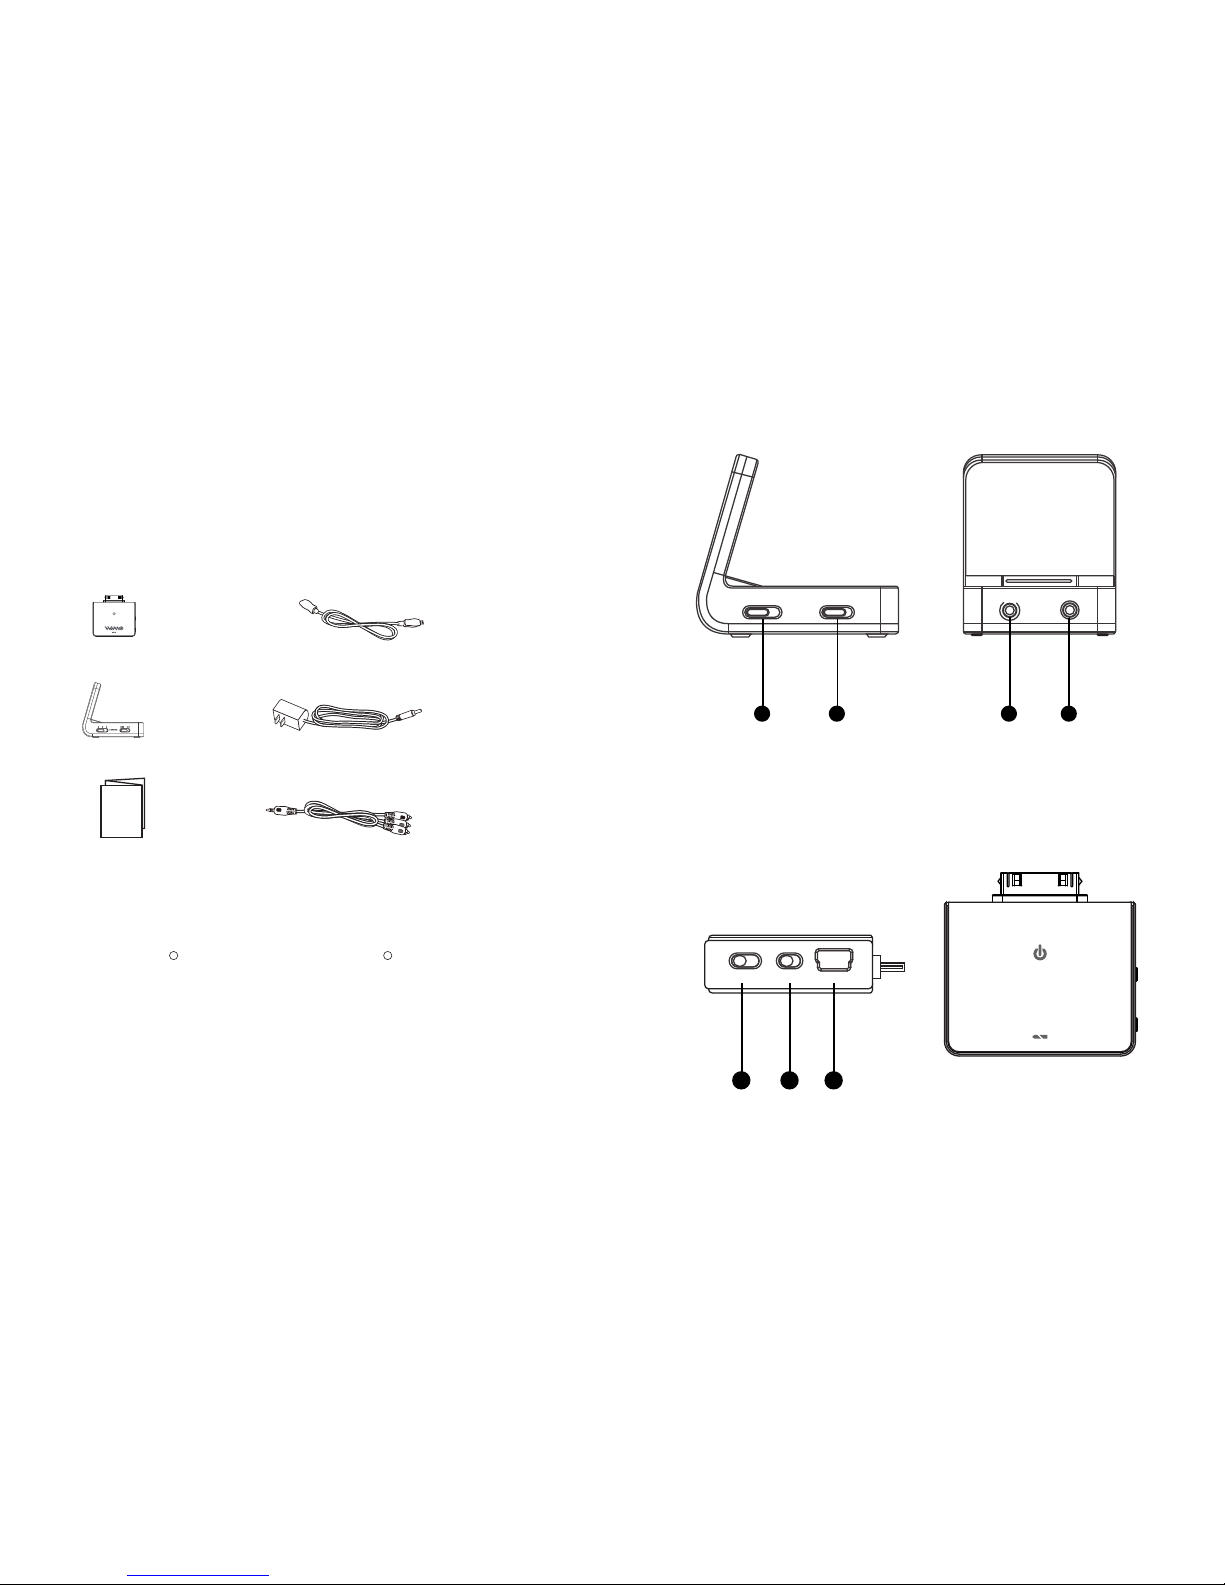
Receiver Connectors/Switches
1. Channel Selector 3. DC-IN Power Port
2. Power Switch 4. A/V OUT
1 2 3 OFF ON
CHANNEL
1 2
D
C
I
N
A
/
V
O
U
T
3 4
Transmitter Connectors/Switches
1. Channel Selector
3 . Mini-USB Port
2. Power Switch
Compatible Devices
1. iPhone 4
c
2. iPhone 3GS
3. iPhone 3G
4. iPhone
5. iPad
TM
6. iPod touch
c
(4th Gen)
7. iPod touch (3
rd
Gen)
8. iPod touch (2
nd
Gen)
9. iPod nano (6
th
Gen)
10. iPod nano (4
th
and 5th Gen)
Package Contents
- Transmitter - Mini-USB to USB Charging
- Receiver - Receiver Power Adapter Cable
- User Manual - Audio/Video Cable
User Manual
CHANNEL
1 2 3 OFF ON
1 2 3
06 Chapter 1: Getting Started With Air Shuttle Chapter 1: Getting Started With Air Shuttle 07
Page 6

2
Connecting Your
Air Shuttle
Page 7
Set Up
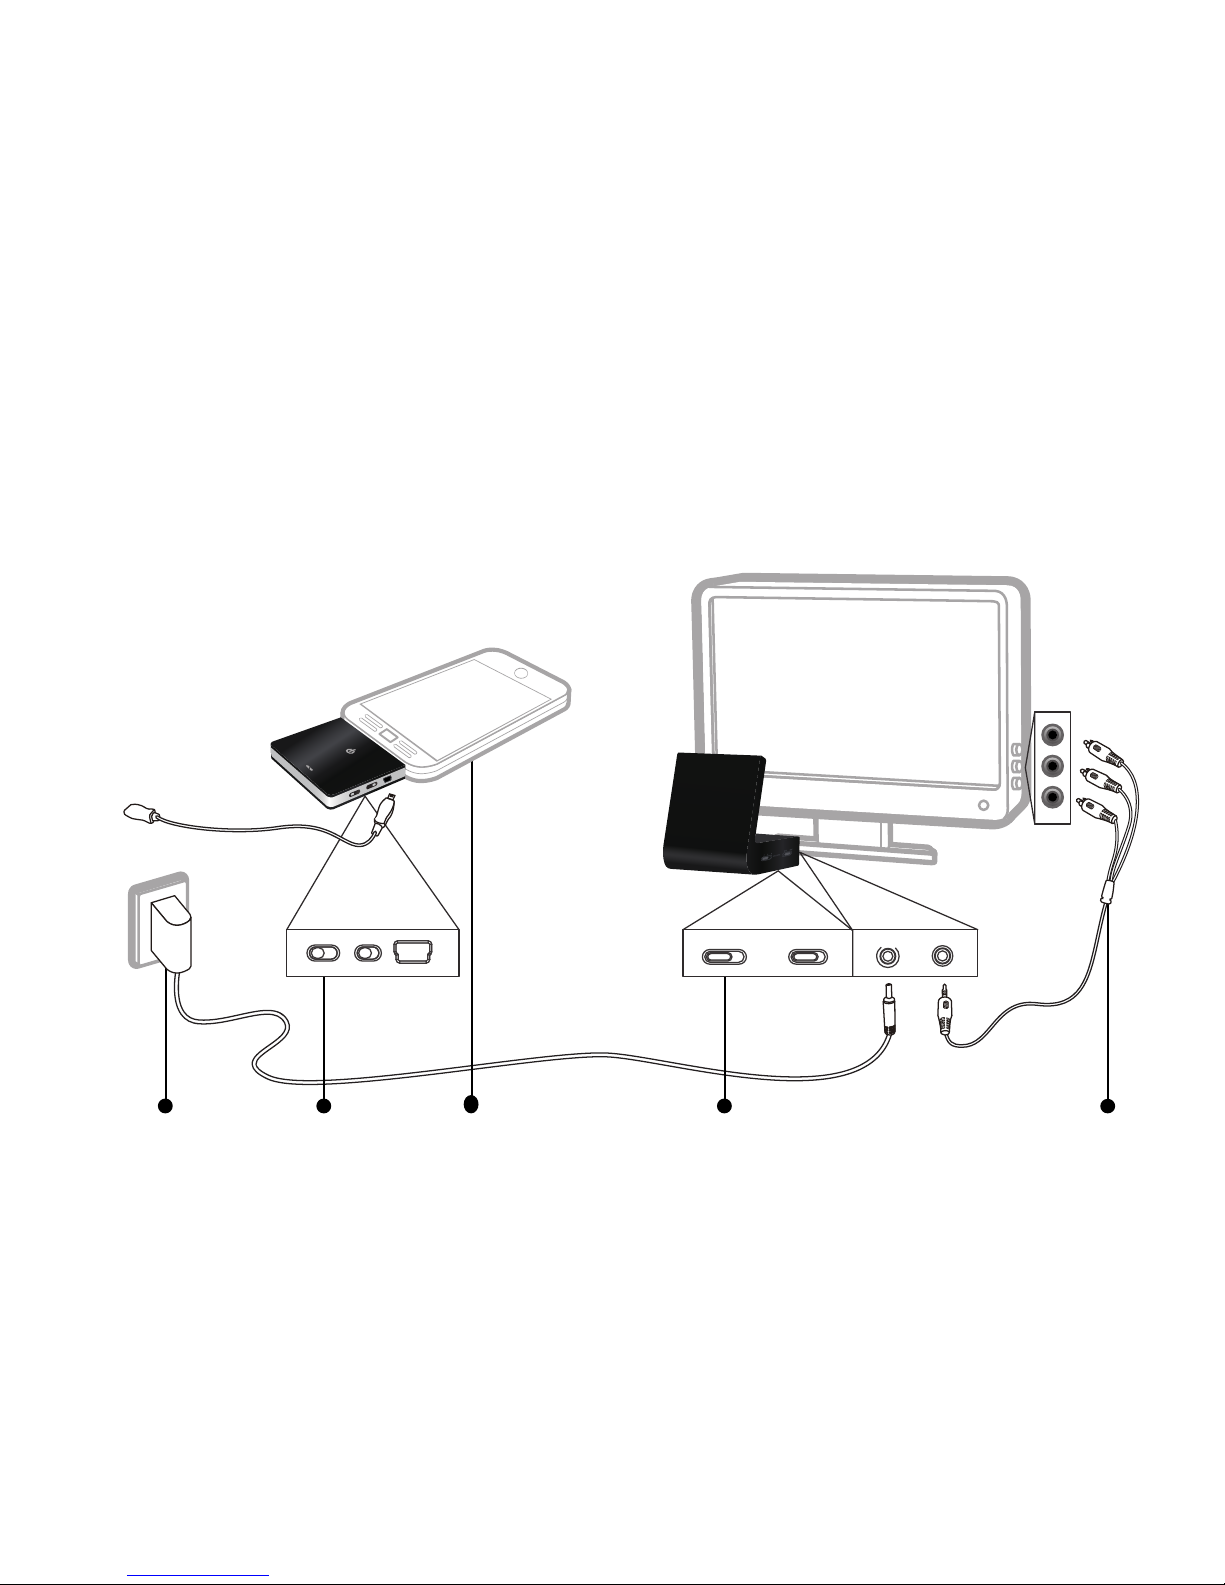
1. Plug the Receiver Power Adapter Cable into the receiver’s
DC-IN power port and turn on the receiver.
2. Set the transmitter and receiver channel switches to the
same channel.
3. Attach the fully charged transmitter into the mobile device
and turn on. When the transmitter is on, the Power LED emits
a green light.
4. Plug the Audio/Video cable (red, yellow, and white
connectors) into the audio/video input ports on your TV.
Attach the opposite end of the cable into the receiver’s
A/V OUT port.
5. On your TV, select the appropriate input setting.
6. You are now ready to begin streaming media wirelessly
to your TV.
1
3
2
1 2 3 OFF ON
CHANNEL
4
2
1 2 3 OFF ON
CHANNEL
D
C
I
N
A
/
V
O
U
T
CHANNEL
1 2 3 OFF ON
10 Chapter 2: Connecting your Air Shuttle Chapter 2: Connecting your Air Shuttle 11
Page 8

Streaming a video/movie
1. Make sure the transmitter is fully charged, and both devices
are set up for streaming (see Set Up).
2. For iPhone users, select the “iPod” icon and then play a
video from your library.
3. For iPad and iPod touch users, select the “Videos” icon
and press “play” to begin streaming.
4. The video will be played on your TV screen.
Streaming an app
1. Download and install an app that supports Apple’s
TV-out function. For a list of apps that support Apple’s
TV-out function, please visit www.cywee.com.
2. Launch the app from your device.
3. Most apps that support TV-out will automatically appear
on the TV screen.
4. For some apps such as games, additional steps may be
required. Follow the onscreen instructions to display on the
TV.
Streaming a presentation
1. You must have a presentation app installed on your device
that supports TV-out to use this function (e.g. Keynote for
iPad).
2. Launch the presentation app.
3. For some presentation apps, the presentation can only be
viewed in slideshow mode.
4. Start the slideshow and the presentation will be instantly
displayed on the TV screen.
Streaming a photo slideshow
1. Select the “Photos” icon.
2. Photos using the TV-out can only be shown as a slideshow.
3. On an iPad, select “slideshow” and “start” to begin viewing
photos.
4. On an iPhone or iPod touch, press “play” to start slideshow
and begin viewing. The slideshow will instantly appear on
the TV.
12 Chapter 2: Connecting your Air Shuttle
3
Troubleshooting
Your Air Shuttle
Page 9
Maintenance
1. Unplug the power and disconnect all external
devices and cables from the transmitter and receiver.
2. Gently remove any surface dirt using a damp, soft
lint-free cloth. Dry the plastic with a soft lint-free cloth
after cleaning.
3. To clean the device, do not use cleaning sprays or
solvents of any kind containing alcohol or other
inflammable liquids.
Charging Instructions
Charging the Transmitter
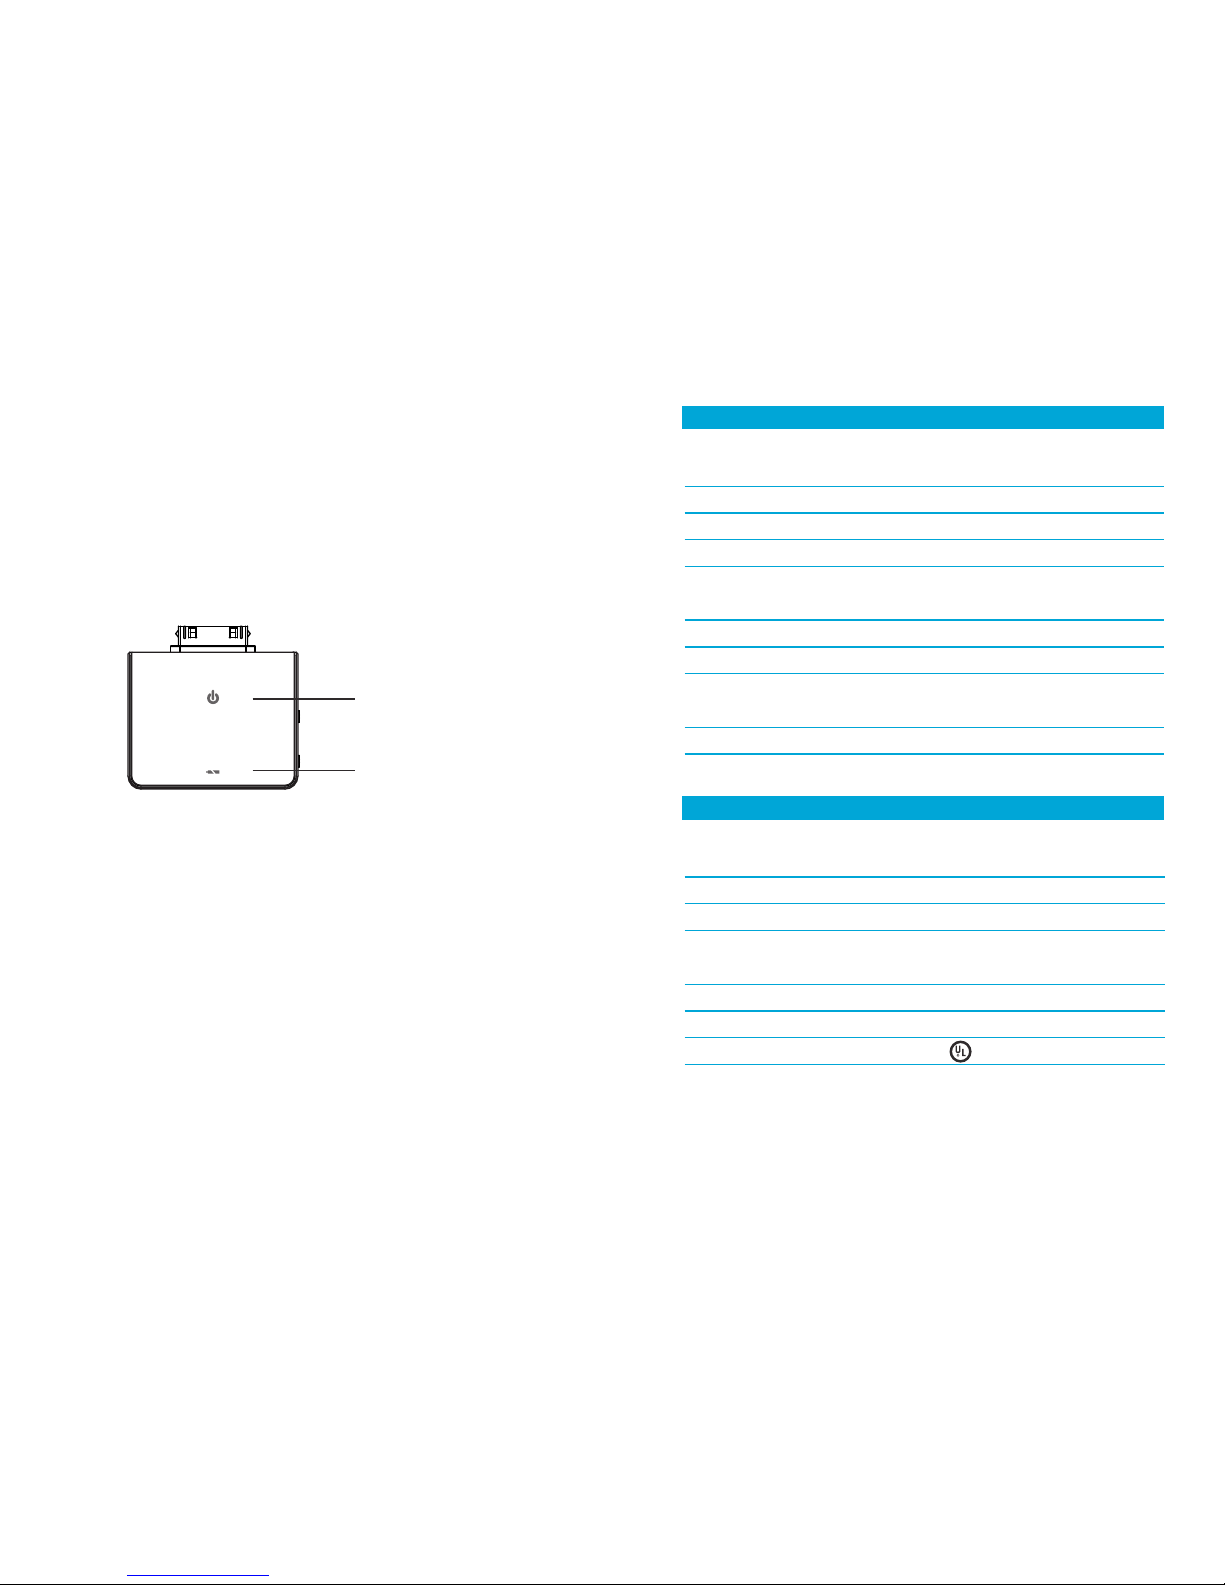
1. When the red LED flashes, the device has less than ten
minutes of playback time and will need to be charged
immediately.
2. Connect the mini-USB cable to the transmitter.
3. Connect the USB cable to a power source that accepts
USB. (computer, USB charger, etc.)
4. When charging, the Battery LED will emit a red light.
5. When the transmitter is fully charged, the Battery LED will
turn off.
Power LED
Battery LED
Technical Specifications
Transmitter End
Dimensions
Weight
Connectors
Switches
Indicators
Video Format
Power & Battery
Operating Frequency
Operating Temperature
1.7 in(L) x 2 in(W) x 0.6 in(H)
44 mm(L) x 53 mm(W) x 15 mm(H)
30.76(g) / 1.09(oz)
Apple 30-pin dock connector,
mini-USB port
Power On/Off Switch, Channel
Selector with 3 channels
2 LED Indicators
NTSC / PAL
335mAh Lithium Ion Battery
Playback time: 2hr+
5.8GHz (FM)
0-50° C, 0-122° F
Receiver End
3 in(L) x 2 in(W) x 3 in(H)
82 mm(L) x 60 mm(W) x 73 mm(H)
80.2(g) / 2.83(oz)
DC-IN, A/V OUT
Power On / Off Switch, Channel
Selector with 3 channels
NTSC / PAL
Power consumption: 230mA / 6V
+6.0V, , 3W
5.8GHz (FM)
Dimensions
Weight
Connectors
Switches
Video Format
Power
AC Adapter
Operating Frequency
14 Chapter 3: Troubleshooting Your Air Shuttle Chapter 3: Troubleshooting Your Air Shuttle 15
Page 10

Troubleshooting
1. I can’t get the transmitter to turn on.
Make sure that your transmitter is fully charged, and that
the receiver is set up properly. In the event that the
transmitter battery is not charged, power the transmitter
with the included mini-USB to USB cable.
2. My picture quality is not clear.
It is possible that there is another user in close proximity. You
can solve this by changing the transmitter and receiver
to a different channel. Choose the channels that provide
the clearest picture and sound quality. Both transmitter
and receiver must have the same channel selected.
3. I can’t get the picture to display on the TV.
Check to make sure you have switched your TV input to
the appropriate selection that corresponds to the plugged
in Audio/Video cable. Additionally, make sure the application
you are running is enabled for iPhone/ iPad/ iPod TV-out
functionality.
4. “This accessory is not optimized for this iPhone” appears
when I attach transmitter into my iPhone.
This message may appear as an indicator that your iPhone’s
pin connectors may be loose. To fix this problem, make sure
that you attach the transmitter to the iPhone in a straight
line (180°) to minimize this occurrence.
16 Chapter 3: Troubleshooting Your Air Shuttle Chapter 3: Troubleshooting Your Air Shuttle 17
Safety Information / Warnings / Warranty Repair
Keep safety notes and other documentation together with
device.
Repair
Only qualified technicians should repair the device.
Unauthorized opening and improper repair can result in
considerable danger to the user, the device, and may also
void the warranty. Please refer to www.cywee.com for
detailed information regarding warranty.
Warning
Never force a connector into a port. If the connector and port
do not join with ease, they probably do not match. Ensure
that the connector matches the port and that you have
positioned the connector correctly in relation to the port.
Service and Support
To learn about Do This
Service and support discussions,
tutorials, and downloads
What apps support Apple’s
TV-out function
Go to www.cywee.com
Go to www.cywee.com
The following table describes where to get service information.
LED Indicators
If Tx is The status LED is
On
Off
Low battery – (power on)
Charging – (power on)
Charging – (power off)
Fully charged
Green status LED is on
Off
Red status LED is flashing /
Green status LED is on
Red status LED is on /
Green status LED is on
Red status LED is on
Off
If Rx is The status LED is
On
Off
Green status LED is on
Off
Page 11

Contact Us
Should you require additional support, please contact one
of our regional offices or contact us at : www.cywee.com
iPhone, iPad, iPod classic, iPod nano, iPod shuffle, and iPod
touch are trademarks of Apple Inc., registered in the U.S. and
other countries. iPad is a trademark of Apple Inc.
“Made for iPod,” “Made for iPhone,” and “Made for iPad”
mean that an electronic accessory has been designed to
connect specifically to iPod, iPhone, or iPad, respectively, and
has been certified by the developer to meet Apple
performance standards. Apple is not responsible for the
operation of this device or its compliance with safety and
regulatory standards. Please note that the use of this
accessory with iPod, iPhone, or iPad may affect wireless
performance.
Other company and product names mentioned herein are
trademarks of their respective companies. Mention of
third-party products is for informational purposes only and
constitutes neither an endorsement nor a recommendation.
CyWee and the CyWee logo are registered trademarks of
CyWee Group Ltd.
This device complies with Part 15 of the FCC Rules.
Operation is subject to the following two conditions: (1) This
device may not cause harmful interference, and (2) this
device must accept any interference received, including
interference that may cause undesired operation.
This device and its antenna(s) must not be co-located or
operating in conjunction with any other antenna or transmitter.
This Class [B] digital apparatus complies with Canadian
ICES-003.
Cet appareil numérique de la classe [B] est conforme à la
norme NMB-003 du Canada.
18 Chapter 3: Troubleshooting Your Air Shuttle Chapter 3: Troubleshooting Your Air Shuttle 19
FCC Compliance Statement
FCC Part 2 / ICRSS102 Notice
This device complies with Part 15 of the FCC Rules.
Operation is subject to the following two conditions:
(1) this device may not cause harmful interference, and (2)
this device must accept any interference received, including
interference that may cause undesired operation.
IMPORTANT NOTE:
FCC Radiation Exposure Statement:
This equipment complies with FCC radiation exposure limits
set forth for an uncontrolled environment. This equipment
should be installed and operated with minimum distance
1.5cm between the radiator & your body.
FCC Interference Statement
This equipment has been tested and found to comply with
the limits for a Class B digital device, pursuant to Part 15 of
the FCC Rules. These limits are designed to provide reasonable
protection against harmful interference in a residential
installation. This equipment generates, uses and can radiate
radio frequency energy and, if not installed and used in
accordance with the instructions, may cause harmful
interference to radio communications. However, there is no
guarantee that interference will not occur in a particular
installation. If this equipment does cause harmful interference
to radio or television reception, which can be determined
by turning the equipment off and on, the user is encouraged
to try to correct the interference by one or more of the
following measures:
. Reorient or relocate the receiving antenna.
. Increase the separation between the equipment and receiver.
. Connect the equipment into an outlet on a circuit different
from that to which the receiver is connected.
. Consult the dealer or an experienced radio/TV technician
for help.
FCC Caution: Any changes or modifications not expressly
approved by the party responsible for compliance could
void the user's authority to operate this equipment.
 Loading...