

Page 1
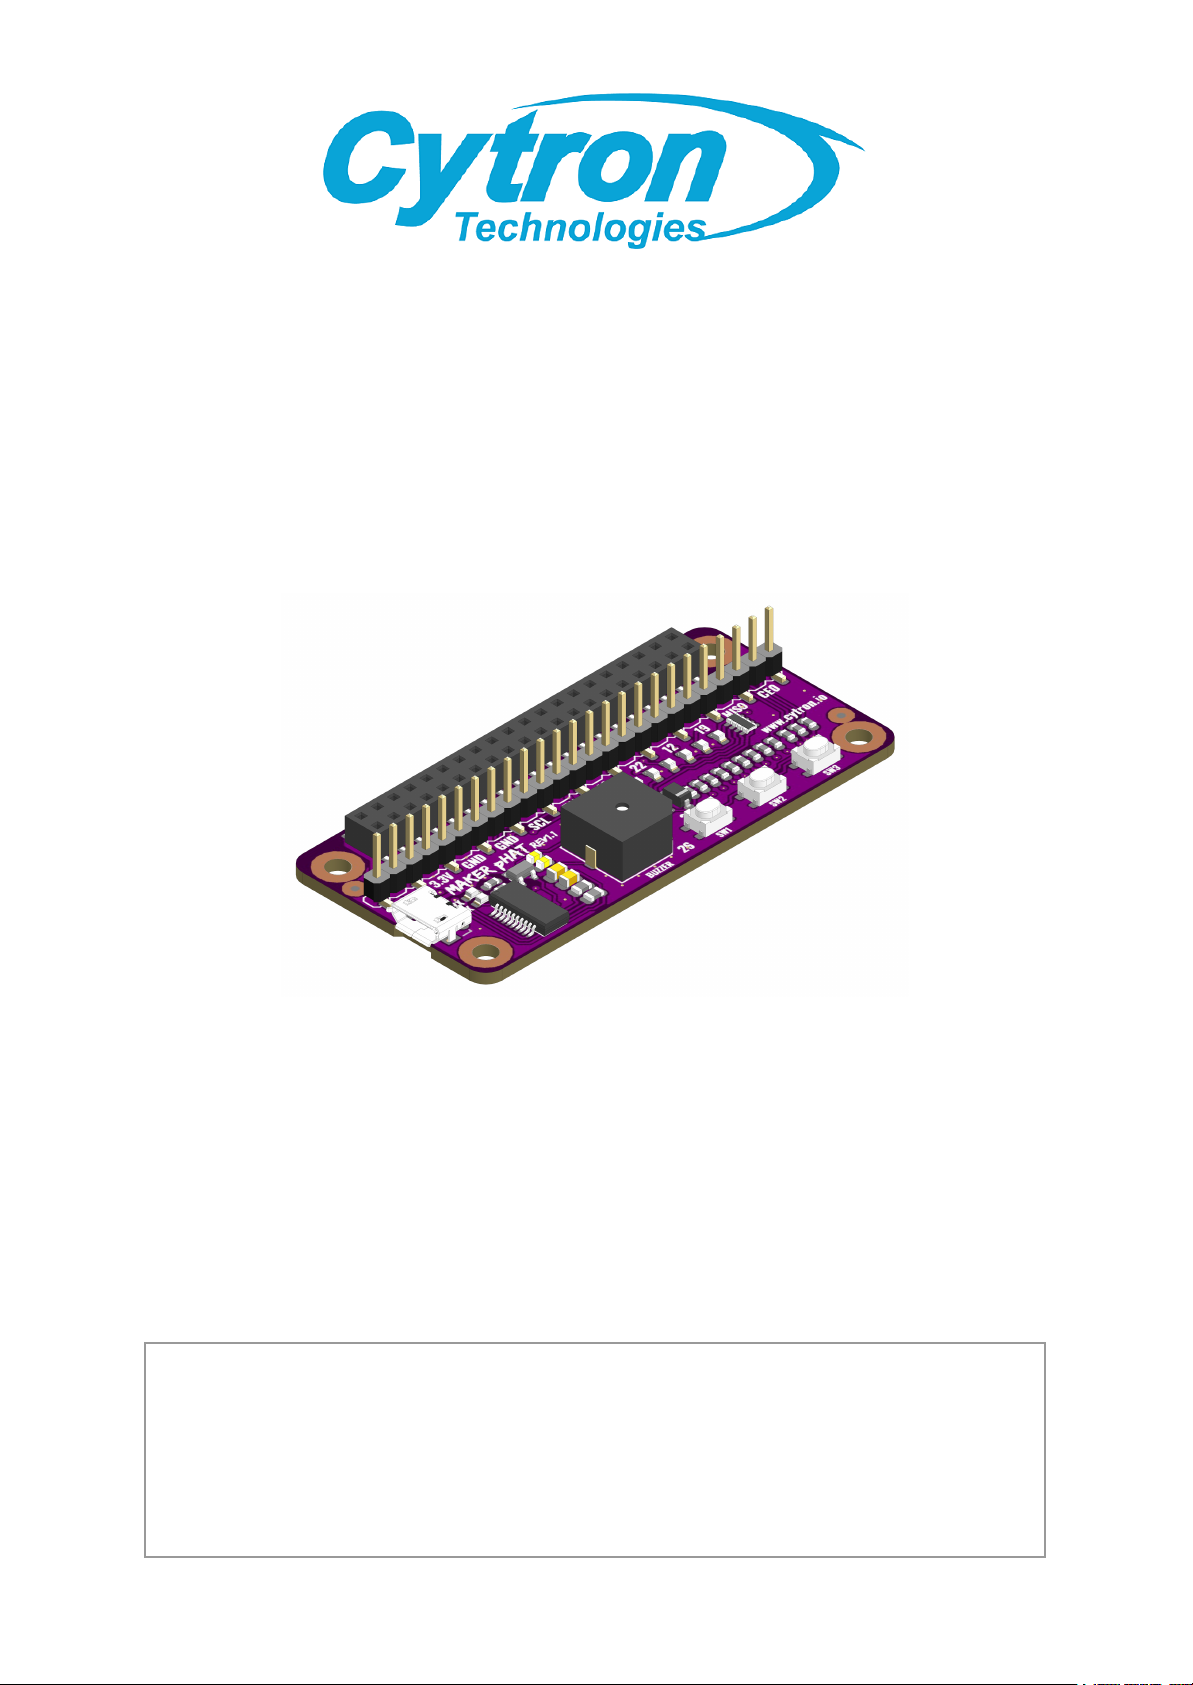
Maker-pHAT
HAT-MAKER
User’s Manual
Rev 1.10
Feb 2019
Information contained in this publication regarding device applications and the like is intended
through suggestion only and may be superseded by updates. It is your responsibility to ensure that
your application meets with your specifications. No representation or warranty is given and no
liability is assumed by Cytron Technologies Incorporated with respect to the accuracy or use of
such information or infringement of patents or other intellectual property rights arising from such
use or otherwise. Use of Cytron Technologies’s products as critical components in life support
system is not authorized except with express written approval by Cytron Technologies. No licenses
are conveyed, implicitly or otherwise, under any intellectual property rights.
Page 2

ROBOT.HEAD to TOE
Product User’s Manual - HAT-MAKER
INDEX
1. INTRODUCTION
2. PACKING LIST
3. PRODUCT SPECIFICATIONS
4. BOARD LAYOUT
5. HARDWARE INSTALLATION
6. GETTING STARTED
7. HIGHLIGHTED FEATURES
8. PYTHON DEMO CODE
9. SCHEMATIC
10. GALLERY
11. WARRANTY
PAGES
2
3
4
5
6
8
20
21
24
25
27
Created by Cytron Technologies Sdn Bhd – All Rights Reserved
Back to INDEX 1
Page 3
ROBOT.HEAD to TOE
Product User’s Manual - HAT-MAKER
1. INTRODUCTION
What is HAT? HAT means Hardware Attached on Top. If Arduino have Shield, Raspberry Pi
(refer to Raspberry Pi B+/2/3/3B+) uses HAT. But with the smaller board, Raspberry Pi
Zero/W/WH is introduced, pHAT (partially Hardware Attached on Top) emerged too. Shield
and HAT/pHAT have the same objective - to ease the hardware development.
Raspberry Pi aims to bring the power of computing and digital making to the masses. It is
being used by many educators, makers, and also engineers. I am sure you will have similar
constraints when get started from scratch, example:
● Lack of on board USB to UART communication for your computer to get the ip address
for SSH (headless), or to kick start configuration directly.
● There is no GPIO status indicator when you write program to control particular pin.
● Access to GPIO is kind of difficult because there is no label, you need to search online to
get the designated pin.
● And there is no extra programmable push button for proper shutdown (hardware) :(
We would like to introduce Maker pHAT. It is designed to ease everyone in getting started
with Raspberry Pi in the absence of additional monitor, keyboard or mouse (Headless); and
also prototyping. It helps user to remote access Raspberry Pi through serial with minimum
steps. The on board LEDs, push buttons and buzzer will further assist beginner in interfacing
with sensors, actuator and coding.
“Maker pHAT is designed for anyone who want to get start with
any Raspberry Pi projects”
Maker pHAT comes with the following features:
● Raspberry Pi Zero Size, stack perfectly on to Pi Zero Series of SBC (Single Board
Computer).
● Compatible with standard Raspberry Pi 3B/3B+ and small size Raspberry Pi Zero/W/WH.
● Standard Raspberry Pi GPIO footprint.
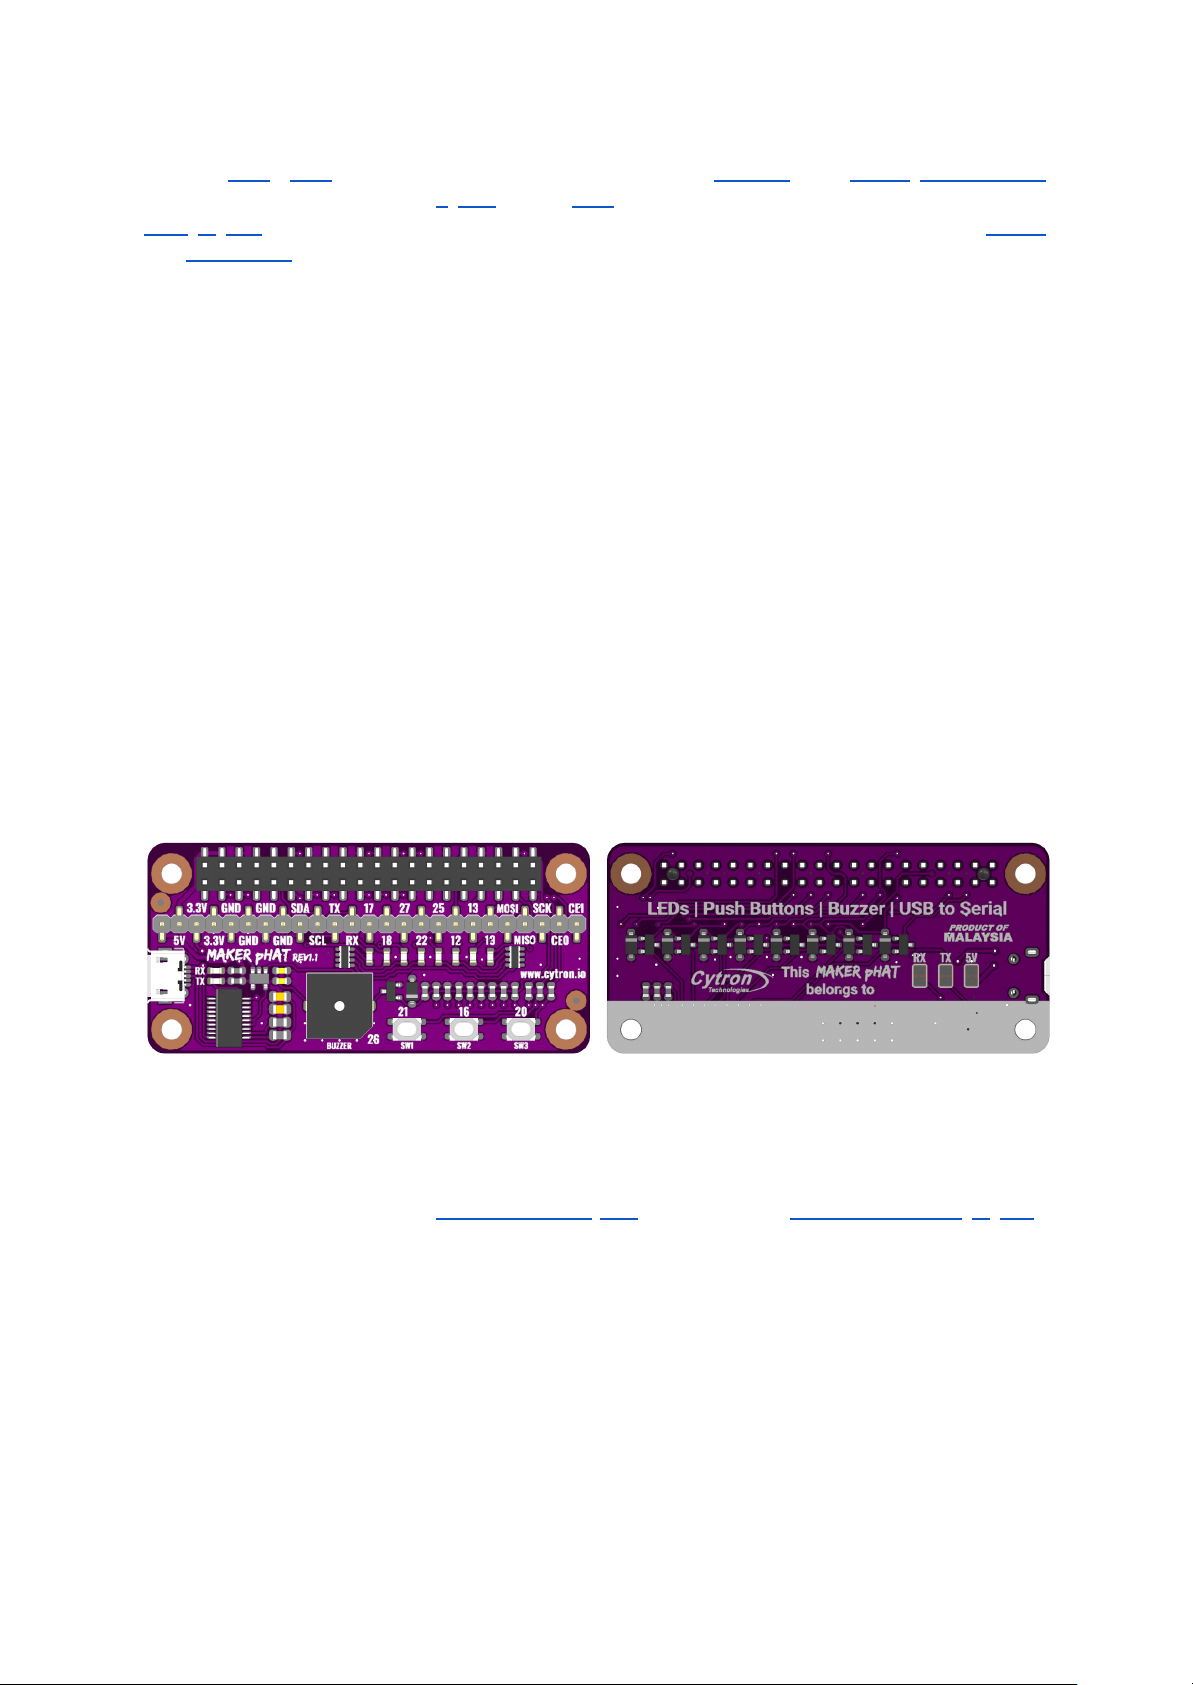
● LED array for selected GPIO pins (GPIO 17, 18, 27, 22, 25, 12, 13, 19).
● 3x on board programmable push buttons (GPIO 21, 19 and 20, need to configure as input
pull up).
● On board active buzzer (GPIO 26).
● Proper label for all GPIOs, including SPI, UART, I2C, 5V, 3.3V, and GND.
● Utilize USB Micro-B socket for 5V input and USB to UART communication.
● USB serial facilitated by the CH340.
● Input voltage: USB 5V, from computer, power bank or standard USB adapter.
● PURPLE PCB!
Created by Cytron Technologies Sdn Bhd – All Rights Reserved
Back to INDEX 2
Page 4
ROBOT.HEAD to TOE
Product User’s Manual - HAT-MAKER
2. PACKING LIST
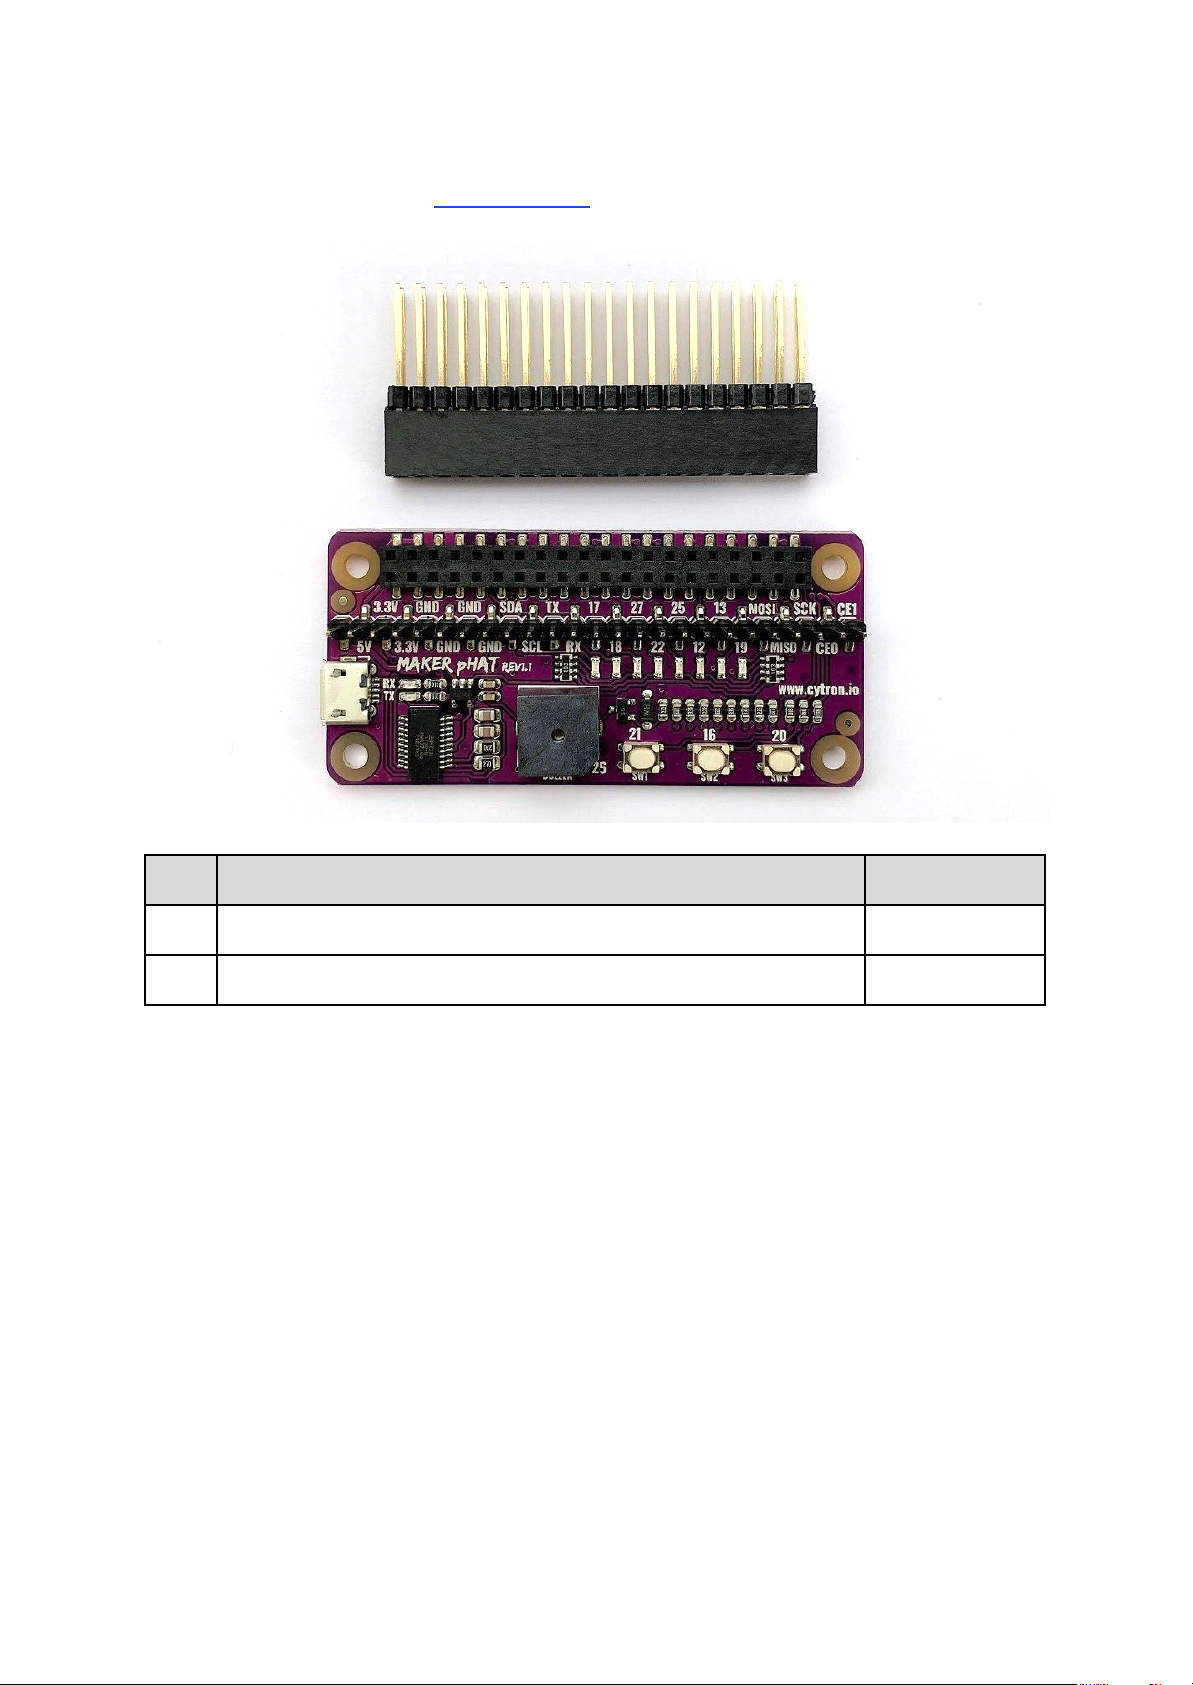
Please check the parts and components according to the packing list. If there are any parts
missing, please contact us at [email protected] immediately.
No
ITEMS
QUANTITY
1
Maker pHAT (Code: HAT-MAKER)
1
2
2x20 Stacking Header (Code: CN-PH-PC104)
1
Created by Cytron Technologies Sdn Bhd – All Rights Reserved
Back to INDEX 3
Page 5
ROBOT.HEAD to TOE
Product User’s Manual - HAT-MAKER
3. PRODUCT SPECIFICATIONS
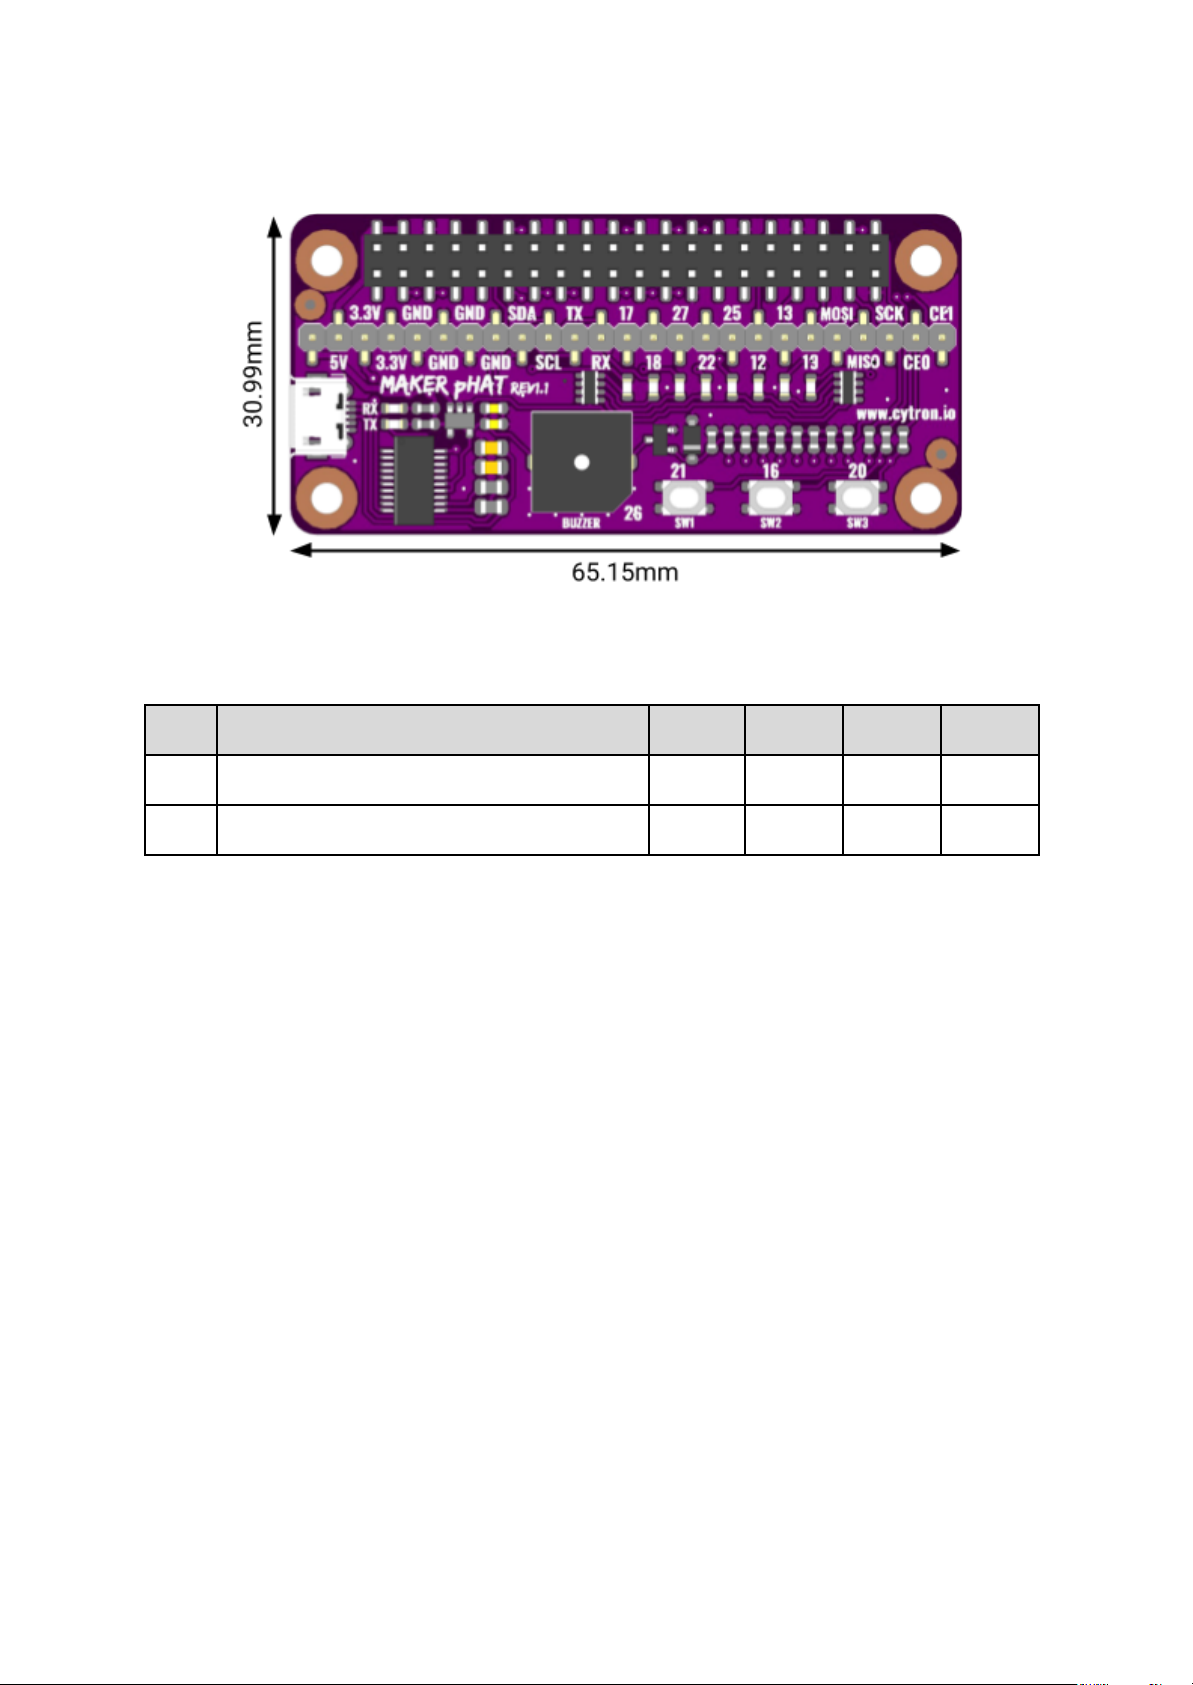
Dimension:
Absolute Maximum Rating of Maker pHAT:
No
PARAMETERS
Min
Typ
Max
Unit
1
Input Voltage via USB connector
4.8–5.2V2
DC Current for 5V Pin (Max Continuous)
––USB
mA
Created by Cytron Technologies Sdn Bhd – All Rights Reserved
Back to INDEX 4
Page 6
ROBOT.HEAD to TOE
Product User’s Manual - HAT-MAKER
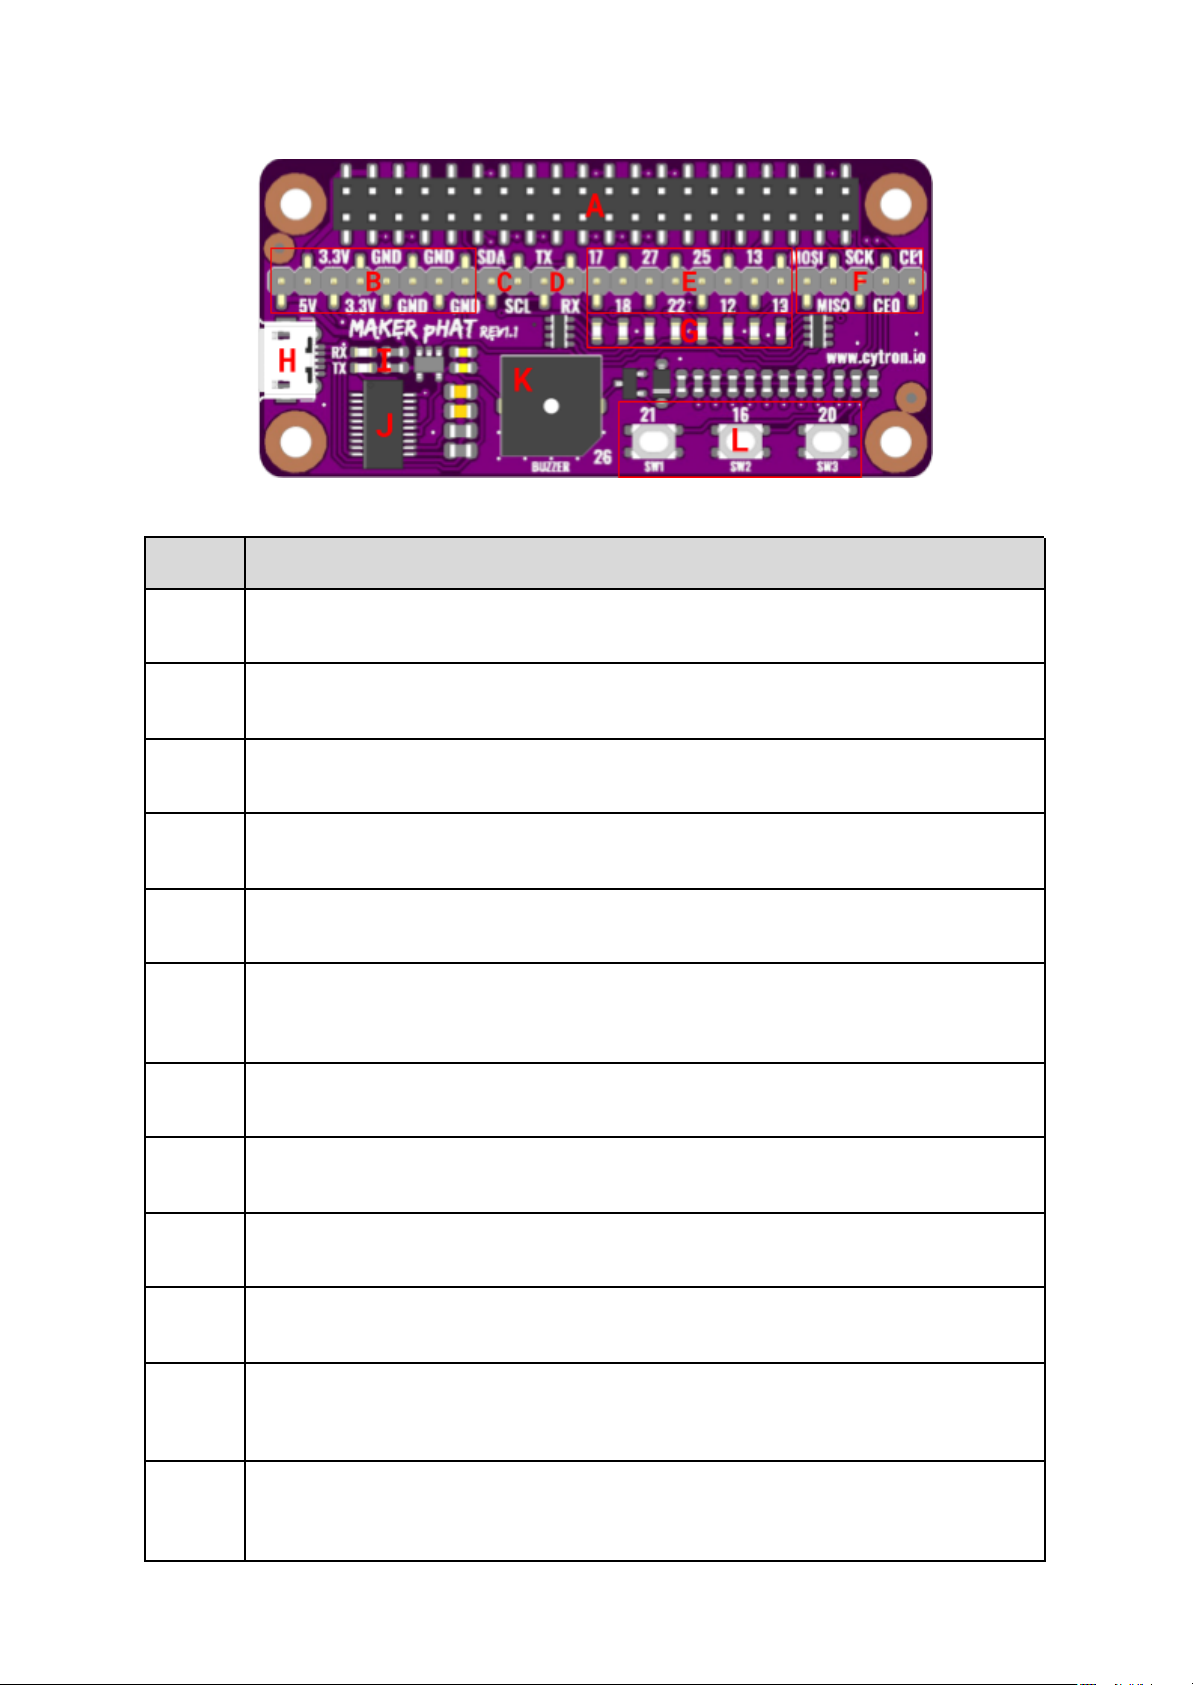
4. BOARD LAYOUT
LABEL
FUNCTION
A
RASPBERRY PI STANDARD 40 HEADER PIN
Stack this pHAT to Raspberry Pi through this standard 40 header pin.
B
BREAKOUT POWER PIN
User can access 5V, 3.3V and GND through power pins.
C
BREAKOUT I2C PIN
User can access SDA (GPIO 2) and SCL (GPIO 3) through I2C pins.
D
BREAKOUT UART PIN
User can access TX (GPIO 14) and RX (GPIO 15) through UART pins.
E
BREAKOUT GPIO PIN
User can access GPIO 17, 18, 27, 22, 25, 12, 13, 19 through GPIO pins.
F
BREAKOUT SPI PIN
User can access MOSI (GPIO 10), MISO (GPIO 9), SCK (GPIO 11), CE0 (GPIO 8) and CE1
(GPIO 7) through SPI pins.
G
GPIO INDICATOR LED
Selected GPIO is equipped with LED, where it can controlled or act as indicator for input.
H
USB MICRO B CONNECTOR
Supply (alternative) to Raspberry Pi and to remote through SSH serial.
I
USB-SERIAL INDICATOR LED
Indicates USB-Serial activity.
J
USB-SERIAL IC CONVERTER (FT231X)
Converts USB data to serial data. Used to remote Raspberry Pi using SSH serial.
K
ACTIVE BUZZER
Active buzzer is connected to GPIO 26. Signal HIGH will activate the buzzer and signal
LOW will turn off the buzzer.
L
PROGRAMMABLE PUSH BUTTONS
3 programmable push button is connected to GPIO 21, 16 and 20. To use it, user need to
configure it as input pull up.
Created by Cytron Technologies Sdn Bhd – All Rights Reserved
Back to INDEX 5
Page 7
ROBOT.HEAD to TOE
Product User’s Manual - HAT-MAKER
5. HARDWARE INSTALLATION
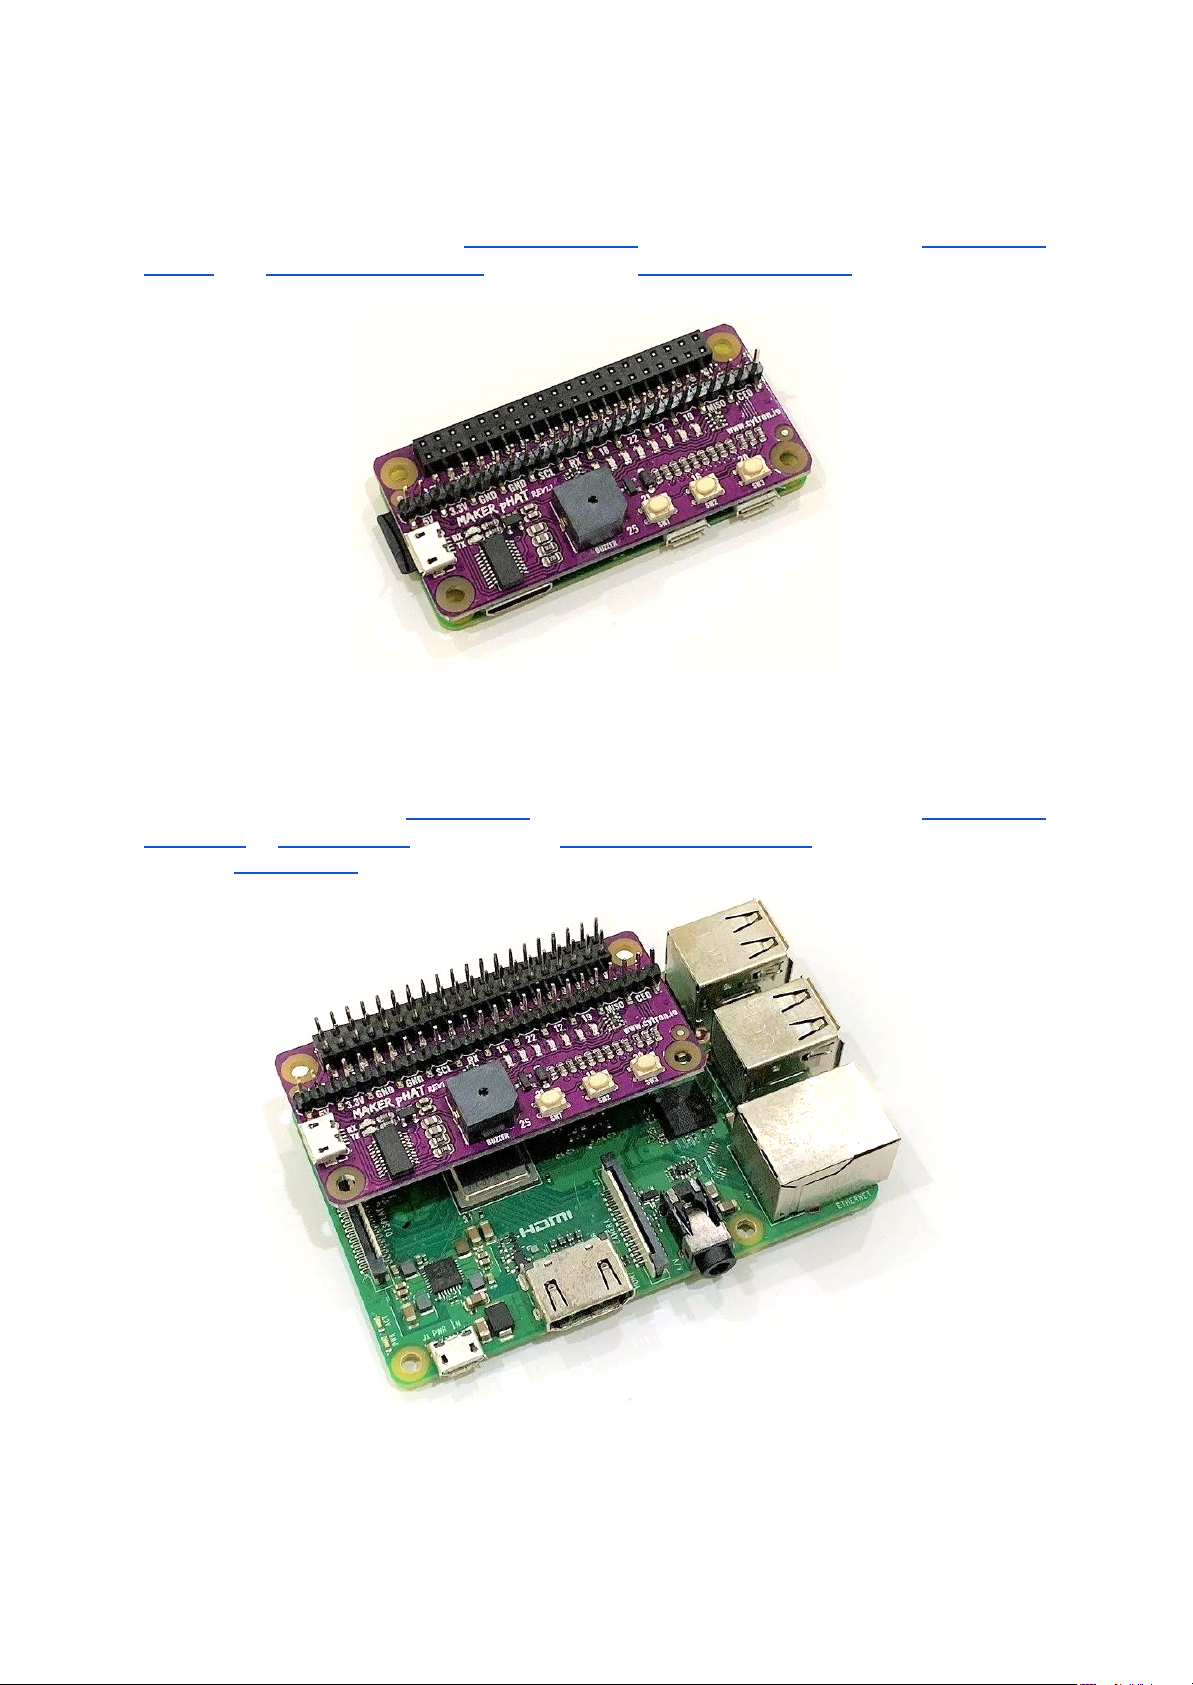
5.1 Raspberry Pi Zero WH
Maker pHAT is designed to fit in Raspberry Pi Zero footprint, means it can fit on Raspberry Pi
Zero W and Raspberry Pi Zero WH. It can stack to Raspberry Pi Zero WH directly without any
extra components.
5.2 Raspberry Pi 3 Model B and Model B Plus
Maker pHAT has standard Raspberry Pi GPIO footprint. So, it is compatible with Raspberry Pi
3 Model B or Model B Plus too. You need PC104 Header Pin (2x20) in order to stack Maker
pHAT on Raspberry Pi.
Created by Cytron Technologies Sdn Bhd – All Rights Reserved
Back to INDEX 6
Page 8
ROBOT.HEAD to TOE
Product User’s Manual - HAT-MAKER
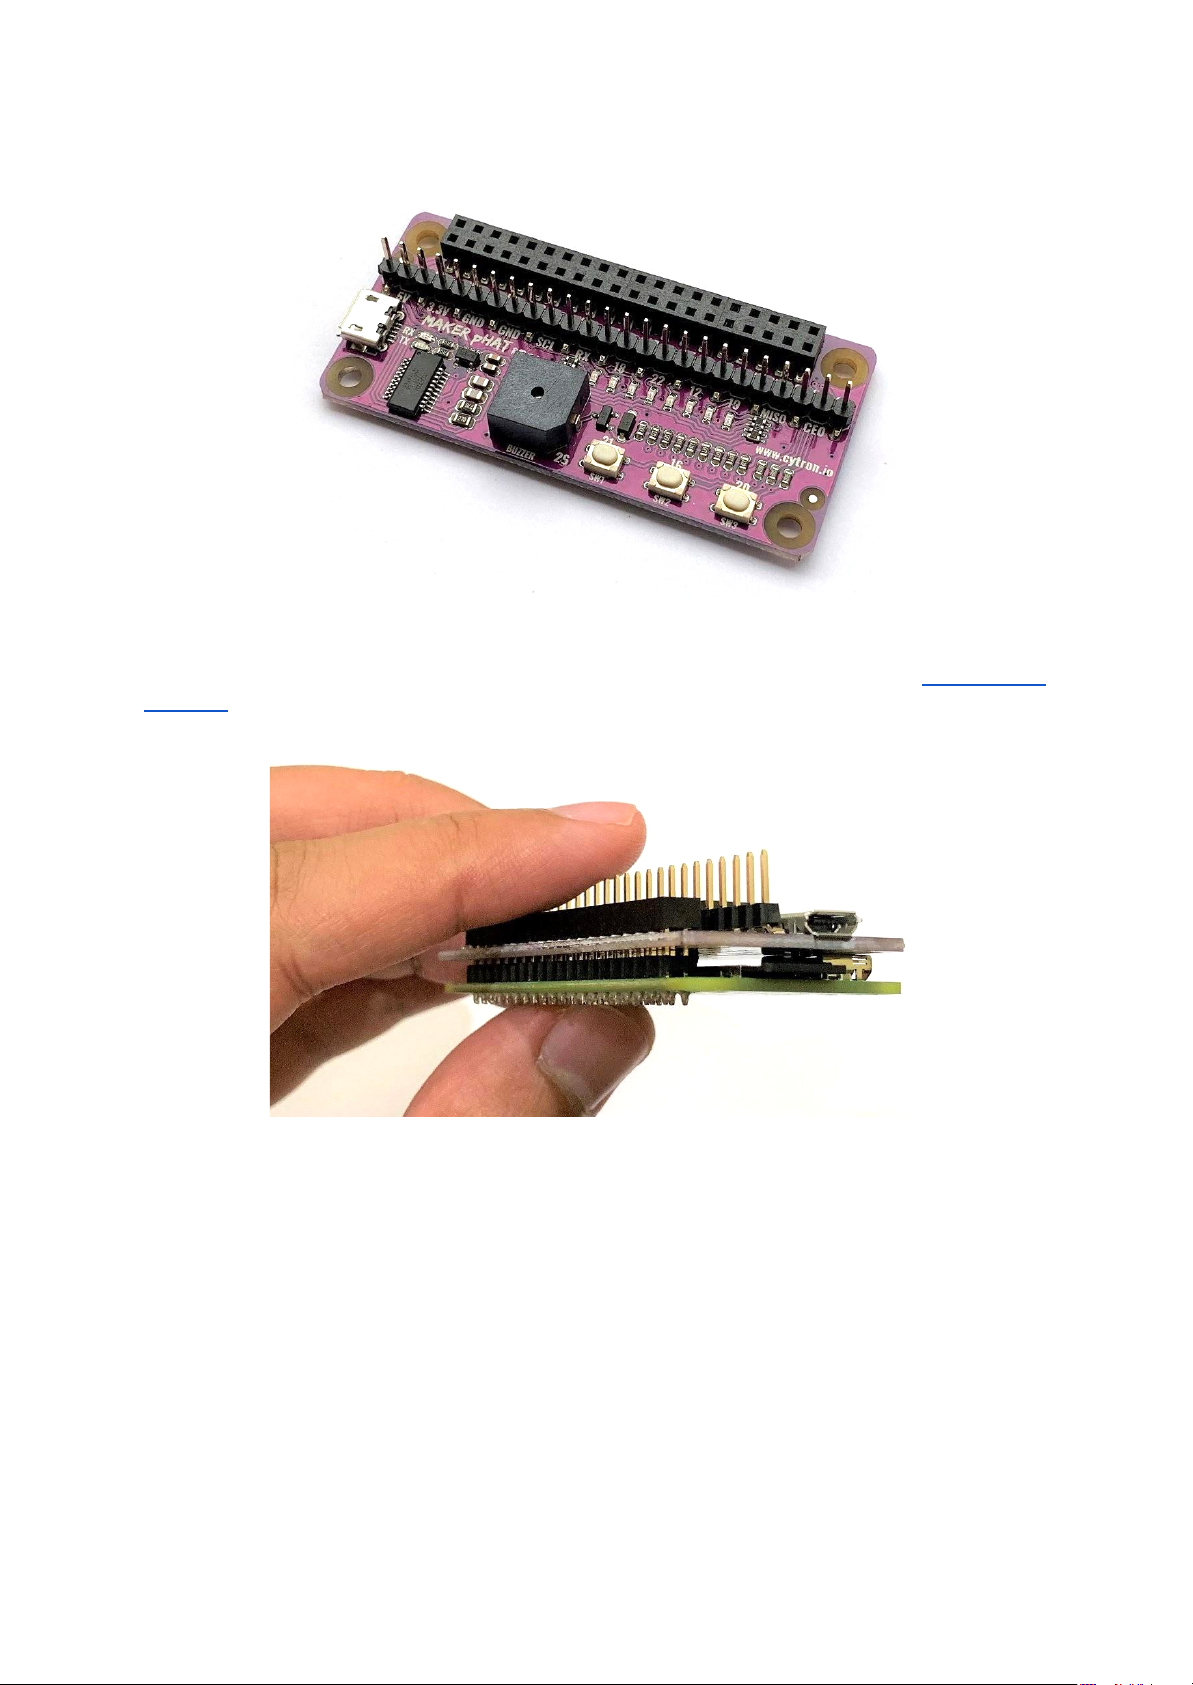
5.3 Access Breakout Pads on Maker pHAT
Maker pHAT Rev1.10 comes with pre-soldered SMD header pin on the breakout pads.
No worry about short circuit when you stack the Maker pHAT Rev1.10 on the Raspberry Pi
Zero WH.
Created by Cytron Technologies Sdn Bhd – All Rights Reserved
Back to INDEX 7
Page 9
ROBOT.HEAD to TOE
Product User’s Manual - HAT-MAKER
6. GETTING STARTED
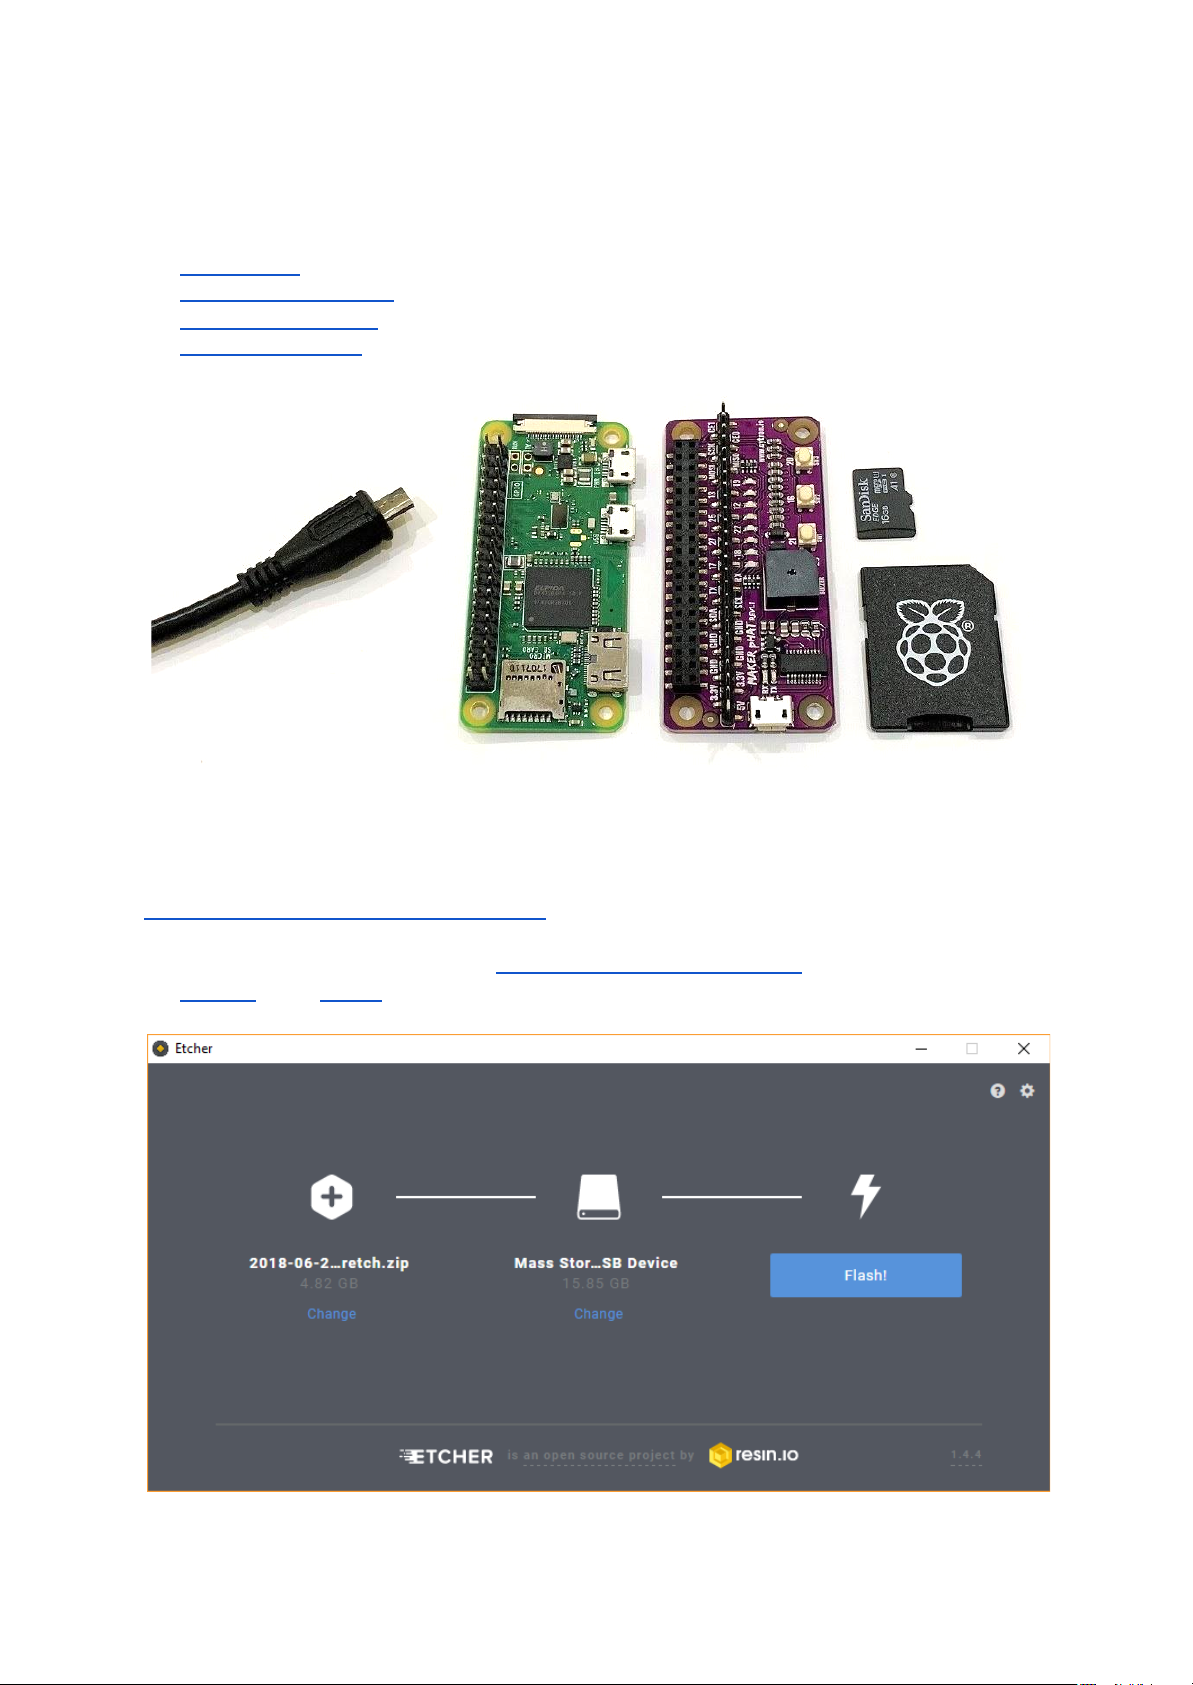
6.1 Preparing Hardware
To get started, we recommend you to have:
1. Maker pHAT
2. Raspberry Pi Zero WH
3. 16GB Micro SD Card
4. USB Micro B Cable
6.2 Install the latest Raspbian OS
Note: The latest NOOBS (V2.9.0) already comes with Raspbian pre-installed. If you get
16GB Micro SD Card with NOOBS for RPI, you don't need to write Raspbian image.
Download the latest Raspbian OS (Raspbian Stretch with Desktop) and write the image on
the SD card using Etcher.
Created by Cytron Technologies Sdn Bhd – All Rights Reserved
Back to INDEX 8
Page 10
ROBOT.HEAD to TOE
Product User’s Manual - HAT-MAKER
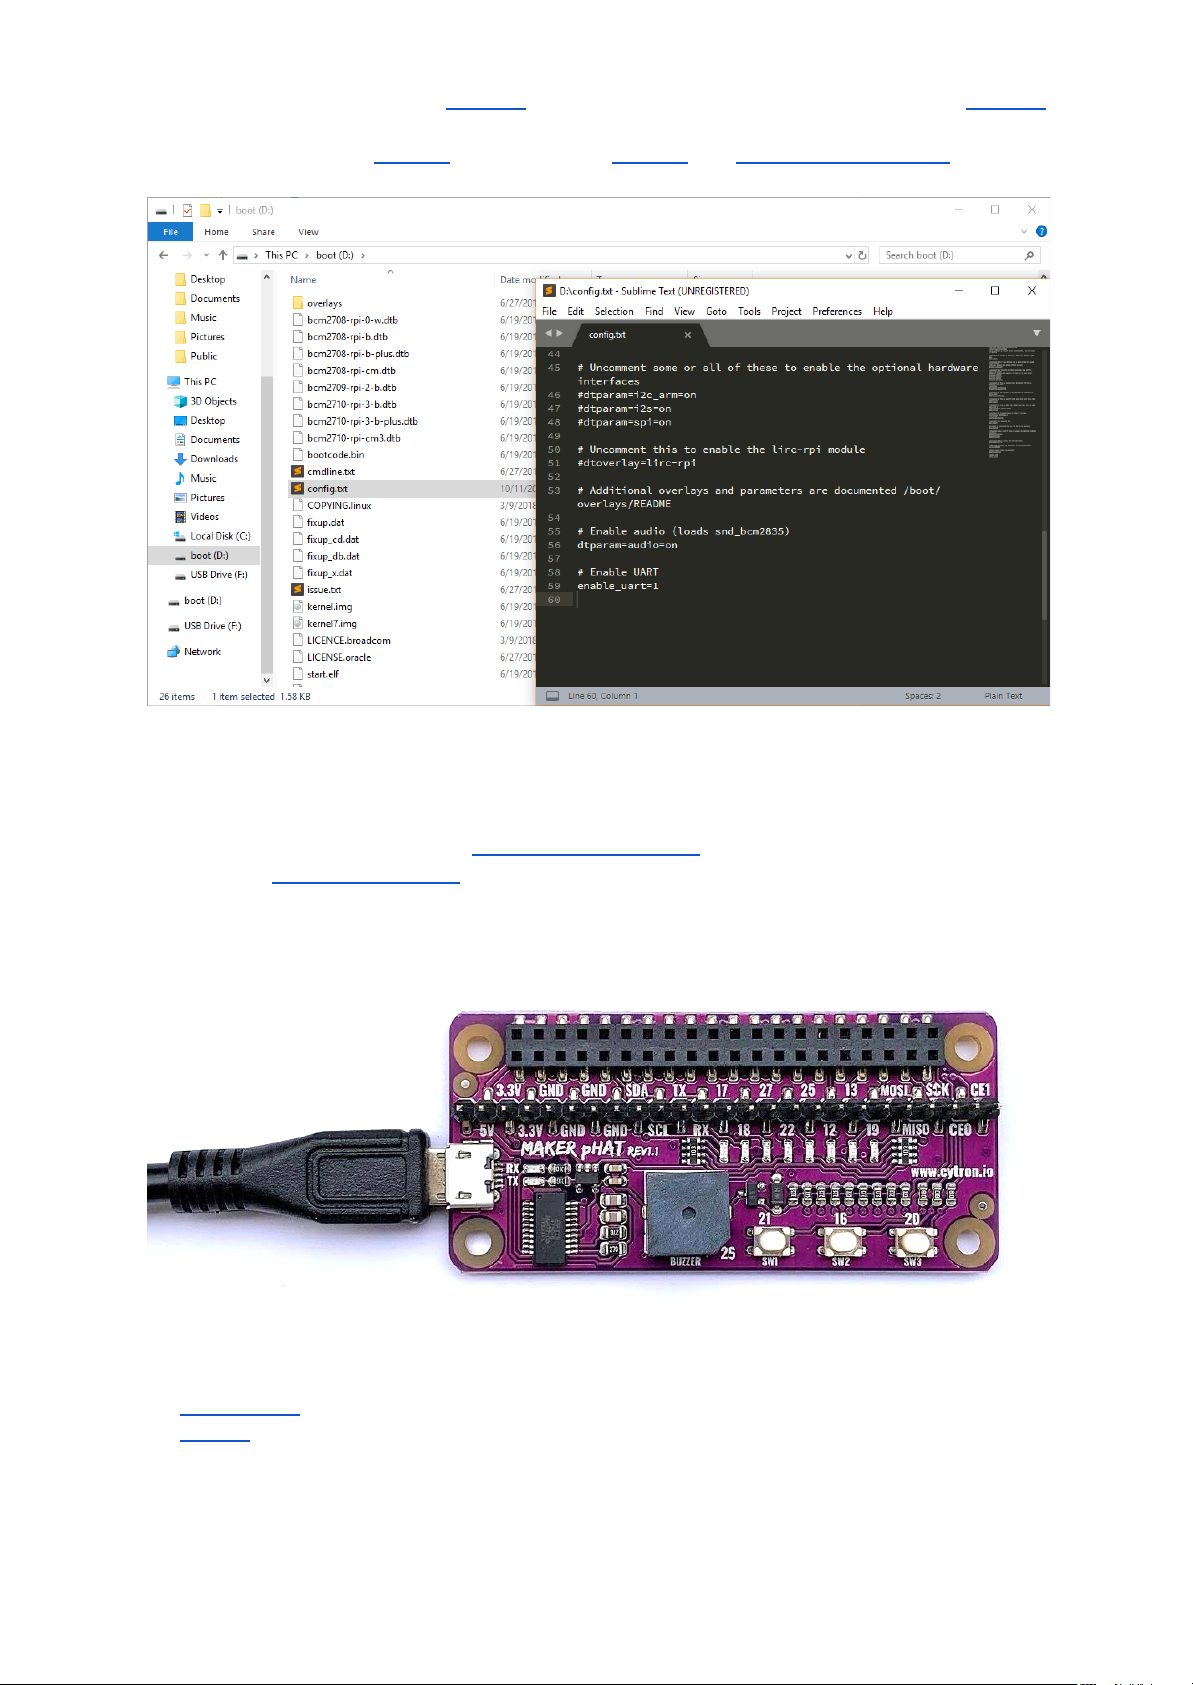
After done flashing, take the SD card out and insert back to your laptop. Open SD card
directory (e.g. D:/boot) and open config.txt file. Put enable_uart=1 at the bottom of the
line. Save and eject the SD card. Then insert the SD card into Raspberry Pi Zero WH.
6.3 Install Maker pHAT Driver
Don’t stack the Maker pHAT to Raspberry Pi Zero WH yet. Connect Maker pHAT to your
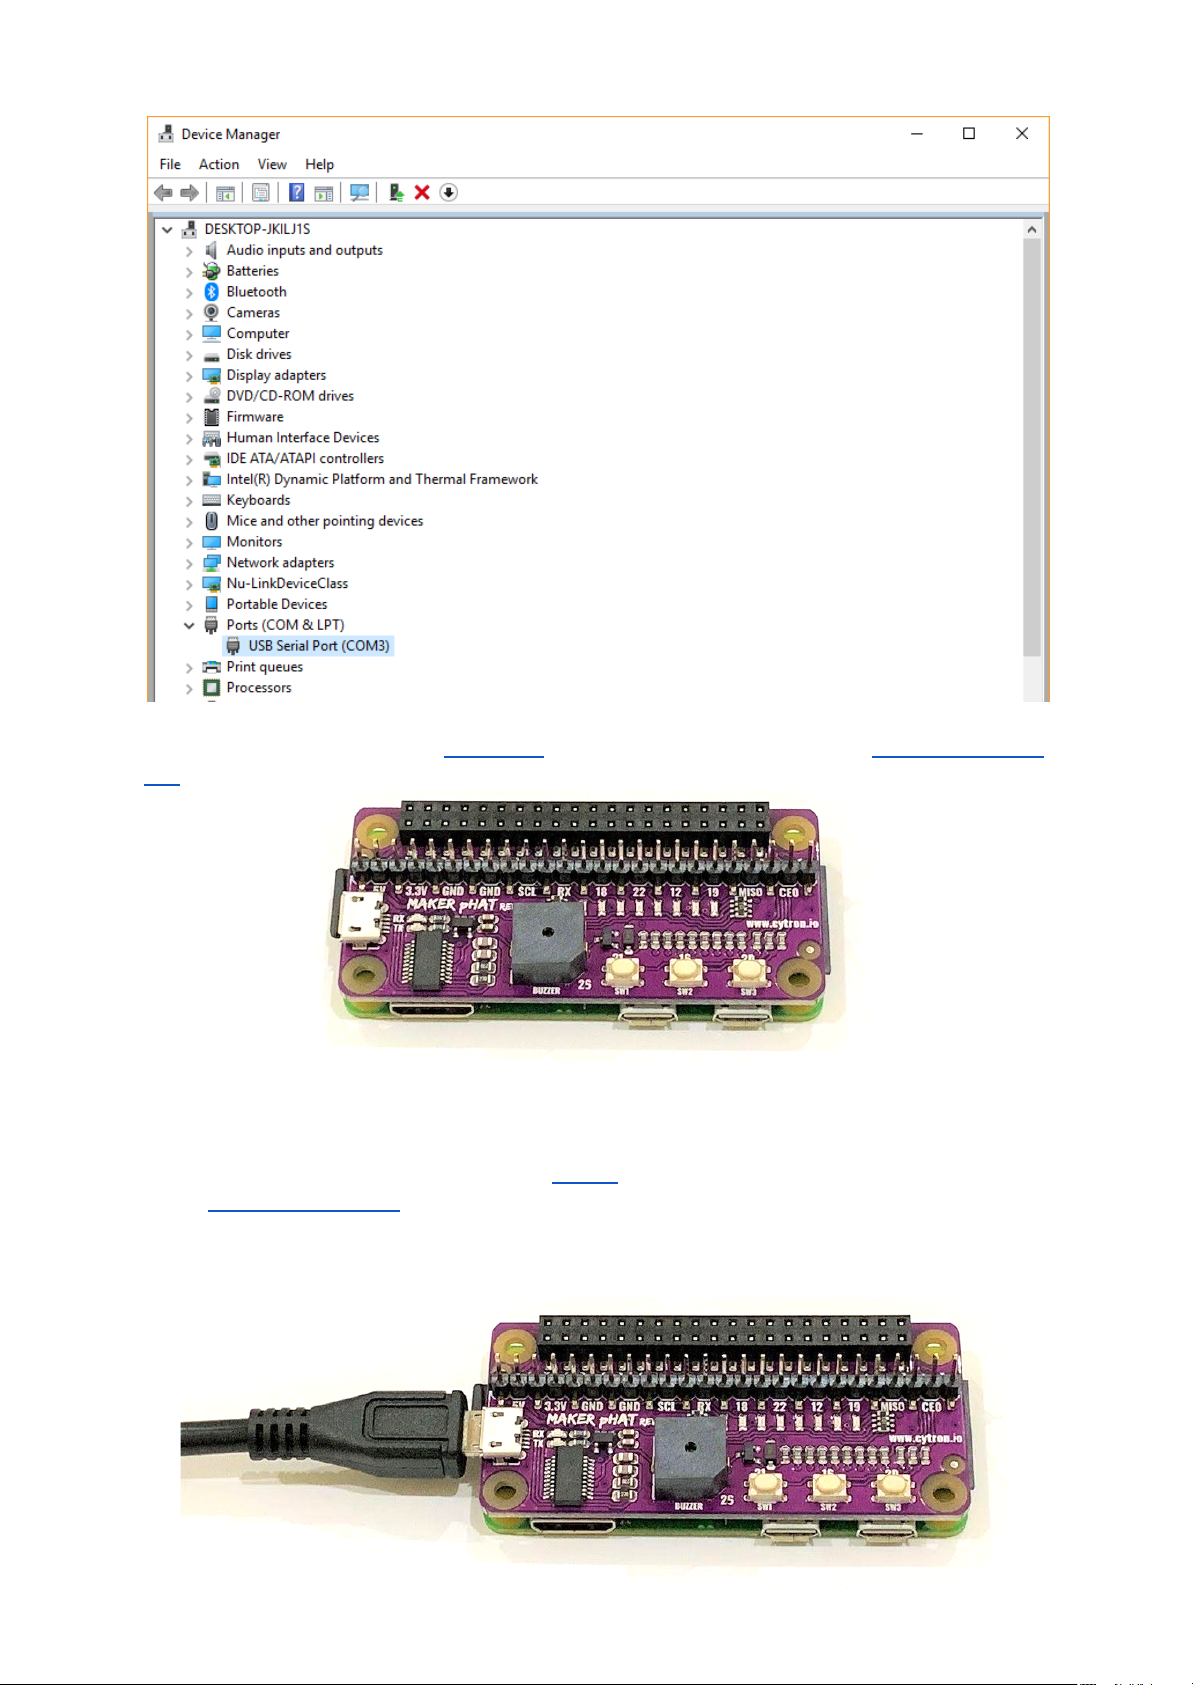
laptop using USB Micro B Cable. Check either your laptop is able to detect the Maker pHAT.
Open Device Manager, and check under Ports (COM & LPT) category. It should be detected
as USB Serial Port (COM number). If yes, you can proceed to the next step. If not, download
and install Maker pHAT driver.
Download and install Maker pHAT driver. Please choose appropriate driver depends on your
laptop/PC operating system:
● Windows 10
● MacOS
Created by Cytron Technologies Sdn Bhd – All Rights Reserved
Back to INDEX 9
Page 11
ROBOT.HEAD to TOE
Product User’s Manual - HAT-MAKER
Once detected, disconnect the USB cable. Stack Maker pHAT on the top of Raspberry Pi Zero
WH.
6.4 Install PuTTY (Windows)
For Windows user, download and install PuTTY. Connect your Maker pHAT to your laptop
using USB Micro B Cable. Since Maker pHAT is already stacked on the Raspberry Pi, this
connection will power up Raspberry Pi through Maker pHAT. Please be reminded to not
simply disconnect the cable without proper shutdown, it might corrupt the microSD card.
Created by Cytron Technologies Sdn Bhd – All Rights Reserved
Back to INDEX 10
Page 12
ROBOT.HEAD to TOE
Product User’s Manual - HAT-MAKER
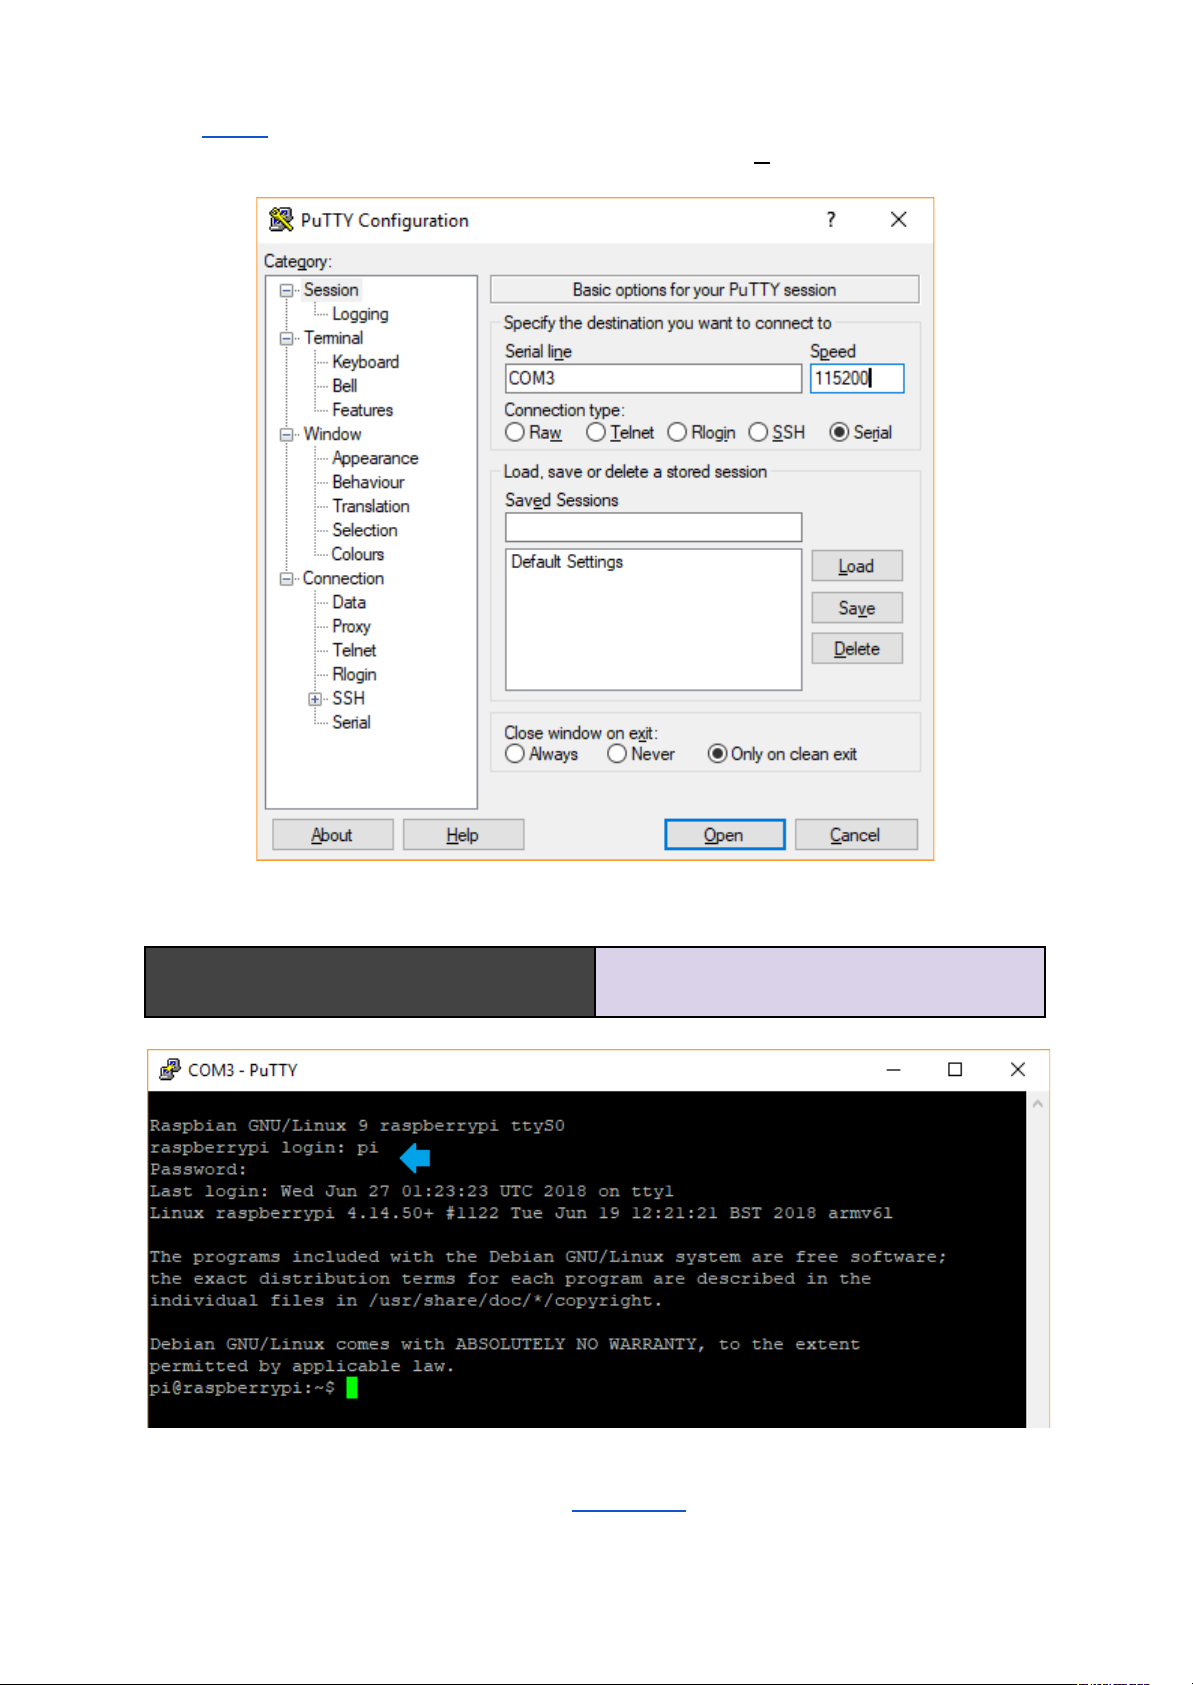
Open PuTTY software. Tick on the Serial, then write your COM number (e.g. COM3). Please
refer to your Device Manager. Set Speed to 115200. Then click Open.
Press Enter, then insert Raspberry Pi default login information as follow.
raspberrypi login: pi
Password: raspberry
You can’t see while typing the password.
So far, you’re able to access Raspberry Pi through serial remote (Maker pHAT). We will
further guide you until we can remote using VNC Viewer (Virtual Network Computing).
Created by Cytron Technologies Sdn Bhd – All Rights Reserved
Back to INDEX 11
Page 13
ROBOT.HEAD to TOE
Product User’s Manual - HAT-MAKER
6.5 Connect to WiFi
To remote using VNC Viewer, we need a WiFi connection. We can set the WiFi connection in
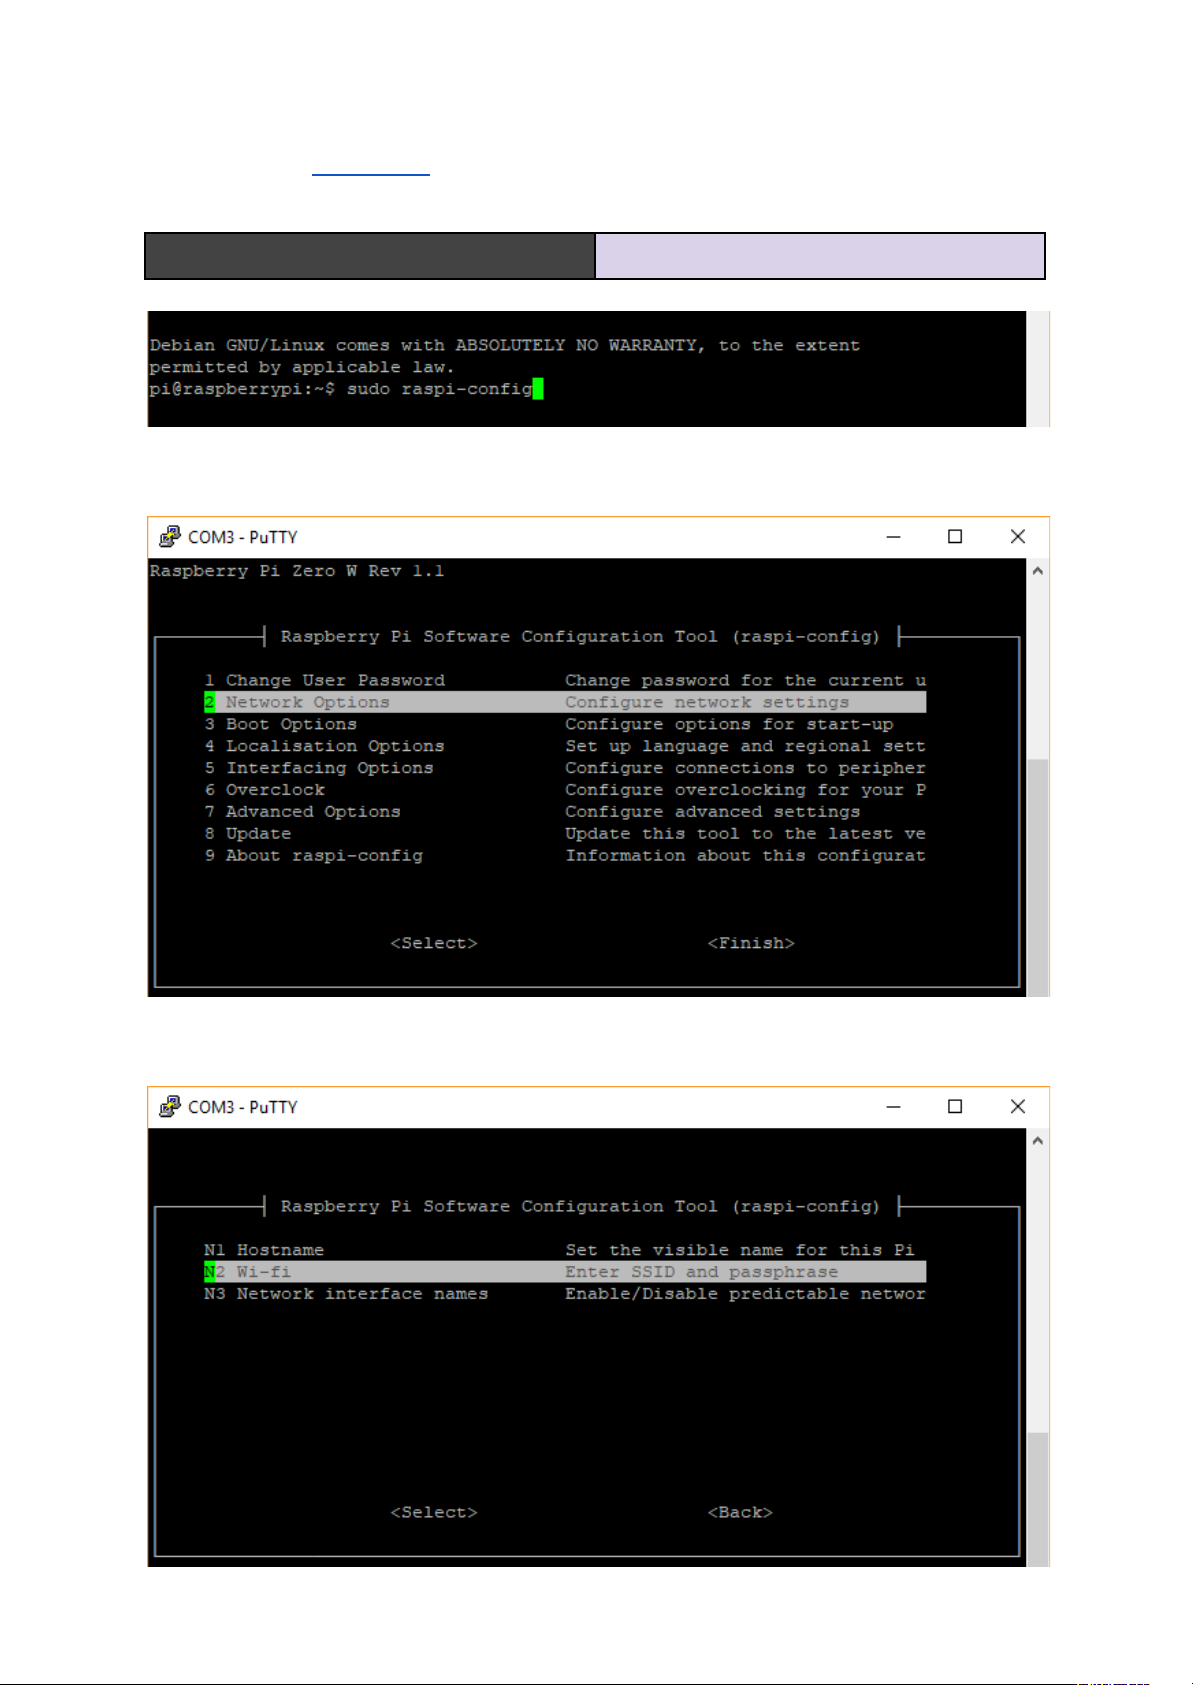
Raspberry Pi Software Configuration Tool. Write the following command and Enter.
pi@raspberrypi:~$ sudo raspi-config
To enter Raspberry Pi Configuration Tool.
Go to number 2 Network Options. Then Enter.
Choose N2 Wi-fi and Enter.
Created by Cytron Technologies Sdn Bhd – All Rights Reserved
Back to INDEX 12
Page 14
ROBOT.HEAD to TOE
Product User’s Manual - HAT-MAKER
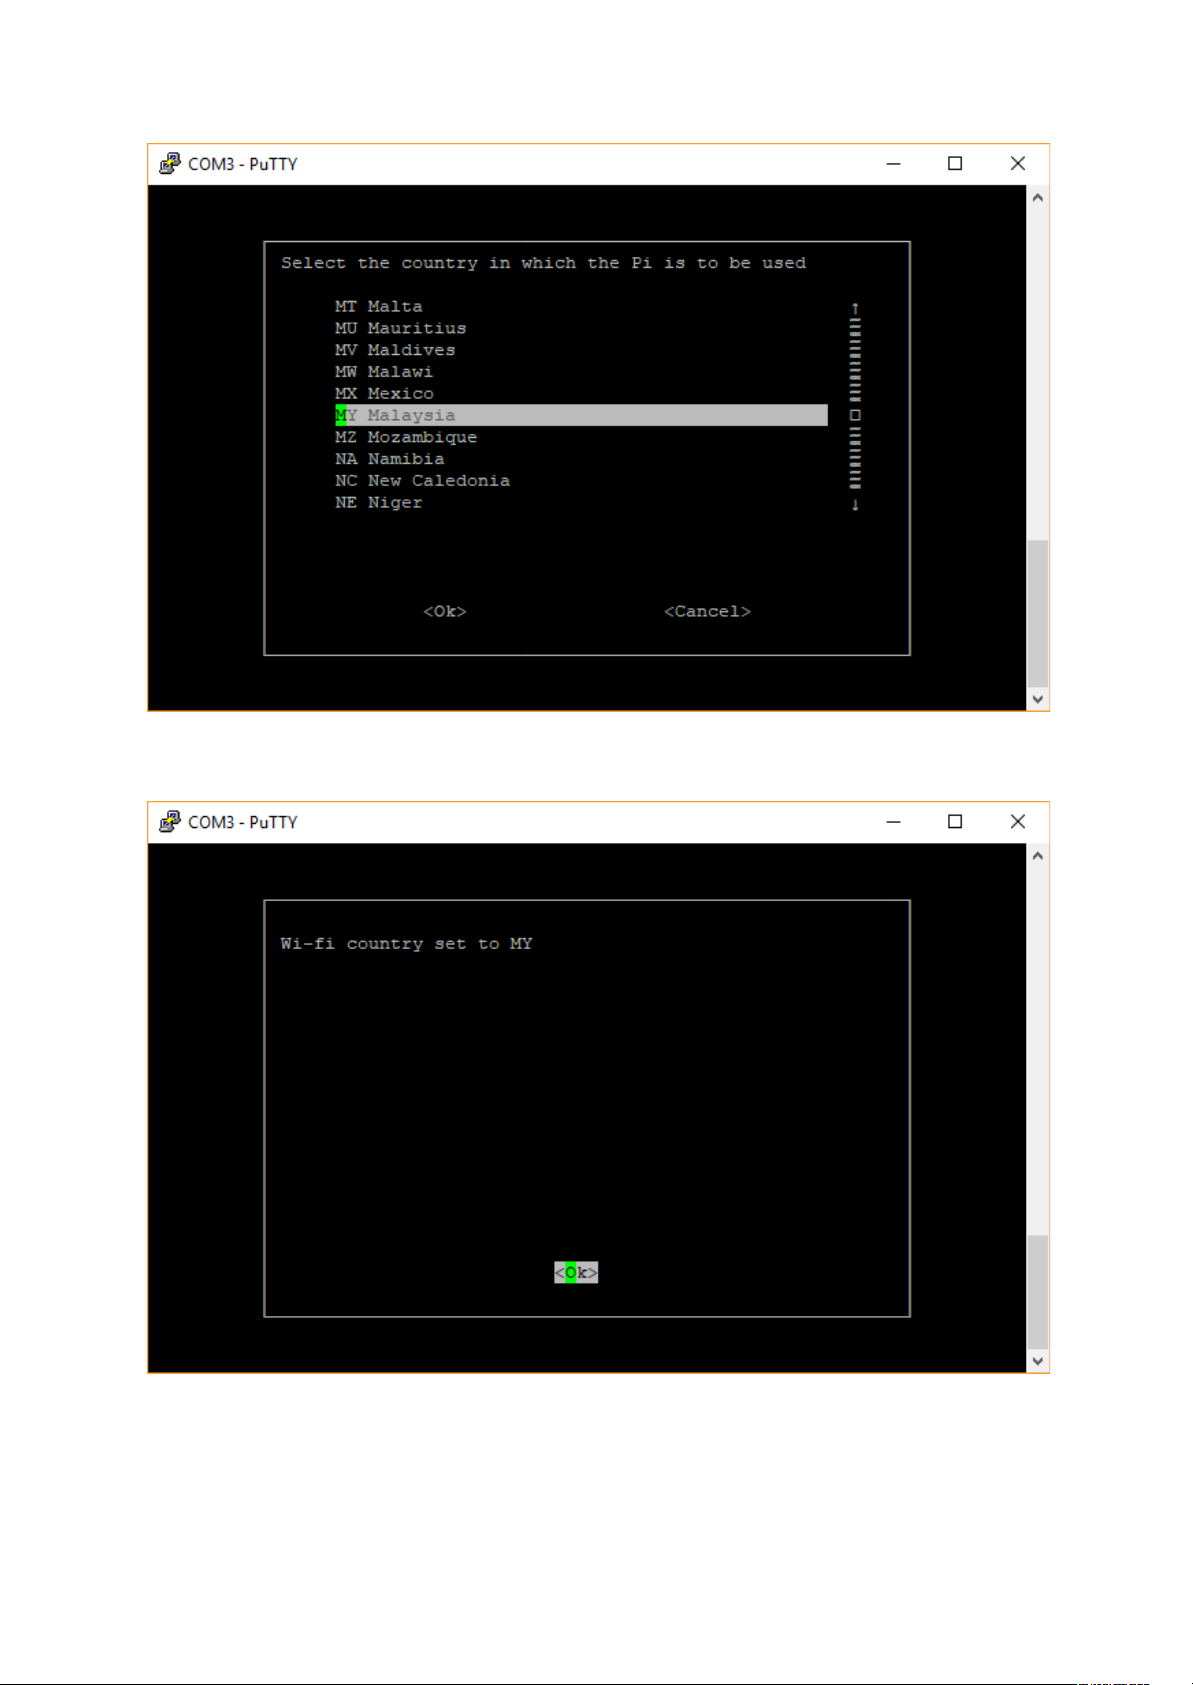
Choose your country and press Enter.
Confirm your WiFi country by pressing Enter.
Created by Cytron Technologies Sdn Bhd – All Rights Reserved
Back to INDEX 13
Page 15
ROBOT.HEAD to TOE
Product User’s Manual - HAT-MAKER
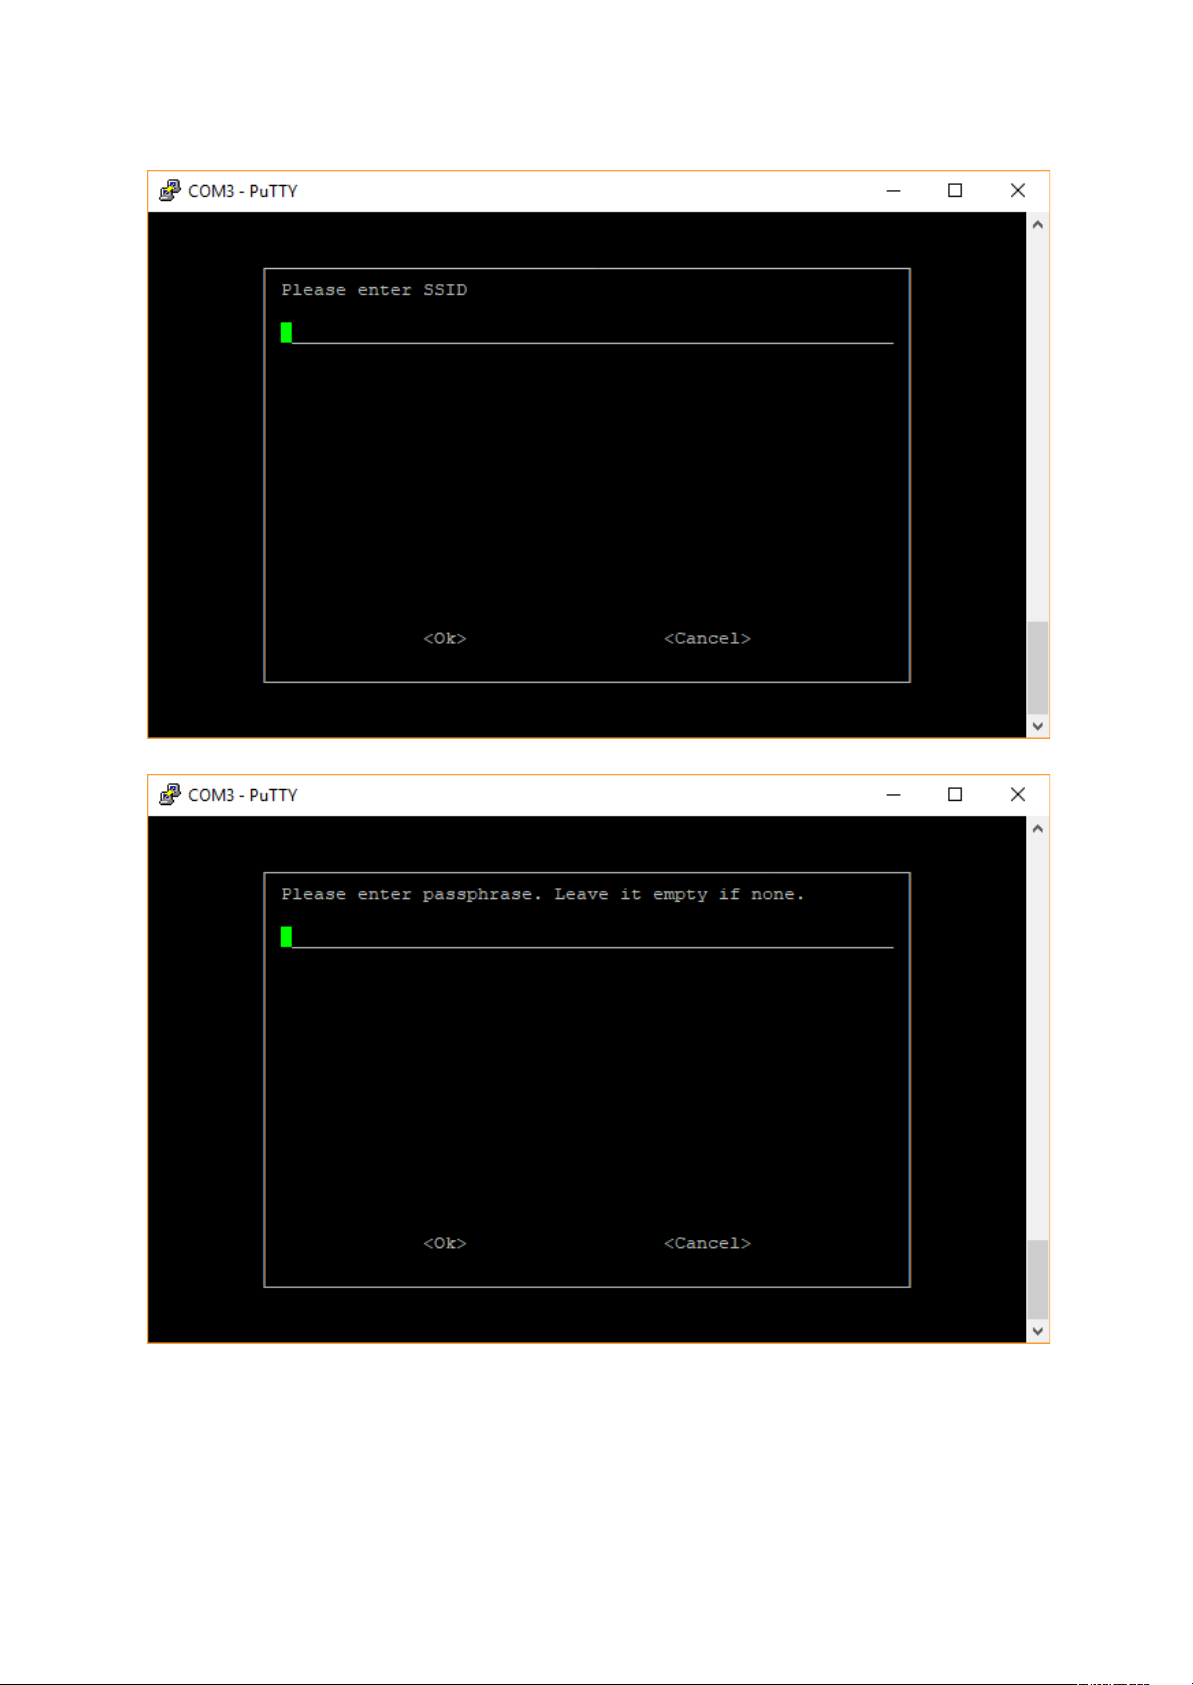
Write your WiFi SSID (WiFi name) then Enter, followed by WiFi passphrase (WiFi password)
then Enter.
Done setting for WiFi connection. Press Enter to <Ok>.
Created by Cytron Technologies Sdn Bhd – All Rights Reserved
Back to INDEX 14
Page 16
ROBOT.HEAD to TOE
Product User’s Manual - HAT-MAKER
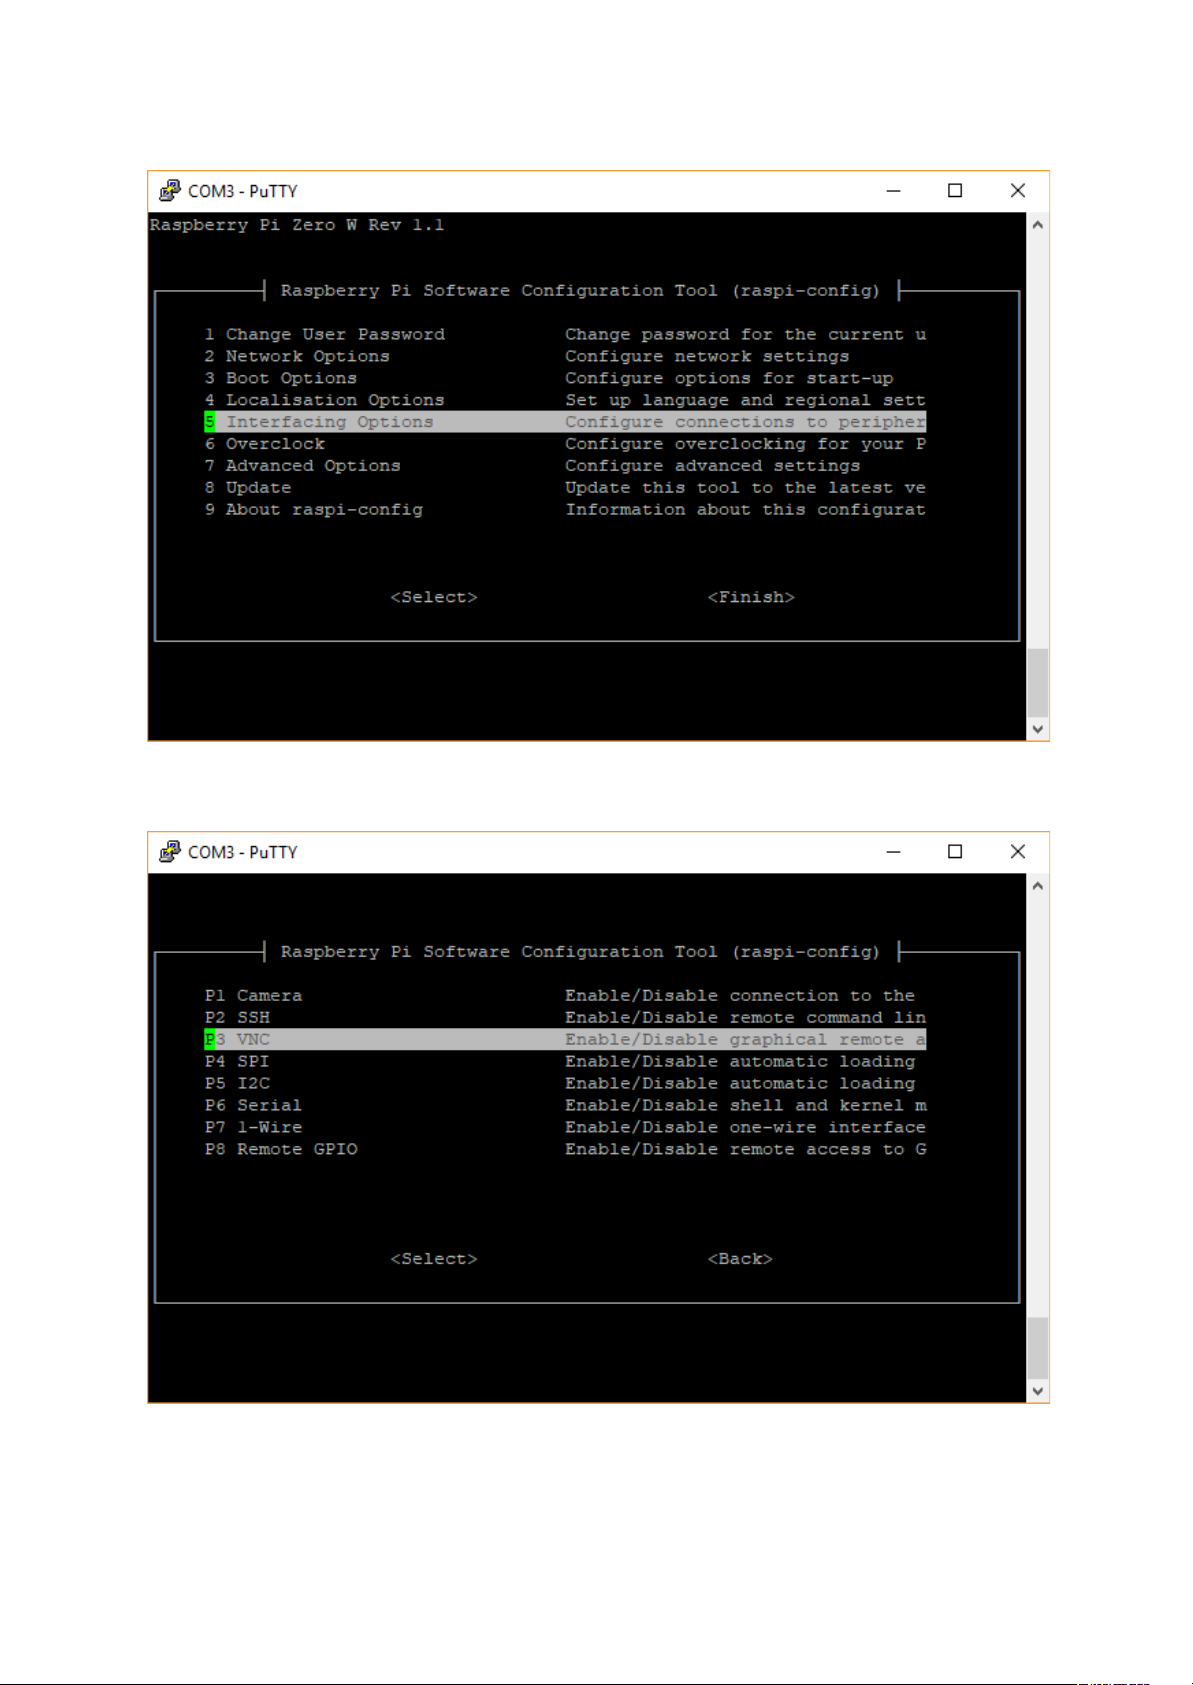
Next, we need to enable VNC server in Raspberry Pi. Go back to the top menu, and select to
the number 5 Interfacing Options.
Select P3 VNC and Enter.
Created by Cytron Technologies Sdn Bhd – All Rights Reserved
Back to INDEX 15
Page 17
ROBOT.HEAD to TOE
Product User’s Manual - HAT-MAKER
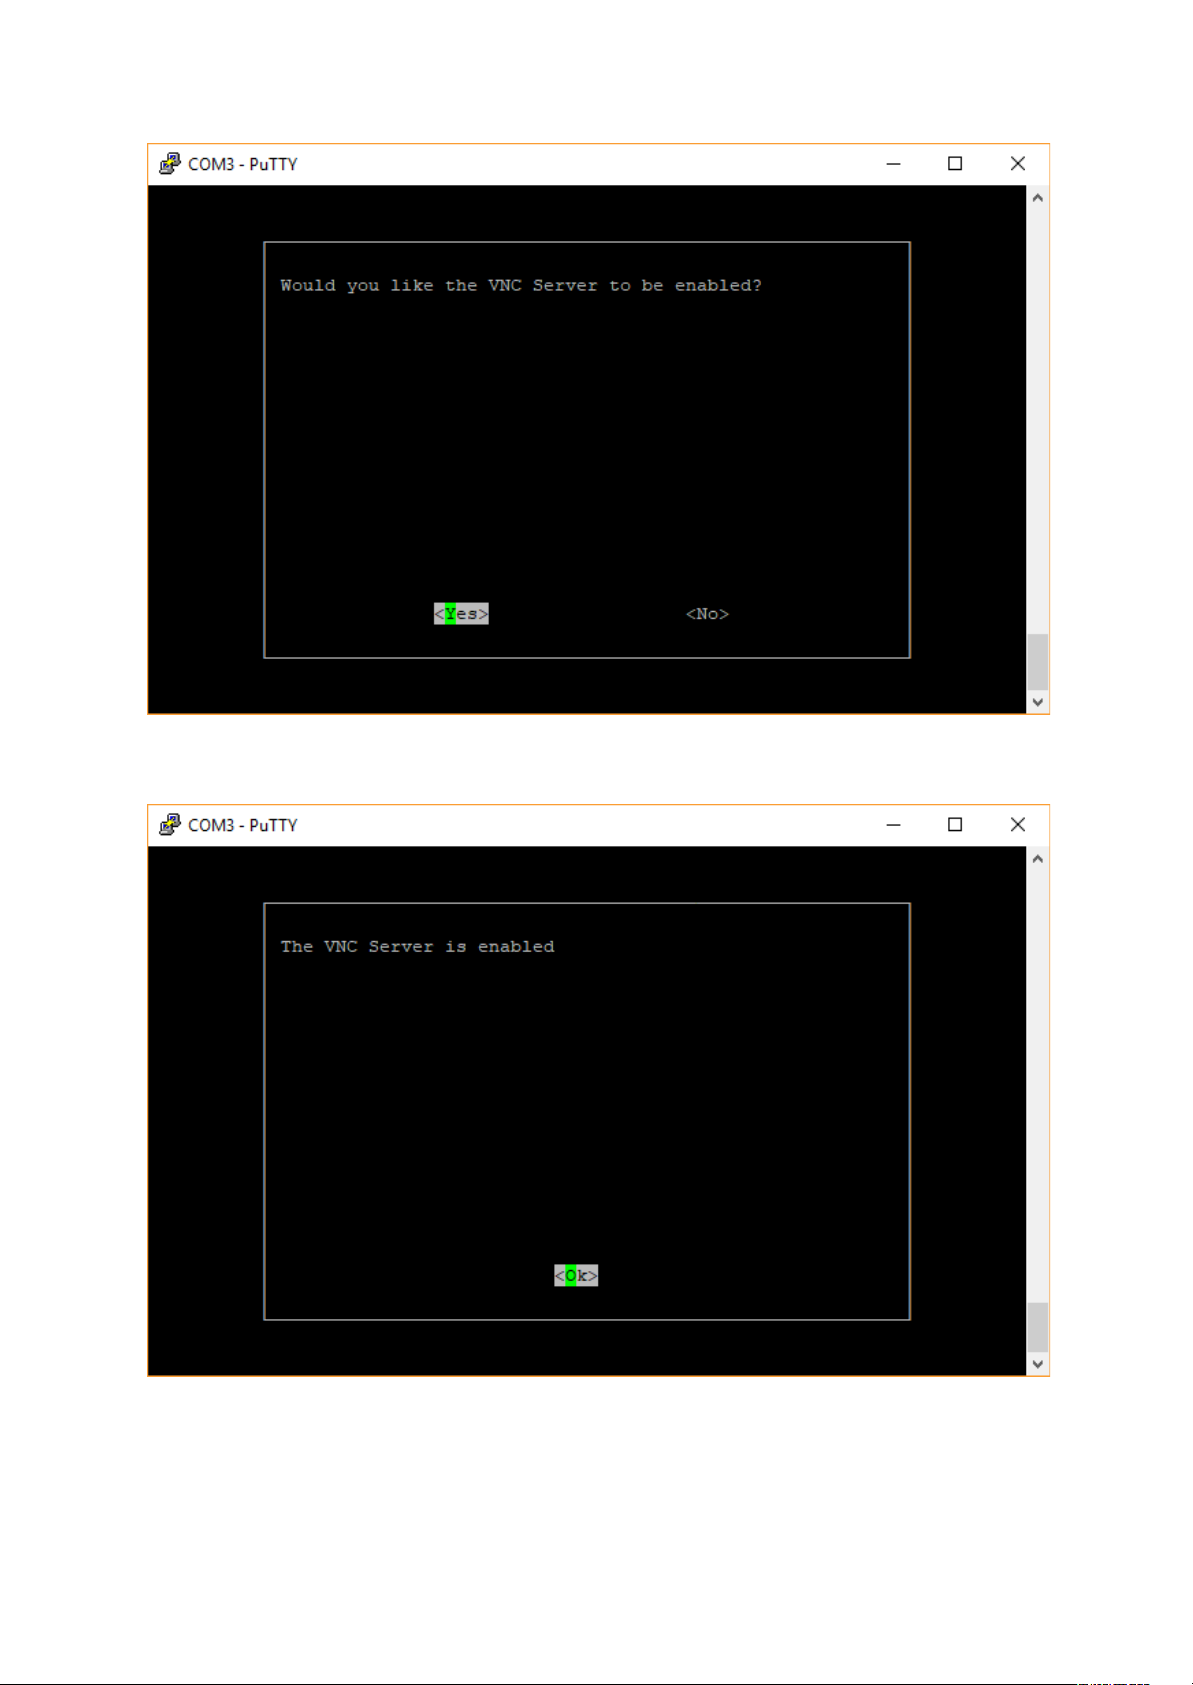
Choose <Yes> and Enter.
VNC server is enabled. Press Enter to <Ok>.
Created by Cytron Technologies Sdn Bhd – All Rights Reserved
Back to INDEX 16
Page 18
ROBOT.HEAD to TOE
Product User’s Manual - HAT-MAKER
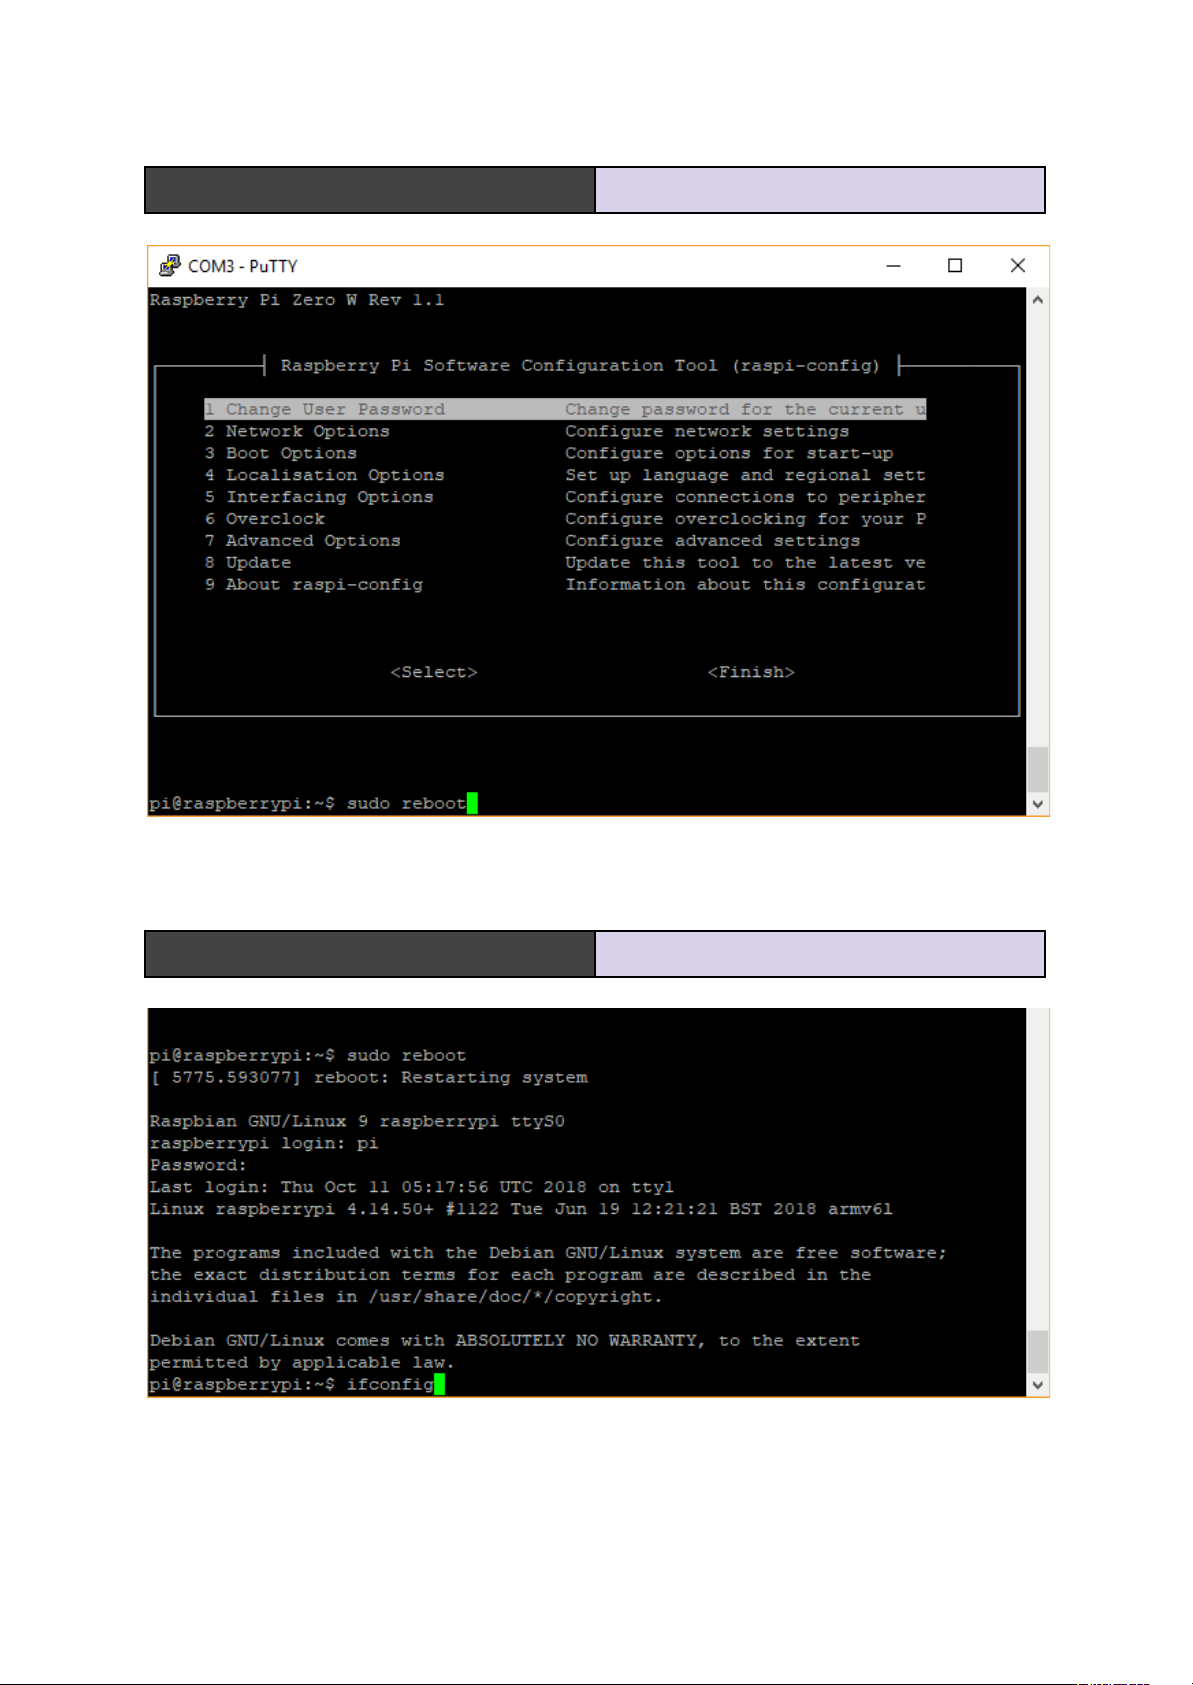
Press Esc to exit Raspberry Pi Configuration Tool. Now, reboot Raspberry Pi to enable WiFi
connection and VNC server. Write following command followed by Enter.
pi@raspberrypi:~$ sudo reboot
Restart Raspberry Pi.
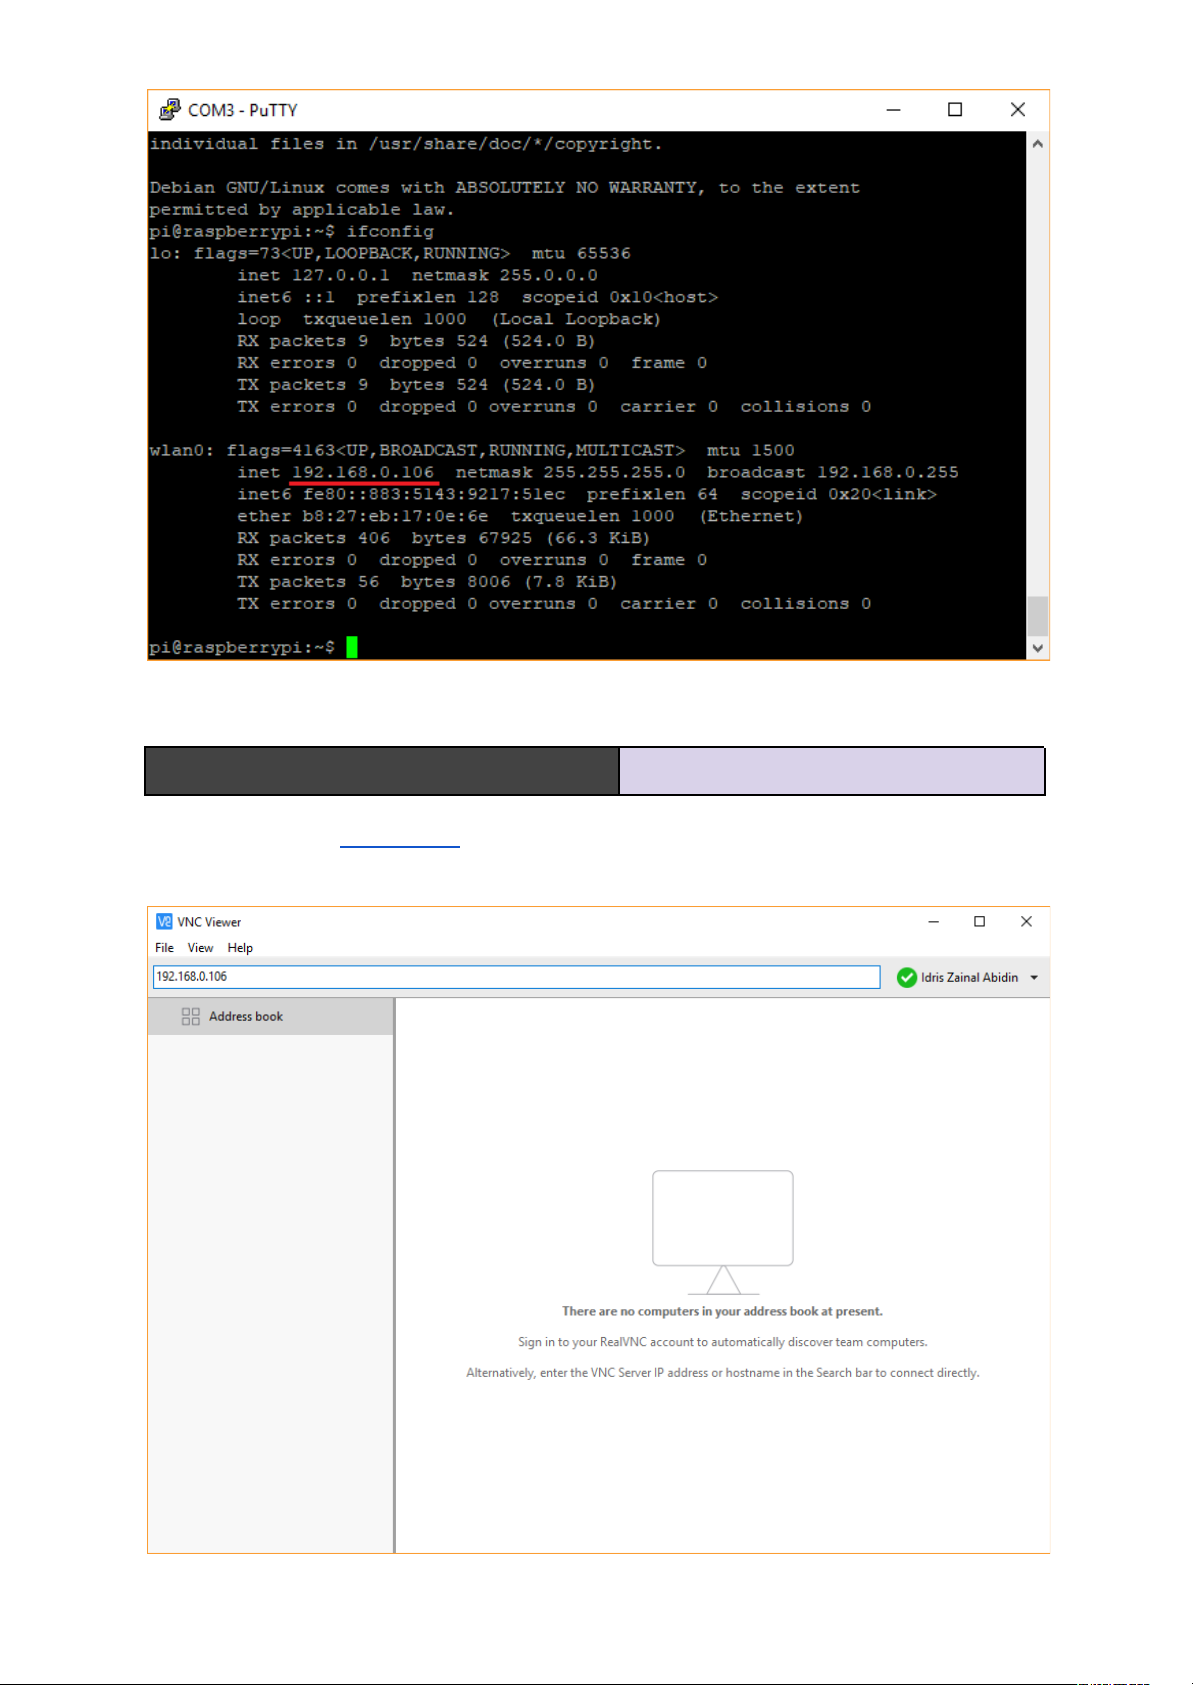
Login to Raspberry Pi like previous. If all your setting is correct, your Pi will connect to WiFi.
Next we need to trace the IP address. Write following command and Enter.
pi@raspberrypi:~$ ifconfig
Check Raspberry Pi IP address.
Your Raspberry Pi will display IP address (e.g. 192.168.0.106).
Created by Cytron Technologies Sdn Bhd – All Rights Reserved
Back to INDEX 17
Page 19
ROBOT.HEAD to TOE
Product User’s Manual - HAT-MAKER
We recommend you to update your Raspbian with following command.
pi@raspberrypi:~$ sudo apt-get update
Update Raspbian OS.
Done update, open VNC Viewer and insert Raspberry Pi’s IP address on the text bar. Then
press Enter.
Created by Cytron Technologies Sdn Bhd – All Rights Reserved
Back to INDEX 18
Page 20
ROBOT.HEAD to TOE
Product User’s Manual - HAT-MAKER
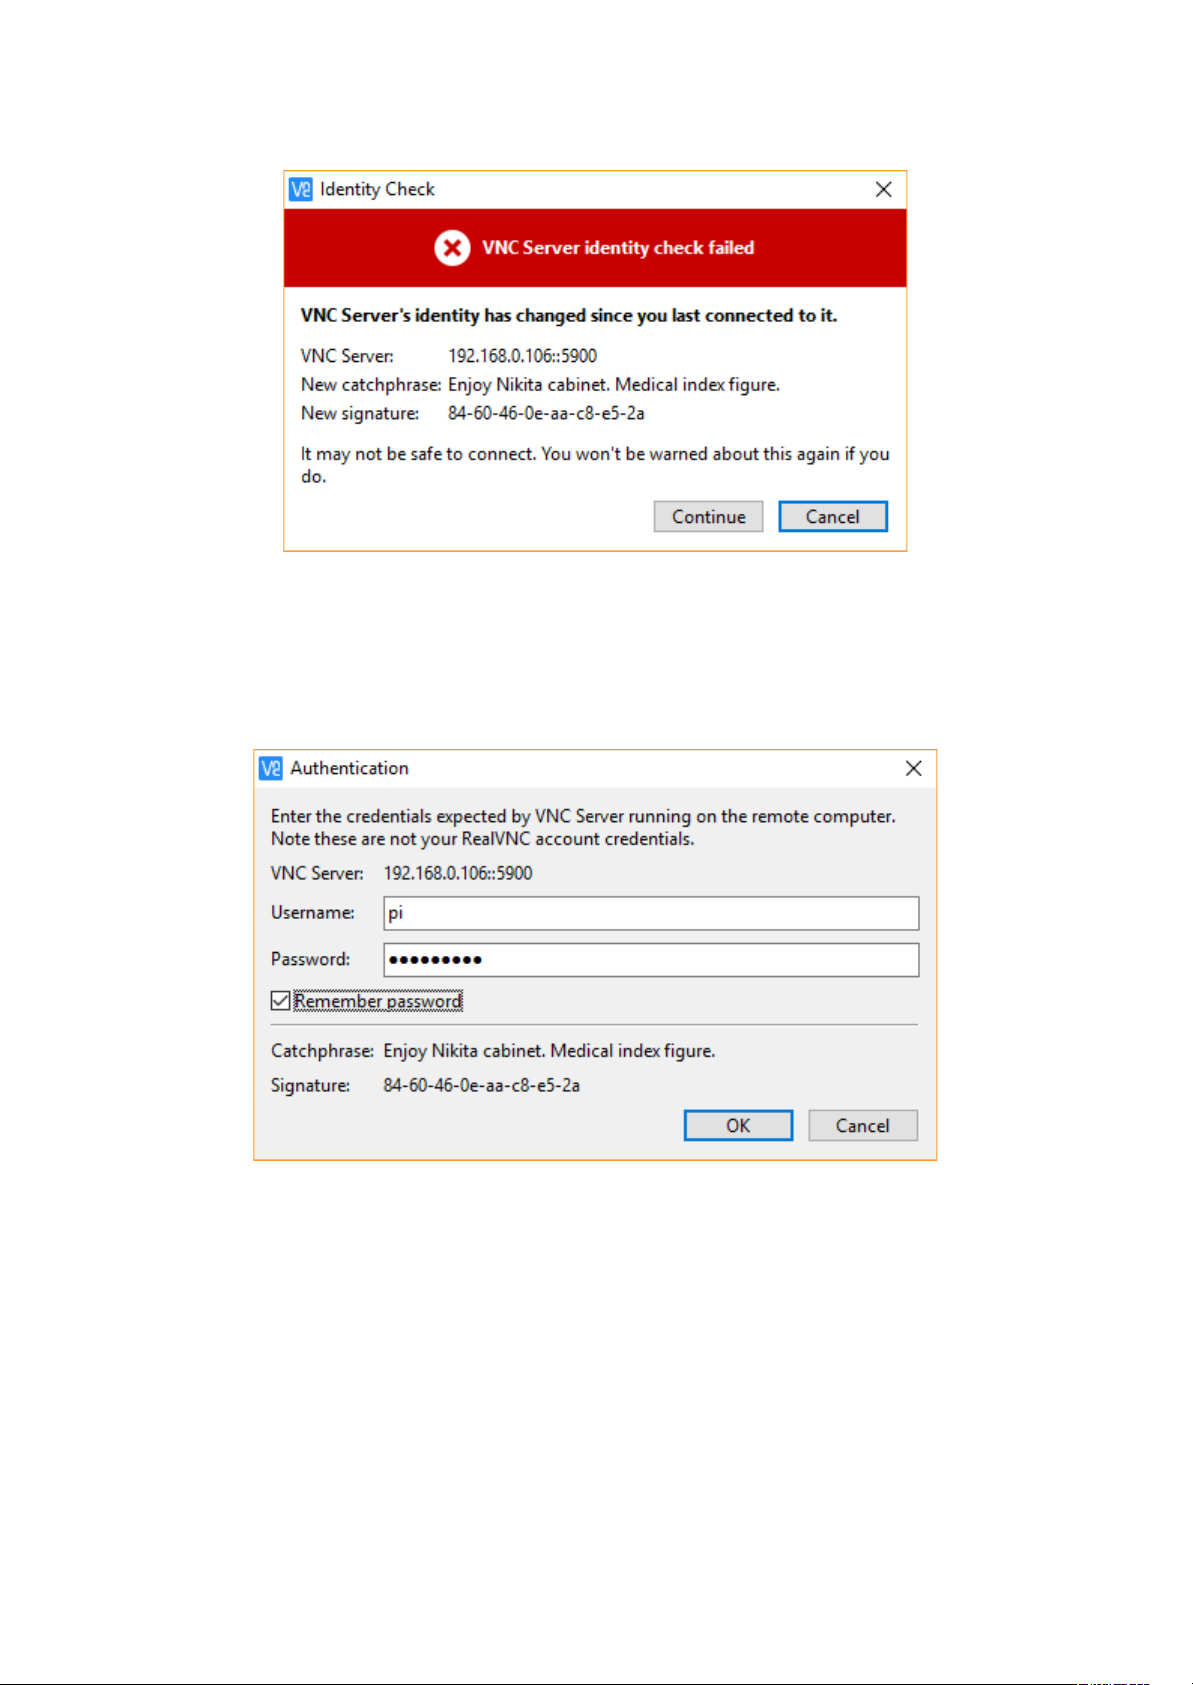
A warning window will popup. Sometimes the warning is in yellow and sometimes in red.
Proceed with Continue button.
Fill up Raspberry Pi default login information.
Username: pi
Password: raspberry
Press OK.
Created by Cytron Technologies Sdn Bhd – All Rights Reserved
Back to INDEX 19
Page 21
ROBOT.HEAD to TOE
Product User’s Manual - HAT-MAKER
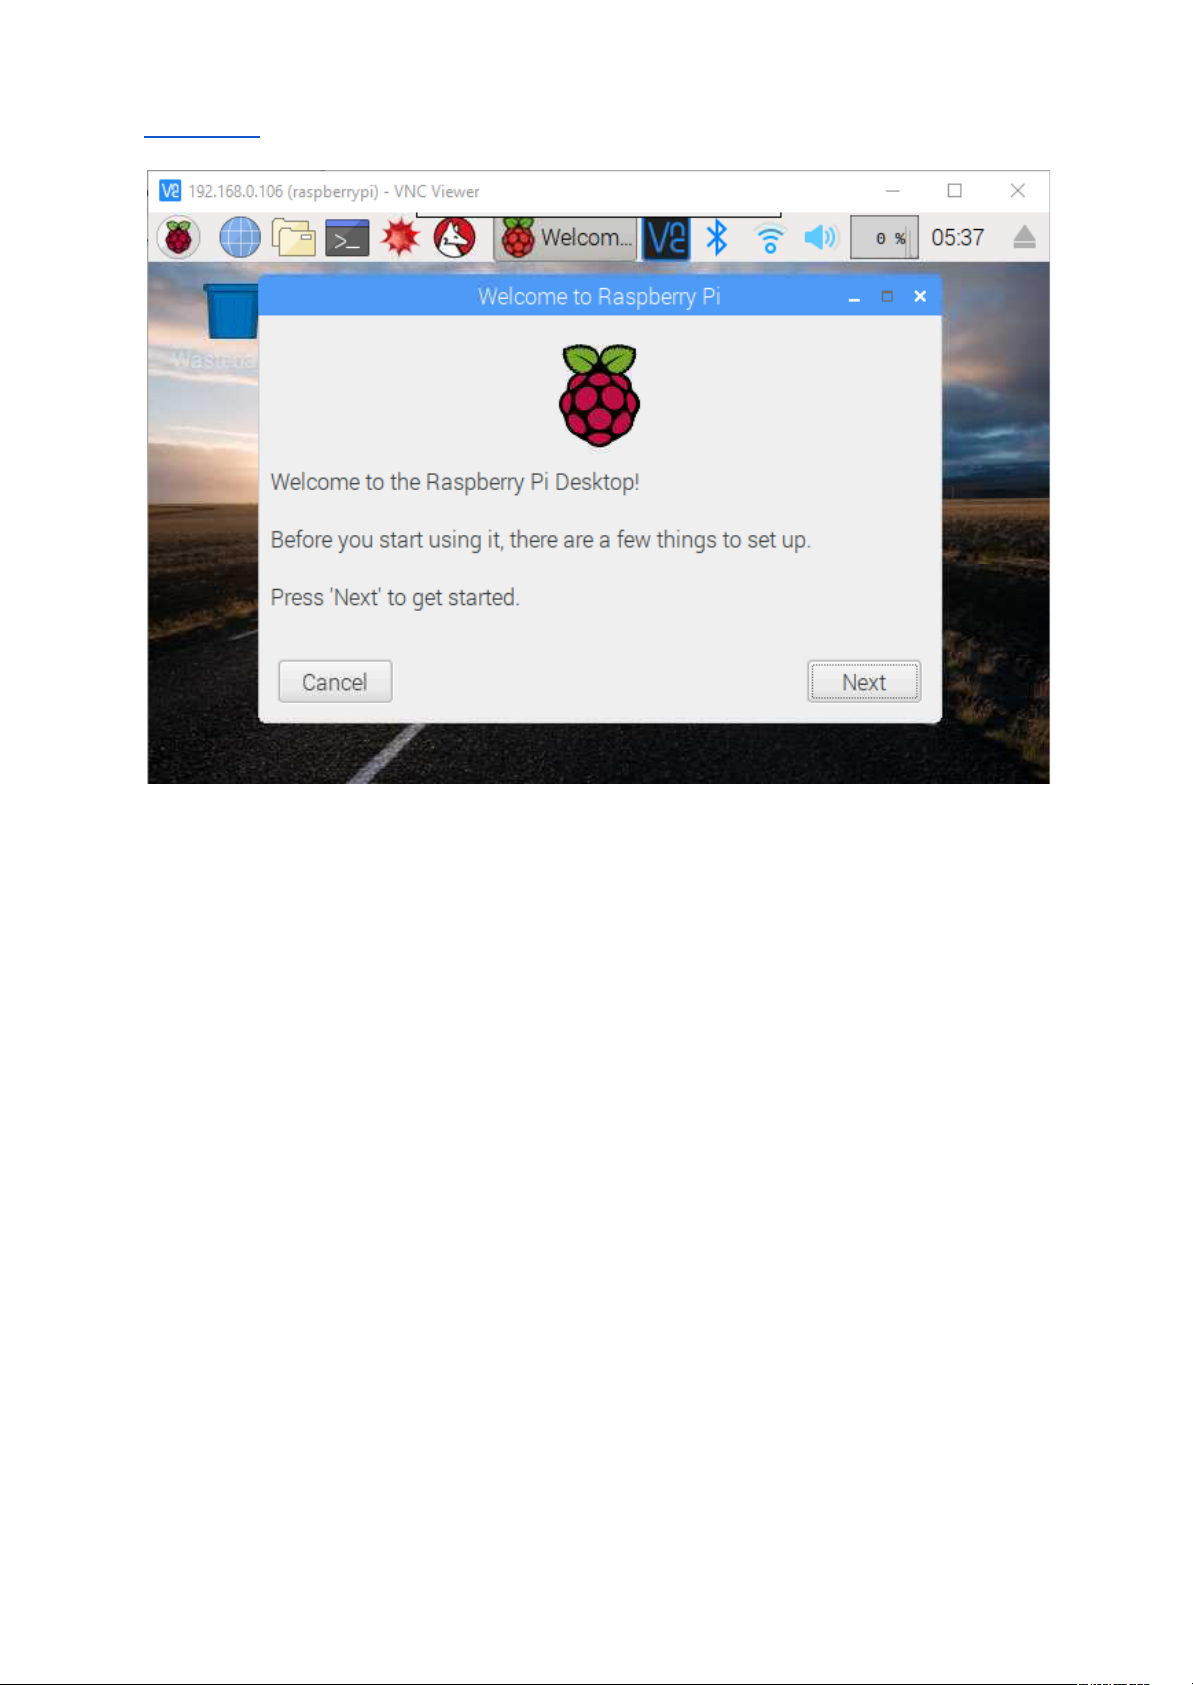
Tadaa. Your VNC remote is successful. Now you can access Raspberry Pi Desktop through
VNC Viewer and WiFi connection.
Created by Cytron Technologies Sdn Bhd – All Rights Reserved
Back to INDEX 20
Page 22
ROBOT.HEAD to TOE
Product User’s Manual - HAT-MAKER
7. HIGHLIGHTED FEATURES
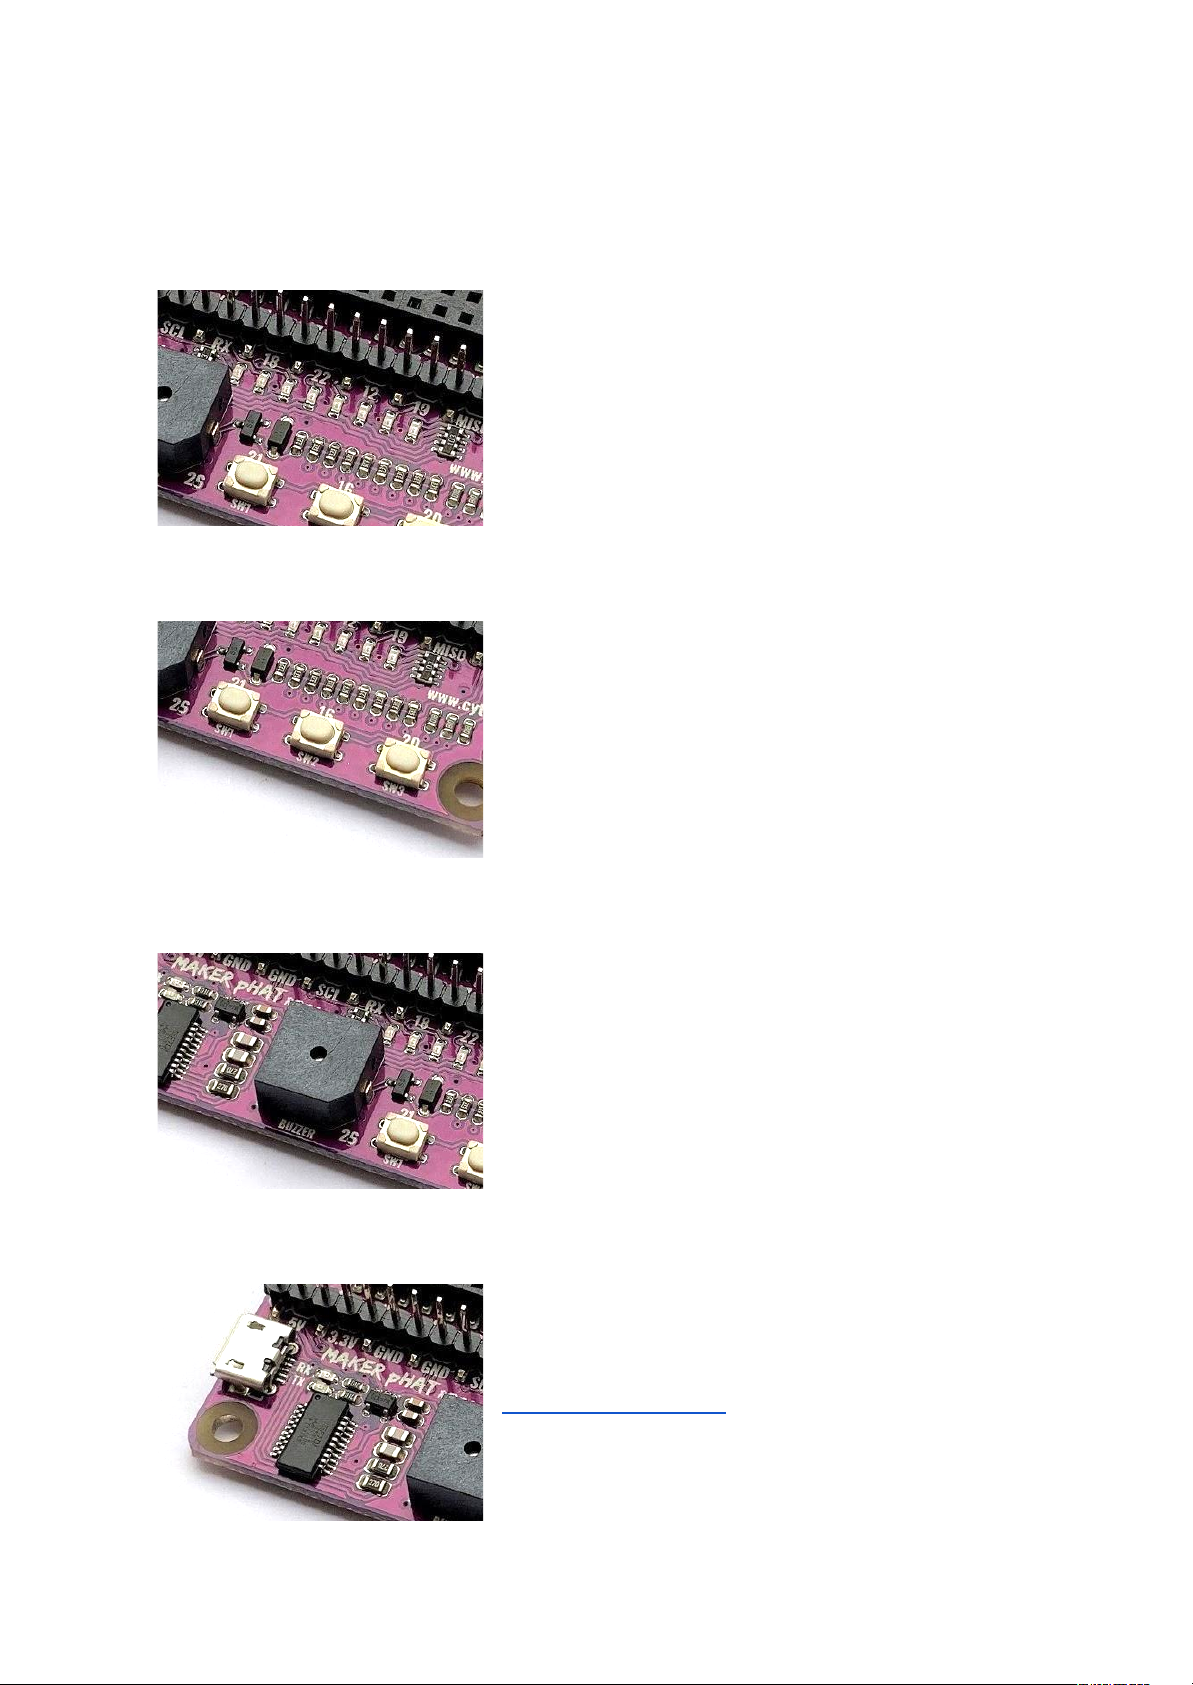
Maker pHAT incorporates 4 interesting features which make it interesting and more suitable
for beginner. Below are the detailed descriptions for each feature.
7.1 LEDs at Selected GPIO Pins
8 LEDs is connected to GPIO 17, 18, 27, 22, 25, 12, 13
and 19. Those LED can be controlled as an output or
can be act as an input (signal monitoring). In other
words, GPIO that connected to the LED, can be
configured as output, input and input pull up.
7.2 Programmable Push Buttons
3 units of programmable push button are included in
the Maker pHAT. To utilize it, user need to configure
push button GPIO as input pullup.
● SW1 is connected to GPIO 21
● SW2 is connected to GPIO 16
● SW3 is connected to GPIO 20
7.3 On-board Active Buzzer
Maker pHAT also comes with on-board active buzzer.
It is standard output digital device connected to GPIO
26. To activate it, set GPIO to high, and to mute it, just
set GPIO to low.
7.4 USB to Serial for Serial Remote
Serial remote is a helpful tool to get started with
Raspberry Pi. Luckily, Maker pHAT comes with USB to
Serial module for this purpose. It is connected to
Raspberry Pi’s UART pin (RX and TX). Please refer to
Getting Started section for more detail.
Created by Cytron Technologies Sdn Bhd – All Rights Reserved
Back to INDEX 21
Page 23
ROBOT.HEAD to TOE
Product User’s Manual - HAT-MAKER
8. PYTHON DEMO CODE
User can try this python demo code to control the LEDs and buzzer using push button on
Maker pHAT. Click on Menu - Programming - Python 3 (IDLE). Then click File - New File.
Write (or copy and paste) the following python code (gist).
MakerpHATDemo.py - /home/pi/Documents/MakerpHATDemo.py (3.5.3)
File Edit Format Run Options Window Help
from gpiozero import LED, Button, Buzzer
from time import sleep
import os
LED1 = LED(17)
LED2 = LED(18)
LED3 = LED(27)
LED4 = LED(22)
LED5 = LED(25)
LED6 = LED(12)
LED7 = LED(13)
LED8 = LED(19)
SW1 = Button(21)
SW2 = Button(16)
SW3 = Button(20)
BUZZER = Buzzer(26)
NONE = 0
DECREASE = 1
INCREASE = 2
ALL_OFF = 9
ALL_ON = 10
def beep(times, sec):
for x in range(times):
BUZZER.on()
sleep(sec)
BUZZER.off()
sleep(sec)
def led(ledNumber):
if ledNumber == 1:
LED1.on()
else:
LED1.off()
if ledNumber == 2:
LED2.on()
else:
LED2.off()
if ledNumber == 3:
LED3.on()
else:
LED3.off()
Created by Cytron Technologies Sdn Bhd – All Rights Reserved
Back to INDEX 22
Page 24

ROBOT.HEAD to TOE
Product User’s Manual - HAT-MAKER
if ledNumber == 4:
LED4.on()
else:
LED4.off()
if ledNumber == 5:
LED5.on()
else:
LED5.off()
if ledNumber == 6:
LED6.on()
else:
LED6.off()
if ledNumber == 7:
LED7.on()
else:
LED7.off()
if ledNumber == 8:
LED8.on()
else:
LED8.off()
if ledNumber == ALL_OFF:
LED1.off()
LED2.off()
LED3.off()
LED4.off()
LED5.off()
LED6.off()
LED7.off()
LED8.off()
elif ledNumber == ALL_ON:
LED1.on()
LED2.on()
LED3.on()
LED4.on()
LED5.on()
LED6.on()
LED7.on()
LED8.on()
mode = NONE
ledPosition = 0
led(ALL_ON)
beep(1, 0.1)
led(ALL_OFF)
try:
while True:
if SW1.is_pressed and mode != DECREASE:
beep(2, 0.07)
mode = DECREASE
Created by Cytron Technologies Sdn Bhd – All Rights Reserved
Back to INDEX 23
Page 25

ROBOT.HEAD to TOE
Product User’s Manual - HAT-MAKER
elif SW2.is_pressed and SW3.is_pressed:
sleep(0.5)
for loop in range(times):
BUZZER.on()
led(ALL_ON)
sleep(0.2)
BUZZER.off()
led(ALL_OFF)
sleep(0.2)
sleep(0.5)
os.system(“sudo shutdown -h now”)
elif SW2.is_pressed and mode != INCREASE:
beep(2, 0.07)
mode = INCREASE
elif SW3.is_pressed and mode != NONE:
beep(1, 0.07)
mode = NONE
if mode == INCREASE:
if ledPosition < 8:
ledPosition = ledPosition + 1
else:
ledPosition = 0
elif mode == DECREASE:
if ledPosition > 0:
ledPosition = ledPosition - 1
else:
ledPosition = 8
led(ledPosition)
sleep(0.05)
except KeyboardInterrupt:
led(ALL_OFF)
Created by Cytron Technologies Sdn Bhd – All Rights Reserved
Back to INDEX 24
Page 26
ROBOT.HEAD to TOE
Product User’s Manual - HAT-MAKER
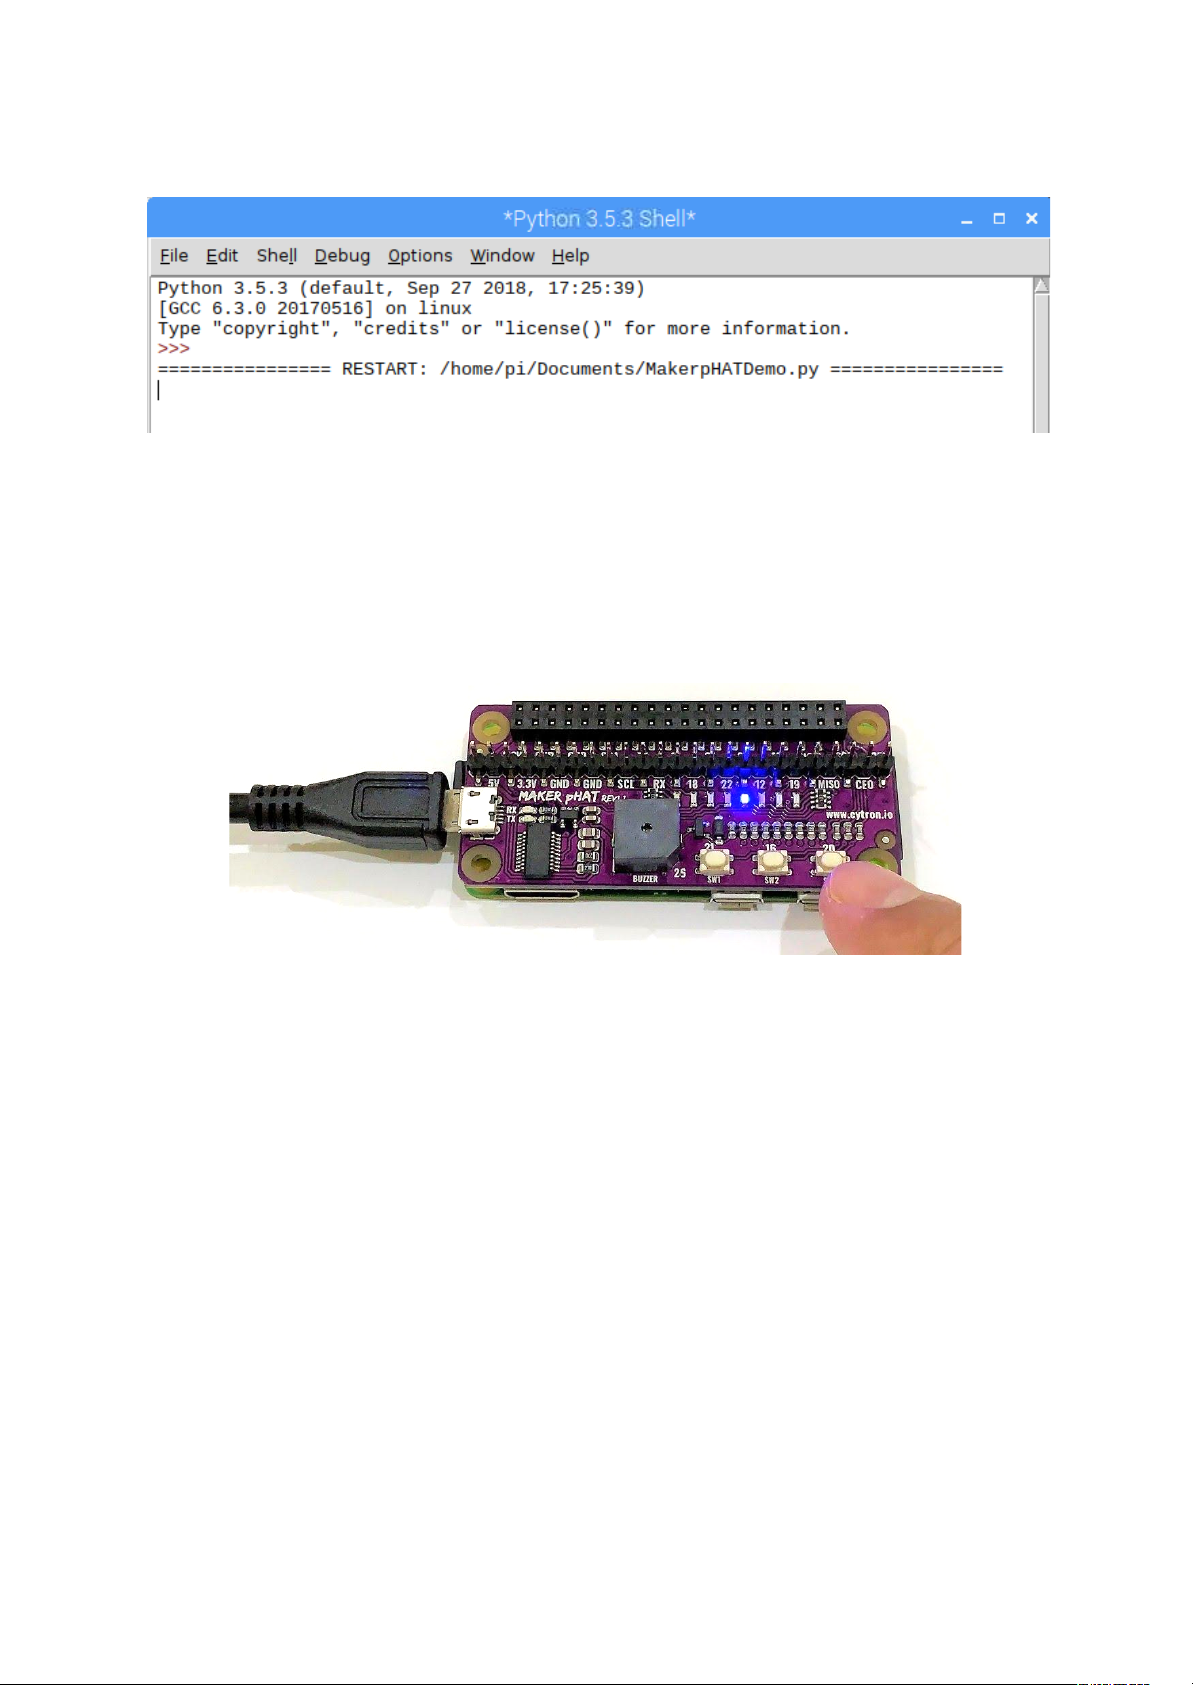
To run it, click Run - Run Module (or can press F5). You need to save your python code first.
You can save your code in Documents folder. Write MakerpHATDemo.py and save. Python
Shell window will popup. Wait until you hear a beep from Maker pHAT.
Now you can control the LED by pressing the push buttons.
● SW1: Buzzer will produce double beep. LED will running from right (GPIO 19) to left
(GPIO17).
● SW2: Buzzer will produce double beep. LED will running from left (GPIO 17) to right
(GPIO19).
● SW3: Buzzer will produce single beep. LED stop running.
● Hold SW2 and SW3: Raspberry Pi shutdown.
Created by Cytron Technologies Sdn Bhd – All Rights Reserved
Back to INDEX 25
Page 27
ROBOT.HEAD to TOE
Product User’s Manual - HAT-MAKER
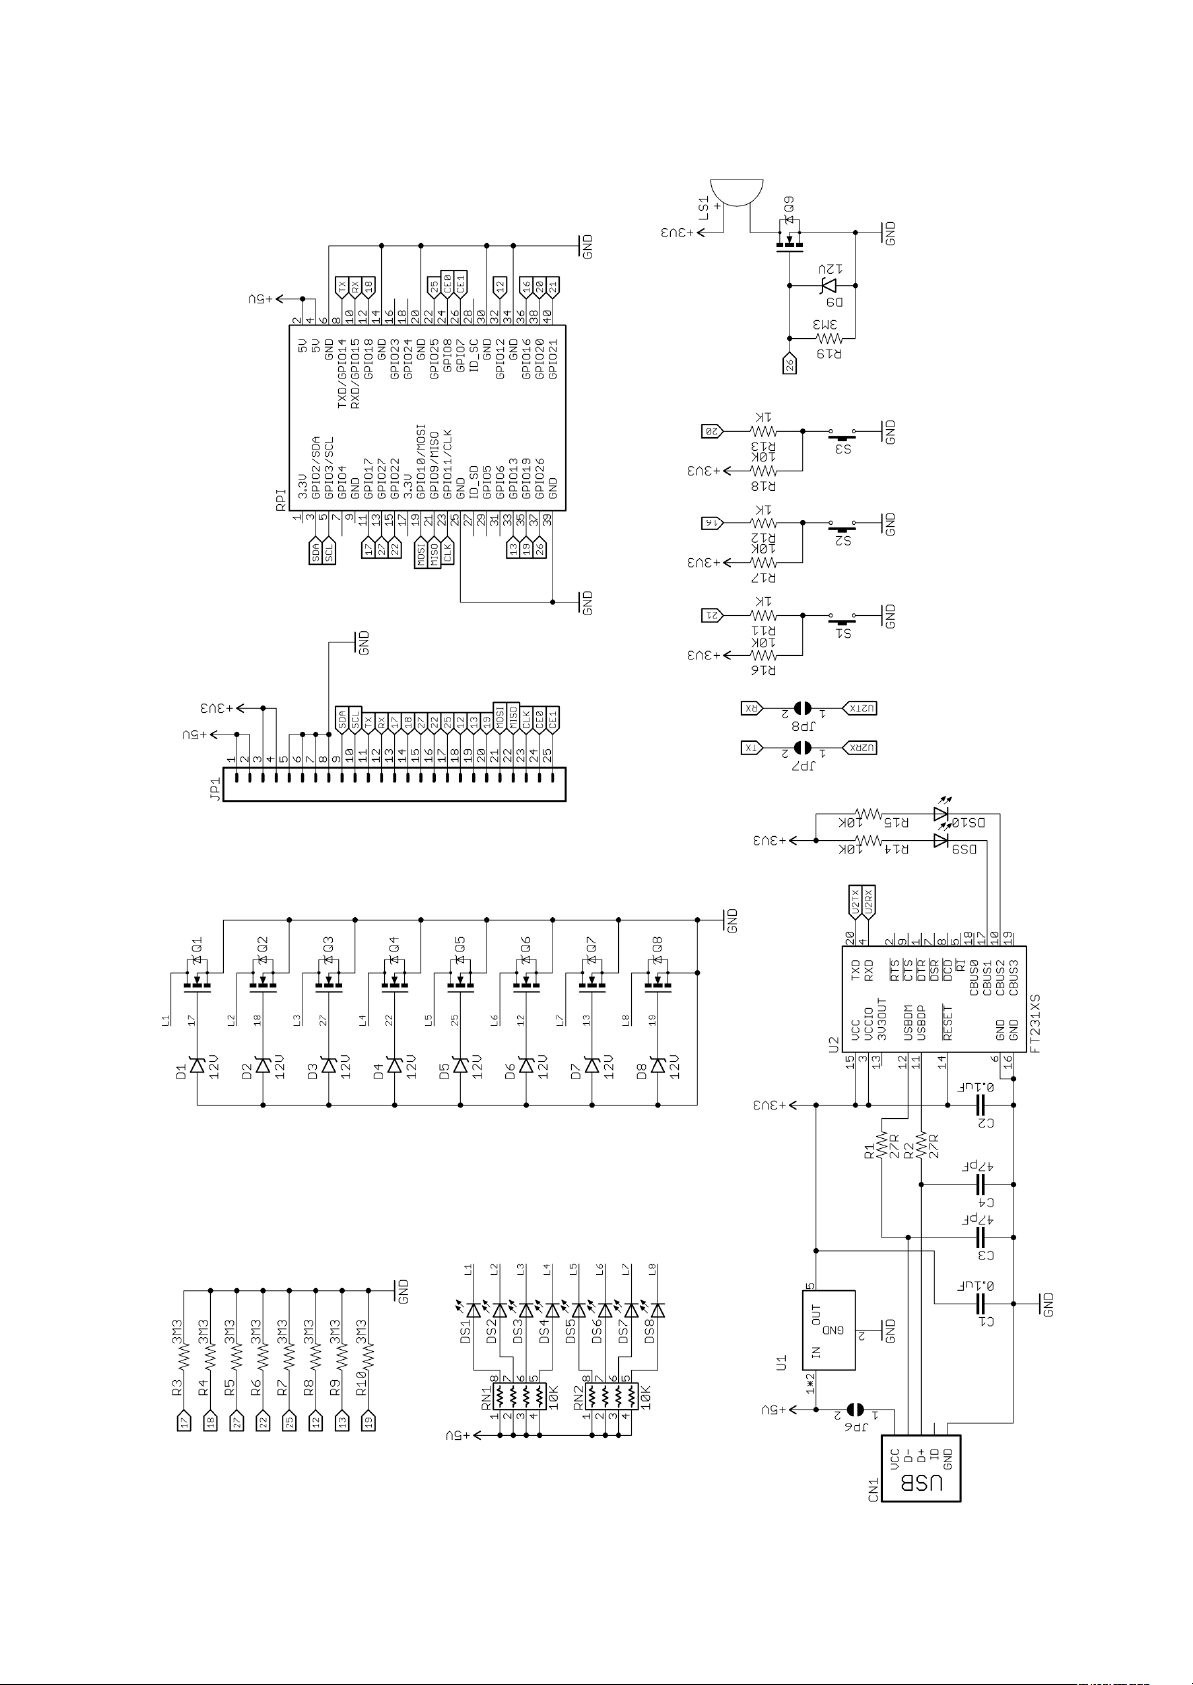
9. SCHEMATIC
Created by Cytron Technologies Sdn Bhd – All Rights Reserved
Back to INDEX 26
Page 28
ROBOT.HEAD to TOE
Product User’s Manual - HAT-MAKER
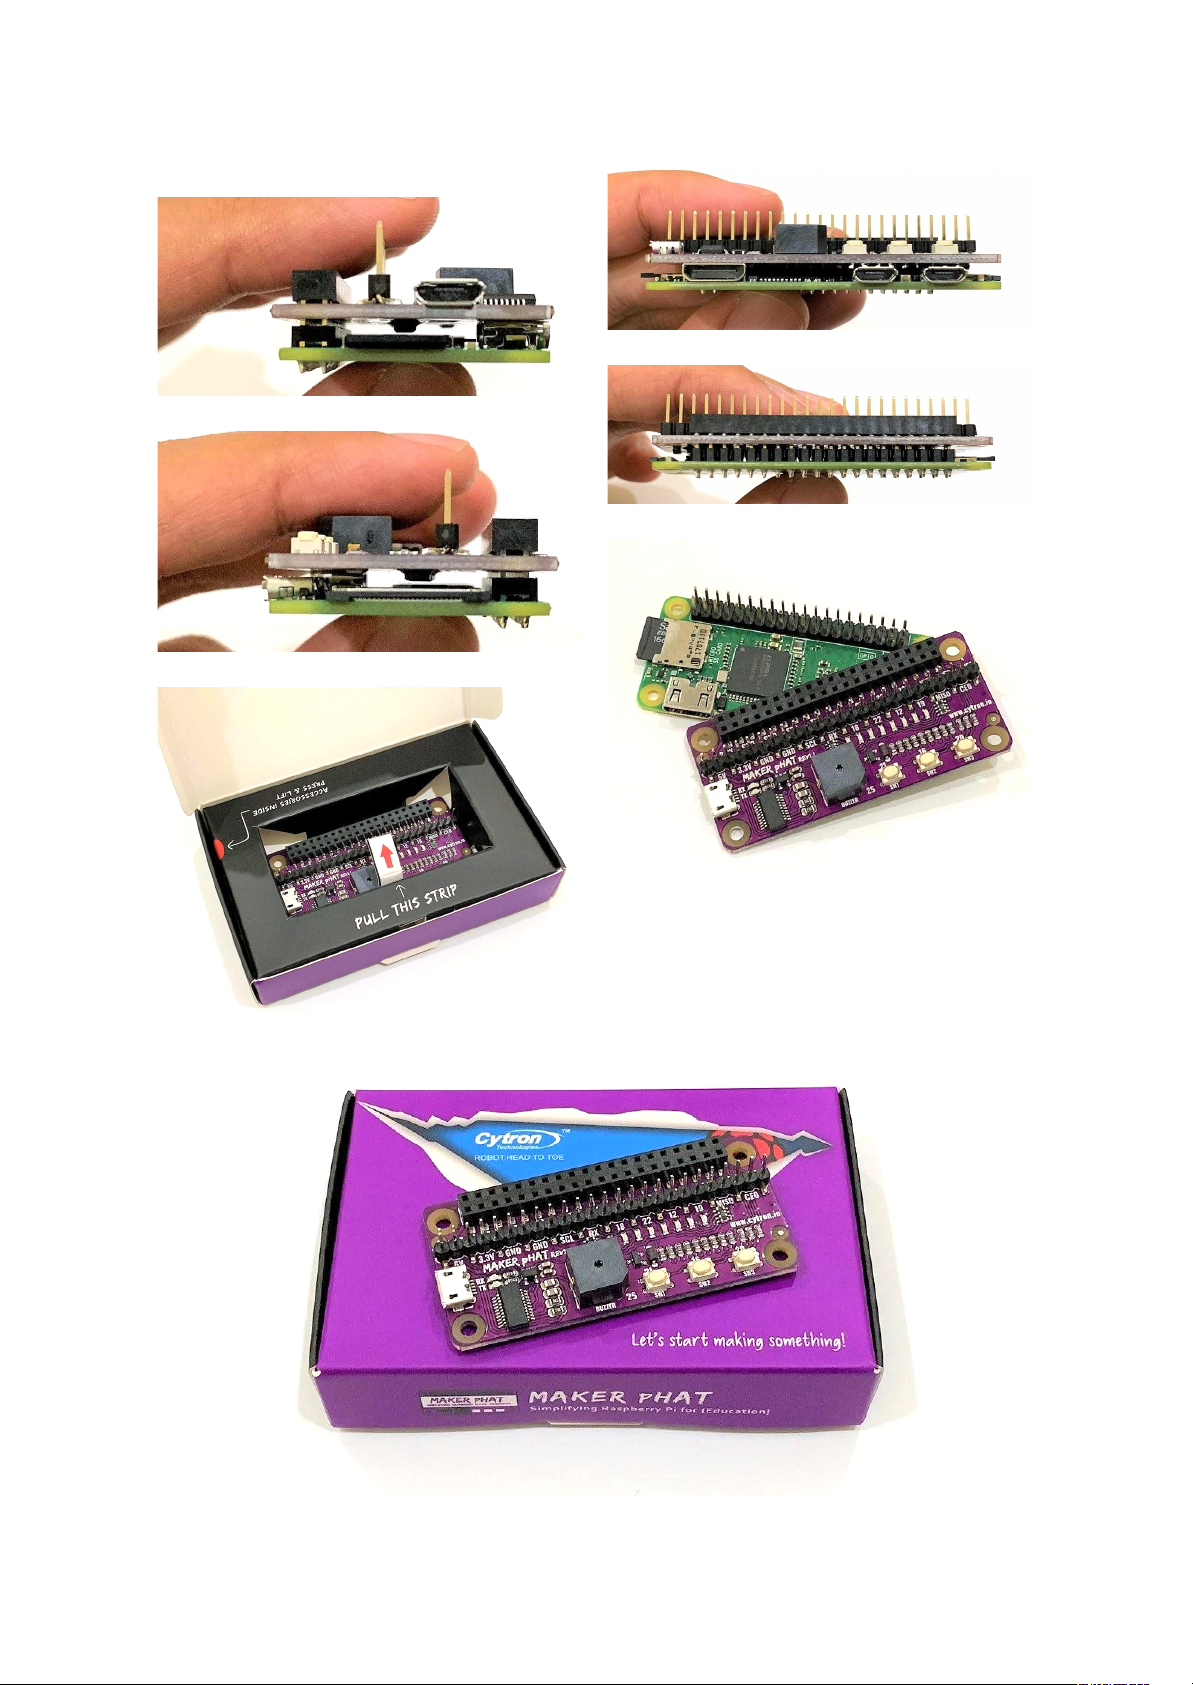
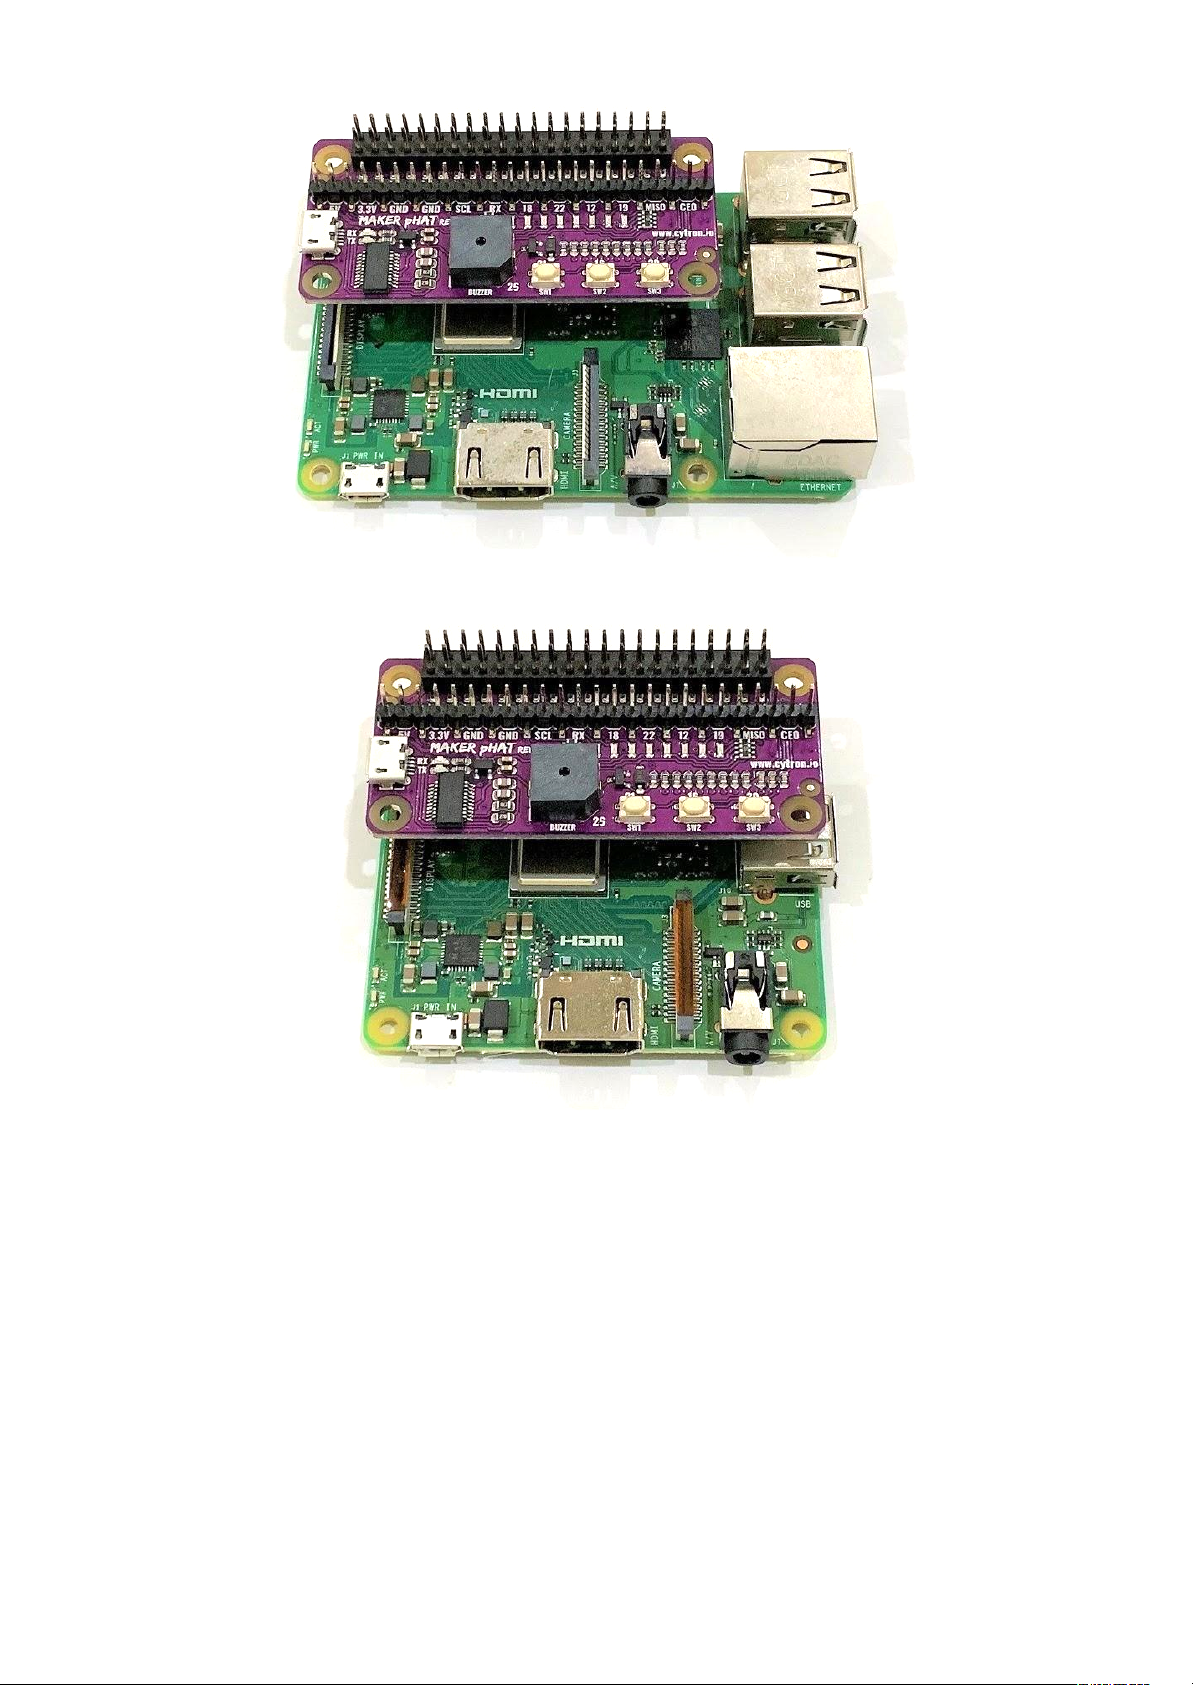
10. GALLERY
Created by Cytron Technologies Sdn Bhd – All Rights Reserved
Back to INDEX 27
Page 29
ROBOT.HEAD to TOE
Product User’s Manual - HAT-MAKER
Created by Cytron Technologies Sdn Bhd – All Rights Reserved
Back to INDEX 28
Page 30

ROBOT.HEAD to TOE
Product User’s Manual - HAT-MAKER
11. WARRANTY
● Product warranty is valid for 1 year.
● Warranty only applies to manufacturing defect.
● Damaged caused by misuse is not covered under warranty.
● Warranty does not cover freight cost for both ways.
Prepared by:
Cytron Technologies Sdn Bhd
www.cytron.io
No. 1, Lorong Industri Impian 1,
Taman Industri Impian,
14000 Bukit Mertajam,
Penang, Malaysia.
Tel: +604 - 548 0668
Fax: +604 - 548 0669
Email:
Created by Cytron Technologies Sdn Bhd – All Rights Reserved
Back to INDEX 29
 Loading...