

ENGINEERED
TO ENTERTAIN
Cyrus Streamline2 series User Instructions
IMPORTANT! Read before operating this equipment!
CAUTION: The exclamation mark is to draw your attention
to important instructions and safety procedures in this
manual.
ATTENTION: The lightning flash warns you of the risk
of electrical shock presented by components inside this
product. Unauthorised personnel must not open this unit.
WARNING: To reduce the risk of electrical shock do not remove any unit
covers or panels. There are no user serviceable parts in this product.
WARNING: To reduce the risk of electric shock, do not expose this
equipment to rain or moisture.
HEED WARNINGS: All warnings on the product and in the operating
instructions should be adhered to.
READ ALL THE INSTRUCTIONS: All the safety and operating instructions
should be read before the product is operated.
RETAIN INSTRUCTIONS: The safety and operating instructions should be
retained for future reference.
FOLLOW INSTRUCTIONS: All operating and use instructions should be
followed.
CLEANING: Unplug this product from the mains before cleaning. Do not
use liquid or aerosol cleaners. Use a damp cloth for cleaning.
WATER AND MOISTURE: Do not use this product near water - for
example, near a bath tub, wash bowl, kitchen sink, or laundry tub, in a
wet basement; or near a swimming pool and the like. The product must
not be exposed to dripping or splashing and no objects filled with liquids,
such as vases, shall be placed on the product.
HEAT: The product should be situated away from heat sources such as
radiators, stoves, or any other products (including amplifiers) that produce
heat.
VENTILATION: Slots and openings in the cabinet are provided for
ventilation, to ensure reliable operation of the product and to protect
it from overheating. These openings must not be blocked or covered.
The openings should never be blocked by placing the product on a bed,
sofa, rug or similar surface. This product should not be placed in a builtin installation such as a bookcase or rack unless proper ventilation is
provided or the manufacturer’s instructions have been adhered to.
OBJECT OR LIQUID ENTRY: Never push objects of any kind into this
product through openings as they may touch dangerous voltage points
or short-out parts that could result in a fire or electric shock.
ACCESSORIES: Do not place this product on an unstable cart, stand,
tripod, bracket, or table. The product may fall, causing serious injury to
a child or adult, and serious damage to the product. Use only with a
cart, stand, tripod, bracket or table recommended by the manufacturer,
or sold with the product. Any mounting of the product should follow
the manufacturer’s instructions, and should use a mounting accessory
recommended by the manufacturer.
ATTACHMENTS: Do not use attachments not recommended by the
product manufacturer as they may cause hazards.
MOVING THE PRODUCT:
should be moved with care. Sudden stops, excessive force, and
uneven surfaces may cause the product and cart to overturn.
A product and cart combination
NAKED FLAMES: No naked flame sources, such as candles, must be
placed on this product. Batteries (battery pack or batteries installed) shall
not be exposed to excessive heat such as sunshine, fire or the like.
LIGHTNING: For added protection for this product during a lightning storm,
or when it is left unattended or unused for long periods of time, unplug it
from the wall outlet and disconnect the antenna or cable system. This will
prevent damage to the product due to lightning and power-line surges.
BATTERIES: Warning: Batteries shall not be exposed to excessive heat
such as sunshine, fire or the like.
CAUTION! POLARISED CONNECTOR (CANADA and USA): To prevent
electrical shock, match wide blade of plug to wide slot, fully insert. Do not
alter or remove this plug if it does not fit your mains power socket. Have
a suitable socket installed by a competent electrician.
ACCESS TO THE MAINS PLUG: The means to disconnect this product
from the mains supply is the mains plug. Ensure that the mains plug is
accessible at all times.
POWER SOURCES: This product should be operated only from the type
of power source indicated on the marking label. If you are not sure of the
type of power supply to your home, consult your product dealer or local
power company. For products intended to operate from battery power,
or other sources, refer to the operating instructions.
OVERLOADING: Never overload wall outlets, extension cords, or integral
convenience receptacles. This can result in an increased risk of fire or
electric shock.
POWER CORD PROTECTION: Power supply cords should be routed so
that they are not likely to be walked on or pinched by items placed upon
or against them, paying particular attention to cords at plugs, convenience
receptacles, and the point where they exit from the product.
1

Cyrus Streamline2 series User Instructions
POWER SUPPLY:
Connect the moulded IEC connector of the AC cord supplied into the
power inlet on the rear of the unit.
The mains supply requirement of your unit is marked on a label on the
rear panel. Before connecting, check that this voltage is the same as your
mains supply.
230V Products: Voltage Range 220V-240V
115V Products: Voltage Range 110V-120V
If you move to an area with a different mains voltage, contact your local
Cyrus distributor to have your product converted.
There are no user replaceable fuses in this unit.
NOTE FOR UK CUSTOMERS:
This product is supplied with a power cable terminated by a fused 13A
mains plug. This plug should not be removed but if it is removed, dispose
of it safely and do not re-use it. To connect a new 13A plug, proceed as
follows: Connect the brown wire to the terminal marked L or coloured red.
Connect the blue wire to the terminal marked N or coloured black. The
internal plug fuse should be 5A.
SERVICING:
Do not attempt to service this product yourself as opening or removing
covers may expose you to dangerous voltage or other hazards. Refer all
servicing to qualified service personnel.
CONDITIONS REQUIRING SERVICE: Unplug this product from the wall
outlet and refer servicing to qualified service personnel when:
When the power supply cord or plug is damaged.•
If liquid has been spilled, or objects have fallen into the product.•
If the product has been exposed to rain or water.•
If the product has been dropped or damaged in any way.•
If the product does not operate normally by following the operating •
instructions. (Adjust only those controls that are covered by the
operating instructions. Improper adjustment of other controls may
result in damage requiring extensive work by a qualified technician to
restore the product to its normal operation).
When the product exhibits a distinct change in performance. •
REPLACEMENT PARTS: When replacement parts are required, be sure the
service technician has used replacements specified by the manufacturer
or have the same characteristics as the original part. Unauthorised
substitutions may result in fire, electric shock, or other hazards.
SAFETY CHECK: Upon completion of any service or repairs to this product,
ask the service technician to perform safety checks to determine that the
product is in proper operating condition.
Welcome to the world of Cyrus!
Congratulations on your choice of Cyrus Hi-fi products. Our state-of-theart design technology and outstanding quality of manufacture has won
countless awards around the world. We are confident that you will derive
great pleasure from owning a product from one of the most recognised
and respected manufacturers of hi-fi equipment.
Now is a good time to register your new Cyrus product. Registration takes
only a few minutes, brings the added benefit of a full two year factory
warranty and adds you to our mailing list for future product updates and
upgrades. To register, visit www.cyrusaudio.com and click the ‘Login/
Register’ link.
Please read these instructions carefully before commencing installation.
They provide full guidance to help you install your amplifier safely and
correctly.
PRODUCT SERVICE CENTRES
For product service or technical advice, contact only authorised Cyrus
service centres. Contact details for Cyrus distributors may be found on
the Cyrus website at www.cyrusaudio.com.
2
Cyrus Streamline2 series User Instructions
IN 4
IN 5
OUT
IN
MC-BUS
USB
PRE OUT FIXED OUT
IN 1 IN 2
IN 3 DIG OUT
ETHERNET
RS232
‘PHONES
MADE IN ENGLAND
MC-BUS
R
L
LEFT
RIGHT
aa bb cc dd ee ff gg hh 1)1) 1!1! 1#1#
ii 1@1@
IN 4
IN 5
OUT
IN
MC-BUS
USB
IN 1 IN 2
IN 3 DIG OUT
ETHERNET
RS232
MADE IN ENGLAND
MC-BUS
IN 4
IN 5
OUT
IN
MC-BUS
USB
PRE OUT FIXED OUT
IN 1 IN 2
IN 3 DIG OUT
ETHERNET
RS232
‘PHONES
MADE IN ENGLAND
MC-BUS
R
L
USE PSX-R ONLY
IN 4
IN 5
OUT
IN
MC-BUS
USB
OUT1 OUT2
IN 1 IN 2
IN 3 DIG OUT
ETHERNET
RS232
MADE IN ENGLAND
MC-BUS
R
L
USE PSX-R ONLY
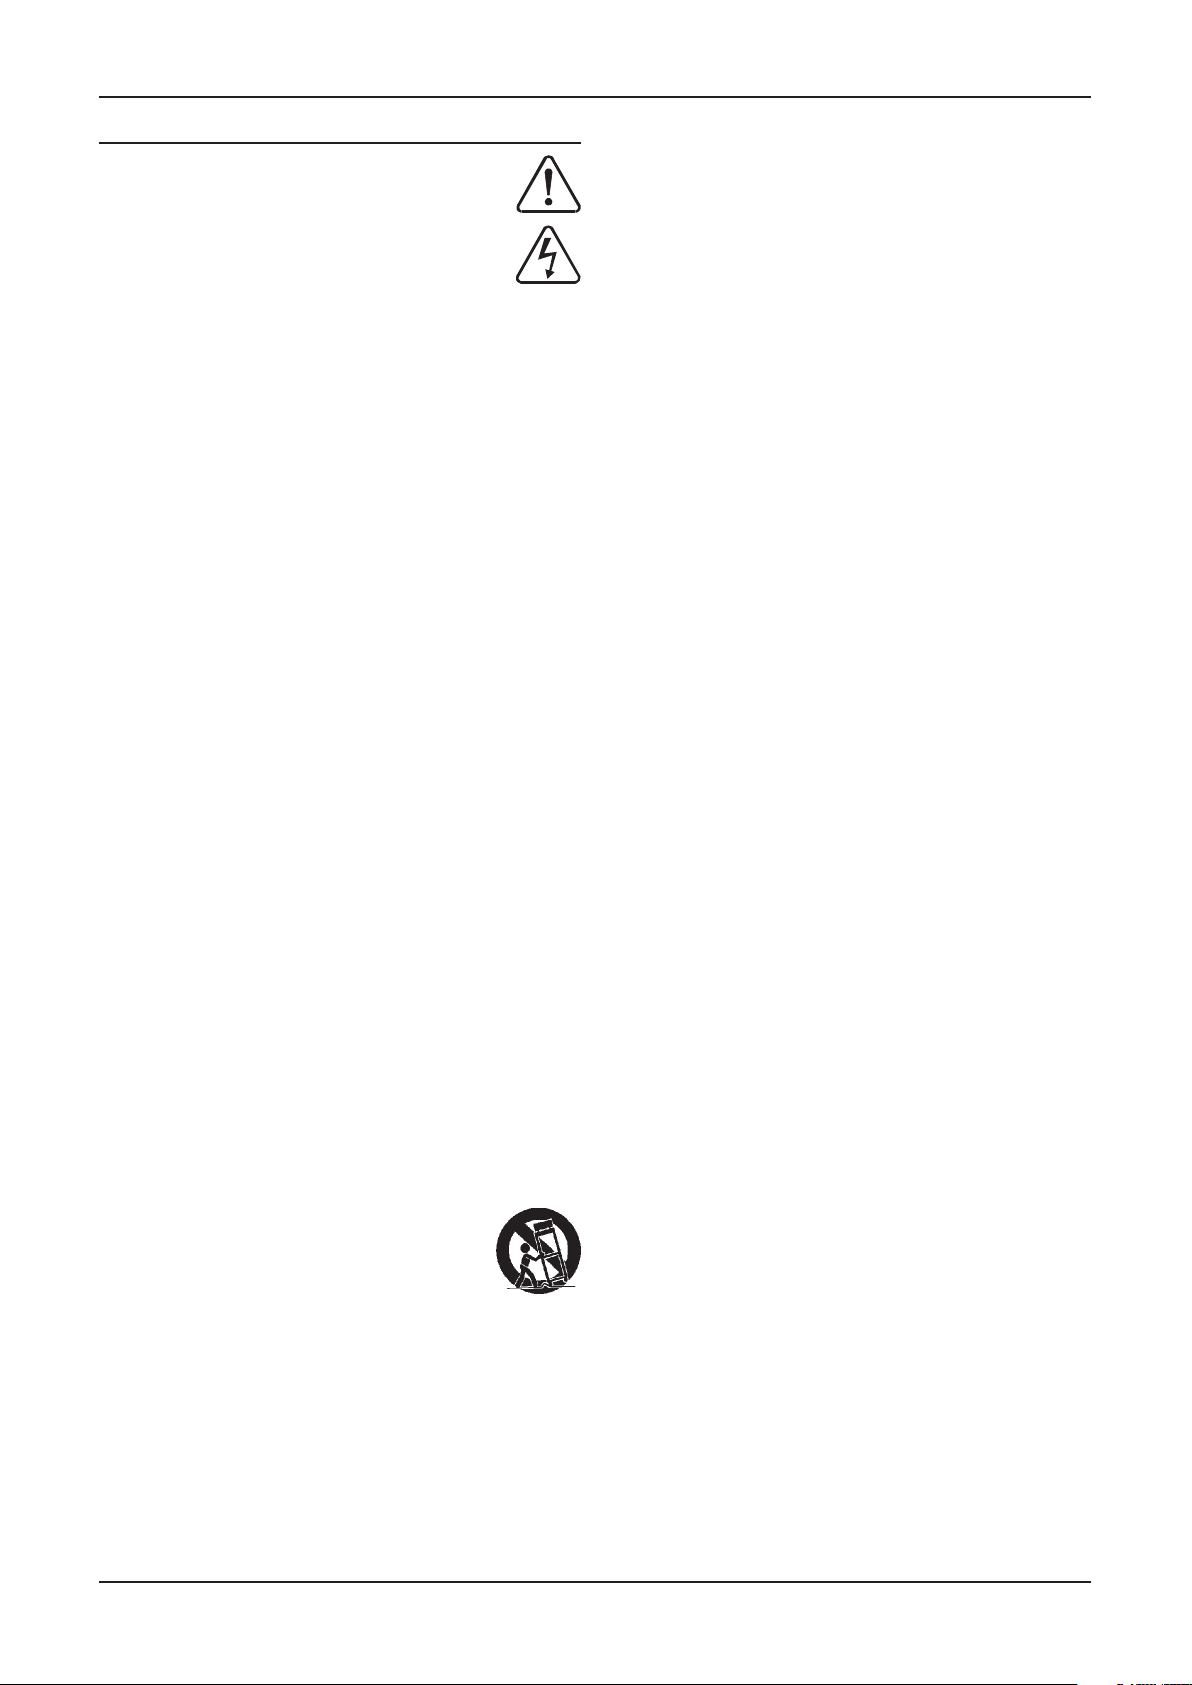
Model Features
There are six Cyrus streaming models in this handbook:
Stream X2, Stream X Signature, Stream Xa, Stream XP2,
Stream XP
This handbook includes instructions for the connection and
operation of the six products. In the text of this handbook all
models are referred to as Streamline
are shown in the text where necessary.
The model number of your unit is printed on the label on the
rear panel of the unit.
The Stream X
Cabled or wireless connectivity for your local computer
network, enabling you to enjoy music stored on devices
connected to the network or Internet radio broadcasts from
around the globe.
A USB port to enable playback of music stored on iPods/
iPhones or USB devices such a memory sticks, hard drives
or personal audio players.
Optical and digital inputs for connection of CD players, DAB
radios, digital TV receivers or other sources with SPDIF digital
connection.
A digital output for connection to a Cyrus amplifier equipped
with digital inputs.
The Stream Xa adds -
Dual fixed analogue audio outputs for connection to a highend analogue integrated or preamplifier. A PSX-R upgrade
connection is also included for the ultimate sound quality.
Stream XP
Fixed and variable analogue audio outputs for connection
to a high-end analogue audio system or directly to a power
amplifier. Headphones may be connected via a dedicated
headphone amplifier stage. A PSX-R upgrade connection is
also included for the ultimate sound quality. The Stream XP
Qx features the high performance Qx DAC upgrade option. A
PSX-R upgrade connection is also included for the ultimate
sound quality.
The Streamline
Fixed and variable analogue audio outputs, a dedicated
headphone amplifier and a stereo power amplifier to drive a
pair of loudspeakers directly.
NOTE: PSX-R and Qx DAC options are not available for the
Streamline
Qx and Streamline
2
and Stream X Signature feature –
2
and Stream XP2 Qx add -
2
adds -
2
.
2
.
2
, and model differences
2
Stream X2, Stream X Signature
Stream Xa
2
Stream XP
, Stream XP2 Qx
2
Key to the rear panel drawings
Speaker outputs1.
Headphone connection2.
Pre-Amplifier output3.
Fixed level analogue output4.
MC-BUS connection5.
USB port6.
Optical digital input 17.
Optical digital input 28.
Coaxial digital input 49.
Coaxial digital input 3 10.
Coaxial digital output11.
Coaxial digital input 512.
Ethernet connection13.
PSX-R connection14.
Power inlet15.
RS232 connection16.
n-remote aerial17.
Wi-Fi network aerial connector18.
Streamline
2
3

Cyrus Streamline2 series User Instructions
How does the Streamline2 work?
The Streamline2 joins your computer network in the same way that a
computer or other networked device would.
Playing music from a network
Once connected to your network, the Streamline
libraries present on your network, catalogue the music found in those
libraries, and present the library content in a choice of easily searchable
categories.
The n-remote
The n-remote communicates with the Streamline
and displays the status of the Streamline2, whether you are browsing a
music library or changing settings. From the comfort of your chair you can
choose a category to search your music, browse that category, and then
play your selection.
Will a Streamline
The Streamline
loudspeakers or can be connected to the analogue or digital inputs of a
connect to a Cyrus audio system?
2
may be used ‘stand-alone’ connected directly to a pair of
2
Cyrus amplifier, DAC or AV processor.
will identify music
2
via a 2-way radio link
2
Music libraries
Audophile systems have progressed over the years from shelves of fragile
vinyl records or magnetic tape to racks of compact discs, played without
any physical contact.
Perfect sound forever? Perhaps, but for a serious audiophile a large
collection of CDs still occupies a large space in a room, usually in the
listening room itself. Cataloguing the CDs can be a chore and remembering
which album your favourite tracks are on can be quite a challenge in a
large collection of CDs.
The Cyrus Streamline
hardware to take the music content from your discs and store the entire
answers all of these problems, by using computer
2
collection in a music library on a hard-drive that occupies little more
space than a few CDs.
Setting up a network music library
Choosing a file format for your library
Hard drive size was once a limitation for storage of a high quality,
uncompressed music library. This is no longer the case as high capacity
hard-drives are now affordable, and multiple drives are also an option.
Lossless formats are also now available, offering the quality of
uncompressed files, but with a useful saving of around 40% of the file
size.
If you already have an existing library of uncompressed WAV or AIFF files
ripped from CD, then this will deliver the highest quality when played
through the Streamline
If you have an existing library that includes MP3, WMA, AAC or other
compressed format files, you may want to consider creating a new library
of uncompressed or lossless files from your CD collection, Although the
Streamline
by these formats to pack the files into a small space removes essential
is compatible with compressed files, the compression used
2
information from the music that cannot be replaced on replay.
The same recommendation applies if you are setting up a new music
library for use with your Streamline
carry the highest recommendation.
Mixing formats
The Streamline
to retain an existing library of compressed format files, rip new music
entries to uncompressed or lossless files and replace the compressed
files as time permits.
The Streamline
retain a library of compressed files for portable audio etc., and set up a
new library of uncompressed or lossless music for the Streamline2.
Buying music on-line
There are currently few sources on-line for the purchase of high quality
uncompressed or lossless files. To achieve the best quality for your music
library, rip your music from CD to uncompressed or lossless files.
Further advice on setting up a library
A good retailer can advise on setting up a library of music files for use
with the Streamline
.
2
. In a new library, uncompressed files
2
will decode most music file types, so it is quite acceptable
2
can also browse multiple libraries, so you may prefer to
2
.
2
4
Cyrus Streamline2 series User Instructions
Streamline2 set-up options
The Streamline2 is extremely versatile and can be incorporated into your
music world in many different ways. This page shows two configurations
recommended by Cyrus, and one that is not recommended.
The systems are illustrated as guidelines only to help you plan the best
way to install your Streamline
.
2
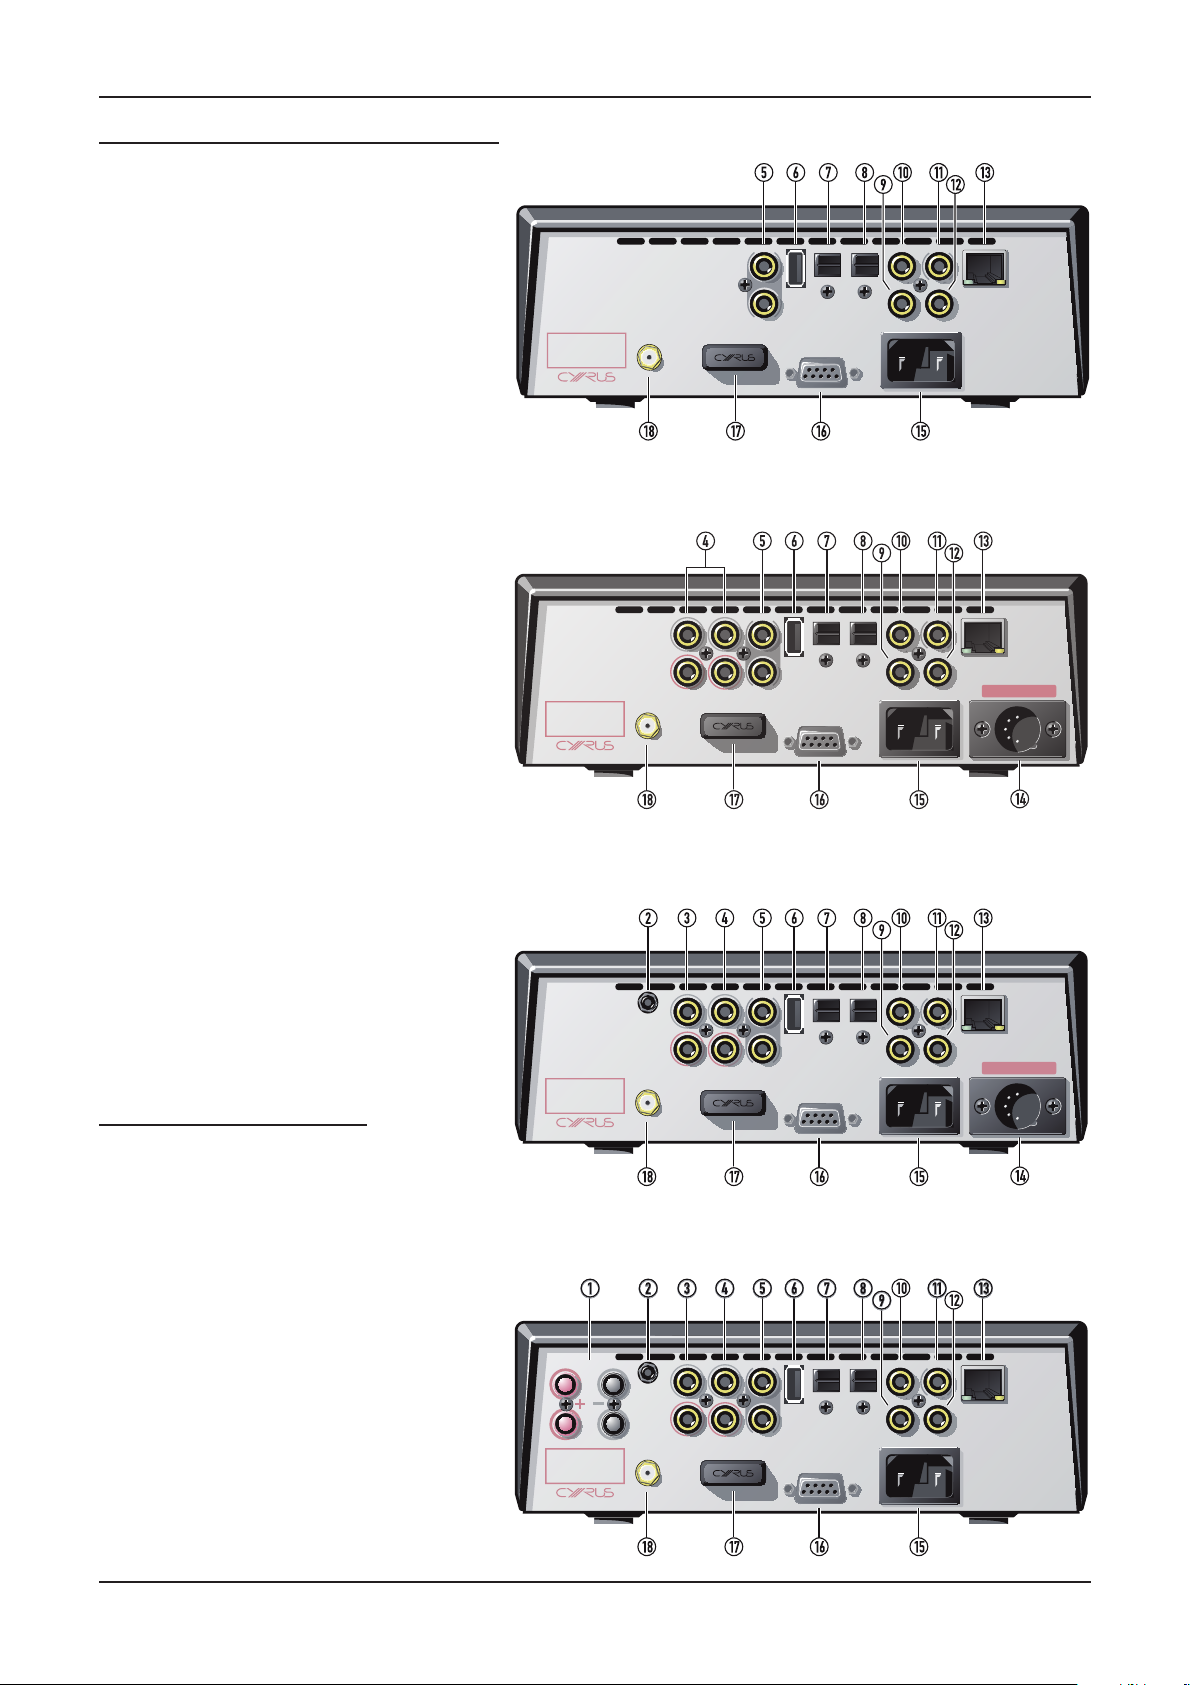
Ethernet system with NAS drive - recommended
This is the optimal Streamline2 system. In this system all network
connections are cabled and the music library is contained on a NAS
drive, located near the Streamline2. The network switch, placed near
the Streamline2, provides local connection between the Streamline2
and the NAS drive for fastest possible data transfer. The network
switch links to the router to enable Internet Radio functions and music
transfer between the computer and the NAS drive.
This system carries the strongest recommendation from Cyrus.
Advantages:
Robust wired connection between network components.•
Easy navigation of music content.•
Music is added to the library on the NAS drive from the computer •
through the network.
Internet radio reception is possible.•
Disadvantages:
None.•
Expansion:
Other sources and USB devices may also be connected to the •
Streamline
.
2
Your retailer will have been trained to provide you expert advice to
find the optimum setup for your Streamline2 system.
USB music store system - recommended
This is the simplest Streamline2 system. With the addition of just a pair of
speakers, you can enjoy all of the music library stored on the hard drive.
Advantages:
Extremely simple to set up.•
Does not require a network or a computer to function.•
Disadvantages:
Library navigation is by folder on the hard drive.•
The hard drive must be re-connected to a computer when you want •
to add music to the library.
With no connection to the Internet, internet radio reception is not •
possible.
NOTE: A hard drive connected via the USB port should be no larger than
500GB and must be formatted as FAT16 or FAT32 only.
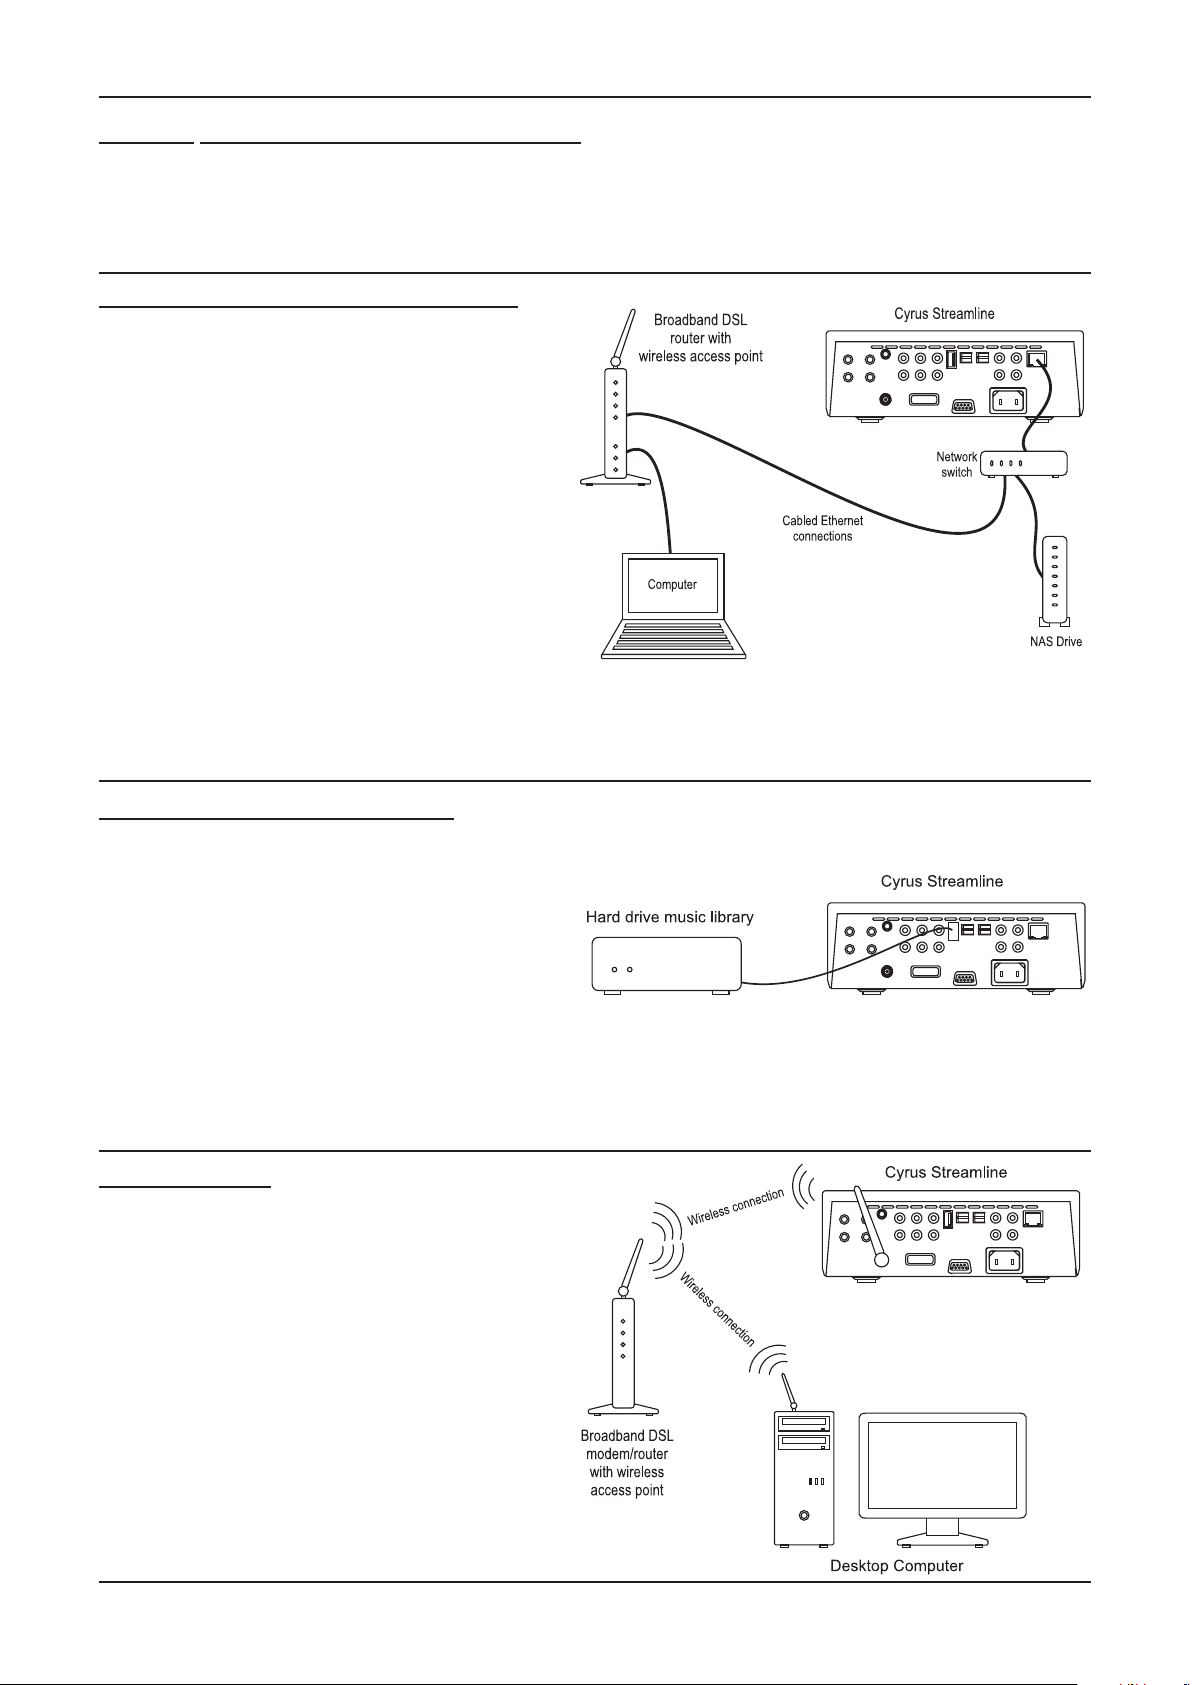
All-wireless system
Although Cyrus wi-fi technology can provide a really easy installation
solution, wireless transfer can be affected by the building and other
wi-fi equipment, Therefore, where possible, a wired installation is
recommended for the best transfer of large files.
Advantages:
Looks simple to install.•
Disadvantages:
Lower quality connection between networked components.•
Installation and configuration of UPnP server software on each •
network computer will be necessary to permit access to the
music library.
Music is only available to the Streamline•
containing the music library are switched on.
when the computer(s)
2
5

Cyrus Streamline2 series User Instructions
Preparations for Installation
Before installing your Cyrus Streamline2 check that the following items
are included in the accessory box.
Power cable•
Wi-Fi aerial•
1m Ethernet cable•
4 Loudspeaker plugs (Streamline•
2 x cables for MC-BUS connection•
)
2
Handbook CD-ROM•
Ferrite clamp•
Cable tie•
After removing these items, please retain the packaging.
Install the unit in a well ventilated location away from sources of high
temperature, dust or humidity. Never stand the unit under another unit or
on any surface likely to obstruct its cooling or ventilation.
Connecting to the AC Mains Supply
Connect the socket on the AC Power cable to the Power inlet on the rear
panel of the unit. Now connect the cable to a suitable AC power point.
IMPORTANT NOTE – READ BEFORE MAKING ANY CONNECTIONS
To avoid possible damage to your unit, it is essential to disconnect
all system components from the mains supply before connecting or
disconnecting any interconnects.
Connecting to a computer network
There are two network connection options, ethernet cable connection
or 802.11b/g/n wireless. If the Streamline2 detects an ethernet cabled
connection, this will be used in preference to a wireless connection.
Where possible, ethernet cable connection to the Streamline
recommended as this enables a far higher data bandwidth than wireless
connection.
Wired Ethernet connection
The
Streamline2 is supplied with a 1m length Ethernet cable. If this cable
is not suitable for your installation, pre-assembled Ethernet cables of the
correct length are readily available. Measure the distance that the cable will
run between the
Streamline2 and a spare connection on the router/switch, or
if the building is pre-wired with ethernet cable, to the nearest ethernet socket
on the wall. Obtain an ethernet cable of at least this length.
Fit the ferrite clamp and tie wrap (supplied) to the cable as shown •
below.
Ethernet plug
(Streamline
end)
2
Ferrite
clamp
Cable
tie
The cable tie is used to retain the clamp close to the plug connected to
the Streamline2.
With the clamp fitted, connect this end to the ethernet socket on the •
Streamline
.
2
The plug will latch into place.
Connect the other end to the modem/router or wall socket.•
Ethernet wired connection is very robust and will run over distances of
50m or more without requiring a repeater.
802.11b/g/n wireless aerial
If you are connecting the Streamline
wireless, you will need to fit the wireless aerial to the Streamline2.
to the network via 802.11b/g/n
2
Screw the aerial directly onto the Wi-Fi aerial network connector on •
the back panel.
The aerial should be aligned vertically for best results.
is strongly
2
To Ethernet
connection
6
Cyrus Streamline2 series User Instructions
Connecting digital audio sources
The digital audio inputs are compatible with a number of different digital
audio sources. These include-
Digital Audio output from a CD player•
Digital Radio•
Blu-ray/DVD players (for replay of 2 channel PCM programs only)•
Digital Satellite receivers (for replay of 2 channel PCM programs only)•
Games Console•
Using a suitable Toslink optical or a digital phono interconnect, connect
each digital audio source to one of the inputs 1-5. Make a note of the
input number used for each source as the inputs can be re-named at the
set-up stage.
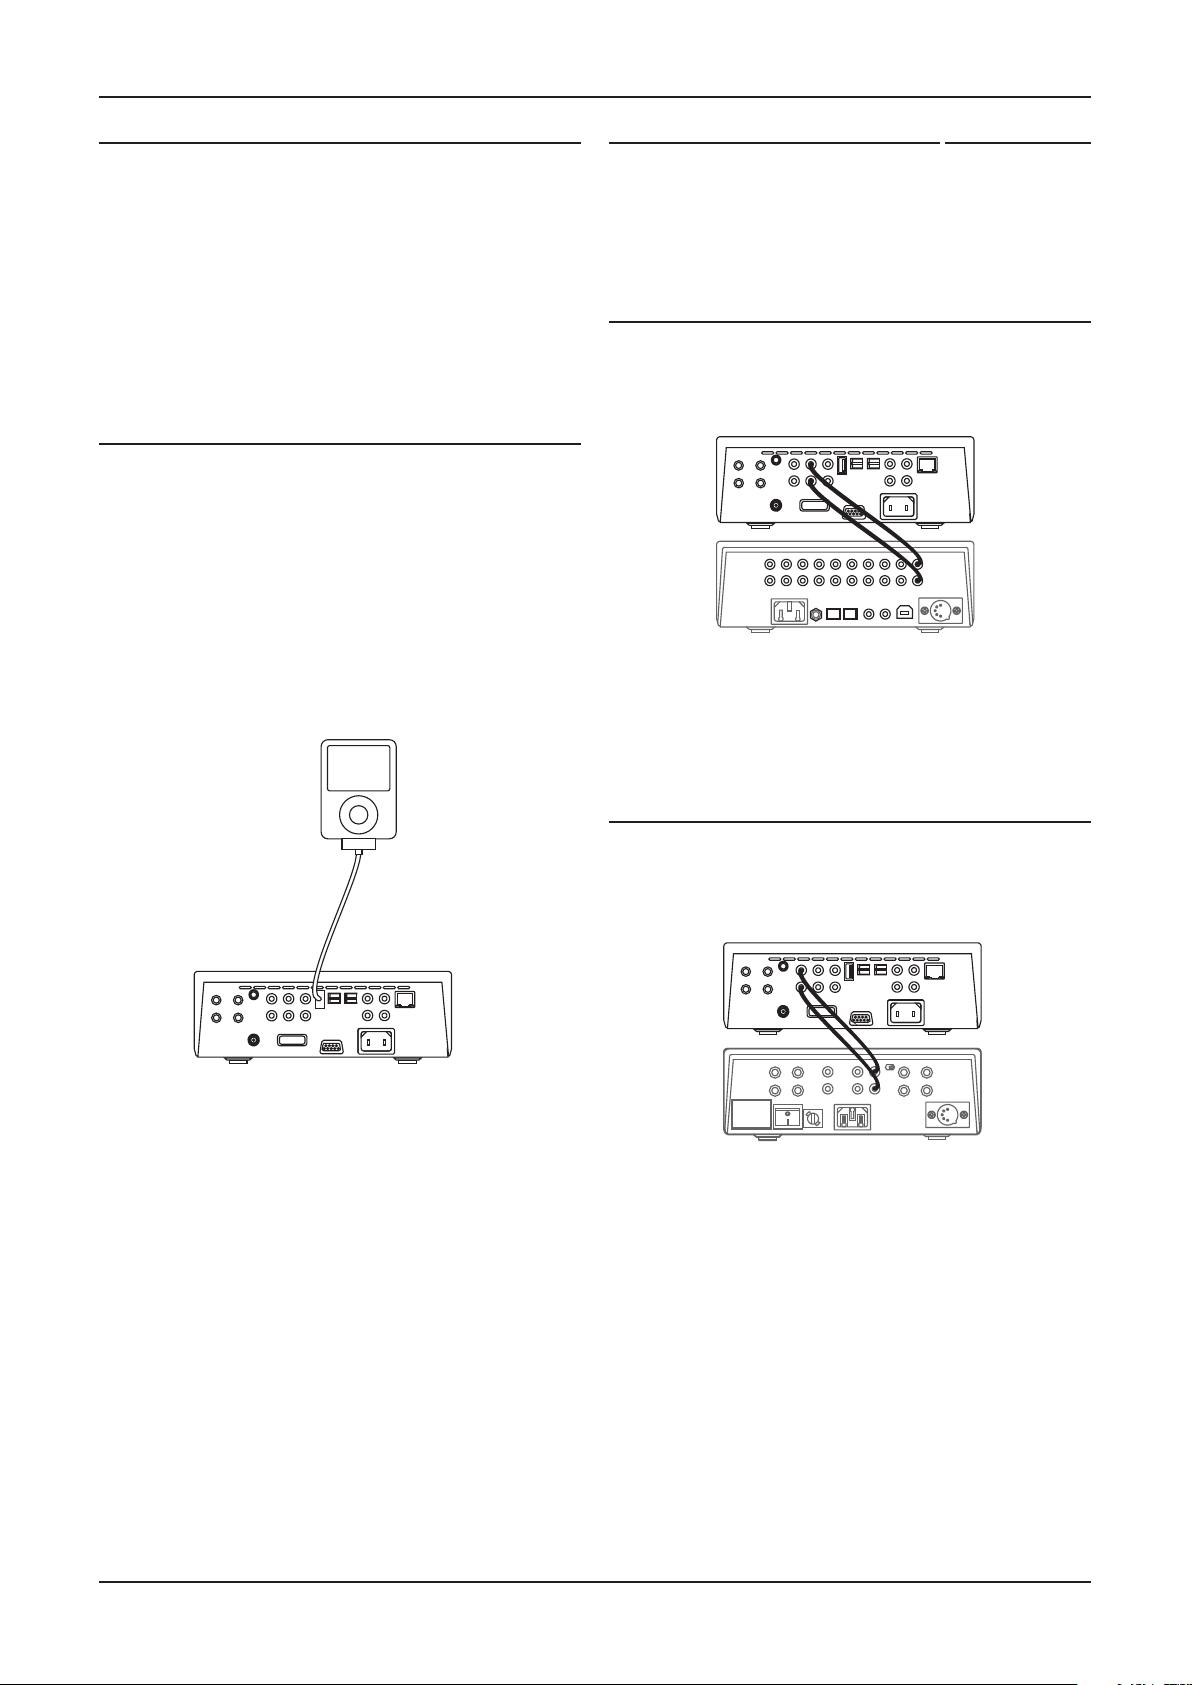
Connecting to the USB port
The USB port is compatible with iPods, iPhones, iPads and other personal
audio players, also memory sticks, hard drives and personal audio players.
It is not intended for connection to the USB port of a computer.
NOTE: If you are connecting a USB flash drive or hard drive, make
sure that the drive is no larger than 500GB and formatted as FAT16 or
FAT32. Larger drives may be slow to navigate and other formats such as
NTFS will not be navigable from the Streamline
larger drive, a NAS drive connected via your computer network is highly
recommended.
As the USB port is located on the back panel of the unit, you may want
to leave a docking cable for your personal audio player permanently
connected and accessible from the front of the unit.
. If you prefer to use a
2
Connecting to loudspeakers (Streamline
only)
2
Fit plugs to the loudspeaker cables, making sure to line up + and - at
each end. Most cables have polarity indicators and may also be marked
for directionality. The + and - terminals must be connected to the
corresponding + and - terminals of the loudspeakers.
Ensure that the connections are secure, then connect the left and right
loudspeakers to the rear panel sockets.
Connecting the fixed analogue outputs to an amplifier
(Streamline2, Stream Xa, Stream XP2 and Stream XP2 Qx)
The Streamline
connected to the analogue inputs of an integrated or pre-amplifier.
Connecting to an integrated or pre-amplifier with volume control
If you are connecting the Streamline2 to an amplifier (or preamplifier) with
volume control, use a suitable audio interconnect to connect the Fixed
Out sockets to a spare analogue input of the amplifier.
NOTE: The Stream Xa features dual fixed outputs labelled OUT1 and
OUT2. Either or both of these may be connected to an integrated or preamplifier input.
, Stream Xa, Stream XP2 and Stream XP2 Qx may be
2
If your personal audio player has an integrated USB connector, a plug
to socket USB extension cable will extend the docking connector to an
accessible place.
Connecting directly to a power amplifier
(Streamline2, Stream XP2 and Stream XP2 Qx)
The preamp outputs of a Streamline
be connected directly to the inputs of a power amplifier.
Connecting directly to a power amplifier
If you are connecting the Streamline2 directly to a power amplifier, use a
suitable audio interconnect to connect the Pre Out sockets to the power
amplifier inputs.
NOTE: The Stream Xa does not include a preamplifier output so must not
be connected directly to a power amplifier.
, Stream XP2 and Stream XP2 Qx may
2
7
Cyrus Streamline2 series User Instructions
Cyrus Tuner
Cyrus CD player
Cyrus Streamline
MC-BUS out
MC-BUS out
MC-BUS out
MC-BUS in
MC-BUS in
MC-BUS in
Connecting the digital output to an amplifier
If you own an amplifier or pre-amplifier with digital inputs, you may prefer
to connect the Streamline2 to the amplifier digitally.
Using a suitable digital phono interconnect, connect from the DIG OUT
connector to a free digital input of the amplifier.
Connecting to an AV system
The Streamline2 should be connected as a digital source component of an
AV system. Follow the instructions in the previous section to connect the
digital output of the Streamline2 to a digital input of the AV system.
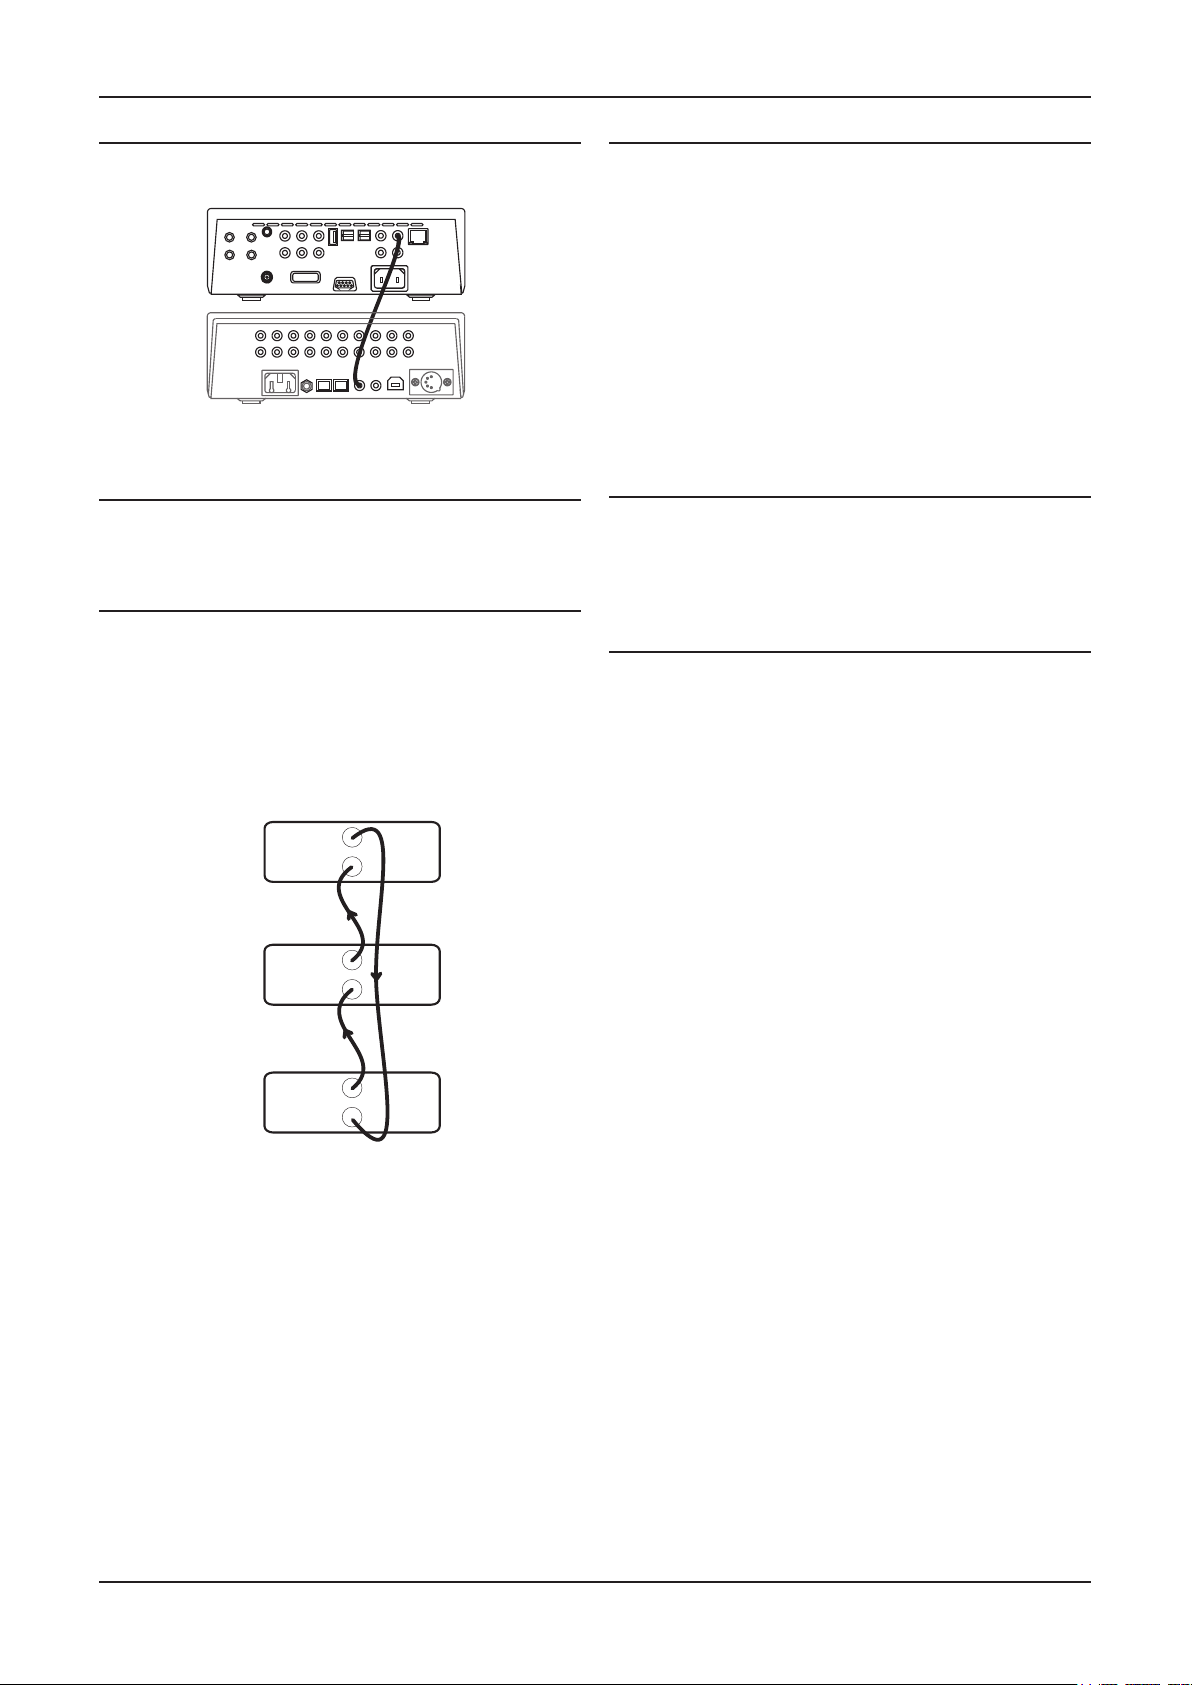
MC-BUS System
Connecting the MC-BUS sockets in an MC-BUS system provides unified
system control. An MC-BUS loop is established by connecting single
phono cables from the MC-BUS output of one unit to the MC-BUS input
of another in a daisy-chain. Complete the loop by returning the MCBUS output of the final component to the MC-BUS input of the first. The
diagram below shows MC-BUS wiring of a typical system that includes
a Streamline2 (used as the system amplifier), and a Cyrus CD player and
tuner that are connected as digital sources to the Streamline2.
External Power Supply - PSX-R
(Stream Xa, Stream XP2 ,
The PSX-R is a unique DC power supply which will upgrade the sonic
performance of your Stream XP
is installed, analogue and signal related sections of the circuit are
powered from this clean, stable power source while other requirements
are supplied internally. This ensures complete isolation of control circuits
and sensitive analogue sections reducing AC mains-borne noise and
power supply ripple.
To connect the PSX-R to the unit, disconnect both components from the
mains, then plug the connector on the umbilical cord of the PSX-R into
the Multi-Pole socket on the rear of the Stream XP
supply for both units.
NOTE: Connection of a PSX-R is detected automatically, so no internal
adjustments are required.
Stream XP2
Qx)
. When a Stream XP2 / PSX-R combination
2
. You will need a mains
2
Connecting Headphones
(Streamline2, Stream XP2 and
The headphones socket is a standard 3.5mm stereo jack socket for
connection to a pair of headphones. Headphones may be permanently
connected to the unit and selected when required with the front panel
switch.
Stream XP2
Qx)
RS232 Connection
This connection is reserved for future use.
The MC-BUS response of a Streamline2, Stream XP2 or Stream XP2 Qx
may be configured through the setup menu (see page 15) to best match
the other Cyrus components you own.
If the Streamline2 is used as an amplifier
(Streamline2, Stream XP2 and Stream XP2 Qx)
If the Streamline2 is the system amplifier, its MC-BUS response can be
set to switch connected Cyrus CD players, DAB tuners, DVD players
etc. to and from Standby (when they are connected to an input named
accordingly (CD, DAB, DVD etc.).
If the Streamline
If the Streamline
BUS response can be set so that the system amplifier will switch the
is used as a source
2
is connected as a source of an amplifier, its MC-
2
Streamline2 to and from Standby.
8

Cyrus Streamline2 series User Instructions
MENU
First time use
The Streamline2 is an extremely powerful and versatile audio streamer.
The n-remote remote control is also a powerful and versatile partner for
the Streamline2.
When using a newly installed Streamline
procedure is highly recommended -
for the first time, the following
2
Unpack the n-remote and set it up to charge (see page 18).•
Follow the instructions for front panel operation in the next section •
until you are satisfied that the Streamline
it, and you have an understanding of basic operation.
is set up as you would like
2
FRONT PANEL OPERATION
Follow the instructions later in this handbook to set up the n-remote •
with your Streamline2 and other system components you may own.
Learn how to make the most of the n-remote when operating your •
Streamline
and other system components.
2
If you encounter any problems during the inital setup of your Streamline
refer to the Troubleshooting section (see page 33).
,
2
Mute key1.
Standby key2.
Standby Indicator3.
Headphone key4.
Remote control receiver5.
Display window6.
Rotary/Push control7.
Power
When power is applied, the STANDBY key is used for power control.
To switch the unit on from Standby:
Press and •hold the STANDBY key.
The unit will switch on and the Standby Indicator will change to green.
To set the unit to Standby when operational:
Press the STANDBY key.•
The unit will set to Standby and the Standby Indicator will change to
orange.
The unit will now check if an iPod is connected to the USB connector. If so,
the iPod will be charged and the indicator will remain orange (charging)
until the iPod is disconnected.
If no iPod is connected, full Standby will be set after a short delay.
In full Standby mode, the Standby Indicator will change to red.
In regular use the unit should be connected permanently to the mains
power supply. When left unattended for a long period (holidays etc) it
should be disconnected from the AC supply.
When switched to Standby, or if disconnected from the mains, network
settings and settings for input selection and Volume/Balance are
retained.
Back key8.
Next key9.
Previous key10.
Play/Pause key11.
AUX input select12.
Internet Radio select13.
Network music select14.
Rotary/Push control
The front panel rotary control is a dual purpose Rotary/Push control.
When playing music
Turn the Rotary/Push control to set the volume level.•
A volume level bargraph and level display will be displayed briefly.
NOTE: There is no volume function for the Stream X2 or Stream X Signature
when playing music.
When navigating a menu or a music library -
Turn the Rotary/Push control to scroll through the options available •
on the display.
Press the Rotary/Push control to select the option displayed next to •
the cursor.
Press the •
NOTE: Press and hold the
time.
(Stream XP2, Stream XP2 Qx and Streamline2)
key to move back through the menus.
key to return to the Main Menu at any
-
Selecting a source
Press the MUSIC Key to listen to music from a music library located •
on a networked computer or drive.
Press the RADIO key to listen to Internet Radio.•
Press the AUX key repeatedly to step through AUX sources 1 to 5 and •
also the USB source.
9

Cyrus Streamline2 series User Instructions
Muting the sound (Streamline
To mute the sound completely, press the MUTE key.•
MUTED will be displayed briefly to confirm.
Press the MUTE key again to restore the volume.•
, Stream XP2 and Stream XP2 Qx)
2
Listening to headphones
(Streamline2, Stream XP2 and Stream XP2 Qx)
To switch to headphone listening -
Press the PHONES key.•
The sound from the speakers will be muted and the headphones will
play.
Press the P•HONES key again to switch off the headphones and listen
through the system speakers.
10
Cyrus Streamline2 series User Instructions
Connecting to a network
When switched on, the Streamline2 logo and a progress bar are displayed
while the unit searches for a network.
Cabled networks
When available, a cabled network connection will always take connection
priority over a wireless connection. If a cabled connection is detected, the
Streamline
The Source Menu will be
displayed (jump to the next
column).
*If the Streamline2 does not join your network automatically, refer to the
troubleshooting section before proceeding.
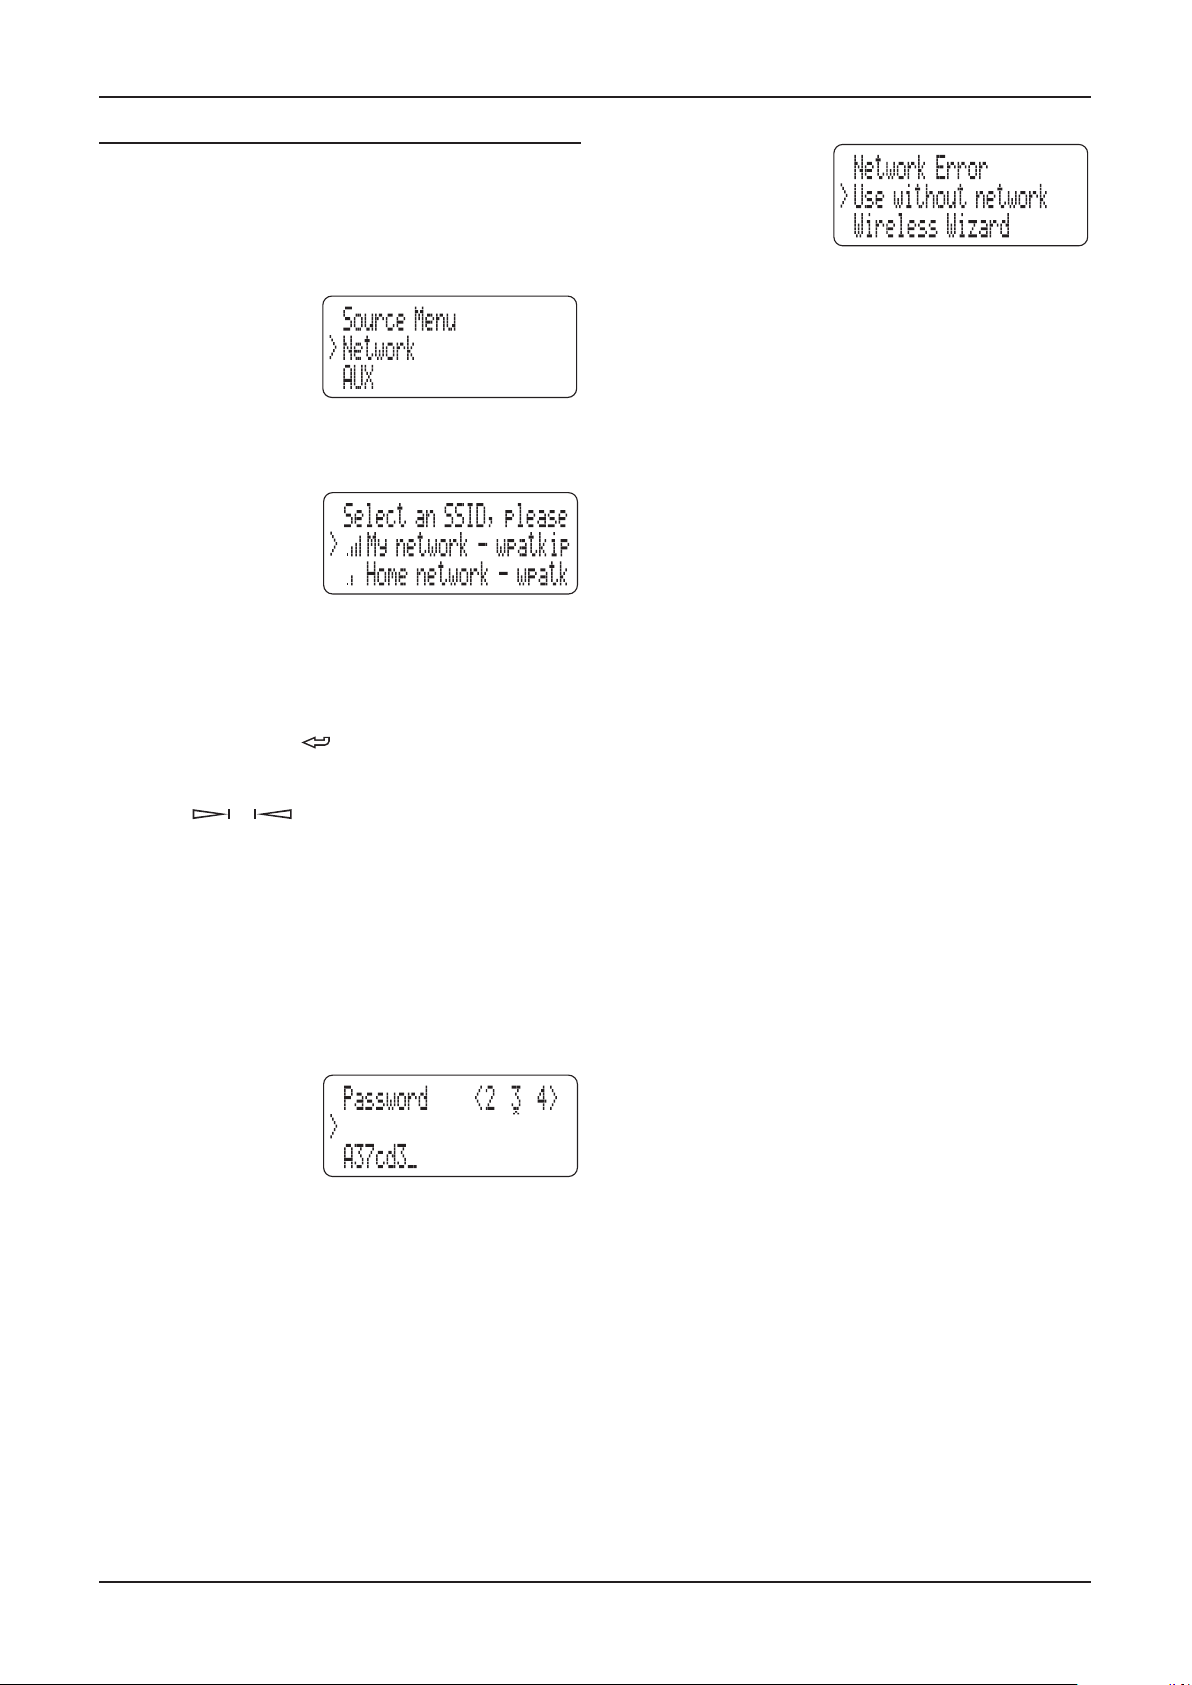
Wireless networks
If no cabled network is found,
and the aerial is connected,
a list of the wireless network
names (SSIDs) in range will be
displayed with signal strength
indication.
NOTE: Streamline2 will only find a wireless network with SSID broadcast
enabled.
If the wireless network requires a security password, the display will
prompt for password entry.
will join the network automatically*.
2
Turn the Rotary/Push control to position the network you want to join •
next to the cursor.
Press the Rotary/Push control to select the network. If you select the •
wrong network, press the
Press the •
or
key repeatedly to switch character set entry
between -
Numeric entry•
Lower case alphabet•
Upper case alphabet•
Punctuation and other symbols•
OK (select this option when you have finished entering the •
password).
Space (select this option to enter a space in the password)•
Delete (select this option to delete the last character you entered.•
Turn the Rotary/Push control to change the character displayed.•
Press the Rotary/Push •
control to add each
character to the password
displayed.
key to return to the network list.
Network not found
If no cabled network was
detected and there are no
wireless networks in range,
the Network Error menu will be
displayed.
Select ‘Use without network’ if you don’t require a network connection. •
Aux and USB inputs will now be available.
Select ‘Wireless Wizard’ to search again.•
NOTE: If the Streamline
Troubleshooting section.
does not list your wireless network, refer to the
2
When you have completed password entry, select the ‘OK’ option •
from the list above.
The system will then restart. The Source Menu menu will be displayed
following successful connection.
11

Cyrus Streamline2 series User Instructions
To play music from a music library on your network
Press the MUSIC key.•
You can now browse a list of the UPnP music servers on your network.
*NOTE: If your server is not listed, refer to the Troubleshooting section.
Turn the Rotary/Push control to position the server you want to use •
next to the cursor.
Press the Rotary/Push control to select this server.•
You can now choose how to browse your music. The browsing options
you see will be those offered by the server you selected, but will typically
allow browsing by album, artist, genre, playlist etc.
Turn the Rotary/Push control to position the category you want to •
select next to the cursor.
Press the Rotary/Push control to select this category.•
You can continue to browse and select sub-category options in the same
way. For example, the Genre category may include sub-categories for
Blues, Classical, Country etc.
When you reach the music selection you want to play (this may be •
an album, a track or a complete category - for example, the Blues
Genre), press the
key.
After a short delay the light above the key will change from red
to green and the music will start to play. A progress bar showing elapsed
time will be displayed above information retrieved from the library about
the track playing, artist etc.
NOTE: Track information will only be displayed if it is available from the
server for the track playing (for example, the ID3 tag of a FLAC file).
Music will continue to play until all tracks in the selection have played. If
a single track is selected, play will continue through the album containing
the selected track. At the end of the selection, play will stop and the light
above the
Changing tracks
To change track, press the •
previous track in the selection.
Pause
To pause playback at any time, press the •
Playback will pause and the light above the
yellow.
Press the •
To make a new selection
Press the •
new selection.
key will change to red.
or key to select the next or
key.
key will change to
key again to re-start play.
key to step back through the categories and make a
12

Cyrus Streamline2 series User Instructions
To play Internet radio
NOTE: To receive Internet Radio, the Streamline2 must be connected to
the Internet through a network.
Press the RADIO key.•
After a short delay, the Internet Radio categories are displayed. You can
browse for a station, searching by location (country), genre etc.
Choose your preference of category to search for the station you •
want.
Further categories or a station list will be displayed.
Continue to navigate to a station you want to hear.•
Press the Rotary/Push control to select the station.•
After a short delay, the Streamline
While listening to Internet Radio, you can step through the stations in •
the current station list by pressing the
Saving favourite stations
Favourite stations are similar to radio presets and are stored in the same
way as favourite tracks, using the n-remote or Cadence app for mobile
devices. Refer to the ‘Favourite Stations’ section on page 26 for more
details of saving favourites with the n-remote.
Browsing favourite stations
Once you have saved your favourite stations, you can browse the list of
favourites from the n-remote, Cadence app or front panel display.
Navigate to the Internet Radio menu.•
Choose the ‘My Favourites’ option.•
will tune to the station.
2
or key.
A list of saved favourite stations will be displayed.
13

Cyrus Streamline2 series User Instructions
To play a source connected to a digital Aux input
Press the AUX key repeatedly to step through the 5 Digital Audio •
sources available from the Streamline2.
Digital inputs
Choose Inputs 1 to 5 to select sources such as CD players, DAB tuners •
etc that you have connected to the Digital Inputs 1 to 5 on the back
panel.
You can now set the source to play.
Set the volume with the Volume/Source control.•
NOTE: You can rename any of the AUX inputs to match the source
connected. For example, you can rename the USB input to ‘iPod’ if you
connect an iPod to it. Refer to the Streamline
input renaming instructions.
Setup Menu section for
2
To play from a USB source
Press the AUX key repeatedly to select USB.•
Playing music from an iPod, iPhone or iPad
If you have connected an iPod, you can now browse the music selection
categories such as Playlists, Artists, Albums etc,
Navigate to the category you want.•
Continue to navigate through the iPod categories to find the music •
selection you want to play. This may be a track, album, playlist or a
complete genre.
Press the •
After a short delay the play light above the key will change from red to
green and the music will start to play. A progress bar showing elapsed
time will be displayed above information retrieved from the library about
the track playing, artist etc.
Track selection and pause functions are selected in the same way as
music play from a network.
NOTE: Track, artist and album information will only be displayed if it is
available from the iPod for the track playing.
Music will continue to play until all tracks in the selection have played. If
a single track is selected, play will continue through the album containing
the selected track. At the end of the selection, play will stop and the play
light will change to red.
Charging an iPod
An iPod connected to the USB socket will charge when the unit is
operational (but not in full Standby).
Playing music from a different USB source
If a memory stick, hard drive or personal audio players is connected to
the USB socket, you will be able to browse the folders on the drive in the
same way that you would browse them from a computer.
key to play the selection.
As shown in the example above, all folders will be displayed (not just
those with music content).
Navigate to the folder where your music is stored.•
Continue to navigate through the folders to find the music selection •
you want to play.
Press the •
After a short delay the play light above the key will change from red to
green and the music will start to play. A progress bar showing elapsed
time will be displayed above information retrieved from the file about the
track playing, artist etc.
Track selection and pause functions are selected in the same way as
music play from a network.
NOTE: Track, artist and album information will only be displayed if it is
available for the track playing.
Music will continue to play until all tracks in the selection have played. If
a single track is selected, play will continue through the folder containing
the selected track. At the end of the selection, play will stop and the play
light will change to red.
14
key to play the selection.

Cyrus Streamline2 series User Instructions
Streamline2 Setup menu
The Setup menu enables you to change settings of your Streamline2 to
best match your system and listening preferences.
To reach the setup menu
Press and hold the •
Select the Setup option from the Main Menu.•
The setup menu will open and the sub-options will be displayed.
Setup - Network Settings - DHCP Settings
The factory default network settings of the Streamline
should be compatible with most modern cabled or wireless networks.
It should not therefore be necessary to change the network settings of a
Streamline
to require Manual IP addresses.
unit, unless you know that your network has been configured
2
If this is the case, you should only proceed to change the network settings
if you fully understand Manual IP address assignment, and know a free
IP address that can be allocated to the Streamline
IP address to the Streamline2 may cause conflicts with other network
devices.
NOTE: These settings can only be changed from the front panel controls.
Select the Network Settings option from the Setup menu.•
The Network Menu will be displayed. The DHCP Settings option
Select the DHCP Settings option from the Network Settings menu.•
The DHCP menu will be displayed.
Select the ‘Off’ option to change to manual IP assignment.•
Enter the IP address in the format nnn.nnn.nnn.nnn using the keys •
listed to follow.
Press the •
between
Numeric entry•
Lower case alphabet•
Upper case alphabet•
Punctuation and other symbols•
OK (select this option when you have finished entering the IP •
address).
Space.•
Delete (select this option to delete the last character you entered).•
Turn the Volume/select control to change the character displayed.•
Press the Volume/select control to add each character to the address •
displayed.
When you have completed entry of the IP address, select the ‘OK’ •
option from the list above.
The display will now prompt for a Subnet Mask.
Follow the same procedure to enter the Subnet Mask in the same •
format.
The display will now prompt for a Gateway address.
Follow the same procedure to enter the Gateway address in the same •
format.
The display will now prompt for a DNS1 address.
Follow the same procedure to enter the DNS1 address in the same •
format.
The display will now prompt for a DNS2 address.
If you want to enter a DNS2 address, follow the same procedure to •
enter the DNS2 address in the same format.
If you don’t want to enter a DNS2 address, select ‘OK’ to bypass this •
setting.
Once the last entry is completed, the Streamline
network using these settings.
NOTE: If a Streamline
these settings must be changed, or DHCP re-enabled, depending on the
network requirements.
key to return to the Main Menu.
(DHCP enabled)
2
. Assigning an existing
2
key repeatedly to switch character set entry
will re-start and join the
2
set to Manual IP is connected to a different network
2
Setup - Network Settings - Status
Select the Status option from the Network menu to display the current
network configuration information. This may be helpful diagnostic
information if network connection problems are encountered.
Setup - Network Settings - Internet Test
Select the Internet Test option from the Network Menu to check that the
Streamline
broadcasts etc. After a short delay the test will confirm if the Internet is
is connected to the Internet for reception of Internet Radio
2
connected.
Setup - Input names
When the Streamline
set to correspond to the rear panel connections, for example Input 1 will
leaves the factory, the default input names are
2
display as- Input 1.
If you prefer, the name of any AUX input (including USB) may be changed
to a choice from the following listCD, DAB, Satellite, Cable, TV, iPod, MP3, DVD, BluRay, CD1, DVD1, SACD,
AV, PVR, Games Console, PC, Laptop, MAC, Special, Keyboard, Aux , AV
Direct*.
*Setting the AV Direct input name will fix the volume control to -6dB
when this input is selected, enabling the Streamline
amplifier for AV systems etc. Only select this input name if you fully
to emulate a power
2
understand the use of a Streamline2 to emulate a power amplifier.
To change the names of the inputs, we recommend making a list of each
input number with your preferred name from the choices above before
setting the names.
Select the Input Names option from the Setup menu.•
The current input names will be listed.
Select the input name that you want to change.•
You can now browse the list of available names.
Select the new name for this input.•
The input will be renamed.
You can continue to rename other inputs if required.•
NOTE: Aux inputs that have been removed from the list can be re-instated
by naming them or by selecting the input number from the list.
15

Cyrus Streamline2 series User Instructions
Setup - AUX display mode
This option changes the presentation of the front panel display when
playing an AUX source.
Select ‘Large Input Name’ to display a large text input name and a volume
bargraph.
Select ‘Sample Rate’ to reduce the size of the input name and add a
sample rate display.
Setup - Used as a source (Setting the MC-BUS response)
Select the ‘Used as a source’ option to change the MC-BUS response.•
Two options will be displayed for a Streamline2 or Stream XP2 - ‘Used
as an amplifier’ (factory setting) and ‘Used as a source’. The Stream Xa.
Stream X2, and Stream X Signature have no amplifier so the menu will
skip this step to choose an input name.
If a Streamline•
system, select the option ‘Used as an amplifier’.
/Stream XP2 is connected as the preamplifier in your
2
‘Amplifier mode enabled’ will be displayed.
If a Streamline•
source of a Cyrus audio amplifier, select the option ‘Used as a
/Stream XP2 is connected as a digital or analogue
2
source’.
You now have the option to select the amplifier input that the Streamline
is connected to.
Choose from CD, Tuner, AV or Stream X.•
When this selection has been made, the volume, balance controls and
headphone connection of the Streamline
will switch on when the chosen input is selected at the amplifier.
are disabled, and the Streamline2
2
Setup - Balance
You can adjust the left/right channel balance with this option.
Select the Balance option from the Setup menu.•
A balance setting scale is displayed.
Turn the Volume/select control to change the balance setting in + •
or - 1dB steps.
The final step will set the balance completely to left or right.
NOTE: When setting balance from an n-remote, press the button to
move the balance right and the button to move the balance left.
Setup - Factory Reset
The factory reset option will reset all settings to ‘factory original’.
NOTE: All settings will be reset including network settings, input names,
etc. A paired n-remote will not be unpaired after a reset.
Select the Factory reset option from the Setup menu.•
A confirmation prompt is displayed.
Choose ‘Yes’ if you want to proceed with a reset.•
All stored settings will be erased when the unit is next set to Standby.
Setup - n-remote
This option will pair or unpair an n-remote.
Pairing an n-remote
Refer to the Getting Started section of the n-remote instructions for the
pairing procedure.
Unpairing an n-remote
If necessary, you can unpair all n-remotes from a Streamline
2
NOTE: If you unpair all n-remotes, there will be no remote control
associated with the Streamline
Press the •
key on the front panel repeatedly to return to the Main
.
2
Menu.
Select the Setup option from the Main Menu.•
The Setup Menu is displayed.
Select the n-remote option from the Setup Menu.•
Highlight and select the Unpair n-remotes option.•
‘Unpaired all devices’ will be displayed to confirm that any paired
n-remotes have been unpaired..
Setup - Language
You can change the Language for the Streamline
2
Select the Language option from the Setup menu.•
display menus.
2
The languages available will be listed.
Select your preferred language.•
The menu language will change.
NOTE: This will also change the language of Streamline
on an n-remote.
menus displayed
2
NOTE: The language of albums, titles and artists etc will not be changed
with the language setting. The Streamline
information in the language stored with the music file.
will always display this
2
Setup - About
Choose this option to display information about the firmware installed
in the Streamline
Cyrus for service or support of your system at any time.
. You may be asked for this information if you contact
2
.
16

Cyrus Streamline2 series User Instructions
Source
Setup
Network
Aux
Radio
Choose UPnP server
Navigate to music
Input 1
Input 2
Input 3
Input 4
Input 5
USB
Navigate to a station
Network Settings
Input Names
DHCP Settings
Status
DHCP
On
Off
Select an Input Select a Name from the Library
Enter Manual IP
Main
Menu
Display network status
Balance
Set the Balance
Factory Reset
No
Yes
Settings clear when next set to Standby
n-remote
Start Pairing
Unpair n-remotes All remotes are unpaired
Detects n-remotes searching for a pair
About
Display Software Version
Used as an amplifier
Used as a source
Used as a source
CD
Tuner
AV
Internet test Checks the Internet connection
AUX Display Mode
Set the display mode for AUX inputs
Language
Select a language for the Streamline menus
Stream X
Menu Map
A full menu map for the Streamline2 is shown below, including both
source selection and setup options.
17

Cyrus Streamline2 series User Instructions
Getting started with the n-remote
Unpack the n-remote and check that the following items are included in
the accessory box.
n-remote•
Charging dock•
Charger•
Charging cable•
After removing these items, please retain the packaging.
Charging the remote control
The remote control must be fully charged for at least 2 hours before first
use.
Place the dock in a convenient and stable position.•
Connect the mini-USB cable from the Charger to the socket on the •
charging dock.
Fit a mains adaptor to the charger to match your power sockets.•
Connect the charger unit to the mains.•
Place the remote control on the dock.•
The battery level indicator on the display will show the current level and
the charge indicator (arrow) when charging.
Charge indicator
NOTE: The charger should only be connected to the mains when charging
the n-remote.
Charging from mini-USB
The n-remote may also be charged from the mini-USB cable connected
directly to the charger, or to a computer.
Connect the mini-USB plug directly to the USB socket on the bottom of
the remote control.
18

Cyrus Streamline2 series User Instructions
System-Settings
User-Settings
Device Selection
Change Zone
System Information
Start Pairing
Stream CyIR
12:30 Not connected
V+/V-/Mute to
Don’t change
CyIR
Line 1
12:30 Not connected
Stream
CyIR
Stream
Pairing success
Please enter name:
Stream
Line 1
12:30 Not connected
CyIR
Choose Hotkey
None
Change Zone
Line 1
12:30 Not connected
CyIR
Hotkey A
Hotkey B
Hotkey C
Hotkey D
CyIr
A B C D
To pair an n-remote to a Streamline
2
The wireless system of each n-remote must be paired to a particular
Streamline2. In this way, neighbouring Streamline2 units can operate
without risk of interference.
Pairing should only be necessary once during initial setup unless the
n-remote or Streamline
When pairing a Streamline
components to be in close range.
Press and hold the •
are later to be paired with another unit.
2
to an n-remote, it is necessary for both
2
key on the front panel to return to the Main
Menu.
Select the Setup option from the Main Menu.•
The Setup Menu is displayed.
Select the n-remote option from the Setup Menu.•
The Start Pairing option will be highlighted. Move on to the next step
before selecting this option.
On the n-remote, press the •
(settings) button.
The System-Settings menu will be displayed.
Highlight the ‘Start Pairing’ •
option.
To begin pairing, select the ‘Start •
Pairing’ options on both the
n-remote and Streamline
one or two seconds.
within
2
Press ENTER to select the default •
name ‘Stream’ (recommended)
or rename this device.
You will now get the option to select how the n-remote volume control
will operate.
Choose ‘Don’t change’ to retain •
the volume setup used when the
n-remote was previously paired
to the Streamline
.
2
Choose ‘Stream’ if you have •
connected speakers to the
Streamline
Streamline2 as a preamplifier.
or if you are using the
2
The n-remote volume buttons will
now control the Streamline
setting.
volume
2
Choose ‘CyIR’ if you have •
connected the Streamline
input to a Cyrus stereo amplifier.
as an
2
The n-remote volume buttons will
now operate the volume control of a
Cyrus stereo amplifier (via infra-red).
You will now get the option to assign the Streamline
four quick-access Hotkeys below the display..
device to one of the
2
Pairing should occur almost immediately. The Streamline
the Source Menu and the n-remote will prompt for a device name.
will return to
2
If you select one of the Hotkeys A •
to D, the ‘Stream’ device will be
selectable by the chosen Hotkey.
In the example on the left, •
Hotkey B is pre-assigned to
the CyIr device (to send remote
control commands to other
Cyrus products), so Hotkey A
would be recommended for the
Streamline
.
2
NOTE: This setting can be changed at any time via the ‘Key mapping’
option of the ‘User-settings’ menu.
Once this setting has been made, pairing is complete.
Unpairing a remote control
If necessary, you can unpair n-remotes from a Streamline
.
2
For more information about unpairing n-remotes, refer to the Setup menu
section of the Streamline
instructions.
2
19

Cyrus Streamline2 series User Instructions
ENTER
2
ABC
3
1
4
5
7
6
89
0
DEF
GHI
JKL
MNO
PQRS
TUV
WXYZ
1
2
3
Now Playing
8 Dirty Pool
Texas Flood
Stevie Ray Vaughan
Stream
CyIR
1:28/5:02
-24dB
all
rep
shuffle
1$
a
1%
3@
b
c
d
e
f
g
h
i
1)
1!
1@
1#
1^
1&
1*
1(
2)
2!
2@
2#
2$
2%
2^
2&
2*
2(
3)
3!
n-remote features
The Streamline2 is partnered with the n-remote wireless remote control.
The features of the remote control are -
Wireless remote control of all Streamline•
Large format, backlit text/graphic display.•
Motion-sensing standby - the display will switch on automatically if •
you lift the remote control or press a button
Re-chargeable operation with a charging dock.•
Infra-red remote control of a Cyrus stereo system.•
Infra-red programming function to control non-Cyrus equipment.•
functions.
2
n-remote functions when operating a Streamline2
Standby button - switches a Streamline1.
Hot-Keys - these can be programmed to select devices controllable 2.
by the n-remote, for instance a Streamline
TV.
No function with Streamline3.
Zone select - selects a zone if the n-remote is set to control multiple 4.
zones.
Up cursor - navigates up a menu list on the display, also browses 5.
alphanumeric characters when renaming etc. Hold the button to
browse faster.
Settings - opens the n-remote settings menu.6.
Right cursor - navigates to the right.7.
Save to list of favourite tracks or stations.8.
Down cursor - navigates down a menu list on the display, also 9.
browses alphanumeric characters when renaming etc. Hold the
button to browse faster.
Jump to list of favourite tracks.10.
No function with Streamline11.
No function with Streamline12.
Next track - selects the next track when playing music. 13.
Skips forward a page when browsing a list.
Pause - pauses music play.14.
Stop - Stops music play.15.
Numeric keypad - enters track numbers or alphanumeric data for 16.
renaming etc.
Repeat button - selects repeat modes (only when supported by the 17.
server or connected device).
Shuffle button - selects shuffle/random modes. Also changes the 18.
character set during alphanumeric entry.
No function with Streamline19.
Previous track - selects the previous track when playing music.20.
Skips back a page when browsing a list.
Play - plays the selection highlighted on the display.21.
Volume down - decreases the volume level.22.
Volume up - increases the volume level.23.
Mute - mutes the audio.24.
Delete a favourite.25.
Back - moves back one step when navigating a menu.26.
Left cursor - navigates to the left.27.
Information - displays additional information about the track playing.28.
Enter - selects highlighted menu options.29.
Home - displays the Home Menu.30.
Display off.31.
Hot-Key display legends - the legends for the Hot-Keys are displayed 32.
here.
.
2
.
2
.
2
.
2
to and from Standby.
2
and a Cyrus system plus
2
20

Cyrus Streamline2 series User Instructions
1
2
3
Stream
CyIR
Device Selection
Stream
CyIr
Line 1
Line 1
Line 1
Line 1
Line 1
Line 1
Line 1
Line 1
12:30 Not connected
Stream
CyIR
Home
NetworkTuneIn Radio
USB
Favourites
Aux Inputs
Settings
StreamCyIR
Remote control operation
Once an n-remote has been paired to a Streamline2, all the functions of
the Streamline2 may be operated from the n-remote. There is no need
to direct the n-remote to the Streamline2 during operation, the wireless
operating system is not directional.
The n-remote display will constantly update to show the status of the
Streamline
be shown on the n-remote display and vice-versa.
. If a setting is changed at the Streamline2 front panel, this will
2
The following section describes n-remote operation. All references in this
section are to the n-remote buttons or display unless otherwise stated.
n-remote display navigation
Press the •, , or buttons to navigate menu options displayed
on the remote control display.
When navigating long selection lists on the display, press and hold •
the or button to navigate the list more quickly, or press the }
or { button to skip a page.
Press the ENTER button to select an option.•
Press the •
button to return to the previous display screen.
Hot keys
There are four hot-keys located below the display. These keys select the
devices displayed immediately above the buttons.
The factory default naming for these buttons is shown in the diagram -
Select Stream to send •
wireless commands to a Cyrus
Streamline2.
Select CyIR to send Infra-red •
commands to a Cyrus amplifier.
The remote control will switch to the
selected mode. More details of the
infra-red commands available are
listed in the section ‘Controlling a
Cyrus Audio System’ on page 28.
Connecting the remote control to a Streamline2
Once paired, the n-remote will remain connected to a Streamline2 unit,
whether operational or in Standby.
The n-remote will disconnect from the Streamline
moved out of wireless range of the Streamline2 whilst operational or if AC
power is removed from the Streamline2.
In this case, ‘There was no response from the selected device’ will be
displayed on the n-remote.
If the n-remote has been moved out of range of the Streamline
Move the n-remote back into •
range of the Streamline2.
Select the ‘Stream’ device from •
the Device Selection menu, or by
pressing the Stream Hot-key.
The n-remote will re-establish
connection.
if the n-remote is
2
2
Power control
Switching on a Streamline2 set to Standby
Press the •
The Streamline
button.
will switch on and the n-remote display will confirm this.
2
The Home Menu will be displayed
when initialisation is complete.
To return to the Home Menu at any time
Press the •
(Home) button.
Setting the Streamline2 to Standby
Press the •
The Streamline
this.
button.
will switch off and the n-remote display will confirm
2
Selecting a source
From the Home Menu
Select one of the Source Icons from the Home Menu.•
Select the Network icon to listen to music from a music library •
located on a networked component.
Select the TuneIn Radio icon to listen to Internet Radio.•
Select the USB icon to listen to a USB source.•
Select Favourites to browse the tracks in your favourites list.•
Select the Aux Input icon to open a sub-menu of the AUX sources •
available.
A sub-menu will open with a list of all AUX inputs. Select the AUX
input you want to play from the list.
Volume control
To set the volume from the remote control
Press the •
A volume level bargraph and level display will be displayed briefly. The
volume setting is then displayed on the ‘Now Playing’ screen.
Muting the sound
To mute the sound completely, press the •
The Mute symbol will be shown on the display to confirm.
Press the •
or button to increase or decrease the volume.
button.
button again to restore the volume.
If AC power has been disconnected from the Streamline
The n-remote will connect to the Streamline
Re-connect AC power to the Streamline•
Wait until the Streamline•
Standby.
has completed initialisation and set to
2
.
2
Select the ‘Stream’ device from the Device Selection menu on the •
n-remote, or by pressing the Stream Hot-key.
.
2
2
21

Cyrus Streamline2 series User Instructions
Now Playing
8 Dirty Pool
Texas Flood
Stevie Ray Vaughan
Stream
CyIR
1:28/5:02
-24dB
all
rep
shuffle
a
b
c
d
e
f
g
h
The ‘Now Playing’ display
When music is playing from a Streamline2, the Now Playing display
shows details of the track playing and the status and settings of the
Streamline2.
The Now Playing display is the same whether playing music from a
network server, an iPod or a USB source.
Repeat indicator.1.
Shuffle indicator.2.
Music file details (when available).3.
Volume level.4.
Elapsed time bargraph.5.
Play/pause indicator.6.
Elapsed time/Total time for the track.7.
Music symbol. Album art will appear 8.
here when available from the server.
NOTE: Track information and album artwork will be displayed if it is
available for the track playing (for example, the ID3 tag of an FLAC file),
and if the format/resolution of album artwork is compatible with the
n-remote display.
22

Cyrus Streamline2 series User Instructions
Audio Server
Asset UPnP: MyMusic
UPnP Server: 4761
Stream CyIR
Asset UPnP: MyMusic
Artist/Album
Album
Title
Composer
Genre
Style
Playlists
Advanced search
Stream CyIR
To play music from a music library on your network
From the Home Menu, select the Network option.
You can now browse a list of the
music servers on your network.
Select the Music Server that you •
want to connect to.
You can now choose how to search
your music. The categories you see
will be those offered by the server
you selected, but will typically include
album, artist, genre, playlist etc, as
shown in the example.
Select the category you want to •
use.
You can continue to browse and select in the same way. For example, the
Genre category may include sub-categories for Blues, Classical, Country
etc.
When you have highlighted the music selection you want to play (this •
may be an album, a track or a complete category (for example, the
Blues Genre), press the / button.
After a short delay the music will start to play. The ‘Now Playing’ display
will be shown.
Music will continue to play until all tracks in the selection have played. If
a single track is selected, play will continue through the album containing
the selected track. At the end of the selection, play will stop.
Changing tracks
To change track, press the •} or { button to select the next or
previous track in the selection.
Pause
To pause playback at any time, press the •, button.
Playback will pause and the pause indicator will show.
Press the •/ button to re-start play.
Repeat
To set a repeat mode, press the •
button repeatedly.
Choose from Repeat Track (displayed ‘single rep’) or Repeat Selection
(displayed ‘all rep’).
To cancel repeat modes, continue to press the •
button until the
repeat indicators are no longer displayed.
Shuffle
To set shuffle/random mode, press the •
button.
The Now Playing display will confirm with the indication ‘shuffle’ and the
tracks selected will play in a random sequence. The shuffle function will
continue to play the selection until cancelled.
Press the •
button again to cancel shuffle mode.
NOTE: The Repeat and Shuffle functions will remain active during further
music selections unless cancelled from the Now Playing screen.
Track information
The track information display shows technical information about the
music file you are playing.
Press the •
button during playback.
The file format and bit-rate are displayed.
To make a new selection
Press the •
key to step back through the categories and make a
new selection or press the button to choose another source.
23

Cyrus Streamline2 series User Instructions
Jeremy’s iPod
Playlists
Artists
Albums
Songs
Podcasts
Genres
Composers
Audiobooks
Stream CyIR
USB
Music
Photos
Documents
Recordings
01 - The Who - My Gen
02 - The Who - I Can’t
03 - The Who - Happy
04 - The Who - I Can S
Stream CyIR
05 - The Who - Magic B
06 - The Who - Long Li
07 - The Who - Anyway
To play from an iPod
From the Home Menu, select the iPod option for a connected iPod, •
iPhone or iPad.
The name of the iPod will be displayed
with the iPod music selection
categories.
Playing music from an iPod, iPhone or iPad
You can now browse the category options of Playlists, Artists, Albums etc
from your iPod.
Navigate to the category you want.•
Continue to navigate through the categories to find the music •
selection you want to play. This may be a track, album, playlist or
a complete genre. The
menus.
Press the •/ or ENTER button to play the selection.
After a short delay the music will start to play. The ‘Now Playing’ display
will be shown.
Track selection, pause, repeat and shuffle functions are selected in the
same way as music play from a network.
Music will continue to play until all tracks in the selection have played. If
a single track is selected, play will continue through the album containing
the selected track. At the end of the selection, play will stop.
key will navigate back through the iPod
To play from a USB device
From the Home Menu, select the USB option for a connected memory •
stick, hard drive or personal audio player.
A list of folders and/or files contained in the root folder will be displayed.
Folders are indicated by a folder symbol, music files are indicated by a
music note as shown.
In the example below, there are both folders and music files in the root
folder. All folders will be displayed (not just those with music content).
Files that cannot be played by a Streamline
Folders
Music files
Playing music
You can now browse the folders in the same way that you would browse
them from a computer.
Navigate to the folder where your music is stored.•
Continue to navigate through the folders to find the music selection •
you want to play.
Press the •/ or ENTER button to play the selection.
After a short delay the music will start to play. The ‘Now Playing’ display
will be shown.
Track selection, pause, repeat and shuffle functions are selected in the
same way as music play from a network.
Music will continue to play until all tracks in the selection have played. If
a single track is selected, play will continue through the folder containing
the selected track.
Track information
The track information display shows technical information about the
music file you are playing.
Press the •
button during playback.
The file format and bit-rate are displayed.
will be hidden.
2
To play a source connected to a digital Aux input
From the Home Menu, select the AUX input that you want to play.•
You can now set the source to play.
Set the volume with the volume buttons.•
24

Cyrus Streamline2 series User Instructions
ENTER
1
2
3
CyIR
Stream
CyIR
12:00 IR mode
Favourite tracks
Your Streamline2 can memorise a list of favourite tracks. You can use the
favourite buttons on the n-remote to add favourites to your list and to
browse your current list of favourite tracks on the n-remote display.
Add a favourite
Browse favourites
Delete a favourite
Saving a favourite track
Browse to the track you want to save to your list of favourites. This •
may be from your music library or a USB source.
NOTE: It is not possible to save tracks playing from an iPod to your
list of favourites.
Press •
.
The track will be saved to your list of favourite tracks.
NOTE: A maximum number of 250 favourites may be stored. This total
includes both favourite tracks and favourite Internet radio stations.
To play a favourite track
Press •
.
The current favourites list will be displayed.
You can now select a track from the list.•
The track will play. When the track finishes, play will continue through the
list of favourite tracks.
Repeat and Shuffle modes can be set in the normal way while playing
favourites.
To delete a favourite track from the list
Browse to the favourite you want to delete.•
Press •
.
The favourite will be removed.
To delete all favourites from the list
Press and hold •
All favourites will be deleted.
for 5 seconds.
25

Cyrus Streamline2 series User Instructions
ENTER
1
2
3
CyIR
Stream
CyIR
12:00 IR mode
To play Internet radio
From the Home Menu, select the TuneIn radio option.•
After a short delay, the Internet Radio categories are displayed. You can
browse for a station, searching by location (country), genre etc.
Choose your preference of category to search for the station you •
want.
Further categories or a station list will be displayed.
Continue to navigate to the station you want to hear.•
Press the ENTER button to select the station.•
After a short delay, the Streamline
While listening to Internet Radio, you can step through the stations in •
the current station list by pressing the } or { button.
Favourite stations
Your Streamline2 can memorise a list of favourite stations. You can use the
favourite buttons on the n-remote to add favourite stations to your list.
will tune to the station.
2
Add a favourite
Delete a favourite
Saving a favourite station
Browse to the station you want to save to your list of favourites.•
Press •
The station will be saved to your list of favourite stations.
.
NOTE: A maximum number of 250 favourites may be saved. This total
includes both favourite tracks and favourite Internet radio stations.
To play a favourite station
From the Home Menu, select the TuneIn radio option.•
From the menu list, select the ‘My Favorites’ option.•
Your favourite stations will be displayed.•
You can now select a station from the list.•
To delete a favourite station from the list
Browse to the favourite you want to delete.•
Press •
.
The favourite will be removed.
26

Cyrus Streamline2 series User Instructions
Setup Menu
Network
Input Names
Balance
Factory Reset
NRemote
About
Stream CyIR
To change the settings of the Streamline2 unit
From the remote control you can change all settings of a Streamline2
unit.
To open the Settings Menu of the Streamline
Press the Home button.•
The Home Menu will be displayed.
Select the ‘Settings’ option.•
The settings options from the Streamline
2
will now be displayed.
2
Refer to the ‘Streamline•
full instructions for setting up the Streamline2.
Setup Menu’ section in this handbook for
2
27

Cyrus Streamline2 series User Instructions
ENTER
2
ABC
3
1
4
5
7
6
8 9
0
DEF
GHI
JKL
MNO
PQRS
TUV
WXYZ
1
2
3
CyIR
Stream
CyIR
12:00 IR mode
1$
a
1%
3#
b
c
d
e
f
g
h
i
1)
1!
1@
1#
1^
1&
1*
1(
2)
2!
2@
2#
2$
2%
2^
2&
2*
2(
3)
3!
3@
Controlling a Cyrus audio system
The n-remote also includes an infra-red system to send commands to a
Cyrus audio system.
To send infra-red commands to a Cyrus audio system
Press the hot-key labelled CyIR.•
NOTE: If there is no hot-key labelled CyIR, refer to the HKEY configuration
section of System Settings for instructions to enable a hot-key for Infrared commands.
The remote control will now send the listed commands to a Cyrus
system.
n-remote functions when operating a Cyrus system
Standby button - switches a Cyrus amplifier to and from Standby.1.
Hot-Keys - programmable for device selection.2.
Amplifier Stream X3.
No function with a Cyrus system.4.
DAB cursor up.5.
No function with a Cyrus system.6.
DAB cursor right.7.
No function with a Cyrus system.8.
DAB cursor down.9.
DAB menu.10.
Amplifier input scroll right.11.
Amplfiier input scroll left.12.
CD next track.13.
CD Pause.14.
CD Stop.15.
CD numeric keypad.16.
CD repeat.17.
No function with a Cyrus system.18.
DAB record.19.
CD previous track.20.
CD play.21.
Amplifier volume down.22.
Amplifier volume up.23.
Amplifier mute.24.
DAB band.25.
No function with a Cyrus system.26.
DAB cursor left.27.
DAB display mode.28.
DAB select.29.
No function with a Cyrus system.30.
Amplifier AV input select.31.
Amplifier TU/DAB input select.32.
Amplifier CD input select.33.
input select.
2
Controlling TVs, PVRs and other non-Cyrus equipment
In addition to the control of Cyrus Audio components, you can add remote
control command systems to the n-remote to control other (non-Cyrus)
equipment.
These additional remote control responses are downloaded from an online library at the Cyrus website and are installed on the n-remote as
‘devices’ that you can assign to the four Hot-keys..
Adding remote control systems (devices)
Additional device responses are downloaded from the Cyrus website via a
computer, connected to the n-remote with a mini-USB cable (the supplied
charger cable may be used for this purpose). Refer to the Cyrus website
at www.cyrusaudio.com for more information about adding devices.
Assigning devices to Hot-keys
Once you have downloaded the devices you need, you can assign up to
four to hot-keys. Refer to the section ‘User-Settings - HKEY configuration’
on page 30 for the details you need to re-assign hot-keys.
28

Cyrus Streamline2 series User Instructions
[All Artists]
Queen
Rick Wakeman
Rihanna
Riptides
Robbie Williams
Robin Gibb
The Rolling Stones
Stream CyIR
Sly & Robbie
Son House
Jump to ‘J’
Change Zone
Default Zone
Kitchen
Line 1
12:30 Not connected
Stream
CyIR
Bedroom
1
2
3
Advanced operation (n-remote)
This section includes advanced features of the n-remote.
Alphabetic search
When navigating menus, you may quickly search for the first letter of a
category, track or other item by entering the corresponding button on the
numeric keypad.
For example:
To search for Artists beginning with the letter J, press the 5 (JKL) •
button once when the Artist category is displayed.
Jump to ‘J’ will be displayed while
the search runs, then the artist list
will update to show artists beginning
with the letter J.
NOTE: The speed of the search will
depend on the size of your music
collection.
Pressing the 5 (JKL) button twice will
search for Artists beginning with the
letter K etc.
Zones
The n-remote has the capability to control up to three separate zones.
Zones will normally be different rooms in a house, each containing a group
of remote controllable products (for example, audio and TV components
and may or may not include a
For each zone that you set up, you can program different device selection
Hot-keys. When changing between zones, the hot-key legends will change
to indicate the products that can be controlled in that selected zone.
Streamline
).
2
Press the •
button to open the
Zone list.
Select the zone you want to •
control from the list.
The Hot-key devices available will
change for the zone you selected.
29

Cyrus Streamline2 series User Instructions
System-Settings
User-Settings
Device Selection
Change Zone
System Information
Start Pairing
Stream CyIR
12:30 Not connected
Setting up the n-remote
The n-remote set-up screens are navigated in the same way as music
lists etc. Details of the settings you can change are listed in this section.
To open the Settings Menu
Press the •
The System-Settings menu will open.
Alphanumeric naming buttons
Some of the menu sub-options enable the renaming of items. The
following buttons select characters when renaming -
Press the • or buttons to step through all characters available
for renaming.
Press the 2 - 0 buttons on the numeric keypad repeatedly to select •
one of the characters printed on the button.
Press the •
set between upper and lower case.
Press the 1 button repeatedly to select 1 or a selection of •
punctuation marks.
Press the • button to insert a space.
Press the • button to delete a character.
button.
There are five options within the
System-Settings menu
User-Settings•
Device Selection•
Change Zone•
System Information•
These four options include sub-menu
options. Selecting an option will
display the sub-menu.
Start Pairing•
button to change the keypad alphabetic character
User-Settings - Brightness
You can change the brightness of the display with this setting.
Highlight and select the Brightness option.•
Select a setting between ‘fixed 1’ (darkest) and ‘fixed 3’ (brightest), •
or choose ‘automatic’ and the light sensor will set the brightness
according to the light in your room.
User-Settings - Change language
You can change the language setting for the menus of the n-remote with
this setting.
Highlight and select the Change Language option.•
Choose from the languages available.•
Press ENTER.•
The display language will change.
NOTE: This setting will change the language for n-remote displays, but not
for the Streamline
on the n-remote. To change the language of the Streamline2 display, refer
front panel display or for Streamline2 displays shown
2
to the ‘Setup - language’ option of the Streamline2 Setup Menu.
User-Settings - HKEY (Hot-keys) configuration
You can assign remote controllable devices to the four Hot-Keys using
this option.
Highlight and select the HKEY configuration option.•
A list of Hot-Keys will be displayed.
Highlight the Hot-Key you want to change.•
Press ENTER.•
The device options for this Hot-Key are listed.
Highlight the device you want to assign to this Hot-Key.•
Press ENTER.•
The Hot-Key will be renamed and the list of Hot-Keys displayed.
Select another Hot-Key to rename or press the •
button to return to
the User-Settings menu.
The User-Settings menu
To open the User-Settings menu
Select the User-Settings option from the System-Settings Menu•
The User-Settings menu will open and the sub-options will be displayed.
User-Settings - Name
Highlight and select the Name option to change the name of the •
n-remote.
The last character of the name is highlighted.
Edit the name with the Alphanumeric Naming Buttons. The maximum •
name length is 19 characters.
Press ENTER when you have finished renaming.•
Press the •
User-Settings - Time
The time stored in the n-remote can be changed with this option.
Highlight the Time: Hours or Time: Minutes option.•
Press ENTER to open the time setting for editing.•
Edit the time.•
Press the ENTER button when the time is set correctly.•
Press the •
User-Settings - Stand-by
This setting sets the backlight delay when a button is pressed. Enter a
time in the range 10 - 90 seconds.
Highlight and select the Standby option.•
Edit the time.•
Press the ENTER button when the time is set correctly.•
Press the •
button at any time to exit without changing the setting.
button at any time to exit without changing the setting.
button at any time to exit without changing the setting.
30

Cyrus Streamline2 series User Instructions
User-Settings - Rename device
Select this menu to rename devices in the device list.
Highlight and select the Rename device option.•
A list of devices will be displayed.
Highlight and select the device you want to rename.•
The last character of the device name is highlighted.
Edit the name with the Alphanumeric Naming Buttons. The maximum •
name length is 19 characters.
Press ENTER when you have finished renaming.•
Press the •
button at any time to exit without changing the setting.
User-Settings - Delete device
Select this option to delete a device from the device list.
NOTE: This operation cannot be undone.
Highlight and select the Delete Device option.•
Choose from the devices available.•
Press ENTER.•
The device will be deleted.
User Settings - Add zone
Select this option to add a new zone.
Highlight and select the Add zone option.•
You will now be prompted to name the new zone.
Edit the name with the Alphanumeric Naming Buttons.•
Press ENTER when you have finished renaming.•
The new zone will be added.
Press the •
button at any time to exit without changing the setting.
User-Settings - Rename zone
Select this option to rename a zone in the zone list.
Highlight and select the Rename zone option.•
A list of zones will be displayed.
Highlight the zone you want to rename.•
Press ENTER.•
The last character of the device name is highlighted.
Edit the name with the Alphanumeric Naming Buttons.•
Press ENTER when you have finished renaming.•
Press the •
button at any time to exit without changing the setting.
User-Settings - Delete zone
Select this option to delete a zone from the zone list.
Highlight and select the Delete zone option.•
Choose from the zones available.•
Press ENTER.•
The zone will be deleted.
User-Settings - Disable motion sensor
Select this option to disable the motion sensor. This may be useful if you
plan to transport or ship the remote control.
Highlight and select the Disable motion sensor option.•
Press the ENTER button.•
The Motion sensor will be disabled.
Press any button to switch the remote control on and re-enable the
motion sensor.
User-Settings - (volume and mute) Key mapping
You can use the key mapping feature to re-assign the volume and mute
buttons to a different device.
For example, if your system includes a Streamline
digital input of a Cyrus amplifier, you may want to re-assign the n-remote
connected to the
2
volume and mute buttons to control the Cyrus amplifier as follows -
Choose the Key mapping option from the System-Settings menu.•
The list of devices will be displayed.
Highlight and select the Streamline•
in this list.
2
Select the option ‘V+/V-/Mute to’.•
The list of devices will be displayed.
Highlight and select the Cyrus IR device.•
The volume and mute commands will now be re-assigned to a Cyrus
amplifier.
NOTE: To reset key mapping for a device, follow the above procedure,
but choose the ‘Reset mapping’ option in place of the ‘V+/V-/Mute to’
option.
31

Cyrus Streamline2 series User Instructions
Device Selection
Stream
CyIr
Line 1
Line 1
Line 1
Line 1
Line 1
Line 1
Line 1
Line 1
12:30 Not connected
Stream
CyIR
Change Zone
Default Zone
Kitchen
Line 1
12:30 Not connected
Stream
CyIR
Bedroom
1
2
3
Device Selection
The two standard devices that may be controlled by an n-remote are the
Streamline2 (by wireless) and a Cyrus stereo system (by infrared).
In addition to these two devices, you may have extended the device
library to include other (infra-red) remote controllable equipment that you
own. For example, a Streamline
, a Cyrus Audio system, a TV and a PVR.
2
To select a device
Highlight and select the ‘Device •
Selection’ option from the
System-Settings menu to select
a different Device from the
Device list.
Select the Device you want to •
control from the list.
The n-remote will now send
commands to the selected device.
Change Zone
The n-remote has the capability to control up to three separate zones.
Zones will normally be different rooms in a house, each containing a group
of remote controllable products (for example, audio and TV components
and may or may not include a Streamline
For each zone that you set up, you can program different device selection
Hot-keys. When changing between zones, the hot-key legends will change
to indicate the products that can be controlled in that selected zone.
To change to a different zone
).
2
Highlight and select the ‘Change •
Zone’ option from the SystemSettings menu to select a
different Zone from the Zone
list.
The zones available will be listed.
Select the zone you want to •
control from the list.
The Hot-key devices available will
change for the zone you selected.
System Information
Choose this option from the System-Settings menu to display technical
information about your handset.
NOTE: It is also possible to install upgraded firmware (when available) via
this menu. This process is only possible when the n-remote is connected
via a computer to download firmware from the Internet. Attempting to
upgrade the firmware without connection to a computer may lock up the
n-remote. In this case it will be necessary to reset the n-remote (see the
‘Troubleshooting’ section).
Start Pairing
This option is used when pairing the n-remote to send commands to a
Streamline
For more instructions on pairing, refer to the pairing instructions in the
‘Getting Started with the n-remote’ section on page 18.
.
2
NOTE: The Change Zone menu may also be opened by pressing the
button on the n-remote.
32

Cyrus Streamline2 series User Instructions
Troubleshooting
1: The Streamline2 will not join a cabled network
If the Streamline
working computer, but the network is not found by the Streamline2:
Temporarily disconnect the ethernet cable from the computer and •
connect it to the Streamline
If the Streamline
that there is a fault with the cabling of the Streamline2 installation.
If the above test proves that the computer will connect to the network, but
not the Streamline
Press and hold the •
Select the Setup option.•
Select the Network Settings option.•
Select the DHCP Settings option.•
Confirm that the ‘On’ option is checked under the DHCP heading. If •
not, change the setting to ‘On’ and re-try connecting to the network.
If DHCP is already set on, then it is probable that your network is set for
manual assignment of IP addresses, and it will be necessary to assign an
IP address to the Streamline2 manually. This should only be attempted if
you fully understand manual IP address assignment and have access to a
range of free IP addresses that can be assigned to the Streamline2. Refer
to the Setup - Network section on page 15 for full instructions to set a
manual IP address.
If you suspect that the network is configured for manual assignment of
IP addresses, but don’t have the knowledge or information necessary to
assign an address manually, enlist the help of an IT Professional.
2: If a wireless network is not visible
If the Streamline
list, or if no wireless networks are found:
Check that an aerial is fitted to the wireless network aerial connector •
on the back panel.
Move the Streamline•
network (usually the modem/router).
Re-connect the power and check if your network is found.•
If the Streamline
source, there may be inadequate signal strength in the original location.
Try setting up the wireless network aerial on the magnetic base and
experiment with different positions to improve signal strength, or install
an ethernet cable which will always give better results than wireless.
If the wireless network is still not visible when the Streamline
close to the wireless source, it may be that the SSID (network name) of
your wireless network is hidden. The Streamline2 will not find a wireless
network with a hidden SSID, so it will be necessary to re-configure the
source of your wireless network (usually the modem/router) so that the
SSID is visible. If you are not sure how to make these changes, enlist the
help of an IT professional.
is connected to a cabled network that includes a
2
.
now connects to the network successfully, it may be
2
, follow these steps to check that DHCP is set on:
2
2
key to return to the Main Menu.
does not display your wireless network in the network
2
very close to the source of your wireless
2
connects successfully when moved close to the wireless
2
is placed
2
3: The network is joined successfully but no UPnP music server is
found
In this case, this screen will be displayed.
It is possible that the UPnP server software installed on your computer
may require you to enable library sharing for the Streamline
.
2
The exact procedure to change library sharing will depend on the UPnP
server software, but you will generally need to open the ‘options’ or
‘preferences’ section within the UPnP server software, locate the section
for ‘Sharing’ and enable sharing for your preference of all devices, or just
the Cyrus Streamline
.
2
Once the settings are saved you should be able to find the server at the
Streamline
.
2
4: USB drive navigation problems
When selecting a drive connected to the USB port, the message Unable
To Browse is displayed.
This message will be displayed if the format of the connected drive is
not compatible with the Streamline2. In this case, the drive should be
formatted as FAT16 or FAT32.
NOTE: Re-formatting the drive will erase all data contained on the drive.
33

Cyrus Streamline2 series User Instructions
5: USB drive slow navigation
Check the size of the drive. A maximum drive size of 500GB is
recommended when connected to the USB port to ensure fast navigation.
If you prefer to use a larger drive, a NAS drive connected via your computer
network is highly recommended.
6: Intermittant drop out (silent passages) when playing from a
network
This is most likely to be caused by inadequate network bandwidth.
If you are using a wireless network, it is probable that the signal strength
is high enough, but may also be due to other wireless network users with
high demands (large downloads etc).
To check signal strength, move the Streamline
the wireless network and check performance. If the dropouts stop, then
consider a cabled link between the modem/router and the Streamline2.
To check if other network users are restricting the bandwidth, test the
Streamline
to the network.
at a time when there are no other wireless users connected
2
NOTE: Lossless and uncompressed files demand more network bandwidth
than compressed files. If the music only drops out when listening to these
files, this may also indicate inadequate network bandwidth.
7: No display
The display may be switched off. Press the ‘red’ button on the n-remote
to switch the display on or off.
8: A paired n-remote will not connect to the Streamline
This may happen occasionally and can be cured by performing a full
power cycle of the Streamline2 (disconnect mains power and re-connect).
Un-pairing and re-pairing the n-remote is not recommended.
9: n-remote unresponsive
This may happen if the internal battery experiences deep discharge. To
restore normal operation after re-charging, it may be necessary to reset
the n-remote. Use the end of a paper clip or similar to press the reset
button through the access hole in the back panel of the n-remote.
close to the source of
2
2
34

Cyrus Streamline2 series User Instructions
Specifications
Power supply
Voltage ...............................................................As plate on rear of unit
Power consumption
Standby ......................................................................................... <1W
Typical Streamline
Stream Xa ........................................8.5W
Stream XP
Stream XP
Stream X
EMC & Safety compliance ..................................................................CE
Enclosure
Dimensions (W x H x D) ............................................ 215 x 75 x 385mm
Weight Streamline
Stream XP
Stream XP
Stream X
Stream X Signature ....................... 4.70kg
Material ........................................................................ Die cast chassis
Network connectivity
Cabled ......................................................................................Ethernet
Wireless..............................................................................802.11b/g/n
Digital audio performance
USB drive format .............................................................. FAT16, FAT32
Digital Input voltage ..........................................................500mV pk-pk
Digital Input Impedance .................................................................75 Ω
Digital audio formats .....................................................PCM stereo only
Analogue audio performance
(Stream Xa)
Output (full volume, 0dB FS)............................................................2.0V
S/N ratio (Pre-out, 0dB FS) ...................................................... >105dBA
THD+N (Pre-out, 0dB FS) ........................................................ <0.005%
Analogue audio performance (Stream XP
Output (full volume, 0dB FS)............................................................2.0V
Preamp output (full volume, 0dB FS) .............................................3.99V
S/N ratio (Pre-out, 0dB FS) ...................................................... >105dBA
THD+N (Pre-out, 0dB FS) ........................................................ <0.005%
Analogue audio performance
(Stream XP
Output (full volume, 0dB FS)............................................................2.0V
Preamp output (full volume, 0dB FS) .............................................3.99V
S/N ratio (Pre-out, 0dB FS) ...................................................... >100dBA
THD+N (Pre-out, 0dB FS) ........................................................ <0.002%
Power amplifier performance
Power output (Streamline
THD+N Speaker out (Streamline
(Streamline
only) ............................................. 30W//8 Ω
2
2
S/N ratio (ref 1W) ...................................................................... >80dBA
.....................................150W
2
......................................8.5W
2
Qx ....................................13W
2
, Stream X Signature .........6.5W
2
...................................3.38kg
2
................................... 3.35kg
2
Qx ................................ 3.45kg
2
.....................................2.15kg
2
& Streamline2)
2
Qx)
2
only)
2
only) ...................................... <0.01%
Warranty
The warranty should be registered on-line within 8 days of purchase.
No Dealer or Distributor may vary the terms of this warranty, which is
personal to the original Purchaser and is not transferable.
Please retain the sales receipt as proof of purchase.
Warranty claims must wherever possible be made through the Dealer
from whom the equipment was purchased.
This warranty excludes:
Damage caused through neglect, accident, misuse, wear and tear, or •
through incorrect installation, adjustment or repair by unauthorised
personnel. Any unauthorised servicing will result in loss of warranty.
Liability for damage or loss occurring in transit to or from the •
purchaser.
Consequential damage, loss or injury, arising from or in conjunction •
with this equipment.
Equipment for attention under warranty should be consigned return
carriage paid. If returned equipment is found to comply with the published
specification, CYRUS reserves the right to raise a charge.
The above conditions do not affect your statutory rights as a consumer.
WEEE
This logo means that this product is not to be disposed
of with your household waste. This product should
be handed over to a designated collection point to be
recycled. Your cooperation in the correct disposal of this
product will contribute to the effective usage of natural
resources. For more information on collection points,
contact your disposal service or City Council.
Remote control disposal
The remote control includes a rechargeable battery that is not user
replaceable. When disposing of the remote control, observe recycling
regulations in your area for products that contain batteries.
Cyrus reserves the right to change all specifications without notice. E&OE
35

Cyrus Audio Ltd., Ermine Business Park, Huntingdon, PE29 6XY, U.K.
 Loading...