

Cyrus Tuner
Cyrus Power Amplifier
Cyrus CD player
MC-BUS
Cyrus amplifier
MC-BUS out
MC-BUS out
MC-BUS out
MC-BUS out
MC-BUS in
MC-BUS in
MC-BUS in
MC-BUS in
-27
Balance
-27
CD
Sample rate 44.1kHz
MUTE PHONES SETUPZONE 2
INPUT
USE PSX-R ONLY
HEADPHONE
MADE IN ENGLAND
IN-11IN-10IN-9IN-8IN-7
IN-1IN-2IN-3IN-4IN-5IN-6ZONE 2
OUT
PRE OUT 1 PRE OUT 2
MCBUS
IN
OUT
Fig 1
Fig 2
Fig 3
a
b c d e
fghi1)
a
b c d e f g h i 1)
1!1@1%1&1* 1$ 1#1^
Fig 4
CDTP1 INTP2 IN
PRE 2
PRE 1 TP OUT
L
L
AV TUAU2 AU1
L
R
R R
Right
bass
Left
bass
Right
treble
Left
treble
+
+
-
-
-
-
+
+
Pre-amplifier
Power amplifier 1
Power amplifier 2
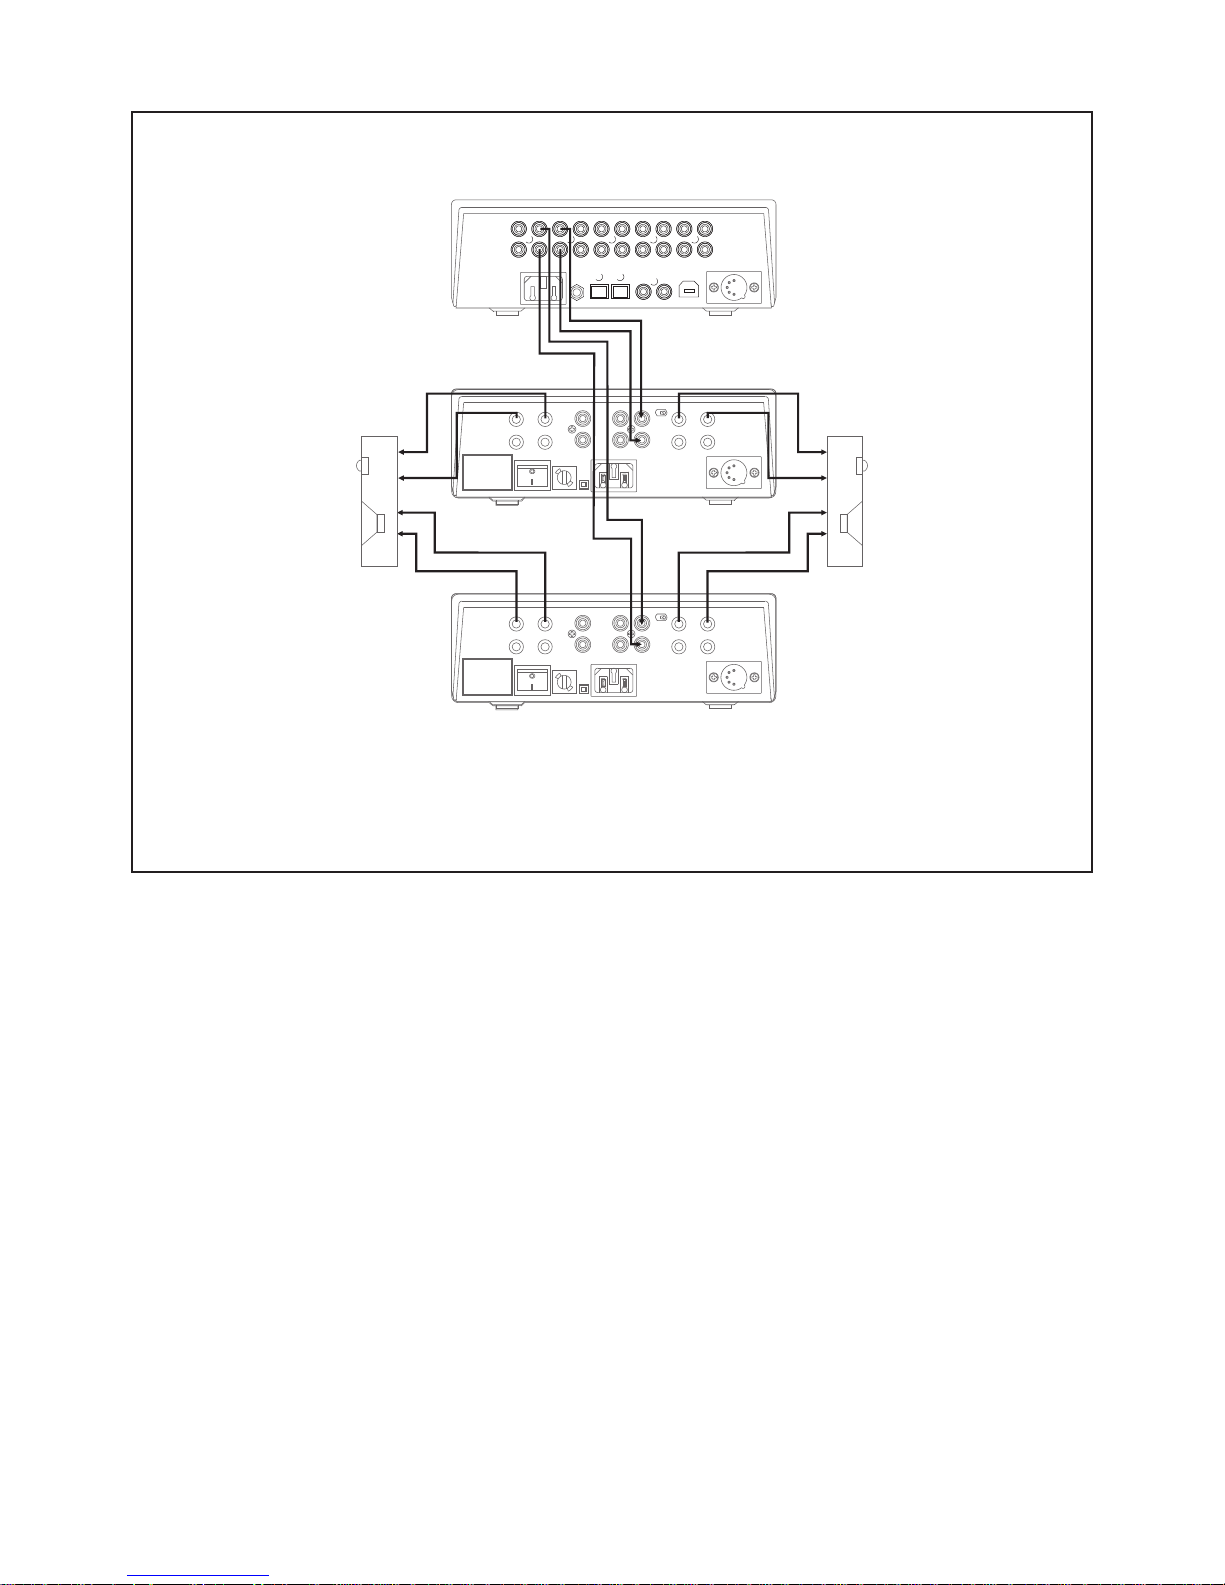
Fig 5
Connecting a bi-amplified speaker system to a pre-amplifier

Cyrus Pre XPd, Cyrus Pre XPd Qx User Instructions
1
IMPORTANT! Read before operating this equipment!
CAUTION: The exclamation mark is to draw your attention to
important instructions and safety procedures in this manual.
ATTENTION: The lightning flash warns you of the risk of
electrical shock presented by components inside this product.
Unauthorised personnel must not open this unit
.
WARNING: To reduce the risk of electrical shock do not remove any unit
covers or panels. There are no user serviceable parts in this product.
WARNING: To reduce the risk of electric shock, do not expose this
equipment to rain or moisture.
HEED WARNINGS: All warnings on the product and in the operating
instructions should be adhered to.
READ ALL THE INSTRUCTIONS: All the safety and operating instructions
should be read before the product is operated.
RETAIN INSTRUCTIONS: The safety and operating instructions should be
retained for future reference.
FOLLOW INSTRUCTIONS: All operating and use instructions should be
followed.
CLEANING: Unplug this product from the mains before cleaning. Do not use
liquid or aerosol cleaners. Use a damp cloth for cleaning.
WATER AND MOISTURE: Do not use this product near water - for example,
near a bath tub, wash bowl, kitchen sink, or laundry tub, in a wet basement; or
near a swimming pool and the like. The product must not be exposed to
dripping or splashing and no objects filled with liquids, such as vases, shall be
placed on the product.
HEAT: The product should be situated away from heat sources such as
radiators, stoves, or any other products (including amplifiers) that produce
heat.
VENTILATION: Slots and openings in the cabinet are provided for ventilation,
to ensure reliable operation of the product and to protect it from overheating
and these openings must not be blocked or covered. The openings should
never be blocked by placing the product on a bed, sofa, rug or similar surface.
This product should not be placed in a built-in installation such as a bookcase
or rack unless proper ventilation is provided or the manufacturer's instructions
have been adhered to.
OBJECT OR LIQUID ENTRY: Never push objects of any kind into this
product through openings as they may touch dangerous voltage points or
short-out parts that could result in a fire or electric shock.
ACCESSORIES: Do not place this product on an unstable cart, stand, tripod,
bracket, or table. The product may fall, causing serious injury to a child or
adult, and serious damage to the product. Use only with a cart, stand, tripod,
bracket or table recommended by the manufacturer, or sold with the product.
Any mounting of the product should follow the manufacturer's instructions,
and should use a mounting accessory recommended by the manufacturer.
ATTACHMENTS: Do not use attachments not recommended by the product
manufacturer as they may cause hazards.
MOVING THE PRODUCT: A product and cart combination
should be moved with care. Sudden stops, excessive force,
and uneven surfaces may cause the product and cart to
overturn.
POWER SOURCES: This product should be operated only from the type of
power source indicated on the marking label. If you are not sure of the type of
power supply to your home, consult your product dealer or local power
company. For products intended to operate from battery power, or other
sources, refer to the operating instructions.
OVERLOADING: Never overload wall outlets, extension cords, or integral
convenience receptacles. This can result in an increased risk of fire or electric
shock.
POWER CORD PROTECTION: Power supply cords should be routed so that
they are not likely to be walked on or pinched by items placed upon
or against
them, paying particular attention to cords at plugs, convenience receptacles,
and the point where they exit from the product.
NAKED FLAMES: No naked flame sources, such as candles, must be placed
on this product. Batteries (battery pack or batteries installed) shall not be
exposed to excessive heat such as sunshine, fire or the like.
LIGHTNING: For added protection for this product during a lightning storm, or
when it is left unattended or unused for long periods of time, unplug it from the
wall outlet and disconnect the antenna or cable system. This will prevent
damage to the product due to lightning and power-line surges.
BATTERIES: Warning : Batteries shall not be exposed to excessive heat
such as sunshine, fire or the like.
CAUTION! POLARISED CONNECTOR (CANADA and USA):
To prevent electrical shock, match wide blade of plug to wide slot, fully insert.
Do not alter or remove this plug if it does not fit your mains power socket.
Have a suitable socket installed by a competent electrician.
POWER SUPPLY: (Refer to Fig.1)
Connect the moulded IEC connector of the AC cord supplied plugs into the
power inlet
1* on the rear of the unit.
The mains supply requirement of your amplifier is marked on a label on the
rear panel. Before connecting, check that this voltage is the same as your
mains supply.
230V Products: Voltage Range 220V-240V
115V Products: Voltage Range 110V-120V
If you move to an area with a different mains voltage, contact your local Cyrus
distributor to have your product converted.
There are no user replaceable fuses in this unit.
SERVICING:
Do not attempt to service this product yourself as opening or removing covers
may expose you to dangerous voltage or other hazards. Refer all servicing to
qualified service personnel.
CONDITIONS REQUIRING SERVICE: Unplug this product from the wall
outlet and refer servicing to qualified service personnel when:
• When the power supply cord or plug is damaged.
• If liquid has been spilled, or objects have fallen into the product.
• If the product has been exposed to rain or water.
• If the product has been dropped or damaged in any way.
• If the product does not operate normally by following the operating
instructions. (Adjust only those controls that are covered by the
operating instructions. Improper adjustment of other controls may
result in damage requiring extensive work by a qualified technician
to restore the product to its normal operation).
• When the product exhibits a distinct change in performance.
REPLACEMENT PARTS: When replacement parts are required, be sure the
service technician has used replacements specified by the manufacturer or
have the same characteristics as the original part. Unauthorised substitutions
may result in fire, electric shock, or other hazards.
SAFETY CHECK: Upon completion of any service or repairs to this product,
ask the service technician to perform safety checks to determine that the
product is in proper operating condition.
PRODUCT SERVICE CENTRES
For product service or technical advice, contact only authorised Cyrus service
centres. Contact details for Cyrus distributors may be found on the Cyrus
website at www.cyrusaudio.com.

Cyrus Pre XPd, Cyrus Pre XPd Qx User Instructions
2
Welcome to the world of Cyrus!
Congratulations on your choice of Cyrus Hi-fi products. Our state-of-the-art
design technology and outstanding quality of manufacture has won countless
awards around the world. We are confident that you will derive great pleasure
from owning a product from one of the most recognised and respected
manufacturers of hi-fi equipment.
Now is a good time to register your new Cyrus product. Registration takes
only a few minutes, brings the added benefit of a full two year factory warranty
and adds you to our mailing list for future product updates and upgrades. To
register, visit www.cyrusaudio.com and click the ‘Login/Register’ link.
Please read these instructions carefully before commencing installation. They
provide full guidance to help you install your amplifier safely and correctly.
Preparations for Installation
Before installing your Cyrus pre-amplifier check that the following items are
included in the accessory box.
• Power Cable
• Remote Handset
• 2 x cables for MC-BUS connection
After removing these items, please retain the packaging.
Install the amplifier in a well ventilated location away from sources of high
temperature, dust or humidity. Never stand the amplifier under another unit or
on any surface likely to obstruct its cooling or ventilation.
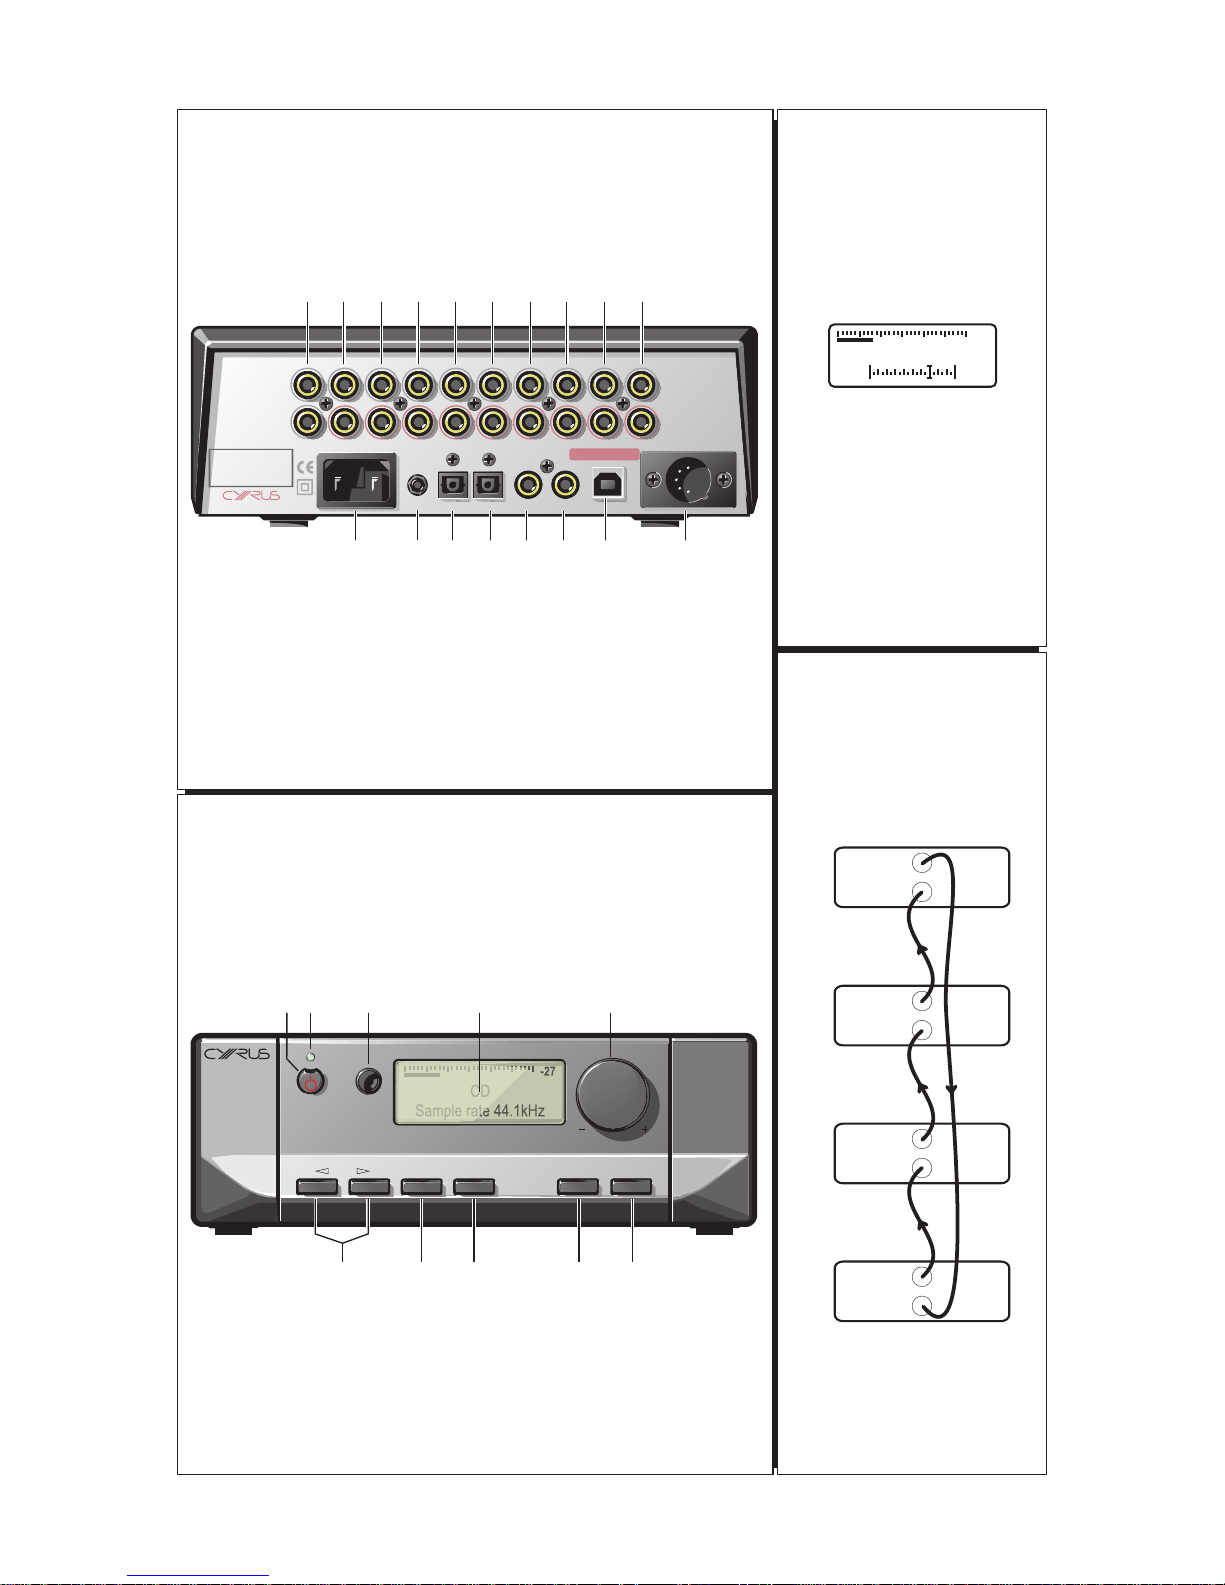
INSTALLATION (Refer to Fig 1):
Key to the rear panel drawings:
1. MC-BUS System Connection
2. Pre-Amplifier Output
3. Pre-Amplifier Output
4. Zone 2 (& tape) Output
5. Analogue Input 6
6. Analogue Input 5
7. Analogue Input 4
8. Analogue Input 3
9. Analogue Input 2
10. Analogue Input 1
11. PSX-R Connection
12. Digital Input 11 (USB)
13. Digital Input 10
14. Digital Input 9
15. Digital Input 8
16. Digital Input 7
17. Headphone Socket
18. Power Inlet
Connecting to the AC Mains Supply
Connect the socket on the AC Power cable to the Power inlet 1* on the rear panel
of the amplifier. Now connect the cable to a suitable AC power point.
NOTE: The means to disconnect this product from the mains supply is the
mains plug. Ensure that the mains plug is accessible at all times.
IMPORTANT NOTE – READ BEFORE MAKING ANY
AUDIO CONNECTIONS
To avoid possible damage to your amplifier, it is essential to disconnect all
system components from the mains supply before connecting or
disconnecting audio interconnects.
Connecting Analogue Audio Sources
Analogue Inputs 1-6 are available for the connection of stereo analogue audio
sources including -
• Analogue output from CD/DVD Players
• Analogue output from DAB or FM Radio tuners
• Phono pre-amplifier for a turntable
• Televisions
• Analogue Satellite Receivers
• Analogue Tape/Disc recorders
• Cyrus surround decoder
The factory set input names for some of the inputs are pre-set as follows Input 1 – CD
Input 2 – Tuner
Input 3 – Cyrus AV (for a Cyrus AV surround processor)
Input 6 – Tape
All inputs may be re-named, but for convenience you may prefer to connect
these sources to the pre-named inputs.
Analogue Input 6 is recommended for connection of Tape Recorders. This
input is not selectable for recording purposes to avoid howl-round with Tape
Recorders, nor is it available to play in a Zone 2 system.
To connect an Analogue Audio source to your amplifier, connect a stereo
audio interconnect cable between each component and the sockets as
marked on the rear panel. Ensure left and right channels are correctly
connected. Make a note of the input number used for each source as the
inputs can be re-named at the set-up stage.
Connecting a Turntable
To play a turntable through your unit an external phono pre-amplifier is
required. This may then be connected to one of the Analogue inputs.
 Loading...