


Cyrus Phono X
User Instructions
Cyrus Phono X
Fig 1
10 //1nF
100 //1nF
1k //1nF
10
100
1k
MC
MM
TURNTABLE GROUND
abac
MC MM
RRR
LLL
de
OUTPUT
MC-BUS
OUT
IN
ghi
MADE IN ENGLAND
USE
PSX-R
ONLY
f
Fig 2
b
MC
e
MM
d
IEC
Phono X
c
Cyrus Phono X
User Instructions Cyrus Phono X
f
IMPORTANT! Read before operating this equipment!
CAUTION: The exclamation mark is to draw your attention
to important instructions and safety procedures in this
manual.
ATTENTION: The lightning flash warns you of the risk o
electrical shock presented by components inside this
product. Unauthorised personnel must not open this unit
WARNING: To reduce the risk of electrical shock do not remove any unit
covers or panels. There are no user serviceable parts in this product.
WARNING: To reduce the risk of electric shock, do not expose this
equipment to rain or moisture.
HEED WARNINGS: All warnings on the product and in the operating
instructions should be adhered to.
READ ALL THE INSTRUCTIONS: All the safety and operating instructions
should be read before the product is operated.
RETAIN INSTRUCTIONS: The safety and operating instructions should be
retained for future reference.
FOLLOW INSTRUCTIONS: All operating and use instructions should be
followed.
CLEANING: Unplug this product from the mains before cleaning. Do not use
liquid or aerosol cleaners. Use a damp cloth for cleaning.
WATER AND MOISTURE: Do not use this product near water - for example,
near a bath tub, wash bowl, kitchen sink, or laundry tub, in a wet basement; or
near a swimming pool and the like. The product must not be exposed to
dripping or splashing and no objects filled with liquids, such as vases, shall be
placed on the product.
HEAT: The product should be situated away from heat sources such as
radiators, stoves, or any other products (including amplifiers) that produce
heat.
VENTILATION: Slots and openings in the cabinet are provided for ventilation,
to ensure reliable operation of the product and to protect it from overheating
and these openings must not be blocked or covered. The openings should
never be blocked by placing the product on a bed, sofa, rug or similar surface.
This product should not be placed in a built-in installation such as a bookcase
or rack unless proper ventilation is provided or the manufacturer's instructions
have been adhered to.
OBJECT OR LIQUID ENTRY: Never push objects of any kind into this
product through openings as they may touch dangerous voltage points or
short-out parts that could result in a fire or electric shock.
ACCESSORIES: Do not place this product on an unstable cart, stand, tripod,
bracket, or table. The product may fall, causing serious injury to a child or
adult, and serious damage to the product. Use only with a cart, stand, tripod,
bracket or table recommended by the manufacturer, or sold with the product.
Any mounting of the product should follow the manufacturer's instructions,
and should use a mounting accessory recommended by the manufacturer.
ATTACHMENTS: Do not use attachments not recommended by the product
manufacturer as they may cause hazards.
MOVING THE PRODUCT: A product and cart combination
should be moved with care. Sudden stops, excessive
force, and uneven surfaces may cause the product and
POWER SOURCES: This product should be operated only from the type of
power source indicated on the marking label. If you are not sure of the type of
power supply to your home, consult your product dealer or local power
company. For products intended to operate from battery power, or other
sources, refer to the operating instructions.
OVERLOADING: Never overload wall outlets, extension cords, or integral
convenience receptacles. This can result in an increased risk of fire or electric
shock.
.
POWER CORD PROTECTION: Power supply cords should be routed so that
they are not likely to be walked on or pinched by items placed upon
them, paying particular attention to cords at plugs, convenience receptacles,
and the point where they exit from the product.
NAKED FLAMES: No naked flame sources, such as candles, must be placed
on this product.
LIGHTNING: For added protection for this product during a lightning storm, or
when it is left unattended or unused for long periods of time, unplug it from the
wall outlet and disconnect the antenna or cable system. This will prevent
damage to the product due to lightning and power-line surges.
CAUTION! POLARISED CONNECTOR (CANADA and USA):
To prevent electrical shock, match wide blade of plug to wide slot, fully insert.
Do not alter or remove this plug if it does not fit your mains power socket.
Have a suitable socket installed by a competent electrician.
or against
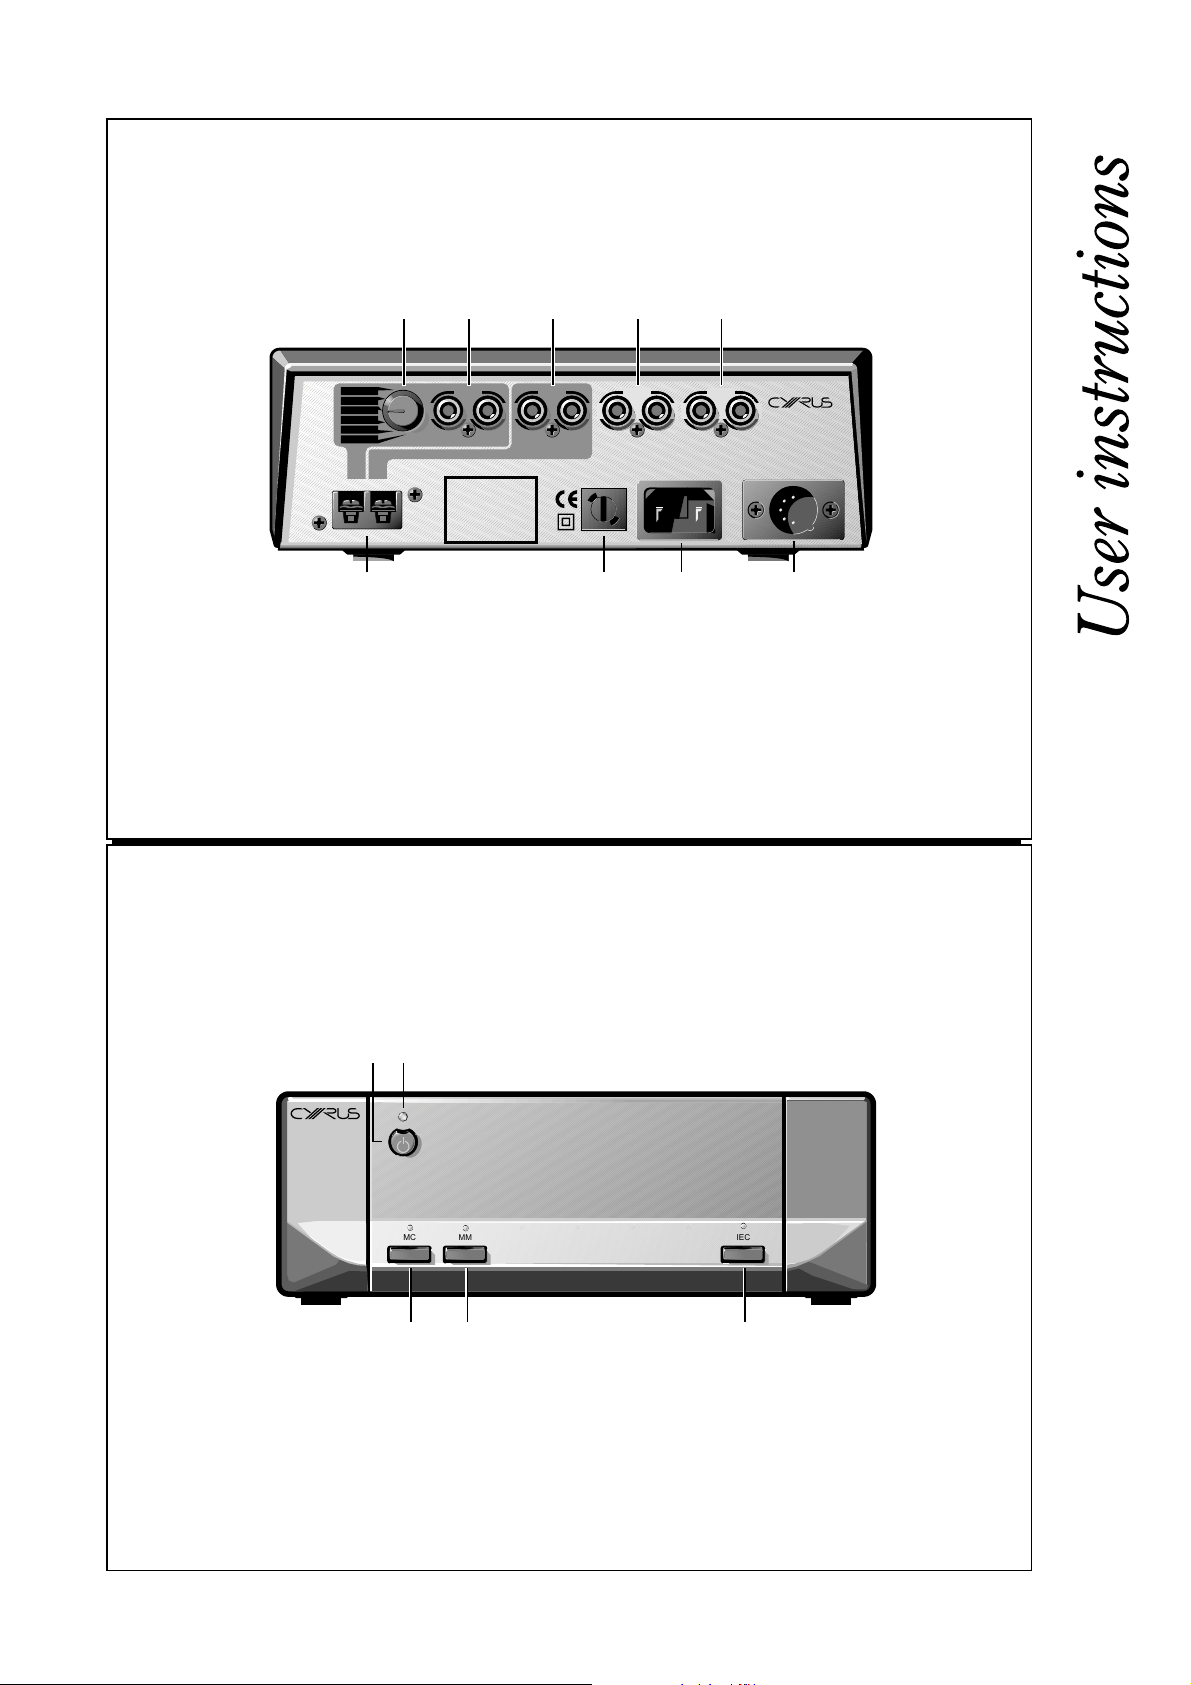
POWER SUPPLY: (Refer to Fig.1)
The moulded IEC connector of the AC cord supplied plugs into the power inlet
g on the rear of the unit. The mains fuse h is on the rear panel next to the
power switch. It must only be replaced as follows:
U.K. / Europe 230V T100mAL/250V 20mm
N. America 115V T200mAL/250V 20mm
The mains supply requirement for your Cyrus Phono X is marked on a label
on the rear panel. Before connecting, check that this voltage is the same as
your mains supply.
230V Products: Voltage Range 220V-240V
115V Products: Voltage Range 110V-120V
If you move to an area with a different mains voltage, contact your local Cyrus
distributor to have your product converted.
NOTE FOR UK CUSTOMERS:
The Phono X is supplied with a power cable terminated by a fused 13A mains
plug. This plug should not be removed but if it is removed, dispose of it safely
and do not re-use it. To connect a new 13A plug, proceed as follows: Connect
the brown wire to the terminal marked L or coloured red. Connect the blue
wire to the terminal marked N or coloured black. The internal plug fuse should
be 5A.
SERVICING:
Do not attempt to service this product yourself as opening or removing covers
may expose you to dangerous voltage or other hazards. Refer all servicing to
qualified service personnel.
CONDITIONS REQUIRING SERVICE: Unplug this product from the wall
outlet and refer servicing to qualified service personnel when:
• When the power supply cord or plug is damaged.
• If liquid has been spilled, or objects have fallen into the product.
• If the product has been exposed to rain or water.
• If the product has been dropped or damaged in any way.
• If the product does not operate normally by following the operating
instructions. (Adjust only those controls that are covered by the
operating instructions. Improper adjustment of other controls may
result in damage requiring extensive work by a qualified technician
to restore the product to its normal operation).
• When the product exhibits a distinct change in performance.
REPLACEMENT PARTS: When replacement parts are required, be sure the
service technician has used replacements specified by the manufacturer or
have the same characteristics as the original part. Unauthorised substitutions
may result in fire, electric shock, or other hazards.
SAFETY CHECK: Upon completion of any service or repairs to this product,
ask the service technician to perform safety checks to determine that the
product is in proper operating condition.
PRODUCT SERVICE CENTRES
For product service or technical advice, contact only authorised Cyrus service
centres. The Cyrus distributors are listed at the end of this instruction manual.
GB
GB
1

Cyrus Phono X User Instructions
Welcome to the world of Cyrus!
Congratulations on your choice of Cyrus Hi-fi products. Our state-of-the-art
design technology and outstanding quality of manufacture has won
countless awards around the world. We are confident that you will derive
great pleasure from owning a product from one of the most recognised
and respected manufacturers of hi-fi equipment.
Please read these instructions carefully before commencing installation.
They provide full guidance to help you install your Phono X safely and
correctly.
Preparations for Installation
Before installing the Phono X check that the following items are included
in the accessory box.
• Warranty Card (back cover of this instruction manual)
• Power Cable
• 2 x Phono leads for MC-BUS connection
After removing these items, please retain the packaging.
Install the Phono X in a well ventilated location away from sources of high
temperature, dust or humidity. Never stand the Phono X under another
unit or on any surface likely to obstruct its cooling or ventilation.
INSTALLATION (Refer to Fig 1):
Key to the rear panel drawing:
1. MC Loading Switch 6. PSX-R Connector
2. Moving Coil Input 7. Power Inlet
3. Moving Magnet Input 8. Mains Fuseholder
4. Preamplifier Output 9 Ground terminals
5. MC-bus Connections
Connecting a Turntable
The Phono X accepts Moving Coil and Moving Magnet cartridge inputs.
If you have two turntables, one equipped with a MM and one with an MC
cartridge, both can be connected at the same time.
Before connecting a turntable to the Phono X, check the specification of
the cartridge which is fitted, then connect the turntable to the correct input
of the Phono X by referring to the following paragraphs.
Moving Magnet Input:
The MM input c accepts:
• Regular moving magnet cartridges
• High output moving coil cartridges (where MM input is
recommended by the cartridge manufacturer)
• Low output MC cartridges connected via step-up transformers
Moving Coil Input:
The MC Input b accepts:
• Low-output moving coil cartridges.
Your Phono X is provided with a loading switch a so that you can set the
correct load impedance for your MC cartridge. Three settings are
available, 10Ω, 100Ω and 1KΩ. Unless your cartridge instructions
recommend a lower value, we suggest you use the 1KΩ setting.
Some MC cartridges are load sensitive and may also require a
capacitance load to control high frequency response peaks. Each load
setting is therefore available with or without a 1nF shunt capacitor. The
shunt settings occupy the last three positions on the switch. Use
capacitance loading only if your cartridge instructions specifically advise
its use.
Shorting plugs
The Phono X is supplied with two shorting phono plugs. When using only
one input, insert these plugs into the unused input.
Note: These plugs must be used only as described above.
Ground Connections
Most turntables include a separate grounding wire.
There are three grounding systems in common use:
1. The motor and tone arm grounds are connected to a common
ground wire. Connect this wire to either the MM or MC ground
terminal i, depending on the cartridge used.
2. There are two ground wires, one from the motor and one from the
tone arm. Connect both wires to the appropriate ground terminal on
the Phono X.
3. There is no separate ground wire. Some units use the signal cable
outer return for turntable and tone arm grounds. Though not best
practice, the method is acceptable. No separate ground connection
will be necessary.
Some cartridges link a negative signal pin to the metal shield. This link
may make contact with the tone arm metalwork and cause a hum loop. If
you think this is the case with your turntable, ask your dealer before you
remove the link.
If you have an amplifier that requires a mains earth, do not use the MM or
MC ground terminals of the Phono X for this purpose. Use an appropriate
ground terminal on the ancillary equipment.
Output Connections
Connect the output sockets d of the Phono X to a line level (AUX) input
on your pre-amplifier. When connecting the Phono X to a Cyrus amplifier,
the AUX input labelled AU, AU1 or AUX/PH is recommended.
All signal connections should be via high quality audio interconnects. The
convention for phono connections is
WHITE or BLACK.
Right Channel RED, Left Channel
External Regulated Power Supply - PSX-R
The PSX-R is a unique DC power supply which will upgrade the sonic
performance of your Phono X. When a Phono X & PSX-R combination is
installed, analogue and signal related sections of the Phono X are
powered from this clean, stable power source while other requirements
are supplied internally. This ensures complete isolation of control circuits
and sensitive analogue sections reducing AC mains-borne noise and
power supply ripple.
To connect the PSX-R to the Phono X plug the connector on the umbilical
cord of the PSX-R into the Multi-Pole socket on the rear of the Phono X
f. You will need a mains supply for both units.
GB
2
GB

User Instructions Cyrus Phono X
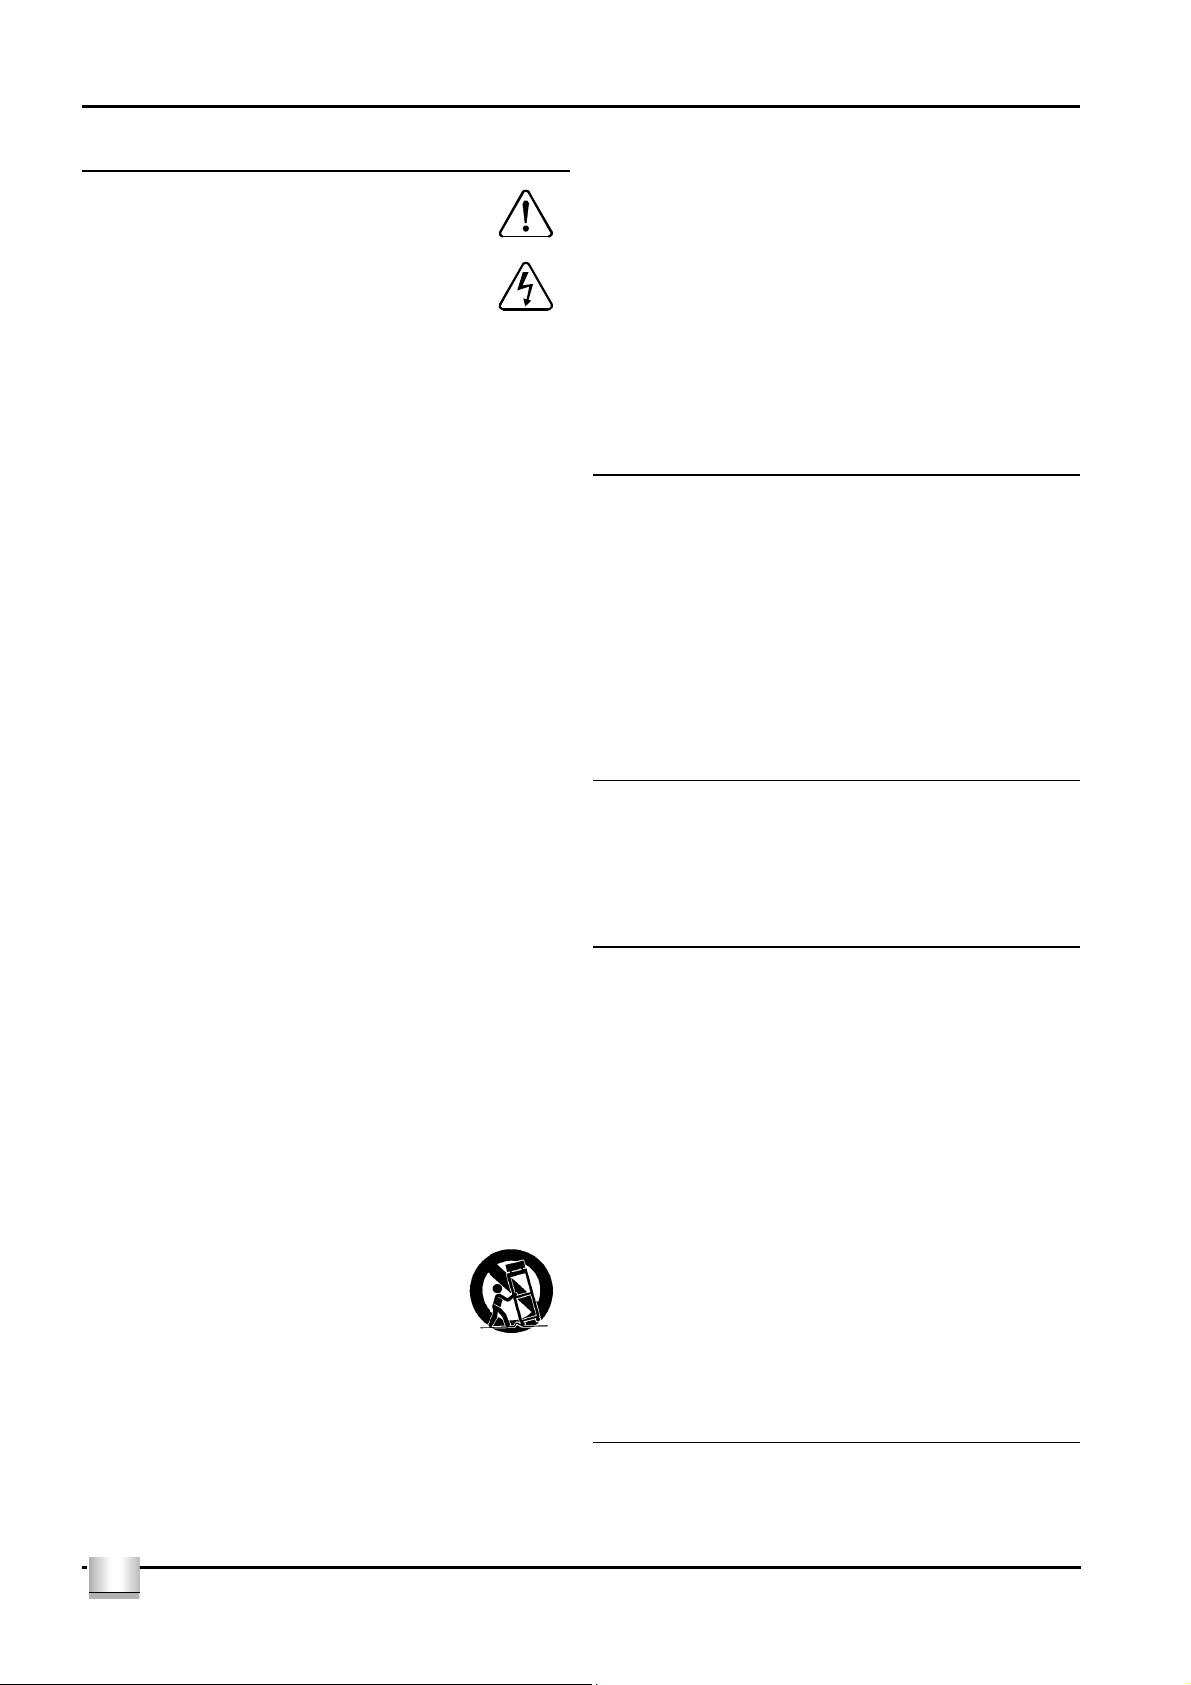
OPERATION (Refer to fig 2)
Key to the front panel drawing:
1. Standby Switch 4 MM Input selector
2. Standby Light 5. MC Input selector
3. IEC Switch
Power Control
The mains power to the Phono X should normally be left on unless left
unattended for a long period when the mains power at the wall socket
should be switched off or the product disconnected from the AC supply.
When power is applied, the Standby key a is used for power control. The
Standby light b shows red when the Phono X is in Standby and green
when operational.
Selecting an Input
Depress the MC e or MM key d to select the appropriate input. The red
indicator above the selected input key will turn on.
Playback Equalisation
The Phono X offers the choice of traditional RIAA playback response or
the newer IEC response. For most systems built from quality audio
components, Cyrus recommends the original RIAA response. If your
turntable is prone to feedback or rumble and/or your loudspeakers have
extended bass response, switching to the IEC setting will help to reduce
bass noise and distortion. The IEC response is also useful to reduce
large cone excursions due to warps.
1. Press the IEC key c to select IEC response.
The red indicator above the key will turn on. When the IEC indicator is not
lit, RIAA response is selected.
Mc-Bus System Connection (Optional)
This feature is usable if you own a Cyrus amplifier. By connecting the
Phono X to the recommended AUX input of your amplifier and setting up
MC-Bus connection for the system, the amplifier will switch on the Phono
X whenever the AUX input is selected. Refer to the relevant amplifier
handbook for MC-Bus wiring instructions.
If preferred, the MC-Bus response of the Phono X can be reconfigured to
always switch on with the amplifier, regardless of which input is selected.
This may be useful if the Phono X is connected to an input other than
AUX. To change the MC-Bus response, follow this sequence:-
1. Set the Phono X to Standby.
2. Press the IEC key c. and hold it down for two seconds, the
indicator above the IEC key will flash.
3. Take the Phono X in and out of Standby to register this setting.
To restore normal operation:
1. Repeat Steps 1 & 2 above, the IEC indicator will flash twice.
2. Take the Phono X in and out of Standby to register this setting.
GB
GB
3

Cyrus Phono X User Instructions
TROUBLESHOOTING GUIDE
If your Phono X is not operating properly, disconnect the power and
carefully check all connections using the notes in this handbook. If
problems persist, the checklists below may help.
If you are in any doubt, consult your dealer.
No sound
Phono X and/or system in Standby Bring unit/system out of Standby
Incorrect input selected Select correct input
System amplifiers are not powered Switch on all system amplifiers
System volume is set to minimum Adjust volume level
No sound from one loudspeaker
BAL control at extreme limit Centralise Balance
Does your speaker have fuses? Check speaker, replace fuses
Poor/faulty cartridge, interconnects Check connections, replace
Muffled Sound or Distortion
MM cartridge connected to MC
Input
Stylus is worn, misaligned or dirty Check, rectify, reset tracking force
Tone arm ground connection poor Check, rectify
If the problem persists
Interchange left and right channels at the Phono X input. If the missing
channel switches, there is a problem with the cartridge or interconnect.
Volume level is too low
MC cartridge in MM input Check, rectify
Hum or interference is present in the background
Tone arm ground connection poor Check, rectify
Interference, e.g. from appliances,
computers, mains transformers
Check, rectify
Reposition turntable and/or Phono
X, have appliances suppressed
SPECIFICATIONS
Power Supply
Voltage:....................................................... ............As plate on rear of unit
Power consumption ................................................................................9W
EMC & Safety Compliance (230V).................................................................CE
EMC & Safety Compliance (115V)............................................... FCC, cCSAus
Enclosure
Dimensions (WxHxD)..................................................... 215 x 75 x 365mm
Weight.................................................................................................3.1Kg
Material ..............................................................................Die cast chassis
Audio Performance
MC Input
Input Sensitivity (Nom.).....................................................................390µV
Input Impedance (Switchable) .........................................1kΩ, 100Ω, 10Ω
Output Headroom (ref. 500µV input, 1kHz).........................................28dB
Channel Balance............................................................................ +/-0.2dB
Crosstalk (20kHz, 500µV input)......................................................... -80dB
S/N ratio, A-weighted (ref. 500µV input, I/P shorted)......................-84dBA
THD (ref. 500µV input) ......................................................................0.01%
MM Input
Input Sensitivity (Nom.).........................................................................5mV
Input Impedance ................................................................................47kΩ
Overall Gain ......................................................................................37.5dB
Output Headroom (ref. 5mV input, 1kHz)............................................27dB
Channel Balance............................................................................ +/-0.1dB
Crosstalk (20kHz, 5mV input) ............................................................ -90dB
S/N ratio, A-weighted (ref. 5mV input, I/P shorted)..........................-92dBA
THD (ref. 5mV input)..........................................................................0.01%
Output
Output Voltage (Nom.) ......................................................................370mV
Frequency Response (RIAA/IEC curve, 20Hz – 20kHz) ................ ±0.2dB
Output Impedance ................................................................................47Ω
GB
4
GB

CYRUS AUDIO LTD
Ermine Business Park, Huntingdon, PE29 6XY
Tel: +44 (0) 1480-435577, Fax: +44 (0) 1480-437715
E-mail: info@cyrusaudio.com Internet: www.cyrusaudio.com
AUSTRALIA: Crestmore Pty Ltd
PO Box 199, North Turramurra, NSW 2074
Tel: +61 29 482 3922 Fax: +61 29 482 3699
Email: crestmore@ans.com.au
AUSTRIA: Cyrus Audio
Ermine Business Park, Huntingdon, PE29 6XY, England.
Tel: +44 1480 435577 Fax: +44 1480 437715
E-mail: info@cyrusaudio.com
BELGIUM: Limit Group BVBA
Pierre Corneliskaai 17, 9300 Aalst, Belgium
Tel: +32 53 76 77 20 Fax: +32 53 76 73 41
E-mail: info@limitgroup.com
CANADA: Europroducts Marketing Ltd
720 Sixth St Suite 386, New Westminster, BC V3L 3C5
Tel: +1 604 522 6168 Fax: +1 604 522 1995
E-mail: europroducts@shaw.ca
DENMARK: SAS Scandinavia
HC Jeppensens Alle 6, DK2670 Mosede.
Tel: +45 4343 1777 Fax: +45 4343 1767
E-mail: info@sas-audio.dk
FINLAND: La Gamma Syntesis OY
Karajapolku 13, 14300 Renko
Tel: +358-36526176 Fax: +358-36526178
E-mail: p.orlandini@lagammasyntesis.fi
FRANCE: Audio Marketing Services
1 Rue Jean Perrin, Le Blanc Mesnil, Paris, 93150
Tel: +33 1 55 81 00 70, Fax: +33 1 48 67 31 47
Email: info@audiomarketingservices.fr
GERMANY: Cyrus Audio
Ermine Business Park, Huntingdon, PE29 6XY, England.
Tel: 0800 101 3169
E-mail: info@cyrusaudio.com
GREECE: Orbilux Hellas
29km National Road, Athens-Lamia, 190 14 Afidnes
Tel: +30 2295 023304
E-mail: spyros@orbilux.net
HOLLAND: TES Nederland BV
Coenecoop 81A, 2741 PH, Waddinxveen
Tel: +31 1826 12669, Fax: +31 182614765
Email: info@tesnl.demon.nl
HONG KONG: Sound Concepts
Room 704, Yee Kuk Ind Ctre, 555 Yee Kuk St, Cheung Sha Wan,
Kowloon, Hong Kong.
Tel: +852 2386 3113, Fax: +852-2386-3666
E-mail: info@hksoundconcepts.com
ICELAND: Radiobaer EHF
Armula 38, PO Box 8933, 128 Reykjavik
Tel: +354 553 1133 Fax: +354 588 4099
E-mail: radiobaer@radiobaer.com
IRELAND: Audio Vision Import Ltd
Acoustic House, John F Kennedy Drive, Nass Road, Dublin 12
Tel: +353 1 450 4855 Fax: +353 1 450 4870
E-mail: info@avi.ie
ISRAEL: AL Audio
PO Box 26, Raanana 4301
Tel: +972 995 17667 Fax: 972 99517669
ITALY: GTO Srl
Via Castelle 48, 40068, San Lazzaro di Savena
Tel: +39 051 6271447 Fax: +39 051 6278317
E-mail: info@gto.it
KOREA: Zen Audio
#49, 4F Kukje-Elec center, Seocho Dong, Seocho Gu, Seoul.
Tel: +822 345 38662 Fax: +822 345 38501
E-mail: tommykim7@naver.com
NEW ZEALAND: Crestmore Pty Ltd
Unit A4, 1066 Great South Road, Mt. Wellington, Auckland
Tel: +64 9 270 4001 Fax: +64 9 270 4007
E-mail: crestmore@ans.com.au
NORWAY: SAS Scandinavia
Industrivej 30, Brondby, DK 2605, Denmark
Tel: +45 4343 1777 Fax: +45 4343 1767
E-mail: info@sas-audio.dk
POLAND: Intrada SC
Ul Szewska 18A, 61-760 Poznan
Tel: +48 61-6624098 Fax: +48 61-8551080
E-mail: gogul@hi-corner.pl
PORTUGAL: Diper CAF Lda
Rua Veloso Salgado 971-C, 4450 Leca Palmeira
Tel: +351 22 Fax: +351 2 9968248
E-mail: diper@mail.telepac.pt
PRINCIPALITY OF ANDORRA: Ischia
C/Les Boigues S/N Ed Racel, Escaldes - Engordany
Tel: +376 822651 or Fax: +376 824732
E-mail: ischia@ischia.ad
RUSSIA: NEXT Company
Granatniy per 3-2, Moscow, 103889
Tel: +7 095 290 6007 or 3109 Fax: +7 095 2902864
E-mail: info@next-hifi.ru
SINGAPORE: Asia Sound Equipment(s) Pte Ltd
1 Coleman Street, #4-49/62 The Adelphi, 179803
Tel: +65 2596120 Fax: +65 2596617
E-mail: dthk33@singnet.com.sg
SWEDEN:
Industrivej 30, Brondby, DK 2605, Denmark
Tel: +45 4343 1777 Fax: +45 4343 1767
E-mail: info@sas-audio.dk
SWITZERLAND: Montana Audio Systems GmbH
Allmendstrasse 14, CH 8320, Fehraltorf
Tel: +41 1 955 0101 Fax: +41 1 955 0303
Email: info@montana-audio.ch
UKRAINE: Leater
102 Gorkogo St, Office 2, 03150 Kiev
Tel: +380 442611646 Fax: +380 442683441
E-mail: leater@mail.ru
USA: The Sound Organisation
11140 Petal St, Suite 350, Dallas, TX75238
Tel: +1 972 234 0182 Fax: +1 972 234 0249
Email: steve@soundorg.com
SAS Scandinavia
 Loading...