


Cyrus Discmaster 8.0 DVD Player
Fig 1
DIGITAL OUTPUT
cd e gb
aabfedc
S-VIDEO
SPDIF
VIDEO
OUT
110-230V
50/60Hz
MADE IN ENGLAND
20W
017
STEREO OUT
R
Cr Cb
VGA VIDEO OUT
Manufactured under licence from Dolby Laboratories. "Dolby," “Pro
Logic,”and thedouble-D symbol aretrademarks ofDolby Laboratories.
HDMI
L
CENT
Y
SUB
01:29:11
5.1 AUDIO OUT
L
FRONTREAR
R
h1@1#1$1%
i1)1!
ff
L
DAC OUT
R
Apparatus Claims of U.S.
Patent Nos. 4,631,603;
4,577,216;4,819,098 and
4,907,093 licensed for
limited viewinguses only.
g
OUT
MC-BUS
IN
User Instructions
Fig 2
2#
2!
1*
1$
2@
2)
1(
1&
1^
1%
1#
Standby
Language Program
Subtitle
Angle
Clear
OK
Title
N/P
HD
12
5
4
789
Display
0
Zoom
Open/close
VGA
Repeat
Menu/PBC
Search
Setup
3
6
Discmaster 8.0
h
a
b
c
d
e
f
g
h
i
1)
1!
1@
Fig 3
Discmaster 8.0

User Instructions Cyrus Discmaster 8.0
IMPORTANT! Read before operating this equipment!
CAUTION: The exclamation mark is to draw your attention to
important instructions and safety procedures in this manual.
ATTENTION: The lightning flash warns you of the risk of
electrical shock presented by components inside this product.
Unauthorised personnel must not open this unit.
WARNING: To reduce the risk of electrical shock do not remove
any unit covers or panels. There are no user serviceable parts in this product.
WARNING: To reduce the risk of electric shock, do not expose this
equipment to rain or moisture.
HEED WARNINGS: All warnings on the product and in the operating
instructions should be adhered to.
READ ALL THE INSTRUCTIONS: All the safety and operating instructions
should be read before the product is operated.
RETAIN INSTRUCTIONS: The safety and operating instructions should be
retained for future reference.
FOLLOW INSTRUCTIONS: All operating and use instructions should be
followed.
CLEANING: Unplug this product from the mains before cleaning. Do not use
liquid or aerosol cleaners. Use a damp cloth for cleaning.
WATER AND MOISTURE: Do not use this product near water - for example,
near a bath tub, wash bowl, kitchen sink, or laundry tub, in a wet basement; or
near a swimming pool and the like. The product must not be exposed to
dripping or splashing and no objects filled with liquids, such as vases, shall be
placed on the product.
HEAT: The product should be situated away from heat sources such as
radiators, stoves, or any other products (including amplifiers) that produce
heat.
VENTILATION: Slots and openings in the cabinet are provided for ventilation,
to ensure reliable operation of the product and to protect it from overheating
and these openings must not be blocked or covered. The openings should
never be blocked by placing the product on a bed, sofa, rug or similar surface.
This product should not be placed in a built-in installation such as a bookcase
or rack unless proper ventilation is provided or the manufacturer's instructions
have been adhered to.
OBJECT OR LIQUID ENTRY: Never push objects of any kind into this
product through openings as they may touch dangerous voltage points or
short-out parts that could result in a fire or electric shock.
ACCESSORIES: Do not place this product on an unstable cart, stand, tripod,
bracket, or table. The product may fall, causing serious injury to a child or
adult, and serious damage to the product. Use only with a cart, stand, tripod,
bracket or table recommended by the manufacturer, or sold with the product.
Any mounting of the product should follow the manufacturer's instructions,
and should use a mounting accessory recommended by the manufacturer.
ATTACHMENTS: Do not use attachments not recommended by the product
manufacturer as they may cause hazards.
MOVING THE PRODUCT: A product and cart combination
should be moved with care. Sudden stops, excessive force,
and uneven surfaces may cause the product and cart to
overturn.
POWER SOURCES: This product should be operated only from the type of
power source indicated on the marking label. If you are not sure of the type of
power supply to your home, consult your product dealer or local power
company. For products intended to operate from battery power, or other
sources, refer to the operating instructions.
OVERLOADING: Never overload wall outlets, extension cords, or integral
convenience receptacles. This can result in an increased risk of fire or electric
shock.
POWER CORD PROTECTION: Power supply cords should be routed so that
they are not likely to be walked on or pinched by items placed upon or against
them, paying particular attention to cords at plugs, convenience receptacles,
and the point where they exit from the product.
NAKED FLAMES: No naked flame sources, such as candles, must be placed
on this product.
LIGHTNING: For added protection for this product during a lightning storm, or
when it is left unattended or unused for long periods of time, unplug it from the
wall outlet and disconnect the antenna or cable system. This will prevent
damage to the product due to lightning and power-line surges.
CAUTION! POLARISED CONNECTOR (CANADA and USA):
To prevent electrical shock, match wide blade of plug to wide slot, fully insert.
Do not alter or remove this plug if it does not fit your mains power socket.
Have a suitable socket installed by a competent electrician.
POWER SUPPLY:
The moulded IEC connector of the AC cord supplied plugs into the power inlet
1% on the rear of the unit.
The mains supply requirement for your Discmaster 8.0 is marked on a label
on the rear panel. Before connecting, check that this voltage is the same as
your mains supply.
If you move to an area with a different mains voltage, contact your local Cyrus
distributor for advice.
There are no user replaceable fuses in this unit.
All Products: Voltage Range 110V-230V
NOTE FOR UK CUSTOMERS:
The Discmaster 8.0 is supplied with a power cable terminated by a fused 13A
mains plug. This plug should not be removed but if it is removed, dispose of it
safely and do not re-use it. To connect a new 13A plug, proceed as follows:
Connect the brown wire to the terminal marked L or coloured red. Connect the
blue wire to the terminal marked N or coloured black. The internal plug fuse
should be 3A.
SERVICING:
Do not attempt to service this product yourself as opening or removing covers
may expose you to dangerous voltage or other hazards. Refer all servicing to
qualified service personnel.
CONDITIONS REQUIRING SERVICE: Unplug this product from the wall
outlet and refer servicing to qualified service personnel when:
• When the power supply cord or plug is damaged.
• If liquid has been spilled, or objects have fallen into the product.
• If the product has been exposed to rain or water.
• If the product has been dropped or damaged in any way.
• If the product does not operate normally by following the operating
instructions. (Adjust only those controls that are covered by the
operating instructions. Improper adjustment of other controls may
result in damage requiring extensive work by a qualified technician
to restore the product to its normal operation).
• When the product exhibits a distinct change in performance.
REPLACEMENT PARTS: When replacement parts are required, be sure the
service technician has used replacements specified by the manufacturer or
have the same characteristics as the original part. Unauthorised substitutions
may result in fire, electric shock, or other hazards.
SAFETY CHECK: Upon completion of any service or repairs to this product,
ask the service technician to perform safety checks to determine that the
product is in proper operating condition.
PRODUCT SERVICE CENTRES:
For product service or technical advice, contact only authorised Cyrus service
centres. The Cyrus distributors are listed at the end of this instruction manual.
Manufactured under license from Dolby Laboratories. "Dolby" and the double-D symbol are
trademarks of Dolby Laboratories.
This product incorporates copyright protection technology that is protected by method claims
of certain U.S. patents and other intellectual property rights owned by Macrovision
Corporation and other rights owners. Use of this copyright protection technology must be
authorized by Macrovision Corporation, and is intended for home and other limited viewing
uses only unless otherwise authorized by Macrovision Corporation. Reverse engineering or
disassembly is prohibited.
GB
GB
1

Cyrus Discmaster 8.0 User Instructions
Welcome to the world of Cyrus!
Congratulations on your choice of Cyrus Audio-Visual products. Our state-of-theart design technology and outstanding quality of manufacture has won
countless awards around the world. We are confident that you will derive
great pleasure from owning a product from one of the most recognised and
respected manufacturers of audio-visual equipment.
Please read these instructions carefully before commencing installation. They
provide full guidance to help you install your Cyrus Discmaster 8.0 safely and
correctly.
Preparations for Installation
Before installing the Discmaster 8.0 check that the following items are
included in the accessory box.
• Warranty Card (with instruction manual)
• AC Mains Cable
• Remote Control Handset
• 2 x Phono leads for MC-Bus connection
After removing these items, please retain the packaging.
Install the Discmaster 8.0 in a well ventilated location away from sources of
high temperature, dust or humidity. Never stand the Discmaster 8.0 under
another unit or on any surface likely to hamper its cooling or ventilation.
INSTALLATION (Refer to Fig.1)
Key to the rear panel drawing:
1. Optical digital audio output 9. 5.1 rear channel audio outputs
2. S-Video output 10. 5.1 sub audio output
3. Coaxial digital audio output 11. 5.1 centre channel audio output
4. Stereo analogue audio output 12. VGA video output
5. HDMI digital video output 13. Component video output
6. Stereo DAC upgrade output 14. Composite video output
7. MC-Bus connections 15. AC power inlet
8. 5.1 front channel audio outputs
Connecting to the AC Mains Supply
Connect the socket on the AC Power cable to the Power inlet 1% on the rear panel
of the Discmaster 8.0. Now connect the cable to a suitable AC power point.
There is no mains power switch on the Discmaster 8.0. To switch off the
mains supply to the Discmaster 8.0 remove the plug from the wall outlet. For
this reason, ensure that the plug is easily accessible when installing the unit.
Connecting the Video Output to a Television
The video output of the Discmaster 8.0 may be connected to the television or
monitor in five different ways. The choice of connection and the picture quality
achieved will depend on the options available at the TV/monitor. The
connections available from the Discmaster 8.0 are listed to follow in order of
quality. Use the connection option that appears highest in the list for best
picture quality performance-
HDMI Digital Video
The HDMI Digital Video output e should be used when connecting a highgrade digital TV, projector or monitor equipped with HDMI digital input.
Component Analogue Video
The Component Video Output 1# should be used when connecting a high
grade analogue TV, projector or monitor equipped with individual connectors
for Component Video input. Ensure that the three phono leads are connected
between the same component video signals.
VGA Analogue Video
The VGA Video Output 1@ should be used when connecting a high-grade
computer monitor, only equipped with an analogue VGA video input.
S-Video Analogue Video
The S-VIDEO (Y/C) Output b offers superior quality to a composite
connection and should be used if the TV has none of the preceding Video
connections. NOTE:- The S-Video connection must be switched on when
used. Refer to the Display settings section of the Menu System.
Composite Analogue Video
A Composite Video Output
have this connection. This is the lowest quality connection.
SCART Connection
To connect the Discmaster 8.0 to a TV, projector or monitor which only has a
SCART input connection, use a SCART break-out cable or adapter which will
give access to the S-Video or Composite video inputs, and also the audio
inputs of the TV if required.
1$ is also provided for TVs and monitors that only
GB
2
GB

User Instructions Cyrus Discmaster 8.0
Connecting Audio
The Discmaster 8.0 offers several alternatives for audio connection.
1. For the highest quality surround-sound, connect digitally to an external
surround-sound decoder.
2. For convenience and simplicity of operation, connect the analogue
outputs of the Discmaster 8.0 directly to power amplifiers and a
subwoofer, or to an active sub-sat system.
3. If you have an analogue two-channel stereo system, connect the stereo
outputs (or those from the upgrade DAC, when fitted) of the Discmaster
8.0 to your stereo integrated amplifier or preamplifier.
4. For the highest quality stereo sound, connect digitally to an external
stereo D/A converter.
1. Connecting Digital Audio to an external Multichannel Surround
Sound Decoder
For the highest quality multi-channel audio performance, the Discmaster 8.0
may be connected digitally to a separate Digital Surround-Sound decoder.
Two options are available for connection, either coaxial c with a digital
interconnect or optical a with a Toslink optical interconnect. Set the
Discmaster 8.0 volume control to maximum (32) for the highest sound quality
when connected in this way.
2. Connecting Audio via the Internal Surround Sound Decoder
The Discmaster 8.0 includes a 5.1 channel digital surround sound decoder for
Dolby encoded program material and can therefore be used as the control
centre for a full 5.1 surround CD/DVD replay system. To set up such a
system, connect power amplifiers to the Discmaster 8.0 outputs for Front
Centre 1! and Surround i audio channels. Surround-sound loudspeakers
can then be connected to this system via the power amplifiers.
An active subwoofer may be separately connected to the ‘SUB’ channel
1).
output
3. Connecting Stereo Audio from the Discmaster 8.0 to a stereo
amplifier
If you are setting up a two-channel stereo system, the stereo analogue audio
outputs d of the Discmaster 8.0 may be connected to a Cyrus stereo
amplifier or preamplifier. The VI or AV inputs are recommended for this. Set
the Discmaster 8.0 volume control to maximum (32) for the highest sound
quality when connected in this way.
3. Stereo audio with high quality stereo DAC upgrade fitted
The Discmaster 8.0 includes the option of a retailer-fitted internal DAC
upgrade option for the highest quality of stereo sound reproduction. If your
Discmaster 8.0 has this option fitted, connect the upgrade DAC outputs f to
your ampliifer. Set the Discmaster 8.0 volume control to maximum (32) for the
highest sound quality when connected in this way.
4. High quality Stereo sound via an external Stereo D/A Converter
If you own a high-end stereo system with a stereo DAC as the control unit,
connect the Discmaster 8.0 digitally to this. Two options are available for
connection, either coaxial
Toslink optical interconnect. Set the Discmaster 8.0 volume control to
maximum (32) for the highest sound quality when connected in this way.
c with a digital interconnect or optical a with a
h,
OPERATION
The Discmaster 8.0 is supplied with a remote control handset that can change
configuration settings and operate all functions as described fully in the
section ‘Remote Control’. In addition to the remote control, Standby control
and essential transport functions are duplicated on the front panel of the unit.
Please read the remote control section of this handbook, and set the
configuration options listed in the Menu System section to ensure that your
Discmaster 8.0 is correctly set up to match your system before playing discs.
Key to the front panel drawing (Fig.2)
1. Disc loading tray ........................Load all discs label side up.
2. Standby......................................Switches the Discmaster 8.0 on and off.
3. Standby Light.............................Indicates when the player is set to
4. Remote Eye...............................Remote command receiver.
5. Display Window .........................Discmaster 8.0 status display.
6. Skip/Search keys.......................Press to skip forward or reverse through
7. Stop/Load ..................................Opens the disc loading drawer.
8. Play/Pause.................................Sets play and pause modes.
Switching On
The mains power to the Discmaster 8.0 should normally be left on unless left
unattended for a long period when the mains power at the wall socket should
be switched off or the product disconnected from the AC supply.
When power is applied, the STANDBY key b is used for power control. The
Standby light c shows red when the Discmaster 8.0 is in Standby and green
when operational. At this time the ‘CYRUS’ logo will also show on the TV
screen.
Disc Compatibility
The Discmaster 8.0 is compatible with DVD-Video discs, VCD Video-CDs,
audio CDs and MP3 compilation discs. You can also view discs containing
digital pictures and computer video files by playing them in the Discmaster
8.0. Instructions for playing each type of disc follow later in this handbook. A
full list of compatible digital file formats is included in the specifications
section.
NOTE: DVD-Video discs include a global ‘region’ identifier. The Discmaster
8.0 will only play discs purchased in the same global region as the player. The
region setting of the Discmaster 8.0 is shown on a globe symbol at the rear of
the player. Ensure that all discs purchased have the same region symbol as
the player or are marked region 0 which will play in any global region.
Standby.
DVD chapters or CD tracks.
MC-Bus System Connection (Optional)
By using the MC-Bus connection on your Discmaster 8.0, a highly functional
integrated system with full remote control may be set up. This feature is
usable if you own a Cyrus amplifier or digital surround decoder. Refer to the
relevant product handbook for MC-Bus wiring instructions.
GB
GB
3

Cyrus Discmaster 8.0 User Instructions
Remote Control Operation
Supplied handset
The remote control handset supplied with the Discmaster 8.0 will control all
disc playing functions, configure the player through the setup menu system
and set the volume for the analogue outputs. If you have a system with 5.1
surround speakers driven from power amplifiers connected directly to the 5.1
channel audio outputs of the Discmaster 8.0, then this handset will control all
functions of your disc playing system including volume.
Cyrus system handsets
If your system includes a Cyrus stereo amplifier or surround decoder you may
already own a Cyrus system handset that will also control most functions of
the Discmaster 8.0. Refer to the handbook for the system handset or to the
Cyrus website www.cyrusaudio.com for a list of commands available to
control the Discmaster 8.0.
Remote Control Handset Commands
1. OPEN/CLOSE. Opens or closes the disc tray for disc loading.
2. PROGRAM. When playing a disc, this key will open the programming
dialog screen on the TV so that you can store a preferred sequence of
titles and/or chapters from a DVD or tracks from a CD. Refer to the
‘Programming’ section under Playing a DVD or Playing a CD later in this
handbook for more information about programming.
3. NEXT/PREVIOUS. These keys will step to the next/previous DVD
chapter or CD track.
4. ANGLE. This key will change the camera angle for DVD discs that
include multiple angle options. Each press will move to the next
available angle. NOTE: If a disc includes multiple camera angles, then a
camera symbol will appear in the top right corner of the TV screen
superimposed on the range of angles available.
5. SETUP. Press this key to open the SETUP menu. A complete map of
the menu options available can be found in the section titled
‘Discmaster 8.0 Menu System’ on the next page.
6. MENU/PBC. Press this key to return to the DVD disc menu.
7. VIDEO MODE SELECTORS. These keys are used to quick access
different video modes. N/P will switch to 480P (NTSC 525 line) or 576P
(PAL 625 line) progressive scan TV modes. If you have a HDMI digital
connection, HD will switch to 720P, 1080I or 1080P modes. VGA will set
different monitor resolutions from the range VGA/SVGA/XGA/SXGA.
8. NUMERIC KEYPAD. Press a key on the numeric keypad to quickaccess a new DVD chapter or CD track. Press the two digits to select a
two-digit chapter/track.
9. SEARCH. This function is not supported by the Discmaster 8.0.
10. SCAN FWD/REV. Press one of these keys to begin scanning the disc.
Press again to increase the scan speed (5 speeds available) or press
the other key to reduce the scan speed.
11. PLAY/PAUSE. Pressing this key will start or pause playback of a DVD
or CD if it is stopped or paused.
12. REPEAT. Press this key to enable the on-screen repeat display.
Continue pressing to select DVD Title or Chapter repeat mode as
required or CD track or disc repeat mode.
13. STOP. Press this key once to select pre-stop mode. In pre-stop mode
the disc will continue to spin, holding for the next command. Press
STOP again to stop the disc completely.
14. ZOOM. Press this key to zoom into the centre of the picture. Press
again to increase the zoom setting in steps from 2x to 5x. Press again to
cancel zoom. When zoom is set, the CURSOR keys will move the zoom
zone around the picture.
15. DISPLAY. Press this key to activate the on-screen status display. The
LEFT/RIGHT cursor keys will change the on-screen display information.
16. TITLE. Press this key to enable direct access selection of DVD-Video
disc titles.
17. CURSOR and OK. Use the cursor keys to move around menu options
and the OK key to confirm selections.
18. CLEAR. This key is used when programming to clear unwanted
selections from the stored program.
19. AUDIO MUTE. This key will mute the audio from the Discmaster 8.0.
Press again to unmute.
20. VOLUME CONTROL. Press these keys to adjust the volume setting
from 0-32. The factory setting for volume is full (32). Leave this setting if
you are connecting your audio system to the digital output or if you are
using an integrated or preamplifier to control the volume of your audio
system.
21. LANGUAGE. Press this key to jump to language selection on the
display bar. Each repeat press will cycle through the available
languages.
22. SUBTITLE. Press this key to jump to subtitle selection on the display
bar. Each repeat press will cycle through the available languages for
subtitles.
23. STANDBY. This key sets or cancels Standby. Volume, Display and
other configuration settings are stored during standby, or when power is
disconnected from the Discmaster 8.0.
2#
2!
1*
2@
2)
1(
1&
1^
1%
Standby
Subtitle
Clear
N/P
123
456
789
Display
Open/clo se
Language Program
Angle
OK
VGA
HD
0
Search
a
b
c
d
Setup
Menu/PBCTitle
e
f
g
h
i
1)
1$
1#
Zoom
Repeat
1@
1!
GB
4
GB

User Instructions Cyrus Discmaster 8.0
Discmaster 8.0 Menu system
The Discmaster 8.0 is configured to match your system through an on-screen menu system. To access the menu system, press the SETUP key on the remote
control. Navigate the menu option s with the CURSOR keys, press the OK key to make selections.
SETUP
Sound Digital Output
Stereo
Speaker setup Speakers
LPCM output
Dolby Digital
DTS
Distance
Volu me
Check this box to enable Dolby Digital audio signals from the Digital output. If you have a stereo
DAC, uncheck this box.
Check this box to enable DTS audio signals from the Digital output. If you have a stereo DAC or a
surround decoder which is not compatible with the DTS form at, uncheck this box.
Check this box to mix down multi-channel programs if you are using the internal surround sound
decoder to drive a syste m with two speakers.
Select this option to display the settings for system speaker size if you are using the internal
surround-sound decod er. Left and Right Front speak ers may be set to Large or Small. The Center,
Left and Right Surround speakers may be set to Large, Small or Off. The Subwoofer may be
switched On or Off. Set Small for satellite or small stand-mount speakers. Set Large for floorstanding or larger stand-mount sp eakers. Set Off if you do not have a speaker in tha t location.
If you are using the Discmaster 8.0 surround sound decoder, select this option to set the distance
you sit from each speaker. Distanc es can be adjusted from 1m to 6.6m.
If you are using the Discmaster 8.0 surround sound decoder, select this option to set the volume
trims for each speaker. Trim adjustments will reduce the level from a particular speaker, so if you
are sat cl ose to the surround speak ers (for example), you can reduce the le vel from these until they
match the front speak ers.
This setting enables 96k sample rate via the PCM digital output when this higher quality source
material is available. Set to 96k if you have a surround sound decoder or DAC that is compatible
with 96k programs, other wise set to 48k.
e
Pro Logic II
Display TV system
TV image
S-Video Select 'on' if you hav e used the S-Video connection to your TV.
Brightness
HDMI mode
Language
Lock Enter Password
Player menus With this menu optio n, you can choose between available menu l anguage options.
Disc menus
Audio
Subtitl es
Change PWD
Ratings Limits
Choose one of the f ive options available for the internal surrou nd sound decoder. DSP mode off will
disable the internal Pro Logic II decoder, Emulation will enable original Pro Logic '4.1' decoding,
Music will enable the Pro Logic II decoder, optimised for playing mus ic, Movie will optimise the Pro
Logic II decoder for playing movies, Matrix is a simpler decoding option.
Choose a suitable resolution for your monitor from the list of available resolutions. NOTE:- Some
monitors will not support all resolution settings, so check your monitor handbook before changing
this setting.
Select the s creen shape of your TV/moni tor. Choose 4x3 Letterbox to show the full pict ure width on
a 4x3 TV with black bands top & bottom. Choose 4x3 Standard for a full-height picture on a 4x3 TV,
but losing the left and r ight picture edges. Choose 16x9 if you have a Widesc reen TV.
This option enables the brightness of the picture from the Discmaster 8.0 to be adjusted to match
the brightness of off- air broadcast.
With this menu option, the signal fo rmat for the HDMI out put can be changed. Selec t the option that
gives the best pictur e performance from your monitor if you are using a digital HDMI connect ion.
The Discmaster 8.0 wi ll always select the selected me nu language when available on a disc.
The Discmaster 8.0 will always select the selected aud io language when available on a disc.
The Discmaster 8.0 wi ll always select the selected s ubtitle language when available on a disc.
Your password must be entered to reach the next menu level. The factory password is 8888. This
may be changed at the next menu le vel. Restoring defau lt settings with th e default menu option wi ll
reset to the factory pas sword.
Use this menu option to c hange your password for access to r atings limit settings.
Ratings limit settings restrict the rating of DVD disc that may be played. Use this menu option to
change your password f or access to ratings limit settings. *
Restores all settings to the factory default. Volume is set to maximum ( NOTE:- Caution is required
Default
*Note:- The func tioning of the Discmaster 8.0 Parental Contr ol system depends on suita ble software coding being available on th e DVD disc. Cyrus cannot ther efore
guarantee functioning of the Pare ntal Control system and denies any liability associated with u nintended watching of disc content. If in d oubt, please make sure the
disc plays accordi ng to your Parental Control setting s before allowing your childr en access.
GB
GB
to reduce this setting before playing a disc if your Discmaster 8.0 is connected directly to power
amplifier s). Dolby Digital and DTS di gital outputs are enabled. Speakers are all set to large size at a
distance of 3.3m (10ft) with the subwoofer switched on. Video is set for 480P with a screen size of
4x3 Letterbox. HDMI is set to RGB/60Hz. All language options are set to En glish.
5

Cyrus Discmaster 8.0 User Instructions
Playing a DVD-Video Disc
You will recognize DVD-Video discs by the logo. Depending on the material
on the disc (a movie, video clips, a drama series, etc.) it may have one or
more Titles, and each Title may have one or more Chapters. To make access
easy and convenient, the Discmaster 8.0 lets you move between Titles, and
also between Chapters.
Playing the disc
When a DVD is loaded the Discmaster 8.0 will automatically begin to play. If
disc play has stopped, press
Disc Menu
Most DVD discs will have a menu for selecting disc options or navigation of
the disc. From a disc menu use the CURSOR keys to highlight your selection,
and press OK.
Moving to another chapter
When a title on a disc has more than one chapter, you can move to another
chapter by pressing
sequence.
To go directly to any chapter, enter the chapter number using the NUMERIC
keys. If the number has more than one digit, press the keys in succession.
Picture Search
To fast search forwards or backwards through the disc, press the
keys. Search begins, and sound is muted. To step up or slow down the
search speed, press
desired.
Still picture and slow motion
To get a still picture, press
motion may be selected, and speed set with the
Camera angle
If the disc contains sequences recorded from different camera angles, the
angle symbol will appear showing the number of available angles, and the
angle currently being displayed. You can then change the camera angle if you
wish by further pressing the ANGLE key.
NOTE:- To switch off the Angle symbol, press the DISPLAY key.
Restricted viewing
If you have set the ratings limits to restrict unauthorised viewing, only DVD
discs of the authorised rating or below will play. Discs with a higher rating may
be played if required by following the on-screen prompts which appear when
the disc is loaded and entering the correct Password.
Repeat title/chapter
Press the remote control REPEAT key once to repeat the current playing title,
or twice to repeat the chapter. Pressing a third time will cancel repeat.
Storing a program
To program a selection of titles and/or chapters from a DVD into the
Discmaster 8.0 memory, load a disc so that it begins playing. Now press the
remote control program key
With the UP/DOWN cursor keys select the title you want to store. Press OK to
store the complete title in memory, or press the RIGHT cursor key to display a
list of chapters within that title. Use the UP/DOWN cursor keys to select the
chapters you want to store, pressing the OK key to store each one in memory.
To return to the Title list, press the LEFT cursor key. To exit the program
menu, press the RIGHT cursor key to highlight the DONE symbol, then press
OK.
to start play of the disc.
or briefly during play to step through the chapter
or
or as required. To end the search, press as
during play. To return to play, press . Slow
or keys.
b to open the on-screen programming menu.
Playing a CD audio disc
Press to play the disc. Play starts when you close the disc drawer.
As the disc plays, the player display shows the current track, and the elapsed
playing time.
Moving to another track
You can move to another track by pressing
step through the track sequence.
To go directly to any track, enter the track number using the NUMERIC keys.
NOTE:- If the number has more than one digit, press the keys in rapid
succession.
Fast Search
To fast search forwards or backwards through the disc, press
during play. Search begins, and sound is muted. To step up or slow down the
search speed, press
desired.
Pause
To pause disc playback, press
Repeat track/disc
Switch on the TV to check on-screen status while setting repeat. Press the
remote control REPEAT key once to repeat the current playing track, or twice
to repeat the whole disc. Pressing a third time will cancel repeat.
Playing a programmed selection
To program a selection of tracks from a CD into the Discmaster 8.0 memory
you will need to switch on your TV. Load the disc so that it begins playing.
Now press the PROGRAM key and use the UP/DOWN cursor keys to select
the tracks you would like to program. Press OK to store each track in
memory. If you add a track in error, press the CLEAR key. Press PLAY when
you are ready to play your programmed selection. Unload the disc to
completely clear the program memory.
or as required. To end the search, press as
during play. To return to play, press .
or briefly during play to
or
GB
6
GB

User Instructions Cyrus Discmaster 8.0
Playing MP3 music, digital photo and video data from
computer discs
The Discmaster 8.0 can also play MP3 audio tracks, digital photo collections
and video data recorded on computer CD-R or DVD-R discs.
Discs with a single data type
To play data from a disc containing only one of these data types, load the disc
and press
multiple folders, the Discmaster 8.0 will play through the files in each folder in
sequence.
Moving to another track or photo
You can move to another track or photo by pressing or during play to
step through the track sequence.
On-screen display options
Pressing the STOP key at any time during playback will display a file list and
list of folders when present. The folder list may be navigated with the
CURSOR keys to find the folder you require, then press
ready to start play.
Discs with mixed data types and data stored in folders
Load the disc and switch on the TV monitor. If the data is a mix of music,
digital picture and video content or stored in folders, then a menu will be
shown to enable selection of the data type or folder you want to play. Once
you have selected the data type you wish to play, press
or use the list of folders on the TV screen to select the data you want.
Navigate the folder list with the CURSOR keys to find the folder you require,
then press
time, press the DISPLAY key.
. The disc will play through all the files in sequence. If there are
when you are
to play everything
when you are ready to start. To return to the folder list at any
Special features available when playing digital photo
discs
Picture Slideshow speed
You can change the speed of a still picture slideshow with the UP/DOWN
cursor keys. Note that higher resolution digital pictures will take longer to load
within the slideshow.
Pausing the slideshow
Press
slideshow.
Picture rotation
When viewing still pictures you can rotate the picture on the screen by
pressing the ANGLE key. Each press will rotate the picture by 90°.
Picture zoom and pan
When viewing still pictures you can zoom into the picture by pressing the
ZOOM key. Four levels of zoom are possible. Pressing ZOOM a fifth time will
cancel zoom.
Picture thumbnails
To display picture thumbnails for easy selection of pictures, press the
MENU/PBC key on the remote control. You can select a picture from the
thumbnails with the cursor keys, then display it and start a slideshow by
pressing
to pause the slideshow at any time. Press again to re-start the
.
GB
GB
7

Cyrus Discmaster 8.0 User Instructions
r
TROUBLESHOOTING GUIDE
If your Discmaster 8.0 is not operating properly, disconnect the power and
check all connections using the notes in this handbook. If problems persist,
the checklist below may help.
If you are in any doubt, consult your dealer.
No picture or sound (all discs)
Switch off the power to the system and check that connections have been
correctly made from the Discmaster 8.0 to the TV, amplifier or surround
decoder.
Check that all equipment is switched on and that the correct input is selected
at the TV, amplifier or surround decoder.
Picture breaking up, incorrect colours or corrupted
The display video mode selected may not be supported by your monitor. Press
the N/P button to switch to basic video mode (NTSC). Press N/P again to
switch to basic video mode (PAL).
The S-Video output may be switched on while watching another video output.
If this is the case, switch off the S-Video output.
Disc Spinning with no sound
Check in the SETUP menu that the correct audio mode is selected for your
system and connections.
Region warning displayed when a disc is loaded
Check that the region symbol on the disc matches the region symbol on the
rear panel of the player (number with a globe symbol). To avoid this problem
ensure that discs are only purchased in the same global region as the player.
DVD picture stops and jumps to another scene
The disc may be dirty or badly scratched. Try playing another disc. If the other
disc plays ok, try cleaning the 1st disc.
NOTE:- Some discs feature dual layers. Playback will pause momentarily
whilst the player changes layer. This will only happen once during playback of
such discs.
A DVD disc does not play from the beginning
If this DVD is the last disc you played, the resume feature will continue from
this point when next used. Press STOP twice to return to the start of the DVD.
No Remote Operation
The handset batteries may need to be replaced:
Remove the battery compartment cover located underneath the unit. Remove
the batteries and replace with new ones carefully noting the orientation
marked in the bottom of the battery case.
The batteries in the unit should only be replaced with new batteries type AAA
(I.E.C. LR03).
Laser Product
This label on the rear panel tells
you that the unit contains a Lase
component. Opening this unit will
expose the user to radiation from
the laser beam.
WEEE
This logo means that this product is not to be disposed of
with your household waste. This product should be handed
over to a designated collection point to be recycled. Your
cooperation in the correct disposal of this product will
contribute to the effective usage of natural resources. For
more information on collection points, contact your disposal
service or City Hall.
8
WARRANTY
The warranty card enclosed should be completed by the purchaser
and returned to CYRUS or its Distributor within 8 days of purchase.
No Dealer or Distributor may vary the terms of this warranty which is
personal to the original Purchaser and is not transferable.
Please retain the sales receipt as proof of purchase.
Warranty claims must wherever possible be made through the Dealer
from whom the equipment was purchased.
This warranty excludes:
• Damage caused through neglect, accident, misuse, wear and
tear, or through incorrect installation, adjustment or repair by
unauthorised personnel. Any unauthorised servicing will result in
loss of guarantee.
• Liability for damage or loss occurring in transit to or from the
purchaser.
• Consequential damage, loss or injury, arising from or in
conjunction with this equipment.
Equipment for attention under warranty should be consigned return
carriage paid. If returned equipment is found to comply with the
published specification, CYRUS reserves the right to raise a charge.
The above conditions do not affect your statutory rights as a
consumer.
SPECIFICATIONS
Power Supply
Voltage............................................................................As plate on rear of unit
Power Consumption
Playing .........................................................................................................12W
Standby..........................................................................................................3W
Safety Requirements .....................................................................................CE
Enclosure
Dimensions (WxHxD) ............................................................215 x 75 x 365mm
Weight........................................................................................................2.6Kg
Material .....................................................................................Die cast chassis
Analogue Audio Performance
Audio Output Level ...............................................................................2.0V rms
Output Impedance ....................................................................................300Ω
Frequency Response...................................................................... 20Hz-20kHz
Channel Separation..................................................................>100dB @ 1kHz
>75dB@20kHz
SNR (using silent track)......................................................................... >97dBA
THD @ -10dB .........................................................................................0.015%
Digital Audio Performance
PCM Output compatibility...........................................................44.1k, 48k, 96k
Surround output compatibility......................................................... Dolby Digital
Output level.............................................................................................0.5Vp-p
Output Impedance ......................................................................................75Ω
Video Performance
Output formats......HDMI Digital, Component video, S-Video (Y/C), Composite
VGA, SVGA, XGA, SXGA
Output level........................................................................................... 1V pk-pk
Output Impedance ......................................................................................75Ω
Cyrus reserves the right to change all specifications without notice. E &OE
GB
GB

Gebrauchsanleitung Cyrus Discmaster 8.0
WICHTIGE HINWEISE! Unbedingt vor Benutzung des
Gerätes lesen!
VORSICHT:Das Ausrufungszeichen soll Ihre Aufmerksamkeit auf
besonders wichtige Bedienungs- und Sicherheitshinweise in dieser
Anleitung lenken.
ACHTUNG: Das Blitzzeichen weist Sie auf die Gefahr eines
elektrischen Schlages durch Bauteile im Innern des Gerätes hin.
Öffnen des Gerätes nur durch fachkundiges Personal.
Warnung: Um die Gefahr eines elektrischen Schlages zu vermeiden, dürfen die
Abdeckungen oder Gehäusewände dieses Geräts nicht entfernt werden. Das
Produkt enthält keine vom Benutzer zu wartenden Teile.
Warnung: Um die Gefahr eines elektrischen Schlages zu vermeiden, darf dieses
Gerät weder Regen noch Feuchtigkeit ausgesetzt werden.
BEACHTEN SIE DIE VORSICHTSHINWEISE: Alle Vorsichtshinweise am Produkt
und in der Gebrauchsanleitung müssen beachtet werden.
LESEN SIE ALLE ANLEITUNGEN: Alle Anweisungen zur Sicherheit und zum
Betrieb müssen vor der Benutzung des Gerätes gelesen werden.
BEWAHREN SIE DIE ANLEITUNGEN AUF: Die Anweisungen zur Sicherheit und
zum Betrieb müssen zum Nachlesen aufbewahrt werden.
BEFOLGEN SIE DIE ANWEISUNGEN: Alle Anweisungen zur Sicherheit und zum
Betrieb müssen befolgt werden.
REINIGUNG: Vor der Reinigung den Netzstecker ziehen. Keine flüssigen
Reinigungsmittel oder Sprays verwenden. Das Gerät mit einem angefeuchteten
Tuch reinigen.
WASSER UND FEUCHTIGKEIT: Verwenden Sie dieses Produkt nicht in der Nähe
von Wasser, z. B. Badewanne, Waschbecken, Spüle, Waschkübel, im feuchten
Keller oder in der Nähe eines Swimmingpools oder dergleichen. Das Gerät darf
niemals tropfenden oder spritzenden Flüssigkeiten ausgesetzt werden. Stellen sie
keinesfalls Vasen oder andere flüssigkeitsgefüllte Behälter auf das Gerät.
WÄRME: Das Produkt darf nicht in der Nähe von Wärmequellen wie
Heizungskörpern, Heizgeräten, Öfen oder von anderen wärmeerzeugenden
Produkten (einschließlich Verstärkern) aufgestellt werden.
LÜFTUNG: Die Schlitze und Öffnungen im Gehäuse dienen zur Belüftung, welche
den ausfallsicheren Betrieb des Produkts sicherstellt und es vor übermäßiger
Erwärmung schützt. Diese Öffnungen dürfen nicht blockiert oder verdeckt werden.
Aus dem Grund darf das Produkt nicht auf ein Bett, ein Sofa, einen Teppich oder
eine ähnliche weiche Oberfläche gestellt werden. Das Produkt eignet sich nicht für
den Einbau in ein Bücherregal oder ein Gestell, es sei denn, für eine ausreichende
Belüftung ist gesorgt und die Anweisungen des Herstellers werden eingehalten.
EINDRINGEN VON GEGENSTÄNDEN ODER FLÜSSIGKEITEN: Durch die
Öffnungen dürfen keinerlei Gegenstände in das Gerät eingeschoben werden, da
diese gefährliche Spannungspunkte berühren oder Teile kurzschließen könnten,
was einen Brand oder elektrischen Schlag verursachen kann.
ZUBEHÖR: Stellen Sie dieses Produkt nicht auf einen instabilen Rollwagen,
Ständer, Stativ oder Tisch oder bringen Sie es nicht an einer instabilen Halterung
an. Es kann herunterfallen, wobei Personen verletzt werden und Schäden am
Produkt entstehen können. Verwenden Sie nur Rollwagen, Ständer, Stative,
Halterungen oder Tische, die vom Hersteller empfohlen oder die mit dem Produkt
verkauft werden. Bei der Wandmontage des Produkts sind die Anweisungen des
Herstellers zu befolgen und das vom Hersteller empfohlene Zubehör ist zu
verwenden.
ZUSATZGERÄTE: Verwenden Sie keine Zusatzgeräte, die nicht vom Hersteller
empfohlen werden, da Gefahren entstehen können.
TRANSPORT: Wenn das Produkt auf einem Wagen transportiert
wird, ist Vorsicht geboten. Durch plötzliches Anhalten,
übermäßige Gewaltanwendung und unebenen Boden kann der
Wagen mit dem Produkt umstürzen.
NETZSPANNUNG: Dieses Produkt darf nur mit der auf dem Geräteschild
angegebenen Netzspannung betrieben werden. Wenn Sie nicht wissen, welche
Netzspannung bei Ihnen vorliegt, wenden Sie sich an Ihren Fachhändler oder Ihr
Elektrizitätswerk. Hinweise zu den Produkten, die mit Batterie oder anderen
Stromquellen betrieben werden, entnehmen Sie der Bedienungsanleitung.
ÜBERLAST: Wandsteckdosen, Verlängerungskabel oder integrierte Steckdosen
dürfen nicht überlastet werden, da dies die Gefahr eines Brandes oder
elektrischen Schlages verursachen kann.
NETZKABELSCHUTZ: Netzkabel müssen so verlegt werden, daß ein
Darüberlaufen oder Einklemmen durch Gegenstände verhindert wird. Besonders
ist auf die Abschnitte des Kabels in der Nähe eines Steckers, einer Steckdose
oder der Austrittsstelle aus dem Gerät zu achten.
OFFENE FLAMME: Keine offenen Flammenquellen wie z. B. Kerzen dürfen auf
das Gerät gestellt werden.
BLITZSCHUTZ: Bei Gewittern oder wenn das Produkt längere Zeit unbeaufsichtigt
oder unbenutzt bleibt, ziehen Sie als zusätzliche Schutzmaßnahme den
Netzstecker und trennen Sie die Antenne oder das Kabelsystem. Damit werden
Schäden durch Blitz oder Spannungsstöße verhindert.
VORISICHT! GEPOLTER STECKER (NUR IN DEN USA UND KANADA):
Zur Verhinderung eines elektrischen Schlages muß der flache Steckerstift in den
breiten Schlitz der Steckdose eingesteckt werden. Den Stecker ganz einstecken.
Wenn der Stecker nicht in Ihre Netzsteckdose paßt, dürfen Sie diesen nicht ändern
oder abtrennen. Lassen Sie von einem ausgebildeten Elektriker eine geeignete
Steckdose installieren.
NETZVERSORGUNG:
Der eingekerbte IEC-Stecker des mitgelieferten Netzkabels gehört in den
entsprechenden Anschluß 1% auf der Rückseite des Geräts.
Die vorgeschriebene Betriebsspannung ist auf einem rückseitigen Aufkleber
angegeben. Stellen Sie vor dem Anschluß sicher, daß diese Ihrem örtlichen
Stromnetz entspricht, z. B.
Alle Produkte: Spannungsbereich von 110V-230V
Wenn Sie in eine andere Region mit unterschiedlicher Netzspannung umziehen,
wenden Sie sich an Ihren Cyrus Vertrieb, um die Anpassung des Geräts
vorzunehmen.
In diesem Gerät befinden sich keine austauschbaren Sicherungen.
REPARATUREN:
Versuchen Sie nicht, dieses Produkt selbst zu reparieren oder das Gehäuse zu
entfernen, da Sie sich dadurch Hochspannung oder anderen Gefahren aussetzen
würden. Überlassen Sie alle Reparaturen den Fachleuten.
BEDINGUNGEN, DIE REPARATUREN ERFORDERN: Ziehen Sie den
Netzstecker und beauftragen Sie den Kundendienst mit der Reparatur des
Gerätes, wenn:
• Netzkabel oder -stecker beschädigt sind
• Flüssigkeit oder Gegenstände in das Gerät eingedrungen sind
• das Gerät Regen oder Wasser ausgesetzt wurde
• das Gerät heruntergefallen oder anderweitig beschädigt ist
• das Gerät unter Befolgung der Bedienungsanleitung nicht normal
funktioniert. Verstellen Sie nur die Regler, die in der
Bedienungsanleitung beschrieben werden. Das unsachgemäße
Verstellen von anderen Reglern kann Schäden verursachen und
aufwendige Reparaturen durch einen qualifizierten Techniker erfordern,
um das Gerät wieder in seinen normalen Betriebszustand
• das Produkt eine deutliche Leistungsminderung aufweist - in dem Fall ist
eine Reparatur notwendig.
ERSATZTEILE: Wenn Ersatzteile erforderlich sind, sollten Sie sich vergewissern,
daß der Techniker Ersatzteile verwendet, die vom Hersteller angegeben werden
oder die gleichen Eigenschaften wie die Originalteile aufweisen. Unzulässige
Ersatzteile können Brände, elektrischen Schlag oder andere Gefahren
verursachen.
SICHERHEITSKONTROLLE: Bitten Sie den Techniker, im Anschluß an
Wartungs- oder Reparaturarbeiten Sicherheitskontrollen durchzuführen, um den
ordnungsgemäßen Betriebszustand des Gerätes zu bestätigen.
zu versetzen.
KUNDENDIENSTZENTRALEN:
Wenden Sie sich bei Fragen zum Produktservice oder bei technischen Problemen
nur an autorisierte Cyrus-Kundendienstzentralen. Eine Liste der Hauptzentralen
finden Sie auf der hinteren Umschlagseite dieser Bedienungsanleitung.
Gebaut unter Lizenz der Dolby Laboratories. „Dolby” und das Doppel-D-Symbol sind
eingetragene Warenzeichen der Dolby Laboratories.
Diese Produkt enthält urheberrechtlich geschützte Technologien, die durch
Verfahrensansprüche gewisser US-Patente end andere Rechte geistigen Eigentums im
Besitz der Macrovision Corporation und andere Rechte-Inhaber geschützt sind. Die
Verwendung dieser urheberrechtlich geschützten Technologien muss durch Macrovision
Corporation genehmigt werden, und ist ausschließlich für den Hausgebrauch und anderen
beschränkten Verwendungszwecken gedacht, wenn nicht die ausdrückliche Zustimmung
der Macrovision Corporation vorliegt. Rück-Entwicklung oder Zerlegung des Geräts ist
untersagt.
D
D
9

Cyrus Discmaster 8.0 Gebrauchsanleitung
Willkommen in der Cyrus Welt!
Vielen Dank, daß Sie sich für Produkte aus der Cyrus-Serie entschieden
haben. Mit „state-of-the-art“ Konzeptionen und hervorragender
Produktqualität konnten wir weltweit zahllose Preise gewinnen. Wir sind
sicher, daß Ihnen dieses Gerät – von einem der anerkanntesten HiFiHersteller – immer viel Freude bereiten wird.
Lesen Sie bitte diese Anweisungen sorgfältig durch, bevor Sie mit der
Installation beginnen. So können Sie Ihren Cyrus Discmaster 8.0 sicher und
korrekt in Betrieb nehmen.
Vorbereitung der Installation
Bevor Sie Ihren Discmaster 8.0 in Betrieb nehmen, überprüfen Sie bitte, ob
folgende Teile dem Gerät beiliegen:
• Garantiekarte (mit Bedienungsanleitung)
• Netzkabel
• Fernbedienung
• 2 x Cinch-Kabel für MC-Bus Verbindung
Bewahren Sie die Verpackung nach dem Auspacken auf.
Bauen Sie Ihren Discmaster 8.0 an einem ausreichend belüfteten Platz auf –
in angemessener Entfernung von starken Wärmequellen, geschützt vor Staub
und Feuchtigkeit. Stellen Sie den Discmaster 8.0 niemals unter ein anderes
Gerät oder auf irgendeine Oberfläche, die die Kühlung durch Verstopfung der
Ventilationsöffnungen behindern könnte.
INSTALLATION (Siehe Abbild. 1):
Legende für die Rückseite:
1. Optischer Digital-Audioausgang 9. 5.1-Rear-Kanal-Audioausgänge
2. S-Video-Ausgang 10. 5.1-Subaudio-Ausgang
3. Koaxialer Digital-Audioausgang 11. 5.1-Centre-Kanal- Audioausgang
4. Stereo-Analog-Audioausgang 12. VGA-Video-Ausgang
5. Digitaler HDMI-Video-Ausgang 13. Component-Videoausgang
6. Stereo-DAC-Upgrade-Ausgang 14. Composite-Videoausgang
7. MC-Bus-Verbindungen 15. Netzanschluss
8. 5.1-Frontkanal-Audioausgänge
VGA-Analogvideo
Der VGA-Videoausgang 1@ sollte verwendet werden, wenn ein hochwertiger
Computer-Monitor angeschlossen wird, der nur einen analogen VGAVideoeingang besitzt.
S-Video Analogvideo
Der S-VIDEO (Y/C)-Ausgang b bietet eine bessere Qualität als eine
Komposit-Verbindung und sollte verwendet werden, wenn der Fernseher über
keine der oben genannten Videoanschlüsse verfügt. HINWEIS:- Der SVideoanschluss muss bei seiner Anwendung eingeschaltet sein. Siehe dazu
Abschnitt "Display-Einstellungen im Menü-System".
Composite-Analog-Video
Ein Composite-Video-Ausgang 1$ ist für Fernseher und Monitore vorgesehen,
die nur diesen Anschluss besitzen. Dies ist die Verbindung mit der
schlechtesten Qualität.
SCART-Anschluss
Um den Discmaster 8.0 an einen Fernseher, Projektor oder Monitor
anzuschließen, der nur eine SCART-Eingangsanschluss besitzt, verwenden
Sie ein SCART-Breakout-Kabel oder einen Adapter, der Ihnen Zugang zu den
S-Video- oder Komposit-Video-Eingängen ermöglicht, und wenn nötig, auch
zu den Audioeingängen des Fernsehers..
Verbindung mit dem Wechselstromnetz
Verbinden Sie die Buchse des Wechselstromkabels mit der Stromzuführung 1% an
der Rückseite des Discmaster 8.0. Verbinden Sie das Kabel nun mit einer
geeigneten Wechselstromquelle.
Das Discmaster 8.0 besitzt keinen Netzschalter. Um die Stromversorgung
zum Discmaster 8.0 zu unterbrechen, ziehen Sie den Stecker aus der
Wandsteckdose. Achten Sie bei der Installation darauf, dass dieser Stecker
gut zu erreichen ist.
Video-Ausgang mit einem Fernseher verbinden
Der Videoausgang des Discmaster 8.0 kann auf fünf verschiedene Arten mit
einem Fernseher oder einem Monitor verbunden werden. Die Wahl der
Anschlussart und damit die erreichbare Bildqualität hängt von den
verfügbaren Optionen des Fernsehers/Monitors ab. Die
Anschlussmöglichkeiten mit dem Discmaster 8.0 sind in der Reihenfolge der
Qualität aufgelistet. Verwenden Sie die Anschlussmöglichkeit, die als erstes
in der Auflistung erscheint, um die beste Bildqualität zu erzielen-
HDMI-Digitalvideo
Der HDMI-Digitalvideoausgang
hochwertiger Digital-Fernseher, Projektor oder Monitor, der mit einem HDMIDigitaleingang ausgestattet ist, verwendet wird.
Component-Analogvideo
Der Component-Videoausgang 1# sollte verwendet werden, wenn ein
hochwertiger Analog-Fernseher, Projektor oder Monitor mit einzelnen
Anschlüssen für einen Component-Videoeingang versehen ist. Sorgen Sie
dafür, dass die drei Phonokabel zwischen den gleichen ComponentVideosignalen angeschlossen sind.
e sollte verwendet werden, wenn ein
10
D
D

Gebrauchsanleitung Cyrus Discmaster 8.0
Audio-Ausgang verbinden
Der Discmaster 8.0 bietet verschiedene Möglichkeiten zur Verbindung mit
einem Audio-Ausgang.
1. Für die beste Surround-Sound-Qualität schließen Sie das Gerät digital
an einen externen Surround-Sound-Decoder an.
2. Für einen einfachen und bequemen Betrieb verbinden Sie die
Analogausgänge des Discmaster 8.0 direkt mit den
Leistungsverstärkern und einem Subwoofer oder einem aktiven Sub/Sat-System.
3. Wenn Sie ein analoges Zweikanalstereosystem besitzen, verbinden Sie
die Stereoausgänge (oder jene vom Upgrade-DAC, falls vorhanden)
des Discmaster 8.0 mit Ihrem integrierten Stereo-Verstärker oder
Vorverstärker.
4. Für den bestmöglichen Stereosound verbinden Sie das Gerät digital mit
einem externen Stereo-Digital-Analog-Wandler.
1. Digitalen Audio-Ausgang mit einem externen Mehrkanal-SurroundSound-Decoder verbinden
Um die bestmögliche Mehrkanal-Audioleistung zu erreichen, muss der
Discmaster 8.0 digital an einen separaten Digital-Surround-Sound-Decoder.
angeschlossen werden. Für diese Verbindung gibt es zwei Möglichkeiten:
entweder koaxial c mit einer digitalen Querverbindung oder optisch a mit
einer Toslink optischen Querverbindung. Stellen Sie den Lautstärkeregler des
Discmaster 8.0 auf das Maximum (32) ein, um bei dieser Anschlussart die
höchste Tonqualität zu erzielen.
2. Audio-Ausgang mit einem internen Surround-Sound-Decoder
verbinden
Der Discmaster 8.0 besitzt einen 5.1-Kanal-Digital-Surround-Sound-Decoder
für Dolby-codiertes Programmmaterial und kann daher als das Steuerzentrum
für ein vollständiges 5.1-Surround-CD/DVD-Wiedergabesystem verwendet
werden. Um ein solches System einzurichten, verbinden Sie die
Leistungsverstärker mit den Discmaster 8.0-Ausgängen für die Audiokanälen
Front h, Centre 1! und Surround i. Surround-Sound-Lautsprecher können
dann über die Leistungsverstärker an dieses System angeschlossen werden.
Ein aktiver Subwoofer kann separat an den ‘SUB’-Kanalausgang
1)angeschlossen werden.
3. Die Stereo-Audioausgänge des Discmaster 8.0 mit einem
Stereoverstärker verbinden
Wenn Sie ein Zweikanal-Stereosystem einrichten, können die Stereo-AnalogAusgänge d des Discmaster 8.0 mit einem Cyrus-Stereoverstärker oder
einem Vorverstärker verbunden werden. Die VI- oder AV-Eingänge sind dafür
geeignet. Stellen Sie den Lautstärkeregler des Discmaster 8.0 auf das
Maximum (32) ein, um bei dieser Anschlussart die höchste Tonqualität zu
erzielen.
3. Stereo-Audio-Ausgang mit einem hochleistungsfähigen StereoDAC-Upgrade
Der Discmaster 8.0 bietet auch die Option einer vom Hersteller installierten
DAC-Upgrade-Option für die bestmögliche Stereosoundwiedergabe. Wenn Ihr
Discmaster 8.0 diese Option besitzt, verbinden Sie die Upgrade-DAC-
Ausgänge
Discmaster 8.0 auf das Maximum (32) ein, um bei dieser Anschlussart die
höchste Tonqualität zu erzielen.
4. Hochqualitativer Stereo-Sound durch einen externen Stereo-D/A-
Wenn Sie ein High-End-Stereo-System mit einem Stereo-DAC als
Steuerungseinheit besitzen, verbinden Sie den Discmaster 8.0 damit digital.
Zwei Möglichkeiten stehen für den Anschluss offen: entweder koaxial c mit
einer digitalen Querverbindung oder optisch a mit einer Toslink optischen
Querverbindung. Stellen Sie den Lautstärkeregler des Discmaster 8.0 auf das
Maximum (32) ein, um bei dieser Anschlussart die höchste Tonqualität zu
erzielen.
f mit Ihrem Verstärker. Stellen Sie den Lautstärkeregler des
Umwandler
MC-Bus-System-Verbindung (Optional)
Durch die MC-Bus-Verbindung an Ihrem Discmaster 8.0 entsteht ein hoch
funktionelles Fernbedienungssystem. Diese Funktionen stehen Ihnen zur
Verfügung, wenn Sie einen Cyrus Verstärker oder Digital Surround Decoder
besitzen. Lesen Sie im Verstärker-Handbuch die Anleitungen zur Vernetzung
des MC-Bus-Systems.
BETRIEB
Der Discmaster 8.0 ist mit einer Fernsteuerung ausgestattet, mit der die
Konfigurationseinstellungen verändert und alle Funktionen, wie im Abschnitt
‘Fernsteuerung’ beschrieben, angewendet werden können. Zusätzlich zur
Fernbedienung sind die Standby-Steuerung und wichtige Transportfunktionen
auch noch auf der Frontplatte des Gerätes zu finden.
Bitte lesen Sie den Abschnitt "Fernsteuerung" in diesem Handbuch und
stellen Sie die Konfigurationsoptionen, die im Abschnitt "Menüsystem"
aufgeführt sind, ein, um zu gewährleisten, dass Ihr Discmaster 8.0 richtig
eingestellt ist, bevor Sie DVDs oder CDs auf ihm abspielen.
Bedienungselemente der Frontplatte (Abb.2)
1. DVD / CD-Fach..........................DVDs und CDs mit Etikett nach oben
einlegen!
2. Standby......................................Schaltet den Discmaster 8.0 ein und aus.
3. Standby-Anzeige .......................Leuchtet im Standby-Zustand.
4. Infrarot-Sensor...........................Empfängt die IR-Fernsteuersignale.
5. Display-Fenster..........................Zeigt den Betriebszustand des
Discmaster 8.0 an.
6. Tasten Suche/Sprung ................Drücken, um vorwärts oder rückwärts
durch die DVD-Kapitel oder die Musiktitel auf der CD zu springen.
7. Stopp/Einlegen ..........................Öffnet die DVD / CD-Fach.
8. Wiedergabe/Pause....................Wählt die Wiedergabe- und Pausenart.
Einschalten
Der Discmaster 8.0 sollte stets mit dem Stromnetz verbunden bleiben. Nur bei
längerer Nichtbenutzung oder Abwesenheit empfehlen wir, den Netzstecker
aus der Steckdose zu ziehen.
Sobald das Gerät angeschlossen ist, dient die STANDBY-Taste b zum Einund Ausschalten. Die Standby-Anzeige c leuchtet rot, wenn der Discmaster
8.0 sich in Bereitschaft befindet und grün, wenn er in Betrieb ist. Gleichzeitig
erscheint das CYRUS-Logo auf dem Bildschirm.
Welche DVDs/CDs abgespielt werden können
Mit dem Discmaster 8.0 lassen sich Video-DVDs, VCD-Video-CDs, AudioCDs und MP3-Disks abspielen. Sie können auch CDs ansehen, die digitale
Bilder und Computer-Videodateien enthalten, indem Sie diese im Discmaster
8.0 abspielen. Das Abspielen aller Arten von CDs wird später in diesem
Handbuch erklärt. Eine vollständige Liste von kompatiblen
Digitaldateiformaten ist im Abschnitt "Spezifikationen" zu finden.
HINWEIS: Video-DVDs sind mit einem Regionalcode versehen. Mit dem
Discmaster 8.0 lassen sich nur DVDs abspielen, die in der gleichen Region
wie der DVD-Spieler gekauft wurden. Der Regionalcode des Discmaster 8.0
ist auf einem Globus-Symbol auf der Rückseite des Geräts abgedruckt.
Achten Sie darauf, dass Sie nur DVDs kaufen, die den gleichen Regionalcode
wie der DVD-Spieler tragen oder codefrei sind (Kennzeichnung 0) und
deshalb in allen Regionen abgespielt werden können.
D
D
11

Cyrus Discmaster 8.0 Gebrauchsanleitung
Einsatz der Fernbedienung
Mitgelieferte Fernbedienung
Mit der mitgelieferten Fernbedienung des Discmaster 8.0 können alle
Abspielfunktionen gesteuert, das Gerät durch das Setup-Menüsystem
konfiguriert und die Lautstärke für die Analogausgänge eingestellt werden.
Wenn Sie ein System mit 5.1-Surround-Lautsprechern besitzen, die von
Leistungsverstärkern betrieben werden, die direkt mit dem 5.1-KanalAudioausgängen des Discmaster 8.0 verbunden sind, dann können Sie mit
dieser Fernbedienung alle Funktionen dieses Gerätes (einschließlich
Lautstärke) steuern.
Cyrus-Systemfernsteuerungen
Wenn Ihr System einen Cyrus-Stereoverstärker oder Surround-Decoder
enthält, haben Sie wahrscheinlich schon eine Cyrus-Systemfernsteuerung,
mit der Sie die meisten Funktionen des Discmaster 8.0 steuern können. Für
eine Liste mit verfügbaren Befehlen zur Steuerung des Discmaster 8.0, sehen
Sie sich das Handbuch an oder besuche die Cyrus-Website
www.cyrusaudio.com.
Befehle auf der Fernbedienung
1. OPEN/CLOSE. Öffnet oder schließt das CD-Fach.
2. PROGRAM. Wenn Sie eine CD oder DVD abspielen, können Sie mit
dieser Taste den Programmierdialogschirm auf dem Fernsehbildschirm
öffnen, so dass Sie eine gewünschte Abfolge von Titeln bzw. Kapiteln
von einer DVD oder Musiktitel von einer CD speichern können. Für
nähere Informationen zum Programmieren, lesen Sie sich den Abschnitt
‘Programmieren’ unter "Eine DVD oder CD abspielen" durch, der später
in diesem Handbuch erscheint.
3. NEXT/PREVIOUS. Mit diesen Tasten springen Sie zum
nächsten/vorherigen DVD-Kapitel oder CD-Titel.
4. ANGLE. Mit dieser Taste können Sie den Kamerawinkel bei DVDs
ändern, die eine Mehrfachwinkeloption haben. Mit jedem Tastendruck
wechseln Sie zum nächsten verfügbaren Winkel. HINWEIS: Wenn die
DVD die Auswahl mehrerer Kamerawinkel ermöglicht, leuchtet ein
Kamerasymbol am rechten oberen Eck des Fernsehbildschirms auf und
zeigt die verfügbaren Kamerawinkel an.
5. SETUP. Drücken Sie diese Taste, um das SETUP-Menü zu öffnen.
Eine vollständige Übersicht über die verfügbaren Menüoptionen finden
Sie im Abschnitt ‘Discmaster 8.0 Menüsystem' auf der nächsten Seite.
6. MENU/PBC. Drücken Sie diese Taste, um zum DVD-Menü
zurückzukehren.
7. VIDEO MODE SELECTORS. Diese Tasten werden für einen schnellen
Zugriff zu verschiedenen Video-Modi verwendet. N/P wechselt auf 480P
(NTSC 525-Anschluss) oder 576P (PAL 625-Anschluss) -ProgressiveScan-TV-Modi. Wenn Sie eine HDMI-Digitalverbindung haben, wechselt
HD auf die Modi 720P, 1080I oder 1080P. VGA stellt verschiedene
Monitorauflösungen im Bereich VGA/SVGA/XGA/SXGA ein.
8. NUMERIC KEYPAD. Drücken Sie eine Taste auf dem Nummernblock,
um ein neues DVD-Kapitel oder einen neuen Titel einer Audio-CD zu
wählen. Drücken Sie zwei Ziffern, um ein(en) zweistelliges/n
Kapitel/Titel zu wählen.
9. SEARCH. Diese Funktion wird von dem Discmaster8.0 nicht unterstützt.
10. SCAN FWD/REV. Drücken Sie eine dieser Tasten, um mit dem
scannen der DVD/CD zu beginnen. Drücken Sie die Taste erneut, um
die Scan-Geschwindigkeit zu erhöhen (5 Geschwindigkeiten verfügbar)
oder drücken Sie die andere Taste, um die Scan-Geschwindigkeit zu
verringern.
11. PLAY/PAUSE. Durch das Drücken dieser Taste starten oder pausieren
Sie die Wiedergabe einer DVD/CD, wenn diese gestoppt wurde oder
auf Pause ist.
12. REPEAT. Drücken Sie diese Taste, um die Wiederholungs-Anzeige auf
dem Bildschirm zu aktivieren. Drücken Sie die Taste weiter, um den
Wiederholungsmodus für DVD-Titel oder Kapitel oder CD-Titel zu
wählen.
13. STOP. Drücken Sie diese Taste einmal, um in den Pre-Stopp-Modus zu
gelangen. Im Pre-Stopp-Modus dreht sich die DVD/CD weiter, so dass
Sie den nächsten Befehl eingeben können. Drücken Sie erneut die
STOP-Taste, um die DVD/CD vollständig anzuhalten.
14. ZOOM. Drücken Sie diese Taste, um die Mitte des Bildes zu
vergrößern. Drücken Sie die Taste erneut, um die Vergrößerungseinstellung in Schritten von 2x bis 5x zu erhöhen. Drücken Sie die Taste
erneut, um die Vergrößerung abzubrechen. Wenn die Vergrößerung
eingestellt ist, können Sie mit den CURSOR-Tasten den Zoombereich
um das Bild wählen.
15. DISPLAY. Drücken Sie diese Taste, um die Statusanzeige auf dem
Bildschirm zu aktivieren. Mit den Cursor-Tasten LINKS/RECHTS ändern
Sie die Anzeigeinformationen auf dem Bildschirm.
16. TITLE. Durch drücken dieser Taste wird das Menü mit den DVD-Titeln
aufgerufen.
17. CURSOR und OK. Verwenden Sie die Cursor-Tasten um zwischen den
Menü-Optionen zu wechseln und drücken Sie die OK-Taste, um Ihre
Auswahl zu bestätigen.
18. CLEAR. Diese Taste wird beim Programmieren verwendet, um eine
unerwünschte Auswahl zu löschen.
19. AUDIO MUTE. Mit dieser Taste schalten Sie das Audio des Discmaster
8.0 auf stumm. Bei erneuter Betätigung der Taste wird die StummSchaltung aufgehoben.
20. VOLUME CONTROL. Drücken Sie diese Tasten, um die Lautstärke von
0-32 einzustellen. Die Werkseinstellung der Lautstärke liegt bei 32.
Belassen Sie diese Einstellung, wenn Sie Ihr Audio-System an einen
Digitalausgang anschließen oder wenn Sie einen integrierten Verstärker
oder Vorverstärker verwenden, um die Lautstärke Ihres Audio-Systems
zu regeln.
21. LANGUAGE. Drücken Sie diese Taste, um die Sprachenauswahl auf
der Anzeigeleiste aufzurufen. Durch erneutes Betätigen der Taste
scrollen Sie durch die verfügbaren Sprachen.
22. SUBTITLE. Drücken Sie diese Taste, um die Untertitelauswahl auf der
Anzeigeleiste aufzurufen. Durch erneutes Betätigen der Taste scrollen
Sie durch die verfügbaren Sprachen für die Untertitel.
23. STANDBY. Diese Taste schaltet das Gerät auf Standby oder bricht das
Standby ab. Volume, Display und andere Konfigurationseinstellungen
werden während des Standby oder wenn der Discmaster 8.0 aus der
Steckdose gezogen wird, gespeichert.
2#
2!
1*
2@
2)
1(
1&
1^
1%
Standby
Subtitle
Clear
N/P
123
456
789
Display
Open/clo se
Language Program
Angle
OK
VGA
HD
0
Search
a
b
c
d
Setup
Menu/PBCTitle
e
f
g
h
i
1)
1$
1#
Zoom
Repeat
1@
1!
12
D
D

Gebrauchsanleitung Cyrus Discmaster 8.0
Discmaster 8.0 Menü-System
Der Discmaster 8.0 besitzt ein Menü-System, das auf dem Bildschirm angez eigt wird. Um Zugang zu dem Menü-System zu erhalten, drücken Sie die SETUP-Taste
auf der Fernbedienung . Mit Hilfe der CURSOR -Tasten können Sie durch die Menüoption en scrollen. Drücken Sie die OK-Taste, um eine Auswahl zu treffen.
SETUP
Ton Digitaler Aus
Stereo
Lautsprecher Lautsprecher
LPCM output
Pro Logic II
Display TV system
TV Bild
S-Video
Brightness
HDMI mode
Dolby Digital
DTS
Entfernung
Lautstärke
Haken Sie dieses Kästchen ab, um die Dolby Digital-Audiosignale aus dem Digitalausgang zu aktivieren.
Wenn Sie einen Stereo-DAC besi tzen, entfernen Sie das Häkchen von die sem Kästchen.
Haken Sie dieses Kästchen ab, um DTS-Audiosignale vom Digitalausgang zu aktivieren. Wenn Sie einen
Stereo-DAC oder einen Surround-Decoder besitzen, der nicht mit dem DTS-Format kompatibel ist,
entfernen Sie das Häkche n von diesem Kästchen.
Haken Sie dieses Kästchen ab, um Mehrkanal-Programme zu mischen, wenn S ie den internen S urroundSound-Decoder ver wenden, um ein System mit zwei Lauts prechern zu betreiben.
Wählen Sie diese Option, um die Einstellungen für die Systemlautsprechergröße anzuzeigen, wenn Sie
den internen Surround-Sound-Decoder verwenden. Der linke und rechte Front-Lautsprecher kann auf
"Groß" oder "Klein" eingestellt werden. Der linke und rechte Center-Surround-Lautsprecher kann auf
"Groß", "Klein" oder "Aus" eingestellt werden. Der Subwoofer kann ein- oder ausgeschaltet werden.
Stellen Sie "Klein" für Satelli tenlautsprecher oder Lautsprecher mit kleinem Standgehäuse ein. Ste llen Sie
"Groß" für einen Bodenlautsprecher oder größere Lautsprecher mit größerem Standgehäuse. Stellen Sie
"Aus" ein, wenn Sie an dieser Stelle keinen Lautspre cher haben.
Wenn Sie den Discmaster 8.0 Surround-Sound-Decoder verwenden, wählen Sie diese Option, um den
Abstand zu wählen, den Sie von jedem Lautsprecher weg sitzen. Die Abstände können zwischen 1m und
6.6m gewählt werden.
Wenn Sie den Discmaster 8.0 Surround-Sound-Decoder verwenden, wählen Sie diese Option; um die
Lautstärke für jeden Lautsprecher einzustellen. Die Trimmung reduziert die Lautstärke eines
Lautsprechers. Wenn Sie in der Nähe der Surround-Lautsprecher sitzen (als Beispiel), können Sie die
Lautstärke dies er Lautsprecher soweit verringer n, bis sie sich den Front-Lautspr echern angepasst haben.
Diese Einstellung ermöglicht eine 96k-Abtastrate über den PCM-Digitalausgang, wenn dieses
hochwertigere Quellmaterial verfügbar ist. Stellen Sie 96k ein, wenn Sie einen Surround-Sound-Decoder
oder einen DAC besitzen, der mit 96k-Programmen kompati bel ist. Andernfalls stellen Sie auf 48k ein.
Wählen Sie eine der fünf verfügbaren Optionen für den internen Surround-Sound-Decoder. "DSP-Modus
aus" schaltet den internen Pro Logic II-Decoder aus, Emulation aktiviert die ursprüngliche Pro Logic '4.1'Dekodierung, Music aktiviert den Pro Logic II-Decoder, der für das Abspielen von Musik optimiert wurde,
Movie optimiert den Pro Logic II-Decoder für das Abspielen von Filmen. Matrix ist eine einfachere
Decodierungsoption.
Wählen Sie aus der Liste der verfügbaren Auflösungen eine geeignete Auflösung für ihren Monitor.
HINWEIS:- Einige Monitore unterstützen nicht alle Auflösungen. Lesen Sie zuerst das Handbuch für
Monitore, bevor Sie diese Einstel lung verändern.
Wählen Sie das Bildschirmformat Ihres Fernsehers/Monitors. Wählen Sie 4x3 Letterbox, um die volle
Bildbreite mit schwarzen Rändern oben und unten auf einem 4x3-Fernseher zu sehen. Wählen Sie 4x3
Standard, um ein v ollständiges Bild auf einem 4x3-Fernseher zu sehen, wobei jedoch der linke und r echte
Bildrand verlor en geht. Wählen Sie 16x9, wenn Sie einen Wides creen-TV besitzen.
Wählen Sie 'Ein', wen n Sie den S-Video-Anschluss zu Ihrem Fe rnseher verwendet haben.
Mit dieser Option können Sie die Helligkeit des Bildes auf dem Discmaster 8.0 so einstellen, dass die
Helligkeit von Aufzeichnungen erreic ht wird.
Mit dieser Menü-Option können Sie das Signalformat des HDMI-Ausgangs verändern. Wählen Sie die
Option, welche Ihnen die beste Bildqualität auf dem Monitor ermöglicht, wenn Sie eine digitale HDMIVerbindung benutzen.
e
Sprachen
Sperre Passwort eingeben
Original
*Hinweis:- Das Funktio nieren des Parental-Control-Systems des Dis cmaster 8.0 hängt davon ab, ob die geeigneten Softwareco dierung auf der DVD verfügbar ist. Cyrus kann
daher keine Ga rantie für das Funktionieren des Parental-Control-Systems geben und übernim mt keine Verantwortung dafür, wenn der Inhalt von DVDs, der nicht für Kinder
und Jugendliche geeignet ist, von diesen gesehen wird. Wenn Sie Zweifel haben, sorgen Sie bitte dafür, dass die DVD gemäß den Einstellungen der Parental Control
abgespielt wird, bevor Sie Ihren Kind ern erlauben, zuzusehen.
D
D
Player menus
Disc menus Der Discmaster 8.0 wähl t immer die ausgewählte Menüsprac he, wenn diese auf einer DVD verfügbar ist.
Audio
Untertitel
Passwort
Altersfreigaben
Mit dieser Menü- Option können Sie zwischen verfügb aren Menü-Sprachoptionen wählen.
Der Discmaster 8.0 wähl t immer die ausgewählte Audiosprache, wenn diese auf einer DVD verfügbar ist.
Der Discmaster 8.0 wählt immer die ausgewählte Untertitelsprache, wenn diese auf einer DVD verfügbar
ist.
Um zum nächste n Bereich des Menüs zu gela ngen, müssen Sie Ihr P asswort eingeben. Das Pass wort aus
der Werkseinstellung ist 8888. Dies kann im nächsten Menübereich geändert werden. Wenn Sie mit der
Menüoption "Werkseinstellungen" diese wieder zurückstellen, wird auch das Passwort aus den
Werkseinstellun gen wieder eingestellt.
Verwenden Sie diese Menü-Option, um Ihr Passwort für den Zugang zu den Sicherheitsstufeneinstellungen z u ändern.
Die Sicherheitsstufeneinstellungen schränken die Freigabe der DVD ein, die abgespielt wird. Verwenden
Sie diese Menüopti on, um Ihr Passwort für den Zugang zu den Sicherheitss tufeneinstellungen zu ändern.*
Stellt alle Einstellungen auf Werkseinstellungen zurück. Die Lautstärke ist auf Maximum eingestellt
(HINWEIS:- Denken Sie daran, die Lautstärke zu verringern, bevor Sie eine DVD/CD abspielen, wenn Ihr
Discmaster 8.0 direkt an Leistungsverstärker angeschlossen ist). Die Dolby Digital- und DTSDigitalausgänge sind aktiviert. Die Lautsprecher sind alle auf "Groß" eingestellt, der Abstand ist auf 3,3 m
eingestellt, der Subwoofer ist eingeschaltet. Video ist bei einer Bildschirmgröße von 4x3 Letterbox auf
480P eingestellt. HDMI ist auf RGB/60Hz eingestellt . Alle Sprachoptione n sind auf "Englisch" eingestel lt.
13

Cyrus Discmaster 8.0 Gebrauchsanleitung
Eine Video-DVD abspielen
Video-DVDs sind als solche an ihrem Logo zu erkennen. Je nach Inhalt (Film,
Video-Clips, Serien-Drama usw.) sind ein oder mehrere Titel auf der DVD,
wobei jeder Titel noch einmal in mehrere Kapitel unterteilt sein kann. Um
schnell auf beliebige Teile des Inhalts zugreifen zu können, ermöglicht der
Discmaster 8.0 es Ihnen, zwischen Titeln und Kapiteln hin- und
herzuschalten.
Abspielen einer DVD
Nach dem Einlegen einer DVD beginnt der Discmaster 8.0 automatisch mit
der Wiedergabe. Wurde die Wiedergabe zuvor gestoppt, können Sie die
Wiedergabe mit
DVD-Menü
Die meisten DVDs besitzen ein Menü zur Optionsauswahl oder zur
Navigation. Im DVD-Menü können Sie die CURSOR-Tasten benutzen, um
Ihre Auswahl zu markieren. Drücken Sie danach OK.
Zu einem anderen Kapitel gehen
Wenn ein Titel auf der DVD aus mehr als einem Kapitel besteht, können Sie
durch kurzes Drücken der Tasten
durch die Kapitel-Folge springen und zu einem anderen Kapitel wechseln.
Durch Eingabe der Kapitel mit den ZIFFERNTASTEN können Sie jedes
Kapitel direkt anwählen. Zweistellige Nummern geben Sie mit der Ziffernfolge
ein.
Bildsuchlauf
Für die Schnellsuche vorwärts oder rückwärts drücken Sie die Tasten
oder
. Die Suche startet und der Ton wird abgestellt. Um die Suchgeschwindigkeit zu erhöhen oder zu verringern, drücken Sie die Taste
oder
. Um die Suche zu beenden, drücken Sie .
Standbild und Zeitlupe
Um während der Wiedergabe auf Standbild zu schalten, drücken Sie die
. Um die Wiedergabe wieder zu starten, drücken Sie die Taste .
Taste
erneut. Sie haben auch die Möglichkeit, Zeitlupe zu wählen. Die
Geschwindigkeit kann dann mit der Taste
Kameraperspektive
Wenn die DVD Szenen enthält, die von verschiedenen Kameraperspektiven
aus aufgenommen wurden, erscheint das Symbol "Kameraperspektive" mit
der Anzahl der verfügbaren Perspektiven und der momentan angezeigten
Perspektive. Sie können die Kameraperspektive ändern, indem Sie die
ANGLE-Taste nocheinmal drücken.
HINWEIS:- Um das Symbol "Kameraperspektive" auszublenden, drücken Sie
die DISPLAY-Taste.
Restricted viewing
Wenn Sie die Sicherheitsstufen eingestellt haben, um zu verhindern, dass
Kinder oder Jugendliche ungeeignete Inhalte sehen können, können Sie nur
DVDs abspielen, welche die entsprechende Freigabe besitzen. DVDs mit
einer höheren Freigabe können abgespielt werden, nachdem die DVD
eingelegt wurde und auf dem Bildschirm das richtige Passwort zur Freigabe
eingegeben wurde.
Wiederholen von Titel / Kapitel
Drücken Sie die REPEAT-Taste auf der Fernbedienung einmal, um den
augenblicklich laufenden Titel zu wiederholen. Bei zweimaligem Drücken wird
die ganze Kapitel wiederholt, bei dreimaligen Drücken wird das Wiederholen
abgebrochen.
Ein Programm speichern
Um eine Auswahl von Titeln bzw. Kapiteln einer DVD im Memory des
Discmaster 8.0 zu speichern, legen Sie eine DVD ein, damit die Wiedergabe
beginnt. Drücken Sie nun die PROGRAMMTASTE
um das Programmiermenü auf dem Bildschirm zu öffnen. Mit den CursorTasten RAUF/RUNTER wählen Sie den Titel, den Sie speichern wollen.
Drücken Sie OK, um den vollständigen Titel im Memory zu speichern oder
drücken Sie die RECHTE Cursor-Taste, um sich eine Kapitelliste innerhalb
dieses Titels anzeigen zu lassen. Verwenden Sie die Cursor-Tasten
RAUF/RUNTER; um die Kapitel, die Sie speichern wollen, auszuwählen.
Drücken Sie dann die OK-Taste, um jedes einzelne Kapitel im Memory zu
speichern. Um zur Titel-Liste zurückzukehren, drücken Sie die LINKE CursorTaste. Um das Programm-Menü zu verlassen, drücken Sie die RECHTE
Cursor-Taste, um das "ERLEDIGT"-Symbol zu markieren. Drücken Sie
anschließend OK.
erneut starten.
oder während der Wiedergabe
oder eingestellt werden.
b auf der Fernbedienung,
Eine Audio-CD abspielen
Drücken Sie die Taste zum Start der Wiedergabe. Die Wiedergabe
startet, wenn Sie das CD-Fach schließen.
Während der Wiedergabe werden der aktuelle Musiktitel und die bereits
abgelaufene Spielzeit auf dem Display angezeigt.
Zu einem anderen Titel gehen
Sie können zu einem anderen Titel gelangen, indem Sie während der
Wiedergabe kurz
schalten.
Durch Eingabe der Titelnummer mit den ZIFFERNTASTEN können Sie jeden
Titel direkt anwählen.
HINWEIS:- Zweistellige Nummern geben Sie in rascher Ziffernfolge ein.
Schnellsuche
Für die Schnellsuche vorwärts oder rückwärts drücken Sie während der
Wiedergabe die Tasten
abgestellt. Um die Suchgeschwindigkeit zu erhöhen oder zu verringern,
drücken Sie
Pause
Um auf Pause zu schalten, drücken Sie während der Wiedergabe die Taste
. Zur Fortsetzung der Wiedergabe, drücken Sie .
Wiederholen von Titel / CD
Schalten Sie den Fernseher ein, um den Status am Bildschirm zu sehen,
während Sie die Wiederholung einstellen. Drücken Sie die REPEAT-Taste auf
der Fernbedienung einmal, um den augenblicklich laufenden Titel zu
wiederholen. Bei zweimaligem Drücken wird die ganze CD wiederholt, bei
dreimaligen Drücken wird das Wiederholen abgebrochen.
Abspielen einer programmierten Auswahl
Um eine Auswahl von Titeln von einer CD in das Memory des Discmaster 8.0
zu programmieren, müssen Sie Ihren Fernseher einschalten. Legen Sie die
CD ein, damit die Wiedergabe starten kann. Drücken Sie nun die Program
Taste und verwenden Sie die Cursor-Tasten RAUF/RUNTER, um die Titel zu
wählen, die Sie programmieren möchten. Drücken Sie OK, um jeden Titel im
Memory zu speichern. Wenn Sie versehentlich einen falschen Titel eingeben,
drücken Sie die CLEA-Taste. Drücken Sie PLAY, wenn Sie Ihre
programmierte Auswahl abspielen möchten. Nehmen Sie die CD heraus, um
das Programm-Memory vollständig zu löschen.
oder drücken, um so durch die Titelfolge zu
oder . Die Suche startet und der Ton wird
oder . Um die Suche zu beenden, drücken Sie .
14
D
D

Gebrauchsanleitung Cyrus Discmaster 8.0
Abspielen von MP3-Musik, Digitalphotos und
Videodaten von Computer-CDs
Der Discmaster 8.0 kann auch MP3-Titel, Digitalphotos und Videodaten
abspielen, die auf Computer-CD-R- oder -DVD-R aufgenommen wurden.
CD mit einem einzigen Datentyp
Um Daten von einer CD abzuspielen, die nur einen dieser Datentypen enthält,
legen Sie die CD ein und drücken Sie
nacheinander ab. Wenn es Mehrfachordner gibt, spielt der Discmaster 8.0 die
Dateien in jedem Ordner nacheinander ab.
Zu einem anderen Titel oder Photo wechseln
Sie können zu einem anderen Titel oder Photo wechseln, indem Sie während
der Wiedergabe
Anzeigeoptionen auf dem Bildschirm
Wenn Sie während der Wiedergabe die STOP-Taste drücken, wird eine
Dateiliste und eventuell auch eine Ordnerliste angezeigt. Sie können mit den
CURSOR-Tasten durch die Ordnerliste scrollen, um den gewünschten Ordner
zu finden. Drücken Sie dann
CDs mit gemischten Datentypen und Daten, die in Ordnern gespeichert
sind
Legen Sie die CD ein und schalten Sie den TV-Bildschirm ein. Wenn es sich
bei den Daten um eine Mischung aus Musik, Digitalbildern und Videos
handelt oder die Daten in Ordnern gespeichert sind, erscheint ein Menü zur
Auswahl des Datenyps oder Ordners, der abgespielt werden soll. Sobald Sie
den gewünschten Datentyp gewählt haben, drücken Sie für die Wiedergabe
oder verwenden die Ordnerliste auf dem TV-Bildschirm, um die
gewünschten Daten zu wählen. Sie können die Ordnerliste mit den CURSORTasten durchscrollen, um den gewünschten Ordner zu finden. Drücken Sie
, wenn die Wiedergabe beginnen soll. Durch drücken der DISPLAY-Taste
können Sie jederzeit zur Ordnerliste zurückkehren.
oder drücken, um durch die Titelfolge zu springen.
, wenn die Wiedergabe beginnen soll.
. Die CD spielt alle Dateien
Spezielle Funktionen beim Abspielen von digitalen
Photo-CDs
Diashow-Geschwindigkeit
Sie können die Geschwindigkeit einer Standbild-Diashow mit den CursorTasten RAUF/RUNTER verändern. Bitte beachten Sie, dass Digitalbilder mit
einer höheren Auflösung bei der Diashow eine längere Zeit zum Laden
brauchen.
Pausieren der Diashow
Drücken Sie
Taste
Drehung des Bildes
Wenn Sie Standbilder ansehen, können Sie diese auf dem Bildschirm drehen,
indem Sie die ANGLE-Taste drücken. Jedes Drücken dreht das Bild um 90°.
Bild-Zoom und Schwenken
Wenn Sie Standbilder ansehen, könne Sie das Bild durch die ZOOM-Taste
vergrößern. Es gibt vier verschiedene Zoom-Levels. Wenn die ZOOM-Taste
ein fünftes Mal gedrückt wird, bricht das den Vergrößerungsvorgang ab.
Thumbnails
Um Thumbnails zur einfachen Auswahl der Bilder anzuzeigen, drücken Sie
die Taste MENU/PBC auf der Fernbedienung. Sie können mit den CURSORTasten ein Bild aus den Thumbnails auswählen, es dann anzeigen lassen und
durch drücken der Taste eine Diashow beginnen.
, um die Diashow jederzeit zu pausieren. Drücken Sie die
erneut, um die Diashow fortzusetzen.
D
D
15

Cyrus Discmaster 8.0 Gebrauchsanleitung
r
HINWEISE ZUR FEHLERBESEITIGUNG
Wenn Ihr Discmaster 8.0 nicht korrekt funktioniert, ziehen Sie den
Netzstecker und kontrollieren Sie alle Verbindungen, wobei Sie die Hinweise
in diesem Handbuch berücksichtigen. Bleibt das Problem bestehen, kann die
folgende Check-Liste helfen.
Im Zweifelsfall setzen Sie sich mit Ihrem Fachhändler in Verbindung.
Kein Bild oder Ton (alle DVDs/CDs)
Schalten Sie die Stromzufuhr zu dem System ab und überprüfen Sie alle
Verbindungen des Discmaster 8.0 zum Fernseher, Verstärker oder SurroundDecoder.
Prüfen Sie, ob alle Geräte eingeschaltet sind und ob am Fernseher, Verstärker
oder Surround-Decoder der richtige Eingang gewählt wurde.
Bild erscheint verrauscht, mit falschen Farben oder zerhakt
Der gewählte Videowiedergabemodus wird von Ihrem Monitor möglicherweise
nicht unterstützt. Drücken Sie die Taste N/P, um auf den Grundvideomodus
umzuschalten (NTSC). Drücken Sie die N/P-Taste erneut, um auf den
Grundvideomodus umzuschalten (PAL).
The S-Video output may be switched on while watching another video output.
If this is the case, switch off the S-Video output.
Die DVD/CD dreht sich ohne Ton
Prüfen Sie im SETUP-Menü, ob der richtige Audiomodus für Ihr System und
Ihre Anschlüsse gewählt wurde.
Warnhinweis zum falschen Regional-Code
Stellen Sie sicher, dass der Regional-Code der DVD mit dem übereinstimmt,
der auf der Rückseite des Gerätes (Nummer mit einem Globus-Symbol)
vermerkt ist. Sie können dieses Problem umgehen, indem Sie nur in der
Region DVDs kaufen, aus der auch der DVD-Spieler stammt.
Bildwiedergabe unterbricht und springt zu einer anderen Szene
Die DVD ist eventuell verschmutzt oder stark zerkratzt. Probieren Sie es mit
einer anderen DVD. Wenn diese einwandfrei funktioniert, versuchen Sie die
andere zu reinigen.
HINWEIS:- Manche DVDs besitzen eine doppelte Beschichtung. Die
Wiedergabe wird einmalig kurz unterbrochen. Dies passiert nur einmal,
während eine solche DVD abgespielt wird.
Die DVD kann nicht von Beginn an abgespielt werden
Wenn es sich dabei um die DVD handelt, die Sie zuletzt abgespielt haben,
setzt die Resume-Funktion die DVD bei ihrer nächsten Verwendung von
diesem Punkt aus fort, an dem Sie zuletzt angehalten wurde. Drücken Sie die
STOPP-Taste zweimal, um an den Anfang der DVD zurückzukehren.
Fernbedienung funktioniert nicht
Die Batterien der Fernbedienung sind eventuell verbraucht:
Öffnen Sie den Batteriefach-Deckel der Fernbedienung. Nehmen Sie die
Batterien heraus und ersetzen Sie sie durch neue. Beachten Sie bitte die
Symbole im Batteriefach, die das richtige Einlegen der Batterien anzeigen.
Verwenden Sie nur Batterien der Größe AAA (I.E.C. LR03).
Laser Product
Dieser Aufkleber auf der Geräterückseite
besagt, daß dieses Gerät einen Lase
beinhaltet. Durch öffnen des Gerätes
setzt man sich unsichtbaren
Laserstrahlen aus.
WEEE
Dieses Symbol bedeutet, dass dieses Gerät nicht mit dem
normalen Haushaltsmüll entsorgt werden darf. Dieses
Gerät muss zu einer speziellen Sammelstelle gebracht und
dort recycelt werden. Bitte helfen Sie uns mit Ihrem
Beitrag, unsere Umwelt zu schützen! Weitere
Informationen zu Sammelstellen erhalten Sie von Ihrer
städtischen Müllabfuhr bzw. der zuständigen Stelle bei der
Stadt.
GARANTIE
Die Garantie tritt nur in Kraft, wenn die beigefügte Garantiekarte vom Käufer
ausgefüllt und innerhalb von 8 Tagen nach dem Kauf an den CYRUS
Vertrieb zurückgeschickt wird. Keinem Händler oder Vertreiber ist es
gestattet die Bedingungen dieser Garantie zu verändern, die nur für den
Erstbesitzer gilt.
Bitte bewahren Sie die Rechnung als Kaufnachweis auf.
Ansprüche müssen, wenn möglich, über den Händler geltend gemacht
werden, bei dem die Ware gekauft wurde.
Die Garantie beinhaltet nicht:
• Alle Schäden, die durch Unfall, falschen Gebrauch, Verschleiß oder
durch falsche Installation, Einstellung oder Reparatur durch
unautorisiertes Personal verursacht wurden. Alle nicht autorisierten
Service-Eingriffe haben den Garantieverlust zur Folge.
• Haftung für Beschädigung oder Verlust während des Transportes vom
und zum Käufer.
• CYRUS haftet nicht für eventuelle Sach- oder Personenschäden, die
durch den Gebrauch dieser Geräte oder in Verbindung mit diesen
Geräten entstanden sind.
Die Transportkosten (zum Händler und zurück) sind vom Käufer zu
tragen.Stellt sich bei der Überprüfung eines Gerätes heraus, daß es den
angegebenen technischen Spezifikationen entspricht, behält sich CYRUS
das Recht vor, Überprüfung und Rücktransport in Rechnung zu stellen.
Die hier angegebenen Bedingungen schränken Ihre Rechte als Käufer nicht
ein.
SPEZIFIKATIONEN
Stromversorgung
Spannung:....................................Gemäß Platte an der Rückseite des Gerätes
Stromverbrauch
EIN...............................................................................................................12W
Standby..........................................................................................................3W
EMC & Sicherheitseinhaltung (230V)............................................................ CE
Gehäuse
Abmessungen (BxHxT)..........................................................215 x 75 x 365mm
Gewicht......................................................................................................2.6Kg
Material .....................................................................................Die cast chassis
Audio-Daten (Analog-Teil)
Ausgangspegel.....................................................................................2.0V rms
Ausgangs-Impedanz .................................................................................300Ω
Frequenzbereich............................................................................. 20Hz-20kHz
Übersprechdämpfung...............................................................>100dB @ 1kHz
>75dB@20kHz
Fremdspannungsabstand...................................................................... >97dBA
Klirrfaktor (bei 10dB)............................................................................... 0.015%
Audio-Daten (Digital-Teil)
PCM-Ausgangskompatibilität......................................................44.1k, 48k, 96k
Surround-Ausgangskompatibilität...................................................Dolby Digital
Ausgangspegel.......................................................................................0,5Vp-p
Ausgangs-Impedanz ...................................................................................75
Video-Daten
Signalformate am Ausgang
..............................HDMI Digital, Component video, S-Video (Y/C), Composite
VGA, SVGA, XGA, SXGA
Ausgangspegel..................................................................................... 1V pk-pk
Ausgangs-Impedanz ...................................................................................75Ω
Cyrus reserves the right to change all specifications without notice. E &OE
Ω
16
D
D

Instrucciones de uso Cyrus Discmaster 8.0
IMPORTANTE: lÉASE ANTES DE UTILIZAR EL
EQUIPO
PRECAUCIÓN: El signo de exclamación pretende llamar su
atención sobre la existencia de importantes instrucciones en este
manual.
ATENCION: El símbolo del relámpago le avisa del riesgo de
descarga eléctrica que pueden presentar determinados
componentes del interior de la unidad. La unidad sólo deberá
abrirse por personal autorizado.
AVISO: Para reducir el riesgo de descarga eléctrica, no retire ninguna cubierta o
panel de la unidad. En este producto no hay piezas utilizables por el usuario.
AVISO: Para reducir el riesgo de descarga eléctrica, no exponga el equipo a la
lluvia o humedad.
OBSERVE LOS AVISOS: Tanto en los productos como en las instrucciones de
uso.
LEA TODAS LAS INSTRUCCIONES: Lea todas las instrucciones de seguridad y
uso antes de utilizar el producto.
GUARDE LAS INSTRUCCIONES: Conserve las instrucciones de seguridad y uso
para futuras consultas.
SIGA LAS INSTRUCCIONES: Siga todas las instrucciones de funcionamiento y
uso.
LIMPIEZA: Desenchufe este producto del suministro de alimentación antes de
limpiarlo. No use productos de limpieza líquidos o en aerosol. Utilice un paño
húmedo para la limpieza.
AGUA Y HUMEDAD: No use este producto cerca del agua (bañera, fregadero,
sótano húmedo, piscina o lugar parecido). El producto no debe exponerse a
goteos o salpicaduras, ni usarse como soporte de objetos que contengan líquido
(tiestos, jarrones...).
CALOR: El producto se colocará alejado de cualquier fuente de calor, como
radiadores, estufas u otros aparatos que generen calor (incluidos los
amplificadores).
VENTILACIÓN: El equipo incorpora ranuras y aberturas de ventilación para
asegurar un correcto funcionamiento y protegerlo contra sobrecalentamientos.
Estas aberturas no se deberán bloquear, por ejemplo situándolo sobre una cama,
sofá, alfombra o superficie similar. Tampoco se instalará el producto en un lugar
cerrado, como una librería o un armario, a menos que se disponga la ventilación
adecuada o se hayan seguido las instrucciones del fabricante.
ENTRADA DE OBJETOS O LÍQUIDOS: No introduzca objetos de ningún tipo en
el equipo a través de las aberturas, pues podrían entrar en contacto con puntos de
tensión peligrosos o cortocircuitar determinadas piezas que podrían ocasionar un
incendio o una descarga eléctrica.
ACCESORIOS: No coloque el producto en un carro, estante, trípode o soporte, ya
que podría caerse y causar lesiones graves a un niño o a un adulto, así como
dañar seriamente el propio producto. Utilice únicamente los carros, estantes,
trípodes, soportes o mesas que recomiende el fabricante o acompañen al
producto. Para el montaje del producto se seguirán las instrucciones del fabricante
y se usará el accesorio recomendado.
SOPORTES: Para evitar riesgos, no utilice soportes que no hayan sido
recomendados por el fabricante del producto.
DESPLAZAMIENTO DEL PRODUCTO: Una combinación de
producto y carro se moverá con cuidado. Las paradas rápidas,
excesiva fuerza y superficies desiguales pueden originar el
vuelco de la combinación de producto y carro.
FUENTES DE ALIMENTACIÓN: Este producto se utilizará exclusivamente con la
fuente de alimentación indicada en la etiqueta. Si no está seguro del tipo de
alimentación de su casa, consulte al proveedor del producto o a la compañía
eléctrica local. En el caso de los productos que se vayan a alimentar por pilas u
otras fuentes, consulte las instrucciones de uso.
SOBRECARGA: No sobrecargue los enchufes murales, cables alargadores o
conectores múltiples, ya que podría ocasionar un riesgo de incendio o de
descarga eléctrica.
PROTECCIÓN DEL CABLE DE ALIMENTACIÓN: Los cables de alimentación se
tenderán de manera que no puedan ser pisados o aprisionados por los objetos
que se coloquen sobre o contra ellos, prestando especial atención a los puntos de
conexión a las tomas y de salida del equipo.
EXPOSICIÓN A LA LLAMA:
que generen llama directa (velas, etc.).
TORMENTAS: Como medida de seguridad durante las tormentas con aparato
eléctrico, o cuando se deje desatendido o inactivo durante períodos prolongados
de tiempo, desenchúfelo de la toma mural y desconecte el sistema de antena o
cable. De esta forma, el producto no resultará dañado por los relámpagos o las
fluctuaciones de la línea eléctrica.
¡PRECAUCIÓN! CONECTOR POLARIZADO (SÓLO EE.UU. y CANADÁ):
Para evitar descargas eléctricas, haga coincidir la patilla ancha del enchufe con la
ranura ancha, e insértela a fondo. No modifique ni retire este enchufe si no encaja
en la toma de alimentación. Solicite a un electricista cualificado la instalación de
un enchufe apropiado.
CONEXIÓN DE ALIMENTACIÓN
El conector IEC moldeado del cable de red facilitado se conecta a la toma de
corriente 1% del panel posterior de la unidad.
Los requisitos de alimentación de la fuente Discmaster 8.0 se indican en una
etiqueta en el panel posterior. Antes de conectar, compruebe que la tensión
indicada coincide con su suministro de red, es decir:
Todos los productos: ............Margen de tensión 110-230 V
Si se traslada a una zona con diferente tensión de red, consulte a su distribuidor
Mission para proceder a la conversión de la unidad.
La unidad no contiene ningún fusible reemplazable por el usuario.
MANTENIMIENTO
No realice tareas de servicio técnico en el equipo por su cuenta, pues al abrir o
retirar las cubiertas puede exponerse a tensiones peligrosas y otros riesgos.
Cualquier tarea de mantenimiento deberá ser realizada por personal
especializado.
CIRCUNSTANCIAS QUE REQUIEREN MANTENIMIENTO: Desconecte el
producto de la toma mural y solicite asistencia técnica especializada:
• Cuando el cable de alimentación o la toma estén dañados.
• Si se han introducido líquidos u objetos en el producto.
• Si el producto ha estado expuesto a la lluvia o al agua.
• Si el producto ha sufrido una caída o algún tipo de daño.
• Si el producto no funciona correctamente aun siguiendo las instrucciones
• Cuando el producto exhiba un cambio acusado en su rendimiento.
PIEZAS DE REPUESTO: Cuando necesite piezas de repuesto, compruebe que el
técnico de mantenimiento utilice los recambios especificados por el fabricante o de
las mismas características que la pieza original. Las sustituciones no autorizadas
podrían ocasionar incendios, descargas eléctricas y otros peligros.
COMPROBACIÓN DE SEGURIDAD: A la conclusión de cualquier trabajo de
mantenimiento o reparación de este producto, solicite al técnico que efectúe las
comprobaciones de seguridad que determinen que el producto está en perfectas
condiciones de uso.
de uso. Ajuste únicamente los controles indicados en las instrucciones de
uso. El ajuste indebido de otros controles podría ocasionar daños, y
normalmente requerirá el esfuerzo de un técnico especializado para
restablecer su normal funcionamiento.
SERVICIO TÉCNICO
Si desea asistencia técnica o formular alguna consulta, póngase en contacto
exclusivamente con los centros de servicio Cyrus autorizados. En la cubierta
posterior de este manual encontrará una lista de los principales centros de servicio
técnico.
Fabricado bajo licencia de Dolby Laboratories. "Dolby" y el símbolo de la doble "D" son
marcas comerciales de Dolby Laboratories.
Este producto incorpora technología de protección de derechos de autor que a su vez está
protegida por ciertas patentes de los EE.UU. y por derechos de propiedad intelectual que
pertenecen a Macrovisión Corporation y a otros propietarios de derechos. El uso de esta
tecnología de protección de derechos de autor deberá estar autorizado por Macrovisión
Corporation, y deberá hacerse en hogares o lugares de visión limitada, a menos que
Macrovisión Corporation estipule lo contrario. El cambio de diseño o el desmontaje están
terminantemente prohibidos.
Sobre este producto no deberán colocarse objetos
E
E
17

Cyrus Discmaster 8.0 Instrucciones de uso
Bienvenido al mundo Cyrus
Le damos la enhorabuena por confiar en los equipos Cyrus de alta fidelidad.
Nuestra avanzada tecnología de diseńo y alta calidad de fabricación nos ha
reportado incontables premios en todo mundo. Confiamos en que disfrute de
un producto fabricado por uno de los fabricantes de Hi-Fi más respetados.
Lea atentamente las siguientes instrucciones antes de proceder a la
instalación.
Serán su mejor aliado a la hora de instalar correctamente el Cyrus
Discmaster8.0.
Preparación
Antes de instalar el Discmaster 8.0, compruebe que la caja de accesorios
contiene los siguientes elementos:
• Tarjeta de garantía (con el manual de instrucciones)
• Cable de alimentación
• Mando de control remoto
• 2 cables MC-Bus
Una vez extraídos de la caja, conserve el embalaje.
Instale el Discmaster 8.0 en un lugar debidamente ventilado, lejos de fuentes
de calor, polvo o humedad. No sitúe nunca el Discmaster 8.0 debajo de otro
equipo ni encima de superficies en las que se pueda obstaculizar la
ventilación.
INSTALACIÓN (Ver Fig 1):
Clave del esquema del panel posterior:
1. Salida de audio digital óptica
2. Salida S-Video
3. Salida de audio digital coaxial
4. Salida de audio analógica estéreo
5. Salida de vídeo digital HDMI
6. Salida de mejora DAC estéreo
7. Conexiones MC-Bus
8. Salidas de audio de canales delanteros de 5.1
9. Salidas de audio de canales traseros de 5.1
10. Salida de audio de subwoofer de 5.1
11. Salida de audio de canal central de 5.1
12. Salida de vídeo VGA
13. Salida de vídeo de componentes
14. Salida de vídeo compuesta
15. Entrada de alimentación de CA
Conexión de la Salida de Vídeo a un Televisor
La salida de vídeo del Discmaster 8.0 puede conectarse a un televisor o
monitor de cinco formas distintas. La opción de conexión y la calidad de
imagen conseguida dependerán de las opciones disponibles en el televisor /
monitor. Las conexiones disponibles del Discmaster 8.0 se listan a
continuación por orden de calidad. Utilice la opción de conexión que
aparezca en un lugar más alto en la lista de mejor calidad de imagen-
Vídeo Digital HDMI
La salida de Vídeo Digital HDMI e debería utilizarse al conectar un monitor,
proyector o televisor digital de alta calidad equipado con entrada digital
HDMI.
Vídeo Analógico de Componentes
La Salida de Vídeo de Componentes 1# debería utilizarse al conectar un
monitor, proyector o televisor analógico de alta calidad equipado con
conectores individuales para entrada de Vídeo de Componentes. Asegúrese
de que los tres cables phono estén conectados correspondiéndose con las
mismas señales de vídeo de componentes.
Vídeo Analógico VGA
La Salida de Vídeo VGA
ordenador de alta calidad sólo equipado con una entrada de vídeo analógico
VGA.
Vídeo Analógico S-Video
La Salida S-VIDEO (Y/C)
compuesta y debería utilizarse si el televisor no tiene ninguna de las
conexiones de Vídeo anteriores. NOTA:- Debe activarse la conexión S-Video
al utilizarla. Consulte la sección de ajustes de Visualización del Sistema de
Menús.
Vídeo Analógico - Salida Compuesta
También se dispone de una Salida de Vídeo Compuesta
monitores que sólo tengan esta conexión. Ésta es la calidad de conexión más
baja.
Conexión SCART
Para conectar el Discmaster 8.0 a un televisor, proyector o monitor que sólo
tenga una conexión de entrada SCART, utilice un adaptador o cable de punto
de desconexión SCART que ofrecerá acceso a las entradas de vídeo
Compuesta o S-Video, y también a las entradas de audio del televisor si es
preciso.
1@ debería utilizarse al conectar un monitor de
b ofrece una calidad superior para una conexión
1$ para televisores y
Conexión de la alimentación de red CA
Conectar la clavija del cable de alimentación CA a la conexión de entrada de red 1%
situada en el panel posterior del Discmaster 8.0. A continuación conectar el
cable a una fuente de alimentación CA adecuada.
No existe un interruptor de puesta en marcha en el Discmaster 8.0. Para
desconectar la alimentación eléctrica del Discmaster 8.0 retirar la clavija de la
toma de red de la pared. Por este motivo debe asegurarse, cuando se realice
la instalación de la unidad, que la clavija es fácilmente accesible.
18
E
E

Instrucciones de uso Cyrus Discmaster 8.0
Conexión de Audio
El Discmaster 8.0 ofrece varias alternativas para conexión de audio.
1. Para el sonido surround de mayor calidad, conéctelo digitalmente a un
descodificador de sonido surround externo.
2. Para un funcionamiento cómodo y simple, conecte las salidas
analógicas del Discmaster 8.0 directamente a amplificadores de
potencia y un subwoofer, o a un sistema sub-sat activo.
3. Si tiene un sistema estéreo analógico de dos canales, conecte las
salidas estéreo (o las del DAC de mejora, cuando estén disponibles) del
Discmaster 8.0 a su amplificador o preamplificador integrado estéreo.
4. Para conseguir el sonido estéreo de mayor calidad, conéctelo
digitalmente a un convertidor D/A estéreo externo.
NOTA:- Para la opción 1, el control de volumen del mando a distancia del
Discmaster 8.0 se utiliza para ajustar el volumen del sistema. Para las
opciones 2-4, el control de volumen del Discmaster 8.0 debería ajustarse al
valor máximo (el ajuste de fábrica).
1. Conexión de Audio Digital a un Descodificador de Sonido
Surround Multicanal
Para un rendimiento de audio multicanal de la máxima calidad, el Discmaster
8.0 puede conectarse digitalmente a un descodificador Digital Surround-
Sound independiente. Se dispone de dos opciones para la conexión: coaxial
c con una interconexión digital u óptica a con una interconexión óptica
Toslink. Ajuste el control de volumen del Discmaster 8.0 al valor máximo (32)
para obtener la mayor calidad de sonido cuando se conecte de esta forma.
2. Conexión de Audio a través del Descodificador de Sonido
Surround Interno
El Discmaster 8.0 incluye un descodificador de sonido surround digital de 5.1
canales para material de programación codificado Dolby, y por consiguiente
puede utilizarse como el centro de control para un sistema de reproducción
de CD / DVD 5.1 surround completo. Para instalar dicho sistema, conecte
amplificadores de potencia a las salidas del Discmaster 8.0 para los canales
de audio Front h, Centre 1! y Surround i. A continuación, los altavoces
con sonido surround pueden conectarse a este sistema a través de los
amplificadores de potencia.
Puede conectarse un subwoofer activo por separado a la salida de canal
“SUB”
1).
3. Conexión de Audio Estéreo desde el Discmaster 8.0 a un
amplificador estéreo
Si está instalando un sistema estéreo de dos canales, las salidas de audio
analógicas estéreo
amplificador o preamplificador estéreo Cyrus. Para esto se recomiendan las
entradas VI o AV. Ajuste el control de volumen del Discmaster 8.0 al valor
máximo (32) para obtener la mayor calidad de sonido cuando se conecte de
esta forma.
3. Audio estéreo con mejora de DAC estéreo de alta calidad instalada
El Discmaster 8.0 incluye una opción de mejora de DAC interna instalada por
el distribuidor para la más alta calidad de reproducción de sonido estéreo. Si
su Discmaster 8.0 tiene esta opción instalada, conecte las salidas DAC de
mejora f a su amplificador. Ajuste el control de volumen del Discmaster 8.0
al valor máximo (32) para obtener la mayor calidad de sonido cuando se
conecte de esta forma.
4. Sonido Estéreo de alta calidad a través de un Convertidor D/A
Estéreo externo
Si tiene un sistema estéreo de alto nivel con un DAC estéreo como unidad de
control, conecte el Discmaster 8.0 digitalmente al mismo. Se dispone de dos
opciones para conexión: coaxial
con una interconexión óptica Toslink. Ajuste el control de volumen del
Discmaster 8.0 al valor máximo (32) para obtener la mayor calidad de sonido
cuando se conecte de esta forma.
d del Discmaster 8.0 pueden conectarse a un
c con una interconexión digital u óptica a
FUNCIONAMIENTO
El Discmaster 8.0 se suministra con un mando a distancia que puede cambiar
los ajustes de configuración y activar todas las funciones de la forma descrita
totalmente en la sección "Mando a Distancia". Además del mando a distancia,
las funciones de transporte fundamental y de control Standby están
duplicadas en el panel delantero de la unidad.
Por favor, lea la sección de mando a distancia de este manual y ajuste las
opciones de configuración listadas en la sección Sistema de Menús para
asegurarse de que su Discmaster 8.0 esté correctamente instalado para
adaptarse a su sistema antes de reproducir discos.
Clave para la ilustración del panel delantero (Fig.2)
1. Bandeja de carga de discos ......Cargue todos los discos con la etiqueta
2. Standby......................................Conecta y desconecta el Discmaster 8.0.
3. Luz de Standby..........................Indica cuando el reproductor está
4. Piloto Remoto ............................Receptor de comando remoto.
5. Ventana de Visualización ..........Visualización de estado del Discmaster
6. Teclas de Salto / Búsqueda.......Púlselas para saltar hacia delante o
7. Parada / Carga ..........................Abre la bandeja de carga de discos.
8. Reproducción / Pausa ...............Ajusta modos de reproducción y pausa.
Conexión
La alimentación de red hacia el Discmaster 8.0 normalmente debería dejarse
conectada a no ser que no vaya a utilizarse el aparato durante un largo
período; entonces debería desconectarse la alimentación de red en la toma
de pared o el producto del suministro de CA.
Al aplicar corriente, se utiliza la tecla STANDBY
alimentación. La lámpara Standby c está en rojo cuando el Discmaster 8.0
está Standby y verde cuando está en funcionamiento. En este momento, el
logotipo “CYRUS” también aparecerá en la pantalla del televisor.
Compatibilidad con los Discos
El Discmaster 8.0 es compatible con discos de DVD-Video, CDs de VCD
Video, CDs de audio y discos de recopilación de MP3. También puede
visualizar discos que contengan ficheros de vídeo de ordenador e imágenes
digitales reproduciéndolos en el Discmaster 8.0. Las instrucciones para
reproducir cada tipo de disco se indican más adelante en este manual. Se
incluye una lista completa de formatos de ficheros digitales compatibles en la
sección de especificaciones.
NOTA: Los discos de DVD-Video incluyen un identificador de “región” global.
El Discmaster 8.0 sólo reproducirá discos comprados en la misma región
global que el reproductor. El ajuste de región del Discmaster 8.0 se muestra
en un símbolo de globo en la parte trasera del reproductor. Asegúrese de que
todos los discos comprados tengan el mismo símbolo de región que el
reproductor o que tengan la marca de región 0, que permitirá la reproducción
en cualquier región global.
mirando hacia arriba.
ajustado a Standby.
8.0.
atrás a través de capítulos de DVD o
pistas de CD.
b para el control de la
Conexión de Sistema MC-Bus (Opcional)
Utilizando la conexión MC-Bus en su Discmaster 8.0, puede instalarse un
sistema integrado altamente funcional con control totalmente remoto. Esta
función puede utilizarse si tiene un descodificador surround digital o un
amplificador Cyrus. Consulte en el manual del producto pertinente las
instrucciones de cableado de MC-Bus.
E
E
19

Cyrus Discmaster 8.0 Instrucciones de uso
Funcionamiento del Mando a Distancia
Mando suministrado
El mando a distancia suministrado con el Discmaster 8.0 controlará todas las
funciones de reproducción de discos, configurará el reproductor mediante el
sistema de menús de ajuste y ajustará el volumen para las salidas
analógicas. Si tiene un sistema con altavoces surround 5.1 activados desde
amplificadores de potencia conectados directamente a las salidas de audio
de canal 5.1 del Discmaster 8.0, este mando controlará todas las funciones
de su sistema de reproducción de discos, incluido el volumen.
Mandos del sistema Cyrus
Si su sistema incluye un descodificador surround o amplificador estéreo
Cyrus, puede ser que ya disponga de un mando del sistema Cyrus que
también controlará la mayoría de las funciones del Discmaster 8.0. Consulte
el manual del mando del sistema o el sitio web de Cyrus
www.cyrusaudio.com para obtener una lista de comandos disponibles para
controlar el Discmaster 8.0.
Comandos del Mando a Distancia
1. OPEN/CLOSE (ABRIR / CERRAR). Abre o cierra la bandeja de disco
para la carga de discos.
2. PROGRAM (PROGRAMA). Al reproducir un disco, esta tecla abrirá la
pantalla de diálogo de programación del televisor de forma que pueda
guardar una secuencia preferida de títulos y / o capítulos de un DVD o
pistas de un CD. Consulte la sección “Programación” de Reproducción
de un DVD o Reproducción de un CD más adelante en este manual
para obtener más información sobre programación.
3. NEXT/PREVIOUS (SIGUIENTE / ANTERIOR). Estas teclas pasarán al
capítulo de DVD o la pista de CD siguiente / anterior.
4. ANGLE (ÁNGULO). Esta tecla cambiará el ángulo de cámara para
discos DVD que incluyan opciones de ángulos múltiples. Cada vez que
se pulse se pasará al siguiente ángulo disponible. NOTA: Si un disco
incluye múltiples ángulos de cámara, aparecerá un símbolo de cámara
en la esquina superior derecha de la pantalla del televisor sobrepuesta
a la gama de ángulos disponibles.
5. SETUP (AJUSTE). Pulse esta tecla para abrir el menú SETUP
(AJUSTE). Puede encontrarse un mapa completo de las opciones de
menú disponibles en la sección titulada “Sistema de Menús del
Discmaster 8.0” en la página siguiente.
6. MENU/PBC (MENÚ / PBC). Pulse esta tecla para volver al menú de
discos de DVD.
7. SELECTORES DE MODO DE VÍDEO. Estas teclas se utilizan para
acceder de forma rápida a diferentes modos de vídeo. N/P cambiará a
modos de televisión de rastreo progresivo 480P (NTSC 525 líneas) o
576P (PAL 625 líneas). Si dispone de una conexión digital HDMI, HD
cambiará a los modos 720P, 1080I o 1080P. VGA ajustará diferentes
resoluciones de monitor entre la gama VGA/SVGA/XGA/SXGA.
8. NUMERIC KEYPAD (TECLADO NUMÉRICO). Pulse una tecla en el
teclado numérico para tener acceso rápido a un nuevo capítulo de DVD
o una nueva pista de CD. Pulse los dos dígitos para seleccionar un
capítulo / una pista de dos dígitos.
9. SEARCH (BÚSQUEDA). Esta función no está disponible en el
Discmaster 8.0.
10. SCAN FWD/REV (AVANCE / RETROCESO). Pulse una de estas teclas
para empezar a avanzar / retroceder en el disco. Vuelva a pulsarla para
aumentar la velocidad de avance / retroceso (se dispone de 5
velocidades) o pulse la otra tecla para reducir la velocidad de avance /
retroceso.
11. PLAY/PAUSE (REPRODUCCIÓN / PAUSA). Al pulsar esta tecla se
iniciará o parará la reproducción de un DVD o CD si está parado o en
pausa.
12. REPEAT (REPETICIÓN). Pulse esta tecla para activar la visualización
de repetición en pantalla. Siga pulsándola para seleccionar el modo de
repetición de Título o Capítulo de DVD según se precise o el modo de
repetición de disco o pista de CD.
13. STOP (PARADA). Pulse esta tecla una vez para seleccionar el modo
de pre-parada. En el modo de pre-parada, el disco seguirá girando,
esperando el siguiente comando. Pulse STOP (PARADA) de nuevo
para parar el disco completamente.
14. ZOOM. Pulse esta tecla para hacer zoom en el centro de la imagen.
Vuelva a pulsarla para aumentar el ajuste de zoom en pasos de 2x a
5x. Vuelva a pulsarla para cancelar el zoom. Cuando se haya ajustado
el zoom, las teclas de CURSOR desplazarán la zona de zoom
alrededor de la imagen.
15. DISPLAY (VISUALIZACIÓN). Pulse esta tecla para activar la
visualización de estado en pantalla. Las teclas de cursor IZQUIERDA /
DERECHA cambiarán la información de visualización en pantalla.
16. TITLE (TÍTULO). Pulse esta tecla para activar la selección de acceso
directo de títulos de discos de DVD-Video.
17. Teclas de CURSOR y OK. Utilice las teclas de cursor para desplazarse
por las opciones de menú y la tecla OK para confirmar las selecciones.
18. CLEAR (ELIMINAR). Esta tecla se utiliza durante la programación para
eliminar selecciones no deseadas del programa guardado.
19. AUDIO MUTE (SUPRESIÓN DE AUDIO). Esta tecla suprimirá el audio
del Discmaster 8.0. Vuelva a pulsarla para eliminar la supresión.
20. VOLUME CONTROL (CONTROL DEL VOLUMEN). Pulse estas teclas
para ajustar el ajuste de volumen de 0-32. El ajuste de fábrica para el
volumen es el máximo (32). Deje este ajuste si está conectando su
sistema de audio a la salida digital o si está utilizando un amplificador
integrado o un preamplificador para controlar el volumen de su sistema
de audio.
21. LANGUAGE (IDIOMA). Pulse esta tecla para pasar a selección de
idioma en la barra de visualización. Cada vez que se pulse de forma
repetitiva se mostrará un nuevo idioma disponible.
22. SUBTITLE (SUBTÍTULOS). Pulse esta tecla para pasar a selección de
subtítulos en la barra de visualización. Cada vez que se pulse de forma
repetitiva se mostrará un nuevo idioma disponible para los subtítulos.
23. STANDBY (STANDBY). Esta tecla ajusta o cancela el modo Standby.
El Volumen, la Visualización y otros ajustes de configuración se
guardan durante el modo Standby o al desconectar la alimentación del
Discmaster 8.0.
2#
2!
1*
2@
2)
1(
1&
1^
1%
Standby
Subtitle
Open/clo se
Language Program
a
b
Angle
c
d
Clear
Setup
OK
Menu/PBCTitle
e
f
N/P
123
456
789
Display
VGA
HD
g
h
Search
0
i
1)
1$
1#
Zoom
Repeat
1@
1!
20
E
E

Instrucciones de uso Cyrus Discmaster 8.0
DAB 8.0 Menú del sistema
El Discmaster 8.0 está configurado para adaptarse a s u sistema mediante un sistema de menús en pantalla. Para acceder al sistema de me nús, pulse la te cla SETUP
(AJUSTE) en el mando a distancia . Navegue por las opciones de menú con las teclas de CURSOR ; pulse la tecla OK para realizar las selecciones.
SETUP
Sonido Salida Digital
Éstereo
Ajuste
Altavo ce
LPCM output
Pro Logic II
Formato
Pan.
Idiomas
Bloqueo
TV system
Imagen de TV
S-Video
Brightness
HDMI mode
Menús del Lec tor Con esta opción de menú, puede escoger entre las opcion es de idioma de menú disponib les.
Menús de Discos
Audio
Subtitulos
Introducir
Contraseña
Altav oces
Distancia
Volu me n
Dolby Digital
DTS
Marque esta casilla para activar las señales de audio Dolby Digital de la salida Digital. Si tiene un DAC
estéreo, desmar que esta casilla.
Marque esta casilla para activar las señales de audio DTS de la salida Digital. Si tiene un DAC estéreo o
un descodifica dor surround que no sea compatible con el formato DTS, des marque esta casilla.
Marque esta casilla para mezclar programas multicanal si está utilizando el descodificador de sonido surround
interno para accion ar un sistema con dos altavoces .
Seleccione esta opción para visualizar los ajustes del tamaño de los altavoces del sistema si está utilizando el
descodificador de sonido surround interno. Los altavoces Delantero Izquierdo y Delantero Derecho pueden
ajustarse a Grande o Pequeño. Los altavoces Surround Central, Izquierdo y Derecho pueden ajustarse a Grande,
Pequeño u Desconectado. El Subwoofer puede ajustarse a Conectado u Desconectado. Ajuste Pequeño para
altavoces satélite o de soporte pequeños. Ajuste Grande para altavoces de suelo o de soporte más grandes. Ajuste
Desconectado si no t iene ningún altavoz en esa ubicación.
Si está utilizando el descodificador de sonido surround Discmaster 8.0, seleccione esta opción para ajustar la
distancia a la que s e sienta de cada altavoz. Las distancia s pueden ajustarse entre 1m y 6,6 m.
Si está utilizando el descodificador de sonido surround Discmaster 8.0, seleccione esta opción para ajustar las
reducciones de volumen para cad a altavoz. Los ajustes de reduc ción reducirán el nivel de un altavoz concreto; así
pues, si está sentado cerca de los al tavoces surround (por ej emplo), puede reducir el nivel de los mism os hasta que
se corresponda con el de l os altavoces delanteros.
Este ajuste permite una velocidad de muestreo de 96k mediante la salida digital PCM cuando este material de
fuente de calidad superior está disponible. Ajústelo a 96k si tiene un descodificador de sonido surround o DAC que
sea compatible c on programas de 96k; en caso contrari o, ajústelo a 48k.
Escoja una de las cinco opciones disponibles para el descodificador de sonido surround interno. El modo DSP
desconectado desactivará el descodificador Pro Logic II interno, Emu lation (Emulación) activará la descodificación
Pro Logic '4.1' original, Music (Música) activará el descodificador Pro Logic II, optimizado para reproducir música,
Movie (Película ) optimizará el descodif icador Pro Logic II para repr oducir películas, Matr ix (Matriz) es una opción de
desco dificació n más simple.
Seleccione e l formato de pantalla de s u televisor / monitor. Escoj a 4x3 Letterbox para mos trar la anchura de imagen
completa en un televisor 4x3 con bandas negras en la parte superior y la inferior. Escoja 4x3 Standard para una
imagen con altura completa en un televisor 4x3, pero perdiendo los bordes izquierdo y derecho de la imagen.
Escoja 16x9 si tien e un televisor de pantalla anch a.
Seleccione Activado si ha utilizado la conexión S-Video haci a su televisor.
Esta opción permite ajustar el brillo de la imagen del Discmaster 8.0 para adaptarse al brillo de la transmisión por
ondas.
Con esta opción de menú, puede cambiarse el formato de señal de la salida HDMI. Selec cione la opción que ofrece
la mejor cali dad de imagen de su monitor si está utili zando una conexión HDMI digital.
El Discmaster 8. 0 siempre seleccionará el idi oma de menús seleccionado cua ndo esté disponible en un disco.
El Discmaster 8.0 s iempre seleccionará el idi oma de audio seleccionado cuan do esté disponible en un disco.
El Discmaster 8.0 siemp re seleccionará el idioma de subtítulos sel eccionado cuando esté disponible en un disco .
Debe introducirse su contraseña para alcanzar el nivel de menús siguiente. La contraseña ajustada de fábrica es
8888. Puede cambiarse en el nivel de menús siguiente. El restablecimient o de los ajustes por defecto con la opción
de menús por defecto r establecerá la contraseña aj ustada de fábrica.
Contraseña
Limit Clasificatión
Original
*Nota:- El funcionamiento del sistema de Control Paren tal del Discmaster 8.0 depende de la disponibilidad de codificación de software adecuada en el disco DVD.
Por consiguiente, Cyrus no puede garantizar el funcionamiento del si stema de Control Parental y declina cualquier respons abilidad asociada con la vi sualización no
deseada del c ontenido del disco. En caso de duda, por favor asegúrese de que el di sco se reproduzca según sus ajustes de Contro l Parental antes de per mitir a sus
hijos utiliz ar.
E
E
Utilice esta opc ión de menú para cambiar su contraseña par a acceder a los ajustes de lími tes de categorías.
Los ajustes de límites de categorías restringen la categoría del disco de DVD que puede reproducirse. Utilice esta
opción de menú para c ambiar su contraseña para acceder a los ajustes de límites de cate gorías.*
Restablece todos los ajustes a los val ores de fábrica por defecto. El volumen se aj usta a su va lor máximo (NOTA:Es preciso tener la precaución de reducir este ajuste antes de reproducir un disco si su Discmaster 8.0 está
conectado directamente a amplificadores de potencia). Las salidas digitales Dolby Digital y DTS están activadas.
Los altavoces están todos ajustados a tamaño grande a una distancia de 3,3m (10 pies) con el subwoofer
conectado. El vídeo está ajustado para 480P con un tamaño de pantalla de 4x3 Letterbox. HDMI está ajustado a
RGB/60Hz. Todas las opciones de idioma están ajus tadas a Inglés.
21

Cyrus Discmaster 8.0 Instrucciones de uso
Reproducción de un Disco de DVD-Vídeo
Reconocerá los discos de DVD-Video por el logotipo. Según el material del
disco (una película, videoclips, una serie dramática, etc.), puede tener uno o
más Títulos, y cada Título puede tener uno o más Capítulos. Para tener un
acceso fácil y cómodo, el Discmaster 8.0 le permite desplazarse entre Títulos
y también entre Capítulos.
Reproducción del disco
Cuando se cargue un DVD, el Discmaster 8.0 iniciará la reproducción
automáticamente. Si se ha parado el disco, pulse
reproducción del disco.
Menú del disco
La mayoría de discos de DVD tendrán un menú para seleccionar opciones
del disco o navegación del disco. Desde un menú del disco, utilice las teclas
de CURSOR para destacar su selección y a continuación pulse OK.
Paso a otro capítulo
Cuando un título de un disco tenga más de un capítulo, puede pasar a otro
capítulo pulsando
moverse por la secuencia de capítulos.
Para ir directamente a cualquier capítulo, introduzca el número de capítulo
utilizando las teclas NUMÉRICAS. Si el número tiene más de un dígito, pulse
las teclas de forma sucesiva.
Búsqueda de imágenes
Para realizar una búsqueda rápida hacia delante o hacia atrás a través del
disco, pulse las teclas
sonido. Para aumentar o reducir la velocidad de la búsqueda, pulse
según se precise. Para finalizar la búsqueda, pulse según se desee.
Paro de imagen y cámara lenta
Para tener un paro de imagen, pulse
a la reproducción, pulse
la velocidad con las teclas
Ángulo de cámara
Si el disco contiene secuencias grabadas desde diferentes ángulos de
cámara, aparecerá el símbolo de ángulo mostrando el número de ángulos
disponibles y el ángulo que se esté visualizando en ese momento. A
continuación, si lo desea, puede cambiar el ángulo de la cámara volviendo a
pulsar la tecla ANGLE (ÁNGULO).
NOTA:- Para suprimir el símbolo de Ángulo, pulse la tecla DISPLAY
(VISUALIZACIÓN).
Visualización restringida
Si ha ajustado los límites de categorías para restringir una visualización no
autorizada, sólo se reproducirán los discos de DVD de la categoría
autorizada o inferior. Los discos de una categoría superior pueden
reproducirse si es preciso siguiendo las indicaciones en pantalla que
aparecen cuando se carga el disco e introduciendo la Contraseña correcta.
Repetición de Títulos / Capitulos
Pulse la tecla REPEAT (Repetición) del mando a distancia una vez para
repetir el Título que se reproduce en ese momento, o dos veces para repetir
todo el Capítulo. Pulsarla una tercera vez cancelará la repetición.
Guardar un programa
Para programar una selección de títulos y / o capítulos de un DVD en la
memoria del Discmaster 8.0, cargue un disco de forma que se inicie su
reproducción. Ahora pulse la tecla de programa del mando a distancia b
para abrir el menú de programación en pantalla. Con las teclas de cursor
ARRIBA / ABAJO seleccione el título que desee guardar. Pulse OK para
guardar el título completo en la memoria, o pulse la tecla de cursor
DERECHA para visualizar una lista de capítulos contenidos en ese título.
Utilice las teclas de cursor ARRIBA / ABAJO para seleccionar los capítulos
que quiera guardar, pulsando la tecla OK para guardar cada uno de ellos en
la memoria. Para volver a la lista de Títulos, pulse la tecla de cursor
IZQUIERDA. Para salir del menú de programación, pulse la tecla de cursor
DERECHA para destacar el símbolo AJUSTADO y a continuación pulse OK.
o brevemente durante la reproducción para
o . Se inicia la búsqueda y se suprime el
durante la reproducción. Para volver
. Puede seleccionarse la cámara lenta y ajustarse
o .
para iniciar la
o
Reproducción de un disco de CD
Pulse para reproducir el disco. La reproducción se inicia cuando se cierra
la bandeja de disco.
Cuando el disco se reproduce, la pantalla del reproductor muestra la pista
actual y el tiempo de reproducción transcurrido.
Paso a otra pista
Puede pasar a otra pista pulsando
reproducción para moverse por la secuencia de pistas.
Para ir directamente a cualquier pista, introduzca el número de pista
utilizando las teclas NUMÉRICAS.
NOTA:- Si el número tiene más de un dígito, pulse las teclas en rápida
sucesión.
Búsqueda Rápida
Para realizar una búsqueda rápida hacia delante o hacia atrás en el disco,
o durante la reproducción. La búsqueda se inicia y se suprime
pulse
el sonido. Para aumentar o reducir la velocidad de búsqueda, pulse
según se precise. Para finalizar la búsqueda, pulse
Pausa
Para parar la reproducción del disco, pulse
volver a la reproducción, pulse
Repetición de pista / disco
Conecte el televisor para comprobar el estado en pantalla mientras ajusta la
repetición. Pulse la tecla REPEAT (Repetición) del mando a distancia una
vez para repetir la pista que se reproduce en ese momento, o dos veces para
repetir todo el disco. Pulsarla una tercera vez cancelará la repetición.
Reproducción de una selección programada
Para programar una selección de pistas del CD en la memoria del Discmaster
8.0, será necesario que conecte su televisor. Cargue el disco de forma que
se inicie la reproducción. Ahora pulse la tecla PROGRAM (Programación) y
utilice las teclas de cursor UP/DOWN (ARRIBA / ABAJO) para seleccionar las
pistas que le gustaría programar. Pulse OK para guardar cada una de las
pistas en memoria. Si añade una pista por error, pulse la tecla CLEAR
(ELIMINAR). Pulse PLAY (REPRODUCCIÓN) cuando esté a punto para
reproducir su selección programada. Descargue el disco para eliminar
completamente la memoria programada.
o brevemente durante la
o
según se desee.
durante la reproducción. Para
.
22
E
E

Instrucciones de uso Cyrus Discmaster 8.0
Reproducción de música MP3, foto digital y datos de
vídeo de discos de ordenador
El Discmaster 8.0 también puede reproducir pistas de audio MP3,
colecciones de fotos digitales y datos de vídeo registrados en discos de CD-R
o DVD-R de ordenador.
Discos con un único tipo de dato
Para reproducir datos de un disco que contenga sólo uno de estos tipos de
datos, cargue el disco y pulse
forma secuencial. Si hay múltiples carpetas, el Discmaster 8.0 reproducirá
todos los ficheros en cada una de las carpetas de forma secuencial.
Paso a otra pista o foto
Puede pasar a otra pista o foto pulsando
para moverse por la secuencia de pistas
Opciones de visualización en pantalla
Al pulsar la tecla STOP en cualquier momento durante la reproducción se
mostrará una lista de ficheros y una lista de carpetas cuando estén
presentes. Es posible desplazarse por la lista de carpetas con las teclas de
CURSOR para encontrar la carpeta que precise, y a continuación pulsar
cuando esté a punto para iniciar la reproducción.
Discos con tipos de datos mezclados y datos guardados en carpetas
Cargue el disco y conecte el monitor de televisión. Si los datos son una
mezcla de música, imágenes digitales y contenido de vídeo o datos
guardados en carpetas, aparecerá un menú para permitir la selección del tipo
de datos o la carpeta que desee reproducir. Una vez haya seleccionado el
tipo de datos que desee reproducir, pulse
la lista de carpetas de la pantalla del televisor para seleccionar los datos que
quiera. Desplácese por la lista de carpetas con las teclas de CURSOR para
encontrar la carpeta que precise, y a continuación pulse
punto para empezar. Para volver a la lista de carpetas en cualquier momento,
pulse la tecla DISPLAY (VISUALIZACIÓN).
. El disco reproducirá todos los ficheros de
o durante la reproducción
para reproducirlo todo o utilice
cuando esté a
Funciones especiales disponibles al reproducir discos
de fotos digitales
Velocidad de visualización de las imágenes
Puede cambiar la velocidad de visualización de imágenes tipo diapositivas
con las teclas de cursor ARRIBA / ABAJO. Observe que las imágenes
digitales con resolución superior tardarán más en cargarse durante la
visualización de imágenes tipo diapositivas.
Parada de la visualización de imágenes tipo diapositivas
Pulse
cualquier momento. Pulse
imágenes tipo diapositivas.
Giro de las imágenes
Al visualizar imágenes sin movimiento puede girar la imagen en la pantalla
pulsando la tecla ANGLE (ÁNGULO). Cada vez que se pulse se girará la
imagen 90°.
Zoom de ampliación y reducción de las imágenes
Al visualizar imágenes sin movimiento puede hacer un zoom de ampliación
de la imagen pulsando la tecla ZOOM. Hay cuatro niveles de zoom posibles.
Al pulsar la tecla ZOOM una quinta vez se cancelará el zoom.
Reproducciones de imágenes en miniatura
Para visualizar reproducciones de imágenes en miniatura para una fácil
selección de las imágenes, pulse la tecla MENU/PBC (MENÚ / PBC) en el
mando a distancia. Puede seleccionar una imagen de las reproducciones de
imágenes en miniatura con las teclas de cursor y a continuación visualizarla e
iniciar una visualización de imágenes tipo diapositivas pulsando
para parar la visualización de imágenes tipo diapositivas en
de nuevo para reiniciar la visualización de
.
E
E
23

Cyrus Discmaster 8.0 Instrucciones de uso
GUÍA DE RESOLUCIÓN DE PROBLEMAS
Si su Discmaster 8.0 no funciona de forma adecuada, desconecte la
alimentación y compruebe todas las conexiones utilizando las notas de este
manual. Si los problemas persisten, la lista de control siguiente puede ser de
ayuda.
Si tiene alguna duda, consulte a su concesionario.
No hay imagen ni sonido (en todos los discos)
Desconecte la alimentación del sistema y compruebe que se hayan realizado
correctamente las conexiones desde el Discmaster 8.0 hasta el televisor, el
amplificador o el descodificador surround.
Compruebe que todo el equipo esté conectado y que se haya seleccionado la
entrada correcta en el televisor, amplificador o descodificador surround.
Perturbaciones en la imagen, colores incorrectos o distorsionados
Puede ser que el modo de vídeo de visualización seleccionado no esté
disponible en su monitor. Pulse la tecla N/P para pasar a modo de vídeo
básico (NTSC). Pulse N/P de nuevo para pasar a modo de vídeo básico
(PAL).
Puede que esté conectada la salida S-Video mientras esté mirando algo de
otra salida de vídeo. Si éste es el caso, desconecte la salida S-Video.
Giro del disco sin sonido
Compruebe en el menú SETUP (AJUSTE) que se haya seleccionado el modo
de audio correcto para su sistema y sus conexiones.
Aparece una advertencia de región al cargar un disco
Compruebe que el símbolo de región del disco se corresponda con el símbolo
de región del panel trasero del reproductor (número con un símbolo de globo).
Para evitar este problema, asegúrese de que los discos se compren
exclusivamente en la misma región global que el reproductor.
La imagen de DVD se para y salta a otra escena
Puede ser que el disco esté sucio o rayado. Intente reproducir otro disco. Si el
otro disco se reproduce bien, trate de limpiar el primer disco.
NOTA:- Algunos discos presentan capas dobles. La reproducción se parará
momentáneamente mientras el reproductor cambia de capa. Esto sólo
ocurrirá una vez durante la reproducción de dichos discos.
Un disco de DVD no se reproduce desde el inicio
Si este DVD es el último disco que reprodujo, la característica de reanudación
continuará desde este punto la próxima vez que lo utilice. Pulse STOP dos
veces para volver al inicio del DVD.
No funciona el mando a distancia
Puede ser que sea necesario cambiar las pilas del mando:
Saque la tapa del compartimento para las pilas que se encuentra debajo de la
unidad. Saque las pilas y cámbielas por otras nuevas con cuidado teniendo en
cuenta la orientación marcada en la base del compartimento para las pilas.
Las pilas de la unidad sólo deberían cambiarse por pilas nuevas del tipo AAA
(I.E.C. LR03).
Producto láser
Esta etiqueta del panel posterior le
indica que la unidad contiene un
componente láser. La apertura de la
unidad significará la exposición del
usuario a la radiación del haz láser.
WEEE
Este logotipo significa que este producto no puede tirarse
con sus residuos domésticos. Este producto debe
entregarse en un punto de recogida designado para ser
reciclado. Su cooperación en la eliminación correcta de
este producto contribuirá al uso eficiente de los recursos
naturales. Para obtener más información sobre los puntos
de recogida, póngase en contacto con su servicio de
eliminación de residuos o Ayuntamiento.
24
GARANTÍA
La tarjeta de garantía adjunta deberá ser cumplimentada por el Comprador, y
remitida a CYRUS o a su Distribuidor antes de 8 días a partir de la fecha de
compra. Ningún Vendedor ni Distribuidor podrá variar las condiciones de la
presente garantía, considerada personal e intransferible para el comprador
original.
Conserve la factura de compra como justificante.
Las reclamaciones al amparo de la presente garantía habrán de realizarse
siempre que sea posible a través del Vendedor a quien se adquirió el equipo.
Esta garantía no cubre:
• Los daños ocasionados por negligencia, accidente, uso indebido o
desgaste, así como por la instalación, ajuste o reparación incorrectos por
personal no autorizado. La prestación de un servicio sin autorización
supondrá la anulación de la garantía.
• Responsabilidad por pérdida o daños ocasionados durante el transporte
hasta o desde el domicilio del comprador.
• Pérdidas o daños materiales o personales derivados del uso directo o
indirecto del equipo.
El equipo atendido al amparo de la presente garantía deberá ser consignado a
portes pagados. Si el equipo resulta cumplir las especificaciones publicadas,
CYRUS se reserva el derecho a reclamar los gastos pertinentes.
Las anteriores condiciones no afectan a sus derechos estatutarios como cliente.
ESPECIFICACIONES
Alimentación eléctrica
Tensión: .......... Según indicación de la placa en la parte posterior de la unidad
Consumo de energía
En conexión .................................................................................................12W
Estado de espera...........................................................................................3W
EMC y Cumplimiento de seguridad (230V) ................................................... CE
Caja
Dimensiones (Ancho x Alto x Profundidad)..........................215 x 75 x 365 mm
Peso........................................................................................................... 2.6Kg
Material ................................................................................Chasis de fundición
Calidad Analógica de Audio
Nivel de Salida de Audio.......................................................................2.0V rms
Impedancia de Salida ...............................................................................300Ω
Respuesta en Frecuencia............................................................... 20Hz-20kHz
Separación de Canales ............................................................>100dB @ 1kHz
>75dB@20kHz
SNR (utilizando pista silenciosa)........................................................... >97dBA
THD @ -10dB .........................................................................................0.015%
Calidad Digital de Audio
Compatibilidad de salida PCM ...................................................44,1k, 48k, 96k
Compatibilidad de salida surround .................................................Dolby Digital
Nivel de salida.........................................................................................0,5Vp-p
Impedancia de salida ..................................................................................75
Calidad de Vídeo
Formatos de salida .......HDMI Digital, Vídeo de componentes, S-Video (Y/C),
Compuesta
VGA, SVGA, XGA, SXGA
Nivel de salida.......................................................................................1V pk-pk
Impedancia de salida .................................................................................75
Cyrus se reserva el derecho a cambiar cualquiera de las especificaciones sin
previo aviso. E &OE
Ω
Ω
E
E
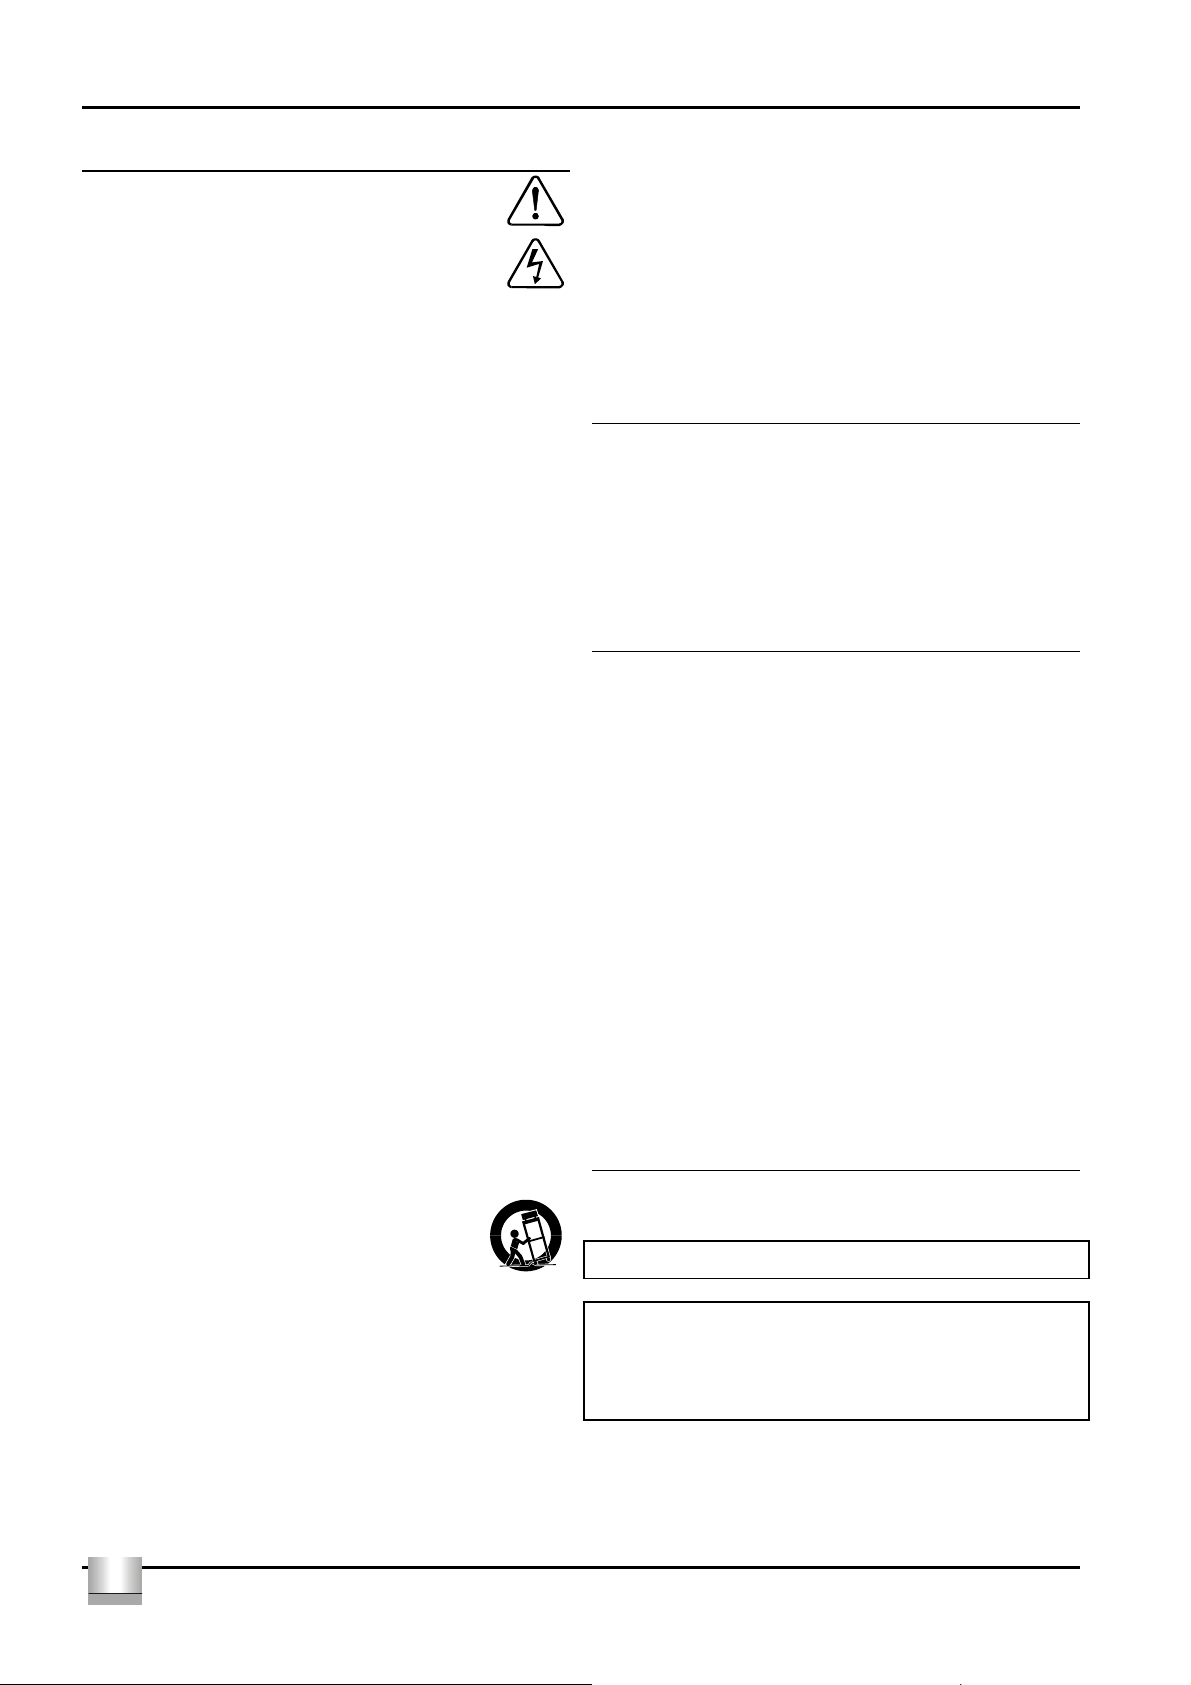
Manuel d’utilisation Cyrus Discmaster 8.0
IMPORTANT ! A lire avant l’utilisation de l’appareil !
MISE EN GARDE : Le point d’exclamation est là pour attirer votre
attention sur les instructions importantes et les procédures de
sécurité de ce manuel.
ATTENTION : L’éclair vous avertie des risques de chocs électriques
présentés par les composants internes. Le personnel non autorisé
ne doit pas ouvrir cet appareil.
AVERTISSEMENT : Pour éviter tout risque d’électrocution ne retirez aucun
couvercle ni panneau de l’appareil. Ce produit ne comporte aucune pièce
réparable par l’utilisateur.
AVERTISSEMENT: Pour éviter tout risque d’électrocution, n’exposez pas cet
équipement à la pluie ni à l’humidité.
TENEZ COMPTE DES AVERTISSEMENTS : Tous les avertissements sur le
produit et dans le mode d’emploi doivent être observés.
LISEZ TOUTES LES INSTRUCTIONS : Toutes les instructions de sécurité et de
fonctionnement doivent être lues avant d’utiliser le produit.
CONSERVEZ LES INSTRUCTIONS : Les instructions de sécurité et de
fonctionnement doivent être gardées pour référence ultérieure.
SUIVEZ LES INSTRUCTIONS : Toutes les instructions de sécurité et de
fonctionnement doivent être observées.
NETTOYAGE: Débranchez l’appareil du secteur avant le nettoyage. N’utilisez pas
de produits de nettoyage liquides ou en aérosol. Utilisez un chiffon humide pour le
nettoyage.
EAU ET HUMIDITE : N’utilisez pas ce produit près de l’eau – par exemple, près
d’une baignoire, d’un lavabo, d’un évier, dans un sous-sol humide, près d’une
piscine ou d’un lieu similaire. L’appareil ne doit pas être exposé à des projections
d’eau et aucun objet contenant un liquide, tel un vase, ne doit être placé sur
l’appareil.
CHALEUR : Le produit doit être éloigné de toute source de chaleur telle que des
radiateurs, des cuisinières, ou tout autre produit (dont les amplificateurs) qui
génèrent de la chaleur.
VENTILATION : Les fentes et les ouvertures sur le châssis sont prévues pour la
ventilation, pour assurer le fonctionnement fiable du produit et pour le protéger
contre toute surchauffe; et ces ouvertures ne doivent pas être obturées ni
couvertes. Les ouvertures ne doivent jamais être bloquées en plaçant le produit
sur un lit, un sofa, un tapis ou une surface similaire. Ce produit ne doit pas être
placé dans une installation encastrée comme une bibliothèque à moins qu’une
ventilation adéquate ne soit assurée ou que les instructions du fabricant aient été
observées.
INSERTION D’OBJETS OU DE LIQUIDE : N’insérez jamais d’objets d’aucune
sorte à l’intérieur de l’appareil à travers les ouvertures car ceux-ci pourraient
toucher des points de tension dangereux ou de court-circuiter des pièces, d’où un
risque d’incendie ou d’électrocution.
ACCESSOIRES : Ne placez pas ce produit sur un meuble, un socle, un trépied,
un support ou une table instable. L’appareil risque de tomber et de causer des
blessures graves à un enfant ou un adulte, et de causer un endommagement
important du produit. Utilisez uniquement un meuble, un socle, un trépied, un
support ou une table recommandée par le fabricant, ou vendus avec le produit.
L’installation de l’appareil doit être conforme aux instructions du fabricant et doit
être effectuée avec un accessoire de montage recommandé par le fabricant.
FIXATIONS : N’utilisez pas de fixations non recommandées par le fabricant du
produit car leur utilisation représente un risque.
DEPLACEMENT : Le produit sur un meuble à roulettes doit être
déplacé avec précaution. Des arrêts soudains, une force
excessive et des surfaces irrégulières représentent un risque de
basculement pour le produit et le meuble à roulettes.
SOURCE D’ALIMENTATION : Ce produit doit être utilisé uniquement à partir du
type de source d’alimentation indiqué sur l’étiquette de marquage. Si vous n’êtes
pas sûr(e) du type d’alimentation que vous avez, consultez votre revendeur ou
votre compagnie d’électricité. Pour les produits destinés à fonctionner sur piles, ou
d’autres sources, consultez le mode d’emploi.
SURCHARGE : Ne surchargez pas les prises murales, les cordons d’extensions
ou les multiprises. Cela augmenterait les risques d’incendie ou d’électrocution.
PROTECTION DU CORDON D’ALIMENTATION : Les cordons de raccordement
doivent être placés de façon à ce qu’il ne soit pas possible de marcher dessus ou
que ceux-ci ne soient pas pincés par des objets placés sur eux ou contre eux, et
veillez tout particulièrement aux fiches des câbles en leur points de contacts avec
les appareils.
FLAMMES NUES : Aucune source de flammes nues, tel une bougie, ne doit être
placée sur l’appareil.
FOUDRE : Pour une plus grande protection de ce produit contre la foudre ou
lorsque le produit est laissé sans surveillance ou encore inutilisé pendant de
longues périodes, débranchez-le de la prise murale et débranchez l’antenne ou le
système de câblage. Ceci va éviter tout endommagement du produit lié à la foudre
ou aux surtensions.
MISE EN GARDE ! CONNECTEURS POLARISES (CANADA et USA) :
Pour éviter les chocs électriques, introduisez la lame la plus large de la fiche du
cordon secteur dans la borne correspondante de la prise de courant et poussez
jusqu’au fond. Ne modifiez pas et ne changez pas cette fiche si elle ne convient
pas à votre prise de courant. Faites-vous installer une prise adéquate par un
électricien compétent.
ALIMENTATION : (Voir Fig.1)
Branchez le connecteur moulé IEC du cordon d’alimentation fourni dans la prise
d’alimentation 1% située à l’arrière de l’appareil.
L’alimentation nécessaire à votre Cyrus Discmaster 8.0 est indiqué sur une
étiquette sur le panneau arrière. Avant branchement, vérifiez que ce voltage est le
même que celui de votre alimentation.
Tous les Produits: Variation de Tension 110V-230V
Si vous déménagez dans un pays utilisant une tension différente, contactez votre
distributeur Cyrus local pour faire modifier votre appareil.
Il n’y a pas de pièce remplaçable par l’utilisateur dans cet appareil.
REPARATION :
N’essayez pas de réparer ce produit vous-même car l’ouverture ou la dépose des
couvercles peuvent vous exposer à des électrocutions dangereuses ou à d’autres
risques. Confiez tout travail de réparation à un personnel d’entretien qualifié.
CONDITIONS RECLAMANT UNE REPARATION : Débranchez votre appareil de
la prise murale et confiez sa réparation au personnel qualifié dans les cas suivants
:
• Lorsque le cordon ou la fiche de raccordement sont endommagés
• Si un liquide ou un objet sont tombés dans l’appareil
• Si l’appareil a été exposé à la pluie ou à l’eau
• Si l’appareil est tombé ou a été endommagé d’une manière quelconque
• Si l’appareil ne fonctionne pas normalement en suivant le mode
d’emploi. (Ajustez uniquement les commandes qui sont couvertes par le
mode d’emploi car un ajustage incorrect des autres commandes peut
causer un endommagement et va souvent réclamer un travail important
de la part du technicien qualifié pour remettre le produit dans son état de
fonctionnement normal)
• Lorsque le produit présente une nette dégradation de ses performances
PIECES DE RECHANGE : Lorsque des pièces de rechange s’avèrent
nécessaires, veillez à ce que le technicien d’entretien possède les pièces de
rechange spécifiées par le fabricant ou qu’elles possèdent les mêmes
caractéristiques que les pièces d’origine. Des remplacements non autorisés
présentent un risque d’incendie, d’électrocution ou d’autres dangers.
CONTRÔLE DE SECURITE : Après tout entretien ou toute réparation effectué sur
ce produit, demandez au technicien d’entretien de procéder aux contrôles de
sécurité pour vérifier que le produit est en bon état de fonctionnement.
CENTRES DE REPARATION DU PRODUIT
Pour toute réparation du produit ou tout conseil technique, contactez uniquement
les centres de réparation agréés Cyrus. Les distributeurs Cyrus sont répertoriés à
la fin de ce manuel d’utilisation.
Fabriqué sous licence de Dolby Laboratories. « Dolby », et le symbole
double-D sont des marques déposées de Dolby Laboratories.
Cet appareil fait appel à divers circuits et principes destinés à interdire la
piraterie des oeuvres protégées par des droits d’auteurs, circuits et principes
qui sont couverts aux Etats-Unis soit par des brevets détenus par
Macrovision Corporation et d’autres sociétés. L’utilisation de la technologie
visant à la protection des droits d’auteur doit être limitée à des fins
domestiques, ou similaires, sauf accord préalable de Macrovision
Corporation. La rétrotechnique et le désassemblage sont proscrits.
F
F
25

Cyrus Discmaster 8.0 Manuel d’utilisation
Bienvenue dans le monde de Cyrus !
Félicitations pour votre choix des produits Audio-Vidéo Cyrus. Notre utilisation de la
technologie de dernière génération et notre qualité de fabrication
exceptionnelle ont remporté d’innombrables récompenses autour du monde.
Nous espérons que vous serez très satisfait de détenir un appareil d’un des
fabricants de matériel hi-fi les plus reconnus et respectés.
Veuillez lire attentivement ces instructions avant de commencer l’installation.
Celles-ci vous fourniront toutes les informations nécessaires pour vous aider
à installer votre Discmaster 8.0 correctement et en toute sécurité.
Préparations pour l’installation
Avant d’installer le Discmaster 8.0 vérifiez que les éléments suivants sont inclus
dans la boîte d’accessoires.
• La carte de garantie (avec le manuel d’utilisation)
• Le câble d’alimentation
• La télécommande
• 2 câbles de modulation MC-Bus
Après avoir enlevé ces éléments, veuillez garder l’emballage.
Installez le Discmaster 8.0 dans un endroit bien ventilé éloigné des sources
de haute chaleur, de poussière ou d’humidité. Ne placez jamais le Discmaster
8.0 sous un autre appareil ou une quelconque surface pouvant obstruer son
refroidissement ou sa ventilation.
Installation
Légende du schéma du panneau arrière (Fig. 1)
1. Sortie audio numérique optique
2. Sortie S-Vidéo
3. Sortie audio numérique coaxiale
4. Sortie audio analogique stéréo
5. Sortie vidéo numérique HDMI
6. Sortie de mise à niveau du convertisseur N/A stéréo
7. Connexions MC-Bus
8. Sorties audio 5.1 par canaux avant
9. Sorties audio 5.1 par canaux arrières
10. Sortie audio sub 5.1
11. Sortie audio 5.1 par canaux centraux
12. Sortie vidéo VGA
13. Sortie vidéo composante
14. Sortie vidéo composite
15. Embase secteur
Connexion de la sortie vidéo à un téléviseur
La sortie vidéo du Discmaster 8.0 peut être connectée à un téléviseur ou à un
écran de cinq manières différentes. Le choix de la connexion et la qualité de
l’image obtenue dépendent des options disponibles sur le téléviseur / l’écran.
Les connexions disponibles sur le Discmaster 8.0 sont répertoriées par ordre
de qualité. Utilisez l’option de connexion qui apparaît le plus haut dans la liste
pour obtenir la meilleure qualité d’image possible.
Vidéo numérique HDMI
La sortie Vidéo numérique HDMI e doit être utilisée lors de la connexion d’un
téléviseur, projecteur ou écran numérique haut de gamme muni d’une entrée
numérique HDMI.
Vidéo analogique composante
La sortie vidéo composante 1# doit être utilisée lors de la connexion d’un
téléviseur, projecteur ou écran analogique haut de gamme muni de différents
connecteurs pour l’entrée vidéo composante. Vérifiez que les trois câbles de
modulation sont bien connectés aux mêmes signaux vidéo composante.
Vidéo analogique VGA
La sortie vidéo VGA 1@ doit être utilisée lors de la connexion d’un écran
d’ordinateur haut de gamme uniquement muni d’une entrée vidéo VGA
analogique.
Vidéo analogique S-Vidéo
La sortie S-Vidéo (Y/C) b offre une qualité supérieure à une connexion
composite et doit être utilisée si le téléviseur ne possède aucune des
connexions vidéo précédentes. REMARQUE : la connexion S-Vidéo doit être
activée lorsqu’elle est utilisée. Consultez la section Display Settings
(Paramètres d’affichage) du système de menu.
Vidéo analogique composite
Une sortie vidéo composite 1$ est également fournie pour les téléviseurs et
les moniteurs qui ne possèdent que cette connexion. Il s’agit de la connexion
de la qualité la plus faible.
Connexion Péritel
Pour connecter le Discmaster 8.0 à un téléviseur, projecteur ou écran qui ne
possède qu’une prise péritel, utilisez un câble de branchement ou un
adaptateur péritel qui vous donnera accès aux prises S-Vidéo ou vidéo
composite, ainsi qu'aux prises audio du téléviseur, le cas échéant.
Connexion à l’alimentation secteur
Branchez la prise du câble d’alimentation secteur dans la prise d’alimentation
1% située sur le panneau arrière du Discmaster 8.0. Connectez maintenant le
câble à une prise d’alimentation secteur appropriée.
Il n’existe pas d’interrupteur secteur sur le Discmaster 8.0. Pour couper
l’alimentation secteur du Discmaster 8.0, débranchez la prise de la prise
murale. Pour cette raison, faites en sorte que la prise soit facile d'accès lors
de l'installation de l'unité.
26
F
F

Manuel d’utilisation Cyrus Discmaster 8.0
Connexion de l’audio
Le Discmaster 8.0 offre plusieurs alternatives pour la connexion de l’audio.
1. Pour obtenir un son surround de la meilleure qualité, connectez-le
numériquement à un préamplificateur AV externe.
2. Pour des raisons pratiques et pour simplifier l’opération, connectez
directement les sorties analogiques du Discmaster 8.0 aux
amplificateurs de puissance et à un caisson de basse, ou à un système
Sub / Sat actif.
3. Si vous possédez un système stéréo à deux canaux analogiques,
connectez les sorties stéréo (ou celles de la mise à niveau du
convertisseur N/A, si installée) du Discmaster 8.0 à votre amplificateur
stéréo intégré ou à votre préamplificateur.
4. Pour obtenir un son stéréo de la meilleure qualité, connectez-le
numériquement à un convertisseur numérique / analogique stéréo
externe.
1. Connexion du signal audio numérique à un préamplificateur AV
externe
Pour un son multicanaux de la meilleure qualité, le Discmaster 8.0 peut être
connecté numériquement à un préamplificateur AV séparé. Deux options sont
disponibles pour la connexion : une connexion coaxiale
interconnexion numérique ou une connexion optique a avec une
interconnexion optique Toslink. Réglez le volume du Discmaster 8.0 sur
maximum (32) pour obtenir un son de la meilleure qualité avec cette
connexion.
2. Connexion du signal audio à l'aide du préamplificateur AV interne
Le Discmaster 8.0 comprend un préamplificateur AV numérique à 5.1 canaux
pour les programmes Dolby encodés et peut donc être utilisé comme centre
de contrôle d’un système de lecture CD/DVD surround 5.1 intégral. Pour
configurer un tel système, connectez les amplificateurs de puissance aux
sorties du Discmaster 8.0 pour les canaux audio avant h, central 1! et
Surround i. Les haut-parleurs de son surround peuvent alors être connectés
à ce système par l'intermédiaire des amplificateurs.
Un caisson de basse actif peut être connecté séparément à la sortie du canal
‘SUB’ 1).
3. Connexion du signal audio stéréo du Discmaster 8.0 à un
Si vous configurez un système stéréo à deux canaux, les sorties audio
analogiques stéréos
amplificateur ou préamplificateur stéréo Cyrus. Les entrées VI ou AV sont
recommandées. Réglez le volume du Discmaster 8.0 sur maximum (32) pour
obtenir un son de la meilleure qualité avec cette connexion.
3. Son stéréo avec un convertisseur numérique / analogique stéréo
Le Discmaster 8.0 comprend l’option d’une mise à niveau du convertisseur
N/A interne installé par le revendeur pour offrir un son stéréo de la plus haute
qualité. Si votre Discmaster 8.0 possède cette option, connectez les sorties f
du convertisseur N/A mis à niveau à votre amplificateur. Réglez le volume du
Discmaster 8.0 sur maximum (32) pour obtenir un son de la meilleure qualité
avec cette connexion.
4. Son stéréo de haute qualité avec un convertisseur N/A stéréo
Si vous possédez un système stéréo haut de gamme avec un convertisseur
N/A stéréo comme unité de contrôle, connectez numériquement le
Discmaster 8.0 à ce dernier. Deux options sont disponibles pour la
connexion : une connexion coaxiale c avec une interconnexion numérique
ou une connexion optique a avec une interconnexion optique Toslink. Réglez
le volume du Discmaster 8.0 sur maximum (32) pour obtenir un son de la
meilleure qualité avec cette connexion.
amplificateur stéréo
d du Discmaster 8.0 peuvent être connectées à un
mis à niveau haut de gamme installé
externe
c avec une
FONCTIONNEMENT
Le Discmaster 8.0 est fourni avec une télécommande qui peut modifier les
paramètres de configuration et contrôler toutes les fonctions, comme décrit en
détail dans la section « Remote Control » (Télécommande). En plus de la
télécommande, les fonctions de veille et de navigation essentielles sont
dupliquées sur le panneau avant de l’appareil.
Veuillez lire la section sur la télécommande de ce manuel et définir les
options de configuration répertoriées dans la section Système de menu afin
de vous assurer que le Discmaster 8.0 est correctement configuré pour votre
système, avant de lire des disques.
Légende du schéma du panneau avant (Fig. 2) :
1. Chargeur de disques .................Insérez les disques avec la face sur le
2. Veille ..........................................Éteint et allume le Discmaster 8.0.
3. Voyant de veille .........................Indique quand le lecteur est en veille.
4. Œil de la télécommande............Capteur de la télécommande.
5. Fenêtre d’affichage....................Affichage de l’état du Discmaster 8.0.
6. Touches Suivant / Recherche ...Appuyez sur ces touches pour passer
7. Stop / Ouvrir...............................Ouvre le chargeur de disques.
8. Lecture / Pause..........................Définit les modes lecture et pause.
Mise en marche
Le Discmaster 8.0 doit généralement rester sous tension sauf s'il n'est pas
utilisé pendant une longue période de temps. Dans ce cas, la prise murale
fournissant l'alimentation secteur doit être débranchée ou la source
d'alimentation du produit doit être débranchée.
Lors de la mise sous tension, la touche STANDBY (VEILLE) b est utilisée
pour contrôler l’alimentation. Le voyant de veille c est rouge lorsque le
Discmaster 8.0 est en veille et vert lorsqu’il fonctionne. En fonctionnement, le
logo ‘CYRUS’ apparaîtra sur l’écran de votre téléviseur.
Compatibilité des disques
Le Discmaster 8.0 est compatible avec les disques DVD-Vidéo, les VCD
(Vidéo-CD), les CD audio et les disques de compilation MP3. Vous pouvez
également visionner les disques contenant des images numériques ou des
fichiers vidéo informatiques en les lisant avec le Discmaster 8.0. Vous
trouverez des instructions pour utiliser chaque type de disque dans les
sections suivantes de ce manuel. Une liste complète des formats de fichiers
numériques compatibles est incluse dans la section des caractéristiques.
REMARQUE : les disques DVD-Vidéo incluent un identifiant de « région ». Le
Discmaster 8.0 ne pourra lire que les disques achetés dans la même
« région » que le lecteur. Le paramètre « région » du Discmaster 8.0 est
indiqué sur un symbole de globe situé à l’arrière de l ‘appareil. Assurez-vous
que les disques que vous achetez ont le même symbole de « région » que
votre lecteur ou qu’ils indiquent la région 0, qui peut être lue partout.
dessus.
aux plages de CD ou aux chapitres de
DVD suivants ou précédents.
Connexion MC-Bus (Optionnelle)
En utilisant une connexion MC-Bus sur votre Discmaster 8.0, vous pouvez
configurer un système intégré à hautes performances avec télécommande.
Cette fonction n’est disponible que si vous avez un amplificateur ou un
préamplificateur AV Cyrus. Consultez le manuel d’utilisation de ce dernier
pour la mise en place de la connexion MC-Bus.
F
F
27
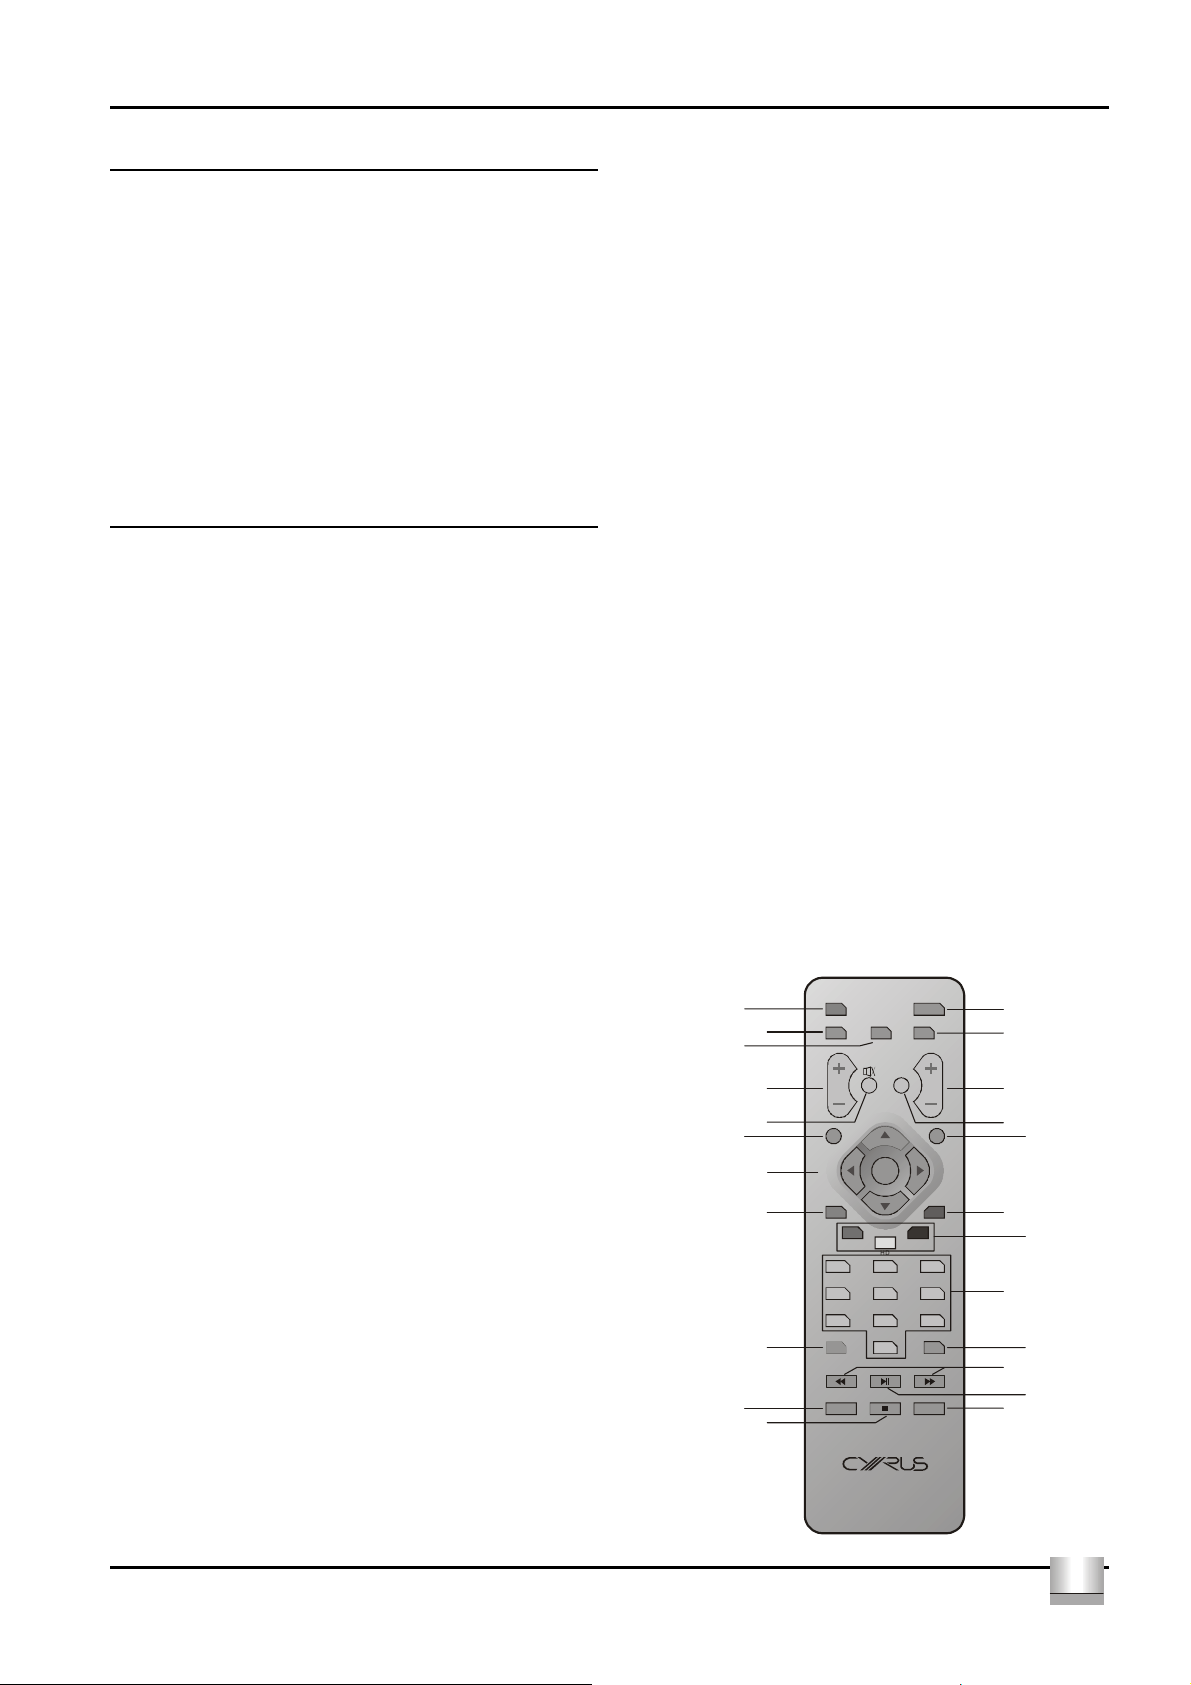
Cyrus Discmaster 8.0 Manuel d’utilisation
Fonctionnement de la télécommande
Télécommande fournie
La télécommande fournie avec le Discmaster 8.0 permet de contrôler toutes
les fonctions de lecture des disques, de configurer le lecteur à l’aide du
système de menu de configuration et de régler le volume pour les sorties
analogiques. Si vous possédez un système de haut-parleurs surround 5.1
alimenté par des amplificateurs connectés directement aux sorties des
canaux audio 5.1 du Discmaster 8.0, alors cette télécommande contrôle
toutes les fonctions du système de lecture du disque, y compris le volume.
Télécommandes système Cyrus
Si votre système inclut un amplificateur ou un préamplificateur AV Cyrus,
vous possédez peut-être déjà une télécommande système Cyrus qui vous
permet de contrôler la plupart des fonctions du Discmaster 8.0. Consultez le
manuel de cette télécommande ou le site web Cyrus à l’adresse suivante :
www.cyrusaudio.com, afin d’obtenir une liste des commandes de contrôle
disponibles pour le Discmaster 8.0.
Commandes des télécommandes
1. OPEN/CLOSE (Ouvrir / fermer) Ouvre ou ferme le chargeur de disques
pour charger un disque.
2. PROGRAM. (Programmation) Lors de la lecture d’un disque, cette
touche permet d’ouvrir une boîte de dialogue de programmation sur
votre téléviseur afin d'enregistrer la séquence de titres d’un CD et / ou
de chapitres de DVD de votre choix. Consultez la section
« Programmation » dans la partie consacrée à la Lecture d’un DVD ou
Lecture d’un CD de ce manuel pour obtenir plus d’informations sur la
programmation.
3. NEXT/PREVIOUS (Suivant / précédent) Ces touches permettent de
passer au chapitre de DVD ou à la plage de CD suivants / précédents.
4. ANGLE. Cette touche permet de changer l’angle de la caméra sur les
DVD qui offrent plusieurs options d'angle. Chaque fois que vous
appuyez sur cette touche, vous passerez à l’angle suivant.
REMARQUE : si un disque comprend plusieurs angles de caméra, alors
un symbole de caméra s’affiche en haut à droite de l’écran de votre
téléviseur en superposition des angles disponibles.
5. SETUP (Configuration) Appuyez sur cette touche pour ouvrir le menu
SETUP (Configuration). Une liste complète des options de menu
disponibles se trouve dans la section intitulée Système de menu du
Discmaster 8.0 à la page suivante.
6. MENU/PBC. (Menu) Appuyez sur cette touche pour retourner au menu
du DVD.
7. VIDEO MODE SELECTORS. (Sélection du mode vidéo) Ces touches
sont utilisées pour accéder rapidement aux différents modes vidéo. N/P
passera au mode à balayage progressif de 480 p (NTSC 525 lignes) ou
au mode 576 p (PAL 625 lignes). Si vous possédez une connexion
numérique HDMI, HD passera aux modes 720 p, 1080 i or 1080 p. VGA
définit des résolutions d’écran différentes de la gamme
VGA/SVGA/XGA/SXGA.
8. NUMERIC KEYPAD. (Clavier numérique) Appuyez sur l’une des
touches du clavier numérique pour accéder rapidement à un nouveau
chapitre de DVD ou à une nouvelle plage de CD. Appuyez sur deux
chiffres pour sélectionner un chapitre / une plage à deux chiffres.
9. SEARCH. (Recherche) Cette fonction n’est pas prise en charge par le
Discmaster 8.0.
10. SCAN FWD/REV. (Recherche avant / arrière) Appuyez sur l’une de ces
touches pour commencer la recherche au sein du disque. Appuyez à
nouveau pour augmenter la vitesse de la recherche (5 vitesses
disponibles) ou appuyez sur l’autre touche pour réduire la vitesse de
recherche.
11. PLAY/PAUSE. (Lecture / pause) Appuyez sur cette touche pour
commencer ou pauser la lecture d’un DVD ou d’un CD, s’il est arrêté ou
sur pause.
12. REPEAT. (Répétition) Appuyez sur cette touche pour activer l’affichage
de répétition à l’écran. Continuez d’appuyer sur cette touche pour
sélectionner le mode de répétition pour le titre ou le chapitre du DVD ou
la plage du CD de votre choix.
13. STOP. (Stop) Appuyez une fois sur cette touche pour sélectionner le
mode pré-stop. En mode pré-stop, le disque continue de tourner en
attendant la prochaine commande. Appuyez à nouveau sur STOP pour
stopper le disque complètement.
14. ZOOM. (Zoom) Appuyez sur cette touche pour zoomer au centre de
l’image. Appuyez à nouveau sur cette touche pour augmenter le
paramètre du zoom par incréments de 2x à 5x. Appuyez à nouveau sur
cette touche pour annuler le zoom. Lorsque le zoom est défini, les
touches de direction vous permettent de déplacer la zone de zoom dans
l'image.
15. DISPLAY. (Affichage) Appuyez sur cette touche pour activer l’affichage
de l’état à l’écran. Les touches LEFT/RIGHT (Gauche/droite) modifient
les informations affichées à l’écran.
16. TITLE. (Titre) Appuyez sur cette touche pour activer la sélection d’accès
direct aux titres du DVD-vidéo.
17. CURSOR (Direction) et OK. (Ok) Utilisez ces touches pour parcourir les
options de menu et la touche OK pour confirmer vos sélections.
18. CLEAR. (Effacer) Cette touche est utilisée lors de la programmation
pour effacer toute sélection indésirable du programme enregistré.
19. AUDIO MUTE. (Son en sourdine) Cette touche met en sourdine le son
du Discmaster 8.0. Appuyez à nouveau sur cette touche pour rétablir le
son.
20. VOLUME CONTROL. (Réglage du volume) Appuyez sur ces touches
pour régler le volume de 0 à 32. Le paramètre usine pour le volume est
32 (maximum). Conservez ce paramètre si vous connectez votre
système audio à la sortie numérique ou si vous utilisez un amplificateur
intégré ou un préamplificateur pour régler le volume de votre système
audio.
21. LANGUAGE. (Langue) Appuyez sur cette touche pour passer à la
sélection de la langue dans la barre d’affichage. Chaque fois que vous
appuyez sur cette touche, vous obtiendrez les langues disponibles.
22. SUBTITLE. (Sous-titres) Appuyez sur cette touche pour passer à la
sélection des sous-titres dans la barre d’affichage. Chaque fois que
vous appuyez sur cette touche, vous obtiendrez les langues disponibles
en sous-titres.
23. STANDBY. (Veille) Cette touche définit ou annule la Veille. Les
paramètres de volume, d’affichage et autres paramètres de
configuration sont enregistrés lors de la veille ou lors de toute mise hors
tension du Discmaster 8.0.
2#
2!
1*
2@
2)
1(
1&
1^
1%
Standby
Subtitle
Clear
N/P
123
456
789
Display
Open/clo se
Language Program
Angle
OK
VGA
HD
0
Search
a
b
c
d
Setup
Menu/PBCTitle
e
f
g
h
i
1)
Repeat
1@
1!
1$
Zoom
1#
28
F
F
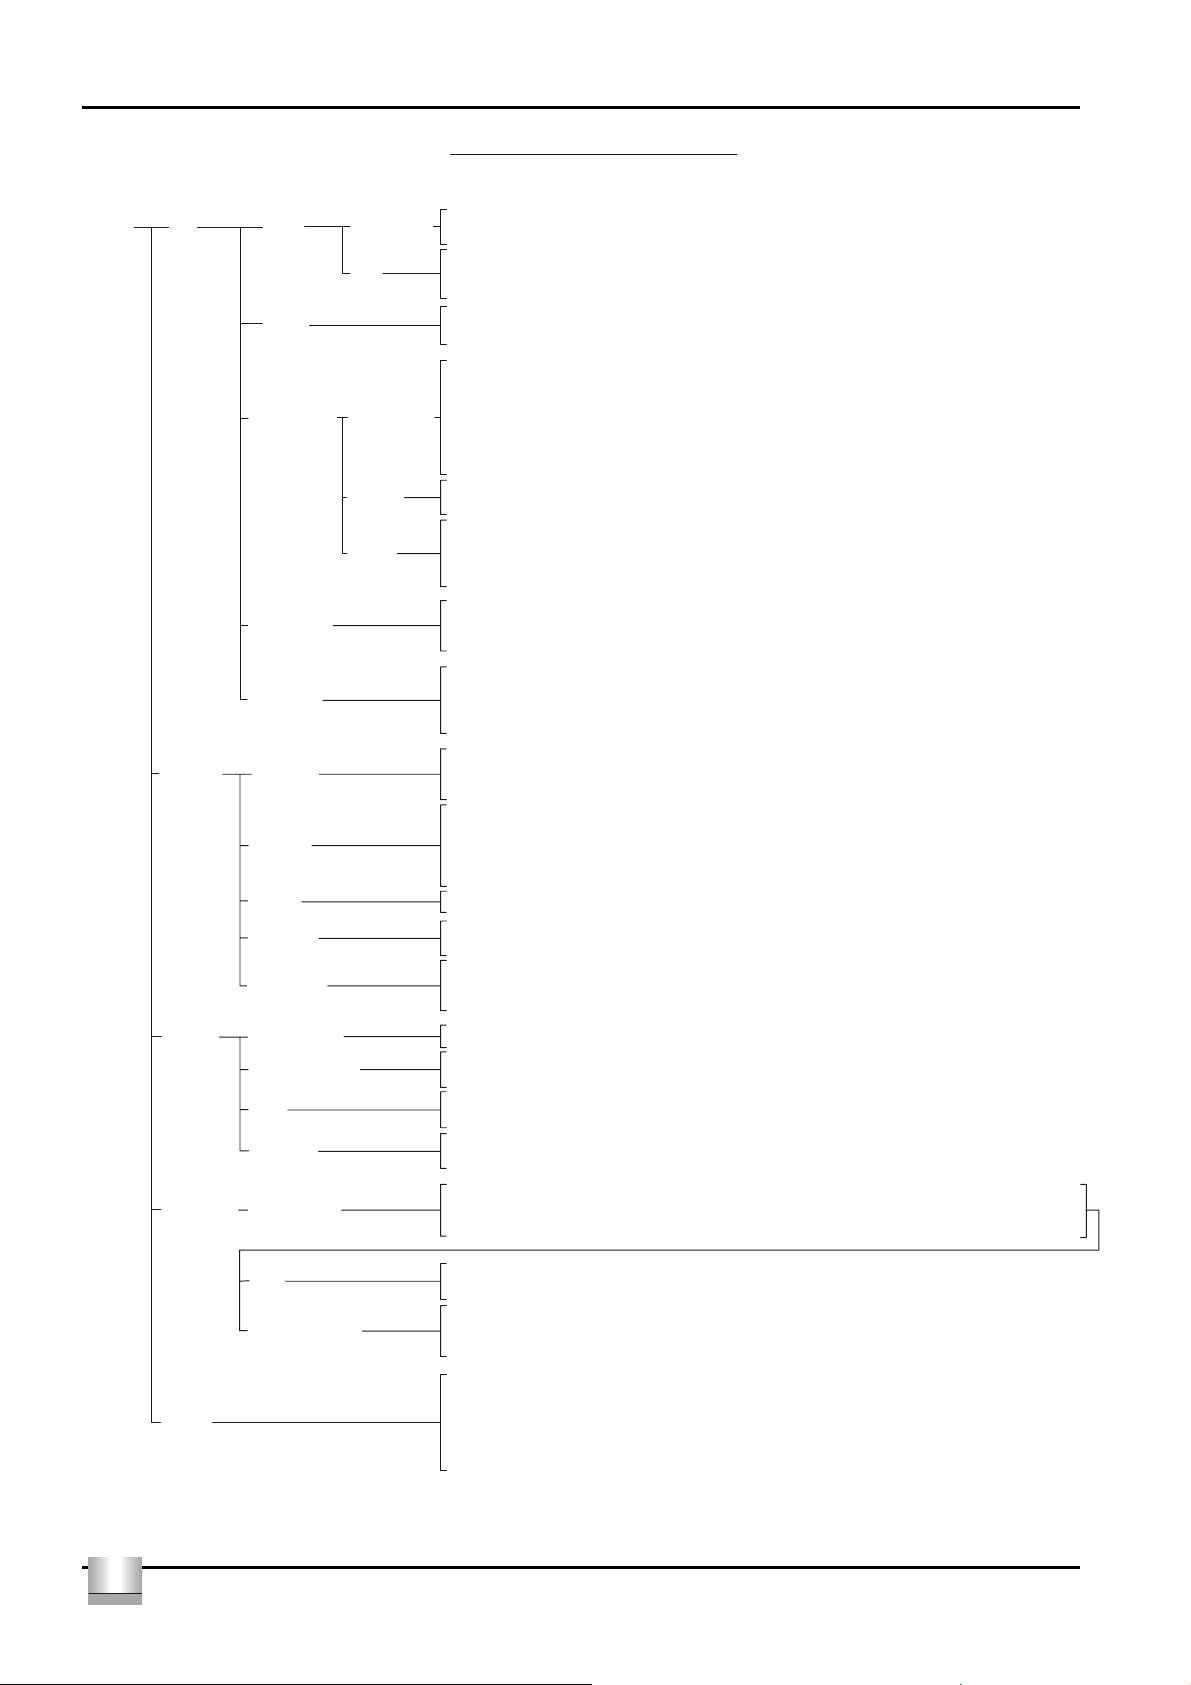
Manuel d’utilisation Cyrus Discmaster 8.0
Discmaster 8.0 Système de menu
Le Discmaster 8.0 es t configuré pour correspondre à votr e système grâce à un système de menu affiché à l'écran. Pour accéder au systèm e de menu, appuyez sur la
touche SETUP (Configur ation) de la télécommande. Parcour ez les options du menu à l'aid e des touches de direction et appuyez sur OK pour effectuer vos sélections.
SETUP
Son
Sortie
numérique
Stéréo
Haut-parleurs Haut-parleurs
Dolby Digital
DTS
Distance
Volu me
Cochez cette case pour activer les signaux audi o Dolby Digital de la sortie num érique. Si vous possédez un
convertisseur numérique / analogique stéréo, d ésélectionnez cette case.
Cochez cette case pour activer les signaux audio DTS de la sortie numérique. Si vous possédez un
convertisseur numérique / analogique stéréo ou un préamplificateur AV qui n'est pas compatible avec le
format DTS, désélecti onnez cette case.
Cochez cette case pour mixer les programmes multicanaux si vous utilisez le préamplificateur AV interne
pour un système avec deux haut-parleur s.
Sélectionnez cette option pour afficher les paramètres pour la taille des haut-parleurs système si vous
utilisez le préamplificateur AV interne. Les haut-parleurs avant droit et avant gauche doivent être
paramétrés sur Grand ou Petit. Les haut-parleurs surround centraux, gauche et droit doivent être
paramétrés sur Grand, Petit ou Désactivé. Le caisson de basse peut être allumé ou éteint. Les hautparleurs satelli tes ou montés sur support doivent être paramé trés sur Petit. Les haut-parleurs posés au sol
ou les haut-parleurs plus importants montés sur support doivent être paramétrés sur Grand. Si vous ne
possédez pas de haut -parleur à cet endroit, sélection nez Désactivé.
Si vous util isez le préamplificateur AV du Discmaster 8.0 , sélectionnez cette optio n pour définir la distance
entre vous et chaqu e haut-parleur. Les distances peuvent être co mprises entre 1 m à 6,6 m.
Si vous uti lisez le préamplific ateur AV Discmaster 8.0, sélectionnez cette option pour définir les corrections
de volume de chaque haut-parleur. Ces corrections réduisent le volume d'un haut-parleur particulier. Par
conséquent, si vous vous trouvez à proximité des haut-parleurs surround (par exemple), vous pouvez
réduire le volume de ces derniers pour qu'ils soi ent au même niveau que les haut-parleur s avant.
LPCM output
Pro Logic II
Affichage TV system
Image TV
S-Video Sélectionnez ' on' (activé) si vous utilis ez la connexion S-Vidéo de votre télév iseur.
Brightness
HDMI mode
Langues
Menus du Lect
Menus du disque
Audio
Sous-titres
Ce paramètre active un taux d'échantillonnage de 96 k via la sortie numérique PCM lorsque ce matériau
source de meilleure quali té est disponible. Défi nissez-le sur 96 k si v ous possédez un préamplificateur AV
ou un convertisseur N/A compatible avec les progr ammes 96 k, sinon définissez- le sur 48 k.
Choisissez l'une des cinq options disponibles po ur le préamplificateur AV interne. DSP mode off désactive
le décodeur Pro Logic II interne, Emulation active le décodage Pro Logic '4.1' original, Music active le
décodeur Pro Logic II, optimisé pour la lecture de musique, Movie opti mise le décodeur Pro Logic II pour la
lecture de films et Matrix est une option de décodage plus simple.
Choisissez une résolution appropriée pour votre écran dans la liste des résolutions disponibles.
REMARQUE : certains écrans ne prennent pas en charge tous les paramètres de résolution. Vérifiez donc
le mode d'emploi de v otre écran avant de modifier ce paramè tre.
Sélectionnez le format de l'écran de votre télévision / écran. Choisissez le format d'image 4/3 Letterbox
pour afficher l'image dans toute sa largeur sur un téléviseur 4/3 avec des bandes noires en haut et en bas
de l'écran. Choisissez le format 4/3 Standard pour afficher l'image dans tou te sa hauteur sur un tél éviseur
4/3, mais en pe rdant les côtés gauches et dr oits de l'image. Choisisse z 16/9 si vous possédez un tél éviseur
grand écran.
Cette option permet de régler la luminosité de l'image du Discmaster 8.0 pour qu'elle corresponde à la
luminosit é de la diffusion hors émission.
Avec cette option de menu, i l est possible de modi fier le format du signal pour la sortie HDMI. Sélectionnez
l'option qui vous donne la meilleure qualité d'image sur votre téléviseur, si vous utilisez une connexion
numérique HDMI.
Avec cette option de menu , vous pouvez choisir parmi les opt ions de langue du menu disponibl es.
Le Discmaster 8.0 sélectionne toujours la langue du menu sélectionnée lorsqu'elle est disponible sur un
disque.
Le Discmaster 8.0 sélectionne toujours la langue audio sélectionnée lorsqu'elle est disponible sur un
disque.
Le Discmaster 8. 0 sélectionne toujour s la langue des sous-ti tres sélectionnée lor squ'elle est disponibl e sur
un disque.
Verrouillage Entrez le code
Code
Niveau restriction
Original
*Remarque : le fon ctionnement du système de c ontrôle parental du Discmas ter 8.0 dépend de la dispo nibilité du codage logic iel approprié sur le DVD. Cyrus ne peut
donc pas garan tir le fonctionnement du s ystème de contrôle par ental et rejette toute r esponsabilité associée au visionnement non int entionné du contenu du disq ue.
En cas de doute, vérif iez que la lecture du disque se fait conformément aux paramètres du cont rôle parental avant d'autoris er vos enfants à le regarder.
F
F
Votre mot de passe doit être saisi pour accéder au niveau de menu suivant. Le mot de passe usine est
8888. Il peut être modifié au niveau suivant du menu. Le fait de rétablir les paramètres par défaut avec
l'option de me nu par défaut rétablira le mot de pas se usine.
Utilisez cett e option de menu pour modifier votre mot de passe afin d' accéder aux paramètres de restr iction
en fonction de la classifi cation.
Les paramètres de restriction en fonction de la classification limitent les classifications de DVD pouvant
être lues. Utilis ez cette option de menu pour modifi er votre mot de passe afi n d'accéder aux paramètres de
restriction en fonc tion de la classification. *
Rétablit tous les paramètres d'usine par défaut. Le volume doit être réglé sur maximum (REMARQUE : il
est recommandé de réduire ce paramètre avant de lire un disque si votre Discmaster 8.0 est directement
connecté à des amplificateurs de puissance). Les sorties Dolby Digital et DTS sont activées. Les hautparleurs sont tous définis pour une gra nde taille à une distance de 3,3 m et le cais son de basse est allumé.
La Vidéo est définie sur 480 p avec une taille d'écran de 4/3 Letterbox. HDMI est défini sur RGB / 60 Hz.
Toutes les options de langue sont définie s sur Anglais.
29

Cyrus Discmaster 8.0 Manuel d’utilisation
Lecture d’un disque DVD-Vidéo
Vous reconnaîtrez les disques DVD-Vidéo par leur logo. Selon le genre de
vidéo contenu sur le disque (un film, des vidéo-clips, des séries télévisées,
etc.) celui-ci contiendra un ou plusieurs titres et chaque titre pourra avoir un
ou plusieurs chapitres. Pour rendre l’accès facile et pratique, le Discmaster
8.0 vous permet de parcourir les titres, ainsi que les chapitres.
Lecture d’un disque
Quand un DVD est chargé, le Discmaster 8.0 commence automatiquement la
lecture. Si la lecture du disque s’est arrêtée, appuyez sur
recommencer la lecture du disque.
Menu du disque
La plupart des DVD ont un menu pour la sélection des options ou pour
parcourir le disque. Dans un menu de disque, utilisez les touches de direction
pour mettre votre sélection en surbrillance et appuyez sur OK.
Passage à un autre chapitre
Quand un titre a plusieurs chapitres, vous pouvez passer à un autre chapitre
pendant la lecture en appuyant brièvement sur la touche
Pour passer directement à n’importe quel chapitre, entrez le numéro du
chapitre à l’aide du pavé NUMÉRIQUE. Si le numéro a plus d’un chiffre,
appuyez sur les touches les unes après les autres.
Recherche d’images
Pour effectuer une recherche rapide avant ou arrière sur le disque, appuyez
sur les touches
accélérer ou ralentir la vitesse de la recherche, appuyez sur les touches
ou
, selon le cas. Pour arrêter la recherche, appuyez sur la touche au
moment de votre choix.
Arrêt sur image et ralenti
Pour obtenir un arrêt sur image, appuyez sur
reprendre la lecture, appuyez sur la touche
ralenti et définir la vitesse à l’aide des touches
Angles de caméra
Si un disque comporte des séquences enregistrées avec différents angles de
caméra, le symbole d’angle apparaîtra affichant le nombre d’angles
disponibles, ainsi que l’angle visionné. Vous pouvez alors changer d’angle de
caméra si vous le désirez en appuyant sur la touche ANGLE.
REMARQUE : Pour désactiver le symbole Angle, appuyez sur la touche
DISPLAY (Affichage).
Visionnement limité
Si vous avez défini des restrictions en fonction de la classification afin de
limiter tout visionnement non autorisé, seuls les DVD de la classification
autorisée ou de classification inférieure pourront être lus. Les disques de
classification supérieure pourront être lus, le cas échéant, en suivant les
invites qui s’affichent à l’écran lors du chargement du disque et de la saisie du
bon mot de passe.
Répétition du titre / du chapitre
Appuyez une fois sur la touche REPEAT (Répétition) de la télécommande
pour répéter le titre en cours de lecture ou deux fois pour répéter le chapitre.
Si vous appuyez une troisième fois sur cette touche, cela annule la répétition.
Enregistrement d’une programmation.
Pour programmer une sélection de titres et/ou de chapitres d’un DVD dans la
mémoire du Discmaster 8.0, chargez un disque pour que sa lecture
commence. Appuyez maintenant sur la touche PROGRAMMATION b de la
télécommande pour ouvrir le menu de programmation affiché à l’écran. À
l’aide des touches de direction haut/bas, sélectionnez le titre à enregistrer.
Appuyez sur OK pour enregistrer le titre complet dans la mémoire ou appuyez
sur la touche droite pour afficher une liste des chapitres de ce titre. Utilisez
les touches de direction haut / bas pour sélectionner les chapitres à
enregistrer et appuyez sur OK pour enregistrer chacun d’entre eux dans la
mémoire. Pour retourner à la liste des titres, appuyez sur la touche gauche.
Pour quitter le menu programmation, appuyez sur la touche droite afin de
mettre en surbrillance le symbole DONE (terminé), puis appuyez sur OK.
ou . La recherche commence et le son est coupé. Pour
pendant la lecture. Pour
. Vous pouvez sélectionner le
ou .
pour
ou .
Lecture d’un CD audio
Appuyez sur la touche pour lire un disque. La lecture commence quand
vous fermez le tiroir de disque.
Pendant la lecture, l’affichage du lecteur indique la plage en cours de lecture
et le temps de lecture écoulé.
Passage à une autre plage
Vous pouvez passer à une autre plage pendant la lecture en appuyant
brièvement sur la touche
Pour passer directement à n’importe quelle plage, entrez le numéro de la
plage en utilisant le pavé NUMÉRIQUE.
REMARQUE :- Si le nombre a plus d’un chiffre, appuyez rapidement sur les
touches, les unes après les autres.
Recherche rapide
Pour effectuer une recherche rapide avant ou arrière sur le disque, appuyez
sur les touches
son est coupé. Pour accélérer ou ralentir la vitesse de la recherche, appuyez
sur les touches
sur la touche
Pause
Pour pauser la lecture d’un disque, appuyez sur
reprendre la lecture, appuyez sur la touche
Répétition de la plage / du disque
Allumez le téléviseur pour vérifier l’état à l’écran pendant que vous définissez
la répétition. Appuyez une fois sur la touche REPEAT (Répétition) de la
télécommande pour répéter la plage en cours de lecture ou deux fois pour
répéter l’intégralité du disque. Si vous appuyez une troisième fois sur cette
touche, cela annule la répétition.
Lecture d’une sélection programmée
Pour programmer une sélection de plages d’un CD dans la mémoire du
Discmaster 8.0, vous devrez allumer votre téléviseur. Chargez le disque de
façon à ce que la lecture démarre. Appuyez maintenant sur la touche
PROGRAM (Programmation) et utilisez les touches haut / bas pour
sélectionner les plages que vous voulez programmer. Appuyez sur OK pour
enregistrer chaque plage dans la mémoire. Si vous ajoutez une plage par
erreur, appuyez sur la touche CLEAR (Effacer). Appuyez sur PLAY (Lecture)
lorsque vous êtes prêt à commencer la lecture de la sélection programmée.
Retirez le disque pour effacer complètement la mémoire du programme.
au moment de votre choix.
ou pour passer à la plage suivante.
ou pendant la lecture. La recherche commence et le
ou , selon le cas. Pour arrêter la recherche, appuyez
pendant la lecture. Pour
.
30
F
F

Manuel d’utilisation Cyrus Discmaster 8.0
Lecture de music MP3, de photos numériques ou de
données vidéo de disques informatiques
Le Discmaster 8.0 peut également lire des plages audio MP3, des collections
de photos numériques et des données vidéo enregistrées sur des disques
CD-R ou DVD-R.
Disques avec un seul type de données
Pour lire les données d’un disque contenant uniquement l’un de ces types de
données, chargez le disque et appuyez sur
seront lus dans l’ordre. S’il y a plusieurs dossiers, le Discmaster 8.0 lira les
fichiers de chaque dossier dans l'ordre.
Passage à une autre plage ou photo
Vous pouvez passer à une autre plage ou photo pendant la lecture en
appuyant brièvement sur la touche
Options d’affichage à l’écran
Appuyez sur la touche STOP à tout moment de la lecture pour afficher une
liste des fichiers et une liste des dossiers, le cas échéant. Vous pouvez
parcourir la liste des dossiers à l'aide des touches de direction pour
rechercher le dossier de votre choix, puis appuyez sur
lecture.
Disques avec plusieurs types de données et des données enregistrées
dans des dossiers
Chargez le disque et allumez votre téléviseur. Si les données représentent un
mélange de fichiers musicaux, d'images numériques et vidéo ou si elles sont
enregistrées dans des dossiers, un menu s'affiche alors pour activer la
sélection du type de données ou du dossier à lire. Une fois que vous avez
sélectionné le type de données à lire, appuyez sur
disque ou utilisez la liste des dossiers affichée sur votre téléviseur pour
sélectionner les données de votre choix. Vous pouvez parcourir la liste des
dossiers à l'aide des touches de direction pour rechercher le dossier de votre
choix, puis appuyez sur
liste des dossiers à tout moment, appuyez sur la touche DISPLAY
(Affichage).
pour commencer la lecture. Pour retourner à la
or pour passer à la plage suivante.
. Tous les fichiers du disque
pour commencer la
pour lire l’intégralité du
Fonctions spéciales disponibles lors de la lecture de
disques de photos numériques
Vitesse du diaporama d'images
Vous pouvez modifier la vitesse d’un diaporama d’images fixes à l’aide des
touches haut / bas. Remarque : les images numériques de résolution
supérieure prendront plus de temps à se charger dans le diaporama.
Pauser un diaporama
Appuyez sur
nouveau sur
Rotation des images
Lors de l'affichage d'images fixes, vous pouvez faire pivoter l'image à l'écran
en appuyant sur la touche ANGLE (Angle). Chaque fois que vous appuyez
sur cette touche, l'image pivotera de 90°.
Zoom et panoramique d'images
Lors de l’affichage d'images fixes, vous pouvez zoomer sur l’image en
appuyant sur la touche ZOOM (Zoom). Quatre zooms différents sont
disponibles. Appuyez sur ZOOM (Zoom) une cinquième fois pour annuler
cette fonction.
Miniatures d’images
Pour afficher des miniatures d’images afin de faciliter la sélection des images,
appuyez sur la touche MENU/PBC (Menu) de la télécommande. Vous pouvez
sélectionner une image à partir des miniatures à l’aide des touches de
direction, puis l’afficher et commencer un diaporama en appuyant sur
pour pauser le diaporama à tout moment. Appuyez à
pour redémarrer le diaporama.
.
F
F
31

Cyrus Discmaster 8.0 Manuel d’utilisation
GUIDE DE DÉPANNAGE
Si votre Discmaster 8.0 ne fonctionne pas correctement, coupez l’alimentation
et vérifiez attentivement toutes les connexions en suivant les instructions de
ce manuel. Si les problèmes persistent, la liste suivante pourra vous aider.
En cas de doute, consultez votre revendeur.
Pas d’image ni de son (tous les disques)
Mettez le système hors tension et vérifiez que les connexions sont correctes
entre le Discmaster 8.0 et le téléviseur, l’amplificateur ou le préamplificateur
AV.
Vérifiez que tous les appareils sont allumés et que la bonne entrée est
sélectionnée sur le téléviseur, l'amplificateur ou le préamplificateur AV.
Saut d’image, couleurs incorrectes ou corrompues
Il se peut que le mode vidéo d’affichage sélectionné ne soit pas pris en
charge par votre écran. Appuyez sur le bouton N/P pour passer au mode
vidéo de base (NTSC). Appuyez à nouveau sur le bouton N/P pour passer
au mode vidéo de base (PAL).
Il se peut que la sortie S-Vidéo soit activée pendant que vous regardez
une autre sortie vidéo. Si c’est le cas, désactivez la sortie S-Vidéo.
Le disque tourne sans son.
Vérifiez dans le menu SETUP (Configuration) que le mode audio
approprié est bien sélectionné pour votre système et vos connexions.
Affichage d’un avertissement sur le code régional lorsqu’un disque
est inséré
Vérifiez que le symbole de la région du disque correspond à celui situé à
l’arrière du lecteur (nombre avec un symbole de globe). Pour éviter ce
problème, faites en sorte d’acheter vos disques dans la même région que
le lecteur.
Le DVD s’arrête et saute à une autre scène.
Le disque peut être sale ou abîmé. Essayez un autre disque. Si l’autre
disque fonctionne correctement, essayez de nettoyer le premier disque.
REMARQUE : certains disques possèdent deux couches. La lecture fera
une courte pause durant le chargement de la couche. Cela ne se produira
qu’une seule fois pendant la lecture de ces disques.
La lecture du DVD ne commence pas au début.
Si ce DVD est le dernier disque que vous avez lu, la fonction de reprise
continuera la lecture à partir de ce moment dès que vous le lisez à
nouveau. Appuyez deux fois sur STOP pour retourner au début du DVD.
La télécommande ne fonctionne pas.
Les piles de la télécommande doivent peut-être être changées :
Retirez le couvercle des piles situé sous la télécommande. Enlevez les
piles et remplacez-les par des piles neuves en faisant bien attention à la
polarité indiquée sur le compartiment des piles.
Les piles ne doivent être remplacées que par des piles neuves de type
AAA (I.E.C. LR03).
Appareil laser
Cette étiquette sur l’arrière de
l’appareil vous indique que ce
produit contient un laser.
L’ouverture de l’appareil vous
exposera à des radiations du laser
WEEE (Equipement électrique et électronique de rebut)
Ce logo signifie que le produit ne doit pas être jeté avec les
déchets ménagers. Il doit être déposé à un point de
ramassage spécialisé pour être recyclé. Votre coopération
contribuera à l'usage efficace des ressources naturelles.
Pour obtenir davantage d'information sur les points de
recyclage, contactez votre service de ramassage ou votre
mairie.
GARANTIE
La carte de garantie jointe doit être complétée par l’acheteur et retournée
à CYRUS ou son Distributeur dans les 8 jours de l’achat. Aucun
Revendeur ou Distributeur ne peut changer les termes de la garantie, qui
est personnelle à l’acheteur original et n’est pas transférable.
Veuillez garder la facture comme preuve d’achat.
Les demandes de garantie doivent être faites autant que possible au
Revendeur chez qui le produit a été acheté.
La garantie exclue :
• Les dommages causés par négligence, accident, mauvaise
utilisation, ou du fait d’une installation incorrecte, d’une modification
ou d’une réparation par un personnel non autorisé. Toute
intervention par un service non agréé entraînera la perte de la
garantie.
• La responsabilité pour dommages ou pertes dus au transport de ou
vers l’acheteur.
• Toute conséquence dommageable, perte ou blessure, causée par ou
en conjonction avec cet équipement.
Les coûts du transport (aller et retour) des appareils sous garantie
envoyés pour réparation sont à la charge du client. Si l’appareil retourné
se trouve correspondre aux normes du constructeur, CYRUS se réserve
le droit de facturer les frais occasionnés.
Ces conditions n’affectent en rien vos droits de consommateurs.
CARACTERISTIQUES
Alimentation
Tension : .................................................Comme indiquée à l’arrière de l’unité.
Consommation
ACTIVE........................................................................................................12W
Veille ..............................................................................................................3W
EMC et sécurité (230 V) ................................................................................ CE
Boîtier
Dimensions (LxHxP).............................................................215 x 75 x 365 mm
Poids..........................................................................................................2.6Kg
Matière...................................................................................Châssis en alliage
Performances audio analogiques
Niveau de sortie.................................................................................... 2.0V rms
Impédance de sortie .................................................................................300Ω
Bande passante.............................................................................. 20Hz-20kHz
Séparation des canaux........................................................... > 100 dB à 1 kHz
> 75 dB à 20 kHz
Rapport signal bruit (avec plage de silence) .......................................> 97 dBA
THD à -10 dB..........................................................................................0.015%
Performances audio numériques
Compatibilité de la sortie PCM ................................................44,1 k, 48 k, 96 k
Compatibilité Surround................................................................... Dolby Digital
Niveau de sortie................................................................................ 0,5 V pk-pk
Impédance de sortie ..................................................................................75 Ω
Performances vidéo
Formats de sortie.....................................HDMI numérique, Vidéo composante
......................................................S-Vidéo (Y/C), Composite
......................................................VGA, SVGA, XGA, SXGA
Niveau de sortie...................................................................................1 V pk-pk
Impédance de sortie ..................................................................................75 Ω
Cyrus se réserve le droit de modifier toute caractéristique sans préavis. E &OE
32
F
F
 Loading...