

Page 1

UserInstructions
CyrusdAD1
Page 2
Cyrus dAD1 INTRODUCTION
English
Page 3
CAUTIONS Cyrus dAD1
Congratulations on the purchase of your Cyrus dAD1 CD
player. This is a precision manufactured state-of-the-art
product, constructed to the highest standards and
specifications. This manual contains installation and
operating instructions to enable you to connect and
operate your CD player correctly, thus ensuring the
greatest satisfaction and long term use.
This instruction manual contains the following sections:
Cautions ..............................................................................2
Installation & Operation.....................................................4
Operation ............................................................................6
Remote Control ..................................................................8
The Cyrus Audio Commander............................................9
Additional Information..................................................... 10
Trouble Shooting.............................................................. 11
UNPACKING
Always follow the instruction handbook and retain it in a
safe place for future reference.
Before proceeding with installing the dAD1, ensure that
the following items are included in the accessory box:
•
Instruction Manual
•
MC-BUS interconnects
•
Remote Handset
After removing these items, please retain the packing for
future use.
CAUTION
POLARISED CONNECTOR (115V PRODUCTS ONLY)
CONNECTOR POLARISE (PRODUITS 115V SEULEMENT)
To prevent electrical shock, match wide blade of plug to wide slot
and fully insert
Specifications & Guarantee.............................................. 12
To enable you to make full use of the comprehensive
facilities of the dAD1 we would suggest that you read
these sections which will explain the fundamental
operations of the unit.
English
Attention: Pour éviter les chocs électriques, introduire la lame la
plus large de la fiche dans la borne correspondante de la prise et
pousser jusqu'au fond.
2
Page 4
Cyrus dAD1 CAUTIONS
SUPPLY VOLTAGE
Your dAD1 is factory set to operate from a fixed mains
supply voltage, which is marked on a label at the rear of
the unit. Before connecting, check that this voltage is the
same as your mains supply, i.e.
230V Products Voltage Range 220V-240V
115V Products Voltage Range 110V-120V
LOCATION
Install the dAD1 in a well-ventilated location where it will
not be exposed to high temperature or humidity. Avoid
installing the dAD1 in a location which is exposed to
direct rays of sun, or near hot appliances or radiators.
Placing or using the dAD1 for long periods on heatgenerating sources will affect performance and may
damage the cabinet. Installation in a damp or dusty
environment may result in malfunction or accident.
PRECAUTIONS REGARDING INSTALLATION
Do not let any liquid or foreign object fall into this unit.
Avoid running the power cord over or near sharp objects.
If the dAD1 is not to be used for a long period of time,
unplug the unit from the mains power supply. This unit
contains no user serviceable parts.
Never
remove any
panels from the unit or attempt to service it. In the rare
event of a failure, refer to qualified service personnel.
RE-LOCATING
The dAD1 is supplied specifically for use in your location.
Consult your Cyrus distributor to arrange for conversion
of your dAD1 should you move to another area with
different mains voltage requirements.
The dAD1 may be positioned as a freestanding unit or
alongside a partnering Cyrus unit. Never stand it on top of
a power amplifier which may generate heat. The dAD1
must always sit horizontally on a flat firm surface.
Important Note for UK Customers
The mains lead of this unit is fitted with a UK 13A Plug.
Do NOT disassemble this plug. If for any reason you
remove the plug, dispose of it safely and do not attempt to
re-use it.
The wires in the mains lead are coloured in accordance
with the following code:
If these colours do not correspond with the coloured
markings identifying the terminals on your new mains
plug:
Connect the
with the letter N or coloured
Connect the
with the letter L or coloured
Ensure that your equipment is connected correctly. If in
doubt, consult a qualified electrician
wire to the terminal which is marked
Blue
Brown
Blue -
wire to the terminal which is marked
neutral,
Black
.
Red
Brown -
.
.
live.
3
English
Page 5

INSTALLATION & OPERATION Cyrus dAD1
)
)
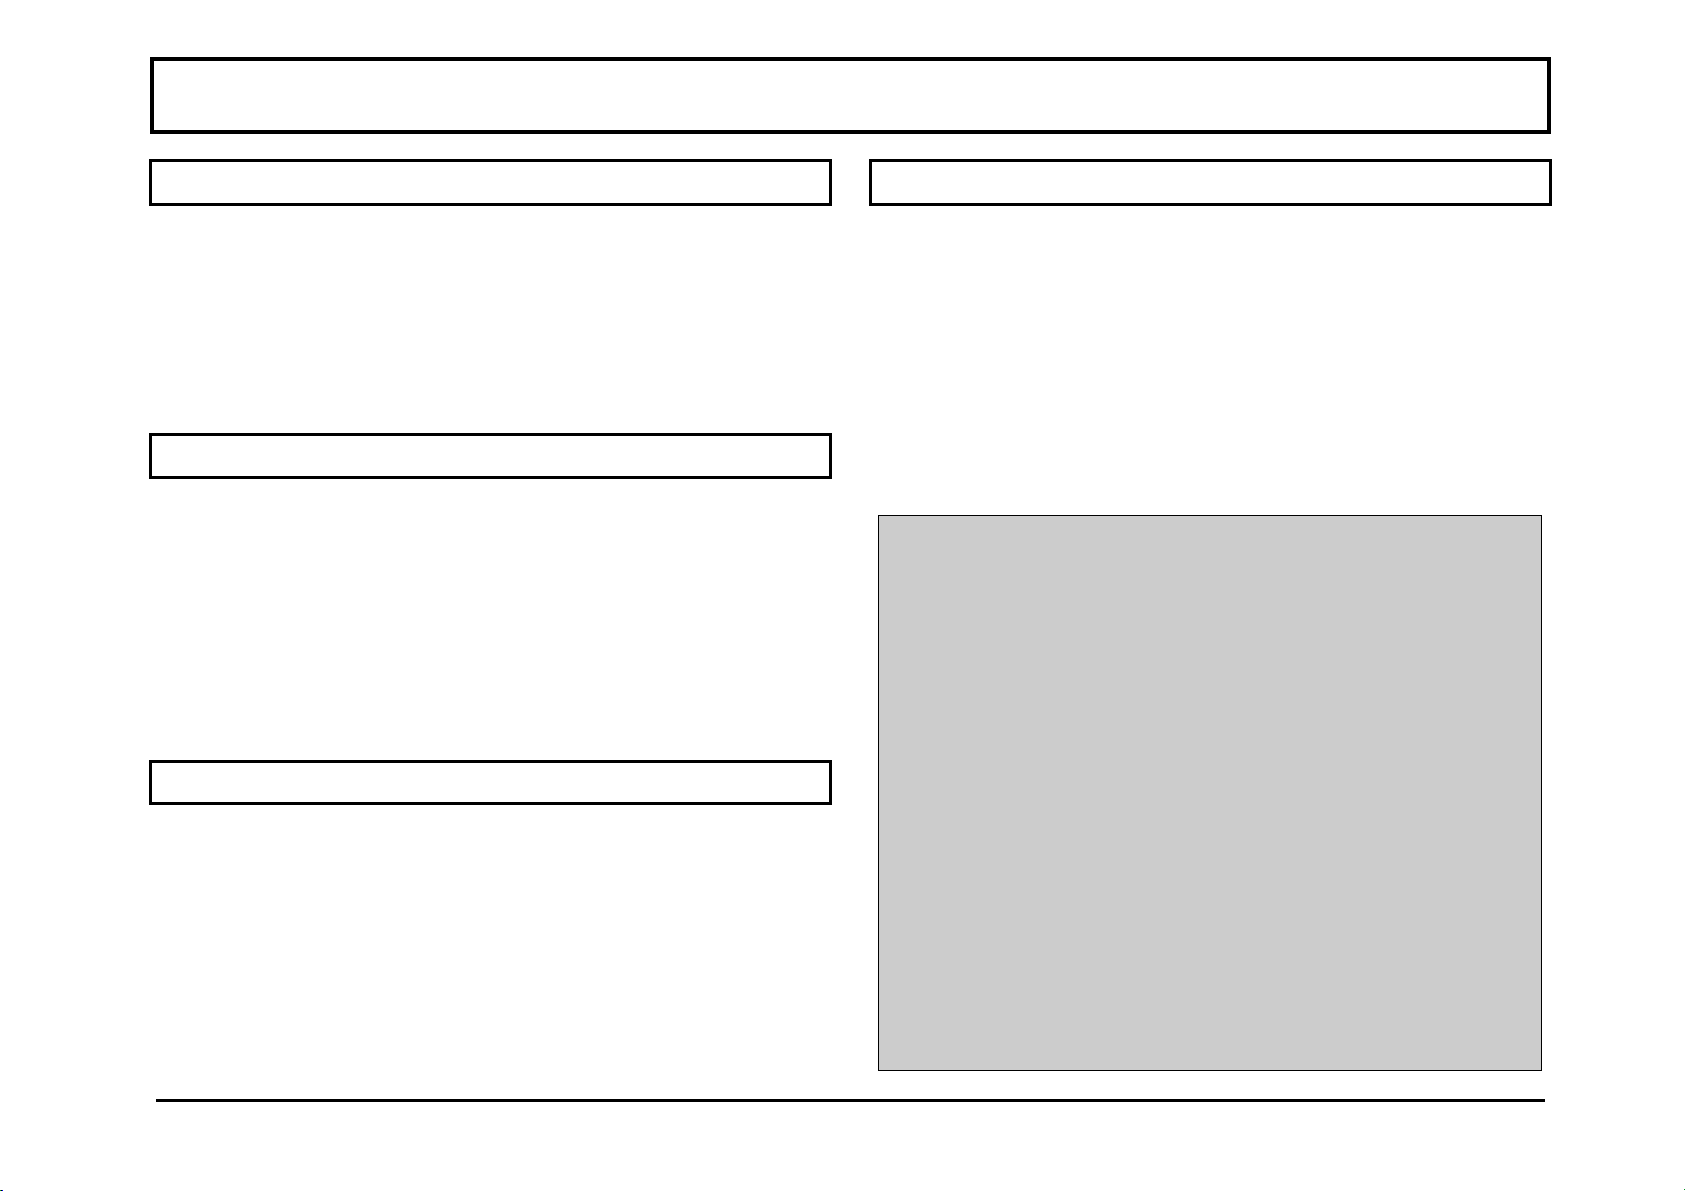
Cyrus dAD1 (rear view
1. MC-BUS connections
2. Audio Outputs
3. Digital Output
English
Cyrus dAD1 (front view
1. CD Loading Door
2. Standby Key
3. Standby Light
4. Remote Eye
5. Display Window
6. Stop/Open
7. Memory Store
8. Search Forward
9. Search Reverse
10. Next Track
11. Previous Track
12. Play/Pause
4
Page 6

Cyrus dAD1 INSTALLATION & OPERATION
CONNECTING POWER TO THE UNIT
In the UK, the dAD1 comes fitted with a mains plug. The
plug fuse should be replaced only with a 3 Amp Fuse.
CONNECTING TO THE SYSTEM AMPLIFIER
Connect one end of a quality RCA interconnect to the
audio output sockets c on the rear panel of the dAD1 and
the other end to a line level input of your amplifier. Inputs
that are suitable for this purpose are CD or AUX. DO
NOT connect the dAD1 to the PHONO input.
CONNECTING AN EXTERNAL D/A CONVERTER
The dAD1 has a digital output signal, which may be used
to drive an external D/A converter. Using a ‘digital’
phono interconnect, connect the socket marked DIGITAL
OUT d on the rear panel of the dAD1 to the input of a
suitable D/A converter. Referring to the relevant
handbooks, connect the audio outputs of the D/A
converter to a suitable input of the amplifier.
POWER CONTROL
The mains power to the dAD1 should normally be left on
unless left unattended for a long period when the mains
power at the wall socket should be switched off or the
product disconnected from the AC supply.
Please refer now to the front view on page 4
When power is applied to the dAD1, the STANDBY key
c can be used to switch the unit on and off. The standby
light d will show red when the Cyrus dAD1 is in standby
and green when operating.
LOADING A DISC
Press the STOP/OPEN key g to open the CD tray.
Load a CD into the tray with the label side upward.
Press the STOP/OPEN key to close the CD tray.
Note:- The dAD1 is designed for reproduction of audio
compact discs only. Do not attempt to play CD-ROM or
other types of disc on this product.
MC-BUS SYSTEM CONNECTION
Connecting the MC-BUS sockets on the rear panel enables
specific Cyrus products to operate as a fully functional
integrated system with your dAD1. The Additional
Information section of this manual has fuller details.
5
PLAYING A DISC
To play a disc, press the PLAY/PAUSE key 1@. Playback
of a disc will always commence from track 1 unless
otherwise selected. Refer to the front panel display on
page 6 for full details of the display information available
during disc playback.
English
Page 7

OPERATION Cyrus dAD1
PAUSING
Pressing the PLAY/PAUSE key 1@ will pause the current
track being played, and hold the disc at the precise point
of interruption. The PAUSE symbol will show on the
display. Press the PLAY/PAUSE key 1@ again to resume
playing the disc.
FAST FORWARD/REVERSE
The SEARCH FORWARD i and SEARCH REVERSE j
keys can be used to locate a specific point within a track.
Fast search will commence at a slow speed increasing
after a few seconds if the key is held down.
The Fast Search keys will also search through next or
previous tracks if held down long enough.
PREVIOUS/NEXT TRACK SELECTION
Pressing the NEXT 1) or PREVIOUS 1! keys allow you to
advance or regress successively through all the tracks on
the CD. Track indications appear on the display.
When you are playing a track, pressing NEXT once will
take you to the next track.
DISPLAY INDICATIONS
f e d b c
1. Repeat Indicator........................................................
Indicates that repeat has been set from the handset.
2. Track Display (Two Digit) ....................................
Track number, disc reading and error display.
3. Memory Display.................................................
Indicates when a program is stored in the memory.
4. Time Mode Indicator .............................
Two display modes are normally available*:-
i) Total time (disc stopped)..................
ii) Elapsed time for the current track......
(*See page 9 for time remaining mode)
If however, when playing a track, you want to go back a
track, you will need to press the PREVIOUS key twice;
once to take you to the start of the current track and once
more to take you to the start of the previous track.
English
5. Time Display ............................................
Shows the total time, time elapsed, or program times.
6. Pause Indicator .........................................................
This symbol indicates that pause is set.
6
Page 8

Cyrus dAD1 OPERATION
STOP/OPEN
The STOP/OPEN key g has several uses.
When a disc is playing, pressing STOP once will stop the
disc immediately.
Pressing STOP twice will stop the disc and open the tray.
A long continued depression of the STOP key will stop
the disc and open the CD loading tray.
If the disc is already stationary, one touch of the
STOP/OPEN key g will open the tray.
PROGRAM MEMORY STORAGE
To store a customised program sequence: Load a disc.
Select the desired track number by using the NEXT key 1)
or PREVIOUS key 1!, then press the MEMORY key h.
The display will confirm memory storage.
As each selection is stored, the display will show the letter
'P', followed by the position of the track in the memory
(for example P:07 indicates this track is in position seven).
Repeat this for up to 20 tracks.
2. When engaging STOP while a program is stored, an
extra press is needed to clear the memory. Thus:
• Press STOP once to stop the disc.
• Press STOP a second time to clear the memory.
• Press STOP a third time to open the tray.
• One continuous press will accomplish all operations.
When using the handset three separate presses are
needed.
PROGRAM MEMORY REVIEW
After storing a selection of tracks you can check the
contents of the memory with a long press of the
MEMORY key h. The program display will show each
memory position in turn and the track display will show
the corresponding track numbers.
PLAYING A PROGRAM
Having stored your program, press PLAY to commence
playing the program.
Note:
1. Memory full indication will show on the display
when the program stored exceeds 20 tracks.
7
If you press the NEXT or PREVIOUS keys during
playback of a stored program, the next or previous track in
the program will be selected.
English
Page 9

REMOTE CONTROL Cyrus dAD1
REMOTE CONTROL HANDSET
The principal functions of the dAD1 are available on the
remote control handset supplied with the unit. These
features have been fully covered in the operation section.
The handset also provides access to additional features
which are detailed opposite.
1. Stop/Open
2. Pause
3. Play
4. Repeat
5. Random Play
REPEAT
RANDOM
INSTALLING THE HANDSET BATTERIES
Remove the battery compartment cover located
underneath the unit. Fit the two AAA batteries, one behind
the other, in the location provided. Observe the polarity
marked in the bottom of the battery case.
REPEAT
The REPEAT key e can be used for replay of the entire
disc or programmed tracks.
When REPEAT is selected, its symbol will show on the
display. To clear REPEAT, press the key a second time.
If a program selection has been stored, the REPEAT key
will allow continuous play of this program sequence.
RANDOM PLAY
Pressing the RANDOM key f will cause the dAD1 to
play all the tracks on the disc in a random order.
6. Next Track
7. Previous Track
English
CD Remote Handset
THE Cyrus AUDIO COMMANDER
The Cyrus Audio Commander (see page 9) is available as
an accessory which facilitates the integrated operation of a
wide range of Cyrus products. When using the Audio
Commander an extended range of operating facilities is
available on the dAD1 which will enhance your enjoyment
of this product.
8
Page 10

Cyrus dAD1 THE CYRUS AUDIO COMMANDER
OPERATING THE dAD1 WITH THE COMMANDER
The Cyrus Audio Commander enables integrated system
operation of Cyrus components including the dAD1.
The handset also provides operating features not found on
the standard remote handset.
1. CD Select
2. System On
3. System Standby
4. Pause
5. Play
6. Stop/Open
7. Next/Previous Track
8. Search Fwd./Rev.
9. Memory Store
10. Number Keypad
11. Repeat
12. Time Display
13. Display
SWITCHING ON/OFF
From Standby, press the CD SELECT key b to select the
dAD1 and bring the system amplifier/s out of Standby.
Alternatively:
Press the SYSTEM ON key c to bring the
Cyrus Pre or Cyrus IIIi/III out of Standby. Now press the
CD SELECT key b to select the dAD1 and activate it.
Pressing the SYSTEM STANDBY key d will set any
Cyrus amplifier, tuner or CD player to Standby.
REMOTE OPERATION –ADDITIONAL FEATURES
Search:
Forward and Reverse Search are engaged by
pressing the and keys i.
Time Display
key 1@
Elapsed Time (
This changes the display between:
.
), which is the time elapsed
from the beginning of the current track, and Remaining
Time (
), which is the time remaining to the
end of the disc or a program, if stored.
Display
key 1#
Direct Access Numeric Keypad:
This key switches the display on/off.
.
Press any number key
1) to select and play a track. The track number will appear
on the display. If the disc has more than ten tracks the
dAD1 will briefly wait for a second digit if appropriate.
When a program is stored, the keypad will enable access
only to tracks included in the program memory.
9
English
Page 11

ADDITIONAL INFORMATION Cyrus dAD1
dAD1 MAINTENANCE
There are no user serviceable parts in the dAD1, so there is
no reason to remove any panels. Clean the cabinet using a
slightly moistened chamois leather. DO NOT use cleaning
agents containing alcohols, ammonia or abrasives.
DISC MAINTENANCE
Treat your discs with care. If you always handle a disc by
its edges and replace it in its storage box after use,
cleaning will not normally be necessary. If fingerprints,
dust or dirt appear on the surface, the disc can be wiped
with a soft, lint-free cloth. Breathe on the disc first if
necessary, and then wipe in straight lines from the centre
outwards.
DO NOT use cleaning agents containing alcohol, spirits,
ammonia or abrasives on compact discs.
POWER SUPPLIES
For peak sonic performance, the dAD1 is equipped with
several separately regulated power supplies, ensuring
optimum isolation between digital disc reading circuitry
and the sensitive analogue D/A conversion stages.
CABLE DIRECTIONALITY
Most electrical cables exhibit directional properties when
used in audio applications. Audible effects can also be
significant in the cable links carrying digital audio signals.
Listen to your dAD1 with the audio output lead connected
first in one direction and then reversed. When the cable
orientation is optimised, focus and timing are improved.
THE MISSION/CYRUS GROUP MANUFACTURES:
• Domestic & Automotive Loudspeakers
MC-BUS SYSTEM CONNECTION
This optional connection enhances and expands the
functional capability of specific Cyrus products, including
your dAD1. Using the MC-BUS, a highly functional
integrated system with full remote control may be set up.
This feature is fully usable if you own a Cyrus IIIi/III
amplifier or Cyrus Pre-amplifier. Your amplifier
handbook has full MC-BUS wiring instructions.
English
• Active and Passive Subwoofers
• Loudspeaker Cables and Stands
• Compact Disc Players
• Domestic & Automotive Amplifiers
• FM Tuners
• Surround Sound Audio Processors
• Multi-Room components
• Regulated Audio Power Supplies
• Precision Equipment Stands & Isolation Platforms
10
Page 12

Cyrus dAD1 TROUBLESHOOTING
TROUBLESHOOTING GUIDE
If you suspect that your dAD1 is not operating to
specification, please read through this section before
returning it to your local dealer.
Disc spinning with no sound
•
Switch off the power to the audio system and check
that connections have been correctly made from the
dAD1 to the amplifier (refer to page 5).
•
If used with an external D/A converter, check the
connection from the 'DIGITAL OUT' socket of the
dAD1 to the D/A converter. Check that power is
applied to the D/A converter and amplifier and that the
input selection and volume control is correctly set.
•
Pause may have been set. Check for the pause symbol
on the display. Press the PLAY/PAUSE key again on
the front panel or handset to cancel pause.
Indication 'EO' on the display (Error: Operating)
•
A function has been selected which is not available.
Indication 'ED' on the display (Error: Disc)
•
Check that the disc is loaded label side upward.
•
The disc may be dirty or scratched. Try loading another
disc. If the disc is dirty, refer to the Disc Maintenance
section on page 10 for details of disc cleaning.
Indication 'EP' on the display (Error: Programming)
•
An incorrect key sequence has been used during
programming
No Remote Operation
•
The handset batteries may need to be replaced, in
which case refer to page 8.
•
The handset batteries should only be replaced with
type AAA (I.E.C.L R03) batteries.
Skipping tracks or distorted sound.
•
The disc may be dirty or scratched. Try playing another
disc. If the disc is dirty, refer to the Disc Maintenance
section on page 10 for details of disc cleaning.
11
English
Page 13

SPECIFICATIONS & GUARANTEE Cyrus dAD1
ELECTRICAL PERFORMANCE
Output level ......................................................... 2.3V rms
Output Impedance ....................................................... 50Ω
Frequency Response...................................... 20-20,000Hz
Channel Separation....................................>75dB @ 1kHz
>75dB @ 20kHz
SNR (using silent track) ....................................... >98dBA
THD @ -10dB ........................................................<0.02%
POWER SUPPLY
Voltage
See the plate attached to the rear of the unit.
Power consumption
Playing ........................................................................ 10W
Standby ..........................................................................5W
Safety Requirement .............................................EN60065
EMC compliance .................................................EN55013
GUARANTEE
This guarantee only becomes effective if the guarantee card
enclosed is completed by the Dealer and the purchaser and
returned to MISSION or Distributor within 8 days of purchase.
This guarantee excludes:
i) All damage caused through accident, misuse, wear and tear,
neglect or through incorrect installation, adjustment or
repair by unauthorised personnel.
ii) Liability for damage or loss occurring in transit to or from
the purchaser.
Claims under this guarantee should be made through the Dealer
from whom the equipment was purchased or if not convenient,
through another authorised MISSION/CYRUS dealer.
MISSION shall not be liable for any consequential damage, loss
or injury, arising from or in conjunction with this equipment.
The cost of return carriage shall be borne by the purchaser.
This guarantee is personal to the original Purchaser and is not
transferable.
If equipment is found on examination to comply with the
published specification, MISSION reserves the right to make a
charge for examination and for return carriage.
ENCLOSURE
Dimensions (WxHxD)..........................215 x 78 x 360mm
Weight........................................................................ 3.1kg
Material......................................................Die cast chassis
The Company reserves the right to change this specification without prior notice.
English
No Dealer or Distributor may vary the terms of this guarantee.
Any unauthorised servicing will result in loss of guarantee.
We strongly recommend that you retain the sales receipt for your
CYRUS
The above conditions do not affect your statutory rights.
equipment in case of any warranty claim.
File:- 7ven8113.wim
12
 Loading...