

Page 1
Page 2
9439 IRONDALE AVE., CHATSWORTH, CALIFORNIA 91311 USA
www.cyron.com
Vanishing Lights™
CL1202 / CL2002
Thank you for purchasing CYRON Vanishing Light System. Please
follow all the steps to assure proper installation and optimum usage of
your lighting system. It is a good idea to read through the instructions
once before you start your project.
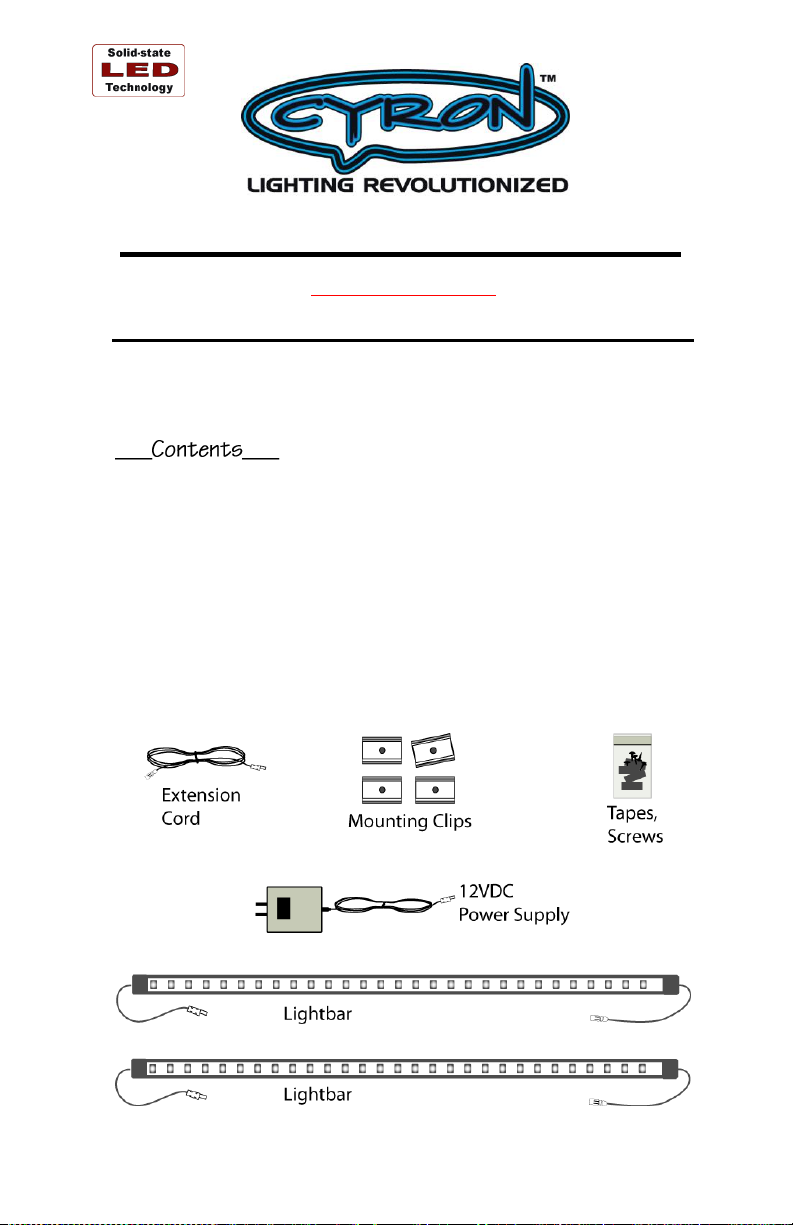
Please locate all system components. If any of the components are
missing or damaged contact CYRON before proceeding with
installation.
2 X Lightbars
1 X Extension Cable
1 X Power Supply
4 X Mounting Clips
4 X Mounting Screws
Two-Sided Tapes and Cleaning Wipe
Page 3
Possibilities CYRON Vanishing Light is an extremely versatile
lighting system. Ultra small profile, low voltage wiring, and moisture
resistance, amongst other features, makes them usable in areas where
traditional lighting cannot be used. Some of the more common
locations are under cabinets, inside display cases, shelving units, step
lights and office task lighting. The lights can also be used for other notso-common applications such as shadow boxes, work benches, cove
lighting, vanity cabinets, signage, edge lighting glass, backlighting seethru counter tops and many more.
Read all the installation steps before you plan your project.
Furthermore, keep in mind that with the help of the field experts the
CYRON Vanishing Lights may be flush mounted for the ultimate
“custom” finish. Consult CYRON Technical Support for further details.
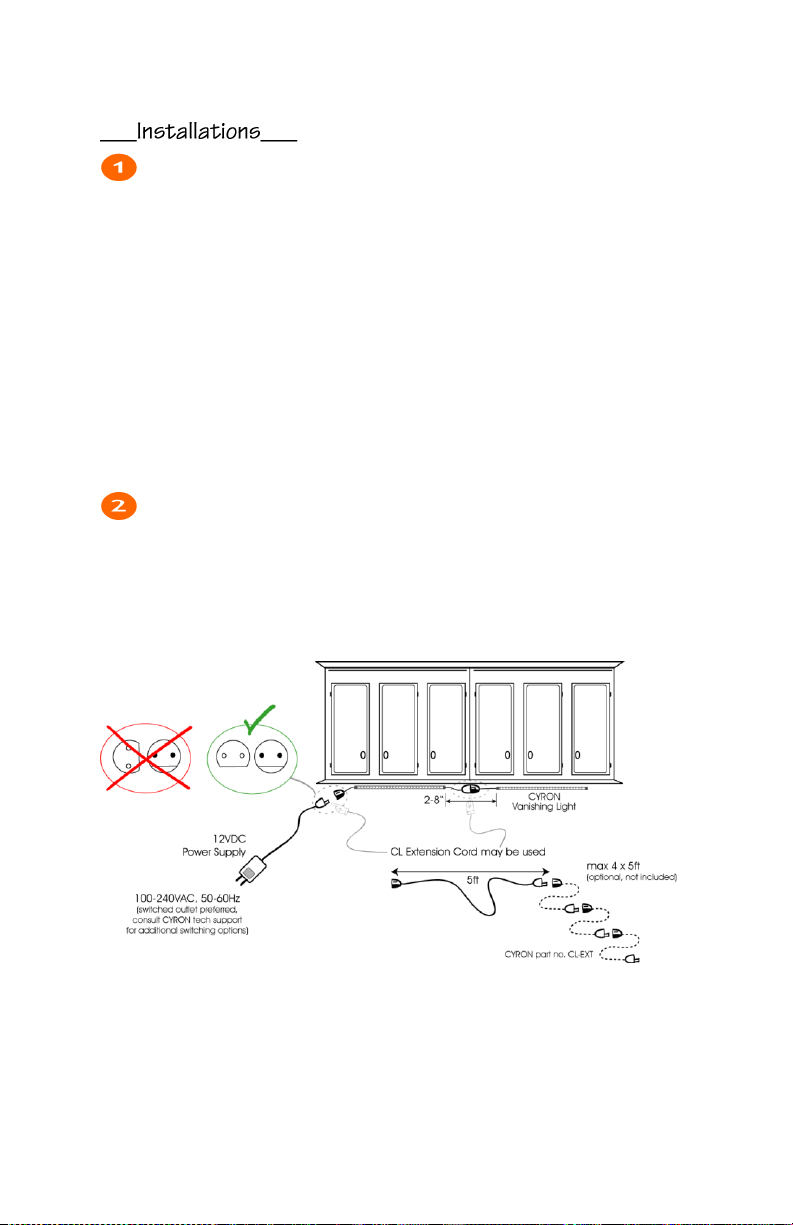
Lightbar Locations The exact location of lightbars will vary
depending on application. Figures below will provide a general
guideline that can be applied to some common installations. Should
you have any questions please contact your local CYRON dealer or
CYRON Technical Support for additional help.
__
__________________ Under Cabinets _____________________
Page 4
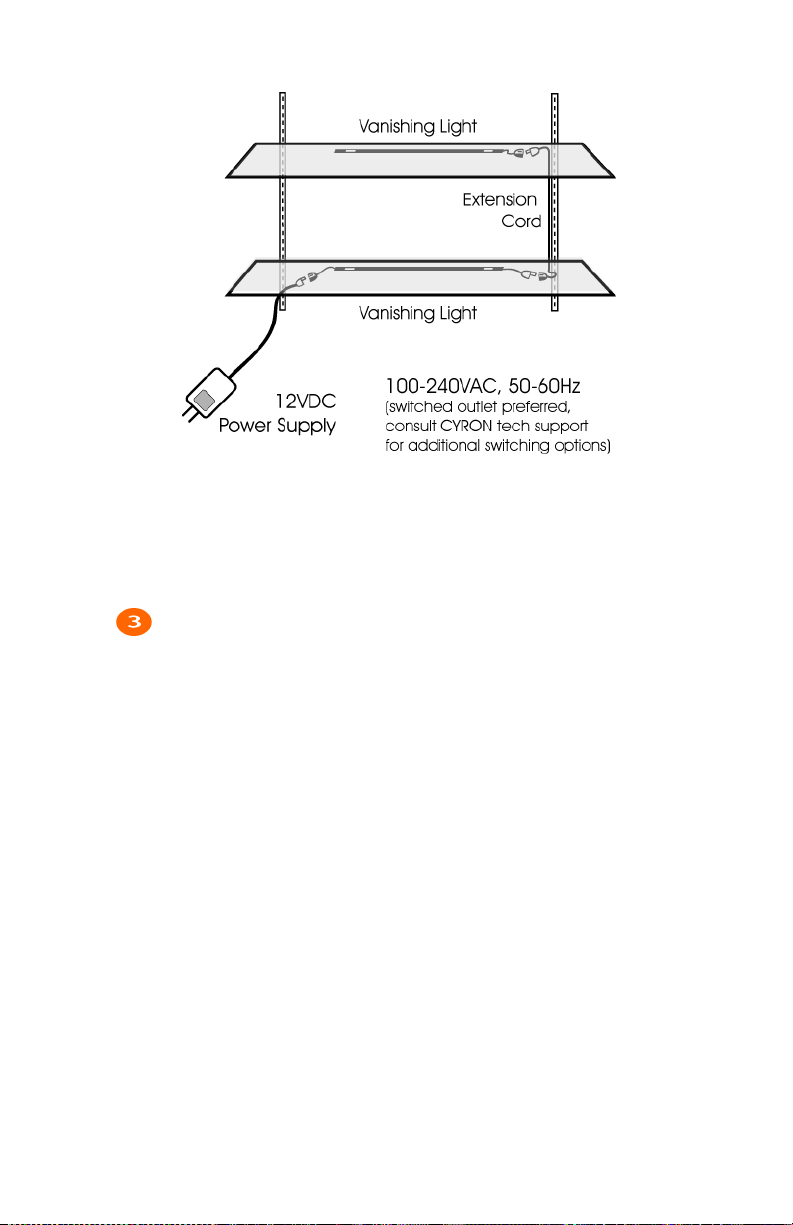
____________________ Shelves/Closets _____________________
There are many ways of illuminating objects using this lighting system.
Try various locations to achieve the best results.
Mounting Lights can be installed using mounting clips or two
sided tape. Each method has its advantages. Things to consider when
deciding:
a. Brackets are not suitable for locations near moving objects or
areas experiencing extreme vibrations.
b. Brackets are best secured with ½” screws. Tapes may be used
to secure brackets instead.
c. Tapes will not add to the total height of the lights.
d. Tapes do not adhere well to rough or wet surfaces.
e. CYRON tapes are highest 3M VHB® grade which can
withstand wide temperature range and moderate outdoor
environments.
f. Tapes may damage some surfaces or cause discoloration over
time.
g. In some situations lights may be securely strapped in place.
Page 5
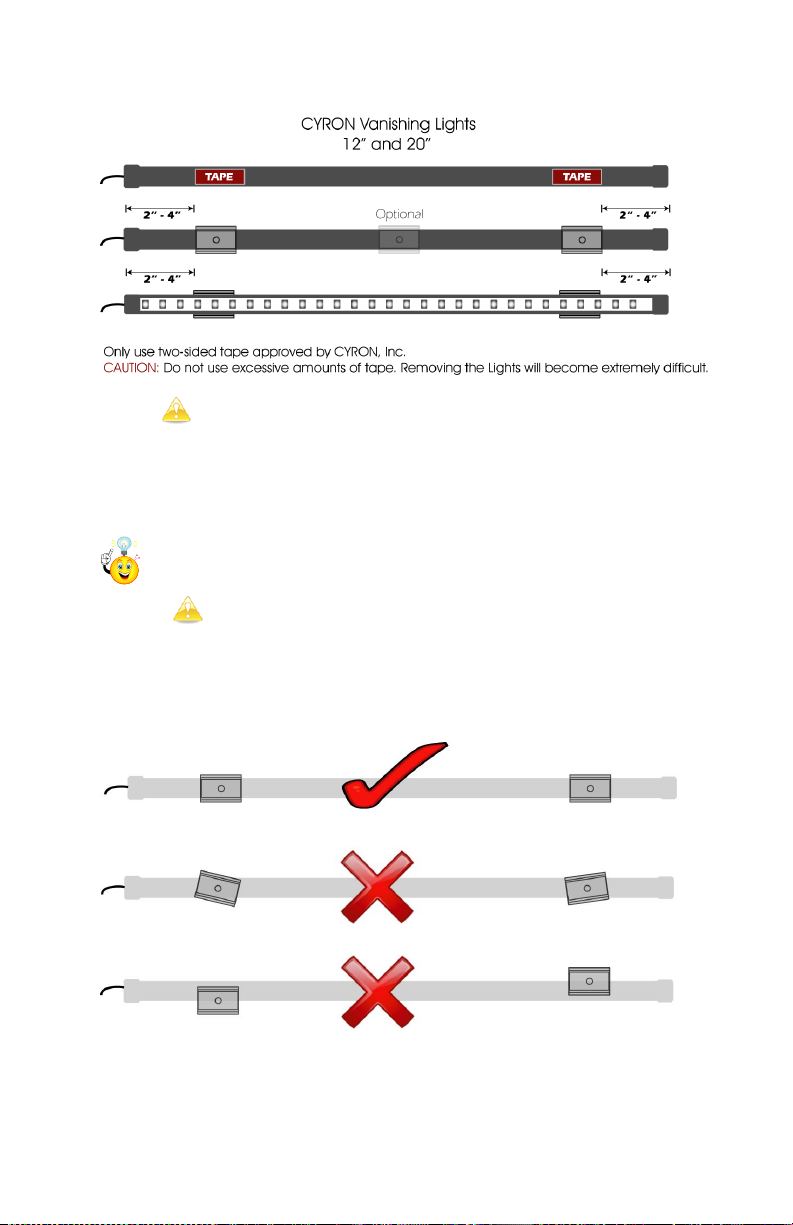
Tape: Test a small area to make sure cleaning wipes do not
affect the mounting surface. Wipe the bottom of the lightbars and
mounting surfaces with the cleaning wipes. Let the surfaces dry.
Remove one side of tape liner and apply to the lights as shown in the
figure above. Place the lights in the intended area while paying close
attention to wires and proper placement. Apply pressure for 5 seconds.
If possible place lightbars far enough from each other so the
wires are not very loose or hanging down.
Bracket: DO NOT USE SCREWS FOR FASTENING TO FRAGILE
SURFACES OR ELECTRICAL DEVICES. Mount the brackets using
screws provided. You may also choose the two sided tape or other
types of hardware that better suit the mounting surface. Make sure the
brackets are lineup up properly.
Page 6
Wiring CYRON Vanishing Light is a low voltage system. With
the exception of Power supply input, all other wires are operating at
low voltages to minimize the risk of electrical shocks or fire hazards.
However, working with electrical devices has risks. Consult with
CYRON Technical Support or your qualified electrician for good
wiring practices. Here are few to keep in mind:
Never cut wires or modify the lighting system without
consulting CYRON team.
Secure all wires using zip ties, electrical staples or wire clips.
Additional finishing touches can be done with wire
management systems such Wiremold®.
Keep wires away from extreme heat, moving objects, strong
chemicals and any other conditions that will hinder the
integrity of the lighting system.
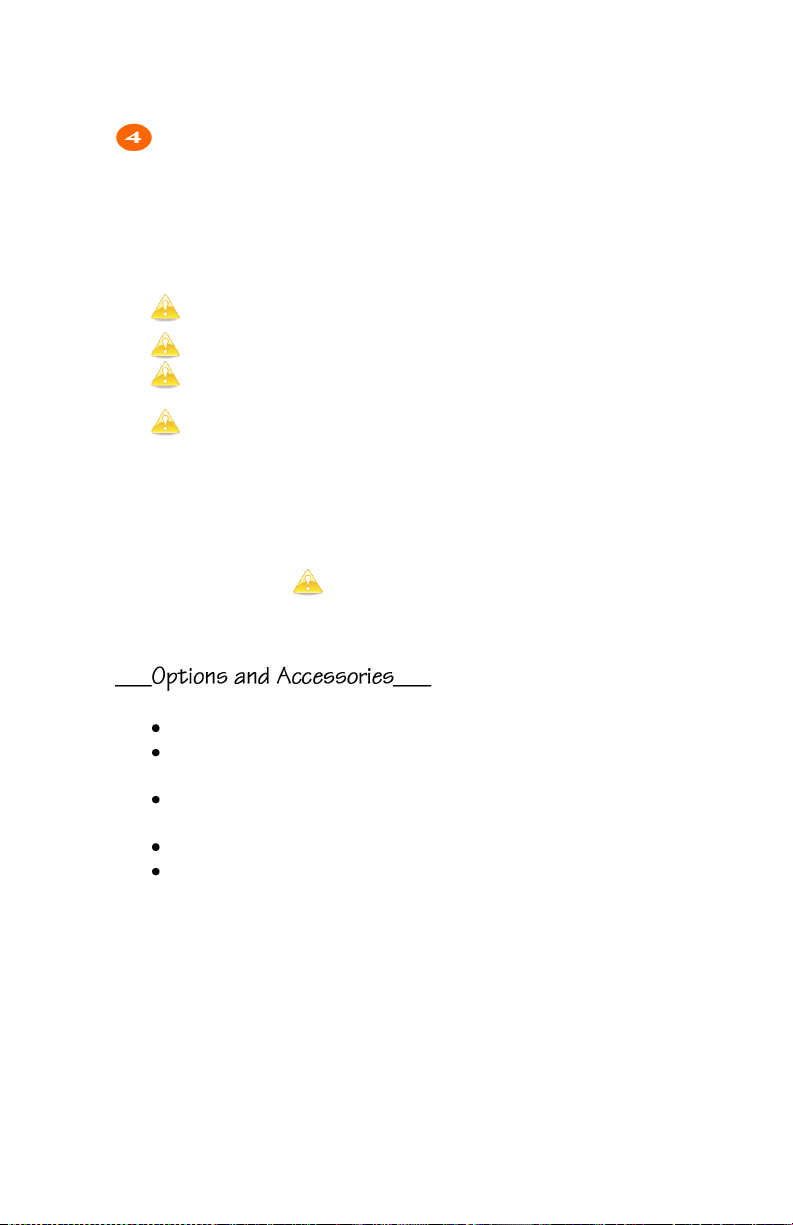
Estimate the distance between the lightbars. Use the extension cord if
lightbars are more than 8 inches apart. Additional extension cords (part
no. CL-EXT) are available from CYRON or by visiting
www.CYRON.com. Maximum 4 extension cords per system.
CYRON staff may be able to help with custom solutions for systems
expanding beyond several lightbars and few extension cords.
General guidelines:
Do not connect more than six lightbars in series.
Do not use more than four extension cords per cluster of
lightbars connected in series.
Never exceed the power supply ratings. See specification table
below for ratings.
Various lightbar sizes can be combined in one system.
CLMW and CLFWs components can be combined to make
“Y” connectors.
20” expansion lightbar, Silver / Black CL20W / CL20BW
12” expansion lightbar, Silver / Black CL12W / CL12BW
Extension Cord, 3ft CL-EXT
Pigtail cord, female connector CON-CLFW
Pigtail cord, male connector CON-CLMW
Page 7
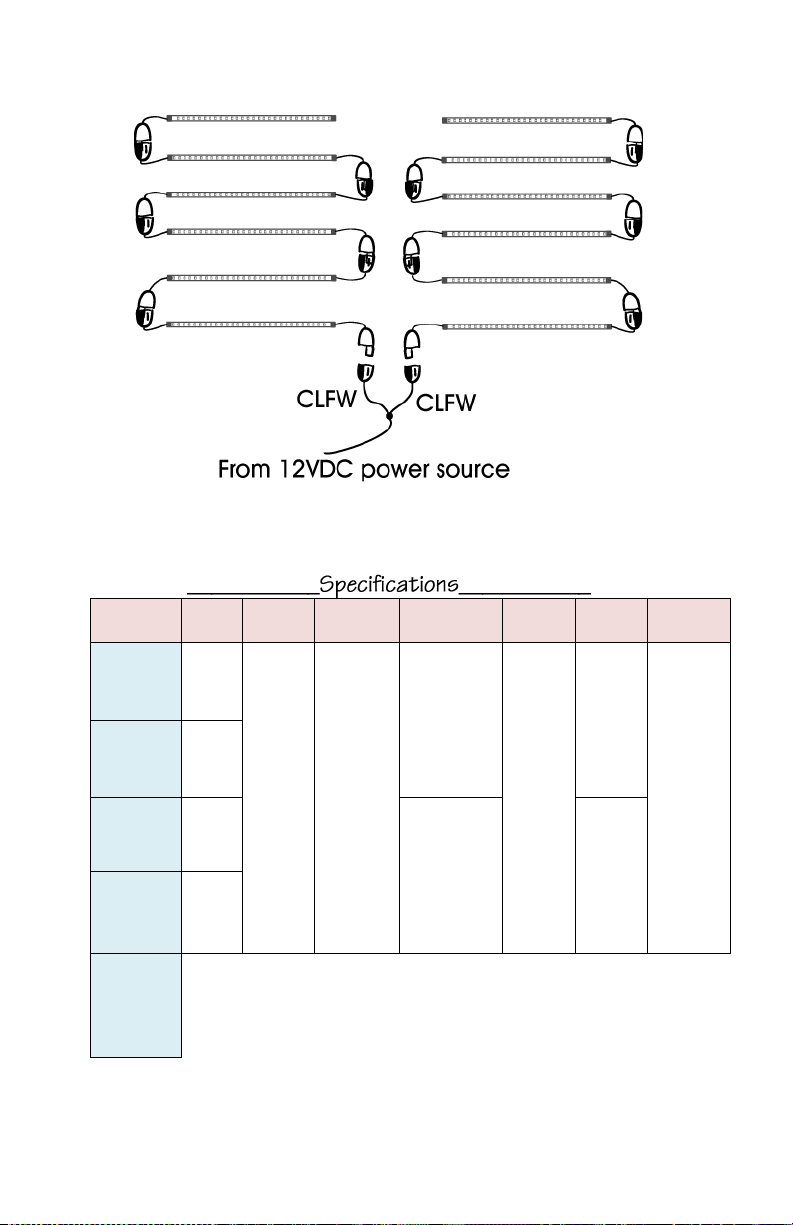
CYRON Part
Number
(Body color)
Output
Color
Controller
Connectivity
Lightbar/ Light
Engine
Hardware
Electrical/
Power
Power
Supply
CL1202W
(Silver)
CL1202BW
(Black)
Daylight
White
(~6400k)
On/Off
switch,
Daisy
chain
maximum
six per
main lead
Daisy chain
series /
parallel
Bi-pin plug,
Water
resistant
2 x 12”
36 Ultrabright
SMD LEDs,
120 degrees light
dispersion
Screws,
Adjustable
Mounting
Brackets,
3M VHB®
Two-sided
tape
3W,
12VDC
100-240VAC,
60Hz, 12W
CL1202WW
(Silver)
Warm
White
(~3000k)
CL2002W
(Silver)
CL2002BW
(Black)
Daylight
White
(~6400k)
2 x 20”
60 Ultrabright
SMD LEDs,
120 degrees light
dispersion
5W,
12VDC
CL2002WW
(Silver
Warm
White
(~3000k)
Notes,
Dimensions(in),
Accessories:
(CL) 12”: 12 1/2(L) x 7/16(W) x 3/16(H) with bracket: 12 1/2(L) x 1/2(W) x 3/8(H)
(CL) 20”: 20 1/2(L) x 7/16(W) x 3/16(H) with bracket: 20 1/2(L) x 1/2(W) x 3/8(H)
CL12xx and CL20xx systems include 5ft extension cords
CL12W: 1x12” Expansion Lightbar, Daylight White, Silver (CL12BW=Black)
CL12WW: 1x12” Expansion Lightbar, Warm White, Silver
CL20W: 1x20” Expansion Lightbar, Daylight White, Silver (CL20BW=Black)
CL20WW: 1x20” Expansion Lightbar, Warm White, Silver
________________ Utilizing More Lightbars __________________
a DO NOT exceed maximum power supply ratings.
Page 8
CYRON’s primary goal is 100% customer satisfaction. You may call
our technical support line or contact us via email 24/7.
[email protected]
818-772-1900 x106
In order to continually improve our products we welcome all comments
about the product you purchased.
Thank You!
Cyron warrants this product against any defects in materials or workmanship for a period of ONE (1) year from the
date of purchase. The warranty covers normal usage as intended by the factory and does not cover misuse, abuse,
accidents, or damages caused due to the acts of God. Proof of purchase is required.
ANY IMPLIED WARRANTIES, INCLUDING WITHOUT LIMITATION THE IMPLIED WARRANTIES OF
MERCHANTABILITY AND FITNESS FOR A PARTICULAR PURPOSE, SHALL BE LIMITED TO THE
DURATION OF THIS LIMITED WARRANTY, OTHERWISE THE REPAIR, REPLACEMENT, OR REFUND AS
PROVIDED UNDER THIS EXPRESS LIMITED WARRANTY IS THE EXCLUSIVE REMEDY OF THE
CONSUMER, AND IS PROVIDED IN LIEU OF ALL OTHER WARRANTIES, EXPRESS OF IMPLIED. IN NO
EVENT SHALL CYRON, INC. BE LIABLE, WHETHER IN CONTRACT OR TORT (INCLUDING
NEGLIGENCE) FOR DAMAGES IN EXCESS OF THE PURCHASE PRICE OF THE PRODUCT, ACCESSORY
OR FOR ANY INDIRECT, INCIDENTAL, SPECIAL OR CONSEQUENTIAL DAMAGES OF ANY KIND, OR
LOSS OF REVENUE OR PROFITS, LOSS OF BUSINESS, OR OTHER FINANCIAL LOSS ARISING OUT OF OR
IN CONNECTION WITH THE ABILITY OR INABILITY TO USE THE PRODUCTS OR ACCESSORIES TO THE
FULL EXTENT THESE DAMAGES MAY BE DISCLAIMED BY LAW.
Some states and jurisdictions do not allow the limitation or exclusion of incidental or consequential damages, or
limitation on the length of an implied warranty, so the above limitations or exclusions may not apply to you. This
warranty gives you specific legal rights, and you may also have other rights that vary from state to state or from one
jurisdiction to another.
Please mail all warranty claims to:
CYRON, Inc.
CL Warranty Claim
9439 Irondale Ave.
Chatsworth, CA 91311 USA
Further warranty inquiries: [email protected]
 Loading...