


CY3280-MBR3 Evaluation Kit User Guide
Doc. #: 001-89905 Rev. *B
Cypress Semiconductor
198 Champion Court
San Jose, CA 95134-1709
Phone (USA): +1.800.858.1810
Phone (Intnl): +1.408.943.2600
http://www.cypress.com

Copyrights
Copyrights
© Cypress Semiconductor Corporation, 2014. The information contained here in is subject to ch ange wi thout noti ce. Cypress
Semiconductor Corporation assumes no responsibility for the use of any circuitry other than circuitry embodied in a Cypress
product. Nor does it convey or imply any license under patent or other rights. Cypress products are not warranted nor
intended to be used for medical, life support, life saving, critical control or sa fety applica tions, unless pursu ant to an express
written agreement with Cypress. Furthermore, Cypress does not authorize its products for use as critical components in lifesupport systems where a malfunction or failure may reasonably be expected to result in significant injury to the user. The
inclusion of Cypress products in life-support systems application implies that the manufacturer assumes all risk of such use
and in doing so indemnifies Cypress against all charges.
Any Source Code (software and/or firmware) is owned by Cypress Semiconductor Corporation (Cypress) and is protected by
and subject to worldwide patent protection (United States and foreign), United States copyright laws and international treaty
provisions. Cypress hereby grants to licensee a personal, non-exclusive, non-transferable license to copy, use, modify, create
derivative works of, and compile the Cypress Source Code and derivative works for the sole purpose of creating custom software and or firmware in support of licensee product to be used only in conjunction with a Cypress integrated circuit as specified in the applicable agreement. Any reproduction, modification, transla tion, compilation, or representation of this Source
Code except as specified above is prohibited without the express written permission of Cypress.
Disclaimer: CYPRESS MAKES NO WARRANTY OF ANY KIND, EXPRESS OR IMPLIED, WITH REGARD TO THIS MATERIAL, INCLUDING, BUT NOT LIMITED TO, THE IMPLIED WARRANTIES OF MERCHANTABILITY AND FITNESS FOR A
PARTICULAR PURPOSE. Cypress reserves the right to make changes without further notice to the materials described
herein. Cypress does not assume any liability arising out of the applica tion or use of any product or circuit described herein.
Cypress does not authorize its products for use as critical components in life-support systems whe re a malfunction or failure
may reasonably be expected to result in significant injury to the user. The inclusion of Cypress’ product in a life-support systems application implies that the manufacturer assumes all risk of such use and in doing so indemnifies Cypress against all
charges.
Use may be limited by and subject to the applicable Cypress software license agreement.
PSoC and CapSense are registered trademarks and EZ-Click and PSoC Creato r are trademarks of Cyp ress Semiconductor
Corp. All other trademarks or registered trademarks referenced herein are property of the respective corporations.
Flash Code Protection
Cypress products meet the specifications contained in their particular Cypress PSoC Data Sheets. Cypress believes that its
family of PSoC products is one of the most secure families of its kind on the market today, regardless of how they are used.
There may be methods, unknown to Cypress, that can breach the code protecti on features. Any of these methods, to our
knowledge, would be dishonest and possibly illegal. Neither Cypress nor any other semiconductor manufacturer can guarantee the security of their code. Code protection does not mean that we are guaranteeing the product as ‘unbreakable’.
Cypress is willing to work with the customer who is concerned about the inte grity of their code. Co de prot ection i s constantly
evolving. We at Cypress are committed to continuously improving the code protection features of our products.
CY3280-MBR3 Evaluation Kit User Guide, Doc. #: 001-89905 Rev. *B 2

Contents
Safety Information 5
1. Introduction 7
1.1 Kit Contents..................................... ... ... ....................................... ... ... ... .... ..................8
1.2 Getting Started.............................................................................................................8
1.3 Factory Default Configuration............................................................. ... .... ... ... ... .........9
1.4 Additional Learning Resources..................... ... ... ... ... .... ... ... .........................................9
1.5 Technical Support........................................................................................................9
1.6 Acronyms.....................................................................................................................9
1.7 Document Conventions .............................................................................................10
2. Kit Installation 11
2.1 Before You Begin.......................................................................................................11
2.2 CY3280-MBR3 EVK Software ...................................................................................11
2.3 Install the Software ....................................................................................................12
2.4 Uninstall the Software................................................................................................15
3. Kit Operation 16
3.1 Powering the Kit.................. ... ... ....................................... ... ... .... ... ... ... ... .... ... ... ... .... ...18
3.2 Communication Between PC Host and Kit ................................................................20
3.3 Configuring the CY8CMBR3116 Controller Using EZ-Click 2.0 ................................21
3.4 Kit Features ........ ... ... ....................................... ... ... ... .... ... ... ... ....................................28
3.4.1 SmartSense Auto-Tuning Feature............................................................... ...28
4. Hardware 32
4.1 Board Details ................................... ... ... ... .... ... ...................................... .... ... ... ... .... ...32
4.2 Theory of Operation..................... .... ... ... ... .... ... ... ... ....................................... ... ... .... ...33
4.3 Functional Description .................................. ......................................... .... ................34
4.3.1 CY8CMBR3116 CapSense Controller ...........................................................34
4.3.2 PSoC 5LP ......................................................................................................35
4.3.3 Power Supply System....................................................................................36
4.3.4 Button Sensors and Proximity Loop Sensor .................................................42
4.3.5 CY3280-MBR3 Kit LEDs ................................................................................43
4.3.6 Buzzer, Shield, and Host Interrupt Multiplexing Jumper ................................44
4.3.7 Capacitance Variation Demonstration............................................................46
4.3.8 Arduino-Compatible Headers..................... ... .... ... ... ... .... ... ... ... ... .... ... ... ..........47
4.3.9 Push Button to Reset CY8CMBR3116...........................................................50
4.3.10 I2C Selection Jumpers...................................................................................50
5. Configuration Files and Exampl e Projects 51
5.1 Running Configuration Files and Host Projects.........................................................51
CY3280-MBR3 Evaluation Kit User Guide, Doc. #: 001-89905 Rev. *B 3

Contents
5.2 Configuration Files.....................................................................................................51
5.2.1 LED Toggle.....................................................................................................52
5.2.2 Proximity Detection........................................................................................55
5.2.3 Water Tolerance.............................................................................................58
5.3 PSoC 4 Host Example Projects.................................................................................62
5.3.1 Host_LED_Toggle_Buzzer_PSoC4_Pioneer_Kit...........................................63
5.3.2 Host_Interrupt_LED_ON_Time_PSoC4_Pioneer_Kit....................................68
5.3.3 Configuring the MBR3 Device From the PSoC 4 Pioneer Kit . .......................72
6. Advanced Topics 74
6.1 Using PSoC 5LP as USB-I2C Bridge ........................................................................74
6.2 Restoring to Factory Default Slave Address from 0x00.............................................78
A. Appendix 79
A.1 Schematic..................................................................................................................79
A.2 Pin Assignment Table................................................................................................87
A.3 Bill of Materials ..........................................................................................................88
A.4 Regulatory Compliance Information ... ... ... .... ... ... ... ... .... ... ... ... .... ... ... ... ... .... ... ... ... .... ...89
CY3280-MBR3 Evaluation Kit User Guide, Doc. #: 001-89905 Rev. *B 4

Safety Information
The CY3280-MBR3 Evaluation Kit contains electrostatic discharge
(ESD) sensitive devices. Electrostatic charges readily accumulate on
the human body and any equipment, and can discharge without
detection. Permanent damage may occur on devices subjected to
high-energy discharges. Proper ESD precautions are recommende d to
avoid performance degradation or loss of functionality. Store unused
CY3280-MBR3 boards in the protective shipping package.
End-of-Life/Product Recycling
This kit has an end-of life five years from the date of manufacture
mentioned on the back of the box. Contact your nearest recycler for
disposing the kit.
Regulatory Compliance
The CY3280-MBR3 Evaluation Kit is intended for use as a development platform for hardware or
software in a laboratory environment. Th e board is an open system design, which do es not inclu de a
shielded enclosure. This may cause interference to other electrical or electronic devices in close
proximity.
In a domestic environment, this product may cause radio interference. The user may then be
required to take adequate prevention measures. Also, the board should not be used near any
medical equipment or RF devices.
Attaching additional wiring to this product or modifying the product ope ration from the factory default
may affect its performance and cause interference with other apparatus in the immediate vicinity. If
such interference is detected, suitable mitigating measures should be taken.
The CY3280-MBR3 Evaluation Kit as shipped from the factory has been verified to meet the
requirements of CE as a Class A product.
CY3280-MBR3 Evaluation Kit User Guide, Doc. #: 001-89905 Rev. *B 5

Safety Information
General Safety Instructions
ESD Protection
ESD can damage boards and associated components. Cypress recommends that you perform
procedures only at an ESD workstation. If an ESD workstation is not available, use appropriate ESD
protection by wearing an antistatic wrist strap attached to chassis ground (any unpainted metal
surface) on your board when handling parts.
Handling Boards
CY3280-MBR3 boards are sensitive to ESD. Hold the board only by its edges. After removing the
board from its box, place it on a grounded, static-free surface. Use a conductive foam pad if
available. Do not slide board over any surface.
6 CY3280-MBR3 Evaluation Kit User Guide, Doc. #: 001-89905 Rev. *B

1. Introduction
Thank you for your interest in the CY3280-MBR3 Evaluation Kit (EVK). This kit is designed to showcase the abilities of the CY8CMBR3116 register-configurable CapSense
®
controller. It is also
designed as an Arduino™-compatible shie ld that supports various Arduino baseboards as well as
other stackable shields available in the market. The CY3280-MBR3 EVK features four CapSense
buttons, one proximity sensor loop, LEDs, a buzzer, and an onboard USB-I
2
C bridge to communi-
cate with the EZ-Click™ 2.0 customizer tool, which configures the CY8CMBR3xxx controller.
The CY8CMBR3xxx series is the latest addition to the register-configurable CapSense Mechanical
Button Replacement (MBR) family of solutions. The CY8CMBR3xxx family of controllers enables
you to quickly and easily add capacitive touch sensin g to your user interface. See Configuring the
CY8CMBR3116 Controller Using EZ-Click 2.0 on page 21 for information on how to configure a
CY8CMBR3116 controller. CY3280-MBR3 offers the best feat ures of Cypr ess’ CapSen se in a small
package that is easy to implement and configure. Coupled with the Capacitive Sigma Delta PLUS
(CSD PLUS) sensing algorithm and the patented SmartSense™ Auto-Tuning feature, the
CY8CMBR3xxx controller provides a robust capacitive sensing solution, with up to 16 CapSense
inputs.
SmartSense Auto-Tuning has the following advantages:
■ Reduces design effort by eliminating manual tuning
■ Adapts to variations in PCB, overlay, paint, and manufactu ring that degrade touch-sensing per-
formance
■ Eliminates manual tuning in production
■ Adapts to changes in the system environment due to noise
■ Allows a platform design approach with different overlays, button shapes, and trace lengths
The MBR3 solution delivers a high signal-to-noise ratio (SNR) even in extremely noisy environments
and maintains optimal sensor performance at run time. The driven shield capability offers robust
proximity sensing and water tolerance, enabling its use in a wide range of applications. The MBR3
solution supports register configurability and SmartSense Auto-Tuning features, which allow customers to gain a faster time-to-market for their end product.
The CY8CMBR3xxx family of controllers is designed with multiple low-power operational states to
meet the low-power requirements of battery-powered applications. These controllers have the following operational states: Boot, Active, Look-for-Touch, Look-for-Proximity, Deep Sleep, and Configuration. The CY8CMBR3xxx controllers automatically manage transitions between the four states.
The Look-for-Proximity state allows ultra-low power consumption whe n a hu man bod y is not in close
proximity. This state is entered only if the wake-on-approach feature is enabled (and toggle is disabled) in the MBR3 register configuration, which can be done using the EZ-Click 2.0 customizer tool.
Refer to the MBR3 device datasheet for more details on the CY8CMBR3xxx family of CapSense
controllers.
The kit package includes the EZ-Click 2.0 customizer tool, which is required to co nfigur e the kit. For
more information and to download the tool, visit the EZ-Click Customizer page.
CY3280-MBR3 Evaluation Kit User Guide, Doc. #: 001-89905 Rev. *B 7
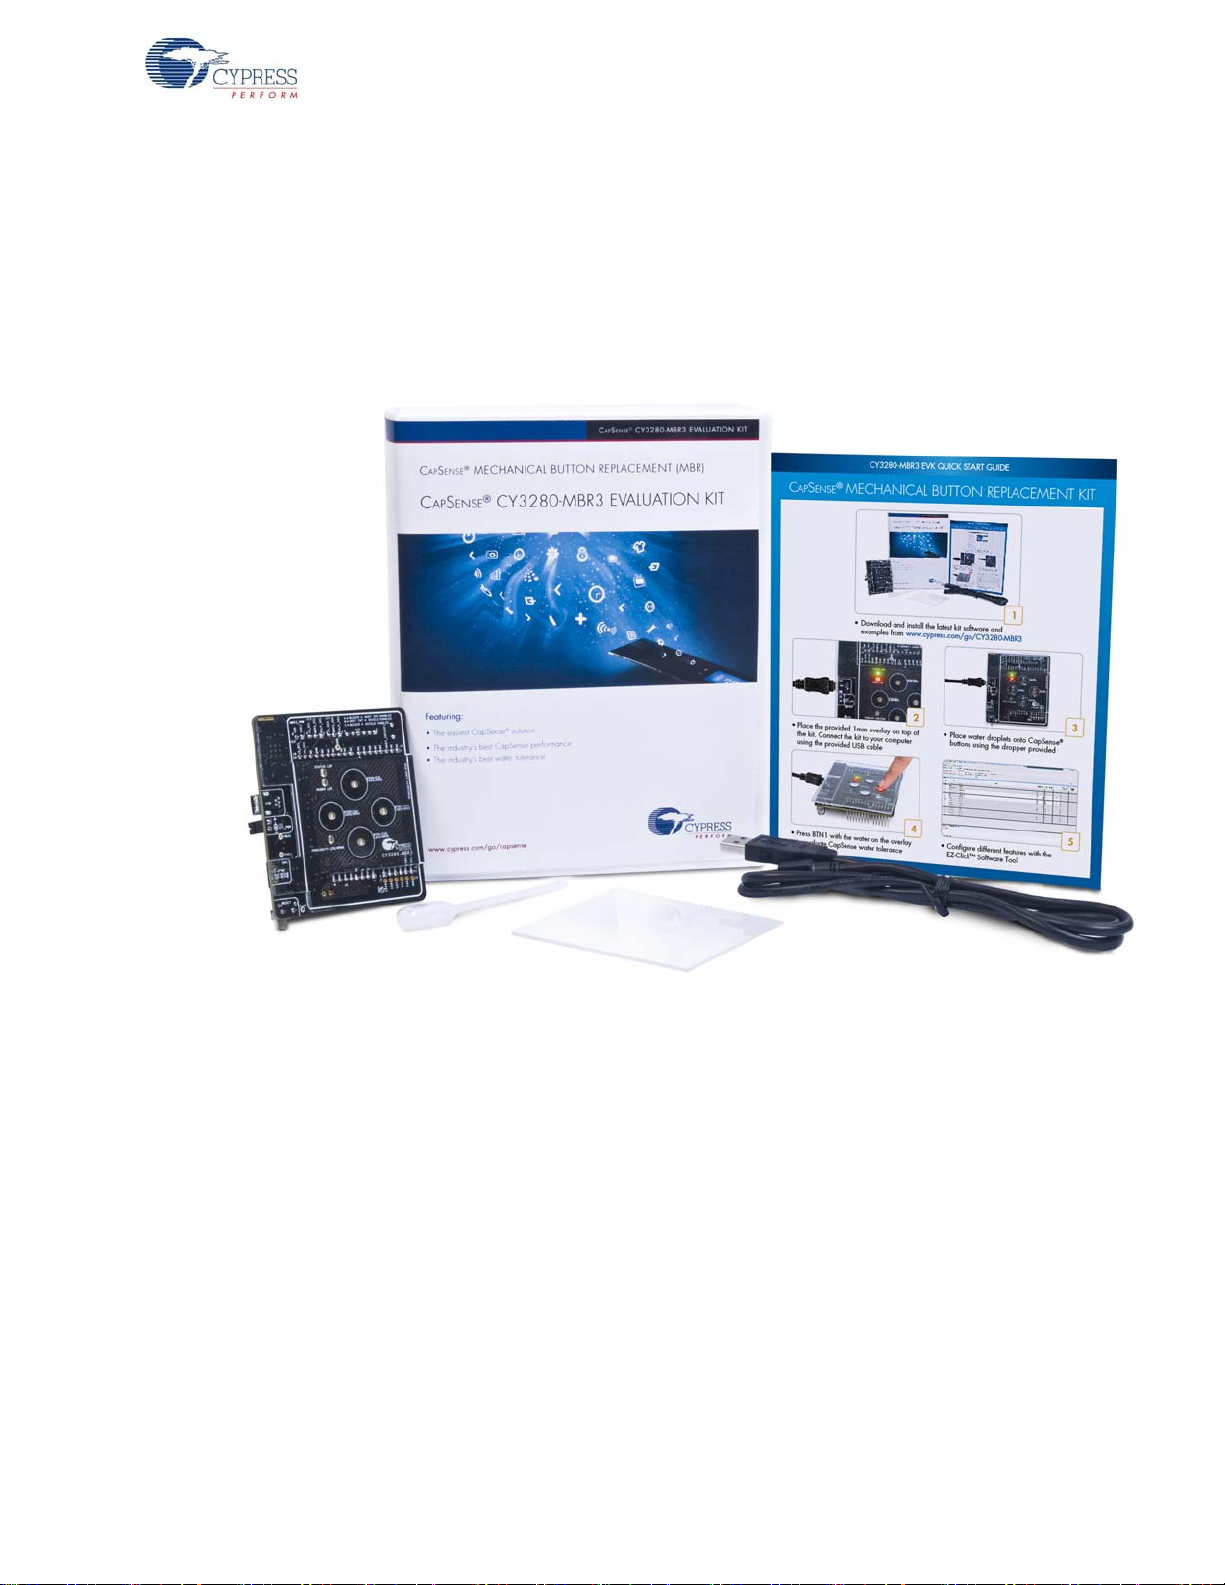
1.1 Kit Contents
The CY3280-MBR3 EVK includes the following components (see Figure 1-1):
■ CY3280-MBR3 EVK with a 2-mm overlay
■ One additional overlay of 1-mm thickness
■ A to Mini-B USB cable
■ Water dropper
Figure 1-1. Kit Contents
Introduction
Inspect the contents of the kit. If you find any part missing, contact your ne ares t Cypre ss sales office
for help: www.cypress.com/go/support.
1.2 Getting Started
This kit guide helps to familiarize you with the CY3280-MBR3 EVK. The Kit Installation chapter on
page 11 describes the installation of the EVK software. The Kit Operation chapter on page 16
explains how to configure the CY8CMBR3116 controller on the kit to test different features using the
EZ-Click 2.0 customizer tool. The hardware details, and configuration files and example projects are
explained in their respective chapters. The configuration files and example projects require EZ-Click
and PSoC Creator™, respectively. The Advanced Topics chapter on page 74 describes how to use
the Bridge Control Panel (BCP) to configure the MBR3 device. The Appendix on page 79 pr ovides
the schematics, board layout, pin assignment, and the bill of materials (BOM).
CY3280-MBR3 Evaluation Kit User Guide, Doc. #: 001-89905 Rev. *B 8

1.3 Factory Default Configuration
The kit installation folder includes three configuration files that demonstrate several features of the
CY8CMBR3116 CapSense controller. The section, Configuration Files on page 51, provides more
details. The CY3280-MBR3 EVK is configured with the Water Toleranc e configuration by default. In
this configuration, water tolerance, flanking sensor suppression (FSS), and auto-reset features are
enabled for four CapSense buttons. The LEDs are also enabled to provide visual feedback for
CapSense button touch. For mor e details on configurin g the MBR3 device, refe r to the EZ- Click 2.0
Customizer Tool User Guide, available at <Install_Directory>\EZ-Click\<version>\Doc-
umentation.
1.4 Additional Learning Resources
Visit the CY8CMBR3116 CapSense Controller page for additional learning resources.
1.5 Technical Support
For assistance, go to our support web page, or contact our customer support at +1(800) 541-4736
extension 2 (in the USA), or +1 (408) 943-2600 extension 2 (International).
Introduction
1.6 Acronyms
Table 1-1. Acronyms Used in the Document
Acronyms Definition
BCP Bridge Control Panel
BOM bill of materials
CS capacitive sensor
CSD CapSense sigma delta
ESD electrostatic discharge
EVK evaluation kit
FSS flanking sensor suppression
GPO general-purpose output
GUI graphical user interface
2
C
IIC/I
LED light-emitting diode
MBR mechanical button replacement
NC not connected
PC personal computer
PCB printed circuit board
®
PSoC
SNR signal-to-noise ratio
UART universal asynchronous receiver/transmitter
USB universal serial bus
inter-integrated circuit
Programmable System-On-Chip
CY3280-MBR3 Evaluation Kit User Guide, Doc. #: 001-89905 Rev. *B 9

1.7 Document Conventions
Table 1-2. Document Conventions for Guides
Convention Usage
Courier New Displays file locations, user entered text, and source code:
C:\...cd\icc\
Italics Displays file names and reference documentation:
Read about the sourcefile.hex file in the PSoC Designer User Guide.
[Bracketed, Bold] Displays keyboard commands in procedures:
[Enter] or [Ctrl] [C]
File > Open Represents menu paths:
File > Open > New Project
Bold Displays commands, menu paths, and icon names in procedures:
Click the File icon and then click Open.
Times New Roman Displays an equation:
2 + 2 = 4
Text in gray boxes Describes Cautions or unique functionality of the product.
Introduction
CY3280-MBR3 Evaluation Kit User Guide, Doc. #: 001-89905 Rev. *B 10

2. Kit Installation
This chapter describes the CY3280-MBR3 EVK software installation and the prerequisites.
2.1 Before You Begin
All Cypress software installations require administrator privileges, but these are not required to run
the software after it is installed. Close any other Cypress software that is curre ntly running before
installing the kit software.
Note: The kit contents are installed in the C:\Program Files\Cypress folder by default. If the
EZ-Click configuration files or PSoC 4 host projects are being run from the default install location,
administrator privileges are required. If you do not have administrator privileges, copy the Firmware
folder from the default install location to any other location on your PC and access the files.
2.2 CY3280-MBR3 EVK Software
The kit requires Cypress' proprietary sof tware, such as PSoC Programmer and the EZ-Click customizer tool, and generic software such as .NET Framework, Windows Installer, and Internet Explorer.
The CY3280-MBR3 software is available on the kit web page in three formats:
Table 2-1. Kit Software Formats
Install Package File Format Usage
This package can be used if the PC does not have any Cypress or non-
CY3280-MBR3_Kit ISO ISO
CY3280-MBR3_Kit Setup EXE
CY3280-MBR3_Kit Only EXE
Cypress prerequisite software installed. It first installs the prerequisites
and then the kit content (firmware, hardware, and docu mentation files) in
the specified location.
This package can be used if the PC does not have any Cypress p rerequi site software installed. If any non-Cypress prerequisites are found to be
missing during installation, the installer provides links to download and
install them and then installs the kit content (firmware, hardware, and
documentation files) in the specified location.
This package can be used if the PC has all the Cypress and non-Cypress
prerequisites installed. It install s only the kit conten t (firmware, hardware,
and documentation files) in the specified location. If any of the prerequisites are found missing during the installation process, the installer
prompts you to install a ll the require d software b efore att empting to inst all
the kit. The installer redirects to the kit web page to download and install
any missing Cypress software. Similarly, it provides links to download
and install the missing non-Cypress prerequisites.
Notes:
■ Adobe Reader is required to view kit document s. If Adobe Reade r is not inst alled on your PC, the
installer provides the link to download and install it.
CY3280-MBR3 Evaluation Kit User Guide, Doc. #: 001-89905 Rev. *B 11

■ PSoC Creator is required to execute the PSoC 4 host example projects shipped with the kit.
However, it is not a mandatory prerequisite and is not installed along with the kit contents. You
can download and install PSoC Creator from www.cypress.com/go/psoccreator.
2.3 Install the Software
1. Run cyautorun.exe in the kit ISO to start the installation process.
2. Click Install CY3280-MBR3 EVK to start the kit installation; see Figure 2-1.
Figure 2-1. Kit Installer Startup Screen
Kit Installation
3. Select the folder to install the CY3280-MBR3 EVK files. Choose the directory and click Next, as
shown in Figure 2-2. The installation directory is referred to as <Install_Directory> in this
document.
CY3280-MBR3 Evaluation Kit User Guide, Doc. #: 001-89905 Rev. *B 12
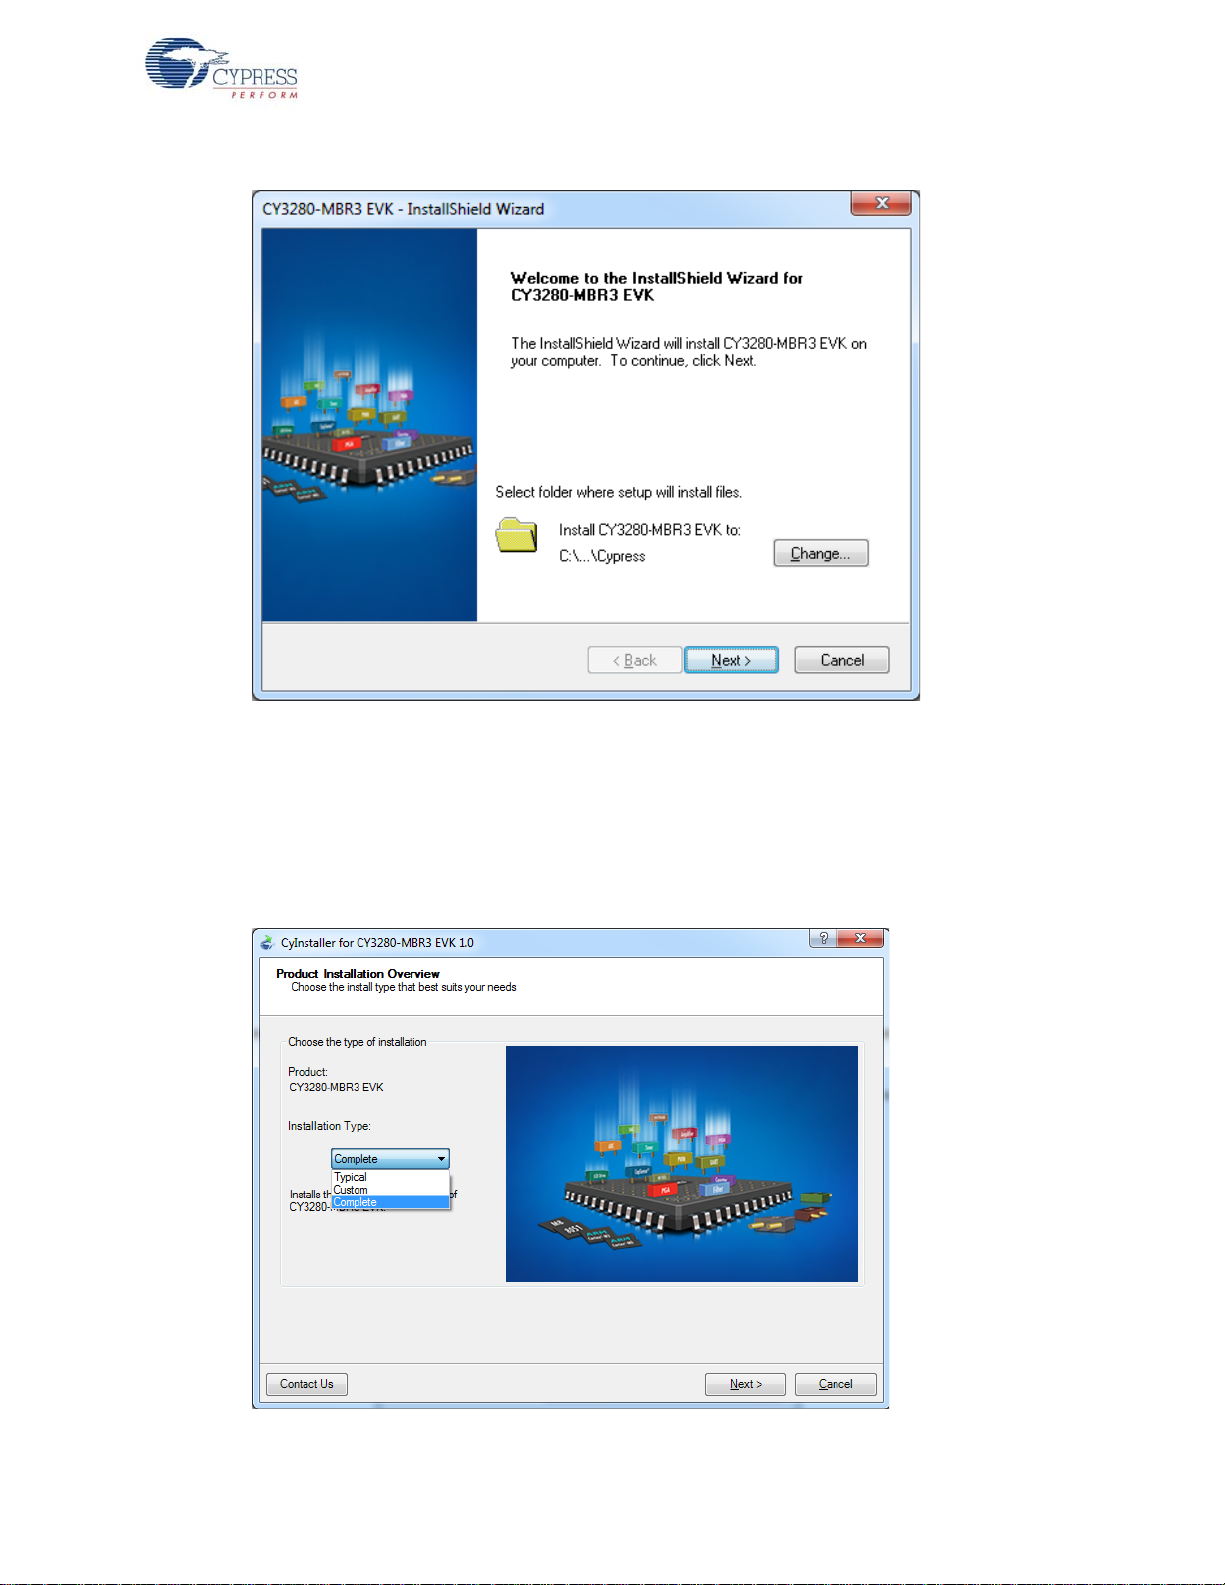
Figure 2-2. Default Path for EVK Installation
Kit Installation
4. When you click Next, the CY3280-MBR3_Kit ISO installer automatically installs the required soft-
ware, if it is not present on your computer.
5. Select the installation type (see Figure 2-3). The drop-down menu contains three options:
Typical (installs all the required features), Custom (lets you choose the feature s to be installed),
and Complete (installs all the contents). Click Next after you select the installation type.
Note: It is recommended that you choose the Complete installation type.
Figure 2-3. Installation Type Options
CY3280-MBR3 Evaluation Kit User Guide, Doc. #: 001-89905 Rev. *B 13

Kit Installation
6. Accept the End-User License Agreement and click Next to proceed with the installation.
7. When the installation begins, a list of packag es appears on the installation page. A green check
mark appears adjacent to every package after successful installation, as Figure 2-4 shows.
Figure 2-4. Installation Page
8. Click Finish to complete the CY3280-MBR3 EVK installation, as illustrated in Figure 2-5.
Figure 2-5. CY3280-MBR3 EVK Installation Complete
After the installation is complete, the kit contents are available at the following location:
<Install_Directory>\CY3280-MBR3 EVK\<version>
CY3280-MBR3 Evaluation Kit User Guide, Doc. #: 001-89905 Rev. *B 14

2.4 Uninstall the Software
You can uninstall the CY3280-MBR3 EVK software using one of the following methods:
■ Go to Start > All Programs > Cypress > Cypress Update Manager > Cypress Update Man-
ager; select the Uninstall button corresponding to the kit software.
■ Go to Start > Control Panel > Programs and Features; select the Uninstall/Change button
corresponding to the kit software.
Kit Installation
CY3280-MBR3 Evaluation Kit User Guide, Doc. #: 001-89905 Rev. *B 15
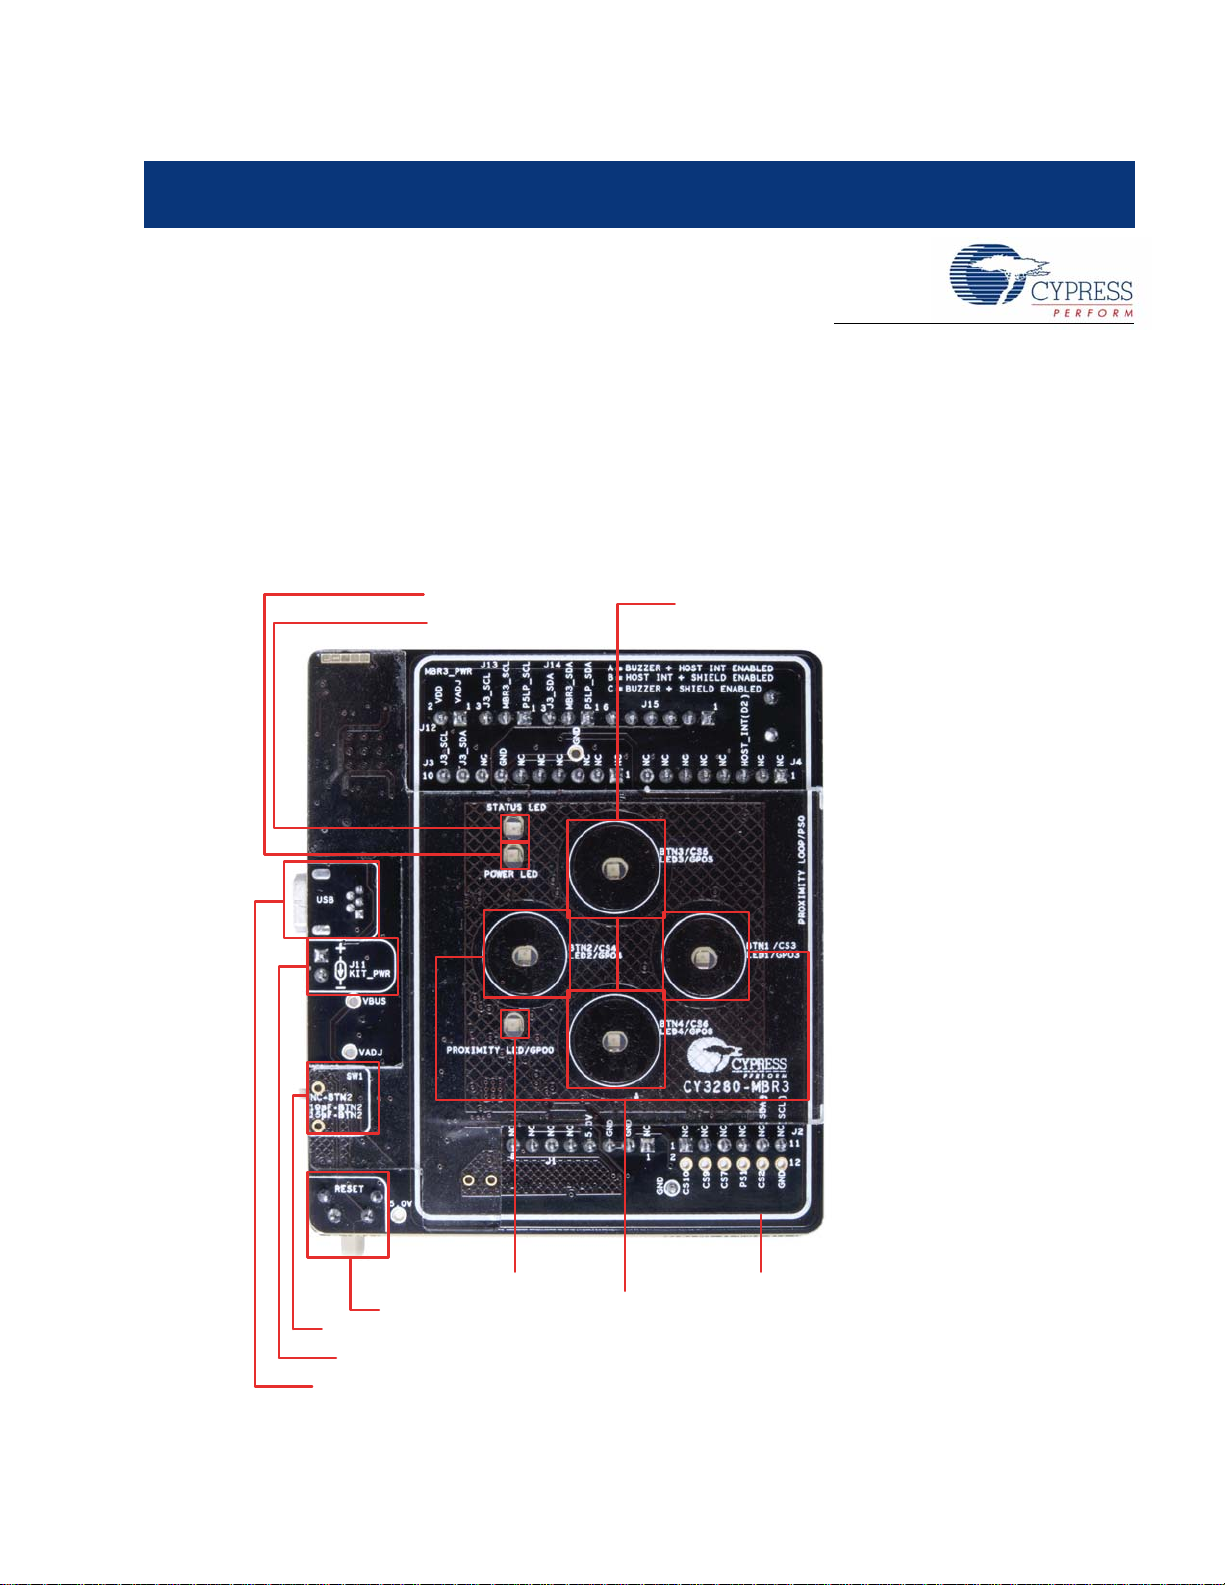
3. Kit Operation
USB connector
Kit current measurement jumper
on the reverse of the board
Slide switch to increase
capacitanceonBTN2
Reset switch
Status LED
Power LED
CapSense buttons with 10-mm
diameter and LED at the center
Proximity LED
Proximity loop
CapSense buttons with 11-mm
diameter and LED at the center
The CY8CMBR3116 CapSense controller is a register-configurable device that supports multiple
features, as listed in Kit Features on page 28. The CY3280-MBR3 EVK hardware includes four
CapSense buttons, a proximity sensor loop, a buzzer, and LEDs; it can be used to demonstr ate all
the features of the MBR3 device.
The CY3280-MBR3 EVK enables you to develop applications using the CY8CMBR3116 controller.
Figure 3-1 and Figure 3-2 illustrate the onboard components of the CY3280-MBR3 EVK.
Figure 3-1. CY3280-MBR3 EVK Top View
CY3280-MBR3 Evaluation Kit User Guide, Doc. #: 001-89905 Rev. *B 16
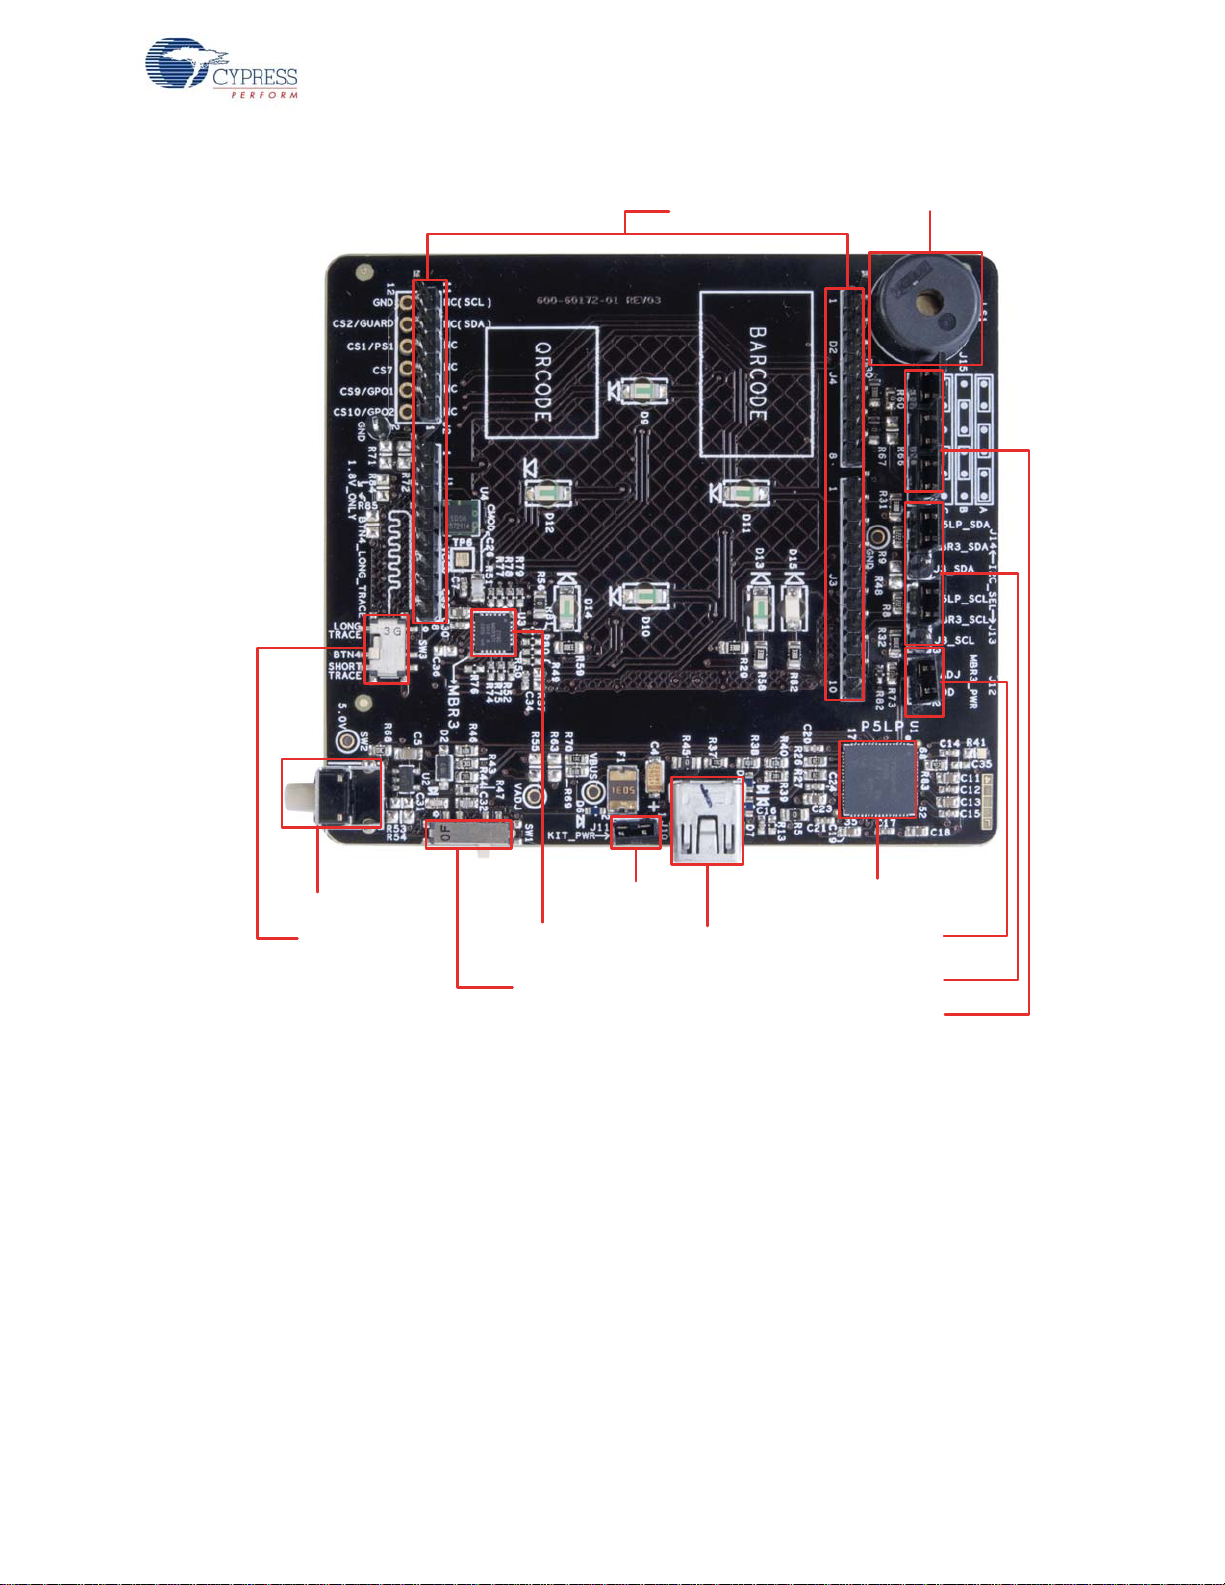
Figure 3-2. CY3280-MBR3 EVK Bottom View
Arduino headers
Slide switch SW1
(capacitance selector
switch for BTN2)
Slide switch SW3
(trace selection
switch for BTN4)
Buzzer
I2C selection jumpers
Buzzer, Shield, and Host
Interrupt selection jumpers
PSoC 5LP USB-I2C
bridge
CY8CMBR3116 CapSense
Express controller
MBR3 current
measurement jumper
Reset switch
USB connector
Kit current
measurement jumper
Kit Operation
CY3280-MBR3 Evaluation Kit User Guide, Doc. #: 001-89905 Rev. *B 17
3.1 Powering the Kit
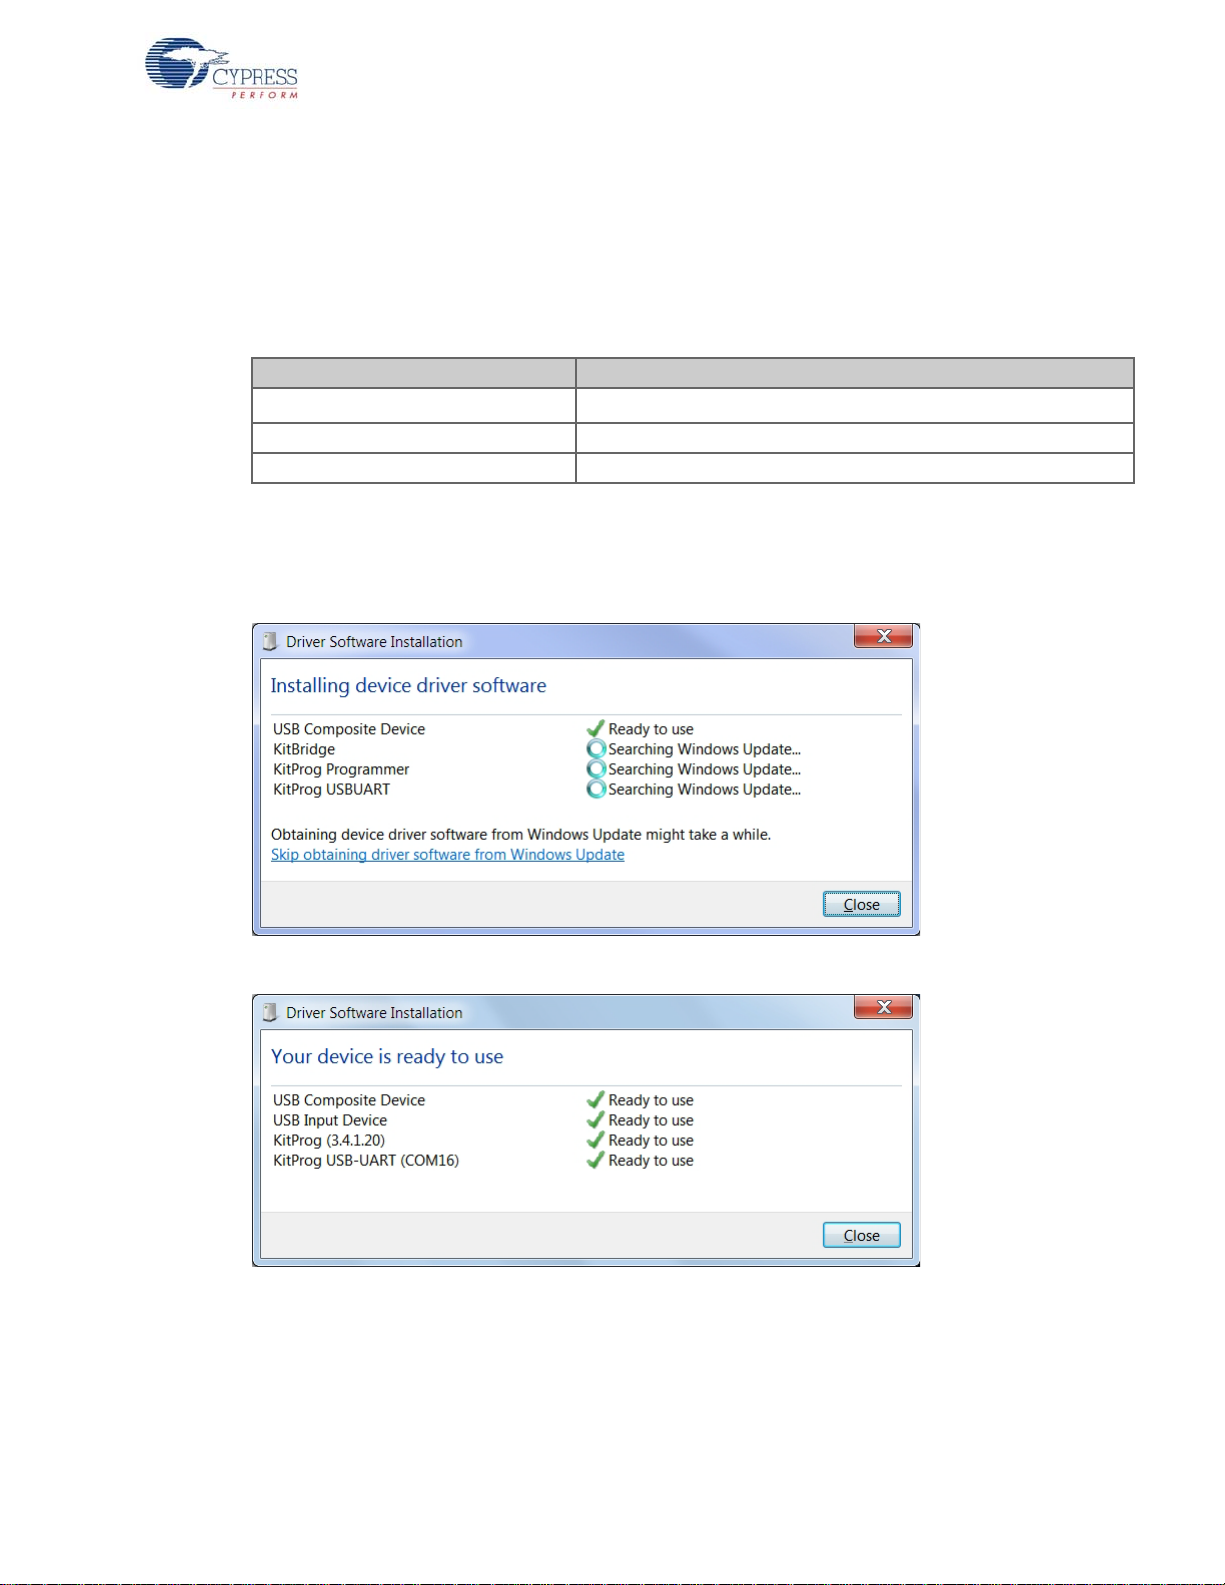
To power the kit, connect the A to Mini-B USB cable, provided with the kit, to yo ur PC or lap to p . T h e
kit enumerates as a composite device (see Table 3-1), and three separate devices appear under the
Device Manager (Start > Control Panel > Device Manager) option of the Windows operating system, as shown in Figure 3-5.
Table 3-1. CY3280-MBR3 Evaluation Kit in Device Manager after Enumeration
Port Description
USB input device
KitProg programmer Programmer and debugger
KitProg USB-UART USB-UART bridge appears as COM# port
Note: Although the kit supports a programmer and a UAR T bridge , these functionalities are no t used
with this kit. Do not use PSoC Programmer to communicate with the PSoC 5LP on the kit, as it may
corrupt the kit firmware.
Figure 3-3. KitProg Driver Installation
USB-I
2
C bridge
Kit Operation
Figure 3-4. KitProg Driver Installation Complete
After the driver installation is complete, all the above devices are listed in the Device Manager, as
shown in Figure 3-5.
CY3280-MBR3 Evaluation Kit User Guide, Doc. #: 001-89905 Rev. *B 18
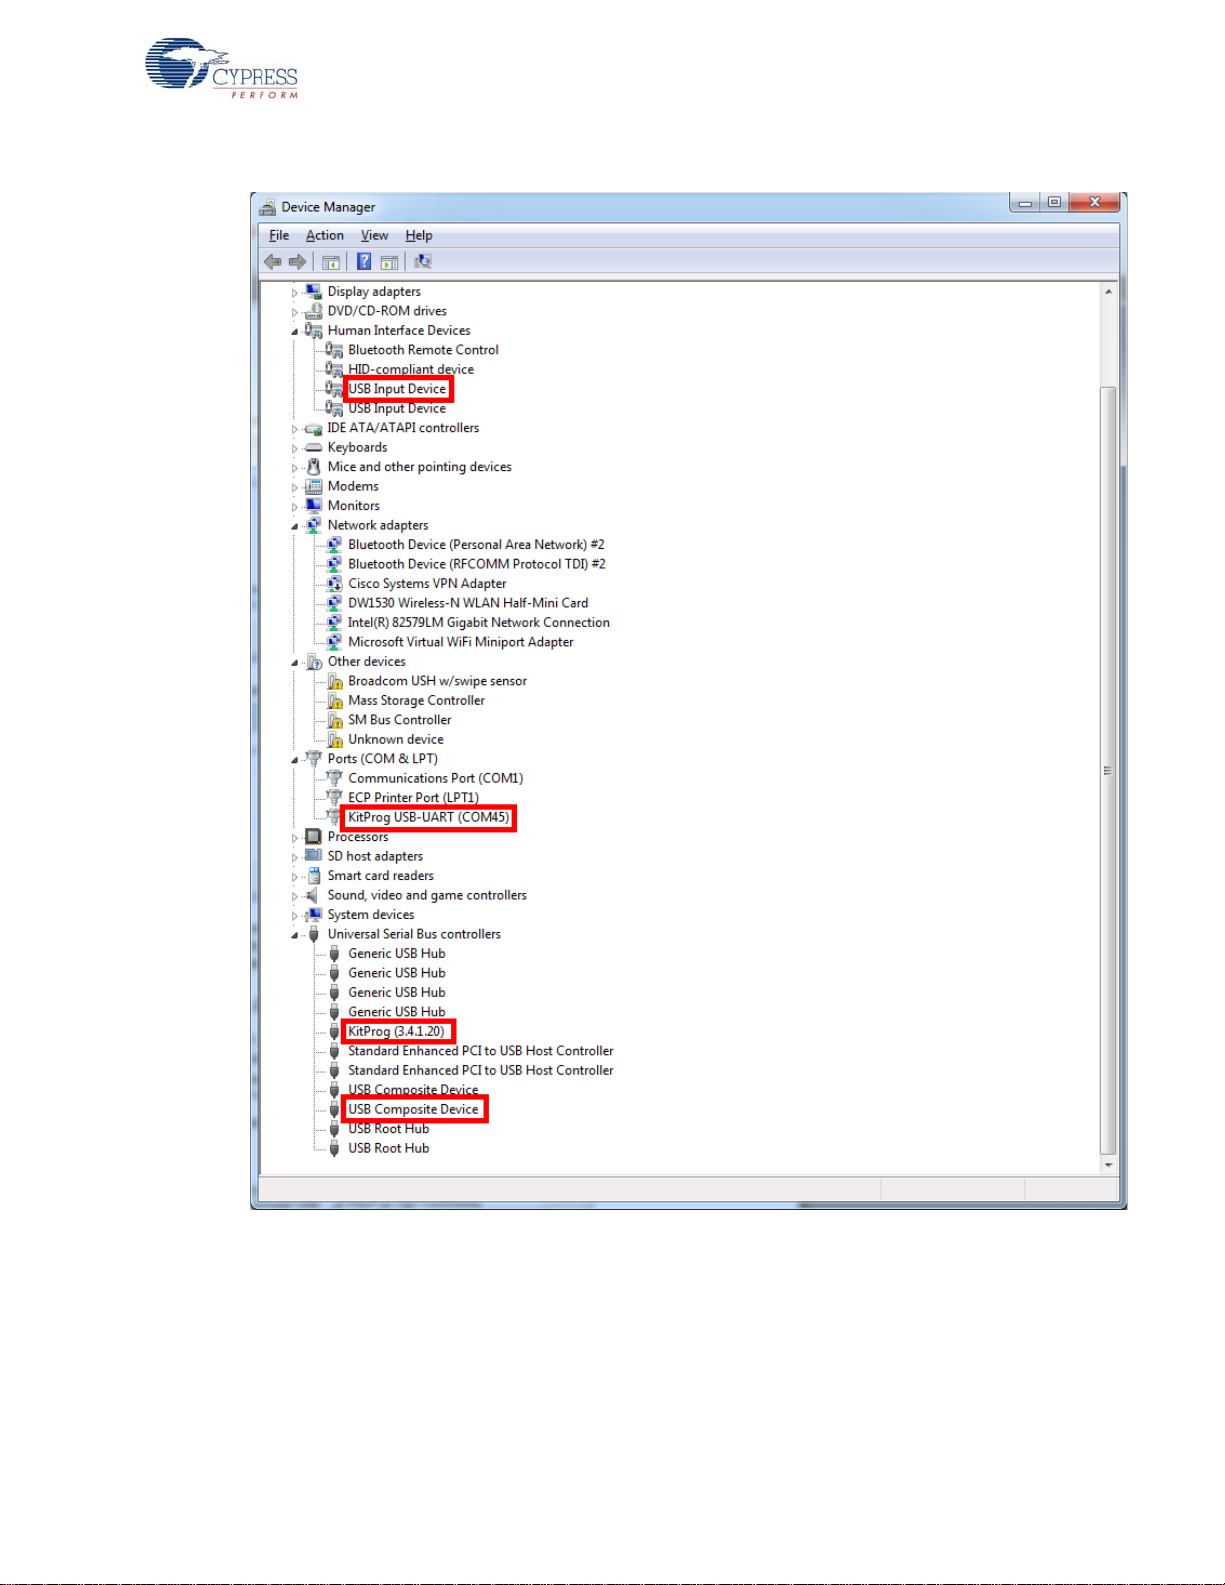
Figure 3-5. Device Manager View after KitProg is Installed
Kit Operation
Note: The Device Manager may have more than one instance of ‘USB Input De vice' and ' USB Composite Device', based on the number of USB devices connected to your PC. The USB Input Device
and USB Composite Device installed with KitProg can be identified by the hardware IDs (VID and
PID); these devices will have hardware IDs 0x4B4 and 0xF139. To find the hardware ID, right-click
on the device and select Properties. In the Details tab, select Hardware IDs from the Property field
drop-down menu.
CY3280-MBR3 Evaluation Kit User Guide, Doc. #: 001-89905 Rev. *B 19

Wait until the USB enumeration completes successfully and the board is powered. When the USB
PC Host
I2C Commands
through U SB
EZ-Click 2.0
Customizer
Tool
B1
B2
B3
B4
LED1
Prox
Loop
Buzz
Shield
P5LP as
USB-I2C
Bridge
MBR3
I2C Commands
LED2
LED3 LED4LED5
enumeration is successful, both the power LED and status LED light up.
The kit is programmed with the Water Tolerance configuration by default. See Wate r Toler anc e o n
page 58 for more information.
3.2 Communication Between PC Host and Kit
The kit includes PSoC 5LP, an ARM-based PSoC that functions as a USB-I2C bridge between the
CY8CMBR3116 controller and the PC host (see Figure 3-6). The CY8CMBR3116 controller communicates with PSoC 5LP using an I
PC and EZ-Click 2.0 customizer tool.
Figure 3-6. Block Diagram - Communication Between PC Host and Kit
2
C interface, and the PSoC 5LP transfers the data over USB to the
Kit Operation
Cypress provides two USB-I
CY3280-MBR3 EVK uses the EZ-Click 2.0 customizer tool for register configuration. BCP is the software provided by Cypress that allows yo u t o co mmu n ica te ove r I
2
C software utilities: EZ-Click 2.0 and Bridge Control Panel (BCP). The
2
C, SPI, or RX8 using your PC and
USB. This application currently supports CY3240, MiniProg3, FirstTouch, FirstTouchRF, TrueTouchBridge, DVKProg1, and KitProg bridges. See Using PSoC 5LP as USB-I2C Bridge on page 74 for
more details on using the BCP.
You should install the EZ-Click 2.0 customizer tool on the PC to evaluate the kit features. This software is part of the kit installer, but it can also be downloaded from www.cypress.com/go/CY3280-
MBR3. You can use EZ-Click 2.0 to configure the CapSense controllers using I
over the USB-I
2
C bridge. You can also use it to monitor raw count, baseline, SNR, and other
2
C communication
CapSense sensor-related information directly.
CY3280-MBR3 Evaluation Kit User Guide, Doc. #: 001-89905 Rev. *B 20
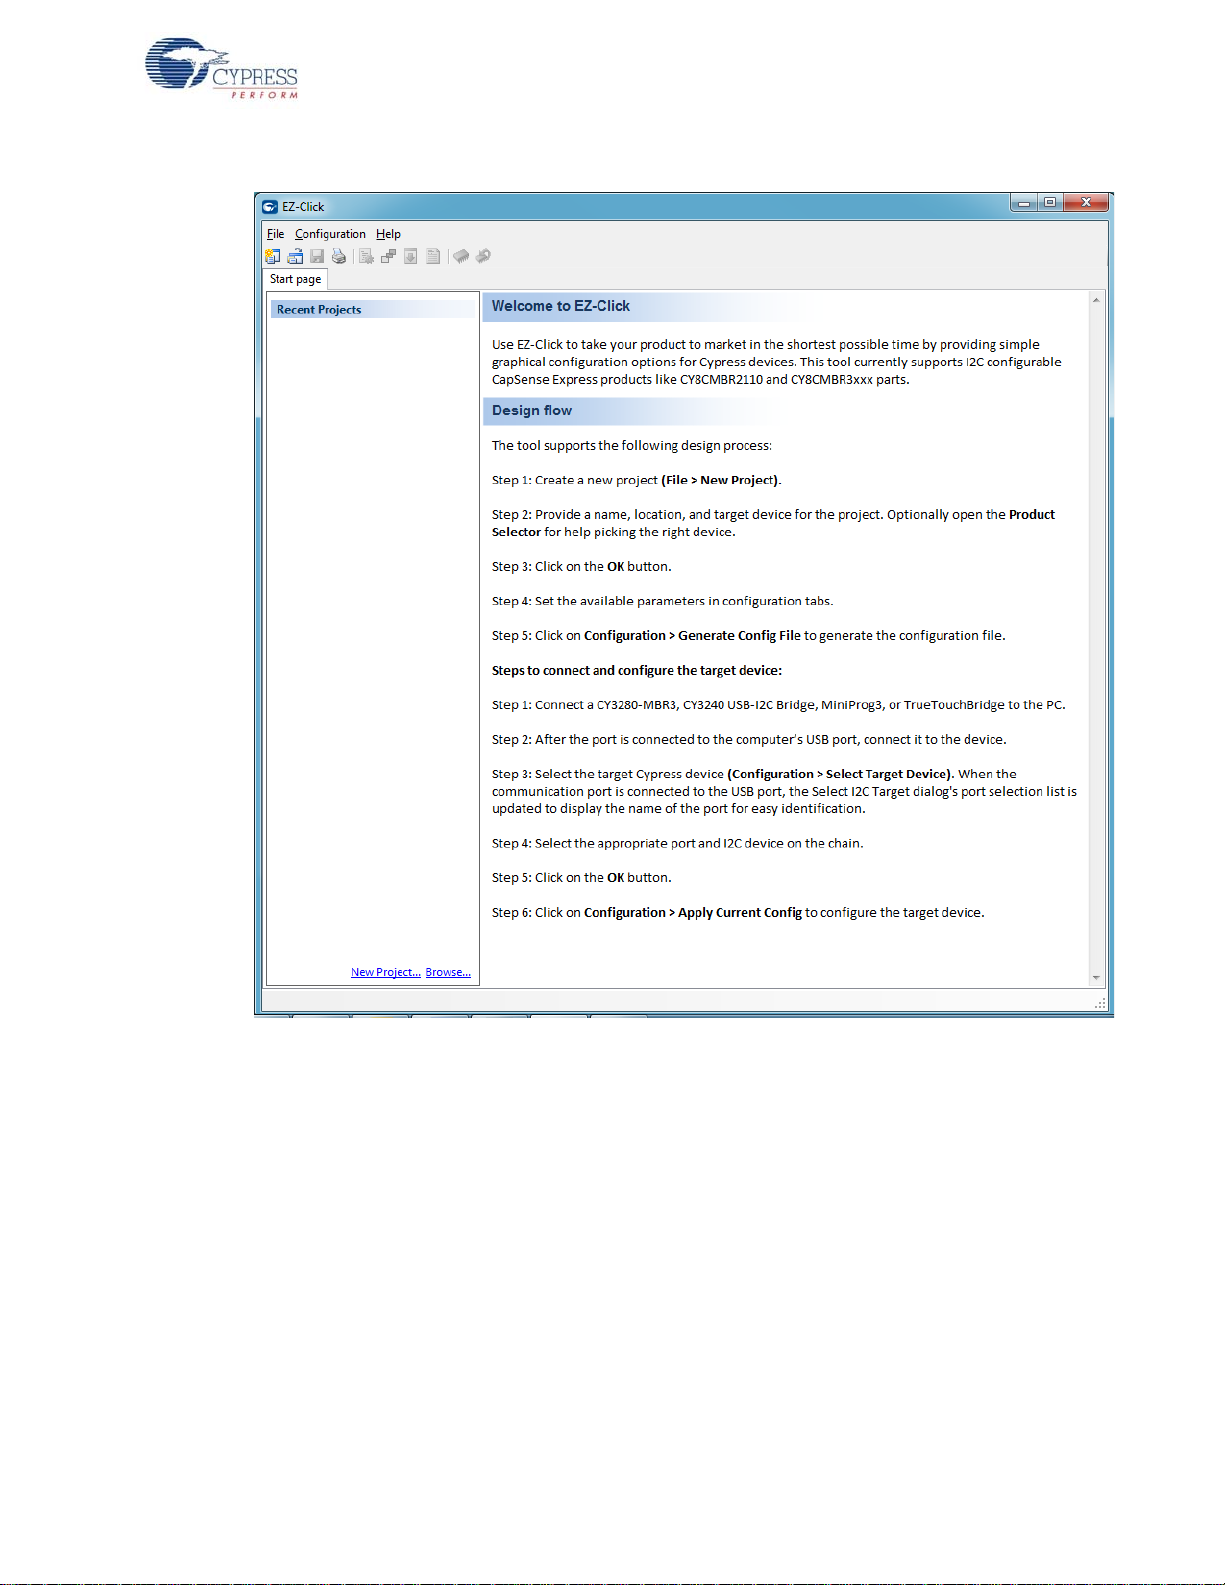
Figure 3-7. EZ-Click 2.0 Customizer Tool – Start Page
Kit Operation
3.3 Configuring the CY8CMBR3116 Controller Using EZ-Click 2.0
Follow these steps to configure the CY8CMBR3116 controller:
1. Connect the CY3280-MBR3 EVK to the PC via the USB port using the USB cable.
2. Open the EZ-Click 2.0 customizer tool from the default location: Start > All Programs > Cypress
> EZ-Click 2.0 > EZ-Click 2.0.
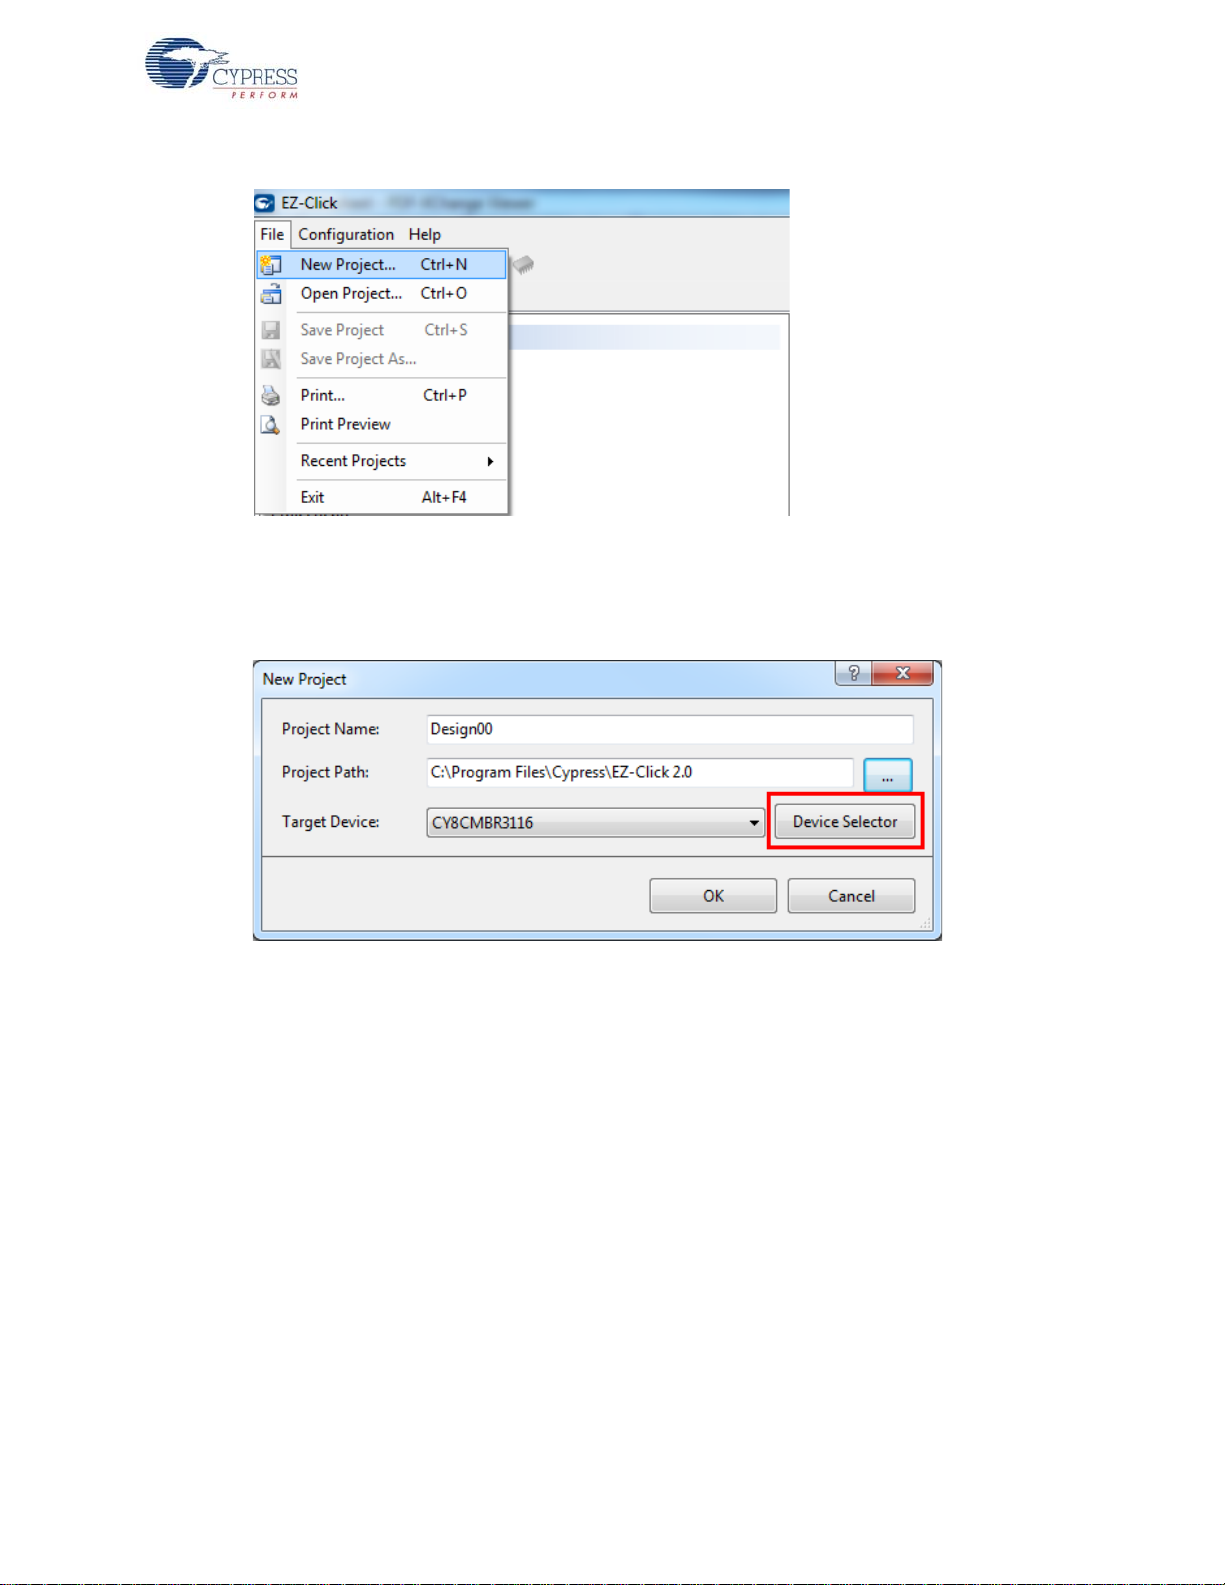
3. Create a new project in EZ-Click 2.0 by clicking New Project… in the File menu, as shown in
Figure 3-8.
CY3280-MBR3 Evaluation Kit User Guide, Doc. #: 001-89905 Rev. *B 21
Kit Operation
Figure 3-8. Creating a New Project in EZ-Click 2.0
4. Enter an appropriate name for the project and choose a location to save your project. Select Tar-
get Device as ‘CY8CMBR3116’ from the Product Selector. To launch the Product Selector, click
the Device Selector button, as shown in the following figure.
Figure 3-9. New Project Details
CY3280-MBR3 Evaluation Kit User Guide, Doc. #: 001-89905 Rev. *B 22
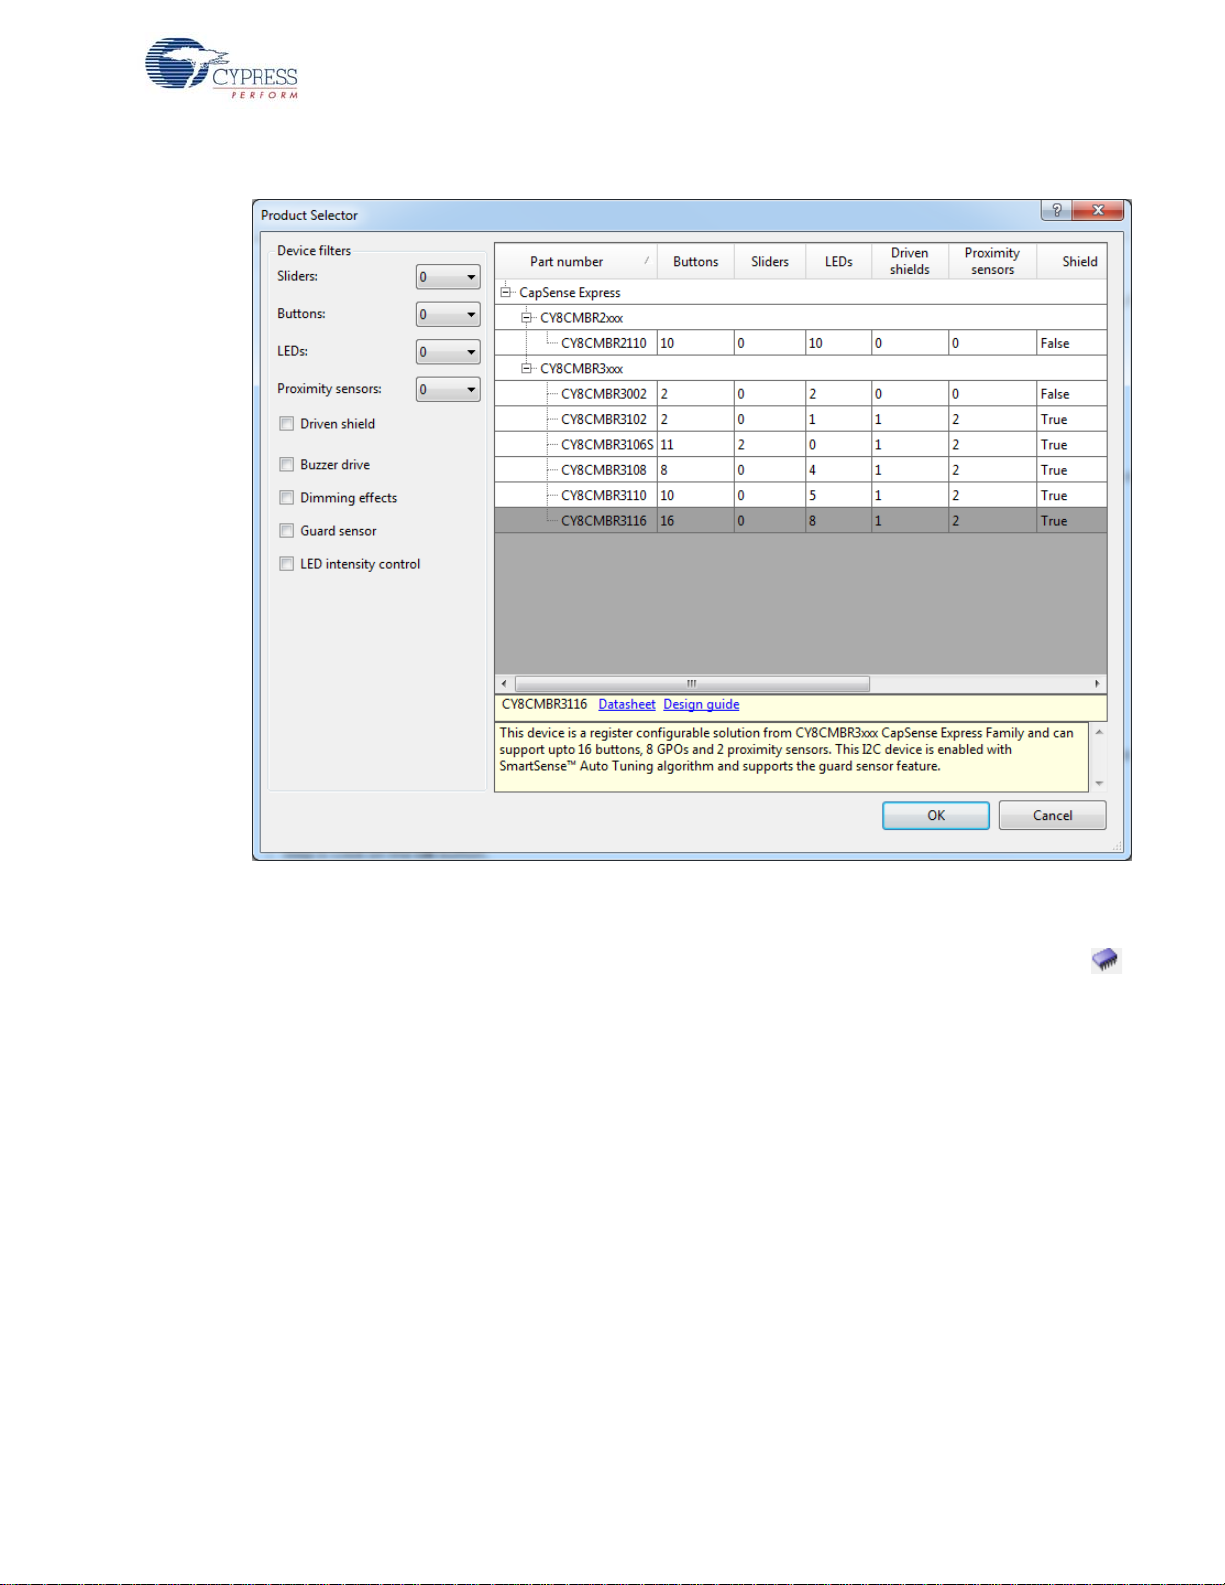
Figure 3-10. Choosing Part Number in Product Selector Guide
Kit Operation
2
5. Ensure that the I
communication with the onboard PSoC 5LP USB-I
C selection jumpers J13 and J14 are shorted between pins 1 and 2 to allow
2
C bridge.
6. Connect the kit to the EZ-Click customizer tool by clicking the Select Target Device button ( )
on the EZ-Click tool bar. This opens a Select I2C Target window (Figure 3-11); select the follow-
ing:
a. KitProg/<kit number> in the Ports window.
b. The I
2
C slave device in the Devices window.
Note: The CY8CMBR3116 has a slave address of 0x37 by default. If multiple slave devices
are connected, you can disconnect from one slave and connect to another by using the Con-
nect/Disconnect button in the Select I2C Target window. See Figure3-11.
c. Select the speed of the I
2
C communication as 400 kHz.
d. Choose the target device voltage by selecting the 3.3 V radio button.
CY3280-MBR3 Evaluation Kit User Guide, Doc. #: 001-89905 Rev. *B 23
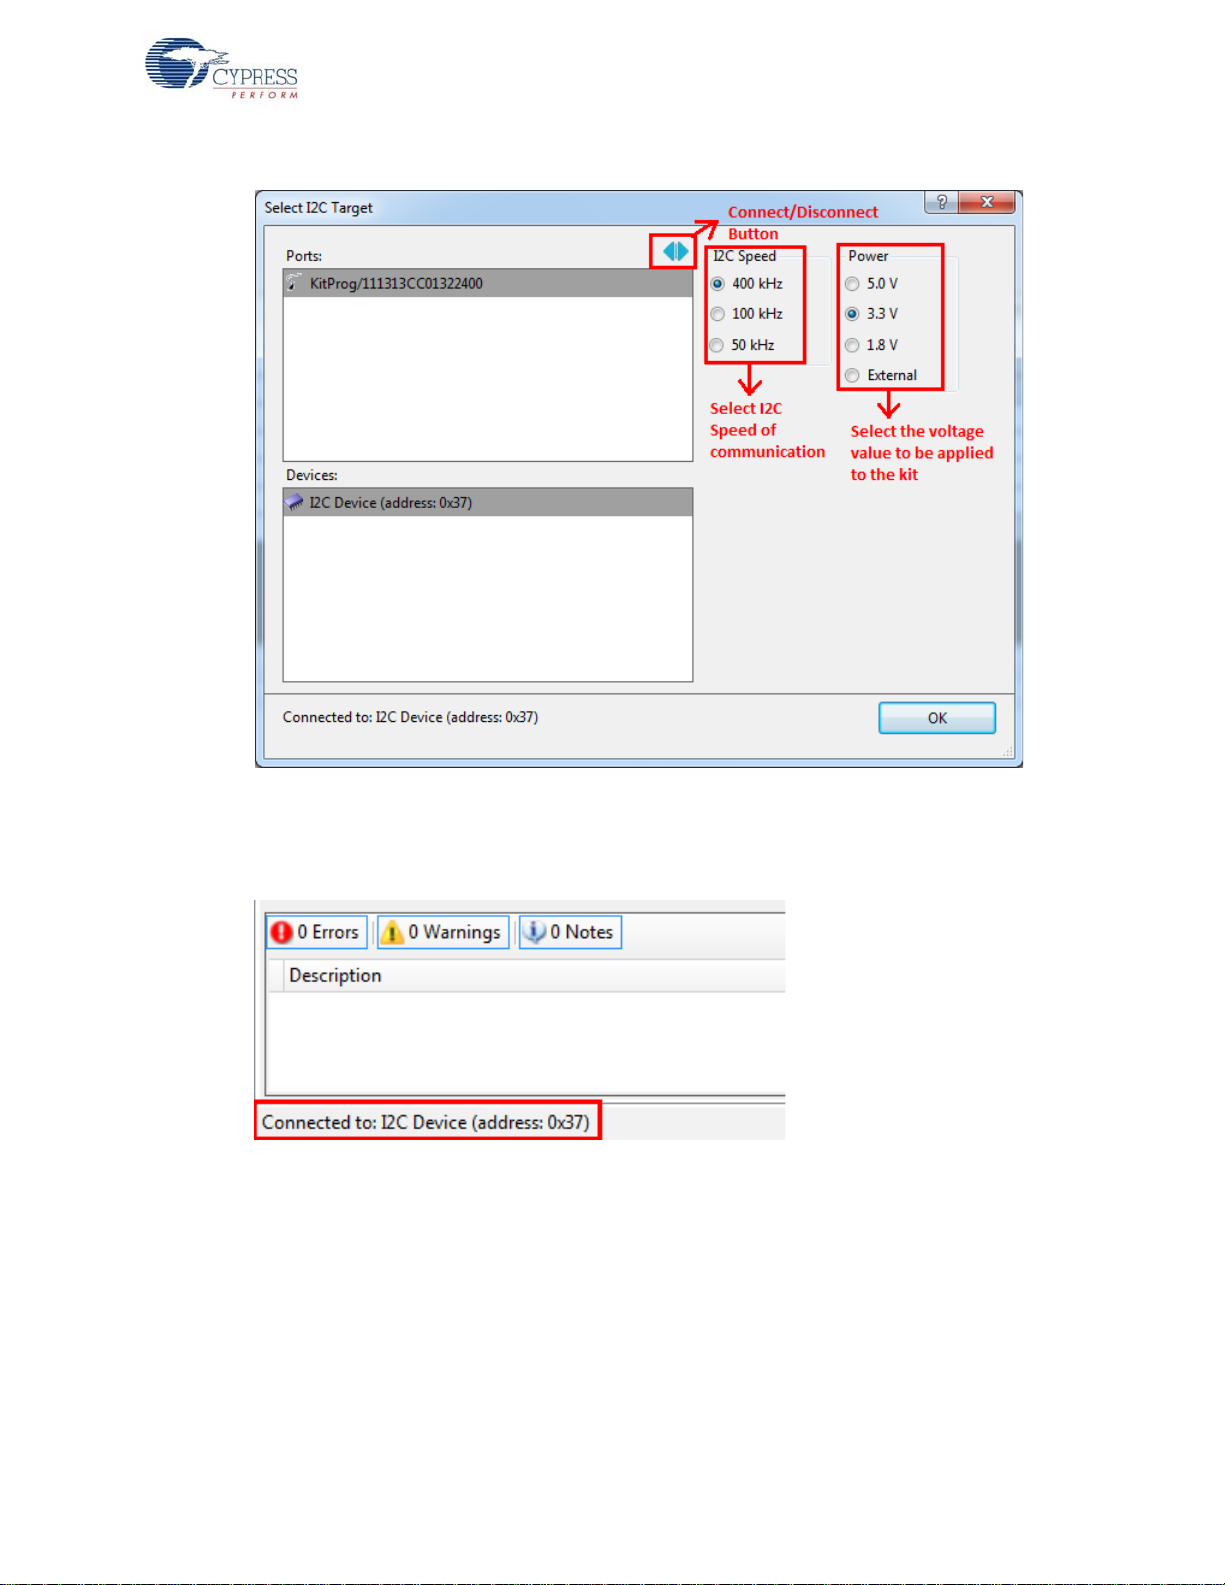
Figure 3-11. Connecting the Kit Using the EZ-Click 2.0 Customizer Tool
Kit Operation
7. Click OK. The I
2
C slave address of the connected device appears on the status bar at the bottom
of the EZ-Click window, as shown in Figure 3-12.
Figure 3-12. I
2
C Slave Address Display
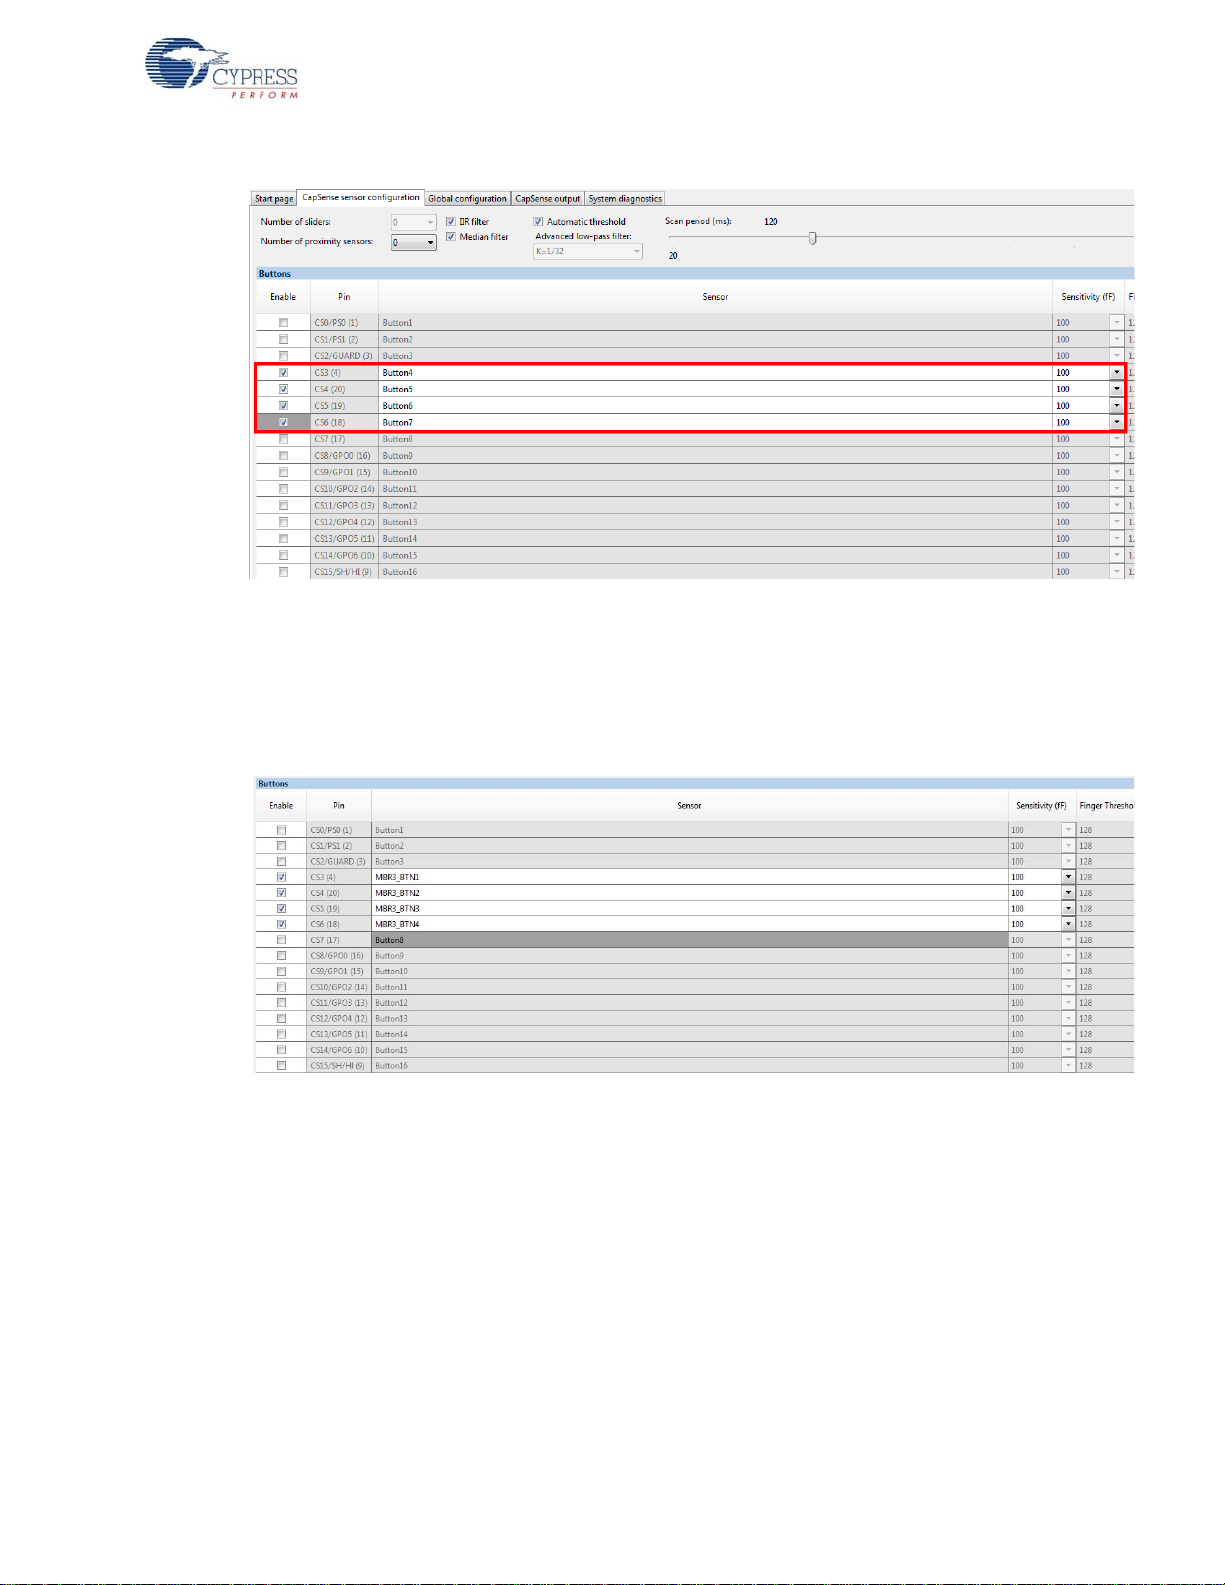
8. Enable the button sensors in the CapSense sensor configuration tab, as sh own in Figure 3-13.
See Pin Mapping Between CY8CMBR3116 and CY3280-MBR3 EVK on page 35 to learn about
the available button sensors and how they are connected to the CY8CMBR3116 device. In this
example, all four available button sensors on the kit are enabled.
CY3280-MBR3 Evaluation Kit User Guide, Doc. #: 001-89905 Rev. *B 24
Kit Operation
Figure 3-13. Enabling Button Sensors Using EZ-Click 2.0
Note: The CapSense buttons BTN1/CS3, BTN2/CS4, BTN3/CS5, and BTN4/CS6 on the CY3280MBR3 EVK correspond to Button4, Button5, Button6, and Button7 in the EZ-Click 2.0 customizer
tool, which map to pins CS3, CS4, CS5, and CS6 respectively on the MBR3 device. Figure 3-15
shows the corresponding four buttons for reference.
9. The sensor names can be modified if desired, as shown in Figure 3-14.
Figure 3-14. Changing Sensor Names
CY3280-MBR3 Evaluation Kit User Guide, Doc. #: 001-89905 Rev. *B 25
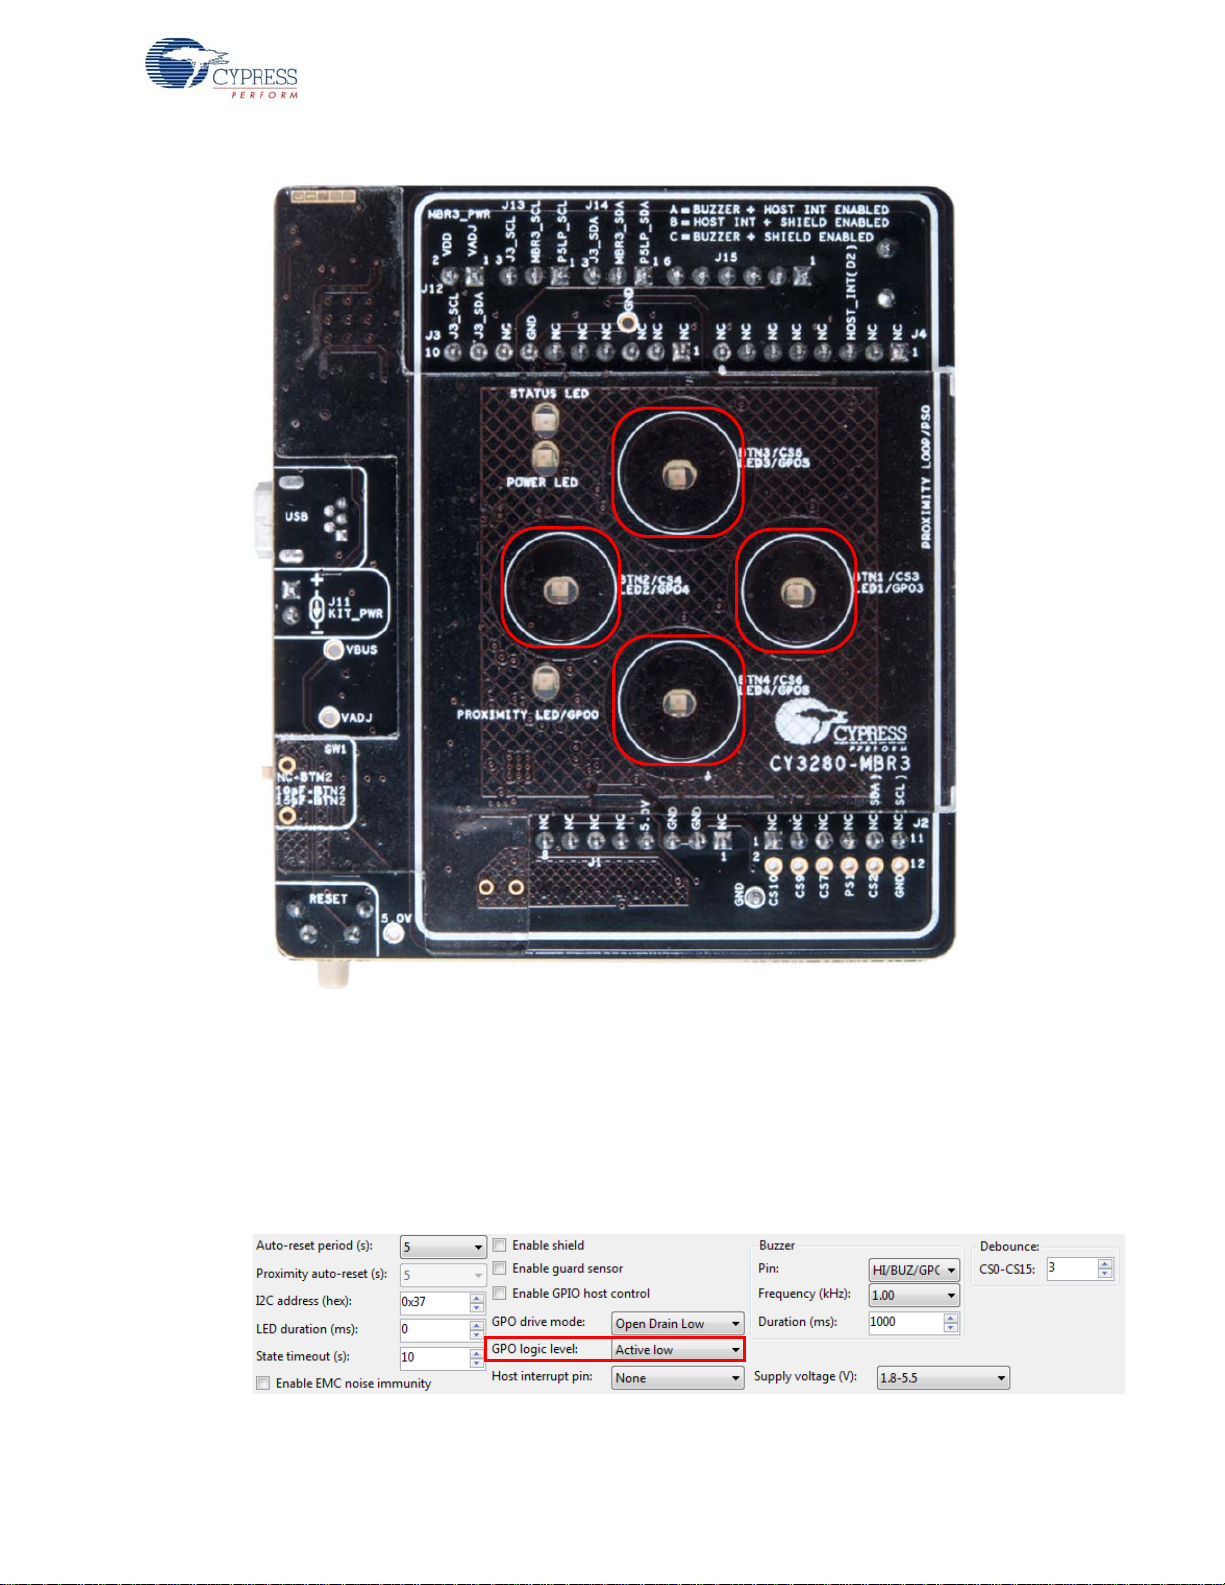
Figure 3-15. Kit Buttons Corresponding to CapSense Sensor Pins
Kit Operation
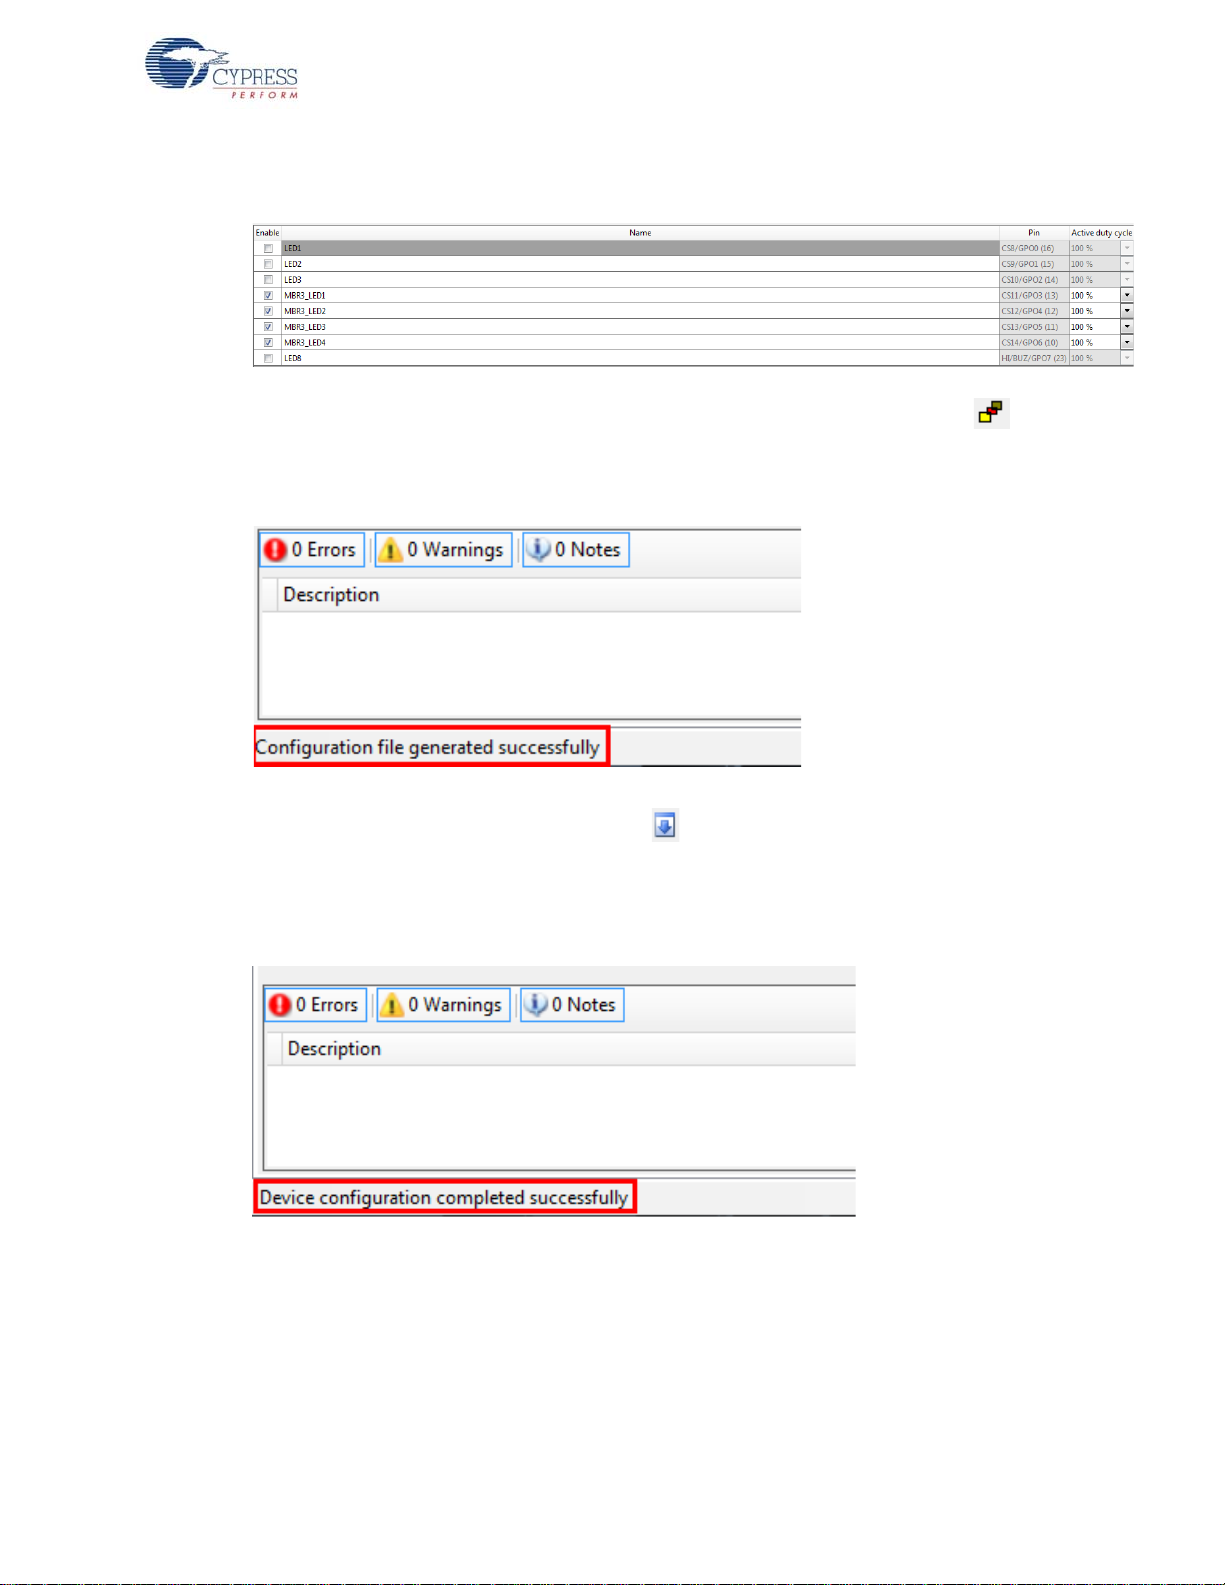
10.Enable the corresponding LEDs in the Global configuration tab, as shown in Figure 3-16, to
view the LED output for each button touch. Ensure that the GPO logic level is Active Low
because the LEDs on the CY3280-MBR3 EVK are active low.
Note: LED1/GPO3, LED2/GPO4, LED3/GPO5, and LED4/GPO6 on the CY3280-MBR3 EVK
correspond to LED4, LED5, LED6, and LED7 in the EZ-Click 2.0 customizer tool, which map to
the general-purpose output (GPO) pins CS11/GPO3, CS12/GPO4, CS13/GPO5, and CS14/
GPO6 respectively on the MBR3 device.
Figure 3-16. Global Configuration Tab
CY3280-MBR3 Evaluation Kit User Guide, Doc. #: 001-89905 Rev. *B 26
Kit Operation
11.The LEDs can also be renamed, as shown in Figure 3-17.
Figure 3-17. Rename LEDs
12.Generate the configuration file by clicking the Generate Configuration File icon on the tool
bar or by pressing [Ctrl] + [G]. The status of configuration file generation is shown in the status
bar at the bottom of the EZ-Click window (see Figure 3-18).
Figure 3-18. EZ-Click Status Bar Showing Configuration Generation Status
13.Click the Apply Current Configuration icon on the tool bar in the EZ-Click 2.0 customizer tool
or press [Ctrl] + [L] to download the generated configuration to the MBR3 device.
14.Wait for the message “Device configuration completed successfully” to be displayed on the status
bar, as illustrated in Figure 3-19.
Figure 3-19. EZ-Click Status Bar Showing Successful Device Configuration
15.Touch the buttons on the kit to observe the features as enabled in the configuration.
Note: The Water Tolerance configuration file is preloaded into the kit. The kit supports the features
mentioned in Water Tolerance on page 58 by default. To learn more about the configurations, see
Configuration Files on page 51.
CY3280-MBR3 Evaluation Kit User Guide, Doc. #: 001-89905 Rev. *B 27

3.4 Kit Features
The CY3280-MBR3 EVK includes the following features:
■ Four CapSense buttons of two different sizes – two buttons of 10-mm diameter (BTN1 and
BTN2) and two buttons of 11-mm diameter (BTN3 and BTN4)
■ LEDs corresponding to sensors indicating button touch
■ A buzzer
■ Shield electrode pin for water tolerance
2
■ I
C selection jumpers
■ Arduino-compatible headers
■ One proximity loop and a corresponding LED to indicate proximity state (o n/off)
■ A host interrupt pin
■ Two slide switches on two CapSense buttons to vary trace capacitance and demonstrate
SmartSense Auto-Tuning
Note: The CS15 pin of the MBR3 device is multiplexed for the CapSense button, host interrupt, and
shield electrode. Similarly, GPO7 is multiplexed for general-purpose output, host interrupt, and
buzzer output. All three features – host interrupt, buzzer, and shield electrode (water tolerance) cannot be enabled simultaneously. See Buzzer, Shield, and Host Interrupt Multiplexing Jumper on
page 44 for more details on CS15 and GPO7 pin connections.
Kit Operation
3.4.1 SmartSense Auto-Tuning Feature
The CY8CMBR3116 device features SmartSense Auto-Tuning, which is the Cypress proprietary
CapSense algorithm that compensates for system, manufacturing, and environmental changes while
providing feature-rich CapSense solutions.
■ Reduces design effort by eliminating tedious manual tuning
■ Adapts to variations in PCB, overlay, paint, and manufactu ring that degrade touch-sensing per-
formance
■ Eliminates production-related manual tuning
■ Adapts to changes in system environment due to noise sources
■ Allows a platform design approach with different overlays, button shapes, and trace lengths
The CY8CMBR3116 also supports setting manual thresholds to override the auto-tuning mechanism, if required.
SmartSense Auto-Tuning is demonstrated using three methods on the kit. See Capacitance Varia-
tion Demonstration on page 46 for hardware details:
1. Using the SW1 slide switch to increase capacitance
a. Power on the kit using USB or an external power supply on pin 4 of the J1 header.
b. Touch BTN2 on the kit; the corresponding LED will turn on, providing visual feedback on each
button touch.
c. Increase the capacitance of BTN2 by sliding SW1 to add an additional 10-pF or 15-pF exter-
nal capacitance on the sensor, as shown in Figure 3-20; the LED turns on as if a touch
occurred due to the increase in capacitance. Now, press the reset switch, SW2, to reset the
board.
d. Touch BTN2 on the kit; the corresponding LED works normally. This demonstrates the
SmartSense Auto-Tuning algorith m, which automatically tunes for the increased CapSense
button capacitance.
CY3280-MBR3 Evaluation Kit User Guide, Doc. #: 001-89905 Rev. *B 28

Kit Operation
Note: The SW1 switch has three positions: at the NC-BTN2 position, the button is directly connected to the CS4 pin on MBR3 and no additional capacitance is added. At the 10pF-BTN2 and
15pF-BTN2 positions, an additional trace capacit ance of 10 pF and 15 pF re spectively are a dded
to the CapSense button.The SW1 switch simulates changes in trace parasitic capacitance.
Figure 3-20. SW1 Slide Switch in NC-BTN2 Position
2. Using a short/long trace by adjusting the SW3 slide switch on the kit
a. Power on the kit using USB or an external power supply on pin 4 of the J1 header.
b. Touch BTN4 on the kit. The LED corresponding to BTN4 will turn on, providing visual feed-
back on each touch.
c. Increase the parasitic capacitance of BTN4 by sliding SW3 (see Figure 3-21) to add a longer
trace on BTN4.
d. The LED turns on as if a touch occurred due to the increase in capacitance. Now, press the
reset switch, SW2, to reset the board.
e. Touch BTN4 on the kit; the corresponding LED works normally and provides visual feedback
on each touch. This demonstrates the SmartSense Auto-Tuning algorithm, which automatically tunes for the increase in CapSense button capacitance due to the long trace.
CY3280-MBR3 Evaluation Kit User Guide, Doc. #: 001-89905 Rev. *B 29

Figure 3-21. SW3 Slide Switch in Long Trace Position
Kit Operation
3. Using the additional 1-mm overlay provided with the kit, as shown in Figure 3-22
a. Power on the kit using USB or an external power supply on pin 4 of the J1 header.
b. Touch BTN1 on the kit. The LED corresponding to BTN1 will turn on, providing visual feed-
back on each touch.
c. Place the additional 1-mm overlay, provided with the kit, on top of the board and press the
reset switch, SW2, to reset the board.
d. Touch BTN1 on the kit; the corresponding LED works normally and provides visual feedback.
This demonstrates the SmartSense Auto-Tuning algorithm, which automatically tunes for the
increase in CapSense button capacitance due to an increase in overlay thickness.
CY3280-MBR3 Evaluation Kit User Guide, Doc. #: 001-89905 Rev. *B 30

Figure 3-22. Board with Additional 1-mm Overlay Placed on the 2-mm Overlay
Kit Operation
CY3280-MBR3 Evaluation Kit User Guide, Doc. #: 001-89905 Rev. *B 31

4. Hardware
The CY3280-MBR3 EVK is designed to demonstrate the features of the CY8CMBR3116 registerconfigurable CapSense controller with four CapSense buttons and a proximity sensor loop. The kit
includes five sensor LEDs, which can be used to demonstrate the direct LED control feature of the
CY8CMBR3116. It also contains two LEDs to indicate power and kit status. The CY8CMBR3116
controller supports multiple features, which are discussed in Functional Description on page 34.
The CY3280-MBR3 EVK has two communication options:
■ A USB interface for the USB-I
■ The I
4.1 Board Details
The CY3280-MBR3 EVK consists of the following blocks:
■ CY8CMBR3116 silicon
■ PSoC 5LP USB-I
■ Power supply system
■ Four button sensors and one proximity loop
■ CY3280-MBR3 EVK LEDs: A power, status, and proximity LED and four CapSense LEDs
■ Capacitance variation demonstration
■ Arduino-compatible headers
■ Push button to reset the CY8CMBR3116
■ Buzzer, shield, and host interrupt pin multiplexing jumper
■ I
2
C interface on the kit to connect to an external I2C host, for example, the PSoC 4 Pioneer
Kit (CY8CKIT-042).
❐ Two-position slide switch to select long/short trace for BTN4
❐ Three-position slide switch to add capacitance on BTN2; the three positions of the slide switch
correspond to 10 pF, 15 pF, and no addition al ca pa cit an ce
2
C selection jumpers to select between onboard PSoC 5LP and external host.
2
C bridge
2
C bridge to communicate with the EZ-Click 2.0 customizer tool.
See Figure 3-1 for the CY3280-MBR3 board details.
CY3280-MBR3 Evaluation Kit User Guide, Doc. #: 001-89905 Rev. *B 32

4.2 Theory of Operation
CY8CMBR3116
P5LP
I2C-USB
Bridge
USB
Mini B
Four Red LEDs
(one for each
CapSense Button)
Proximity Red
LED
Power LED
Red
Status LED
Green
ESD Protection
IEC 61000-4-2
Level 4
LDO
Buzzer
Arduino Headers (From Baseboard)
Slide
Switch(SW1)
Proximity Sensor
VBUS
VADJ
1.8V/
3.3V/
4.7V
VDD
I2C_SDA/
SCL
I2C_SCL
HI/Buz
D+/D-
Variable Cp
(10pF, 15pF, 0pF)
Voltage
Control
Current
Sense
Buzzer
Shield
I2C
Host
Interrupt
I2C_SDA
Switch for
choosing a
longer parasitic
trace on BTN4
PolyZen
HI/
Shield
VDDIO2 =VDDIO3=VADJ
VDDIO0=VDDIO1=VBUS
VDD=VBUS
GND
Diode
V5.0
Jumper for
measuring Whole
Kit Current
Consumption
Reset SW
(SW2)
V4.6
V5.0_External
Slide
Switch(
SW3)
NO Load Res for
1.8V operation
Host
Interrupt
J11
J12
J15
J13 and J14
BTN2
BTN4
BTN1
BTN3
This section provides a block-level description of the CY3280-MBR3 EVK.
Figure 4-1. Block Diagram
Hardware
This kit can be powered using the USB Mini-B, the Arduino-compatible header, or an external power
supply. You can configure the input voltage (1.8 V, 3.3 V, 5 V, or external supply) while connecting
the device to the EZ-Click 2.0 customizer tool. The voltage is controlled by using a low dropout
(LDO) regulator, which can provide regulated power of 1.8 V, 3.3 V, and 4.7 V to the CY8CMBR3116
device. The power to the MBR3 device is controlled by the Power setting in the EZ-Click customizer
tool; see Figure 3-11.
The CY3280-MBR3 EVK includes a status LED, a power LED, LEDs corresponding to all CapSense
buttons, and a proximity LED co rresponding to the proximity loop on the kit. It contains an onboard
PSoC 5LP, which acts as a USB-I
This kit also includes a reset button, which connects to the reset pin (XRES) of the CY8CMBR3116
device. All the unused pins of the device are brought out onto the Arduino header J2 on the kit to
enable you to test different types of self-designed sensors and observe the output on the oscilloscope.
CY3280-MBR3 Evaluation Kit User Guide, Doc. #: 001-89905 Rev. *B 33
Note: The kit operation voltage is 4.7 V when the kit is configured for 5 V.
2
C bridge to support I2C communication using a PC host.

4.3 Functional Description
4.3.1 CY8CMBR3116 CapSense Controller
The CY8CMBR3116 CapSense controller includes the following features:
■ SmartSense Auto-Tuning – Cypress' CapSense algorithm that continuously compensates for
system, manufacturing, and environmental changes.
■ Proximity sensing – Supports configurability of sensors for proximity sensing.
■ Button sensor auto-reset – Prevents a stuck sensor when a metal object is placed close to that
sensor.
■ Flanking sensor suppression (FSS) – Eliminates false touches by distinguishing between signals
from closely spaced buttons.
■ Toggle (touch on/off) – Mimics the mechanical button functionality by toggling sensor output sta-
tus on every sensor activation.
■ LED-on time – Provides better visual feedback by enabling the general-purpo se ou tput (GPO) to
be on for a configurable period after the button is released.
■ Debounce control – Prevents false trigger by specifying the minimum time for which a sen sor
must be touched for a valid ON status.
■ Buzzer signal output – Enables direct drive of a buzzer with configurable frequency.
■ Host-controlled GPO – Enables device GPOs to be controlled by the host (I
■ LED brightness control – Offers duty cycle configurability to control the brightness of the LEDs
connected to the GPOs.
■ Wake-on approach – Wakes the device from low-power and switches to the active state using
proximity sensors.
■ Water tolerance – Enables water-tolerant user interface applications. The shield ele ctrode should
be enabled through the register map to prevent false touches under wet conditions. To prevent
false touches in streaming water conditions, both the shield electrode and guard sensor need to
be enabled. However, the MBR3 kit does not have the guard sensor loop. So, water tolerance
under streaming water conditions cannot be tested on the board.
2
■ I
C slave – An I2C interface with support for 50/100/400-kHz clock speeds and hardware slave
address comparison.
■ Host interrupt – Alerts the host processor upon touch detection; for every touch and release
event, an active low pulse of typically 250 µs is generated.
■ System diagnostics – Supports production testing and debugging.
2
C master).
Hardware
See the CY8CMBR3116 datasheet for more details on these features.
The CY3280-MBR3 EVK can be configured using the EZ-Click 2.0 customizer tool. The kit includes
three configuration files with specific features described in Configuration Files on page 51. Additional
configurations can be generated and applied to the kit using this tool.
See the EZ-Click 2.0 Customizer Tool User Guide for additional details on how to generate more
configurations to evaluate the features in this section using the EZ-Click 2.0 customizer tool. This
guide is available at the location <Install Directory>\EZ-Click\<version>\Documenta-
tion.
4.3.1.1 Pin Mapping Between CY8CMBR3116 and CY3280-MBR3 EVK
The CY8CMBR3116 device can be configured for 16 button sensors of which two sensors are configurable as proximity sensors. The kit demonstrates four button sensors and one proximity sensor.
CY3280-MBR3 Evaluation Kit User Guide, Doc. #: 001-89905 Rev. *B 34

Table 4-1 maps the device pins to the physical sensors on the kit.
Table 4-1. Pin Mapping on the Kit
Sensor Device Kit
CS0/PS0
CS1/PS1
CS2/Guard
CS3 CapSense button, controls GPO3 Used as button BTN1 on the kit
CS4 CapSense button, controls GPO4 Used as button BTN2 on the kit
CS5 CapSense button, controls GPO5 Used as button BTN3 on the kit
CS6 CapSense button, controls GPO6 Used as button BTN4 on the kit
CS7 CapSense button, controls GPO7
CS8/GPO0 CapSense button/general- purpose output
CS9/GPO1 CapSense button/general- purpose output
CS10/GPO2 CapSense button/general- purpose output
CS11/GPO3 CapSense button/general- purpose output
CS12/GPO4 CapSense button/general- purpose output
CS13/GPO5 CapSense button/general- purpose output
CS14/GPO6 CapSense button/general- purpose output
CS15/SH/HI
HI/BUZ/GPO7
CapSense button/proximity sensor, controls
GPO0
CapSense button/proximity sensor, controls
GPO1
CapSense button/guard sensor, controls
GPO2
CapSense button/shield electrode/host
interrupt
Host interrupt/buzzer output/general-purpose output
Connected to proximity loop on kit
Routed to Arduino header; can be used for
external button/proximity sensor
Routed to Arduino header; can be used for
external button/guard sensor
Routed to Arduino header; can be used for
external button sensor
Connected to proximity LED on the kit; driven
by CS0/PS0
Routed to Arduino header; can be used for
external button sensor/GPO
Routed to Arduino header; can be used for
external button sensor/GPO
Connected to LED1 on the kit; driven by CS3
(BTN1)
Connected to LED2 on the kit; driven by CS4
(BTN2)
Connected to LED3 on the kit; driven by CS5
(BTN3)
Connected to LED4 on the kit; driven by CS6
(BTN4)
Connected to header J15 multiplexing buzzer,
shield, and host interrupt pin on the kit
Connected to header J15 multiplexing buzzer,
shield, and host interrupt pin on the kit
Hardware
4.3.2 PSoC 5LP
An onboard PSoC 5LP is used as a USB-I2C bridge for communicating with the PC host. It also sets
the operating voltage applied to the target device. The MBR3 d evice can be oper ated at e ither 5.0 V,
3.3 V, and 1.8 V. By default, the onboard PSoC 5LP USB-I
for the MBR3 device. The PSoC 5LP connects to the USB po rt of the PC th rou gh a USB Mini- B connector and to the I
2
C interface of the CY8CMBR3116 device.
PSoC 5LP is a true system-level solution, prov idin g an M CU, memo r y, analog, and digital peripheral
functions in a single chip. The CY8C58LPxx family offers a modern method of signal acquisition, signal processing, and control with high accuracy, high bandwidth, and high flexibility. Analog capability
spans the range from thermocouples (near DC voltages) to ultrasonic signals. For more information,
refer to the PSoC 5LP web page and datasheet.
CY3280-MBR3 Evaluation Kit User Guide, Doc. #: 001-89905 Rev. *B 35
2
C bridge sets 3.3 V as operating voltage

4.3.3 Power Supply System
I/O Header
Protection
Device
5V_EXT
5.0 V
LDO
PSoC 5LP
Vdd, Vddio0, Vddio1
Vddio2 and
Vddio3
MBR3
VDD
SDA, SCL, Host
INT and MBR3
XRES
USB
PTC
ESD
Protection
Jumper for Current Measurement of
MBR3
Jumper for
Whole Kit
Current
Measurement
J11
J12
Control Lines
EN_CTRL, 3.3_CTRL,
1.8_CTRL
The CY8CMBR3116 device supports operation from 1.71 V to 5.5 V. The CY8CMBR3116 device
has two modes of operation: internally regulated mode a nd externally regulated mode. Table 4-2 lists
the voltage ranges supported for both the operating modes.
Table 4-2. Operating Voltage Ranges for CY8CMBR3116 Device Modes
Operating Voltage Range Internally Regulated Mode Externally Regulated Mode
1.71 V to 1.8 V No Yes
1.8 V to 1.89 V Yes Yes
1.89 V to 5.5 V Yes No
Note: See the MBR3 device datasheet for more details.
The power supply system on this board is versatile, allowing the input supply to come from the fol-
lowing sources:
■ 5-V power from the onboard USB Mini-B header (J10)
■ 5-V power from an Arduino board or an external supply using pin 4 of the J1 header
The power system of this kit is designed to support 1.8-V, 3.3-V, and 4.7-V operation of the
CY8CMBR3116 device. At 1.8 V, the kit can be operated in either internally regulated or externally
regulated mode. By default, the kit and ex ample projec ts are designed to operate in internally regulated mode. See Externally Regulated Operation Mode on page 37 to operate the kit in externally
regulated mode. The PSoC 5LP firmware configures the required voltage according to the selection
made while connecting to the USB-I
Vbus voltage and enabling the LDO regulator (U2–MIC 5219). When the kit is powered externally
through the J1 header, the kit operational voltage is regulated to 3.3 V.
Hardware
2
C bridge. This configuration is performed by monitoring the
CY3280-MBR3 Evaluation Kit User Guide, Doc. #: 001-89905 Rev. *B 36
When the board is powered using the Arduino header, a PolyZen protection device (U4) is added in
series with the 5-V external power line to protect against overvoltag e an d reve rse- voltage scenarios.
The device can protect overvoltage and reverse voltage up to 12 V.
Figure 4-2. Power Supply Block Diagram with Protection Circuits

Figure 4-3. Power Supply Section Schematic Snippet
Hardware
Figure 4-4. Protection from Overvoltage and Reverse Voltage from Arduino Header
4.3.3.1 Externally Regulated Operation Mode
To operate the kit in externally regulated mode at 1.8 V, solder resistors R84 and R85 with 0-ohm
resistors. Select the Supply Voltage (V) parameter on the EZ-Click customizer tool, as shown in
Figure 4-5.
CY3280-MBR3 Evaluation Kit User Guide, Doc. #: 001-89905 Rev. *B 37

Figure 4-5. Supply Voltage Parameter for Externally Regulated Mode
Hardware
Populating R84 shorts the VCCD and VDD pin of CY8CMBR3116 for the externally regulated mode.
Populating R85 ensures that the board is always powered at 1.8 V . This overrid es the power settings
done from the EZ-Click customizer tool (see Figure 3-11).
Figure 4-6. R84 and R85 for Externally Regulated Operation at 1.8 V
Note: Do not configure the device with the Supply Voltage (V) parameter set to 1.8±5%, before
populating resistors R84 and R85. If you do so, the EZ-Click customizer tool will throw an error, as
shown in Figure 4-7. The kit will not be functional until the resistors R84 and R85 are populated.
CY3280-MBR3 Evaluation Kit User Guide, Doc. #: 001-89905 Rev. *B 38

Hardware
Figure 4-7. EZ-Click Error
To switch the kit operation from externally regulated mode to internally regulated mode, follow these
steps:
1. Select the Supply Volt age (V) parameter on the EZ-Click customizer tool, as shown in Figure 4-8
and apply the configuration. This turns the internal regulator on.
Caution: You cannot apply any configuration if you remove resistors R84 and R85 before step 1.
Figure 4-8. Supply Voltage Parameter
CY3280-MBR3 Evaluation Kit User Guide, Doc. #: 001-89905 Rev. *B 39

2. Remove the USB cable connected to the kit.
3. Desolder (unpopulate) resistors R84 an d R85 ( Figure 4-6), which were previously loaded for
externally regulated mode operation.
4. Connect the USB cable to the kit and apply the EZ-Click configuration with the Supply Voltage (V)
parameter as 1.8-5.5, as shown in Figure 4-8.
Note: To operate the kit in internally regulated mode, the Supply Voltage (V) parameter should
be selected as 1.8-5.5, as shown in Figure 4-8.
4.3.3.2 Protection Circuit
The power supply rail has reverse-voltage, overvoltage, and short-circuit protection features.
■ The PTC resettable fuse is connected to protect the comp uter's USB p orts from overcurrent; see
Figure 4-9.
Figure 4-9. USB Power Supply Section Schematic Snippet
Hardware
■ D2 – A series protection diode to ensure there is no back power to the header; see Figure 4-3.
■ U4 – A PolyZen protection device (ZEN056V075A48LS) that protects the kit against overvoltage
and reverse voltage from the headers; see Figure 4-4.
Caution: There is no protection on the current measurement jumper, test points, and I/O pins. Do
not apply more than 5.5 V on these ports.
4.3.3.3 Procedure to Measure the CY8CMBR3116 Current Consumption
This kit provides a way to measure the current consumption of both the whole kit and the
CY8CMBR3116 device individually, without soldering. There are two separate jumpers on the board
for this purpose.
CY3280-MBR3 Evaluation Kit User Guide, Doc. #: 001-89905 Rev. *B 40

Hardware
1. T o measure current consumption of only the CY8CMBR3116 device, remove the power su pply by
either disconnecting the USB cable or removing the power source at pin 4 of the J1 header and
connect an ammeter across J12. Now , power the kit again b y either conn ecting the USB cable or
supplying power at pin 4 of the J1 header.
Figure 4-10. CY8CMBR3116 Device Current Consumption Measurement
2. To measure the current consumption of the whole kit, remove board power and connect an
ammeter across J11. Now, power the kit again by connecting the USB cable.
CY3280-MBR3 Evaluation Kit User Guide, Doc. #: 001-89905 Rev. *B 41

Figure 4-11. Kit Current Consumption Measurement
Hardware
Note: Do not remove the current measurement jumper J12 while the kit is powered. This can damage the MBR3 silicon.
4.3.4 Button Sensors and Proximity Loop Sensor
The kit has four CapSense buttons (two circular buttons of 10-mm diameter and two circular buttons
of 11-mm diameter) and one proximity loop onboard, as Figure 4-12 shows. These sensors can be
driven by the CY8CMBR3116 device to perform touch and proximity detection.
CY3280-MBR3 Evaluation Kit User Guide, Doc. #: 001-89905 Rev. *B 42

Figure 4-12. Button Sensor and Proximity Loop Connections on the Kit
Hardware
4.3.5 CY3280-MBR3 Kit LEDs
The EVK has seven onboard LEDs. A green LED (D15) indicates the status of the USB-I2C bridge. A
red LED (D13) indicates the status of the power supplied to the board.
The kit also has an active-low red LED for each CapSense button and proximity loop. The
CY8CMBR3116 drives these LEDs by driving the GPO low.
Figure 4-13 and Figure 4-14 detail the schematic of the LEDs.
Note: These LEDs are dim when working at 1.8 V compared to 3.3-V and 4.7-V operation.
Figure 4-13. Power and Status LED Connection
CY3280-MBR3 Evaluation Kit User Guide, Doc. #: 001-89905 Rev. *B 43

Hardware
Figure 4-14. Sensor Indicator LEDs
Note: The sensor indicator LEDs are connected to the adjustable voltage, VADJ, which is the output
of the LDO regulator (U2-MIC 5219). The ano de of a ll the LEDs is connected to VADJ, which is high.
Therefore, these are all active-low LEDs.
4.3.6 Buzzer, Shield, and Host Interrupt Multiplexing Jumper
The CS15 pin of the MBR3 device is multiplexed for the CapSense button, host interrupt, and shield
electrode. Similarly, GPO7 is multiplexed for general-purpose output, host interrupt, and buzzer output. All three features – host interrupt, buzzer, and shield electrode (water tolerance) cannot be
enabled simultaneously. These features can be enabled using the multiplexing jumper J15, which
has three combinations.
Table 4-3. J15 Combinations
Combination Features
A Buzzer on GPO7, Host Interrupt on CS15
B Host Interrupt on GPO7, Shield on CS15
C Buzzer on GPO7, Shield on CS15
Note: If water tolerance (shield) is not used and only buzzer or host interrupt features are used, then
the shield pin must be connected to ground by shorting pins 5 and 6 of jumper J15.
See the MBR3 device datasheet and the schematic for more details.
CY3280-MBR3 Evaluation Kit User Guide, Doc. #: 001-89905 Rev. *B 44

Figure 4-15. Buzzer, Shield, and Host Interrupt Connection
Hardware
CY3280-MBR3 Evaluation Kit User Guide, Doc. #: 001-89905 Rev. *B 45

Figure 4-16. Default J15
Hardware
Note: The kit is shipped with the combination/setting 'C' and the third jumper is connected vertically
so that it is not shorted to any other pin.
4.3.7 Capacitance Variation Demonstration
The kit provides three methods to demonstrate parasitic capacitance variation on the button sensors
available on the kit, as shown in Figure 4-17. These methods are used to showcase the SmartSense
auto-tuning capability of the device. See SmartSense Auto-Tuning Feature on page 28 to learn the
procedure to test these methods using this kit.
The methods are:
■ Using the trace method: Button BTN4 (connected to the CS6 pin of CY8CMBR3116) is con-
nected to the SW3 slide switch, which can be used to provide two different routes between the
pin and the sensor pad. One route is longer than the other. Different trace lengths have different
parasitic capacitance; therefore, you can change the length of the trace to change the parasitic
capacitance on the sensor.
■ Using external capacitance: The SW1 switch is provided to add an extra capacitance of 10 pF or
15 pF on BTN2 (connected to the CS4 pin of the CY8CMBR3116).
■ Using an additional 1-mm overlay: An additional overlay of 1 mm is provided with th is kit. You can
place this overlay over the sensors to change the parasitic capacitance.
CY3280-MBR3 Evaluation Kit User Guide, Doc. #: 001-89905 Rev. *B 46

Figure 4-17. Parasitic Capacitance Configuration
Hardware
4.3.8 Arduino-Compatible Headers
The I/O headers J1–J4 comply with t he Arduino UNO (R3 ) kit to support Ardu ino base boards . The
Arduino-defined signals include digital/analog signals from the CY8CMBR3116; system power signals are brought to the outer rows of headers J1–J4.
Pin maps of the Arduino-compatible headers J1–J4 are shown in the following tables. The pins connected between the Arduino board and the CY3280-MBR3 EVK appear in red. The pins shown in
blue are on the second row of the J2 connector; these are the unused pins of the CY8CMBR3116
device.
This kit also provides additional I
by older Arduino boards, such as the Arduino UNO R2 and Arduino Mega boards. These lines are
not connected (NC) by default and can be used by loading a 0- resistor on R71 and R72 and
removing both jumpers from headers J13 and J14.
CY3280-MBR3 Evaluation Kit User Guide, Doc. #: 001-89905 Rev. *B 47
2
C lines on pins J2.9 (SDA) and J2.11 (SCL). These pins are used

Table 4-4. J1 Arduino Header or Power Connector
Power Connector (J1)
Pin Arduino Board Signal CY3280-MBR3 EVK Signal
J1.1 VIN NC
J1.2 GND GND
J1.3 GND GND
J1.4 V5.0 V5.0
J1.5 V3.3 NC
J1.6 RESET NC
J1.7 IOREF NC
J1.8 NC NC
Table 4-5. J2 Arduino Header
J2 Connector
Pin Arduino Board Signal CY3280-MBR3 EVK Signal
J2[1,3,5,7,] A0 – A3 NC
J2.9 A4 SDA (Default – NC)
J2.11 A5 SCL (Default – NC)
J2.2 NC CS10
J2.4 NC CS9
J2.6 NC CS7
J2.8 NC PS1
J2.10 NC CS2/GAURD
J2.12 NC GND
Hardware
Table 4-6. J3 Arduino Header
J3 Connector
Pin Arduino Board Signal CY3280-MBR3 EVK Signal
J3.1 D8 NC
J3.2 D9 NC
J3.3 D10 NC
J3.4 D11 NC
J3.5 D12 NC
J3.6 D13 NC
J3.7 GND GND
J3.8 AREF NC
J3.9 SDA J3_SDA
J3.10 SCL J3_SCL
CY3280-MBR3 Evaluation Kit User Guide, Doc. #: 001-89905 Rev. *B 48

Table 4-7. J4 Arduino Header
J4 Connector
Pin Arduino Board Signal CY3280-MBR3 EVK Signal
J4.1 D0 NC
J4.2 D1 NC
J4.3 D2 Host Interrupt
J4.4 D3 NC
J4.5 D4 NC
J4.6 D5 NC
J4.7 D6 NC
J4.8 D7 NC
Figure 4-18. Arduino Connectors Schematic Snippet
Hardware
CY3280-MBR3 Evaluation Kit User Guide, Doc. #: 001-89905 Rev. *B 49

4.3.9 Push Button to Reset CY8CMBR3116
The kit contains a mechanical reset push button, SW2, to reset the CY8CMBR3116 device, as
shown in Figure 4-19.
Figure 4-19. Push Button Reset Switch
4.3.10 I2C Selection Jumpers
Hardware
The I2C communication lines (SCL and SDA) can be connected to either the onboard USB-I2C
bridge (PSoC 5LP) or to the I
Figure 4-18 for the schematic snippet.
2
C pin location on the Arduino header (J3.9 and J3.10). See
CY3280-MBR3 Evaluation Kit User Guide, Doc. #: 001-89905 Rev. *B 50

5. Configuration Files and Example Projects
This section documents the high-level design process to open, configure, generate, and apply configuration files to the CY3280-MBR3 EVK using the EZ-Click 2.0 customizer tool. This kit provides
three sample configurations. Each sample configuration file has different configuration settings,
demonstrating various kit and device features. By default, the kit is configured with the Water Toler-
ance sample configuration.
Table 5-1. Features in Configuration Files
Configuration Features
LED Toggle Four CapSense buttons, four LEDs, buzzer, and LED toggle
Proximity Detection
Water Tolerance
To use the sample configuration files, you need the EZ-Click 2.0 customizer tool, which is installed
along with the kit.
Four CapSense buttons, four LEDs, proximity loop, proximity LED, buzzer, and LED
brightness
Four CapSense buttons, four LEDs, water tolerance, flanking sensor suspension (FSS),
auto-reset
5.1 Running Configuration Files and Host Projects
The EZ-Click configuration files and PSoC 4 host projects require administrator privileges if they are
run directly from the default install location (C:\Program Files\Cypress). If you do not have
administrator privileges, copy the Firmware folder from the default install location to any other location on your PC and use the files.
5.2 Configuration Files
Follow these steps to run the configuration files and verify the features. Before running any of the
configuration files, short pins 1 and 2 on J13 and J14. This is required to short the I
tion lines (SCL and SDA) of the MBR3 device to the PSoC 5LP I
The jumper J15 should be in setting C, as shown in Figure 5-1.
2
C lines.
2
C communica-
CY3280-MBR3 Evaluation Kit User Guide, Doc. #: 001-89905 Rev. *B 51

Figure 5-1. Jumpers J13, J14, and J15 Settings
5.2.1 LED Toggle
This configuration file configures the CY8CMBR31 16 for demonstrating the LED toggle (touch o n/off)
and buzzer drive features for all four available button sensors.
5.2.1.1 Loading LED Toggle Configuration
Configuration Files and Example Projects
1. Connect the CY3280-MBR3 EVK to the PC via the USB port using the USB cable. Ensure that
the status and power LEDs glow.
2. Open the EZ-Click 2.0 customizer tool from the default location: Start > All Programs > Cypress
> EZ-Click 2.0 > EZ-Click 2.0.
3. Click Open Project in the File menu. Figure 5-2 shows the default location of the Load Project
action.
Figure 5-2. Load Project
4. Navigate to the project directory in the Open Project window.
5. Double-click the LED Toggle.cprj file to open it.
CY3280-MBR3 Evaluation Kit User Guide, Doc. #: 001-89905 Rev. *B 52

Configuration Files and Example Projects
6. Ensure that the I2C selection jumpers J13 and J14 are shorted between pins 1 and 2 to allow
communication with the PSoC 5LP onboard USB-I
2
C bridge.
7. Connect the kit to the EZ-Click 2.0 customizer tool using the following steps.
a. Click the Select Target Device button ( ) on the tool bar of EZ-Click 2.0.
b. Select 3.3 V as target power and 400 kHz as I
2
C speed; click OK to connect to the CY3280-
MBR3 EVK, which has the slave address of 0x37.
Figure 5-3. Connecting the Kit with the Customizer
8. Select Apply Current Config in the Configuration menu to apply the configura tion to the kit, as
illustrated in Figure 5-4.
Figure 5-4. Apply Current Configuration
9. Wait until the message “Device configuration completed successfully” appears on the status bar
at the bottom of the EZ-Click window, as displayed in Figure 5-5.
CY3280-MBR3 Evaluation Kit User Guide, Doc. #: 001-89905 Rev. *B 53

Configuration Files and Example Projects
Figure 5-5. Successful Configuration Status Message
10.Verify the following features:
a. Toggle (touch on/off) feature: Touch any CapSense button; the respective LED toggles its sta-
tus.
b. Buzzer feature (frequency of 4 kHz and duration of 100 msecs): Touch any CapSense button;
the respective LED toggles along with an audio feedback for 100 m secs at a 4-kHz frequ ency.
Figure 5-6. Verify LED Toggle Feature
CY3280-MBR3 Evaluation Kit User Guide, Doc. #: 001-89905 Rev. *B 54

5.2.2 Proximity Detection
This configuration file configures the CY8CMBR3116 to demonstrate proximity detection, CapSense
buttons, LED brightness, and buzzer drive features.
5.2.2.1 Loading Proximity Detection Configuration
1. Follow steps 1 to 4 as described in section 5.2.1.1 Loading LED Toggle Configuration.
2. Double-click the Proximity Detection.cprj file to open it.
3. Follow steps 6 to 9 as described in section 5.2.1.1 Loading LED Toggle Configuration to continue.
4. Verify the following features:
a. CapSense buttons: Touch any CapSense button; the corresponding LED turns on, detecting
your touch.
b. LED brightness feature (93 percent Activ e du ty cyc le an d 7 pe rcent Inactive duty cycle): The
LEDs are driven by a pulse width modulator (PWM); the percentage of active and inactive
duty cycles represent the PWM duty cycle for which the LEDs will be on. According to the configuration settings, when none of the CapSense buttons are touched, the LEDs glow with a
faint brightness with a PWM duty cycle of 7 percent. When a CapSense button is touched, the
LED glows with higher brightness, with a PWM duty cycle of 93 percent.
c. Buzzer feature (1-kHz frequency and 1-second duration): Touch a CapSense button or prox-
imity loop; the respective LED turns on along with an audio feedback for 1 second at a 1-kHz
frequency.
Configuration Files and Example Projects
Figure 5-7. LEDs with 7 Percent Inactive Duty Cycle
CY3280-MBR3 Evaluation Kit User Guide, Doc. #: 001-89905 Rev. *B 55

Figure 5-8. LEDs with 93 Percent Brightness on Button Touch
Configuration Files and Example Projects
d. Proximity: Hover your hand/finger (3-cm distance) over the kit; the proximity LED lights up,
showcasing proximity detection.
The proximity sensor has three states: OFF, Proximity, and ON (or Touch). The buzzer is enabled
when the Proximity state becomes ON – when the pr oximity loop is touched. The change in Pro ximity state can be seen in the System Diagnostics tab in EZ-Click. In the System Diagnostics
tab, select Sensor1 from the drop-down list and click St art to monitor the sensor status and SNR
for the selected CapSense sensor.
Figure 5-9. Selecting Proximity Sensor in System Diagnostics
Figure 5-10. Proximity Sensor in Off State
CY3280-MBR3 Evaluation Kit User Guide, Doc. #: 001-89905 Rev. *B 56

Figure 5-11. Proximity Sensor in Proximity State
Note: In the Proximity state, the LED brightness increases.
Figure 5-12. Proximity Sensor in ON State
Configuration Files and Example Projects
In this state, the buzzer is also enabled.
Note: The EZ-Click customiser tool computes the SNR. To establish a reliable noise range, the tool
should be allowed to collect data samples for at least 30 seconds before a button press or pro ximity
sensor state change. If sufficient noise samples are not collected, the EZ-Click tool reports an error
and extremely high values for SNR.
Figure 5-13. Verify Proximity Sensor
CY3280-MBR3 Evaluation Kit User Guide, Doc. #: 001-89905 Rev. *B 57

5.2.3 Water Tolerance
This configuration file configures the CY8CMBR3116 to demonstrate water tolerance, FSS, and the
button auto-reset feature. The Water Tolerance configuration is the factory default configuration for
the CY3280-MBR3 EVK.
5.2.3.1 Loading Water Tolerance Configuration
1. Follow steps 1 to 4 as described in section 5.2.1.1 Loading LED Toggle Configuration.
2. Double-click the Water Tolerance.cprj file to open it.
3. Follow steps 6 to 9 as described in section 5.2.1.1 Loading LED Toggle Configuration to continue.
4. Verify the following features:
a. FSS feature: Touch any CapSense button; the corresponding LED turns on. Keep your finger
on the same button and touch any of the other buttons; the LED corresponding to the second
button does not turn on. Remove your finger from the first button and then touch the second
button again; the corresponding LED turns on.
Figure 5-14. Verify FSS Feature
Configuration Files and Example Projects
b. Button auto-reset feature (5 seconds): Touch any CapSense button; the corresponding LED
turns on. Do not release your finger; the LED turns off automatically af ter 5 seconds.
CY3280-MBR3 Evaluation Kit User Guide, Doc. #: 001-89905 Rev. *B 58

Figure 5-15. Auto-Reset Feature - LED Output on Button Touch
Configuration Files and Example Projects
Figure 5-16. Auto-Reset Feature - LED Output Five Seconds After Button Touch
Note: For the buzzer and LED effect features, use a voltage setting of 5 V or 3.3 V for optimal
performance.
CY3280-MBR3 Evaluation Kit User Guide, Doc. #: 001-89905 Rev. *B 59

Configuration Files and Example Projects
c. Water tolerance feature: Place the additional 1-mm overlay on top of the 2-mm overlay. Place
water droplets on top of the CapSense buttons using the water dropper provided with the kit.
Observe that the LEDs do not turn on indicating that none of the CapSense buttons were triggered due to water.
Figure 5-17. Verify Water Tolerance - Without Finger
Touch a CapSense button and observe that it is triggered even in the presence of water droplets.
CY3280-MBR3 Evaluation Kit User Guide, Doc. #: 001-89905 Rev. *B 60

Figure 5-18. Verify Water Tolerance - With Finger
Configuration Files and Example Projects
Note: The board does not have a guard sensor loop and cannot detect false touches in streaming
water conditions. Therefore, while testing the board for water toler anc e failur e , ensure that the water
droplets placed on one CapSense button do not come in contact with water droplets placed on
another CapSense button.
Note: If the liquid in the dropper has significant conductivity, false touch may occur when the dropper
touches the overlay on the board. This is not observed with clean water.
Water Tolerance Failure Demonstration: In the existing Water Tolerance configuration, uncheck the
Enable Shield check box in the Global Configuration tab.
Figure 5-19. Water Tolerance Failure Demonstration
Now, click the 'Gene rate Config File' icon to g enerate the configu ration; apply it to the board by clicking the 'Apply Current Config File’ icon.
Press the reset switch, SW2, on the board and place water droplets on the CapSense button using
the water dropper; observe that the LED turns on as if the button has been touched.
Note: The MBR3 SmartSense algorithm constantly updates baseline measurements, which may
compensate for small droplets of water such that water tolerance failure is not observed. Therefore,
a sufficient volume of water (one fu ll droppe r) is re quired to demonstrate water toleranc e failur e without the shield enabled.
CY3280-MBR3 Evaluation Kit User Guide, Doc. #: 001-89905 Rev. *B 61

5.3 PSoC 4 Host Example Projects
In this section, you learn how to use the CY3280-MBR3 EVK as an Arduino shield with boards compatible with the Arduino UNO form factor. The example projects in this section use the CY8CKIT-042
PSoC 4 Pioneer Kit as the baseboard. You can mount the CY3280-MBR3 EVK directly on top of the
PSoC 4 Pioneer Kit, as displayed in Figure 5-20.
The kit can be used with other Arduino boards in a similar fashion. To begin, configure your kit for
communication with the embedded host. On the CY3280-MBR3 EVK:
■ Change the jumper position on header J13 to connect pins J13-2 and J13-3.
■ Change the jumper position on header J14 to connect pins J14-2 and J14-3.
■ Change the jumper position of J15 to position A; see Figure 5-21.
Connect the two kits such that the USB ports of both kits align with each other. When the USB ports
are aligned, the J1, J2, J3, and J4 headers on the PSoC 4 Pioneer Kit connect to J1, J2, J3, and J4
headers on the CY3280-MBR3 EVK.
Note: The J2 header on the PSoC 4 Pioneer Kit is a dual-row header and has three extra pins for
which there are no corresponding pins on the CY3280-MBR3 EVK.
Figure 5-20. Final Mounted Kit
Configuration Files and Example Projects
CY3280-MBR3 Evaluation Kit User Guide, Doc. #: 001-89905 Rev. *B 62

Configuration Files and Example Projects
Figure 5-21. Jumper Location on the Kit
Two example projects showcase how to configure the MBR3 device and how to communicate with
the device. To open these projects, you need PSoC Creator 3.0 or later. Download and install the
software from www.cypress.com/PSoCCreator, if required.
To verify these projects, you need a PSoC 4 Pioneer Kit.
See Running Configuration Files and Host Projects on page 51 for information on how to access the
example projects.
5.3.1 Host_LED_Toggle_Buzzer_PSoC4_Pioneer_Kit
5.3.1.1 Project Description
This example project uses PSoC 4 as the I2C master (host) to configure the CY8CMBR3116 device.
This project shows how to write data to the CY8CMBR3116 device using I
In this project, PSoC 4 loads the 12 8-by te co nfigu ration data to th e MB R3 de vice u sing I
nication. The 128-byte configuration data of the LED Toggle configuration is sent to the MBR3
device.
This project can be used to learn the process of configuring the device using an external host. See
Configuring the MBR3 Device From the PSoC 4 Pioneer Kit on page 72 for details
2
C communication lines.
2
C commu-
CY3280-MBR3 Evaluation Kit User Guide, Doc. #: 001-89905 Rev. *B 63

Figure 5-22. PSoC Creator Schematic
Configuration Files and Example Projects
5.3.1.2 Hardware Connections
Connect the CY3280-MBR3 EVK to the PSoC 4 Pioneer Kit, as discussed in PSoC 4 Host Example
Projects on page 62.
Ensure that the jumper J15 is connected in position A (see Figure 5-21). Table 5-2 shows the pin
connections used for I
CY8CMBR3116 device I
Table 5-2. Pin Connections
Component Pin Name Port Pin Used
I2C – SCL P4[0]
I2C – SDA P4[1]
Blue LED P0[3]
Red LED P1[6]
2
Ensure that I
C selection jumpers J13 and J14 are shorted on pins 2 and 3 , as shown in Figure 5-21.
2
C communication; the corresponding pins of the EVK are connected to the
2
C pins.
CY3280-MBR3 Evaluation Kit User Guide, Doc. #: 001-89905 Rev. *B 64

5.3.1.3 Flow Chart
Start
Initialize I2C Master
component
Configure and load
toggle and buzzer
feature to MBR3
Configuration was
loaded to MBR3
successfully?
MBR3 drives the
LEDs and
buzzer on touch
Yes
The RGB LED on
CY8CKIT-042 blinks
continuously indicating
I2C write error
No
Figure 5-23 shows the flow chart of the code implemented in main.c.
Figure 5-23. Project Flow Chart
Configuration Files and Example Projects
5.3.1.4 Build and Program the PSoC 4 Project
CY3280-MBR3 Evaluation Kit User Guide, Doc. #: 001-89905 Rev. *B 65
Follow these steps to open and program code examples:
1. Launch PSoC Creator 3.0 (or later) from the Start menu.
2. Open the Host_LED_Toggle_Buzzer_PSoC4_Pioneer_Kit.cywrk workspace by choosing File >
Open > Project/Workspace and navigating to the directory in which your project was saved, as
shown in Figure 5-24.
Figure 5-24. Navigating to the Project
3. Build the code example by choosing Build > Build <Project name> or by selecting Build <proj-
ect name> in the menu options obtained by right-clicking on the project name in the Workspace
Explorer to generate the hex file (see Figure 5-25).

Configuration Files and Example Projects
Figure 5-25. Building the Project from PSoC Creator
4. To program, connect the PSoC 4 Pioneer Kit to a computer using the USB cable connected to the
USB port/J10 of the PSoC 4 Pioneer Kit.
5. Choose Debug > Program in PSoC Creator (see Figure 5-26).
Figure 5-26. Programming the Device from PSoC Creator
6. The CY8CKIT -042 is detected as "KitProg/<Kit numbe r>” and is seen in the Select Debu g Target
window. If the PSoC 4 device is not yet acquired, PSoC Creator opens the Programming window.
Select the KitProg and click the Port Acquire button (see Figure 5-27).
CY3280-MBR3 Evaluation Kit User Guide, Doc. #: 001-89905 Rev. *B 66

Figure 5-27. Acquiring the Device from PSoC Creator
Configuration Files and Example Projects
7. After the device is acquired, it is shown in a tree structure below the KitProg. Click the Connect
button (see Figure 5-28).
Figure 5-28. Connecting the Device from PSoC Creator
8. Click OK to exit the window and start programming.
CY3280-MBR3 Evaluation Kit User Guide, Doc. #: 001-89905 Rev. *B 67

5.3.1.5 Verify Output
Configuration Files and Example Projects
Ensure that the EVK is connected to the PSoC 4 Pioneer Kit. Touch any CapSense button on the kit;
the corresponding LED toggles, with audio feedback through the buzzer (see Figure 5-29). If an I
write error occurs while loading the co nfigura tion to t he MBR3 de vice, the RG B LED on the PSoC 4
Pioneer Kit blinks in blue continuously indicating an I
2
C write error.
2
Figure 5-29. Verify Output
C
5.3.2 Host_Interrupt_LED_ON_Time_PSoC4_Pioneer_Kit
5.3.2.1 Project Description
This example project uses PSoC 4 as the I2C master (host) to implement the LED-on time feature on
the CY3280-MBR3 EVK using the host interrupt and host-controlled GPOs feature. This project also
shows how to read the status register of the de vice with an I
device.
In this project, PSoC 4 loads the following configuration:
■ Four button sensors enabled
■ Host interrupt enabled
■ Host-controlled GPOs
On every touch and release, the device issues a host interrupt (active-low pulse of 250-µs duration)
to the PSoC 4 Pioneer Kit. Upon receipt of the interrupt, PSoC 4 sends an I
read the button status register (0xAA-0xAB). Depending upon the content of the register, PSoC 4
controls the onboard RGB LED. See Table 5-4 for the expected RGB output. Also, it detects if the
host interrupt was generated because of a touch or a release. If a button is released, the corresponding RGB LED keeps glowing for one second before going off. This is implemented using the
counter (TCPWM component) available in PSoC 4.
CY3280-MBR3 Evaluation Kit User Guide, Doc. #: 001-89905 Rev. *B 68
2
C master upon an interrupt from the
2
C read command to

Figure 5-30. PSoC Creator Schematic
Configuration Files and Example Projects
5.3.2.2 Hardware Connections
Connect the CY3280-MBR3 EVK to the PSoC 4 Pioneer Kit, as shown in Figure 5-20. Ensure that
the jumper J15 is connected in position A (see Figure 5-21). No specific hardware connection is
required for this project because all connections are hard wired.
Table 5-3 lists the pin connections used for I
are connected to the CY8CMBR3116 device I
Table 5-3. Pin Connections
Component Pin Name Port Pin Used
HostInt_Pin P0[7]
I2C – SCL P4[0]
I2C – SDA P4[1]
Red_LED P1[6]
Green_LED P0[2]
Blue_LED P0[3]
2
C communication; the corresponding pin s of the EVK
2
C pins.
CY3280-MBR3 Evaluation Kit User Guide, Doc. #: 001-89905 Rev. *B 69

5.3.2.3 Flow Chart
Start
Initialize the components (TCPWM,
I2C Master, Interrupt)
Configure the MBR3 device for 4 buttons and to
generate host interrupt
Check if any LED on-time
counter is greater than 0
Check if host interrupt occured
Read buttons status
register
Check the reason for
interrupt
Turn on the corresponding
RGB LED and the LED on
the MBR3 kit
Yes
Yes
No
Check if timer flag is set
Yes
No
Touch
Turn off the LED for which
on-time is elapsed
Decrement LED
on-time coun ter
Check if LED on-time
counter equals 0
Yes
No
Set LED on-time
counter
Release
No
Figure 5-31 shows the flow chart of the code implemented in main.c.
Figure 5-31. Project Flow Chart
Configuration Files and Example Projects
CY3280-MBR3 Evaluation Kit User Guide, Doc. #: 001-89905 Rev. *B 70

5.3.2.4 Build and Program the PSoC 4 Project
Follow these steps to open and program code examples:
1. Launch PSoC Creator 3.0 (or later) from the Start menu.
2. Open the Host_Interrupt_LED_ON_Time_PSoC4_Pioneer_Kit.cywrk workspace by choosing
File > Open > Project/Workspace and navigating to the directory in which your project was
saved, as shown in Figure 5-24.
3. Follow steps 3 to 8 as described in Build and Program the PSoC 4 Project on page 71 to continue.
5.3.2.5 Verify Output
Ensure that the EVK is connected to the PSoC 4 Pioneer Kit. Touch a CapSense button. Observe
that the corresponding LED on the CY3280-MBR3 EVK turns on; the RGB LED also turns on based
on the button touched according to Table 5-4. Remove the finger from the CapSense button.
Observe that the corresponding LED on the CY3280-MBR3 EVK turns off immediately but the RGB
LED turns off one second after removing the finger (see Figure 5-32).
Table 5-4. RGB LED Mapping on PSoC 4 Pioneer Kit with Button Sensors on CY3280-MBR3 EVK
Button Sensor Touched LED Connection on PSoC 4 Pioneer Kit
BTN1 Green LED
BTN2 Red LED
BTN3 Blue LED
BTN4 All three LEDs on
Configuration Files and Example Projects
Note: When BTN4 is touched, all three LEDs turn on; this is the expected RGB output. Therefore, if
any other button is touched along with BTN4, there will not be a visible change in the RGB output
because all LEDs turn on when BTN4 is touched. Similarly, if any other button is touched along with
BTN4, and BTN4 is released first, all three LEDs turn off after one second; this is the expected output. There will not be any RGB output for the button that is still being touched.
CY3280-MBR3 Evaluation Kit User Guide, Doc. #: 001-89905 Rev. *B 71

Figure 5-32. Verify Output
Configuration Files and Example Projects
5.3.3 Configuring the MBR3 Device From the PSoC 4 Pioneer Kit
The MBR3 device can be conf igured as required from an extern al host such as the CY8CKIT-042
PSoC 4 Pioneer Kit. This can be done using the configuration files generated by EZ-Click. Follow
these steps to configure the MBR3 device from an external host:
1. Open the EZ-Click 2.0 customizer tool.
2. Create a new project and select the CY8CMBR3116 device in the Product Selector Guide.
3. Configure the features as needed, considering the kit pin mapping (see Pin Mapping Between
CY8CMBR3116 and CY3280-MBR3 EVK on page 34).
4. Generate the configuration file.
5. Navigate to the EZ-Click project directory and look for <file name>.h file inside the directory.
6. Open <file name>.h either from within PSoC Creator or using any text editor such as WordPad.
7. Copy and paste the contents of the 128-byte array CY8CMBR3116_configur ation[128] in <file
name>.h to the configData array in the configuration.c file in the PSoC 4 project.
Note: The array is defined as "const" in the <file name>.h file; in the PSoC 4 project, it is a 128-
byte array of unsigned char type.
Note: When configuring the MBR3 device from an exter nal host such as the PSoC 4 Pione er Kit,
ensure that a blank configuration or a slave address of 0x00 is not sent to the device. If this happens, see Restoring to Factory Default Slave Address from 0x00 on page 78 to revert the kit back
to factory default. The valid slave address for the MBR3 device is from 0x08–0x77.
CY3280-MBR3 Evaluation Kit User Guide, Doc. #: 001-89905 Rev. *B 72

Configuration Files and Example Projects
Figure 5-33. Configuration.C File
8. Build the project (see steps 3 to 8 in Bu ild and Pr ogr am the PSoC 4 Pro ject on page 65) and pro-
gram it on to the PSoC 4 Pioneer Kit; verify the functionality on the CY3280-MBR3 EVK.
CY3280-MBR3 Evaluation Kit User Guide, Doc. #: 001-89905 Rev. *B 73

6. Advanced Topics
6.1 Using PSoC 5LP as USB-I2C Bridge
The PSoC 5LP on the CY3280-MBR3 EVK serves as a USB-I2C bridge, which can be used to communicate with USB-I
installed along with PSoC Programmer during kit installation. BCP works with I
bridges, which communicate with slave devices. This application currently supports CY3240,
MiniProg3, FirstTouch, FirstTouchRF, True-TouchBridge, DVKProg1, and KitProg bridges.
The following steps describe how to use the USB-I
and CY8CMBR3116 device.
1. Open BCP from Start > All Programs > Cypress > Bridge Control Panel <version number>.
2. Connect the CY3280-MBR3 EVK to your PC via a USB port using the USB cable.
3. Ensure that the I
2
I
C communication between PSoC 5LP and the MBR3 device. Connect jumper J15 in setting C,
as shown in Figure 5-1.
4. Select the KitProg in the BCP to use the USB-I
‘Connected’ and ‘Powered’ tabs turn green, as shown in Figure 6-1.
Figure 6-1. KitProg USB-I
2
C software such as Bridge Control Panel. Bridge Control Panel (BCP) is
2
C bridge, which can communicate between BCP
2
C selection jumpers J13 and J14 are shorted between pins 1 and 2 to enable
2
C functionality. On successful connection, the
2
C Connected in Bridge Control Panel
2
C, SPI, and RX8
CY3280-MBR3 Evaluation Kit User Guide, Doc. #: 001-89905 Rev. *B 74

Advanced Topics
5. The EZ-Click customizer tool generates an IIC file, which can be used in the BCP software. Click
File > Open File and navigate to the EZ-Click project directory in
<Install_Directory>\CY3280-MBR3 EVK\<version>\Firmware\Config Files\ and
open the required project and select the IIC file.
Figure 6-2. Opening IIC File
Figure 6-3. LED Toggle.iic File
Note: The location of the LED Toggle.iic file is shown as reference. Any IIC file can be used.
CY3280-MBR3 Evaluation Kit User Guide, Doc. #: 001-89905 Rev. *B 75

Advanced Topics
6. The MBR3 device is in a deep-sleep state until a CapSense or I2C activity occurs. When receiving an I
sleep. This I
pliant devices on the bus. An I
resend the I
2
C command while in deep sleep, MBR3 will NACK the request and begin to wake from
2
C approach is in lieu of I2C clock stretching, which may corrupt non-stretching com-
2
C command until the MBR3 device wakes and acknowledges. Two dummy write
2
C command sent from BCP may not be acknowledged. Therefore,
operations to the MBR3 device are sufficient before sending the 128-byte configuration. To send
a dummy write, edit each write command in the IIC file with the prefix “w 37 0 p w 37 0 p”.
7. From the BCP, transfer the 128-byte configuration data to the MBR3 device; to do this, place the
cursor on the command to be sent to the MBR3 device and click the Send button on the GUI or
press the Enter key on your keyboard. The log shows if the transaction is a success or failure. A
“+” after each byte indicates that the transaction is a success and a “–” indicates that it is a fa ilure
(see Figure 6-4).
8. Send both I
2
C commands in the IIC file to see the configuration in effect on the CY3280-MBR3
kit.
9. Press the reset switch, SW2, on the kit. The configuration specified by 128 bytes in the first command will take effect.
Note: See LED To gg le on page 52 for more details and expected output of the LED Toggle con-
figuration.
Figure 6-4. Writing to I
2
C Slave in BCP
10.Read five bytes of data from the register offset address 0x00 of the MBR3 device. The log shows
if the transaction is a success or a failure.
CY3280-MBR3 Evaluation Kit User Guide, Doc. #: 001-89905 Rev. *B 76

Figure 6-5. Reading from I2C Slave in BCP
Advanced Topics
The command format to communicate with this kit using the BCP is as follows:
■ Write data command format: To write ‘N’ bytes of data after the register offset address, use this
format to send data.
w Slave address Register offset Data to write (N bytes) p
■ Read data command format: To read ‘N’ bytes of data beginning with the register offset address,
use this format to receive data.
w Slave address Register offset r Slave address
write ‘N’ number of x’s with
spaces
p
Notes:
■ The Write/Read transaction with an MBR3 device requires specifying an offset address to the
MBR3 device from which the data reading/writing should start. The MBR3 device automatically
increments the register address for every byte after the offset address. Therefore, a Read/Write
transaction with an MBR3 device start s with an I
2
C write operation to specify the register of fset to
the MBR3 device.
■ All bytes in the IIC file are in hex format.
The status box below the editor window shows the offset register content, where:
■ w – Write command.
■ Address – Slave device address (in hex). Default address for the device on this kit is 0x37.
■ Register offset – Offset address of the confi guration register you want to wr ite. See the datasheet
for the list of registers and their offset addresses.
■ Data – Write ‘N’ byte data here to write sequentially beginning with the offset address.
■ r – Read command.
CY3280-MBR3 Evaluation Kit User Guide, Doc. #: 001-89905 Rev. *B 77

■ x – Reserved symbol. Each ‘x’ in the command signifies that 1 byte of data should be read.
■ p – Stop command
6.2 Restoring to Factory Default Slave Address from 0x00
When configuring the MBR3 device from an external host such as the CY8CKIT-042 PSoC 4 Pioneer Kit, ensure that either a blank configuration (128 bytes of 0x00) or a slave address of 0x00 is
not programmed into the MBR3 silicon. The valid slave address for MBR3 is 0x08–0x77 (8–119).
If a slave address is configured to the MBR3 device, the kit becomes unusable because it cannot be
reconfigured from the EZ-Click customizer tool. In such a situation, follow these steps to restore the
slave address to the default slave address 0x37.
1. Disconnect the CY3280-MBR3 kit from the external host or CY8CKIT-042.
2. Change the I
3. Change the J15 setting to setting C.
4. Launch BCP, as explained in steps 1 to 4 in 6.1 Using PSoC 5LP as USB-I2C Bridge.
5. Click File > Open and navigate to the Water Tolerance configuration project directory and open
Water Tolerance.iic in BCP.
6. Change "37" next to w to "00" in both the IIC commands. Also, edit the IIC commands with
dummy write operations and send the configuration to the MBR3 device, as explained in step 6 of
Using PSoC 5LP as USB-I2C Bridge on page 74.
2
C selection jumpers J13 and J14 in positions 1 and 2.
Advanced Topics
Figure 6-6. Restore Factory Default Slave Address in BCP
7. Both the I
ACK'ed (acknowledged). If any I
2
C commands are sent one after another. Ensure that all bytes of the I2C command are
2
C command is NACK'ed (not acknowledged), send the I2C
commands again. See Figure 6-4 for ACK and NACK indications.
8. After both the commands are successfully sent to the MBR3 de vice, that is, all bytes are ACK'ed,
press the reset switch (SW2) on the CY3280-MBR3 EVK.
9. The kit will become operational again and exhibit the "Water Tolerance" output. Refer to Water
Tolerance on page 58. The kit will also be recognized with the slave ID of 0x37 in EZ-Click.
CY3280-MBR3 Evaluation Kit User Guide, Doc. #: 001-89905 Rev. *B 78

A. Appendix
A.1 Schematic
CY3280-MBR3 Evaluation Kit User Guide, Doc. #: 001-89905 Rev. *B 79

CY3280-MBR3 Evaluation Kit User Guide, Doc. #: 001-89905 Rev. *B 80

No Load
No Load
P5LP_XRES
P5LP3_1
P5LP2_4
P5LP_VDD
P5LP_VDD
VTARG
1206R
D15
Status LED Green
2 1
0603
R83
4.7K
0805
R62
330 ohm
0402
C35
100 pF
0603
R41
4.7K
CY3280-MBR3 Evaluation Kit User Guide, Doc. #: 001-89905 Rev. *B 81

VCCD
NOTE: Keep VCCD and
CMOD cap near U2.
And keep the CMOD
Cap Trace thick like
power Trace
NOTE: Load R84 and R85 only during 1.8V externally regulated mode of operation.
WARNING: When R84 is loaded DO NOT operate the kit at
any voltage more than 1.8V i.e. 3.3V or 5V.Otherwise
the CY8CMBR3116 silicon will get damaged.
PS1
CS3
CMOD
VCCD
HI/SHIELD
LED4
LED3
LED2
LED1
CS10
CS9
PROX_LED
CS6
XRES
PS0
CS5
CS4
CS7
CS2/GUARD
SCL
SDA
HI/BUZ
VDD VCCD
VDD
P5LP12_4
0402
R74
560 ohm
0402
R52
560 ohm
0402
R49
560 ohm
0402
R80330 ohm
0402
R81330 ohm
0402
R50
560 ohm
U3
CY8CMBR3116
CS0/PS0
1
CS1/PS1
2
CS2/GUARD
3
CS3
4
CMOD
5
VCCD
6
VDD7VSS8CS15/SH/HI9CS14/ GPO610CS13/ GPO511CS12/ GPO4
12
CS11/ GPO3
13
CS10/ GPO2
14
CS9/ GPO1
15
CS8/ GPO0
16
CS7
17
CS6
18
CS5
19
CS4
20
I2C SDA
21
I2C SCL
22
HI/ BUZ/ GPO7
23
XRES
24
EPAD
25
0402
R76
560 ohm
0402
C7
0.1 uF
0402
C30
0.1 uF
0402
R51
560 ohm
0402
R75
560 ohm
0805
R84
ZERO No Load
0402
R78
560 ohm
0603
C33
1.0 uF
0805
R56
ZERO
0402
R77
560 ohm
0402
R79
560 ohm
TP6
1
1
C26
2.2nF
No Load
GND Test Point
NOTE: DO NOT POWER FROM J12 JUMPER
External Pull Up for XRES and HOST Interrupt
pin of CY8CMBR3116
J12 is shorted By Default
J12 for Current Measurement
CY8CMBR3116 Reset Switch
XRES
XRES
VDDVADJ
VADJ
VADJ
HOST_INT
J12
2 PIN HDR
112
2
0402
C34
100 pF
TP7 BLACK
SW2
RS-022R05C1-PA
1 2
0805
R48
ZERO No load
0603
R73
4.7K
0603
R57
4.7K
CY3280-MBR3 Evaluation Kit User Guide, Doc. #: 001-89905 Rev. *B 82

CY3280-MBR3 Evaluation Kit User Guide, Doc. #: 001-89905 Rev. *B 83

CY3280-MBR3 Evaluation Kit User Guide, Doc. #: 001-89905 Rev. *B 84

CY3280-MBR3 Evaluation Kit User Guide, Doc. #: 001-89905 Rev. *B 85

CY3280-MBR3 Evaluation Kit User Guide, Doc. #: 001-89905 Rev. *B 86

A.2 Pin Assignment Table
Pin No. Pin Name Type Description Usage
1 CS0/PS0 I/O
2 CS1/PS1 I/O
3 CS2/GUARD I/O
4 CS3 I/O CapSense button controls GPO3 BTN1 (10-mm diameter).
CapSense button/proximity sensor, controls
GPO0
CapSense button/proximity sensor, controls
GPO1
CapSense button/guard sensor, controls
GPO2
Proximity loop.
Brought out to dual header through a 560-ohm
resistor.
Brought out to dual header through a 560-ohm
resistor.
5 CMOD I/O
6 VCCD Power Power. Connect 0.1-uF capacitor Bypass capacitor of 0.1 uF.
7 VDD Power Power VADJ= 5 V, 3.3 V, or 1.8 V.
8 VSS Power Ground GND
9 CS15/SH/HI I/O
10 CS14/GPO6 I/O CapSense button/general-purpose output LED 4 for button 4 (BTN4).
11 CS13/GPO5 I/O CapSense button/general-purpose output LED 3 for button 3 (BTN3).
12 CS12/GPO4 I/O CapSense button/general-purpose output LED 2 for button 2 (BTN2).
13 CS11/GPO3 I/O CapSense button/general-purpose output LED 1 for button 1 (BTN1).
14 CS10/GPO2 I/O CapSense button/general-purpose output
15 CS9/GPO1 I/O CapSense button/general-purpose output
16 CS8/GPO0 I/O CapSense button/general-purpose output Proximity LED.
17 CS7 I/O CapSense button, controls GPO7
18 CS6 I/O CapSense button, controls GPO6
19 CS5 I/O CapSense button, controls GPO5 BTN3 (11-mm diameter).
20 CS4 I/O CapSense button, controls GPO4
21 I2C SDA
22 I2C SCL
23 HI/BUZ/GPO7 O
24 XRES XRES External reset
External modulator capacitor.
Connect 2.2-nF capacitor
CapSense button/shield electrode/host interrupt/buzzer output
2
I
C data
2
I
C clock
Host interrupt/buzzer output/general-purpose output
2.2 nF Cmod capacitor (COG type).
This pin will be connected to a 6-pin jumper to select
between Hash GND for water proofing or host interrupt.
Brought out to dual header through a 560-ohm
resistor.
Brought out to dual header through a 560-ohm
resistor.
Cannot be used because GPO7 is multiplexed with
the host interrupt so brought out to a header.
BTN4 (11-mm diameter): A long trace option will be
provided on this pin.
BTN2 (10-mm diameter): Button 2 will have a slide
switch, which varies the Cp to 10 pF or 15 pF,
depending on the position of the switch.
This pin will be connected to a 3-pin jumper, to
choose between the onboard I2C-USB bridge or
external host.
This pin will be connected to a 3-pin jumper, to
choose between the onboard I2C-USB bridge or
external host.
This pin will be connected to a 6-pin jumper to select
the host interrupt or buzzer.
Reset switch and an SIO pin on PSoC 5LP I
bridge.
2
C-USB
Note: Pins shaded blue are left open; the other pins have been used for some function.
CY3280-MBR3 Evaluation Kit User Guide, Doc. #: 001-89905 Rev. *B 87

A.3 Bill of Materials
Item Qty Reference Description Manufacturer Manufacturer Part No.
16
2 1 C4 CAP TANT 10UF 16V 10% 1206 AVX TAJA106K016R
3 1 C5 CAP CER 22UF 10V 20% JB 0805 TDK Corporation C2012JB1A226M125AB
49
5 1 C16 CAP 10000PF 16V CERAMIC 0402 SMD TDK Corporation C1005X7R1C103K050BA
6 1 C26 CAP, CER, 2200pF, 50V, 5%, C0G, 0805 Murata GRM2165C1H222JA01D
7 1 C31 CAP CER 15PF 50V 5% NP0 0603 TDK Corporation C1608C0G1H150J080AA
8 1 C32 CAP CER 10PF 50V 5% NP0 0603
9 1 C34 CAP CER 100PF 50V 5% NP0 0402 TDK Corporation C1005C0G1H101J050BA
10 1 D2 DIO , SCHOTTKY, 20V, 0.5A, SOD-123 Fairchild Semiconductor MBR0520L
11 3 D6,D7,D8 DIO, SUPPRESSOR ESD 5VDC 0603 SMD Bourns Inc. CG0603MLC-05LE
12 6
13 1 D15 LED GREEN CLEAR 1206 REAR MNT SMD Lite-On Inc LTST-C230GKT
14 7
15 2 R80,R81 RES 330 OHM 1/10W 5% 0402 SMD
16 10
17 4 R5,R45,R67,R56 RES 0.0 OHM 1/8W 0805 SMD Panasonic-ECG ERJ-6GEY0R00V
18 1 R82 RES 0.0 OHM .125W JUMP 0402 SMD Vishay Dale CRCW04020000Z0EDHP
19 1 R60 RES 0.0 OHM 1/10W JUMP 0603 SMD
20 2 R8,R9 RES 2.2K OHM 1/10W 5% 0603 SMD
21 1 R13 RES 100K OHM 1/10W 5% 0402 SMD
22 2 R26,R27 RES 22 OHM 1/10W 1% 0603 SMD
23 3 R37,R39,R70 RES 15K OHM 1/10W 5% 0603 SMD
24 2 R73, R83 RES 4.7K OHM 1/10W 5% 0603 SMD
25 2 R43,R68 RES, 10K OHM, 1/16W, 1%, 0603, SMD Yageo RC0603FR-0710KL
26 4 R38,R40,R46,R69 RES 30K OHM 1/10W 1% 0603 SMD
27 1 R44 RES 37.4K OHM 1/10W .5% 0603 SMD Yageo RT0603DRD0737K4L
28 1 R47 RES 5.49K OHM 1/10W 1% 0603 SMD
29 1 LS1 BUZZER PIEZO 4KHZ 12.2MM PC MNT
C11,C13,C18,C19,C
23,C33
C7,C12,C14,C15,C1
7,C20,C21,C24,C30
D9,D10,D11,D12,D1
3,D14
R29,R30,R31,R32,R
58,R59, R62
R49,R50,R51,R52,
R74,R75,R76,R77,R
78,R79
CAP CER 1UF 10V 10% X5R 0603 TDK Corporation C1608X5R1A105K080AC
CAP CER 0.1UF 10V 10% X5R 0402 Taiyo Yuden LMK105BJ104KV-F
Samsung ElectroMechanics America, Inc
LED Red CLEAR 1206 REAR MNT SMD Stanley Electric Co BR1111R-TR
RES 330 OHM 1/8W 5% 0805 SMD Panasonic ERJ-6GEYJ331V
Panasonic Electronic
Components
RES 560 OHM 1/16W 5% 0402 SMD Yageo Corporation RC0402JR-07560RL
Panasonic Electronic
Components
Panasonic Electronic
Components
Panasonic Electronic
Components
Panasonic Electronic
Components
Panasonic Electronic
Components
Panasonic Electronic
Components
Panasonic Electronic
Components
Panasonic Electronic
Components
TDK CORPORATION
(VA)
CL10C100JB8NNNC
ERJ-2GEJ331X
ERJ-3GEY0R00V
ERJ-3GEYJ222V
ERJ-2GEJ104X
ERJ-3EKF22R0V
ERJ-3GEYJ153V
ERJ-3GEYJ472V
ERJ-3EKF3002V
ERJ-3EKF5491V
PS1240P02BT
CY3280-MBR3 Evaluation Kit User Guide, Doc. #: 001-89905 Rev. *B 88

Item Qty Reference Description Manufacturer Manufacturer Part No.
30 1 F1 PTC Resettable Fuses 15Volts 100Amps Bourns MF-MSMF050-2
31 2 J13,J14
32 2 J1,J4
33 1 J2
34 1 J3
35 2 J11,J12
36 1 J15 CONN, HEADER, VERT, SGL, 6POS, GOLD PROTECTRON P9101-06-12-1
37 1 J10 MINI USB RCPT R/A DIP TE Connectivity 1734510-1
38 1 SW1 SWITCH SLIDE SP3T LOW PROF SMD Copal Electronics Inc CUS-13TB
39 1 SW2 SWITCH TACTILE SPST-NO 0.05A 12V TE Connectivity FSMRA5JH
40 1 SW3 SWITCH SLIDE DPDT LOW PROF SMD Copal Electronics Inc CUS-22TB
41 1 TP7 TP, PC Mini, 0.040" D Black Keystone Electronics 5001
42 1 U2 IC REG LDO ADJ 0.5A SOT23-5 Micrel Inc MIC5219YM5 TR
43 1 U4 POLYZEN 5.6V PPTC/ZENER SMD TE Connectivity ZEN056V075A48LS
44 1 U1 CY8C5868LTI-LP039, QFN68 Cypress SemiConductor CY8C5868LTI-LP039
45 1 U3 CY8CMBR3116 -LQXI, 24QFN Cypress SemiConductor CY8CMBR3116 -LQXI
46 1 PCB
No Load Components
HDR, CONN, HEADER, MALE, 2.54mm,
3POS, GOLD, TH
2.54mm PITCH SINGLE ROW 8POS
HEADER, 13mm MATING LENGTH
2.54mm PITCH SINGLE ROW 6POS
HEADER, 13mm MATING LENGTH
2.54mm PITCH SINGLE ROW 10POS
HEADER, 13mm MATING LENGTH
CONN, HEADER, VERT, SGL ROW, 2POS,
GOLD
CY3280-MBR3 PCB
(Size: 3 inch x 2.7 inch
No of Layers: 4
Impedance Control USB Line
Surface Finish: ENIG
Solder Mask color: Black
Board thickness: 1.6mm)
PROTECTRON P9101-03-12-1
PROTECTRON P9101-08-D32-1
PROTECTRON P9101-06-D32-1
PROTECTRON P9101-10-D32-1
PROTECTRON P9101-02-12-1
Cypress SemiConductor 600-60172-01 Rev 1
19
2 1 R53 RES, 10K OHM, 1/16W, 1%, 0603, SMD Yageo RC0603FR-0710KL
3 2 R41,R57 RES 4.7K OHM 1/10W 5% 0603 SMD Panasonic-ECG ERJ-3GEYJ472V
4 1 C35 CAP CER 100PF 50V 5% NP0 0402 TDK Corporation C1005C0G1H101J050BA
5 3 TP2,TP3,TP4 TP, PC Mini, 0.040" D Red Keystone Electronics 5000
6 1 TP5 TP, PC Mini, 0.040" D Black Keystone Electronics 5001
R48, R54,R55,R63,
R66,R71,R72,R84,R85RES 0.0 OHM 1/8W 0805 SMD Panasonic-ECG ERJ-6GEY0R00V
A.4 Regulatory Compliance Information
The CY3280-MBR3 EVK has been tested and verified to comply with the following electromagnetic
compatibility (EMC) regulations.
■ EN 55022:2010 Class A – Emissions
■ EN 55024:2010 - Immunity
CY3280-MBR3 Evaluation Kit User Guide, Doc. #: 001-89905 Rev. *B 89

Revision History
CY3280-MBR3 Evaluation Kit User Guide Revision History
Document Title: CY3280-MBR3 Evaluation Kit User Guide
Document Number: 001-89905
Revision Issue Date
** 02/18/2014 SASH New kit guide
*A 02/21/2014 SASH Updated EZ-Click images
*B 03/10/2014 PAVA Updates to include support for externally regulated operating mode at 1.8 V
Origin of
Change
Description of Change
CY3280-MBR3 Evaluation Kit User Guide, Doc. #: 001-89905 Rev. *B 90
 Loading...