

Cypress Communications 1140 User Manual

IP Phone 1140
User Guide

About the IP Phone 1140
The IP Phone 1140 brings voice and data to the desktop by connecting
directly to a Local Area Network (LAN) through an Ethernet connection.
When you are logged on to the network, the handset and keypad of the IP
Phone operate in the same way as a standard business telephone. You
can access additional services and features through the soft keys. identifies the current
IP Phone terminal description
The IP Phone 1140 offers these features:
•
Six light-emitting diode (LED) indicator lamps
— message waiting lamp
— data waiting lamp
— mute lamp
— headset lamp
— handsfree lamp
— link lamp
•
volume control keys
• standard telephone dialpad
•
12 feature keys
• one
soft key
• five navigation keys
—up
—down
— left
— right
Page 1

About the IP Phone 1140
— send (located in the middle of the navigation key, this key is mapped
to execute the current function of the soft key)
•
multifield LCD screen
— adjustable contrast
— backlight
•
three audio modes
— handsfree speak and listen
— headset (autodetect support)
— handset
•
one USB port
— future support for USB mouse and keyboard
•
automatic network configuration
•
upgradeable firmware
•
wideband audio support
Page 2

About the IP Phone 1140
IP Phone 1140 components
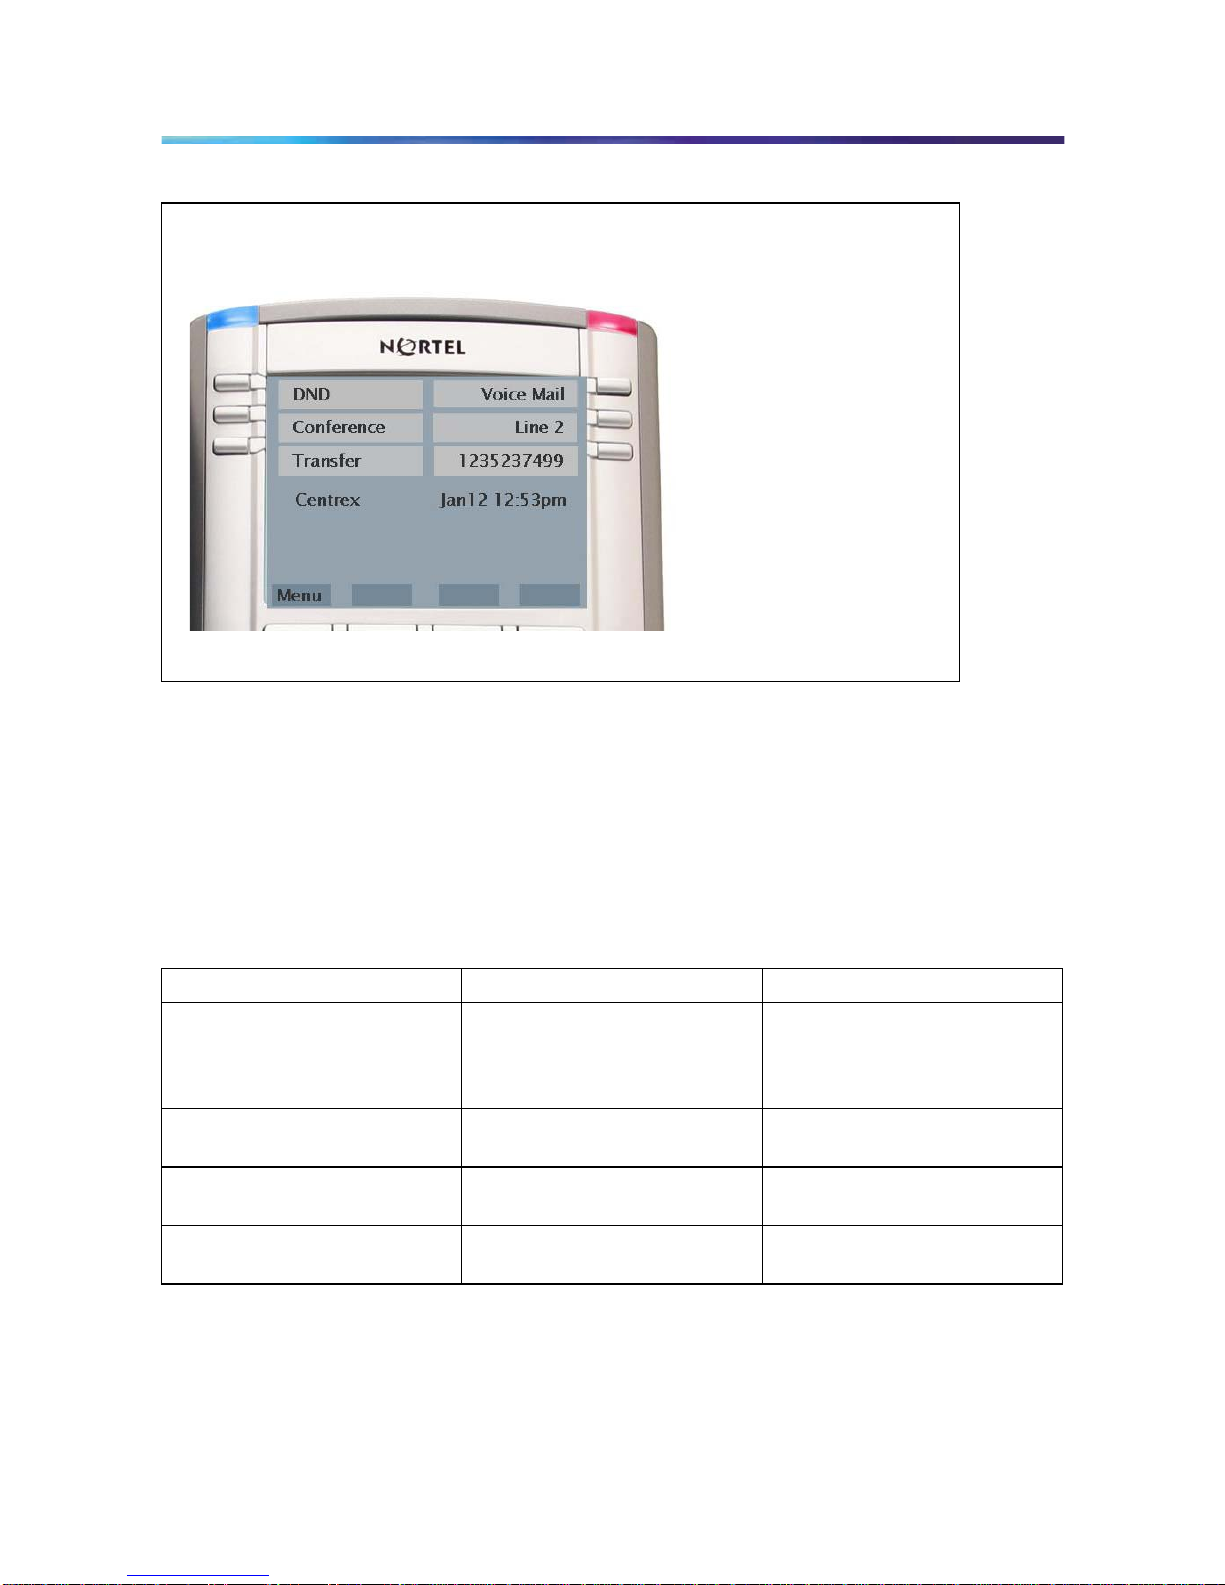
Terminal display
The display on the IP Phone terminal has blue LED backlighting, which you
can turn on and off.
The IP Phone 1140 display has three distinct areas:
•
The upper area shows line and feature key status.
• The middle area shows single-line information for items such as caller
number, caller name, feature prompt strings, user-entered digits, date
and time information, and telephone information.
•
The lower area displays the labels for the soft keys.
.
Page 3
12 About the IP Phone 1140
IP Phone 1140 display
Terminal indicators
The IP Phone terminal uses light-emitting diodes (LEDs) of different colors
to indicate the current state of the terminal. This table describes each color
and its associated state.
A steady indicator means that the extension or feature beside it is active. A
flashing indicator means the line is on hold or the feature is in the process of
being programmed.
Indicator LED color Meaning
Message waiting Red (located on the top right
corner of the set)
Lit when a message is waiting,
or a call is missed. The light
turns off after you retrieve your
message.
Data waiting Blue (located on the top left
corner of the set)
Lit when the terminal is on an
active call.
Headset Red (located on the front, on
the headset key)
Lit when the headset is in use.
Handsfree Red (located on the front, on
the handsfree key)
Lit when the handsfree mode
is active.
Terminal display
The 1140 feature keys
display on the LCD screen. ns off automatically after a period
The feature key functions are:
Transfer, Conference, DND,
Voicemail, Speed Dial,
Inspect, Cell,
Charge Code,
and the Auto Dial numbers.
.
Page 4

Terminal indicators 13
Indicator LED color Meaning
Mute Red (located on the front, on
the mute key)
Lit when the mute feature
is active. The system
administrator can configure
the mute lamp to be steady on
or blinking.
Link/Data Green (located on the back
cover near the network
Ethernet jack)
Lit when the link is alive and
flashes to indicate activity.
IP Phone 1140 Menu Systems
Use the up or down arrow on the navigation key to scroll to items.
Labels appear next to the soft keys, in response to items selected on screen.
Logging On & Logging Off
Use this item to log in and out from the IP Phone system.
See "Logging On" and "Logging Off".
Display
Use this item to adjust the contrast level of the display.
See "Adjusting the contrast level of the display"
Feature
Use the Feature menu to access these submenus:
Language
Use the Language item to select the language used in the display.
See "Selecting the Language ".
Time
Use the Time menu to:
•
select a time zone
•
enable or disable Daylight Saving Time
Page 5
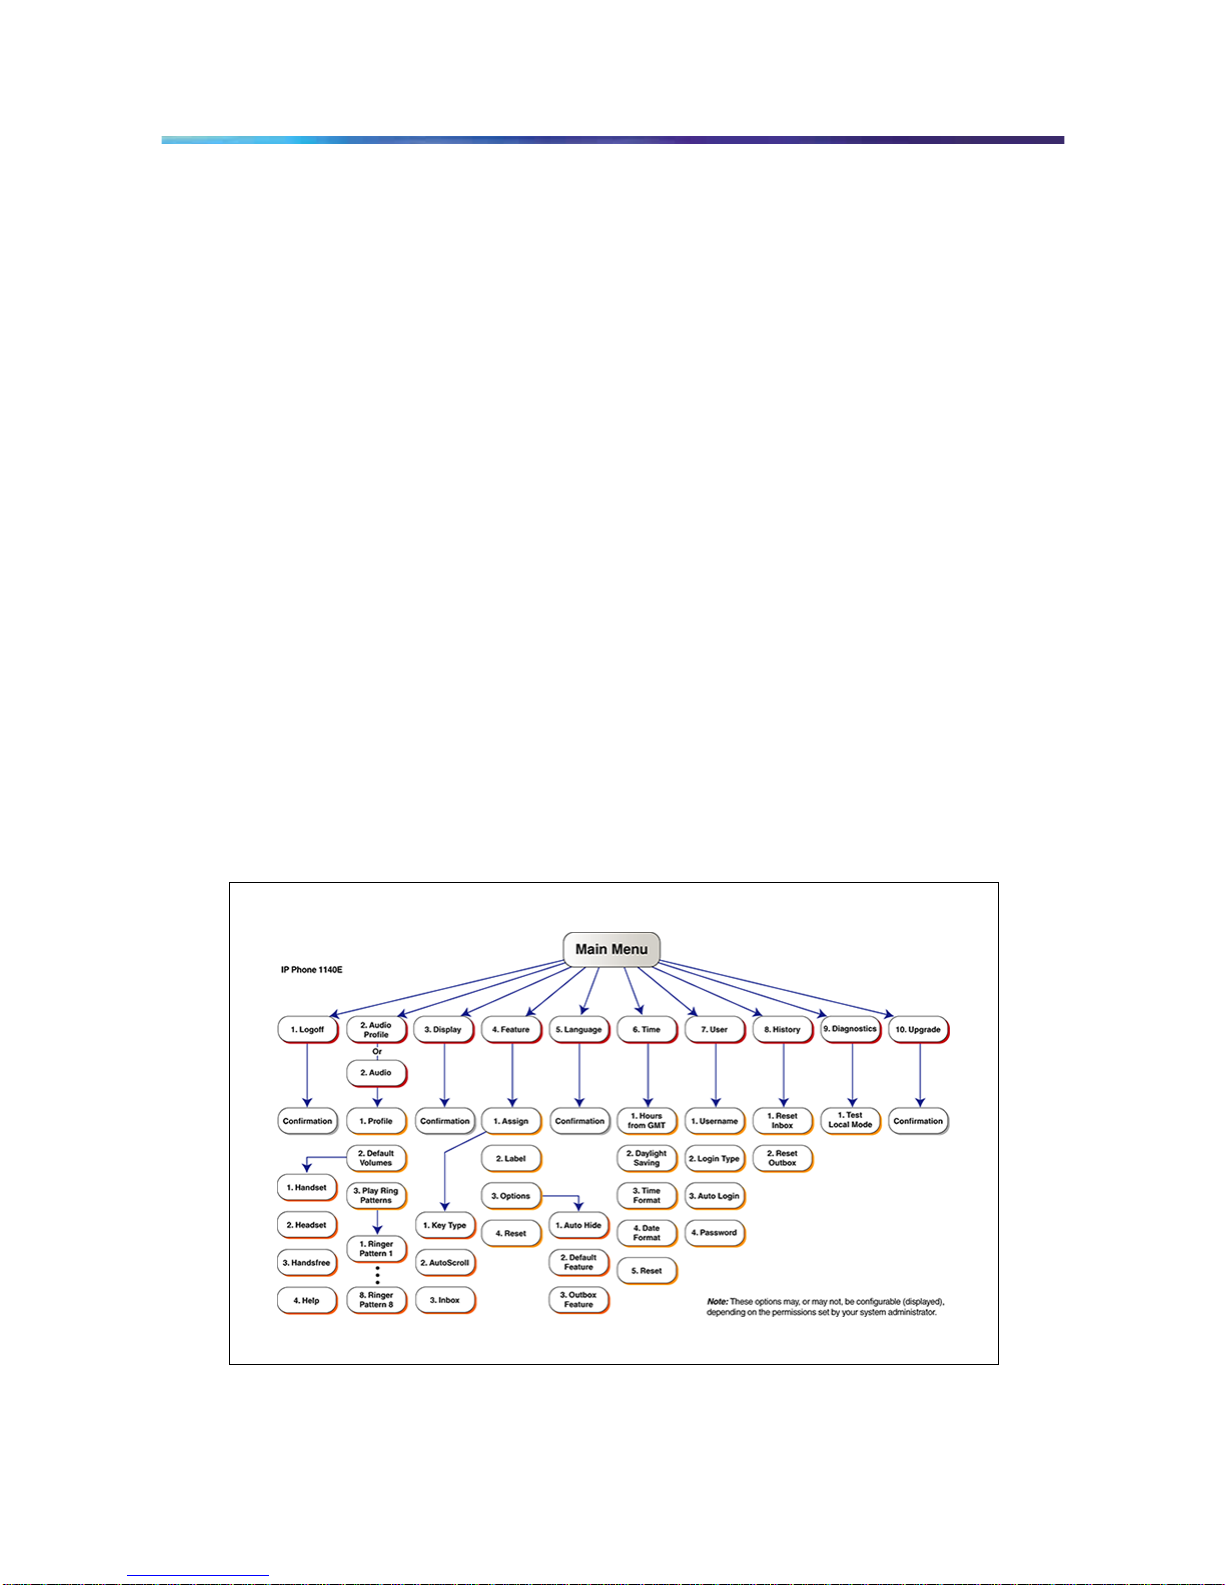
User
Use the User menu to:
•
view your user name
•
view your login type
•
enable or disable auto login feature
•
change your password
See "Using the User
Menu" .
History
Use History menu to:
•
reset the Inbox
•
reset the Outbox
See "Resetting the Inbox"
and "Resetting the Outbox". ..
Diagnostics
Use the Diagnostics item to test the local mode.
See "Testing
the Local Mode" .
Menu hierarchy
Page 6
18 IP Phone 1140 menu systems
18 IP Phone 1140 menu systems
How to use the navigation keys
The IP Phone terminal has navigation keys that you use to navigate the
menus and to help you to enter text in the display. See "IP
components" (page 11) for the location of these keys.
When the menu system is active, the navigation keys behave this way:
•
up—return to the previous menu item
•
down—go to the next menu item
•
left/right—active when you can enter text. To move the cursor to the left,
press the left key. Press the right key to move the cursor to the right.
•
send key—located in the middle of the navigation keys, press to select
the menu item
19
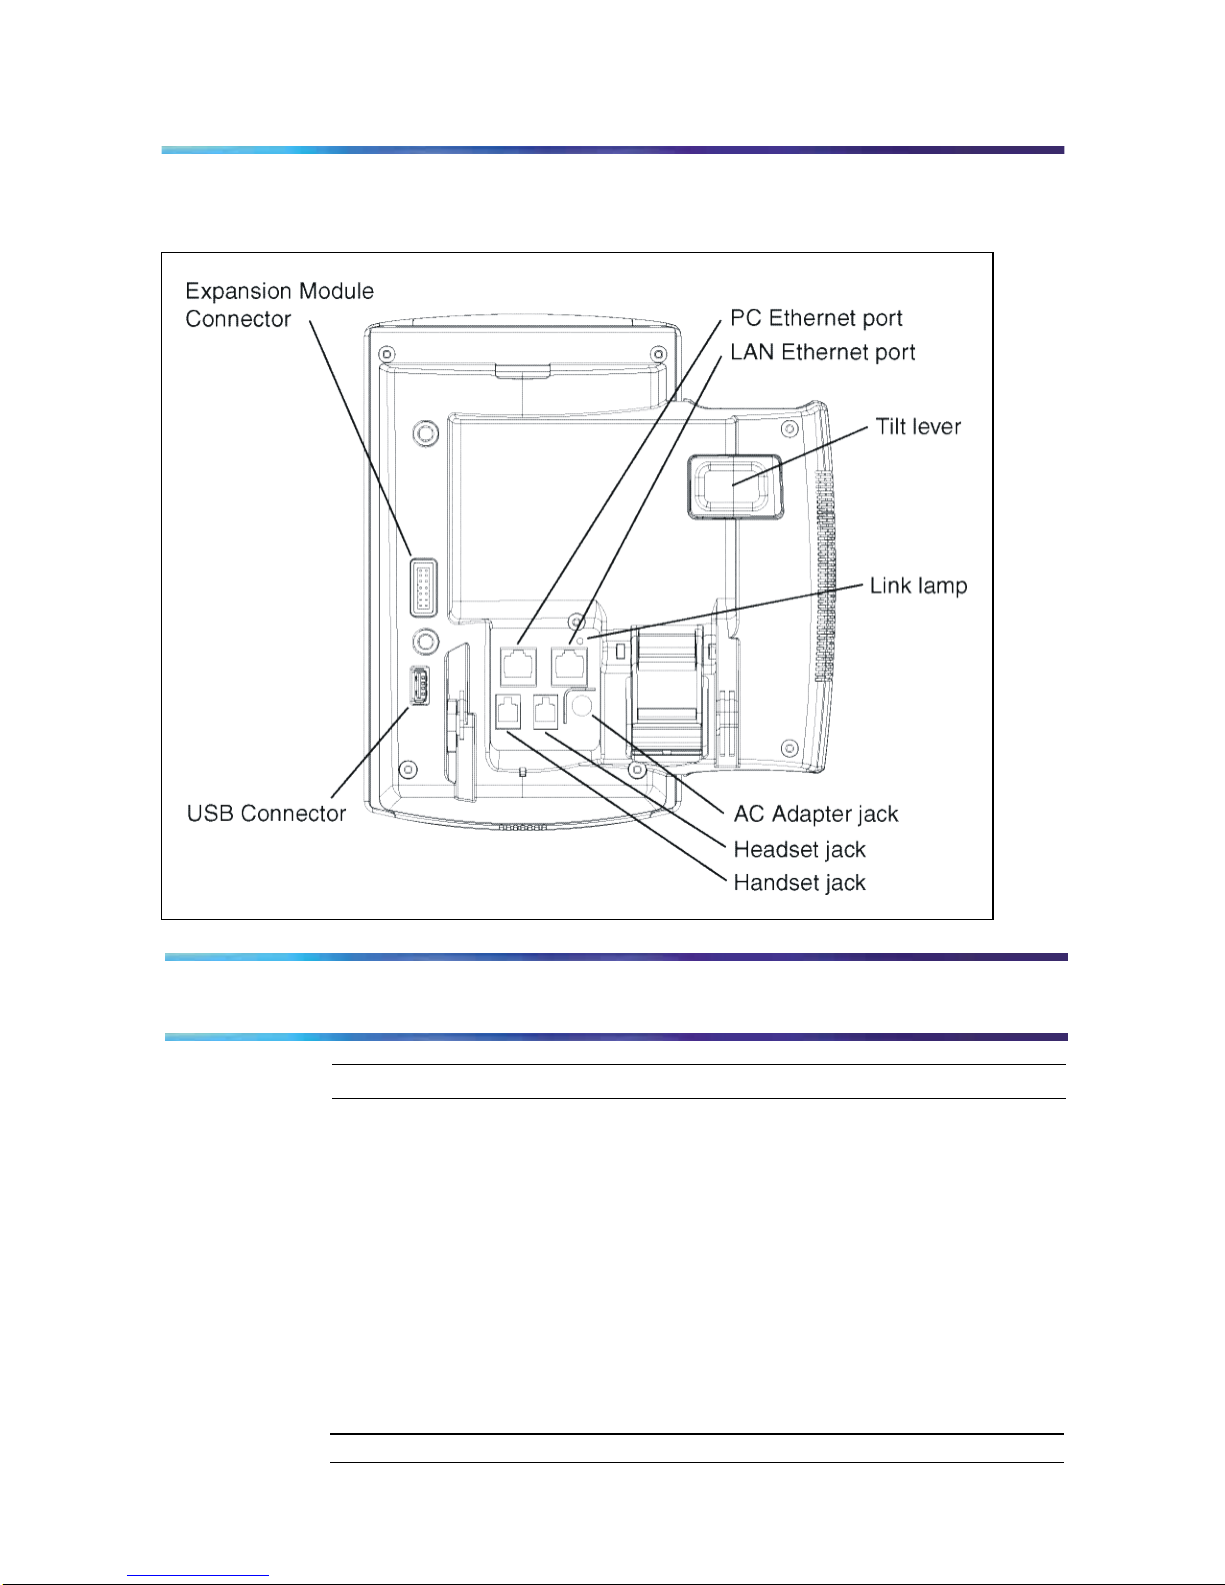
Connecting the IP Phone to the LAN
CAUTION
Risk of equipment damage
Do not plug the IP Phone into a regular telephone jack. This
causes severe damage to the terminal. Consult your system
administrator to ensure that you plug your telephone into a
10/100BaseT Ethernet jack.
Prerequisites
•
IP Phones can be powered by an AC adapter or over a LAN. Contact
your insystem administrator to identif the correct power option.
•
See "IP Phone 1140 connectors" for the location of the
connectors on the back of the IP Phone.
Step Action
1
Connect one end of the CAT-5 line cable to the LAN Ethernet port,
identified with a LAN icon, located on the underside of the terminal.
2
Connect the other end of the CAT-5 line cable to the IP network jack.
For a terminal sharing LAN access with a PC, connect a second
CAT-5 line cable to the PC Ethernet port located on the back of the
terminal, identified by the PC icon. Connect the other end of the
cable to the Ethernet port on the computer.
3
For a secure power connection, thread the cord around the strain
relief retaining hook and through the channel on the underside of
the terminal.
4
Secure the terminal footstand to the terminal base.
—End—
Page 7
20 Connecting the IP Phone to the LAN
IP Phone 1140 connectors
Logging On
Step Action
1
Enter your user name. Press OK
.
Note: If your user name i s too long for the display (longer than 15
characters), the digits scroll to the left and an ellipsis appears to
the left of the user name.
2
Enter your password. Press OK
.
Note:
If you make an error, press the Clear key key to clear the feld, and then
enter your user name or password again.
You are logged on and the Menu screen appears.
—End—
Page 8
 Loading...