

Page 1
CY3672-USB
Clock Programming Kit
Clock Programming Kit
CyClockWizard
CY3672 Software
JEDE C Fi le
Bit
Stream
CY3672
Programmer
Features
Functional Description
■ Supports these field-programmable clock generators:
CY2077FS, CY2077FZ, CY22050KF, CY22150KF, CY22381F,
CY22392F, CY22393F, CY22394F, CY22395F, CY23FP12,
CY25100ZXCF/IF, CY25100SXCF/IF, CY25200KF,
CY25701FLX
■ Allows quick and easy prototyping
■ Easy to use Microsoft
Windows 95, 98, NT, 2K, ME,
XP-compatible interface
■ User-friendly CyClockWizard software for JEDEC file
development
CY3672-USB Kit Contents
■ CY3672 programmer base unit
■ CD ROM with CY3672 software and USB driver
■ USB cable
■ AC/DC power adapter
■ User’s manual
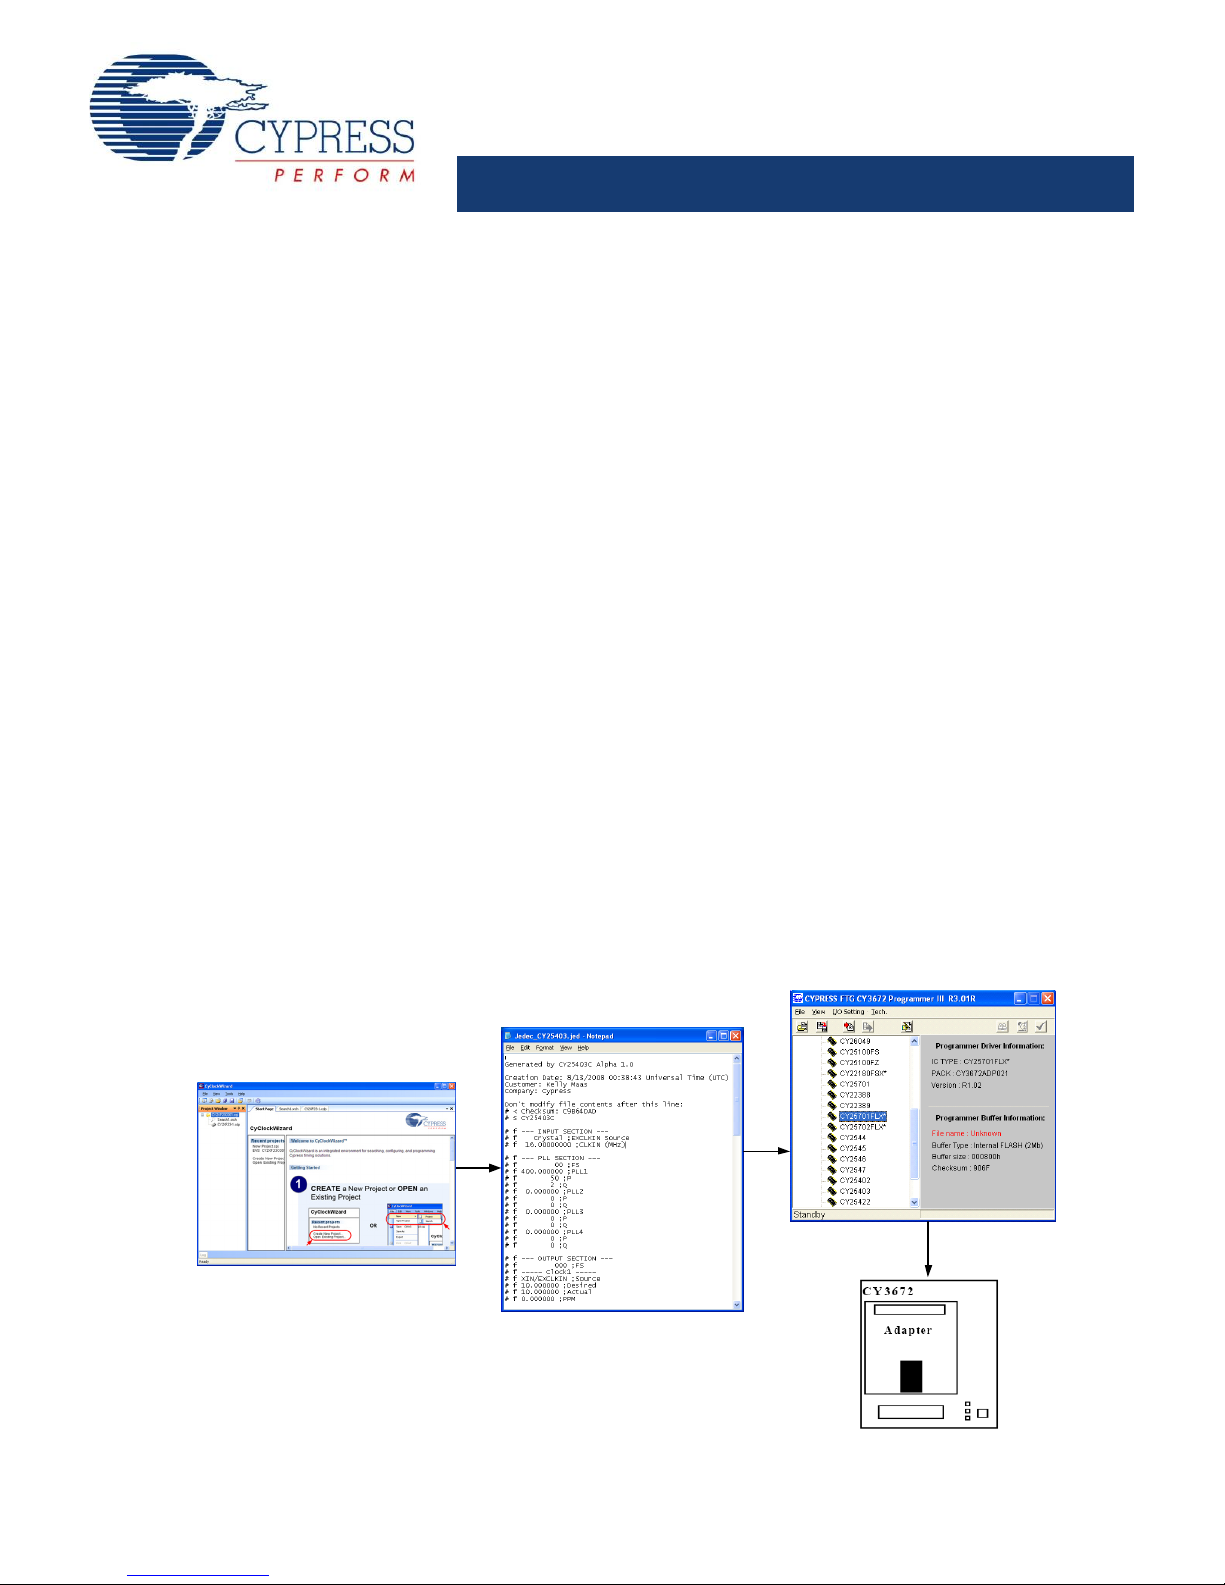
The CY3672-USB programming kit enables any user with a PC
to quickly and easily program Field-programmable Clock
Generators. The only setup requirements are a power
connection and a USB port connection with the PC, as shown in
Figure 2 on page 2.
Using CyClockWizard software, users can configure their parts
to a given specification and generate the corresponding JEDEC
file.
The JEDEC file is then loaded into CY3672-USB software that
communicates with the programmer. The CY3672-USB software
has the ability to read and view the EPROM table from a
programmed device. The programming flow is outlined in
Figure 1.
Setup
Hardware
The CY3672-USB programming kit has a simple setup
procedure. A socket adapter must be inserted into the CY3672
base unit. Available socket adapters are listed in Table 1, and are
ordered separately. No socket adapters are included in the
CY3672-USB Clock Programming Kit. As shown in Figure 2 on
page 2, only two connections are required. The programmer
connects to a PC through a USB cable, and receives power
through the AC/DC adapter that connects to a standard
110 V/220 V wall outlet.
Figure 1. Programming Procedure
Cypress Semiconductor Corporation • 198 Champion Court • San Jose, CA 95134-1709 • 408-943-2600
Document Number: 38-07409 Rev. *I Revised February 22, 2012
Page 2

CY3672-USB
Figure 2. CY3672 Programming Kit Setup
CY3672
Adapter
PC with Parallel Port
Wall
Power Adapter
Parallel Cable
PC with USB Port
USB Cable
Figure 3 is a close-up of the socket adapter and illustrates the
correct orientation for placing the device into the socket. Pin1
must always be in the lower left corner, as shown in Figure 3.
Software
Setting up the software is just as easy as setting up the
hardware. It is important to note that the CY3672 programmer
software is separate and distinct from the software used to
configure devices and generate the JEDEC format programming
file.
Figure 3. Device Orientation
The CY3672 programmer software is included on the CD that
ships with the programmer. The latest revision can also be
downloaded from the Cypress web site www.cypress.com. A
USB driver is included as part of the installation package. See
the next section for setup details.
CyClockWizard configuration software is also downloadable
from the Cypress web site.
Document Number: 38-07409 Rev. *I Page 2 of 7
Page 3
CY3672-USB
Quick Start Guide
Step 9
Step 5
Note
1. For more detailed information on all the functions of the software and programmer, please see the user manual.
Go through the following steps to properly configure and use the
CY3672.
1.
❐ Insert the CY3672 software CD, or download and unzip the
CY3672 from the website. Connect the CY3672 power
supply, connect the USB cable to the programmer and PC,
and turn on the power switch. When the PC detects the new
hardware, follow the wizard and search for the suitable driver
either from the CD-ROM or from the USB unzipped CY3672
software folder.
❐ Use the programmer arrow buttons to set the programmer
LCD display to “TYPE”
2.
❐ Install CyClockWizard configuration software, available at
www.cypress.com
❐ Install the CY3672 software onto your computer by running
SETUP.EXE.
Figure 4. CY3672 Software, Device Selection Page
3. Use CyClockWizard to generate a JEDEC file for the device
you wish to program.
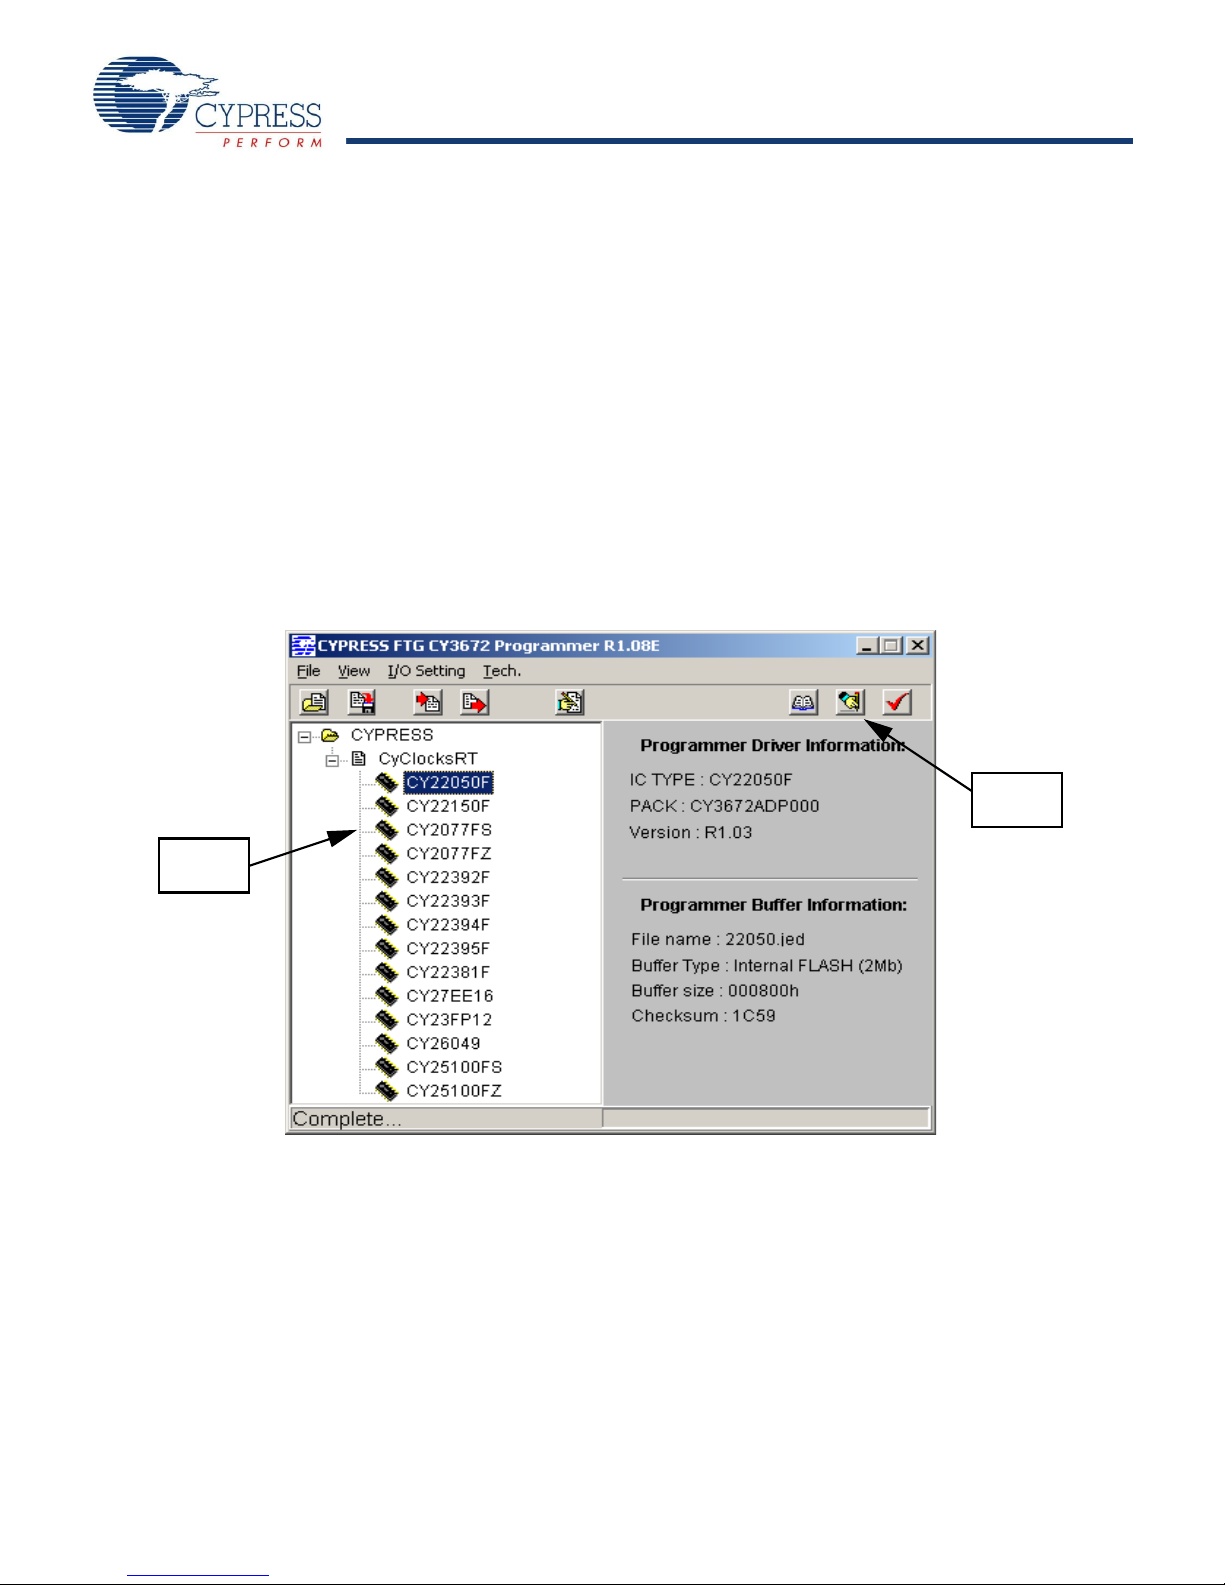
4. Open up the CY3672 software: go to Start Menu > Programs
> Cypress > CY3672 or the location where the software was
installed.
5. Double click on the device that you wish to program under the
menu on the left side of the screen, see Figure 4.
6. Click on the “Start” button at the bottom of the popup window,
see Figure 5.
7. Browse to and select the JEDEC file which you created earlier
in step 4 and click on “Open”.
8. Click “Yes” when the Upload Message screen pops up.
9. Once you see “Complete...” on the status bar at the bottom of
the window click on the “Program IC” icon at the top right of
the window (see Figure 4).
10.When you see a window with “Socket 1... Program OK.” pop
up you have successfully programmed a device.
[1]
Document Number: 38-07409 Rev. *I Page 3 of 7
Page 4

CY3672-USB
Figure 5. CY3672 Software, Programming Sequence
Step 6
Step 8
Document Number: 38-07409 Rev. *I Page 4 of 7
Step 10
Page 5

CY3672-USB
Socket Adapters
Notes
2. The legacy configuration software for this device is CyberClocks Online.
3. The legacy configuration software for this device is CyClocksRT, which is an application embedded within CyberClocks software.
4. The legacy configuration software for this device is CyClocks, which is an application embedded within CyberClocks software.
Socket adapters and the CY3672-USB Programming Kit can be ordered at http://www.cypress.com, where they are categorized as
development kits. Ta bl e 1 lists the available socket adapters and their corresponding devices and configuration software.
Table 1. Available Socket Adapters
Adapter Part Number Adapter Label Programmable Device Configuration Software
CY3690 CY3672ADP009 CY25100ZXCF / ZXIF (TSSOP) CyClockWizard
CY3691 CY3672ADP008 CY25100SXCF / SXIF (SOIC) CyClockWizard
CY3692 CY3672ADP006 CY23FP12 CyClockWizard
CY3695 CY3672ADP000 CY22050KF, CY22150KF CyClockWizard
CY25200KF CyClockWizard
CY3696 CY3672ADP001 CY2077FS (SOIC) CyClockWizard
CY3697 CY3672ADP002 CY2077FZ (TSSOP) CyClockWizard
CY3698 CY3672ADP003 CY22392F, CY22393F, CY22394F, CY22395F CyClockWizard
CY3699 CY3672ADP004 CY22381F CyClockWizard
CY3724 CY3672ADP021 CY25701FLX CyClockWizard
[2]
[2]
[3]
[3]
[2]
[4]
[4]
[3]
[3]
[2]
Ordering Information
Ordering Code Description Operating Voltage
CY3672-USB Clock programming kit with base unit 110 V/220 V
CY3690 Socket adapter for CY25100ZXCF / ZXIF (TSSOP) N/A
CY3691 Socket adapter for CY25100SXCF / SXIF (SOIC) N/A
CY3692 Socket adapter for CY23FP12 N/A
CY3695 Socket adapter for CY22050KF, CY25150KF, CY25200KF N/A
CY3696 Socket adapter for CY2077FS (SOIC) N/A
CY3697 Socket adapter for CY2077FZ (TSSOP) N/A
CY3698 Socket adapter for CY22392F, CY22393F, CY22394F, CY22395F N/A
CY3699 Socket adapter for CY22381F N/A
CY3724 Socket adapter for CY25701FLX N/A
Document Number: 38-07409 Rev. *I Page 5 of 7
Page 6

CY3672-USB
Document History Page
Document Title: CY3672-USB, Clock Programming Kit
Document Number: 38-07409
Rev. ECN
** 114456 CKN 07/24/02 New data sheet
*A 118435 CKN 12/05/02 Updated CY3672-USB Kit Contents (Removed CD containing CyClocksRT
*B 127454 RGL 09/05/03 Added Quick Start Guide.
*C 223822 RGL 05/11/04 Updated Quick Start Guide (Added a Note containing registration process for
*D 270030 RGL 10/11/04 Updated Features
*E 390555 RGL 08/25/05 Updated Socket Adapters (Added adapter part numbers CY3617, CY3618 and
*F 404668 KVM 11/03/05 Updated Socket Adapters (Added adapter part number CY3724 and its details
*G 2897245 KVM 03/22/10 Updated title to read “Clock Programming Kit”.
*H 3287649 BASH 06/20/11 Updated Ordering Information (Updated Description column for the ordering
*I 3532571 PURU 02/22/2012 Updated Socket Adapters (Updated Programmable Device column in Table 1
Orig. of
Change
Submission
Date
Description of Change
software, CY3672 programmer interface software, data sheets and added
Quick Start Guide).
Updated Functional Description (To include information on new software
CyberClocks).
Updated Socket Adapters (Added adapter part numbers CY3690, CY3691,
CY3692, CY3693 and CY3694 and its details in Table 1).
the CyberClocks Online).
Updated Ordering Information (Fixed to match the DevMaster).
Updated Socket Adapters (Updated the details of adapter part number CY3695
and added adapter part number CY3713 and its details in Ta bl e 1 ).
Updated Ordering Information.
their details in Ta bl e 1 ).
Updated Ordering Information (Added the ordering code CY3672-USB and its
details).
in Table 1).
Removed references of parallel port interface and cable across the document.
Updated Ordering Information (Removed the ordering code CY3672 and
CY3672-PRG and their details).
Updated Socket Adapters (Updated Adapter Label column for the adapter part
numbers CY3690 and CY3691 (swapped Adapter Labels CY3672ADP008 and
CY3672ADP009), removed adapter part numbers CY3693, CY3694, CY3613,
CY3617, CY3618 and their details, updated Configuration Software column as
CyClockWizard for all adapter part numbers in Table 1).
codes CY3690 and CY3691).
for the adapter part numbers CY3690 and CY3691).
Updated Ordering Information (Updated Description column for the ordering
codes CY3690 and CY3691).
Updated in new template.
Document Number: 38-07409 Rev. *I Page 6 of 7
Page 7

CY3672-USB
Sales, Solutions, and Legal Information
Worldwide Sales and Design Support
Cypress maintains a worldwide network of offices, solution centers, manufacturer’s representatives, and distributors. To find the office
closest to you, visit us at Cypress Locations.
Products
Automotive cypress.com/go/automotive
Clocks & Buffers cypress.com/go/clocks
Interface cypress.com/go/interface
Lighting & Power Control cypress.com/go/powerpsoc
cypress.com/go/plc
Memory cypress.com/go/memory
Optical & Image Sensing cypress.com/go/image
PSoC cypress.com/go/psoc
Touch Sensing cypress.com/go/touch
USB Controllers cypress.com/go/USB
Wireless/RF cypress.com/go/wireless
PSoC Solutions
psoc.cypress.com/solutions
PSoC 1 | PSoC 3 | PSoC 5
© Cypress Semiconductor Corporation, 2002-2012. The information contained herein is subject to change without notice. Cypress Semiconductor Corporation assumes no responsibility for the use of
any circuitry other than circuitry embodied in a Cypress product. Nor does it convey or imply any license under patent or other rights. Cypress products are not warranted nor intended to be used for
medical, life support, life saving, critical control or safety applications, unless pursuant to an express written agreement with Cypress. Furthermore, Cypress does not authorize its products for use as
critical components in life-support systems where a malfunction or failure may reasonably be expected to result in significant injury to the user. The inclusion of Cypress products in life-support systems
application implies that the manufacturer assumes all risk of such use and in doing so indemnifies Cypress against all charges.
Any Source Code (software and/or firmware) is owned by Cypress Semiconductor Corporation (Cypress) and is protected by and subject to worldwide patent protection (United States and foreign),
United States copyright laws and international treaty provisions. Cypress hereby grants to licensee a personal, non-exclusive, non-transferable license to copy, use, modify, create derivative works of,
and compile the Cypress Sou rce Code and derivative works for the sole purpose of cr eating custom software and or firmware in support of licensee product to be used only in conjunction with a Cypress
integrated circuit as specified in the applicable agreement. Any reproduction, modification, translation, compilation, or representation of this Source Code except as specified above is prohibited without
the express written permission of Cypress.
Disclaimer: CYPRESS MAKES NO WARRANTY OF ANY KIND, EXPRESS OR IMPLIED, WITH REGARD TO THIS MATERIAL, INCLUDING, BUT NOT LIMITED TO, THE IMPLIED WARRANTIES
OF MERCHANTABILITY AND FITNESS FOR A PARTICULAR PURPOSE. Cypress reserves the right to make changes without further notice to the materials described herein. Cypress does not
assume any liability arising out of the application or use of any product or circuit described herein. Cypress does not authorize its products for use as critical components in life-support systems where
a malfunction or failure may reasonably be expected to result in significant injury to the user. The inclusion of Cypress’ product in a life-support systems application implies that the manufacturer
assumes all risk of such use and in doing so indemnifies Cypress against all charges.
Use may be limited by and subject to the applicable Cypress software license agreement.
Document Number: 38-07409 Rev. *I Revised February 22, 2012 Page 7 of 7
Microsoft and Windows are registered trademarks of Microsoft Corporation. CyberClocks and CyClocksRT are trademarks of Cypress Semiconductor Corporation. All products and company names
mentioned in this document may be the trademarks of their respective holders.
Page 8

Mouser Electronics
Authorized Distributor
Click to View Pricing, Inventory, Delivery & Lifecycle Information:
Cypress Semiconductor:
CY3672-USB
 Loading...