

Cypher PUMA User Manual

PUMA
Portable Universal Media Archive
User Manual V 2.1
October 2008
Cypher Technology Ltd
Leatherhead, UK
cyphertechnology.co.uk

1 Table of Contents
1 Table of Contents...................................................................................................2
2 Description.............................................................................................................4
3 Quick Start Guide...................................................................................................6
3.1 Turning On..........................................................................................................6
3.2 Transferring Flash Card Data .............................................................................6
3.3 Turning Off..........................................................................................................6
4 Detailed Operation .................................................................................................7
4.1 Setting up and Powering Puma ..........................................................................7
4.2 Turning Off (Display Software Revision and serial Number)...............................7
4.3 Automated Transfer Operation ...........................................................................7
4.4 Menu System......................................................................................................9
4.5 Make Working Copy ...........................................................................................9
4.6 Make Master Copy............................................................................................10
4.7 Verify Master Copy against Flash Card ............................................................10
4.8 Restore the Master Copy to a Flash Card ........................................................10
4.9 Wipe Flash Card...............................................................................................10
4.10 Calculate the Checksum of the Flash Card ...................................................11
4.11 Format Flash card .........................................................................................11
4.12 Calculate the Checksum of the Master Disk Image.......................................11
4.13 Enable JPEG creation on Working Copies....................................................12
4.14 Software Installation Procedure.....................................................................12
4.15 Adjust the Internal Time and Date .................................................................12
4.16 How is the Master Copy used?......................................................................13
4.17 Accessing the Master Copy with WinImage ..................................................13
4.18 ImageMaker – Combining Multiple Disk Images ...........................................14
5 Technical Background .........................................................................................16
5.1 Master Copy (bit for bit copy)............................................................................16
5.2 Disk Verify Read...............................................................................................17
5.3 Working Copy (file copy)...................................................................................17
5.4 Card and Disk Checksum .................................................................................18
5.5 Flash Card Wipe (Erasing) ...............................................................................18
5.6 System Architecture .........................................................................................18
Cypher Technology Ltd 2008
2

5.7 Transfer Times .................................................................................................18
5.8 RAW File handling............................................................................................19
6 Technical Support ................................................................................................20
6.1 System re-starting in the event of failure ..........................................................20
6.2 Contact .............................................................................................................20
6.3 Software Updates .............................................................................................20
7 Specifications.......................................................................................................21
8 Disclaimer ............................................................................................................21
9 Appendix 1...........................................................................................................22
9.1 Supported Camera Types.................................................................................22
Cypher Technology Ltd 2008
3

2 Description
Puma is a rugged and evidentially secure system for archiving Flash card data to
CDROM/DVD media. Its automated backup procedure make it simple to use. It is aimed
primarily at backing up digital cameras and Flash based audio and video recorders and
includes a RAW to JPEG image converter. Puma will back up any type of file data and
can be used to archive USB pen drives and other USB disk drives. The main features
are as follows:
• Simple operation. Single, dedicated “Transfer” button initiates entire archive
sequence. This eliminates the chance of the operator omitting part of the
procedure.
• Any size of card can be archived up using multiple DVDs or CDs (new in V2.1).
• Rugged construction and no hard drive increases reliability and evidential
security.
• Unique bit for bit copy of Flash card provides ultimate evidential audit trail and
reduces possibility of legal challenges.
• Three automated steps in transfer procedure: Transfer, data verify, and Flash
media overwrite/erase/format.
• Flash card, forensic wipe process ensures that deleted data cannot be recovered
and removes any viruses.
• Fast transfer rates reduces back-up time. Up to four times faster than laptop for
transferring files. 20Mbyte /sec transfer rate.
• Self contained unit with premium quality, full height DVD/CDROM R/W drive.
• Re-mounts and verifies disk after writing to ensure maximum reliability of backup.
• Supports wide range of DVD +/- R, +R/W, +R DL and CD -R media.
• Will back up USB Flash sticks.
• Proprietary software tailored precisely to the needs of law enforcement and
evidence gathering. Closed nature of operating system increases evidential
security
• Produces two media outputs: a Master Copy which is a bit-for-bit copy of the
entire Flash memory card and a Working Copy which contains only the files from
the Flash card. Where these are image files in RAW format, the system will
generate JPEG versions of these files which will also be stored on the Working
Copy. A list of supported RAW camera formats is given in APPENDIX 1
• Can be powered from mains, vehicle power or external batteries.
• Supports all common Flash media (see Specification).
Cypher Technology Ltd 2008
4
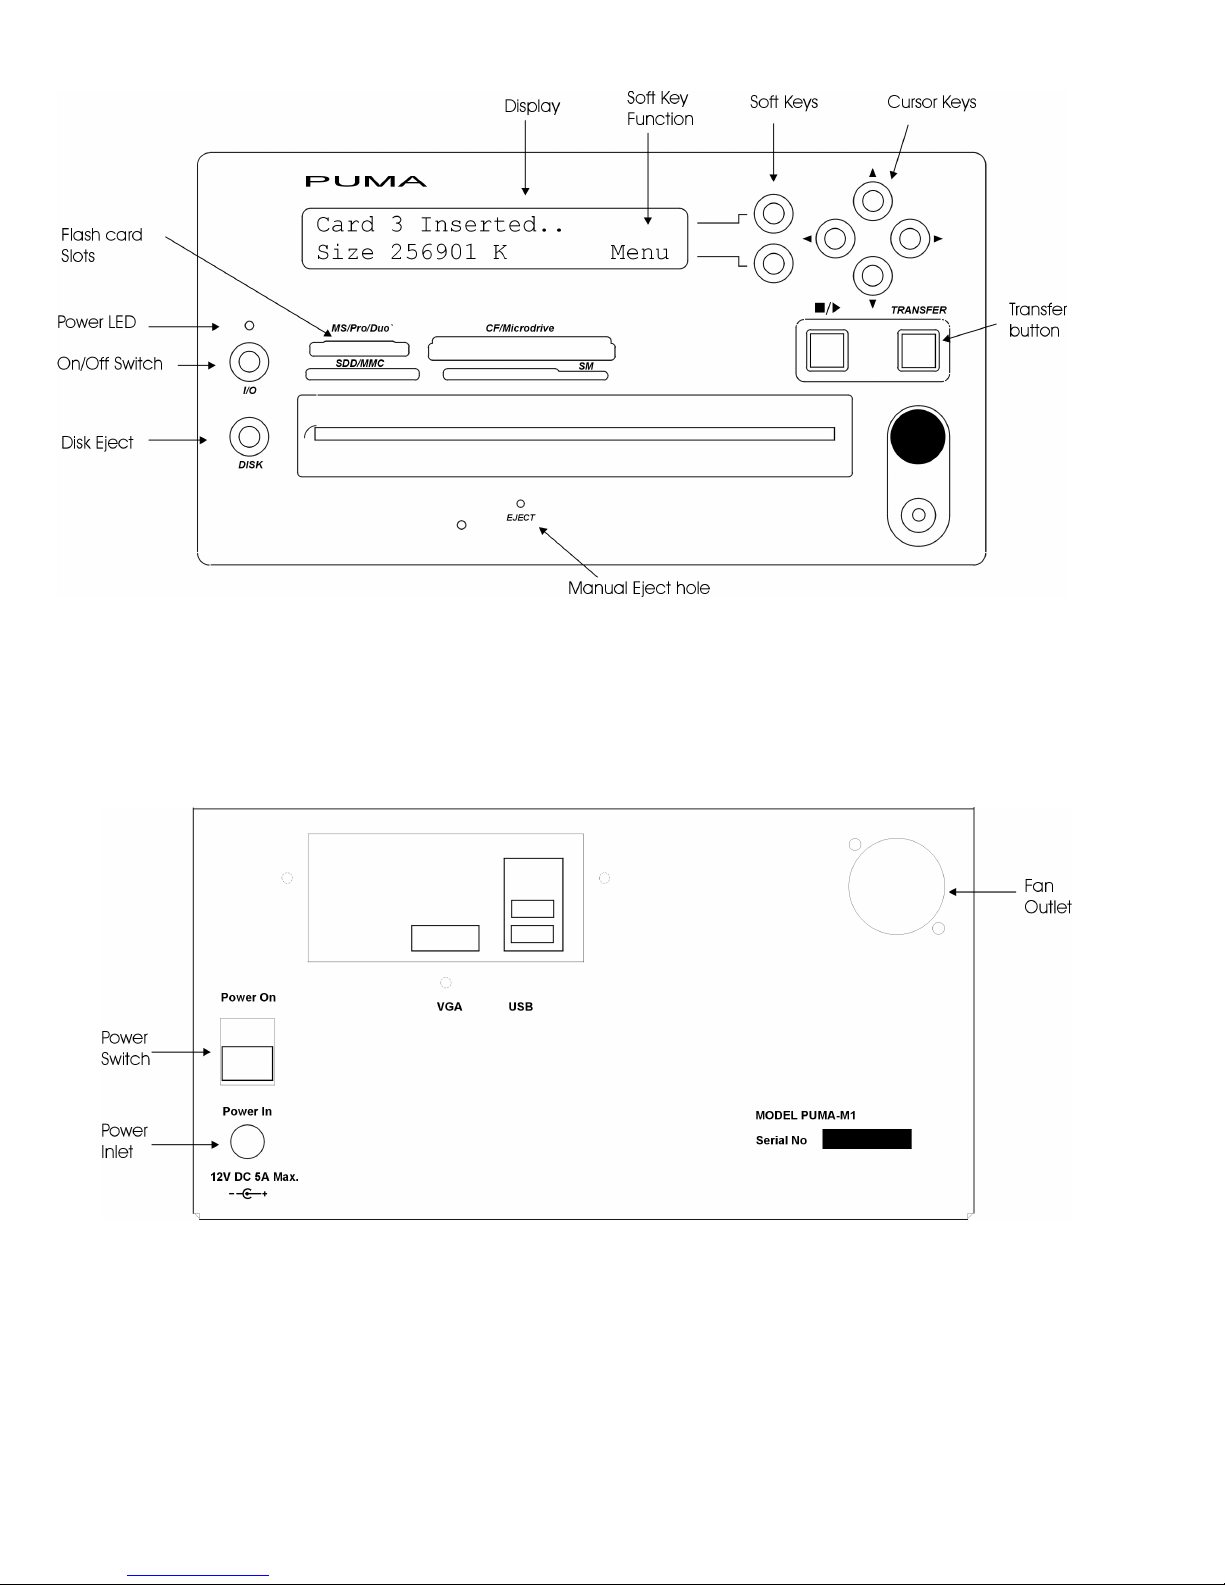
Fig 1. Front Panel
Cypher Technology Ltd 2008
Fig 2. Rear Panel
5

3 Quick Start Guide
3.1 Turning On
1. Connect the supplied 12V 5A power supply (PSU) lead to rear panel power inlet and
screw up the connector. Connect the PSU to a mains supply using the supplied
cable.
2. Remove any Flash card.
3. Switch on the Power Switch on the rear panel (switch up). The display panel will
light up and show “Press I/O”. The green front panel LED will flash.
4. Press the I/O (On/Off) switch below the green Flashing LED. “On..” will be displayed
and the green LED will be on constantly.
5. After a few seconds, a growing line of dots will appear on the display and the system
will be ready for use after about 20 seconds.
3.2 Transferring Flash Card Data
1. Check that the displayed time and date are correct.
2. Insert the Flash card into the appropriate front panel slot. The display will show the
card’s size and number of files. A USB stick may be plugged into the rear panel.
3. Press the Disk button to open the DVD/CD draw. Place a DVD/CD in the tray and
press the Disk button once more to close the tray.
4. Press the TRANSFER button to start the transfer.
a) A Master copy is produced first. This consists of the transfer of the data from the
card to the disk and a verification read of the disk image file and the card. On
successful completion the Master disk will be ejected and the checksum of the Flash
card will be shown. This can be noted down for future reference. (where multiple disks are
produced, there are separate disk checksums also).
b) Remove the Master Copy disk and place a new DVD on the tray. Press the lower
soft key Marked “Continue” to proceed. The Working copy is now produced. On
successful completion the disk will be automatically ejected.
c) The Flash card may now be wiped and re-formatted. Press “N” when prompted if
this is NOT required.
The Transfer is complete.
Note: If further copies are required, do not wipe the card, and use the appropriate
functions available in the “Menu”. Press “Menu” soft key and the Up/Down cursor keys.
3.3 Turning Off
Press the I/O button below the green LED to shutdown. When “Switch Off” is displayed,
turn off the rear panel Power Switch.
Cypher Technology Ltd 2008
6

4 Detailed Operation
4.1 Setting up and Powering Puma
1. Connect the supplied 12V 5A power supply (PSU) lead to rear panel power inlet and
screw up the connector. Connect the PSU to a mains supply using the supplied
cable.
2. Remove any Flash card.
3. Switch on the Power Switch on the rear panel (switch up). The display panel will
light up and show “Press I/O”. The green front panel LED will flash.
4. Press the I/O (On/Off) switch below the green Flashing LED. “On..” will be displayed
and the green LED will be on constantly.
5. After a few, a growing line of dots will appear. This line will extend to the full width of
the screen and then “Wait” will be displayed. A few seconds after that “Ready” will
be displayed and the system is ready for use. The whole boot up procedure, from
switch on, takes about 20 seconds.
6. When PUMA makes a Working Copy of RAW image files, it creates JPEG versions
of these files for ease of viewing across a wide range of platforms. Where this
feature is required, it must be enabled from the menu. This is done by selecting the
“Enable JPEGs” function in the Menu (Section 4.13 ).
7. Check that the displayed time and date are correct. If not, use the “Adjust Time”
menu function to adjust the time and date (Section 4.15).
4.2 Turning Off (Display Software Revision and Serial Number)
Press the I/O button below the green LED to shutdown. Press {Y} to confirm. When
“Switch Off” is displayed, turn off the rear panel Power Switch.
If {N} is pressed the Software Revision and Serial Number (where appropriate) will be
displayed and Puma will resume operation.
4.3 Automated Transfer Operation
1. Place the Flash card in appropriate slot. If a USB drive is to be archived, plug this
into either of the USB slots in the rear panel. An extension lead may be required for
bulky USB flash drives
2. Place a blank CD-R or DVD +/- R in the drive. The Master Copy is generated first.
The size of the Flash card is shown on the display when it is inserted. A CD will hold
730Mbytes and a standard DVD 4,700 Mbytes. Where the flash card is larger than
the disk size, multiple disks will be produced. These disks will be automatically
numbered as Master Disk #1, Master Disk #2 etc. A Windows utility program is
supplied, which combines the multiple disks into one master image file for ease of
access. This utility program, called ImageMaker, is copied to the first disk of the set.
Cypher Technology Ltd 2008
7

The Master Copy has the current time and date stamp as displayed on the front of
the machine.
3. Press the Transfer button.
(The “Cancel” soft key allows the transfer to be aborted)
Please note: The first time a new disk type is used, there may be a delay before writing occurs
as the drive calibrates itself to the disk.
Action Display (See front panel layout)
Transfer Master begins Make Master Copy 05:23
32% @ 8.4MB/S Cancel>
Verifying Master begins Verify Master 00:23
10% @ 8.5MB/s Cancel>
4. Puma then ejects the verified Master Disk and displays the Checksum. This should
be noted down.
(Multiple disk transfer - If the flash card is bigger than the disk size, further disks will be
requested. Each disk has its own checksum, which is displayed at the end of each disk
transfer. When all the data has been transferred, no new disks will be requested. Press
{Continue} and the checksum of the whole Master Image will be shown. This should be
noted down. This final checksum is the same value as the checksum produced for the card.)
5.
Puma then prompts for another blank disk to be inserted. If the process was not
successful the disk will not be ejected and an error message will be displayed (the
disk can be ejected manually using the [Disk] button.
Mster is ejected Insert Blank Disk..
Continue>
Press the {Continue} soft key to proceed with the Working Copy
Transfer Working begins dcn0004.jpg 04:34
19% @ 8.3MB/s Cancel>
If the size of the files on the flash card is bigger than the disk size, further disks will
be requested.
Is Flash erase required? Wipe Card Y>
N>
Press {Y} to wipe Flash card or {N} to proceed without wiping card. After the card is
wiped it is automatically partitioned and re-formatted with a FAT32 file system. If
successful the display will show :
Wipe Completed Wipe Complete.. 00:00
The Transfer process is now complete. A new Flash card may be inserted.
Cypher Technology Ltd 2008
Formatted Continue>
8
 Loading...