

Page 1
CyntrX – CyntrX ELD
March 2018 / V1.0.1804-1805
Page 2

Version
Date
Author
Reviewer
1621
10/26/16
Editha Dura
Roel Sinadjan
1622/1623
11/21/16
Editha Dura
Roel Sinadjan
1624
12/8/16
Mia Ladoroz
Roel Sinadjan
1625
12/22/16
Mia Ladoroz
Roel Sinadjan
1626
01/18/17
Mia Ladoroz
Roel Sinadjan
1701
01/26/17
Mia Ladoroz
Roel Sinadjan
1702
01/31/17
Mia Ladoroz
Roel Sinadjan
1703
02/14/17
Mia Ladoroz
Roel Sinadjan
1704
03/02/17
Mia Ladoroz
Roel Sinadjan
1705
03/17/17
Mia Ladoroz
Roel Sinadjan
1707/1708
04/25/17
Mia Ladoroz
Roel Sinadjan
1709/1710
05/23/17
Editha Dura
Roel Sinadjan
1711/1712
06/23/17
Editha Dura
Mia Ladoroz/Roel Sinadjan
1713/1715
07/20/17
Editha Dura
Mia Ladoroz/Roel Sinadjan
1716/1717
08/24/17
Editha Dura
Mia Ladoroz/Roel Sinadjan
1718/1719
09/28/17
Editha Dura
Mia Ladoroz/Roel Sinadjan
1720/1721
10/12/17
Editha Dura
Roel Sinadjan
1722/1723
12/05/17
Precious Mae Cenia
Roel Sinadjan
1724/1801
01/03/18
Precious Mae Cenia
Roel Sinadjan
1802/1803
02/05/18
Precious Mae Cenia
Roel Sinadjan
1804/1805
03/05/18
Precious Mae Cenia
Roel Sinadjan
Page 3
CyntrX
Title
Name
Signature
Date
Partner Name
Title
Name
Signature
Date
Change Log
This section includes the following pages with the modified section details:
Page
Modified Section
Page 12
Updated 2.1.3 Customizing the Carrier Information
Page 17
Updated 2.1.4 Driving Rules>Available US Exceptions Options
Page 29
Updated 3.2 Changing the Driver’s Duty Status
Page 34
Updated 3.5 Data Transfer>Select Vehicle
Page 57
Updated 5.2.12 Edit a Log>Modify Log Event Using Grid View Editing
Page 73
Updated 5.4.4 Starting Your DVIR
Page 92 & 94
Updated 7.5.3 Manage Vehicles / Trailers – Add
Page 4
CyntrX
Page 4
920-338-0479 | [email protected]| www.CyntrX.com
Copyright
© CyntrX 2018. All rights reserved.
No part of this publication may be reproduced or transmitted in any form or by any means or
stored in any retrieval system of any nature without prior written permission except as expressly
permitted by any written contract signed by CyntrX with the recipient.
The contents of this documentation are the confidential information of CyntrX and are subject to
the provisions of CyntrX standard Customer Agreement or Non-disclosure Agreement (as
relevant) or any similar agreement signed by CyntrX and entered into with the recipient. The
contents of this documentation (or any part or it) must not be used or disclosed to any third party
by the recipient except as expressly permitted by the relevant agreement. If you (or your
company) have not signed an agreement with CyntrX you must not use this documentation, must
treat it as strictly confidential and must promptly return it to CyntrX.
Change History
This section details what changes have been made in order to prompt a new version of this
product specification:
Version
Date
Author(s)
Section Page
No.
Change
Page 5

CyntrX
Page 5
920-338-0479 | [email protected]| www.CyntrX.com
Contents
1 Main Screen ............................................................................................................................................. 8
1.1 Using the HOS Action Bar ................................................................................................................. 8
2 Customizing the CyntrX ELD App Preferences ........................................................................................ 9
2.1 Hours of Service Settings................................................................................................................ 10
2.1.1 Set Hours of Service Preferences .............................................................................................. 10
2.1.2 Capturing the Driver’s Signature .............................................................................................. 11
2.1.3 Customizing the Carrier Information ........................................................................................ 12
2.1.4 Driving Rules ............................................................................................................................ 12
2.2 Vehicle Data Settings ..................................................................................................................... 23
2.3 Device Preferences ......................................................................................................................... 24
3 Familiarizing the Hours of Service Main Screen Tiles ........................................................................... 27
3.1 Time Remaining Tile ....................................................................................................................... 27
3.2 Changing the Driver’s Duty Status ................................................................................................. 28
3.3 Recap .............................................................................................................................................. 30
3.4 Start Break ...................................................................................................................................... 31
3.5 Data Transfer .................................................................................................................................. 32
3.6 Options ........................................................................................................................................... 38
3.7 Logs ................................................................................................................................................. 38
3.8 DVIR ................................................................................................................................................ 39
3.9 Shift/Cycle ...................................................................................................................................... 39
4 Check Driver Availability ....................................................................................................................... 40
5 Driver Logs ............................................................................................................................................. 40
5.1 Using the Driver Logs Bulk/ Multiple Selection Functions ............................................................ 41
5.2 The Driver Logs Accordion Header Features .................................................................................. 42
5.2.1 Daily Driver’s Log Entry Check-box (Uncertified Log) ................................................................ 42
5.2.2 Daily Driver’s Log Entry Check-box (Already Certified) ............................................................. 42
5.2.3 Daily Driver’s Title Log (Recertify Log) ...................................................................................... 42
5.2.4 Recap ....................................................................................................................................... 42
5.2.5 Daily Drivers Log Grid ............................................................................................................... 44
5.2.6 Edit Daily Drivers Log Form ...................................................................................................... 45
5.2.7 Shipment Details ...................................................................................................................... 46
Page 6

CyntrX
Page 6
920-338-0479 | [email protected]| www.CyntrX.com
5.2.8 Miles Driven by State ............................................................................................................... 47
5.2.9 DVIR ......................................................................................................................................... 48
5.2.10 Certify a Log ........................................................................................................................... 49
5.2.11 Email a Log ............................................................................................................................. 50
5.2.12 Edit a Log ............................................................................................................................... 52
5.3 Malfunction and Data Diagnostic Events ....................................................................................... 62
5.4 DVIR ................................................................................................................................................ 70
5.4.1 DVIR Feature – Main Navigation Menu .................................................................................... 70
5.4.2 DVIR Feature – Hours of Service Main Screen .......................................................................... 70
5.4.3 Selecting Your DVIR Type ......................................................................................................... 72
5.4.4 Starting Your DVIR.................................................................................................................... 73
5.4.5 Completing the First DVIR Area ................................................................................................ 73
5.4.6 Capturing an Image of a DVIR Item .......................................................................................... 74
5.4.7 Add a Comment or Remark to a DVIR Item .............................................................................. 74
5.4.8 Finishing / Certifying Your DVIR ............................................................................................... 75
5.4.9 Submit or Certify the DVIR ........................................................................................................ 78
5.4.10 Deleting a DVIR ...................................................................................................................... 79
5.4.11 Emailing a DVIR ...................................................................................................................... 79
5.5 DVIR History ................................................................................................................................... 80
5.5.1 Viewing DVIR History by Vehicle............................................................................................... 80
6 Roadside Inspection .............................................................................................................................. 81
6.1 Roadside Inspection – Main Navigation Menu .............................................................................. 81
6.2 Roadside Inspection – CyntrX Main Menu..................................................................................... 82
.............................................................................................................................................................. 82
6.3 Inspection Screen – Start Review ................................................................................................... 82
6.4 Roadside Inspection Screen – Data Transfer ................................................................................. 84
7 Switch Equipment ................................................................................................................................. 85
7.1 Switch Equipment – Main Navigation Menu ................................................................................. 85
7.2 Options Menu ................................................................................................................................. 86
7.3 Switch Equipment – DVIR Screen ................................................................................................... 86
7.4 Switching Equipment ..................................................................................................................... 87
7.5 Managing Vehicles / Trailers .......................................................................................................... 88
Page 7

CyntrX
Page 7
920-338-0479 | [email protected]| www.CyntrX.com
7.5.1 Manage Vehicles / Trailers – Delete ......................................................................................... 89
7.5.2 Manage Vehicles / Trailers - Edit .............................................................................................. 90
7.5.3 Manage Vehicles / Trailers – Add ............................................................................................. 90
8 Documents ............................................................................................................................................ 94
8.1 Documents – Main Navigation Menu ............................................................................................ 95
8.2 Documents – Options Menu .......................................................................................................... 96
8.3 Adding Documents ......................................................................................................................... 97
8.4 Editing / Deleting a Document ....................................................................................................... 98
9 Add Fuel Receipts .................................................................................................................................. 99
9.1 Main Navigation Menu .................................................................................................................. 99
9.2 Fuel Receipts Screen..................................................................................................................... 100
9.3 Adding Fuel Receipts .................................................................................................................... 100
9.4 Editing or Deleting a Fuel Receipts .............................................................................................. 102
10 Co-Drivers .......................................................................................................................................... 103
10.1 Logon Co-Driver .......................................................................................................................... 103
10.2 Switch Driver .............................................................................................................................. 108
11 Shipping Documents ......................................................................................................................... 109
12 Add Remark ....................................................................................................................................... 110
13 Exempt Driver .................................................................................................................................... 111
14 Logout ................................................................................................................................................ 112
15 Unidentified Driving Events .............................................................................................................. 113
16 Warning Features .............................................................................................................................. 114
17 List of Login Errors ............................................................................................................................. 116
Page 8
CyntrX
Page 8
920-338-0479 | [email protected]| www.CyntrX.com
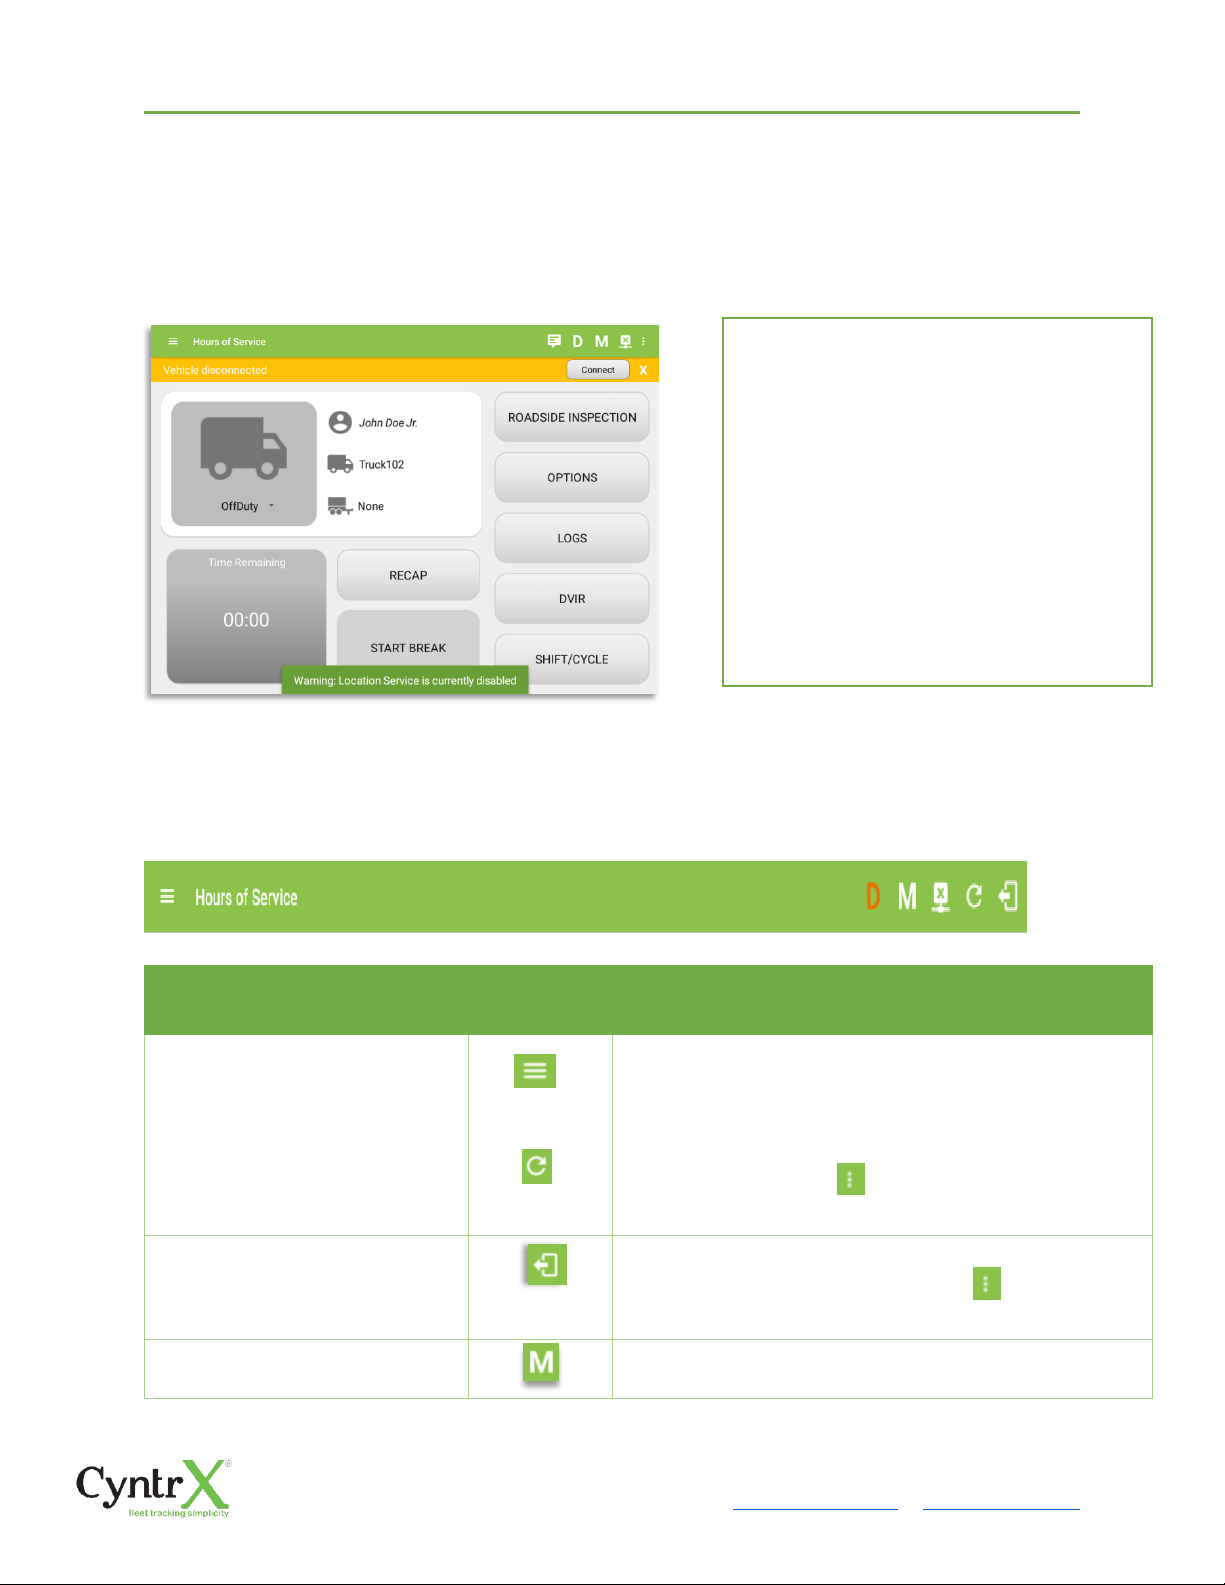
1 Main Screen
The Hours of Service main screen is where you log your duty status events and which, in
turn, determines your compliance with FMCSA Hours of Service Regulations. This screen
also serves as your gateway to the rest of the app’s features.
1.1 Using the HOS Action Bar
The HOS Action Bar is the starting point for navigating to the different pages within the
app and is always present in the app’s topmost portion:
The action bar features the following navigational controls of the app:
Action Tool Name
Action
Tool Icon
Description
Main navigation hamburger
Tap to open the main navigation menu of the
application
Refresh Button
Tap to manually refresh the data in the app
page. Hidden under submenu icon once all
icons are present.
Logout Button
Tap to log out of the app, this will also set your
status to Off Duty. Hidden under submenu
icon once all icons are present.
Malfunction Button
Tap to see uncleared Malfunctions
The main screen also provides essential
information about the app’s user:
• Driver Name: Displays the name of
the driver who is logged in and
whose logs are displayed
• Vehicle Name: Displays the driver’s
vehicle name
• Trailer Name: Display’s the driver’s
Note: Can tap Vehicle and Trailer name to
display Switch Vehicle Dialog.
Page 9
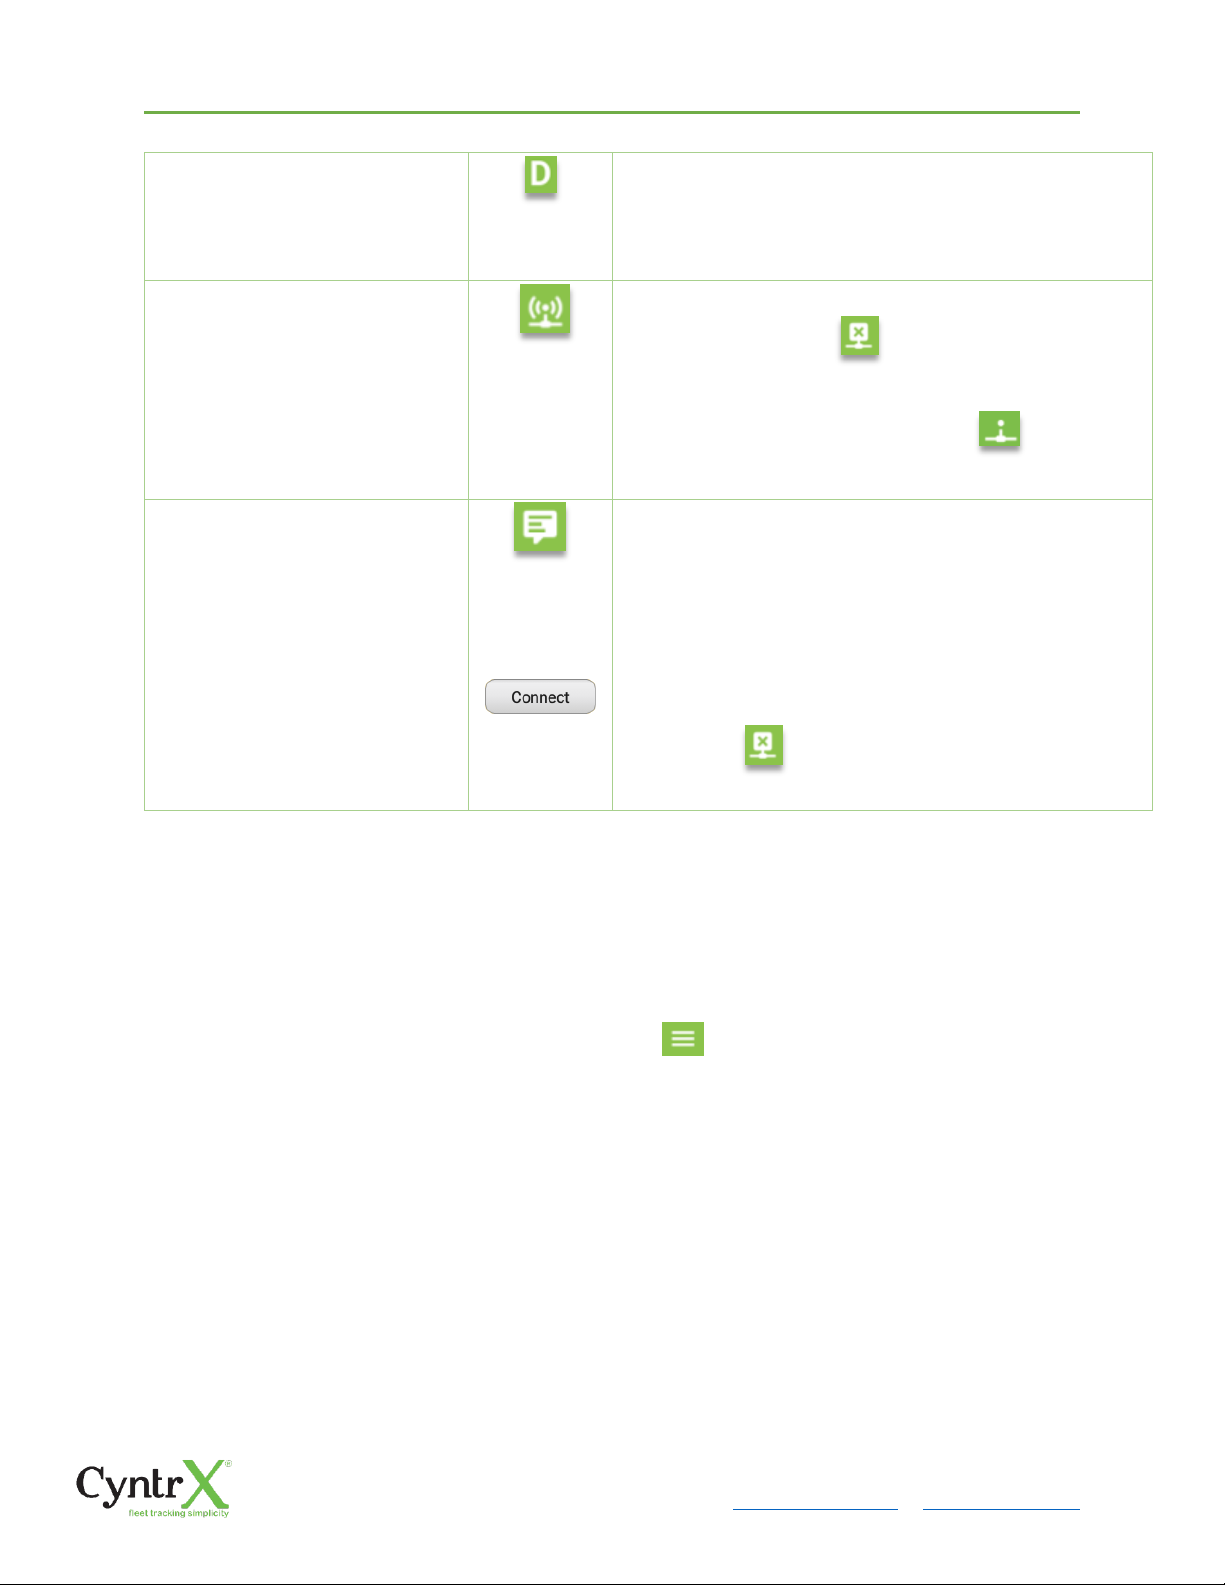
Data Diagnostics Button
Tap to see uncleared Data Diagnostics. Turns
into an accent color (based on the app’s theme)
if there are new events and turns white when
already viewed.
VBUS Connectivity
Indicates that the device is connected to a VBUS
device and turns to when disconnected.
Hence, connection interruptions may occur
which will turn into flashing icon while in a
reconnecting state.
Pending Edit Request
Button
Tap to display the pending edit request dialog,
edit request is from Motor Carrier Edit
Suggestions, correction of errors with Team
Drivers, and Events logged under Unidentified
Driver Profile.
Connect Button
Tap to display a dialog to Connect to Vehicle’s
VBUS Device. It has the same capabilities as the
VBUS icon .
2 Customizing the CyntrX ELD App Preferences
The app’s settings and preferences can be customized in the Hours of Service Preferences
screen.
To navigate to this part of the app, select the icon or swipe the screen to the
right to display the main navigation menu, select the Settings option and then select the
Hours of Service option, this will display the Settings screen.
Page 10
CyntrX
Page 10
920-338-0479 | [email protected]| www.CyntrX.com
2.1 Hours of Service Settings
2.1.1 Set Hours of Service Preferences
This is where the basic driver, vehicle, carrier and shipping data is entered and stored
within the app. The identification data stored here is then used by the app, web portal
and in the driver’s daily log report.
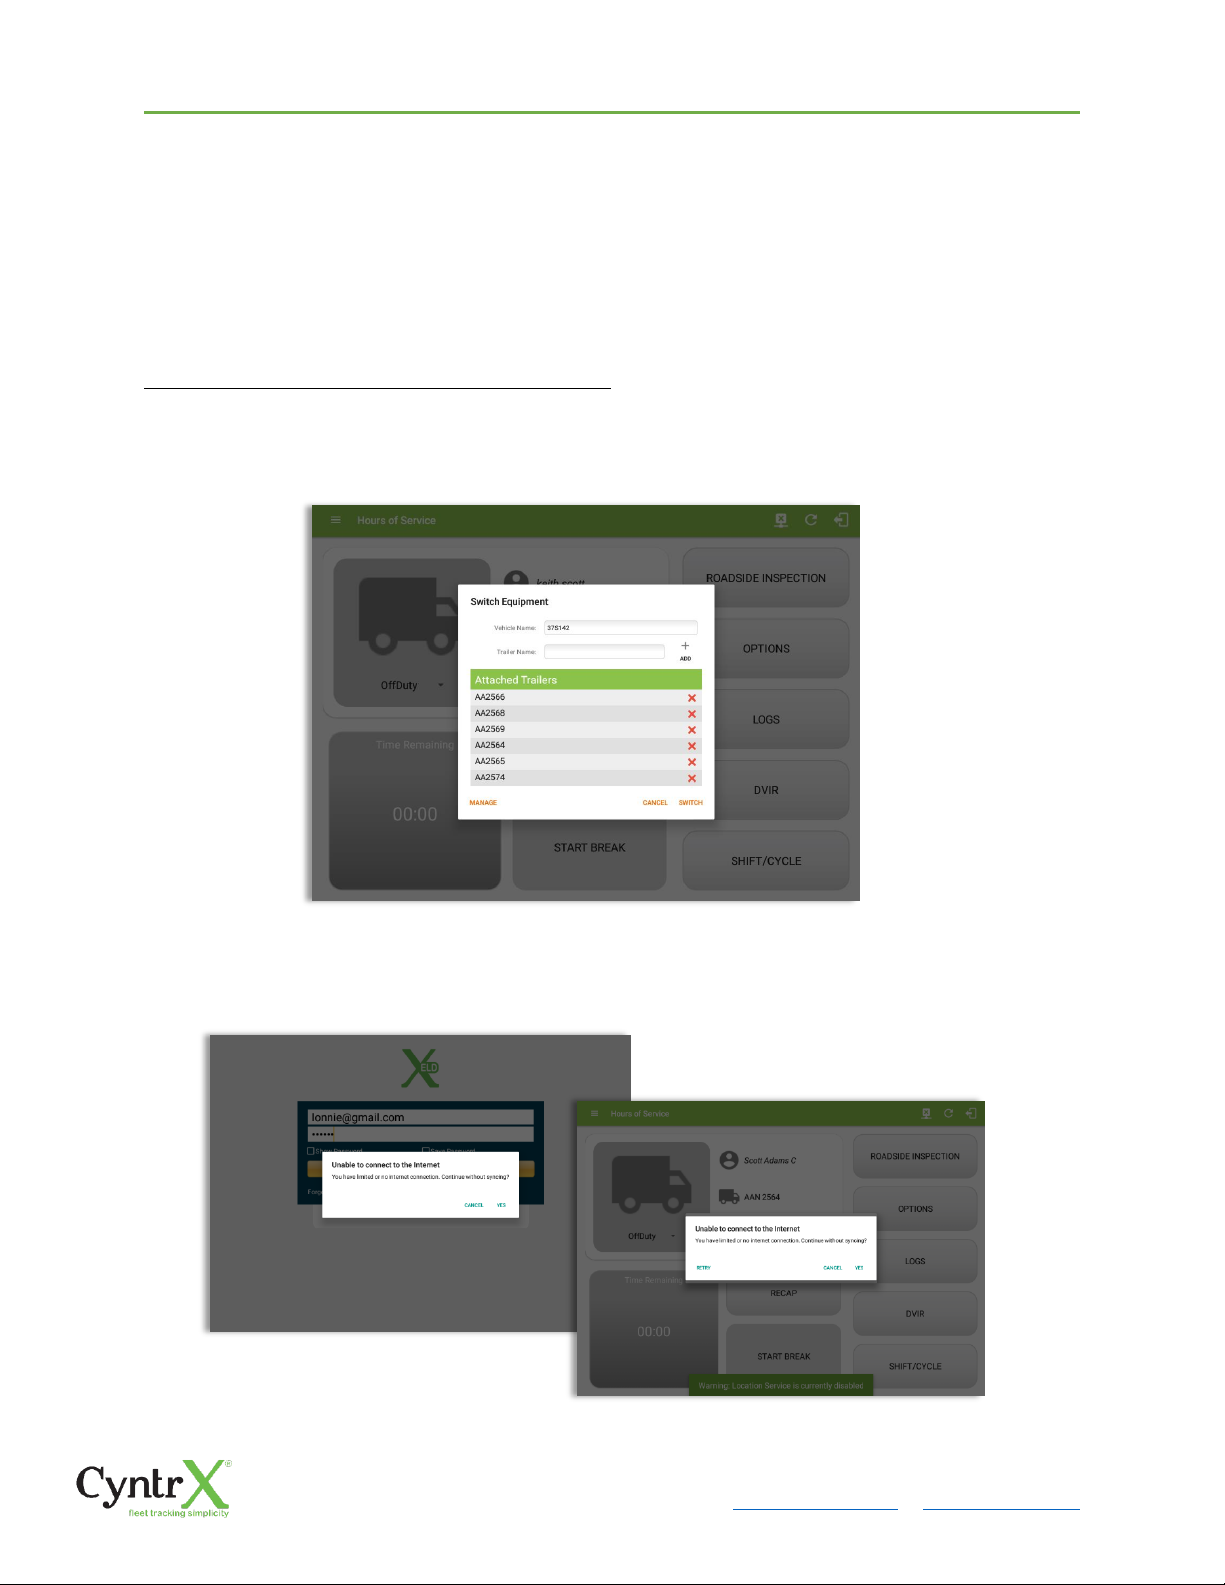
After logging in to the app for the first time
When the app is used for the first time, the driver is taken directly to the Main
Dashboard after which a Select Equipment dialog box will be displayed requiring the
driver to select a vehicle and trailer (if needed).
If you are logging in to the device you have logged in to before, the driver can login and
logout successfully to the app when an internet connection is not available.
Page 11
CyntrX
Page 11
920-338-0479 | [email protected]| www.CyntrX.com
2.1.2 Capturing the Driver’s Signature
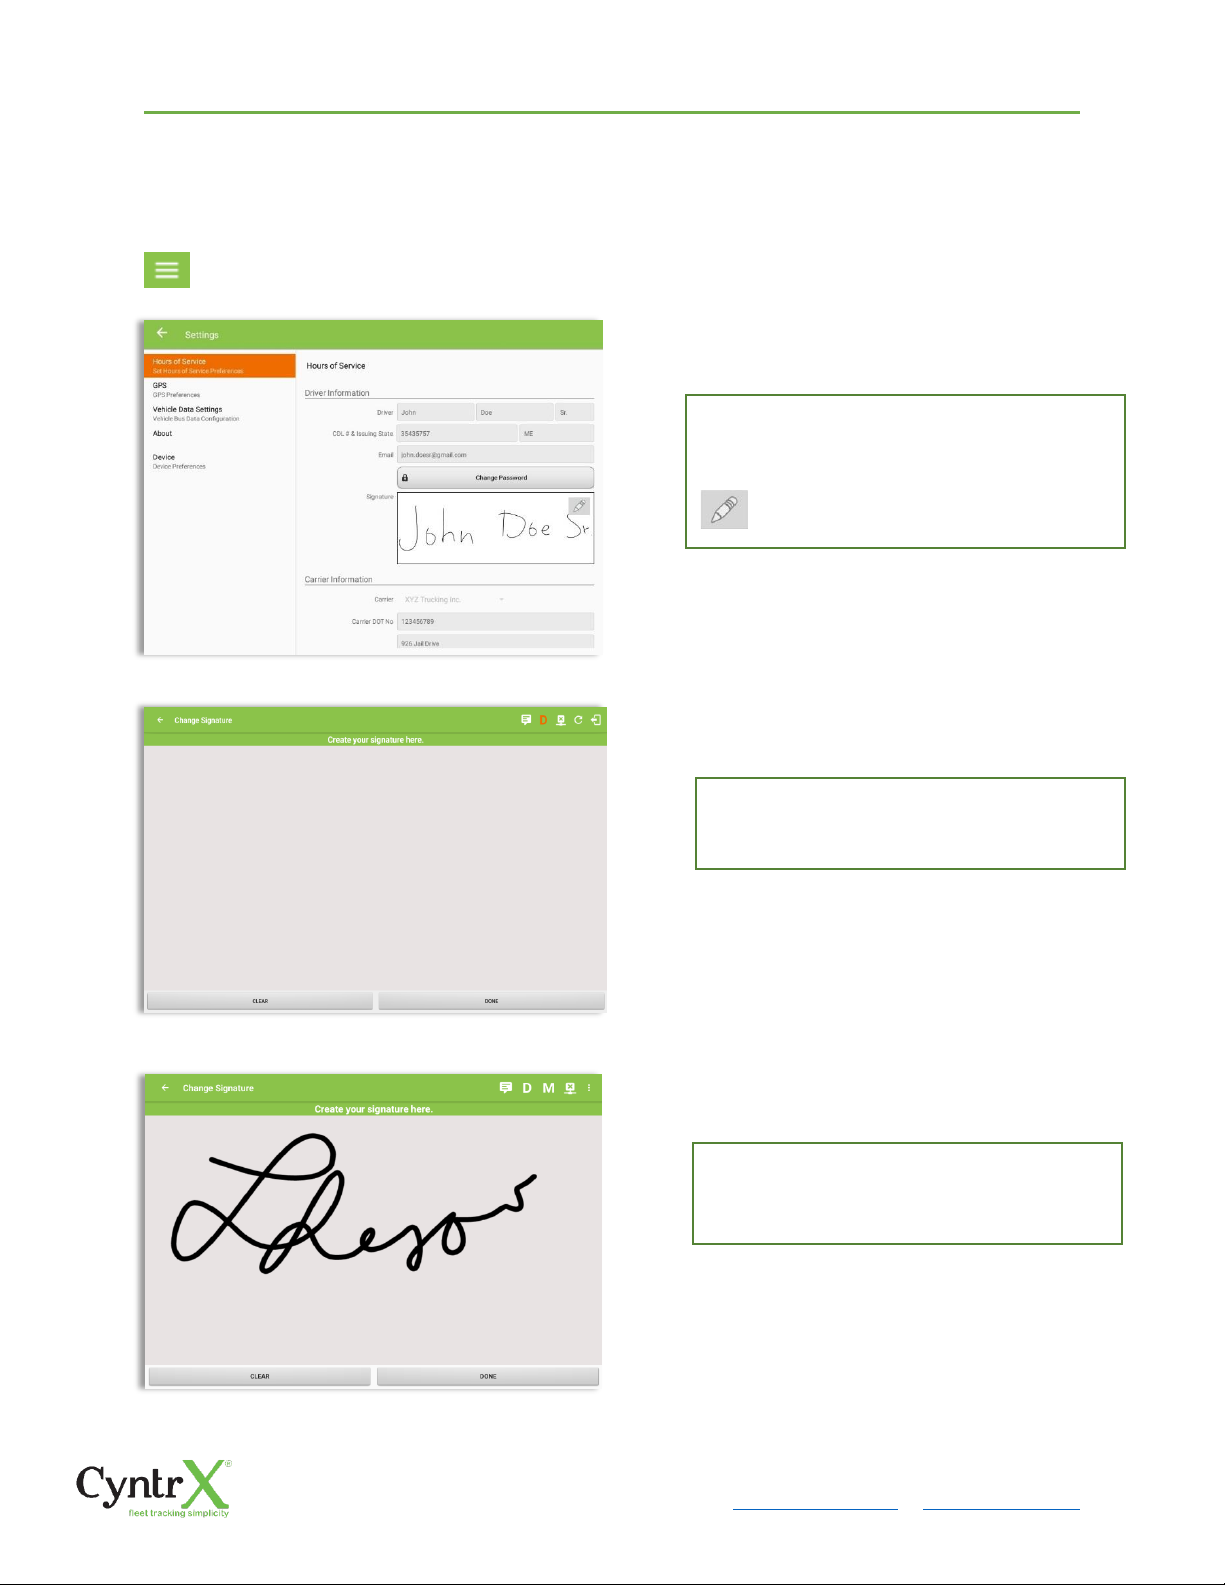
The application can capture the signature of the driver which is then used for digitally
certifying a log. To create the driver signature, select the main navigation hamburger
, select the Settings option and then select Hours of Service:
The Driver Information section of the screen
will be displayed along with any signature that
has been created for the driver. Tap on the
icon to create or change the signature.
Create or update your signature in the app
by using your finger to create your signature.
Tap the Done button to save your signature.
You can also select the Clear button to clear
the captured signature and start again.
Page 12
CyntrX
Page 12
920-338-0479 | [email protected]| www.CyntrX.com
2.1.3 Customizing the Carrier Information
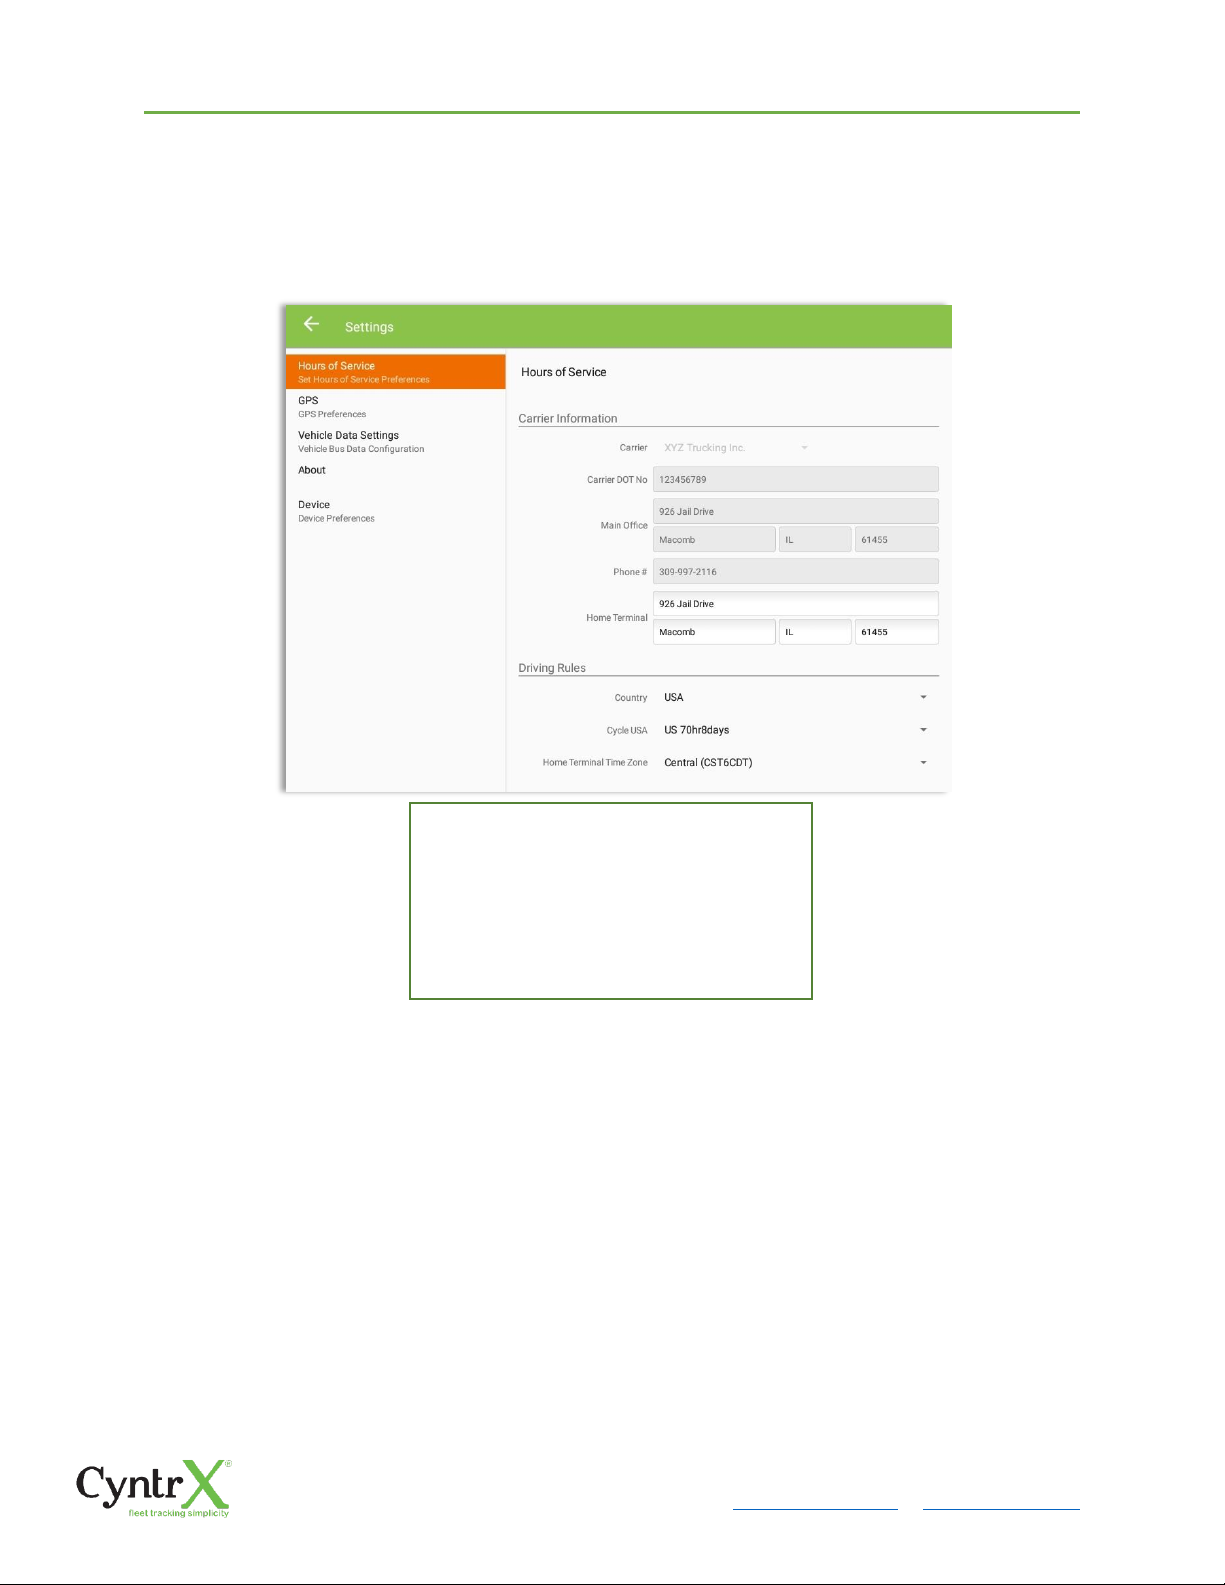
The carrier information can also be set from within the Hours of Service section (main
navigation hamburger > Settings > Hours of Service). You can scroll the screen down to
the Carrier Information section:
Note: The driver is allowed to select a specific Carrier Information if ‘Allow driver ability to change carrier
in portal->settings->account setting under Portal Controls and ‘Allow Carrier Change’ in Drivers
Management page are enabled.
2.1.4 Driving Rules
This is where you change the HOS rules or the Federal Motor Carrier Safety
Administration’s (FMCSA) regulations that govern the hours that a commercial vehicle
driver can legally accumulate driving or being on duty for a motor carrier in a working day
and week. This is also where you apply the HOS rules exceptions.
Enter details for the following:
Carrier Name
Carrier DOT Number
Main Office Address
Phone Number
Home Terminal Details of the driver
Page 13
CyntrX
Page 13
920-338-0479 | [email protected]| www.CyntrX.com
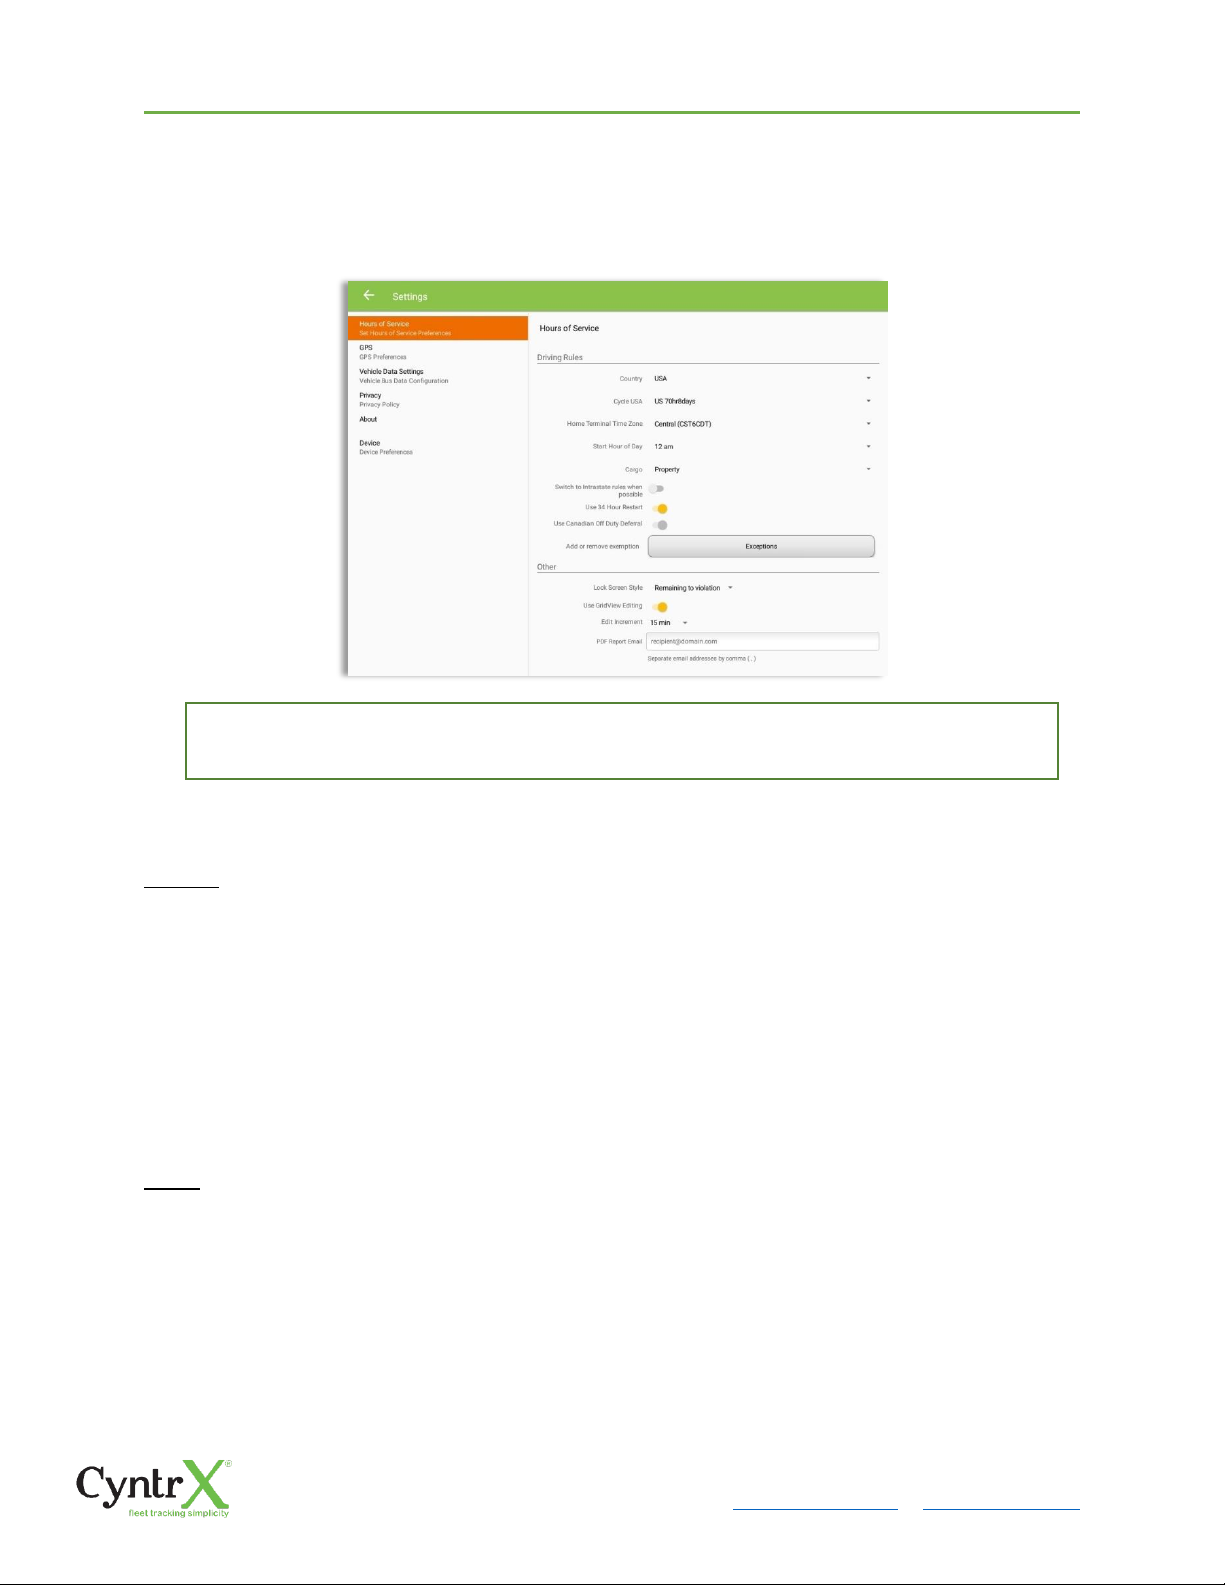
The driving rules can also be set from within the Hours of Service section (main
navigation hamburger > Settings > Hours of Service). You can scroll the screen down to
the Driving Rules section:
Region
This is where you can set the region. The options are USA and Canada. The cycle and
exceptions displayed are dependent on which region has been set by the driver.
Note: If the region selected is Canada, then the condition “Canada Off-Duty Deferral” is enabled. This
means that you are allowed to get an extra two hours of driving and on duty in a 24 hour period (day 1)
and take the required extra two hours off on the following day (day 2). The Deferral status is shown on the
Driver’s Daily Logs
Cycle
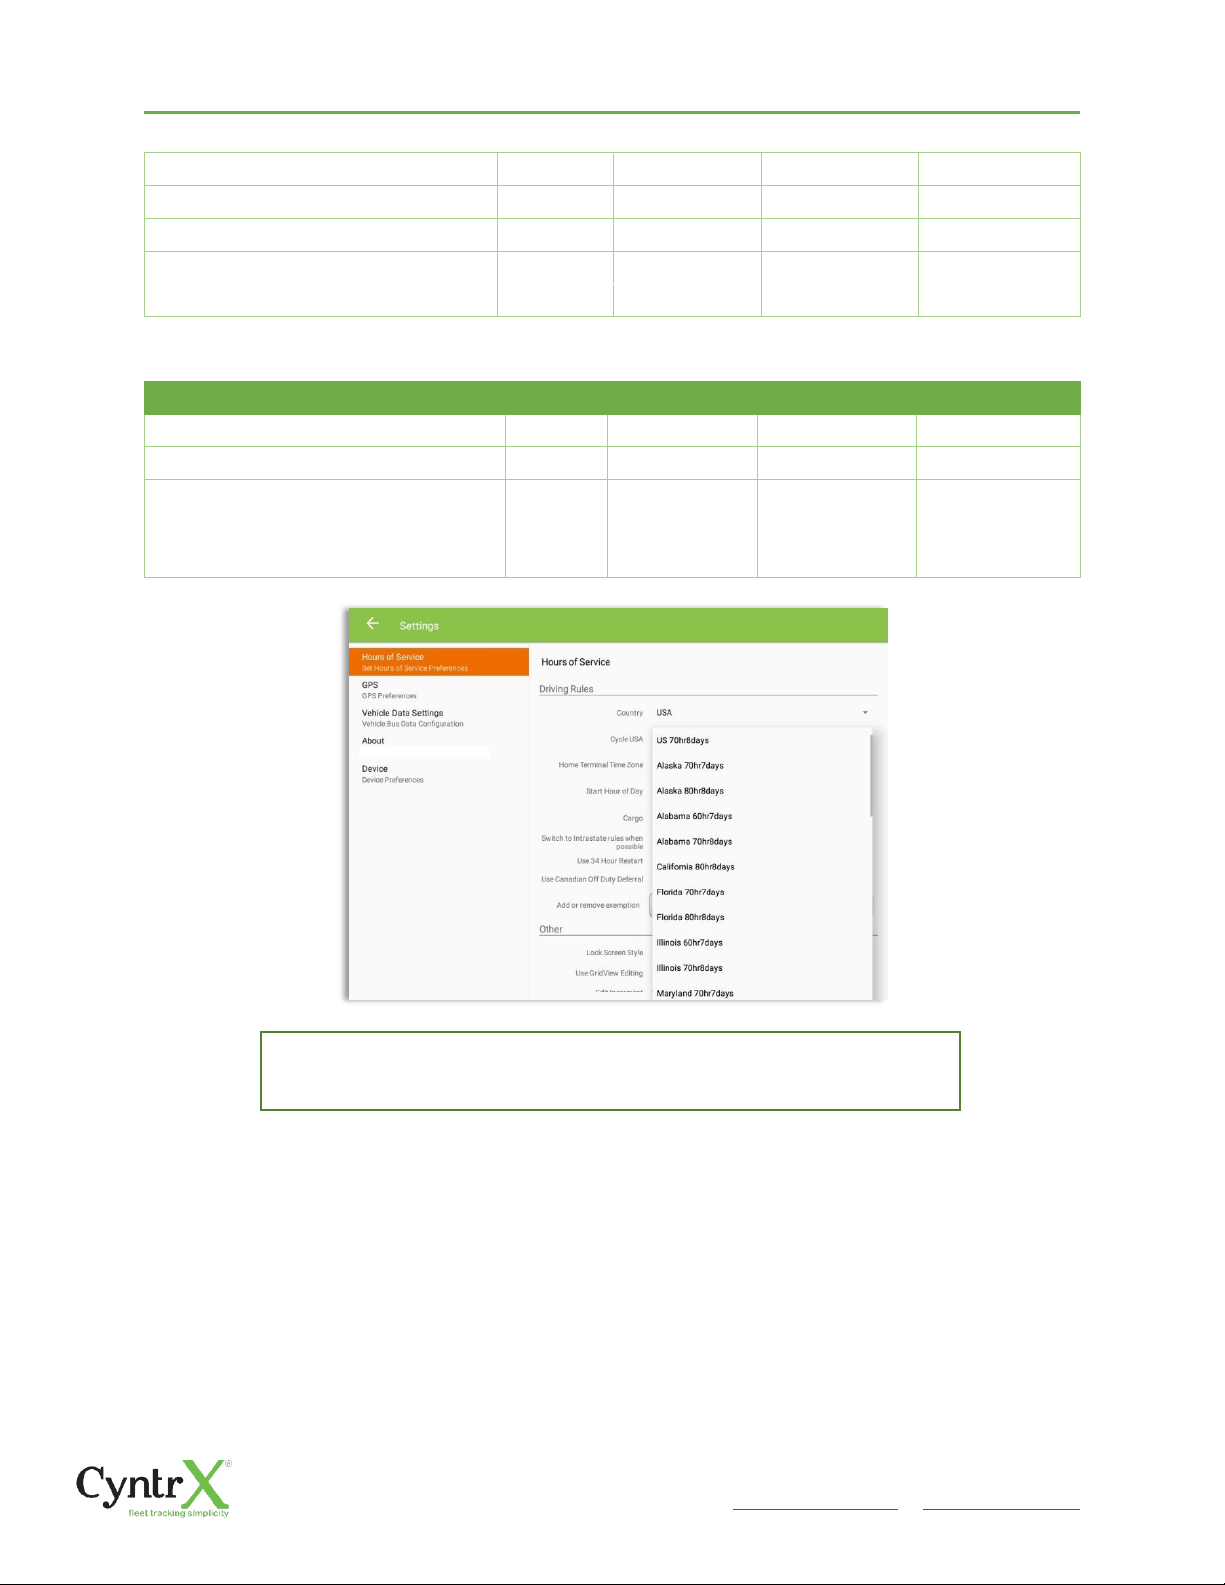
This is where you can set the consecutive multi-day duty period which the driver will
follow. Choosing a cycle will take into effect the corresponding legal limitations on the
hours that can be used by the driver in a 7 day or 8 day working cycle.
Select the appropriate HOS rules that you would like the app to use from the drop down list.
You can customize the region, cycle, cargo, exceptions and time zone rules
Page 14
CyntrX
Page 14
920-338-0479 | [email protected]| www.CyntrX.com
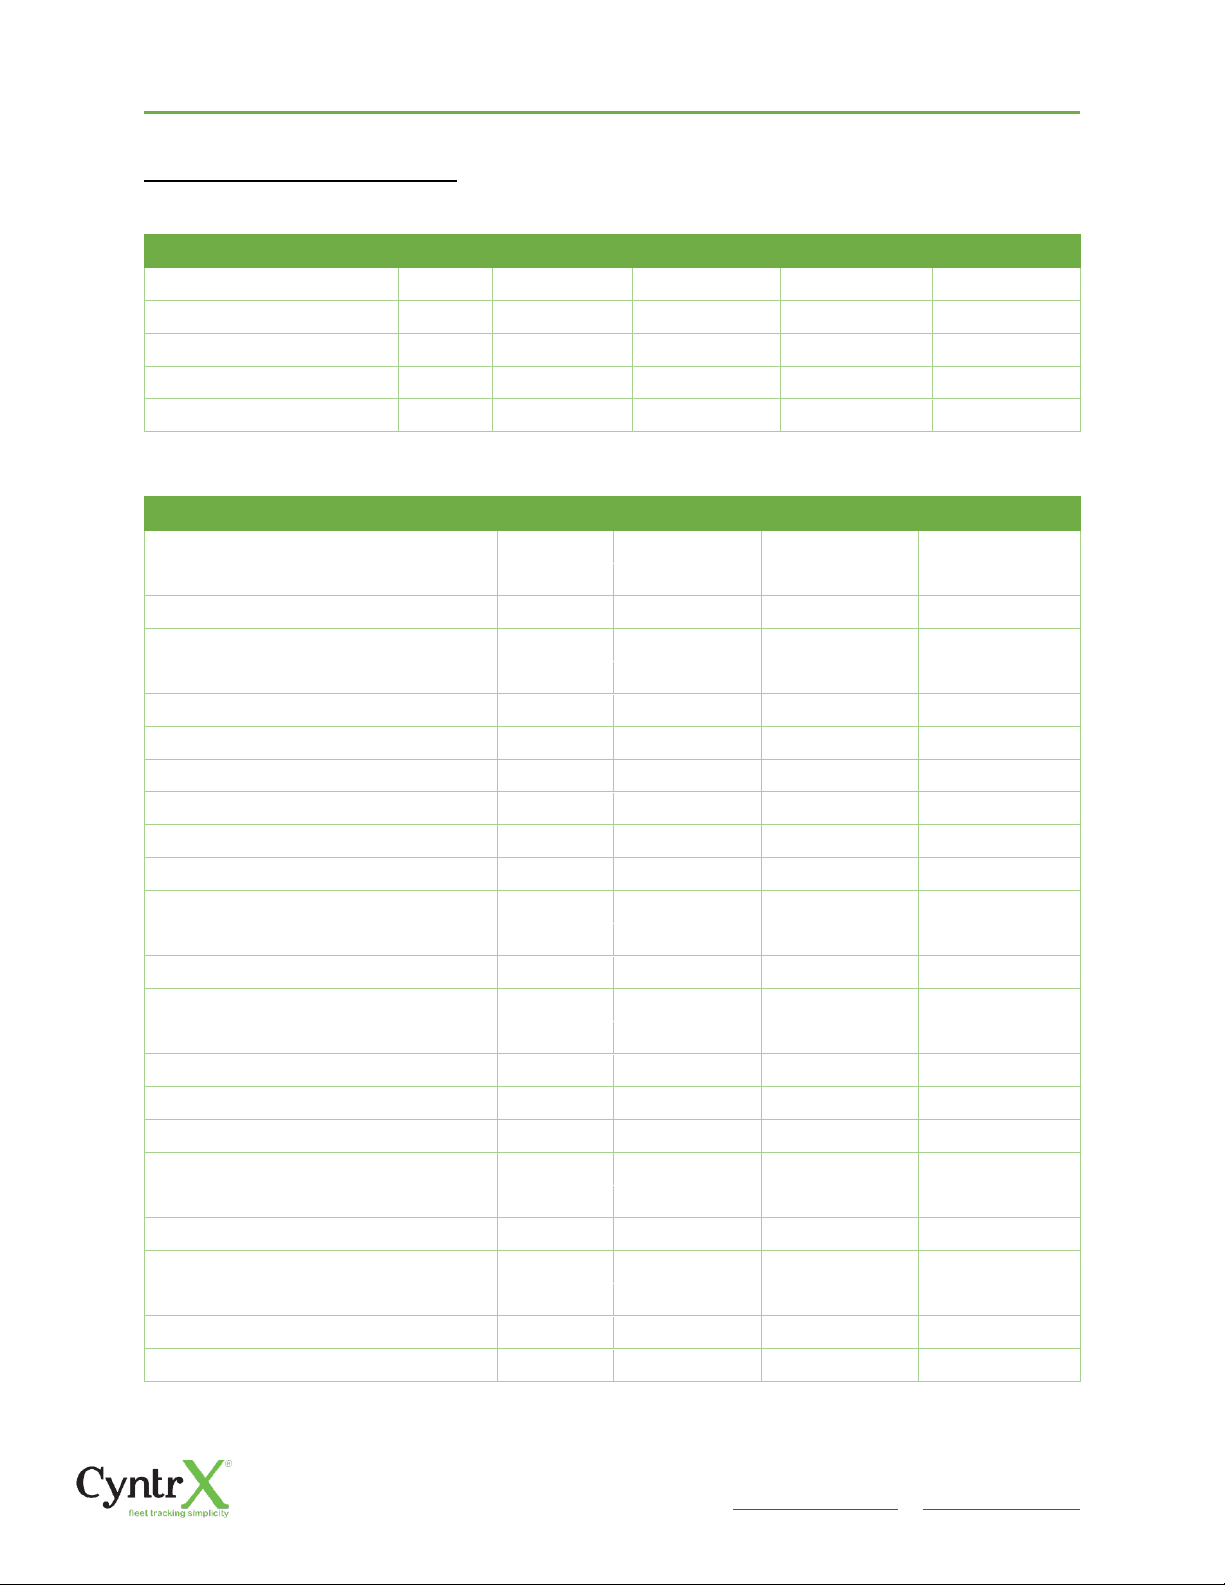
Available cycle Rules Options
Interstate - Federal Rules
Cycle
Shift Limit
Drive Limit
Until Break
Break Left
US60hr7days
7 days
14 hours
11 hours
8 hours
30 minutes
US70hr8days
8 days
14 hours
11 hours
8 hours
30 minutes
Alaska70hr7days
7 days
20 hours
15 hours
8 hours
30 minutes
Alaska80hr8days
8 days
20 hours
15 hours
8 hours
30 minutes
California80hr8days
8 days
16 hours
12 hours
N/A
N/A
Intrastate Cycle Rules
Cycle
Shift Limit
Drive Limit
Break Limit
Alabama60hr7days
7 days
15 hours
10 hours
N/A
Alabama 70hr8days
8 days
15 hours
10 hours
N/A
Florida 70hr7days
7 days
16 hours
12 hours
N/A
Florida 80hr8days
8 days
16 hours
12 hours
N/A
Illinois 60hr7days
7 days
14 hours
11 hours
N/A
Illinois 70hr8days
8 days
14 hours
11 hours
N/A
Maryland 70hr7days
7 days
16 hours
12 hours
N/A
Maryland 80hr8days
8 days
16 hours
12 hours
N/A
Massachusetts 60hr7days
8 days
14 hours
11 hours
N/A
Massachusetts 70hr8days
8 days
14 hours
11 hours
N/A
Michigan 60hr7days
7 days
14 hours
11 hours
30 minutes
Michigan 70hr8days
7 days
14 hours
11 hours
30 minutes
New Hampshire 60hr7days
7 days
14 hours
11 hours
N/A
New Hampshire 70hr8days
8 days
14 hours
11 hours
N/A
New York 60hr7days
7 days
14 hours
11 hours
N/A
New York 70hr8days
8 days
14 hours
11 hours
N/A
North Carolina 70hr7days
7 days
16 hours
12 hours
N/A
North Carolina 80hr8days
8 days
16 hours
12 hours
N/A
Pennsylvania 60hr7days
7 days
14 hours
11 hours
N/A
Pennsylvania 70hr8days
8 days
14 hours
11 hours
N/A
South Carolina 70hr7days
7 days
16 hours
12 hours
N/A
South Carolina 80hr8days
8 days
16 hours
12 hours
N/A
Tennessee 60hr7days
7 days
14 hours
11 hours
N/A
Tennessee 70hr8days
8 days
14 hours
11 hours
N/A
Texas 70hr7days
7 days
15 hours
12 hours
N/A
Wisconsin 70hr7days
70 days
16 hours
12 hours
30 minutes
Page 15
Wisconsin 80hr8days
80 days
16 hours
12 hours
30 minutes
Vermont 60hr8days
7 days
14 hours
11 hours
N/A
Vermont 70hrs8days
8 days
14 hours
11 hours
N/A
Virginia 70hr7days
7 days
16 hours
12 hours
N/A
Virginia 80hr8days
8 days
16 hours
12 hours
N/A
Canada Cycle Rules
Cycle
Shift Limit
Drive Limit
Break Limit
Canada 70hr7days South
7 days
16 hours
13 hours
30 minutes
Canada 120hr14days South
7 days
16 hours
13 hours
30 minutes
Canada 80hr7days North
7 days
20 hours
15 hours
30 minutes
Canada 120hr14days North
7 days
20 hours
15 hours
30 minutes
Alberta Province
15 hours
13 hours
30 minutes
• Intrastate to Interstate driving rules
If the driver is operating in intrastate mode and is crossing over a state line then the app
automatically switches to federal rules. A dialog will display confirming that the driving rules
have changed right after crossing boundaries.
Any of the above cycle rules are depending on the region selected and can
be applied given the appropriate rule from the region drop down list.
Page 16

CyntrX
Page 16
920-338-0479 | [email protected]| www.CyntrX.com
Example:
SouthCarolina80hr8days to US70hr8days
or
SouthCarolina70hr7days to US60hr7days
• Interstate to Intrastate driving rules
The driver must also follow the Federal HOS regulations for a short period of time while operating
in interstate commerce. If the driver were using the 60-hour/7-day schedule, he must follow the
Federal HOS regulations for the next 7 days having done operating in interstate commerce. If you
were using the 70-hour/8-day schedule, you must follow the Federal hours-of-service regulations
for the next 8 days after you finish operating in interstate commerce.
Note:
To perform intrastate check, enable the
option available in the Settings > HOS Preferences
(however this check is optional). The user has the
ability to whether or not perform to the checking.
Also, it is important for the driver to monitor the cycle used for the past 7 or 8 days.
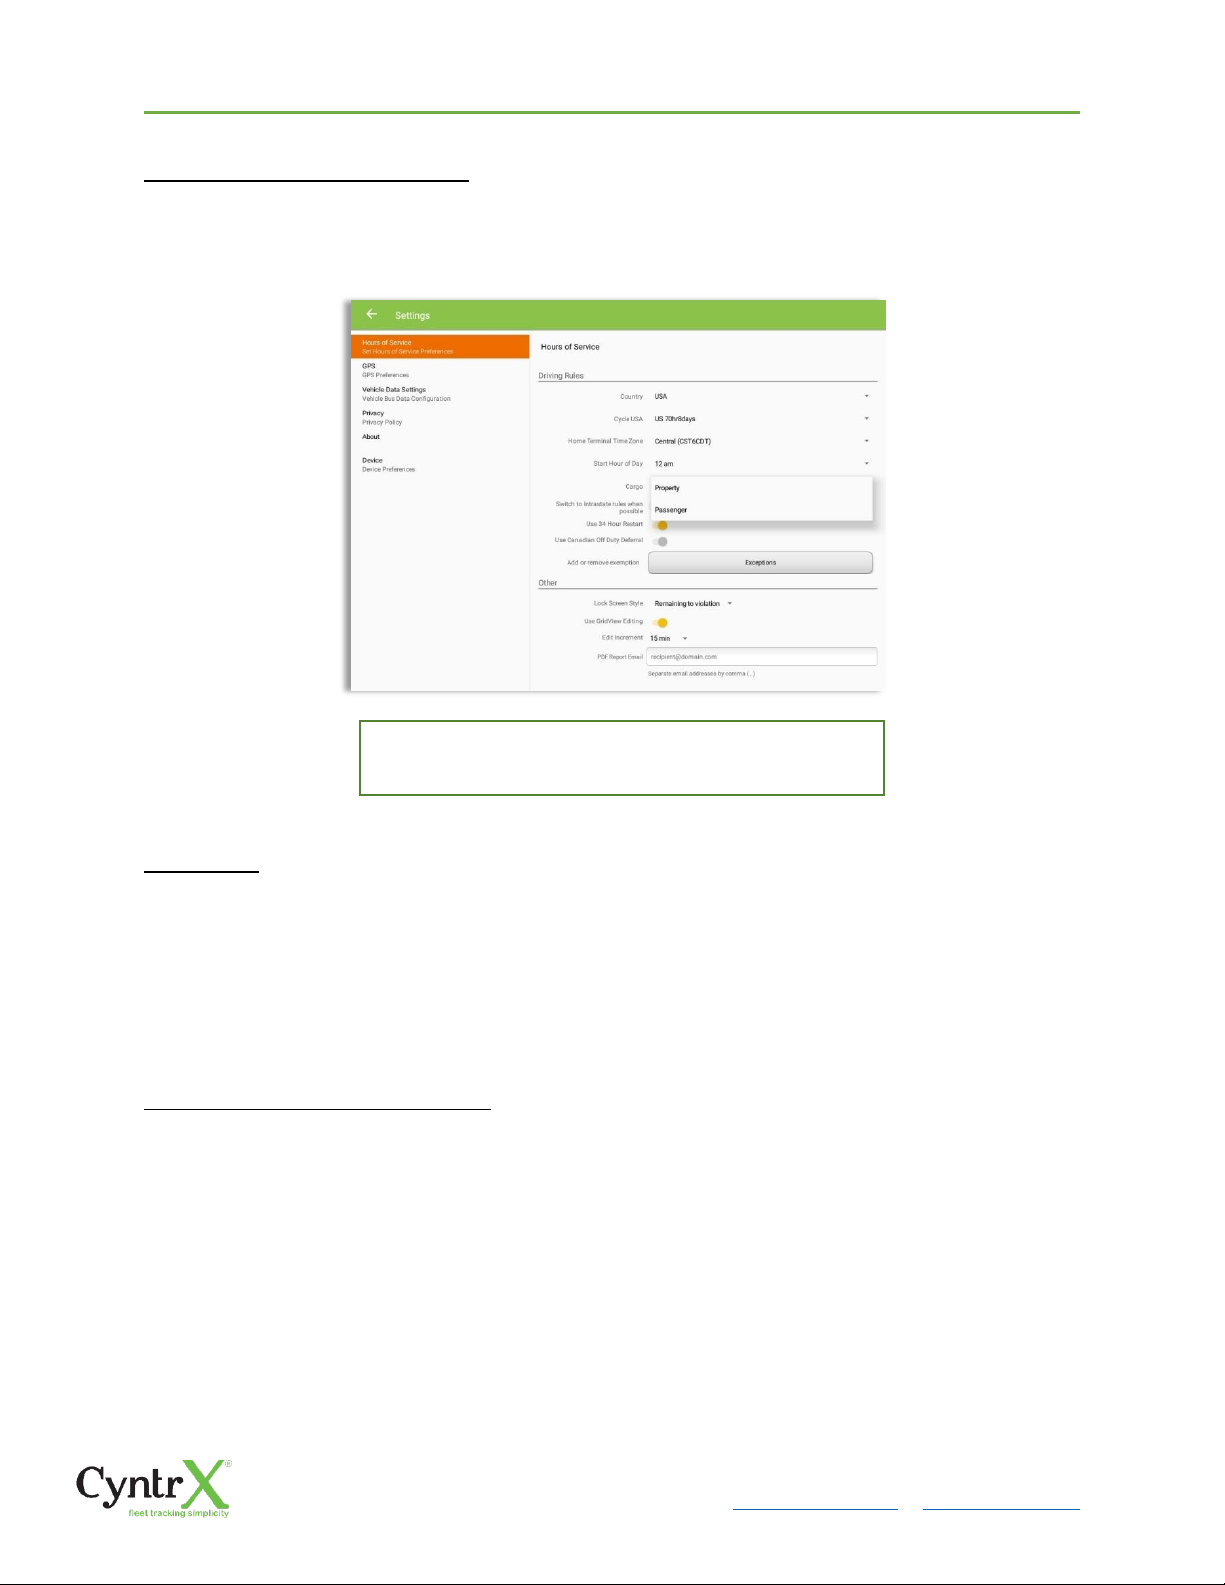
Cargo
This will set the applicable Hours of Service rules for property carrying or passenger
carrying commercial vehicles.
Page 17
CyntrX
Page 17
920-338-0479 | [email protected]| www.CyntrX.com
Available Cargo Rules Options
• Property – the 11 and 14 hours rule will apply
• Passenger – the 10 and 15 hours rule will apply
Exceptions
The options that appear when tapping the Exceptions button will allow the driver to avail
of exceptions from the Hours of Service rules for as long as certain conditions are met as
stipulated the Hours of Service section of the Code of Federal Regulations (49 CFR Part
395.1-Hours of Service of Drivers-Scope of rules in this part) and other pertinent FMCSA
regulations.
Available US Exceptions Options
• 2 Hour Driving Extension for Adverse Driving Conditions
• Relief from all driving rules for Emergency Conditions
• Oilfield Operations with 24 hour restart
• 30 Minute Break Exemption for Short-Haul Drivers
• 30 Minute OnDuty break for Asphalt drivers
• No Logs for Short-haul Drivers operating within 100 air miles or Non-CDL-Drivers
operating within 150 air miles
• 24 Hour Restart for Construction, Groundwater well-drilling
Either of the above cargo rules can be applied by
selecting the appropriate rule from the drop down
Page 18
CyntrX
Page 18
920-338-0479 | [email protected]| www.CyntrX.com
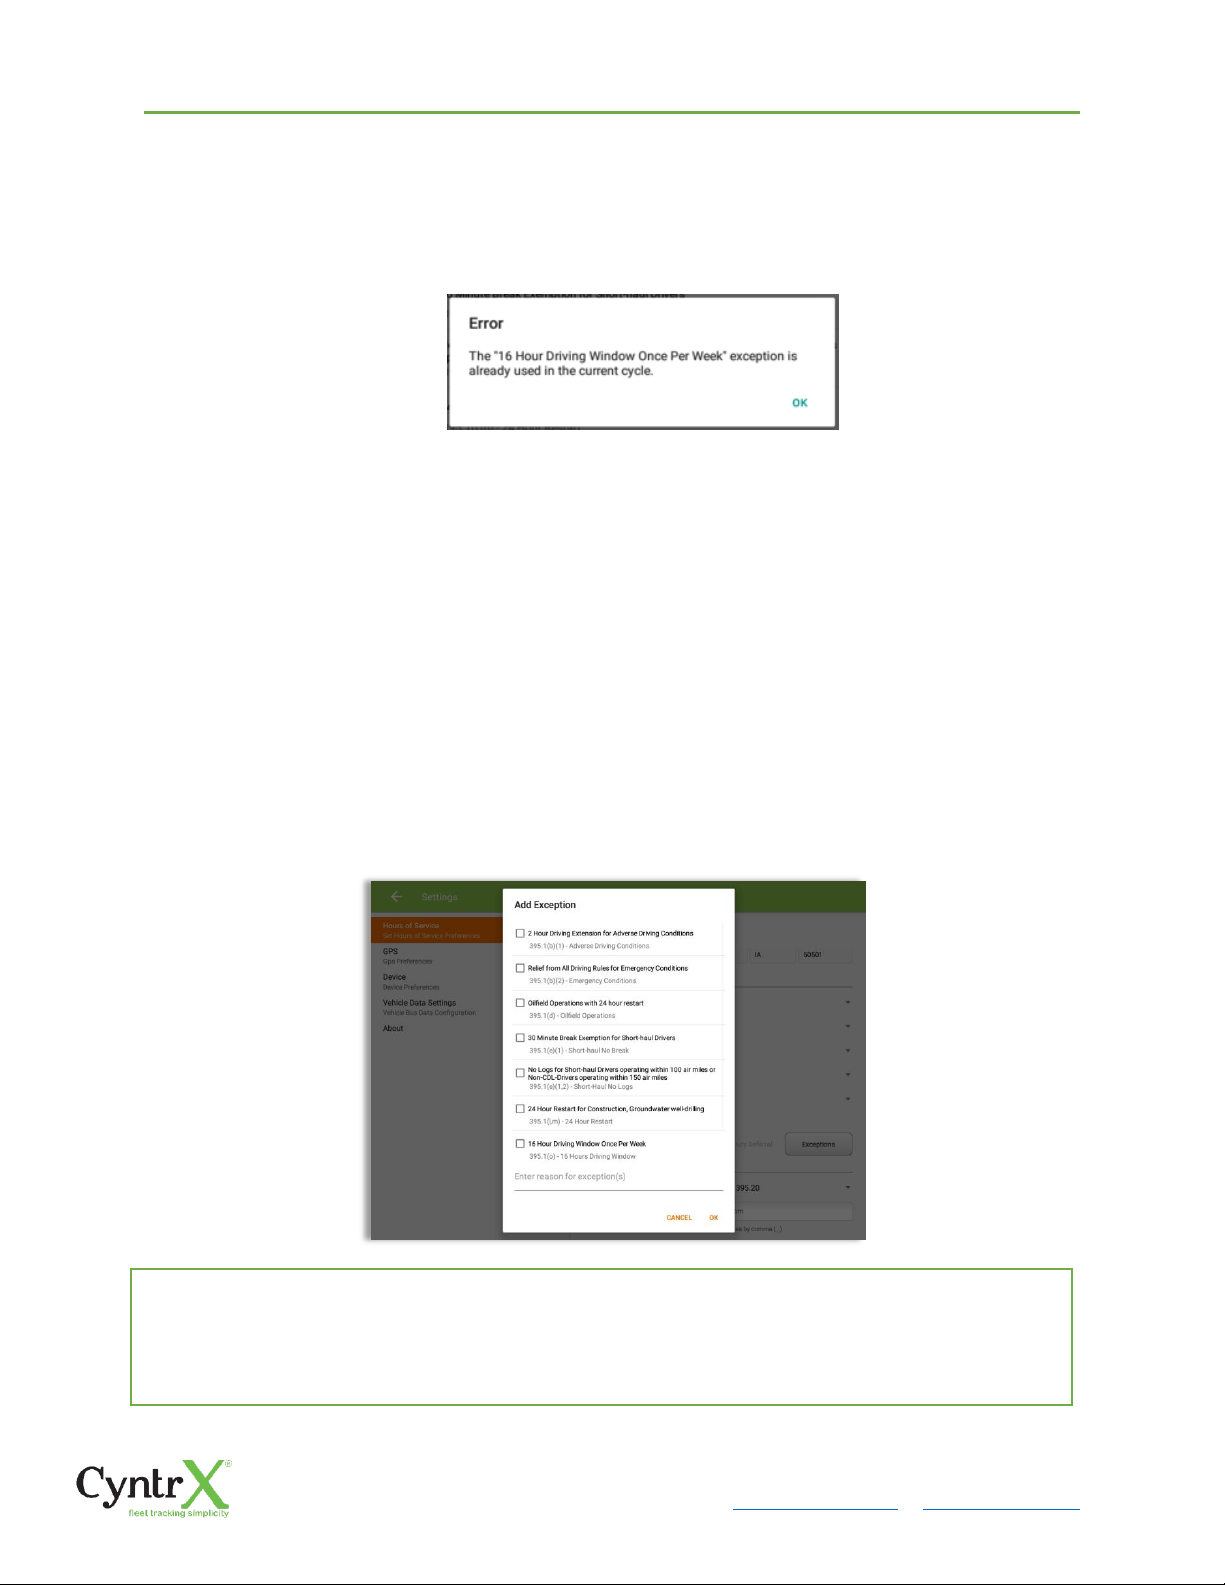
• 16 Hour Driving Window
Note: ‘16 Hour Driving Window’ exception can only be used once for the last 7 days or in every
70hr cycle, if the driver attempted to enable the exception an error dialog will display stating the
following:
However, it is possible for the driver to add another ‘16 Hour Driving Window’ exception when a
cycle reset has occurred. Nevertheless, the driver will need to wait for the current cycle to end to
be able to add the exception again.
• Utility Service Vehicle
• 30 Minute Break Exemption for Specialized Carriers & Rigging Association
(SC&RA)
• Agricultural Operations
• Transport of Commercial Bees, Livestock
• Hi-rail 2 hour travel exclusion - 395.1(w)
• Driver salesperson - 395.1(c)
• Relief from Driving rules for State of Emergency - 390.23
Select the appropriate exception from the list; you must then enter a reason for applying the
exception in the Enter reason for exception(s) field. Once complete, select the OK option to apply the
selected exception
Note: Exceptions are different depending on the Region selected.
Page 19
CyntrX
Page 19
920-338-0479 | [email protected]| www.CyntrX.com
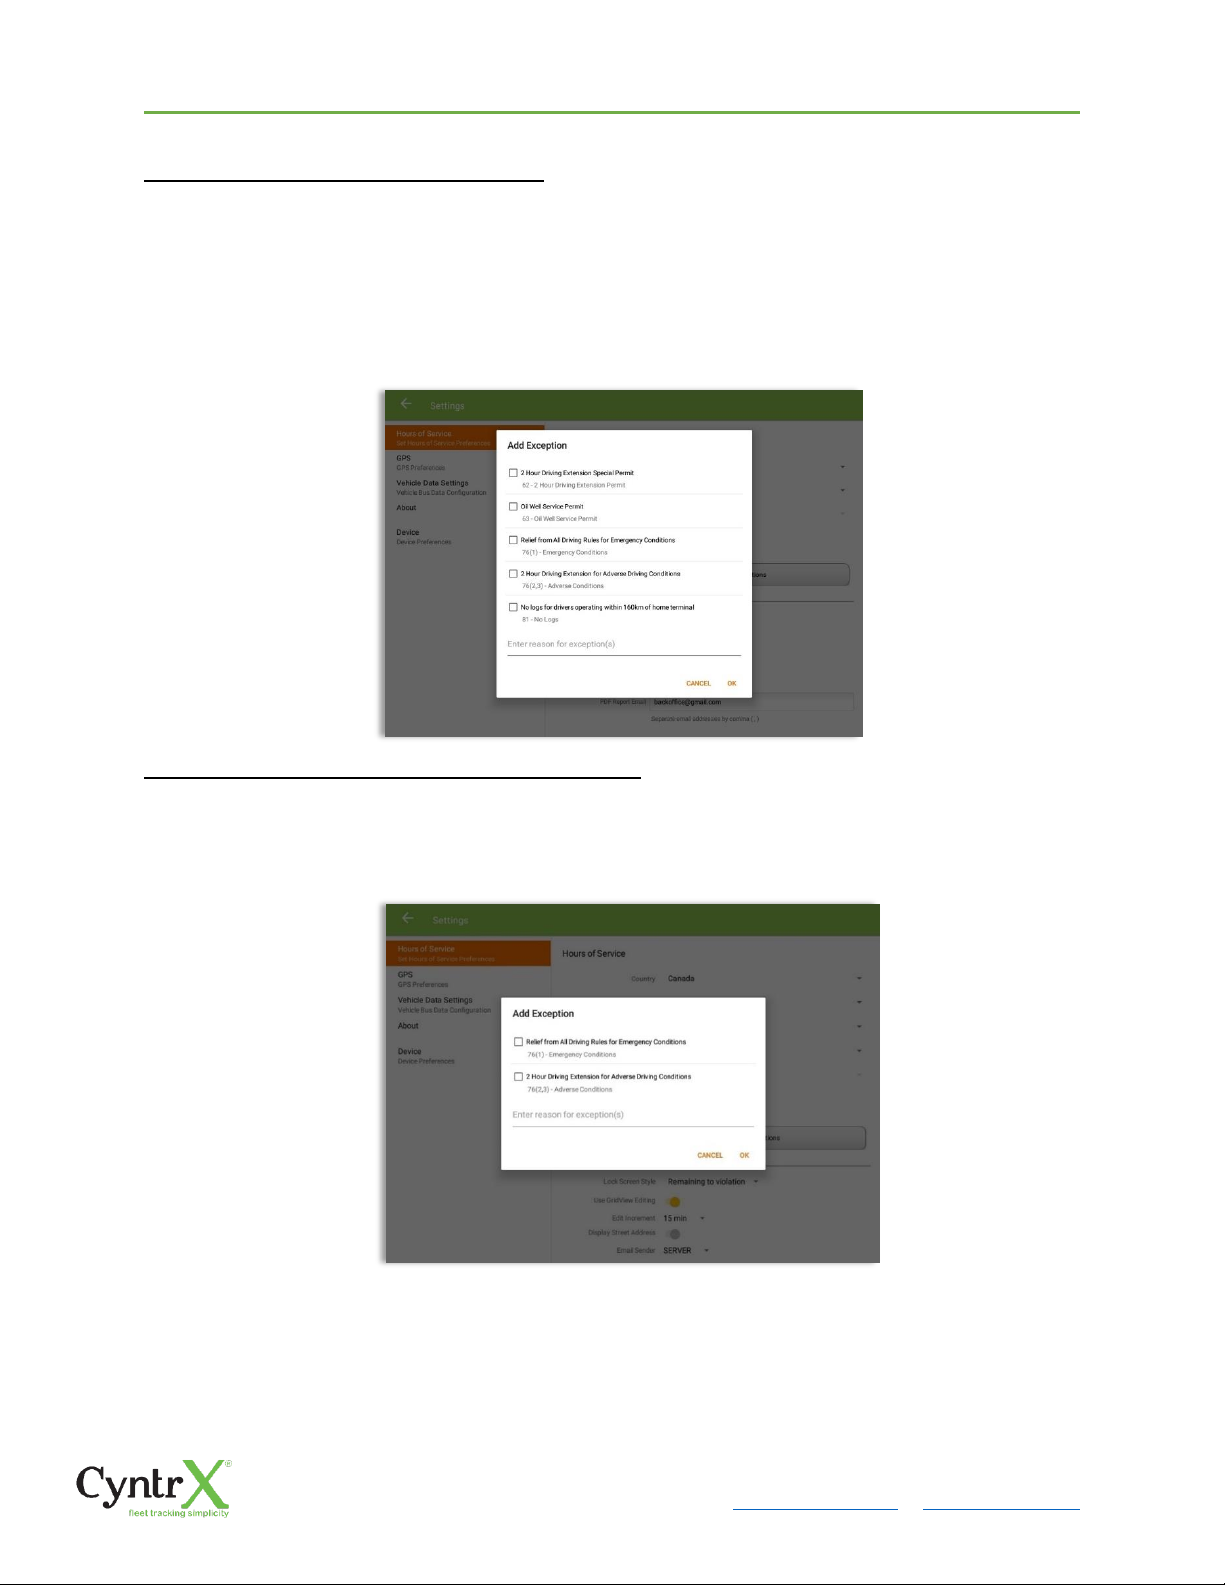
Available Canada Exceptions Options
• 2 Hour Driving Extension Special Permit
• Oil Well Service permit
• CanEmergencyConditions
• 2 Hour Driving Extension for Adverse Driving Conditions
• No Logs for drivers operating within 160km of home terminal
Available Alberta Province Exceptions Options
• CanEmergencyConditions
• 2 Hour Driving Extension for Adverse Driving Conditions
Page 20
CyntrX
Page 20
920-338-0479 | [email protected]| www.CyntrX.com
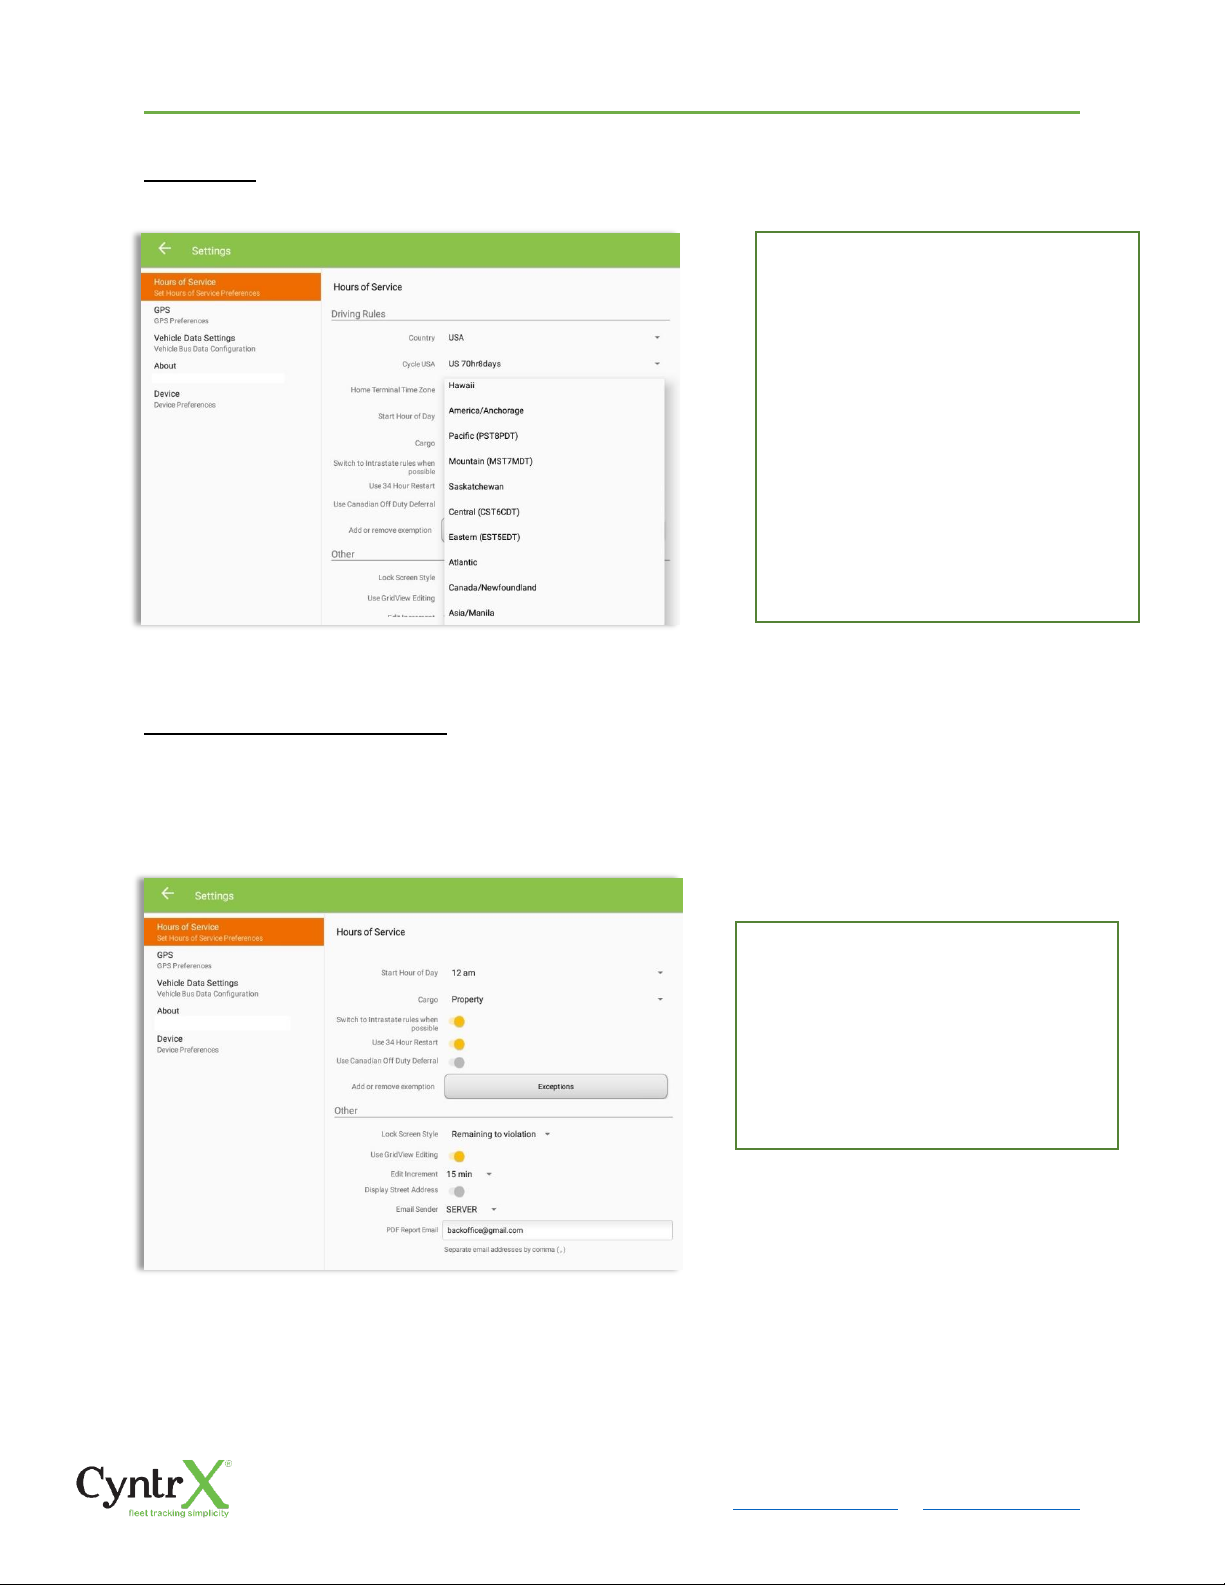
Time Zone
PDF Report Email Recipients
You can set the default recipients of your Driver Daily Log PDF report in the part of the
Settings Menu.
Select the driver’s Home Terminal time
zone. Time zones available are:
Hawaii
America/Anchorage
Pacific Time (PST8PDT)
Mountain Time (MST7MDT)
Saskatchewan
Central Time (CST6CDT)
Eastern Time (EST5EDT)
Atlantic
Canada/Newfoundland
Asia/Manila
Enter the email address or addresses
that will become a recipient or
recipients of the Hours of Service app’s
Daily Driver Log PDF report.
The email addresses must be
separated by a comma (,)
Page 21
CyntrX
Page 21
920-338-0479 | [email protected]| www.CyntrX.com
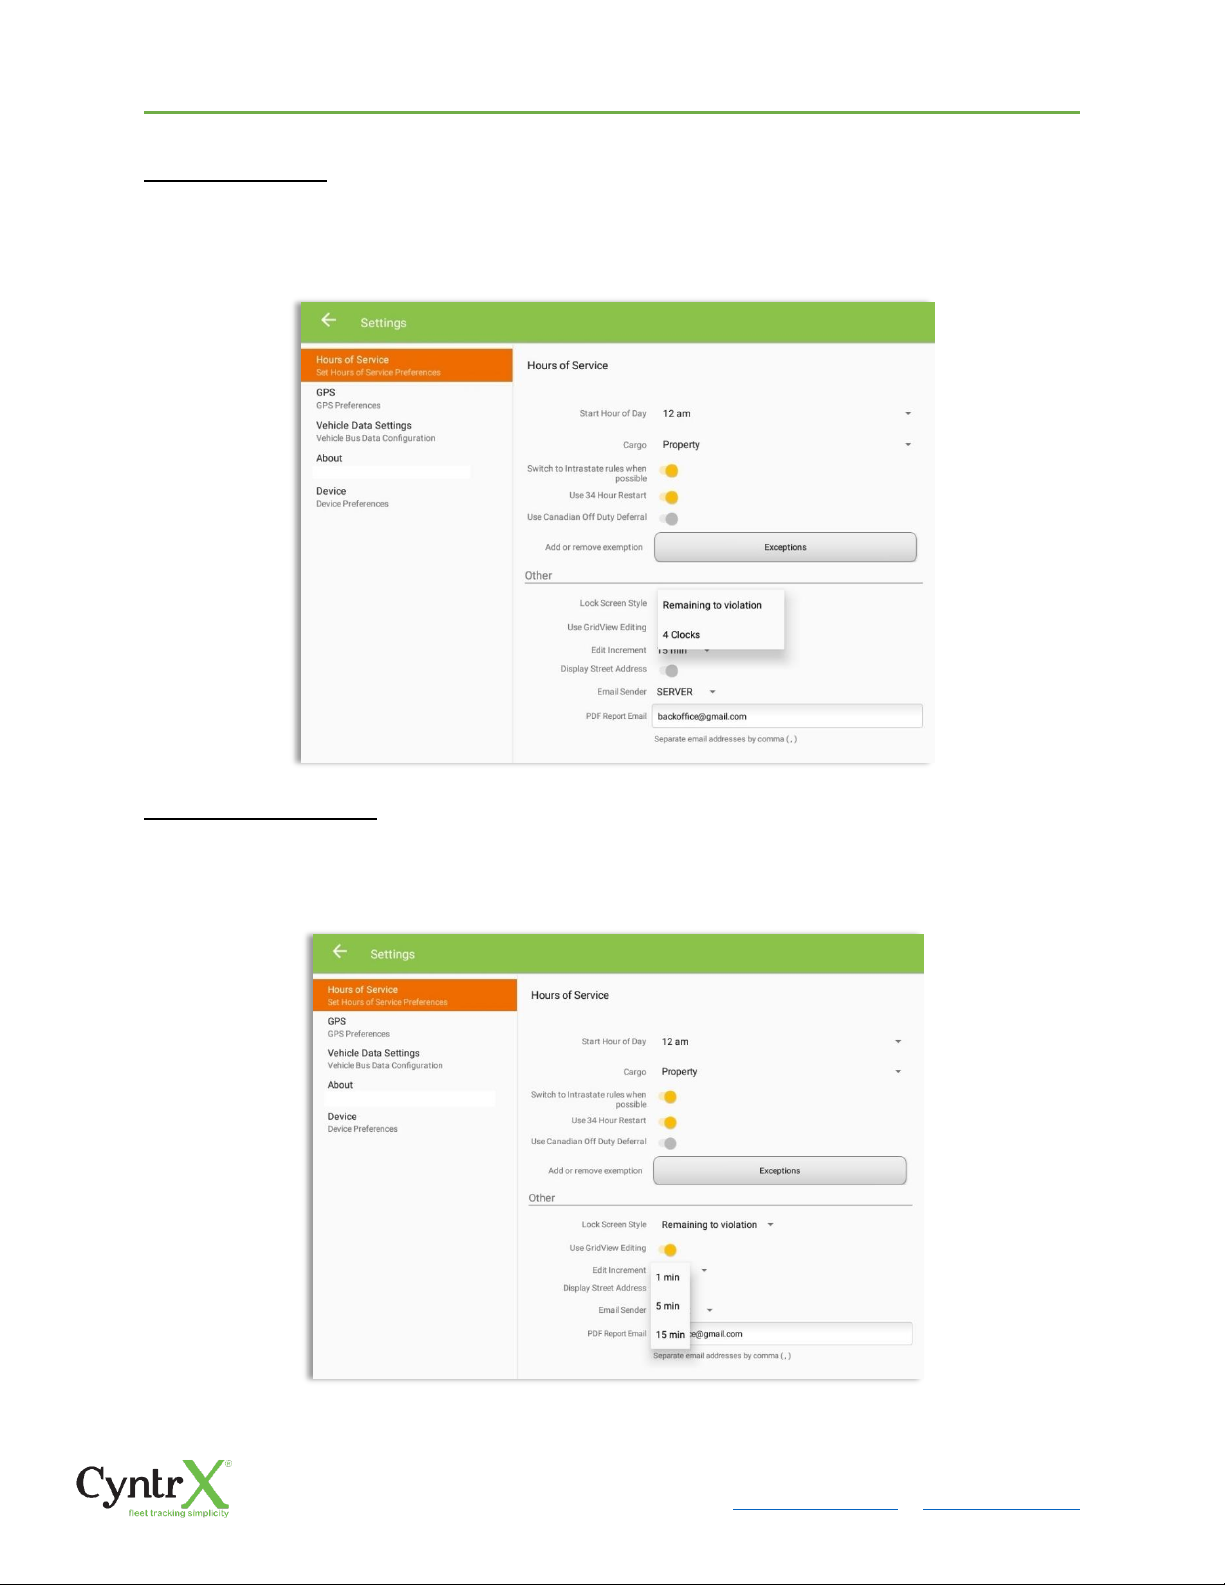
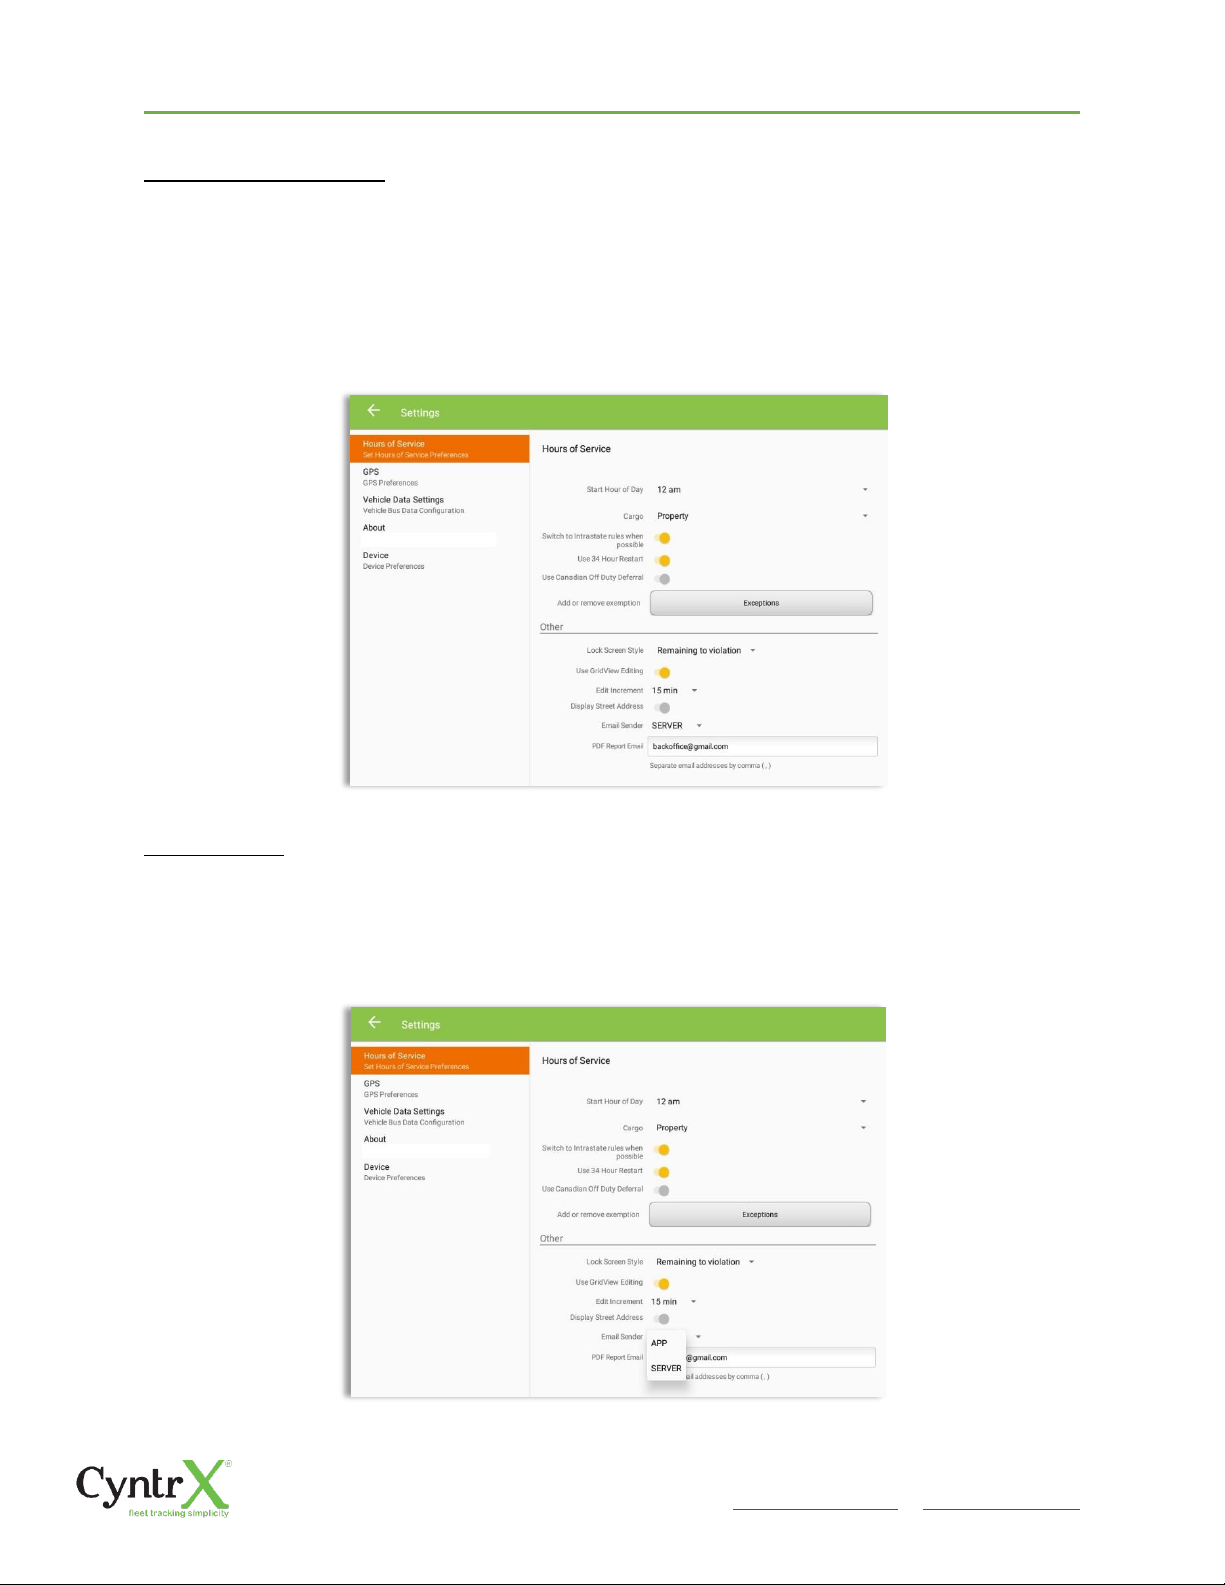
Lock Screen Style
The user has the ability to control the lock screen display. There are two (2) types
available: new 'Remaining to violation' lock screen or the old '4 clocks' lock screen.
Use Grid View Editing
The user has the ability to use grid view editing. Once enabled, user can also set the edit
increment time. (See Section 5.2.11 Editing a Log)
Page 22
CyntrX
Page 22
920-338-0479 | [email protected]| www.CyntrX.com
Display Street Address
Display Street address option will allow drivers to select where to get the location if it is
the actual location or the nearest City with 5,000 population when in AOBRD mode. The
option will only display for drivers that have permission which is set by the personnel in
the portal->Account Settings->Carrier Information tab->’Display Street Address for
AOBRD mode’.
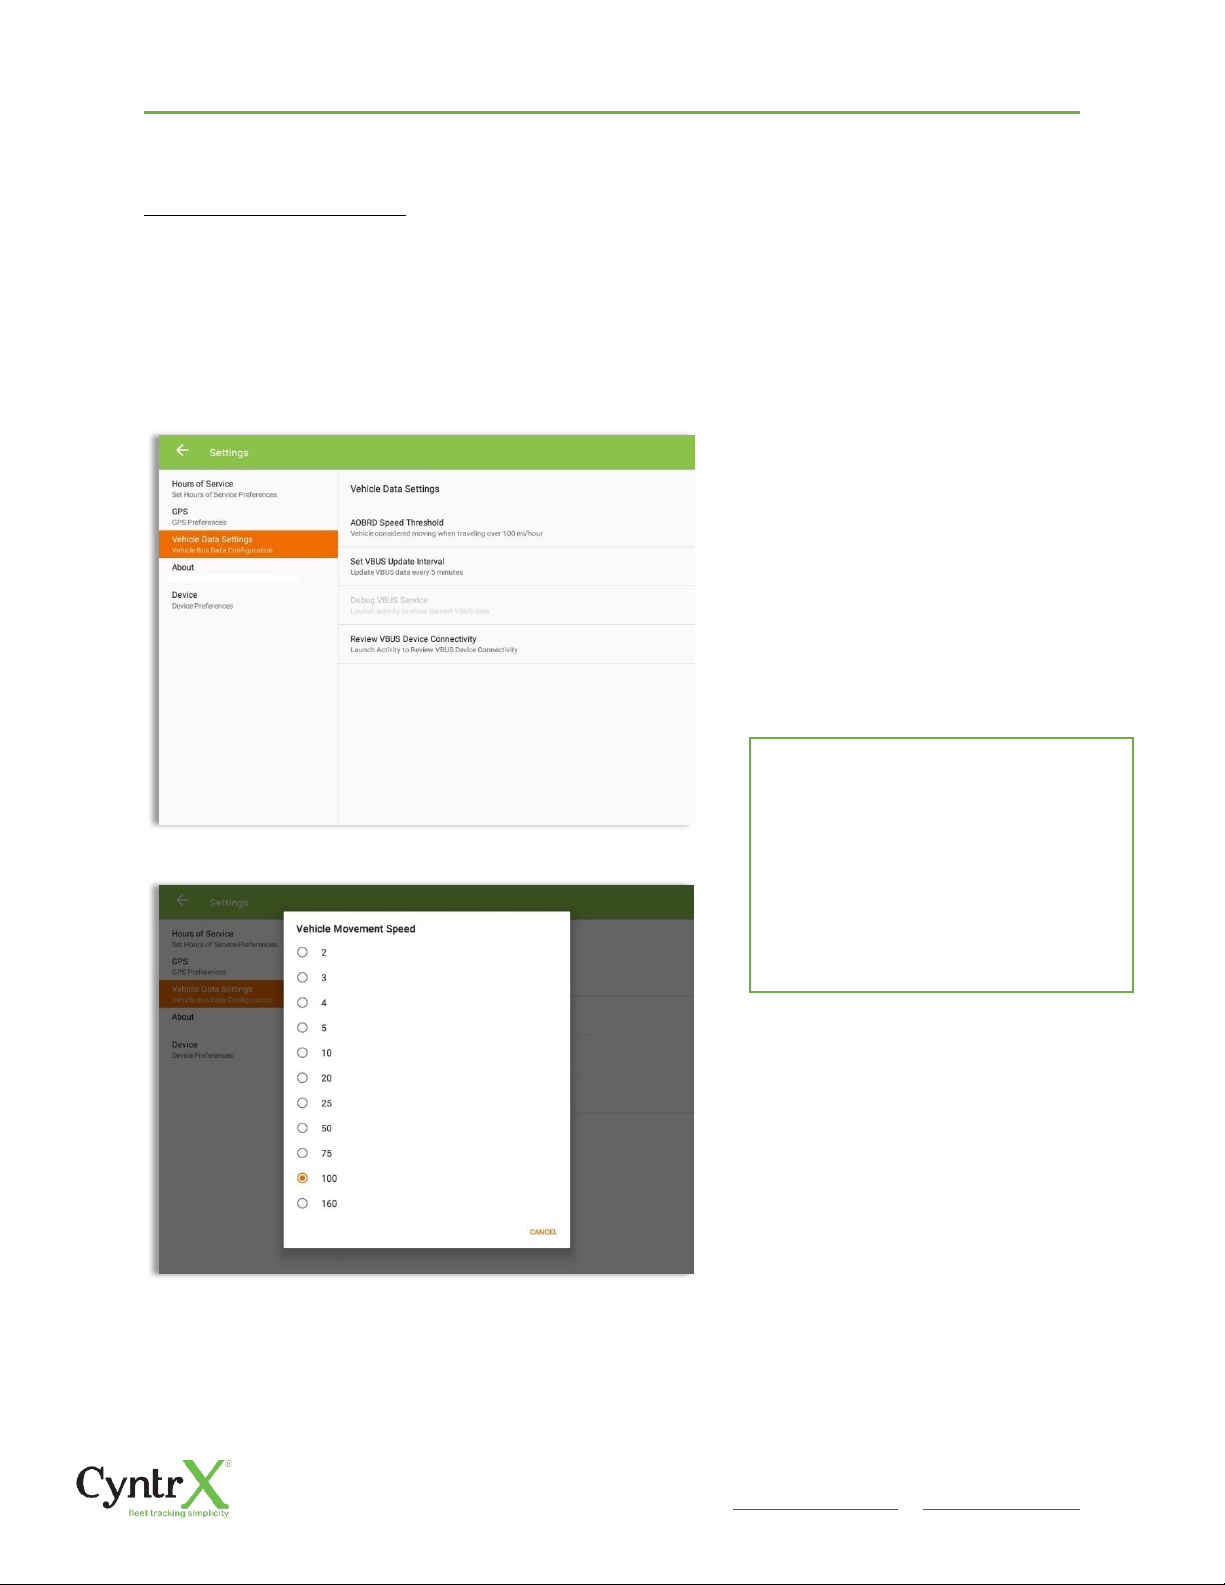
Email Sender
Email Sender option allows the driver to specify email sender when drivers’ need to send
certified log PDF and DVIR report PDF. There are (2) two email sender options: via App or
Server.
Page 23
CyntrX
Page 23
920-338-0479 | [email protected]| www.CyntrX.com
2.2 Vehicle Data Settings
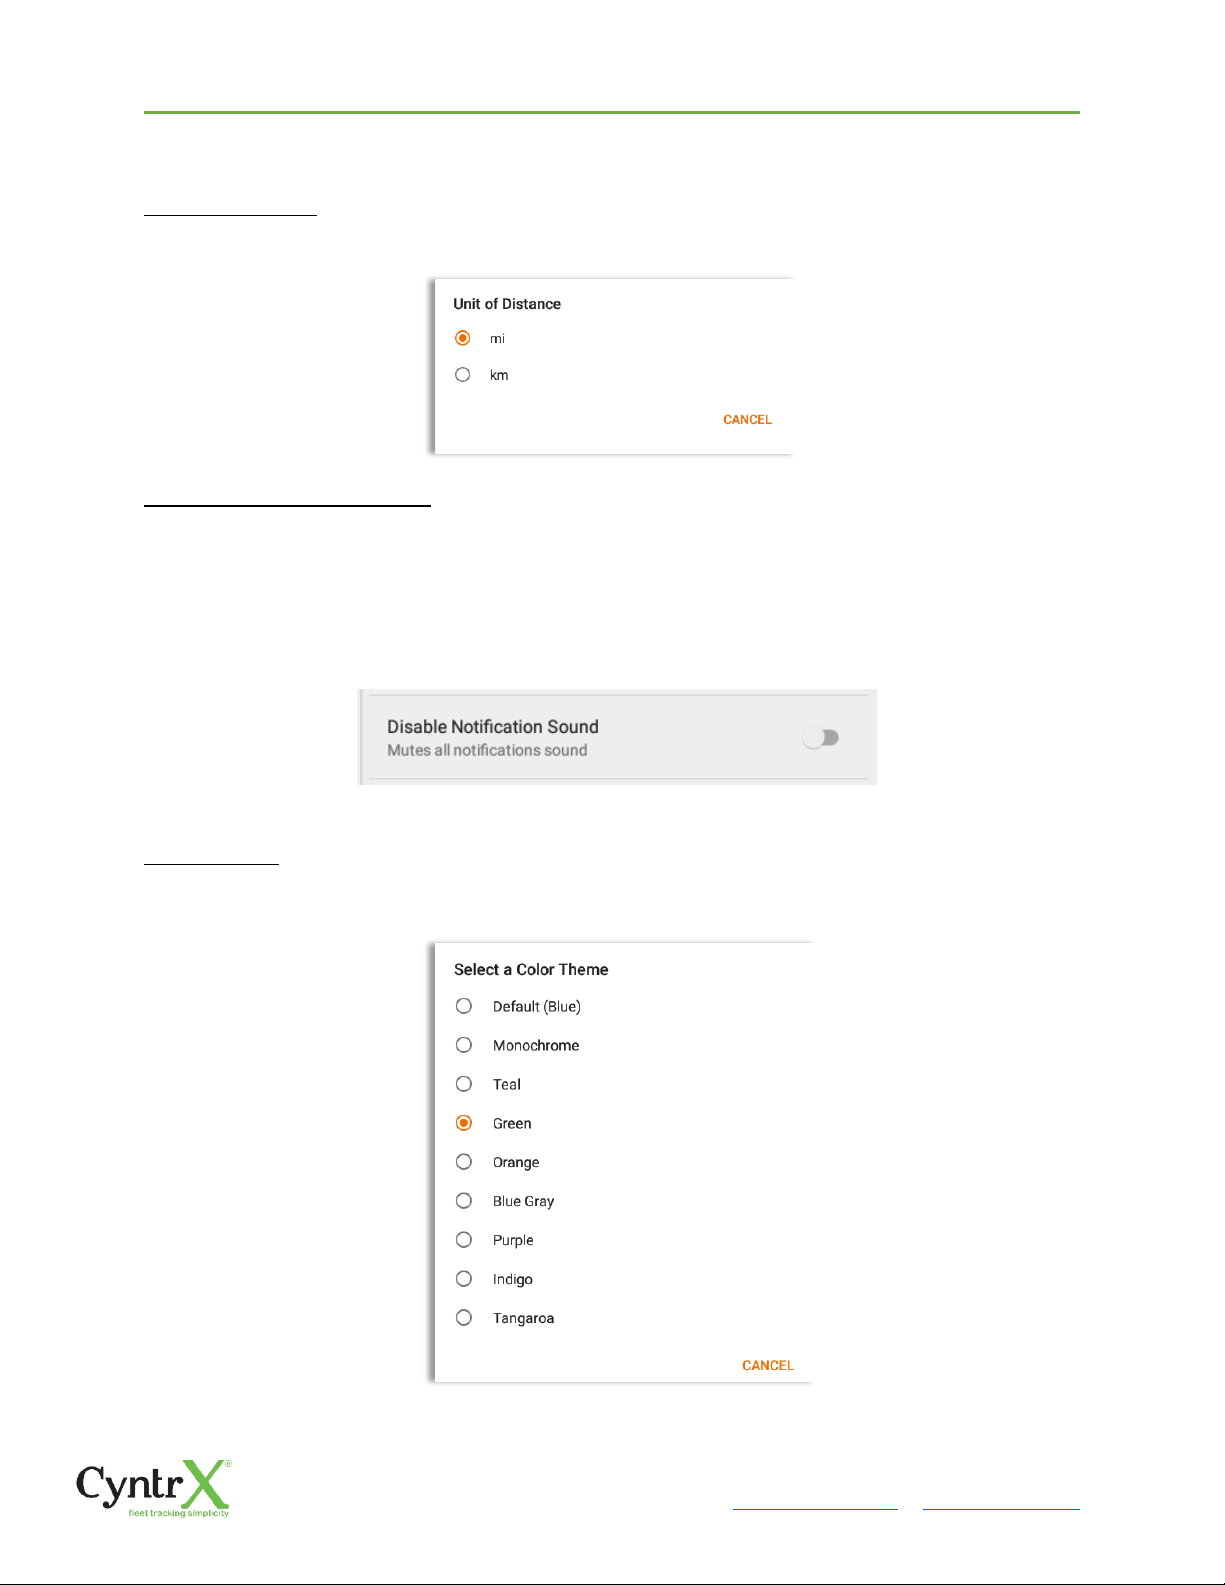
AOBRD Speed Threshold
For vehicle in AOBRD mode, speed threshold setting is dependent on what is set on the
portal->account settings->AOBRD Speed Threshold. The default value is 100 Mph/Kph.
(For example: When the set AOBRD Speed Threshold is 100 Mph/Kph, lock screen will
be shown and the app will be in driving state once the vehicle speed threshold reached
to 100 mi/hour)
Also, drivers have the ability to set
speed threshold on the app->Vehicle
Data Settings->AOBRD Speed
Threshold only if the driver is allowed.
To allow a specific driver, enable the
option which can be seen in portal>Drivers Management Page->Set
AOBRD Speed Threshold option.
Page 24
CyntrX
Page 24
920-338-0479 | [email protected]| www.CyntrX.com
2.3 Device Preferences
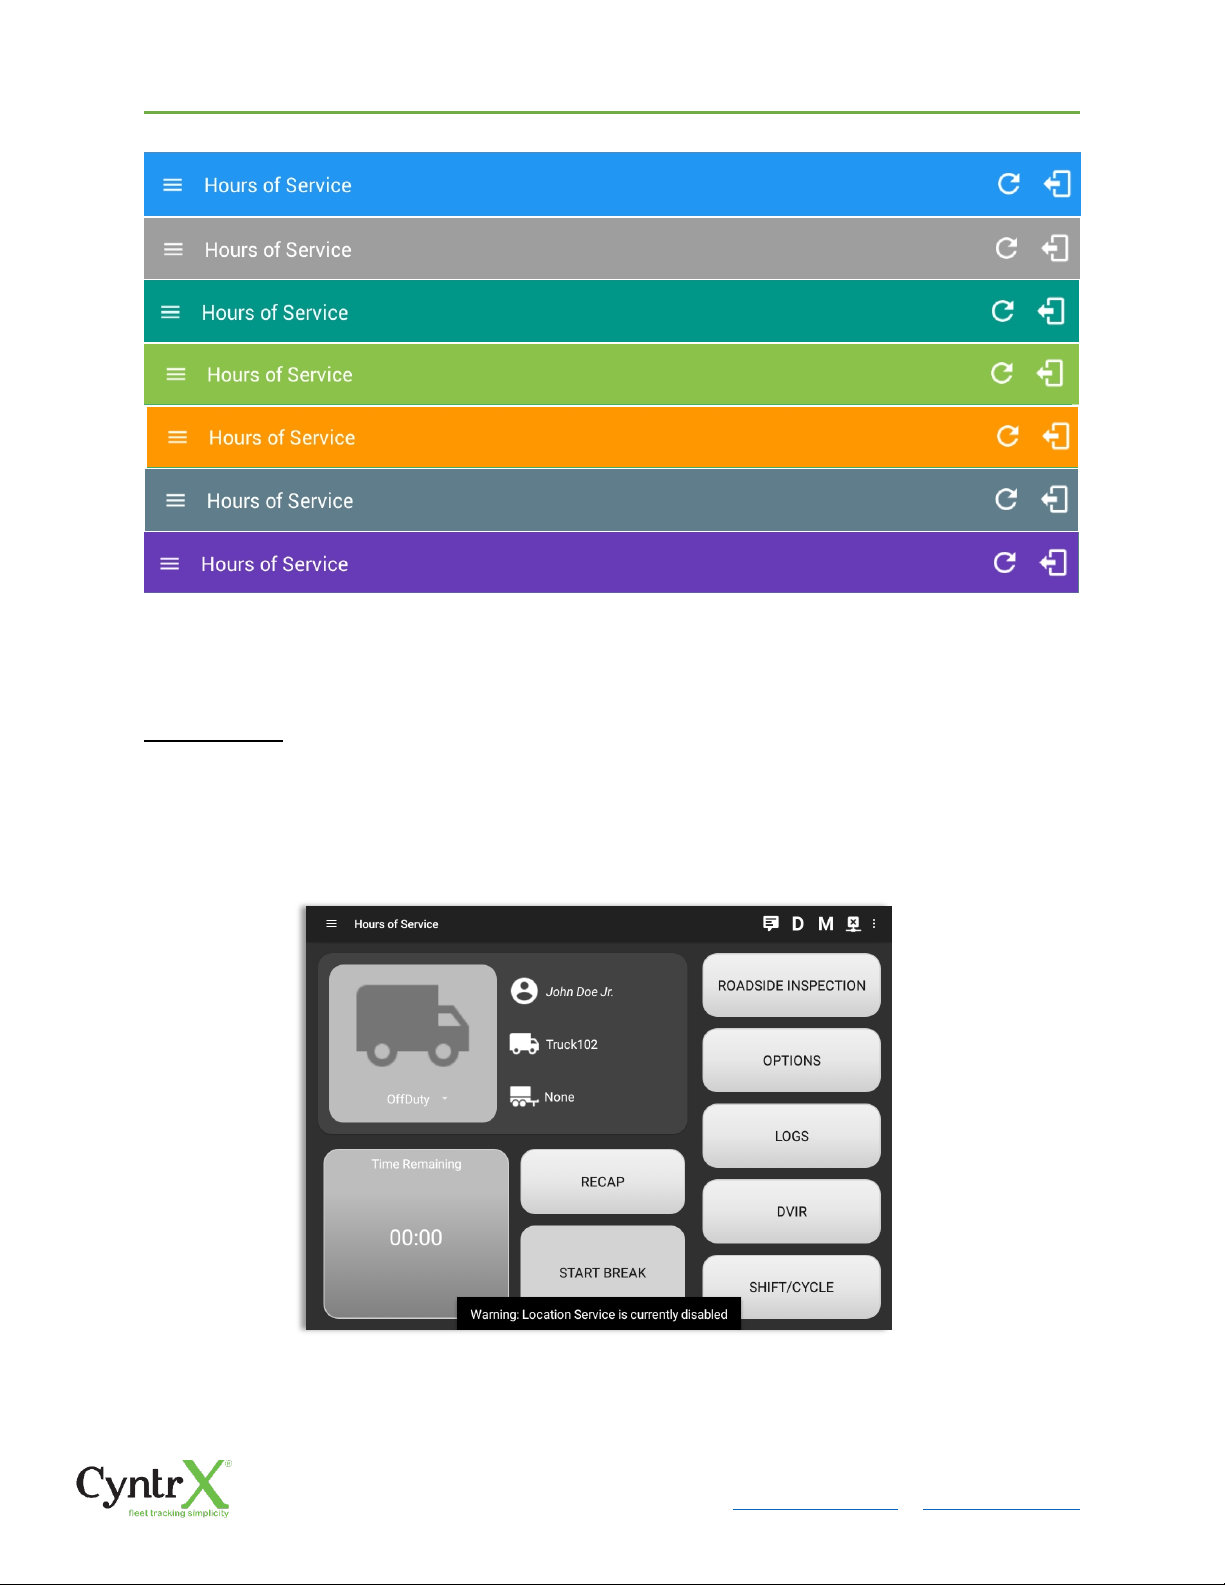
Unit of Distance
Setting the default unit of measures
Disable Notification Sound
The application has a Mute button to silence all sounds that could come from the
application. Also, the ELD rules state that all application sounds should be muted during
Sleeper status. However, the mobile device should not be muted so that sound will be
available for phone calls.
Note: When the current status is Sleeper Berth, it automatically mutes the application sound.
Color Theme
Displays option for selecting Color Theme
Page 25
CyntrX
Page 25
920-338-0479 | [email protected]| www.CyntrX.com
Night Theme
By default, the application automatically changes to a night theme based on the sunset
time calculated from the device's location. If location is not available, the local time of
the device is used.
Page 26
CyntrX
Page 26
920-338-0479 | [email protected]| www.CyntrX.com
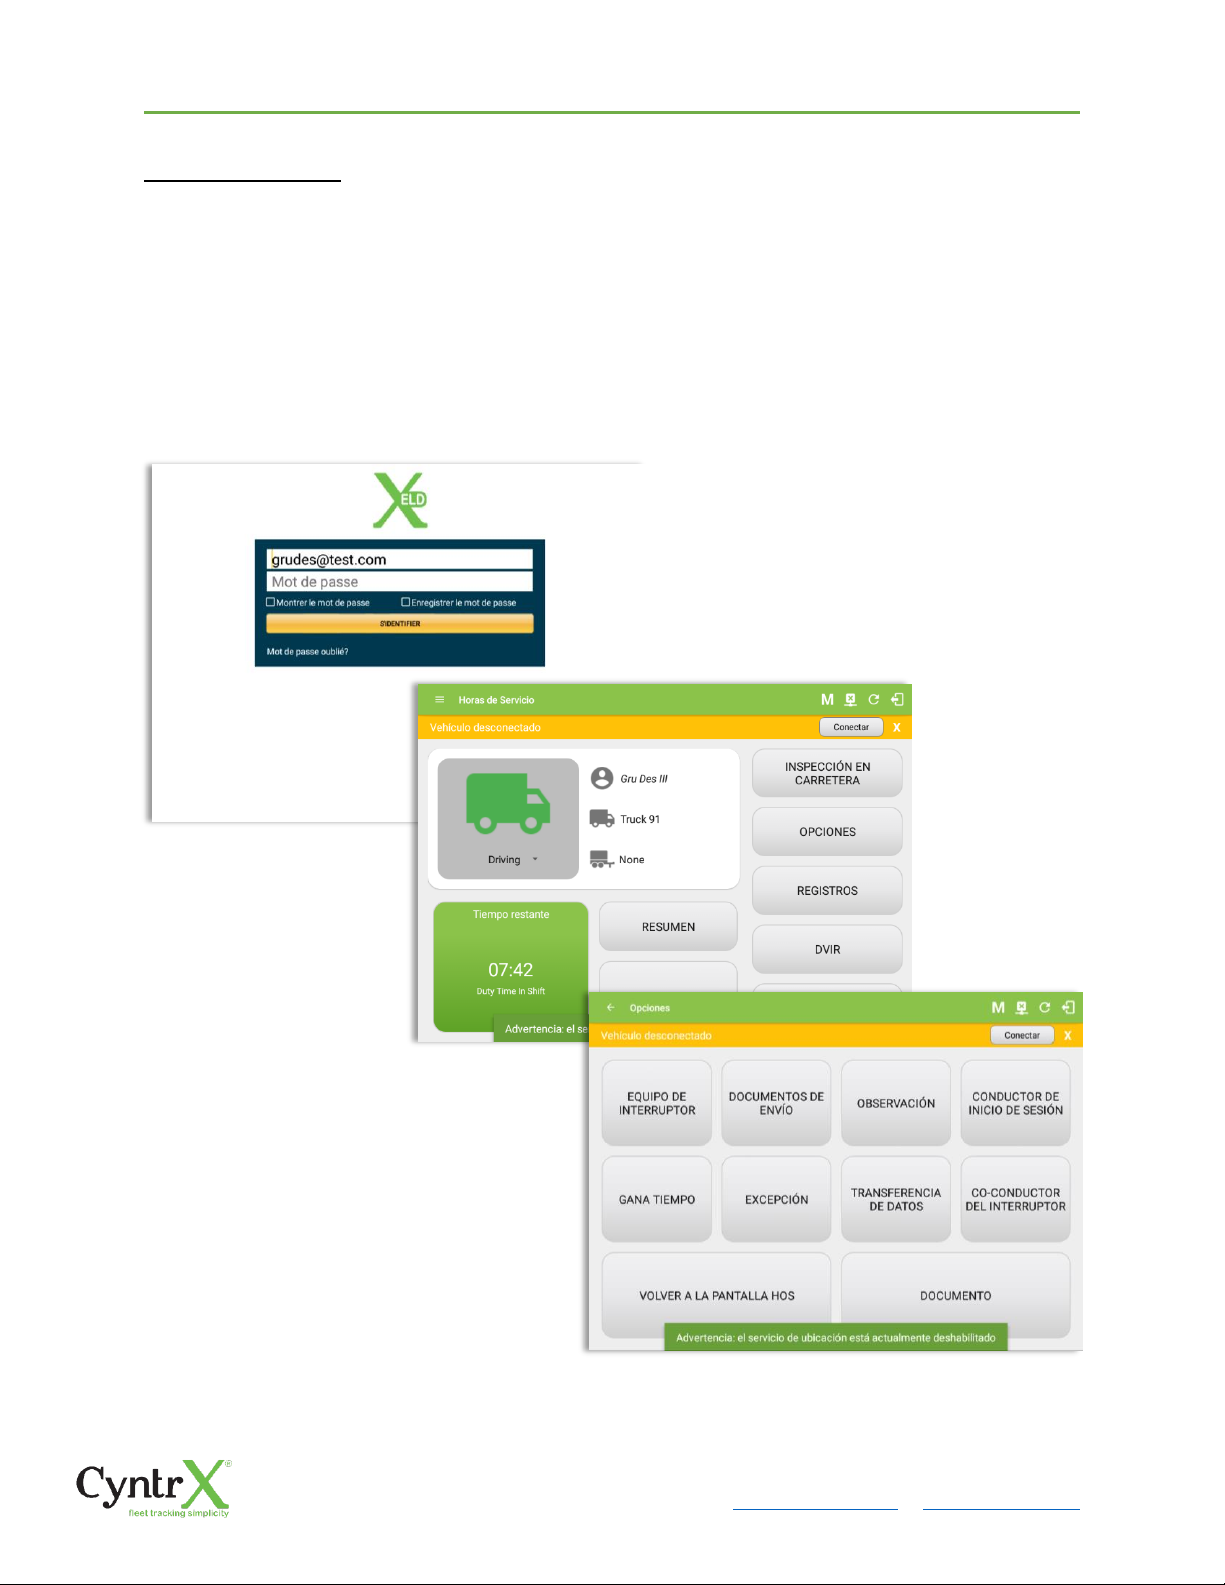
Language Support
The application supports language translation for French-Canadian (Francais (Canada))
and Spanish (Español (Estados Unidos)).
To enable the translation, go to the Android Device Settings > Language and Input > Language.
Select between the supported language and the translation will take effect immediately.
Page 27
CyntrX
Page 27
920-338-0479 | [email protected]| www.CyntrX.com
3 Familiarizing the Hours of Service Main Screen Tiles
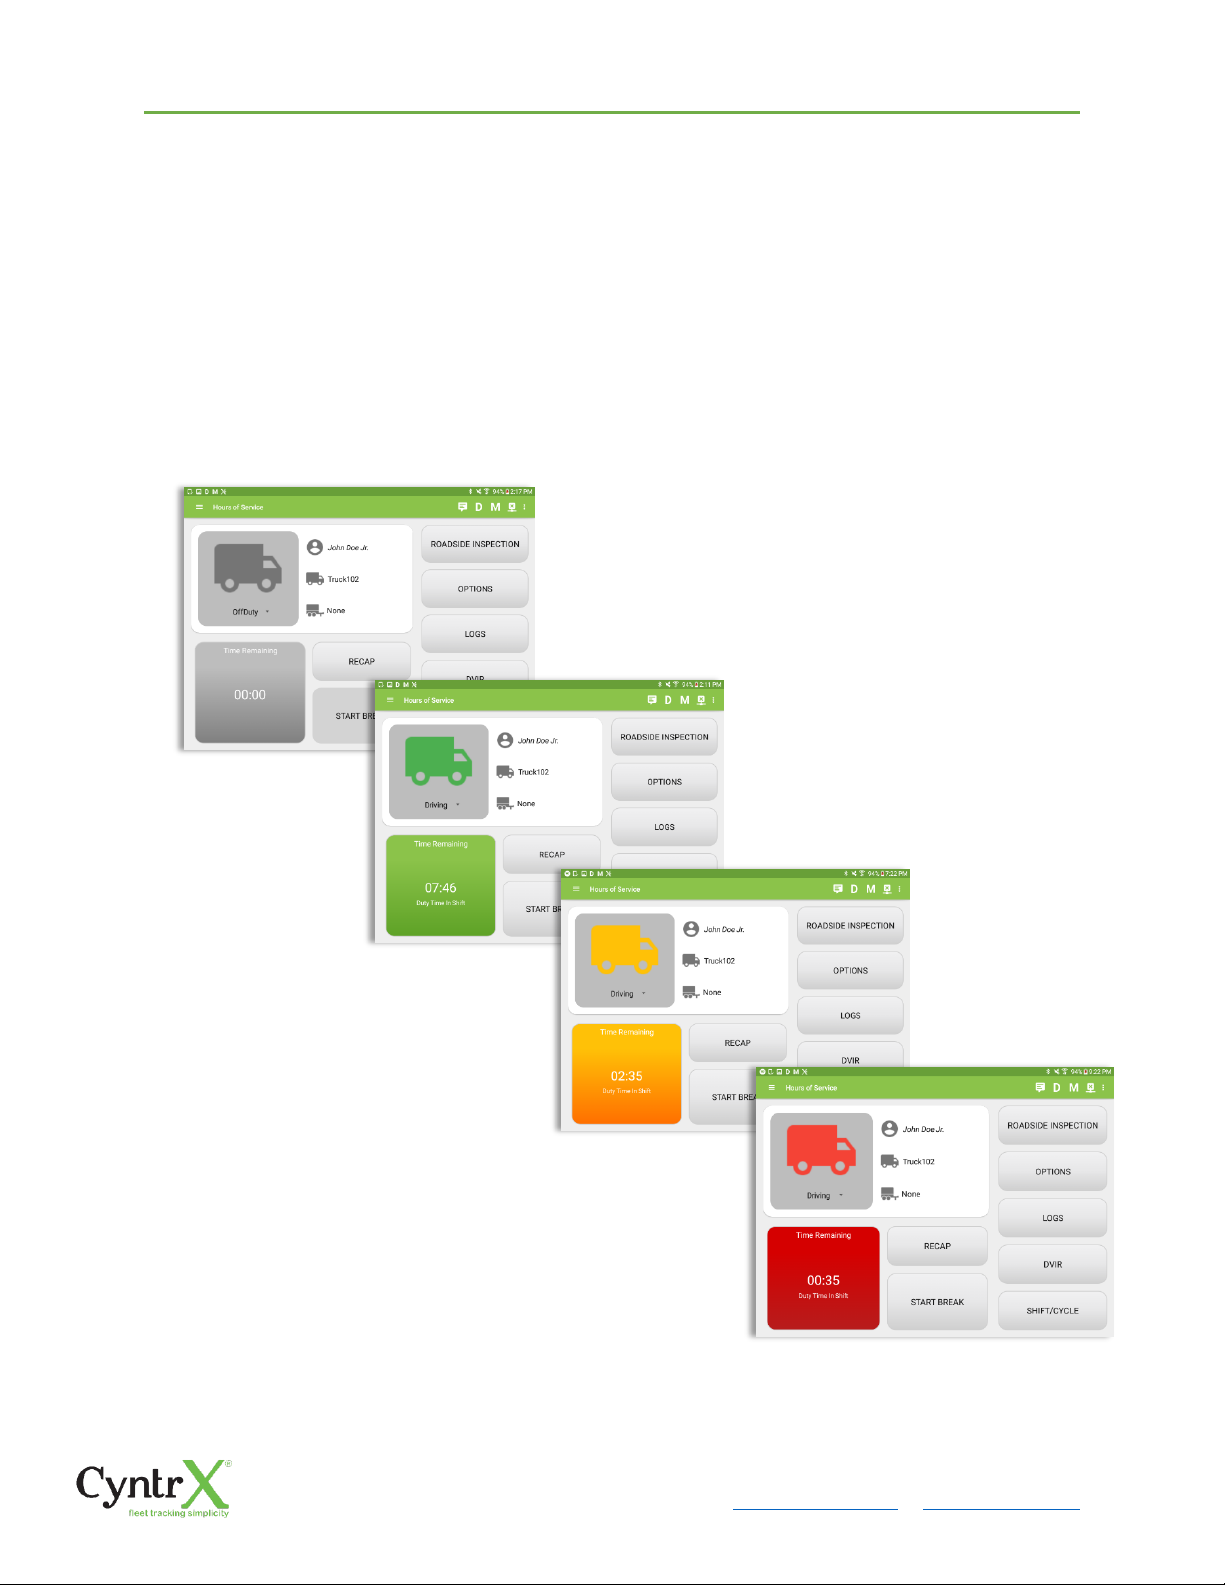
3.1 Time Remaining Tile
When the time remaining tile displays a grey color, it indicates that the driver is Off
Duty, Sleeper or Waiting at Well Site; when the tile displays a green color, it indicates
that the driver’s status is Driving or On Duty; when the tile displays an amber color, it
indicates that the driver’s status is Driving or On Duty and has less than 3 hours left;
when the tile displays a red color, it indicates that the driver’s status is Driving or On
Duty and has less than 1 hour left or has already ran out of time.
Page 28
CyntrX
Page 28
920-338-0479 | [email protected]| www.CyntrX.com
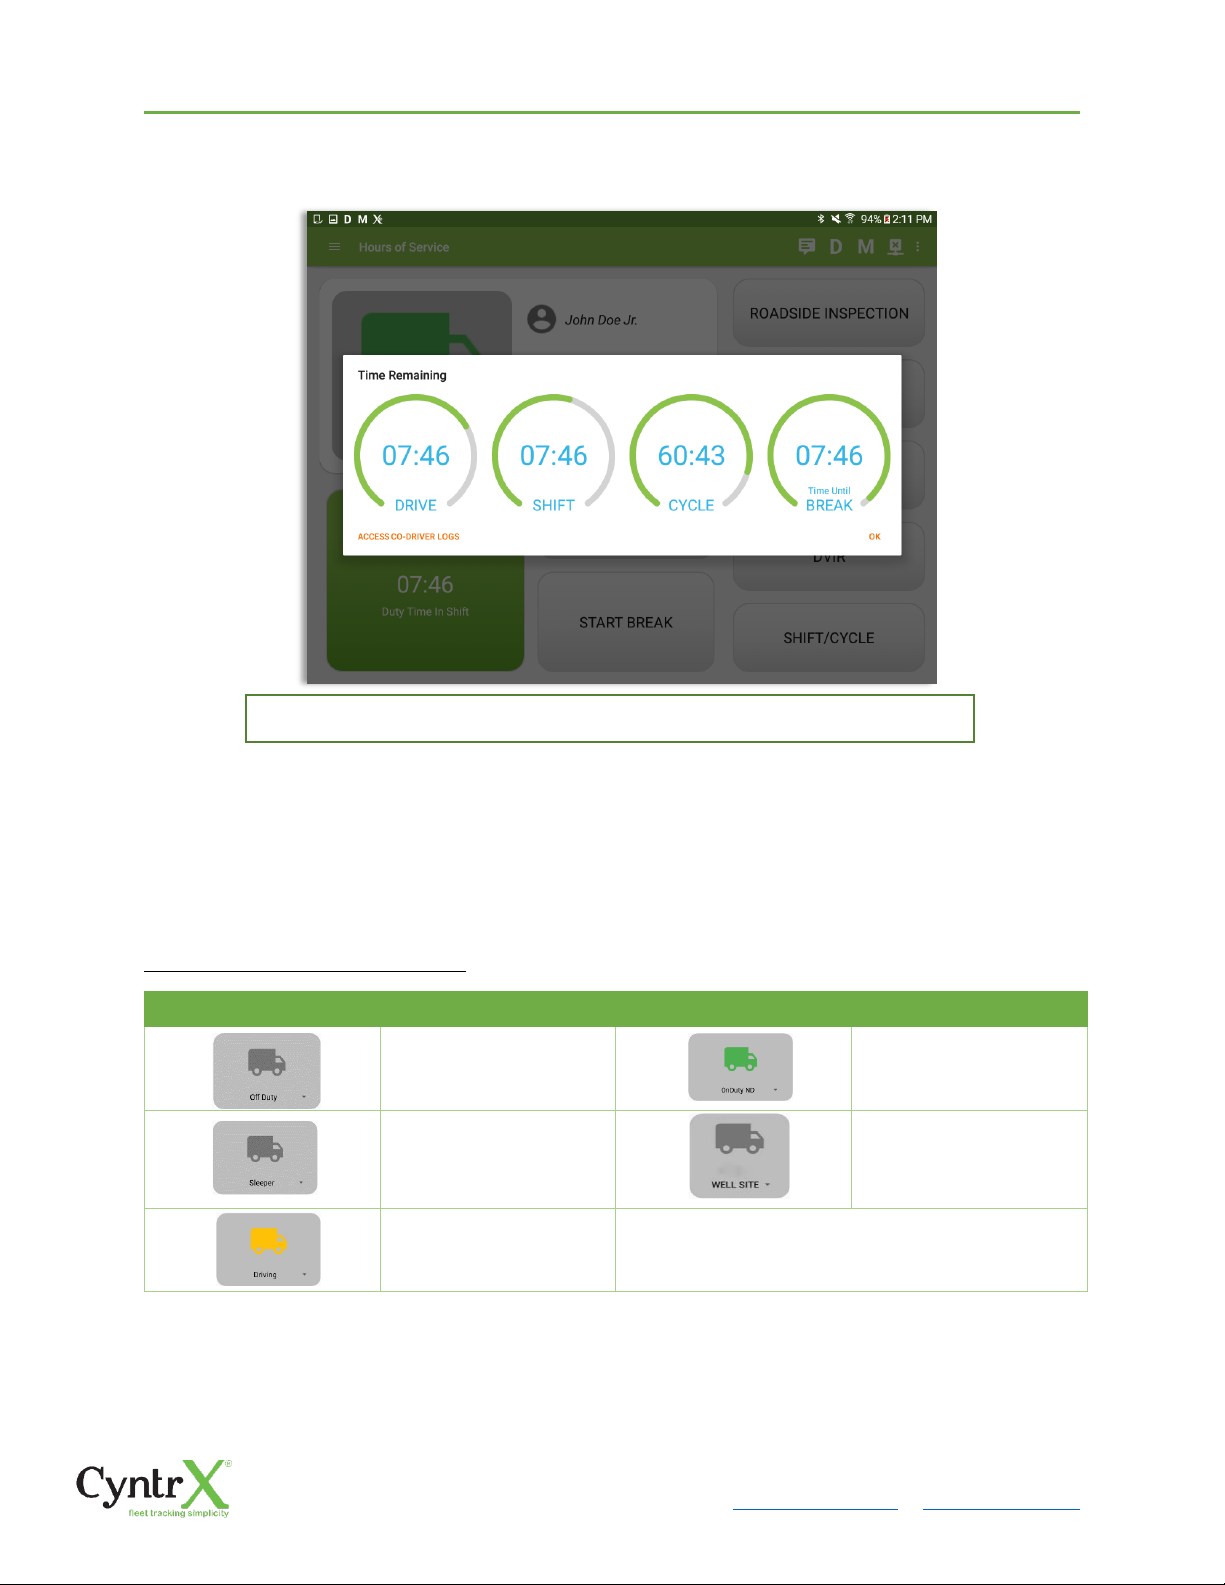
Tap the time remaining panel to view the Time Remaining Clocks.
3.2 Changing the Driver’s Duty Status
To change the duty status of the driver, tap the Duty Status button and select the
appropriate driver duty status.
Available Duty Status Options
Duty Status Icon
Duty Status
Duty Status Icon
Duty Status
Off Duty
On Duty
Sleeper Berth
Waiting at Site
Driving
The time remaining clocks are color coded to match the time remaining panel
Page 29
CyntrX
Page 29
920-338-0479 | [email protected]| www.CyntrX.com
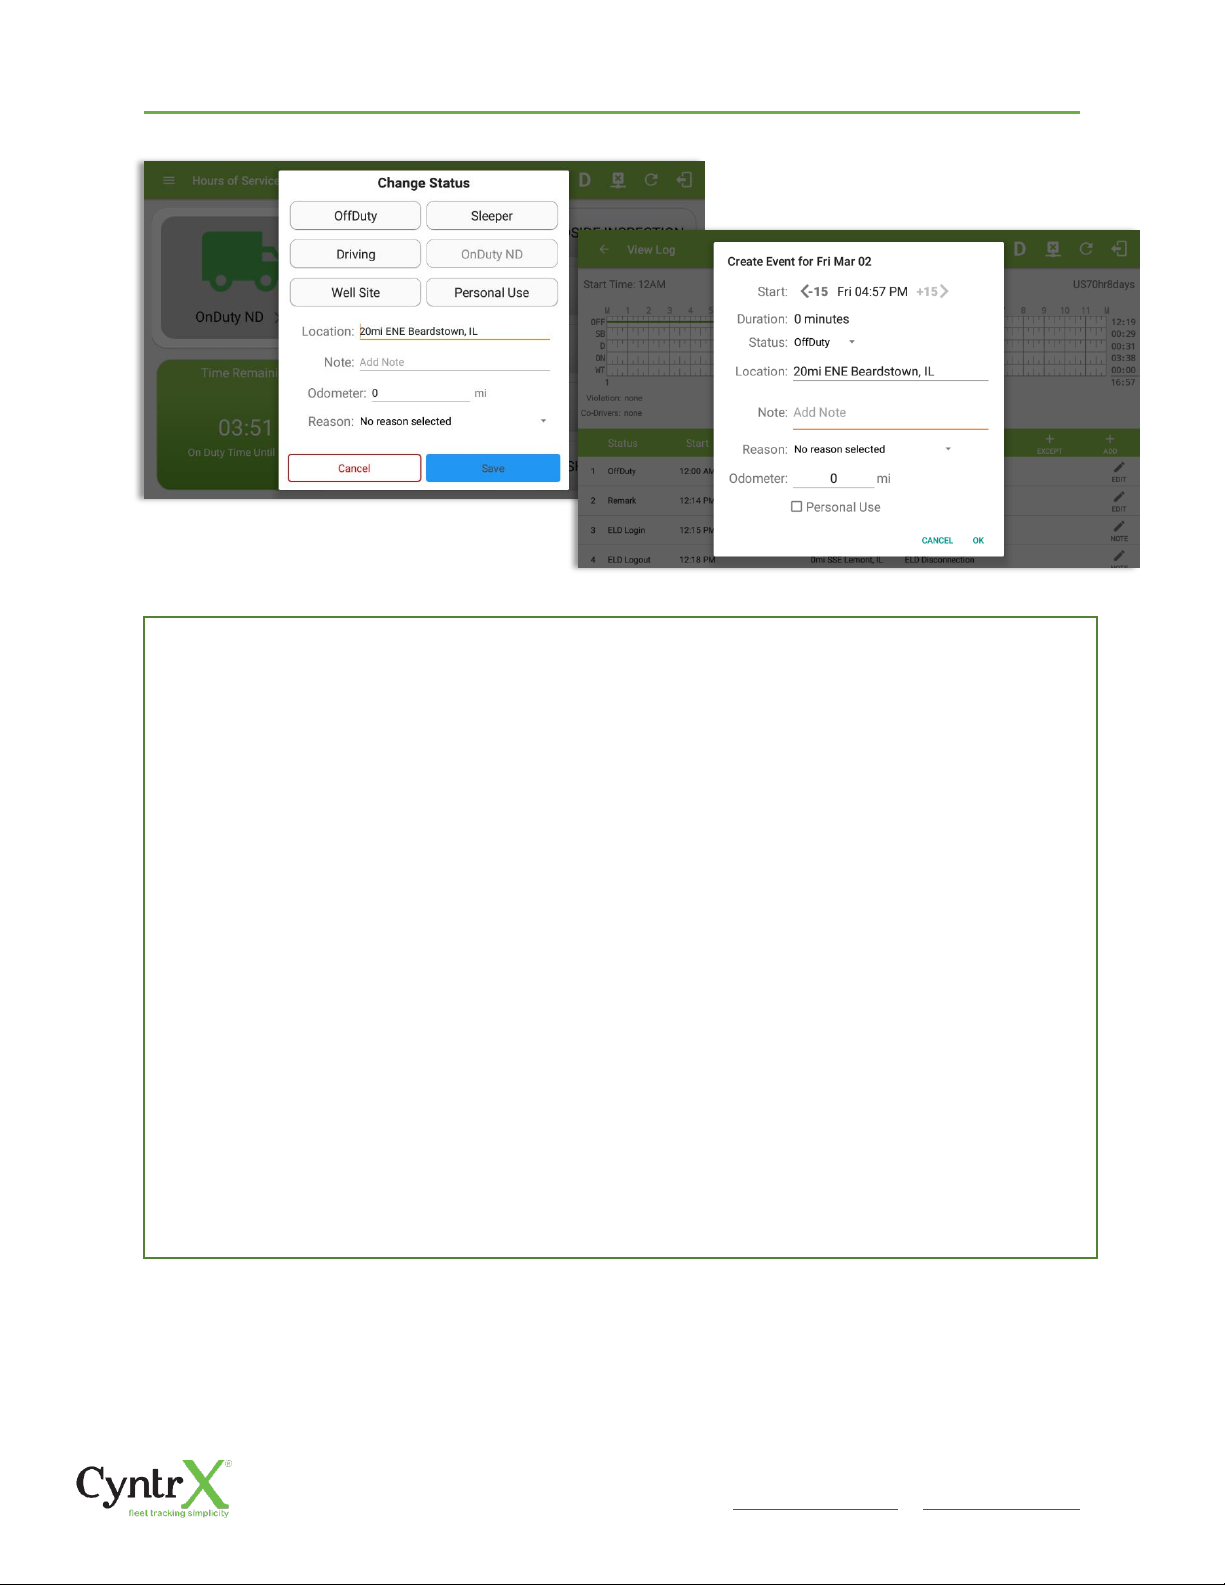
Note: Attempt to create a new event such as Off Duty, On Duty, Sleeper Berth in the middle of an
automatically Driving event is not allowed, instead an error dialog is displayed stating "Error: shortening
of prior driving event is not allowed. Select a time before or after the driving event."
Tapping the duty status button will show the Change Status pop up dialog. You can adjust the duration
of the duty status event by tapping the Previous 15 minutes Time Interval button to increase the time
duration and the Next 15 minutes Time Interval button to decrease the time duration. However, these
buttons are disabled prevent time from going before or after the current day. (eg. 12:00AM –
11:59PM).
• If Personal Use is enabled, the status will be set to Off Duty automatically and will disable the
other checkboxes. Selection of this option will be recorded within the events history.
• If Personal Use is enabled, events except Off Duty will not be displayed in the grid but is
displayed in the event history list. Off duty will always be the display in the grid and when the
driver makes an automatic event, lock screen will also be shown.
• If Yard Moves is enabled, the status will be set to On Duty automatically and will disable the
other checkboxes. Selection of this option will be recorded within the events history.
• If Yard Moves is enabled, events except On Duty will not be displayed in the grid but is displayed
in the event history list. Off duty will always be the display in the grid and when the driver makes
an automatic event, lock screen will also be shown.
Note: All options are enabled in all events.
Page 30
CyntrX
Page 30
920-338-0479 | [email protected]| www.CyntrX.com
When the app is able to obtain a valid GPS fix, the Location field will be automatically
populated with the current location information of the user. If there is no GPS fix, the
Location field will remain blank, in this instance; you must manually input the relevant
details.
Once all relevant details have been entered and the correct duty status selected, tap the
OK button to save the new duty status event. You can also select the Cancel button to
cancel adding the selected duty status.
Changing the status to On Duty or Driving also enables the options for ‘Personal Use’ and
‘Off Road’. Personal Use is mentioned in the FMCSA’s Supplemental Proposal, which was
published on March 28, 2014, that mandates ELDs for most drivers of CMVs that currently
log. The proposal says that ELDs may be set up to allow drivers to put themselves in a
special driving category called “personal use.” When a driver selects this option, the ELD
will record the time as off duty until the driver de-selects the option. Off Road, on the
other hand, means that the vehicle is running on rough terrain. Lastly, Yard Moves, has
been established under a mandate which allows a driver or another personnel to perform
duties like moving trucks around the home yard by establishing a single set of thresholds
for all ELDs in an On Duty, not Driving status without triggering the device by reaching the
thresholds.
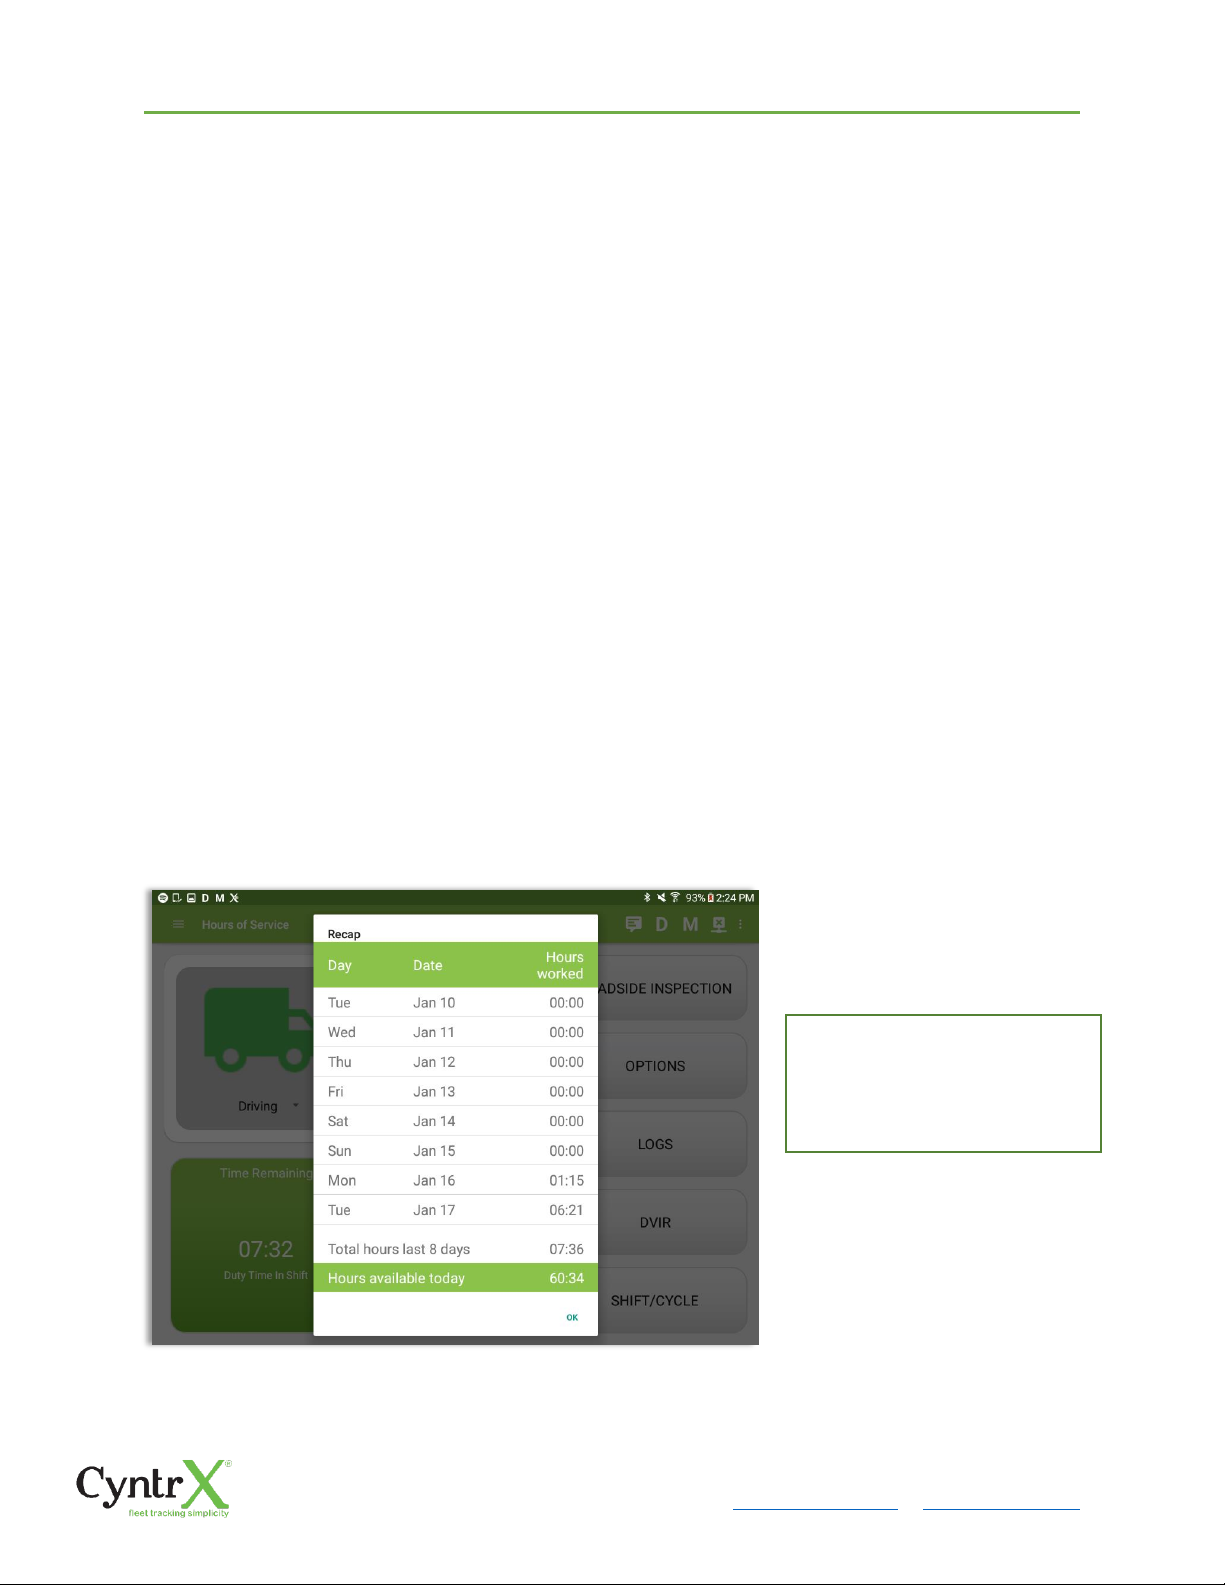
3.3 Recap
Tap the Recap button to bring
up the recap information for
the specified duty day and
corresponding cycle data.
Page 31
CyntrX
Page 31
920-338-0479 | [email protected]| www.CyntrX.com
3.4 Start Break
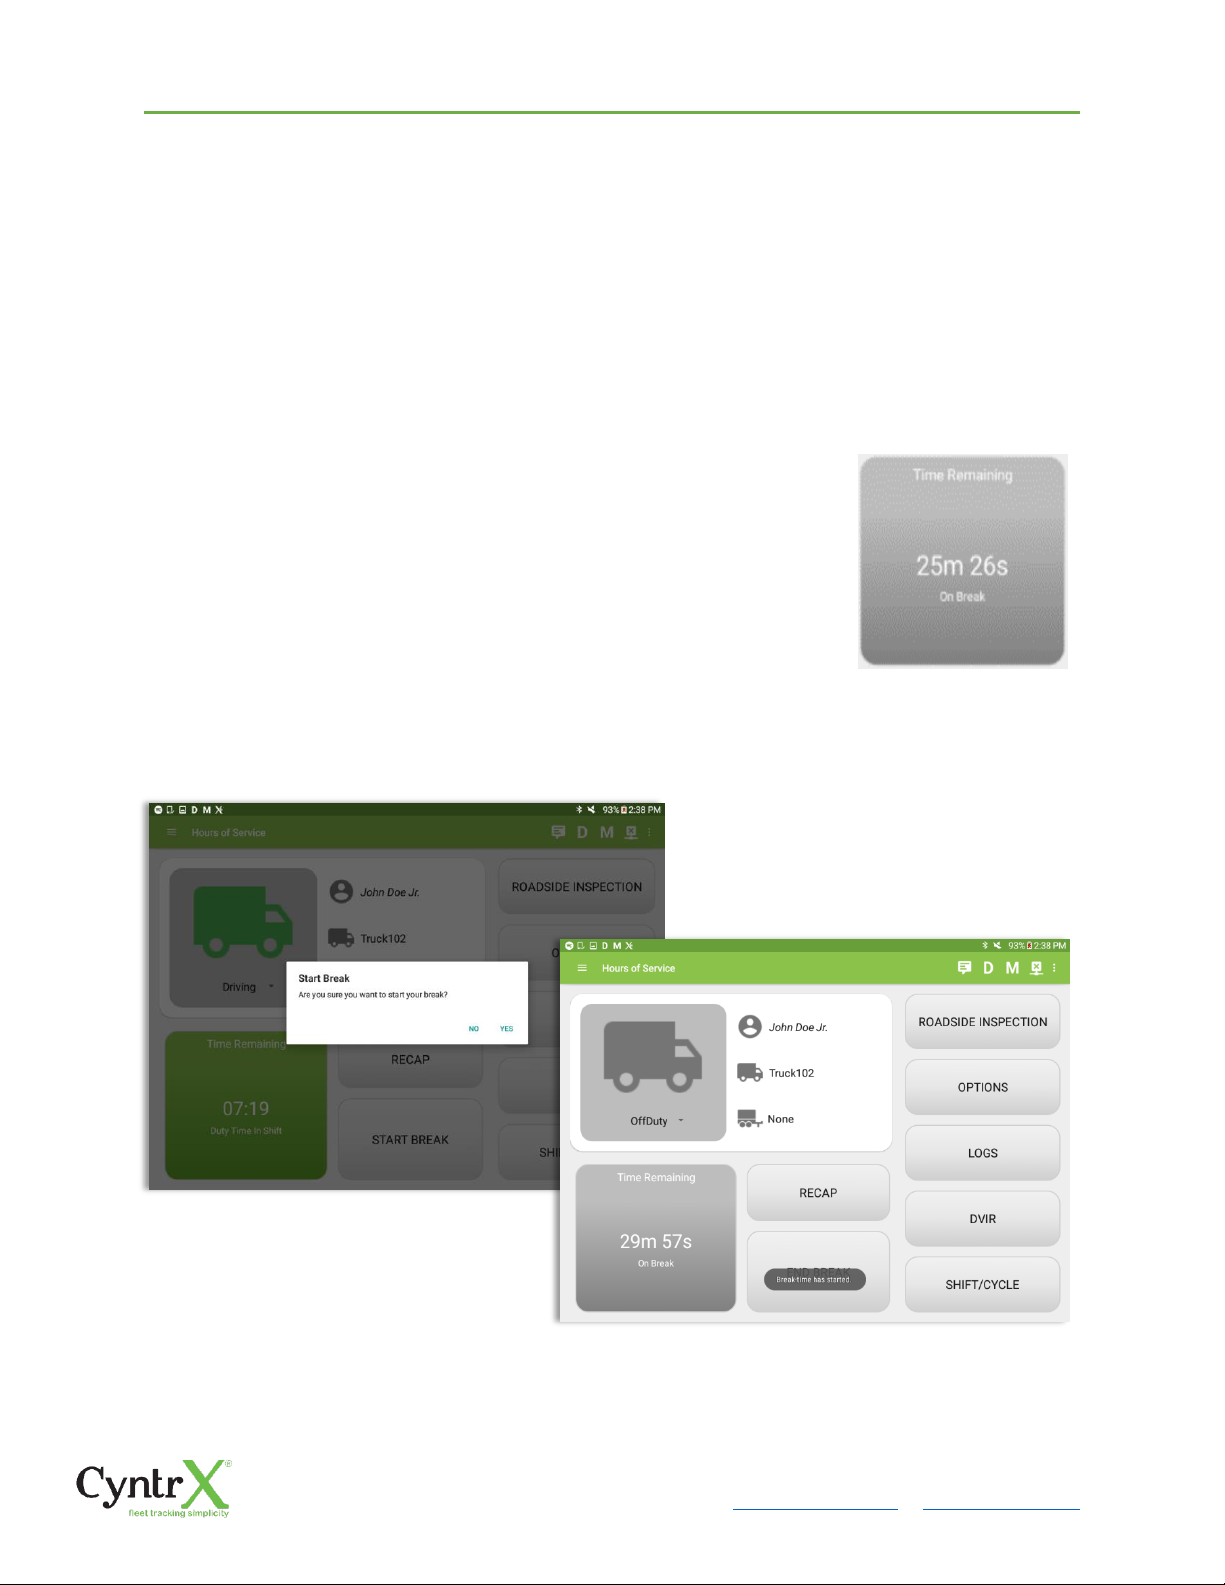
The Start Break button will be disabled when the duty status is Off Duty, Sleeper Berth
or Waiting at Well Site.
The Start Break button will be enabled when the duty status is On Duty or Driving. Once
you tap the Start Break button, a pop up dialog will be displayed asking you to confirm
that you wish to start your break.
➢ If the ‘Start Break’ button is pressed, then:
o It sets the status to OffDuty
o The ‘Start Break’ button turns to ‘End Break’
o The Time remaining button turns to On Break and the
second line shows “time remaining 00:00”
➢ If the ‘End Break’ button is pressed, then:
o It sets the status to ‘On Duty’ (if the vehicle is not moving) or
‘Driving’ (if the vehicle is moving)
Note: An audible alert activated when 30 minute break is over.
Page 32
CyntrX
Page 32
920-338-0479 | [email protected]| www.CyntrX.com
3.5 Data Transfer
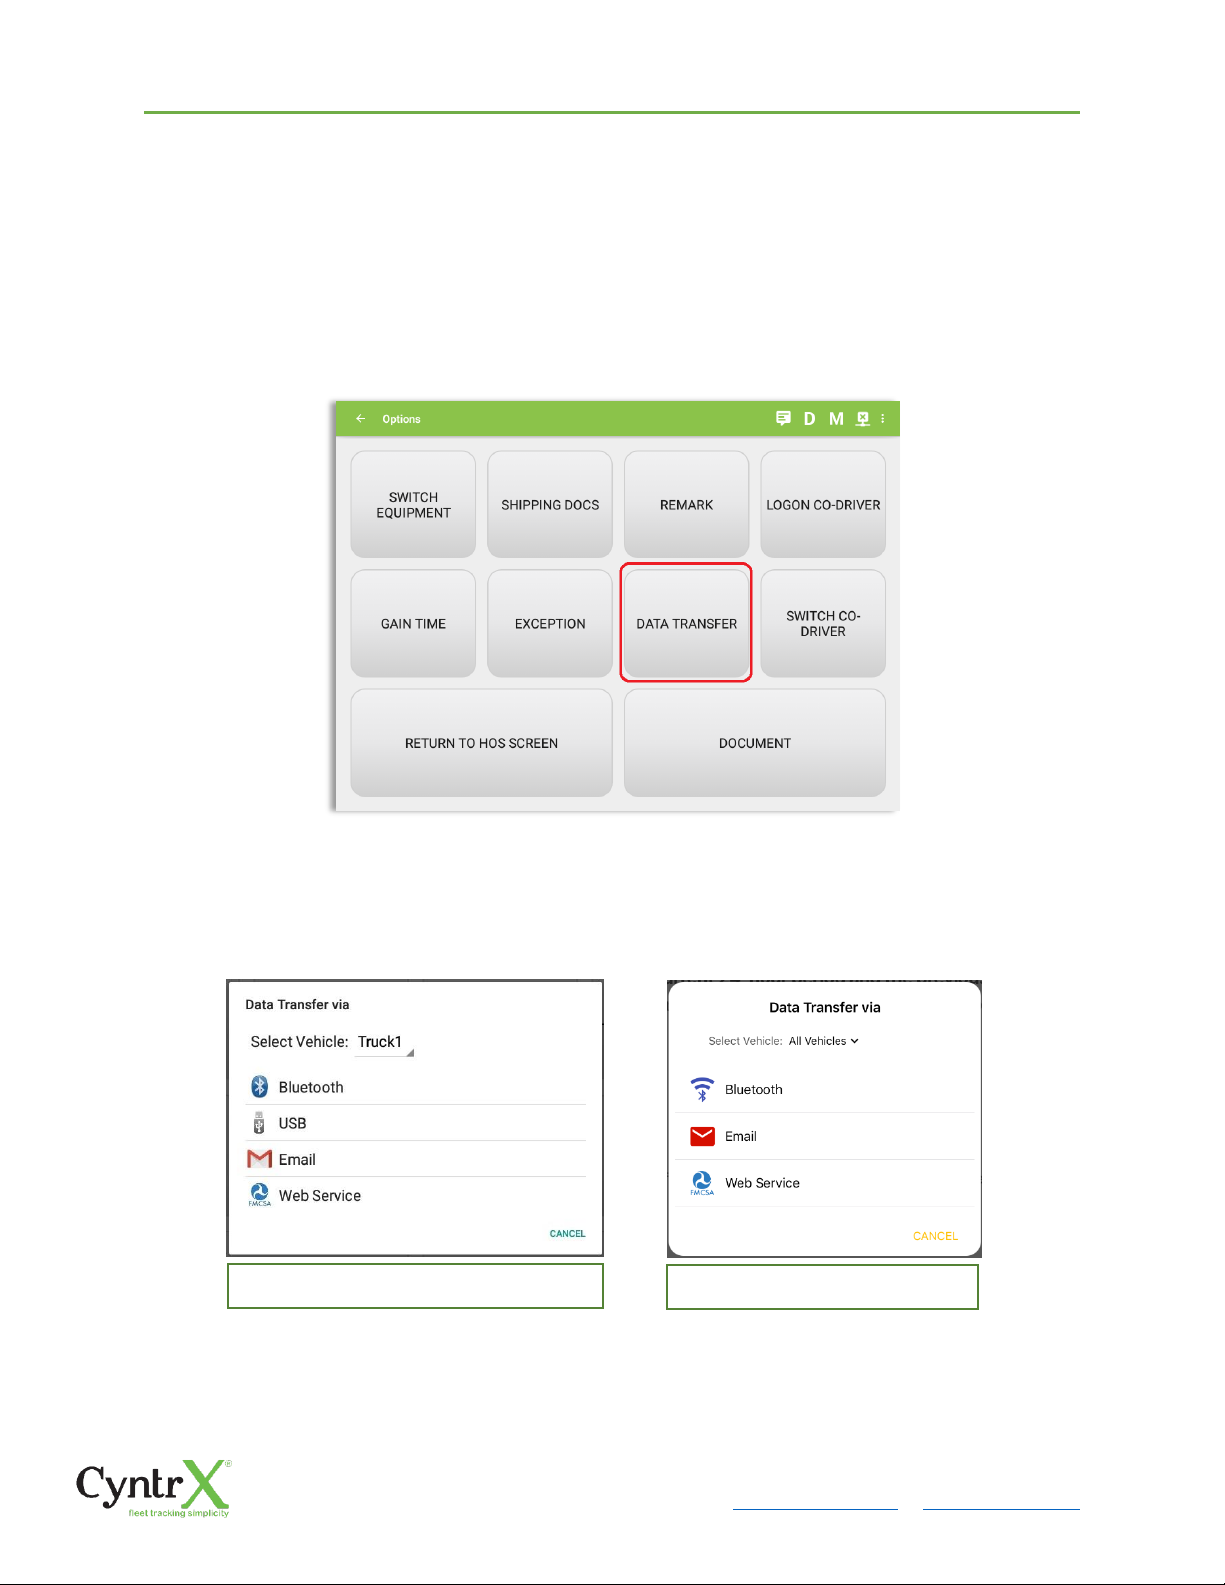
Selecting the Data Transfer button from the Options Screen will display the list of
supported data transfer options.
The ELD provides a standardized single-step compilation for the driver’s ELD records and
initiation of the data transfer to authorized safety officials when requested during a
roadside inspection.
Tap the Data Transfer button to transfer data of the compilation of the driver’s ELD
records. Once tapped, a selection of the supported data transfer options by the ELD will
prompt to the user. For iOS app, the available data transfer services are thru Bluetooth,
Email and Web Services only.
• Select Vehicle - this option enables the ELD to produce a data file or a series of
data files of ELD records for a subset of its vehicles used by the driver.
Android app Data Transfer options
iOS app Data Transfer options
Page 33
CyntrX
Page 33
920-338-0479 | [email protected]| www.CyntrX.com
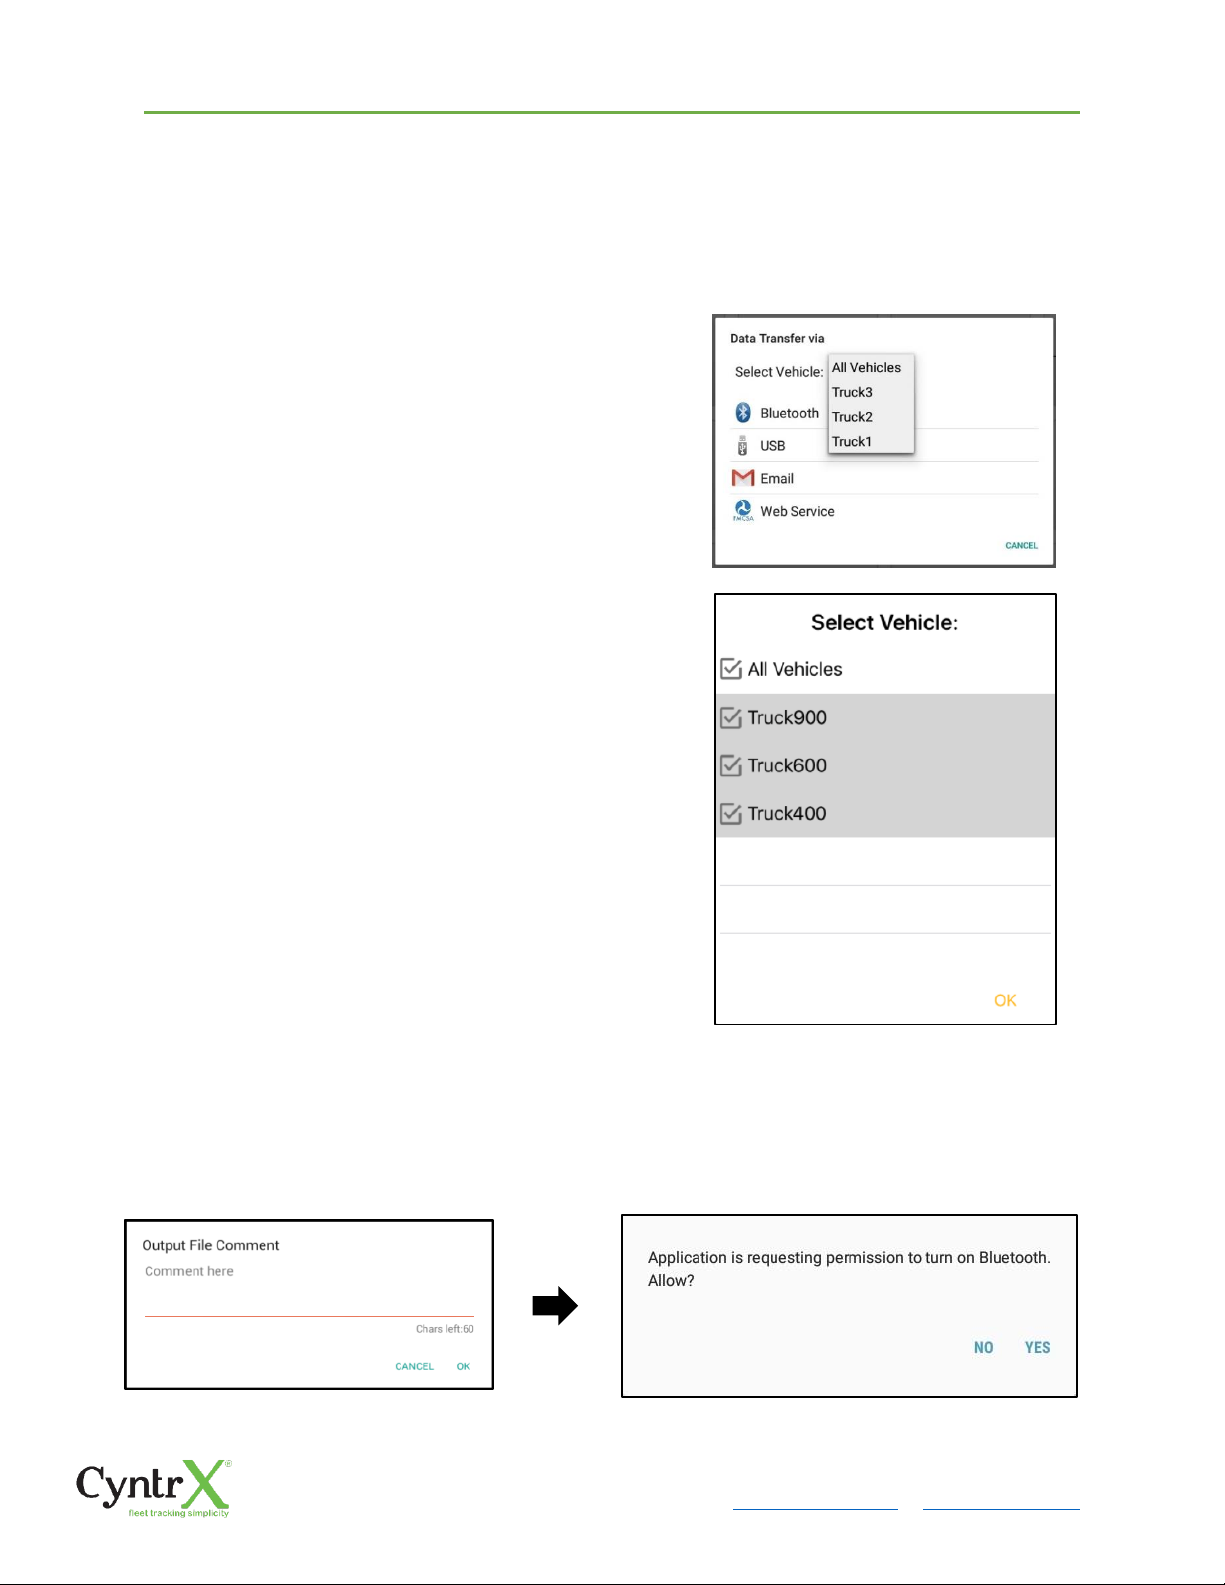
Tap the Select Vehicle menu to show the list of vehicles used by the driver.
The ‘All Vehicles’ option will only display on the list when the driver has already driven
multiple vehicles for the day.
For Android app, list of vehicle/s are displayed in
drop down list which allows to select a specific
vehicle or ‘All Vehicles’ in Data Transfer.
For iOS app, list of vehicle/s are displayed in
checkboxes. The app allows to select specific
vehicle(s) to be included in ELD output file. The list
of vehicles displayed are the vehicles that the driver
used within the current cycle.
Select or deselect a vehicle by tapping the checkbox
button. Tap OK button to save selection.
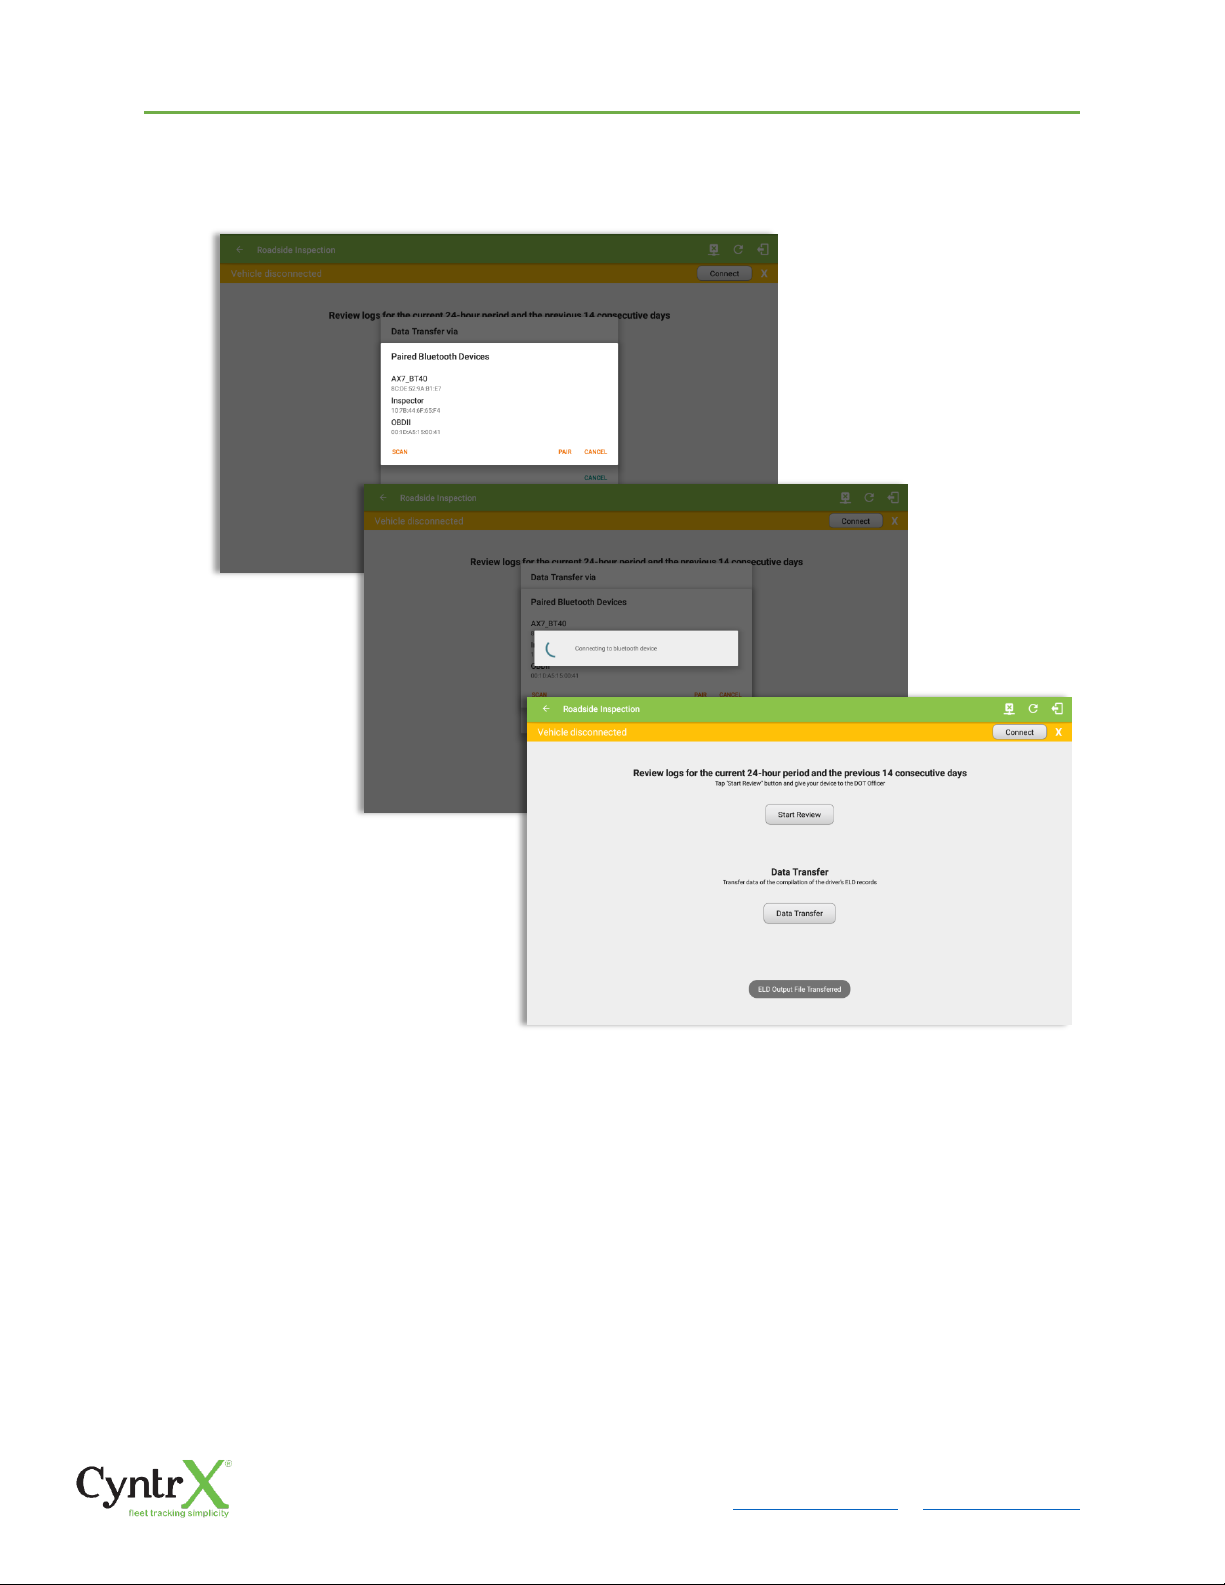
• Transfer via Bluetooth Tethering - this option enables the user to transfer files
through Bluetooth tethering. The ELD prompts for an output file comment which
the driver may enter (optional). After the input, if Bluetooth is not yet turned on,
a prompt will appear asking you to turn it on.
Page 34
CyntrX
Page 34
920-338-0479 | [email protected]| www.CyntrX.com
You will then be asked to pick the device to which the ELD output file will be
transmitted via Bluetooth tethering.
After the data transfer process is successful, a toast message will then display at
the bottom stating that the ‘ELD Output File Transferred’.
Page 35
CyntrX
Page 35
920-338-0479 | [email protected]| www.CyntrX.com
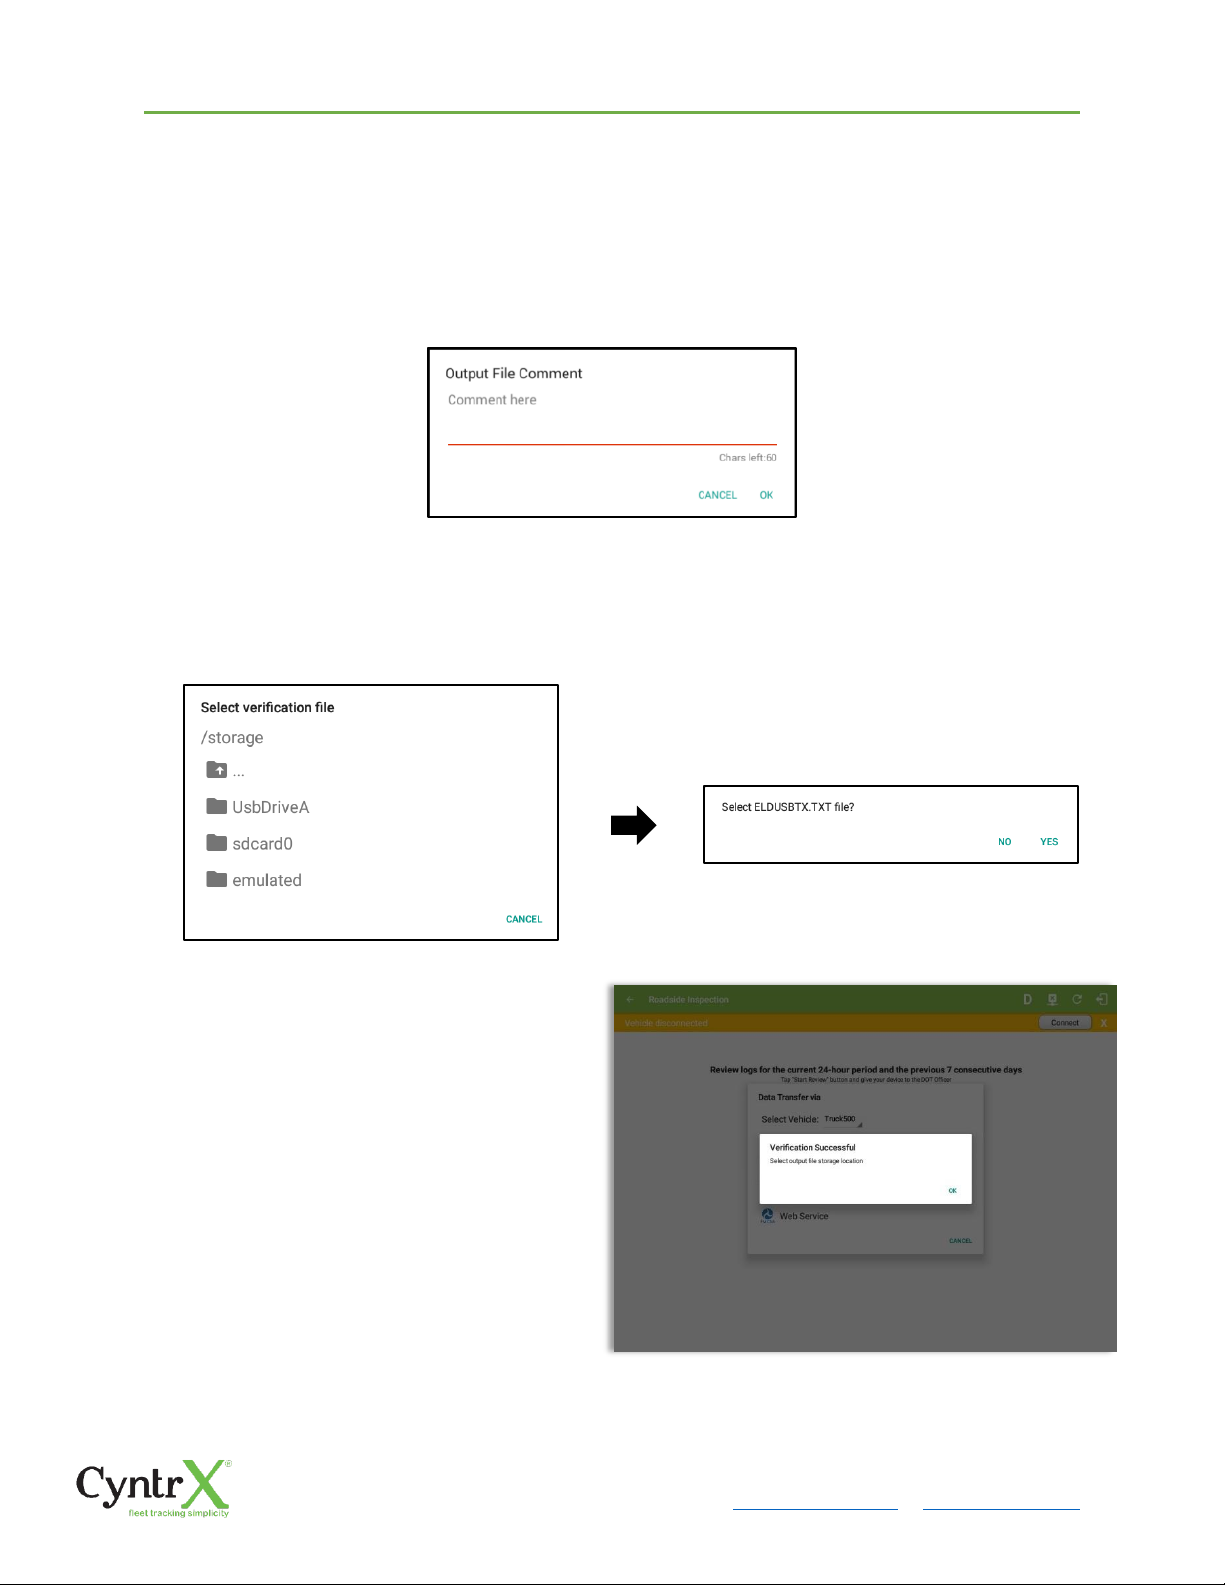
• Transfer via USB (Android Only) - this option enables the user to transfer files
through USB (external devices).
After selecting a data transfer option, the ELD prompts for an output file comment
which the driver may enter (optional). The ELD accommodates the entry of an
output file comment up to 60 characters long.
Prior to saving the driver’s ELD file to an external storage/device, the ELD must
read a verification text file from the USB device provided by the Authorized
Safety Officials. This can be done by selecting the path where the verification file
is located on the Safety Official’s USB device.
If the verification process is
successful, a ‘Verification
Successful’ dialog will display.
Page 36
CyntrX
Page 36
920-338-0479 | [email protected]| www.CyntrX.com
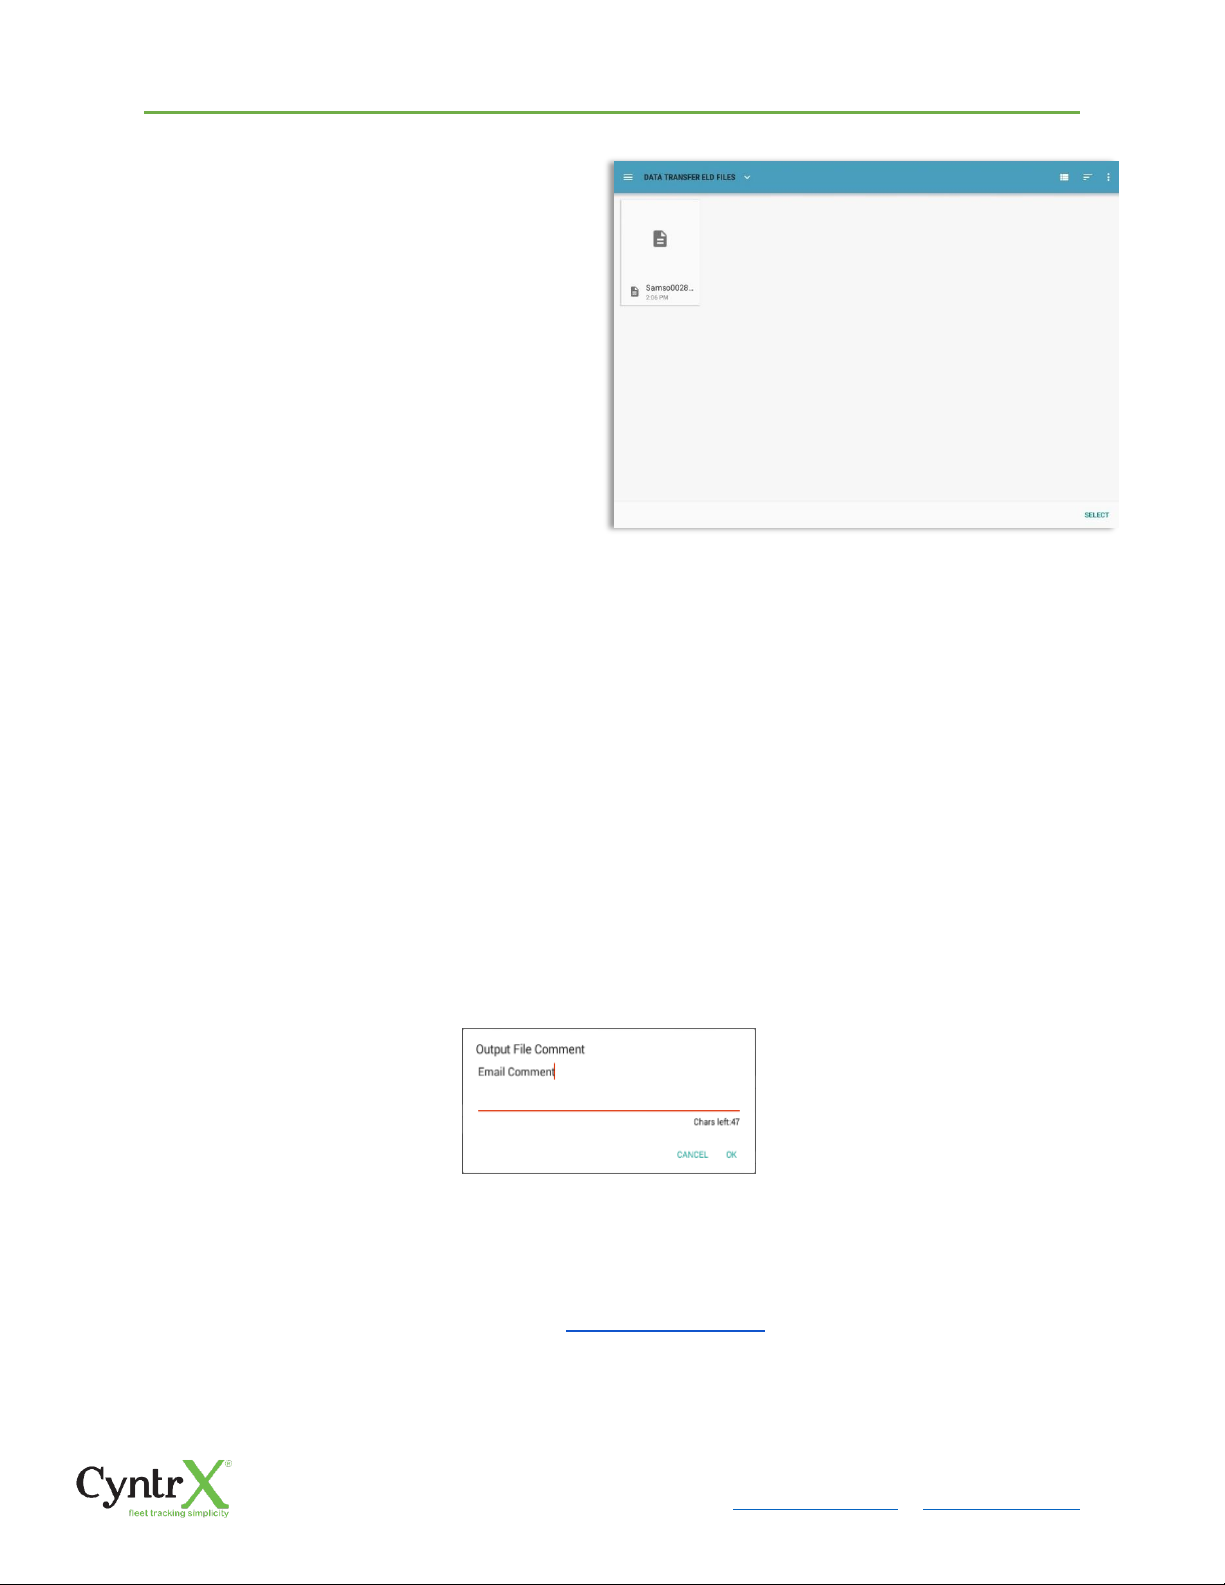
Once ‘OK’ button is tapped, then
the driver can now select on
where to save the ELD file.
Upon confirmation, the ELD generates the compliant output file and performs the
data transfer. A toast message will display at the bottom stating that the ‘ELD
Output File Transferred’.
Note: You cannot transfer a file via USB when the verification file on the device is not the same
as the verification file on the inspector’s USB drive. If this issue occurs a toast message will
display stating ‘Invalid verification file’.
• Transfer via Email - this option enables the user to transfer files through email.
The ELD output file transferred is encrypted using AES-256 in FIPS Publication
197. Before sending, the ELD prompts for an output file comment which the
driver may enter (optional).
After the data transfer process is successful, a toast message will then display at
the bottom stating that the ‘ELD Output File Transferred’.
Note: Data transfer via email is sent to [email protected].
Page 37
CyntrX
Page 37
920-338-0479 | [email protected]| www.CyntrX.com
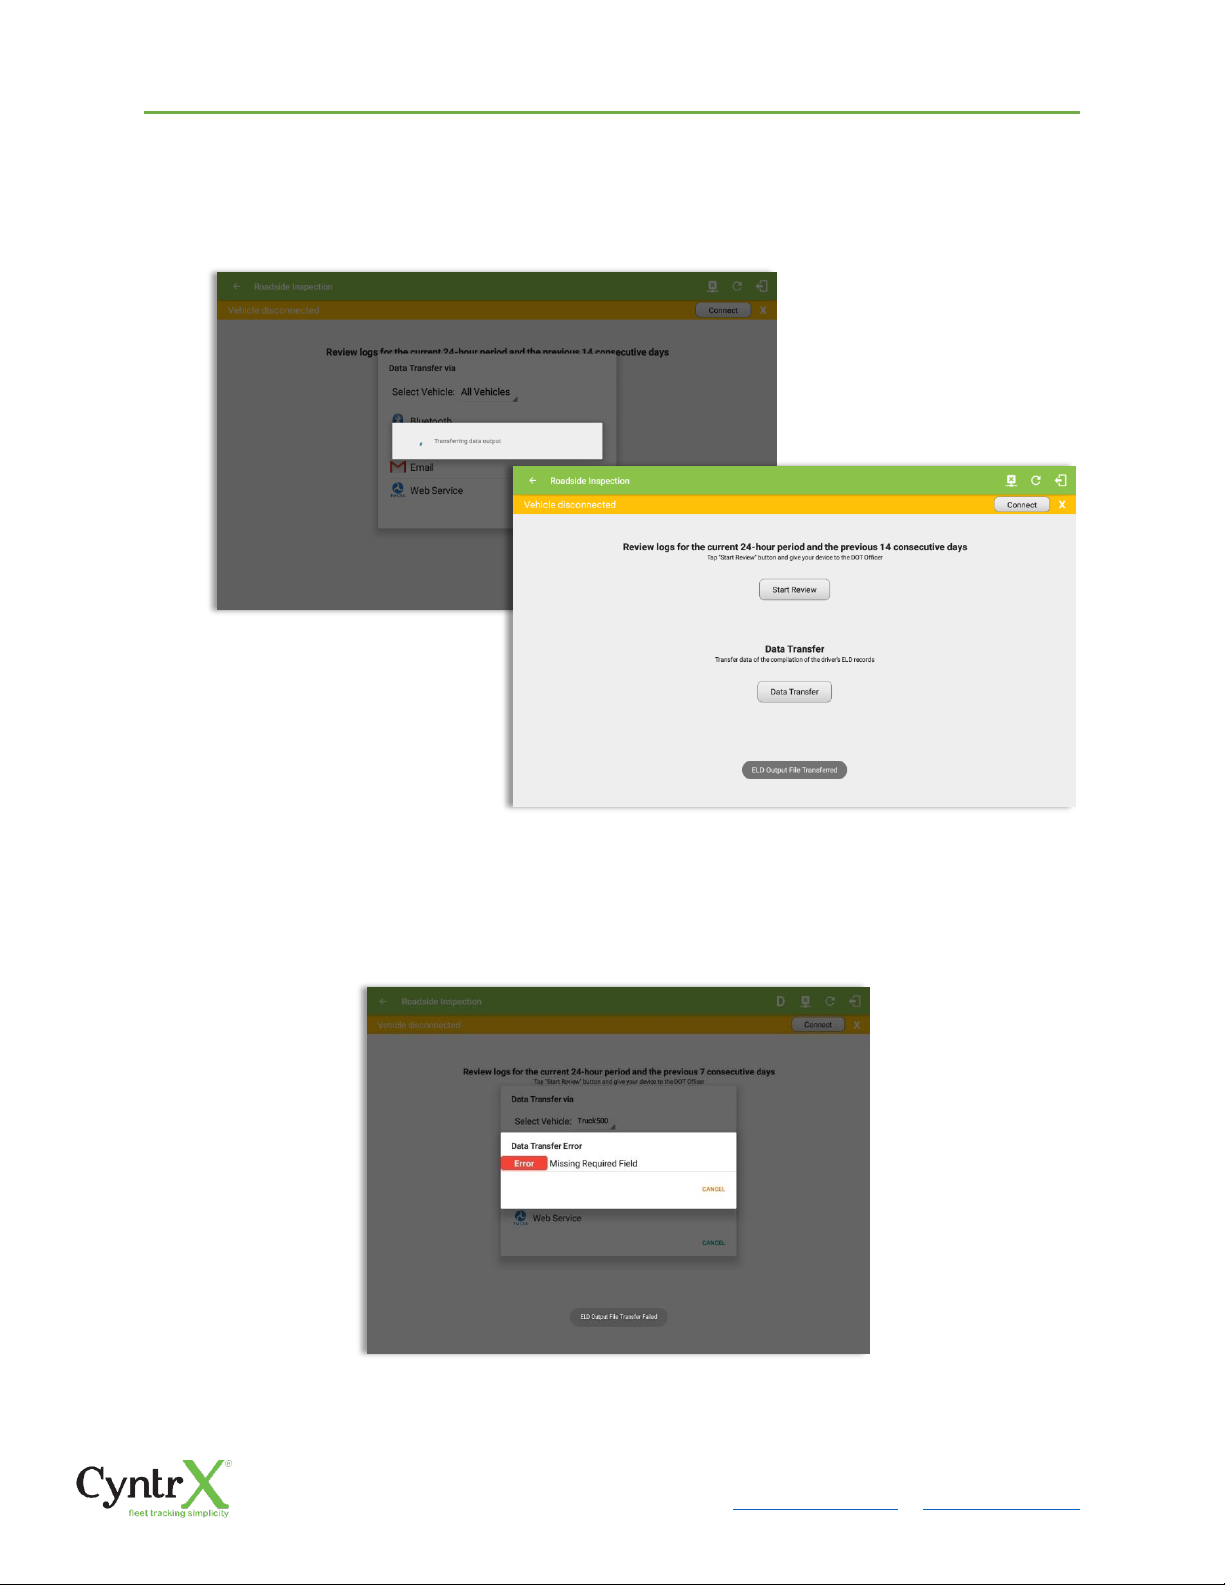
• Transfer via Web Service - this option enables the user to submit ELD output
files, and verify that the ELD’s certificate, ELD Identifier, and Registration ID are
still valid.
After the data transfer process is successful, a toast message will then display at
the bottom stating that the ‘ELD Output File Transferred’. When the selected
vehicle has an invalid information then a dialog will display with an error
message.
Page 38
CyntrX
Page 38
920-338-0479 | [email protected]| www.CyntrX.com
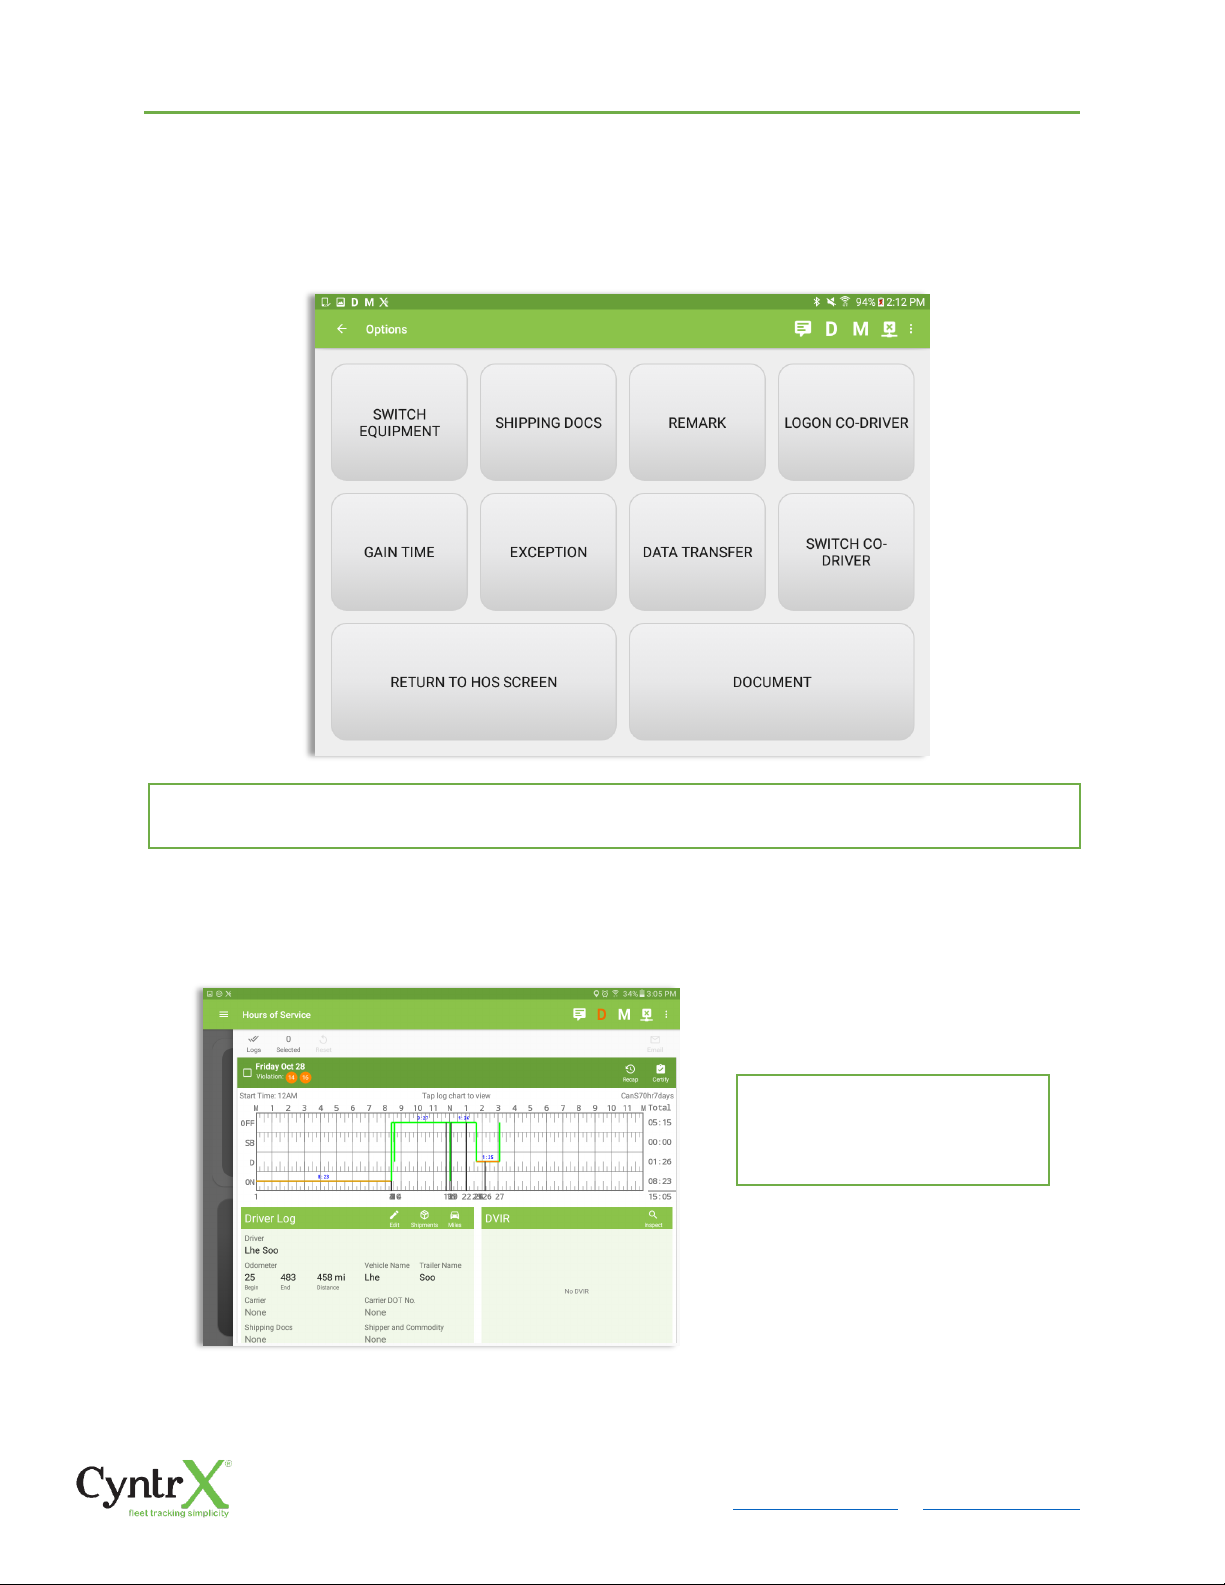
3.6 Options
Selecting the Options button from the HOS Main Screen will display the Options
module:
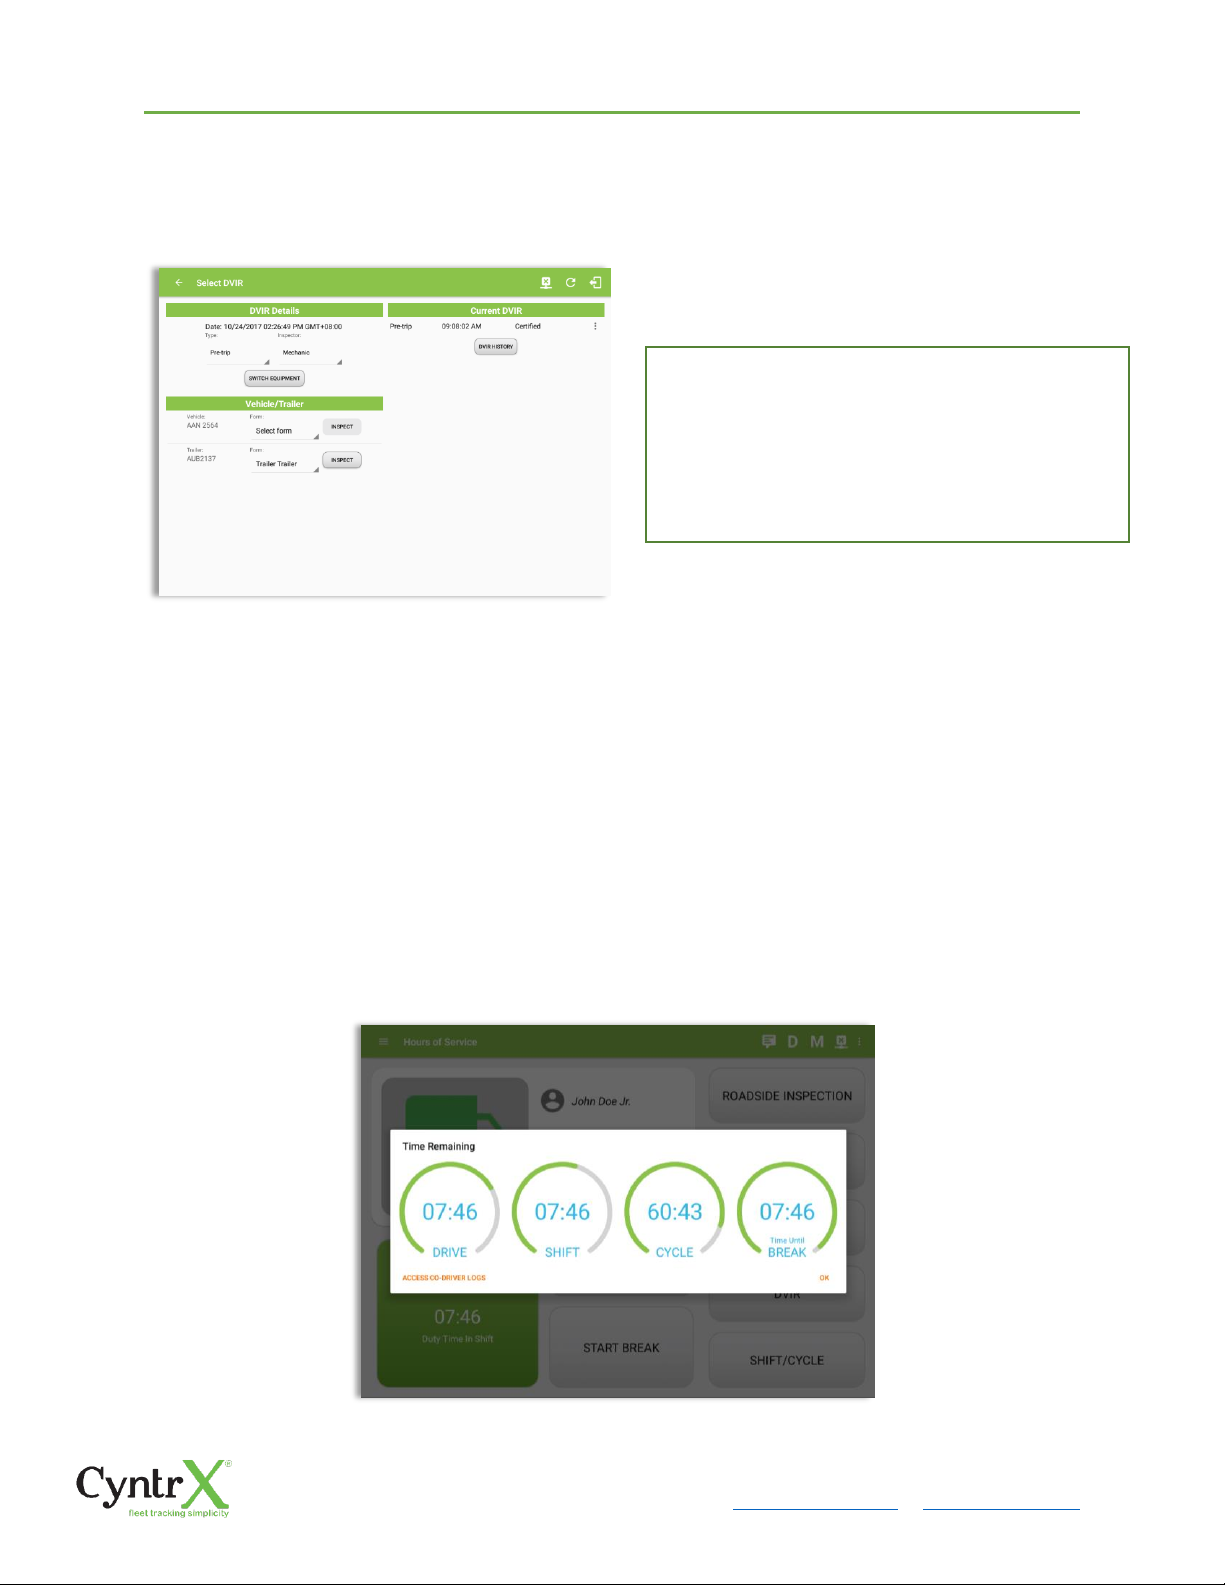
3.7 Logs
Selecting the Logs button from the HOS Main Screen will display the current days log
and provide the ability to navigate backwards to view the previous seven logs:
The functions within the Options module will be covered in more detail throughout this document.
Scroll the screen to view all of
the information, or, tap the log
grid to view the log events.
Page 39
CyntrX
Page 39
920-338-0479 | [email protected]| www.CyntrX.com
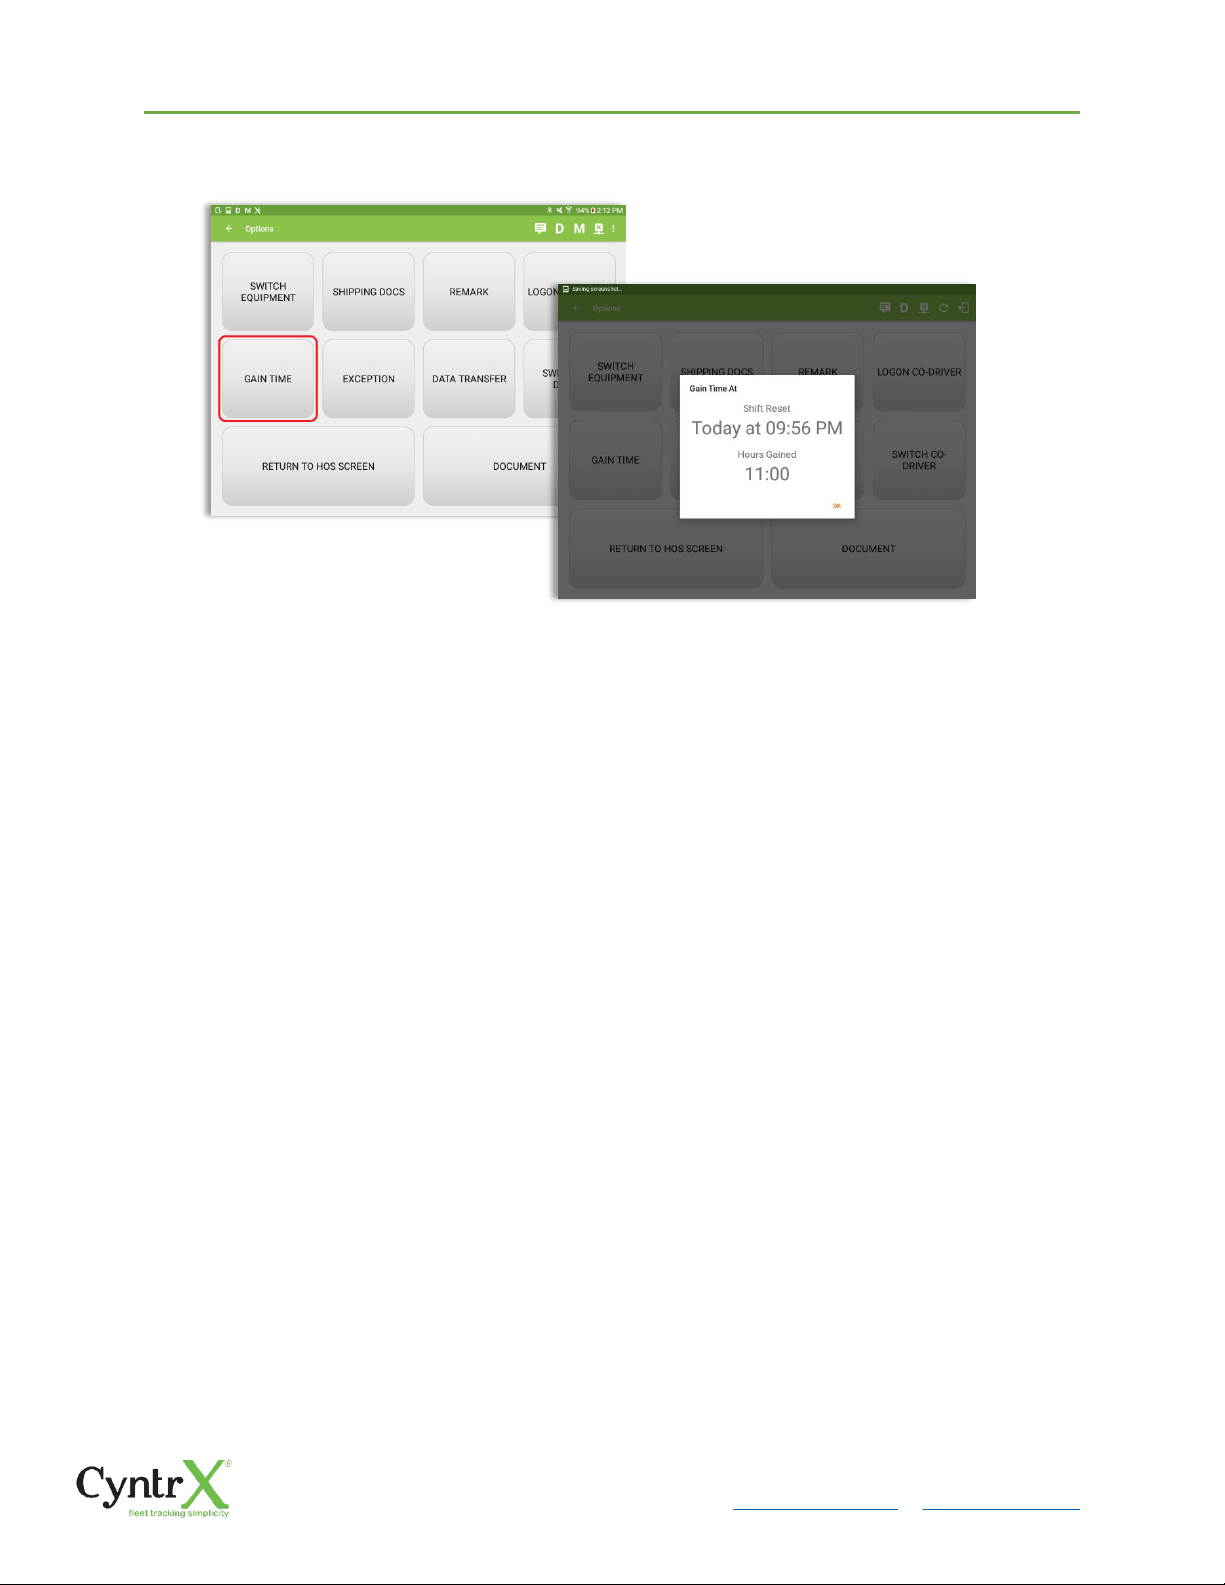
3.8 DVIR
Selecting the DVIR button from the HOS Main Screen will display the Select DVIR screen:
Note:
• When switching the vehicles, the equipment’s will be displayed along with their associated
forms. Changing the forms used will pop up a message dialog stating “Are you sure you want to
use a different form?” with a ‘Cancel’ or ‘Ok’ button.
• Highlighted text only displays when conducting an inspection for the first time and that no DVIR
forms are associated to the current equipment used.
3.9 Shift/Cycle
Selecting the Shift/Cycle button from the HOS Main Screen will display the total work
hours of the driver’s current work shift and the total working hours that the driver can
legally accumulate over a certain cycle or a consecutive multi-day period:
• DVIR can be created to suit the vehicle
types, all DVIRs will be displayed on this
screen.
• DVIR History can be viewed by tapping the
DVIR History button in the DVIR screen.
Page 40
CyntrX
Page 40
920-338-0479 | [email protected]| www.CyntrX.com
4 Check Driver Availability
From the Hours of Service Main Screen, tap the Options button and then tap the Gain
Time button, this will then display a date & time of when the driver will gain his/her
maximum hours.
5 Driver Logs
The Driver Logs allows you to view and update the electronic recording of your duty
status events in the HOS app’s online driver logs. This is where you also store shipment
data, send the certified logs to its intended recipients and manage other driving duty
information.
Page 41
CyntrX
Page 41
920-338-0479 | [email protected]| www.CyntrX.com
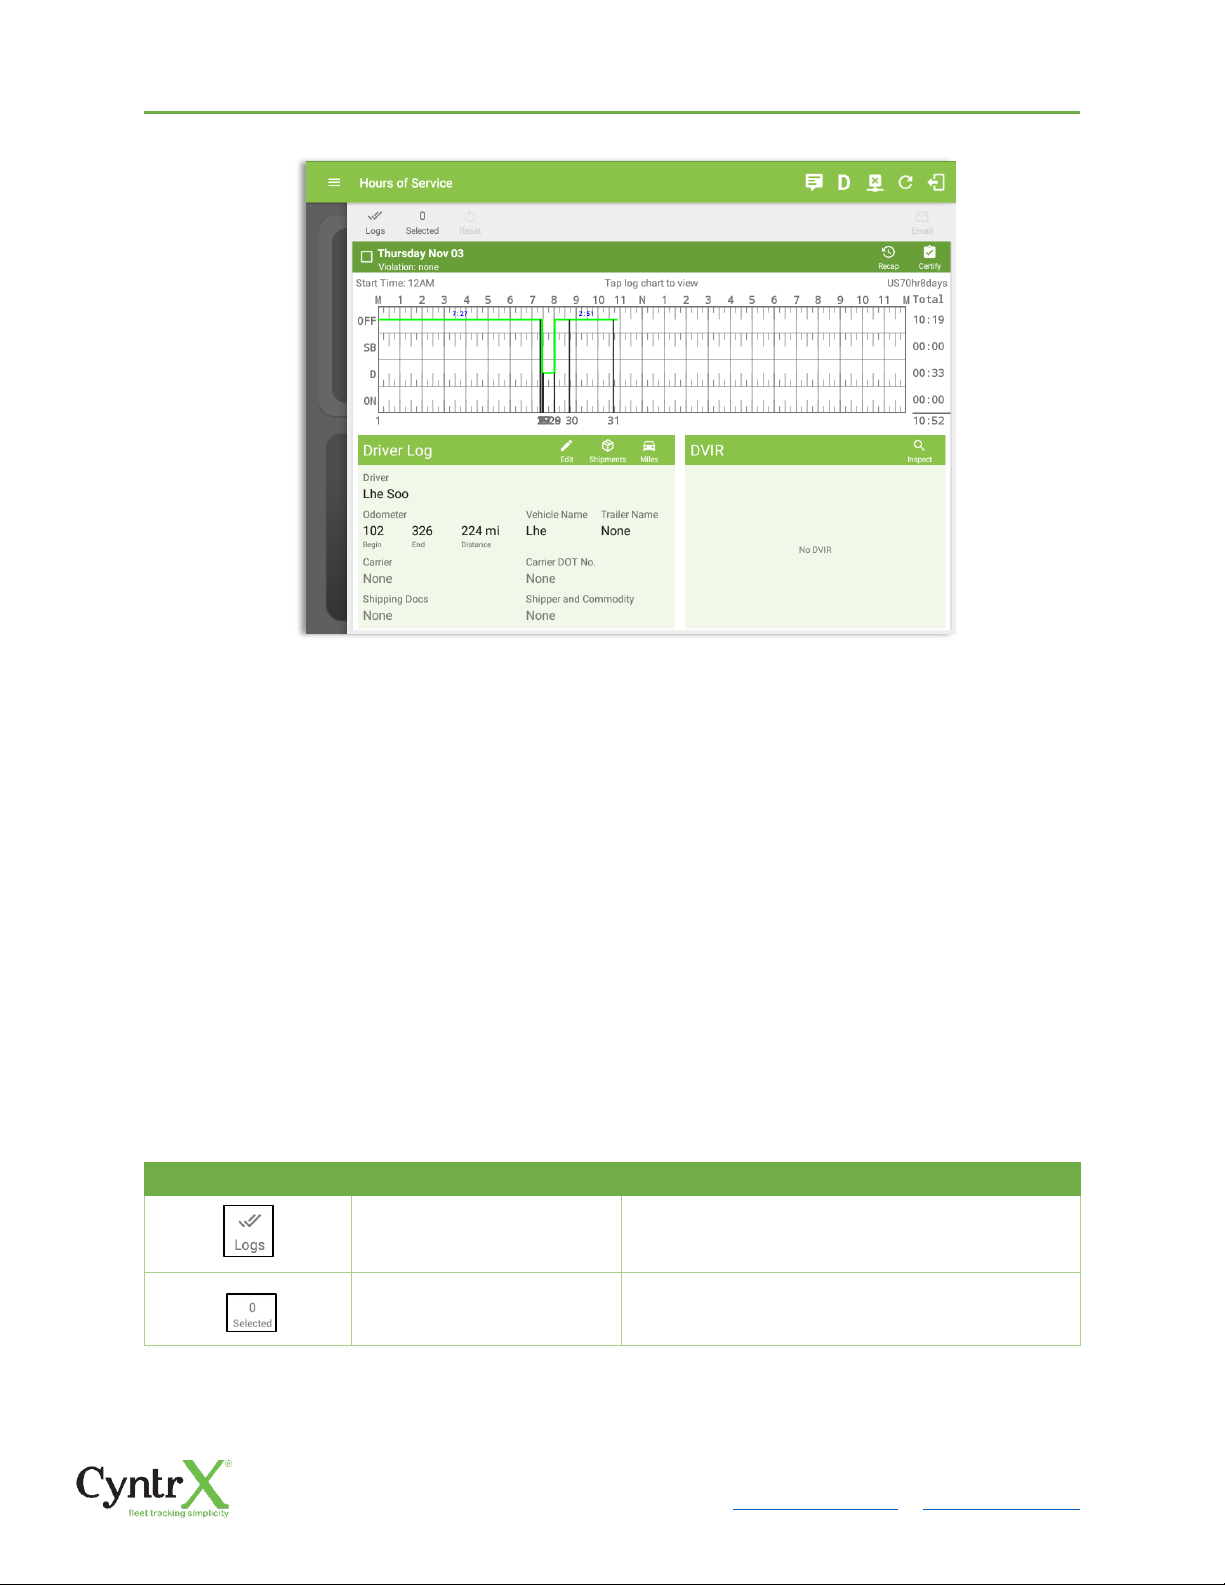
Scroll the screen to view all of the information, or, tap the log grid to view the log
events. The daily log for the current day will be in expanded view by default. The daily
driver logs for the previous days will be in collapsed view.
To expand or collapse a daily log, tap the Collapsible Menu Header
Cycles and the Start Hour time used are also shown in the Log, it is found on the upper
right corner just above the Grid Chart.
5.1 Using the Driver Logs Bulk/ Multiple Selection Functions
The first part of the Driver Logs user interface feature controls and information for the
bulk/multiple selection features. These controls will allow you to perform features for
multiple selected driver logs.
Function icon
Function
Description
Selection Button
Tap the button to select all certified logs
Selected Logs Counter
This shows the number of selected
certified driver logs
Page 42
Reset Button
This clears/deselects all of the selected
driver logs
5.2 The Driver Logs Accordion Header Features
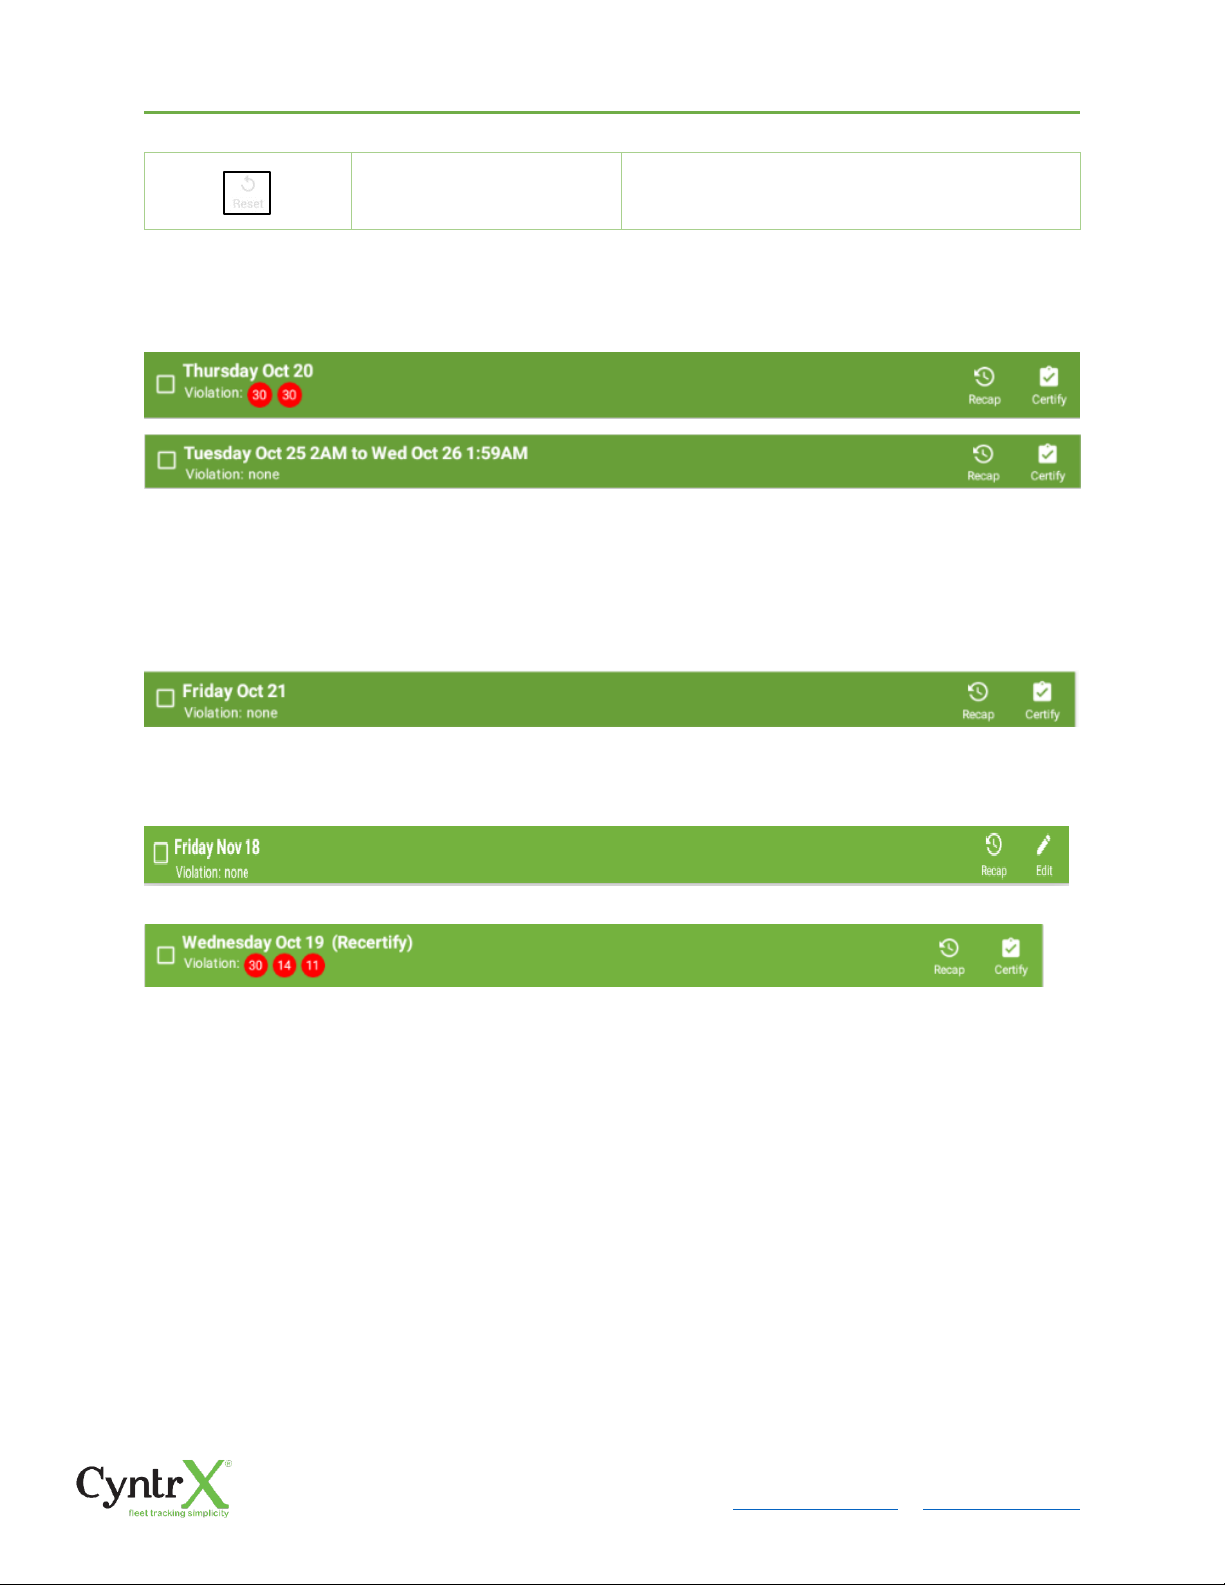
To expand or collapse a daily log, tap the Driver Logs Accordion/Collapsible Menu
Header:
Note: Driver Logs title shows the full time range when the Start Hour time is not zero. You can change
the time by going to Settings > HOS Preferences
5.2.1 Daily Driver’s Log Entry Check-box (Uncertified Log)
Tap the check-box to certify the selected daily log:
5.2.2 Daily Driver’s Log Entry Check-box (Already Certified)
Tap the check-box to uncertify the selected daily log:
5.2.3 Daily Driver’s Title Log (Recertify Log)
When a certified log has been edited in the portal, it prompts the driver to either accept
or reject the proposed changes through the “Edit Suggestions” dialog. Once the driver
accepts an edit request, it will display a note on the daily driver’s title log stating
“Recertify”, which indicates the log needs to be certified again in order to include the
records changes.
5.2.4 Recap
Tap the Recap button to bring up the recap information and corresponding cycle data
for the specified duty day
Page 43
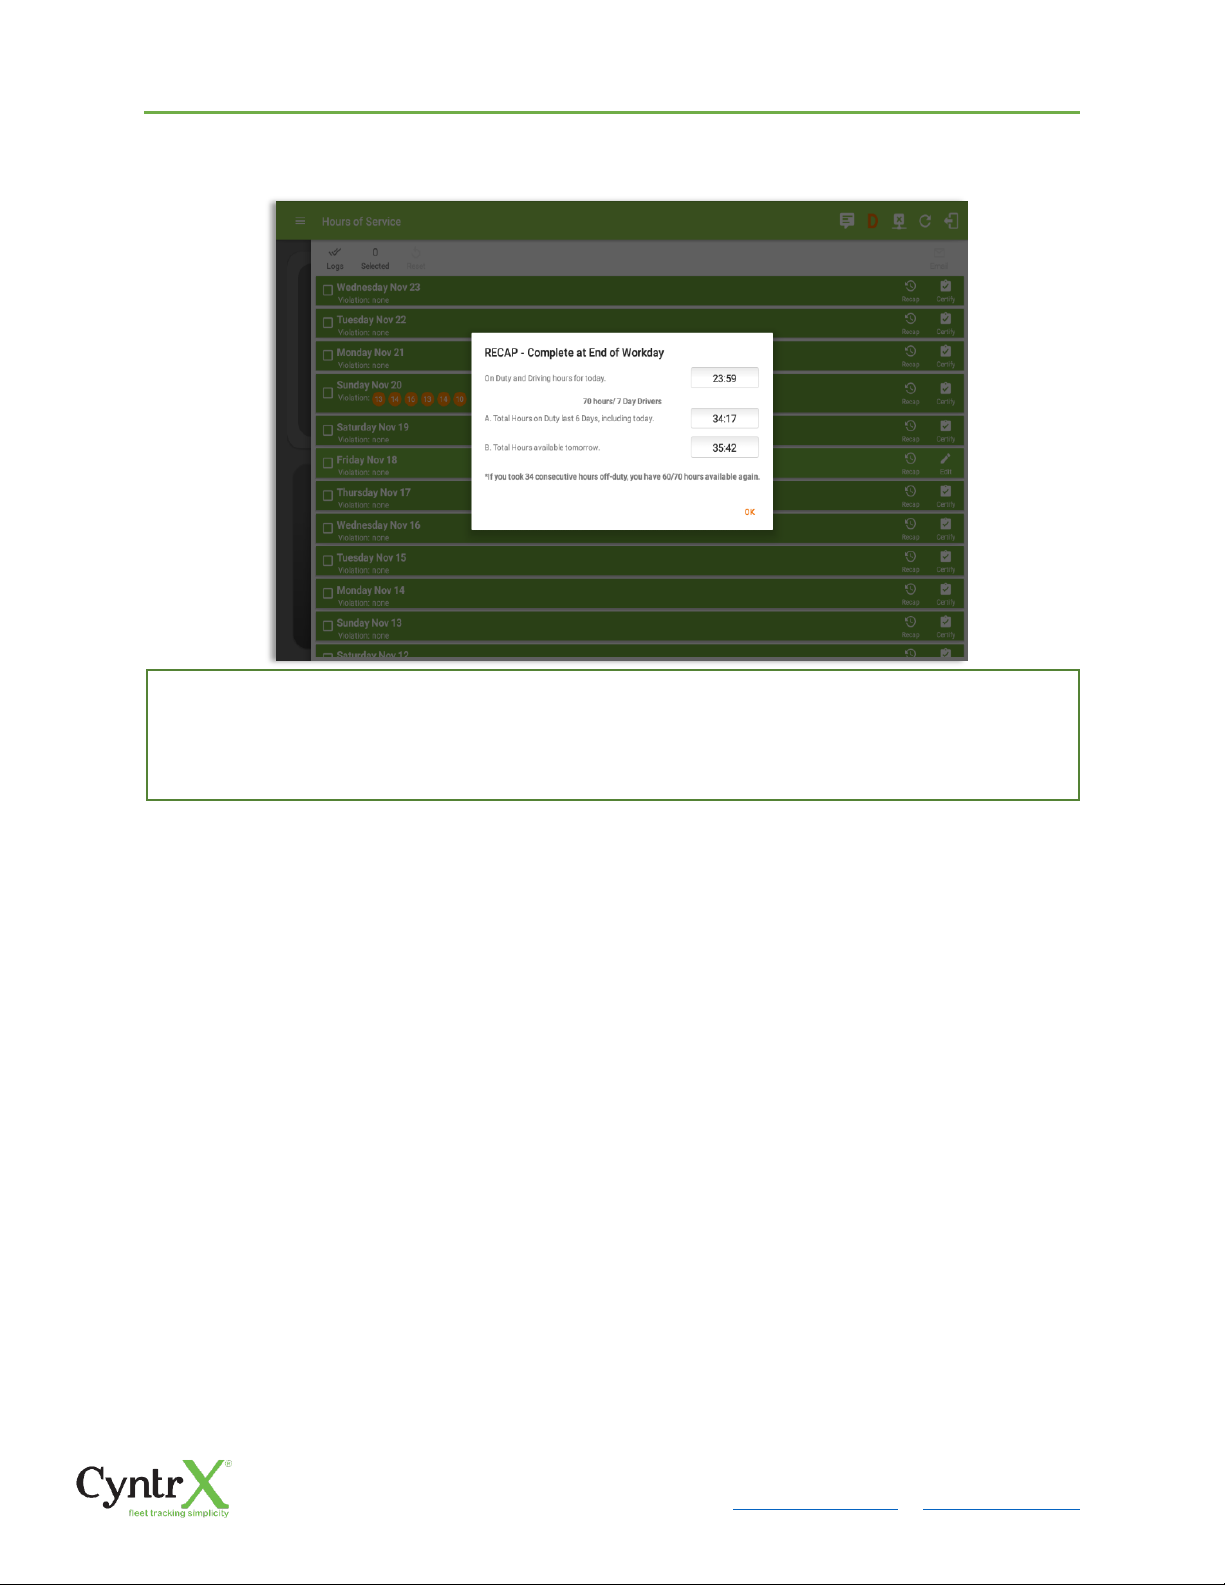
Tapping the Recap button will display a complete recap for the end of the workday including:
- On Duty & Driving Hours, - Total hours on duty last 7 days (including current day), - Total
hours available tomorrow, - Total hours On Duty last 8 days (including current day)
Page 44
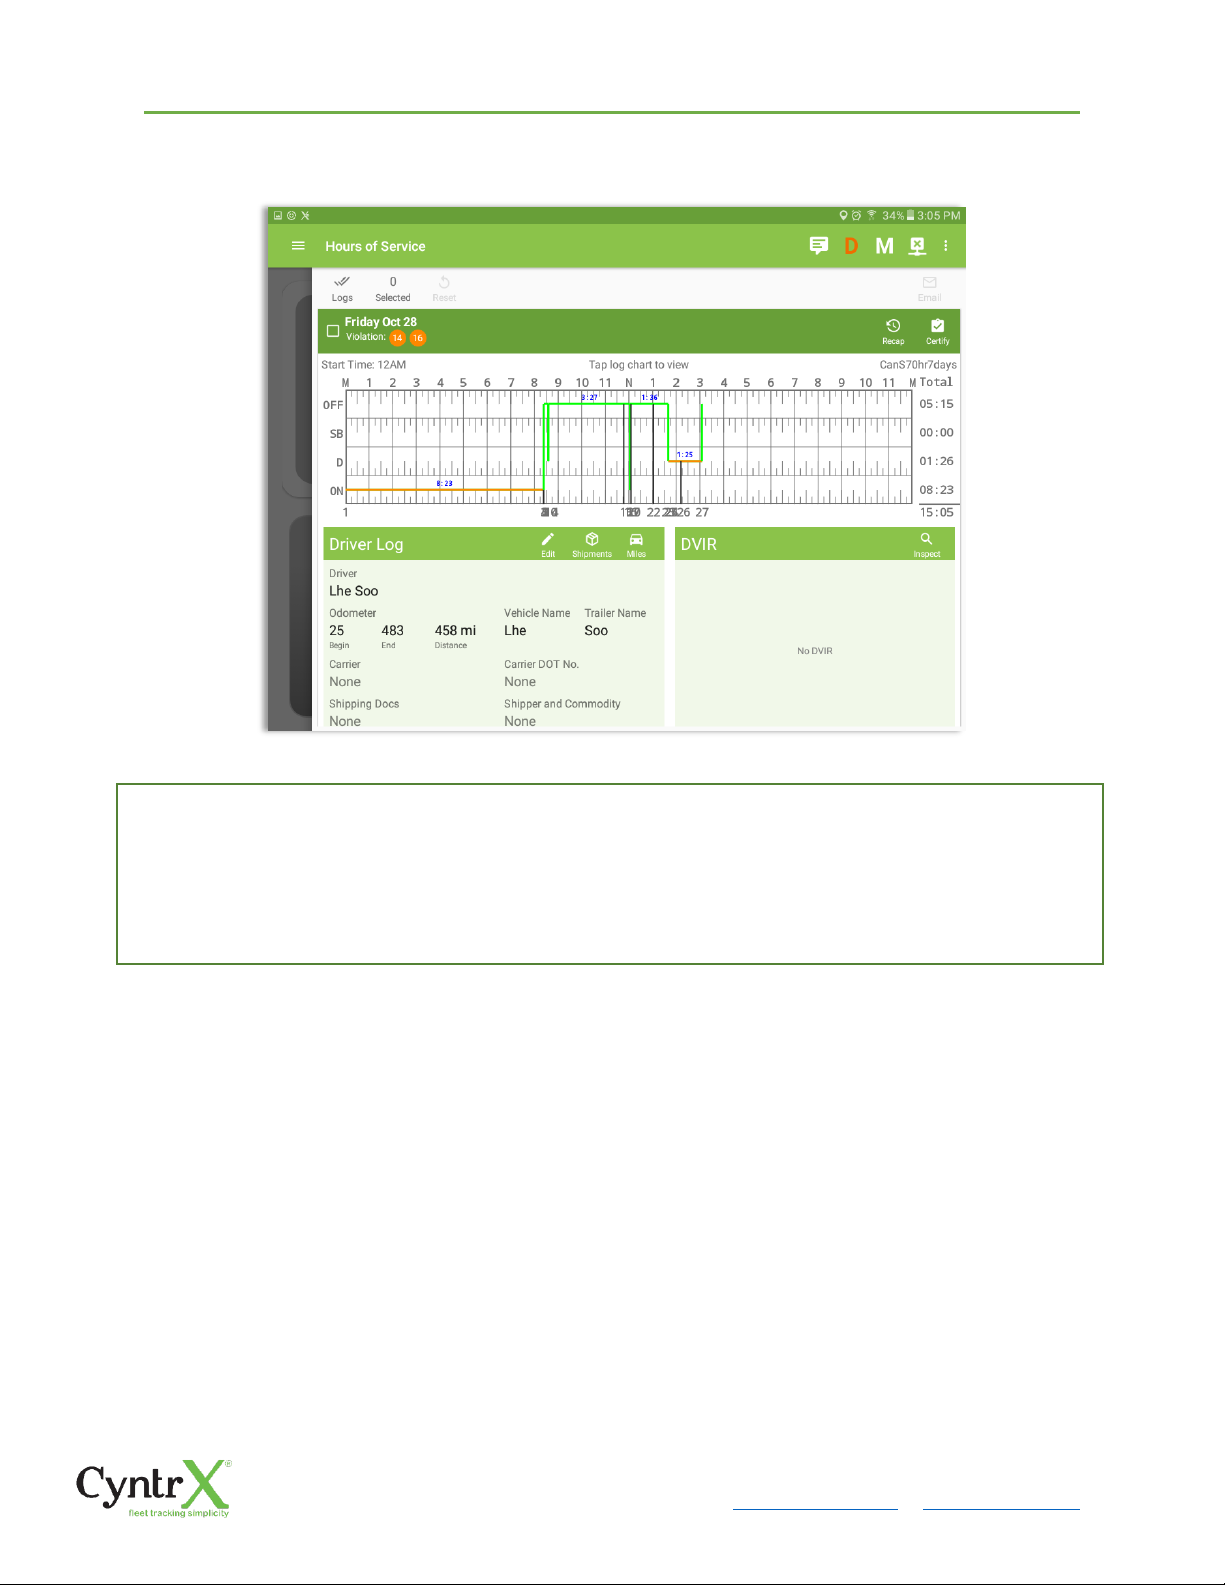
Tap the driver’s log grid to view the log events and edit the log. Scroll up/down the screen to view the Daily
Driver’s Form; this is where you can view the other required information that must appear in the driver’s daily
log. In addition, not all of the events statuses are displayed on the grid chart. Personal Use and Yard Moves are
also displayed on the grid chart as an Amber color line to be visually different with the other event statuses, a
dashed line represents the Personal Use event and a dotted line represents the Yard Moves event. The legends
for Personal Use and Yard Moves event will only display when the said events occurred.
Page 45
CyntrX
Page 45
920-338-0479 | [email protected]| www.CyntrX.com
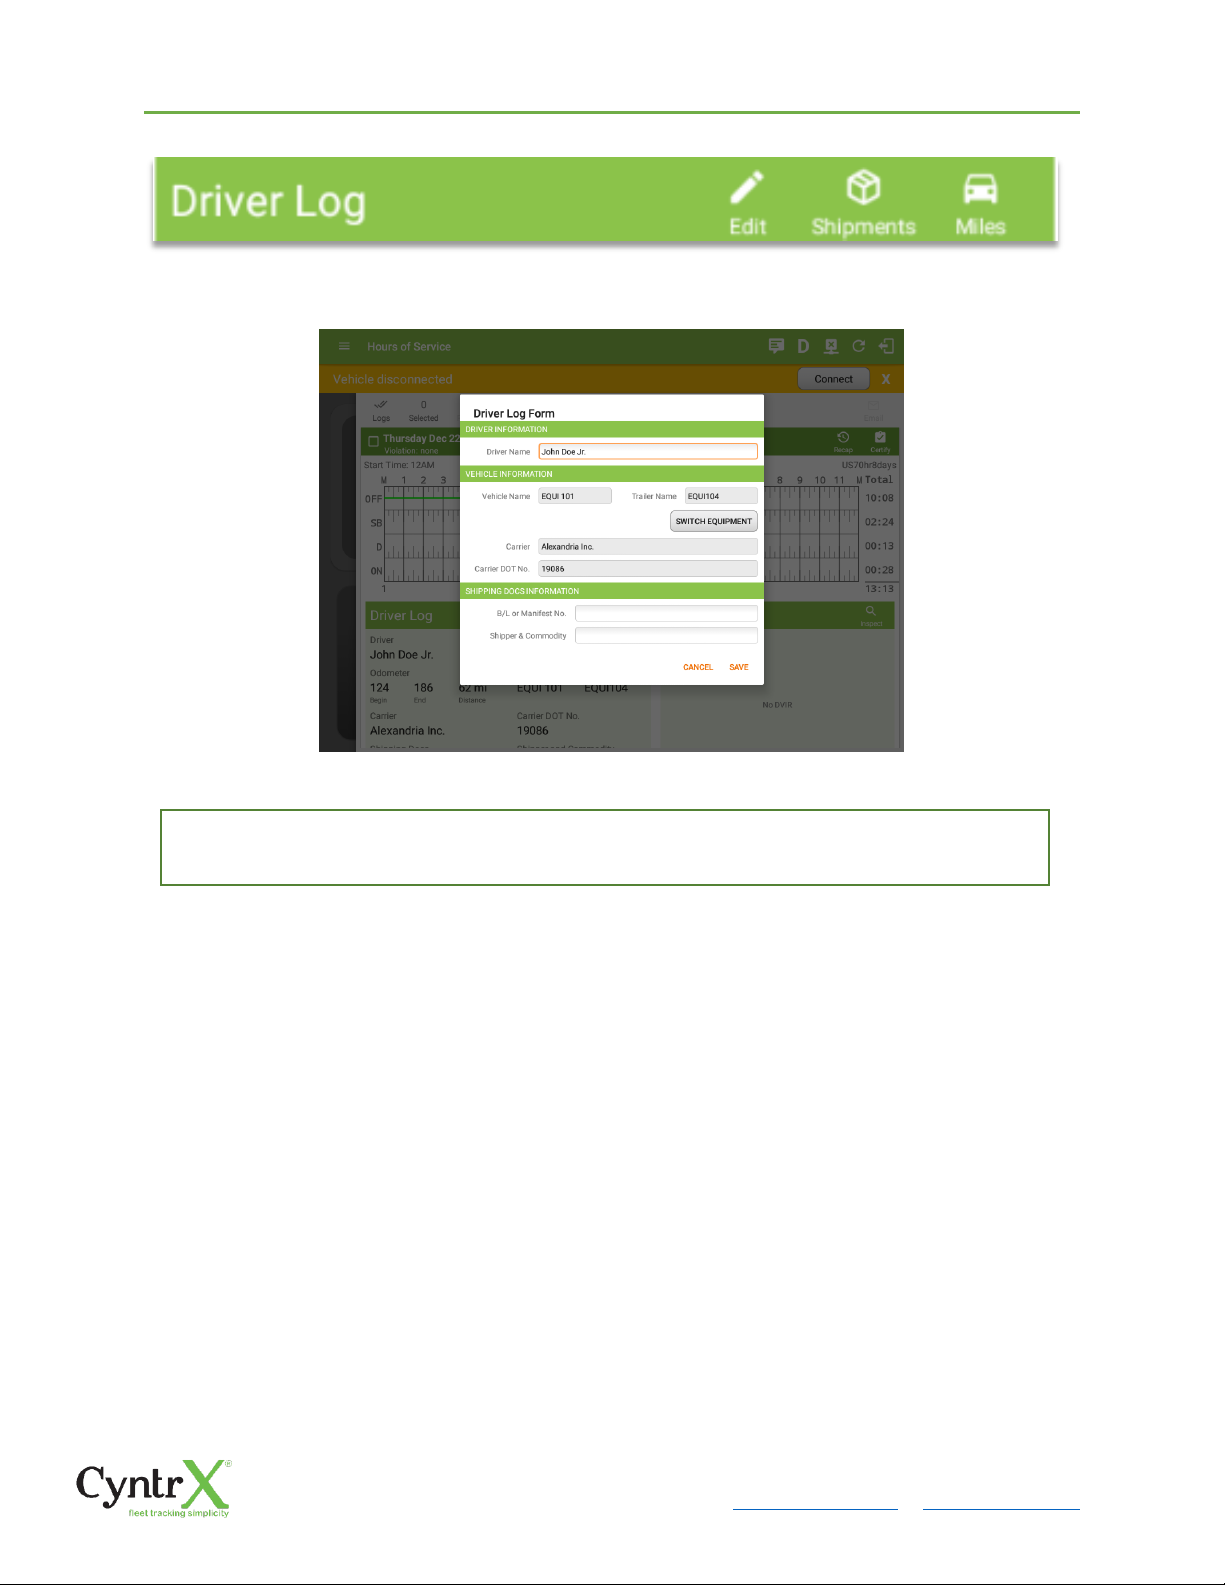
5.2.6 Edit Daily Drivers Log Form
The following information can be viewed / amended within the Daily Drivers Log Grid:
Driver Information
a) Driver Name – displays the name of the driver
b) Vehicle Information
• Vehicle Name – displays the name of the current Vehicle of the driver.
• Trailer Name – displays the name of the current Trailer of the driver.
• SWITCH EQUIPMENT – tap this button to launch the Switch Equipment dialog to
select another Vehicle or Trailer names.
• Carrier – a non-editable field which displays the Name of the Carrier.
• Carrier DOT Number – a non-editable field which displays the Carrier DOT
Number
c) Shipping Information
Tap the Edit button to open the Driver Log Form, from here. You can update the other required
information that must appear in the driver’s daily log (as listed below)
Page 46
CyntrX
Page 46
920-338-0479 | [email protected]| www.CyntrX.com
• Shipping docs – displays the bill of lading or manifest number entered by the
driver
• Shipper & Commodity – displays the shipper name and the type of commodity
which the shipment contains
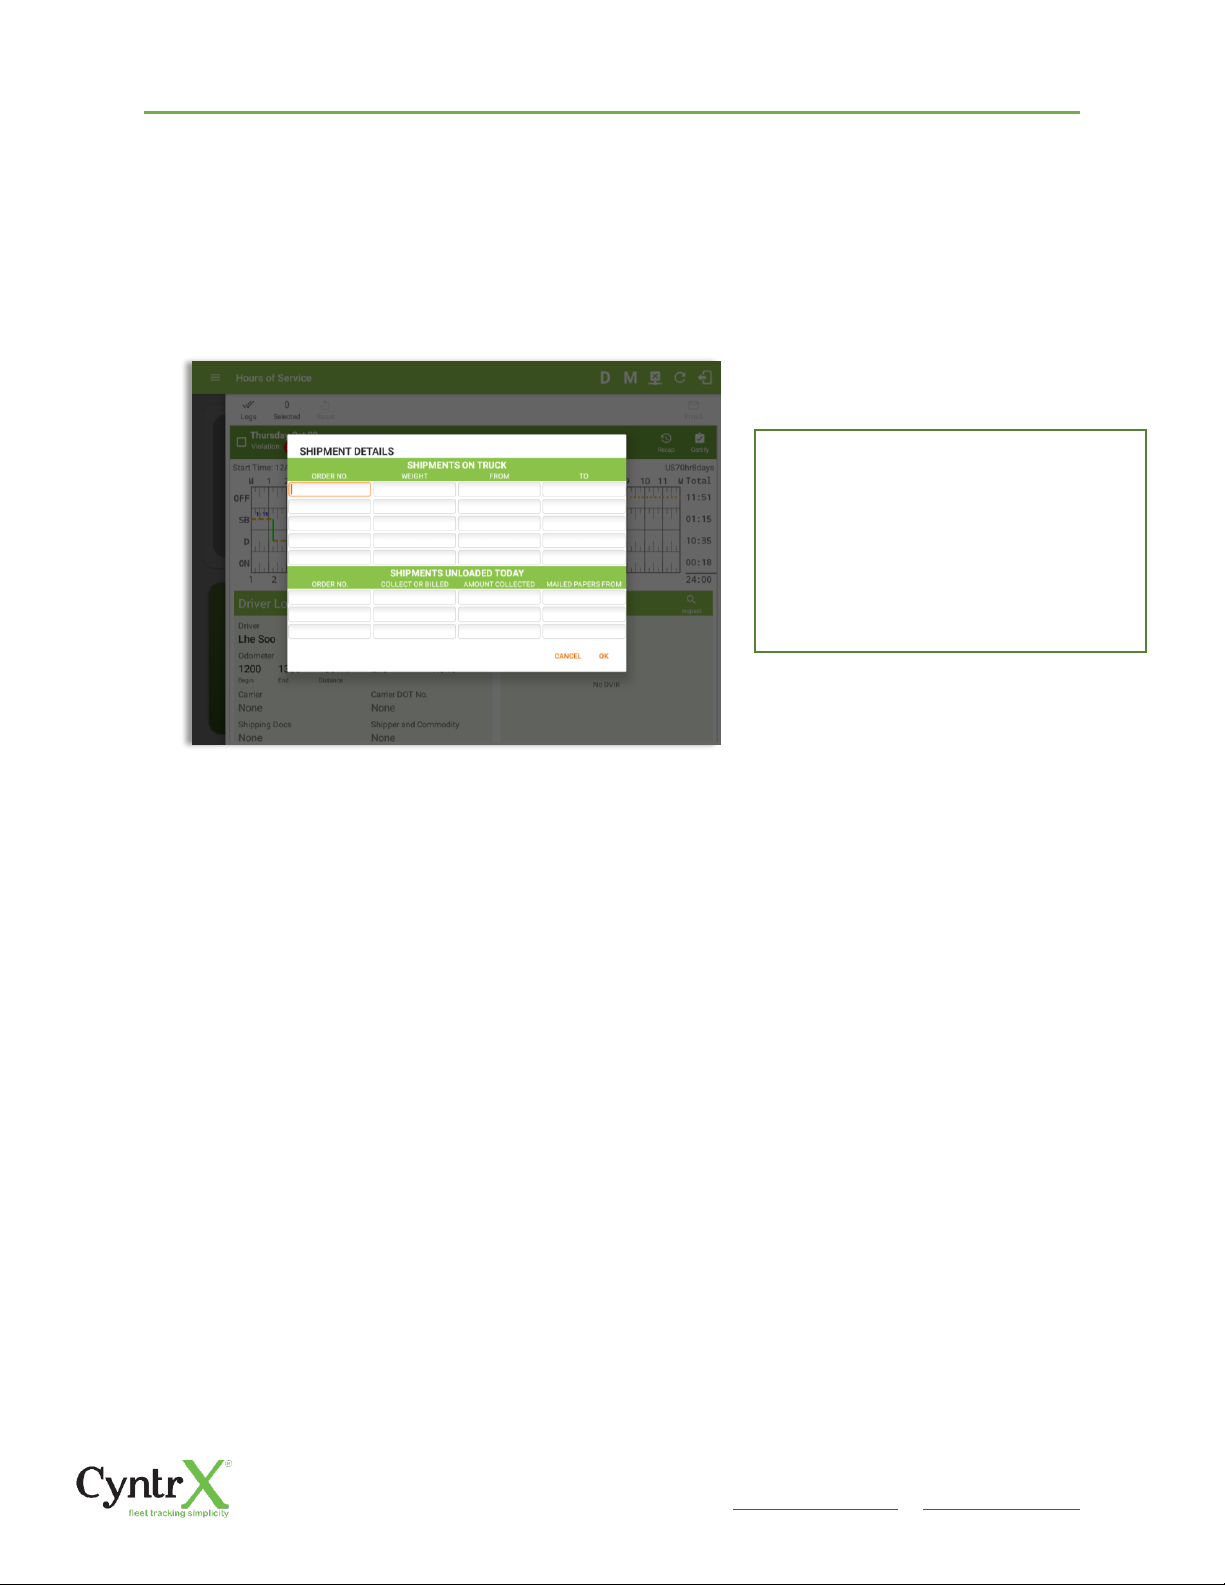
5.2.7 Shipment Details
Data that can be included within the Shipment Details Form includes:
Shipments on Truck
• Order Number – the order number of the specific shipment item
• Weight – the weight of the shipments
• From – the point of origin of the commercial motor vehicle
• To – the destination of the commercial motor vehicle
Shipments Unloaded Today
• Order Number – the order number of the specific shipment item
• Collected or Billed – the preferred payment method
• Amount Collected – the amount collected for the shipment
• Mailed Papers From – the name of the shipment company where the shipping
related documents are from
Tap the Shipments button to open the
Shipment Details Form; you can fill in
the shipment data that is
to be included in the driver’s daily log.
Note: The data that can be included in
this form is listed on the next page.
Page 47
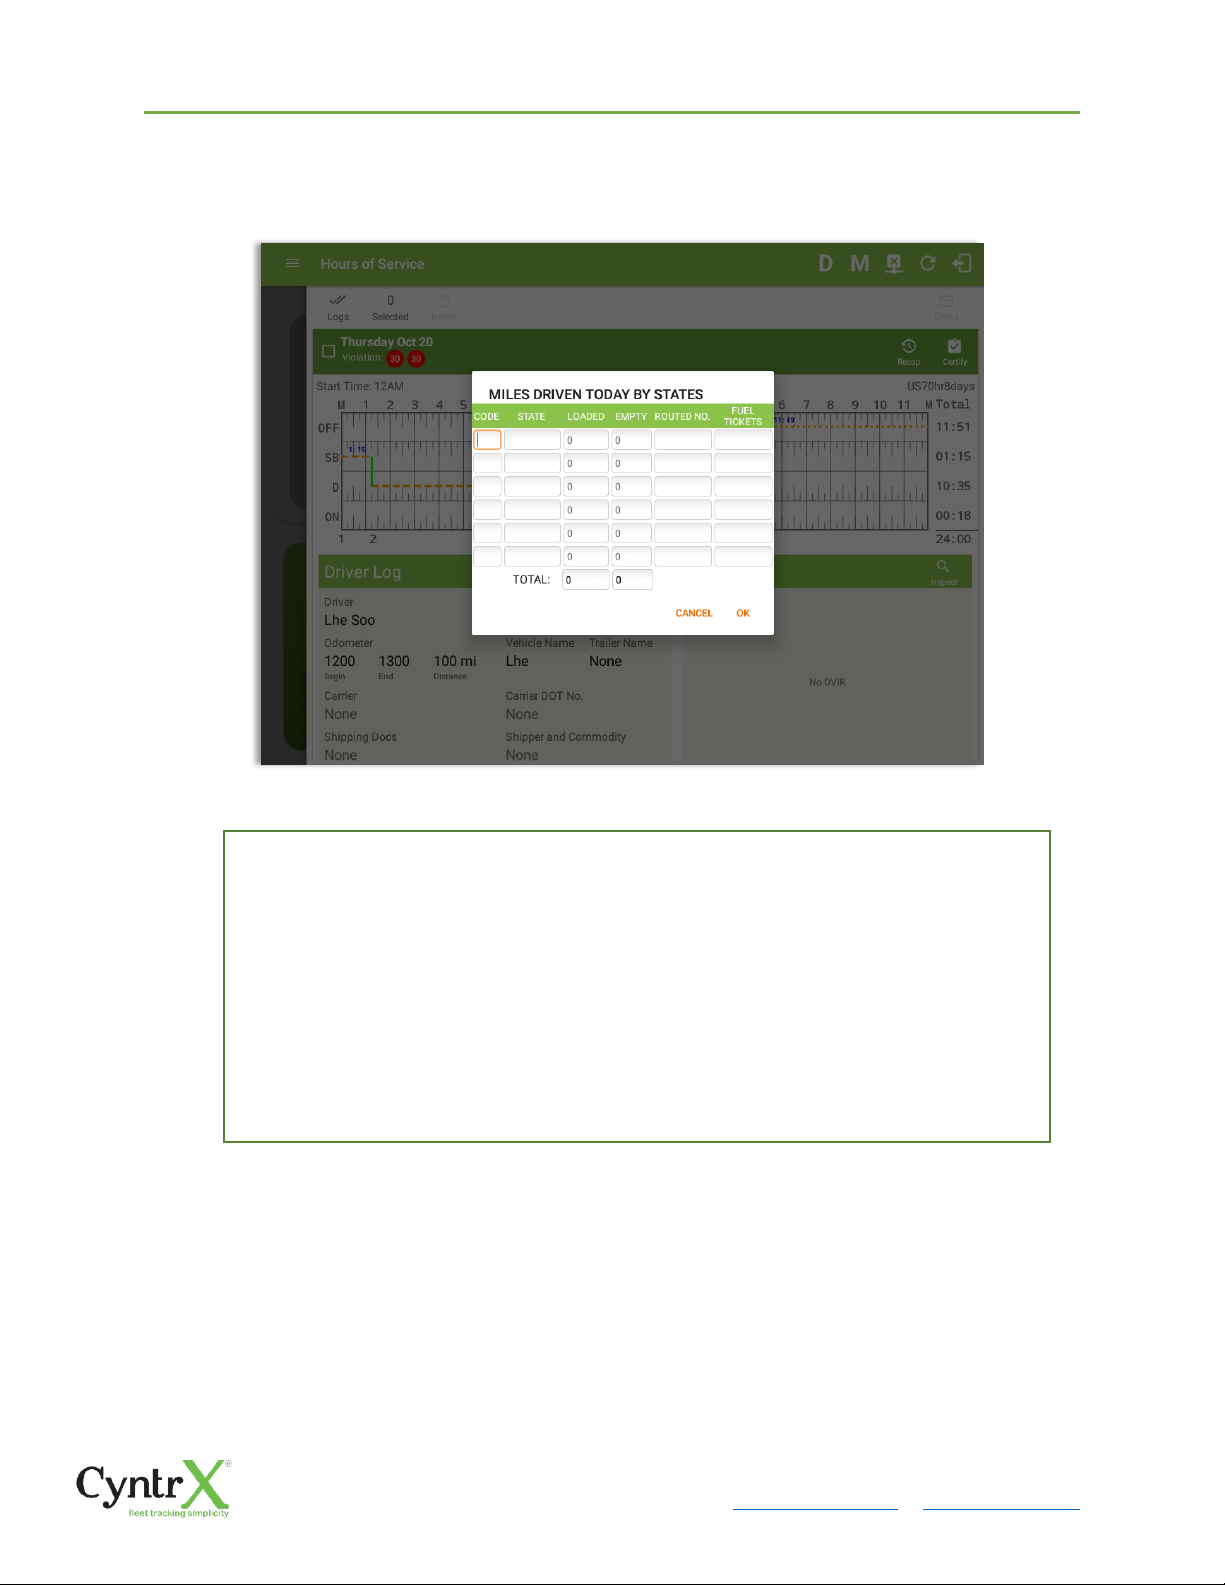
Tap the Miles button to open the Miles Driven Today by States dialog. This is where you
can fill in the shipment data that is required to be included in the driver’s daily log.
Required data includes:
Code
State
Loaded
Empty
Routed Number
Fuel Purchased Tickets Attached
Page 48
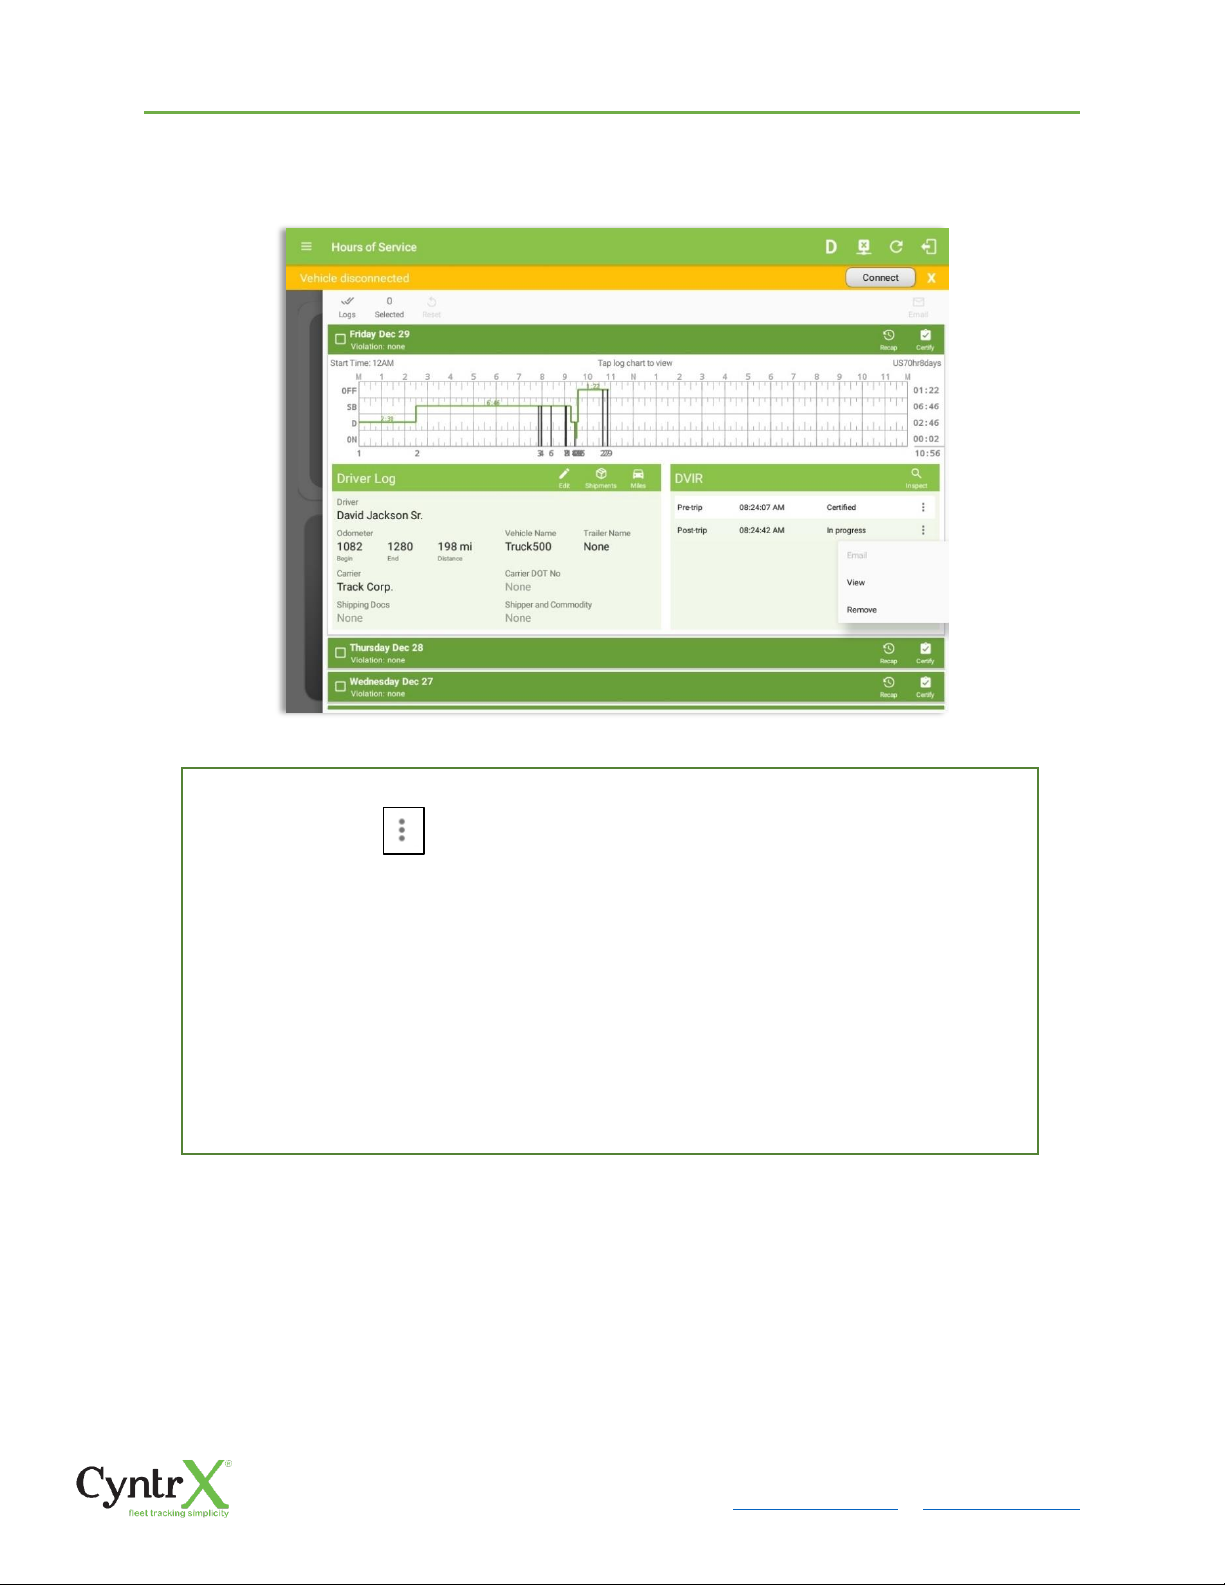
This is where you can view a list of the DVIRs conducted during the selected working day.
Tap the icon to open the pane for the email and view options.
Tap the Email button to send the completed DVIR.
Tap the View button to view the DVIR.
Tap the Remove button to remove the DVIR.
Note:
• Email button will only be enabled if the DVIR Log is already certified.
• Certified logs cannot be removed (unless uncertified).
Page 49
CyntrX
Page 49
920-338-0479 | [email protected]| www.CyntrX.com
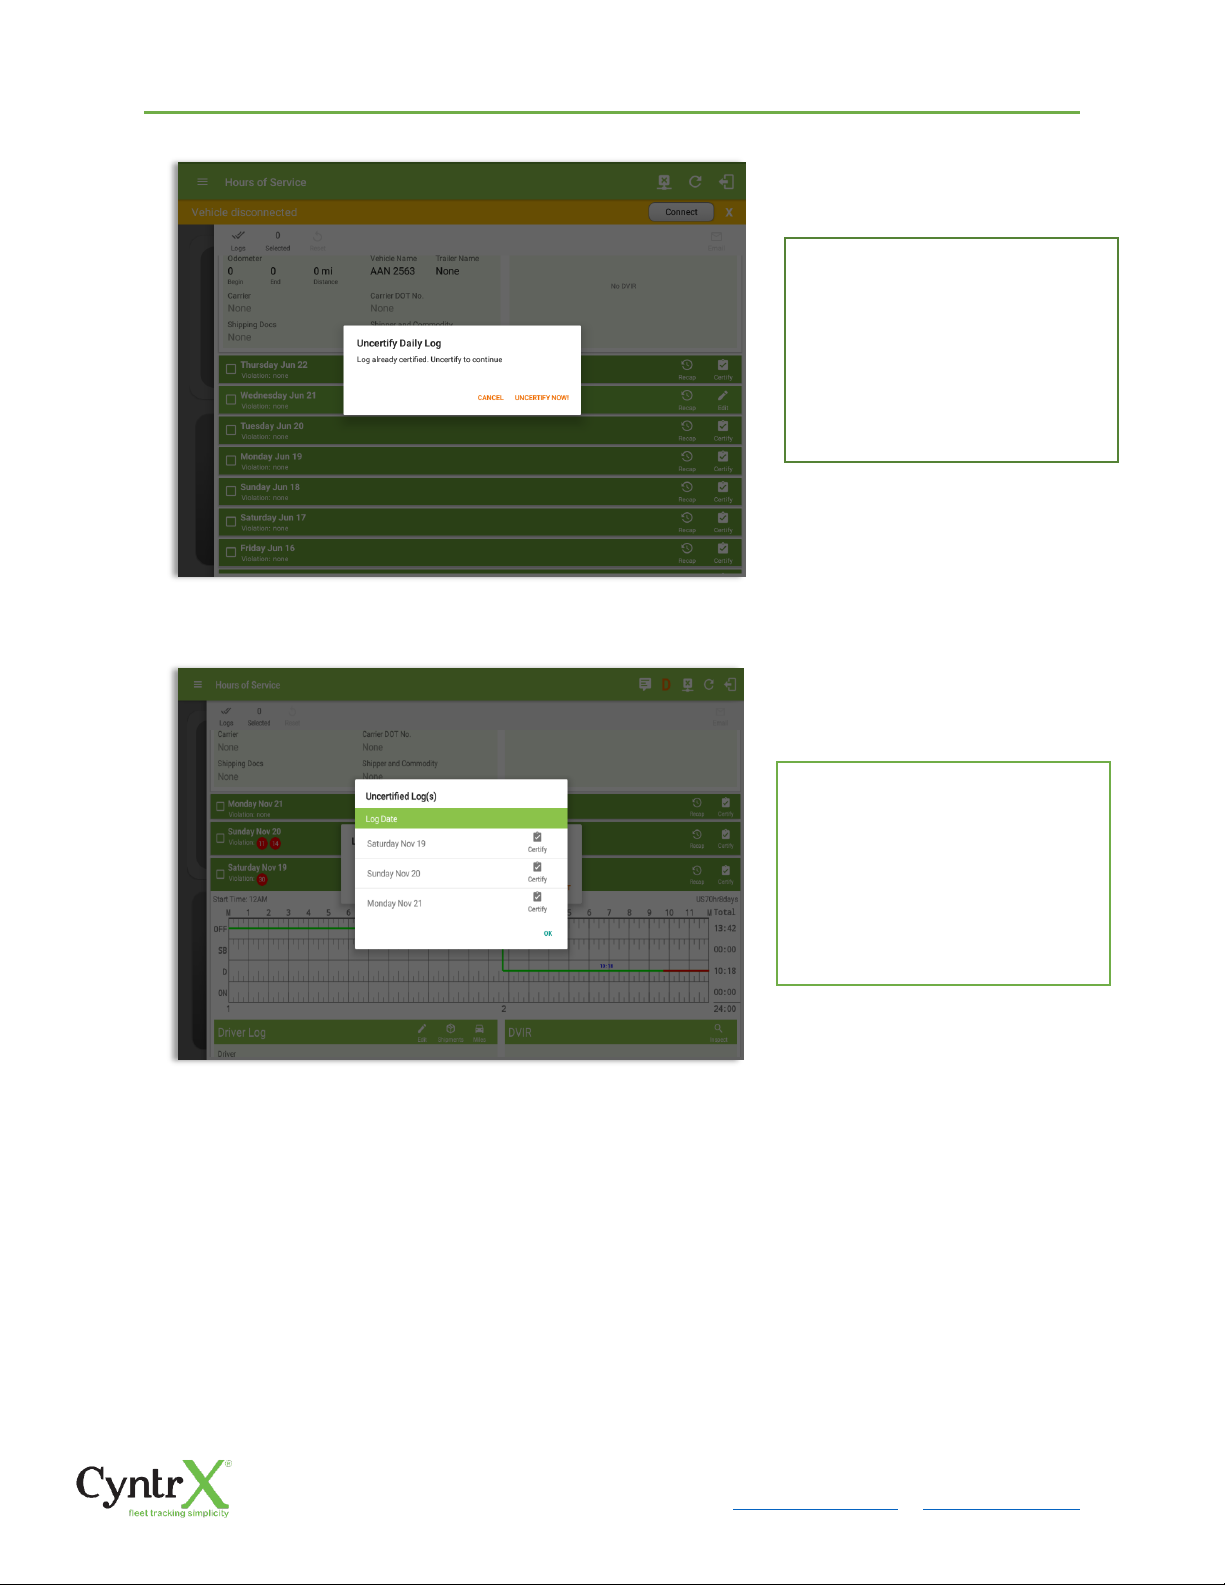
5.2.10 Certify a Log
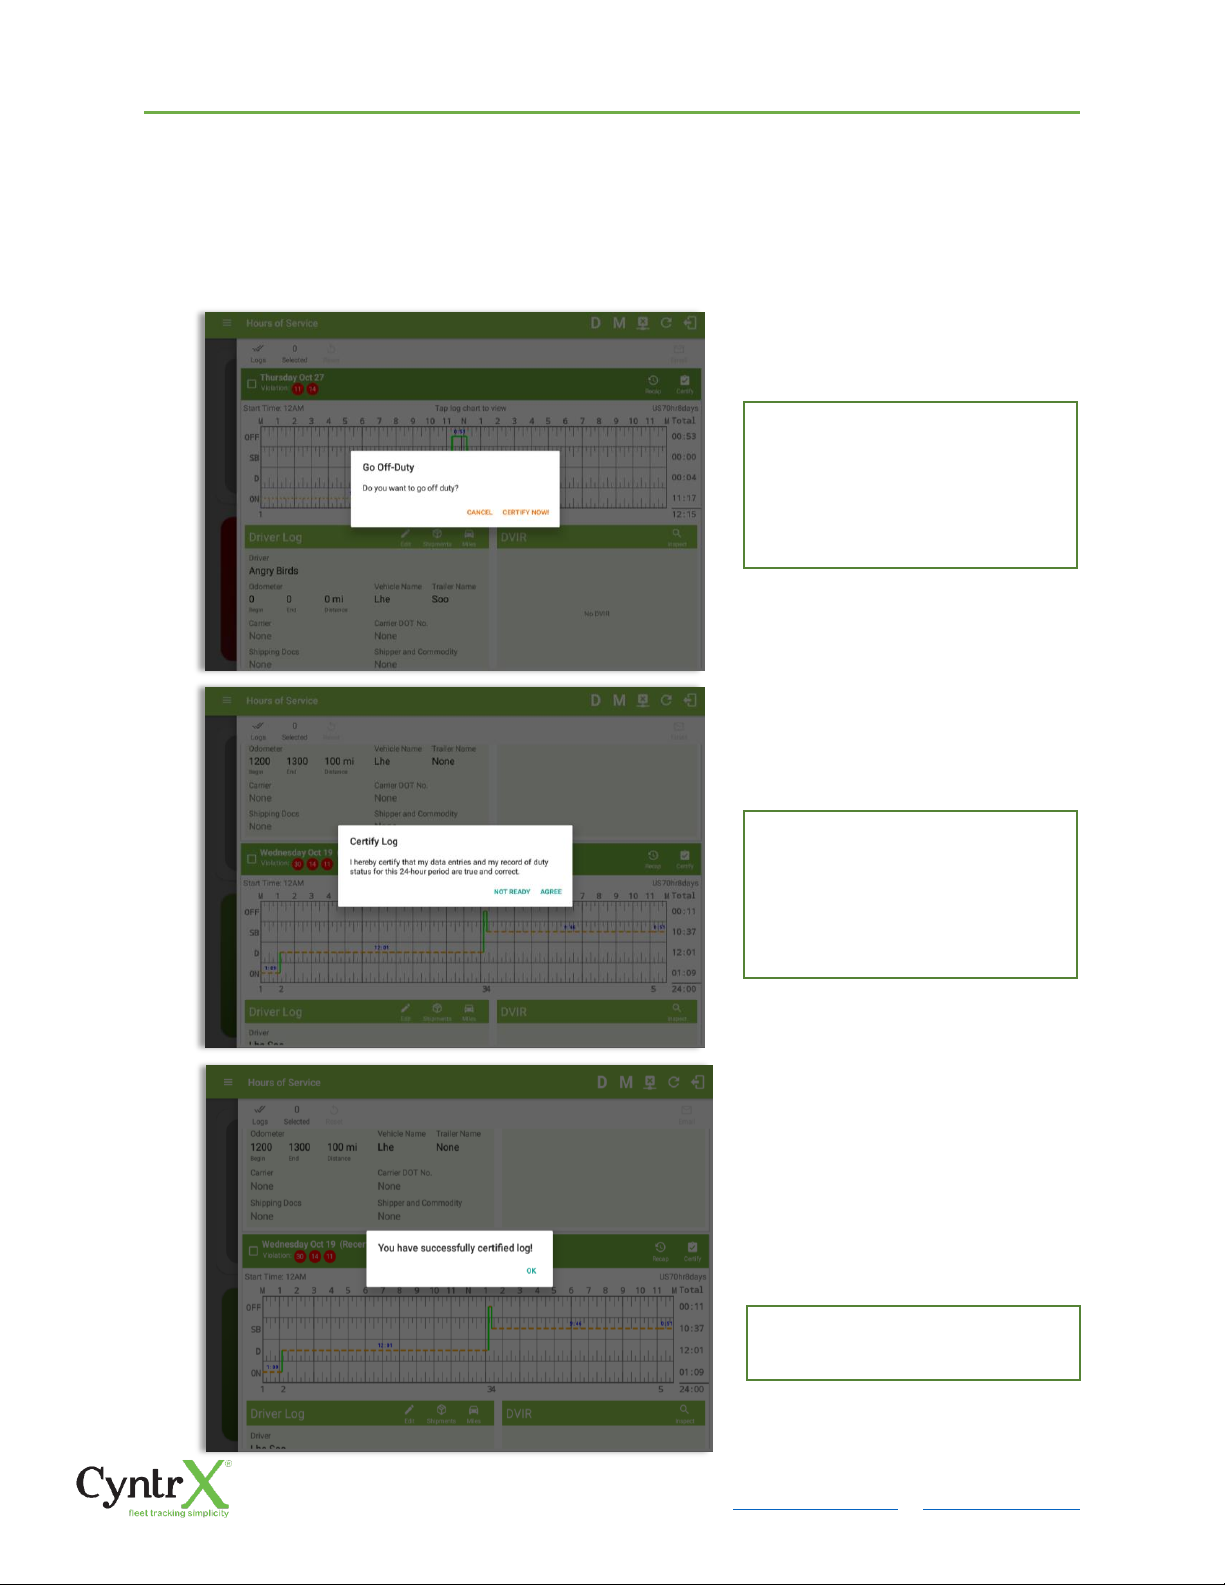
Tap the Certify button to certify the selected daily log. If the current status is Driving, a
pop up dialog will open and you will be asked to confirm changing the status to Off
Duty:
Tap the Certify Now button to
confirm you wish to go Off Duty.
Tap the Cancel button to cancel
changing the status.
Tap the Agree button to confirm
certifying a daily log.
Tap the Not Ready button to
cancel certifying a log.
Tap the OK button to close the
confirmation pop up dialog
Page 50
CyntrX
Page 50
920-338-0479 | [email protected]| www.CyntrX.com
5.2.11 Email a Log
When driver need to email a certified logs PDF to the back office, the driver can send
directly from the App used (e.g Gmail app for Android) or have the HOS Server send the
email instead of sending it directly from the mobile device.
Tap the OK button if you wish to
email the certified log to a
selected recipient.
Select the Cancel button to close
the pop up dialog without
emailing the certified log.
If the driver did not certify all the
daily logs, the ELD will prompt
the driver regarding uncertified
logs upon logging in and logging
out to the app along with the
option to certify the relevant
days.
Page 51
CyntrX
Page 51
920-338-0479 | [email protected]| www.CyntrX.com
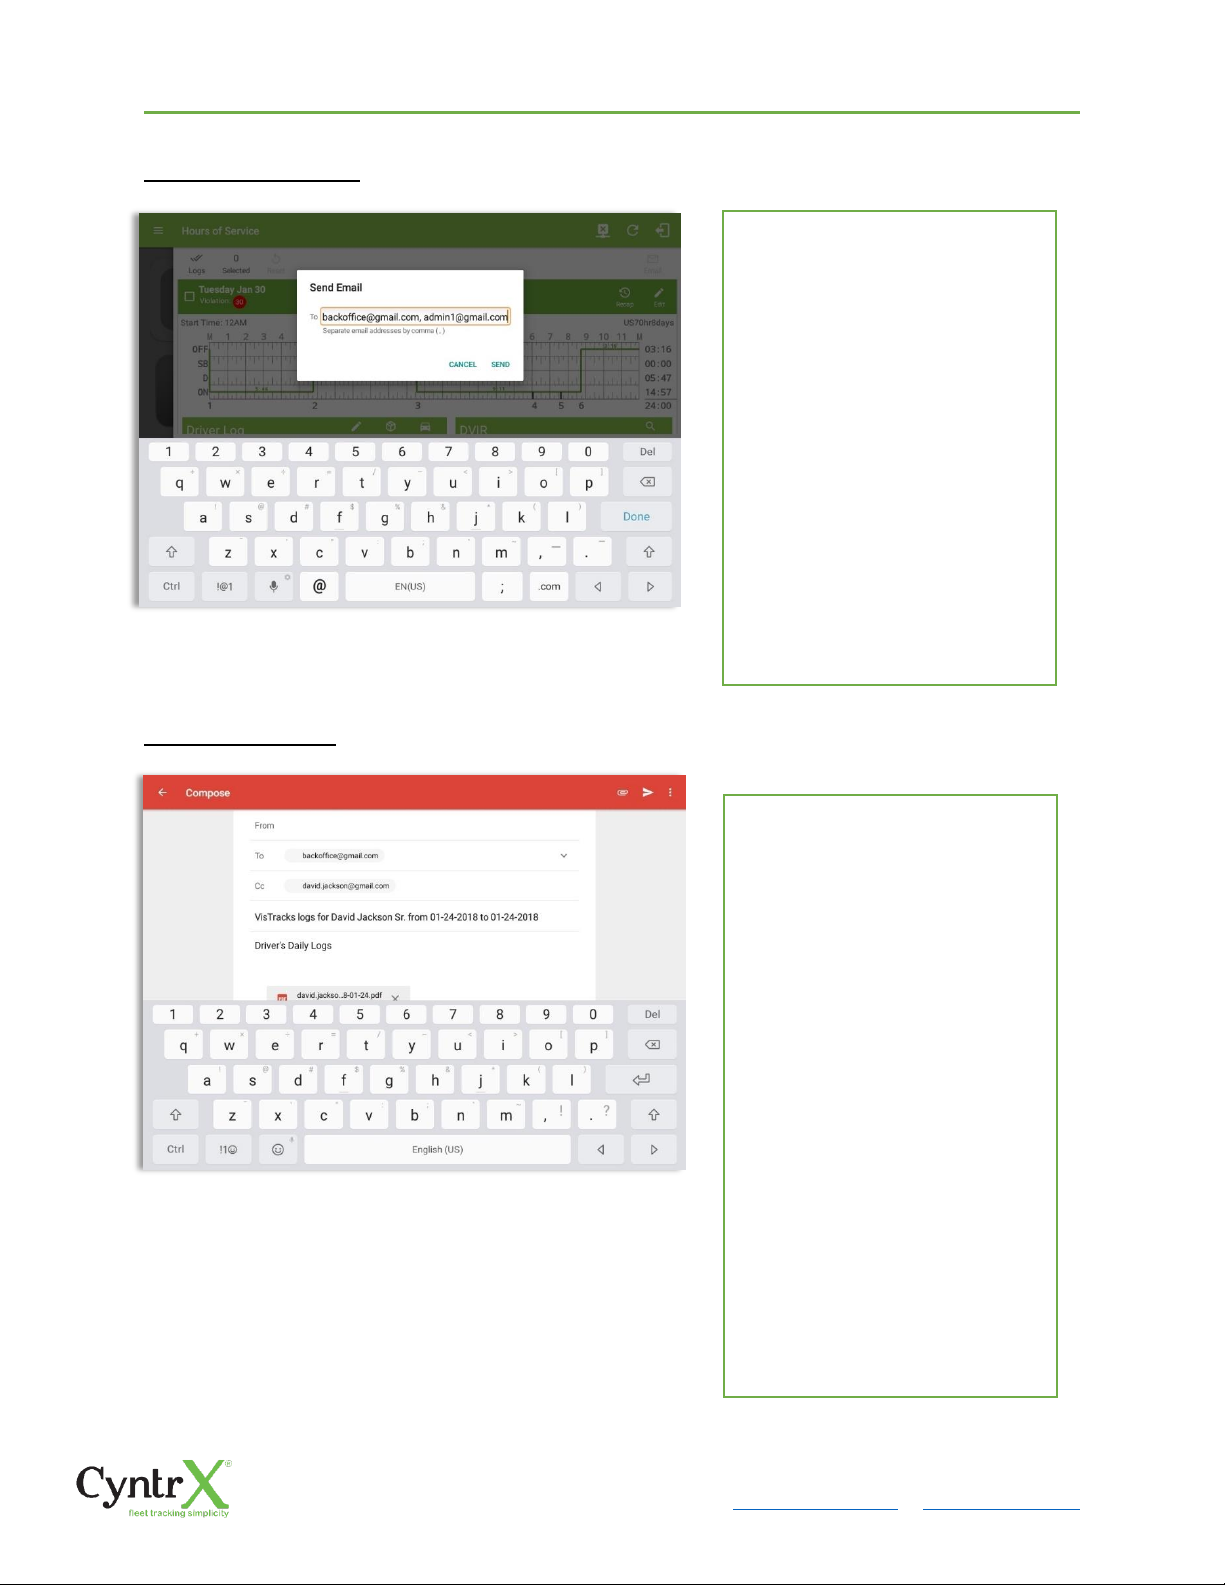
Email Log via Server
Email Log via App
An app will open (e.g. Gmail app
will open for Android device)
with a new message that has a
PDF file attached when the driver
taps ‘Yes’ on the prompt to send
certified log.
If driver has recipient email
populated in the
portal>settings>drivers’
management page>PDF Report
or in the app>settings>PDF
Report Email, then recipient
email is also pre-populated in the
email draft.
Note: To send certified log PDF
via App, set the Email Sender
option to App in Settings
screen>HOS Preferences>Other.
A Send Email dialog will display
when the driver taps ‘Yes’ on the
prompt to send certified log.
Enter the email address for the
recipient. If the recipient is more
than one, separate email
addresses by comma. Tap Send
button to send the certified log
PDF.
Note: To send certified log PDF
via HOS Server, set the Email
Sender option to Server (default
to Server) in Settings screen>HOS
Preferences>Other.
Page 52
CyntrX
Page 52
920-338-0479 | [email protected]| www.CyntrX.com
5.2.12 Edit a Log
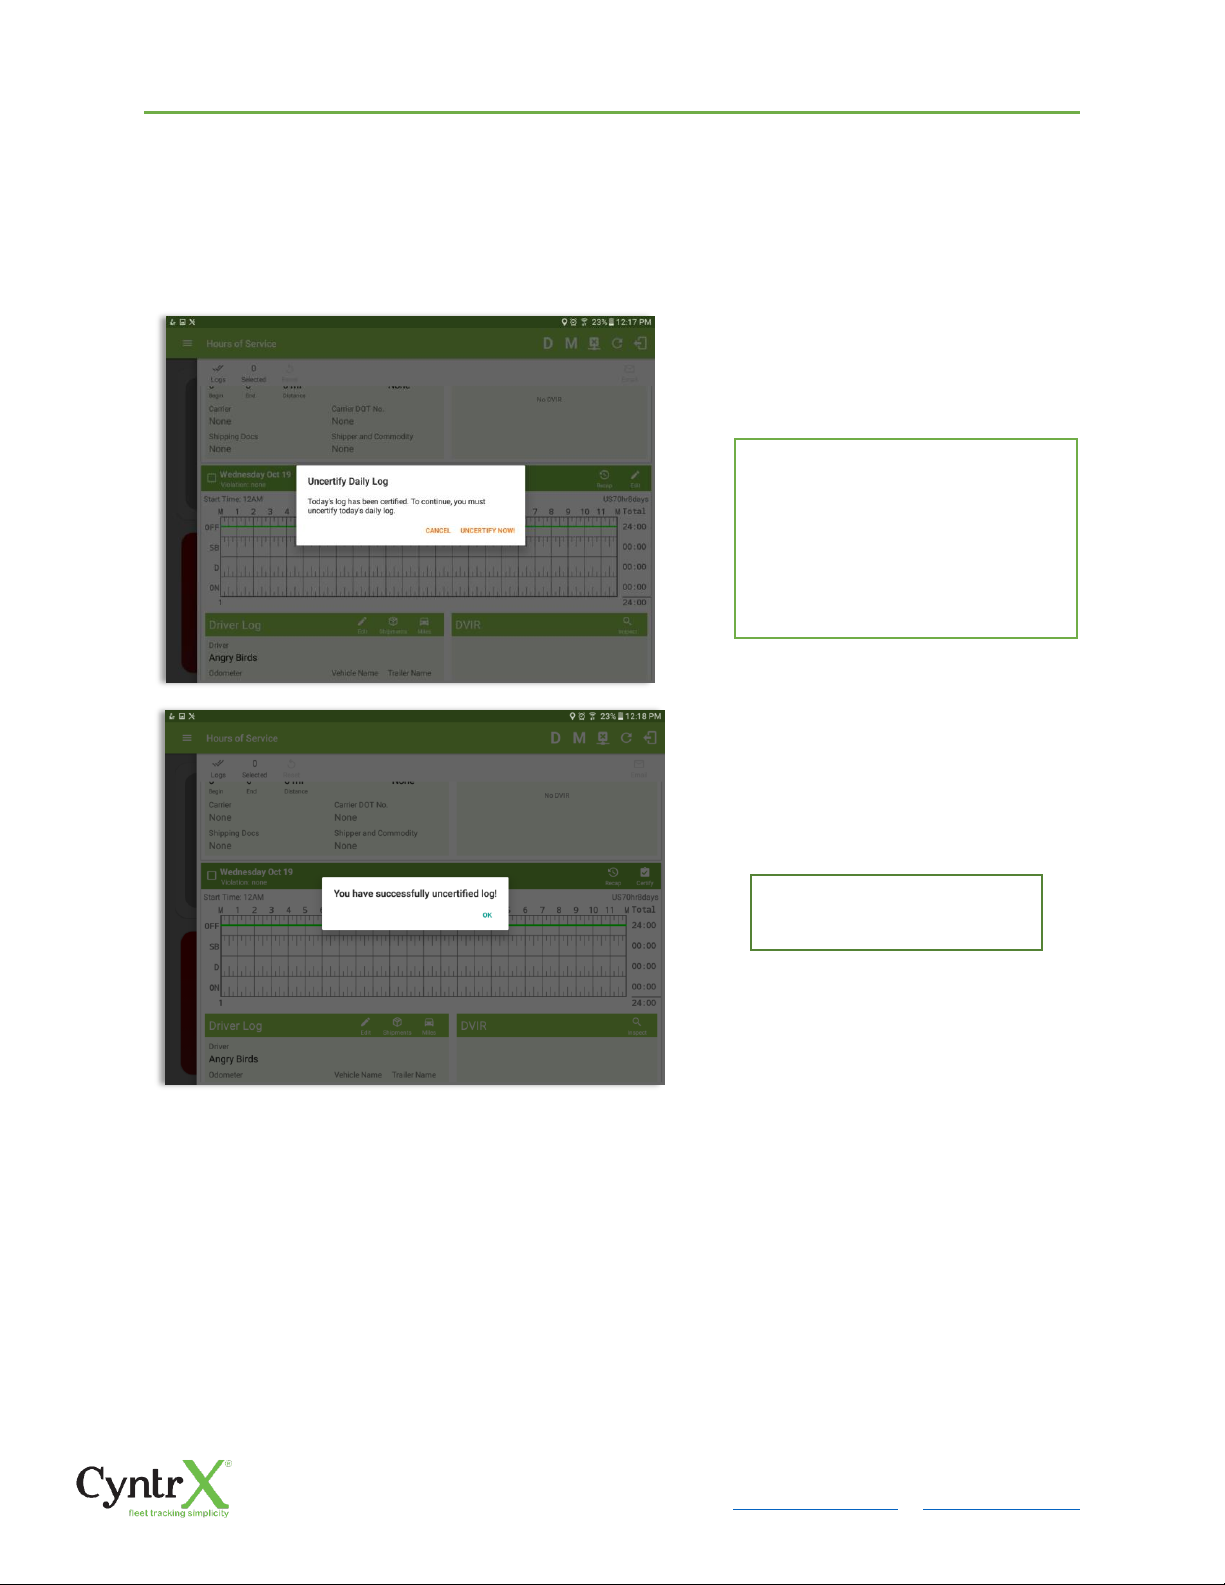
Only driver logs that have not yet been certified can be edited, you will have to uncertify
a driver log in order to update its contents, to do this, tap the Edit button to uncertify
the selected log and reopen it for editing:
The Edit Log screen can update/correct the driver’s or driving duty data entries logged
through the app. It can also view the history of an edited log.
Tap the Uncertify Now button to
confirm uncertifying the selected
log.
Tap the Cancel button to cancel
uncertifying the selected log.
Tap the OK button to close
the pop up dialog.
Page 53
CyntrX
Page 53
920-338-0479 | [email protected]| www.CyntrX.com
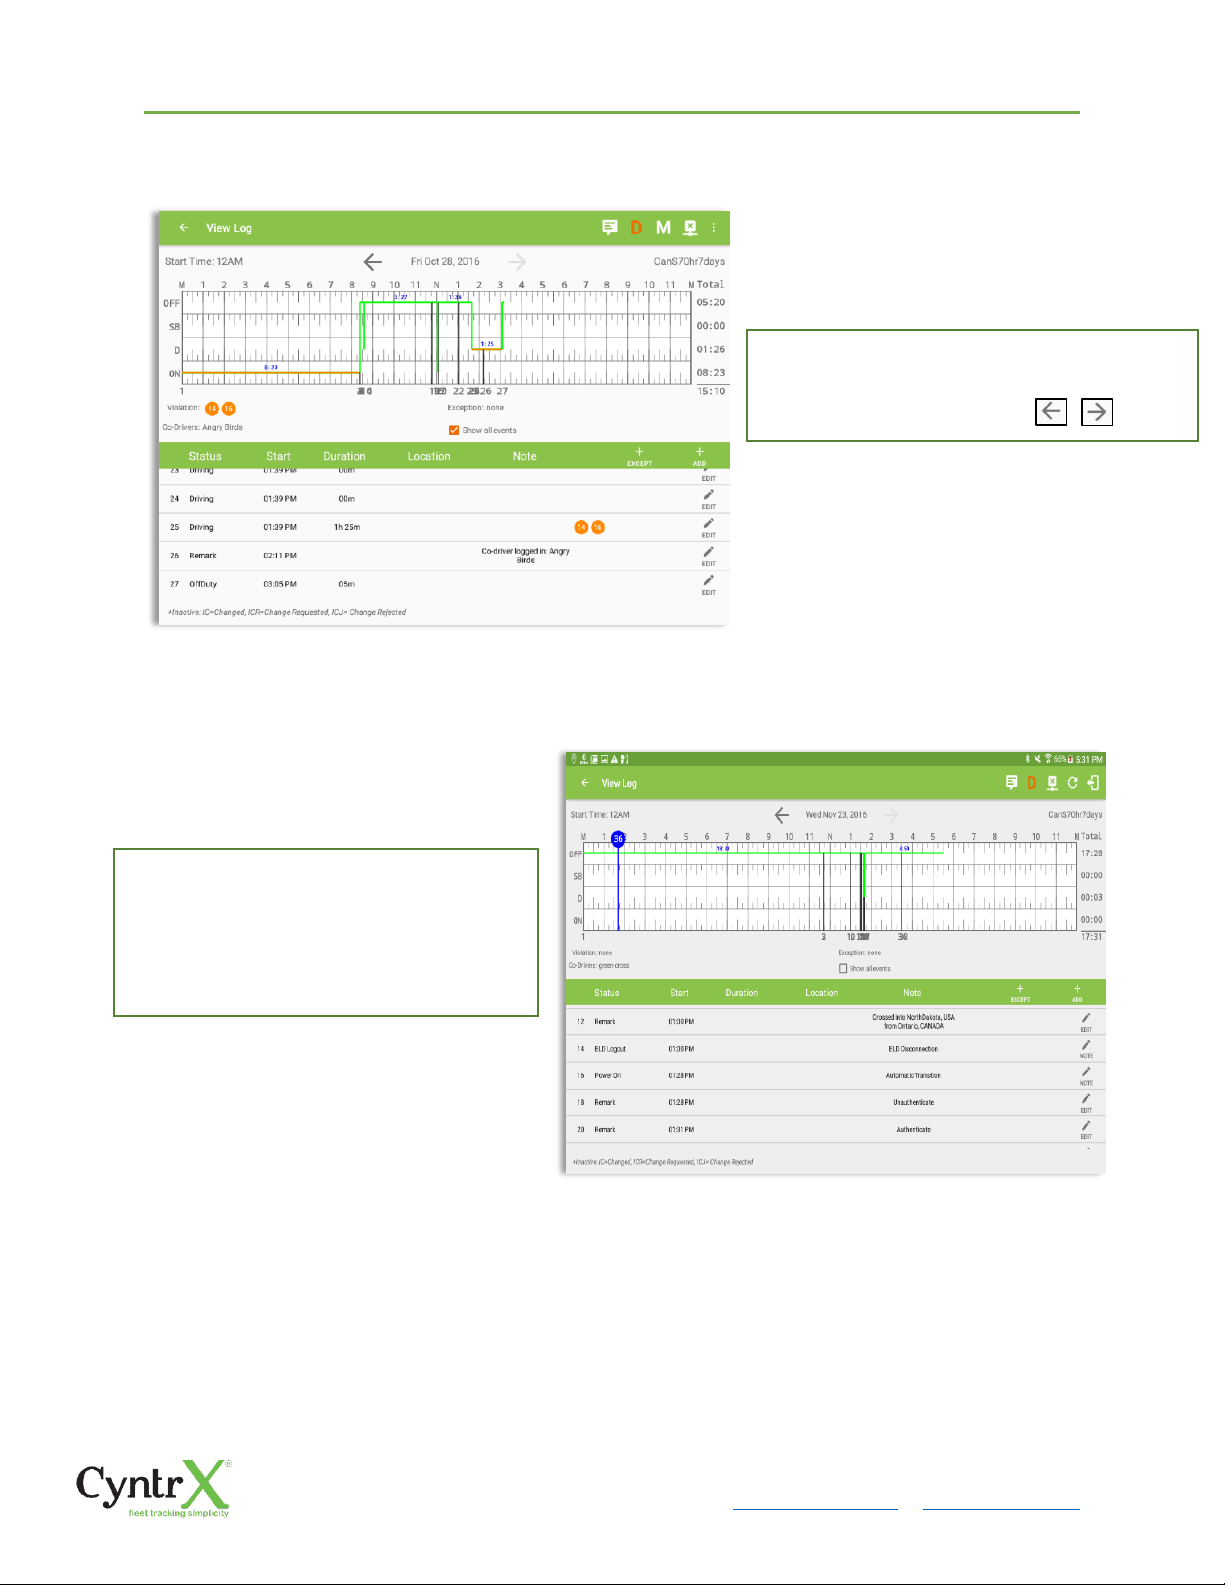
Tap the driver’s log grid to start editing it:
You can navigate through the daily driver logs
by selecting either back or forward arrows
located above the grid
Driver will be able to add a note to the
following events: Intermediate log
• Login/logout
• CMV Engine power up/shut down
• Malfunctions and diagnostic events
Page 54
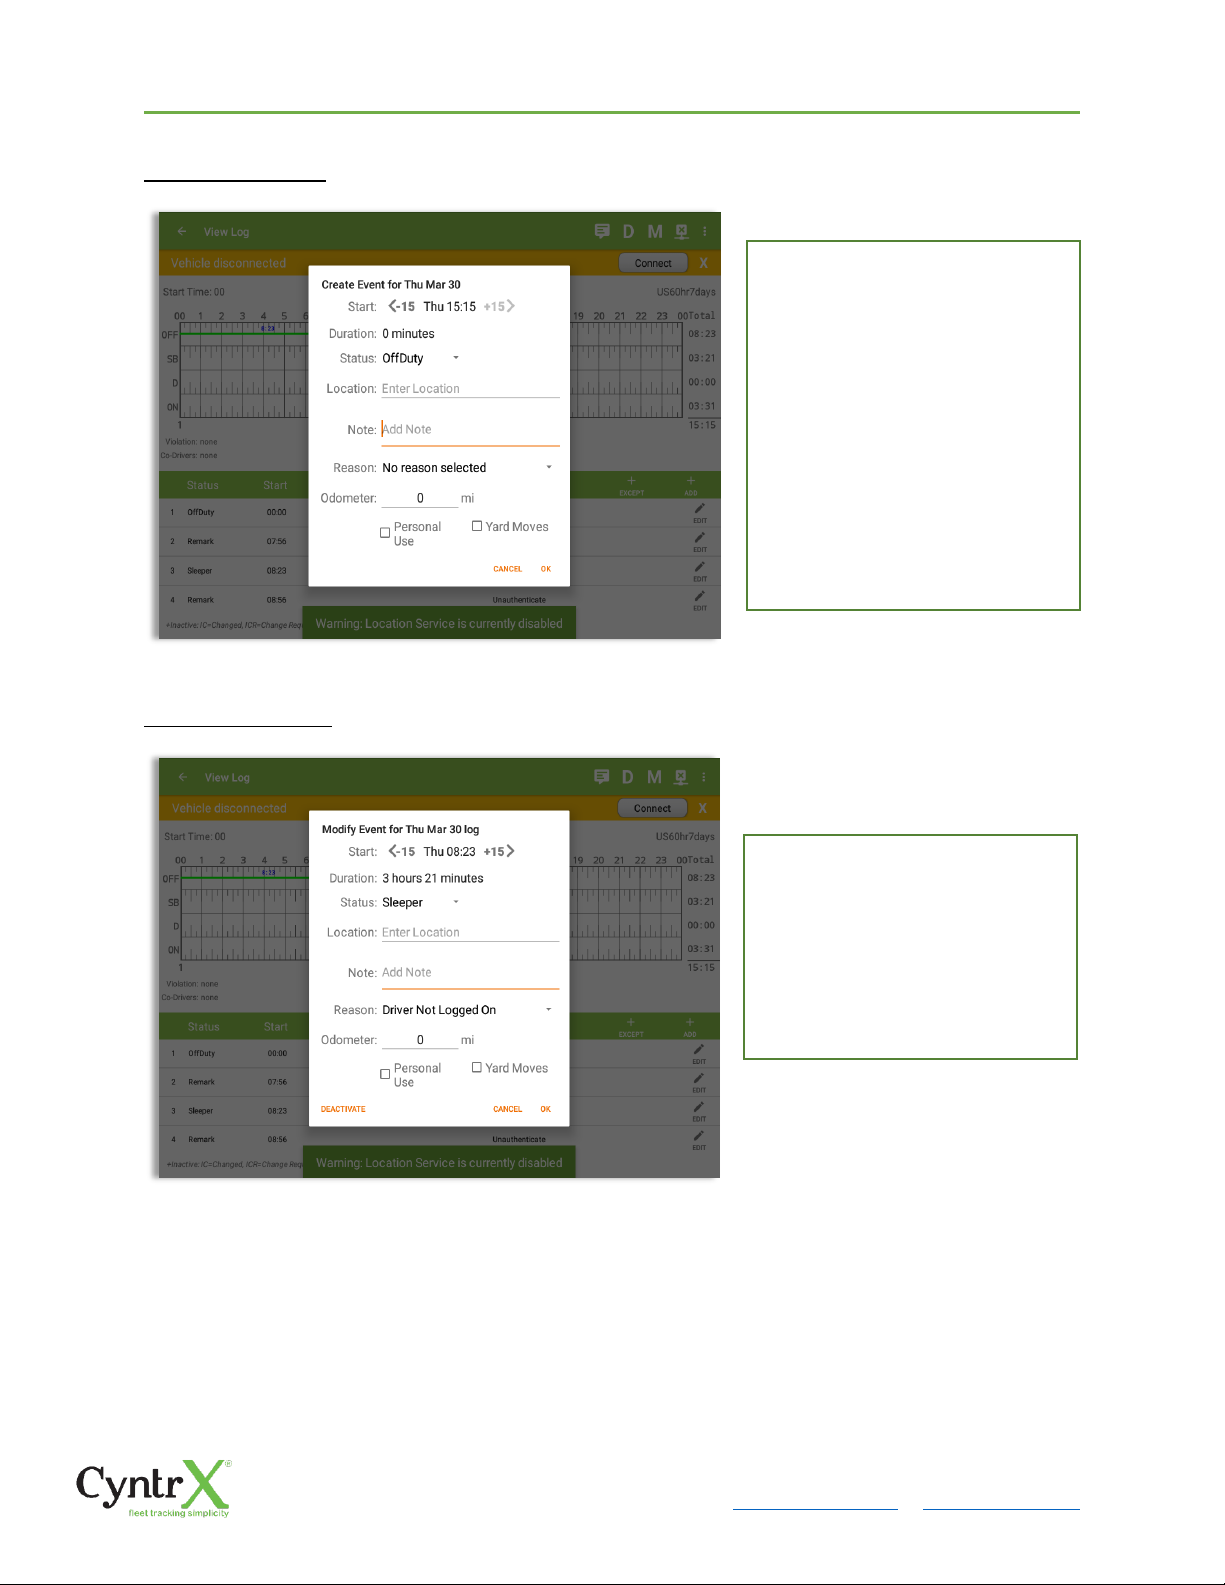
To add a new event to the
selected log, tap the Add button,
input the relevant details to
create the event, once complete,
tap the OK button to save the
event. Also, the current status of
the app is disabled to prevent
adding the same status
consecutively.
Note: Refer to 3.2 Changing the
Driver’s Status for ‘Personal Use’
Tap the Edit button adjacent to
any of the existing log events,
make any required changes,
select a reason for the edit from
the drop down list and then
tap the OK button to save the
changes
Page 55
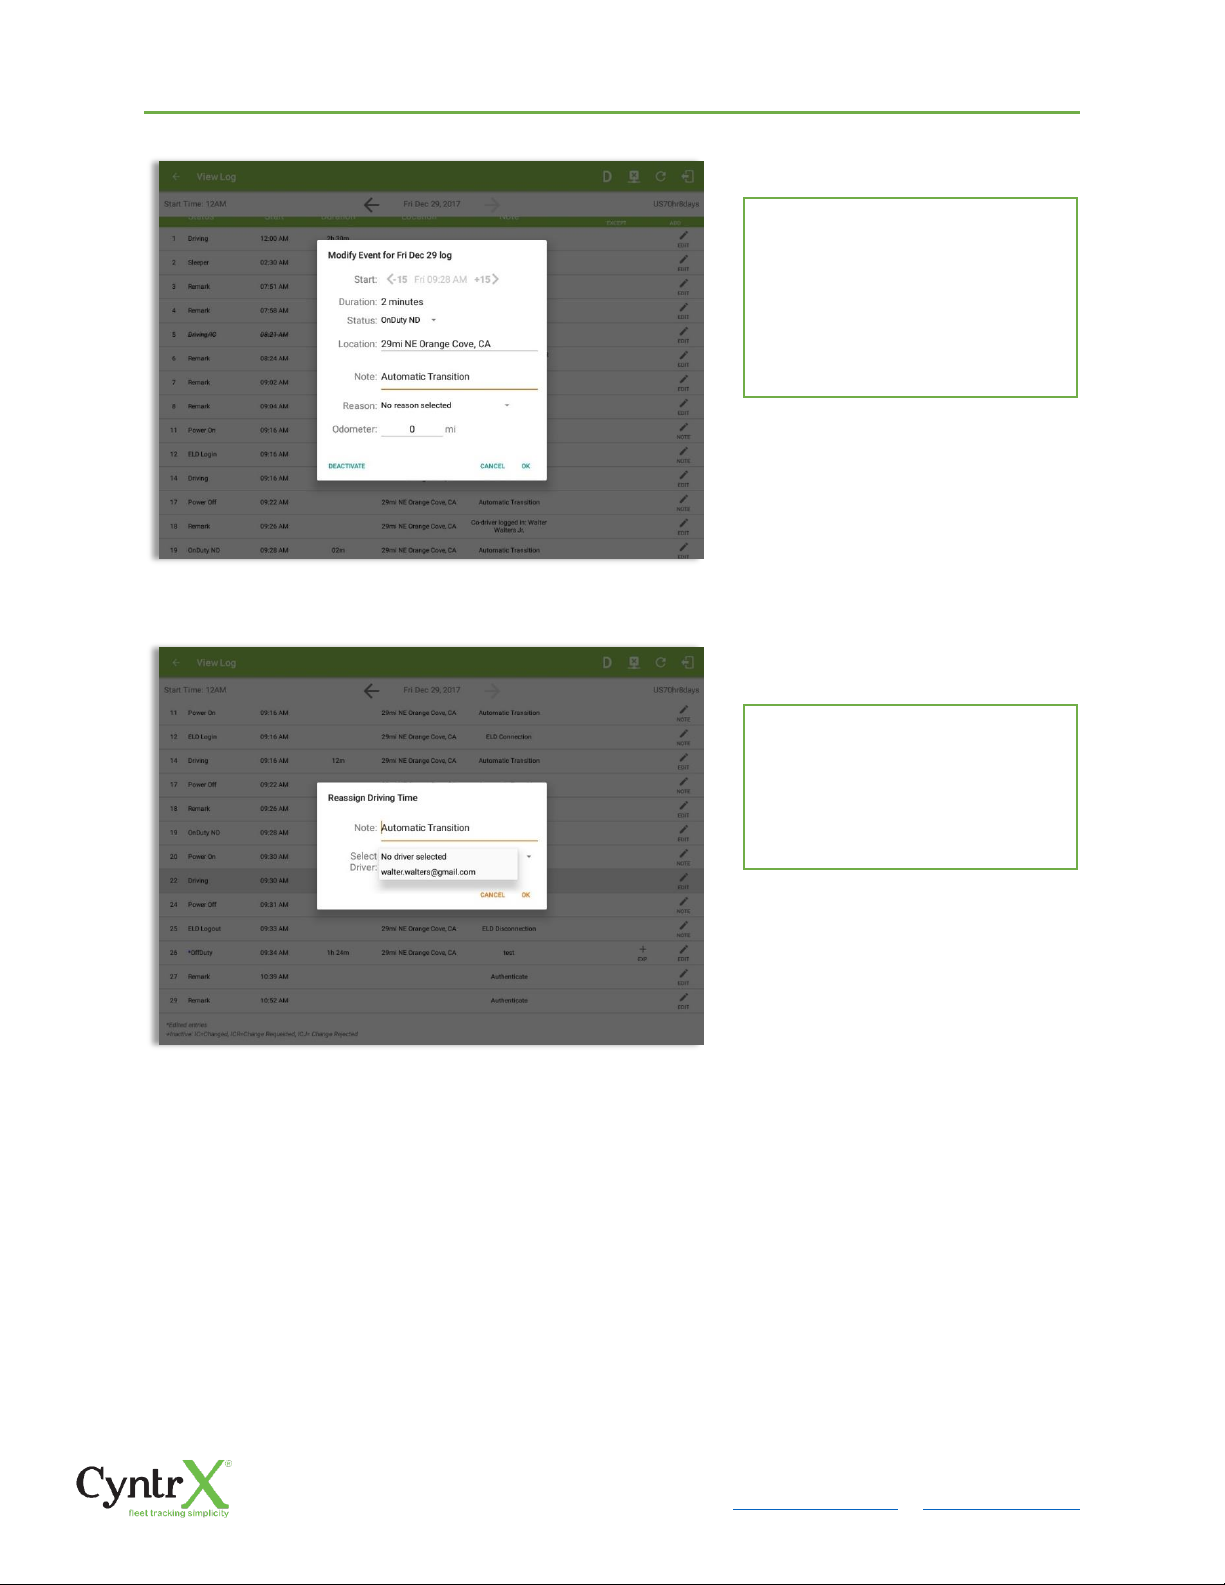
Regardless if the vehicle currently
used is in AOBRD or ELD mode,
driver can be able to edit the
Auto OnDuty ND event the same
with editing a manually created
events.
For Auto Driving event, driver
can be able to edit a note or
reassign the event to a co-driver.
(See Section 10.1 Logon CoDriver-> Reassign Driving Time)
Page 56
CyntrX
Page 56
920-338-0479 | [email protected]| www.CyntrX.com
Modify Log Event Using Grid View Editing
Notes:
• All log events that have been manually created or amended, will be displayed with an asterisk
against it in the log events list depicting that it has been edited. Also scroll down to see check
boxes for Personal Use, Yard Moves and Off Road.
• Upon editing a past event, the Note field should not be empty and must contain at least 4
characters when filled out
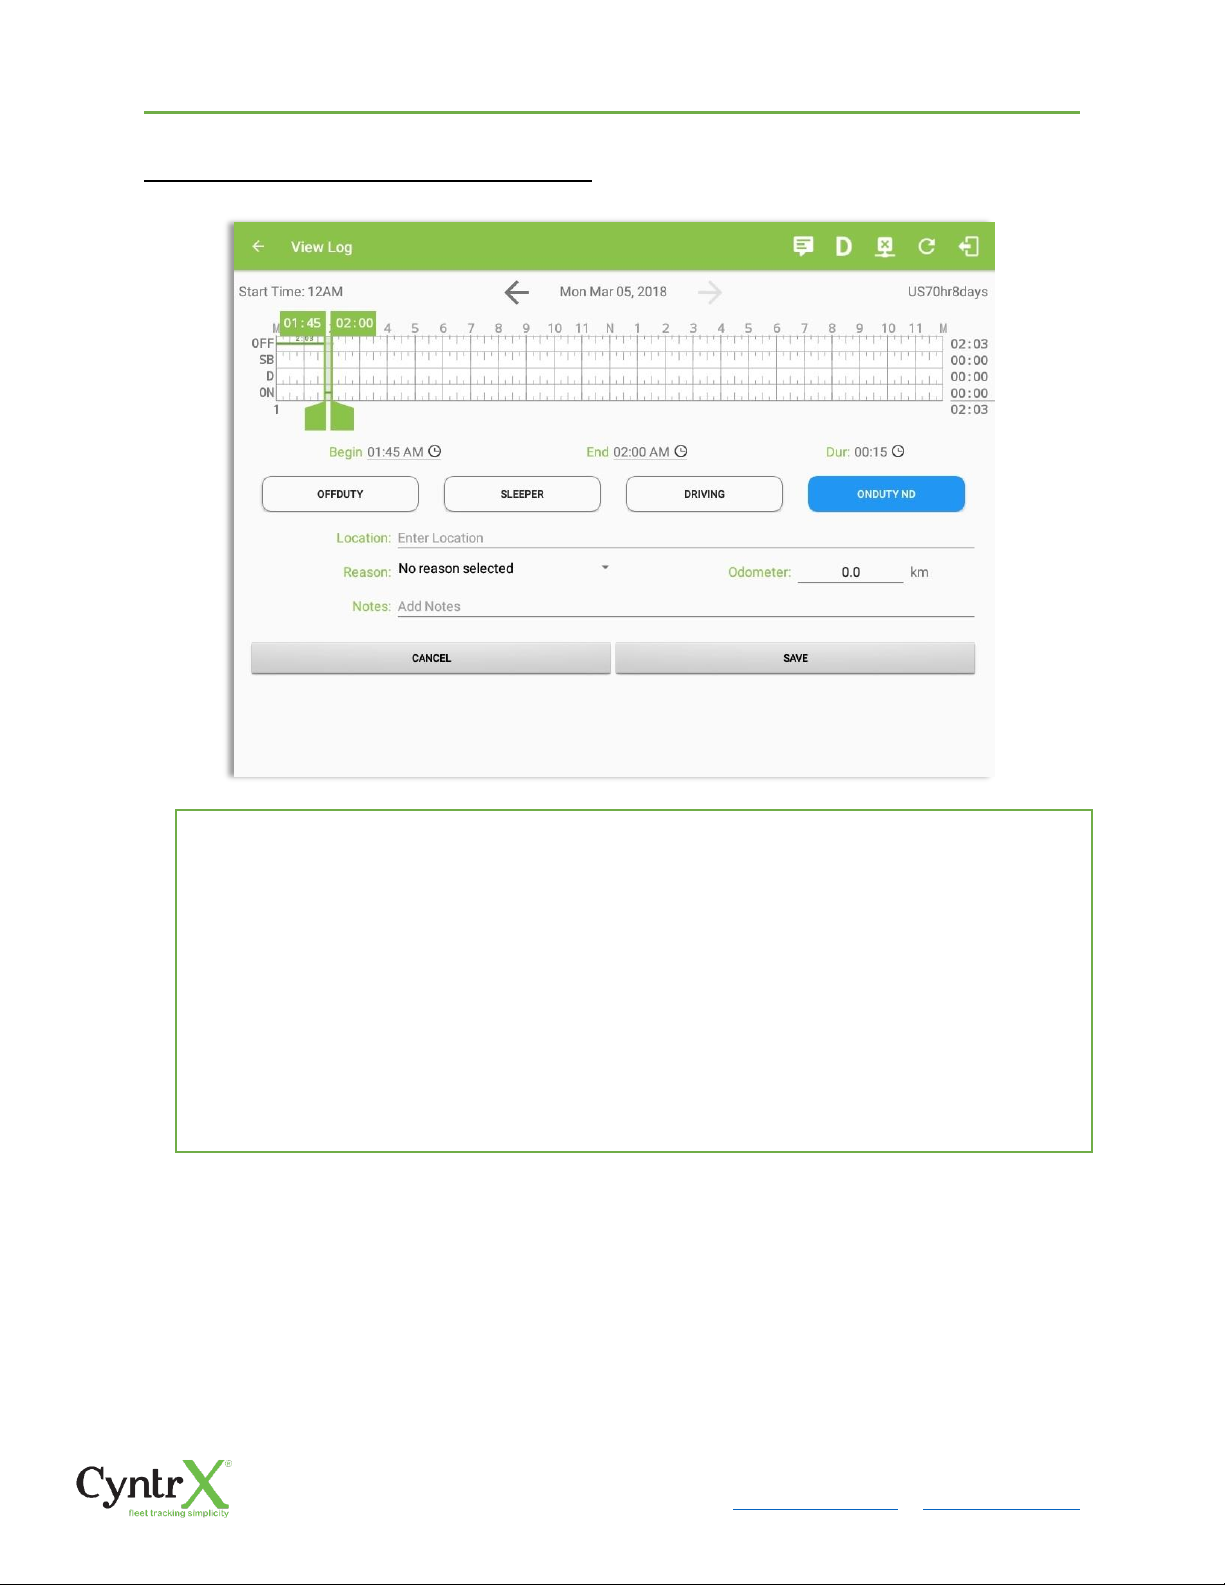
When Use GridView Editing is enabled in Settings->HOS Preferences, a grid view editing form will
display upon tapping Edit button to any of the existing log events or tapping the Insert Past Status
button.
User can then make any required changes:
• Drag the sliders on the grid to set the Begin Time and End Time or by manually entering
the time using time picker field.
• Select Off Duty, Sleeper Berth, Driving or On Duty ND button
• Select a reason for the edit from the drop-down list.
• Fill other fields required fields.
• Then tap the Save button to save the changes.
Page 57
CyntrX
Page 57
920-338-0479 | [email protected]| www.CyntrX.com
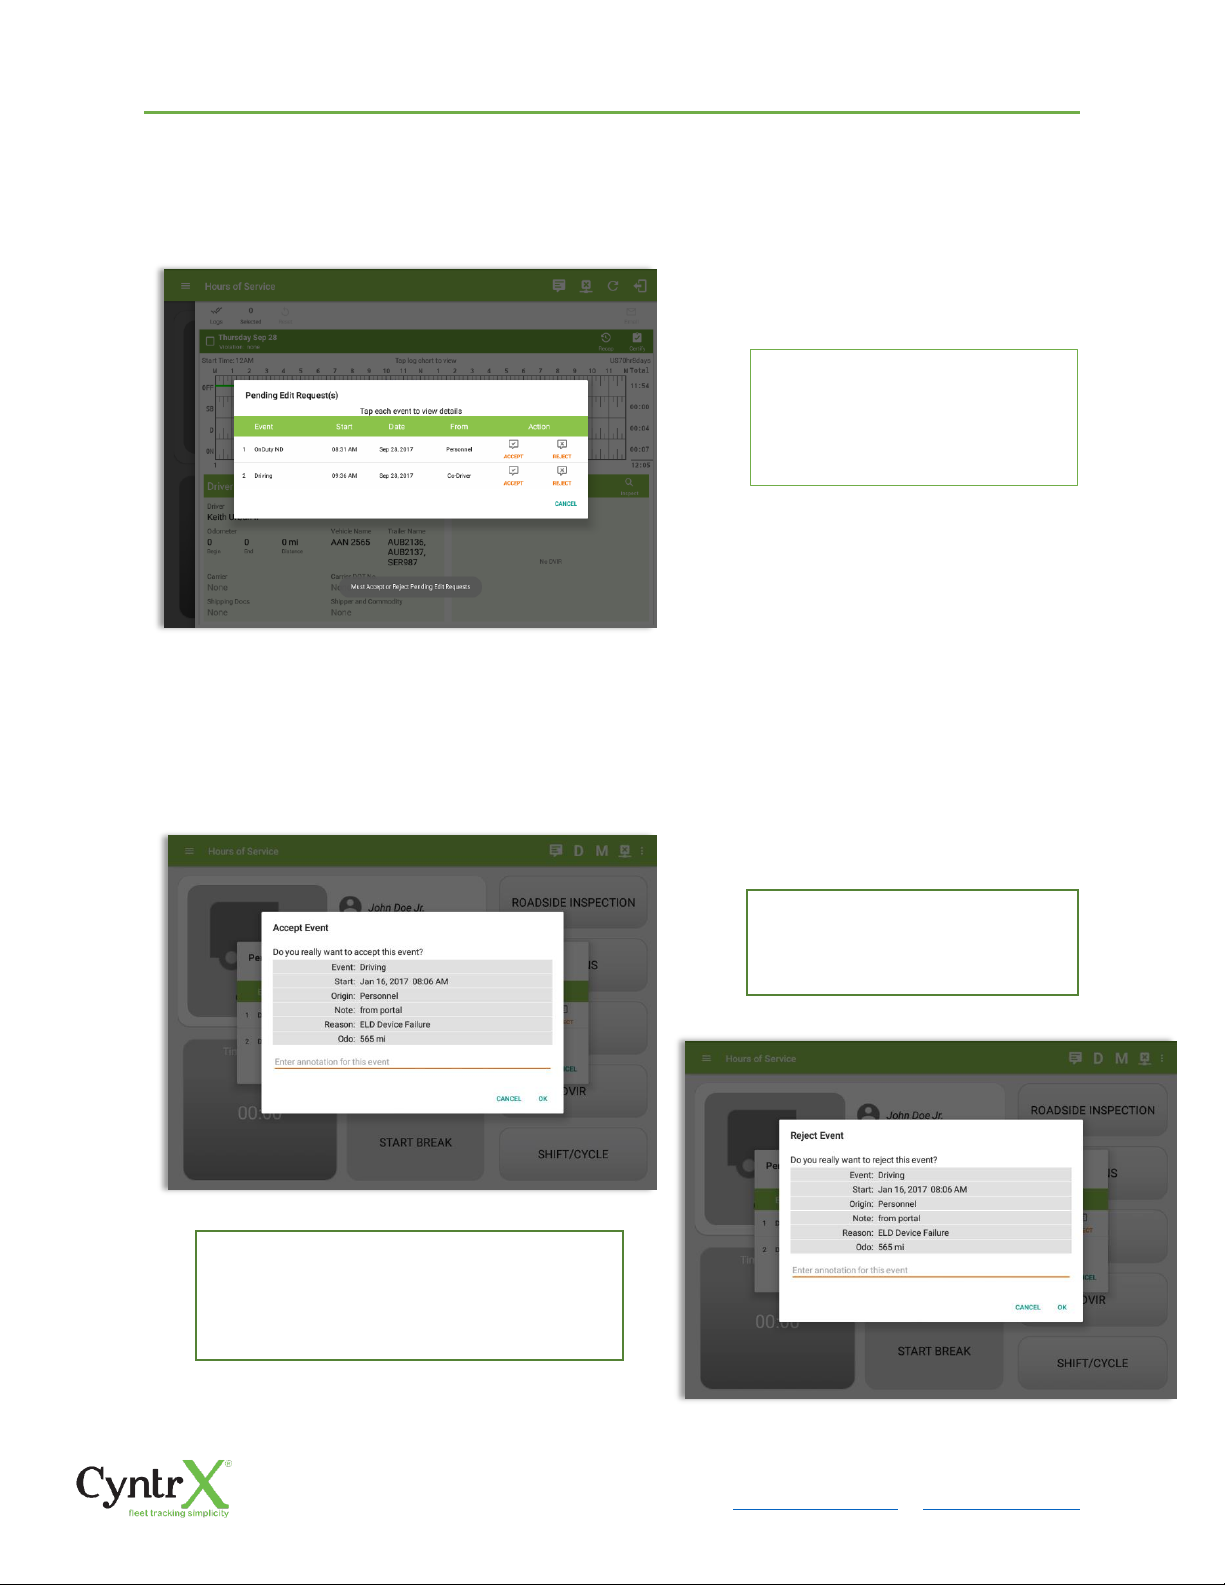
Pending Edit Requests
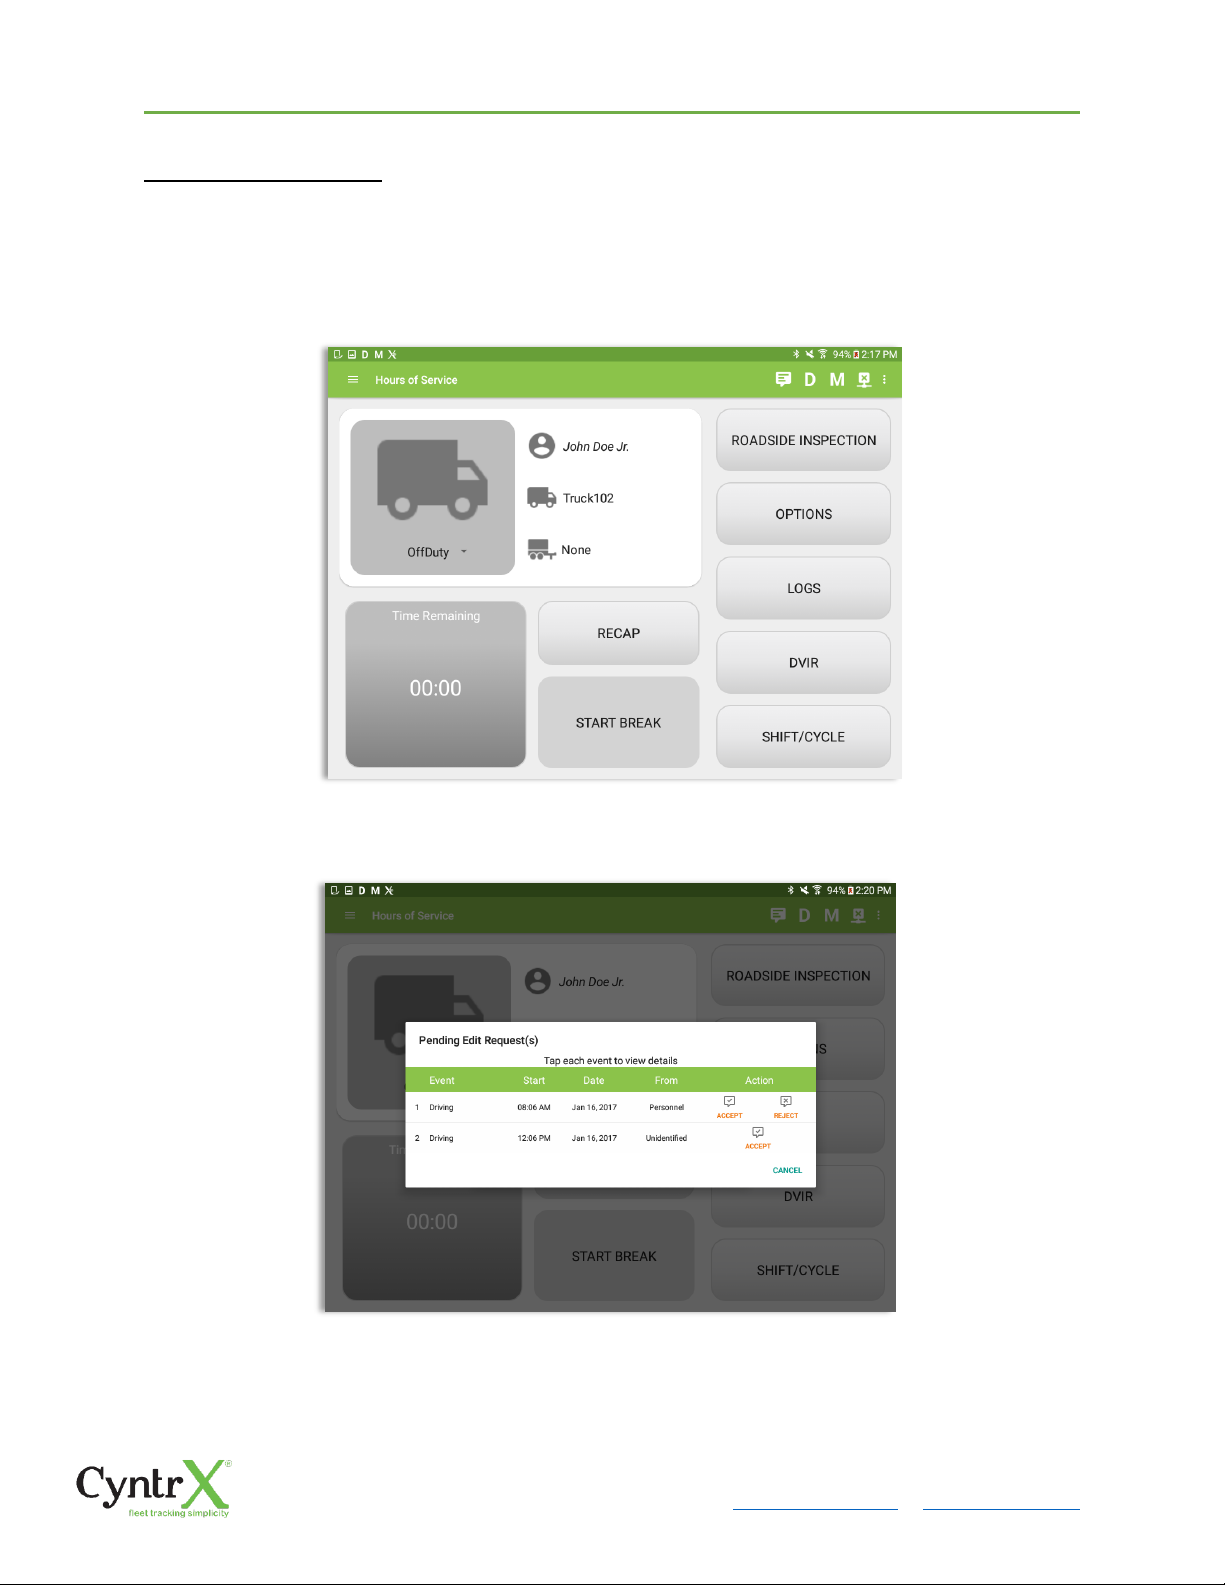
The Motor Carrier can request edits to the driver’s logs. In the application allows the
driver to review the requested edits which requires the driver to take necessary action
whether the driver wants to “confirm” or “reject” the requested edits.
Tap the icon beside the refresh button to display the pending edit request dialog
Page 58
CyntrX
Page 58
920-338-0479 | [email protected]| www.CyntrX.com
The Pending Request dialog also appears upon certifying a log only if driver has pending
requests. Driver must accept or reject the pending request(s) first before certifying the
days’ log.
Note: The events from the 'Unidentified' driver does not require acceptance.
The Reject and Accept Event dialog shows the comparison of the Original status vs the
changes (requested edits). Also, accepting the edits requested requires the driver to fill
in the annotation field (Required) to successfully save the changes.
If the driver rejects the edit
suggestions then the original
record remains.
If the driver approves the edit suggestions,
the new status will replace the old status and
the changes will be reflected in the events
history list.
A toast message will be
displayed at the bottom of app
stating: "Must Accept or Reject
Pending Requests”.
Page 59
CyntrX
Page 59
920-338-0479 | [email protected]| www.CyntrX.com
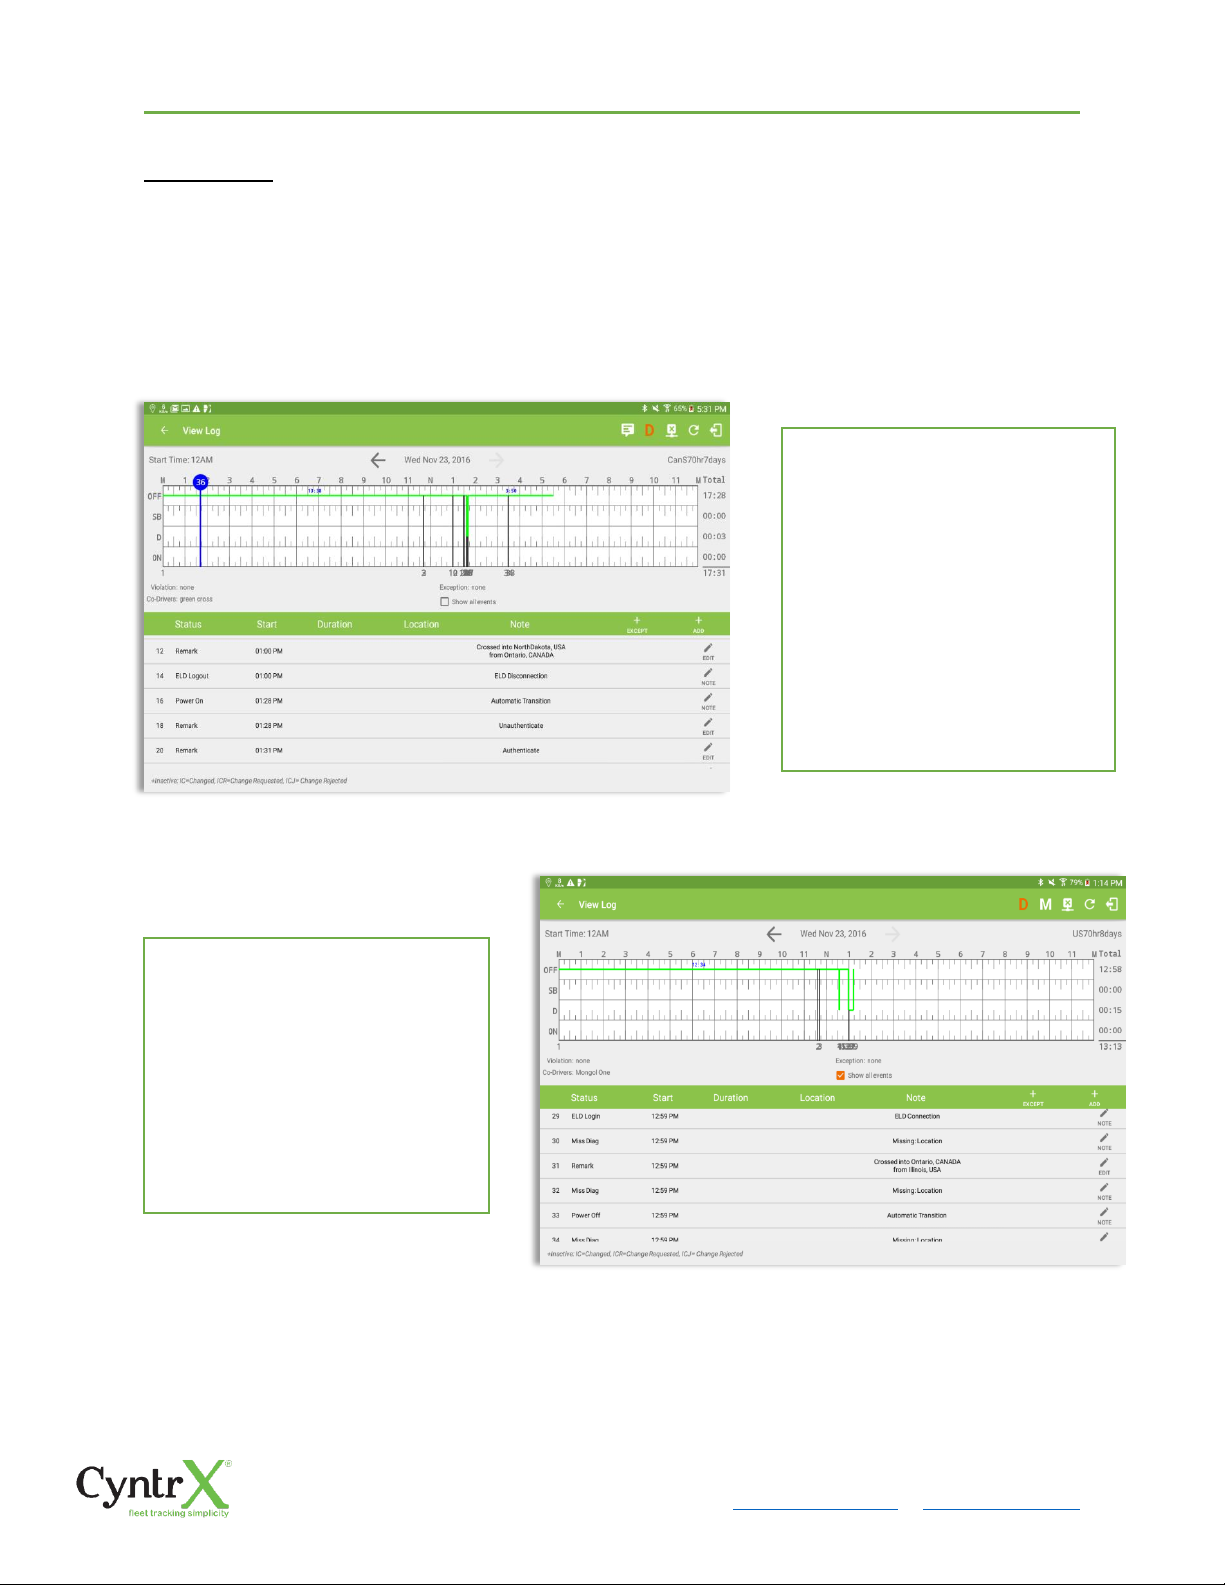
Auto Events
The ELD automatically records the driving time when the vehicle is in motion by setting
duty status to driving for the driver unless, before the vehicle is in motion, the driver has
sets the duty status to off-duty and indicates personal use of CMV, in which case duty
status must remain off-duty until driver’s indication of the driving condition ends;
Note: The graph-grid overlay periods of driver’s indications of authorized personal use of CMV and yard
moves using a different style line (such as the dashed or dotted line in amber color).
Events such as Power On, Power
Off, Driving and OnDuty are
automatically created when
connecting to a device. Auto
events created were recorded
and displayed on the Events
history list indicated with a note
“Automatic Transition”.
(These events are also displayed
in the Portal)
To view all the auto created events
(primary or secondary events)
when connecting to a device, tap
on the ‘Show all events’ checkbox
to enable.
To hide all the secondary events,
tap back on the checkbox to
disable.
Page 60
CyntrX
Page 60
920-338-0479 | [email protected]| www.CyntrX.com
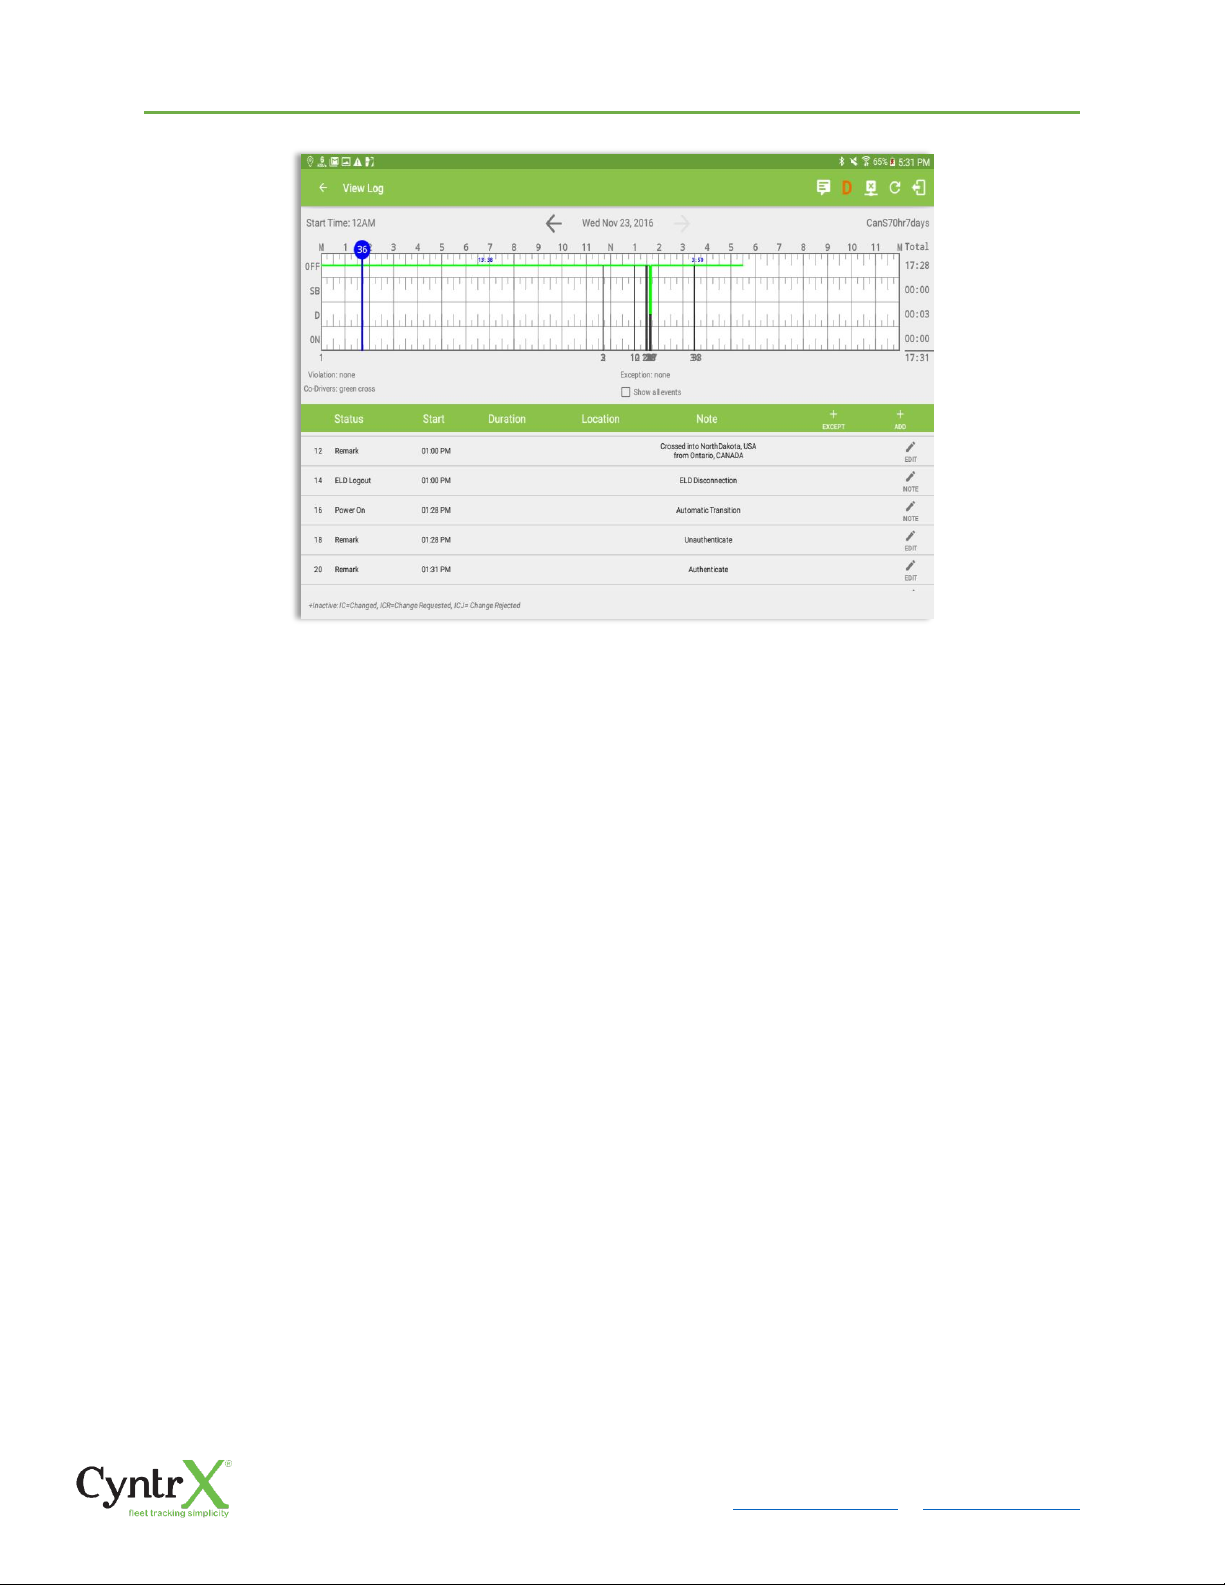
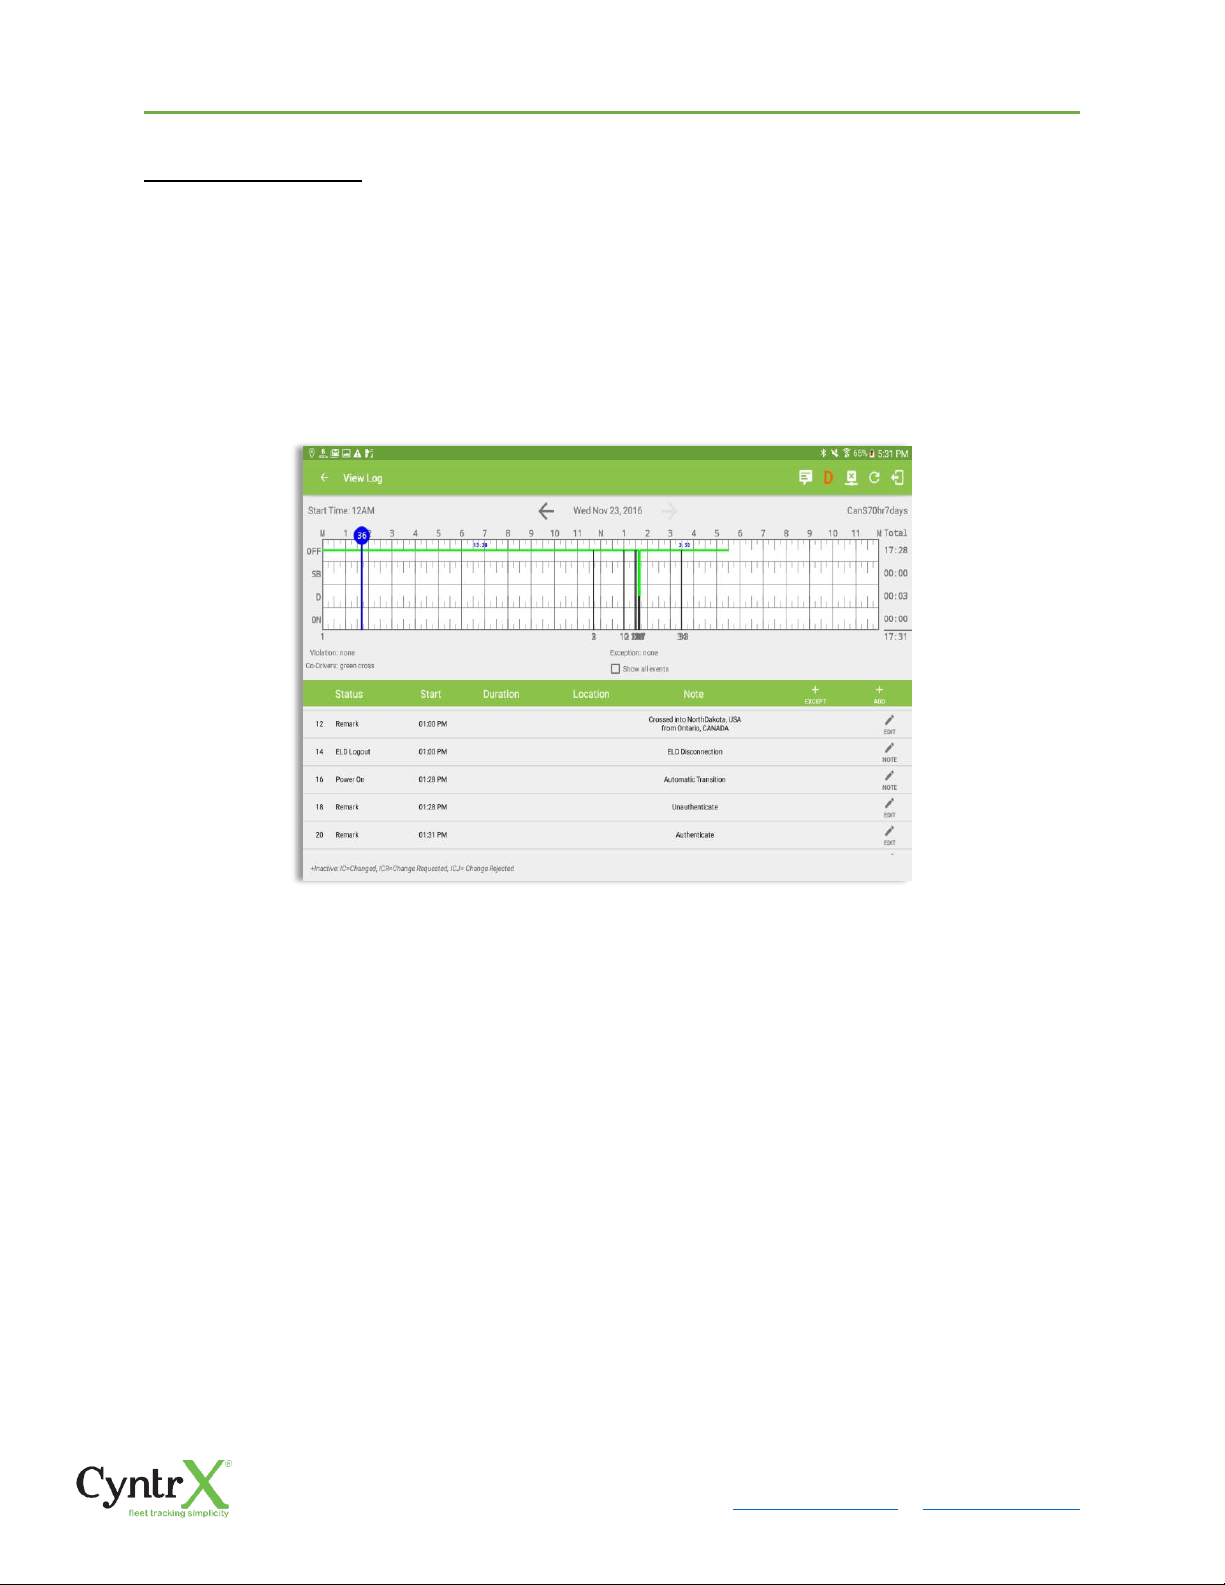
• A Remark will be recorded with a note “Authenticate” to the events history list if Driver
will login to app.
• A Remark will be recoded with a note “Unauthenticate” if driver will logout from app.
• ELD Login will be recorded with a note “ELD Connection” to events’ history list when app
successfully connected to VBUS Device.
• ELD Logout will be recorded with a note “ELD Disconnection” to events’ history list when
driver manually disconnect to VBUS Device by tapping the connect/disconnect icon
located at the App header.
Page 61
CyntrX
Page 61
920-338-0479 | [email protected]| www.CyntrX.com
Crossing Boundaries
The border crossing calculation uses the VBUS GPS coordinates if they are available, and
the android coordinates if they are not. The following instances happens when the
driver crossed boundaries between Canada and US (vice versa):
a. If the GPS coordinates are changed to a different state or province, a remark
event will be recorded in the driver log.
b. If the current location is in Canada, the driving rules will automatically switched
to Canadian rules. Similarly, if the location is in the US, the driving rules
automatically switched to US rules.
c. If there is a co-driver logged in, both the remark and the rules changes will be
occurring to be applied for him/her as well.
Page 62
CyntrX
Page 62
920-338-0479 | [email protected]| www.CyntrX.com
5.3 Malfunction and Data Diagnostic Events
At Each instance when an ELD malfunction or data diagnostic event is detected or cleared
by the ELD, the ELD records the event. The recorded malfunctions and data diagnostic
events are inconsistencies found while monitoring the app/ELD against FMCSA
compliance requirements. These instances are indicated in the application header and in
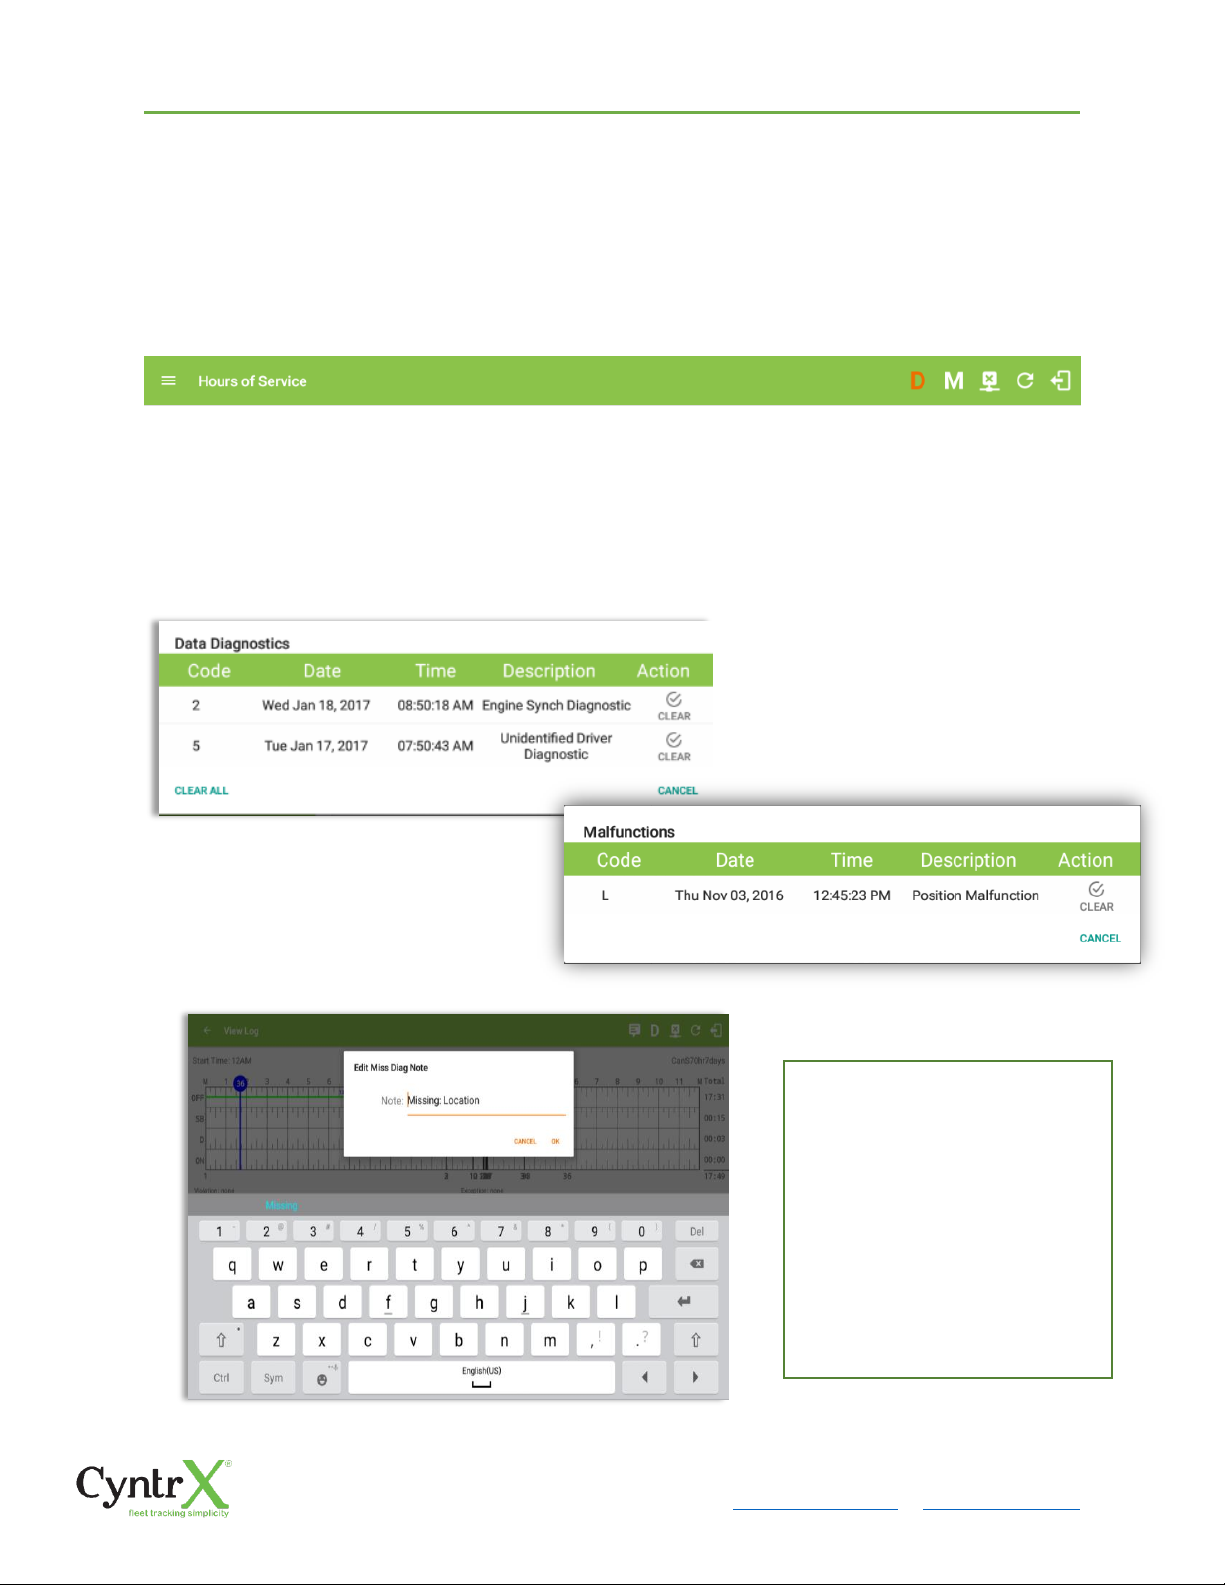
the Android notification toolbar with the letters M and D, respectively.
Note: The ELD Data Diagnostic indicator provides notification of active data diagnostics events applicable
to the active driver. The Data Diagnostics “D” icon will flash in amber color if there are new active Data
Diagnostics events that is not yet reviewed by the driver and will only turn back to white once the Data
Diagnostic dialog is closed after being reviewed by the driver. There will also be a notification in the
Android toolbar indicating a malfunction or a data diagnostic event.
The Malfunction and Data
Diagnostic events note can also
be edited on the edit log screen
Tap the Clear button to clear the
malfunction or data diagnostic
event detected
To clear all Data Diagnostic
Events, tap the Clear All button.
Page 63
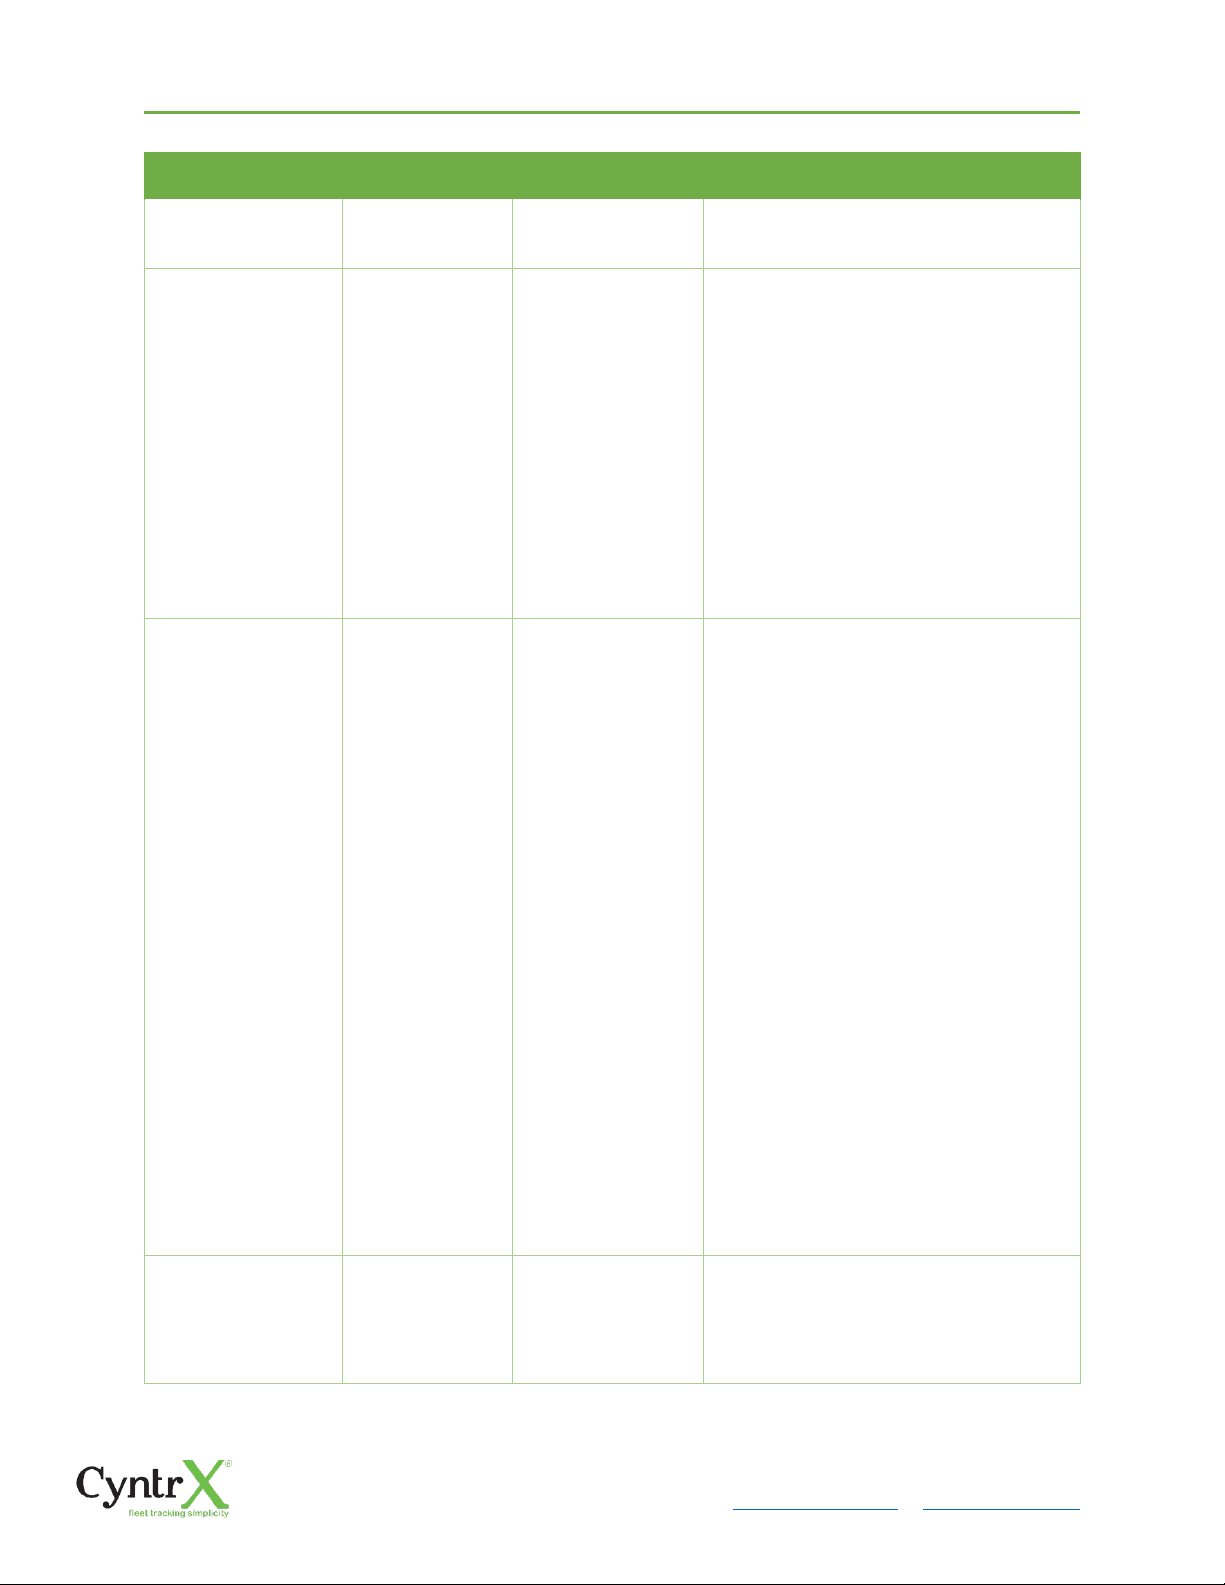
Malfunction Events
Requirement
No.
Event Code
Event Name
Description
4.6.1.1
P / Power MF
Power
Malfunction
An ELD must set a power
compliance malfunction if the
power data diagnostics event
described in paragraph 4.6.1.1(a)
of this appendix indicates an
aggregated in-motion driving
time understatement of 30
minutes or more on the ELD over
a 24-hour period across all driver
profiles, including the
unidentified driver profile.
4.6.1.2
E / Sync MF
Engine
Synchronization
Malfunction
An ELD must set an engine
synchronization compliance
malfunction if connectivity to any
of the required data sources
specified in section 4.3.1 of this
87 appendix is lost for more than
30 minutes during a 24-hour
period aggregated across all
driver profiles, including the
unidentified driver profile.
4.6.1.3
T / Timing MF
Timing
Malfunction
The ELD must periodically crosscheck its compliance with the
requirement specified in section
4.3.1.5 of this appendix with
respect to an accurate external
UTC source and must record a
timing compliance malfunction
when it can no longer meet the
underlying compliance
requirement.
4.6.1.4
L / Pos MF
Position
Malfunction
ELD records requiring location
information must use the last
valid position measurement and
include the latitude/longitude
Page 64

coordinates and distance
traveled, in miles, since the last
valid position measurement.
An ELD must monitor elapsed
time during periods when the ELD
fails to acquire a valid position
measurement within 5 miles of
the CMV’s movement. When such
elapsed time exceeds a
cumulative 60 minutes over a 24hour period, the ELD must set and
record a positioning compliance
malfunction.
4.6.1.5
R / DR MF
Data Recording
Malfunction
An ELD must monitor its storage
capacity and integrity and must
detect a data recording
compliance malfunction if it can
no longer record or retain
required events or retrieve
recorded logs that are not
otherwise catalogued remotely
by the motor carrier.
4.6.1.7
S / Trans MF
Data Transfer
Malfunction
(a) An ELD must implement inservice monitoring functions to
verify that the data transfer
mechanism(s) described in
section 4.9.1 of this appendix are
continuing to function properly.
An ELD must verify this
functionality at least once every 7
days. These monitoring functions
may be automatic or may involve
manual steps for a driver.
(c) After an ELD records a data
transfer data diagnostic event,
the ELD must increase the
Page 65
frequency of the monitoring
function to check at least once
every 24-hour period. If the ELD
stays in the unconfirmed data
transfer mode following the next
three 90 consecutive monitoring
checks, the ELD must detect a
data transfer compliance
malfunction.
4.6.1.8
O / Other MF
Other
Malfunction
In addition to the required
monitoring schemes described in
sections 4.6.1.1– 4.6.1.7 of this
appendix, the ELD provider may
implement additional,
technology-specific malfunction
and data diagnostic detection
schemes and may use the ELD’s
malfunction status indicator and
data diagnostic status indicator
(described in sections 4.6.2.1 and
4.6.3.1) to communicate the
ELD’s malfunction or noncompliant state to the operator(s)
of the ELD.
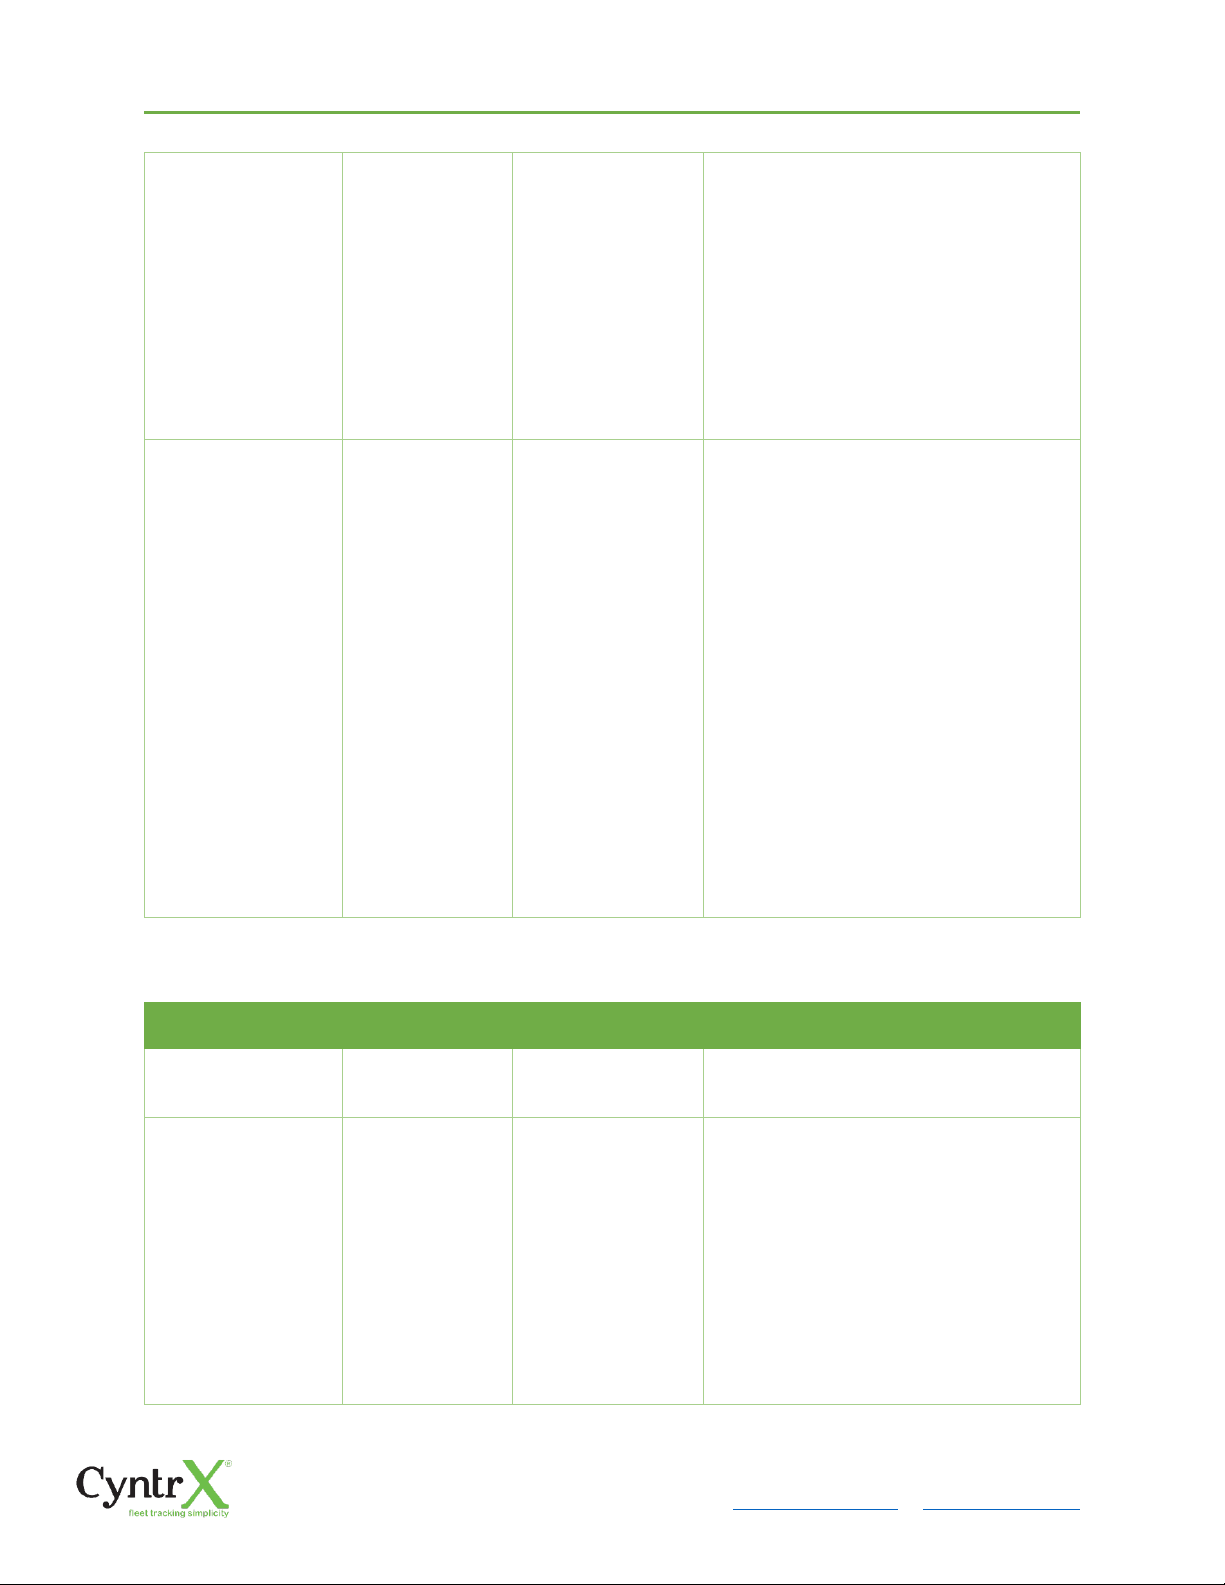
Data Diagnostic Events
Requirement
No.
Event Code
Event Name
Description
4.6.1.1
1 / Pwd Diag
Power
Diagnostic
An ELD must monitor data it
receives from the engine ECM or
alternative sources as allowed in
sections 4.3.1.1-4.3.1.4 of this
appendix, its onboard sensors,
and data record history to identify
instances when it may not have
complied with the power
requirements specified in section
Page 66

4.3.1.1, in which case, the ELD
must record a power data
diagnostics event for the
corresponding driver(s), or under
the unidentified driver profile if
no drivers were authenticated at
the time of detection.
4.6.1.2
2 / Sync Diag
Engine
Synchronization
Diagnostic
An ELD required to establish a link
to the engine ECM as described in
section 4.2 must monitor its
connectivity to the engine ECM
and its ability to retrieve the
vehicle parameters described
under section 4.3.1 of this
appendix and must record an
engine-synchronization data
diagnostics event when it no
longer can acquire updated
values for the ELD parameters
required for records within 5
seconds of the need.
4.6.1.4 (d)
3 / Miss Diag
Missing Data
Elements
Diagnostic
If a new ELD event must be
recorded at an instance when the
ELD had failed to acquire a valid
position measurement within the
most recent elapsed 5 miles of
driving, but the ELD has not yet
set a positioning compliance
malfunction, the ELD must record
the character “X” in both the
latitude and longitude fields,
unless location is 88 entered
manually by the driver, in which
case it must log the character “M”
instead. Under the circumstances
listed in this paragraph, if the ELD
event is due to a change in duty
status for the driver, the ELD must
prompt the driver to enter
Page 67

location manually in accordance
with section 4.3.2.7 of this
appendix. If the driver does not
enter the location information
and the vehicle is in motion, the
ELD must record a missing
required data element data
diagnostic event for the driver.
4.6.1.7
4 / Trans Diag
Data Transfer
Diagnostic
(b) If the monitoring mechanism
fails to confirm proper in-service
operation of the data transfer
mechanism(s), an ELD must
record a data transfer data
diagnostic event and enter an
unconfirmed data transfer mode.
4.6.1.6
5 / Unid Diag
Unidentified
Driver
Diagnostic
(b) If more than 30 minutes of
driving in a 24-hour period show
unidentified driver on the ELD,
the ELD must detect and record
an unidentified driving records
data diagnostic event and the
data diagnostic indicator must be
turned on for all drivers logged in
to that ELD for the current 24hour period and the following 7
days.
(c) An unidentified driving records
data diagnostic event can be
cleared by the ELD when driving
time logged under the
unidentified driver profile for the
current 24-hour period and the
previous 7 consecutive days
drops to 15 minutes or less.
4.6.1.8
6 / Other
Diag
Other
Diagnostic
In addition to the required
monitoring schemes described in
sections 4.6.1.1– 4.6.1.7 of this
appendix, the ELD provider may
Page 68
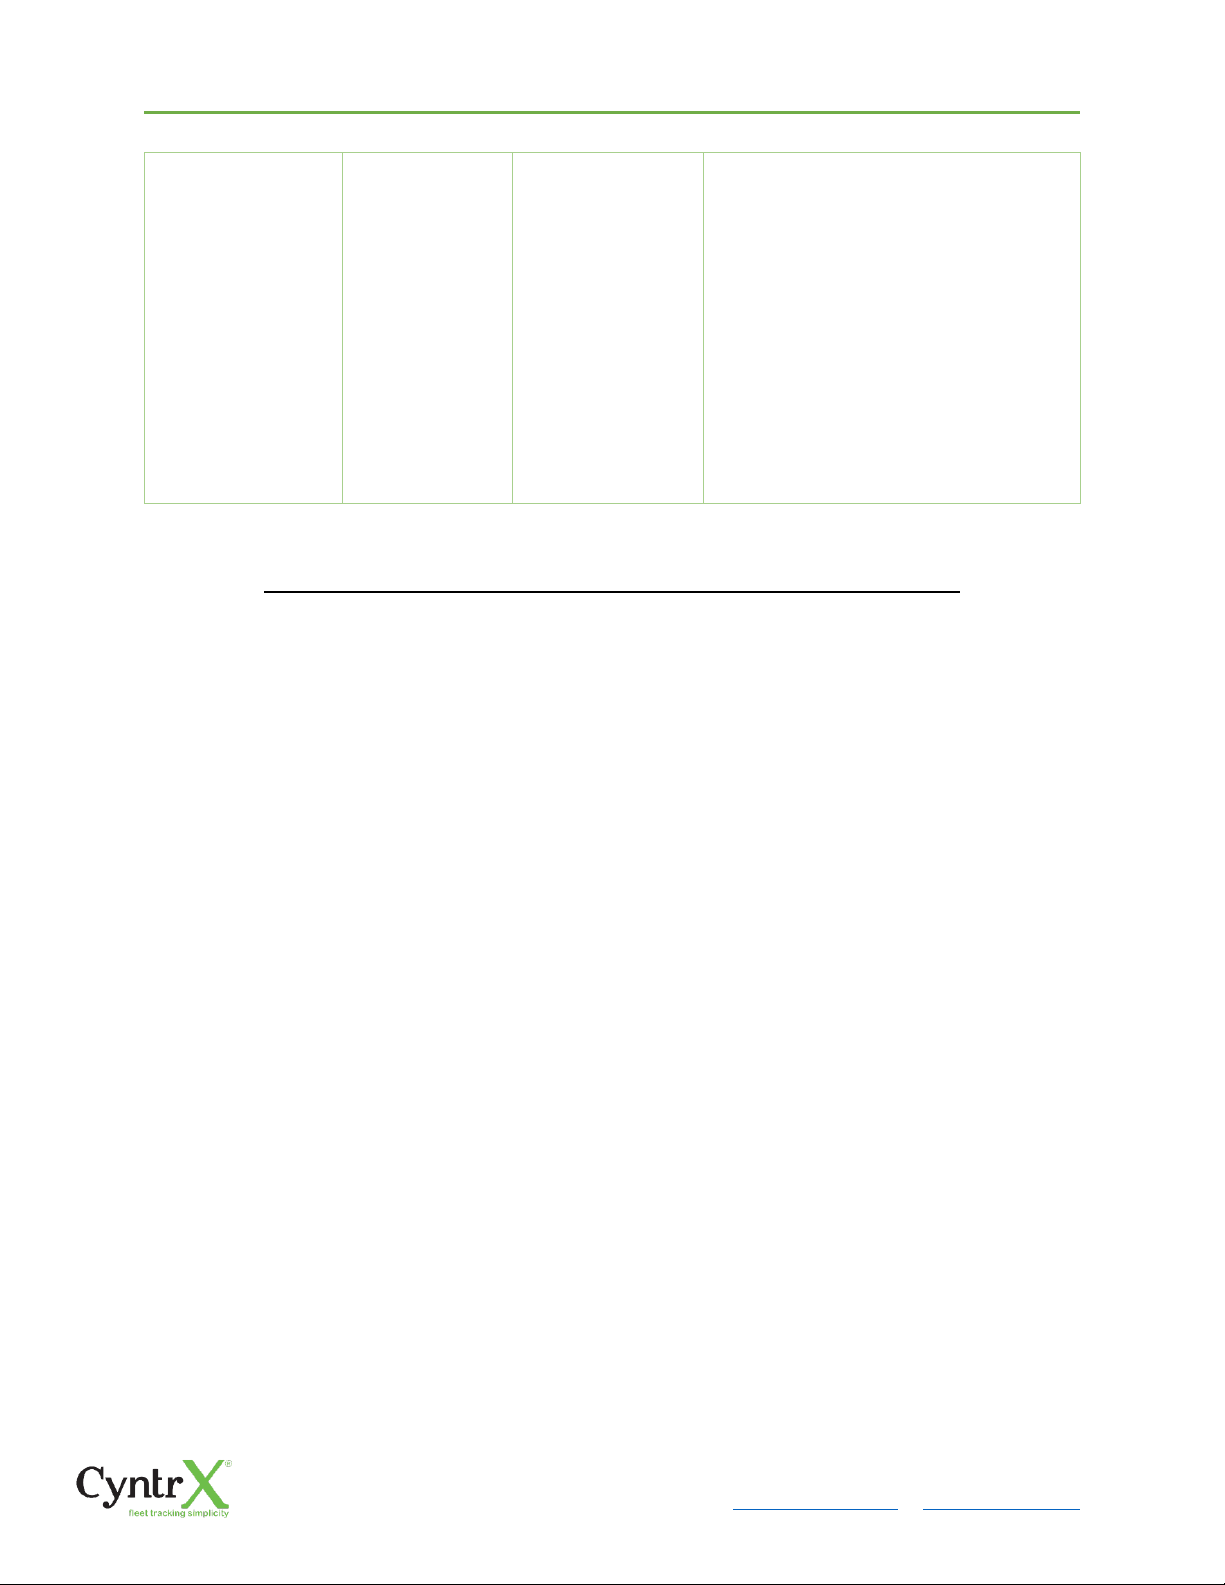
implement additional,
technology-specific malfunction
and data diagnostic detection
schemes and may use the ELD’s
malfunction status indicator and
data diagnostic status indicator
(described in sections 4.6.2.1 and
4.6.3.1) to communicate the
ELD’s malfunction or noncompliant state to the operator(s)
of the ELD.
Actions for Malfunction & Data Diagnostic Events
Carrier responsibilities regarding malfunctions:
▪ Provide drivers with an instruction sheet describing the various ELD malfunction
events and recordkeeping procedures (395.22)
▪ Provide drivers with a supply of 8 days’ worth of blank paper driver records
(395.22)
▪ Repair, replacement, or service
o Motor carrier must correct the malfunction of the ELD within 8 days of
discovery of the condition or a driver's notification to the motor carrier,
whichever occurs first (395.34)
Record keeping responsibilities by the driver:
▪ Malfunction events
o Note the ELD malfunction and provide carrier with written notice within
24hrs (395.34)
o Reconstruct driving events for the current 24hr period and previous 7
consecutive days using paper logs (unless they can be retrieved from the
ELD) (395.34)
o Continue to manually prepare driving logs until ELD is serviced and
brought back into compliance (395.34)
Page 69

CyntrX
Page 69
920-338-0479 | [email protected]| www.CyntrX.com
o During inspections which take place when a malfunction has occurred:
provide safety official with manually kept driver logs (395.34)
▪ Data diagnostic events
o Driver must follow the motor carrier's and ELD provider's
recommendations in resolving the data inconsistency (395.34)
Clearing of malfunction and data diagnostic events:
▪ ELD needs to capture when a malfunction or data diagnostic event has been
cleared by the driver (4.5.1.7)
▪ Unidentified driving records data diagnostic
o Events that drop to 15 minutes or less during the current 24hr period and
previous 7 days can be cleared automatically and there is no requirement
to record the automatic clear (4.6.1.6)
Page 70
CyntrX
Page 70
920-338-0479 | [email protected]| www.CyntrX.com
5.4 DVIR
The DVIR feature provides a way for you to create online vehicle DVIR reports while in
the field. This helps to ensure that your vehicle confirms to the FMCSA’s safety
regulations.
There are a number of ways to access this feature:
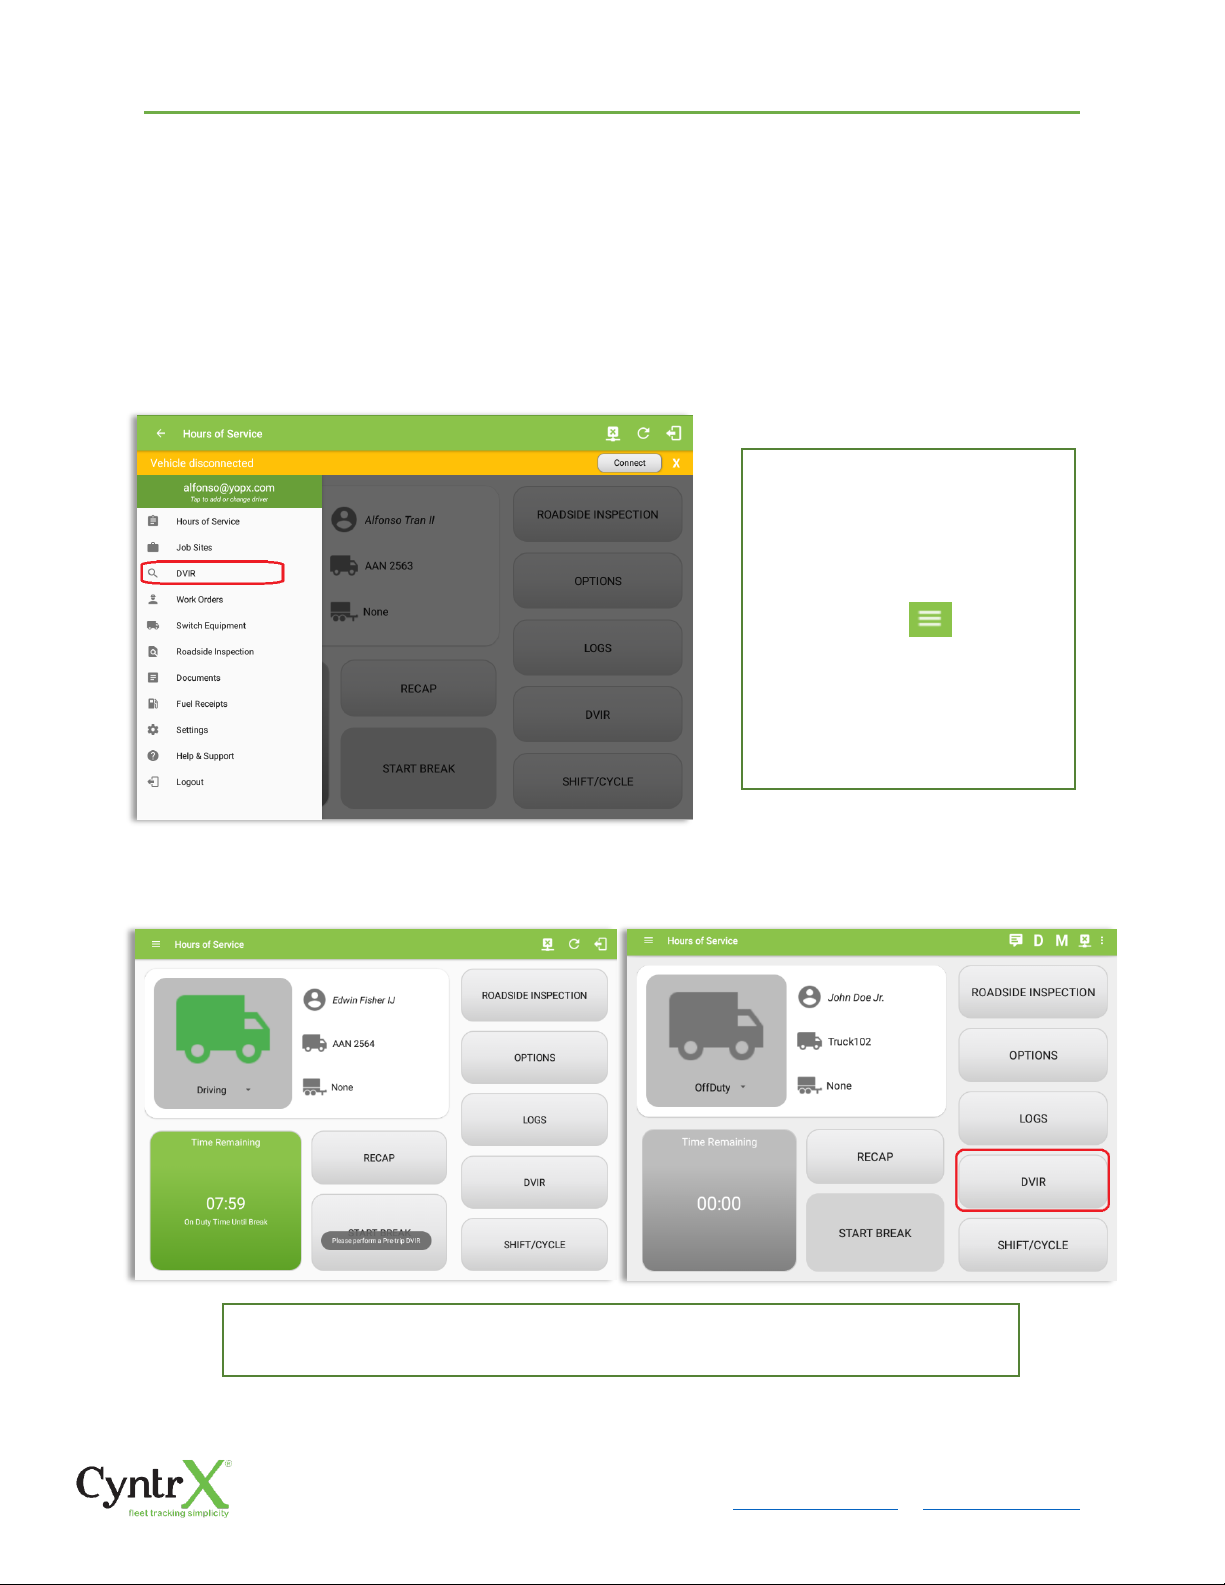
5.4.1 DVIR Feature – Main Navigation Menu
5.4.2 DVIR Feature – Hours of Service Main Screen
From the Hours of Service Main Screen, tap the DVIR button to display the DVIR
screen.
1. Slide the screen from left to
right to show the Main
Navigation Menu
Or
2. Tap the Main Navigation
Hamburger icon
to show the Main Navigation
Menu
Tap the DVIR option within the
Page 71
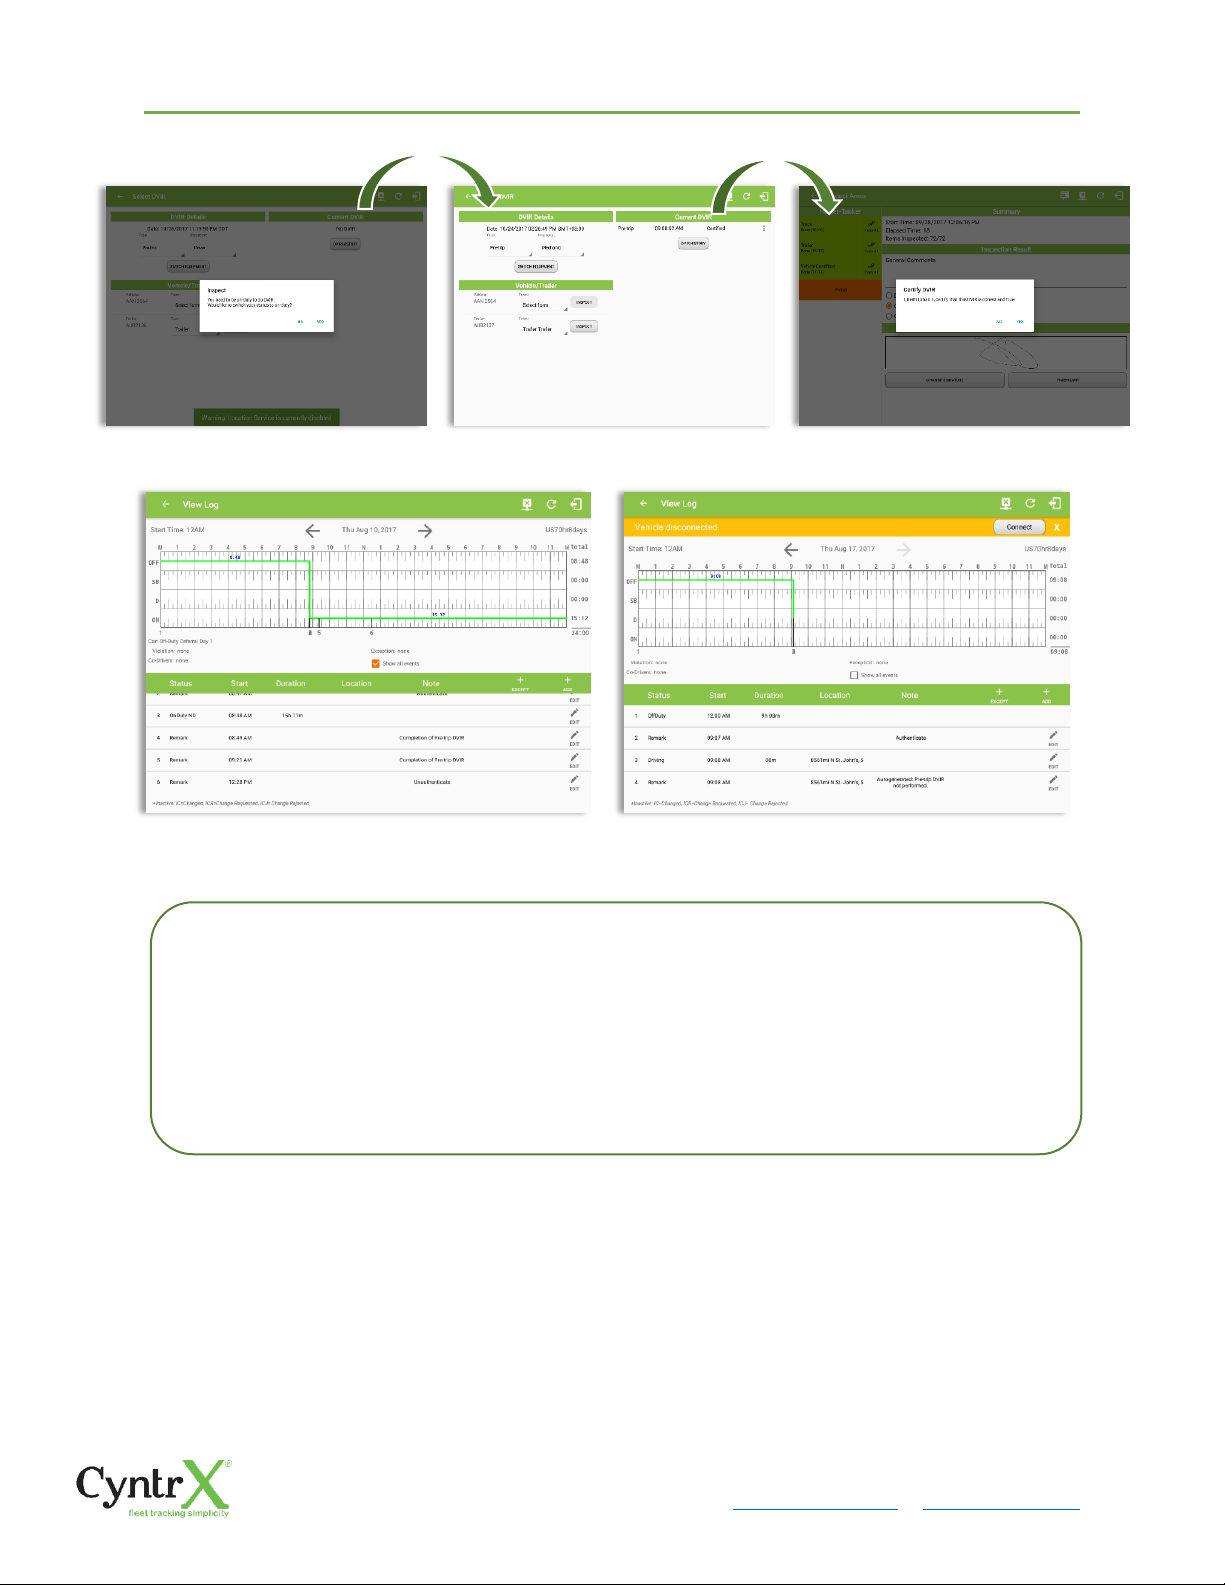
• When driver manually/automatically change to Driving event without completing the Pre-
trip DVIR, it will create a 'Remark' event with a note ‘Pre-trip DVIR not performed.’
• The Remark event will only be created once per shift.
• The Remark event will be created after it detects or when a first Driving event on the shift
cycle is created.
• Also, an alert is sent only once for each vehicle that begins to drive without having done a
Pre-Trip DVIR.
Page 72
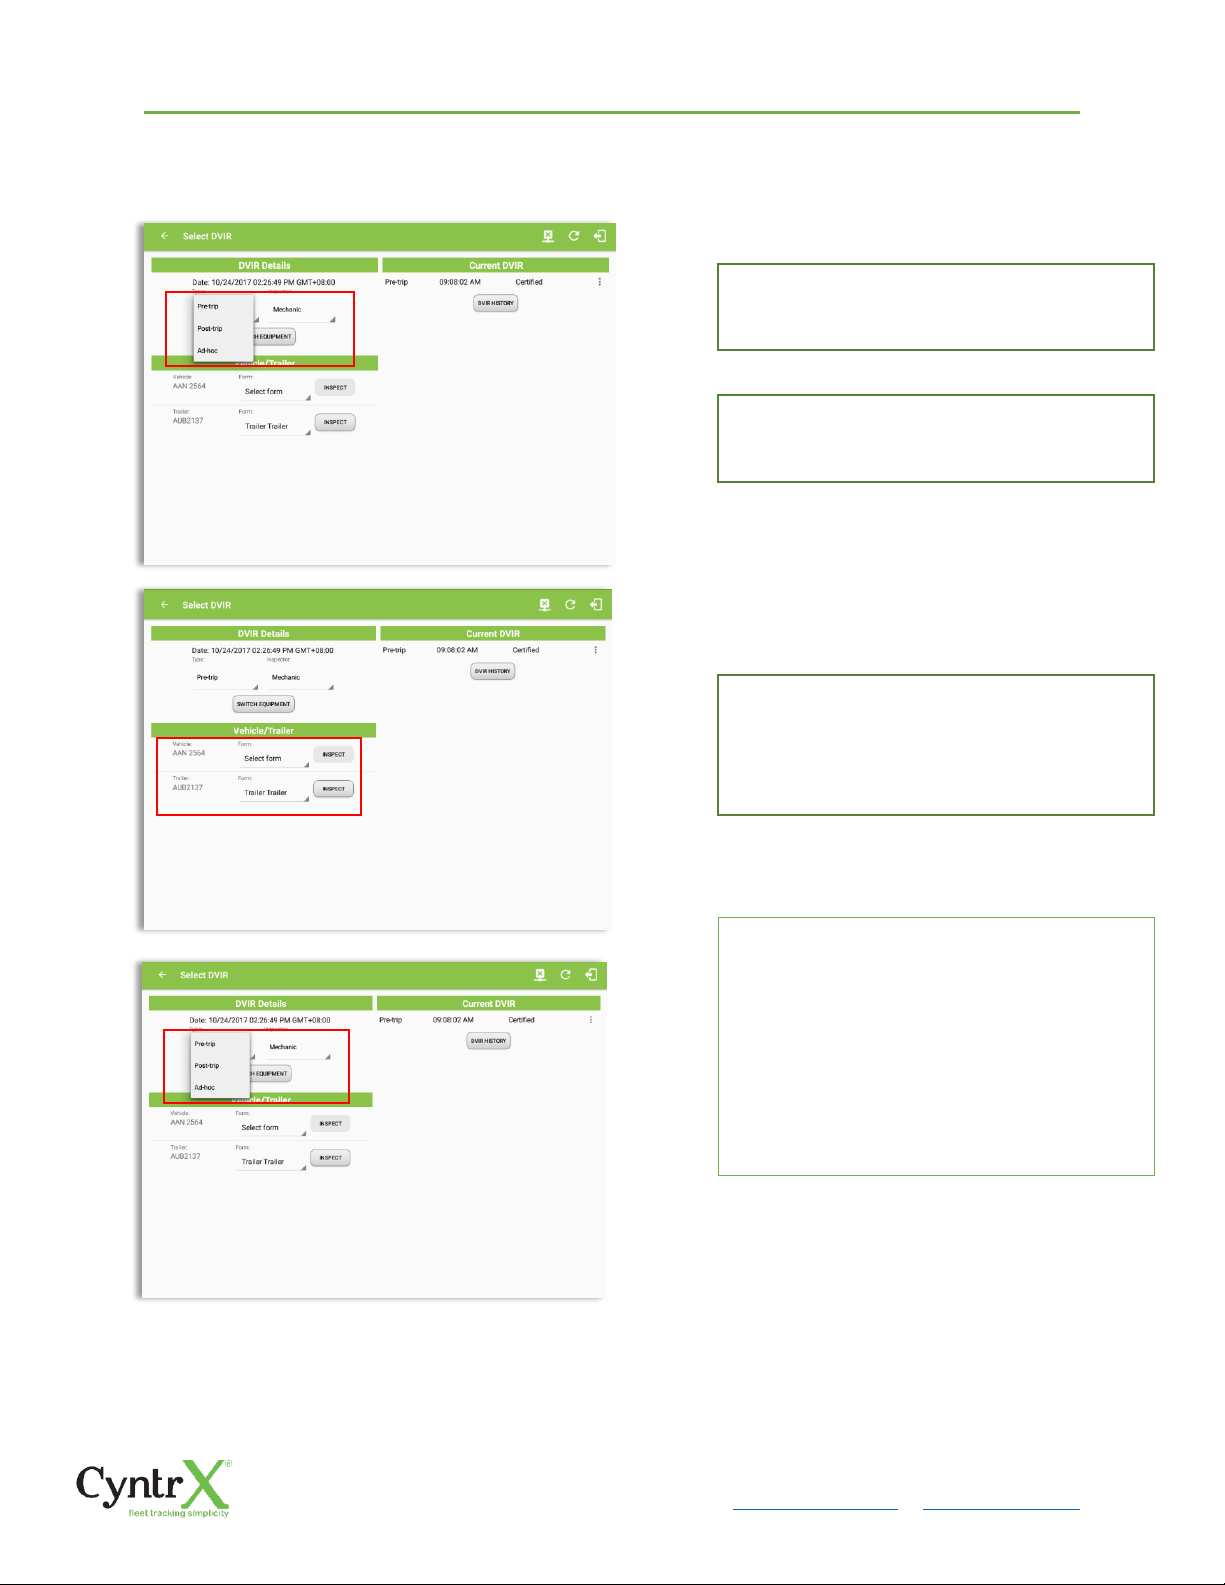
You can select a DVIR Form from the 6
default DVIR forms or you can also select a
Customized DVIR Forms for Asset(s) also
from the list.
Choose the appropriate DVIR Type from the
following options.
a) Pre: A DVIR conducted before driving
the CMV.
b) Post: A DVIR conducted after driving
a CMV.
c) Ad Hoc: Any DVIR conducted in any
other period that the ones specified
in points a & b.
Choose the appropriate Inspector from the
following options.
Page 73
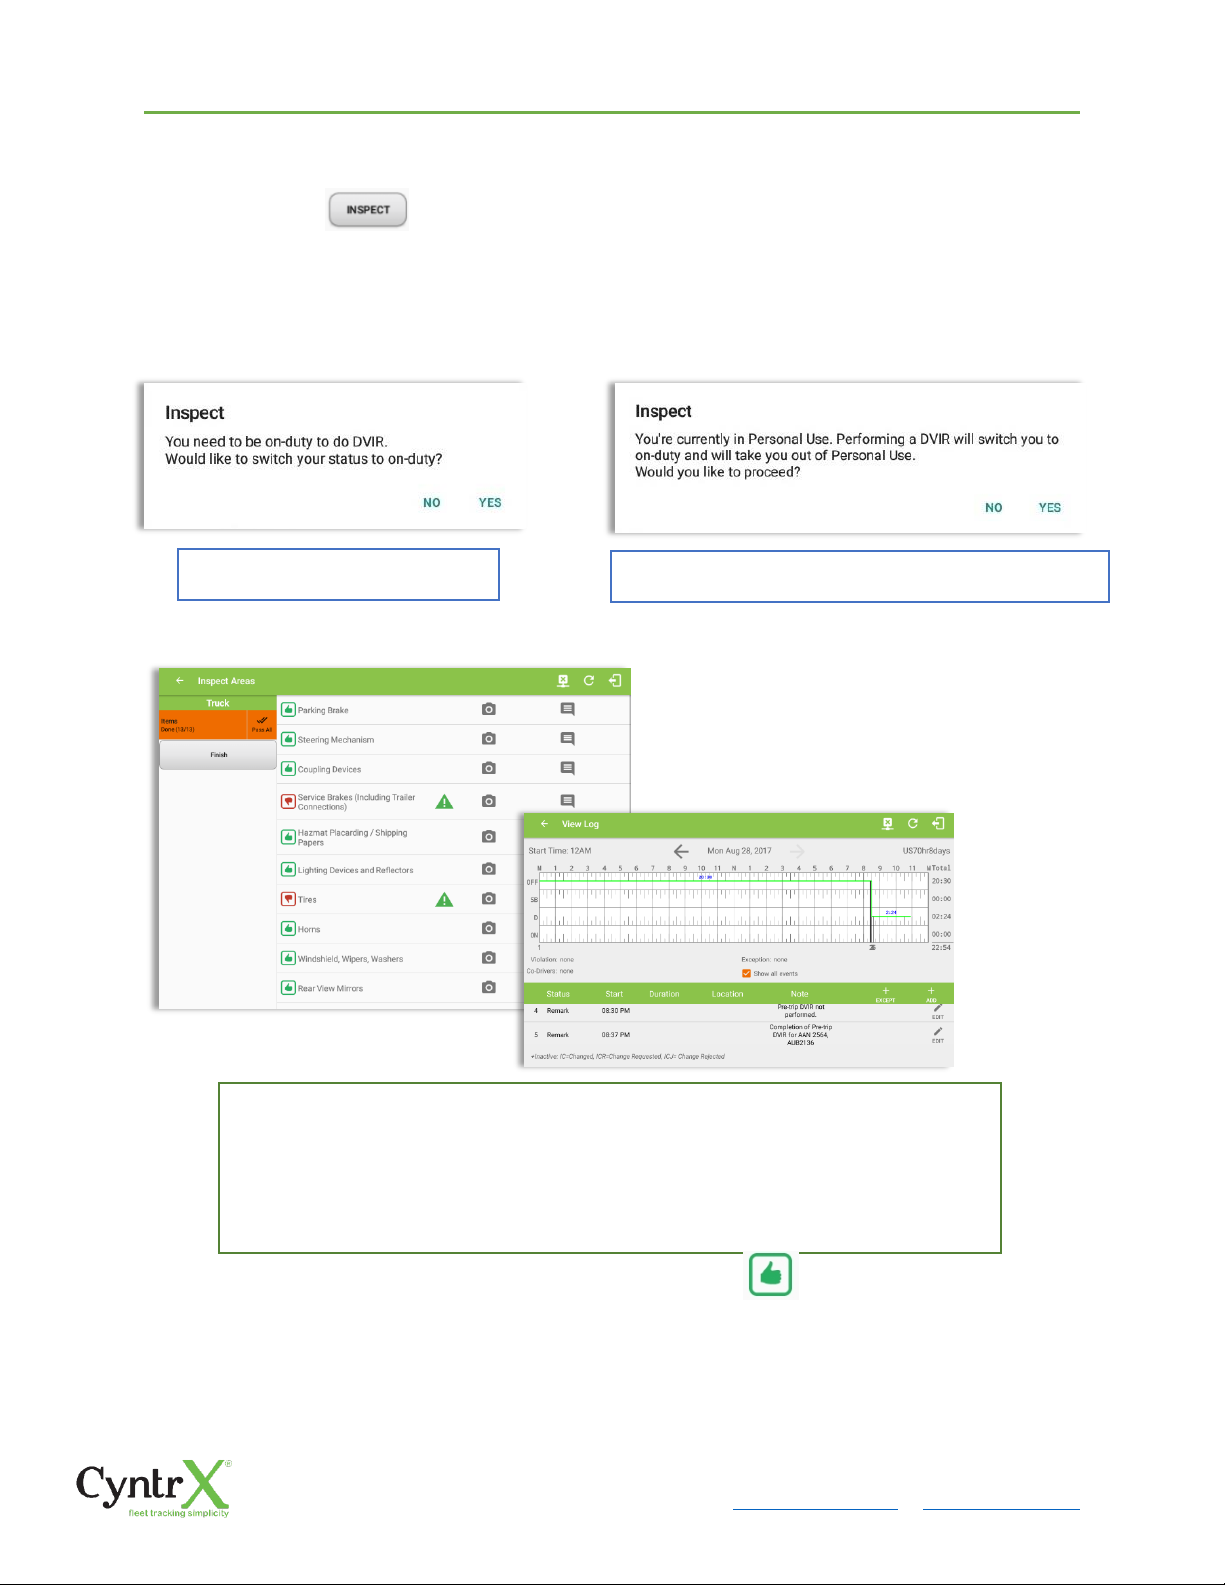
CyntrX
Page 73
920-338-0479 | [email protected]| www.CyntrX.com
5.4.4 Starting Your DVIR
Tap the Inspect button in each equipment to start the DVIR, you will be
directed to the DVIR screen.
Note: However, a dialog as shown below will display that will ask confirmation to switch you to On Duty
status to do DVIR if current duty status is in Off Duty or will take you out to Personal Use if current status
is Off Duty under Personal Use.
5.4.5 Completing the First DVIR Area
Tap the unselected check box once or select the green Thumbs Up icon to
specify that the item has passed.
The first DVIR Area is selected by default; you can also tap its corresponding tab to
display the DVIR items under this area.
You can select the status of each DVIR Item by tapping their respective tri-state
check boxes as listed below:
If current duty status is Off Duty
If current duty status is Off Duty under Personal Use
Page 74
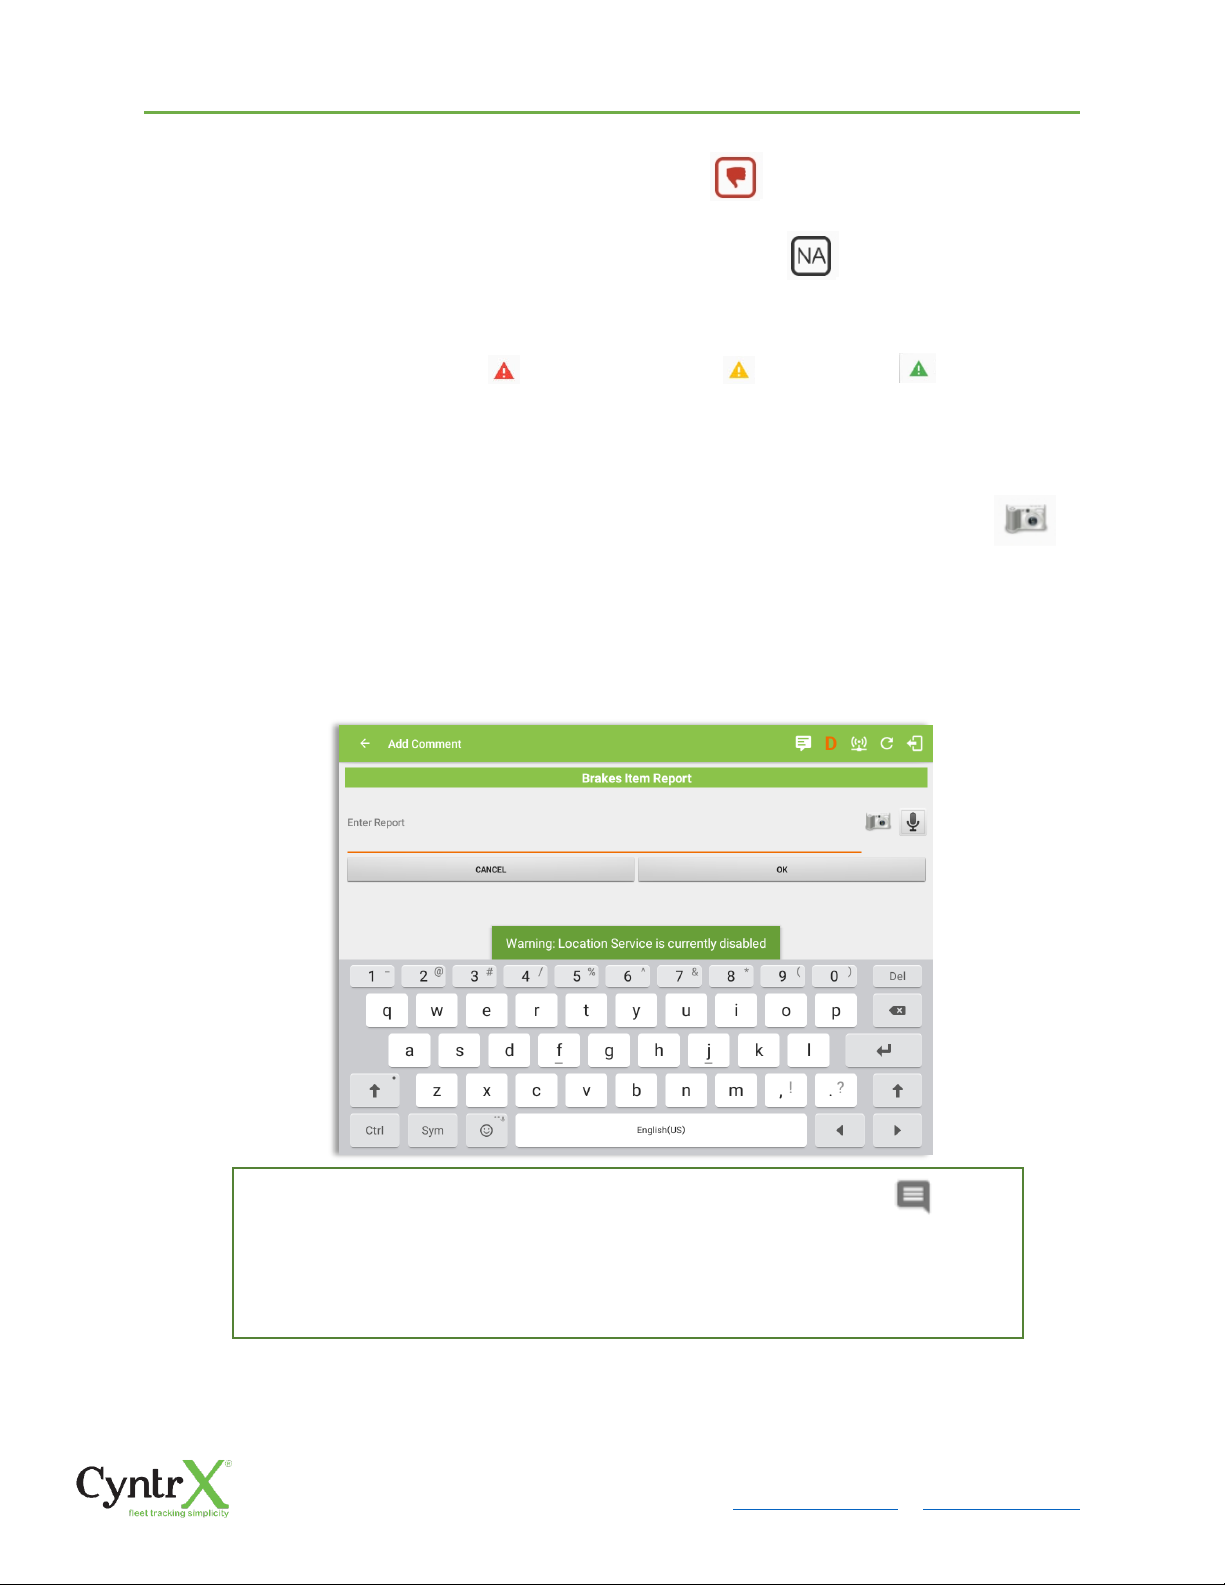
CyntrX
Page 74
920-338-0479 | [email protected]| www.CyntrX.com
Tap the unselected check box twice or select the red Thumbs Down icon to
specify that the item has failed.
Tap the unselected check box three times or select the NA icon it the item is not
applicable for the current DVIR.
When failing a DVIR, an option for selecting a severity level will appear with its
corresponding color: High – Red , Medium – Yellow , Low – Green .
Tap the Check All button to automatically select all the DVIR items.
5.4.6 Capturing an Image of a DVIR Item
If you wish to capture an image of a DVIR item, you can tap the Camera Button.
The Camera app will then appear, proceed to take a picture of the DVIR item.
After tapping the Capture Image Button, select the Save button to save the image and
add it to your item report. You can also discard the captured image by selecting the Cancel
button.
5.4.7 Add a Comment or Remark to a DVIR Item
You may add comments or remarks against a DVIR item by tapping the
Comments button, enter the relevant comment or remark in the Enter Report field,
tap the Camera button to add more images if required and select the OK button to
finish adding your images and comments or remarks.
Page 75
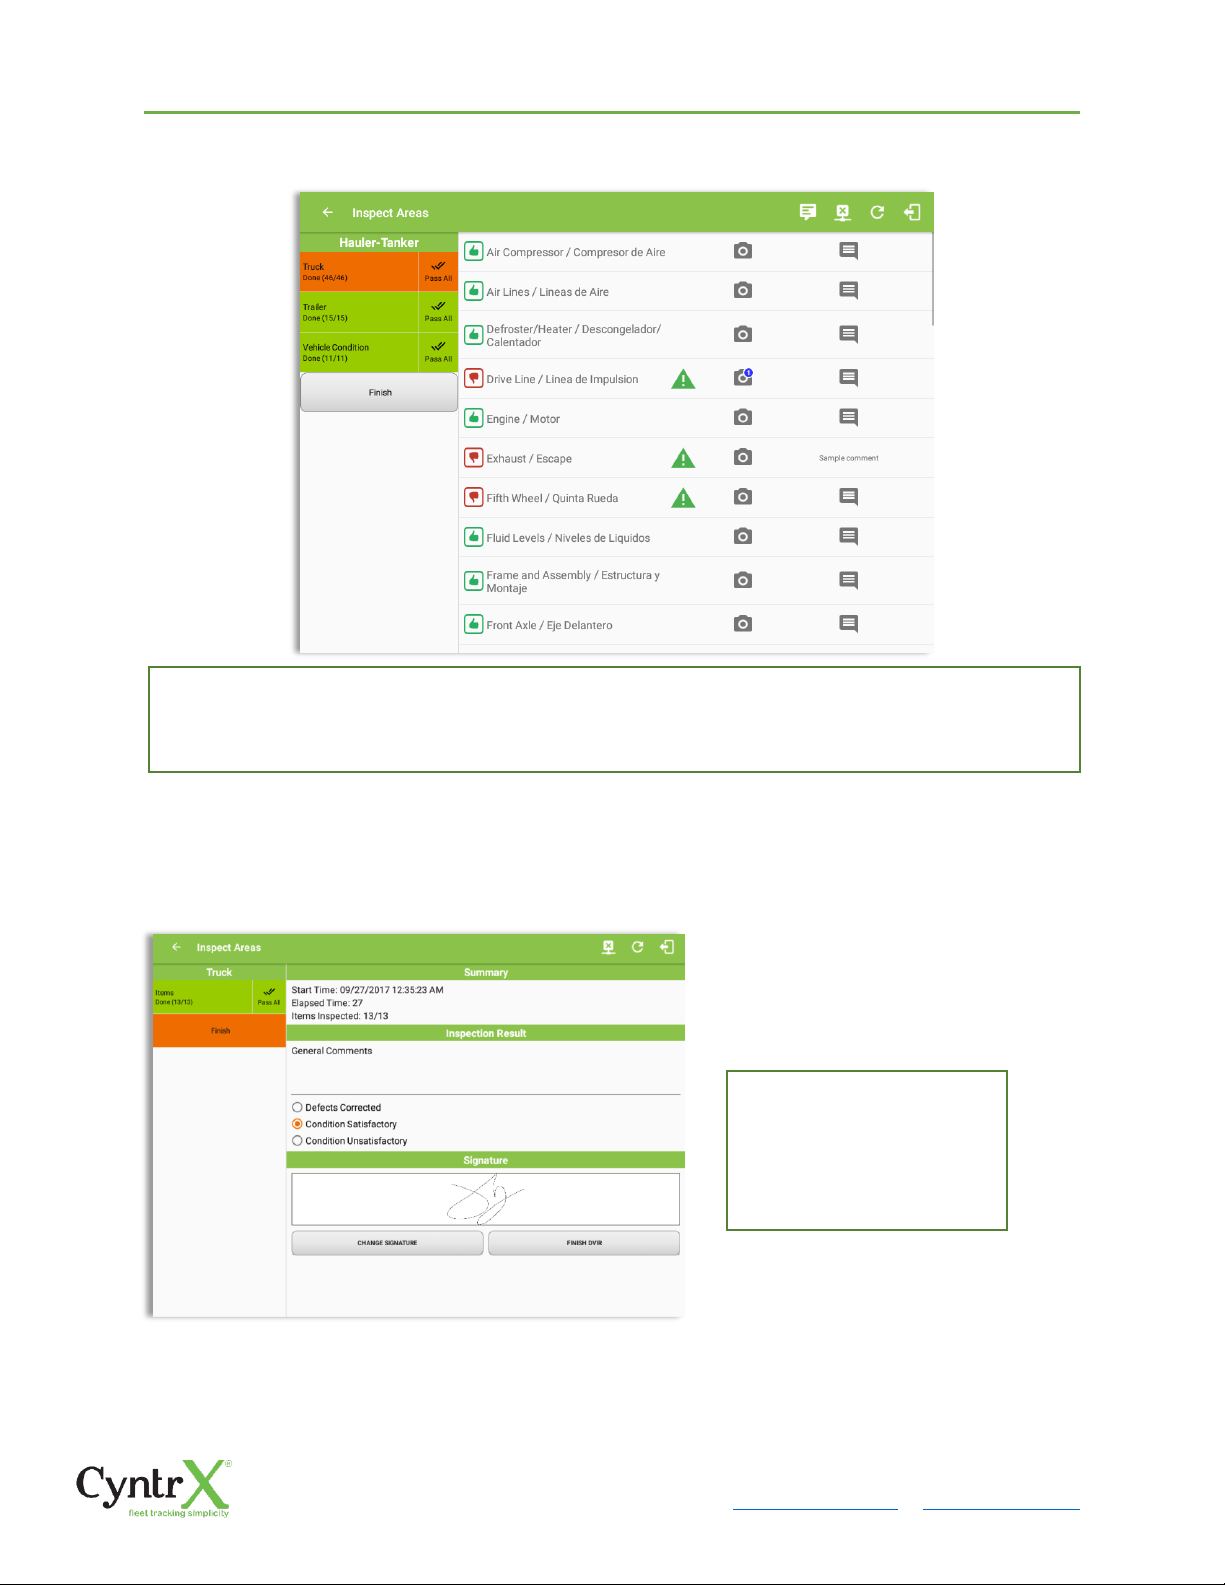
CyntrX
Page 75
920-338-0479 | [email protected]| www.CyntrX.com
Note: You can also tap the Voice Dictation button (speech to text) to use voice dictation instead of typing
your comments or remarks.
5.4.8 Finishing / Certifying Your DVIR
If you add an image and a comment or remark to the DVIR item, the camera button will have a
numbered icon over it depicting the number of images that have been attached; also, any comments
or remarks that have been added will be displayed and will replace the Comments button
To finish / certify your
DVIR, select the Finish
tab, this will display the
information detailed on the
next page.
Page 76
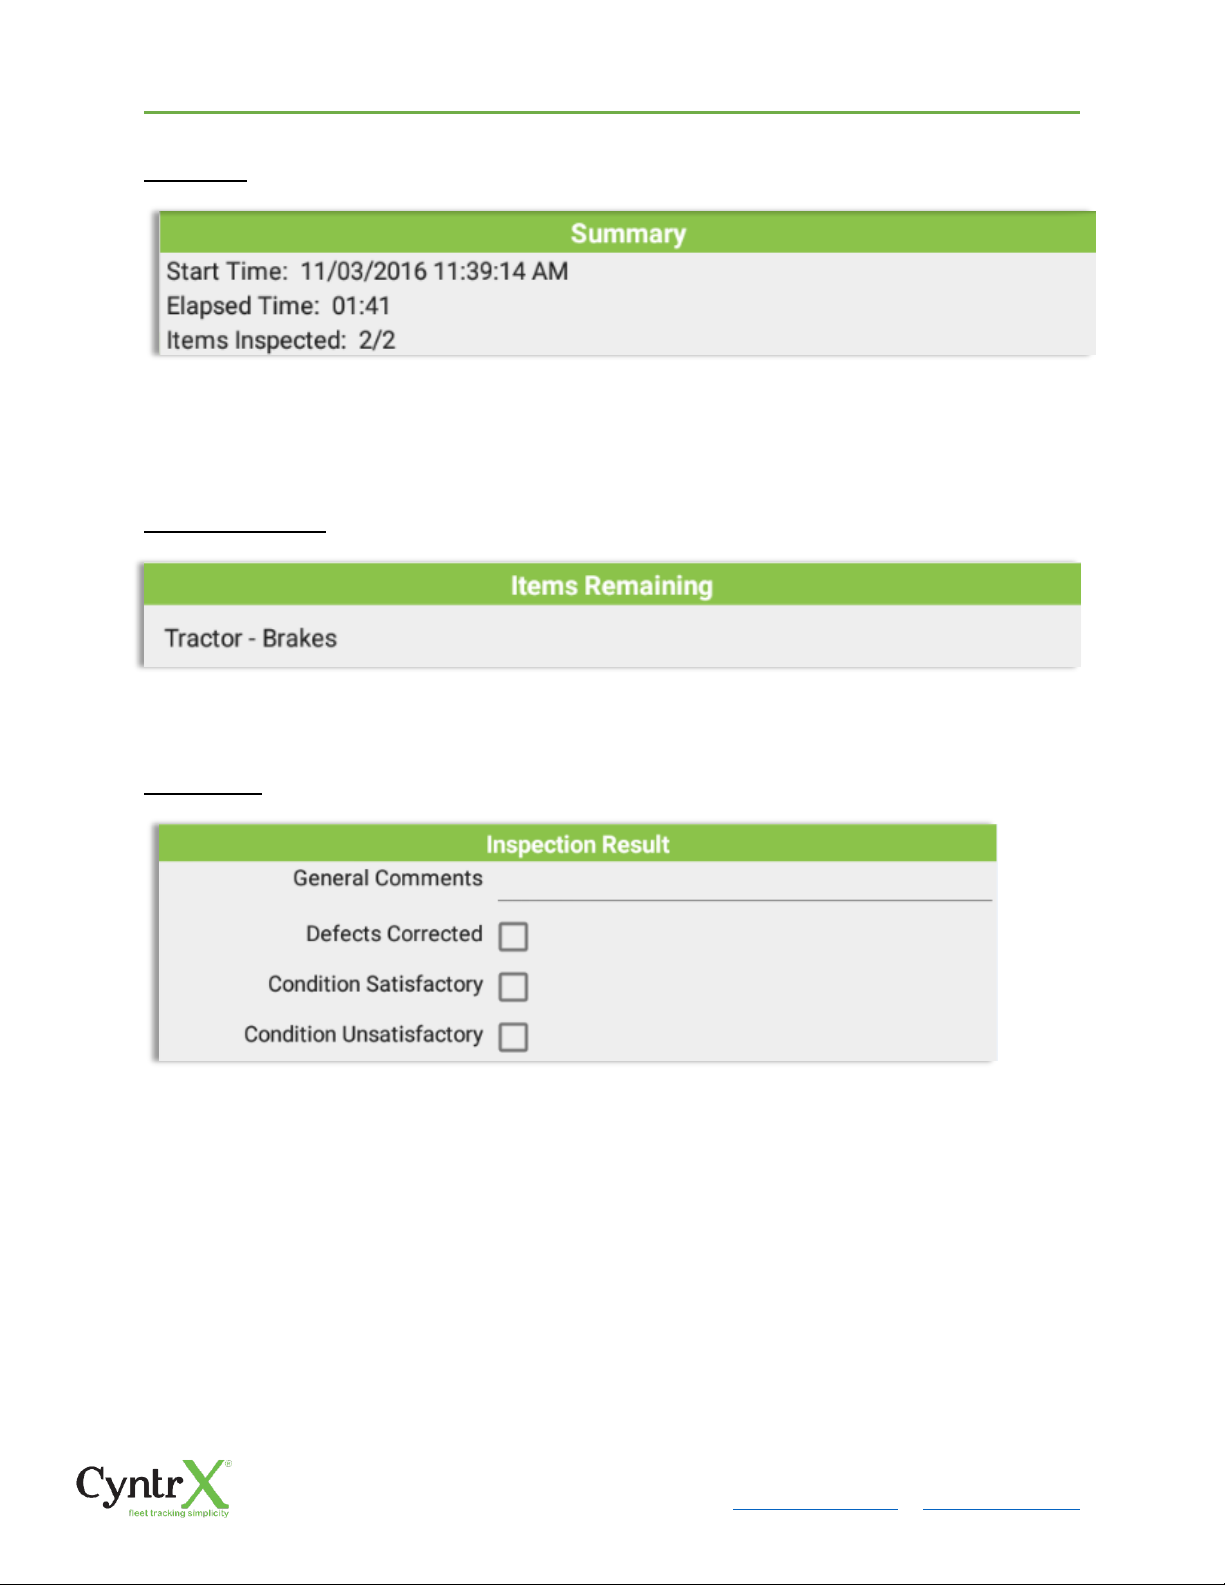
CyntrX
Page 76
920-338-0479 | [email protected]| www.CyntrX.com
Summary
• Start Time – the date and time the DVIR was started
• Elapsed Time – the duration of the current DVIR
• Items Inspected – this is a counter for the number of items already inspected
Items Remaining
This will only be displayed if you have not yet updated all of the DVIR items, this will
show the item(s) that are still to be inspected.
Final Items
General Comments – this is where you can enter your general DVIR report comments
One of the following options must be selected before the DVIR can be finished /
certified.
• Defects Corrected
• Condition Satisfactory
• Condition Unsatisfactory
Page 77
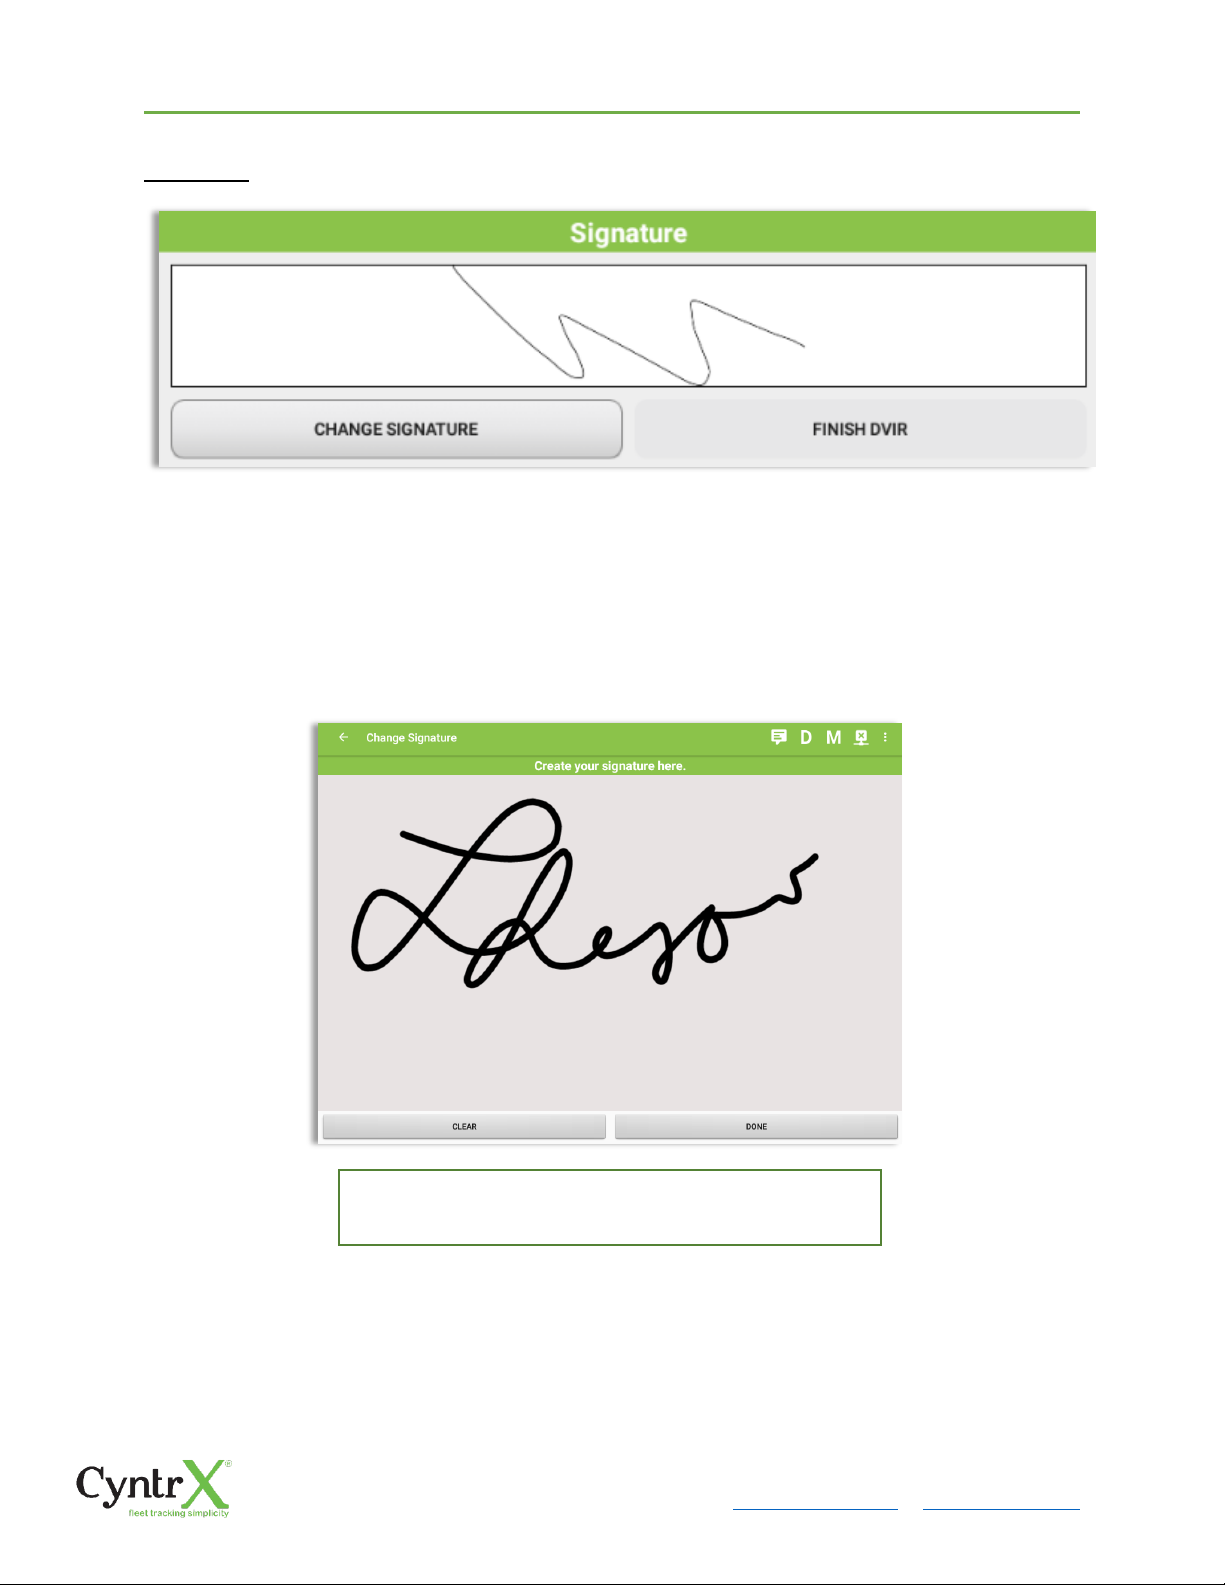
CyntrX
Page 77
920-338-0479 | [email protected]| www.CyntrX.com
Signature
Drivers can change their signature by tapping the Change Signature button.
Mechanics and other inspectors can create their signatures by tapping the Change
Signature button.
Selecting the Change Signature button will open the Create Your Signature Here
screen:
Tap the Done button to save your signature or tap the
Clear button to discard the signature
Page 78
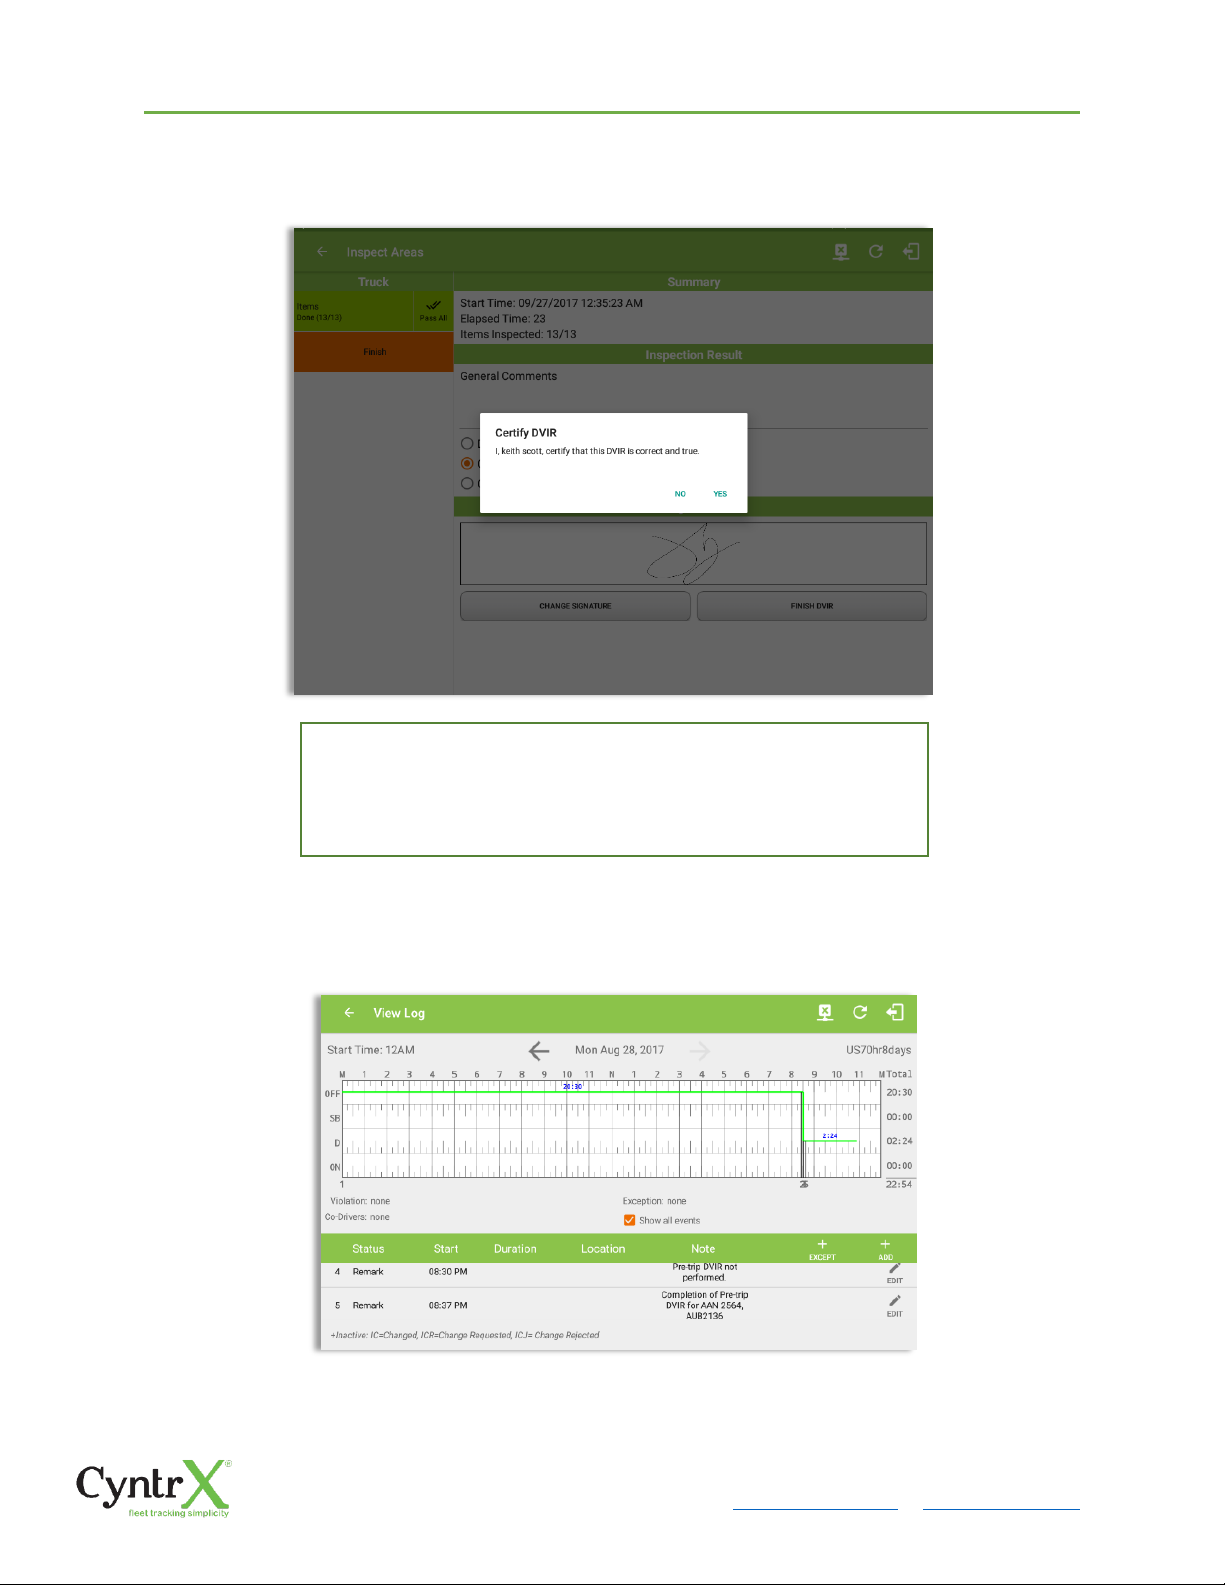
CyntrX
Page 78
920-338-0479 | [email protected]| www.CyntrX.com
5.4.9 Submit or Certify the DVIR
After successfully certifying the DVIR, a remark event will be created in the Edit Logs
screen stating the completion of Pre/Post/Ad-Hoc DVIRs.
Tap the Finish DVIR button to finish / certify the current vehicle
DVIR. Finally, after reviewing all of the DVIR details tap the OK
button to certify the DVIR. You can also cancel certifying the DVIR
by tapping the Cancel button.
Page 79
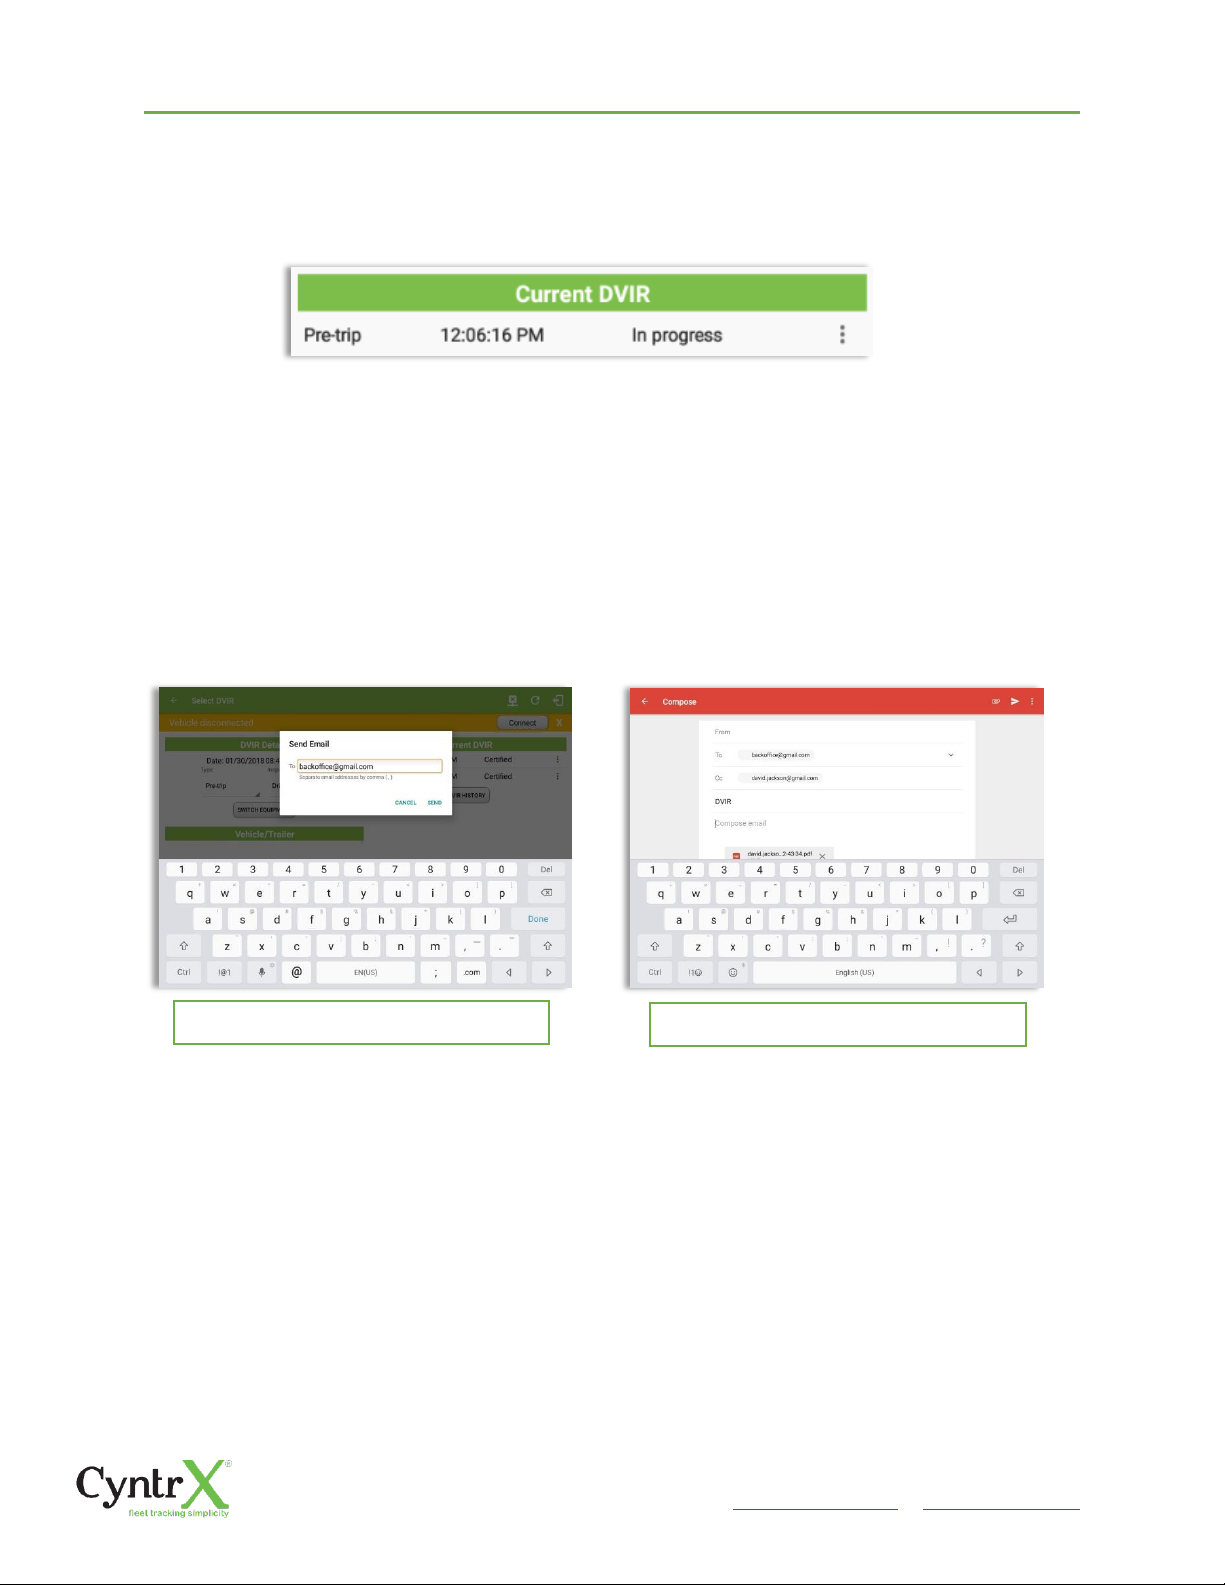
CyntrX
Page 79
920-338-0479 | [email protected]| www.CyntrX.com
5.4.10 Deleting a DVIR
Go to the Current DVIR section. This is where you can view a list of the DVIRs conducted
within the Vehicle DVIR screen:
• Tap the Email button to send the completed DVIR to an intended recipient.
• Tap the View button to view the DVIR details (once submitted, this cannot be
amended).
• Tap the Remove button to remove the DVIR (once submitted, this cannot be
removed).
5.4.11 Emailing a DVIR
• If Email Sender is set to Server, a Send Email dialog will display when the driver
taps Email button to send the completed DVIR. Enter the email address for the
recipient. If the recipient is more than one, separate email addresses by comma.
• If Email Sender is set to App, an app will open (e.g. Gmail app will open for
Android device) with a new message that has a DVIR Report PDF file attached.
Note: Email Sender option can be seen and set in settings screen>HOS Preferences>Others.
Emailing a DVIR via Server
Emailing a DVIR via App
Page 80
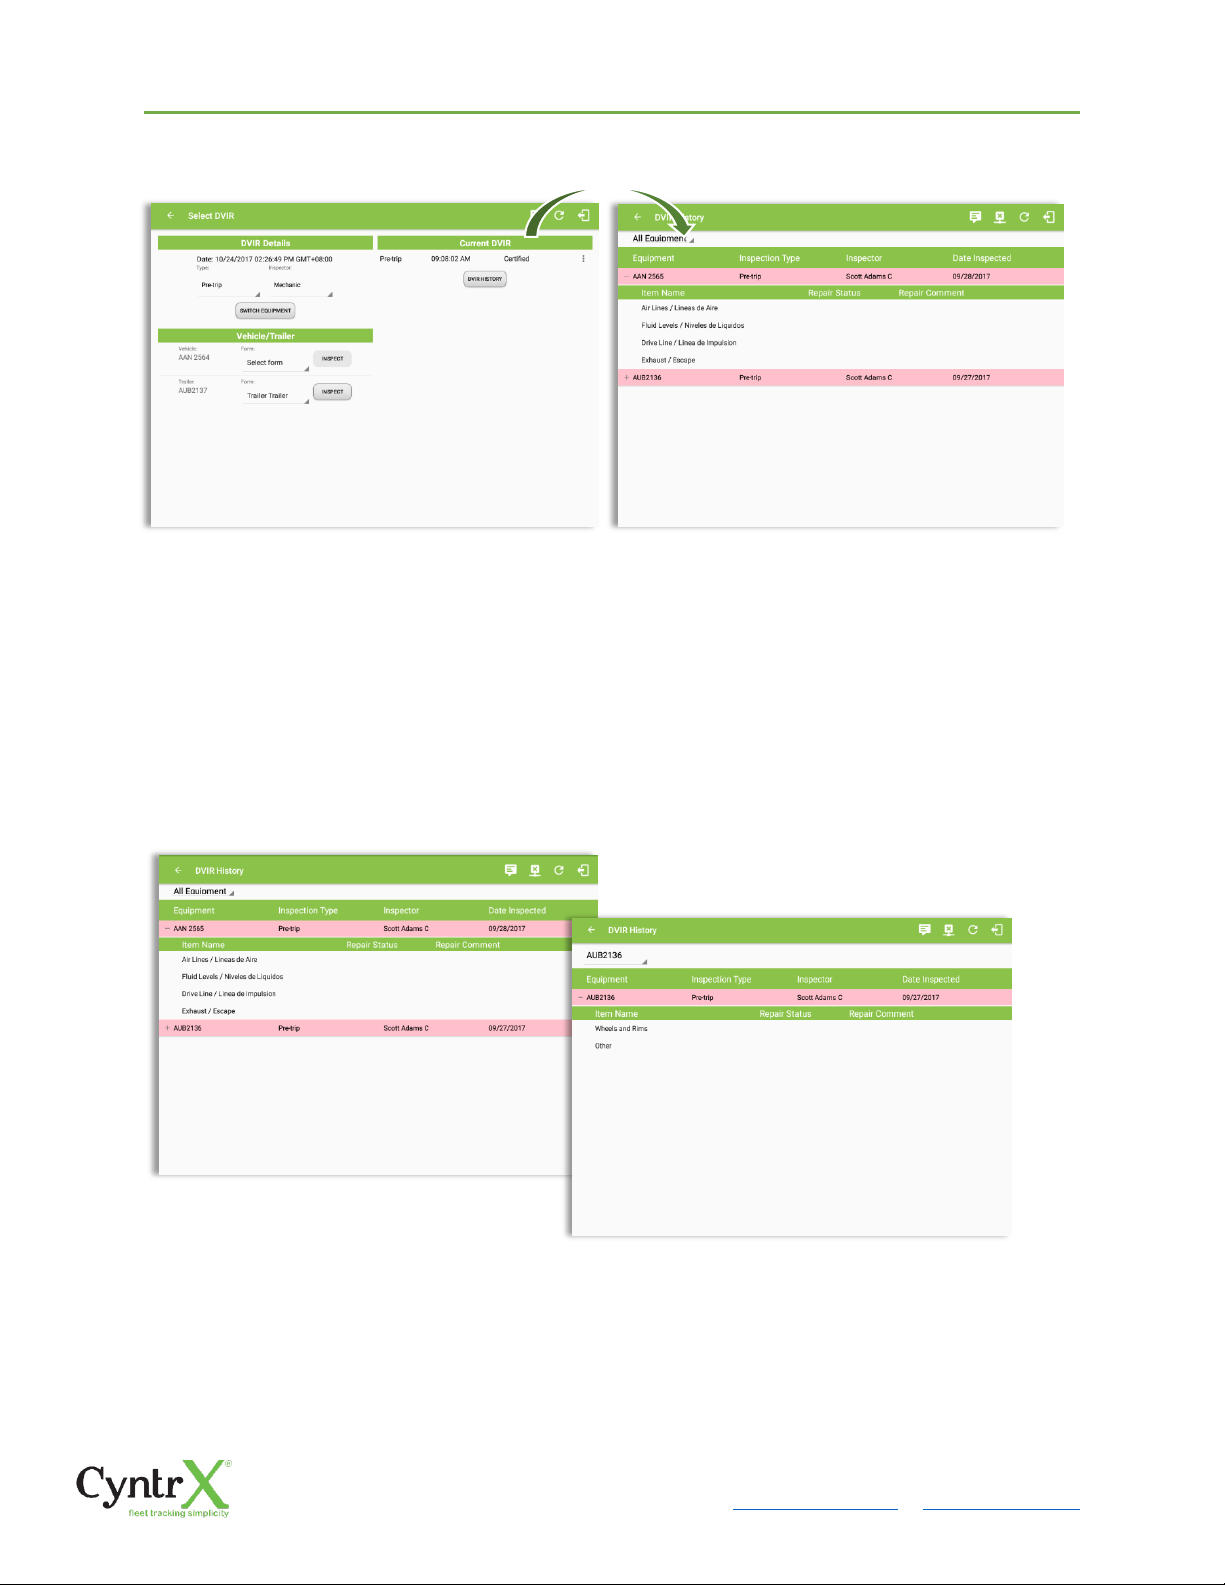
CyntrX
Page 80
920-338-0479 | [email protected]| www.CyntrX.com
5.5 DVIR History
The DVIR History feature displays the DVIRs for the last 30 days for the currently selected
equipment. Completed DVIRs that don't have failed items shows in a row highlighted in
green color while Completed DVIRs with failed items are highlighted in red. Also, a '+' can
be tap to show the details of failed items.
5.5.1 Viewing DVIR History by Vehicle
• DVIR History Screen displays DVIR inspections for all equipment by default
• Tap the Equipment name on the upper left of the screen to view the DVIR of the
specified vehicle
Page 81
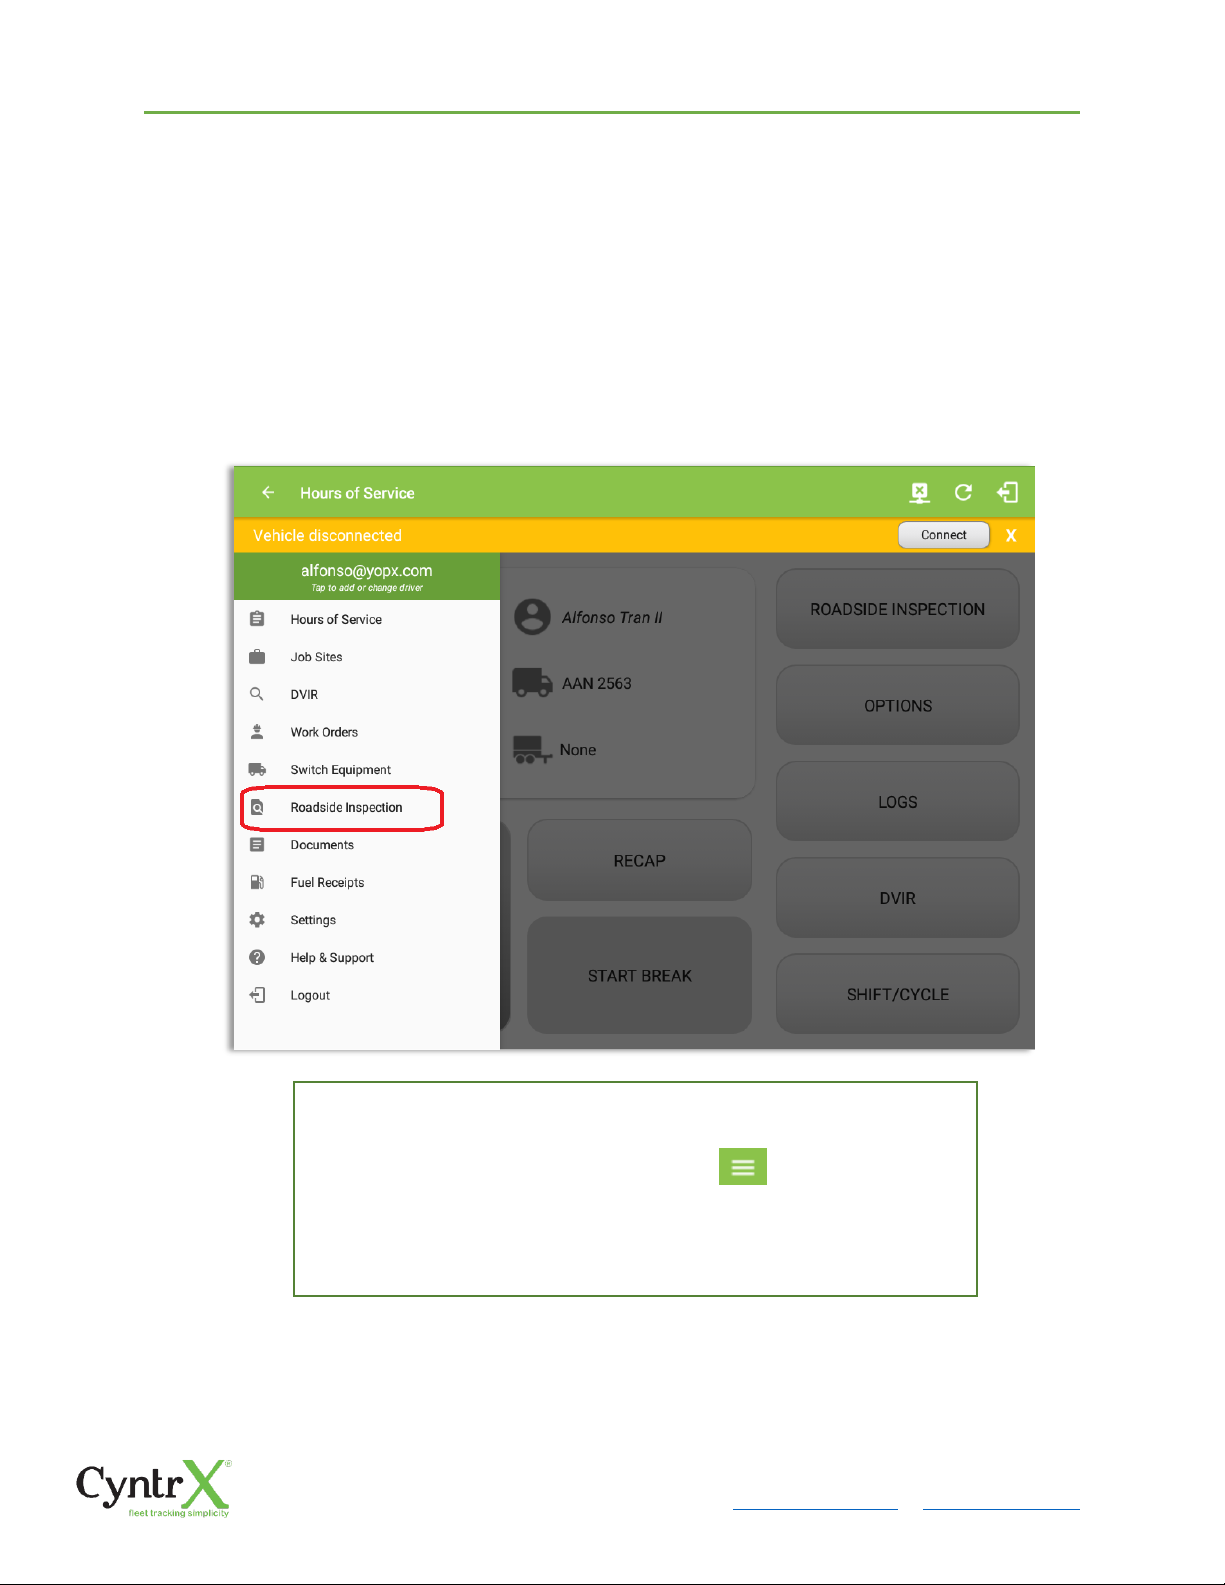
CyntrX
Page 81
920-338-0479 | [email protected]| www.CyntrX.com
6 Roadside Inspection
The Roadside Inspection feature provides the ability to view the driver daily logs for the
past one week. It includes information on the vehicle used, shipments and driving
statuses. It also has the ability to send all the logs that have already been certified to an
intended recipient.
There are a number of ways to access this feature:
6.1 Roadside Inspection – Main Navigation Menu
1. Slide the screen from left to right to show the Main Navigation Menu
Or
2. Tap the Main Navigation Hamburger icon to show the Main
Navigation Menu
Tap the Roadside Inspection option within the Main Navigation Menu
Page 82
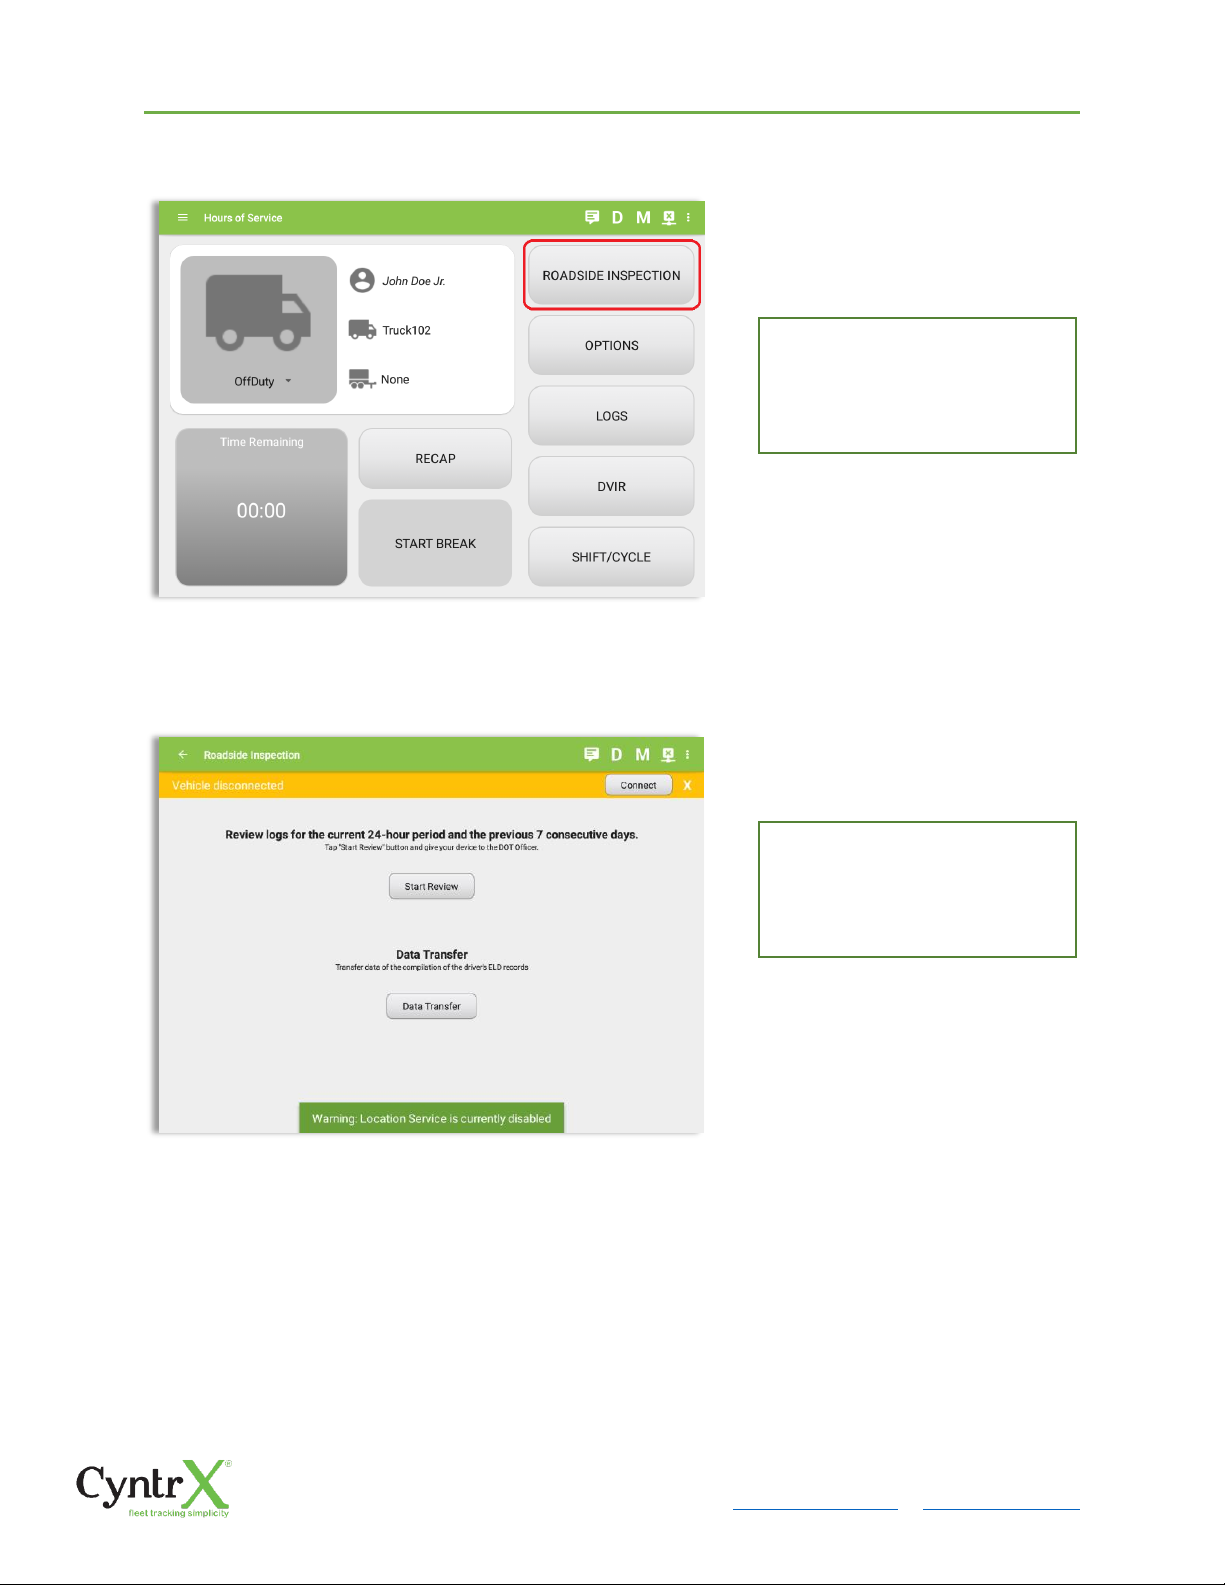
CyntrX
Page 82
920-338-0479 | [email protected]| www.CyntrX.com
6.2 Roadside Inspection – CyntrX Main Menu
6.3 Inspection Screen – Start Review
From the Hours of Service
Main Screen then tap the
Roadside Inspection button.
From the Roadside Inspection
Screen, tap the Start Review
button to view the Driver’s
Daily Log screen.
Page 83
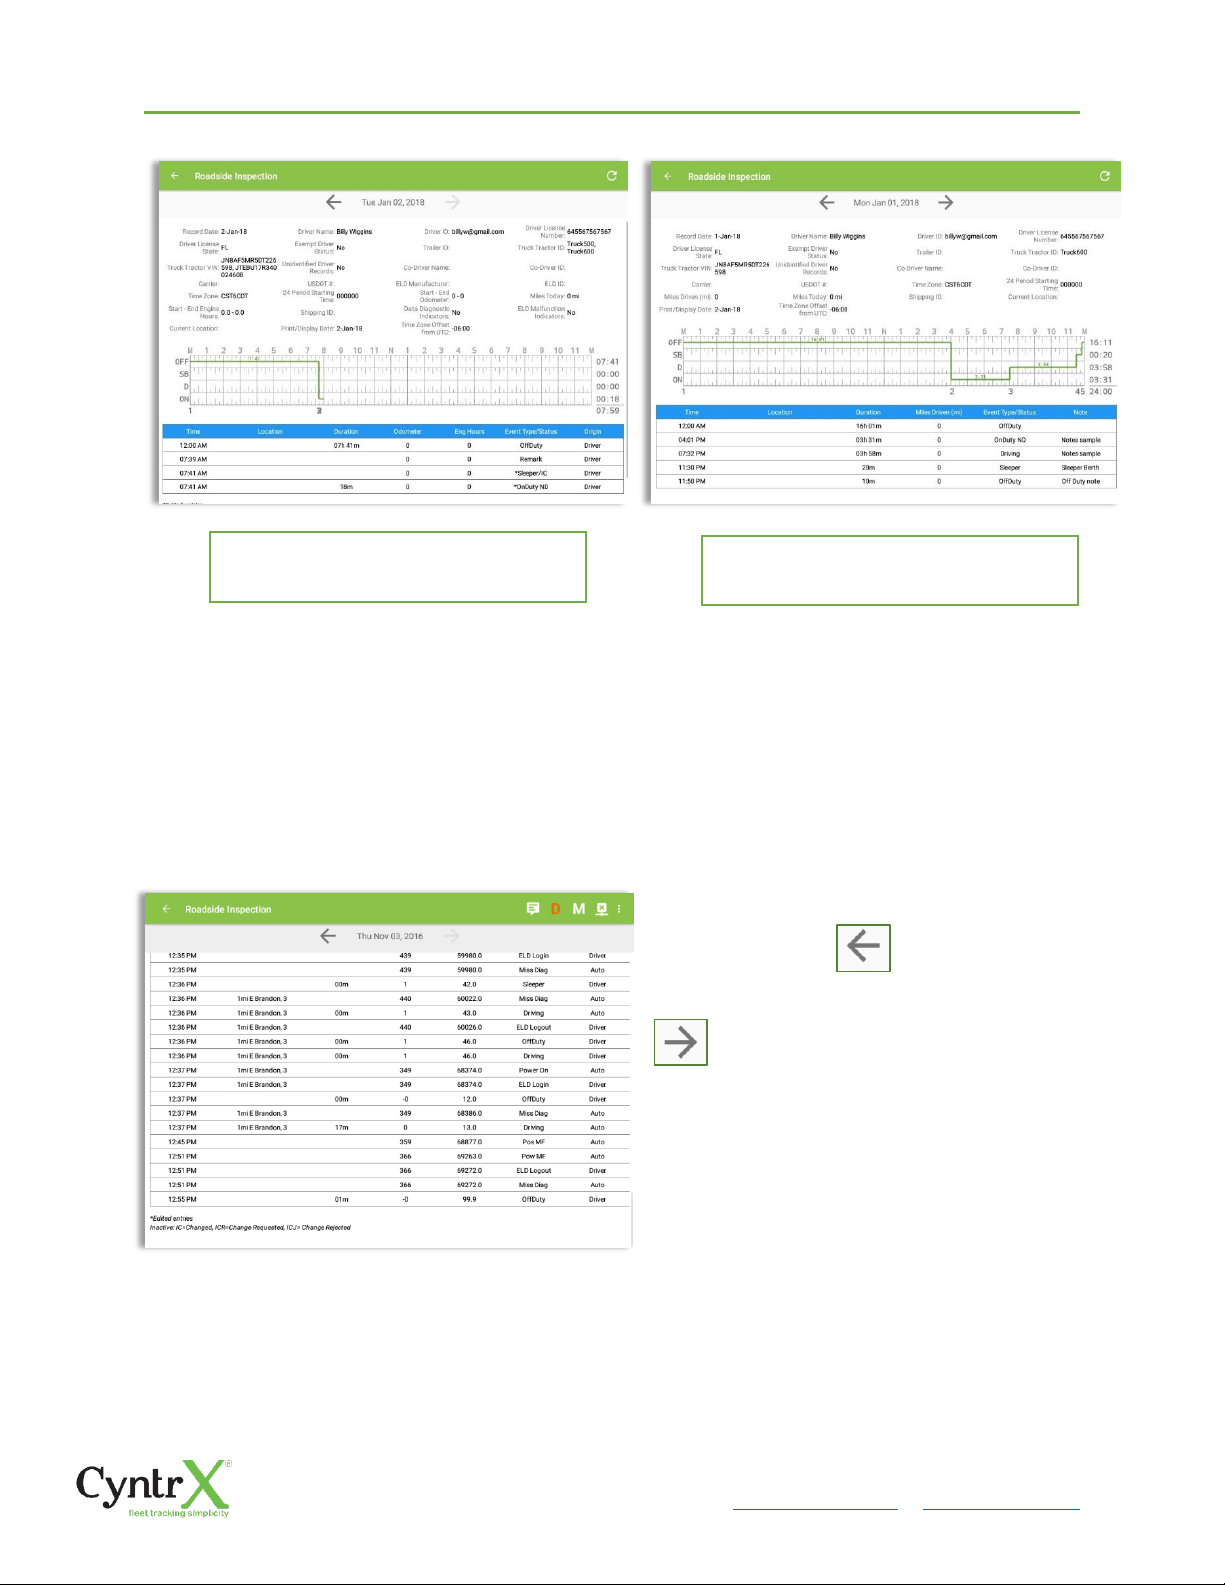
CyntrX
Page 83
920-338-0479 | [email protected]| www.CyntrX.com
Note:
• Automatic ‘Remarks’ will not be displayed in the screen such as ‘Pre-Trip not performed’,
‘Authenticate’ and border crossing remarks if current vehicle is in AOBRD mode.
• Notes entered in an added event will be displayed in the Roadside Inspection screen under the
"Note" column when in AOBRD mode.
• Driver that is being inspected must provide a password when exiting from the Roadside
Inspection Screen.
Tap the Previous button to
navigate to the previous log or tap the
Next button to navigate to the
next log.
Roadside Inspection screen for vehicle
in ELD mode
Roadside Inspection screen for vehicle
in AOBRD mode
Page 84
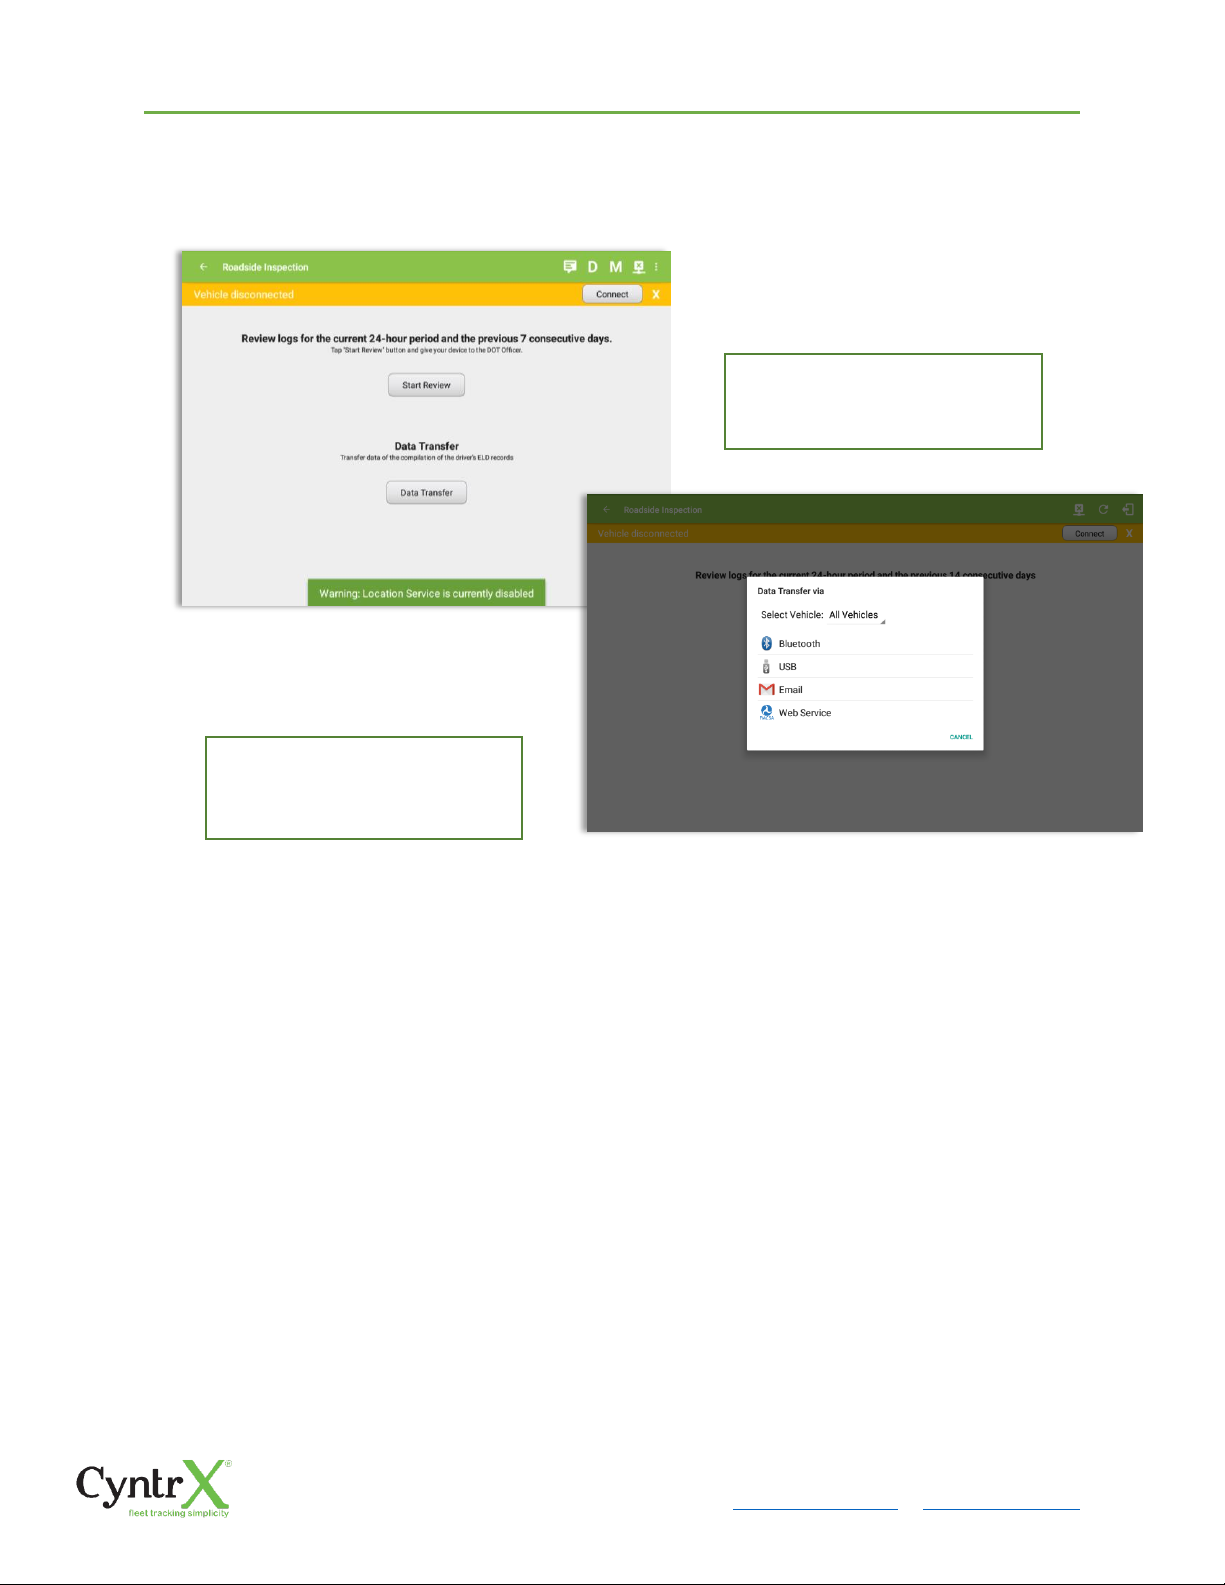
CyntrX
Page 84
920-338-0479 | [email protected]| www.CyntrX.com
6.4 Roadside Inspection Screen – Data Transfer
From the Roadside Inspection
Screen, tap the Data Transfer
button.
Select an option to transfer the
compilation of the driver’s ELD
records.
Page 85
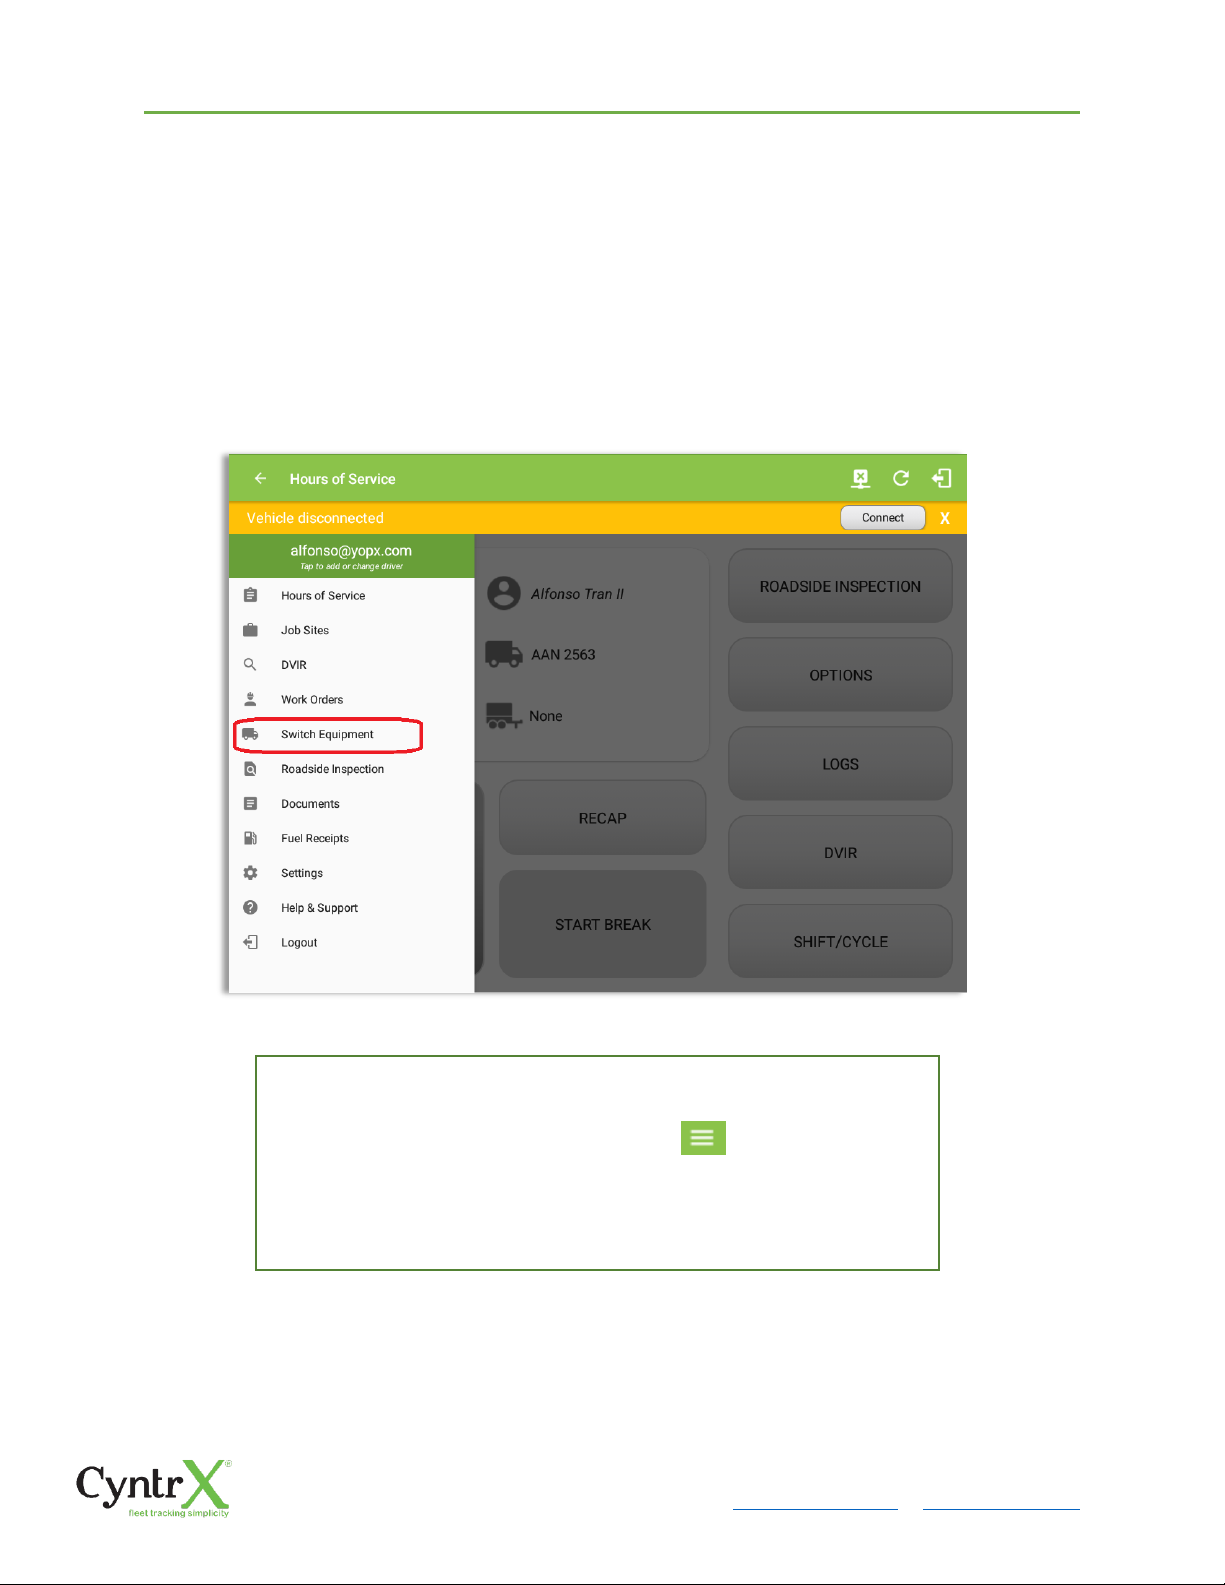
CyntrX
Page 85
920-338-0479 | [email protected]| www.CyntrX.com
7 Switch Equipment
The Switch Equipment feature allows a driver to easily ‘switch’ from one vehicle to
another. It also assists in monitoring and documenting the vehicles being used as part of
their driver logs.
There are a number of ways to access this feature:
7.1 Switch Equipment – Main Navigation Menu
1. Slide the screen from left to right to show the Main Navigation Menu
Or
2. Tap the Main Navigation Hamburger icon to show the Main
Navigation Menu
Tap the Switch Equipment option within the Main Navigation Menu
Page 86
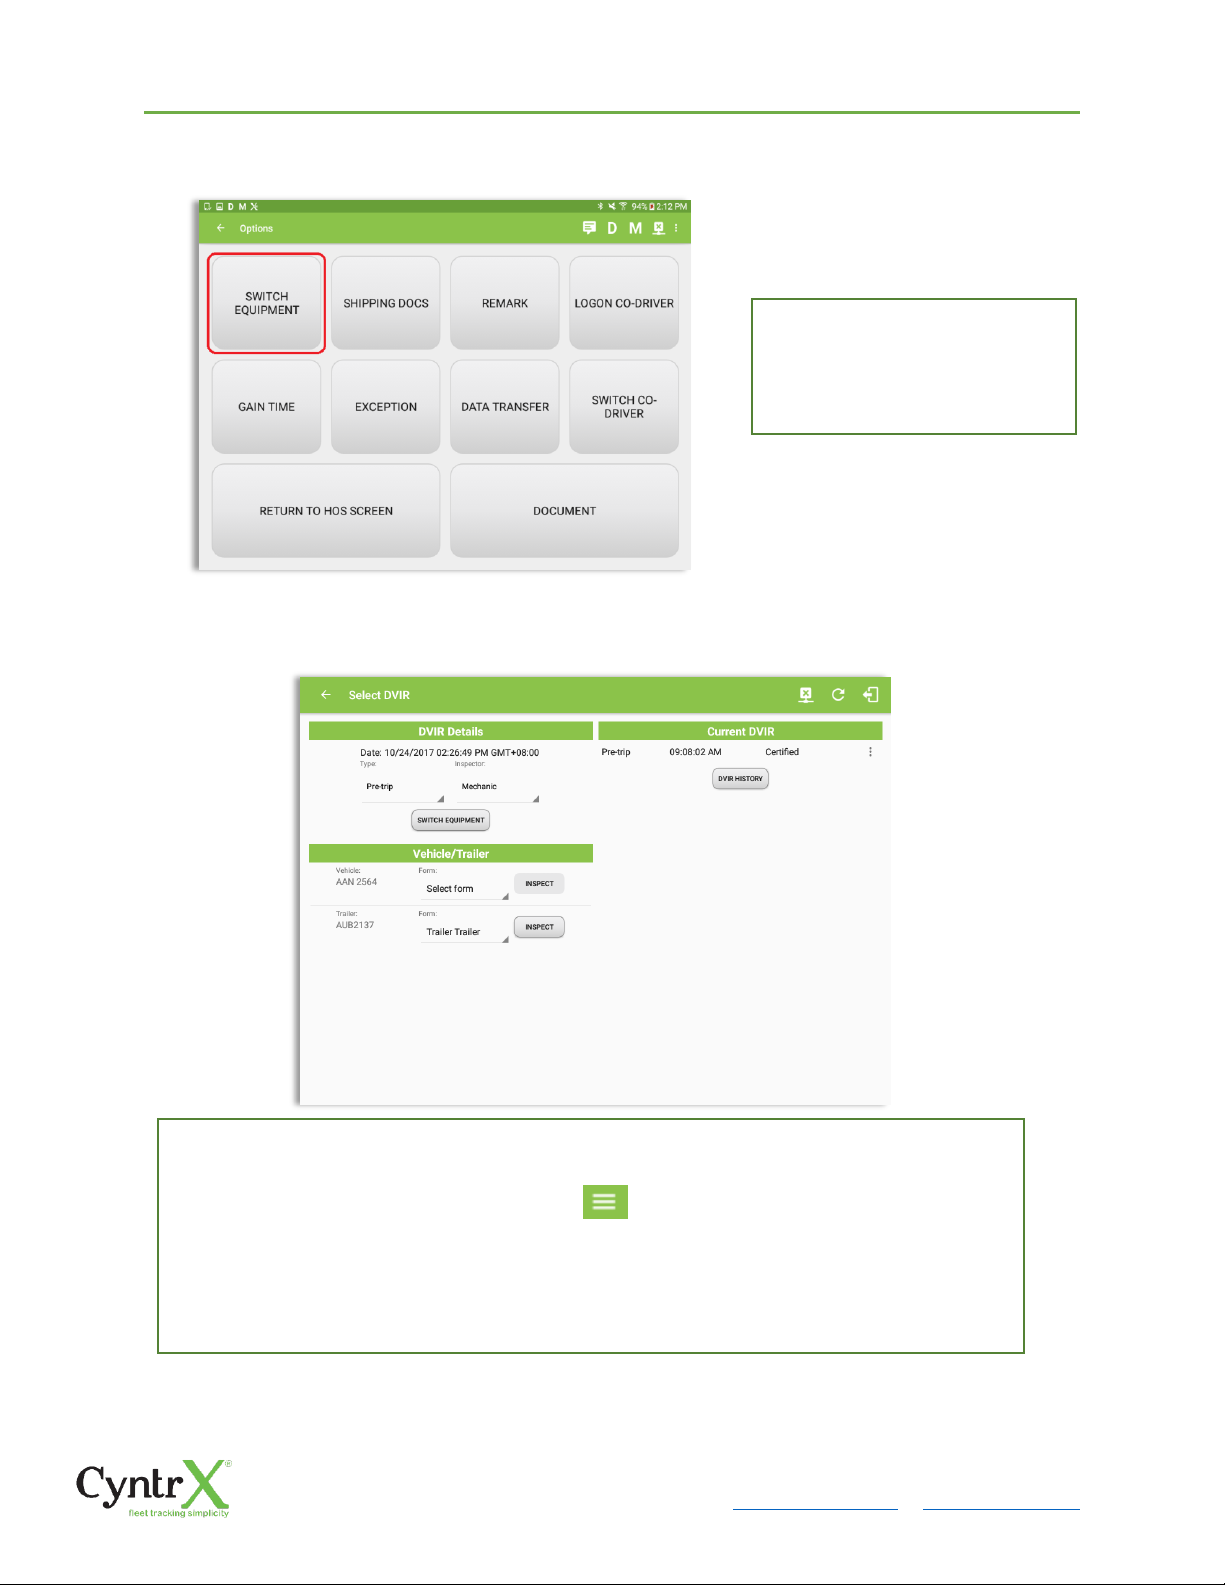
CyntrX
Page 86
920-338-0479 | [email protected]| www.CyntrX.com
7.2 Options Menu
7.3 Switch Equipment – DVIR Screen
From the Hours of Service Main
Screen, tap the Options button
and then tap the Equipment
button
1. Slide the screen from left to right to show the Main Navigation Menu
Or
2. Tap the Main Navigation Hamburger icon to show the Main Navigation Menu
Tap the DVIR option within the Main Navigation Menu
3. Select the DVIR button from the Main Hours of Service Menu and then select the Switch
button
Page 87
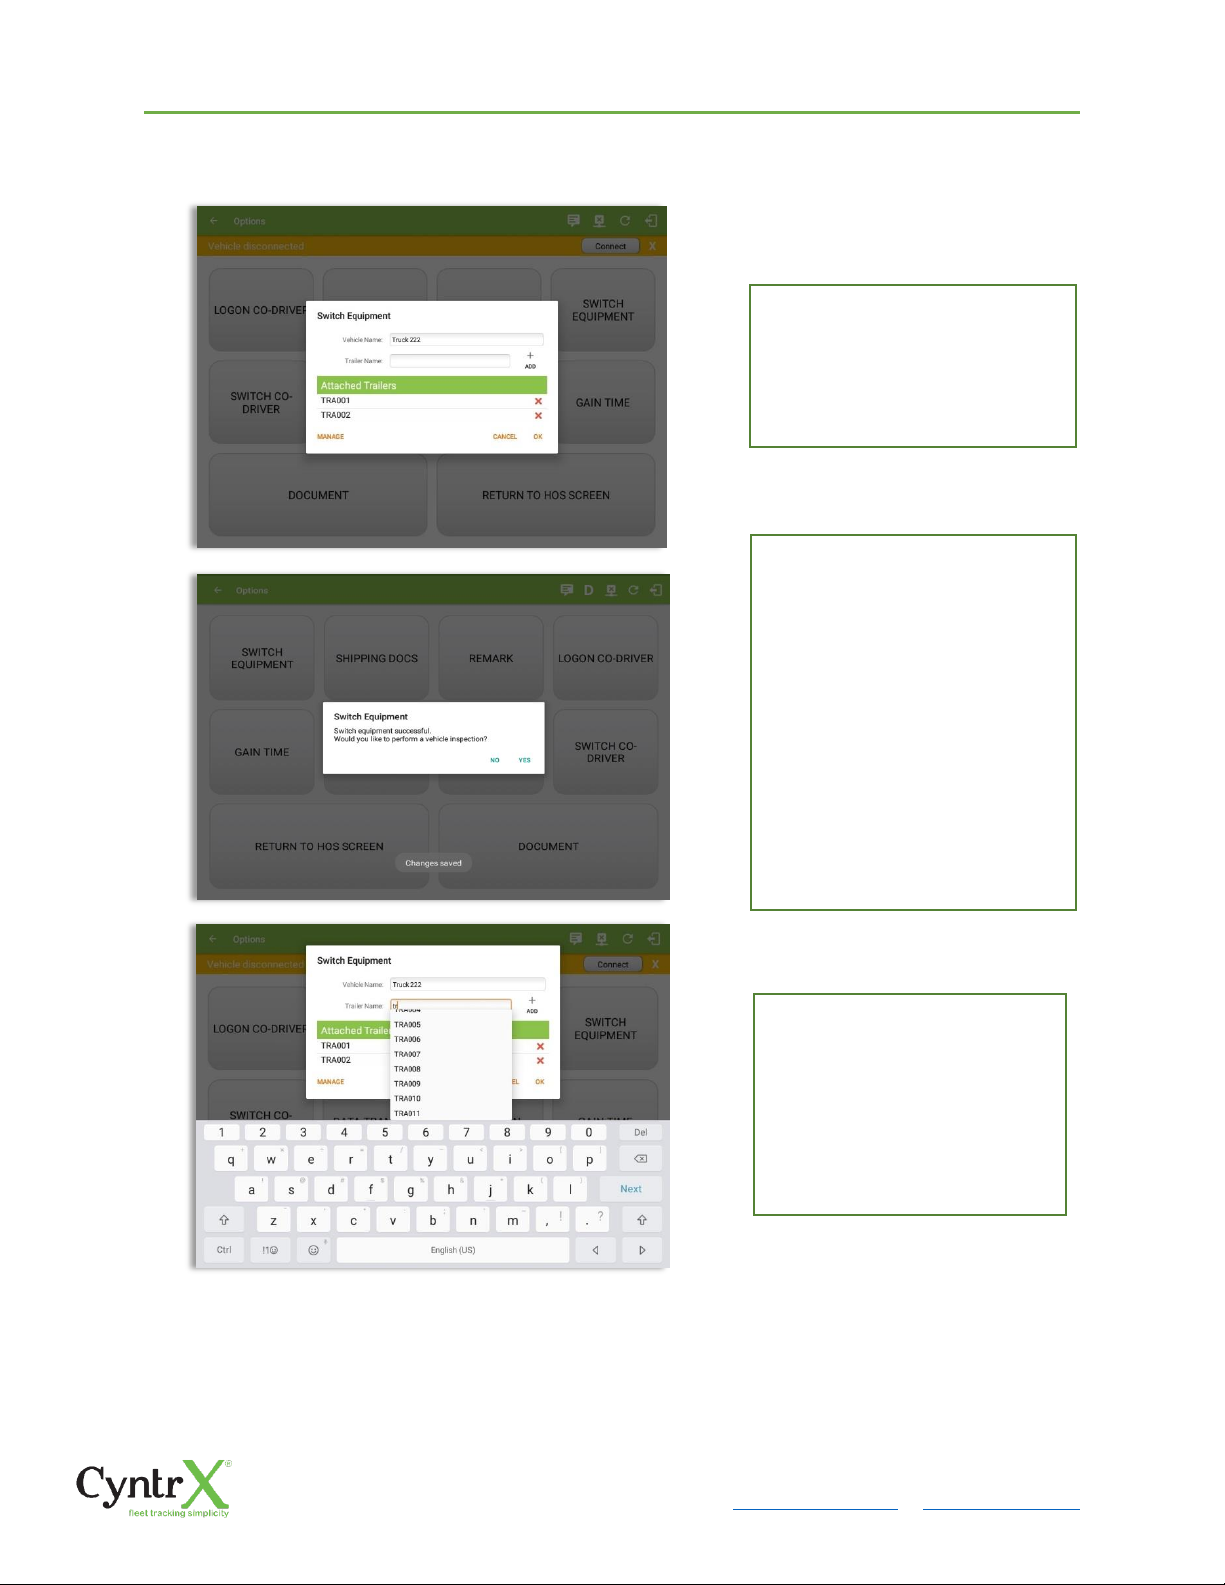
CyntrX
Page 87
920-338-0479 | [email protected]| www.CyntrX.com
7.4 Switching Equipment
Switching or selecting a Vehicle with a preconfigured VBUS device enables the app to find and
connect on the match device.
Note: On the VBUS Settings, VBUS Data and Automatic Configuration should be enabled.
Select the Vehicle ID or Trailer
ID dropdown list and select the
required vehicle or trailer, then
tap the OK button to switch to
the selected vehicle or trailer.
After tapping the Switch button,
you will be asked if you would
like to perform a vehicle DVIR,
tap the YES button to navigate
to the Vehicle DVIR screen or
tap the NO button to close the
dialog box and continue.
Switch truck can be performed
also in the dashboard, by
tapping the vehicle/trailer icon.
Vehicles and Trailers can also be
filtered through text entry on
the vehicle/trailer text fields.
Text entry availability starts if
the total number of
trailers/vehicles numbers 250 or
more.
Page 88
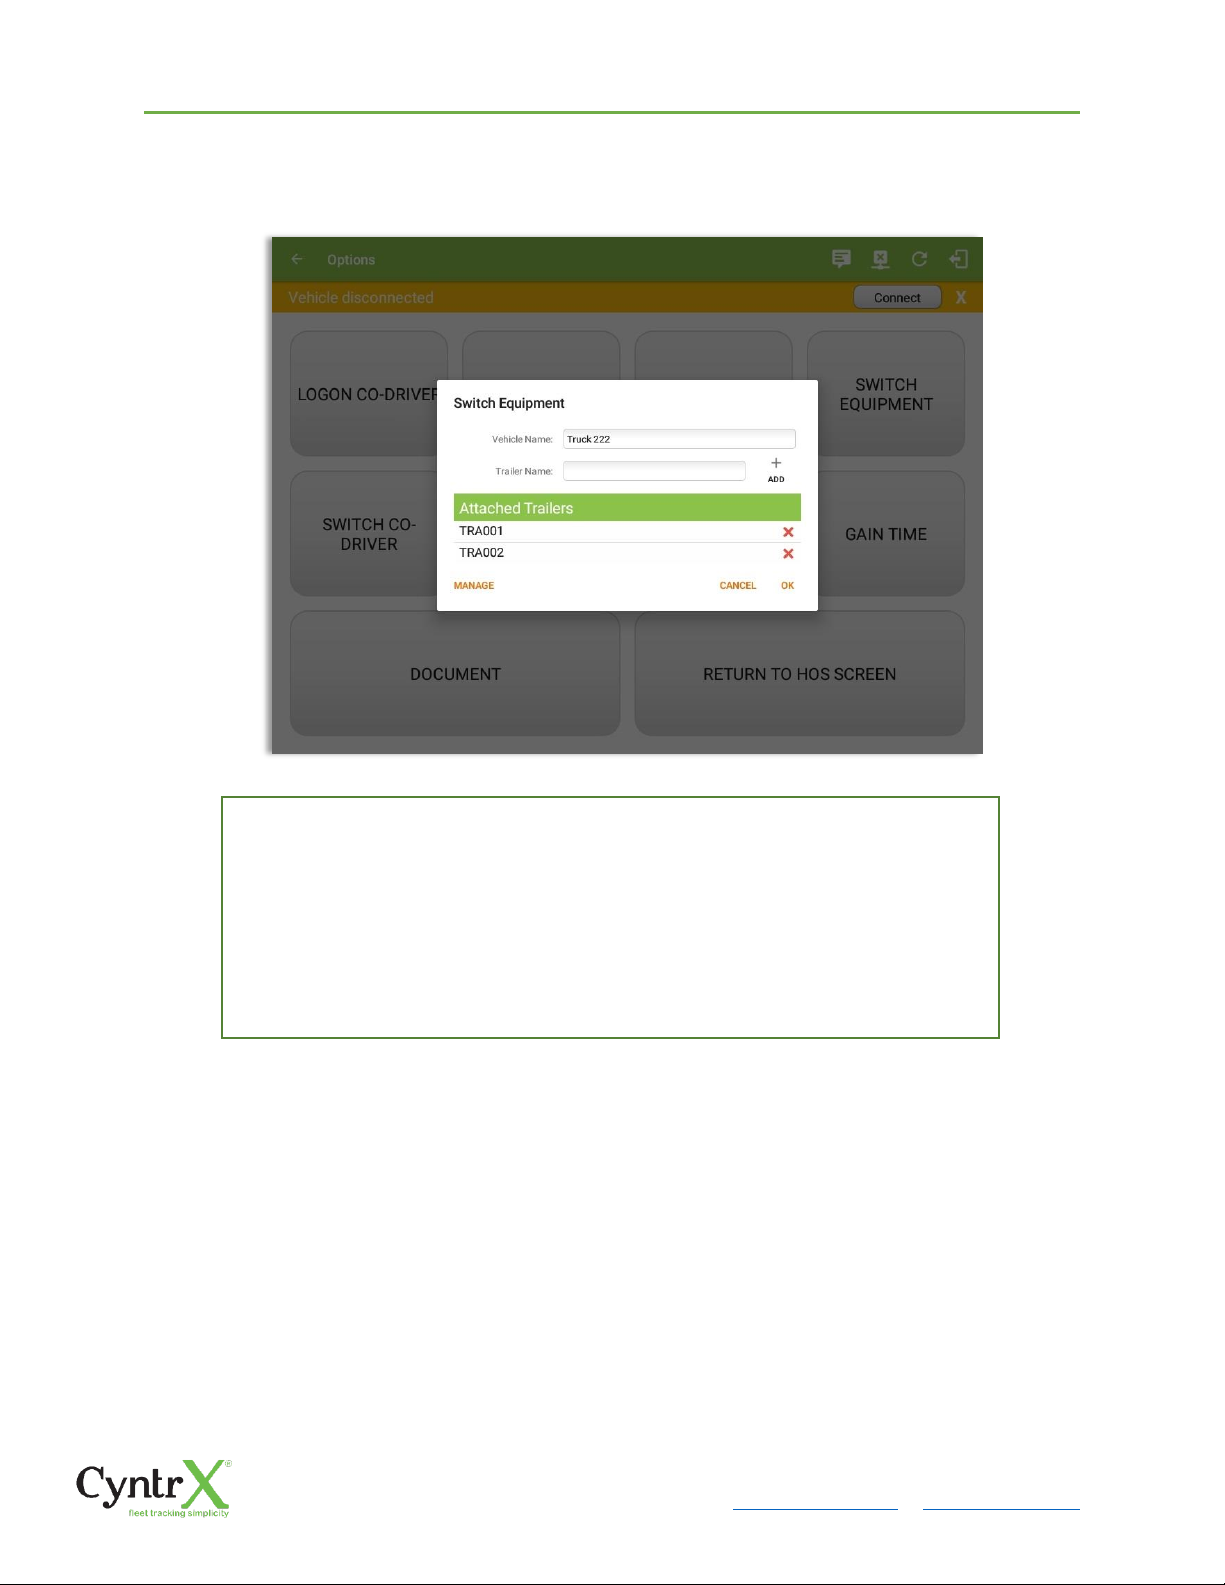
You can add, update and delete vehicles or trailers by tapping the Manage button;
this will display the Manage Vehicles/Trailers Screen.
The 'Manage' button is only available given a situation, that the driver is an asset
admin and that the 'Manage Equipment' option (found in the Equipment
Management Page) is also enabled. Otherwise, the button will not be available on
the Switch Equipment dialog.
7.5 Managing Vehicles / Trailers
Page 89
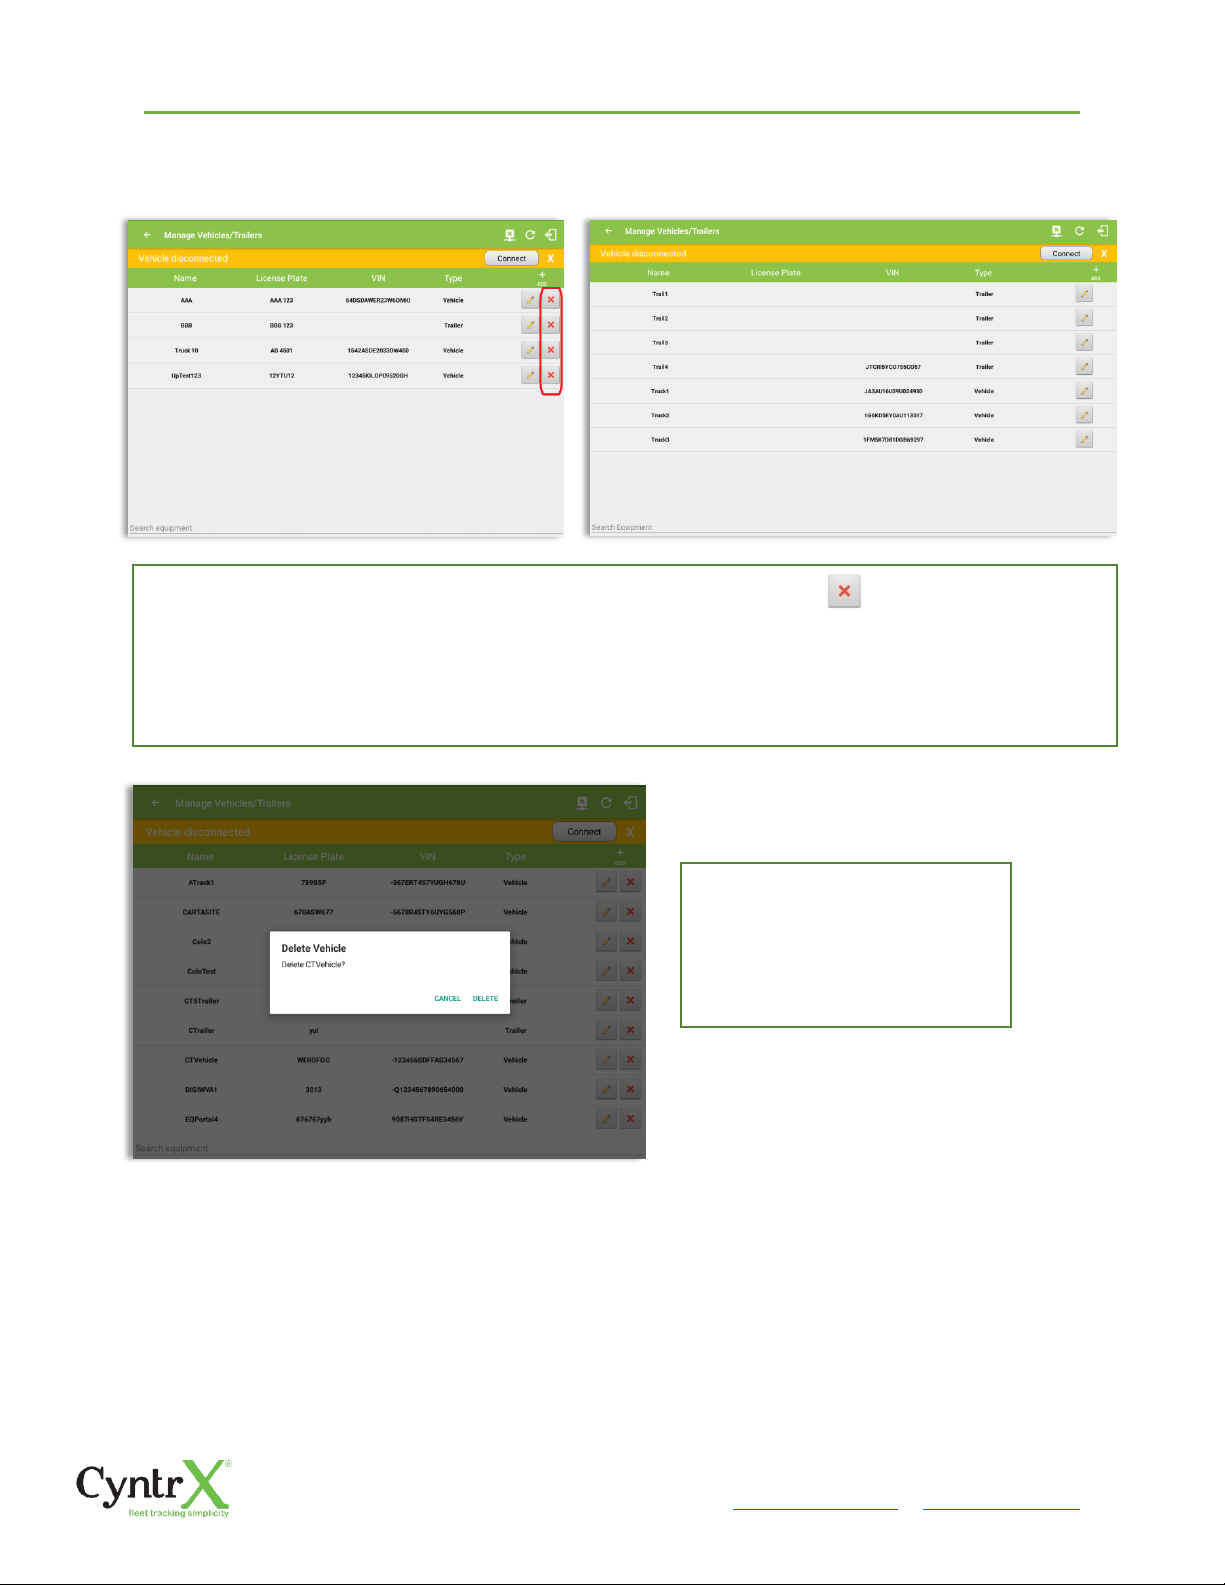
CyntrX
Page 89
920-338-0479 | [email protected]| www.CyntrX.com
7.5.1 Manage Vehicles / Trailers – Delete
To delete any of the vehicles or trailers listed, tap the icon
Vehicles/Trailers made in the portal can be edited or deleted can be in the Smart Truck app and vice versa.
Note: If "Allow drivers to delete equipment" is unchecked in the portal then delete button will not be
displayed in the screen.
Tap the DELETE button within
the Delete Vehicle dialog to
confirm deletion or, tap the
CANCEL button to return without
deleting.
Tap the DELETE button within
the Delete Vehicle dialog to
confirm deletion or, tap the
CANCEL button to return without
deleting.
Page 90
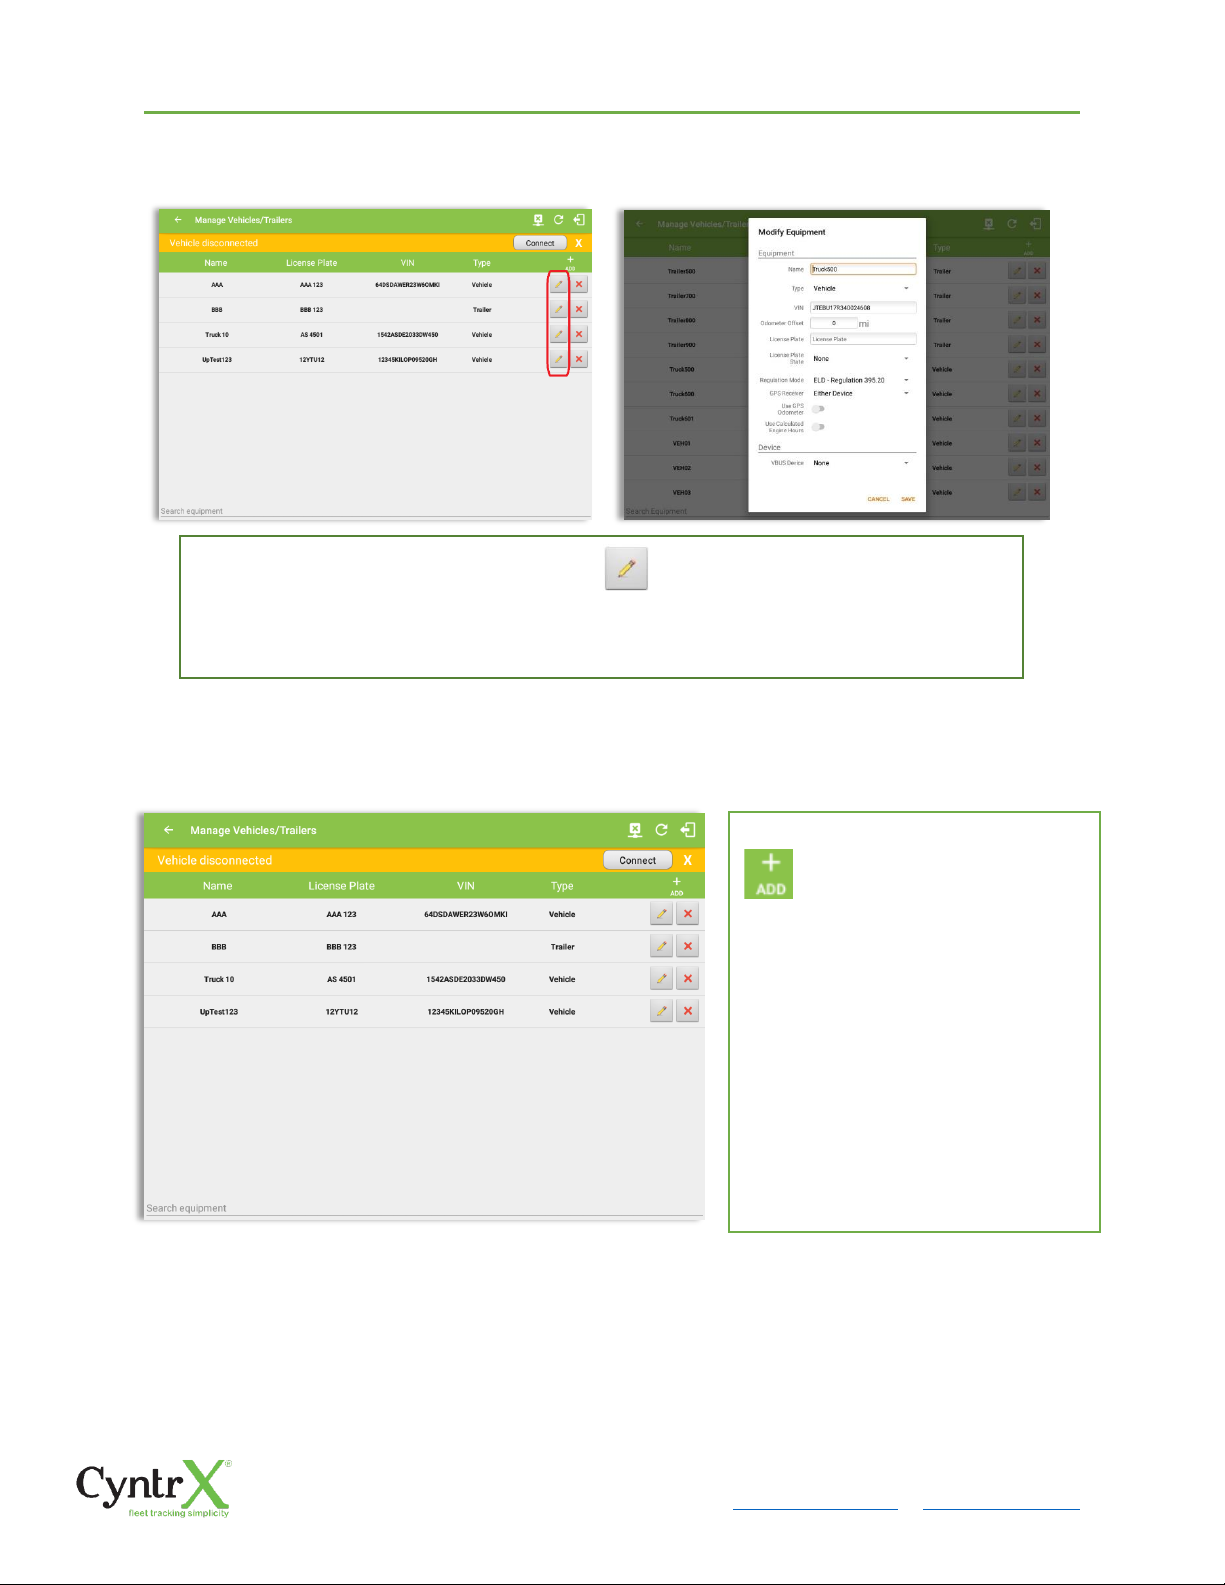
CyntrX
Page 90
920-338-0479 | [email protected]| www.CyntrX.com
7.5.2 Manage Vehicles / Trailers - Edit
7.5.3 Manage Vehicles / Trailers – Add
To edit any of the trucks or trailers listed, tap the icon, make any required changes to
the selected truck or trailer and then tap the SAVE button to save the changes or, tap the
CANCEL button to return without saving.
To add a new truck or trailer, tap the
button, this will open the Add
Truck dialog, enter the following
details:
Vehicle Name – Truck or trailer name
VIN – Vehicle Identification Number
License Plate – license number
Vehicle Type – Vehicle or Trailer
Fill in the Device Information section
to pre-configure the Vehicle to a
specific VBUS device.
Page 91
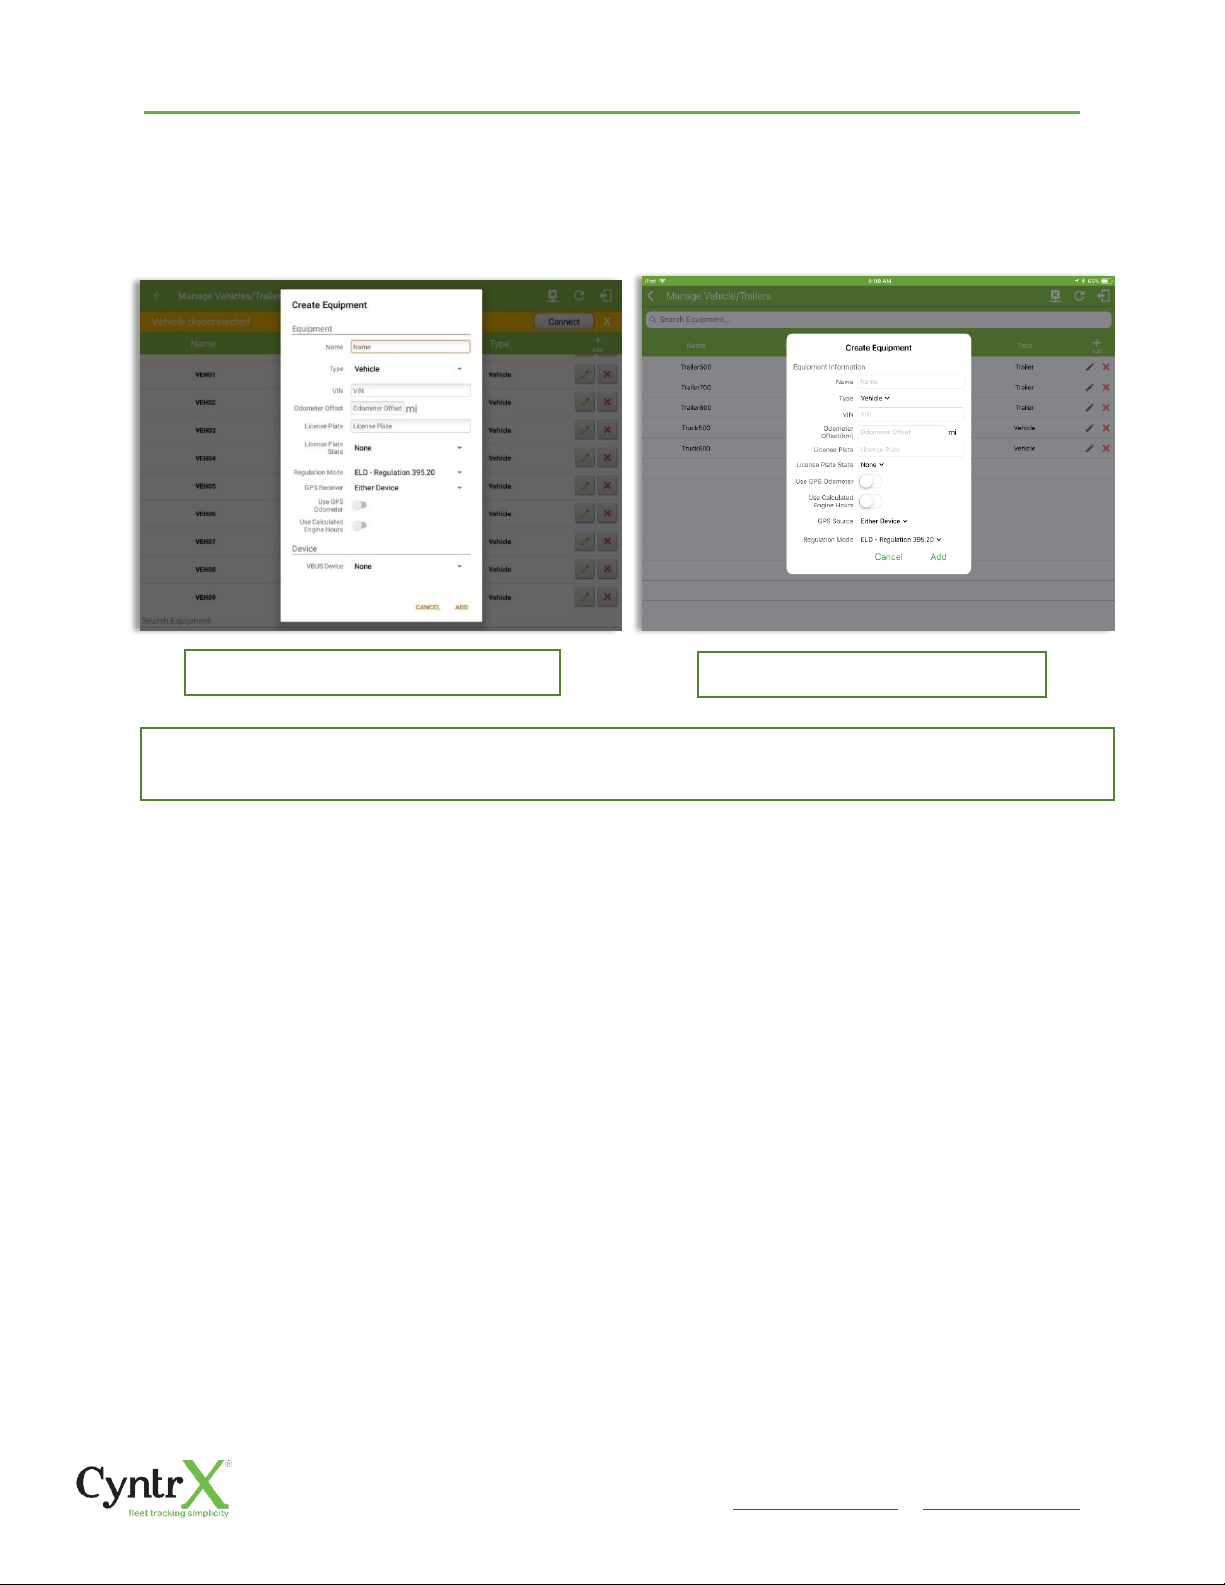
CyntrX
Page 91
920-338-0479 | [email protected]| www.CyntrX.com
When creating a new equipment, the default selected device option is set to "None".
Also, If the option "None" is selected, on the create/edit equipment screen, all other
fields on the ELD configuration section will be hidden.
Note:
• The connection type defers on the VBUS Device selected.
• If user selects “Digi WVA” in connection type, then admin password field is required.
• Firmware version field can be manually populated. For some VBUS device, it is already pre-
populated.
• In the Portal, an ability to determine on which VBUS devices will be displayed is present.
Accordingly, on the app, only those devices selected on the portal will be displayed in the “VBUS
Device” menu.
Tap the ADD button to save the new truck or trailer or Tap the CANCEL button to cancel adding the new
truck or trailer.
Android app Create Equipment dialog
iOS app Create Equipment dialog
Page 92
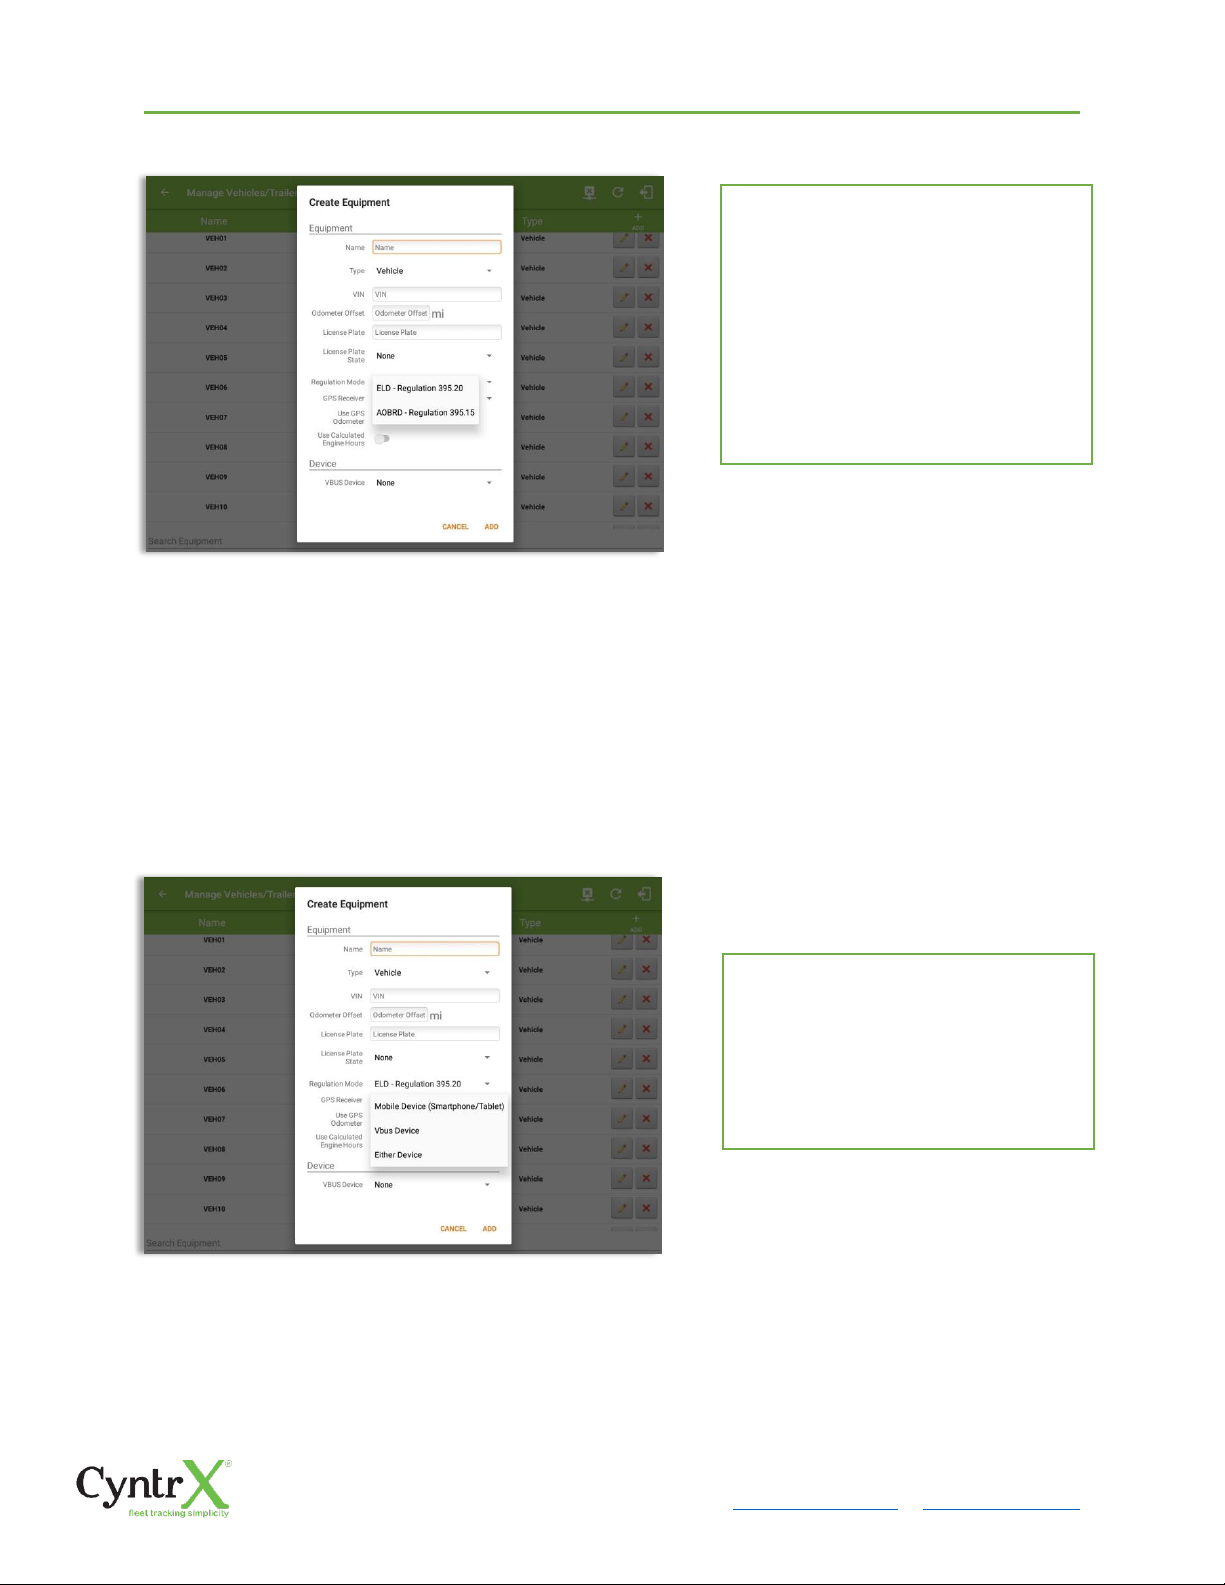
CyntrX
Page 92
920-338-0479 | [email protected]| www.CyntrX.com
Notes:
• Drivers on the app cannot change the Regulation Mode unless the driver is allowed to do so by
enabling the following account control within the Account Settings->Carrier Information tab->
‘Allow drivers to specify vehicle HOS Regulation Mode (AOBRD or ELD).
• When in AOBRD mode, disables the data transfer button in the Options screen and changed the
button to ‘Email Logs’ in the Roadside Inspection screen.
• When the driver is in AOBRD mode then the edit "*" sign & events will not be displayed in the Edit
Logs screen and on the Certified PDF logs.
A Regulation Mode option to switch
between 395.15 (AOBRD) and 395.20
(ELD) support is available. When
395.15 (AOBRD) mode is selected it
turns off all 395.20 (ELD) features. It
simply records the drivers’ events
regardless to the FMCSA rules. ELD is
set as the default regulation mode for
all new equipment.
A GPS Receiver option allows the
user to change how to get the device
GPS positions. The GPS Receiver
settings can be set in a specific
vehicle in the portal->equipment
management page.
Page 93
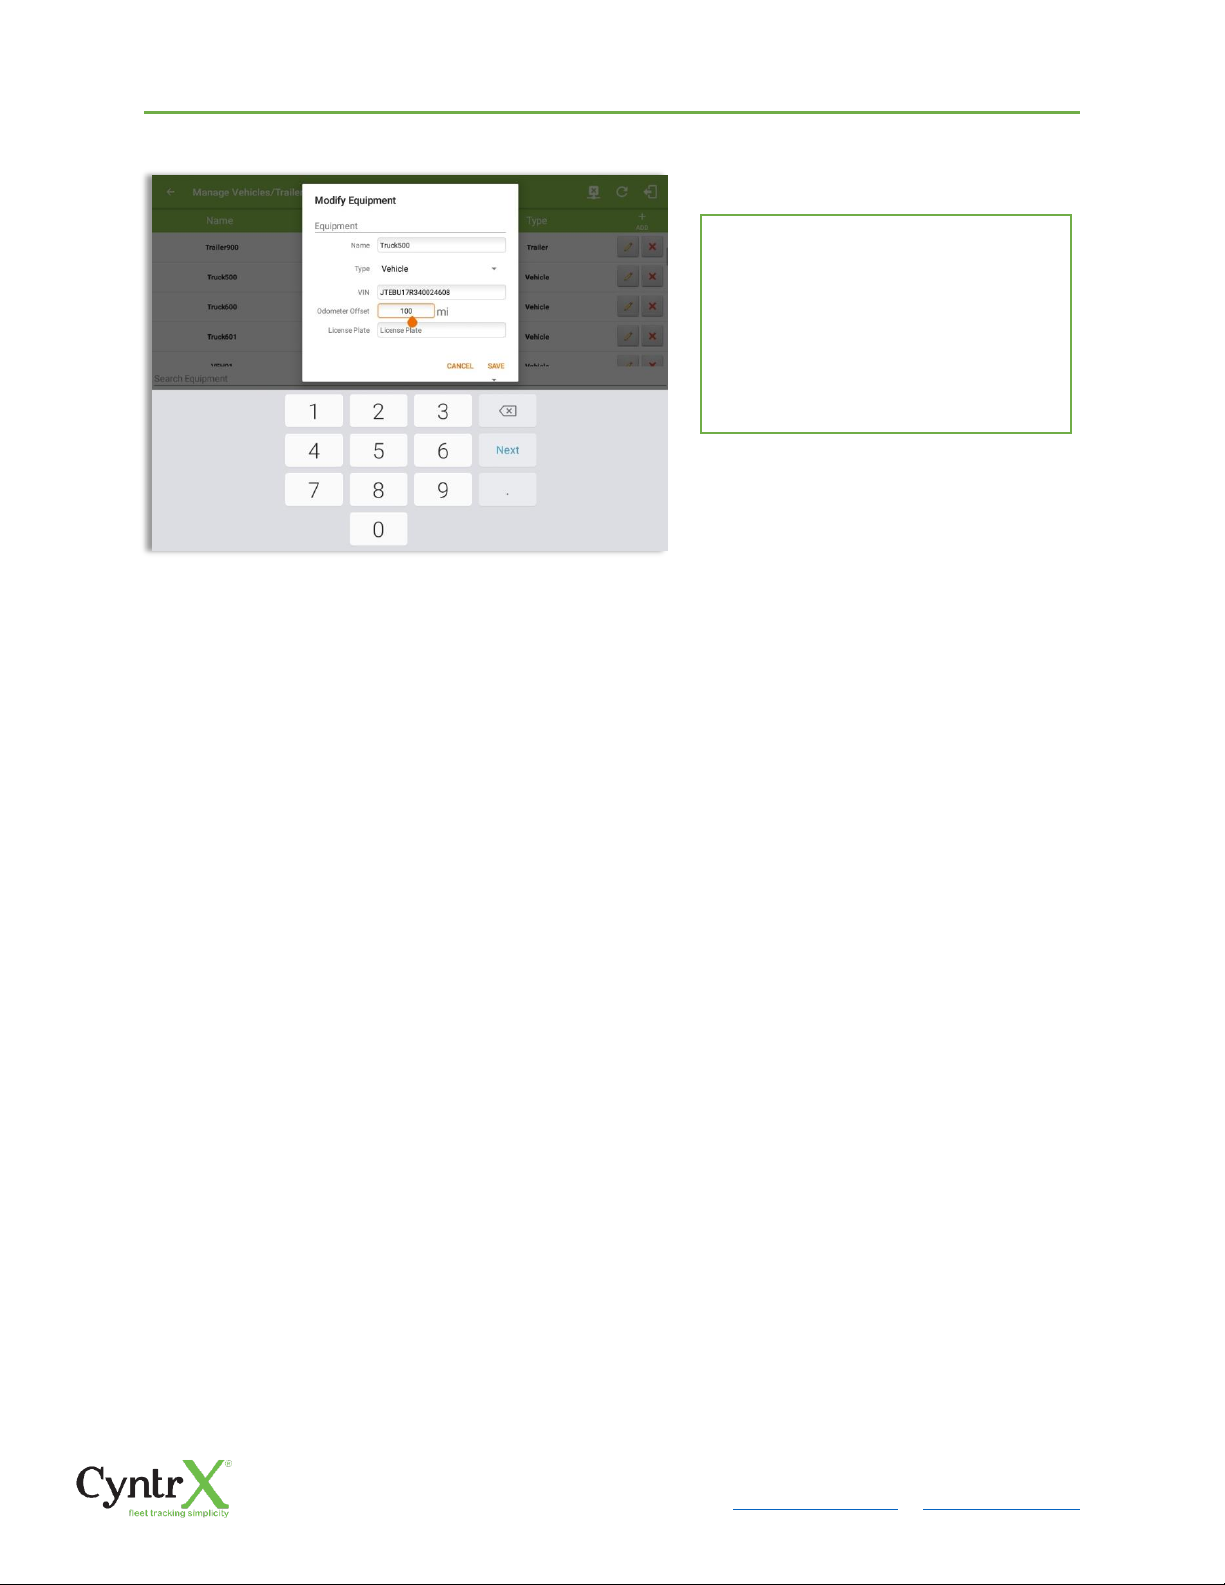
CyntrX
Page 93
920-338-0479 | [email protected]| www.CyntrX.com
Notes:
• Negative entry for odometer offset field is allowed.
• Odometer offset does not affect app screens like Roadside Inspection and Certified Logs PDF.
• If the saved offset is 100, and the logs have odometer values of 10, 20, 30, 40, will display to the
driver 110, 120, 130, 140 (Odometer + Offset).
• If the offset is 100, and the driver edits an event to change the odometer from 140 to 130, will
display 130 - 100 (the Offset) or 30 to the log.
When creating/modifying an equipment with a selected type of “Trailer”, the VIN field is
also enabled but is not required when saving. VIN field does not require valid format.
If the VIN is optionally populated and that the source is not the engine ECM, it will auto
be converted to capital letters when saved.
An Odometer Offset allows driver or
personnel to adjust the odometer so
that the driver will see an odometer
matches their dashboard, rather the
engine odometer. Possible scenario is
when the engine is replaced and the
value is not yet synchronized.
Page 94
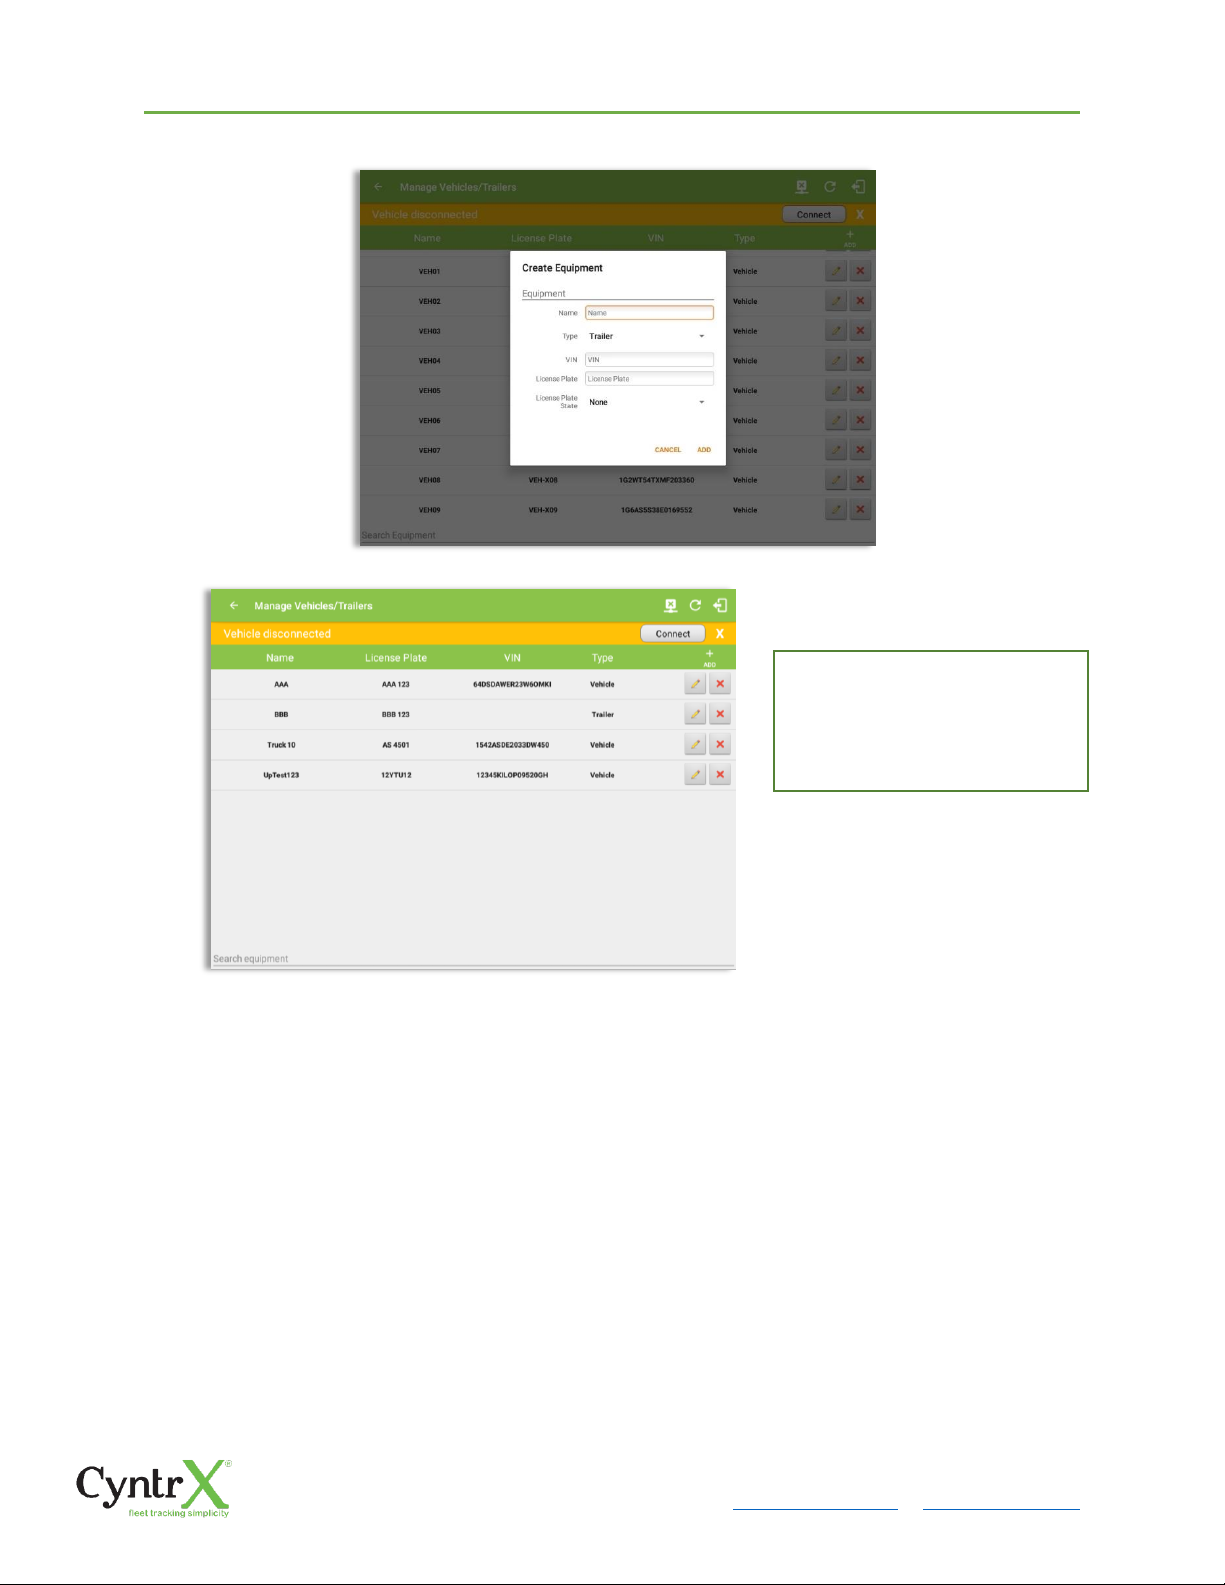
CyntrX
Page 94
920-338-0479 | [email protected]| www.CyntrX.com
8 Documents
The Documents feature provides an easy way to capture, view and email documents
related to hours of service activities. This includes documentation such as bill of lading,
fuel receipts, accident photos etc.
There are a number of ways to access this feature:
Once the new vehicle or trailer
has been added, it will be
displayed in the Manage
Vehicles/Trailers screen.
Page 95
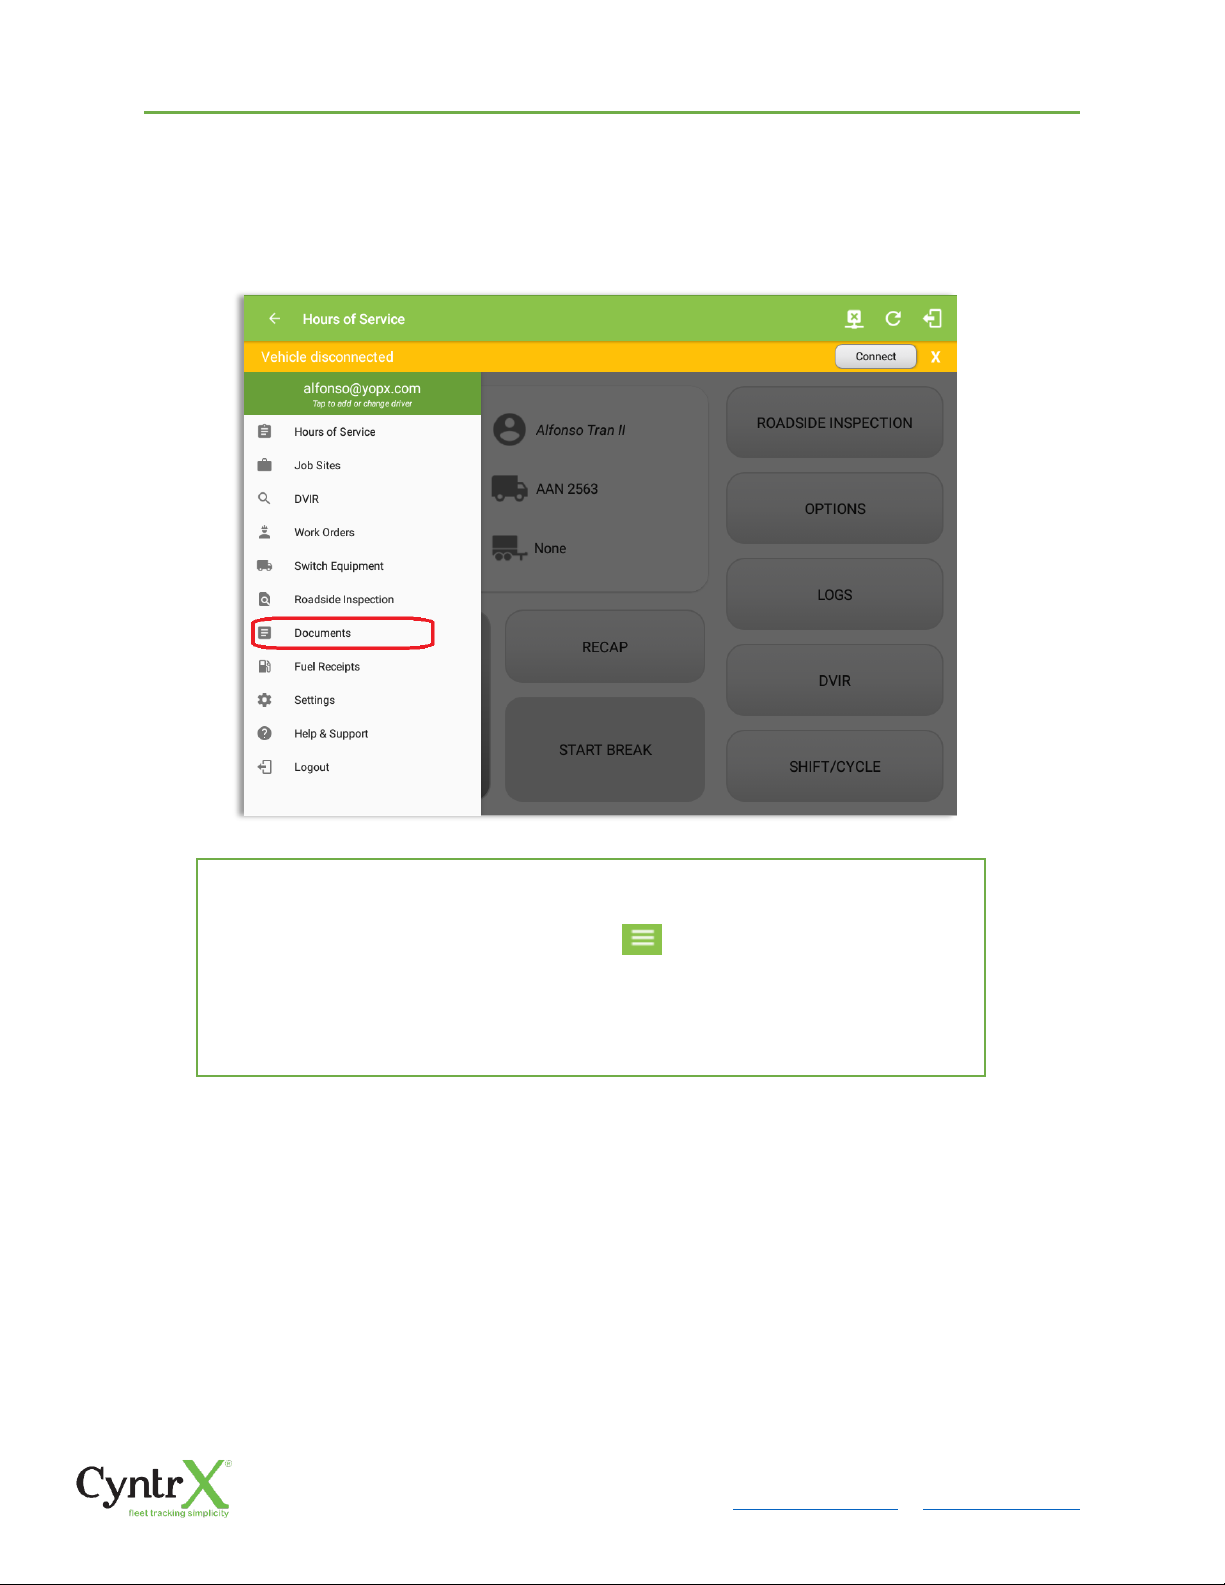
CyntrX
Page 95
920-338-0479 | [email protected]| www.CyntrX.com
8.1 Documents – Main Navigation Menu
1. Slide the screen from left to right to show the Main Navigation Menu
Or
2. Tap the Main Navigation Hamburger icon to show the Main Navigation
Menu
3. Select the Documents button from the Main Hours of Service Menu
Page 96
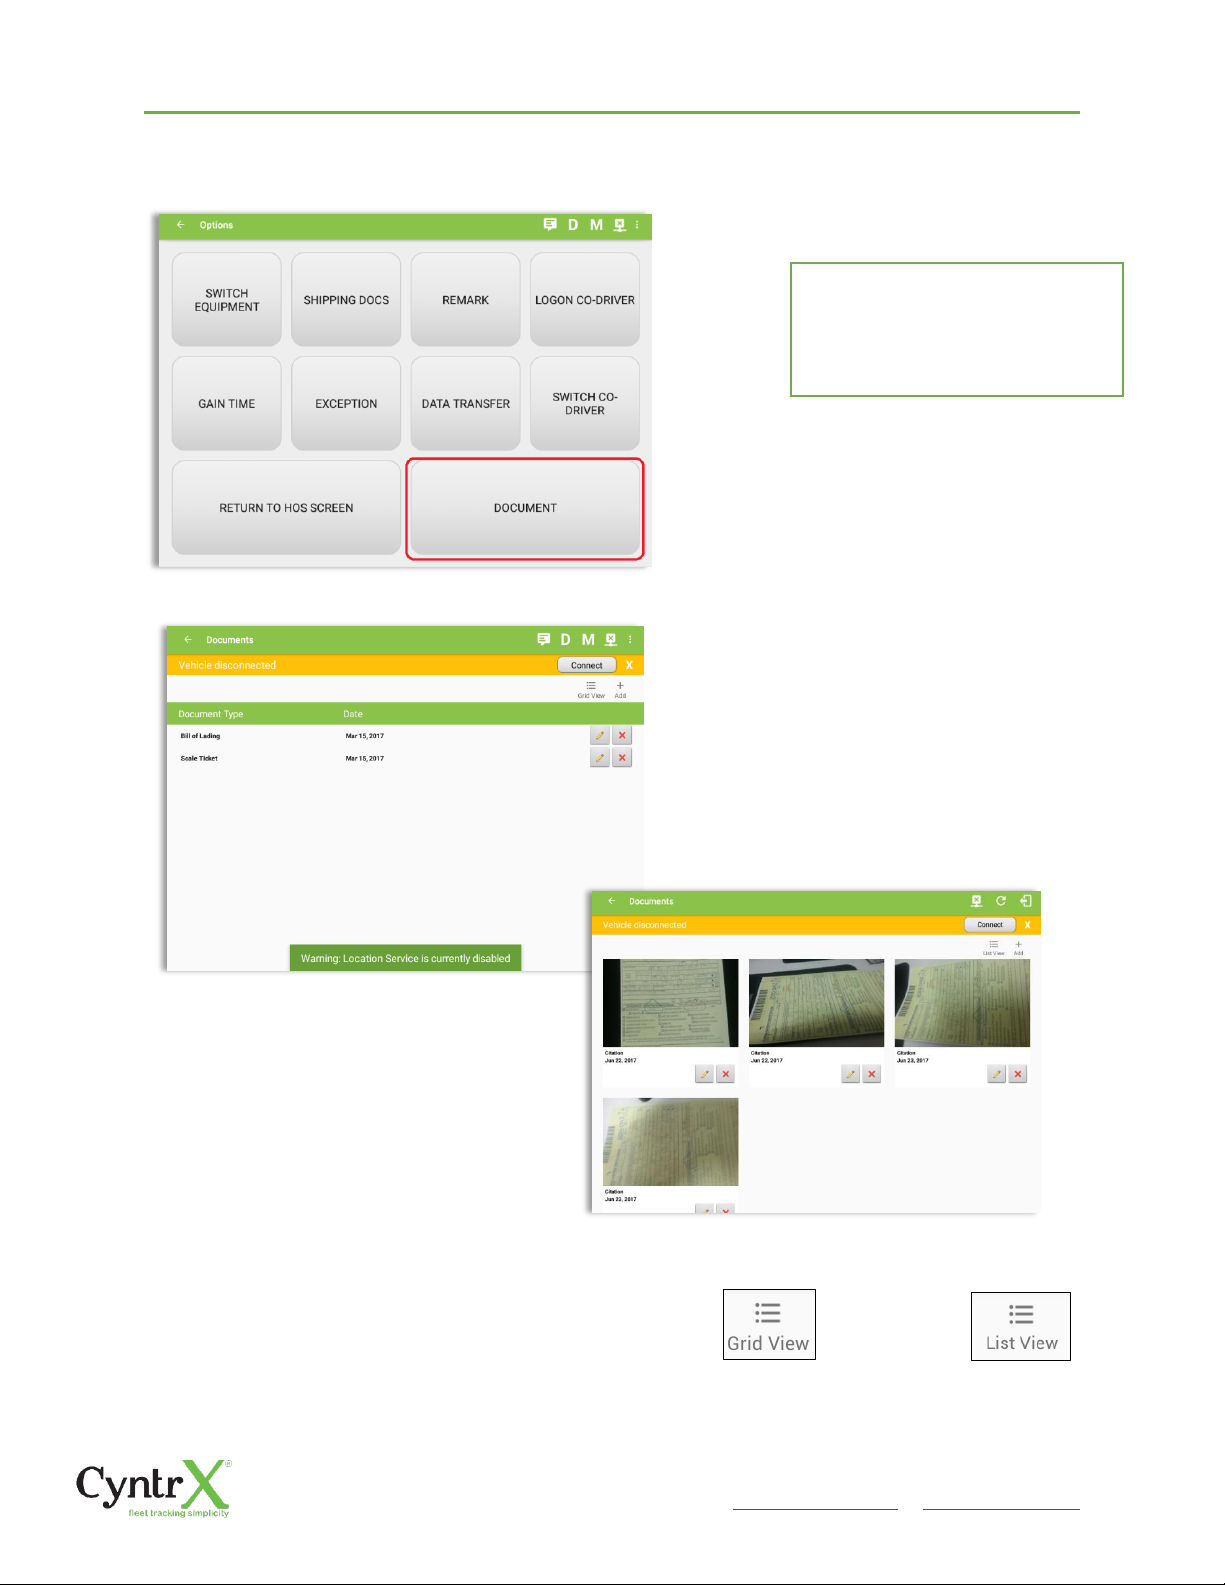
CyntrX
Page 96
920-338-0479 | [email protected]| www.CyntrX.com
8.2 Documents – Options Menu
Note: The Documents screen has two views: Grid View or ‘List View’ .
From the Hours of Service Main
Screen, tap the Options button
and then tap the Document
button
Page 97
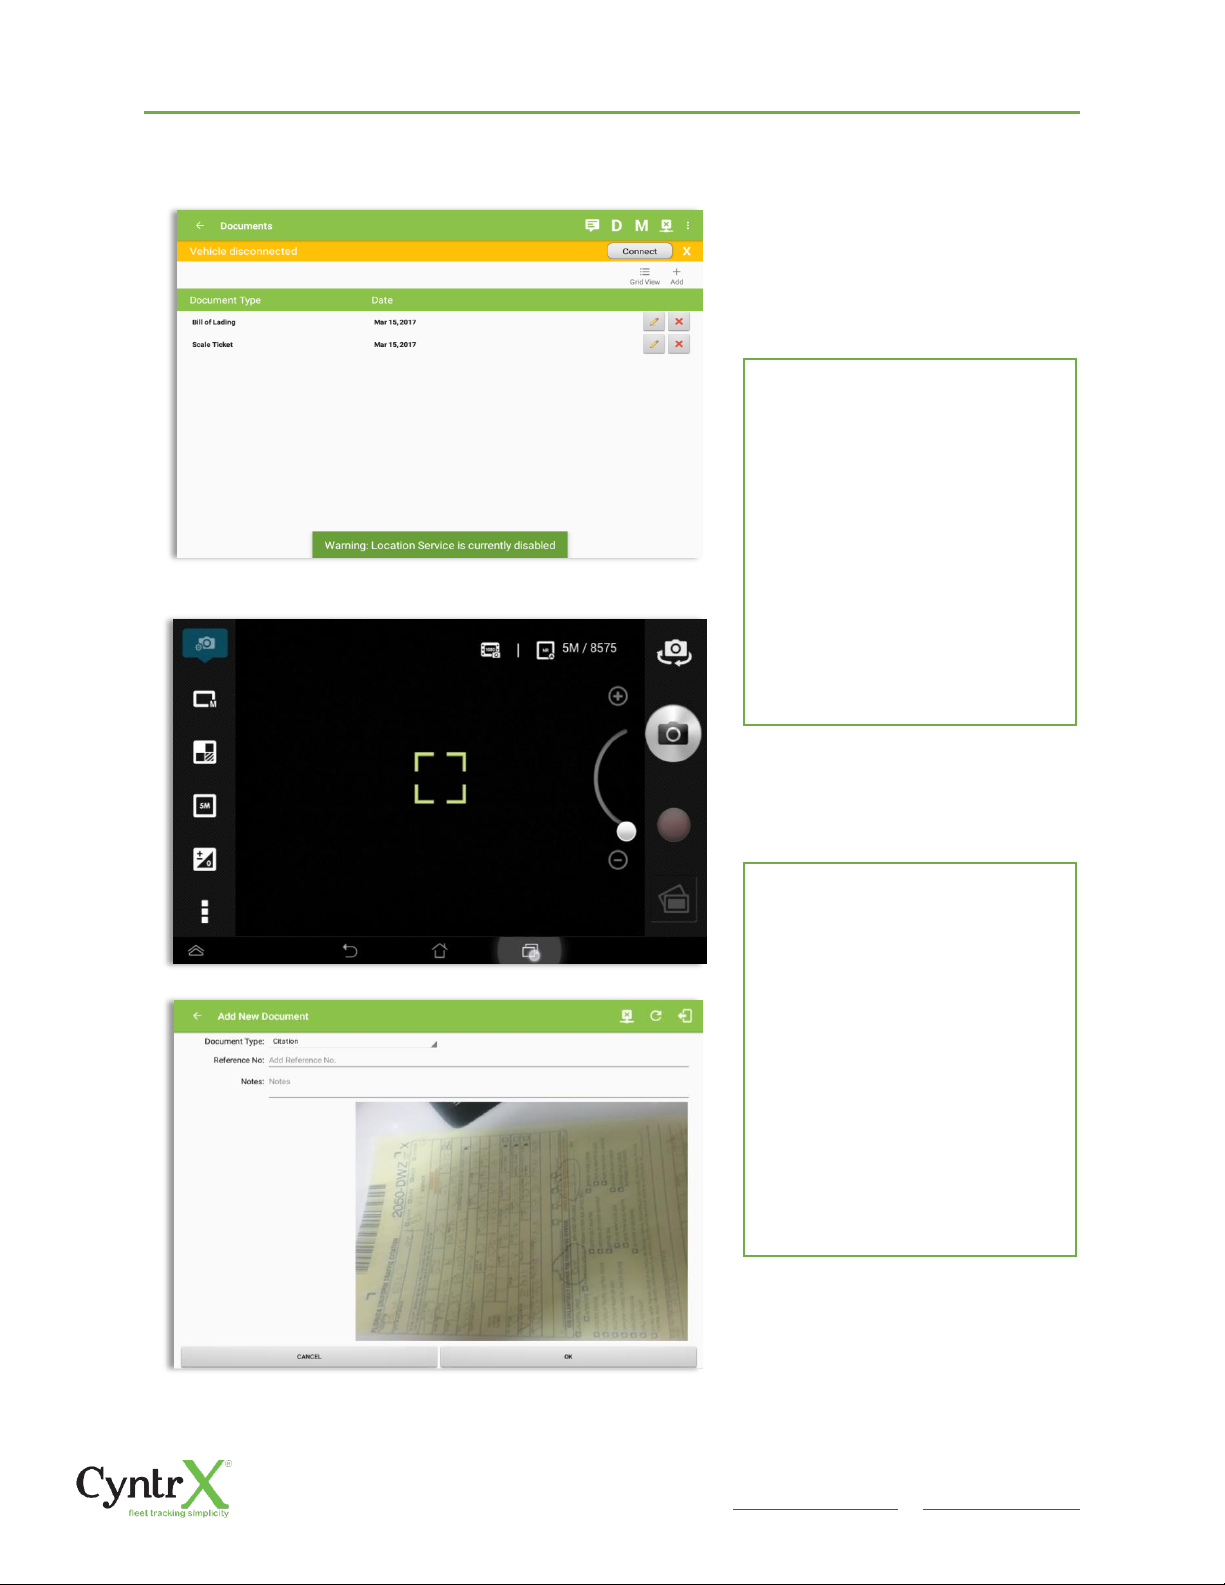
Tap the Add button, the camera
app will open and you can then
take a picture of the document
or damage etc.
After tapping the Capture Image
button, tap the
Save button to save the image
and add it to your document. You
can also discard the image if you
are not happy with the picture by
tapping the Retry button.
Select the type of document you
wish to save by tapping the
Document Type drop down list
and selecting from the available
options.
Enter your Reference Number
Add any Notes to support the
image.
Tap the OK button to save and
continue or tap the CANCEL
button to return without saving.
Page 98
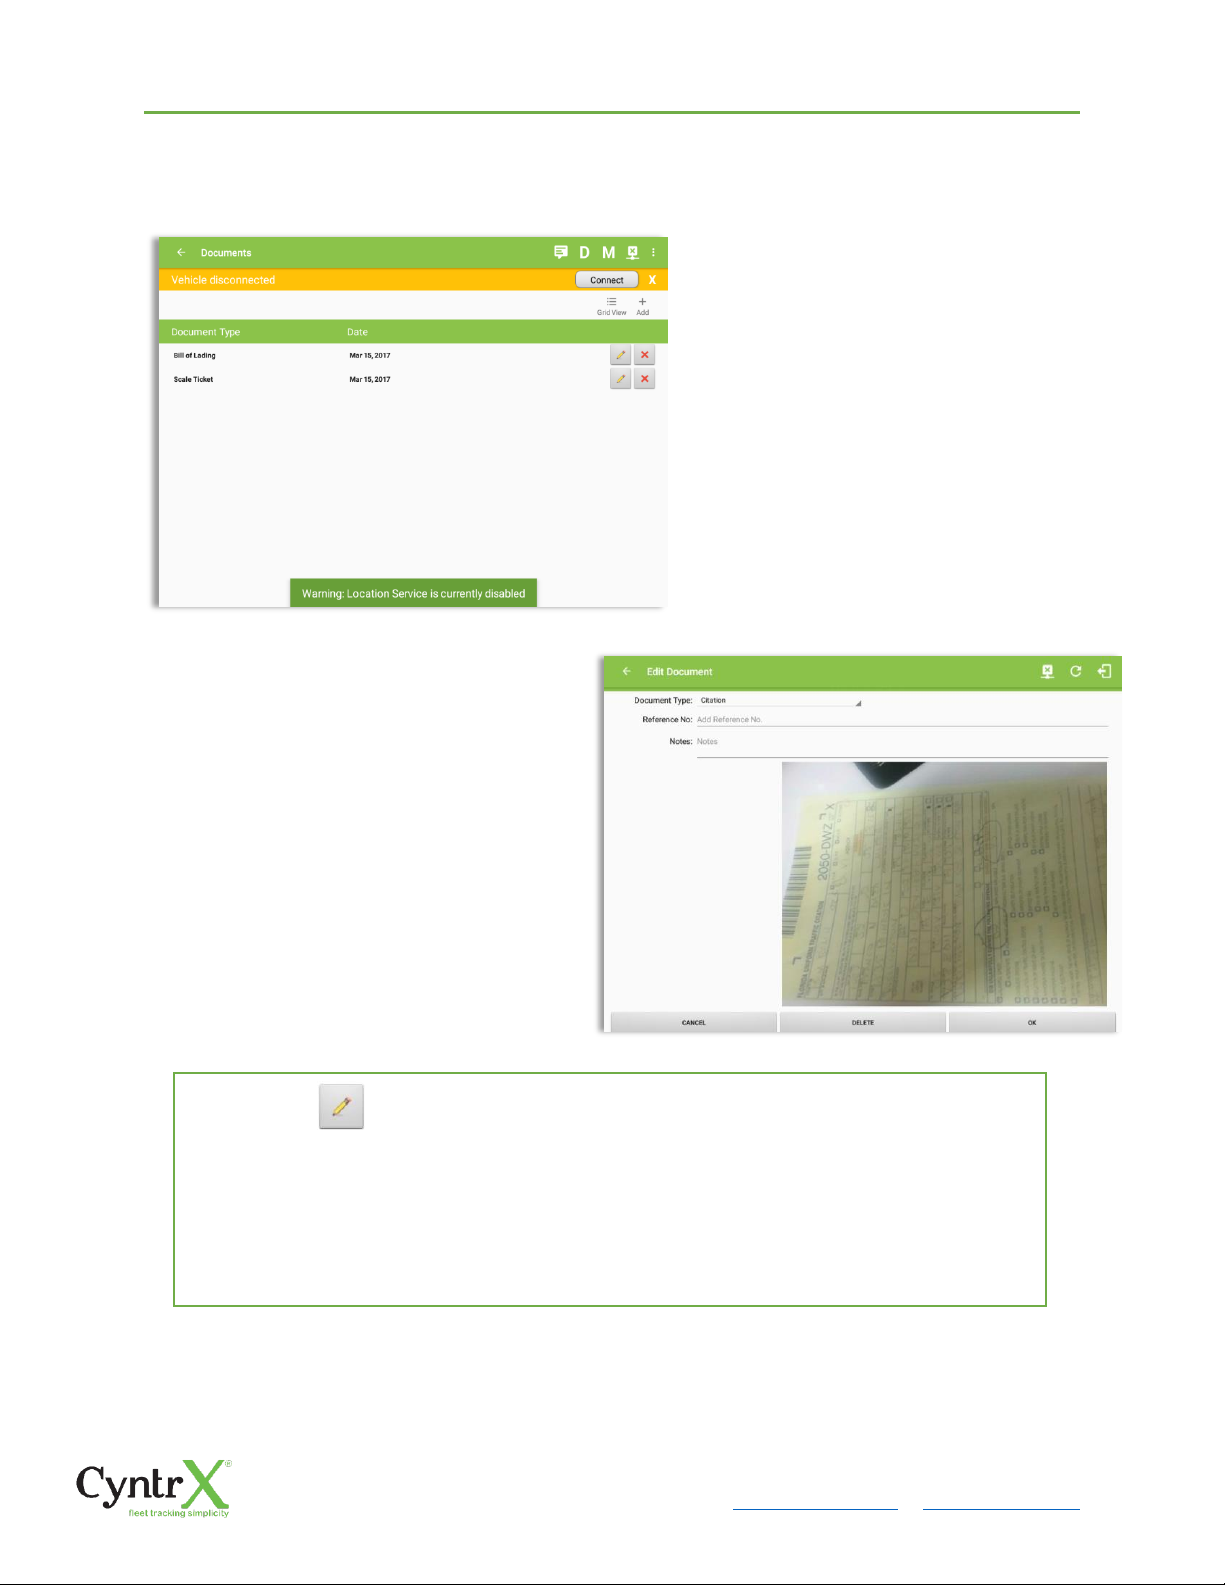
Tap the Edit button adjacent to the relevant document, make any required changes.
Tap the OK button to save the changes.
Tap the CANCEL button to return without saving the changes.
Tap the DELETE button to delete the document completely.
Page 99
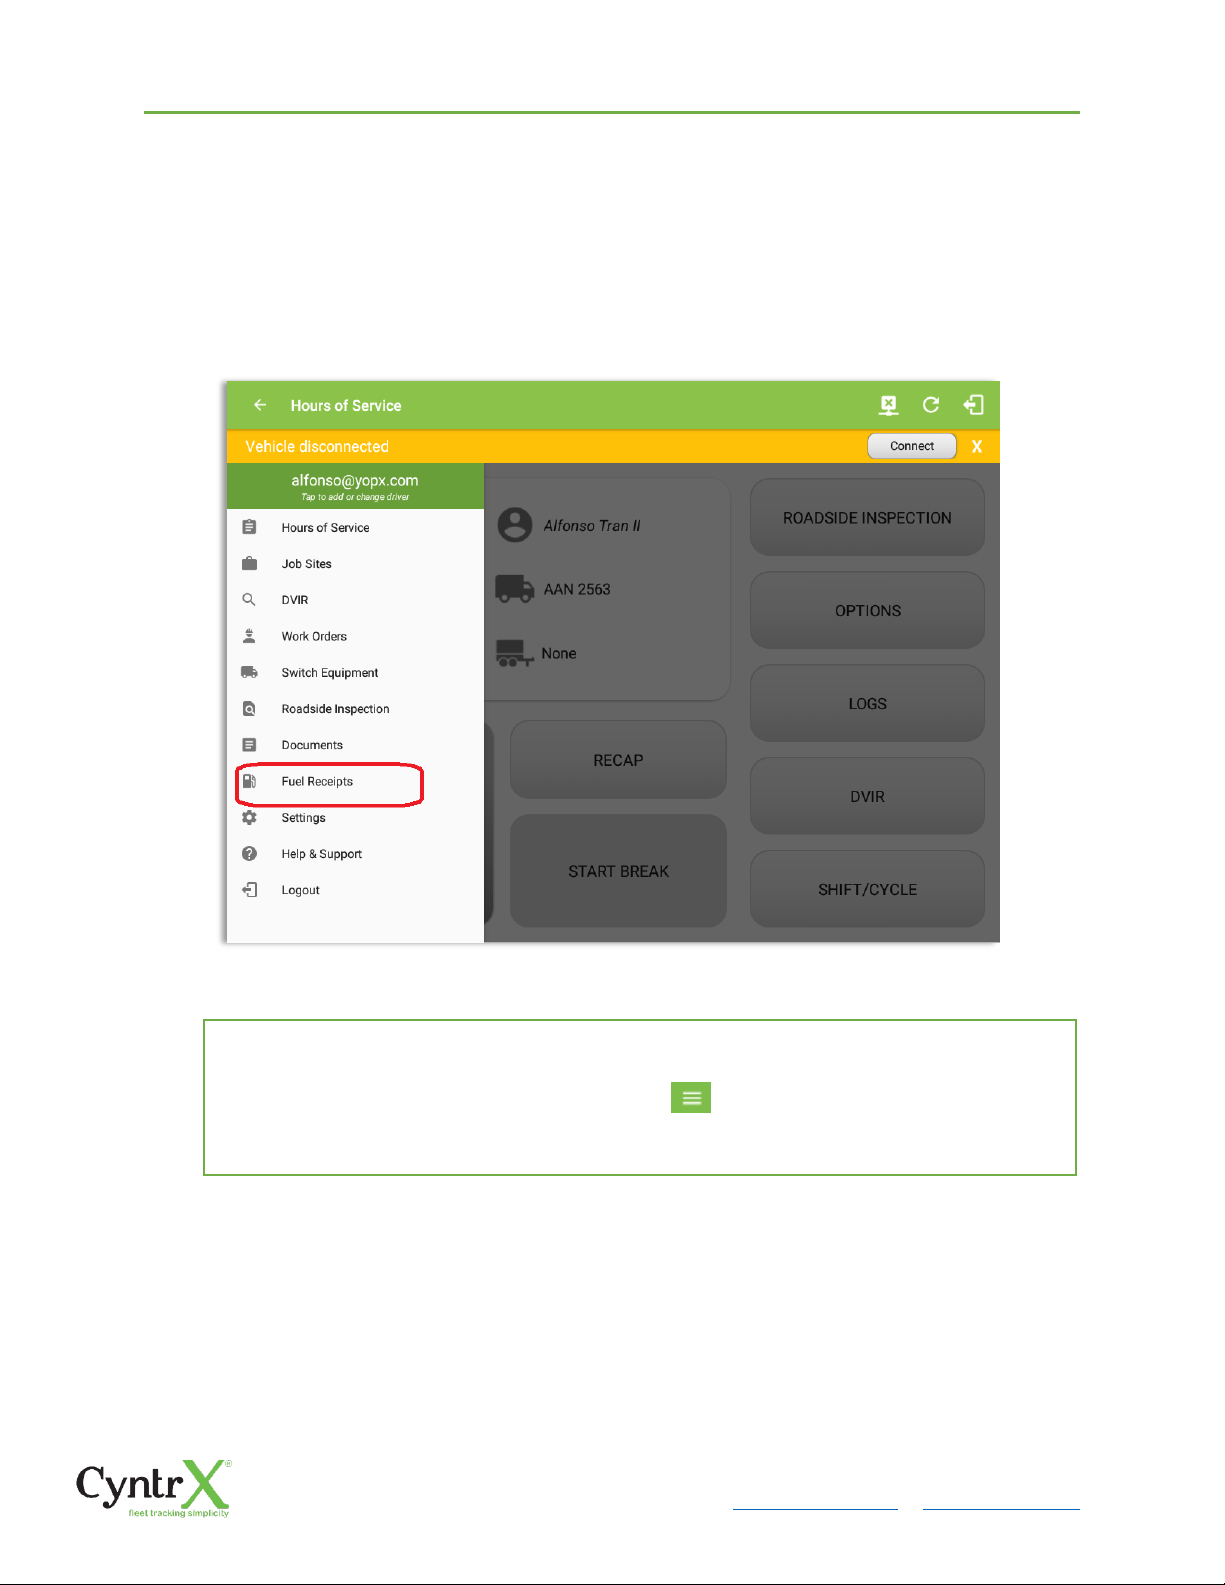
CyntrX
Page 99
920-338-0479 | [email protected]| www.CyntrX.com
9 Add Fuel Receipts
The Fuel Receipt’s feature provides an easy way to capture and view fuel receipts
purchased related to hours of service activities.
9.1 Main Navigation Menu
1. Slide the screen from left to right to show the Main Navigation Menu
or
2. Tap the Main Navigation Hamburger icon to show the Main Navigation Menu
3. Tap on the Fuel Receipts button from the Main Hours of Service Menu
Page 100
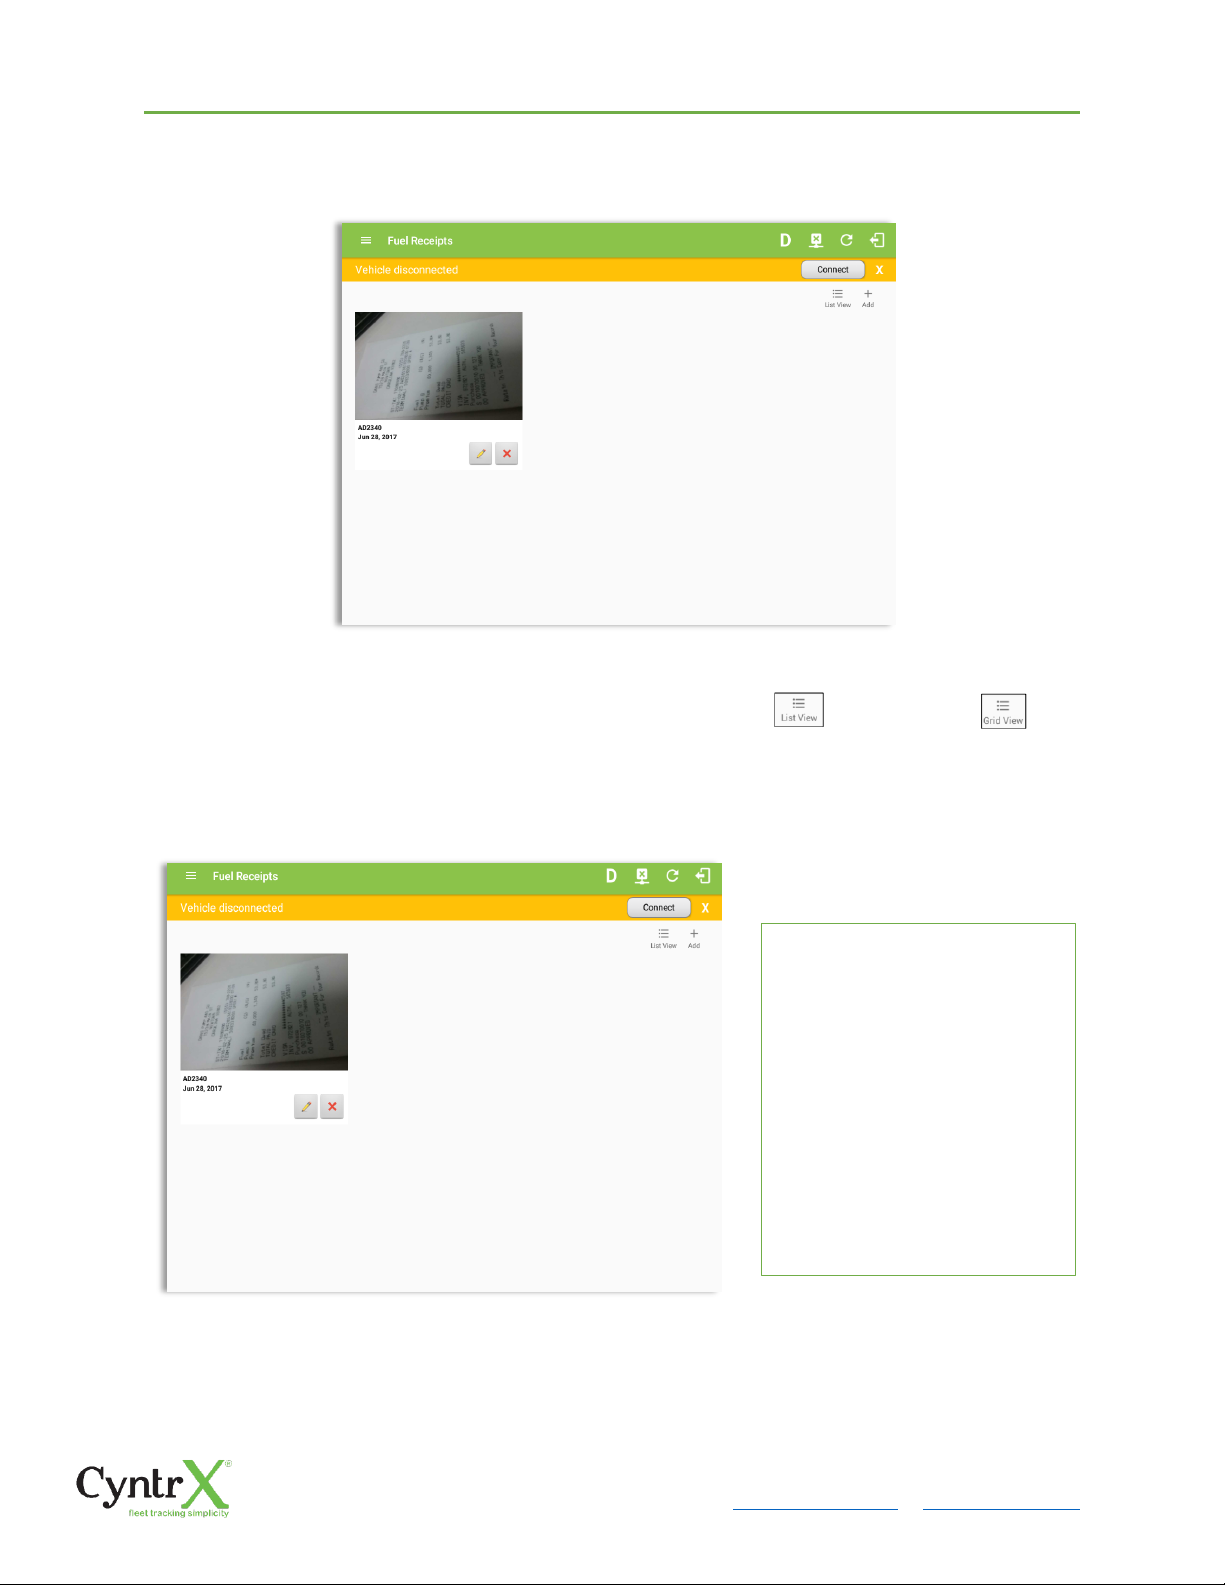
CyntrX
Page 100
920-338-0479 | [email protected]| www.CyntrX.com
9.2 Fuel Receipts Screen
Note: You can change the documents’ view to either “List View” or “Grid View” .
9.3 Adding Fuel Receipts
The camera app will then
appear to take a picture of the
fuel receipt.
After tapping the Capture
Image button, select the Check
mark button to save the image
and add it to your document.
You can also discard the
captured image by selecting
the X mark button.
 Loading...