

Cymatic Audio uTrack24 operation manual
User Manual
uTrack24
May 2016

User Manual
uTrack24
May 2016
Table of Contents
Table of Contents ........................................................................................................................................................... 2
1. WHAT’S IN THE BOX ........................................................................................................................................... 3
2. SAFETY PRECAUTIONS ...................................................................................................................................... 4
3. USAGE PRECAUTIONS ....................................................................................................................................... 5
4. LIMITED WARRANTY ........................................................................................................................................... 5
5. INTRODUCTION ................................................................................................................................................... 6
6. FEATURE LIST ..................................................................................................................................................... 7
7. FRONT PANEL ..................................................................................................................................................... 8
8. REAR PANEL ...................................................................................................................................................... 10
9. USAGE: MIXER FOR LIVE CONCERT RECORDING ........................................................................................ 13
10. USAGE: RECORDING SPLIT/OUTBOARD MIC PREAMPS .............................................................................. 14
11. GETTING STARTED WITH RECORDING AND PLAYBACK ............................................................................. 15
11.1. Preparing the attached USB drive for recording ............................................................................................. 15
11.2. USB Hard Drives vs. USB Flash Drives ......................................................................................................... 15
11.3. Recording ....................................................................................................................................................... 16
11.4. Playback ........................................................................................................................................................ 16
11.4.1. File playback modes .............................................................................................................................. 16
11.4.2. Switching between different playback modes: ....................................................................................... 17
11.4.3. Playing Back Audio ................................................................................................................................ 17
12. FILE FORMATS .................................................................................................................................................. 19
13. SETTINGS BAR .................................................................................................................................................. 20
14. RECORD PAGE .................................................................................................................................................. 21
15. MIX PAGE ........................................................................................................................................................... 22
15.1. Saving Mixer Parameters: .............................................................................................................................. 23
15.1.1. In Recording .......................................................................................................................................... 23
15.1.2. In Playback ................................ ................................ ................................................................ ............ 23
16. PLAY PAGE ........................................................................................................................................................ 23
17. uTrack24 SETTINGS MENUS ............................................................................................................................. 25
17.1. Clock Source Menu ........................................................................................................................................ 25
17.2. Footswitch Menu ............................................................................................................................................ 26
17.3. Recording Menu ............................................................................................................................................. 26
17.4. Playback Menu .............................................................................................................................................. 27
17.5. Sync Menu ..................................................................................................................................................... 28
17.6. Inputs ............................................................................................................................................................. 28
17.7. MADI .............................................................................................................................................................. 29
Table of Contents 2

User Manual
uTrack24
May 2016
17.8. ADAT ............................................................................................................................................................. 30
17.9. AudioLan ........................................................................................................................................................ 30
17.10. Utilities Menu .......................................................................................................................................... 31
17.11. Load Settings ......................................................................................................................................... 31
17.12. Save Settings ......................................................................................................................................... 31
18. USING THE uTrack24 AS A COMPUTER AUDIO INTERFACE ......................................................................... 32
18.1. Using the uTrack24 as an Audio Interface with Microsoft Windows ............................................................... 32
18.1.1. Minimum System Requirements ............................................................................................................ 32
18.1.2. WDM and ASIO driver installation ......................................................................................................... 32
18.1.3. uTrack24 Control Panel for PC .............................................................................................................. 33
18.2. Using the uTrack24 as an Audio Interface with an OS X ............................................................................... 38
18.2.1. Minimum System Requirements ............................................................................................................ 38
18.3. Using the uTrack24 as an Audio Interface with an Apple® iPad® ................................................................. 39
18.3.1. Minimum System Requirements ............................................................................................................ 39
18.4. Audio Interface Control Room Features ......................................................................................................... 39
19. UPDATING THE FIRMWARE OF uTrack24 ....................................................................................................... 40
19.1. Firmware update using a Network Connection (Windows & OS X) ................................................................ 40
19.2. Firmware update using the USB connection (Windows & OS X) ................................................................... 42
19.3. Firmware update using USB drive ................................................................................................................. 42
20. Legal Disclaimer .................................................................................................................................................. 43
1. WHAT’S IN THE BOX
Your uTrack24 comes with the following components:
uTrack24 unit
AC/DC power adapter, incl. UL and US power cables
19” rack ears (removable)
USB cable
Printed Quick Start Guide
Note: It is recommended to update your uTrack24 to the latest firmware, available at the Cymatic website, to avail the
latest features and capabilities we added to uTrack24. See the chapter Updating the firmware of uTrack24.
WHAT’S IN THE BOX 3

User Manual
uTrack24
May 2016
2. SAFETY PRECAUTIONS
AC adapter
Be sure to use only the supplied 15 V DC, 1500 mA AC adapter, which is equipped with a “center-positive”
plug. The use of an adapter other than the specified type may damage the unit and could pose a safety
hazard.
Connect the AC adapter only to an AC outlet that supplies the rated voltage required by the adapter.
When disconnecting the AC adapter from the AC outlet, always grasp the adapter itself and do not pull at the
cable.
During lightning or when not using the unit for an extended period, disconnect the AC adapter from the AC
outlet.
Environment
To prevent the risk of fire, electric shock or malfunction, avoid using your uTrack24 in environments where it will be
exposed to:
Extreme temperatures
Heat sources
Excessive humidity or moisture
Excessive dust or sand
Excessive vibration or shock
Handling
Never place objects filled with liquids on the uTrack24, as this can cause electric shock.
Do not place an open flame source, such as a lighted candle, on the uTrack24 since this can cause fire.
The uTrack24 is a precision instrument. Do not exert undue pressure on the keys and other controls. Also
take care not to drop the unit, and do not subject it to shock or excessive pressure.
Take care that no foreign objects (coins, pins etc.) or liquids can enter the unit.
Connecting cables and input and output jacks
Always turn off the power to the uTrack24 and all other equipment before connecting or disconnecting the power
source. Make sure to disconnect all connection cables and the power cord before moving the uTrack24.
Alterations
Do not open the case of the uTrack24, or attempt to modify the product in any way. Doing so will void the warranty.
There are no serviceable parts inside the unit.
Volume
Do not use the uTrack24 at a loud volume for a long time since this can cause hearing impairment.
SAFETY PRECAUTIONS 4
User Manual
uTrack24
May 2016
This product complies with the European Union Council Directives and
Standards relating to Directive 2004/108/EC for Electromagnetic compatibility
This product is compliant with the EU Directive 2011/65/EU for the Restriction of
the use of Certain Hazardous Substances in Electrical and Electronic Equipment.
No lead (Pb), cadmium (Cd), mercury (Hg), hexavalent chromium (Cr+6), PBB or
PBDE is intentionally added to this device. Any traces of impurities of these
substances contained in the parts are below the RoHS specified threshold levels.
This equipment has been tested and found to comply with the requirements of 47
CFR of PART 15 limit for radiation and conduction emission relating to FCC rules
A NOTE ABOUT DISPOSAL:
This product must be disposed in accordance with the local recycling regulations.
The crossed out wheeled bin symbol informs you that the product should not be
disposed of along with municipal waste and invites you to use the appropriate
separate take-back systems licensed for the recycling of electrical and electronic
equipment (EEE).
CERTIFICATIONS
3. USAGE PRECAUTIONS
Electrical interference
For safety considerations, the uTrack24 has been designed to provide maximum protection against the emission of
electromagnetic radiation from inside the device, and protection from external interference. However, equipment that
is very susceptible to interference or that emits powerful electromagnetic waves should not be placed near the
uTrack24, as the possibility of interference cannot be ruled out entirely. With any type of digital control device, the
uTrack24 included, electromagnetic interference can cause malfunctioning and can corrupt or destroy data. Care
should be taken to minimize the risk of damage.
Cleaning
Use a soft, dry cloth to clean the uTrack24. If necessary, slightly moisten the cloth. Do not use abrasive cleanser,
wax, or solvents (such as paint thinner or cleaning alcohol), since these may dull the finish or damage the surface.
4. LIMITED WARRANTY
For the applicable warranty terms and conditions and additional information on Cymatic Audio’s Limited Warranty,
please see complete details online at www.cymaticaudio.com/warranty
(EMC) and Low Voltage Directive 2006/95/EC
Part 15B: 2010.
USAGE PRECAUTIONS 5

User Manual
uTrack24
May 2016
5. INTRODUCTION
Congratulations on your purchase of the Cymatic Audio uTrack24! The uTrack24 is three powerful products in one:
A 24-track solid-state audio recorder
A 24-track digital audio file player
A 24-input, 24-output computer audio interface
The uTrack24 records to and plays back from standard, off-the-shelf USB drives, while offering a large complement
of professional features. The display and dedicated front-panel hardware controls make it an intuitive and easy to
use device. Recording is never further away than a single push of the dedicated front panel “Record” button.
With the addition of the SYNC group feature, uTrack24 turns into a scalable recorder and player system, adding up to
up to 96 audio channels, or offering redundant channels and still keeping the simple and intuitive handling that you
already are familiar with.
Network / uRemote Control:
A network port allows for powerful control using the free uRemote software and app. In addition, the network port
enables synchronization of up to 4 units to create a powerful 96-channel recorder/player with single point of control,
either through the local controls of the master unit or through the uRemote app.
uTool
uTool is a free application provided by Cymatic Audio that greatly facilitates preparation and conversions between the
USB drive and your PC:
Conversion between uTrack24’s multi-channel and your PC’s standard mono wave files
Create playback content on your USB drive, including:
o definition of every track’s output volume
o creation of playlists
INTRODUCTION 6
User Manual
uTrack24
May 2016
6. FEATURE LIST
Allows connection of 24 channels of balanced input/output through 25-pin D-Sub connectors
Large, easy to use illuminated front panel transport buttons
Detailed LCD screen, dedicated menu buttons, and rotary push control allow for fast and intuitive adjustment
of various settings
Up to 24-bit resolution, 96 kHz sample rate
BNC Word Clock Input/Output allows integration into larger digital systems
Synchronization of up to 4 units over Ethernet, to create a 96-channel system
Ethernet connection allows comprehensive control of uTrack24 using uRemote software, available for iOS,
Android, OS X and Windows
Optional digital I/O cards offer 24x24 I/O in digital formats such as MADI, ADAT and AES67/AUDIOLAN
Scalable recorder/player adding upto 96 Channels with the sync group feature.
24-Channel Multitrack Recorder
Records directly to standard USB 2.0 and USB 3.0 drives, attached to convenient front-panel USB port
3-color input level metering per input channel, also works as 24-segment full scale meter
Internal DSP mixer offers stereo monitor mix of all 24 inputs through front-panel headphone output and the
two channel balanced output (main out) on the rear panel, with dedicated level controls. Adjust level,
panning, mute, and solo for all 24-inputs while enjoying detailed 24-segment hardware input/output
metering, all with no external mixer required!
Pre-recording feature sets the uTrack24 to constantly buffer a minimum of 3 seconds of the incoming audio
signal
24-Channel Multi-Track Player
Play back 24 tracks of audio, perfect for virtual sound checks or expanding live performances with individual
pre-recorded tracks
Gapless playback of multitrack songs in playlist when the song parameters (channel count, sample rate and
bit depth) are same between the songs. Gapless playback also happens in continuous and repeat all
playback mode
Pre-load feature loads a song into the buffers so that it can be started instantaneously on a button press.
Pre-load feature is active in playlists and when pre-recording is switched off. uTrack24 also preloads the
next song while the current song is in playback
Playback Standard MIDI files synchronized with audio file playback
Edit song order on the fly, during playback, directly from the front panel or with uRemote
Playback start and stop via optional footswitch
On the fly loop playback with mark-in/mark-out points allows for easy looping
uTool software allows you to easily create custom audio playlists, with features like set pause times between
songs or assign songs to be played back continuously
FEATURE LIST 7
User Manual
uTrack24
May 2016
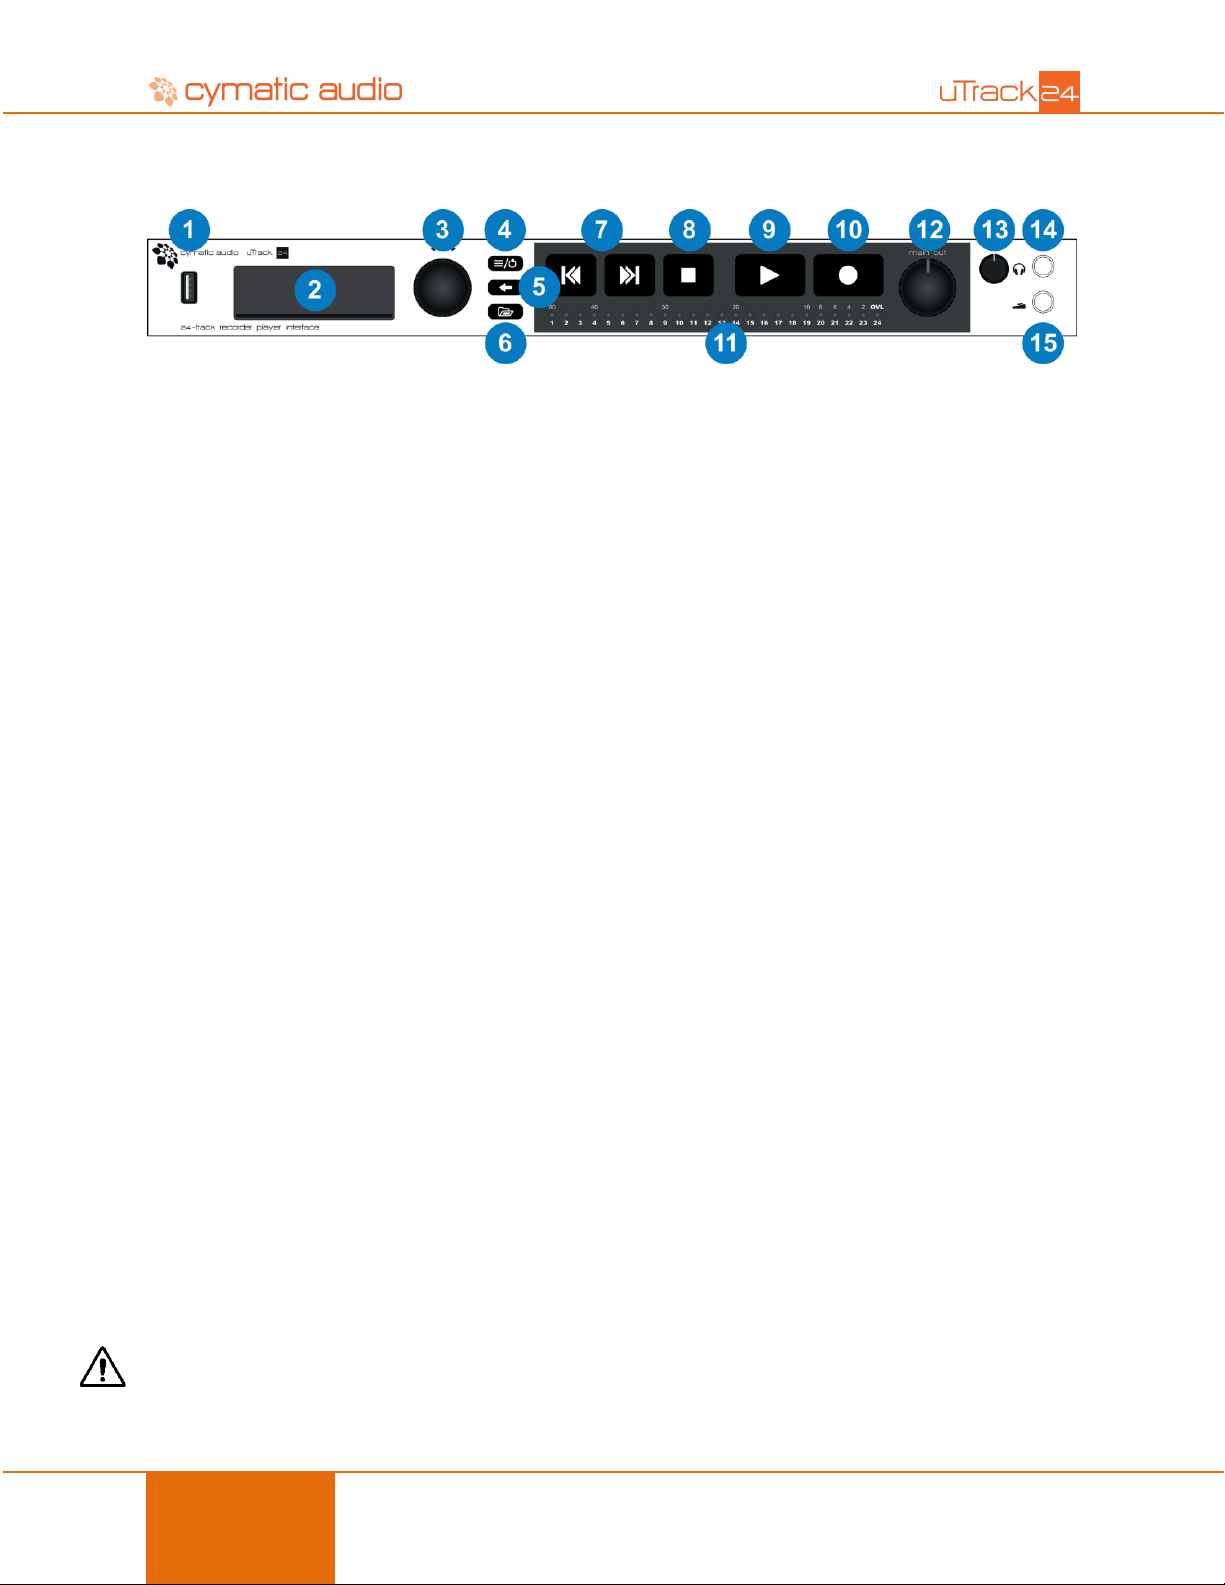
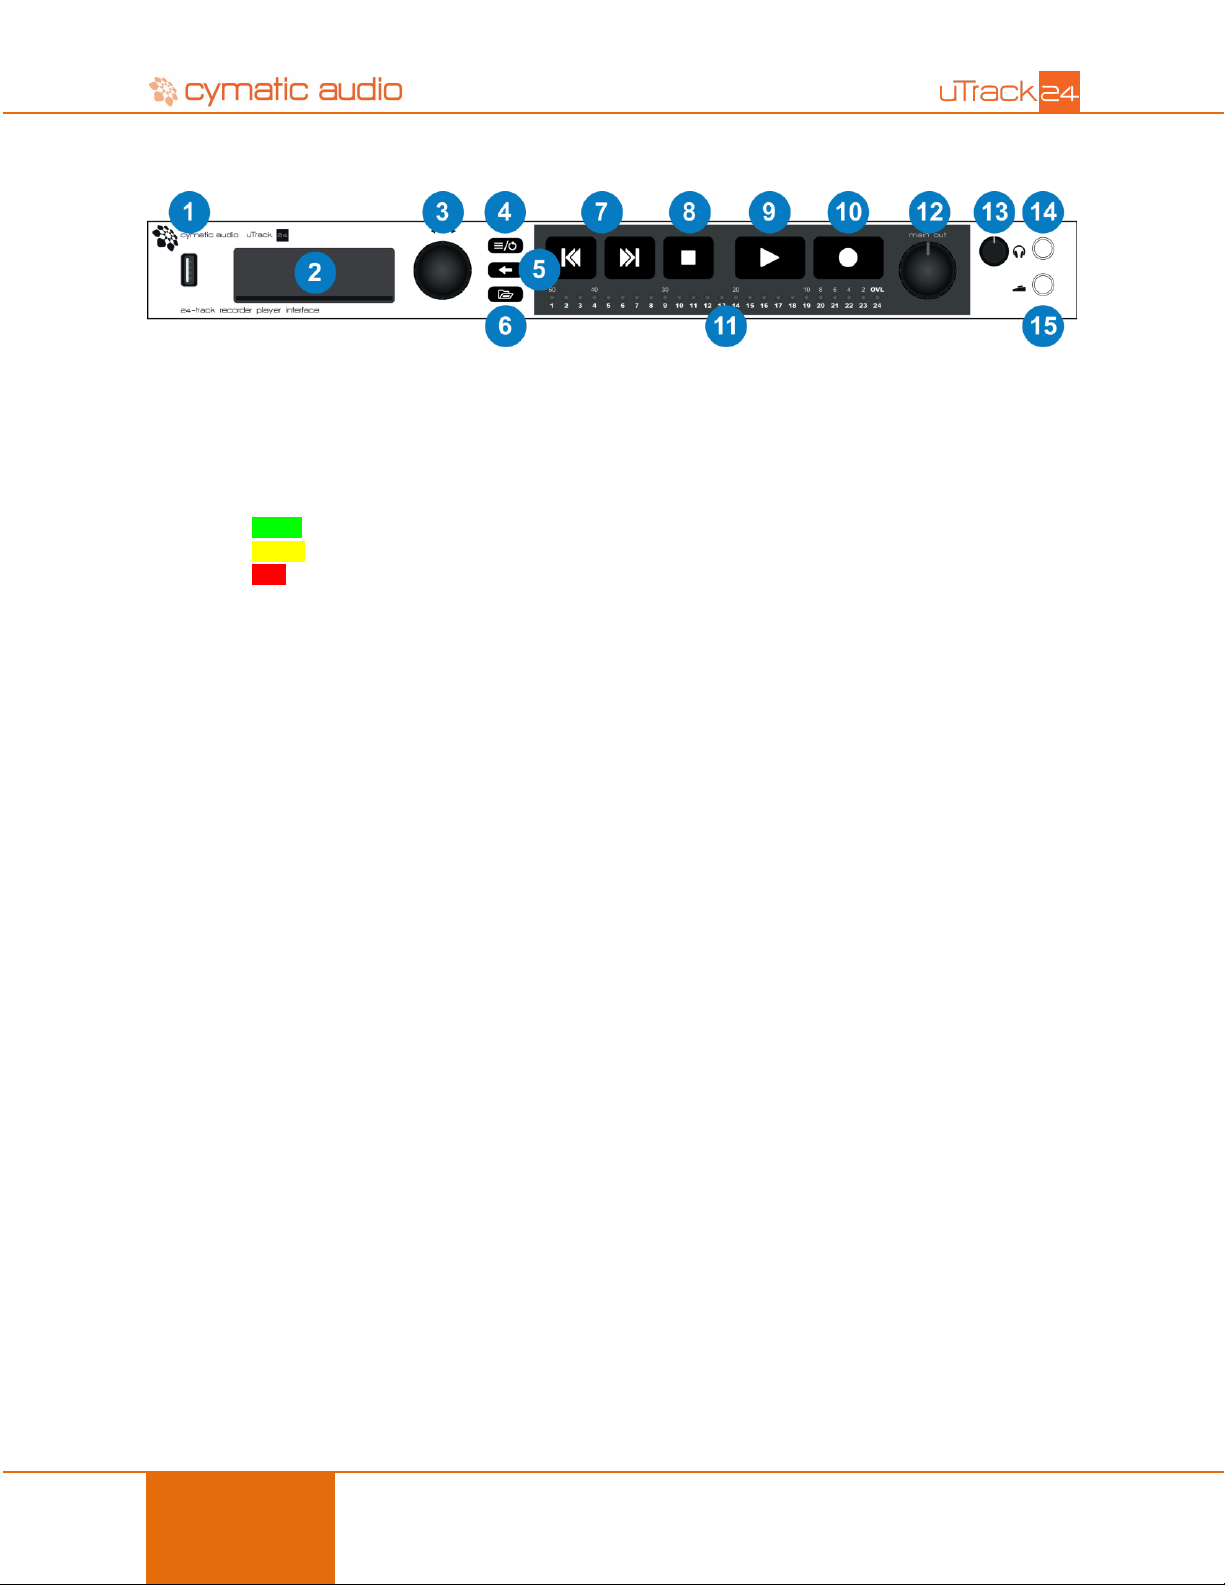
7. FRONT PANEL
1. USB Host Port
This port allows connection of a standard, off-the-shelf USB drive. The uTrack24 records and plays back up to 24
tracks of audio to/from the connected USB drive. The uTrack24 supports USB drives up to 16TB.
2. Graphic Display
This LCD screen displays assorted useful information while recording and playing back audio, as well as when
working with the settings menus.
3. Encoder Wheel
Rotate the encoder wheel to adjust various settings; it also contains a “push” function, allowing it to work as button.
4. MENU/LOOP Button
Press the MENU/LOOP button to bring up the uTrack24 settings menus, allowing various adjustments to the
products’ settings. In playback mode, this button helps to setup the playback loop.
5. BACK Button
Press the BACK button to navigate backwards through the menu tree until reaching the home screen.
6. BROWSE Button
Switch the BROWSER screen on and off. In the BROWSER screen you navigate the files on the attached USB drive
and select them for playback. Long press brings you instantly to the top directory level (root).
7. Skip Back/Forward Buttons
During playback, press the skip back/skip forward buttons to navigate among saved markers in an audio take
(recording). When playing back a playlist, press the buttons to navigate among the different songs in the playlist.
When recording, press these buttons to add a new marker at the current timeline location.
8. STOP Button
Press to stop a current recording or playback. Long press in any state will send out a MIDI panic reset.
9. PLAY Button
Press the PLAY button to begin playback of the currently loaded audio project.
When recording, press the PLAY button to add a new marker at the current timeline location.
10. RECORD Button
Press the RECORD button to begin a new recording without losing a sample. The uTrack24 is always ready to start a
new recording as soon as the RECORD button is pressed.
Note: The transport buttons are lit whenever they are active. In SYNC mode, most buttons on slave units are not
active and hence not lit up.
FRONT PANEL 8
User Manual
uTrack24
May 2016
11. Meters
The 24 separate LED meters display the signal strength for incoming signals during recording and display outgoing
signals during playback. The meter LEDs work in two different ways:
When recording or playing back audio, the 24 separate LEDs represent the input/output levels of channels
1-24. Each channel’s LED illuminates in three separate colors, acting as a 3-segment meter:
o Green: -40dB
o Yellow: -10dB
o Red: Overload
When working with the monitor mixer for recording or playback, the meter bridge operates as a single, 24-
segment input/output meter for the currently selected channel. Click the rotary button to open the monitor
mixer settings.
12. Main Output Volume Control
Rotate to adjust the listening level of the rear panel’s main outputs, which carry the stereo signal of the monitor mixer
(standalone recorder/player mode) or outputs 1-2 of your DAW software (Computer Audio Interface).
13. Headphone Volume Control
Rotate to adjust the listening volume level of the front panel headphone output, which offers the same signal path as
the main outputs.
14. Headphone Connector
Connect a pair of headphones to listen to the onboard monitor mix or channels 1-2 of your DAW software.
15. Footswitch Connector
Connect a standard two-position footswitch to this connector for hands-free operation of various functions. For
specifics, see “footswitch” in the menus section of this document.
FRONT PANEL 9
User Manual
uTrack24
May 2016
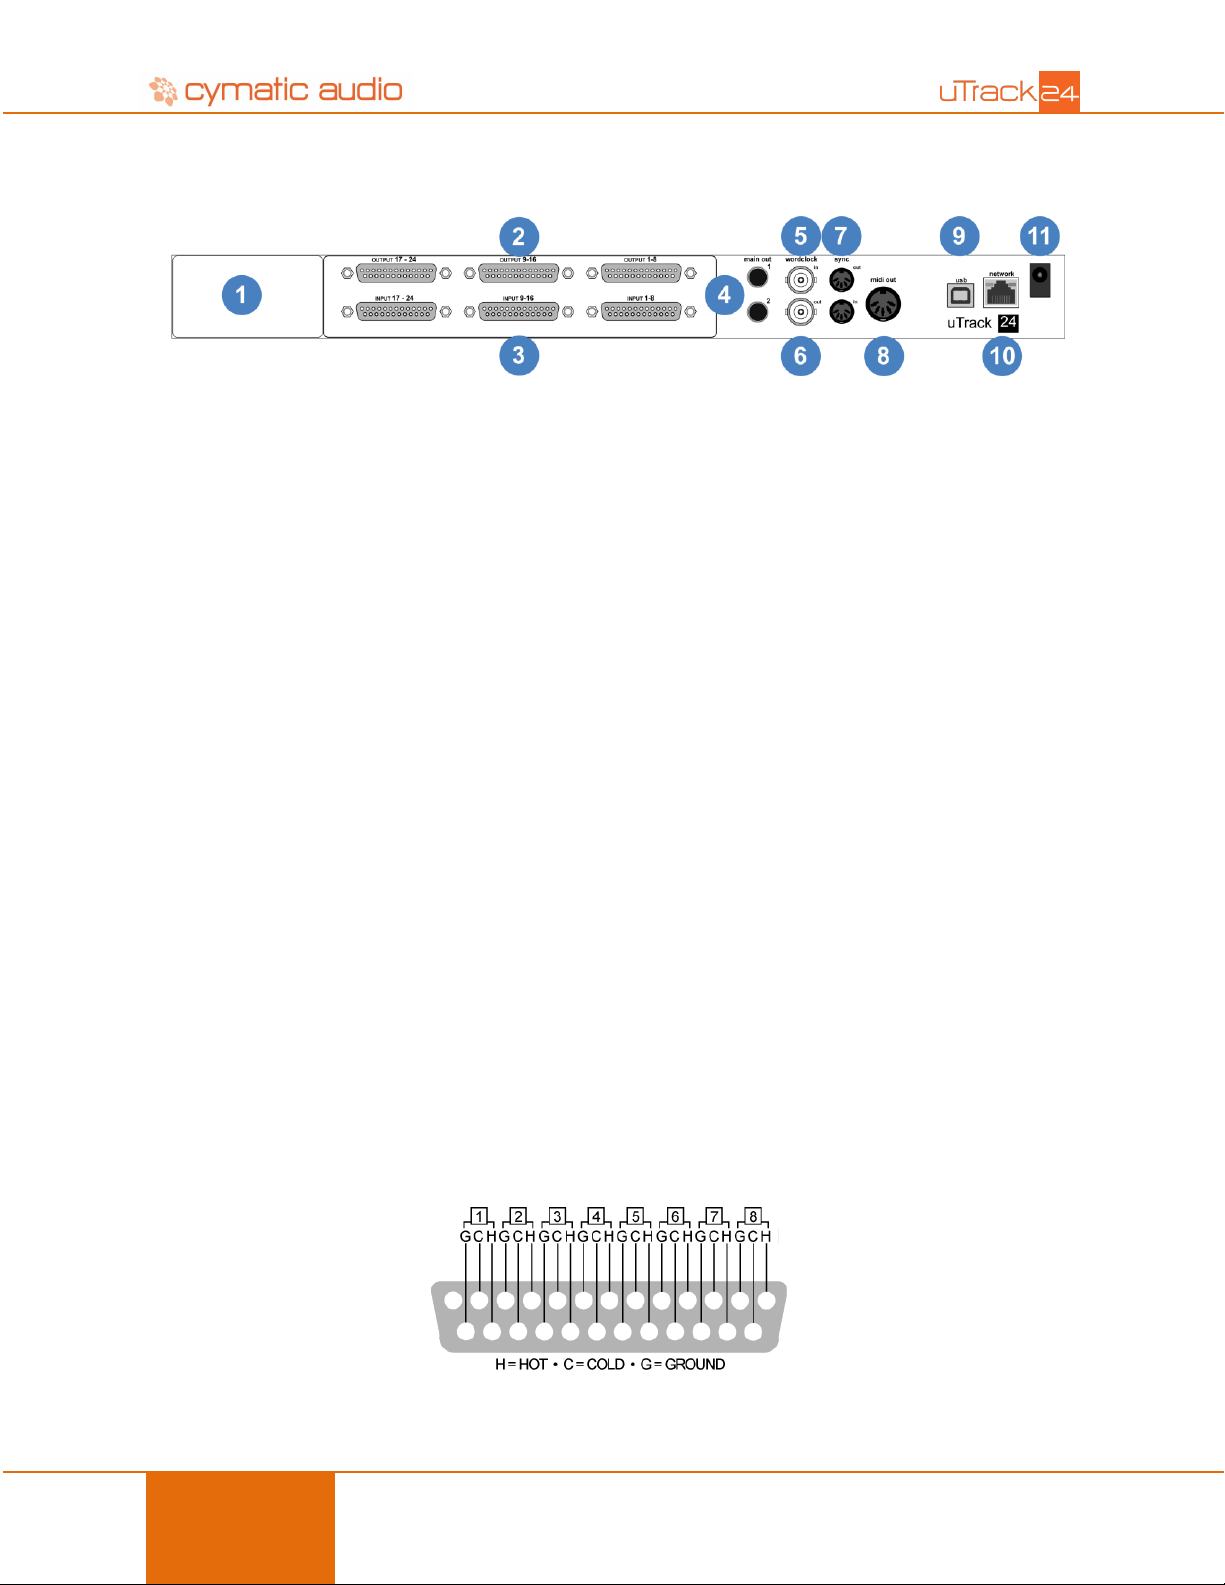
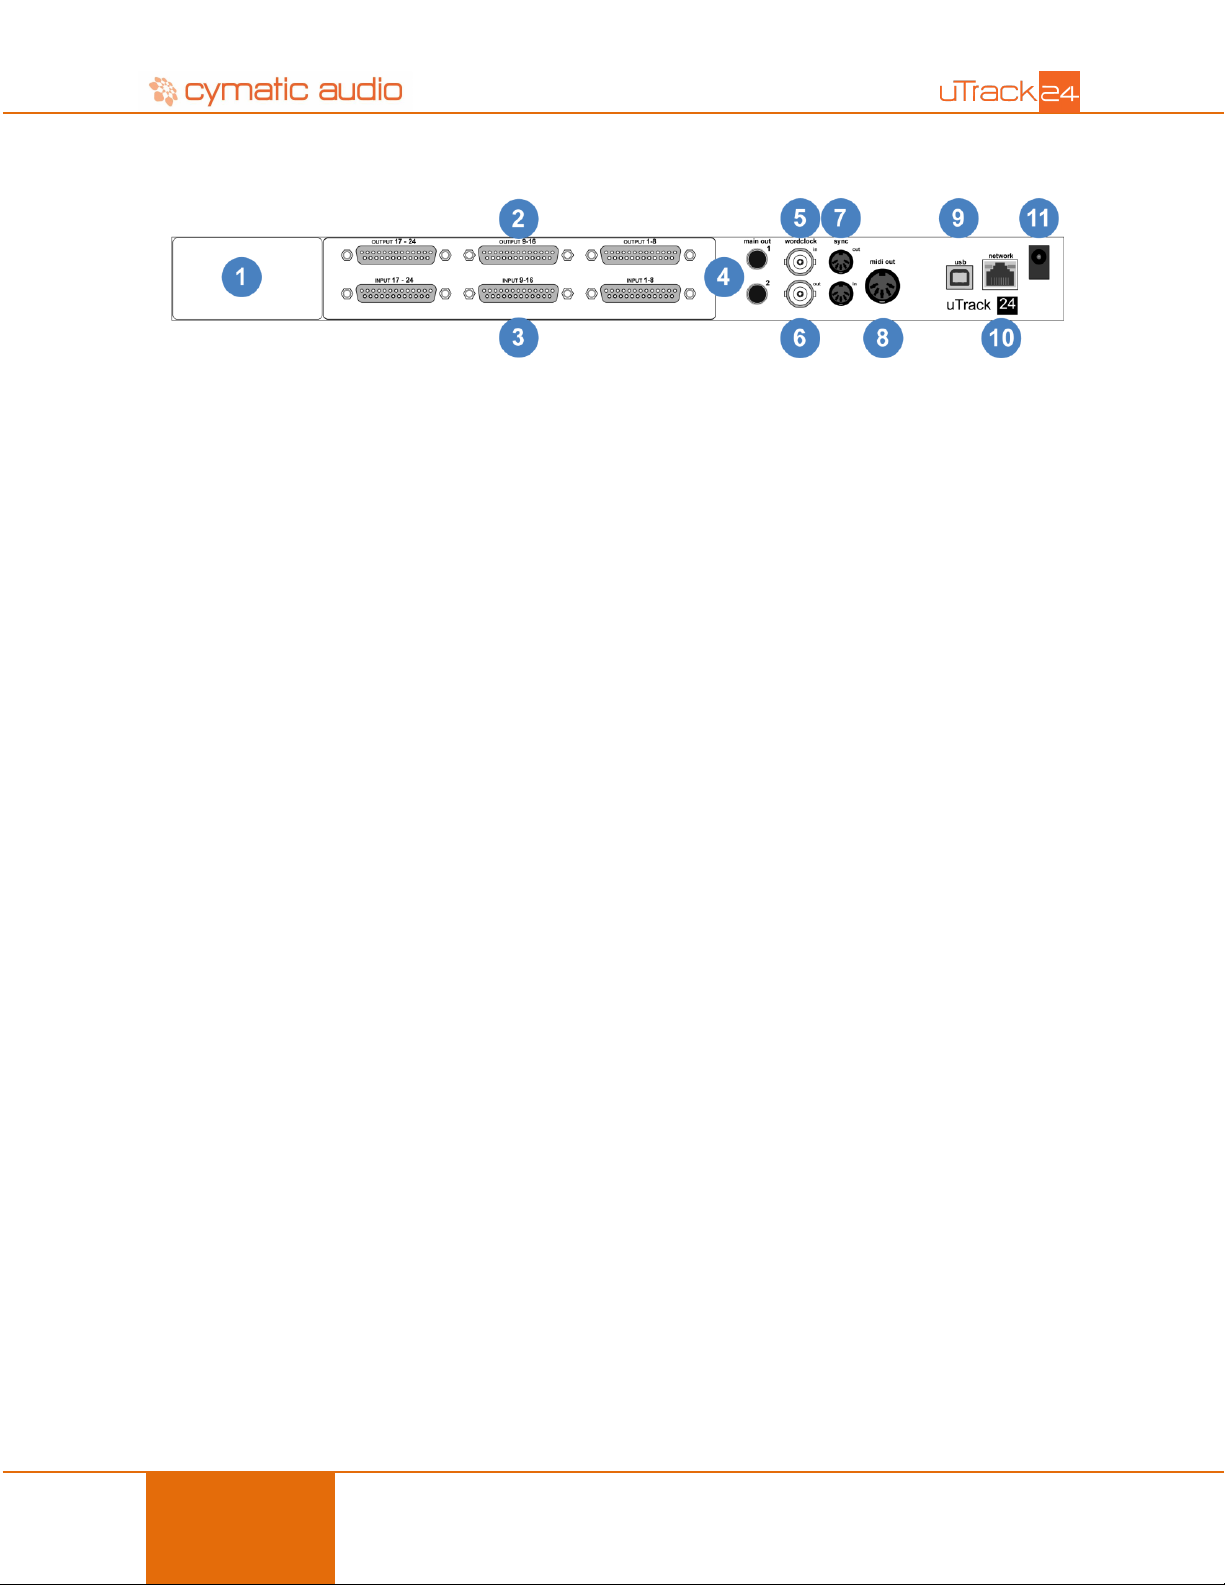
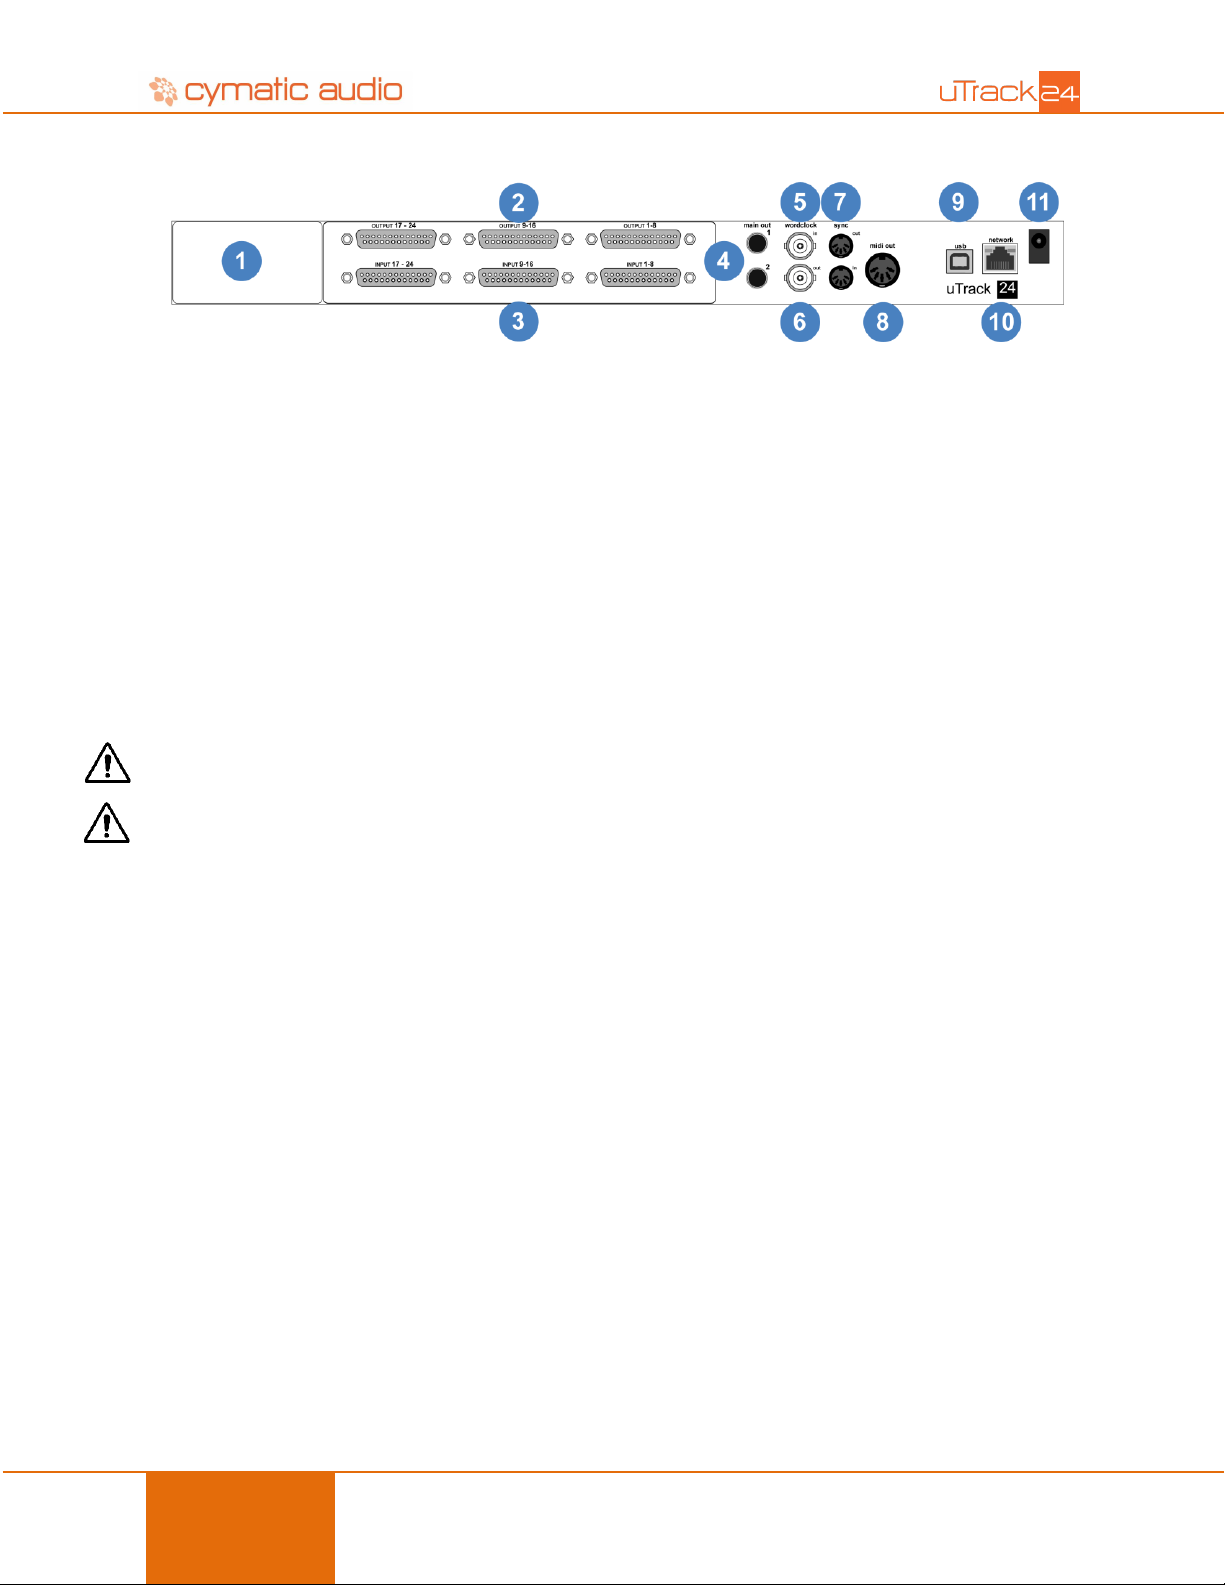
8. REAR PANEL
1. Option Card Slot
The uTrack24 can be fitted with an optional 24-input, 24-output option card that provides an alternate audio I/O path
from the onboard analog I/O. The first currently available card is a MADI I/O card; more flavors of digital I/O will be
available in the future.
This option brings a powerful level of flexibility to the uTrack24, allowing you to:
Expand the unit with 24 channels of digital I/O, and then use that I/O with your own A/D and D/A converters
of choice.
Add a digital I/O format to the uTrack24 that allows 24x24 channels of networked audio, allowing the unit to
conveniently integrate into large setups with a single cable.
Allows the use of external clock from the Digital I/O card to be used in the uTrack24.
2. Analog Outputs 1-24
These 24 outputs carry 24 channels of audio either from:
A multi-track audio project from a USB drive connected to the front panel USB port
A multitrack DAW session running on a computer connected to the rear panel USB port
3. Analog Inputs 1-24
Connect the 24 separate audio signals that you wish to record to these inputs; the 24 separate audio signals can then
be recorded to either:
A USB drive connected to the front panel USB port
DAW software running on a computer connected to the rear panel USB port
Both the analog inputs and outputs operate at balanced line level, +20dB, and are configured as three separate, 8channel, 25-pin D-subminiature connectors. The D-sub connectors are wired to the “Tascam Standard” as shown
below.
REAR PANEL 10
User Manual
uTrack24
May 2016
4. Main Outputs
The balanced stereo main outputs on ¼” tip-ring-sleeve (TRS) jacks can be sourced from either:
The stereo output of the onboard 24-channel monitor mixer. In this scenario, the main outputs allow you to
monitor a stereo mix of the 24 input or output channels.
Output channels 1-2 of your favorite DAW software. In this scenario, the main outputs allow you to monitor a
stereo mix of your DAW session, when using the uTrack24 as a computer audio interface in a recording
studio.
5. Word Clock Input
The uTrack24 can be “slaved” to an external word clock signal by connecting it to the BNC word clock input. This
allows the uTrack24 to be integrated into a larger complement of digital audio equipment, where the clock signals of
all connected equipment need to be synchronized.
Adjust the uTrack24’s “Word Clock” menu to configure it to slave to an incoming external clock, as opposed to
running on its own internal clock. The settings bar at the top of the LCD screen will indicate whether the uTrack24 is
using an internal or external clock signal.
6. Word Clock Output
This connector outputs a standard digital word clock signal, running at the sample rate that the uTrack24 is currently
set to. The word clock output is useful when you want to use the uTrack24 as a “clock master” and wish to slave
other digital equipment to its internal clock signal. It could also be used to loop the incoming word clock signal to
another device.
7. Synchronization Connectors
These synchronization connectors are non-functional with the present firmware. Use the Ethernet-based SYNC
feature for syncing up to 4 uTrack24 units.
8. MIDI Output Connector
The MIDI output connector outputs MIDI data from a SMF (Standard MIDI File) that is exported with a song using
uTool..
This allows the uTrack24 to output MIDI data to a software synthesizer, MIDI controlled lighting system, effects
switching system, etc., synchronized and in time with audio data that is played out of the uTrack24’s audio outputs.
9. USB Connector
The rear panel USB connector can be connected to the USB port of a Windows or OS X computer, or an iPad
camera connection accessory. The uTrack24 acts as a 24-input, 24-output computer audio interface in this case.
The 24 separate outputs allow for great flexibility in routing outputs from a DAW session, such as sending many
separate headphone mixes to an external headphone amplifier, or sending 24 separate channels of audio to an
external analog mixer, for “mixing out of the box”.
REAR PANEL 11
User Manual
uTrack24
May 2016
10. Network Connector
This RJ45 connector allows connection of the uTrack24 to a standard Ethernet network. The network connection can
be used for two different functions:
Updating the uTrack24 firmware
Controlling the uTrack24 from the uRemote software
Synchronizing up to 4 uTrack24 units and control them through uRemote as one large multi-track device
11. Power Connector
Connect the included external power supply to this connector. Do not connect any other power supply except the one
that was supplied with your uTrack24.
Note: that the uTrack24 does not contain an “on/off” power switch; this is by design, as it reduces the possibility of
accidentally shutting down the unit during a critical recording from pressing a power switch.
Note: your uTrack24 is always powered on when connected to the power supply.
REAR PANEL 12
User Manual
uTrack24
May 2016
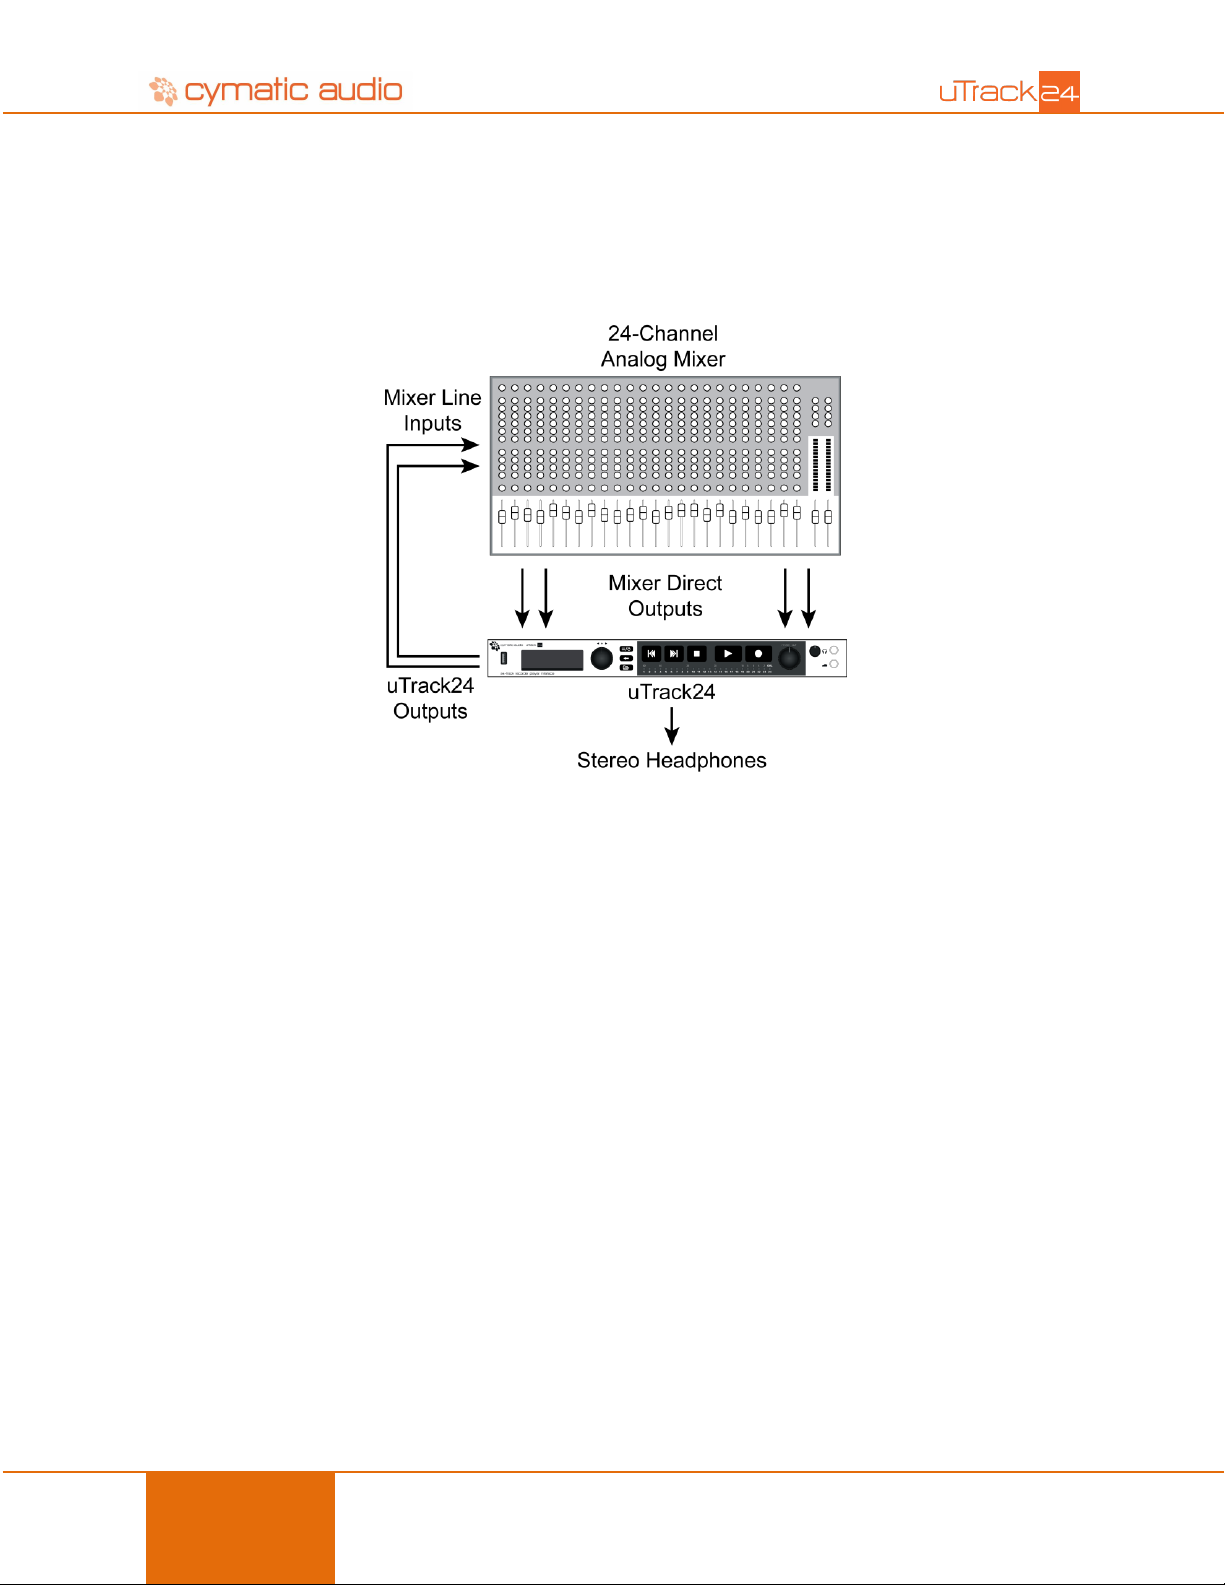
9. USAGE: MIXER FOR LIVE CONCERT RECORDING
The uTrack24 is the perfect tool for capturing up to 24 individual tracks of a live concert, which can then be imported
into your DAW software of choice. The physical connections work as follows:
Connect 24 balanced, direct outs of an analog mixer to the analog inputs of the uTrack24
Connect a pair of headphones to the uTrack24’s front panel phones jack, or a set of monitors to the rear panel
main output; you can monitor and adjust an onboard stereo mix of the 24-track recording.
At the same time, the uTrack24 allows you to play back 24 channels of multi-track audio back into the live sound
console, perfect for performing a “virtual sound check” using recordings of previous performances, or for
expanding live performers with individual pre-recorded tracks.
Connect the analog outputs of the uTrack24 to the line inputs of the mixer. The FOH operator can switch to the
mixer channel’s line inputs to monitor the uTrack24’s 24 channels of playback.
USAGE: MIXER FOR LIVE CONCERT RECORDING 13
User Manual
uTrack24
May 2016
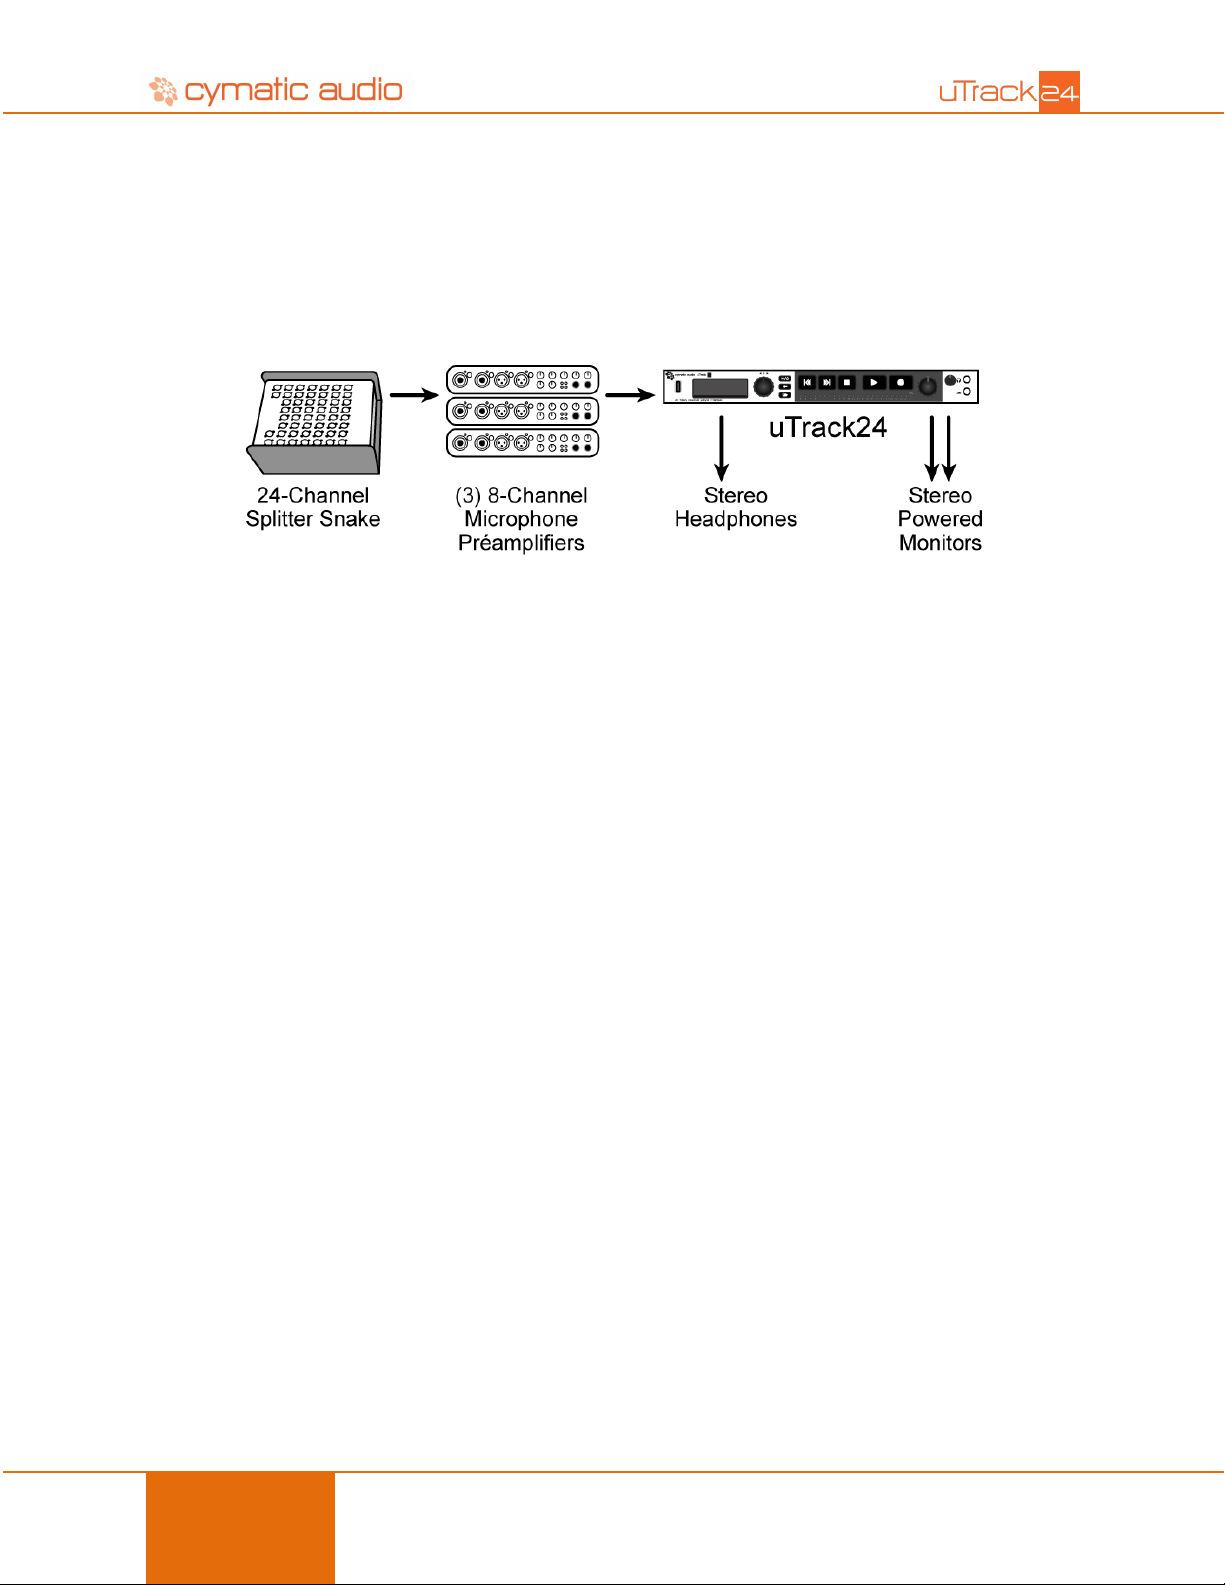
10. USAGE: RECORDING SPLIT/OUTBOARD MIC PREAMPS
In some instances, you may wish to use the uTrack24 in a higher end remote recording setup, with a dedicated
recording split of the stage snake (as opposed to the mixer’s direct outputs).
In this case, the connections would work as follows:
The stage microphone signals are connected to a microphone splitter containing a dedicated split of recorder
outputs
Connect the recorder outputs (mic level signals) to the inputs of the microphone preamplifiers
Connect the line level outputs of the microphone preamps to the analog inputs of the uTrack24
Connect a pair of headphones to the front panel phones jack, to monitor a stereo mix of the uTrack24’s multi-
track recording
If you are working in an acoustically separated space from the musicians themselves, you can also connect a
pair of powered monitors to the uTrack24’s rear panel main outputs. This will allow you to monitor the onboard
stereo mix on a pair of powered monitor speakers and also adjust the monitoring volume using the front panel
volume control.
USAGE: RECORDING SPLIT/OUTBOARD MIC PREAMPS 14
 Loading...