

cymatic audio LR-16 Live Recorder User Manual

Version 2 / Firmware Release 8520
Page 1
User Manual

Version 2 / Firmware Release 8520
Page 2
Table of Contents
1. Introduction ................................................................................................................................................................................ 5
2. What’s In the Box ........................................................................................................................................................................ 5
3. LR-16 Connections and User Interface ........................................................................................................................................ 6
Front View ......................................................................................................................................................................... 6 1.
Rear View .......................................................................................................................................................................... 6 2.
Top View ............................................................................................................................................................................ 7 3.
4. Signal Flow .................................................................................................................................................................................. 8
5. Direct to USB Recording .............................................................................................................................................................. 9
Turn on the device ............................................................................................................................................................. 9 1.
Connect USB storage device .............................................................................................................................................. 9 2.
Observe storage device test results .................................................................................................................................. 9 3.
Recording ‘Home screen’ ................................................................................................................................................ 11 4.
Start recording ................................................................................................................................................................. 12 5.
Creating a new take “on the fly” ..................................................................................................................................... 12 6.
Stop the recording ........................................................................................................................................................... 12 7.
Playing back the recorded tracks .................................................................................................................................... 13 8.
Recording priority ............................................................................................................................................................ 13 9.
Recorder Menu ................................................................................................................................................................ 14 10.
6. Player Mode .............................................................................................................................................................................. 19
Start playback .................................................................................................................................................................. 19 1.
Using the Player Menu .................................................................................................................................................... 20 2.
7. Supported USB storage devices ................................................................................................................................................ 21
USB 2.0 Thumb Drives ..................................................................................................................................................... 21 1.
USB 2.0 Hard Drives ......................................................................................................................................................... 22 2.
8. Connecting Recording Sources ................................................................................................................................................. 23
9. 16x2 Channel USB Interface Mode ........................................................................................................................................... 26
Using the LR-16 as an Audio Interface with Microsoft Windows .................................................................................... 27 1.
Using the LR-16 as an Audio Interface with an Apple® Mac® ......................................................................................... 32 2.
Using the LR-16 as an Audio Interface with an Apple® iPad® ......................................................................................... 33 3.
10. Updating the Firmware on your LR-16 ................................................................................................................................ 33
11. Troubleshooting ................................................................................................................................................................... 34
12. Specifications ....................................................................................................................................................................... 36
13. Cymatic Audio Limited Warranty ......................................................................................................................................... 37

Version 2 / Firmware Release 8520
Page 3
SAFETY PRECAUTIONS
AC adapter
Be sure to use only the supplied 12 V DC, 1000 mA AC adapter, which is equipped with a "center-positive" plug.
The use of an adapter other than the specified type may damage the unit and pose a safety hazard.
Connect the AC adapter only to an AC outlet that supplies the rated voltage required by the adapter.
When disconnecting the AC adapter from the AC outlet, always grasp the adapter itself and do not pull at the
cable.
During lightning or when not using the unit for an extended period, disconnect the AC adapter from the AC
outlet.
Environment
To prevent the risk of fire, electric shock or malfunction, avoid using your Live Recorder LR-16 in environments where it
will be exposed to:
• Extreme temperatures
• Heat sources
• Excessive humidity or moisture
• Excessive dust or sand
• Excessive vibration or shock
Handling
Never place objects filled with liquids on the Live Recorder LR-16, as this can cause electric shock.
Do not place an open flame source, such as a lighted candle, on the Live Recorder LR-16 since this can cause
fire.
The Live Recorder LR-16 is a precision instrument. Do not exert undue pressure on the keys and other controls.
Also take care not to drop the unit, and do not subject it to shock or excessive pressure.
Take care that no foreign objects (coins, pins etc.) or liquids can enter the unit.
Connecting cables and input and output jacks
Always turn off the power to the Live Recorder LR-16 and all other equipment before connecting or disconnecting the
power source. Make sure to disconnect all connection cables and the power cord before moving the Live Recorder LR-
16.
Alterations
Do not open the case of the Live Recorder LR-16, or attempt to modify the product in any way. Doing so will void the
warranty. There are no serviceable parts inside the unit.
Volume
Do not use the headphone output of the Live Recorder LR-16 at a loud volume for a long time since this can cause
hearing impairment.

Version 2 / Firmware Release 8520
Page 4
Usage Precautions
Electrical interference
For safety considerations, the Live Recorder LR-16 has been designed to provide maximum protection against the
emission of electromagnetic radiation from inside the device, and protection from external interference. However,
equipment that is very susceptible to interference or that emits powerful electromagnetic waves should not be placed
near the Live Recorder LR-16, as the possibility of interference cannot be ruled out entirely. With any type of digital
control device, the Live Recorder LR-16 included, electromagnetic interference can cause malfunctioning and can
corrupt or destroy data. Care should be taken to minimize the risk of damage.
Cleaning
Use a soft, dry cloth to clean the Live Recorder LR-16. If necessary, slightly moisten the cloth. Do not use abrasive
cleanser, wax, or solvents (such as paint thinner or cleaning alcohol), since these may dull the finish or damage the
surface.
Certifications
CE This product complies with the European Union Council Directives and Standards relating to Directive 2004/108/EC for
Electromagnetic compatibility (EMC) and Low Voltage Directive 2006/95/EC.
RoHS This product is compliant with the EU Directive 2011/65/EU for the Restriction of the use of Certain Hazardous
Substances in Electrical and Electronic Equipment. No lead (Pb), cadmium (Cd), mercury (Hg), hexavalent chromium (Cr+6),
PBB or PBDE is intentionally added to this device. Any traces of impurities of these substances contained in the parts are
below the RoHS specified threshold levels.
FCC This equipment has been tested and found to comply with the requirements of 47 CFR of PART 15 limit for radiation and
conduction emission relating to FCC rules Part 15B: 2010.

Version 2 / Firmware Release 8520
Page 5
1. Introduction
Thank you for purchasing the Cymatic Audio Live Recorder LR-16.
The Live Recorder LR-16 is the world’s easiest to use Direct to USB 16-track recorder and 16 in / 2 out USB audio
interface for PC, Mac® and iPad®.
The LR-16 was designed using high-grade components, in order to ensure optimum performance as a recorder for live
performances, while sparing users the hassle of “traditional” multi-track recording. The LR-16 does not require any
additional hardware, other than a USB hard drive and cabling, in order to record 16 audio tracks as standard wave files
directly from a live sound mixer’s insert connections. Perfect for beginner recordists who don’t want to deal with
difficult and time consuming learning curves, as well as the most seasoned professionals who don’t want to be troubled
with complicated setups.
Used in connection with a PC, Mac® or iPad®, the LR-16 also serves as an 16 input/ 2 output USB audio interface. When
you’ve finished your live recording in the field, simply connect the LR-16 to your computer or Ipad, and you have a high
quality USB audio interface. Plug your USB drive into your computer, and drag and drop your files into your favorite
DAW to edit your audio and perform additional overdubs. Convenient features such as native Mac and iPad® driver
support make installation a breeze. Zero latency hardware monitoring and a built in digital mixer allow for near-zero
latency recording, flexibility and a hassle free setup.
The LR-16 User Manual contains in-depth details of your Live Recorder’s features and functionality, including:
Direct to USB hard drive recording (16 tracks at 24-bit, 44.1/48kHz, 2 tracks at 24-bit, 96kHz)
16 analog 1/4" TRS insert-style inputs
Independent and Global 10dB input level padding on all inputs
Stereo Line level output
Front panel headphone output with dedicated level control
Zero latency hardware input monitoring
Built in digital mixer with per-channel level control, panning, mute, and solo functions
24 bit/44.1/48/96 kHz USB Class Compliant Audio Interface
Mac® OS-X® compatible: Core Audio plug and play drivers
Windows® PC compatible (Windows XP, Vista, 7 & 8 32-bit/64-bit) WDM and ASIO® drivers.
IPad® compatible: Plug and play (USB adapter required including
o Apple® Lightning to USB Camera Adapter
o Apple® USB Camera Connection Kit
Stereo wave file player for background/break music
2. What’s In the Box
LR-16 recorder
AC/DC power adapter and power cable
USB cable
Quick Start Guide
Version 2 / Firmware Release 8520
Page 6
3. LR-16 Connections and User Interface
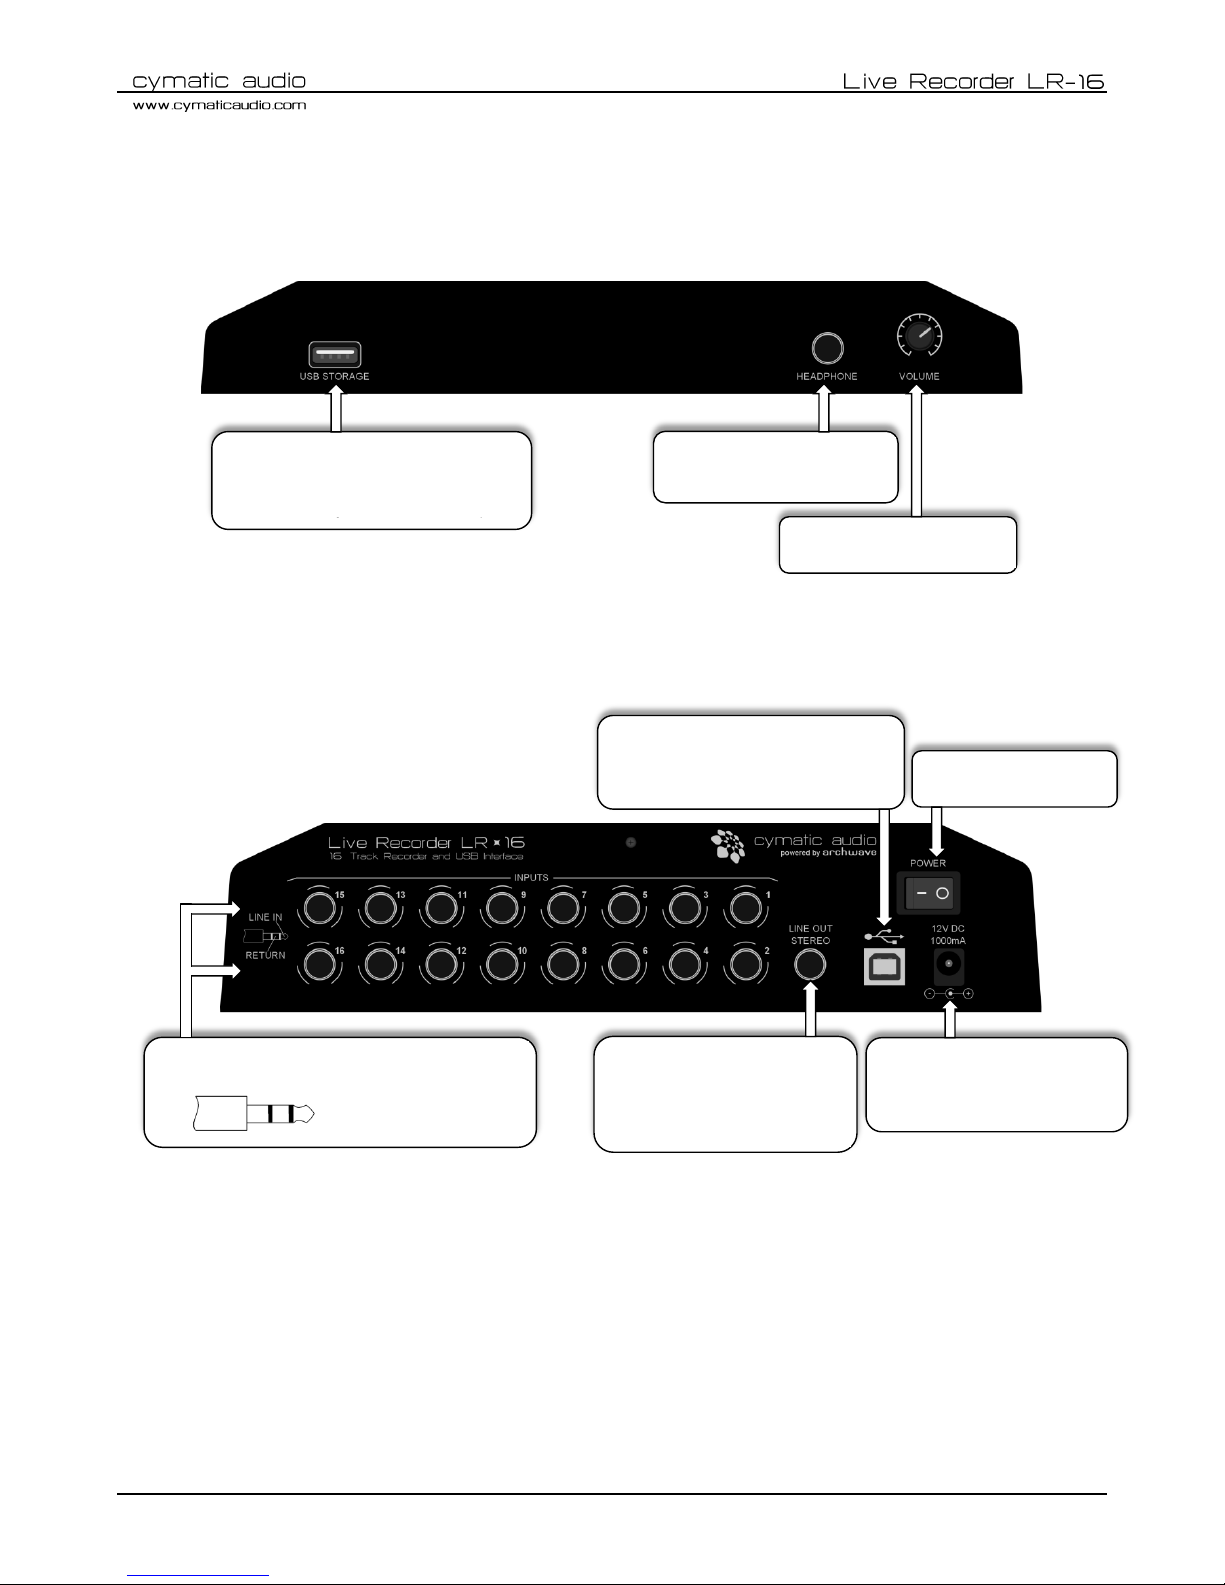
Front View 1.
Rear View 2.
③
HEADPHONE VOLUME
①
USB STORAGE CONNECTOR
USB 2.0 connector, for connection of
a USB hard drive or thumb drive
②
HEADPHONE
¼ Inch Headphone Connector
⑤
POWER SWITCH
⑧
POWER CONNECTOR
12V DC, 1000mA,
center positive
④
USB 2.0 PORT
For connection to a Mac®, PC or iPad
when device is used as audio interface
⑦
LINE OUT STEREO
Stereo, fixed-level, line output
(unbalanced), contains stereo
mix of all input channels
⑥
Line Level INPUTS 1-16
16 analog 1/4" TRS insert-style inputs (unbalanced)
Version 2 / Firmware Release 8520
Page 7
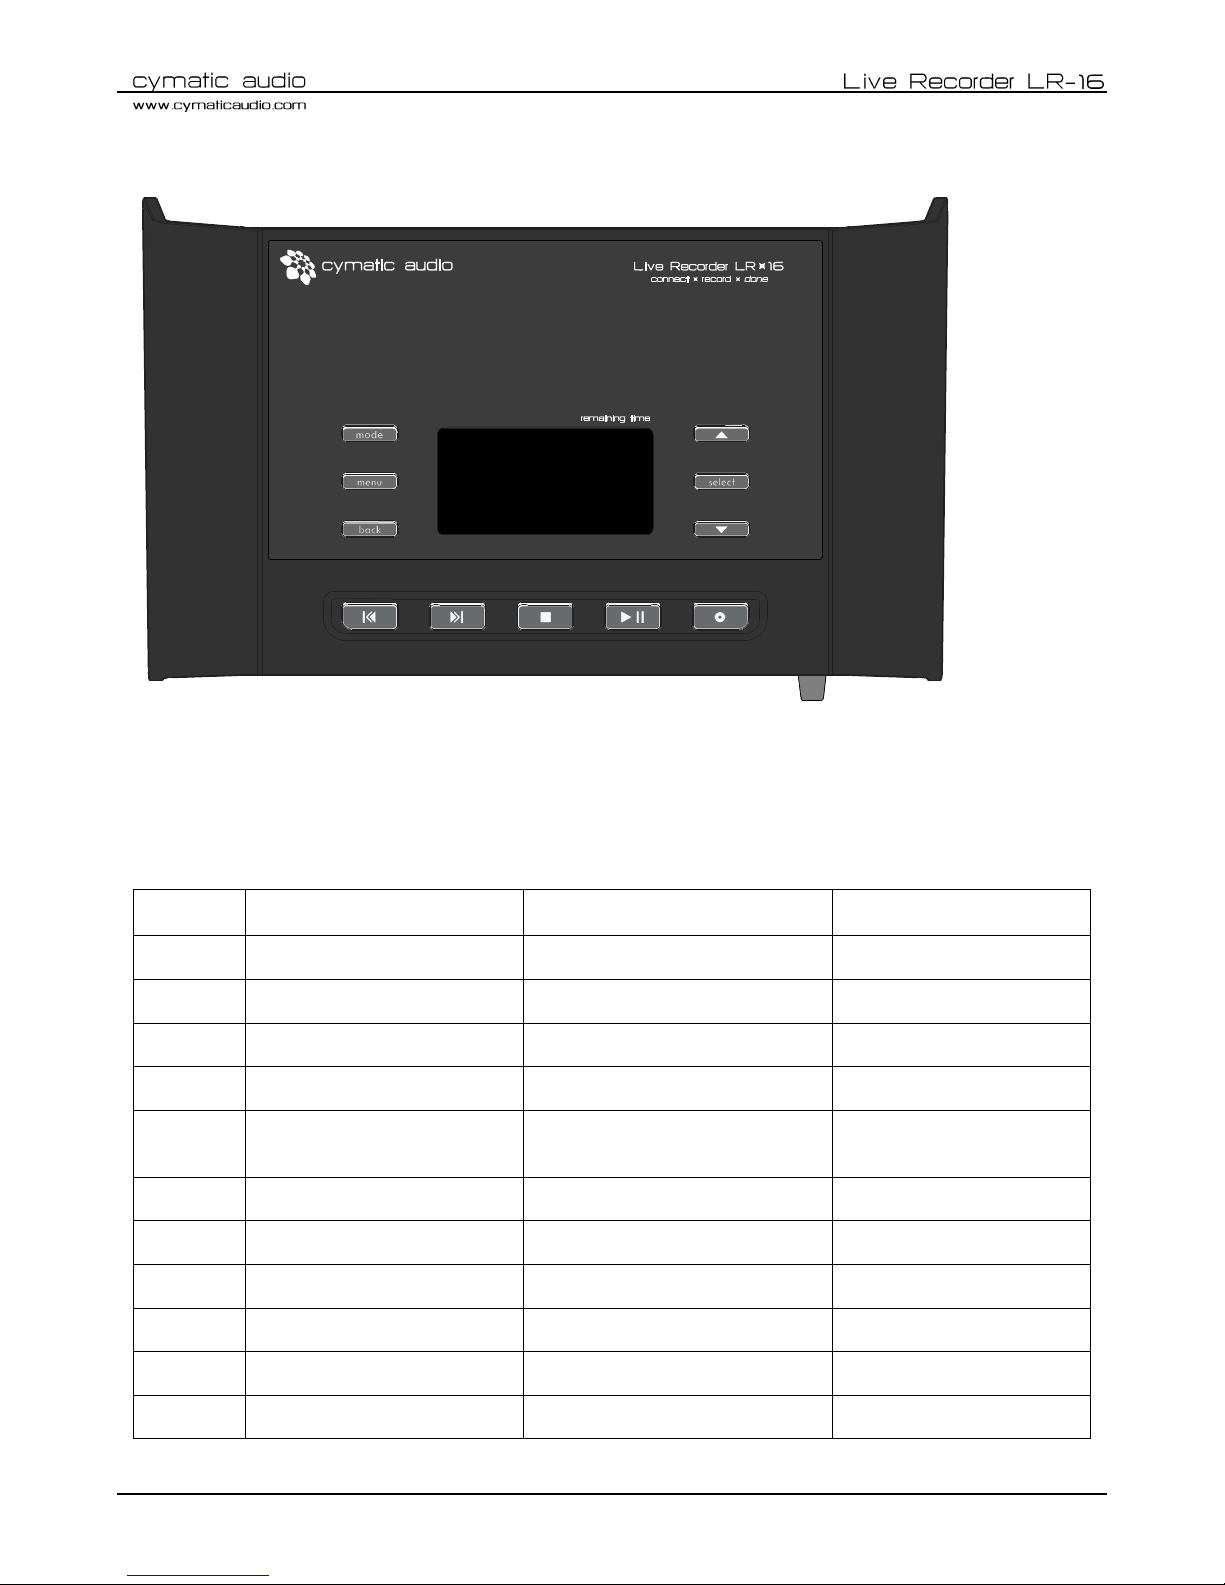
Top View 3.
The LR-16 contains two separate modes of operation:
Recorder Mode: The main mode of operation, this mode allows recording of 16 separate signals feeding the inputs.
Player Mode: This mode allows playback of stereo wave files, for playback of song files for pre/post/break music.
The top panel buttons perform the following functions when the unit is set to the two different modes:
Recorder Mode
Player Mode
USB Interface Mode
❾
Switch to player mode
Switch to recorder mode
N/A
❿
Show recorder menu
Show player menu
Show input settings menu
⓫
Go back to previous screen
Go back to previous screen
Go back to previous screen
⓬
Go to previous song
Go to previous song
Mackie Control/MMC Skip Back
⓭
Go to next song
Go to next song
Mackie Control/MMC Skip
Forward
⓮
Stop recording / playback
Stop playback
Mackie Control/MMC Stop Back
⓯
Start / pause playback
Start / pause playback
Mackie Control/MMC Play
⓰
Start new recording
Switch to recorder mode/start recording
N/A ⓱ Selection up
Selection up
Selection up
⓲
Select
Select
Select
⓳
Selection down
Selection down
Selection down
⑨
⑩ ⑪ ⑯ ⑮ ⑭ ⑬ ⑫ ⑲ ⑱
⑰
Version 2 / Firmware Release 8520
Page 8
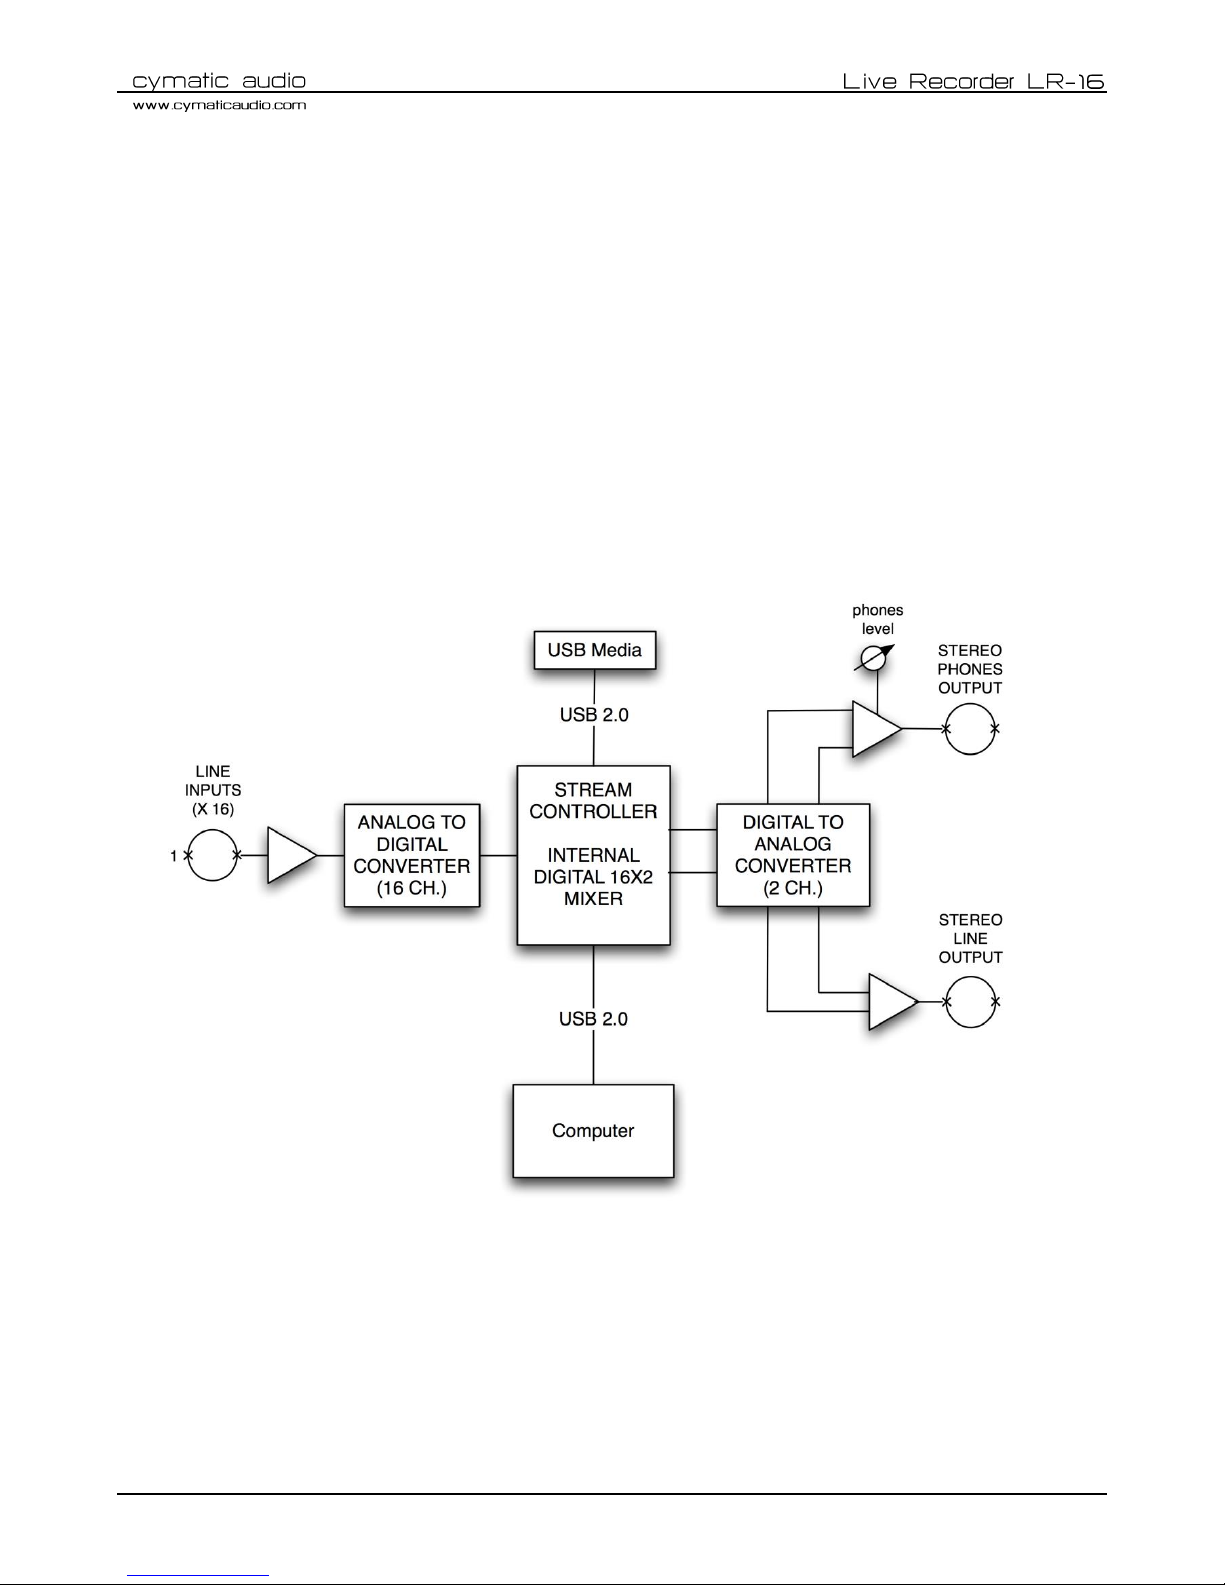
4. Signal Flow
The LR-16 contains 16 separate line-level inputs, which are digitized into 16 discrete audio streams and sent to the
internal stream controller
The LR-16 contains an internal digital mixer that provides a stereo mix down of the 16 separate incoming audio
signals, to a 2-channel stereo mix
This 2-channel mix is output to both the stereo line output, as well as the stereo phones output (recorder mode)
When operating as a USB computer audio interface, the stereo line output/phones output is sourced from a
combination of the internal mixer and 2-chanel DAW return (Windows) or purely the 2-channel DAW return (OS
X).
Version 2 / Firmware Release 8520
Page 9
5. Direct to USB Recording
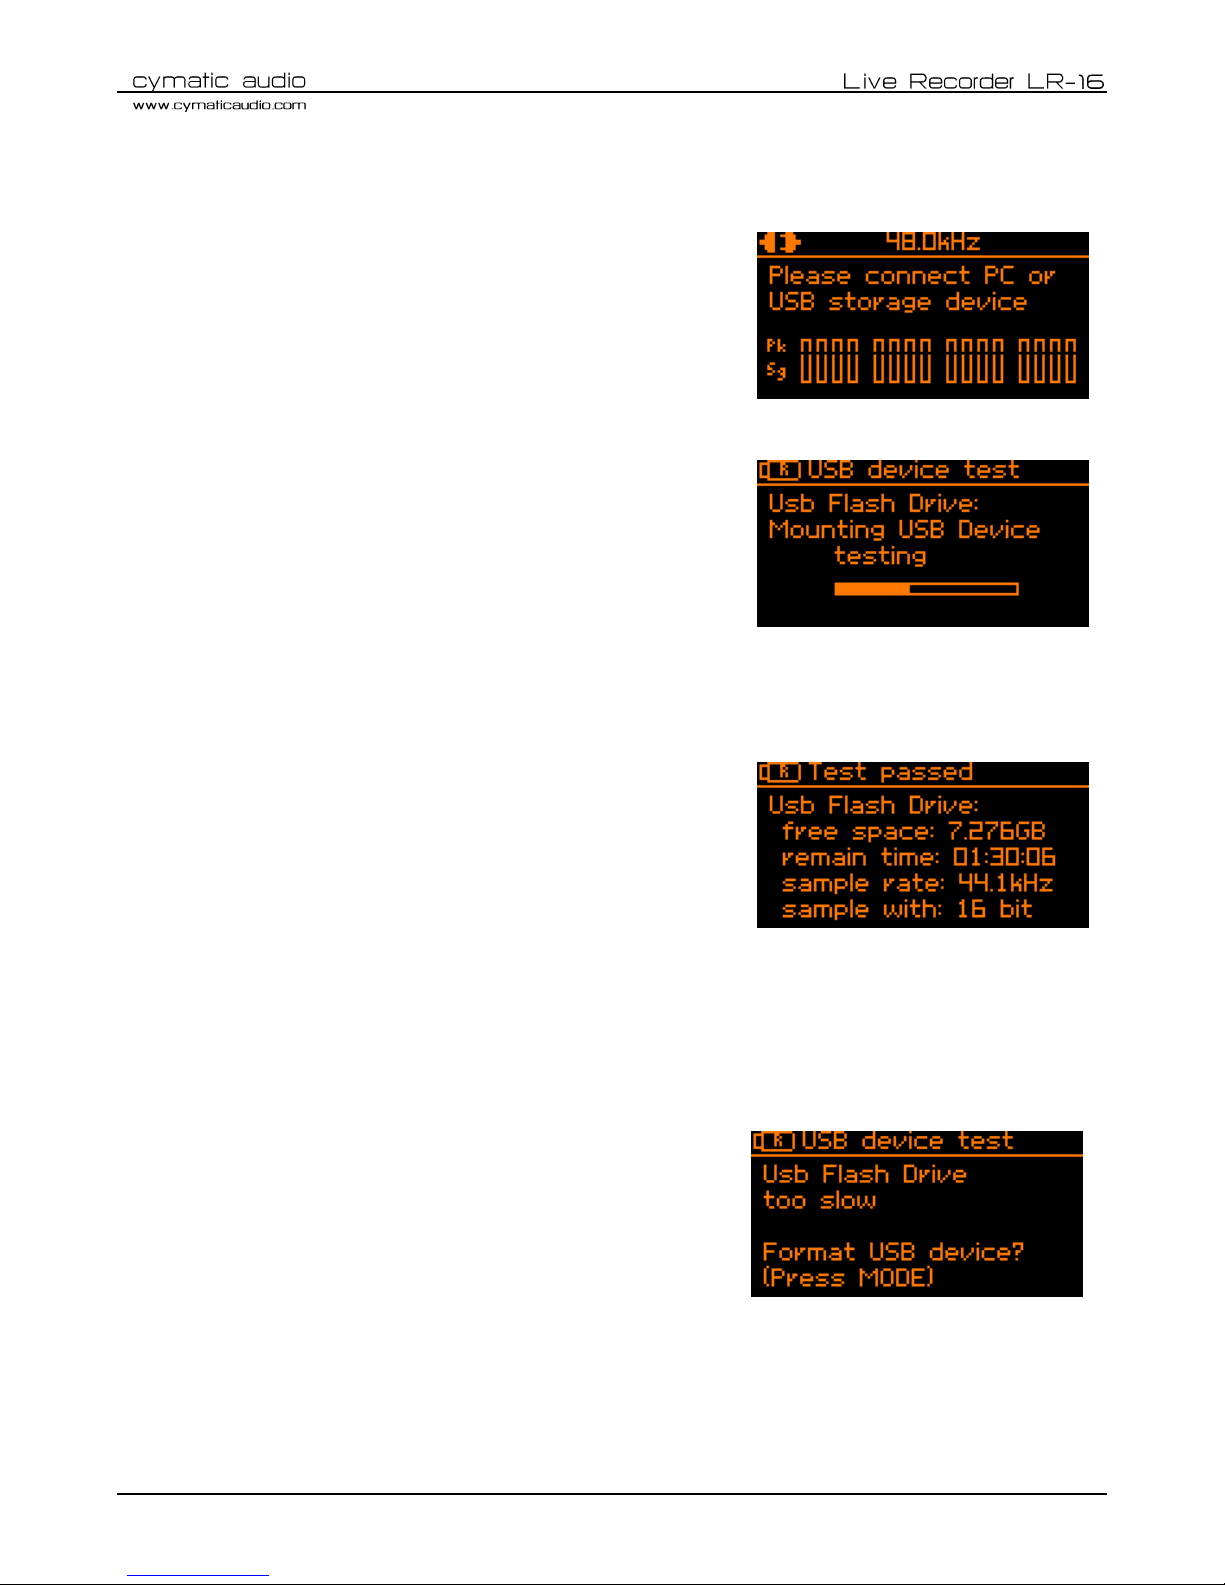
Turn on the device 1.
Connect the LR-16 to the power supply and turn it on. After the
start-up screen you will see the following screen:
Connect USB storage device 2.
Plug in a USB hard drive or USB thumb drive into the USB storage
connector on the front of the LR-16.
The LR-16 will start testing the drive’s performance automatically.
This can take up to two minutes for slower storage devices. Please
do not remove the storage device while this test is conducted.
Observe storage device test results 3.
1. Test passed
If the LR-16 determines that the storage device is suitable
for recording, the following screen will appear for a few
seconds, displaying the following information:
Total amount of space on the attached drive
Amount of actual remaining recording time
available on the attached drive
The currently selected sample rate
The currently selected bit rate
After displaying this information for a few seconds, the device’s display switches to the recording “home
screen”. The LR-16 is now ready to start recording, merely by pressing the record button a single time.
2. Test failed: USB Flash drive too slow
If the inserted drive’s performance is too slow for reliable
Direct-to-USB recording, you are given the option to
format the drive.
Doing do can, in some cases, improve the device’s
performance (e.g. if the memory is too fragmented or the
disc’s existing formatting uses the wrong cluster size).
Please refer to section “Format USB device”

Version 2 / Firmware Release 8520
Page 10
3. Test failed: Wrong file system
The inserted drive needs to be formatted in the FAT32
format, in order to be suitable for Direct-to-USB
recording. If this is not the case, you are given the option
to format the drive.
Please keep in mind that formatting the drive will erase
all data currently residing on the drive.
Please see section “Format USB device”
4. Test failed: Disk error
If the inserted drive is defective, or is of a disk speed that
is simply too slow for the LR-16’s drive test to offer
reliable recording, the screen will give a “Disk Error”
If this occurs, please remove the device and refer to
section ‘Supported USB storage devices’

Version 2 / Firmware Release 8520
Page 11
Recording ‘Home screen’ 4.
After the attached drive has been successfully tested, the LR-16’s screen will display the recording “home screen”.
This screen displays the pertinent settings and displays you will want to view, when performing a recording
operation.
LR-16 connection status: This icon shows whether the device is connected to a PC / Mac or a USB storage device. When
the screen displays a USB drive icon with an “R” inside it, the LR-16 is in “recorder mode”, with a valid USB drive
attached, and is ready to record 16 separate tracks.
Currently selected sample rate: This number shows the sample rate that will be used when starting a new recording. To
change the sample rate please, refer to section “Recorder Menu / Sample rate & bit-depth”.
Remaining time: This number represents the available recording time still available on the attached drive. This number
will dynamically adjust itself, based on three separate settings you can adjust, that affect how quickly you use up the
available storage of an attached drive:
Number of Tracks recorded in the take (2, 4, 8, or 16)
Sample Rate (44.1kHz, 48kHz, or 96kHz)
Bit-Depth (16 or 24-bit)
Press and hold SELECT to see the total available recording time on the USB storage device.
Total number of recordings on device: This line displays the name of the current recording, as well as the total number
of recordings on the attached drive.
Name of currently selected recording: This line displays the name of the currently selected recording. All recordings will
automatically be named and numbered sequentially, starting with “Take_01” and going all the way up to “Take_99”.
The maximum number of recordings per attached drive is 99 separate takes.
Signal / Peak Meters: This group of meters displays the approximate signal strength of an audio signal for all active
input channels. If a signal reaches the peak level of the meter, you should lower the input sensitivity of the LR-16 in
order to prevent signal distortion. Please refer to section “Recorder Menu / Input sensitivity”
The meters display will only show signal meters that correspond to the currently active number of input channels. For
example, if you have configured the recorder to only record 8 tracks, only the first 8 meters will be visible.
Number of Channels/Sample rate of currently selected recording: This line displays both the number of tracks, as well
as the sample rate of currently selected recording. To change the sample rate of the recorder for subsequent
recordings, please refer to the section “Recorder Menu / Sample rate & width”
Total number of recordings on device
Name of currently selected recording
3 segment signal / peak detection
(-30dB / -3dB / 0dB)
Number of tracks in take/Sample rate of
currently selected recording
Currently selected sample rate
Remaining time
LR-16 connection status
Version 2 / Firmware Release 8520
Page 12
Start recording 5.
Connect your recording source to the inputs on the rear panel of
the LR-16 (please refer to section “Connecting recording sources”)
and check whether you have an input signal by observing the Signal
/ Peak detection meters.
If necessary, adjust the input levels of the LR-16 (please refer to
section “Recorder Menu / Input sensitivity”)
Press the Record button to start the recording. The LR-16 will create a new take, the hardware record button light
will illuminate in red, and the “walking dots” in the display indicate that the recording is running.
At the same time the “Remaining time” indicator in the top right
corner will start counting down the maximum remaining time for
this recording. The recording will be stored as separate wave files
into the ‘Recording/Take XX’ folder, located on the attached USB
drive.
Creating a new take “on the fly” 6.
When the Record button is pressed while the LR-16 is already recording, it will close the current take, and create a
new take on the USB storage device.
Note that when creating a new recording on the fly, the transition between the two takes will not be seamless.
There will be a gap between the former recording and the new one, in the same way as if you first pressed stop,
and then pressed record to initiate a new recording. Creating a new take on the fly simply saves an extra button
press.
For live recordings where you do not want any gaps between songs of any kind, it is required to record the event as
one single long take.
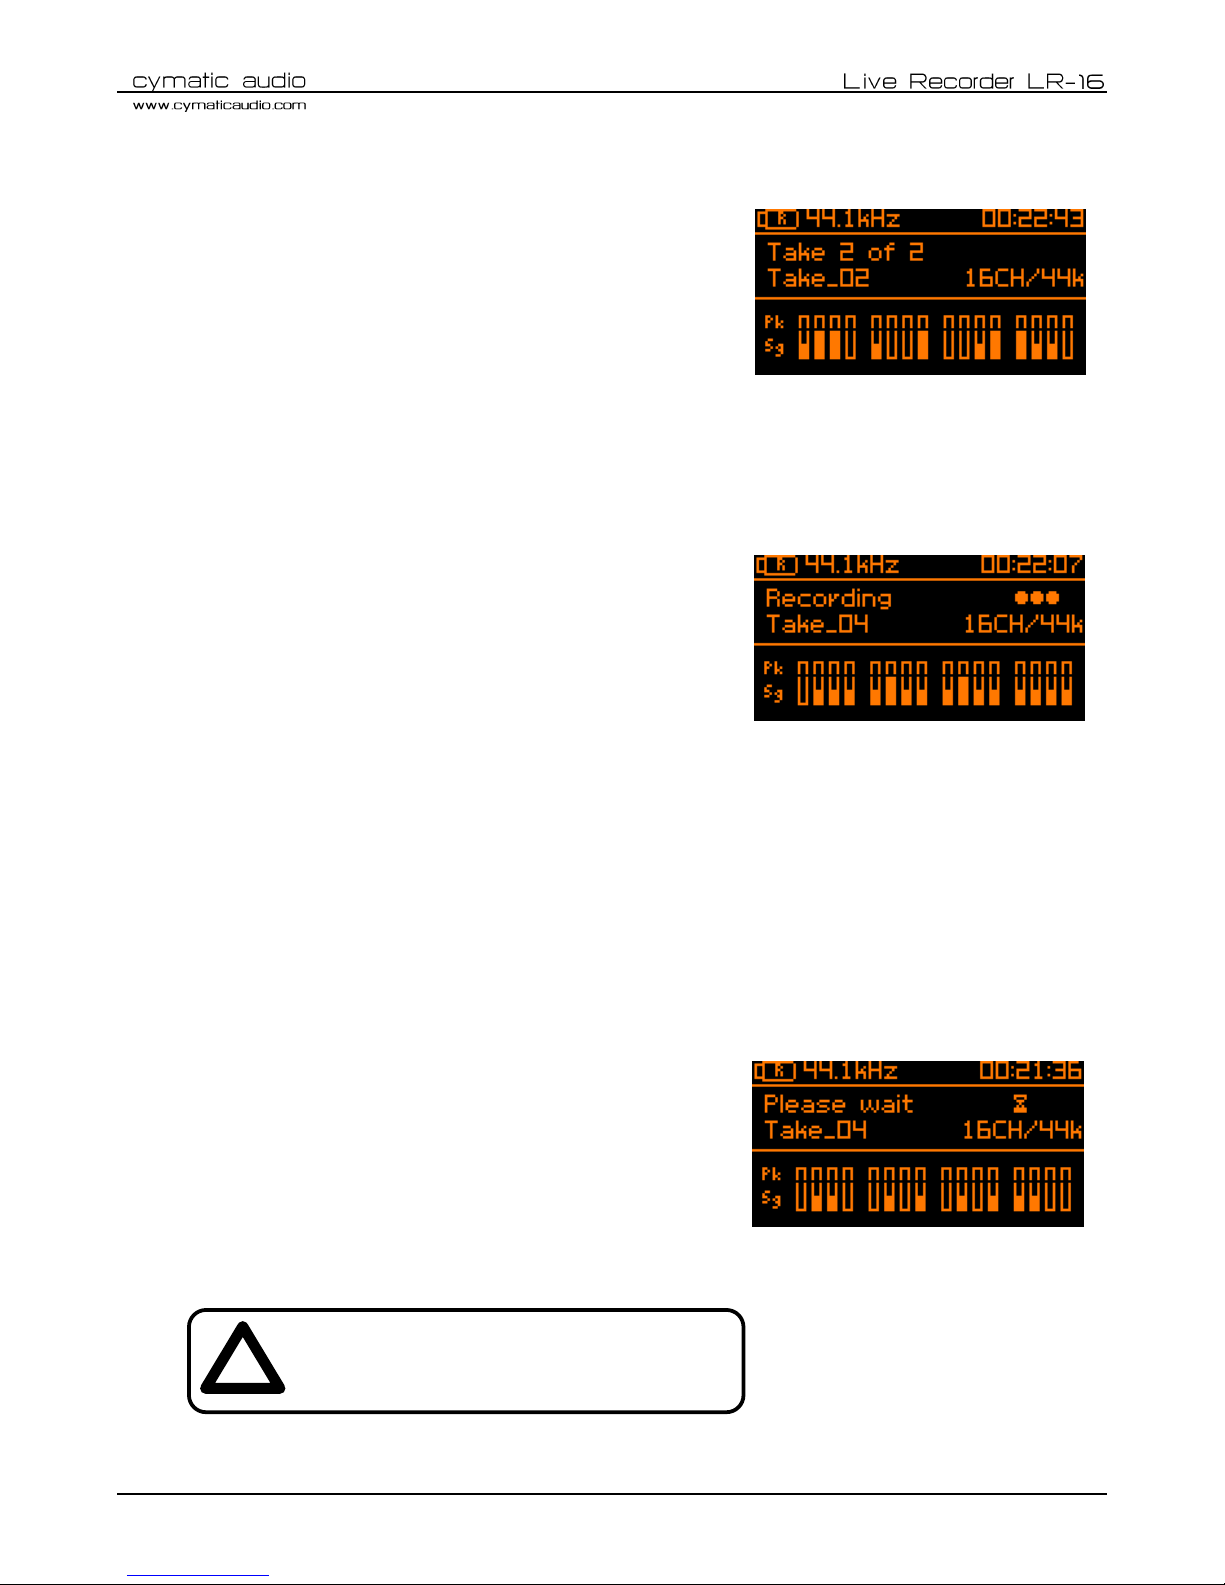
Stop the recording 7.
To stop the recording, press the Stop button. The Play and Record
buttons will flash for a few moments and the display will display
“Please wait” until the LR-16 has finished writing all data to the
storage device.
!
Warning! Do NOT remove the storage device while
the Record and Play buttons are still flashing. Your
recording might become unusable if you do so.
 Loading...