

Cylinda DM 3038 FI User Manual

user manual
DM 3038 FI

DM 3038 FI
Please read this user manual first!
Dear Customer,
We hope that you get the best results from your product which has been manufactured
with high quality and state-of-the-art technology. Therefore, please read this entire user
manual and all other accompanying documents carefully before using the product and
keep it as a reference for future use. If you handover the product to someone else, give the
user manual as well. Follow all warnings and information in the user manual.
Remember that this user manual is also applicable for several other models. Differences
between models will be identified in the manual.
Explanation of symbols
Throughout this User Manual the following symbols are used:
C
Important information or useful
hints about usage.
A
Warning for hazardous situations
with regard to life and property.
B
Warning for electric shock.
Packaging materials of the
product are manufactured
from recyclable materials in
accordance with our National
Environment Regulations.
Do not dispose of the packaging materials together with the domestic or other wastes.
Take them to the packaging material collection points designated by the local authorities.

CONTENTS
1 INSTRUCTIONS FOR SAFETY
AND ENVIRONMENT 4
General safety ............................................... 4
Intended use ................................................... 4
Children’s safety ............................................ 5
Disposing of packaging material ................. 5
Transportation of the product ....................... 5
Compliance with WEEE Directive and
Disposing of the Waste Product ...................6
Compliance with RoHS Directive .................6
Package information ...................................... 6
2 DISHWASHER 7
Overview ........................................................ 7
Fan drying system .......................................... 8
Technical specifications ................................. 8
3 INSTALLATION 9
Appropriate installation location .................. 9
Connecting water supply .............................. 9
WaterProtect+ ..............................................10
Connection to the drain ..............................10
Electrical connection ................................... 11
4 PREPARATION 12
Tips for energy saving ................................. 12
Water softening system ............................... 12
Adjusting the water softening system ......... 12
Adding salt ................................................... 14
Adding detergent ......................................... 15
Tablet detergents ......................................... 16
Silverware basket ........................................20
Silverware basket piece ..............................20
Cutlery basket .............................................20
Collapsible lower basket tines .................... 21
Collapsible lower basket tines .................... 21
Lower basket multipurpose / height
adjustable service rack ...............................22
Lower basket bottle wire .............................23
Upper basket height adjustable rack .........23
Upper basket drawer ..................................23
Upper basket glass support piece .............24
Collapsable upper basket wires .................24
Collapsible upper basket tines ...................25
Collapsible upper basket tines ...................25
Adjusting the height of loaded upper
basket............................................................26
Adjusting the height of the upper basket ...27
Height setting with empty basket ...............28
5 OPERATING THE
PRODUCT 29
Keys ...............................................................30
Preparing the machine ................................30
Programme selection ...................................30
Auxiliary functions .......................................32
InnerClean ....................................................33
Scheduling the washing time ......................33
Starting the programme ..............................34
Cancelling the programme .........................34
Salt indicator ( ) .......................................34
Rinse Aid indicator ( ) ..............................35
End of programme .......................................35
Water cut-off warning ..................................35
Overflowing warning ..................................35
Cleaning the filters .......................................36
6 MAINTENANCE AND
CLEANING 36
Cleaning the outer surface of the product 36
Cleaning the interior of the machine..........36
Cleaning the hose filter ...............................37
Cleaning the impellers.................................37
Lower impeller ..............................................37
Upper impeller .............................................38
7 TROUBLESHOOTING 39

4
DISHWASHER / USER INSTRUCTIONS
/44 EN
INSTRUCTIONS FOR SAFETY AND ENVIRONMENT
1
This section contains safety
instructions that will help to get
protected from risk of personal
injury or property damage. Failure
to follow these instructions shall
void all warranties.
General safety
• Never place the product
on a carpet-covered floor;
otherwise, lack of airflow
beneath the product will cause
electrical parts to overheat.
This will cause problems with
your product.
• Do not operate the product
if the power cable / plug is
damaged! Call the Authorised
Service Agent.
• Connect the product to a
grounded outlet protected
by a fuse complying with
the values in the “Technical
specifications” table. Do
not neglect to have the
grounding installation made
by a qualified electrician.
Our company shall not be
liable for any damages that
will arise when the product
is used without grounding in
accordance with the local
regulations.
• The water supply and
draining hoses must be
securely fastened and remain
undamaged.
• Unplug the product when not
in use.
• Never wash the product by
spreading or pouring water
onto it! There is the risk of
electric shock!
• Never touch the plug with
wet hands! Never unplug by
pulling on the cable, always
pull out by grabbing the plug.
• The product must be
unplugged during installation,
maintenance, cleaning and
repairing procedures.
• Always have the installation
and repairing procedures
carried out by the Authorised
Service Agent. Manufacturer
shall not be held liable for
damages that may arise from
procedures carried out by
unauthorised persons.
• Never use chemical solvents in
the product. They bring forth
the risk of explosion.
• When you pull the upper and
lower baskets out completely,
the door of the product will
bear all the weight of the
baskets. Do not put other
loads on the door; otherwise,
the product may tilt.
• Never leave the door of the
product open apart from
loading and unloading
procedures.
• Do not to open the door of
the product when it is running
unless necessary. Be careful
for the rush of hot vapour
when you need to open the
door.
Intended use
• This product has been
designed for domestic use.
• It must be used to do the
domestic type dishes only.

DISHWASHER / USER INSTRUCTIONS
5 / 44
EN
instructions for safety and environment
• This appliance is intended
to be used in household and
similar applications such as:
- Staff kitchen areas in shops,
offices and other working
environments;
- Farm houses;
- By clients in hotels, motels
and other residential type
environments;
- Bed and breakfast type
environments
• Only dishwasher safe
detergents, rinse aids and
additives must be used.
• The manufacturer waives
any responsibility arisen
from incorrect usage or
transportation.
• The service life of your product
is 10 years. During this period,
original spare parts will be
available to operate the
product properly.
• This product should not be
used by persons with physical,
sensory or mental disorders or
unlearned or inexperienced
people (including children)
unless they are attended
by a person who will be
responsible for their safety
or who will instruct them
accordingly for use of the
product.
Children’s safety
• Electrical products are
dangerous for the children.
Keep children away from the
product when it is in use. Do
not let them to tamper with the
product.
• Do not forget to close the door
of the product when leaving
the room where it is located.
• Store all detergents and
additives in a safe place away
from the reach of the children.
Disposing of packaging
material
Packaging materials are
dangerous to children. Keep
packaging materials in a safe
place away from reach of the
children.
Packaging materials of the product
are manufactured from recyclable
materials. Dispose of them
properly and sort in accordance
with recycled waste instructions.
Do not dispose of them with
normal domestic waste.
Transportation of the
product
A
If you need to move the
product, do it in upright
position and hold from
the rear side. Slanting
the product onto its front
side may cause the
electronic parts in it get
wet and damaged.
1. Unplug the product before
transporting it.
2. Remove water drainage and
water supply connections.
3. Drain the remaining water in
the product completely.

6
DISHWASHER / USER INSTRUCTIONS
/44 EN
instructions for safety and environment
Compliance with WEEE
Directive and Disposing
of the Waste Product
This product complies with
EU WEEE Directive
(2012/19/EU). This product
bears a classification symbol
for waste electrical and electronic
equipment (WEEE).This product
has been manufactured with high
quality parts and materials which
can be reused and are suitable for
recycling. Do not dispose of the
waste product with normal
domestic and other wastes at the
end of its service life. Take it to the
collection center for the recycling
of electrical and electronic
equipment. Please consult your
local authorities to learn about
these collection centers.
Compliance with RoHS
Directive
The product you have purchased
complies with EU RoHS Directive
(2011/65/EU). It does not
contain harmful and prohibited
materials specified in the Directive.
Package information
Packaging materials of the product
are manufactured from recyclable
materials in accordance with our
National Environment Regulations.
Do not dispose of the packaging
materials together with the
domestic or other wastes. Take
them to the packaging material
collection points designated by the
local authorities.
DISHWASHER / USER INSTRUCTIONS
7 / 44
EN
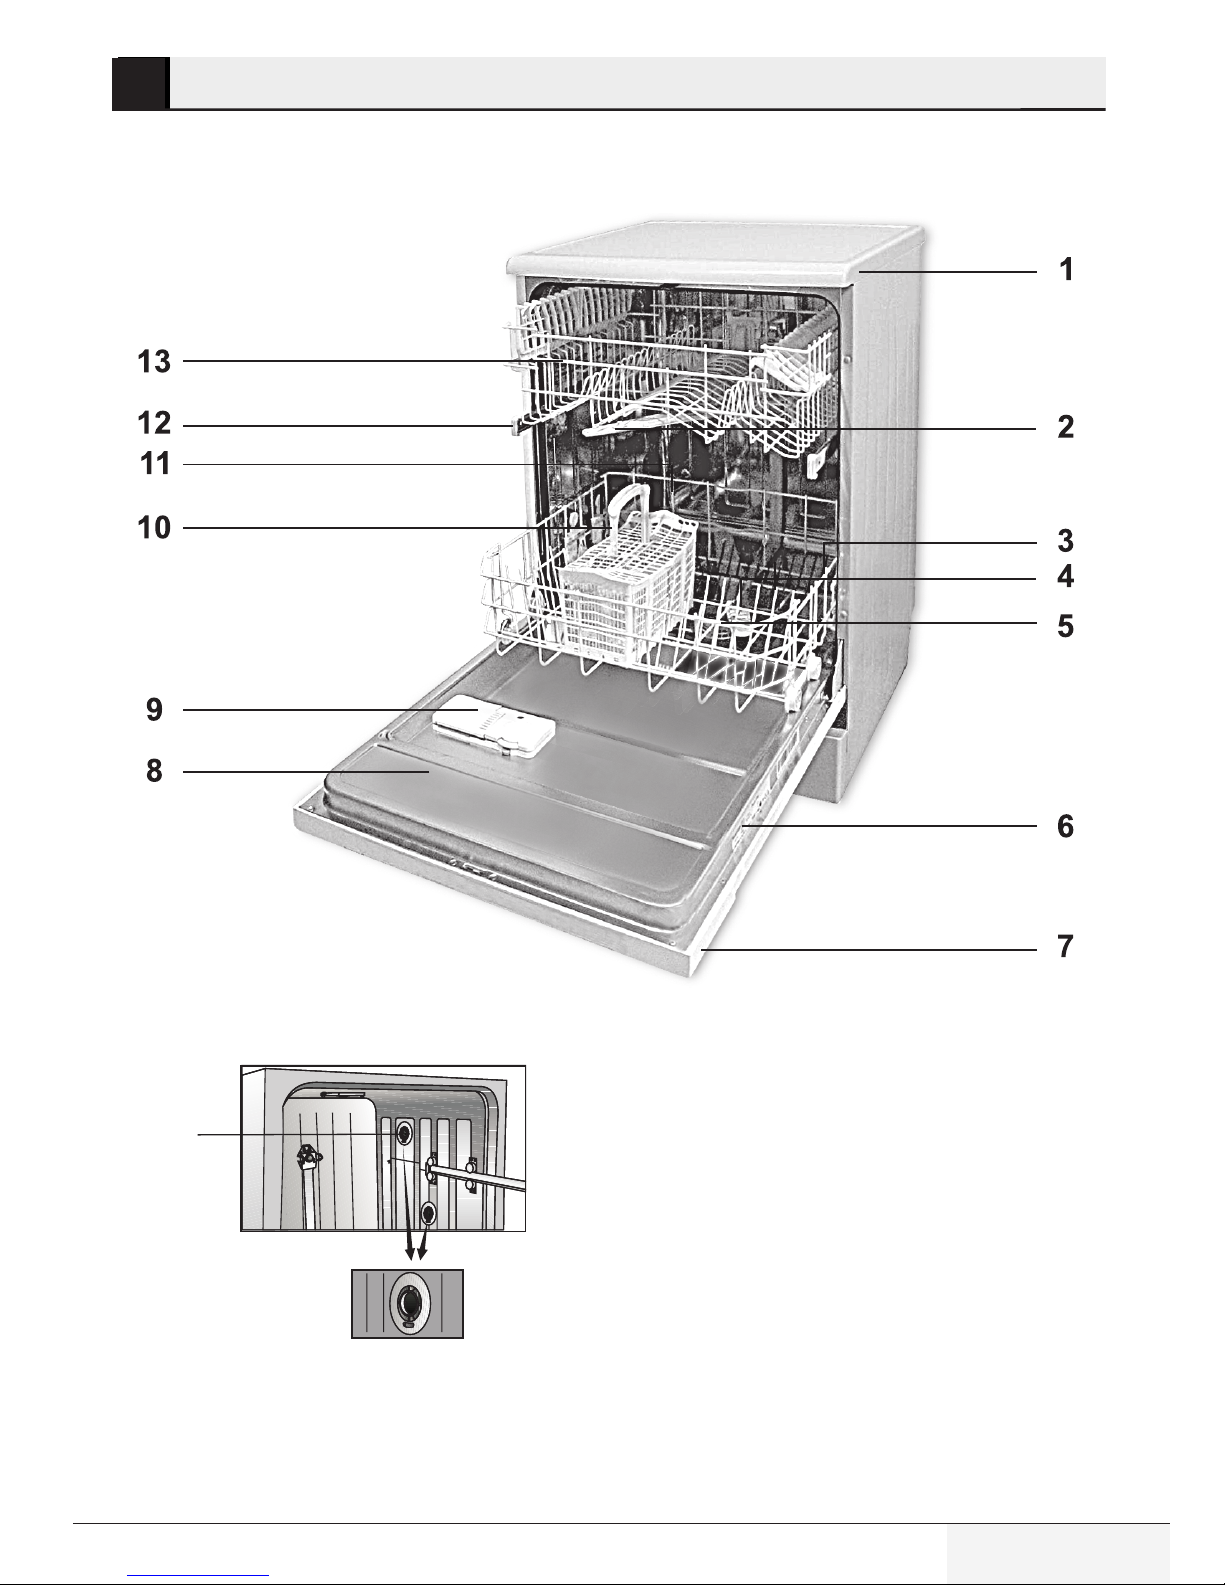
DISHWASHER
2
Overview
14
1. Top Cover
2. Upper impeller
3. Lower basket
4. Lower impeller
5. Filters
6. Rating Label
7. Control panel
8. Door
9. Detergent dispenser
10. Cutlery basket
11. Salt reservoir lid
12. Upper basket rail
13. Upper basket
14. Fan drying system
(depends on model)
(depends on model)
8
DISHWASHER / USER INSTRUCTIONS
/44 EN
Dishwasher
Technical specifications
Compliance to standards and test data / EC declaration of conformity
This product complies with the following EU directives;
Development, production and sales stages of this product comply with the safety
rules included in all pertaining European Community regulations.
2006/95/EC, 2004/108/EC, 93/68/EC, IEC 60436/DIN 44990, EN 50242
Power input 220-240 V, 50 Hz (see rating label)
Total power consumption 1800-2100 W (see rating label)
Heater power consumption 1800 W (see rating label)
Total current (depends on the model) 10 A (see rating label)
Drain pump power consumption 30 W (see rating label)
Water pressure 0.3 –10 bar (= 3 – 100 N/cm² = 0.01-1.0
Mpa)
C
Technical specifications may be changed without prior notice to improve the
quality of the product.
C
Figures in this manual are schematic and may not match the product exactly.
C
Values stated on the markings of the product or in the printed documents
accompanying the product are obtained in the laboratory on basis of the relevant
standards. Depending on operational and environmental conditions of the
product, these values may vary.
Note for test institutions:
Data required for performance tests shall be provided upon request. Requests can be
e-mailed to the following address:
dishwasher@standardloading.com
Do not forget to provide the code, stock and serial numbers of the product to be tested in your
request e-mail along with your contact information. Code, stock and serial numbers of the
product may be found on the type label attached to the side wall of the door.
Fan drying system
Fan drying system ensures efficient drying of your dishes.
It is normal to hear a different sound than that of washing cycle during fan operation.

DISHWASHER / USER INSTRUCTIONS
9 / 44
EN
3
INSTALLATION
Refer to the nearest Authorised Service
Agent for installation of your product. To
make the product ready for use, make sure
that the electricity, tap water supply and
water drainage systems are appropriate
before calling the Authorised Service Agent.
If they are not, call a qualified technician
and plumber to have any necessary
arrangements carried out.
C
Preparation of the location and
electrical, tap water and waste
water installations at the place
of installation is under customer's
responsibility.
B
Installation and electrical
connections must be carried out
by the Authorised Service Agent.
Manufacturer shall not be held
responsible for damages arising
from processes carried out by
unauthorised persons.
A
Prior to installation, visually
check if the product has any
defects on it. If so, do not have
it installed. Damaged products
cause risks for your safety.
C
Make sure that the water inlet
and discharge hoses are not
folded, pinched or crushed
while pushing the product into
its place after installation or
cleaning procedures.
When placing the product, pay attention not
to damage the floor, walls, piping, etc. Do
not hold the product from its door or panel
to move it.
Appropriate installation
location
• Place the product on a solid and flat
floor that has sufficient load carrying
capacity! The product must be installed
on a flat surface in order for the door to
be closed comfortably and securely.
• Do not install the product at places
where temperature may fall below 0ºC.
• Place the product at least 1 cm away
from the edges of other furniture.
• Place the product on a rigid floor. Do
not place it on a long pile rug or similar
surfaces.
B
Do not place the product on the
power cable.
• Make sure that you select a location
that will allow you to load and unload
the dishes in a fast and comfortable
manner.
• Install the product in a place close to
the tap and the drain hole. Select the
installation location by considering
that it will not be changed after the
connections are made.
Connecting water supply
C
We recommend attaching a
filter on the house/apartment
supply water inlet to protect the
machine from damages that
may arise from impurities (sand,
dirt, rust, etc.) coming from the
urban water supply system or
from your own water system as
well as to prevent complaints
such as yellowing or sludge
accumulation at the end of
washing.
Permitted water temperature: up to
25°C
The dishwasher may not be connected to
open warm water devices or flow-through
water heaters.
• Do not use old or used water inlet hose
10
DISHWASHER / USER INSTRUCTIONS
/44 EN
Installation
min
300
min
120
max 1000
min 500
on the new product. Use the new water
inlet hose supplied with the product.
• Connect the water inlet hose directly
to the water tap. Pressure coming from
the tap should be minimum 0.3 and
maximum 10 bars. If the water pressure
exceeds 10 bars, a pressure relief valve
should be installed in between.
• Open the taps completely after making
the connections to check for water leaks.
C
Use a screw-on hose connector
to connect the water inlet hose
to a water tap with a ¾ inch
external thread. If required, use
a filter insert to filter deposits
from the pipes.
A
For your safety, close the water
inlet tap completely after the
washing programme is over.
Connection to the drain
Water discharge hose can directly be
connected to the drain hole or sink’s drainage.
The length of this connection must be min.
50 cm and max. 100 cm from the floor. A
discharge hose longer than 4 meters causes
dirty washing.
Attach the water discharge hose to the
drainpipe without bending it. Tightly fix the
water discharge hose to the drainpipe in
order to prevent any dislocation of the water
discharge hose during operation of the
product.
WaterProtect+
The WaterProtect+ system protects against
water leaks that may occur at the hose inlet.
Water contact with the valve box of the
system must be avoided to prevent damage
to the electrical system. If the WaterProtect+
system is damaged, unplug the product and
call the Authorised Service Agent.
A
As the hose set contains
electrical connections and
assemblies, never shorten or
lengthen the hose with extension
hoses.

DISHWASHER / USER INSTRUCTIONS
11 / 44
EN
Installation
C
Drainpipe must be connected to
the sewage system and it should
not be connected to any surface
water.
Adjusting the feet
If the door of the product cannot be closed
properly or if the product swings when
you push it slightly, then you need to adjust
the feet of the product. Adjust the feet of
the product as illustrated in the installation
manual supplied with the product.
Electrical connection
Connect the product to a grounded outlet
protected by a fuse complying with the
values in the “Technical specifications” table.
Our company shall not be liable for any
damages that will arise when the product is
used without grounding in accordance with
the local regulations.
• Connection must comply with national
regulations.
• Power cable plug must be within easy
reach after installation.
B
Unplug the product after the
washing programme is over.
• The voltage and allowed fuse or
breaker protection are specified in the
“Technical specifications” section. If the
current value of the fuse or breaker in
the house is less than 16 Amps, have a
qualified electrician install a 16 Amp
fuse.
• The specified voltage must be equal to
your mains voltage.
• Do not make connections via extension
cables or multi-plugs.
B
Damaged power cables must
be replaced by the Authorised
Service Agent.
B
If your dishwasher is equipped
with internal illumination, lamp
should only be replaced by the
Authorised Service Agent in case
of failures that may occur on the
lamp.
B
If the product has a failure, it
should not be operated unless
it is repaired by the Authorised
Service Agent! There is the risk
of electric shock!
Initial use
Before starting to use the product, make
sure that all preparations are made
in accordance with the instructions in
sections “Important safety instructions” and
“Installation”.
• To prepare the product to do the dishes,
perform first operation in the shortest
programme with detergent while the
machine is empty. During the initial use,
fill the salt reservoir with 1 litre of water
prior to filling it with salt.
A
There might be a small amount
of water left in the product after
factory quality control tests. This
has no harm on the product.

12
DISHWASHER / USER INSTRUCTIONS
/44 EN
PREPARATION
4
Tips for energy saving
Following information will help you use the
product in an ecological and energy-efficient
manner.
Wipe away any coarse food remnants on
the dishes before putting them in the product.
Operate the product after filling it completely.
When selecting a programme, consider the
table of “Programme data and average
consumption values”.
Do not put more detergent than suggested on
the detergent package.
Water softening system
C
Your dishwasher requires soft
water. If the hardness of the
water is above 6°dH, the water
must be softened and descaled.
Otherwise, ions that create the
hardness will accumulate on the
surfaces of the dishes and may
adversely affect the washing,
shining and drying performances
of the product.
The product is equipped with a water
softening system which reduces the hardness
of incoming water. This system softens the
supply water that enters into the product to a
level that will allow washing the dishes with
the required quality.
Adjusting the water softening
system
Washing performance will increase when
water softening system is adjusted properly.
Adjust the new water hardness level
according to the Water hardness level
instruction in this booklet.
DISHWASHER / USER INSTRUCTIONS
13 / 44
EN
Preparation
If the hardness level of the water that you use is above 90°dF (French standard for water hardness) or if
you are using well water, than it is recommended to use filter and water purification devices.
* If the hardness level of the water that you use is below 8°dF (French standard for water hardness),
there is no need to use salt in your dishwasher. If this is the case, Salt Indicator (if any) illuminates
continuously on the panel of your machine.
If the water hardness is set to level 1, the Salt Indicator will illuminate continuously although it is not
necessary to use salt. If you use salt under this condition, salt will not be consumed and the lamp will
not illuminate.
WARNING:
If you move your house, it is very important to make the water hardness level adjustment of your machine
according to the new location you move in order to preserve the washing efficiency.
If the water hardness level of your machine is adjusted previously, your machine will display the most
recent hardness level adjustment. Adjust the new water hardness level of the machine based on the water
hardness level of the tap water.
Adjusting the water softening system
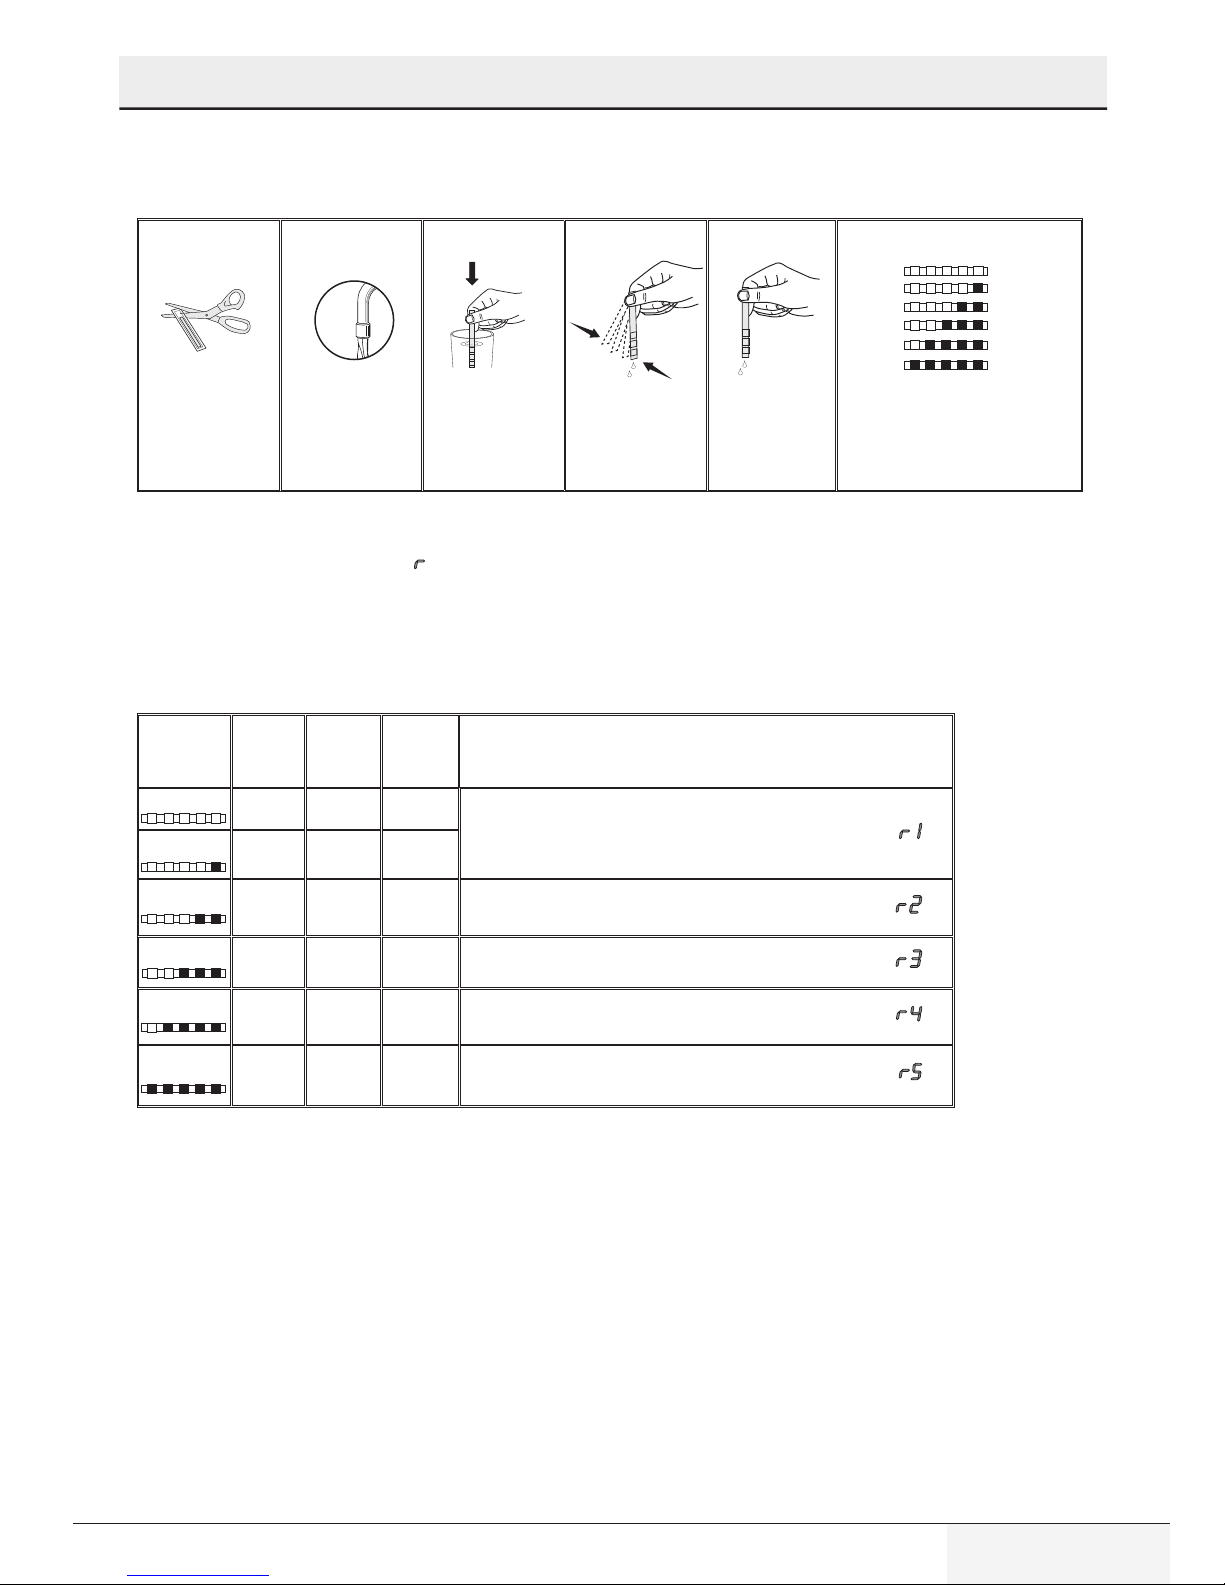
Washing performance will increase when water softening system is adjusted properly. Use the test stripe
supplied with the product to determine the supply water hardness in order to adjust the system.
Hardness
Level
English
Water
Hardness
°dE
German
Water
Hardness
°dH
French
Water
Hardness
°dF*
Water Hardness Level Indicator
1st Level
0-5 0-4 0-8
Press the Time Delay key to switch the water hardness level to position 1.
2
nd
Level
6-9 5-7 9-13
3rd Level
10-15 8-12 14-22
Press the Time Delay key to switch the water hardness level to position 2.
4
th
Level
16-19 13-15 23-27
Press the Time Delay key to switch the water hardness level to position 3.
5
th
Level
20-24 16-19 28-34
Press the Time Delay key to switch the water hardness level to position 4.
6
th
Level
25-62 20-50 35-90
Press the Time Delay key to switch the water hardness level to position 5.
1 min.
1 Second
1st Level
2
nd
Level
3
rd
Level
4
th
Level
5
th
Level
6
th
Level
Lime free
A little limy
Limy
Mediocre limy
High Lime
Very high
lime
1. After turning on the machine, press Time Delay and P+ keys simultaneously. After the countdown (3,2,1)
is displayed keep the keys pressed for a while.
2. Press P+ key to activate the
position.
3. Using Time Delay key, adjust water hardness level according to the hardness of the supply water. See
“Water hardness level adjustment table” for correct setting.
4. Press On / Off key to save the setting.
Water hardness level adjustment table
A B C D E F
Unpack the test
strip.
Open the tap and
let the water flow for
approx. 1 minute.
Dip in the test strip
into the water for 1
second.
Take out the strip
from the water and
shake.
Wait for 1 minute. According to the result
obtained from the test strip,
adjust the water hardness of
the machine.
 Loading...