


Cygnus 2+
Multi-mode Ultrasonic Thickness Gauge
Operating Manual
Covers Gauge Model : M5-C2P
Doc No. M5-CYG2P-M-01_Iss6.doc
18 October 2016

Cygnus 2+ Operating Manual
M5-CYG2P-M-01_Iss6.doc
2
QUALITY POLICY STATEMENT
Cygnus Instruments’ mission is to be a premier supplier of niche test and
measurement instruments. To achieve this we will:
Customers
• Be dedicated to customer satisfaction by listening to direct and
indirect feedback regarding our performance and product
requirements in general.
• Design state-of-the-art products that are robust, reliable, simple-touse and compliant with applicable industry and regulatory
requirements.
• Provide products and services that meet or exceed customer
expectations in terms of performance, reliability and safety.
Internal Systems
• Operate effective and safe working practices that comply with ISO
9001:2008 and EN I SO/IEC 80079-34 and other applicable regulatory
and statutory requirements.
• Provide adequate resources to ensure product and service quality is
maintained.
• Set, communicate and measure performance objectives and targets
to promote continual improvement.
• Ensure employees are competent and involved in improvement and
customer satisfaction matters.
Suppliers
• Use suppliers and subcontractors who share our passion for customer
satisfaction and who consistently perform reliably.

M5-CYG2P-M-01_Iss6.doc
Cygnus 2+ Operating Manual
3
Contents
1. Important Notice .............................................................. 6
2. Introduction ...................................................................... 7
Cygnus 2+ Thickness Gauge ....................................................7
Cygnus Instruments ...............................................................8
Gauge Kit Contents ................................................................. 9
Basic Gauge Kit .....................................................................9
Kit supplied with Single Element Probe ......................................9
Kit supplied with Twin Element Probe ........................................9
3. Gauge Preparation .......................................................... 10
Fitting the Batteries ............................................................. 10
Connecting the Probe ........................................................... 11
Fitting the Hand Strap or Belt Clip .......................................... 12
Fitting the Neck Strap .......................................................... 13
4. Selecting the Right Probe ................................................ 15
Measuring Meta ls ................................................................. 15
Measurement Modes Explained and Compared ......................... 16
Multiple Echo Mode (ME) (Mode 3) ....................................... 16
Single Echo Mode (SE) (Mode 2) ......................................... 16
Echo-Echo Mode (EE) (Mode 3) ........................................... 17
Measuring Non-Steels .......................................................... 17
Measuring Non-Metals .......................................................... 18
Single Element Probes and Protective Membranes ..................... 18
Summary of Cygnus Probes .................................................. 21
Twin Element probes ......................................................... 21
Single Element probes ....................................................... 21
The ‘Probe Type’ Code ....................................................... 22
5. Gauge Operation ............................................................. 23
Gauge Controls ................................................................... 23
Turning the Gauge On .......................................................... 24
Turning the Gauge Off .......................................................... 24
Automatic Power Off .......................................................... 24
‘No Probe’ Message .............................................................. 24
Taking Thickness Measurements ............................................ 25
Zeroing the Probe (twin element probes) .............................. 25
Taking the Thickness Measurement...................................... 25
Echo Indicators in Multiple Echo Mode .................................. 26

Cygnus 2+ Operating Manual
M5-CYG2P-M-01_Iss6.doc
4
Measurement Stability Indication in SE & EE Modes ................ 26
Measuring Small Diameter Pipe & Tubes .................................. 27
Battery Life ......................................................................... 28
Battery Level ...................................................................... 28
Low Battery Warning ............................................................ 28
6. Calibration ...................................................................... 29
Why should I Calibrate my Thickness Gauge? ........................... 29
Calibration Options .............................................................. 30
Calibrating to a known thickness (Single or 1 Point) .................. 30
Two Point Calibration ........................................................... 32
Ladder Step Wedge ........................................................... 32
Two Point Calibration Procedure .......................................... 32
Probe Zero (twin element probes) .......................................... 34
Starting a Probe Zero from the Main Menu ............................ 35
Probe Zero Function .......................................................... 35
Setting the Velocity of Sound ................................................ 36
7. Gauge Setup ................................................................... 38
Main Menu Operation ........................................................... 38
Settings are Saved with the Probe Type .................................. 39
Selecting the Probe Type ...................................................... 40
Automatic Probe Detection ................................................. 41
Measurement Un its .............................................................. 42
Resolution Setting ............................................................... 43
Deep Coat Function (multiple echo mode) ............................... 44
Vibrate Alert Function ........................................................... 46
Display Rotate Function ........................................................ 47
8. General Points On Thickness Gauging ............................. 49
9. Troubleshooting .............................................................. 50
The Gauge will not Switch On ................................................ 50
Difficulty obtaining a Reading ................................................ 50
If Readings are Erratic or Unstable ......................................... 50
Tips for Optimising Battery Life .............................................. 50
10. Updating your Gauge.................................................... 52
Update Software .................................................................. 52
Gauge Firmware Files ........................................................... 52
11. Care and Servicing ....................................................... 53
Cleaning the Gauge .............................................................. 53
Batteries ............................................................................ 53
Environmental ..................................................................... 53

M5-CYG2P-M-01_Iss6.doc
Cygnus 2+ Operating Manual
5
Storage .............................................................................. 53
Repairs .............................................................................. 53
OLED Display ...................................................................... 54
Returning the Gauge for Servicing .......................................... 54
12. Information .................................................................. 55
Technical Specifications ........................................................ 55
Table of Sound Velocities ...................................................... 59
Reading Conversions ......................................................... 60
13. EU Declaration of Conformity ....................................... 61
14. Recycling and Disposal (EC Countries) ......................... 62
15. Warranty Information .................................................. 63
16. Index ........................................................................... 64

Cygnus 2+ Operating Manual
M5-CYG2P-M-01_Iss6.doc
6
1. Important Notice
The following important information must be read and
understood by all users of Cygnus u ltrasonic thickness
gauges.
The correct use of Cygnus ultrasonic thickness gauges requires
identification of the correct equipment for the specific application
coupled with an appropriately trained and qua lified operator or
technician. The incorrect use of this equipment, along with its
incorrect calibration, can result in serious financial loss due to
damage to components, facilit ies, personal injury and even death.
N
either Cygnus Instruments nor any of its employees or
representatives can be held responsible for improper use of this
equipment. Proper training, a complete understanding of ultrasonic
wave propagation, thorough read ing of this manual, proper
transducer selection, correct zero i n g of the transducer, correct
sound velocity, correct use of the appropriate test blocks, proper
cable length and proper couplant selection all play a factor in
successful ultrasonic thickness gaugin g. Of critical importance is
the process of complete and accurate calibration of the
instrument.
This manual will provide instructions in the set up and operation of
the thickness gauge. Additional f actors that can affect the use of
ultrasonic equipment are beyond th e scope of this manual and to
that end it is understood that the operat or of this equipment is a
well-trained inspector qualified by either their own organisation or
another outside agency to the appropriate level of both theory and
practical application of ultrasonics .
T
herefore Cygnus Instruments recommends that users of its
ultrasonic thickness gauges should be formally qualified to a
minimum of UT “Level 1” (ASNT or PCN) which will provide
approximately 40 hours of tra in in g.

M5-CYG2P-M-01_Iss6.doc
Cygnus 2+ Operating Manual
7
2. Introduction
Cygnus 2+ Thickness Gauge
The Cygnus 2+ Ultrasonic Thickness Gauge is a rugged,
handheld, battery-powered instrument designed for high-reliability
thickness measurements in harsh environments using ultrasound.
The gauge can be used with a choice of Ultrasonic Probes, selected
to suit the material and thickness range to be measured.
The gauge can measure material thickness using three methods;
Single Echo, Echo-Echo or Multiple Echo. Echo-Echo and Multiple
Echo allow measurements through surf ace coatings which are
ignored.
Measurements can be displayed in either Metric (mm) or in
Imperial (inch) units. The gauge has an end–mounted OLED
(Organic LED) graphic display which can be easily read in most
light situations.
The gauge can easily be calibrated to a known thickness or to a
known Velocity of Sound.
The gauge is able to operate accurately over a wide range of
ambient temperatures and is environmentally sealed to IP67 for
use in wet conditions.
The gauge is a solid-state electronic instrument which, under
normal operating conditions, will give many years of active
service.
Although designed for ease of operation th e first time user
should carefully read this manual to familiarise themselves
with the features of the Gauge.

Cygnus 2+ Operating Manual
M5-CYG2P-M-01_Iss6.doc
8
Cygnus Instruments
Cygnus Instruments Limited, founded in 1983,
were pioneers in the development of the Digital
Ultrasonic Multiple-Echo Technique used for
measurement through coatings. This has long
been the standard required to ensure that
accurate measurements are taken without the
need to first zero the gauge or remove any
coatings.
O
ur philosophy is to work closely with each of our customers to
provide a range of products specif ically for each application.
Cygnus Ultrasonic Thickness Gaug es are designed to be simple to
use and to withstand the harsh env iron ments that they are
intended for. We have built up an enviable reputation with our
customers in over 45 countries around the world.

M5-CYG2P-M-01_Iss6.doc
Cygnus 2+ Operating Manual
9
Gauge Kit Contents
Basic Gauge Kit
1. Cygnus 2 Gauge
2. Operating Manual (in side pouch)
3. Neck Strap (in side pouch)
4. Accessory Pouch, containing; 3 x AA Batteries, Blue
Couplant Gel.
Kit supplied with Single Element Probe
1. Ultrasonic Probe
2. Moulded Probe Cable (in side pouch)
3. 15mm (or ½”) Steel Test Block
4. Spare Membranes
5. Membrane Key
6. Membrane Couplant
Kit supplied with Twin Element Probe
1. Ultrasonic Probe
2. Moulded Probe Cable (in side pouch)
3. Ladder Step Wedge (if ordered)

Cygnus 2+ Operating Manual
M5-CYG2P-M-01_Iss6.doc
10
3. Gauge Preparation
The gauge is supplied ready to use out of the box . Just insert the
batteries, connect the probe to the gauge, turn on the power and
you are ready to take thickness m ea su rements.
Fitting the Batteries
The gauge requires 3 x AA/LR6/UM3 Batteries. Cygnus supplies
and recommends Duracell Alkaline batteries. The batteries are
located behind a cover on the rear of gauge. The hand strap can
be separated by a push-button buckle to gain access to the bat t ery
cover. The battery cover is removed by pressing in with your
thumb the at the base to release the clip.
Press the bottom of the
battery cover to release
the retaining clip and lift
up the battery cover.
The batteries are located
underneath.
The gauge is protected
against electrical damage
from incorrect battery
insertion.
The battery compartment
itself is sealed to contain
any battery fluids that
may leak out.
The gauge can be fitted with NiCad or NiMH rechargeable
batteries but this may alter the specified operating time.

M5-CYG2P-M-01_Iss6.doc
Cygnus 2+ Operating Manual
11
To avoid damage from leaking batteries always remove the
batteries if the gauge will be unused for any length of time.
If the batteries run flat they may leak acid into the battery
compartment and damage the electrical contacts. This would
not be covered by the warranty.
Connecting the Probe
The Cygnus probe lead uses a cus t om made cable that offers
superior flexibility and resistance to oil s and ultraviolet light. The
cable will not stiffen after exposure to ultraviolet light.
T
he connector uses original Lemo connectors for reliability. The
twin connectors are over-mounded to form a tough housing that
will provide a long lasting probe cable
T
he connector is orientated with a ‘pip’ and can only be plugged in
one-way around.
Depending on the type
of probe supplied the
probe end will have
either a twin Lemo 00,
BNC or single Lemo 00
connector.

Cygnus 2+ Operating Manual
M5-CYG2P-M-01_Iss6.doc
12
To release the connector
simply pull back on the
connector body. DO NOT
pull the cable.
Fitting the Hand St ra p or Belt Clip
The gauge is supplied fitted with an adjustable elasticated Hand
Strap. This can be easily removed and the optional Krusell
®
belt
clip attachment fitted instead.
Elasticated Hand Strap

M5-CYG2P-M-01_Iss6.doc
Cygnus 2+ Operating Manual
13
Optional Krusell® belt clip
attachment parts.
There are four Pozidrive screws
holding the hand strap or Krusell®
belt clip attachment in place. Two
are under the battery c o ver.
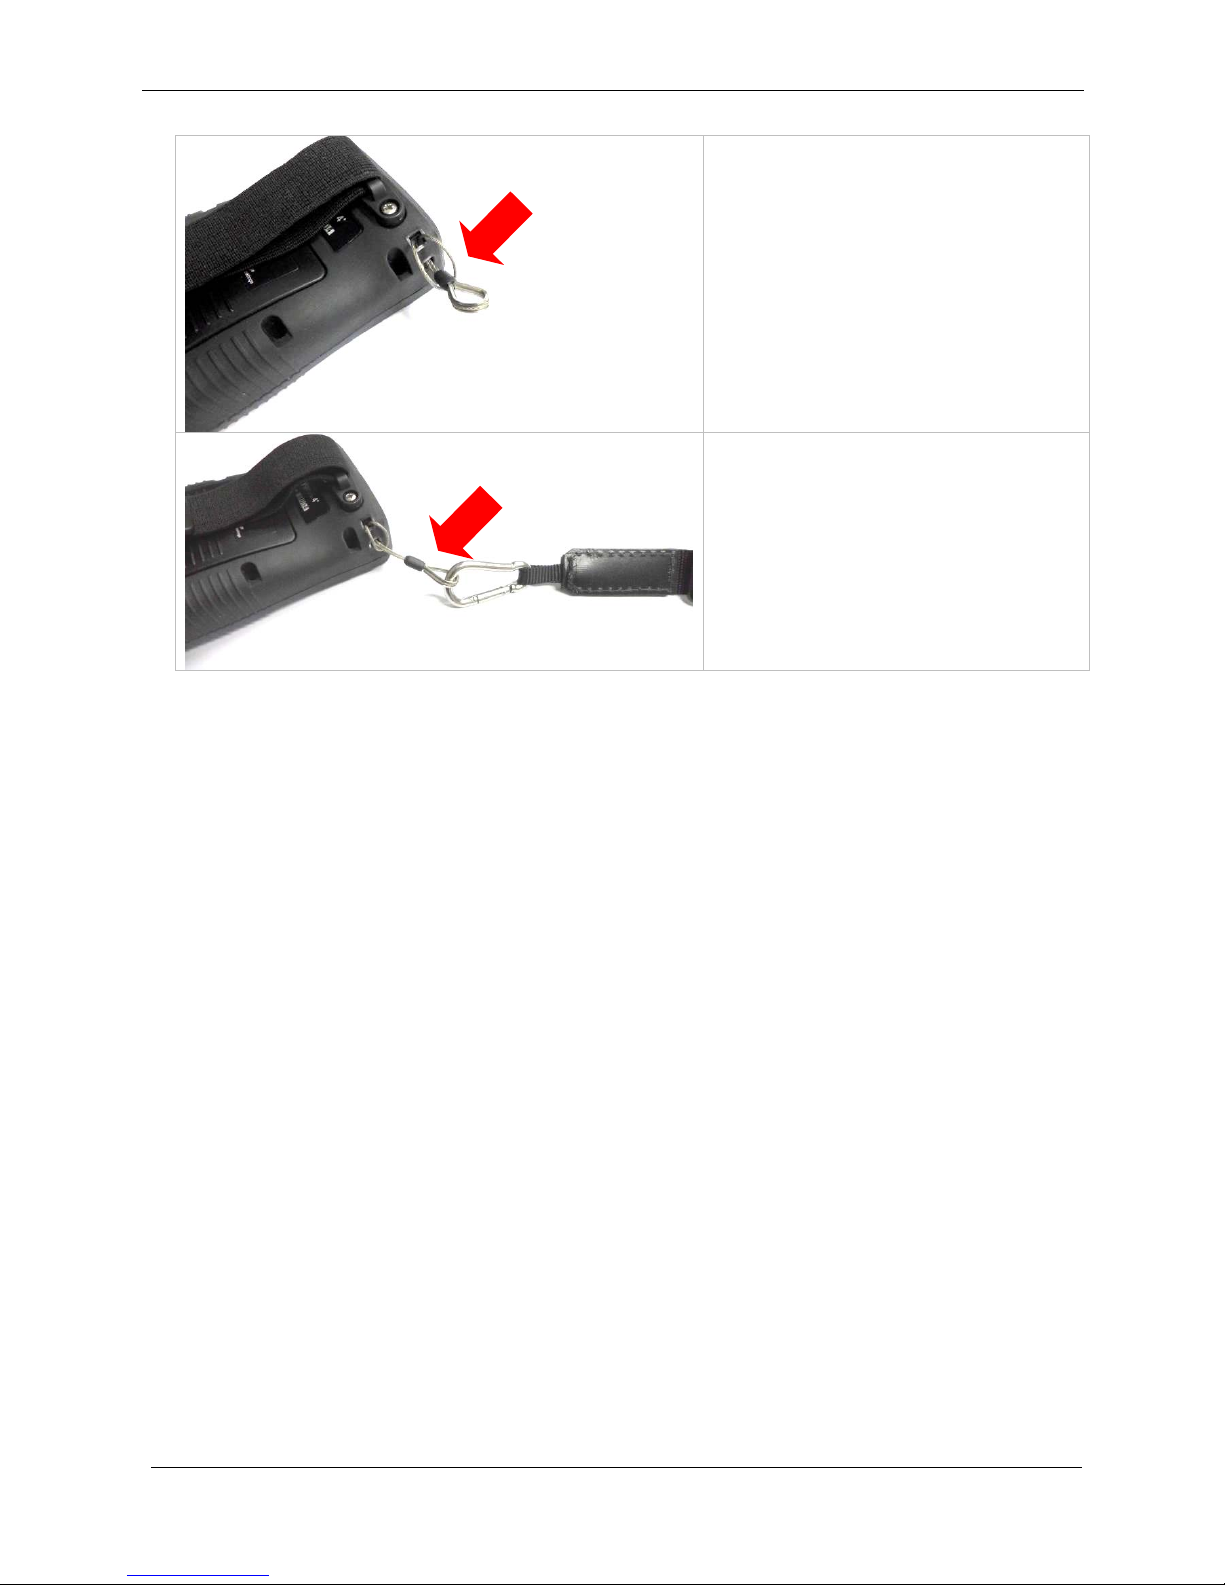
Fitting the Neck Strap
The gauge is supplied with an adjustable Neck Strap. The ends of
the neck strap clip onto two wire loops fitted to the gauge. These
wire loops are made from coated stainless steel.
Cygnus 2+ Operating Manual
M5-CYG2P-M-01_Iss6.doc
14
Wire loop fitted to the
gauge body.
Simply pass the loop
through the hole in the
gauge and back over the
other end.
The neck strap can then be
clipped on to the loops.
M5-CYG2P-M-01_Iss6.doc
Cygnus 2+ Operating Manual
15
4. Selecting the Right Probe
The performance of any thickness gauge, and its ability to get a
reliable measurement depends on selecting the right ultrasonic
probe for the application and con ditio n s. Cygnus gauges are
therefore offered with a selection of probes suitable for most
thickness gauging applications.
The following section helps you select the right probe for the
application.
The gauge must be set for the probe connected to it, see
Selecting the Probe Type on page 40.
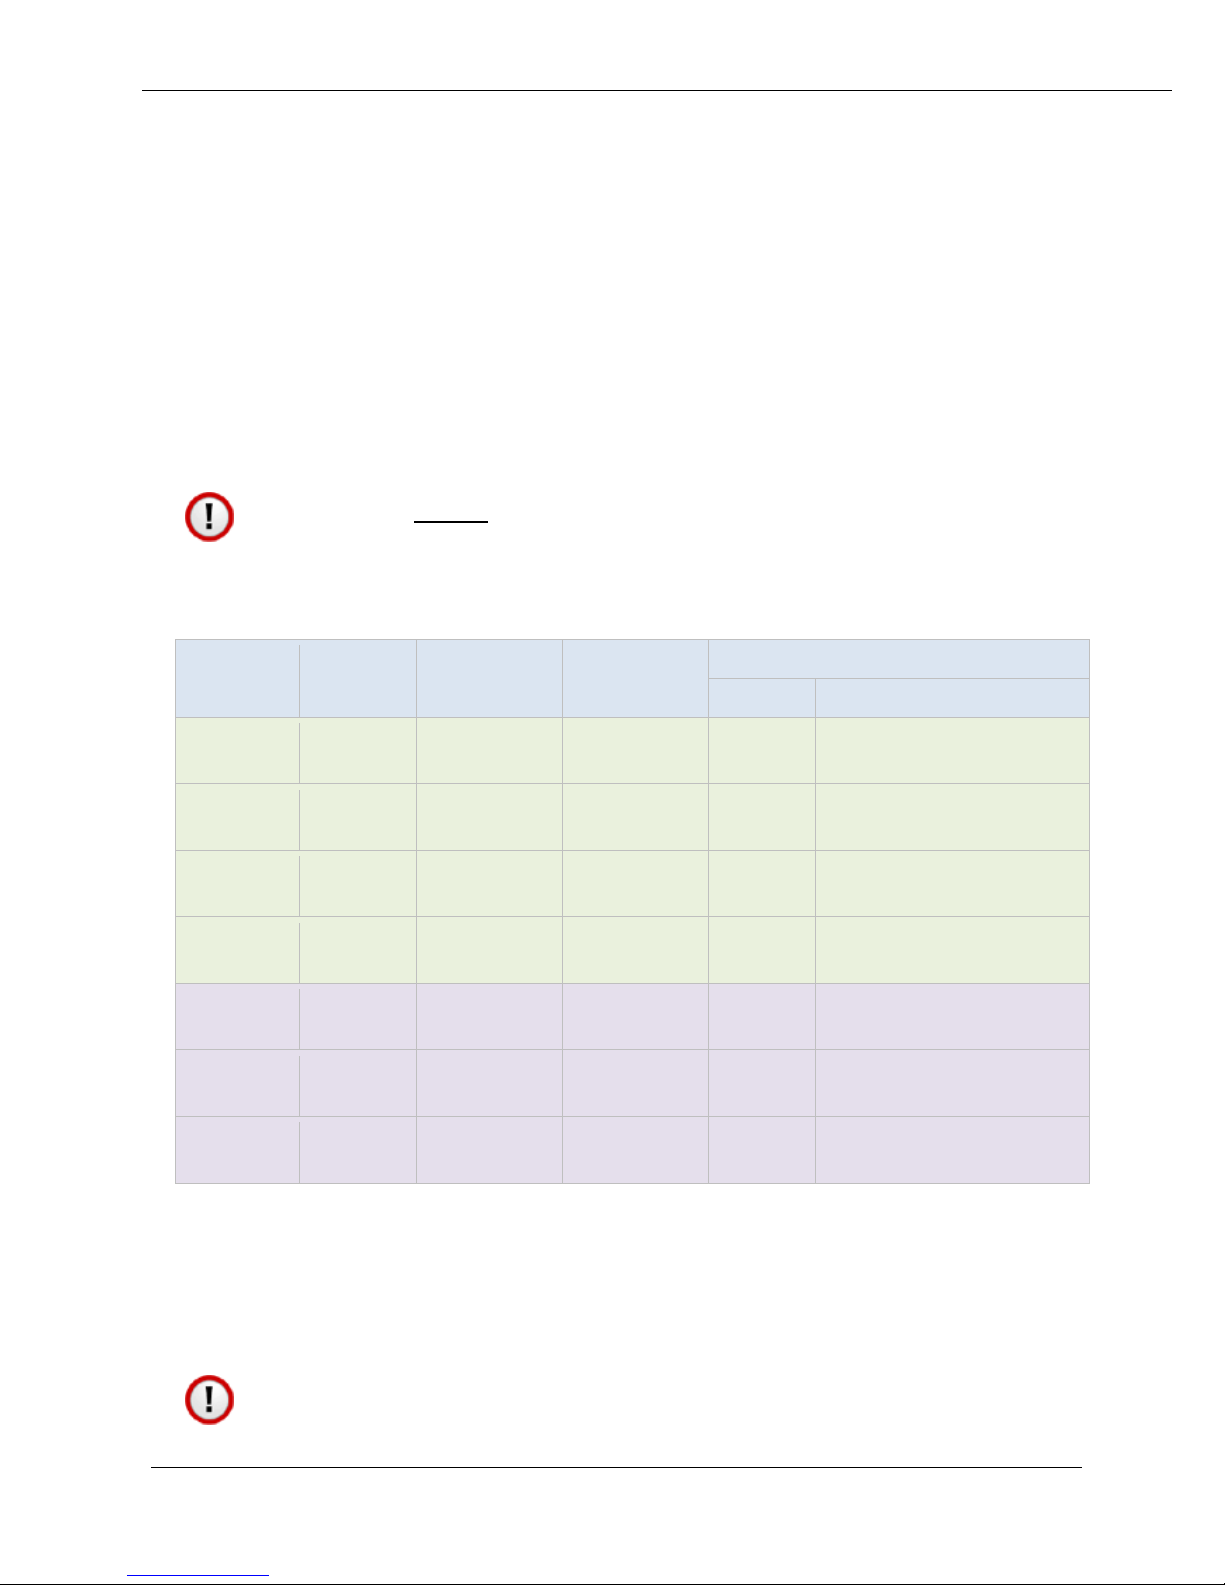
Measuring Metals
Material Coating Corrosion Thickness
Recommended..
Probe
Measurement Mode
Steels
Any
Non to
Moderate
1 mm+
S5A
Multiple Echo
Steels
Any
Non to
Moderate
2 mm+
S3C
Multiple Echo
Steels
Any
Non to
Moderate
3 mm+
S2C
Multiple Echo
Steels
Any
Non to
Moderate
3 mm+
(0.12”+)
S2D
Multiple Echo
Steels
Non
Non to
Heavy
0.8 mm+
(0.03”+)
T7A
Single Echo
Steels
Non
Non to
Heavy
1.5 mm+
(0.06”+)
T5B
Single Echo
Cast
Iron
Non
Non to
Moderate
2.5 mm+
(0.1”+)
T2C
Single Echo
The table above shows that to be able to measure coated and uncoated steels with non to heavy corrosion ideally you will require
at least two probes, in almost all applications this will be a S2C
probe and a T5B probe.
When measuring in Multiple Echo mode the coating will be
ignored and just the metal thickness measured.

Cygnus 2+ Operating Manual
M5-CYG2P-M-01_Iss6.doc
16
It is possible to use a Twin Element (T**) probe in Echo-
Echo Mode to ignore thin paint coatings. However this
method does not have the ability to verify measurements
and without an A-Scan display it is possible to get incorrect
measurements.
Measurement Modes Explained and Compared
Multiple Echo Mode (ME) (Mode 3)
Multiple Echo measurement mode is by far the most reliable and
easy method for thickness measurements, because it works by
looking for three matched echoes it can verify the thickness
measurement is valid. This method has been used in all Cygnus
gauges since the late 1970s.
Multiple echo mode will ignore surface coatings (Through Coating
mode), there is no need to remove the paint to take a
measurement.
Also because it uses a single element (or single crystal) probe
there are no errors due to the V-pat h of the ultrasound beam
found in all twin element probes. This makes it simple to calibrate
– two point calibrations are not required.
However because it requires three echoes to take a measurement,
in heavily corroded steels there is often an insufficient number of
echoes so no measurement is possible.
Single Echo Mode (SE) (Mode 2)
Single Echo measurement mode is most useful on heavily corroded
metals where Multiple Echo fails. Because it only needs the first
return echo to take a measurement it performs well on virtually all
steel conditions.
However single echo mode will not ignore any surface coatings, so
if you measure through a coating it will give an incorrectly metal
thickness measurement . If the surface coating is very thin paint
(0.2mm / 0.01”) you can make an allowance for this error, but
thicker coatings introduce too much error to be practical.

M5-CYG2P-M-01_Iss6.doc
Cygnus 2+ Operating Manual
17
Single echo measurements use a twin element (twin element)
probe, because there are two e l ements angled to a focal point
there is a v-path error introduced. However this v-path error is
mostly corrected by the gauge, and furthermore by performing a
two point calibration.
Twin element probes require “zeroing” at regular intervals,
especially if the ambient temperature is changing.
Echo-Echo Mode (EE) (Mode 3)
Echo-Echo mode uses a twin elem ent probe, but measures
between the first two echoes. This method is intended to ignore
any thin surface coatings whilst stil l using a twin element probe.
Echo-echo mode is not able to verify its measurements unlike
Multiple echo mode, therefore it is liable to give incorrect readings.
As the Cygnus 2
+
gauge does not have an A-Scan display there is
no way the user can check the measurement is correct.
Echo-echo mode must therefore be used with caution, and only on
thin paint surface coatings (less than 0.5mm). It is recommended
a Single Echo measurement should also be made to help verify the
measurement makes sense (th e Single Echo measurement shou ld
always be slightly thicker due to the coating thickness).
Measuring Non-Steels
The gauge will measure the following non-steels;
• Aluminium alloys
• Copper and Brass alloys
• Titanium
Use the same rules as steels when selecting a suitable probe. The
gauge will ideally be re-calibrated to suit the metal being
measured, or the standard velocity of sound for that material
would be entered into the gauge.

Cygnus 2+ Operating Manual
M5-CYG2P-M-01_Iss6.doc
18
Measuring Non-Metals
You can measure certain types of plastics with the gauge using a
twin element probe and the gauge set to Single Echo
measurement mode. Generally the hard e r the plastic the better,
soft materials like rubber or TPE s tend to absorb too much
ultrasound so only thin samples c an be measured.
Engineering plastics like Acetal, Tufset (Polyurethane), Nylon and
High-density polyethylene (HDPE) can be measured successfully.
Rotationally mounded parts can generally be measured
successfully.
• You must use Single Echo mode to measure plastics.
• You must generally use a low frequency probe (i.e. T2C) to
measure plastics, but this will depend on the properties of the
material.
• Any material with a closed-cell construction cannot be
measured.
• Any material with internal voids, air bubbles or honeycomb
cannot be measured .
Typically these materials cannot be measured with the gauge;
• Concrete
• Wood
• Thermal insulation ma t e r ials
• Foams
• Composites
Single Element Probes and Protective Memb r an es
All Cygnus single element probes ha ve a soft face and are
therefore fitted with a Polyurethane Mem brane which provides
better contact on rough surfaces and protects the probe face from
wear, prolonging the life of the probe.

M5-CYG2P-M-01_Iss6.doc
Cygnus 2+ Operating Manual
19
Check the membrane regularly as it is important the
membrane is changed as soon as i t sh ows any signs of wear.
Single Element Probe Membrane Parts.
Single Element Probe Membrane Locking Key
Probe Body
Locking Ring
Polyurethane Membrane
Knurled Ring

Cygnus 2+ Operating Manual
M5-CYG2P-M-01_Iss6.doc
20
Changing the Protective Membrane on Single element Probes
1.
Unscrew the Knurled Ring from the
end of the Probe.
2.
Use the Membrane Key to unscrew
the Locking Ring from inside the
Knurled Ring. The old membrane
can then be removed and
discarded.
3.
Place a new membran e into th e en d
of the Knurled Ring ensuring it
locates in the groove.
4.
Screw the Locking Ring back inside
the Knurled Ring and tighten with
the Membrane Key.
5.
Place a few drops of Membrane
Couplant on to the probe face.
6.
Screw the Knurled Ring back onto
the probe. Use your thumb to
squeeze the couplant from under
the membrane as you tighten the
Knurled Ring down.
7.
You should see the membrane has
a very thin film of couplant between
itself and the probe face with no air
bubbles.

M5-CYG2P-M-01_Iss6.doc
Cygnus 2+ Operating Manual
21
Measuring Higher Temperatures
The polyurethane membranes fitted to t he single element probes
are suitable for measuring surface temperatures up to 70°C
(160°F). For measuring higher tempe ratures Teflon membranes
are available and suitable for surface temperatures up to 150°C
(300°F) with intermittent contact. Contact Cygnus instruments to
order Teflon membranes.
When measuring high temperatures limit the time the probe is in
contact with the hot surface to less th an 4 seconds and ensure the
probe has sufficient time between measu rements to cool down.
Summary of Cygnus Probes
Twin Element probes
Probe
Type
Size Frequency
Range in
Steel
(SE Mode)
Typical Uses
T2C
12mm
2 MHz
2.5 to 250
mm
0.1 to 10”
Attenuative materials
Cast irons, plastics
T5B
8mm
5 MHz
1.5 to 200
mm
0.06 to 8”
General purpose
Most metals
T7A
5mm
7.5 MHz
0.8 to 50 mm
0.03 to 2”
Thin metals
Single Element probes
Probe
Type
Size Frequency
Range in
Steel
Typical Uses
S2C
13mm
2.25 MHz
3 to 250 mm
General purpose probe suitable
for most applications that can
use Multiple Echo
measurement.
Coated metals
S2D
19mm
0.75”
2.25 MHz
3 to 250 mm
0.12 to 10”
As S2C but has longer focal
point (33 mm) and narrower
beam so may perform better
on thicker materials

Cygnus 2+ Operating Manual
M5-CYG2P-M-01_Iss6.doc
22
S3C
13mm
3.5 MHz
2 to 150 mm
Coated metals
S5C
13mm
5.0 MHz
1 to 50 mm
Coated metals
S5A
6mm
5.0 MHz
1 to 50 mm
Small diameter tubes
Thin metals
Coated metals
The ‘Probe Type’ Code
S
2
C
Single or Twin
Crystal
Frequency in MHz
Size
A 6mm
B 8mm
C 13mm
D 19mm

M5-CYG2P-M-01_Iss6.doc
Cygnus 2+ Operating Manual
23
5. Gauge Operation
Gauge Controls
End view of gauge
Front view of gauge
OLED
Display
Probe
Connection
Power /
Cancel
Key
Select
Keys
Menu
Key

Cygnus 2+ Operating Manual
M5-CYG2P-M-01_Iss6.doc
24
Turning the Gauge On
1.
Press the Power key
2.
Cygnus Instruments name is displ ayed
3.
The model and serial number are
displayed
4.
The firmware & hardware version are
displayed
6.
The gauge is ready to use
Turning the Gauge Off
1.
Press & Hold the Power key,
2.
The display shows ‘power-off’ and the
gauge turns off.
Automatic Power Off
The gauge will turn off automatically after 5 minutes of in activity.
Taking thickness measurements or accessing the menu will reset
the 5 minute timer back to zero.
‘No Probe’ Message
1.
If the gauge cannot detect a probe a
message will be disp layed.
2.
This message should disappear when a
probe is connected to the gauge.

M5-CYG2P-M-01_Iss6.doc
Cygnus 2+ Operating Manual
25
Taking Thickness Measurements
Taking ultrasonic thickness measurements is a straight forward
process that involves first making sure the surface is clean and
prepared, applying an ultrasonic couplant gel then placing the
probe on the surface and observing the display for the
measurement.
Zeroing the Probe (twin element probes)
When a twin element probe is conn ected to the gauge (and the
gauge is set to the correct probe) you must first perform a Probe
Zero before you can begin taking measurements. For instructions
see Probe Zero Function on page 35.
It is recommended to frequently perform a Probe Zero if
conditions such as temperature are changing.
Taking the Thickness Measurement
1.
Remove all scale, rust, dirt or loo se
coatings and brush the test area cl ea n .
2.
Apply ultrasonic couplant to the test
surface.
3.
Place the probe-face on the clean,
lubricated test surface and make firm
contact applying gentle pressure.
4.
The gauge will display a thickness
measurement.
(Or an indication of Echo Strength if no
valid measurement has been found in
Multiple Echo mode).

Cygnus 2+ Operating Manual
M5-CYG2P-M-01_Iss6.doc
26
5.
When a thickness measurement is
displayed the display also shows the
Measurement Mode and the Units.
SE = Single Echo mode
EE = Echo-Echo mode
ME = Multiple Echo mode
Echo Indicators in Multiple Echo Mode
Should the gauge be unable to detect a stable multiple echo signal
it displays an Echo indication to help the operator lo cate a suitable
position.
1.
1 Bar Flashing:
No echoes detected
2.
1 steady + 1 Bar Flashing:
Only 1 echo detected
3.
2 steady + 1 Bar Flashing:
Only 2 echoes detected
4.
3 steady + 1 Bar Flashing:
3 echoes detected but they are not
matched
To help obtain a multiple echo reading the operator should
continue to move the probe around to locate a suitable reflector,
using a slight rocking motion.
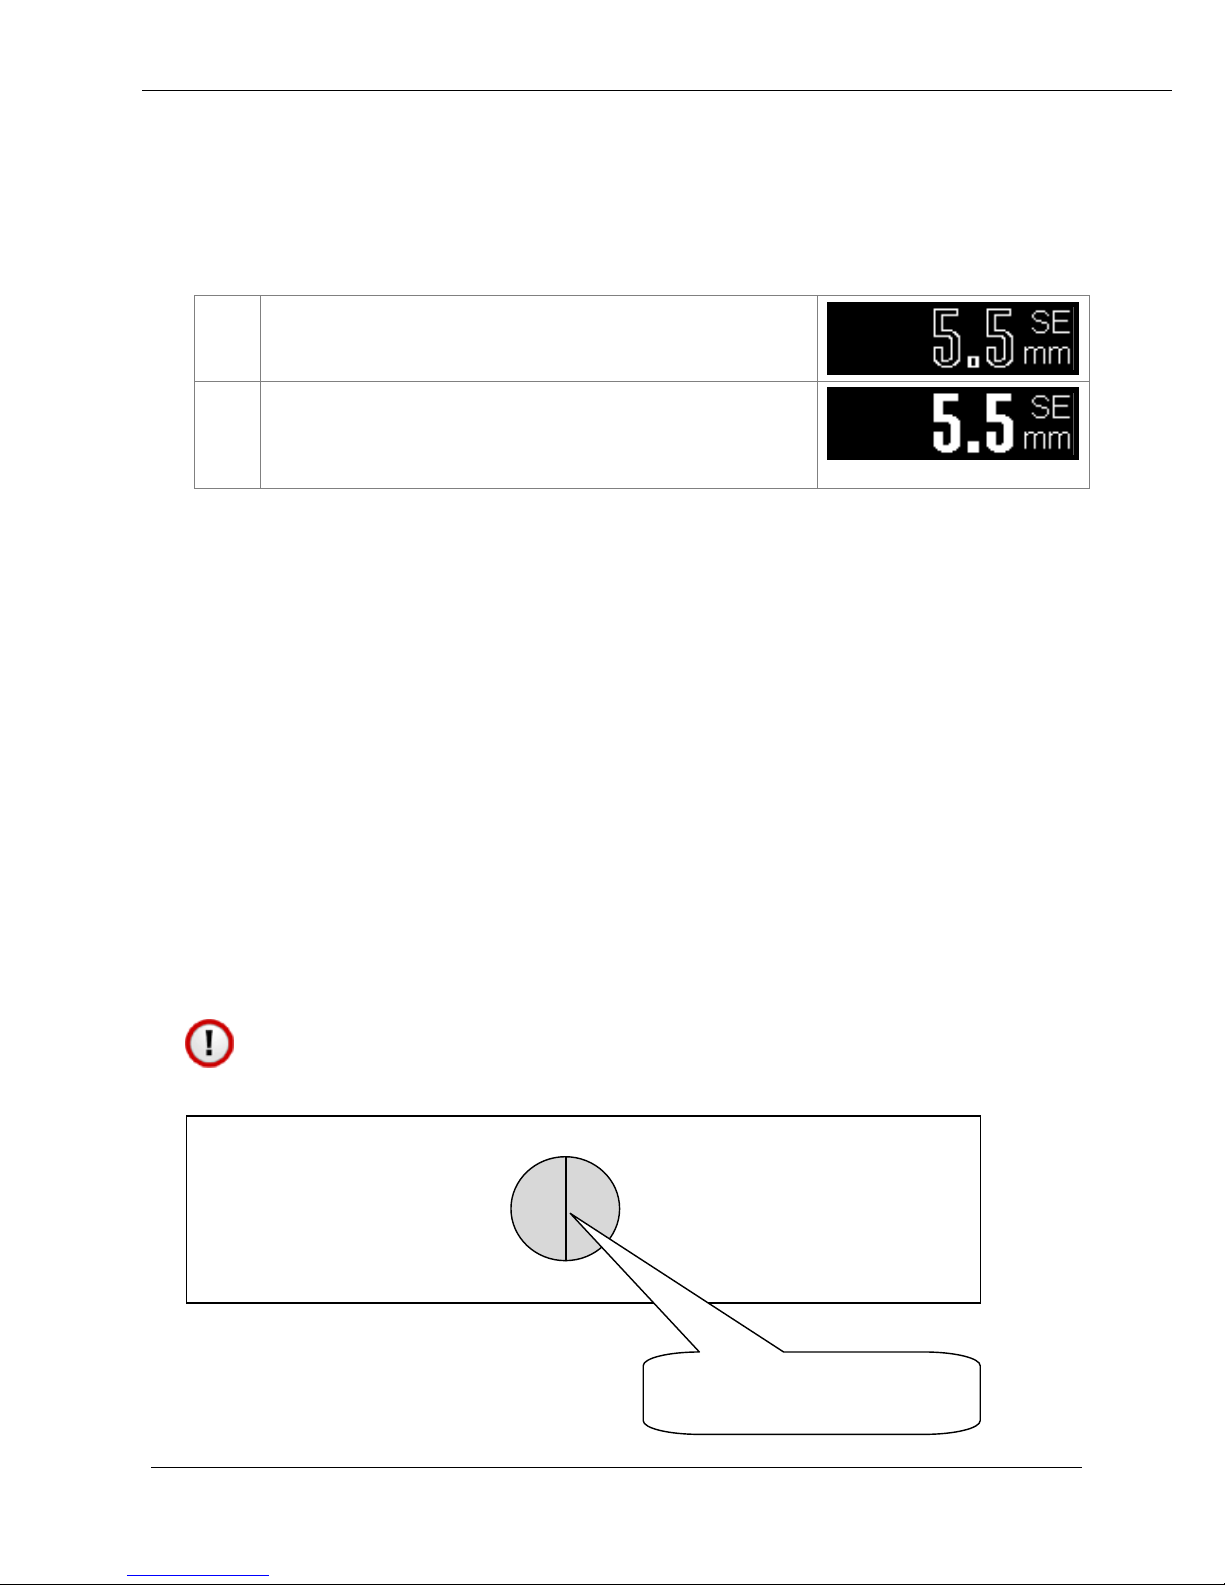
Measurement Stability Indication in SE & EE Modes
To help indicate when a Single Ech o or Ech o-Echo measurement is
stable – and thus probably reliable – the gauge changes the
thickness measurement number from Hollow to Solid when the
measurement has been stable for 2 consecutive seconds.
When measuring using Single Echo or Ech o-Echo mode once you
have a measurement keep the probe still and wait for the gauge to
signal a “stable reading”.
M5-CYG2P-M-01_Iss6.doc
Cygnus 2+ Operating Manual
27
If the ultrasound signal is poor or erratic then the thickness value
may remain hollow – thus indicating the measurement may not be
reliable.
1.
Initial measurements will be displayed
as hollow numbers.
2.
If the measurement remains sta ble for
2 consecutive seconds then th e
measurement will change to solid.
Stable is defined as; the thickness measurement changing no
more than + or - the Resolut ion setting.
Example.
The Resolution is set to 0.05mm, therefor the thickness
measurement must not change by more than +0.05mm or
-0.05mm for 2 seconds or more to be “stable”.
Measuring Small Diameter Pipe & Tubes
When measuring small diameter pipe and tubes with a twin
element probe, 75mm (3”) or under, you must ensure the face of
the probe is correctly aligned to the curvature of the pipe
otherwise measurements may be inaccurate.
The dividing line on the face of the probe should be at
right angles to the length of the pipe.
Pipe
Probe Face
Probe Face Division is at
right angles to the pipe

Cygnus 2+ Operating Manual
M5-CYG2P-M-01_Iss6.doc
28
Battery Life
The gauge will operate continuously for approximately 10 hrs
when fitted with Duracell Alkaline 1500 mA/hr batteries.
Battery Level
When not displaying a thickness measurement the display shows a
battery level gauge.
Note. The battery level gauge moves slowly up and down the
display to avoid display “burn in”.
Battery almost full
Battery about 1/3 full
Battery flat
Low Battery Warning
The gauge will periodically flash a Low Battery warning messa ge
when the batteries have approximately 1 hour of use remaining.
Low battery warning
When the batteries are exhausted the gauge will display a Flat
Battery message for 5 seconds then turn off automatically.
Turn off message

M5-CYG2P-M-01_Iss6.doc
Cygnus 2+ Operating Manual
29
6. Calibration
Why should I Calibrate my Thickness Gauge?
Ultrasonic thickness gauges measure time in order to measure the
thickness of the material being tested. The rely on the principal
that sound travels through a mat erial at a constant velocity or
speed. If you can accurately measure the time it takes to travel
through a material and you know its velocity then you can
calculate its thickness;
Thickness = time x velocity
2
Modern thickness gauge are easily capable of measuring time
accurately to 10 nano seconds (0.000,000,01 seconds) so this is
considered to be more than sufficiently accurate.
This means the accuracy of any thickness gauge measurement
relies principally on the velocity being correct for the material
being measured.
There are tables listing the velocit y of most common metals and
materials, but these velocities are only “typical” values. For
example Mild Steel has a typical velocity of 5920 m/s – but in
practice when measuring a variety of mild steel samples the
velocity can range anywhere from 5860 to 5980 m/s.
This means if you want to achieve the most accurate thickness
measurements you must calibrate your thickness gauge to a
sample of the same material you will be testing – and a sample
that you can accurately measure the thickness of with a Vernier or
micrometer.
Your measurements are only as good as your calibration
Instructions for calibrating the gauge can be found on page 30
onwards.

Cygnus 2+ Operating Manual
M5-CYG2P-M-01_Iss6.doc
30
Calibration Options
The Gauge is supplied tested and calibrated. The Gauge will have
been calibrated to measure thickness through steel (grade
S355JO) with a velocity of sound of 5920 m/s.
Either a 15mm or 1/2” Test Block is supplied with the kit so the
Gauge can be quickly checked for correct operation. Note, this test
block is not intended to be used for calibration of the Gauge.
The best way to calibrate the Gauge is to Calibrate to a
Known Thickness using a sample of the material you intend
to measure. This method determines the velocity of sound
for the material sample, which will always be more accurate
than using a ‘general’ velocity value. For calibration
instructions see
Calibrating to a known thickness (Single or
1 Point) on page 30 and Two Point Calibration on page 30.
If there is no test sample available the Gauge can be calibrated by
Setting the Velocity of Sound directly. A Tab l e of Sound Velocities
on page 59 lists common materials and their velocity of sound
value. For instructions on Setting the Velocity of Sound see page
36.
A third method is to leave the Gauge set to its factory-preset value
for Steel [5920 m/s or 0.2332 in/us], and then use a Conversion
Factor from the Table of Sound Velocities on page 59.
Calibrating to a known thickness (Single or 1 Point)
This method of calibrating the gauge is more accurate than using a
standard velocity value as the gauge calculates the velocity of
sound for the sample mater ia l .
You can use this calibration meth od for all measurement modes.
1.
Accurately measure the
thickness of your sample
material.
25.40
mm

M5-CYG2P-M-01_Iss6.doc
Cygnus 2+ Operating Manual
31
2.
Place the Probe on the sample
and verify the gauge can get a
thickness value.
3.
Press the Menu key
4.
Press the Up Select key to get to
the Calibrate Single Point item
5.
Press the Menu key to start
calibration
6.
While holding the probe firmly
on the sample, and while a
steady thickness measurement
is displayed..
7.
...use the Up and Down Select
keys to adjust the thickness to
the required value.
8.
When done press the Menu key
to save the calibration.
Or press the Power / Cancel to
exit without saving the
calibration.

Cygnus 2+ Operating Manual
M5-CYG2P-M-01_Iss6.doc
32
Two Point Calibration
The Two Point Calibration option is only available in Sin gle Echo
and Echo-Echo modes.
Two point calibration allows the gauge to be calibrated against two
reference thicknesses of the same material, one at the minimum
(thin) thickness range the other at the maximum (thick) thickness
range.
To achieve maximum accuracy in Single Echo mode
you must perform a Two Point Calibration – your
measurement is only as good as your calibration.
When performing a two point cali bration both sample thicknesses
should be mad e from the same material. Th e temperature of the
sample material should be the close to t he temperature of the
material to be measu r ed.
The gauge will automatically com pensa te for v-path error in
addition to either single or two poin t calibrations.
Ladder Step Wedge
Typically a Ladder Step Wedge is
used to calibrate the probe and
gauge for Steel. The ladder step
wedge has 4 or 5 different
thicknesses typically ranging from
2.5 mm to 20.0 mm. You would
typically choose to calibrate us ing
the 2.5 and 20 mm thicknesses.
Ladder Step Wedges
Two Point Calibration Procedure
1.
Assuming you have a step
wedge of known thicknesses
20.00
2.50

M5-CYG2P-M-01_Iss6.doc
Cygnus 2+ Operating Manual
33
2.
Wipe clean the step wedge then
add some fresh couplant to the
step wedge
3.
Place the Probe on the sample
and verify the gauge can get a
thickness value.
4.
Press the Menu key
5.
Press the Up Select key to get to
the Calibrate Two Point item
6.
Press the Menu key to start
calibration
7.
Start with the Thick sample –
Maximum thickness.
While holding the pr o be firmly
on the thick sample, and while a
steady thickness measurement
is displayed..

Cygnus 2+ Operating Manual
M5-CYG2P-M-01_Iss6.doc
34
...use the Up and Down Select
keys to adjust the thickness to
the required value.
8.
When the correct measurement
is displayed press the menu key
9.
Next measure t he Thin sample –
Minimum thickness.
While holding the probe firmly
on the thin sample, and while a
steady thickness measurement
is displayed..
...use the Up and Down Select
keys to adjust the thickness to
the required value.
10.
When done press the Menu key
to save the calibration.
Or press the Power / Cancel to
exit without saving the
calibration.
Probe Zero (twin element probes)
Twin element probes must be zeroed to compensate for any wear
or operating temperature changes. The gauge will always perform

M5-CYG2P-M-01_Iss6.doc
Cygnus 2+ Operating Manual
35
a Probe Zero when first turned on or when a twin element probe is
connected.
If the probe gets significantly warmer during use this can cause a
shift in the zero position and thus introduce small errors in the
thickness measurement. Typically a 20° C change in temperature
the measurements can shift by 0.1 mm.
It is recommended to frequently perform a Probe Zero
if conditions such as temperature are changing.
See also Zeroing the Probe (twin element probes) on page 25.
Starting a Probe Zero from the Main Menu
1.
Press the Menu key
2.
Press the Up Select key to get to
the Probe Zero item
3.
Press the Menu key
Probe Zero Function
4.
Display shows the Zero Probe message.

Cygnus 2+ Operating Manual
M5-CYG2P-M-01_Iss6.doc
36
5.
Press the Up select key to proceed
6.
Wipe any couplant from the probe face
7.
Press the Up select key to proceed
8.
The gauge measures the probe zero
point.
9.
If the Probe Zero fails a message will be
displayed.
• Check the probe has not been
unplugged or the cable is
damaged/faulty.
• The probe face must be clea n and
in the air.
• Are you using a non-Cygnus
probe?
Setting the Velocity of Sound
The gauge uses the Velocity of So u n d value to calculate the
material thickness value. It is therefore important the velocity
value is set for the material being measured.
If you perform a Calibration (single or two point) the Velocity
of Sound will be set for you during the calibration – so you
don’t need to adjust it afterwards .
You can manually set the velocity of sou n d value if required,
normally you would do this if;
• You can’t perform a calibrat ion
• You want to use the same velocity setting as last time
• You want to use a velocity from a material list

M5-CYG2P-M-01_Iss6.doc
Cygnus 2+ Operating Manual
37
A list of velocity of sound values for common material can be
found on page 59.
1.
Press the Menu key
2.
Press the Up Select key to get to
the Velocity item
3.
Press the Menu key to change
the velocity value
4.
Use the Up and Down Select
keys to adjust the velocity value
as required
5.
When done press the Menu key
to save the new value.
Or press the Power / Cancel to
exit without saving.

Cygnus 2+ Operating Manual
M5-CYG2P-M-01_Iss6.doc
38
7. Gauge Setup
Main Menu Operation
1.
Press the Menu key..
2.
..to display the Main Menu.
3.
Press the Up select key to scroll around
the Main Menu items one at a time.
The Down select key will scroll in t h e
other direction.
4.
Change the Meas ure m ent Mode
5.
Set the Probe Type
6.
Do a Probe Zero
(twin element probes only)
7.
Set the Velocity of sound
8.
Perform a Single Point Calibration
9.
Perform a Single Point Calibration
(twin element probes only)
10.
1
Turn the Deep Coat function on or off
(single element probes only)
11.
Set the measurement Resolution
1
Deep Coat must be enabled – contact Cygnus for instructions.

M5-CYG2P-M-01_Iss6.doc
Cygnus 2+ Operating Manual
39
12.
Set measurement Units
13.
Set the Vibrate option
14.
Set the Display Rotation option
15.
To exit the menu press the Power /
Cancel key once.
16.
If you want to change or select the
item currently displayed simply press
the Menu button
17.
If the item has a number of choices
you can use the Up and Down keys to
step through each option.
Example.
Units goes from mm to inch.
18.
To save your choice press the me n u
key.
To cancel without saving press the
Power / Cancel key.
Settings are Saved with the Probe Type
Certain gauge settings are saved against the probe type. This
allows each probe type to have different settings that will be
recalled when that probe is re-connected and the probe type is
correctly set. The following settings are saved with each probe
type;

Cygnus 2+ Operating Manual
M5-CYG2P-M-01_Iss6.doc
40
• Measurement mode
• Units
• Resolution
• Velocity of sound
• Calibration
• Deep Coat (if a single element probe)
Selecting the Probe Type
The Probe Type must be set to the probe connected to it. If
the wrong probe is selected the gauge will not measure
accurately if at all.
The gauge can Auto Detect certain types of probes when they are
first connected to the gauge, or you can manually select the probe
from a list.
These probes can be Auto Detect ed;
T2C, T5B, T7A, S2C
These probes must be selected manually;
S2D, S3C, S5A & S5C
1.
Press the Menu key
2.
Press the Up Select key to get to
the Probe Type item

M5-CYG2P-M-01_Iss6.doc
Cygnus 2+ Operating Manual
41
3.
Press the Menu key to change
the probe type
4.
Use the Up and Down Select
keys to select from Auto or a
specific probe type
5.
When done press the Menu key
to save the new value.
Or press the Power / Cancel to
exit without saving.
Remember settings and calibration is saved with each probe
type. So if you change the probe type you may find a setting
has changed – this is normal.
The reason settings are saves wit h each probe type is so you
can swap probes during a survey without having to recalibrate each time.
Also you may want Multiple Echo measurements in 0.1mm
resolution but Single Echo measurements in 0.01mm
resolution.
Automatic Probe Detection
The Automatic Probe Detection works by listening to how the
probe behaves when first plugged in. For that reason the probe
MUST BE in the air and not coupled to a surface when plugging in
or turning on the gauge.

Cygnus 2+ Operating Manual
M5-CYG2P-M-01_Iss6.doc
42
When Probe Type = Auto and a probe is connected a message will
be displayed informing what type of probe was det ecte d;
Observe this message and check it matches the probe connected
to the gauge.
If the gauge fails to correctly detect the probe type then you must
select it manually from the list of probes. See Selecting the Probe
Type on page 40.
Measurement Units
The Gauge can display thickness measurements in either Metric
(mm) or Imperial (inch). Changing the measurement units will not
affect the calibration.
1.
Press the Menu key
2.
Press the Up Select key to get to
the Units item
3.
Press the Menu key to change
the value
4.
Use the Up and Down Select
keys to switch from mm to Inch

M5-CYG2P-M-01_Iss6.doc
Cygnus 2+ Operating Manual
43
5.
When done press the Menu key
to save the new value.
Or press the Power / Cancel to
exit without saving.
Resolution Setting
The gauge can display thickness measurements in three resolution
settings:
• 0.1 mm 0.005 inch
• 0.05 mm 0.002 inch
• 0.01 mm 0.001 inch
For general metal corrosion measurement the 0.1 mm setting is
recommended.
To change the Resolution setting:
1.
Press the Menu key
2.
Press the Up Select key to get to
the Resolution item

Cygnus 2+ Operating Manual
M5-CYG2P-M-01_Iss6.doc
44
3.
Press the Menu key to change
the value
4.
Use the Up and Down Select
keys to switch from mm to Inch
5.
When done press the Menu key
to save the new value.
Or press the Power / Cancel to
exit without saving.
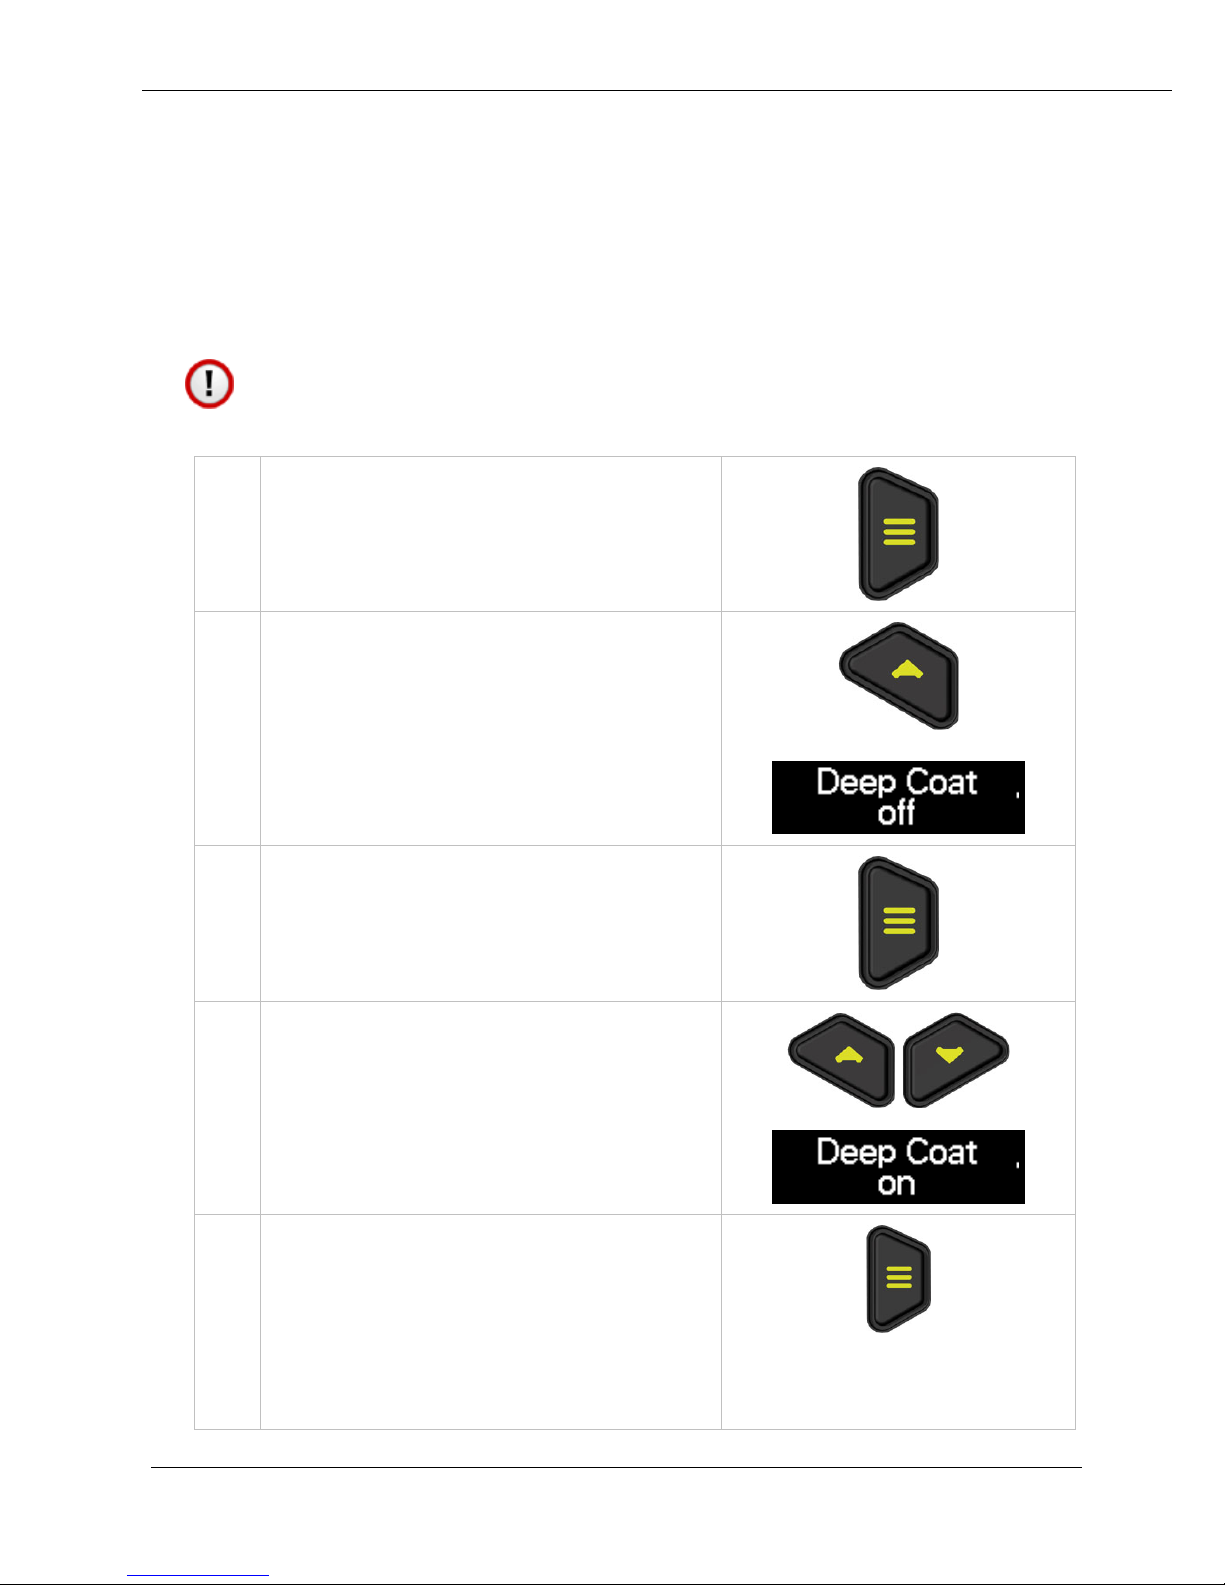
Deep Coat Function (multiple echo mode)
The Deep Coat function is not available from the Main Menu
by default. To show the Deep Coat option in the menu please
contact Cygnus for instructions.
In Multiple Echo mode with the Deep Coat turned Off the gauge
can measure through most protective coatings up to 3 mm (0.11”)
thick when using a S2C type probe. Coatings like paint, anti-foul,
hard plastics and epoxy shou ld present no problems as long as
they have not de-laminated/de-bonded from the metal surface.
In Multiple Echo mode with Deep Coat turned On will allow the
gauge to measure through coat in gs over 3mm (0.11”) thick up to
a maximum of around 20 mm (0.78”) depending on the properties
of the coating material.
Measuring through thick coatings is ultimate ly limited by how well
the coating material allows the ultrasound to pass through, soft
M5-CYG2P-M-01_Iss6.doc
Cygnus 2+ Operating Manual
45
coatings like rubber or bitumen don’t transmit ultrasound very
well.
Deep Coat is only available in Multiple Echo mode.
Using Deep Coat will not affect the calibration.
Turn Deep Coat Off when NOT measuring through thick
coatings otherwise this may cause inaccurate measurements.
1.
Press the Menu key
2.
Press the Up Select key to get to
the Deep Coat item
3.
Press the Menu key to change
the value
4.
Use the Up and Down Select
keys to switch from On to Off
5.
When done press the Menu key
to save the new setting.
Or press the Power / Cancel to
exit without saving.

Cygnus 2+ Operating Manual
M5-CYG2P-M-01_Iss6.doc
46
Vibrate Alert Function
The gauge can vibrate to alert the user when a thickness
measurement has been made. Thi s feature can be turned on or off
as required.
In Single Echo and Echo-Echo measurement mod es the vibrate
alert will be triggered when a stable measurement is detected. See
Measurement Stability Indication in SE & EE Modes on page 26.
1.
Press the Menu key
2.
Press the Up Select key to get to
the Vibrate item
3.
Press the Menu key to change
the value
4.
Use the Up and Down Select
keys to change the setting from
On to Off

M5-CYG2P-M-01_Iss6.doc
Cygnus 2+ Operating Manual
47
5.
When done press the Menu key
to save the new value.
Or press the Power / Cancel to
exit without saving.
Display Rotate Function
If the gauge is worn on a belt using t h e Krusell belt clip the end
display will be upside down. To rotate the display so it can be read
set the Display Rotate function to ‘y es’. Now the thickness
measurement display will be rotated 180 degrees.
When you remove the gauge from the belt clip and access the
Main menu the display will rotate back the normal way around so
you can hold the gauge normally.
1.
Press the Menu key
2.
Press the Up Select key to get to
the Rotate Display item
3.
Press the Menu key to change
the value
4.
Use the Up and Down Select
keys to change the setting
between yes and no

Cygnus 2+ Operating Manual
M5-CYG2P-M-01_Iss6.doc
48
no = don’t rotate.
yes = rotate 180 degrees
5.
When done press the Menu key
to save the new setting.
Or press the Power / Cancel to
exit without saving.

M5-CYG2P-M-01_Iss6.doc
Cygnus 2+ Operating Manual
49
8. General Points On Thickness Gauging
On very rough surfaces and especially if both sides are badly
corroded, it is often necessary to move the Probe around to locate
a back wall reflector. Sometimes a slight rocking movement can
help find reflectors which are otherwise impossible.
Badly corroded sections can also be soaked with a light lubricating
oil to improve ultrasound coupling through to the good material.
Always ensure that there is p lenty of couplant present for good
contact, but beware that on a pitted surface the Gauge may just
measure the couplant-filled pit, always avoid measuring directly
over external pits.
Beware that in extreme conditions or if the plate is of poor quality
and contains many inclusions the ultrasound will be scattered to
such an extent that measurement may not be possible.
Beware that the multiple-echo technique will not work if the front
and back surfaces of the mater ial being measured are not close to
parallel. Also note that long narrow bars cannot be gauged along
their length with the multiple-echo method.
The Gauge should not be used near arc-welding equipment, as th is
affects its performance.

Cygnus 2+ Operating Manual
M5-CYG2P-M-01_Iss6.doc
50
9. Troubleshooting
The Gauge will not Switch On
• Are the batteries exhausted?
• Check the batteries are inserted correctly.
Difficulty obtaining a Reading
• Check that the Probe lead is properly connected to both Probe
and Gauge.
• Check the gauge is set for the probe connected.
• Check the condition of the lead, replace if necessary.
• Check the Probe and its membrane are properly assembled (if
a single element probe).
• On heavily corroded areas this is often a problem, try and
take measurements in adjacent areas of the same material.
You could also consider using a twin element probe in single
echo mode.
• Check the Gauge and Probe together on a test block, if there
is still no reading the Gauge may require servicing.
If Readings are Erratic or Unstable
• Check that the Probe-lead is properly connected to both
Probe and Gauge.
• Check that the Probe and its membrane are correctly
assembled with sufficient couplant between the probe face
and membrane (if a single element probe).
• Check the Probe Type is suitable for the probable minimum
thickness of the material being measured. Probe frequencies
too low cause doubling and tripling of the actual thickness.
Tips for Optimising Battery Life
• Couplant left on the probe face will stop the gaug e e ntering
low power saving mode – so wipe couplant off the probe face
between measurement sessions.

M5-CYG2P-M-01_Iss6.doc
Cygnus 2+ Operating Manual
51
• When measuring on very heavily corroded metal with single
element probes the gauge uses more power searching for a
multiple echo match – this can significantly reduce battery
life. So if you are frequently measuring on very heavy
corrosion consider using a twin element probe as this will
require less power to get measurements.

Cygnus 2+ Operating Manual
M5-CYG2P-M-01_Iss6.doc
52
10. Updating your Gauge
As part of our policy of ongoing development and product
improvement Cygnus may issue firmware updates for your model
of gauge. The firmware on the gauge can be easily updated by
the user using update software downloaded from the Cygnus
website.
Before updating your gauge note the model and serial number of
the gauge (se e Turning the Gauge On on page Error! Bookmark
not defined.). You can then check on the Cygnus website if your
gauge has the latest firmware version, and if not proceed to
download the update software.
You can check for the latest gauge firmware on the Cygnus
website [ http://www.cygnus-instruments.com
]. Navigate to
Support -> Downloads -> Technical Software and look for a
PDF document called ‘M5 Surface Gauge Firmware Version Info’
view this document to find the latest version for your gauge along
with any changes made. Note yo u will n eed to create an account
to access this section of the website.
Update Software
To update a gauge you must first download and install the ‘Cygnus
M5 Surface Gauge Updater’ software. This is available from the
Cygnus website in the Support -> Downloads -> Technical
Software section. There is a PDF document with instructions
available.
Gauge Firmware Files
You must download the appropriate Gauge Firmware file for the
model of gauge, there are three to ch oose from; Cygnus 2/2
+
,
Cygnus 4/4
+
or Cygnus 6+ PRO.
Once downloaded the gauge can be easily updates via the USB
cable connecting the gauge to the computer. The whole process
takes about 2 minutes. There is a PDF document with detailed
instructions available on the website.

M5-CYG2P-M-01_Iss6.doc
Cygnus 2+ Operating Manual
53
11. Care and Servicing
Cleaning the Gauge
Clean the Gauge and accessories with a damp cloth. Use
water with a mild detergent household cleaner.
Do not use solvents to clean the Gauge.
Do not use any abrasive cleaner, especially on the display
window.
Do not immerse the Gauge in liquid when cleaning.
Batteries
Always remove the batteries if the Gauge will not be used for
more than a few days.
Only use leak-proof batteries, Cygnus recommend Duracell
batteries.
Environmental
Do not immerse the Gauge in liquids. The gauge is designed
to be IP67 but it is not intended for use in water.
Do not subject the Gauge to temperatures greater than 50˚C
(122˚F).
Do not store the Gauge for long periods in conditions of high
humidity.
Storage
Do not store the Gauge in temperatures greater than 35˚C
(95˚F).
Repairs
There are no user serviceable parts inside the Gauge.
Therefore all repair work should be carried out by Cygnus
Instruments or by an Authorised Cygnus Service dealer.

Cygnus 2+ Operating Manual
M5-CYG2P-M-01_Iss6.doc
54
OLED Display
Avoid leaving the gauge in direct sunlight as the high
temperatures generated can shorten the life of the OLED display.
Returning the Gauge for Servicing
A full Manufacturer’s Factory Service is available from Cygnus
Instruments.
The Complete Kit should always be returned for Service or
Repair, including all Probes and Leads.
Cygnus Gauges are renowned for their reliability, very often
problems with getting measurements are simply due to the way
the Gauge is being used.
However, if you do need to return y ou r Gauge for Repair please let
us know the details of the problem, to help us guarantee the best
possible service:
• Is the problem Intermittent Behaviour?
• Is there a problem turning the Gauge On?
Or a problem with the Gauge turning itself Off?
• Does the Gauge constantly give Incorrect Readings, or
Unsteady Readings?
• Is it not possible to Calibrate the Gauge?

M5-CYG2P-M-01_Iss6.doc
Cygnus 2+ Operating Manual
55
12. Information
Technical Specifications
Cygnus M5-C2P Technical Specifications
General Attributes
Size
84 mm x 130 mm x 35 mm (W x H x D)
(3.3 in x 5.1 in x 1.4 in)
Weight
Gauge with batteries 300 g (10.5 oz.)
Power Supply
3 x AA / R6 Batteries.
Probe Sockets
2 x Lemo 00
Operating Temperature Range
-10°C to +50°C (14°F to 122°F)
Storage Temperature Range
-10°C to +35°C (14°F to 95°F)
Battery Operation Time
Approximately 10 hrs. continuous measurem ent with fully
charged Duracell Alkaline LR6 batteries.
Battery Voltage Range
Min 3.0 V dc, Max 4.5 V dc
Battery Type
AA Size. LR6 Alkaline / HR6 NiMH.
Low Battery Indication
Batte ry level indication on display with low battery warning
message.
PRF
N/A
Monitor Outputs
N/A
Through Coating
Measurements
Multiple-Echo mode with Single element 0° probe;
• Through coating measurement for coatings up to 3 mm
thick as standard depending on coating velocity.
• Deep Coat mode provides ability to measure through
thicker coatings depending on coating material.
Echo-Echo mode with Twin element probe;
• Through coating measurement for coatings up to 1 mm
thick as standard depending on coating velocity.
Materials
Sound velocity from 1000 m/s to 9000 m/s
[0.0390 in/us to 0.3543 in/us]

Cygnus 2+ Operating Manual
M5-CYG2P-M-01_Iss6.doc
56
Cygnus M5-C2P Technical Specifications
Measurement Ranges
(in steel)
Single element 0° probes in Multiple Echo mode;
S2C/D probe
3 to 250 mm
[0.120 in. to 10.00 in.]
S3C probe
2 to 150 mm
[0.080 in. to 6.000 in.]
S5C/A probes
1 to 50 mm
[0.040 in. to 2.000 in.]
Twin element probes in Single Echo mode;
T2C probe
2.5 to 250 mm
[0.098 in. to 10.00 in.]
T5B probe
1.5 to 200 mm
[0.059 in. to 7.900 in.]
T7A probe
0.8 to 50 mm
[0.031 in. to 2.000 in.]
Twin element probes in Echo-Echo mode;
T2C probe
5.0 to 50 mm
[0.200 in. to 2.000 in.]
T5B probe
4.0 to 50 mm
[0.160 in. to 2.000 in.]
T7A probe
3.0 to 25 mm
[0.120 in. to 1.000 in.]
Probe Zero
Twin element probes are zeroed in the air without the need of
a zero block. The user is prompted to zero the probe at power
up and after a probe change.
Single element probes in multiple echo mode do not need to
be zeroed.
Measurement Modes
Single Echo mode with Twin element probe. Measures
thickness using the time from the delay line (ze ro point) to the
first back-wall echo. (UT Mode 2)
Echo-Echo mode with Twin element probe. Measures thickness
using the time between the first and second back-wall echoes.
(UT Mode 3)
Multiple Echo using Single element probe. Uses three matched
and verified back-wall echoes to determine the material
thickness and ignore surface coatings.
High Temperature
Measurement
All standard single element and twin element probes:
Allows continuous measurement up to 75°C (160°F).
Resolution
Single Echo and Echo-Echo measurement modes;
Low
0.1 mm
[0.005”]
Medium
0.05 mm
[0.002”]
High
0.01 mm
[0.001”]
Multiple Echo measurement modes;
Low
(measurement > 120 mm)
0.1 mm
[0.005”]
Medium
(measurement < 120 mm)
0.05 mm
[0.002”]
Accuracy
±0.1 mm (±0.004”) or 0.1% of thickness measurement whichever is
the greatest.
Display

M5-CYG2P-M-01_Iss6.doc
Cygnus 2+ Operating Manual
57
Cygnus M5-C2P Technical Specifications
Type of Display
OLED Monochrome
Display Size
128 x 32 Pixels. 25.58 mm (W) x 6.38 mm (H)
Display Information
Digital Thickness Value. Settings. Battery Level.
Transmitter
Shape of Pulse
Square
Pulse Energy : Voltage (peakto-peak)
70 V p-p
Pulse Energy : Rise Time
3 ns (max)
Pulse Energy : Pulse Duration
S2C : 220 ns
S2D : 220 ns
S3C : 100 ns
S5A / S5C : 67ns
T2C : 220 ns
T5B : 100 ns
T7A : 67 ns
HT5 : 100 ns
Receiver
Gain Control
Automatic Gain Control depending on probe and measurement
mode.
Frequency Range
1.0 MHz to 10.0 MHz (-6dB)
Other Information
Data Output and Storage
Non.
Data Connector
USB Mini B Connector under battery cover.
Can be used to update the gauge firmware and load gauge
settings.
Calibration setting storage
Calibration Data stored to Internal Flash Memory
Calibration Mechanisms
Not required for Mult iple Echo mode.
Automatic V-path correction for twin element probes.
Option of two point calibration for twin element probes.
Display & Recall Facilities
N/A
Display Response Time
125 ms / 500 ms
Printer Output
N/A
Environmental Rating
IPX67 (Water immersion 1 metre depth for 30 minutes)
MIL STD 810G Method 501.6 (High Temp +55°C)
MIL STD 810G Method 502.6 (Low temp -20°C)
MIL STD 810G Method 507.6 (Humidity 95%)
MIL STD 810G Method 512.6 (Immersion 1m, 30min)
Shock & Impact
MIL STD 810G Method 514.7 (Vibration)
MIL STD 810G Method 516.7 (Shock 20g)
MIL STD 810G Method 516.7 (Transit Drop 1.22m)
Compliance
RoHS Complia n t.
Designed for BS EN 15317:2000.
CE Marked including EMC.

Cygnus 2+ Operating Manual
M5-CYG2P-M-01_Iss6.doc
58
Specifications are subject to change for p roduct improvement.

M5-CYG2P-M-01_Iss6.doc
Cygnus 2+ Operating Manual
59
Table of Sound Velocities
Velocities will vary according to the pre cise grade and processing
conditions of the material being measured.
This table is included as a guide only.
Wherever possible, the Gauge should always be calibrated on
the material under test.
These Velocities are given in good faith and are believed to
be accurate within the limits described above.
No liability is accepted for errors.
Velocities given are the compressional wave velocity cl.
Material
Velocity of Sound (V)
Conversion
Factor (f)
m/s in/us
Aluminium (alloyed)
6380
0.2512
1.078
Aluminium (2014)
6320
0.2488
1.068
Aluminium (2024 T4)
6370
0.2508
1.076
Aluminium (2117 T4)
6500
0.2559
1.098
Brass (CuZn40)
4400
0.1732
0.743
Brass (Naval)
4330
0.1705
0.731
Brass (CuZn30)
4700
0.1850
0.794
Copper
4700 - 5000
0.1850 – 0.1969
0.794 – 0.845
Core Ten
5920
0.2331
1.000
Grey Cast Iron
4600
0.1811
0.777
Inconel
5700
0.2244
0.963
Lead
2150
0.0846
0.363
Monel
5400
0.2126
0.912
Nickel
5630
0.2217
0.951
Phosphor Bronze
3530
0.1390
0.596
Mild Steel
5920
0.2331
1.000
Tool Steel
5870
0.2311
0.992
Stainless Steel 302
5660
0.2228
0.956
Stainless Steel 347
5790
0.2279
0.978

Cygnus 2+ Operating Manual
M5-CYG2P-M-01_Iss6.doc
60
Stainless Steel 304
5664
0.2229
0.956
Stainless Steel 314
5715
0.2250
0.965
Stainless Steel 316
5750
0.1163
0.971
Tin
3320
0.1307
0.561
Titanium
6100 - 6230
0.2402 – 0.2453
1.030 – 1.052
Tungsten Carbide
6660
0.2622
1.125
Epoxy Resin
2500
0.0986
0.422
Acrylic
2730
0.1076
0.461
Nylon (Polyamid e)
2620
0.1032
0.443
Reading Conversions
If only a few measurements are to be taken on a material other
than Steel, it may be easier to leave the calibration set for Steel
and merely convert th e readings by multiply ing by the
Conversion Factor for the material being measured.
This method avoids unnecessary recalibration.
Example.
The Gauge is calibrated for Steel [5920 m/s], but the reading is
being taken on Copper [4700 m/s] :
T = t x V
COPPER
/ V
STEEL
= t x 4700 / 5920
= t x 0.794
thus : T = t x f [ where: f = V
COPPER
/ V
STEEL
]
where : T = true thickness of Copper being measured
t = actual reading obtained
f = Conversion Factor (from table)
V
COPPER
= Sound Velocity in Copper : 4700 m/s
V
STEEL
= Sound Velocity in Steel : 5920 m/s
The Conversion Factor f: is given for various materials in the
Table of Sound Velocities

M5-CYG2P-M-01_Iss6.doc
Cygnus 2+ Operating Manual
61
13. EU Declaration of Conformity

Cygnus 2+ Operating Manual
M5-CYG2P-M-01_Iss6.doc
62
14. Recycling and Disposal (EC Countries)
The WEEE Directive (Waste Electrical and Electronic Equipment
2002/96.EC) has been put into place to ensure that products are
recycled using best available treatment, recovery and recycling
techniques to ensure human health and high environmental
protection.
The Gauge has been designed and manufactured with high quality
materials and components which can be recycled and reused. It
may contain hazardous substances that could impact health and
the environment. In order to avoid the dissemination of those
substances in our environment and to diminish the pressure on
natural resources we encourage you to dispose of this product
correctly.
D
O NOT dispose of this product with general household
waste.
D
O dispose of the complete product i n cluding cables,
plugs and accessories in the designed WEEE collection
facilities.
T
his product may also be returned to th e agent or manufacturer
who supplied it for safe end-of-life disposal.
C
ygnus Instruments Ltd registration number for The WEEE
Directive is WEE/HE1274RU.

M5-CYG2P-M-01_Iss6.doc
Cygnus 2+ Operating Manual
63
15. Warranty Information
LIMITED THREE YEAR WARRANTY
FOR CYGNUS ULTRASONIC THICKNESS GA UGES
1. Cygnus Instruments Limited (“CYGNUS”) warrants that, subject as set out below,
the Products manufactured by it (excluding consumables, batteries, probes, leads,
microphones and telescopic extensions) will be free from defects in materials and
workmanship for a period of three years from the date of purchase either from
CYGNUS or from an Authorised CYGNUS Distributor. Batteries, probes, leads,
microphones and telescopic extensions are warranted for 6 months. This warranty is
limited to the original Purchaser of the Product and is not transferab le. During the
warranty period, CYGNUS will repair, replace or refund, at its option, any defective
Products at no additional charge, provided that the product is returned by the
original Purchaser, shipping prepaid, to CYGNUS or an Authorised CYGNUS
Distributor. If shipped by mail or any common carrier, the Purchaser must insure
and accept all liability for loss or damage to the Product and must use shipping
containers equivalent to the original packaging. Replacement products or parts will
be furnished on an exchange basis only. All replaced products or parts become the
property of CYGNUS.
2. Any defects in ma terials or workm a ns hi p m us t be n otified to CYGNU S by the
Purchaser within seven days after the discovery of the defect or failure.
3. Dated proof of purchase must be provided by the Purchaser when requesting
warranty work to be performed or making any other claim under this warranty.
CYGNUS will not be liable under this warranty unless the total price for the Product
was paid by the due date for pay me nt.
4. This warranty does not exten d to any pro du ct s whic h have be en da ma ge d as a
result of, accident, misuse or abuse, natural or personal disaster, service,
modification or repair by anyone other than CYGNUS or an Authorised CYGNUS
Service Centre, failure to properly store or maintain the Product, negligence,
abnormal working conditions, fair wear and tear, or failure to follow the instructions
issued by CYGNUS in relation to the Product.
5. Except as expressly set forth above or in the CYGNUS Terms of Sale, subject to
which the Products were purchased, all warranties, conditions or other terms implied
by Statute or Common Law are extended to the fullest extent permitted by law.
6. Except in respect of death or personal injury caused by the negligence of Cygnus,
Cygnus shall not be liable to the Purchaser or to any other person by reason of any
representation (unless fraudulent), or any implied warranty, condition or other term,
or any duty at common law, or under the express terms of the contract for purchase
of the Products, for loss of profit or for any indirect, special or consequential loss or
damage, costs, expenses or other claims for compensation whatsoever (whether
caused by the negligence of Cygnus, its employees or agents or otherwise) which
arise out of or in connection with the supply of the Products or their use or resale by
the Purchaser or by any other person. The entire liability of Cygnus under or in
connection with the Products shall not exceed the price paid for the Products, except
as expressly provided in this warranty.

Cygnus 2+ Operating Manual
M5-CYG2P-M-01_Iss6.doc
64
16. Index
Automatic Power Off, 24
Batteries
Fitting, 10
Level, 28
Life, 28
Low Battery Warning, 28
NiCad, 10
NiMH, 10
Belt Clip, 13
BS EN 15317:2007, 30
Calibration
Conversion Factor, 60
Ladder Step Wedge, 32
Single Point, 30
Two Point Calibration, 32
Velocity of Sound, 36
Deep Coat, 44
Display
Rotate, 47
Disposal, 62
Echo-Echo, 17
Gauge
Cleaning, 53
Display, 23
Keys, 23
Serial Number, 24
Version Number, 24
Hand Strap, 12
Ignore Coatings, 16
Imperial, 42
Main Menu, 38
Measurement
Pitted surface, 49
Measurement
Resolution, 43
Rough surfaces, 49
Small Pipes, 27
Stability, 26
Units, 42
Metric, 42
Multiple Echo, 16
Echo Bars, 26
Neck Strap, 13
No Probe Message, 24
Plastics, 18
Power button, 24
Probes
Automatic Detection, 41
Cable, 11
Connector, 23
Knurled Ring, 20
Membrane Couplant, 20
Membrane Key, 2 0
Polyurethane Membrane
Membrane, 18
Type, setting, 40
Zero, 34
Recycling, 62
Repair, 54
Resolution, 43
Service, 54
Single Echo, 16
Sound Velocities, 59
Test block, 30
Thick Coatings, 44
Thickness Measurement, 25
Troubleshooting, 50
Units, 42
Vibrate Alert, 46
Warranty, 63
WEEE Directive, 62
Zeroing, 34

ALPINE
COMPONENTS
Postal Address
Alpine Components Ltd
Innovation Centre, Highfield Drive
Churchfields
St. Leonards-on-
Sea
TN38 9UH
United Kingdom
Telephone
01424 858118
Website Address
www.alpine-
components.co.uk
"Alpine Components" is the abbreviated trading name for "Alpine Components Limited"
The company has been trading since 1991 and was incorporated on 13/11/2006 in the United Kingdom
Company Registration Number: 05996485
VAT Number: GB583598190
 Loading...