

Page 1

GrooveToons
Speaker & alarm clock system
for iPod nano
Page 2

Warranty
Cygnett 12 month Manufacturers Warranty
For product support, check the latest instructions &
updates in the Support Section of our website:
www.cygnett.com or email us at info@cygnett.com
Register online at www.cygnett.com to
activate your warranty.
Thank you for purchasing Cygnett's
GrooveToons speaker & alarm clock system.
Now you can wake up to your favourite
iPod tunes.
iPod is a trademark of Apple Inc., registered in the U.S.
and other countries.
Page 3

Contents
1
Your GrooveToons . . . . . . . . . . . . . . . . . . . . . . . . . . . .
Docking . . . . . . . . . . . . . . . . . . . . . . . . . . . . . . . . . . .
Setting up Power Supply . . . . . . . . . . . . . . . . . . . . . .
Setting Automatic Clock Display . . . . . . . . . . . . . . .
Setting Alarm . . . . . . . . . . . . . . . . . . . . . . . . . . . . . . . .
Snooze Operation . . . . . . . . . . . . . . . . . . . . . . . . . . . . .
Other Operation . . . . . . . . . . . . . . . . . . . . . . . . . . . . . .
2
3 - 4
5
6
7 - 8
8
9
Page 4
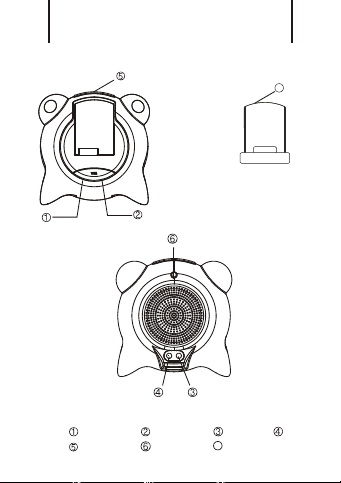
Your GrooveToons
2
7
? ?
Volume ‘-’
?SNOOZ E ?POWER
Volume ‘+’ ?9V DC IN
7
Dock for iPod nano G3
?LINE IN
Page 5

Docking
3
Step 1a
A special insert is included for use with iPod nano Gen 3.
Please follow the following steps to correctly dock your
iPod nano Gen 3:
1) Move the dock connector to the right
2) Slide the insert carefully on top of the dock
connector. Then carefully dock the iPod.
- iPod nano Generation 3
Page 6

Docking
4
Step 1b
Dock iPod into Docking Station. The dock can be
repositioned depending on which generation nano is to
be used. Slide the dock into the correct position for your
generation nano.
- iPod nano Generations 1 & 2
Gen 2 Gen 1
Page 7

Setting up Power Supply
Step 2
Plug power adaptor into “9V DC in” on rear of
Groovetoons unit. Connect adaptor to wall socket.
5
Page 8

Setting automatic clock display
Step 3
Your nano may automatically display time when docked on
your Groovetoons unit. If it does not automatically display the
clock it can be displayed automatically by doing the following.
1) Hold down the snooze button for 3 seconds and go
into the main menu.
2) Press the snooze button to move to ‘Extras’. Press the
snooze button for 3 seconds over ‘Extras’ to enter the
menu.
3) Press and hold the Snooze button over ‘Clock’ to enter the
clock.
4) Power cycle the GrooveSnooze
by turning the power off
at the wall.
After programming the
clock view as above, the ipod
nano will automatically
display the clock when docked
in the GrooveSnooze unit.
6
Page 9

Setting alarm - iPod nano G3
Step 4a
1) Choose Extras > Alarms.
2) Choose Create Alarm and set one or more of the
following options:
a. Turn the alarm on. To turn the alarm on
choose ‘Alarm’ and choose On.
b. Set the time. To set the time Choose ‘Time’. Use
the Click Wheel to change the selected value.
Press the Center button to move to the next value.
c. Set the date. To set the date Choose ‘Date’. Use
the Click Wheel to change the elected value. Press
the Center button to move to the next value.
d. Choose a sound. Choose a tone or playlist. If
you choose playlist, select the playlist you would
like to hear when the alarm triggers. (Please note
the speaker unit must be on, in iPod mode to hear
through speakers).
e. Set a repeat option. To set a repeat option
choose ‘Repeat’ and choose an option (for
example, “weekdays”).
f. Name the alarm. To name the alarm choose
‘Label’ and choose an option (for example,
“Wake up”).
7
Page 10

Setting Alarm - iPod nano G1 & G2
Step 4b
1) Enter the main menu of your ipod and select ‘extras’ and
then ‘clock’
2) Select ‘Alarm’ and set the time(s) for your alarm(s)
3) Go back into the clock display mode
4) Press pause when you want to stop your iPod
and sound. iPod will automatically play again when alarm
initiates
Step 5
Snooze operation
Press the snooze button on top of the unit after alarm
sounds. The alarm will snooze for approximately 9
minutes before it sounds again. (Note snooze and alarm
function only operates with iPod nano)
8
Page 11

Other Operation
Step 5
The Groovetoons unit can be used to play other devices
by connecting the auxiliary cable from ‘line in’ on the
back of the unit to the ‘line out’ from another device
9
Page 12

©2007 Cygnett www.cygnett.com
iPod is a trademark of Apple Inc., registered in the U.S. and other countries
 Loading...