

Page 1

360 Degree Panoramic Camera
User Manual
Contents
Precaution
Camera Interface
Button Function
Camera Operation
Power on/off
Battery Charging
Video Mode
Normal Recording
Loop Recording
Picture Mode
Slow Motion Mode
Menu Setting
Install and Use CG360 Applications
Smart phone CG360 application
Windows CG360 application
Connect HDMI
Playback on PC
Technical specification
Precaution
Please read through the following guidelines prior to using the camera.
Please refer to manual instructions to operate the camera correctly. Incorrect
operation may cause damage to internal components.
Do not alter or dismantle the camera to avoid damage to the camera.
The temperature of the camera will rise while in use for a long period of time.
Do not touch the lens when recording this will affect the video quality.
Please use a "Class10" or above Micro SD card to ensure proper operation.
Page 2
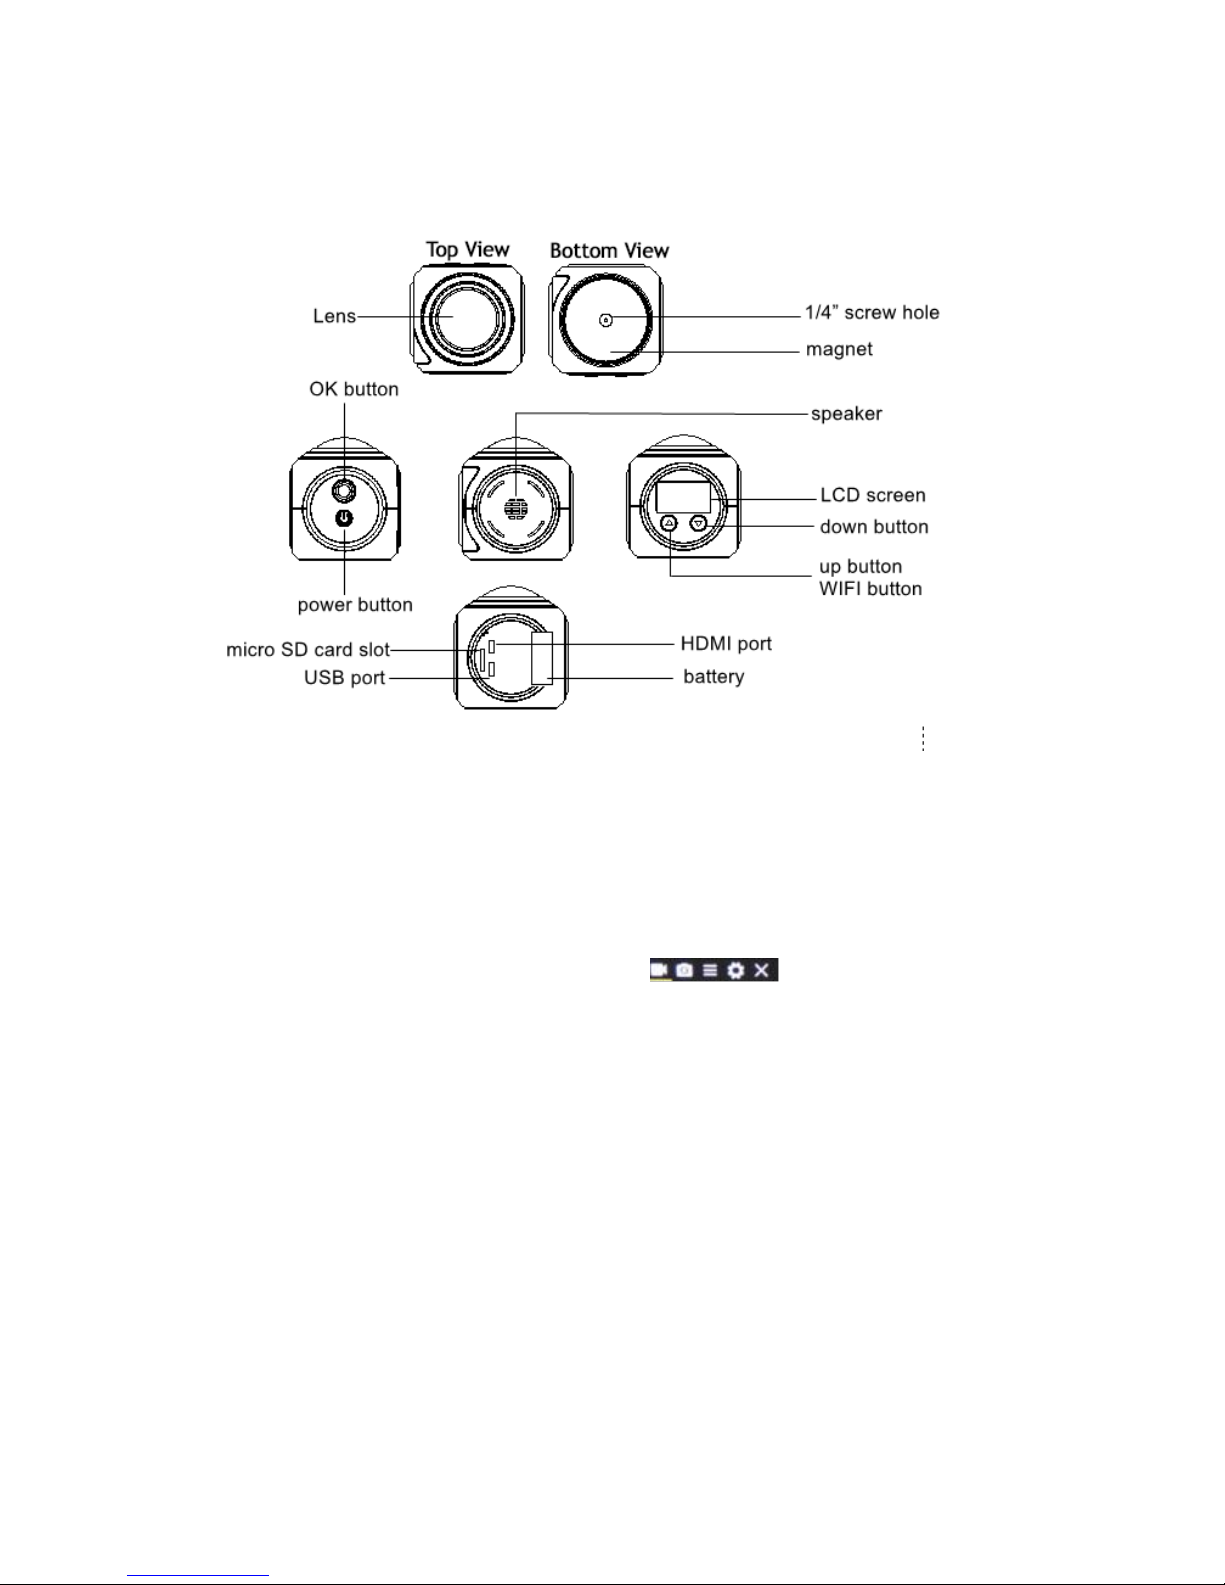
Camera Interface
Button Function
Power button:
Long press to turn on or turn off the camera
In standby mode - short press to switch into Video/Picture/Slow Motion/Menu Mode
In menu mode - short press to switch between Video menu/Picture menu/Function
menu/System menu and Exit
Shutter button:
In video mode: short press to capture
In picture mode: short press to take picture
In video/slow motion mode: short press to start/stop recording
In menu mode: short press to confirm setting
UP button/Wi-Fi button:
In menu mode: choose the last option or file
In video/picture/slow motion mode: long press to enter/exit Wi-Fi
Down button:
In video/picture/slow motion mode: short press to enter menu setting
In menu setting: short press to choose the next option or file
Page 3
Camera Operation
Power on/off
Power on: Long press power button, the display illuminates with a beep, camera
enters standby mode.
Power off: When camera is on, long press power button to switch the camera off.
Battery Charging
Connect camera with power charger via USB cable, the camera will power on
automatically. To fully charge the camera it will take approximately 90 minutes.
Video Mode
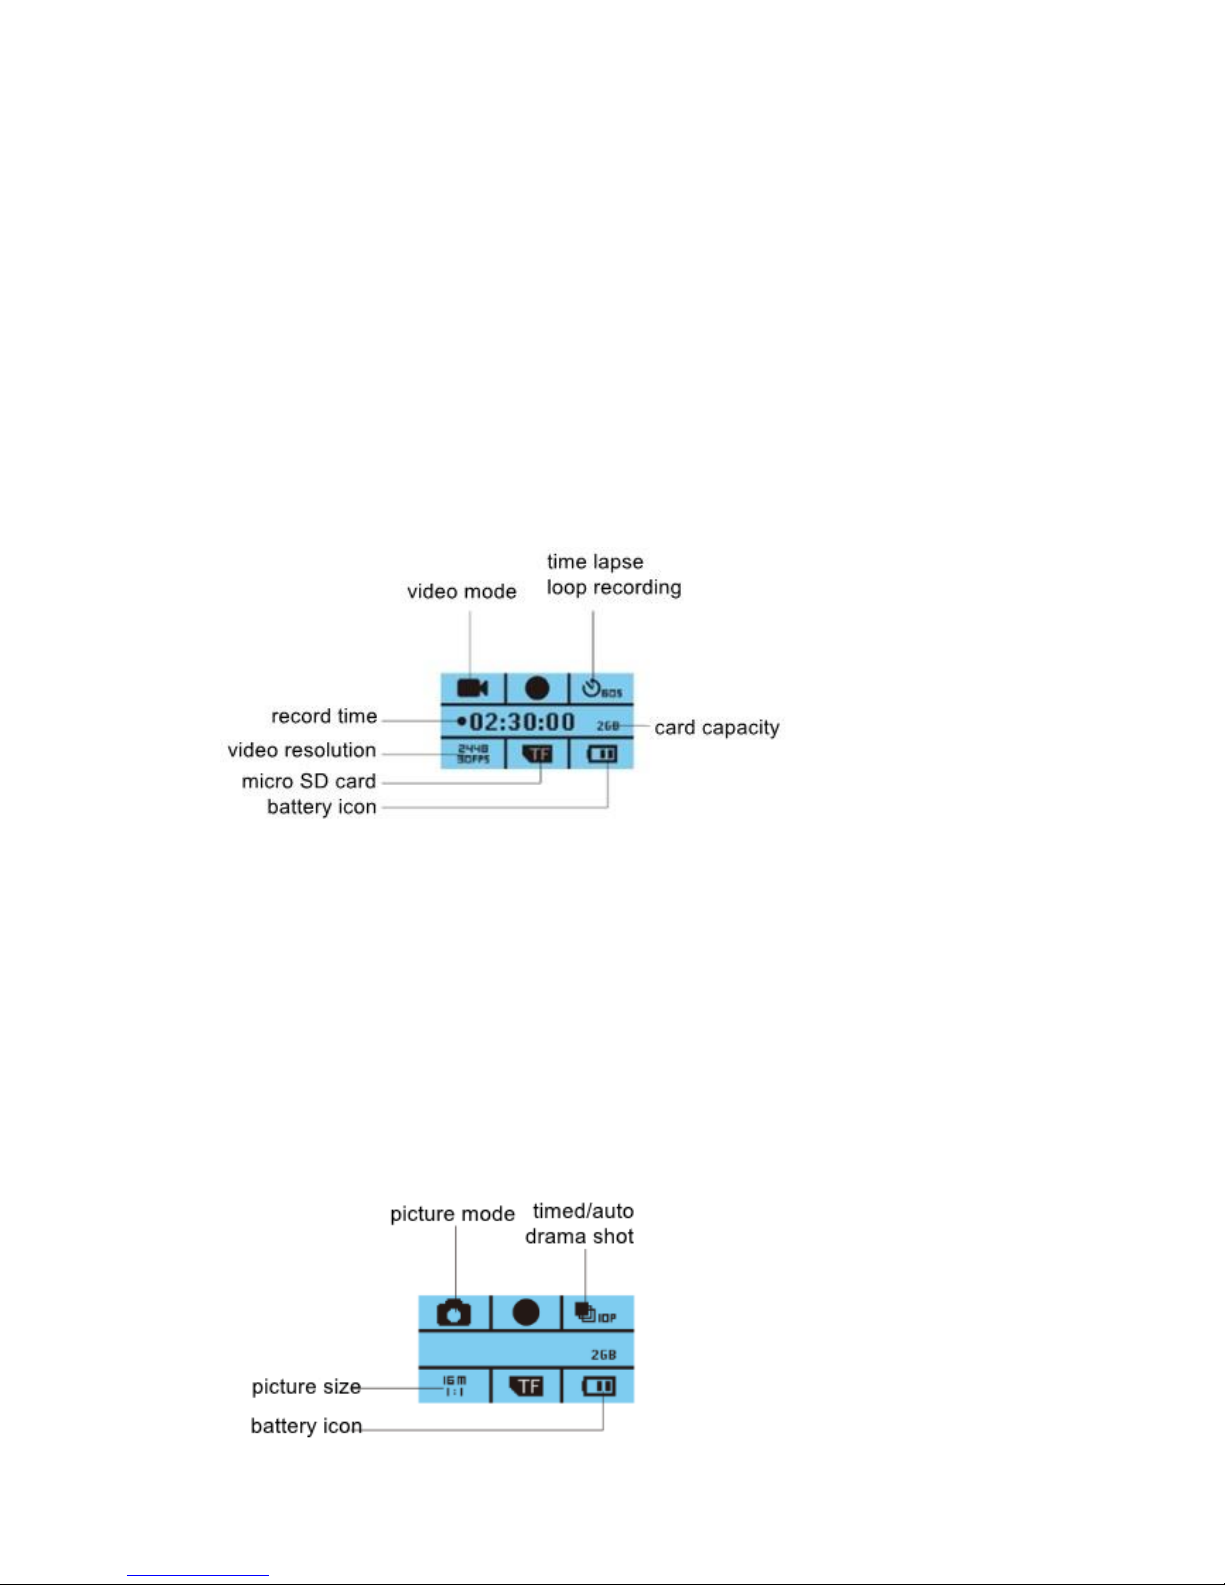
Normal recording
Short press Shutter button to start the recording. Camera will record till card is full.
Short press Shutter button again to stop recording.
Loop recording (refer to menu setting)
In menu settings for loop recording, set to either 2, 3, or 5 minute intervals. In standby
mode, short press Shutter button to start recording, the video will be saved as every
2mins/3mins/5mins per your loop recording interval setting. The earliest video file will
be overwritten when micro SD card is full.
Picture Mode
Page 4
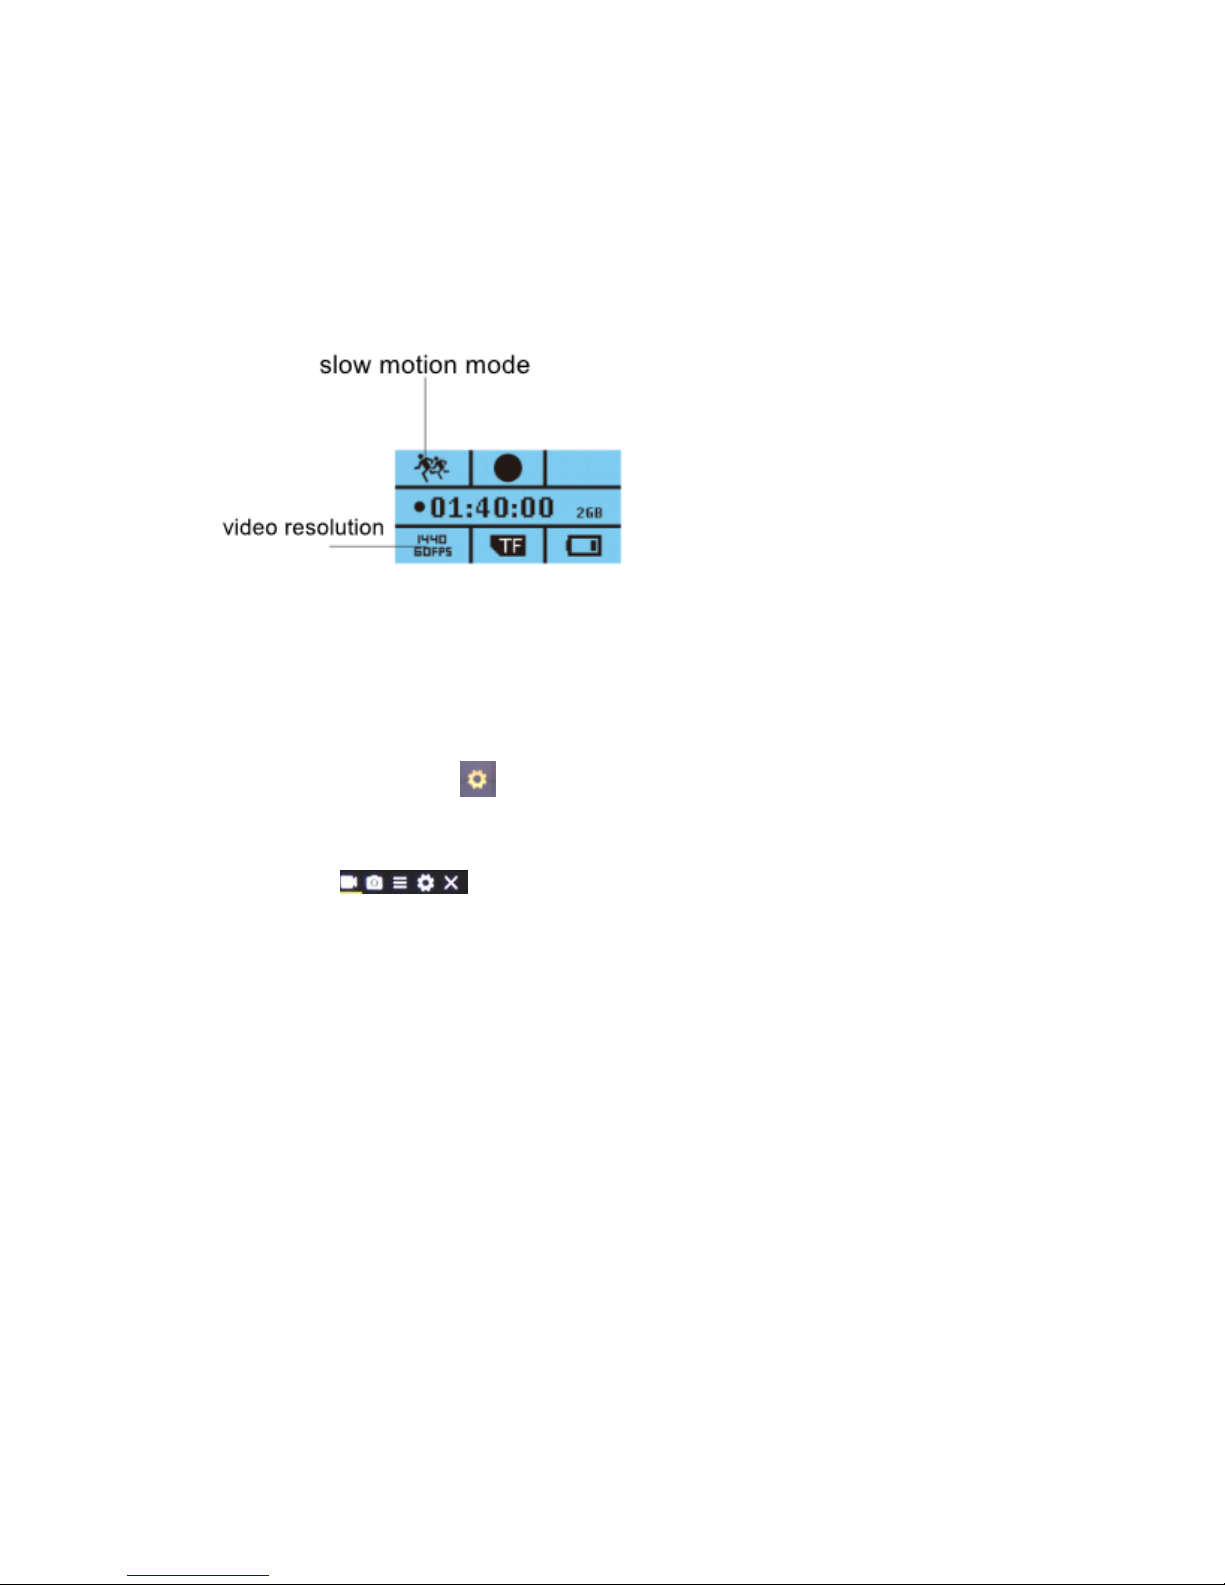
Camera default setting is Video mode. In standby mode, short press Power button
once to enter picture mode, aim at the object you want to shoot and press Shutter
button, camera will save pictures automatically.
Slow Motion Mode
The camera is in a locked setting and will take video in 1440p 60fps and the video will
be played in 1440p 30fps.
Menu Setting
In standby mode, short press Power button three times, then press Shutter button to
enter Menu setting mode .
Short press Power button to switch between Video/Picture/Function/System menus
and the Exit .
Press UP/Down button to select the option, and press the Shutter button to confirm
the menu setting.
Press Power button to switch to Exit, then press Shutter button to go back to standby
mode.
If you are in the Video mode, Picture mode, or Slow motion mode, short press the
Down button to enter corresponding Menu settings. Short press Power button to
switch between Video/Picture Modes OR the Function Menu and Exit.
For further instructions and support visit http://www.cyclopsgear.com/get-support
Video menu:
Resolution:2448P 30fps/2048P 30fps/1440P 60fps/1440P 30fps
1072P 60fps/1072P 30fps
Recording Sound: Off / On
Time lapse: Close/0.5s/1s/2s/5s/10s/30s/60s
Page 5

Loop recording: Close/2 minutes/3 minutes/ 5minutes
Slow motion:1440p 60fps
Picture menu:
Photo Size: 16M / 12M / 8M / 5M
Timed: Close/3s/5s/10s/20s
Auto: Close/3s/10s/15s/20s/30s
Drama Shot: Close 3P/S 5P/S 10P/S
Function Menu:
Exposure: -3 -2 -1 0 1 2 3
White Balance: Auto/Sunny/Cloudy/Incandescent light/Fluorescent light
Wi-Fi: Off / On
Image Rotation: Off / On
Driving Mode: Off / On
Light Source Frequency: Auto/50HZ/60Hz
Led Indicator Light: Off / On
Auto Screen saver: Close/10s/20s/30s
Auto Shutdown: Close/1 minute/3 minutes/5 minutes
System menu:
Language: English/Traditional Chinese/Simplified Chinese/Japanese/Korean/
Russian/German/French/Spanish/Italian/Dutch/Polish/Portuguese/Arabic
Date & Time: 2016 09 18 17:08:21
Format: Confirmation/Cancel
Reset to Factory Settings: Confirmation/Cancel
Firmware Version:20160918V06
Install and Use CG360 Applications
Smart phone mobile application
Search for "CG360" in Google Play or Apple App Store to download and install
CG360 application.
Long press Up button on the camera to turn on Wi-Fi, the screen displays the
Wi-Fi icon. Then it will display “Wi-Fi SSID:CG360” and Wi-Fi password.
Find “CG360” in the Wi-Fi list of smart phone, enter the password (Default
password is recordlife) to connect to it.
Open the CG360 application on your smart phone, you can now
control the camera via the smart phone application.
Long press UP Button of camera to go back to standby mode.
Page 6
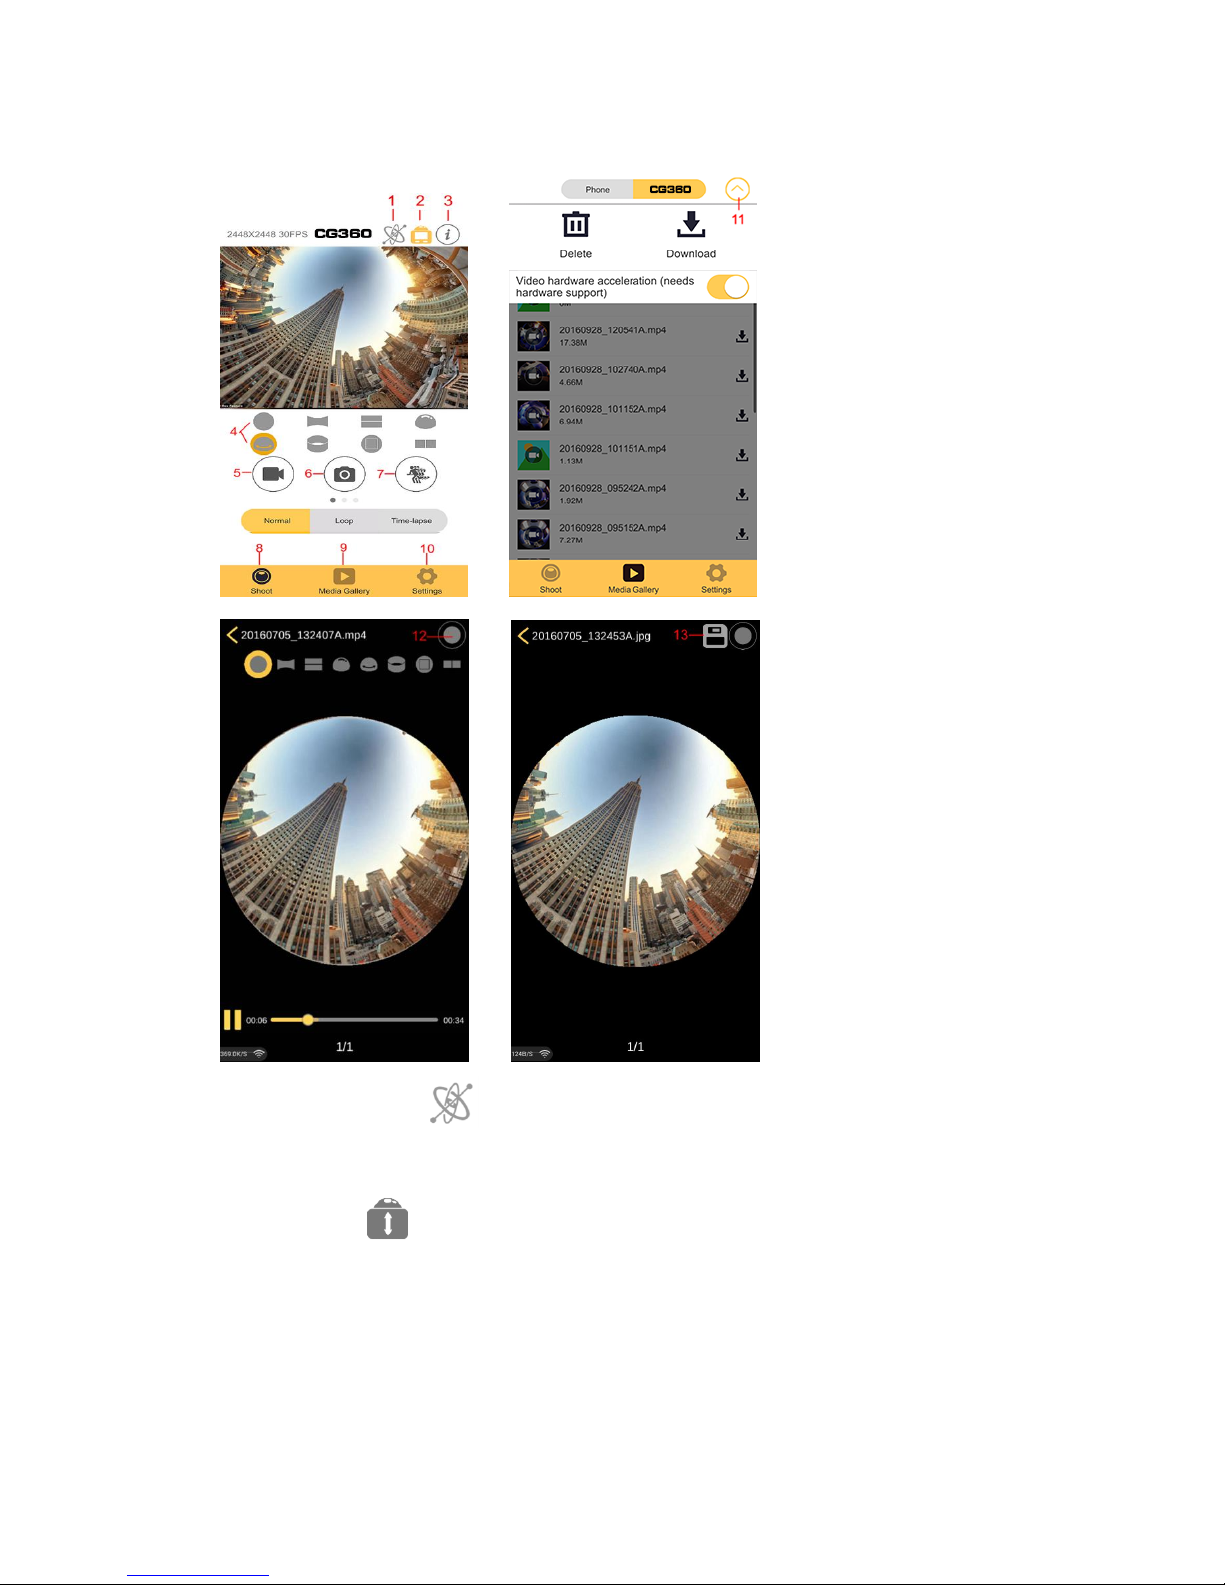
CG360 Application Interface
1. Gyroscope Mode: The gyroscope function is used to determine the phone
position using gyroscope data; you can toggle this on/off to change the viewing
experience.
2.Invert Mode: The picture will be rotated 180 degrees; you can toggle this
on/off to change the viewing experience.
3.Application version
4.Image special effects
5.Video icon: click it to start/stop recording.
6.Picture icon: click it to take pictures.
7.Slow motion icon: click it to start/stop slow motion recording.
Page 7
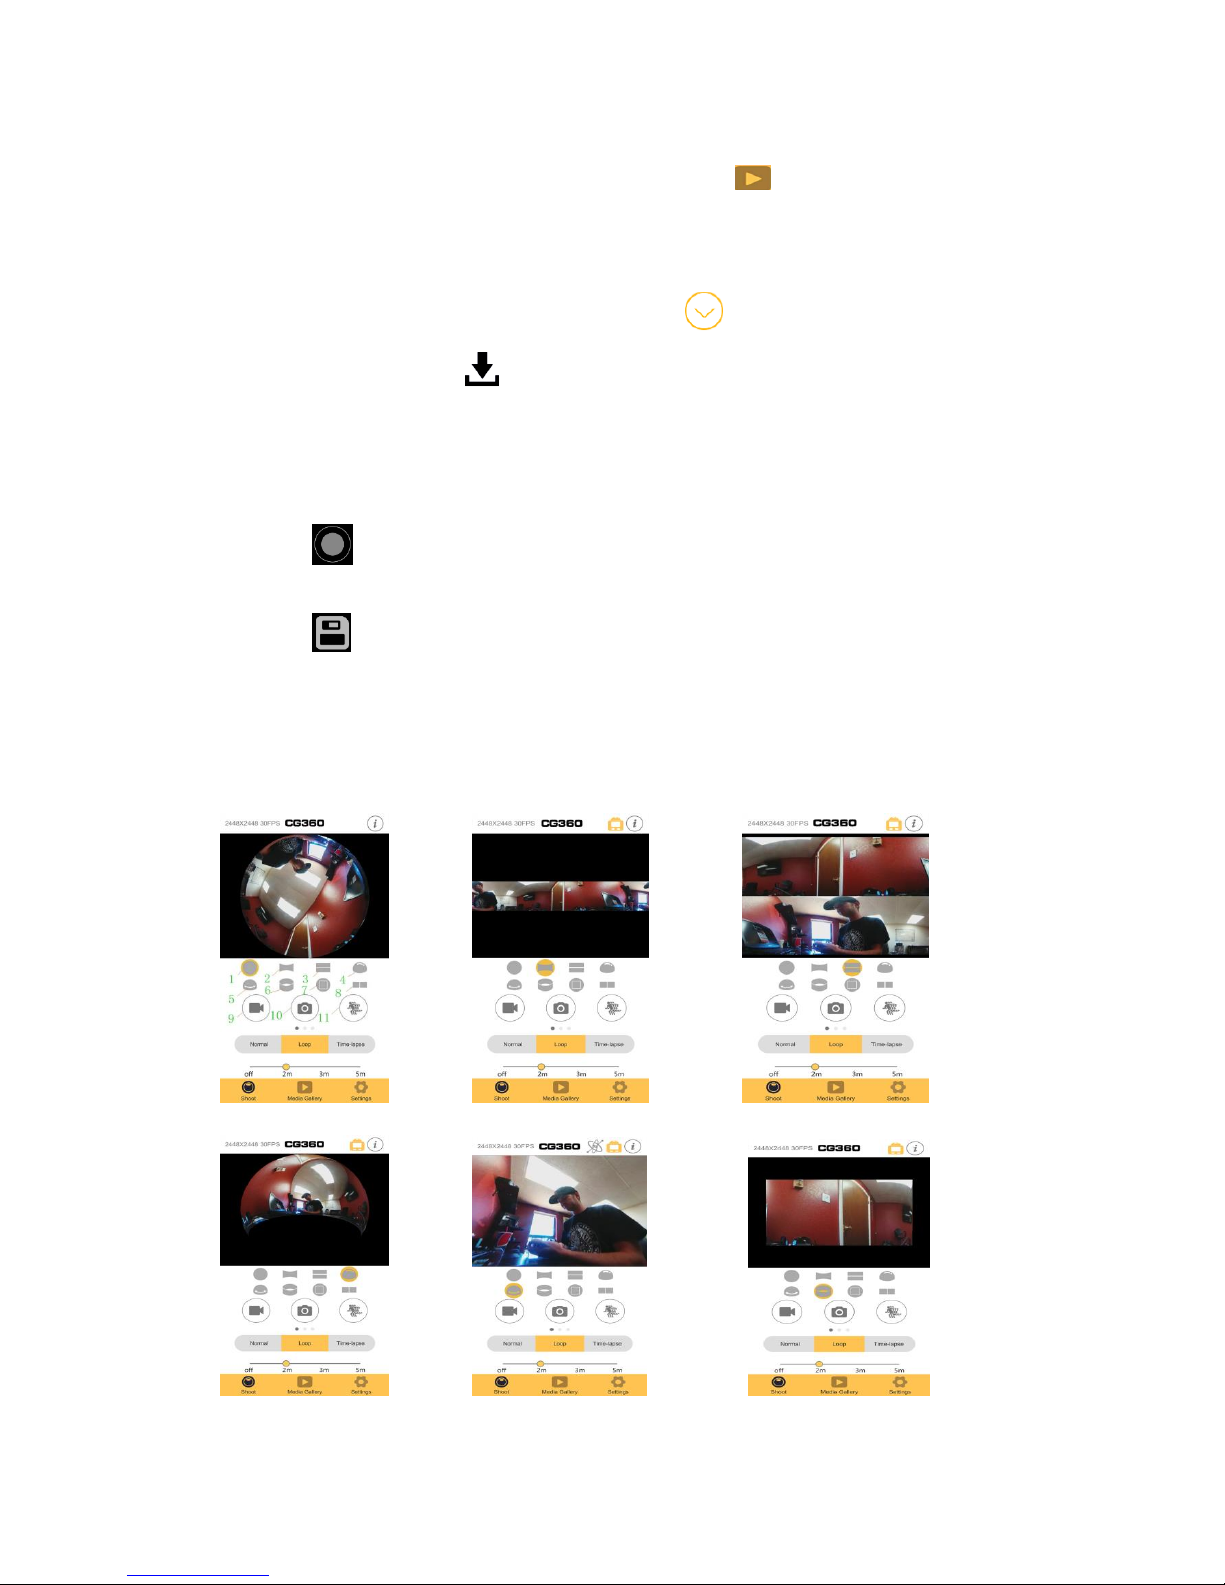
8.Video mode
9.Playback mode: In the standard interface, click to enter preview/play-
back mode and choose the file you want to view.
10.Setting
11.Switch into preview and download interface.
In the preview/playback interface, click the icon to enter the download
screen and then choose to download the files you want to transfer from the
camera to the smartphone.
Note: Be sure to select either “Phone” or “CG360” at the top of the application to
determine where you will be playing back the files from.
12.Click to display/hide the image special effects icon. In special effect
interface, slide the screen to change the perspective of image.
13.Click to save picture directly to smart phone.
Eight Effects Interface:
1.Fisheye 2.360-degree panorama 3.Split level 4.Asteroid
5.Inner ring 6.3D ring 7.16:9 Standard 8.VR
Fisheye 360 Panorama Split Level
Asteroid Inner Ring 3D Ring
Page 8
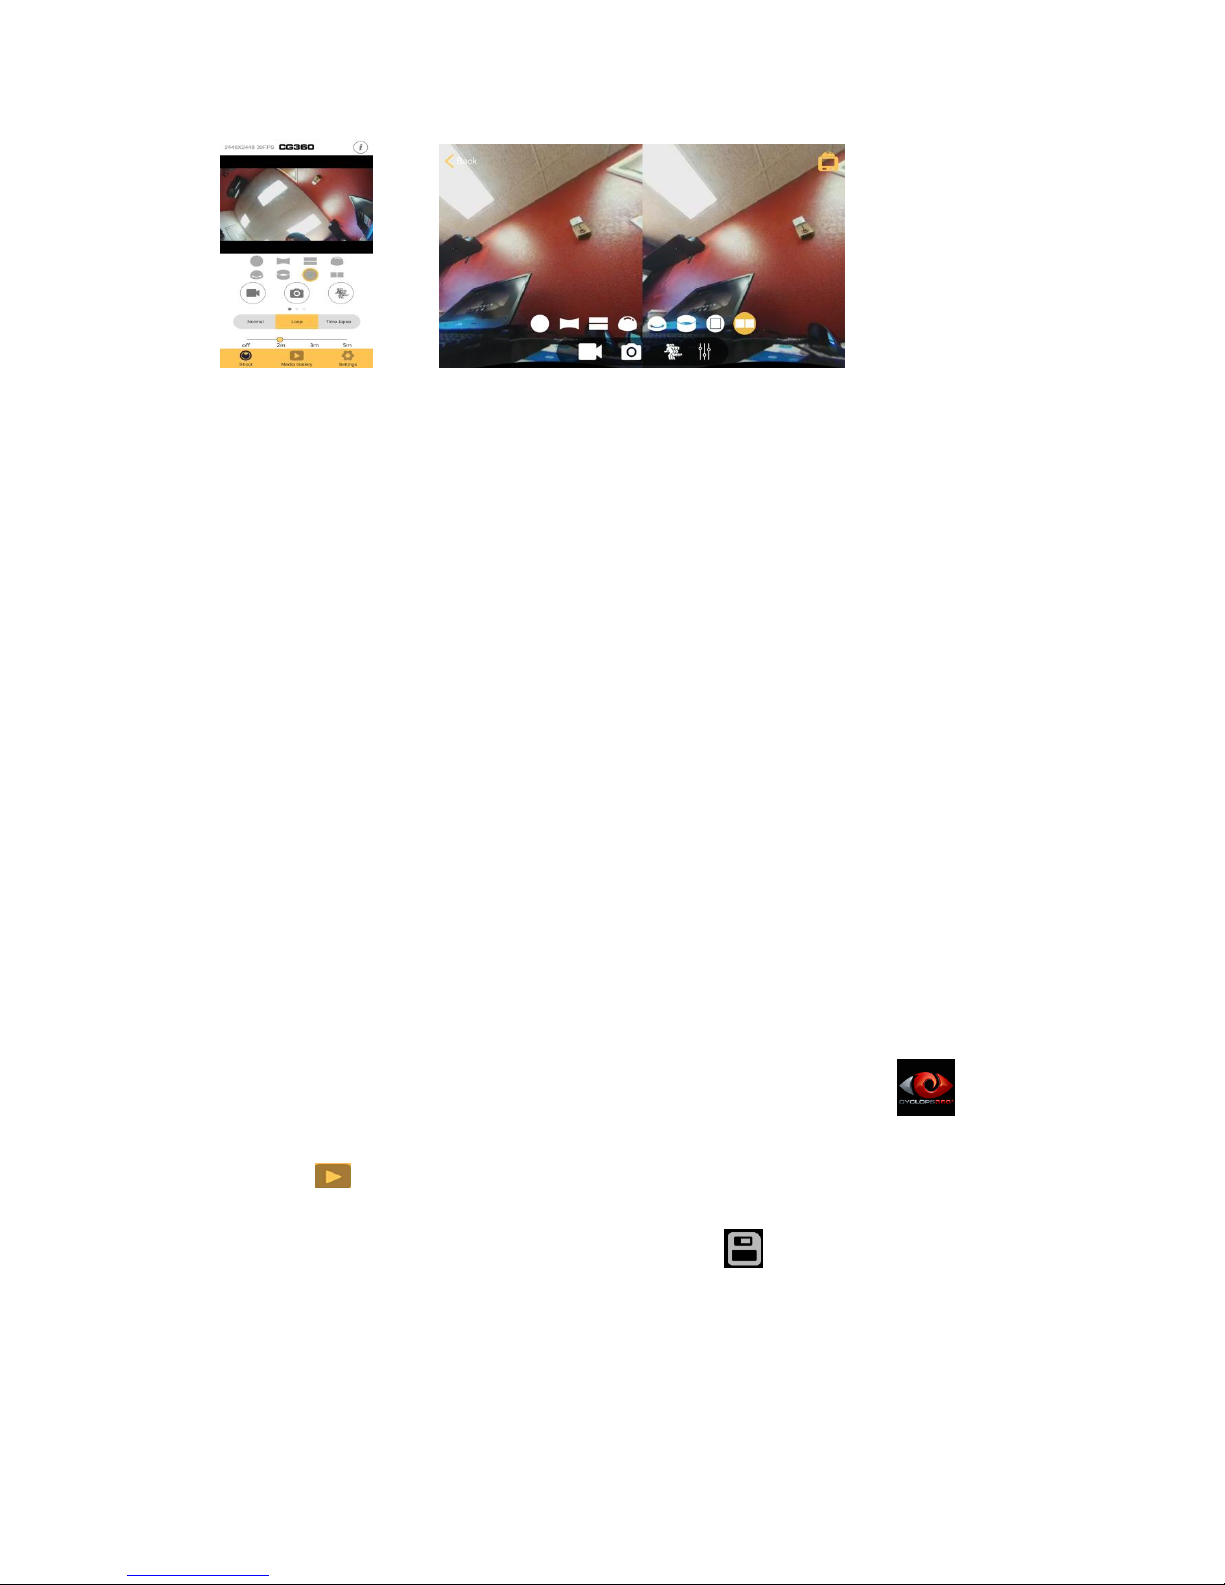
16:9 Standard VR
Application sharing:
The videos and pictures downloaded to the smart phone can be shared by other
applications installed on the smart phone. (COMING SOON) Please refer to
http://www.cyclopsgear.com/get-support/software for software release updates and
related information.
Windows CG360 Desktop Application
Features:
Contains all the standard features of the mobile phone application.
The special video effects can be used on an ordinary video player.
Supports playback offline.
Software Installation:
Download Windows desktop CG360 application to your computer. To find your
compatible version for download, please go to:
http://www.cyclopsgear.com/get-support/software
Operation:
Open the camera’s Wi-Fi function, and connect the camera to the Windows
computer, tablet or PC using the standard Wi-Fi connection by finding the camera
via your Windows Wi-Fi available networks.
Open Windows CG360 desktop application by double clicking on the icon
directly.
Click to enter playback mode, choose the video files you want to transcode.
(refer to pic1)
Play the video with special effects (pic2) and click to save the transcode file
(pic3). It will start the transcode automatically. (pic4)
Page 9
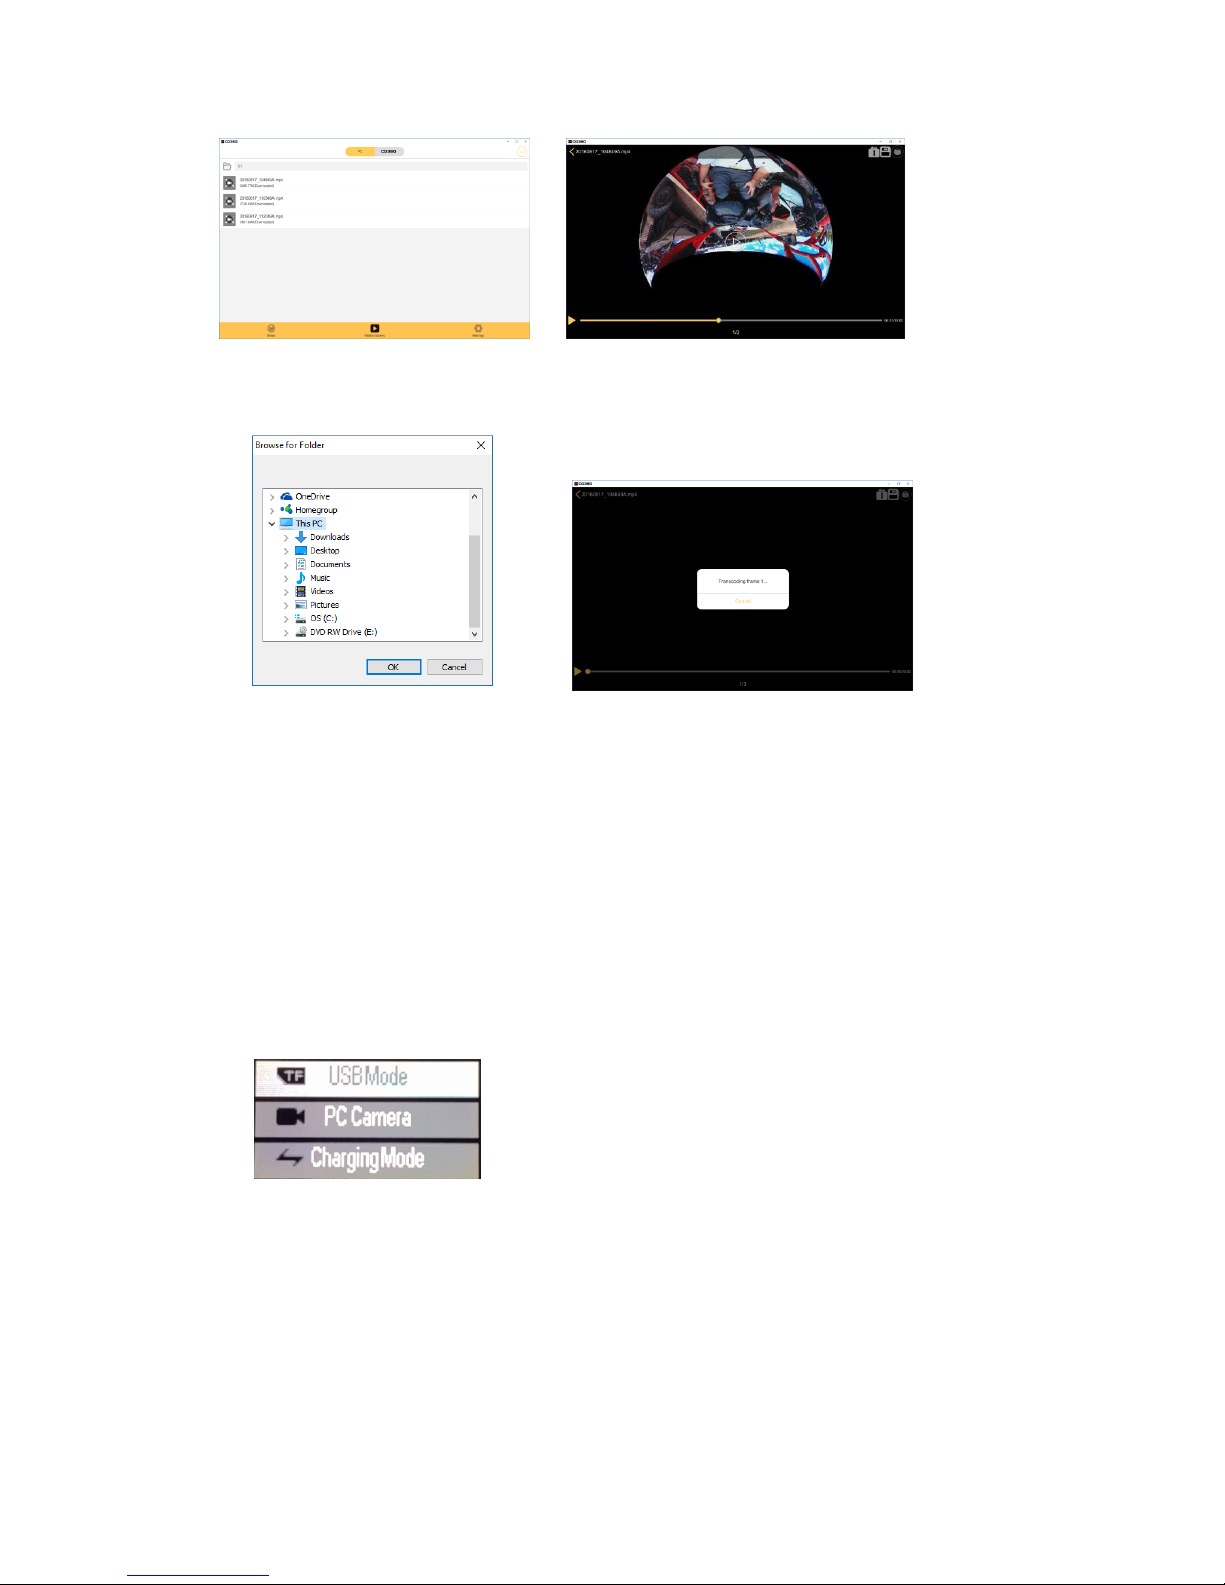
pic1 pic2
pic3 pic4
Connect via HDMI
Connect the camera to an HDMI TV via an HDMI cable. All operations can be
displayed in high definition on an HDMI TV screen.
Note:
Support for preview and playback ONLY, you cannot take videos or pictures.
Playback on PC
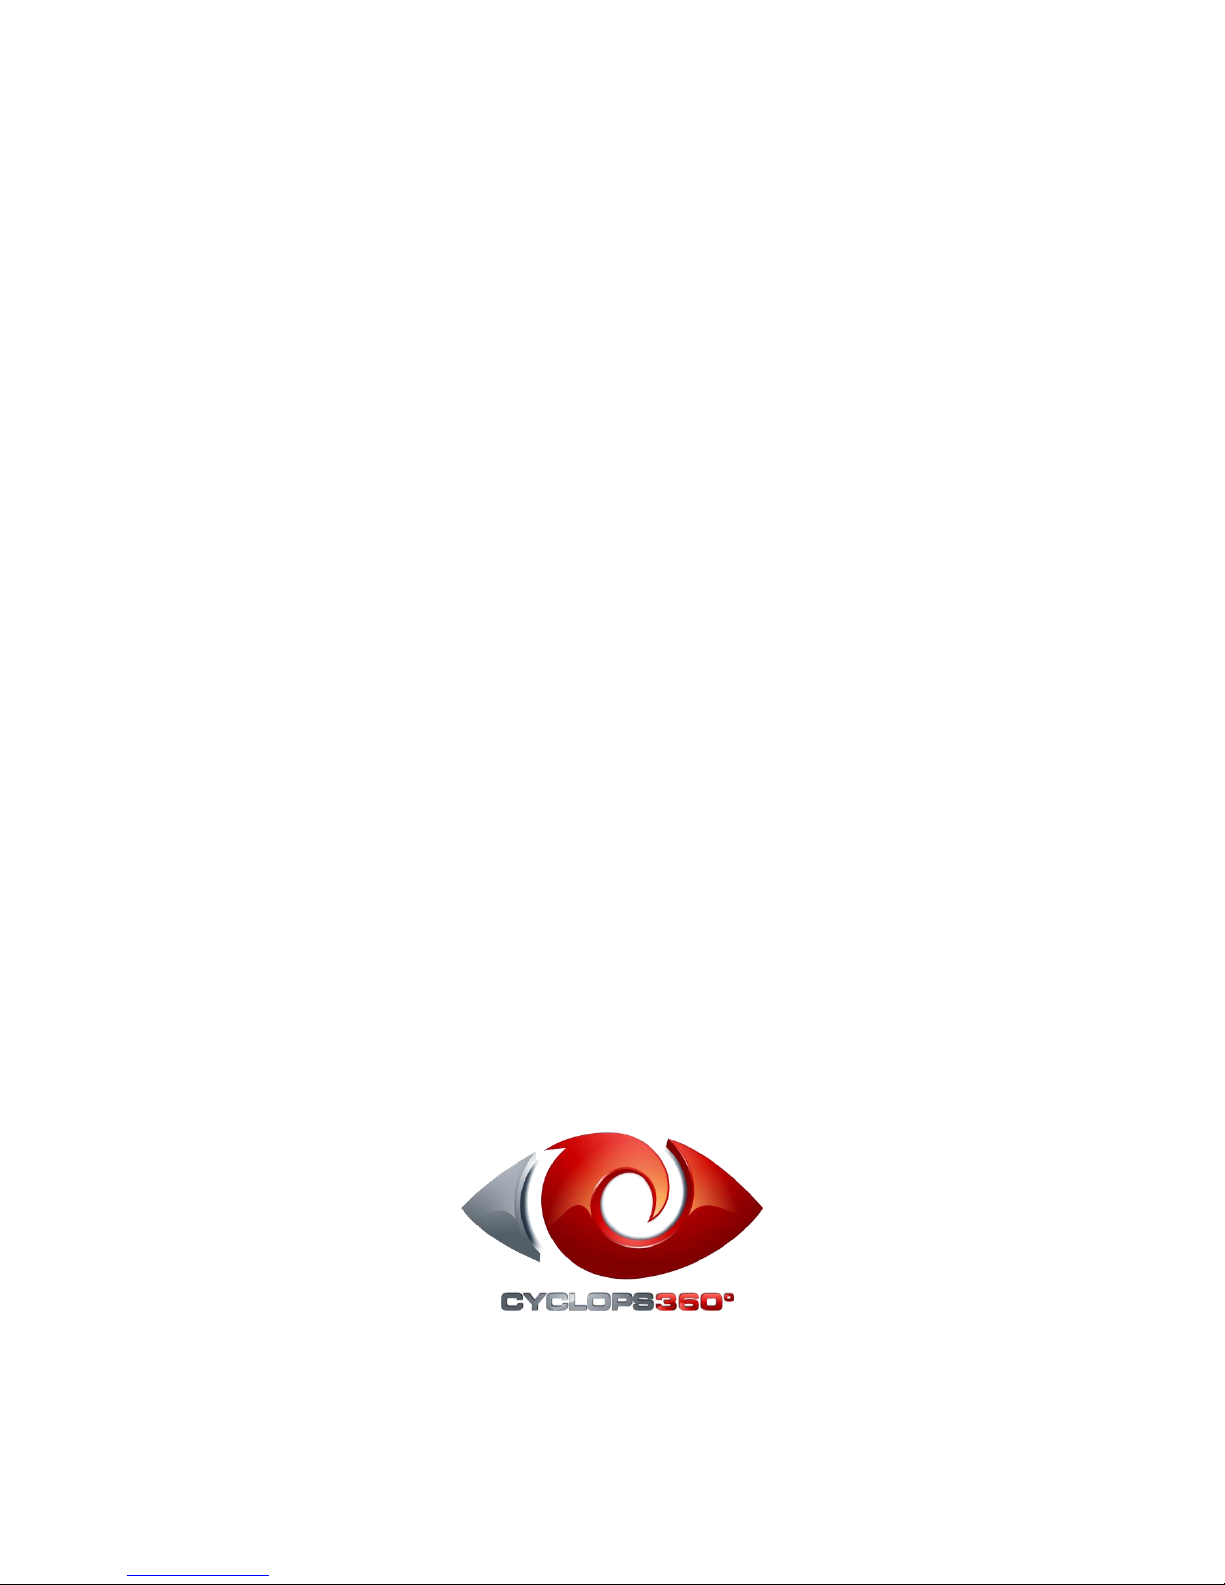
Connect the camera to a PC via the provided USB cable. The camera will turn on
automatically and the screen will display: “USB Mode”, “PC Camera”, “Charging
Mode”.
Press Up button or Down button to choose the option, press Shutter button to confirm.
USB Mode: Camera will be used as a removable disk.
PC Camera: Camera will be used as a PC camera.
Charging Mode: Camera can be used normally and be powered by the PC.
Page 10
Technical specification
Dimension
45mm*44mm*56mm
DSP
Allwinner V3
Sensor
SONY IMX179
Lens
220°FOV
Image size
16M / 12M / 8M / 5M
Resolution
2448×2448 30fps (1:1)
2048×2048 30fps (1:1)
1440×1440 60fps (1:1)
1440×1440 30fps (1:1)
1072×1072 60fps (1:1)
1072×1072 30fps (1:1)
Screen
0.96 inch LCD screen
Waterproof
50M
Audio
Built-in Microphone/speaker
Battery
Replaceable battery 1050mAh, recording time is about 80mins
Loop recording
Optional 2/3/5 minutes
File format
MP4 H.264/JPEG
Memory card
4GB to 32GB(Micro SD Card Class10 and Above)
APP Effects
Fisheye / 360° Panorama / Split Level / Asteroid /
Inner Ring / 3D Ring / 16:9 Standard / VR
Language
English / Traditional Chinese / Simplified Chinese/Japanese/
Korean/ Russian/German/French/Spanish/Italian/Dutch/
Polish/Portuguese/Arabic
Operating system
Windows XP/7/8.1/10/Vista and Mac 10.5 or above
Para Otros Idiomas: تاغل ىرخأ : 其他语言 : Pour D'autres
Langues : Für Andere Sprachen : 他 の 言 語 の : Per Altre Lingue
www.cyclopsgear.com/product-manuals.html
 Loading...