

Page 1
Please read all instructions before installing and operating.
All wiring and installation must be in accordance with CEC, NEC and local
electrical codes.
Attention : All Cyclone range hoods require a 6’’ducting. You must use no less
than 6 ‘‘ ducting for your warranty to be active. If you use any size ducting less
than mentioned above your warranty is automatically voided.
ONLY CYS1000R may use a 4’’ ducting.
Self-Cleaning Range Hoods
Installation and Operating Instructions
Page 2

2
READ AND SAVE THESE INSTRUCTIONS
CONTENTS
Pg. 3) Ducting
Pg. 4) Mount Heights & Clearance
Pg. 5) Canopy Range Hood Installation
Pg. 6) Electrical Grounding
Pg. 7) Specifications
Pg. 8) Control Panel
Pg. 9) Island Range Hood Installation instructions
Pg. 10) Mounting the Island Range Hood
Pg. 11) Diagram
Pg. 14) Island Surface Maintenance/Filters/ Replacing
Light Bulbs
Pg. 15) Cyclone Warranty
All rights reserved to North America Range Hoods Inc.
110 Silver Star Blvd., Unit 105, Scarborough, Ontario, Canada, M1V5A2
TEL: 416.293.0933 FAX: 416.293.4793
www.cyclonerangehoods.com
Page 3

3
READ AND SAVE THESE INSTRUCTIONS
Caution:
FOR GENERAL VENTILATING USE ONLY. DO NOT USE TO EXHAUST HAZORDOUS OR EXPLOSIVE
MATERIALS OR VAPORS.
This appliance must be installed by a qualified technician. The manufacturer declines all responsibility in case
of failure to adhere to safety standards. Ensure that exhausted air not directed into flue that is uses for venting
fumes from other appliances.
Warning
To reduce the risk of fire, electric shock, or injury to persons, observe the following:
1. Use this unit only in the manner intended by the manufacturer.
2. Before servicing or cleaning the unit switch power off at service panel and lock service panel
disconnecting means to prevent power from being switched on accidentally. When the service
disconnecting means cannot be locked securely fasten a prominent warning device to the service panel.
3. Installation work and electrical wiring must be done by qualified persons in accordance with all
applicable codes and standards, including fire-rated construction.
4. Sufficient air is needed for proper combustion and exhausting of gases through the flue of fuel burning
equipment to prevent back drafting. Follow the heating equipment manufacturer’s guideline and safety
standards as published by the local code authorities.
5. When cutting or drilling into wall or ceiling, do not damage electrical wiring.
6. Ducted ventilation systems must always be vented to the outdoors.
CAUTION:
To reduce risk of fire and to properly exhaust air, be sure to duct air outside – do not vent exhaust air into spaces within
walls, ceilings, attics, crawl spaces, or garages.
WARNING
TO REDUCE THE RISK OF FIRE, USE ONLY METAL DUCT WORK.
Install this hood in accordance with all requirements specified.
TOOLS AND MATERIALS REQUIRED
Electrical drill or Ratchet Driver
½” drill bit for drilling pilot holes
1 ¼” drill bit for drilling electrical wiring access hole.
Screwdrivers: Phillips & straight blade
Pliers
Tape measure or ruler and pencil
Electrical supplies for wiring
Aluminum foil tape and/or duct tape
Hammer
Jigsaw or saber saw
Two ¾” -1 ½” screws
Stud finder
All rights reserved to North America Range Hoods Inc.
110 Silver Star Blvd., Unit 105, Scarborough, Ontario, Canada, M1V5A2
TEL: 416.293.0933 FAX: 416.293.4793
www.cyclonerangehoods.com
Page 4
4
BEFORE INSTALLING THE HOOD
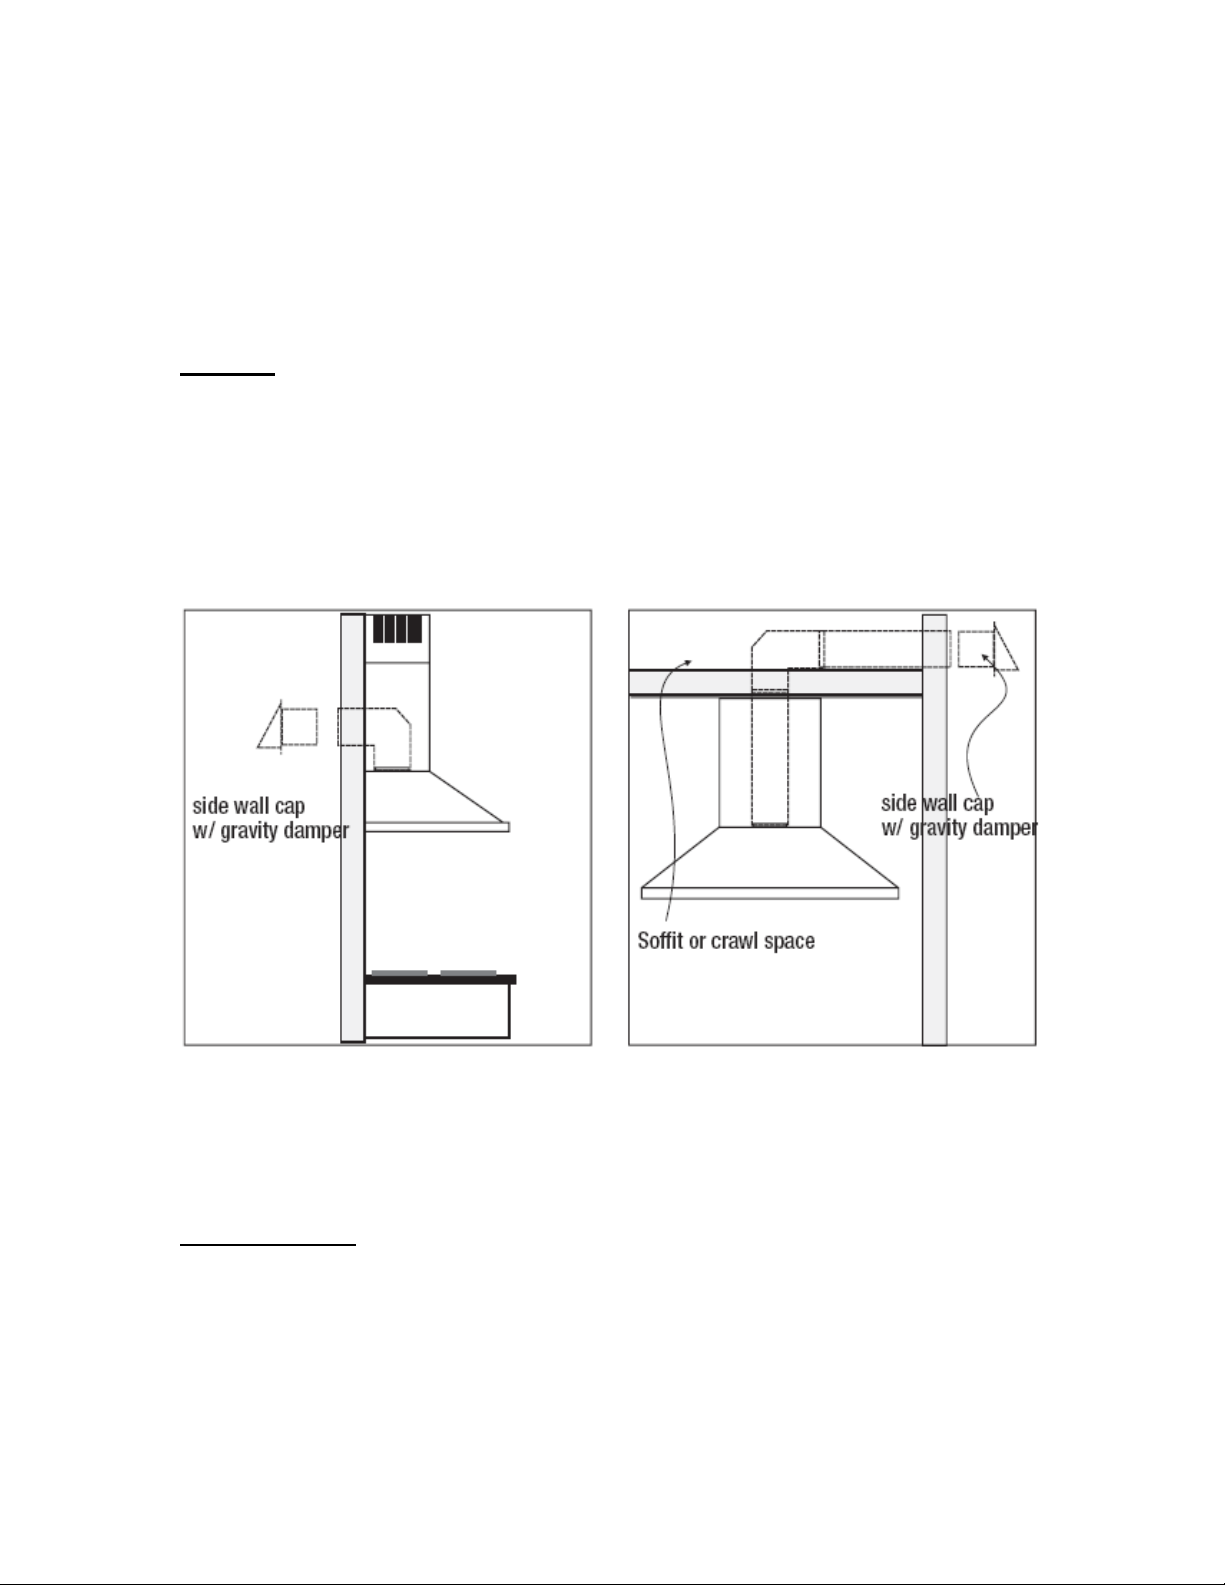
1. For the most efficient airflow exhaust use a straight run or as few elbows as possible. Vent unit to the outside
only.
2. Two people are required for installation
Ducting
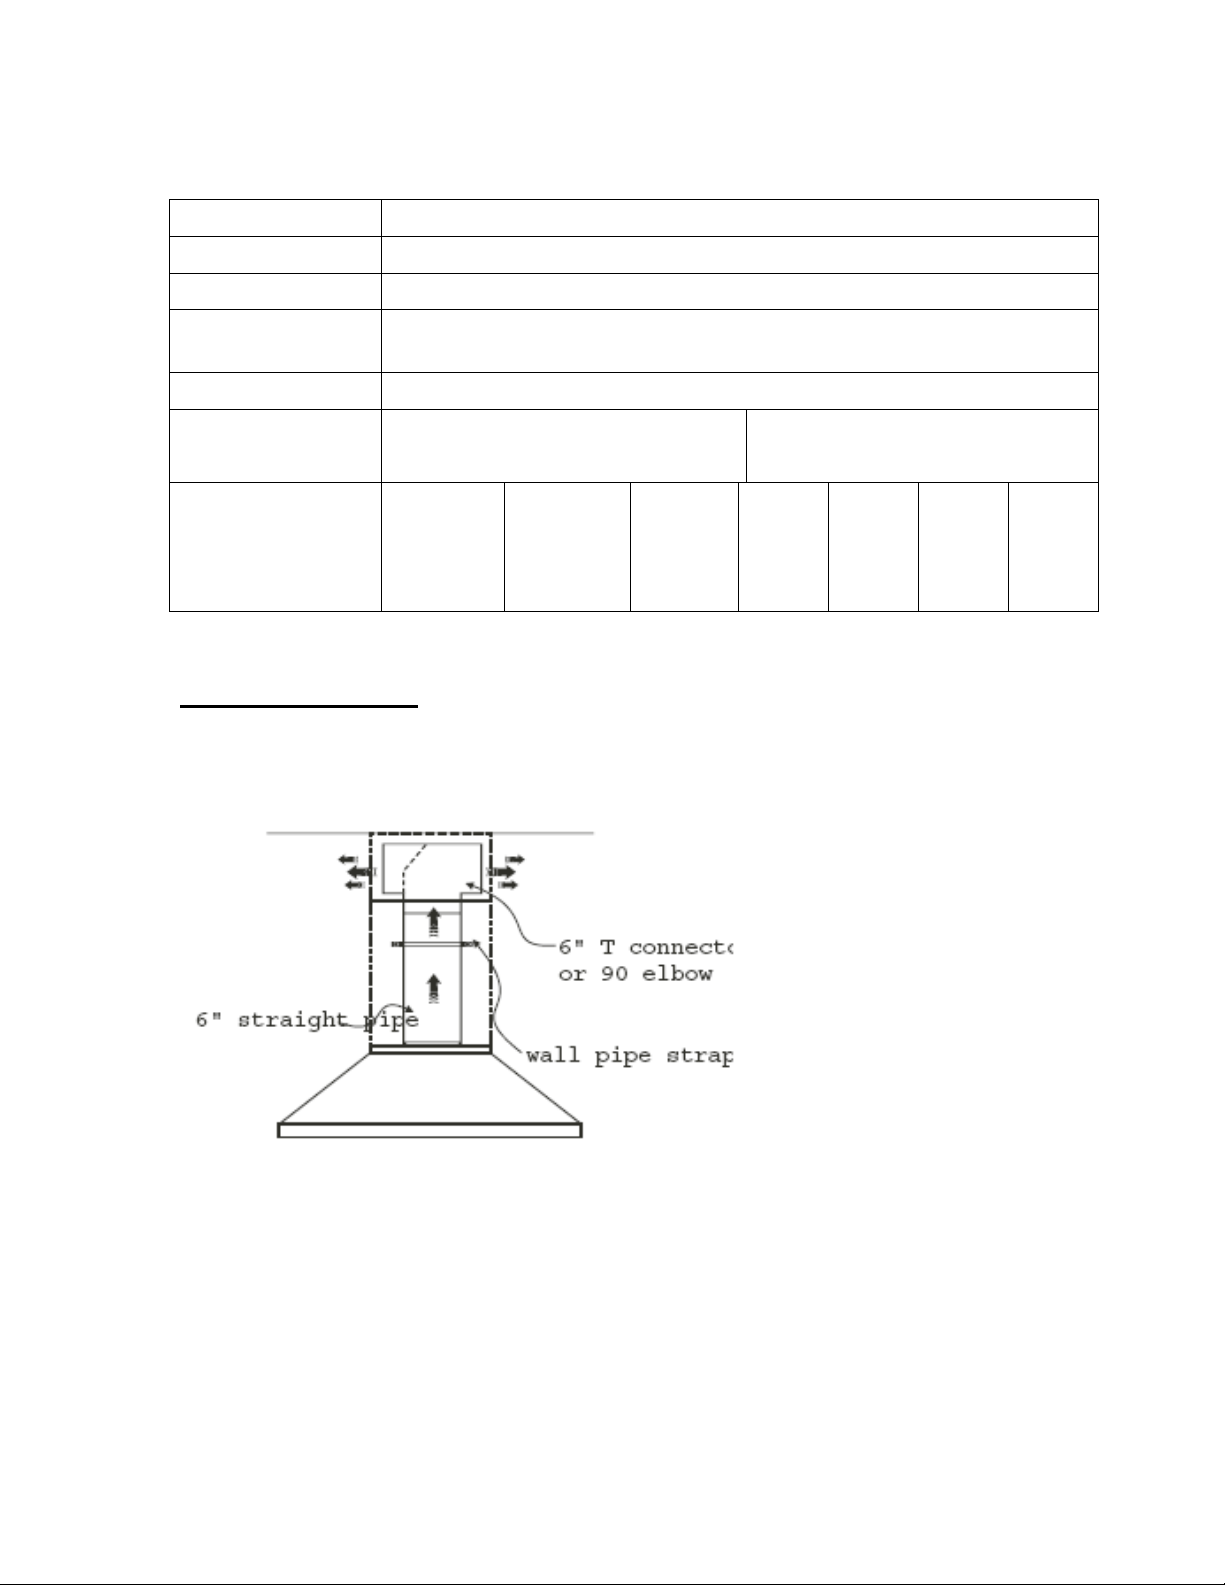
Always use rigid type metal ducts. Flexible ducts can restrict airflow by more than 50%.
6” round ductwork must be used to maintain maximum air flow efficiency with the 550 CFM motor.
Reduce the number of transitions and turns as much as possible. If a reducer is used, install a long reducer instead of a
pancake reducer. Reduce duct size as far away from the opening as possible. If turns and transitions are required install
them as far away from the opening as possible and as far apart between two as possible.
Here are some examples of different types of ventilation:
PREPARATION
Do not cut a joist or stud unless absolutely necessary. If a joist or stud must be cut then a supporting frame must be
constructed.
Before making cutouts make sure there is proper clearance within the ceiling or wall for exhaust vent.
All rights reserved to North America Range Hoods Inc.
110 Silver Star Blvd., Unit 105, Scarborough, Ontario, Canada, M1V5A2
TEL: 416.293.0933 FAX: 416.293.4793
www.cyclonerangehoods.com
Page 5
5
Hood installation height above cook top is the user’s preference. The lower the hood is above the cook top the more
efficient it will be in drawing out cooking odours, grease and smoke.
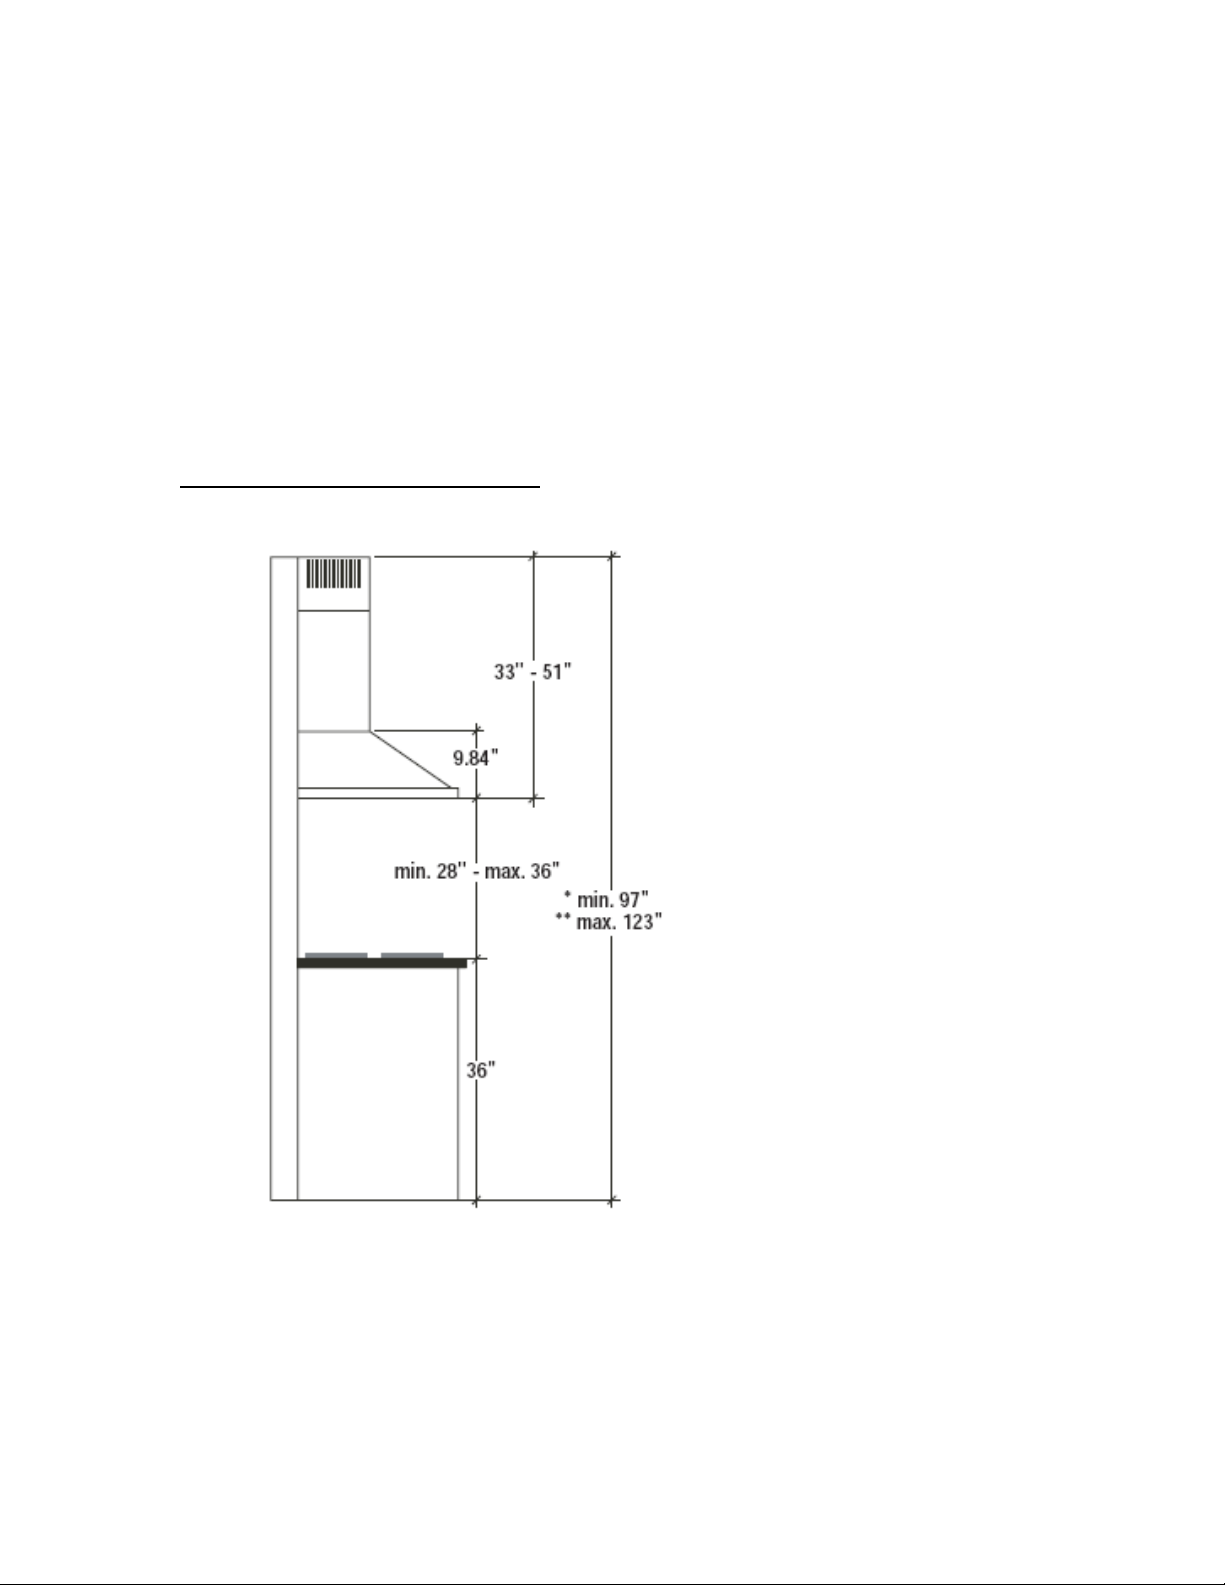
THE HOOD SHALL BE INSTALLED AT 28” MINIMUM TO 36” ABOVE THE COUNTERTOP.
Check your ceiling height and the hood height maximum before you select your hood.
Mount Heights and Clearance
Minimum mount height between range top to hood bottom should be no less than 28”. The maximum
mount height should be no more than 36”. The hood must be installed at the correct mounting height.
Hoods mounted too low could result in heat damage. Hoods mounted too high, on the other hand, will
be less effective and performance will suffer.
All rights reserved to North America Range Hoods Inc.
110 Silver Star Blvd., Unit 105, Scarborough, Ontario, Canada, M1V5A2
TEL: 416.293.0933 FAX: 416.293.4793
www.cyclonerangehoods.com
Page 6
6
Installation:
1. Determine the necessary height for the conduit and cut a 1-1/4” hole. Run wires through the hole according to
local codes and ordinances. Use caulking to seal all openings. Do not turn the power on until completion of
installation.
2. Find studs behind drywall by tapping wall or using a stud finder. Make sure there is a stud or that the wall is
strong enough to support the weight of the Canopy fan. If no stud attach a piece of wood or whatever
necessary to ensure the strength of the wall is enough to handle the weight of the machine. NOTE: all
fastener locations must span the studs otherwise proceed as follows: Cutout drywall along marked lines.
Install each necessary between studs firmly flush with already existing stud front. Make sure all the
mounting screws will anchor to added studs. Replace drywall and refinish.
3. Screw the screws in three quarters of the way and hang machine. Use two or more people to move and
install hood. Failure to do so may result in injury.
4. Tighten screws completely.
5. Level the machine using a carpenter’s level across the bottom.
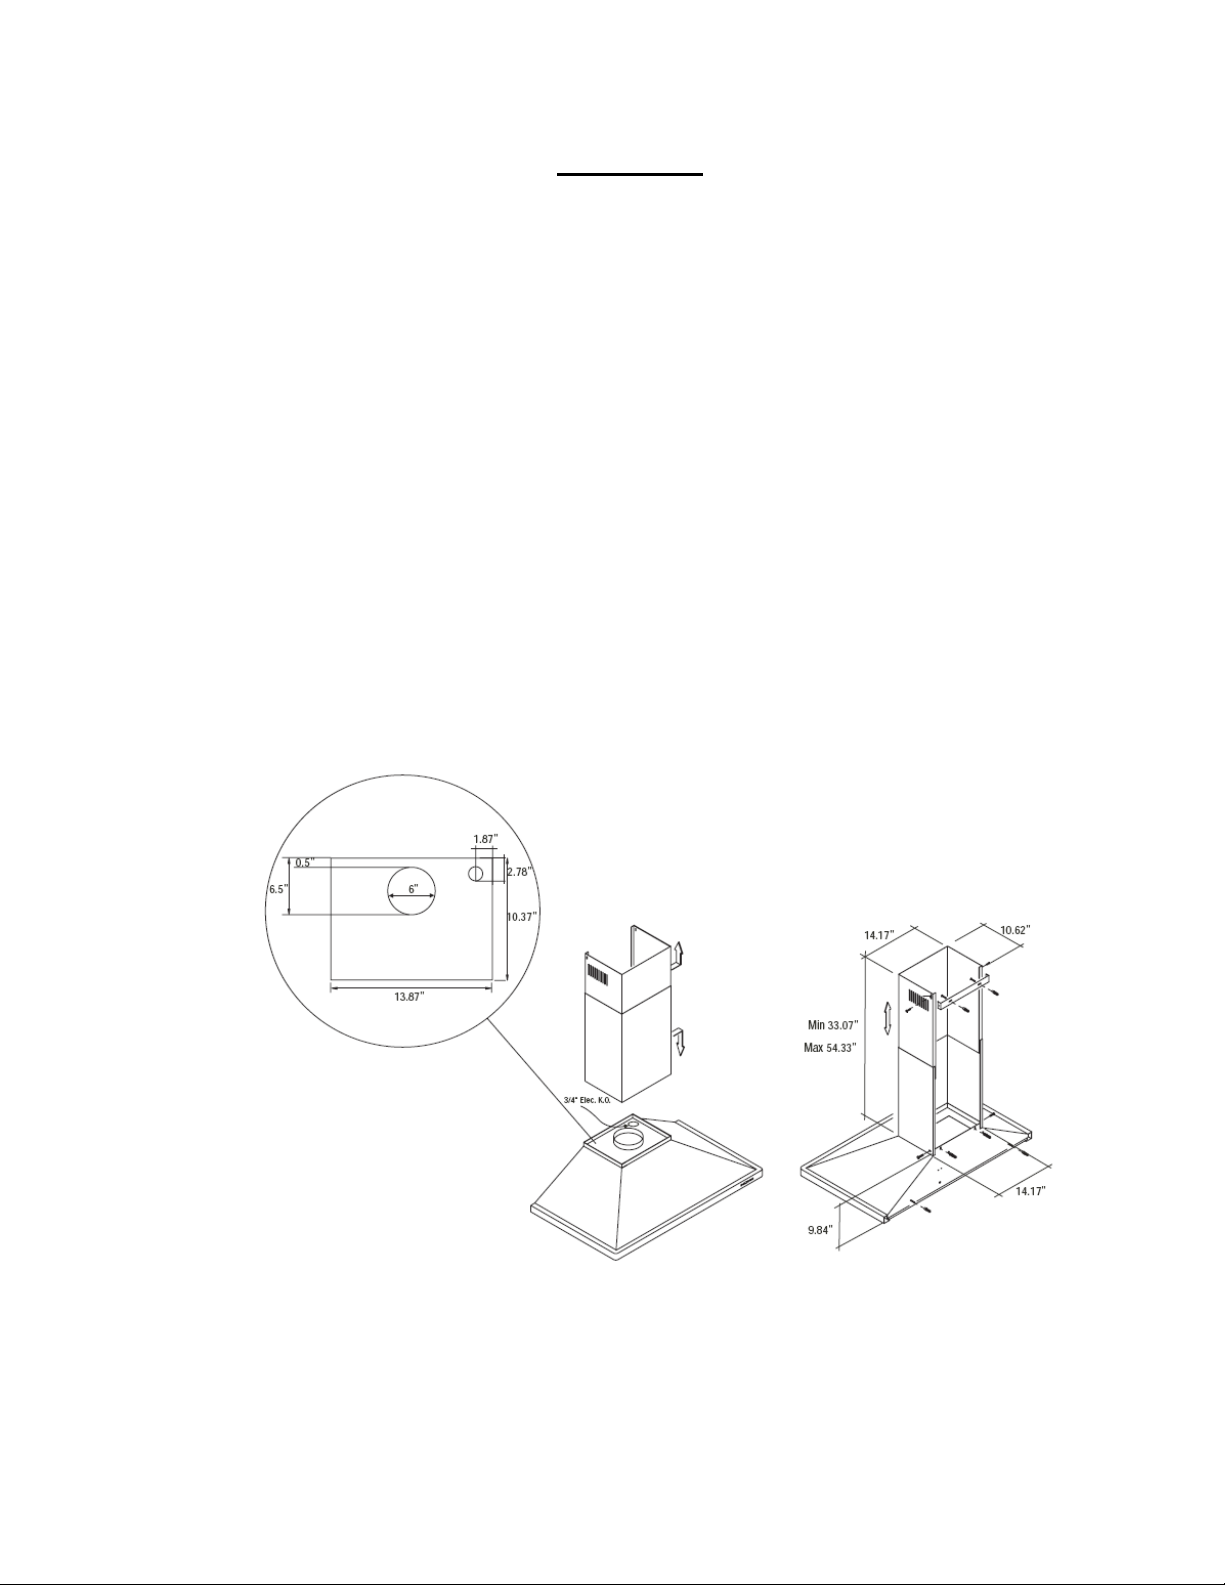
6. Attach shaft of the Canopy fan and adjust according to need. A small metal bracket can be secured to the top
of the shaft for better stability.
7. Connect ducting to transition then seal with duct tape.
8. Electrical connection
Warning:
Electrical Shock Hazard
Turn off power circuit at the service panel before wiring this unit
All electrical work must be done by a qualified electrician or person with technical background and
understanding.
All rights reserved to North America Range Hoods Inc.
110 Silver Star Blvd., Unit 105, Scarborough, Ontario, Canada, M1V5A2
TEL: 416.293.0933 FAX: 416.293.4793
www.cyclonerangehoods.com
Page 7

7
Electrical Grounding Instructions
This appliance is fitted with an electrical junction box with 3 wires, one of which (green/yellow) serves to ground
the appliance. To protect you against electric shock the green and yellow wire must be connected to the grounding
wire in your home electrical system and it must not be cut or removed under any circumstances. Failure to do so
may result in death or injury to persons.
Facing the front of the range hood remove the left knockout and the Junction box cover and install the conduit
connector in junction box.
Run 3 wires; black, white and green, according to the National Electrical Code and local codes and ordinances in
½” conduit from service panel to junction box.
Connect black wire from service panel to black or red in junction box, white-to-white and green to green-yellow.
Check all light bulbs to make sure they are secure in their sockets.
Turn power on in service panel.
Check lights and blower operation.
All rights reserved to North America Range Hoods Inc.
110 Silver Star Blvd., Unit 105, Scarborough, Ontario, Canada, M1V5A2
TEL: 416.293.0933 FAX: 416.293.4793
www.cyclonerangehoods.com
Page 8
8
Air Flow Volume
550 CFM
Electrical Connections
120V, 60Hz
Power Consumption
200 Watts
Fan Speed /
# Of Motor(s)
1550 RPM / One motor
Colours
Stainless Steel
Venting
SC-500. SC-501, SC-502
SC-503, SC-510
SI-521, SI-522, SI-520, SI-523, SI530, SI-531
Dimensions
Width:
Height Max:
Depth:
SC-500
SC-501/
SI-521
30” / 36”
34.4”/35.2”
20” / 24”
SC-502/
SI-522
30”/36”
44”/44”
20”/24”
SC-503
30”/36”
40”
20”
SC-510
36”
28”
20”
SI-523/
DI-531
36”
47.2”
24”
SI-530
36”
72”
24”
SPECIFICATIONS
All rights reserved to North America Range Hoods Inc.
110 Silver Star Blvd., Unit 105, Scarborough, Ontario, Canada, M1V5A2
TEL: 416.293.0933 FAX: 416.293.4793
www.cyclonerangehoods.com
Page 9
9
SURFACE MAINTENANCE
Always switch off power and unplug before cleaning and maintenance.
Clean with warm soapy water and clean cloth. Do not use corrosive or abrasive detergent or steel wool pads that
can scratch the surface of the machine.
Use non-abrasive stainless steel polish to buff out the luster and grain. Scrub lightly.
The stainless steel filters trap residue and grease from cooking. The filters should never have to be replaced but
should be cleaned thoroughly every thirty to sixty days depending on cooking habits. Filters may be placed in the
dishwasher on at low heat or soaked in warm, soapy water.
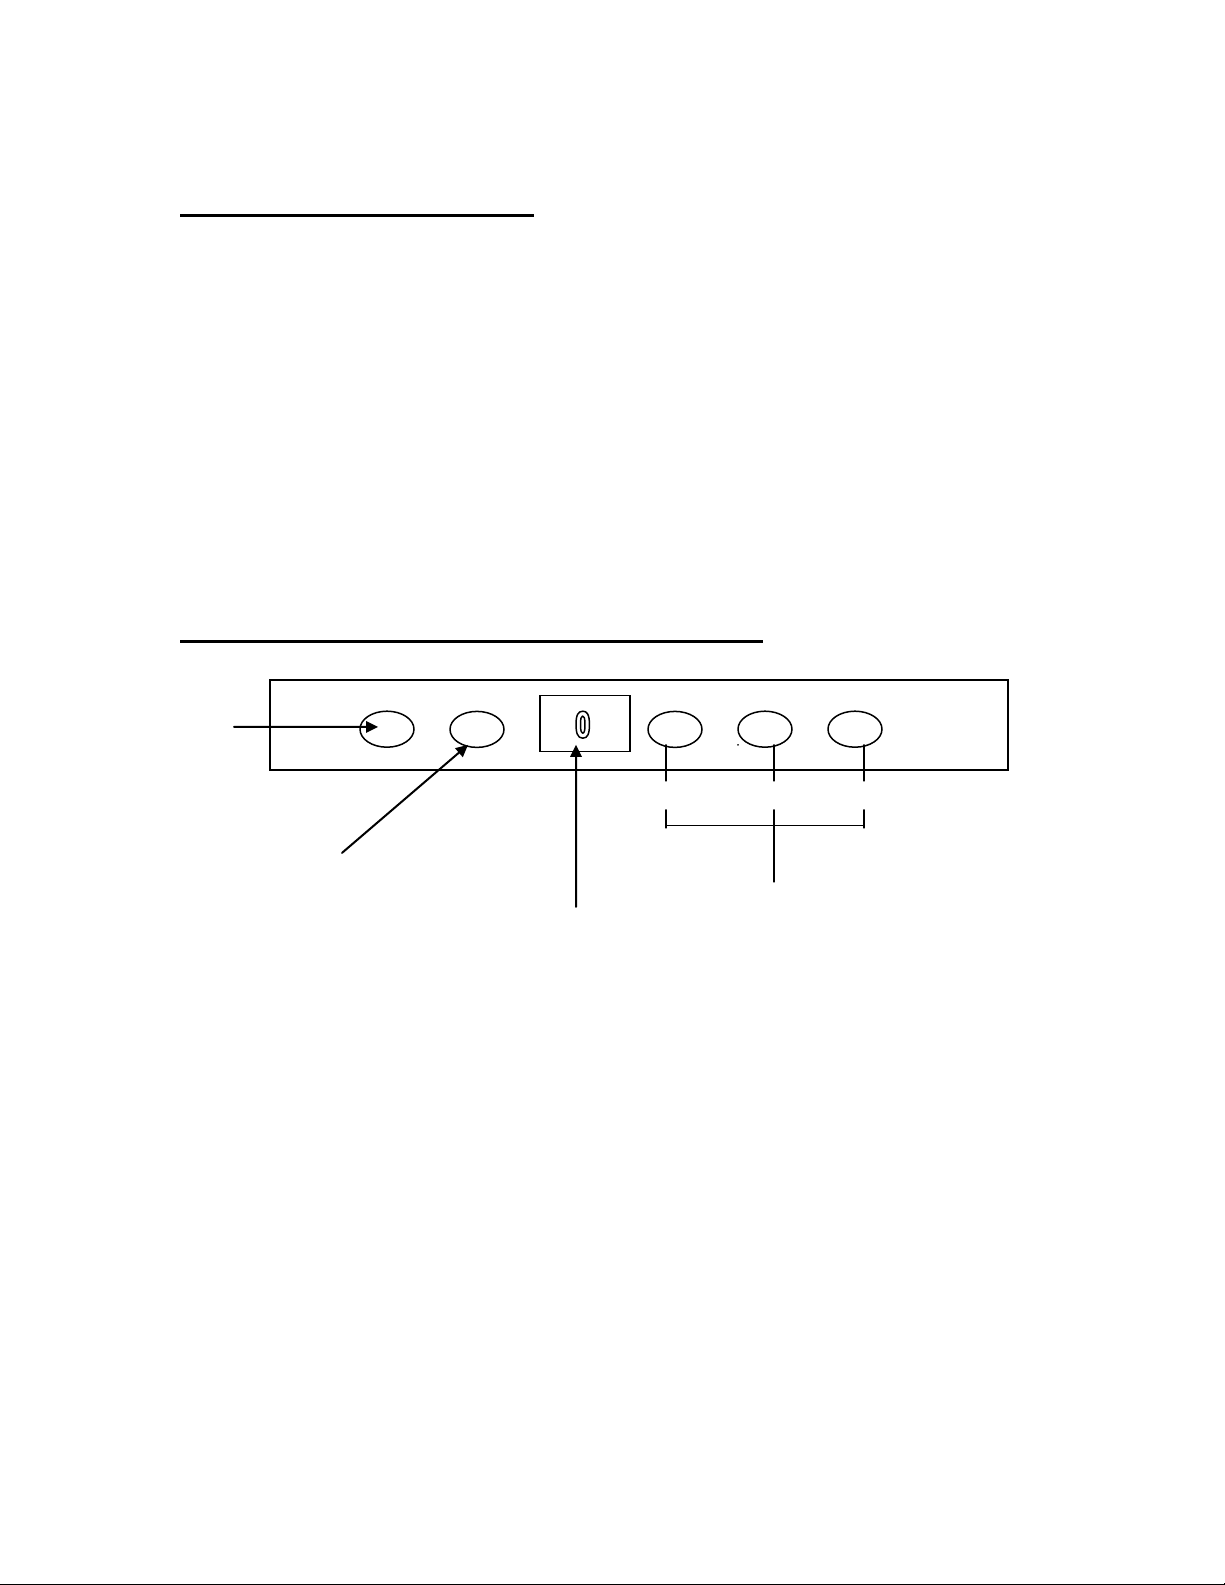
OUTLINE OF CONTROL PANEL/FEATURES
Time
Delay
1 2 3
Lights Power levels
LED Screen
To engage time-delay off functions:
1. Turn the machine on at any speed
2. Press and hold time delay button
3. Using the power level one button scroll through and select the number of minutes
you would like the machine to wait before automatically shutting off.
All rights reserved to North America Range Hoods Inc.
110 Silver Star Blvd., Unit 105, Scarborough, Ontario, Canada, M1V5A2
TEL: 416.293.0933 FAX: 416.293.4793
www.cyclonerangehoods.com
Page 10
10
Island Hoods installation instructions:
Warning:
For personal safety, remove house fuse or open circuit breaker before beginning
installation. Do not use extension cord or adapter plug with this appliance.
Follow National electrical codes or prevailing local codes and ordinances.
Electrical Supply
This appliance requires a 120V 60 Hz electrical supply, and must be connected to
an individual properly grounded branch circuit, protected by a 15 or 20-ampere
circuit breaker or time delay fuse.
All rights reserved to North America Range Hoods Inc.
110 Silver Star Blvd., Unit 105, Scarborough, Ontario, Canada, M1V5A2
TEL: 416.293.0933 FAX: 416.293.4793
www.cyclonerangehoods.com
Page 11
11
All rights reserved to North America Range Hoods Inc.
110 Silver Star Blvd., Unit 105, Scarborough, Ontario, Canada, M1V5A2
TEL: 416.293.0933 FAX: 416.293.4793
www.cyclonerangehoods.com
Page 12

12
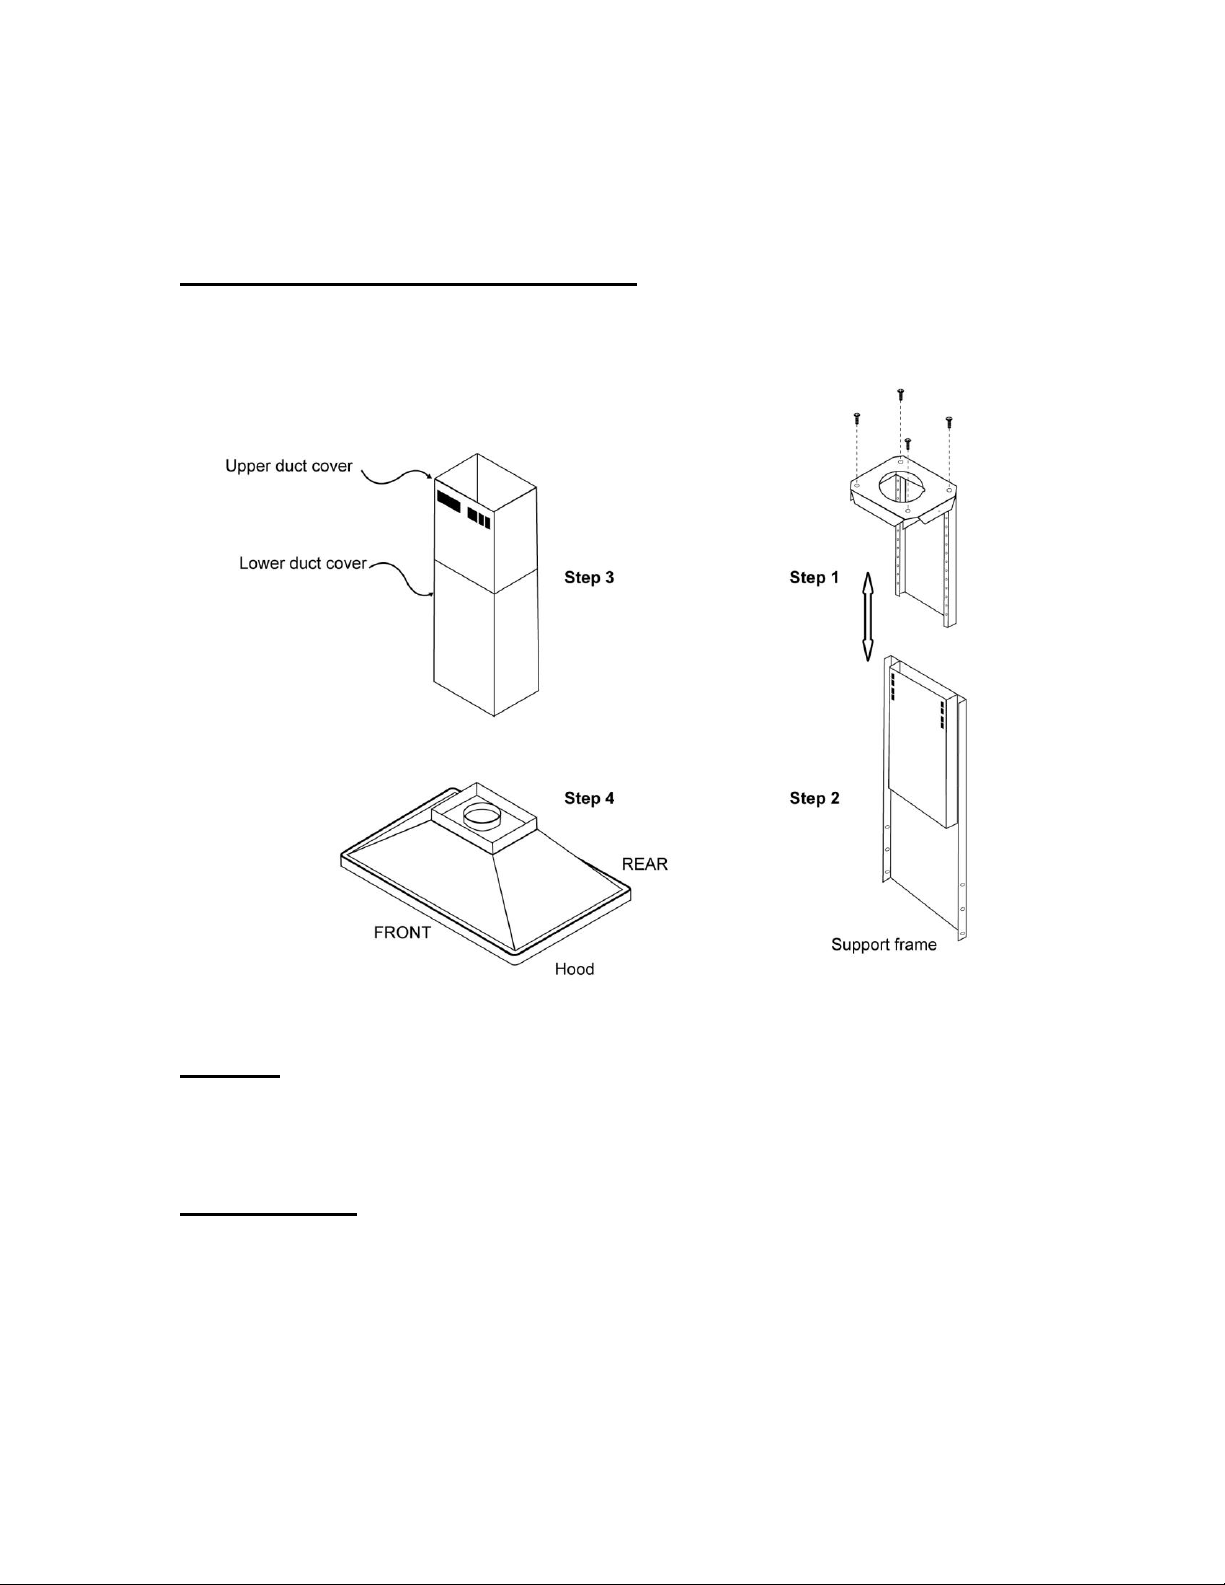
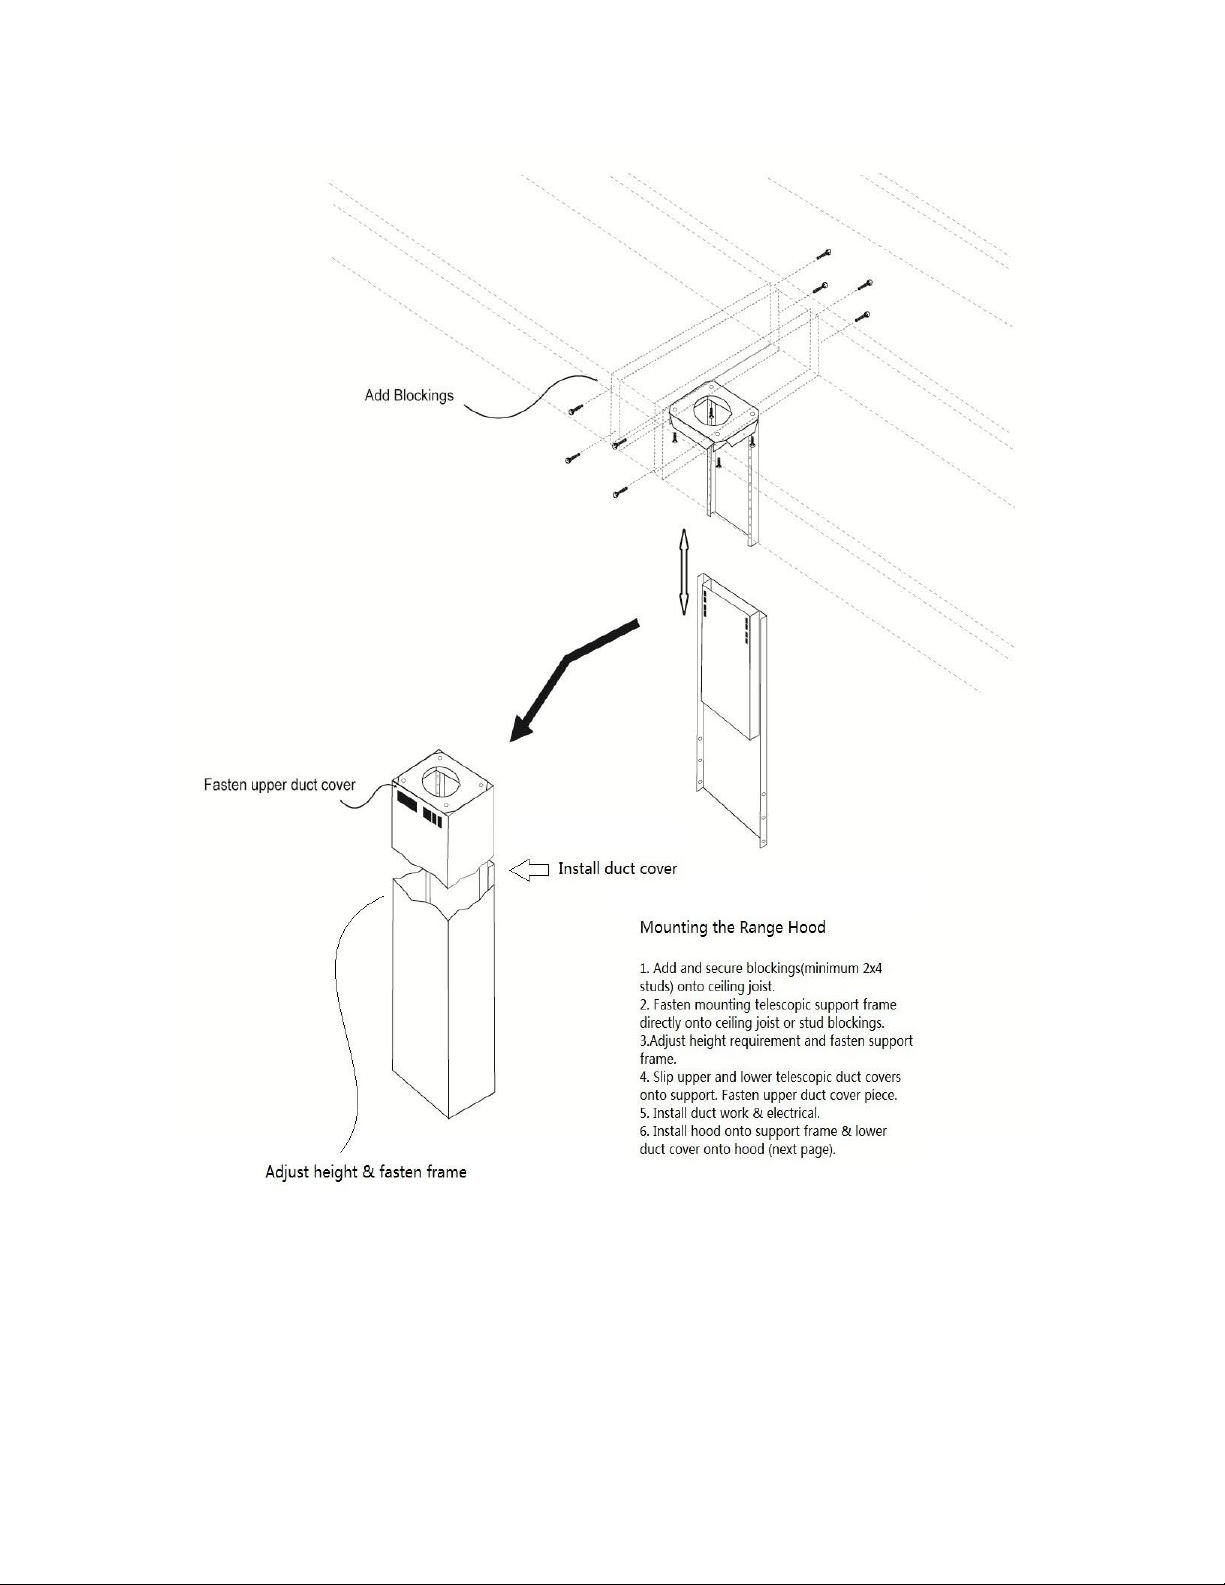
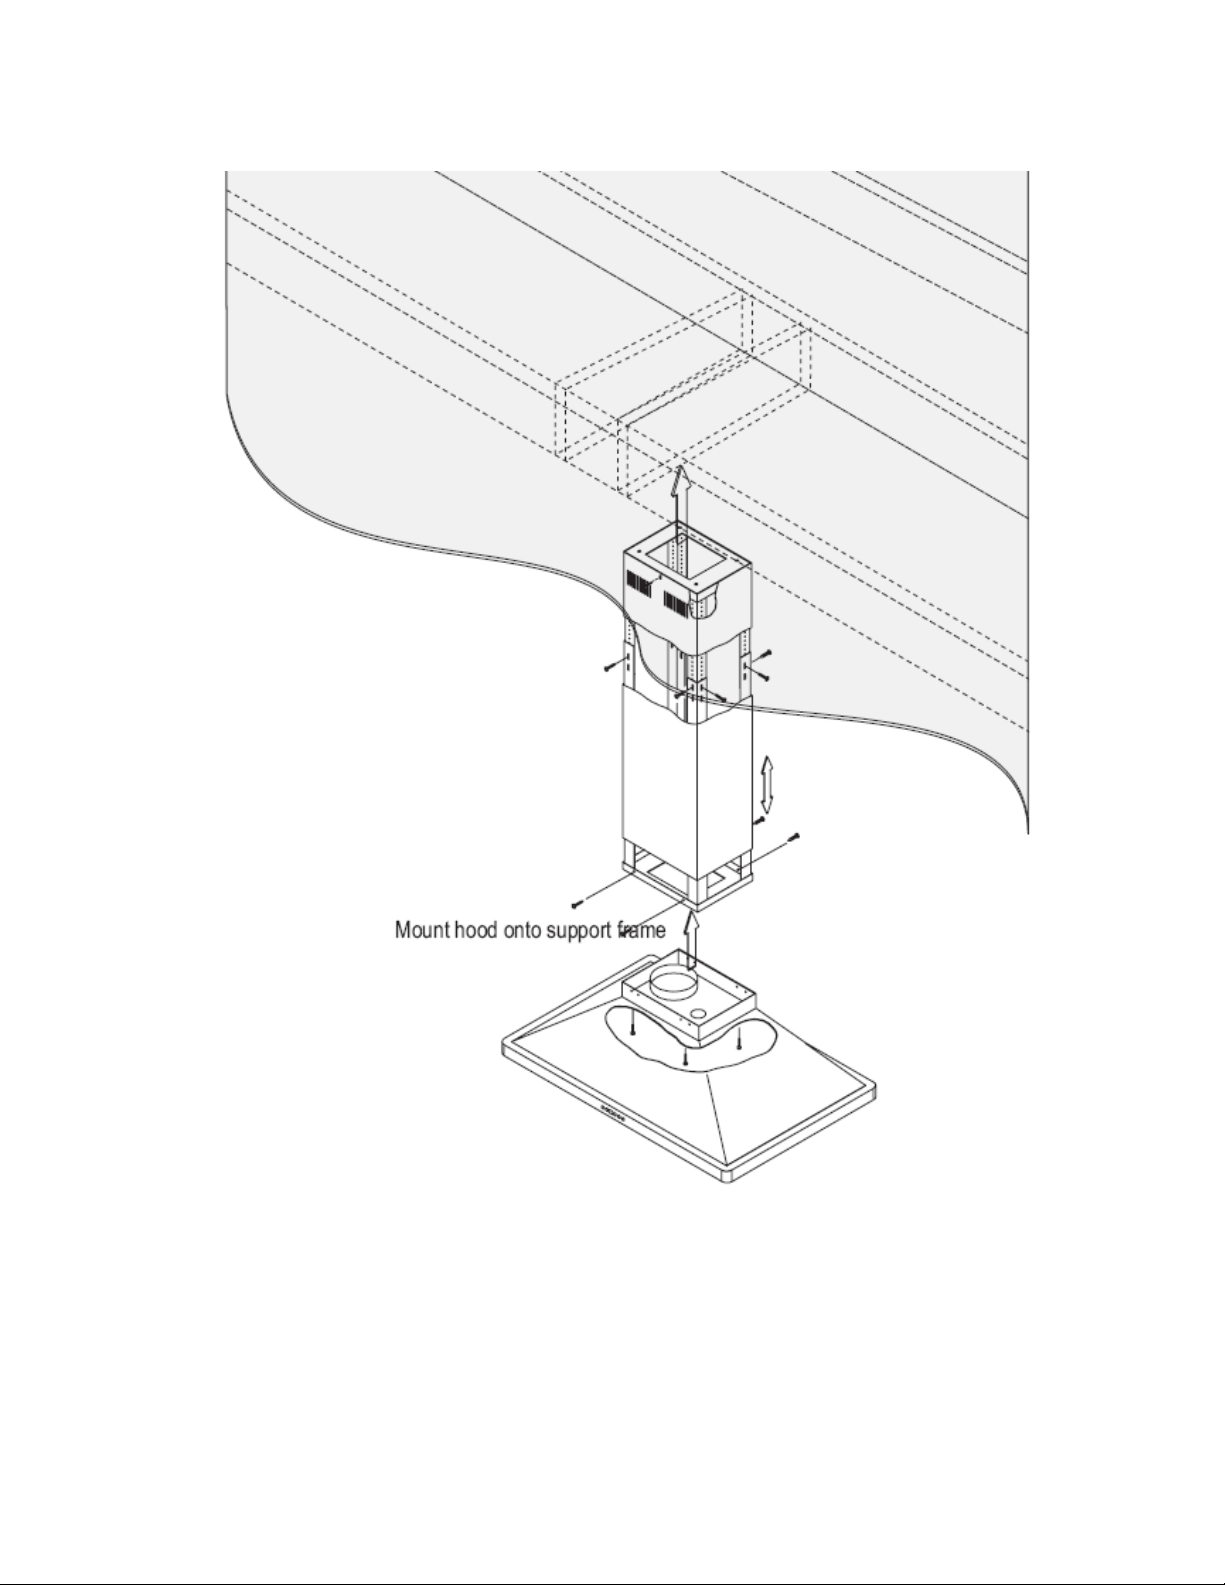
Installing island range hood:
1. Remove kitchen ceiling tiles etc. and locate/create ducting hole.
2. Locate wooden beams adjacent to ducting hole.
3. Insert and attach two wooden pieces forming a square frame
around the ducting hole with the already existing beams.
4. With included screws attach the adjustable white metal support
to the wooden frame.
5. Attach duct through the support into the ducting hole in the
ceiling.
6. Attach the island range hood to the support system with the
included screws after adjusting the support to the required
height.
7. Attach duct to the top of the island range hood.
8. Slip stainless steel duct cover over the duct and adjust to the
necessary height.
All rights reserved to North America Range Hoods Inc.
110 Silver Star Blvd., Unit 105, Scarborough, Ontario, Canada, M1V5A2
TEL: 416.293.0933 FAX: 416.293.4793
www.cyclonerangehoods.com
Page 13
13
All rights reserved to North America Range Hoods Inc.
110 Silver Star Blvd., Unit 105, Scarborough, Ontario, Canada, M1V5A2
TEL: 416.293.0933 FAX: 416.293.4793
www.cyclonerangehoods.com
Page 14
14
SURFACE MAINTENANCE FOR ISLAND RANGE HOOD
Always switch off power and unplug before cleaning and maintenance.
Clean with warm soapy water and clean cloth. Do not use corrosive or abrasive detergent or steel wool pads that can
scratch the surface of the machine.
Use non-abrasive stainless steel polish to buff out the luster and grain. Scrub lightly.
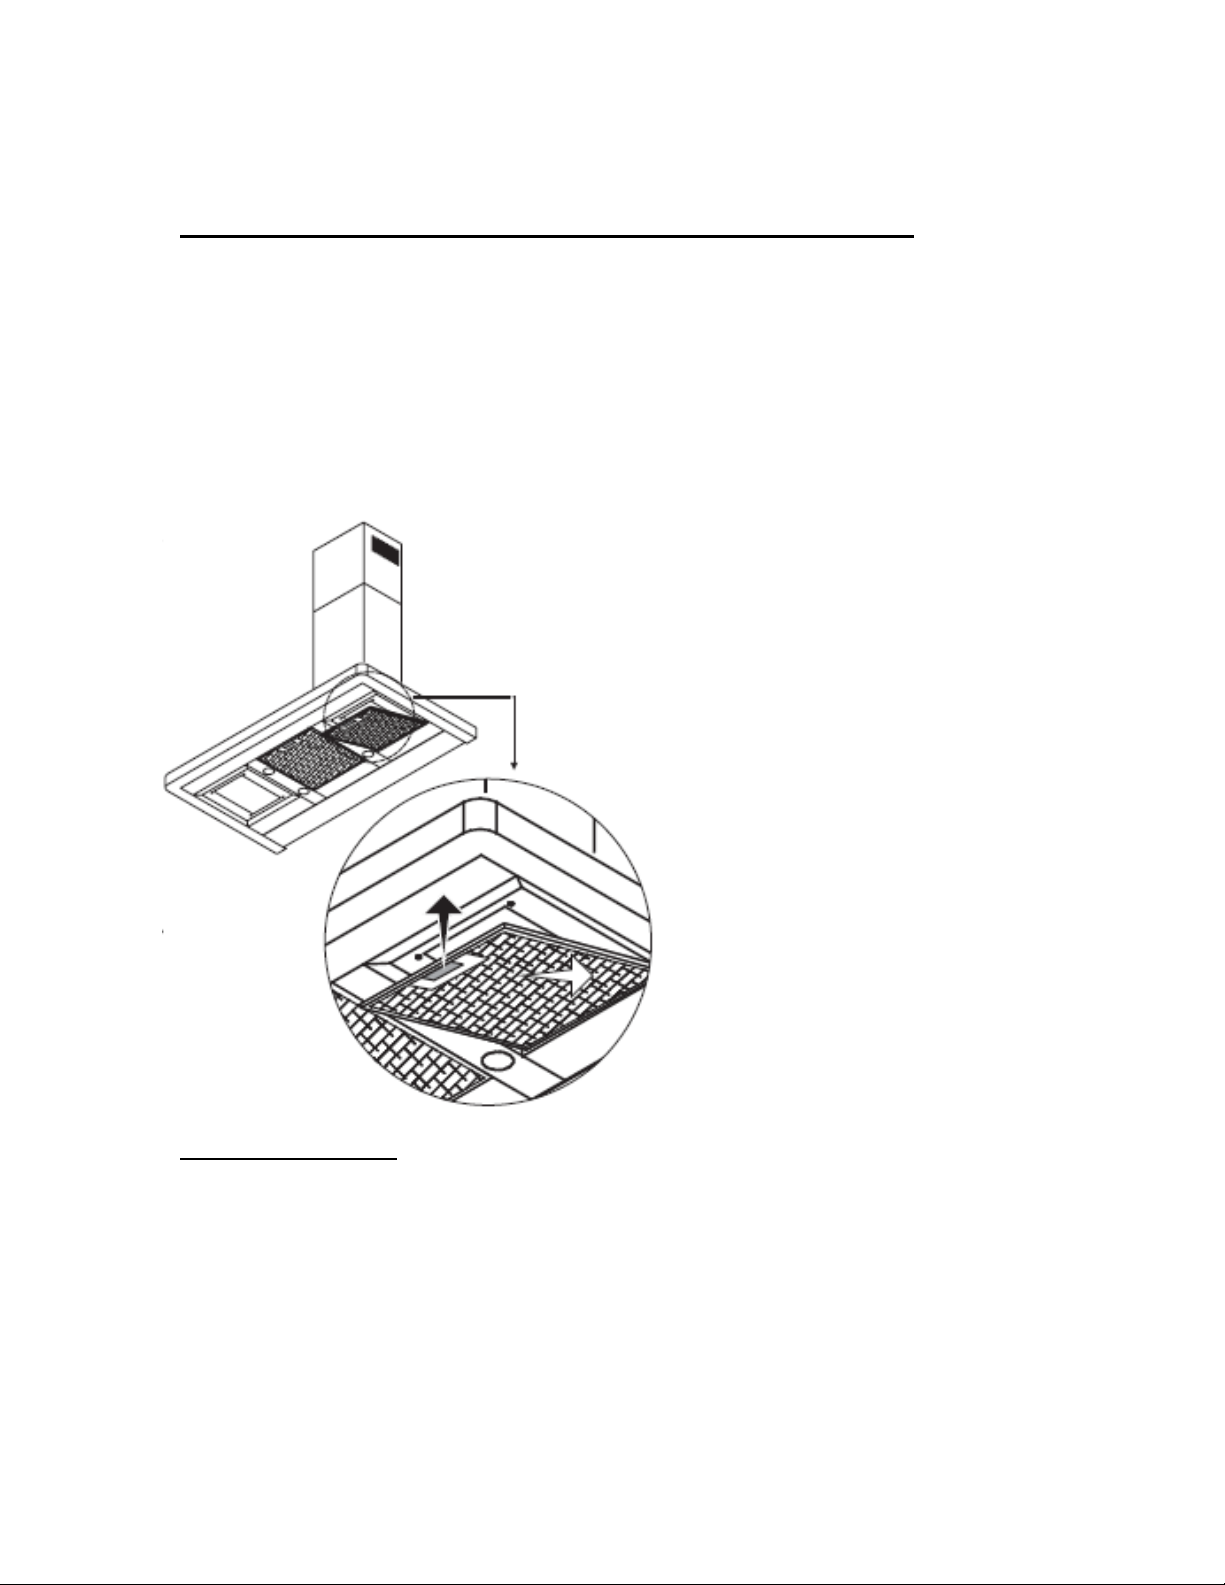
The stainless steel filters trap residue and grease from cooking. The filters should never have to be replaced but should
be cleaned thoroughly every thirty to sixty days depending on cooking habits. Filters may be placed in the dishwasher
on at low heat or soaked in warm, soapy water.
Grease filters
Replacing light bulbs
Make sure all power is turned off and bulbs are not hot.
Remove by using a slot-head screwdriver to pop out the bulb cover off, and unscrew and replace bulb.
To replace cover simply insert the three prongs into the slots and pop back into place.
All rights reserved to North America Range Hoods Inc.
110 Silver Star Blvd., Unit 105, Scarborough, Ontario, Canada, M1V5A2
TEL: 416.293.0933 FAX: 416.293.4793
www.cyclonerangehoods.com
Page 15

15
Cyclone Range Hood Limited Warranty
North American Range Hoods Inc. (hereunder called “The Company”) provides a
warranty that its products are free from defects in workmanship and materials for
a period of two (2) year from the date of purchase. During that time period, The
Company will, at no charge, replace at the Company’s option, any parts or
complete unit found to be defective. Further, the warranty for the motor extends
for an additional three (3) years, with labour costs extra.
This warranty is not transferable and does not include light bulbs, ducts roof caps,
and other accessories for ducting. The warranty does not include normal
maintenance and service. The warranty does not apply to damages caused by
misuse, incorrect installation, mistreatment, negligence, improper shipping,
attempts to alter of modify the function of part or the complete assembly, acts of
God, or any other circumstances beyond the control of The Company. The
Warranty does not cover the costs of removal, installation and transportation of
defective product.
The warranty on your Cyclone range hood begins on the date of original purchase.
In order to register your purchase, please fill out both the customer and
manufacturer copies of the Limited Warranty Registration card below. Retain the
customer copy, with the dated bill of sale or other evidence of the original proof
of purchase, and return the manufacturer copy within 30 days of purchase.
For warranty services or repair. Please contact the dealer from whom you
purchase the product or the address shown below.
North American Range Hoods Inc
110 Silver Star Blvd.
Scarborough, ON M1V 5A2
Tel: (416) 293-0933 Fax (416) 293-4793
Email: [email protected]
Website: www.cyclonerangehoods.com
All rights reserved to North America Range Hoods Inc.
110 Silver Star Blvd., Unit 105, Scarborough, Ontario, Canada, M1V5A2
TEL: 416.293.0933 FAX: 416.293.4793
www.cyclonerangehoods.com
 Loading...