

Page 1
INSTRUCTION MANUAL
FOR
MODEL 5, 5C & 5CE CYCLO ORBITAL POLISHER/SANDER
Cyclo Toolmakers, Inc · 1740 Skyway Drive · Longmont, CO 80504 · USA
Page 2

2
INSTRUCTION MANUAL
FOR
MODEL 5, 5C & 5CE CYCLO ORBITAL POLISHER/SANDER
This instruction manual is furnished with each Cyclo Model 5, 5C & 5CE Electric Polisher/Sander tool.
The entire manual should be read carefully before using the Cyclo Polisher/Sander tool and retained for future reference.
This manual contains separate sections to inform the purchaser of the tool on:
#1 SAFETY INSTRUCTIONS
#2 OPERATING INSTRUCTIONS
#3 POLISHERS, CLEANERS & PROTECTANTS
#4 USER MAINTENANCE & TROUBLESHOOTING
TECHNICAL SPECIFICATIONS:
Volts Cycle H.P. Amp
Model 5: 115 60 1/3 2.0 (.23kW)
Model 5C & 5CE: 230 50 1/3 1.0 (.23kW)
RPM: 2800 to 3200
Weight: 6.5 lbs (2.9 kg)
Noise Emissions - 5CE: 82.6 dBA
Vibration - 5CE (m/s2)*: Vertical Lateral Front-To-Back
Front Handle 26.3 30.2 18.4
Rear Handle 29.9 41.9 11.2
Motor: Alternating current, Universal, Semi-Enclosed 24-bar commutator
Electric Cord: 6' long, Non-Marking, 18/3 SJT or 8' long, CEE 7/7
Housing: Heavy-duty cast aluminum
Listing/Approvals: European Community - Model 5CE
Testing Labs: TÜV, Components Reliability and Safety - Model 5CE
• Vibration testing per ISO 8662-1:1986
Page 3

3
WARNING: When using electric tools, basic safety precautions should always be followed to reduce the risk of fire, electric shock,
and personal injury, including but not limited to the following:
-READ ALL INSTRUCTIONS -
1) GROUNDING INSTRUCTIONS FOR MODEL 5 & 5C
The Cyclo Polisher/Sander should be grounded while in use to protect the operator from electric shock.
This tool is equipped with an approved three-conductor cord and three-prong grounding type plug to fit the proper grounding type
receptacle. The green conductor wire in the cord is the grounding wire. NEVER CONNECT THE GREEN WIRE TO A LIVE
TERMINAL.
If there is any doubt as to whether the wall receptacle is properly grounded, you should have it checked by a qualified electrician.
DO NOT UNDER ANY CIRCUMSTANCES CUT OR REMOVE THE THIRD (GROUND) PRONG FROM THE POWER CORD
PLUG.
2) EXTENSION CORD
With the Orbital Polisher/Sander, use only three-wire extension cords that have three-prong grounding type plugs and three-pole
receptacles that accept the tool's plug. Replace or repair damaged cords. When using this tool at a distance from the power source, a
three conductor grounding type extension cord of ADEQUATE SIZE must be used for safety and to prevent the loss of power and
overheating.
For the 115 Volt, 2.0 Amp tool, the figures on page 3 indicate the size of wire which must be within the indicated length of extension
cord.
Extension Cord Length Size of Wire in Cord
0-100 feet 18 gauge
101-250 feet 16 gauge
Extension Cord Length Size of Wire in Cord
0-100 feet 18 gauge
101-250 feet 18 gauge
3) MOTOR
Your Cyclo Orbital Polisher/Sander is powered with a sturdy motor. Be certain your power supply agrees with that shown on the name
plate. A.C. means alternating current. Variance in your voltage by more than 10% will mean loss of power and overheating. This tool
is factory tested. If it will not operate, check electric supply for blown fuses, check plug and electrical receptacle for proper contact.
ADDITIONAL SAFETY INSTRUCTIONS
1) Keep Work Area Clean. Cluttered areas and benches invite injuries.
2) Consider Work Area Environment. Don't use power tools in damp or wet locations. Keep work area well lit. Do not use the
tool in the presence of flammable liquids or gases.
3) Guard Against Electrical Shock. Prevent body contact with grounded surfaces. For example: pipes, radiators, ranges.
4) Keep Children Away. Do not let visitors contact tool or extension cord. All visitors should be kept away from work area.
5) Store Idle Tools. When not in use, tools should be stored in dry, and high or locked-up places - out of reach of children.
6) Do not Force Tool. It will do the job better and safer at the rate for which it was intended.
7) Use the Right Tool. Do not force small tool or attachment to do the job of a heavy-duty tool.
8) Dress Properly. Do not wear loose clothing or jewelry. They can be caught in moving parts. Rubber gloves and non-skid
footwear are recommended. Wear protective hair covering to contain long hair.
SAFETY INSTRUCTIONS
AMPERE 2.0 (Model 5)
AMPERE 1.0 (Model 5C &5CE)
Page 4

4
9) Use Safety Glasses. Always wear eye protection wh en using the tool. Also use face or dust masks if operation is dusty.
10) Do not Abuse Cord. Never carry tool by cord or yank it to disconnect from receptacle. Keep cord away from heat, oil and sharp
edges. Do not force sharp bend in cord, especially where it exits the handle and particularly when curling cord for storage.
11) Secure Work. Use clamps or a vise to hold work. It is safer than using your hands and it frees both hands to operate tool.
12) Do not Overreach. Keep proper footing and balance at all times.
13) Use Proper Hearing Protection. Prolonged exposure to tool without hearing protection could promote a loss of hearing.
14) Maintain Tool with Care. Keep tool clean for better and safer performance. Follow instructions for lubricating and changing
accessories. Inspect cord periodically and if damaged, have repaired by authorized Cyclo service facility. Inspect extension cords
periodically and replace if damaged. Keep handles dry, clean, and free from oil and grease.
15) Disconnect Tools. When not in use, and always before servicing, or changing accessories, such as heads, sanding jackets, and
bonnets, disconnect power cord from power source.
16) Remove Adjusting Keys and Wrenches. Form a habit of checking to see that adjusting wrench is removed from tool before
connecting to power.
17) Avoid Unintentional Starting. Be sure switch is off when plugging in to power source.
18) Use Only Outdoor Extension Cords. Use only extension cords intended for use outdoors and so marked.
19) Stay Alert. Watch what you are doing. Use common sense. Do not operate tool while tired. Keep fingers away from moving
parts at all times.
20) Check Damaged Parts. Before further use of tool, a guard or other part that is damaged should be carefully checked to
determine whether it will operate properly and perform its intended function. Check for alignment of moving parts, binding of moving
parts, breakage of parts, mounting, and any other condition which may affect the tools operation. A guard or other part that is damaged
should be properly repaired or replaced by an authorized Cyclo service center unless otherwise indicated elsewhere in this instruction
manual. Have defective switches replaced by authorized Cyclo service center. Do not use tool if switch does not turn tool on and off.
21) Insulated Handles. Do not operate the tool without the properly insulated handles. NOTE: If shrink wrap insulation on the rear
metal handle is damaged or is removed at the time of repair, it must be replaced before the tool is put back into service. The proper
precut length is available from Cyclo Toolmakers or your dealer.
22) Use only Cyclo Toolmakers Recommended Products. The use of any other accessories or attachments other than those
recommended in the operating instructions or the catalogue may present a risk of personal injury, and could void any warranties.
Using the Cyclo polisher:
Your Cyclo tool has two heads rather than the single head you may be accustomed to seeing. As soon as the Cyclo tool is placed on a
working surface, and switched on, orbital “hand-rubbing” action takes place. Therein lies the secret of its ability to do many different
types of jobs that could not be done with single head or rotary tools. The two heads move in a circular, overlapping motion and are
counterweighted to balance. Thus, very little centrifugal force is exerted and the vibration, heat and throwing and pulling action of a
rotary tool is eliminated.
No matter how much pressure you apply to your Cyclo tool, whether you are sanding or polishing, the machine remains steady. The
more pressure you apply the harder the heads work, although even, moderate or gravity-only pressure works best in most situations.
The hand-like action of the counterbalanced heads prevents sur face damage, regardless of the pressure applied. Move the machine
slowly; you need not be afraid of burning the surface.
The polishing pads:
1) Pads are available in three different attachment methods: standard Velcro, premium Velcro and bonnets. The standard Velcro
pads have loop material that extends the full diameter of the pad. The premium Velcro pads have loop material that is smaller than the
full diameter of the pad. And the bonnets are rubber pad holders with a pad permanently affixed.
Pad Type Standard P/N Premium P/N Bonnet P/N
White Foam Finishing Pad 72-110-std 72-110 71-110-a
Green Foam Polishing Pad 72-120-std 72-120 71-120-a
Orange Foam Polishing and Compounding Pad 72-125-std 72-125 71-125-a
Yellow Foam Cutting Pad 72-135-std 72-135 71-135-a
Yellow Foam Scrubbing Pad 72-160-std 72-160 71-160-a
Light Cutting White Wool Pad 72-455-a 71-455-a
OPERATING INSTRUCTIONS
Page 5

5
2) In order to affix the Cyclo bonnets to the twin heads, first disconnect the power cord, then simply turn the polisher upside down
and rest it in your lap. Turn the bonnet inside out and place its rubber base squarely on one of the heads. Now, grip the head and the
bonnet firmly between both hands, and with the thumbs, turn the edge of the bonnet down over the head. Rotate the head slightly and
repeat the step above until the bonnet’s edge is completely over the head.
With the velcro pads, you install the rubber pad holder (a rubber jacket with Velcro attached) in the same manner as above.
However, to change pads just peel off the used pads and attach a fresh pad by pressing it firmly in place centered on the velcro jacket.
3) The pads and bonnets should be cleaned as soon as possible after use with a good industrial cleaner or detergent in warm water.
For best results, wash the foam pads out by hand, squeeze dry (do not twist or wring) and let air dry. The wool pile pads should also be
washed with a good industrial cleaner or detergent and then run through with a brush. The wool pads and can also be washed in warm
water and tumble dried in a cool dryer.
CYCLO POLISHERS, CLEANERS & PROTECTANTS
Never try to use a rotary type polish or cleaner with the Cyclo polisher and never try to use Cyclo polishes with rotary tools. The
Cyclo products are specifically formulated for use with the Cyclo and though some hand application type polishes may give
satisfactory results, we recommend that for the BEST results only the laboratory and field tested genuine Cyclo products be used with
the Cyclo tool.
1) On painted surfaces use the CTI Pro Paint Care line or the CTI One Pass Express:
CTI Pro Paint Care Line:
1. Heavy Compounding Gel – Removes scratches and heavy oxidation from surface. Very aggressive compounding
polish for use on any surface.
2. Light Compounding Liquid – Great for removing hairline scratches and medium oxidation. It’s mildly aggressive and
can be applied to entire painted surfaces.
3. Cleaner-Deoxidizer – Smooths and conditions the paint surface and removes light to medium oxidation, leaving the
rejuvenated paint ready for polish or sealants.
4. Polish and Protective Sealant – Gives paint that lustrous shine it had when new, and gives tough -as-nails protection
for up to 18 months.
CTI One Pass Express:
1. Cleaner-Polish-Sealant – With just one step you can do it all. Remove oxidation and scratches. Rejuvenate a dull
finish. Protect the mirror shine from the elements.
2) On unpainted aluminum or stainless steel use the CTI Metal Polish:
CTI Metal Polish:
1. Free FliteTM Cleaner-Polish - With one easy step this aggressive rubbing compoun d removes corrosion, oxidation and
surface film while also leaving a polished finish that is absolutely stunning. For quality that meets high government
standards for its aircraft, insist on Free FliteTM Cleaner-Polish
2. Free FliteTM Protectant Sealant – Specially formulated to bond to bare metal, allowing you to deoxidize the surface
and effortlessly remove polishing scratches. Plus, its protective coat helps prevent further oxidation.
Polishing:
1) After you have placed the pads or bonnets on your Cyclo tool, connect the tool to the power supply.
2) Apply a small amount (about a teaspoon, or a spot the size of a dime) of the proper polish to each pad; small amounts work
better than large amounts.
3) Place the twin -head Cyclo tool, pad side down on the surface and move the tool around before turning it on in order to distribute
the polish within the pad and over the surface.
4) Turn on the tool and move it back and forth and side to side across an area approximately 2’ x 2’ in size. This will spread the
polish or deoxidizer across the surface in a latticed pattern.
5) Grip both handles of the polisher, and using only light or moderate pressure - letting the action and the weight of the tool do the
work - move the polishing heads across the area at a comfortable speed. Deoxidize or polish the entire car in this manner. When you
have finished, rub out by hand the powdery residue left from the deoxidizer or smooth out any smudges left by the glaze. We
recommend our white pads/bonnets, microfiber or terry covers for removing any remaining residue.
Page 6

6
6) If the residue does not wipe off easily, the surface is still not clean.
7) Repeat steps 2-5 as necessary.
8) As the pads become fully impregnated with polish or oxidized paint, they should be removed and washed. Never keep polish in
pads overnight.
USER MAINTENANCE AND TROUBLESHOOTING
Motor:
Always be sure the Cyclo polisher/sander is disconnected from the electrical outlet before any inspection or maintenance is performed.
The motor is only for the voltage specified on the nameplate. It is universal in that it can be used on either direct or alternating current
from 25 to 60 cycles. Voltage should not vary more than 10% over or under the voltage shown on the nameplate.
Although the Cyclo is built to last a lifetime it can encounter problems from heavy wear and tear. All problems are repairable, and can
most often be repaired by the user.
If the Cyclo tool has stopped:
1) Inspect the carbon brushes. Most likely the brushes have been worn down and need to be replaced. When replacing your carbon
brushes, keep in mind that Cyclo carbon brushes have been made specifically for the Cyclo with a pre-cut contour on the front edge of
the carbon block to match our commutator, a section of the motor armature, and a nylon plug has been placed in the rear of the carbon
block (in front of the spring) to interrupt the electrical flow when the carbon block wears down to this point. This prevents the load
spring from coming in contact with the commutator and shorting out t he entire armature.
CAUTION: Be sure the power cord is disconnected. Unscrew the black brush cap found on each side of the motor housing. The
carbon brush and spring can then be easily withdrawn from the motor housing. Note how the contour in the carbon block matches the
contour of the motor armature. The carbon brush must be reinserted in this same pattern to maximize electrical contact with the
armature. If badly worn, down to the first printed letter, call Cyclo to order new brushes. Also replace if assembly has a weak spring.
Keep brushes clean and sliding freely in their guides.
2) Check the electrical supply for blown fuses and the plug and electrical receptacle for proper contact.
How to maintain your Cyclo polisher/sander:
1) Every eight hours of use, lubricate the upper motor bearing by placing 3 drops of light machine oil (e.g. 3-in-1 oil) in the center of
the copper bushing found at the top of the motor housing.
2) Every eight hours of use, or as conditions warrant, blow out the motor housing with an air hose to clean out any accumulated
dust or dirt. If the tool is being used to clean carpets, be sure to blow out the motor housing after every use. If tool should get wet, be
sure to blow out the underside of the tool.
3) Never operate the polisher with chipped or otherwise damaged brush caps. Be sure the power cord is disconnected. Using a
screwdriver, remove the damaged brush cap and the carbon brush and spring, with a cotton Q-tip wipe the threads on the inside of the
brush holder clean of any foreign matter, replace the carbon brush and spring and screw on a new brush cap.
ANY OTHER SERVICING SHOULD BE PERFORMED BY AN AUTHORIZED CYCLO SERVICE CENTER OR THE TOOL
SHOULD BE SENT TO CYCLO TOOLMAKERS, INC.
Lubrication:
This tool was properly lubricated at the factory and is ready to use. The gears should be inspected after approximately 400 hours of
use. If necessary, relubricate with Texaco Multifax #2 or equivalent.
Timing:
The secret of the operation of your Cyclo polisher/sander lies in the fact that the two heads are timed exactly 1/2 turn apart. This is
necessary for the balanced operation of the tool. If the machine is disassembled, use the following procedures to insure proper timing
of the heads.
1) Turn the tools main case upside down, with the motor case, cover plate, and idler gear removed. Move the two heads together as
close as possible. Then, put a heavy rubber band around the side of the two heads to keep them together.
2) Turn the tool right side up and carefully replace the idler gear without moving the drive gears. Now, pack the recessed well in
back of the idler gear with lubricant. Also, lubricate the metal shafts in the center of each gear.
3) Reassemble the cover plate and motor case and remove the rubber band.
Page 7

7
Bearings:
Cyclo Toolmakers, Inc. 6 Plus 6 Warrant
y
Cyclo Toolmakers, Inc. warrants this machine to the original purchaser/user to be free from material or workmanship defects for
ory
or a Cyclo authorized repair center. Our obligations under this warranty are expressly limited to replacement or repair of such
m misuse, negligence, alterations, accidents, damage caused by improper use of chemicals, or improper
repair by unauthorized parties, or “wear and tear” from normal usage, are not covered. Use of parts other than genuine Cyclo
adjustments or replacements of defective parts made under this warranty will not void the warranty, nor will it extend the
g the purchaser a
Sending Your Cyclo Polisher In For Repair
If you would like your tool repaired, please indicate
that Cyclo has permission to make repairs costing up
our credit card information. For all
repairs over $60, Cyclo will contact you to confirm
If your tool is not claimed within 30 days after repair quotation (when not in
The bearings in the counterweights will loosen slightly with continued long use. This actually improves the action of the tool by
allowing the heads to tilt slightly and follow a contoured surface better. These bearings should not be considered defect ive until they
become objectionably noisy at which time the entire polisher should be sent to an authorized Cyclo service center for repair.
Heads:
The twin heads of the polisher will wear out gradually with use and should be replaced when they no longer hold the polishing
bonnets firmly in position. Simply turn the polisher upside down (so the twin heads are facing up), rest the polisher on a counter or on
your lap. Slide a flat 5/8” wrench between the head and the counterweight. With the wrench in one hand and the head in the other,
twist the head counterclockwise until the threaded shaft is completely clear of the nut. Oil the nut threads slightly and reverse the
above procedure to attach new heads or brushes. Be sure to screw the head of brush straight into the counterweight nut. If the shaft
seems to be screwing into the nut with difficulty, back it out and start over again. Be sure to tighten the heads or brushes snugly into
the nut or the polisher will vibrate badly when in use.
a period of 6 months from the date of purchase provided the machine is delivered or shipped freight prepaid to the Cyclo Fact
parts as inspection shall disclose to have been defective and the labor required for installation.
Conditions resulting fro
parts may void warranty.
Any
original warranty.
For an additional 6 months, Cyclo agrees to share the cost of any necessary replacement part or parts by allowin
30% discount from list prices on part or parts replaced for a period of 6 months from the date the warranty expires.
q Please attach a note answering the following questions:
o Is your tool unde r warranty? (Enclose proof of purchase)
o Would you like an estimate, or a repair?
q
to $60. We can only repair your tool if you have
provided us with y
q Please include $10 for return shipping charges if your tool is not under
o What is wrong with your tool?
warranty. (If paying by credit card, please provide Visa/MC number,
expiration date and the cardholder name.)
q
warranty), your tool will be disposed of. If $10 was included for return
shipping, we will ret urn the polisher to the address given.
q Repair labor is $45/hour.
q Send repairs to:
Cyclo Toolmakers, Inc.
ATTN: Service Dept.
1740 Skyway Drive
Longmont, CO 80504
the price before making any repairs.
Page 8
8
Page 9
9
Page 10

10
CYCLO TOOLMAKERS, INC.
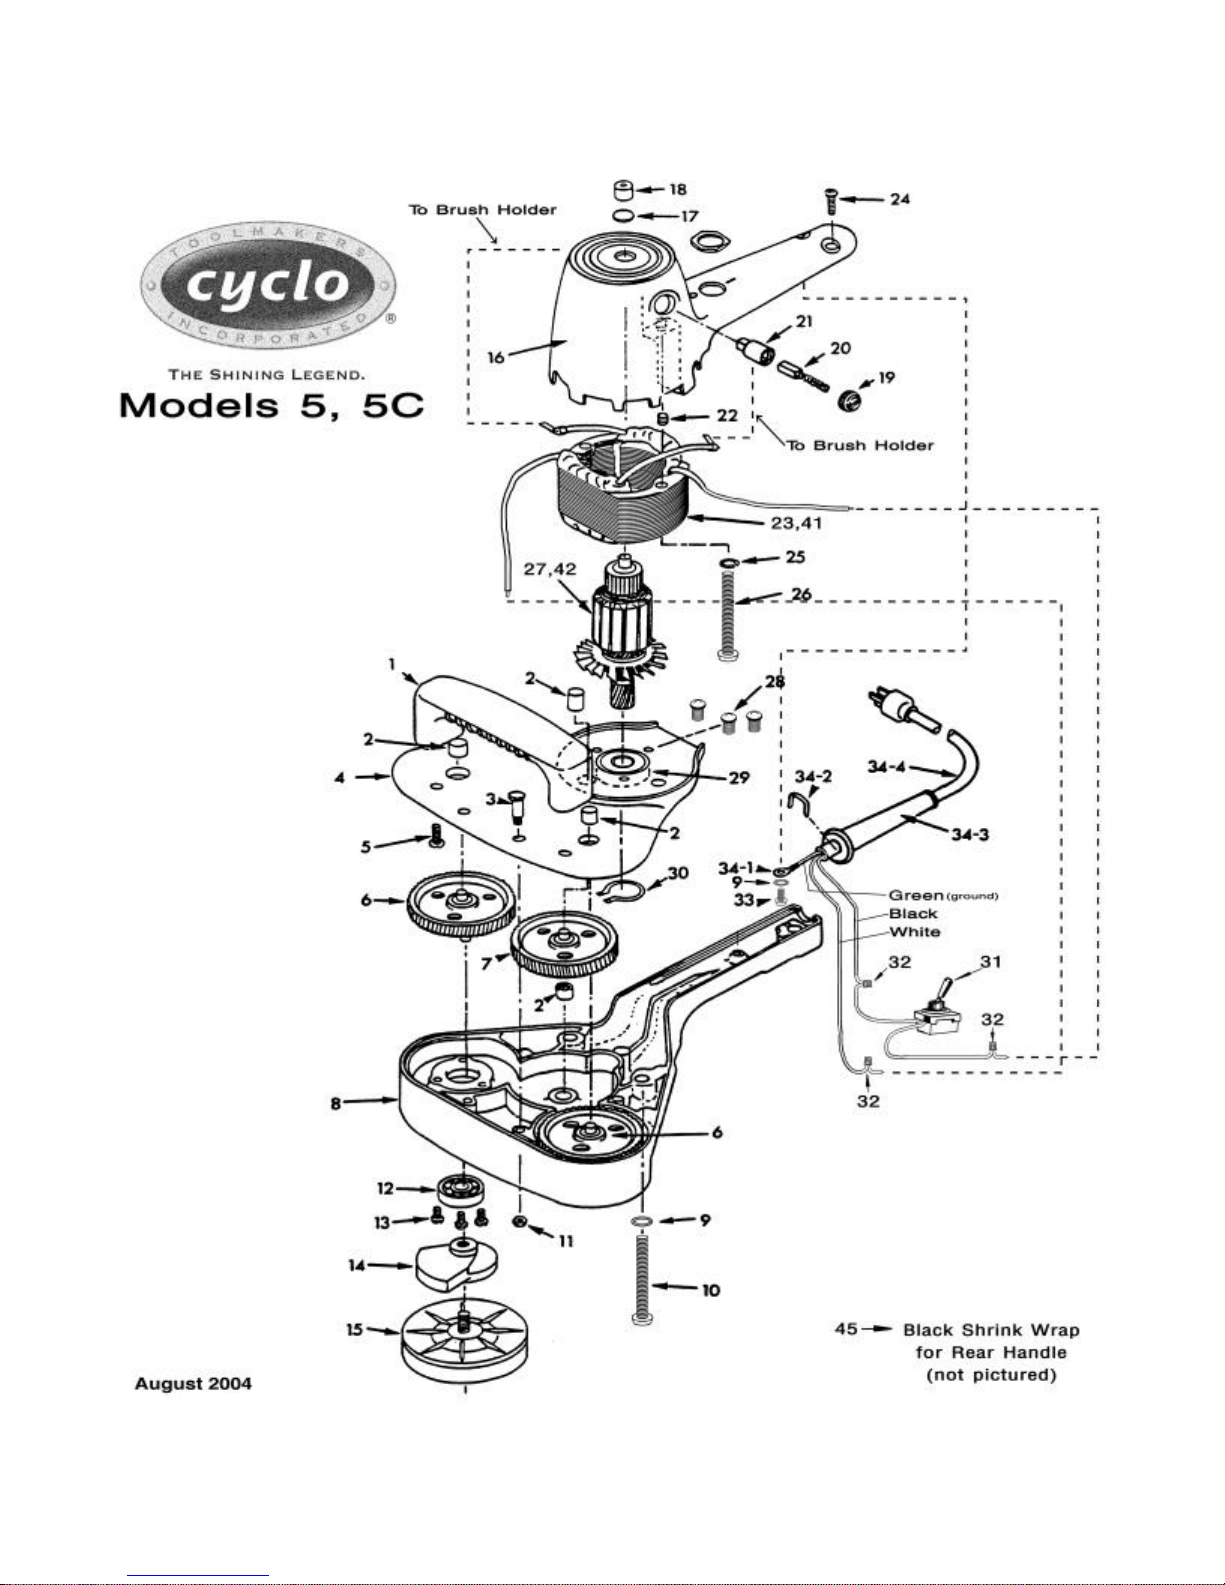
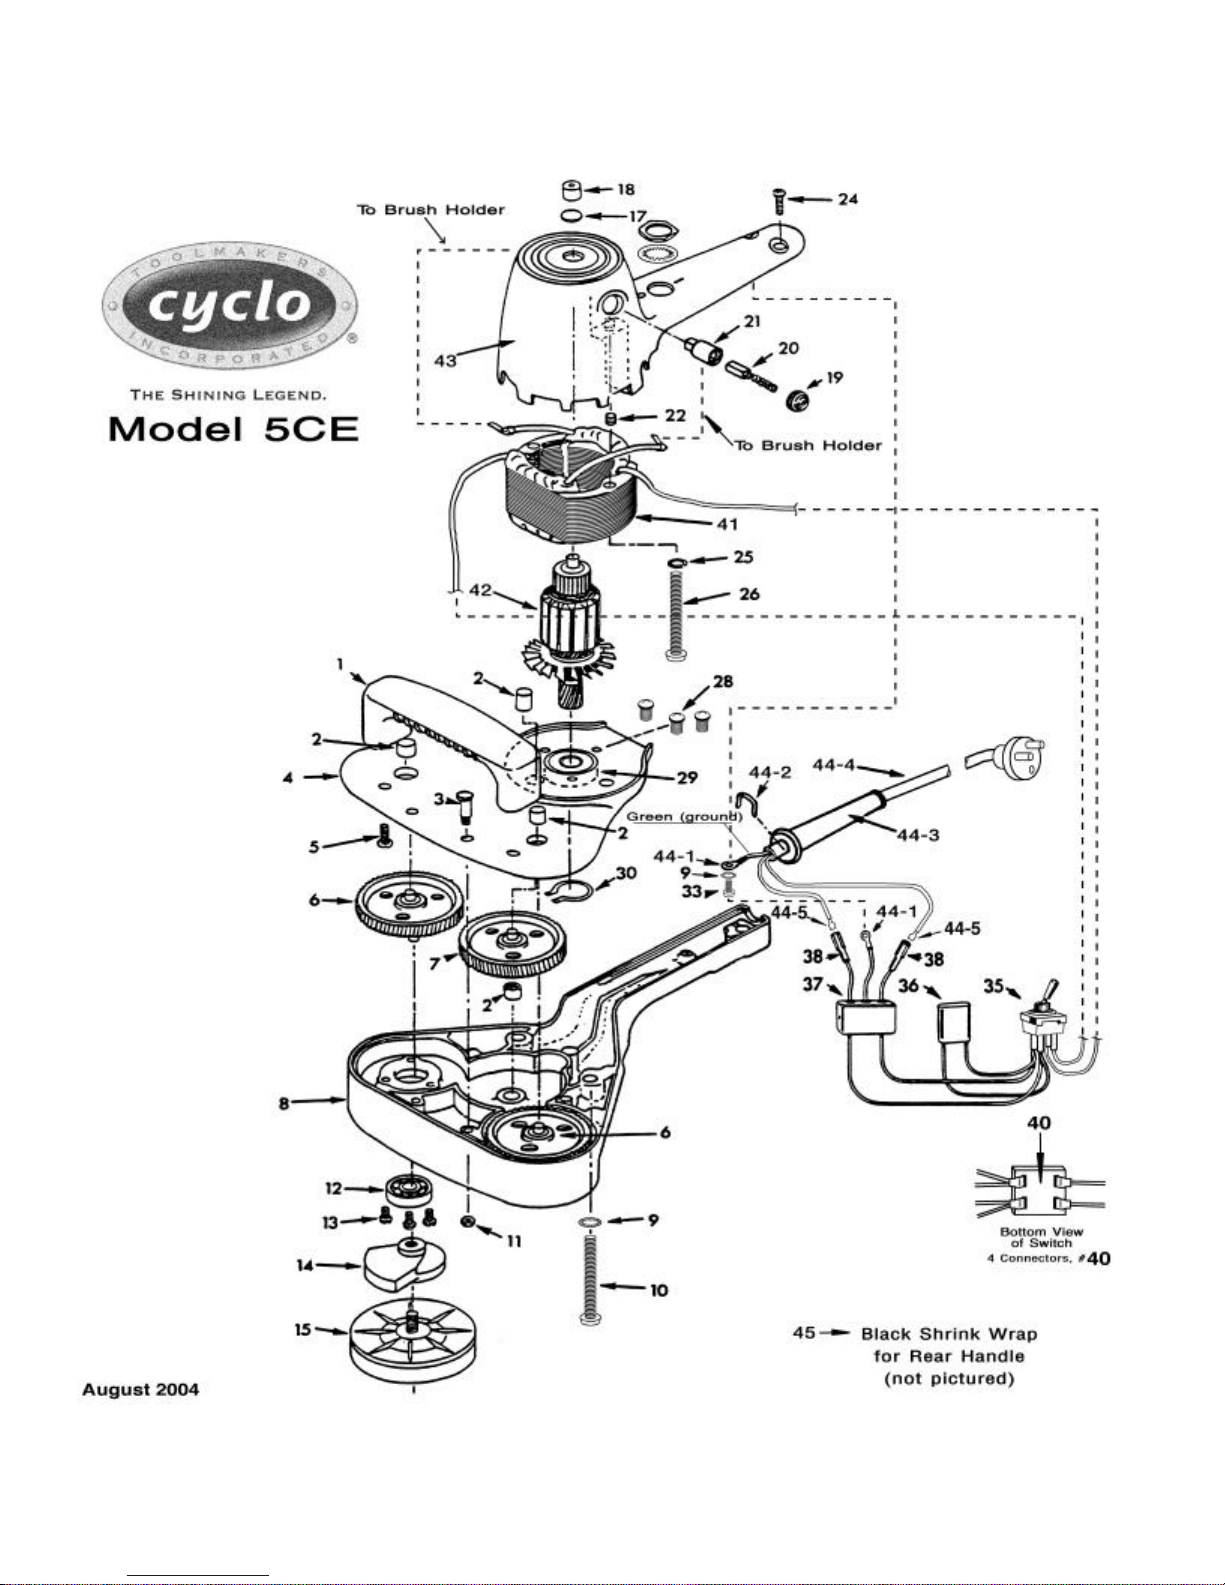
30 Counterweight Assembly) (Unit of Measure =
ORBITAL POLISHER - SANDER MODEL 5, 5C & 5CE
Parts Price List - Effective March 1, 2005
Indicator Part Price
Number Number Description Each
1
2
3
4
5
6
7
8
9
10
11
12
13
14
14
15 60-055-ASSY
15
16
17
18
19
19
20
21
22
23
23
24
25
26
27
27
28
29
30
31
32
33
34
34-1
34-2
12-560-ASSY Handle, Plastic Front, Polisher (Unit of Measure = each) $ 11.90
50-010 Needle Bearing (unit of measure = each) $ 5.35
11-080 Short Shoulder Bolt for Retaining Cover Plate (Unit of Measure = ea) $ 1.65
10-020-ASSY Metal Cover Plate (Unit of measure = each) $ 22.70
20-190 Screw, Handle Retaining (Unit of Measure = ea) $ 0.27
60-010-ASSY Nylon Drive Gear, Connects to Counterweight (Unit of Measure = each) $ 11.30
60-020-ASSY Nylon Idler Gear (Center Gear) (Unit of Measure = each) $ 11.30
10-010-ASSY Main Gear Case (Unit of Measure = each) $ 48.85
22-160 Washer, Star Lock Washer for Long Shoulder Bolt (Unit of Measure = ea) $ 0.18
20-500 Screw, Metal Housing Retaining (767) (Unit of Measure = ea) $ 0.80
22-520 Nut For Front Shoulder Bolt (Unit of Measure = ea) $ 0.28
50-040 Bearing, Main Drive Gear (Unit of Measure = ea) $ 8.85
20-180 Screw, Main Bearing Retaining (Unit of Measure = ea) $ 0.21
60-030-ASSY Counterweight Assembly (with bearing) (Unit of Measure = each) $ 18.15
*
60-025-ASSY OLD STYLE Counterweight Assembly (with bearing) (Unit of Measure = each) $ 9.00
Head Assembly (connects to 60-0
each) $ 12.85
*
60-050 OLD STYLE Head Assembly w/ Bearing (323-1) (Unit of Measure = ea) $ 20.60
10-040-ASSY Motor Case, Models 5 or 5C (Unit of Measure = each) $ 34.00
51-705 Oiler Felt for Bronze Bearing (Unit of Measure = ea) $ 0.46
50-020 Bronze Bearing (Unit of Measure = ea) $ 2.38
*
30-525 Brush Holder Caps (Unit of Measure = ea) $ 2.06
*
30-520 OLD STYLE Brush Holder Caps (Unit of Measure = ea) $ 2.83
30-500 Carbon Brush, Countoured Spring, and Dead Stop (Unit of Measure = ea) $ 4.60
30-515 Carbon Brush Holder (Unit of Measure = ea) $ 4.60
21-020 Screw, Brush Holder Retaining (Unit of Measure = ea) $ 0.35
**
30-300 Field 115V, 60Hz (Unit of Measure = ea) $ 28.80
**
30-300-GR Field 115V, 60Hz –GR model (Unit of Measure = ea) $ 28.80
20-020 Screw, Rear Handle (Unit of Measure = ea) $ 0.27
22-010 Split Lock Washer For Field Retaining Screw (Unit of Measure = ea) $ 0.13
20-100 Screw, Field Retaining (Unit of Measure = ea) $ 0.28
**
30-200 Armature, 115V, 60Hz (Unit of Measure = ea) $ 28.80
**
30-200-GR Armature, 115V, 60Hz –GR model (Unit of Measure = ea) $ 60.00
20-080 Screw, Motor Bearing Hold (Unit of Measure = ea) $ 0.21
50-030 Bearing, Lower Motor (Unit of Measure = ea) $ 8.85
51-710 Lock Ring for Pinion Gear (Unit of Measure = ea) $ 0.62
30-000 Switch, Single Pole, Single Throw, 230V, Model 5 and 5C (Unit of Measure = ea) $ 6.15
31-800 Crimp-on Wire Connector (Unit of measure = ea) $ 0.35
20-060 Screw, Grounding (Unit of Measure = ea) $ 0.18
31-000-ASSY Power Cord Assembly, U.S.A. Standard. (Unit of Measure = each) $ 10.60
31-810 Grounding Terminal (Unit of Measure = ea) $ 0.18
31-040 Bakelite Electric Cord Clip (Unit of Measure = ea) $ 0.29
Page 11

11
34-3
34-4
35
36
37
38
40
41
41
42
42
43
44
44-1
44-2
44-3
44-4
44-5
45
31-030 Strain Relief, Model 5 and 5C (Unit of Measure = ea) $ 2.06
31-011 Power Cord, Raw, USA Standard (Unit of Measure = ea) $ 5.40
30-020 Switch, Double Pole, Single Throw, 230V, Model 5CE (Unit of Measure = ea) $ 12.25
30-030 Noise Suppression Capacitor (Unit of Measure = ea) $ 3.41
30-040 RFI Power Line Filter (Unit of Measure = ea) $ 21.80
31-815 Terminal, Nylon Female Quick Disconnect (Unit of Measure = ea) $ 0.61
31-825 Female Connector (Unit of Measure = ea) $ 0.56
**
30-320 Field, 230V, 50Hz (Unit of Measure = ea) $ 28.85
**
30-320-GR Field, 230V, 50Hz –GR model (Unit of Measure = ea) $ 28.85
**
30-220 Armature, 230V, 50Hz (Unit of Measure = ea) $ 28.85
**
30-220-GR Armature, 230V, 50Hz –GR model (Unit of Measure = ea) $ 60.00
10-045-ASSY Motor Case, Model 5CE (Unit of Measure = each) $ 57.60
31-025-ASSY Power Cord Assembly, European CE Standard (Unit of Measure = each) $ 16.90
31-835 CE Grounding Terminal (Unit of Measure = ea) $ 0.46
31-040 Cord Clip (Unit of Measure = ea) $ 0.57
31-031 Strain Relief, Model 5CE (Unit of Measure = ea) $ 4.15
31-012 Power Cord, Raw, European CE (Unit of Measure = ea) $ 10.15
31-820 Terminal, Nylon Male Quick Disconnect (Unit of Measure = ea) $ 0.61
99-900-CUT LENGTH Shrink Wrap, Rear Handle (Unit of Measure = 6 inches) $ 5.00
Page 12
12
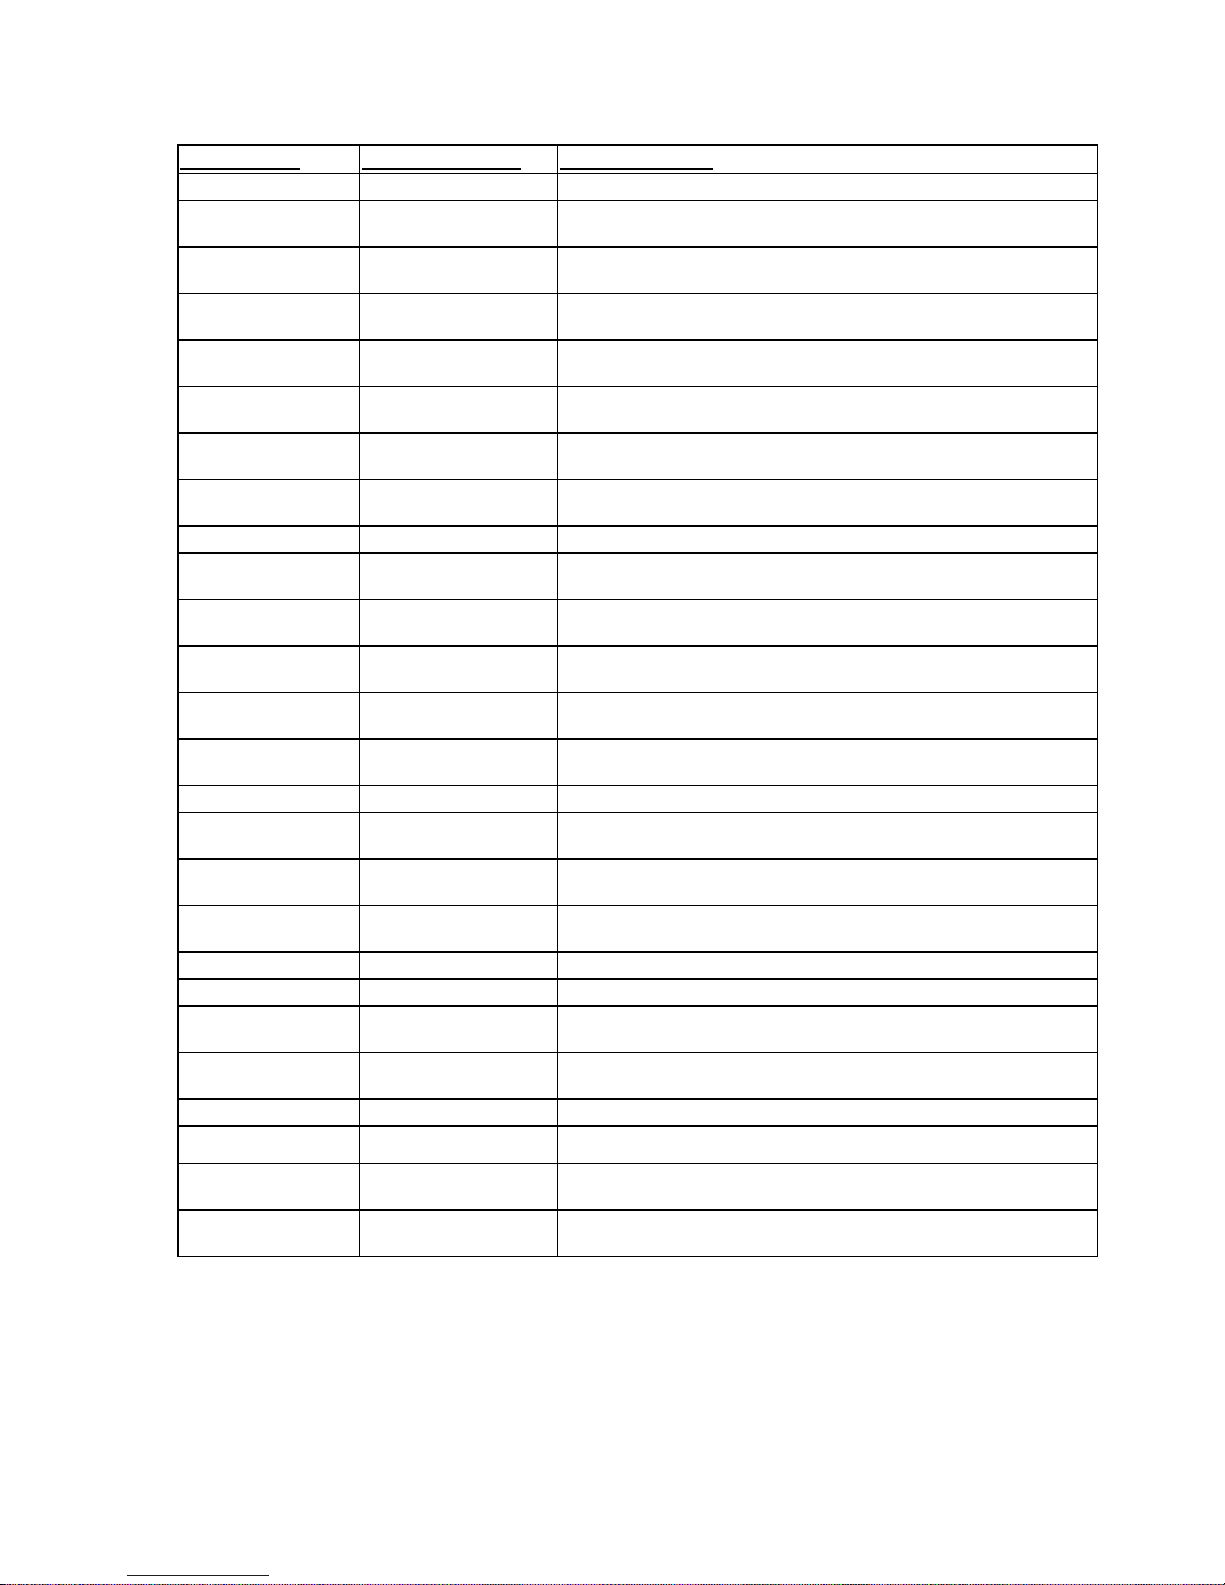
Part Number Old Part Number Cyclo Accessory
85-110-a Rubber Pad Holder w/Velcro Hook (Unit of Measure = each)
71-110-a 85-030 White Foam Finishing Bonnet (Unit of Measure = each)
White Foam Finishing Pad w/Velcro Loop (Unit of Measure = each)-
72-110-std
72-110 85-085
71-120-a 85-035 Green Foam Polishing Bonnet (Unit of Measure = each)
72-120-std
72-120 85-095
71-125-a Orange Foam Compounding & Polishing Bonnet (Unit of Measure = each)
72-125-std
72-125
71-135-a 85-040
72-135-std
72-135 85-065
71-160-a Yellow Foam Scrubbing Bonnet (Unit of Measure = each)
72-160-std
72-160
STANDARD
White Foam Finishing Pad w/Velcro Loop (Unit of Measure = each)-
PREMIUM
Green Foam Polishing Pad w/Velcro Loop (Unit of Measure = each)STANDARD
Green Foam Polishing Pad w/Velcro Loop (Unit of Measure = each)PREMIUM
Orange Foam Compounding & Polishing Pad w/Velcro Loop (Unit of
Measure = each)-STANDARD
Orange Foam Compounding & Polishing Pad w/Velcro Loop (Unit of
Measure = each)-PREMIUM
Yellow Foam Cutting Bonnet (Equivalent to Former p/n 85-040) (Unit of
Measure = each)
Yellow Foam Cutting Pad w/Velcro Loop (Unit of Measure = each)STANDARD
Yellow Foam Cutting Pad w/Velcro Loop (Unit of Measure = each)PREMIUM
Yellow Foam Scrubbing Pad w/Velcro Loop (Unit of Measure = each)STANDARD
Yellow Foam Scrubbing Pad w/Velcro Loop (Unit of Measure = each)PREMIUM
73-550 85-020 2004 Terry Pad Cover, Polishing (Unit of Measure = ea)
73-530 85-025 Microfiber Terry Pad Cover (Unit of Measure = ea)
74-660 85-150 Fastcut Deox Pads, 600 Grit (Unit of Measure = ea)
76-870 85-230 Scrub Brush, Stiff - Black Bristles (Unit of Measure = each)
76-840 85-240 Shampoo Brush, Soft - White Bristles (Unit of Measure = each)
76-830 85-250 Shampoo Brush, Softer - Aqua Bristles (Unit of Measure = each)
76-810 85-260
71-455-a 85-010 Light Cutting Wool Pad (Bonnet) (Unit of Measure = each)
72-455-a 85-075 Light Cutting Wool Pad (Velcro Attachment) (Unit of Measure = each)
Shampoo Brush, Ultra-Soft - Gray Flagged Bristles (Unit of Measure =
each)
STANDARD pads have loop material extending the full diameter of pad; PREMIUM have loop
material in smaller diameter than foam disc.
 Loading...