

INSTRUCTION MANUAL
Product name:CYCLEVISION HELMET
Model:CVHC-01-01,CVHC-01,CVHC-01-02

............................................................ 4
....................................................................... 6
................................................................................... 7
...................................................................... 8
............................................................................... 9
................................................ 10
.................................................. 13
.................................................... 15
.................................................. 16
............................................................. 17
................................................................. 18
YOUR CYCLEVISION HELMET
SAFETY PRECAUTIONS
CERTIFICATION
PACKAGING CONTENTS
GETTING STARTED
SETTING UP CYCLEVISION HELMET
CHARGING CYCLEVISION HELMET
CHARGING WITH A POWER BANK
POWERING ON/OFF CYCLEVISION
BATTERY LEVEL INDICATOR
DUAL CAMERA FUNCTION
TABLE OF CONTENTS TABLE OF CONTENTS
CYCLEVISION APP
WI-FI, SSID AND PASSWORD
CONNECTING TO WI-FI
USING THE APP
APP SETTINGS
TRANSFERRING VIDEO/S TO PC/MAC
PCB & CPU RESET
MAINTENANCE
PRODUCT GUARANTEE
REGULATORY INFORMATION
CUSTOMER SUPPORT
.......................................................... 19
............................................................ 20
..................................................................... 22
................................................................................... 23
.................................................................................... 26
............................................. 31
.............................................................................. 33
.................................................................................... 34
.................................................................... 36
........................................................... 38
....................................................................... 39
4
5
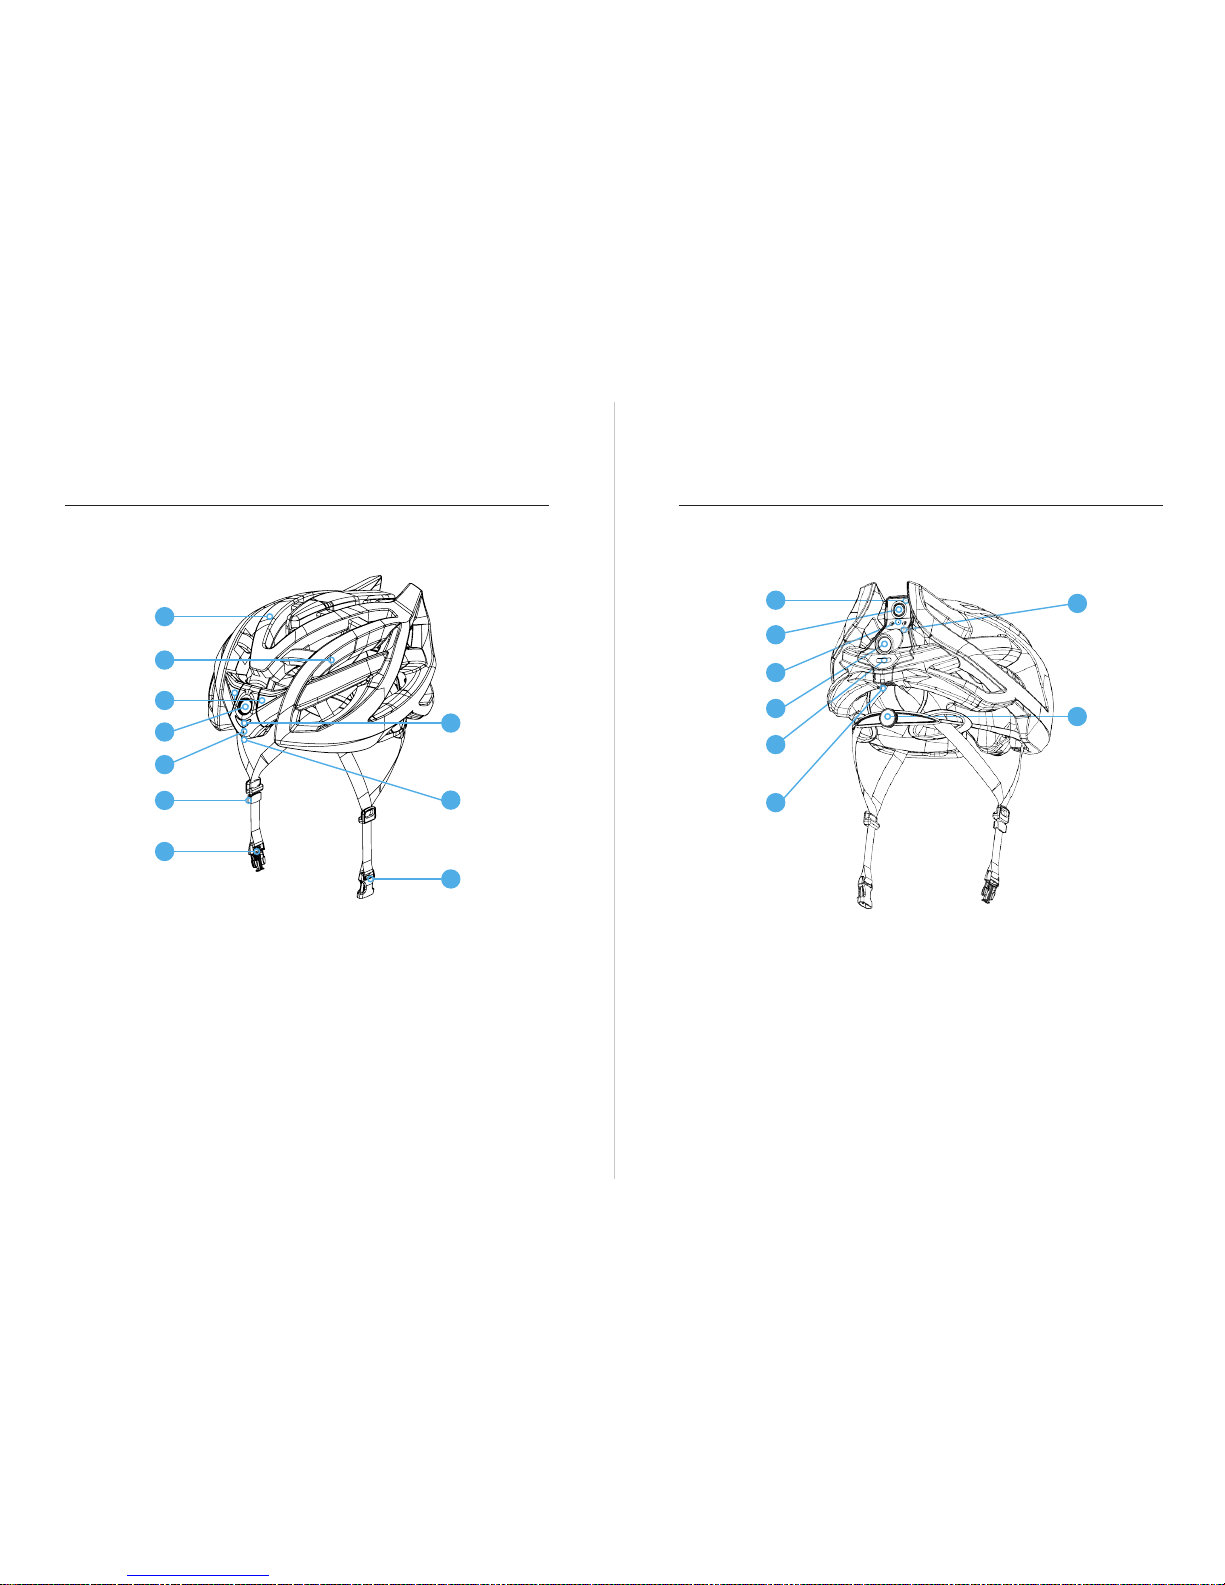
1. Cyclevision Helmet Shell
2. Inner Lining
3. Forward PCB/CPU Heat Sinks
4. Forward HD Camera
5. Forward Microphone
6. Strap Sliders
11. Helmet Electronics ‘Reset’
Button
12. On/Off Button
13. Rear Microphone
14. Rear HD Camera
15. Battery Power Status LED
Light Pipes
7. Right Hand-side Male Buckle
8. Forward Camera Operational
Status Light
9. Forward Camera Micro USB
Vision/Sound Data Connection
Port
10. Left Hand-side Female Buckle
16. Rear Camera Micro USB
Vision/Sound Data and
Battery Recharge Port
17. Rear Camera Operational
Status Light
18. Rotary Headset Restraint
Head Sizing Adjustment Dial
12
13
14
11
15
16
18
2
3
4
5
6
7
10
8
9
1
FRONT REAR
17
YOUR CYCLEVISION HELMET YOUR CYCLEVISION HELMET

6
7
• Warning! The Cyclevision Helmet must be adjusted before each ride.
• The Cyclevision Helmet must feel comfortable on the head, if not the
helmet straps must be readjusted to ensure a comfortable rm t.
• The Cyclevision Helmet must cover your forehead and be correctly
positioned.
• The Cyclevision Helmet is not a motorcycle helmet and is not suitable
for any motorsport use.
• The Cyclevision Helmet has been designed and tested to withstand
high speed water injection, but is not designed nor suitable for water
sports.
• The Cyclevision Helmet must not be used for water sports or any other
applications other than that of a cycling helmet.
• The Cyclevision Helmet must be replaced if it is involved in a crash or
is damaged.
• The Cyclevision Helmet is not a toy.
• Always be aware of your surroundings to avoid injury to yourself or
others.
Your Cyclevision Helmet complies with destructive testing standards
1. Australian and New Zealand AS/NZS 2006/2008: A1-2009
2. European (including UK) EN 1078:2012 +A1-2012
3. North American (including Canada)16CFR 1203
Your Cyclevision Helmet complies with electrical conformance standards
CE, FCC & C-Tick.
Your Cyclevision Helmet complies with European chemical testing
standards REACH, Annex XVII, EN 12472, AZO Dyestuff, EN 420, EN ISO
3071.
SAFETY PRECAUTIONS CERTIFICATION
8
9
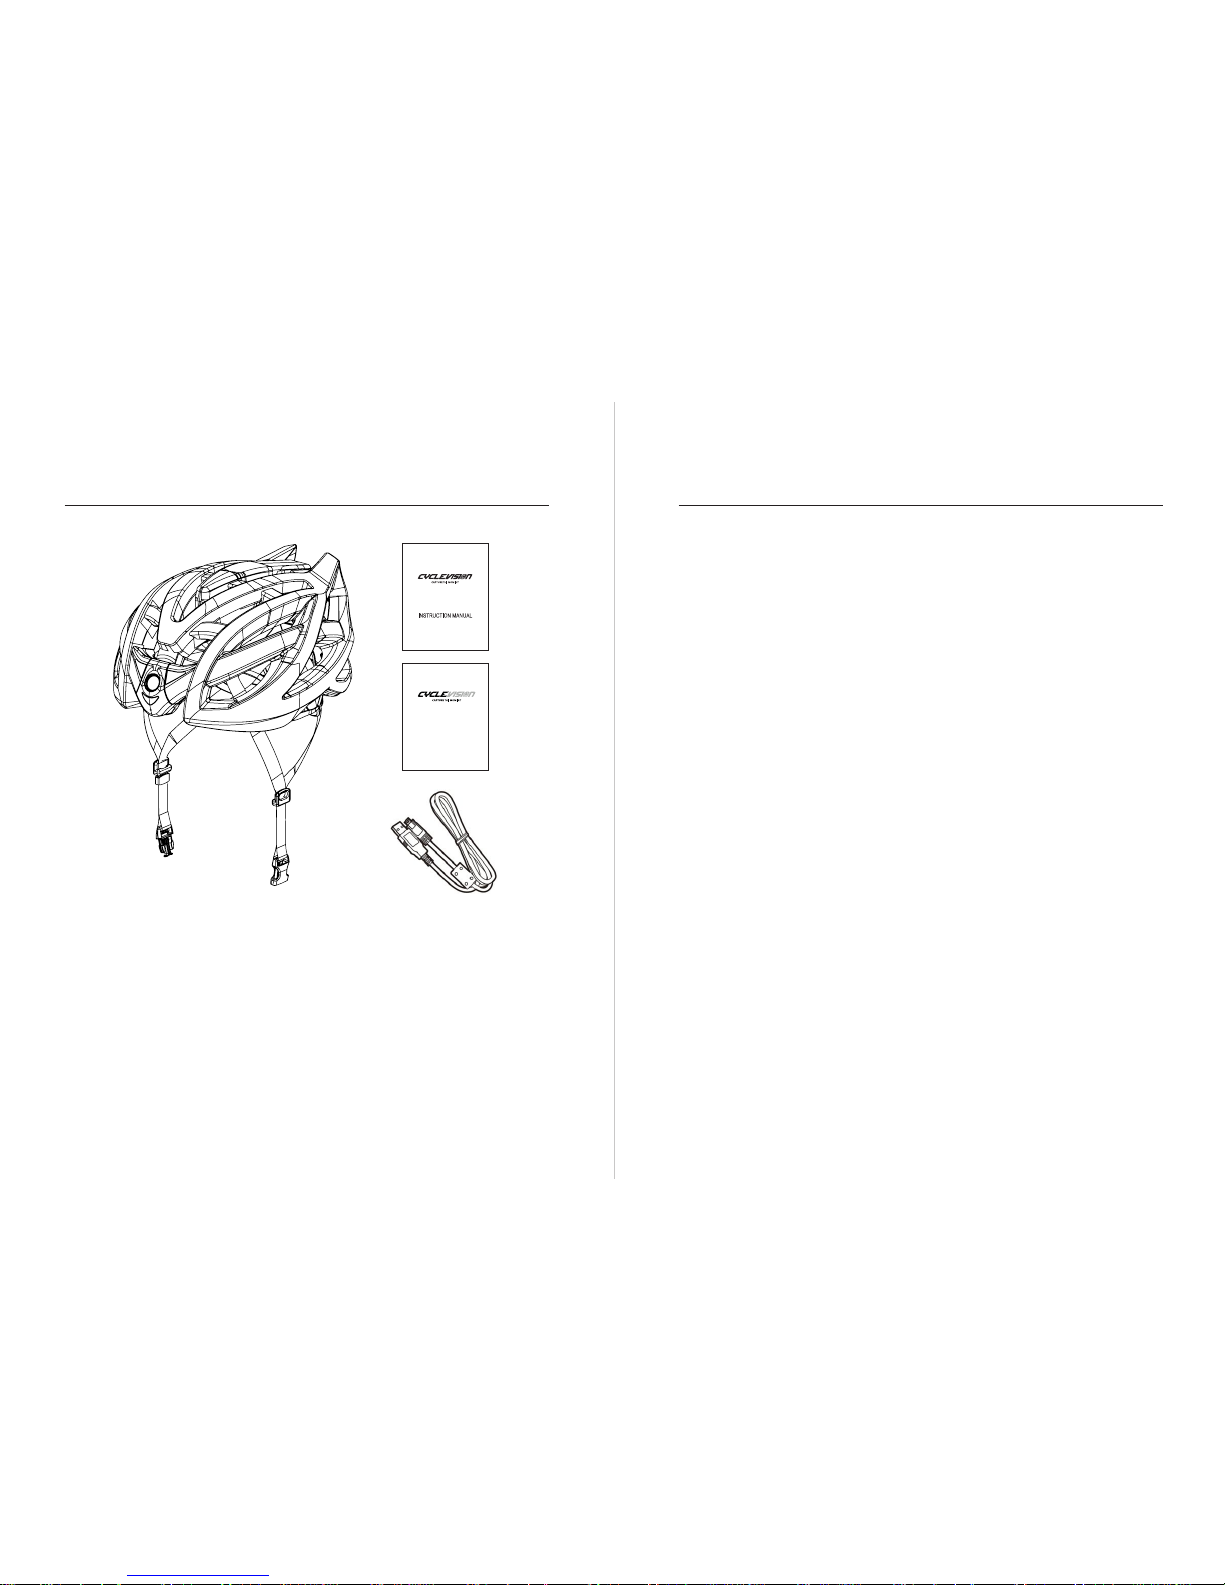
Package contents:
• 1x Cyclevision Helmet
• 1x Instruction Manual
• 1x Quick Guide
• 1x Micro USB Data/Power Transfer Cable
• 1x Spare Helmet Liner
QUICK GUIDE
LET’S GET STARTED
Congratulations on purchasing your Cyclevision Helmet. Please refer to
SETTING UP CYCLEVISION HELMET to make sure you properly adjust
the Cyclevision Helmet to suit.
For the best experience, we recommend fully charging the internal
3250mA Lithium Polymer Battery before rst use. Full charge is indicated
by illumination of 4X battery status indicator lights.
The Cyclevision Helmet comes with dual integrated 32GB memory cards
and are not removable, upgradable or interchangeable. Do not attempt
to open the helmet to change the cards under any circumstances. The
housings have been sealed and damage to the housings, camera and
PCB may occur. Any attempt to open the camera housing will result in
voiding of the warranty.
Each camera records in 1080p = 1920 x 1080 x 30fps HD Vision.
Each memory card is written at approximately 100Mb per minute of
record time, the vision data les are recorded in 2 minute loops; if the
integrated memory becomes full during recording, the older video les
will be overwritten by the newer video les. This process (under normal
circumstances) will occur every 4 hours of recording time.
The Cyclevision Helmet also records sound and the microphone holes
must never be poked with foreign objects or damage to microphone
components will occur.
PACKAGING CONTENTS GETTING STARTED
10
11
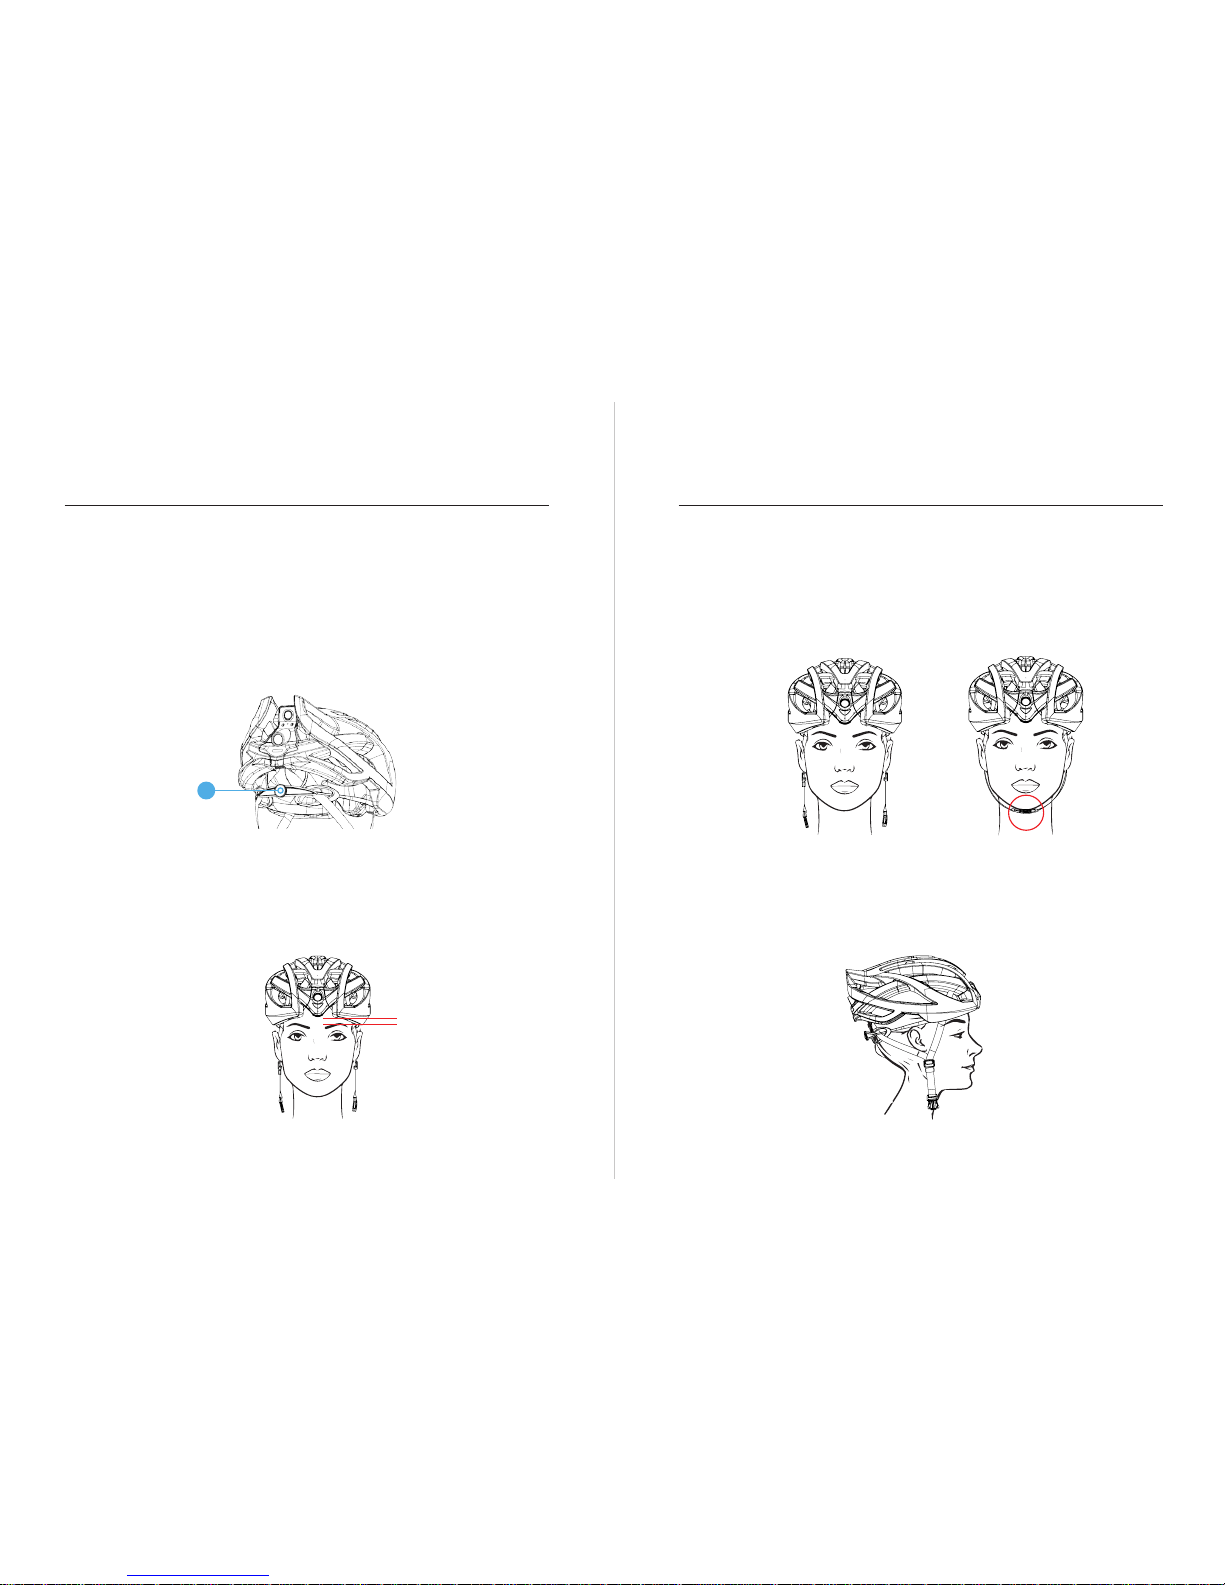
WARNING! The Cyclevision Helmet must be adjusted before each ride.
Step 1 - Retention System
Before putting on the Cyclevision Helmet, completely loosen the rotary
retention dial (1), place the Helmet on your head and rotate the dial to
tighten the Helmet for a snug and comfortable t. The Helmet should not
feel loose on the head.
Step 2 - Position
The Cyclevision Helmet should sit level on your head about one or two
nger-widths above your eyebrows. The Helmet should not be worn
sloping back off your head. Tighten the retention system until the Helmet
feels snug.
SETTING UP CYCLEVISION HELMET SETTING UP CYCLEVISION HELMET
1
Step 3 - Buckle Strap Adjustment
Connect the male/female retention strap buckles, centering them under
the chin. The straps can be adjusted to lengthen or shorten them so the
Helmet stays rm on your head and the straps maintain a rm t under
your chin.
Step 4 - Side Strap Slider Adjustment
The side strap must be adjusted using the slider to form a “V” shape
under and in front of the ears.
12
13
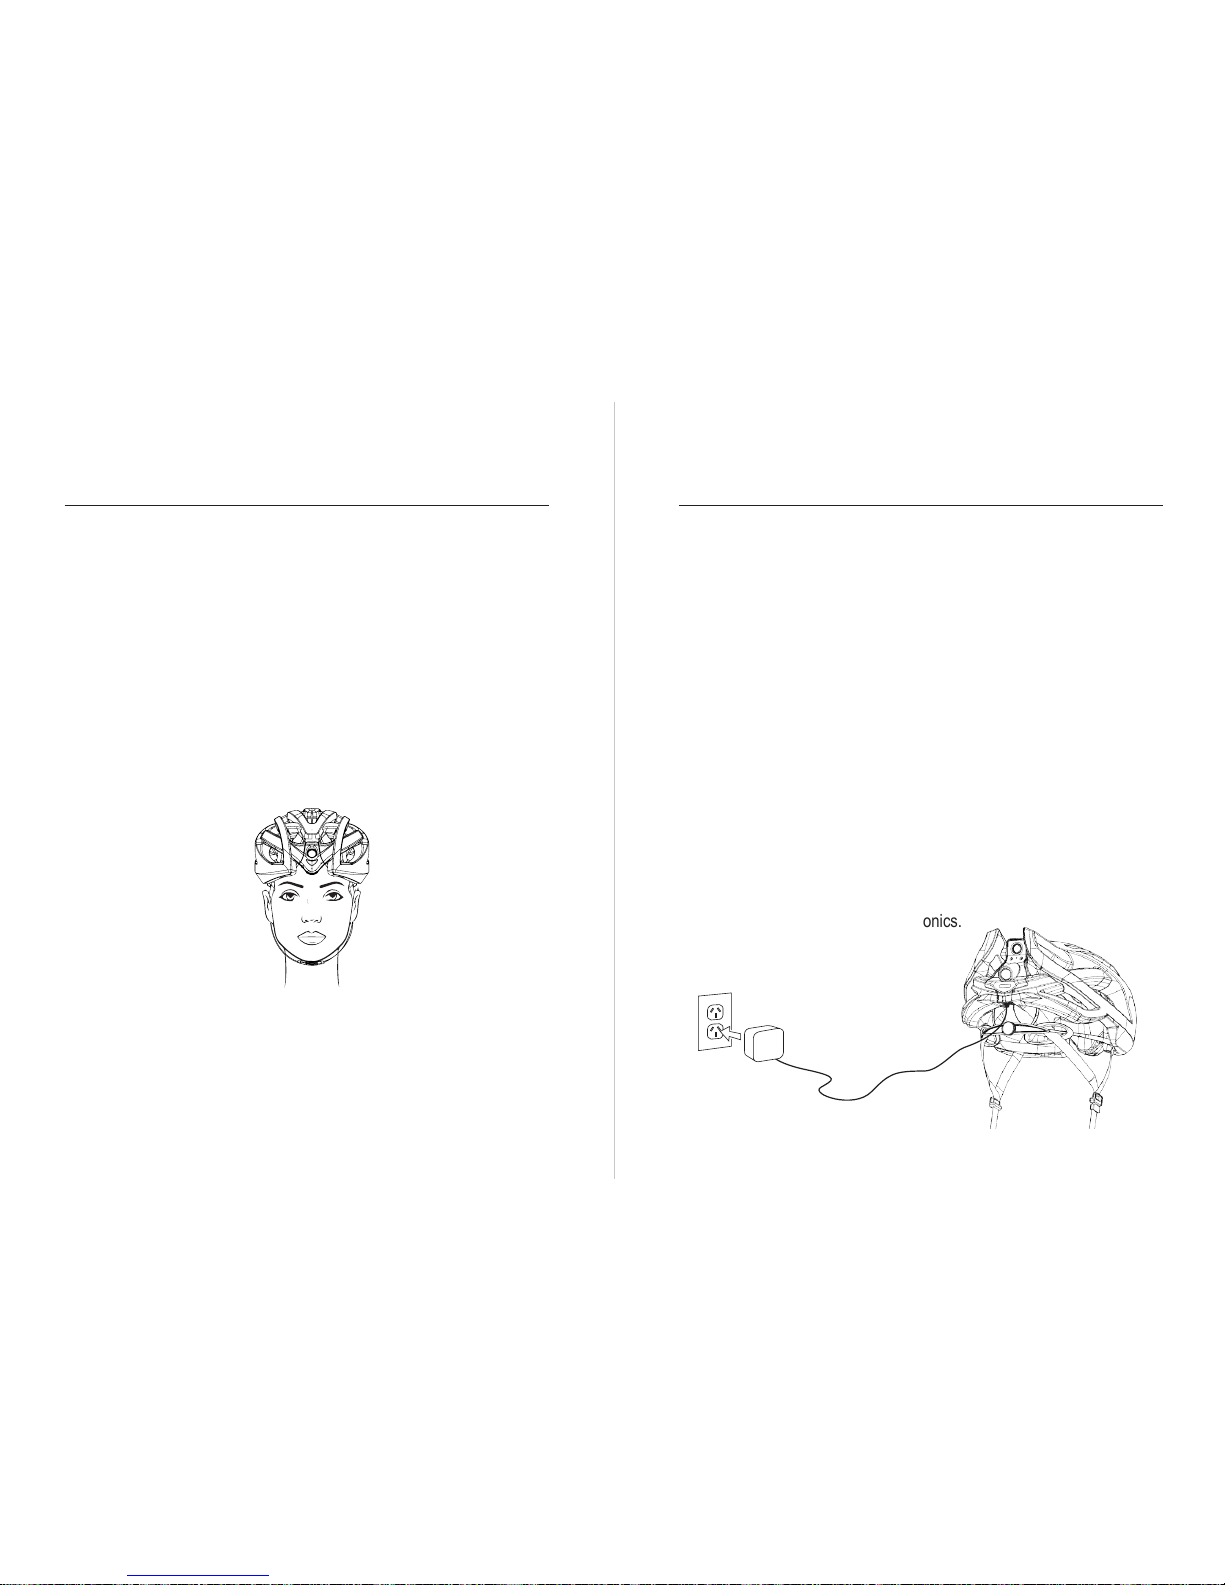
Charging the Battery
The Cyclevision Helmet comes fully assembled with an internal 3250mA
Lithium Polymer Battery.
The Battery is fully enclosed in its own separate housing and is not
removable from the Cyclevision Helmet. Do not attempt to open the
Helmet to change the battery under any circumstances. The battery
housing has been sealed therefore damage to the housing, camera
and PCB may occur if tampered with. Any attempt to open the camera
housing will result in voiding of the warranty.
To charge the Cyclevision Helmet plug one end of the USB cable
into any wall power outlet, we recommend a DC5V - 2A USB charger
adapter, and place the other end of the Micro USB cable into the REAR
Micro USB Port.
Do not plug power into the front USB port – this will not result in battery
recharge and may damage the electronics.
Step 5 - Final Check
The Cyclevision Helmet must be properly secured on the head without
rocking forward over the eyes and/or backward on the head.
This does not only provide correct protection in case of a crash but is
necessary for the quality of the video recording. Both the front and rear
camera angles are preset for correct helmet positioning.
Cyclevision cannot be held responsible for vision data capture angle
differences if the Helmet is not correctly placed and secured on the head.
SETTING UP CYCLEVISION HELMET CHARGING CYCLEVISION HELMET

14
15
Battery LED status lights
Battery recharge will commence immediately once the USB cable is
plugged into the rear USB port, and the rear Battery LED status lights will
illuminate indicating the battery is recharging.
Charger Requirements: Output current: DC 5V 2.0A
If using a Power Bank to charge the Cyclevision Helmet, turn ON the
Helmet and make sure it is in RECORDING mode, then plug-in the
Power Bank connection.
Note: If charging the Cyclevision Helmet by Power Bank whilst in
RECORDING mode, the charging speed will be very slow due to
insufcient charging current given from the Power Bank.
The Cyclevision Helmet can be topped up with a Power Bank once the
Helmet has been turned on and is operating correctly.
Turn the Cyclevision Helmet ON let the 10 second start sequence
complete. When both red LEDs are ashing, plug in your remote Power
Bank to the rear micro USB port, the Helmet will now be accepting a
power top up whilst continuing to record.
The Cyclevision Helmet has a 3250Ma battery. The useable life can
be extended approximately by 1000Ma for every hour. For example, a
2000Ma power bank will extend the runtime for approximately 2 hours if
fully charged.
WARNING!
DO NOT USE A POWER BANK TO CHARGE THE BATTERY IN
DIRECT SUNLIGHT. DURING CHARGING, THE TEMPERATURE
SHOULD NOT BE OVER 45°C.
Note: Both USB ports are open to the weather. They are both sealed
inside the helmet and are of waterproof nature so no damage can be
done if water is sprayed into this area.
WARNING!
DO NOT PLUG THE USB CABLE INTO BOTH THE FRONT AND REAR
USB PORTS AT THE SAME TIME UNDER ANY CIRCUMSTANCES!
THIS WILL DAMAGE THE ELECTRONIC CIRCUITRY.
DO NOT SWITCH CAMERA ON WHILST HELMET IS CHARGING AS IT
MAY CAUSE CAMERA TO OVERHEAT.
CHARGING CYCLEVISION HELMET CHARGING WITH A POWER BANK

16
17
Powering On: Press the On/Off button on the back of the Cyclevision
Helmet for at least 1.5 seconds to power on. The camera start sequence
will commence which takes approximately 10 seconds. Once the start
sequence has been activated do not press the ON/OFF button again until
the start sequence has fully completed.
The rear camera status light located to the top right hand side of the rear
camera lens tube will illuminate as a solid Red light for approximately 4
seconds. Additionally, the front camera status light will illuminate red and
follow the same start sequence as the rear.
Powering Off: To turn the helmet OFF hold the power button down for
2 seconds then release. The helmet will take 3 seconds and then shut
down, all lights will turn off indicating power OFF.
Power ON / OFF
POWERING ON / OFF CYCLEVISION
Once the ON/OFF button has been pressed, the red front and rear
camera status lights are illuminated, and all 4 Blue LED battery level
indicators will illuminate for approximately 4 seconds, then revert back to
display the remaining useable battery charge.
When fully charged the 3250 mA battery will run the helmet continually
for approximately 2.5 hours without WIFI running.
4 LED lights = 4/4 full charge
3 LED lights = 3/4 charge
2 LED lights = 1/2 charge
1 LED light = 1/4 charge
BATTERY LEVEL INDICATOR

18
19
During the start up sequence, both the front and rear camera status
lights will go off for approximately 3 seconds, then come back on as solid
red lights for another 3 seconds, after which the front and rear camera
status lights will start ashing, indicating that the front and rear cameras
are both in simultaneous operation and recording correctly.
If there is a solid Red light being omitted from either the front or rear
camera status lights, then this indicates that the camera is not recording.
For example, once the helmet has been turned on and has completed
its 10 second start sequence, if the front camera status light is ashing
and the rear camera status light is displaying as a solid red, then this
indicates that only the front camera is recording, and the rear camera is
not recording.
To recap:
LED ashing Red - Camera Recording
LED solid Red - Camera not recording
DUAL CAMERA FUNCTION
Connecting to Streaming App
Your Cyclevision helmet functions in conjunction with the ‘Cyclevision’
App. Before using the Cyclevision camera it will be necessary to
download and install the App onto your smartphone.
The ‘Cyclevision’ App lets you stream the footage from the Cyclevision
Helmet during recording . This allows the user to use their mobile
device as a rear view camera.
Download the free ‘Cyclevision' App from either:
Connecting to the Helmet
Turn your Cyclevision Helmet ON and open your smartphone settings.
Search available wireless networks.
Please note that WIFI is turned off by default, a short press of the ON/
OFF button can turn WIFI on/off.
The Cyclevision helmet can stream live vision to your smartphone
through the ‘Cyclevision’ App from either the front or rear cameras.
CYCLEVISION APP

20
21
WIFI
The Cyclevision Helmet is set by ‘factory default’ to the following:
For viewing vison from the rear camera:
MTEK_b_WIFI
Password 87654321
For viewing vision from the front camera:
MTEK_f_WIFI
Password 87654321
SSID
The ‘SSID’ and name of the viewing camera can be changed to suit the
user i.e.
MTEK_b_WIFI –change to- ROB_b_WIFI
MTEK_f_WIFI – change to- ROB_f_WIFI
Password
The password (87654321) can also be changed to suit the users
preference; however just by changing the SSID name, is more than
satisfactory to uniquely electronically mark your Cyclevision camera
helmet.
Refer to ‘Camera WIFI Settings’ for full details. This is found in App
Settings.
WI-FI, SISS AND PASSWORD
After selecting either MTEK_b_WIFI or MTEK_f_WIFI, enter the default
password 87654321. A small blue tick will come up next to the Wi-Fi
network connection once it has successfully connected.The Password
can be changed at a later date in the App settings.
The pairing of Wi-Fi with the ‘Cyclevision’ App merely allows the use of a
mobile smart phone to be used as an ‘electronic rear vision mirror’ when
mounted on the bicycle handlebars, suitable for the display of rearview
approaching trafc. The pairing of Wi-Fi is not necessary to continue
helmet recording functions. All vision and sound data is stored within the
Cyclevision Helmet on twin Micro SD Cards and not in the App.
CONNECTING TO WI-FI

22
23
To show that either of the front or rear helmet cameras have been paired
with your smartphone, the default Red camera status LED lights will
revert from ashing Red to ashing Green.
Once the Wi-Fi connection has been made, close Settings on your
smartphone and open the ‘Cyclevision’ App.
Front Rear
CONNECTING TO WI-FI
The Cyclevision App start screen will appear and the rear helmet camera
will connect to the App. This will take approximately 4 seconds and then
live vision will be displayed from the rear camera.
Open the Cyclevision App
The rst time you open the Cyclevision App you will get the connection
screen, and the spiral connection icons will appear. In later times you
will get a black screen while loading.
In this example we have chosen the rear camera to view Wi-Fi streaming
MTEK_b_WIFI.
USING THE APP

24
25
The smartphone screen can be rotated from portrait to landscape modes
to suit user preference.
Landscape mode is the preference for viewing rearward approaching
trafc, because this provides a larger screen display.
The large central Red App control button on your smart phone screen
will be ashing when in record mode. If the button is not ashing press to
activate the record mode.
App control button
USING THE APP
If the red control button within the app is ashing, so will the green
helmet camera status light, indicating the camera is in record mode.
If you press the ashing button so that it becomes solid red, the helmet
camera status light will also show solid green, indicating that it is not
recording from that helmet camera.
If the helmet camera has been turned on and the front or rear camera
status lights are displaying one red ashing light, and one solid red light,
then the associated non ashing camera status light indicates that the
camera is not in record mode and the user must change the settings in
the ‘Cyclevision’ App.
The underlying reason the rear camera does not record immediately
upon helmet camera ‘start-up’ is the ‘Auto Recording’ mode is not
engaged. Go to ‘Settings’ and make sure ‘Auto Recording’ is turned ON.
USING THE APP

26
27
How to access App Settings
Step 1 - Select the round yellow settings button on the vision screen.
Step 2 - Select ‘Other Settings’ located under ‘Quick Settings’.
For example, if you nd the ‘Auto Recording’ feature is off, go to ‘Other
Settings’ and you will nd ‘Auto Recording’ as the 6th option down.
Simply move the slide bar to the right to expose the green ‘ON’ mode.
The Helmet will now function with the rear camera in operation every
time the Helmet is turned ON.
Settings Other Settings
APP SETTINGS
The Cyclevision App has various other functions and controls including
the ability to control the operation of either the front or rear helmet
cameras, but also the mode of viewing and vision data recording.
Note: The red camera control button must always be OFF (not ashing)
before any setting or mode changes can take place. Pressing this button
will turn OFF the associated camera while you make setting adjustments.
Remember to turn the red camera control button back ON again after
adjusting any of the App settings.
VIDEO SETTINGS
Video Display
This will mirror the current vision data capture mode that the App has
been set to, and highlight in yellow.
Video Resolution
By default, this is set at 1920x1080 = equal to true HD recording and is
not adjustable.
APP SETTINGS
Select Mirror Mode ON to view rearwards approaching traffic on the
correct side of the rider, as seen on
your smartphone when mounted on
the bicycle handlebars facing the rider.
CAUTION : If the Mirror Mode setting is OFF rearwards
approaching vehicles will appear on your smartphone screen on the
opposite side to the rider

28
29
Video WDR
Cameras with wide dynamic range (WDR) have special software that
allows them to balance that lighting for a clear image. Select WDR to
improve the overall exposure throughout your entire image. It enables
the camera to pick up greater detail in dark shadows, while making sure
that the highlights don’t get blown-out, the result is a natural looking
video.
Video Exposure
The Cyclevision camera has terric ability to record astounding vision
clarity while riding directly into or towards the sun or very bright objects,
by default the setting is 0.0, if riding in low light situations or at night, then
select this option and change the setting to +2.0 this will do two things:
1. Lighten the smartphone viewing screen.
2. Open the camera aperture to allow more light onto the image
sensor and enable low light recording
Remember when the Cyclevision Helmet or ‘Cyclevision’ App is
subsequently shut down the last settings will be maintained, and if for
example you rode at night and adjusted the App to suit, remember to
readjust back to 0.0 for riding in bright sunlight, to prevent
overexposure of the next loop of recorded image.
APP SETTINGS
OTHER SETTINGS
Auto Recording
This must be selected to ON, so that when the Cyclevision Helmet has
been turned OFF and then back ON it continues to automatically record
without any need for user intervention.
SYSTEM SETTINGS
Camera Time
Press this button to sync the front and rear cameras – this can be done
by selecting Auto (same as the smartphone device time) or manually.
G-Sensor
Not a feature with the Cyclevision Helmet, can be left ON or OFF.
Microphone sound
Select sound ON to record from the rear or front cameras, select sound
OFF to stop sound recording.
Light frequency
Please leave it remaining at 50Hz. This is the recommended Cyclevision
Helmet Camera setting.
APP SETTINGS
Video Stamp
Select this from screen overlay of day and date time
stamping, if selected, this will appear in all the downloaded
vision data on the lower bottom part of the screen

30
31
Camera Language
Select English
Auto Power Off
By default, this is set to ‘never’. If changed to 1, 3, or 5 minutes the
Cyclevision Helmet will automatically shut the cameras down after
the specied time. If you select this remember when you next turn the
helmet ON the same feature will be enabled and the Cyclevision Helmet
will continue to shut down at the specied time, unless you change the
settings back to ‘Never’.
Format Camera Storage
Reformatting the camera is not normally necessary unless you are
experiencing difculty with memory card storage. Selecting and
conrming Format Camera Storage will wipe any existing data from the
internal memory card storage and reset it like new.
Reset Camera Settings
Returns all ‘Cyclevision’ App settings to the factory default.
Camera Wi-Fi Settings
You are able to personalise your Cyclevision Helmet WIFI name and
password.
APP SETTINGS
Viewing Your Video Footage
To playback your video, you must rst transfer the video le/s to your
computer.
Downloading Vision Data From Either The Front Or Rear Cameras
The Cyclevision Helmet has two separate high denition cameras, thus
creating two separate video les each time you record.
Simply connect the USB Cable provided to the desired camera and
connect the other end to a computer and turn ON the Cyclevision
Helmet. Browse the internal memory card and select the video/s you
want to transfer to your computer.
WARNING!
DO NOT PLUG THE USB CABLE INTO BOTH THE FRONT AND REAR
USB PORTS AT THE SAME TIME! THIS WILL DAMAGE THE SEALED
(UNREMOVABLE) INTERNAL BATTERY.
TRANSFERRING VIDEO/S TO PC/MAC

32
33
Your computer will take up to 14 seconds to detect the Cyslevision
Helmet camera and once detected simply follow the onscreen prompts to
download the vision data les to your storage area of preference.
The Cyclevision Helmet records in true HD 1920 x 1080 x 30fps which is
equal to 100 MB per minute. This is a reference point only, environmental
factors may vary le size.
The vision data is recorded in 2 minute loop sequences, i.e. if the inbuilt
32GB memory card were empty and the camera activated the rst 2
minute loop will be recorded followed immediately by another 2 minute
loop and so on. When the card becomes full the programming will dump
the very rst loop recorded (oldest loop) and replace it with the newest
loop, (and so on).
If you do not download the vision the loops will simply continue to
overwrite each other ad innitum.
A 32 GB memory card when full will download approximately 120 x
2 minute loops of vision and sound. This is why Cyclevision has kept
the default card to 32GB, if we elected to install a 64 GB memory card
(approximately 8 hours of storage) it would require 240 les to be
transferred and downloaded and you may be quite annoyed at the length
of time it takes to do this.
TRANSFERRING VIDEO/S TO PC/MAC
The Cyclevision Helmet has a reset button located on the top right hand
side of the ON/OFF button.
If the helmet is not functioning correctly, refuses to shut down correctly or
has any other troubling issues, use a paper clip and gently insert it into
the hole and feel for the reset button, located slightly to the top corner of
the reset hole.
Push this button to interrupt the power supply and reset the CPUs.
Reset
Rear
BCB & CPU RESET

34
35
Caring for your Cyclevision Helmet
• Do not reuse the Cyclevision Helmet if it is dropped, damaged or
has been involved in a crash.
• The Cyclevision Helmet is water and splash resistant only and
cannot be submerged in any liquid.
• The Cyclevision Helmet is not designed for swimming, diving or
any other watersport applications.
• After every use in a wet environment, carefully wipe the
Cyclevision Helmet with a soft, dry cloth and leave to dry.
• A spare Cyclevision Helmet Liner has been provided.
• For best audio performance, pat dry both microphone holes at the
front and back of the Cyclevision Helmet.
• Do not use compressed air to blow water out of the Cyclevision
Helmet microphone holes.
• Do not leave the Cyclevision Helmet near direct or indirect heat.
• We recommend replacing the Cyclevision Helmet every 3-5 years
from the date of purchase.
MAINTENANCE MAINTENANCE
• Clean the Cyclevision Helmet using only a soft cloth, warm water
and mild soap.
• Do not use harsh chemicals such as Petroleum based solvents.
• Use a soft, lint-free cloth to clean both lenses of the Cyclevision.
• Do not use harsh cleaning chemicals on the camera lens.
• Do not insert foreign objects around the lens.
• Do not insert a pin or paper clip into the front or rear microphones
holes - as it will damage internal microphone components.

36
37
The manufacturer makes every effort to ensure that its products are
manufactured without any defect. However, in the rare event of defects
due to faulty workmanship or materials, we guarantee to repair or replace
the product, or any part thereof, free of charge.
The guarantee is granted to the original purchaser only and is valid for
one year from the date of purchase indicated by the sales receipt.
This guarantee does not apply if the product is altered or repaired or
otherwise tampered with by unauthorised persons and/or is used other
than in accordance with manufacturer’s instructions and/or is subject to
other than reasonable use of a product of its nature.
This guarantee in no way affects your rights under the statutory law.
If you think your product might be faulty, contact Cyclevision Pty Ltd at
info@cyclevision.com.au to arrange for the product to be repaired or
replaced.
PRODUCT GUARANTEE PRODUCT GUARANTEE
Our goods come with a guarantee that complies with Australian
Consumer Law. You are entitled to a replacement or refund for a major
failure. You are also entitled to have the goods repaired or replaced if
the faulty helmet is returned to Cyclevision or the goods fail to be of
acceptable quality and the failure does not amount to a major failure.
Any replacement helmet will be posted/freighted out to the consumer
(normal standard) post/freight at cost to Cyclevision.
For further information on consumer law, please visit:
https://www.accc.gov.au/consumers/consumer-rights-guarantees

38
39
For customer support, visit:
www.cyclevision.com.au
or email us:
info@cyclevision.com.au
CYCLEVISION PTY LTD
PO Box 438,
Brisbane,
Queensland
4000
Australia.
+61 (0)475 931 808
CUSTOMER SUPPORTREGULATORY INFORMATION
This symbol means that according to local laws and regulations your
product should be disposed of separately from household waste.
Electrical Ratings
3.7V 3200mAh

FCC Caution.
This device complies with part 15 of the FCC Rules. Operation is subject to the following two
conditions: (1) This device may not cause harmful interference, and (2) this device must accept
any interference received, including interference that may cause undesired operation.
Any Changes or modifications not expressly approved by the party responsible for compliance
could void the user's authority to operate the equipment.
Note: This equipment has been tested and found to comply with the limits for a Class B digital
device, pursuant to part 15 of the FCC Rules. These limits are designed to provide reasonable
protection against harmful interference in a residential installation. This equipment generates
uses and can radiate radio frequency energy and, if not installed and used in accordance with the
instructions, may cause harmful interference to radio communications. However, there is no
guarantee that interference will not occur in a particular installation. If this equipment does
cause harmful interference to radio or television reception, which can be determined by turning
the equipment off and on, the user is encouraged to try to correct the interference by one or
more of the following measures:
-Reorient or relocate the receiving antenna.
-Increase the separation between the equipment and receiver.
-Connect the equipment into an outlet on a circuit different from that to which the receiver is
connected.
-Consult the dealer or an experienced radio/TV technician for help.
The device has been evaluated to meet general RF exposure requirement. The device can be used
in portable exposure condition without restriction.

CYCLEVISION.COM.AU
 Loading...