

Page 1

ALT360
Hand-held
Ink-jet Printer
MANUAL
SHANGHAI YUCHANG INDUSTRIAL CO., LIMITED
Page 2
1
Table of contents
Declare
Safty Instruction
2
3
Packing List
4
Technical Data
5
Environment/Electrical Requirement
6
Install & Test
7
Switch On/Off
9
Operation
10
1. <the main screen> description
10
2. <the switch of modes> description
11
2.1 <system>
11
2.1.1 “password”
11
2.1.2 “load”
12
2.1.3 “ink information”
12
2.1.4 “date time’
12
2.1.5 “calibrate”
13
2.1.6 “idlejet”
13
2.1.7 “counter continue”
13
2.2 <Parameter>
14
2.3 <Print>
14
2.4 <Browse>
14
2.5 <Edit>
15
2.5.1 zone of display printing content
15
2.5.2 zone of creat & save text block
15
2.5.2.1 creat “character/number”
16
2.5.2.2 creat “date/time/serial No./ shiftgroup
17
2.5.2.3 creat “barcode”
19
2.5.3 tools to edit text block
20
Eliminate Troubles
21
Daily Maintenance
23
The Manual of CYCJET Ink-jet Printer
Page 3

2
Declare
Please read the manual seriously before running machine. Any mistake or damage caused by user’s
incorrect operation, shall be not on our responsibility.
In any circumstances, the ink-jet printer shall use the accessories and consumables (include inks &
cleaner) approved by our company. Disassemble machine without our agreement is strictly prohibit.
The machine we produced which includes appearance, structure, hardware and software, has already
got patent. Any piracy shall bears the legal liability.
Our company reserves the right of final interpretation. If you have any questions, please feel free to
contact us.
Our company reserves the right of update at any moment, and unnecessary to notify the users.
Copyright reserved by CYCJET. Any unauthorized reproduction, articles picked or other non-approved
usages shall bears the legal liability.
Instruction for assembled battery
1.Please plug the high voltage part of charger into plug socket (AC 220 V), the indictor light of the charger
will turn green ar this moment. Then connect the charge part successfully with assembled battery, the light
will turn red if connect successfully.
2.Indicator light: red stands for charging, green for charge complete or the assembled battery have not
been connected to the charger successfully. Note: Power off the printer when charging as it will need
longer when charging with power on. Usually it will take 3 hours for charging, after charging, the printer can
work as long as 7 hours continuously.
3.Switch on the printer while the printer does not work or if the printer power off automatically when
operation, the reason may be the battery power is not enough please charge the battery timely, Charging
time should be long enough(at least 0.5 hours before reuse). If not, the battery life will be reduced by over
discharge or cause charge failure.
4.If the printer is not used for a long time, in order to ensure the battery remain in normal condition it is
strongly recommended to charge the battery once a month.
5.If long time printing is needed, you can carry out the printing with charger or hacked battery
6.Warning: Use only the assembled battery and charger offered by original manufactural.You must not
disassemble the battery or throw the battery to the file.
You should make sure the battery not be contacted by metal or the pins be shorted
by metal.It is not allowed to store the battery in the overheat(more than 60℃),damp or corrosion
environment.
The Manual of CYCJET Ink-jet Printer
Page 4

3
Safety Instructions
Personal Safety
Some inks & cleaners are harmful, please installing & running machine in well ventilated conditions.
Some inks & cleaners are flammable; Keep away from all sources of heat and ignition.
Fire-extinguisher shall be equipped nearby the machine.
Wear safety glasses, gloves and masks when handling inks & cleaners.
In the condition of inhalation and eye contact, please flush thoroughly with water and seek medical aid
immediately.
Turn the power off before maintenance.
Forbid to disassemble machine without our technician’s instruction. The ink-jet printer must be
properly grounded. When connecting electricity, the cabinet is powered with high voltage to risk life.
Only trained technicians are authorized to carry out installation, maintenance or repair.
Machine Safety
Loading Requirement
1、Ink-jet printer shall be packaged in standard carton which filled with anti-vibration materials.
2、Purge the inside and outside of printhead and plug up the ink inlet. The printhead shall be covered by
cap and packed by anti-vibration film to prevent from scratch.
3、Just left an empty cartridge in Ink system before loading.
The warranty calims will not be accepted in the following situations:.
1、Printhead or inks system damages caused by using unauthorized inks and cleaners.
2、Printhead or inks system damages caused by replacing different types of consumable randomly.Such as
replaced oil-base inks into solvent-base inks, the two types of ink will cause chemical reaction to
damage machine.
3、 Damages caused by running in unsuitable environments or electrical requirements.
4、 Damages caused by unauthorized disassembling and assembling.
5、 The permanent damages caused by not performing scheduled maintenance, or printhead scratching.
6、 Damages caused by disassembling or assembling through unauthorized people .
7、 Damages caused by the Force Majeure.
Environmental Protection
Dispose of the waste inks & cleaners shall be in accordance with Local Authority Regulation. The wastes
are not allowed into the sewer system.
The Manual of CYCJET Ink-jet Printer
Page 5

4
Name
Quantity
HandJet Printer
1 PC
Charger
1 PC
Manual
1 Copy
Packing List
The Manual of CYCJET Ink-jet Printer
Page 6

5
Technical Data
System: 32-bit high-speed processor
Printhead: 128 dots height, holediameter in 50 um, 185dpi in vertical.
Printhead number: 1
Print height from 0.8mm to18mm.
Print Lines capability: Multi-lines(up to character height)
Line speed capability: Max.33mt/min(200 dpi in lateral).
Print Information: Date, Time, Character, Photo, Shiftgroup, Serial number and Barcode.
Storage: 100 text files and a bitmap in 256*128.
Operation: Color touch screen with photo menu
Independence Print Parameters
PC Editing & Online Editing.
Display:3.5 inch color touch screen
Inks: Porous ink, Non-porous ink, UV anti-counterfeit inks, food grade ink, invisible ink etc.
Inks color: red, yellow, blue, green, black, white etc.
Through USB interface to import single color bitmap which can be operated by mouse.
The Manual of CYCJET Ink-jet Printer
Page 7

6
Environment/Electrical Requirement
Electrical requirement:AC 100-240V 50/60Hz
Max Power:13W (average﹤5W)
Temperature:5-40℃
Humidity:10-90%(non-condensing)
Electromagnetic interference: running far away from electromagnetic radiation zone
The Manual of CYCJET Ink-jet Printer
Page 8
7
Install & Test
Only trained technicians are authorized to carry out installation.
Before install, confirm the machine was stay in a solid & smooth place without electromagnetic radiation.
Installed as stipultated in manufacturer’s specification, do not change the relative position of ink system
and print head. Any special requirements, please consult the manufacturer and supplier directly.
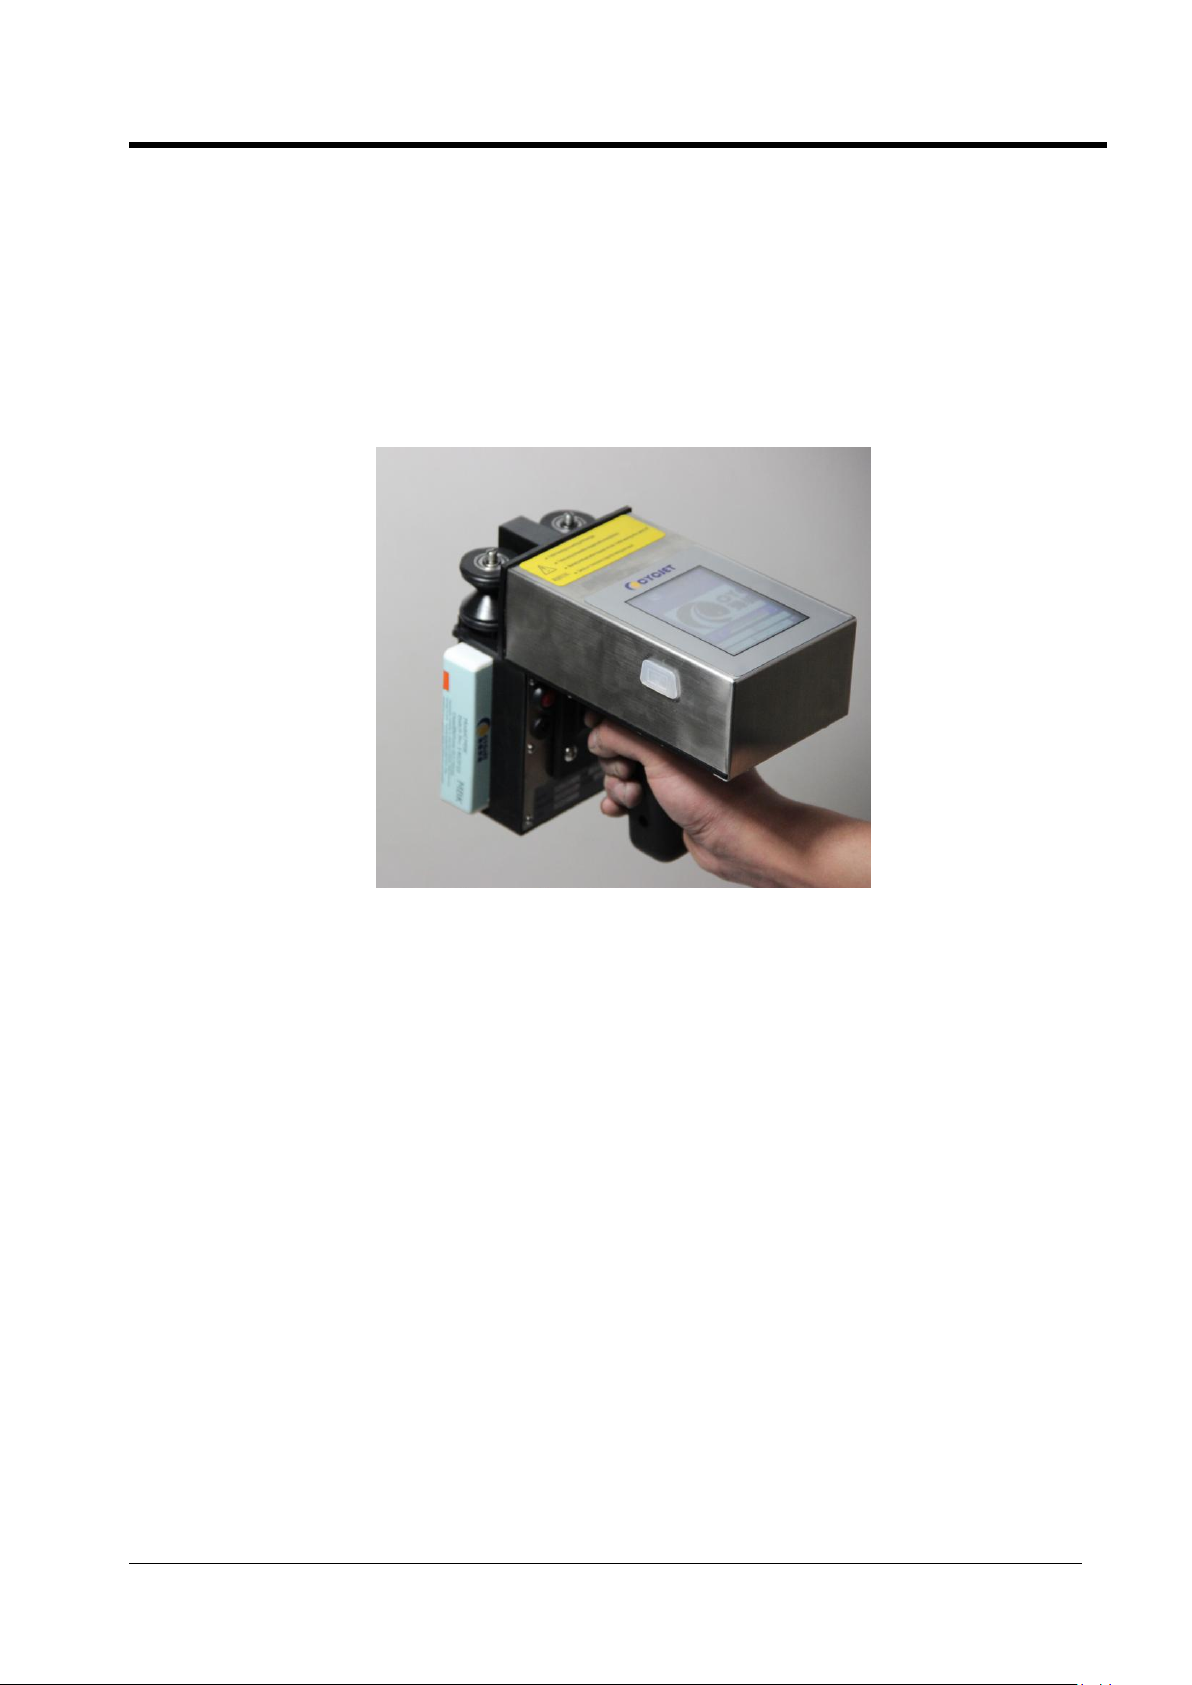
Ink-jet Printer Installation & Testing
Photo1
1、 Unpacking: open the package and move out Handjet printer.
2、 Switch On: Press the Red power switch, wait for 15 seconds to entering eidt screen.
3、 Ink cartridge installation: Insert the ink cartridge into ink-tube system in correct direction.
4、 Move off printhead cap, and then squeeze ink cartridge to drain out air and cleaner. Repeat squeezing
several times for new machine.( more details see page24)
5、 Print:a) Click PRINTING key. b)Press the button of handlebar. c) move the Handjet printer by wheels
(ensure the wheels contact to product surface)
6、 If the screen cannot work when switch on, it may power off, please charge up the battery. When the
Red light turns into Green, means complete charging. The charging time is nearly 3 hours each time.
The Manual of CYCJET Ink-jet Printer
Page 9

8
Switch on/off
Switch on:
Checked up the power connection status before switch on. After switch on, it will enter into the operation
system within 15 seconds. Remove the printhead cap and press PRINT key to start printing when using
oil-based inks.
When using solvent-base inks, please purged printhead and drained out the dry-inks by blotting-paper.
After that, test the printing result by a blank paper.(more details see page24)
The procedure for using solvent-base inks: purge-squeeze-clean-test.
Switch off:
Press the power botter off and cover up the print head cap.
Note: Before switch off, ensured the printhead in normal condition. Forbid to purge printhead gap
before/after switch off! Just sealed by cap!
The Manual of CYCJET Ink-jet Printer
Page 10
9
Operation
1. <The mian screen>
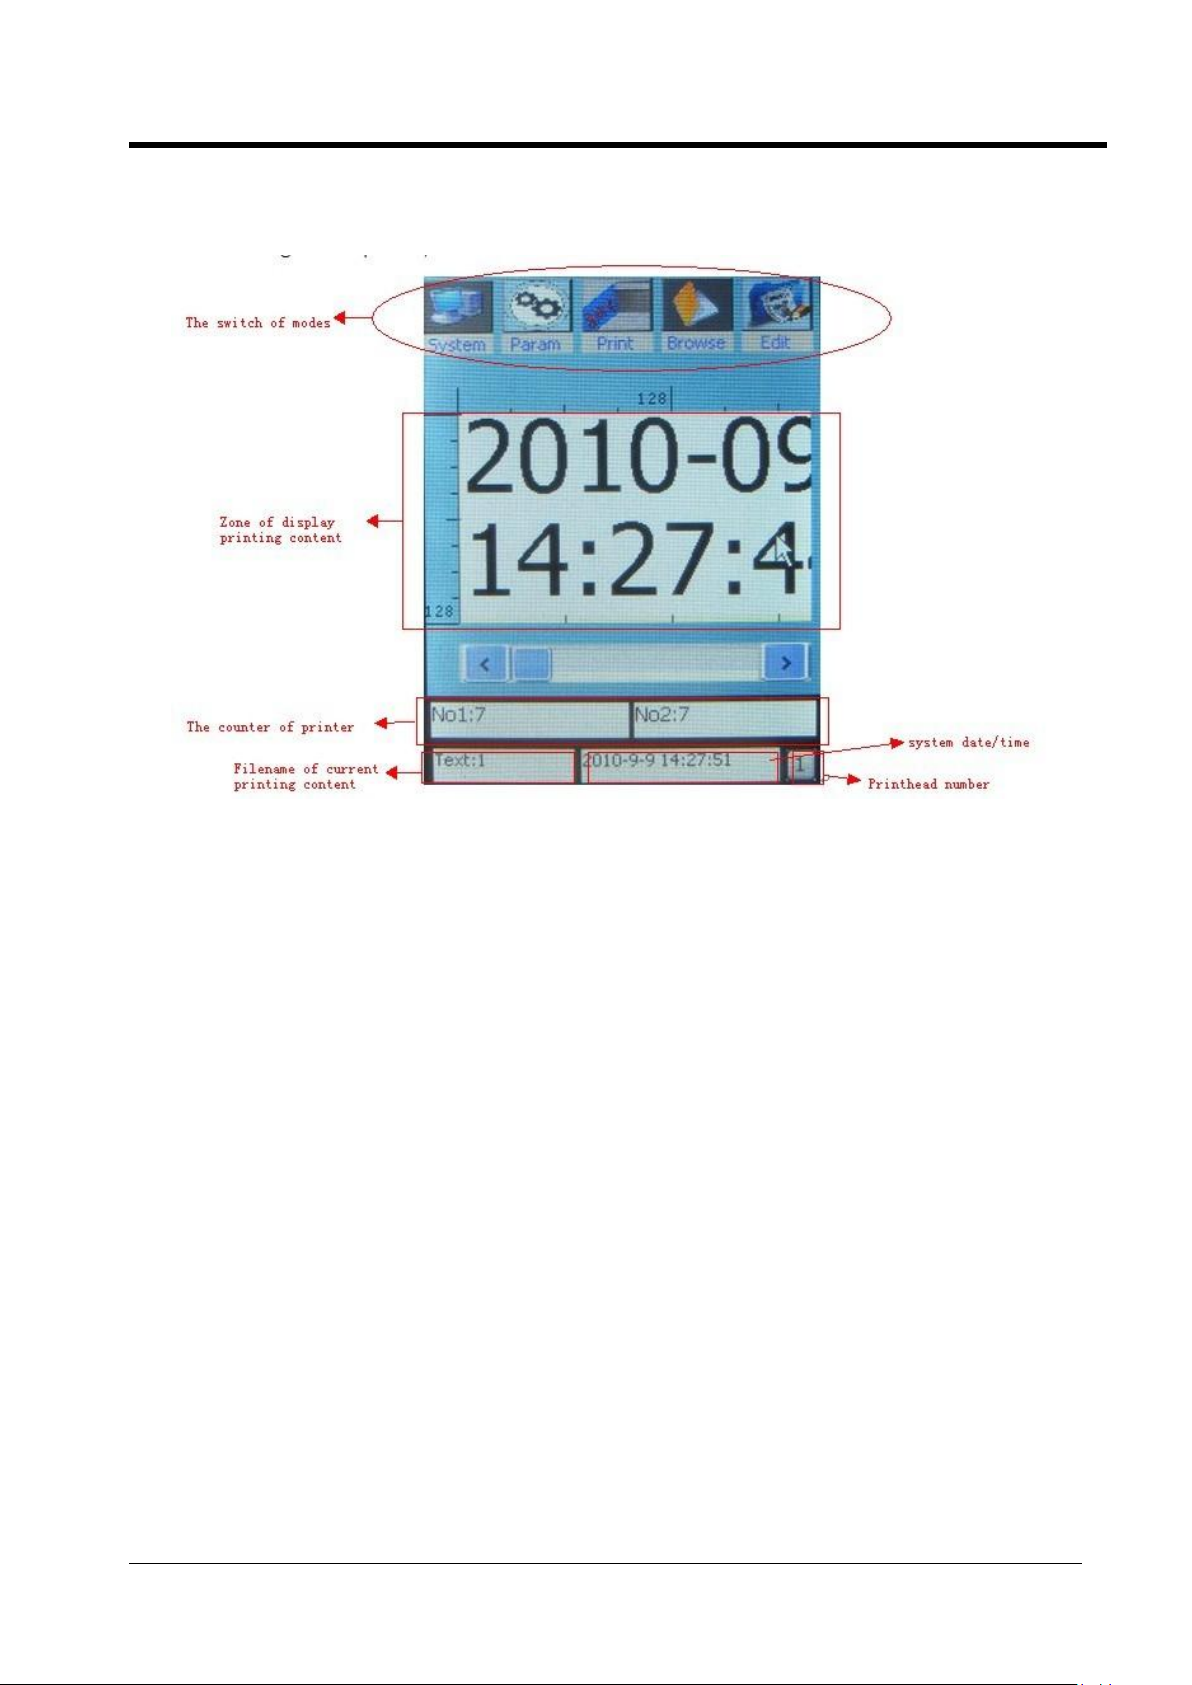
At switching on the printer, it will show <The main screen> as Photo2.
Photo 2
<the main screen> contains the following zones:
Zone of display printing content
The counter of printer
Filename of current printing content
System date/time
The number of print head
The switch of modes
●Zone of display printing content is located in the middle part of screen.
128 dots height *20000 dots width with graduated scale.
The content shows here is what will be printed out.
●The counter of printer is located in the bottom part of the screen. It can count the printing number
of times. It is kept at corrent deenergizing the printer.
●Filename of current printing content is in a left bottom corner of the screen.
●System date/time is in a middle bottom corner of the screen. Shows the current system time/date.
●The number of print head is in a right bottom corner of the screen. It shows the current choosed
printhead. If in multi-head system, it can also shows No.2 No.3….
●The switch of modes is located in the top part of the screen and contains 5 buttons.
<System> - The basic management in printer
<Param> - Management in parameters of current printing content
<Print> - Carry on printing task
<Browse> - selecte the saved printing files
<Edit> - Edit printing content
The Manual of CYCJET Ink-jet Printer
Page 11
10
Operation
2. <The switch of modes>
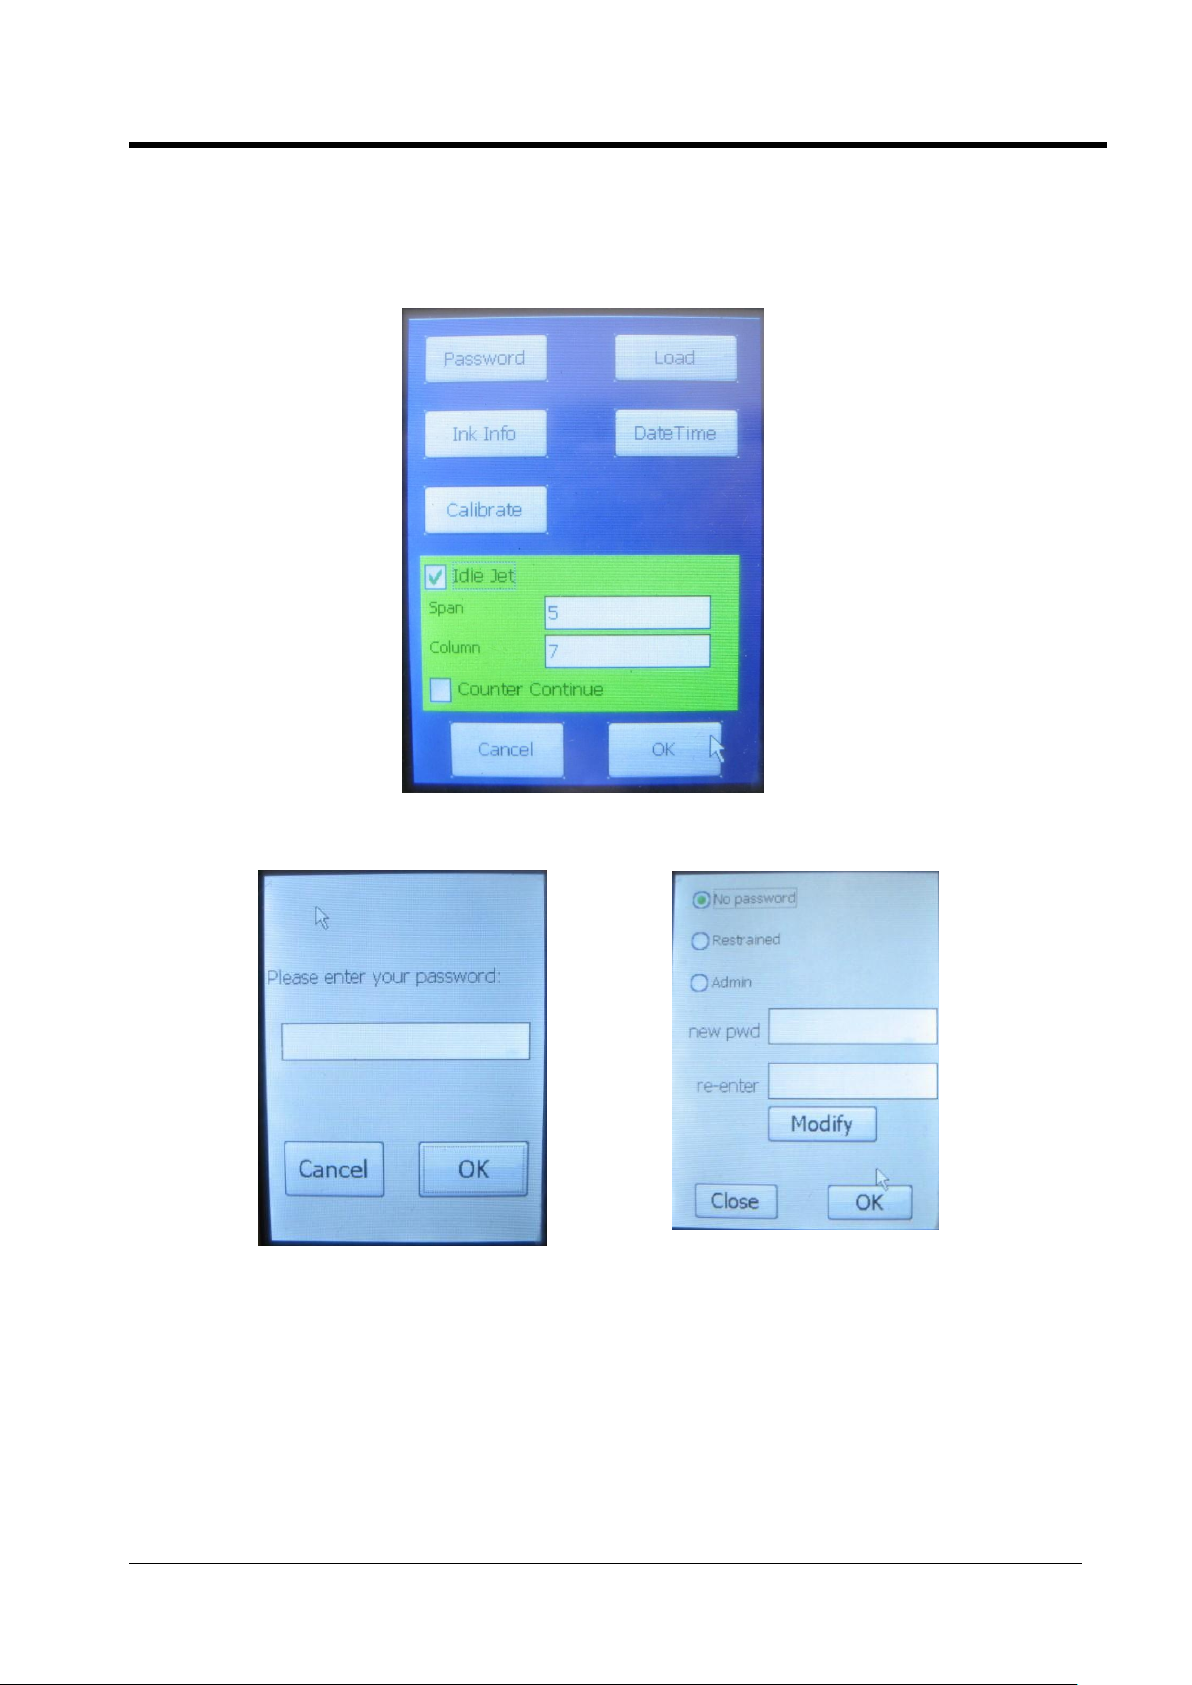
2.1 <system>-click the button<system> opens a screen as photo3. And shows the following buttons:
“Password” “Load” “Ink Info” “Date Time” “Calibrate” “Idle Jet” “Counter continue”.
Photo 3
2.1.1 “password”- click the button<password> opens a screen as photo4.
Photo 4 photo 5
Click<OK> button of photo4, to open screen as photo5.
In photo5 besides“No password”, there are two levels protection“Restrained”& “Admin”
“No password”means no limit of authority(every people can edit and operate printer).
“Restrained”- the frist level protection – at activation of the restrained function, without password,
the <Edit> mode will be locked.
“Admin”- the second level protection – at activation of the admin function, without password, just
can operate<Print> mode.
Final value should be confirmed with button “OK”or the reference value is retruned by button
“Cancle”/ “Close”.
The Manual of CYCJET Ink-jet Printer
Page 12
11
Operation
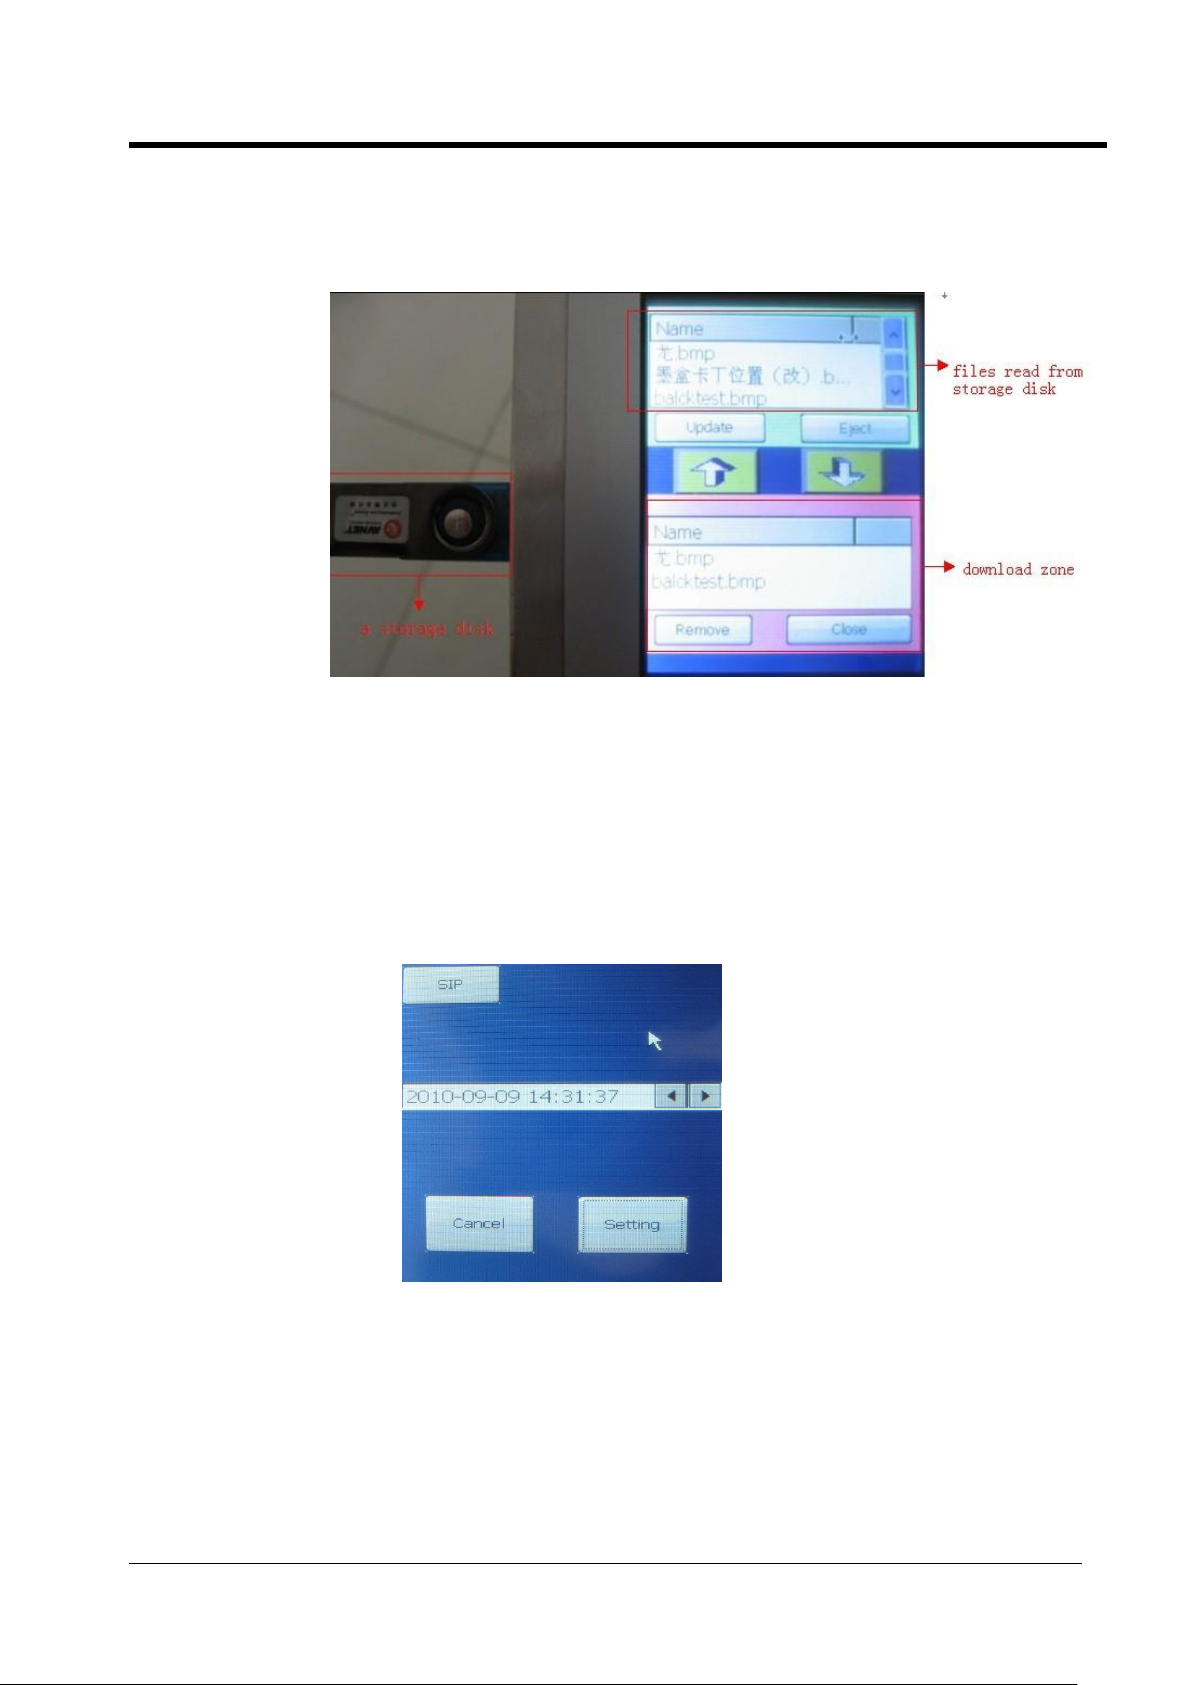
2.1.2 “load” – it can only load .bmp format single color files from storage disk throught USB interface.
Insert a storage disk into USB interface and click the botton<load> opens a screen as
photo 6.
photo6
touch the needed file in the top zone of screen and click< an arrow downwards> button in the middle part,
when file shows in download zone, it means download successful.
2.1.3 “Ink Info”- click the botton<ink info> ,it shows information as follow:
<Cur Dots> - The dot numbers of the current printing content takes.
<Breadths/Litre> - number of times for printing current content by one liter ink.
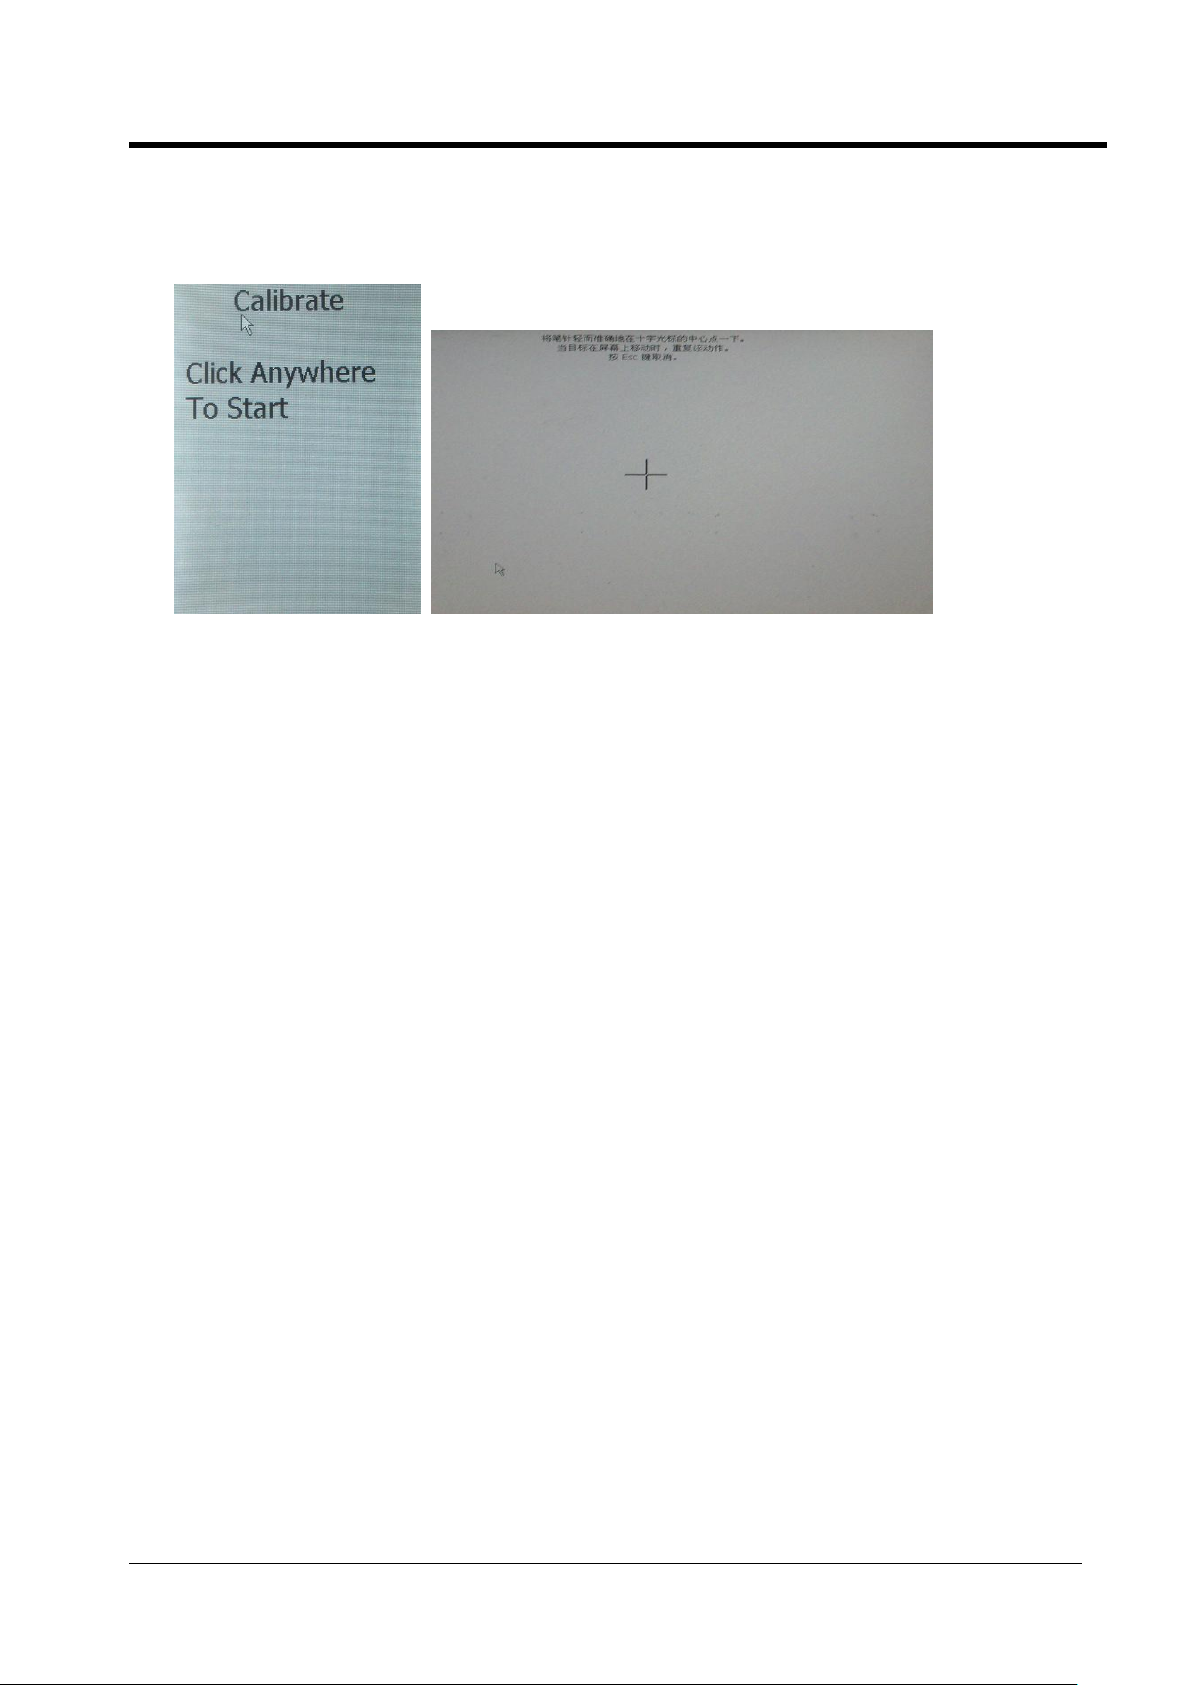
2.1.4 “Date Time” – click the botton<Date Time> to open screen as photo7
Photo 7
Adjust Date Time by <an arrow left/right>, or touch the button <SIP> to open an keyboard for help.
Perform IdleJet
Final value should be confirmed with button “Setting”or retruned by button “Cancle”
The Manual of CYCJET Ink-jet Printer
Page 13
12
Operation
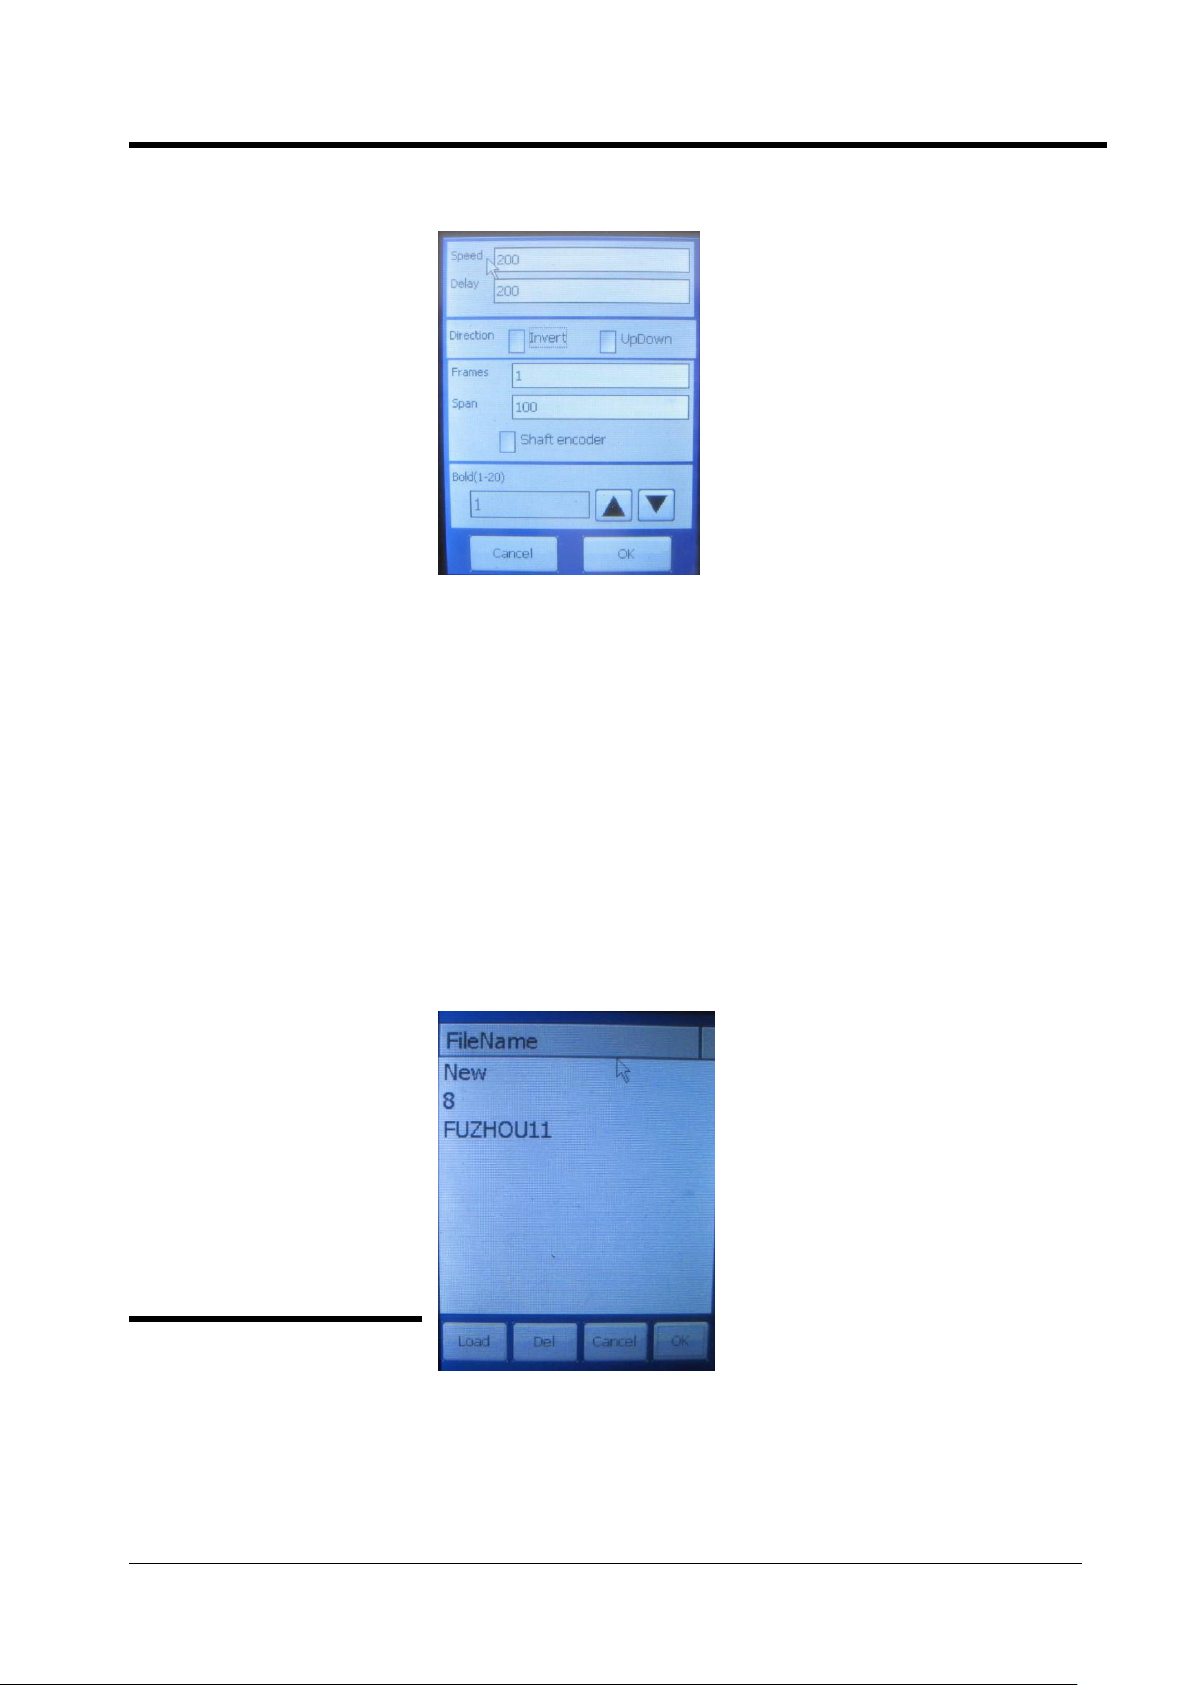
2.1.5 “Calibrate” - If the keypad misalignment, click CALIBRATION for adjustment.
click the botton<Calibrate> to open screen as photo8
Photo8
Use nib to click the cross center shows in photo10. when target moving above the screen, please
repeat it. After the first click, the latest calibration will be settled. If the second click is correct, please
back to system window and click OK to finish.
If the two times calibration are differen, it means failed. Please click again for a new calibration.
2.1.6 “IdleJet”- see photo3. By setting the parameter of Idle Jet Gap (interval of time) and IdleJet Column,
the printer will spray out ink automatically at regualr intervals
Perform Idlejet when using solvent-base inks(non-porous ink).
It can prevents from illegible printing result caused by dry-ink of printhead after printer long time no
running.
The IdleJet interval and IdleJet lines are depend on ink types, temperature, humidity and the speed of
air flow. In normal situation, the suggested IdleJet interval is 10 seconds and the IdleJet lines shall be
in 10.
When using oil base ink, it is unnecssary to perform IdleJet, however, in dusty enviroment, perform
idlejet could protect printhead.
When start IdleJet Printing, please keep sensor in non-reaction status.
2.1.7 “Counter Continue”- see photo3.
When printing serial number, it can be changed along with printing times. No matter switch off or
inter-print other documents, the serial number is continuing.
The Manual of CYCJET Ink-jet Printer
Page 14
13
Operation
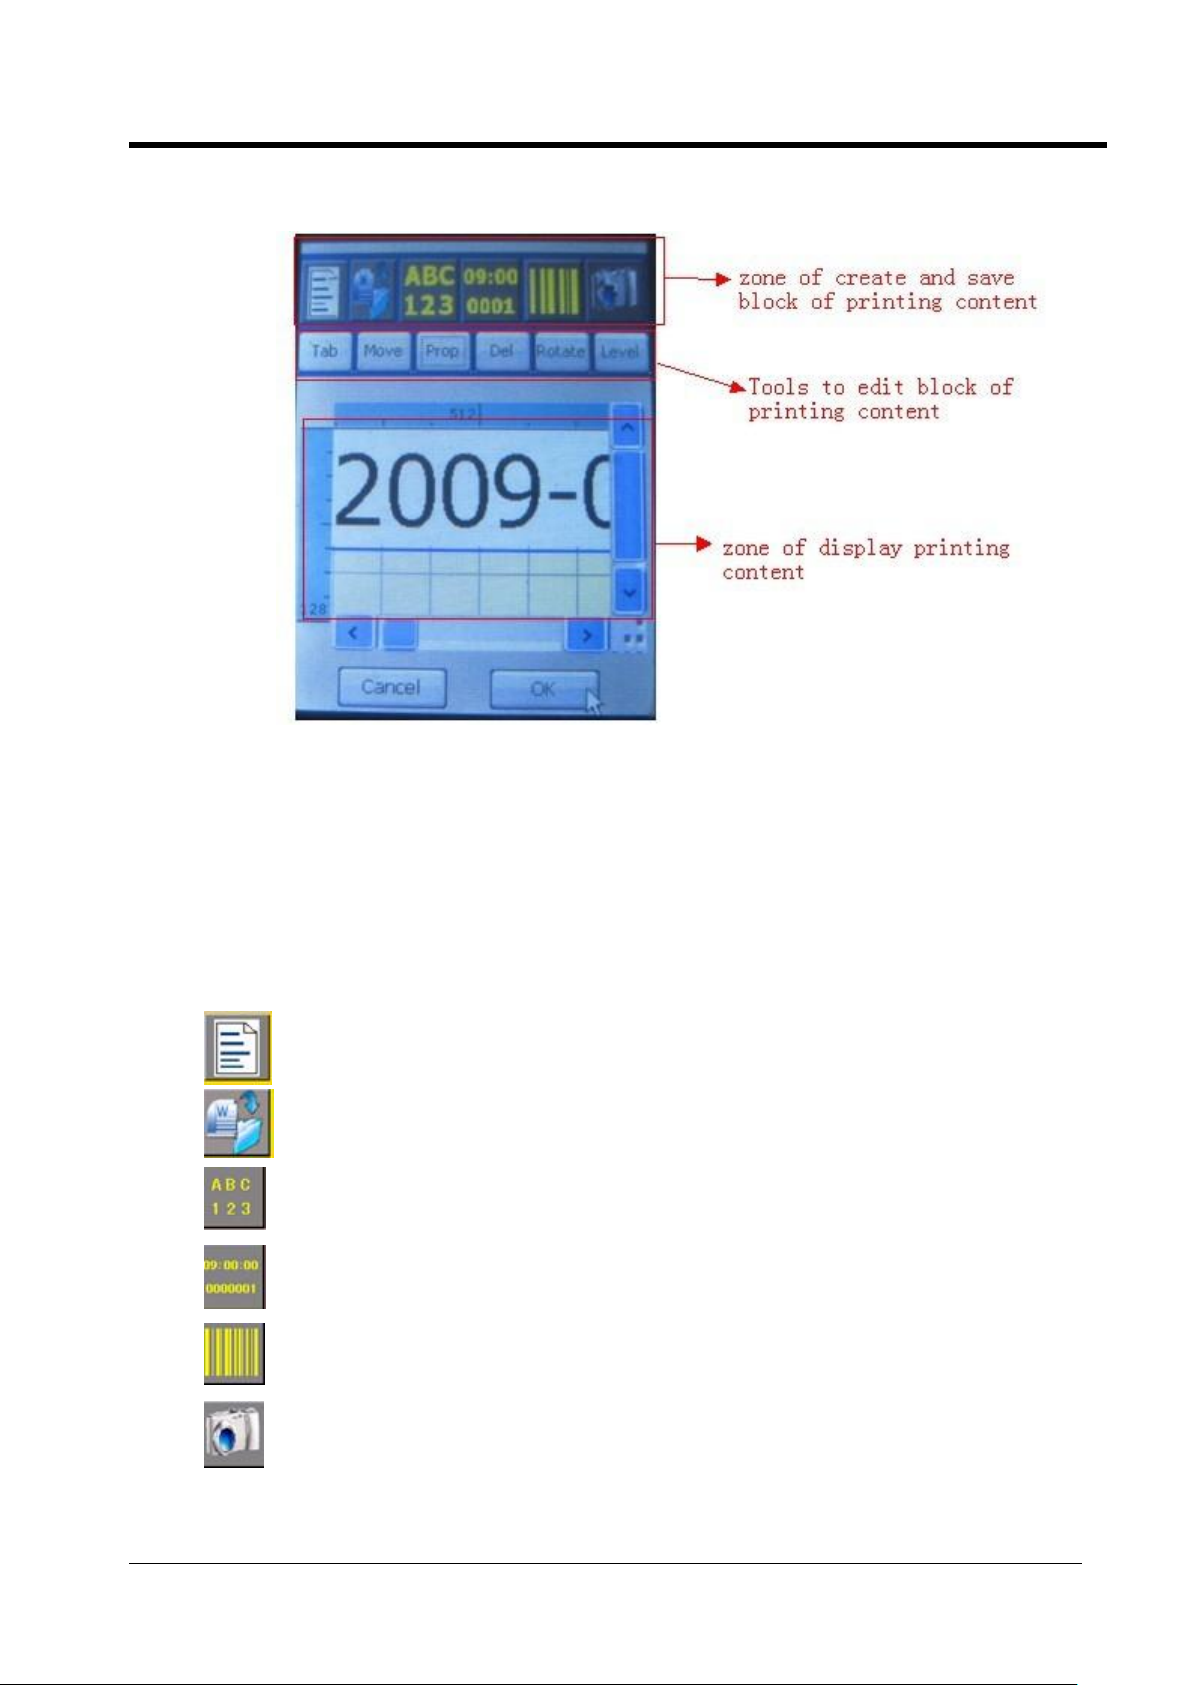
2.2. <Param>- click of the button<param> opens a screen as photo9.
Photo 9
There are 7 buttons: “speed” “Delay” ‘Direction’ “Frames” “Span” “Shaft encoder” “Bold”.
2.2.1 “Speed” – The value shall be on the contrary of production line speed.(micro second)
(When the number bigger, the font will widen, the number smaller, the font will narrow down)
2.2.2 “Delay” – start print within the setted value(millisecond) after object passed sensor.
(It control location of text, the number bigger, text will move to left, when number smaller, text will move to right)
2.2.3 “Direction” – management in the direction of printing content.
2.2.4 “Frames” – after object passed across sensor, the number of times for content will be printed.
2.2.5 “Span” – the space of time between two times contents(millisecond).
2.2.6 “Shaft encoder” – activates the button when using encoder. Encoder could prvents from
irregualar printing result which caused by inconstant speed of production line.
2.3. <Print>- click of the button<print>, when it turns red means start printing
2.4. <Browse>- click of the button<Browse> opens a screen as photo10.
Photo 10
It is a storage disk to store jet. format files only. It allows replace printing files quickly by click related
filename.Select filename on your request and click the OK key to complete files replacement.
Delete useless files to enlarge the storage space.
What if not replace printing files, please click the CLOSE key to exit system.
Note:The deleted files are unrecoverable, please pay attention to delete files.
The Manual of CYCJET Ink-jet Printer
Page 15
14
Operation
2.5. <Edit>- click of the button<Edit> opens a screen as photo11.
Photo11
<Edit> contains the following zones:
Zone of display printing content
Zone of create and save text block
Tools to edit text block
2.5.1 zone of display printing content – What shows in is what will be printed out.
2.5.2 zone of creat and save text block – it contains five buttons as follow:
“create a new printing content”
“saved as… ”
“create <character or number content> ”
“ creat <Date> <Time> <Serial No.> <Shift group>”
“ creat <Barcode>”
“load saved sigle color bmp. format ”
The Manual of CYCJET Ink-jet Printer
Page 16
15
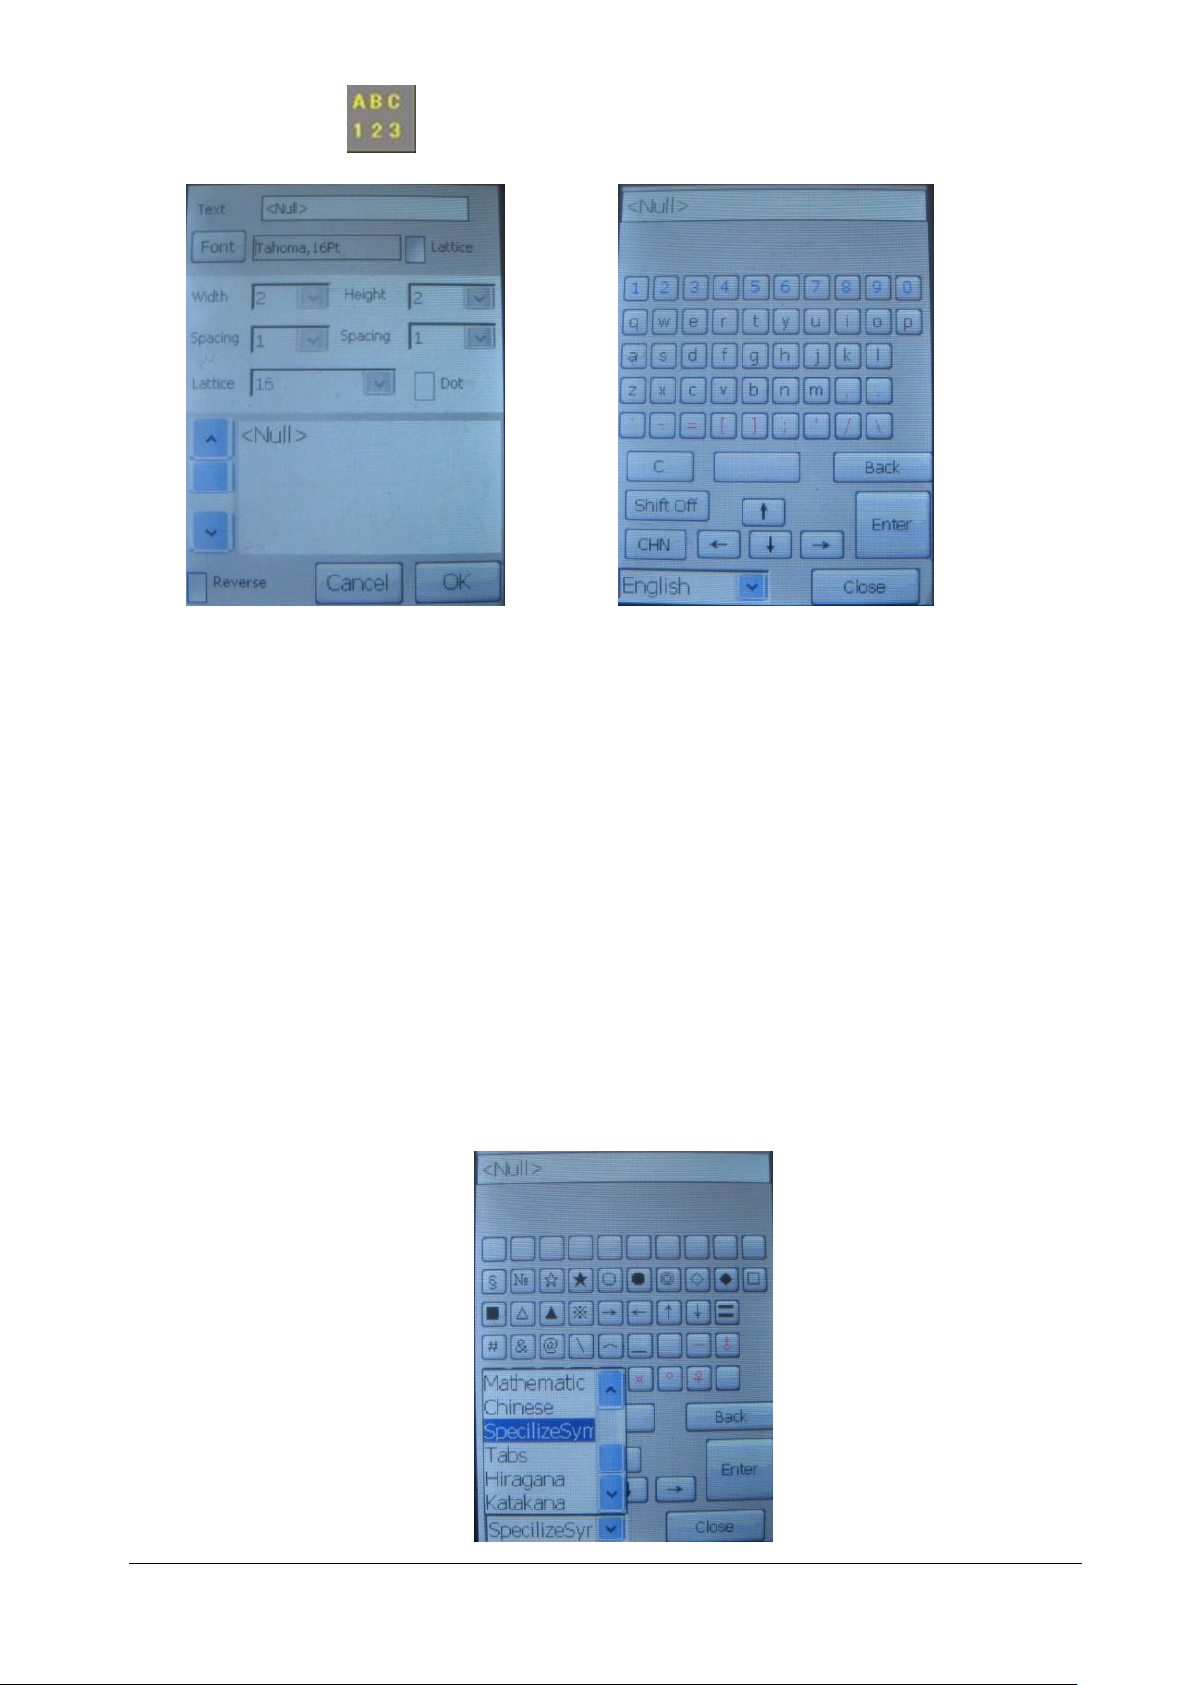
2.5.2.1 Click button of “creat <character or number content>” opens screen as photo12.
photo12 photo13
Click the blank zone of <Text> opens a keyboard as photo13. Move the cursor to creat content.
If the content is what you want, click OK to save it
See photo12. button<Font> - revise content font.
Squrare button <Lattice> - change the printing matrix to dot matrix(dot in square shape)
button<width> - the distance from dot matrix content to right margin( in Lattice mode) .
button<Height> - the distance from dot matrix content to up margin( in Lattice mode)
button<Spacing> - the distance two dots (vertical direction, horizontal direction)
button<Lattice> - adjust dot size(in Lattice mode)
button<dot> - change the square shape dot into circle shape dot.(in Lattice mode)
button<Reverse> - obtain the effect of reversed out.
See photo13. Button <C> - clear whole content.
Button<blank> - blank key
Button<Back> -back to last edit content.
Button<Shift On> - Caps Lock
Button<CHN> - Chinese language input.
Button<Language selection> - select different languages or special signs as photo14
Photo14
The Manual of CYCJET Ink-jet Printer
Page 17
16
Operation
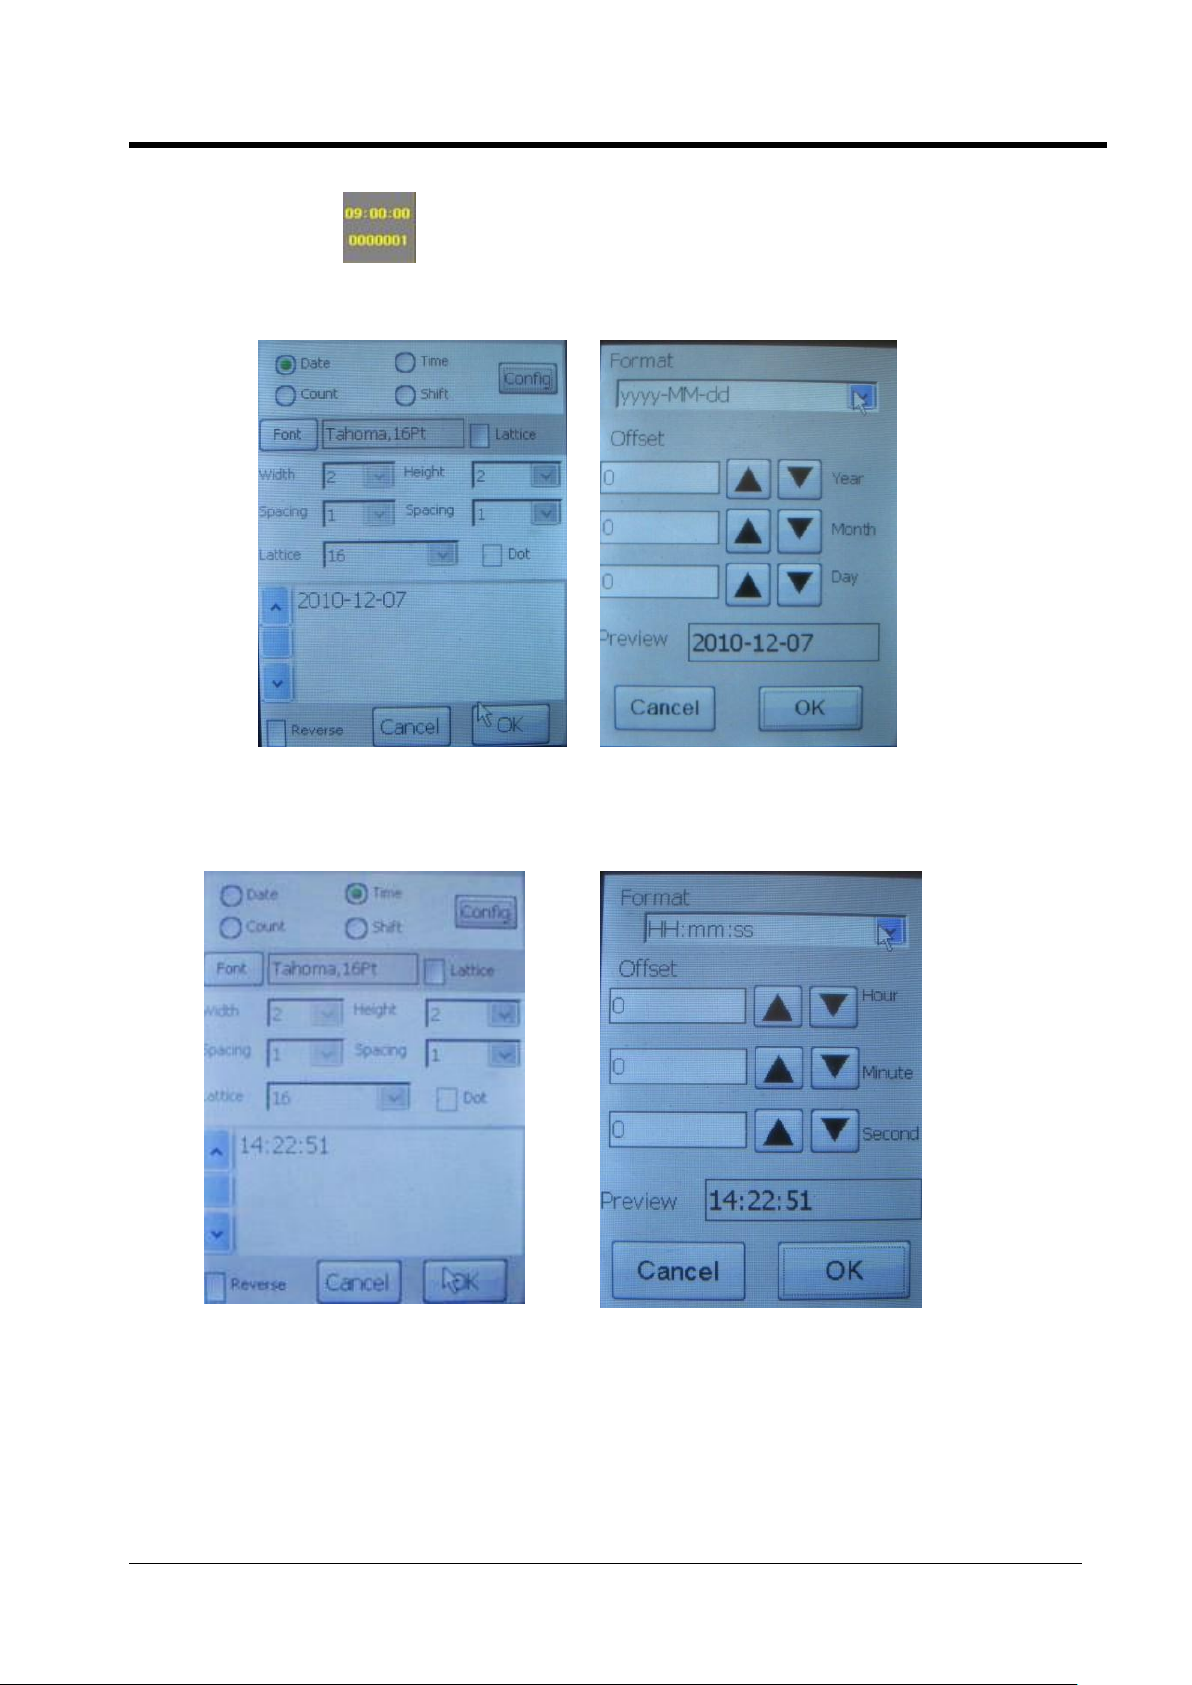
2.5.2.2 Click button of “ creat <Date> <Time> <Serial No.> <Shift group>”opens a screen as
photo15. Select<Date> - click the button <Config> to set up date, see as photo16.
Photo15 photo16
Select <Time> - click <Config> to set up time, see as photo17, photo18.
Photo17 photo18
The Manual of CYCJET Ink-jet Printer
Page 18
17
Operation
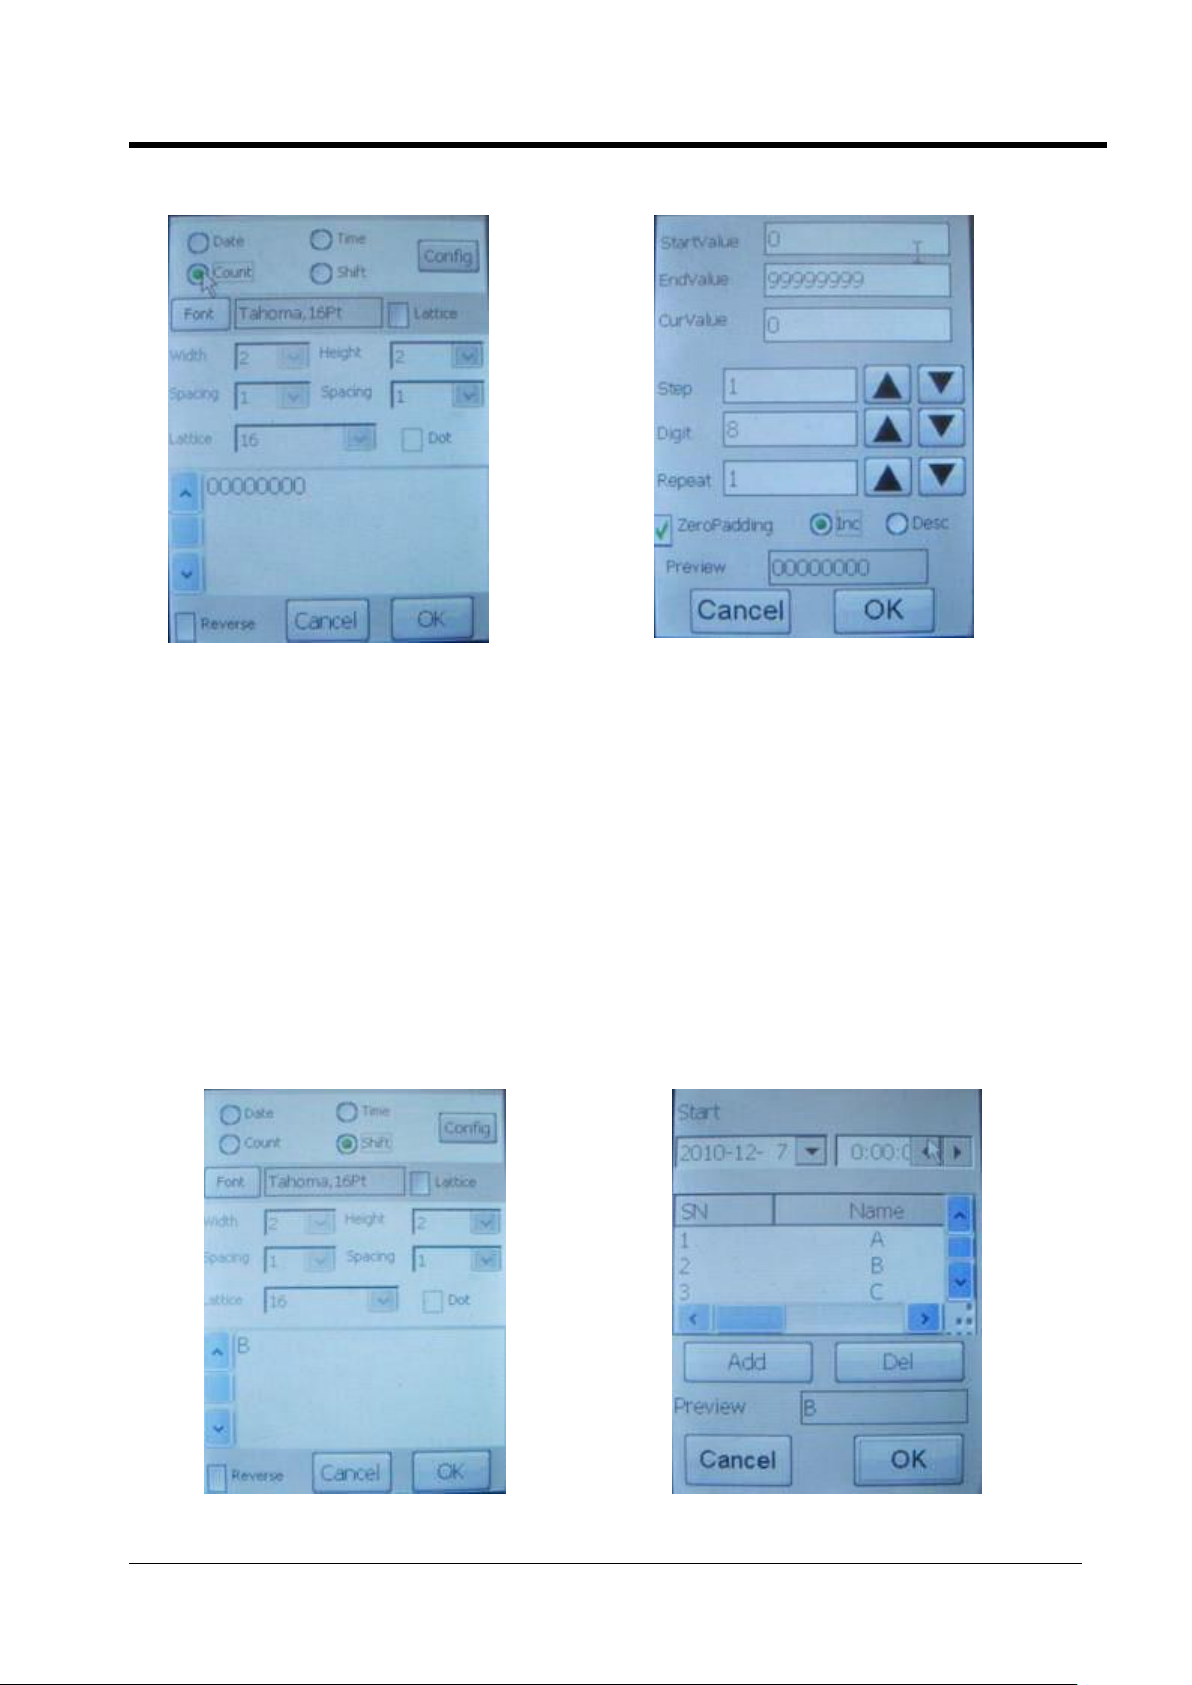
Select <Count> - click <Config> to set up serial number, see as photo19, photo20.
Photo19 photo20
Serial number:
See photo20 - <StartValue>- the original value of serial number.
<EndValue> - the final value of serial number.
<CurValue> - the current printing value of serial number.
<Step> - each time printing will skip over setted number. (example: set it as 2, the
printing content shall be 00000002, 00000004, 00000006…)
<Digit> - the shown digit numbers.
<Repeat> - each serial number repeat printing time.
<ZeroPadding> -set zero in preposition.
<Inc> - serial number count increased.
<Desc> - serial number count descreased.
Select <Shift> - click <Config> to set up shiftgroup, see as photo21, photo22.
Photo21 photo22
The Manual of CYCJET Ink-jet Printer
Page 19
18
Operation
shiftgroup :If a working day has some group working people, set up shift group could trace the goods
information.
For example, we set up three group a day, named A, B, C, each working time is 8 hours. After passed the
frist 8 hours, the printing content will be changed from A into B auto.
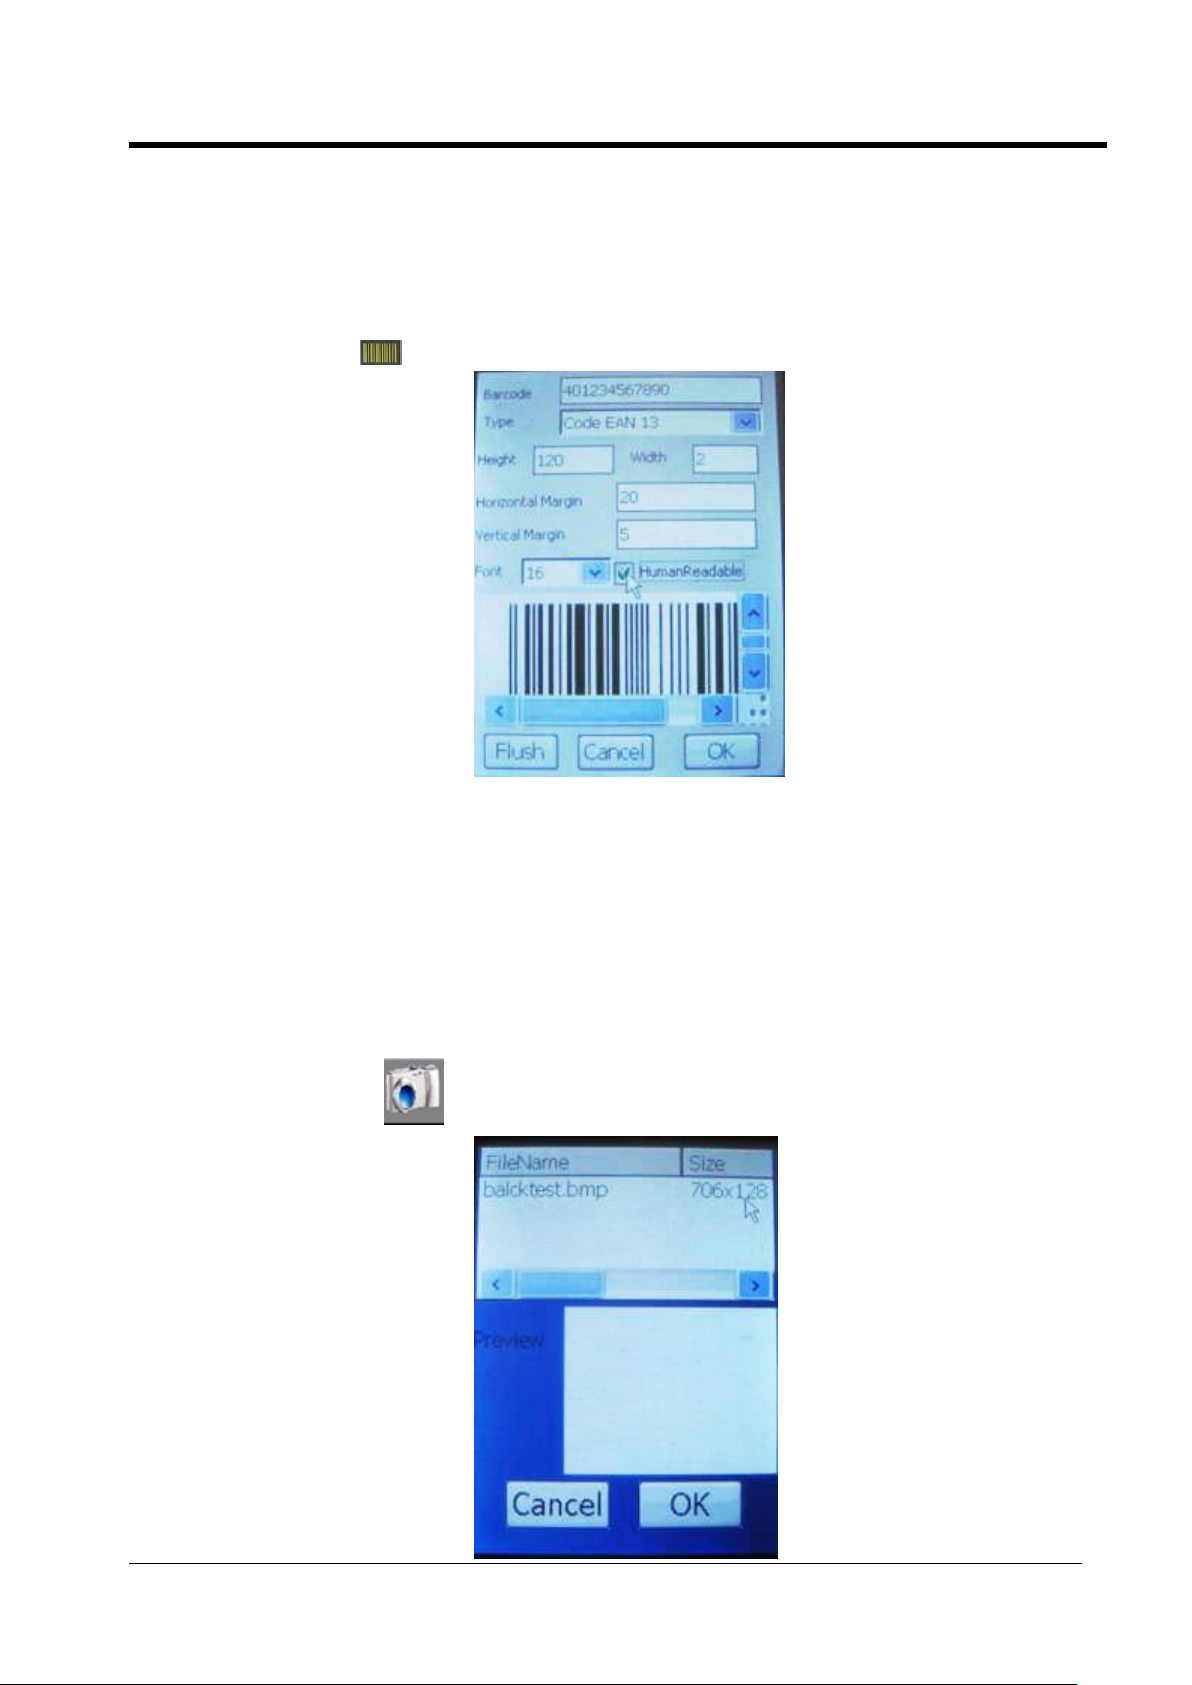
2.5.2.3 Click button of opens a screen as photo23 to set up barcode:
Photo23
Barcode:
Click the blank zone of <Barcode> opens a keyboard. Input the number on request.
Click the arrow of <Type>, there are 14 types for selection.
<Height> - adjust the barcode height.
<Width> - adjust the barcode width.
<Font> -the size of Arabic numerals.
<HumanReadable> - hide up the Arabic numerals.
Note:The validation code of barcode will be obtained automatically.
2.5.2.4 Click button of opens a screen as photo24 to edit saved bitmap files.
Photo24
The Manual of CYCJET Ink-jet Printer
Page 20
19
Operation
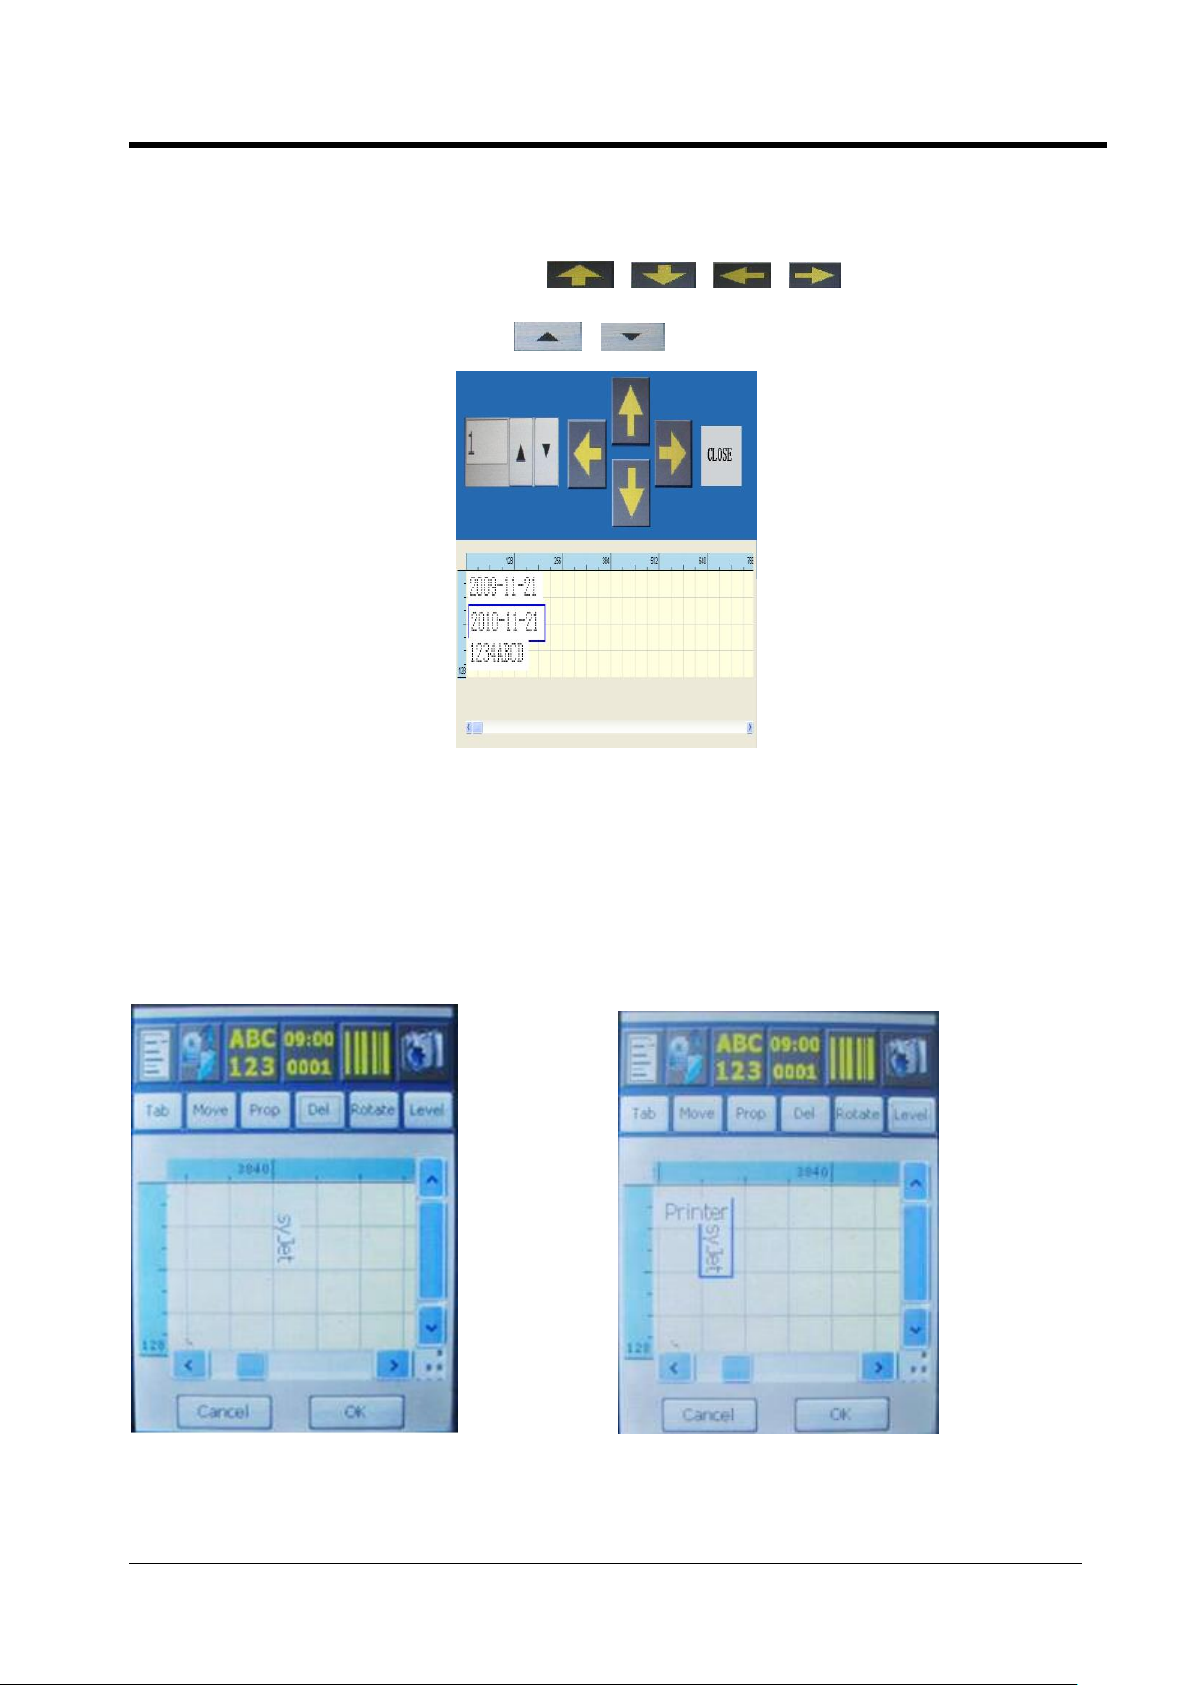
2.5.3. Tools to edit text block. – it contains 6 tools:
<Tab> - select each text block with blue frame in order.
<Move> -Click the button opens 4 arrows of 、 、 、 to adjust the position of each
text block. Click the buttons of 、 to alter the offset text block. see photo25.
Photo25
<Prop> -management in parameter of each selected text block.
<Del> - Delete selected text block.
<Rotate> - each time click to rotate selected text block 90 degree in anticlockwise. See photo26.
<Level> - seveal text blocks suprapositon. Click this button to alter the level orders. the frist click, it will
remove to the bottom. Click again, it will remove to the top. See photo27.
Note:the supraposition of blocks level is a important part to apply in anti-counterfeit!such
as add the time in text information.
Photo 26 photo27
Note: “Tools to edit text block” are very important to revise the block property and perfect the
printing effect.
The Manual of CYCJET Ink-jet Printer
Page 21
20
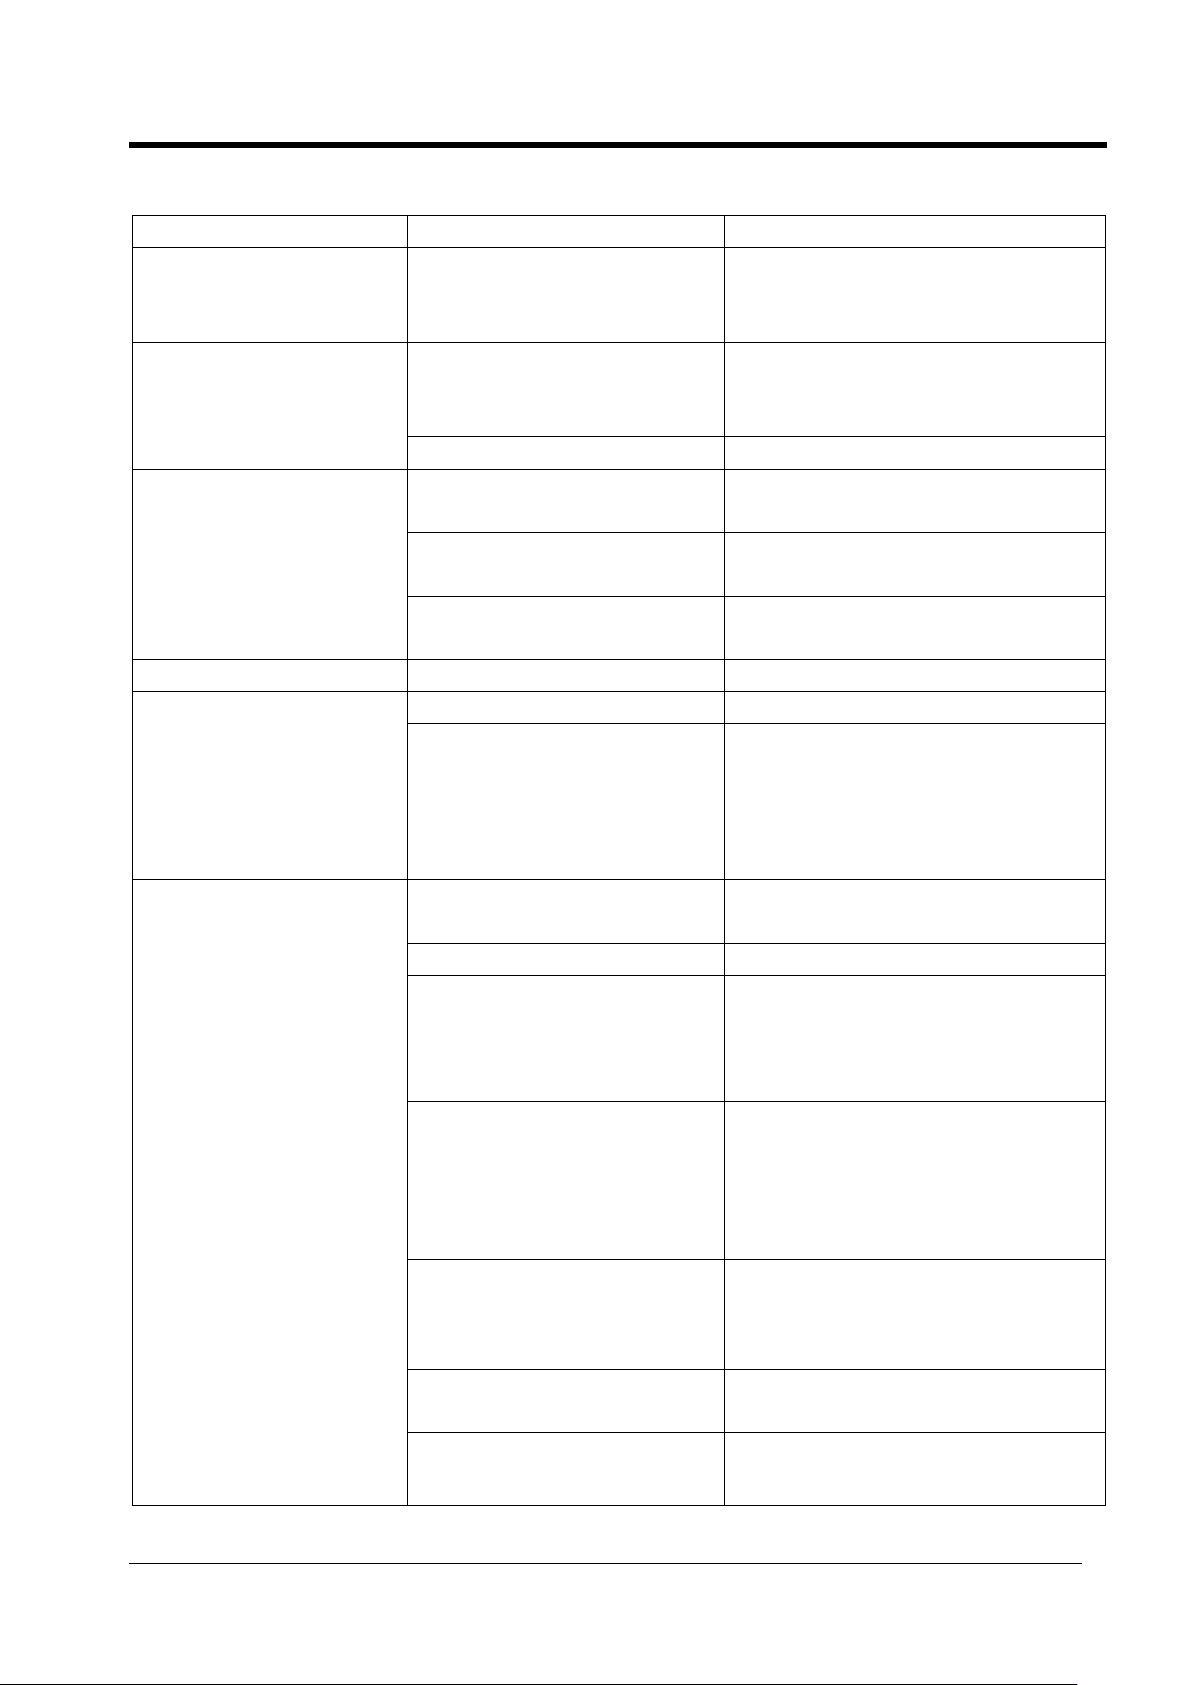
Eliminate Troubles
Trouble
Reason
Solution
The character is entire,
however is illegible and in
shadow
The distance from printhead to
product surface is too far; or
running in fast airflow condition.
Shorten the distance
The character is un-entire
The surface of printhead &
nozzle leaves impurity, or the
inks were dry.
Purge the printhead by cleaner;
Squeeze the ink-cartridge until the inks
spill out.
Printhead system is damaged.
Replace printhead system
Ink leaks for long time(It’s a
normal situation that after
squeeze ink cartridge, ink
will spill out for seconds)
Printhead stand is not in
horizontal.
Adjust the stand in horizontal.
Printhead installation is not
according to user manual.
Inquire manufacturer to re-install.
Some parts connection are
loose.
tighten or replace the parts.
character is shortage
As above
As above
After squeezed the ink
cartridge, it can get a good
result, however the result
will goes bad in a very
short time, especially the
top of character.
Injector or filter was blocked
Purge or replace the blocked parts.
Some parts of ink system was
loose.(ink hose, ink cartridge,
injector ect.)
Tighten or replace the blocked parts.
No dot can be spilt out
Printhead cap is not open, or
did not purge printhead gap.
Open printhead cap, purge printhead
gap and squeeze ink cartridge.
Print function is not start up
Press PRINT key
The indicator light of sensor
shows dark or bright all the
time.
Adjust installed distance.
Check up if the surface has inks
Check up the cable plug.
Replace the photoelectric sensor
Printing parameters are
incorrect
Turn down speed rate.
Reduce print delay
Shorten the files space.
When encoder is not connected,
cacel the encoder selection.
No inks leak when squeezed
ink cartridge; injector, filter or
printhead were blocked.
Purge or replace blocked part.
Ink cartridge is too thick or
uselss
Replace a new ink cartrige and
squeeze it
Working condition temperature
is too low
The working condition temp, shall
higher than 5℃
System troubles:
The Manual of CYCJET Ink-jet Printer
Page 22
21
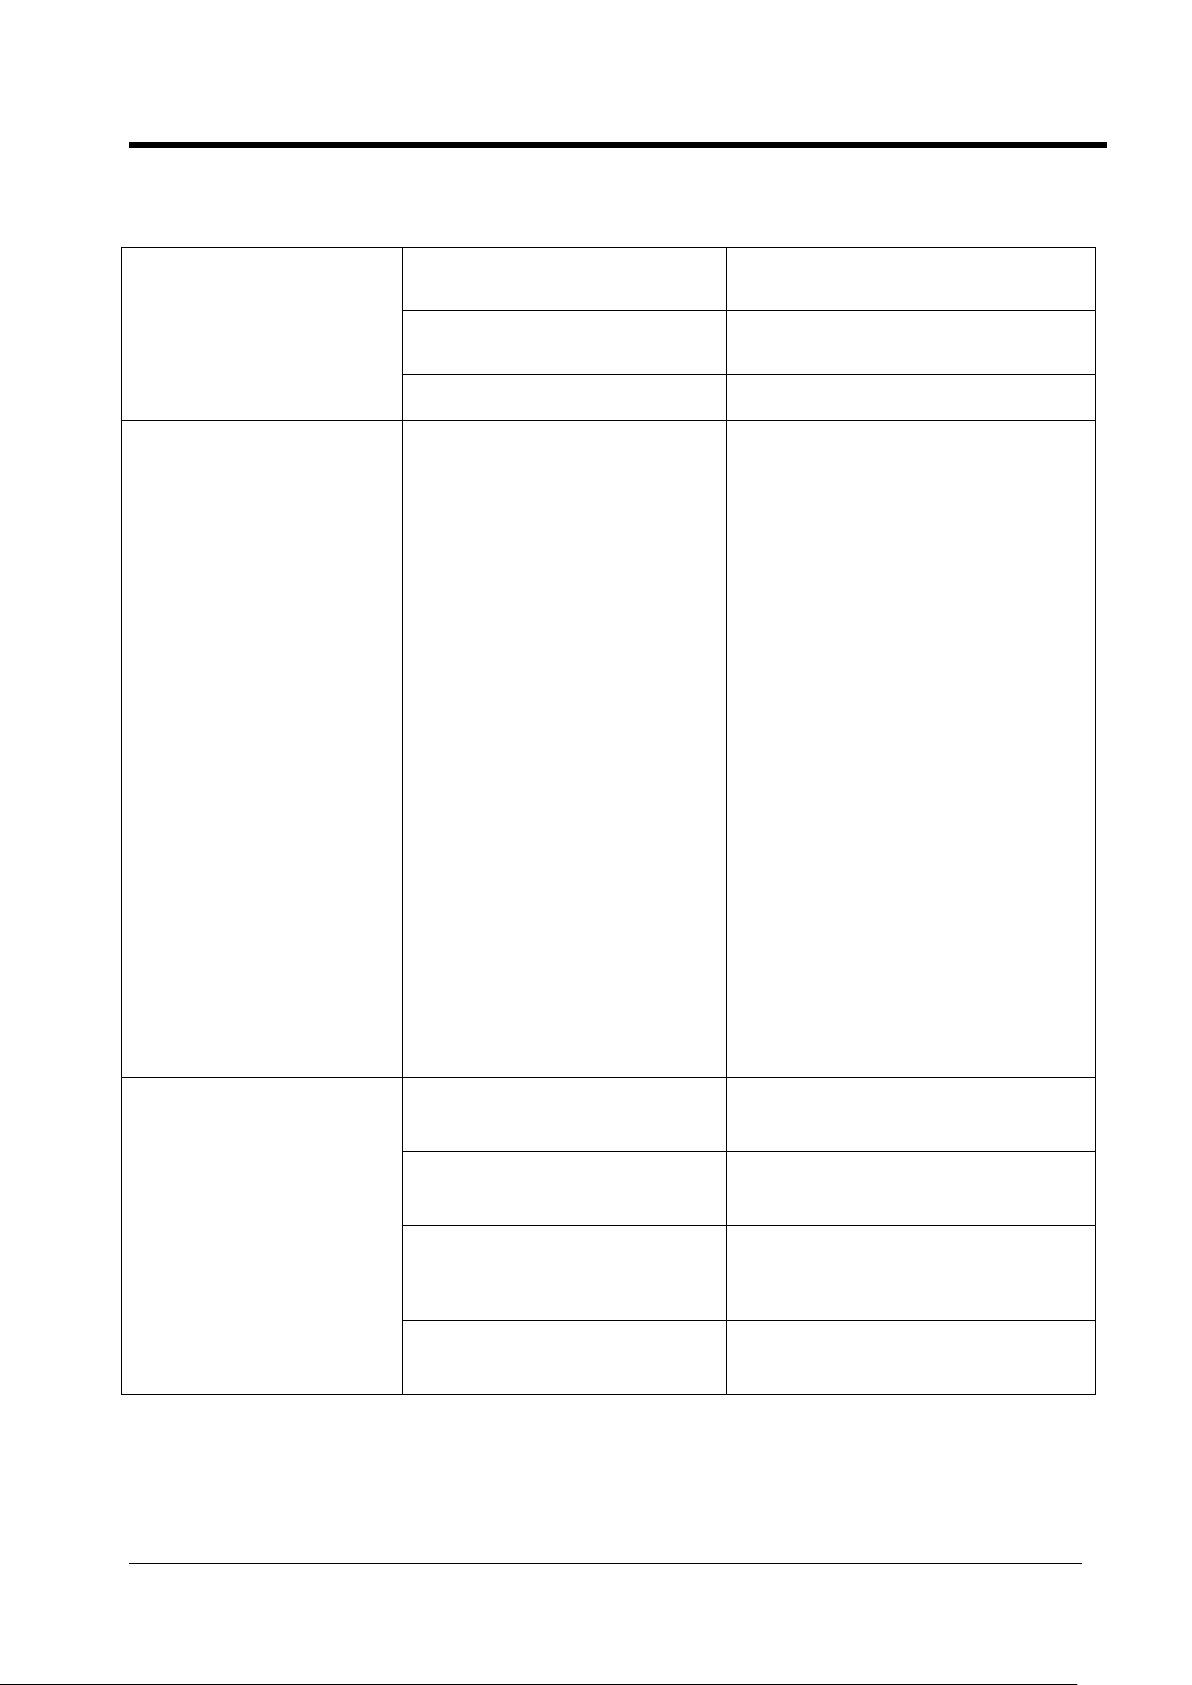
Eliminate Troubles
No dot can be spilt out
The data wire of printhead is
loose
Power off, connect the data wire once
again
electromagnetic radiation
interference.
Far away from the source of radiation
and restart the machine
Printhead system is damaged
Replace the printhead system
Printhead system is
damaged
Scratch caused by
something inserting into
printhead gap.
Printhead blocked caused
by using non-approved
consumables.
Printhead blocked caused
by Blended using the
different types of
consumable.
The unregular mantenance
makes ink dryness.
The electrocircuit is
damaged by connecting the
data wire in POWER ON
status.
Break wire or loose wire
caused by pulling.
Printer is not grounded, and
the power supply is not
good.
Replace the printhead system
When installed with
encoder, the printing result
shows nonuniform in
length.
The encoder selection function
is not startup.
Please start up the encoder selection
function
Encoder wheel rolls unentired
Ensure the encoder wheel is contact
product completely.
speed rate of printing is too
small
The normal value of speed rate is
around in 8, the value is smaller, the
printed file is shorter.
Product moving speed is too
fast.
Slow down the moving speed. The
System troubles:
The Manual of CYCJET Ink-jet Printer
Page 23
22
Maintenance Operation
Daily maintenance
1. It is required to squeeze the ink cartridge for first use of the new printer& printer after maintenance or
disassemble&assemble as there is air,cleaner and maintenance solution remaining in the ink system and
print head.
2. When using solvent based ink,and the”idle-jet”is not activated or unreasonably set(Generally set is 5
columns per 5 seconds),ink inside the nozzle will dry gradually. In order to get good print quality, it is
required to squeeze the ink cartridge.
3. When using solvent based ink,after power off, the idle-jet closed automatically, ink inside the nozzle will
dry gradually. In order to get good print quality, it is required to squeeze the ink cartridge before reuse.
4. When using solvent based ink,after power off, the idle-jet closed automatically, ink inside the nozzle will
dry gradually. In order to get good print quality,it is required to squeeze the ink cartridge before reuse.
5. When the ink pipe and print head is under vibration, the nozzle will inhale air bubble, in order to keep
good print quality, it is required to squeeze the ink cartridge.
6.Drifts,dirts and static electricity the in the environment contaminate the print head surface. In order to
maintain good print quality, it is required to squeeze the ink cartridge.
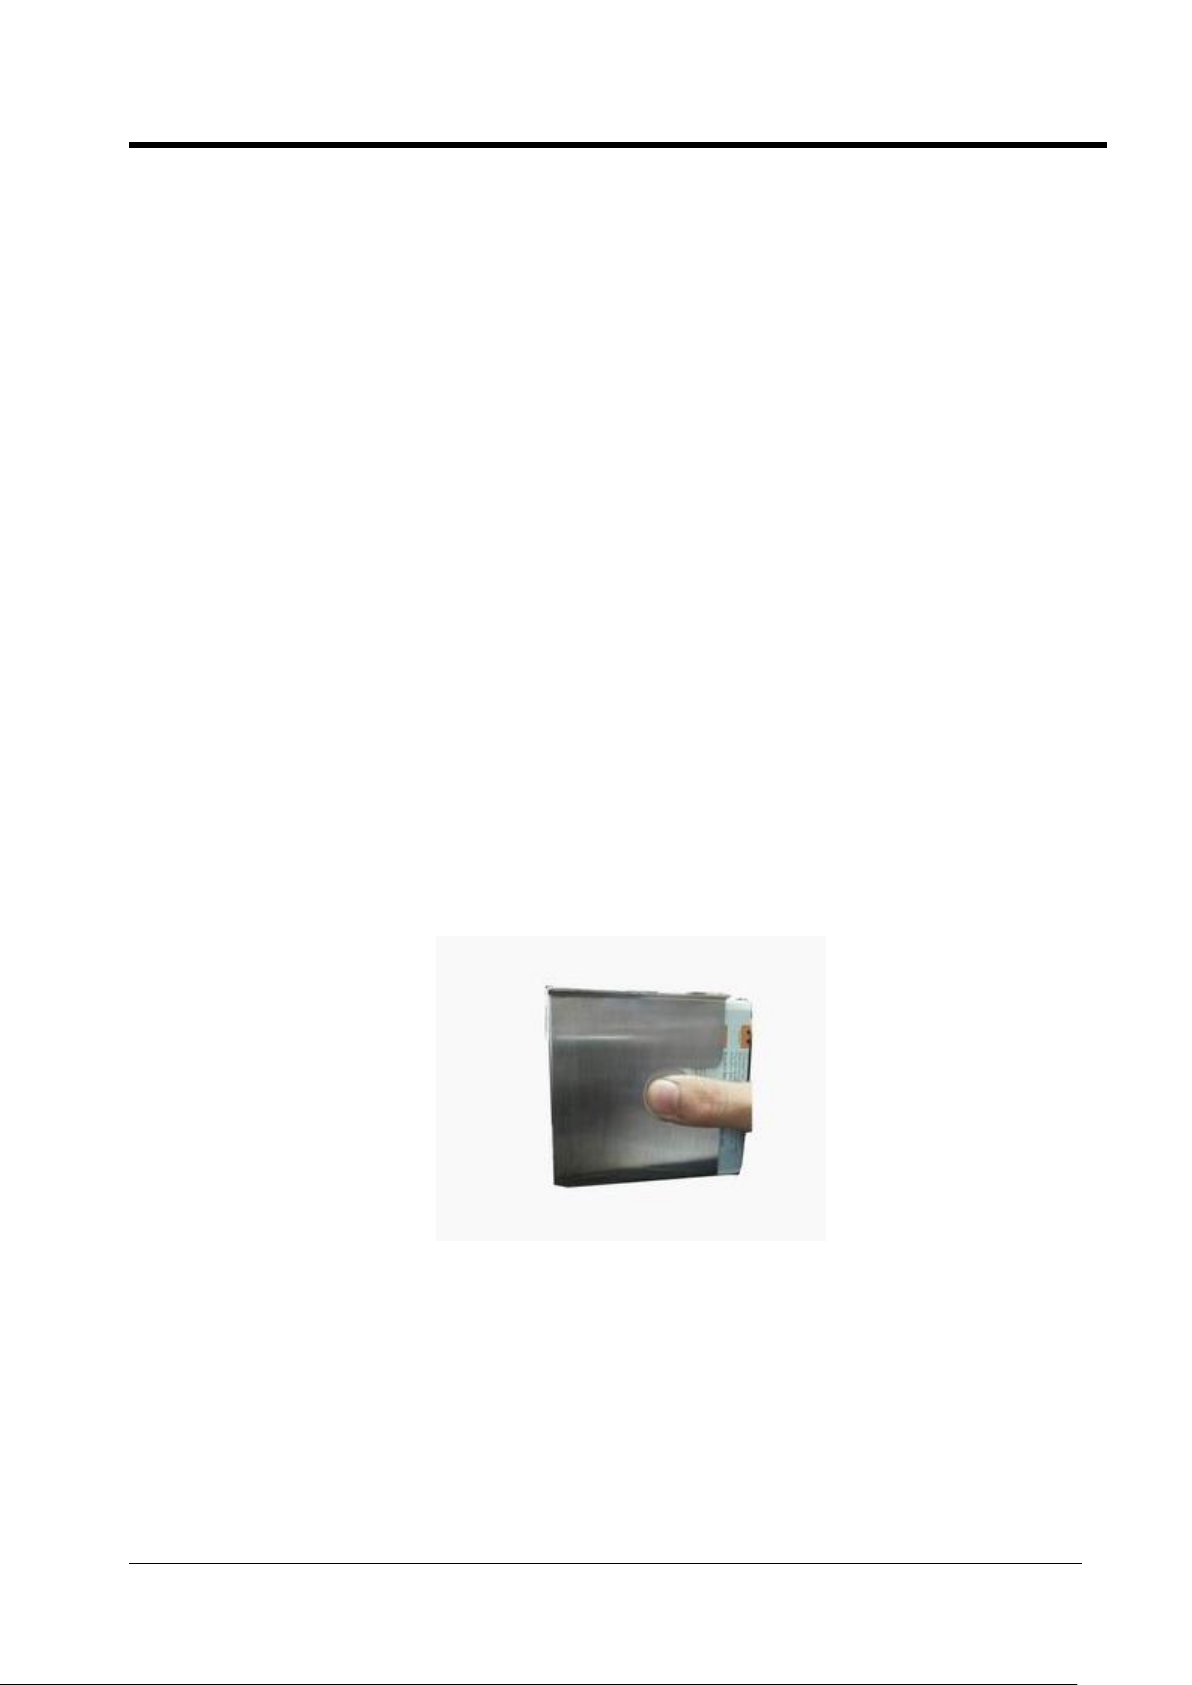
How to squeeze ink cartridge
Press the bottom button of the ink cartridge as below picture
Ink cartridge squeeze
a.Purge the print head with the spray before squeezing the ink cartridge to dilute the ink inside the nozzle
especially when the printer is power off for several hours. Under this situation, squeeze the ink cartridge
immediately will bring certain damage to the print head which will shorten the life span of the print head.
b. Click Print icon to stop printing. If the print head is installed forward, Place an napkin under the print
head firstly and then squeeze the ink cartridge slowly. The pressing force should be less than 1 Newton,
then will see some ink spilling through the nozzle.
c. The higher part in the print head, the less ink be squeezed out. Pressing force should be determined by
The Manual of CYCJET Ink-jet Printer
Page 24

23
the standard that is the ink can spill out from the very top of the print head. If small bubbles be found,
loosen the button in ink cartridge or in the ink pump slowly. and then squeeze the ink cartridge until there is
no bubbles.
d. If the print head is installed forward, place an napkin under the print head firstly and then squeeze the
ink cartridge slowly. Then some ink will spill out from the nozzle.If small bubbles be found, loosen the
button in ink cartridge or in the ink pump slowly. and then squeeze the ink cartridge until there is no
bubbles.
e. Each time of squeezing ink cartridge, please cover the print head with the napkin for 3 seconds to dry
the ink in the nozzle and surface of the print head.
7.If you have tried several times to squeeze the ink cartridge and still can not get good print quality or
nothing can be printed. Please refer to page 26 for frequent problem solution.
8.How to replace ink cartridge:
a. Replacement of the ink cartridge can be performed under printing status. However, you shall make the
replacement as fast as possible to prevent the air flowing into the ink system.
b. If the print content is too large and the print speed is too fast, it’s better to replace ink cartridge after
printing stops.
C. it’s better to leave some inks in the ink cartridge when replacing the ink cartridge, which can prevent
from air coming into the ink cartridge and enables you to have enough time for replace. When there is little
ink remaining, please replace it with a new ink cartridge timely
Maintenance for long time un-running.
1、 When printer does not running every day, please switch on for maintenance each three days. Purge
printhead, squeeze ink cartridge, take a printing test. Before switch off, ensure the printing result
was perfect. Do not flush the printhead before&after power off, just covers the printhead by the
cap.
2. If you cannot switch on each seven days, please perform the maintenance via clean tool cartridge and
maintenance solution cartridge according to per of the manual.
3. When using oil based ink(EJ13YBK), the printer can be free from any of the maintenance as for solvent
based ink system even if the printer is not used for long time. Maintenance does not needed for the print
head even it is not used for 1 years. Just need to replace the ink cartridge so that to get good print quality.
4. Keep printer staying in dry and clean environment, and covered the printhead by cap. The temperature
of environment shall be during 5℃~40℃。
5.Replace the filter each two years as per inks usage.
The Manual of CYCJET Ink-jet Printer
Page 25

24
How to use the clean cartridge
For the printer needs to work with solvent base ink, the clean procedure for the ink system and print head should
be as following
3、 Flush the gap of the print head with the cleaner bottle with spray for several times to dissolve the ink inside the
nozzle. Press the button under the ink cartridge continuously until the ink can be squeezed from the nozzle smoothly.
(If you does not perform the maintenance for the printer for more than half a month, you should take out the ink
cartridge from the ink tank and place the top 1cm of the printhead inside the cleaner for a few hours or even a few
days.)
2.Then change the ink cartridge with the clean tool cartridge and inject 10ml of cleaner to the ink system. Then push
out all of the ink and remaining cleaner inside the ink system with an empty syringe. Repeat this operation for three
times to thoroughly clean the print head and ink system. It is very important to push out all the remaining liquid.
3. If you will not use the printer for a long time and with no maintenance available, you should keep the clean tool
cartridge in the ink tank, fold and fix the external tube of the clean cartridge and then seal the printhead. In every 15
days, you should perform the clean operation and push out all the remaining liquid as second tips.
4. Before your next use of the printer, please flush the gap of the print head with the cleaner bottle with spray for
several times and then replace the clean tool cartridge with solvent base ink cartridge, press the button under the ink
cartridge continuously until 5ml of ink can be squeezed from the nozzle. Wipe up the ink in the nozzle and make a
print test.
5.If printer will not be used for a long time, a maintenance cartridge is necessary for the maintenance of the printer,
Actual maintenance operation please refer to the manual of the maintenance.
Model for the clean cartridge: CL01M, CL01M-S
How to use maintenance cartridge
If you are using the printer with solvent base ink and you can not make sure to power on the printer every seven
days. You should use the maintenance box to maintain the printer in the case of not being used for a long time.
The maintenance process is as following:
1.Flush the gap of the print head with the cleaner bottle with spray for several times to dissolve the ink inside the
nozzle. Press the button under the ink cartridge continuously until the ink can be squeezed from the nozzle smoothly.
(If you does not perform the maintenance for the printer for more than half a month, you should take out the ink
cartridge from the ink tank and place the top 1cm of the printhead inside the cleaner for a few hours or even a few
days.)
2.Then change the ink cartridge with the clean tool cartridge and inject 10ml of cleaner to the ink system. Then push
out all of the ink and remaining cleaner inside the ink system with an empty syringe. Repeat this operation for three
times to thoroughly clean the print head and ink system. It is very important to push out all the remaining liquid.
3.Replace the clean tool cartridge with maintenance cartridge, press the button under the cartridge continuously until
5ml of liquid can be squeezed from the nozzle. keep the maintenance cartridge inside the ink system, then seal the
printhead.
4.It is recommended to squeeze 5ml of maintenance liquid every 6 months to prevent the interior of the print head
being dried.
5.When you use the printer for the first time and during the process to return the printer to our company for repair,
you need to clean the printhead and ink system and filled them with maintenance liquid and only keep the empty
clean cartridge in the ink tank.
6.Before power on the printer next time, please replace the maintenance box with the ink cartridge, press the button
under the ink cartridge continuously until 5ml of ink can be squeezed from the nozzle. Dry the ink in the nozzle and
make a print test.
Model of the maintenance cartridge: MA01,M01-S
The Manual of CYCJET Ink-jet Printer
Page 26
25
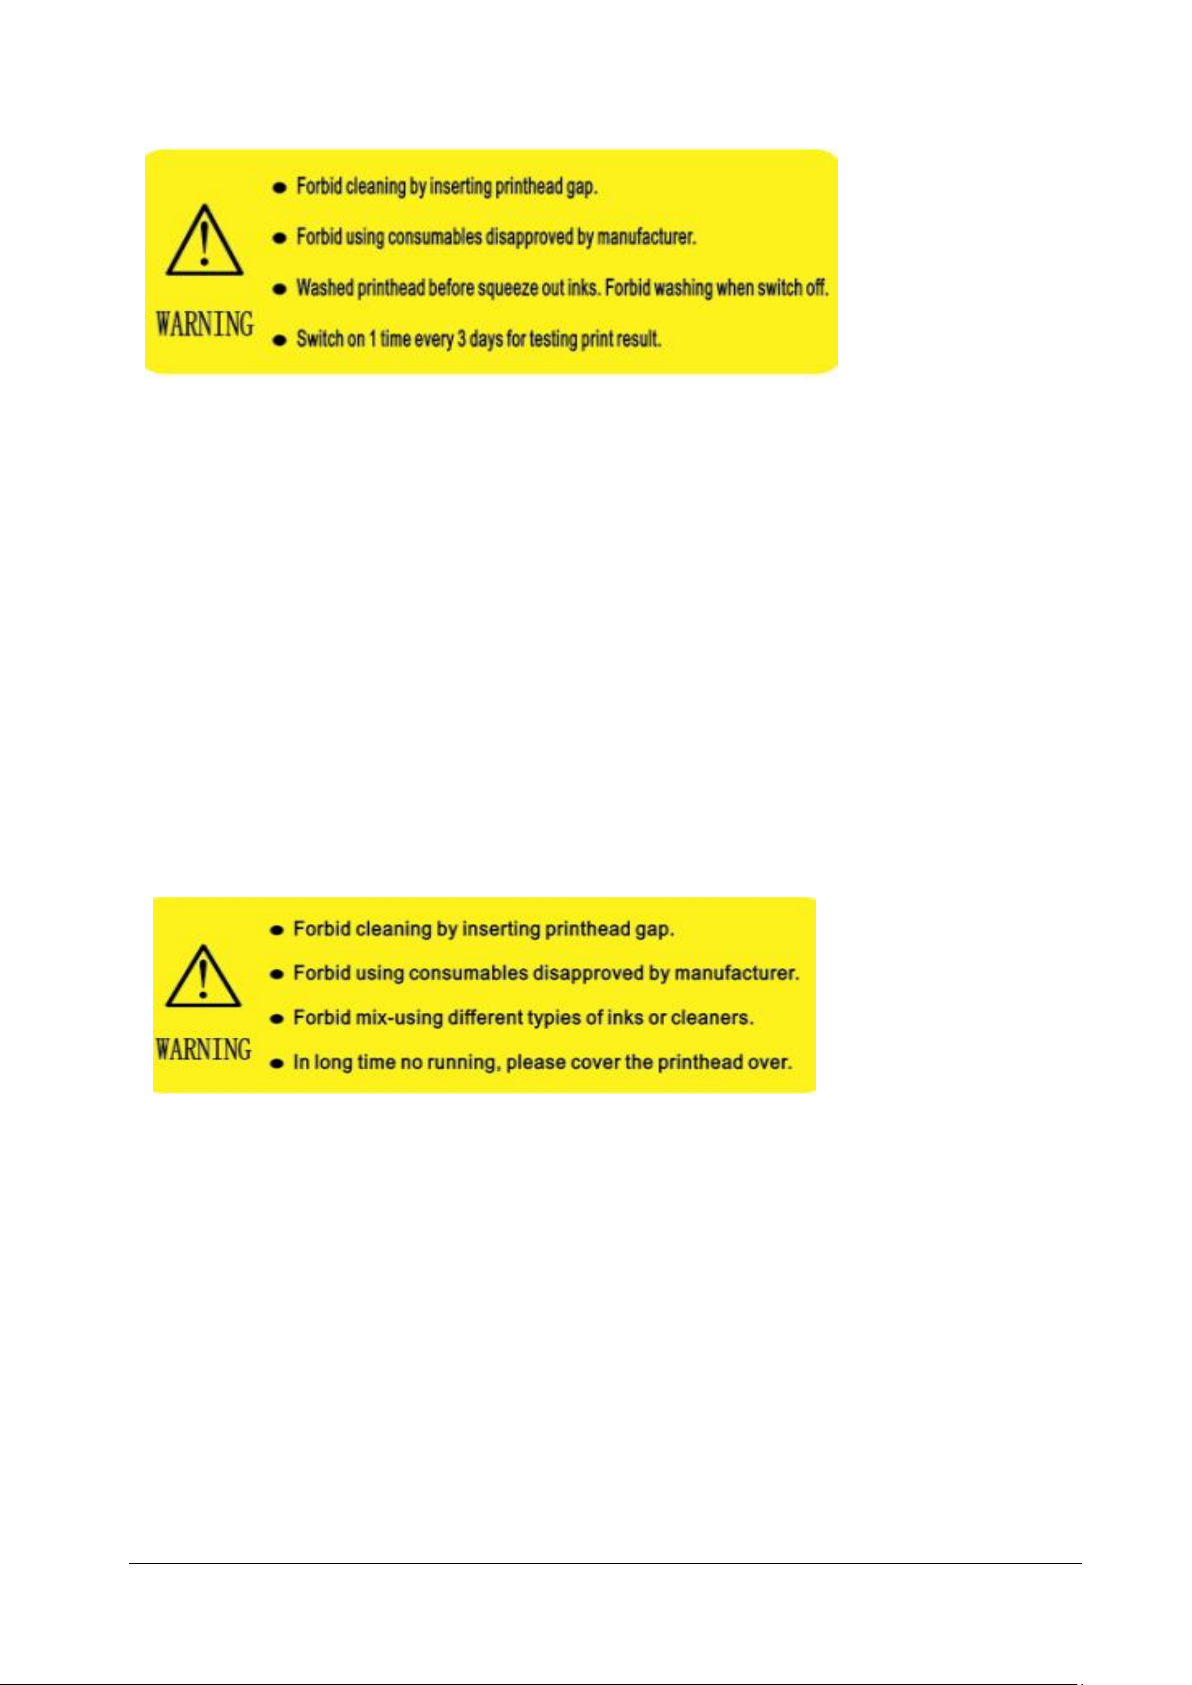
Warning label attached on the printer of solvent based ink:
Note:
1.It is Forbidden to clean the printhead with napkin or lint free cloth through the print head gap.
It will cause a permanent damage to the printhead.
2. Using consumables from other companies will affect the print quality and cause permanent
damage to print head.
3. Purge the print head with the spray before squeezing the ink cartridge to dilute the ink inside the
nozzle especially when the printer is power off for several hours. Under this situation, squeeze the ink
cartridge immediately will bring certain damage to the print head which will shorten the life span of the
print head. Ensure the print quality is normal before power off and do not flush the print head
before&after power off, just cover it by print head cap. As dry ink will create a membrane outside the
nozzle to protect the print head so that ink will not dry fast inside the print head. However, flushing the
print head at this time make the ink in the print head dry faster.
4. If maintenance does not performed more than 7 days after power off, dried ink inside the print head
will affect the print quality and shorten the life span of the print head.
Warning label attached on the printer of oil based ink:
Different consumables(ink cartridge,cleaner and maintenance solutions) can not be mix used. Eg. The oil based ink
and solvent based ink can not be mix used, otherwise, it will cause a unrecoverable damage to the ink system and
the print head. warranty will not be claimed in this case.
If the printer does not used for long time, even if using oil based ink, it is necessary to seal the print head.
Declare: If any violation of the above maintenance process and procedure will shorten
the life span of the print head or bring permanent damage to the print head such as
membrane of the print head damage&falling and print head clog will not be claimed for
warranty.
The maintenance terms stipulated in contract is base on this manual. Please read it carefully.
Thanks for reading. If you have any questions or problems cannot solved, please consult supplier
immediately!!!
The Manual of CYCJET Ink-jet Printer
 Loading...