

Page 1
Please read
Waiting ID Options Ser vices, this phone will display caller/Caller
Waiting party’s name and phone number, and the accessing soft
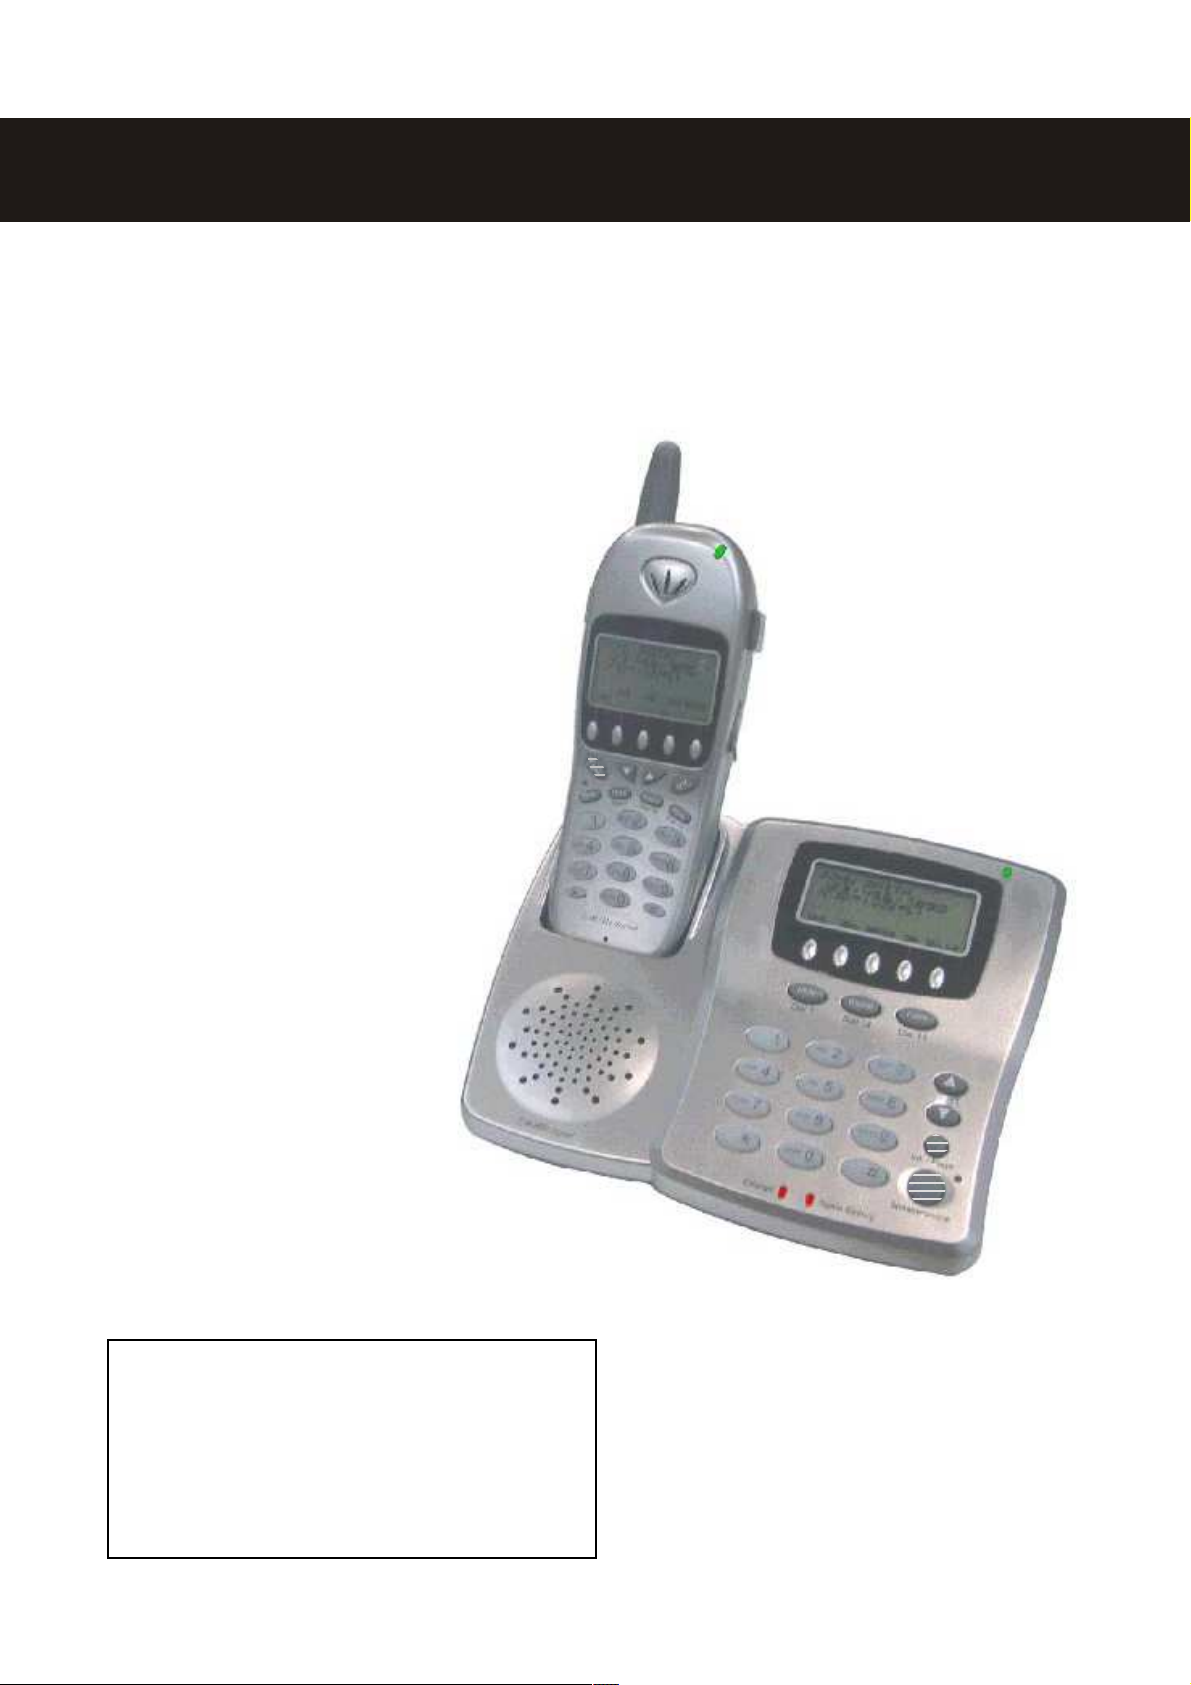
CY-368B-SB
MULTI-HANDSET CORDLESS SYSTEM
2.4 GHz Di gital DSS
Caller ID/Call W aiting Type 2 and Call W aiting ID Options
Owner’s Manual
Installation and operating
instructions
this manual
carefully
before use.
Keep for your
reference.
CAL L ER I D / CALLE R ID CALL W AITING /
CAL L W AITING ID OPTIONS CO M PATIBLE
Caller ID, Caller ID Call Waiting, and/or Call Waiti ng ID Opti ons
Services, where availabl e, are subscription ser vices. Aft er
subscribing to Caller ID, Caller ID Call Waiting and/or Call
keys of the Call Waiting ID Options ser vice.
CYBIOLINK©
Page 2

C O NT E NT S
PAGE
IM PORTANT INFORMATION 3
IM PO RTANT SAFETY INSTRUCTIO NS 3
SPECIAL FEATURES 4
Q UICK REFERENCE 5
PREPARATION 7
CHARGING THE BATTERY PACK 7
LOCATIO N OF CONTRO LS 8
LCD DISPLAY 11
GETTING STARTED 12
CHO O SE THE BEST LO CATIO N 12
CO NNECTING THE BASE UNIT 13
SPARE BATTERY 13
W ALLM O UNTING BASE UNIT 14
REG ISTRATIO N O F HANDSETS 15
CHO O SE THE DIALING M ODE 16
M ENU SETTINGS 17
STRUCTURE AND O PTIO NS 17
M ENU FUNCTIO NS 19
BASIC OPERATION 26
TO MAKE A CALL 26
TO ANSW ER A CALL 26
TO REDIAL A CALL 27
TO M UTE A CALL 2 7
ADJUSTING HANDSET VOLUM E 28
USING HANDSET SPEAKERPHO NE 28
PAG ING FROM BASE TO HANDSETS 28
ADVANCED OPERATION 29
FLASH 29
PAUSE 29
DIALING M ODE: PULSE TO TO NE 29
DIAL VOICE M AIL 30
DIAL BACK FROM CALLER ID LIST 30
DIALING FROM PHONE BO OK DIRECTORY 30
HEADSET INSTALLATIO N 30
CALLER ID OPERATION 31
ABO UT CALLER IDENTIFICATIO N 31
CALLER ID LIST 31
CALL W AITING ID OPTIO NS 34
PHONE BOOK DIRECTORY 36
REVIEW ING PHONE BOOK DIRECTORY 36
ADDING A PHO NE BO OK NUM BER 3 6
EDITING A PHO NE BOOK NUM BER 39
DELETING AN ENTRY FROM A PHONE BOOK DIRECTO RY 39
DELETING ALL PHO NE BO O K DIRECTORY RECO RDS 40
DIALING FROM PHONE BO OK DIRECTORY 40
M ULTI-HANDSET OPERATION 41
INTERCOM 4 1
CALL TRANSFER 4 1
CALL CO NFERENCING 42
OPTIONAL FEATURES DIAL LIST 43
DIALING SERVICES 43
3-W AY CALLING 4 4
1
Page 3

C O NT E NT S
ADDITIONAL INFORM ATION 45
CAPACITY 45
O UT O F RANG E 4 5
NO CO NNECTIO N 45
TROUBLESHOOTING 46
CARE AND M AINTENANCE 47
FCC REQUIREMENTS 48
2
Page 4

IM PO RT AN T IN FOR M AT IO N
Important Safety Instructions:
To reduce the risk of fire, electric shock and/or injury to persons, always follow
these basic safety precautions when using your telephone equipm ent.
1. Read, understand, and follow all instructions.
2. Unplug this telephone from the wall outlet
before cleaning. Do not use liquid or
aerosol cleaners. If necessary, use a soft
cloth lightly m oistened with a m ild detergent
solution.
3. Do not use this telephone near a bathtub,
kitchen sink, wash bowl, laundry tub,
swim m ing pool, a wet basem ent or anywhere
else there is water or liquid.
4. Do not place this telephone on an unstable
cart, stand or table. A fall could cause
serious dam age to the phone.
5. Slots and openings in the cabinet at the back
or bottom are provided for ventilation to
protect the unit from overheating. These
openings m ust not be blocked or covered.
Do not place this telephone on a bed, sofa,
rug or other similar surface. This telephone
should never be placed near or over a
radiator or heat register. This telephone
should not be placed in a built-in installation
unless proper ventilation is provided.
6. Never push objects of any kind through slots
in the phone. They could touch dangerous
voltage points or short out parts that could
result in a risk of fire or electric shock.
Never spill liquid of any kind on the
telephone.
7. Unplug this telephone from the wall outlet and
refer to a qualified service representative in
any of the following situations:a) If liquid has been spilled into the
telephone.
b) If the telephone has been exposed to rain
or water.
c) If the telephone does not operate normally
by following the operating instructions.
Adjust only those controls that are covered
by the operating instructions. Im proper
adjustm ent of other controls m ay result in
damage and will often require extensive
work by a qualified technician to restore
Use only with Class 2 Power Source, 9V DC, 700m A
SAVE THESE INSTRUCTIONS
8. Do not use the telephone to report a gas leak
9. Avoid using a telephone (other than a
10. Never install jacks in a wet location unless
11. Never touch uninsulated telephone wires or
12. Use with caution when installing or m odifying
13. To reduce the risk of electric shock, do not
14. CAUTIO N
15. Use only the power cord and batteries
16. Plug the adaptor to the socket-outlet that near
the telephone to norm al operation.
d) If the telephone has been dropped or the
case has been damaged.
e) If the telephone exhibits a distinct change
in performance.
in the vicinity of the leak.
cordless type) during an electrical storm .
There m ay be a rem ote risk of electric shock
from lightning.
the jack is specifically designed for wet
locations.
terminals unless the telephone line has been
disconnected at the network interface.
telephone lines.
disassemble this product, but take it to a
qualified servicem an when som e service or
repair work is required. O pening or
rem oving covers may expose you to
dangerous voltages or other risks. Incorrect
reassem bly can cause electric shock when
the appliance is subsequently used.
RISK OF EXPLO SION IF BATTERY IS
REPLACED BY AN INCORRECT TYPE.
Sanyo Energy (Hong Kong) Co., Ltd,
3KR-600AAL, NiCd 3.6V, 600m Ah
DISPOSE OF USED BATTERIES
ACCORDING TO THE INSTRUCTIONS.
indicated in this manual. Do not dispose of
batteries in fire. They may explode. Check
with local codes for possible special disposal
instructions.
the equipm ent and shall be easily accessible.
3
Page 5

I MP OR T AN T IN FO R MAT I O N
SPECIAL FEATURES
Your new Multi-handset Cordless System is designed and engineered to exacting
standards for reliability, long life, and outstanding perform ance.
Note:
Charge the battery for about 15 hours before initial use.
• 2.4 GHz Digital DSS Cordless Phone
• Multiple handsets capability, supports up to 8 handsets
• Handset-to-Handset two-way intercom independent of the base unit.
• Handsfree speakerphone on base unit, giving the base com plete functionality of
another handset
• Dedicated keys on the base unit : Redial / Intercom / Speakerphone / Mute / Flash /
Directory / Voicem ail / Optional features Dial
• Handsfree speakerphone on handset
• Two-way intercom between handsets
• Caller ID Type I, II and Call W aiting ID Options capability
• Backlit 6-Line Multi-Function LCD on both the handset and the base unit
• Five Softkeys on both handset and base unit to access different functions depending
on which m ode the phone is currently in.
• Handset and base unit Volum e Control
• New Call/Voice Mail Message W aiting Indicator on both handset and base unit
• Out of Range indication
• Non-volatile m em ory for 50 Nam e and Num ber Caller ID Records, 50 Nam e and
Num ber Phone Book Directory Records, and 20 Last Dialed num bers.
• English/Spanish Intelligent LCD Display
• Spare Battery Capability
• 2.5 mm Headset Jack
4
Page 6
Press [Talk] or [Spk.] on the handset or
press [Speakerphone] on the base unit
Press [Talk] or [Spk.] on the handset or
press [Speakerphone] on the base unit
Press [Redial] to dial out the last dialed
on the handset or
press [Speakerphone] on the base unit
then press [Talk] or [Spk.] on the handset or
I MP OR T AN T IN FO R MAT I O N
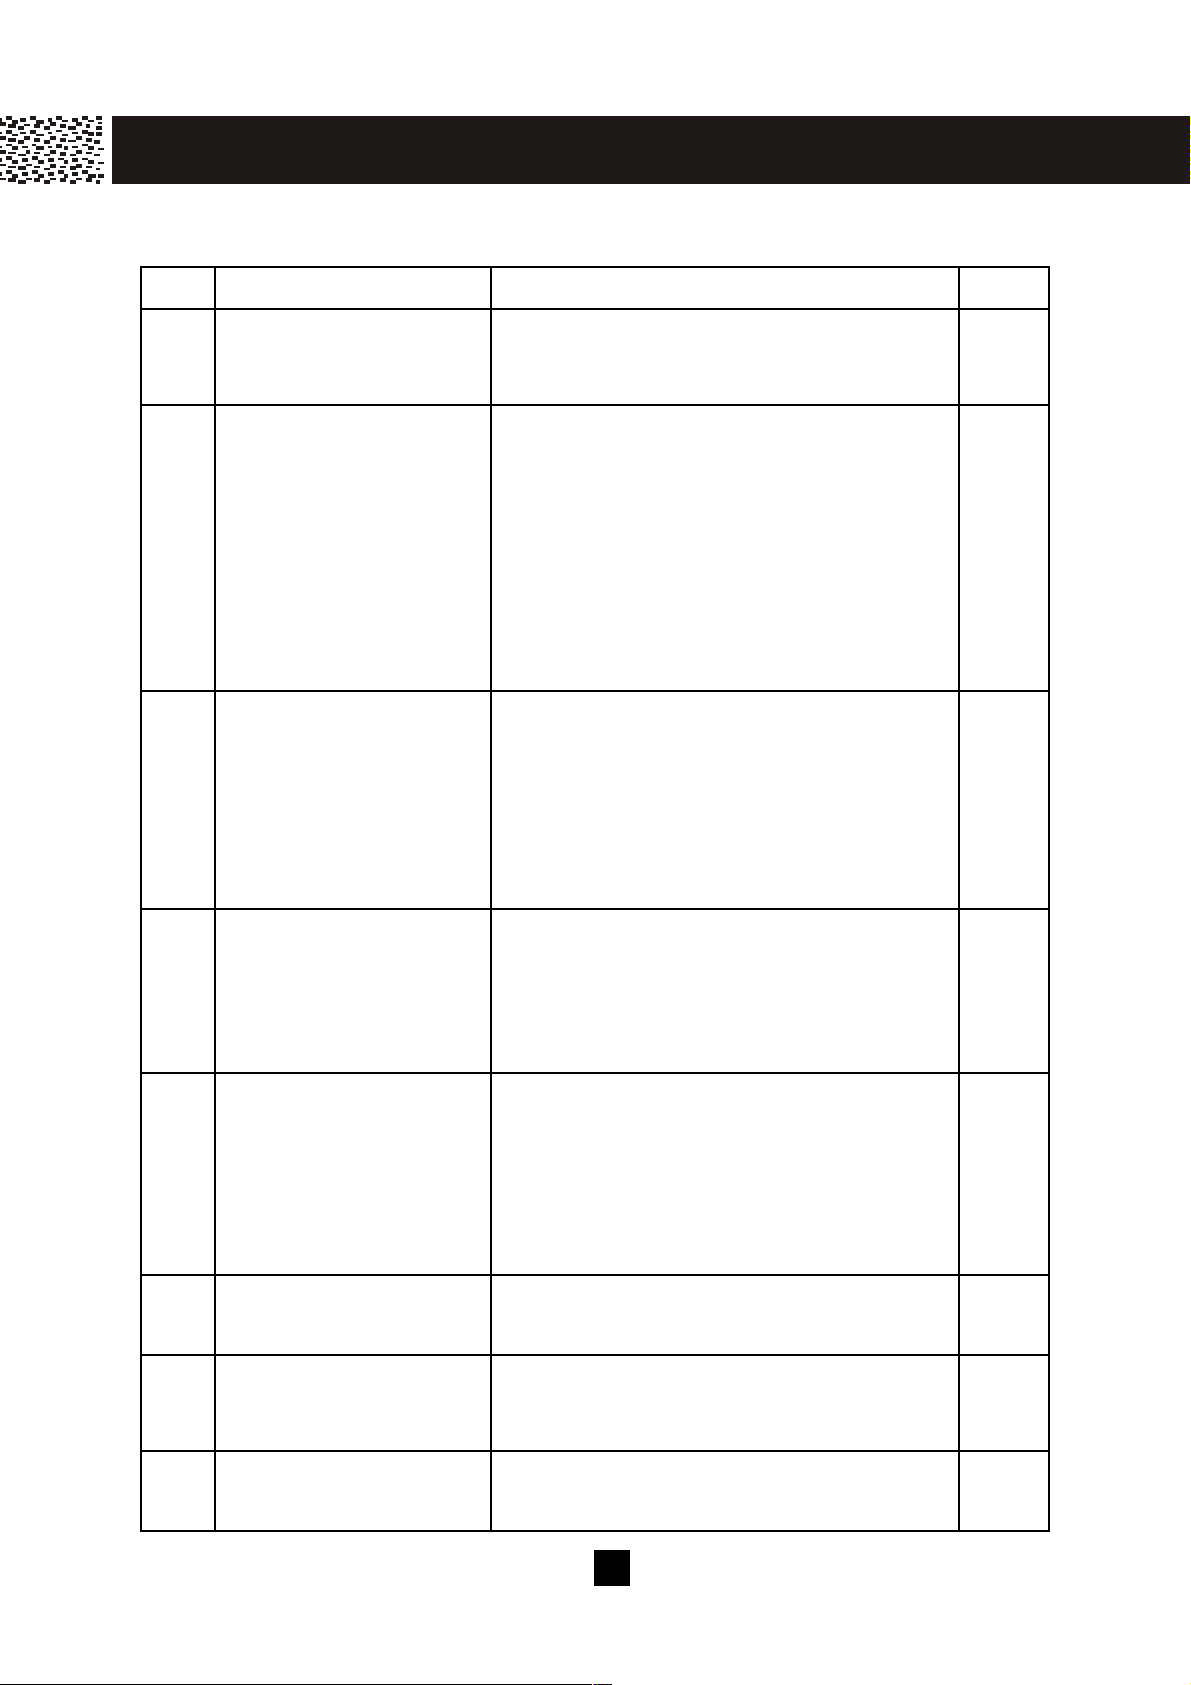
QUICK REFERENCE
Task Steps Page
1 Adjust receiver volum e The handset and the base unit have 4
2 Make call 1.
3 Answer call 1. Press [Talk] or [Spk.] on the handset or
28
receiver levels which can be adjusted
during off hook.
26
and listen for dial tone.
2. Dial num ber (For m em ory dial feature,
see related reference.)
3. Press [OFF] or return the handset to
base to hang up, or press
[Speakerphone] if talking on the base
unit.
26
press [Speakerphone] on the base unit
to pick up a call
2. Press [OFF] or return the handset to
base to hang up, or press
[Speakerphone] if talking on the base
unit.
4 Redial last num ber 1.
5 Dial from redial list 1. Press [Redial].
6 Review Caller ID List Press [▼ ] or [▲ ] during standby m ode. 32
7 Dial Caller ID num ber Review Caller ID List to display num ber,
8 Delete Caller ID num ber Review Caller ID List to display num ber,
27
and listen for dial tone.
2.
num ber.
27
2. Press [▼ ] or [▲ ] to review list.
3. Press [Talk] or [Spk.]
to access dial tone and dial the
num ber.
33
[Speakerphone] on the base unit.
33
then press [DELETE].
5
Page 7
Store Caller ID num ber to
Press [Int.] on handset or [Int./Page] on
I MP OR T AN T IN FO R MAT I O N
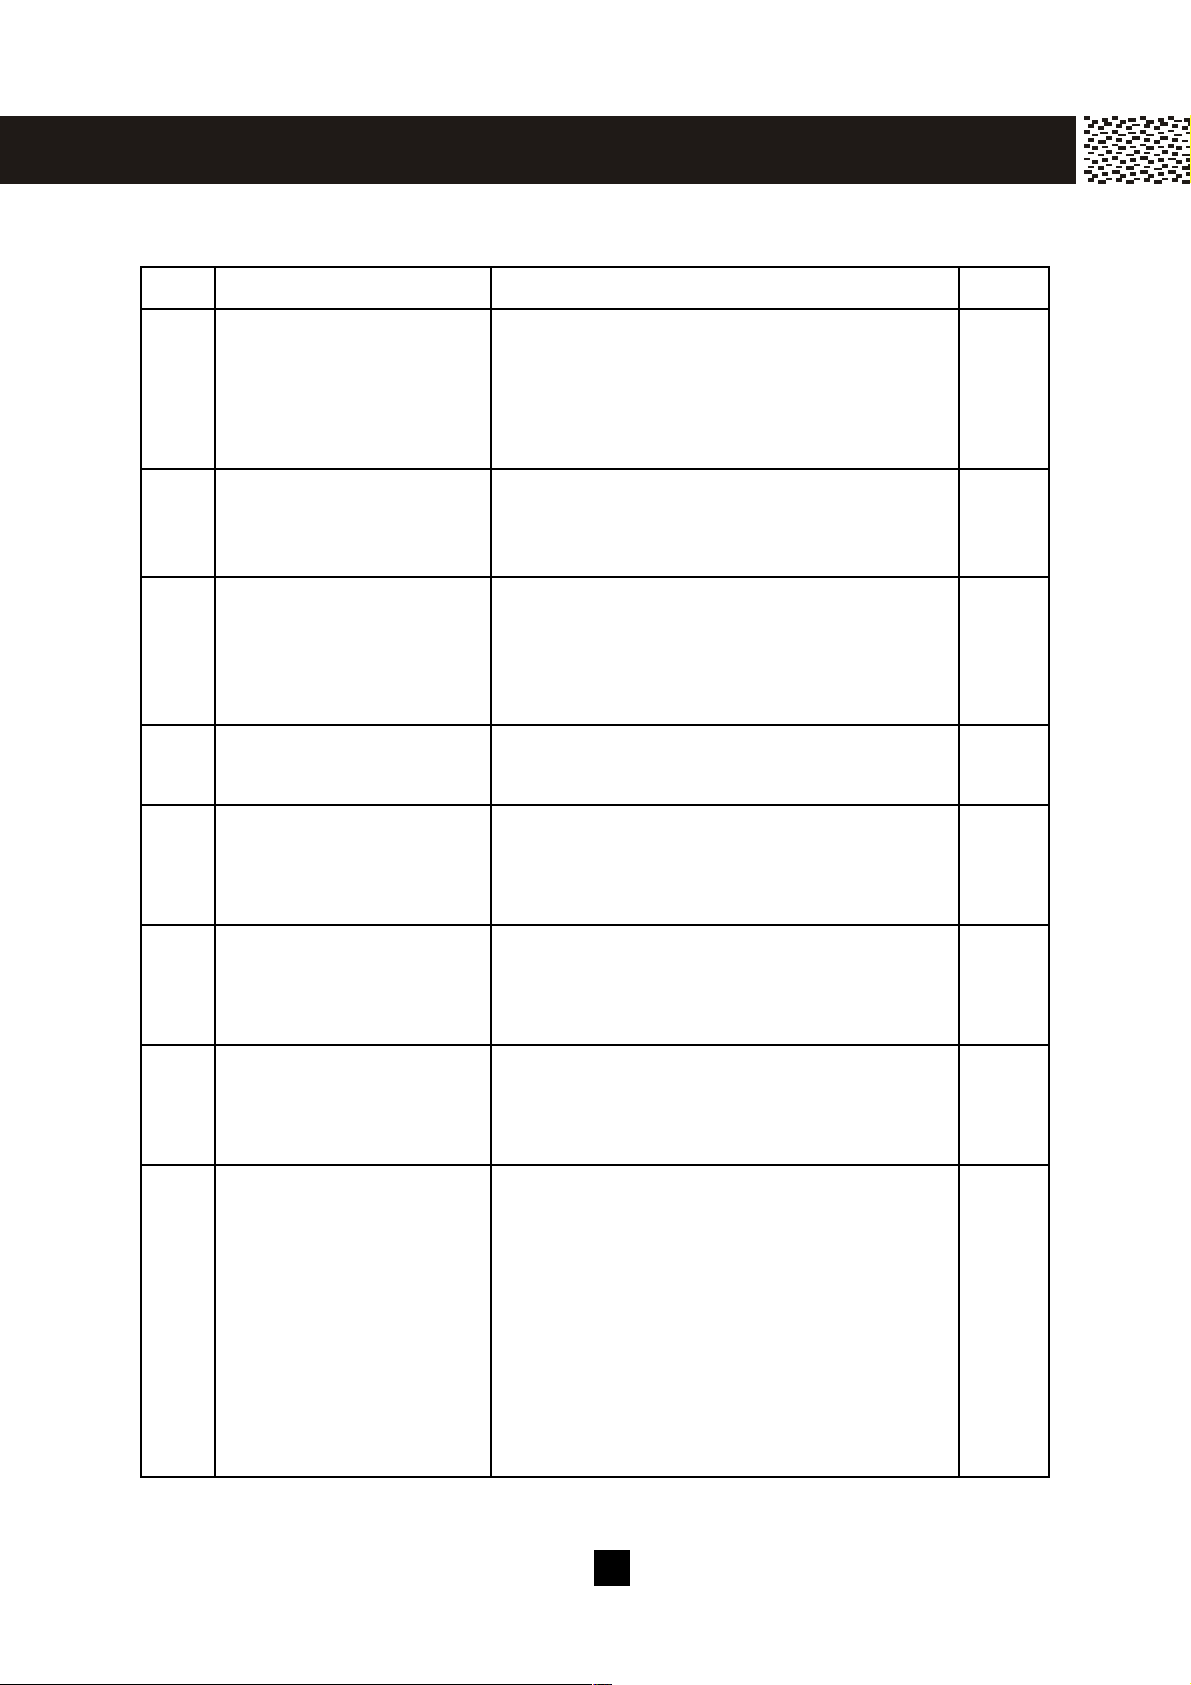
QUICK REFERENCE
Task Steps Page
9 Add new num ber to
Phone Book
10
Phone Book
11 Dial from Phone Book 1. Press [DIR.].
12 Switch to waiting call Press [Flash]. 29
13 Page from base to all
handsets
1. Press [DIR.].
2. Press [SAVE] and input num ber.
3. Press [O.K.] and input nam e.
4. Press [SAVE] to store.
1. Display Caller ID num ber.
2. Press [SAVE] to store the num ber to
Phone Book.
2. Press [▼ ] or [▲ ] to find the desired
directory record.
3. Press [O.K.] to dial out.
1. Press [Int./Page].
2. Press [*]
38
37
41
28
14 Intercom between
handsets
15 Intercom between
handsets and base unit
16 Call Transfer 1.
3. All handset(s) in range will ring.
1. Press [Int.].
2. Press the desired handset num ber.
3. Press [EXIT] to term inate the intercom .
1. Press [Int.]
2. Press [0] to access base unit
3. Press [EXIT] to term inate the intercom
base unit while engaging external line.
2. Press the desired handset num ber or
press [0] for base unit.
3. Press [Talk] on handset or
[Speakerphone] on the base unit to
take back the call at any point, or the
call will be returned to you if the party
you are transferring does not answer
within 20 seconds.
42
42
42
6
Page 8

P REPAR AT I O N
Your new telephone includes the highest quality NiCd (Nickel Cadm ium ) batteries
available. Following these sim ple instructions can significantly im prove your
operational results.
CHARGING THE BATTERY PACK
Charge all the battery pack for at least 15 hours prior to connecting to the telephone line.
** AFTER INITIAL CHARGE: To enhance battery life and telephone perform ance,
com pletely charge and then com pletely discharge the batteries before
returning the handsets to the charging cradle. This will extend your battery
life allowing longer talk-tim e and stand-by.
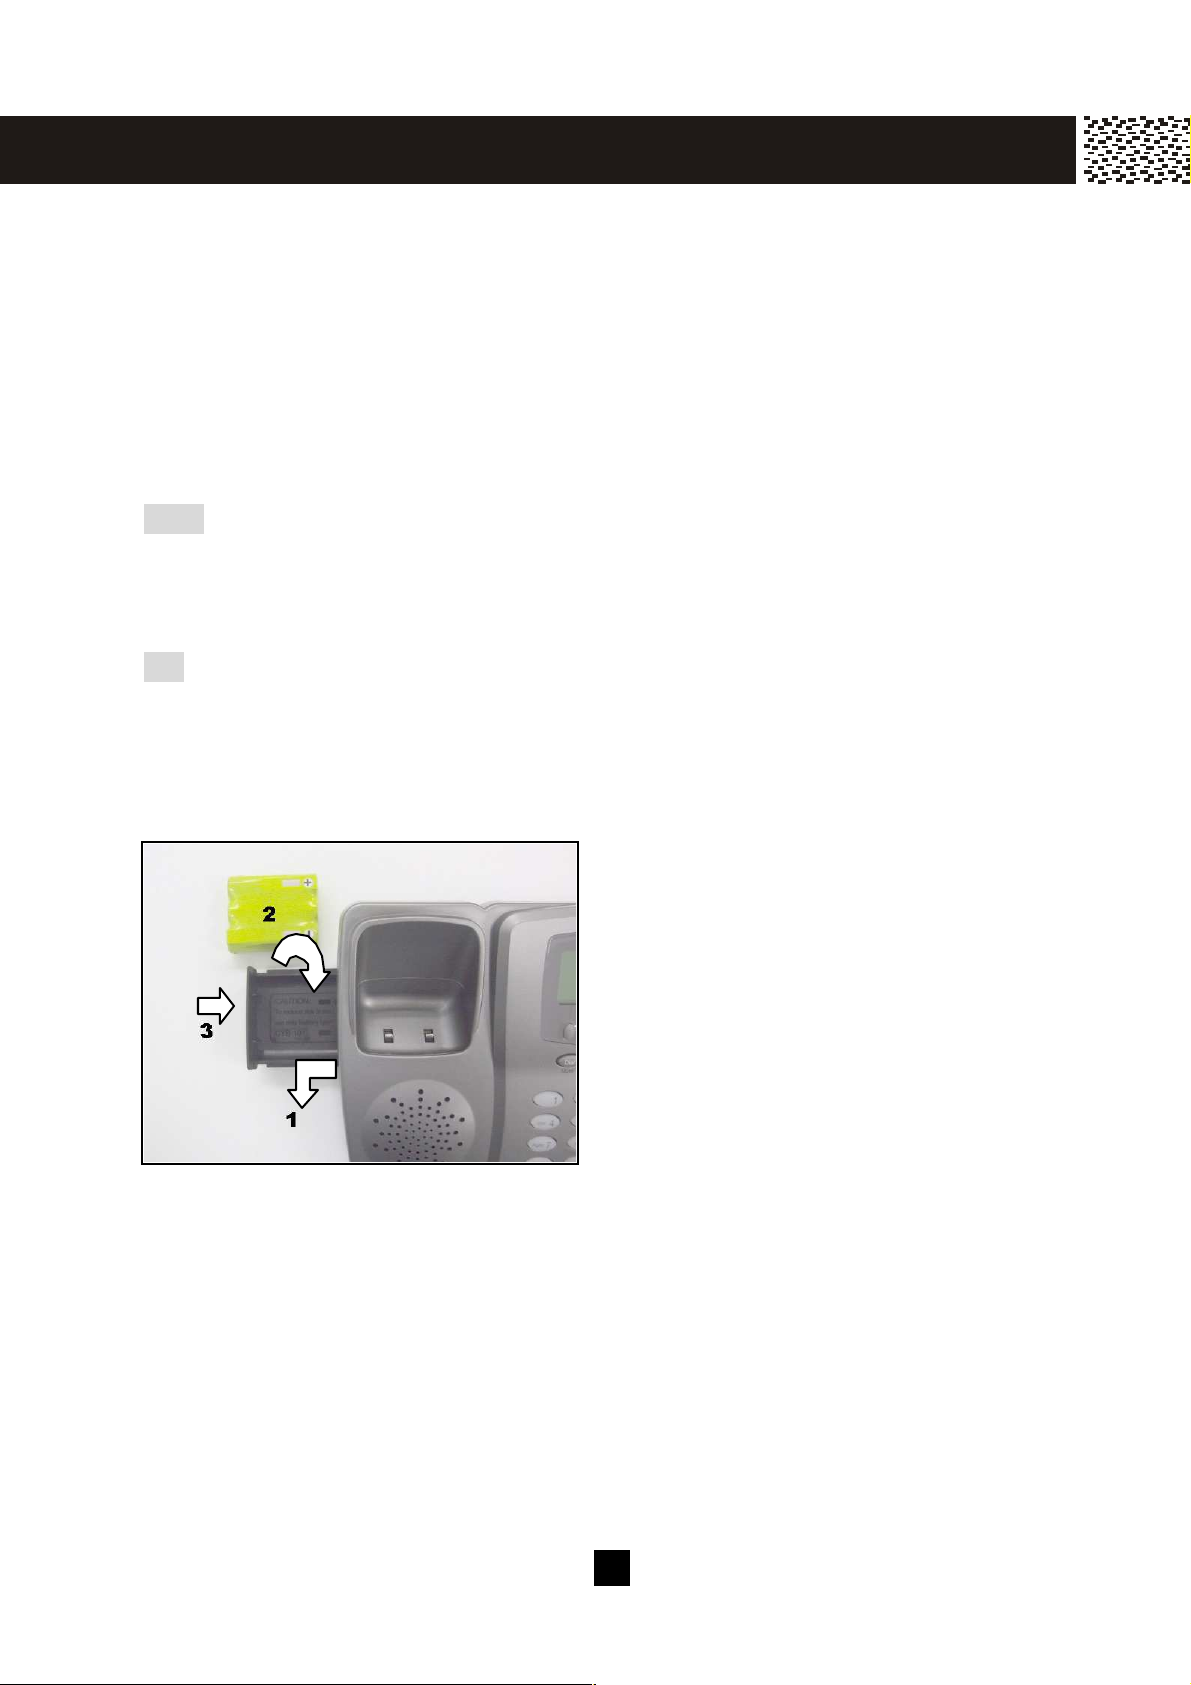
1. Press the battery release point on the back of the handset and slide downward to
open the battery com partm ent.
2. Insert the battery pack into the battery com partm ent and m ake sure to position
according to polarity m arkings.
3. Slide the battery cover upward until it snaps into place.
4. Place the handset on the base unit. Connect the AC adapter to the 9V DC jack of
the base unit and to a standard 120V AC wall outlet. Make sure that the Charge
LED of the base unit lights, and charging begins.
Low Battery
W hen the battery power is low, the battery icon on the left of the display will be on
and the handset beeps interm ittently while it is in use. If you DO NOT recharge the
handset battery, will be on for certain period, and then “BACK TO CHARGER” is
displayed and the handset does not function when you press the keys.
Clean the Battery Contacts
To m aintain a good charge, it is im portant to clean all battery contacts on the handset
and the base unit with a soft, dry cloth about once a m onth. Use a pencil eraser or
other contact cleaner. Do not use any liquids or solvents.
Caution:
1. Use ONLY with CY-368D AC Adapter (AC 120V, DC9V, 700m A).
2. The AC adapter m ust rem ain connected at all tim es (It is norm al for the adapter to
feel warm during in use).
3. Do not rem ove the battery from the handset to charge it.
4. Never throw the battery into a fire, disassem ble it, or heat it.
5. Do not rem ove or dam age the battery casing.
6. If you do not expect to use your phone for a m onth or longer, rem ove the batteries.
Batteries can leak chem icals that can destroy electronic parts.
7. For the longest battery life and optimal operation of the phone system ALW AYS
com pletely charge and discharge the batteries. 3 batteries have been included to
allow you to keep 1 battery continually charging for use in a low battery condition.
7
Page 9
P REPAR AT I O N
LOCATION OF CONTROLS
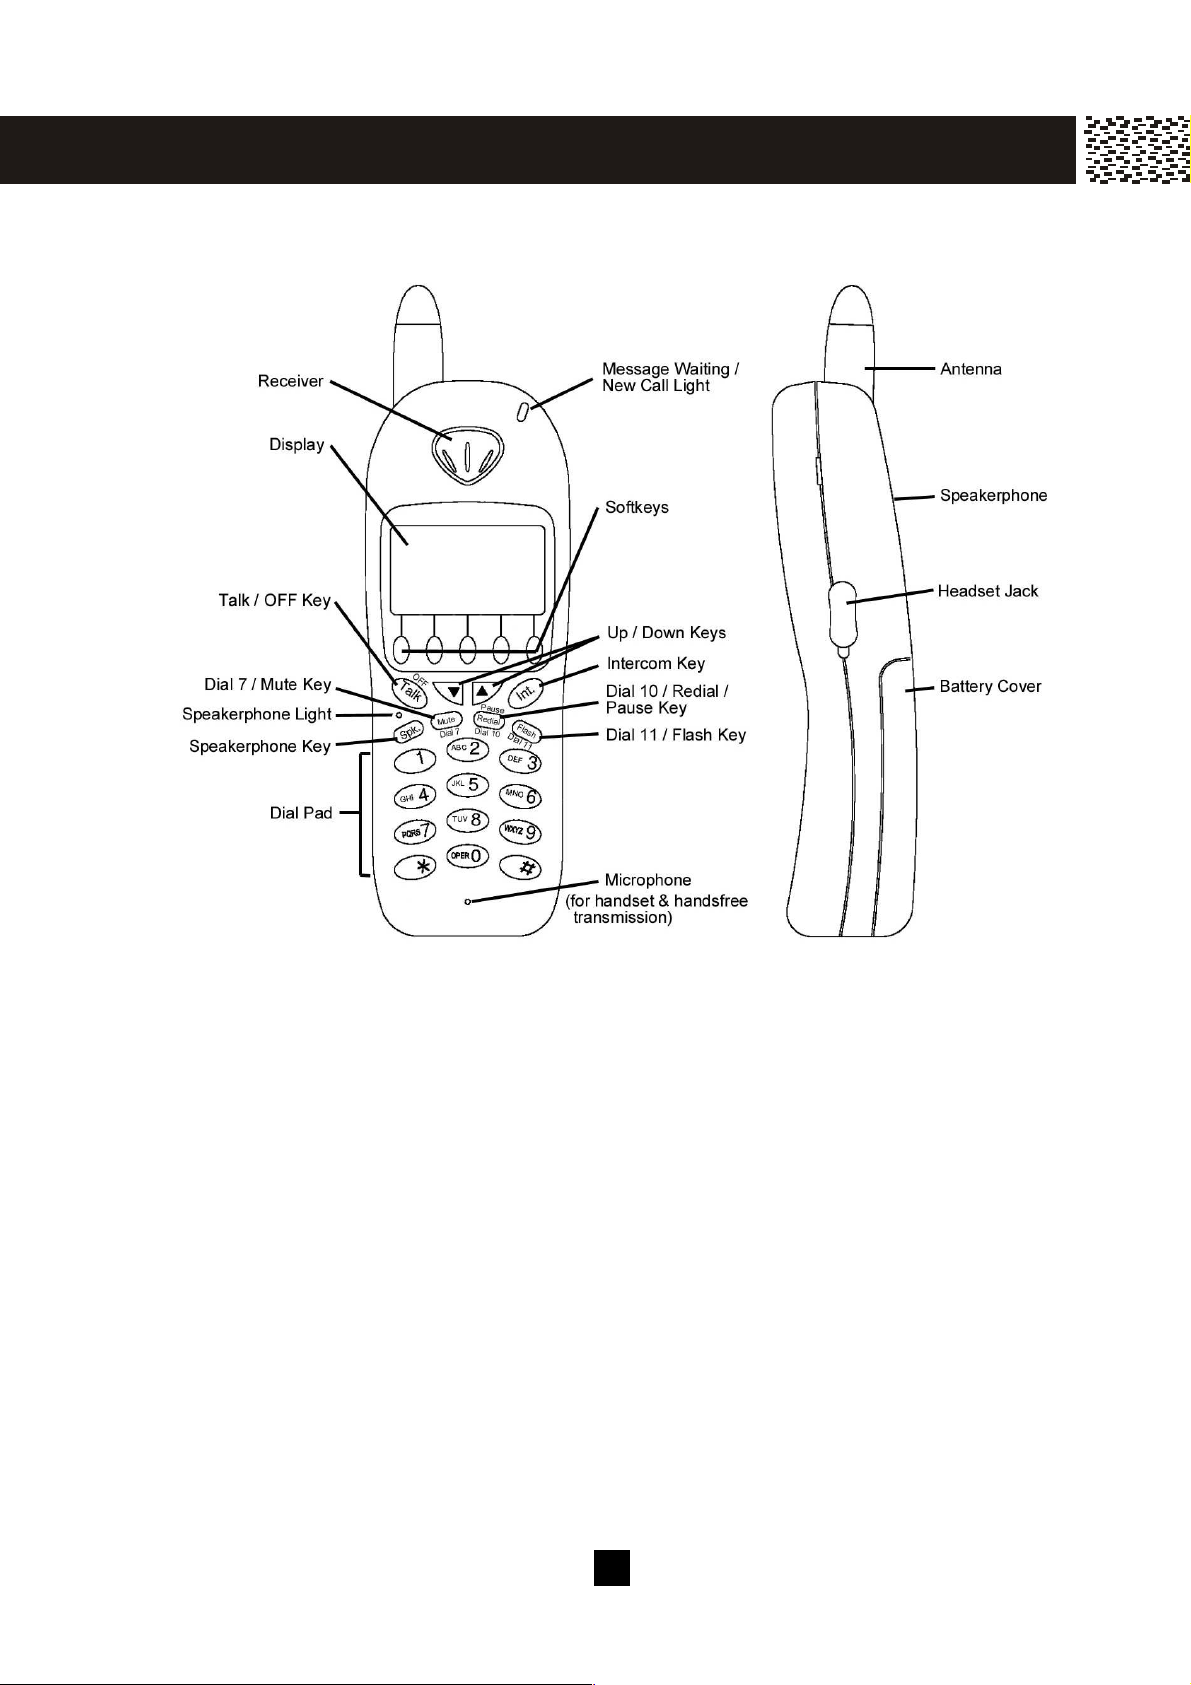
Handset
Message W aiting /New Call Light
(a) Flash rapidly when ringing.
(b) Flash regularly if you have m essage in your voicemail or new Caller ID in Call Log.
(c) Light when the handset is in use.
Speakerphone Light
Light when speakerphone is in use.
Headset Jack
The headset jack allows the use of a headset with a standard 2.5mm plug.
Dial Pad
The num eric keys are used in the conventional m anner for dialling.
Talk / OFF Key
Allow you to access the telephone line or to end a call.
Up / Down Keys [▼] / [▲]
(a) W hile on a call, press [▼ ] or [▲ ] to adjust the volum e.
(b) During standby, press [▼ ] or [▲ ] to scroll through Menu options; access Caller ID
Records, Phonebook Directory Records and Redial List.
8
Page 10
Dial 7 / Mute Key
P REPAR AT I O N
(a) W hile reviewing the Call ID Record, press [Dial 7] to dial a Call Back in 7-digit form at.
(b) W hile on a call, press [Mute] to m ute the m icrophone for privacy.
Dial 10 / Redial / Pause Key
(a) W hile reviewing the Call ID Record, press [Dial 10] to dial a Call Back in 10-digit
form at.
(b) W hile off-hook, press [Redial] to recall and dial the last phone num ber dialed.
(c) W hile on-hook, press [Redial] to access the Redial List. Using [▼ ] or [▲ ] to select
the desired num ber and press [Talk] to dial it out.
(d) Press the key during Pre-dial or Phone book num ber entry will enter a 2-second
pause into a dialing sequence with “P” appears on the display.
Dial 11 / Flash Key
(a) W hile reviewing the Call ID Record, press [Dial 11] to dial a Call Back in 11-digit
form at.
(b) The [Flash] key is used to access telephone com pany services such as Call W aiting.
Intercom Key [Int.]
During standby, press the key to activate the intercom function between handsets,
answer a paging call, or term inate an intercom call. W hile on a line, press the key to
transfer the call to a particular handset or the base.
Speakerphone Key [Spk.]
Press to turn on the handsfree speakerphone and also dial the num ber on the display.
You are still required to press [Talk] to end your call.
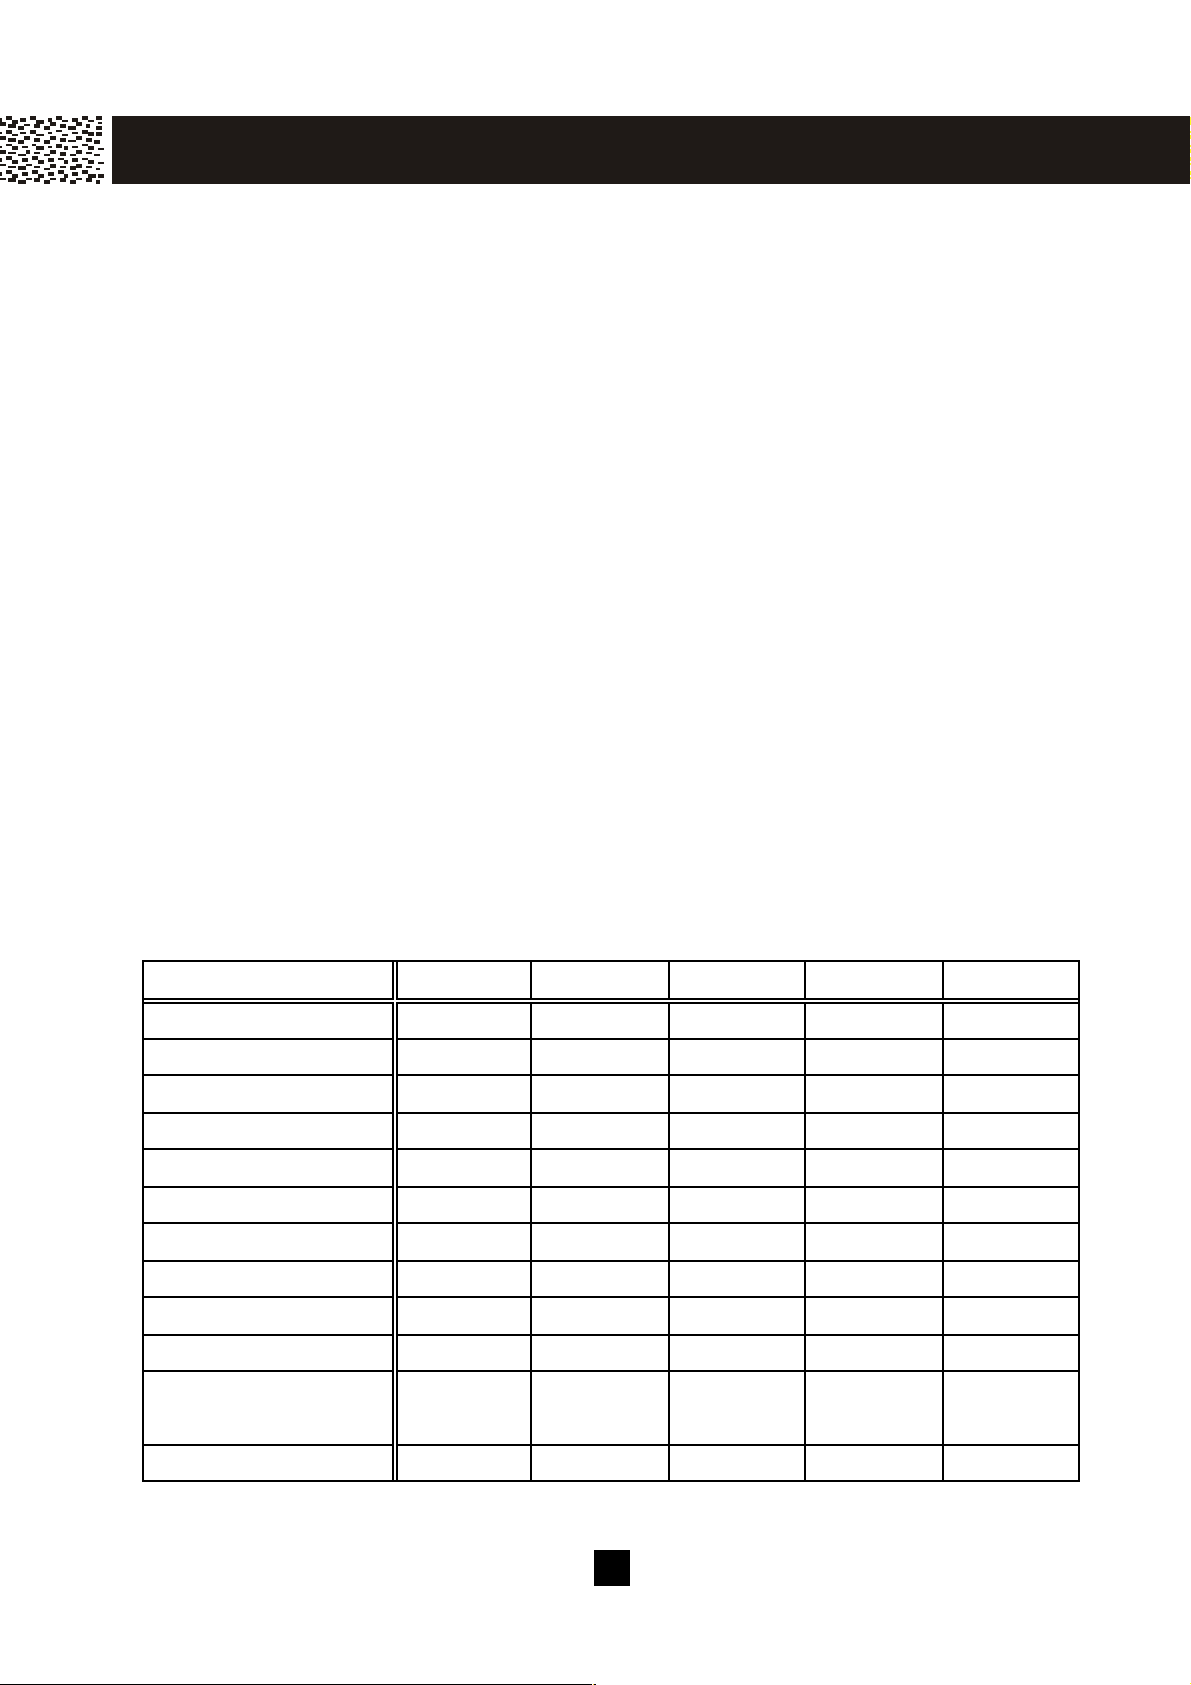
5 Softkeys
Depending on the handset’s m ode, the appropriate functions of the 5 Softkey keys are
displayed on the screen.
Mode Softkey1 Softkey2 Softkey3 Softkey4 Softkey5
Standby SAVE MENU SERVICE DIR. DIAL V. M .
MENU Operation - - O.K. EXIT -
SERVICE Operation - - O.K. EXIT -
DIAL V. M. - EDIT O.K. EXIT -
Off-Hook - - SERVICE DIR. DIAL V. M .
Talk 3W AY - SERVICE - -
Caller ID Review SAVE - - EXIT DELETE
Directory Review SAVE EDIT O.K. EXIT DELETE
Pre-Dialing SAVE - O.K. EXIT DELETE
Redial List Review SAVE - O.K. EXIT DELETE
Call W aiting ID
Options
Call W aiting - ANS - - -
HOLD DROP
ANS
JOIN SAY
BUSY
9
SEND
V.M .
Page 11
Base Unit
P REPAR AT I O N P REPAR AT I O N
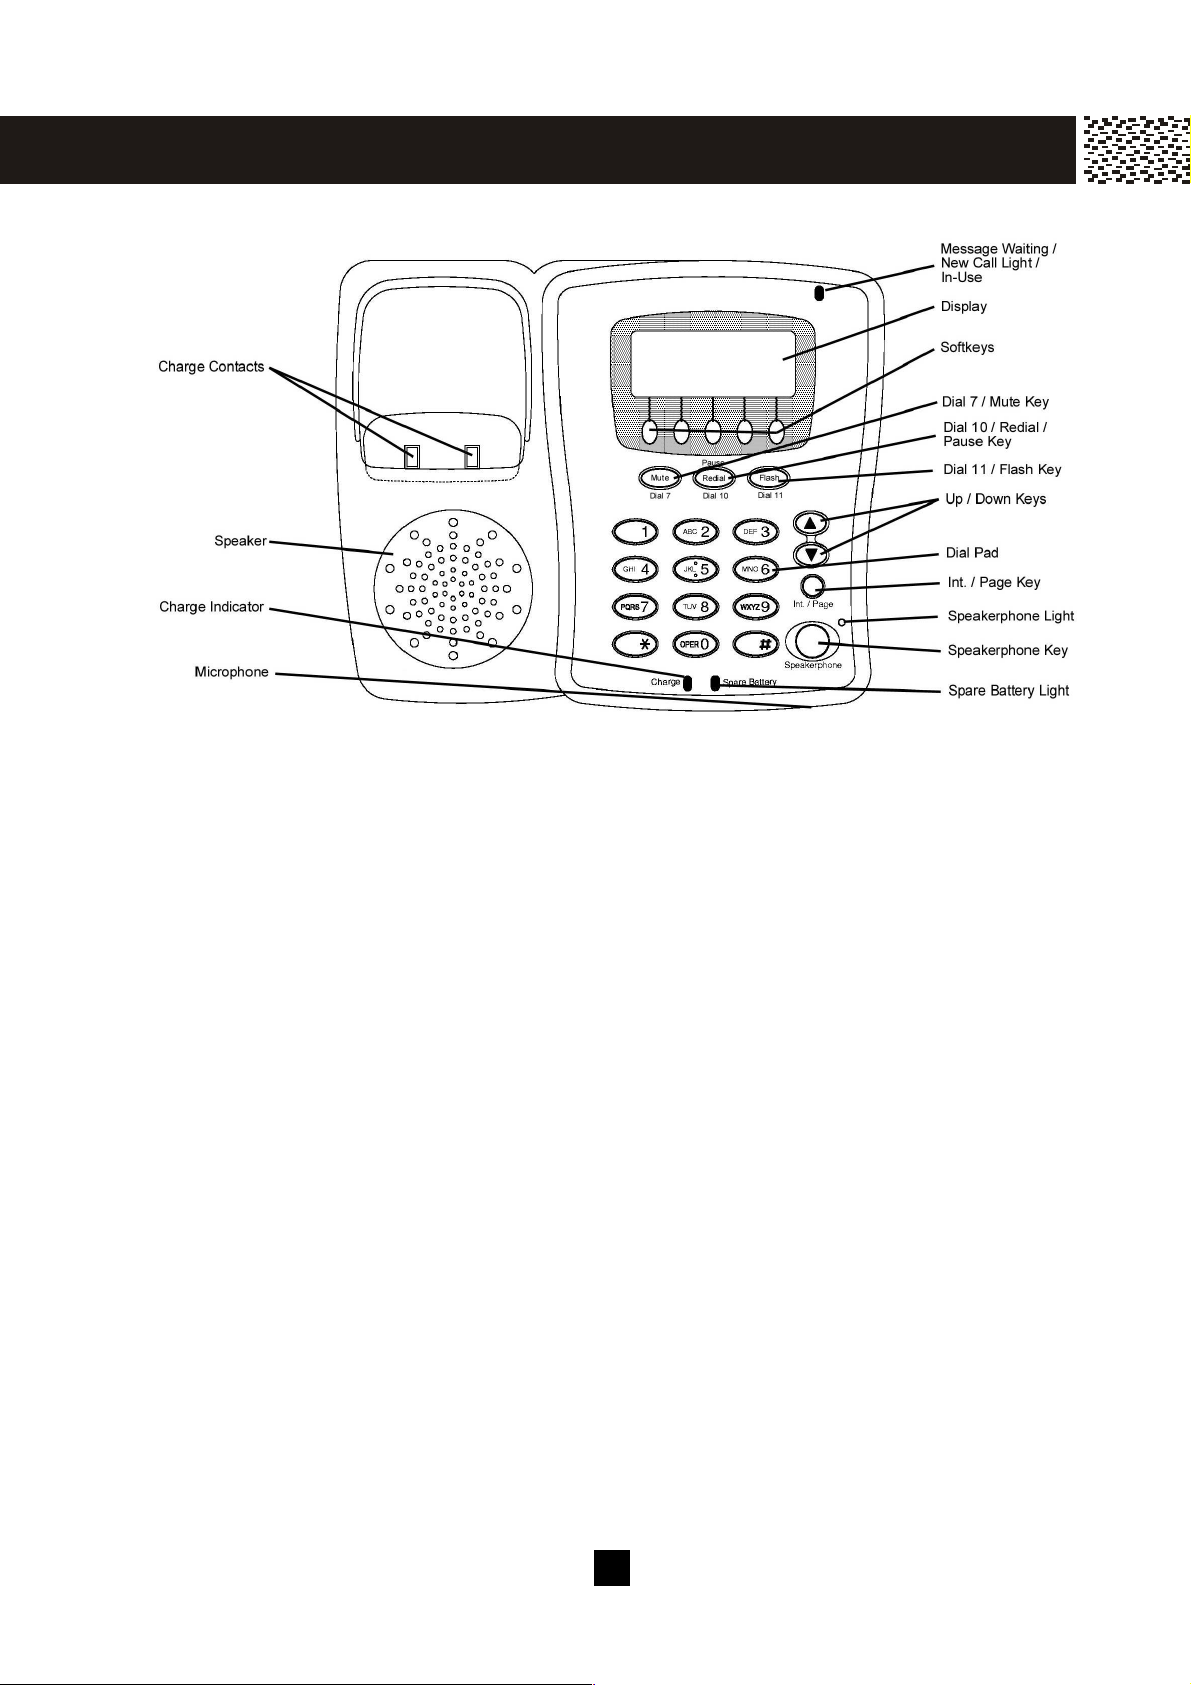
Message W aiting / New Call Light / In-Use Indicator
(a) Flash when ringing, or if you have m essage in your voicem ail or new Caller ID in Call
Log.
(b) Light whenever this phone, or any other telephone on the line, is being used.
Speakerphone Light
Light when speakerphone is in use.
Charge Light
Light when handset is on the cradle and being charged.
Spare Battery Light
Light when the spare battery is in the charging com partm ent.
Dial Pad
The num eric keys are used in the conventional m anner for dialling.
Speakerphone Key
Press to turn on the speakerphone and also dial the num ber on the display.
Up / Down Keys [▼] / [▲]
(a) W hile on a call, press [▼ ] or [▲ ] to adjust the volum e.
(b) During standby, press [▼ ] or [▲ ] to scroll through Menu options; access Caller ID
Records, Phonebook Directory Records and Redial List.
Dial 7 / Mute Key
(a) W hile reviewing the Call ID Record, press [Dial 7] to dial a Call Back in 7-digit form at.
(b) W hile on a call, press [Mute] to m ute the m icrophone for privacy.
10
Page 12
Dial 10 / Redial / Pause Key
P REPAR AT I O N
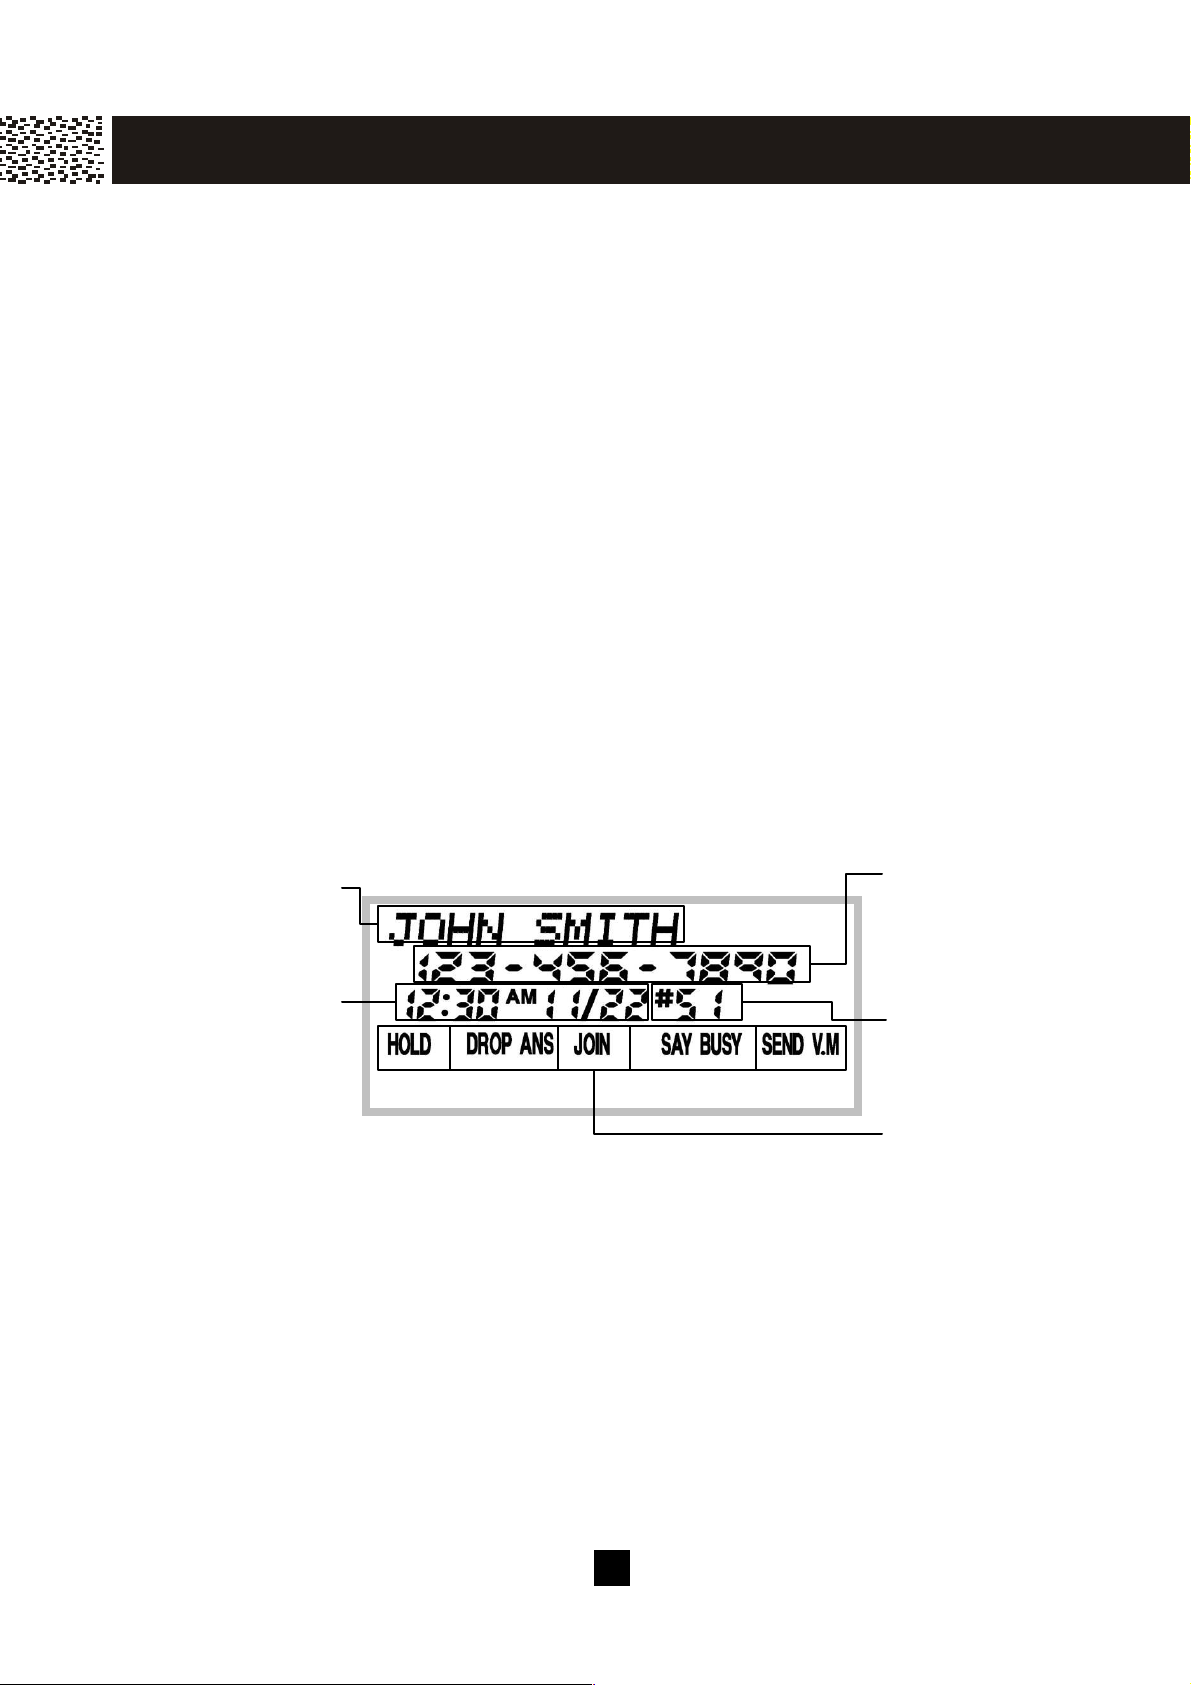
Caller’s Nam e
Calling Date
(a) W hile reviewing the Call ID Record, press [Dial 10] to dial a Call Back in 10-digit
form at.
(b) W hile off-hook, press [Redial] to recall and dial the last phone num ber dialed.
(c) W hile on-hook, press [Redial] to access the Redial List. Using [▼ ] or [▲ ] to select
the desired num ber and press [Speakerphone] to dial it out.
(d) Press the key during Pre-dial or Phone book num ber entry will enter a 2-second
pause into a dialing sequence with “P” appears on the display.
Dial 11 / Flash Key
(a) W hile reviewing the Call ID Record, press [Dial 11] to dial a Call Back in 11-digit
form at.
(b) The [Flash] key is used to access telephone com pany services such as Call W aiting.
Intercom / Page Key [Int./Page]
During standby, press the key to page all handsets or activate the intercom function
between base and handset, answer a paging call, or term inate an intercom call. W hile
on a line, press the key to transfer the call to a particular handset.
5 Softkeys
Depending on the handset’s m ode, the appropriate functions of the 5 Softkey keys are
displayed on the screen. Please refer to the table on page 9 for detailed descriptions.
LCD DISPLAY
& Tim e
Backlit LCD Display
Both the handset and the base unit have the backlit LCD display. It will light when you
start using the handset or the base unit, or when a call is received. The display light will
stay on for a few seconds after pressing a button or lifting the handset off the base unit.
Backlit Keypad
The keypad will light when you press a key or when a call is received. The light will stay
on for a few seconds after pressing a key or answering a call.
Caller’s Num ber
Sequence in caller list
Labels of 5 softkeys
11
Page 13

G ET T I N G STAR T ED
Check to be sure the following item s com e with the phone.
• Base Unit
• Two Handsets with Belt Clips
• Recharge Cradle
• Three Battery Packs
• Long Telephone Line Cord
• Short Telephone Line Cord for W all Mounting
• AC Adapter
• W all-Mounting Bracket
• Owner’s Manual
CHOOSE THE BEST LOCATION
Calls are transm itted between the base unit and the handset, or between handset &
handset, by using wireless radio waves. For m axim um distance and noise-free
operation, here are som e im portant guidelines you should consider:
1. The location should be close to both a phone jack and a continuous power outlet
which is not switch controlled.
2. Keep the base and the handset away from sources of electrical noise such as TV,
personal com puter, or another cordless phone.
3. In a HIGH and CENTRAL location with no obstructions such as walls.
4. The base can be placed on a desk, tabletop or m ounted on wall.
Note:
W hile using the handset:
If you are near a m icrowave oven which is being used, noise m ay be heard from the
receiver or the speaker. Move away from the m icrowave oven and closer to the base
unit.
If m ore than one cordless phone is being used and your handset is near another
cordless phone’s base unit, noise m ay be heard. Move away from other cordless
phone’s base unit and closer to your base unit.
12
Page 14
CONNECTING THE BASE UNIT
G ET T IN G STAR T ED
1. Plug one end of the telephone line cord into the jack on the back of the base unit
and plug the other end of this cord into the m odular telephone wall jack.
2. Press the line cord into the slot provided on the back of the telephone.
3. Plug the AC adapter into the 9V DC jack on the base and the other end into a
standard 120V AC wall outlet.
4. Press the cord in the slot on the housing to prevent the cord from pulling loose.
5. Set the base unit on a tabletop and then place the handset on the base unit.
Note:
1. Use only the AC adapter supplied.
2. Connect the AC adapter to a continuous power outlet.
3. Place the base unit close to the AC outlet so that you can unplug the AC adapter
easily.
Tip:
If your telephone outlet is not m odular, contact your telephone com pany for assistance.
SPARE BATTERY
You can use the spare battery pack to replace a drained handset battery to ensure
uninterrupted use.
1. Open the spare battery com partm ent by
pressing the release button on the left
side of the base unit.
2. Place a battery pack in the drawer with
the charge contacts facing up and to the
right.
3. Push to close the drawer. Make sure
the Spare Battery LED lights, and
charging begins.
13
Page 15
G ET T IN G STAR T ED
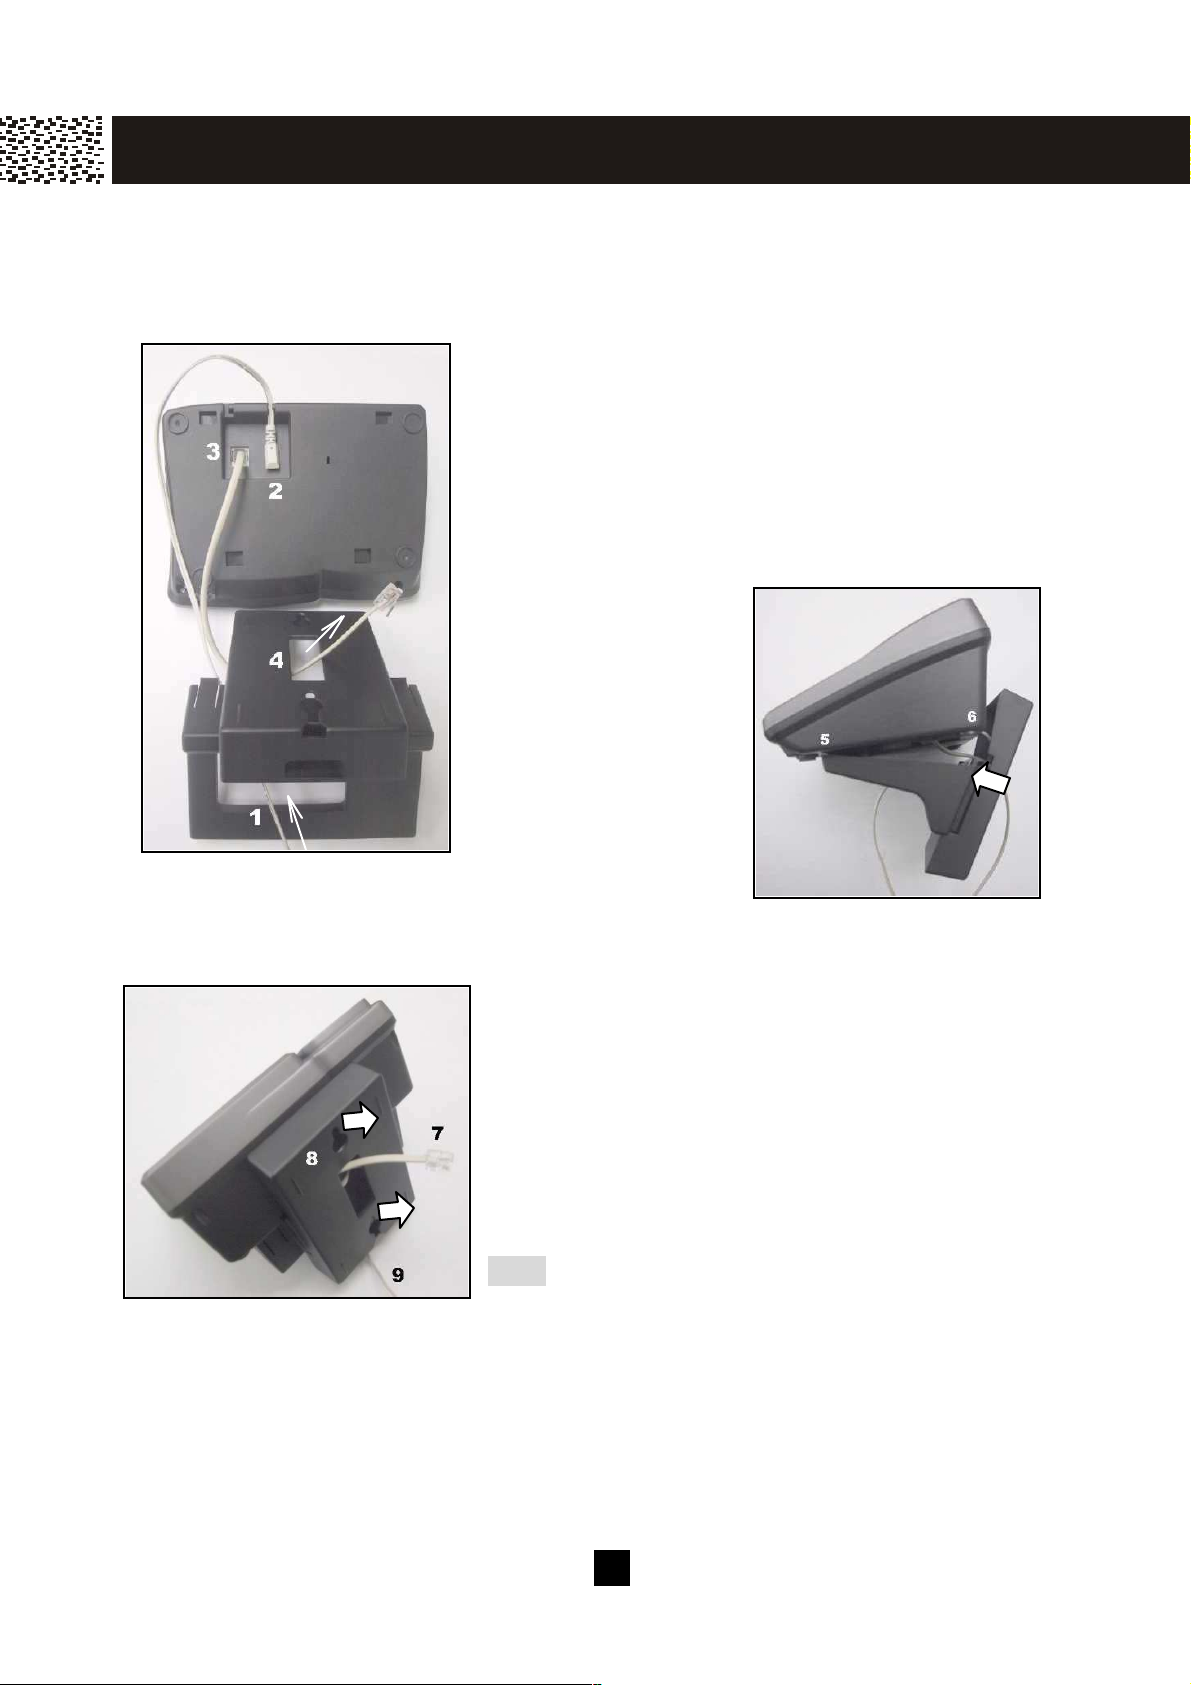
W ALLMOUNTING BASE UNIT
The base unit can be m ounted on a wall phone plate by using the supplied wall-mounting
bracket.
1. Bring the barrel plug of the AC adapter through the
rectangular opening on the bottom of the
wall-m ounting bracket.
2. Plug the adapter’s barrel plug into the 9V DC jack on
the base unit and press the cord in the slot provided.
3. Plug one end of the short telephone line cord into the
TEL. LINE jack at the bottom of the base unit.
4. Bring the free end of
the telephone line
cord through the
opening (between
the upper and lower
keyholes) in the
bracket.
5. Place the
wall-m ounting
bracket on the
bottom of the base
unit and insert two short tabs on the base unit.
6. Press on the two hook-tabs, aligning it over the
respective slots and press down until it snaps into place.
7. Hold the base up next to the wall jack and plug in
the line cord.
8. Place the base unit on the posts of the wall plate
and push down until the unit is firm ly seated.
9. Plug the AC adapter into a standard 120VAC wall
outlet.
Note: If you are not using a standard wall plate to m ount
the phone on wall, you m ay also mount it with ordinary
screws. Insert 2 screws with vertical separation of 33/
or 315/16 inches and leave the screws 1/8 inch from the
wall. Make sure the screw heads are not bigger than
5
/16 inch.
16
14
Page 16
REGISTRATION OF HANDSET
G ET T IN G STAR T E D
The first registered handset will be autom atically assigned as HS-1 to the base unit.
W hen additional handsets are registered to the system , they will be assigned extension
num bers in the following sequence: HS-2, HS-3, and up to HS-8.
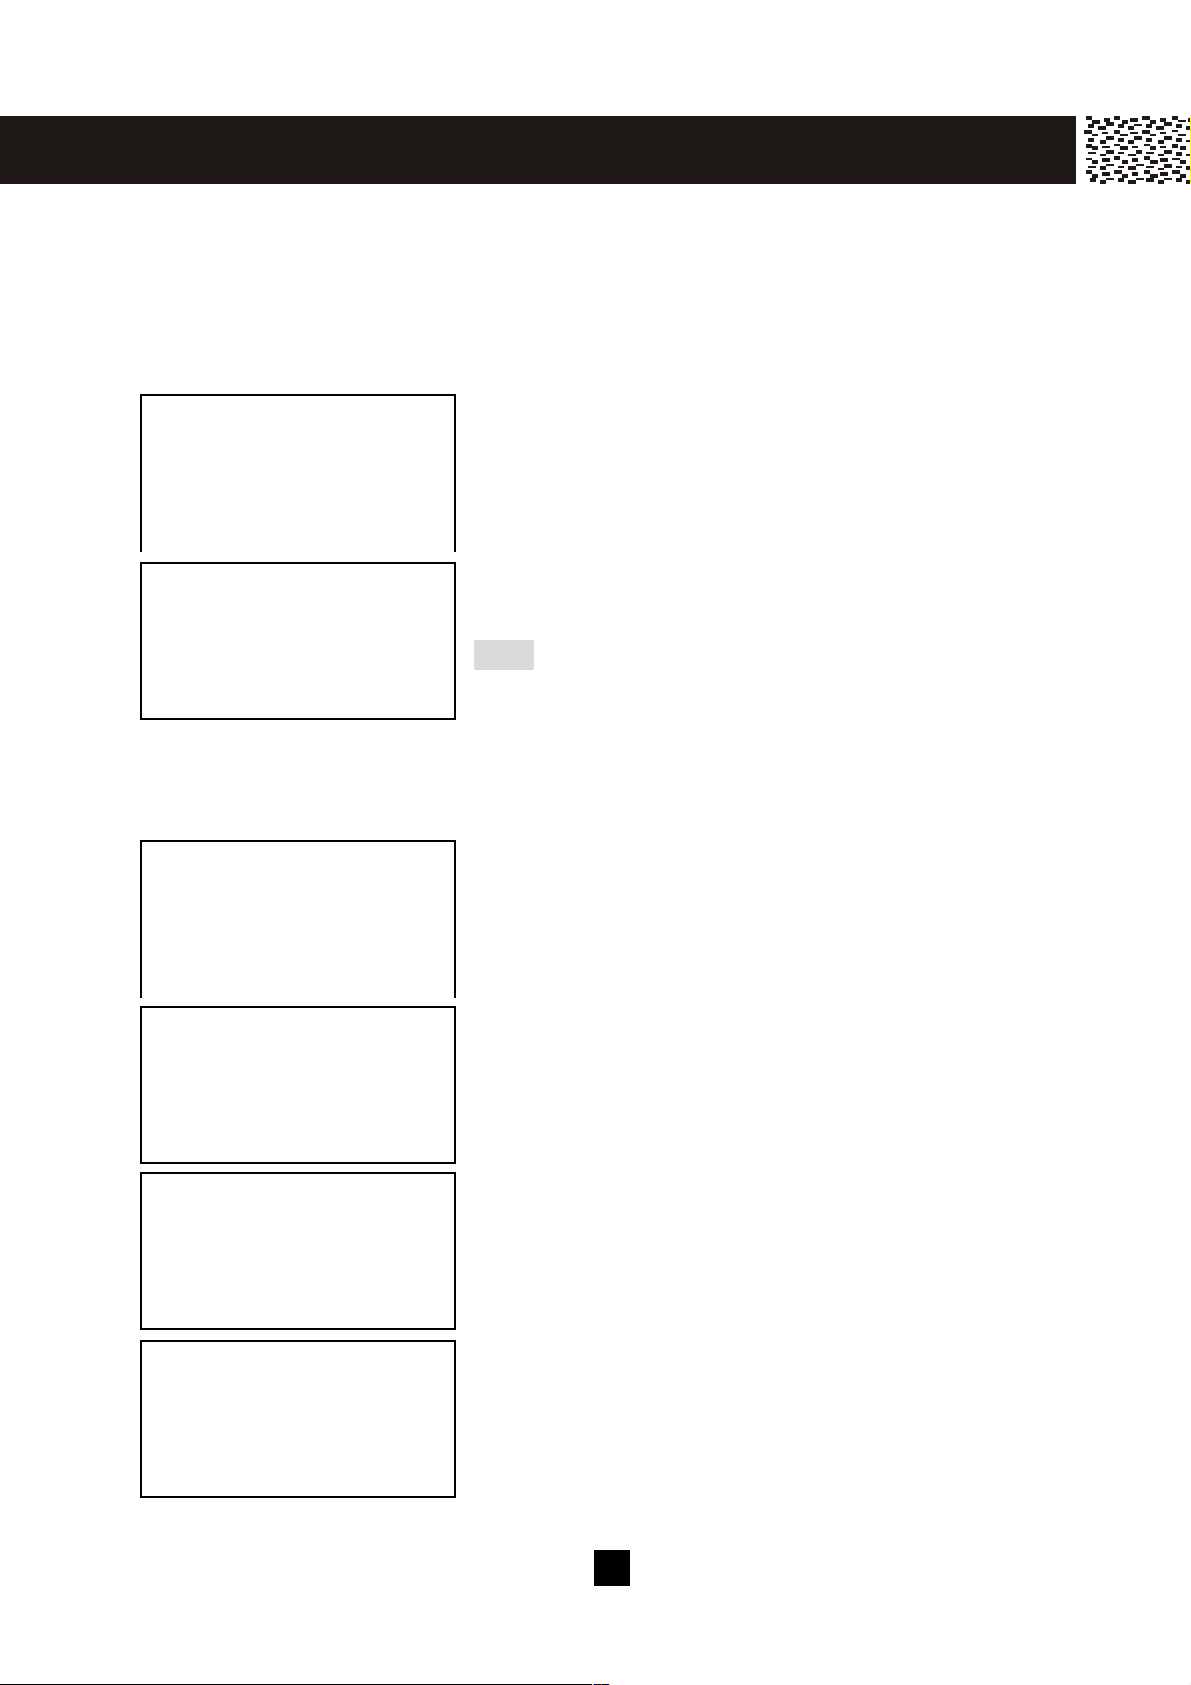
On the Base Unit:
REGISTRATION
Press [MENU] and “REGISTRATION” appears on the
O.K. EXIT
display.
WAITING REGISTER
Press [O.K.] and “W AITING REGISTER” is displayed.
EXIT
You are now ready to register your handset.
Note: The base unit will return to standby m ode if no
handset registration takes place within 25 seconds.
On the Handset:
NO NEW CALL
HS_ _
10:00AM 1/01
SAVE MENU SERVICE DIR. DIAL V.M.
REGISTRATION
HS_ _
O.K. EXIT
ADD A HANDSET?
O.K. EXIT
REG OK NEW ID=1
After the handset is charged, rem ove it from the base
unit. “HS_ _” is displayed
Press [MENU] and “REGISTRATION” appears on the
display.
Press [O.K.] and select “ADD A HANDSET?”.
Press [O.K.] to register and “CONNECTING” is
displayed for 1 to 2 seconds.
If the handset displays “REG OK NEW ID=1”, the
connection with the base unit is established.
If the handset displays “NO CONNECTION”, repeat the
previous steps.
15
Page 17

SAVE MENU SERVICE DIR. DIAL V.M.
G ET T IN G STAR T E D
NO NEW CALL
HS-1
10:00AM 1/01
The handset will return to “REGISTRATION” after 2
seconds. Press [EXIT] to end the registration.
CHOOSE THE DIALING MODE
If your hom e is equipped with a touchtone dialing system , the phone will be ready to use
as soon as the battery is charged. If you have a pulse (rotary) dialing system , you will
need to set the dialing m ode as follows:
1. Press [MENU].
2. Press [▼ ] or [▲ ] to select “DIAL MODE”.
3. Press [O.K.]. Using [▼ ] or [▲ ] to select “PULSE MODE”.
4. Press [SAVE] to confirm the selection.
You are now ready to use your new telephone
16
Page 18
M E N U S E T T I N G S
The phone offers an extensive range of functions which are grouped in m enus. You can
personalize your phone by pressing the Menu key and using review keys to scroll
through the options.
STRUCTURE AND OPTIONS
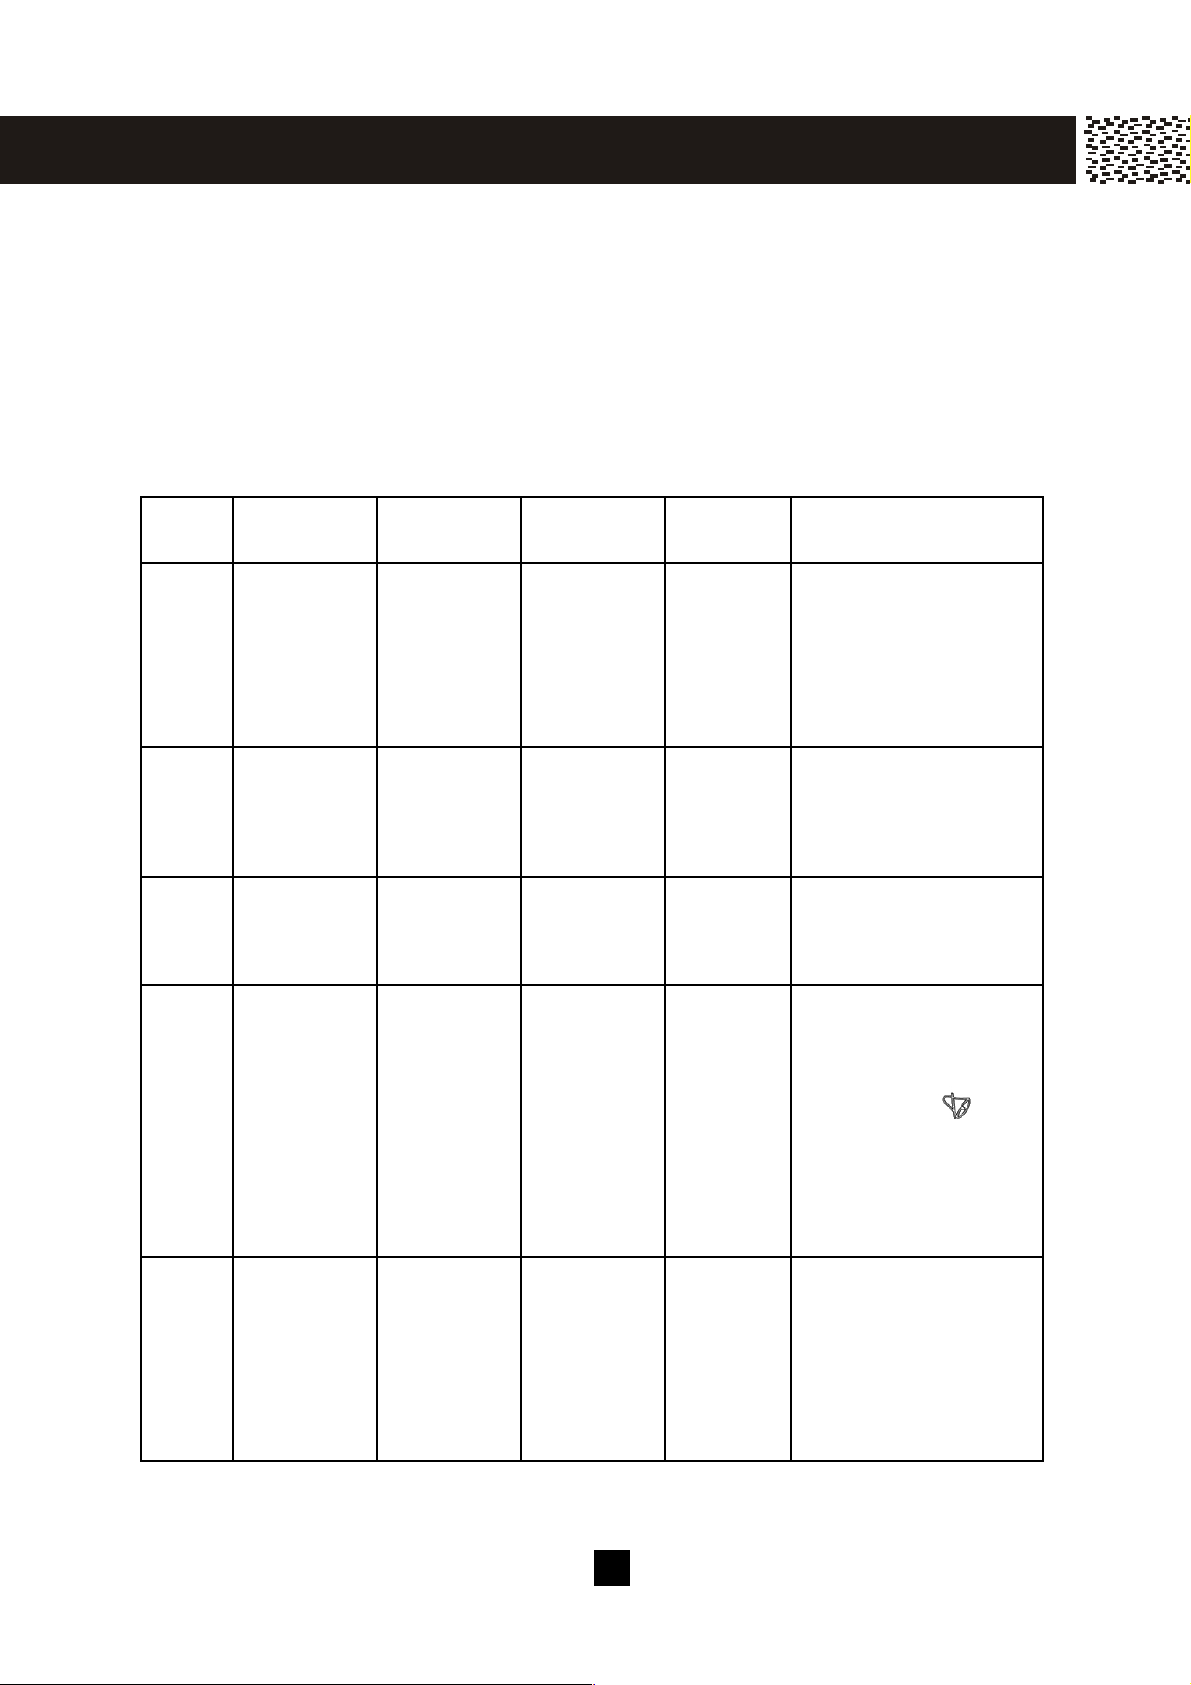
The m enu settings have two levels. There are twelve item s on the handset and eleven
items on the base unit in the first level and the num ber of item s in the second level
depends on the calling item s of the first level.
M enu Available on
base unit
Available on
handse t
First Level Second
Level
Re m arks
1 Ye s Ye s Re gistration Add a
2 Ye s Ye s Dial M ode Tone /
3 Ye s Ye s Language English /
4 Ye s Ye s Ringer
5 No Ye s Answer
Sound
M ode
This aligns or quits the
handse t? /
De lete
handse t? /
De lete all
handse ts?
Pulse
Spanish
3 Types There are 3 type s of
Auto /
M anual
handse t to a desired
base .
This se ts the base to dial
out in Tone or Pulse
M ode. The default is
Tone.
This se ts the language
use d on the LCD display.
The de fault is English.
ringing tone s and 8
le vels of ringer volum e.
W he n the ringer volume
is O ff , the icon and
“RING ER IS O FF” will
appe ar on the display
and LED will blink while
re ce iving a call.
This se ts the handse t to
pick up an incom ing with
or without any ke y
pre sse d if the handse t is
placed on the base unit.
The de fault is Auto.
17
Page 19

M E N U S E T T I N G S
M enu Available on
base unit
6 Ye s Ye s Contrast 0-8 Le vels This se ts the LCD
7 Ye s Ye s Call W aiting
8 Ye s Ye s PBX M ode PBX Pre fix This se ts to add the PBX
9 Ye s Ye s Ne w Call
10 Yes Yes Se t Date /
11 Yes Yes Last Call
12 Yes Yes De lete
Available on
handse t
First Level Second
Level
O n / Off This se ts to activate or
ID O ption
O n / Off This se ts the New Call
Lam p
Date and
Tim e
Tim e r
M essage
Tim e
Se tting
This displays the last call
This se ts to clear the
Re m arks
contrast. The de fault is
5
deactivate Call W aiting
ID O ptions ope ration.
The de fault is O n.
Pre fix number for
outgoing calls.
Lam p to be on or off.
The de fault is O ff.
This se ts the curre nt
date and tim e.
duration.
m essage waiting lam p.
This m ode is available
only whe n there is new
or non-viewed m essage
in your voicem ail.
18
Page 20
M E N U S E T T I N G S
MENU FUNCTIONS
Registration
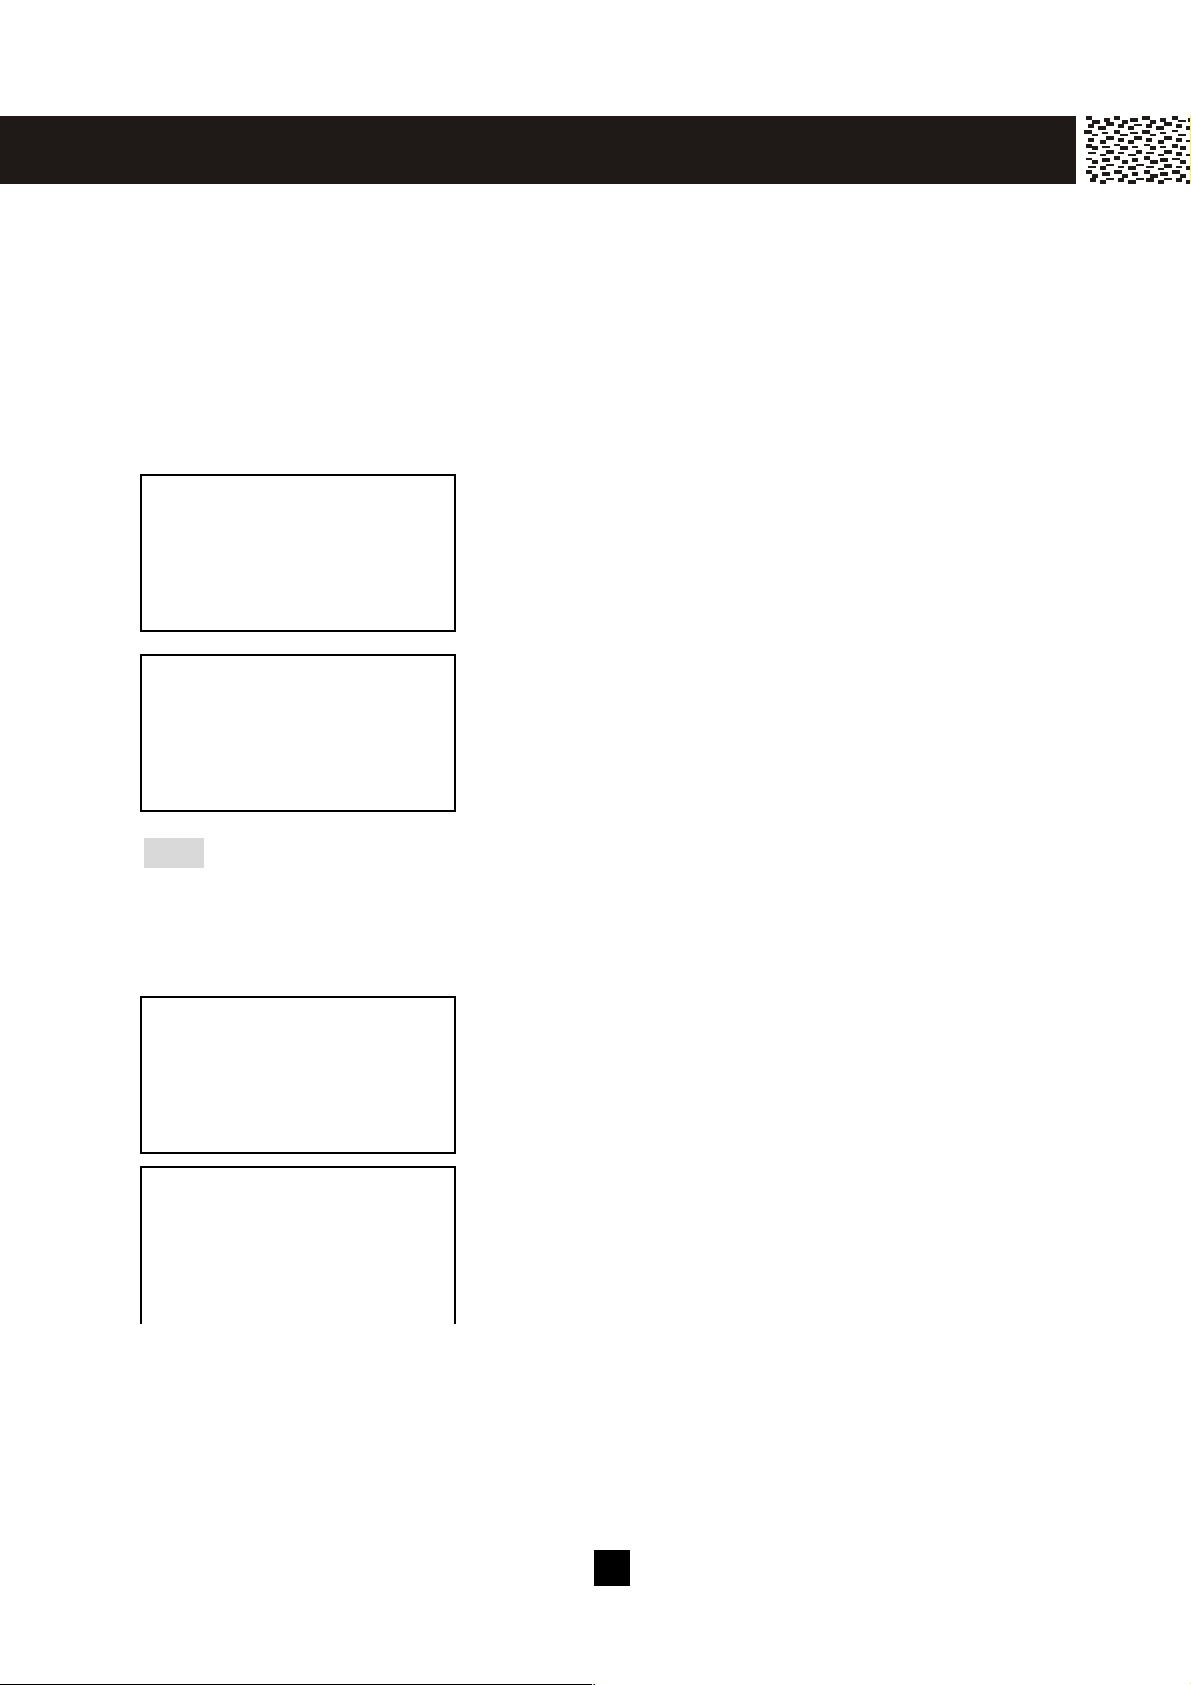
You m ust first set the base unit to registration m ode prior to adding or deleting handsets.
Sim ply press [MENU] on the base unit to select “Registration” then press [O.K.] to
confirm . The base unit will return to standby m ode if no handset registration takes place
within 25 seconds.
To add a handset to a desired base
REGISTRATION
HS_ _
O.K. EXIT
ADD A HANDSET?
O.K. EXIT
Press [MENU] on the handset during standby.
Using [▼ ] or [▲ ] to select “REGISTRATION”.
Press [O.K.] to enter into the selection.
In the second level, using [▼ ] or [▲ ] to select “ADD A
HANDSET?”
Follow the steps of REGISTRATION OF HANDSET in
GETTING STARTED.
Note: If a new base is selected, the original registration will be replaced by the new
registration.
To delete a handset from the base
DEL HANDSET?
O.K. EXIT
In the second level, using [▼ ] or [▲ ] to select “DEL
HANDSET?”.
Press [O.K.] to de-register the handset.
UNREGISTERED!
“UNREGISTERED!” appears on the display to confirm
handset de-registration. The handset returns to
“REGISTRATION” after 2 seconds. Press [EXIT] to
return and “HS_ _” is displayed.
19
Page 21
ME N U S E T T IN G S
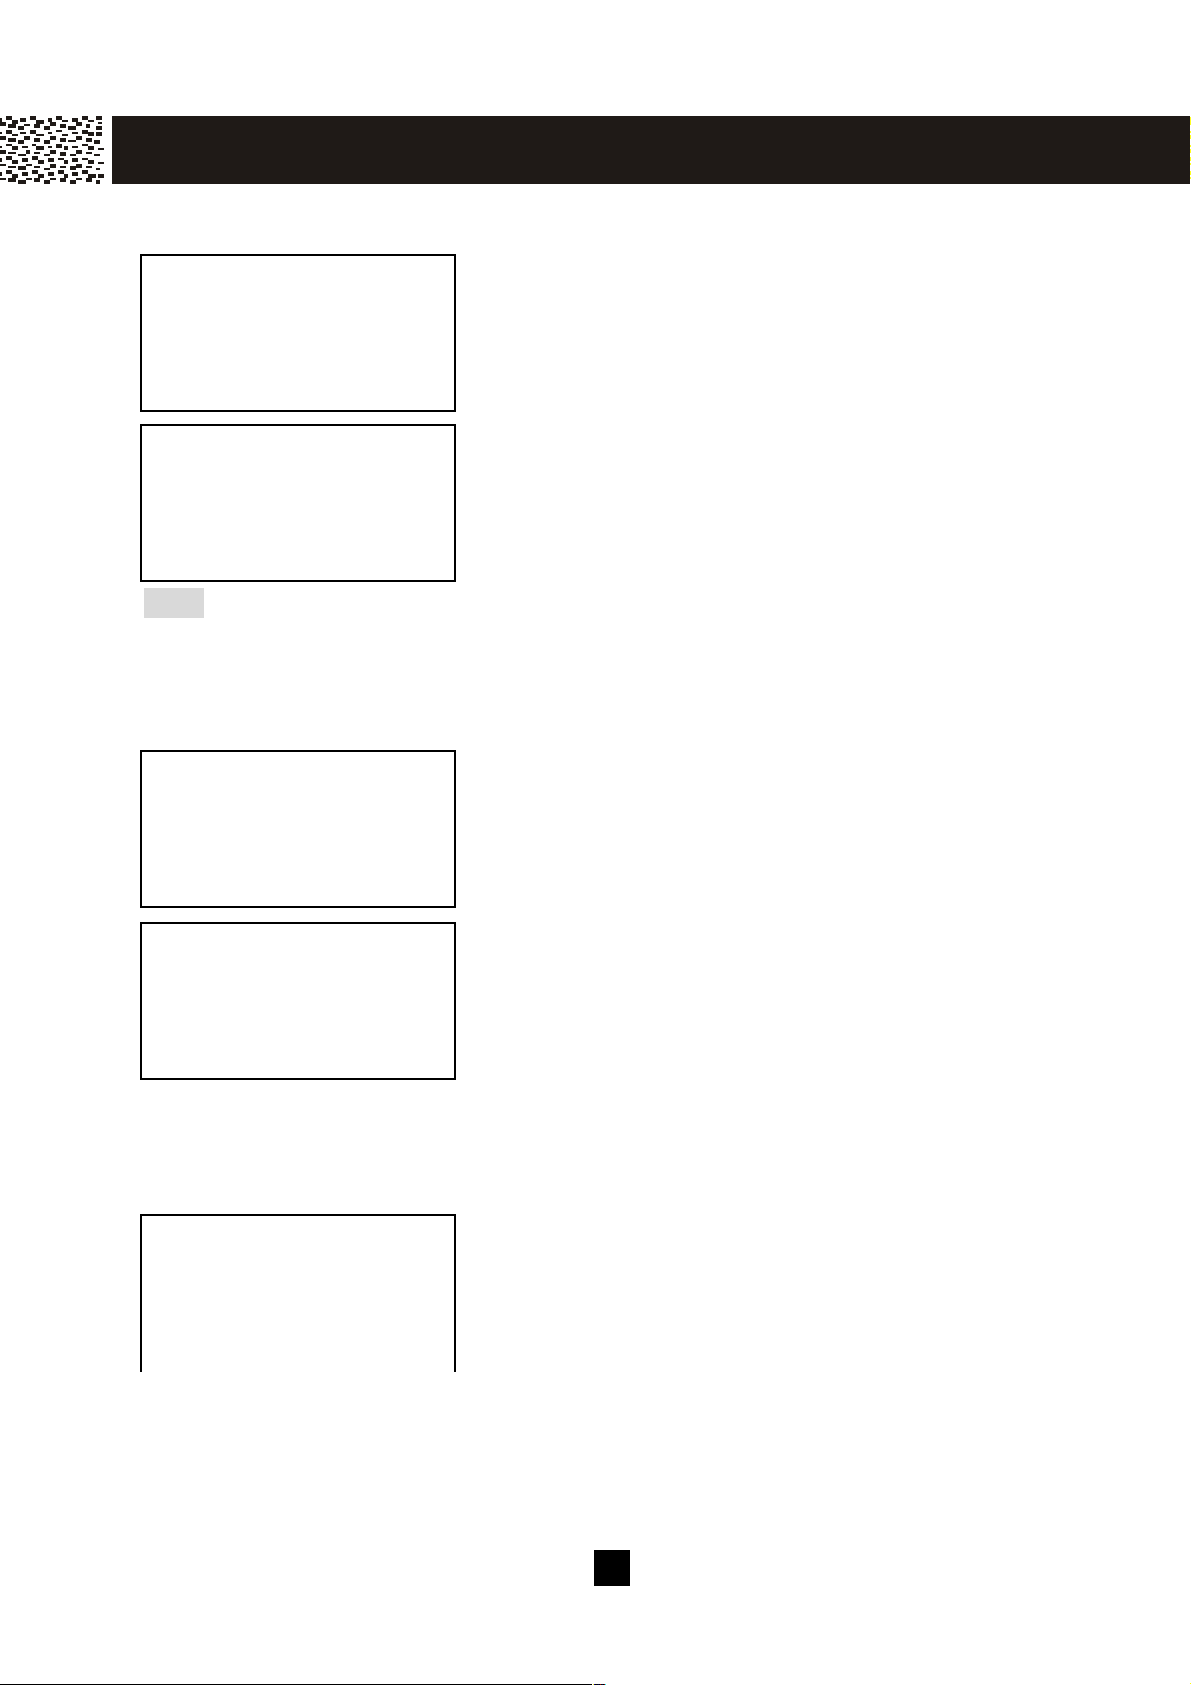
To delete all handsets from the base
DEL ALL HANDSET
O.K. EXIT
DEL ALL HS OK!
Note: In case of registration failure or “REG FAIL ID FULL” is displayed when registering,
sim ply delete all handsets from the base and restart the registration of handsets.
Dial Mode
In the second level, using [▼ ] or [▲ ] to select “DEL
ALL HANDSET”.
Press [O.K.] to de-register all handsets from the base.
“DEL ALL HS OK!” appears on the display to confirm
global de-registration. The handset returns to
“REGISTRATION” after 2 seconds. Press [EXIT] to
return and “HS_ _” is displayed.
DIAL MODE
O.K. EXIT
TONE MODE
EXIT
SAVE
Language
LANGUAGE
O.K. EXIT
Press [MENU].
Using [▼ ] or [▲ ] to select “DIAL MODE”.
Press [O.K.] to enter into the selection.
Using [▼ ] or [▲ ] to s elect the des ired dial mode, then
press [SAVE] to confirm. Press [EXIT] to return.
Press [MENU].
Using [▼] or [▲ ] to s elect “LANGUAGE”.
Press [O.K.] to enter into the s election.
20
Page 22
ME N U S E T T IN G S
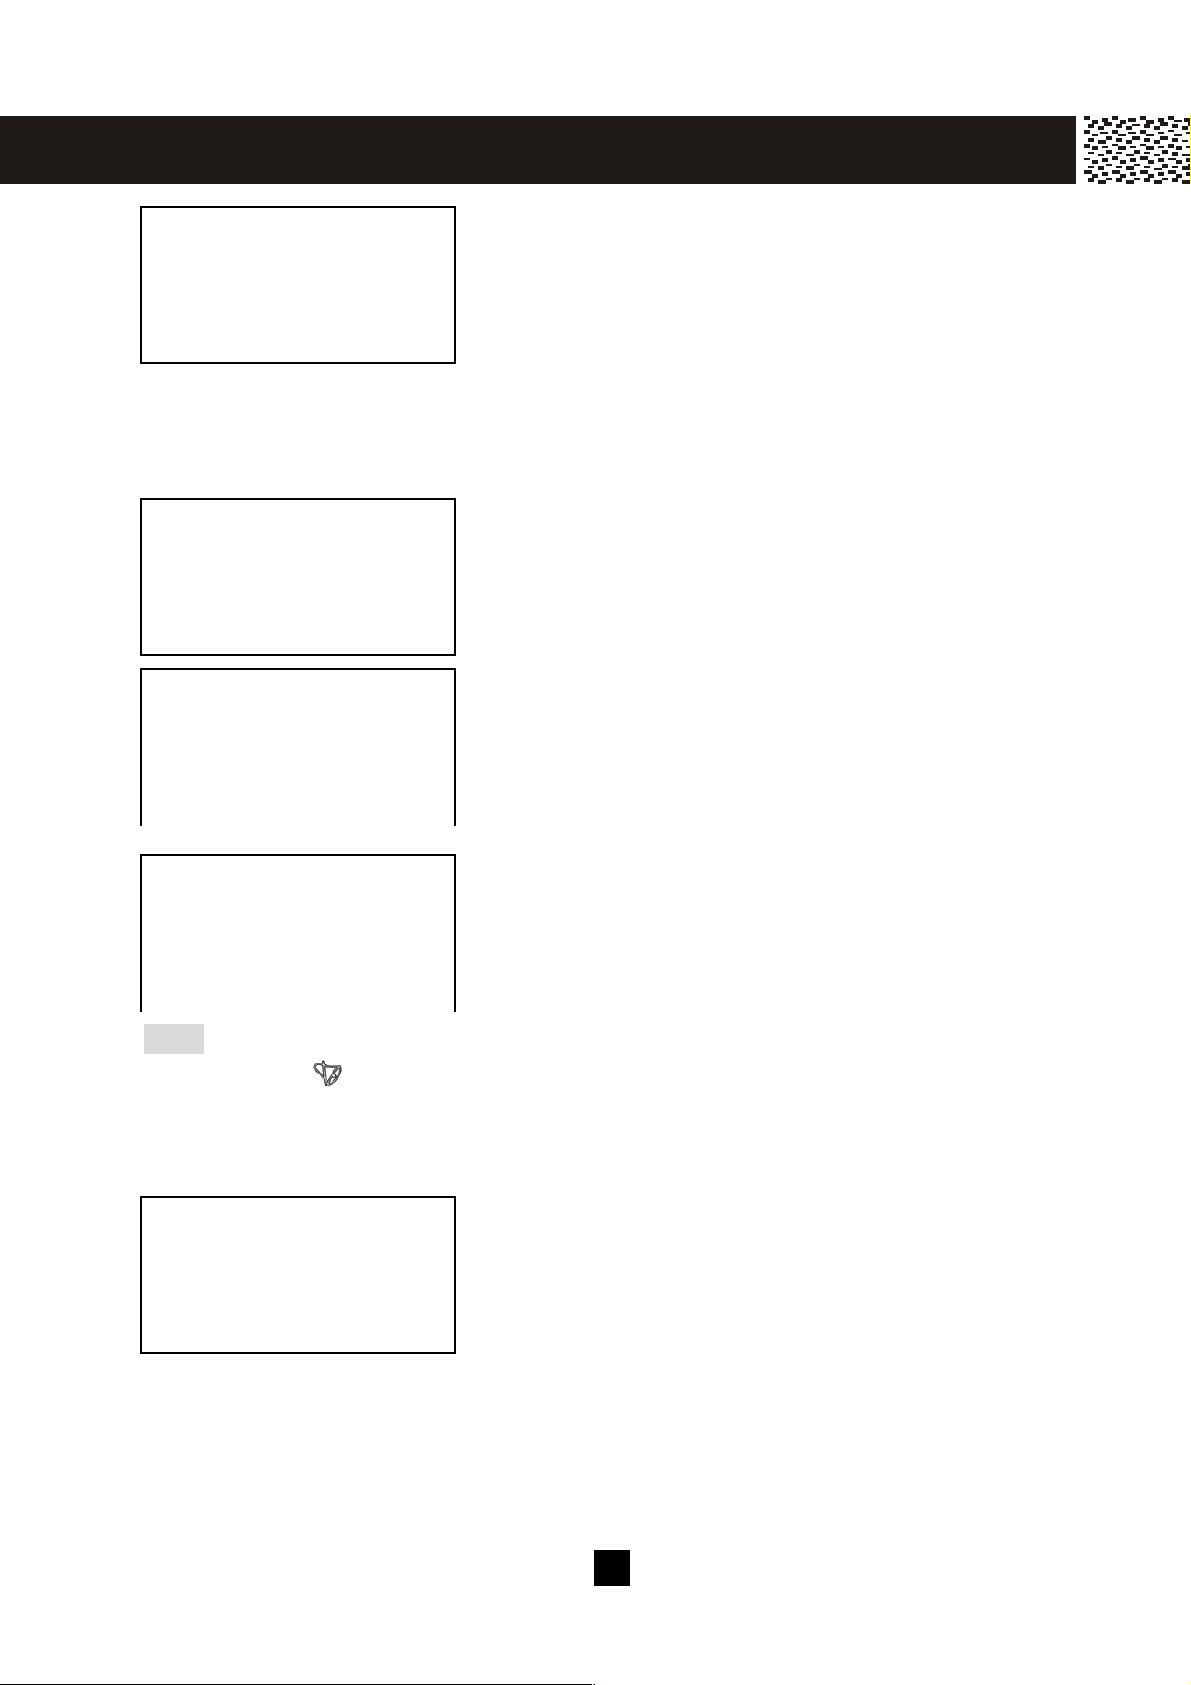
ENGLISH?
EXIT
SAVE
Ringer Sound
RINGER SOUND
O.K. EXIT
TONE:1 (1,2,3?)
EXIT
SAVE
1,2,3=TONE=VOL
EXIT
SAVE
Note: There are eight levels of ringer volum e. If the ringer volum e is off, the handset
Using [▼] or [▲ ] to s elect the desired language, then
press [SAVE] to confirm. Press [EXIT] to return.
Press [MENU].
Using [▼] or [▲ ] to s elect “RINGER SOUND”.
Press [O.K.] to enter and the current ringer tone will be
played for a few seconds.
Press [1], [2] or [3] to select the ringing tone for an
incom ing call. The corresponding ringer tone will be
played for a few seconds.
“1,2,3=TONE=VOL” is displayed to guide to us e
[▼] or [▲ ] to adjust ringer volum e. The ringer of the
corres ponding volum e level will be played for a few
seconds . Press [SAVE] to confirm, and then press
[EXIT] to return.
will display the icon and the LED will blink while receiving a call.
Answer Mode
ANSWER MODE
O.K. EXIT
Press [MENU].
Using [▼] or [▲ ] to s elect “ANSW ER MODE”.
Press [O.K.] to enter into the s election.
2 1
Page 23
ME N U S E T T IN G S
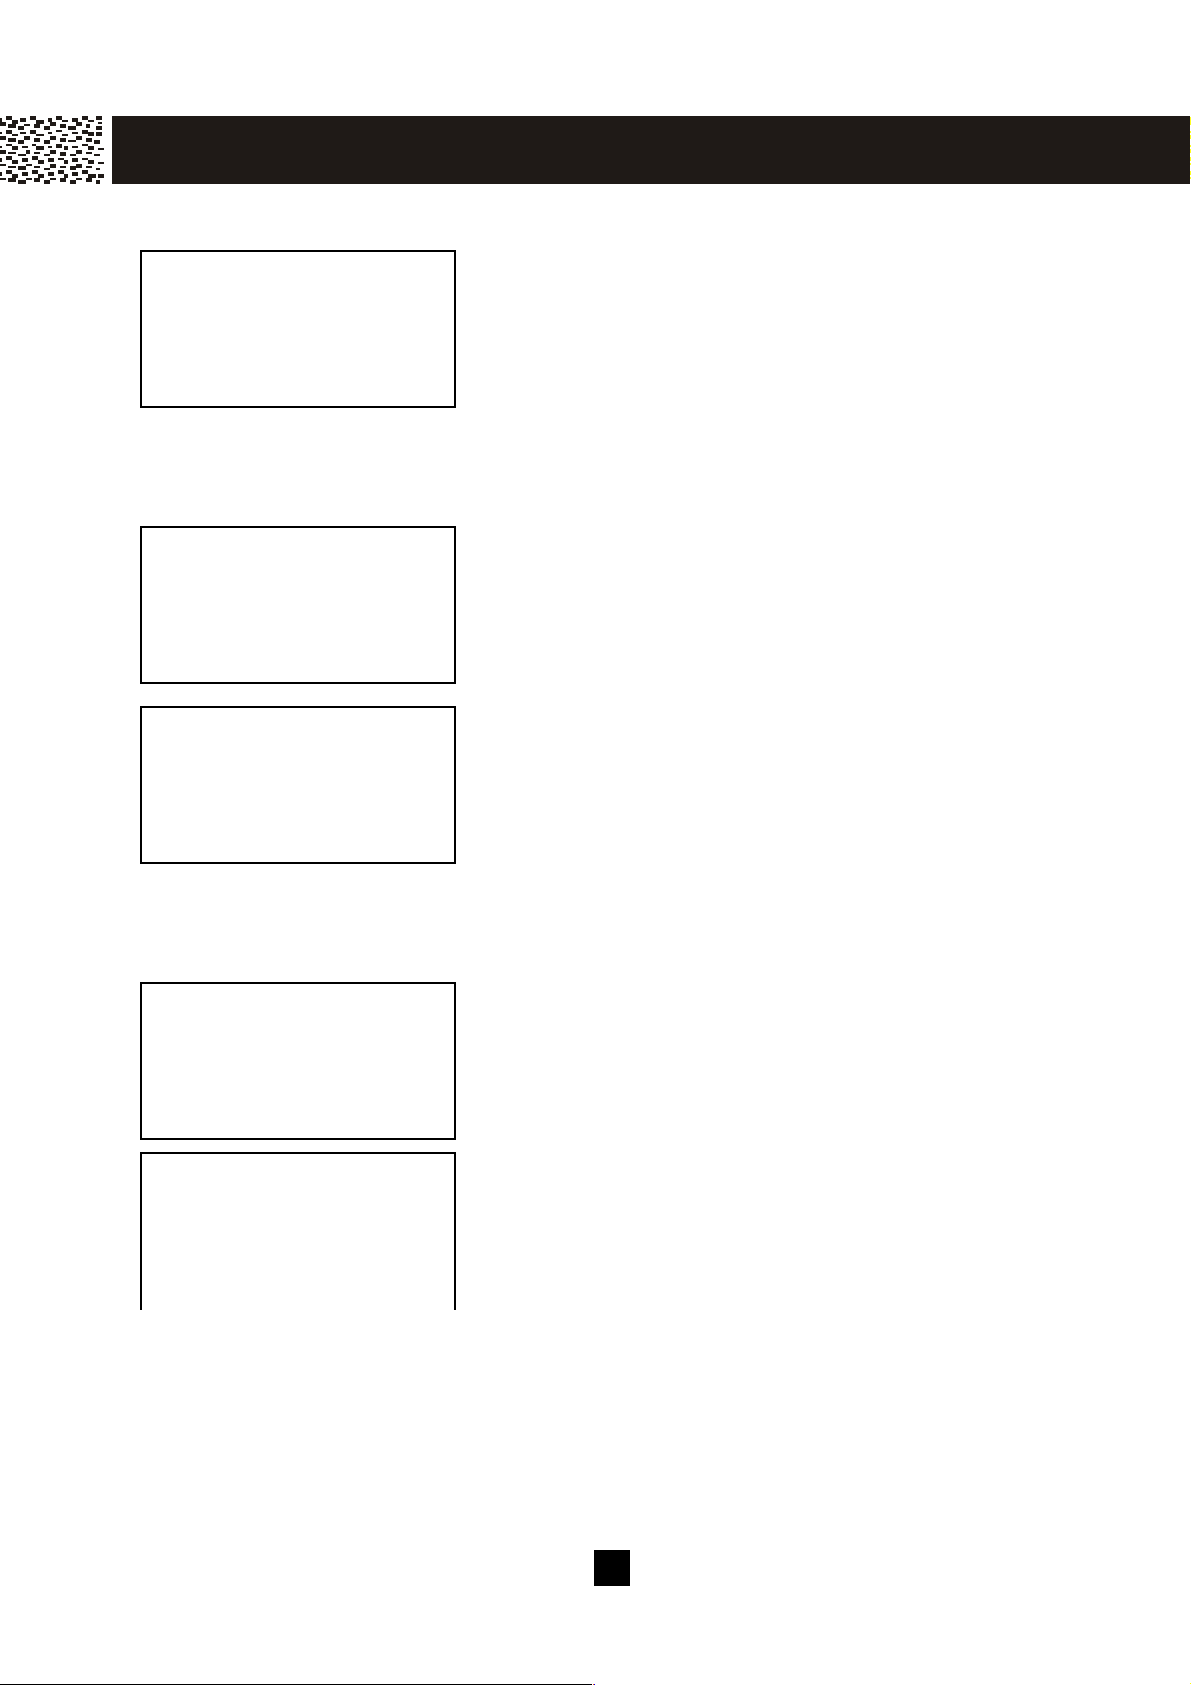
AUTO MODE
EXIT
SAVE
Contrast
CONTRAST
O.K. EXIT
LEVEL:05
EXIT
SAVE
Using [▼] or [▲ ] to s elect “AUTO MODE” or “M ANUAL
MODE”.
Press [SAVE] to confirm , and then press [EXIT] to
return.
Press [MENU].
Using [▼] or [▲ ] to s elect “CONTRAST”.
Press [O.K.] to enter into the s election.
Using [▼] or [▲ ] to adjus t the contras t level.
Press [SAVE] to confirm , and then press [EXIT] to
return.
Call W aiting ID Options
CW ID OPTION
O.K. EXIT
OPTION IS ON
EXIT
SAVE
Press [MENU].
Using [▼] or [▲ ] to s elect “CW ID OPTION”.
Press [O.K.] to enter into the s election.
Using [▼] or [▲ ] to turn the Call W aiting ID Options
ON or OFF.
Press [SAVE] to confirm , and then press [EXIT] to
return.
2 2
Page 24
ME N U S E T T IN G S
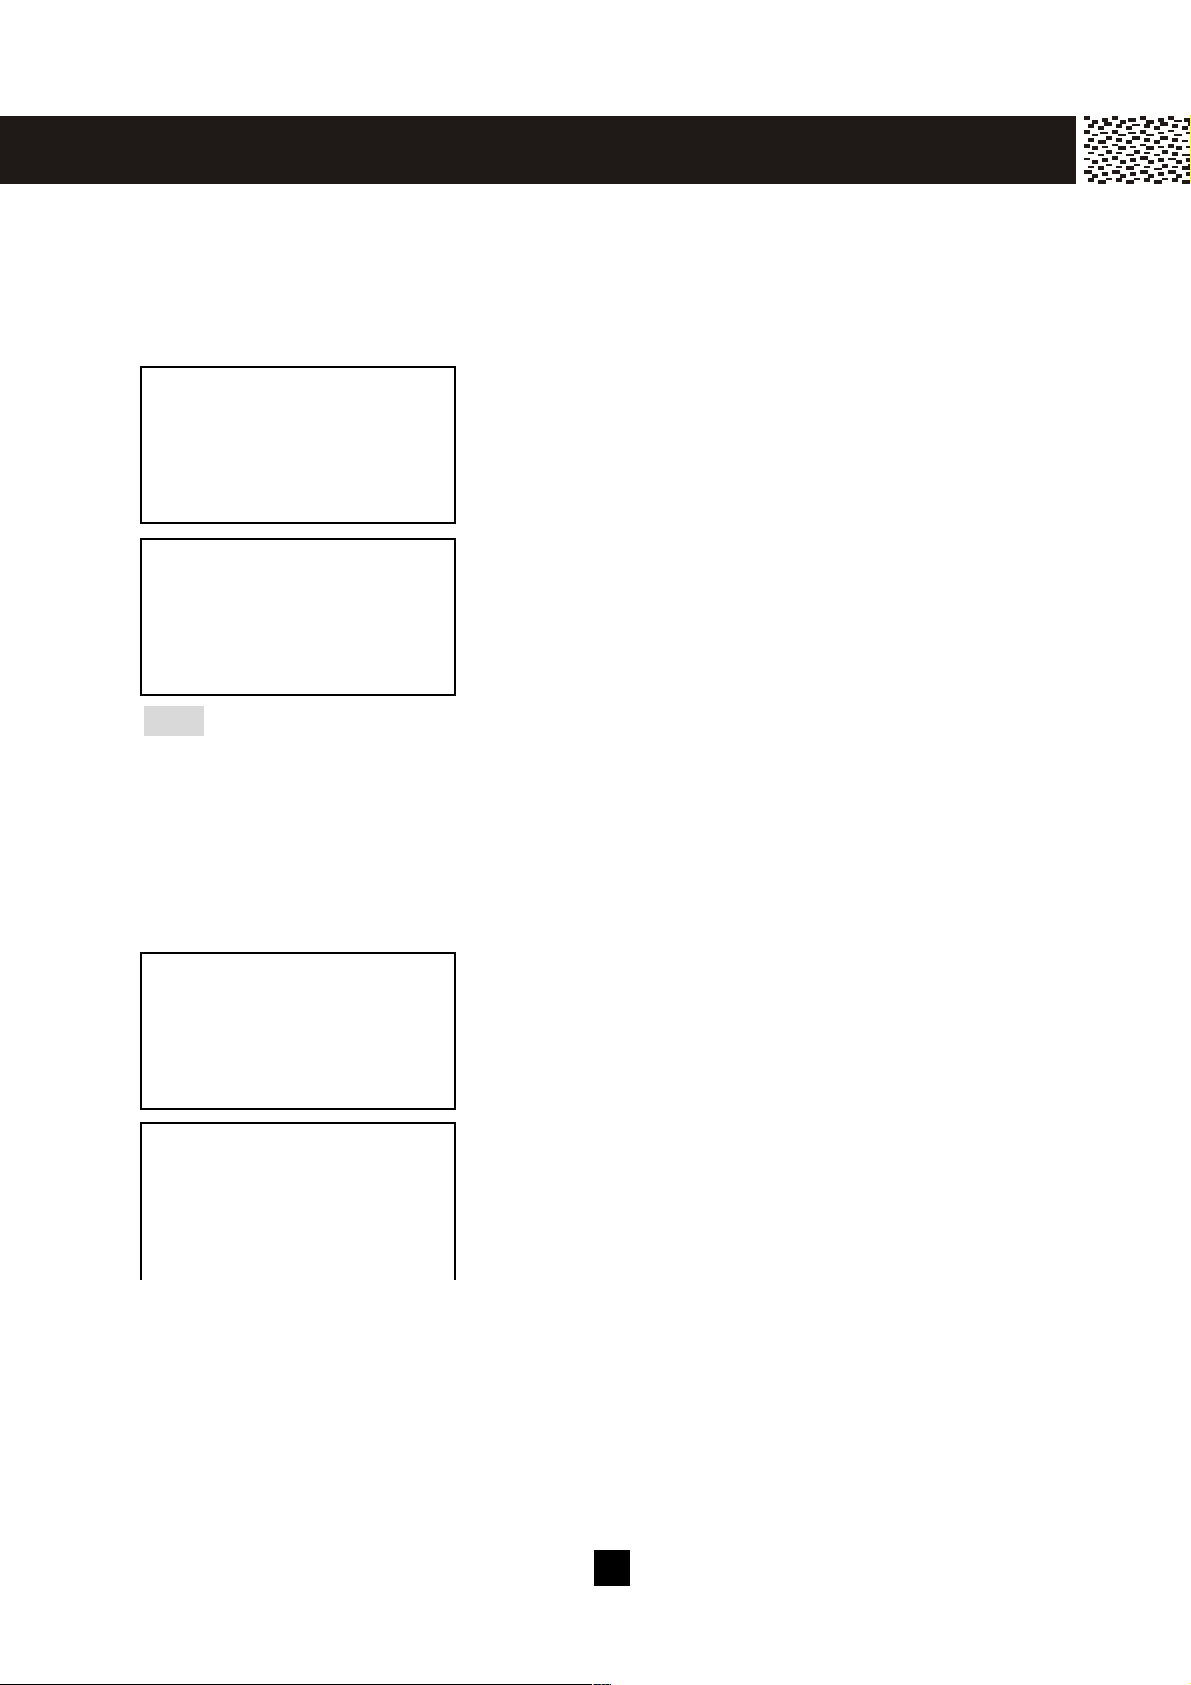
PBX Mode
If you us e an in-hous e phone s ys tem, you m ay have to dial an external access code
before placing an outgoing call. Follow the steps below and enter that code in the PBX
PREFIX field. This code will then be added to all stored num bers when dialing out.
PBX MODE
O.K. EXIT
PBX PREFIX:_
EXIT
SAVE
Note: The phone will automatically screen all Pre-dial numbers prior to dialing out if
PBX Prefi x is s et. Enter the access code and the phone num ber you wish to dial, the
phone will autom atically insert a ‘paus e’ after the first digit when dialing out the number.
On the contrary, if the firs t digit is not the access code, the s ys tem will classify it as an
internal call and dial out the displayed number only.
Press [MENU].
Using [▼] or [▲ ] to s elect “PBX MODE”.
Press [O.K.] to enter into the s election.
Using [▼] or [▲ ] to enter a digit number for outgoing
calls.
Press [SAVE] to confirm , and then press [EXIT] to
return.
New Call Lam p
NEW CL LAMP
O.K. EXIT
NEW CL LAMP IS OFF
EXIT
SAVE
Press [MENU].
Using [▼] or [▲ ] to s elect “NEW CL LAMP”.
Press [O.K.] to enter into the s election.
Using [▼ ] or [▲ ] to turn the New Call Lamp ON or OFF.
Press [SAVE] to confirm , and then press [EXIT] to
return.
2 3
Page 25

Tim e and Date Setting
SET DATE/TIME
10:05AM 05/03
O.K. EXIT
ENTER DATE/TIME:
10:05AM 03/25
O.K. EXIT
SAVE
Press [MENU].
Using [▼] or [▲ ] to s elect “SET DATE/TIME”.
Press [O.K.] to enter into the s election.
Press [▼] or [▲ ] to s et tim e and date. Press [O.K.] to
m ove from hour to minute, to AM/PM, from m onth to
day. Press [▼] or [▲ ] to change the dis played setting.
Press [SAVE] to confirm , and then press [EXIT] to
return.
2 4
Page 26
SAVE MENU S ERVICE DIR. DIAL V.M.
ME N U S E T T IN G S
Last Call Timer
LAST CALL TIMER
00-06-25
EXIT
Message W aiting Lamp
MESSAGES
HS-1
10:05AM 05/03
DELETE MESSAGE?
O.K. EXIT
Press [MENU].
Using [▼ ] or [▲ ] to display “LAST C ALL TIMER”.
Press [EXIT] to return.
This m ode is available only when there is new or
non-viewed message in your voicem ail.
Press [MENU].
Using [▼ ] or [▲ ] to select “DELETE MESSAGE?”.
Press [O.K.] to confirm clearing of the message waiting
lam p.
2 5
Page 27
SERVICE DIR. DIAL V.M.
SERVICE
SAVE
SERVICE
BAS IC O PE R AT IO N
TO MAKE A CALL
Dial Direct
PHONE ON
PHONE ON
1234568
00:01
3W AY
Pre-dial
Pre-dial allows you to key in the phone num ber and verify it before dialing out.
Press [Speakerphone] on the base unit or [Talk] / [Spk.]
on the handset and listen for the dial tone. The
“In-Use” indicator on the base unit will be turned ON.
Use the keypad to dial the phone num ber. The phone
num ber will be shown on the display along with the call
tim er. Press [Speakerphone] on the base unit or
[OFF] on the handset to end your call.
1234568
O.K. EXIT DELETE
Use the keypad to key in the phone num ber. To edit
the num ber on the display, press [DELETE] to clear
wrong input.
PHONE ON
1234568
00:01
3W AY
Press [Speakerphone] on the base unit or [Talk] / [Spk.]
on the handset to call the num ber. The call tim er will
start counting. Press [Speakerphone] on the base
unit or [OFF] on the handset to end your call.
TO ANSW ER A CALL
This phone is default to Auto Answer m ode. To answer a call, if the handset is on the
charge cradle, just lift the handset and the line is autom atically connected.
--- OR ---
This phone can also be set to Manual Answer m ode. To change the Answer Mode
setting, please refer to page 22. After set to Manual Answer m ode, or whenever the
handset is not on the charge cradle; to answer a call, lift the handset and press [TALK].
* Alternatively you m ay press [Spk.] on the handset or [Speakerphone] on the base unit
to answer regardless of Answer Mode setting.
If caller ID service is subscribed from your local phone com pany, the handset will display
the caller’s num ber (or with the name) between the first and second ring. You m ay look
at the inform ation on the display to decide if it is a call you want to answer.
2 6
Page 28
SERVICE DIR. DIAL V.M.
SAVE
BAS IC O PE R AT IO N
TO REDIAL A CALL
Redial Last Number
PHONE ON
PHONE ON
1234568
00:01
3W AY
Dial from the Redial List
The Redial List stores up to 20 last dialed out phone num bers, each one can be up to 32
digits.
Press [Speakerphone] on the base unit or [Talk] / [Spk.]
on the handset and listen for the dial tone.
Press [Redial] to dial the last dialed num ber.
REDIAL USE↓=VIEW
EXIT
In Standby Mode, press [Redial] once to access the
redial list. Press [▼ ] to view the last 20 dialed num bers.
REDIAL (OK=DIAL)
1234568
O.K. EXIT DELETE
Scroll to the num ber you want, and press [O.K.] to call
the num ber.
Note : You m ay delete an individual record from the Redial List or copy the record to the
Phone book directory. Scroll to the num ber you want. Press [DELETE] once and
“DELETED!” is displayed to confirm the deletion, or press [SAVE] and “SAVED TO DIR!”
is displayed to confirm the entry.
TO MUTE A CALL
W hile on a call, press [MUTE] to turn OFF the m icrophone. The display will show
“MUTE” and the other party will not hear you. Press [MUTE] again to return to norm al
conversation and the “MUTE ” on the display will disappear.
2 7
Page 29

BAS IC O PE R AT IO N
ADJUSTING HANDSET VOLUM E
There are 4 receiver levels in handset. It can be adjusted by pressing [▼ ] or [▲ ]
during talk m ode. (Also apply to handset and base speakerphone volum e adjustm ent
when the phone is in Speakerphone m ode.)
USING HANDSET SPEAKERPHONE
W hile on a call, press [Spk.] to turn the speakerphone ON and OFF. The
Speakerphone Light com es ON when the speakerphone is in use.
PAGING FROM BASE TO HANDSET
To locate the handset while it is not on the base unit, press [Int./Page] on the base unit
and “EXTENSION #:?” will appear on the screen. Press [*] and all handset(s) in the
range will display “PAGING FROM BASE”, and sim ultaneously em it alert signal that is
different from others, e.g. incom ing call.
To stop a paging call, press [Int./Page] again or press [EXIT] on the handset. If no
handsets answer, the paging call will autom atically stop after 30 seconds.
2 8
Page 30

ADVAN C E D O PE R AT I O N
FLASH
Call W aiting
1. Use [Flash] for accessing Call W aiting service. For exam ple, if you receive a
second call during your initial call, press [Flash] to put the first call on hold to answer
the waiting call.
2. After you finish a private talk with the second caller, press [Flash] to return to the first
caller.
Note : If you also have conference Calling service, press [Flash] to allow the first caller
enter into a conference call.
Conference Calling
1. Use [Flash] for accessing Conference Calling service. For exam ple, while on a call,
press [Flash] to put the initial call on hold and to obtain a new dial tone to m ake a
second call.
2. After finished a private talk with the second caller, press [Flash] to add the first caller
into a conference call.
Note : If you do not have Conference Calling service, press [Flash] can hang up from a
call and obtain a new dial tone
PAUSE
The [Pause] key allows you to add a 2-second pause in a phone num ber sequence
during pre-dialing or storing num ber in the Phone Book Directory.
Enter a Pause in Dialing Sequence
To add a 2-second pause, press [Redial] at the desired position when you are creating
or editing a phone num ber and “ P ” appears on the display. For a longer delay,
press [Pause] additional tim es.
Note : Rem em ber, the phone num ber you wish to store cannot have m ore than 32 digits,
including a pause. The “ P ” counts as one digit.
DIALING MODE: PULSE TO TONE
If your telephone line uses pulse dialing (such as for a rotary dial phone), you can
tem porarily override the Pulse Mode setting with the Tone Mode until the unit goes
back on-hook. This may be necessary to access certain special services such as
bank-by-phone service:
1. Use pulse dialing to call the service.
2. W hen the service answers, press [*].
3. Follow the norm al procedure for the special service you are using. Any additional
num bers you dial are sent as tone signals.
4. W hen you hang up, the telephone returns to pulse mode.
Note : The tem porary tone can be saved in m em ory and can be executed in norm al
dialing, redialing or Directory dialing.
2 9
Page 31
SAVE
ADVAN C E D O PE R AT I O N
DIAL VOICE M AIL
If you have subscribed to the Voice Mail and Message W aiting Indicator services, you
can access your voice m ail system by pressing [DIAL V.M.]. To use this feature, you
m ust first program your voicem ail num ber (your telephone num ber) into the handset and
base unit.
Program your own Voicemail access number
DIAL VOICE MAIL
-----------
EDIT EXIT
ENTER NUMBER:
1234567_
EXIT DELETE
Press the softkey [DIAL V.M.].
Press the softkey [EDIT], you will then be prom pted to
“ENTER NUMBER :”.
Enter your telephone num ber. If you m ake a m istake,
press [DELETE] to erase the last digit and re-enter.
Press [SAVE] to confirm program ming.
You are now ready to use the Dial voicemail key.
Using DIAL V.M . softkey
DIAL VOICE MAIL
1234567
EDIT EXIT
Press the softkey [DIAL V.M.]. Your 7-digit access
num ber will be displayed. Press [O.K.] to dial. Follow
the instruction in the voice prom pt after the line is
connected.
DIAL BACK FROM CALLER ID LIST
See Call Back from Caller ID List in CALLER ID OPERATION for detailed descriptions.
DAILING FROM PHONE BOOK DIRECTORY
In standby m ode, press [DIR.] and then using [▼ ] or [▲ ] scroll through the m em ory
contents in alphabetical order to the nam e and num ber you want. Press [O.K.] to call
the num ber.
Tip: To quickly find a nam e and phone num ber, press [DIR.] in standby m ode. Key in
the first letter of the nam e, and scroll to the nam e you want.
HEADSET INSTALLATION
Your phone allows using of an optional headset for handsfree operation. If you choose
to use the headset option, sim ply plug any standard 2.5 m m headset into the headset
jack. Your phone is ready for handsfree conversation.
30
Page 32
SAVE MENU SERVICE DIR. DIAL V.M.
SAVE
CALLE R I D O PE R AT IO N
ABOUT CALLER IDENTIFICATION
This telephone has a Caller ID feature that works with Caller ID service provided by your
local telephone com pany. There is a fee for this service, and it m ay not be available in
all areas. This phone can provide inform ation only if both you and the caller are in
areas offering Caller ID service, and if both telephone com panies use com patible
equipm ent. Depending on your service, you will be able to see the number, or the
nam e and num ber of your caller.
JOHN SMITH
123-123-4568
11:00AM 1/01 X1
CALLER ID LIST
The Caller ID List is your incom ing call history. W hen a new Caller ID record arrives, it
is assigned a num ber from 1 to 50. The m ost recent record will have the lowest num ber.
W hen the Caller ID List is full, the oldest record is deleted to m ake room for new record,
and all the record num bers are shifted one num ber higher.
If you have subscribed the Caller ID service, the
incom ing call inform ation including nam e (if available)
and num ber and the calling tim e and date will be shown
on the display. The phone will also save the call
inform ation in the Caller ID List.
Memory Match
Nam es stored in m em ory, will appear in your Caller ID List as stored in your m em ory.
For exam ple, if you store your parents’ telephone num ber with their nicknam e, “MO M
AND DAD”, in m em ory, the Caller ID display will show “MOM AND DAD” whenever
you receive an incom ing call from their phone num ber.
Review Caller ID List
50 CALLS ↓=VIEW
EXIT DELETE
Press [▼ ] or [▲ ] during standby m ode.
JOHN SMITH ↓
123-123-4568
10:00AM 1/01 #01 X1
EXIT DELETE
Press [▼ ] to show the latest record.
W hile reviewing the Caller ID List, press [SAVE] to copy
the displayed record into the Phonebook directory.
31
Page 33
SERVICE
C AL L E R I D O P E R AT I O N
Delete Caller ID List
50 CALLS ↓=VIEW
EXIT DELETE
JOHN SMITH ↓
123-123-4568
10:00AM 1/01 #01 X1
EXIT DELETE
Call Back from Caller ID List
You phone is equipped with three Caller ID Call Back keys which allow you to dial a
Caller ID record in the correct form at.
JOHN SMITH ↓
123-123-4568
10:00AM 1/01 #01 X1
EXIT DELETE
SAVE
PHONE ON
1234568
00:05
3W AY
Note:
[Dial 7]: Dials only the last seven digits of a num ber you are calling, i.e. without an area
code.
[Dial 10]: Dials all 10 digits on the display, i.e. three digits of area code plus seven
digits of phone num ber without inserting a “1” before the area code.
[Dial 11]: Dials all 10 digits on the display plus a “1” autom atically inserted before the
area code.
To delete all Caller ID records:
Press [▼ ] or [▲ ] during standby m ode to enter into Caller
ID List default page.
Press [DELETE] and “DELETE ALL?” is displayed, then
press [O.K.] to confirm deletion.
To delete an individual Caller ID record:
W hile reviewing the Caller ID List, press [DELETE] to
erase the displayed record from the list.
W hile you are reviewing the Call ID List, you can dial a
displayed num ber by pressing [Dial 7], [Dial 10] or [Dial
11] in the correct form at directly.
For instance, if a 10-digit phone num ber is displayed and
you want to call back in a 7-digit form at, you can sim ply
press [Dial 7] and dial only the last seven digits of a
num ber.
Special Call Display
JOHN SMITH ↓
123-123-4568 LDC
10:00AM 1/01 #01 X1
EXIT DELETE
SAVE
Long Distance Call
W hen a long distance call is received, the [LDC] icon will
appear on the screen with the call inform ation.
32
Page 34

C AL L E R I D O P E R AT I O N
JOHN SMITH ↓
123-123-4568
10:00AM 1/01 #01 X1
EXIT DELETE
SAVE
JOHN SMITH ↓
123-123-4568
10:00AM 1/01 #01 X6
EXIT DELETE
SAVE
Call Display Messages
W hen a new Caller ID record arrives with incom plete call inform ation, the following call
display m essages will be shown. The messages may accompany, if available, an
actual nam e or an actual num ber.
1. “PRIVATE NAME” – The other party is blocking nam e inform ation.
2. “PRIVATE NUMBER” – The other party is blocking telephone num ber inform ation.
3. “UNKNOW N NAME” – Caller’s nam e is not available.
4. “UNKNOW N NUMBER ” – Caller’s num ber is not available.
5. “ERROR!” – The call inform ation received is corrupted or incomplete.
Forwarded Call
If the call was forwarded from another num ber through
the call forwarding service provided by the telephone
com pany, the icon will appear on the screen with the
call inform ation.
Repeat Call
If a call is received from the sam e phone num ber more
than once, the num ber of tim es repeated will be shown
on the display. For exam ple “x6” appears after the date
indicated the sam e num ber has been received six tim es.
The situations for call display m essages m ay include, but not lim ited to, the following
reasons:
1. The Caller ID was blocked for privacy reasons.
2. The call originates from an area office or a long-distance service provider that dose
not support Caller ID service.
3. The call is m ade with a calling card.
4. The call is an operator-assisted call.
3 3
Page 35
SERVICE
C AL L E R I D O P E R AT I O N
CALL W AITING ID OPTIONS
If you have subscribed the Call W aiting and Call W aiting ID Options from your local
telephone com pany, you will hear a Call W aiting tone when a new call com es in while
you are talking. You can either alternate between calls or disposition the call.
Call W aiting ID Options Set to OFF
JOHN SMITH
123-123-4568
10:00AM 1/01 X1
ANS
PHONE ON
F
00:05
3W AY
If there is an incom ing call during a conversation, the
Caller ID Call W aiting inform ation appears on the display.
Press [ANS] to answer the Call W aiting party and put the
first call on hold.
You can press [Flash] to switch between calls.
Call W aiting ID Options Set to ON
JOHN SMITH
123-123-4568
10:00AM 1/01 X1
HOLD DROP JOIN SAY BUSY SEND V.M.
PHONE ON
00:05
3W AY
If there is an incom ing call during a conversation, all the
five labels for Call W aiting ID Options features will be
autom atically shown on the display.
W hen you hear the Call W aiting tone, press the
corresponding softkey to apply a disposition to the call.
Note:
You m ust disposition the call within 26 seconds of the Call W aiting tone. The
following options are available.
[JOIN]: Add the waiting call to your first call.
[DROP ANS]: End the first call and answer the waiting call.
[HOLD]: Place the waiting call on hold and send a hold announcem ent.
[SAY BUSY]: Play a pre-recorded message from your phone com pany that the line
is busy and end the waiting call.
[SEND V.M.]: Forward the waiting call to your voice m ail or answering service.
Tip: Call W aiting ID Options may not be available in all areas. Contact your local
telephone com pany for details.
3 4
Page 36
SERVICE
C AL L E R I D O P E R AT I O N
Call W aiting ID Option: JOIN
JOHN SMITH L1
123-123-4568
10:00AM 1/01 X1
D R O P
After the 3-parties conference call, you m ay select to drop a line and retain the other:
DROPPED #1
00:05
3W AY
Call Waiting ID Option: HOLD
JOHN SMITH L1
123-123-4568
10:00AM 1/01 X1
JOIN D R O P
After the private convers ation with the original caller, you m ay select to drop the original
call and take the waiting call or to add the waiting caller into the call conference.
L1 ON
00:05
HOLD
3W AY
If [JOIN] softkey is pressed, “CONFERENCE” will be
displayed for a short while and then the waiting party is
being added to the original call as a 3-parties conference
call.
• To drop the first caller (the original call), press [DROP]
softkey and “DROPPED #1” will be displayed.
• To drop the second caller (the waiting call), press
[Flas h] and “DROPPED #2” will be displayed.
If [HOLD] s oftkey is pressed, “HOLD” will be displayed for
a short while and then a hold announcem ent will be sent
and put the waiting call on hold.
• To drop the talking line and answer the waiting call,
press [DROP] softkey.
• To add the waiting caller into the call and form a
3-party call conference, press [JOIN] softkey. For
further disposition of the 3-party call conference, refer
to Call Waiting ID Option: JOIN section above.
3 5
Page 37
SAVE
P H O N E B O O K D IR E CT O RY
Your phone has a Phone Book Directory for storing up to 50 im portant nam es and
telephone num bers. Each mem ory can s tore 32 digits and 15 characters. You can
edit the Phone Book Directory records , but not the Caller ID List records. The Directory
records are saved in alphabetical order. The Phone Book Directory can be access ed
by pressing [DIR.] during s tandby m ode.
REVIEWING PHONE BOOK DIRECTORY
50 ITEMS ↓=VIEW
EXIT DELETE
JOHN SMITH ↓
123-123-4568
EDIT O.K. EXIT DELETE
Tip: To quickly find a nam e and phone num ber, press [DIR.] in standby m ode. Key in
the first letter of the nam e, and s croll to the nam e you want.
Press [DIR.] during standby m ode.
Press [▼ ] or [▲ ] to view the Directory in alphabetical
order. If a caller’s nam e has been recorded, it will be
played.
ADDING A PHONE BOOK NUM BER
Copy from a Caller ID Num ber
JOHN SMITH ↓
123-123-4568
10:00AM 1/01 #01 X1
EXIT DELETE
During Caller ID reviewing, select the valid record you
want to save as a Phone Book record.
SAVED TO DIR!
Press [SAVE] and “SAVED TO DIR!” on the display to
confirm the entry.
Note: If the m em ory locations are full, the m ess age “LIST
FULL” will appear and your request is rejected.
3 6
Page 38
SAVE
SAVE
SAVE
P H O N E B O O K D IR E CT O RY
Add a New Number/Name
NO ITEM
EXIT
USE SAVE=CREATE
EXIT
ENTER NUMBER:
12312_
O.K. EXIT DELETE
_NAME
1231234567
EXIT DELETE
JOHN SMITH_
1231234567
EXIT DELETE
SAVED TO DIR!
Press [DIR.] during standby m ode. “NO ITEM” appears if
no records in the directory, or “20 ITEMS ↓=VIEW ”
appears if there is 20 records in the directory. If the
m em ory locations are full, the m essage “LIST FULL” will
appear and your request is rejected.
After 3 seconds, “USE SAVE=CREATE” appears on the
display.
Press [SAVE]. Enter the num ber.
Tip: 1. Pressing [Pause] to add a two second delay
(pause) in the num ber field and P is displayed. 2.
Pressing [Flash] to add a flash in the num ber field and F
is displayed.
After finished num ber entry, press [O.K.] and “_NAME” is
displayed.
Use the digit keys to enter the nam e. If you m ake a
m istake, press [DELETE] and re-enter. W hen finished,
press [SAVE].
You will see “SAVED TO DIR!” on the display to confirm
the entry.
3 7
Page 39

P H O N E B O O K D IR E CT O RY
Entering Alphanumeric Characters:
Each num eric key is assigned a set of letters and sym bols. Press the corresponding
num ber until the desired letter is displayed.
Num eric: 1 2 3 4 5 6 7 8 9 0
Characters: Space A,B,C D,E,F G,H,I J,K,L M,N,O P,Q,R,S T,U,V W ,X,Y,Z
Adding Special Symbols
You can also use the [*] and [#] to select the following special sym bols in the nam e field.
∗ + , - . / @ : ; < = > ? { ¦ } ~ [ \ ] ^ _ ` ! ″ # $ % & ´ ( )
3 8
Page 40
SAVE
SAVE
SAVE
SAVE
P H O N E B O O K D IR E CT O RY
EDITING A PHONE BOOK NUMBER
JOHN SMITH ↓
1231234568
EDIT O.K. EXIT DELETE
PLAYING
1231234568
EDIT O.K. EXIT DELETE
ENTER NUMBER:
1231234568_
O.K. EXIT DELETE
JOHN SMITH_
1231234567
EXIT DELETE
JOHNNY SMITH ↓
1231234567
EDIT O.K. EXIT DELETE
DELETING AN ENTRY FROM A PHONE BOOK DIRECTORY
JOHN SMITH ↓
123-123-4568
EDIT O.K. EXIT DELETE
DELETE!
Select the record you want to edit.
The recorded nam e will be played back instead if there
was caller nam e being recorded.
Press [EDIT] during playback to re-record the m essage
(see last section for details), or press [DELETE] during
playback to rem ove the recorded nam e. The display
shows “VOICE DELETED !” to confirm the deletion.
W hen you see the record you want to edit is displayed,
press [EDIT] and then edit the number. Press [DELETE]
to rem ove the error and enter the correction as needed.
Press [O.K.] to confirm the edited num ber.
Then press [DELETE] to rem ove the error and re-enter
the correct nam e as needed. Press [SAVE] and “SAVE
TO DIR!” appears on the display. Press [O.K.] if your
want to re-record the Voice Announce Nam e as well, or
press [EXIT] to return.
W hen finished the screen will display the edited entry.
Select the record to be deleted.
If a Voice Announce Nam e was recorded, wait until the
playback is finished and the record you want to delete is
displayed.
Press [DELETE] and you will see “DELETE!” on the
display to confirm the deletion of the current record.
The phone will then m ove to the next available record in
the directory. Press [EXIT] to return to standby m ode.
3 9
Page 41

P H O N E B O O K D IR E CT O RY
DELETING ALL PHONE BOOK DIRECTORY RECORDS
20 ITEM ↓=VIEW
EXIT DELETE
DELETE ALL?
O.K. EXIT
DIALING FROM PHONE BOOK DIRECTORY
During standby m ode (on hook or off-hook), press [DIR.] and find the entry you want to
call. Press [O.K.] to call the num ber.
Press [DIR.] to enter into Phone Book Directory default
page.
Press [DELETE] and “DELETE ALL?” is displayed. To
confirm the deletion of all records, press [O.K.]. To exit
without deleting, press [EXIT].
40
Page 42
.
M U LT I- H AN D SET O P E R AT IO N
Your new telephone provides a m ultiple handset capability which supports up to 8
handsets. Each additional handset com es with a charger you can plug into any
electrical outlet. No extra phone jack is required.
It is possible to make an internal call between two handsets while another handset is
engaging the external line
INTERCOM
CY-368D base unit can support 4 groups of intercom conversation sim ultaneously if you
have 8 handsets in your system . Handset-to-Handset two-way intercom is operated
independently of the base unit.
EXTENSION #:?
PAGING #2
EXIT
PAGING FROM #1
EXIT
W hen the Handset 1 is in standby m ode, press [Int.],
LCD display shows “EXTENSION #:?”
Key in the num ber of the handset (1,2… 8) or base (0)
you want to call. For instance, if Handset #2 is being
paged, LCD display shows “PAGING #2”
The handset being called will ring and the display
shows “PAGING FRO M # 1”.
Press [Int.] on the called handset to answer the
intercom .
Press [EXIT] to term inate the intercom .
Note:
This phone system can allow you to conference or intercom by using the handset and
base sim ultaneously. If the handset is operated too close to the base unit, you m ay
experience feedback noise. Should this occur, m ove the handset away from the
base unit and the feedback will stop.
CALL TRANSFER
CY-368D cordless system allows you to transfer calls from Base to Handset, Handset to
Handset, or Handset to Base.
EXTENSION #:?
EXIT
W hen the handset is engaging external line. Press
[Int.] and followed by the num ber of the handset you
want to transfer the call to.
41
Page 43
SERVICE DIR. DIAL V.M
SERVICE DIR. DIAL V.M
.
M U LT I- H AN D SET O P E R AT IO N
INVALID NUMBER
EXIT
TRANSFER FROM BS
EXIT
PHONE ON
If you are entering an unregistered handset num ber,
“INVALID NUMBER” is display and you need to repeat
the above step again.
The handset you called rings and “TRANSFER FROM
BS” on the display. Press [Talk] or [Spk.] on the
called handset, the call will be connected
autom atically.
If the handset you called does not answer in 20 seconds,
the unanswered call will ring back to you again.
Press [Talk] or [Spk.] to pick up the call again, or the
line will be release autom atically after 20 seconds if
you do not answer.
CALL CONFERENCING
Your new cordless system supports conference calls with one handset and base unit.
PHONE ON
W hen engaging an external line, press [Talk] or [Spk.]
on another handset or press [Speakerphone] on the
base unit to enter a conference call.
CONFERENCE
“CONFERENCE” appears on the display of the base
unit. Press [OFF] on one handset or [Speakerphone]
on the base unit will only end that party from the call.
To end the call, m ake sure all parties have
disconnected from the line and returned to standby
m ode.
Note:
This phone system can allow you to conference or intercom by using the handset and
base sim ultaneously. If the handset is operated too close to the base unit, you m ay
experience feedback noise. Should this occur, m ove the handset away from the
base unit and the feedback will stop.
42
Page 44
O PT IO N A L F E AT U R E S D IAL L IS T
You phone has been pre-program m ed at the factory with an optional services dial list.
D ISPLAY CLASS SERVICE DIAL CODE
411 Help Hotline 1411
RPT DIAL Repeat Dialing 66
FW D ON Activate Call Forwarding 72#
FW D OFF Cancel Call Forwarding 73#
CALL RTN Activate Call Return 69
3W AY Three W ay Calling Flash
Note:
These optional services, except 1411, are accessible only if you subscribe from your
local telephone com pany.
DIALING SERVICES
50 NEW CALLS
HS-1
10:05AM 05/03
411 RPT DIAL FWD ON FWD OFF CAL L RT N
USE L1 OR L2?
├66
During standby m ode, press [SERVICE] softkey to
prom pt the pre-program med optional features dial list.
Press the corresponding softkey to the optional service
you wish to activate. Or, press [▼ ] / [▲ ] if you want to
return to standby m ode.
For instance, if you want to activate Repeat Dialing
function, press [RPT DIAL] softkey. The dial code will
be shown on the display. Press a LINE key to send the
signal. W hen you can hear a second dialing tone, the
code is accepted. Press [Bye] on the handset or on the
base unit to hang up.
43
Page 45

SERVICE
SERVICE
OPT IO N A L F E AT U R E S D IAL L IS T
3-W AY CALLING
PHONE ON
1234568
00:05
3W AY
PHONE ON
3456812
00:30
3W AY
While on a call, press [3WAY] to access Three Way
Calling service. The system will dial out a long Flas h to
put the initial call on hold and obtain a new dial tone to
m ake a second call.
Key in the phone num ber of the second party. After the
second call is connected, press [3WAY] to add the first
caller into the conference call.
4 4
Page 46

AD D IT IO N A L IN F O R M AT IO N
CAPACITY
Mem ory
The Caller ID List: 50 m em ory locations; 24 digits and 15 characters per location.
Phone Book Directory: 50 m em ory locations; 32 digits and 15 characters per location.
Voice Announce Caller Name: 25 m em ory locations; 3 s econds per location.
Redial List: 20 m em ory locations; 32 digits per location.
Call Repeat Num ber
The Call Repeat num ber is seven m aximum .
OUT OF RANGE
If the handset cannot com m unicate with the bas e unit or the handset is too far away
from the base during a conversation and the RF signal is not present, the m essage
“OUT OF RANGE” will be appeared on the display.
NO CONNECTION
If the handset cannot connect to the base unit when m aking a call, the m essage “NO
CONNECTION” appears on the display for 2 seconds, and then goes back to standby
m ode.
4 5
Page 47

ansmit range channel
T R O U BLE S HO OT IN G
Before calling for service, please check this list of the m os t com m on problems.
Problem Check
The phone does not work
The phone does not ring
Cannot dial
The audio sounds s cratchy Is the base unit located next to m etal objects or
CALLER ID doesn’t work Do you have CALLER ID service?
No caller’s nam e Does the CALLER ID service to which you subs cribe
Are the LINE CORD and AC adapter connected properly?
Is the hands et too far away from the base unit?
Does the battery pack becom e weak? Charge the battery
on the bas e unit for about 15 hours.
Check the RINGER setting.
Do you have touch tone s ervice?
Check the TONE/PULSE setting.
appliances? Try relocation.
include the CALLERS NAME DELIVERY feature?
You cannot hear or be heard
clearly
Caller’s inform ation is not
registered
Interference from wireless
networking device
SAVE THESE INSTRUCTIONS.
Increase the handset receiver volum e (See page 29).
Did you or your ans wering m achine answer calls before
the s econd ring?
Change the location of the wireless networking device
and/or the base of the cordless phone.
Switch the channel on the wireless networking device.
Please refer to the m anual of your wireless networking
device, or consult a qualified technician of how to switch
the channel. If that doesn’t work, try another channel.
For optim um result, switch to a mid tr
(e.g. channel 6 at 2.437GHz).
4 6
Page 48
CAR E AN D M A IN T E N AN CE
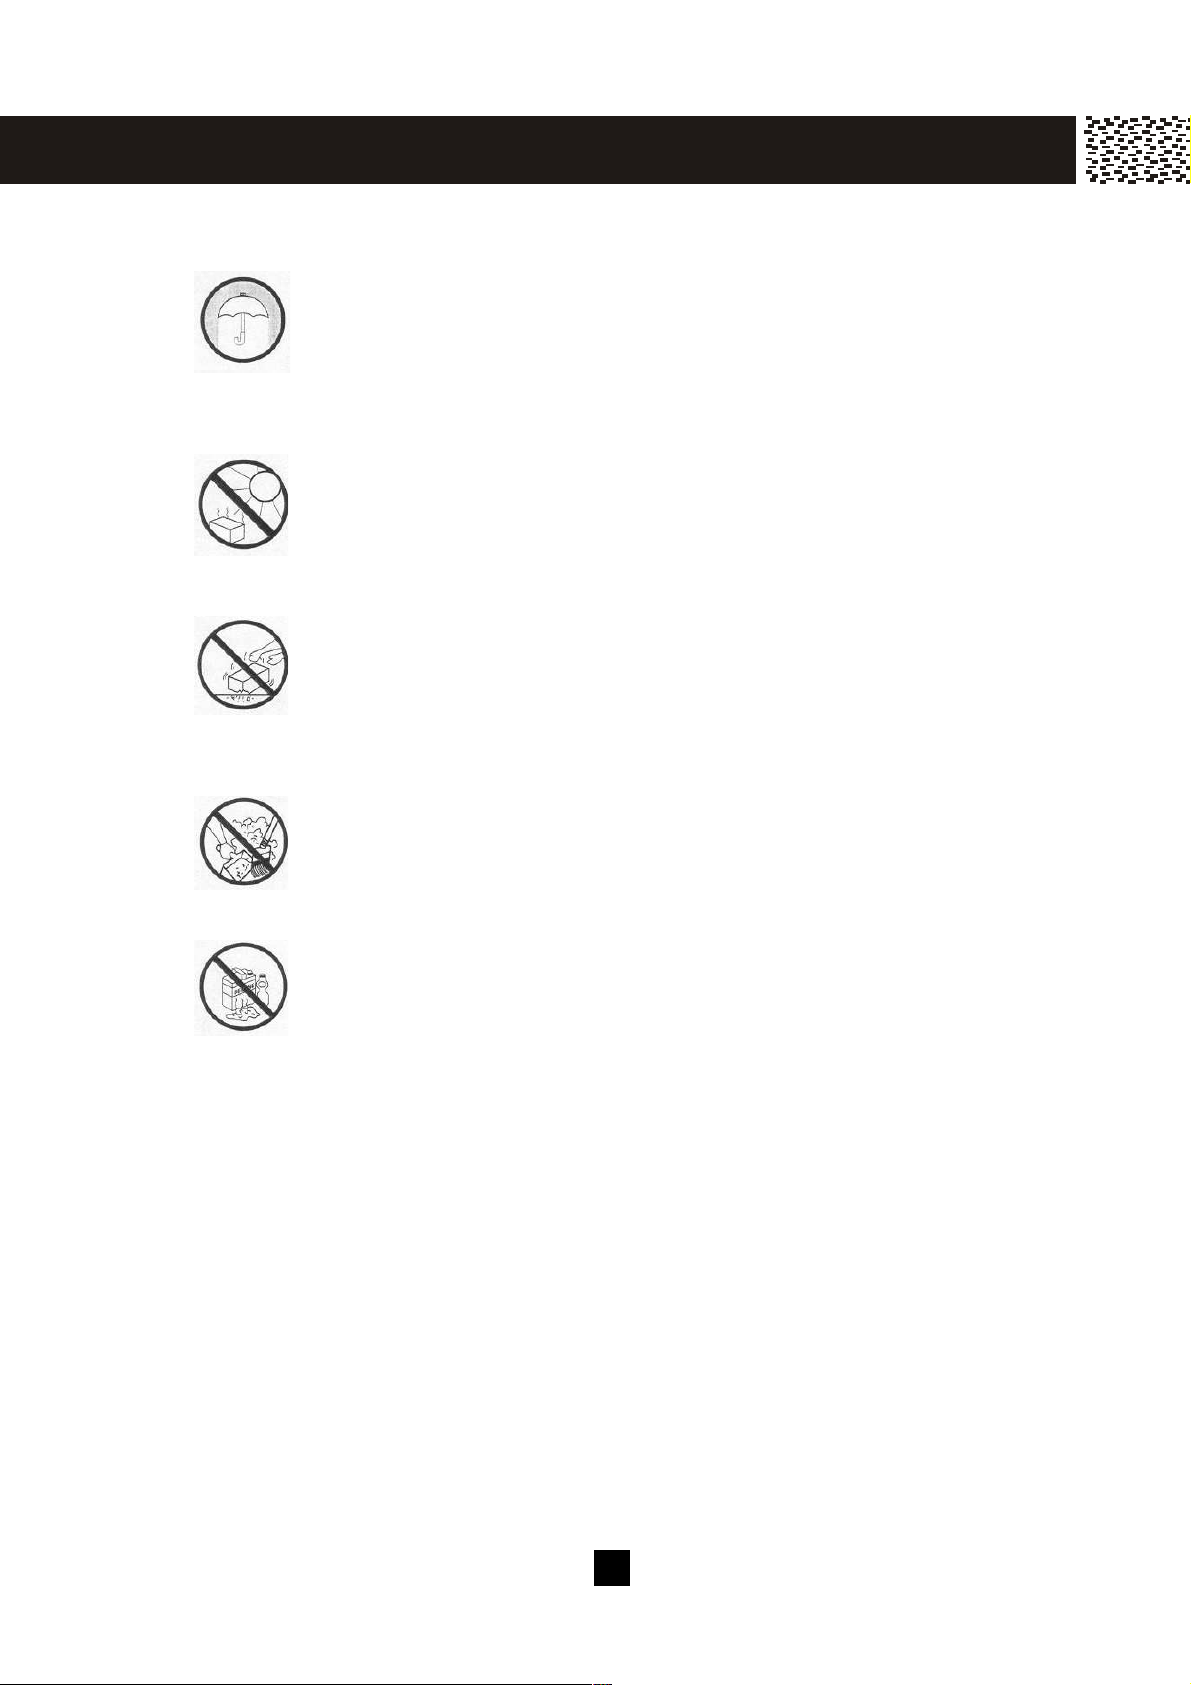
The following s uggestions will help you care for the s ystem so you can enjoy it for years .
Keep the s ystem dry. If it gets wet, wipe it dry imm ediately. Liquids m ight contain m inerals that can corrode the electronic
circuits.
Use and store the system only in norm al tem perature environm ents. Tem perature extrem es can shorten the life of
electronic devices, and distort or m elt plastic parts.
Handle the s ystem gently and carefully. Dropping it can
dam age circuit boards and cas es and can cause the s ystem to
work im properly.
Keep the s ystem away from excess ive dust and dirt, which can
caus e premature wear of parts.
Wipe the system with a dam p cloth occasionally to keep it
looking new. Do not use harsh chem icals, cleaning solvents, or
strong detergents to clean the system .
Modifying or tam pering with the system ’s internal com ponents can cause a m alfunction and m ight invalidate the system ’s warranty and void your FCC
authorization to operate it.
4 7
Page 49

FCC R E Q U IR E M E N T S
This equipm ent complies with Part 68 of FCC rules and the requirem ents adopted by the
ACTA. On the b ottom of this equipment is a label that contains, among other information,
a product identifier in the form at US:CACWI00B368001. If requested, this num ber
m us t be provided to the telephone com pany.
The REN is us ed to determ ine the num ber of devices that m ay be connected to a
telephone line. Excessive RENs on a telephone line may res ult in the devices not
ringing in respons e to an incom ing call. In m os t but not all areas , the sum of the RENs
should not exceed five (5.0). To be certain of the num ber of devices that may be
connected to a line, as determined by the total RENs, contact the local telephone
com pany. [For products approved after July 23, 2001, the REN for this product is part
of the product identifier that has the form at US:CACWI00B368001. The digits
represented by 00B are the REN without a decim al point (e.g., 03B is a REN of 0.3B).
For earlier products, the REN is separately shown on the label.]
Should you experience trouble with this equipm ent, please contact:
Cybiolink L.P.
1-210-688-2353, Service Departm ent
for repair or warranty inform ation. If the equipm ent is caus ing harm to the telephone
network, the telephone com pany m ay request that you dis connect the equipm ent until
the problem is resolved.
NOTICE: If your hom e has specially wired alarm equipm ent connected to the telephone
line, ensure the installation of this equipm ent ID does not disable your alarm equipm ent.
If you have ques tions about what will disable alarm equipm ent, consult your telephone
com pany or a qualified installer.
If your equipm ent should cause harm to the telephone network, the telephone com pany
m ay temporarily dis connect your service. If poss ible, they will notify you in advance
that tem porary dis continuance of service may be required.
However, when advance written notice is not poss ible, the telephone com pany m ay
tem porarily discontinue service without notice if such action is necessary under the
circum stances.
The telephone com pany m ay m ake changes in its comm unication facilities, equipm ent,
operations, or procedures where such action is reasonably required in the operation of
its bus iness and is not inconsistent with the rules and regulations of the Federal
Com m unications Comm ission.
FCC R E Q U IR E M E N T S
Do not attem pt to repair or m odify this equipm ent. Changes or m odifications not
4 8
Page 50

express ly approved by the party respons ible for its com pliance could void the us er’s
authority to operate the equipm ent.
This equipment should not be us ed on coin telephone lines. Connection to party line
services are subject to s tate tariffs . If trouble is experienced, dis connect this equipm ent
from the telephone line to determ ine if it is caus ing the malfunction. If the equipm ent is
determ ined to be m alfunctioning, its use s hould be discontinued until the problem has
been corrected.
Current FCC regulations specify that any direct connections to a telephone com pany line
be done us ing only s tandard phone jacks USOC RJ11C and plugs that is TIA-968-A
com pliant.
Note:
This equipment has been tes ted and found to com ply with the lim its for a Class B digital
device, pursuant to Part 15 of the FCC Rules . These limits are designed to provide
reasonable protection against harm ful interference in a res idential installation. This
equipm ent generates, uses , and can radiate radio frequency energy and, if not installed
and us ed in accordance with the instructions , m ay caus e harm ful interference to radio
com m unications . However, there is no guarantee that interference will not occur in a
particular installation. If this equipm ent does cause harm ful interference to radio or
television reception, which can be determ ined by turning the equipm ent off and on, the
user is encouraged to try to correct the interference by one or m ore of the following
m easures:
1. Reorient or relocate the receiving antenna.
2. Increas e the separation between the equipm ent and receiver.
3. Connect the equipment into an outlet on a circuit different from that to which the
receiver is connected.
4. Cons ult the dealer or an experienced radio / TV technician for help.
NOTICE TO HEARING AID WEARERS: This telephone has been registered with the
FCC as hearing aid com patible
W arning: Changes or m odifications to this unit not expressly approved by the
party responsible for com pliance could void the user’s authority to operate the
equipm ent.
Caution: To m aintain com pliance with the FCC’s RF exposure guidelines place the
base unit at least 20 cm from nearby persons.
4 9
Page 51

CY-368B-SB
20041014
50
 Loading...