

Page 1

XP AXP A
XP A
XP AXP A
DMINISTRATORDMINISTRATOR
DMINISTRATOR
DMINISTRATORDMINISTRATOR
Installer/User Guide
Huntsville, Alabama 35805-6201 • USA
256-430-4000 (Fax) 256-430-4030
4991 Corporate Drive
www.cybex.com
Page 2

Page 3

XP Administrator
Installer/User Guide
Cybex Computer Products Corporation
4991 Corporate Drive
Huntsville, Alabama 35805-6201 • USA
256-430-4000 (Fax) 256-430-4030
www.cybex.com
©2000 Cybex Computer Products Corporation. All rights reserved.
Cybex, XP, and the Cybex logo are trademarks or registered trademarks of Cybex Computer Products Corporation. All other products are
trademarks or registered trademarks of their respective owners.
Page 4

Page 5

Table of Contents
Chapter 1 - Product Overview
Overview .........................................................................................................................................................................................1
System Requirements................................................................................................................................................................. 1
Chapter 2 - Installation and Configuration
Downloading the XP Administrator Software ................................................................................................................... 3
Installing XP Administrator Software ................................................................................................................................... 4
Installing/Verifying the XPDU................................................................................................................................................ 4
Upgrading the XPDU.................................................................................................................................................................. 5
Installing/Configuring the XPIA ............................................................................................................................................ 5
Testing the Network Connections ..........................................................................................................................................8
Chapter 3 - Importing and Exporting Configurations
Importing from the XPDU ......................................................................................................................................................... 9
Exporting to the XPDU............................................................................................................................................................ 12
Chapter 4 - Operations
Overview ....................................................................................................................................................................................... 13
Adding Servers ........................................................................................................................................................................... 14
Adding Users .............................................................................................................................................................................. 15
Creating Server Groups ........................................................................................................................................................... 17
Creating User Groups .............................................................................................................................................................. 18
Customizing Access .................................................................................................................................................................. 20
Searching a Database ............................................................................................................................................................. 23
Setting the Administrator Password................................................................................................................................... 23
Locking/Unlocking a Database .......................................................................................................................................... 24
Using Auto Configure for Large Systems.......................................................................................................................... 24
Chapter 5 - Product Assistance and Troubleshooting
Customer/Technical Support ............................................................................................................................................... 29
Page 6

Page 7

1
Product Overview
Overview
Administrative control fromAdministrative control from
Administrative control from
Administrative control fromAdministrative control from
a centralized point ofa centralized point of
a centralized point of
a centralized point ofa centralized point of
accessaccess
access
accessaccess
Fast, easy configuration ofFast, easy configuration of
Fast, easy configuration of
Fast, easy configuration ofFast, easy configuration of
larger systemslarger systems
larger systems
larger systemslarger systems
Import existing XPDUImport existing XPDU
Import existing XPDU
Import existing XPDUImport existing XPDU
database for easy editingdatabase for easy editing
database for easy editing
database for easy editingdatabase for easy editing
Create Server/User groupsCreate Server/User groups
Create Server/User groups
Create Server/User groupsCreate Server/User groups
for easy configuration andfor easy configuration and
for easy configuration and
for easy configuration andfor easy configuration and
administrationadministration
administration
administrationadministration
The XP Administrator is a software utility program which allows XP4000 Series
KVM switches to be configured through a Windows based graphical interface.
This utility, used in conjunction with the XPDU and XPIA modules of the XP4000
system, provides a centralized point of control for administrators of medium to
large data centers. The intuitive, graphical interface with drag and drop capability
makes the XP Administrator an ideal tool for assigning and maintaining server/
user access to your XP4000 Series switch.
The XP Administrator makes the configuration of larger systems fast and easy. The
Auto Configure feature lets you create long lists of identical server or user profiles
with a few quick clicks of the mouse - all from one pop-up window.
If you have an existing XPDU server/user database, you can import it into the XP
Administrator, update and organize it as needed, then export it back to the XPDU
for on-screen channel identification and selection. XPDU modules are automatically
updated with the latest database.
The XP Administrator allows you to organize your servers into meaningful groups
for easy identification and assignment. Once a server group is established, the icon
for the group can be dragged and dropped onto the icon for any user for the
convenient assignment of access to a group of servers. Similarly, the XP
Administrator allows the creation of user groups as well. All members of a user
group have the same access to each server included in the group. For customization,
additional servers can be added to individual users.
Administrator security lockAdministrator security lock
Administrator security lock
Administrator security lockAdministrator security lock
featurefeature
feature
featurefeature
System
Requirements
The XP Administrator features lock-out capability for greater control over database
editing. When enabled, a database can only be edited through the XP Administrator.
An unlocked system can be edited at the user consoles by a user with administrative
privileges.
The XP Administrator has the following system requirements:
Hardware
• PC with Windows 95/98, NT 4.0 (service pack 4.0 or higher) or Windows 2000
operating systems.
• At least one XPDU and XPIA module in the XP4000 system. If you have an
XPIN in your system that you would like to upgrade to an XPIA, a factory
upgrade is available. Contact Cybex Technical Support.
XPDU Firmware/FLASH revision
• The XPDU Firmware revision must be A-02 or higher. If the firmware revision
is below A-02, you will need to contact Technical Support for updated chips
before continuing.
1
Page 8

• The XPDU FLASH revision must be at B-00 or higher. If it is not, this can
be FLASH upgraded in the field. (See ‘Upgrading the XPDU’ on page 5 for
more details.)
If you plan to upload a database from an existing XPDU
• A null modem (cross over) cable to attach between the PC and your XPDU.
• The XP4000 Series OSD Configuration Utility (available for download from
ftp://ftp.cybex.com/pub/product-upgrades/UTILS/ or from Technical Support)
2
Page 9
Installation and
2
Downloading
the XP
Administrator
Software
Configuration
The XP Administrator software is available for download from our FTP website.
Follow the steps below to retrieve the software.
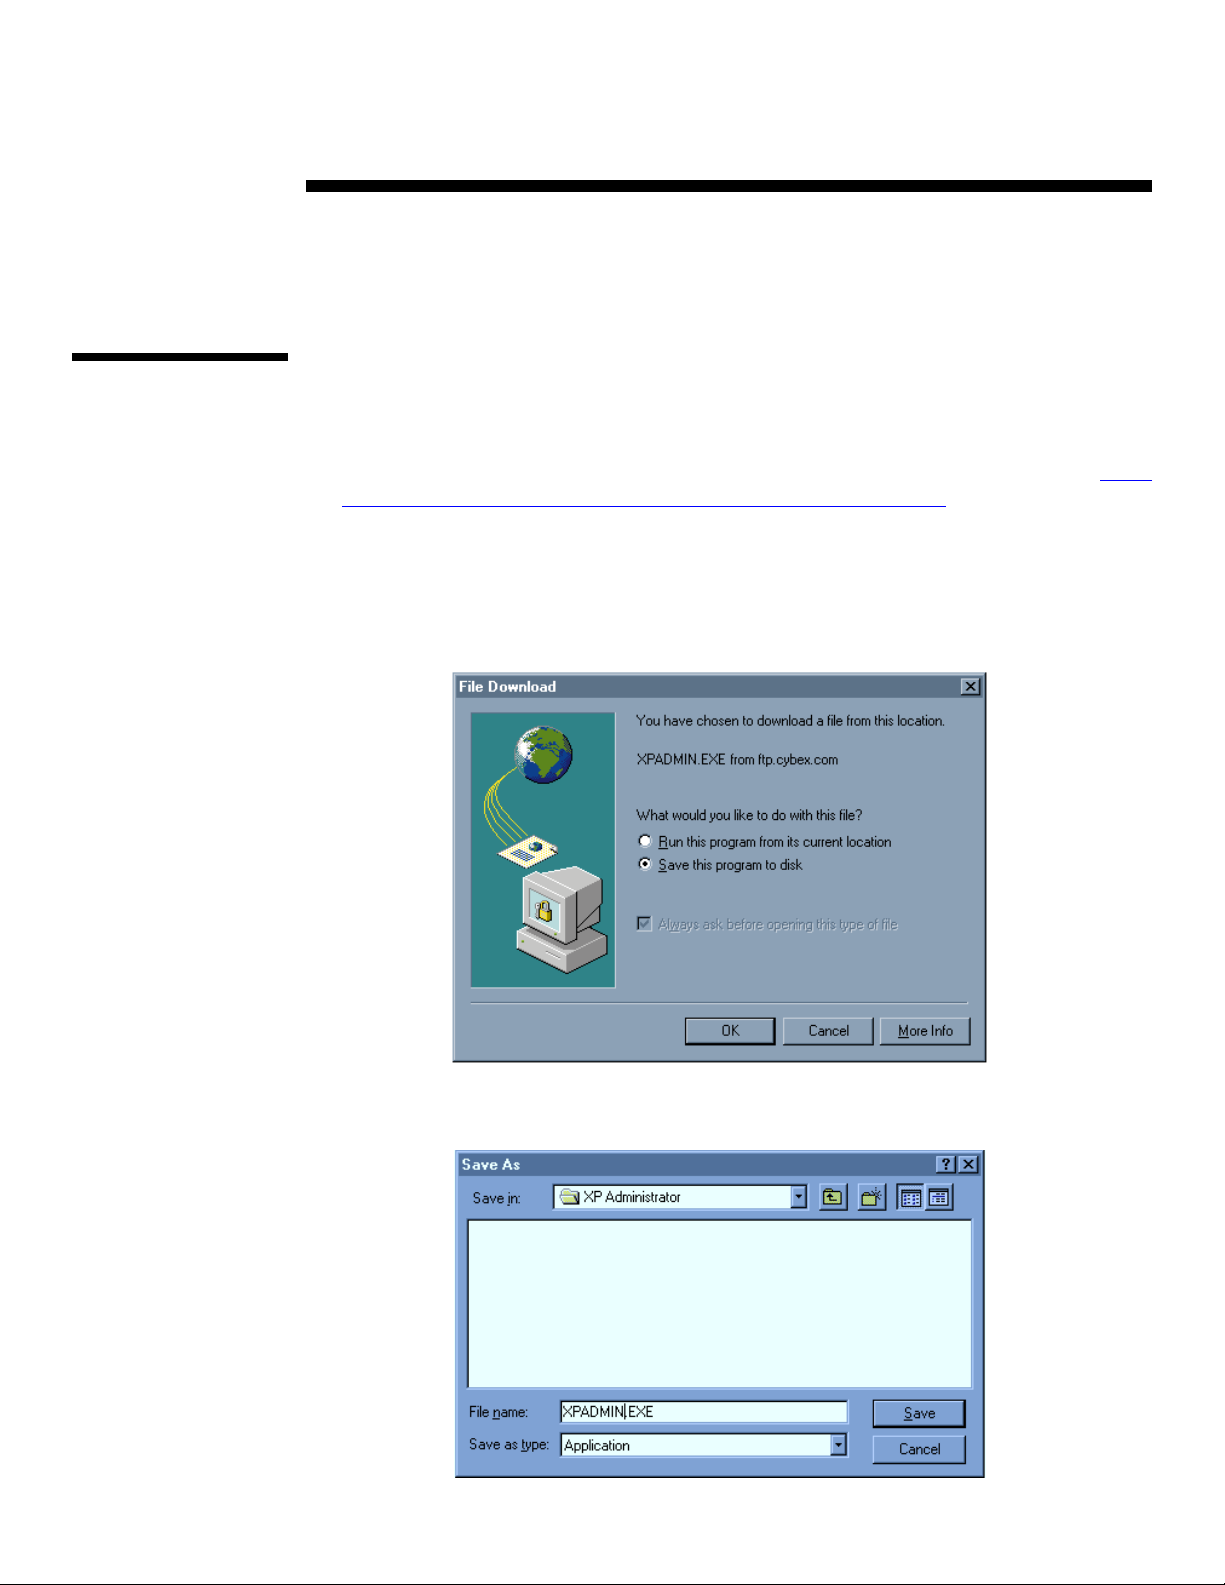
1. From your web browser, enter the following Cybex website address,
ftp.cybex.com/pub/product-upgrades/XP4000/XP_Admin.
2. Once the site loads, double click on file XPADMIN.EXE.
3. A ‘File Download’ window will appear on your screen. Choose the option to
save the program to disk and click ‘OK’.
ftp://
4. The ‘Save As’ window will appear on your screen. Enter the file name as
XPADMIN.EXE and save it to a directory of your choice.
3
Page 10

Installing XP
Administrator
Software
To install the XP Administrator, choose the ‘Run’ command from your Windows
Start menu. Run the XPADMIN.EXE file that you downloaded from the Cybex
FTP Website. Be sure to include the correct path to your XPADMIN file (example:
C:\XP Administrator\XPADMIN.EXE). The following files will be downloaded to
your system:
XPadmintool.exe - This is the XP Administrator program which is opened by
clicking on the XP4000 System Admin icon on your desktop. This icon is
automatically created when the XPADMIN program is run.
DAO support (Database Access object) - During the download process, you will
be prompted to answer whether “Access” is loaded on your computer. If you
answered no to this question, the software will be installed at this time.
Installation DLLs/Freeware Utilities - This contains up-to-date versions of
freeware programs MFC42 (Windows support program), PumpKIN (TFTP Server),
and Klog (Network Event log). The PumpKIN and Klog programs are run on
request. These programs may be needed during your installation/configuration of
the XP Administrator.
When installation is complete, the XP4000 System Admin icon will appear on your
desktop. Double click this icon to open the XP Administrator software.
Installing/
Verifying the
XPDU
Before you can import server/user configurations into your XP Administrator or
export new configurations from XP Administrator, you must have at least one
current XPDU and XPIA module in your XP4000 system. Follow the steps in the
next sections to ensure that you have properly installed and configured modules
before continuing with the XP Administrator software.
Installing the XPDU Module
If you are not working with an existing XPDU module, you will need to install the
module into your XP4000 Series unit. Follow the instructions in your XP4000
Series Installer/User guide to properly install your XPDU. (
instructions from the XP4000 Series Installer/User Guide).
XPDU installation
Verifying the Firmware and FLASH Revisions of the XPDU Module
To insure that your XPDU module is at the required revision level to operate with
the XP Administrator, follow the steps below.
1. Press either Control key twice within one second to bring up your XPDU OSD
menu system.
2. Log in to the XPDU. Note that for proper operation with the XP Administrator,
the administrator password must be set. (
password from the XP4000 Series Installer/User Guide).
Instructions for setting the administrator
3. Press Alt-Tab until the command line prompt is visible.
4. Type VER and press Enter. The firmware revision must read A-02/A-02 or
higher to proceed. If your firmware is below this revision, contact Technical
Support. You will need updated chips before continuing.
4
Page 11

The FLASH revision must be B-00 or higher. If it is, ensure that you have
established a valid chassis ID for this unit in this XPDU module. A chassis ID
is required before continuing. (
XPDU from the XP4000 Series Installer/User Guide) If a valid Chassis ID
exists, then proceed to the section ‘
If the FLASH revision is below B-00, you will need to upgrade your XPDU
module before you can use it with the XP Administrator.
NOTE: If you have an XPDU created server/user database that you want to save
for use with the XP Administrator, you will need to import it to the software
before you upgrade. Upgrading the XPDU will delete your existing database.
See the section ‘
follow the instructions in Chapter 3, ‘
Testing the Network Connections’ later in this chapter, then
Instructions for setting the Chassis ID for the
Installing/Configuring the XPIA’.
Importing from the XPDU’.
Upgrading
the XPDU
Installing/
Configuring
the XPIA
The latest firmware revision of the XPDU is available for download from Cybex
ftp://ftp.cybex.com/pub/product-upgrades/XP4000/XPDU/. Once you have
at
loaded this site from your web browser, you will see the XPDU firmware hex file.
Select this file for download and any associated text file you wish to read.
Now, follow the instructions in Chapter 9 of the XP4000 Series Installer/User
Guide,
FLASH upgrade your XPDU module.
Your XPDU is now installed and configured for operation with the XP Administrator.
Note that a chassis ID is required before continuing. If you do not have a chassis
ID established for this XP4000 unit in this XPDU module, configure it now.
Instructions for setting the Chassis ID for the XPDU from the XP4000 Series
(
Installer/User Guide)
“Serial port advanced operations (for XPLU, XPDU and LCI modules)” to
Installing the XPIA Module
For proper operation of the XP Administrator, there must be at least one XPIA
module installed in the XP4000 system. Follow the Quick Install instructions that
shipped with your XPIA to install this module into your system. (
Install Guide).
XPIA Quick
Note: Setting the IP address, User Node ID and password for your XPIA is required
for proper operation with the XP Administrator. Make sure to note the IP address
for your XPIA, as you will need it in the following steps.
Configuring the XPIA Module
To configure the XPIA for use with the XP Administrator, follow the steps below.
1. From a PC with a network connection to your XPIA module, go to your
command prompt.
2. Type telnet xxx.xxx.xxx.xxx replacing ‘x’s with the IP address of your XPIA
module (example: telnet 123.45.67.89). The User Node ID for the XPIA will be
displayed and you will be prompted for the password. Enter the password that
you configured for your XPIA.
3. Now, the User Option Menu of the XPIA will be displayed, as shown.
5
Page 12

User Option Menu
Revision: B-00 Address: 1-F
-----------------------M Management tools
U User option menu
O Open a port session
X eXit session
-----------------------Enter Selection:
4. Select option M to access the System Management Tools.
System Management Tools
Main Menu
1) Display chassis configuration
2) Display Flash ROM status
3) Upgrade local Flash ROM
4) Reboot computer
5) Search for connected chassis
6) Set Date and Time
7) Configure serial port
8) Configure log host IP
X) Exit System Management Tools
Enter your selection:
5. From the System Management Tools Main Menu, select option 6 to set the date
and time. Update these settings appropriately.
Optional Configuration Options
Option 8 of the System Management Tools Main Menu, Configure log host IP,
allows you to provide the security log from your XP4000 Series switch to a server
at a specified IP address. This feature enables you to continually archive log events
beyond the 1000 event capacity of the XPIN and XPIQ modules. To enable this
feature, follow the steps below.
1. From the System Management Tools Main Menu, select option 8 to configure
the log host IP.
6
Page 13

System Management Tools
Main Menu
1) Display chassis configuration
2) Display Flash ROM status
3) Upgrade local Flash ROM
4) Reboot computer
5) Search for connected chassis
6) Set Date and Time
7) Configure serial port
8) Configure log host IP
X) Exit System Management Tools
Enter your selection: 8
Configure Log Host IP Address
Current Log Host: 0.0.0.0
New Log Host IP address [123.45.67.89]:
2. Enter the IP address of the server you wish to use as the security log host. The
default setting in brackets is the IP address of the telnet client currently
connected to the XPIA. If this is your log host server, simply press Enter.
New Log Host IP address [123.45.67.89]:
Log Host now set as 123.45.67.89
Press any key to continue
Press any key to return to the System Management Tools Main Menu.
Security events are sent to the log host using the UNIX syslog feature. Events are
sent using the local0 facility identifier.
To disable the logging feature, enter 0.0.0.0 as the log host address.
Your XPIA is now installed and configured for use with the XP Administrator.
7
Page 14

Testing the
Network
Connections
Before using the XP Administrator software, you must test the network connection
to every XPIA in the system. Follow the steps below:
1. Launch the XP Administrator program by double clicking on the XP4000
System Admin icon.
2. Click on the ‘Test’ icon to begin testing your connections.
3. The following menu will appear.
Enter the IP address of your XPIA module. Enter “admin” or “root” as the
username, and the password that you configured when you installed the card.
Note that the password is case sensitive.
4. Select ‘OK’. You will receive a message “Valid IP Address @ xxx.xxx.xxx.xxx”.
If you do not receive this message, contact your network administrator to verify
your IP address and/or network connection.
5. Repeat steps 3 and 4 for every XPIA in your system. It is recommended that you
have the same password for all XPIAs for easier system maintenance.
Your XP Administrator Utility is now properly configured for operation.
8
Page 15

3
Importing and Exporting
Configurations
Importing from
the XPDU
If you already have XPDU modules in your system, you may want to import your
server/user information to the XP Administrator for editing and grouping. To do
this, you will need the following:
• Access to a PC that is not currently part of your XP4000 Series system
• A null modem (cross over) cable connected between your XPDU and the PC
• The XP4000 Series OSD Configuration Utility (available for download from
ftp://ftp.cybex.com/pub/product-upgrades/UTILS/ or from Technical Support)
Once you have all of the necessary equipment and software, follow the steps below
to import an existing XPDU OSD database.
From an XP4000 system computer
1. Log in to your XPDU as the administrator.
2. Press Alt-tab twice to reach the Administrator Controls menu. Highlight and
select Configuration Control.
Program Manager
CYBEX Control Panel
Administrator Controls
Scanning
Broadcast
Confirm Deletes
Menu Activation
Switch Alt. User Module
Control Alt. User Module
System Configuration
Configuration Control
F1- help
Space - change
Off
Off
On
On
Enter - select
F11- more
3. Highlight the Configuration Port option and toggle the space bar until ‘external’
is selected. Highlight and select Begin Configuration. The Configuration
Transfer message will be displayed on-screen.
Program Manager
CYBEX Control Panel
Configuration Control
Configuration Port
Remote User Module
Direction of Transfer
Remote Admin Passwd
Begin Configuration
F1- help
9
External
Recv
Enter - select
Space - change
Page 16

From the PC not currently part of your XP4000 Series system
(This may be the PC where the XP Administrator is installed.)
1. Open the OSD Configuration Utility software by clicking on the OSD.exe icon.
2. Select the Transfer Menu.
3. Choose the option, ‘Set Transfer Port’.
4. Enter the com port setting that corresponds with the port you are using for
communication between the XPDU and the PC. Leave the remaining options at
their default values.
5. Click on ‘Test’.
6. Choose ‘OK’ to end the test, then click ‘OK’ again to exit Terminal Options.
7. Reopen the Transfer Menu and select the ‘Read’ option.
8. Click the ‘Start’ button to begin reading information from the XPDU. When the
process is finished, select close.
10
Page 17

9. Go to the file menu and select the ‘Save As’ option. Name your configuration
and close the program.
10. If this is not the PC where your XP Administrator is installed, transfer this
configuration to the XP Administrator PC.
In the XP Administrator
1. Launch the XP Administrator by double clicking on the XP4000 System Admin
icon on your PC.
2. Select ‘Import OSD File’ from the File Menu.
3. Select your XPDU configuration and open the file.
Now the server/user information from your existing XPDU module(s) has been
transferred to the XP Administrator.
11
Page 18

Exporting to
the XPDU
Once you have created a database of your user/server configuration setup, you will
want to distribute it to all of your XPDU modules for use with your XPDU’s OSD
feature. To distribute this database, follow the steps below.
1. Retest the link between all XPIA modules and the PC. (See the section
the Network Connections’ in Chapter 2 for details.)
2. In your XP Administrator, choose the option to open the FTP port to the XPIA(s).
3. Select the IP addresses of the XPIA(s) in the system and click ‘OK’. This will
allow you to download the database to the XPIA(s) you choose.
‘Testing
You will be prompted by a message that asks you if you wish to download the
OSD database. Answer yes to this prompt. When the database has finished
downloading, you will receive a message indicating that the database has been
successfully downloaded.
4. Select the option to close the FTP link.
You have now successfully transferred your new database. The next time you log
in to your XPDU module, the system will automatically update your information.
12
Page 19

4
Operations
Overview
When you first launch the XP Administrator software, the following window will
appear on your screen.
This window can be broken down into four main components: the Menu/Icon Bar,
the Server/User Lists, the Information Panel and the Status Bar.
A) The Menu/Icon Bar displays all of the options available to create, edit, maintain
and transfer your XP Administrator database.
B) The Server/User List area is where you create and maintain your complete lists
of all servers and users in the system. Server and user groups are configured here
as well, for easy system management.
C) The Information Panel contains current information on the selected server, user
or group. No editing is done in this area. Change this display by clicking on the tab
corresponding to the information you wish to view.
D) The Status Bar, at the bottom of the menu, displays the lock and link status of
your database. A locked database can only be edited through the XP Administrator;
an unlocked system can be altered through the XPDU as well. The link status shows
the activity of the FTP link between the XP Administrator software and the XPIA.
An open link is displayed as active, a closed link is inactive.
13
Page 20

Adding
Servers
To add servers to your database, click the ‘Add Server’ icon. The following
window will appear.
Enter the name and XP4000 address of the new server. Configure the ID dwell
time, Scan dwell time and ID Window style settings for this server. (Information
on configuring settings from the XP4000 Series Installer/User Guide) Click ‘OK’
when finished.
Enter all servers that are part of your XP4000 system. When completed, your server
list will display your attached servers in alphabetical order. Clicking on a server
will bring up that server’s configuration settings in the Information Panel. To
change the settings, double click the server name in the Root Server List.
14
Page 21

Adding Users
To add users to your database, click the ‘Add User’ icon. The following window
will appear.
Enter the name of the user and password, if applicable. At the Automatic Logout
Time field, enter the time in minutes this user can leave a station unattended before
being automatically logged out. Setting the value at ‘0’ makes this feature inactive.
The server list in this window contains all of the servers that you have added to your
system. Using the control and/or shift keys in conjunction with your mouse, click
on each server that you want this user to have access to. Now, right click to bring
up the access window as shown.
Select the access you wish this user to have to the selected server(s). Choose from
no access (the default), view only access, keyboard/video monitor/mouse access
(KVM), or full access (KVM access with power control).
When you have made your selection, click ‘OK’ to save your assignment.
15
Page 22

When you are returned to the ‘Add User’ window, the new access status will be
reflected in the server list. When you have finished configuring access for this
user, click ‘OK’ to save these settings.
Your XP Administrator main window will now show all of your system users.
Clicking on a user will bring up that user’s information and access privileges in the
Information Panel for quick reference. To change a user’s profile, double click on
the user name in the Root User List.
16
Page 23

Creating
Server Groups
The XP Administrator allows you to organize your servers into meaningful groups
for easy identification and assignment. Once a server group is established, the icon
for the group can be dragged and dropped onto the icon for any user for the
convenient assignment of access to a group of servers.
To create a server group, click on the Create Server Group icon. The following
window will appear on-screen.
Enter a name and description for this group of
servers. Click on the servers you wish to add to
this group. As you select servers, the red ‘x’
will change to a green check mark to indicate
acceptance of your selection.
When you have added all servers for this group,
click ‘OK’ to save your choices.
The window below will become active, with
your new server group displayed in the server
list. The Information Panel at the right shows
the details of the group, including name,
description, and list of included servers.
To edit a server group, double click on the
group icon in the Root Server List.
17
Page 24

Creating User
Groups
The XP Administrator allows you to organize your users into meaningful groups
for easy identification and assignment. All members of a user group have the same
access to each server included in the group. For customization, additional servers
can be added to individual users. See the section, ‘
this chapter.
To create a server group, click on the Create Server Group icon. The following
window will appear on-screen.
Customizing Access’ later in
Enter the group name and description for this user group. Then, using the control
and/or shift keys in conjunction with your mouse, click on each user that will be
a part of the group.
Now, select a server or group of servers and click on the desired level of access for
the selected server(s). Each server may be configured for a different level of access
for this user group.
18
Page 25

When you have finished making your selections, click ‘OK’. The main XP
Administrator window will become active as shown below.
The new user group is now displayed in the user list. The Information Panel at the
right shows the name and description of the user group, as well as the member
users, servers this group can access, and access rights for each server.
To edit a user group, double click on the group icon in the Root User List.
19
Page 26

Customizing
Access
The previous section described how to create a user group that shares identical
access rights to a group of servers. However, there are other ways to configure
access as well.
To grant a user access to a server group, drag the server group’s icon and drop it
on top of the user name in the main user list. (Do not drop onto a user group, as this
will not be recognized by the XP Administrator.)
Click on the access rights you wish this user to have to this group of servers, then
click ‘OK’. The new group, and the servers that comprise it, will now be displayed
in the Information Panel when this user is selected.
20
Page 27

Additional servers may be added to a user’s profile in one of two ways: via drag
and drop or by editing the user profile.
You may drag an individual server name and drop it onto the user name in the main
user list. Click on the appropriate access when the access rights window appears.
You also may double click on the user name in the main user list. This brings up
the Add/Edit User menu. Click on the server in the right hand list that you want to
add to this user’s profile. Next, right click to bring up the access rights window.
Choose the access you wish this user to have and click ‘OK’.
21
Page 28

The XP Administrator main window will become active again. The Information
Panel to the right will now contain the new server as well.
22
Page 29

Searching a
Database
The XP Administrator features three ways to search your database for quick and
easy reference: by Server Name, by Server Address or by User Name.
To search by server name or address, click on the appropriate XP Administrator
icon. Enter the name or address of the server you are searching for. The search
function is not case sensitive. Click on the ‘Search’ button and the Add/ Edit Server
window will appear on-screen.
To search by user name, click on the appropriate XP Administrator icon. Enter the
name of the user you are searching for. The search function is not case sensitive.
Click on the ‘Search’ button and the Add/Edit User window will appear on-screen.
Setting the
Administrator
Password
FIND BY
SERVER NAME
FIND BY
SERVER ADDRESS
FIND BY
USER NAME
To set the administrator password for your XP Administrator system, click on the
appropriate icon. Enter your password, then enter it again to confirm. The
administrator password is not case sensitive. Click on the ‘Set Password’ button to
save your entry.
23
Page 30

Locking/
Unlocking a
Database
The XP Administrator provides a lock feature for the security of your database. A
locked database can only be edited through the XP Administrator. An unlocked
system can be altered through the XPDU as well. To lock your database, click on
the closed lock icon in your Menu/Icon Bar. The lock status display on the Status
Bar at the bottom of the main menu will change to reflect your selection. To unlock
the database, simply click on the open lock icon.
Using Auto
Configure for
Large Systems
If you have a large number or users or servers in your system, you may want to use
the Auto Configure feature. Auto Configure allows you to quickly set up a number
of users or servers with identical configurations.
Click on the Auto Configure icon to bring up the Auto Configuration window as
shown below.
You may generate user or server lists from this menu.
Auto Configuring Servers
To automatically configure a server list, follow the steps below:
1. Using your mouse, click on the light bulbs under the channel letters in the
sample XP4000 Series unit. Click to green each slot in your chassis configuration
that contains a computer interface card. Click to blue each slot that does not
contain a computer interface card.
2. Enter a base, generic name for your servers in the Generic Name field.
3. Enter the number of servers you are adding to this auto configured list in the
Number to Generate field.
24
Page 31

4. Enter the chassis address of the first chassis that contains your auto configured
servers in the Start Chassis field.
5. Check the ‘FAIL if Duplicates Found’ box if you want the entire auto created
server list to fail if a duplicate server address is found in the system. If you
would like for the auto configured server list to flow around any duplicate
server addresses, leaving any previously configured servers unchanged, leave
this box unchecked.
6. Click the ‘Use Chassis Address in Name’ box if you would like for your auto
configured servers’ names to include the chassis address.
7. In the Configuration Type section, click the ‘Servers’ radio button, as well as
the button corresponding to the XP4000 Series chassis type you are configuring.
Your Auto Configuration menu will now look similar to the one shown below.
8. Click on the Configure button to set up this list of servers.
25
Page 32

9. Configure the options you choose for this server list and click ‘OK’ when you
have finished making selections.
10. Your auto configured server list will appear in the XP Administrator Root
Server List as shown.
Auto Configuring Users
To automatically configure a user list, follow the steps below:
1. Enter a base, generic name for your users in the Generic Name field.
2. Check the ‘FAIL if Duplicates Found’ box if you want the entire auto created
user list to fail if a duplicate user profile is found in the system. If you would
like for the auto configured server list to flow around any duplicate users,
leaving any previously configured users unchanged, leave this box unchecked.
3. In the Configuration Type section, click the ‘Users’ radio button.
Your Auto Configuration menu will now look similar to the one shown on the
following page.
26
Page 33

4. Click on the Configure button to set up this list of users.
9. Configure the options you choose for this user list and click ‘OK’ when you
have finished making selections.
10.Your auto configured user list will appear in the XP Administrator Root User
List as shown on the following page.
27
Page 34

28
Page 35

5
Product Assistance and
Troubleshooting
Customer/
Technical
Support
Our Customer Support staff is ready to assist you with any installation or operations
problem you may encounter with the XP Administrator. If a problem should
develop and you are unable to find a resolution, document the problem as
thoroughly as possible. Contact Cybex Technical Support for assistance, either by
telephone or fax. Have this manual available when you call. For the Technical
Support location nearest you, please refer to the back cover of this manual.
29
Page 36

Page 37

Warranty
EXCEPT AS OTHERWISE STATED IN AN AGREEMENT BETWEEN
CYBEX COMPUTER PRODUCTS CORPORATION (CYBEX) AND
YOURSELF, SOFTWARE UTILITIES MADE AVAILABLE BY CYBEX
FOR DOWNLOAD FROM THIS WEB SERVER ARE PROVIDED “AS IS”
WITHOUT WARRANTY OF ANY KIND.
TO THE MAXIMUM EXTENT ALLOWED BY LAW, CYBEX DISCLAIMS
ALL WARRANTIES AND CONDITIONS, WHETHER EXPRESS,
IMPLIED, OR STATUTORY, WITH REGARD TO THE SOFTWARE
UTILITIES MADE AVAILABLE BY CYBEX FROM THIS WEB SERVER,
INCLUDING IMPLIED WARRANTIES OF MERCHANTABILITY,
FITNESS FOR A PARTICULAR OR INTENDED PURPOSE, NONINFRINGEMENT AND TITLE.
TO THE MAXIMUM EXTENT ALLOWED BY LAW, CYBEX SHALL
NOT BE LIABLE FOR ANY DIRECT, SPECIAL, INDIRECT OR
CONSEQUENTIAL DAMAGES (INCLUDING DAMAGES FOR LOSS OF
PROFITS, LOSS OF BUSINESS, LOSS OF INFORMATION, FINANCIAL
LOSS, LOSS OF PRIVACY, OR NEGLIGENCE) WHICH MAY BE CAUSED
BY OR RELATED TO, DIRECTLY OR INDIRECTLY, THE USE OF (OR
INABILITY TO USE) THE SOFTWARE UTILITIES MADE AVAILABLE
BY CYBEX FOR DOWNLOAD FROM THIS WEB SERVER - EVEN IF
CYBEX OR AN AUTHORIZED CYBEX DEALER HAS BEEN ADVISED
OF THE POSSIBILITY OF SUCH DAMAGES OR LOSS.
Page 38

Cybex Computer Products Corporation
4991 Corporate Drive
Huntsville, Alabama 35805-6201 • USA
Tel: 800 932 9239
Fax: 256 430 4031
E-Mail: techsupport@cybex.com
Cybex Computer Products International Ltd.
Cybex House
Shannon Free Zone
Shannon, Co. Clare, Ireland
Tel: 00353 61 471 877
Fax: 00353 61 471 871
E-mail: techsupp_eur@cybex.ie
Cybex Asia Pacific
Singapore Representative Office
19-B Bukit Pasoh Road
Singapore 089833
Tel: 0065 223 9198
Fax: 0065 223 9155
E-mail: info.asiapac@cybex.ie
Cybex Germany
Dachauerstrasse 44a
80335 Munchen
Germany
Tel:. 0049 89 599 0830
Fax: 0049 89 599 08350
E-mail: techsupp_eur@cybex.ie
Cybex Canada
20 Mural Street, Unit#5
Richmond Hill, Ontario
Canada, L4B 1K3
Tel: 1 877 992 9239
Fax: 1 877 524 2985
E-mail: tech@cybex.ca
590-146 REV. A590-146 REV. A
590-146 REV. A
590-146 REV. A590-146 REV. A
 Loading...