

Page 1
CYBEX GmbH
Riedingerstr. 18 | 95448 Bayreuth | Germany
INFO@CYBEX-ONLINE.COM / WWW.CYBEX-ONLINE.COM
WWW.FACEBOOK.COM/CYBEX.ONLINE
GO TO WWW.CYBEX-ONLINE.COM
TO WATCH AN INSTRUCTIONAL VIDEO
CY_171_2518_B1017
Page 2
DE
FR ENNL ITPL
HU
CZSKESPT
CYBEX PALLAS S-FIX
UN R44/04, Gr. 1 | 9-18 kg
PALLAS S - F IX
User guide
CYBEX SOLUTION S-FIX
UN R44/04, Gr. 2/3 | 15 - 36 kg
Page 3
Kurzanleitung Gruppe 1 (9-18 kg) Brief instructions Group 1 (9-18 kg) Istruzioni brevi Gruppo 1 (9-18 kg)DE: EN: IT:
Skrócona instrukcja Grupa 1 (9-18 kg)Korte handleiding Groep 1 (9-18 kg) PL:NL:
Stručné instrukce Sk. 1 (9-18 kg) Stručné inštrukcie Sk. 1 (9-18 kg)
CZ: SK:
Rövid használati utasítás 1 csoport (9-18 kg)
HU:
Instrucciones abreviadas Grupo 1 (9-18 kg) Instruções breves Gr. 1 (9-18 kg)ES: PT:
Instructions en bref Groupe 1 (9-18 kg)FR:
1
180°
4
7
2
CLICK!
5
8
3
6
9
CLICK!
10
MAX
2
Page 4

DE - WARNUNG! Ohne Genehmigung der Zulassungsstelle dürfen keine Veränderungen am Kindersitz vorgenommen und keine Ergänzungen hinzugefügt werden. Reparaturen dürfen ausschließlich durch
Personen vorgenommen werden, die hierfür autorisiert sind. Dabei dürfen stets nur original Bau- und Zubehörteile verwendet werden. Die Schutzfunktion des Kindersitzes ist sonst nicht mehr gewährleistet.
WARNUNG! Der Kindersitz bietet nur dann den bestmöglichen Schutz für Ihr Kind, wenn Sie die Gebrauchsanweisung genau befolgen.
EN - WARNI NG! Without the approval of the certification office, the child seat may not be modified or added to in any way. Repairs may only be performed by person authorised to this effect. Only original parts
EN - WARNI NG! Without the approval of the certification office, the child seat may not be modified or added to in any way. Repairs may only be performed by person authorised to this effect. Only original parts
and accessories may be used for repairs. Failure to comply with the above will result in the protective function of the child seat no longer being guaranteed.
and accessories may be used for repairs. Failure to comply with the above will result in the protective function of the child seat no longer being guaranteed.
WARNING! The child seat only offers optimum protection for your child if you follow the usage instructions precisely.
WARNING! The child seat only offers optimum protection for your child if you follow the usage instructions precisely.
ATTENZIONE! Senza l’approvazione dell’ufficio di certificazione il seggiolino non può subire modifiche o aggiunte di alcun genere. Eventuali riparazioni dovranno essere effettuate solo da persone autorizzate,
utilizzando soltanto componenti ed accessori originali. Il mancato rispetto di quanto sopra avrà come conseguenza il termine della garanzia della funzione protettiva del seggiolino.
ATTENZIONE! Il seggiolino offre la protezione ottimale per il bambino solo qualora vengano seguite precisamente le istruzioni per l’uso.
FR - ATTENTION ! Ce siège auto ne saurait être modifié sans l’autorisation préalable de l’organisme de certification compétent. Toute réparation ne peut être effectuée que par une personne habilitée. Seuls des
pièces détachées et des accessoires d’origine peuvent être utilisés. Toute entorse aux règles précitées compromettra la fonction de protection du siège auto.
ATTENTION ! Le siège auto n’offre une protection optimale que si vous suivez précisément les instructions d’utilisation.
NL - BELANGRIJK! Zonder de goedkeuring van het certificeringsinstelling mag het autostoeltje niet worden aangepast en mag er niets aan worden toegevoegd. Reparaties mogen alleen worden uitgevoerd door
personen die daartoe bevoegd zijn. Er mogen uitsluitend originele onderdelen en accessoires worden gebruikt voor reparaties. Niet-naleving van het bovenstaande heeft tot gevolg dat de beschermende functie
van het autostoeltje niet langer gegarandeerd is.
BELANGRIJK! Het autostoeltje biedt uw kind alleen optimale bescherming als u de handleiding precies volgt.
PL - OSTRZEŻENIE! Bez zgody instytucji certyfikującej produkt, fotelik nie może być w żaden sposób modyfikowany lub zmieniany. Naprawy dokonuje tylko specjalnie upoważniona do tego osoba. Tylko
oryginalne części i akcesoria mogą być użyte do naprawy. Niezastosowanie się do tych zasad może spowodować utratę funkcji ochronnej fotelika oraz utratę gwarancji.
OSTRZEŻENIE! Fotelik zapewnia optymalną ochronę tylko w przypadku postępowania zodnie z instrukcją.
HU - FIGYELMEZTETÉ S! A hitelesítő intézet jóváhagyása nélkül a terméken semmilyen módosítás nem végezhető. Javítást csak az erre felhatalmazott személy végezhet. Kizárólag eredeti alkatrészek és
tartozékok használhatók javításhoz. A fentiek be nem tartásával már nem garantálható a gyermekülés védelmi funkciója.
FIGYELMEZTETÉS! A gyermekülés akkor nyújt megfelelő védelmet gyermekének, ha pontosan követi a használati utasításokat.
CZ - VAROVÁNÍ! Bez povolení certifikačního úřadu nesmí být autosedačka jakkoliv upravována. Opravy mohou provádět pouze autorizované osoby. K opravám lze používat pouze originální náhradní díly a
příslušenství. Při nedodržení výše uvedených podmínek nelze zaručit ochrannou funkci dětské autosedačky.
VAROVÁNÍ! Dětská autosedačka poskytuje Vašemu dítěti optimální ochranu pouze při důkladném dodržení pokynů k použití.
SK - VAROVANIE! Bez povolenia certifikačného úradu nesmie byť autosedačka akokoľvek upravovaná. Opravy môžu vykonávať len autorizované osoby. K opravám možné používať len originálne náhradné diely a
príslušenstvo. Pri nedodržaní vyššie uvedených podmienok nemožno zaručiť ochrannú funkciu detskej autosedačky.
VAROVANIE! Detská autosedačka poskytuje Vášmu dieťaťu optimálnu ochranu len pri dôkladnom dodržaní pokynov na použitie.
DE
FR ENNL ITPL
HU
CZSKESPT
ES - ¡ATENCIÓN! La silla de auto no puede ser modificada ni se le pueden añadir componentes sin la aprobación de la oficina de certificación. Las reparaciones las realizará únicamente una persona autorizada
para ello. Sólo se utilizarán recambios y accesorios originales en las reparaciones. El incumplimiento de lo expuesto anteriormente resultará en la pérdida de cobertura por garantía sobre la silla.
¡ATENCIÓN! La silla de coche solo ofrece una protección óptima para su hijo si sigue las instrucciones de uso de forma precisa.
PT - Atenção! Sem expressa autorização, a cadeira infantil não poderá ser modificada de nenhuma maneira. As reparações só podem ser feitas por pessoas autorizadas para este efeito. Apenas partes e
acessórios originais devem ser utilizados nas reparações. Não ir de encontro ao descrito anteriormente irá fazer com que a proteção da criança não possa ser assegurada.
Atenção! A cadeira auto só oferece proteção ótima para a criança quando segue todas as instruções corretamente.
3
Page 5
Kurzanleitung Gruppe 2/3 (15-36 kg) Brief instructions Group 2/3 (15-36 kg) Istruzioni brevi Gruppo 2/3 (15-36 kg)DE: EN: IT:
Skrócona instrukcja Grupa 2/3 (15-36 kg)Korte handleiding Groep 2/3 (15-36 kg) PL:NL:
Stručné instrukce Sk. 2/3 (15-36 kg) Stručné inštrukcie Sk. 2/3 (15-36 kg)
CZ: SK:
Instructions en bref Groupe 2/3 (15-36 kg)FR:
Rövid használati utasítás 2/3 csoport (15-36 kg)
HU:
Instrucciones abreviadas Grupo 2/3 (15-36 kg) Instruções breves Gr. 2/3 (15-36 kg)ES: PT:
13
1
180°
5
PRESS!
9
CLICK!
2
CLICK!
6
10
3
7
11
4
8
12
MAX
14
4
Page 6

DE - WARNUNG! Ohne Genehmigung der Zulassungsstelle dürfen keine Veränderungen am Kindersitz vorgenommen und keine Ergänzungen hinzugefügt werden. Reparaturen dürfen ausschließlich durch
Personen vorgenommen werden, die hierfür autorisiert sind. Dabei dürfen stets nur original Bau- und Zubehörteile verwendet werden. Die Schutzfunktion des Kindersitzes ist sonst nicht mehr gewährleistet.
WARNUNG! Der Kindersitz bietet nur dann den bestmöglichen Schutz für Ihr Kind, wenn Sie die Gebrauchsanweisung genau befolgen.
EN - WARNI NG! Without the approval of the certification office, the child seat may not be modified or added to in any way. Repairs may only be performed by person authorised to this effect. Only original parts
EN - WARNI NG! Without the approval of the certification office, the child seat may not be modified or added to in any way. Repairs may only be performed by person authorised to this effect. Only original parts
and accessories may be used for repairs. Failure to comply with the above will result in the protective function of the child seat no longer being guaranteed.
and accessories may be used for repairs. Failure to comply with the above will result in the protective function of the child seat no longer being guaranteed.
WARNING! The child seat only offers optimum protection for your child if you follow the usage instructions precisely.
WARNING! The child seat only offers optimum protection for your child if you follow the usage instructions precisely.
ATTENZIONE! Senza l’approvazione dell’ufficio di certificazione il seggiolino non può subire modifiche o aggiunte di alcun genere. Eventuali riparazioni dovranno essere effettuate solo da persone autorizzate,
utilizzando soltanto componenti ed accessori originali. Il mancato rispetto di quanto sopra avrà come conseguenza il termine della garanzia della funzione protettiva del seggiolino.
ATTENZIONE! Il seggiolino offre la protezione ottimale per il bambino solo qualora vengano seguite precisamente le istruzioni per l’uso.
FR - ATTENTION ! Ce siège auto ne saurait être modifié sans l’autorisation préalable de l’organisme de certification compétent. Toute réparation ne peut être effectuée que par une personne habilitée. Seuls des
pièces détachées et des accessoires d’origine peuvent être utilisés. Toute entorse aux règles précitées compromettra la fonction de protection du siège auto.
ATTENTION ! Le siège auto n’offre une protection optimale que si vous suivez précisément les instructions d’utilisation.
NL - BELANGRIJK! Zonder de goedkeuring van het certificeringsinstelling mag het autostoeltje niet worden aangepast en mag er niets aan worden toegevoegd. Reparaties mogen alleen worden uitgevoerd door
personen die daartoe bevoegd zijn. Er mogen uitsluitend originele onderdelen en accessoires worden gebruikt voor reparaties. Niet-naleving van het bovenstaande heeft tot gevolg dat de beschermende functie
van het autostoeltje niet langer gegarandeerd is.
BELANGRIJK! Het autostoeltje biedt uw kind alleen optimale bescherming als u de handleiding precies volgt.
PL - OSTRZEŻENIE! Bez zgody instytucji certyfikującej produkt, fotelik nie może być w żaden sposób modyfikowany lub zmieniany. Naprawy dokonuje tylko specjalnie upoważniona do tego osoba. Tylko
oryginalne części i akcesoria mogą być użyte do naprawy. Niezastosowanie się do tych zasad może spowodować utratę funkcji ochronnej fotelika oraz utratę gwarancji.
OSTRZEŻENIE! Fotelik zapewnia optymalną ochronę tylko w przypadku postępowania zodnie z instrukcją.
HU - FIGYELMEZTETÉ S! A hitelesítő intézet jóváhagyása nélkül a terméken semmilyen módosítás nem végezhető. Javítást csak az erre felhatalmazott személy végezhet. Kizárólag eredeti alkatrészek és
tartozékok használhatók javításhoz. A fentiek be nem tartásával már nem garantálható a gyermekülés védelmi funkciója.
FIGYELMEZTETÉS! A gyermekülés akkor nyújt megfelelő védelmet gyermekének, ha pontosan követi a használati utasításokat.
CZ - VAROVÁNÍ! Bez povolení certifikačního úřadu nesmí být autosedačka jakkoliv upravována. Opravy mohou provádět pouze autorizované osoby. K opravám lze používat pouze originální náhradní díly a
příslušenství. Při nedodržení výše uvedených podmínek nelze zaručit ochrannou funkci dětské autosedačky.
VAROVÁNÍ! Dětská autosedačka poskytuje Vašemu dítěti optimální ochranu pouze při důkladném dodržení pokynů k použití.
SK - VAROVANIE! Bez povolenia certifikačného úradu nesmie byť autosedačka akokoľvek upravovaná. Opravy môžu vykonávať len autorizované osoby. K opravám možné používať len originálne náhradné diely a
príslušenstvo. Pri nedodržaní vyššie uvedených podmienok nemožno zaručiť ochrannú funkciu detskej autosedačky.
VAROVANIE! Detská autosedačka poskytuje Vášmu dieťaťu optimálnu ochranu len pri dôkladnom dodržaní pokynov na použitie.
DE
FR ENNL ITPL
HU
CZSKESPT
ES - ¡ATENCIÓN! La silla de auto no puede ser modificada ni se le pueden añadir componentes sin la aprobación de la oficina de certificación. Las reparaciones las realizará únicamente una persona autorizada
para ello. Sólo se utilizarán recambios y accesorios originales en las reparaciones. El incumplimiento de lo expuesto anteriormente resultará en la pérdida de cobertura por garantía sobre la silla.
¡ATENCIÓN! La silla de coche solo ofrece una protección óptima para su hijo si sigue las instrucciones de uso de forma precisa.
PT - Atenção! Sem expressa autorização, a cadeira infantil não poderá ser modificada de nenhuma maneira. As reparações só podem ser feitas por pessoas autorizadas para este efeito. Apenas partes e
acessórios originais devem ser utilizados nas reparações. Não ir de encontro ao descrito anteriormente irá fazer com que a proteção da criança não possa ser assegurada.
Atenção! A cadeira auto só oferece proteção ótima para a criança quando segue todas as instruções corretamente.
5
Page 7
PALLAS S-fix
UN-R44-04
UNIVE RSAL
SEM I-UNIVERSAL
9 - 18 kg
04301358
CYBEX GmbH
Riedingerstr. 18, 95448 Bayreuth
Germany
SOLUTION S-fix
UN-R44-04
UNIVE RSAL
SEM I-UNIVERSAL
15 – 36 kg
04301359
CYBEX GmbH
Riedingerstr. 18, 95448 Bayreuth
Germany
6
Zulassung
UN R-44/04
CYBEX PALLAS S-FIX - Gruppe 1, 9 bis 18 kg
CYBEX SOLUTION S-FIX - Gruppe 2/3, 15 bis 36 kg
Sitzerhöher mit Rückenlehne und Kopfstütze auf einem
verstellbaren Grundrahmen mit tiefenverstellbarem
Fangkörper.
Empfohlen für:
Alter: ca. 9 Monate bis 4 Jahre
Gewicht: 9-18 kg
nur geeignet für Fahrzeugsitze mit DreipunktAutomatik-Gurt, der nach UN Regelung Nr. R16 oder
gleichwertigem Standard zugelassen ist
Certification
UN R-44/04
CYBEX PALLAS S-FIX - group 1, 9 to 18 kg
CYBEX SOLUTION S-FIX - group 2/3, 15 to 36 kg
Seat elevator with backrest and headrest on an adjustable
base frame with height-adjustable impact shields.
Recommended for:
Age: Approx. 9 months to 4 years
Weight: 9-18 kg
Only suitable for vehicle seats with automatic three-point
belts approved in accordance with UN regulation R16 or a
comparable standard
Approvazione
UN R-44/04
CYBEX PALLAS S-FIX - Gruppo 1, da 9 a 18 kg
CYBEX SOLUTION S-FIX - Gruppo 2/3, da 15 a 36 kg
Elevatore del seggiolino con schienale e poggiatesta su un
telaio di base regolabile con cuscini di sicurezza regolabili
in altezza.
Raccomandato per:
Età: da 9 mesi a 4 anni circa
Peso: 9-18 kg
Adatto solo ai sedili dei veicoli con cinture automatiche a tre
punti approvate ai sensi del regolamento UN R16 o di uno
standard equivalente
DE
!
WARNUNG! Um den optimalen Schutz für Ihr Kind zu gewährleisten, muss der
INHALT
CYBEX PALLAS S-FIX unbedingt so verwendet werden, wie es in dieser Anleitung
beschrieben wird.
HINWEIS! Bewahren Sie die Anleitung immer griffbereit auf (z.B. im dafür vorgesehenen
Fach an der Rückseite der Rückenlehne).
HINWEIS! Durch länderspezifische Anforderungen (z.B. Farbkennzeichnungen am
Kindersitz) können Produktmerkmale in ihrer äußeren Erscheinung variieren. Die korrekte
Funktionsweise des Produktes wird davon jedoch nicht beeinflusst.
DER RICHTIGE PLATZ IM FAHRZEUG ............................................................................................................................................................. 8
SICHERHEIT IM FAHRZEUG ................................................................................................................................................................................10
DEN SITZ INS FAHRZEUG STELLEN .............................................................................................................................................................. 10
BEFESTIGEN DES KINDERSITZES MITTELS ISOFIX CONNECT SYSTEM ...............................................................................12
AUSBAU DES KINDERSITZES .............................................................................................................................................................................14
EINSTELLEN DER SEITENPROTEKTOREN ..................................................................................................................................................14
NEIG UNGSVERSTELLBARE KOPFSTÜTZE ................................................................................................................................................16
ANPASSEN AN DIE KÖRPERGRÖSSE .........................................................................................................................................................18
EINSTELLEN DES FANGKÖRPERS GRUPPE 1 918 KG ..............................................................................................................18
ANSCHNALLEN MIT FANGKÖRPER GRUPPE 1 918 KG ............................................................................................................20
SITZ UND LIEGEPOSITION GRUPPE 1 918 KG ............................................................................................................................22
IST IHR KIND RICHTIG GESICHERT? FANGKÖRPER GRUPPE 1 918KG 24
WECHSEL VON PALLAS SFIX AUF SOLUTION SFIX GRUPPE 1 ZU GRUPPE 2/3 26
ANSCHNALLEN DES KINDES GRUPPE 2/3 1536 KG .....................................................................................................................28
IST IHR KIND RICHTIG GESICHERT? FAHRZEUGGURT GRUPPE 2/3 1536 KG 30
ENTFERNEN DES BEZUGES ...............................................................................................................................................................................32
REINIGUNG ....................................................................................................................................................................................................................34
PFLEGE .............................................................................................................................................................................................................................36
VERHALTEN NACH EINEM UNFALL ..................................................................................................................................................................36
PRODUKTLEBENSDAUER.....................................................................................................................................................................................36
ENTSORGUNG ............................................................................................................................................................................................................38
GARANTIEBEDINGUNGEN ..................................................................................................................................................................................38
Page 8

EN IT
CONTENTS INDICE
!
WARNING! To ensure optimum protection for your child, the CYBEX PALLAS S-FIX
must be used as described in these instructions.
NOTE! Always keep these instructions to hand (e.g. in the designated compartment on the
rear of the backrest).
NOTE! Country-specific regulations (e.g. regarding colour-coding on child seats) may
mean that product features may vary in appearance. This will, however, not affect the
product in its correct function.
NOTA BENE! Tenere sempre a portata di mano queste istruzioni (ad esempio
nell’apposito scomparto sul retro dello schienale).
NOTA BENE! Le norme nazionali (ad esempio rispetto alla codifica cromatica dei
seggiolini) possono implicare che le caratteristiche esteriori del prodotto possano variare.
Questo comunque non influisce sul corretto funzionamento del prodotto.
!
ATTENZIONE! Per assicurare la protezione ottimale per il bambino il CYBEX
PALLAS S-fix deve essere usato come descritto nelle presenti istruzioni.
DE
ENIT
POSITIONING THE SEAT CORRECTLY IN THE VEHICLE ..................................................................................................................... 9
SAFETY IN THE VEHICLE ........................................................................................................................................................................................11
PLACING THE SEAT IN THE VEHICLE .............................................................................................................................................................11
SECURING THE CHILD SEAT USING THE ISOFIX CONNECT SYSTEM ....................................................................................13
REMOVAL OF THE CHILD SEAT .........................................................................................................................................................................15
ADJUSTING THE SIDE PROTECTORS ............................................................................................................................................................15
RECLINING HEADREST .........................................................................................................................................................................................17
ADAPTING TO BODY SIZE .....................................................................................................................................................................................19
ADJUSTING THE IMPACT SHIELD GROUP 1 918 KG ...................................................................................................................19
STRAPPING WITH THE IMPACT SHIELD GROUP 1 918 KG .....................................................................................................21
SEATED AND LYING POSITION GROUP 1 918 KG .........................................................................................................................23
IS YOUR CHILD CORRECTLY SECURED? IMPACT SHIELD GROUP 918KG 25
SWITCHING FROM PALLAS SFIX TO SOLUTION SFIX GROUP 1 TO GROUP 2/3 27
FASTENING YOUR CHILD’S SEATBELT GROUP 2/3 1536 KG.....................................................................................................29
IS YOUR CHILD CORRECTLY SECURED? VEHICLE BELT GROUP 2/3 1536 KG 31
REMOVING THE SEAT COVER ............................................................................................................................................................................33
CLEANING .......................................................................................................................................................................................................................35
CARE & MAINTENANCE...........................................................................................................................................................................................37
HOW TO ACT FOLLOWING AN ACCIDENT .................................................................................................................................................37
PRODUCT LIFESPAN ................................................................................................................................................................................................37
DISPOSAL .......................................................................................................................................................................................................................39
WARRANTY CONDITIONS.....................................................................................................................................................................................39
POSIZIONE CORRETTA DEL SEGGIOLINO NEL VEICOLO ............................................................................................................... 9
SICUREZZA NELL’INSTALLAZIONE IN AUTO ..............................................................................................................................................11
COLLOCAZIONE DEL SEGGIOLINO NEL VEICOLO .............................................................................................................................11
FISSAGGIO DEL SEGGIOLINO CON IL SISTEMA ISOFIX CONNECT ........................................................................................13
DISINSTALLARE IL SEGGIOLINO ......................................................................................................................................................................15
REGOLARE LE PROTEZIONI LATERALI..........................................................................................................................................................15
POGGIATESTA INCLINABILE ..............................................................................................................................................................................17
REGOLAZIONE IN BASE ALLA CORPORATURA ....................................................................................................................................19
REGOLARE IL CUSCINO DI SICUREZZA GRUPPO 1 918 KG ...............................................................................................19
ALLACCIARE CON IL CUSCINO DI SICUREZZA GRUPPO 1 918 KG ................................................................................21
POSIZIONE SEDUTA E SDRAIATA GRUPPO 1 918 KG ................................................................................................................23
IL BAMBINO È MESSO IN SICUREZZA CORRETTAMENTE? CUSCINO DI SICUREZZA GRUPPO 918KG 25
PASSAGGIO DA PALLAS SFIX A SOLUTION SFIX DAL GR UPPO 1 AL GRUPPO 2/3 27
ALLACCIARE IL BAM BINO CON LA CINTURA GRUPPO 2/3 1536 KG ...................................................................................29
IL BAMBINO È MESSO IN SICUREZZA CORRETTAMENTE? CINTURA DELL’AUTOMOBILE GRUPPO 2/3 1536 KG 31
RIMOZIONE DELLA FODERA DEL SEGGIOLINO ....................................................................................................................................33
PULIZIA ..............................................................................................................................................................................................................................35
CURA E MANUTE NZIONE ......................................................................................................................................................................................37
COME PROCEDERE IN SEGUITO A UN INCIDENTE.............................................................................................................................37
VITA UTILE DEL PRODOTTO ..................................................................................................................................................................................37
SMALTIMENTO ..............................................................................................................................................................................................................39
CONDIZIONI DI GARANZIA ...................................................................................................................................................................................39
7
Page 9
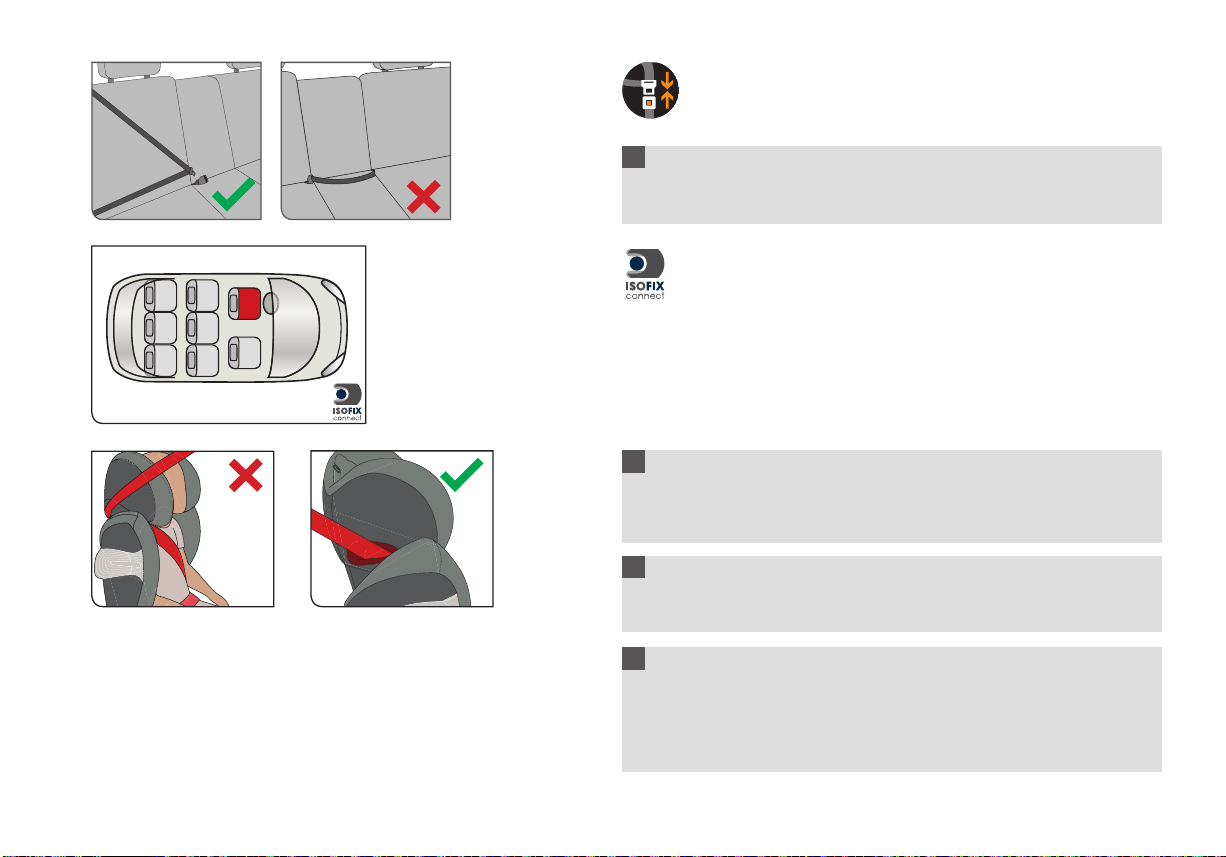
DER RICHTIGE PLATZ IM FAHRZEUG
Der Kindersitz ist mit eingeklapptem ISOFIX Connect System auf
allen Fahrzeugplätzen mit Dreipunkt-Automatikgurt verwendbar, die im
Fahrzeughandbuch für die „universelle“ Verwendung zugelassen sind.
!
WARNUNG! Der Sitz ist nicht für die Verwendung mit einem 2-Punkt- oder
Beckengurt geeignet. Wird der Sitz mit einem 2-Punkt-Gurt gesichert, kann es bei
einem Unfall zu schweren oder gar tödlichen Verletzungen des Kindes kommen.
Für die Befestigung mit den ISOFIX Connect Rastarmen besteht eine „semiuniversale“ Genehmigung. Aus diesem Grund kann ISOFIX Connect nur in
bestimmten Fahrzeugen eingesetzt werden. Die zugelassenen Fahrzeuge
entnehmen Sie bitte der beigelegten Fahrzeugtypenliste. Die aktuelle Version
erhalten Sie auf www.cybex-online.com.
In Ausnahmefällen kann der Kindersitz auch vorne am Beifahrersitz verwendet werden.
Beachten Sie dabei die folgenden Punkte:
• Bei Fahrzeugen mit Airbag sollten Sie den Beifahrersitz so weit wie möglich nach hinten
schieben. Beachten Sie jedoch, dass der obere Gurtpunkt des Fahrzeuggurtes hinter
der Gurtführung des Kindersitzes bleibt.
• Die Empfehlungen des Fahrzeugherstellers sind unbedingt zu befolgen.
!
WARNUNG! Der Diagonalgurt muss schräg nach hinten verlaufen und darf nie nach
vorn zum oberen Gurtpunkt in Ihrem Fahrzeug führen. Sollte dies nicht einzustellen
sein z.B. durch Vorschieben des Autositzes oder Verwendung auf einem anderen
Sitzplatz, so ist der Kindersitz für dieses Fahrzeug nicht geeignet.
!
WARNUNG! Gepäckstücke oder andere Gegenstände im Fahrzeug, welche bei
einem Unfall Verletzungen verursachen können, müssen immer gut befestigt werden.
Sie können zu tödlichen Geschossen im Fahrzeug werden.
!
WARNUNG! Auf Fahrzeugplätzen, die quer zur Fahrtrichtung angeordnet sind, ist
die Verwendung des Sitzes nicht zulässig. Auf rückwärtsgerichteten Fahrzeugsitzen,
wie z.B. in einem Van oder Minibus, ist die Verwendung zulässig, sofern der
Fahrzeugsitz für die Beförderung eines Erwachsenen zugelassen ist. Zu beachten
ist, dass die Fahrzeugkopfstütze bei rückwärtsgerichtetem Einbau nicht entfernt
werden darf!
HINWEIS! Bitte lassen Sie Ihr Kind nie unbeaufsichtigt im Fahrzeug zurück.
8
Page 10
POSITIONING THE SEAT CORRECTLY IN THE VEHICLE
The car seat with retracted ISOFIX Connect system can be used on all vehicle
seats with automatic three-point safety belts approved in the vehicle manual for,
universal‘ use.
POSIZIONE CORRETTA DEL SEGGIOLINO NEL VEICOLO
Il seggiolino, con sistema ISOFIX Connect rientrato nella base, può essere
utilizzato su tutti i sedili con cinture di sicurezza automatiche a tre punti
approvate dal manuale della vettura per uso ‘universale’.
DE
!
WARNING! The seat is not suitable for use with a two-point or lap belt. If the seat is
secured using a two-point belt, an accident may result in severe or even fatal injuries
to the child.
A ‘semi-universal’ certification is given to restraint systems that are connected to
the car through ISOFIX Connect locking arms. For this reason, ISOFIX Connect
can only be used in certain vehicles. Please refer to the enclosed vehicle type
list for approved vehicles. You can obtain the most up-to-date version from www.
cybex-online.com.
In exceptional cases, the child seat may also be used on the front passenger seat. Please
note the following in this case:
• In cars with airbags, you should push the passenger seat back as far as possible. When
doing so, however, ensure that the upper pivot point of the safety belt is behind the belt
feed point of the child seat.
• Always comply with the recommendations of the vehicle manufacturer.
!
WARNING! The diagonal belt must run back at a recline and must never run forward
to the upper belt point in your vehicle. If it is not possible to adjust the seat in this
way, e.g. by pushing the car seat forward or using it on another seat, this child seat is
not suitable for your vehicle.
!
WARNING! Luggage or other objects present in the vehicle that may cause injury
in the event of an accident must always be firmly secured. Otherwise, they may be
thrown, causing fatal injuries.
WARNING! The child seat may not be used on car seats facing to the side of the
!
direction of travel. Use of the child seat is permitted on rear-facing seats, e.g. in a van
or minibus, provided that the seat is permitted for transporting an adult. Please note
that the vehicle headrest must not be removed when fitting on a rear-facing seat!
Even if not in use, the child seat must always be secured with the safety belt.
!
ATTENZIONE! Il seggiolino è inadatto all’uso con una cintura subaddominale o a
due punti. Gli incidenti possono causare lesioni gravi o mortali al bambino in caso di
messa in sicurezza con una cintura a due punti.
Ai sistemi di ritenuta collegati alla vettura mediante sistema ISOFIX Connect è
data una omologazione ‘semi-universale’. Gli ISOFIX CONNECT sono perciò
utilizzabili solo in alcuni veicoli. Consultare la lista di tipi di veicoli allegata
per conoscere i veicoli approvati. La versione sempre aggiornata della lista è
disponibile nel nostro sito al link: www.cybex-online.com.
In casi eccezionali, il seggiolino può essere utilizzato anche sul sedile del passeggero
anteriore. In questo caso tenere conto di quanto segue:
• Nelle auto dotate di airbag il sedile del passeggero va spinto il più indietro possibile. Nel
fare ciò accertarsi però che il punto di snodo superiore della cintura di sicurezza si trovi
dietro alla guida della cintura del seggiolino.
• Rispettare sempre le raccomandazioni del costruttore del veicolo.
!
ATTENZIONE! La cintura diagonale deve sempre scorrere indietro inclinata e non
deve mai scorrere in avanti verso il punto superiore della cintura nel veicolo. Nel caso
non sia possibile regolare il sedile in questo modo, ad esempio spingendo avanti il
sedile o usando un altro sedile, il seggiolino non sarà adatto all’uso in questo veicolo.
!
ATTENZIONE! Bagagli o altri oggetti presenti nel veicolo che possono causare
lesioni in caso di incidente devono essere fissati saldamente. In caso contrario
potrebbero essere scagliati e causare lesioni mortali.
!
ATTENZIONE! Il seggiolino non è utilizzabile sui sedili rivolti lateralmente rispetto
alla direzione di marcia. L‘utilizzo del seggiolino auto è consentito nei sedili rivolti
contrari al senso di marcia, ad esempio nei furgoncini o nei minibus, a condizione
che il sedile sia omologato per il trasporto dell‘adulto. Non rimuovere il poggiatesta
del sedile del veicolo durante l’installazione del seggiolino nei sedili rivolti contrari
al senso di marcia. Anche quando non si trasporta il bambino il seggiolino auto va
assicurato con la cintura.
ENIT
NOTE! Never leave your child unattended in the vehicle.
NOTA BENE! Non lasciare mai il tuo bambino incustodito all’interno dell’auto
9
Page 11
SICHERHEIT IM FAHRZEUG
!
WARNUNG! Der Kindersitz muss, auch dann wenn er nicht benutzt wird, immer
korrekt mit dem Fahrzeuggurt im Fahrzeug befestigt sein. Bereits bei einer
Notbremsung oder einem geringen Aufprall können unbefestigte Teile andere
Mitfahrer und Sie selbst verletzen.
Achten Sie zum Schutz aller Fahrzeuginsassen stets darauf, dass...
• die umklappbaren Rückenlehnen der Fahrzeugsitze eingerastet sind und sich in einer
aufrechten Position befinden.
• bei Einbau des Kindersitzes auf dem Beifahrersitz, dieser in der hintersten Position
steht.
• im Fahrzeug alle beweglichen Gegenstände gesichert sind.
• alle Personen im Fahrzeug angeschnallt sind.
DEN SITZ INS FAHRZEUG STELLEN
Stellen Sie den Kindersitz auf den entsprechenden Fahrzeugsitz im Auto.
• Achten Sie unbedingt darauf, dass die Rückenlehne (1) des CYBEX PALLAS S-FIX
flächig an der Rückenlehne des Fahrzeugsitzes anliegt. Gegebenenfalls können Sie den
Abstand mit dem ISOFIX Verstellgriff (2) einstellen.
• Sollte die Kopfstütze des Fahrzeuges störend sein, ziehen Sie diese ganz heraus oder
nehmen Sie diese ganz ab (Ausnahme siehe Abschnitt „DER RICHTIGE PLATZ IM
FAHRZEUG“). Die Rückenlehne (1) passt sich optimal stufenlos nahezu jeder Neigung
des Fahrzeugsitzes an.
!
1
2
WARNUNG! Die Rückenlehne des CYBEX Kindersitzes muss an der Lehne des
Fahrzeuges flächig aufliegen. Um den größtmöglichen Schutz für das Kind zu
gewährleisten, muss sich der Sitz in einer normalen aufrechten Position befinden!
HINWEIS! An einigen Autositzen aus empfindlichem Material (z.B. Velours, Leder,
etc.) können durch die Benutzung von Kindersitzen mögliche Gebrauchsspuren und/
oder Abfärbungen auftreten. Um das zu vermeiden, können Sie z.B. eine Decke oder
ein Handtuch unterlegen. Ferner weisen wir in diesem Zusammenhang auf unsere
Reinigungshinweise in dieser Gebrauchsanleitung hin, die vor der ersten Verwendung des
Sitzes unbedingt beachtet werden sollten.
!
WARNUNG! Benutzen Sie niemals andere als die in der Bedienungsanleitung beschriebenen und am Sitz markierten Punkte, um den Kindersitz zu befestigen.
10
HINWEIS! Bitte verwenden Sie die ISOFIX-Einführhilfen, um sicherzustellen, dass der
Fahrzeugsitz nicht durch die ISOFIX Connect Rastarme zerstört wird.
Page 12

SAFETY IN THE VEHICLE
!
WARNING! The car seat must always be secured correctly with the vehicle belt
in the vehicle even when not in use. In case of an emergency brake or accident, an
unsecured car seat may injure other passengers or your.
In order to guarantee the best possible safety for all passengers make sure that...
• the foldable backrests in the vehicle are locked in their upright position.
• when installing the car seat on the front passenger seat, adjust the vehcile seat in
rearmost position.
• you properly secure all objects likely to cause injury in the case of an accident.
• all passengers in the vehicle are buckled up.
PLACING THE SEAT IN THE VEHICLE
Place the child seat on the appropriate seat in the car.
• Always ensure that the entire surface of the backrest (1) of the CYBEX PALLAS S-FIX
is placed against the backrest of the vehicle seat. If necessary, you can adjust the
distance using the ISOFIX adjustment lever (2).
• If the headrest of the vehicle is in the way, pull it out all the way or remove it completely
(for exceptions to this, please refer to the section “POSITIONING THE SEAT
CORRECTLY IN THE VEHICLE”). The backrest (1) will perfectly adapt to practically
any recline of the vehicle seat.
SICUREZZA NELL’INSTALLAZIONE IN AUTO
!
ATTENZIONE! Il seggiolino deve sempre assicurato correttamente con la cintura presente
nel veicolo anche quando il veicolo non è in uso. Nel caso di una frenata di emergenza o di
un uno scontro, un seggiolino assicurato male può ferire voi o altri passeggeri.
Per garantire la miglior sicurezza per tutti i passeggeri assicuratevi che:
• gli schienali regolabili dei sedili del veicolo sono bloccati in posizione eretta.
• quando il seggiolino viene installato sul sedile anteriore, regolare il sedile nella posizione
più arretrata possibile.
• assicurate adeguatamente tutti gli oggetti presenti nel veicolo in quanto possono
diventare proiettili pericolosi in caso di incidente.
• assicuratevi che tutti i passeggieri abbiano le cinture allacciate.
COLLOCAZIONE DEL SEGGIOLINO NEL VEICOLO
Collocare il seggiolino sul sedile dell‘auto appropriato.
• Accertare sempre che l‘intera superficie dello schienale (1) del CYBEX PALLAS S-FIX
poggi completamente contro lo schienale del sedile veicolare. Se necessario è possibile
regolare la distanza con la leva di regolazione (2).
• Se il poggiatesta del veicolo è di ingombro, alzarlo del tutto o rimuoverlo completamente
(per eccezioni, si prega di consultare la sezione „POSIZIONAMENTO CORRETTO
DEL SEGGILINO NEL VEICOLO“) Lo schienale (1) si adatterà perfettamente
praticamente a qualsiasi reclinazione del sedile del veicolo.
DE
ENIT
!
WARNING! The full surface of the backrest of the CYBEX child seat must be
against the backrest of the vehicle. To ensure maximum protection for your child, the
seat must be in a normal upright position!
NOTE! On some car seats made of sensitive materials (e.g. suede, leather etc.), the use
of child seats may leave marks and/or cause discolouration. To prevent this, you can place
a blanket or towel underneath it, for example. Please also refer in this connection to our
cleaning advises in these usage instructions; these cleaning instructions must be observed
prior to using the seat for the first time.
!
WARNING! Do not use any load bearing contact points other than those described
in the instructions and marked in the child restraint.
NOTE! Please use the Isofix Guides provided to ensure that the vehicle seat is not
destroyed by the ISOFIX Connect locking arms.
!
ATTENZIONE! L‘intera superficie dello schienale del seggiolino CYBEX deve
poggiare contro lo schienale del veicolo. Per assicurare la massima protezione
per il bambino il sedile deve trovarsi nella normale posizione eretta!
NOTA BENE! L‘uso del seggiolino su alcuni sedili veicolari realizzati in materiali delicati
(come pelle scamosciata, pelle, ecc.) può lasciare tracce e/o causare scoloriture.
Questo è evitabile utilizzando ad esempio una coperta o un asciugamano come
appoggio. Al riguardo vedere anche le istruzioni di pulizia nelle presenti istruzioni
per l‘uso; le istruzioni di pulizia devono essere consultate prima del primo uso del
seggiolino.
!
ATTENZIONE! Non utilizzare i punti di contatto di carico diversi da quelli
descritti nelle istruzioni e codificato il sistema di ritenuta.
NOTA BENE! Prego usare gli applicatori Isofix per garantire che il Isofix Connect non
distrugga il sedile del veicolo.
11
Page 13
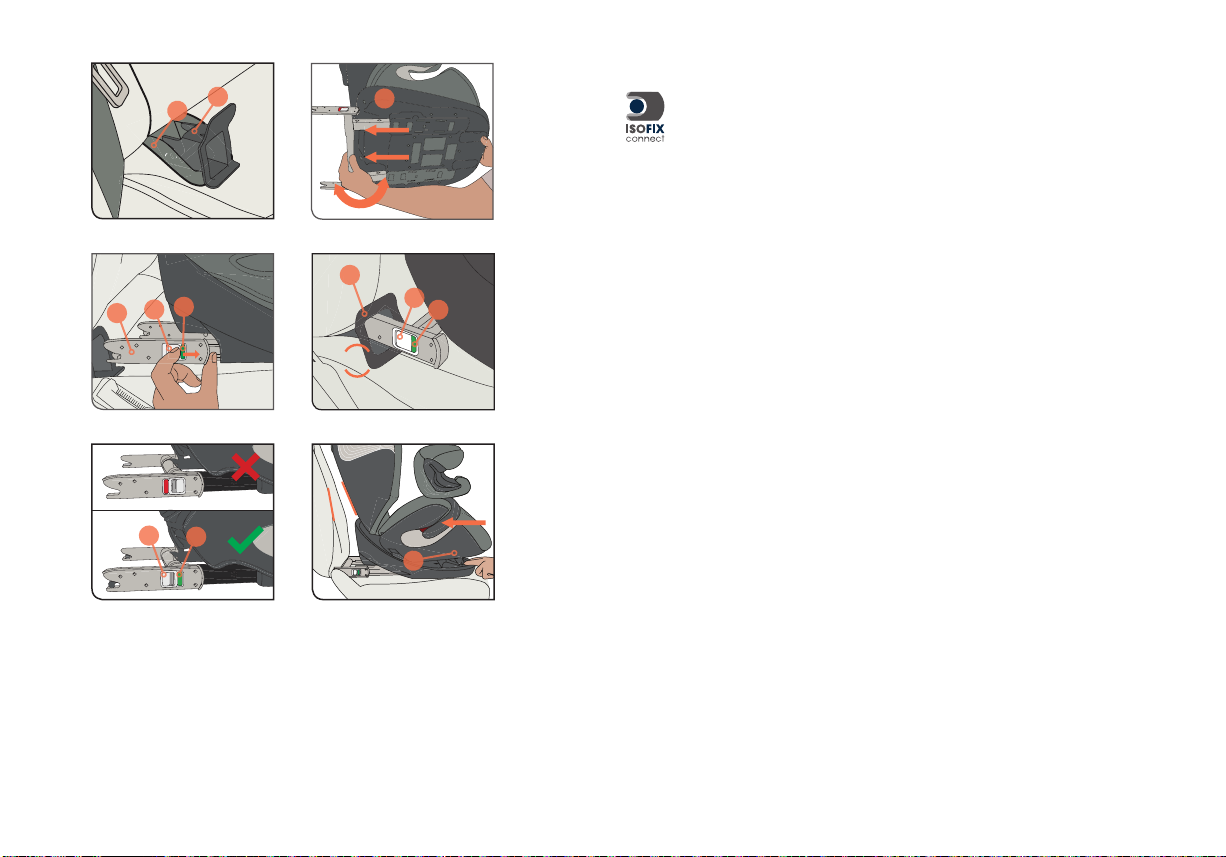
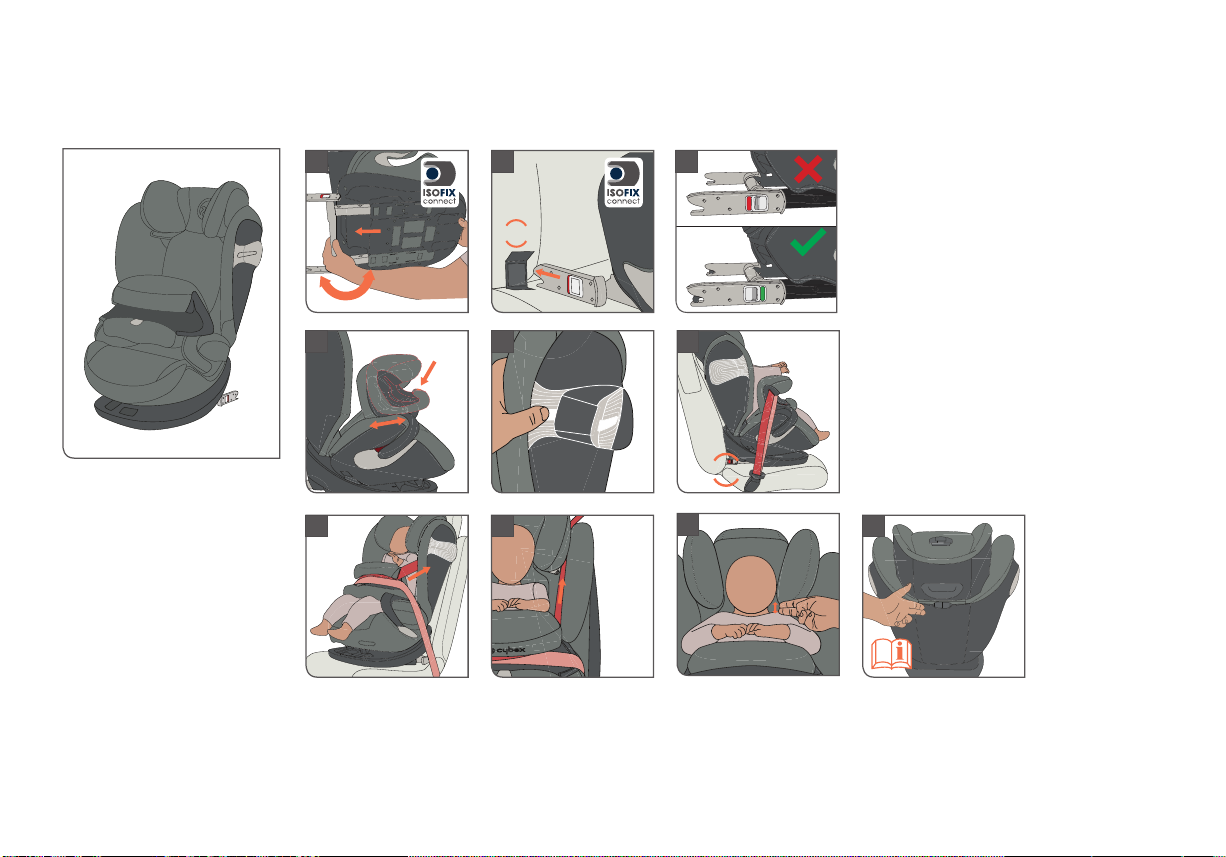
BEFESTIGEN DES KINDERSITZES MITTELS ISOFIX CONNECT SYSTEM
3
4
6
180°
4
9
8
7
CLICK!
8
9
8
9
2
Mit dem ISOFIX Connect System können Sie den CYBEX PALLAS S-FIX mit
dem Fahrzeug verbinden und so die Sicherheit Ihres Kindes erhöhen. Ihr Kind
muss weiterhin mit dem 3-Punkt-Gurt Ihres Fahrzeuges angeschnallt werden.
• Hängen Sie die mitgelieferten Einführhilfen (3) mit der längeren Lasche nach oben in
den beiden ISOFIX Befestigungspunkten (4) ein. In manchen Fahrzeugen eignet sich
eine entgegengesetzte Einbaurichtung der Einführhilfen (3) besser.
HINWEIS! Die ISOFIX Befestigungspunkte (4) sind zwei Metalllaschen pro Sitzplatz und
befinden sich zwischen Rückenlehne und Sitzfläche des Fahrzeugsitzes. Im Zweifelsfall
nehmen Sie die Bedienungsanleitung Ihres Fahrzeuges zu Hilfe.
• Betätigen Sie den Verstellgriff (2) unter dem Sitzkissen (5), am Rahmen (6) des CYBEX
PALLAS S-FIX Kindersitzes.
• Ziehen Sie die beiden ISOFIX Connect Rastarme (7) bis zum Endanschlag.
• Drehen Sie nun die ISOFIX Connect Rastarme (7) um 180°, damit diese in Richtung
der Einführhilfen (3) zeigen.
HINWEIS! Überprüfen Sie vor dem Verbinden der ISOFIX Connect Rastarme (7) mit
den ISOFIX Befestigungspunkten (4) deren Entriegelungstasten (8). Sind die grünen
Sicherheitsindikatoren (9) zu sehen, müssen Sie vor dem Verbinden zunächst die
ISOFIX Connect Rastarme entriegeln, indem Sie die Entriegelungstaste (8) drücken und
zurückziehen. Wiederholen Sie den Vorgang gegebenenfalls auch beim zweiten Rastarm.
• Schieben Sie die beiden Rastarme (7) in die Einführhilfen (3) bis diese mit einem
hörbaren „KLICK“ an den ISOFIX Befestigungspunkten (4) einrasten.
• Vergewissern Sie sich, dass der Sitz gut hält, indem Sie versuchen ihn aus den
Einführhilfen (3) herauszuziehen.
• Der grüne Sicherheitsindikator (9) muss nun an den beiden grauen Entriegelungstasten
(8) gut sichtbar sein.
• Mit dem Verstellgriff (2) am Rahmen (6) des CYBEX PALLAS S-FIX Kindersitzes
können Sie nun die Position des Sitzes einstellen.
HINWEIS! Beachten Sie dazu den Abschnitt „DEN SITZ INS FAHRZEUG STELLEN“.
12
Page 14
SECURING THE CHILD SEAT USING THE ISOFIX CONNECT SYSTEM
Using the ISOFIX Connect system, you can fix the CYBEX PALLAS S-FIX to the
vehicle, thereby increasing your child’s safety. The child still needs to be secured
with the three-point belt of your vehicle.
• Insert the supplied ISOFIX guides (3) with the longer strap upwards into the
two ISOFIX fixture points (4). In some vehicles, it is better to mount the ISOFIX guides
(3) in the opposite direction.
NOTE! The ISOFIX fixture points (4) are two metallic clips for each seat and are
positioned between the backrest and the seating surface of the vehicle seat. In case of
doubt, please refer to the driver’s manual of your vehicle.
• Use the adjustment lever (2) under the seat cushion (5) on the frame (6) of the CYBEX
PALLAS S-FIX child car seat.
• Pull the two ISOFIX Connect locking arms (7) as far as they will go.
• Now twist the ISOFIX Connect locking arms (7) 180° so that they are facing the
direction of the ISOFIX guides (3).
NOTE! Before clicking the the ISOFIX Connect locking arms (7) into the ISOFIX fixture
points (4), check the release buttons (8). If the green safety indicators (9) are visible, you
must first release the ISOFIX Connect locking arms before joining by pressing and pulling
back the release button (10). Repeat the process if necessary with the second locking arm.
• Push the two locking arms (7) into the ISOFIX guides (3) until these lock into place in
the ISOFIX locking arms with an audible ‘click’.
• Ensure that the seat is secure by trying to pull it out of the ISOFIX guides (3).
• The green safety indicator (9) must now be clearly visible on the two grey release
buttons (8).
• You can now use the adjustment lever (2) on the frame (6) of the CYBEX PALLAS
S-FIX child car seat position.
NOTE! Note the information in the section “Placing the seat in the vehicle”.
FISSAGGIO DEL SEGGIOLINO CON IL SISTEMA ISOFIX CONNECT
Con il sistema ISOFIX CONNECT è possibile fissare il CYBEX PALLAS S-fix
al veicolo, aumentando così la sicurezza del bambino. Il bambino deve essere
allacciato utilizzando la cintura a tre punti del veicolo.
• Inserire le guide iISOFIX in dotazione (3), con la linguetta più lunga rivolta verso l’alto,
nei due punti di ancoraggio ISOFIX (4) della vettura. In alcuni veicoli è preferibile
montare le guide ISOFIX in dotazione (3) nella direzione opposta.
NOTA BENE! I punti di ancoraggio ISOFIX (4) sono due clip metalliche per ogni sedile,
posizionate tra lo schienale e la seduta del sedile del veicolo. In caso di dubbio consultare
il manuale istruzioni del proprio veicolo.
• Usare la leva di regolazione (2) sotto il cuscino di seduta (5) sul telaio (6) del seggiolino
CYBEX PALLAS S-FIX.
• Estrarre completamente il carrello con i due braccetti ISOFIX Connect (7).
• Ora ruotare i connettori ISOFIX Connect (7) di 180° in modo che siano rivolti verso le
guide ISOFIX (3).
NOTA BENE! Prima di agganciare i connettori ISOFIX Connect (7) nei punti di
ancoraggio ISOFIX (4), controllare i punti di rilascio (8). Se risultano visibili gli indicatori
di sicurezza di colore verde (11), prima del fissaggio è necessario sbloccare i connettori
ISOFIX premendo e tirando indietro il pulsante di rilascio (8). Se necessario ripetere
l’operazione con il secondo braccio di bloccaggio.
• Premere i due bracci di bloccaggio (7) negli ausili di inserimento (3) fino a fissarli in
posizione nei punti di fissaggio ISOFIX con un udibile scatto.
• Accertare che il seggiolino sia in sicurezza tentando di tirarlo fuori dagli ausili di
inserimento (3).
• L’indicatore di sicurezza verde (9) deve ora essere chiaramente visibile sui due pulsanti
di rilascio rossi (8).
• Usare ora la leva di regolazione (2) sul telaio (6) del seggiolino CYBEX PALLAS S-FIX
per regolare la posizione.
NOTA BENE! Consultare la sezione “Collocazione del seggiolino nel veicolo”.
DE
ENIT
13
Page 15
L.S.P.
7
3
8
180°
CLICK!
10
PRESS!
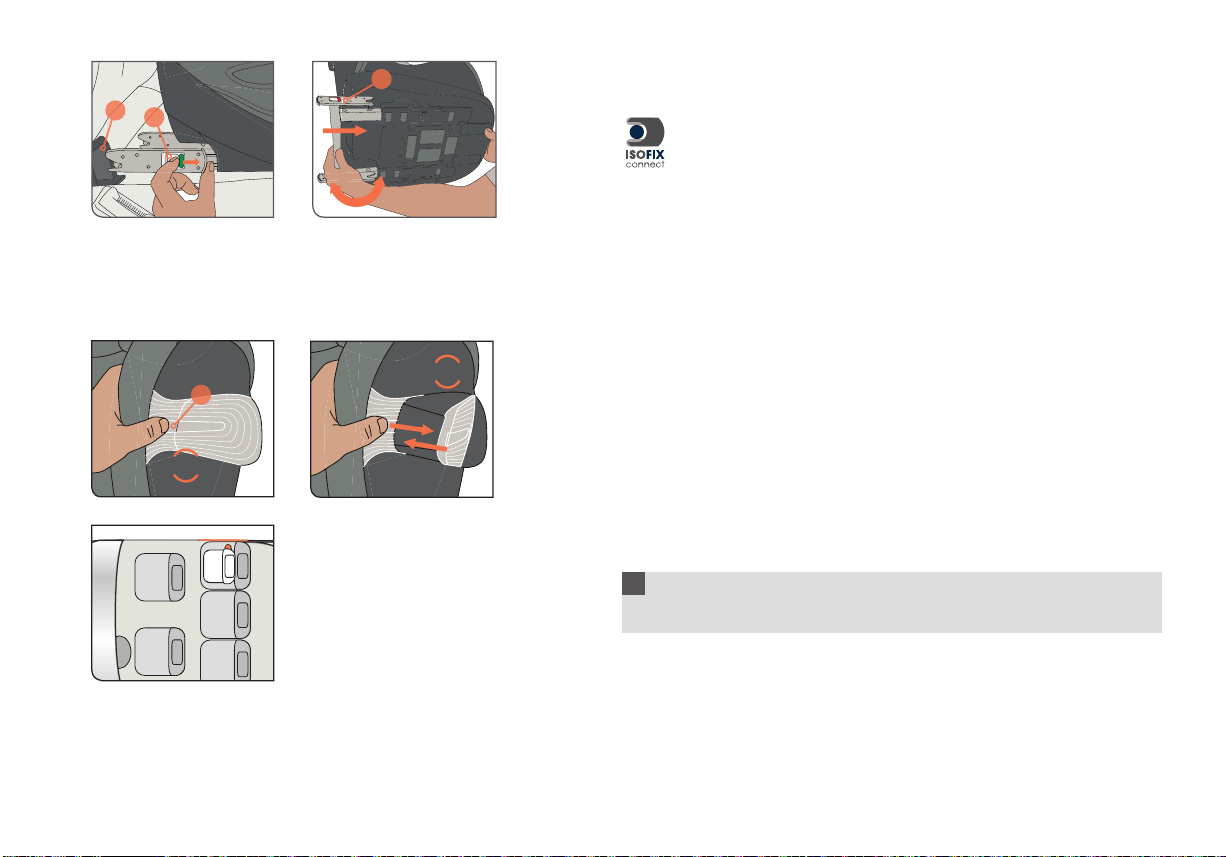
AUSBAU DES KINDERSITZES
Führen Sie die Einbauschritte in umgekehrter Reihenfolge durch.
• Entriegeln Sie die ISOFIX Rastarme (7) beidseitig, indem Sie die grauen
Entriegelungstasten (8) drücken und gleichzeitig zurückziehen.
• Ziehen Sie den Sitz aus den Einführhilfen (3).
• Drehen Sie die Rastarme (7) um 180°.
• Betätigen Sie den Verstellgriff (2) am Rahmen (6) des CYBEX PALLAS
S-FIX Kindersitzes und schieben Sie die Rastarme (7) bis zum Anschlag
hinein.
HINWEIS! Durch das Einklappen der Rastarme (7) schonen Sie nicht nur den
Fahrzeugsitz, sondern schützen auch die Rastarme des ISOFIX Connect Systems vor
Verunreinigung und Beschädigung.
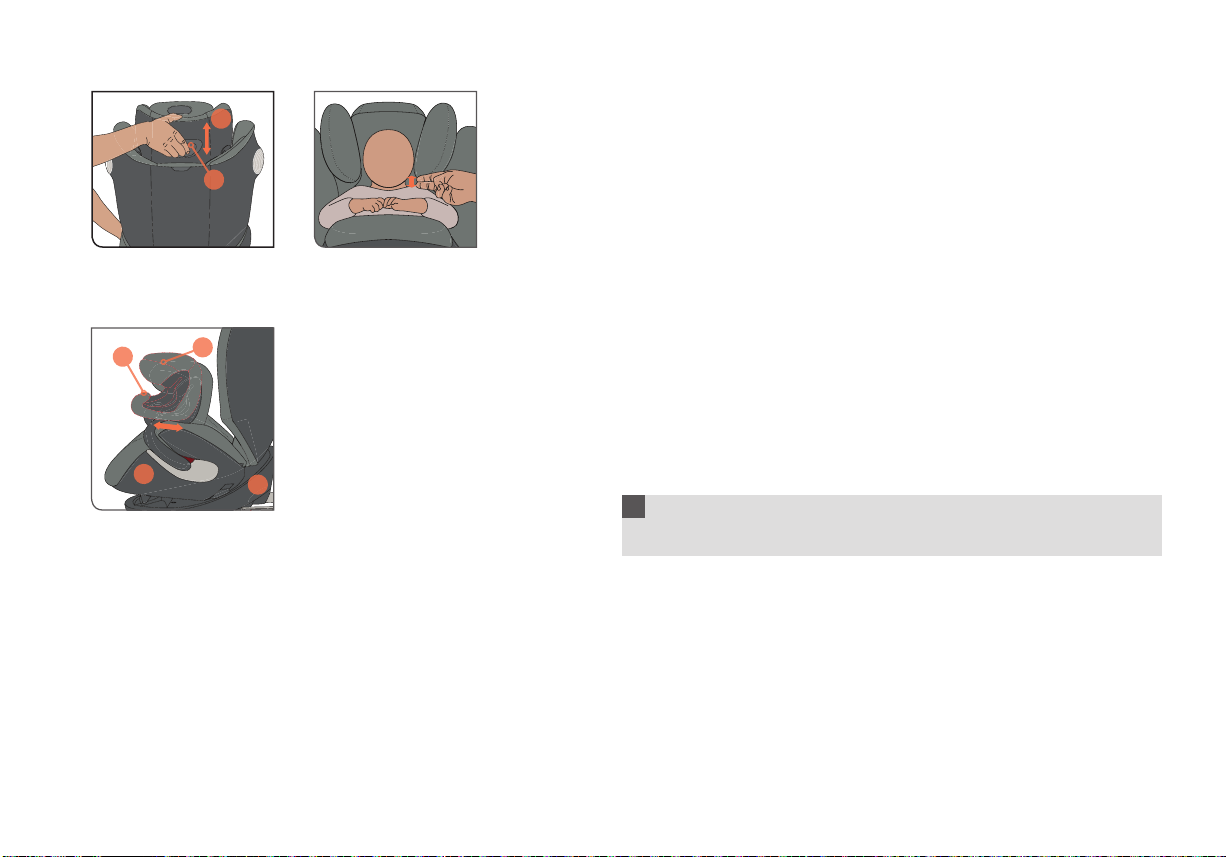
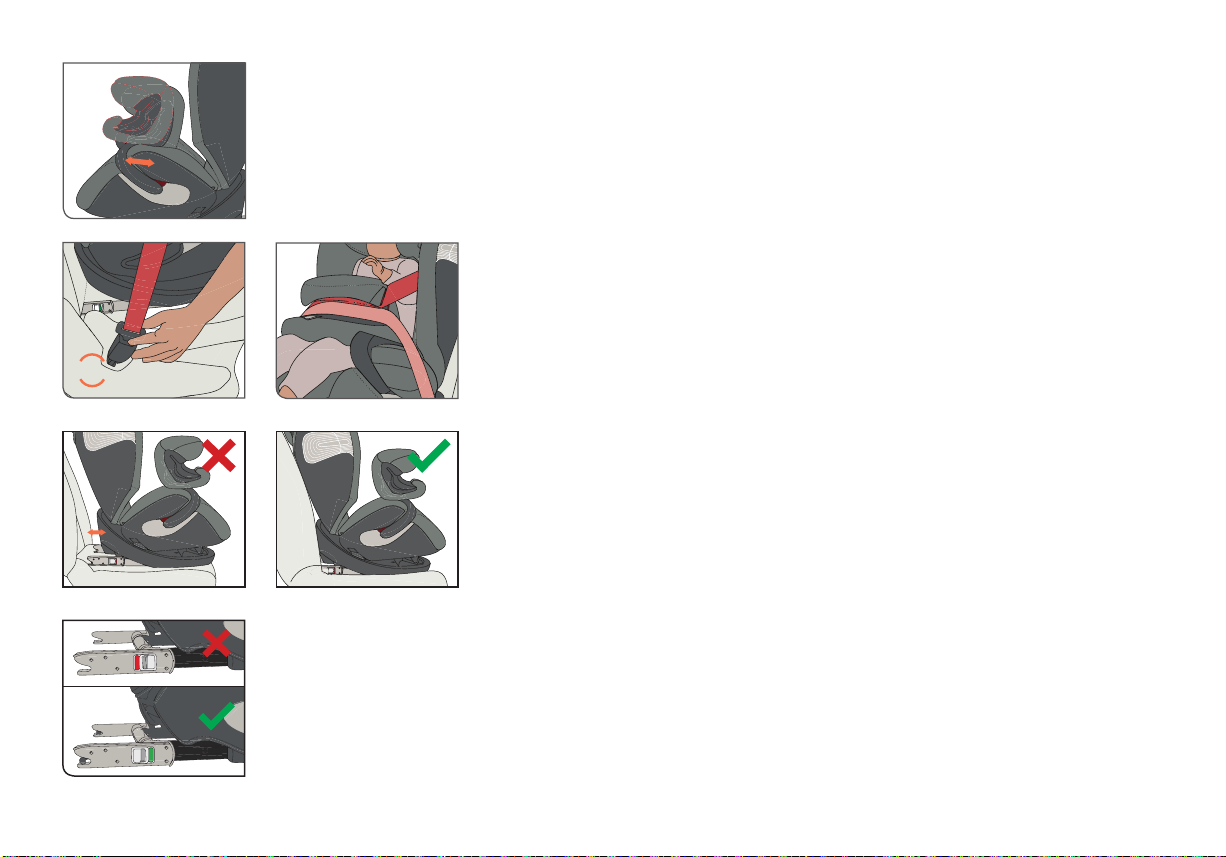
EINSTELLEN DER SEITENPROTEKTOREN
Im Kindersitz ist das „Linear Side-Impact Protection“ System (L.S.P.) verbaut. Dieses
System erhöht die Sicherheit Ihres Kindes im Falle eines seitlichen Aufpralls. Um die
bestmögliche Schutzwirkung zu erzielen, aktivieren Sie das L.S.P. auf der zur nächsten
Fahrzeugtür zeigenden Seite des Sitzes. Drücken Sie hierfür den markierten Bereich (10).
HINWEIS! Achten Sie darauf, dass der ausklappbare Teil einrastet. Dies ist durch ein
„KLICK“ hörbar. Sollte das L.S.P. an der Türe anstehen, klappen Sie es wieder ein.
Eine Verwendung mit ordnungsgemäß verstautem L.S.P. ist zulässig. Das L.S.P. lasst
sich wieder komplett in den Sitz verstauen, indem Sie es leicht nach außen ziehen und
anschließend einklappen, bis es mit einem hörbaren „KLICK“ einrastet.
HINWEIS! Beim Einbau des Kindersitzes auf einem mittleren Sitzplatz dürfen Sie den
linearen Seitenaufprallschutz (L.S.P.) nicht ausklappen.
!
WARNUNG! Der ausgeklappte Seitenaufprallschutz (L.S.P.) dient nicht als Tragegriff
oder Einstiegshilfe.
14
Page 16
REMOVAL OF THE CHILD SEAT
Perform the installation steps in the reverse order.
• Unlock the ISOFIX Connect locking arms (7) on both sides by pushing the
grey release buttons (8) and pulling them back simultaneously.
• Pull the seat out of the ISOFIX guides (3).
• Rotate the ISOFIX Connect locking arms (7) 180°.
• Operate the adjustment lever (2) on the frame (6) of the CYBEX PALLAS
S-FIX and push the locking arms in as far as they will go.
NOTE! By folding in the ISOFIX Connect locking arms (7), you are not just protecting the
vehicle seat but also the locking arms of the ISOFIX Connect system from dirt and damage.
DISINSTALLARE IL SEGGIOLINO
Seguire il procedimento per l’installazione nell’ordine inverso.
• Sloccare i bracci di bloccaggio ISOFIX (7) su entrambi i lati premendo e
tirando simultaneamente i pulsanti di rilancio rossi (8)
• Estrarre il seggiolino dagli ausili di inserimento (3).
• Ruotare di 180° i bracci di bloccaggio(7).
• Azionare la leva di regolazione (2) sul telaio (6) del Kindersitz e
spingere all’interno i bracci di bloccaggio fino al limite.
NOTA BENE! Ripiegando i connettori ISOFIX (7), proteggerete da possibili danni non
solo il sedile dell’auto, ma anche da danneggiamento e sporcizia i connettori ISOFIX
stessi.
DE
ENIT
ADJUSTING THE SIDE PROTECTORS
The child seat is equipped with the “Linear Side-impact Protection“ system (L.S.P.). This
system increases the safety of your child in case of side impact. Activate the L.S.P. to
the nearest door side for having the best possible safety. To release the L.S.P. press the
marked area (10) on the L.S.P.
NOTE! Make sure, that the L.S.P. is fixed with an audible “CLICK”. In case the L.S.P.
touches the door, it ought to be stored away properly.
It‘s allowed to be used in this position. In order to push back the L.S.P. into the seat, pull
out the L.S.P. slightly and fold it, until it locks with an audible “CLICK”.
NOTE! When using the child seat on a middle position in the vehicle, it‘s prohibited to fold
out the L.S.P. device.
!
WARNING! Using the L.S.P. device for carrying or climbing into the child seat
is prohibited.
REGOLARE LE PROTEZIONI LATERALI
Il seggiolino auto è dotato del sistema di “Protezione Lineare da Impatto Laterale” L.S.P.).
Tale sistema aumenta la sicurezza del tuo bambino in caso di incidente a collisione laterale.
Estrarre la protezione L.S.P. sul lato più vicino alla portiera per garantire la massima
sicurezza possibile. Per rilasciare il sistema L.S.P premere il pulsante L.S.P (10)
NOTA BENE! Assicuratevi che il sistema L.S.P sia in posizione corretta a seguito di
un chiaro scatto. Nel caso l’L.S.P. arrivi a toccare la portiera, dovrebbe essere riposto
correttamente.
E’ ammesso l’uso in questa posizione. Premere nuovamente il pulsante L.S.P e spingere il
L.S.P in posizione iniziale per farlo rietrnare nell’alloggiamento.
NOTA BENE! Quando il seggiolino è installato nel sedile centrale del veicolo gli L.S.P.
NON devono essere estratti.
!
ATTENZIONE! E’ assolutamente vietato utilizzare il dispositivo L.S.P. per trasportare
il seggiolino o per inserirlo nell’auto.
15
Page 17

11
NEIGUNGSVERSTELLBARE KOPFSTÜTZE
Die neigungsverstellbare Kopfstütze hilft, das gefährliche Nach-Vorne-Kippen des Kopfes
im Schlaf zu verhindern. Bei einem Aufprall folgt die Kopfstütze der Kopfbewegung Ihres
Kindes nach vorne, rastet ein und fängt somit die anschließende Rückwärtsbewegung des
12
Kopfes ab.
HINWEIS! Achten Sie bitte darauf, dass der Kopf des Kindes immer in Kontakt mit der
neigungsverstellbaren Kopfstütze (11) bleibt, da die Kopfstütze nur so ihre optimierte
Seitenaufprall-Schutzfunktion erfüllen kann.
Die Neigung der Kopfstütze lässt sich in drei Positionen verstellen. Nach vorne lässt sie
sich ohne Betätigen des Hebels in die zweite bzw. dritte Position verstellen, bis diese
jeweils einrastet. Zum Zurückstellen in die Ausgangsposition, muss der Hebel betätigt und
die Kopfstütze nach hinten gezogen werden.
!
WARNUNG! Auf keinen Fall darf die Einrastvorrichtung (12) mit Gegenständen
blockiert werden! Im Falle eines Unfalls muss die Leichtgängigkeit der
Neigungsverstellung gewährleistet sein, da es sonst eventuell zu Verletzungen Ihres
Kindes kommen kann.
16
Page 18

RECLINING HEADREST
The reclining headrest helps to prevent the child’s head from dangerously tipping forward
during sleep. In the event of a collision, the headrest will follow the movement of your
child’s head forwards, lock into place and absorb the subsequent backwards motion of
your child’s head.
NOTE! Ensure that your child’s head is always in contact with the reclining headrest
(11), as this is the only way that the headrest can provide optimum protection in case of
side collisions.
The recline angle of the headrest can be set to one of three positions. It can be moved
forward without moving the lever to the second or third position until the rest locks into
position. To return it to the original position, the lever must be operated and the headrest
pulled back.
POGGIATESTA INCLINABILE
Il poggiatesta inclinabile aiuta a impedire che la testa del bambino si rovesci
pericolosamente in avanti nel sonno. In caso di collisione, il poggiatesta seguirà il
movimento in avanti della testa del bambino, si bloccherà in posizione e assorbirà il
successivo movimento indietro della testa del bambino.
NOTA BENE! Accertare che la testa del bambino sia sempre a contatto con il
poggiatesta inclinabile (11): questa è la condizione indispensabile affinchè il poggiatesta
offra la protezione ottimanle dalle collisioni laterali.
L’angolo di inclinazione del poggiatesta è regolabile in una delle tre posizioni. È spostabile
in avanti senza azionare la leva nella seconda o terza posizione, fino a che il poggiatesta
scatta in posizione. Per tornare in posizione originale è necessario azionare la leva e tirare
indietro il poggiatesta.
DE
ENIT
!
WARNING! Never block the locking mechanism (12)! In the event of an accident, the
recline adjustment mechanism must move smoothly, or else your child may be injured!
!
ATTENZIONE! Non bloccare mai il meccanismo di bloccaggio (12) con degli
oggetti! Il meccaniscmo di regolazione dell’inclinazione deve operare scorrevolmente
in caso di incidente per evitare il ferimento del bambino !
17
Page 19
ANPASSEN AN DIE KÖRPERGRÖSSE
Einstellen der Kopfstütze
11
13
14
15
5
6
MAX
• Die Kopfstütze muss so eingestellt werden, dass der Abstand zwischen den Schultern
des Kindes und der Kopfstütze nicht breiter als 2cm (ca. 2 Finger) ist.
• Ziehen Sie den Verstellhebel (13) an der Unterseite der Kopfstütze, und führen Sie die
Kopfstütze in die gewünschte Position.
HINWEIS! Nur eine in optimaler Höhe eingestellte Kopfstütze (11) bietet den
größtmöglichen Schutz und Komfort für Ihr Kind und gewährleistet außerdem den
optimalen Verlauf des Diagonalgurtes. Die Höhenverstellung kann beim CYBEX PALLAS
S-FIX in 12 Positionen erfolgen.
EINSTELLEN DES FANGKÖRPERS GRUPPE 1 918 KG
Durch Betätigen des zentralen Verstellknopfes (14) können Sie den Fangkörper an Ihr Kind
anpassen. Halten Sie den Verstellknopf (14) gedrückt, während Sie den Fangkörper an Ihr
Kind anpassen.
Die seitlichen Flügel des Fangkörpers (15) passen exakt zwischen Armlehnen und
Sitzfläche (5) und dienen der Abstützung des Fangkörpers (15) am Sitz.
Stellen Sie den Fangkörper (15) so ein, dass er am Kind anliegt, jedoch ohne auf den
Körper des Kindes zu drücken.
!
WARNUNG! Der Fangkörper (15) darf nur in Verbindung mit dem Rahmen (6) und
bis maximal 18 kg verwendet werden!
18
Page 20

ADAPTING TO BODY SIZE
Adjustment of the headrest Regolazione del poggiatesta
• The headrest must be adjusted so that max. 2cm (ca. two finger‘s width) or less remains
free between the child’s shoulder and the headrest.
• Push the adjustment button (13) on the lower end of the headrest and move it into the
desired position.
REGOLAZIONE IN BASE ALLA CORPORATURA
• Il poggiatesta deve essere regolato in modo che ci siano 2cm (ca. due dita) liberi tra le
spalle del bambino e il poggiatesta.
• Premere il pulsante di regolazione (13) sulla parte bassa del poggiatesta e muovere fino
alla posizione desiderata.
DE
ENIT
NOTE! Only an optimally adjusted headrest (11) can offer your child maximum protection
and comfort while ensuring that the diagonal belt can be fitted smoothly. The height of the
CYBEX PALLAS S-FIX can be adjusted to one of twelve positions.
ADJUSTING THE IMPACT SHIELD GROUP 1 918 KG REGOLARE IL CUSCINO DI SICUREZZA GRUPPO 1 918 KG
By pushing the central adjustment button (14), you can adapt the impact shield to your
child. Hold down the central adjustment button (14) while you adapt the impact shield to
your child.
The side flaps of the impact shield (15) fit exactly between the arm rests and booster (5)
and are used to support the impact shield (15) on the seat.
Adjust the impact shield (15) so that it rests against the child without pushing against the
child’s body.
!
WARNING! The impact shield (15) may only be used in conjunction with the frame
(6) up to a maximum of 18 kg!
NOTA BENE! Soltanto se regolato correttamente il poggiatesta (11) è in grado di offrire al
vostro bambino la massima sicurezza ed il massimo comfort e nello stesso tempo garantire
che la cintura diagonale sia nella posizione corretta. CYBEX PALLAS S-FIX può essere
regolato in altezza in dodici posizioni.
Premendo il pulsante di regolazione centrale (14) è possibile adattare il cuscino di
sicurezza al bambino. Tenere premuto il pulsante di regolazione centrale (14) mentre si
adatta il cuscino di sicurezza al bambino.
Le alette laterali del cuscino di sicurezza (15) entrano precisamente tra i braccioli e la
superficie di seduta (5) e supportano il cuscino di sicurezza (15) sul seggiolino.
Regolare il cuscino di sicurezza (15) in modo che poggi contro il bambino senza
comprimerne il corpo.
!
ATTENZIONE! Il cuscino di sicurezza (15) è utilizzabile solo unitamente al telaio (6)
fino a 18 kg al massimo!
19
Page 21
16
17
20
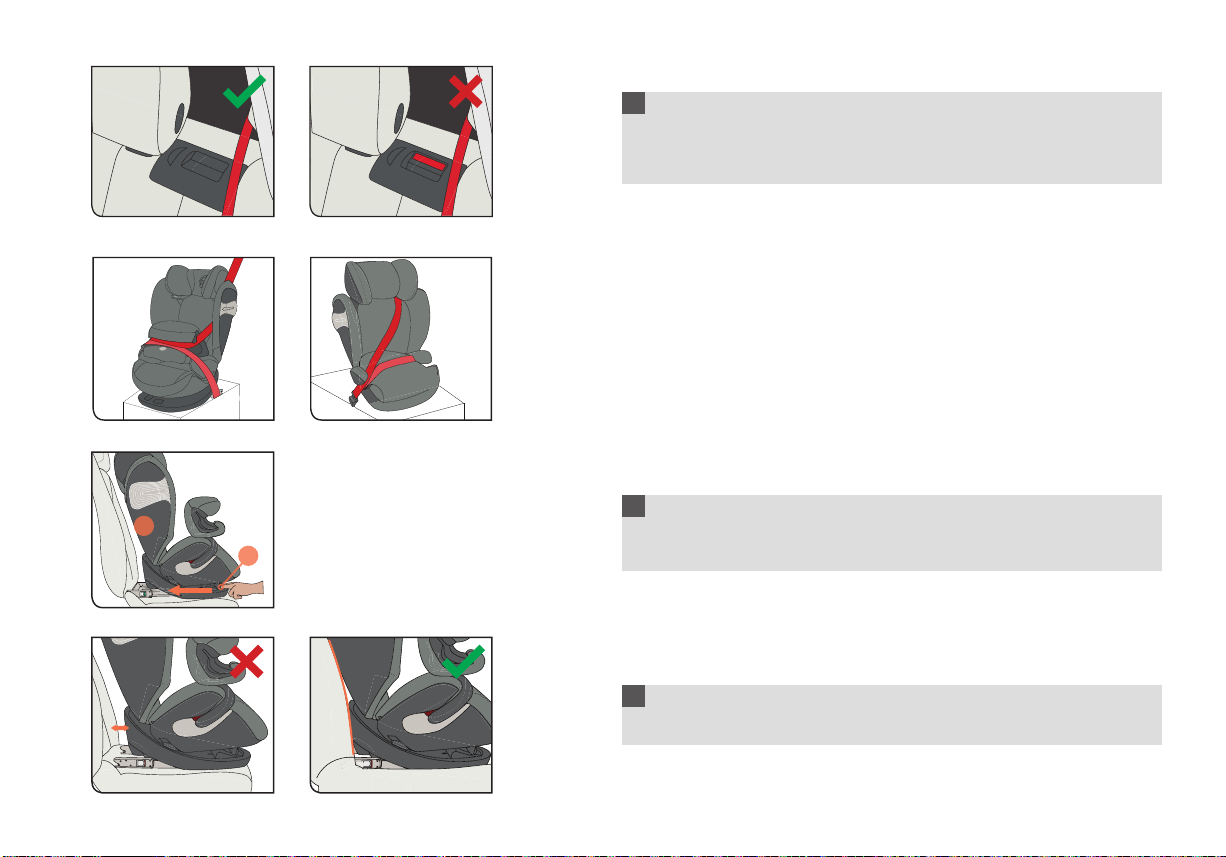
ANSCHNALLEN MIT FANGKÖRPER GRUPPE 1 918 KG
• Legen Sie nun den bereits eingestellten Fangkörper (15) ein (siehe Abschnitt
15
19
18
CLICK!
17
20
„EINSTELLEN DES FANGKÖRPERS“).
• Ziehen Sie die gesamte Gurtlänge des Fahrzeug-Dreipunktgurtes heraus. Nehmen
Sie den Beckengurt (16) und legen Sie diesen in die dafür vorgesehene rot markierte
Gurtführung (17) des Fangkörpers (15) ein.
• Stecken Sie die Fahrzeug-Gurtzunge (18) in das Gurtschloss (19). Diese muss mit
einem hörbaren „KLICK“ einrasten.
• Spannen Sie den Beckengurt (16) vor, indem Sie am Diagonalgurt (20) ziehen.
• Führen Sie nun den Diagonalgurt (20) parallel zum Beckengurt (16) in der Gurtführung
(17) zurück.
• Ziehen Sie den Diagonalgurt (20) straff und achten Sie dabei darauf, dass beide
Gurtteile, über die gesamte Breite des Fangkörpers (15), innerhalb der Gurtführung (17)
verlaufen.
• Ziehen sie nun den Diagonalgurt (20) nach oben fest in die Gurtführung (17) des
Fangkörpers (15), damit dieser sich festklemmt. Legen sie danach den Diagonalgurt
zwischen Kopfstütze (11) und Schulterstütze.
20
15
17
11
16
20
!
WARNUNG! Stellen Sie stets sicher, dass das Rückhaltesystem korrekt eingestellt
ist und straff am Körper anliegt. Den Gurt auf keinen Fall verdrehen!
!
WARNUNG! Der Dreipunktgurt darf nur in den dafür vorgesehenen Führungen
verlaufen. Die Gurtführungen werden in diesem Handbuch genau beschrieben und
sind zudem am Kindersitz rot markiert.
Page 22

STRAPPING WITH THE IMPACT SHIELD GROUP 1 918 KG ALLACCIARE CON IL CUSCINO DI SICUREZZA GRUPPO 1 918 KG
• Now insert the previously adjusted impact shield (15) (refer to the section “ADJUSTING
THE IMPACT SHIELD”).
• Pull out the entire length of the vehicle seat belt. Take the lap belt (16) and place it in
the designated red belt routing (17) in the impact shield (15).
• Lock the vehicle seat belt (18) into the belt buckle (19). It must lock into place with an
audible “CLICK”.
• Tighten the lap belt (16) by pulling the diagonal belt (20).
• Now feed the diagonal belt (20) in parallel with the lap belt (16) back into the belt
routing (17).
• Pull the diagonal belt (20) tight and ensure that both parts of the belt cover the entire
width of the impact shield (15) in the belt routing (17).
• Now feed the diagonal belt (20) tightly through the belt routing (17) of the impact
shield (15) until it is clamped inside the belt guide. Then put the diagonal belt between
headrest (11) and shoulder rest.
!
WARNING! Always check the tightness and the right adjustment of the restraint
system to the child‘s body. Never twist the belt!
!
WARNING! The three-point belt may only be inserted into the routings designated
for that purpose. The belt routings are described precisely in this manual and are also
marked red on the car seat.
• Inserire ora il cuscino di sicurezza (15) precedentemente regolato (vedere “REGOLARE
IL CUSCINO DI SICUREZZA”).
• Estrarre per tutta la lunghezza la cintura a tre punti del veicolo. Collocare la cintura
subaddominale (16) nell'apposita guida rossa della cintura (17) nel cuscino di sicurezza
(15).
• Inserire la lingueta (18) della cintura nella fibbia (19). Il blocco in posizione corretta deve
essere segnalato da uno scatto udibile.
• Tendere la cintura subaddominale (16) tirando la cintura diagonale (20).
• Inserire ora nuovamente la cintura diagonale (20) nella guida della cintura (17) in
parallelo alla cintura subaddominale (16).
• Tendere la cintura diagonale (20) e accertare che entrambe le parti della cintura
coprano l'intera larghezza del cuscino di sicurezza (15) nella guida della cintura (17).
• Ora far passare la cintura diagonale (20) ben tesa attraverso la guida cintura (17) del
cuscino di sicurezza (15) fino a quando viene bloccata all'interno della guida. Quindi far
passare la cintura diagonale tra il poggiatesta (11) e la protezione per le spalle.
!
ATTENZIONE! Controllare sempre la larghezza e il corretto posizionamento del
sistema di ritenuta sul corpo del bambino. Non torcere mai la cintura!
!
ATTENZIONE! La cintura a tre punti deve essere inserita solo nelle apposite guide.
Le guide della cintura sono descritte precisamente nel presente manuale e sono
inoltre contrassegnate in rosso sul seggiolino.
DE
ENIT
21
Page 23

21
20
15
5
18
6
SITZ UND LIEGEPOSITION GRUPPE 1 918 KG
Um den Kindersitz in die Liege-Position zu bringen, muss das fahrzeugeigene Gurtsystem
nicht geöffnet werden.
• Wenn ihr Kind während der Fahrt einschläft, betätigen Sie die Einstelltaste (21) an
der Unterseite des Sitzkissens (5) und der Kindersitz gleitet automatisch, mit Hilfe des
Körpergewichtes des Kindes, nach unten.
!
WARNUNG! Eine Einstellung der Liege-Position durch den Fahrzeugführer ist
während der Fahrt zu unterlassen!
• Um nach dem Aussteigen des Kindes den Sitz von der Liege- in die aufrechte
Sitzposition zurückzubringen, betätigen Sie erneut die Einstelltaste (21) und führen Sie
den Kindersitz mit einem leichten Druck gegen das Sitzkissen (5) wieder nach oben.
!
WARNUNG! Achten Sie immer darauf, dass die Einstelltaste (21) in Liege- sowie in
Sitzposition hörbar einrastet. Die Liege-Position steht nur für Gruppe 1 (9-18 kg) in
der Pallas Konfiguration mit Fangkörper (15) und Rahmen (6) zur Verfügung.
HINWEIS! Achten Sie darauf, dass der Beckengurt (16) und der Diagonalgurt (20) immer
gut gespannt sind.
22
Page 24

SEATED AND LYING POSITION GROUP 1 918 KG POSIZIONE SEDUTA E SDRAIATA GRUPPO 1 918 KG
To bring the Kindersitz to a lying position, the vehicle’s own belt system does not need to
be opened.
• If your child falls asleep during travel, simply press the adjustment button (21) on the
underside of the seat cushion (5), and the Kindersitz will slide downwards using your
child’s weight.
Per porre il Kindersitz in posizione sdraiata non è necessario aprire il sistema di cinture del
veicolo.
• Se il bambino si addormenta in viaggio, premere semplicemente il pulsante di
regolazione (21) sul lato inferiore del cuscino di seduta (5): il Kindersitz scorrerà in
basso sfruttando il peso del bambino.
DE
ENIT
!
WARNING! An adjustment of the lying position by the driver is prohibited while
travelling!
• To restore the upright seat position from the lying position once the child is out of the
seat, press the adjustment button (21) again and apply light pressure against the seat
cushion (5) to guide the child car seat back up.
!
WARNING! Always ensure that the adjustment button (21) gives an audible click
when locking into the lying or seated position. The lying position is only available for
group 1 (9-18 kg) in the Pallas configuration with impact shield (15) and base frame
(6).
NOTE! Ensure that the lap belt (16) and diagonal belt (20) are always tight. NOTA BENE! Accertare che la cintura subaddominale (16) e la cintura diagonale (20)
!
ATTENZIONE! Al guidatore è vietata la regolazione della posizione sdraiata durante
la guida!
• Per tornare alla posizione seduta dalla posizione sdraiata una volta che il bambino non
siede più nel seggiolino, premere nuovamente il pulsante di regolazione (21) e applicare
una leggera pressione al cuscino di seduta (5) per spingere il seggiolino in posizione
eretta.
!
ATTENZIONE! Accertare sempre che il pulsante di regolazione (21) emetta uno
scatto udibile al momento del bloccaggio in posizione sdraiata o seduta. La posizione
sdraiata è disponibile solo per il gruppo 1 (9-18 kg) nella configurazione Pallas con
cuscino di sicurezza (15) e telaio di base (6).
siano sempre tese.
23
Page 25
CLICK!
IST IHR KIND RICHTIG GESICHERT? FANGKÖRPER GRUPPE 1 918KG
Um die bestmögliche Sicherheit Ihres Kindes zu gewährleisten, prüfen Sie bitte vor Beginn
der Fahrt, ob…
• der Fangkörper ordnungsgemäß eingestellt ist.
• die Gurtschlosszunge im Gurtschloss eingerastet ist.
• der Beckengurt und der Diagonalgurt straff und nicht verdreht durch die Gurtführung
des Fangkörpers verlaufen.
• die Rückenlehne des Kindersitzes vollflächig an der Rückenlehne des Fahrzeugsitzes
anliegt.
• Bei Verwendung von ISOFIX Connect: dass der Sitz beidseitig mit den Konnektoren
in den ISOFIX Befestigungspunkten eingerastet ist und die beiden grünen
Sicherheitsindikatoren deutlich zu sehen sind.
24
Page 26

IS YOUR CHILD CORRECTLY SECURED? IMPACT SHIELD GROUP 918KG IL BAMBINO È MESSO IN SICUREZZA CORRETTAMENTE? CUSCINO DI
To ensure optimum safety for your child, please always check before commencing travel
that…
• the impact shield is correctly adjusted.
• the belt tongue has locked into place in the belt buckle.
• the lap belt and the shoulder belt are running taut through the belt routing of the
impact shield and are not twisted.
• the backrest of the child seat lies completely flush with the backrest of the car seat.
• If ISOFIX Connect is used: the seat has locked into place on both sides with the
connectors into the ISOFIX anchorage points and both green safety indications can
be seen clearly.
SICUREZZA GRUPPO 918KG
Per garantire la sicurezza ottimale del bambino, prima di iniziare il viaggio controllare
sempre che
• che il cuscino di sicurezza sia regolato correttamente.
• che le linguette delle cinture siano saldamente fissate all'interno della fibbia.
• che la cintura ventrale e quella diagonale passino correttamente all'interno della
guida del cuscino di sicurezza, e che non siano attorcigliate.
• che lo schienale del seggiolino sia perfettamente aderente a quello del sedile
dell'auto.
• Se si utilizza is sistema ISOFIX connect: che il seggiolino sia bloccato in posizione
corretta da entrambi i lati, con i connettori inseriti nei punti di ancoraggio ISOFIX, e
che entrambi gli indicatori siano chiaramente diventati verdi.
DE
ENIT
25
Page 27
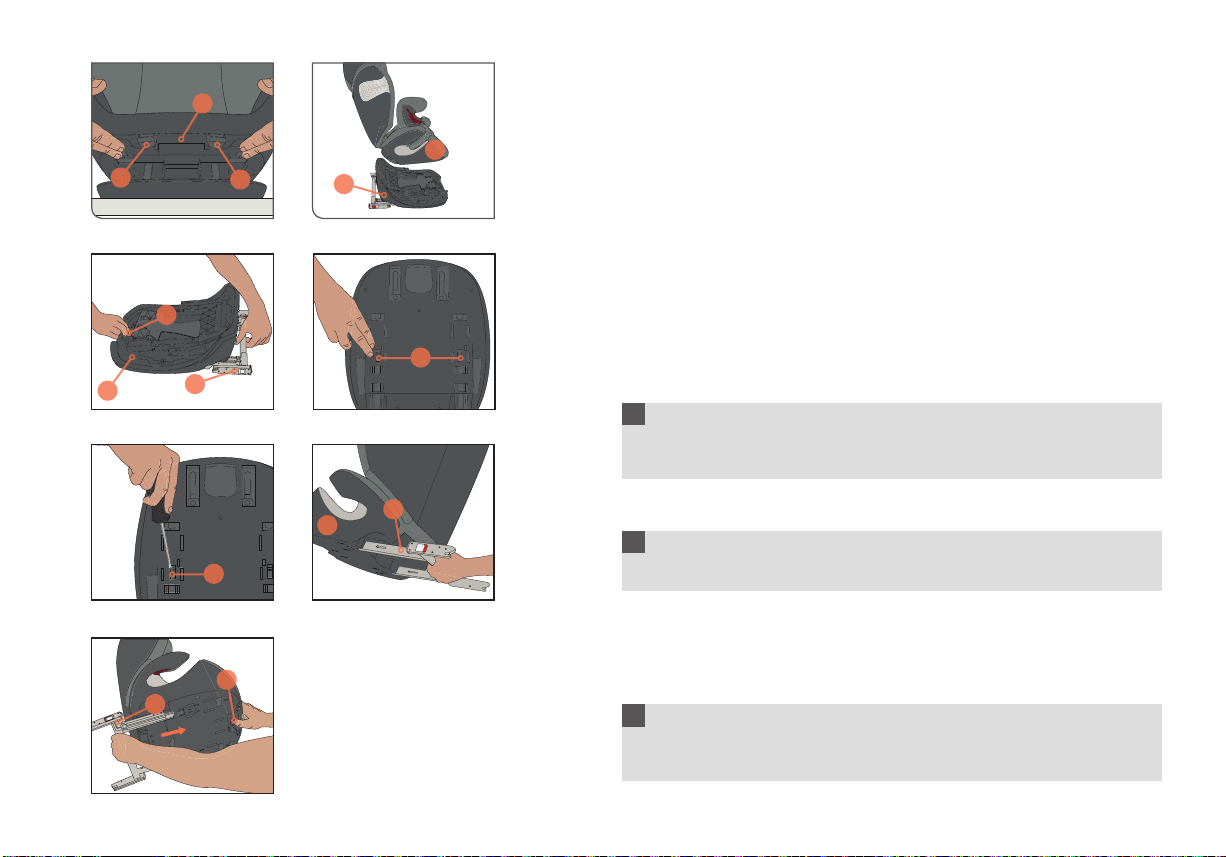
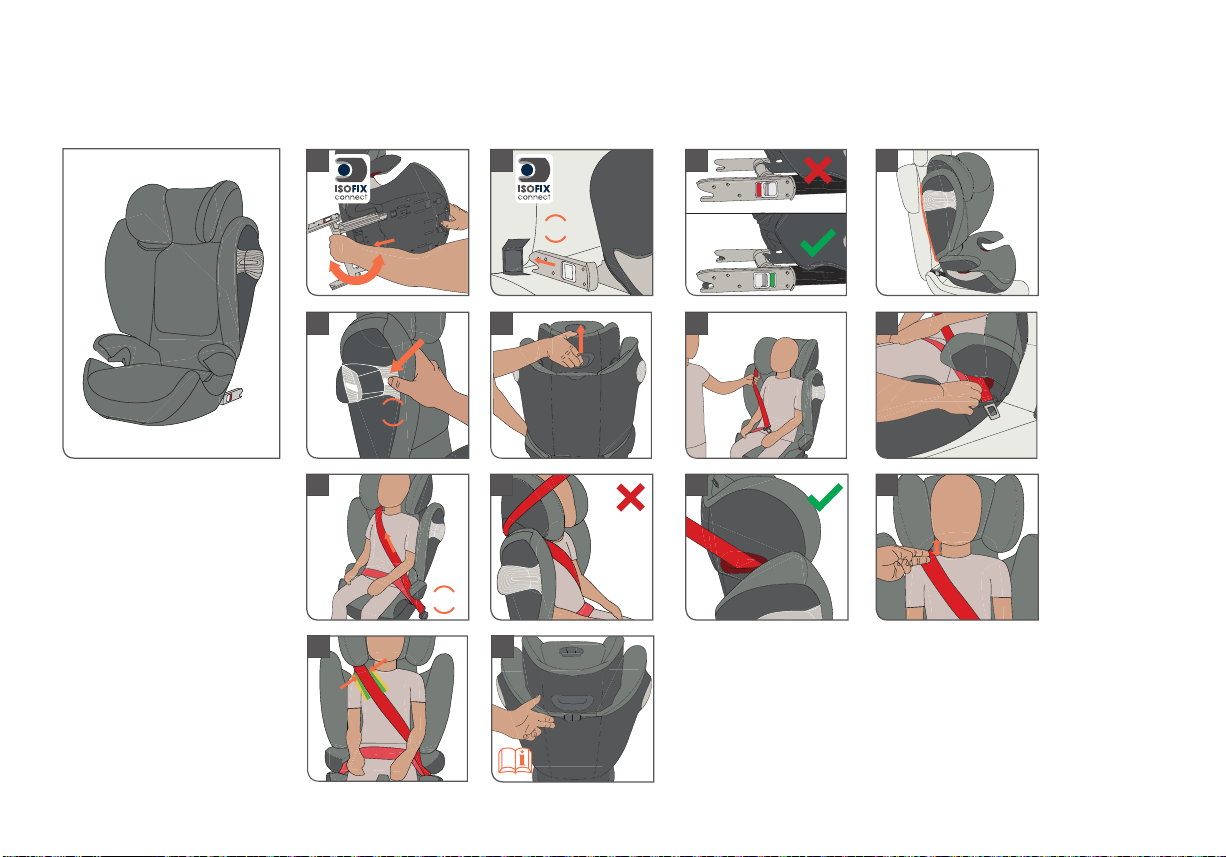
WECHSEL VON PALLAS SFIX AUF SOLUTION SFIX GRUPPE 1 ZU GRU PPE 2/3
21
5
22
22
6
2
24
6
7
7
• Entfernen Sie den Fangkörper.
• Drücken Sie die beiden Entriegelungstasten (22) an der Unterseite des Sitzkissens (5)
und ziehen Sie dieses bis zum ersten Widerstand vom Rahmen (6) weg.
• Betätigen Sie nun die Einstelltaste (21) und ziehen Sie den Sitz komplett vom Rahmen
(6) ab.
ISOFIX Connect Umbau
• Betätigen Sie den Verstellgriff (2) am Rahmen (6) und ziehen Sie die beiden ISOFIX
Connect Rastarme (7) bis zum ersten Widerstand heraus.
• Halten Sie weiterhin den Verstellgriff (2) und lösen Sie nun nacheinander die beiden
Schnapphaken (24) an der Unterseite des Sitzerhöhers (5). Falls erforderlich, nehmen
Sie einen Schraubenzieher zu Hilfe.
HINWEIS! Bei korrekter Durchführung lassen sich die ISOFIX Connect-Raststangen (7)
mühelos vom Rahmen (6) lösen.
!
WARNUNG! Achten Sie auf eine minimale Fallhöhe der ISOFIX ConnectRaststangen. Andernfalls könnten Bauteile beschädigt, bzw. Sie selbst oder andere
Personen in Ihrer näheren Umgebung verletzt werden.
• Schieben Sie nun die ISOFIX Connect Rastarme (7) in die dafür vorgesehenen
Öffnungen an der Unterseite des Sitzerhöhers (5) bis zum ersten Widerstand.
5
!
WARNUNG! Achten sie darauf, dass die Rastarme richtig herum eingebaut werden
24
21
7
und die Verzahnung der Raststangen oben ist, wenn Sie sie in den Sitz einführen.
• Betätigen Sie die Einstelltaste (21) an der Unterseite des Sitzerhöhers (5) und schieben
Sie die Rastarme (7) vollständig hinein.
• Für den weiteren ordnungsgemäßen Einbau verweisen wir auf den Abschnitt
„BEFESTIGEN DES KINDERSITZES MITTELS ISOFIX CONNECT SYSTEM“.
HINWEIS! Bewahren Sie die demontierten Teile gut geschützt und gemeinsam auf.
!
WARNUNG! Beim Wiederzusammenbau gehen Sie genau in umgekehrter
Reihenfolge vor. Überprüfen Sie zuvor anhand der Anleitung, ob alle Teile vorhanden
sind.
26
Page 28

SWITCHING FROM PALLAS SFIX TO SOLUTION SFIX GROUP 1 TO GROUP 2/3 PASSAGGIO DA PALLAS SFIX A SOLUTION SFIX DAL GRUPPO 1 AL
• Remove the impact shield.
• Press the two release buttons (22) on the underside of the seat cushion (5) and pull it
away from the frame until there is some resistance.
• Press the adjustment button (21) and pull the seat away from the frame (6) completely.
ISOFIX Connect modification Conversione a ISOFIX Connect
• Operate the adjustment lever (2) on the frame (6) and pull the two ISOFIX Connect
locking arms (7) until there is some resistance.
• Keep the adjustment lever held (2) and release the two snap clips (24) on the underside
of the seat elevator (5), one after the other. If necessary, use a screwdriver.
GRUPPO 2/3
• Rimuovere il cuscino di sicurezza.
• Premere i due pulsanti di rilascio (22) sul lato inferiore del cuscino di seduta (5) e tirare
via quest'ultimo dal telaio fino a percepire una certa resistenza.
• Premere il pulsante di regolazione (21) e tirare via completamente il seggiolino dal telaio
(6).
• Azionare la leva di regolazione (2) sul telaio (6) e tirare i due bracci di bloccaggio
ISOFIX Connect (7) fino a percepire una certa resistenza.
• Trattenere la leva di regolazione (2) e rilasciare in successione le due clip a scatto (24)
sul lato inferiore dell'elevatore del seggiolino (5). Se necessario usare un cacciavite.
DE
ENIT
NOTE! If this is done correctly, the ISOFIX Connect locking arms (7) will easily release
from the frame (6).
!
WARNING! Note the minimum drop height of the ISOFIX Connect locking arms.
Failure to note this may result in damage to components or injury to yourself or other
persons nearby.
• Now push the ISOFIX Connect locking arms (7) into the designated openings on the
underside of the seat elevator (5) until there is some resistance.
!
WARNING! Ensure that the locking arms are installed the right way around and that
the teeth of the locking arms are up when inserting them into the seat.
• Operate the adjustment button (21) on the underside of the seat elevator (5) and push
the locking arms (7) in as far as they will go.
• For further information on correct installation, please refer to the section “SECURING
THE Child car seat USING THE ISOFIX CONNECT SYSTEM”
NOTE! Keep removed parts together in a safe and secure place.
!
WARNING! When reassembling the seat, proceed in precisely the reverse order.
Use the instructions to check beforehand if all parts are present.
NOTA BENE! Se l'operazione è svolta correttamente i bracci di bloccaggio ISOFIX
Connect (7) si staccheranno agevolmente dal telaio (6).
!
ATTENZIONE! Tenere conto dell‘altezza di caduta minima dei bracci di bloccaggio
ISOFIX Connect. In caso contrario possono verificarsi danni ai componenti o lesioni
al diretto interessato e alle persone nelle vicinanze.
• Premere ora i bracci di bloccaggio ISOFIX Connect (7) nelle apposite aperture sul lato
inferiore dell'elevatore del seggiolino (5) fino a percepire una certa resistenza.
ATTENZIONE! Accertare che i bracci di bloccaggio siano installati correttamente
!
e che i denti dei bracci di bloccaggio siano rivolti verso l‘alto al momento
dell‘inserimento nel seggiolino.
• Azionare il pulsante di regolazione (21) sul lato inferiore dell'elevatore del seggiolino (5)
e spingere all'interno i bracci di bloccaggio (7) fino al limite.
• Per maggiori informazioni sull'installazione corretta vedere “FISSAGGIO DEL
SEGGIOLINO CON IL SISTEMA ISOFIX CONNECT”
NOTA BENE! Conservare le parti rimosse riunite in un luogo sicuro.
!
ATTENZIONE! Procedere esattamente in ordine inverso nel riassemblaggio del
seggiolino. Usare le istruzioni per verificare preliminarmente che tutte le parti siano
presenti.
27
Page 29

19
ANSCHNALLEN DES KINDES GRUPPE 2/3 1536 KG
• Setzen Sie Ihr Kind in den Kindersitz. Ziehen Sie den Dreipunktgurt weit heraus und
führen Sie diesen vor Ihrem Kind entlang zum Gurtschloss (19).
HINWEIS! Der Dreipunktgurt darf nur über die dafür vorgesehenen
Führungen verlaufen. Die Gurtführung wird in diesem Handbuch
genau beschrieben und ist zudem am Kindersitz rot markiert.
!
WARNUNG! Den Gurt auf keinen Fall verdrehen.
28
CLICK!
20
25
20
20
16
25
11
• Stecken Sie die Gurtzunge (18) in das Gurtschloss (19). Dieses muss mit einem
hörbaren „KLICK“ einrasten.
• Als nächstes legen Sie den Beckengurt (16) in die rot gekennzeichneten unteren
Gurtführungen (25) des Kindersitzes ein.
• Ziehen Sie nun kräftig am Diagonalgurt (20), um den Beckengurt (16) zu straffen.
Je enger der Gurt anliegt, desto besser kann er vor Verletzungen schützen. Auf der
Seite des Gurtschlosses (19) müssen der Diagonalgurt (20) und der Beckengurt (16)
zusammen in die untere Gurtführung (25) eingelegt sein.
• Der Beckengurt (16) sollte auf beiden Seiten des Sitzkissens in den rot
gekennzeichneten unteren Gurtführungen (25) liegen.
• Nun führen Sie den Diagonalgurt (20) durch die obere Gurtführung (23) in der
Kopfstütze (11) bis er sich innerhalb der Gurtführung befindet.
20
HINWEIS! Bringen Sie Ihrem Kind von Anfang an bei, immer auf eine straffe Gurtführung
zu achten und bei Bedarf, selbst den Gurt festzuziehen.
23
11
20
16
!
WARNUNG! Der Beckengurt (16) muss auf beiden Seiten so tief wie möglich über
der Leistenbeuge Ihres Kindes verlaufen, um im Falle eines Unfalls optimal wirken
zu können.
Achten Sie darauf, dass der Diagonalgurt (20) zwischen Schulteraußenkante und Hals
Ihres Kindes verläuft. Falls erforderlich, passen Sie durch Verstellen der Kopfstützenhöhe
den Gurtverlauf an. Die Höhe der Kopfstütze (11) kann auch im eingebauten Zustand im
Auto eingestellt werden.
25
Page 30

FASTENING YOUR CHILD’S SEATBELT GROUP 2/3 1536 KG
• Place your child in the child seat. Pull the three-point belt right out and feed it along the
belt buckle (19) in front of your child.
NOTE! The three-point belt must only be passed through the
designated routings. The belt routings are described in detail in
this manual and are marked in red on the car seat.
ALLACCIARE IL BAMBINO CON LA CINTURA GRUPPO 2/3 1536 KG
• Collocare il bambino nel seggiolino. Estrarre ampiamente la cintura a tre punti e farla
scorrere fino al fermaglio della cintura (19) davanti al bambino.
NOTA BENE! La cintura a tre punti deve passare solo tra
i passaggi designati Il passaggio per le cinture sono descritte nel dettaglio
in questo manuale ed evidenziate nel seggiolino auto
DE
ENIT
!
WARNING! Never twist the belt.
• Insert the belt tongue (18) into the belt buckle (19). It must lock into place with an
audible “CLICK”.
• Next, place and tighten the lap belt (16) in the red colored lower belt guides (25) of the
child seat.
• Now pull the diagonal belt (20) firmly to tighten the lap belt (16). The tighter the belt
sits, the better it provides protection from injury. On the side of the belt buckle (19),
the diagonal belt (20) and the lap belt (16) must be inserted together in the lower belt
guide (25).
• The lap belt (16) should have been fed through the lower belt guides (25) on both sides
of the booster seat.
• Now feed the diagonal belt (20) through the upper belt guide (23) in the headrest (11)
until it is inside the belt guide.
NOTE! Teach your child from the start to always ensure that the belt is tight and, if
necessary, how to tighten the belt themselves.
!
WARNING! The lap belt (16) must run as low as possible on both sides along your
child’s groin to have optimum effect in the event of an accident.
Ensure that the diagonal belt (20) runs between the outside of the shoulder and the neck
of your child. If necessary, adjust the height of the headrest to change the position of the
belt. The height of the headrest (11) can still be adjusted while in the car.
!
ATTENZIONE! Non torcere mai la cintura.
• Inserire la linguetta della cintura (18) nel fermaglio della cintura (19). Il blocco in
posizione deve essere segnalato da uno scatto udibile.
• Collocare successivamente la cintura subaddominale (23) nelle guide rosse della
cintura inferiori (25) del seggiolino.
• Ora tirare saldamente la cintura diagonale (20) per tendere la cintura subaddominale
(16). Maggiormente tesa è la sede della cintura e maggiore è la protezione dalle lesioni.
Cintura diagonale (20) e cintura subaddominale (16) vanno inserite assieme nella guida
cintura inferiore (25) a lato del fermaglio della cintura (19).
• La cintura subaddominale (16) dovrebbe passare attraverso le guide della cintura
inferiori (25) su ambo i lati del cuscino di seduta.
• Far passare ora la cintura diagonale (20) attraverso la guida della cintura superiore (23)
nel poggiatesta (11) fino a che si trova nella rossa guida della cintura.
NOTA BENE! Insegnare al bambino fin dall’inizio a controllare sempre che la cintura sia
tesa e a tenderla autonomamente se necessario.
!
ATTENZIONE! La cintura subaddominale (16) deve scorrere più bassa possibile
su ambo i lati lungo l’inguine del bambino per avere l’effetto ottimale in caso di
incidente.
Accertare che la cintura diagonale (20) scorra tra l’esterno della spalla e il collo del
bambino. Se necessario regolare l’altezza del poggiatesta per cambiare la posizione della
cintura. L’altezza del poggiatesta (11) è regolabile anche in auto.
29
Page 31

CLICK!
20
25
23
11
16
IST IHR KIND RICHTIG GESICHERT? FAHRZEUGGURT GRUPPE 2/3 1536 KG
Um die bestmögliche Sicherheit Ihres Kindes zu gewährleisten, prüfen Sie bitte immer vor
5
19
Beginn der Fahrt, ob…
• der Beckengurt (16) auf beiden Seiten des Sitzkissens (5) in den rot gekennzeichneten
unteren Gurtführungen (25) verläuft und straff und tief sitzt.
• der Diagonalgurt (20) auf der Gurtschlossseite auch in der unteren Gurtführung (25)
des Sitzes verläuft.
• der Diagonalgurt (20) durch die rot markierte obere Gurtführung (16) der Kopfstütze
(11) verläuft.
• der Diagonalgurt (20) schräg nach hinten verläuft.
• der gesamte Gurt straff ist und nicht verdreht am Körper des Kindes anliegt.
• bei Verwendung von ISOFIX-Connect das Sitzkissen beidseitig mit den ISOFIX
Connect Rastarmen (7) in den ISOFIX Befestigungspunkten eingerastet und der grüne
Sicherheitsindikator (9) deutlich zu sehen ist.
!
WARNUNG! Das Fahrzeuggurtschloss (19) darf keinesfalls über die Armlehne
reichen. Ist die Gurtpeitsche zu lang, ist der Kindersitz für eine Verwendung auf
dieser Position im Fahrzeug nicht geeignet. Bitte wenden Sie sich im Zweifelsfall an
den Hersteller.
!
WARNUNG! Bitte lassen Sie Ihr Kind nie unbeaufsichtigt im Fahrzeug zurück.
Die Kunststoffteile des Kindersitzes heizen sich in der Sonne auf. Ihr Kind kann
sich daran verbrennen. Schützen Sie Ihr Kind und den Kindersitz vor intensiver
Sonneneinstrahlung (z.B. indem Sie ein helles Tuch über den Sitz legen).
30
20
7
9
Page 32

IS YOUR CHILD CORRECTLY SECURED? VEHICLE BELT GROUP 2/3 1536 KG
To ensure optimum safety for your child, please always check before commencing travel that
• the lap belt (16) has been fed through the lower red belt guides (25) on both sides of
the booster seat (5).
• the diagonal belt (20) on the belt buckle side has also been fed through the lower red
belt guide (25) of the seat.
• the diagonal belt (20) has been fed through the upper belt guide (16) marked red in the
headrest (11).
• the diagonal belt (20) is at a recline backwards.
• the entire belt is tightly against your child’s body and is not twisted.
• If ISOFIX Connect is used: The seat is locked in place on both sides with the ISOFIX
Connect locking arms (7) and the green safety indications (9) are clearly visible.
!
WARNING! The vehicle belt buckle (19) must never cross the arm rest. If the belt
system is too long, the child seat is not suitable for use in this position in the vehicle.
In case of doubt, please consult the retailer.
!
WARNING! Never leave your child unattended in the car. The plastic parts in the
child restraint system heat up in sun and the child may sustain burns.
Protect your child and the car seat from direct sun exposure (e.g. by covering it with
a light colored cloth).
IL BAMBINO È MESSO IN SICUREZZA CORRETTAMENTE? CINTURA
DELL’AUTOMOBILE GRUPPO 2/3 1536 KG
Per garantire la sicurezza ottimale del bambino, prima di iniziare il viaggio controllare
sempre che
• la cintura subaddominale (16) passo attraverso le guide della cintura inferiori (25) su
ambo i lati del cuscino di seduta (5).
• la cintura diagonale (20) sul lato del fermaglio della cintura passi attraverso la guida
inferiore della cintura (25) del seggiolino auto
• la cintura diagonale (20) passi attraverso la guida della cintura (16) colorata di rosso nel
poggia-spalla (11).
• la cintura diagonale (20) scorra verso il basso inclinata
• l’intera cintura poggi tesa contro il corpo del bambino e non sia attorcigliata.
• Se si utilizza is sistema ISOFIX connect: Il seggiolino sia bloccato da entrambi i lati
tramite il sistema ISOFIX (7) e gli indicatori verdi (9) siano chiaramente visibili.
!
ATTENZIONE! La cintura dell’automobile (19) non deve mai incrociarsi sulle braccia
del bambino. Se il sistema di cinture è troppo lungo il seggiolino non è adatto all’uso
in questa posizione nel veicolo. In caso di dubbi, consultare il rivenditore autorizzato.
!
ATTENZIONE! Non lasciare mai il bambino incustodito nell’auto. Le parti in plastica
del sistema di ritenuta per bambini si riscaldano nel sole e il bambino può sostenere
ustioni. Proteggi il seggiolino auto dall’esposizione diretta dal sole (ad es. con una
copertura con un tessuto dai colori chiari).
DE
ENIT
31
Page 33

11 11
13
ENTFERNEN DES BEZUGES
Der Bezug am Kindersitz besteht aus fünf Teilen (Kopfstützenklappe, Kopfstütze,
Schulterteil, Sitzkissen, Fangkörper).
Die Sitzbezüge sind in den am Rand des Kindersitzes verlaufenden Bezugführungen
versenkt und/oder an mehreren Stellen mit Druckknöpfen am Kindersitz befestigt.
Sobald Sie alle Befestigungen lösen, können die Einzelteile aus den Bezugführungen
gezogen werden.
Um den Bezug wieder zu befestigen, verfahren Sie in umgekehrter Reihenfolge.
!
WARNUNG! Der Kindersitz darf keinesfalls ohne Bezug verwendet werden.
Entfernen des Bezugs von der Kopfstützenklappe
Ziehen Sie die Kopfstütze (11) mit Hilfe des Verstellgriffes der Kopfstütze (13) in die
höchste Position. Ziehen Sie die Aussparung des Bezugs über den Verstellhebel, sodass
der Bezug beim Abziehen nach oben hin nicht am Hebel hängen bleibt.
Entfernen des Bezugs von der Kopfstütze
Schieben Sie den Bezug an der Öffnung am hinteren Schulterbereich vom Haken. Ziehen
Sie den Bezug aus dem Stoffkanal.
Entfernen des Bezugs vom Schulterteil
Ziehen Sie den Bezug aus dem Stoffkanal heraus.
32
Page 34

REMOVING THE SEAT COVER
The cover of the child seat consists of five parts (Headrest flap, headrest, shoulder part
cover, booster cover and/or seat surface cover, impact shield).
The five covers of the seat are fitted into the cover attachment channels on the edge of the child
seat and are held in position at several places by press-studs (see image).
Once all studs have been released, the single parts of the cover can be removed from the
cover attachment channels.
RIMOZIONE DELLA FODERA DEL SEGGIOLINO
La fodera del seggiolino è composta da cinque parti (aletta del poggiatesta, poggiatesta,
fodera dell’aera della spalla, fodera dell’elevatore e/o fodera della superficie di seduta,
cuscino di sicurezza).
Le cinque fodere del seggiolino sono inserite nelle guide di attacco della fodera sui bordi
del seggiolino e sono tenute in posizione da bottoni automatici (vedere figura).
Una volta sbloccati tutti gli automatici, le singole parti della fodera possono essere rimosse
dalle guide di attacco della fodera.
DE
ENIT
In order to put the covers back on the seat, proceed in the reversed order as removing them.
!
WARNING! The child seat must never be used without the cover.
Removing the cover from the headrest flap
Pull the opening of the cover over the adjustment lever headrest (13) so that the cover
does not get jammed on the lever when pulling it up to remove it.
Removing the cover from the head support
Unlock the cover from the hook at each side of the rear of the shoulder area.
Pull the cover out of the cover attachment channel.
Removing the cover from the shoulder part
Pull the cover out of the cover attachment channel.
Procedere in ordine inverso rispetto alla rimozione al fine di ricollocare le fodere sul seggiolino
!
ATTENZIONE! Il seggiolino non deve mai essere usato senza la fodera.
Rimozione della fodera dall’aletta del poggiatesta
Rilasciare i due bottoni automatici su ogni lato del retro area della spalla (13) Estrarre la
fodera dalla guida di attacco della fodera.
Rimozione della fodera dal poggiatesta
Sbloccare i quattro bottoni automatici anteriori e posteriori dela fodera del sedile.
Estrarre la fodera dalla guida di attacco della fodera.
Rimozione della fodera dall’area della spalla
Estrarre la fodera dalla guida di attacco della fodera.
33
Page 35

Entfernen des Bezugs von der Sitzfläche
Lösen Sie die 2 Druckknöpfe des Sitzbezugs vorder- und rückseitig. Ziehen Sie nun den
Bezug über die Armlehnen und entlang der Sitzfläche ab.
Entfernen des Bezugs vom Fangkörper
Öffnen Sie zuerst die beiden Druckknöpfe des Fangkörperbezugs. Ziehen Sie dann den
Bezug um das Kissengehäuse hin zur dritten Befestigung am zentralen Verstellknopf ab
und lösen Sie den Bezug an der Gummiöse des zentralen Verstellknopfes.
REINIGUNG
HINWEIS! Bitte den Bezug vor der ersten Verwendung waschen. Der Bezug darf nur bei
30 °C im Schonwaschgang gewaschen werden. Sollten Sie mit mehr als 30°C waschen,
kann es zu Ausfärbungen des Bezugstoffes kommen. Bitte den Bezug gesondert von
anderer Wäsche waschen und nicht im Trockner trocknen! Den Bezug keinesfalls in der
prallen Sonne trocknen! Die Kunststoffteile können mit einem milden Reinigungsmittel und
warmen Wasser gereinigt werden.
!
WARNUNG! Bitte auf keinen Fall scharfe Reinigungs- oder Bleichmittel verwenden!
34
Page 36

Removing the cover from the booster
Release the 2 press-studs of the seat cover at the front and the back. Now, pull off the
cover over the armrests and along the seat surface.
Removing the cover from the impact shield Rimozione della fodera dal cuscino di sicurezza
First, release the two press-studs of the impact shield cover. Then pull off the cover around
the cushion towards the third attachment around the central adjustment button and release
the cover at the rubber eyelet of the adjustment button.
Rimozione della fodera dalla superficie di seduta
Sbloccare i due bottoni automatici anteriori e posteriori della fodera del sedile. Estrarre ora
la fodera oltre i braccioli e lungo la superficie di seduta.
Sbloccare prima i due bottoni automatici della fodera del cuscino di sicurezza. Estrarre
quindi la fodera attorno al cuscino verso il terzo attacco attorno al pulsante di regolazione
centrale e sbloccare la fodera sull'occhiello in gomma del pulsante di regolazione.
DE
ENIT
CLEANING
NOTE! Please wash the cover before you use it the first time. The cover may only be
washed at 30 °C with a delicate wash program. Washing at more than 30°C may result
in discolouration of the cover fabric. Please wash the cover separately from other laundry
and do not dry in the dryer! Never dry the cover in direct sunlight! The plastic parts can be
cleaned with a mild cleaning agent and warm water.
!
WARNING! Never use harsh cleaning agents or bleaches!
PULIZIA
NOTA BENE! Consigliamo il lavaggio prima del primo utilizzo. La fodera è lavabile solo
a 30 °C con un programma di lavaggio delicato. Il lavaggio oltre i 30 °C può causare lo
scolorimento del tessuto della fodera. Lavare la fodera separatamente dagli altri capi e non
asciugare in asciugatrice! Non fare mai asciugare la fodera alla luce solare diretta! Le parti
in plastica possono essere pulite con un detergente delicato e dell’acqua tiepida.
!
ATTENZIONE! Non usare mai detergenti aggressivi o candeggine!
35
Page 37

PFLEGE
Um die größtmögliche Schutzwirkung Ihres Kindersitzes zu gewährleisten, ist es unbedingt
notwendig, dass Sie Folgendes beachten:
• Alle wichtigen Teile des Kindersitzes sollten regelmäßig auf Beschädigungen kontrolliert
werden. Die mechanischen Bauteile müssen einwandfrei funktionieren.
• Es ist unbedingt notwendig darauf zu achten, dass der Kindersitz nicht zwischen harten
Teilen wie Fahrzeugtür, Sitzschiene usw. eingeklemmt wird und dadurch beschädigt
werden könnte.
• Der Kindersitz muss z.B. nach einem Sturz unbedingt vom Hersteller überprüft werden.
Es ist darauf zu achten, dass nur ein original CYBEX Sitzbezug verwendet wird, da auch der
Bezug ein wesentlicher Bestandteil der Funktion ist. Ersatzbezüge erhalten Sie im Fachhandel.
VERHALTEN NACH EINEM UNFALL
!
WARNUNG! Aufgrund eines Unfalles können am Kindersitz Beschädigungen
auftreten, die mit bloßem Auge nicht erkennbar sind. Bitte tauschen Sie nach einem
Unfall unbedingt den Sitz aus. Im Zweifelsfall wenden Sie sich bitte an den Händler
oder Hersteller.
PRODUKTLEBENSDAUER
Dieser Kindersitz ist so ausgelegt, dass er bei gewöhnlicher Nutzung für die gesamte
Produktlebensdauer von ca. 9 Jahren seine Eigenschaften erfüllt. Durch den langsamen
Verschleiß des Kunststoffs, beispielsweise durch Sonneneinstrahlung (UV), können sich
die Eigenschaften des Produkts geringfügig verschlechtern. Da in Fahrzeugen sehr große
Temperaturschwankungen herrschen und andere unvorhersehbare Belastungen auftreten
können, ist es notwendig, folgende Punkte zu beachten:
• Wenn das Fahrzeug längere Zeit der prallen Sonne ausgesetzt ist, muss der Kindersitz
aus dem Fahrzeug entfernt oder mit einem hellen Tuch abgedeckt werden.
• Prüfen Sie regelmäßig alle Kunststoff- und Metallteile des Kindersitzes auf
Beschädigung oder Veränderung von Form oder Farbe. Stellen Sie eine Veränderung
fest, ist der Kindersitz zu entsorgen oder muss vom Hersteller geprüft und
gegebenenfalls ausgetauscht werden.
• Veränderungen des Stoffes, insbesondere das Ausbleichen, sind normal und stellen
keine Beeinträchtigung dar.
36
Page 38

CARE & MAINTENANCE
To ensure that your child seat provides maximum protection, it is imperative that you note
the following:
• All major parts of the child seat should be checked regularly for damage. The
mechanical components must be free of defects.
• It is absolutely necessary to ensure that the child seat is not jammed between hard
elements such as the vehicle door or seat rail, which could potentially damage it.
• When exposed to extreme shock, e.g. after a crash, the child seat must be checked by
the manufacturer.
Ensure that only an original CYBEX seat cover is used, as the cover is a key element of the
seat’s function. Spare covers can be obtained from a specialist retailer.
CURA E MANUTENZIONE
Per garantire che il seggiolino offra la massima protezione è imperativo osservare
quanto segue:
• Tutte le parti principali del seggiolino dovrebbero essere controllate regolarmente alla
ricerca di danni. I componenti meccanici devono essere privi di difetti.
• E’ assolutamente necessario assicurare che il seggiolino non sia incastrato tra elementi
duri, quali la portiera o le guide dei sedili, che potrebbero potenzialmente danneggiarlo.
• Se esposto a colpi estremi, ad esempio in caso di incidente, il seggiolino deve essere
controllato dal produttore.
Accertarsi di utilizzare solo una fodera del sedile CYBEX, in quanto la fodera rappresenta
un elemento chiave di funzionamento del seggiolino. Le fodere di ricambio sono ottenibili
presso i rivenditori specializzati.
DE
ENIT
HOW TO ACT FOLLOWING AN ACCIDENT
!
WARNING! An accident may cause damage to the child seat that is not identifiable
with the naked eye. Please replace the seat after an accident. In case of doubt,
please consult your dealer or the manufacturer.
PRODUCT LIFESPAN
This child seat has been designed to be able to fulfill its intended functions by ordinary use
for a product life span of approx. 9 years. Gradual wear of the plastic, for example caused
by exposure to sunlight (UV), can cause slight deterioration of the product’s properties.
Since very high temperature fluctuations and other unforeseeable stresses are common in
vehicles, it is necessary to observe the following points:
• If the vehicle is directly exposed to strong sunlight for long periods, the child seat must
be removed from the vehicle or covered with a light cloth.
• Check all plastic and metal parts of the seat regularly for damage or change of shape or
colour. If you notice any change in the child seat, the seat must be disposed or checked
and possibly replaced by the manufacturer.
• Changes to the fabric, especially fading, are normal when used in a vehicle and do not
impair the seat’s function.
COME PROCEDERE IN SEGUITO A UN INCIDENTE
!
ATTENZIONE! Un incidente può causare danni al seggiolino non identificabili a
occhio nudo. Sostituire il seggiolino dopo un incidente. In caso di dubbio, consultare
il proprio rivenditore o il produttore.
VITA UTILE DEL PRODOTTO
Questo seggiolino è progettato per soddisfare le proprie specifiche l’intera vita utile, pari
a circa 9 anni. Nel tempo le parti in plastica tendono ad usurarsi, es. per l’esposizione al
sole (UV) e le caratteristiche del prodotto possono subire leggere variazioni. Alla luce delle
possibili fluttuazioni massicce di temperatura e degli sforzi imprevedili nei veicoli, devono
essere tenuti in considerazione i punti seguenti:
• Se il veicolo viene lasciato al sole per un periodo di tempo prolungato, il seggiolino deve
essere rimosso dall’abitacolo o coperto con un panno chiaro.
• Controllare regolarmente tutte le parti di plastica e metallo del seggiolino alla ricerca di
danni, deformazioni o cambiamenti di colore. Qualora si scopra qualsiasi cambiamento,
il seggiolino dovrà essere smaltito o controllato e, possibilmente, sostituito dal
produttore.
• Le variazioni del tessuto, in particolare la scoloritura, sono perfettamente normali in caso
di uso di un veicolo e non intaccano il funzionamento del seggiolino.
37
Page 39

ENTSORGUNG
Am Ende der Produktlebensdauer des Kindersitzes ist eine sachgemäße Entsorgung
vorzunehmen. Die Abfalltrennung kann kommunal unterschiedlich sein. Um eine
vorschriftsgemäße Entsorgung des Kindersitzes zu gewährleisten, setzen Sie sich mit Ihrer
kommunalen Abfallentsorgung bzw. Verwaltung Ihres Wohnortes in Verbindung. Beachten
Sie auf jeden Fall die Entsorgungsbestimmungen Ihres Landes.
GARANTIEBEDINGUNGEN
Die nachfolgenden Garantiebestimmungen gelten nur in dem Land, in dem dieses
Produkt erstmalig über den Einzelhandel an einen Verbraucher verkauft wurde. Die
Garantie deckt sämtliche Herstellungs- und Materialfehler ab, die im Zeitpunkt des Kaufs
bestanden haben oder die innerhalb von drei (3) Jahren nach dem Erstverkauf dieses
Produkts über den Einzelhandel an einen Verbraucher in Erscheinung getreten sind
(Herstellergarantie). Tritt während der Garantiezeit ein Herstellungs- und Materialfehler
auf, wird das Produkt kostenlos repariert oder – nach unserem freien Ermessen – gegen
ein neues ausgetauscht. Um Leistungen im Rahmen dieser Garantie in Anspruch nehmen
zu können, muss das Produkt an den Einzelhändler zurückgegeben werden, der es
erstmalig verkauft hat und ein Nachweis über den Kauf (Kaufbeleg oder Rechnung) im
Original vorgelegt werden, welcher das Kaufdatum, Namen und Adresse des Händlers,
sowie die Produktbezeichnung aufzeigt. Der Anspruch aus diesem Garantieversprechen
besteht nicht, wenn das Produkt an den Hersteller oder irgendeine andere Person als
den Einzelhändler, der es erstmalig verkauft hat, zum Zweck der Inanspruchnahme der
Garantieleistung geschickt wird. Die Garantie gilt nur, wenn das Produkt nach dem Kauf
umgehend auf Vollständigkeit, Herstellungs- und Materialfehler überprüft wurde. Wurde
das Produkt im Versandhandel gekauft, ist es umgehend nach Erhalt auf Vollständigkeit,
Herstellungs- und Materialfehler zu überprüfen. Falls Schäden vorhanden sind, darf
das Produkt nicht mehr benutzt werden und muss umgehend an den Händler, der es
erstmalig verkauft hat, zurückgegeben werden. Im Garantiefall muss das Produkt in
einem vollständigen und sauberen Zustand zurückgegeben werden. Bitte lesen Sie
vor einer Kontaktaufnahme mit dem Händler sorgfältig die Gebrauchsanleitung. Die
Garantie deckt keine Schäden ab, die durch Fehlgebrauch, äußere Einflüsse (Wasser,
Feuer, Verkehrsunfälle o.ä.) oder normalen Verschleiß entstanden sind. Die Garantie
wird nur gewährt, wenn das Produkt in Übereinstimmung mit der Gebrauchsanweisung
behandelt und benutzt wurde, Reparaturen oder Veränderungen ausschließlich durch
Personen vorgenommen wurden, die hierzu befugt waren und stets nur Original Bau- und
Zubehörteile verwendet wurden. Durch diese Garantie werden weder die auf Grundlage
der jeweils anwendbaren Gesetze bestehenden Verbraucherrechte noch Rechte gegen
den Verkäufer wegen der Vertragswidrigkeit des Produkts ausgeschlossen, begrenzt oder
in anderer Weise eingeschränkt.
CYBEX GmbH
Riedingerstr. 18, 95448 Bayreuth, Germany
Tel.: 0921 78 511-511, Fax.: 0921 78 511- 888
38
Page 40

DISPOSAL
At the end of the child seat’s service life, it must be disposed of correctly. The separation
of waste may be handled differently from place to place. To ensure that the child seat is
disposed of in accordance with regulations, please contact your local waste disposal
institution or local council. Always observe the waste disposal regulations of your country.
WARRANTY CONDITIONS
The following warranty conditions only apply to the country in which this product was first
sold through retail channels to a consumer. This warranty covers all manufacturing and
material defects that existed at the time of purchase or which manifest themselves within
three (3) years of first sale of this product via retail channels to a consumer (manufacturer
warranty). If a manufacturing or material defect arises during the warranty period, the
product will be repaired at no charge or – at our discretion – may be replaced by a new
one. In order to make a claim on this warranty, the product must be returned to the retailer
that first sold it and the original proof of purchase (receipt or invoice), containing the date
of purchase, name and address of the retailer, and the product name, must be presented.
No claims may be made on this warranty if the product is sent to the manufacturer or
any other person than the retailer having first sold it for the purpose of making a claim
on the warranty. The warranty only applies if the product was checked for completeness,
manufacturing defects and material defects immediately upon purchase. If the product
was purchase by way of a mail order outlet, it must be checked for completeness,
manufacturing defects and material defects immediately upon receipt. If damage arises,
the product may no longer be used and must be returned to the retailer that original sold
it. When claiming on the warranty, the product must be returned in a complete and clean
state. Please read the usage instructions carefully before contacting the retailer. The
warranty does not cover damage caused by misuse, external influences (water, fire, traffic
accidents etc.) or normal wear and tear. Claims on the warranty will only be honoured if
the product is treated and used in accordance with the usage instructions, repairs and
modifications are only performed by persons authorised to do so, and only original parts
and accessories are used. This warranty does not nullify or limit in any way any consumer
rights or rights against the seller based on infringement of the purchase agreement granted
by applicable legislation.
SMALTIMENTO
Al termine della sua vita utile il seggiolino dovrà essere smaltito correttamente. La
differenziazione dei rifiuti potrebbe avvenire con modalità diverse da luogo a luogo. Per
garantire lo smaltimento corretto preghiamo di contattare l’ufficio di competenza della
vostra città. Seguire sempre le normative vigenti nella vostra nazione.
CONDIZIONI DI GARANZIA
La seguente garanzia vale unicamente nella nazione in cui il prodotto è stato
originariamente venduto da un rivenditore al consumatore. La garanzia copre eventuali
difetti di fabbricazione e di materiali riscontrati all’acquisto o entro un periodo di tre (3)
anni dalla data di acquisto presso il rivenditore (garanzia del produttore). Qualora, durante
il periodo di garanzia, si presenti un difetto di produzione o dei materiali, il prodotto verrà
riparato gratuitamente o sostituito con uno nuovo a nostra discrezione. Per avere diritto
alla garanzia è necessario riportare o spedire il prodotto al rivenditore presso il quale è
stato acquistato ed è indispensabile fornire la prova di acquisto (scontrino fiscale, fattura,
ecc.) in originale. La prova d’acquisto dovrà contenere indicati la data di acquisto, il nome
e indirizzo del rivenditore e identificativo del prodotto. Non sono ammesse richieste relative
a questa garanzia qualora il prodotto, allo scopo di effettuare una richiesta di garanzia, sia
inviato al produttore o a qualsiasi altra persona diversa dal dettagliante che lo ha venduto
per la prima volta. La garanzia è valida soltanto se il prodotto è stato sottoposto ad un
accurato controllo di completezza e funzionalità all’acquisto e se eventuali manchevolezze
di produzione o di materiali sono state prontamente segnalate. Se il prodotto è
stato acquistato tramite un canale di vendita a distanza, dovrà essere controllato
immediatamente al momento del ricevimento per verificarne la completezza ed eventuali
difetti di produzione o di materiali. In caso si riscontri qualsiasi difetto/danneggiamento
del prodotto invitiamo a non utilizzarlo e a restituirlo imediatamente al rivenditore presso
il quale è stato acquistato. I diritti di garanzia sono validi soltanto se il prodotto è reso
pulito e completo in ogni sua parte. Leggere attentamente le istruzioni per l’uso prima di
contattare il dettagliante. La garanzia non copre danni provocati da utilizzo improprio o
da eventi fortuiti e cause ambientali (acqua, fuoco, incidenti stradali, ecc.) o dal normale
deperimento d’uso. La garanzia è valida soltanto per prodotti usati in conformità a quanto
stabilito nel manuale istruzioni, se eventuali modifiche o riparazioni sono state effettuate
da personale autorizzato e se sono state utilizzate solo parti ed accessori originali. Questa
garanzia non esclude, limita o comunque pregiudica eventuali diritti legali dei consumatori,
comprese istanze in caso di torto e in caso di una violazione del contratto, che l’acquirente
può avere nei confronti del rivenditore.
DE
ENIT
39
Page 41

PALLAS S-fix
UN-R44-04
UNIVE RSAL
SEM I-UNIVERSAL
9 - 18 kg
04301358
CYBEX GmbH
Riedingerstr. 18, 95448 Bayreuth
Germany
SOLUTION S-fix
UN-R44-04
UNIVE RSAL
SEM I-UNIVERSAL
15 – 36 kg
04301359
CYBEX GmbH
Riedingerstr. 18, 95448 Bayreuth
Germany
40
Homologation
UN R 44-04
CYBEX PALLAS S-fix - groupe 1, de 9 à 18 kg
CYBEX SOLUTION S-fix - groupe 2/3, de 15 à 36 kg
Réhausseur de siège avec dossier et appuie-tête sur un
châssis réglable avec des boucliers d’impact réglables en
hauteur.
Recommandé pour :
Age : de 3 à 12 ans environ
Poids : 15 à 36 kg
Taille : jusque 150 cm
Ne convient que pour les véhicules équipés d’une ceinture
automatique trois points norme UN R16 ou équivalent
Certificering
UN R 44-04
CYBEX PALLAS S-fix - groep 1, 9 – 18 kg
CYBEX SOLUTION S-fix - groep 2/3, 15 – 36 kg
Verhoging met rug- en hoofdsteun op een verstelbaar
frame met in hoogte verstelbaar veiligheidskussen.
Aanbevolen voor:
Leeftijd: vanaf ongeveer 3 tot 12 jaar
Gewicht: 15 tot 36 kg
Lichaamslengte: tot maximaal 150 cm
Alleen geschikt voor autostoelen met automatische
driepuntsgordels die zijn goedgekeurd conform UN R16
of een vergelijkbare norm.
Certyfikaty
UN R 44-04
CYBEX PALLAS S-fix - grupa 1, 9 do 18 kg
CYBEX SOLUTION S-fix - grupa 2/3, 15 do 36 kg
Siedzisko z podnoszonym oparciem i zagłówkiem na
regulowanej bazie z poduszką bezpieczeństwa z regulacją
wysokości.
Polecany dla:
Wiek: od ok. 3 do 12 lat
Waga: 15 do 36 kg
Wysokość ciała: do 150 cm
Tylko do montażu w samochodach z automatycznymi
3-punktowymi pasami w zgodzie z regulacją UN R16 lub
w porównywalnym standardzie.
FR
ATTENTION ! Le siège CYBEX PALLAS S-fix doit être utilisé conformément aux
SOMMAIRE
!!
présentes instructions afin de garantir une protection optimale de votre enfant.
NOTE ! Gardez toujours ces instructions à portée de main (par ex. dans le compartiment
prévu à cet effet à l’arrière du dossier du siège).
NOTE ! Les règlements spécifiques à chaque pays (concernant notamment les codes de
couleurs sur les sièges auto) peuvent faire varier l’apparence des produits. Ceci n’affecte
cependant pas le fonctionnement du produit.
POSITIONNEMENT CORRECT DU SIÈGE DANS LE VÉHICULE ...................................................................................................42
SÉCURITÉ EN VOITURE ..........................................................................................................................................................................................44
POSITIONNEMENT DU SIÈGE DANS LE VÉHICULE .............................................................................................................................44
INSTALLATION DU SIÈGE AVEC LE SYSTÈME ISOFIX CONNECT .................................................................................................46
RETRAIT DU CYBEX PALLAS SFIX ...................................................................................................................................................................48
RÉGLAGE DES PROTECTIONS LATÉRALES ..............................................................................................................................................48
APPUITÊTE INCLINABLE ......................................................................................................................................................................................50
ADAPTATION À LA TAILLE CORPORELLE ....................................................................................................................................................52
RÉGLAGE DU BOUCLIER D’IMPACT GROUPE 1 918 KG ..........................................................................................................52
FIXER LE BOUCLIER .................................................................................................................................................................................................54
POSITION ASSISE ET ALLONGÉE GROUPE 1 918 KG ................................................................................................................56
SÉCURISER CORRECTEMENT VOTRE ENFANT GROUPE 1 918 KG ................................................................................58
PASSAGE DU MODÈLE PALLAS SFIX À LA SOLUTION SFIX GROUPE 1 AU GROUPE 2/3 60
INSTALLATION AVEC LA CEINTURE DE SECURITÉ ................................................................................................................................62
VOTRE ENFANT ESTIL ATTACHÉ CORRECTEMENT? .........................................................................................................................64
RETIRER LA HOUSSE ..............................................................................................................................................................................................66
NE TTOYAGE ....................................................................................................................................................................................................................68
ENTRETIEN ET MAINTENANCE ...........................................................................................................................................................................70
EN CAS D’ACCIDENT ............................................................................................................................................................................................... 70
DURÉE DE VIE DU PRODUIT ................................................................................................................................................................................70
DESTRUCTION .............................................................................................................................................................................................................72
CONDITIONS DE GARANTIE ................................................................................................................................................................................ 72
Page 42

NL PL
! !
BELANGRIJK! Voor optimale bescherming van uw kind moet u de CYBEX PALLAS
S-FIX gebruiken zoals in deze handleiding beschreven.
SPIS TREŚCIINHOUD
OSTRZEŻENIE! Aby zapewnić dziecku optymalną ochronę, CYBEX PALLAS S-FIX
musi być użytkowany zgodnie z instrukcją.
LET OP! Houd deze handleiding altijd bij de hand (bijvoorbeeld in het daarvoor bestemde
vakje aan de achterzijde van rugsteun).
LET OP! Nationale regelgeving (bijvoorbeeld over de kleurcodering op autostoeltjes) kan
ertoe leiden dat productkenmerken er anders uitzien. Dat heeft echter geen gevolgen voor
het goed functioneren van het autostoeltje.
HET STOELTJE GOED IN DE AUTO PLAATSEN .........................................................................................................................................43
VEILIGHEID IN DE AUTO .........................................................................................................................................................................................45
HET STOELTJE IN DE AUTO PLAATSEN .........................................................................................................................................................45
INSTALLATIE VAN HET AUTOSTOELTJE MET HET ISOFIX CONNECTSYSTEEM 47
DE CYBEX PALLAS SFIX VERWIJDE REN .....................................................................................................................................................49
AANPASSEN VAN DE ZIJBESCHERMERS ...................................................................................................................................................49
KANTELBARE HOOFDSTEUN ............................................................................................................................................................................51
AANPASSING AAN DE LICHAAMSLENGTE ................................................................................................................................................53
HET VEILIGHEIDSKUSSEN AANPASSEN GROEP 1 918 KG ...................................................................................................53
VASTMAKEN MET HET VEILIGHEIDSKUSSEN ..........................................................................................................................................55
ZITTENDE EN LIGGENDE POSITIE GROEP 1 918 KG..................................................................................................................57
HET KIND JUIST VASTMAKEN GROEP 1 918 KG .............................................................................................................................59
VAN PALLAS SFIX NAAR SOLUTION SFIX GROEP 1 NAAR GROEP 2/3 61
DE AUTOGORDEL VAN UW KIND VASTMAKEN ........................................................................................................................................63
IS UW KIND GOED VASTGEMAAKT? ..............................................................................................................................................................65
DE BEKLEDINGSHOES VERWIJDEREN .......................................................................................................................................................67
REINIGING ......................................................................................................................................................................................................................69
REINIGING & ONDERHOUD ................................................................................................................................................................................71
WAT TE DOEN NA EEN ONGEVAL ....................................................................................................................................................................71
LEVENSDUUR VAN HET PRODUCT .................................................................................................................................................................71
VERWIJDERING ...........................................................................................................................................................................................................73
GARANTIE ........................................................................................................................................................................................................................73
UWAGA! Zachowaj instrukcję w zasięgu ręki (np. w specjalnym schowku z tyłu oparcia
fotelika).
UWAGA! Przepisy krajowe (na przykład w zakresie oznaczenia kolorów na fotelikach
dziecięcych) mogą mieć wpływ, że cechy produktu mogą odbiegać wyglądem.. Nie wpływa
to na poprawne funkcjonowanie fotelika.
FRNLPL
OPTYMALNE MI EJSCE FOTELIKA W SAMOCHODZIE ........................................................................................................................43
BEZPIECZEŃSTWO W SAMOCHODZIE......................................................................................................................................................45
ZABEZPIECZANIE DZIECKA ...............................................................................................................................................................................45
MONTAŻ FOTELIKA ZA POMOCĄ ZACZEPÓW ISOFIX........................................................................................................................47
ODPINAN IE FOTELIKA CYBEX PALLAS SFIX .............................................................................................................................................49
DOPASOWANIE OSŁON BOCZNYCH ...........................................................................................................................................................49
REGU LOWANY ZAGŁÓWEK ...............................................................................................................................................................................51
DOSTOSOWANIE FOTELIKA DO WZROSTU DZIECKA ......................................................................................................................53
REG ULACJA OSŁONY TUŁOWIA GRU PA 1 918 KG ........................................................................................................................53
ZAPINANI E OSŁONY TUŁOWIA ...........................................................................................................................................................................55
POZYCJA SIEDZĄCA I ODCHYLONA GROUP 1 918 KG ............................................................................................................57
ZAPINANIE D ZIECKA G ROUP 1 918 KG ...............................................................................................................................................59
ZMIANA FOTELIKA ZGODNEG O Z GRUPA 1 918 KG W GRUPĘ 2/3 1536 KG 61
ZAPINANI E FOTELIKA SAMOCHODOWYM PASEM BEZPIECZ EŃSTWA .................................................................................63
CZY TWOJE DZIECKO JEST DOBRZE ZABEZPIECZONE? ..............................................................................................................65
ŚCIĄGANIE TAPICERKI ............................................................................................................................................................................................ 67
CZYSZCZENIE..............................................................................................................................................................................................................69
KONSERWACJA ........................................................................................................................................................................................................... 71
POSTĘPOWANIE PO WYPADKU DROGOWYM .......................................................................................................................................71
TRWAŁOŚĆ PRODUKTU ........................................................................................................................................................................................71
UTYLIZACJA ....................................................................................................................................................................................................................73
WARUNKI GWARANCJI ........................................................................................................................................................................................... 73
41
Page 43

POSITIONNEMENT CORRECT DU SIÈGE DANS LE VÉHICULE
Ce siège auto, si son système ISOFIX Connect est rétracté, peut être utilisé
sur tous les sièges de véhicules équipés de ceinture de sécurité trois points et
approuvés dans le manuel du véhicule pour une utilisation universelle.
!
ATTENTION ! Le siège ne convient pas pour une ceinture à deux points ou ventrale.
L’utilisation du siège en conjonction avec une ceinture à deux points risque de
blesser gravement, voire mortellement l’enfant.
Un autorisation «semi-universelle» est fournie pour les équipements utilisant les
connecteurs ISOFIX Connect. C’est pour cette raison que le système ISOFIX
Connect ne peut être utilisé que dans certains véhicules. Veuillez consulter la liste
ci-jointe des véhicules approuvés. Vous pouvez consulter la dernière version ici :
www.cybex-online.com
Dans des cas exceptionnels, le siège auto peut également être installé sur le siège
passager avant. Dans ce cas, veuillez tenir compte des remarques suivantes:
• Dans les véhicules équipés d’airbags, vous devez reculer le siège au maximum. Veuillez
cependant vous assurer que le mécanisme de la ceinture de sécurité se trouve à
l’arrière du point d’attache du siège auto.
• Conformez-vous toujours aux recommandations du fabricant du véhicule.
!
ATTENTION ! La ceinture diagonale (6) doit être à l’arrière en position inclinée et ne
doit jamais être positionnée en direction du point le plus haut de la ceinture de votre
véhicule. S’il est impossible de positionner le siège de cette manière, en poussant le
siège auto vers l’avant ou en l’utilisant sur un autre siège, cela signifie que ce siège
auto ne convient pas à votre véhicule.
!
ATTENTION ! Les bagages ou autres objets présents dans le véhicule peuvent
provoquer des blessures en cas d’accident et doivent toujours être bien attachés.
Sinon, ils risqueraient d’être projetés, provoquant des blessures mortelles.
!
ATTENTION ! Le siège auto ne doit pas être utilisé sur des sièges de véhicules
faisant face au côté de la route. L’utilisation de ce siège auto est permise sur les
sièges de véhicules orientés dos à la route, notamment dans un van ou un minibus,
à condition que le siège du véhicule en question soit prévu pour transporter une
personne adulte. Veuillez noter que l’appui-tête d’une banquette orientée dos à la
route ne doit pas être retiré ! Le siège auto pour enfant être attaché avec la ceinture
de sécurité, même s’il est vide.
42
NOTE ! Ne laissez jamais votre enfant sans surveillance dans la voiture.
Page 44

HET STOELTJE GOED IN DE AUTO PLAATSEN OPTYMALNE MIEJSCE FOTELIKA W SAMOCHODZIE
Het autostoeltje is met ingeklapt ISOFIX Connect-systeem te gebruiken op alle
autostoelen met automatische driepuntsgordels die volgens de handleiding bij
de auto zijn goedgekeurd voor ‘universeel’ gebruik.
!
BELANGRIJK! Het stoeltje is niet geschikt voor gebruik met een tweepuntsgordel
of heupgordel. Als het stoeltje met behulp van een tweepuntsgordel wordt vastgezet,
kan een ongeval leiden tot ernstig of zelfs fataal letsel van het kind.
Als het beveiligingssysteem uitsluitend met ISOFIX Connect-vergrendelarmen in
de auto wordt bevestigd, geldt een ‘semi-universele’ goedkeuring. Dat betekent
dat ISOFIX Connect alleen in bepaalde voertuigen mag worden gebruikt. U kunt
op de bijgevoegde lijst van voertuigtypen controleren of uw auto hier geschikt voor
is. Het meest actuele overzicht kunt u downloaden op www.cybex-online.com.
In uitzonderlijke gevallen mag het autostoeltje ook op de passagiersstoel voorin gebruikt
worden. Let daarbij dan op het volgende:
• In auto’s met airbags moet u de passagiersstoel zo ver mogelijk naar achteren zetten.
Zorg er daarbij echter voor dat het bovenste draaipunt van de veiligheidsgordel achter
de gordelgeleider van het autostoeltje blijft.
• Volg altijd de aanbevelingen van de autofabrikant op.
!
BELANGRIJK! De borstriem (6) moet schuin naar achteren lopen en mag nooit
voorwaarts naar het bovenste gordelpunt in uw auto lopen. Als het niet mogelijk is
het stoeltje op deze manier te plaatsen, bijvoorbeeld door de autostoel naar voren te
schuiven of door het stoeltje op een andere autostoel te gebruiken, is dit autostoeltje
niet geschikt voor uw auto.
!
BELANGRIJK! Bagage en andere objecten die in de auto liggen en letsel
kunnen veroorzaken tijdens een ongeval, moeten altijd goed worden vastgezet.
Rondvliegende voorwerpen kunnen fataal letsel veroorzaken.
!
BELANGRIJK! Het autostoeltje mag niet worden gebruikt op autostoelen die
haaks op de rijrichting staan. Gebruik van het autostoeltje is wel toegestaan op
achterwaarts gerichte stoelen, bijvoorbeeld in een busje, vooropgesteld dat de stoel
bedoeld is voor het vervoer van een volwassene. De hoofdsteun van de autostoel
mag niet verwijderd worden als het autostoeltje op een achterwaarts gerichte stoel
wordt geplaatst! Ook als het autostoeltje niet wordt gebruikt, dient het altijd met de
veiligheidsgordel te zijn vastgemaakt.
Fotelik ze schowanymi zaczepami Isofix może być montowany na wszystkich
siedzeniach pojazdu z automatycznymi trzypunktowymi pasami bezpieczeństwa
zatwierdzonymi w instrukcji pojazdu do powszechnego użytku.
!
OSTRZEŻENIE! Fotelik nie nadaje sie do montażu w pojazdach z dwupunktowymi
pasami bezpieczeństwa lub pasami biodrowymi. Używanie tego typu pasów
bezpieczeństwa może skutkować poważnymi lub śmiertelnymi obrażeniami dziecka w
razie wypadku.
Używanie systemu Isofix do montażu fotelika zalicza się do kategorii
„półuniwersalnej”, co umożliwia używanie go tylko w wybranych pojazdach. Z tego
powodu ISOFIX CONNECT może być używany tylko w niektórych modelach
samochodów. Prosimy sprawdzić, czy na liście dopuszczonych pojazdów znajduje
się Państwa samochód. Aktualną listę znajdą Państwo na stronie: www.cybex-online.com.
W wyjątkowych przypadkach, fotelik może być również montowany na przednim siedzeniu
pasażera. Należy wtedy przestrzegać poniższych wskazówek:
• Jeżeli pojazd posiada poduszkę powietrzną pasażera, odsuń siedzenie do tyłu najdalej,
jak to możliwe. Należy się upewnić, ze górne mocowanie pasa znajduje się za fotelikiem.
• Ściśle przestrzegaj zaleceń producenta pojazdu.
!
OSTRZEŻENIE! Pas barkowy (6) powinien zawsze przebiegac skośnie od
tyłu i nie powinien nigdy przechodzić ku przodowi w kierunku górnego zaczepu
samochodowego pasa bezpieczeństwa. W przypadku braku możliwości
dopasowania siedzenia, np. poprzez przesuniecie fotelika do przodu lub montaż na
innym siedzeniu, oznacza to, że fotelik nie pasuje do twojego samochodu.
!
OSTRZEŻENIE! Bagaże i inne przedmioty znajdujące się w samochodzie, które
mogą zranić pasażerów w czasie wypadku powinny zostać dokładnie zabezpieczone.
Pozostawione luzem przedmioty mogą spowodować obrażenia w czasie wypadku
!
OSTRZEŻENIE! Montowanie fotelika na siedzeniach samochodowych ustawionych
bokiem do kierunku jazdy jest niedozwolone. Montowanie fotelika na siedzeniach
ustawionych tyłem do kierunku jazdy jest możliwe, np. w pojazdach typu van, minibus,
pod warunkiem, że siedzenie jest przeznaczone do przewozu osób dorosłych. Nalezy
pamiętać, że zagłówek siedzenia samochodowego nie może być zdemontowany w
przypadku umiejscowienia fotelika na siedzeniu ustawionym tyłem do kierunku jazdy!
Fotelik zawsze powinien być zabezpieczony pasami bezpieczeństwa, nawet jeśli nie
jest w użytku.
FRNLPL
LET OP! Laat uw kind nooit alleen in de auto achter. UWAGA! Nigdy nie pozostawiaj dziecka bez opieki w samochodzie
43
Page 45

SÉCURITÉ EN VOITURE
!
ATTENTION ! Le siège auto doit toujours être attaché avec la ceinture de sécurité
du véhicule, même lorsqu’il n’est pas utilisé. En cas de freinage d’urgence ou
d’accident, un siège auto non attaché peut causer des blessures aux autres
passagers et à vous même.
Afin de garantir la meilleure sécurité possible pour tous les passagers, assurez-vous que :
Les dossiers inclinables des banquettes soient relevés dans leur position initiale droite.
En installant le siège auto sur le siège passager avant, reculer le siège au maximum.
Tous les objets susceptibles de causer des blessures en cas d’accident soient
correctement rangés dans l’habitacle.
Tous les passagers de la voiture attachent leur ceinture.
POSITIONNEMENT DU SIÈGE DANS LE VÉHICULE
Placez le siège auto pour enfant sur un siège du véhicule convenant à cet effet.
• Assurez-vous toujours que la surface entière du dossier (2) du siège CYBEX PALLAS
S-fix soit bien en contact avec le dossier du siège du véhicule. Le siège auto ne doit
jamais être incliné. Vous pouvez, si nécessaire, régler la profondeur des connecteurs
ISOFIX en utilisant la poignée de réglage (9).
• Si l’appui-tête du véhicule gêne, relevez-le ou retirez-le complètement (les exceptions
à cette règle figurent au chapitre «POSITIONNEMENT CORRECT DU SIÈGE DANS
LE VÉHICULE»). Le dossier (2) s’adaptera parfaitement à pratiquement toutes les
inclinaisons de la banquette du véhicule.
!
ATTENTION ! La surface entière du dossier du siège auto CYBEX doit reposer sur
le dossier de la banquette du véhicule. Le siège doit se trouver en position verticale
1
pour garantir la sécurité optimale de votre enfant.
2
NOTE ! Sur certaines banquettes fragiles (par exemple : velours, cuir etc.), le siège auto
peut parfois laisser des traces ou causer une décoloration. Afin d’éviter ce problème, vous
pouvez, par exemple, mettre une couverture ou une serviette sous le siège auto. Veuillez
également combiner ces précautions à nos instructions de nettoyage; ces dernières
doivent être appliquées avant d’utiliser le siège pour la première fois.
44
!
ATTENTION ! Ne pas utiliser de points de contact autres que ceux décrits dans les
instructions.
NOTE ! Utilisez les Guidese Isofix fournis pour ne pas endommager la banquette avec les
bras ISOFIX Connect.
Page 46

VEILIGHEID IN DE AUTO BEZPIECZEŃSTWO W SAMOCHODZIE
! !
BELANGRIJK! Het autostoeltje moet altijd correct zijn geïnstalleerd in het voertuig,
ook als het niet wordt gebruikt. Door plotseling remmen of tijdens een ongeval kan
een niet vastgemaakt autostoeltje andere passagiers of uzelf verwonden.
Om de hoogst mogelijke veiligheid van alle passagiers te garanderen is het nodig dat...
de neerklapbare stoelruggen in het voertuig rechtop staan en zijn vergrendeld.
de voorstoel zo ver mogelijk naar achteren staat als u het autostoeltje op deze stoel
installeert.
u alle voorwerpen die letsel kunnen veroorzaken tijdens een ongeval goed opbergt.
alle passagiers in het voertuig hun gordel dragen.
HET STOELTJE IN DE AUTO PLAATSEN
Plaats het autostoeltje op de juiste stoel in de auto.
• Zorg altijd dat de gehele rugleuning (2) van de CYBEX PALLAS S-FIX goed op de
rugleuning van de autostoel aansluit. Het autostoeltje mag nooit in een liggende positie
worden geplaatst. U kunt zo nodig de stand van de rugleuning aanpassen met behulp
van de ISOFIX-aanpassingshendel. (9).
• Als de hoofdsteun van de auto in de weg zit, trek die dan helemaal uit of verwijder
hem (zie voor uitzonderingen hierop onder het kopje ‘HET STOELTJE GOED IN DE
AUTO PLAATSEN’). De rugsteun (2) past zich volledig aan aan vrijwel elke hoek van de
autostoel.
!
BELANGRIJK! Zorg altijd dat de hele rugleuning van het CYBEX-autostoeltje
goed op de rugleuning van de autostoel aansluit. Om verzekerd te zijn van maximale
bescherming van uw kind, moet het stoeltje normaal rechtop staan!
LET OP! Op sommige kwetsbare autostoelbekledingen (zoals suède of leer) kan het
gebruik van autostoeltjes sporen achterlaten en/of tot verkleuring leiden. Om dit te
voorkomen kunt u er bijvoorbeeld een deken of handdoek onder leggen. In verband
hiermee verwijzen we u ook naar de reinigingsadviezen in deze handleiding; die
reinigingsadviezen moeten in acht worden genomen alvorens het stoeltje voor het eerst
te gebruiken.
!
BELANGRIJK! Gebruik geen andere dragende contactpunten dan de in de
handleiding beschreven en op het autostoeltje aangegeven punten.
LET OP! Gebruik de meegeleverde Isofix-geleiders om te verzekeren dat de autostoel niet
wordt beschadigd door de vergrendelarmen van ISOFIX Connect.
OSTRZEŻENIE! Fotelik samochodowy musi zawsze być przypięty samochodowym
pasem bezpieczeństwa. Nawet kiedy dziecko nie jest w nim przewożone. W razie
nagłego hamowania lub kolizji, nieprzypięty fotelik może zranić któregoś z pasażerów
lub kierowcę.
W celu zagwarantowania najlepszej ochrony wszystkich pasażerów, upewnij się, że...
rozkładane oparcia samochodowe ustawione są w pozycji pionowej.
montując fotelik na przednim siedzeniu samochodu, na fotelu pasażera, odsuń fotel
samochodowy maksymalnie do tyłu.
wszystkie elementy wewnątrz pojazdu są zabezpieczone tak, by nie spowodować obrażeń
w przypadku kolizji.
wszyscy pasażerowie mają zapięte pasy.
ZABEZPIECZANIE DZIECKA
Umieść fotelik na odpowiednim siedzeniu samochodu
• Upwenij się, że oparcie fotelika (2) CYBEX PALLAS S-FIX przylega do oparcia
siedzenia samochodowego. Fotelik nie powinien być ustawiony w pozycji do spania. W
razie potrzeby mozna dopasować fotelik używając zaczepów Isofix z regulacją. (9).
• Jesli zagłówek siedzenia smaochodowego przeszkadza w montażu fotelika, należy
go ustawić w najwyzszej pozycji lub zdemontować (z wyjątkiem sytuacji opisanej
w punkcie “OPTYMALNE MIEJSCE W SAMOCHODZIE”).Oparcie fotelika (2)
idealnie dopasowuje się do praktycznie każdego kąta nachylenia oparcia siedzenia
samochodowego.
!
OSTRZEŻENIE! Cała powierzchnia oparcia fotelika CYBEX powinna przylegać
do oparcia fotela samochodowego. Dla zapewnienia jak najlepszej ochrony dziecku
fotelik powinien być ustawiony w normalnej, pionowej pozycji.
UWAGA! Na nektórych tapicerkach samochodu wykonanych z delikatnego materiału (np.
zamsz, skóra itp.), fotelik może pozostawić ślady i/lub spowodować przebarwienia. W
celu zabezpieczenia tapicerki należy podłozyc pod fotelik np. kocyk lub ręcznik. Prosimy
zapoznać się z instrukcją w zakresie czyszczenia jeszcze przed pierwszym użyciem fotelika.
!
OSTRZEŻENIE! Nie używaj żadnych punktów kontaktowych nośnych innych niż
opisane w instrukcji i oznaczone na foteliku.
UWAGA! Prosimy używać nakładek na zaczepy Isofix w celu zabezpieczenia tapicerki
przed zniszczeniem.
FRNLPL
45
Page 47

INSTALLATION DU SIÈGE AVEC LE SYSTÈME ISOFIX CONNECT
3
4
6
4
9
8
7
CLICK!
8
9
8
9
2
Le système ISOFIX Connect vous permet de fixer le siège auto au véhicule,
augmentant ainsi la sécurité de votre enfant. L’enfant doit toujours être sécurisé
avec la ceinture de sécurité trois points du véhicule.
• Insérez les guides ISOFIX fournis (7), côté le plus long vers le haut, dans les points
d’ancrage ISOFIX (8). Dans certains véhicules, il est préférable d’installer les guides
ISOFIX (7) dans la direction opposée.
NOTE ! Les points d’ancrage ISOFIX (8) sont deux barres métalliques et sont positionnés
entre le dossier et l’assise de la banquette du véhicule. En cas de doute, veuillez consulter
le manuel de votre véhicule.
• Utilisez le levier de réglage (2) sous le coussin du siège (5) sur le châssis (6) du siège
auto pour enfant CYBEX PALLAS S-FIX.
• Tirez les deux connecteurs ISOFIX Connect (5) autant que possible.
• Faites maintenant pivoter les connecteurs ISOFIX Connect (5) à 180° de manière à ce
qu’ils soient face aux guides ISOFIX (7).
NOTE ! Avant de fixer les connecteurs ISOFIX Connect (5) dans les point d’ancrage
ISOFIX (8), vérifiez les boutons déclencheurs (10). Si les indicateurs de sécurité verts (11)
sont visibles, vous devez tout d’abord libérer les connecteurs ISOFIX Connect avant de
les ajuster en appuyant et en reculant le bouton déclencheur (10). Répétez la procédure si
nécessaire avec le deuxième connecteur.
• Poussez les deux connecteurs (8) dans les guides ISOFIX (7) jusqu’à ce que ceux-ci
s’emboîtent dans les points d’ancrage ISOFIX en émettant un «clic» audible.
• Assurez-vous que le siège est bien fixé en essayant de l’extraire des points d’ancrage
ISOFIX (7).
• L’indicateur de sécurité vert (11) doit désormais être clairement visible au niveau des
deux boutons déclencheurs (10).
• Vous pouvez désormais utiliser le levier de réglage (2) sur le châssis (6) du siège auto
pour enfant CYBEX PALLAS S-FIX.
NOTE ! Tenez compte des informations du chapitre «Positionnement du siège dans le véhicule».
46
Page 48

INSTALLATIE VAN HET AUTOSTOELTJE MET HET ISOFIX CONNECTSYSTEEM MONTAŻ FOTELIKA ZA POMOCĄ ZACZEPÓW ISOFIX
De veiligheid van uw kind neemt toe dankzij het ISOFIX Connect-systeem
waarmee u de CYBEX PALLAS S-FIX kunt bevestigen in het voertuig. Uw kind
moet nog wel met de driepuntsgordel van uw voertuig worden vastgemaakt.
• Plaats de meegeleverde ISOFIX-geleiders (7) met de lange kant naar boven in de twee
ISOFIX-bevestigingspunten (8). In sommige auto’s is het beter om de ISOFIX-geleiders
(7) omgekeerd aan te brengen.
LET OP! The ISOFIX-bevestigingspunten (8) zijn twee metalen beugels per stoel, die
geplaatst zijn tussen de rugleuning en zitting van de autostoel. Als u twijfelt, kijk dan in de
handleiding van uw voertuig.
• Gebruik de aanpassingshendel (2) onder het zitkussen (5) van het frame (6) van het
CYBEX PALLAS S-FIX-kinderzitje
• Trek de twee ISOFIX Connect-vergrendelarmen (5) zo ver mogelijk uit.
• Draai de ISOFIX Connect-vergrendelarmen (5) nu 180°, zodat ze in de richting van de
ISOFIX-geleiders (7) wijzen.
LET OP! Controleer de ontgrendelingsknoppen (10) voordat u de ISOFIX Connect-
vergrendelarmen (5) in de ISOFIX bevestigingsbeugels (8) vastklikt. Als de groene
veiligheidsindicators (11) zichtbaar zijn, moet u de ISOFIX Connect-vergrendelarmen
ontgrendelen voordat u ze vastmaakt. Dat doet u door de ontgrendelingsknop (10)
in te duwen en terug te trekken. (10). Herhaal het proces zo nodig voor de tweede
vergrendelarm.
• Duw de twee vergrendelarmen (8) in de ISOFIX-geleiders (7) tot ze met een hoorbare
‘klik’ vergrendelen.
• Controleer of het stoeltje goed vastzit door te proberen het uit de ISOFIX- geleiders (7)
te trekken.
• De groene veiligheidsindicator (11) moet nu goed zichtbaar zijn op de twee grijze
ontgrendelingsknoppen (10).
• Nu kunt u de positie van het CYBEX PALLAS S-FIX-kinderzitje verstellen met de
aanpassingshendel (2) op het frame (6).
LET OP! Lees de informatie onder het kopje ‘Het stoeltje in de auto plaatsen’.
System ISOFIX w CYBEX PALLAS S-FIX zwiększa bezpieczeństwo
Twojego dziecka w samochodzie. Dziecka wciąż powinno być zabezpieczone
trzypunktowymi pasami bezpieczeństwa.
• Użyj dołączonych osłon ISOFIX (7) kierując dłuższą część do góry na zaczepy (8). W
niektórych pojazdach lepiej użyć osłon(7) w drugą stronę.
UWAGA! Zaczepy ISOFIX (8) to dwa metalowe pierścienie znajdujace się miedzy
oparciem a siedziskiem samochodu. W razie wątpliwości należy zajrzeć do instrukcji
obsługi samochodu.
• Do regulacji służy uchwyt (2) znajdujący się pod siedziskiem (5), w podstawie (6)
CYBEX PALLAS S-FIX.
• Wyciągnij zaczepy (5) najdalej jak to możliwe.
• Obróć zaczepy ISOFIX (5) o 180° tak by były skierowane w kierunku osłon uchwytów
w siedzeniu (7).
UWAGA! Upewnij się, że dwa zielone przyciski zabezpieczające (5) nie są wciśnięte
(8), sprawdź przyciski zwalniające (10). Jeśli zielone wskaźniki (11) sa widoczne, należy
odbezpieczyć uchwyty ISOFIX przed połączeniem poprzez przesuniecie przycisku
zwalniającego (10). Powtórz w razie potrzeby czynności z drugą szyną.
• Wsuń zaczepy (8) w osłony ISOFIX (7) aż usłyszysz wyraźne kliknięcie i zaczepy
zatrzasną się w uchwytach Isofix.
• Pociągnij za fotelik by sprawdzić czy jest prawidłowo zamontowany (7).
• Zielone przyciski zabezpieczające (11) musza być widoczne z obu stron (10).
• pomocą uchwytu (2) znajdującego się w podstawie (6) fotelika możesz teraz ustawić
położenie fotelika.
UWAGA! Dodatkowe informacje w punkcie „ZABEZPIECZANIE DZIECKA“
FRNLPL
47
Page 49

RETRAIT DU CYBEX PALLAS SFIX
L.S.P.
3
8
CLICK!
10
PRESS!
7
Procédez en inversant les étapes d’installation.
• Déverrouillez les connecteurs ISOFIX (5) des deux côtés en appuyant sur les
boutons déclencheurs rouges (10) et en les reculant simultanément.
• Retirer le siège des guides ISOFIX (7).
• Faites pivoter les bras ISOFIX Connect (5) à 180°.
• Actionnez le levier de réglage (2) du châssis (6) du siège CYBEX PALLAS
S-fix et poussez les connecteurs aussi loin que possible.
NOTE ! En repliant les connecteurs (5), vous ne vous contentez pas de protéger le siège
du véhicule, mais vous protégez également les connecteurs du système ISOFIX Connect
de la saleté et des dommages.
RÉGLAGE DES PROTECTIONS LATÉRALES
Le siège auto est équipé du système de «Protection Linéaire contre les Impacts Latéraux»
(L.S.P.). Ce système accroît la sécurité de votre enfant en cas d’impact latéral. Sortez le
L.S.P. du côté de la portière adjacente pour un maximum de securite. Pour l’enclencher,
pressez l’emplacement indiqué (24) sur le L.S.P.
NOTE ! Assurez vous que le L.S.P. est enclenché avec un «CLICK» audible. Si le L.S.P.
touche la porte, il doit être correctement rangé.
Il est possible de l´utiliser dans cette position. Afin de replacer le L.S.P. sur le siège, tirez le
légèrement et pliez le, jusqu’à ce qu’il se verrouille avec un «CLICK» audible.
NOTE ! Lorsque vous utilisez le siège auto sur la position centrale arrière, il est interdit de
déplier le dispositif (L.S.P.).
!
ATTENTION ! Il est interdit d´utiliser le dispositif L.S.P. pour porter ou grimper
dans le siège.
48
Page 50

DE CYBEX PALLAS SFIX VERWIJDEREN
Voer de stappen van het plaatsen in omgekeerde volgorde uit.
• Ontgrendel de ISOFIX Connect-vergrendelarmen (5) aan beide zijden door
op de grijze ontgrendelingsknoppen (10) te drukken en ze tegelijkertijd terug
te trekken.
• Trek het stoeltje uit de ISOFIX-geleiders (7).
• Draai de ISOFIX Connect-vergrendelarmen (5) 180°.
• Gebruik de aanpassingshendel (2) op het frame (6) van de CYBEX PALLAS
S-fix en duw de grijparmen zo ver mogelijk in.
LET OP! Door de ISOFIX Connect-vergrendelarmen (5) zover mogelijk in te klappen,
beschermt u niet alleen de autostoel, maar ook de vergrendelarmen van het ISOFIX
Connect-systeem zelf tegen vuil en beschadiging.
AANPASSEN VAN DE ZIJBESCHERMERS DOPASOWANIE OSŁON BOCZNYCH
Het autostoeltje is uitgerust met het ‘Linear Side-Impact Protection’-systeem (L.S.P.). Dit
systeem vergroot de veiligheid van het kind bij een zijdelingse botsing. Trek de L.S.P. uit
aan de kant van het dichtstbijzijnde portier voor de grootst mogelijke veiligheid. Druk op het
gemarkeerde gebied (24) op de L.S.P. om het systeem te ontgrendelen.
LET OP! Zorg dat de L.S.P. met een duidelijke ‘KLIK’ vergrendelt. De L.S.P. mag het
portier niet raken; als dat gebeurt, moet u het systeem weer inklappen.
Het autostoeltje kan ook worden gebruikt met goed opgeborgen L.S.P.-systeem. U kunt de
L.S.P. weer geheel in de zitting opbergen door het systeem iets uit te trekken en vervolgens
weer in te klappen totdat het met een duidelijke KLIK vergrendelt.
LET OP! Als u het stoeltje op de middenstoel in het voertuig gebruikt, is het verboden de
L.S.P. uit te klappen.
!
BELANGRIJK! De L.S.P. mag niet worden gebruikt om het autostoeltje te dragen of
om erin te klauteren.
ODPINANIE FOTELIKA CYBEX PALLAS SFIX
Postępuj zgodnie ze wskazówkami nt. montażu, w odwrotnej kolejności.
• Zwolnij zaczepy ISOFIX (5) po obu stronach wciskając szare przyciski
zwalniające (10) i przesunięcie ich.
• Wyjmij fotelik z osłon Isofix (7).
• Obróć zaczepy (5) o 180°.
• Pociągnij za uchwyt do regulacji (2) znajdujący się w podstawie (6) fotelika
CYBEX PALLAS S-fix i wciśnij zaczepy (7) najdlaej jak to możliwe.
UWAGA! Składając zaczepy ISOFIX (5), nie tylko chronisz siedzenie samochodu ale
również same zaczepy ISOFIX od zanieczyszczeń i zniszczenia.
Fotelik został wyposażon w “Liniowy System Ochrony Bocznej“, system (L.S.P.). Podnosi
on poziom bezpieczeństwa w przypadku kolizji bocznej. Dla zapewnienia najlepszej
ochrony, wyciągnij osłonę L.S.P. najdalej jak się da w kierunku drzwi, które są najbliżej
fotelika dziecka. Aby wysunąć osłony L.S.P. naciśnij oznaczone miejsce (24) na L.S.P.
UWAGA! Upewnij się, że usłyszysz wyraźne kliknięcie. W przypadku, gdy osłona boczna
L.S.P. dotyka drzwi, złóż ją do kolejnej długości.
Korzystanie z niej jest również bezpieczne. By wcisnąć L.S.P. do fotelika, pociagnij lekko
L.S.P. i złóż, aż usłyszysz kliknięcie.
UWAGA! W przypadku montażu fotelika na środkowym siedzeniu, zabronione jest
rozkładanie osłon L.S.P.
!
OSTRZEŻENIE! Wykorzystanie osłon L.S.P w celu noszenia fotelika lub wspinania
się po foteliku jest zabronione.
FRNLPL
49
Page 51

11
APPUITÊTE INCLINABLE
L’appui-tête ajustable permet d’éviter le basculement de la tête de l’enfant vers l’avant
lorsque celui-ci dort. En cas de collision, l’appuie-tête suivra le mouvement de la tête de
votre enfant, se verrouillera et absorbera le mouvement vers l’arrière de la tête de votre
enfant consécutif au choc.
12
NOTE ! Assurez-vous que la tête de votre enfant est toujours en contact avec l’appuietête inclinable (11), puisque c’est la seule manière de garantir une protection optimale en
cas de collision latérale.
L’angle d’inclinaison de l’appui-tête peut être réglé sur l’une de trois positions. Il peut être
déplacé vers l’avant sans bouger le levier vers la deuxième ou la troisième position jusqu’à
ce qu’il s’enclenche dans la position souhaitée. Pour revenir à la position d’origine, il faut
lever et faire reculer l’appui-tête.
!
ATTENTION ! N’utilisez jamais d’objet pour bloquer le mécanisme de verrouillage
(12) ! En cas d’accident, le mécanisme doit rester souple, sans quoi votre enfant
risque d’être blessé.
50
Page 52

KANTELBARE HOOFDSTEUN REGULOWANY ZAGŁÓWEK
De kantelbare hoofdsteun helpt voorkomen dat het hoofd van uw kind gevaarlijk naar voren
valt tijdens het slapen. Tijdens een botsing volgt de hoofdsteun de beweging van het hoofd
van uw kind naar voren, klikt vast en vangt de daaropvolgende achterwaartse beweging
van het hoofd van uw kind op.
LET OP! Zorg dat het hoofd van uw kind altijd contact heeft met de kantelbare hoofdsteun
(11), omdat de hoofdsteun alleen dan optimale bescherming kan bieden tijdens een
botsing van opzij.
De hoofdsteun kan in drie standen worden gekanteld. Hij kan naar voren worden ingesteld
zonder de hendel in de tweede of derde stand te zetten totdat de hoofdsteun vastklikt. Om
hem in de uitgangspositie terug te brengen, gebruikt u de hendel om de hoofdsteun naar
achteren te trekken.
!
BELANGRIJK! Zorg dat het vergrendelingsmechanisme (12) nooit door iets wordt
geblokkeerd! Tijdens een ongeval moet het kantelmechanisme ongestoord kunnen
werken, anders kan uw kind letsel oplopen!
Odchylany zagłówek zapobiega niebezpiecznemu opadaniu głowy dziecka podczas snu. W
przypadku kolizji czołowej, zagłówek porusza się do przodu, podobnie jak głowa dziecka,
blokuje się i absorbuje siłę uderzenia podczas powrotnego ruchu głowy dziecka do tyłu.
UWAGA! Upewnij się, że głowa dziecka jest zawsze umiejscowiona wewnątrz zagłówka
(11), aby zapewnić maksymalną ochronę w przypadku kolizji bocznej.
Kąt odchylenia zagłówka może być ustawiony w trzech pozycjach. Unosząc lekko do góry
zagłówek można go ustawić w żądanej pozycji Ustawienie do oryginalnej pozycji wymaga
użcyia dźwigni.
!
OSTRZEŻENIE! Nigdy nie blokuj mechanizmu blokującego (12)! Ruch zagłówka
nie może być niczym ograniczony, ponieważ w przeciwnym razie dziecko może ulec
obrażeniom w czasie wypadku.
FRNLPL
51
Page 53

ADAPTATION À LA TAILLE CORPORELLE
11
13
14
15
5
6
MAX
Réglage du siège auto
• L’appuie-tete doit etre ajusté de sorte que un espace de 2 cm max. (c’est a dire
deux doigts en largeur) ou moins reste vide entre les épaules de l’enfant et le bas de
l’appuie-tete.
• Appuyer sur le bouton de réglage (13) situé la partie inférieure de l’appuietete et le
déplacer jusqu’a la position désirée.
NOTE ! Seul un dossier bien réglé (11) permettant également à la ceinture diagonale
de passer aisément peut garantir à votre enfant une protection maximale. La hauteur du
dossier du siège CYBEX PALLAS S-fix peut être réglée sur l’une des douze positions
disponibles.
RÉGLAGE DU BOUCLIER D’IMPACT GROUPE 1 918 KG
Vous pouvez ajuster le bouclier d’impact à votre enfant en poussant le bouton de réglage
central (14). Maintenez le bouton de réglage central (14) enfoncé pendant que vous
ajustez le bouclier d’impact à votre enfant.
Les rabats latéraux du bouclier d’impact (15) ont une position parfaitement adaptée, entre
les accoudoirs et la surface du siège (5) et servent à maintenir le bouclier d’impact (15)
sur le siège.
Ajustez le bouclier d’impact (15) de manière à ce qu’il soit proche de l’enfant, sans
toutefois le confiner.
!
ATTENTION! Le bouclier d’impact (15) ne peut être utilisé qu’en conjonction avec le
châssis (6) pour un poids maximum de 18kg.
52
Page 54

AANPASSING AAN DE LICHAAMSLENGTE DOSTOSOWANIE FOTELIKA DO WZROSTU DZIECKA
Aanpassing aan de lichaamslengte
• De stand van de hoofdsteun moet zodanig zijn dat de ruimte tussen de schouder van
het kind en de hoofdsteun maximaal 2 cm. (ongeveer twee vingers breed) is.
• Duw op het verstellipje (13) aan de onderkant van de hoofdsteun en zet de hoofdsteun in
de gewenste stand.
LET OP! Alleen een optimaal afgestelde hoofdsteun (11) biedt uw kind maximale
bescherming en comfort en zorgt ervoor dat de borstriem goed kan worden afgesteld. De
hoogte van de CYBEX PALLAS S-FIX kan in twaalf standen worden ingesteld.
Dostosowanie fotelika do wzrostu dziecka
• Zagłówek musi być ustawiony w sposób, gdzie pomiędzy ramieniem dziecka a dolną
częścia zagłówka będzie 2 cm lub (mniej więcej na dwa złączone palce) mniejszy
odstęp.
• Wcisnij przycisk regulacji (13) znajdujący się w dolnej części zagłówka i ustaw w
odpowiedniej pozycji
UWAGA! Tylko prawidłowe dopasowanie wysokości zagłówka (11) zapewnia maksymalne
bezpieczeństwo i komfort dziecku oraz pas barkowy poprowadzony w sposób poprawny.
Wysokość CYBEX PALLAS S-FIX może być dopasowana do jednej z 12 pozycji.
HET VEILIGHEIDSKUSSEN AANPASSEN GROEP 1 918 KG
Door op de centrale aanpassingsknop (14) te drukken, kunt u het veiligheidskussen
aanpassen aan uw kind. Houd de centrale aanpassingsknop (14) ingedrukt terwijl u het
veiligheidskussen aanpast aan uw kind.
De zijflappen van het veiligheidskussen (15) passen precies tussen de armleuning en de
zitting (5) en worden gebruikt om het veiligheidskussen (15) met de zitting te verbinden.
Pas het veiligheidskussen (15) zo aan dat het kussen het kind raakt, maar niet tegen het
lichaam van uw kind duwt.
!
BELANGRIJK! Het veiligheidskussen (15) mag alleen samen met het frame (6)
worden gebruikt tot een maximum van 18 kg!
REGULACJA OSŁONY TUŁOWIA GRUPA 1 918 KG
iedy naciśniesz przyciski (14), osłonę (15) można przesunąć do przodu. Kiedy zwolnisz
przyciski (14), osłona (15) zatrzaśnie się w wybranej pozycji.
Boczne części osłony (15) dokładnie pasują do podpórek na ręce siedziska. Łączą one
osłonę (15) z siedziskiem (5).
Osłona tułowia powinna być tak ustawiona, aby dotykała klatki piersiowej dziecka.Nie może
jednak uciskać ciała dziecka.
!
OSTRZEŻENIE! Osłona tułowia (15) i podstawa (6) muszą być zawsze używane w
komplecie i tylko dla dzieci o wadze do 18 kg!
FRNLPL
53
Page 55

16
17
20
FIXER LE BOUCLIER
• Insérez le bouclier d’impact ajusté (15) (consultez le chapitre «RÉGLAGE DU
15
19
18
CLICK!
17
20
16
BOUCLIER»).
• Tirez la ceinture du véhicule sur toute sa longueur. Prenez la ceinture ventrale (16) et
insérez-la dans le guide prévu à cet effet (17) sur le bouclier (15).
• Vérouillez la ceinture de sécurité dans la boucle (19). Elle doit s’enclencher et émettre
un «CLIC» audible.
• Serrez la ceinture ventrale (16) en tirant sur la ceinture d’épaule (20).
• Faites repasser la ceinture d’épaule (20) parallèlement à la ceinture ventrale (16) dans
le guide de ceinture (17).
• Serrez la ceinture d’épaule (20) et assurez-vous que les deux parties de la ceinture
couvrent bien toute la largeur du bouclier (15) et qu’elles soient bien positionnées dans
le guide (17).
• Faites ensuite passer la ceinture d’épaule (20) dans le guide de ceinture (17) du
bouclier (15) jusqu’à ce qu’elle soit fixe dans le guide. Passez ensuite la ceinture
d’épaule (20) entre l’appuie-tête et le dossier.
!
ATTENTION ! Toujours vérifier le bon ajustement du système de retenue au corps
de l’enfant. Ne vrillez jamais la ceinture.
54
15
17
11
20
!
ATTENTION ! La ceinture de sécurité trois points ne peut être insérée que dans
les guides prévus à cet effet. Les guides sont décrits précisément dans le présent
manuel et sont de couleur rouge.
Page 56

VASTMAKEN MET HET VEILIGHEIDSKUSSEN ZAPINANIE OSŁONY TUŁOWIA
• Plaats het eerder aangepaste veiligheidskussen (15) (zie onder het kopje “HET
VEILIGHEIDSKUSSEN AANPASSEN”).
• Trek de driepuntsgordel van uw auto helemaal uit. Neem de buikriem (16) en voer die
door de daarvoor bedoelde geleiders (17) in het veiligheidskussen (15).
• Maak de autogordel vast in het gordelslot (19). Die moet met een hoorbare “KLIK”
vergrendelen.
• Trek de buikriem (16) strak door aan de borstriem (20) te trekken.
• Voer nu de borstriem (20) parallel met de buikriem (16) terug door de gordelgeleiders
(17).
• Trek de borstriem (20) strak en controleer of beide delen van de gordel over de hele
breedte van het veiligheidskussen (15) door de gordelgeleiders (17) lopen.
• Voer nu de borstriem (20) strak door de gordelgeleider (17) van het veiligheidskussen
(15) zodat die zich vastklemt. Trek dan de borstriem tussen de hoofdsteun (20) en
schoudersteun door.
• Teraz włóż wcześniej już wyregulowaną osłonę tułowia (15) (o regulacji przeczytasz w
sekcji “REGULACJA OSŁONY TUŁOWIA”).
• Wyciągnij całą długość pasa samochodowego. Pas biodrowy (16) umieść w
przeznaczonych do tego czerwonych prowadnicach (17) znajdujących się na osłonie
tułowia (15).
• Zapnij pas (19). Jeśli pas zostanie poprawnie wpięty będzie słychać kliknięcie.
• Zaciśnij biodrową część pasa (16) poprzez pociągnięcie pasa piersiowego (20).
• Teraz wprowadź pas piersiowy (20) równolegle z pasem biodrowym (16) z powrotem w
prowadnice pasa (17).
• Naciągnij pas piersiowy (20) mocno i upewnij się, że obydwie części pasa zakrywają
całą szerokość osłony tułowia (15) w prowadnicy pasa (17).
• Teraz wprowadź piersiową część pasa (20) ciasno przez prowadnice pasa (17)
osłony tułowia (15) do momentu aż zostanie zaciśnięta w prowadnicy pasa. Następnie
poprowadź piersiową część pasa pomiędzy zagłówkiem (20) a oparciem ramion.
FRNLPL
!
BELANGRIJK! Controleer altijd hoe strak het beveiligingssysteem rond het lichaam
van het kind zit en of het goed aansluit. Draai de gordel nooit!
!
BELANGRIJK! De driepuntsgordel mag alleen door de daarvoor bestemde
geleiders worden gevoerd. De gordelgeleiders worden precies beschreven in deze
handleiding en zijn met rood aangegeven op het autostoeltje.
!
OSTRZEŻENIE! Zawsze sprawdź czy osłona tułowia dobrze przylega do ciała
dziecka. Nigdy nie skręcaj pasa!
!
OSTRZEŻENIE! Trzy punktowy pas może zostać również przeprowadzony
przeznaczonymi do tego prowadnicami pasa. Prowadnice pasa są dokładnie
opisane w tej instrukcji oraz zostały oznaczone na foteliku samochodowym kolorem
czerwonym.
55
Page 57

21
20
15
5
18
6
POSITION ASSISE ET ALLONGÉE GROUPE 1 918 KG
Pour régler le siège CYBEX PALLAS S-FIX en position allongée, il n’est pas nécessaire
d’ouvrir le système de ceinture du véhicule.
• Si votre enfant s’endort au cours du voyage, il vous suffit d’appuyer sur le bouton de
réglage (21) situé sur le dessous du coussin du siège (5) et le siège CYBEX PALLAS
S-FIX glissera vers le bas en se servant du poids de votre enfant.
!
ATTENTION! Tout réglage de la position allongée par le conducteur en route est
strictement interdit.
• Pour rétablir la position droite du siège à partir de la position allongée une fois que
l’enfant est sorti du siège, appuyez une nouvelle fois sur le bouton de réglage (21) et
appliquez une légère pression contre le coussin du siège (5) afin de relever le siège
auto pour enfant.
!
ATTENTION! Assurez-vous toujours que le bouton de réglage (21) émette un clic
audible au moment de s’enclencher en position allongée ou assise. La position
allongée n’est disponible que pour le groupe 1 (9-18 kg) du modèle Pallas équipé du
bouclier d’impact (15) et du châssis de base (6).
Remarque! Assurez-vous que la ceinture sous-abdominale (16) et la ceinture diagonale
(20) soient toujours bien serrées.
56
Page 58

ZITTENDE EN LIGGENDE POSITIE GROEP 1 918 KG POZYCJA SIEDZĄCA I ODCHYLONA GROUP 1 918 KG
Om de CYBEX PALLAS S-FIX in een liggende positie te brengen, hoeft het gordelsysteem
van de auto niet te worden losgemaakt.
• Als uw kind tijdens de reis in slaap valt, kunt u eenvoudigweg op de aanpassingsknop
(21) aan de onderkant van het zitkussen (5) drukken, waarna de CYBEX PALLAS S-FIX
onder het gewicht van uw kind naar beneden glijdt.
!
BELANGRIJK! Aanpassing in de liggende positie door de bestuurder tijdens het
rijden is verboden!
• Om de stoel weer rechtop te krijgen vanuit de liggende positie als het kind eenmaal uit
het zitje is, drukt u weer op de aanpassingsknop (21) en duwt u rustig tegen de zitting
(5) tot het kinderzitje rechtop staat.
!
BELANGRIJK! Controleer altijd of de aanpassingsknop (21) een duidelijke klik laat
horen als het zitje in ligstand of rechtop wordt gezet. De liggende positie is alleen
mogelijk voor groep 1 (9-18 kg) in de Pallas-configuratie met veiligheidskussen (15)
en basisframe (6).
Let op! Zorg dat de buikriem (16) en borstriem (20) altijd strak zijn.
Odchylenie oparcia PALLAS S-FIX nie wymaga odpinania pasów bezpieczeństwa.
• Jeśłi Twoje dziecko zaśnie podczas podróży, wciśnij klawisz regulacji (21) pod
siedziskiem (5) a CYBEX PALLAS S-FIX osunie się leeko pod ciężarem dziecka.
!
OSTRZEŻENIE! Zabronione jest regulowanie oparcia przez kierowcę podczas
prowadzeniea auta!
• Przywrócenie pozycji siedzącej, kiedy dziecko jest poza fotelikiem, naciśnij przycisk
regulacji (21) poniownie, popchnij siedzisko (5), aby powróciło do pozycji pionowej.
!
OSTRZEŻENIE! Upewnij się, że uchwyt (21) za pomocą którego odchyla się
fotelik, zatrzaskuje się w miejscu z głośnym kliknięciem. Odchylanie dozwolone jest
wyłącznie dla grupy 1 (9-18kg), zawsze w połączeniu z podstawą (6) i osłoną tułowia
(15).
UWAGA! Zawsze sprawdzaj, czy pas biodrowy (16) i barkowy (20) są mocno naprężone.
FRNLPL
57
Page 59

CLICK!
SÉCURISER CORRECTEMENT VOTRE ENFANT GROUPE 1 918 KG
• Pour assurer la sécurité optimale de votre enfant, veuillez toujours procéder aux
vérifications suivantes avant le départ:
• que le bouclier soit correctement ajusté.
• que la ceinture de sécurité soit bien bouclée.
• que les ceintures ventrale et diagonale passent dans le guide du bouclier et ne soient
pas vrillées.
• que toute la surface du dossier du siège auto repose sur le dossier de la banquette du
véhicule.
• Si utilisation du système ISOFIX Connect: que les connecteurs soient vérouillés de
chaque coôté dans les points d’ancrage ISOFIX et que les deux indicateurs verts soient
visibles.
58
Page 60

HET KIND JUIST VASTMAKEN GROEP 1 918 KG ZAPINANIE DZIECKA GROUP 1 918 KG
• Controleer voordat u op weg gaat voor optimale veiligheid van uw kind of:
• het veiligheidskussen juist is afgesteld.
• de gordeltongen vastzitten in het gordelslot.
• de buikriem en schouderriem strak door de gordelgeleiders van het veiligheidskussen
lopen en niet gedraaid zijn.
• de hele rugleuning van het autostoeltje volledig op de rugleuning van de autostoel
aansluit.
• Als u ISOFIX Connect gebruikt: moet het stoeltje aan beide zijden aan de ISOFIXankerpunten vergrendeld zijn met de grijparmen en beide groene veiligheidsindicatoren
moeten duidelijk zichtbaar zijn.
• Chcąć zapewnić dziecku maksymalne bezpieczeństwo, przed rozpoczęciem jazdy
proszę sprawdzić czy:
• osłona tułowia jest poprawnie założona.
• klamra pasa bezpieczeństwa została poprawnie wpięta.
• biodrowa i barkowa część pasa bezpieczeństwa przebiega ściśle przez prowadnicę
pasa wzdłuż osłony tułowia i nie jest skręcona.
• oparcie fotelika samochodowego dziecka przylega do oparcia fotela/kanapy
samochodowej.
• Jeśli korzystają Państwo z ISOFIX Connect należy sprawdzić, czy: fotelik samochodowy
został poprawnie wpięty po obu stronach w zaczepy ISOFIX i czy wyraźnie widać dwa
zielone wskaźniki znajdujące się po bokach fotelika.
FRNLPL
59
Page 61

PASSAGE DU MODÈLE PALLAS SFIX À LA SOLUTION SFIX GROUPE 1 AU
GROU PE 2/3
21
• Retirez le bouclier d’impact.
5
22
22
6
2
24
6
7
7
5
24
• Appuyez sur les deux boutons déclencheurs (22) situés sur le dessous du coussin
du siège (5) et tirez-les en direction de l’extérieur du châssis jusqu’à ce que vous
ressentiez une légère résistance.
• Appuyez sur le bouton de réglage (21) et extrayez complètement le siège du châssis (6).
Modification d’ISOFIX Connect
• Maniez le levier de réglage (2) sur le châssis (6) et tirez les deux connecteurs ISOFIX
Connect (7) jusqu’à ce que vous ressentiez une légère résistance.
• Maintenez le levier de réglage en place (2) et relâchez les deux clips (24) situés
sur le dessous du réhausseur de siège (5), l’un après l’autre. Utilisez un tournevis si
nécessaire.
Remarque! Les connecteurs ISOFIX Connect (7) se détacheront aisément du châssis (6)
si cette opération est effectuée correctement.
!
ATTENTION! Veuillez noter la faible hauteur de décrochement des connecteurs
ISOFIX Connect. Sans cela, vous risquez d’endommager certains composants ou
vous blesser ou blesser d’autres personnes à proximité.
• Ensuite, poussez les connecteurs ISOFIX Connect (7) dans les orifices prévus à cet
effet situés sous le réhausseur de siège (5) jusqu’à ce que vous ressentiez une légère
résistance.
!
ATTENTION! Assurez-vous que les connecteurs sont installés dans le bon sens et
que les dents des connecteurs sont en position verticale au moment de les insérer
dans le siège.
• Actionnez le bouton de réglage (21) situé sous le réhausseur de siège (5) et poussez
les connecteurs (7) aussi loin que possible.
• Pour de plus amples informations sur l’installation correcte du siège, veuillez consulter
le chapitre «ATTACHE DU SIÈGE AVEC LE SYSTÈME ISOFIX CONNECT».
21
7
Remarque! Gardez les pièces que vous avez retirées dans un endroit sûr.
!
ATTENTION! Au moment de remonter le siège, procédez dans l’ordre inverse.
Servez-vous des instructions pour vérifier au préalable que vous disposez bien de
toutes les pièces.
60
Page 62

VAN PALLAS SFIX NAAR SOLUTION SFIX GROEP 1 NAAR GROEP 2/3 ZMIANA FOTELIKA ZGODN EGO Z GRUPA 1 918 KG W GRUPĘ 2/3 1536 KG
• Haal het veiligheidskussen weg.
• Druk de twee ontgrendelingsknoppen (22) onder op de basis (5) in en trek het uit het
frame totdat u enige weerstand voelt.
• Druk de aanpassingsknop (21) in en trek de zitting helemaal los van het frame (6).
ISOFIX Connect-aanpassing Przekładanie zaczepów ISOFIX
• Gebruik de aanpassingshendel (2) op het frame (6) en trek de twee ISOFIX Connectgrijparmen (7) terug tot u enige weerstand voelt.
• Houd de aanpassingshendel (2) vast en maak een voor een de twee clips (24) onder op
de basis (5) los. Gebruik zo nodig een schroevendraaier.
Let op! Als dit correct gebeurt, komen de ISOFIX Connect-grijparmen (7) gemakkelijk uit
het frame (6).
!
BELANGRIJK! Bewaar een zekere hoogte van de ISOFIX Connect-grijparmen om
te voorkomen dat onderdelen beschadigd of uzelf of anderen vlakbij verwond raken.
• Duw nu de ISOFIX Connect-grijparmen (7) in de daarvoor bestemde geleiders aan de
onderkant van de basis (5) tot u enige weerstand voelt.
!
BELANGRIJK! Zorg dat de grijparmen op de juiste manier zijn geïnstalleerd en dat
de tanden van de grijparmen naar boven wijzen als u ze in de autostoel aanbrengt.
• Gebruik de aanpassingsknop (21) onder op de basis (5) en duw de grijparmen (7) zo
ver mogelijk in.
• Verdere informatie over de juiste installatie kunt u lezen onder het kopje “HET
KINDERZITJE PLAATSEN MET HET ISOFIX CONNECTSYSTEEM”.
Let op! Bewaar verwijderde onderdelen bij elkaar op een veilige plek.
• Zdejmij osłonę tułowia.
• Naciśnij przyciski (22) na spodzie (5) i ściągaj siedzisko z podstawy (6), aż do blokady.
• Pociągnij za uchwyt do odchylania fotelika (21) i ściągnij siedzisko z podstawy (6)
• Odciągnij przycisk odchylania (2) i wyciągnij szyny ISOFIX (7), aż do oporu.
• Naciśnij uchwyt do regulacji (2) znajdujący się w podstawie (6) fotelika i wyciągnij
zaczepy ISOFIX (7), aż poczujesz opór. W razie potrzeby użyj śrubokręta.
Uwaga! Jeśli wykonałeś to poprawnie szyny ISOFIX Connect (7) łatwo wysuną się z
podstawy siedziska (6).
!
OSTRZEŻENIE! Zwróć uwagę, aby szyny ISOFIX Connect nie upadły ze zbyt dużej
wysokości. Może to spowodować uszkodzenia części lub urazy osób w otoczeniu.
• Teraz możesz wsunąć zaczepy ISOFIX (7) w przeznaczone do tego otwory znajdujące
się na spodzie siedziska (5) fotelika, do momentu aż poczujesz opór.
!
OSTRZEŻENIE! Upewnij się, że ząbki służące do mocowania oraz regulacji
znajdują się na górze ramion zaczepów ISOFIX przed włożeniem ich do siedziska.
• Użyj przycisku (21) pod siedziskiem (5) i wsuń szyny ISOFIX (7) do końca.
• Dalszy montaż fotelika opisany jest w punkcie „MONTAŻ FOTELIKA ZA POMOCĄ
ZACZEPÓW ISOFIX”
UWAGA! Przechowuj wszystkie części razem, w odpowiednich warunkach
!
!
BELANGRIJK! Als u de stoel weer in elkaar zet, volg dan precies de omgekeerde
volgorde. Gebruik de handleiding om vooraf te controleren of u alle onderdelen hebt.
OSTRZEŻENIE! Aby ponownie przekształcić fotelik wykonuj czynności w odwrotnej
kolejności. prawdź wcześniej w instrukcji użytkowania, czy nie brakuje żadnej części.
FRNLPL
61
Page 63

19
INSTALLATION AVEC LA CEINTURE DE SECURITÉ
• Installez votre enfant dans le siège auto. Tirez la ceinture trois points du véhicule et
passez-la jusque la boucle de ceinture (19) devant votre enfant.
NOTE ! La ceinture de sécurité trois points ne doit passer que
dans les guides dédiés Les guides de ceinture sont décrits en détail dans
ce manuel et sont de couleur rouge sur le siège auto.
!
ATTENTION ! Ne vrillez jamais la ceinture.
62
CLICK!
20
25
20
20
16
25
• Insérez la languette de la ceinture de sécurité (18) dans sa boucle (19). Elle doit
s’enclencher et émettre un «CLIC» audible.
• Ensuite, placez la ceinture ventrale (16) dans les glissières inférieures (25) du siège auto.
• Tirez la ceinture diagonale (20) fermement pour serrer la ceinture sous-abdominale (16).
Plus la ceinture est serrée, meilleure est la protection offerte contre les blessures. Sur le
côté de la boucle de ceinture (19), la ceinture diagonale (20) et la ceinture ventrale (16)
doivent être insérées ensemble dans la guide inférieur (25).
• La ceinture ventrale (16) doit passer par les deux glissières inférieures (25) situées des
deux côtés de l’assise du siège.
• Ensuite, faites passer la ceinture diagonale (20) par la glissière supérieure (17) au
niveau de l’appui-tête (11) jusqu’à ce qu’elle se trouve dans la glissière.
11
20
23
11
20
NOTE ! Apprenez à votre enfant à s’assurer que la ceinture est bien serrée et, si
nécessaire, à s’attacher seul.
!
ATTENTION ! La ceinture ventrale (16) doit passer aussi bas que possible le long
de l’aine de votre enfant pour assurer une protection optimale en cas d’accident.
Assurez-vous que la ceinture diagonale (20) passe entre l’extérieur de l’épaule et le cou
de votre enfant. Si nécessaire, ajustez la hauteur de dossier pour modifier la position de la
ceinture. La hauteur du dossier (11) peut être ajustée dans la voiture.
16
25
Page 64

DE AUTOGORDEL VAN UW KIND VASTMAKEN ZAPINANIE FOTELIKA SAMOCHODOWYM PASEM BEZPIECZEŃSTWA
• Zet uw kind in het autostoeltje. Trek de driepuntsgordel ver uit en voer die voor het kind
langs naar het gordelslot (19).
LET OP! De driepuntsgordel mag uitsluitend over de daarvoor bedoelde geleiders lopen.
Hoe de gordel moet lopen, wordt in deze handleiding precies beschreven en is op het
autostoeltje met rood aangegeven.
!
BELANGRIJK! De gordel mag in geen geval verdraaid zijn.
• Posadź dziecko w foteliku. Wyciągnij pas i przeprowadź w kieunku zapięcia pasów (19)
przed dzieckiem.
UWAGA! Trzypunktowy pas bezpieczeństwa powinien być poprowadzony przez
odpowiednie szczeliny. Droga przechodzenia pasa jest szczegółowo opisana
w tej instrukcji oraz oznaczona na czerwono.
!
OSTRZEŻENIE! Nigdy nie skręcaj pasa.
• Steek de gordeltong (18) in het gordelslot (19). Die moet met een hoorbare ‘KLIK’
vergrendelen.
• Voer vervolgens de buikriem (16) door de met rood aangegeven onderste
gordelgeleiders (25) van het autostoeltje.
• Trek nu de borstriem (20) stevig aan om de buikriem (16) strak te trekken. Hoe strakker
de gordel zit, hoe beter deze bescherming biedt tegen letsel. Aan de kant van het
gordelslot (19) worden de borstriem (20) en de buikriem (16) samen in de onderste
gordelgeleider (25) geplaatst.
• De buikriem (16) moet aan beide zijden van de zitting door de met rood aangegeven
onderste gordelgeleiders (25) lopen.
• Voer nu de borstriem (20) door de bovenste gordelgeleider (17) in de hoofdsteun (11)
totdat deze in de gordelgeleider valt.
LET OP! Leer uw kind vanaf het begin altijd te controleren of de gordel strak genoeg is en
hoe het zelf de gordel strak kan trekken als dat nodig is.
!
BELANGRIJK! De buikriem (16) moet aan beide zijden zo laag mogelijk over de lies
van uw kind lopen om optimaal effect te hebben tijdens een ongeval.
Zorg dat de borstriem (20) tussen de buitenkant van de schouder en de hals van
uw kind loopt. Pas de hoogte van de hoofdsteun indien nodig aan om de positie van
de gordel te veranderen. De hoogte van de hoofdsteun (11) kan ook in de auto nog
steeds worden aangepast.
• Włóż zapięcia pasa (18) w klamry (19). Usłyszysz kliknięcie.
• Następnie, ułóż odpowiednio i zaciśnij pas biodrowy (16) w czerwonych szczelinach
prowadzących (25) fotelika.
• Teraz pociagnij skośny pas barkowy (20) by naprężyć pas biodrowy (16). m ciaśniej
zapięty pas, tym lepiej chroni przed obrażeniami. Po stronie klamry zamykającej pasa
samochodowego (19), pas barkowy (20) i biodrowy (16) powinny razem przechodzić
przez boczną szczelinę prowadzącą (25).
• Pas biodrowy (16) powinien być poprowadzony przez szczeliny (25) po obu stronach
siedziska.
• Teraz poprowadź pas barkowy (20) przez górną szczelinę (17) w zagłówku (11) aż
znajdzie sie w środku.
UWAGA! Od początku ucz swoje dziecko, aby zwracało uwagę, czy pas jest ciasno
zapięty i samo naprężało go w razie potrzeby.
!
OSTRZEŻENIE! Pas biodrowy (16) musi przechodzić najniżej jak to możliwe po
obu stronach pachwin dziecka w celu najlepszego zabezpieczenia.
Upewnij się, że pas barkowy (20) biegnie po zewnetrznej stronie ramion i szyi dziecka. Jeśli
to konieczne, dopasuj wysokość zagłówka tak, by zmienić pozycję, w której przebiega pas.
Wysokość zagłówka (11) może być dopasowana wewnątrz samochodu.
FRNLPL
63
Page 65

CLICK!
20
25
23
11
16
VOTRE ENFANT ESTIL ATTACHÉ CORRECTEMENT?
Pour assurer la sécurité optimale de votre enfant, veuillez toujours procéder aux
5
19
vérifications suivantes avant le départ:
• la ceinture ventrale (16) doit passer par les deux glissières inférieures (25) situées des
deux côtés de l’assise du siège (5).
• la ceinture diagonale (20) du côté de la boucle de ceinture passe également dans la
glissière inférieure (25) du siège.
• la ceinture diagonale (20) passe bien dans la glissière (17) présentant la couleur rouge
sur le support d’épaule (11).
• La ceinture diagonale (20) est inclinée vers le bas.
• la ceinture est bien ajustée contre le corps de votre enfant et n’est pas entortillée.
• Si utilisation du système ISOFIX Connect : le siège doit bien être fixé des deux côtés
avec les connecteurs ISOFIX Connect (7) et les deux indicateurs verts (9) doivent
être visibles.
!
ATTENTION ! La boucle de la ceinture du véhicule (19) ne doit jamais croiser
l’accoudoir. Si le système de ceinture est trop long, ce siège auto pour enfant
n’est pas adapté pour cette position dans le véhicule. En cas de doute, contactez
votre revendeur.
!
ATTENTION ! Ne laissez jamais votre enfant sans surveillance dans la voiture. Les
parties plastiques chauffent en plein soleil et votre enfant peut subir des brûlures.
Protégez votre enfant et le siège auto de l’exposition directe au soleil (en couvrant le
siège avec un linge par exemple).
64
20
7
9
Page 66

IS UW KIND GOED VASTGEMAAKT? CZY TWOJE DZIECKO JEST DOBRZE ZABEZPIECZONE?
Controleer voordat u op weg gaat voor optimale veiligheid van uw kind of Aby mieć pewność, że Twoje dziecko jest dobrze zabezpieczone, przed
• de buikriem (16) aan beide zijden van de zitting (5) door de met rood aangegeven
gordelgeleiders (25) loopt.
• de borstriem (20) aan de kant van het gordelslot ook door de met rood aangegeven
gordelgeleider (25) van het stoeltje loopt.
• de borstriem (20) door de met rood aangegeven bovenste gordelgeleider (17) van de
hoofdsteun (11) loopt.
• de borstriem (20) schuin naar achteren loopt.
• de hele gordel strak tegen het lichaam van uw kind valt en niet gedraaid is.
• Als u ISOFIX Connect gebruikt, controleert u of het stoeltje aan beide zijden verankerd
is met de ISOFIX Connect-vergrendelarmen (7) en of de groene veiligheidsindicatoren
(9) duidelijk zichtbaar zijn.
!
BELANGRIJK! De autogordel (19) mag nooit over de armleuning lopen. Als het
gordelsysteem te lang is, is het autostoeltje in die stand ongeschikt voor gebruik in
uw auto. Neem bij twijfel contact op met de fabrikant.
uruchomieniem samochodu sprawdź, czy:
• pas biodrowy (16) przechodzi przez boczne szczeliny (25) po obu stronach siedziska (5).
• pas barkowy (20) również przechodzi przez czerwone szczeliny w podstawie (25)
fotelika.
• pas barkowy (20) przechodzi przez górną szczelinę (17) oznaczoną na czerwono w
zagłówku (11).
• pas przebiega ukośnie (20) z tyłu.
• pas na całej swojej długości jest naprężony i nie jest skręcony.
• Jeśli korzystają Państwo z ISOFIX Connect należy sprawdzić, czy: Fotelik jest
zablokowany po obu stronach zaczepami Isofix (7) a zielone przyciski zabezpieczające
(11) są dobrze widoczne.
!
OSTRZEŻENIE! Klamra fotela samochodowego (19) nie może przechodzić pod
podłokietnikiem. Jeżeli pas klamry jest zbyt długi, fotelik nie nadaje się do tego typu
samochodu W przypadku wątpliwości, skontaktuj się ze sprzedawcą.
! !
BELANGRIJK! Laat uw kind nooit alleen in de auto achter. De kunststof
onderdelen van het kinderbeveiligingssysteem worden in de zon zeer heet en kunnen
brandwonden veroorzaken.
Bescherm uw kind en het autostoeltje tegen directe blootstelling aan de zon
(bijvoorbeeld met een lichte kleur doek).
OSTRZEŻENIE! Nigdy nie zostawiaj dziecka w samochodzie bez opieki! Plastikowe
części w pasach bezpieczeństwa nagrzewają się w słońcu, co może spowodować
poparzenie dziecka.
Nalezy chronić dziecko i fotelik samochodowy przed bezpośrednią ekspozycją na
słońce (np. poprzez przykrycie lekką tkaniną).
FRNLPL
65
Page 67

11 11
13
RETIRER LA HOUSSE
La housse du siège auto est composée de 5 parties (rabat, dossier, épaules, assise et/ou
surface, bouclier).
Les quatre housses du siège sont insérées dans les canaux d’attache situés sur les
rebords du siège auto et sont maintenus par des boutons-pressions (voir illustration).
Une fois les boutons-pressions détachés, les différentes pièces de la housse peuvent être
extraites des canaux d’attache.
Pour remettre les housses sur le siège, inversez la procédure effectuée.
!
ATTENTION ! Le siège auto ne doit jamais être utilisé sans la housse.
Retrait de la housse du rabat de l’appuie-tête
Tirez la housse pour la rabattre par-dessus la poignée de réglage (13) de manière à ce que
la housse ne s’entremêle pas dans le levier au moment de son retrait.
Retrait de la housse de l’appuie-tête
Détachez les deux boutons-pressions situés sur chaque côté de l’arrière du siège, au
niveau des épaules.
Extrayez la housse de son canal d’attache.
Retrait de la housse du support d’épaule
Extrayez la housse de son canal d’attache.
66
Page 68

DE BEKLEDINGSHOES VERWIJDEREN ŚCIĄGANIE TAPICERKI
De bekleding van het autostoeltje bestaat uit 5 onderdelen (zijstuk hoofdsteun, hoofdsteun,
schoudergedeelte, zitting en/of inlegkussen, veiligheidskussen).
De vier hoezen van het stoeltje worden in de bekledinggeleiders aan de rand van het
autostoeltje geplaatst en worden op verschillende plaatsen op hun plek gehouden met
drukknopen (zie afbeelding).
Als alle drukknopen zijn losgemaakt, kunnen de afzonderlijke delen van de bekleding uit de
geleiders worden getrokken.
Om de hoezen weer op de stoel te bevestigen, volgt u de omgekeerde volgorde van de
verwijdering.
!
BELANGRIJK! Het autostoeltje mag nooit worden gebruikt zonder bekleding.
De hoes van het zijstuk hoofdsteun verwijderen
Trek de opening in de hoes over de verstelhendel van de hoofdsteun (13) zodat de hoes
niet blijft haken achter de hendel wanneer u deze omhoog trekt.
De bekleding van de hoofdsteun verwijderen
Haal de hoes uit de haakjes aan beide zijden van achterkant van het schouderstuk.
Trek de hoes uit de bekledinggeleiders.
De bekleding van het schouderdeel verwijderen
Trek de hoes uit de bekledinggeleiders.
Tapicerka fotelika składa się z 5 części (Klapka zagłówka, zagłówek, część zabezpieczeń
barkowych, siedzisko, osłony tułowia).
Wszytskie części tapicerki dopasowane sa ściśle do krawędzi fotelika i przytwierdzone w
kilku miejscach napami lub zatrzaskami (obrazek).
Po odpięciu wszystkich zapięć tapicerkę można zdjąć.
W celu ponownego założenia tapicerki fotelika należy wykonać czynności podobnie jak
przy ściąganiu, ale w odwrotnej kolejności.
!
OSTRZEŻENIE! Fotelik nie może być używany bez tapicerki
Zdejmowanie tapicerki z klapki zagłówka
Odepnij napy tapicerki (13) tak by nie została przytrzaśnięta przez dźwignię regulującą
zagłówek, pociągnij do góry i ściągnij.
Zdejmowanie tapicerki z zagłówka
Ostrożnie ściagnij tapicerkę w okolicy haków z każdej strony na tylnej części barkowej.
Odciągnij tapicerkę od krawędzi.
Zdejmowanie tapicerki z osłon barkowych
Odciągnij tapicerkę od krawędzi.
FRNLPL
67
Page 69

Retirer la housse de l’assise
Détachez les quatre boutons-pressions de la housse situé à l’avant et à l’arrière du siège.
Retirez la housse des accoudoirs et le long de la surface du siège.
Retrait de la housse du bouclier d’impact
Tout d’abord, détachez les deux boutons-pressions de la housse du bouclier d’impact.
Ensuite, retirez la housse autour du bouclier en tirant vers la troisième attache située autour
du bouton de réglage central et détachez la housse au niveau de l’orifice en caoutchouc
du bouton de réglage.
NETTOYAG E
NOTE ! Lavez la housse avant la première utilisation. La housse ne peut être lavée qu’à
30°C, en programme délicat. Tout lavage de la housse à une température supérieure à
30°C peut provoquer une décoloration du tissu. Veuillez laver la housse séparément et ne
la passez pas au sèche-linge. Ne pas sécher directement au soleil ! Vous pouvez nettoyer
les éléments en plastique à l’aide d’un détergent doux et à l’eau tiède.
!
ATTENTION ! N’utilisez jamais de détergents agressifs ou d’eau de javel.
68
Page 70

De hoes van de zitting verwijderen Zdejmowanie tapicerki
Maak de 2 drukknopen aan de voor- en achterkant van de zittinghoes los. Trek nu de hoes
over de armleuningen en over de zitting.
Odepnij 2 napy na tapicerce z przodu i z tyłu. Następnie sciągnij tapicerkę z
podłokietników i dalej z siedziska.
De bekleding van het veiligheidskussen verwijderen Zdejmowanie tapicerki z osłony tułowia
Maak eerst de twee drukknopen van de bekleding van het veiligheidskussen los.
Trek de bekleding dan over het kussen naar het derde bevestigingspunt rond de
centrale aanpassingsknop en maak de bekleding los van het rubberen oog van de
aanpassingsknop.
REINIGING
LET OP! Was de zittinghoes voordat u deze voor de eerste keer gaat gebruiken. De
bekleding mag alleen op 30 °C worden gewassen met een fijnwasprogramma. Wassen
op hogere temperaturen dan 30 °C kan verkleuring van de bekleding veroorzaken.
Was de bekleding apart en droog deze niet in de droger! Droog de bekleding ook niet
in de felle zon! De kunststof onderdelen kunnen worden schoongemaakt met een mild
reinigingsmiddel en warm water.
!
BELANGRIJK! Gebruik nooit agressieve reinigingsmiddelen of bleekmiddel!
Najpierw odepnij dwie napy z osłony tułowia. Następnie ściągnij pokrowiec dookoła
poduszki w kierunku trzeciego zaczepu wokół przycisku regulacji.
CZYSZCZENIE
UWAGA! Należy wyprać przed pierwszym użyciem. Tapicerka może być prana w
30°C, program do tkanin delikatnych. Wyższa temperatura prania może spowodować
wyblaknięcie koloru. Tapicerkę należy prać oddzielnie i nigdy nie należy suszyć jej w
suszarce! Nie należy suszyć na słońcu. Plastikowe części fotelika można przecierać ciepłą
wodą z delikatnym detergentem.
!
OSTRZEŻENIE! W żadnym wypadku nie stosować chemicznych środków do
czyszczenia ani wybielaczy!
FRNLPL
69
Page 71

ENTRETIEN ET MAINTENANCE
Afin de protéger au maximum votre enfant, il est primordial de respecter les points suivants :
• Toutes les pièces principales du siège auto doivent faire l’objet d’un contrôle régulier
pour vérifier qu’elles ne sont pas endommagées. Les composants mécaniques ne
doivent pas présenter de défauts.
• Il est absolument nécessaire de vérifier que le siège auto n’est pas coincé entre deux
éléments rigides, comme par exemple la porte du véhicule et le rail de la banquette, qui
seraient susceptibles de l’endommager.
• En cas d’exposition à un choc extrême, p. ex. suite à une collision, le siège auto ne doit
plus être utilisé et doit être remplacé.
Veillez à utiliser uniquement une housse de siège CYBEX, celle-ci étant un élément-clé de
la fonction du siège. Des housses de rechange sont disponibles auprès d’un revendeur
spécialisé.
EN CAS D’ACCIDENT
!
ATTENTION ! Tout accident peut provoquer des dégâts sur le siège auto pour
enfant non identifiables à l’œil nu. Veuillez remplacer le siège après un accident. En
cas de doute, contactez votre revendeur ou le fabricant.
DURÉE DE VIE DU PRODUIT
Ce siège auto a été conçu pour satisfaire ses fonctions initiales en utilisation normale pour
une durée de vie de 9 ans environ. L’usure progressive de la matière plastique, causée
par exemple par l’exposition au soleil (UV), peut provoquer une légère détérioration des
propriétés du produit. Le siège auto pouvant être exposé à des variations de température
et autres désagréments, merci de suivre les instructions ci-dessous :
• Si le véhicule est exposé à la lumière directe du soleil pendant une période prolongée,
le siège auto doit être retiré du véhicule ou recouvert d’un linge clair.
• Vérifiez régulièrement que les pièces en plastique et en métal du siège ne présentent
aucun dommage ni aucune altération de forme ou de couleur Si vous constatez un
changement quelconque, le siège doit être détruit ou faire l’objet d’une vérification par
le fabricant, voire être remplacé par celui-ci.
• Les changements de couleur de la housse, surtout la décoloration, sont parfaitement
normaux lors de l’utilisation du siège dans un véhicule et n’en affectent pas l’efficacité.
70
Page 72

REINIGING & ONDERHOUD
Om te garanderen dat uw autostoeltje maximale bescherming biedt, is het volgende
uiterst belangrijk:
• Alle belangrijke onderdelen van het autostoeltje dienen regelmatig op schade
gecontroleerd te worden. De mechanische onderdelen mogen geen defecten vertonen.
• Het autostoeltje mag absoluut niet worden ingeklemd tussen harde voorwerpen, zoals
een autoportier of stoelrail, omdat het daardoor beschadigd kan raken.
• Zodra het autostoeltje heeft blootgestaan aan een extreme schok, bijvoorbeeld een
botsing, moet het worden gecontroleerd door de fabrikant.
Zorg dat alleen een originele CYBEX-bekledingshoes wordt gebruikt, omdat de bekleding
een belangrijk element van de werking van de stoel is. Reserveonderdelen kunnen bij een
gespecialiseerde winkel worden gekocht.
KONS ERWACJA
Aby zagwarantować najwyższy poziom bezpieczeństwa dziecka, należy pamietać:
• Wszystkie ważne części fotelika powinny być regularnie sprawdzane. Części
mechaniczne powinny działać bez zarzutu.
• Zwracaj szczególną uwagę, aby fotelik nie został uszkodzony poprzez zaklinowanie
pomiedzy drzwiami a siedzeniam samochodowym lub innymi twardymi częściami.
• W przypadku upadku fotelika, produkt powinien być poddany przegladowi.
Tylko oryginalna tapicerka CYBEX zapewni maksymalny komfort i bezpieczeństwo Twojemu
dziecku Tapicerki można nabyć u autoryzowanych partnerów.
FRNLPL
WAT TE DOEN NA EEN ONGEVAL
! !
BELANGRIJK! Een ongeval kan schade aan het autostoeltje veroorzaken die niet
met het blote oog zichtbaar is. Vervang het stoeltje na een ongeval. Neem bij twijfel
contact op met uw winkelier of de fabrikant.
LEVENSDUUR VAN HET PRODUCT TRWAŁOŚĆ PRODUKTU
Dit autostoeltje is zo ontworpen dat het bij normaal gebruik de bedoelde functies
gedurende een levensduur van ongeveer 9 jaar kan vervullen. Door geleidelijke slijtage
van kunststof onderdelen, bijvoorbeeld door blootstelling aan zonlicht (UV), kunnen de
producteigenschappen enigszins worden aangetast. Omdat grote temperatuurverschillen
en andere onvoorziene omstandigheden normaal zijn in voertuigen, dient u met de
volgende aspecten rekening te houden:
• Als het voertuig gedurende langere tijd in direct zonlicht staat, moet het autostoeltje uit
de auto worden verwijderd dan wel met een lichte doek worden afgedekt.
• Controleer regelmatig alle kunststof en metalen onderdelen van het stoeltje op schade,
vervorming of verkleuring. Als u veranderingen opmerkt aan het autostoeltje, moet u het
wegdoen of laten controleren en mogelijk laten vervangen door de fabrikant.
• Veranderingen in de stof, vooral het flets worden daarvan, zijn normaal bij gebruik in een
voertuig en schaden de functie van het stoeltje niet.
POSTĘPOWANIE PO WYPADKU DROGOWYM
OSTRZEŻENIE! Po wypadku drogowym uszkodzenia fotelika mogą nie być
widoczne gołym okiem. Fotelik należy wymienić po kolizji. W razie wątpliwości
skontaktuj sie z dealerem lub producentem.
Fotelik został zaprojektowany tak, by spełniać swoje funkcje przy normalnym użytkowaniu
przez ok 9 lat. W związku z tym, że plastikowe części z czasem się zużywają, np. z powodu
ekspozycji na słońce, cechy produktu mogą się nieznacznie zmieniać. Jako że fotelik może
być narażony na duże wahania temperatur podczas jego eksploatacji w samochodzie oraz
inne nieprzewidziane sytuacje, należy stosować się do poniższych zaleceń:
• Jeżeli pojazd jest wystawiony na silne działanie promieni słonecznych przez długi czas,
fotelik powinien być wyciagnięty z samochodu lub przykryty lekką tkaniną.
• Należy regularnie sprawdzać plastikowe i metalowe części fotelika pod kątem
uszkodzeń, deformacji czy utraty koloru. W razie zmian w foteliku, produkt powinien
zostać zutylizowany lub ewentualnie wymieniony przez producenta.
• Zmiany na materiale, w szczególności wyblakły kolor, są naturalne podczas użytkowania
w samochodzie i nie mają wpływu na funkcjonowanie fotelika.
71
Page 73

DESTRUCTION
À la fin de la durée de vie du siège, veillez à le mettre au rebut correctement. Le tri
des déchets peut fortement varier d’un endroit à un autre. Afin de veiller à respecter la
législation en vigueur en matière de tri des déchets, veuillez contacter l’organisme ou le
conseil local compétent. Toujours suivre les consignes d’élimination de votre pays.
CONDITIONS DE GARANTIE
La garantie ci-dessous s’applique uniquement dans les pays où ce produit a été
initialement vendu par un détaillant à un consommateur. La garantie couvre tous les
défauts de fabrication et de matériaux, qui existaient au moment de l’achat ou survenus
dans les trois (3) ans suivant l’achat initial auprès d’un détaillant par un consommateur (la
garantie du fabricant). Si un défaut de fabrication ou de matériau se manifeste au cours
de la période de garantie, le produit sera réparé sans frais ou pourra, à notre discrétion,
être remplacé par un produit neuf. Afin de faire valoir une réclamation portant sur la
présente garantie, le produit doit être renvoyé au détaillant qui a procédé à sa première
vente, accompagné de la preuve d’achat originale présentant la date de l’achat, le nom
et l’adresse du détaillant, ainsi que le nom du produit. Aucune réclamation n’est possible
directement auprès du fabricant ou de toute autre personne autre que le détaillant chez
qui le produit a été initialement acheté. La garantie ne s’applique que si le produit a fait
l’objet d’un contrôle visant à vérifier son intégralité, d’éventuels défauts de fabrication ou
des défauts matériels constatés immédiatement lors de l’achat. Si le produit a été acheté
par commande et livré par voie postale, il doit être soumis à un contrôle immédiat après
réception visant à vérifier son intégralité, d’éventuels défauts de fabrications ou défauts
matériels. Si le produit présent des défauts, il faut cesser de l’utiliser et le renvoyer
au détaillant ayant effectué la vente. Toute réclamation au titre de la garantie implique
que le produit soit renvoyé propre et dans son intégralité. Veuillez lire attentivement
les instructions d’emploi avant de contacter le détaillant. La garantie ne couvre pas les
dommages causés par une mauvaise utilisation, des facteurs externes (eau, feu, accidents
de la circulation ou autres) ou par l’usure normale. Toute réclamation dans le cadre de
la garantie ne sera autorisée que si le produit a été manipulé et utilisé conformément
aux instructions d’utilisation, si des réparations ont été effectuées par des personnes
autorisées à le faire et si des pièces détachées et des accessoires d’origine ont été
utilisés. En aucun cas la présente garantie ne saurait invalider ou limiter les droits du
consommateur ou les droits de recours contre le revendeur sur la base d’une infraction au
contrat d’achat tel qu’autorisé par la législation en vigueur.
CYBEX GmbH
Riedingerstr. 18, 95448 Bayreuth, Germany
Tel.: 0921 78 511-511, Fax.: 0921 78 511- 888
72
Page 74

VERWIJDERING UTYLIZACJA
Aan het eind van de levensduur van het autostoeltje moet u het correct verwijderen.
Afvalscheiding kan van plaats tot plaats verschillen. Om te zorgen dat u het autostoeltje
overeenkomstig de regelgeving verwijdert, kunt het best contact opnemen met uw lokale
afvalverwerkingsbedrijf of de gemeente. Houd u in ieder geval aan de afvalregelgeving van
uw land.
GARANTIE WARUNKI GWARANCJI
De volgende garantievoorwaarden gelden alleen in het land waar het product voor
het eerst via de detailhandel is verkocht aan een consument. Deze garantie dekt alle
fabricagefouten en materiaaldefecten die bestaan op het moment van verkoop of die
zich voordoen binnen drie (3) jaar na eerste verkoop van het product via de detailhandel
aan de consument (fabrieksgarantie). Als er zich een fabricagefout of materiaaldefect
voordoet in de garantieperiode, wordt het product kosteloos gerepareerd of – naar
ons goeddunken – vervangen door een nieuw product. Om aanspraak te maken op
deze garantie dient u het product te retourneren aan de winkelier die het oorspronkelijk
heeft verkocht en er dient een origineel aankoopbewijs (kassabon of factuur) te worden
overlegd met de aankoopdatum, de naam en het adres van de winkelier en de naam
van het product. Er kunnen geen aanspraken worden gemaakt op deze garantie als het
product aan de fabrikant wordt verstuurd of naar een andere persoon dan de winkelier
die het oorspronkelijk heeft verkocht ten behoeve van een aanspraak op de garantie. De
garantie geldt alleen als het product direct na aankoop is gecontroleerd op volledigheid,
fabricagefouten en materiaaldefecten. Als het product per postorder is gekocht, moet
het direct na ontvangst worden gecontroleerd op volledigheid, fabricagefouten en
materiaaldefecten. Als er schade ontstaat, mag het product niet langer worden gebruikt en
moet het worden geretourneerd aan de winkelier die het oorspronkelijk heeft verkocht. Als
u aanspraak maakt op de garantie, moet het product in complete en schone staat worden
geretourneerd. Lees de gebruikshandleiding zorgvuldig voordat u contact opneemt met
de detailhandelaar. Deze garantie dekt geen schade veroorzaakt door verkeerd gebruik,
omgevingsfactoren (zoals water, brand, aanrijdingen) of normale slijtage. Aanspraken
op de garantie worden slechts gehonoreerd als het product is behandeld en gebruikt
overeenkomstig de gebruikshandleiding, als reparaties en aanpassingen uitsluitend
zijn uitgevoerd door daartoe bevoegde personen, en als er alleen originele onderdelen
en accessoires zijn gebruikt. Deze garantie vernietigt of beperkt op geen enkele wijze
de consumentenrechten of rechten jegens de verkoper vanwege schending van de
koopovereenkomst die zijn toegekend krachtens toepasselijk recht.
Wraz z końcem okresu przydatności fotelika do użytkowania, produkt musi zostać
odpowiednio zutylizowany. Sposoby usuwania odpadów mogą różnić się w zależności od
kraju. To ensure that the child seat is disposed of in accordance with regulations, należy
skontaktować się z lokalną instytucją utylizacji odpadów lub zarządcą komunalnym. Always
observe the waste disposal regulations of your country.
Gwarancja obejmuje państwa, w których produkt został po raz pierwszy sprzedany
w sklepie finalnemu odbiorcy. Gwarancja obejmuje wszytskie usterki fabryczne oraz
wady materiałów, które miały miejsce przed zakupem lub które pojawiły się w ciągu (3)
lat od dnia pierwszej sprzedaży produktu klientowi w sklepie (gwarancja producenta).
Jeśli wady fabryczne lub materiałów powstaną w okresie, w którym produkt objety jest
gwarancją, zostanie on bezpłatnie naprawiony lub naszą decyzją, wymieniony na nowy.
W celu skorzyastania z gwarancji, produkt powinien być zwrócony do sklepu, w którym
został sprzedany po raz pierwszy z oryginalnym dowodem zakupu (rachunek lub faktura),
zawierającym datę zakupu, nazwę i adres sklepu, oraz nazwę produktu. Roszczenia
dotyczące gwarancji nie obejmują produktów wysłanych bezpośrednio do producenta
lub innych osób, nie bedących sklepem, w którym produkt został oryginalnie zakupiony.
Gwarancja obejmuje produkty, które zostały sprawdzone pod kątem poprawności działania,
defektów fabrycznych oraz materiałów podczas zakupu. Jeśli produkt został zakupiony
on line, poprzez sprzedaż mailową, powinien zostać sprawdzony pod kątem wykonania,
funkcjonowania, defektów fabrycznych oraz materiałów podczas odbioru. W przypadku
pojawienia się usterki, produkt może nie nadawać się do dalszego użytkowania i musi
zostać zwrócony do sprzedawcy, u którego został oryginalnie zakupiony. W przypadku
roszczenia z tutuły gwarancji, produkt powinien być zwrócony w czystym stanie oraz
komplatny. Przed kontaktem ze sklepem należy uważnie przeczytać instrukcję użytkowania.
Gwarancja nie obejmuje zniszczeń spowodowanych poprzez nieprawidłowe użytkowanie,
wpływ czynników zewnętrznych (woda, ogień, zderzenie itp.) lub naturalne zużycie podczas
regularnego użytkowania. Roszczenia z tytułu gwarancji będą rozpartywane tylko jeżeli
produkt był użytkowany zgodnie z instrukcją, naprawy i modyfikacje były przeprowadzane
tylko przez upoważnione do tego osoby, a użyte części i akcesoria są oryginalne. Niniejsza
gwarancja nie anuluje oraz nie ogranicza praw konsumenta oraz praw sprzedawcy na
podstawie naruszenia umowy sprzedaży zgodnie z obowiązującym prawem.
FRNLPL
73
Page 75

PALLAS S-fix
UN-R44-04
UNIVE RSAL
SEM I-UNIVERSAL
9 - 18 kg
04301358
CYBEX GmbH
Riedingerstr. 18, 95448 Bayreuth
Germany
SOLUTION S-fix
UN-R44-04
UNIVE RSAL
SEM I-UNIVERSAL
15 – 36 kg
04301359
CYBEX GmbH
Riedingerstr. 18, 95448 Bayreuth
Germany
74
Jóváhagyás
UN R 44-04
CYBEX PALLAS S-fix - 1 csoport, 9-18 kg
CYBEX SOLUTION S-fix - 2/3 csoport, 15-36 kg
Ülésmagasító háttámlával, állítható fejtámlával és
biztonsági pajzzsal.
Ajánlott:
Kor: kb. 3-tól 12 évig
Súly: 15-től 36 kg-ig
Testmagasság: 150 cm-ig
Kizárólag olyan járművekhez alkalmas, amelyek
rendelkeznek az UN R16 szabványa szerint jóváhagyott
automatikus hárompontos biztonsági övvel
Schválení
UN R 44-04
CYBEX PALLAS S-fix - skupina 1, 9 až 18 kg
CYBEX SOLUTION S-fix - skupina 2/3, 15 až 36 kg
Sedák s opěrkou zad a opěrkou hlavy na nastavitelné
základně s nastavitelným bezpečnostním pultem.
Doporučené pro:
Věk: od cca 3 do 12 let
Váha: 15 až 36 kg
Tělesná výška: až do 150 cm
Vhodné pouze pro sedadla s 3bodovým samonavíjecím
pásem, schváleným dle UN standardu R16 nebo jeho
ekvivalentu.
Schválenie
UN R 44-04
CYBEX PALLAS S-fix - skupina 1, 9 až 18 kg
CYBEX SOLUTION S-fix - skupina 2/3, 15 až 36 kg
Sedák s opierkou chrbta a opierkou hlavy na nastaviteľné
základni s nastaviteľným bezpečnostným pultom.
Doporučené pre:
Vek: od cca 3 do 12 rokov
Váha: 15 až 36 kg
Telesná výška: až do 150 cm
Vhodné len na sedadlá s 3-bodovým samonavíjacím
pásom, schváleným podľa UN štandardu R16 alebo jeho
ekvivalentu.
HU
!
FIGYELMEZTETÉS! Hogy biztosítsa az optimális védelmet gyermekének, használja
TARTALOMJEGYZÉK
a CYBEX PALLAS S-FIX-t a jelen útmutatóban megfogalmazott módon.
FIGYELEM! Mindig tartsa kéznél az útmutatót (pl. a háttámla mögött lévő, erre a célra
kialakított rekeszben).
FIGYELEM! Az ország-specifikus (pl. a gyermekülések színkódjaira vonatkozó) szabályok
miatt a termékek megjelenése változhat. Ez azonban nem befolyásolja a terméket a korrekt
működésben.
AZ ÜLÉS HELYES BESZERELÉSE A JÁRMŰBE .......................................................................................................................................76
BIZTONSÁG AZ AUTÓBAN ....................................................................................................................................................................................78
AZ ÜLÉS BEHELYEZÉSE A GÉPJÁRMŰBE .................................................................................................................................................78
A GYERMEKÜLÉS RÖGZÍTÉSE AZ ISOFIX CSATLAKOZÓ RENDSZERREL 80
A CYBEX PALLAS SFIX ELTÁVOLÍTÁSA ..........................................................................................................................................................82
AZ OLDALVÉDŐK CSATLAKOZTATÁSA ...........................................................................................................................................................82
ELHAJLÓ FEJTÁMLA ..................................................................................................................................................................................................84
TESTMÉRETHEZ IGAZÍTÁS ...................................................................................................................................................................................86
A VÉDŐPAJZS BEÁLLÍTÁSA 1. KORCSOPORT 918 KG.................................................................................................................86
BEKÖTÉS VÉDŐPAJZZSAL ...................................................................................................................................................................................88
ÜLŐ ÉS DÖNTÖTT POZÍCIÓ 1. KORCSOPORT 918 KG ...............................................................................................................90
A GYERMEK HELYES RÖGZÍTÉSE 1. KORCSOPORT 918 KG .................................................................................................92
ÁTALAKÍTÁS PALLAS SFIXRŐL SOLUTION SFIXRE 1. 918 KG KORCSOPORTRÓL 2/3. KORCSOPORTRA
1536 KG .........................................................................................................................................................................................................................94
BEKÖTÉS A JÁRMŰ BIZTONSÁGI ÖVÉVEL ..................................................................................................................................................96
MEGFELELŐEN RÖGZÍTETTE GYERMEKÉT? ............................................................................................................................................98
AZ ÜLÉSH UZAT ELTÁVOLÍTÁSA ........................................................................................................................................................................ 100
TISZTÍTÁS ......................................................................................................................................................................................................................10 2
TISZTÍTÁS & KARBANTARTÁS .............................................................................................................................................................................10 4
HOGYAN JÁRJON EL BALESET UTÁN ...........................................................................................................................................................10 4
A TERMÉK ÉLETTARTAMA ................................................................................................................................................................................... 104
ÁRTALMATLANÍTÁS .................................................................................................................................................................................................. 106
JÓTÁLLÁSI FELTÉTELEK ........................................................................................................................................................................................ 10 6
Page 76

CZ SK
! !
VAR OVÁNÍ! Pro zajištění optimální ochrany vašeho dítěte je třeba autosedačku
OBSAH
CYBEX PALLAS S-FIX používat dle těchto pokynů.
VAR OVANIE! Pre zaistenie optimálnej ochrany vášho dieťaťa je potrebné
autosedačku CYBEX PALLAS S-FIX používať podľa týchto pokynov.
UPOZORNĚNÍ! Mějte tyto instrukce vždy po ruce (např. v příslušné přihrádce na zadní
straně opěrky zad).
UPOZORNĚNÍ! Předpisy jednotlivých států (např. ohledně barevného označení na
dětských autosedačkách) mohou ovlivnit vzhled produktu. Nijak to ovšem neovlivňuje
správnou funkčnost produktu.
SPRÁVNÉ UMÍSTĚNÍ AUTOSEDAČKY VE VOZIDLE ...............................................................................................................................77
BEZPEČNOST VE VOZIDLE ..................................................................................................................................................................................79
UMÍSTĚNÍ AUTOSEDAČKY VE VOZIDLE ......................................................................................................................................................79
ZAJIŠTĚNÍ DĚTSKÉ AUTOSEDAČKY POMOCÍ SYSTÉMU ISOFIX CONNECT 81
VYJMUTÍ AUTOSEDAČKY CYBEX PALLAS SFIX .......................................................................................................................................83
NASTAVENÍ BOČNÍCH PROTEKTORŮ ............................................................................................................................................................83
NAKLÁPĚCÍ OPĚRKA HLAVY ..............................................................................................................................................................................85
PŘIZPŮSOBENÍ VELIKOSTI TĚLA .....................................................................................................................................................................87
NASTAVENÍ B EZPEČN OSTNÍHO PU LTU SK. 1 918 KG .................................................................................................................87
ZABEZPEČENÍ BEZPEČNOSTNÍM PÁSEM .................................................................................................................................................89
POLOHA VSEDĚ A VLEŽE SK. 1 918 KG ................................................................................................................................................91
SPRÁVNÉ ZABEZ PEČENÍ D ÍTĚTE SK. 1 918 KG................................................................................................................................93
PŘEM ĚNA Z PALLAS SFIX NA SOLUTION SFIX SKUPINA 1 NA SKUPINU 2/3 95
PŘIPOUTÁNÍ DĚTSKÉ AUTOSEDAČKY ...........................................................................................................................................................97
JE VAŠE DÍTĚ SPRÁVNĚ ZAJIŠTĚNÉ? ..............................................................................................................................................................99
SUN DÁNÍ POTAHU AUTOSE DAČKY...............................................................................................................................................................101
ČIŠTĚNÍ .......................................................................................................................................................................................................................... 10 3
PÉČE A ÚDRŽBA ...................................................................................................................................................................................................... 10 5
JAK POSTUPOVAT PO NEHODĚ ..................................................................................................................................................................... 105
ŽIVOTNOST PRODUKTU ...................................................................................................................................................................................... 105
LIKVIDACE .....................................................................................................................................................................................................................107
ZÁRUKA ..........................................................................................................................................................................................................................10 7
UPOZORNENIE! Majte tieto inštrukcie vždy po ruke (napr. v príslušnej priehradke
na zadnej strane opierky chrbta).
UPOZORNENIE! Predpisy jednotlivých štátov (napr. ohľadom farebného označenia na
detských autosedačkách) môžu ovplyvniť vzhľad produktu. Nijako to však neovplyvňuje
správnu funkčnosť produktu.
SPRÁVNE UMIESTNENIE AUTOSEDAČKY VO VOZIDLE ....................................................................................................................77
BEZPEČNOSŤ VO VOZIDLE .................................................................................................................................................................................79
UMIESTNENIE AUTOSEDAČKY VO VOZIDLE ............................................................................................................................................79
ZAISTENIE DETSKEJ AUTOSEDAČKY POMOCOU SYSTÉMU ISOFIX CONNECT 81
VYBRATIE AUTOSEDAČKY CYBEX PALLAS SFIX....................................................................................................................................83
NASTAVENIE BOČNÝCH PROTEKTOROV ....................................................................................................................................................83
NAKLÁPACIA OPIERKA HLAVY ..........................................................................................................................................................................85
PRISPÔSOBENIE VEĽKOSTI TELA ..................................................................................................................................................................87
NASTAVENIE BEZPEČNOSTNÉHO PULTU SK. 1 918 KG ............................................................................................................87
ZABEZPEČENIE BEZPEČNOSTNÝM PÁSOM ...........................................................................................................................................89
POLOHA V SEDE A POLEŽIAČKY SK. 1 918 KG ................................................................................................................................91
SPRÁVNE ZABEZ PEČENI E DIEŤAŤA SK. 1 918 KG ..........................................................................................................................93
PREMENA Z PALLAS SFIX NA SOLUTION SFIX SKUPINA 1 NA SKUPINU 2/3 95
PRIPÚTANIE DETSKÉ AUTOSEDAČKY ............................................................................................................................................................97
JE VAŠE DIEŤA SPRÁVNE ZAISTENÉ? .............................................................................................................................................................99
ZLOŽENIE POŤAHU AUTOSEDAČKY .............................................................................................................................................................101
ČISTENIE .......................................................................................................................................................................................................................10 3
STAROSTLIVOSŤ A ÚDRŽ BA ............................................................................................................................................................................. 10 5
AKO POSTUPOVAŤ PO NEHODE ................................................................................................................................................................... 10 5
ŽIVOTNOSŤ PRODUKTU ...................................................................................................................................................................................... 105
LIKVIDÁCIA ....................................................................................................................................................................................................................107
ZÁRUKA ..........................................................................................................................................................................................................................10 7
HU
CZSK
75
Page 77

AZ ÜLÉS HELYES BESZERELÉSE A JÁRMŰBE
Az autós ülés ISOFIX csatlakozó rendszerrel használható minden olyan
járműben, ami automata 3 pontos biztonsági övvel van felszerelve, a jármű
használati utasításában univerzális használatra.
!
FIGYELMEZTETÉS! Az ülés nem használható kétpontos vagy lapos övvel. Ha az
ülést kétpontos övvel használják, baleset esetén a gyermek súlyos vagy akár halálos
sérülést is szenvedhet.
Egy féluniverzális tanúsítványt adnak azoknak az utasbiztonsági rendszereknek,
amik az autóhoz csatlakoznak az ISOFIX csatlakozó karjain keresztül. Ezen okból
kifolyólag az ISOFIX csak bizonyos járműveken használható. Kérjük, a mellékelt
típuslistában nézze át a jóváhagyott járműveket. A legfrissebb verziót letöltheti a
www.cybex-online.com oldalról.
Kivételes esetekben a gyermekülés az első ülésen is használható. Ebben az esetben vegye
figyelembe az alábbiakat:
• A légzsákkal rendelkező autókban tolja hátra az autó ülését amennyire csak lehet. Ennek
ellenére győzödjön meg arról, hogy a biztonsági öv felső csuklóponja a gyermekülés
övadagolása mögött van.
• Mindig vegye figyelembe a jármű gyártójának ajánlásait.
!
FIGYELMEZTETÉS! Az átlós övnek (6) vissza kell húzódnia a háttámlára, és soha
sem szabad a jármű felső övének útjában futnia. Ha nem lehetséges az ülés ilyen
módú beállítása, pl. ha az autósülés előre nyomja, ez a gyermekülés nem alkalmas az
ön járművébe.
!
FIGYELMEZTETÉS! Az autóban lévő csomagokat vagy más tárgyakat, amelyek
baleset esetén sérülést okozhatnak, mindig rögzíteni kell. Ellenkező esetben ezek
„elrepülhetnek” és akár halálos sérülést okozhatnak.
76
!
FIGYELMEZTETÉS! A gyermekülés nem használható olyan üléseken, amelyek
oldalra néznek. A gyermekülés használata hátsó üléseken engedélyezett, pl.
kisbuszon is, feltéve, hogy az ülés alkalmas felnőtt szállítására. Vegye figyelembe,
hogy a jármű háttámláját tilos eltávolítani, ha ráillesztik a gyermekülést. Használaton
kívül is rögzítse a gyermekülést biztonsági övvel.
FIGYELEM! Soha ne hagyja gyermekét felügyelet nélkül a járműben.
Page 78

SPRÁVNÉ UMÍSTĚNÍ AUTOSEDAČKY VE VOZIDLE SPRÁVNE UMIESTNENIE AUTOSEDAČKY VO VOZIDLE
Dětskou autosedačku se zasunutým ISOFIX Connect systémem lze používat
na všech sedadlech se samonavíjecími 3bodovými bezpečnostními pásy,
schválenými v manuálu vozidla pro „univerzální“ použití.
! !
VAR OVÁNÍ! Autosedačka není vhodná pro použití s 2bodovým nebo pouze s
břišním pásem. Zabezpečení autosedačky 2bodovým pásem může při nehodě vést k
vážným nebo dokonce fatálním zraněním dítěte.
Detskú autosedačku so zasunutým ISOFIX Connect systémom je možné
používať na všetkých sedadlách so samonavíjacími 3-bodovými bezpečnostnými
pásmi, schválenými v manuáli vozidla pre „univerzálne“ použitie.
VAR OVANIE! Autosedačka nie je vhodná pre použitie s 2-bodovým alebo len s
brušným pásom. Zabezpečenie autosedačky 2-bodovým pásom môže pri nehode
viesť k vážnym alebo dokonca fatálnym zraneniam dieťaťa.
„Semi-univerzální“ certifikace je udělována zádržným systémům, které jsou s
vozidlem spojeny pomocí konektorů ISOFIX Connect. Proto lze ISOFIX Connect
používat pouze v některých vozidlech. Prosíme nahlédněte do přiloženého seznamu
vhodných vozidel. Nejaktuálnější verzi seznamu naleznete na
www.cybex-online.com.
Ve výjimečných případech lze dětskou autosedačku používat i na předním sedadle
spolujezdce. V takovém případě prosíme berte na vědomí následující:
• Ve vozidlech s airbagy byste měli sedadlo spolujezdce posunout co nejvíce dozadu.
Horní vodící bod bezpečnostního pásu však musí zůstat za vrchním vedením pásu
dětské autosedačky.
• Vždy dodržujte doporučení výrobce vozidla.
! !
VAR OVÁNÍ! Diagonální pás (6) musí vždy vést od vrchního vedení pásu autosedačky
v náklonu směrem dozadu k hornímu vodícímu bodu bezpečnostního pásu. Pokud
toho nejste schopni dosáhnout (např. posunutím sedadla dopředu nebo volbou
jiného místa ve vozidle), není tato autosedačka vhodná pro vaše vozidlo.
! !
VAR OVÁNÍ! Zavazadla a ostatní předměty ve vozidle, které mohou při nehodě
způsobit zranění, musí být pevně zajištěny. V opačném případě mohou způsobit
smrtelná zranění.
!
VAR OVÁNÍ! Autosedačka se nesmí používat na sedadlech otočených bokem ke
směru jízdy. Používání dětské autosedačky na sedadlech v pozici proti směru jízdy
(např. v dodávce nebo v minimbusu) je možné pouze, pokud je sedadlo schválené
pro přepravu dospělých osob. Při používání autosedačky na sedadle v pozici proti
směru jízdy nesmí být ze sedadla sundaná opěrka hlavy! Autosedačka musí být vždy
zajištěná bezpečnostním pásem.
UPOZORNĚNÍ! Nikdy nenechávejte vaše dítě ve vozidle bez dozoru.
„Semi-univerzálna“ certifikácia je udeľovaná zadržiavacím systémom, ktoré sú s
vozidlom spojené pomocou konektorov ISOFIX Connect. Preto je možné ISOFIX
Connect používať iba v niektorých vozidlách. Prosíme nahliadnite do priloženého
zoznamu vhodných vozidiel. Najaktuálnejšiu verziu zoznamu nájdete na
www.cybex-online.com.
Vo výnimočných prípadoch možno detskú autosedačku používať aj na prednom sedadle
spolujazdca. V takom prípade prosíme berte na vedomie nasledujúce:
• Vo vozidlách s airbagmi by ste mali sedadlo spolujazdca posunúť čo najviac dozadu.
Horný vodiaci bod bezpečnostného pásu však musí zostať za vrchným vedením pásu
detskej autosedačky.
• Vždy dodržiavajte odporúčania výrobca vozidla.
VAR OVANIE! Diagonálny pás (6) musí vždy viesť od vrchného vedenia pásu
autosedačky v náklone smerom dozadu k hornému vodiacemu bodu bezpečnostného
pásu. Ak toho nie ste schopní dosiahnuť (napr. posunutím sedadla dopredu alebo
voľbou iného miesta vo vozidle), nie je táto autosedačka vhodná pre vaše vozidlo.
VAR OVANIE! Batožiny a ostatné predmety vo vozidle, ktoré môžu pri nehode
spôsobiť zranenie, musí byť pevne zaistené. V opačnom prípade môžu spôsobiť
smrteľné zranenia.
!
VAR OVANIE! Autosedačka sa nesmie používať na sedadlách otočených bokom
k smeru jazdy. Používanie detskej autosedačky na sedadlách v pozícii proti smeru
jazdy (napr. v dodávke alebo v minimbusu) je možné len, ak je sedadlo schválené pre
prepravu dospelých osôb. Pri používaní autosedačky na sedadle v pozícii proti smere
jazdy nesmie byť zo sedadla odobratá opierka hlavy! Autosedačka musí byť vždy
zaistená bezpečnostným pásom.
UPOZORNENIE! Nikdy nenechávajte vaše dieťa vo vozidle bez dozoru.
HU
CZSK
77
Page 79

BIZTONSÁG AZ AUTÓBAN
!
FIGYELMEZTETÉS! A gyermekülést mindig megfelelően be kell csatolni a jármű
biztonsági övével, még akkor is, ha épp nincs használatban. Vészfékezés vagy baleset
esetén a rögzítetlen, be nem kötött gyermekülés balesetveszélyes lehet a többi utas
és az Ön számára is.
Hogy garantálni tudja a lehető legbiztonságosabb utazást minden utas számára, győzödjön
meg a következőkről:
a járműbe szerelhető, összecsukható háttámlákat függőleges helyzetben rögzítse.
amikor az első utasülésre szereli be a gyermekülést, a jármű ülését a lehető leghátsó
pozícióba állítsa.
minden olyan tárgyat, ami egy esetleges baleset során sérülést okozhat, rögzítsen
biztonságosan.
a jármű minden utasa legyen bekötve.
AZ ÜLÉS BEHELYEZÉSE A GÉPJÁRMŰBE
Helyezze az ülést alkalmas helyre a gépjárműben.
• Mindig győzödjön meg arról, hogy a CYBEX PALLAS S-FIX háttámlája (2) teljesen
az utósülés háttámlájának felületére van helyezve. A gyermekülésnek sosem szabad
fekvőhelyzetben lennie. Szükség esetén tud állítani a távolságon az ISOFIX beállító
karjának (9) segítségével.
• Ha a jármű fejrésze útban van, húzza ki és távolítsa el teljesen (ennek elmulasztásakor
kérjük olvassa el az „gyermekülés helyes elhelyezése a járműben” fejezetet). A háttámla
(2) tökéletesen illeszkedik bármelyik jármű üléséhez.
!
1
2
FIGYELMEZTETÉS! A CYBEX gyermekülés háttámlájának teljes felülete
érintkezzen a jármű ülésének háttámlájával. Gyermeke maximális védelme érdekében
a legjobb, ha a gyermekülés normál függőleges pozícióban van!
FIGYELEM! Bizonyos érzékeny anyagokon (pl. bőr) a gyermekülés használata nyomokat
és/vagy elszíneződéseket hagyhat. Ennek megelőzése érdekében használjon takarót vagy
törülközőt. Kérjük fogadja meg az itt megfogalmazott tisztítási tanácsokat. Ezeket már az
ülés legelső használatakor be kell tartani!
78
!
FIGYELMEZTETÉS! Nem alkalmazzon más rögzítési pontot azon kívül, amit az
útmutatóban leírtunk és a gyermekülésen jelöltünk.
FIGYELEM! Kérjük használja az ISOFIX útmutatót annak biztosítása érdekében, hogy a
játmű ülését ne roncsolják az ISOFIX rögzítő karok.
Page 80

BEZPEČNOST VE VOZIDLE BEZPEČNOSŤ VO VOZIDLE
! !
VAR OVÁNÍ! Dětská autosedačka musí být vždy řádně zajištěná bezpečnostním
pásem a to i v případech, kdy se nepoužívá. V případě prudkého zabrždění nebo při
nehodě může nezajištěná autosedačka zranit vás nebo ostatní cestující.
VAR OVANIE! Detská autosedačka musí byť vždy riadne zaistená bezpečnostným
pásom a to aj v prípadoch, keď sa nepoužíva. V prípade prudkého zabrzdenia alebo
pri nehode môže nezaistená autosedačka zraniť vás alebo ostatných cestujúcich.
Pro zajištění nejvyšší možné ochrany všem pasažérům se ujistěte, že…
opěrky zad ve vozidle jsou uzamčené ve vzpřímené poloze.
při instalaci autosedačky na přední sedadlo spolujezdce je sedadlo v nejzazší možné pozici.
jste řádně zajistili všechny předměty, které by při nehodě mohly způsobit zranění.
jsou všichni pasažéři ve vozidle připoutaní.
UMÍSTĚNÍ AUTOSEDAČKY VE VOZIDLE
Umístěte dětskou autosedačku na vhodné sedadlo ve vozidle.
• Vždy se ujistěte, že se celá plocha opěrky zad (2) autosedačky CYBEX PALLAS S-FIX
dotýká opěrky zad sedadla ve vozidle. Dětská autosedačka nesmí být v žádném případě
v pozici vleže. K upravení vzdálenosti můžete případně použít ISOFIX nastavovací madlo
(9).
• Pokud vám ve vozidle překáží opěrka hlavy sedadla, vytáhněte ji do nejvyšší pozice
nebo ji zcela sundejte (výjimky viz kapitola „SPRÁVNÉ UMÍSTĚNÍ AUTOSEDAČKY
VE VOZIDLE“). Opěrka zad (2) se dokonale přizpůsobí prakticky jakémukoli náklonu
sedadla ve vozidle.
!
VAR OVÁNÍ! Celá plocha opěrky zad autosedačky CYBEX se musí opírat o opěrku
zad ve vozidle. Pro zajištění maximální ochrany vašeho dítěte musí být sedadlo v
běžné vzpřímené pozici!
UPOZORNĚNÍ! Na sedadlech, vyrobených z citlivých materiálů (např. semiš, kůže atd.) se
při používání dětské autosedačky mohou projevit stopy opotřebování a/nebo ztráty barvy.
K předejití tohoto problému můžete pod autosedačku vložit např. deku nebo ručník. Ve
spojitosti s tím si prosíme přečtěte také naše doporučení ohledně čištění; tyto pokyny je
třeba si přečíst ještě před prvním použitím dětské autosedačky.
!
VAR OVÁNÍ! Pro upevnění autosedačky nepoužívejte jiné kontaktní body než ty, které
jsou popsány v návodu a označeny na autosedačce.
UPOZORNĚNÍ! Pro předejití poškození sedadel ve vozidle ISOFIX konektory, prosíme,
používejte přiložené naváděcí plasty.
Pre zaistenie najvyššej možnej ochrany všetkým pasažierom sa uistite, že …
opierky chrbta vo vozidle sú uzamknuté vo vzpriamenej polohe.
pri inštalácii autosedačky na predné sedadlo spolujazdca je sedadlo v najzadnejšej
možnej pozícii.
ste riadne zaistili všetky predmety, ktoré by pri nehode mohli spôsobiť zranenie.
sú všetci pasažieri vo vozidle pripútaní.
UMIESTNENIE AUTOSEDAČKY VO VOZIDLE
Umiestnite detskú autosedačku na vhodné sedadlo vo vozidle.
• Vždy sa uistite, že sa celá plocha opierky chrbta (2) autosedačky CYBEX PALLAS
S-FIX dotýka opierky chrbta sedadla vo vozidle. Detská autosedačka nesmie byť v
žiadnom prípade v pozícii ležmo. K upravenie vzdialenosti môžete prípadne použiť
ISOFIX nastavovacie madlo (9).
• Ak vám vo vozidle prekáža opierka hlavy sedadla, vytiahnite ju do najvyššej pozície alebo
ju úplne zložte (výnimky viď kapitola „SPRÁVNE UMIESTNENIE AUTOSEDAČKY VO
VOZIDLE“). Opierka chrbta (2) sa dokonale prispôsobí prakticky akémukoľvek náklonu
sedadla vo vozidle.
!
VAR OVANIE! Celá plocha opierky chrbta autosedačky CYBEX sa musí opierať o
opierku chrbta vo vozidle. Pre zaistenie maximálnej ochrany vášmu dieťaťu musí byť
sedadlo v bežnej vzpriamenej pozícii!
UPOZORNENIE! Na sedadlách, vyrobených z citlivých materiálov (napr. semiš, kože
atď.) sa pri používaní detskej autosedačky môžu prejaviť stopy opotrebovania a/alebo straty
farby. Aby sa predišlo tohto problému môžete pod autosedačku vložiť napr. deku alebo
uterák. V spojitosti s tým si prosíme prečítajte tiež naše odporúčania ohľadom čistenia; tieto
pokyny je potrebné si prečítať ešte pred prvým použitím detskej autosedačky.
!
VAR OVANIE! Pre upevnenie autosedačky nepoužívajte iné kontaktné body ako tie,
ktoré sú popísané v návode a označené na autosedačke.
UPOZORNENIE! Pre odvrátenie poškodenie sedadiel vo vozidle ISOFIX konektormi,
prosíme, používajte priložené navádzacie plasty.
HU
CZSK
79
Page 81

A GYERMEKÜLÉS RÖGZÍTÉSE AZ ISOFIX CSATLAKOZÓ RENDSZERREL
3
4
6
4
9
8
7
CLICK!
8
9
8
9
2
Az ISOFIX csatlakozó rendszer segítségével rögzítheti a CYBEX PALLAS S-FIX
gyermekülést a járműbe, ezáltal növelve gyermeke biztonságát. A gyermeket
továbbra is a jármű hárompontos biztonsági övével kell bekötnie.
• Helyezze be a mellékelt ISOFIX vezetőket (7) a hosszabbik hevederrel felfelé a két
ISOFIX rögzítési pont között (8). Néhány járműben jobb, ha az ISOFIX vezetőket (7)
az ellenkező irányban rögzíti.
FIGYELEM! Az ISOFIX rögzítési pontok (8) két fém kapocsból állnak, minden egyes
üléshez pozícionálva a hátrész és az ülőrész felszíne között. Kétség esetén tanulmányozza
az autója használati utasítását.
• Húzza meg az állító fogantyút (2), ami a CYBEX PALLAS S-fix ülőrésze (5) alatt
található a vázon (6).
• Húzza meg a két ISOFIX csatlakozó záró kart (5) amennyire csak engedi.
• Most fordítsa be az ISOFIX csatlakozó záró kart (5) 180°-ban úgy, hogy az ISOFIX
vezetők (7) felé nézzen.
FIGYELEM! Mielőtt bekattintja az ISOFIX csatlakozó záró karokat (5) az ISOFIX rögzítési
pontokba (8), ellenőrizze a kioldó gombokat (10). Ha a zöld biztonsági kiejlzől (11) láthatók,
akkor először engedje el az ISOFIX csatlakozó záró kart a csatlakozás előtt a kioldó gomb
(10) megnyomásával és visszaengedésével. Ha szükséges, ismételje meg ezt a másik
csatlakozóval is.
• Nyomja a két záró kart (8) az ISOFIX vezetőkbe (7) addig, amíg az ISOFIX
rögzítőkarokba egy kattanás halltával nem rögzülnek be.
• Ügyeljen arra, hogy az ülést biztonságosan próbálja eltávolítani az ISOFIX vezetőkből (7).
• A zöld biztonsági jelzőknek (11) tisztán láthatónak kell lennie a két szürke kioldó
gombon (10).
• Az állító karral (2), ami a PALLAS S-fix vázán (6) található, állíthatja be a gyermekülés
pozícióját.
FIGYELEM! Vegye figyelembe az alábbi fejezetben található információkat is “Az ülés
beszerelése a járműbe”.
80
Page 82

ZAJIŠTĚNÍ DĚTSKÉ AUTOSEDAČKY POMOCÍ SYSTÉMU ISOFIX CONNECT ZAISTENIE DETSKEJ AUTOSEDAČKY POMOCOU SYSTÉMU ISOFIX CONNECT
Pomocí systému ISOFIX Connect můžete autosedačku CYBEX PALLAS S-FIX
připevnit přímo k vozidlu a zvýšit tak bezpečí dítěte. Stále je ovšem nezbytné zajistit
dítě 3bodovým bezpečnostním pásem ve vozidle.
• Vložte přiložené ISOFIX naváděcí plasty (7) do ISOFIX kotevních bodů (8) s delší částí
směrem nahoru. V některých vozidlech je lepší používat ISOFIX naváděcí plasty (7)
otočené.
UPOZORNĚNÍ! ISOFIX kotevní body (8) jsou dvě kovová oka u každého sedadla,
nacházející se v prostoru mezi opěrkou zad a sedákem sedadla ve vozidle. V případě
pochybností, prosíme nahlédněte do uživatelského manuálu vašeho vozidla.
• Použijte nastavovací páčku (2), umístěnou na základně (6) pod sedákem (5)
autosedačky CYBEX PALLAS S-fix.
• Co nejvíce vytáhněte oba ISOFIX Connect konektory (5).
• Nyní otočte ISOFIX konektory (5) o 180 ° tak, aby směřovaly k ISOFIX naváděcím
plastům (7).
UPOZORNĚNÍ! Před nacvaknutím ISOFIX konektorů (5) do ISOFIX kotevních bodů
(8) zkontrolujte uvolňovací tlačítka (10). Pokud jsou vidět zelené bezpečnostní ukazatele
(11), je třeba ISOFIX konektory nejdříve uvolnit. Provedete tak stisknutím a zatažením za
uvolňovací tlačítko (10). V případě nutnosti opakujte postup i u druhého konektoru.
• Zasuňte konektory (8) do ISOFIX naváděcích plastů (7) tak, aby se kotevní body
uzamkly do konektorů se slyšitelným cvaknutím.
• Pokusem o vytažení autosedačky z naváděcích plastů (7) zkontrolujte řádné připojení
autosedačky.
• Na obou uvolňovacích tlačítkách (10) musí být nyní jasně viditelný zelený bezpečnostní
ukazatel (11).
• Nyní můžete použít nastavovací páčku (2) na základně (6) autosedačky CYBEX PALLAS
S-fix.
UPOZORNĚNÍ! Dbejte informací v sekci „Umístění autosedačky ve vozidle“.
Pomocou systému ISOFIX Connect môžete autosedačku CYBEX PALLAS S-FIX
pripevniť priamo k vozidlu a zvýšiť tak bezpečie dieťaťa. Stále je však potrebné
zabezpečiť dieťa 3-bodovým bezpečnostným pásom vo vozidle.
• Vložte priložené ISOFIX navádzacie plasty (7) do ISOFIX kotviacich bodov (8) s dlhšou
časťou smerom nahor. V niektorých vozidlách je lepšie používať ISOFIX navádzacie
plasty (7) otočené.
UPOZORNENIE! ISOFIX kotevné body (8) sú dve kovové oká u každého sedadla,
nachádzajúce sa v priestore medzi opierkou chrbta a sedákom sedadla vo vozidle. V
prípade pochybností, prosíme nahliadnite do užívateľského manuálu vášho vozidla.
• Použite nastavovací páčku (2), umiestnenou na základni (6) pod sedákom (5)
autosedačky CYBEX PALLAS S-fix.
• Čo najviac vytiahnite oba ISOFIX Connect konektory (5).
• Teraz otočte ISOFIX konektory (5) o 180 ° tak, aby smerovali k ISOFIX navádzacím
plastom (7).
UPOZORNENIE! Pred nacvaknutím ISOFIX konektorov (5) do ISOFIX kotviacich bodov
(8) skontrolujte uvoľňovacie tlačidlá (10). Ak sú vidieť zelené bezpečnostné indikátory
(11), je potrebné ISOFIX konektory najskôr uvoľniť. Urobíte tak stlačením a zatiahnutím za
uvoľňovacie tlačidlo (10). V prípade nutnosti opakujte postup aj u druhého konektora.
• Zasuňte konektory (8) do ISOFIX navádzacích plastov (7) tak, aby sa kotevné body
uzamkli do konektorov s počuteľným cvaknutím.
• Pokusom o vytiahnutie autosedačky z navádzacích plastov (7) skontrolujte riadne
pripojenie autosedačky.
• Na oboch uvoľňovacích tlačidlách (10) musí byť teraz jasne viditeľný zelený
bezpečnostný ukazovateľ (11).
• Teraz môžete použiť nastavovaciu páčku (2) na základni (6) autosedačky CYBEX
PALLAS S-fix.
UPOZORNENIE! Dbajte informácií v sekcii „Umiestnenie autosedačky vo vozidle“.
HU
CZSK
81
Page 83

L.S.P.
A CYBEX PALLAS SFIX ELTÁVOLÍTÁSA
3
8
CLICK!
10
PRESS!
7
Végezze el a beszerelési lépéseket fordított sorrendben.
• Kapcsolja ki az ISOFIX csatlakozó záró karokat (5) mindkét oldalon a szürke
kijelző gomb (10) megnyomásával és egyidejűleg húzza őket vissza.
• Húzza ki a gyermekülést az ISOFIX vezetőkből (7).
• Forgassa 180°-kal az ISOFIX csatlakozó záró karokat (5).
• Húzza meg az állító kart (2), ami a CYBEX PALLAS S-fix vázán (6) található és
nyomja be a csatlakozókat ameddig csak lehet.
FIGYELEM! Az ISOFIX csatlakozó záró karok (5) összecsukásával nem csak a jűrmű ülését
védi, hanem az ISOFIX csatlakozó záró karjait is a szennyeződésektől és a sérüléstől.
AZ OLDALVÉDŐK CSATLAKOZTATÁSA
A gyermekülés “Lineáris oldalütközés elleni védelmi“ (L.S.P.) rendszerrel van felszerelve.
Ez a rendszer növeli a gyermek biztonságát oldalirányú ütközés esetén. A lehető legjobb
védelem érdekében az L.S.P.-t a legközelebbi ajtó irányába kell aktiválni. Az L.S.P.
aktiválásához nyomja meg a kijelölt részt (24) rajta.
FIGYELEM! Győzödjön meg arról, hogy az L.S.P. biztosítása megtörtént egy hallható
kattanás kíséretében. Ha az L.S.P. hozzáér az ajtóhoz, akkor teljesen be kell hajtani.
Ebben a pozícióban kell használni. Az L.S.P. ülésbe való visszanyomásához húzza kis
óvatosan, majd hajtsa be, amíg nem záródik egy hallható kattanás kíséretében.
FIGYELEM! Ha a gyermekülést a jármű középső ülésén használja, tilos az L.S.P.
rendszer használata!
!
FIGYELMEZTETÉS! Az L.S.P. rendszer használatakor az ülés szállítása vagy a
rajta való mászkálás tilos!
82
Page 84

VYJMUTÍ AUTOSEDAČKY CYBEX PALLAS SFIX
Proveďte kroky instalace v opačném pořadí.
• Stisknutím a současným zatažením za obě šedá uvolňovací tlačítka (10)
uvolněte ISOFIX konektory (5).
• Vytáhněte autosedačku z ISOFIX naváděcích plastů (7).
• Otočte ISOFIX konektory (5) o 180 °.
• S pomocí nastavovací páčky (2) na základně (6) autosedačky CYBEX PALLAS
S-fix zatlačte konektory co nejvíce dovnitř autosedačky.
UPOZORNĚNÍ! Zasunutím ISOFIX konektorů (5) nechráníte před znečištěním a
poškozením pouze sedadla ve vozidle, ale také samotné konektory.
NASTAVENÍ BOČNÍCH PROTEKTORŮ NASTAVENIE BOČNÝCH PROTEKTOROV
Dětská autosedačka je vybavena systémem „lineární ochrany při bočním nárazu“ (L.S.P.).
Tento systém zvyšuje bezpečí vašeho dítěte při nárazu z boku. Pro nejvyšší možnou
ochranu používejte L.S.P. protektor na straně autosedačky, která je blíže ke dveřím vozidla.
Pro uvolnění L.S.P. stiskněte označenou oblast protektoru (24).
UPOZORNĚNÍ! Ujistěte se, že se L.S.P. zajistilo se slyšitelným cvaknutím. Pokud se L.S.P.
protektor dotýká dveří, měl by být řádně zasunutý.
L.S.P. je možné používat i v původní pozici. Pro navrácení L.S.P. protektoru zpět do původní
pozice jej nejdříve mírně vytáhněte a potom jej složte tak, aby se zajistil se slyšitelným cvaknutím.
UPOZORNĚNÍ! Při používání dětské autosedačky na prostředním sedadle ve vozidle je
používání vyklopeného L.S.P. zakázáno.
!
VAR OVÁNÍ! L.S.P. protektory se nesmí používat pro přenášení autosedačky nebo
jako pomůcka dítěte pro nástup do autosedačky.
VYBRATIE AUTOSEDAČKY CYBEX PALLAS SFIX
Vykonajte kroky inštalácie v opačnom poradí.
• Stlačením a súčasným zatiahnutím za obe šedá uvoľňovacie tlačidlá (10)
uvoľnite ISOFIX konektory (5).
• Vytiahnite autosedačku z ISOFIX navádzacích plastov (7).
• Otočte ISOFIX konektory (5) o 180 °.
• S pomocou nastavovacej páčky (2) na základni (6) autosedačky CYBEX
PALLAS S-fix zatlačte konektory čo najviac dovnútra autosedačky.
UPOZORNENIE! Zasunutím ISOFIX konektorov (5) nechráníte pred znečistením a
poškodením iba sedadlá vo vozidle, ale aj samotné konektory.
Detská autosedačka je vybavená systémom „lineárne ochrany pri bočnom náraze“ (L.S.P.).
Tento systém zvyšuje bezpečie vášho dieťaťa pri náraze z boku. Pre najvyššiu možnú
ochranu používajte L.S.P. protektor na strane autosedačky, ktorá je bližšie k dverám vozidla.
Pre uvoľnenie L.S.P. stlačte označenú oblasť protektora (24).
UPOZORNENIE! Uistite sa, že sa L.S.P. zabezpečilo s počuteľným cvaknutím. Ak sa
L.S.P. protektor dotýka dverí, mal by byť riadne zasunutý.
L.S.P. je možné používať aj v pôvodnej pozícii. Pre navrátenie L.S.P. protektora späť do
pôvodnej pozície ho najskôr mierne vytiahnite a potom ho zložte tak, aby sa zabezpečil s
počuteľným cvaknutím.
UPOZORNENIE! Pri používaní detskej autosedačky na prostrednom sedadle vo vozidle
je používanie vyklopeného L.S.P. zakázané.
!
VAR OVANIE! L.S.P. protektory sa nesmie používať na prenášanie autosedačky
alebo ako pomôcka dieťaťa pre nástup do autosedačky.
HU
CZSK
83
Page 85

11
ELHAJLÓ FEJTÁMLA
Az elhajló fejtámla segíti megakadályozni, hogy a gyermek feje alvás közben veszélyesen
előreereszkedjen. Egy esetleges ütközés esetén, a fejtámla követi a gyermek fejének
előrebukását, beakad a helyére és megakadályozza a gyermek fejének további mozgását.
12
FIGYELEM! Biztosodjon meg róla, hogy a gyermek feje érintkezik a fejtámlával (11),
mivel kizárólag ebben az esetben nyújt a fejtámla optimális védelmet egy esetleges
oldalütközés esetén.
A fejtámla elhajlási szöge három különböző pozícióba állítható. A kar mozgatása nélkül
előre lehet hajtani a második vagy a harmadik pozícióba, amíg a helyére kattan. Az eredeti
pozíciójába visszahelyezés a beállító kar segítségével lehetséges, a fejtámla húzása közben.
!
FIGYELMEZTETÉS! Soha se akadályozza meg ezt a mechanizmust (12)! Baleset
esetén a döntésállító mechanizmust óvatosan kell mozgatni, különben a gyermek
megsérülhet!
84
Page 86

NAKLÁPĚCÍ OPĚRKA HLAVY NAKLÁPACIA OPIERKA HLAVY
Naklápěcí opěrka hlavy napomáhá předcházet nebezpečnému přepadávání hlavy dítěte
dopředu během spánku. V případě nehody se opěrka hlavy pohybuje dopředu společně s
hlavou dítěte, následně se uzamkne a absorbuje energii zpětného pohybu.
UPOZORNĚNÍ! Ujistěte se, že je hlava dítěte vždy v kontaktu s naklápěcí opěrkou hlavy
(11). Pouze tehdy může opěrka hlavy při nehodě poskytnout optimální ochranu.
Opěrku hlavy lze nastavit do 3 pozic. Dopředu do druhé a třetí pozice lze opěrku hlavy
nastavit bez použití páčky. Pro navrácení opěrky do původní pozice je třeba zatáhnout za
páčku a zatlačit opěrku směrem dozadu.
! !
VAR OVÁNÍ! Nikdy neblokujte zamykací mechanismus (12)! V případě nehody musí
mechanismus polohování řádně fungovat, jinak může vaše dítě utrpět zranění!
Naklápacia opierka hlavy napomáha predchádzať nebezpečnému prepadávanie hlavy
dieťaťa dopredu počas spánku. V prípade nehody sa opierka hlavy pohybuje dopredu
spoločne s hlavou dieťaťa, následne sa uzamkne a absorbuje energiu spätného pohybu.
UPOZORNENIE! Uistite sa, že je hlava dieťaťa vždy v kontakte s naklápacou opierkou
hlavy (11). Iba vtedy môže opierka hlavy pri nehode poskytnúť optimálnu ochranu.
Opierku hlavy možno nastaviť do 3 pozícií. Dopredu do druhej a tretej pozície možno
opierku hlavy nastaviť bez použitie páčky. Pre navrátenie opierky do pôvodnej pozície treba
zatiahnuť za páčku a zatlačiť opierku smerom dozadu.
VAR OVANIE! Nikdy neblokujte zamykací mechanizmus (12)! V prípade nehody musí
mechanizmus polohovanie riadne fungovať, inak môže vaše dieťa utrpieť zranenia!
HU
CZSK
85
Page 87

TESTMÉRETHEZ IGAZÍTÁS
86
11
13
14
15
5
6
MAX
Testmérethez igazítás
• A fejtámlát úgy kell beállítani, hogy max. 2 cm (kb. kétujjnyi hely) vagy ennél kevesebb
maradjon szabadon a gyermek válla és a fejtámla között.
• Nyomja meg a fejtámla alján lévő állítógombot (13) és állítsa a kívánt pozícióba.
FIGYELEM! Kizárólag a megfelelően beállított fejrész (11) adja meg gyermeke számára a
maximális védelmet és kényelmet, miközben biztosítja a mellső öv könnyed illeszkedését. A
CYBEX PALLAS S-FIX magassága 12 pózícióban állítható.
A VÉDŐPAJZS BEÁLLÍTÁSA 1. KORCSOPORT 918 KG
A központi állító gomb (14) megnyomásával a védőpajzs gyermekéhez állítható. Tartsa
lenyomva a központi állító gombot (14) miközben a védőpajzsot a gyermekhez igazítja.
A védőpajzs (15) oldalsó részei pontosan illeszkedjenek a karfa és az ülőrész közé (5), a
pajzs (15) ezekkel támaszkodik az ülésre.
A védőpajzsot (15) megfelelően be kell állítani, úgy, hogy a gyermek előtt legyen, de anélkül
hogy a gyermeket nyomná, szorítaná.
!
FIGYELEM! A védőpajzsot (15) a vázzal (6) együtt szabad csak használni, és
maximum 18 kg-ig!
Page 88

PŘIZPŮSOBENÍ VELIKOSTI TĚLA PRISPÔSOBENIE VEĽKOSTI TELA
Přizpůsobení dle velikosti těla
• Opěrka hlavy musí být nastavená tak, aby mezi ramenem dítěte a opěrkou hlavy zůstal
prostor max 2 cm (cca šířka dvou prstů) nebo méně.
• Stiskněte nastavovací tlačítko (13) na spodní straně opěrky hlavy a nastavte opěrku do
požadované pozice.
UPOZORNĚNÍ! Pouze správně nastavená opěrka hlavy (11) může vašemu dítěti zaručit
maximální ochranu a pohodlí a zároveň zajistit řádné vedení diagonálního pásu. Výšku
autosedačky CYBEX PALLAS S-FIX lze nastavit do jedné z dvanácti pozic.
NASTAVENÍ BEZPEČNOSTNÍHO PULTU SK. 1 918 KG NASTAVENIE BEZPEČNOSTNÉHO PULTU SK. 1 918 KG
Stisknutím středového nastavovacího tlačítka (14), můžete přizpůsobit bezpečnostní pult
vašemu dítěti. Při nastavování bezpečnostního pultu podle vašeho dítěte držte středové
nastavovací tlačítko (14) stisknuté.
Boční křídla bezpečnostního pultu (15) přesně pasují mezi opěrky rukou a sedák (5) a
slouží jako podpěra bezpečnostního pultu (15) na autosedačce.
Bezpečnostní pult (15) nastavte tak, aby těsně přiléhal k vašemu dítěti, ale netlačil příliš na
jeho tělo.
VAR OVÁNÍ! Bezpečnostní pult (15) lze používat pouze společně se základnou (6),
do max. 18 kg váhy dítěte!
Prispôsobenie podľa veľkosti tela
• Opierka hlavy musí byť nastavená tak, aby medzi ramenom dieťaťa a opierkou hlavy
zostal priestor max 2 cm (cca šírka dvoch prstov) alebo menej.
• Stlačte nastavovacie tlačidlo (13) na spodnej strane opierky hlavy a nastavte opierku do
požadovanej pozície.
UPOZORNENIE! Iba správne nastavená opierka hlavy (11) môže vášmu dieťaťu
zaručiť maximálnu ochranu a pohodlie a zároveň zabezpečiť riadne vedenie
diagonálneho pásu. Výšku autosedačky CYBEX PALLAS S-FIX možno nastaviť do
jednej z dvanástich pozícií.
Stlačením stredového nastavovacieho tlačidla (14), môžete prispôsobiť bezpečnostný pult
vášmu dieťaťu. Pri nastavovaní bezpečnostného pultu podľa vášho dieťaťa držte stredové
nastavovacie tlačidlo (14) stlačené.
Bočné krídla bezpečnostného pultu (15) presne pasujú medzi opierky rúk a sedák (5) a
slúži ako podpera bezpečnostného pultu (15) na autosedačke.
Bezpečnostný pult (15) nastavte tak, aby tesne priliehal k vášmu dieťaťu, ale netlačil príliš
na jeho telo.
!!
VAR OVANIE! Bezpečnostný pult (15) možno používať len spoločne so základňou
(6), do max. 18 kg váhy dieťaťa!
HU
CZSK
87
Page 89

15
16
17
20
BEKÖTÉS VÉDŐPAJZZSAL
• Most helyezze fel az előzőleg beállított védőpajzsot (15) (további információ “A
15
19
18
CLICK!
17
20
VÉDŐPAJZS RÖGZÍTÉSE” fejezetben).
• Húzza ki a jármű biztonsági övét teljes hosszában. Fogja meg az öv alsó részét (16) és
vezesse végig a pirossal jelzett útvonalon (17) a védőpajzson át (15).
• Csatolja be a biztonsági övet (19). Hallható kattanással kell rögzülnie.
• Szorítsa meg az öv alsó részét (16) úgy, hogy meghúzza a felső övszárat (20).
• Most vezesse a felső övszárat (20) az alsó övszárral (16) párhuzamosan vissza az
övvezetőn (17) át.
• Húzza a felső övszárat (20) szorosra és győződjön meg róla, hogy az öv mindkét része
végigfut a védőpajzs (15) övvezetőjében (17).
• Most vezesse tovább a felső övszárat (20) szorosan a védőpajzs (15) övvezetőjébe
(17) amíg szorosan illeszkedik. Azután vezesse át a felső övszárat a fejtámla (20) és a
vállvédő között.
!
FIGYELEM! Mindig ellenőrizze, hogy elég szorosan-e az öv és hogy jól állította-e be
az ülést a gyermek testéhez. Az öv soha ne legyen megcsavarodva!
16
!
11
FIGYELEM! A hárompontos övet csak az erre a célra kialakított övvezetőkön
keresztül szabad vezetni. A bekötési útvonalat pontosan leírjuk a használati
útmutatóban és pirossan jelöljük az ülésen.
88
17
20
Page 90

ZABEZPEČENÍ BEZPEČNOSTNÍM PÁSEM ZABEZPEČENIE BEZPEČNOSTNÝM PÁSOM
• Nyní vložte předem nastavený bezpečnostní pult (15) (viz sekce „NASTAVENÍ
BEZPEČNOSTNÍHO PULTU“).
• Co nejvíce vytáhněte bezpečnostní pás vozidla. Vezměte břišní pás (16) a vložte jej do
příslušného vedení pásu (17) na bezpečnostním pultu (15).
• Zasuňte bezpečnostní pás do spony pásu (19). Pás se musí zajistit se slyšitelným
„CVAKNUTÍM“.
• Zatažením za diagonální pás (20) utáhněte břišní pás (16).
• Nyní zasuňte diagonální pás (20) do vedení pásu (17) souběžně s břišním pásem (16).
• Pevně diagonální pás (20) utáhněte a ujistěte se, že oba pásy zakrývají ve vedení pásu
(17) celou šířku bezpečnostního pultu (15).
• Nyní zasuňte diagonální pás (20) pevně do vedení pásu (17) na bezpečnostním pultu
(15) tak, aby pás ve vedení držel. Poté vložte diagonální pás mezi opěrku hlavy (20) a opěrku
ramen.
!
VAR OVÁNÍ! Vždy zkontrolujte řádné utažení zádržného systému a jeho správné
nastavení dle těla dítěte. Nikdy pás nepřekrucujte!
!
VAR OVÁNÍ! 3bodový pás musí vést pouze skrze k tomu určená vedení pásu. Vedení
pásu jsou podrobně popsána v této příručce a na autosedačce jsou označena
červenou barvou.
• Teraz vložte vopred nastavený bezpečnostný pult (15) (viď sekcia „NASTAVENIE
BEZPEČNOSTNÉHO PULTU“).
• Čo najviac vytiahnite bezpečnostný pás vozidla. Vezmite brušný pás (16) a vložte ho do
príslušného vedenia pásu (17) na bezpečnostnom pulte (15).
• Zasuňte bezpečnostný pás do spony pásu (19). Pás sa musí zaistiť s počuteľným
„cvaknutím“.
• Zatiahnutím za diagonálny pás (20) utiahnite brušný pás (16).
• Teraz zasuňte diagonálny pás (20) do vedenia pásu (17) súbežne s brušným pásom
(16).
• Pevne diagonálny pás (20) utiahnite a uistite sa, že oba pásy zakrývajú vo vedení pásu
(17) celú šírku bezpečnostného pultu (15).
• Teraz zasuňte diagonálny pás (20) pevne do vedenia pásu (17) na bezpečnostnom pulte
(15) tak, aby pás vo vedení držal. Potom vložte diagonálny pás medzi opierku hlavy (20)
a opierku ramien.
!
VAR OVANIE! Vždy skontrolujte riadne utiahnutie zádržného systému a jeho správne
nastavenie podľa tela dieťaťa. Nikdy pás neprekrúcajte!
!
VAR OVANIE! 3bodový pás musí viesť iba skrze na to určená vedenia pásu. Vedenia
pásu sú podrobne uvedená v tejto príručke a na autosedačke sú označená červenou
farbou.
HU
CZSK
89
Page 91

21
20
15
5
18
ÜLŐ ÉS DÖNTÖTT POZÍCIÓ 1. KORCSOPORT 918 KG
Nem szükséges a biztonsági öv kicsatolása ahhoz, hogy a CYBEX PALLAS S-FIX-et
döntött pozícióba állítsuk.
• Amikor a gyermek utazás közben elalszik, nyomja meg a gombot (21) az ülőrész aljánál
(5) és a CYBEX PALLAS S-FIX a gyermek súlyát kihasználva lejjebb csúszik.
6
!
FIGYELEM! Amíg az autó mozgásban van, a vezető nem állíthat a gyermekülés
pozícióján!
• Amikor a gyermeket már kivettük az ülésből, a gyermekülést fekvő pozícióból függőleges
pozícióba állíthatjuk úgy, hogy újra megnyomjuk az állító gombot (21) és addig nyomjuk
a ülőrészt (5) amíg ismét függőleges pozícióba kerül.
!
FIGYELEM! Minden esetben bizonyosodjon meg arról, hogy az állító gomb (21)
jól hallhatóan rögzül az ülő vagy fekvő pozícióban. A döntött pozíció csak az 1.
korcsoportban (9-18 kg) alkalmazható, a védőpajzzsal (15) és a vázzal (6) együtt.
Fontos! Bizonyosodjon meg arról, hogy a derék öv (16) és az átlós öv (20) mindig
szorosra meg van húzva.
90
Page 92

POLOHA VSEDĚ A VLEŽE SK. 1 918 KG POLOHA V SEDE A POLEŽIAČKY SK. 1 918 KG
Pro uvedení autosedačky CYBEX PALLAS S-FIX do pozice vleže není potřeba rozepnout
bezpečnostní pás vozidla.
• Pokud vaše dítě během cesty usne, jednoduše stiskněte nastavovací tlačítko (21)
vespod sedáku (5) a autosedačka CYBEX PALLAS S-FIX se pomocí váhy vašeho dítěte
posune níže.
Pre uvedenie autosedačky CYBEX PALLAS S-FIX do pozície ľahu nie je potreba rozopnúť
bezpečnostný pás vozidla.
• Ak vaše dieťa počas cesty zaspí, jednoducho stlačte nastavovacie tlačidlo (21) naspodu
sedadla (5) a autosedačka CYBEX PALLAS S-FIX sa pomocou váhy vášho dieťaťa
posunie nižšie.
!!
VAR OVANIE! Nastavovanie pozície ľahu vodičom vozidla je za jazdy zakázané!VAR OVÁNÍ! Nastavování pozice vleže řidičem vozidla je za jízdy zakázáno!
• Jakmile není dítě v autosedačce, lze autosedačku navrátit z pozice vleže do vzpřímené
pozice stisknutím nastavovacího tlačítka (21) a mírným zatlačení proti sedáku (5)
autosedačky.
VAR OVÁNÍ! Vždy se ujistěte, že při uzamčení autosedačky v pozici vleže či vsedě
slyšitelně cvakne nastavovací tlačítko (21). Pozici vleže je možné použít pouze ve
skupině 1 (9-18 kg) v Pallas sestavě s bezpečnostním pultem (15) a základnou (6).
Upozornění! Vždy se ujistěte, že jsou břišní (16) a diagonální (20) pás utaženy.
• Akonáhle nie je dieťa v autosedačke, možno autosedačku navrátiť z pozície ľahu do
vzpriamenej pozície stlačením nastavovacieho tlačidla (21) a miernym zatlačenie proti
sedáku (5) autosedačky.
!!
VAR OVANIE! Vždy sa uistite, že pri uzamknutí autosedačky v pozícii v ľahu alebo v
sede počuteľne cvakne nastavovacie tlačidlo (21). Pozíciu v ľahu je možné použiť iba
v skupine 1 (9-18 kg) v Pallas zostave s bezpečnostným pultom (15) a základným
rámom (6).
Upozornenie! Vždy sa uistite, že sú brušny (16) a diagonálny (20) pás utiahnuté.
HU
CZSK
91
Page 93

CLICK!
A GYERMEK HELYES RÖGZÍTÉSE 1. KORCSOPORT 918 KG
• Gyermeke optimális védelme érdekében az utazás megkezdése előtt mindig ellenőrizze,
hogy …
• a védőpajzs jól van-e beállítva.
• a biztonsági öv nyelve megfelelően rögzült-e az övcsatban.
• az alsó és a felső övszár szorosan a védőpajzs övvezetőjében fut-e és nincs-e
megcsavarodva.
• a gyermekülés háttámlája teljesen egy síkban van-e az autóülés háttámlájával.
• Ha ISOFIX csatlakozót használ: az ülés mindkét oldalon a helyére rögzült-e az ISOFIX
csatlakozópontokon és tisztán látszik-e mindkét zöld biztonsági jelzés.
92
Page 94

SPRÁVNÉ ZABEZPEČENÍ DÍTĚTE SK. 1 918 KG SPRÁVNE ZABEZPEČENIE DIEŤAŤA SK. 1 918 KG
• Pro zajištění optimálního bezpečí pro vaše dítě, prosíme před každou jízdou zkontrolujte,
že...
• je správně nastavený bezpečnostní pult.
• se jazyk bezpečnostního pásu zajistil ve sponě pásu.
• diagonální a bříšní pás vedou skrze vedení pásu bezpečnostního pultu, jsou napnuté a
nejsou překroucené.
• se opěrka zad dětské autosedačky zcela opírá o opěrku zad sedadla ve vozidle.
• V případě použítí ISOFIX Connect: autosedačka se pomocí konektorů na obou stranách
zajistila do upevňovacích bodů ISOFIX a oba zelené bezpečnostní indikátory jsou jasně
viditelné.
• Pre zaistenie optimálneho bezpečie pre vaše dieťa, prosíme pred každou jazdou
skontrolujte, že...
• je správne nastavený bezpečnostný pult.
• sa jazyk bezpečnostného pásu zaistil v spone pásu.
• diagonálny a brušný pás vedú skrze vedenie pásu bezpečnostného pultu, sú napnuté a
nie sú prekrútené.
• sa opierka chrbta detské autosedačky úplne opiera o opierku chrbta sedadla vo vozidle.
• V prípade použitia ISOFIX Connect: autosedačka sa pomocou konektorov na oboch
stranách zaistila do upevňovacích bodov ISOFIX a obaja zelené bezpečnostné
indikátory sú jasne viditeľné.
HU
CZSK
93
Page 95

ÁTALAKÍTÁS PALLAS SFIXRŐL SOLUTION SFIXRE 1. 918 KG KORCSO
PORTRÓL 2/3. KORCSOPORTRA 1536 KG
21
• Távolítsa el a védőpajzsot.
5
22
22
6
2
24
6
7
7
5
24
21
7
• Nyomja meg a két kioldó gombot (22) az ülőrész (5) alulsó részén és ezzel egyidejűleg
húzza le a vázról mindaddig, amíg érzi az ellenállást.
• Nyomja meg az állító gombot (21), és húzza le teljesen a gyermekülést a vázról (6).
ISOFIX CSATLAKOZÁS módosítása
• Húzza meg a vázon (6) lévő állító kart (2) és húzza a két ISOFIX csatlakozó kart (7),
amíg ellenállást érez.
• Egyidejűleg tartsa az állító kart (2) és egymás után oldja ki az ülőrész alján találahtó két
patentot (24). Ha szüksége, használjon csavarhúzót.
Fontos! Ha ezt megfelelően végzi el, az ISOFIX csatlakozó karok (7) könnyen
eltávolíthatóak a vázról (6).
!
FIGYELEM! Figyeljen az ISOFIX csatlakozók helyes illesztésére. Ha ezt nem
megfelelően végzi el, károsodhatnak az alkatrészek vagy személyi sérülés történhet.
• Most nyomja az ISOFIX csatlakozó karokat (7) az erre a célra szolgáló nyílásokba az
ülőrész (5) alulsó részén, amíg ellenállást nem tapasztal.
!
FIGYELEM! Gondoskodjon arról, hogy a zárókarok megfelelően legyenek beállítva
és a rögzítő fogak az ISOFIX csatlakozó karok tetején legyenek, amikor beilleszti az
ülésbe.
• Nyomja meg az állító fogantyút (21), ami az ülőrész (5) alulsó részén található és nyomja
az ISOFIX csatlakozókat (7) az ülőrészbe, amennyire csak lehet.
• További szerelési lépéseket tanulmányozza a „GYERMEKÜLÉS RÖGZÍTÉSE ISOFIX
KAPCSOLÓDÁSI RENDSZERREL” fejezetet.
Fontos! Az eltávolított alkatrészeket biztonságos helyen együtt tárolja.
!
FIGYELEM! Amikor az ülést újra összeszereli, végezze el ezeket a lépéseket fordított
sorrenben. Olvassa el a használati utasítást és győződjön meg arról, hogy nincs
hiányzó alkatrész.
94
Page 96

PŘEMĚNA Z PALLAS SFIX NA SOLUTION SFIX SKUPINA 1 NA SKUPINU
2/3
PREMENA Z PALLAS SFIX NA SOLUTION SFIX SKUPINA 1 NA SKUPINU
2/3
• Sundejte bezpečnostní pult.
• Stiskněte dvě uvolňovací tlačítka (22) na spodní straně sedáku (5) a vytahujte jej pryč ze
zakládny, dokud neucítíte odpor.
• Stiskněte nastavovací tlačítko (21) a zcela vytáhněte sedák pryč ze základny (6).
Úprava systému ISOFIX Connect Úprava systému ISOFIX Connect
• Použijte nastavovací páčku (2) na základně (6) a vytahujte ISOFIX Connect konektory
(7), dokud neucítíte odpor.
• Držte nastavovací páčku (2) stisknutou a jednu po druhé uvolněte pojistky (24) na
spodní straně sedáku (5). V případě nutnosti použijte šroubovák.
Upozornění! Pokud je toto provedeno správně, ISOFIX Connect konektory (7) půjdou
snadno uvolnit z rámu (6).
!
VAR OVÁNÍ! Dbejte na malou výšku případného pádu ISOFIX Connect konektorů. V
opačném případě může dojít k poškození součástí nebo ke zranění vás nebo osob ve
vaší blízkosti.
• Nyní zatlačte ISOFIX Connect konektory (7) do odpovídajících otvorů na spodní straně
sedáku (5), dokud neucítíte odpor.
!
VAR OVÁNÍ! Ujistěte se, že jsou konektory namontovány správným směrem a že
jejich zuby při vkládání do sedáku směřují vzhůru.
• Pomocí nastavovacího tlačítka (21) na spodní straně sedáku (5) zatlačte konektory (7)
co nejvíce dozadu.
• Pro více informací o správné instalaci, prosíme přejděte do sekce „ZAJIŠTĚNÍ DĚTSKÉ
AUTOSEDAČKY POMOCÍ SYSTÉMU ISOFIX Connect“.
Upozornění! Sundané části uchovávejte pohromadě na zabezpečeném místě. Upozornenie! Odobraté časti uchovávajte pohromade na zabezpečenom mieste.
• Zložte bezpečnostný pult.
• Stlačte dve uvoľňovacie tlačidlá (22) na spodnej strane sedáku (5) a vyťahujte ho preč
zo základne, kým nepocítite odpor.
• Stlačte nastavovacie tlačidlo (21) a úplne vytiahnite sedák preč zo základne (6).
• Použite nastavovací páčku (2) na základni (6) a vyťahujte ISOFIX Connect konektory
(7), kým nepocítite odpor.
• Držte nastavovaciu páčku (2) stlačenú a jednu po druhej uvoľnite poistky (24) na
spodnej strane sedáku (5). V prípade nutnosti použite skrutkovač.
Upozornenie! Ak je toto vykonané správne, ISOFIX Connect konektory (7) pôjdu ľahko
uvoľniť zo základni (6).
!
VAR OVANIE! Dbajte na malú výšku prípadného pádu ISOFIX Connect konektorov.
V opačnom prípade môže dôjsť k poškodenie súčastí alebo k zranenie vás alebo
osôb vo vašej blízkosti.
• Teraz zatlačte ISOFIX Connect konektory (7) do zodpovedajúcich otvorov na spodnej
strane sedáku (5), kým nepocítite odpor.
!
VAR OVANIE! Uistite sa, že sú konektory namontované správnym smerom a že ich
zuby pri vkladaní do sedadla smerujú nahor.
• Pomocou nastavovacieho tlačidla (21) na spodnej strane sedáku (5) zatlačte konektory
(7) čo najviac dozadu.
• Pre viac informácií o správnej inštalácii, prosíme prejdite do sekcie „ZAISTENIE
DETSKÉ AUTOSEDAČKY POMOCOU SYSTÉMU ISOFIX Connect“.
HU
CZSK
!
VAR OVÁNÍ! Pro opětovnou montáž autosedačky postupujte přesně podle návodu v
opačném pořádí. Předem si podle návodu zkontrolujte, zda máte všechny součásti.
!
VAR OVANIE! Pre opätovnú montáž autosedačky postupujte presne podľa návodu v
opačnom poradí. Vopred si podľa návodu skontrolujte, či máte všetky súčasti.
95
Page 97

19
BEKÖTÉS A JÁRMŰ BIZTONSÁGI ÖVÉVEL
• Helyezze gyermekét a gyermekülésbe. Húzza ki a 3 pontos biztonsági övet és a gyermek
előtt elvezetve vigye az övcsathoz (19).
FIGYELEM! A 3 pontos biztonsági övet csak a kijelölt vonalon szabad elvezetni. Az öveket
részletesen ismertetjük ebben a használati útmutatóban és az ülés pirossal kijelölt részén.
!
FIGYELMEZTETÉS! Az öv soha ne legyen megcsavarodva.
96
CLICK!
20
25
20
20
16
25
11
20
23
11
20
• Helyezze az öv nyelvét (18) az övcsatba (19). Hallania kell egy kattanást.
• Ezután helyezze be és húzza meg az alsó övet (16) a gyermekülés pirossal jelölt
övelvezető részén (25).
• Most húzza meg erősen a mellső övet (20) hogy kifeszítse az alsó övet (16). Minél
szorosabb az öv, annál inkább véd a sérüléstől. Az övcsat (19) oldalán, a mellső biztonsági
öv (20) és az alsó öv (16) egyszerre kell hogy beillesztődjön az övelvezetőbe (25).
• Az alsó övnek (16) az ülés mindkét oldalán az alsó övelvezetőn (25) keresztül kell
elhaladnia.
• Vezesse el a mellső övet (20) a felső övelvezetőbe (17) a fejrészen (11) keresztül.
FIGYELEM! Tanítsa meg gyermekét, hogy mindig figyeljen arra, hogy az öve mindig feszes
legyen és ha szükséges, arra is, hogy ő maga megfeszítse az övet.
!
FIGYELMEZTETÉS! Az alsó övnek (16) a lehető legalacsonyabban kell végigfutnia
mindkét oldalon a gyermek ágyéka mentén, hogy baleset esetén optimális hatást
fejtsen ki.
Biztosítsa a mellső övet (20) a gyermeke válla és nyaka között elvezetve. Ha szükséges,
állítsa be a fejrész magasságát és változtassa az öv pozícióját. A fejrész (11) magasságát
az autóban kell beállítani.
16
25
Page 98

PŘIPOUTÁNÍ DĚTSKÉ AUTOSEDAČKY PRIPÚTANIE DETSKÉ AUTOSEDAČKY
• Posaďte dítě do autosedačky. Vytáhněte 3bodový bezpečnostní pás a veďte jej před
dítětem směrem k pásové sponě (19).
UPOZORNĚNÍ! 3bodový pás musí vždy vést skrze příslušná vedení pásu na
autosedačce.
Vedení pásu jsou podrobně popsána v tomto manuálu a na autosedačce jsou označena
červenou barvou.
• Posaďte dieťa do autosedačky. Vytiahnite 3-bodový bezpečnostný pás a veďte ho pred
dieťaťom smerom k pásovej spone (19).
UPOZORNENIE! 3-bodový pás musí vždy viesť skrze príslušná vedenia pásu na
autosedačke.
Vedenia pásu sú podrobne uvedené v tomto manuáli a na autosedačke sú označené
červenou farbou.
!
VAR OVÁNÍ! Nikdy pás nepřekrucujte.
• Zasuňte jazyk pásu (18) do pásové spony (19). Jazyk pásu se musí zajistit se slyšitelným
cvaknutím.
• Poté vložte břišní pás (16) do červeně označených spodních vedení pásu (25) na
autosedačce a utáhněte jej.
• Zatažením za diagonální pás (20) nyní dotáhnete břišní pás (16). Čím pevněji je pás
utažený, tím lepší poskytuje ochranu před zraněním. Na straně, kde je pásová spona (19)
musí oba pásy (diagonální (20) a břišní (16) společně vést skrze spodní vedení pásu (25).
• Břišní pás (16) musí vést skrze spodní vedení pásu (25) na obou stranách sedáku
autosedačky.
• Poté vložte diagonální pás (20) do horního vedení pásu (17) v opěrce hlavy.
UPOZORNĚNÍ! Již od začátku se snažte vaše dítě naučit zkontrolovat řádné utažení pásu
a jeho případné dotažení.
!
VAR OVÁNÍ! Pro co nejlepší funkčnost v případě nehody je třeba, aby břišní pás (16)
vedl na obou stranách co nejníže přes rozkrok dítěte.
Ujistěte se, že diagonální pás (20) vede mezi vnější stranou ramene a krkem vašeho dítěte.
Pro změnu pozice pásu upravte výšku opěrky hlavy. Výšku opěrky hlavy (11) lze nastavit i ve
vozidle.
!
VAR OVANIE! Nikdy pás neprekrúcajte.
• Zasuňte jazyk pásu (18) do pásovej spony (19). Jazyk pásu sa musí zaistiť s počuteľným
cvaknutím.
• Potom vložte brušný pás (16) do červeno označených spodných vedenie pásu (25) na
autosedačke a utiahnite ho.
• Zatiahnutím za diagonálny pás (20) teraz dotiahnete brušný pás (16). Čím pevnejšie je
pás utiahnutý, tým lepšie poskytuje ochranu pred zranením. Na strane, kde je pásová
spona (19) musia obaja pásy (diagonálný (20) a brušný (16) spoločne viesť skrze
spodné vedenie pásu (25).
• Brušný pás (16) musí viesť skrz spodné vedenie pásu (25) na oboch stranách sedadla
autosedačky.
• Potom vložte diagonálny pás (20) do horného vedenia pásu (17) v opierke hlavy.
UPOZORNENIE! Už od začiatku sa snažte vaše dieťa naučiť skontrolovať riadne
utiahnutie pásu a jeho prípadné dotiahnutie.
!
VAR OVANIE! Pre čo najlepšiu funkčnosť v prípade nehody je potrebné, aby brušný
pás (16) viedol na oboch stranách čo najnižšie cez rozkrok dieťaťa.
Uistite sa, že diagonálny pás (20) vedie medzi vonkajšou stranou ramena a krkom vášho
dieťaťa. Pre zmenu pozície pásu upravte výšku opierky hlavy. Výšku opierky hlavy (11)
možno nastaviť aj vo vozidle.
HU
CZSK
97
Page 99

CLICK!
20
25
23
11
16
MEGFELELŐEN RÖGZÍTETTE GYERMEKÉT?
Hogy gyermeke számára az optimális biztonságot garantálja, még az utazás megkezdése
5
előtt ellenőrizze, hogy...
• Az alsó övet (16) az alsó piros övvezetőn (25) vezette keresztül az ülésmagasító (5)
mindkét oldalán.
• A mellső övet (20) az övcsathoz szintén a gyermekülés alsó piros övvezetőn (25)
keresztül vezette el.
• A mellső öv (20) a felső övvezetőn (17) keresztül lett elvezetve a fejrész (11) kijelölt
piros részén.
• A mellső öv (20) visszahúzódik.
• Az egész öv megfelelően feszes-e, és nincs-e megtekeredve.
• Ha ISOFIX csatlakozót használ: A gyermekülés csatlakozott az ISOFIX csatlakozó záró
karokhoz (7) mindkét oldalon és a zöld biztonsági jelzés (9) tisztán látható.
!
FIGYELMEZTETÉS! A jármű övcsatja (19) nem mehet keresztül a kartámaszon. Ha
az öv túl hosszú, a biztonsági germekülés nem alkalmas ehhez a gépjárműhöz. Kétség
esetén keresse fel a kereskedőt.
19
!
FIGYELMEZTETÉS! Soha ne hagyja a gyermeket felügyelet nélkül az autóban. A
gyermekülés védelmi rendszerének műanyag részei felmelegedhetnek a Naptól és
égési sérülést okozhatnak.
A gyermekülés csatlakozott az ISOFIX csatlakozó záró karokhoz (7) mindkét oldalon
és a zöld biztonsági jelzés (9) tisztán látható.
Ne tegye ki közvetlen napsütésnek a gyermekülést és az utósülést (pl. világos színű
anyaggal való letakarás nélkül).
98
20
7
9
Page 100

JE VAŠE DÍTĚ SPRÁVNĚ ZAJIŠTĚNÉ? JE VAŠE DIEŤA SPRÁVNE ZAISTENÉ?
Pro zajištění optimální ochrany vašeho dítěte se před jízdou ujistěte, že: Pre zaistenie optimálnej ochrany vášho dieťaťa sa pred jazdou uistite, že:
• břišní pás (16) vede na obou stranách sedáku (5) skrze spodní červené vedení pásu (25).
• na straně pásové spony vede diagonální pás (20) skrze spodní červené vedení pásu
(25).
• diagonální pás (20) vede skrze červeně označené horní vedení pásu (17) v opěrce hlavy.
(11).
• diagonální pás (20) vede v náklonu směrem dozadu.
• celý pás je pevně utažený k tělu dítěte a není překroucený.
• V případě použítí ISOFIX Connect: Autosedačka je na obou stranách zajištěná ISOFIX
Connect konektory (7) a jsou vidět zelené bezpečnostní ukazatele (11).
!
VAR OVÁNÍ! Pásová spona (19) ve vozidle nesmí nikdy dosahovat k opěrce ruky.
Pokud je pás příliš dlouhý, není autosedačka vhodná pro použití na této pozici ve
vozidle. V případě pochybností, prosíme, kontaktujte vašeho prodejce.
• brušný pás (16) vedie na oboch stranách sedadla (5) skrz spodné červené vedenie pásu (25).
• na strane pásové spony vedie diagonálny pás (20) skrz spodné červené vedenie pásu
(25).
• diagonálny pás (20) vedie skrz červeno označené horné vedenie pásu (17) v opierke
hlavy (11).
• diagonálny pás (20) vedie v náklone smerom dozadu.
• celý pás je pevne utiahnutý k telu dieťaťa a nie je prekrútený.
• V prípade použitia ISOFIX Connect: Autosedačka je na oboch stranách zaistená
ISOFIX Connect konektormi (7) a sú vidieť zelené bezpečnostné indikátory (11).
!
VAR OVANIE! Pásové spona (19) vo vozidle nesmie nikdy dosahovať k opierke ruky.
Ak je pás príliš dlhý, nie je autosedačka vhodná pre použitie na tejto pozícii vo vozidle.
V prípade pochybností, prosíme, kontaktujte vášho predajca.
!
VAR OVÁNÍ! Nikdy dítě nenechávejte ve vozidle bez dozoru. Plastové části
autosedačky se na slunci mohou zahřát a dítě se o ně může spálit.
Chraňte vaše dítě i dětskou autosedačku před přímým slunečním světlem (např.
přikrytím světlou látkou).
!
VAR OVANIE! Nikdy dieťa nenechávajte vo vozidle bez dozoru. Plastové časti
autosedačky sa na slnku môžu zahriať a dieťa sa o ne môže spáliť.
Chráňte vaše dieťa aj detskú autosedačku pred priamym slnečným svetlom (napr.
prikrytím svetlou látkou).
HU
CZSK
99
 Loading...