

Page 1
Cybex Eagle® NX Overhead Press
Medical Owner’s Manual
Strength Systems
Part Number 20010-888-4
www.cybexintl.com
Page 2

Table of Contents
Safety
Safety Guidelines and Practices ...............3
Anchoring Equipment .......................3
Facility Safety Precautions ...................3
User Safety Precautions . . . . . . . . . . . . . . . . . . . . . 4
Warnings and Cautions......................6
Label Placement . . . . . . . . . . . . . . . . . . . . . . . . . . . 7
Exercise
Intended Use..............................8
Instructions ...............................8
Customer Service
Contacting Service ........................10
Maintenance
Warnings ................................11
Daily Procedures..........................11
Weekly Procedures ........................13
Yearly Procedures .........................15
Cable Adjustment .........................16
Belt Adjustment ...........................17
Cybex® and the Cybex logo are registered trademarks of Cybex International, Inc.
Eagle® and its mark are registered trademarks of Cybex International, Inc.
DISCLAIMER: Cybex International, Inc., makes no representations or warranties regarding the contents of this manual. We reserve the right to revise
this document at any time or to make changes to the product described within it without notice or obligation to notify any person of such revisions or
changes.
© Copyright 2014, Cybex International, Inc. All rights reserved. Printed in the United States of America.
10 Trotter Drive Medway, MA 02053 • 508-533-4300 • FAX 508-533-5183 www.cybexintl.com • 20010-888-4 • September 2014
Page 3
Cybex Owner’s Manual
Safety
Safety Guidelines and Practices
This product complies with the European Medical Directive 93/42/EEC
Read the Owner’s Manual carefully before assembling, servicing, or using the equipment.
Owner must comply with all safety guidelines in this manual. It is also the owner’s responsibility to
instruct users on the safe and proper operation of the equipment and to properly display any and
all warning labels and instructional placards. All users should read these labels and placards before
using equipment.
Death or serious injury could occur if the
following safety precautions and instructions are
WARNING
not followed.
Anchoring Equipment
• Owner should not allow equipment to be used until it is properly anchored
as described below.
• To maximize stability and eliminate rocking, tipping, or falling over,
equipment must be anchored to a solid, level surface, utilizing all
anchoring holes provided.
• Fasteners must have a minimum of 500 lbs. tensile capacity. Cybex
recommends .3/8” grade 2 bolts or better. A minimum pull force of
220 lbs/100 kgs is required for each anchor position.
• If leg frames do not contact surface, DO NOT pull down with anchors.
Shim any leg or frame not in contact with surface using at washers.
• Due to the wide variation of ooring on which machines may be anchored
or installed, consult with a qualied and licensed contractor to ensure
proper anchoring and installation.
Facility Safety Precautions
Do not allow anyone, including trainers, to use equipment in a manner other than that shown on the
warning labels and instructional placards located on every machine.
Do not install equipment on an uneven surface. The solid, level surface should not deviate more than
1/8” over a 10’ distance or as dened and required by local building and architectural codes.
3
Page 4

Cybex Owner’s Manual
It is the responsibility of the facility owner/owner of the equipment to ensure that there is appropriate
clearance around each machine to allow for safe use and passage.
In compliance with the ADA (American Disabilities Act) there must be clear floor space of at least
30 by 48 inches and be served by an accessible route for at least one of each type of exercise
equipment. If the clear space is enclosed on three sides (e.g., by walls or the equipment itself), the
clear space must be 36 by 48 inches.
All other machines must have a clear floor space of 23” for all access point on the machine, unless
shown in the Owner’s Manual.
The dimensions stated in the assembly instructions of this manual include the maximum foot print (in
use) dimensions.
All equipment should be used in a supervised, access-controlled area.
Do not allow equipment to be used by children 12 and under. Supervise disabled and children 13 and
older.
The owner should ensure that regular inspection and maintenance checks as detailed in this manual
are performed. Keep a log of all maintenance and repair activities.
Each day before use, the owner should inspect the equipment. If there are any loose or worn
components such as belts, cables, grips, pulleys, or any missing, damaged labels, or placards, the
owner should x any deciencies before they allow the equipment to be used.
Use only Cybex components to maintain and repair the equipment.
Display the Facility Safety Sign so it is visible and prominent.
User Safety Precautions
Owners must instruct users to DO the following:
• Follow all warning labels and instructional placards when using equipment.
• Insert weight pin completely before using selectorized equipment.
• Consult a physician prior to commencing an exercise program. If at any time during exercise you
feel faint, dizzy or experience pain, stop and consult your physician.
• Use a spotter for Free Weight equipment.
Owners must instruct users to NOT DO the following:
• DO NOT pin weights on selectorized equipment in an elevated position or use the machine if
found in this position.
• DO NOT increase weight resistance on equipment by any means other than those provided by
Cybex.
• DO NOT wear loose or dangling clothing or jewelry while using equipment. Stay clear of moving
parts.
4
Page 5

Cybex Owner’s Manual
• DO NOT lean or pull on machine
• DO NOT use machine for support during stretching.
• DO NOT attach resistance straps, ropes or other means to equipment, except those provided by
the manufacturer for intended use on the equipment.
• DO NOT exceed the maximum specied user weight.
• DO NOT use if equipment appears damaged or inoperable upon inspection.
• DO NOT use if guards are missing or damaged.
• DO NOT remove any labeling from equipment.
5
Page 6
Cybex Owner’s Manual
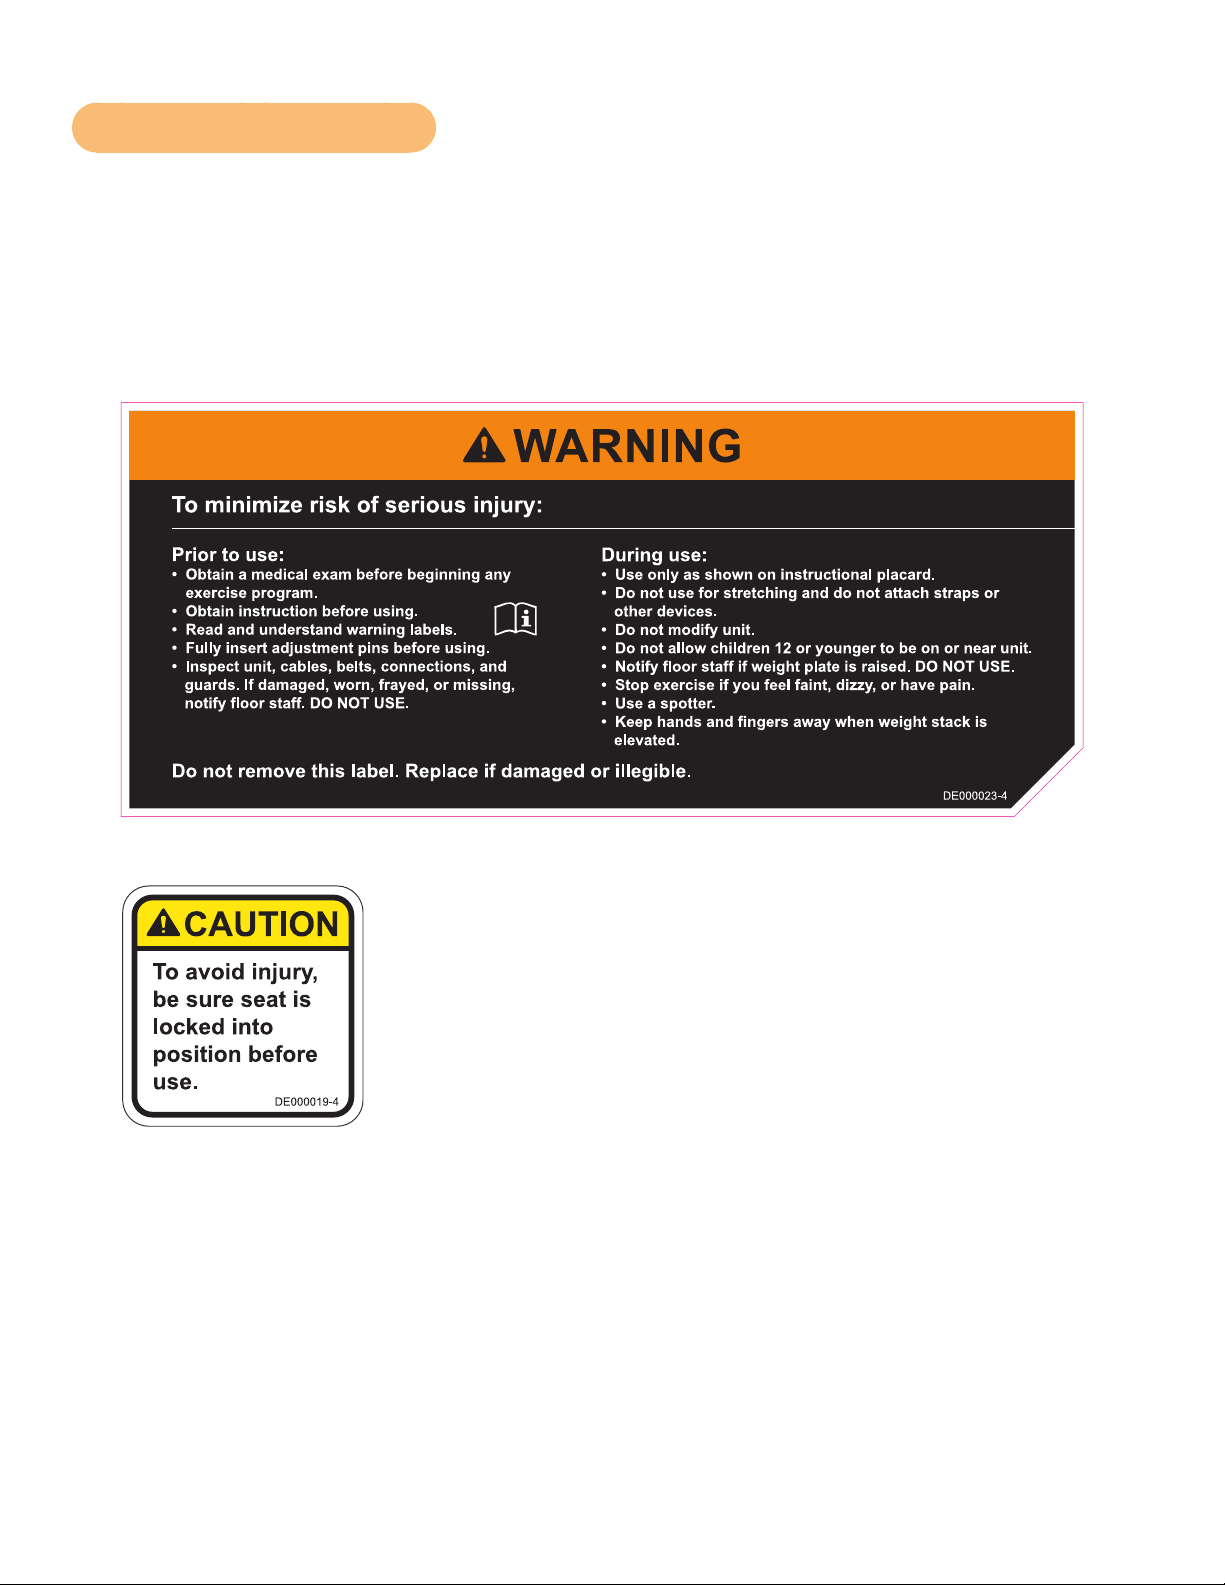
Warnings and Cautions
Warning decals indicate a potentially hazardous situation that could result in death or serious injury if
the precautions are not observed.
Caution decals indicate a potentially hazardous situation that could result in minor or moderate injury
if the precautions are not observed.
The diagram following the decals show where each decal is located.
6
Page 7

Label Placement
Cybex Owner’s Manual
DE000023-X
DE000019-X
7
Page 8

Cybex Owner’s Manual
Exercise
Intended Use
This equipment is suitable for treatment of patients with illness or injuries and for prevention. This
equipment does not possess any measurement functions.
This equipment is only intended to be operated for use under the supervision of a physician,
physiotherapist who has the requisite training and instruction.
The use of this equipment is the responsibility of the physician or trained medical expert.
Instructions
Read and understand all instructions and warnings prior to using this machine in the Safety
section of the Owner’s Manual.
Indications:
This machine is used for muscle training or physical rehabilitation and preventive health training only.
Equipment may only be used under supervision of an authorized trainer.
A patient needs to be capable of a full motion range.
The machine is not intended for any exercises other than the ones shown in the short instruction
decal on the machine.
Contraindications:
The following conditions must be cleared by a physician beforehand: fractures, recent operations,
severe osteoporosis with less than 80% bone density, acute herniated disc with surgical indication,
tumors and severe circulatory or vascular illnesses and pulmonary functional disruptions, asthma,
severe diabetes, pregnancy shortly before delivery, detached retina.
Equipment without motion limiters may only be used by patients capable of full range of motion.
The equipment is not sterile and should not be used by patients with contagious diseases or open
wounds.
If weakness, dizziness or pain occurs during training, stop the training and consult your physician.
Un-controlled or forced training can lead to pain/physical overloading. Only adjust the settings/weight
intensity/number of repetitions after talking with your trainer.
Training may only be carried out after a prior instruction session by a qualied person.
8
Page 9

Cybex Owner’s Manual
CAUTION: Use only in manner depicted
To avoid serious injury, use equipment only as describe below.
All adjustment points on the machine have yellow handles or knobs.
Set Up Motion Muscles Used
• Adjust seat bottom so hands are
slightly above shoulders.
• Select hand position that allows
Push handles upward until arms
are fully straightened.
hands to nish above shoulders.
Anterior Deltoid,
Middle Deltoid,
Triceps
9
Page 10

Contacting Service
SCHWEIZ
Leuenberger Medizintechnik AG
Industriestr. 19
CH-8304 Wallisellen
Tel.: +41 (0) 44 877 84 00
Fax: +41 (0) 44 877 84 10
Chemin du Croset 9 B
CH-1024 Ecublens
Tél.: +41 (0) 21 711 11 45
Fax: +41 (0) 21 711 11 46
lmt@lmt.ch
Cybex Owner’s Manual
Customer Service
DEUTSCHLAND
LMT Deutschland AG
Stuttgarter Strasse 57
D-74321 Bietigheim-Bissingen
Tel.: +49 (0) 7142 99386 0
Fax: +49 (0) 7142 99386 10
info@lmt.eu
ÖSTERREICH
LMT CYBEX GmbH
Anton Hanakgasse 5
A-2103 Langenzersdorf
Tel.: +43 (0) 2244 26 755 0
Fax: +43 (0) 2244 26 755 10
info@lmt.at
10
Page 11

Cybex Owner’s Manual
Maintenance
All preventive maintenance activities must be performed on a regular basis. Performing routine
preventive maintenance actions can aid in providing safe, trouble-free operation of all Cybex
equipment.
Cybex is not responsible for performing regular inspection and maintenance actions for your
machines. Instruct all personnel in equipment inspection and maintenance actions and also in
accident reporting/recording. Cybex representatives are available to answer any questions that you
may have.
Warnings
Read all warnings in this chapter.
WARNING: For maintenance, service and repair:
• Must be performed by trained service personnel only
• Use only Cybex replacement parts.
Observe the following warnings:
WARNING: Equipment hazard.
To avoid serious injury or death replace worn or damaged components immediately
and keep the equipment out of use until repair is completed.
Daily Procedures
When using strong cleaning agents such as rubbing alcohol or bleach, it is advisable to rst test in an
inconspicuous area. Other cleaning agents may contain harsh or unknown solvents and are subject to
formula changes by the product manufacturer without notice. Should you desire to use other cleaning
agents, carefully try them in an inconspicuous area to determine potential damage to the material.
Never use harsh solvents or cleaners which are intended for industrial applications. To clean stained
or soiled areas, a soft white cloth is recommended. Avoid use of paper towels.
Cleaning products may be harmful/irritating to your skin, eyes, etc. Use protective gloves and eye
protection. Do Not inhale or swallow any cleaning product. Protect surrounding area/clothing from
exposure. Use in well ventilated area. Follow all product manufacturer’s warnings. Cybex and its
vendors cannot be held responsible for damage or injuries resulting from the use or misuse of
cleaning products.
11
Page 12

Clean Upholstery
If Then
Light Soiling
MoreDifcultStains
MoreDifcultStains(AlternativeMethod)
Restoring Luster
Cybex Owner’s Manual
1. Prepare a solution of 10% household
liquid soap and warm water.
2. Apply with a soft damp cloth.
3. If necessary, apply a solution of liquid
cleanser with a soft bristle brush.
4. Dampen a clean soft cloth in water and
wipe residue away.
1. Prepare a solution of 10% household
bleach (sodium hypochlorite) and 90%
water. Dampen a soft white cloth in the
solution.
2. Rub gently on the stained area.
3. Dampen a clean soft cloth in water and
rinse area.
4. If stains are still present, a full strength
household bleach may be used. Allow
bleach to puddle on the affected area
or apply with a bleached-soaked cloth
for approximately 30 minutes. Dampen
a clean soft cloth in water, and rinse
area to remove any remaining bleach
concentration.
1. Dampen a soft white cloth with rubbing
alcohol.
2. Gently rub stained area.
3. Dampen a clean soft cloth in water and
rinse area.
1. Apply a light coat of furniture wax for 30
seconds.
2. Lightly rub area using a clean white cloth.
Clean Frames
Wipe down all frames using a mild solution of warm water and car wash soap. Be sure to dry
thoroughly. AVOID acid or chlorine based cleaners and also cleaners containing abrasives as these
could scratch or damage the equipment.
Clean Chrome
Clean chrome tubes, rst using chrome polish and then using a car wax seal. Neutral cleaners with a
pH between 5.5 and 8.5 are recommended. Be sure to dry thoroughly. AVOID acid or chlorine based
cleaners and also cleaners containing abrasives as these could scratch or damage the equipment.
12
Page 13

Cybex Owner’s Manual
Guidelines for cleaning front panel:
Use clean soft cloths or sponges for application of cleaners and again for washing and rinsing. Follow
up each application with warm water rinse.
• DO NOT use abrasives or high alkaline cleaners.
• DO NOT leave cleaners on for long periods, wash immediately.
• DO NOT apply cleaners in direct sunlight or at elevated temperatures.
• DO NOT use scrapers, squeegees, or razors.
• DO NOT clean with gasoline.
Weekly Procedures
Inspect All Nuts and Bolts
Tighten all loose nuts and bolts as required.
WARNING: Equipment hazard.
To avoid serious injury or death replace worn or damaged components immediately
and keep the equipment out of use until repair is completed.
Inspect cables and belts
Inspect all cables and belts for wear or damage and proper tension. When inspecting cables and
belts, run ngers on the cable or belt, paying particular attention to bends in cables and attachment
points. The following conditions may indicate a worn cable:
Cables
Condition of Cable Diagram
A tear or crack in the cable sheath
that exposes the cable
A kink in the cable
A curled sheath
Necking - A stretched cable sheath
13
Page 14

Belts
Cybex Owner’s Manual
Condition of Belt 3D View 3D or Side View
Peeling of the belt’s skin.
Wave in belt
Belt is necked down (narrow section)
Cracks or splits
One or more strands of kevlar is
hanging out, or if there is a signicant
amount of frayed kevlar.
Replace belt if any
section is over 1/32”
(.03) narrower than the
rest of belt
Examine edge of belt (both sides).
Replace belt if any section is
narrower than the rest.
14
Page 15

Cybex Owner’s Manual
CAUTION: Worn handles
• Do not use handles if less then 1/8” of material remains on edge.
• Replace all worn handles immediately.
Inspect bars and handles for wear, paying particular attention to tab area connection points.
Replace bar if less
than 1/8” of material
remains to the edge.
Attachment
Hole
Inspection Action
Inspect bars and handles for wear, paying
particular attention to tab area connection points.
Inspect snap links for proper latching (indicates
wear).
Inspect all labeling for readability, including
instructional placards, warning and caution
decals.
Inspect all weight stacks for proper alignment
and operation.
Inspect guide rods for lubrication.
Yearly Procedures
Replace all cables and belts annually
Replace all worn handles immediately.
Replace all loose or worn grips immediately.
Replace all worn labeling immediately.
Correct all improper alignment and operation
issues immediately.
Wipe Weight Stack Guide Rods clean over entire
length. Lubricate with a light coat of medium
weight automotive engine oil.
15
Page 16

Cybex Owner’s Manual
Cable Adjustment
Tools Required
9/16” Wrench (2)
Four types of cable tension adjustment are used on Cybex Strength Systems:
Cable
Adjustment
Jam Nut
Adjustment
Rod End
Adjustment
Description Diagram
This type of adjustment uses a jam
nut and a tension adjustment nut at
the cable cam end as the primary
adjustment. The other end of the
cable usually contains a roll pin
adjustment.
This type of adjustment uses a
socket head cap screw (SHCS)
securing a cable rod end bearing to
the machine. Primary adjustment
is by turning the rod end bearing.
The other end of the cable usually
contains a roll pin cable adjustment.
Jam
Cable
End
SHCS
Nut
Tension
Adjustment
Nut
Jam Nut
Cable Rod End
Bearing
Nylon
Locknut
Roll Pin
Adjustment
Cam End
Adjustment
This type of adjustment uses a roll
pin and series of holes in the weight
stack top weight connector.
This type of adjustment uses an
adjustment bolt on the pulley
bracket. Loosen nut and rotate cam
bolt to adjust cable.
16
Roll
Pin
Nut
Top Weight
Connector
Cam Bolt
Adjustment
Page 17

Cybex Owner’s Manual
Belt Adjustment
Tools Required
• 7/32” Wrench
• Torque wrench (lbs-in)
Belt Adjustment Action
1. Using a 7/32” Allen wrench loose set screws.
2. Pull belt tight.
3. Secure belt in place with set screws.
Loose Belt
4. Torque set screws to 300-350 lb-in.
5. Verify that the belt is moving smoothly and is routed straight from
the top pulley bracket to the to weight belt clamp
17
Page 18

Page 19

Page 20

10 Trotter Drive Medway, MA 02053 • 508-533-4300 • FAX 508-533-5183
www.cybexintl.com
 Loading...