

Page 1

CLOUD Q
ECE R- 44 /04, Gr. 0 +, 0-13kg (ca . 0-18M)
instruction manual
DEENITFRNLPLHUCZES SKPT
Page 2

DE – WARNUNG! Die folgende Kurzanleitung dient nur der Übersicht. Um maximale Sicherheit und maximalen Komfort für Ihr Kind zu erreichen,
ist es unbedingt notwendig, die gesamte Gebrauchsanleitung aufmerksam zu lesen. Reihenfolge: Schale einrichten - Kind anschnallen - Schale
ins Fahrzeug einbauen.
EN – WARNING! The following brief instructions are only intended to provide an overview. In order to achieve maximum security and comfort
for your child it is absolutely imperative that you read the whole instruction manual carefully. Order of tasks: set up infant car seat - strap child in install infant car seat in vehicle.
IT – ATTENZIONE! Le istruzioni a lato sono soltanto un sommario generale. Per garantire massima sicurezza e comfort al vostro bambino è
indispensabile leggere attentamente ed interamente il manuale d'uso. Sequenza operazioni: predisporre il seggiolino - allacciare il bambino installare il seggiolino nell'auto.
FR – ATTENTION ! Les brèves instructions suivantes sont uniquement destinées à donner un aperçu. An d’assurer la sécurité et le confort
maximum pour votre enfant, il est absolument impératif de lire la totalité du manuel d’instructions. Ordre des tâches : préparer le siège auto installer l’enfant - installer le siège auto dans le véhicule.
NL – WAARSCHUWING! De volgende korte handleiding is uitsluitend bedoeld als overzicht. Voor optimale veiligheid en maximaal comfort voor
het kind is het absoluut noodzakelijk dat u de gehele handleiding zorgvuldig doorleest. Volgorde van taken: autostoeltje gereedmaken - kind in
het autostoeltje vastmaken - autostoeltje in de auto plaatsen.
PL – UWAGA! Skrócona instrukcja ma zadanie dać tylko ogólny pogląd. Tylko zapoznanie się z całą instrukcją daje pewność, że Twoje dziecko
będzie podróżować bezpiecznie i komfortowo. Kolejność czynności: przygotuj fotelik - zapnij dziecko w pasy n - zamontuj fotelik w samochodzie.
HU – FIGYELMEZTETÉS! Az alábbi rövid használati utasítás csak áttekintésül szolgál. Gyermeke maximális biztonsága és kényelme érdekében
szükséges, hogy a teljes használati utasítást alaposan áttanulmányozza. A teendők sorrendje: Végezze el a beállításokat a hordozón - kösse be
a gyermeket - rögzítse a hordozót az autóban.
CZ – VAROVÁNÍ! Následující stručné instrukce slouží pouze jako přehled. Pro dosažení maximální ochrany a pohodlí pro vaše dítě je naprosto
nezbytné si pozorně přečíst celý návod k použití. Pořadí kroků: nastavení dětské autosedačky - připoutání dítěte - montáž dětské autosedačky
do vozidla.
SK – VAROVANIE! Nasledujúce stručné inštrukcie slúži iba ako prehľad. Pre dosiahnutie maximálnej ochrany a pohodlie pre vaše dieťa je úplne
nevyhnutné si pozorne prečítať celý návod na použitie. Poradie krokov: nastavenie detské autosedačky - pripútanie dieťaťa - montáž detskej
autosedačky do vozidla.
ES – ¡ATENCIÓN! Estas breves instrucciones solo tienen por objeto proporcionar una visión general. Para obtener la máxima protección y la
mejor seguridad para su hijo es esencial que lea todo el manual de instrucciones. Orden correcto: sentar al niño en la silla -asegurar al niño instalar la silla de seguridad infantil en el coche.
PT – ATENÇÃO! Estas instruções são um resumo e só têm o objectivo de proporcionar uma visão geral. .De maneira a garantir a máxima
segurança e conforto à criança é essencial que leia cuidadosamente o manual de instruções. Ordem do procedimento: preparar a cadeira colocar a criança - instalar a cadeira ao automóvel.
2
Page 3

D
E
F
Stručné inštrukcie
Instrucciones abreviadas
Instruções resumidas
4 5
Korte handleiding
Skrócona instrukcja
Rövid használati utasítás
Stručné instrukce
7
Kurzanleitung
Brief instructions
Sommario istruzioni
Instructions en bref
C
21
3
6 | INHALT
DEENIT
B
A
6
CLICK!
8
9
7 | CONTENTS
7 | INDICE
52 | CONTENU
53 | INHOUD
53 | ZAWARTOŚĆ
98 | TARTALOM
99 | OBSAH
99 | OBSAH
144 | CONTENIDO
145 | CONTEÚDO
FRNLPLHUCZES SKPT
3
Page 4

CLOUD Q
CLOUD Q
SEMI-U NIVERSAL
UNIVER SAL
- 13 kg
04 3 013 16
ECE R 44/04
Approved for CYBEX
Base Q-fix
CYBEX GmbH
Riedinger Str. 18, 95448 Bayreuth
Germany
09/2014
4
Homologation
CYBEX CLOUD Q – Babyschale
ECE R44/04 Gruppe 0+
Gewicht: 0 bis 13 kg
Alter: ab Geburt bis ca. 18 Monate
Nur geeignet für Fahrzeugsitze
mit Dreipunkt-Automatik-Gurt,
zugelassen nach ECE Regelung Nr.
R16 oder gleichwertigem Standard
Homologation
CYBEX CLOUD Q – infant car seat
ECE R44/04 age group 0+
weight: 0 to 13kg
age: from birth up to approx. 18
months
Only suitable for vehicle seats with a
three-point automatic belt, approved
under ECE regulation no. R16 or
equivalent standard
Omologazione
CYBEX CLOUD Q – seggiolino di
sicurezza per auto
ECE R44/04 Gruppo 0+
Peso: da 0 a 13kg
Età: dalla nascita ai 18 mesi circa
Solo per veicoli con sedili dotati di
cinture di sicurezza automatiche
a 3 punti omologate ECE R16 o
standard equivalente
SEHR GEEHRTE KUNDIN, SEHR GEEHRTER KUNDE,
vielen Dank, dass Sie sich entschieden haben, den
CYBEX CLOUD Q zu erwerben. Wir versichern Ihnen,
dass bei der Entwicklung des CYBEX CLOUD Q
Sicherheit, Komfort und Bedienungsfreundlichkeit im
Vordergrund standen. Das Produkt wird unter besonderer
Qualitätsüberwachung hergestellt und erfüllt strengste
Sicherheitsanforderungen.
HINWEIS! Bewahren Sie die Anleitung immer griffbereit
in dem dafür vorgesehenen Fach an der Unterseite des
CYBEX CLOUD Q auf.
!
WARNUNG! Damit Ihr Kind richtig geschützt werden
kann, ist es unbedingt notwendig, den CYBEX
CLOUD Q so zu verwenden, wie es in dieser
Anleitung beschrieben wird.
HINWEIS! Durch länderspezische Anforderungen
(z.B. Farbkennzeichnungen an der Babyschale) können
Produktmerkmale in ihrer äußeren Erscheinung variieren.
Die korrekte Funktionsweise des Produktes wird davon
jedoch nicht beeinusst.
WARNUNG! Der Dreipunktgurt darf nur über die
!
dafür vorgesehenen Führungen verlaufen. Die
Gurtführung wird in diesem Handbuch genau
beschrieben und ist zudem an der Babyschale blau
markiert.
Page 5

DEAR CUSTOMER, GENTILE CLIENTE,
Thank you for buying the CYBEX CLOUD Q. We can
assure you that safety, comfort and ease of use were our
highest priorities when developing the CYBEX CLOUD
Q. This product is manufactured under exceptional quality
control and meets the strictest safety requirements.
Grazie di avere scelto un prodotto CYBEX. Le assicuriamo che nel progettare CYBEX CLOUD Q i nostri principa-
li obiettivi sono stati la sicurezza, il comfort e la facilità di
utilizzo. Il prodotto è stato elaborato sotto uno stretto
controllo qualitativo e risponde ai più severi standard di
sicurezza.
DEENIT
NOTE! Always keep this Instruction Manual at hand in the
compartment on the underside of the CYBEX CLOUD Q
that has been provided for that purpose.
!
WARNING! In order to keep your child properly
protected it is absolutely essential that you use the
CYBEX CLOUD Q as described in this manual.
NOTE! Due to country-specic requirements (e.g. colour
labelling on the infant car seat), product features may
vary in their external appearance. However, this does not
affect the correct functioning of the product.
!
WARNING! The three-point belt must only be
passed through the designated guides. The belt
guides are described in detail in this manual and are
marked in blue on the infant car seat.
NOTA BENE! Raccomandiamo di tenere il manuale di
CYBEX CLOUD Q sempre a portata di mano e di con-
servarlo nell'apposito alloggiamento sotto il seggiolino.
!
ATTENZIONE! Per la massima sicurezza del Vostro
bambino è essenziale usare CYBEX CLOUD Q
secondo quanto descritto in questo manuale.
NOTA BENE! In base alle normative locali l'aspetto di
alcune caratteristiche del prodotto potrebbe differire (es.
colori delle etichette sul seggiolino). Questo non inuisce
sul corretto funzionamento del prodotto.
ATTENZIONE! La cintura automatica a tre punti
!
deve passare attraverso le guide designate. Le
guide per il passaggio della cintura sono descritte
in dettaglio nel manuale e sul seggiolino sono
contrassegnate nel colore blu.
5
Page 6

INHALTDE
KURZANLEITUNG .........................................................................................3
HOMOLOGATION ..........................................................................................4
VERWENDUNG IM FAHRZEUG .................................................................8
ZUM SCHUTZ IHRES FAHRZEUGES .....................................................10
EINSTELLEN DES TRAGEBÜGELS ........................................................12
ANPASSEN DER KOPFSTÜTZE ..............................................................14
ANSCHNALLEN MITTELS GURTSYSTEM ............................................14
SICHERHEIT FÜR IHR BABY ....................................................................18
SICHERHEIT BEIM EINBAU INS FAHRZEUG .......................................20
DER EINBAU INS FAHRZEUG ..................................................................22
EINSTELLEN DER SEITENPROTEKTOREN ........................................26
AUSBAU AUS DEM FAHRZEUG ..............................................................28
SO IST IHR BABY RICHTIG GESICHERT ...............................................28
SO IST DIE BABYSCHALE RICHTIG EINGEBAUT ...............................30
ÖFFNEN DES SONNENVERDECKES ....................................................32
EINSTELLEN DER LIEGEPOSITION .......................................................32
CYBEX TRAVEL-SYSTEM .........................................................................34
DEMONTAGE ...............................................................................................34
PFLEGE .........................................................................................................36
VERHALTEN NACH EINEM UNFALL .......................................................36
REINIGUNG ..................................................................................................38
ENTFERNEN DES BEZUGES...................................................................40
ANBRINGEN DES BEZUGES....................................................................40
PRODUKTLEBENSDAUER .......................................................................42
ABFALLTRENNUNG ....................................................................................44
INFORMATIONEN ZUM PRODUKT .........................................................44
GUARANTEE CONDITIONS ......................................................................46
6
Page 7

EN
BRIEF INSTRUCTIONS ................................................................................3
HOMOLOGATION ..........................................................................................4
USE IN VEHICLE ............................................................................................9
PROTECTING YOUR VEHICLE ................................................................11
ADJUSTING THE CARRYING HANDLE ..................................................13
ADJUSTING THE HEADREST ..................................................................15
STRAPPING IN WITH THE BELT SYSTEM ............................................15
SAFETY FOR YOUR BABY........................................................................19
SAFETY WHEN INSTALLING IN VEHICLE .............................................21
INSTALLATION IN CAR ...............................................................................23
ADJUSTING THE SIDE PROTECTOR .....................................................27
REMOVAL FROM THE VEHICLE .............................................................29
CORRECT SECURING OF YOUR BABY ................................................29
CORRECT INSTALLATION OF THE INFANT CAR SEAT .....................31
OPENING THE SUN CANOPY ..................................................................33
ADJUSTING THE RECLINING POSITION ..............................................33
CYBEX TRAVEL SYSTEM ..........................................................................35
REMOVAL ......................................................................................................35
CARE ..............................................................................................................37
WHAT TO DO AFTER AN ACCIDENT ......................................................37
CLEANING .....................................................................................................39
REMOVING THE COVER ..........................................................................41
ATTACHING THE COVER ..........................................................................41
PRODUCT LIFESPAN .................................................................................43
WASTE SEPARATION ................................................................................45
PRODUCT INFORMATION ........................................................................45
GUARANTEE CONDITIONS ......................................................................47
CONTENTS INDICE
IT
SOMMARIO ISTRUZIONI .............................................................................3
OMOLOGAZIONE ..........................................................................................4
USO NEL VEICOLO .......................................................................................9
PROTEGGERE IL VEICOLO ......................................................................11
REGOLAZIONE DEL MANIGLIONE DI TRASPORTO ..........................13
REGOLAZIONE DEL POGGIATESTA ......................................................15
ALLACCIARE CON IL SISTEMA DI CINTURE ........................................15
SICUREZZA DEL BAMBINO ......................................................................19
SICUREZZA NELL'INSTALLAZIONE IN AUTO .......................................21
INSTALLAZIONE NELLA VETTURA .........................................................23
REGOLAZIONE DELLE PROTEZIONI LATERALI .................................27
RIMOZIONE DEL SEGGIOLINO DALL'AUTO .........................................29
IL BAMBINO È FISSATO CORRETTAMENTE? ......................................29
IL SEGGIOLINO E' INSTALLATO CORRETTAMENTE? .......................31
APERTURA DELLA CAPOTTINA ..............................................................33
REGOLARE LA POSIZIONE DI RECLINAZIONE...................................33
CYBEX SISTEMA DA VIAGGIO .................................................................35
SMONTAGGIO ..............................................................................................35
CURA E MANUTENZIONE .........................................................................37
COSA FARE DOPO UN INCIDENTE ........................................................37
PULIZIA ...........................................................................................................39
TOGLIERE IL RIVESTIMENTO .................................................................41
RIMETTERE IL RIVESTIMENTO ...............................................................41
DUREVOLEZZA DEL PRODOTTO ...........................................................43
SMALTIMENTO .............................................................................................45
INFORMAZIONI SUL PRODOTTO............................................................45
GARANZIA - CONDIZIONI ..........................................................................47
DEENIT
7
Page 8

VERWENDUNG IM FAHRZEUG
HINWEIS! Steht die Babyschale nicht stabil oder zu
steil auf dem Fahrzeugsitz, so können Sie dies mit einer
zusätzlichen Decke ausgleichen. Alternativ wählen Sie
einen anderen Sitzplatz im Fahrzeug.
WARNUNG! Verwenden Sie die Babyschale nicht
auf einem Sitz, auf dem ein Frontairbag aktiviert ist.
Dies gilt nicht für die so genannten Seitenairbags.
HINWEIS! Der großvolumige Front-Airbag entfaltet sich
explosionsartig und kann Ihr Kind schwer verletzen oder
sogar töten.
WARNUNG! Die Babyschale bietet nur dann den
bestmöglichen Schutz für ihr Kind, wenn Sie die
Gebrauchsanweisung genau befolgen.
WARNUNG! Ohne Genehmigung der CYBEX
GmbH dürfen keine Veränderungen am CYBEX
CLOUD Q vorgenommen und keine Ergänzungen
hinzugefügt werden. Reparaturen dürfen
ausschließlich durch Personen vorgenommen
werden, die hierfür autorisiert sind. Dabei dürfen
stets nur original Bau- und Zubehörteile verwendet
werden. Die Schutzfunktion der Babyschale ist sonst
nicht mehr gewährleistet.
8
Page 9

USE IN VEHICLE USO NEL VEICOLO
NOTE! If the infant car seat is placed on the vehicle seat
in a way that is not stable or at too steep an angle, it
can be adjusted with an additional blanket. Alternatively,
choose another seat in the vehicle..
NOTA BENE! Se il seggiolino appoggiato sul sedile appare instabile o troppo sollevato consigliamo di utilizzare un
telo o un asciugamano per compensare. In alternativa,
scegliere un'altra collocazione nell'auto.
DEENIT
WARNING! Do not use the infant car seat on a seat
on which a front airbag is activated. This does not
apply to so-called side airbags.
NOTE! The large-volume front airbag expands
explosively and may cause your child serious injury or
even death.
WARNING! The infant car seat only offers the
best possible protection when exactly following the
instructions given in this manual.
WARNING! No modications or additions may be
made to the CYBEX CLOUD Q without the approval
of CYBEX GmbH. Repairs may only be undertaken
by persons who have been authorised to do so. In
doing so, they must always use original components
and accessory parts only. If not, the infant car seat’s
protective function is no longer guaranteed.
ATTENZIONE! Non utilizzare su sedili anteriori con
airbag frontale attivato. L'avvertenza non riguarda i
cosiddetti airbag laterali.
NOTA BENE! Gli airbag anteriori hanno grandi dimensioni con apertura automatica esplosiva e possono provocare gravi ferite, anche letali, al bambino.
ATTENZIONE! Il seggiolino Gruppo 0+ offrirà la
migliore protezione possibile soltanto se utilizzato
seguendo scrupolosamente le istruzioni contenute in
questo manuale.
ATTENZIONE! CYBEX CLOUD Q non può essere
in alcun modo modicato senza autorizzazione
di CYBEX GmbH. Eventuali riparazioni dovranno
essere effettuate solo da persone autorizzate,
utilizzando soltanto componenti ed accessori
originali. Agendo diversamente la funzione
protettiva del seggiolino non potrà più essere
garantita.
9
Page 10

WARNUNG! Ein Baby im Auto NIE auf dem Schoß
halten. Durch die enormen Kräfte, die bei einem
Unfall frei werden, können Sie das Baby unmöglich
festhalten. Schnallen Sie sich und ein Kind niemals
zusammen mit einem Autogurt an.
ZUM SCHUTZ IHRES FAHRZEUGES
An einigen Autositzen aus empndlichem Material (z.B.
Velours, Leder, etc.) können durch die Benutzung von
Kindersitzen mögliche Gebrauchsspuren und/oder
Abfärbungen auftreten. Um das zu vermeiden, können
Sie z.B. eine Decke oder ein Handtuch unterlegen.
Ferner weisen wir in diesem Zusammenhang auf unsere
Reinigungshinweise hin, die vor der ersten Verwendung
der Schale unbedingt beachtet werden sollten.
10
Page 11

WARNING! NEVER hold a baby on your lap in a
car. The forces released in a collision are way too
high for any person to hold on to the baby. Never
secure yourself and the child with only one seatbelt.
braccio nell'auto. In caso di incidente le forze d'urto
sarebbero troppo elevate per riuscire a trattenerlo
da parte di chiunque. Non utilizzare mai la stessa
cintura di sicurezza per allacciare il vostro corpo e
quello del bambino.
PROTECTING YOUR VEHICLE PROTEGGERE IL VEICOLO
ATTENZIONE! Non tenere MAI il bambino in
Traces of use and/or discolouration can appear on some
infant car seats made from delicate materials (e.g. velour,
leather etc.) if child seats are used. You can avoid this
by putting, e.g., a blanket or towel underneath the child
seat. In this context, also see our cleaning directions. It
is essential that these are followed before rst use of the
infant car seat.
I sedili con rivestimenti particolarmente delicati (velluto,
pelle, ecc.) potrebbero essere danneggiati dall'uso di
seggiolini di sicurezza. E' possibile prevenire eventuali
segni di usura stendendo un telo o un asciugamano sotto
al seggiolino per proteggere il sedile. A riguardo, vedere
anche le istruzioni per la pulizia: è essenziale seguire
quanto indicato prima dell'uso del seggiolino.
DEENIT
11
Page 12

D
C
B
E
A
EINSTELLEN DES TRAGEBÜGELS
WARNUNG! Schnallen Sie Ihr Kind immer mit dem
integrierten Gurtsystem an.
Sie können den Tragebügel in vier Positionen einrasten
lassen:
A: Fahrzeugposition.
C: Trageposition.
B+D+E: Zum Hineinlegen Ihres Babys.
F: Zum sicheren Stand auf einer ebenen Fläche
außerhalb des Fahrzeugs.
F
a
a
b
12
WARNUNG! Um zu verhindern, dass der Sitz
während des Tragens kippt, überprüfen Sie, ob der
Tragebügel in der Trageposition C eingerastet ist.
• Zur Verstellung des Tragebügels drücken Sie
gleichzeitig die beiden Tasten (b) links und rechts am
Tragebügel (a).
• Schwenken Sie nun mit gedrückten Tasten (b), den
Tragebügel (a) vor oder zurück, bis er selbsttätig in der
gewünschten Position einrastet.
Page 13

ADJUSTING THE CARRYING HANDLE REGOLAZIONE DEL MANIGLIONE DI TRASPORTO
WARNING! Always strap your child in with the
integrated belt system.
ATTENZIONE! Allacciare sempre il bambino con il
sistema di cinture.
DEENIT
You can lock the carrying handle in place in four
positions:
A: vehicle position
C: carrying position
B+D+E: for putting your baby inside
F: for setting the infant car seat down safely on a
level surface outside the vehicle.
WARNING! In order to prevent the seat from tipping
over during carrying, check whether the carrying
handle is locked in place in carrying position C.
• To adjust the carrying handle, simultaneously press the
left and right buttons (b).
• Then pivot carrying handle a forwards or backwards
while pressing button (b), until it automatically locks in
place in the desired position.
E' possibile regolare il maniglione di trasporto in 4
posizioni:
A: posizione di viaggio
C: posizione di trasporto
B+D+E: posizione per l'inserimento del bambino
F: posizione di appoggio sicuro su supercie
piana al di fuori dell'auto.
ATTENZIONE! Per evitare il rischio di capovolgimento durante il trasporto assicuratevi sempre che il
manico sia bloccato nella posizione di trasporto C.
• Per regolare il manico di trasporto premere
contemporaneamente i due pulsanti (b).
• Mantenendo premuti i pulsanti (b) ruotare il manigione
in avanti o indietro no a che si ssa automaticamente
nella posizione desiderata.
13
Page 14

ANPASSEN DER KOPFSTÜTZE
HINWEIS! Nur eine in optimaler Höhe eingestellte
Kopfstütze gewährt ihrem Kind größtmöglichen Schutz
und Komfort. Die Höhenverstellung kann in acht
v
c
e
g
14
Positionen erfolgen.
• Als zusätzliches Element zur Anpassung ist der CYBEX
CLOUD Q mit einem Sitzverkleinerer ausgestattet,
welcher entfernt werden muss, bevor die Kopfstütze
zum ersten Mal in der Höhe verstellt wird.
• Die Kopfstütze muss so eingestellt werden, dass max.
zwei Finger breit oder weniger zwischen Schulter des
Kindes und Kopfstütze frei bleiben.
• Ziehen Sie den Verstellschlaufe (v) an der Oberseite
der Kopfstütze nach oben, und führen Sie die
Kopfstütze in die gewünschte Position.
HINWEIS! Die Schultergurte (c) sind mit der Kopfstütze
fest verbunden und müssen nicht separat eingestellt
werden.
ANSCHNALLEN MITTELS GURTSYSTEM
HINWEIS! Achten Sie darauf, dass die Kopfstütze
ordnungsgemäß eingerastet ist, bevor Sie den Sitz
verwenden.
HINWEIS! Sorgen Sie dafür, dass die Babyschale frei von
Spielsachen und harten Objekten ist.
• Lockern Sie die Schultergurte (c), indem Sie die
Verstelltaste am Zentralversteller (g) betätigen und
gleichzeitig beide Schultergurte nach oben ziehen.
• Öffnen Sie das Gurtschloss durch kräftiges Drücken der
roten Taste (e).
Page 15

ADJUSTING THE HEADREST REGOLAZIONE DEL POGGIATESTA
NOTE! The headrest only ensures the best possible
protection for your child if it is adjusted to the optimum
height. There are eight height positions that can be set.
NOTA BENE! Il poggiatesta offre la protezione ottimale
soltanto se regolato correttamente in altezza. Può essere
ssato in otto posizioni diverse.
DEENIT
• As an additional element for ensuring correct t, the
CYBEX CLOUD Q is equipped with a seat reducer,
which must be removed before the height of the
headrest is adjusted for the rst time.
• The headrest must be adjusted so that max. two
ngers’ breadth or less remains free between the child’s
shoulder and the headrest.
• Pull up adjustment tab (v) on the top of the headrest
and move the headrest into the desired position.
NOTE! The shoulder belts (c) are rmly connected to the
headrest and must not be adjusted separately.
STRAPPING IN WITH THE BELT SYSTEM
NOTE! Ensure that the headrest is correctly locked in
place before using the seat.
NOTE! Ensure that the infant car seat is free from toys
and hard objects.
• Loosen shoulder belts (c) by pressing the adjustment
button on central adjuster (g) and simultaneously pulling
both shoulder belts up.
• Undo the belt buckle by pressing red button (e) rmly.
• Per adattarsi sempre perfettamente CYBEX CLOUD Q
è dotato anche di un inserto riduttore, un cuscino che
dovrà essere rimosso prima di modicare l'altezza del
poggiatesta la prima volta.
• Il poggiatesta deve essere regolato in modo che tra le
spalle del bambino e la base del poggiatesta possano
passare al massimo due dita.
• Tirando la linguetta (v) nella parte superiore del
poggiatesta, spostarlo nella posizione desiderata.
NOTA BENE! Le cinture per le spalle (c) sono collegate
al poggiatesta e non richiedono una regolazione a parte.
ALLACCIARE CON IL SISTEMA DI CINTURE
NOTA BENE! Vericare che il poggiatesta sia bloccato
correttamente prima di utilizzare il seggiolino.
NOTA BENE! Assicuratevi che il seggiolino sia libero da
giocattoli o altri oggetti rigidi.
• Allentare le cinture (c) premendo il pulsante centrale (g)
e tirare entrambe le cinture, insieme, verso l'alto.
• Slacciare le cinture premendo con forza il pulsante
rosso (e) sulla bbia centrale.
15
Page 16

c
d
t
e
16
HINWEIS! Bitte ziehen Sie immer am Schultergurt (c) und
nicht an den Gurtpolstern (d).
• Setzen Sie ihr Kind in den Kindersitz.
• Führen Sie die Schultergurte (c) gerade über die
Schultern ihres Kindes.
HINWEIS! Achten Sie darauf, dass die Schultergurte (c)
nicht verdreht sind.
• Führen Sie die beiden Schlosszungen (t) zusammen,
und rasten Sie diese im Gurtschloss (e) mit einem
hörbaren „CLICK“ ein.
• Ziehen Sie behutsam am Zentralverstellgurt (g), um
die Schultergurte (c) soweit zu straffen, bis diese am
Körper ihres Kindes anliegen.
HINWEIS! Für den optimalen Schutz des CYBEX CLOUD
Q sollten die Schultergurte (c) so nahe wie möglich am
Körper anliegen.
Page 17

NOTE! Please always pull on shoulder belt (c) and not on
belt pads (d).
• Put your child into the child seat.
• Place shoulder belt (c) directly over your child’s
shoulders.
NOTE! Ensure that shoulder belts (c) are not twisted.
• Place both buckle tongues together and lock them in
place in belt buckle (e) with an audible “CLICK”.
• Pull cautiously on central adjustment belt (g) in order to
tighten shoulder belts (c) until they t your child’s body.
NOTE! For CYBEX CLOUD Q to offer optimum
protection, shoulder belts (c) should t the body as
closely as possible.
NOTA BENE! Tirare sempre agendo sulle cinture(c) non
sui cuscinetti (d).
• Posizionare il bambino nel seggiolino auto.
• Appoggiare le cinture (c) sulle spalle del bambino.
NOTA BENE! Le cinture (c) non devono mai essere
attorcigliate
• Unire tra loro le due linguette (t) ed inserirle insieme
nella bbia centrale (e) dove si bloccano con un sonoro
“CLICK”.
• Tirare delicatamente la cintura di regolazione centrale
(g) per stringere le cinture (c) no a farle aderire
perfettamente alle spalle del bambino.
NOTA BENE! Per garantire la massima protezione da
parte di CYBEX CLOUD Q le cinture per le spalle (c)
devono aderire il più possibile al corpo del bambino.
DEENIT
17
Page 18

SICHERHEIT FÜR IHR BABY
HINWEIS! Schnallen Sie Ihr Baby in der Babyschale
immer an und lassen Sie Ihr Baby niemals aus den
Augen, wenn Sie es in der Babyschale auf erhöhten
Flächen abstellen (z.B. Wickelkommode, Tisch, Bank,
Sessel...).
WARNUNG! Die Kunststoffteile der Babyschale
erhitzen sich in der Sonne. Ihr Baby kann sich
daran verbrennen. Schützen Sie Ihr Baby und die
Babyschale vor intensiver Sonneneinstrahlung (z.B.
indem Sie ein helles Tuch über die Schale legen).
• Nehmen Sie Ihr Baby so oft wie möglich aus der
Babyschale und entlasten Sie seine Wirbelsäule.
• Unterbrechen Sie dazu längere Autofahrten. Denken
Sie auch außerhalb des Autos daran, Ihr Baby nicht zu
lange in der Babyschale zu lassen.
WARNUNG! Bitte lassen Sie Ihr Kind nie unbeaufsichtigt
im Fahrzeug zurück.
18
Page 19

SAFETY FOR YOUR BABY SICUREZZA DEL BAMBINO
NOTE! Always strap your baby into the infant car seat
and never lose sight of your baby if you put him or her
down on a raised surface (e.g. changing unit, table,
bench, armchair…) while in the baby infant car seat.
NOTA BENE! Allacciare sempre il bambino quando
seduto nel seggiolino e non lasciarlo mai per alcun motivo
incustodito quando il seggiolino è posto su superci
rialzate (ad es. fasciatoio, tavolo, panchina, poltrona...).
DEENIT
WARNING! The plastic parts of the infant car seat
heat up in the sun. Your baby can suffer burns from
this. Protect your baby and the infant car seat from
intense sun exposure (e.g. by placing a light cloth
over the seat).
• Take your baby out of the infant car seat as often as
possible in order to relieve pressure from his or her
spine.
• Take breaks on longer car journeys for this purpose.
Also ensure that you do not leave your child for too long
in the infant car seat even when not in the car.
WARNING! Please never leave your child unattended in
a vehicle.
ATTENZIONE! Le parti in plastica del seggiolino
tendono a riscaldarsi se esposte al sole. Per evitare
il rischio di scottature al bambino, proteggerlo e
proteggere il seggiolino da un'eccessiva esposizione
al sole (per esempio stendendo un telo chiaro sopra
il seggiolino).
• Cercate di interrompere sedute troppo prolungate del
bambino nel seggiolino sollevandolo quando possibile
per permettergli di rilassare la colonna vertebrale.
• Prevedere quindi soste durante i viaggi più lunghi, ma
anche durante i tragitti non in automobile.
ATTENZIONE! Non lasciare MAI il bambino incustodito
nella vettura.
19
Page 20

SICHERHEIT BEIM EINBAU INS FAHRZEUG
Achten Sie zum Schutz aller Fahrzeuginsassen stets
darauf, dass ...
• die umklappbaren Rückenlehnen der Fahrzeugsitze
eingerastet sind und sich in einer aufrechten Position
benden.
• bei Einbau der Babyschale auf dem Beifahrersitz,
dieser in der hintersten Position steht.
WARNUNG! Verwenden Sie die Babyschale nicht
auf einem Sitz, auf dem ein Frontairbag aktiviert ist.
Dies gilt nicht für die so genannten Seitenairbags.
• im Fahrzeug alle beweglichen Gegenstände gesichert
sind.
• alle Personen im Fahrzeug angeschnallt sind.
WARNUNG! Das Fahrzeuggurtschloss (q) darf
keinesfalls in die untere Beckengurtführung (k)
hineinreichen. Ist die Gurtpeitsche zu lang, ist
die Babyschale für eine Verwendung auf dieser
Position im Fahrzeug nicht geeignet. Bitte wenden
Sie sich im Zweifelsfall an den Hersteller Ihres
Fahrzeugs.
k
q
20
WARNUNG! Die Babyschale muss, auch dann
wenn sie nicht benutzt wird, immer mit dem
Fahrzeuggurt befestigt sein. Bereits bei einer
Notbremsung oder einem geringen Aufprall kann
eine unbefestigte Babyschale andere Mitfahrer und
Sie selbst verletzen.
Page 21

SAFETY WHEN INSTALLING IN VEHICLE SICUREZZA NELL'INSTALLAZIONE IN AUTO
In order to protect all passengers, ensure that… Per garantire la massima sicurezza di tutti i passeggeri
nell'auto è necessario…
• the infant car seats’ folding backrests are locked in
place and in an upright position
• if installing the infant car seat on the passenger seat,
that this is in its rearmost position
• che gli schienali regolabili dei seggiolini siano ben
bloccati e nella posizione eretta;
• che il sedile passeggero anteriore sia arretrato al
massimo quando il seggiolino guppo 0+ vi è installato;
DEENIT
WARNING! Do not use the infant car seat on a seat
with an activated front seat airbag. This does not
apply to so-called side airbags.
• all unsecured objects in the vehicle are secured
• all persons in the vehicle are strapped in
WARNING! The vehicle belt buckle (q) must under
no circumstances reach into the lower lap belt
guide (k). If the belt stalk is too long, the infant
car seat is not suitable for use in this position in
the vehicle. In case of doubt, please contact the
manufacturer of your vehicle.
WARNING! The infant car seat must always be
secured with the vehicle seatbelt, even when not
being used. In the event of an emergency stop or
a minor collision, an unsecured infant car seat can
injure other passengers and yourself.
ATTENZIONE! Non usare MAI il seggiolino gr. 0+
sul sedile passeggero anteriore con airbag attivato.
Quest'avvertenza non si applica agli airbag laterali.
• ssare tutti gli oggetti mobili all'interno del veicolo;
• che tutti i passeggeri abbiano le cinture allacciate.
ATTENZIONE! La bbia della cintura dell'auto (q)
non deve in nessun caso arrivare all'altezza della
guida cintura (k). Quando l'attacco della bbia è
troppo lungo, non è possibile utilizzare il seggiolino
in quella posizione. Nel dubbio, rivolgersi alla casa
costruttrice del veicolo.
ATTENZIONE! Il seggiolino deve sempre essere
allacciato con la cintura di sicurezza dell'auto,
anche quando non utilizzato. In caso di frenata
brusca o di incidente, un seggiolino non allacciato
potrebbe ferire altri passeggeri o il guidatore.
21
Page 22

a
p
m
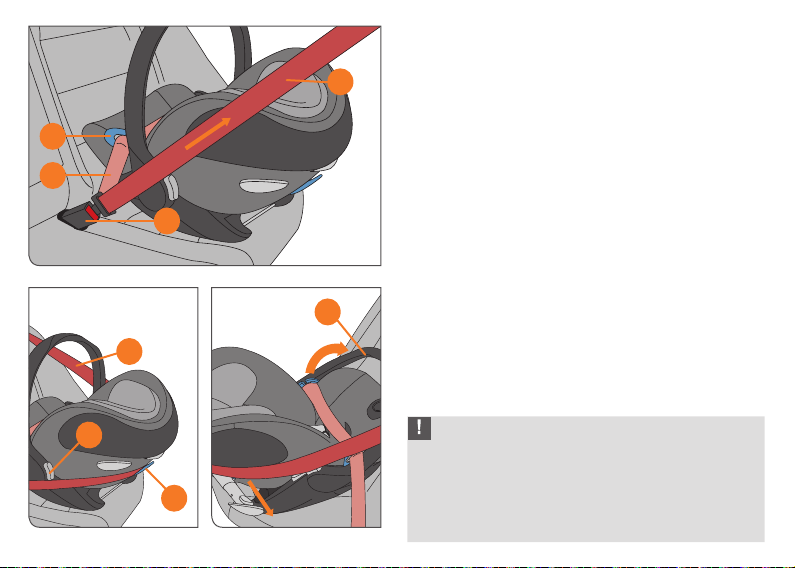
DER EINBAU INS FAHRZEUG
• Stellen Sie die Babyschale entgegen der Fahrtrichtung
auf den Fahrzeugsitz (die Füße des Kindes zeigen in
Richtung Fahrzeugsitzlehne).
HINWEIS! Der CYBEX CLOUD Q ist auf allen Plätzen
mit Dreipunkt-Automatikgurt verwendbar. Wir empfehlen
generell, den Sitz hinten im Fahrzeug zu verwenden.
Vorne ist Ihr Kind bei einem Unfall in den meisten Fällen
höheren Gefahren ausgesetzt.
WARNUNG! Der Sitz ist nicht für die Verwendung
mit einem 2-Punkt- oder Beckengurt geeignet.
Bei Sicherung mit einem 2-Punkt-Gurt kann es
bei einem Unfall zu schweren oder tödlichen
Verletzungen des Kindes kommen.
• Stellen Sie sicher, dass die Einbaumarkierung des sich
seitlich am Sitz bendlichen Warnaufklebers (p) parallel
zum Fahrzeugboden ausgerichtet ist.
• Überprüfen Sie auch, dass sich die Babyschale in der
Sitzposition bendet und die Gurtführung (m) entriegelt
ist.
• Ziehen Sie den Fahrzeuggurt heraus und führen Sie ihn
über die Babyschale.
• Rasten Sie die Schlosszunge im Fahrzeug-Gurtschloss
(q) ein.
q
22
Page 23

INSTALLATION IN CAR INSTALLAZIONE NELLA VETTURA
• Place the infant car seat facing the rear of the vehicle
on the vehicle seat (the child’s feet point towards to the
backrest of the vehicle seat).
NOTE! The CYBEX CLOUD Q can be used on all seats
with three-point automatic belts. We recommend as a rule
that the seat is used in the rear of the vehicle. In most
cases, your child is exposed to higher risk in the front.
• Appoggiare il seggiolino sul sedile, rivolto in direzione
opposta a quella di marcia (i piedi del bambino sono
rivolti verso lo schienale dell'auto).
NOTA BENE! CYBEX CLOUD Q può essere installato su
tutti i sedili dotati di cinture di sicurezza automatiche a tre
punti. Raccomandiamo di utilizzare preferibilmente i sedili
posteriori. Generalmente sui sedili anteriori il bambino è
esposto a maggiori rischi.
WARNING! The seat is not suitable for use with a
two-point or lap seatbelt. Securing with a two-point
seatbelt could result in serious or fatal injuries to the
child in the event of an accident.
ATTENZIONE! Il seggiolino NON può essere
installato con cinture a due punti o soltanto con
quella ventrale. Fissando il bambino con cinture a
due punti soltanto lo si espone al rischio di gravi
ferite, anche letali, in caso di incidente.
• Ensure that the installation mark on warning sticker (p),
located on the side of the seat, is aligned with the oor
of the vehicle.
• Also check that the infant car seat is in the sitting
position and that belt guide (m) is unlocked.
• Pull out the vehicle seatbelt and route it over the infant
car seat.
• Lock the buckle tongue in place in vehicle seatbelt (q).
• Vericare che la marcatura orizzontale sull'adesivo di
sicurezza (p), posto sul anco del seggiolino, risulti
parallela al pavimento della vettura.
• Controllare che il seggiolino sia nella posizione seduta
e che la guida cintura (m) sia aperta.
• Estrarre la cintura a tre punti e farla passare attorno al
seggiolino.
• Allacciare la cintura inserendo il gancio di chiusura nella
bbia (q).
DEENIT
23
Page 24
m
HINWEIS! Die Babyschale darf im Fahrzeug nicht
in der Liegeposition verwendet werden. Um dies
sicherzustellen, wird die Gurtführung automatisch
l
k
q
a
l
verschlossen, sobald der Sitz in Liegeposition gebracht
wird.
• Legen Sie den Beckengurt (k) in die blauen
Gurtführungen (m) an beiden Seiten des BabyschalenRandes ein.
• Straffen Sie den Beckengurt (k), indem Sie am
Diagonalgurt (l) in Fahrtrichtung ziehen.
• Ziehen Sie den Diagonalgurt (l) hinter das Kopfende der
Babyschale.
HINWEIS! Fahrzeuggurt dabei nicht verdrehen.
• Führen Sie den Diagonalgurt (l) durch die hintere blaue
Gurtführung (n).
• Straffen Sie den Diagonalgurt (l).
HINWEIS! Der Diagonalgurt (l) muss durch die
rückseitige, blaue Gurtführung (n) und unterhalb des
ausgeklappten Seitenaufprallschutzes (L.S.P.) geführt
werden.
• Schwenken Sie nun mit gedrückten Tasten (b), den
Tragebügel (a) in die Fahrzeugposition A (s. Seite 12).
b
n
24
WARNUNG! Es kann vorkommen, dass das
Schlossteil (q) des Autogurtes zu lang ist, sodass
dieser bis an die blauen Gurtführungen der Schale
heranreicht. Dadurch kann die Babyschale nicht
straff befestigt werden. Wählen Sie in diesem Fall im
Auto einen anderen Sitzplatz für die Babyschale.
Page 25

NOTE! The infant car seat must not be used in the
reclining position in a vehicle. In order to ensure this, the
belt guide is automatically locked as soon as the seat is
put into the reclining position.
• Place the lap belt (k) into blue belt guides (m) on both
sides of the infant car seat.
• Tighten lap belt (k) by pulling on diagonal belt (l) in the
direction of the front of the vehicle.
• Pull diagonal belt (l) behind the head end of the infant
car seat.
NOTE! Do not twist the vehicle seatbelt while doing this.
• Route diagonal belt (l) through the rear blue belt guide
(n) and ensure the belt is placed above the L.S.P.
• Tighten diagonal belt (l).
NOTE! Diagonal belt (l) must be routed through rear, blue
belt guide (n) and above the unfolded telescopic Linear
Side-impact Protector (L.S.P.).
• Now swing the carrying handle (a) with both buttons (b)
pressed, into the vehicle position A (see page 12)
NOTA BENE! Il seggiolino non deve essere utilizzato nella posizione reclinata per il trasporto in auto. Per evitare
errori la guida cintura si blocca automaticamente quando
il seggiolino è nella posizione reclinata.
• Inserire la parte di cintura ventrale (k) nelle guide blu
(m) su ambo i lati del seggiolino.
• Stringere al massimo la cintura ventrale (k) tirando la
parte diagonale (l) verso la parte frontale del veicolo.
• Tirare la cintura diagonale (l) e farla passare dietro al
lato testa del seggiolino.
NOTA BENE! Non attorcigliare MAI la cintura!
• Inserire la cintura diagonale (l) nella guida posteriore (n)
di colore blu, deve scorrere al di sopra dell'L.S.P.
• Tendere al massimo la cintura diagonale (l).
NOTA BENE! La cintura diagonale (l) deve essere
inserita nella guida posteriore (n) di colore blu e passare
al di sopra della protezione L.S.P. estratta.
• Ora ruotare la maniglia di trasporto (a), con entrambi
i pulsanti (b) premuto, nella posizione del veicolo A
(vedere pagina 12).
DEENIT
WARNING! It may be that buckle part (q) of the
car seatbelt is too long so that is reaches the blue
belt guides of the infant car seat. This means that
the infant car seat cannot be fastened tightly. If this
is the case, choose another seat in the car for the
infant car seat.
ATTENZIONE! Talvolta il punto di ssaggio della
cintura (q) ha un aggancio troppo lungo, tanto da
arrivare all'altezza delle guide per la cintura del seg-
giolino. Ciò compromette un'installazione corretta
del seggiolino. In casi come questo raccomandiamo
di scegliere un'altra posizione per l'installazione del
seggiolino.
25
Page 26

EINSTELLEN DER SEITENPROTEKTOREN
Im CYBEX CLOUD Q ist das „Linear Side-Impact
Protection“ System (L.S.P.) verbaut. Dieses System
erhöht die Sicherheit ihres Kindes im Falle eines
seitlichen Aufpralls. Um die bestmögliche Schutzwirkung
zu erzielen, ziehen Sie das L.S.P. zu der zur Babyschale
zugewandten Autotür soweit wie möglich heraus.
HINWEIS! Achten Sie darauf, dass der ausfahrbare Teil
einrastet. Dies ist durch ein „KLICK“ hörbar.
CLICK!
f
26
Das L.S.P. verfügt über zwei Positionen. Sollte das
L.S.P. in der äußersten Position an die AutotürInnenseite anstoßen, müssen Sie die Zwischenposition
verwenden. Dazu müssen Sie zuerst das L.S.P.
komplett herausziehen. Anschließend betätigen Sie die
Entriegelungstaste (f) und schieben das L.S.P. in die
Zwischenposition zurück.
Das L.S.P. lässt sich wieder komplett in den Sitz
einschieben, indem Sie die Entriegelungstaste (f) drücken
und gleichzeitig mit leichtem Druck den ausgezogenen
Teil zum Sitz hin bewegen.
HINWEIS! Beim Einbau der Babyschale auf
einem mittleren Sitzplatz dürfen Sie den linearen
Seitenaufprallschutz (L.S.P.) nicht herausziehen.
WARNUNG! Der ausgezogene Seitenaufprallschutz
(L.S.P.) dient nicht als Tragegriff oder zur
Befestigung der Babyschale.
Page 27

ADJUSTING THE SIDE PROTECTOR REGOLAZIONE DELLE PROTEZIONI LATERALI
The “Linear Side-impact Protector” (L.S.P.) is built into the
CYBEX CLOUD Q. This system enhances the safety of
your child in the event of a side crash. In order to achieve
the best possible protective effect, fold the L.S.P. out as
far as possible towards the car door closest to the infant
car seat.
La protezione lineare nell'impatto laterale (sistema L.S.P.)
è integrata in CYBEX CLOUD Q. Questo sistema migliora
la sicurezza del vostro bambino in caso di incidente
laterale. Per ottenere la massima protezione possibile,
estrarre al massimo la protezione L.S.P. sul lato più vicino
alla portiera dell'auto.
DEENIT
NOTE! Ensure that the extendable part locks in place.
You will hear a „CLICK“ when it is locked.
The L.S.P. has two positions. If the L.S.P. touches the
inside of the car door when in its outermost position,
you must use the intermediate position. To do so, you
rst have to unfold the L.S.P. completely. Then press
unlocking button (f) and push the L.S.P. back into the
intermediate position.
The L.S.P. can be completely pushed back into the seat
if you press unlocking button (f) at the same time as
moving the folded out part towards the seat with a gentle
pressure.
NOTE! If installing the infant car seat on a middle seat,
you must not fold out either Linear Side-impact Protectors
(L.S.P.).
WARNING! The folded out Linear Side-impact
Protector (L.S.P.) does not function as a handle or
for fastening the infant car seat.
NOTA BENE! Vericare che il sistema telescopico sia
bloccato in posizione, dovrete udire un sonoro "CLICK".
Il braccetto L.S.P. ha due posizioni. Se arriva a toccare
l'interno della portiera quando esteso al massimo, è
necessario ricorrere alla posizione intermedia. Per
questo è necessario estrarre completamente il sistema
telescopico, quindi premere il pulsante di sblocco (f)
e spingere il braccetto all'interno no alla posizione
intermedia.
Per riportare l'L.S.P. nella posizione iniziale, premere il
pulsante di sblocco (f) e contemporaneamente spingere
dolcemente il braccetto verso il seggiolino.
NOTA BENE! Quando il seggiolino è installato nel sedile
centrale del veicolo gli L.S.P. NON devono essere estratti.
ATTENZIONE! E' assolutamente vietato utilizzare
i braccetti L.S.P. in estensione per trasportare o
allacciare il seggiolino.
27
Page 28

AUSBAU AUS DEM FAHRZEUG
Durch Drücken der Entriegelungstaste (f) können Sie den
linearen Seitenaufprallschutz (L.S.P.) wieder in den Sitz
schieben.
HINWEIS: Um Ihr Fahrzeug, sowie die Babyschale vor
m
k
n
c
Beschädigung zu schützen, muss der Seitenprotektor
(L.S.P.) vor der Entnahme wieder in den Sitz geschoben
werden.
• Nehmen Sie den Diagonalgurt aus der hinteren blauen
Gurtführung (n).
• Öffnen Sie das Auto-Gurtschloss (q) und nehmen Sie
den Beckengurt (k) aus den blauen Gurtführungen (m).
SO IST IHR BABY RICHTIG GESICHERT
Prüfen Sie zur Sicherheit Ihres Babys, dass:
• die Schultergurte (c) der Babyschale körpernah
anliegen, ohne das Baby einzuengen und dass die
Schultergurte nicht verdreht sind.
• die Position der Kopfstütze richtig eingestellt ist
• die Schlosszungen (t) im Gurtschloss (e) eingerastet
sind.
t
e
28
Page 29

REMOVAL FROM THE VEHICLE RIMOZIONE DEL SEGGIOLINO DALL'AUTO
By pressing the release button (f) you can push the
Linear Side-impact Protector (L.S.P.) back into the seat.
Premere il pulsante di sblocco (f) e spingere la protezione
L.S.P. all'interno del seggiolino.
DEENIT
PLEASE NOTE: In order to protect both your vehicle
and the infant car seat, the Linear Side-impact Protector
(L.S.P.) must be pushed back into the seat before taking
NOTA BENE: Fare rientrare i dispositivi L.S.P. prima di
togliere il seggiolino dall'auto, questo per proteggere sia il
seggiolino che la vettura da eventuali danni.
the seat out.
• Take the diagonal belt out of rear, blue belt guide (n).
• Undo the car seatbelt buckle and take lap belt (k) out of
belt guide (m).
• Togliere la cintura diagonale dalla guida posteriore (n)
di colore blu.
• Slacciare la cintura dell'auto dalla bbia e slare la
parte ventrale (k) dalle guide (m).
CORRECT SECURING OF YOUR BABY IL BAMBINO È FISSATO CORRETTAMENTE?
To ensure your baby’s safety, check that: Per garantire la sicurezza del bambino è bene vericare:
• shoulder belt (c) ts the baby’s body closely without
constricting the baby and the belt is not twisted.
• the position of the headrest is correctly adjusted
• buckle tongues (t) are locked in place in belt buckle (e).
• che le cinture di sicurezza per le spalle (c) aderiscano
bene al suo corpo senza stringerlo eccessivamente e
che non siano attorcigliate.
• che il poggiatesta sia regolato alla giusta altezza;
• che gli agganci delle cinture (t) siano saldamente ssati
nella bbia (e).
29
Page 30

SO IST DIE BABYSCHALE RICHTIG EINGEBAUT
Prüfen Sie zur Sicherheit Ihres Babys, dass:
• die Babyschale entgegen der Fahrtrichtung befestigt
ist (die Füße des Kindes zeigen in Richtung
Fahrzeugsitzlehne).
• die Babyschale nur dann auf dem Beifahrersitz
befestigt ist, wenn kein Front-Airbag auf die Babyschale
einwirken kann.
• der CYBEX CLOUD Q mit einem 3-Punkt-Gurt befestigt
ist.
• der Beckengurt (k) durch die beiden blauen
Gurtführungen (m) am Rand der Babyschale verläuft.
• der Diagonalgurt (l) durch die blaue Gurtführung (n) an
der Rückenlehne der Babyschale verläuft.
• das Auto-Gurtschloss (q) nicht an die blaue Gurtführung
(m) heranreicht.
m
m
q
30
• der Autogurt straff und nicht verdreht ist.
• die Babyschale waagerecht (Markierung) und in
Sitzposition mit entriegelter Gurtführung im Fahrzeug
steht.
• das L.S.P. auf der zur Autotür zugewandten Seite
soweit wie möglich heraus gezogen ist, um die
bestmögliche Schutzwirkung zu erzielen.
• Schwenken Sie mit gedrückten Tasten (b), den
Tragebügel (a) in die Fahrzeugposition A.
HINWEIS! Die Babyschale darf ausschließlich auf einem
nach vorne gerichteten Sitz benutzt werden, der mit
einem Dreipunkt-Sicherheitsgurt ausgestattet und nach
ECE R16 zugelassen ist.
Page 31

CORRECT INSTALLATION OF THE INFANT CAR SEAT IL SEGGIOLINO E' INSTALLATO CORRETTAMENTE?
To ensure your baby’s safety, check that: Per garantire la sicurezza del bambino è bene vericare:
• the infant car seat is secured with the child facing
the rear of the car (the child’s feet point towards the
backrest of the infant car seat)
• the infant car seat is only used on the front passenger
seat if there is no front airbag that can impact on the
infant car seat.
• the CYBEX CLOUD Q is fastened with a three-point
automatic infant car seat belt
• lap belt (k) runs through the two blue belt guides (m) on
both sides of the infant car seat
• diagonal belt (l) runs through blue belt guide (n) on the
backrest of the infant car seat
• car seatbelt buckle (q) is not touching blue belt guide
(m)
• the car seatbelt is taut and not twisted
• the infant car seat is leveled (see marking) in the
vehicle and in the sitting position with the belt guide
unlocked
• the L.S.P. has been unfolded as far as possible on the
side nearest to the car door, in order to achieve the best
possible protective effect.
• Swing the carrying handle (a) with both buttons (b)
pressed, into the vehicle position A.
NOTE! The infant car seat may only be used on a front-
facing seat that has been tted with a three-point safety
belt and is approved under ECE R16.
• che il seggiolino sia installato contro il senso di marcia
(i piedi del bambino devono essere rivolti verso lo
schienale del sedile dell'auto);
• che, nel caso il seggiolino sia installato sul sedile passeggero anteriore, non vi sia airbag frontale che possa
impattare sul seggiolino;
• che CYBEX CLOUD Q sia allacciato con una cintura
automatica a tre punti;
• che la cintura ventrale (k) scorra attraverso le apposite
guide (m) su ambo i lati del seggiolino;
• che la parte diagonale della cintura (l) passi attraverso
la guida (n) di colore blu sul retro del seggiolino;
• che la bbia della cintura dell'auto (q) non raggiunga
l'altezza delle guide (m) del seggiolino;
• che la cintura dell'auto sia ben tesa e non attorcigliata;
• che il seggiolino sia a livello nell'auto (vedi contrassegno) e nella posizione seduta con le guide cintura
aperte;
• che la protezione L.S.P. sia estesa al massimo sul lato
vicino alla portiera dell'auto, per la massima efcacia
protettiva.
• Ruotare la maniglia di trasporto (a), con entrambi i
pulsanti (b) premuto, nella posizione del veicolo A.
NOTA BENE! Il seggiolino può essere installato
esclusivamente su sedili rivolti nel senso di marcia dotati
di cinture di sicurezza a tre punti omologate secondo la
norma ECE R16.
DEENIT
31
Page 32

4
3
2
1
o
m
CLICK!
32
ÖFFNEN DES SONNENVERDECKES
Klappen Sie das Sonnenverdeck durch Ziehen an der
Kunststoffabdeckung stufenweise aus. Zum Einklappen
schieben Sie das Sonnenverdeck in die Ausgangsposition
zurück.
EINSTELLEN DER LIEGEPOSITION
WARNUNG! Die Babyschale darf ausschließlich
außerhalb des Fahrzeugs in die Liegeposition gebracht
werden.
Der CYBEX CLOUD Q kann durch betätigen der
Entriegelungstaste (o) und gleichzeitiges Hinterdrücken
des Rückenteiles in die Liegeposition gebracht werden.
Vergewissern Sie sich, dass der Sitz in der Liegeposition
richtig verrastet ist.
Die Position ist ausschließlich für die Benutzung
außerhalb des Fahrzeuges zulässig, wie zum Beispiel
im Kinderwagen und darf keines Falls im Fahrzeug
verwendet werden.
Zur Sicherheit verriegelt sich bei dem Wechsel von
der Sitz- in die Liegeposition die Gurtführung (m)
automatisch.
HINWEIS! Nehmen Sie während der Fahrt keine
Änderungen an der Sitzeinstellung vor.
Um zurück in die Sitzposition zu kommen, betätigen Sie
die Entriegelungstaste und ziehen dabei den Rückenteil
hinauf, bis Sie das Einrastgeräusch hören.
Page 33

OPENING THE SUN CANOPY APERTURA DELLA CAPOTTINA
Unfold the sun canopy by pulling gradually on the plastic
cover. To fold up, push the sun canopy back to its starting
position.
Per aprire la capottina basta semplicemente tirare gradualmente in avanti il pannello in plastica. Per chiuderla,
spingere il pannello verso la posizione iniziale.
ADJUSTING THE RECLINING POSITION REGOLARE LA POSIZIONE DI RECLINAZIONE
WARNING! The CYBEX CLOUD Q must only be reclined
outside of the vehicle.
The CYBEX CLOUD Q can be put into the reclining
position by pressing the release button (o) at the same
time as pushing the back section down.
ATTENZIONE! CYBEX CLOUD Q può essere reclinato
completamente soltanto fuori dall'auto.
Per ottenere la posizione reclinata di CYBEX CLOUD Q
premere il pulsante di sblocco (o) spingendo contemporaneamente lo schienale verso il basso.
DEENIT
Ensure that the seat has been correctly locked in place in
the reclining position.
The position is permitted exclusively for use outside of the
vehicle, for example on a stroller, and must not be used in
a vehicle under any circumstances.
For safety purposes, belt guide (m) locks automatically if
the seat is put into the reclining position.
NOTE! Do not undertake any adjustments to the seat setup while the vehicle is in motion.
To get back to the sitting position, press the unlocking
button while pulling the back section up until you hear the
lock “CLICK”.
Vericare che il seggiolino sia bloccato correttamente
nella posizione di reclinazione.
La reclinazione è permessa soltanto per l'uso al di fuori
del veicolo, per esempio sul passeggino; non deve MAI
essere utilizzata per il trasporto in auto.
Per ragioni di sicurezza, le guide (m) per la cintura dell'auto si bloccano automaticamente quando il seggiolino
è in posizione reclinata.
NOTA BENE! Non effettuare regolazioni o modiche alla
posizione del seggiolino mentre l'auto è in movimento.
Per tornare alla posizione seduta, premere il pulsante di
sblocco (o) e tirare lo schienale verso l'alto no a sentire il
“CLICK” di blocco.
33
Page 34

CYBEX TRAVEL-SYSTEM
Befolgen Sie die Gebrauchsanweisung Ihres Kinder-
s
CLICK!
34
wagens!
Sie können den CYBEX Cloud Q auf jedem dafür
zugelassenen CYBEX-Kinderwagen und auf den
dafür zugelassenen Kinderwagen anderer Hersteller
befestigen. Rasten Sie die Babyschale auf dem dafür
zugelassenen Adapter mit Blickrichtung des Kindes zum
Elternteil ein. Vergewissern Sie sich, dass die Babyschale
auf beiden Seiten hörbar einrastet.
Kontrollieren Sie immer, ob die Babyschale fest mit dem
Buggy verbunden ist.
DEMONTAGE
Zur Entriegelung halten Sie die beiden
Entriegelungstasten (s) der Babyschale gedrückt und
heben Sie die Schale nach oben.
Page 35

CYBEX TRAVEL SYSTEM CYBEX SISTEMA DA VIAGGIO
Follow the instruction manual for your stroller! Vi preghiamo di seguire le istruzioni contenute nel
manuale del passeggino!
DEENIT
You can attach the Cloud Q on any approved CYBEX
or other brand stroller. Click the infant car seat onto the
approved adapter with the child looking towards the
parent. Make sure the infant car seats audibly locks in
place on both sides.
Always check that the infant car seat is rmly connected
to the stroller.
Cloud Q è compatibile con tutti i passeggini CYBEX o di
altre marche approvati. Si ssa agli appositi adattatori
omologati, con il bambino rivolto verso il genitore.
Assicurarsi che il seggiolino si agganci saldamente ad
entrambi gli adattatori con un sonoro click.
Controllare che il seggiolino sia saldamente ssato al
passeggino.
REMOVAL SMONTAGGIO
To unlock, press and hold both unlocking buttons (s) on
the infant car seat and lift the seat up.
Per sganciare il seggiolino dagli adattatori, premere
contemporaneamente i pulsanti (s) e, mantenendoli
premuti, sollevare il seggiolino.
35
Page 36

PFLEGE
Um die größtmögliche Schutzwirkung Ihrer Babyschale
zu gewährleisten, ist es unbedingt notwendig, dass Sie
folgendes beachten:
• Alle wichtigen Teile der Babyschale sollten regelmäßig
auf Beschädigungen kontrolliert werden, sodass alle
mechanischen Bauteile einwandfrei funktionieren.
• Es ist unbedingt darauf zu achten, dass die Babyschale
nicht zwischen harten Teilen wie Fahrzeugtür,
Sitzschiene usw. eingeklemmt wird, da sie dadurch
beschädigt werden kann.
• Nach massiver Krafteinwirkung (z.B. nach einem
Sturz) muss die Babyschale unbedingt vom Hersteller
überprüft werden.
HINWEIS! Es ist ratsam, bereits beim Kauf eines CYBEX
CLOUD Q einen zusätzlichen Bezug zu kaufen, sodass
auch während des Waschens und Trocknens des
Bezuges der CYBEX CLOUD Q weiter benutzt werden
kann.
VERHALTEN NACH EINEM UNFALL
Aufgrund eines Unfalles können am CYBEX CLOUD Q
Beschädigungen auftreten, die mit bloßem Auge nicht
erkennbar sind. Bitte tauschen Sie nach einem Unfall
unbedingt den Sitz aus. Im Zweifelsfall wenden Sie sich
bitte an den Händler oder Hersteller.
36
Page 37

CARE CURA E MANUTENZIONE
In order to ensure that your infant car seat provides
the maximum protective effect you must observe the
Perchè il seggiolino continui ad offrire la massima protezione è necessario tenere presente quanto segue:
following:
• All important parts of the infant car seat should be
checked regularly for damage so that all mechanical
components function without problems.
• It is absolutely essential to ensure that the infant car
seat is not jammed between hard objects such as
vehicle doors, seat rails etc., because this can lead to
damage.
• After exposure to massive forces (e.g. after a collision),
it is essential that the infant car seat is checked by the
manufacturer.
• Tutte le parti principali del seggiolino devono essere
sottoposte ad un regolare controllo per vericare even-
tuali danni e assicurare il perfetto e scorrevole funzionamento delle parti meccaniche.
• E' essenziale che il seggiolino non venga mai schiacciato tra oggetti rigidi, come le porte dell'auto, i binari del
sedile, ecc. perchè ne sarebbe danneggiato.
• Dopo l'esposizione a forze intense (es. dopo un incidente) è indispensabile che il seggiolino sia controllato dal
produttore.
DEENIT
NOTE! It is advisable to buy an additional cover on
purchasing a CYBEX CLOUD Q so that the CYBEX
CLOUD Q can continue to be used even when the cover
is being washed and dried.
NOTA BENE! Consigliamo sempre l'acquisto di un secon-
do rivestimento per CYBEX CLOUD Q. Questo permette
di avere sempre il seggiolino utilizzabile anche quando le
fodere devono essere lavate e lasciate asciugare.
WHAT TO DO AFTER AN ACCIDENT COSA FARE DOPO UN INCIDENTE
An accident can cause damage to the CYBEX CLOUD Q
that is not visible to the naked eye. Please exchange the
seat without fail after an accident. In case of doubt please
contact the retailer or manufacturer.
In un incidente CYBEX CLOUD Q può subire danni non
immediatamente visibili ad occhio nudo. Dopo un incidente il seggiolino dovrebbe essere subito sostituito. Per
qualsiasi dubbio vi preghiamo di contattare il rivenditore
o il produttore.
37
Page 38

REINIGUNG
Es ist darauf zu achten, dass nur ein Original CYBEX
CLOUD Q Sitzbezug verwendet wird, da auch der
Bezug ein wesentlicher Bestandteil der Funktion ist.
Ersatzbezüge erhalten Sie im Fachhandel.
HINWEIS! Bitte den Bezug vor der ersten Verwendung
waschen. Der Bezug darf bei 30°C im Schonwaschgang
gewaschen werden. Sollten Sie mit mehr als 30°C
waschen, kann es zu Ausfärbungen kommen. Bitte den
Bezug gesondert von anderer Wäsche waschen und
niemals im Trockner trocknen! Den Bezug keinesfalls in
der direkten Sonne trocknen! Die Kunststoffteile können
mit einem milden Reinigungsmittel und warmen Wasser
gewaschen werden.
WARNUNG! Auf keinen Fall scharfe Reinigungsoder Bleichmittel verwenden!
WARNUNG! Das Gurtsystem kann nicht
ausgebaut werden! Entfernen Sie niemals einzelne
Bestandteile des Gurtsystems!
Sie können die Gurte mit einer lauwarmen Seifenlösung
abwaschen. Achten Sie darauf, dass die Gurte nicht zu
nass werden.
38
Page 39

CLEANING PULIZIA
Care should be taken only to use an original CYBEX
CLOUD Q seat cover because the cover is also an
essential functional component. Spare covers can be
obtained from your specialist retailer.
NOTE! Please wash the cover before rst use. The
cover can be washed at 30°C on the delicate cycle. If
you wash it at more than 30°C discolouration may occur.
Please wash the cover separately from other laundry and
never tumble dry! Never leave the cover to dry in strong
sunlight! The plastic parts can be cleaned with a mild
Il rivestimento è una parte essenziale del seggiolino ed
è indispensabile utilizzare soltanto rivestimenti originali
CYBEX CLOUD Q. Rivestimenti originali sono disponibili
su richiesta presso i nostri rivenditori autorizzati.
NOTA BENE! Consigliamo il lavaggio prima del primo
utilizzo. Rivestimenti lavabili in lavatrice con ciclo delicato
a max 30°. Temperature più elevate possono scolorire i
tessuti. Lavare separatamente e non asciugare a macchina! Non asciugare alla luce diretta del sole! Pulire le parti
in plastica con un detergente neutro e acqua tiepida.
detergent and warm water.
DEENIT
WARNING! Never use harsh cleaning or bleaching
agents!
WARNING! The belt system cannot be dismantled!
Never remove individual parts of the belt system!
You can clean the belts with a clean cloth and some
lukewarm soapy water. Try to avoid getting the belts too
wet.
ATTENZIONE! Non usare MAI detergenti aggressivi
o sbiancanti!
ATTENZIONE! Il sistema cinture non può essere
smontato! Non rimuovere alcuna parte del sistema
di cinture del seggiolino!
Il sistema di cinture può essere pulito con un panno e
acqua tiepida saponata. Evitare di bagnare eccessivamente le cinture.
39
Page 40

ENTFERNEN DES BEZUGES
Der Bezug besteht aus 6 Teilen: 1 Rückenlehnenbezug,
1 Beinauagenbezug, 1 Kopfstützenbezug, 1
Gurtschlosspolster, und 2 Schultergurtpolster. Zum
Entfernen gehen Sie bitte wie folgt vor:
• Öffnen Sie das Gurtschloss.
• Ziehen Sie die beiden Schulterpolster vom Gurt ab.
• Ziehen Sie den Kopfstützenbezug über den
Kopfstützenrand ab.
• Fädeln Sie die Schultergurte mit den Schlosszungen
aus dem Kopfstützenbezug aus.
• Ziehen Sie den Kopfstützenbezug ab ohne dabei das
weiße Schaumstofffutter zu beschädigen.
• Öffnen Sie die beiden Druckknöpfe zwischen
Rückenlehnenbezug und Beinauagenbezug.
• Fädeln Sie das Gurtschloss aus dem
Beinauagenbezug und ziehen dieses anschließend ab.
• Öffnen Sie bei Druckknöpf hinter der Sonnenblende.
• Nun können Sie den Rückenlehnenbezug abnehmen,
ohne dabei das Schaumstofffutter zu beschädigen.
WARNUNG! Die Babyschale darf keinesfalls ohne
Bezug verwendet werden.
HINWEIS! Es dürfen nur CYBEX CLOUD Q original
Bezüge verwendet werden.
ANBRINGEN DES BEZUGES
Führen Sie die zuvor beschriebenen Handgriffe in
40
umgekehrter Reihenfolge aus, um den Bezug wieder zu
befestigen.
Page 41

REMOVING THE COVER TOGLIERE IL RIVESTIMENTO
The cover consists of 6 parts: 1 backrest cover, 1 leg
support cover, 1 headrest cover, 1 belt buckle pad and
2 shoulder pads. To remove, please apply the following
procedure:
• Undo the belt buckle.
• Remove both shoulder pads from the belt.
• Pull the headrest cover over the edge of the headrest
and remove.
• Thread the shoulder belts with the buckle tongues out
of the headrest cover.
• Remove the headrest cover, taking care not to damage
the white foams underneath the cover.
• Undo both press studs between the backrest cover and
leg support cover.
• Thread the belt buckle out of the leg support cover and
then remove it.
• Undo the press stud behind the sun visor.
• Now you can remove the backrest cover, taking care
not to damage the white protective foams underneath
the cover.
Il rivestimento comprende 6 parti: 1 rivestimento schienale,
1 rivestimento appoggiagambe, 1 rivestimento poggiatesta,
1 cuscinetto bbia cinture 2 cuscinetti cinture spalle. Per la
rimozione seguire il procedimento seguente:
• Slacciare le cinture dalla bbia centrale.
• Rimuovere entrambi i cuscinetti spalle dalla cintura.
• Slare dall'alto il rivestimento del poggiatesta.
• Slare le cinture e le bbie dal rivestimento del poggia-
testa.
• Togliere il rivestimento del poggiatesta, con attenzione
per non danneggiare le protezioni bianche in schiuma.
• Slacciare i due bottoni tra il rivestimento schienale e
quello dell'appoggiagambe.
• Slare la bbia cintura dal rivestimento appoggiagambe
e toglierlo.
• Slacciare il bottone a pressione sotto il visore.
• Ora è possibile togliere il rivestimento dello schienale,
facendo attenzione a non danneggiare le protezioni
bianche in schiuma sottostanti.
DEENIT
WARNING! The infant car seat must under no
circumstances be used without the cover.
NOTE! Only CYBEX CLOUD Q original covers may be
used.
ATTENZIONE! Non usare MAI il seggiolino di
sicurezza senza il rivestimento.
NOTA BENE! Usare solo ed esclusivamente rivestimenti
CYBEX CLOUD Q originali.
ATTACHING THE COVER RIMETTERE IL RIVESTIMENTO
Follow the steps described above but in reverse order in
order to re-fasten the cover.
Per riposizionare il rivestimento ripetere le operazioni
sopra descritte nell'ordine inverso.
41
Page 42

HINWEIS! Die Schultergurte dabei nicht verdrehen oder
vertauschen.
PRODUKTLEBENSDAUER
Durch den langsamen Verschleiß des Kunststoffs,
beispielsweise durch Sonneneinstrahlung (UV), können
sich die Eigenschaften des Produkts geringfügig
verschlechtern.
Da in Fahrzeugen sehr große Temperaturschwankungen
herrschen und andere unvorhersehbare Belastungen
auftreten können, ist es notwendig, folgende Punkte zu
beachten:
• Wenn das Fahrzeug längere Zeit der prallen Sonne
ausgesetzt ist, muss die Babyschale aus dem Fahrzeug
entfernt oder mit einem hellen Tuch abgedeckt werden.
• Prüfen Sie jährlich alle Kunststoffteile der Schale auf
Beschädigung oder Veränderung von Form oder Farbe.
• Sollten Sie eine Veränderung an der Schale feststellen,
wenden Sie sich bitte an den Händler, da sich jegliche
Veränderungen auf die Funktionsweise der Babyschale
auswirken können. Veränderungen des Stoffes
insbesondere das Ausbleichen sind normal und stellen
keine Beeinträchtigung dar.
42
Page 43

NOTE! In doing so, do not twist or mix up the shoulder
belts.
NOTA BENE! Durante le operazioni fare molta attenzione
a non attorcigliare le cinture per le spalle.
PRODUCT LIFESPAN DUREVOLEZZA DEL PRODOTTO
Gradual wear of the plastic, for example caused by
exposure to sunlight (UV), can cause slight deterioration
of the product’s properties.
Because very high temperature uctuations are common
in vehicles and other unforeseeable stresses can occur, it
is necessary to observe the following points:
Nel tempo le parti in plastica tendono ad usurarsi, es. per
l'esposizione al sole (UV) e le caratteristiche del prodotto
possono subire leggere variazioni.
All'interno della vettura il seggiolino è esposto a variazioni
di temperatura e/o a circostanze imprevedibili, pertanto
raccomandiamo di osservare quanto segue:
DEENIT
• If the vehicle is exposed to strong sunlight for long
periods, the infant car seat must be removed from the
vehicle or covered with a light cloth.
• Check all plastic parts annually for damage or change
of shape or colour.
• If you notice a change in the infant car seat, please
consult your retailer as the change could affect the
performance of the infant car seat. Changes to the
fabric, especially fading, are normal and do not
constitute damage.
• Nel caso l'auto venga lasciata al sole per un lungo
periodo, consigliamo di estrarre il seggiolino o di
ripararlo con un telo di colore chiaro.
• Controllare accuratamente almeno una volta l'anno
tutte le parti in plastica per vericarne eventuali danni,
modiche di forma o di colore.
• In caso di modiche riscontrate consultare il rivenditore,
la modica potrebbe inuire sulle prestazioni.
Modiche ai tessuti, in particolare lo sbiadimento, sono
considerate normali e non costituiscono un difetto.
43
Page 44

ABFALLTRENNUNG
Aus Umweltschutzgründen bitten wir den Benutzer zu
Beginn (Verpackung) und am Ende (Produktteile) der
Lebensdauer der Babyschale, den anfallenden Abfall
zu trennen. Die Abfallentsorgung kann kommunal
unterschiedlich geregelt sein. Um eine vorschriftsmäßige
Entsorgung der Babyschale zu gewährleisten, setzen
Sie sich mit Ihrer kommunalen Abfallentsorgung bzw.
Verwaltung lhres Wohnortes in Verbindung. Beachten
Sie auf jeden Fall die Entsorgungsbestimmungen lhres
Landes.
WARNUNG! Bewahren Sie Verpackungsmaterial
aus Kunststoff außer Reichweite Ihres Kindes auf,
es besteht Erstickungsgefahr!
INFORMATIONEN ZUM PRODUKT
Bei Fragen wenden Sie sich zuerst an Ihren Händler.
Folgende Angaben sollten Ihnen vorliegen:
• Seriennummer (siehe Aufkleber).
• Marke und Typ des Autos und die Position der Schale,
auf dem die Babyschale benutzt wird.
• Gewicht (Alter, Größe) des Kindes.
Weitere Informationen zu unseren Produkten nden Sie
auch unter WWW.CYBEX-ONLINE.COM
44
Page 45

WASTE SEPARATION SMALTIMENTO
To protect the environment we ask the user to separate
waste arising at the start (packaging) and end (product
parts) of the infant car seat’s lifespan. Waste removal is
arranged differently depending on the local authorities. In
order to ensure that the infant car seat is disposed of in
accordance with regulations, contact your area’s waste
removal agency or local authority. Always observe your
country’s waste disposal regulations.
Per ragioni di natura ambientale chiediamo a tutti i nostri
clienti di provvedere allo smaltimento appropriato di ogni
parte dall'inizio (imballo) alla ne dell'utilizzo (seggiolino
ed ogni sua parte). Le norme per lo smaltimento variano
localmente. Al ne di garantire lo smaltimento corretto
preghiamo contattare gli ufci competenti della vostra
città per le informazioni necessarie. In ogni caso, seguire
sempre le normative vigenti nella zona di residenza.
DEENIT
WARNING! Keep plastic packing material out of
your child’s reach: danger of suffocation!
ATTENZIONE! Tenere tutte le parti in plastica
dell'imballo lontane dalla portata dei bambini:
pericolo di soffocamento!
PRODUCT INFORMATION INFORMAZIONI SUL PRODOTTO
If you have any questions contact your retailer rst. You
should have the following details ready:
• Serial number (see sticker).
• Make and model of the car and the position of the infant
car seat on which the car infant seat is used.
• Weight (age, height) of the child.
Further information about our products can be found at
WWW.CYBEX-ONLINE.COM
Per qualsiasi dubbio o informazione rivolgetevi subito al
vostro rivenditore. Accertandovi di avere questi dati:
• Numero di serie (vedi etichetta adesiva).
• Marca e modello dell'auto, posizione in cui il seggiolino
è normalmente installato.
• Peso (età, altezza) del bambino.
Per ulteriori informazioni sui nostri prodotti, visitare il
nostro sito WWW.CYBEX-ONLINE.COM
45
Page 46

GUARANTEE CONDITIONS
Die nachfolgenden Garantiebestimmungen gelten
nur in dem Land, in dem dieses Produkt erstmalig
über den Einzelhandel an einen Verbraucher verkauft
wurde. Die Garantie deckt sämtliche Herstellungs- und
Materialfehler ab, die im Zeitpunkt des Kaufs bestanden
haben oder die innerhalb von drei (3) Jahren nach dem
Erstverkauf dieses Produkts über den Einzelhandel
an einen Verbraucher in Erscheinung getreten sind
(Herstellergarantie). Tritt während der Garantiezeit ein
Herstellungs- und Materialfehler auf, wird das Produkt
kostenlos repariert oder – nach unserem freien Ermessen
– gegen ein neues ausgetauscht. Um Leistungen im
Rahmen dieser Garantie in Anspruch nehmen zu können,
muss das Produkt an den Einzelhändler zurückgegeben
werden, der es erstmalig verkauft hat und ein Nachweis
über den Kauf (Kaufbeleg oder Rechnung) im Original
vorgelegt werden, welcher das Kaufdatum, Namen und
Adresse des Händlers, sowie die Produktbezeichnung
aufzeigt. Der Anspruch aus diesem Garantieversprechen
besteht nicht, wenn das Produkt an den Hersteller oder
irgendeine andere Person als den Einzelhändler, der es
erstmalig verkauft hat, zum Zweck der Inanspruchnahme
der Garantieleistung geschickt wird. Die Garantie gilt
nur, wenn das Produkt nach dem Kauf umgehend
auf Vollständigkeit, Herstellungs- und Materialfehler
überprüft wurde. Wurde das Produkt im Versandhandel
gekauft, ist es umgehend nach Erhalt auf Vollständigkeit,
Herstellungs- und Materialfehler zu überprüfen. Falls
46
Schäden vorhanden sind, darf das Produkt nicht mehr
Page 47

GUARANTEE CONDITIONS GARANZIA - CONDIZIONI
The following guarantee conditions are only valid in the
country in which this product was initially sold by a retailer
to a consumer. The guarantee covers all manufacturing
and material faults that were present at the time of
purchase or that became apparent within three (3) years
following initial sale of this product by a retailer to a
consumer. If a manufacturing or material fault appears
during the guarantee period, the product will be repaired
free of charge or — at our discretion — exchanged for
a new one. In order to claim services within the scope
of this guarantee, the product must be returned to the
retailer who initially sold it, and an original proof of
purchase (receipt or invoice), which shows the purchase
date, name and address of the retailer and product name,
must be presented. There is no entitlement resulting
from this guarantee if the product is sent for purposes
of claiming the guarantee service to the manufacturer
or any person other than the retailer who initially sold it.
The guarantee is only valid if the product was checked
immediately after purchase for completeness and
manufacturing and material faults. If the product was
sold via mail order, it must be checked immediately after
receipt for completeness and manufacturing and material
faults. If damage is present, the product must not be used
and must immediately be returned to the retailer who
initially sold it. In the event that the guarantee is claimed,
the product must be returned in a complete and clean
condition. Please read the instruction manual carefully
before making contact with the retailer. The guarantee
Le seguenti condizioni di garanzia si applicano solo alla
nazione in cui questo prodotto è stato venduto al cliente
per la prima volta attraverso i canali di vendita al dettaglio. Questa garanzia copre tutti i difetti di produzione e
dei materiali esistenti al momento dell'acquisto o manifestatisi entro tre (3) anni dalla prima vendita di questo
prodotto al cliente attraverso i canali di vendita al dettaglio (garanzia del produttore). Nel caso venga riscontrato
o appaia un difetto di fabbricazione o di materiali nel
corso di validità della garanzia, provvederemo -a nostra
discrezione- a riparare il prodotto senza costi o a
sostituirlo. Per avere diritto alla garanzia è necessario
riportare o spedire il prodotto al rivenditore presso il quale
è stato acquistato ed è indispensabile fornire la prova
di acquisto (scontrino scle, fattura, ecc.) in originale.
La prova d'acquisto dovrà contenere indicati la data di
acquisto, il nome e indirizzo del rivenditore e identicativo
del prodotto. Nessun intervento in garanzia se il prodotto
verrà inviato al produttore o a qualsiasi altra persona
diversa dal rivenditopre presso il quale si è effettuato
l'acquisto. La garanzia è valida soltanto se il prodotto è
stato sottoposto ad un accurato controllo di completezza
e funzionalità all'acquisto e se eventuali manchevolezze
di produzione o di materiali sono state prontamente
segnalate. Per acquisti a distanza, raccomandiamo
di effettuare un controllo completo al ricevimento
del prodotto. In caso si riscontri qualsiasi difetto/
danneggiamento del prodotto invitiamo a NON utilizzarlo
e a restituirlo imediatamente al rivenditore presso il quale
DEENIT
47
Page 48

benutzt werden und muss umgehend an den Händler,
der es erstmalig verkauft hat, zurückgegeben werden.
Im Garantiefall muss das Produkt in einem vollständigen
und sauberen Zustand zurückgegeben werden. Bitte
lesen Sie vor einer Kontaktaufnahme mit dem Händler
sorgfältig die Gebrauchsanleitung. Die Garantie deckt
keine Schäden ab, die durch Fehlgebrauch, äußere
Einüsse (Wasser, Feuer, Verkehrsunfälle o.ä.) oder
normalen Verschleiß entstanden sind. Die Garantie wird
nur gewährt, wenn das Produkt in Übereinstimmung mit
der Gebrauchsanweisung behandelt und benutzt wurde,
Reparaturen oder Veränderungen ausschließlich durch
Personen vorgenommen wurden, die hierzu befugt
waren und stets nur Original Bau- und Zubehörteile
verwendet wurden. Durch diese Garantie werden weder
die auf Grundlage der jeweils anwendbaren Gesetze
bestehenden Verbraucherrechte noch Rechte gegen den
Verkäufer wegen der Vertragswidrigkeit des Produkts
ausgeschlossen, begrenzt oder in anderer Weise
eingeschränkt.
CYBEX IN EUROPE
CYBEX GmbH,
Riedinger Str. 18, 95448 Bayreuth, Germany
48
Tel.: +49 921 78 511-0, Fax.: +49 921 78 511- 999
Page 49

does not cover damage caused by misuse, external
inuences (water, re, trafc accidents or the like) or by
normal wear and tear. The guarantee is only granted if
the product has been handled and used in accordance
with the instruction manual, repairs or modications have
been exclusively made by persons who had permission to
do so and only original components and accessory parts
were used at all times. This product guarantee does not
exclude, restrict or in any other way limit either the basis
of the consumer rights of the applicable laws or rights
against the seller due to breach of contract.
è stato acquistato. I diritti di garanzia sono validi soltanto
se il prodotto è reso pulito e completo in ogni sua parte.
Prima di contattare il rivenditore vi preghiamo di leggere
con attenzione le istruzioni contenute nel manuale. La
garanzia non copre danni provocati da utilizzo improprio
o da eventi fortuiti e cause ambientali ( acqua, fuoco,
incidenti stradali, ecc.) o dal normale deperimento
d'uso. La garanzia è valida soltanto per prodotti usati
in conformità a quanto stabilito nel manuale d'uso, se
eventuali modiche o riparazioni sono state effettuate
da personale autorizzato e se sono state utilizzate solo
parti ed accessori originali. Questa garanzia non esclude,
limita o comunque pregiudica eventuali diritti legali dei
consumatori, comprese istanze in caso di torto e in caso
di una violazione del contratto, che l'acquirente può avere
nei confronti del rivenditore.
CONTATTO
CYBEX Sede Secondaria in Italia,
Via Medaglie d'Oro 17, 36100 Vicenza, Italia
tel. +39 0444 963953, fax +39 0444 963953
email: italy@cybex-online.com
DEENIT
49
Page 50

CLOUD Q
CLOUD Q
SEMI-U NIVERSAL
UNIVER SAL
- 13 kg
04 3 013 16
ECE R 44/04
Approved for CYBEX
Base Q-fix
CYBEX GmbH
Riedinger Str. 18, 95448 Bayreuth
Germany
09/2014
50
Homologation
CYBEX CLOUD Q – coque
ECE R44/04 groupe 0+
poids : 0 à 13kg
âge : de la naissance à 18 mois
environ
Ne convient que pour les véhicules
équipés d’une ceinture automatique
à trois points, réglementation ECE
R16 ou équivalent
Goedkeuring
CYBEX CLOUD Q – Autostoeltje
ECE R44/04 leeftijdsgroep 0+
gewicht: tot 13 kg
leeftijd: vanaf geboorte tot ongeveer
18 maanden
Alleen geschikt voor autostoelen met
automatische driepuntsgordels die
zijn goedgekeurd conform ECE R16
of een vergelijkbare norm.
Homologacja
CYBEX CLOUD Q – fotelik dla dzieci
ECE R44/04 wiek grupa 0+
waga: 0 to 13kg
wiek: od urodzeni do ok. 18 miesięcy
Przenaczony tylko do samochodów
z trzypunktowym, automatycznym
pasem bezpieczeństwa
spełniajjącym normę ECE regulację
nr R16 lub równoznaczną.
CHER CLIENT,
Merci d’avoir acheté le CYBEX CLOUD Q. Nous pouvons
vous assurer que la sécurité, le confort et la facilité
d’utilisation ont été nos priorités lors du développement
du CYBEX CLOUD Q. Ce produit est fabriqué selon un
contrôle qualité exceptionnel et répond aux exigences les
plus strictes en matière de sécurité.
REMARQUE : Toujours garder ce mode d’emploi à
portée de main dans le compartiment prévu à cet effet
situé sous le CYBEX CLOUD Q.
!
ATTENTION ! An de bien protéger votre enfant,
il est absolument essentiel d’utiliser le CYBEX
CLOUD Q comme indiqué dans ce manuel.
REMARQUE En raison des exigences propres à chaque
pays (par exemple l’étiquetage de couleur sur la coque),
les caractéristiques extérieures des produits peuvent
varier dans. Cependant, cela n’affecte pas le bon
fonctionnement du produit.
!
ATTENTION ! La ceinture de sécurité trois points ne
doit passer que dans les guides dédiés. Les guides
de ceinture sont décrits en détail dans ce manuel et
également marqués en bleu sur la coque.
Page 51

BESTE KLANT, DROGI KLIENCIE,
Hartelijk dank voor uw aanschaf van de CYBEX
CLOUD Q. Wij verzekeren u dat veiligheid, comfort
en gebruiksgemak bij de ontwikkeling van de CYBEX
CLOUD Q de hoogste prioriteit hebben gekregen. Dit
product is aan een uitzonderlijk strenge kwaliteitscontrole
onderworpen en voldoet aan de strengste
veiligheidseisen.
LET OP! Bewaar deze handleiding zorgvuldig in het
daarvoor bestemde vakje aan de onderzijde van de
CYBEX CLOUD Q.
Dziękujemy za zakup fotelika CYBEX CLOUD Q.
Pragniemy zapewnić, iż bezpieczeństwo, wygoda i łatwa
obsługa to wartośći nadrzęne , przyśiwecające nam przez
cały proces projektu i produkcji CLOUD Q Ten produkt
wytwarzany jest pod nadzwyczajną kontrolą jakości i
spełnia najbardziej rygorystyczne normy.
UWAGA! Zawsze należy mieć dostęp do instrukcji.
Najlepiej przechowywać ją w miejscu do tego
przeznaczonym pod spodem CLOUD Q.
FRNLPL
!
WAARSCHUWING! Voor de goede bescherming
van het kind is het van belang dat u bij het gebruik
van de CYBEX CLOUD Q de aanwijzingen in deze
handleiding volgt.
LET OP! Vanwege nationale regelgeving (bijvoorbeeld
betreffende kleurlabels op het autostoeltje) kunnen
bepaalde productkenmerken er anders uitzien. Dit is
echter niet van invloed op het correct functioneren van
het product.
WAARSCHUWING! De driepuntsgordel mag
!
uitsluitend in de daarvoor bedoelde geleiders
worden geplaatst. De gordelgeleiders worden in
deze handleiding precies beschreven en zijn op het
autostoeltje blauw gemarkeerd.
!
UWAGA! Używaj CYBEX CLOUD Q zgodnie
z instrukcją obsługi, aby zapewnić najwyższe
bezpieczeństwo Twojemu dziecku
UWAGA! W zależności od kraju i jego wymagań
dotyczących np. koloru oznakowania - produkt może
różnić się zewnętrznie. Jednakże nie ma to żadnego
wpływu na funkcjonowanie produktu.
UWAGA! Trzypunktowe pasy bezpieczeństwa
!
muszą być umieszczone tylko w prowadnicach
do tego przeznaczonych. Prowadnie są opisane
szczegółowo w tej instrukcji i dodatkowo oznaczone
na niebiesko w foteliku.
51
Page 52

CONTENUFR
INSTRUCTIONS EN BREF ...........................................................................3
HOMOLOGATION ........................................................................................50
UTILISATION DANS LE VÉHICULE ..........................................................54
PROTÉGER VOTRE VÉHICULE ..............................................................56
RÉGLAGE DE LA POIGNÉE ......................................................................58
RÉGLAGE DE L’APPUI-TÊTE ....................................................................60
AJUSTEMENT DES SANGLES .................................................................60
SÉCURITÉ POUR VOTRE ENFANT ........................................................64
SÉCURITÉ LORS DE L’INSTALLATION EN VOITURE .........................66
INSTALLATION EN VOITURE ....................................................................68
RÉGLAGE DU PROTECTEUR LATÉRAL ...............................................72
RETIRER LE SIÈGE AUTO DU VÉHICULE.............................................74
SÉCURISER CORRECTEMENT VOTRE ENFANT ...............................74
INSTALLATION CORRECTE DU SIÈGE AUTO......................................76
OUVRIR LE CANOPY PARE-SOLEIL .......................................................78
RÉGLAGE DE LA POSITION ALLONGÉE ............................................... 78
TRAVEL SYSTEM CYBEX ..........................................................................80
RETRAIT ........................................................................................................80
ENTRETIEN ET MAINTENANCE ..............................................................82
QUE FAIRE APRÈS UN ACCIDENT .........................................................82
NETTOYAGE .................................................................................................84
RETRAIT DE LA HOUSSE DU SIÈGE ......................................................86
REMETTRE LA HOUSSE DU SIÈGE .......................................................86
DURÉE DE VIE DU PRODUIT ...................................................................88
ÉLIMINATION ................................................................................................90
INFORMATIONS SUR LE PRODUIT ........................................................90
CONDITIONS DE GARANTIE ....................................................................92
52
Page 53

INHOUD ZAWARTOŚĆNL
PL
KORTE HANDLEIDING .................................................................................3
GOEDKEURING ...........................................................................................50
GEBRUIK IN DE AUTO ................................................................................ 55
UW AUTO BESCHERMEN .........................................................................57
STAND VAN DRAAGBEUGEL ...................................................................59
STAND VAN DE HOOFDSTEUN AANPASSEN ......................................61
MAAK HET KIND ALTIJD VAST MET HET GORDELSYSTEEM. ........61
VEILIGHEID VOOR HET KIND ..................................................................65
VEILIGHEID BIJ HET PLAATSEN VAN HET AUTOSTOELTJE IN DE
AUTO. .............................................................................................................67
INSTALLATIE IN DE AUTO .........................................................................69
DE ZIJWAARTSE BESCHERMING AANPASSEN .................................73
VERWIJDERING UIT DE AUTO .................................................................75
HET KIND OP DE JUISTE WIJZE VASTMAKEN ....................................75
CORRECTE INSTALLATIE VAN HET AUTOSTOELTJE .......................77
DE ZONNEKAP UITVOUWEN ...................................................................79
HET AUTOSTOELTJE IN DE LIGSTAND ZETTEN ................................79
CYBEX-REISSYSTEEM ..............................................................................81
VERWIJDEREN ............................................................................................81
ONDERHOUD ...............................................................................................83
NA EEN ONGEVAL .......................................................................................83
REINIGING .....................................................................................................85
DE BEKLEDING VERWIJDEREN .............................................................87
DE BEKLEDING VASTMAKEN ..................................................................87
LEVENSDUUR VAN HET PRODUCT .......................................................89
AFVALSCHEIDING .......................................................................................91
PRODUCTINFORMATIE .............................................................................91
GARANTIEBEPALINGEN ...........................................................................93
SKRÓCONA INSTRUKCJA ..........................................................................3
HOMOLOGACJA ..........................................................................................50
UŻYTKOWANIE W AUCIE .......................................................................... 55
OCHRONA SAMOCHODU .........................................................................57
REGULACJA RĄCZKI ..................................................................................59
REGULOWANIE ZAGŁÓWKA ...................................................................61
ZAPINANIE PASAMI ....................................................................................61
BEZPIECZEŃSTWO TWOJEGO DZIECKA ............................................65
ZACHOWANIE BEZPIECZEŃSTWA PODCZAS MONTAŻU W AUCIE ..
67
MONTAŻ W SAMOCHODZIE ....................................................................69
DOPASOWANIE BOCZNYCH OSŁON ....................................................73
WYJMOWANIE Z AUTA ...............................................................................75
PRAWIDŁOWE ZABEZPIECZANIE DZIECKA ........................................75
PRAWIDŁOWY MONTAŻ FOTELIKA .......................................................77
ROZKŁADANIE BUDKI ................................................................................79
ROZKŁADANIE DO POZYCJI PŁASKIEJ ................................................79
CYBEX TRAVEL SYSTEM ..........................................................................81
WYJMOWANIE .............................................................................................81
KONSERWACJA...........................................................................................83
POSTĘPOWANIE PO WYPADKU ............................................................83
CZYSZCZENIE..............................................................................................85
ZDEJMOWANIE TAPICERKI ......................................................................87
ZAKŁADANIE TAPICERKI ...........................................................................87
TRWAŁOŚĆ PRODUKTU ...........................................................................89
UTYLIZACJA ..................................................................................................91
INFORMACJA O PRODUKCIE ..................................................................91
WARUNKI GWARANCJI .............................................................................93
FRNLPL
53
Page 54

UTILISATION DANS LE VÉHICULE
REMARQUE : Si la coque est installée sur la banquette
d’une manière qui n’est pas stable ou à un angle trop
aigu, elle peut être ajustée avec une textile. Vous pouvez
également choisir un des autres sièges du véhicule.
ATTENTION ! Ne pas utiliser la coque sur un siège
où un airbag frontal est activé. Cet avertissement ne
s’applique pas pour les airbags latéraux.
REMARQUE : Le volume d’un airbag frontal augmente
de façon explosive et peut causer à votre enfant de
graves blessures ou même la mort.
ATTENTION ! La coque n’offre la meilleure
protection possible que quand elle est utilisée en
suivant exactement les instructions données dans
ce manuel.
ATTENTION ! Aucune modication ou rajout ne peut
être fait au CYBEX CLOUD Q sans l’approbation
de CYBEX GmbH. Les réparations ne peuvent
être effectuées que par des personnes qui ont été
autorisées à les faire. Ce faisant, elles doivent
toujours utiliser des composants et des pièces
accessoires uniquement. Dans le cas contraire, la
fonction protectrice de la coque n’est plus garantie.
54
Page 55

GEBRUIK IN DE AUTO UŻYTKOWANIE W AUCIE
LET OP! Indien het autostoeltje instabiel of te rechtop
op de autostoel staat, kan dit met behulp van een extra
deken worden gecompenseerd. Als dat niet mogelijk is,
moet u het autostoeltje op een andere stoel in de auto
zetten.
UWAGA! Jeśli fotelik ustawiony na sziedzeniu w aucie
nie jest stabilnylub zbyt duży kąt pochylenia, można to
zniwelować podkłądająć koc. Innym sposobem jest wybór
innego siedzenia w samochodzie,
WAARSCHUWING! Plaats het autostoeltje niet
op een stoel met een geactiveerde airbag aan de
voorzijde. Dit geldt niet voor zij-airbags.
LET OP! De grote airbag aan de voorzijde wordt in zeer
korte tijd explosief opgeblazen en kan daardoor ernstig
letsel of zelfs overlijden van het kind tot gevolg hebben.
WAARSCHUWING! Het autostoeltje biedt
uitsluitend optimale bescherming indien de
aanwijzingen in deze handleiding nauwlettend
worden opgevolgd.
WAARSCHUWING! Er mogen geen aanpassingen
of toevoegingen aan de CYBEX CLOUD Q worden
uitgevoerd zonder toestemming van CYBEX GmbH.
Reparaties mogen alleen worden uitgevoerd door
personen die daartoe bevoegd zijn. Zij dienen
daarbij te allen tijde uitsluitend van originele
onderdelen en accessoires gebruik te maken. Doen
zij dit niet, dan kan de beschermende werking van
het autostoeltje niet langer worden gegarandeerd.
UWAGA! Nie montuj fotelika na siedzeniu jeśli
poduszka powietrzna z przodu jest włączona. Nie
dotyczy to bocznych poduszek powietrznych.
UWAGA! The large-volume front airbag expands
explosively and may cause your child serious injury or
even death.
UWAGA! Fotelik zapewnia ochronę najlepszą z
możliwych tylko wtedy jeśli używane jest zgodnie z
instrukcją obsługi.
UWAGA! Niedozwolonym jest dokonywanie
jakichkolwiek modykacji i zmian w foteliku CYBEX
CLOUD Q bez zgody CYBEX GmbH. Naprawy
mogą byc dokonywane tylko przez osoby do tego
przeszkolone. Używać należy tylko orygnalnych
części i akcesoriów. W innym wypadku fotelik możę
utracić swoje funkcje ochronne.
FRNLPL
55
Page 56

ATTENTION ! Ne tenez JAMAIS un bébé sur vos
genoux dans une voiture. Les forces générées lors
d’une collision sont beaucoup trop élevés pour toute
personne tenant le bébé. Ne jamais vous attacher
vous-même et votre enfant avec une seule ceinture
de sécurité.
PROTÉGER VOTRE VÉHICULE
Des traces d’utilisation et/ou de décoloration peuvent
apparaître sur certaines banquettes en matériaux délicats
(velours, cuir, etc) si des sièges auto sont utilisés.
Vous pouvez éviter cela en mettant, par exemple, une
couverture ou une serviette sous le siège auto. Dans ce
contexte, voir aussi nos instructions de nettoyage. Il est
essentiel que celles-ci soient suivies avant la première
utilisation du siège auto.
56
Page 57
WAARSCHUWING! Houd een kind in de auto
NOOIT op uw schoot. De krachten die bij een
botsing vrijkomen, zijn dermate hoog dat het kind
onmogelijk kan worden vastgehouden. Gebruik nooit
dezelfde veiligheidsgordel voor zowel uzelf als het
UWAGA! NIGDY nie trzymaj dziecka na kolanach
w samochodzie. Siły oddziałujące podczas kolizji są
zbyt duże, aby utrzymać dziecko. Nigdy nie zapinaj
się jednym pasem z dzieckiem.
kind.
UW AUTO BESCHERMEN OCHRONA SAMOCHODU
Het gebruik van autostoeltjes kan op sommige
autostoelen met een kwetsbare bekleding (velours, leder
enz.) sporen nalaten of deze doen verkleuren. U kunt dit
voorkomen door bijvoorbeeld een deken of handdoek op
de stoel onder het autostoeltje te leggen. Raadpleeg in dit
verband ook onze aanwijzingen voor reiniging. Het is van
groot belang dat u deze aanwijzingen opvolgt voordat u
Ślady zużycia lub odbarwień moga wystąpić na
delikatnych tapicerkach samochodowych (welur, skóra
etc), podczas używania fotelika. Aby tego uniknąć można
zabezpieczyć tapicerkę przez podłożenie koca lub
ręcznika pod fotelik Sprawdź nasze wytyczne dotyczące
czyszczenia. Ważne, aby zapoznać się z tym przed
pierwszym uiżyciem fotelika
het autostoeltje voor het eerst gaat gebruiken.
FRNLPL
57
Page 58

D
C
B
E
A
RÉGLAGE DE LA POIGNÉE
ATTENTION ! Toujours attacher votre enfant avec le
système de harnais intégré.
Vous pouvez verrouiller la poignée dans quatre positions:
A: position véhicule
C: position portage
B+D+E: pour installer votre enfant
F: pour laisser la coque en toute sécurité sur
une surface plane à l’extérieur du véhicule.
F
a
a
b
58
ATTENTION ! An d’empêcher le siège de basculer
pendant le transport, vérier si la poignée est
verrouillée en place dans la position de transport C.
• Pour régler la poignée de transport, appuyez
simultanément sur les touches gauche et droite (b).
• Ensuite, vous pouvez réaliser un mouvement avant
ou arrière tout en appuyant sur le bouton (b), jusqu’à
ce qu’il se verrouille automatiquement dans la position
souhaitée.
Page 59

STAND VAN DRAAGBEUGEL REGULACJA RĄCZKI
WAARSCHUWING! Maak het kind altijd vast met
het geïntegreerde gordelsysteem.
U kunt de draagbeugel in vier standen vergrendelen:
A: autostand
C: draagstand
B+D+E: om het kind in het autostoeltje te plaatsen
F: om het autostoeltje veilig op een vlakke
ondergrond buiten de auto te plaatsen.
WAARSCHUWING! Om te voorkomen dat het
autostoeltje tijdens het dragen omkiept, moet u
controleren of de draagbeugel in draagstand C is
vergrendeld.
• Om de draagbeugel in een andere stand te zetten,
drukt u de linkerknop en de rechterknop gelijktijdig in
(b).
• Beweeg vervolgens de draagbeugel naar voren of
naar achteren terwijl u knop (b) ingedrukt houdt tot de
draagbeugel in de gewenste stand vastklikt.
UWAGA! Zawsze zapinaj dziecko pasami w foteliku.
Można zablokować rączkę w czterech pozycjach:
A: w samochodzie
C: w do noszenia
B+D+E: aby włożyć dziecko do fotelika
F: aby ustawić fotelik bezpiecznie na
nawierzchni, poza samochodem
UWAGA! W czasie noszenia należy zablokować
rączkę w pozycji C.
• Aby zmienić pozycję rączki wciścnij jednocześnie
klawisze po lewej i prawej stronie (b).
• Potem przekręć rączkę do przodu lub tyłu naciskając
(b), aż zatrzaśnie się automatycznie w żadanej pozycji.
FRNLPL
59
Page 60

RÉGLAGE DE L’APPUI-TÊTE
REMARQUE : L’appui-tête assure la meilleure protection
possible pour votre enfant si elle est réglée à la hauteur
optimale. Il existe huit positions de réglage en hauteur.
v
• Pour assurer un ajustement correct, le CYBEX CLOUD
Q est équipé d’un réducteur qui doit être retiré avant de
régler la hauteur de l’appui-tête pour la première fois.
• L’appui-tête doit être ajustée de sorte que deux doigts
c
e
g
60
maximum de largeur reste libre entre l’épaule de
l’enfant et l’appui-tête.
• Tirer la patte de réglage (v) sur la partie supérieure de
l’appui-tête et le déplacer jusqu’à la position désirée.
REMARQUE : Les sangles d’épaule (c) sont connectées
à l’appui-tête et ne doivent pas être réglées séparément.
AJUSTEMENT DES SANGLES
REMARQUE : Assurez-vous que l’appui-tête est
correctement verrouillé dans la position correcte avant
d’utiliser le siège.
REMARQUE : Assurez-vous que la coque ne contient
pas de jouets et d’objets durs.
• Desserrer les sangles d’épaule (c) en appuyant sur le
bouton de réglage central (g) et en tirant simultanément
les deux sangles d’épaule.
• Défaire la boucle de ceinture en appuyant sur le bouton
rouge (e) fermement.
Page 61

STAND VAN DE HOOFDSTEUN AANPASSEN REGULOWANIE ZAGŁÓWKA
LET OP! De hoofdsteun biedt het kind alleen optimale
bescherming indien deze in de hoogste stand is gezet.
De hoofdsteun kan in acht hoogtestanden worden gezet.
• Een zitverkleiner zorgt als extra accessoire voor
de juiste pasvorm van de CYBEX CLOUD Q. De
zitverkleiner moet worden verwijderd voordat de hoogte
van de stand van de hoofdsteun voor het eerst wordt
aangepast.
• De stand van de hoofdsteun moet zodanig zijn dat
de ruimte tussen de schouder van het kind en de
hoofdsteun maximaal twee vingers breed is.
• Trek het verstellipje (v) aan de bovenzijde van de
hoofdsteun omhoog en zet de hoofdsteun in de
UWAGA! Zagłówek zapenia najlepszą ochronę jeśli
dopasowany jest optymalnie do wzrostu. Fotelik ma 8
poziomów regulacji.
• Jako dodatkowy element zapewniający właściwe
dopasowanie, CYBEX CLOUD Q wyposażony jest we
wkładkę redukcyjną, którą należy wyjąć po pierwszym
dopasowaniu zagłówka.
• Zagłówek powinien znajdować się w pozycji, aby
maksymalnie dwa palce mieściły się między ramieniem
dziecka i zagłówka.
• Podciągnij zawleczkę regulacyjną (v) na górze
zagłówka i przesuń zagłówek do żądanej pozycji.
gewenste stand.
LET OP! De schouderriemen (c) zijn stevig aan de
hoofdsteun bevestigd en mogen niet afzonderlijk worden
versteld.
MAAK HET KIND ALTIJD VAST MET HET
GORDELSYSTEEM.
LET OP! De hoofdsteun moet in de juiste stand worden
vergrendeld voordat het autostoeltje in gebruik wordt
UWAGA! Pasy naramienne (c) są zintegrowane z
zagłówkiem i nie trzeba ich regulować osobno.
ZAPINANIE PASAMI
UWAGA! Upewnij się, zę zagłówek jest prawidłowo
zablokowany przed użyciem fotelika.
genomen.
LET OP! In het autostoeltje mogen geen speelgoed en
harde voorwerpen aanwezig zijn.
• Maak de schouderriemen (c) losser door de verstelknop
op de centrale bediening (g) in te drukken en
tegelijkertijd beide schouderriemen omhoog te trekken.
• Open het gordelslot door stevig op de rode knop te
drukken (e).
UWAGA! Sprawdź, czy w foteliku nie znajdują się
zabawki lub inne twarde przedmioty.
• Poluzuj pasy (c) poprzez wciśniecie klawisza (g) i
równocześnie pociągnij oba pasy naramienne.
• Undo the belt buckle by pressing red button (e) rmly.
Odepnij klamrę pasa, naciskając mocno czerwony
przycisk (i).
FRNLPL
61
Page 62

c
d
t
e
62
REMARQUE : Toujours tirer sur le harnais (c) et non sur
des protèges harnais (d).
• Installez votre enfant dans la coque.
• Placez le harnais (c) directement sur les épaules de
votre enfant.
REMARQUE : Assurez-vous que le harnais (c) n’est pas
entortillé.
• Placer les deux parties de la boucle ensemble et les
verrouiller en place dans la boucle de ceinture (e) avec
un «CLIC» audible.
• Tirer doucement sur la courroie de réglage central (g)
an de resserrer le harnais (c) jusqu’à ce qu’il épouse le
corps de l’enfant.
REMARQUE : Pour que le CYBEX CLOUD Q offre une
protection optimale, le harnais (c) doit se trouver le plus
près possible du corps.
Page 63

LET OP! Trek altijd aan de schouderriemen (c) en niet
aan de riempads (d).
• Plaats het kind in het zitje.
• Doe de schouderriemen (c) rechtstreeks over de
schouders van het kind.
UWAGA! Zawsze pociągaj za pasy naramienne (c) nie za
nakładki (d).
• Wsadź dziecko do fotelika
• Umieść pasy (c) tuż nad ramionami dziecka.
LET OP! De schouderriemen (c) mogen niet gedraaid
zitten.
• Plaats beide slottongen tegen elkaar en vergrendel
deze in het gordelslot (e). U moet ze daarbij horen
vastklikken.
• Trek bij het centrale gordelslot (g) voorzichtig aan de
schouderbanden (c) tot deze goed op het lichaam van
het kind aansluiten.
LET OP! De CYBEX CLOUD Q biedt alleen optimale
bescherming als de schouderbanden (c) zo nauw
mogelijk op het lichaam aansluiten.
UWAGA! Upewniij się, że pasy naramienne (c) nie są
skręcone.
• Złącz oba pasy razem i zatrzaśnij w klamrze (e), aż do
kliknięcia.
• Ściągnij pas centralnym klawiszem (g), aby dopasować
pasy naramienne, ciasno, do dziecka.
UWAGA! Aby CYBEX CLOUD Q zapewniał maksymalną
ochronę, pasy naramienne (c) powinny być dopasowane
jak najbliżej ciała dziecka.
FRNLPL
63
Page 64

SÉCURITÉ POUR VOTRE ENFANT
REMARQUE : Toujours attacher votre enfant dans la
coque et ne jamais perdre de vue votre bébé si vous le
mettez sur une surface surélevée (par exemple table,
banc, fauteuil, ...), lorsqu’il est dans la coque.
ATTENTION ! Les pièces en plastique de la coque
chauffent au soleil. Votre bébé peut être brûlé.
Protégez votre bébé et la coque de l’exposition
intense au soleil (par exemple en plaçant un tissu
léger sur le siège).
• Sortez votre bébé du siège auto aussi souvent que
possible an de soulager la pression exercée sur sa
colonne vertébrale.
• Prenez des pauses lors des longs trajets en voiture à
cet effet. Assurez-vous également de ne pas laisser
votre enfant trop longtemps dans la coque même
lorsqu’il n’est pas dans la voiture.
ATTENTION ! Ne jamais laisser votre enfant en voiture
sans surveillance.
64
Page 65

VEILIGHEID VOOR HET KIND BEZPIECZEŃSTWO TWOJEGO DZIECKA
LET OP! Maak het kind altijd vast in het autostoeltje en
verlies het kind nooit uit het oog terwijl u het autostoeltje
op een verhoogd oppervlak neerzet (bijvoorbeeld een
commode, tafel, bank of stoel).
UWAGA! Zawsze zapineaj dziecko pasami w foteliku.
NIe zostawiaj dziecka bez opieki odstawiając fotelik
(np. przewijak, stół, ławka, fotel...), kiedy dziecko jest w
środku.
WAARSCHUWING! De kunststof onderdelen van
het autostoeltje worden in de zon warmer. Het kind
kan daardoor brandwonden oplopen. Bescherm het
kind en het autostoeltje tegen blootstelling aan direct
zonlicht (bijvoorbeeld door een dunne doek over het
autostoeltje te leggen).
• Haal het kind zo veel mogelijk uit het autostoeltje om de
druk op de wervelkolom van het kind weg te nemen.
• Zorg dat u in dit verband regelmatig rustpauzes inlast
tijdens langere autoritten. Let er daarbij op dat het kind
ook buiten de auto niet te lang in het autostoeltje zit.
BELANGRIJK! Laat het kind nooit zonder toezicht in een
auto.
UWAGA! Plastikowe elementy fotelika mogą
nagrzewać się do słońca. Może to spowodować
oparzenie u dziecka. Chroń swoje dziecko i fotelik
przed nagrzaniem w słońcu np. poprzez przykrycie
jasną tkaniną fotelika.
• Wyjmuj dziecko z fotelika, aby odciążyć kręgosłup.
• Rób w tym celu przerwy podczas dłuższych podróży
Nie pozostawiaj dziecka zbyt długo w foteliku, nawet
jeśli fotelik nie jest w aucie.
OSTRZEŻENIE! Nigdy nie zostawiaj dziecka bez opieki
w samochodzie
FRNLPL
65
Page 66

SÉCURITÉ LORS DE L’INSTALLATION EN VOITURE
An de protéger tous les passagers, veiller à ce que :
• Les dossiers rabattables des banquettes soient
verrouillés en place et en position verticale.
• Si la coque est installée sur le siège passager, celui-ci
doit être dans sa position la plus reculée.
ATTENTION ! Ne pas utiliser la coque sur un siège
avec un airbag frontal activé. Cela ne s’applique pas
aux airbags latéraux.
• Tous les objets dangereux du véhicule doivent être
sécurisés.
• Tous les passagers du véhicule doivent être attachés.
ATTENTION ! La boucle de la ceinture du véhicule
(q) ne doit en aucun cas atteindre le guide de
ceinture de sécurité inférieur (k). Si la bande de
la ceinture est trop longue, le siège auto n’est pas
approprié pour une utilisation dans cette position
du véhicule,. En cas de doute, merci de contacter
le fabricant de votre véhicule.
k
q
66
ATTENTION ! La coque doit toujours être attachée
avec la ceinture de sécurité du véhicule, même
lorsqu’il n’est pas utilisé. Dans le cas d’un freinage
d’urgence ou d’une collision mineure, un siège
auto non attaché peut blesser les passagers ou le
conducteur du véhicule.
Page 67

VEILIGHEID BIJ HET PLAATSEN VAN HET
AUTOSTOELTJE IN DE AUTO.
Om andere passagiers te beschermen, moet u zorgen dat:
• de opvouwbare rugsteun van het autostoeltje
vergrendeld is en rechtop staat
• indien het autostoeltje op de passagiersstoel wordt
geplaatst deze zover mogelijk naar achteren is
geschoven.
WAARSCHUWING! Plaats het autostoeltje niet
op een stoel met een geactiveerde airbag aan de
voorzijde. Dit geldt niet voor zij-airbags.
• alle losse voorwerpen in de auto zijn vastgemaakt
• alle personen in de auto de autogordel dragen
ZACHOWANIE BEZPIECZEŃSTWA PODCZAS
MONTAŻU W AUCIE
Zadbaj o bezpieczeństwo wszystkich pasażerów,
sprawdź czy..
• ruchome oparcie fotelika znajduje się w gónym
położeniu,
• Jeśli fotelik montowany jest na przednim siedzeniu,
odsuń fotel i zamontuj tyłem fotelik
UWAGA! Nie używaj fotelika na siedzeniu z
aktywną przednią poduszką. Nie dotyczy to tzw
bocznym poduszek powietrznych
• zabezpieczone są wszystkie luźne przedmioty
• wszyscy pasażerowie są zapięci pasami
FRNLPL
WAARSCHUWING! Het slot van de autogordel (q)
mag nooit in de geleider van de buikriem (k) zitten.
Als het bevestigingdeel van de autogordel te lang
is, is het autostoeltje ongeschikt om op die plaats in
de auto te worden gebruikt. Als u twijfelt, neem dan
contact op met de fabrikant van uw auto.
WAARSCHUWING! Het autostoeltje moet altijd
met de autogordel worden vastgezet, zelfs
wanneer er geen kind in zit. Een niet-vastgemaakt
autostoeltje kan andere passagiers en uzelf
verwonden wanneer u een noodstop moet maken
of zelfs bij een kleine aanrijding.
UWAGA! samochodowe zapiecie pasów (q)
nie może w ządanym wypadku dosięgąć do
prowadnicy pasa (k). jeśli zapięcie pasa jest za
długie, oznacza to, że fotelik nie pasuje do tego
miejsca w aucie. W razie wątpliwości skontakuj się
z przedstawiecielem producenta aut.
UWAGA! Fotelik zawsze musi być zabezpieczony
pasami, nawet wtedy, gdy nie jest używany. W razie
nagłego hamowania lub kolizji niezabezpieczony
fotelik może spowodować obrażenia u pasażerów.
67
Page 68

a
p
m
INSTALLATION EN VOITURE
• Placez la coque dos à la route sur la banquette
(les pieds de l’enfant pointent vers le dossier de la
banquette).
REMARQUE : Le CYBEX CLOUD Q peut être utilisé sur
tous les sièges équipés de ceintures automatiques trois
points. Nous recommandons en règle générale d’utiliser
le siège à l’arrière du véhicule. Dans la plupart des cas,
votre enfant est exposé à un risque plus élevé à l’avant.
ATTENTION ! Le siège n’est pas adapté pour
une utilisation avec une ceinture de sécurité deux
points ou une ceinture ventrale. La xation avec
une ceinture deux points pourrait entraîner des
blessures graves ou mortelles à l’enfant en cas
d’accident.
• Assurez-vous que le repère d’installation sur
l’autocollant (p) situé sur le côté du siège est alignée
avec le plancher du véhicule.
• Vériez également que la coque est en position assise
et que le guide de ceinture (m) est déverrouillé.
• Tirez sur la ceinture de sécurité du véhicule et la placer
au-dessus du siège auto.
• Verrouillez la boucle de la ceinture de sécurité du
véhicule (q).
q
68
Page 69

INSTALLATIE IN DE AUTO MONTAŻ W SAMOCHODZIE
• Plaats het autostoeltje achterstevoren op de autostoel
(zodat de voeten van het kind naar de rugleuning van
de autostoel wijzen).
LET OP! De CYBEX CLOUD Q kan worden gebruikt op
alle stoelen die van een automatische driepuntsgordel
zijn voorzien. Wij bevelen aan het autostoeltje in de
regel op de achterbank van de auto te plaatsen. In de
meeste gevallen loopt het kind een hoger risico als het
• Umieść fotelik na siedzeniu, tyłem do kierunku jazdy
(stopy dziecka umieszczone na oparciu siedzenia
samochodowego).
UWAGA! CYBEX CLOUD Q może bycużywany
na wszystkich siedzeniach z trzypunktowymi,
automatycznymi pasami bezpieczeństwa. Zalecamy, aby
fotelik był używany na tylnym siedzeniu samochodu. Z
reguły przewożęnie z prodzy stwarza większe ryzyko.
autostoeltje op de passagiersstoel voorin is geplaatst.
UWAGA! Fotelik nie może być używany w autach
WAARSCHUWING! Het autostoeltje is niet
geschikt voor gebruik met een tweepuntsgordel of
heupgordel. Het gebruik van een tweepuntsgordel
z dwupunktowymi pasami bezpieczeństwa lub
biodrowymi Używanie takich pasów może być
przyczyną obrażeń w razie wypadku
kan bij een ongeval dodelijk letsel van het kind tot
gevolg hebben.
• Upewnij się, że znacznik montażowy z naklejki
• Zorg ervoor dat het merkteken op de
waarschuwingssticker (p) op de zijkant van de stoel
overeenkomt met de lijn van de autovloer.
• Zorg er ook voor dat het autostoeltje in de zitstand staat
en dat de gordelgeleider (m) niet is vergrendeld.
• Trek de autogordel uit en leidt deze over het
ostrzegawczej (p) jest równolegle do podłogi.
• Sprawdź czy fotelik jest w pozycji „siedzącej” oraz czy
prowadnice (m) są odblokowane.
• Wyciągnij pas samochodowy i przeciągnij go przez
fotelik.
• Zapnij pas samochodowy (q).
autostoeltje.
• Vergrendel de tong van de gesp in het gordelslot (q).
FRNLPL
69
Page 70

m
REMARQUE : La coque ne doit pas être utilisée en
position inclinée dans un véhicule. Pour ce faire, le guide
de ceinture est automatiquement verrouillé dès que le
l
k
q
a
l
siège est mis en position inclinée.
• Placez la ceinture abdominale (k) dans des guides de
ceinture bleu (m) sur les deux côtés du siège auto.
• Serrez la ceinture abdominale (k) en tirant sur la
ceinture diagonale (l) vers l’avant du véhicule.
• Tirez la sangle diagonale (l) vers l’arrière du siège auto.
REMARQUE : Ne pas tordre la ceinture de sécurité du
véhicule pendant cette opération.
• Placer la ceinture diagonale (l) dans le guide de
ceinture arrière bleue (n) et veiller à la passer au
dessus du L.S.P.
• Serrer la ceinture diagonale (l).
REMARQUE : La ceinture diagonale (l) doit être
acheminée par l’arrière dans le guide de ceinture bleu (n)
et au-dessus du Protecteur Linéaire contre les Impacts
Latéraux telescopique déplié (L.S.P.).
• Maintenant balancer la poignée de transport (a) avec
les deux boutons (b) enfoncée, dans la position du
véhicule A (voir page 58).
b
n
70
ATTENTION ! Il est possible qu’une partie de la
boucle (q) de la ceinture de sécurité soit trop longue
pour atteindre les guides de ceinture bleus du siège
auto. De ce fait, le siège auto ne peut pas être xé
fermement. Dans ce cas, choisissez un autre siège
dans la voiture pour installer le siège auto.
Page 71

LET OP! Het autostoeltje mag niet in de ligstand in een
auto worden gebruikt. Om te voorkomen dat dit gebeurt,
wordt de gordelgeleider automatisch vergrendeld zodra
het autostoeltje in de ligstand wordt gezet.
• Plaats de buikriem (k) in de blauwe riemgeleiders (m)
aan weerszijden van het autostoeltje.
• Trek de buikriem (k) aan door de borstriem (l) in de
richting van de voorzijde van de auto te trekken.
• Trek de borstriem (l) achter het hoofdeinde van het
autostoeltje langs.
LET OP! Zorg dat de autogordel daarbij niet gedraaid
komt te zitten.
• Leidt de borstriem (l) door de achterste, blauwe
riemgeleider (n) en zorg dat de riem boven de
LSP (Linear Side-impact Protector, systeem voor
bescherming bij zijwaartse botsingen) zit.
• Trek de borstriem aan (l).
LET OP! De borstriem (l) moet door de achterste, blauwe
riemgeleider (n) en boven de uitgetrokken telescopische
LSP worden geleid.
• Nu zwaaien de draagbeugel (a) met beide knoppen (b)
drukt, in de positie van het voertuig A (zie pagina 58).
UWAGA! Fotelik nie może być używany w pozycji
rozłożonej w samochodzie. Prowadnice są automatycznie
blokowane, aby wykluczyć niepoprawne użycie.
• Umieść pas biodrowy (k) w niebieskich prowadnicach
po obu stronach fotelika.
• Ściągnij pas biodrowy (k) przez pociągnięcie pasa
barkowego (l) w kierunku przidu samochodu
• Ściągnij pas barkowy (l) poza zagłowkiem fotelika.
UWAGA Nie skręcaj pasów podcas tych czynnośći.
• Przeciągnij pas barkowy (l) przez niebieską prowadnicę
(n) i sprawdź czy pas przechodzi nad osłonami L.S.P.
• Naciągnij pas barkowy (l).
UWAGA! Pas barkowy (l) należy przeciągnąć przez
niebieską prowadnicę (n) i ponad złożonymi osłonami
L.S.P.
• Teraz huśtawka rączkę (a) z obu przycisków (b)
sprasowane, do położenia pojazdu A (patrz strona 58).
FRNLPL
WAARSCHUWING! Mogelijk is het gespgedeelte
(q) van de autogordel te lang zodat het tot bij de
blauwe riemgeleiders van het autostoeltje komt. Dit
betekent dat het autostoeltje niet stevig kan worden
vastgemaakt. Mocht dit het geval zijn, kies dan een
andere autostoel om het autostoeltje op te plaatsen.
UWAGA! Jeśli zapięcie pasa samochodowego (q)
jest za długie i dotyka niebieskiej prowadnicy w
fotleiku. Oznacza to, że fotelik nie może być zapięty
ciasno. Należy wybrać w takim przypadku inne
siedzenie do montażu.
71
Page 72

RÉGLAGE DU PROTECTEUR LATÉRAL
Le «Protecteur Linéraire contre les Impacts Latéraux»
(L.S.P.) est intégré dans le CYBEX CLOUD Q. Ce
système améliore la sécurité de votre enfant en cas
d’impact latéral. An d’obtenir la meilleure protection,
dépliez le L.S.P. aussi loin que possible vers la porte du
véhicule la plus proche de la coque.
REMARQUE : Veillez à ce que les parties extensibles
soient vérrouillées. Vous entendrez un «CLIC» audible.
CLICK!
f
72
Le L.S.P. a deux positions. Si le L.S.P. touche l’intérieur
de la porte de la voiture lorsqu’il est dans sa position la
plus étendue, vous devez utiliser la position intermédiaire.
Pour ce faire, vous devez d’abord étendre complètement
le L.S.P. Appuyez ensuite sur le bouton de déverrouillage
(f) et appuyez sur le L.S.P. pour le mettre dans la position
intermédiaire.
Le L.S.P. peut être complètement repoussé dans le siège
si vous appuyez sur le bouton de déverrouillage (f) en
même temps que vous repoussez légèrement le L.S.P.
vers le siège.
REMARQUE : Si vous installez la coque sur le siège
du milieu, vous ne devez pas déplier les Protecteurs
Linéraires contre les Impacts Latéraux (L.S.P.).
ATTENTION ! Le lProtecteur Linéaire contre les
Impacts Latéraux (L.S.P.) ne fonctionne pas comme
un manche et ne sert pas à xer la coque.
Page 73

DE ZIJWAARTSE BESCHERMING AANPASSEN DOPASOWANIE BOCZNYCH OSŁON
De LSP (Linear Side-impact Protector) is speciaal voor
de CYBEX CLOUD Q gemaakt. Met dit systeem wordt de
veiligheid van het kind bij een zijwaartse botsing vergroot.
Voor het optimale beschermende effect moet u de LSP
zover mogelijk uitschuiven in de richting van het portier
Osłony boczne “Linear Side-impact Protector” (L.S.P.) są
wbudowane w CYBEX CLOUD Q. Ten system zapewnia
bezpieczeństwo Twojemu dziecku w przypadku kolizji
bocznej. Maksymalny efekt zapewnia rozłożenie L.S.P. w
stronę drzwi najbliżej jak to możliwe.
dat zich het dichtst bij het autostoeltje bevindt.
LET OP! Zorg dat het uitschuifbare gedeelte op
zijn plaats klikt. U hoort een klik wanneer dit wordt
vergrendeld.
De LSP heeft twee standen. Indien de LSP in de
uitgeschoven positie de binnenzijde van het autoportier
raakt, moet u de tussenpositie gebruiken. Om dit te
doen, moet u de LSP eerst volledig uitschuiven. Druk
vervolgens op de ontgrendelingsknop (f) en schuif de
UWAGA! upewnij sie że rozkładana część zablokowała
się. Usłyszysz wtedy kliknięcie.
L.S.P. ma dwie pozycje. Jeśli L.S.P. w pozycji
maksymalnie rozłożonej dotyka drzwi wewnątrz
samochodu, należy użyć pośredniej pozycji. Najpierw
rozłożyć L.S.P. maksymalnie. Potem nacisnąć przycisk (f)
i wsunąć L.S.P. do pozycji pośredniej.
LSP naar de tussenpositie.
FRNLPL
De LSP kan volledig in het zitje worden geschoven indien
u op de ontgrendelingsknop (f) drukt en tegelijkertijd het
uitgeschoven deel met lichte druk in het zitje schuift.
LET OP! Indien het autostoeltje op een middenstoel
wordt geïnstalleerd, moet u geen van de LSP’s
uitschuiven.
WAARSCHUWING! De uitgeschoven LSP kan
niet worden gebruikt als handgreep of voor het
bevestigen van het autostoeltje.
L.S.P. możę być wsunięte całkowicie. Jeśli wciśniesz
klawisz (f) w tym samym czasie wsuwając je do środka.
UWAGA! Jeśli fotelik montowany jest pośrodku siedzenia
nie należy wysuwać osłonbocznych (L.S.P.).
UWAGA! Osłony boczne nie mogą byc używane do
przenoszenia bądź zapinania fotelika.
73
Page 74

RETIRER LE SIÈGE AUTO DU VÉHICULE
En appuyant sur le bouton de déverrouillage (f), vous
pouvez appuyer sur le Protecteur Linéaire contre les
Impacts Latéraux (L.S.P.) pour le rentrer dans le siège.
NOTE : An de protéger votre véhicule et la coque, le
m
k
n
c
Protecteur Linéaire contre les Impacts Latéraux (L.S.P.)
doit être repoussé dans le siège avant de le retirer du
véhicule.
• Prenez la ceinture diagonale sur l’arrière et la retirer
guide de ceinture bleue (n).
• Dévérrouiller la boucle de ceinture de sécurité et retirer
la ceinture abdominale (k) du guide de ceinture (m).
SÉCURISER CORRECTEMENT VOTRE ENFANT
Pour assurer la sécurité de votre bébé, vériez que :
• Le harnais (c) s’adapte parfaitement au corps du bébé
sans le gêner et n’est pas entortillé.
• La position de l’appui-tête est ajustée correctement.
• Les deux parties de la boucle (t) sont verrouillées en
place dans la boucle de ceinture (e).
t
e
74
Page 75

VERWIJDERING UIT DE AUTO WYJMOWANIE Z AUTA
Door de ontgrendelingsknop (f) in te drukken, kunt
u de LSP (Linear Side-impact Protector) in het zitje
terugschuiven.
ATTENTIE: Ter bescherming van zowel uw auto
als het autostoeltje moet de LSP in het zitje worden
teruggeschoven voordat het zitje uit de auto wordt
verwijderd.
• Neem de borstriem uit de achterste, blauwe
riemgeleider (n).
• Maak de autogordel los en neem de buikriem (k) uit de
riemgeleider (m).
Po naciśnięciu przycisku blokującego
f, można złożyć element zabezpieczający przed
zderzeniem bocznym (LSP) z powrotem do pozycji
wyjściowej
UWAGA: Przed wyjęciem fotelika z samochodu należy
złożyć z powrotem elementy zabezpieczające przed
zderzeniem bocznym.
• Wyjmij samochodowy pas z niebieskiej szczeliny (n) z
tyłu fotelika.
• Rozepnij klamrę zapinającą pasa i wyjmij pas
biodrowy (k) z niebieskich prowadnic (m).
HET KIND OP DE JUISTE WIJZE VASTMAKEN PRAWIDŁOWE ZABEZPIECZANIE DZIECKA
Om er zeker van te zijn dat het kind veilig in het
autostoeltje zit, controleert u of:
• de schouderriem (c) goed om het lichaam van het kind
sluit zonder dat het kind daar hinder van ondervindt, en
of de riem niet gedraaid zit
• de hoofdsteun in de juiste stand staat
Dla bezpieczeństwa Twojego dziecka sprawdź, czy ..
• szelki naramienne (c) są dobrze dopasowane i nie
uciskają dziecka oraz są nie skręcone.
• pozycja zagłówka jest prawidłowo dopasowana
• klamerki szelek (t) są wpięte w główną klamrę (e)
• de gesptongen (t) in het gordelslot (e) vergrendeld zijn.
FRNLPL
75
Page 76

INSTALLATION CORRECTE DU SIÈGE AUTO
Pour assurer la sécurité de votre bébé, vériez que :
• La coque est xée avec l’enfant dos à la route
(les pieds de l’enfant pointent vers le dossier de la
banquette).
• La coque est utilisée sur le siège passager avant si
l’airbag frontal est bien désactivé.
• Le CYBEX CLOUD Q est xé avec une ceinture de
sécurité automatique à trois points.
• La ceinture abdominale (k) traverse les deux guides de
ceinture bleus (m) sur les deux côtés du siège auto.
• La ceinture diagonale (l) est tendue et passe à travers
le guide de ceinture bleue (n) sur le dossier du siège
auto.
• La boucle de la ceinture de sécurité de la voitire (q)
n’est pas en contact avec guide de ceinture bleu (m)
m
m
q
76
• La ceinture de sécurité du véhicule est tendue et pas
entortillée.
• La coque est à niveau (voir marquage) dans le véhicule
et dans la position assise avec le guide de ceinture
déverrouillé.
• la L.S.P. a été déployé le plus loin possible sur le côté
le plus proche de la portière, de manière à avoir la
meilleure protection possible.
• Balancer la poignée de transport (a) avec les deux
boutons (b) enfoncée, dans la position du véhicule A.
REMARQUE : La coque ne peut être utilisée que sur
une banquette face à la route équipée d’une ceinture de
sécurité trois points approuvée en vertu de la ECE R16.
Page 77

CORRECTE INSTALLATIE VAN HET AUTOSTOELTJE PRAWIDŁOWY MONTAŻ FOTELIKA
Om er zeker van te zijn dat het kind veilig in het
autostoeltje zit, controleert u of:
• het autostoeltje achterstevoren op de autostoel is
geplaatst (zodat de voeten van het kind naar de
rugleuning van de autostoel wijzen)
• het autostoeltje uitsluitend op de passagiersstoel voorin
is geplaatst als er zich geen airbag aan de voorzijde
van de passagiersstoel bevindt die gevaar voor het kind
in het autostoeltje kan opleveren
• de CYBEX CLOUD Q is bevestigd met een
automatische driepuntsgordel
• de buikriem (k) door de blauwe riemgeleiders (m) aan
weerszijden van het autostoeltje gaat
• de borstriem (l) door de blauwe riemgeleider (n) op de
rugsteun van het autostoeltje gaat
• het slot van de autogordel (q) de blauwe riemgeleider
(m) niet raakt
• de autogordel strak en niet gedraaid zit
• het autostoeltje op de juiste plaats (zie markering) in de
auto is geplaatst, in de zitstand en met de riemgeleider
ontgrendeld
• voor het optimale beschermende effect de LSP zover
mogelijk is uitgeschoven in de richting van het portier
dat zich het dichtst bij het autostoeltje bevindt.
• Zwaaien de draagbeugel (a) met beide knoppen (b)
drukt, in de positie van het voertuig A.
LET OP! Het autostoeltje mag uitsluitend worden gebruikt
Dla bezpieczeństwa Twojego dziecka upewnij się, czy ...
• otelik zamontowany jest tyłem do kierunku jazdy
(nóżki dziecka skierowane są w stronę oparcia fotela
samochodowego)
• Fotelik zamontowany na przednim fotelu
samochodowym nie znajduje się w zasięgu przedniej
poduszki powietrznej
• Fotelik CYBEX CLOUD Q jest zapięty przy pomocy
trzypunktowego pasa bezpieczeństwa
• pas biodrowy (k) przechodzi przez dwie niebieskie
prowadnice (m) po obu stronach fotelika
• pas barkowy (l) przechodzi przez niebieską prowadnicę
za zagłówkiem fotelika.
• zapięcie pasa samochodowego(q) nie dotyka
prowadnicy (m)
• pasy samochodowe są naprężone i nie są skręcone
• fotelik ma odpowiednią pozycję (zobacz oznaczenia)
w samochodzie, oraz jest w pozycji siedzącej z
odblokowanymi prowadnicami
• osłony boczne L.S.P. zostały rozłożone najbliżej drzwi,
aby zapewniały maksymalną ochronę.
• Huśtawka rączkę (a) z obu przycisków (b) sprasowane,
do położenia pojazdu A.
UWAGA! Fotelik może być używany tylko na siedzeniu
przodem do kierunku jazdy z trzypunktowymi pasami
bezpieczeństwa spełniającymi ECE R16.
op een naar voren gekeerde stoel die is voorzien van een
driepuntsgordel die aan de ECE R16-norm voldoet.
FRNLPL
77
Page 78

4
3
2
OUVRIR LE CANOPY PARE-SOLEIL
Déplier la canopy pare-soleil en tirant progressivement
sur la visière en plastique. Pour le replier, pousser le
canopy pare-soleil dans sa position initiale.
1
o
m
CLICK!
78
RÉGLAGE DE LA POSITION ALLONGÉE
ATTENTION ! Le CYBEX CLOUD Q ne doit en position
allongée qu’à l’extérieur du véhicule.
Le CYBEX CLOUD Q peut être mis en position allongée
en appuyant sur le bouton de déverrouillage (o) et en
poussant en même temps le siège vers le bas.
Assurez-vous que le siège est correctement verrouillé en
position couchée.
La position allongée est autorisée exclusivement pour
un usage à l’extérieur du véhicule, par exemple sur une
poussette, et ne doit pas être utilisée dans un véhicule.
Pour des raisons de sécurité, le guide de ceinture (m) se
verrouille automatiquement lorsque le siège est mis en
position allongée.
REMARQUE : Ne pas entreprendre de réglage sur le
siège lorsque le véhicule est en mouvement.
Pour revenir à la position assise, appuyez sur le bouton
de déverrouillage tout en tirant la partie arrière jusqu’à
entendre un «CLIC» audible.
Page 79

DE ZONNEKAP UITVOUWEN ROZKŁADANIE BUDKI
Vouw de zonnekap uit door de kunststof kap naar voren
te trekken. Klap de zonnekap dicht door deze terug te
Rozłóż budkę prze pociągnięcie stopniowo za plastikową
listwę. Aby złożyć budkę, wsuń ją do pozycji wyjściowej.
duwen naar de opgevouwen positie.
HET AUTOSTOELTJE IN DE LIGSTAND ZETTEN ROZKŁADANIE DO POZYCJI PŁASKIEJ
WAARSCHUWING! De CYBEX CLOUD Q mag alleen
buiten de auto in de ligstand staan.
Om de CYBEX CLOUD Q in de ligstand te zetten drukt
u op de ontgrendelingsknop (o) terwijl u tegelijkertijd het
UWAGA! CYBEX CLOUD Q może być rozkładany na
płasko tylko poza autem
CYBEX CLOUD Q można rozłożyć przez naciśnięcie
przycisku (o) i równoczesnym pochyleniu oparcia do dołu.
achterdeel naar beneden duwt.
FRNLPL
Het autostoeltje moet op de juiste wijze in de ligstand
worden vergrendeld.
Deze stand is uitsluitend buiten de auto toegestaan,
bijvoorbeeld wanneer het autostoeltje in een buggy is
bevestigd, en mag nooit in een auto worden gebruikt.
Om veiligheidsredenen wordt de gordelgeleider (m)
automatisch vergrendeld zodra het autostoeltje in de auto
in de ligstand wordt gezet.
LET OP! Breng geen wijzigingen aan in de instellingen
van het autostoeltje terwijl de auto in beweging is.
Om het autostoeltje in de zitstand te zetten, drukt u op de
ontgrendelingsknop terwijl u tegelijkertijd het achterdeel
omhoogtrekt tot u de vergrendeling hoort klikken.
Upewnij się, że fotelik jest prawidłowo zablokowany w
pozycji rozłożonej.
W tej pozycji fotelika można używać tylko poza
samochodem np. na wózku.
Ze względów bezpieczeństwa prowadnice pasów (m) są
automatycznie zablokowane, po rozłożeniu fotelika.
UWAGA! nie zmieniaj pozycji fotelika podczas jazdy
Aby przywrócic pozycję siedzącą użyj przycisku blokady i
pociągnij oparcie aż usłyszysz kliknięcie.
79
Page 80

TRAVEL SYSTEM CYBEX
Suivez le mode d’emploi de votre poussette !
s
Vous pouvez adapter le Cloud Q sur toutes les
poussettes approuvées CYBEX ou d’autres marques.
Clipser la coque sur l’adaptateur d’origine avec l’enfant
installé vers le parent. Assurez-vous que la coque se
verrouille de manière audible sur les deux côtés.
CLICK!
80
Toujours vérier que la coque est bien connectée
fermement à la poussette.
RETRAIT
Pour déverrouiller, appuyer et maintenir les deux boutons
de déverrouillage (s) sur la coque et lever le siège.
Page 81

CYBEX-REISSYSTEEM CYBEX TRAVEL SYSTEM
Volg de handleiding voor uw buggy. Sprawdź instrukcję obsługi Twojego wózka
U kunt de Cloud Q bevestigen op elke goedgekeurde
CYBEX-buggy of goedgekeurde buggy’s van een ander
merk. Klik het autostoeltje vast op de goedgekeurde
adapter, waarbij de richting zodanig is dat het kind naar
de duwende persoon kijkt. Zorg dat het autostoeltje aan
weerszijden hoorbaar vergrendeld wordt.
Controleer altijd of het autostoeltje stevig op de buggy is
Możesz zamontować Cloud Q na wózkach CYBEX lub
innych marek. Wepnij fotelik na odpowiedni adapter.
Dziecko powinno być zwrócone twarzą do rodzica.
Upewnij się, że fotelik jest poprawnie zapięty. Słyszalne
kliknięcie z obu stron.
Zawsze należy sprawdzić połączenie adapterów i wózka
jest stabilne.
bevestigd.
VERWIJDEREN WYJMOWANIE
Om het autostoeltje uit de buggy te verwijderen, houdt
u beide ontgrendelingsknoppen (s) van het autostoeltje
Odblokuj, naciśnij i przytrzymaj przyciski po obu stronach
(s) fotelika i podnieś fotelik.
ingedrukt en tilt u het zitje omhoog.
FRNLPL
81
Page 82

ENTRETIEN ET MAINTENANCE
An de vous assurer que votre siège auto fournit une
protection maximale, vous devez respecter les consignes
suivantes :
• Toutes les pièces importantes de la coque doivent être
régulièrement vériées an que tous les composants
mécaniques fonctionnent sans problème.
• Il est absolument essentiel de s’assurer que la coque
n’est pas coincée entre des objets durs tels que les
portes du véhicule, rails de sécurité etc, car cela peut
entraîner des dommages.
• Après exposition à des forces massives (par exemple
après une collision), il est essentiel que le siège auto
soit contrôlé par le fabricant.
REMARQUE : Il est conseillé d’acheter une housse
supplémentaire lors de l’achat d’un siège auto CLOUD Q
de sorte que le CYBEX CLOUD Q peut continuer à être
utilisé même lorsque la housse doit être lavée ou séchée.
QUE FAIRE APRÈS UN ACCIDENT
Un accident peut causer des dommages au CYBEX
CLOUD Q qui ne sont pas visibles à l’œil nu. Vous devez
toujours changer de siège auto après un accident. En cas
de doute veuillez contacter le détaillant ou le fabricant.
82
Page 83

ONDERHOUD KONSERWACJA
Om er zeker van te zijn dat het autostoeltje optimale
bescherming biedt, moet u op het volgende letten:
Aby zagwarantować maksymalne bezpieczeństwo
swojemu dziecku, zwracaj uwagę na następujące sprawy:
• Alle belangrijke onderdelen van het autostoeltje dienen
regelmatig op beschadigingen te worden gecontroleerd
en alle mechanische onderdelen moeten zonder
problemen functioneren.
• Het autostoeltje mag absoluut niet tegen iets hards
worden gestoten, zoals een autoportier of stoelrail,
omdat het daardoor beschadigd kan raken.
• Na blootstelling aan grote krachten (bijvoorbeeld bij een
botsing) moet het autostoeltje door de fabrikant worden
gecontroleerd.
LET OP! Het is aan te raden een extra hoes te kopen als
u een CYBEX CLOUD Q aanschaft, zodat u de CYBEX
CLOUD Q kunt blijven gebruiken als de hoes moet
• Wszystkie ważne części fotelika powinny być regularnie
sprawdzane. Części mechaniczne powinny działać bez
zarzutu.
• Zwracaj szczególną uwagę, aby fotelik nie został
uszkodzony poprzez zaklinowanie się w drzwiach,
prowadnicy fotela samochodowego czy między innymi
twardymi elementami.
• Jeżeli fotelik brał udział w kolizji, lub został poddany
innym dużym przesileniom powinien zostać sprawdzony
przez producenta.
UWAGA! Przy zakupie fotelika CYBEX CLOUD Q zaleca
się również zakup dodatkowej tapicerki. W wypadku
prania może on służyć jako tapicerka zastępcza.
worden uitgewassen en gedroogd.
NA EEN ONGEVAL POSTĘPOWANIE PO WYPADKU
Een ongeval kan schade aan de CYBEX CLOUD Q
veroorzaken die niet voor het blote oog zichtbaar is.
Vervang het zitje na een ongeval onmiddellijk. Als
u twijfelt, neem dan contact op met de winkelier of
Au drogowym uszkodzenia fotelika mogą być
niewidoczne. Fotelik powinien wtedy zostać niezwłocznie
wymieniony. W razie wątpliwości należy skontaktować
się ze sprzedawcą lub producentem.
fabrikant.
FRNLPL
83
Page 84

NETTOYAGE
Il faut prendre soin d’utiliser une housse originale de
siège CYBEX CLOUD Q car la housse est également un
élément fonctionnel essentiel. Des housses de rechange
peuvent être obtenues auprès de votre revendeur
spécialisé.
REMARQUE : Merci de laver la housse avant la première
utilisation. La housse peut être lavée à 30°C à cycle
délicat. Si vous la lavez à plus de 30°C, une décoloration
peut se produire. Merci de laver la housse séparément
des autres vêtements et ne jamais utiliser le sèche-linge
! Ne jamais laisser la housse sécher en plein soleil !
Les pièces en plastique peuvent être nettoyées avec un
détergent doux et de l’eau chaude.
ATTENTION ! Ne jamais utiliser de produits
détergent ou d’agents blanchissants !
ATTENTION ! Le système de harnais ne peut pas
être démonté ! Ne jamais enlever de parties du
système de harnais !
Vous pouvez nettoyer les ceintures avec un chiffon
propre et de l’eau savonneuse tiède. Essayez d’éviter
d’avoir les sangles trop humide.
84
Page 85

REINIGING CZYSZCZENIE
Omdat de bekleding een belangrijk functioneel
onderdeel is, moet erop worden gelet dat uitsluitend
originele CYBEX CLOUD Q-bekleding wordt gebruikt.
Reservehoesjes kunnen bij een speciaalzaak worden
gekocht.
LET OP! Was de bekleding voordat u deze voor de
eerste keer gaat gebruiken. De bekleding is wasbaar op
maximaal 30° op een antikreukprogramma. Bij wassen op
hogere temperaturen dan 30° kan verkleuring optreden.
Was de bekleding apart en droog deze niet in de droger.
Laat de bekleding nooit in fel zonlicht drogen. De plastic
onderdelen kunnen worden schoongemaakt met een
zacht schoonmaakmiddel en warm water.
Należy używać tylko oryginalnej tapicerki fotelika
CYBEX Cloud Q, ponieważ jest ona niezbędna do jego
sprawnego funkcjonowania. Zapasowe tapicerki dostępne
są w sklepach oferujących produkty CYBEX.
UWAGA! Przed pierwszym użyciem tapicerkę należy
wyprać. Można ją prać w pralce w temperaturze maks.
30°C, w delikatnym cyklu prania Wyższatemperatura
prania możne spowodować wyblaknięcie koloru.
Tapicerkę należy prać oddzielnie i nigdy nie należy
suszyć jej w suszarce! Nie należy także suszyć tapicerki
w pełnym słońcu! Plastikowe części fotelika można
przecierać ciepłą wodą z delikatnym detergentem
FRNLPL
WAARSCHUWING! Gebruik nooit agressieve
schoonmaakmiddelen of bleekmiddel.
WAARSCHUWING! Het gordelsysteem kan niet uit
elkaar worden genomen. Verwijder nooit onderdelen
uit het gordelsysteem.
U kunt de riemen schoonmaken met een schone doek,
lauw water en zeep. Zorg dat de riemen niet te nat
worden.
UWAGA! Nie stosować chemicznych środków do
czyszczenia i wybielaczy!
UWAGA! Szelki bezpieczeństwa fotelika nie mogą
być wyjmowane. Nie zdejmuj żadnych stałych
elementów szelek!
Szelki bezpieczeństwa fotelika mogą być czyszczone
ciepłą wodą z dodatkiem łagodnego detergentur. Unikaj
przemoczenia pasów.
85
Page 86

RETRAIT DE LA HOUSSE DU SIÈGE
La housse se compose de 6 parties : 1 housse de dossier,
1 housse de repose-pieds, 1 housse pour l’appui-tête, 1
protection entre-jambes et 2 protections d’épaules. Pour
retirer la housse, veuillez suivre la procédure suivante :
• Desserrer la boucle de ceinture.
• Retirer les deux protecteurs d’épaules de la ceinture.
• Tirer sur le bord de la housse de l’appui-tête et
l’enlever.
• Retirer les bretelles du harnais de la housse.
• Retirer la housse de l’appui-tête en prenant soin de
ne pas endommager les mousses blanches située en
dessous.
• Défaire les deux boutons-pression entre la housse du
dossier et celle du repose-pieds.
• Retirer la boucle de ceinture de la housse puis l’enlever.
• Retirer le bouton-pression à l’arrière du pare-soleil.
• Vous pouvez maintenant retirer la housse du dossier en
prenant soin de ne pas endommager les mousses de
protection blanches situées en dessous.
ATTENTION ! La coque ne doit en aucun cas être
utilisée sans la housse.
REMARQUE : Seuls les housses originales CYBEX
CLOUD Q peuvent être utilisées.
REMETTRE LA HOUSSE DU SIÈGE
Suivre les étapes décrites ci-dessus dans l’ordre inverse
86
an de rexer la housse.
Page 87
DE BEKLEDING VERWIJDEREN ZDEJMOWANIE TAPICERKI
De bekleding bestaat uit zes onderdelen: 1
rugsteunbekleding, 1 beensteunbekleding, 1
hoofdsteunbekleding, 1 gordelslotpad en 2 schouderpads.
U kunt deze als volgt verwijderen:
• Open het gordelslot.
• Verwijder beide schouderpads van de riem.
• Trek de hoofdsteunbekleding over de rand van de
hoofdsteun en verwijder deze.
• Haal de schouderriemen met de tongen van de gespen
uit de hoofdsteunbekleding.
• Verwijder de hoofdsteunbekleding zonder het witte
vulmateriaal onder de bekleding te beschadigen.
• Open de drukkertjes tussen de rugsteunbekleding en
de beensteunbekleding.
• Haal het gordelslot uit de beensteunbekleding en
verwijder deze.
• Open het drukkertje achter de zonneklep.
• Verwijder de rugsteunbekleding zonder het witte
Tapicerka składa się z 6 cześci: Tapicerka siedziska,
tapicerka zagłówka, tapicerka dolnej części, 2 nakładki
na szelki naramiennei nakładka na klamrę Aby zdjąć
postępuje jak poniżej:
• Odepnij klamrę pasów.
• Zdejmij nakładki na szelki
• Podciągnij tapicerkę zagłówkę do krawędzi i zdejmij.
• Wyciągnij szelki naramienne z tapicerki zagłówka.
• Teraz zdejmij tapicerkę z zagłówka, aby nie uszkodzić
białych pianek pod nią.
• Odepnij napy po bokach pomiędzy oparciem i dolną
częścią.
• Przełóż tapicerkę przez główną klamrę i zdejmij
tapicerkę.
• Odepnij napy za budką.
• Teraz zdejmij dolną część tapicerki, tak aby nie
uszkodzić białych pianek ochronnych po nią.
beschermende vulmateriaal onder de bekleding te
beschadigen.
FRNLPL
WAARSCHUWING! Het autostoeltje mag nooit
worden gebruikt zonder bekleding.
LET OP! Gebruik uitsluitend de originele CYBEX CLOUD
Q-bekleding.
UWAGA! Fotelika nie wolno używać bez tapicerki.
UWAGA! Używaj tylko oryginalnej tapicerki CYBEX
Cloud Q
DE BEKLEDING VASTMAKEN ZAKŁADANIE TAPICERKI
Volg de bovenstaande stappen in omgekeerde volgorde
om de bekleding weer vast te maken.
Ponów kroki opisane powyżej w odwrotnej kolejności, aby
ponownie założyć tapickę.
87
Page 88

REMARQUE : Ce faisant, ne pas tordre ou mélanger les
bretelles du harnais.
DURÉE DE VIE DU PRODUIT
L’usure progressive de la matière plastique, causée par
exemple par l’exposition au soleil (UV), peut provoquer
une légère détérioration des propriétés du produit.
En raison des uctuations de température très élevées
courantes dans les véhicules et d’autres contraintes
imprévisibles pouvant se produire, il est nécessaire de
respecter les points suivants :
• Si le véhicule est exposé aux rayons du soleil pendant
de longues périodes, le siège auto doit être retiré du
véhicule ou recouvert d’un tissu léger.
• Vérier toutes les pièces en plastique une fois par an
(dommages, changements de forme ou de couleur).
• Si vous remarquez un changement dans le siège auto,
consultez votre revendeur car cela pourrait affecter
les performances du siège auto. Les modications
survenant sur les textiles, notamment la décoloration,
sont normales et ne constituent pas des dommages.
88
Page 89

LET OP! Zorg daarbij dat de schouderriemen niet
UWAGA! Nie skręcaj szelek naramiennych
gedraaid komen te zitten of verkeerd om worden
bevestigd.
LEVENSDUUR VAN HET PRODUCT TRWAŁOŚĆ PRODUKTU
Door geleidelijke slijtage van kunststof onderdelen,
bijvoorbeeld door blootstelling aan zonlicht (UV-straling),
kunnen de producteigenschappen ietwat worden
aangetast.
Omdat in auto’s grote temperatuurverschillen normaal
zijn en andere onvoorziene omstandigheden zich kunnen
W związku z tym, że plastikowe części z czasem się
zużywają, np. z powodu ekspozycji na słońce, cechy
produktu mogą się nieznacznie zmieniać.
Jako że fotelik może być narażony na duże wahania
temperatury oraz inne nieprzewidziane sytuacje, należy
stosować się do następujących wskazówek:
voordoen, dient u met de volgende aspecten rekening te
houden:
• Als het voertuig gedurende langere tijd in direct
zonlicht staat, moet het autostoeltje uit de auto worden
verwijderd dan wel met een dunne doek worden
afgedekt.
• Controleer alle kunststof onderdelen jaarlijks op
beschadigingen, vervorming of verkleuring.
• Indien u veranderingen constateert aan het autostoeltje,
raadpleeg dan de winkelier, want de verandering kan
invloed hebben op de prestaties van het autostoeltje.
Veranderingen in de stof, vooral het ets worden
daarvan, zijn normaal en worden niet als beschadiging
• Jeśli samochód stoi przez dłuższy czas na
słońcu,należy wyjąć z niego fotelik lub nakryć fotelik
lekką tkaniną
• Raz do roku sprawdzaj, czy plastikowe elementy
fotelika nie są uszkodzone lub czy nie zmienił się ich
kształt czy kolor
• Przy stwierdzeniu jakichkolwiek zmian, należy
skonsultować się ze sprzedawcą. zmiany wyglądu
tapicerki, jak blaknięcie kolorów, nie są wadą wyrobu,
ale normalnym efektem eksploatacji.
beschouwd.
FRNLPL
89
Page 90

ÉLIMINATION
Pour protéger l’environnement, nous demandons à
l’utilisateur de trier les déchets dès le départ (emballage)
jusqu’à la n (pièces du produit) de la durée de vie du
siège auto. L’élimination des déchets est différentes selon
les autorités locales. An d’assurer que le siège auto est
mis au rebut conformément à la réglementation, vérier
avec l’agence de l’enlèvement des déchets de votre
région ou les autorités locales. Toujours respecter les
consignes d’élimination des déchets de votre pays.
ATTENTION ! Tenir les matériaux d’emballage en
plastique hors de portée de votre enfant : risque
d’asphyxie !
INFORMATIONS SUR LE PRODUIT
Si vous avez des questions, contactez d’abord votre
revendeur. Les informations suivantes sont nécessaires :
• Numéro de série (voir autocollant).
• Marque et modèle de la voiture ainsi que la position du
siège auto sur la banquette.
• Poids (âge, taille) de l’enfant.
Plus d’informations sur nos produits peuvent être
trouvées sur notre site web WWW.CYBEX-ONLINE.COM
90
Page 91

AFVALSCHEIDING UTYLIZACJA
Ter bescherming van het milieu vragen wij de gebruiker
afval te scheiden aan het begin (verpakking) en einde
(productonderdelen) van de levensduur van het
autostoeltje. Afvalverwijdering vindt op verschillende
manieren plaats, afhankelijk van de lokale verordeningen
die op dat gebied gelden. Om te zorgen dat u het
autostoeltje conform de geldende regelgeving verwijdert,
kunt het best contact opnemen met uw lokale
afvalverwerkingsbedrijf of de lokale overheid. Neem u in
elk geval de afvalregelgeving van uw land in acht.
Dla ochrony środowiska należy zutylizować wszystkie
niepotrzebne elementy fotelika (najpierw opakowanie,
a po zakończeniu użytkowania – cały fotelik) zgodnie
z przepisami obowiązującymi w danym kraju. Przepisy
regulujące sposoby utylizacji mogą się różnić w
zależności od kraju. Skontaktuj się z lokalną rmą
zajmującą się gospodarką odpadami, aby we właściwy
sposób zutylizować fotelik. Zawsze stosuj się do
przepisów dotyczących postępowania z odpadami w
swoim kraju.
FRNLPL
WAARSCHUWING! Houd kunststof
verpakkingsmateriaal buiten het bereik van
kinderen: bij dit materiaal bestaat het risico van
UWAGA! Wszystkie elementy opakowania fotelika
powinny znajdować się w miejscu niedostępnym dla
dziecka. Istnieje ryzyko uduszenia
verstikking.
PRODUCTINFORMATIE INFORMACJA O PRODUKCIE
In het geval dat u vragen hebt, dient u zich allereerst
tot uw detailhandelaar te wenden. Zorg daarbij dat u de
volgende gegevens bij de hand hebt:
• Serienummer (zie sticker).
• Merk en model van de auto en de stand van het
autostoeltje waarin het autostoeltje wordt gebruikt.
• Gewicht (leeftijd, lengte) van het kind.
Nadere informatie over het product is te vinden op WWW.
CYBEX-ONLINE.COM
W przypadku pytań prosimy kontaktować się w pierwszej
kolejności ze sklepem Wcześniej przygotuj informacje:
• numer seryjny (patrz etykieta)
• marka i typ samochodu oraz miejsce, na którym zwykle
montowany jest fotelik.
• waga, wiek, wzrost dziecka
Aby uzyskać więcej informacji o produkcie odwiedź
stronę internetową: WWW.CYBEX-ONLINE.COM
91
Page 92

CONDITIONS DE GARANTIE
Les conditions de garantie suivantes s’appliquent
uniquement au pays dans lequel le présent produit a
été vendu par des voies de distribution commerciale à
un consommateur. La présente garantie couvre tous
les défauts de fabrication et de matériaux existant au
moment de l’achat ou se présentant dans les trois (3)
années suivant la première vente de ce produit par des
voies de distribution commerciale à un consommateur
(garantie du fabricant). Dans le cas où des défauts
de fabrication et de matériel apparaîtraient au cours
de la période de garantie, le produit sera réparé ou
remplacé, à notre entière discrétion. An de faire valoir
une réclamation portant sur la présente garantie, le
produit doit être renvoyé au détaillant qui a procédé à
sa première vente, accompagné de la preuve d’achat
originale présentant la date de l’achat, le nom et l’adresse
du détaillant, ainsi que le nom du produit. Aucune
réclamation ne peut être faite au titre de la présente
garantie si le produit est renvoyé au fabricant par toute
autre personne que le détaillant ayant vendu le produit
en premier lieu, avec l’intention de faire une réclamation
au titre de la garantie. La garantie est valable uniquement
si sans délai après l’achat il a été vérié que le produit
était complet et qu’il ne présentait aucun défaut de
fabrication ni aucun défaut matériel. Si le produit a été
acheté par correspondance, vous devez vérier sans
délai à réception que le produit est complet et qu’il ne
présente aucun défaut de fabrication ni aucun défaut
92
matériel. Si le produit présent des défauts, il faut cesser
Page 93

GARANTIEBEPALINGEN WARUNKI GWARANCJI
Deze garantie is uitsluitend van toepassing in het land
waar dit product oorspronkelijk door een detailhandelaar
is verkocht aan een klant. De garantie dekt alle
fabricagefouten en materiaaldefecten die bestaan op het
moment van verkoop of die binnen drie (3) jaar na eerste
verkoop van het product door de detailhandelaar aan de
consument zijn opgetreden. Als zich een fabricagefout of
materiaaldefect voordoet in de garantieperiode, wordt het
product kosteloos gerepareerd of – naar ons goeddunken
– vervangen door een nieuw product. Om aanspraak
te maken op services die binnen het bestek van deze
garantie vallen, dient u het product te retourneren aan de
detailhandelaar die het oorspronkelijk heeft verkocht en
dient een origineel aankoopbewijs (kassabon of factuur)
te worden overlegd met de aankoopdatum, de naam en
het adres van de detailhandelaar en de naam van het
product. Men kan geen rechten doen gelden als gevolg
van deze garantie indien het product omwille van een
beroep op de garantieservice wordt verzonden naar de
fabrikant of een andere persoon dan de detailhandelaar
die het product aanvankelijk heeft verkocht. De garantie
is uitsluitend geldig indien het product onmiddellijk na
aankoop is gecontroleerd op volledigheid, fabricagefouten
en materiaaldefecten. Indien het product per postorder
werd verkocht, moet het onmiddellijk na ontvangst
worden gecontroleerd op volledigheid, fabricagefouten
en materiaaldefecten. Als er sprake is van schade, mag
het product niet worden gebruikt en moet het onmiddellijk
worden geretourneerd naar de detailhandelaar die het
Niniejsza gwarancja obowiązuje wyłącznie w kraju,
w którym produkt został po raz pierwszy sprzedany
klientowi przez sklep detaliczny. Gwarancja obejmuje
wszelkie wady materiałowe i produkcyjne istniejące w
momencie zakupu czy wykryte w ciągu trzech (3) lat
od daty zakupu produktu w sklepie detalicznym przez
pierwszego właściciela (gwarancja producenta). Jeśli
wada materiałowa czy produkcyjna zostanie wykryta,
producent, według własnego uznania, bezpłatnie
naprawi produkt lub wymieni go na nowy. Aby skorzystać
z warunków niniejszej gwarancji, należy zanieść lub
wysłać produkt do sklepu, w którym został po raz
pierwszy zakupiony oraz przedłożyć oryginalny dowód
zakupu (paragon lub fakturę) zawierający datę zakupu,
nazwę sklepu oraz nazwę towaru. Warunki gwarancji
nie obowiązują, jeśli produkt zostanie odesłany do
producenta lub innego podmiotu, a nie do sklepu, w
którym został po raz pierwszy zakupiony. Prosimy o
sprawdzenie produktu pod kątem jego kompletności
czy jakichkolwiek wad w momencie jego zakupu. W
przypadku sprzedaży wysyłkowej - natychmiast po jego
otrzymaniu. W przypadku stwierdzenia wady należy
zaprzestać użytkowania produktu i odesłać go do sklepu,
w którym został po raz pierwszy zakupiony Reklamowany
w ramach gwarancji produkt powinien zostać dostarczony
czysty i kompletny. Jednakże przed kontaktem
ze sklepem należy uważnie przeczytać instrukcję
użytkowania. Gwarancja nie obejmuje uszkodzeń
wynikających z niewłaściwego użytkowania, czynników
FRNLPL
93
Page 94

de l’utiliser et le renvoyer au détaillant ayant effectué
la vente. Pour toute réclamation dans le cadre de la
garantie, le produit doit être retourné complet et propre.
Avant de contacter le détaillant, veuillez lire attentivement
le manuel de l’utilisateur. La garantie ne couvre pas les
dommages causés par une mauvaise utilisation, des
facteurs externes (eau, feu, accidents de la circulation ou
autres) ou par l’usure normale. Toute réclamation dans
le cadre de la garantie ne sera autorisée que si le produit
a été manipulé et utilisé conformément aux instructions
d’utilisation, si des réparations ont été effectuées par
des personnes autorisées à le faire et si des pièces
détachées et des accessoires d’origine ont été utilisés.
Cette garantie n’exclut, ne limite et ne restreint en rien
les droits actuels des consommateurs conformément à
l’ensemble des lois actuellement en vigueur, ni les droits
contre les vendeurs en cas de violation du contrat de
produit.
CYBEX EN EUROPE
CYBEX GmbH,
Riedinger Str. 18, 95448 Bayreuth, Germany
94
Tel. : +49 921 78 511-0, Fax : +49 921 78 511- 999
Page 95

oorspronkelijk heeft verkocht. Als u aanspraak maakt
op de garantie, moet het product in complete en schone
staat worden geretourneerd. Lees de handleiding
zorgvuldig door voordat u contact opneemt met de
detailhandelaar. Deze garantie dekt geen schade
veroorzaakt door verkeerd gebruik, omgevingsfactoren
(zoals water, brand, verkeersongevallen) of normale
slijtage. De garantie wordt alleen verleend indien
het product is gehanteerd en gebruikt conform de
handleiding, en reparaties of aanpassingen uitsluitend
zijn uitgevoerd door personen die daarvoor toestemming
hadden en er altijd uitsluitend originele onderdelen en
accessoires zijn gebruikt. Deze productgarantie strekt
niet tot uitsluiting, beperking of welke andere beperking
dan ook van de basis van de rechten van de consument
onder de van toepassing zijnde wetten of de rechten
jegens de verkoper vanwege contractbreuk.
zewnętrznych (woda, ogień itp) lub znormalnego zużycia.
g
warancja obowiązuje wyłącznie wtedy, jeśli produkt był
użytkowany zgodnie z instrukcją użytkowania, jeśli był
naprawiany/modykowany przez uprawnione osoby
i użyto do tego celu wyłącznie oryginalnych części
i akcesoriów Niniejsza gwarancja nie wyłącza, nie
ogranicza ani nie zawiesza uprawnień
kupującego wynikających z niezgodności towaru z
umową konsumencką.
CYBEX IN EUROPE
CYBEX GmbH,
Riedinger Str. 18, 95448 Bayreuth, Germany
tel. +39 0444 602721, fax +39 0444 1876734
email: italy@columbustp.com
FRNLPL
95
Page 96

CLOUD Q
CLOUD Q
SEMI-U NIVERSAL
UNIVER SAL
- 13 kg
04 3 013 16
ECE R 44/04
Approved for CYBEX
Base Q-fix
CYBEX GmbH
Riedinger Str. 18, 95448 Bayreuth
Germany
09/2014
96
Homologizáció
CYBEX CLOUD Q – hordozó
ECE R44/04 0+ korcsoport
súly: 0-13kg
kor: születéstől kb.18 hónapos korig
Kizárólag olyan hárompontos,
automata biztonsági övvel
rendelkező autóülésen használható,
amely megfelel az ECE R16
vagy más ezzel egyenértékű
szabványnak.
Schválení
CYBEX CLOUD Q – dětská
autosedačka
ECE R44/04 věková skupina 0+
váha: 0 až 13kg
věk: od 0 až do cca 18 měsíců
Vhodné jen pro sedadla vozidel
s 3-bodovým automat. pásem,
schváleným podle ECE předpisu č.
R16 nebo jeho ekvivalentem.
Schválenie
CYBEX CLOUD Q - detská
autosedačka
ECE R44 / 04 veková skupina 0 +
váha: 0 až 13kg
vek: od 0 až do cca 18 mesiacov
Vhodné len pre sedadlá vozidiel
s 3-bodovým automat. pásom,
schváleným podľa ECE predpisu č.
R16 alebo jeho ekvivalentom.
KEDVES VÁSÁRLÓ,
Köszönjük, hogy a CYBEX CLOUD Q-t választotta.
A CYBEX CLOUD Q fejlesztése során elsődleges
szempontok a biztonság, a kényelem és a könnyű
használhatóság voltak. A termék gyártása során
különleges minőségi ellenőrzést alkalmaztunk ezért
megfelel a legszigorúbb biztonsági elvárásoknak.
FONTOS! A használati utasítást mindig tartsa elérhető
helyen, az erre a célra kialakított tároló rekeszben, ami a
CYBEX CLOUD Q alsó részén található.
!
FIGYELMEZTETÉS! Gyermeke biztonsága
érdekében elengedhetetlenül fontos, hogy a CYBEX
CLOUD Q-ot a használati utasításban leírtak szerint
használja.
FONTOS! Az országspecikus követelmények miatt (pl. a
címke színe a hordozón), a termékek külső megjelenése
eltérő lehet. Ez azonban nem érinti a termék működését.
FIGYELMEZTETÉS! A hárompontos övet csak az
!
erre a célra szolgáló övvezetőkben lehet vezetni.
Az övvezetők használatát részletesen ismertetjük
ebben a használati utasításban és a hordozón kék
színnel jelöljük.
Page 97

VÁŽENÝ ZÁKAZNÍKU, VÁŽENÝ ZÁKAZNÍK,
děkujeme vám za nákup dětské autosedačky CYBEX
CLOUD Q. Můžeme vás ujistit, že při vývoji CYBEX
CLOUD Q byly našemi hlavními prioritami bezpečnost,
pohodlí a snadná obsluha. Tento produkt je vyroben pod
výjimečným kvalitativním dohledem a splňuje nejpřísnější
bezpečnostní předpisy.
ďakujeme vám za nákup detskej autosedačky CYBEX
CLOUD Q. Môžeme vás uistiť, že pri vývoji CYBEX
CLOUD Q boli našimi hlavnými prioritami bezpečnosť,
pohodlie a jednoduchá obsluha. Tento produkt je
vyrobený pod výnimočným kvalitatívnym dohľadom a
spĺňa najprísnejšie bezpečnostné predpisy.
UPOZORNĚNÍ! Vždy mějte tento návod k použití po ruce
v přihrádce na spodní straně dětské autosedačky CYBEX
CLOUD Q, která je k tomu určená.
!
VAROVÁNÍ! Pro řádné zajištění dítěte v bezpečí
je nezbytné používat CYBEX CLOUD Q tak, jak je
popsáno v tomto návodu.
UPOZORNĚNÍ! Kvůli odlišným předpisům jednotlivých
zemí (např. barva štítků na dětské autosedačce)
se mohou prvky autosedačky vizuálně lišit. To však
neovlivňuje správnou funkčnost produktu.
VAROVÁNÍ! Tříbodový pás musí vést pouze
!
skrze k tomu určená vedení pásu. Vedení pásu
jsou podrobně popsána v tomto manuálu a na
autosedačce jsou dodatečně označena modrou
barvou.
UPOZORNENIE! Vždy majte tento návod na použitie po
ruke v priehradke na spodnej strane detskej autosedačky
CYBEX CLOUD Q, ktorá je na to určená.
!
VAROVANIE! Pre riadne zabezpečenie dieťaťa v
bezpečí je nevyhnutné používať CYBEX CLOUD Q
tak, ako je popísané v tomto návode.
UPOZORNENIE! Kvôli odlišným predpisom jednotlivých
krajín (napríklad. Farba štítkov na detskej autosedačke)
sa môžu prvky autosedačky vizuálne líšiť. To však
neovplyvňuje správnu funkčnosť produktu.
VAROVANIE! Trojbodový pás musí viesť iba
!
skrze k tomu určená vedenie pásu. Vedenie
pásu je podrobne uvedené v tomto manuáli a na
autosedačke sú dodatočne označené modrou
farbou.
HUCZSK
97
Page 98

TARTALOMHU
RÖVID HASZNÁLATI UTASÍTÁS .................................................................3
HOMOLOGIZÁCIÓ .......................................................................................96
HASZNÁLAT JÁRMŰBEN .........................................................................100
A JÁRMŰ VÉDELME ..................................................................................102
A HORDOZÓKAR BEÁLLÍTÁSA ..............................................................104
A FEJTÁMLA BEÁLLÍTÁSA .......................................................................106
RÖGZÍTÉS BIZTONSÁGI ÖVVEL ...........................................................106
A GYERMEK BIZTONSÁGA .....................................................................11 0
BIZTONSÁG AZ AUTÓBA VALÓ BESZERELÉSKOR .........................11 2
BESZERELÉS AZ AUTÓBA ......................................................................114
AZ OLDALVÉDŐK BEÁLLÍTÁSA .............................................................11 8
A HORDOZÓ KIVÉTELE A JÁRMŰBŐL .................................................120
A GYERMEK MEGFELELŐ RÖGZÍTÉSE .............................................120
A HORDOZÓ MEGFELELŐ BESZERELÉSE .......................................122
A NAPTETŐ KINYITÁSA ...........................................................................124
A DÖNTÖTT POZÍCIÓ BEÁLLATÁSA .....................................................124
CYBEX TRAVEL SYSTEM ........................................................................126
LEVÉTEL ......................................................................................................126
TISZTÍTÁS & KARBANTARTÁS...............................................................128
MI A TEENDŐ BALESET UTÁN ...............................................................128
TISZTÍTÁS ....................................................................................................130
AZ ÜLÉLSHUZAT ELTÁVOLÍTÁSA .........................................................132
A HUZAT VISSZARAKÁSA: ......................................................................132
A TREMÉK ÉLETTARTAMA ......................................................................134
MEGSEMMISÍTÉS .....................................................................................136
TERMÉKINFORMÁCIÓ .............................................................................136
GARANCIÁLIS FELTÉTELEK ..................................................................138
98
Page 99

OBSAH OBSAHCZ
SK
STRUČNÉ INSTRUKCE................................................................................3
SCHVÁLENÍ ...................................................................................................96
POUŽITÍ VE VOZIDLE ...............................................................................101
OCHRANA VAŠEHO VOZIDLA ................................................................103
NASTAVENÍ MADLA NA NOŠENÍ ............................................................105
NASTAVENÍ OPĚRKY HLAVY..................................................................107
ZAJIŠTĚNÍ SYSTÉMEM PÁSŮ ................................................................107
BEZPEČÍ PRO VAŠE DÍTĚ ....................................................................... 111
BEZPEČNOST PŘI MONTÁŽI DO VOZIDLA ........................................113
MONTÁŽ VE VOZIDLE ..............................................................................115
NASTAVENÍ BOČNÍHO PROTEKTORU ................................................119
VYJMUTÍ Z VOZIDLA .................................................................................121
SPRÁVNÉ ZAJIŠTĚNÍ VAŠEHO DÍTĚTE ..............................................121
SPRÁVNÁ INSTALACE DĚTSKÉ AUTOSEDAČKY ............................123
ROZTAŽENÍ SLUNEČNÍ STŘÍŠKY .........................................................125
NASTAVENÍ SKLOPENÉ POZICE ..........................................................125
CYBEX TRAVEL SYSTÉM ........................................................................127
SUNDÁNÍ .....................................................................................................127
PÉČE & ÚDRŽBA .......................................................................................129
CO DĚLAT PO NEHODĚ ..........................................................................129
ČIŠTĚNÍ ........................................................................................................131
SUNDÁNÍ POTAHU ....................................................................................133
PŘIPEVNĚNÍ POTAHU..............................................................................133
ŽIVOTNOST PRODUKTU .........................................................................135
TŘÍDENÍ ODPADU .....................................................................................137
INFORMACE O PRODUKTU ...................................................................137
ZÁRUČNÍ PODMÍNKY ...............................................................................139
STRUČNÉ INŠTRUKCIE...............................................................................3
SCHVÁLENIE ................................................................................................96
POUŽITIE VO VOZIDLE ............................................................................101
OCHRANA VÁŠHO VOZIDLA ..................................................................103
NASTAVENIE MADLÁ NA NOSENIE ......................................................105
NASTAVENIE OPIERKY HLAVY ..............................................................107
ZAISTENIE SYSTÉMOM PÁSOV ...........................................................107
BEZPEČIE PRE VAŠE DIEŤA .................................................................111
BEZPEČNOSŤ PRI MONTÁŽI DO VOZIDLA ........................................113
MONTÁŽ VO VOZIDLE .............................................................................115
NASTAVENIE BOČNÉHO PROTEKTORA ............................................119
VYJMUTIE Z VOZIDLA ..............................................................................121
SPRÁVNE ZABEZPEČENIE VÁŠHO DIEŤAŤA ...................................121
SPRÁVNA INŠTALÁCIA DETSKEJ AUTOSEDAČKY ..........................123
ROZTIAHNUTIE SLNEČNEJ STRIEŠKY ...............................................125
NASTAVENIE SKLOPENEJ POZÍCIE .....................................................125
CYBEX TRAVEL SYSTÉM ........................................................................127
ZVESENIA ....................................................................................................127
STAROSTLIVOSŤ & ÚDRŽBA .................................................................129
ČO ROBIŤ PO NEHODE ...........................................................................129
ČISTENIE .....................................................................................................131
ODOBRATIE POŤAHU ..............................................................................133
PRIPEVNENIE POŤAHU ..........................................................................133
ŽIVOTNOSŤ PRODUKTU.........................................................................135
TRIEDENIE ODPADU ................................................................................137
INFORMÁCIE O PRODUKTE ..................................................................137
ZÁRUČNÉ PODMIENKY ...........................................................................139
HUCZSK
99
Page 100

100
HASZNÁLAT JÁRMŰBEN
FONTOS! Ha a hordozó a jármű ülésére helyezve nem
áll stabilan vagy túl meredek szögben áll, helyezhet alá
takarót. Esteleg válasszon másik ülést a járműben.
FIGYELMEZTETÉS! Ne használja a hordozót olyan
ülésen, ahol bekapcsolt (nem kikapcsolható) légzsák
van. Ez nem vonatkozik az oldalsó légzsákokra.
FONTOS! A nagy terjedelmű első légzsákok
robbanászserűen nyílnak ki és gyermekének komoly
sérülést vagy akár halált is okozhatnak.
FIGYELMEZTETÉS! A hordozó akkor biztosítja
a lehető legjobb védelmet, ha pontosan követik a
használati utasításokat.
FIGYELMEZTETÉS! A CYBEX CLOUD Q terméken
semmilyen módosítás vagy kiegészítés nem
végezhető a CYBEX GmbH hozzájárulása nélkül.
Javítást csak az erre jogosult személy végezhet.
Javításhoz csak eredeti alkatrészeket szabad
használni. Ellenkező esetben a hordozó védő
funkcióját a továbbiakban nem garantáljuk.
 Loading...