

Page 1

CYBEX GmbH
Riedingerstr. 18 | 95448 Bayreuth | Germany
INFO@MYCBX.COM
WWW.MYCBX.COM
CY_171_2663_B0118
Page 2
DEENNLPLDK ITFR
ES
NO
PT
SV
MY.GO
USER GUIDE
Page 3

Page 4
DEENNLPLDK ITFR
ES
NO
PT
SV
3 | INHALT
9 | CONTENT
15 | INDICE
21 | TABLE DES MATIÈRES
27 | INHOUD
33 | SPIS TREŚCI
39 | CONTENIDO
45 | CONTEÚDO
51 | INDHOLD
57 | INNHOLD
63 | INNEHÅLL
Page 5
I Ia IIa IIb
CLICK
IIIb IVIIIa
1 2/3 4 5
6 7 8 9
1
Page 6

10 11
12
13
14
18
22
15 17
19 20 21
16
2
Page 7

ACHTUNG! FÜR SPÄTERES
NACHSCHLAGEN AUFBEWAHREN!
UM DIE SICHERHEIT IHRES KINDES ZU GEWÄHRLEISTEN IST ES SEHR WICHTIG,
DASS SIE DEN CBX MY.GO GEMÄSS DIESER GEBRAUCHSANLEITUNG BENUTZEN. BEI
FRAGEN KÖNNEN SIE SICH JEDERZEIT GERNE AN UNS WENDEN.
SEHR GEEHRTE KUNDIN, SEHR GEEHRTER KUNDE!
Vielen Dank, dass Sie sich für den CBX MY.GO entschieden haben. Wir versichern Ihnen, dass bei
der Entwicklung des CBX MY.GO Sicherheit, Komfort und einfache Handhabung im Vordergrund
standen. Das Produkt wurde unter strengen Qualitätskontrollen entwickelt und erfüllt alle
Sicherheitsstandards.
INHALT
ÜBERSICHT ............................................................................................................................. 4
PFLEGE .................................................................................................................................... 4
ALLGEMEINE WARNHINWEISE ...................................................................................... 4 - 5
VORBEREITUNG .....................................................................................................................5
VORNE TRAGEN OHNE SITZVERKLEINERER (6 KG – 12 KG) ..................................5 - 6
IN DER HÜFTE TRAGEN (6 KG – 12 KG) .............................................................................6
AM RÜCKEN TRAGEN (8 KG – 20 KG) .................................................................................6
VERWENDEN DER INTEGRIERTEN KOPFSTÜTZE ......................................................... 6
GARANTIEBEDINGUNGEN ................................................................................................... 7
3
Page 8
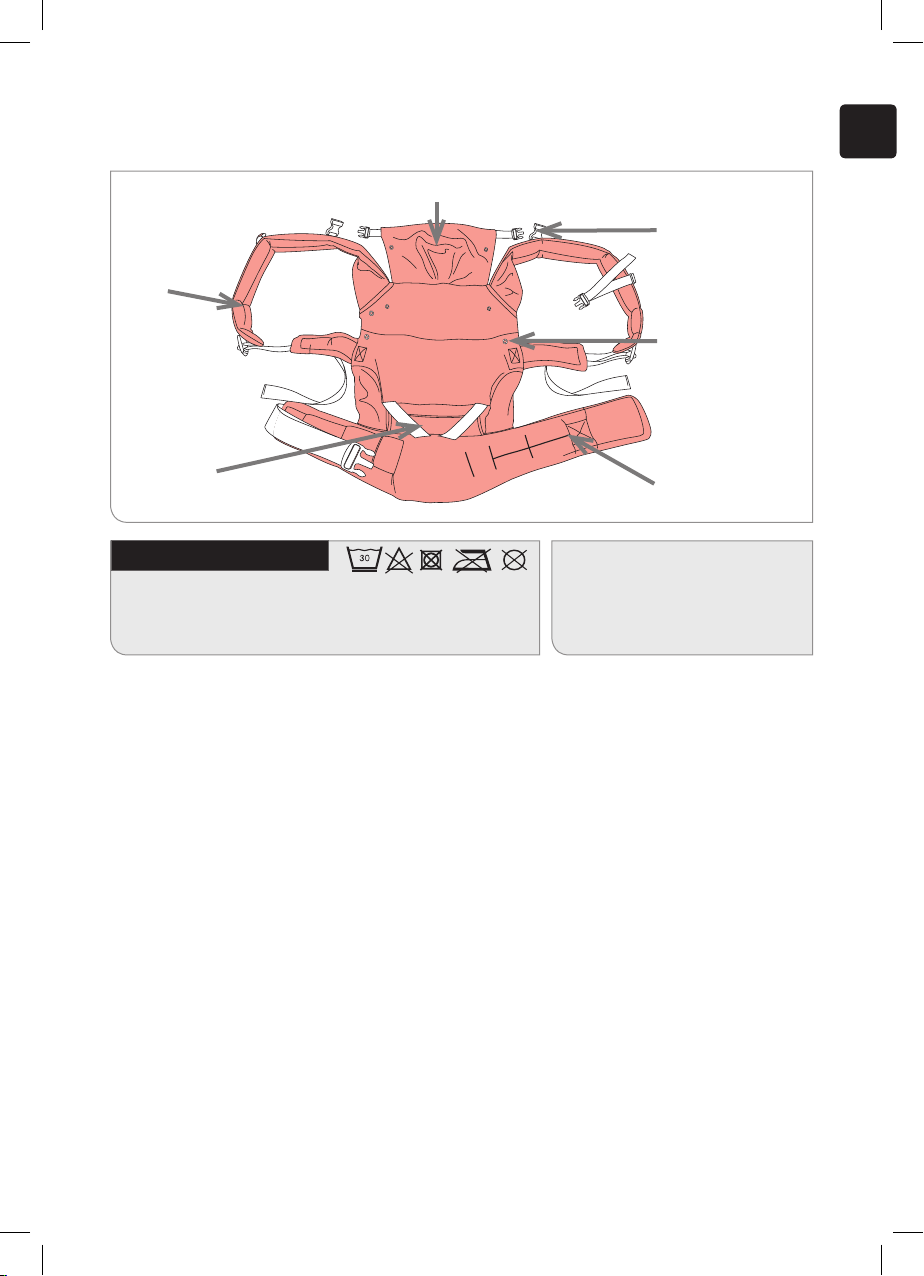
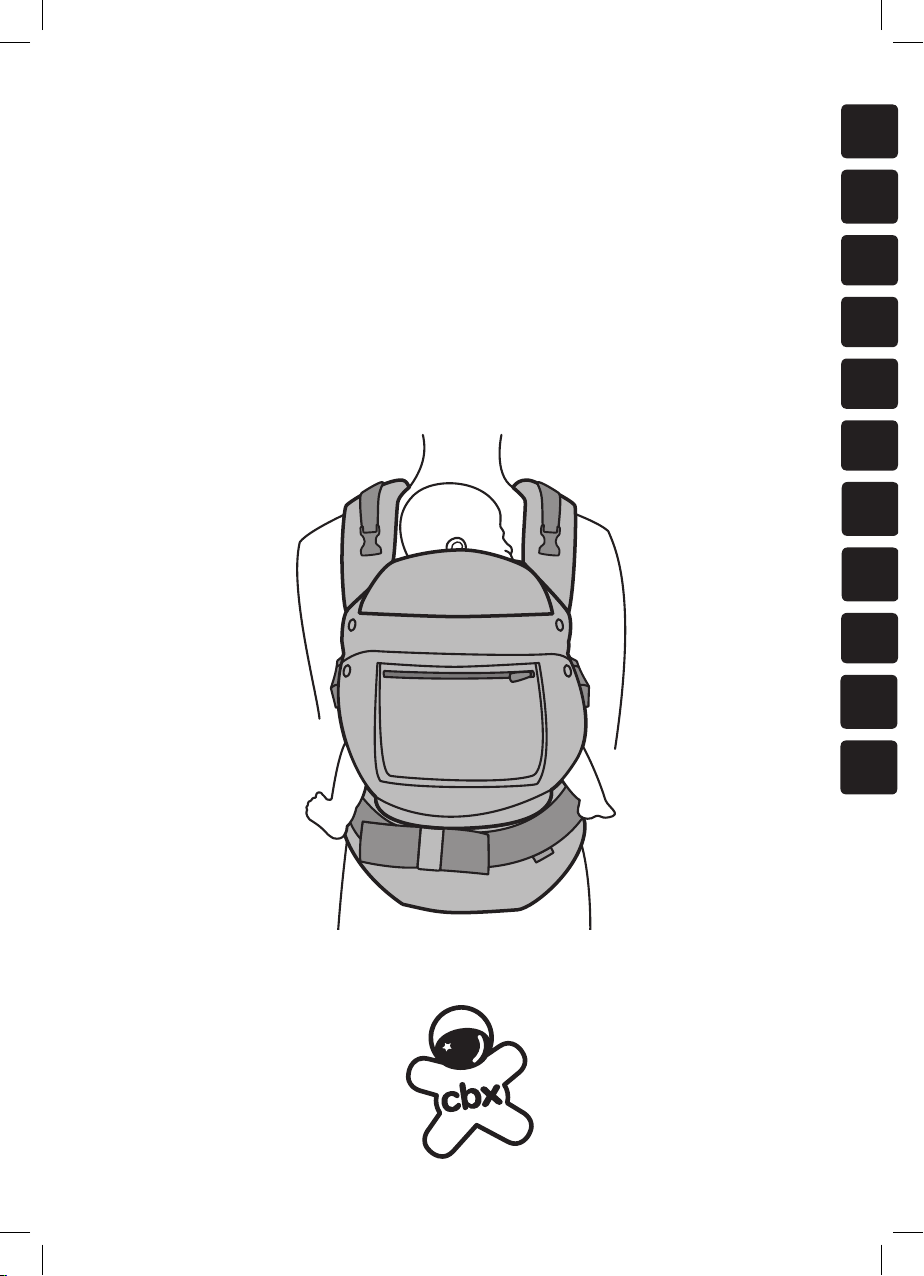
CBX MY.GO baby carrier
Integrierte Kopfstütze
Schnallen zur
Befestigung der
Schultergurte mit
Komfortpolsterung
integrierter
Sitzverkleinerer
Pege
Hinweis! Bitte das Produkt vor der ersten Verwendung
gesondert waschen. Keinesfalls schleudern, nicht maschinell
oder in der prallen Sonne trocknen und nicht bügeln!
Schließen Sie alle Schnallen vor dem Waschen.
Hergestellt in China
ALLGEMEINE WARNHINWEISE:
Bitte achten Sie beim Gebrauch der Babytrage besonders auf folgende Punkte:
WARNUNG!
IHR GLEICHGEWICHT KANN DURCH IHRE BEWEGUNG UND DIE DES KINDES NACHTEILIG
BEEINTRÄCHTIGT WERDEN.
CBX MY.GO – Babytrage
ab Geburt bis 5 Jahre
Gewicht: 3,5 – 20 kg / 8 – 44,09 lbs
Kopfstütze
Drückknöpfe zur
Befestigung des
Sitzver kleinerers
Gepolsterter Hüftgurt
DE
WARNUNG!
SEIEN SIE VORSICHTIG BEIM NACH VORNE ODER SEITWÄRTS BEUGEN ODER LEHNEN.
WARNUNG!
DIESE TRAGE IST ZUR ANWENDUNG BEI SPORTLICHEN AKTIVITÄTEN NICHT GEEIGNET!
WARNUNG!
STELLEN SIE SICHER, DASS EINE ZWEITE PERSON WÄHREND DES ANLEGENS DER
BABYTRAGE DAS KIND SICHERT.
WARNUNG!
STELLEN SIE BEIM ANLEGEN DES HÜFTGURTES SICHER, DASS IMMER DAS MÄNNLICHE
SCHNALLENSTÜCK VOLLSTÄNDIG DURCH DIE ELASTISCHE SICHERHEITSSCHLAUFE GEFÄDELT
WURDE, BEVOR DIE SCHNALLE GESCHLOSSEN WIRD. DAS MÄNNLICHE SCHNALLENSTÜCK
MUSS SICH VOLLSTÄNDIG IN DIE ELASTISCHE SICHERHEITSSCHLAUFE EINHÄNGEN.
WARNUNG!
BEI KINDERN BIS 6 KG SOLLTE DER INTEGRIERTE SITZVERKLEINERER ZUR BESSEREN
POSITIONIERUNG IHRES BABYS BENUTZT WERDEN, DA DIES DIE SICHERHEIT ERHÖHT.
4
Page 9

• Stellen Sie sicher, dass Sie die Gebrauchsanleitung vollständig gelesen und ihren Inhalt verstanden
haben, bevor Sie die Babytrage benutzen.
• Die Babytrage muss immer optimal an die Größe des Babys angepasst werden.
• Die Babytrage darf nur durch Erwachsene benutzt werden. Eine beschädigte Babytrage darf keinesfalls
benutzt werden!
• Überprüfen Sie stets, ob alle Schnallen, Laschen, Gurte, Knöpfe und Verschlüsse richtig justiert,
geschlossen und in einwandfreiem Zustand sind; ist dies nicht der Fall oder im Zweifelsfall, benutzen
Sie die Babytrage nicht.
• Stellen Sie stets sicher, dass um den Kopfbereich des Babys genug Platz ist, damit eine freie
Luftzirkulation möglich ist.
• Ziehen Sie Ihr Baby nicht zu warm an und sorgen Sie dafür, dass eine angenehme Temperatur
beibehalten wird.
• Önen Sie niemals den Hüftgurt während sich Ihr Baby noch in der Trage bendet.
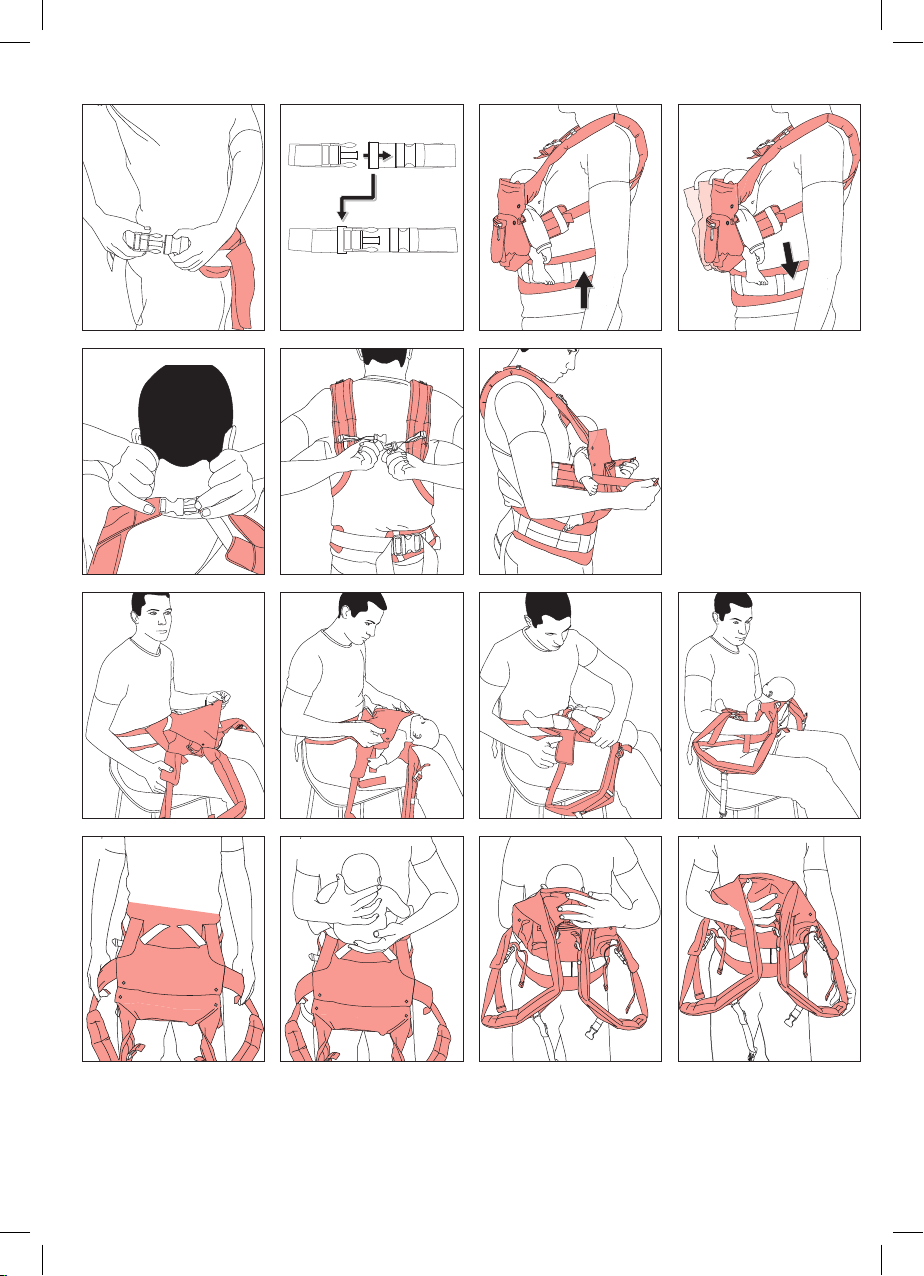
VORBEREITUNG:
I. Legen Sie den Hüftgurt an, schließen Sie die Schnalle und stellen Sie die Länge so ein, dass der Gurt
fest sitzt. Stellen Sie beim Anlegen des Hüftgurtes sicher, dass immer das männliche Schnallenstück
vollständig durch die elastische Sicherheitsschlaufe gefädelt wurde, bevor die Schnalle geschlossen
wird.
Ia. Achten Sie beim Schließen der Schnalle auf ein lautes „CLICK“.
II. Höhenverstellung: Die Position des Hüftgurtes hat die Funktion einer Höhenverstellung. (a) Zum
Tragen kleinerer Kinder befestigen Sie den Gurt um die Taille, so dass das Baby höher sitzt. (b) Zum
Tragen größerer Kinder befestigen Sie den Gurt um die Hüfte. Die Sitzposition des Babys ist optimal,
wenn Sie den Kopf des Babys mit den Lippen berühren können.
III. Verbindungsgurt: (a) Der Verbindungsgurt ist in Länge und Höhe individuell einstellbar. (b) Sie können
ihn im Nacken oder im Rücken schließen.
IV. Weitenregulierung: Ziehen Sie die Schultergurte fest, so dass es für Sie und Ihr Baby angenehm ist.
Mit der Einstellung der Weite regulieren Sie auch die Unterstützung des Babyrückens. Verstauen Sie
anschließend die Überlänge der Gurte in den dafür vorgesehenen Schlaufen.
ACHTEN SIE DARAUF, DASS IHR KIND MIT EINEM LEICHTEN RUNDRÜCKEN IN DER TRAGE SITZT.
ZIEHEN SIE DESHALB DIE SCHULTERGURTE NICHT ZU FEST.
VORNE TRAGEN MIT SITZVERKLEINERER (3,5 KG – CA. 6 KG):
1. Schließen Sie den Hüftgurt wie unter „Vorbereitung“ beschrieben, schieben Sie die Schnalle auf Ihren
Rücken und stellen Sie die Längen der Schultergurte grob ein. Setzen Sie sich auf einen Stuhl und
breiten Sie das Rückenteil ach auf Ihren Oberschenkeln aus. Falten Sie den Sitzverkleinerer aus.
WARNUNG:
DIE SCHNALLE MUSS UNTER DER SICHERHEITSSCHLAUFE DURCHGEFÄDELT SEIN UND AUF
DEM GEPOLSTERTEN STEG LIEGEN.
2. Legen Sie Ihr Baby auf das Rückenteil. Die Oberkante des Rückenteiles sollte bis in den Nacken
reichen – verwenden Sie gegebenenfalls die Kopfstütze.
3. Ziehen Sie den Sitzverkleinerer, wie eine Windel, zwischen die Beine Ihres Kindes nach oben - dabei
sind die Beine Ihres Kindes leicht angehockt.
4. Schließen Sie die Druckknöpfe und achten Sie darauf, dass die Füße nicht in den Hüftgurt
eingeklemmt werden.
5
Page 10

5. Richten Sie Ihr Kind nun mitsamt der Trage auf. Die Füße Ihres Babys verbleiben dabei innerhalb der
Trage angehockt in der Spreiz-Anhockstellung.
Fahren Sie fort wie unter Punkt 10 beschrieben.
VORNE TRAGEN OHNE SITZVERKLEINERER (3,5 KG – CA. 12 KG):
6. Schließen Sie den Hüftgurt wie unter „Vorbereitung“ beschrieben und schieben Sie die Schnalle auf
Ihren Rücken. Lassen Sie das Rückenteil der Trage vor sich herunterhängen.
WARNUNG:
DIE SCHNALLE MUSS UNTER DER SICHERHEITSSCHLAUFE DURCHGEFÄDELT SEIN UND AUF
DEM GEPOLSTERTEN STEG LIEGEN.
7. Nehmen Sie Ihr Kind und halten es mit gespreizten Beinen vor Ihren Bauch.
8. Ziehen Sie das Rückenteil der Trage mit der einen Hand über den Rücken Ihres Kindes nach oben,
während Ihre andere Hand Ihr Kind sichert.
9. Lassen Sie ihr Kind ganz tief in den CBX MY.GO hineinrutschen, so dass zwischen Po und Sto kein
Zwischenraum mehr ist.
10. Schlüpfen Sie nacheinander mit beiden Armen in die Schultergurte, während die jeweils andere Hand
ihr Kind sichert.
11. Schließen Sie den Verbindungsgurt im Nacken.
12. Ziehen Sie die kurzen Enden des Schultergurtes nur soweit, bis das Kind eng am Oberkörper anliegt.
IN DER HÜFTE TRAGEN (6 KG – CA. 12 KG):
13. Schließen Sie den Hüftgurt wie unter „Vorbereitung“ beschrieben und schieben Sie die Schnalle auf
Ihren Rücken.
WARNUNG:
DIE SCHNALLE MUSS UNTER DER SICHERHEITSSCHLAUFE DURCHGEFÄDELT SEIN UND AUF
DEM GEPOLSTERTEN STEG LIEGEN.
DE
14. Wenn Sie Ihr Kind auf der linken Hüfte tragen wollen, Verlängern Sie den rechten Schultergurt und
verkürzen Sie den linken. Für Tragen auf der rechten Hüfte verfahren Sie umgekehrt. Schließen Sie
den Verbindungsgurt.
15. Schlüpfen Sie mit beiden Armen durch die Schultergurte
16. Schieben Sie die Trage auf Ihre linke bzw.rechte Hüfte
17. Lassen Sie ihr Baby von oben in die Trage hineingleiten. Achten Sie darauf, dass ihr Kind genau in
der Mitte des Stopanels auf ihrer Hüfte positioniert ist.
18. Ziehen Sie die kurzen Enden des Schultergurtes nur soweit, bis das Kind eng am Oberköper anliegt.
AM RÜCKEN TRAGEN (8 KG – 20 KG):
Diese Trageposition sollte erst genutzt werden, wenn das Baby seinen Kopf sicher halten kann.
19. Legen Sie den Hüftgurt wie unter „Vorbereitung“ beschrieben an. Schieben Sie die Babytrage auf
ihren Rücken. Schlüpfen Sie mit dem linken Arm durch den linken Schultergurt.
WARNUNG:
ALLE SCHNALLEN MÜSSEN UNTER DER SICHERHEITSSCHLAUFE DURCHGEFÄDELT SEIN UND
AUF DEM GEPOLSTERTEN STEG LIEGEN.
6
Page 11

20. Nehmen Sie nun Ihr Baby auf den rechten Arm. Schieben Sie es nach hinten in die Trage, wobei Sie
Ihre linke Hand auf den Rücken legen und den linken Fuß Ihres Kindes fassen. Beugen Sie sich dazu
leicht nach vorne und halten Sie dabei Ihr Baby stets fest. Sobald das Baby sicher sitzt, schlüpfen Sie
auch in den rechten Schultergurt.
21. Schließen Sie den Verbindungsgurt auf Höhe Ihres Brustbeines und justieren Sie ggf. die Weite.
ACHTEN SIE DARAUF, DASS IHR KIND MIT EINEM LEICHTEN RUNDRÜCKEN IN DER TRAGE SITZT.
ZIEHEN SIE DESHALB DIE SCHULTERGURTE NICHT ZU FEST.
VERWENDEN DER INTEGRIERTEN KOPFSTÜTZE:
22. Zur Verwendung der Kopfstütze rollen Sie diese aus und befestigen beide Enden an den dafür
vorgesehenen Schnallen am Schultergurt. Bei Verwendung als Rückentrage befestigen Sie bitte die
Kopfstütze bereits vor dem Anlegen.
GARANTIEBEDINGUNGEN:
Die nachfolgenden Garantiebestimmungen gelten nur in dem Land, in dem dieses Produkt erstmalig
über den Einzelhandel an einen Verbraucher verkauft wurde. Die Garantie deckt sämtliche Herstellungsund Materialfehler ab, die im Zeitpunkt des Kaufs bestanden haben oder die innerhalb von zwei
(2) Jahren nach dem Erstverkauf dieses Produkts über den Einzelhandel an einen Verbraucher in
Erscheinung getreten sind (Herstellergarantie). Tritt während der Garantiezeit ein Herstellungs- und
Materialfehler auf, wird das Produkt kostenlos repariert oder – nach unserem freien Ermessen– gegen
ein neues ausgetauscht. Um Leistungen im Rahmen dieser Garantie in Anspruch nehmen zu können,
muss das Produkt an den Einzelhändler zurückgegeben werden, der es erstmalig verkauft hat und
ein Nachweis über den Kauf (Kaufbeleg oder Rechnung) im Original vorgelegt werden, welcher das
Kaufdatum, den Namen des Händlers sowie die Produktbezeichnung aufzeigt. Der Anspruch aus
diesem Garantieversprechen besteht nicht, wenn das Produkt an den Hersteller oder irgendeine andere
Person als den Einzelhändler, der es erstmalig verkauft hat, zum Zweck der Inanspruchnahme der
Garantieleistung geschickt wird. Die Garantie gilt nur, wenn das Produkt nach dem Kauf umgehend auf
Vollständigkeit, Herstellungs- und Materialfehler überprüft wurde. Wurde das Produkt im Versandhandel
gekauft, ist es umgehend nach Erhalt auf Vollständigkeit, Herstellungs- und Materialfehler zu überprüfen.
Falls Schäden vorhanden sind, darf das Produkt nicht mehr benutzt werden und muss umgehend
an den Händler, der es erstmalig verkauft hat, zurück gegeben werden. Im Garantiefall muss das
Produkt in einem vollständigen und sauberen Zustand zurückgegeben werden. Bitte lesen Sie vor einer
Kontaktaufnahme mit dem Händler sorgfältig die Gebrauchsanleitung. Die Garantie deckt keine Schäden
ab, die durch Fehlgebrauch, äußere Einüsse (Wasser, Feuer, Verkehrsunfälle o.ä.) oder normalen
Verschleiß entstanden sind. Die Garantie wird nur gewährt, wenn das Produkt in Übereinstimmung mit
der Gebrauchsanweisung behandelt und benutzt wurde, Reparaturen oder Veränderungen ausschließlich
durch Personen vorgenommen wurden, die hierzu befugt waren und stets nur Original Bau- und
Zubehörteile verwendet wurden. Durch diese Garantie werden weder die auf Grundlage der jeweils
anwendbaren Gesetze bestehenden Verbraucherrechte noch Rechte gegen den Verkäufer wegen der
Vertragswidrigkeit des Produkts ausgeschlossen, begrenzt oder in anderer Weise eingeschränkt.
CYBEX GMBH,
Riedinger Str. 18, 95448 Bayreuth, Germany
Tel.: +49 921 78511-0, Fax.: +49 921 78511- 999
7
Page 12
DE
8
Page 13

IMPORTANT! KEEP FOR FUTURE
REFERENCE!
TO GUARANTEE YOUR CHILD’S SAFETY, IT IS VERY IMPORTANT THAT YOU USE CBX
MY.GO IN ACCORDANCE WITH THIS INSTRUCTION MANUAL. SHOULD YOU HAVE ANY
QUESTIONS, PLEASE FEEL FREE TO CONTACT US AT ANY TIME.
DEAR CUSTOMER
Thank you very much for purchasing the CBX MY.GO! We assure you that in developing the
CBX MY.GO safety, comfort and easy operation were our main focus. The product was subject
to strict quality controls and meets all safety standards.
CONTENT
OVERVIEW ............................................................................................................................. 10
CARE INSTRUCTIONS ......................................................................................................... 10
GENERAL WARNINGS ...................................................................................................10 - 11
GENERAL INFORMATION ....................................................................................................11
FRONT POSITION WITH INFANT INSERT (3.5 KG – APPROX. 6 KG) ...........................11
FRONT POSITION WITHOUT INFANT INSERT (6 KG – 12 KG) ...................................... 12
HIP POSITION (6 KG – 12 KG) ............................................................................................. 12
BACK POSITION (8 KG – 20 KG) ..................................................................................12 - 13
HOW TO USE THE INTEGRATED HEAD REST................................................................ 13
WARR ANTY ........................................................................................................................... 13
9
Page 14
CBX MY.GO baby carrier
Integrated head rest with size adjustment
Elastic loops to x the
head rest
Shoulder straps with
comfortable padding
Press studs to attach
the infant insert
Padded waist belt Integrated infant insert
CARE
Note! Please wash the product separately before using it for
the rst time. Do not tumble dry and do not expose to direct
sunlight! Do not iron! Fasten all buckles when washing.
Made in China
GENERAL WARNINGS!
Please pay special attention to the following aspects when using the CBX MY.GO BABY CARRIER:
WARNING!
YOUR BALANCE MAY BE ADVERSELY AFFECTED BY YOUR MOVEMENT AND THAT OF YOUR
CHILD.
CBX MY.GO – baby carrier
from birth to 5 years
Weight: 3,5 – 20 kg / 8 – 44,09 lbs
EN
WARNING!
TAKE CARE WHEN BENDING OR LEANING FORWARD.
WARNING!
THIS CARRIER IS NOT SUITABLE FOR USE DURING SPORTING ACTIVITIES.
WARNING!
PLEASE ENSURE THAT A SECOND PERSON SECURES THE BABY WHEN PUTTING ON THE BABY
CARRIER.
WARNING!
PLEASE ENSURE THAT THE MALE PART OF THE BUCKLE IS ALWAYS FED THROUGH THE
ELASTIC SAFETY LOOP BEFORE CLOSING THE BUCKLE. THE MALE PART OF THE BUCKLE MUST
BE COMPLETELY HOOKED INTO THE ELASTIC SAFETY LOOP.
WARNING!
THE INTEGRATED INFANT INSERT IS RECOMMENDED FOR CHILDREN UP TO 6 KG. THIS
SECURES YOUR CHILD IN A BETTER POSITION AND INCREASES SAFETY .
10
Page 15

• Make sure you read and fully understand the instructions before using the BABY CARRIER.
• The BABY CARRIER has to be optimally adjusted to the baby s size before each use.
• The BABY CARRIER is for adult use only. A damaged BABY CARRIER must NOT be used!
• Always check that all buckles, loops, straps, buttons and clips are securely fastened and in perfect
functioning condition; if this is not the case, or when in doubt, do NOT use the carrier.
• Always make sure that there is sucient space around the head to ensure proper air- ow.
• Do not dress your baby too warmly and check regularly to ensure that a comfortable temperature is
maintained.
• Never unbuckle the waist belt while the baby is in the carrier.
PREPARATION:
I. Position the waist belt around your waist/hips, fasten the buckle and adjust the length until it sits
tightly. Please ensure that the male part of the buckle is always fed through the elastic safety loop
before fastening the buckle.
Ia. When closing the buckle of the waist belt keep pushing until you hear a loud “CLICK”.
II. Height adjustment: The waist belt also functions as a height adjustment system. (a) To carry smaller
children, the belt should be placed around the waist, allowing the child to sit in an elevated position.
(b) For larger children the belt should be placed around the hips. The child is sitting at the right height
when the adult can kiss the child s head; the child’s position should be adjusted accordingly.
III. Connector belt: (a) For ease of use, the connector belt on the shoulder straps can be adjusted both in
length and height. (b) It can be fastened across the chest or across the top of the back.
IV. Width adjustment: Tighten the shoulder straps until they are comfortable for yourself and your baby.
By changing the width, you alsoadjustthesupporttoyourchild’sback. Tuck the excess lengths of belt in
the storage loops.
PLEASE ENSURE YOUR CHILD’S BACK IS SLIGHTLY ROUNDED WHILE SITTING IN THE CARRIER
AND DO NOT, THEREFORE, FASTEN THE SHOULDER STRAPS TOO TIGHTLY.
FRONT POSITION FACING PARENT WITH INFANT INSERT
(3.5 KG – APPROX. 6 KG):
1. Fasten the waist belt as described under “Preparation”. Push the waist belt buckle around your back
and pre adjust the length of the shoulder straps. Sit down on a chair and spread the back section of
the carrier across your lap. Unfold the infant insert.
WARNING:
THE BUCKLE MUST ALWAYS BE FED THROUGH THE ELASTIC SAFETY LOOP AND BE
POSITIONED ON THE PADDED BASE.
2. Position your child on the back section of the carrier. The upper edge of the back section should meet
the neck of your baby – if necessary, use the head rest.
3. Similar to a nappy, pull the infant insert up between your child’s legs which should be slightly tucked
up.
4. Close the press studs and ensure that the child’s feet do not get caught in the waist belt.
11
Page 16

5. Now hold your child upright in the carrier. Your baby s feet should remain tucked up in the carrier in
the required “spread-squat position”.
Continue as described under Point 10.
FRONT POSITION FACING PARENT WITHOUT INFANT INSERT
(6 KG – APPROX. 12 KG):
6. Close the waist belt as described under “Preparation” and push the waist belt buckle around your
back. Pre adjust the length of the shoulder straps and leave the back section of the carrier hanging
down.
WARNING:
THE BUCKLE MUST ALWAYS BE FED THROUGH THE ELASTIC SAFETY LOOP AND BE
POSITIONED ON THE PADDED BASE.
7. Lift your child and hold him with legs spread in front of your belly.
8. Now use one hand to pull the back section of the carrier across and up your child’s back whilst
supporting your child with the other hand.
9. Let your child slide all the way down into the CBX MY.GO until there is no space between your baby’s
bottom and the carrier fabric.
10. Now slip your arms through the closed shoulder straps one after the other, whilst always supporting
your child with your free hand.
11. Fasten the connector belt behind your neck.
12. Pull the short ends of the shoulder straps only until your child is positioned close to your body.
HIP POSITION (6 KG – APPROX. 12 KG):
13. Fasten the waist belt as described under “Preparation” and let the back section of the carrier hang
down in front of you.
WARNING:
THE BUCKLE MUST ALWAYS BE FED THROUGH THE ELASTIC SAFETY LOOP AND MUST BE
POSITIONED ON THE PADDED BASE.
EN
14. If you want to carry your child on your left hip, enlarge the right shoulder strap and shorten the left
one. For carrying on your right hip please do vice versa. Close the sternum strap
15. Now slip hrough the shoulder straps with both arms.
16. Move the carrier to your left ( right ) hip
17. Let your baby slide from the top all the way down into the carrier. Ensure your child is placed in the
middle of the carrier right on your hip.
18. Adjust the shoulder straps by pulling its short ends only until your child is positioned tightly to your
body.
BACK POSITION (8 KG – 20 KG):
This carrying position should only be used when your baby is able to support its own head safely.
19. Put on the waist belt as described under “Preparation”. Push the baby carrier onto your back. Slide
your left arm through the left shoulder strap.
WARNING:
ALL BUCKLES MUST ALWAYS BE FED THROUGH THE ELASTIC SAFETY LOOPS AND BE
POSITIONED ON THE PADDED BASE.
12
Page 17

20. Lift your baby onto your right arm, then place your left hand on your back and take hold of your baby s
left foot and then shift your baby into the carrier. To do so, bend forward slightly and hold and support
your baby at all times. As soon as your baby is sitting safely, slip on the right shoulder strap.
21. Close the sternum strap at the height of your chest and if necessary adjust the width.
PLEASE ENSURE THAT YOUR CHILD’S BACK IS SLIGHTLY ROUNDED WHILE SITTING IN THE
CARRIER AND DO NOT, THEREFORE, FASTEN THE SHOULDER STRAPS TOO TIGHTLY.
HOW TO USE THE INTEGRATED HEADREST:
22. For using the integrated headrest simply coast it and x both side parts to the buckles on the shoulder
straps. If use in back carrying position please x the headrest before you put on the carrier.
WARRANTY
The following warranty applies solely in the country where this product was rst sold by a retailer to a
customer. The warranty covers all manufacturing and material defects, existing and appearing at the
date of purchase or appearing within a term of two (2) years from the date of purchase from the retailer
who rst sold the product to a consumer (manufacturer’s warranty). In the event that a manufacturing or
material defect should appear, we will – at our own discretion – either repair the product free of charge
or replace it with a new product. To invoke the warranty the product must be taken or shipped to the
retailer, who rst sold this product to a customer together with the original proof of purchase (sales receipt
or invoice) containing the date of purchase, the name of the retailer and the product designation. This
warranty shall not apply in the event that this product is taken or shipped to the manufacturer or any
person other than the retailer who rst sold this product to a consumer. Please check the product with
respect to completeness and manufacturing or material defects immediately at the date of purchase
or, in the event that the product was purchased in distance selling, immediately on receipt. In case of a
defect stop using the product and take or ship it immediately to the retailer who rst sold it. In a warranty
case the product has to be returned in a clean and complete condition. Prior to contacting the retailer,
please read this instruction manual carefully. This warranty does not cover any damages caused by
misuse, environmental inuence (water, re, road accidents etc.) or normal wear and tear. It only applies
if the product was always used and handled in compliance with the operating instructions, if any and
all modications and services were performed by authorized persons and if original components and
accessories were used. This warranty does not exclude, limit or otherwise aect any statutory consumer
rights, including claims in tort and claims with respect to a breach of contract, which the buyer may have
against the seller or the manufacturer of the product.
13
Page 18
EN
14
Page 19

IMPORTANTE! CONSERVARE A
SCOPO DI RIFERIMENTO FUTURO!
PER GARANTIRE LA SICUREZZA DEI BAMBINI, È FONDAMENTALE UTILIZZARE CBX
MY.GO SEGUENDO IL MANUALE DI ISTRUZIONI. POTETE CONTATTARCI IN QUALSIASI
MOMENTO PER EVENTUALI CHIARIMENTI.
GENTILE CLIENTE
Grazie per avere acquistato CBX MY.GO! Garantiamo che sicurezza, comfort e semplicità di
funzionamento sono stati le nostre priorità nello sviluppo di CBX MY.GO. Il prodotto è stato
sottoposto a controlli di qualità rigorosi e soddisfa gli standard di sicurezza.
INDICE
SOMMARIO ............................................................................................................................ 16
ISTRUZIONI DI MANUTENZIONE ......................................................................................16
AVVERTENZE GENERALI ............................................................................................ 16 - 17
INFORMAZIONI GENERALI .................................................................................................17
POSIZIONE FRONTALE CON INSERTO NEONATO (3,5 KG – APPROSS. 6 KG) ........17
POSIZIONE FRONTALE SENZA INSERTO NEONATO (6 - 12 KG) ................................ 18
POSIZIONE SUL FIANCO (6 - 12 KG) ................................................................................. 18
POSIZIONE SULL A SCHIENA (8 - 20 KG) ................................................................... 18 - 19
UTILIZZO DEL POGGIATESTA INTEGRATO .................................................................... 19
GARANZIA .............................................................................................................................19
15
Page 20
CBX MY.GO Marsupio
Poggiatesta integrato con misura regolabile
Fasce spalle con
imbottitura comfort
Occhielli elastici per
ssaggio poggiatesta
Perni a pressione
per ssaggio inserto
neonato
IT
Inserto neonato integrato
Cinghia in vita
imbottita
MANUTENZIONE
N.B. Lavate il prodotto separatamente prima di utilizzarlo la
prima volta. Non centrifugate e non esponete a luce solare
diretta! Non stirate! Allacciate le bbie prima del lavaggio.
Fabbricato in Cina
AVVERTENZE GENERALI
Quando utilizzate il marsupio porta bebè CBX MY.GO, prestate particolare attenzione a quanto segue:
AVVERTENZA
L‘EQUILIBRIO POTREBBE ESSERE COMPROMESSO DAL VOSTRO MOVIMENTO E DA QUELLO
DEL BIMBO.
AVVERTENZA
PRESTATE ATTENZIONE QUANDO VI PIEGATE O SPORGETE IN AVANTI.
AVVERTENZA
IL MARSUPIO NON È ADATTO ALL‘USO DURANTE ATTIVITÀ SPORTIVE.
AVVERTENZA
DOVRÀ ESSERE UNA SECONDA PERSONA AD ASSICURARE IL BAMBINO MENTRE INDOSSATE IL
MARSUPIO.
AVVERTENZA
PRIMA DI CHIUDERE LA FIBBIA, VERIFICATE CHE LA PARTE MASCHIO DELLA STESSA SIA
SEMPRE INSERITA E COMPLETAMENTE AGGANCIATA ALL‘OCCHIELLO ELASTICO DI SICUREZZA.
Marsupio CBX MY.GO
da 0 a 5 anni
Peso: 3,5 – 20 kg / 8 – 44,09 lbs
AVVERTENZA
PER TENERE IL BAMBINO IN POSIZIONE OTTIMALE E PIÙ SICURA, SI CONSIGLIA L‘INSERTO
NEONATO INTEGRATO PER BAMBINI FINO A 6 KG.
16
Page 21

• Assicuratevi di avere letto e compreso integralmente le istruzioni prima di utilizzare il MARSUPIO.
• Prima dell‘uso, regolate il MARSUPIO in base alla taglia del bambino.
• Il MARSUPIO è utilizzabile solo da adulti. Non utilizzate il MARSUPIO se danneggiato!
• Controllate sempre che bbie, occhielli, fasce, bottoni e clip siano allacciati correttamente e
perfettamente funzionanti; in caso contrario o dubbio, NON utilizzate il marsupio.
• Vericate che vi sia spazio suciente intorno alla testa per consentire un usso d‘aria adeguato.
• Non coprite eccessivamente il bambino e controllate regolarmente che sia mantenuta una temperatura
gradevole.
• Non sganciate la cinghia in vita mentre il bambino è nel marsupio.
UTILIZZO
I. Posizionate la cinghia attorno alla vita/ai anchi, allacciate la bbia e regolate la lunghezza in modo
che risulti tesa. Prima di allacciare la bbia, vericate che la parte maschio sia sempre inserita
nell‘occhiello elastico di sicurezza.
Ia. Per chiudere la bbia della cinghia in vita, continuate a premere no allo scatto.
II. Regolazione dell‘altezza: la cinghia in vita funziona anche come sistema di regolazione dell‘altezza.
(a) Per portare i bambini più piccoli, posizionate la cinghia attorno alla vita, consentendo al bambino
di stare in posizione elevata. (b) Per bambini più grandi, posizionate la cinghia attorno ai anchi.
Il bambino è posizionato all‘altezza corretta quanto l‘adulto può baciarlo sulla testa; regolate la
posizione del bambino di conseguenza.
III. Cinghino di giunzione: (a) per facilità d‘uso, il cinghino di giunzione sulle fasce spalle è regolabile in
lunghezza e altezza. (b) si può allacciare sul petto o sulla parte superiore della schiena.
IV. Regolazione della larghezza: tendete le fasce spalle in modo che siano confortevoli per voi e il
bambino. Variando la larghezza, regolate anche il supporto schiena del bambino. Piegate la cinghia in
eccesso negli occhielli utilizzati per riporre il marsupio.
VERIFICATE CHE ALL‘INTERNO DEL MARSUPIO IL BAMBINO ABBIA LA SCHIENA LEGGERMENTE
INCURVATA, QUINDI NON STRINGETE ECCESSIVAMENTE LE FASCE SPALLE.
POSIZIONE FRONTALE VERSO IL GENITORE CON INSERTO NEONATO
(3,5 KG – APPROSS. 6 KG):
1. Allacciate la cinghia in vita come descritto in “Utilizzo”. Spingete la bbia della cinghia in vita attorno
alla schiena e preregolate la lunghezza delle fasce spalle. Sedetevi e appoggiate la parte posteriore
del marsupio sul grembo. Aprite l‘inserto neonato.
AVVERTENZA:
AGGANCIATE SEMPRE LA FIBBIA ALL‘OCCHIELLO ELASTICO DI SICUREZZA E POSIZIONATELA
SULLA BASE IMBOTTITA.
2. Sedete il bambino sul supporto posteriore del marsupio. L'estremità del marsupio deve essere
perfettamente all'altezza del collo del bambino - se necessario utilizzate anche il poggiatesta
aggiuntivo.
3. Come con un pannolino, tirate l‘inserto neonato verso l‘alto tra le gambe del bambino leggermente
piegate.
4. Chiudete i perni a pressione e controllate che i piedi del bambino non si impiglino nella cinghia in vita.
17
Page 22

5. Sistemate il bambino in posizione eretta nel marsupio. I piedi del bambino dovranno restare all‘interno
del marsupio in „posizione a ranocchia“.
Continuate come descritto al punto 10.
POSIZIONE FRONTALE VERSO IL GENITORE SENZA INSERTO NEONATO
(6 KG – APPROSS. 12 KG):
6. Chiudete la cinghia in vita come descritto in “Utilizzo” e spingete la bbia attorno alla schiena.
Preregolate la lunghezza delle fasce spalle e lasciate ricadere la parte posteriore del marsupio.
AVVERTENZA:
AGGANCIATE SEMPRE LA FIBBIA ALL‘OCCHIELLO ELASTICO DI SICUREZZA E POSIZIONATELA
SULLA BASE IMBOTTITA.
7. Sollevate il bambino e tenetelo davanti alla pancia a gambe aperte.
8. Con una mano sollevate la parte posteriore del marsupio verso la schiena del bambino, tenendolo con
l‘altra mano.
9. Fate scivolare il bambino verso il basso in CBX MY.GO in modo che non vi sia spazio tra il sederino
del bambino e il tessuto del marsupio.
10. Inlate le braccia nelle fasce spalle chiuse, una dopo l‘altra, reggendo sempre il bambino con la mano
libera.
11. Allacciate il cinghino di giunzione dietro il collo.
12. Tirate solo le estremità corte delle fasce spalle in modo che il bambino sia posizionato vicino
al vostro corpo.
POSIZIONE SUL FIANCO (6 KG – APPROSS. 12 KG):
13. Allacciate la cinghia in vita come descritto in “Utilizzo” e lasciate ricadere la parte posteriore del
marsupio davanti a voi.
AVVERTENZA:
AGGANCIATE SEMPRE LA FIBBIA ALL‘OCCHIELLO ELASTICO DI SICUREZZA E POSIZIONATELA
SULLA BASE IMBOTTITA.
IT
14. Per portare il bambino sul anco sinistro, allargate la fascia spalle destra e accorciate la sinistra. Per
portarlo sul anco destra, agite sull‘altro lato. Chiudete la fascia sterno
15. Inlate ambo le braccia nelle fasce spalle.
16. Spostate il marsupio sul anco sinistro (destro)
17. Fate scivolare il bambino dall‘alto verso il basso nel marsupio. Posizionate il bambino al centro del
marsupio proprio sul vostro anco.
18. Regolate le fasce spalle tirando solo le estremità corte in modo che il bambino sia a stretto contatto
con il vostro corpo
POSIZIONE SULLA SCHIENA (8 - 20 KG):
Utilizzate questa posizione di trasporto solo quando il bambino è in grado di sostenere la testa in
sicurezza.
19. Indossate la cinghia in vita come descritto in “Utilizzo”. Spingete il marsupio sulla schiena. Fate
scorrere il braccio sinistro nella fascia spalle sinistra.
AVVERTENZA:
AGGANCIATE SEMPRE LA FIBBIA ALL‘OCCHIELLO ELASTICO DI SICUREZZA E POSIZIONATELA
SULLA BASE IMBOTTITA.
18
Page 23

20. Sollevate il bambino con il braccio destro, posizionate la mano sinistro sulla vostra schiena, tenendo il
piede sinistro del bambino, quindi spostate il bambino nel marsupio. Piegatevi leggermente in avanti,
reggendo sempre il bambino. Appena il bambino è posizionato in sicurezza, inlate la fascia spalle
destra.
21. Chiudete la fascia sterno all‘altezza del petto ed eventualmente regolate la larghezza.
VERIFICATE CHE LA SCHIENA DEL BAMBINO NEL MARSUPIO SIA LEGGERMENTE INCURVATA E
QUINDI NON STRINGETE ECCESSIVAMENTE LE FASCE SPALLE.
UTILIZZO DEL POGGIATESTA INTEGRATO:
22. Per utilizzare il poggiatesta integrato, fatelo semplicemente scorrere e ssate ambo i lati alle bbie
sulle fasce spalle. Per il trasporto sulla schiena, ssate il poggiatesta prima di indossare il marsupio.
GARANZIA
La seguente garanzia è valida unicamente nel paese in cui il prodotto è stato venduto inizialmente dal
rivenditore al cliente. La garanzia copre tutti i difetti di fabbricazione e materiale, esistenti e riscontrati
alla data di acquisto oppure riscontrati entro due (2) anni dalla data di acquisto presso il rivenditore che
ha venduto inizialmente il prodotto al cliente (garanzia del fabbricante). Qualora si riscontri un difetto
di fabbricazione o materiale, ripareremo - a nostra discrezione - il prodotto senza costi aggiunti o lo
sostituiremo con uno nuovo. Per applicare la garanzia, il prodotto deve essere consegnato o spedito al
rivenditore che ha venduto inizialmente il prodotto al cliente, unitamente alla prova d‘acquisto originale
(scontrino scale o fattura) recante data di acquisto, nome del rivenditore e denominazione del prodotto.
La garanzia non sarà valida qualora il prodotto sia consegnato o spedito al fabbricante o a terzi diversi
dal rivenditore che ha venduto inizialmente il prodotto al cliente. Vericate immediatamente integrità,
difetti di fabbricazione e materiale del prodotto alla data di acquisto o, qualora il prodotto sia stato
acquistato a distanza, alla ricezione. In caso di difetto, non utilizzate il prodotto e consegnatelo o speditelo
immediatamente al rivenditore che l‘ha venduto inizialmente. Se la garanzia è valida, il prodotto deve
essere restituito pulito e integro. Prima di contattare il rivenditore, leggete attentamente questo manuale
di istruzioni. La presente garanzia non copre i danni derivanti da uso improprio, fattori ambientali (acqua,
incendi, incidenti stradali, ecc.) o normale usura. Si applica unicamente se il prodotto è sempre stato
utilizzato e manipolato in conformità con le istruzioni per l‘uso, se tutte le modiche e gli interventi sono
stati eettuati da personale autorizzato e se sono stati impiegati componenti e accessori originali. La
presente garanzia non esclude, limita o lede in alcun modo i diritti legali del cliente, compresi reclami per
illeciti e in violazione del contratto eventualmente in essere tra acquirente e venditore o fabbricante del
prodotto.
19
Page 24

IT
20
Page 25

IMPORTANT ! CONSERVER POUR
TOUTE RÉFÉRENCE ULTÉRIEURE !
AFIN DE GARANTIR LA SÉCURITÉ DE VOTRE ENFANT, IL EST PRIMORDIAL DE
RESPECTER LES CONSIGNES D‘UTILISATION FOURNIES AVEC MY.GO DE CBX. POUR
TOUTE QUESTION, PRENEZ CONTACT AVEC NOUS.
CHER CLIENT,
Merci d‘avoir acheté le porte-bébé MY.GO de CBX ! Soyez assuré que lors de l‘élaboration
du porte-bébé MY.GO, CBX a accordé une grande importance à la sécurité, le confort et la
fonctionnalité. Le produit a été soumis à des contrôles stricts en matière de qualité et répond à
toutes les normes de sécurité.
TABLE DES MATIÈRES
PR ÉS EN TATION .................................................................................................................... 22
CONSEILS D‘ENTRETIEN ................................................................................................... 22
AVERTISSEMENTS GÉNÉRAUX .................................................................................22 - 23
INFORMATIONS GÉNÉRALES ...........................................................................................23
POSITION SUR LE DEVANT AVEC COUSSIN POUR NOURRISSON (3,5 - 6 KG ENVIRON) 23
POSITION SUR LE DEVANT SANS COUSSIN POUR NOURRISSON (6 - 12 KG) .......24
POSITION SUR LE CÔTÉ (6 - 12 KG) .................................................................................. 24
POSITION DANS LE DOS (8 - 20 KG) .......................................................................... 24 - 25
COMMENT UTILISER L‘APPUI-TÊTE INTÉGRÉ ? ............................................................ 25
GARANTIE .............................................................................................................................25
21
Page 26

CBX MY.GO Porte-bébé MY.GO de CBX
Appui-tête réglage intégré
Boucles élastiques
Bretelles avec
rembourrage
confortable
pour xer l‘appui-tête
Fixation du coussin
pour nourrisson par
des boutons-pression
Coussin pour nourrisson intégré
Ceinture ventrale
rembourrée
ENTRETIEN
Remarque ! Laver le produit séparément avant la première
utilisation. Ne pas sécher en machine et ne pas exposer à la
lumière directe du soleil ! Ne pas repasser ! Attacher toutes
les boucles lors du lavage.
Fabriqué en Chine
AVERTISSEMENTS GÉNÉRAUX !
Veuillez porter une attention particulière aux aspects suivants lors de l‘utilisation du PORTE-BÉBÉ MY.GO
de CBX :
AVERTISSEMENT !
VOS MOUVEMENTS ET CEUX DE VOTRE ENFANT PEUVENT AFFECTER VOTRE ÉQUILIBRE.
AVERTISSEMENT !
PRUDENCE LORSQUE VOUS VOUS BAISSEZ OU QUE VOUS VOUS PENCHEZ EN AVANT !
AVERTISSEMENT !
CE PORTE-BÉBÉ N‘EST PAS ADAPTÉ POUR UNE UTILISATION DANS LE CADRE D‘ACTIVITÉS
SPORTIVES.
„Porte-bébé MY.GO de CBX
de la naissance à 5 ans
Poids : 3,5 – 20 kg/8 – 44,09 lbs“
FR
AVERTISSEMENT !
VEILLEZ À CE QU‘UNE SECONDE PERSONNE ASSURE LA SÉCURITÉ DE L‘ENFANT LORSQUE
VOUS L‘INSTALLEZ DANS LE PORTE-BÉBÉ.
AVERTISSEMENT !
VEILLEZ À CE QUE LE CONNECTEUR MÂLE DE LA CEINTURE SOIT TOUJOURS PASSÉ DANS LA
BOUCLE DE SÉCURITÉ ÉLASTIQUE AVANT DE VERROUILLER LA CEINTURE. LE CONNECTEUR
MÂLE DE LA CEINTURE DOIT ÊTRE INTÉGRALEMENT PASSÉ DANS LA BOUCLE DE SÉCURITÉ
ÉLASTIQUE.
AVERTISSEMENT !
L‘UTILISATION DU COUSSIN POUR NOURRISSON INTÉGRÉ EST RECOMMANDÉE POUR LES
ENFANTS PESANT JUSQUE 6 KG. IL PERMET L‘INSTALLATION DE VOTRE ENFANT DANS UNE
POSITION PLUS SÛRE ET OPTIMISE SA SÉCURITÉ.
22
Page 27

• Veuillez lire attentivement et dans leur intégralité les consignes qui suivent avant d’utiliser le
PORTE-BÉBÉ.
• Le PORTE-BÉBÉ doit être réglé de manière optimale en fonction de la taille du bébé avant chaque
utilisation.
• L‘utilisation du PORTE-BÉBÉ est réservée aux adultes uniquement. Si le PORTE-BÉBÉ est
endommagé, veuillez ne pas l‘utiliser.
• Vériez toujours que les ceintures, boucles, bretelles, boutons et clips sont correctement attachés et en
parfait état. Dans le cas contraire ou en cas de doute, N‘utilisez PAS le porte-bébé.
• Veillez toujours à ce que l‘espace libre autour de la tête de l‘enfant soit susant pour garantir la bonne
circulation de l‘air.
• N‘habillez pas trop chaudement votre enfant et assurez-vous régulièrement que sa température
corporelle est correcte.
• Ne déverrouillez jamais la ceinture ventrale lorsque l‘enfant est dans le porte-bébé.
PRÉPARATION :
I. Placez la ceinture ventrale autour de votre taille/vos hanches, verrouillez la ceinture et réglez la taille
de la ceinture pour un ajustement parfait. Veillez à ce que le connecteur mâle de la ceinture soit
toujours passé dans la boucle de sécurité élastique avant de verrouiller la ceinture.
Ia. Lors du verrouillage de la ceinture, enfoncez la boucle jusqu‘à ce que vous entendiez un clic.
II. Réglage en hauteur : La ceinture ventrale permet également un réglage en hauteur. (a) Pour le
transport d‘enfants de petite taille, la ceinture doit être placée autour de la taille, ce qui permet à
l‘enfant d‘être assis plus haut. (b) Pour le transport d‘enfants de grande taille, la ceinture doit être
placée au niveau des hanches. L‘enfant est assis à la bonne hauteur lorsque l‘adulte qui le porte peut
l‘embrasser sur le front. Ajustez la position de l‘enfant en conséquence.
III. Connecteur de la ceinture : (a) Le connecteur de la ceinture situé sur les bretelles est réglable en
hauteur comme en longueur pour une utilisation plus aisée. (b) Il peut être xé au niveau de la poitrine
ou des omoplates.
IV. Réglage de la largeur : Serrez les bretelles jusqu‘à ce que vous et votre enfant soyez à votre aise. En
modiant la largeur, vous modiez également le maintient dorsal de l‘enfant. Rentrez les extrémités de
la ceinture dans les boucles de rangement.
VEILLEZ À CE QUE LE DOS DE L‘ENFANT SOIT LÉGÈREMENT ARRONDI LORSQU‘IL EST ASSIS
DANS LE PORTE-BÉBÉ. POUR CE FAIRE, NE SERREZ PAS DÉMESURÉMENT LES BRETELLES DU
PORTE-BÉBÉ.
POSITION SUR LE DEVANT, FACE À L‘ADULTE, AVEC COUSSIN POUR
NOURRISSON (3,5 - 6 KG ENVIRON) :
1. Serrez la ceinture ventrale comme indiqué dans la rubrique Préparation. Passez la ceinture ventrale
autour de votre corps et préréglez la longueur des bretelles. Asseyez-vous sur une chaise et placez la
partie arrière du porte-bébé sur vos genoux. Dépliez le coussin pour nourrisson.
AVERTISSEMENT :
LA CEINTURE DOIT TOUJOURS ÊTRE PASSÉE DANS LA BOUCLE DE SÉCURITÉ ÉLASTIQUE ET
PLACÉE SUR LA BASE MATELASSÉE.
2. Positionnez votre enfant sur le dossier du MY.GO. La partie supérieure du dossier doit être à la
hauteur du cou de votre enfant ; si nécessaire, il vous est possible d’utiliser l’appui-tête intégré.
3. Placez le coussin entre les jambes de l‘enfant comme s‘il s‘agissait d‘une couche de sorte que les
jambes soient légèrement repliées.
4. Fermez les boutons-pression et veillez à ce que les pieds de l‘enfant ne soient pas pris dans la
ceinture ventrale.
23
Page 28

5. Placez à présent l‘enfant en position debout dans le porte-bébé. Les jambes de l‘enfant doivent être
légèrement échies pour permettre la position dite de la « grenouille ».
Poursuivre comme indiqué à l‘étape 10.
POSITION SUR LE DEVANT, FACE À L‘ADULTE, SANS COUSSIN POUR
NOURRISSON (6 - 12 KG ENVIRON) :
6. Verrouillez la ceinture ventrale comme indiqué dans la rubrique Préparation et passez-la autour de
votre corps. Préréglez la longueur des bretelles et laissez pendre la partie arrière du porte-bébé.
AVERTISSEMENT :
LA CEINTURE DOIT TOUJOURS ÊTRE PASSÉE DANS LA BOUCLE DE SÉCURITÉ ÉLASTIQUE ET
PLACÉE SUR LA BASE MATELASSÉE.
7. Portez votre enfant et placez-le de sorte que ses jambes soient placées autour de votre ventre.
8. D‘une main, placez la partie arrière du porte-bébé au niveau du dos de l‘enfant tout en maintenant ses
jambes de l‘autre main.
9. Faites glisser votre enfant dans le porte-bébé MY.GO de CBX jusqu‘à ce qu‘il soit parfaitement
installé.
10. Passez à présent vos bras dans les bretelles préalablement verrouillées l‘une après l‘autre tout en
maintenant l‘enfant d‘une main.
11. Verrouillez la ceinture au niveau de votre cou.
12. Ne tirez sur les extrémités des bretelles qu‘une fois votre enfant placé contre vous.
POSITION SUR LE CÔTÉ (6 - 12 KG ENVIRON) :
13. Verrouillez la ceinture ventrale comme indiqué dans la rubrique Préparation et laissez pendre la partie
arrière du porte-bébé devant vous.
AVERTISSEMENT
LA CEINTURE DOIT TOUJOURS ÊTRE PASSÉE DANS LA BOUCLE DE SÉCURITÉ ÉLASTIQUE ET
PLACÉE SUR LA BASE MATELASSÉE.
14. Si vous souhaitez transporter votre enfant au niveau de votre hanche gauche, agrandissez la bretelle
droite et raccourcissez la bretelle gauche, et inversement si vous souhaitez le transporter au niveau
de votre hanche droite. Verrouillez la sangle de poitrine.
15. Passez à présent vos bras dans la bretelle correspondante.
16. Placez le porte-bébé au niveau de votre hanche gauche (ou droite).
17. Faites glisser votre enfant dans le porte-bébé jusqu‘à ce qu‘il soit correctement installé. Veillez à ce
que l‘enfant soit installé au centre du porte-bébé, bien au niveau de votre hanche.
18. Réglez les bretelles en tirant sur les extrémités courtes jusqu‘à ce que votre enfant soit bien installé
contre vous.
FR
POSITION DANS LE DOS (8 - 20 KG) :
Cette position de transport doit uniquement être utilisée lorsque l‘enfant est capable de soutenir sa tête
seul en toute sécurité.
19. Serrez la ceinture ventrale comme indiqué dans la rubrique Préparation. Placez l‘enfant dans votre
dos. Passez votre bras gauche dans la bretelle gauche.
AVERTISSEMENT
TOUTES LES CEINTURES DOIVENT TOUJOURS ÊTRE PASSÉES DANS LES BOUCLES DE
SÉCURITÉ ÉLASTIQUES ET PLACÉES SUR LA BASE MATELASSÉE.
24
Page 29

20. Maintenez l‘enfant avec votre bras droit, placez votre main gauche dans votre dos et attrapez le pied
gauche de l‘enfant, puis installez l‘enfant dans le porte-bébé. Pour ce faire, penchez-vous légèrement
vers l‘avant et maintenez votre enfant en permanence. Une fois votre enfant installé en toute sécurité
dans le porte-bébé, passez votre bras droit dans la bretelle droite.
21. Verrouillez la sangle de poitrine à hauteur de votre sternum en réglant la largeur si nécessaire.
VEILLEZ À CE QUE LE DOS DE L‘ENFANT SOIT LÉGÈREMENT ARRONDI LORSQU‘IL EST ASSIS
DANS LE PORTE-BÉBÉ. POUR CE FAIRE, NE SERREZ PAS DÉMESURÉMENT LES BRETELLES DU
PORTE-BÉBÉ.
COMMENT UTILISER L‘APPUI-TÊTE INTÉGRÉ :
22. Pour utiliser l‘appui-tête intégré, faites-le glisser à l‘endroit prévu à cet eet et xez les deux côtés au
niveau des boucles correspondantes sur les bretelles. Si vous utilisez le porte-bébé en position dans
le dos, installez l‘appui-tête avant de placer le porte-bébé dans votre dos.
GARANTIE
Les conditions de garantie suivantes ne sont valables que dans le pays dans lequel, ce produit a été
vendu à l‘origine par un détaillant à un consommateur. La garantie couvre tous les défauts de fabrication
et de matériaux, qui existaient au moment de l‘achat ou qui sont devenus apparents dans les deux (2)
ans suivant l‘achat initial auprès d‘un détaillant par un consommateur (la garantie du fabricant). Dans
le cas où des défauts de fabrication et de matériel apparaîtraient au cours de la période de garantie,
le produit sera réparé ou remplacé, à notre entière discrétion. Pour toute réclamation concernant des
services couverts par cette garantie, le produit doit être retourné au détaillant auprès duquel le produit a
été acheté et l‘original de la preuve d‘achat (ticket de caisse ou facture) doit être présenté, mentionnant la
date d‘achat, le nom du détaillant, le nom du produit et sa description. Aucune réclamation n‘est possible
directement auprès du fabricant ou de toute autre personne autre que le détaillant chez qui le produit
a été initialement acheté. La garantie est valable uniquement si sans délai après l‘achat il a été vérié
que le produit était complet et qu‘il ne présentait aucun défaut de fabrication ni aucun défaut matériel.
Si le produit a été acheté par correspondance, vous devez vérier sans délai à réception que le produit
est complet et qu‘il ne présente aucun défaut de fabrication ni aucun défaut matériel. Si le produit est
endommagé, il ne doit pas être utilisé et doit être renvoyé sans délai au détaillant chez qui il a été acheté.
Pour toute réclamation dans le cadre de la garantie, le produit doit être retourné complet et propre. Avant
de contacter le détaillant, veuillez lire attentivement le manuel de l‘utilisateur. La garantie ne couvre
pas les dommages causés par une mauvaise utilisation, des facteurs externes (eau, feu, accidents de
la circulation ou autres) ou par l‘usure normale. Toute réclamation dans le cadre de la garantie ne sera
autorisée que si le produit a été manipulé et utilisé conformément aux instructions d‘utilisation, si des
réparations ont été eectuées par des personnes autorisées à le faire et si des pièces détachées et des
accessoires d‘origine ont été utilisés. Cette garantie n‘exclut, ne limite et ne restreint en rien les droits
actuels des consommateurs conformément à l‘ensemble des lois actuellement en vigueur, ni les droits
contre les vendeurs en cas de violation du contrat de produit.
25
Page 30

FR
26
Page 31

BELANGRIJK! BEWAAR VOOR
TOEKOMSTIGE REFERENTIE!
OM DE VEILIGHEID VAN UW KIND TE GARANDEREN IS HET ZEER BELANGRIJK DAT U
DE CBX MY.GO VOLGENS DIT HANDBOEK GEBRUIKT. ALS U VRAGEN HEBT, GELIEVE
ONS TE ALLEN TIJDE TE CONTACTEREN.
GEACHTE KLANT
Hartelijk bedankt voor het kopen van de CBX MY.GO! Wij verzekeren u dat bij de ontwikkeling
van deze CBX MY.GO ons hoofdfocus veiligheid, comfort en eenvoudige bediening
was. Het product werd onderworpen aan stricte kwaliteitscontroles en voldoet aan alle
veiligheidstandaards.
INHOUD
OVERZICHT ........................................................................................................................... 28
ONDERHOUDINSTRUCTIES .............................................................................................. 28
ALGEMENE WAARSCHUWINGEN ..............................................................................28 - 29
ALGEMENE INFORMATIE ................................................................................................... 29
FRONT POSITIE MET BABY INSERT (3.5 KG – CA. 6 KG) ............................................. 29
FRONT POSITIE ZONDER BABY INSERT (6 KG – 12 KG) ..............................................30
HEUP POSITIE (6 KG – 12 KG) ............................................................................................30
RUG POSITIE (8 KG – 20 KG) ....................................................................................... 30 - 31
HOE DE GEÏNTEGREERDE HOOFDSTEUN IS TE GEBRUIKEN .................................. 31
WAARBORG........................................................................................................................... 31
27
Page 32

CBX MY.GO babydrager
Geïntegreerde in grootte verstelbare hoofdsteun
Elastische lussen
voor het xeren van
Goed gepolsterde
schouderriemen
ONDERHOUD
Noot! Was het product a.u.b. apart vooraleer u het voor de
eerste keer gebruikt. Doe het niet in de droger en stel het niet
bloot aan direct zonnelicht! Niet strijken! Bij het wassen alle
gespen sluiten.
Made in China
ALGEMENE WAARSCHUWINGEN!
Let a.u.b. speciaal op de volgende aspecten als u de CBX MY.GO BABYDRAGER gebruikt:
„CBX MY.GO – babydrager
van geboorte tot 5 jaar
Gewicht: 3,5 – 20 kg / 8 – 44,09 lbs“
de hoofdsteun
Druk op de noppen
om de baby insert te
bevestigen
Gepolsterde buikriemGeïntegreerde baby insert
NL
WAARSCHUWING!
UW EVENWICHT ZOU NADELIG KUNNEN WORDEN BEINVLOED DOOR UW BEWEGINGEN OF DIE
VAN HET KIND .
WAARSCHUWING!
LET OP ALS U ZICH VOOROVER BUIGT.
WAARSCHUWING!
DEZE DRAGER IS NIET GESCHIKT VOOR HET GEBRUIK TIJDENS SPORTACTIVITEITEN.
WAARSCHUWING!
VERZEKER U A.U.B. DAT ER EEN TWEEDE PERSOON HET BABY BEVEILIGD ALS U DE BABY
DRAGER AANTREKT.
WAARSCHUWING!
VERZEKER U DAT HET MANNELIJK DEEL VAN DE GESP ALTIJD DOOR DE ELASTISCHE
VEILIGHEIDSLUS LOOPT VOORDAT U DE GESP SLUIT. HET MANNELIJK DEEL VAN DE GESP
MOET COMPLEET IN DE ELASTISCHE VEILIGHEIDSLUS INGEHAAKT ZIJN.
WAARSCHUWING!
DE GEINTEGREERDE BABY INSERT IS AANBEVOLEN VOOR KINDEREN TOT 6 KG. DIT BEVEILIGD
UW KIND IN EEN BETERE POSITIE EN VERHOOGD DE VEILIGHEID.
28
Page 33

• Verzeker u de instructies te lezen en volledig te hebben verstaan vooraleer u de BABYDRAGER
gebruikt.
• Vóór elk gebruik moet de BABY DRAGER optimaal aan de grootte van de baby worden ingesteld.
• De BABYDRAGER is slechts te gebruiken door volwassene. Een beschadigde BABYDRAGER mag
NIET worden gebruikt!
• Controleer altijd dat alle gespen, lussen, riemen, knoppen en clips veilig zijn vastgemaakt en in een
perfect functionerende conditie zijn; gebruik de drager NIET als dit niet het geval is of als er twijfels zijn.
• Verzeker u altijd dat er voldoende plaats rond het hoofd is om een goede luchtstroming te garanderen.
• Kleed uw baby niet te warm en controleer regelmatig dat er een comfortabele temperatuur wordt
bijgehouden.
• Maak de buikriem nooit los als de baby in de drager is.
VOORBEREIDING:
I. Positioneer de buikriem rond uw buik/heupen, sluit de gesp en stel de lengte in tot het goed zit.
Verzeker u dat het mannelijk deel van de gesp altijd door de elastische veiligheidslus loopt voordat u
de gesp sluit.
Ia. Bij het sluiten van de gesp aan de buikriem drukt u totdat u een luide “CLICK” hoort.
II. Hoogte instellen: de buikriem functioneert ook als een hoogte instellings-systeem. (a) Om kleinere
kinderen te dragen moet de riem rond de buik worden geplaatst, waardoor het kindje verhoogd zit. (b)
Voor grotere kinderen moet de belt rond de heupen worden geplaatst. Het kind zit op de juiste hoogte
als de volwassene het hoofd van het kindje kan kussen; de positie van het kind moet desbetreend
worden ingesteld.
III. Verbindingsriem: (a) Voor het eenvoudig gebruik kan de verbindingsriem op de schouderbanden in
lengte en hoogte worden ingesteld. (b) Het kan worden vastgemaakt over de borst of op de rug.
IV. Breedte instellen: Verstel de schouderriemen totdat ze comfortabel zitten voor uzelf en uw baby.
Als de breedte wordt gewijzigd, moet ook de rugsteun van uw kindje worden ingesteld. Steek het
overschot van de riem in de lussen.
VERZEKER U DAT HET KINDJE EEN BOLLE RUG HEEFT ALS HET IN DE DRAGER ZIT EN MAAK
DAAROM DE SCHOUDERBANDEN NIET TE STRAK VAST.
FRONT POSITIE MET HET GEZICHT NAAR DE OUDER TOE EN BABY INSERT
(3.5 KG – CA. 6 KG):
1. Sluit de buikriem zoals omschreven onder “Voorbereiding”. Leg de buikriem over uw rug en verstel de
lengte van de schouderbanden. Ga op een stoel zitten en spreidt het rugdeel van de drager over uw
schoot. Ontvouw de baby insert.
WAARSCHUWING:
DE GESP MOET ALTIJD DOOR DE ELASTISCHE VEILIGHEIDSLUS GAAN EN OP DE
GEWATTEERDE BASIS WORDEN GEPOSITIONEERD.
2. Plaats uw kind met zijn rug tegen de binnenkant van de carrier. De bovenste rand van de carrier moet
zich op dezelfde hoogte als de nek van uw kind bevinden, zo nodig kunt u de hoofdsteun gebruiken.
3. Trek de baby insert net als een luier tussen de licht opgetrokken benen van uw kindje.
4. Sluit de noppen en verzeker dat de voeten van het kindje zich niet in de buikriem vervangen.
29
Page 34

5. Houdt nu uw kindje rechtop in de drager. De voeten van uw baby zouden nu opgetrokken in de drager
in de aanbevolen “spread-squat position” zijn.
Ga door zoals het onder punt 10 wordt beschreven.
FRONT POSITIE TOEGERICHT NAAR OUDER ZONDER BABY INSERT.
(6 KG – CA. 12 KG):
6. Sluit de buikriem zoals omschreven onder “Voorbereiding” en leg de buikriemgesp over uw rug.
Verstel de lengte van de schouderbanden en laat het rugdeel van de drager naar beneden hangen.
WAARSCHUWING:
DE GESP MOET ALTIJD DOOR DE ELASTISCHE VEILIGHEIDSLUS LOPEN EN OP DE
GEWATTEERDE BASIS WORDEN GEPOSITIONEERD
7. Hef uw kindje omhoog en houdt hem met de benen naar voren vóór uw buik.
8. Neem nu één hand om het rugdeel van de drager over de rug van uw kindje te trekken terwijl u de rug
van uw kindje met de andere hand steunt.
9. Laat uw kindje de hele weg in de CBX MY.GO glijden totdat er geen ruimte meer tussen zijn billetjes
en het textiel van de drager is.
10. Steek nu uw armen door de gesloten schouderbanden, één na de ander, terwijl u altijd uw kindje met
de vrije hand steunt.
11. Sluit de verbindingsriem achter uw nek.
12. Trek de korte einden van de schouderbanden enkel tot uw kindje dicht bij uw lichaam zit.
HEUP POSITIE (6 KG – CA. 12 KG):
13. Sluit de buikriem zoals omschreven onder “Voorbereiding” en laat het rugdeel van de drager vóór uw
naar beneden hangen.
WAARSCHUWING:
DE GESP MOET ALTIJD DOOR DE ELASTISCHE VEILIGHEIDSLUS LOPEN EN OP DE
GEWATTEERDE BASIS WORDEN GEPOSITIONEERD.
14. Als u uw kindje op de linker heup wilt dragen, vergroot de rechter schouderband en verkort de linker
schouderband. Vice versa voor het dragen op de rechter heup. Sluit de borstband.
15. Leg nu beide armen door de schouderbanden.
16. Trek de drager naar uw linker (rechter) heup.
17. Laat uw baby van boven helemaal in de drager glijden. Verzeker u dat uw kindje in het midden van de
drager zit, direct op uw heup.
18. Stel de schouderbanden d.m.v. de korte einden in tot uw peuter dicht aan uw lichaam zit.
NL
RUG POSITIE (8 KG – 20 KG):
Deze draagpositie mag alleen worden gebruikt als uw kindje in staat is zijn hoofd veilig omhoog te
houden.
19. Trek de buikriem aan zoals omschreven onder “Voorbereiding”. Druk de baby drager op uw rug. Steek
uw linker arm door de linker schouderband.
WAARSCHUWING:
ALLE GESPEN MOETEN ALTIJD DOOR DE ELASTISCHE VEILIGHEIDSLUSSEN WORDEN
GEVOERD EN OP DE GEWATTEERDE BASIS WORDEN GEPOSITIONEERD.
30
Page 35

20. Neem uw peuter op de rechter arm, leg dan uw linker hand op uw rug en pak het linker voetje van uw
peuter en trek uw peuter de drager in. Hiervoor buigt u zich lichtjes naar voren en hou en steun uw
peuter de hele tijd. Zodra uw peuter veilig zit, kunt u de rechter schouderband aantrekken.
21. Sluit de borstband ter hoogte van uw borst en verstel de breedte indien nodig.
VERZEKER DAT UW PEUTER EEN BOLLE RUG HEEFT ALS HIJ IN DE DRAGER ZIT, TREK DAAROM
DE SCHOUDERBANDEN NIET TE VAST.
HOE DE GEÏNTEGREERDE HOOFDSTEUN TE GEBRUIKEN IS:
22. Om de geïntegreerde hoofdsteun te gebruiken, moet u het gewoon overtrekken en beide zijden aan
de gespen van de schouderbanden bevestigen. Als u de rug positie gebruikt, moet u de hoofdsteun
bevestigen voordat u de drager aandoet.
WAARBORG
De volgende waarborg geldt slechts in het land waar dit product het eerst van een retailer aan een klant
werd verkocht. De waarborg dekt de productie en alle materiële defecten af, welke op de koopdag
existeren en opkomen of welke opkomen binnen twee (2) jaar vanaf de koop van de retailer, die het
product het eerst aan een klant had verkocht (fabrieksgarantie). In het geval dat er een materieel gebrek
of defect opkomt, zullen wij - naar ons eigen goeddunken – het of gratis repareren of het met een nieuw
product vervangen. Om een beroep op de waarborg te kunnen doen, moet het product naar de retailer
worden getransporteerd, die dit product het eerst aan een klant had verkocht, samen met het origineel
koopbewijs (kwitantie of factuur) met koopdatum, naam van retailer en productnaam. Deze waarborg zal
niet gelden in het geval dat dit product naar de producent of enig ander persoon werd getransporteerd
dan naar de retailer die dit product het eerst aan een klant heeft verkocht. Controleer het product met
betrekking tot de volledigheid en materiële gebreken of defecten direct op de koopdag of als het product
per verkoop op afstand werd gekocht, direct bij ontvangst. In het geval van een defect, stop het gebruik
van dit product en laat het onmiddelijk naar de retailer brengen, die het het eerst heeft verkocht. Voor een
geval van waarborg moet het product in een schone en complete conditie terug worden gestuurd. Lees
deze handleiding zorgvuldig door, voordat u contact opneemt met de retailer. Deze waarborg dekt geen
schade die ontstaan is door misbruik, milieu-invloeden (water, vuur, verkeersongevallen, etc.) of normale
slijtage. Ze geldt slechts als het product steeds volgens de handleiding werd gebruikt en behandeld, als
alle wijzigingen en services door bevoegde personen werden uitgevoerd en als er originele componenten
en toebehoor werden gebruikt. Wettelijke klantenrechten worden door deze waarborg niet uitgesloten,
beperkt of anders benadeeld, inclusieve aanspraken op onrechtmatige daden en aanspraken met
betrekking tot een contractbreuk, welke de koper tegen de verkoper of de producent van het product
mocht hebben.
31
Page 36

NL
32
Page 37

WAŻNE! ZACHOWAĆ INSTRUKCJĘ
NA PRZYSZŁOŚĆ!
DLA BEZPIECZEŃSTWA DZIECKA BARDZO WAŻNE JEST, ABY UŻYWAĆ
NOSIDEŁKA CBX MY.GO ZGODNIE Z NINIEJSZĄ INSTRUKCJĄ UŻYTKOWANIA.
W RAZIE PYTAŃ PROSIMY O KONTAKT.
DRODZY KLIENCI,
Dziękujemy za zakup nosidełka CBX MY.GO! Możemy Państwa zapewnić, że projektując je,
szczególną uwagę zwracaliśmy na bezpieczeństwo, wygodę i prostotę użytkowania. Produkt
ten spełnia wszelkie wymogi bezpieczeństwa i stworzono go, ściśle kontrolując jego jakość.
SPIS TREŚCI
PRZEGLĄD ............................................................................................................................34
KONSERWACJA .................................................................................................................... 34
OSTRZEŻENIA OGÓLNE ..............................................................................................34 - 35
INFORMACJE OGÓLNE ....................................................................................................... 35
NOSZENIE DZIECKA Z PRZODU Z WKŁADKĄ DLA NIEMOWLĘCIA
(3.5 KG – OK.6 KG) ................................................................................................................35
NOSZENIE DZIECKA Z PRZODU BEZ WKŁADKI (6 KG – 12 KG) .................................. 36
NOSZENIE DZIECK A NA BIODR ZE (6 KG – 12 KG) ......................................................... 36
NOSZENIE DZIECK A NA PLECACH (8 KG – 20 KG) ................................................. 36 - 37
UŻY WANIE ZAGŁÓWK A ...................................................................................................... 37
GWARANCJA ......................................................................................................................... 37
33
Page 38

CBX MY.GO nosidełko
regulowany zagłówek
klamerki do przypięcia
zagłówka
miękko wyściełane
wygodne szelki
zatrzaski do
przypięcia wkładki
dla niemowlęcia
wkładka dla niemowlęcia
KONSERWACJA
Uwaga! Przed pierwszym użyciem produkt należy oddzielnie
wyprać. Nie należy suszyć go w suszarce ani wystawiać na
bezpośrednie działanie słońca! Nie prasować! Przed praniem
należy zapiąć wszystkie zapinki.
Made in China
OSTRZEŻENIA OGÓLNE!
Używając nosidełka CBX MY.GO, należy zwrócić szczególną uwagę na następujące sprawy:
CBX MY.GO – nosidełko
dla dzieci od urodzenia do 5 lat
waga: 3,5 – 20 kg / 8 – 44,09 lbs
miękko wyściełany
pas brzuszny
PL
OSTRZEŻENIE!
TWOJE RUCHY I RUCHY DZIECKA MOGĄ ZABURZYĆ TWOJĄ RÓWNOWAGĘ.
OSTRZEŻENIE!
ZACHOWAJ OSTROŻNOŚĆ, GDY POCHYLASZ SIĘ DO PRZODU.
OSTRZEŻENIE!
NOSIDEŁKA NIE NALEŻY UŻYWAĆ W CZASIE UPRAWIANIA SPORTU.
OSTRZEŻENIE!
DRUGA OSOBA POWINNA PILNOWAĆ DZIECKA, GDY ZAKŁADASZ NOSIDEŁKO.
OSTRZEŻENIE!
PRZED ZAPIĘCIEM KLAMRY NALEŻY ZAWSZE SPRAWDZIĆ, CZY JEJ MĘSKA CZĘŚĆ JEST
W CAŁOŚCI PRZEWLECZONA PRZEZ ELASTYCZNĄ PĘTELKĘ ZABEZPIECZAJĄCĄ.
OSTRZEŻENIE!
UŻYWANIE WKŁADKI DLA NIEMOWLĘCIA JEST ZALECANE DO WAGI 6 KG. WKŁADKA ZAPEWNIA
DZIECKU WYGODNIEJSZĄ I BEZPIECZNIEJSZĄ POZYCJĘ.
34
Page 39

• Przed użyciem nosidełka należy uważnie przeczytać instrukcję użytkowania
• Nosidełko należy zawsze optymalnie dostosowywać do rozmiarów dziecka.
• Nosidełko może być używane tylko przez osoby dorosłe – nie należy używać uszkodzonego nosidełka!
• Zawsze sprawdzaj, czy wszystkie klamry, zatrzaski, paski i zapięcia są pewnie i bezpiecznie przymoco-
wane oraz że są w idealnym stanie; jeśli tak nie jest lub gdy masz wątpliwości, NIE UŻYWAJ nosidełka.
• Zawsze dbaj, żeby dziecko miało wystarczająco dużo przestrzeni i powietrza wokół głowy.
• Nie przegrzewaj dziecka i regularnie sprawdzaj, czy jest mu wygodnie i ciepło.
• Nigdy nie odpinaj pasa brzusznego, gdy dziecko znajduje się w nosidełku.
PRZYGOTOWANIE:
I. Załóż pas brzuszny wokół talii lub bioder, zapnij klamrę i wyreguluj długość pasa, aż będzie ściśle
przylegał. Przed zapięciem klamry zawsze sprawdzaj, czy jej męska część jest przewleczona przez
elastyczną szlufkę zabezpieczającą.
Ia. Klamra pasa brzusznego jest prawidłowo zapięta, jeżeli usłyszysz głośne „kliknięcie”.
II. Regulacja wysokości: pas brzuszny służy również do regulacji wysokości nosidełka.
(a) W przypadku mniejszych dzieci pas należy założyć wokół talii, tak aby dziecko siedziało wyżej.
(b) W przypadku większych dzieci pas należy umieścić na biodrach. Wysokość nosidełka należy tak
wyregulować, aby rodzic mógł pocałować dziecko w głowę - wtedy dziecko znajduje się
w optymalnej pozycji.
III. Pasek łączący: (a) Pasek łączący na szelkach naramiennych można regulować pod względem
wysokości i długości. (b) Pasek można zapiąć na piersi lub u góry na plecach.
IV. Regulacja szerokości: ściągnij pasy naramienne, tak aby było wygodnie Tobie i dziecku. Dostosowując
szerokość, regulujesz również podparcie pleców dziecka. Zwisające końcówki pasów można złożyć
i włożyć do specjalnych szlufek na pasach naramiennych.
NALEŻY ZWRACAĆ UWAGĘ, ABY DZIECKO MIAŁO LEKKO ZAOKRĄGLONE PLECKI, GDY SIEDZI
W NOSIDEŁKU. DLATEGO NIE NALEŻY ŚCIĄGAĆ PASÓW NARAMIENNYCH ZBYT MOCNO.
NOSZENIE DZIECKA Z PRZODU Z WKŁADKĄ DLA NIEMOWLĘCIA
(3.5 KG – OK. 6 KG):
1. Załóż pas brzuszny, tak jak jest to opisane w punkcie „PRZYGOTOWANIE”. Zapnij klamrę pasa na
plecach i wstępnie dostosuj długość szelek naramiennych. Usiądź na krześle i połóż nosidełko na
swoich kolanach. Rozłóż wkładkę dla niemowlęcia.
WARNING:
KLAMRA PASA BRZUSZNEGO POWINNA BYĆ ZAWSZE PRZEWLECZONA PRZEZ ELASTYCZNĄ
SZLUFKĘ ZABEZPIECZAJĄCĄ I ZNAJDOWAĆ SIĘ NA WYŚCIEŁANEJ PODKŁADCE PASA.
2. Niemowlę należy połołyć na części przeznaczoną na plecy. Gòrny ròg części przeznaczonej na plecy
powinna sięgać i wystarczać do karku - zastosować w tym przypadku osłonę na głowę dziecka.
3. Przełóż wkładkę dla niemowlęcia między nóżkami dziecka tak jak pieluszkę. Nóżki dziecka powinny
być lekko podkurczone.
4. Zapnij zatrzaski i sprawdź, czy stopy dziecka nie zostały przyciśnięte pod pasem brzusznym.
35
Page 40

5. Teraz podnieś dziecko w nosidełku. Nóżki dziecka powinny być w nosidełku lekko podkurczone
i rozchylone w zalecanej pozycji „żabki”.
Dalej postępuj tak, jak opisano w punkcie 10.
NOSZENIE DZIECKA Z PRZODU BEZ WKŁADKI
(6 KG – OK. 12 KG):
6. Zapnij pas brzuszny, tak jak jest to opisane w punkcie „PRZYGOTOWANIE”. Zapnij klamrę pasa na
plecach i wstępnie dostosuj długość szelek naramiennych. Pozostaw nosidełko zwisające w dół.
OSTRZEŻENIE:
KLAMRA PASA BRZUSZNEGO POWINNA BYĆ ZAWSZE PRZEWLECZONA PRZEZ ELASTYCZNĄ
SZLUFKĘ ZABEZPIECZAJĄCĄ I ZNAJDOWAĆ SIĘ NA WYŚCIEŁANEJ PODKŁADCE PASA.
7. Podnieś dziecko i trzymaj je z nóżkami rozchylonymi na wysokości swojego brzucha.
8. Teraz jedną ręką załóż nosidełko na plecki dziecka, drugą ręką podtrzymując dziecko.
9. Pozwól dziecku wsunąć się całkowicie w nosidełko, tak aby pupa dziecka dokładnie przylegała do
nosidełka.
10. Teraz przełóż po kolei swoje ręce przez zapięte szelki naramienne, cały czas podtrzymując dziecko
wolną ręką.
11. Zapnij pasek łączący z tyłu na szyi.
12. Pociągnij za krótsze końcówki pasów naramiennych, aby przybliżyć dziecko do siebie.
NOSZENIE DZIECKA NA BIODRZE (6 KG – OK. 12 KG):
13. Zapnij pas brzuszny, tak jak jest to opisane w punkcie „PRZYGOTOWANIE”. Pozostaw nosidełko
zwisające w dół.
OSTRZEŻENIE:
KLAMRA PASA BRZUSZNEGO POWINNA BYĆ ZAWSZE PRZEWLECZONA PRZEZ ELASTYCZNĄ
SZLUFKĘ ZABEZPIECZAJĄCĄ I ZNAJDOWAĆ SIĘ NA WYŚCIEŁANEJ PODKŁADCE PASA.
PL
14. Jeżeli chcesz nosić dziecko na lewym biodrze, wydłuż prawy pas naramienny, a lewy - skróć. Do
noszenia dziecka na prawym biodrze zrób odwrotnie. Zapnij pasek łączący.
15. Teraz przełóż ręce przez pasy naramienne.
16. Przesuń nosidełko na swoje lewe (prawe) biodro.
17. Pozwól dziecku wsunąć się całkowicie w nosidełko. Dziecko powinno się znajdować po środku
nosidełka, dokładnie na Twoim biodrze.
18. Dostosuj długość pasów naramiennych, pociągając za ich krótsze końcówki, tak aby dziecko
znajdowało się jak najbliżej Ciebie.
NOSZENIE NA PLECACH (8 KG – 20 KG):
Dziecko można nosić w tej pozycji dopiero wtedy, gdy potra samodzielnie trzymać główkę.
19. Zapnij pas brzuszny, tak jak jest to opisane w punkcie „PRZYGOTOWANIE”. Załóż nosidełko na plecy.
Przełóż lewą rękę przez lewy pas naramienny.
OSTRZEŻENIE:
WSZYSTKIE KLAMRY POWINNY BYĆ ZAWSZE PRZEWLECZONE PRZEZ ELASTYCZNE SZLUFKI
ZABEZPIECZAJĄCE I ZNAJDOWAĆ SIĘ NA WYŚCIEŁANEJ PODKŁADCE.
36
Page 41

20. Podnieś dziecko i trzymaj je na swojej prawej ręce. Następnie przełóż swoją lewą rękę do tyłu, chwyć
nią lewą stopę dziecka i przełóż dziecko do nosidełka. Wkładając dziecko, pochyl się do przodu i cały
czas mocno trzymaj i podtrzymuj dziecko. Gdy dziecko będzie bezpiecznie siedziało w nosidełku,
przełóż rękę przez prawy pas naramienny.
21. Zapnij pasek łączący z przodu na wysokości klatki piersiowej i w razie potrzeby wyreguluj go.
NALEŻY ZWRACAĆ UWAGĘ, ABY DZIECKO MIAŁO LEKKO ZAOKRĄGLONE PLECKI, GDY SIEDZI
W NOSIDEŁKU. DLATEGO NIE NALEŻY ŚCIĄGAĆ PASÓW NARAMIENNYCH ZBYT MOCNO.
UŻYWANIE ZAGŁÓWKA:
22. Nosidełko posiada zagłówek, który wystarczy rozłożyć i przypiąć z obu stron do szelek naramiennych.
W przypadku noszenia dziecka na plecach należy przypiąć zagłówek przed założeniem nosidełka.
GWARANCJA
Niniejsza gwarancja obowiązuje wyłącznie w kraju, w którym produkt został po raz pierwszy sprzedany
klientowi przez sklep detaliczny. Gwarancja obejmuje wszelkie wady materiałowe i produkcyjne istniejące
w momencie zakupu czy wykryte w ciągu 2 lat od daty zakupu produktu w sklepie detalicznym przez
pierwszego właściciela (gwarancja producenta). Jeśli wada materiałowa czy produkcyjna zostanie
wykryta, producent, według własnego uznania, bezpłatnie naprawi produkt lub wymieni go na nowy. Aby
skorzystać z warunków niniejszej gwarancji, należy zanieść lub wysłać produkt do sklepu, w którym został
po raz pierwszy zakupiony oraz przedłożyć oryginalny dowód zakupu (paragon lub fakturę) zawierający
datę zakupu, nazwę sklepu oraz nazwę towaru. Warunki gwarancji nie obowiązują, jeśli produkt zostanie
odesłany do producenta lub innego podmiotu, a nie do sklepu, w którym został po raz pierwszy zakupiony.
Prosimy o sprawdzenie produktu pod kątem jego kompletności czy jakichkolwiek wad w momencie
jego zakupu, a w przypadku sprzedaży wysyłkowej - natychmiast po jego otrzymaniu. W przypadku
stwierdzenia wady należy zaprzestać użytkowania produktu i odesłać go do sklepu, w którym został po
raz pierwszy zakupiony. Reklamowany w ramach gwarancji produkt powinien zostać dostarczony czysty
i kompletny. Jednakże przed kontaktem ze sklepem należy uważnie przeczytać instrukcję użytkowania.
Niniejsza gwarancja nie obejmuje żadnych uszkodzeń wynikajających z nieprawidłowego użytkowania,
warunków zewnętrznych (woda, ogień, wypadki drogowe i inne) oraz normalnego zużycia. Gwarancja
obowiązuje wyłącznie wtedy, jeśli produkt był użytkowany zgodnie z instrukcją użytkowania, jeśli był
naprawiany/modykowany przez uprawnione osoby i użyto do tego celu wyłącznie oryginalnych części
i akcesoriów. Niniejsza gwarancja nie wyłącza, nie ogranicza ani nie zawiesza uprawnień kupującego
wynikających z niezgodności towaru z umową.
CYBEX GMBH,
Riedinger Str. 18, 95448 Bayreuth, Germany
Tel.: +49 921 78511-0, Fax.: +49 921 78511- 999
37
Page 42

PL
38
Page 43

¡MENSAJE IMPORTANTE! TÉNGALO
EN CUENTA EN UN FUTURO:
PARA GARANTIZAR LA SEGURIDAD DE SU HIJO ES MUY IMPORTANTE QUE UTILICE LA
CBX MY.GO DE ACUERDO CON ESTE MANUAL DE INSTRUCCIONES.
EN CASO DE TENER CUALQUIER CONSULTA NO DUDE EN CONTACTAR CON NOSOTROS.
APRECIADO CLIENTE
Gracias por adquirir la MY.GO. En el desarrollo de la MY.GO nuestros principales ejes de trabajo
han sido la seguridad, el confort y la facilidad de uso. El producto ha sido desarrollado bajo un
estricto control de calidad y cumple con todas las normativas de seguridad.
CONTENIDO
RESUMEN ..............................................................................................................................40
INSTRUCCIONES DE CUIDADO Y MANTENIMIENTO ................................................... 40
ADVERTENCIAS GENERALES ......................................................................................4 0-41
INFORMACIÓN GENER AL ...................................................................................................41
POSICIÓN FRONTAL CON REDUCTOR (3.5 KG – APROX. 6 KG) .................................41
POSICIÓN FRONTAL SIN REDUCTOR (6 KG – 12 KG) .................................................... 42
POSICIÓN DE CADERA (6 KG – 12 KG) ............................................................................. 42
POSICIÓN DE ESPALDA (8 KG – 20 KG) ........................................................................... 42
CÓMO UTILIZAR EL REPOSACABEZAS INTEGRADO .................................................. 42
GARANTÍA .............................................................................................................................43
39
Page 44

CBX MY.GO mochila portabebés
Reposacabezas integrado regulable
Cintas elásticas
para ajustar el
Cintas acolchadas
para los hombros
CUIDADOS
¡Aviso! Lave el producto separadamente antes del primer
uso. No lo seque en la secadora y no lo ponga a la luz
directa del sol. ¡No lo planche!
Made in China
ADVERTENCIAS
Por favor, sea especialmente cuidadoso con los siguientes aspectos cuando utilice la mochila portabebés
CBX MY.GO
¡ATENCIÓN!
SU EQUILIBRIO PUEDE VERSE AFECTADO ADVERSAMENTE POR SUS MOVIMIENTOS Y LOS DE
SU HIJO
¡ATENCIÓN!
TENGA CUIDADO CUANDO SE INCLINE O SE LADEE
¡ATENCIÓN!
ESTE PORTABEBÉS NO ES ADECUADO PARA UTILIZARSE CUANDO SE REALICEN ACTIVIDADES
DEPORTIVAS
¡ATENCIÓN!
REQUIERA A OTRA PERSONA QUE ASEGURE AL BEBÉ CUANDO LO PONGA EN EL PORTABEBÉS
¡ATENCIÓN!
POR FAVOR, ASEGÚRESE DE QUE EL MACHO DE LA HEBILLA PASA A TRAVÉS DE LA CINTA
ELÁSTICA DE SEGURIDAD ANTES DE CERRARLA. EL MACHO DE LA HEBILLA DEBE ESTAR
COMPLETAMENTE FIJADO AL CIERRE ELÁSTICO DE SEGURIDAD
¡ATENCIÓN!
EL REDUCTOR PARA RECIÉN NACIDOS ESTÁ RECOMENDADO PARA BEBÉS DE HASTA 6 KG.
ESTO ASEGURA QUE SU HIJO ESTÁ EN UNA MEJOR Y MÁS SEGURA PÓSICIÓN
CBX MY.GO – portabebés
Edad: del nacimiento a los 5 años
Peso: 3,5 – 20 kg / 8 – 44,09 lbs
reposacabezas
Ajuste los botones
para jar el reductor
Cinturón acolchadoReductor para recién nacidos
ES
40
Page 45

• Asegúrese de leer y entender completamente estas instrucciones antes de usar el portabebés.
• El portabebés siempre debe ser ajustado para adaptarse perfectamente a la medida del bebé.
• El portabebés está concebido para ser utilizado exclusivamente por adultos.
• Examine que todas las hebillas, botones y clips se encuentran abrochados de forma segura y que
funcionan perfectamente; si no es el caso, o si tiene alguna duda al respecto, NO utilice el portabebés.
• Asegúrese que hay suciente espacio alrededor de la cabeza del niño para que pueda respirar bien.
• No abrigue demasiado al bebé y asegúrese que mantiene una temperatura confortable.
• Nunca desabroche el cinturón mientras el bebé está en el portabebés.
PREPARACIÓN:
I. Pase el cinturón a través de su cintura, abróchelo y ajústelo hasta que quede tensado. Por favor,
asegúrese de que el macho de la hebilla siempre pase a través de la cinta elástica de seguridad
antes de quedar jada.
Ia. Cuando cierre los anclajes deberá oir un “CLICK”.
II. Ajuste de la altura: el cinturón tiene la función de ajuste de altura. (a) Para llevar a los niños más
pequeños, el cinturón debería situarse alrededor de la cintura, permitiendo al niño sentarse en una
posición más elevada.
III. Cinturón conector: Para una utilización cómoda, el cinturón conector de los tirantes puede ajustarse
tanto en longitud como en altura (a), de forma que pueda cerrarse tanto por la parte trasera del cuello
como por la parte baja de la espalda.
IV. Ajuste de anchura: apriete los tirantes hasta que el puinto en que tanto el bebé como usted se sientan
confortables. El ajuste de anchura también regula la sujeción de espalda de su hijo. Si le sobra
mucha cinta, puede plegarla y colocarla en las trabillas de los tirantes.
POR FAVOR, VERIFIQUE QUE LA ESPALDA DE SU HIJO ESTÁ LIGERAMENTE CURVADA CUANDO
ESTÉ EN EL PORTABEBÉS. DE AHÍ QUE NO DEBA APRETAR DEMASIADO LOS TIRANTES.
POSICIÓN FRONTAL CON REDUCTOR (3.5 KG – APROX. 6 KG):
1. Abróchese el cinturón como se describe en el apartado “Preparación”. Para ello colóquese el cinturón
previamente y haga un pre-ajsute la longitud de las cintas. Siéntese en una silla y deje caer la
mochila sobre su regazo. Despliegue el reductor.
¡ATENCIÓN!
EL MACHO DE LA HEBILLA SIEMPRE DEBE PASAR A TRAVÉS DE LA CINTA ELÁSTICA DE
SEGURIDAD Y ESTAR ORIENTADO HACIA LA BASE ACOLCHADA.
2. Coloque a su hijo en la parte trasera de la mochila. El borde superior de la parte de la espalda
debería coincidir con el cuello del niño – si fuese necesario, utilice la extensión del respaldo.
3. Coloque el reductor como si fuese un pañal, entre las piernas ligeramente dobladas.
4. Cierre los botones de presión y asegúrese de que los pies de su hijo no quedan atrapados con el
cinturón.
5. Ahora mantenga a su hijo erguido en la mochila. Los pies de su hijo deben quedar escondidos en la
mochila facilitando la posición de la rana.
Continúe como se describe en el punto 10.
41
Page 46

POSICIÓN FRONTAL SIN REDUCTOR (6 KG – APROX. 12 KG):
6. Abróchese el cinturón como se describe en el apartado “Preparación” y ajústelo en su espalda.
Haga un pre-ajuste de la longitud de las cintas de los hombros y deje la parte trasera de la mochila
colgando.
¡ATENCIÓN!
EL MACHO DE LA HEBILLA SIEMPRE DEBE PASAR A TRAVÉS DE LA CINTA ELÁSTICA DE
SEGURIDAD Y ESTAR ORIENTADO HACIA LA BASE ACOLCHADA.
7. Coja a su hijo y manténgalo con las piernas abietas delante de su vientre.
8. Ahora use una mano para tirar de la parte posterior de la mochila y subir la espalda de su hijo a la
misma vez que aguanta su peso con la otra mano.
9. Deje que su niño se deslice hasta el fondo de la MY.GO hasta que no quede espacio entre las piernas
y el fondo de la mochila.
10. Ahora pase los brazos a través de las cintas a la vez que aguanta a su hijo con la mano que le va
quedando libre.
11. Abroche la cinta detras del cuello.
12. Ciña las cintas tirando de los extremos hasta que su hijo esté bien colocado.
POSICIÓN DE CADERA (6 KG – APROX. 12 KG):
13. Abróchese el cinturón como se describe en el apartado “Preparación” y deje caer la parte trasera de
la mochila sobre usted.
¡ATENCIÓN!
EL MACHO DE LA HEBILLA SIEMPRE DEBE PASAR A TRAVÉS DE LA CINTA ELÁSTICA DE
SEGURIDAD Y ESTAR ORIENTADO HACIA LA BASE ACOLCHADA.
14. Si desea llevar al niño en el lado izquierdo, extienda la cinta lateral derecha y acorte la izquierda.
Para llevar al niño en el lado derecho haga lo opuesto. Cierre la cinta del esternón.
15. Ahora pase los brazos a través de las cintas.
16. Mueva la mochila hacia su lado izquierdo (o derecho).
17. Deje que su niño se deslice hasta el fondo de la mochila portabebés. Asegúrese de que el niño está
colocado en la parte central de la mochila y sobre su cadera.
18. Ajuste las cintas de los hombros tirando de ellas hasta que su niño esté bien colocado.
ES
POSICIÓN DE ESPALDAS (8 KG – 20 KG):
Esta posición de transporte debería adoptarse únicamente cuando su hijo sea capaz de sujetar él solo la
cabeza.
19. Abróchese el cinturón como se describe en el apartado “Preparación”. Colóquese la mochila en la
espalda. Pase su brazo izquierdo por la cinta izquierda.
¡ATENCIÓN!
EL MACHO DE LA HEBILLA SIEMPRE DEBE PASAR A TRAVÉS DE LA CINTA ELÁSTICA DE
SEGURIDAD Y ESTAR ORIENTADO HACIA LA BASE ACOLCHADA.
20. Sostenga a su niño con el brazo derecho y a continuación sitúe el brazo izquierdo en su propia
espalda, coja rmemente la pierna izquierda de su hijo y levántelo colocándolo en el portabebés. Para
hacerlo, agáchese hacia adelante y continúe sujetando a su niño todo el tiempo. Tan pronto como su
esté sentado de forma segura, deslíce el tirante derecho.
21. Cierre la cinta del esternón a la altura de su pecho y ajuste la anchura si fuera necesario.
POR FAVOR, VERIFIQUE QUE LA ESPALDA DE SU HIJO ESTÁ LIGERAMENTE CURVADA CUANDO
ESTÉ EN EL PORTABEBÉS. DE AHÍ QUE NO DEBA APRETAR DEMASIADO LOS TIRANTES.
42
Page 47

CÓMO USAR EL REPOSACABEZAS INTEGRADO:
22. Para utilizar el reposacabezas integrado simplemente ajuste ambos lados a los anclajes
correspondientes de las cintas de los hombros. Si va a utilizar la posición de espalda, ajústelo antes
de ponerse la mochila.
GARANTÍA
La presente garantía sólo es de aplicación en el país en el que el consumidor adquirió inicialmente el
producto a un detallista. La garantía cubre todos los defectos de materiales y fabricación, existentes
o que puedan aparecer, por un período de dos (2) años desde la fecha de compra inicial (garantía
del fabricante). En caso de que aparezca cualquier defecto de materiales o de fabricación, nosotros
decidiremos, según nuestro criterio, reparar el producto sin coste o entregar un producto nuevo. Para
obtener esta garantía es preciso entregar o enviar el producto al detallista que vendió inicialmente el
producto y aportar una prueba de compra (recibo o factura) que muestre la fecha de compra, el nombre
del detallista y el modelo del producto. Esta garantía no es de aplicación en caso de que el producto
sea enviado o entregado al fabricante o a cualquier otra persona que no sea el detallista que vendió
el producto inicialmente al consumidor. Por favor, verique que el producto está completo y que no
presenta ningún defecto de materiales ni de fabricación en el momento de la compra o, si se ha adquirido
a distancia, en el mismo momento de recibirlo. En caso de apreciar cualquier defecto, deje de utilizar
el producto y entréguelo o envíelo al detallista. El producto debe entregarse limpio y completo. Antes
de contactar con la tienda lea este manual detenidamente. La garantía no cubre ningún daño causado
por un mal uso, la inuencia del entorno (agua, fuego, irregularidades del terreno, etc.) o el desgaste
normal de producto. Sólo es de aplicación en caso de que el uso del producto sea acorde al manual
de instrucciones y si cualquier modicación o reparación ha sido efectuada por personas autorizadas y
se han utilizado piezas y accesorios originales. La garantía no excluye, limita o afecta de ningún modo
a los derechos del consumidor establecidos por ley, incluyendo reclamaciones por responsabilidad
civil o quejas por incumplimiento de contrato que el comprador quiera interponer contra el vendedor, el
fabricante o el producto.
43
Page 48

44
ES
Page 49

IMPORTANTE! MANTENHA ESTE
MANUAL SEMPRE À MÃO PARA
FUTURAS CONSULTAS!
PARA GARANTIR A MÁXIMA SEGURANÇA DA CRIANÇA, É MUITO IMPORTANTE QUE
UTILIZE A CBX MY.GO DE ACORDO COM O MANUAL DE INSTRUÇÕES. EM CASO DE
DÚVIDA FAÇA O FAVOR DE CONTATAR COM A CBX.
CARO CLIENTE
Obrigado por ter adquirido a CBX MY.GO! Assegurmos-lhe de que ao manufaturar a CBX MY.GO
a segurança, o conforto e a facilidade de uso foram os pontos mais importantes para a sua
elaboração. Este produto foi exposto a standarts de segurança bastante exigentes.
CONTEÚDO
GERAL ....................................................................................................................................46
INSTRUÇÕES DE LAVAGEM ...............................................................................................46
ALERTAS ...........................................................................................................................46-47
INFORMAÇÃO GERAL ..........................................................................................................47
POSIÇÃO FRONTAL COM REFORÇO DE ALTURA (3,5 KG - 6 KG APROX.) ...............47
POSIÇÃO FRONTAL SEM REFORÇO DE ALTUR A (6 KG - 12KG) ................................. 48
POSIÇÃO DE CINTURA (6 KG – 12 KG) .............................................................................48
POSIÇÃO DE COSTAS (8 KG – 20 KG) ............................................................................... 48
COMO USAR O ENCOSTO DE CABEÇA INTEGRADO ................................................... 49
GARANTIA .............................................................................................................................49
45
Page 50

CBX MY.GO Mochila Porta-bebés
Encosto de cabeça integrado regulável
Alças almofadadas
(para maior conforto)
Bandas elásticas para
xar o encosto de
cabeça
Botões de pressão
(para colocar o reforço
de altura)
Reforço de altura para as crianças mais
pequenas.
Cinto de cintura
almofadado
AO LAVAR:
Nota!Lave este produto em separado antes da primeira
utilização. Não seque na máquina, nem exponha o produto
diretamente ao sol. Não passe a ferro. Ao lavar este produto
aperte todas as velas.
Made in China
ALERTAS!
Ao utilizar a mochila Porta-bebés CBX MY.GO, preste especial atenção aos seguintes aspetos:
ATENÇÃO
O SEU EQUILÍBRIO PODERÁ SER AFETADO PELO MOVIMENTO AO CAMINHAR ASSIM COMO O
MOVIMENTO DA PRÓPRIA CRIANÇA.
ATENÇÃO
TENHA CUIDADO AO INCLINAR-SE TANTO PARA A FRENTE COMO PARA TRÁS.
ATENÇÃO
ESTA MOCHILA NÃO COMPATÍVEL COM ATIVIDADES DESPORTIVAS.
ATENÇÃO
AO COLOCAR A CBX MY.GO ASSEGURE-SE DE QUE UMA SEGUNDA PESSOA AGUENTA A
CRIANÇA.
ATENÇÃO
ASSEGURE-SE SEMPRE DE QUE A FIVELA PASSE PELA BANDA ELÁSTICA DE SEGURANÇA
ANTES DE APERTAR O CINTO. A FIVELA DEVERÁ PASSAR COMPLETAMENTE PELA BANDA
ELÁSTICA DE SEGURANÇA.
ATENÇÃO
O REFORÇO DE ALTURA É RECOMENDADO PARA CRIANÇAS ATÉ AOS 6 KG. ESTA PEÇA
ASSEGURA A MÁXIMA SEGURANÇA AO MESMO TEMPO QUE A COLOCA NUMA POSIÇÃO MAIS
CONFORTÁVEL.
CBX MY.GO – Mochila Porta-bebés
Desde o nascimento até aos 5
anos. Peso: 3,5 – 20 kg /
8 – 44,09 lbs
PT
46
Page 51

• Antes de utilizar a Mochila, assegure-se de que lê e entende perfeitamente o manual de instruções.
• A Mochila MY.GO deverá ser devidamente ajustada ao tamanho da criança antes da sua utilização.
• Uso exclusivo para adultos. Uma mochila defeituosa NÃO deverá ser usada.
• Verique sempre que todas as velas, bandas, cintos, botões estão corretamente apertados e em
perfeito estado; se este não é o caso, ou em caso de dúvida NÃO utilize a mochila.
• Assegure-se de que há suciente espaço na zona da cabeça para assegurar a circulação de ar.
• Não vista o seu bebé com roupa demasiado quente e verique regularmente se a temperatura é a
adequada.
• Nunca desaperte o cinto de cintura com o bebé posto na mochila.
PREPARAÇÃ0:
I. Posicione o cinto à volta da cintura, aperte a vela e regule o comprimento até que esteja
devidamente apertado. Assegure-se de que a vela passa pelas bandas elásticas de segurança antes
de apertar o cinto.
Ia. Ao apertar o cinto de cintura assegure-se de ouve um “CLICK”.
II. Reforço de altura: o cinto de cintura também funciona como um reforço de altura regulável. (a) ao
transportar uma criança mais pequena o cinto deverá ser colocado na cintura. A criança estará
sentada na altura indicada no momento em que o adulto que transporta a criança consiga beijar a
cabeça da criança; deverse-à colocar a criança a esta altura.
III. Cinto extra: (a) Para a facilidade de uso, o cinto extra que está situado nas alças da mochila pode ser
ajustada em tamanho e altura. (b) Poderá ser apertado pelo peito ou pelas costas.
IV. Ajuste de largura: Aperte as velas da mochila até que ambos estejam confortáveis. Ao modicar a
largura está também a ajustar o suporte nas costas da criança. Guarde o que sobre do cinto dentro
dos arcos de armazenamento.
ASSEGURE-SE DE QUE AS COSTAS DA CRIANÇA FICAM LIGEIRAMENTE ENCURVADAS
ENQUANTO SENTADAS NA MOCHILA, NÃO A APERTE DEMASIADO.
POSIÇÃO FRONTAL - VIRADO PARA DENTRO (3.5 KG – APROX. 6 KG):
1. Aperte o cinto de cintura como indicado em “Instalação”. Coloque o cinto de cintura à volta das costas
e faça um pré-ajustamento do comprimento das alças. Sente-se numa cadeira e deixe que a parte
das costas da mochila caia diretamente no seu colo. Desaperte a parte do reforço de altura onde
colocará a criança.
ATENÇÃO
A FIVELA DEVERÁ SEMPRE PASSAR PELA BANDA ELÁSTICA DE SEGURANÇA E DEVERÁ SER
POSICIONADO NA BASE ALMOFADADA.
2. Posicione a criança na parte traseira do mochila. A parte superior das costas deverá estar em contato
com o pescoço do bebé - se necessário, estenda as costas da mochila.
3. Igual que numa fralda, puxe o reforço de altura para cima entre as pernas da criança.
4. Feche os botões de pressão e assegure-se de que os pés da criança não cam presos no cinto de
cintura.
5. Coloque a criança em posição reta na mochila. Os pés da criança deverão estar corretamente
acomodados permitindo a tão desejada e recomendada “posição de rã”.
Continue como indicado no ponto 10.
47
Page 52

POSIÇÃO FRONTAL - VIRADO PARA DENTRO SEM O REFORÇO DE ALTURA
(6 KG – APROX. 12 KG):
6. Feche o cinto de cintura da maneira indicada em “Instalação” e coloque-o à volta da cintura. Faça o
pré-ajuste do comprimento das alças e deixe a parte das costas caída.
ATENÇÃO
AS FIVELAS DEVEM SEMPRE PASSAR PELA BANDA ELÁSTICA DE SEGURANÇA E POSICIONADAS
SOBRE A BASE ALMOFADADA.
7. Levante a criança e coloque-o com as pernas abertas em frente à sua barriga.
8. Neste momento utilize uma mão para puxar a parte das costas da mochila através e por cima das
costas da criança e ao mesmo tempo aguente a criança.
9. Deixe que a criança deslize até ao nal da CBX MY.GO até que já não haja espaço entre o corpo da
criança e o tecido.
10. Neste momento passe os braços pelas alças, um de cada vez, aguentando a criança com a mão que
tenha livre.
11. Aperte o cinto por trás do pescoço
12. Puxe das tiras das alças até que a criança esteja posicionada perto do seu corpo.
POSIÇÃO DE CINTURA (6 KG – APROX. 12 KG):
13. Aperte o cinto de cintura como indicado em “Instalação” e deixe que a parte traseira da Mochila cair.
ATENÇÃO:
A FIVELA DEVERÁ SEMPRE PASSAR PELAS BANDAS ELÁSTICAS DE SEGURANÇA E DEVERÁ
SER POSICIONADA NA BASE ALMOFADADA.
14. Se quiser levar a criança no lado esquerdo da cintura, aumente o comprimento da vela do ombro
direito e ponha mais curta a do lado esquerdo, Para tranportar a criança do lado direito faço o mesmo
procedimento mas mudando de lado.
15. Agora faça deslizar as alças da mochila em ambos os braços.
16. Coloque a mochila no lado esquerdo (direito) da cintura.
17. Deixe o bebé deslizar até à parte nal da mochila. Assegure-se de que a criança está colocada na
parte central da mochila e corretamente colocada na altura da sua cintura.
18. Ajuste as alças da mochila até que a criança esteja perto do seu corpo.
PT
POSIÇÃO DE COSTAS (8 KG – 20 KG):
Esta posição só deverá usar-se a partir do momento em que a criança consiga aguentar a cabeça.
19. Coloque o cinto de cintura como indicado em “Instalação”. Coloque a mochila às costas e faça
deslizar o braço esquerdo através da alça esquerda.
ATENÇÃO
TODAS AS FIVELAS DEVERÃO PASSAR ATRAVÉS DAS BANDAS ELÁSTICAS DE SEGURANÇA E
POSICIONADAS NA BASE ALMOFADADA.
20. Levante o seu bebé com o braço direito, depois coloque a sua mão esquerda nas costas de forma a
alcançar o pé esquerdo do seu bebé. Desta forma coloque a criança de todo bem na mochila. Para
isso deverá dobrar-se ligeiramente para a frente ao mesmo tempo que aguenta a criança. Quando a
criança esteja devidamente segura coloque a alça direita da mochila.
21. Ajuste o comprimento da alça até à altura do peito e se necessário ajuste também a sua largura.
ASSEGURE-SE DE QUE AS COSTAS DA CRIANÇA ESTÃO LIGEIRAMENTE SOLTAS ENQUANTO
SENTADAS NA MOCHILA, OU SEJA NÃO APERTE DEMASIADO AS ALÇAS DA MOCHILA.
48
Page 53

COMO USAR O ENCOSTO DE CABEÇA INTEGRADO NA MOCHILA:
22. Ao utilizar a mochila na posição de costas coloque o encosto de cabeça antes de pôr-se a mochila.
GARANTIA
A presente garantia só é aplicada no País em que o consumidor adequiriu inicialmente o produto a
um retalhista. A garantia cobre todos os defeitos de materiais e fabricação, existentes ou que possam
aparecer, por um periodo de (2) anos desde a data de compra inicial (garantia do fabricante). No caso
de aparecer qualquer defeito de materiais ou de fabricação, a CBX decidirá, segundo o nosso critério,
reparar o produto sem custo ou entregar um produto novo. Para obter esta garantia é preciso entregar ou
enviar o produto ao retalhista que vendeu inicialmente o produto e juntar uma prova de compra (recibo ou
factura) que indique a data de compra, o nome do retalhista e o modelo do produto. Esta garantia não
é aplicada em caso de que o produto seja enviado por outra pessoa, que não o retalhista que vendeu
o produto inicialmente. Por favor, verique que o produto está completo e que não apresenta nenhum
defeito de materiais nem de fabricação na altura da compra, ou se adequiriu o produto num sistema
de venda à distância , verique o produto no momento em que o recebe. No caso de vericar qualquer
defeito envie o produto ao retalhista. O produto deverá ser entregue limpo e completo. Antes de contactar
com a loja leia este manual detalhadamente. A garantia não cobre nenhum dano causado por má
utilização, inuência do ambiente (água, fogo, irregularidades do terreno, etc...) ou desgaste normal
do produto. Só é aplicada no caso do produto ser usado de acordo com o manual de instruções e se
qualquer modicação ou reparação tenha sido feita por pessoas autorizadas e se se utilizou peças e
acessórios originais. A garantia não exclui, imita ou afecta de nenhum modo os direitos do consumidor
estabelecidos pela lei, incluíndo reclamações por responsabilidade civil ou queixas por incumprimento de
contrato que o comprador queira interpôr contra o vendedor, o fabricante ou o produto.
49
Page 54

50
PT
Page 55

VIGTIGT! GEM DENNE VEJLEDNING
TIL SENERE BRUG!
AF HENSYN TIL DIT BARNS SIKKERHED ER DET MEGET VIGTIGT, AT CBX
MY.GO ANVENDES I OVERENSSTEMMELSE MED ANVISNINGERNE I DENNE
BRUGERVEJLEDNING. HVIS DU HAR NOGEN SPØRGSMÅL, ER DU MEGET
VELKOMMEN TIL AT KONTAKTE OS.
Kære kunde
Tak, fordi du valgte CBX MY.GO! Sikkerhed, komfort og betjeningsvenlighed har været vores
altoverskyggende prioritet i udviklingen af CBX MY.GO. Bæreselen er udviklet under streng
kvalitetskontrol og opfylder alle sikkerhedsstandarder.
INDHOLD
OVERSIGT ..............................................................................................................................52
VEDLIGEHOLDELSE ............................................................................................................ 52
GENERELLE ADVARSLER .............................................................................................52-53
GENERELLE OPLYSNINGEN .............................................................................................. 53
MAVEPOSITION MED SÆDEINDL ÆG (3.5 KG – CA. 6 KG) ........................................... 53
MAVEPOSITION UDEN SÆDEINDLÆG(6 KG – 12 KG) ................................................... 54
HOFTEPOSITION (6 KG – 12 KG) ........................................................................................ 54
RYGPOSITION (8 KG – 20 KG) .............................................................................................54
ANVENDELSE AF DEN INTEGREREDE HOVEDSTØTTE .............................................. 55
GARANTI ................................................................................................................................55
51
Page 56

CBX MY.GO Babybæresele
Justerbar integreret hovedstøtte
Skulderstropper med
komfortabelt fyld
Vedligeholdelse
Bemærk! Vask produktet separat før ibrugtagning. Undgå
tørretumbling og direkte sollys. Må ikke stryges. Saml alle
spænder før vask.
Made in China
Elastisk fastgørelse af
hovedstøtte
Trykknapper til
fastgørelse af
sædeindlæg til nyfødte
Polstret taljeremIntegreret sædeindlæg til nyfødte
CBX MY.GO – babybæresele
fra fødsel til 5 år
Vægt: 3,5 – 20 kg / 8 – 44,09 lbs
DK
GENERELLE ADVARSLER!
Vær særlig opmærksom på følgende ved brug af CBX MY.GO BÆRESELE:
ADVARSEL!
DIN BALANCE KAN BLIVE NEGATIVT PÅVIRKET AF DINE ELLER BARNETS BEVÆGELSER.
ADVARSEL!
VÆR FORSIGTIG, NÅR DU BØJER ELLER LÆNER DIG FREM.
ADVARSEL!
BÆRESELEN ER IKKE EGNET TIL BRUG UNDER UDFØRELSE AF SPORTSAKTIVITETER.
ADVARSEL!
SØRG FOR, AT BARNET BLIVER FASTGJORT AF EN ANDEN PERSON, NÅR BÆRESELEN
TAGES PÅ.
ADVARSEL!
SØRG FOR ALTID AT FØRE TUNGEN GENNEM DEN ELASTISKE SIKRINGSLØKKE,
FØR SPÆNDET LUKKES. TUNGEN SKAL FØRES HELT IGENNEM DEN ELASTISKE
SIKRINGSLØKKE.
ADVARSEL!
DET INTEGREREDE SÆDEINDLÆG BØR BRUGES TIL BARNET ER OP TIL 6 KG. DETTE
SIKRER DEN BEDSTE POSITION FOR DIT BARN OG ØGER SIKKERHEDEN
52
Page 57

• Sørg for at læse og forstå vejledningen, før du bruger bæreselen.
• Bæreselen skal altid indstilles til den optimale pasform i forhold til dit barn.
• Bæreselen må kun anvendes af voksne. En beskadiget bæresele må ALDRIG anvendes!
• Kontroller altid, at alle spænder, låse, stropper, trykknapper og klikknapper er sikkert lukket og fuldt
funktionsdygtige. Hvis dette ikke er tilfældet, eller hvis du er i tvivl, skal du IKKE bruge bæreselen.
• Sørg altid for, at der er nok plads rundt omkring barnets hoved til at sikre tilstrækkelig ventilation.
• Undgå at klæde barnet for varmt på, og sørg for, at der holdes en behagelig temperatur.
• Luk aldrig taljeremmen op, mens barnet sidder i bæreselen.
GENERELLE OPLYSNINGER:
I. Anbring taljeremmen rundt om taljen/hofterne, luk spændet, og juster længden, indtil den sidder godt
fast. Sørg for altid at føre tungen gennem den elastiske sikringsløkke, før spændet lukkes.
Ia. Sørg for at du hører et højt ”KLIK”, når du lukker spændet.
II. Højdeindstilling: Taljeremmen bruges til at indstille højden. (a) Når bæreselen bruges til mindre børn,
bør remmen anbringes rundt om taljen, så barnet sidder højt oppe. (b) Ved brug til større børn, bør
remmen anbringes rundt om hofterne. Barnet sidder korrekt, når den person, der bærer det, kan
berøre barnets hoved med læberne. Sørg for, at bæreselen er indstillet til denne position.
III. Lukkespænde: (a) For at sikre nem betjening kan lukkespændet på skulderstropperne justeres i både
længden og højden, (b) hvilket gør det muligt at lukke det bag nakken eller ryggen.
IV. Breddeindstilling: Stram ikke skulderstropperne mere, end at det er behageligt for dig selv og
barnet. Når du indstiller bredden, regulerer du samtidig rygstøtten. Overskydende længde af
skulderstropperne kan føres ind gennem de løkker, der sidder på skulderstropperne.
SØRG FOR, AT BARNETS RYG ER SVAGT RUNDET, NÅR DET SIDDER I BÆRESELEN.
SKULDERSTROPPERNE MÅ DERFOR IKKE STRAMMES FOR MEGET.
MAVEPOSITION MED SÆDEINDLÆG (3.5 KG – CA. 6 KG)
1. Anbring taljeremmen som beskrevet under ”Generelle oplysninger”. Forudjustér længden på
skulderstropperne. Sid på en stol og læg bæreselens rygstykke ned i dit skød. Fold sædeindlægget ud.
ADVARSEL:
SØRG FOR ALTID AT TUNGEN ER FØRT GENNEM DEN ELASTISKE SIKRINGSLØKKE, OG AT
SPÆNDET ER PLACERET PÅ DEN POLSTREDE TALJEREM.
2. Læg dit barn på bæreselens rygstykke, således at barnets nakke møder den øverste kant af rygtykket.
Rygstykket kan om nødvendigt justeres i længden.
3. Som med en ble foldes sædeindlægget op mellem barnets let løftede ben.
4. Luk trykknapperne til fastgørelse af sædeindlægget and sørg for at barnets fødder ikke bliver fanget i
taljeremmen.
5. Løft barnet op og sørg for, at barnets fødder forbliver let løftede for at opnå den anbefalede
hugsiddende position.
Fortsæt under punkt 10.
53
Page 58

MAVEPOSITION UDEN BABYINDLÆG (6 KG – 12 KG):
6. Anbring taljeremmen som beskrevet under ”Generelle oplysninger”. Forudjustér længden på
skulderstropperne og lad bæreselens rygstykke hænge ned.
ADVARSEL:
SØRG FOR ALTID AT TUNGEN ER FØRT GENNEM DEN ELASTISKE SIKRINGSLØKKE, OG AT
SPÆNDET ER PLACERET PÅ DEN POLSTREDE TALJEREM.
7. Løft barnet op mod din mave. Barnet skal have let spredte ben.
8. Brug den ene hånd til at løfte bæreselens rygstykke op over barnets ryg, idet du holder dit barn fast
med den anden hånd.
9. Lad barnet glide helt ned i bæreselen, indtil barnets bagdel hviler ned mod bæreselen.
10. Før nu armene igennem de lukkede skulderstropper en af gangen, imens du hele tiden støtter barnet
med den frie hånd.
11. Luk forbindelsesremmen bag din nakke.
12. Justér skulderstropperne indtil barnet sidder tæt ind til din krop.
HOFTEPOSITION (6 KG – CA. 12 KG):
13. Anbring taljeremmen som beskrevet under ”Generelle oplysninger” og lad bæreselens rygstykke
hænge ned foran dig.
ADVARSEL:
SØRG FOR ALTID AT TUNGEN ER FØRT GENNEM DEN ELASTISKE SIKRINGSLØKKE, OG AT
SPÆNDET ER PLACERET PÅ DEN POLSTREDE TALJEREM.
14. Hvis du vil bære barnet på venstre hofte, skal du gøre højre skulderstrop længere og venstre
skulderstrop kortere. Vil du bære barnet på højre hofte. er det modsat. Luk forbindelsesremmen.
15. Træk nu forbindelsesremmen over hovedet og før armene igennem skulderstropperne.
16. Flyt nu bæreselen til din venstre (hhv. højre) hofte.
17. Lad barnet glide ned i selen fra topåbningen, til barnet sidder midt i selen på din hofte.
18. Justér skulderstropperne indtil barnet sidder tæt ind til din krop.
DK
RYGPOSITION (8 KG – 20 KG):
Denne bæreposition bør kun anvendes, når barnet er i stand til selv at holde hovedet.
19. Anbring taljeremmen som beskrevet uner ”Generelle oplysninger”. Drej bæreselen om på din ryg og
før venstre arm igennem skulderstroppen.
ADVARSEL:
SØRG FOR ALTID AT TUNGEN ER FØRT GENNEM DEN ELASTISKE SIKRINGSLØKKE, OG AT
SPÆNDET ER PLACERET PÅ DEN POLSTREDE TALJEREM.
20. Løft barnet op med din højre arm, før derefter din venstre arm om på ryggen, grib fat i barnets venstre
fod, og før det ind i bæreselen. Læn dig lidt forover, mens du gør dette, og sørg hele tiden for at holde
og støtte barnet. Så snart barnet sidder sikkert, tager du den højre skulderstrop på.
21. Luk brystremmen over dit bryst, og juster om nødvendigt bredden.
SØRG FOR, AT BARNETS RYG ER SVAGT RUNDET, NÅR DET SIDDER I BÆRESELEN.
SKULDERSTROPPERNE MÅ DERFOR IKKE STRAMMES FOR MEGET.
54
Page 59

ANVENDELSE AF DEN INTEGREREDE HOVEDSTØTTE:
22. For at bruge den integrerede hovedstøtte skal den foldes op og begge seletunger fastgøres i
spænderne på skulderstropperne. Ved brug af rygposition skal hovedstøtten fastgøres før du tager
selen på.
GARANTI
Den følgende garanti gælder udelukkende i det land, hvor dette produkt oprindeligt blev solgt af en
forhandler til en forbruger. Garantien dækker alle produktions- og materialefejl, som forendes og opstår
på købsdatoen eller indenfor 2 år fra købsdatoen hos den forhandler, som oprindeligt solgte produktet
til forbrugeren (producentens garanti). Hvis en produktions- eller materialefejl opstår, vil CYBEX - efter
egen vurdering - enten reparere produktet uden beregning, eller udskifte produktet med et nyt. For at
opnå denne garanti, skal produktet indleveres hos den forhandler, hvor produktet oprindeligt blev købt,
sammen med købsbevis, som viser købsdato, forhandlerens navn og typebetegnelsen for proudktet.
Garantien dækker ikke i tilfælde af, at produktet bringes til producenten eller nogen anden person end
den oprindelige forhandler. Undersøg produktet grundigt på købstidspunktet for eventuelle produktionseller materialefejl, og ved køb pr. postordre straks efter modtagelsen. I tilfælde af fejl, skal brugen af
produktet stoppes, og produktet skal omgående vises til forhandleren. I tilfælde af reklamation, skal
produktet aeveres i ren og komplet stand. Før henvendelse til forhandleren bedes brugsanvisningen
nøje gennemlæst. Garantien dækker ikke skader påført ved forkert brug af produktet, udefra kommende
eekter (vand, ild, bilulykker etc.) eller normalt slid. Garantien gælder kun når produktet har været
anvendt i henhold til brugsanvisningen, hvis eventuelle reparationer er blevet udført af autoriserede
personer og hvis originale komponenter og reservedele er anvendt.
55
Page 60

56
DK
Page 61

VIKTIG! OPPBEVAR FOR FREMTIDIG
BRUK
FOR Å GARANTERE DITT BARNS SIKKERHET ER DET SVÆRT VIKTIG AT CBX MY.GO
BRUKES I SAMSVAR MED DENNE BRUKERVEILEDNINGEN. DU MÅ GJERNE TA
KONTAKT MED OSS HVIS DU HAR SPØRSMÅL.
KJÆRE KUNDE!
Takk for at du valgte CBX MY.GO! I utviklingen av CBX MY.GO har vi fokusert på sikkerhet,
komfort og brukervennlighet. Produktet er utviklet under streng kvalitetskontroll og oppfyller alle
sikkerhetsstandarder.
INNHOLD
OVERSIKT .............................................................................................................................. 58
VEDLIKEHOLD ......................................................................................................................58
GENERELLE ADVARSLER ............................................................................................ 58-59
GENERELL INFORMASJON ................................................................................................ 59
MAGEPOSISJON MED SETEINNLEGG (3.5 - CA. 6 KG) ................................................ 59
MAGEPOSISJON UTEN SETEINNLEGG (6 KG – 12 KG) .................................................60
HOFTEPOSISJON (6 KG - 12 KG) ....................................................................................... 60
RYGGPOSISJON (8KG - 20 KG) ..........................................................................................60
ANVENDELSE AV DEN INTEGRERTE HODESTØTTE ................................................... 61
GARANTI ................................................................................................................................ 61
57
Page 62

CBX MY.GO Babybæresele
Justerbar integrert hodestøtte
Skulderstropper med
komfortable polstring
VEDLIKEHOLD
Bemerk! Vask produktet separat før bruk første gang. Unngå
tørketrommel og direkte sollys. Må ikke strykes!
Made in China
Elastisk fastspenning
av hodestøtte
Trykknapper til
fastspenning av
seteinnlegg til nyfødte
Polstret midjebelteIntegrert seteinnlegg til nyfødte
CBX MY.GO – Babybæresele fra
fødsel til 5 år.
Vekt: 3,5 – 20 kg / 8 – 44,09 lbs
NO
GENERELLE ADVARSLER!
Vær spesielt oppmerksom på følgende ved bruk av CBX MY.GO bæresele:
ADVARSEL:
DIN BALANSEEVNE KAN PÅVIRKES NEGATIVT AV BARNETS OG DINE EGNE BEVEGELSER.
ADVARSEL:
VÆR FORSIKTIG NÅR DU BØYER DEG ELLER LENER DEG FOROVER.
ADVARSEL:
DENNE BÆRESELEN EGNER SEG IKKE TIL BRUK VED SPORTSAKTIVITETER.
ADVARSEL:
SØRG FOR AT EN ANNEN PERSON HOLDER BARNET MENS DU TAR PÅ DEG BÆRESELEN.
ADVARSEL:
FORSIKRE DEG OM AT SPENNENS HANNDEL ALLTID FØRES GJENNOM
SIKKERHETSLØKKEN FØR SPENNEN FESTES. SPENNENS HANNDEL MÅ VÆRE HEKTET
HELT FAST I SIKKERHETSLØKKEN.
ADVARSEL:
DET INTEGRERTE SETEINNLEGGET BØR BRUKES TIL BARNET ER OPP TIL 6 KG. DETTE
SIKRER DEN BESTE POSISJON FOR DITT BARN OG ØKER SIKKERHETEN.
58
Page 63

• Påse at du leser og forstår alle instruksjonene i veiledningen før du tar i bruk BÆRESELEN.
• BÆRESELEN skal alltid justeres slik at den er tilpasset barnets størrelse.
• BÆRESELEN skal kun brukes av voksne. En skadet BÆRESELE skal IKKE brukes!
• Sjekk alltid at alle spenner, løkker, remmer, knapper og klips er sikkert festet og fungerer som de skal.
Om det ikke er tilfelle eller om du er i tvil, skal du IKKE bruke bæreselen.
• Kontroller alltid at det er tilstrekkelig plass omkring hodet for å sikre god lufting.
• Ikke kle babyen for varmt, og sjekk at temperaturen er passe.
• Spennen på hofteremmen må aldri åpnes mens barnet er i bæreselen.
GENERELLE OPPLYSNINGER
I. Plasser hofteremmen rundt livet/hoftene, lukk spennen og juster lengden til remmen sitter stramt.
Forsikre deg om at spennens hanndel alltid føres gjennom sikkerhetsløkken før spennen festes.
Ia. Sørg for at du hører et ”klikk” når du låser spennen.
II. Høydejustering: Hofteremmen fungerer som et høydejusteringssystem. (a) Ved bæring av mindre
barn skal hofteremmen plasseres rundt livet, slik at barnet kommer høyere opp. (b) Ved bæring av
større barn skal remmen plasseres rundt hoftene. I optimal sitteposisjon for barnet kan den som bærer
barnet, berøre barnets hode med leppene. Justér bæreselen i henhold til dette.
III. Tverrgående sikkerhetsrem: (a) Den tverrgående sikkerhetsremmen kan justeres både i lengde og
høyde, noe som gir enkel betjening, og (b) den kan lukkes bak nakken eller bak på ryggen.
IV. Breddejustering: Stram skulderremmene slik at de føles komfortable for både deg selv og barnet.
Breddejusteringen regulerer også graden av støtte for barnets rygg. Løse remmer kan foldes sammen
og plasseres i løkkene på skulderremmene.
BARNET SKAL SITTE MED LITT BUET RYGG I BÆRESELEN. DET BETYR AT DU IKKE SKAL
STRAMME SKULDERREMMENE FOR MYE.
MAGEPOSISJON MED SETEINNLEGG (3.5 - CA. 6 KG)
1. Fest midjebeltet som beskrevet under ”generelle opplysninger” Justèr lengden på skulederstroppene.
Sitt på en stol og legg bæreselens ryggstykket ned i ditt fang. Fold ut seteinnlegget.
ADVARSEL:
SØRG ALLTID FOR AT TUNGEN ER FØRT GJENNOM DEN ELASTISKE SIKRINGSLØKKEN OG
AT SPENNEN ER PLASSERT PÅ DET POLSTREDE MIDJEBELTET.
2. Legg ditt barn på bæreselens ryggstykke sånn at barnets nakke møter den øverste kanten på
ryggstykket. Ryggstykket kan om nødvendig justeres i lengden.
3. Som en bleie foldes seteinnlegget opp mellom barnets lett løftede ben.
4. Lukk trykknappene og sørg for at banets føtter ikke blir fanget i midjebeltet.
5. Løft barnet opp og sørg for at barnets føtter forblir lett løftede for å oppnå den anbefalte huksittende
posisjon.
Fortsett som beskrevet under punkt 10.
59
Page 64

MAGEPOSISJON UTEN BABYINNLEGG (6 KG - 12 KG):
6. Lås midjebeltet som beskrevet under ”Generelle opplysninger”. Juster lengden på skulderstroppene
og la bæreselens ryggstykke henge ned.
ADVARSEL:
SØRG ALLTID FOR AT TUNGEN ER FØRT GJENNOM DEN ELASTISKE SIKRINGSLØKKEN OG
AT SPENNEN ER PLASSERT PÅ DET POLSTREDE MIDJEBELTET.
7. Løft barnet opp mot magen din. Barnet skal ha lett spredde ben.
8. Bruk den ene hånden til å løfte bæreselens ryggstykke opp over barnets rygg samtidig som du holder
barnet fast med den andre hånden.
9. La barnet gli helt ned i bæreselen intill baken til barnet hviler ned mot bæreselen.
10. Før nå armene til barnet gjennom de lukkede skulderstroppene, en av gangen, imens du hele tiden
støtter barnet med den frie hånden.
11. Fest beltereimen bak nakken din.
12. Justèr skulderstroppene intill barnet sitter tett intill din kropp.
HOFTEPOSISJON (6 KG - 12 KG) :
13. Fest midjebeltet som beskrevet under ”Generelle opplysninger” og la bæreselens ryggstykke henge
ned foran deg.
ADVARSEL:
SØRG ALLTID FOR AT TUNGEN ER FØRT GJENNOM DEN ELASTISKE SIKRINGSLØKKEN OG
AT SPENNEN ER PLASSERT PÅ DET POLSTREDE MIDJEBELTET.
14. Hvis du vil bære barnet på venstre hofte, skal du gjøre høyre skulderstropp lengre og den venstre
kortere. Vil du bære barnet på høyre hofte, er det motsatt. Lukk beltereimen.
15. Trekk nå beltereimen over hodet og før armene gjennom skulderstroppene.
16. Flytt nå bæreselen til din venstre (høyre) hofte.
17. La barnet gli ned i selen fra topp-åpningen til barnet sitter midt i selen på din hofte.
18. Justèr skulderstroppene intill barnet sitter tett intill din kropp.
NO
RYGGPOSISJON (8 KG - 20 KG)
Denne posisjonen skal bare brukes når barnet er blitt stort nok til å holde hodet støtt selv.
19. Put on the waist belt as described under “Preparation”. Push the baby carrier onto your back. Slide
your left arm through the left shoulder strap.
ADVARSEL:
SØRG ALLTID FOR AT TUNGEN ER FØRT GJENNOM DEN ELASTISKE SIKRINGSLØKKEN OG
AT SPENNEN ER PLASSERT PÅ DET POLSTREDE MIDJEBELTET.
20. Løft opp barnet på høyre arm, og rekk venstre arm bak på ryggen og ta tak i barnets venstre fot.
Plasser deretter barnet i bæreselen. Dette gjør du ved å lende deg forover, mens du hele tiden holder
fast i og støtter barnet ditt. Når barnet sitter trygt, tar du på deg høyre skulderrem.
21. Lukk spennen på brystremmen i brysthøyde, og stram remmen ved behov.
BARNET SKAL SITTE MED LITT BUET RYGG I BÆRESELEN. DET BETYR AT DU IKKE SKAL
STRAMME SKULDERREMMENE FOR MYE.
60
Page 65

ANVENDELSE AV DEN INTEGRERTE HODESTØTTEN.
22. For å bruke den integrerte hodestøtten skal den foldes opp og begge seletunger festes i spennene på
skulderstroppene. Ved bruk av ryggposisjon skal hodestøtten festes før du tar på selen.
GARANTI
Denne garantien gjelder kun i det landet der produktet ble solgt og under forutsetning av at det ble solgt
til forbrukeren av en forhandler. Garantien dekker alle produksjons- og materialfeil som enten eksisterte
på kjøpstidspunktet eller er avdekket innen to (2) år fra datoen da forbrukeren kjøpte produktet fra
forhandleren (produsentgaranti). Hvis produksjons- eller materialfeil skulle avdekkes, vil vi – etter eget
skjønn – enten reparere produktet kostnadsfritt eller erstatte det med et nytt produkt. For å fremme
garantikrav må du ta produktet med til forhandleren som solgte det, og fremvise originalt kjøpsbevis
(kvittering eller faktura). Kjøpsbeviset skal inneholde kjøpsdato, forhandlerens navn samt produktets
typebetegnelse. Garantien gjelder ikke hvis produktet leveres eller sendes til produsenten eller en annen
part enn den forhandleren som opprinnelig solgte produktet til forbrukeren. Kontroller at produktet er i
fullstendig stand og uten produksjons- eller materialfeil umiddelbart på selve kjøpsdagen, eller, dersom
produktet ikke er kjøpt av en fysisk forhandler, umiddelbart etter at du har mottatt det. Ved feil på
produktet må du umiddelbart slutte å bruke det og i stedet ta det med eller sende det til forhandleren du
kjøpte det av. Ved fremming av garantikrav skal produktet tilbakeleveres i ren og fullstendig stand. Les
grundig gjennom bruksanvisningen før du kontakter forhandleren. Denne garantien dekker ikke skader
som skyldes feilbruk, ytre påvirkning (vann, brann, trakkulykker osv.) eller normal bruk og slitasje.
Garantien forutsetter at produktet er brukt i henhold til bruksanvisningen og at samtlige endringer og
reparasjoner er utført av autorisert personell ved bruk av originale reservedeler og tilbehør.
61
Page 66

62
NO
Page 67

VIKTIGT! BEHÅLL
BRUKSANVISNINGEN FÖR
FRAMTIDA REFERENS!
FÖR ATT KUNNA GARANTERA DITT BARNS SÄKERHET ÄR DET MYCKET VIKTIGT ATT
ANVÄNDA CBX MY.GO ENLIGT BRUKSANVISNINGEN. HAR DU NÅGRA FRÅGOR ÄR DU
VÄLKOMMEN ATT KONTAKTA OSS.
BÄSTA KUND!
Tack för att du valde att köpa en CBX MY.GO! Vi försäkrar att säkerhet, komfort och enkel
användning stod i fokus vid utvecklingen av CBX MY.GO. Produkten är utvecklad under noggrann
kvalitetskontroll och uppfyller alla säkerhetsstandarder.
INNEHÅLL
ÖVERSIKT .............................................................................................................................. 64
SKÖTSEL ................................................................................................................................64
GENERELLA VARNINGAR! ........................................................................................... 64-65
GENERELL INFORMATION ................................................................................................. 65
MAGPOSITION MED BABY INLÄGG (3,5 KG - CA.6 KG) ................................................ 65
MAGPOSITION UTAN BABY INLÄGG (6 KG - 12 KG) ....................................................... 66
HÖFTPOSITION (6 KG - 12 KG) ...........................................................................................66
RYGGPOSITION (8 KG - 20 KG) .......................................................................................... 66
ANVÄNDNING AV DET INTEGRERADE HUVUDSTÖDET37 .......................................... 67
GARANTI ................................................................................................................................ 67
63
Page 68

CBX MY.GO Babybärsele
Justerbart integrerat huvudstöd
Skulderstroppar med
komfort
SKÖTSEL
Observera! Tvätta produkten separat innan du använder
den första gången. Torktumla den inte och utsätt den inte för
direkt solljus! Stryk den inte!
Made in China
Elastisk fastsättning
av huvudstödet
Tryckknappar för
fastsättning av
babyinlägg
Mjukt midjebälteIntegrerat inlägg till nyfödda
CBX MY.GO – Babybärsele
från födsel till 5 år.
Vikt: 3,5 – 20 kg / 8 – 44,09 lbs
GENERELLA VARNINGAR!
Var uppmärksam på följande saker när du använder CBX MY.GO bärsele:
VARNING:
DIN BALANS KAN PÅVERKAS NEGATIV AV DINA OCH DITT BARNS RÖRELSER.
VARNING:
VAR FÖRSIKTIG NÄR DU BÖJER ELLER LUTAR DIG FRAMÅT.
VARNING:
BÄRSELEN ÄR INTE LÄMPLIG ATT ANVÄNDA VID SPORTAKTIVITETER.
VARNING:
SE TILL ATT YTTERLIGARE EN PERSON HÅLLER I BARNET NÄR DU TAR PÅ DIG BÄRSELEN.
VARNING:
SE TILL ATT SPÄNNETS HANDEL ALLTID MATAS IN GENOM DEN ELASTISKA
SÄKERHETSÖGLAN INNAN SPÄNNET STÄNGS. SPÄNNETS HANDEL MÅSTE VARA HELT
FASTGJORT I DEN ELASTISKA SÄKERHETSÖGLAN.
VARNING:
DET INTEGRERADE INLÄGGET BÖR ANVÄNDAS TILL BARNET VÄGER 6 KG. DET SÄKRAR
BARNETS PLACERING OCH ÖKAR SÄKERHETEN.
SV
64
Page 69

• Försäkra dig om att du har läst och förstått instruktionerna innan du använder bärselen.
• Bärselen måste alltid justeras för att passa barnets storlek optimalt.
• Bärselen får endast bäras av vuxna. En skadad bärsele får INTE användas!
• Undersök alltid så att öglor, remmar, knappar och alla typer av spännen är ordentligt fästa och i per fekt
skick.Om så inte är fallet, eller vid tveksamhet använd INTE bärselen.
• Se alltid till att det nns tillräckligt med plats runt barnets huvud för god ventilation.
• Klä inte ditt barn för varmt och se till att upprätthålla en behaglig temperatur.
• Knäpp aldrig upp midjebältet medan barnet sitter i selen.
GENERELLA UPPLYSNINGAR:
I. Placera midjebältet runt midjan/höfterna, knäpp spännet och justera längden tills det sitter åt. Se till att
spännets handel alltid matas in genom den elastiska säkerhetsöglan innan spännet stängs.
Ia. Se till att du hör ett ”KLICK” när du låser spännet.
II. Höjdjustering: Midjebältet kan justeras efter längd. (a) När man bär mindre barn ska bältet placeras
runt midjan så att barnet får en högre position. (b) Vid större barn ska bältet placeras runt höfterna.
När den som bär kan nudda barnets huvud med läpparna har barnet bästa sitthöjd. Selen bör justeras
i enlighet med detta.
III. Rygg-/bröstspänne: (a) Rygg-/bröstspännet på axelremmarna kan justeras både på längden och på
höjden (b) vilket gör att det kan knäppas bakom nacken såväl som bakom ryggen.
IV. Breddjustering: Spänn åt axelremmarna så att det blir bekvämt för dig och ditt barn. Justeringen av
bredden reglerar också stödet för barnets rygg. Blir det mycket över av remmarna kan de vikas in och
placeras i öglorna på axelremmarna.
SE TILL ATT DITT BARNS RYGG ÄR NÅGOT RUNDAD NÄR DET SITTER I BÄRSELEN. SPÄNN
ALLTSÅ INTE AXELREMMARNA FÖR HÅRT.
MAGPOSITION MED BABY INLÄGG (6 KG - 12 KG)
1. Tag fram midjebältet som är beskrivet under ”Generella upplysningar”. Justera längden på
skulderstroppen. Sitt på en stol och lägg bärselens ryggstycke i ditt knä. Tag ut baby inlägget.
VARNING:
SE TILL ATT LÅSET ÄR PLACERAT GENOM DEN ELASTISKA SÄKERHETSBYGELN, OCH ATT
SPÄNNET ÄR PLACERAT PÅ DET MJUKA MIDJEBÄLTET.
2. Lägg ditt barn på bärselens ryggstycke, så att barnets nacke möter den översta kanten av ryggstycket.
Om det behövs går ryggstycket att justeras på längden.
3. Som en blöja placeras inlägget mellan barnets lätt böjda ben.
4. Använd tryckknapparna till att sätta fast inlägget och se till att barnets fötter inte fastnar i midjebältet.
5. Lyft upp barnet och se till att barnets ben är något lyfta för att uppnå den rekommenderade
huksittande positionen.
Fortsätt under punkt 10.
65
Page 70

MAGPOSITION UTAN BABY INLÄGG (6 KG - 12 KG)
6. Tag fram midjebältet som är beskrivet under ”Generella upplysningar” Justera längden på
skulderstropparna och låt bärselens ryggstycke hänga ned.
VARNING:
SE TILL ATT LÅSET ÄR PLACERAT GENOM DEN ELASTISKA SÄKERHETSBYGELN, OCH ATT
SPÄNNET ÄR PLACERAT PÅ DET MJUKA MIDJEBÄLTET.
7. Lyft upp barnet mot din mage. Barnet skall ha lätt särade ben.
8. Använd ena handen till att lyfta upp bärselens ryggstycke över barnets rygg, medan du håller fast
barnet med den andra handen.
9. Låt barnet glida ner i bärselen så att barnets nederdel vilar ner mot bärselen.
10. För nu ärmarna genom de låsta skulderstropparna, en åt gången medan du hela tiden stöttar barnet
med den fria handen.
11. Lås remmen bakom din nacke.
12. Justera skulderstropparna tills barnet sitter tätt intill din kropp.
HÖFTPOSITION (6 KG - CA. 12 KG)
13. Tag fram midjebältet som är beskrivet under ”Generella upplysningar” och låt bärselens ryggstycke
hänga ned framför dig
VARNING:
SE TILL ATT LÅSET ÄR PLACERAT GENOM DEN ELASTISKA SÄKERHETSBYGELN OCH ATT
SPÄNNET ÄR PLACERAT PÅ DET MJUKA MIDJEBÄLTET.
14. Om du vill bära barnet på din vänstra höft, skall du göra höger skulderstropp längre än den vänstra.
Vill du bära barnet på höger höft, gör det motsatta. Lås förbindelse remmen.
15. Drag nu förbindelse remmen över ditt huvud och för ärmarna genom skulderstropparna.
16. Flytta nu bärselen till din vänsta eller högra höft.
17. Låt barnet glida ner i bärselen från toppöppningen, tills barnet sitter mitt i bärselen på din höft.
18. Justera skulderstropparna tills barnet sitter in till din kropp.
SV
RYGGPOSITION (8 KG - 20 KG)
Du ska inte bära barnet på ryggen förrän det garanterat kan hålla upp sitt eget huvud.
19. Tag fram midjeremmen som är beskrivet under ”Generella upplysningar” Vrid bärselen till din rygg och
för vänster ärm genom skulderstroppen.
VARNING:
SE TILL ATT LÅSET ÄR PLACERAT GENOM DEN ELASTISKA SÄKERHETSBYGELN OCH ATT
SPÄNNET ÄR PLACERAT PÅ DET MJUKA MIDJEBÄLTET.
20. Lyft upp barnet på höger arm, placera din vänstra hand på ryggen, ta tag i barnets vänstra fot och
placera sedan barnet i bärselen. För att göra detta böjer du dig framåt och håller tag i barnet hela
tiden. När ditt barn sitter säkert trär du armen igenom höger axelrem.
21. Knäpp igen bröstremmen i brösthöjd och justera bredden om det behövs.
SE TILL ATT DITT BARNS RYGG ÄR NÅGOT RUNDAD NÄR DET SITTER I BÄRSELEN. SPÄNN
ALLTSÅ INTE AXELREMMARNA FÖR HÅRT.
66
Page 71

ATT ANVÄNDA DET INTEGRERADE HUVUDSTÖDET
22. För att använda det integrerade huvudstödet skall det fällas upp och båda bältena skall fastsättas i
spännet på skulderstropparna. När du använder ryggposition skall huvudstödet sättas fast innan du
tar på bärselen.
GARANTI
Följande garanti gäller endast i det land där produkten ursprungligen såldes av en återförsäljare till en
kund. Garantin täcker alla tillverknings- och materialfel, bentliga och som uppstår, vid inköpsdatum
eller som uppstår inom två (2) år från det datum då återförsäljaren sålde produkten till kunden
(tillverkargaranti). Om ett tillverknings- eller materialfel skulle uppstå kommer vi efter eget gottnnande att
antingen reparera produkten utan kostnad eller ersätta den med en ny produkt. För att erhålla en sådan
garanti krävs det att man lämnar in eller skickar produkten till återförsäljaren som ursprungligen sålde
produkten till kunden och att lämna in inköpsbeviset i original (kvitto eller faktura) som visar inköpsdatum,
återförsäljarens namn och produktens typbeteckning. Garantin gäller inte om produkten lämnas in eller
skickas till tillverkaren eller någon annan person än återförsäljaren som ursprungligen sålde produkten
till kunden. Kontrollera produkten på inköpsdagen så att den är komplett och att det inte nns några
tillverknings- eller materialfel.Om produkten köpts genom postorder ska den kontrolleras så snart den
anlänt. Om någon defekt upptäcks ska produkten inte användas utan lämnas in eller skickas tillbaka till
återförsäljaren som ursprungligen sålde produkten. Garantin gäller endast om den returnerade produkten
är ren och i komplett skick. Innan du kontaktar återförsäljaren ska den här bruksanvisningen läsas
igenom noggrant. Garantin täcker inte några skador orsakade av felanvändning, yttre påverkan (vatten,
brand, trakolyckor etc.) eller normalt slitage. Den gäller endast då produkten har använts i enlighet med
bruksanvisningarna, om eventuella modieringar och underhåll har utförts av auktoriserade personer och
om originaldelar och -tillbehör använts.
67
Page 72

68
SV
 Loading...