

CYBEX GmbH
Riedingerstr. 18 | 95448 Bayreuth | Germany
info@mycbx.com
ATON CBX
USER GUIDE
DE / EN / IT / FR / NL / PL / ES / PT / DK / NO / SE
ECE R44/04 Gr. 0+ | -13kg (- ca.18 M)

2
DE
EN
IT
FR
NL
PL
ES
PT
DK
NO
SE
WARNUNG!
DE
Ihr Kind zu erreichen, ist es unbedingt notwendig, die gesamte Gebrauchsanleitung aufmerksam zu lesen. Reihenfolge:
Schale einrichten - Kind anschnallen - Sitz ins Fahrzeug einbauen.
EN
WARNING!
essential to read and follow the entire instruction manual carefully. Correct Order: Baby seat initial setup - fasten child fasten baby seat in the car.
IT
ATTENZIONE!
bambino è molto importante leggere attentamente ed interamente il manuale e seguirne scrupolosamente le indicazioni.
Ordine corretto delle operazioni: Approntare il seggiolino – allacciare il bambino – ssare il seggiolino al sedile dell’auto.
FR
AVERTISSEMENT!
est essentiel de lire et de suivre correctement le manuel d‘instructions dans son intégralité. Ordre de lecture: Installation
du siège auto - attacher l‘enfant - attacher le siège auto dans la voiture.
NL
WAARSCHUWING!
optimaal komfort voor uw kind, is het essentieel de volledige handleiding zorgvuldig te lezen en te volgen.
PL
OSTRZEŻENIE!
maksymalne bezpieczeństwo i wygodę, należy uważnie przeczytać całą instrukcję. Prawidłowa kolejność: wstępne
złożenie fotelika - zapięcie dziecka - montaż fotelika w samochodzie.
ES
¡ATENCIÓN!
confort para su hijo es esencial leer y seguir cuidadosamente todo el manual de instrucciones. El orden correcto es:
conguración inicial de la silla infantil - asegurar al niño - asegurar la silla en el automóvil!
PT
ATENÇÃO!
conforto para o seu lho é essencial ler e seguir cuidadosamente todo o manual de instruções. A ordem correcta é:
conguração inicial da cadeira infantil - prender a criança - prender a cadeira ao automóvel.
DK
ADVARSEL!
dit barn er det vigtigt at læse og følge hele brugervejledningen omhyggeligt. Rigtig rækkefølge: Første indstilling af
barnesædet – fastgørelse af barnet – fastgørelse af barnesædet i bilen.
NO
ADVARSEL!
det så komfortabelt som det går an, er det avgjørende at du leser og følger hele brukerhåndboken nøye. Riktig rekkefølge:
Første gangs montering av barnesetet – fest barnet – fest barnesetet i bilen.
SE
VARNING!
bästa sätt och har högsta komfort måste du läsa igenom och följa den kompletta manualen. Rätt ordningsföljd: Montera
bilbarnstolen – spänn fast barnet – fäst bilbarnstolen i bilen.
Die folgende Kurzanleitung dient nur der Übersicht. Um maximale Sicherheit und maximalen Komfort für
This short manual serves as an overview only. For maximum protection and best comfort for your child it is
Queste istruzioni sono solo un sommario. Per garantire la massima sicurezza e comfort al Vostro
Ce manuel résumé sert de synthèse seulement! Pour un maximum de protection et de confort, il
De volgende korte handleiding dient enkel als overzicht! Voor een maximale bescherming en een
Instrukcja ta jest tylko obrazkowym streszczeniem! Aby zagwarantować swojemu dziecku
El siguente manual abreviado sirve sólo como visión general! Para una máxima protección y el mejor
O seguinte manual abreviado serve só como visão geral! Para uma máxima protecção e um melhor
Denne korte manual fungerer kun som en oversigt. For at sikre maksimal beskyttelse og komfort for
Følgende korthåndbok tjener kun til å gi et overblikk! For at barnet ditt skal være best mulig beskyttet og ha
Denna korta manual fungerar bara som en översikt! För att försäkra dig om att ditt barn skyddas på
3
Kort vejledning
CLICK
Instrucciones breves
instruções breves
Kort instruksjon
kort instruktion
1
2
3
Kurzanleitung
4
Short instruction
Istruzioni in breve
Breves instructions
Korte instructie
Skrócona instrukcja obsługi
6
7
8
DE
EN
IT
FR
NL
PL
ES
PT
DK
NO
SE
8 | INHALT
54
9 | CONTENT
9 | ARGOMENTI
50 | CONTENU
51 | INHOUD
51 | SPIS TREŚCI
9
92 | CONTENIDO
93 | CONTEÚDO
93 | INDHOLD
134 | INNHOLD
135 | INNEHÅLL
5

6

DE
EN
IT
Sehr geehrte Kundin, sehr geehrter Kunde!
VIELEN DANK, DASS SIE SICH BEI DER WAHL EINES KINDERSITZES FÜR DEN ATON CBX
ENTSCHIEDEN HABEN. BEI DER ENTWICKLUNG DES KINDERSITZES STANDEN SICHERHEIT, KOMFORT
UND BEDIENFREUNDLICHKEIT IM VORDERGRUND. DAS PRODUKT WIRD UNTER BESONDERER
QUALITÄTSÜBERWACHUNG HERGESTELLT UND ERFÜLLT STRENGSTE SICHERHEITSANFORDERUNGEN.
Dear Customer!
THANK YOU FOR BUYING THE ATON CBX.
WE CAN ASSURE YOU THAT SAFETY, COMFORT AND EASE OF USE WERE OUR HIGHEST PRIORITIES
WHEN DEVELOPING THE CAR SEAT. THIS PRODUCT IS MANUFACTURED UNDER EXCEPTIONAL QUALITY
CONTROL AND MEETS THE STRICTEST SAFETY REQUIREMENTS.
Gentile Cliente!
GRAZIE DI AVERE SCELTO ATON CBX.
LE ASSICURIAMO CHE NEL PROGETTARE QUESTO SEGGIOLINO AUTO I NOSTRI PRINCIPALI OBIETTIVI
SONO STATI LA SICUREZZA, IL COMFORT E LA FACILITÀ DI UTILIZZO. IL PRODOTTO È STATO ELABORATO
SOTTO UNO STRETTO CONTROLLO QUALITATIVO E RISPONDE AI PIÙ SEVERI STANDARD DI SICUREZZA.
7
ATON CBX
ECE R 44/04
____________
SEMI-U NIVERSAL
04301297
____________
Riedingerstr. 18, 95448 Bayreuth
8
ATON CBX
UNIVER SAL
- 13 kg
CYBEX GmbH
Germany
Approved for
ATON CBX Base-fi x
ZULASSUNG
ATON CBX – Babyschale
ECE R44/04 Gruppe 0+
Gewicht: Bis 13 kg
Alter: Bis ca. 18 Monate
Nur geeignet für Fahrzeugsitze
mit Dreipunkt-Automatik-Gurt,
zugelassen nach ECE Regelung
Nr. R16 oder gleichwertigem
Standard.
HOMOLOGATION
Aton CBX – infant car seat
ECE R44/04 age group 0+
Weight: up to 13 kg
Age: up to approx. 18 months
Only suitable for vehicle seats
with a three-point automatic belt,
approved under ECE regulation
no. R16 or equivalent standard.
OMOLOGAZIONE
Aton CBX – seggiolino di
sicurezza per auto
ECE R44/04 Gruppo 0+
Peso: no a 13 kg
Età: no ai 18 mesi circa
Adatto soltanto per veicoli con
sedili dotati di cinture di sicurezza
automatiche a 3 punti omologate
ECE R16 o standard equivalente
DE
WARNUNG! Damit Ihr Kind richtig geschützt
!
werden kann, ist es unbedingt notwendig, den
Kindersitz so zu verwenden, wie es in dieser
Anleitung beschrieben wird.
Hinweis! Bewahren Sie die Anleitung immer gribereit in
dem dafür vorgesehenen Fach am Kindersitz auf.
Hinweis! Durch länderspezische Anforderungen
(z. B. Farbkennzeichnungen am Kindersitz) können
Produktmerkmale in ihrer äußeren Erscheinung variieren.
Die korrekte Funktionsweise des Produktes wird davon
jedoch nicht beeinusst.
Hinweis! Der Dreipunktgurt darf nur durch die dafür
vorgesehenen Führungen verlaufen. Die Gurtführung wird
in diesem Handbuch genau beschrieben und ist zudem
am Kindersitz blau markiert.
DE
EN
IT
EN
WARNING! In order to keep your child properly
!
protected it is absolutely essential that you use
the car seat as described in this manual.
IT
ATTENZIONE! Per la massima sicurezza del
!
bambino è essenziale usare il seggiolino secondo
quanto descritto in questo manuale.
Note! Always keep this Instruction Manual at hand in the
compartment that has been provided for that purpose on
the car seat.
Note! Due to country-specic requirements (e.g. colour
labelling on the car seat), the product features may vary in
their external appearance. This, however, does not aect
the correct functioning of the product.
Note! The three-point belt must only be passed through
the designated routings. The belt routings are described
in detail in this manual and are marked in blue on the
car seat.
Nota Bene! Raccomandiamo di tenere il manuale
sempre a portata di mano e di conservarlo nell‘apposito
alloggiamento del seggiolino.
Nota Bene! In base alle diverse normative nazionali
l‘aspetto di alcune caratteristiche del prodotto potrebbe
dierire (es. colori delle etichette sul seggiolino). Ciò tuttavia
non inuisce sul corretto funzionamento del prodotto.
Nota bene! La cintura automatica a tre punti deve
passare attraverso le guide designate. Le guide per
la cintura sono descritte in dettaglio nel manuale e sul
seggiolino sono contrassegnate nel colore blu.
9

INHALTSVERZEICHNIS
KURZANLEITUNG..................................................................4
VERWENDUNG IM FAHRZEUG ......................................... 12
ZUM SCHUTZ IHRES FAHRZEUGS .................................. 12
SICHERHEIT IM FAHRZEUG ..............................................14
EINSTELLEN DES TRAGEBÜGELS .................................. 16
ANPASSEN DER SCHULTERGURTE ................................ 18
SICHERHEIT FÜR IHR BABY ............................................. 20
ANSCHNALLEN DES BABYS .............................................22
DER EINBAU INS FAHRZEUG ...........................................24
SO IST IHR BABY RICHTIG GESICHERT .........................26
SO IST DIE BABYSCHALE RICHTIG EINGEBAUT .......... 26
AUSBAU AUS DEM FAHRZEUG ........................................28
ENTFERNEN DER HERAUSNEHMBAREN EINLAGE .....30
ÖFFNEN DES ATON CBX SONNENVERDECKES ........... 30
ENTFERNEN DES BEZUGES.............................................32
ANBRINGEN DES BEZUGES .............................................32
REINIGUNG .......................................................................... 34
PFLEGE .................................................................................36
VERHALTEN NACH EINEM UNFALL ................................. 36
REISESYSTEM .....................................................................38
PRODUKTLEBENSDAUER ................................................. 40
ABFALLTRENNUNG ............................................................42
INFORMATIONEN ZUM PRODUKT ...................................42
GARANTIEBEDINGUNGEN ................................................ 44
10
DE
EN
IT
CONTENT ARGOMENTI
SHORT INSTRUCTION .........................................................4
THE BEST POSITION IN THE CAR ....................................13
FOR THE PROTECTION OF YOUR CAR .......................... 13
SAFETY IN THE VEHICLE .................................................. 15
CARRYING HANDLE ADJUSTMENT ................................. 17
ADJUSTING THE SHOULDER BELTS ............................... 19
SAFETY FOR YOUR BABY ................................................. 21
SECURING THE BABY ........................................................23
INSTALLING THE SEAT ......................................................25
SECURING YOUR CHILD CORRECTLY ...........................27
INSTALLING THE BABY SEAT CORRECTLY ...................27
REMOVING THE CAR SEAT ...............................................29
REMOVING THE INSERT ....................................................31
OPENING THE ATON CBX CANOPY ................................. 31
REMOVING THE COVER .................................................... 33
ATTACHING THE SEAT COVERS ...................................... 33
CLEANING ............................................................................ 35
PRODUCT CARE .................................................................37
IN CASE OF AN ACCIDENT ................................................ 37
TRAVEL SYSTEM ................................................................. 39
DURABILITY OF PRODUCT ...............................................41
DISPOSAL .............................................................................43
PRODUCT INFORMATION ..................................................43
WARRANTY ..........................................................................45
SOMMARIO.............................................................................4
LA POSIZIONE MIGLIORE ALL’INTERNO DELL’AUTO ...13
PER LA SALVAGUARDIA DELL’AUTO ............................... 13
SICUREZZA NELL’AUTO .....................................................15
REGOLAZIONE DEL MANICO PER IL TRASPORTO.......17
REGOLAZIONE DELLE CINGHIE PER LE SPALLE .........19
SICUREZZA DEL BAMBINO ...............................................21
ALLACCIARE IL BAMBINO .................................................23
INSTALLAZIONE DEL SEGGIOLINO ................................. 25
FISSARE CORRETTAMENTE IL BAMBINO ......................27
INSTALLARE CORRETTAMENTE IL SEGGIOLINO ......... 27
TOGLIERE IL SEGGIOLINO ............................................... 29
TOGLIERE IL RIDUTTORE ................................................. 31
APERTURA DELLA CAPOTTINA DI ATON CBX ...............31
RIMOZIONE DEL RIVESTIMENTO .................................... 33
FISSARE IL RIVESTIMENTO .............................................. 33
PULIZIA .................................................................................35
MANUTENZIONE ................................................................. 37
IN CASO DI INCIDENTE ......................................................37
SISTEMA DA VIAGGIO ........................................................39
DUREVOLEZZA PRODOTTO ............................................. 41
SMALTIMENTO.....................................................................43
INFORMAZIONI TECNICHE................................................43
GARANZIA ............................................................................45
11
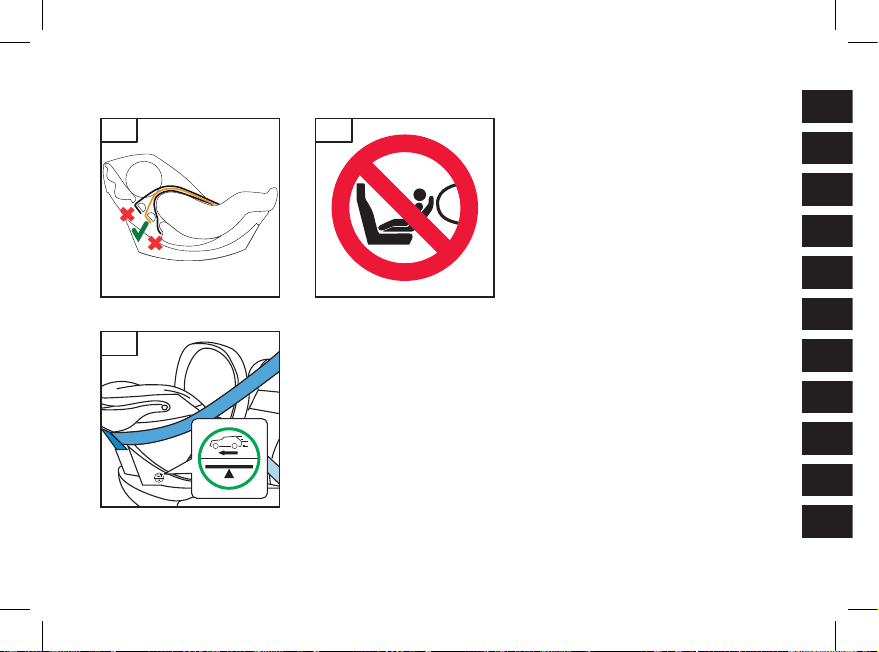
VERWENDUNG IM FAHRZEUG
Die Babyschale ist auf allen Fahrzeugplätzen
mit Dreipunkt-Automatikgurt verwendbar, die im
Fahrzeughandbuch für die „universelle“ Verwendung
zugelassen sind.
Hinweis! Steht die Babyschale nicht stabil oder zu steil
auf dem Fahrzeugsitz, so können Sie dies mit einer
zusätzlichen Decke ausgleichen. Alternativ wählen Sie
einen anderen Sitzplatz im Fahrzeug.
Hinweis! Prüfen Sie vor dem Kauf der Babyschale immer,
ob sich der Sitz ordnungsgemäß in ihrem Fahrzeug
einbauen lässt. Die Empfehlungen im Fahrzeughandbuch
sind unbedingt zu befolgen.
WARNUNG! Ohne Genehmigung von Cybex
!
dürfen keine Veränderungen an der Babyschale
vorgenommen und keine Ergänzungen hinzugefügt
werden. Reparaturen dürfen ausschließlich durch
Personen vorgenommen werden, die hierfür autorisiert
sind. Dabei dürfen stets nur original Bau- und
Zubehörteile verwendet werden. Die Schutzfunktion
der Babyschale ist sonst nicht mehr gewährleistet.
ZUM SCHUTZ IHRES FAHRZEUGS
An einigen Autositzen aus empndlichem Material (z.B.
Velours, Leder, etc.) können durch die Benutzung von
Kindersitzen mögliche Gebrauchsspuren und/oder
Abfärbungen auftreten. Um das zu vermeiden, können
Sie z.B. eine Decke oder ein Handtuch unterlegen.
Ferner weisen wir in diesem Zusammenhang auf unsere
Reinigungshinweise hin, die vor der ersten Verwendung
12
des Sitzes unbedingt beachtet werden sollten.
DE
EN
IT
THE CORRECT POSITION IN THE VEHICLE
The infant car seat can be used on all vehicle seats with
automatic three-point safety belts approved in the vehicle
manual for ‚universal‘ use.
Note! If the infant car seat is placed on the vehicle seat in
a way that is not stable or at too steep an angle, it can be
adjusted with an additional blanket. Alternatively, choose
another seat in the vehicle.
Note! Always check before buying the infant car seat
whether the seat can be properly installed in your vehicle.
Always comply with the recommendations in the vehicle‘s
manual.
WARNING! No modifications or additions are
!
allowed to be made to the infant car seat without the
approval of Cybex. Repairs are only allowed to be
undertaken by persons who have been authorised
to do so. In doing so, they must always use original
components and accessory parts only. If not, the
protective function of the infant car seat is no longer
guaranteed.
FOR THE PROTECTION OF YOUR CAR
It is possible that some car seats that are made of soft
material (e.g. velours, leather, etc.) may show signs of
usage and/or discolouration. In order to avoid this, you
could, for example, place a cover or towel underneath it.
In this context, we would also like to refer to you to our
cleaning instructions, which must absolutely be followed
before the rst use of the seat.
LA POSIZIONE MIGLIORE ALL‘INTERNO DELL‘AUTO
Il seggiolino può essere utilizzato su tutti i sedili con
cinture di sicurezza automatiche a tre punti approvate
dal manuale della vettura, con uso universale.
Nota Bene! Se il seggiolino appoggiato sul sedile appare
instabile o troppo sollevato consigliamo di utilizzare un
telo o un asciugamano per compensare. In alternativa,
scegliere un'altra posizione all'interno della vettura.
Nota Bene! Prima dell‘acquisto vericare sempre la
compatibilità del seggiolino e che possa essere installato
correttamente nella vostra vettura. Rispettare sempre le
raccomandazioni fornite nel manuale istruzioni del veicolo.
ATTENZIONE! Non sono ammesse modifiche
!
o aggiunte al seggiolino senza la preventiva
approvazione da parte di Cybex. Le riparazioni
possono essere eseguite soltanto da persone
autorizzate a farlo, utilizzando soltanto componenti
ed acessori originali. Agendo diversamente la
funzione protettiva del seggiolino non potrà più
essere garantita.
PER LA SALVAGUARDIA DELL’AUTO
Nel caso di sedili in materiali particolarmente delicati (per
esempio velluto, pelle, ecc.) per evitare danneggiamenti
consigliamo di di stendere un telo protettivo sotto il
seggiolino. Con l‘occasione ricordiamo di fare riferimento
anche alle istruzioni per il lavaggio, che devono essere
seguite scrupolosamente prima dell‘utilizzo.
13
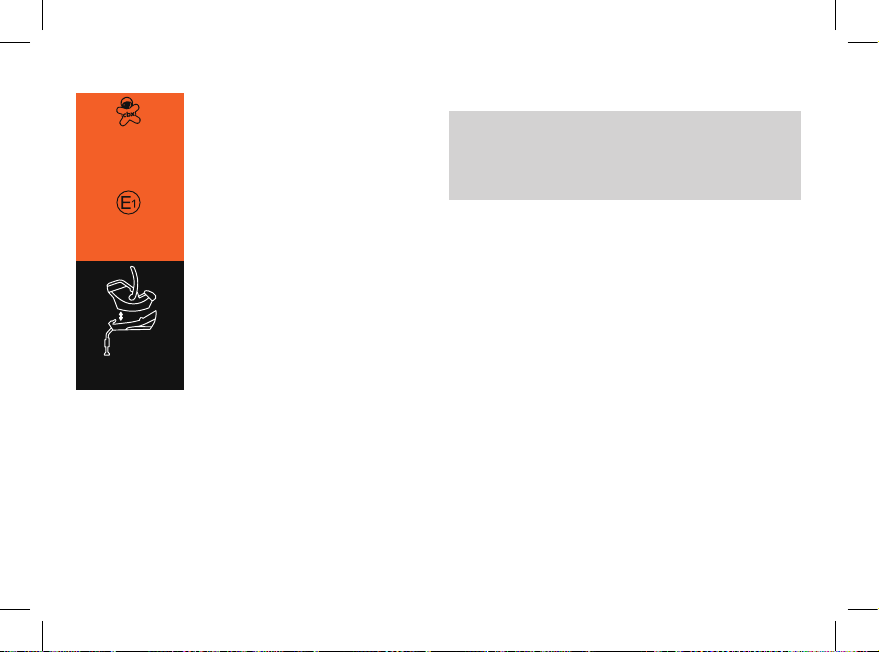
SICHERHEIT IM FAHRZEUG
WARNUNG! Verwenden Sie den Kindersitz nicht
!
auf einem Sitz, auf dem ein Frontairbag aktiviert ist.
Dies gilt nicht für so genannte Seitenairbags.
Hinweis! Der großvolumige Frontairbag entfaltet sich
explosionsartig und kann Ihr Kind schwer verletzen oder
sogar töten.
WARNUNG! Der Kindersitz sowie die Basis müssen,
!
auch dann wenn sie nicht benutzt werden, immer
korrekt im Fahrzeug befestigt sein. Bereits bei einer
Notbremsung oder einem geringen Aufprall können
unbefestigte Teile andere Mitfahrer und Sie selbst
verletzen.
Achten Sie zum Schutz aller Fahrzeuginsassen stets
darauf, dass...
• die umklappbaren Rückenlehnen der Fahrzeugsitze
eingerastet sind und sich in einer aufrechten Position
benden.
• bei Einbau des Kindersitzes auf dem Beifahrersitz,
dieser in der hintersten Position steht.
• im Fahrzeug alle beweglichen Gegenstände gesichert sind.
• alle Personen im Fahrzeug angeschnallt sind.
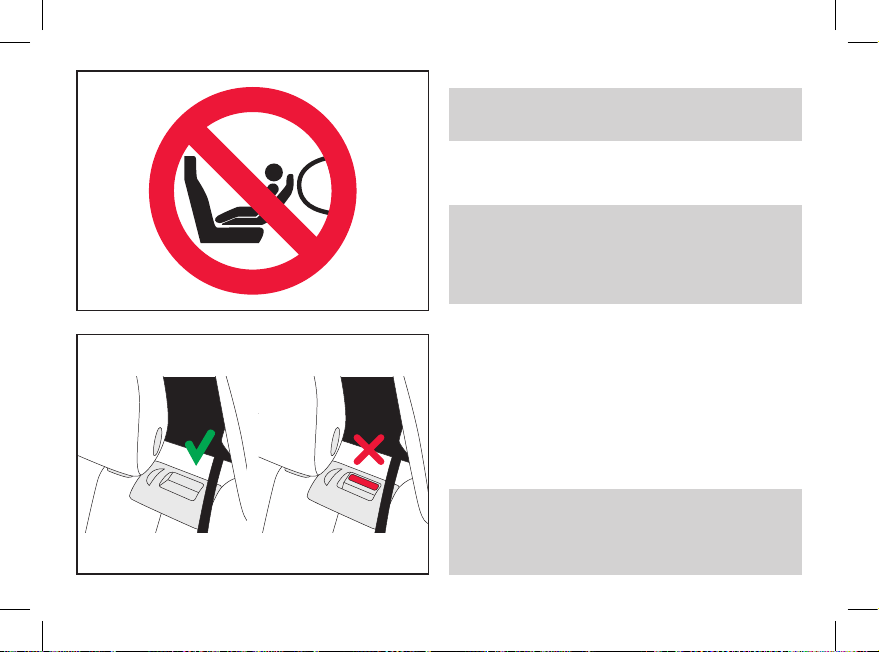
WARNUNG! NIE ein Baby im Auto auf dem Schoß
!
halten. Durch die enormen Kräfte, die bei einem
Unfall frei werden, können Sie das Baby unmöglich
festhalten. Schnallen Sie sich und ein Kind niemals
zusammen mit einem Autogurt an.
14
DE
EN
IT
SAFETY IN THE VEHICLE SICUREZZA NELL’AUTO
WARNING! Never use the car seat on a vehicle
!
seat with an activated front airbag. This does not
apply to so-called side airbags.
Note! The large-volume front airbag expands explosively
and may cause your child serious injury or even death.
WARNING! The car seat and the base must always
!
be secured correctly in the vehicle even when not in
use. In case of an emergency brake or accident, an
unsecured car seat may injure other passengers or
yourself.
In order to guarantee the best possible safety for all
passengers make sure that...
• foldable backrests in the vehicle are locked in their
upright position.
• when installing the car seat on the front passenger seat,
adjust the vehcile seat in rearmost position.
• you properly secure all objects likely to cause injury in
the case of an accident.
• all passengers in the vehicle are buckled up.
WARNING! NEVER hold a baby on your lap in a
!
vehicle. The forces released in a collision are way
too high for any person to hold on to the baby. Never
secure yourself and the child with only one vehicle
seat belt.
ATTENZIONE! Non utilizzare mai il seggiolino su
!
sedili anteriori dotati di airbag frontale attivato. Qest
avvertenza non riguarda i cosiddetti airbag laterali.
Nota Bene! Gli airbag anteriori sono di grandi dimensioni,
con apertura automatica esplosiva, e possono provocare
gravi ferite, anche letali, al bambino.
ATTENZIONE! Il seggiolino e la base devono essere
!
sempre fissati correttamente nell'auto anche quando
non in uso. In caso di brusche frenate o di incidente,
un seggiolino non fissato può ferire i passeggeri o il
guidatore.
Per garantire la massima sicurezza di tutti i passeggeri
nell'auto è indispensabile vericare che…
• gli schienali reclinabili siano ben ssati e nella posizione
eretta.
• nel caso il seggiolino sia installato sul sedile
passeggero anteriore, vericare che questo si trovi
nella posizione più arretrata.
• tutti gli oggetti che potrebbero costituire pericolo in caso
di incidente siano ssati in modo adeguato
• tutti i passeggeri abbiano le cinture allacciate.
ATTENZIONE! Non tenere mai il bambino in braccio
!
nell'auto in movimento. In caso di incidente le
forze d'urto sarebbero troppo elevate per riuscire a
trattenerlo da parte di chiunque. Non utilizzare mai
la stessa cintura di sicurezza per allacciare il vostro
corpo e quello del bambino.
15
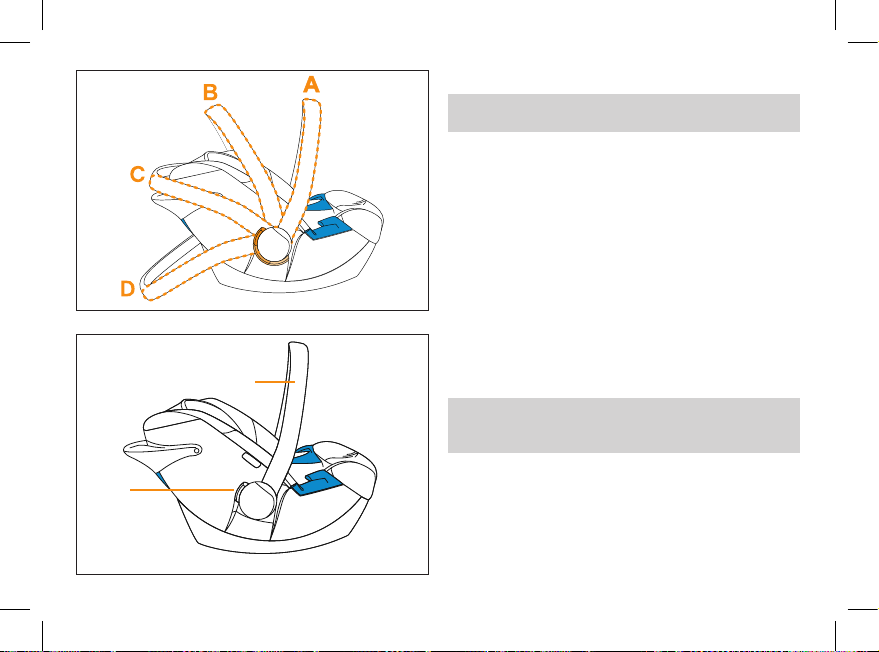
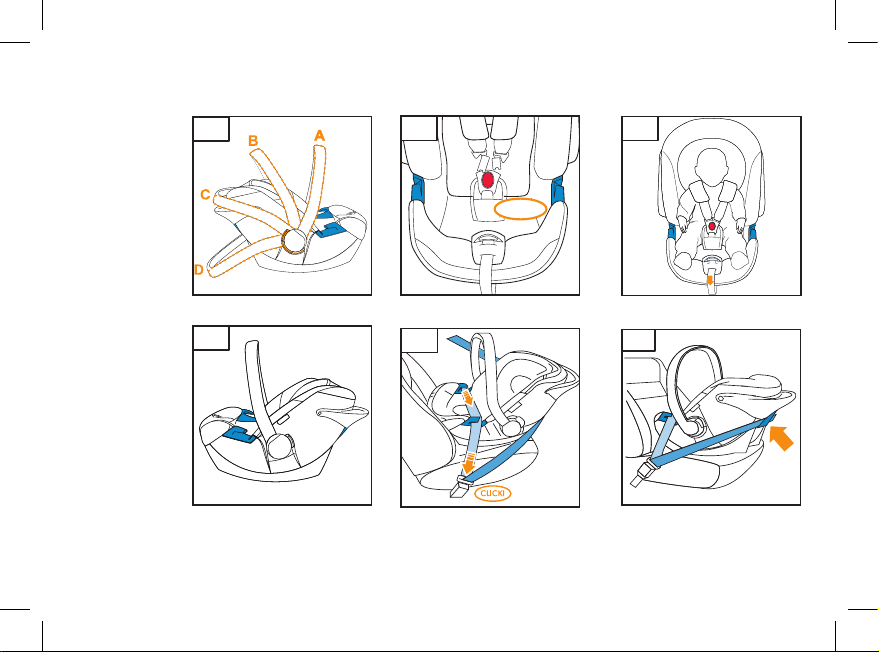
EINSTELLEN DES TRAGEBÜGELS
WARNUNG! Schnallen Sie Ihr Kind immer mit dem
!
integrierten Gurtsystem an.
Sie können den Tragebügel in 4 Positionen einrasten
lassen:
A: Fahrzeug- und Trageposition.
B+C: Zum Hineinlegen Ihres Babys.
D: Zum sicheren Stand auf einer ebenen Fläche
außerhalb des Fahrzeugs.
HINWEIS! Bei Verwendung der ATON CBX Base-x
in Kombination mit ATON CBX ändert sich die
Fahrzeugposition des Tragebügels von A auf B.
2
WARNUNG! Um zu verhindern, dass der Sitz
!
während des Tragens kippt, überprüfen Sie, ob der
Tragebügel in der Trageposition A eingerastet ist.
1
16
• Zur Verstellung des Tragebügels drücken Sie
gleichzeitig die beiden Tasten (1) links und rechts am
Tragebügel (2).
• Schwenken Sie nun mit gedrückten Tasten (1), den
Tragebügel (2) vor oder zurück, bis er selbsttätig in der
gewünschten Position einrastet.
DE
EN
IT
CARRYING HANDLE ADJUSTMENT
WARNING! Always secure the baby with the integ-
!
rated harness system.
REGOLAZIONE DEL MANICO PER IL TRASPORTO
ATTENZIONE! Allacciare sempre il bambino con il
!
sistema di cinture integrato.
The carrying handle can be adjusted into 4 dierent
positions:
A: Carrying/Driving-Position.
B+C: For placing the baby in the seat.
D: Safe sitting position outside the car.
NOTE! When using ATON CBX in combination with ATON
CBX Base-x the driving-position of the handle changes
from A to B.
WARNING! In order to avoid unwanted tilting of the
!
seat whilst carrying, make sure that the handle is
locked in the carrying position A.
• In order to adjust the handle press buttons (1) on left
and right side on the handle (2).
• Adjust the carrying handle (2) to the desired position by
pressing the buttons (1).
Il manico per il trasporto può essere regolato in 4 diverse
posizioni:
A: Posizione di trasporto/di viaggio
B+C: Posizione per l‘inserimento del bambino nel
seggiolino
D: Posizione di seduta in sicurezza al di fuori dell’auto.
NOTA BENE! Quando ATON CBX viene utilizzato in
combinazione con la BASE, ATON CBX Base-x, la
posizione della maniglia deve passare da
A a B.
ATTENZIONE! Per evitare il rischio di capovolgi-
!
mento durante il trasporto, assicuratevi sempre
che il manico sia fissato nella posizione di trasporto A.
• Per regolare la posizione del manico premere i
pulsanti (1) su ambo i lati del manico (2).
• Regolare il manico per il trasporto (2) nella posizione
desiderata premendo i pulsanti (1).
17
ANPASSEN DER SCHULTERGURTE
Hinweis! Nur richtig angepasste Schultergurte (3) geben
Ihrem Baby in der Babyschale optimalen Halt.
6
3
5
4
7
18
• Ab ca. 3 Monaten sollte die herausnehmbare Einlage in
der Schale entfernt werden, um ausreichend Platz für
Ihr Kind zu schaen (lesen Sie dazu Seite 30).
• Die Schultergurte (3) müssen so durch die Gurtschlitze
(4) der Babyschale verlaufen, dass sie auf Schulterhöhe
des Babys eingestellt sind.
Um die Höhe der Schultergurte (3) anzupassen, gehen Sie
bitte folgendermaßen vor:
• Önen Sie das Gurtschloss (5) durch kräftiges Drücken
auf den roten Knopf.
• Ziehen Sie die Gurtpolster (6) über die Schlosszungen
(7) ab.
• Ziehen Sie erst eine Schlosszunge (7) durch den Bezug
und den Gurtschlitz (4) hinaus. Stecken Sie diese in der
nächst passenden Höhe sofort wieder hinein, danach
wiederholen Sie diesen Vorgang für die andere Seite.
Hinweis! Achten Sie unbedingt darauf, dass die
Schultergurte (3) beim Einziehen nicht verdreht sind
und glatt an der Schale entlang bis zum Gurtschloss (5)
verlaufen.

DE
EN
IT
ADJUSTING THE SHOULDER BELTS
Note! Only if the shoulder belts (3) are adjusted correctly
optimum security can be provided.
• When the baby is approximately 3 months the seat
insert can be removed to provide enough space for the
child (see page 31).
• The height of the shoulder belts (3) must be adjusted
in such a way that they run through the belt slots (4)
directly above the baby‘s shoulders.
To adjust the height of the shoulder belts (3) please follow
the next steps:
• Press the red button to open the buckle (5).
• Pull the shoulder pads (6) over the belt tongues (7) to
remove them.
• First pull one buckle tongue (7) through the cover and
out of the belt slot (4). Now insert it again through the
next higher slot. Repeat this step to the adjust the other
side as well.
REGOLAZIONE DELLE CINGHIE PER LE SPALLE
Nota Bene! La sicurezza ottimale si ottiene soltanto se le
cinghie per le spalle (3) sono regolate in modo corretto.
• Al raggiungimento dei tre mesi circa del bambino, il
riduttore potrà essere rimosso per garantire più spazio
(vedi pagg. 31)
• L’altezza delle cinghie per le spalle (3) dovrà essere
regolata in modo che esse scorrano attraverso le
fessure (4) direttamente al di sopra delle spalle del
bambino.
Per regolare l’altezza delle cinghie per le spalle (3) seguite
il procedimento di seguito descritto:
• Premere il pulsante rosso per aprire la bbia (5).
• Slare i cuscinetti copricinghie (6) facendoli scorrere
sugli agganci (7).
• Slare l’aggancio (7) attraverso il rivestimento e quindi
attraverso la fessura (4). Reinserirlo quindi attraverso la
fessura superiore. Ripetere l’operazione da ambo i lati.
Note! Please make sure that the shoulder belts (3) are not
twisted but should lie at against the main seat, run evenly
through the belt slots (4) and down to the buckle (5).
Nota Bene! Vericare che le cinghie per le spalle (3) siano
perfettamente piatte contro il sedile e non
attorcigliate, che scorrano uniformemente attraverso le
apposite fessure (4) no alla bbia (5).
19
SICHERHEIT FÜR IHR BABY
Hinweis! Schnallen Sie Ihr Baby in der Babyschale
immer an und lassen Sie Ihr Baby niemals aus den
Augen, wenn Sie es auf erhöhten Flächen abstellen. (z.B.
Wickelkommode, Tisch, Bank, Sessel...)
WARNUNG! Die Kunststoffteile der Babyschale
!
heizen sich in der Sonne auf. Ihr Baby kann sich
daran verbrennen. Schützen Sie Ihr Baby und die
Babyschale vor intensiver Sonneneinstrahlung (z.B.
indem Sie ein helles Tuch über die Schale legen).
• Nehmen Sie Ihr Baby so oft wie möglich aus der
Babyschale und entlasten Sie seine Wirbelsäule.
• Unterbrechen Sie dazu längere Autofahrten. Denken
Sie auch außerhalb des Autos daran, Ihr Baby nicht zu
lange in der Babyschale zu lassen.
Hinweis! Bitte lassen Sie Ihr Kind nie unbeaufsichtigt im
Fahrzeug zurück.
20
DE
EN
IT
SAFETY FOR YOUR BABY
Note! Always secure the baby in the child seat and never
leave your child unattended when putting the ATON CBX
on elevated surfaces (e.g. diaper changing table, table,
bench ...).
WARNING! Plastic parts of ATON CBX heat up
!
in the sun. Your baby may get burnt. Protect your
baby and the car seat from intense exposure to the
sun (e.g. putting a white blanket over the seat).
• Take your baby out of the car seat as often as possible
in order to relax its spine.
• Interrupt longer journeys. Remember this as well, when
using the ATON CBX outside the car.
Note! Never leave your child in the car unattended.
SICUREZZA DEL BAMBINO
Nota Bene! Allacciare sempre il bambino quando
all’interno del seggiolino e non lasciarlo mai per alcun
motivo incustodito quando l’ATON CBX è posto su
superci rialzate (es. tavolo per il cambio, panchina, ecc)
ATTENZIONE! Le parti in plastica del seggiolino
!
tendono a riscaldarsi se esposte al sole. Per evitare il rischio di scottature al bambino, proteggerlo e
proteggere il seggiolino da un’eccessiva esposizione al sole (per esempio stendendo un telo bianco
sul seggiolino).
• Cercate di interrompere sedute troppo prolungate del
bambino nel seggiolino, sollevandolo quando possibile
per permettergli di rilassare la colonna
vertebrale.
• Prevedere quindi soste durante il viaggi più lunghi. Ma
anche durante i tragitti non in automobile.when using
the ATON CBX outside the car.
Nota Bene! Non lasciare MAI il bambino incustodito
nell’autovettura.
21
6
3
7
5
8
3
5
CLICK
ANSCHNALLEN DES BABYS
Hinweis! Sorgen Sie dafür, dass die Schale frei von
Spielsachen und harten Objekten ist.
• Gurtschloss (5) önen.
• Lockern Sie die Schultergurte (3), indem Sie auf die
Verstelltaste am Zentralversteller (8) drücken und
gleichzeitig beide Schultergurte (3) nach oben ziehen.
Bitte ziehen Sie immer an den Schlosszungen (7) und
nicht an den Gurtpolstern (6).
• Legen Sie Ihr Baby in die Babyschale.
• Führen Sie die Schultergurte (3) gerade über die
Schultern Ihres Babys.
Hinweis! Achten Sie darauf, dass die Schultergurte (3)
nicht verdreht oder vertauscht sind.
• Führen Sie die beiden Schlosszungen (7) zusammen.
Rasten Sie sie im Gurtschloss (5) mit einem hörbaren
CLICK ein! Ziehen Sie am Zentralverstellergurt (9) und
straen Sie damit die Schultergurte (3) bis sie eng am
Körper Ihres Babys anliegen.
• Zum Önen des Gurtschlosses (5) drücken Sie auf die
rote Taste.
Hinweis! Lassen Sie maximal eine Fingerdicke Spielraum
zwischen dem Gurt und dem Kind.
9
22

DE
EN
IT
SECURING THE BABY
Note! Please remove all toys and other hard objects from
the car seat.
• Open the buckle (5).
• To loosen pull up the shoulder belts (3) while pushing
the central adjuster button (8) and pulling the shoulder
belts (3) up. Please always pull the belt tongues (7) and
not the belt pads (6).
• Place your baby into the seat.
• Put the shoulder belts (3) straight over the baby‘s
shoulders.
ALLACCIARE IL BAMBINO
Nota Bene! Rimuovere dal sedile eventuali giocattoli e
qualsiasi oggetto rigido.
• Aprire la bbia (5).
• Per allentare le cinture (3), tirarle mantenendo premuto
il pulsante di regolazione centrale (8). Tirare sempre gli
agganci (7) e non i cuscinetti (6).
• Adagiare il bambino nel seggiolino.
• Posizionare le cinghie (3) sulle sue spalle.
Note! Make sure that the shoulder belts (3) are not
twisted.
• Join the buckle tongue sections (7) together and
insert them into the buckle (5) with an audible CLICK.
Pull the central adjuster belt (9) until the shoulder belts
t the baby‘s body snugly.
• Push the red button to open the buckle (5).
Note! Leave a maximum space of one nger between the
baby and the shoulder belts.
Nota Bene! Controllare bene che le cinghie (3) non
siano mai attorcigliate!
• Avvicinare i due agganci (7) ed inserirli nella bbia (5)
no a sentire il CLICK! Tirare la cinghia di regolazione
centrale (9) no a quando le cinghie per le spalle sono
bene aderenti al corpo del bambino.
• Premere il pulsante rosso per aprire la bbia (5).
Nota Bene! Tra le spalle del bambino e le cinghie lo
spazio massimo è quello di un dito.
23
2
11
12
2
10
13
14
11
24
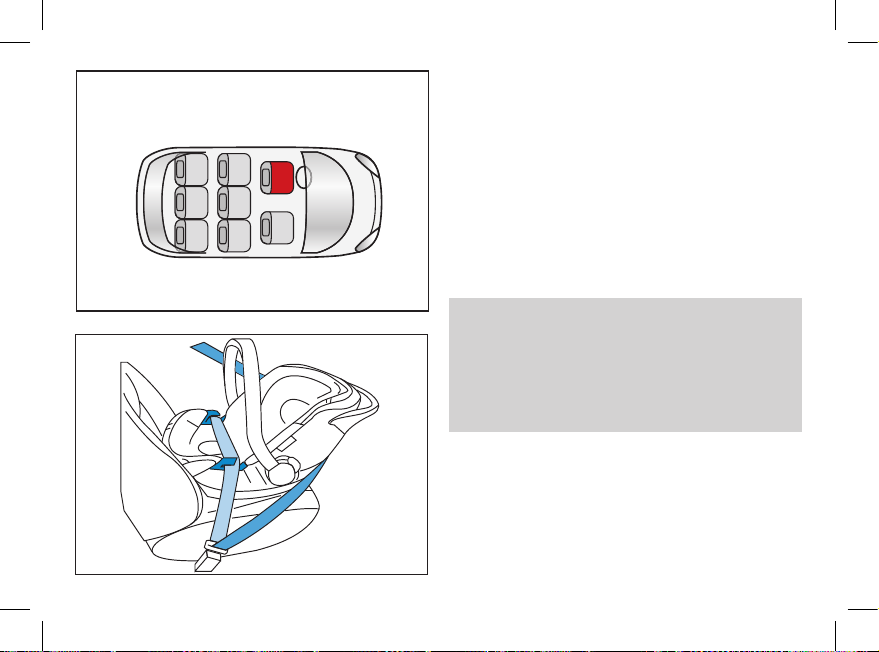
DER EINBAU INS FAHRZEUG
• Stellen Sie die Babyschale entgegen der Fahrtrichtung
auf den Fahrzeugsitz.
• Vergewissern Sie sich, dass der Tragebügel (2) in der
Fahrzeugposition A eingerastet ist (siehe Seite 16).
• Stellen Sie sicher, dass die Einbaumarkierung des
sich seitlich am Sitz bendlichen Warnaufklebers (10)
parallel zum Fahrzeugboden ausgerichtet ist.
• Ziehen Sie den Fahrzeuggurt heraus und führen Sie ihn
über die Babyschale.
• Legen Sie den Beckengurt (12) in die blauen
15
Gurtführungen (13) an beiden Seiten der Babyschale ein.
• Rasten Sie die Schlosszunge im Fahrzeuggurtschloss
(11) ein.
• Straen Sie den Beckengurt (12), indem Sie am
Diagonalgurt (14) in Fahrtrichtung ziehen.
• Ziehen Sie den Diagonalgurt (14) hinter das Kopfende
der Babyschale.
Hinweis! Fahrzeuggurt dabei nicht verdrehen.
• Führen Sie den Diagonalgurt (14) durch die hintere
blaue Gurtführung (15).
• Straen Sie den Diagonalgurt (14).
WARNUNG! Der Sitz ist nicht für die Verwendung
!
mit einem 2-Punkt- oder Beckengurt geeignet. Bei
Sicherung mit einem 2-Punkt-Gurt kann es bei
einem Unfall zu schweren oder tödlichen Verletzungen des Kindes kommen.

DE
EN
IT
INSTALLING THE SEAT INSTALLAZIONE DEL SEGGIOLINO
• Place the infant car seat facing the rear of the vehicle
on the vehicle seat.
• Ensure, that the carrying handle (2) is locked in car
postion A (see page 17.)
• Ensure that the installation mark on warning sticker (10),
located on the side of the infant car seat, is aligned with
the oor of the vehicle.
• Pull out the vehicle seat belt and route it over the infant
car seat.
• Place the lap belt (12) into blue belt routings (13) on
both sides of the infant car seat.
• Lock the buckle tongue in place in vehicle seat belt (11).
• Tighten lap belt (12) by pulling on diagonal belt (14) in
the direction of the front of the vehicle.
• Pull diagonal belt (14) behind the head end of the infant
car seat.
Note! Do not twist the vehicle seat belt while doing this.
• Bring the diagonal belt (14) into the blue belt slot (15)
on the back.
• Tighten the diagonal belt (14).
WARNING! The seat must not be used with a two-
!
point belt or a lap belt. When securing your child
with a two-point belt, this may result in injuries or
death of the child.
• Appoggiare il seggiolino sul sedile dell'auto, rivolto in
direzione opposta a quella di marcia.
• Vericare che il maniglione di trasporto (2) sia bloccato
nella posizione "in auto" A (Vedi pag. 17).
• Vericare che la marcatura orizzontale sull'adesivo di
sicurezza (10), posto sul anco del seggiolino, risulti
parallela al pavimento della vettura.
• Estrarre la cintura a tre punti e passarla attorno al
seggiolino.
• Inserire la parte di cintura ventrale (12) nelle guide blu
(13) su ambo i lati del seggiolino.
• Inserire la linguetta della cintura nella bbia (11).
• Stringere al massimo la cintura ventrale (12) tirando la
parte diagonale (14) verso la parte anteriore del veicolo.
• Tirare la cintura diagonale (14) e farla passare dietro al
lato testa del seggiolino.
Nota Bene! Fare attenzione a non attorcigliare mai la cintura.
• Posizionare la cintura diagonale (14) nell’apposita
fessura (15) di colore blu sul retro.
• Stringere la cintura diagonale (14).
ATTENZIONE! Il seggiolino NON può essere uti-
!
lizzato su sedili con cinture a due punti o soltanto
quella ventrale. Fissando il bambino con cinture a
due punti soltanto lo si espone a grave rischio di
ferite o di morte in caso di incidente.
25

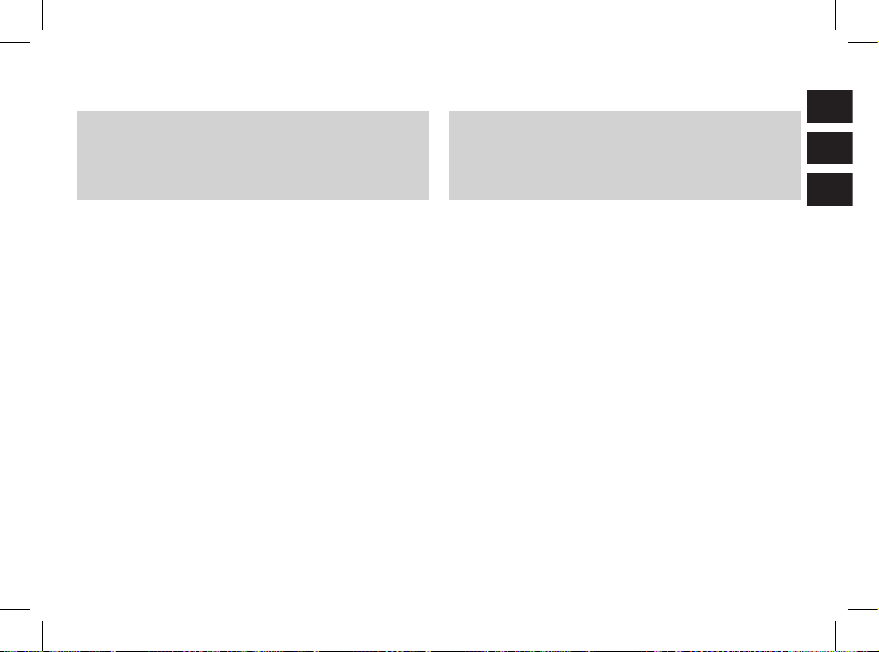
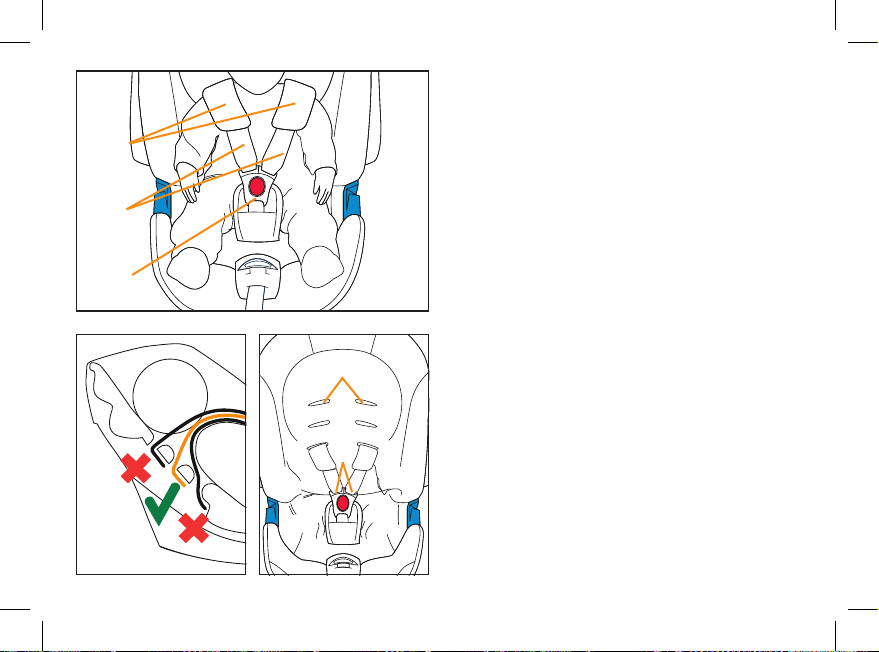
SO IST IHR BABY RICHTIG GESICHERT
Prüfen Sie zur Sicherheit Ihres Babys, dass …
• die Schultergurte (3) der Babyschale körpernah anliegen, ohne das Baby einzuengen
3
• die Position der Kopfstütze richtig eingestellt ist
• die Schultergurte (3) nicht verdreht sind
• die Schlosszungen (7) im Gurtschloss (5) eingerastet
sind
7
5
26
SO IST DIE BABYSCHALE RICHTIG EINGEBAUT
Prüfen Sie zur Sicherheit Ihres Babys, dass …
• die Babyschale entgegen der Fahrtrichtung befestigt
ist (die Füße des Kindes zeigen in Richtung
Fahrzeugsitzlehne)
• die Babyschale nur dann auf dem Beifahrersitz
befestigt ist, wenn kein Front-Airbag auf die Babyschale
einwirken kann
• der ATON CBX mit einem 3-Punkt-Gurt befestigt ist
Hinweis! Die Babyschale darf ausschließlich auf einem
nach vorne gerichteten Sitz benutzt werden, der mit einem
Dreipunkt-Sicherheitsgurt ausgestattet ist, welcher nach
ECE R16 zugelassen ist.

DE
EN
IT
SECURING YOUR CHILD CORRECTLY
For the safety of your child please check …
• if the shoulder belts (3) t well to the body without
restricting the baby
• that the headrest is adjusted to the correct height
• if the shoulder belts (3) are not twisted
• if the buckle tongues (7) are fastened in the buckle (5)
FISSARE CORRETTAMENTE IL BAMBINO
Per la massima sicurezza del bambino raccomandiamo di
vericare…
• che le cinture di sicurezza per le spalle (3) siano ben
aderenti al suo corpo, senza stringerlo eccessivamente
• che il poggiatesta sia sempre regolato all’altezza giusta
• che le cinghie non siano in alcun modo attorcigliate
• che gli agganci delle cinture (7) siano ben ssati
all’interno della bbia (5)
SECURING YOUR CHILD CORRECTLY
For the safety of your child please make sure ...
• that the ATON CBX is positioned against driving
INSTALLARE CORRETTAMENTE IL SEGGIOLINO
Per la sicurezza del bambino è necessario vericare…
• che il seggiolino ATON CBX sia sempre posizionato
direction (the feet of the baby point in the direction of
the backrest of the car seat)
• if the car seat is installed in front, that the front airbag is
• che, nel caso il seggiolino ATON CBX sia collocato sul
deactivated
• that ATON CBX is secured with a 3-point belt
Note! The ATON CBX is exclusively made for forward
facing car seats, which are equipped with a 3-point belt
system according to ECE R16.
• che il seggiolino ATON CBX sia ssato con cinture di
Nota Bene! ATON CBX è adatto esclusivamente a sedili
rivolti in direzione del senso di marcia, equipaggiati con
sistemi di cinture di sicurezza a tre punti secondo le norme
ECE R16.
in direzione contraria al senso di marcia (I piedi del
bambino devono trovarsi verso lo schienale del sedile)
sedile anteriore, l’airbag frontale sia disattivato
sicurezza a tre punti
27
• der Beckengurt (12) durch die beiden blauen Gurt-
12
13
11
28
führungen (13) am Rand der Babyschale verläuft
• der Diagonalgurt (14) durch die blaue Gurtführung (15)
an der Rückenlehne der Babyschale verläuft
• das Auto-Gurtschloss (11) nicht in die blaue Gurtführung (13) reicht
• der Autogurt stra und nicht verdreht ist
• die Babyschale waagrecht im Fahrzeug steht
(Markierung)
WARNUNG! Es kann vorkommen, dass das
!
Fahrzeuggurtschloss des Autogurtes zu lang ist,
sodass dieser bis an die blauen Gurtführungen der
Schale heranreicht. Dadurch kann die Babyschale
nicht straff befestigt werden. Wählen Sie in diesem
Fall im Auto einen anderen Sitzplatz für die
Babyschale. Im Zweifelsfall wenden Sie sich an
den Hersteller der Babyschale.
AUSBAU AUS DEM FAHRZEUG
• Nehmen Sie den Gurt aus der hinteren blauen
Gurtführung (15).
• Önen Sie das Auto-Gurtschloss (11) und nehmen Sie
den Beckengurt (12) aus den blauen Gurtführungen
(13).
DE
EN
IT
• that the lap belt (12) is running through the belt slots
(13) on each side of the baby seat
• that the diagonal belt (14) is running through the blue
belt hook (15) on the back of the baby seat
• that the car buckle (11) is not reaching all the way to the
blue belt slot (13)
• that the car belt is tight and not twisted
• that the ATON CBX is vertically installed on the car seat
(see marking)
WARNING! It may be that buckle part of the
!
vehicle seat belt is too long so that it reaches
the blue belt routing of the infant car seat. This
means that the infant car seat cannot be fastened
tightly. If this is the case, choose another seat in
the vehicle for the infant car seat. In case of doubt
contact the manufacturer of the infant car seat.
• che la parte di cintura ventrale (12) scorra
correttamente attraverso le apposite guide (13) su ambo
i lati del seggiolino
• che la parte di cintura diagonale (14) scorra attraverso
il gancio di ssaggio (15) di colore blu sul retro del
seggiolino
• che il punto di ssaggio della cintura dell’auto (11) non
raggiunga l’altezza delle guide (13) del seggiolino
• che la cintura dell’auto sia ben tesa e non attorcigliata
• che l’ATON CBX sia installato in posizione verticale sul
sedile dell’auto (vedi contrassegno)
ATTENZIONE! Talvolta il punto di fissaggio della
!
cintura ha un aggancio troppo lungo, tanto da
arrivare all‘altezza delle guide blu per il passaggio
della cintura. In questi casi il seggiolino non
può essere fissato saldamente. In questo caso
raccomandiamo di scegliere un‘altra posizione per
l‘installazione del seggiolino. Nel dubbio, rivolgersi
alla casa costruttrice del veicolo.
REMOVING THE CAR SEAT
• Take the seat belt out of the blue belt slot (15) in the
back.
• Open the car buckle (11) and take the lap belt (12) out
of the blue belt slots (13).
TOGLIERE IL SEGGIOLINO
• Togliere la cintura dalla fessura (15) di colore blu sul
retro.
• Slacciare la cintura dalla bbia (11) e slare la cintura
(12) dagli alloggiamenti (13) di colore blu.
29

ENTFERNEN DER HERAUSNEHMBAREN EINLAGE
Die bereits bei Auslieferung in der Schale integrierte
Einlage gibt Ihrem noch kleinen Baby die notwendige
Unterstützung und bringt mehr Liegekomfort und Halt für
Neugeborene. Zur Entfernung lösen Sie den Bezug im
unteren Bereich, danach heben Sie die herausnehmbare
>3m.
30
Einlage leicht an und nehmen sie aus der Schale.
Ab ca. 3 Monaten sollte der Einleger in der Schale entfernt
werden, um ausreichend Platz für Ihr Kind zu schaen.
Der Sitzverkleinerer (17) (siehe S. 32 oben) erhöht den
Liegecomfort für Kinder bis ca. 9 Monate. Danach kann
dieser entfernt werden, um zusätzlichen Platz für Ihr Kind
zu schaen.
ÖFFNEN DES ATON CBX SONNENVERDECKES
Ziehen Sie das Sonnenverdeck über den Tragebügel.
Befestigen Sie das Verdeck mittels Klettbandes beidseitig
am Bügel. Zum Entfernen des Sonnenverdeckes lösen Sie
das Klettband und ziehen das Verdeck über das Kopfende
der Babyschale.

DE
EN
IT
REMOVING THE INSERT
The insert, which is preinstalled when purchased, helps
to support lying comfort and t for the smallest babies. In
order to remove the insert please loosen the cover in the
baby seat, lift the insert a little bit and take it out of the
seat.
TOGLIERE IL RIDUTTORE
Il riduttore, preinstallato all’acquisto, fornisce maggiore
supporto e comfort ai bambini più piccoli. Per toglierlo
basta allentare il rivestimento del seggiolino e sollevare
delicatamente il riduttore.
The insert may be removed after approx. 3 months to
provide more space.
The adjustable insert (17) (see page 33) enhances
the comfort of the child up to approx. 9 months. Later the
insert can be removed to give the child additional space.
OPENING THE ATON CBX CANOPY
Pull the canopy cover over the carrying handle adjustment.
Ax the cover on both sides of the handle adjustment via
velcro. To fold away the canopy cover release the velcro
and pull it over the top end of the baby seat.
Il riduttore potrà essere rimosso quando il bambino ha
circa 3 mesi per concedergli maggiore spazio.
L‘inserto regolabile (17) (immagine in alto a sx a pag.
33) rende più confortevole la seduta dei bambini no ai
9 mesi circa. In seguito l‘inserto potrà essere rimosso per
aumentare lo spazio al bambino più grande.
APERTURA DELLA CAPOTTINA DI ATON CBX
Stendere il tessuto della capottina sopra il manico di
trasporto e ssare da ambo i lati con l‘apposito velcro.
Per rimuovere la copertura, staccare il velcro e sistemare il
tessuto sul retro del sedile.
31

ENTFERNEN DES BEZUGES
ENTFERNEN DES BEZUGES
Der Bezug besteht aus 5 Teilen: 1 Schalenbezug, 1
Sitzverkleinerer, 2 Gurtpolster und 1 Gurtschlosspolster.
Zum Entfernen gehen Sie bitte wie folgt vor:
• Önen Sie das Gurtschloss (5).
• Önen Sie die beiden Schulterpolster (6) und nehmen
Sie diese vom Gurt (3) ab.
• Ziehen Sie den Hauptbezugteil über den Schalenrand
ab.
• Fädeln Sie die Schultergurte (3) mit den Schloss-
17
32
zungen (7) aus dem Bezug aus.
• Ziehen Sie das Gurtschloss (5) aus dem Bezug.
• Nun können Sie den Bezug abnehmen.
Warnung! Der Kindersitz darf keinesfalls ohne
!
Bezug verwendet werden.
Hinweis! Es dürfen nur ATON CBX Originalbezüge
verwendet werden!
ANBRINGEN DES BEZUGES
Führen Sie die zuvor beschriebenen Handgrie in
umgekehrter Reihenfolge aus, um den Bezug wieder
zu befestigen.
Hinweis! Die Schultergurte dabei nicht verdrehen oder
vertauschen.

DE
EN
IT
REMOVING THE COVER
The cover consists of 5 parts. 1 seat cover, 1 adjustable
insert, 2 shoulder pads and 1 buckle pad. To remove the
cover please follow these steps:
• Open the buckle (5).
• Remove the shoulder pads (6) from shoulder belts (3).
• Pull the cover over the seat rim.
• Pull the shoulder belts (3) with the buckle tongues (7)
out of the cover parts.
• Pull the buckle (5) through the seat cover.
• Now you can remove the cover parts.
WARNING! The child seat must never be used
!
without the cover.
Hinweis! Use original ATON CBX covers only!
RIMOZIONE DEL RIVESTIMENTOREMOVING THE COVER
RIMOZIONE DEL RIVESTIMENTO
Il rivestimento è costituito da cinque parti: 1 rivestimento
seduta, 1 inserto riduttore, 2 cuscinetti per le cinghie, 1
cuscinetto per bbia centrale. Per togliere il rivestimento
seguire il procedimento di seguito descritto:
• Aprire la bbia (5).
• Togliere i cuscinetti (6) dalle cinghie per le spalle (3).
• Tirare il rivestimento sopra al bordo del seggiolino.
• Slare le cinghie (3) e gli agganci (7) dal rivestimento.
• Slare la bbia (5) dal rivestimento seduta.
• Ora è possibile rimuovere le varie parti del
rivestimento.
ATTENZIONE! Il seggiolino di sicurezza non deve
!
essere MAI utilizzato senza l’apposito rivestimento.
Nota Bene! Utilizzare solo ed esclusivamente
rivestimenti ATON CBX originali!
ATTACHING THE SEAT COVERS
In order to put the covers back onto the seat, proceed in
the reverse order as shown above.
Note! Do not twist the shoulder straps.
FISSARE IL RIVESTIMENTO
Per riposizionare il rivestimento sul seggiolino ripetere le
operazioni sopra descritte nell’ordine inverso.
Nota Bene! Fare molta attenzione a non attorcigliare mai
le cinghie per le spalle.
33

REINIGUNG
Es ist darauf zu achten, dass nur ein Original ATON
CBX Sitzbezug verwendet wird, da auch der Bezug ein
wesentlicher Bestandteil der Funktion ist. Ersatzbezüge
erhalten Sie im Fachhandel.
Hinweis! Bitte den Bezug vor der ersten Verwendung
waschen.Vor Gebrauch waschen. Der Bezug darf bei
30°C im Schonwaschgang gewaschen werden. Sollten
Sie mit mehr als 30°C waschen, kann es zu Ausfärbungen
kommen. Bitte den Bezug gesondert von anderer Wäsche
waschen und keinesfalls maschinell trocknen! Den
Bezug keinesfalls in der prallen Sonne trocknen! Die
Kunststoteile können mit einem milden Reinigungsmittel
und warmem Wasser gewaschen werden.
WARNUNG! Bitte auf keinen Fall chemische Reini-
!
gungs- oder Bleichmittel verwenden!
WARNUNG! Das Gurtsystem kann nicht aus-
!
gebaut werden! Entfernen Sie niemals einzelne
Bestandteile des Gurtsystems!
Sie können die Gurte mit einer lauwarmen Seifenlösung
abwaschen.
34

DE
EN
IT
CLEANING
It is important to use only an original ATON CBX seat cover
since the cover is an essential part of the function. You
may obtain spare covers at your retailer.
Note! Please wash the cover before you use it the rst
time. Seat covers are machine washable at max. 30°C
on delicate cycle. If you wash it at higher temperature,
the cover fabric may lose colour. Please wash the cover
separately and never dry it mechanically! Do not dry the
cover in direct sunlight! You can clean the plastic parts with
a mild detergent and warm water.
PULIZIA
Il rivestimento è una parte importante per il
funzionamento del seggiolino ed è indispensabile
utilizzare soltanto rivestimenti originali ATON CBX.
Rivestimenti di ricambio originali sono disponibili presso i
rivenditori autorizzati.
Nota Bene! Consigliamo il lavaggio prima del primo
utilizzo. Rivestimenti lavabili in lavatrice, ciclo delicato
max 30°. L‘uso di temperature più elevate può scolorire
i tessuti. Lavare separatamente e non asciugare mai a
macchina. Non asciugare alla luce diretta del sole. Le parti
in plastica possono essere pulite con detergente neutro e
acqua tiepida.
WARNING! Please do not use chemical detergents
!
or bleaching agents under any circumstances!
WARNING! The integrated harness system cannot
!
be removed from the baby seat. Do not remove
parts of the harness system.
The integrated harness system can be cleaned with a mild
detergent and warm water.
Il sistema di imbragatura integrato può essere lavato con
un detergente neutro e acqua calda.
ATTENZIONE! Non usare MAI detergenti chimici o
!
agenti sbiancanti.
ATTENZIONE! Il sistema di imbragatura integrato
!
non può essere rimosso! Non rimuovere alcuna
parte del sistema di imbragatura dal seggiolino.
35

PFLEGE
Um die größtmögliche Schutzwirkung Ihrer Babyschale
zu gewährleisten, ist es unbedingt notwendig, dass Sie
Folgendes beachten:
• Alle wichtigen Teile der Babyschale sollten regelmäßig
auf Beschädigungen kontrolliert werden.
• Die mechanischen Bauteile müssen einwandfrei
funktionieren.
Es ist unbedingt darauf zu achten, dass die Babyschale
nicht zwischen harten Teilen wie Fahrzeugtür, Sitzschiene
usw. eingeklemmt wird, da sie dadurch beschädigt werden
kann.
• Die Babyschale muss z.B. nach einem Sturz unbedingt
vom Hersteller überprüft werden.
Hinweis! Es ist ratsam, bereits beim Kauf eines ATON
CBX einen zusätzlichen Bezug zu kaufen, sodass der
ATON CBX weiter benutzt werden kann, auch während
des Waschens und Trocknens des Bezuges.
VERHALTEN NACH EINEM UNFALL
Aufgrund eines Unfalles können am Kindersitz
Beschädigungen auftreten, die mit bloßem Auge nicht
erkennbar sind. Bitte tauschen Sie nach einem Unfall
unbedingt den Sitz aus. Im Zweifelsfall wenden Sie sich
bitte an den Händler oder Hersteller.
36

DE
EN
IT
PRODUCT CARE
In order to guarantee the best possible protection for your
child, please take note of the following:
• All important parts of the child seat should be examined
MANUTENZIONE
Per garantire la massima protezione del bambino è
necessario tenere presente quanto segue:
• Tutte le parti importanti del seggiolino devono essere
for damages on a regular basis.
• The mechanical parts must function awlessly.
• Le parti meccaniche devono funzionare correttamente.
sottoposte ad un controllo regolare per vericare
eventuali danni.
It is essential that the child seat does not get jammed
between hard parts like the door of the car, seat rail etc.
which might cause damage to the seat.
• The child seat must be examined by the manufacturer
after e.g. having been dropped or similar situations.
Note! When you buy a ATON CBX it is recommended to
buy a second seat cover. This allows you to clean and dry
one whilst using the other one in the seat.
IN CASE OF AN ACCIDENT
In an accident the seat can sustain damages which are
invisible to the eye. Therefore the seat should be replaced
immediately in such cases. If in doubt please contact your
retailer or the manufacturer.
E’ essenziale che il seggiolino non venga danneggiato
a causa di un eventuale schiacciamento tra il sedile
dell’auto e la porta o da altri ostacoli solidi.
• Il seggiolino dovrà essere inviato al produttore per un
controllo in caso di caduta o altri eventi similari.
Nota Bene! Consigliamo sempre l’acquisto di un secondo
rivestimento per ATON CBX. Questo consente di avere
sempre il seggiolino completo di rivestimento mentre uno
dei due viene lavato e pulito.
IN CASO DI INCIDENTE
In caso di incidente il seggiolino può essere soggetto
a danni non immediatamente visibili. A seguito di un
incidente il seggiolino dovrebbe essere immediatamente
sostituito. Per qualsiasi dubbio vi preghiamo di contattare il
rivenditore o il produttore.
37

REISESYSTEM
Befolgen Sie die Gebrauchsanleitung Ihres Kinderwagens!
Sie können die Babyschale auf jedem dafür zugelassenen
Kinderwagen befestigen.
16
38
Rasten Sie die Babyschale auf dem dafür zugelassenen
Adapter mit Blickrichtung des Kindes zum Elternteil ein.
Vergewissern Sie sich, dass die Babyschale auf beiden
Seiten hörbar einrastet. Kontrollieren Sie immer, ob die
Babyschale fest mit dem Kinderwagen verbunden ist. Zur
Entriegelung halten Sie die beiden Entriegelungstasten
(16) der Babyschale gedrückt und heben sie nach oben.

DE
EN
IT
TRAVEL SYSTEM SISTEMA DA VIAGGIO
Follow the instruction manual for your stroller!
You may attach the infant car seat on any approved
stroller.
Click the infant car seat onto the approved adapter with
the child looking towards the parent. Make sure the infant
car seat audibly locks in place on both sides. Always check
that the infant car seat is rmly connected to the stroller.
To unlock, press and hold both release buttons (16) on the
infant car seat and lift it.
Seguire le istruzioni contenute nel manuale del
passeggino!
Il seggiolino è installabile su tutti i passeggini approvati.
Si ssa agli appositi adattatori omologati, con il bambino
rivolto verso il genitore. Vericare che il seggiolino si
agganci saldamente da ambo i lati. Controllare sempre
che il seggiolino sia saldamente ssato al passeggino.
Per sganciarlo, premere e mantenere premuti i due
pulsanti di rilascio (16) sul seggiolino e sollevarlo.
39

PRODUKTLEBENSDAUER
Dieser Kindersitz ist so ausgelegt, dass er
bei gewöhnlicher Nutzung für die gesamte
Produktlebensdauer von ca. 7 Jahren seine Eigenschaften
erfüllt. Durch den langsamen Verschleiß des Kunststos,
beispielsweise durch Sonneneinstrahlung (UV), können
sich die Eigenschaften des Produkts geringfügig
verschlechtern.
Da in Fahrzeugen sehr große Temperaturschwankungen
herrschen und andere unvorhersehbare Belastungen
auftreten können, ist es notwendig, folgende Punkte zu
beachten:
• Wenn das Fahrzeug längere Zeit der prallen Sonne
ausgesetzt ist, muss der Kindersitz aus dem Fahrzeug
entfernt oder mit einem hellen Tuch abgedeckt werden.
• Prüfen Sie regelmäßig alle Kunststo- und Metallteile
des Kindersitzes auf Beschädigung oder Veränderung
von Form oder Farbe. Stellen Sie eine Veränderung fest,
ist der Kindersitz zu entsorgen oder muss vom Hersteller
geprüft und gegebenenfalls ausgetauscht werden.
• Veränderungen des Stoes, insbesondere
das Ausbleichen, sind normal und stellen keine
Beeinträchtigung dar.
40

DE
EN
IT
DURABILITY OF PRODUCT DUREVOLEZZA PRODOTTO
This car seat has been designed to be able to fulll its
intended functions by ordinary use for a product life
span of approx. 7 years. Gradual wear of the plastic, for
example caused by exposure to sunlight (UV), can cause
slight deterioration of the product’s properties. Since very
high temperature uctuations and other unforeseeable
stresses are common in vehicles, it is necessary to
observe the following points:
• If the vehicle is directly exposed to strong sunlight for
long periods, the child seat must be removed from the
vehicle or covered with a light cloth.
• Check all plastic and metal parts of the seat regularly
for damage or change of shape or colour. If you notice
any change in the child seat, the child car seat must
be disposed or checked and possibly replaced by the
manufacturer.
• Changes to the fabric, especially fading, are normal
when used in a vehicle and do not impair the seat‘s
function.
Questo seggiolino è stato progettato per garantire la
funzionalità per l’intera durata del periodo di utilizzo
raccomandato, per un periodo di circa 7 anni. Un graduale
deterioramento delle plastiche, dovuto per esempio
all’esposizione al sole (UV), può nel tempo dare origina
a leggere variazioni delle proprietà del prodotto. Poichè
all’interno della vettura le temperature sono soggette ad
elevate uttuazioni, è necessario osservare quanto segue:
• Nel caso l’automobile venga lasciata al sole per un
lungo periodo di tempo, consigliamo di estrarre il seggiolino
dall’abitacolo o di ripararlo con un telo di copertura di colore
chiaro.
• Controllare accuratamente e regolarmente tutte le
parti in plastica e metalliche del seggiolino per vericarne
eventuali danni o cambiamenti di forma o di colore. In caso
di evidenti modiche il seggiolino deve essere smaltito,
oppure controllato e nel caso sostituito dal produttore.
• Modiche al tessuto di rivestimento, in particolare
lo sbiadimento, sono considerate normali con l’utilizzo
all’iterno della vettura e non inuiscono sulla funzionalità
del prodotto.
41

ABFALLTRENNUNG
Aus Umweltschutzgründen bitten wir den Benutzer
zu Beginn (Verpackung) und am Ende (Produktteile)
der Lebensdauer der Babyschale, den anfallenden
Abfall zu trennen. Die Abfallentsorgung kann
kommunal unterschiedlich geregelt sein. Um eine
vorschriftsmäßige Entsorgung der Babyschale zu
gewährleisten, setzen Sie sich mit Ihrer kommunalen
Abfallentsorgung bzw. Verwaltung lhres Wohnortes
in Verbindung. Beachten Sie auf jeden Fall die
Entsorgungsbestimmungen lhres Landes.
WARNUNG! Bewahren Sie Verpackungsmaterial
!
aus Kunststoff außer Reichweite Ihres Kindes auf,
es besteht Erstickungsgefahr!
INFORMATIONEN ZUM PRODUKT
Bei Fragen wenden Sie sich zuerst an Ihren Händler.
Folgende Angaben sollten Ihnen vorliegen:
• Seriennummer (siehe Aufkleber).
• Marke und Typ des Autos und die Position des Sitzes,
auf dem die Babyschale benutzt wird.
• Gewicht (Alter, Größe) des Kindes.
Weitere Informationen zu unseren Produkten nden Sie
auch unter www.mycbx.com
42

DE
EN
IT
DISPOSAL
For environmental reasons we kindly ask our customers
to dispose of the beginning (packing) and at the end
(seat parts) of the lifetime of the child seat all incidental
waste properly. Waste disposal regulations may vary
regionally. In order to guarantee a proper disposal
of the child seat, please contact your communal
waste management or administration of your place of
residence. In any case, please take note of the waste
disposal regulations of your country.
SMALTIMENTO
Per ragioni di natura ambientale chiediamo a tutti i nostri
clienti di provvedere allo smaltimento appropriato di ogni
parte dall’inizio (imballo) alla ne (seggiolino ed ogni sua
parte). Le norme per lo smaltimento variano localmente.
Al ne di garantire lo smaltimento corretto preghiamo
di contattare l’ucio di competenza della vostra città di
residenza per delucidazioni in merito. In ogni caso, seguire
sempre le normative dello stato di residenza.
WARNING! Keep all packing materials away from
!
children. There is a risk of suffocation!
PRODUCT INFORMATION
If you have questions please contact your dealer rst.
Please collect the following information before:
• serial number (see sticker).
• brand name and type of car and the position where the
seat is mounted normally.
• weight (age, size) of child.
For further information about our products please visit
www.mycbx.com
ATTENZIONE! Tenere tutte le parti dell’imballo lon-
!
tane dalla portata dei bambini. Questo per evitare
qualsiasi rischio di soffocamento!
INFORMAZIONI TECNICHE
Per qualsiasi dubbio o informazione rivolgetevi subito al
distributore. Prima di contattare il distributore accertatevi di
avere questi dati:
• Numero di serie (vedi adesivo)
• Marca e modello dell’auto, posizione in cui il seggiolino
viene normalmente installato.
• Peso (età, statura) del bambino.
Per ulteriori informazioni sul prodotto vi invitiamo a
visitare il nostro sito: www.mycbx.com
43

GARANTIEBEDINGUNGEN
Die nachfolgenden Garantiebestimmungen gelten nur in dem
Land, in dem dieses Produkt erstmalig über den Einzelhandel
an einen Verbraucher verkauft wurde. Die Garantie deckt
sämtliche Herstellungs- und Materialfehler ab, die im Zeitpunkt
des Kaufs bestanden haben oder die innerhalb von drei (3)
Jahren nach dem Erstverkauf dieses Produkts über den
Einzelhandel an einen Verbraucher in Erscheinung getreten
sind (Herstellergarantie). Tritt während der Garantiezeit
ein Herstellungs- und Materialfehler auf, wird das Produkt
kostenlos repariert oder – nach unserem freien Ermessen –
gegen ein neues ausgetauscht. Um Leistungen im Rahmen
dieser Garantie in Anspruch nehmen zu können, muss das
Produkt an den Einzelhändler zurückgegeben werden, der
es erstmalig verkauft hat und ein Nachweis über den Kauf
(Kaufbeleg oder Rechnung) im Original vorgelegt werden,
welcher das Kaufdatum, den Namen des Händlers sowie
die Produktbezeichnung aufzeigt. Der Anspruch aus diesem
Garantieversprechen besteht nicht, wenn das Produkt an den
Hersteller oder irgendeine andere Person als den Einzelhändler,
der es erstmalig verkauft hat, zum Zweck der Inanspruchnahme
der Garantieleistung geschickt wird. Die Garantie gilt nur, wenn
das Produkt nach dem Kauf umgehend auf Vollständigkeit,
Herstellungs- und Materialfehler überprüft wurde. Wurde das
Produkt im Versandhandel gekauft, ist es umgehend nach
Erhalt auf Vollständigkeit, Herstellungs- und Materialfehler zu
überprüfen. Falls Schäden vorhanden sind, darf das Produkt
nicht mehr benutzt werden und muss umgehend an den
44

DE
EN
IT
WARRANTY
The following warranty applies solely in the country where
this product was initially sold by a retailer to a customer.
The warranty covers all manufacturing and material defects,
existing and appearing, at the date of purchase or appearing
within a term of three (3) years from the date of purchase
from the retailer who initially sold the product to a consumer
(manufacturer’s warranty). In the event that a manufacturing or
material defect should appear, we will – at our own discretion
– either repair the product free of charge or replace it with a
new product. To obtain such warranty it is required to take or
ship the product to the retailer, who initially sold this product to
a customer and to submit an original proof of purchase (sales
receipt or invoice) that contains the date of purchase, the
name of the retailer and the type designation of this product.
This warranty shall not apply in the event that this product is
taken or shipped to the manufacturer or any other person other
than the retailer who initially sold this product to a consumer.
Please check the product with respect to completeness and
manufacturing or material defects immediately at the date of
purchase or, in the event that the product was purchased in
distance selling, immediately after receipt. In case of a defect
stop using the product and take or ship it immediately to the
retailer who initially sold it. In a warranty case the product
has to be returned in a clean and complete condition. Prior
to contacting the retailer, please read this instruction manual
carefully. This warranty does not cover any damages caused
by misuse, environmental inuence (water, re, road accidents
GARANZIA
La seguente garanzia vale unicamente nella nazione in cui il
prodotto è stato originariamente venduto da un rivenditore al
consumatore. La garanzia copre eventuali difetti di fabbricazione
e di materiali riscontrati all‘acquisto o entro un periodo di tre (3)
anni dalla data di acquisto presso il rivenditore (garanzia del
produttore). Nel caso venga riscontrato o appaia un difetto di
fabbricazione o di materiali nel corso di validità della garanzia
provvederemo - a nostra discrezione - a riparare il prodotto
senza costi o a sostituirlo. Per avere diritto alla garanzia è
necessario riportare o spedire il prodotto al rivenditore presso
il quale è stato acquistato ed è indispensabile fornire la prova
d‘acquisto (scontrino scale, fattura, ecc.) in originale. La
prova d‘acquisto dovrà contenere indicati la data di acquisto,
il nome del rivenditore e le caratteristiche del prodotto (tipo/
modello). Nessun intervento in garanzia se il prodotto verrà
inviato al produttore o a qualsiasi altra persona diversa dal
rivenditore presso il quale si è eettuato l‘acquisto. La garanzia
è valida soltanto se il prodotto è stato sottoposto ad un
accurato controllo di completezza, funzionalità all‘acquisto e
eventuali manchevolezze di produzione o di materiali sono state
prontamente segnalate. Per acquisti a distanza, raccomandiamo
di eettuare un controllo completo al ricevimento del prodotto.
In caso si riscontri qualsiasi danneggiamento invitiamo a NON
utilizzare il prodotto e a restituirlo immediatamente al rivenditore
da cui è stato acquistato. I diritti di garanzia sono validi soltanto
se il prodotto è reso pulito e completo di ogni parte. Prima di
contattare il rivenditore Vi preghiamo di leggere con attenzione
45

Händler, der es erstmalig verkauft hat, zurückgegeben werden.
Im Garantiefall muss das Produkt in einem vollständigen und
sauberen Zustand zurückgegeben werden. Bitte lesen Sie
vor einer Kontaktaufnahme mit dem Händler sorgfältig die
Gebrauchsanleitung. Die Garantie deckt keine Schäden ab,
die durch Fehlgebrauch, äußere Einüsse (Wasser, Feuer,
Verkehrsunfälle o.ä.) oder normalen Verschleiß entstanden
sind. Die Garantie wird nur gewährt, wenn das Produkt in
Übereinstimmung mit der Gebrauchsanweisung behandelt und
benutzt wurde, Reparaturen oder Veränderungen ausschließlich
durch Personen vorgenommen wurden, die hierzu befugt waren
und stets nur Original Bau- und Zubehörteile verwendet wurden.
Durch diese Garantie werden weder die auf Grundlage der
jeweils anwendbaren Gesetze bestehenden Verbraucherrechte
noch Rechte gegen den Verkäufer wegen der Vertragswidrigkeit
des Produkts ausgeschlossen, begrenzt oder in anderer Weise
eingeschränkt.
46

DE
EN
IT
etc.) or normal wear and tear. It does solely apply in the event
that the use of the product was always in compliance with
the operating instructions, if any and all modications and
services were performed by authorized persons and if original
components and accessories were used. This warranty does
not exclude, limit or otherwise aect any statutory consumer
rights, including claims in tort and claims with respect to a
breach of contract, which the buyer may have against the seller
or the manufacturer of the product.
le istruzioni contenute nel manuale. La garanzia non copre
danni provocati da utilizzo improprio o eventi fortuiti e cause
ambientali (acqua, fuoco, incidenti stradali, ecc) o dal normale
deperimento d‘uso. La garanzia è valida soltanto per prodotti
usati in conformità a quanto stabilito nel manuale istruzioni,
se eventuali modiche o riparazioni sono state eettuate da
personale autorizzato e se sono state utilizzate solo parti ed
accessori originali. Questa garanzia non esclude, limita o
comunque pregiudica eventuali diritti legali dei consumatori,
comprese istanze in caso di torto e in caso di una violazione del
contratto, che l‘acquirente può avere nei confronti del rivenditore
o del produttore.
CYBEX GmbH
Riedingerstr. 18, 95448 Bayreuth, Germany
Tel.: +49 921 78 511-0, Fax.: +49 921 78 511- 999
47

48

FR
NL
PL
Cher client!
MERCI D’AVOIR ACHETÉ LE SIÈGE ATON CBX. NOUS POUVONS VOUS ASSURER QUE LA SÉCURITÉ, LE
CONFORT ET LA FACILITÉ D’UTILISATION ONT ÉTÉ NOS PRIORITÉS LORS DU DÉVELOPPEMENT DE L’ATON
CBX. CE PRODUIT EST FABRIQUÉ SELON UN CONTRÔLE QUALITÉ EXCEPTIONNEL ET RÉPOND AUX
EXIGENCES LES PLUS STRICTES EN MATIÈRE DE SÉCURITÉ.
Beste klant!
HARTELIJK DANK VOOR UW AANSCHAF VAN DE ATON CBX. WIJ VERZEKEREN U DAT VEILIGHEID,
COMFORT EN GEBRUIKSGEMAK BIJ DE ONTWIKKELING VAN HET AUTOSTOELTJE DE HOOGSTE
PRIORITEIT HEBBEN GEKREGEN. DIT PRODUCT IS AAN EEN UITZONDERLIJK STRENGE
KWALITEITSCONTROLE ONDERWORPEN EN VOLDOET AAN DE STRENGSTE VEILIGHEIDSEISEN.
Szanowny Kliencie!
DZIĘKUJEMY ZA ZAKUP FOTELIKA SAMOCHODOWEGO ATON CBX. PRAGNIEMY ZAPEWNIĆ, IŻ
BEZPIECZEŃSTWO, WYGODA I ŁATWA OBSŁUGA TO WARTOŚCI NADRZĘDNE, PRZYŚWIECAJĄCE NAM
PODCZAS PROJEKTOWANIA NASZYCH PRODUKTÓW. TEN PRODUKT POWSTAJE POD NADZWYCZAJNĄ
KONTROLĄ JAKOŚCI I SPEŁNIA NAJBARDZIEJ RYGORYSTYCZNE NORMY BEZPIECZEŃSTWA.
49

ATON CBX
SEMI-U NIVERSAL
____________
50
ATON CBX
ECE R 44/04
____________
UNIVER SAL
- 13 kg
04301297
CYBEX GmbH
Riedingerstr. 18, 95448 Bayreuth
Germany
Approved for
ATON CBX Base-fi x
HOMOLOGATION
Aton CBX – siège auto
ECE R44/04 group 0+
Poids: Jusque 13 kg
Age: jusque 18 mois environ
Ne convient que pour les
véhicules équipés d’une ceinture
automatique trois points norme
ECE R16 ou équivalent.
GOEDKEURING
Aton CBX – autostoeltje
ECE R44/04 leeftijdsgroep 0+
Gewicht: tot 13 kg
Leeftijd: tot ongeveer 18 maanden
Alleen geschikt voor
autostoelen met automatische
driepuntsgordels die zijn
goedgekeurd conform ECE R16 of
een vergelijkbare norm.
HOMOLOGACJA
Aton CBX – fotelik samochodowy
ECE R44/04
grupa wiekowa: 0+
waga dziecka: do 13 kg
Wiek dziecka: do ok. 18 miesięcy
Z fotelika samochodowego Aton
CBX można korzystać wyłącznie
w pojazdach wyposażonych w
trzypunktowe pasy bezpieczeństwa.
Zgodne z regulacją ECE nr R16 lub
równorzędną.
FR
ATTENTION! Pour une protection optimale de
!
votre enfant, il est essentiel d’installer et d’utiliser
ce siège auto conformément au manuel.
NOTE! Toujours garder ce mode d’emploi à portée de
main dans le compartiment prévu à cet eet situé sur le
siège auto.
NOTE! En raison des législations locales (ex. coloris de
l’étiquette sur le siège auto), l’apparence du produit peut
varier. Ceci n’aecte cependant pas le fonctionnement du
produit.
NOTE! La ceinture de sécurité trois points ne doit passer
que dans les guides dédiés. Les guides de ceinture sont
décrits en détail dans ce manuel et sont de couleur bleue
sur le siège auto.

FR
NL
PL
NL
BELANGRIJK! Voor de goede bescherming van
!
uw kind is het van belang dat u bij het gebruik van
het autostoeltje de instructies in deze handleiding
volgt.
LET OP! Bewaar deze handleiding zorgvuldig in het
daarvoor bestemde vakje van het autostoeltje.
LET OP! Vanwege nationale regelgeving (bijvoorbeeld
betreende kleurlabels op het autostoeltje) kunnen de
productkenmerken er anders uitzien. Dit is echter niet van
invloed op het correct functioneren van het product.
LET OP! De driepuntsgordel mag uitsluitend in de
daarvoor bedoelde geleiders worden geplaatst. De
gordelgeleiders worden uitgebreid beschreven in
deze handleiding en zijn in blauw aangegeven op
het autostoeltje.
PL
OSTRZEŻENIE! W celu zapewnienia dziecku
!
bezpieczeństwa należy używać fotelika w sposób
opisany w instrukcji obsługi.
UWAGA! Instrukcję przechowuj zawsze pod ręką, w
specjalnie przygotowanym w tym celu kieszonce/schowku
fotelika.
UWAGA! Ze względu na wymagania poszczególnych
krajów (np. oznakowanie kolorystyczne na foteliku) cechy
produktów mogą różnić się pod względem wyglądu
zewnętrznego. Nie wpływa to na poprawne funkcjonowanie
fotelika.
UWAGA! Trzypunktowy pas bezpieczeństwa należy
przeprowadzić wyłącznie przez wskazane do tego
prowadnice. Prowadnice pasa bezpieczeństwa
zostały szczegółowo opisane w niniejszej instrukcji
obsługi. Oznaczono je kolorem niebieskim.
51

CONTENU
INSTRUCTIONS RÉSUMÉES ..................................... 4
HOMOLOGATION.......................................................50
LA MEILLEURE POSITION DANS LA VOITURE .... 54
POUR LA PROTECTION DE VOTRE VOITURE .....54
AJUSTER LA POIGNÉE.............................................56
AJUSTER LES SANGLES DES ÉPAULES ..............58
SÉCURITÉ POUR VOTRE BÉBÉ ............................. 60
SÉCURISER L‘ENFANT .............................................62
SÉCURITÉ DANS LA VOITURE ...............................64
INSTALLER LE SIÈGE ............................................... 66
ÔTER LE SIÈGE AUTO.............................................. 68
SÉCURISER UN ENFANT CORRECTEMENT ........ 70
INSTALLER LE SIÈGE AUTO CORRECTEMENT ... 70
ÔTER LE RÉDUCTEUR ............................................. 72
OUVERTURE DU CANOPY DE L‘ATON CBX .........74
CYBEX TRAVEL-SYSTEM.........................................74
DÉMONTAGE .............................................................74
ENTRETIEN DU PRODUIT........................................76
EN CAS D‘ACCIDENT ................................................ 76
NETTOYAGE...............................................................78
ÔTER LA HOUSSE .....................................................80
ATTACHER LES HOUSSES DU SIÈGE ................... 80
DURÉE DE VIE DU PRODUIT ..................................82
RECYCLAGE .............................................................. 84
INFORMATION PRODUIT ......................................... 84
GARANTIE .................................................................. 86
52

FR
NL
PL
INHOUD SPIS TREŚCI
KORTE HANDLEIDING ................................................4
GOEDKEURING ......................................................... 51
DE BESTE POSITIE IN DE AUTO ............................55
VOOR DE BESCHERMING VAN UW AUTO ............ 55
AANPASSING VAN DE DRAAGARM ........................ 57
DE SCHOUDERGORDELS AANPASSEN................59
VEILIGHEID VOOR UW BABY ..................................61
DE BABY VASTMAKEN ............................................. 63
VEILIGHEID IN DE AUTO .......................................... 65
HET ZITJE INSTALLEREN ........................................ 67
HET AUTOZITJE VERWIJDEREN ............................69
UW KIND KORREKT VASTMAKEN ..........................71
HET BABYZITJE KORREKT INSTALLEREN ...........71
HET INLEGKUSSEN VERWIJDEREN......................73
OPEN DE ATON CBX ZONNEKAP ........................... 75
CYBEX REIS-SYSTEEM............................................75
DEMONTEREN ........................................................... 75
ONDERHOUD ............................................................. 77
IN GEVAL VAN EEN ONGEVAL ................................77
REINIGING .................................................................. 79
DE BEKLEDING VERWIJDEREN .............................81
DE BEKLEDING VAN HET ZITJE VASTMAKEN .....81
DUURZAAMHEID VAN HET PRODUKT ...................83
AFVALVERWIJDERING .............................................85
PRODUKTINFORMATIE ............................................85
GARANTIE .................................................................. 87
INSTRUKCJA SKRÓCONA ...................................................4
DOPUSZCZENIE DO UŻYTKU - NORMA .......................... 51
NAJLEPSZE MIEJSCE W SAMOCHODZIE .......................55
OCHRONA TWOJEGO SAMOCHODU............................... 55
REGULACJA UCHWYTU DO NOSZENIA ..........................57
DOPASOWANIE SZELEK NARAMIENNYCH .................... 59
BEZPIECZEŃSTWO DZIECKA ...........................................61
ZABEZPIECZANIE DZIECKA ..............................................63
BEZPIECZEŃSTWO W SAMOCHODZIE ...........................65
MONTAŻ FOTELIKA ............................................................. 67
WYJMOWANIE FOTELIKA .................................................. 69
PRAWIDŁOWE ZABEZPIECZENIE DZIECKA. ..................71
PRAWIDŁOWY MONTAŻ DZIECIĘCEGO FOTELIKA
SAMOCHODOWEGO...........................................................71
ZDEJMOWANIE WKŁADKI ..................................................73
OTWIERANIE BUDKI FOTELIKA ATON CBX ....................75
SYSTEM PODRÓŻNY CYBEX ............................................ 75
DEMONTAŻ ...........................................................................75
KONSERWACJA ................................................................... 77
POSTĘPOWANIE PO WYPADKU DROGOWYM .............. 77
CZYSZCZENIE ..................................................................... 79
ZDEJMOWANIE TAPICERKI ............................................... 81
ZAKŁADANIE TAPICERKI ................................................... 81
TRWAŁOŚĆ PRODUKTU ....................................................83
UTYLIZACJA .........................................................................85
INFORMACJA O PRODUKCIE ............................................ 85
GWARANCJA ........................................................................ 87
53

LA MEILLEURE POSITION DANS LA VOITURE
Ce siège auto peut être utilisé sur tous les sièges de
véhicules équipés de ceintures de sécurité à trois points
approuvées dans le manuel du véhicule pour une
utilisation universelle.
NOTE! Si la coque est installée sur la banquette d’une
manière qui n’est pas stable ou à un angle trop aigu, elle
peut être ajustée avec une textile. Sinon, choisissez une
autre position dans le véhicule.
NOTE! Toujours vérier avant d’acheter le siège que
celui-ci peut être installé correctement dans votre véhicule.
Conformez-vous toujours aux recommandations dans le
manuel du véhicule.
ATTENTION! Aucune modification et aucun ajout
!
ne peut être fait au siège auto sans l’approbation de
Cybex. Les réparations ne doivent être faites que par
du personnel autorisé. Dans ce cas, il est obligatoire
d’utiliser des pièces de rechange et accessoires
originaux. Dans le cas contraire, les fonctions
protectrices de la coque ne sont plus garanties.
PROTECTION DU VÉHICULE
Des traces d’utilisation et/ou de décoloration peuvent
apparaître sur certaines banquettes en matériaux délicats
(velours, cuir, etc) si des sièges auto sont utilisés. An
d’éviter cela, mettre une serviette ou une couverture entre
la banquette et le siège auto. Dans ce contexte, voir aussi
nos instructions de nettoyage. Il est essentiel des les
suivre avant la première utilisation du siège auto.
54

FR
NL
PL
DE JUISTE PLAATS IN HET VOERTUIG
Het autostoeltje kan op alle autostoelen worden gebruikt die
zijn voorzien van automatische driepuntsgordels die in het
autohandboek zijn goedgekeurd voor ‘universeel’ gebruik.
LET OP! Indien het autostoeltje instabiel of te rechtop op
de autostoel staat, kan dit met behulp van een extra deken
worden gecompenseerd. Als dat niet mogelijk is, moet u het
autostoeltje op een andere stoel in de auto zetten.
LET OP! Controleer altijd vóór de aanschaf van het
autostoeltje of dit stoeltje goed kan worden geïnstalleerd in uw
auto. Volg altijd de aanbevelingen van de autofabrikant op.
WARNING! Het autostoeltje mag niet worden
!
aangepast en er mag niets aan worden toegevoegd
zonder toestemming van Cybex. Reparaties mogen
alleen worden uitgevoerd door personen die
daartoe bevoegd zijn. Zij dienen daarbij te allen tijde
uitsluitend van originele onderdelen en accessoires
gebruik te maken. Doen zij dit niet, dan kan de
beschermende werking van het autostoeltje niet
langer worden gegarandeerd.
HET VOERTUIG BESCHERMEN
Het gebruik van autostoeltjes kan op sommige autozittingen
met een kwetsbare bekleding (zoals velours of leer) sporen
nalaten en/of deze doen verkleuren. U kunt dit voorkomen door
bijvoorbeeld een deken of een handdoek onder het autostoeltje
op de stoel te leggen. Raadpleeg in dit verband ook onze
reinigingsinstructies. Het is van groot belang dat u die opvolgt
voordat u het autostoeltje voor het eerst gebruikt.
WYBÓR ODPOWIEDNIEGO MIEJSCA W SAMOCHODZIE
Fotelik samochodowy można używać na wszystkich
miejscach wyposażonych w trzypunktowy pas
bezpieczeństwa zatwierdzony w instrukcji obsługi pojazdu do
użytku „uniwersalnego”.
UWAGA! Jeśli fotelik ustawiony na siedzeniu w aucie nie jest
stabilny lub pojawia się zbyt duży kąt nachylenia, można to
zniwelować podkłądając np. kocyk. Ewentualnie proszę wybrać
inne miejsce w samochodzie.
UWAGA! Zawsze przed dokonaniem zakupy należy sprawdzić
czy wybrany fotelik samochodowy może zostać poprawnie
zamontowany w Twoim samochodzie. Zawsze stosuj się do
rekomendacji zawartej w instrukcji obsługi pojazdu.
OCHRONA TAPICERKI SAMOCHODOWEJ
Podczas używania fotelika na delikatnych tapicerkach
samochodowych (np.: welur, skóra etc.) moga wystąpić ślady
zużycia lub odbarwień. Aby tego uniknąć można zabezpieczyć
tapicerkę przez podłożenie koca lub ręcznika pod fotelik.
Zachęcamy do zapoznania się z zaleceniami dotyczącymi
czyszczenia fotelika oraz jego tapicerki. Należy ich
bezwzględnie przestrzegać przed pierwszym skorzystaniem
z fotelika.
OSTRZEŻENIE! Bez zgody Cybex nie wolno
!
dokonywać żadnych modyfikacji fotelika
samochodowego. Napraw można dokonywać
wyłącznie w autoryzowanych do tego punktach
serwisowych. W celu naprawy muszą zostać użyte
wyłącznie oryginalne części oraz akcesoria. Jeśli nie
będzie to przestrzegane to producent nie gwarantuje
bezpieczeństwa fotelika.
55

SÉCURITÉ EN VOITURE
ATTENTION! Ne jamais utiliser le siège auto sur une
!
place équipée d’un airbag frontal. Cela ne s’applique
pas aux airbags latéraux.
NOTE! Le volume d’un airbag frontal augmente de
façon explosive et peut causer à votre enfant de graves
blessures ou même la mort.
ATTENTION! Le siège auto et la Base i-Size doivent
!
toujours être sécurisés même si l‘enfant n´y est pas
installé. En cas de freinage d‘urgence ou d‘accident,
un siège auto non attaché peut causer des blessures
aux autres passagers et à vous même.
An de garantir la meilleure sécurité possible pour tous les
passagers, assurez-vous que...
• Les dossiers inclinables des banquettes soient relevés
dans leur position initiale droite.
• En installant le siège auto sur le siège passager avant,
reculer le siège au maximum.
• Tous les objets susceptibles de causer des
blessures en cas d’accident soient correctement rangés
dans l’habitacle.
• Tous les passagers de la voiture attachent leur ceinture.
ATTENTION! Ne tenez JAMAIS un bébé sur vos
!
genoux dans une voiture. Les forces générées lors
d’une collision sont beaucoup trop élevés pour toute
personne tenant le bébé. Ne jamais vous attacher
vous-même et votre enfant avec une seule ceinture
de sécurité.
56

FR
NL
PL
VEILIGHEID IN DE AUTO
BELANGRIJK! Plaats het stoeltje nooit op een stoel
!
met een geactiveerde voorairbag. Dit geldt niet voor
zogeheten zij-airbags.
LET OP! De grote airbag aan de voorzijde wordt in zeer
korte tijd explosief opgeblazen en kan daardoor ernstig
letsel of zelfs overlijden van het kind tot gevolg hebben.
BELANGRIJK! Het autostoeltje en de basis moeten
!
altijd juist zijn geïnstalleerd in het voertuig, ook als
ze niet worden gebruikt. Door plotseling remmen
of tijdens een ongeval kan een niet vastgemaakt
autostoeltje andere passagiers of uzelf verwonden.
Om de hoogst mogelijke veiligheid van alle passagiers te
garanderen is het nodig dat...
• neerklapbare rugleuningen in het voertuig rechtop staan
en zijn vergrendeld.
• de passagiersstoel zo ver mogelijk naar achteren staat
als u de het autostoeltje op deze stoel installeert.
• u alle voorwerpen die letsel kunnen veroorzaken tijdens
een ongeval goed opbergt.
• alle passagiers in het voertuig hun gordel dragen.
BELANGRIJK! Houd een kind in de auto NOOIT
!
op uw schoot. De krachten die bij een botsing
vrijkomen, zijn dermate hoog dat het kind onmogelijk
kan worden vastgehouden. Gebruik nooit dezelfde
veiligheidsgordel voor zowel uzelf als het kind.
BEZPIECZEŃSTWO W POJEŹDZIE
OSTRZEŻENIE! Nie korzystaj z fotelika samochodowego
!
na przednim fotelu pasażera z włączoną przednią
poduszką powietrzną. Nie dotyczy to bocznych poduszek
powietrznych tzw. kurtyn bocznych.
UWAGA! Poduszka powietrzna jest wystrzeliwana
pirotechnicznie podczas zderzenia. Może doprowadzić do
śmierci lub poważnych uszkodzeń ciała dziecka.
OSTRZEŻENIE! Fotelik samochodowy i baza zawsze
!
muszą być przypięte pasami bezpieczeństwa, nawet kiedy
nie podróżuje w nim dziecko. W razie nagłego hamowania
lub wypadku nieprzypięty fotelik samochodowy może
spowodować obrażenia u pasażerów lub kierowcy.
W celu zapewnienia możliwie najlepszego bezpieczeństwa
wszystkim pasażerom upewnij się, że:
• składane oparcia w samochodzie są zablokowane w pozycji
pionowej.
• montując fotelik na przednim siedzeniu samochodu, na fotelu
pasażera, odsuń fotel samochodowy maksymalnie do tyłu.
• wszystkie rzeczy znajdujące się wewnątrz samochodu
zostały zabezpieczone w należyty sposób i nie spowodują
uszkodzeń/nie zranią pasażerów w razie wypadku/ostrego
hamowania.
• wszyscy pasażerowie mają zapięte pasy bezpieczeństwa.
OSTRZEŻENIE! NIGDY nie przewoź dziecka trzymając
!
go na kolanach. Siły oddziałujące podczas kolizji są
zbyt duże, aby utrzymać dziecko. NIGDY nie przypinaj
siebie oraz dziecka przy pomocy jednego pasa
bezpieczeństwa.
57

AJUSTER LA POIGNÉE
AVERTISSEMENT! Toujours sécuriser l‘enfant
!
avec le système de harnais intégré.
La poignée peut être ajustée en 4 positions diérentes:
A: Position- Porter/En voiture.
B+C: Position pour insérer l‘enfant dans le siège.
D: Position de sécurité assise en dehors du véhicule.
REMARQUE! Lorsque l‘ATON CBX est utilisé avec la
ATON CBX Base-x, la position de la poignée change de
A à B.
2
AVERTISSEMENT! De façon à éviter un balance-
!
ment en portant le siège, s‘assurer que la poignée
est bien verrouiller en position A.
1
58
• De façon à ajuster la poignée, appuyer sur les boutons
(1) de gauche et de droite sur la poignée (2).
• Ajuster la poignée (2) en fonction de la position
souhaitée en appuyant sur les boutons (1).

FR
NL
PL
AANPASSING VAN DE DRAAGARM
WAARSCHUWING! Maak de baby steeds vast
!
met het geïntegreerde harnassysteem.
REGULACJA UCHWYTU DO NOSZENIA
OSTRZEŻENIE! Zawsze zabezpieczaj dziecko
!
pasami bezpieczeństwa fotelika.
De draagarm kan in 4 verschillende posities versteld
worden.
A: Dragende/Rijdende positie
B+C: Om de baby in het zitje te plaatsen
D: Veilige zitpositie buiten de auto
OPGELET! Wanneer u de ATON CBX in combinatie met
de ATON CBX Base-x gebruikt, verandert de positie van
het handvat van A naar B.
WAARSCHUWING! Om te voorkomen dat het zitje
!
bij het dragen te veel voorover zou hellen, dient u
de draagarm in de draagpositie A vast te zetten.
• Om de draagarm aan te passen, dient u de knoppen (1)
aan de linker- en rechterzijkant van de draagarm (2) in
te drukken.
• Pas de draagarm (2) aan naar de gewenste positie door
de knoppen (1) in te drukken.
Uchwyt do noszenia fotelika może być ustawiony w 4
różnych pozycjach:
A: Noszenie/Jazda.
B+C: Wkładanie dziecka do fotelika.
D: Zablokowana pozycja do siedzenia poza
samochodem.
UWAGA! Kiedy fotelik ATON CBX zamontowany jest
na bazie ATON CBX Base-x, wtedy położenie uchwytu
fotelika w czasie jazdy należy zmienić z pozycji A na
pozycję B.
OSTRZEŻENIE! Aby uniknąć niestabilności foteli-
!
ka podczas jego noszenia, upewnij się, że uchwyt
jest zastrzaśnięty w pozycji do noszenia A.
• Aby wyregulować uchwyt, naciśnij przyciski (1) po
prawej i lewej stronie uchwytu (2).
• Ustaw uchwyt (2) w pożądanej pozycji, naciskając
przyciski (1).
59

AJUSTER LES SANGLES DES ÉPAULES
Attention! Un maximum de maintien peut être assuré si
les sangles des épaules (3) sont correctement ajustées.
6
3
5
4
7
60
• Lorsque le bébé a approximativemet 3 mois, le
réducteur peut être ôté an de libérer davantage
d‘espace à l‘enfant (page 72).
• La hauteur des sangles des épaules (3), doit être
ajustée de façon à être juste sur le dessus des épaules
et de façon à ce qu‘elle soit insérées dans les passants
(4) prévus à cet eets.
Pour ajuster la hauteur des sangles des épaules (3), merci
de suivre les étapes suivantes:
• Appuyer sur le bouton rouge pour ouvrir la boucle (5).
• An de retirer les coussinets, tirer sur les coussinets
(6) des sangles des épaules et faites les passer sur
les parties plastiques de verrouillage à insérer dans la
boucle.
• D‘abord retirer du coussinet une sangle (7) puis la
sangle du passant (4). Maintenant, insérer à nouveau la
sangle dans le passant supérieur. Répéter cette action
pour ajuster l‘autre côté également.
Attention! S‘assurer que les sangles des épaules (3) ne
sont pas enroulées (tortillées) qu‘elles sont bien à plat et
qu‘elles passent bien dans les passants (4) et vont jusqu‘à
la boule de verrouillage (5).

FR
NL
PL
DE SCHOUDERGORDELS AANPASSEN
OPMERKING! De optimale veiligheid wordt alleen
verkregen als de schoudergordels (3) korrekt aangepast
zijn.
• Wanneer de baby ongeveer 3 maanden oud is, kan het
inlegkussentje verwijderd worden zodat het kind meer
plaats heeft (zie pag.73).
• De hoogte van de schoudergordels (3) moet zodanig
aangepast zijn dat de gordels net boven de schouders
van de baby door de openingen (4) gaan.
Volg de volgende stappen om de hoogte van de
schoudergordels (3) aan te passen:
• Duw op de rode knop om gesp (5) te openen.
• Schuif de schouderbeschermers (6) over de uiteinden
van de gordels (7) om ze te verwijderen.
• Trek eerst één gespuiteinde (7) door de bekleding en
uit de schoudergleuf (4). Trek het nu opnieuw door de
volgende hogergelegen gleuf. Herhaal dit om ook de
andere kant aan te passen.
DOPASOWANIE SZELEK NARAMIENNYCH
UWAGA! La sicurezza ottimale si ottiene soltanto se le
cinghie per le spalle (3) sono regolate in modo corretto.
• Kiedy dziecko ma ok. 3 miesiące, można wyjąć
wkładkę, aby miało więcej miejsca (patrz strona 73).
• Wysokość szelek naramiennych (3) musi być tak
dopasowana, aby szelki przechodziły przez szczeliny
dokładnie nad ramionami dziecka.
Aby dopasować wysokość szelek naramiennych (3) należy
zrobić co następuje:
• Naciśnij czerwony przycisk, aby otworzyć klamrę
główną (5).
• Zdejmij nakładki (6) z szelek naramiennych przez
klamerki pasa (7).
• Najpierw przeciągnij jedną klamrę (7) przez tapicerkę
i szczelinę (4). Następnie przełóż ją ponownie przez
następną szczelinę znajdującą się powyżej. To samo
zrób z drugim pasem.
OPMERKING! Controleer dat de schoudergordels (3) niet
gedraaid zijn maar plat tegen de autozetel aanliggen.
UWAGA! Upewnij się, że szelki naramienne (3) nie
są skręcone, tylko leżą płasko płasko na foteliku
samochodowym, przełóż je przez szczeliny (4) i w dół do
klamry głównej (5).
61

SÉCURITÉ POUR VOTRE BÉBÉ
ATTENTION! Toujours sécuriser son enfant et ne jamais le
laisser sans surveillance même attaché si l‘ATON CBX est
posé en hauteur (table à langer, table, banc...).
AVERTISSEMENT! Les parties plastiques de
!
l’ATON CBX chauffent au soleil. Votre enfant pourrait être brûlé. Protéger votre enfant et son siège
auto de la lumière directe du soleil. (Poser un drap
blanc sur le siège).
• Retirer son enfant le plus souvent possible du siège
auto de façon à relaxer sa colonne vertébrale.
• Interrompre les longues journées. Se remémorer cela
même en utilisant l‘ATON CBX en dehors de la voiture.
ATTENTION! Ne jamais laisser un enfant sans
surveillance!
62

FR
NL
PL
VEILIGHEID VOOR UW BABY
OPGELET! Maak de baby steeds vast in het kinderzitje
en laat uw kind nooit alleen wanneer de ATON CBX op
een verhoogd oppervlak staat (bv. een luiertafel, tafel,
bank....).
WAARSCHUWING! De plastiek onderdelen van
!
de ATON CBX kunnen opwarmen in de zon. Uw
baby kan hierdoor verbrand worden. Bescherm uw
baby en de autozetel tegen intensieve blootstelling
aan de zon (bv. door een wit dekentje over de zetel
te leggen).
• Neem de baby zo vaak mogelijk uit het zitje om de
ruggegraat te ontlasten.
• Onderbreek regelmatig langere reizen. Denk hieraan,
ook als u de ATON CBX buiten de auto gebruikt.
OPGELET! Laat uw kind nooit alleen in de auto.
BEZPIECZEŃSTWO DZIECKA
UWAGA! Dziecko siedzące w foteliku zawsze powinno
być zapięte szelkami. Nigdy nie zostawiaj dziecka bez
opieki, gdy fotelik postawiony jest na podwyższeniu (np.
przewijaku, stole czy ławce...).
OSTRZEŻENIE! Plastikowe części fotelika
!
nagrzewają się na słońcu. Dziecko może się
poparzyć. Chroń dziecko i fotelik przed nadmierną
ekspozycją na słońce (np. kładąc biały kocyk na
fotelik).
• Wyjmuj dziecko z fotelika tak często jak jest to możliwe,
aby mogło odpocząć w innej pozycji.
• Rób przerwy w czasie dłuższej podróży. Pamiętaj o
przerwach również, kiedy używasz fotelika ATON CBX
poza samochodem.
UWAGA! Nigdy nie pozostawiaj dziecka w samochodzie
bez opieki.
63

6
3
7
5
8
3
5
CLICK
SÉCURISER L‘ENFANT
ATTENTION! Merci de retirer tous les jouets et objets durs
du siège auto.
• Ouvrir la boucle (5).
• Pour relâcher, tirer vers le haut les sangles des épaules
(3) simultanément et presser le bouton d‘ajustement
central (8). Merci de toujours tirer sur les sangles ( 7) et
non sur les coussinets (6).
• Placer son enfant dans le siège.
• Mettre les sangles des épaules (3) par dessus les
épaules du bébé.
ATTENTION! S‘assurer que les sangles des épaules (3)
ne sont pas enroulées.
• Joindre les attaches ensembles (7) et les insérer dans
la boucle de verrouillage jusqu‘à entendre un CLICK.
Tirer sur la sangle d‘ajustement central (9) jusqu‘à ce
que l‘enfant soit correctement maintenu.
• Appuyer sur le bouton rouge pour ouvrir la boucle (5).
ATTENTION! Laisser l‘espace équivalent à un doigt entre
le bébé et les sangles des épaules.
9
64

FR
NL
PL
DE BABY VASTMAKEN
OPGELET! Gelieve alle speelgoed en andere harde
objekten van de autozetel te verwijderen.
• Open de gesp (5).
• Om de schoudergordels (3) los te maken, dient u eraan
te trekken terwijl u de centrale aanpassingsknop (8)
induwt. Gelieve steeds aan de uiteinden t van de gordel
te trekken en niet aan de schouder-beschermers (6).
• Plaats uw baby in het zitje.
• Trek de schoudergordels (3) recht over de schouders
van de baby.
OPGELET! Controleer dat de schoudergordels (3) niet
gedraaid zijn.
• Breng de gespuiteinden (7) samen en duw ze in de
gesp (5) tot u een KLIK hoort. Trek aan de centrale
aanpassingsgordel (9) totdat de schoudergordels nauw
tegen het lichaam van de baby aansluiten.
• Druk op de rode knop om de gesp (5) te openen.
ZABEZPIECZANIE DZIECKA
UWAGA! Należy zdjąć wszystkie zabawki i twarde
przedmioty z fotela samochodowego.
• Otwórz główną klamrę (5).
• Pasy luzuje się, ciągnąc jednocześnie za szelki
naramienne (3) i wciskając blokadę regulatora (8).
Zawsze ciągnij za klamerki (7), a nie za nakładki na
szelki (6).
• Włóż dziecko do fotelika.
• Przełóż szelki naramiennie (3) na ramiona dziecka.
UWAGA! Upewnij się, że szelki nie są skręcone.
• Połącz obie klamerki (7) i wciśnij je do szczeliny klamry
głównej (5), aż usłyszysz charakterystyczne kliknięcie.
Pociągnij w dół pas regulacyjny (9), aż szelki będą
dobrze dopasowane do dziecka.
• Aby otworzyć klamrę główną (5), naciśnij czerwony
przycisk.
OPGELET! Laat een ruimte van maximaal één nger
breed tussen de baby en de schoudergordels.
UWAGA! Między szelkami a ramionami dziecka powinna
zostać szczelina na maksimum jeden palec.
65

2
11
12
2
10
13
14
11
66
INSTALLER LE SIÈGE
• Placez la coque dos à la route sur la banquette (les pieds
de l’enfant pointent vers le dossier de la banquette).
• Assurez-vous que la poignée (2) est verrouillée en position
A.
• Assurez-vous que le repère d’installation sur l’autocollant
(10) situé sur le côté du siège est alignée avec le plancher
du véhicule.
• Tirez sur la ceinture de sécurité du véhicule et la placer audessus du siège auto.
• Placez la ceinture abdominale (12) dans des guides de
ceinture bleu (13) sur les deux côtés du siège auto.
• Boucler la ceinture dans l‘encoche de sécurité du véhicule
15
prévue à cet eet (11).
• Tirer sur la ceinture diagonale (14) de façon à serrer
fermement la ceinture des cuisses.
• Tirer la ceinture diagonale (14) derrière le haut du siège
auto.
NOTE! Ne pas tordre la ceinture de sécurité du véhicule
pendant cette opération.
• Amener la ceinture diagonale (14) dans l‘encoche bleue
(15) à l‘arrière.
• Serrer la ceinture diagonale (14).
AVERTISSEMENT! Ce siège ne doit pas être utili-
!
sé avec une ceinture 2 points dite de ceinture „du
milieu“. Ceci pouvant causer de blessures graves
voir entraîner la mort de l‘enfant.

FR
NL
PL
HET ZITJE INSTALLEREN MONTAŻ FOTELIKA
• Plaat het autostoeltje achterwaarts gericht op de autostoel.
• Let op dat de draagbeugel (2) is vergrendeld in de
autostand A.
• Zorg ervoor dat het installatieteken op de
waarschuwingssticker (10) op de zijkant van het autostoeltje
overeenkomt met de stand van de autovloer.
• Trek de autogordel uit en leid deze over het autostoeltje.
• Plaats de buikriem (12) in de blauwe gordelgeleiders (13)
aan weerszijden van het autostoeltje.
• Steek de gesp in het gordelslot van het voertuig (11).
• Trek de buikriem (12) aan door de borstriem (14) in de
richting van de voorzijde van de auto te trekken.
• Trek de borstriem (14) achter het hoofdeinde van het
autostoeltje langs.
• Umieść fotelik na siedzeniu, tyłem do kierunku jazdy
(stopy dziecka umieszczone na oparciu siedzenia
samochodowego).
• Upewnij się, że rączka fotelika (2) jest zablokowana w
pozycji A.
• Upewnij się, że znacznik montażowy znajdujący
się na naklejce ostrzegawczej (10) jest równoległy do
podłogi pojazdu.
• Wyciągnij pas samochodowy i przeciągnij go za fotelikiem.
• Przeprowadź pas biodrowy (12) przez niebieskie
prowadnice (13) po obu stronach fotelika.
• Zapnij pas samochodowy (11).
• Ściągnij pas biodrowy (12) przez pociągnięcie pasa
barkowego (14) w kierunku przodu samochodu.
• Ściągnij pas barkowy (14) poza zagłowkiem fotelika.
LET OP! Zorg ervoor dat de autogordel daarbij niet
gedraaid komt te zitten.
• Leid de borstriem (14) door de achterste blauwe
gordelgeleider (15).
• Trek de borstriem aan (14).
WAARSCHUWING! Het zitje mag niet gebruikt
!
worden met een 2-puntsgordel of een heupgordel.
Het gebruik met een 2-puntsgordel kan verwondingen of de dood van uw kind tot gevolg hebben.
UWAGA! Uważaj, żeby nie poskręcać pasa.
• Przeprowadź pas barkowy (14) przez tylne niebieskie
prowadnice (15).
• Zaciśnij pas ramienny (14).
OSTRZEŻENIE! Fotelika nie wolno używać na
!
siedzeniu, gdzie znajdują się 2-punktowe pasy
bezpieczeństwa lub pas biodrowy. Używanie
2-punktowego pasa bezpieczeństwa może
spowodować obrażenia, a nawet śmierć dziecka.
67

SÉCURISER UN ENFANT CORRECTEMENT
Pour la sécurité de son enfant, vérier ...
• que les sangles des épaules (3) passent sur le corps de
l‘enfant sans trop le serrer
3
• que l‘ajustement de la ceinture est correct
• que les sangles des épaules (3) ne sont pas enroulées
(tortillées)
• que les boucles de verrouillage (7) sont enclenchées
dans le système (5)
7
5
68
INSTALLER LE SIÈGE AUTO CORRECTEMENT
Pour la sécurité de son enfant, s‘assurer que ...
• que l‘ATON CBX est positionné dos à la route (les pieds
de l‘enfant pointent en direction du dossier du siège de
la voiture)
• que si le siège auto est installé à l‘avant, les airbags
latéraux ne peuvent pas toucher l‘ATON CBX
• que l‘ATON CBX est sécurisé par une ceinture 3 points
ATTENTION! L‘ATON CBX est exclusivement conçu pour
les sièges face à la route, équipés de ceintures avec un
syteme 3 points répondant à la norme ECE R16.

FR
NL
PL
UW KIND KORREKT VASTMAKEN
Voor de veiligheid van uw kind, is het belangrijk te
PRAWIDŁOWE ZABEZPIECZENIE DZIECKA
Dla bezpieczeństwa Twojego dziecka sprawdź, czy …
controleren …
• dat de schoudergordels (3) goed tegen het lichaam
aansluiten, zonder de baby te beklemmen
• dat de gordel goed afgesteld werd
• dat de schoudergordels (3) niet gedraaid zijn
• dat de gespuiteinden (7) vastzitten in gesp (5)
• szelki naramienne (3) są dobrze dopasowane i nie
• pasy są prawidłowo zapięte
• szelki naramienne (3) nie są skręcone
• plastikowe klamerki szelek (7) są wpięte w główną
PRAWIDŁOWY MONTAŻ DZIECIĘCEGO
HET BABYZITJE KORREKT INSTALLEREN
Voor de veiligheid van het kind, is het belangrijk
te controleren …
FOTELIKA SAMOCHODOWEGO
Dla bezpieczeństwa Twojego dziecka upewnij się, czy …
• fotelik ATON CBX zamontowany jest tyłem do kierunku
• dat de ATON CBX tegen de rijrichting in geplaatst is.
(De voeten van de baby wijzen in de richting van de
rugleuning van de autozetel)
• fotelik ATON CBX zamontowany na przednim
• indien het autozitje vooraan staat, dat de voorste airbag
de ATON CBX niet kan raken.
• dat de ATON CBX met een 3-puntsgordel vastgemaakt
• fotelik ATON CBX zabezpieczony jest 3-punktowymi
is
OPGELET! ATON CBX is enkel geschikt voor wagens
met zetels met vooraanzicht, die voorzien zijn van een
3-puntgordelsysteem, conform met ECE R16.
UWAGA! Fotelik ATON CBX przeznaczony jest do
montażu wyłącznie na fotelach samochodowych
skierowanych przodem do kierunku jazdy, wyposażonych
w 3-punktowe pasy bezpieczeństwa zgodne z normą ECE
R16.
uciskają dziecka
klamrę (5)
jazdy (nóżki dziecka skierowane są w stronę
oparcia fotela samochodowego)
fotelu samochodowym nie znajduje się w zasięgu
poduszki powietrznej
pasami bezpieczeństwa
69

• que la ceinture des cuisses (12) passe dans les
12
13
11
70
encoches (13) de chaque côté du siège auto
• que la ceinture diagonale passe dans les encoches
bleues (15) à l‘arrière du siège auto.
• que le system de verrouillage de la ceinture de la
voiture n‘atteint pas le passant de sangle bleu (13)
• que la ceinture est serrer et pas enroulée (tortillée)
• que l‘ATON CBX est installé verticalement
(voir marquage)
ATTENTION! Dans certains cas, la boucle de la
!
ceinture du véhicule est trop longue et atteint les
guides de ceinture bleus de la coque. De ce fait, le
siège auto ne peut pas être fixé fermement. Dans
ce cas, choisissez un autre siège dans la voiture
pour installer le siège auto. En cas de doute,
contactez le fabricant du siège auto.
ÔTER LE SIÈGE AUTO
• Retirer la ceinture de l‘encoche bleue (15) à l‘arrière du
siège auto.
• Détacher la ceinture de sécurité (11) et passer la
ceinture des cuisses (12) en dehors des encoches
bleus (13).

FR
NL
PL
• dat de heupgordel (12) door de gordelgleuven (13)
langs elke kant van het babyzitje loopt
• dat de diagonale gordel (14) door de blauwe gordelhaak
(15) aan de achterkant van het babyzitje loopt
• dat de autogesp (11) niet helemaal tegen de blauwe
gordelgleuf (13) raakt
• dat de autogordel goed spant en niet gedraaid is
• dat de ATON CBX verticaal op de autozetel
geïnstalleerd is (zie markering)
BELANGRIJK! Mogelijk is het gespgedeelte
!
van de autogordel te lang waardoor het tot bij de
blauwe riemgeleiders van het autostoeltje komt.
Dit betekent dat het autostoeltje niet stevig kan
worden vastgemaakt. Mocht dit het geval zijn, kies
dan een andere autostoel om het autostoeltje op te
plaatsen. Als u twijfelt, neem dan contact op met de
fabrikant van het autostoeltje.
• biodrowy pas samochodowy (12) przebiega przez
prowadnice (13) znajdujące się po bokach fotelika
• ukośna część pasa (14) przebiega przez niebieską
szczelinę (15) znajdującą się z tyłu fotelika
• klamra zapinająca pasa samochodowego (11) nie
dosięga niebieskich prowadnic fotelika (13)
• pas samochodowy jest dobrze napięty i nieposkręcany
• fotelik ATON CBX jest zamontowany pionowo (patrz
znak bezpieczeństwa)
OSTRZEŻENIE! Może się zdarzyć tak, że zapięcie
!
pasa samochodowego jest za długie i dotyka
niebieskiej prowadnicy w foteliku. Oznacza to,
że fotelik nie może być zapięty ciasno. W takim
przypadku należy wybrać inne siedzenie do
montażu fotelika. W razie wątpliwości należy
skontaktować się z producentem fotelika
samochodowego.
HET AUTOZITJE VERWIJDEREN
• Trek de autogordel uit de blauwe gordelgleuf (15) aan
de achterkant.
• Open de autogesp (11) en trek de heupgordel (12) uit
de blauwe gordelgleuf (13).
WYJMOWANIE FOTELIKA
• Wyjmij samochodowy pas z niebieskiej szczeliny (15) z
tyłu fotelika.
• Rozepnij klamrę zapinającą pasa (11) i wyjmij pas
biodrowy (12) z niebieskich prowadnic (13).
71

ÔTER LE RÉDUCTEUR
Le réducteur préinstallé lors de l‘achat, aide au confort
en position allongée des bébés. Pour Ôter le réducteur,
relâcher la housse du siège, soulever un peu le réducteur
et le retirer du siège.
>3m.
Le réducteur put être retiré après environ 3 mois an de
libérer del‘espace à l‘enfant.
Le coussin réducteur (17) (photo de gauche haut de la
page 74) améliore le confort du bébé jusqu‘environ 9 mois.
Ce coussin réducteur peut également être ôté pour libérer
de l‘espace au bébé.
OUVERTURE DU CANOPY DE L‘ATON CBX BASIC
Tirez le canopy par dessus la poignée de portage. Fixez le
de chaque côté de la poignée avec les velcros, et tirez le
par dessus le haut du siège bébé.
72

FR
NL
PL
HET INLEGKUSSEN VERWIJDEREN
Het inlegkussen, dat bij de aankoop reeds op het zitje
voorzien is, zorgt voor een hoger ligkomfort bij kleine
baby‘s. Om het inlegkussen te verwijderen, moet u de
bekleding van het zitje losmaken, het inlegkussen een
beetje opheen en het uit het zitje nemen.
ZDEJMOWANIE WKŁADKI
Wkładka, która znajduje w foteliku w momencie zakupu,
przeznaczona jest do wykorzystania przy przewożeniu
najmłodszych dzieci. Aby ją zdjąć, należy poluzować
tapicerkę fotelika, podnieść trochę wkładkę i ją wyjąć.
Het inlegkussentje mag na ongeveer 3 maanden
verwijdered worden zodat het kind meer plaats heeft.
Het aanpasbare inlegkussentje (17) (foto links bovenaan
pag. 75) verhoogt het komfort van het kind tot ong eveer 9
maanden. Het inlegkussentje kan later verwijderd worden
om het kind meer plaats te bieden.
OPEN DE ATON CBX BASIC ZONNEKAP
Trek de zonnekap over de draagbeugel Maak de zonnekap
vast aan beide zijden van de draagbeugel doormiddel van
de klittenbanden.Om de zonnekap weg te vouwen maak
je de klittenbanden los en trek je de zonnekap over het
hoofdeinde van het zitje.
Wkładka może być wyjęta, kiedy dziecko ma ok. 3
miesiące i potrzebuje więcej miejsca.
Wkładka podwyższająca (17) (lewe zdjęcie na górze 75
strony) zapewnia wygodę dziecku w wieku do ok.
9 miesięcy. Kiedy dziecko jest starsze, aby zapewnić mu
więcej miejsca, należy wkładkę wyjąć.
OTWIERANIE BUDKI FOTELIKA ATON CBX
BASIC
Naciągnij tkaninę budki na uchwyt do przenoszenia. Z obu
stron przypnij ją na rzepy do uchwytu. Aby złożyć budkę,
odepnij rzepy i załóż tkaninę za zagłówek fotelika.
73

RETRAIT DE LA HOUSSE
La housse se constitue de 5 parties. 1 housse de siège,
1 réducteur ajustable, 2 coussinets des épaules,
1 coussinet de boucle. Pour ôter les housses suivre les
étapes suivantes:
• Ouvrir la boucle (5).
• Ôter les coussinets (6) des sangles des épaules (3).
• Tirer la housse sur le siège.
• Tirer les sangles des épaules (3) avec les clips de
verrouillage (7) en dehors des parties couvertes.
• Tirer la boucle (5) à travers la housse du siège.
17
74
• Maintenant retirer la housse.
AVERTISSEMENT! Le siège auto ne doit jamais
!
être utilisé sans sa housse.
ATTENTION! Utiliser uniquement les housses du ATON
CBX!
ATTACHER LES HOUSSES DU SIÈGE
De façon à remettre les housses sur le siège, inverser
cette procédure comme indiqué ci-dessus.
ATTENTION! Ne pas enrouler (tortiller) les sangles des
épaules.

FR
NL
PL
VERWIJDEREN VAN DE HOES
De bekleding bestaat uit 5 delen. 1 bekleding van het zitje,
1 aanpasbaar inlegkussen, 2 schouder-beschermers,
1 gespbeschermer. Het verwijderen van de bekleding
gebeurt volgens de volgende stappen:
• Open gesp (5).
• Verwijder de schouderbeschermers (6) van de
schourdergordels (3).
• Trek de bekleding over de rand van het zitje.
• Trek de schoudergordels (3) met de gespuiteinden (7)
uit de delen van de bekleding.
• Trek gesp (5) door de bekleding van het zitje.
• Nu kan u de onderdelen van de bekleding verwijderen.
WAARSCHUWING! Het kinderveiligheidzitje mag nooit
!
zonder bekleding gebruikt worden.
ZDEJMOWANIE TAPICERKI
Tapicerka składa się z 5 części: tapicerka fotelika,
1 wkładka dla niemowlęcia, 2 nakładki na szelki
naramienne oraz 1 nakładka na klamrę. Aby zdjąć
tapicerkę należy postępować w następujący sposób:
• Otwórz klamrę główną (5).
• Zdejmij nakładki (6) z szelek naramiennych (3).
• Zsuń tapicerkę z fotelika.
• Wyciągnij szelki (3) naramienne (7) z tapicerki.
• Przełóż tapicerkę przez klamrę główną (5).
• Teraz możesz już zdjąć tapicerkę.
Ostrzeżenie! Fotelika nie wolno używać bez
!
tapicerki.
OPGELET! Gebruik alleen de ATON CBX bekleding!
DE BEKLEDING VAN HET ZITJE VASTMAKEN
Doe het omgekeerde om de bekleding opnieuw op het zitje
aan te brengen.
OPGELET! Draai de schoudergordels niet.
UWAGA! Używaj tylko oryginalnej tapicerki ATON CBX!
ZAKŁADANIE TAPICERKI
Aby założyć z powrotem tapicerkę, wykonaj powyższe
czynności w odwrotnej kolejności.
UWAGA! Nie skręcaj szelek naramiennych.
75

NETTOYAGE
Il est important d‘utiliser uniquement les housses originales
du ATON CBX, partie intégrante des fonctions du siège.
Vous pouvez obtenir des housses supplémentaires auprès
de votre revendeur.
REMARQUE! Merci de laver la housse avant la première
utilisation. Les housses sont lavables en machine à 30°C
maximum, cycle délicat. Si vous lavez à température
plus élevée, le tissu peut passer. Veuillez laver la housse
séparément et ne jamais sécher mécaniquement! Ne
pas sécher au soleil directement! Les parties plastiques
peuvent être nettoyées au savon doux et à l‘eau tiède.
AVERTISSEMENT! Merci de ne jamais utiliser de
!
détergents, d‘eau de javel ou d‘agents blanchissants!
AVERTISSEMENT! Le système de harnais intégré
!
ne peut pas être retiré du siège. Ne pas retirer les
pièces du system de harnais.
Le système de harnais intégré peut être nettoyé avec un
savon doux et de l‘eau tiède.
76

FR
NL
PL
REINIGING
Het is belangrijk enkel een origineel ATON CBX bekleding
te gebruiken aangezien deze bekleding een essentiëel
onderdeel van het zitje is. U kan reserve-bekledingen bij
uw verdeler verkrijgen.
CZYSZCZENIE
Należy używać tylko oryginalnej tapicerki fotelika
ATON CBX, ponieważ jest ona niezbędna do jego
sprawnego funkcjonowania. Zapasowe tapicerki dostępne
są w sklepach oferujących produkty CYBEX.
LET OP! Was de bekleding voordat u deze voor de eerste
keer gaat gebruiken. De bekleding van het zitje mag in de
machine gewassen worden op 30°C, met een voorzichtig
programma. Indien u de bekleding op een hogere
temperatuur wast, kan ze haar kleur verliezen. Gelieve
de bekleding apart te wassen en ze nooit machinaal te
drogen! Droog de bekleding niet in direkt zonlicht! U kan
de plastieken onderdelen met een milde detergent en
warm water afwassen.
WAARSCHUWING! Gebruik onder geen beding
!
chemische detergenten of bleekmiddelen!
WAARSCHUWING! Het geïntegreerde harnas-
!
systeem mag niet verwijderd worden van het
babyzitje. Vewijder ook geen onderdelen van het
harnassysteem.
Het geïntegreerde harnassysteem kan met warm water en
een milde detergent gewassen worden.
UWAGA! Przed pierwszym użyciem tapicerkę należy
wyprać.. Można ją prać w pralce w temperaturze maks.
30°C, w delikatnym cyklu prania. Wyższa temperatura
prania możne spowodować wyblaknięcie koloru. Tapicerkę
należy prać oddzielnie i nigdy nie należy suszyć jej w
suszarce! Nie należy także suszyć tapicerki w pełnym
słońcu! Plastikowe części fotelika można przecierać ciepłą
wodą z delikatnym detergentem.
Szelki bezpieczeństwa fotelika mogą być czyszczone
ciepłą wodą z dodatkiem łagodnego detergentu.
Ostrzeżenie! W żadnym wypadku nie stosować
!
chemicznych środków do czyszczenia ani wybielaczy!
Ostrzeżenie! Szelki bezpieczeństwa fotelika
!
nie mogą być z niego wyjmowane. Nie zdejmuj
żadnych stałych elementów szelek.
77

ENTRETIEN DU PRODUIT
De façon à garantir la meilleure protection de votre enfant,
merci de vous assurer des points suivants:
• Toutes les pièces principales du siège auto pour enfant
doivent faire l’objet d’un contrôle régulier vériant qu’elles
ne sont pas endommagées.
• Les parties mécaniques doivent fonctionner facilement.
• Il est essentiel que le siège auto ne soit pas
endommagé par des coups de portière ou par le rail des
sièges de la voiture.
Il est essentiel que le siège auto ne soit pas endommagé
par des coups de portière ou par le rail des sièges de la
voiture.
• Le siège auto doit être examiné par le constructeur en
cas de chute ou d‘accident.
NOTE! Il est conseillé d’acheter une housse
supplémentaire lors de l’achat d’un siège auto de sorte
que le siège puisse continuer à être utilisé même lorsque
la housse doit être lavée ou séchée.
EN CAS D‘ACCIDENT
Lors d‘un accident, même mineur, un siège-auto peut subir
des dégâts invisibles à l‘oeil nu. Il est donc très important
de remplacer immédiatement un siège accidenté. En cas
de doute, contactez votre revendeur ou le fabricant.
78

FR
NL
PL
ONDERHOUD
Om er zeker van te zijn dat het autostoeltje optimale
bescherming biedt, moet u op het volgende letten:
• Alle belangrijke onderdelen van het autostoeltje dienen
regelmatig op beschadigingen te worden gecontroleerd.
• Alle mechanische onderdelen dienen goed te
functioneren.
• Het autostoeltje mag absoluut niet klem zitten tussen
harde voorwerpen, zoals een autoportier of stoelrail, omdat
PIELĘGNACJA PRODUKTU
Aby zagwarantować maksymalne bezpieczeństwo
swojemu dziecku, zwróć uwagę na poniższe:
• Wszystkie ważne części fotelika powinny być regularnie
sprawdzane.
• Części mechaniczne powinny działać bez zarzutu.
• Zwracaj szczególną uwagę, aby fotelik nie zaklinował
się w drzwiach, prowadnicy fotela samochodowego, gdyż
może to uszkodzić jego strukturę.
het daardoor beschadigd kan raken.
Het is heel belangrijk dat het kinderveiligheidszitje niet
geklemd geraakt tussen harde delen, zoals bijvoorbeeld de
deur van de auto, enz. Dit kan het het zitje beschadigen.
• Het kinderveiligheidszitje moet door de fabrikant
onderzocht worden wanneer het bijvoorbeeld gevallen is,
of iets gelijkaardigs.
Zwracaj szczególną uwagę, aby fotelik nie został
uszkodzony poprzez zaklinowanie się w drzwiach,
prowadnicy fotela samochodowego czy między innymi
twardymi elementami.
• Jeżeli fotelik upadnie i/lub zostanie poważnie
uszkodzony, musi zostać wymieniony na nowy.
LET OP! Het is aan te raden een extra hoes voor het
autostoeltje te kopen, zodat u het autostoeltje kunt
blijven gebruiken als de originele hoes wordt gewassen
en moet drogen.
IN GEVAL VAN EEN ONGEVAL
Na een ongeval kan het zitje schade opgelopen hebben,
die onzichtbaar is voor het blote oog. Daarom moet het
zitje na een ongeval onmiddellijk vervangen worden.
Contacteer in geval van twijfel de verdeler of de fabrikant.
UWAGA! Zalecamy zakup drugiej tapicerki fotelika. Dzięki
temu, gdy jedna tapicerka będzie w praniu, Twoje dziecko
nadal będzie mogło korzystać z fotelika.
POSTĘPOWANIE PO WYPADKU DROGOWYM
Po wypadku drogowym uszkodzenia fotelika mogą być
niewidoczne. Fotelik powinien wtedy zostać niezwłocznie
wymieniony. W razie wątpliwości należy skontaktować się
ze sprzedawcą lub producentem.
79

TRAVEL SYSTEM
Suivez le mode d’emploi de votre poussette!
Vous pouvez xer la coque sur toutes les poussettes
approuvées.
16
80
Clipser la coque sur l’adaptateur homologué avec l’enfant
installé vers le parent. Assurez-vous que la coque se
verrouille de manière audible sur les deux côtés. Toujours
vérier que la coque est bien connectée fermement à la
poussette. Pour détacher la coque, pressez d‘abord sur
les boutons (16). Gardez les boutons appuyés et levez la
coque.

FR
NL
PL
REISSYSTEEM SYSTEM PODRÓŻNY
Volg de handleiding voor uw buggy!
U kunt het autostoeltje bevestigen op elke goedgekeurde
buggy.
Klik het autostoeltje vast op de goedgekeurde adapter,
waarbij de richting zodanig is dat het kind naar de
ouder kijkt. Zorg dat het autostoeltje aan weerszijden
hoorbaar vergrendeld wordt. Controleer altijd of het
autostoeltje stevig op de buggy is bevestigd. Om het
autostoeltje van de buggy te verwijderen, houdt u beide
ontgrendelingsknoppen (16) van het autostoeltje ingedrukt
en tilt u het stoeltje omhoog.
Sprawdź instrukcję obsługi Twojego wózka.
Fotelik samochodowy można zamontować do każdego
zatwierdzonego wózka.
Zamontuj fotelik samochodowy na stelażu wózka przy
pomocy adapterów. Fotelik oraz dziecko powinny
być odwrócone twarzą do rodzica/rączki wózka. Przy
wpinaniu fotelika w adaptery będzie słychać wyraźne
klinięcie. Upewnij się, że fotelik jest poprawnie przypięty.
Usłyszysz kliknięcia. Zawsze sprawdzaj czy fotelik
jest pewnie przymocowany do stelaża wózka. W celu
wypięcia fotelika, przytrzymaj przyciski (16) fotelika
wciśnięte i podnieś fotelik do góry.
81

DURÉE DE VIE DU PRODUIT
Ce siège auto a été conçu pour satisfaire ses fonctions
initiales en utilisation normale pour une durée de vie de 7
ans. L’usure progressive de la matière plastique, causée
par exemple par l’exposition au soleil (UV), peut provoquer
une légère détérioration des propriétés du produit.
Le siège auto pouvant être exposé à des variations de
température et autres désagréments, merci de suivre les
instructions ci-dessous :
• Si le véhicule est exposé à la lumière directe du soleil
pendant une période prolongée, le siège auto doit être
retiré du véhicule ou recouvert avec un linge clair.
• Vériez régulièrement que les pièces plastiques ou les
parties en métal ne présentent aucun dommage ni de
changement de forme ou de couleur.
Si vous constatez un changement quelconque, le siège
doit être détruit ou faire l’objet d’une vérication par le
fabricant, voire être remplacé par celui-ci.
• Les changements de couleur de la housse, surtout
la décoloration, sont parfaitement normaux lors de
l’utilisation du siège dans un véhicule et n’en aectent
pas l’ecacité.
82

FR
NL
PL
LEVENSDUUR CYKL ŻYCIA PRODUKTU
Dit autostoeltje is zo ontworpen dat het bij normaal gebruik
de bedoelde functies gedurende een levensduur van
ongeveer 7 jaar kan vervullen. Door geleidelijke slijtage
van kunststof onderdelen, bijvoorbeeld door blootstelling
aan zonlicht (UV), kunnen de producteigenschappen
enigszins worden aangetast. Omdat grote
temperatuurverschillen en andere onvoorziene
omstandigheden normaal zijn in voertuigen, dient u met de
Fotelik został zaprojektowany w sposób, który pozwala na
bezpieczne korzystanie z niego przez 7 lat. W związku z
tym, że plastikowe części z czasem się zużywają, np. z
powodu ekspozycji na słońce, cechy produktu mogą się
nieznacznie zmieniać. Jako że fotelik może być narażony
na duże wahania temperatur podczas jego eksploatacji w
samochodzie oraz inne nieprzewidziane sytuacje, należy
stosować się do poniższych zaleceń:
volgende aspecten rekening te houden:
• Als het voertuig gedurende langere tijd in direct
zonlicht staat, moet het autostoeltje uit de auto worden
verwijderd dan wel met een lichte doek worden
afgedekt.
• Controleer regelmatig alle kunststof en metalen
onderdelen van het stoeltje op schade, vervorming of
verkleuring. Als u veranderingen constateert aan het
autostoeltje, moet u het wegdoen of laten controleren
en mogelijk laten vervangen door de fabrikant.
• Veranderingen in de stof, vooral het ets worden
daarvan, zijn normaal bij gebruik in een voertuig en
• Jeśli samochód będzie zaparkowany w bezpośrednim
słońcu przez dłuższy czas, powinno się przykryć fotelik
samochodowy materiałem lub wyjąć z samochodu.
• Regularnie sprawdzaj, czy plastikowe i metalowe
elementy fotelika nie są uszkodzone lub czy nie zmienił
się ich kształt lub kolor. Przy stwierdzeniu jakichkolwiek
zmian, należy skonsultować się ze sprzedawcą. Może
zajść potrzeba utylizacji lub zakupu nowego fotelika.
• miany w wyglądzie tapicerki, w szczególności blaknięcie
kolorów, nie są wadą wyrobu, ale normalnym efektem
eksploatacji.
schaden de functie van het stoeltje niet.
83

RECYCLAGE
Pour des raisons environnementales et écologiques,
nous vous demandons d‘évacuer emballages et pièce
du siège en n de vie, selon les normes et régulation en
vigueur de votre pays. De façon à garantir le recyclage
des déchets, merci de contacter votre commune de
résidence an de prendre connaissance des consignes
d‘évacuation.
AVERTISSEMENT! Ne pas conserver les em-
!
ballages à porté des enfants. Il y a un risque de
suffocation!
INFORMATION PRODUIT
Pour toutes informations complémentaires, merci de
contacter votre revendeur en priorité et merci de collecter
au préalable, les informations suivantes:
• Numéro de série (voir autocollant).
• Marque, Type et nom du véhicule ainsi que la
position dans l‘habitacle où est installé le siège auto
habituellement.
• Poids (Age, Taille) de l‘enfant.
Pour plus d‘information sur nos produits, merci de visiter
www.mycbx.com.
84

FR
NL
PL
AFVALVERWIJDERING
Wij vragen onze klanten om alle afval, zowel in het
begin (verpakking) als op het einde van de levensduur
(onderdelen) van het zitje, op milievriendelijke wijze te
verwijderen. De richtlijnen voor afvalverwerking kunnen
verschillen van regio tot regio. Om de juiste richtlijnen
te kennen, neemt u best contact op met de plaatselijke
autoriteiten voor afvalverwerking in uw woonplaats.
Neem in elk geval steeds de regels voor afvalverwerking
van uw land in acht.
WAARSCHUWING! Houd alle verpakkingsmate-
!
rialen uit de buurt van kinderen om het risico op
verstikking te vermijden!
PRODUKTINFORMATIE
Contacteer eerst uw verdeler in geval van vragen. Gelieve
eerst de volgende informatie te verzamelen:
• Serienummer (zie Etiket)
• Merknaam en autotype en de positie waar het zitje
normaal gemonteerd wordt.
• Gewicht (Leeftijd, Grootte) van uw kind.
Voor verdere informatie over onze produkten, gelieve te
surfen naar www.mycbx.com.
UTYLIZACJA
Dla ochrony środowiska należy zutylizować wszystkie
niepotrzebne elementy fotelika (najpierw opakowanie,
a po zakończeniu użytkowania – cały fotelik) zgodnie
z przepisami obowiązującymi w danym kraju. Przepisy
regulujące sposoby utylizacji mogą się różnić w zależności
od kraju. Skontaktuj się z lokalną rmą zajmującą
się gospodarką odpadami, aby we właściwy sposób
zutylizować fotelik. Zawsze stosuj się do przepisów
dotyczących postępowania z odpadami w swoim kraju.
INFORMACJA O PRODUKCIE
W przypadku pytań prosimy kontaktować się w pierwszej
kolejności ze sklepem. Wcześniej przygotuj następujące
informacje:
• numer seryjny (patrz etykieta).
• marka i typ samochodu oraz miejsce, na którym zwykle
• waga, wiek, wzrost dziecka.
Aby uzyskać więcej informacji o produkcie prosimy
odwiedzić stronę internetową www.mycbx.com.
Ostrzeżenie! Wszystkie elementy opakowa-
!
nia fotelika powinny znajdować się w miejscu
niedostępnym dla dziecka. Istnieje ryzyko zakrztuszenia się.
montowany jest fotelik.
85

GARANTIE
Les conditions de garantie suivantes ne sont valables que
dans le pays dans lequel, ce produit a été vendu à l‘origine
par un détaillant à un consommateur. La garantie couvre tous
les défauts de fabrication et de matériaux, qui existaient au
moment de l‘achat ou qui sont devenus apparents dans les
trois (3) ans suivant l‘achat initial auprès d‘un détaillant par un
consommateur (la garantie du fabricant). Dans le cas où des
défauts de fabrication et de matériel apparaîtraient au cours
de la période de garantie, le produit sera réparé ou remplacé,
à notre entière discrétion. Pour toute réclamation concernant
des services couverts par cette garantie, le produit doit être
retourné au détaillant auprès duquel le produit a été acheté et
l‘original de la preuve d‘achat (ticket de caisse ou facture) doit
être présenté, mentionnant la date d‘achat, le nom du détaillant,
le nom du produit et sa description. Aucune réclamation n‘est
possible directement auprès du fabricant ou de toute autre
personne autre que le détaillant chez qui le produit a été
initialement acheté. La garantie est valable uniquement si sans
délai après l‘achat il a été vérié que le produit était complet et
qu‘il ne présentait aucun défaut de fabrication ni aucun défaut
matériel. Si le produit a été acheté par correspondance, vous
devez vérier sans délai à réception que le produit est complet
et qu‘il ne présente aucun défaut de fabrication ni aucun
défaut matériel. Si le produit est endommagé, il ne doit pas
être utilisé et doit être renvoyé sans délai au détaillant chez
qui il a été acheté. Pour toute réclamation dans le cadre de la
garantie, le produit doit être retourné complet et propre. Avant
86

FR
NL
PL
GARANTIE
Deze garantie is alleen van toepassing in het land van
aankoop, en verkocht door een retailer direct aan een
consument. De garantie dekt alle productie en matreriaal
fouten. Bestaande op datum aankoop of verschijnende
in de periode van 3 jaar na aankoop bij de retailer.
(Fabrieksgarantie) In het geval dat een fabricagefout of een
materiaalfout verschijnt zullen wij het product kosteloos
repareren of vervangen voor een gelijkwaardig product.
Om van dergelijke garantie gebruik te maken dient u het
product in de winkel van aankoop aan te bieden voorzien
van aankoopsbewijs met datum aankoop en naam retailer.
Deze garantie vervalt bij doorverkoop aan derden. Gelieve
het product direct na aankoop / ontvangst controleren op
eventuele gebreken. In geval van gebreken, gebruik het
artikel niet maar breng deze in nette en originele staat naar
de winkel van aankoop om zo verzekerd te zijn van de
garantie. Voorafgaand aan contact met de retailer, lees deze
gebruiksaanwijzing aandachtig door. Deze garantie dekt geen
schade veroorzaakt door verkeerd gebruik, milieu-invloed
(water, vuur, verkeersongevallen, of normale slijtage.) Het
is uitsluitend van toepassing in het geval dat het gebruik
van het product altijd in overeenstemming was met de
gebruiksaanwijzing, en alle reparaties of wijzigingen aan het
product door daar toe aangewezen personen is uitgevoerd, en
alleen originele onderdelen zijn gebruikt. Deze garantie sluit
niet uit, beperkt of heeft anderszins invloed op enige wettelijke
rechten van de consument, waaronder begrepen vorderingen
GWARANCJA
Niniejsza gwarancja obowiązuje wyłącznie w kraju, w którym
produkt został po raz pierwszy sprzedany klientowi przez sklep
detaliczny. Gwarancja obejmuje wszelkie wady materiałowe i
produkcyjne istniejące w momencie zakupu czy wykryte w ciągu
trzech (3) lat od daty zakupu produktu w sklepie detalicznym
przez pierwszego właściciela (gwarancja producenta). Jeśli
wada materiałowa czy produkcyjna zostanie wykryta, producent,
według własnego uznania, bezpłatnie naprawi produkt lub
wymieni go na nowy. Aby skorzystać z warunków niniejszej
gwarancji, należy zanieść lub wysłać produkt do sklepu, w
którym został po raz pierwszy zakupiony oraz przedłożyć
oryginalny dowód zakupu (paragon lub fakturę) zawierający datę
zakupu, nazwę sklepu oraz nazwę towaru. Warunki gwarancji
nie obowiązują, jeśli produkt zostanie odesłany do producenta
lub innego podmiotu, a nie do sklepu, w którym został po raz
pierwszy zakupiony. Prosimy o sprawdzenie produktu pod kątem
jego kompletności czy jakichkolwiek wad w momencie jego
zakupu, a w przypadku sprzedaży wysyłkowej - natychmiast
po jego otrzymaniu. W przypadku stwierdzenia wady należy
zaprzestać użytkowania produktu i odesłać go do sklepu,
w którym został po raz pierwszy zakupiony. Reklamowany
w ramach gwarancji produkt powinien zostać dostarczony
czysty i kompletny. Jednakże przed kontaktem ze sklepem
należy uważnie przeczytać instrukcję użytkowania. Niniejsza
gwarancja nie obejmuje żadnych uszkodzeń wynikających
z nieprawidłowego użytkowania, warunków zewnętrznych
(woda, ogień, wypadki drogowe i inne) oraz normalnego
87

de contacter le détaillant, veuillez lire attentivement le manuel
de l‘utilisateur. La garantie ne couvre pas les dommages causés
par une mauvaise utilisation, des facteurs externes (eau, feu,
accidents de la circulation ou autres) ou par l‘usure normale.
Toute réclamation dans le cadre de la garantie ne sera autorisée
que si le produit a été manipulé et utilisé conformément aux
instructions d‘utilisation, si des réparations ont été eectuées par
des personnes autorisées à le faire et si des pièces détachées
et des accessoires d‘origine ont été utilisés. Cette garantie
n‘exclut, ne limite et ne restreint en rien les droits actuels
des consommateurs conformément à l‘ensemble des lois
actuellement en vigueur, ni les droits contre les vendeurs en cas
de violation du contrat de produit.
88

FR
NL
PL
uit onrechtmatige daad en claims met betrekking tot een
schending van het contract, welke de koper jegens verkoper of
de fabrikant van het product heeft.
zużycia. Gwarancja obowiązuje wyłącznie wtedy, jeśli produkt
był użytkowany zgodnie z instrukcją użytkowania, jeśli był
naprawiany/modykowany przez uprawnione osoby i użyto
do tego celu wyłącznie oryginalnych części i akcesoriów.
Niniejsza gwarancja nie wyłącza, nie ogranicza ani nie zawiesza
uprawnień kupującego wynikających z niezgodności towaru z
umową konsumencką.
CYBEX GmbH
Riedingerstr. 18, 95448 Bayreuth, Germany
Tel.: +49 921 78 511-0, Fax.: +49 921 78 511- 999
89

90

ES
PT
DK
Apreciado Cliente!
GRACIAS POR ADQUIRIR SU PRODUCTO ATON CBX. PODEMOS ASEGURAR QUE LA SEGURIDAD, LA
COMODIDAD Y FACILIDAD DE USO HAN SIDO NUESTRAS PRINCIPALES PRIORIDADES EN EL DESARROLLO
DE ESTA SILLA DE SEGURIDAD. ESTE PRODUCTO SE HA FABRICADO SIGUIENDO LOS CONTROLES DE
CALIDAD MÁS ELEVADOS Y LOS CRITERIOS DE SEGURIDAD MÁS ESTRICTOS.
Caro cliente!
AGRADECEMOS A SUA ESCOLHA PELA ATON CBX. GARANTIMOS-LHE QUE O PROCESSO DE
DESENVOLVIMENTO DESTEB OVINHO FOI FOCADO NA SEGURANÇA,CONFORTO E FACILIDADE DE
UTILIZAÇÃO. ESTE PRODUTO É FABRICADO SOB CONTROLO DE QUALIDADE EXEPCIONAL E DE ACORDO
COM OS MAIS ELEVADOS CRITÉRIOS DE SEGURANÇA.
Kære kunde!
TAK FOR DIT KØB AF ATON CBX. VORES HOVEDFOKUS I UDVIKLINGEN AF ATON CBX HAR VÆRET AT
KOMBINERE SIKKERHED, KOMFORT OG NEM BETJENING. PRODUKTET ER FREMSTILLET UNDER SÆRLIG
KVALITETSKONTROL OG OPFYLDER DE STRENGESTE SIKKERHEDSKRAV.
91

ATON CBX
SEMI-U NIVERSAL
____________
92
ATON CBX
ECE R 44/04
____________
UNIVER SAL
- 13 kg
04301297
CYBEX GmbH
Riedingerstr. 18, 95448 Bayreuth
Germany
Approved for
ATON CBX Base-fi x
HOMOLOGACIÓN
Aton CBX –silla de seguridad
infantil
ECE R44/04 grupo 0+
Peso: Hasta 13 kg
Edad: Hasta los 18 meses, aprox
Solo compatible con vehículos
con cinturón de seguridad de
3 puntos, con la homologación
ECE R16 o equivalente.
HOMOLOGAÇÃO
Aton CBX – ovinho
ECE R44/04 grupo 0+
Peso: até 13 kg
Idade: até aprox. 18 meses
Recomendado apenas para
assentos de veiculos com cintos
de três pontos com retractor
automático, de acordo com
ECE R16 ou outros standarts
equivalentes.
GODKENDELSE
Aton CBX – babyautostolt
ECE R44/04 aldersgruppe 0+
Vægt: Op til 13 kg
Alder: op til ca. 18 måneder
Kun anvendelig på bilsæder med
automatisk 3-punktssele i henhold
til ECE R16 eller tilsvarende
standard.
ES
¡Atención! Con el fin de mantener a su hijo
!
correctamente protegido, es absolutamente
esencial que se utilice la silla de seguridad como
se describe en este manual.
¡AVISO! Guarde siempre el manual de instrucciones en el
compartimento de la silla de seguridad previsto para ello.
¡AVISO! Debido a los requisitos especícos de cada país
(por ejemplo, color del etiquetado en la silla de seguridad),
las características de los productos pueden variar en
apariencia externa. A pesar de ello, estos requerimientos
no afectan al correcto funcionamiento del producto.
¡AVISO! El cinturón de tres puntos solamente se debe
deslizar a través de las guías designadas para ello. Las
guías del cinturón se describen detalladamente en este
manual de instrucciones y están marcadas en azul en la
silla de coche.

ES
PT
DK
PT
Atenção! Para manter a criança em segurança é
!
essencial que utilize a cadeira auto como descrito
neste manual.
DK
ADVARSEL! For at kunne beskytte dit barn bedst
!
muligt er det af absolut nødvendighed, at autostolen benyttes som beskrevet i denne manual.
NOTA! Por favor,tenha sempre à mão este manual de
instruções e guarde-o no compartimento destinado para
o efeito.
NOTA! Devido aos requisitos especicos de cada
pais (ex cor da etiqueta presente na cadeira auto) as
características a nivel visual poderão variar. Contudo
estas situações não afectam o correto funcionamento do
produto.
NOTA! O cinto de três pontos deve passar apenas
pelos pontos designados para o efeito. Os pontos de
passagem do cinto estão descritos neste manual e
marcadas a azul no ovinho.
BEMÆRK! Opbevar altid denne betjeningsvejledning i
rummet på autostolen, som er beregnet til formålet.
BEMÆRK! På grund af landespecikke krav (f.eks.
farvemærkning på autostolen) kan produktegenskaber
variere i deres ydre fremtoning. Dette påvirker dog ikke
produktets funktionalitet.
BEMÆRK! 3-punktsselen må kun føres gennem de dertil
beregnede seleføringer. Seleføringerne er beskrevet
grundigt i detaljer i denne vejledning og er fremhævede
med blåt på autostolen.
93

CONTENIDO
INSTRUCCIONES BREVES ........................................ 4
LA MEJOR POSICIÓN EN EL VEHÍCULO ...............96
PROTECCIÓN DEL VEHÍCULO ................................96
SEGURIDAD EN EL VEHÍCULO ............................... 98
AJUSTE DEL ASA DE TRANSPORTE ....................100
AJUSTE DE LOS CINTURONES ............................102
SEGURIDAD PARA SU BEBÉ ................................. 104
ASEGURANDO AL BEBÉ ........................................ 106
INSTALAR LA SILLA.................................................108
ASEGURAR A SU HIJO CORRECTAMENTE ........ 110
INSTALAR LA SILLA INFANTIL ADECUADAMENTE ..
.................................................................................... 110
EXTRAER EL REDUCTOR ...................................... 11 4
APERTURA DE LA CAPOTA DE LA ATON BASIC 114
EXTRAER LA VESTIDURA ...................................... 116
COLOCAR LA VESTIDURA ..................................... 11 6
LIMPIEZA .................................................................. 118
MANTENIMIENTO DEL PRODUCTO ..................... 120
EN CASO DE ACCIDENTE ......................................120
TRAVEL SYSTEM ..................................................... 122
DURABILIDAD DEL PRODUCTO ........................... 124
RECICLADO .............................................................126
INFORMACIÓN DEL PRODUCTO .......................... 126
GARANTÍA ................................................................128
94

ES
PT
DK
INSTRUÇÕES CURTAS INDHOLD
INSTRUÇÕES BREVES ........................................................4
A POSIÇÃO CORRETA NO AUTOMÓVEL ......................... 97
PROTEÇÃO DO AUTOMÓVEL ...........................................97
SEGURANÇA NO AUTOMÓVEL ......................................... 99
REGULAÇÃO DA ASA DE TRANSPORTE .......................101
REGULAÇÃO DOS CINTOS .............................................103
SEGURANÇA PARA O SEU BEBÉ ...................................105
COLOCAR O BEBÉ ............................................................ 107
INSTALAR A CADEIRA ......................................................109
COLOQUE O SEU FILHO CORRECTAMENTE ................111
INSTALAR A CADEIRA INFANTIL ADEQUADAMENTE ..111
RETIRAR O REDUTOR ..................................................... 115
ABERTURA DA CAPOTA DA ATON BASIC ...................... 11 5
EXTRAIR O ACOLCHOADO ............................................. 117
COLOCAR O ACOLCHOADO ........................................... 117
LIMPEZA ............................................................................. 119
MANUTENÇÃO DO PRODUTO ........................................121
EM CASO DE ACIDENTE .................................................. 121
TRAVEL SYSTEM ............................................................... 123
TEMPO DE VIDA DO PRODUTO ...................................... 125
RECICLAGEM ....................................................................127
INFORMAÇÃO DO PRODUTO .........................................127
GARANTIA ..........................................................................129
KORT VEJLEDNING ..............................................................4
PRAVILNA NAMESTITEV V VOZILO .................................97
BESKYTTELSE AF BILEN ................................................... 97
SIKKERHED I BILEN ...........................................................99
VARNOST V VOZILU .........................................................101
SÅDAN JUSTERES SKULDERSELERNE ....................... 103
SIKKERHED FOR DIT BARN ............................................105
SÅDAN SPÆNDES BARNET FAST..................................107
SÅDAN INDSTILLES BARNESÆDET ..............................109
SÅDAN SPÆNDES BARNET KORREKT FAST ...............111
KORREKT MONTERING AF BARNESÆDET ...................111
SÅDAN TAGES INDLÆGGET AF ..................................... 115
SÅDAN ÅBNES ATON BASIC-KALECHEN ...................... 115
SÅDAN TAGES BETRÆKKET AF ..................................... 117
SÅDAN SÆTTES SÆDEBETRÆKKET PÅ ..................... 117
RENGØRING ...................................................................... 119
PRODUKTPLEJE ...............................................................121
I TILFÆLDE AF EN ULYKKE ............................................. 121
TRAVEL SYSTEM ............................................................... 123
PRODUKTETS LEVETID ................................................... 125
BORTSKAFFELSE ............................................................. 127
PRODUKTINFORMATION .................................................127
GARANTI ............................................................................. 129
95

LA MEJOR POSICIÓN EN EL VEHÍCULO
La silla de coche puede utilizarse en todos los modelos
de automóvil con cinturones de tres puntos retráctiles
automáticamente aprobados para „uso universal“ en el
manual de instrucciones del vehículo.
¡AVISO! Compruebe siempre que la silla puede instalarse
adecuadamente en su vehículo antes de comprarla.
Siga siempre las recomendaciones del manual de
instrucciones.
¡AVISO! Si la silla de seguridad no es estable o se asienta
en un ángulo demasiado pronunciado, puede utilizar una
manta o toalla para compensarlo. Como alternativa, puede
elegir otro asiento para colocarla en el vehículo.
¡ATENCIÓN! Ninguna modificación o añadidura en
!
la silla de coche está permitida sin la aprobación de
ATON CBX. Las reparaciones solo pueden llevarse
a cabo por personas autorizadas a este efecto. Para
llevarlas a cabo, deben ser siempre efectuadas
únicamente con componentes y y piezas de repuesto
originales. En caso contrario, el grado de protección
del portabebés ya no está garantizado.
PROTECCIÓN DEL VEHÍCULO
Los asientos de algunos vehículos confeccionados con
materiales delicados (como terciopelo o piel) pueden sufrir
marcas como consecuencia de la instalación de la silla de
seguridad. Esto se evita poniendo una manta o una toalla
debajo de la silla de seguridad. En este manual también
encontrará nuestras instrucciones de limpieza. Es esencial
seguirlas antes de utilizar su silla de seguridad por primera
96
vez.

ES
PT
DK
A POSIÇÃO CORRETA NO AUTOMÓVEL
O ovinho pode ser utilizado em todos os assentos
com cinto de segurança de três pontos com retração
automática, aprovados no manual do automóvel para uso
universal.
NOTA! Verique sempre antes de comprar uma cadeira
auto, se esta pode ser instalada corretamente no
seu automóvel. Proceda sempre de acordo com as
recomendações do manual do automóvel.
NOTA! Se o ovinho não estiver estável ou car muito
inclinado no assento do automóvel, poderá utilizar um
cobertor ou toalha para compensar. Alternativamente
escolha outro assento do automóvel.
ATENÇÃO! Não podem ser feitas modificações
!
ou adições ao ovinho sem a aprovação da ATON
CBX Apenas pessoas autorizadas poderão fazer
reparações. Ao serem feitas só poderão ser
utilizados componentes/acessórios originais. Caso
contrário a função de proteção do ovinho não é
garantida.
PROTEÇÃO DO AUTOMÓVEL
Alguns assentos de automóvel podem estar forrados com
materiais delicados (por exemplo: alcantara, pele) e como
consequência da utilização da cadeira poderão aparecer
marcas ou sinais de desgaste. Poderá evitar esta situação
colocando um cobertor ou toalha por baixo da cadeira
auto. Poderá encontrar direções de limpeza neste manual.
É essencial que siga as indicações antes da primeira
utilização.
PRAVILNA NAMESTITEV V VOZILO
Babyautostolen kan bruges på alle bilsæder med
automatisk 3-punktssele, der i bilmanualen er godkendt til
’universelt’ brug.
BEMÆRK! Undersøg venligst før køb af babyautostol,
om stolen kan monteres korrekt i din bil. Anbefalingerne i
bilens manual bør altid følges.
BEMÆRK! Hvis babyautostolen er placeret på et bilsæde
på en måde, der ikke er stabilt eller for stejl en vinkel, kan
den justeres med en ekstra tæppe. Alternativt bør der
vælges et andet sæde i bilen.
BESKYTTELSE AF BILEN
Det er muligt, at nogle bilsæder, der er lavet af blødt
materiale (f.eks. velour, læder, etc.) kan vise tegn på
brug og/eller misfarvning. For at undgå dette kan der
eksempelvis placeres et tæppe eller håndklæde under
autostolen. I denne sammenhæng vil vi også gerne
henvise til vores rengøringsinstruktioner. Det er af
absolut nødvendighed, at disse følges før første brug af
autostolen.
ADVARSEL! Det er ikke tilladt at modificere eller tilføje
!
dele til babyautostolen uden en forhåndsgodkendelse
fra ATON CBX. Reparationer må kun foretages af
autoriseret personale. Ved reparationer må der kun
anvendes originale komponenter og tilbehør. Hvis
dette ikke overholdes, vil stolen ikke længere kunne
yde den beregnede sikkerhed.
97

SEGURIDAD EN EL VEHÍCULO
¡ATENCIÓN! NUNCA utilice la silla de seguridad con
!
el airbag frontal activado. Esto no se aplica en los
llamados airbags laterales.
¡AVISO! La mayoría de airbags frontales se expanden de
forma explosiva y pueden causar lesiones graves o incluso
la muerte del niño.
¡ATENCIÓN! La silla de seguridad y la base deben
!
estar siempre bien fijadas en el vehículo aunque
no las utilice. En caso de frenado de emergencia
o accidente, una silla de seguridad no asegurada
puede lesionar a otros pasajeros o a usted mismo.
Para garantizar la mayor seguridad de todos los
pasajeros, asegúrese de que...
• Los respaldos plegables del vehículo están bloqueados
en posición vertical.
• Cuando instale la silla de seguridad en el asiento del
copiloto, ajusta el asiento del coche lo más hacia atrás
posible.
• Protege adecuadamente todos los objetos que pudieran
causar daños en caso de un accident.
• Todos los pasajeros van debidamente asegurados.
¡AVISO! NUNCA transporte al niño en su regazo
!
dentro del vehículo. Las fuerzas liberadas en una
colisión son demasiado fuertes para cualquier
persona que sostenga al bebé. Nunca asegure al
niño y a usted con un único cinturón de seguridad.
98

ES
PT
DK
SEGURANÇA NO AUTOMÓVEL SIKKERHED I BILEN
ATENÇÃO! Nunca utilize uma cadeira auto no
!
banco da frente com o airbaig activo Isto não se
aplica aos airbags laterais.
NOTA! Não utilize a Aton CBX no banco frontal caso o
airbaig não esteja desactivado, pos expande de forma
violenta e poderá provocar danos ou mesmo a morte.
ATENÇÃO! O ovinho e a base devem estar sempre
!
corretamente seguras no automóvel mesmo quando
não está a ser utilizado. Em caso de travagem de
emergência ou acidente uma cadeira mal instalada
poderá causar ferimentos tanto para o condutor ou
outros passageiros.
Para garantir a melhor segurança possível para todos os
passageiros assegure-se que:
• O encosto dos assentos reclináveis estão na posição
vertical.
• Quando instalar a cadeira no lugar do copiloto, ajuste o
assento do automóvel na posição mais para trás possivel.
• todos os objectos que podem provocar danos em caso de
acidente estão acondicionados de forma segura.
• todos os passageiros estão seguros com o cinto de
segurança.
ATENÇÂO! NUNCA leve um bebé ao colo no
!
automóvel. A energia libertada num impacto é
demasiado forte para que uma pessoa possa
aguentar o bebé nos braços. Nunca prenda a si
e ao bebé apenas com o cinto de segurança do
automóvel.
ADVARSEL! Tag aldrig autostolen i brug på sæder
!
med en aktiv front airbag.. Dette gælder ikke
såkaldte side-airbags.
BEMÆRK! Frontairbagsystemers store volumen
udvider sig eksplosivt og kan forårsage dit barn alvorlig
personskade eller endog dødsfald.
ADVARSEL! Autostolen og basen skal altid være
!
monteret korrekt i bilen. Dette gælder også selvom,
at disse ikke er i brug. En ikke-fastgjort autostol kan
i tilfælde af en nødbremsning eller ulykke forårsage
store personskader på passagerer i bilen.
Med henblik på at kunne yde den bedst mulige sikkerhed
for alle passagerer, er det vigtigt, at...
• foldbare ryglæn i bilen er fastlåste i opretstående stilling.
• forreste passagersæde er skubbet helt tilbage, hvis
autostolen er placeret herpå.
• alle objekter, der ved en ulykke kan påføre skade, er
sikrede.
• alle passengere i bilen er fastgjort med sele.
ADVARSEL! Sid aldrig med et barn på skødet under
!
kørsel. De kræfter, der frigives i en kollision er alt for
høje for en person til at kunne fastholde barnet. Brug
aldrig samme sikkerhedssele til at fastgøre dig selv
og barnet.
99
 Loading...