

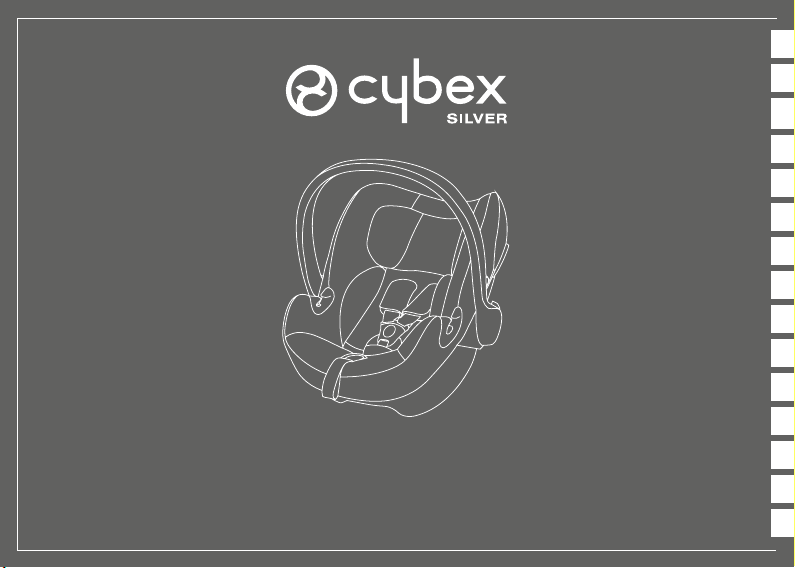
ATON B i-SIZE
UN R-129, 45 -87cm, max. 13kg
User guide
DEENITFRNLPLHUCZSKESPTSENOFIDK

DE- WARNUNG! Diese Kurzanleitung dient nur der Übersicht. Um maximale Sicherheit und maximalen Komfort für Ihr Kind zu erreichen,
ist es unbedingt notwendig, die gesamte Gebrauchsanleitung aufmerksam zu lesen.
EN - WARNING! This short manual serves as an overview only. For maximum protection and best comfort for your child it is essential to
read and follow the entire instruction manual carefully.
IT - ATTENZIONE! Questo è soltanto un sommario. Per garantire la massima sicurezza e il migliore comfort al vostro bambino è
indispensabile leggere attentamente ed interamente il manuale d'uso e seguirne scrupolosamente le istruzioni.
FR - ATTENTION! Ces instructions sommaires ne consistent qu’en un apperçu. Pour plus de confort et de protection pour votre enfant, il
est nécessaire de lire attentivement l’intégralité du manuel du siège auto.
NL - BELANGRIJK! Deze korte handleiding dient slechts als overzicht. Voor maximale bescherming en het meeste comfort voor uw kind
is het essentieel dat u de volledige handleiding goed leest en opvolgt.
PL - OSTRZEŻENIE! Skrócona instrukcja obsługi służy wyłącznie jako materiał poglądowy. W celu zapewnienia maksymalnej ochrony i
komfortu Twojemu dziecku, prosimy dokładnie zapoznać się z całą instrukcją obsługi.
HU - FIGYELMEZETÉS! Ez a rövid leírás csak áttekintésül szolgál. Gyermeke maximális védelme és legnagyobb kényelme érdekében
fontos és szükséges, hogy gyelmesen olvassa el és kövesse a teljes használati utasításban leírtakat.
CZ - VAROVÁNÍ! Tento krátký návod je určený pouze pro náhled. Pro maximální ochranu a nejvyšší pohodlí pro vaše dítě je nezbytné
pozorně si přečíst celý návod k použití a postupovat podle něj.
SK - VAROVANIE! Tento krátky návod je určený iba pre náhľad. Pre maximálnu ochranu a najvyššie pohodlie pre vaše dieťa je
nevyhnutné pozorne si prečítať celý návod na použitie a postupovať podľa neho.
ES –¡ATENCIÓN! Las viñetas de la página siguiente son simplemente un resumen. Para un mayor confort y seguridad de su niño, es
imprescindible que lea y siga las instrucciones de la versión completa.
PT – ATENÇÃO! Estas instruções são um resumo. Para máxima segurança e maior conforto é essencial ler e seguir cuidadosamente
todo o manual de instruções.
2

SE – VARNING! Denna korta manual utgör endast en översikt. För maximalt skydd och bästa komfort för ditt barn är det viktigt att läsa och
följa hela bruksanvisningen noga.
NO – ADVARSEL! Denne korte manualen brukes kun som en hurtig oversikt av produktet. For maksimal beskyttelse og best komfort for
ditt barn er det viktig å lese og følge hele instruksjonen nøye.
FI – VAROITUS! Tämä lyhyt käyttöohje antaa vain yleiskatsauksen. Jotta lapsesi saisi parhaan turvallisuuden ja mukavuuden, on erittäin
tärkeää, että luet koko käyttöohjeen huolellisesti ja noudatat sitä.
DK – ADVARSEL! Denne korte manual giver kun et overblik over produktet. For at sikre maksimal beskyttelse og komfort for dit barn er
det vigtigt at læse og følge hele brugervejlednignen omhyggeligt.
3

4

1
3
42
C
A
B
8 | INHALT
9 | CONTENT
9 | ARGOMENTI
DEENITFRNLPLHUCZSKESPTSENOFIDK
Stručný návod
Resumen de instrucciones
Manual reduzido
Kort instruktion
Kort instruksjo
Lyhyt ohje
Kort vejledning
Kurzanleitung
Short instruction
Sommario
Instructions résumées
Korte handleiding
Instrukcja skrócona
Rövid tájékoztató
Zkrácený návod
option A
5
option B
8
D
6
9
7
10
50 | CONTENU
51 | INHOUD
51 | SPIS TREŚCI
94 | TARTALOM
95 | OBSAH
95 | OBSAH
134 | CONTENIDO
135 | CONTEÚDO
135 | INNEHÅLL
178 | INNHOLD
179 | SISÄLLYS
179 | INDHOLD
5
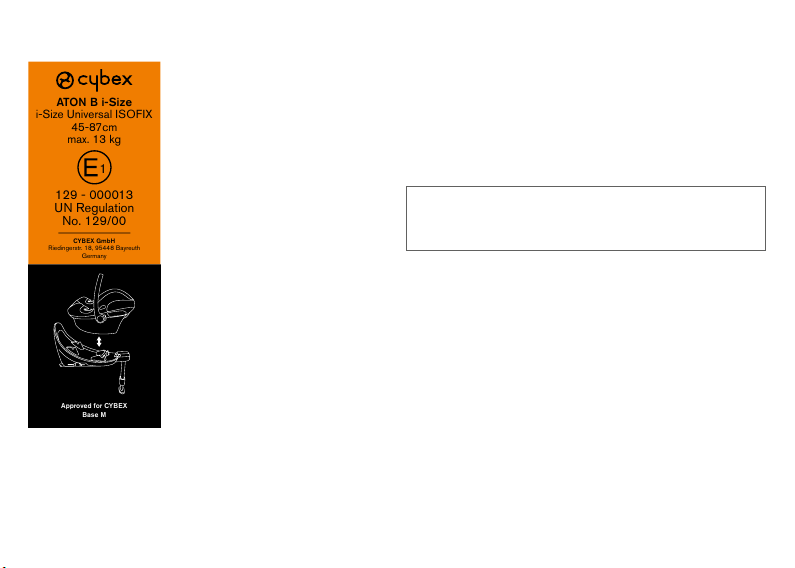
ZULASSUNG
Approved for CYBEX
Base M
129 - 000013
UN Regulation
No. 129/00
ATON B i-Size
i-Size Universal ISOFI X
45-87cm
max. 13 kg
1
CYBEX GmbH
Riedingerstr. 18, 95448 Bayreuth
Germany
Aton B i-Size – Babyschale
UN R 129
Größe: 45-87 cm
Gewicht: bis 13 kg
SEHR GEEHRTE KUNDIN, SEHR GEEHRTER KUNDE!
Vielen Dank, dass Sie sich entschieden haben, den Aton B i-Size
zu erwerben. Wir versichern Ihnen, dass bei der Entwicklung des
Kindersitzes Sicherheit, Komfort und Bedienungsfreundlichkeit
im Vordergrund gestanden haben. Das Produkt wird unter
besonderer Qualitätsüberwachung hergestellt und erfüllt strengste
Sicherheitsanforderungen.
6
HOMOLOGATION
Aton B i-Size – infant car seat
UN R 129
Size: 45-87 cm
Weight: up to 13 kg
OMOLOGAZIONE
Aton B i-Size – seggiolino auto
UN R 129
Dimensioni: 45-87 cm
Peso: no a 13 kg
WARNUNG! Damit Ihr Kind richtig geschützt werden
!
kann, ist es unbedingt notwendig, den Kindersitz so
zu verwenden, wie es in dieser Anleitung beschrieben
wird.
HINWEIS! Bewahren Sie die Anleitung immer gribereit in dem
dafür vorgesehenen Fach auf.
HINWEIS! Durch länderspezische Anforderungen (z.B.
Farbkennzeichnungen am Kindersitz) können Produktmerkmale in
ihrer äußeren Erscheinung variieren. Die korrekte Funktionsweise
des Produktes wird davon jedoch nicht beeinusst.

DEAR CUSTOMER! GENTILE CLIENTE,
Thank you very much for purchasing the Aton B i-Size. We assure
you that in the development process of the car seat we focused on
safety, comfort and user friendliness. The product is manufactured
under special quality surveillance and complies with the strictest
safety requirements.
Grazie di avere acquistato Aton B i-Size. Le assicuriamo che
nel progettare questo seggiolino auto i nostri principali obiettivi
sono stati la sicurezza, la confortevolezza e la facilità di utilizzo. Il
prodotto è stato prodotto sotto uno stretto controllo qualitativo e
risponde ai più severi standard di sicurezza.
DEENIT
WARNING! For proper protection of your child, it is
!
essential to use and install the car seat according to
the instructions given in this manual.
NOTE! Please always have the instruction manual at hand and
store it in the dedicated slot.
NOTE! Due to country-specic requirements (e.g. colour labelling
on the car seat), the product features may vary in their external
appearance. This, however, does not aect the correct functioning
of the product.
ATTENZIONE! Per la massima sicurezza del Suo
!
bambino è essenziale installare il seggiolino auto
seguendo scrupolosamente le istruzioni fornite in
questo manuale.
NOTA BENE! Tenere sempre a portata di mano queste istruzioni e
conservarle nell’apposito scomparto.
NOTA BENE! In base alle diverse normative nazionali l’aspetto
di alcune caratteristiche del prodotto potrebbe dierire (es. colori
delle etichette sul seggiolino). Ciò tuttavia non inuisce sul corretto
funzionamento del prodotto.
7

DE INHALT
KURZANLEITUNG ....................................................................................3
ZUM SCHUTZ DES FAHRZEUGS ..........................................................8
VERWENDUNG IM FAHRZEUG .............................................................8
SICHERHEIT IM FAHRZEUG ................................................................10
SICHERHEIT FÜR DAS BABY ..............................................................12
EINSTELLEN DES TRAGEBÜGELS ....................................................14
EINSTELLEN DES SONNENVERDECKS ...........................................14
ANPASSEN AN DIE KÖRPERGRÖSSE ..............................................16
ANSCHNALLEN MITTELS GURTSYSTEM .........................................18
VERWENDUNG DER BABYSCHALE MIT BASIS ..............................20
EINBAU DER BABYSCHALE MIT FAHRZEUGGURT........................26
RICHTIGES SICHERN DES BABYS ....................................................30
ENTFERNEN DES BEZUGES ..............................................................32
REINIGUNG.............................................................................................34
PFLEGE ...................................................................................................36
REISESYSTEM .......................................................................................38
VERHALTEN NACH EINEM UNFALL ...................................................38
PRODUKTINFORMATION .....................................................................38
PRODUKTLEBENSDAUER ...................................................................40
ENTSORGUNG .......................................................................................42
GARANTIEBESTIMMUNGEN ...............................................................44
8

EN CONTENTS IT ARGOMENTI
DEENIT
SHORT INSTRUCTION ............................................................................3
PROTECTING THE VEHICLE .................................................................9
CORRECT POSITION IN THE VEHICLE ...............................................9
SAFETY IN THE VEHICLE ....................................................................11
SAFETY FOR THE BABY ......................................................................13
ADJUSTING THE CARRYING HANDLE ..............................................15
ADJUSTING THE SUN CANOPY .........................................................15
ADJUSTING TO BODY SIZE .................................................................17
STRAPPING WITH HARNESS SYSTEM .............................................19
CONNECTING THE INFANT CAR SEAT WITH BASE .......................21
INSTALLING THE INFANT CAR SEAT WITH VEHICLE BELT .........27
SECURING THE BABY CORRECTLY ..................................................31
REMOVING THE COVER ......................................................................33
CLEANING ...............................................................................................35
PRODUCT CARE ....................................................................................37
TRAVEL SYSTEM ...................................................................................39
WHAT TO DO AFTER AN ACCIDENT ..................................................39
PRODUCT INFORMATION ....................................................................39
PRODUCT LIFESPAN ............................................................................41
DISPOSAL ...............................................................................................43
WARRANTY .............................................................................................45
SOMMARIO ...............................................................................................3
PROTEGGERE IL VEICOLO ...................................................................9
LA POSIZIONE MIGLIORE ALL’INTERNO DELL’AUTO ......................9
SICUREZZA NELL’AUTO .......................................................................11
SICUREZZA PER IL BAMBINO .............................................................13
REGOLAZIONE DEL MANICO PER IL TRASPORTO ........................15
REGOLAZIONE DELLA CAPOTTINA ..................................................15
REGOLAZIONE IN BASE ALLA CORPORATURA ..............................17
ALLACCIARE CON IL SISTEMA DI CINTURE ....................................19
INSTALLARE IL SEGGIOLINO SULLA BASE .....................................21
INSTALLARE IL SEGGIOLINO CON LA CINTURA DELL’AUTO .....27
ALLACCIARE CORRETTAMENTE IL BAMBINO ................................31
RIMOZIONE DEL RIVESTIMENTO ......................................................33
PULIZIA ....................................................................................................35
CURA DEL PRODOTTO .........................................................................37
SISTEMA DA VIAGGIO ..........................................................................39
COSA FARE A SEGUITO DI UN INCIDENTE ......................................39
INFORMAZIONI SUL PRODOTTO .......................................................39
DURATA DEL PRODOTTO ....................................................................41
SMALTIMENTO .......................................................................................43
GARANZIA ...............................................................................................45
9

ZUM SCHUTZ DES FAHRZEUGS
An einigen Autositzen aus empndlichem Material (z.B. Velours,
Leder, etc.) können durch die Benutzung von Kindersitzen
mögliche Gebrauchsspuren und/oder Abfärbungen auftreten. Um
das zu vermeiden, können Sie z.B. eine Decke oder ein Handtuch
unterlegen. Ferner weisen wir in diesem Zusammenhang auf
unsere Reinigungshinweise hin, die vor der ersten Verwendung der
Schale unbedingt beachtet werden sollten.
VERWENDUNG IM FAHRZEUG
Dies ist ein Kinderrückhaltesystem der Kategorie „i-Size“. Es
ist nach der Regelung UN R 129 zur Verwendung auf solchen
Fahrzeugsitzen genehmigt worden, die gemäß den Angaben
des Fahrzeugherstellers im Fahrzeughandbuch für i-SizeRückhaltesysteme geeignet sind. Verfügt Ihr Fahrzeug über keinen
i-Size Sitzplatz, überprüfen Sie bitte anhand der beigelegten
Typenliste, oder auf www.cybex-online.com, ob der Einbau
erlaubt ist.
WARNUNG! Weder die i-Size Babyschale noch die
!
i-Size Basis dürfen mit anderen Systemen kombiniert
und verwendet werden. Die Zulassung erlischt, sobald
etwas verändert wird.
Prüfen Sie vor dem Kauf der Babyschale immer, ob sich die
Babyschale ordnungsgemäß in ihrem Fahrzeug einbauen lässt.
Ein ordnungsgemäßer Einbau kann entweder mittels i-Size Basis,
über das ISOFIX System, oder den 3-Punkt Gurt des Fahrzeuges
erfolgen.
10

PROTECTING THE VEHICLE PROTEGGERE IL VEICOLO
Traces of use and/or discolouration can appear on some vehicle
seats made from delicate materials (e.g. velour, leather, etc.) if car
seats are used. You can avoid this by putting, e.g. a blanket or a
towel underneath the car seat. In this context also see our cleaning
directions. It is essential that these are followed before the rst use
of the car seat.
CORRECT POSITION IN THE VEHICLE LA POSIZIONE MIGLIORE ALL’INTERNO DELL’AUTO
This is an „i-Size“ Child Restraint System. It is approved to UN R
129, for use in, „i-Size compatible“ vehicle seating positions as
indicated by vehicle manufacturers in the vehicle users’ manual.
If your vehicle does not have an i-Size seating position, please
check the vehicle typelist that is included or www.cybex-online.com
whether the installation is allowed.
L’uso del seggiolino in auto può lasciare tracce e/o causare
scoloriture sui sedili dell’auto, soprattutto se realizzati in materiali
delicati (come velluto, pelle, ecc.). Questo è evitabile utilizzando ad
esempio un telo o un asciugamano sotto al seggiolino. A riguardo,
vedere anche le istruzioni per la pulizia: è essenziale seguire
quanto in esse indicato prima dell’uso del seggiolino.
Questo è un sistema di ritenuta “i-Size”. Approvato secondo UN
R 129, per l’uso in sedili di veicoli “i-Size compatibili”, secondo le
indicazioni della casa automobilistica produttrice contenute nel
manuale istruzioni della vettura. Se la vettura non è dotata di una
posizione di seduta i-Size, preghiamo vericare l’elenco allegato
o meglio le liste compatibilità nel nostro sito, che sono sempre
aggiornate, per vericare se l’installazione è permessa.
DEENIT
WARNING! Neither the i-Size infant car seat yet the
!
i-Size base may be combined with other systems and
be used. The warranty expires as soon as something
is changed.
Always check before buying the i-Size infant car seat whether the
seat can be properly installed in your vehicle. Proper installation
can be done either by using the i-Size base, ISOFIX on the system
or by using the 3-point belt system of the vehicle.
ATTENZIONE! Nè l’ovetto i-Size nè la base i-Size
!
possono essere abbinati ed utilizzati con altri
sistemi. In caso di modiche la garanzia si annulla
automaticamente.
Prima dell’acquisto del seggiolino i-Size vericare la compatibilità
e che possa essere installato correttamente nella vostra vettura.
L’installazione corretta avviene con l’uso della base i-Size, con
ISOFIX, oppure allaccinado il seggiolino con la cintura a 3 punti
dell’auto.
11

SICHERHEIT IM FAHRZEUG
WARNUNG! Verwenden Sie den Kindersitz nicht auf
!
einem Sitz, auf dem ein Frontairbag aktiviert ist. Dies
gilt nicht für so genannte Seitenairbags.
HINWEIS! Der großvolumige Frontairbag entfaltet sich
explosionsartig und kann Ihr Kind schwer verletzen oder sogar
töten.
WARNUNG! Der Kindersitz sowie die Basis müssen,
!
auch dann wenn sie nicht benutzt werden, immer
korrekt im Fahrzeug befestigt sein. Bereits bei einer
Notbremsung oder einem geringen Aufprall können
unbefestigte Teile andere Mitfahrer und Sie selbst
verletzen.
Achten Sie zum Schutz aller Fahrzeuginsassen stets darauf,
dass...
• die umklappbaren Rückenlehnen der Fahrzeugsitze eingerastet
sind und sich in einer aufrechten Position benden.
• bei Einbau des Kindersitzes auf dem Beifahrersitz, dieser in der
hintersten Position steht.
• im Fahrzeug alle beweglichen Gegenstände gesichert sind.
• alle Personen im Fahrzeug angeschnallt sind.
WARNUNG! Nie ein Baby im Auto auf dem Schoß
!
halten. Durch die enormen Kräfte, die bei einem
Unfall frei werden, können Sie das Baby unmöglich
festhalten. Schnallen Sie sich und ein Kind niemals
zusammen mit einem Autogurt an.
12

SAFETY IN THE VEHICLE SICUREZZA NELL’AUTO
WARNING! Never use the car seat on a vehicle seat
!
with an activated front airbag. This does not apply to
so-called side airbags.
NOTE! The large-volume front airbag expands explosively and
may cause your child serious injury or even death.
WARNING! The car seat and the base must always
!
be secured correctly in the vehicle even when not in
use. In case of an emergency brake or accident, an
unsecured car seat may injure other passengers or
yourself.
In order to guarantee the best possible safety for all passengers
make sure that...
• foldable backrests in the vehicle are locked in their upright
position.
• when installing the car seat on the front passenger seat, adjust
the vehicle seat in rearmost position.
• you properly secure all objects likely to cause injury in the case
of an accident.
• all passengers in the vehicle are buckled up.
WARNING! Never hold a baby on your lap in a vehicle.
!
The forces released in a collision are way too high
for any person to hold on to the baby. Never secure
yourself and the child with only one vehicle seat belt.
ATTENZIONE! Non utilizzare mai il seggiolino su sedili
!
anteriori dotati di airbag frontale attivato. L’avvertenza
non riguarda i cosiddetti airbag laterali.
NOTA BENE! Gli airbag anteriori sono di grandi dimensioni con
apertura automatica esplosiva e possono provocare gravi ferite,
anche letali, al bambino.
ATTENZIONE! Il seggiolino e la base devono essere
!
sempre ssati correttamente nell’auto anche quando
non in uso. In caso di brusche frenate o di incidente,
un seggiolino non ssato può ferire i passeggeri o il
guidatore.
Per garantire la massima sicurezza di tutti i passeggeri nell’auto è
indispensabile vericare che…
• gli schienali reclinabili siano ben ssati e nella posizione eretta.
• nel caso il seggiolino sia installato sul sedile passeggero
anteriore, vericare che questo si trovi nella posizione più
arretrata possibile.
• tutti gli oggetti che potrebbero costituire pericolo in caso di
incidente siano ssati in modo adeguato.
• tutti i passeggeri abbiano le cinture allacciate.
ATTENZIONE! Non tenere mai il bambino in braccio
!
nell’auto in movimento. In caso di incidente le
forze d’urto sarebbero troppo elevate per riuscire a
trattenerlo da parte di chiunque. Non utilizzare mai
la stessa cintura di sicurezza per allacciare il vostro
corpo e quello del bambino.
DEENIT
13

SICHERHEIT FÜR DAS BABY
WARNUNG! Schnallen Sie Ihr Kind immer mit dem
!
integrierten Gurtsystem an.
HINWEIS! Lassen Sie Ihr Baby niemals aus den Augen.
HINWEIS! Bitte lassen Sie Ihr Baby nie unbeaufsichtigt im
Fahrzeug zurück.
Nehmen Sie Ihr Baby so oft wie möglich aus der Babyschale und
entlasten Sie seine Wirbelsäule. Unterbrechen Sie dazu längere
Autofahrten. Denken Sie auch außerhalb des Autos daran, Ihr
Baby nicht zu lange in der Babyschale zu lassen.
WARNUNG! Die Kunststoteile der Babyschale
!
erhitzen sich in der Sonne. Ihr Baby kann sich daran
verbrennen. Schützen Sie Ihr Baby und die Babyschale
vor intensiver Sonneneinstrahlung (z.B. indem Sie ein
helles Tuch über die Schale legen).
14

SAFETY FOR THE BABY SICUREZZA PER IL BAMBINO
WARNING! Always strap your child with the integrated
!
harness system.
NOTE! Never lose sight of your baby.
NOTE! Please never leave your baby unattended in a vehicle.
ATTENZIONE! Allacciare sempre il bambino con il
!
sistema di cinture.
NOTA BENE! Non perdere mai di vista il bambino.
NOTA BENE! Non lasciare mai il bambino incustodito nel veicolo.
DEENIT
Take your baby out of the infant car seat as often as possible in
order to relieve pressure from his or her spine. Take breaks during
longer car journeys for this purpose. Also ensure that you do not
leave your baby for too long in the infant car seat even when not
in the vehicle.
WARNING! The plastic parts of the infant car seat heat
!
up in the sun. Your baby can suer burns from this.
Protect your baby and the infant car seat from intense
sun exposure (e.g. by placing a light cloth over the
seat).
Cercate di interrompere sedute troppo prolungate del bambino
nel seggiolino sollevandolo quando possibile per permettergli di
rilassare la colonna vertebrale. Allo scopo prevedete delle soste
durante il viaggio. Non solo, non lasciate il bambino troppo a lungo
nel seggiolino anche durante i tragitti non in automobile.
ATTENZIONE! Le parti in plastica del seggiolino
!
tendono a surriscaldarsi se esposte al sole. Per evitare
il rischio di scottature al bambino, proteggerlo e
proteggere il seggiolino da un’eccessiva esposizione
al sole (per esempio stendendo un telo chiaro sopra il
seggiolino).
15
B
1
2
A
C
D
16
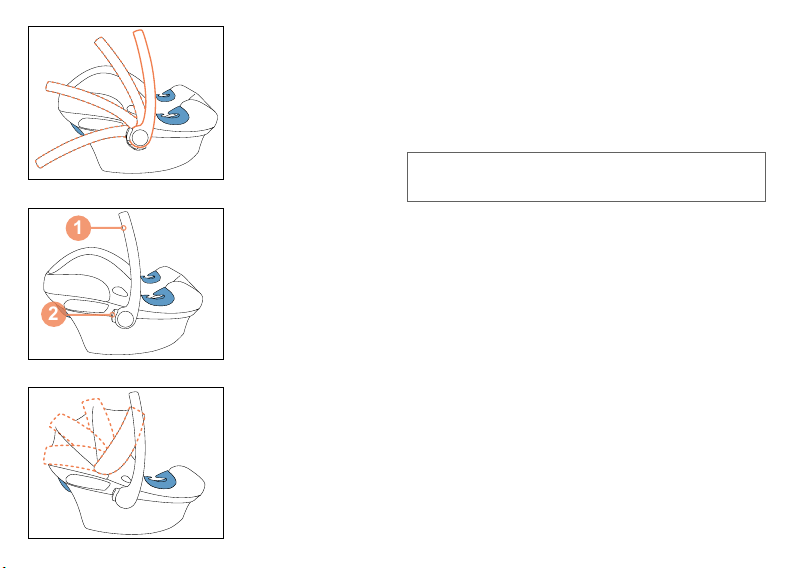
EINSTELLEN DES TRAGEBÜGELS
Sie können den Tragebügel in 4 Positionen einrasten lassen:
A: Fahrzeug- und Trageposition.
B+C: Zum Hineinlegen Ihres Babys.
D: Zum sicheren Stand auf einer ebenen Fläche außerhalb des
Fahrzeugs.
WARNUNG! Um zu verhindern, dass der Sitz während
!
des Tragens kippt, überprüfen Sie, ob der Tragebügel
(1) in der Trageposition A eingerastet ist.
• Zur Verstellung des Tragebügels drücken Sie gleichzeitig die
beiden Tasten (2) links und rechts am Tragebügel (1).
• Schwenken Sie nun mit gedrückten Tasten (2), den Tragebügel
(1) vor oder zurück, bis er selbsttätig in der gewünschten Position
einrastet.
EINSTELLEN DES SONNENVERDECKS
Klappen Sie das Sonnenverdeck durch Ziehen an der
Kunststoabdeckung stufenweise aus. Zum Einklappen schieben
Sie das Sonnenverdeck in die Ausgangsposition zurück.
ADJUSTING THE CARRYING HANDLE REGOLAZIONE DEL MANICO PER IL TRASPORTO
You can lock the carrying handle in place in 4 positions:
A: Carrying/Driving-Position.
B+C: For placing the baby in the seat.
D: Safe sitting position outside the car.
Il maniglione di trasporto può essere regolato in 4 posizioni:
A: Posizione di trasporto/di viaggio.
B+C: Posizione per l’inserimento del bambino nel seggiolino.
D: Posizione di seduta in sicurezza fuori dall’auto.
DEENIT
WARNING! In order to prevent the seat from tipping
!
over during carrying, check whether the carrying
handle (1) is locked in place in carrying position A.
• To adjust the carrying handle, simultaneously press the left and
right buttons (2).
• Then pivot carrying handle (1) forwards or backwards while
pressing buttons (2) until it automatically locks in place in the
desired position.
ADJUSTING THE SUN CANOPY REGOLAZIONE DELLA CAPOTTINA
Unfold the sun canopy by pulling gradually on the plastic cover. To
fold back, push the sun canopy back to its initial position.
ATTENZIONE! Per evitare il rischio di capovolgimento
!
durante il trasporto assicuratevi sempre che il manico
(1) sia bloccato nella posizione di trasporto A.
• Per regolare il manglione di trasporto premere
contemporaneamente i due pulsanti (2).
• Ruotare quindi il manglione di trasporto (1) in avanti o all’indietro,
mantenendo contemporaneamente premuti i pulsanti (2), no a
quando si blocca automaticamente nella posizione desiderata.
Per aprire la capottina basta semplicemente tirare gradualmente
in avanti il pannello in plastica. Per chiuderla, spingerla verso la
posizione iniziale.
17

ANPASSEN AN DIE KÖRPERGRÖSSE
4
3
Anpassen der Kopfstütze
HINWEIS! Nur eine in optimaler Höhe eingestellte Kopfstütze
gewährt Ihrem Kind größtmöglichen Schutz und Komfort. Die
Höhenverstellung kann in 11 Positionen erfolgen.
• Die Kopfstütze muss so eingestellt werden, dass der Abstand
zwischen den Schultern des Kindes und der Kopfstütze 2 cm (ca.
2 Finger) nicht überschreitet.
MAX.
5
18
• Ziehen Sie den Verstellgri (3) nach oben, um die Kopfstütze (4)
zu entriegeln. Nun können Sie die Einstellung vornehmen.
HINWEIS! Die Schultergurte sind mit der Kopfstütze fest
verbunden und müssen nicht separat eingestellt werden.
Entfernen der Neugeboreneneinlage
Ab 61cm (ca. 3 Monaten) sollte die Neugeboreneneinlage (5) aus
der Babyschale entfernt werden, um ausreichend Platz für Ihr Kind
zu schaen. Zur Entfernung der Neugeboreneneinlage (5) önen
und entfernen Sie die Schulterpolster. Anschließend entfernen Sie
die Neugeboreneneinlage und bringen die Schulterpolster erneut
an den Schultergurten an.

ADJUSTING TO BODY SIZE REGOLAZIONE IN BASE ALLA CORPORATURA
Adjusting the Headrest Regolazione del poggiatesta
NOTE! The headrest ensures the best possible protection for your
child only if it is adjusted to the optimum height. There are 11 height
positions that can be set.
• The headrest has to be adjusted in a way that the distance
between the child‘s shoulders and the headrest doesn‘t exceed 2
cm (approx. 2 ngers width).
• Pull the adjustment handle (3) upwards to unlock the headrest
(4). Now you can adjust the headrest.
NOTA BENE! Il poggiatesta ore protezione ottimale per il
bambino soltanto se regolato all’altezza corretta. Può essere
ssato in 11 (undici) posizioni diverse.
• Il poggiatesta deve essere regolato in modo che la distanza tra
le spalle del bambino e la base del poggiatesta sia al massimo 2
cm (ovvero circa lo spessore di due dita).
• A tale ne tirare in alto la leva di regolazione (3) per sbloccare
il poggiatesta (4). A questo punto è possibile regolare il
poggiatesta.
DEENIT
NOTE! The shoulder belts are rmly connected to the headrest and
do not have to be adjusted separately.
Removing the Newborn Inlay Rimuovere il riduttore per neonato.
The newborn inlay (5) may be removed after the baby is
61 cm (approx. 3 months) to provide more space for the child. To
remove the newborn inlay (5) open and remove the shoulder pads.
Then remove the newborn inlay and place the shoulder pads back
on the shoulder belts.
NOTA BENE! Le cinture per le spalle sono ssate al poggiatesta e
non devono essere regolate separatamente.
L’inserto neonato (5) può essere rimosso dopo che il bambino
ha superato i 61 cm (3 mesi circa), per fornire maggiore spazio
di seduta. Per togliere l’inserto neonato (5) aprire e rimuovere
i cuscinetti delle cinture per le spalle. Rimuovere il riduttore e
mettere nuovamente i cuscinettu sulle cinture per le spalle.
19
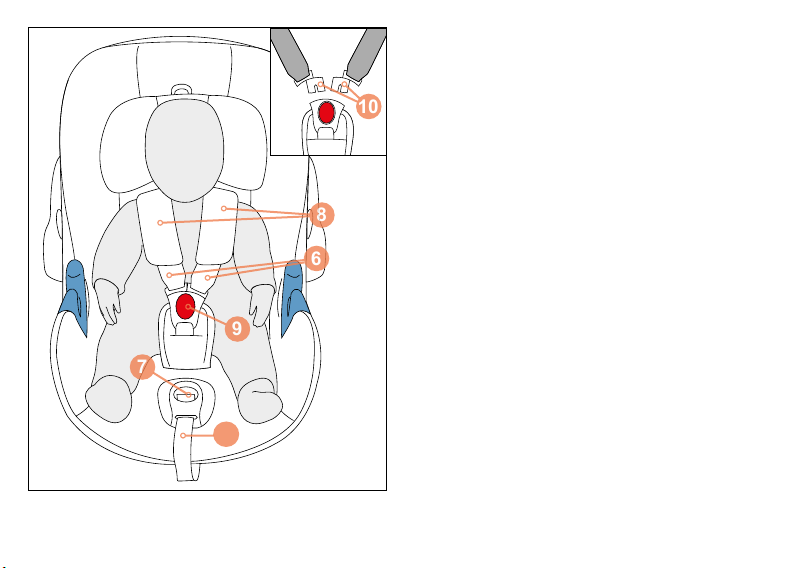
ANSCHNALLEN MITTELS GURTSYSTEM
6109118
7
HINWEIS! Achten Sie darauf, dass die Kopfstütze ordnungsgemäß
eingerastet ist, bevor Sie den Kindersitz verwenden.
HINWEIS! Sorgen Sie dafür, dass der Kindersitz frei von
Spielsachen und harten Objekten ist.
• Lockern Sie die Schultergurte (6), indem Sie die Verstelltaste
am Zentralversteller (7) betätigen und gleichzeitig beide
Schultergurte nach oben ziehen.
HINWEIS! Bitte ziehen Sie immer am Schultergurt (6) und nicht an
den Schulterpolster (8).
• Önen Sie das Gurtschloss (9) durch kräftiges Drücken der roten
Taste.
HINWEIS! Achten Sie darauf, dass die Schultergurte (6) nicht
verdreht sind.
• Setzen Sie Ihr Kind in den Kindersitz.
• Führen Sie die Schultergurte (6) gerade über die Schultern Ihres
Kindes.
• Führen Sie die beiden Schlosszungen (10) zusammen und
rasten Sie diese im Gurtschloss (9) mit einem hörbaren „KLICK“
ein.
• Ziehen Sie behutsam am Zentralverstellgurt (11), um die
Schultergurte (6) soweit zu straen, bis diese am Körper Ihres
Kindes anliegen.
HINWEIS! Für den optimalen Schutz des Kindersitzes sollten die
Schultergurte (6) so nahe wie möglich am Körper anliegen.
20

STRAPPING WITH HARNESS SYSTEM ALLACCIARE CON IL SISTEMA DI CINTURE
NOTE! Ensure that the headrest is correctly locked in place before
using the car seat.
NOTE! Ensure that the car seat is free from toys and hard objects. NOTA BENE! Vericare che il seggiolino sia libero da giocattoli o
• Loosen shoulder belts (6) by pressing the adjustment button on
central adjuster (7) and simultaneously pulling both shoulder
belts up.
NOTE! Please always pull on shoulder belt (6) and not on belt
pads (8).
• Undo the belt buckle (9) by pressing the red button rmly. • Slacciare le cinture (6) premendo con forza il pulsante rosso.
NOTA BENE! Vericare che il poggiatesta sia bloccato
correttamente in posizione prima di utilizzare il seggiolino.
altri oggetti rigidi.
• Allentare le cinture (6) premendo il pulsante di regolazione
centrale (7) e tirare simultaneamente entrambe le cinture verso
l’alto.
NOTA BENE! Tirare sempre agendo sulle cinture(6) non sui
cuscinetti (8).
DEENIT
NOTE! Ensure that shoulder belts (6) are not twisted. NOTA BENE! Assicuratevi che le cinture (6) non siano invertite o
• Put your child into the car seat.
• Place shoulder belts (6) directly over your child’s shoulders.
• Place both buckle tongues (10) together and lock them in place
in belt buckle (9) with an audible “CLICK”.
• Pull cautiously on central adjustment belt (11) in order to tighten
shoulder belts (6) until they t your child’s body.
NOTE! For the car seat to oer optimum protection, shoulder belts
(6) should t the body as closely as possible.
attorcigliate.
• Collocare il bambino nel seggiolino.
• Appoggiare le cinture (6) direttamente sopra le spalle del
bambino.
• Unire tra loro le due linguette (10) ed inserirle nella bbia centrale
(9) dove si ssano con un sonoro “CLICK”.
• Tirare delicatamente la cintura di regolazione centrale (11) per
stringere le cinture (6) no a farle aderire perfettamente al corpo
del bambino.
NOTA BENE! Per garantire la massima protezione le cinture per le
spalle (6) devono aderire il più possibile al corpo del bambino.
21

VERWENDUNG DER BABYSCHALE MIT BASIS
14
16
17
15
Einbau der Basis
Wählen Sie einen zulässigen Fahrzeugsitz. Verfügt Ihr Fahrzeug
über keinen i-Size Sitzplatz, überprüfen Sie bitte anhand der
13
12
21
12
18
22
15
Typenliste, ob der Einbau erlaubt ist.
HINWEIS! Die ISOFIX-Befestigungspunkte (12) sind zwei
Metalllaschen pro Sitzplatz und benden sich zwischen
Rückenlehne und Sitzäche des Fahrzeugsitzes. Im Zweifelsfall
nehmen Sie die Bedienungsanleitung Ihres Fahrzeugs zu Hilfe.
• Sind die ISOFIX Befestigungspunkte (12) Ihres Fahrzeugs
schwer zugänglich, so können Sie die mitgelieferten ISOFIX
Einführhilfen (13) in den beiden ISOFIX Befestigungspunkten
(12) dauerhaft einhängen.
HINWEIS! Stellen Sie keine Gegenstände in den Fußraum vor den
Kindersitz.
• Klappen Sie immer den Stützfuß (14) aus, bis er vorne einrastet.
• Lösen Sie die Arretierung der ISOFIX- Konnektoren (15). Beide
Arretierungen lassen sich unabhängig voneinander verstellen.
Betätigen Sie beide Tasten (16) und (17) gleichzeitig und ziehen
die ISOFIX Arretierung bis zum Anschlag aus der Basis.
• Die ISOFIX Konnektoren (15) müssen hörbar an den beiden
ISOFIX- Befestigungspunkten (12) einrasten.
• Vergewissern Sie sich, dass die Basis gut hält, indem
Sie versuchen sie aus den ISOFIX-Befestigungspunkten
herauszuziehen.
• Der grüne Sicherheitsindikator (18) muss an den beiden ISOFIX-
Entriegelungstasten gut sichtbar sein.
• Anschließend schieben Sie die Base in Richtung Rückenlehne,
bis diese fest und vollächig anliegt.
HINWEIS! Wechselseitiges Hin- und Herbewegen der Basis
verspannt diese zusätzlich mit der Rückenlehne des Fahrzeuges.

CONNECTING THE INFANT CAR SEAT WITH BASE INSTALLARE IL SEGGIOLINO SULLA BASE
Installation of the base
Please select an appropriate seat in the vehicle. If your vehicle
does not have an i-Size seating position, please check the vehicle
typelist that is included whether the installation is allowed.
NOTE! The ISOFIX anchorage points (12) are two metal lugs per
seat and are located between the backrest and the seat of the car.
If you are in any doubt, consult your car‘s instruction manual for
assistance.
• If the ISOFIX anchorage points (12) of your vehicle are dicult to
access please use the provided ISOFIX insert guides (13) that x
on the ISOFIX attachment points (12) permanently.
NOTE! Do not put any objects in the foot area in front of the child
seat.
• Always fold out the supporting leg (14) until it locks.
• Release the lock of the ISOFIX connectors (15). Both locks can
be adjusted independently. Push both buttons (16) and (17)
simultaneously and pull the ISOFIX connectors out of the base to
the endstopper.
• The ISOFIX connectors (15) have to lock into the ISOFIX
anchorage points (12) with an audible click.
• Make sure that the base stays rmly in place by trying to pull it
out of the ISOFIX connect guides.
• The green safety indicator (18) must be clearly visible on both
ISOFIX release buttons.
• Next, push the base in the direction to the backrest until it is fully
aligned with the backrest.
NOTE! Moving the base sideways will further brace the base with
the backrest.
Installazione della base
Collocare il seggiolino sul sedile dell’auto appropriato. Se la vettura
non è dotata di una posizione compatibile i-Size, preghiamo
controllare se il veicolo è presente nell’elenco delle vetture in cui
l’installazione è permessa.
NOTA BENE! I punti di ancoraggio ISOFIX (12) sono due clip
metalliche per ogni sedile, posizionate tra lo schienale e la seduta
del sedile del veicolo. Se in dubbio consultare il manuale istruzioni
della vettura.
• Se i punti di ancoraggio ISOFIX (12) della vettura sono dicili da
raggiungere, consigliamo di utilizzare le guide ISOFIX (13) fornite
in dotazione, ssandole permanentemente ai punti di ancoraggio
ISOFIX (12).
NOTA BENE! Non lasciare nessun oggetto nell’area piedi di fronte
al seggiolino.
• Portare in posizione il piede di supporto (14) no a quando si
blocca.
• Sbloccare la chiusura dei connettori ISOFIX (15). Entrambi i
fermi si regolano singolarmente. Premere entrambi i pulsanti (16)
e (17) simultaneamente ed estrarre i connettori ISOFIX dalla
base no a ne corsa.
• I connettori ISOFIX (15) devono agganciarsi saldamente ai punti
di ancoraggio ISOFIX (12) con un sonoro “click”.
• Vericate che il seggiolino sia ssato saldamente cercando di
tirarlo verso la parte opposta alle guide di connessione ISOFIX.
• L’indicatore di sicurezza verde (18) deve essere ora
chiaramente visibile su entrambi i pulsanti di rilascio ISOFIX.
• Quindi, spingere la base verso lo schienale no a quando si trova
perfettamente allineata con esso.
NOTA BENE! Spostando lateralmente la base si rinforza
ulteriormente la base con lo schienale.
DEENIT
23

Einstellen des Stützfusses
19
Schieben Sie die Verstelltaste (19) am Stützfuß nach oben
und halten Sie diese gedrückt um den Stützfuß auszuziehen.
Ziehen Sie den Stützfuß (14) soweit heraus, bis dieser den
14
20
19
15
16
24
17
Fahrzeugboden berührt. Ziehen Sie den Stützfuß zur nächsten
Verrastung aus, um eine optimale Kraftaufnahme zu gewährleisten.
Der Stützfußindikator (20) an der Basis schaltet dann auf GRÜN
um, dabei ist ein charakteristisches Klicken zu hören.
HINWEIS! Achten Sie darauf, dass die Basis ächig auf dem
Fahrzeugsitz auiegt.
WARNUNG! Der Stützfuß (14) muss immer direkten
!
Bodenkontakt haben. Es dürfen keine Gegenstände
oder Hohlräume zwischen Fahrzeugboden und dem
Stützfuß sein. Besitzt Ihr Auto Staufächer im Fußraum,
wenden Sie sich unbedingt an den Fahrzeughersteller.
Ausbau der Basis
Führen Sie die Einbauschritte in umgekehrter Reihenfolge durch.
• Entriegeln Sie nacheinander beide ISOFIX Konnektoren (15)
durch gleichzeitiges Betätigen der Tasten (16) und (17) und ziehen
diese aus den Einführhilfen.
• Schieben Sie die Konnektoren (15) in die Ausgangsposition
zurück.
• Durch Drücken der Verstelltaste (19) können Sie den Stützfuß
wieder in seine Ausgangsposition schieben und danach
platzsparend zurückklappen.
Adjusting the supporting leg Regolazione del piede di supporto
Push the adjustment button (19) upwards on the support leg and
press it to pull the support leg. Pull the supporting leg (14) out
until it touches the vehicle oor. After this, pull the foot out to the
next locking position to ensure optimal force transmission. The
supporting leg indicator (20) on the base will show GREEN and a
characteristic ‚CLICK‘ may be heard.
Spingere verso l’alto il pulsante di regolazione (19) sul piede di
supporto e premerlo per estrarre il piede di supporto. Estrarre il
piede di supporto (14) no a quando appoggia bene sul pavimento
dell’auto. A questo punto allungare leggermente per ssare il piede
di supporto nel foro di blocco immediatamente successivo, per
garantire la trasmissione ottimale delle forze d’impatto. La spia del
piede di supporto (27) sulla base mostrerà il colore VERDE e si
potrà udire il caratteristico “Click”.
DEENIT
NOTE! Make sure that the base still rests at on the car seat. NOTA BENE! Vericare che la base sia ben appoggiata sulla
WARNING! The supporting leg (14) must always be in
!
direct contact with the vehicle oor. There must be no
objects or spaces between the vehicle oor and the
supporting leg. If there are storage compartments in
the oor of the vehicle you must contact the vehicle
manufacturer.
Removal of the base Togliere la base dall’auto
Carry out the installation steps in the reverse order. Eseguire i passaggi d’installazione nell’ordine inverso.
• Unlock both ISOFIX connectors (15) through pushing the buttons
(16) and (17) simultaneously and pull them out of the ISOFIX
connect guides.
• Push the connectors (15) back into the original position.
• By pressing the adjustment button (19) you can push back the
supporting leg into its original position and then fold it back to
save space.
supercie del sedile dell’auto.
ATTENZIONE! Il piede di supporto (14) dev’essere
!
sempre a contatto diretto con il pavimento della
vettura. Non ci devono essere oggetti o spazio tra il
pavimento della vettura ed il piede di supporto. Se
nel pavimento sono presenti scomparti portaoggetti è
necessario contattare il produttore della vettura.
• Sbloccare entrambi i connettori ISOFIX (15) premendo
simultaneamente i pulsanti (16) e (17) ed estrarli dalle guide
ISOFIX.
• Spingere i connettori (15) per farli rientrare nella posizione
originaria.
• Premendo il pulsante di regolazione (19) è possibile fare rientrare
il piede di supporto nella posizione originaria, quindi ripiegarlo
per salvare spazio.
25

Befestigung der Babyschale auf der Basis
25
24
21
HINWEIS! Stellen Sie sicher, dass die Oberäche der Basis frei
von Fremdkörpern ist.
Vergewissern Sie sich, dass sich der Tragebügel in der
Fahrzeugposition A bendet und das Kind mit dem integrierten
Gurtsystem gesichert wurde. Positionieren Sie den Kindersitz
entgegen der Fahrtrichtung auf der Basis. Stellen Sie sicher, dass
beide Raststangen (21) mit einem hörbaren „KLICK“ verriegeln.
Kontrollieren Sie anschließend, ob der Basisindikator (22) an der
Basis GRÜN zeigt. Sollte der Indikator nicht GRÜN zeigen, ist
der Sitz nicht ausreichend verriegelt. Wiederholen sie ggf. den
Vorgang.
22
Ausbau
Drücken Sie gleichzeitig die zentrale Entriegelungstaste (24) und
eine der seitlichen Entriegelungstasten (25), um die Babyschale
von der Basis zu entriegeln. Kippen Sie den Sitz etwas an.
Der Basisindikator (22) zeigt nun ROT. Nun können Sie die
Entriegelungstasten (24) und (25) loslassen und die Babyschale
von der Basis abheben.
25
26

Installing the infant car seat on the base Installare il seggiolino sulla base
NOTE! Make sure that the surface of the base is clear of free
objects.
Make sure that the carrying handle is xed in car position A and the
child is secured with the integrated harness system. Place the car
seat in rearward facing position on the base. Please ensure that
both locking bars (21) lock with an audible „CLICK“. Check whether
the base indicator (22) on the base is GREEN. If the indicator is not
GREEN, the car seat is not suciently locked. If necessary, repeat
the procedure.
NOTA BENE! Assicuratevi che la supercie della base sia
completamente libera da qualsiasi oggetto.
Vericare che il maniglione di trasporto sia ssato nella posizione
di trasporto A e che il bambino sia correttamente allacciato con le
cinture di sicurezza. Collocare il seggiolino sulla base, rivolto contro
il senso di marcia. Vericare che entrambe le barre (21) siano ben
ssate, dovrete udire un sonoro „CLICK“. Controllare quindi che
l’indicatore (22) sulla base sia di colore VERDE. Se l’indicatore non
è di colore VERDE, il seggiolino non è ssato correttamente. Se
necessario, ripetere il procedimento.
DEENIT
Removal
Push the central release button (24) and one of the release buttons
on the side (25) simultaneously to unlock the infant car seat from
the base. Tilt the seat a little. The base indicator (22) now shows
RED. Now you can release the unlocking buttons (24) and (25) to
lift the infant car seat o the Base.
Rimozione
Premere il pulsante di rilascio centrale (24) e contemporaneamente
uno dei pulsanti di rilascio laterali (25) per sbloccare il seggiolino
dalla base. Inclinare leggermente il seggiolino. L’indicatore (22) sulla
base ora è di colore ROSSO. A questo punto si possono rilasciare i
pulsanti di sblocco (24) e (25) e sollevare il seggiolino dalla Base.
27

1
28
27
26
29
30
31
28
EINBAU DER BABYSCHALE MIT FAHRZEUGGURT
Einbau
• Stellen Sie die Babyschale entgegen der Fahrtrichtung auf den
Fahrzeugsitz.
• Vergewissern Sie sich, dass der Tragebügel (1) in der
Fahrzeugposition A eingerastet ist.
• Stellen Sie sicher, dass die Einbaumarkierung des sich
seitlich am Sitz bendlichen Warnaufklebers (26) parallel zum
Fahrzeugboden ausgerichtet ist.
• Ziehen Sie den Fahrzeuggurt heraus und führen Sie ihn über die
Babyschale.
• Legen Sie den Beckengurt (27) in die blauen Gurtführungen (28)
an beiden Seiten der Babyschale ein.
• Rasten Sie die Schlosszunge im Fahrzeuggurtschloss (29) ein.
• Straen Sie den Beckengurt (27), indem Sie am Diagonalgurt
(30) in Fahrtrichtung ziehen.
• Ziehen Sie den Diagonalgurt (30) hinter das Kopfende der
Babyschale.
HINWEIS! Fahrzeuggurt dabei nicht verdrehen.
• Führen Sie den Diagonalgurt (30) durch die hintere blaue
Gurtführung (31).
• Straen Sie den Diagonalgurt (30).
WARNUNG! Der Diagonalgurt (30) muss durch die
!
rückseitige, blaue Gurtführung (31) geführt werden.

INSTALLING THE INFANT CAR SEAT WITH VEHICLE BELT INSTALLARE IL SEGGIOLINO CON LA CINTURA
Installation Installazione
• Place the infant car seat facing the rear of the vehicle on the
vehicle seat.
• Ensure, that the carrying handle (1) is locked in car postion A.
• Ensure that the installation mark on warning sticker (26), located
on the side of the infant car seat, is aligned with the oor of the
vehicle.
• Pull out the vehicle seat belt and route it over the infant car seat.
• Place the lap belt (27) into blue belt routings (28) on both sides of
the infant car seat.
• Lock the buckle tongue in place in vehicle seat belt (29).
• Tighten lap belt (27) by pulling on diagonal belt (30) in the
direction of the front of the vehicle.
• Pull diagonal belt (30) behind the head end of the infant car seat.
DELL’AUTO
• Appoggiare il seggiolino sul sedile dell’auto, rivolto in direzione
opposta a quella di marcia.
• Vericare che il maniglione di trasporto (1) sia bloccato nella
posizione “in auto” A.
• Vericare che il contrassegno orizzontale sull’adesivo di
sicurezza (26), posto sul anco del seggiolino, sia parallelo al
pavimento della vettura.
• Estrarre la cintura a tre punti e passarla attorno al seggiolino.
• Inserire la parte di cintura ventrale (27) nelle guide (28) di colore
blu su ambo i lati del seggiolino.
• Inserire la linguetta della cintura nella bbia (29).
• Stringere al massimo la cintura ventrale (27) tirando la parte
diagonale (30) verso la parte anteriore del veicolo.
• Tirare la cintura diagonale (30) e farla passare dietro al lato testa
del seggiolino.
DEENIT
NOTE! Do not twist the vehicle seat belt while doing this.
• Route diagonal belt (30) through the rear blue belt
routing (31).
• Tighten diagonal belt (30).
WARNUNG! Diagonal belt (30) must be routed through
!
rear, blue belt routing (31).
NOTA BENE! Fare attenzione a non attorcigliare mai la cintura.
• La cintura diagonale (30) deve passare all’interno della guida blu
posteriore (31).
• Stringere al massimo la cintura diagonale (30).
ATTENZIONE! La cintura diagonale (30) deve passare
!
all’interno della guida blu posteriore (31).
29

HINWEIS! Die Babyschale ist auf allen Plätzen mit Dreipunkt-
28
31
Automatikgurt verwendbar. Wir empfehlen generell, den Sitz hinten
im Fahrzeug zu verwenden. Vorne ist Ihr Kind bei einem Unfall in
den meisten Fällen höheren Gefahren ausgesetzt.
WARNUNG! Der Sitz ist nicht für die Verwendung
!
mit einem 2-Punkt- oder Beckengurt geeignet. Bei
Sicherung mit einem 2-Punkt-Gurt kann es bei einem
Unfall zu schweren oder tödlichen Verletzungen des
Kindes kommen.
WARNUNG! Es kann vorkommen, dass das
!
Fahrzeuggurtschloss des Autogurtes zu lang ist,
sodass dieser bis an die blauen Gurtführungen der
Schale heranreicht. Dadurch kann die Babyschale
nicht stra befestigt werden. Wählen Sie in diesem Fall
im Auto einen anderen Sitzplatz für die Babyschale.
Im Zweifelsfall wenden Sie sich an den Hersteller der
Babyschale.
Ausbau
• Nehmen Sie den Gurt aus der hinteren blauen Gurtführung (31).
• Önen Sie das Fahrzeuggurtschloss und nehmen Sie den
Beckengurt aus den blauen Gurtführungen (28).
30

NOTE! The infant car seat may be used on all vehicle seats with
threepoint automatic belts. We recommend as a rule that the infant
car seat is used in the rear of the vehicle. In most cases, your child
is exposed to higher risk in the front.
WARNING! The infant car seat is not suitable for use
!
with a two-point or lap vehicle seat belt. Securing with
a two-point vehicle seat belt could result in serious or
fatal injuries to the child in the event of an accident.
WARNING! It may be that buckle part of the vehicle
!
seat belt is too long so that it reaches the blue belt
routing of the infant car seat. This means that the infant
car seat cannot be fastened tightly. If this is the case,
choose another seat in the vehicle for the infant car
seat. In case of doubt contact the manufacturer of the
infant car seat.
Removal Rimozione
• Take the vehicle seat belt out of the blue belt routing in the back
(31).
• Open the vehicle belt buckle and take the lap belt out of the blue
belt routings (28).
NOTA BENE! il seggiolino può essere installato su tutti i
sedili dotati di cinture di sicurezza automatiche a tre punti.
Raccomandiamo di utilizzare preferibilmente i sedili posteriori.
Generalmente sui sedili anteriori il bambino è esposto a maggiori
rischi.
ATTENZIONE! Il seggiolino non può essere installato
!
con cinture a due punti o soltanto con quella ventrale.
Fissando il seggiolino con cinture a due punti soltanto
si espone il bambino al rischio di gravi ferite, anche
letali, in caso di incidente.
ATTENZIONE! Talvolta il punto di ssaggio della
!
cintura ha un aggancio troppo lungo, tanto da arrivare
all’altezza delle guide blu per il passaggio della cintura.
Ciò compromette l’installazione salda e corretta del
seggiolino. In casi come questo raccomandiamo
di scegliere un’altra posizione nella vettura per
l’installazione del seggiolino. In caso di dubbio
consultare il produttore del seggiolino.
• Togliere la cintura dalla guida di colore blu sul retro del seggiolino
(31).
• Slacciare la cintura dell’auto dalla bbia e slare la parte ventrale
della cintura dalle guide di colore blu (28).
DEENIT
31
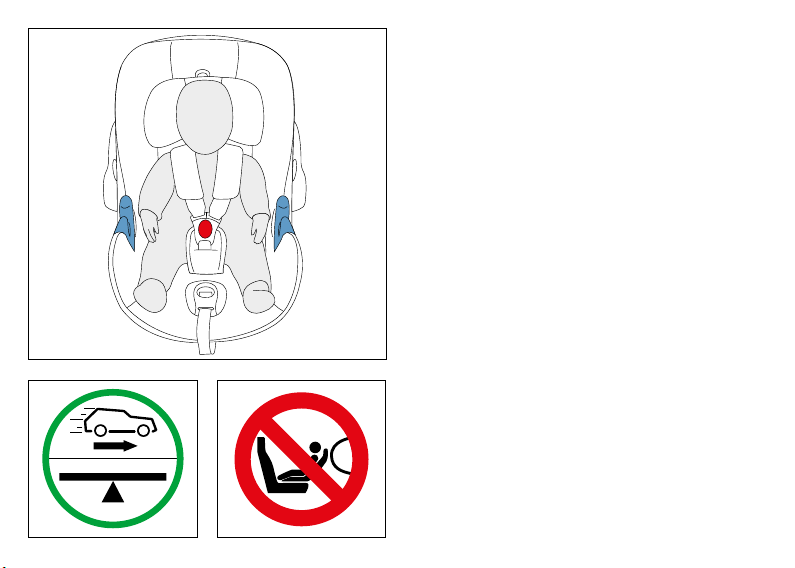
RICHTIGES SICHERN DES BABYS
So ist Ihr Baby richtig gesichert
Prüfen Sie zur Sicherheit Ihres Babys, dass …
• die Position der Kopfstütze richtig eingestellt ist.
• die Gurtschlosszungen im Gurtschloss eingerastet sind.
• die Schultergurte der Babyschale körpernah anliegen, ohne das
Baby einzuengen und dass die Schultergurte nicht verdreht sind.
• Sie am Zentralverstellgurt ziehen um die Schultergurte zu
straen, damit diese eng am Körper des Kindes anliegen.
So ist die Babyschale richtig eingebaut
HINWEIS! Die Babyschale darf ausschließlich auf einem nach
vorne gerichteten Sitz benutzt werden, der mit
ISOFIX oder einem Dreipunkt-Sicherheitsgurt nach
UN R16 ausgestattet ist.
Prüfen Sie zur Sicherheit Ihres Babys, dass …
• die Babyschale entgegen der Fahrtrichtung befestigt ist.
• die Babyschale nur dann auf dem Beifahrersitz befestigt ist, wenn
kein Frontairbag auf die Babyschale einwirken kann.
• die Babyschale entweder mit dem Fahrzeuggurt oder mit der
Basis gesichert ist (Siehe Kapitel „EINBAU DER BABYSCHALE
MIT FAHRZEUGGURT“ bzw. „VERWENDUNG DER
BABYSCHALE MIT BASIS“).
32

SECURING THE BABY CORRECTLY ALLACCIARE CORRETTAMENTE IL BAMBINO
Correct securing of your baby
To ensure your baby’s safety, check that...
• the position of the headrest is correctly adjusted.
• belt tongues are locked in place in belt buckle.
• shoulder belts t the baby’s body closely without constricting the
baby and the belt is not twisted.
• you pull on the central adjustment belt to tighten shoulder belts
until they t your child‘s body.
Correct installation of the infant car seat Installazione corretta del seggiolino
NOTE! The infant car seat is exclusively made for forward facing
car seats, which are equipped with ISOFIX or with a 3-point belt
system according to UN R16.
Allacciare correttamente il bambino
Per garantire la sicurezza del bambino è necessario vericare
che...
• il poggiatesta sia regolato alla corretta altezza.
• le linguette delle cinture siano saldamente ssate nella bbia.
• le cinture di sicurezza per le spalle aderiscano bene al corpo
del bambino senza stringerlo eccessivamente e che non siano
attorcigliate.
• la cintura di regolazione centrale venga tirata in modo da
stringere le cinture per le spalle, nché non si adattano al corpo
del bambino.
NOTA BENE! Il seggiolino è adatto esclusivamente a sedili rivolti
nella direzione di marcia, equipaggiati con ISOFIX o cinture di
sicurezza a tre punti secondo norma UN R16.
DEENIT
To ensure your baby’s safety, check that …
• the infant car seat is secured with the child facing the rear of the
vehicle.
• the infant car seat is only used on the front passenger seat if
there is no front airbag that can impact on the infant car seat.
• the infant car seat is either fastened with the vehicle belt or with
the base (see section „INSTALLING THE INFANT CAR SEAT
WITH VEHICLE BELT“ or „CONNECTING THE INFANT CAR
SEAT WITH BASE“).
Per garantire la sicurezza del bambino è bene vericare che...
• il seggiolino sia installato con il bambino rivolto contro il senso
di marcia.
• nel caso il seggiolino sia installato sul sedile passeggero
anteriore, non vi sia airbag frontale che possa impattare sul
seggiolino.
• il seggiolino sia ben ssato con la cintura a 3 punti della vettura
o conla base (vedi sezioni “INSTALLARE IL SEGGIOLINO CON
LA CINTURA DELL’AUTO” oppure “FISSARE IL SEGGIOLINO
SULLA BASE”).
33
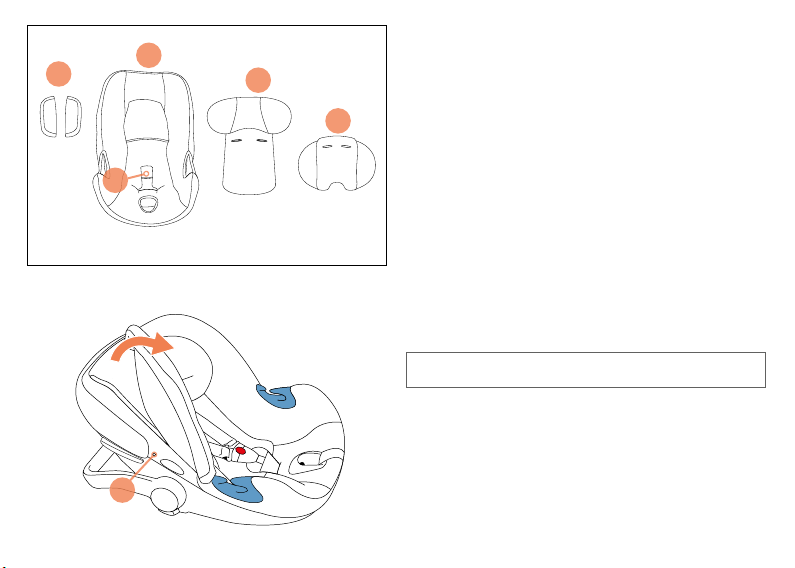
ENTFERNEN DES BEZUGES
8
34
5
35
36
34
33
Entfernen
Der Bezug besteht aus 5 Teilen: 1 Schalenbezug (33),
1 Kopfstützenbezug (34), 2 Schulterpolster (8) und 1
Neugeboreneneinlage (5). Zum Entfernen gehen Sie bitte wie folgt
vor:
• Önen Sie das Gurtschloss.
• Ziehen Sie die beiden Schulterpolster (8) vom Gurt ab.
• Fädeln Sie, falls noch in Verwendung, die Neugeboreneneinlage
(5) über die Schultergurte aus.
• Fädeln Sie die Schultergurte mit den Schlosszungen aus dem
Kopfstützenbezug (34) aus.
• Ziehen Sie den Kopfstützenbezug (34) nach oben von der
Kopfstütze ab.
• Ziehen Sie das Gurtschloss aus dem
Gurtschlosspolster (35).
• Önen Sie die beiden Doppeldruckknöpfe (36) seitlich an
der Schale und ziehen Sie den Schalenbezug (33) über den
Schalenrand ab.
WARNUNG! Der Kindersitz darf keinesfalls ohne Bezug
!
verwendet werden.
HINWEIS! Es dürfen nur CYBEX Aton B i-Size Originalbezüge
verwendet werden.
Anbringen des Bezugs
HINWEIS! Die Schultergurte dabei nicht verdrehen oder
vertauschen.
Führen Sie die zuvor beschriebenen Handgrie in umgekehrter
Reihenfolge aus, um den Bezug wieder zu befestigen.
REMOVING THE COVER RIMOZIONE DEL RIVESTIMENTO
Removal
The cover consists of 5 parts: 1 shell cover (33), 1 headrest cover
(34), 2 shoulder pads (8) and 1 newborn inlay (5). To remove,
please apply the following procedure:
• Undo the belt buckle.
• Remove both shoulder pads (8) from the belt.
• If still in use, thread out the newborn inlay (5) from the shoulder
belts.
• Thread the shoulder belts with the buckle tongues out of the
headrest cover (34).
• Pull the headrest cover (34) upwards and o the headrest.
• Pull the seat buckle through the belt buckle pad (35).
• Undo both double-press buttons (36), which are located on the
side of the shell and pull o the shell cover (33) around the shell
edging.
Rimozione
Il rivestimento comprende 5 parti: 1 rivestimento scocca (33), 1
rivestimento poggiatesta (34), 2 cuscinetti per le cinture spalle (8)
e 1 inserto neonato (5). Per la rimozione seguire il procedimento
seguente:
• Slacciare le cinture dalla bbia centrale.
• Rimuovere entrambi i cuscinetti (8) dalla cintura.
• Se ancora in uso, slare il riduttore neonato (5) dalle cinture.
• Slare le cinture per le spalle con le linguette dal rivestimento del
poggiatesta (34).
• Slare dall’alto il rivestimento del poggiatesta (34).
• Estrarre la bbia dal cuscinetto (35).
• Slacciare entrambi i doppi bottoni a pressione (36) ai lati della
scocca e slare delicatamente il tessuto della scocca (33) dai
bordi.
DEENIT
WARNING! The infant car seat must under no
!
circumstances be used without the cover.
NOTE! Only CYBEX Aton B i-Size original covers may be used. NOTA BENE! Usare solo ed esclusivamente rivestimenti Aton B
Attaching the cover Fissare il rivestimento
NOTE! Ensure to not twist or mix up the shoulder belts. NOTA BENE! Fare molta attenzione a non attorcigliare o invertire
Follow the steps described above but in reverse order in order to
re-fasten the cover.
ATTENZIONE! Non usare MAI il seggiolino di sicurezza
!
senza il rivestimento.
i-Size originali.
le cinture per le spalle.
Per riposizionare il rivestimento ripetere le operazioni sopra
descritte nell’ordine inverso.
35

REINIGUNG
Es ist darauf zu achten, dass nur ein original Sitzbezug verwendet
wird, da auch der Bezug ein wesentlicher Bestandteil der Funktion
ist. Ersatzbezüge erhalten Sie im Fachhandel.
HINWEIS! Bitte den Bezug vor der ersten Verwendung waschen.
Der Bezug darf bei 30°C im Schonwaschgang gewaschen werden.
Sollten Sie mit mehr als 30°C waschen, kann es zu Ausfärbungen
kommen. Bitte den Bezug gesondert von anderer Wäsche waschen
und keinesfalls maschinell trocknen! Den Bezug keinesfalls in
der prallen Sonne trocknen! Die Kunststoteile können mit einem
milden Reinigungsmittel und warmen Wasser gewaschen werden.
WARNUNG! Bitte auf keinen Fall chemische
!
Reinigungs- oder Bleichmittel verwenden!
WARNUNG! Das Gurtsystem kann nicht ausgebaut
!
werden! Entfernen Sie niemals einzelne Bestandteile
des Gurtsystems!
36
CLEANING PULIZIA
It is important to use an original seat cover only since the cover is
an essential part of the function. You may obtain spare covers at
your retailer.
NOTE! Please wash the cover before you use it the rst time. Seat
covers are machine washable at max. 30°C on delicate cycle. If
you wash it at higher temperature, the cover fabric may lose colour.
Please wash the cover separately and never dry it mechanically!
Do not dry the cover in direct sunlight! You can clean the plastic
parts with a mild detergent and warm water.
Il rivestimento è una parte importante per la funzionalità del
seggiolino ed è indispensabile utilizzare solo rivestimenti originali.
Rivestimenti di ricambio originali sono disponibili su ordinazione
presso i nostri rivenditori.
NOTA BENE! Lavare il rivestimento prima del primo utilizzo. I
rivestimenti sono lavabili in lavatrice, cliclo delicato a max 30°.
L’uso di temperature più elevate può scolorire i tessuti. Lavare
separatamente e non asciugare mai a macchina. Non fare
asciugare il rivestimento alla luce solare diretta. Le parti in plastica
possono essere pulite con un detergente neutro e acqua tiepida.
DEENIT
WARNING! Please do not use chemical detergents or
!
bleaching agents under any circumstances!
WARNING! The integrated harness system cannot be
!
removed from the baby seat. Do not remove parts of
the harness system.
ATTENZIONE! Raccomandiamo di non usare
!
detergenti chimici o agenti sbiancanti.
ATTENZIONE! Il sistema di cinture integrato non può e
!
non deve essere rimosso. Non rimuovere alcuna parte
del sistema di cinture dal seggiolino.
37

PFLEGE
Um die größtmögliche Schutzwirkung Ihrer Babyschale zu
gewährleisten, ist es unbedingt notwendig, dass Sie Folgendes
beachten:
• Alle wichtigen Teile der Babyschale sollten regelmäßig auf
Beschädigungen kontrolliert werden.
• Die mechanischen Bauteile müssen einwandfrei funktionieren.
• Es ist unbedingt darauf zu achten, dass die Babyschale nicht
zwischen harten Teilen wie Fahrzeugtür, Sitzschiene usw.
eingeklemmt wird, da sie dadurch beschädigt werden kann.
HINWEIS! Es wird empfohlen, einen zusätzlichen Bezug für die
Babyschale zu kaufen, sodass sie auch während des Waschens
und Trocknens des originalen Bezuges weiter benutzt werden
kann.
38

PRODUCT CARE CURA DEL PRODOTTO
In order to ensure that your infant car seat provides the maximum
protection you must observe the following:
Per garantire che il seggiolino ora la massima protezione è
necessario osservare quanto segue:
DEENIT
• All important parts of the infant car seat should be checked
regularly for damage.
• All mechanical components function properly.
• It is absolutely essential to ensure that the infant car seat is not
jammed between hard objects such as vehicle doors, seat rails
etc., because this may lead to damage.
NOTE! It is recommended to buy a spare cover for the infant car
seat so that it can continue to be used even when the original cover
is being washed and dried.
• Tutte le parti principali del seggiolino devono essere sottoposte
ad un regolare controllo per vericare eventuali danni.
• Tutte le parti meccaniche devono funzionare correttamente.
• È assolutamente necessario assicurare che il seggiolino non sia
incastrato tra elementi rigidi, quali la portiera o le guide dei sedili,
che potrebbero danneggiarlo.
NOTA BENE! Si raccomanda l’acquisto di un secondo rivestimento
in modo da avere sempre il seggiolino utilizzabile anche quando le
fodere devono essere lavate e lasciate asciugare.
39
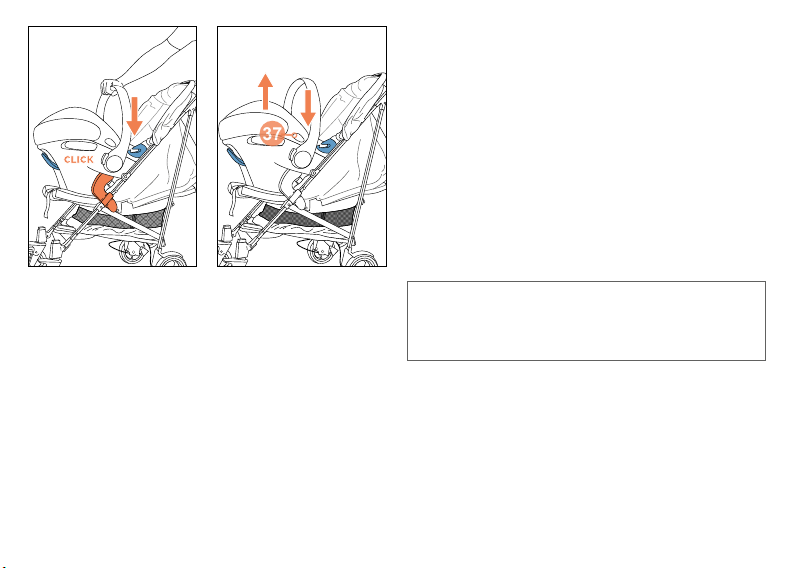
REISESYSTEM
37
Befolgen Sie die Gebrauchsanleitung Ihres Kinderwagens!
Sie können die Babyschale auf jedem dafür zugelassenen
Kinderwagen befestigen.
Rasten Sie die Babyschale auf dem dafür zugelassenen Adapter
mit Blickrichtung des Kindes zum Elternteil ein. Vergewissern Sie
sich, dass die Babyschale auf beiden Seiten hörbar einrastet.
Kontrollieren Sie immer, ob die Babyschale fest mit dem
Kinderwagen verbunden ist. Zur Entriegelung halten Sie die beiden
Entriegelungstasten (37) der Babyschale gedrückt und heben sie
nach oben.
HINWEIS! Schnallen Sie Ihr Baby in der Babyschale immer an,
auch außerhalb des Fahrzeugs.
VERHALTEN NACH EINEM UNFALL
WARNUNG! Aufgrund eines Unfalls können am
!
Kindersitz Beschädigungen auftreten, die mit bloßem
Auge nicht erkennbar sind. Bitte tauschen Sie nach
einem Unfall unbedingt den Sitz aus. Im Zweifelsfall
wenden Sie sich an den Händler oder Hersteller.
PRODUKTINFORMATION
Bei Fragen wenden Sie sich zuerst an Ihren Händler. Folgende
Angaben sollten Ihnen vorliegen:
• Seriennummer (siehe Aufkleber auf der Unterseite der
Babyschale)
• Marke und Typ des Autos und die Position des Sitzes, auf dem
der Kindersitz benutzt wird
• Gewicht, Alter und Größe des Kindes
Weitere Informationen zu unseren Produkten nden Sie auch unter
www.cybex-online.com.
40

TRAVEL SYSTEM SISTEMA DA VIAGGIO
Follow the instruction manual for your stroller!
You may attach the infant car seat on any approved stroller.
Click the infant car seat onto the approved adapter with the child
looking towards the parent. Make sure the infant car seat audibly
locks in place on both sides. Always check that the infant car seat
is rmly connected to the stroller. To unlock, press and hold both
release buttons (37) on the infant car seat and lift it.
Seguire le istruzioni contenute nel manuale del passeggino!
Il seggiolino è installabile su tutti i passeggini approvati.
Si ssa agli appositi adattatori omologati, con il bambino rivolto
verso il genitore. Vericare che il seggiolino si agganci saldamente
da ambo i lati. Controllare che il seggiolino sia saldamente ssato
al passeggino. Per sganciarlo, premere e mantenere premuti i due
pulsanti di rilascio (37) sul seggiolino e sollevarlo.
DEENIT
NOTE! Always strap your baby into the infant car seat, even
outside the car.
WHAT TO DO AFTER AN ACCIDENT COSA FARE A SEGUITO DI UN INCIDENTE
WARNING! An accident may cause damage to the
!
car seat that is not visible to the naked eye. Please
exchange the seat without fail after an accident. In case
of doubt contact the retailer or manufacturer.
PRODUCT INFORMATION INFORMAZIONI SUL PRODOTTO
If you have any questions contact your retailer rst. You should
have the following details ready:
• Serial number (see sticker on the underside of the infant car
seat)
• Make and model of the vehicle and the position of the vehicle
seat on which the car seat is used
• Weight, age and height of the child
Further information about our products can be found at www.
cybex-online.com.
NOTA BENE! Assicurare sempre il bambino al seggiolino auto,
anche fuori dall’auto.
ATTENZIONE! Un incidente può causare danni al
!
seggiolino non identicabili a occhio nudo. Dopo un
incidente il seggiolino dev’essere subito sostituito. Se
in dubbio contattare il rivenditore o il produttore.
Per qualsiasi dubbio o informazione rivolgersi prima al rivenditore.
Accertandovi di avere a portata di mano questi dati:
• Numero di serie (vedi etichetta alla base del seggiolino)
• Marca e modello dell’auto e posizione in cui viene normalmente
installato il seggiolino
• Peso, età e altezza del bambino
Maggiori informazioni sui prodotti nel sito
www.cybex-online.com.
41

PRODUKTLEBENSDAUER
Dieser Kindersitz ist so ausgelegt, dass er innerhalb seiner
maximalen Produktlebensdauer von ca. 7 Jahren seine
Eigenschaften erfüllen kann. Durch den langsamen Verschleiß
des Kunststos, beispielsweise durch Sonneneinstrahlung
(UV), können sich die Eigenschaften des Produkts
geringfügig verschlechtern. Da in Fahrzeugen sehr große
Temperaturschwankungen herrschen und andere unvorhersehbare
Belastungen auftreten können, ist es notwendig, folgende Punkte
zu beachten:
• Wenn das Fahrzeug längere Zeit der prallen Sonne ausgesetzt
ist, muss der Kindersitz aus dem Fahrzeug entfernt oder mit
einem hellen Tuch abgedeckt werden.
• Prüfen Sie regelmäßig alle Kunststo- und Metallteile des
Kindersitzes auf Beschädigung oder Veränderung von Form oder
Farbe. Stellen Sie eine Veränderung fest, ist der Kindersitz zu
entsorgen oder muss vom Hersteller geprüft und gegebenenfalls
ausgetauscht werden.
• Veränderungen des Stoes, insbesondere das Ausbleichen, sind
normal und stellen keine Beeinträchtigung dar.
42

PRODUCT LIFESPAN DURATA DEL PRODOTTO
This car seat has been designed to be able to fulll its intended
functions for a maximum product life span of
7 years. Gradual wear of the plastic, for example caused by
exposure to sunlight (UV), can cause slight deterioration of the
product’s properties. Since very high temperature uctuations
and other unforeseeable stresses are common in vehicles, it is
necessary to observe the following points:
• If the vehicle is directly exposed to strong sunlight for long
periods, the child seat must be removed from the vehicle or
covered with a light cloth.
• Check all plastic and metal parts of the seat regularly for damage
or change of shape or colour. If you notice any change in the
child seat, the child car seat must be disposed or checked and
possibly replaced by the manufacturer.
• Changes to the fabric, especially fading, are normal when used
in a vehicle and do not impair the seat‘s function.
Il seggiolino auto è progettato per soddisfare le proprie speciche
per l’intera vita utile, pari a 7 anni. Nel tempo le parti in plastica
tendono ad usurarsi, es. per l’esposizione al sole (UV) e le
caratteristiche del prodotto possono subire leggere variazioni.
Poichè all’interno della vettura il seggiolino è esposto a variazioni
di temperatura e/o a circostanze imprevedibili, raccomandiamo di
osservare quanto segue:
• Se il veicolo viene lasciato al sole per un periodo di tempo
prolungato, il seggiolino deve essere rimosso dall’abitacolo o
coperto con un panno chiaro.
• Controllare regolarmente tutte le parti di plastica e metallo
del seggiolino alla ricerca di eventuali danni, deformazioni o
cambiamenti di colore. Qualora si
scopra qualsiasi cambiamento, il seggiolino dovrà
essere smaltito o controllato e, possibilmente, sostituito dal
produttore.
• Modiche del tessuto, in particolare la scoloritura, sono
perfettamente normali in caso di uso in un veicolo e non
intaccano il funzionamento del seggiolino.
DEENIT
43

ENTSORGUNG
Aus Umweltschutzgründen bitten wir den Benutzer zu Beginn
(Verpackung) und am Ende (Produktteile) der Lebensdauer des
Kindersitzes, den anfallenden Abfall zu trennen und zu entsorgen.
Die Abfallentsorgung kann kommunal unterschiedlich geregelt
sein. Um eine vorschriftsmäßige Entsorgung des Kindersitzes
zu gewährleisten, setzen Sie sich mit Ihrer kommunalen
Abfallentsorgung bzw. Verwaltung lhres Wohnortes in Verbindung.
Beachten Sie auf jeden Fall die Entsorgungsbestimmungen lhres
Landes.
WARNUNG! Bewahren Sie Verpackungsmaterial aus
!
Kunststo außer Reichweite Ihres Kindes auf, da
Erstickungsgefahr besteht!
44

DISPOSAL SMALTIMENTO
To protect the environment we ask the user to separate and
dispose the waste arising at the start (packaging) and the
end (product parts) of the car seat’s lifespan. Waste removal
is arranged dierently depending on the local authorities. In
order to ensure that the car seat is disposed o in accordance
with regulations, contact your area’s waste removal agency or
local authority. Always observe your country’s waste disposal
regulations.
Per ragioni di natura ambientale chiediamo agli utilizzatori di
provvedere allo smaltimento separato e corretto di ogni parte
dall’inizio (imballo) alla ne (seggiolino ed ogni sua parte) alla ne
della durata di utilizzo del seggiolino. Le norme per lo smaltimento
variano localmente. Per garantire lo smaltimento corretto
secondo le normative vigenti vi preghiamo di contattare l’ucio
di competenza della vostra città. In ogni caso, seguire sempre le
normative vigenti nella zona di residenza.
DEENIT
WARNING! Keep plastic packaging material out of your
!
child’s reach: danger of suocation!
ATTENZIONE! Tenere tutte le parti in plastica
!
dell’imballo lontane dalla portata dei bambini. pericolo
di soocamento!
45

GARANTIEBESTIMMUNGEN
Die nachfolgenden Garantiebestimmungen gelten nur in dem Land,
in dem dieses Produkt erstmalig über den Einzelhandel an einen
Verbraucher verkauft wurde.
1. Die Garantie deckt sämtliche Herstellungs- und Materialfehler
ab, die im Zeitpunkt des Kaufs bestanden haben oder die
innerhalb von drei (3) Jahren nach dem Erstverkauf dieses
Produkts über den Einzelhandel an einen Verbraucher
in Erscheinung getreten sind (Herstellergarantie). Bitte
überprüfen Sie das Produkt nach dem Kauf oder wenn es
im Versandhandel gekauft wurde nach Erhalt umgehend auf
Vollständigkeit, Herstellungs- und Materialfehler.
2. Falls Schäden vorhanden sind, darf das Produkt nicht mehr
benutzt werden. Um Leistungen im Rahmen dieser Garantie
in Anspruch nehmen zu können, muss das Produkt in einem
vollständigen und sauberen Zustand an den Einzelhändler
zurückgegeben werden, der es erstmalig verkauft hat und
ein Nachweis über den Kauf (Kaufbeleg oder Rechnung) im
Original vorgelegt werden. Bitte bringen oder schicken Sie das
Produkt nicht direkt zum Hersteller!
3. Die Garantie deckt keine Schäden ab, die durch Fehlgebrauch,
äußere Einüsse (Wasser, Feuer, Unfälle o.ä.), normalen
Verschleiß oder durch Behandlung und Benutzung entstanden
sind, die im Gegensatz zu den Instruktionen dieser
Gebrauchsanweisung stehen. Die Garantie wird nur gewährt,
wenn Reparaturen oder Veränderungen ausschließlich durch
Personen vorgenommen wurden, die hierzu befugt waren und
stets nur originale Bau- und Zubehörteile verwendet wurden.
4. Durch diese Garantie werden weder bestehende
Verbraucherrechte noch Rechte gegen den Verkäufer wegen
Vertragswidrigkeit des Produkts beeinusst.
46

WARRANTY GARANZIA
The following warranty applies solely in the country where this
product was initially sold by a retailer to a customer.
1. The warranty covers all manufacturing and material defects,
existing and appearing, at the date of purchase or appearing
within a term of three (3) years from the date of purchase
from the retailer who initially sold the product to a consumer
(manufacturer’s warranty). Please check the product with
respect to completeness and manufacturing or material defects
immediately at the date of purchase or immediately after receipt.
Please always keep your dated proof of purchase.
2. In case of a defect, stop using the product immediately. To
obtain the warranty please take or ship the product to the
original retailer, who initially sold this product to you in a clean
and complete condition and submit an original proof of purchase
(sales receipt or invoice). Please do not take or ship the product
to the manufacturer directly.
3. This warranty does not cover any damages which result from
misuse, environmental inuence (water, re, accidents etc.),
normal wear and tear or failure to comply with the instructions
provided in this user manual. The warranty does not apply if
modications and services were performed by unauthorized
persons or if non-original components and accessories were
used.
4. This warranty does not aect any statutory consumer rights,
including claims in tort and claims with respect to a breach of
contract, which the buyer may have against the seller or the
manufacturer of the product.
La garanzia vale unicamente nella nazione in cui il prodotto è stato
inizialmente venduto da un rivenditore al consumatore.
1. La garanzia copre eventuali difetti di fabbricazione e di
materiali riscontrati all’acquisto o entro un periodo di tre (3)
anni dalla data di acquisto presso il rivenditore (garanzia del
produttore). La garanzia è valida soltanto se il prodotto è stato
sottoposto ad un accurato controllo di completezza, funzionalità
all’acquisto e se eventuali manchevolezze di produzione o di
materiali sono state prontamente segnalate. Per acquisti a
distanza, raccomandiamo di eettuare un controllo completo al
ricevimento del prodotto. Conservare accuratamente la prova di
acquisto con la data.
2. In caso si riscontri qualsiasi difetto smettere di utilizzare il
prodotto immediatamente. Per avere diritto alla garanzia è
necessario riportare o spedire il prodotto pulito e completo al
rivenditore presso il quale è stato acquistato ed è indispensabile
fornire la prova di acquisto (scontrino scale, fattura, ecc.)
in originale. Preghiamo di non riportare o spedire il prodotto
direttamente al produttore.
3. La garanzia non copre danni provocati da utilizzo improprio o
cause ambientali (acqua, fuoco, incidenti, ecc.), dal normale
deperimento d’uso o dall’innosservanza delle indicazioni fornite
in questo manuale d’utilizzo. La garanzia decade in caso di
modiche o riparazioni eettuate da personale non autorizzato e
se non sono state utilizzate parti ed accessori originali.
4. Questa garanzia non esclude, limita o comunque pregiudica
eventuali diritti legali dei consumatori, comprese istanze in caso
di torto e in caso di una violazione del contratto che l’acquirente
può avere nei confronti del rivenditore o del produttore.
DEENIT
47

HOMOLOGATION
Approved for CYBEX
Base M
129 - 000013
UN Regulation
No. 129/00
ATON B i-Size
i-Size Universal ISOFI X
45-87cm
max. 13 kg
1
CYBEX GmbH
Riedingerstr. 18, 95448 Bayreuth
Germany
Aton B i-Size – siège auto
UN R 129
Taille : 45-87 cm
Poids : jusque 13 kg
CHER CLIENT!
Merci beaucoup d’avoir choisi l’Aton B i-Size. Lors du
développement de ce siège auto, nous nous sommes focalisés
sur la sécurité, le confort et la facilité d‘utilisation. Ce produit
est fabriqué dans le cadre d’un processus de contrôle qualité
spécique et répond aux normes de sécurité les plus strictes.
48
GOEDKEURING
Aton B i-Size – autostoeltje
UN R 129
Lengte: 45-87 cm
Gewicht: tot 13 kg
HOMOLOGACJA
Aton B i-Size – fotelik samochodowy
UN R 129
Wzrost: 45-87 cm
Waga: do 13 kg
ATTENTION! Pour une bonne protection de votre
!
enfant, il est essentiel d’utiliser et d’installer le siège
auto conformément au manuel d’utilisation.
NOTE! Toujours garder ce mode d’emploi à portée de main dans le
compartiment prévu à cet eet situé sur le siège auto.
NOTE! En raison des législations locales (ex. coloris de l’étiquette
sur le siège auto), l’apparence du produit peut varier. Ceci n’aecte
cependant pas le fonctionnement du produit.

BESTE KLANT! SZANOWNY KLIENCIE!
Het verheugt ons dat u de Aton B i-Size hebt gekocht. U
kunt erop vertrouwen dat we bij de ontwikkeling van het
autostoeltje ons volledig hebben gericht op veiligheid, comfort
en gebruiksvriendelijkheid. Dit product is aan een bijzondere
kwaliteitscontrole onderworpen en voldoet aan de strengste
veiligheidseisen.
BELANGRIJK! Voor de goede bescherming van
!
uw kind is het noodzakelijk het autostoeltje te
gebruiken en te installeren volgens de instructies in
deze handleiding.
Dziękujemy za zakup fotelika samochodowego Aton B i-Size.
Pragniemy zapewnić, iż bezpieczeństwo, wygoda i łatwa obsługa
to wartości nadrzędne, przyświecające nam podczas projektowania
naszych produktów. Fotelik ten został wyprodukowany pod
specjalną kontrolą jakości i spełnia najbardziej surowe wymogi
bezpieczeństwa.
OSTRZEŻENIE! Korzystaj z fotelika samochodowego
!
zgodnie z instrukcją obsługi, aby zapewnić najwyższy
poziom bezpieczeństwa Twojemu dziecku.
FRNLPL
LET OP! Zorg er a.u.b. voor dat u de handleiding altijd bij de hand
hebt door hem in de daarvoor bedoelde sleuf onder het autostoeltje
te bewaren.
LET OP! Vanwege nationale regelgeving (bijvoorbeeld betreende
kleurlabels op het autostoeltje) kunnen de productkenmerken
er anders uitzien. Dit is echter niet van invloed op het correct
functioneren van het product.
OSTRZEZENIE! Dobrze jest mieć instrukcję zawsze w zasięgu
ręki. Radzimy, aby przechowywać ją w przeznaczonym do tego
miejscu znajdującym się pod fotelikiem samochodowym.
OSTRZEZENIE! Ze względu na wymagania poszczególnych
krajów (np. oznakowanie kolorystyczne na foteliku) cechy
produktów mogą różnić się pod względem wyglądu zewnętrznego.
Nie wpływa to na poprawne funkcjonowanie fotelika.
49

FR TABLE DES MATIÈRES
INSTRUCTIONS RÉSUMÉES .................................................................3
PROTECTION DU VÉHICULE ..............................................................50
POSITION CORRECTE DANS LE VÉHICULE ...................................50
SÉCURITÉ EN VOITURE ......................................................................52
SÉCURITÉ DE VOTRE ENFANT ..........................................................56
RÉGLAGE DE LA POIGNÉE .................................................................58
AJUSTER LE CANOPY PARE-SOLEIL ................................................58
RÉGLAGE À LA TAILLE DE L’ENFANT ................................................60
UTILISATION DU HARNAIS ..................................................................62
INSTALLER LE SIÈGE AUTO SUR LA BASE......................................64
INSTALLATION DU SIÈGE AUTO AVEC LA CEINTURE DE
SECURITÉ ..............................................................................................70
SÉCURISER CORRECTEMENT VOTRE ENFANT ............................74
RETRAIT DE LA HOUSSE .....................................................................76
NETTOYAGE ...........................................................................................78
ENTRETIEN DU PRODUIT ....................................................................80
TRAVEL SYSTEM ...................................................................................82
EN CAS D´ACCIDENT ...........................................................................82
INFORMATIONS PRODUIT ...................................................................82
DURÉE DE VIE DU PRODUIT ..............................................................84
RECYCLAGE ...........................................................................................86
GARANTIE ...............................................................................................88
50

NL INHOUD PL SPIS TREŚCI
KORTE HANDLEIDING ............................................................................3
HET VOERTUIG BESCHERMEN .........................................................51
JUISTE PLAATS IN HET VOERTUIG ...................................................51
VEILIGHEID IN DE AUTO ......................................................................53
VEILIGHEID VOOR DE BABY ...............................................................57
STAND VAN DRAAGBEUGEL ...............................................................59
DE ZONNEKAP VERSTELLEN .............................................................59
AANPASSEN AAN DE LICHAAMSOMVANG ......................................61
VASTMAKEN MET HET GORDELSYSTEEM .....................................63
HET AUTOSTOELTJE OP DE BASIS PLAATSEN ..............................65
HET AUTOSTOELTJE INSTALLEREN MET DE AUTOGORDEL .....71
DE BABY VEILIG IN HET STOELTJE ZETTEN ..................................75
DE BEKLEDING VERWIJDEREN .........................................................77
REINIGING ..............................................................................................79
ONDERHOUD .........................................................................................81
REISSYSTEEM .......................................................................................83
NA EEN ONGEVAL .................................................................................83
PRODUCTINFORMATIE ........................................................................83
LEVENSDUUR VAN HET PRODUCT ...................................................85
VERWIJDERING .....................................................................................87
GARANTIE ...............................................................................................89
INSTRUKCJA SKRÓCONA .....................................................................3
OCHRONA TAPICERKI SAMOCHODOWEJ .......................................51
POPRAWNY MONTAŻ W POJEŹDZIE ................................................51
BEZPIECZEŃSTWO W SAMOCHODZIE ............................................53
BEZPIECZEŃSTWO TWOJEGO DZIECKA.........................................57
REGULACJA RĄCZKI FOTELIKA .........................................................59
REGULACJA BUDKI PRZECWISŁONECZNEJ ..................................59
REGULACJA FOTELIKA DO WIELKOŚCI DZIECKA .........................61
ZAPINANIE DZIECKA PASAMI ZINTEGROWANYMI Z
FOTELIKIEM ...........................................................................................63
MONTAŻ FOTELIKA SAMOCHODOWEGO NA BAZIE......................65
MONTAŻ FOTELIKA PASAMI BEZPIECZEŃSTWA ..........................71
POPRAWNE ZAPIĘCIE DZIECKA W FOTELIKU ...............................75
ZDEJMOWANIE TAPICERKI .................................................................77
CZYSZCZENIE ........................................................................................79
PIELĘGNACJA PRODUKTU .................................................................81
SYSTEM PODRÓŻNY CYBEX ..............................................................83
CO ZROBIĆ Z FOTELIKIEM, KTÓRY BRAŁ UDZIAŁ W
WYPADKU? .............................................................................................83
INFORMACJA PRODUKTOWA .............................................................83
CYKL ŻYCIA PRODUKTU ......................................................................85
UTYLIZACJA ...........................................................................................87
GWARANCJA ..........................................................................................89
FRNLPL
51

PROTECTION DU VÉHICULE
Des traces d’utilisation et/ou de décoloration peuvent apparaître
sur certaines banquettes en matériaux délicats (velours, cuir, etc)
si des sièges auto sont utilisés. An d’éviter cela, mettre une
serviette ou une couverture entre la banquette et le siège auto.
Dans ce contexte, voir aussi nos instructions de nettoyage. Il est
essentiel des les suivre avant la première utilisation du siège auto.
POSITION CORRECTE DANS LE VÉHICULE
Ce produit est un siège auto „i-Size“. Il est homologué selon
la norme UN R 129, pour une utilisation sur les positions des
véhicules „compatibles i-Size» comme indiqué dans le manuel
du constructeur. Si votre véhicule n’est pas équipé d’une position
i-Size, merci de consulter la liste de compatibilité incluse ou www.
cybex-online.com an de vérier si l’installation est autorisée.
ATTENTION! Ni le siège i-Size ou la base i-Size ne
!
peuvent être combinés avec d’autres systèmes. La
garantie expire en cas de modication.
Toujours vérier avant d’acheter le siège i-Size que le siège peut
être installé correctement dans votre véhicule. Une installation
correcte peut se faire soit en utilisant la Base i-Size ISOFIX ou en
utilisant la ceinture 3 points du véhicule.
52
HET VOERTUIG BESCHERMEN OCHRONA TAPICERKI SAMOCHODOWEJ
Het gebruik van autostoeltjes kan op sommige autozittingen met
een kwetsbare bekleding (zoals velours of leer) sporen nalaten en/
of deze doen verkleuren. U kunt dit voorkomen door bijvoorbeeld
een deken of een handdoek onder het autostoeltje op de stoel te
leggen. Raadpleeg in dit verband ook onze reinigingsinstructies.
Het is van groot belang dat u die opvolgt voordat u het autostoeltje
voor het eerst gebruikt.
JUISTE PLAATS IN HET VOERTUIG POPRAWNY MONTAŻ W POJEŹDZIE
Dit is een i-Size kinderbeveiligingssysteem. Het is goedgekeurd
conform UN R 129 voor gebruik op voor i-Size geschikte
autostoelen, zoals door de autofabrikant aangegeven in de
handleiding van het voertuig. Als uw voertuig geen stoelen met
i-Size heeft, controleer dan
op het meegeleverde overzicht van voertuigtypes of
www.cybex-online.com of de installatie is toegestaan.
Niektóre tapicerki samochodowe wykonane z delikatnego materiału
jak (np. welur, skóra) mogą doznać zużycia/przetarcia lub wytarcia.
Aby tego uniknąć można zabezpieczyć tapicerkę przez podłożenie
koca lub ręcznika pod fotelik. Zachęcamy do zapoznania się
z zaleceniami dotyczącymi czyszczenia fotelika oraz jego
tapicerki. Należy ich bezwzględnie przestrzegać przed pierwszym
skorzystaniem z fotelika.
To jest fotelik samochodowy zgodny z regulacją „i-Size“. Fotelik
zgodny z regulacją UN R 129, przeznaczony do użytku w
samochodach „i-Size kompatybilnych“ jak wskazuje instrukcja
obsługi producenta samochodu. Jeśli Twój samochód nie posiada
pozycji siedzącej i-Size, proszę sprawdź na dołączonej liście marek
samochodów lub na stronie: www.cybex-online.com czy dozwolony
jest montaż tego fotelika w Twoim modelu pojazdu.
FRNLPL
BELANGRIJK! Noch het i-Size autostoeltje, noch
!
de i-Size basis mogen met andere systemen worden
gecombineerd of gebruikt. De garantie vervalt zodra er
iets wordt gewijzigd.
Controleer altijd vóór de aanschaf van het i-Size autostoeltje of
dit stoeltje goed kan worden geïnstalleerd in uw auto. Goede
installatie is alleen mogelijk door de i-Size basis, ISOFIX op het
systeem of de 3-puntsgordel van het voertuig te gebruiken.
OSTRZEŻENIE! Zarówno fotelik i-Size jak i baza
!
i-Size nie mogą być łączone ani używane z innymi
systemami. Produkt traci gwarancję w chwili dokonania
nieautoryzowanych zmian.
Przed zakupem fotelika i-Size, sprawdź czy fotelik można
poprawnie zainstalować w Twoim samochodzie. Poprawnego
montażu fotelika możesz dokonać z pomocą bazy i-size, systemu
ISOFIX lub przy pomocy 3-punktowego pasa bezpieczeństwa.
53

SÉCURITÉ EN VOITURE
ATTENTION! Ne jamais utiliser le siège auto sur une
!
place équipée d’un airbag frontal. Cet avertissement ne
s’applique pas aux airbags latéraux.
NOTE! Le volume d’un airbag frontal augmente de façon
importante en cas de choc et peut causer à votre enfant de graves
blessures ou même la mort.
ATTENTION! Le siège auto et la Base i-Size doivent
!
toujours être sécurisés même si l‘enfant n’y est pas
installé. En cas de freinage d’urgence ou d’accident, un
siège auto non attaché peut causer des blessures aux
autres passagers et à vous même.
An de garantir la meilleure sécurité possible pour tous les
passagers, assurez-vous que...
• Les dossiers inclinables des banquettes soient relevés dans leur
position initiale droite.
• En installant le siège auto sur le siège passager avant, reculer le
siège au maximum.
• Tous les objets susceptibles de causer des blessures en cas
d’accident soient correctement rangés dans l’habitacle.
• Tous les passagers de la voiture attachent leur ceinture de
sécurité.
54
VEILIGHEID IN DE AUTO BEZPIECZEŃSTWO W SAMOCHODZIE
BELANGRIJK! Plaats het stoeltje nooit op een stoel
!
met een geactiveerde voorairbag. Dit geldt niet voor
zogeheten zij-airbags.
LET OP! De grote airbag aan de voorzijde wordt in zeer korte
tijd explosief opgeblazen en kan daardoor ernstig letsel of zelfs
overlijden van het kind tot gevolg hebben.
BELANGRIJK! Het autostoeltje en de basis moeten
!
altijd juist zijn geïnstalleerd in het voertuig, ook als
ze niet worden gebruikt. Door plotseling remmen
of tijdens een ongeval kan een niet vastgemaakt
autostoeltje andere passagiers of uzelf verwonden.
Om de hoogst mogelijke veiligheid van alle passagiers te
garanderen is het nodig dat...
• neerklapbare rugleuningen in het voertuig rechtop staan en zijn
vergrendeld.
• de passagiersstoel zo ver mogelijk naar achteren staat als u het
autostoeltje op deze stoel installeert.
• u alle voorwerpen die letsel kunnen veroorzaken tijdens een
ongeval goed opbergt.
• alle passagiers in het voertuig hun gordel dragen.
OSTRZEŻENIE! Nie korzystaj z fotelika
!
samochodowego na przednim fotelu pasażera z
włączoną przednią poduszką powietrzną. Nie dotyczy
to bocznych poduszek powietrznych tzw. kurtyn
powietrznych.
OSTRZEZENIE! Poduszka powietrzna jest wystrzeliwana
pirotechnicznie podczas zderzenia. Może doprowadzić do śmierci
lub poważnych uszkodzeń ciała dziecka.
OSTRZEŻENIE! Fotelik samochodowy i baza zawsze
!
muszą być przypięte pasami bezpieczeństwa,
nawet kiedy nie podróżuje w nim dziecko. W razie
nagłego hamowania lub wypadku nieprzypięty fotelik
samochodowy może spowodować obrażenia u
pasażerów lub kierowcy.
W celu zapewnienia możliwie najlepszego bezpieczeństwa
wszystkim pasażerom upewnij się, że...
• składane oparcia w samochodzie są zablokowane w pozycji
pionowej.
• montując fotelik na przednim siedzeniu samochodu, na fotelu
pasażera, odsuń fotel samochodowy maksymalnie do tyłu.
• wszystkie rzeczy znajdujące się wewnątrz samochodu zostały
zabezpieczone w należyty sposób i nie spowodują uszkodzeń/nie
zranią pasażerów w razie wypadku.
• wszyscy pasażerowie mają zapięte pasy.
FRNLPL
55
ATTENTION! Ne tenez JAMAIS un bébé sur vos
!
genoux dans une voiture. Les forces générées lors
d’une collision sont beaucoup trop élevés pour toute
personne tenant le bébé. Ne jamais vous attacher
vous-même et votre enfant avec une seule ceinture de
sécurité.
56
BELANGRIJK! Houd een kind in de auto NOOIT
!
op uw schoot. De krachten die bij een botsing
vrijkomen, zijn dermate hoog dat het kind onmogelijk
kan worden vastgehouden. Gebruik nooit dezelfde
veiligheidsgordel voor zowel uzelf als het kind.
OSTRZEŻENIE! NIGDY nie przewoź dziecka trzymając
!
go na kolanach. Siły oddziałujące podczas kolizji są
zbyt duże, aby utrzymać dziecko. NIGDY nie przypinaj
siebie oraz dziecka przy pomocy jednego pasa
bezpieczeństwa.
FRNLPL
57

SÉCURITÉ DE VOTRE ENFANT
ATTENTION! Toujours attacher votre enfant avec le
!
système de harnais intégré.
NOTE! Ne jamais perdre de vue votre enfant.
NOTE! Ne jamais laisser votre enfant en voiture sans surveillance.
Sortez votre bébé du siège auto aussi souvent que possible an
de soulager la pression exercée sur sa colonne vertébrale. Prenez
des pauses lors des longs trajets en voiture à cet eet. Assurez-
vous également de ne pas laisser votre enfant trop longtemps dans
la coque même lorsqu’il n’est pas dans la voiture.
ATTENTION! Les pièces en plastique de la coque
!
chauent au soleil. Votre bébé peut être brûlé. Protégez
votre bébé et la coque de l’exposition intense au soleil
(par exemple en plaçant un tissu léger sur le siège).
58
VEILIGHEID VOOR DE BABY BEZPIECZEŃSTWO TWOJEGO DZIECKA
BELANGRIJK! Maak het kind altijd vast met het
!
geïntegreerde gordelsysteem.
LET OP! Verlies uw baby nooit uit het oog.
LET OP! Laat het kind nooit zonder toezicht achter in een auto.
Haal het kind uit het autostoeltje zodra dat kan om de druk op de
wervelkolom van het kind weg te nemen. Zorg er daarom voor dat
u regelmatig rustpauzes inlast tijdens langere autoritten. Let er op
dat het kind ook buiten de auto niet te lang in het autostoeltje zit.
OSTRZEŻENIE! Zawsze zapinaj dziecko
!
zintegrowanymi z fotelikiem pasami.
OSTRZEZENIE! Miej dziecko na oku.
OSTRZEZENIE! Nigdy nie zostawiaj dziecka bez opieki w
pojeździe.
Wyjmuj dziecko z fotelika, aby odciążyć kręgosłup. W związku
z tym pamiętaj, aby robić postoje podczas dłuższych podróży
samochodem. Wyjmuj dziecko z fotelika samochodowego tak
często jak to możliwe. Pamiętaj o tej zasadzie również kiedy
korzystasz z fotelika poza samochodem.
FRNLPL
BELANGRIJK! De kunststof onderdelen van het
!
autostoeltje worden in de zon warmer. Het kind kan
daardoor brandwonden oplopen. Bescherm het kind
en het autostoeltje tegen blootstelling aan direct
zonlicht (bijvoorbeeld door een dunne doek over het
autostoeltje te leggen).
OSTRZEŻENIE! Plastikowe elementy fotelika mogą
!
nagrzewać się do słońca. Może to spowodować
oparzenie u dziecka. Chroń dziecko i fotelik przed
nadmierną ekspozycją na słońce (np.: przykrywając
nieużywany fotelik lekkim materiałem).
59

RÉGLAGE DE LA POIGNÉE
1
2
Vous pouvez verrouiller la poignée dans quatre positions :
A : Position porter / en voiture.
B+C : Position placer l’enfant dans le siège.
D : Position de sécurité en dehors du véhicule.
C
B
A
D
ATTENTION! An d’empêcher le siège de basculer
!
pendant le transport, vérier si la poignée (1) est
verrouillée en position de transport A.
• Pour régler la poignée de transport, appuyez simultanément sur
les touches gauche et droite (2).
• Déplacer ensuite la poignée (1) en avant ou en arrière en
appuyant sur les boutons (2) jusqu’à ce qu’elle se bloque dans la
position souhaitée.
AJUSTER LE CANOPY PARE-SOLEIL
Déplier la canopy pare-soleil en tirant progressivement sur la
visière en plastique. Remettre le canopy dans sa position initiale
pour le replier.
60

STAND VAN DRAAGBEUGEL REGULACJA RĄCZKI FOTELIKA
U kunt de draagbeugel in vier standen vergrendelen:
Rączkę można ustawić w jednej z 4 pozycji:
A: Draag/Rijstand.
B+C: Om de baby in het stoeltje te plaatsen.
D: Veilige zitstand buiten de auto.
BELANGRIJK! Om te voorkomen dat het autostoeltje
!
tijdens het dragen omkiept, moet u controleren of de
draagbeugel (1) in de draagstand is vergrendeld A.
• Om de draagbeugel in een andere stand te zetten, drukt u de
linker- en rechterknop (2) gelijktijdig in.
• Beweeg vervolgens de draagbeugel (1) naar voren of naar
achteren terwijl u de knoppen (2) ingedrukt houdt tot de
draagbeugel in de gewenste stand vastklikt.
DE ZONNEKAP VERSTELLEN REGULACJA BUDKI PRZECWISŁONECZNEJ
Vouw de zonnekap uit door de kunststof kap naar voren te
trekken. Klap de zonnekap dicht door deze terug te duwen naar de
opgevouwen positie.
A: Poczas niesienia fotelika/w trakcie jazdy.
B+C: Podczas wkładania/wyjmowania dziecka do/z fotelika.
D: Bezpieczna pozycja poza samochodem.
OSTRZEŻENIE! Aby zapobiec przekręceniu się fotelika
!
podczas przenoszenia należy sprawdzić, czy rączka (1)
jest zablokowana w pozycji A.
• Aby zmienić pozycję rączki wciścnij jednocześnie przycisk po
lewej i prawej stronie (2).
• Następnie przestaw rączkę (1) do przodu lub tyłu cały
czas trzymając wciśnięte przyciski (2), aż zatrzaśnie się
automatycznie w żądanej pozycji.
Budkę przeciwsłoneczną otworzysz pociągając delikatnie za jej
plastikowy fragment. W celu złożenia budki przeciwsłonecznej,
popchnij ją do jej początkowej pozycji.
FRNLPL
61

RÉGLAGE À LA TAILLE DE L’ENFANT
4
3
Réglage de la têtière
NOTE! La têtière n’ore une protection et une sécurité optimales
à votre enfant que lorsqu‘elle est correctement réglée. Il existe 11
positions de réglage en hauteur.
• La têtière doit être réglée de sorte que l’écart entre l’épaule de
l’enfant et le bas de la têtière ne dépasse pas 2 cm (2 doigts
environ).
MAX.
5
62
• Pour cela, tirez le levier de réglage (3) vers le haut pour
déverrouiller l’appui-tête (4). Vous pouvez maintenant régler la
têtière.
NOTE! Les sangles d’épaules sont indisociables de la têtière et ne
doivent pas être réglées séparément.
Retirer le réducteur nouveau-né.
Le réducteur nouveau-né (5) peut être retiré une fois que l’enfant
fait 61 cm (3 mois environ) pour donner plus d’espace à votre
enfant. Pour retirer le réducteur nouveau-né (5), ouvrir et retirer les
protections de harnais. Retirer alors le réducteur nouveau-né et
replacer les protections de harnais sur les sangles d’épaules.

AANPASSEN AAN DE LICHAAMSOMVANG REGULACJA FOTELIKA DO WIELKOŚCI DZIECKA
De hoofdsteun verstellen Regulacja zagłówka
LET OP! De hoofdsteun biedt uw kind alleen optimale
bescherming indien deze in de optimale hoogtestand
is gezet. De hoofdsteun kan in 11 hoogtestanden
worden gezet.
• De hoofdsteun moet zo ingesteld zijn dat de ruimte tussen de
schouder van het kind en de hoofdsteun niet meer is dan 2 cm
(ongeveer twee vingers).
• Trek de verstelgreep (3) omhoog om de hoofdsteun (4) te
ontgrendelen. Nu kunt u de hoofdsteun verstellen.
OSTRZEZENIE! Zagłówek fotelika zapewni dziecku najlepszą
ochronę wyłącznie, jeśli jest ustawiony w optymalnej wysokości.
Wysokość zagłówka można ustawić w jednej z 11 pozycji.
• Zagłówek należy ustawić tak, aby odcinek pomiędzy ramionami
dziecka a zagłówkiem nie był większy niż
2 cm (na szerokość ok. 2 palców).
• Pociągnij za zaczep (3) ku górze w celu odblokowaniu
zagłówka(4). Teraz dokonaj regulacji zagłówka.
FRNLPL
LET OP! De schouderriemen zijn stevig aan de hoofdsteun
bevestigd en hoeven niet afzonderlijk te worden versteld.
De inleg voor pasgeborenen verwijderen WYJMOWANIE WKŁADKI NIEMOWLĘCEJ
Het inlegkussen voor pasgeborenen (5) kan worden verwijderd
als de baby 61 cm lang is (ongeveer 3 maanden) om het kind
meer ruimte te bieden. Om het inlegkussen voor pasgeborenen
(5) te verwijderen maakt u de schouderpads los en verwijdert die.
Neem dan het inlegkussen voor pasgeborenen weg en breng de
schouderpads weer op de schouderriemen aan.
OSTRZEZENIE! Pasy naramienne są połączone zintegrowane z
zagłówkiem, dzięki czemu nie trzeba ich osobno regulować.
Wkładkę niemowlęcą (5) można wyjąć, gdy dziecko mierzy 61 cm
(ok. 3 miesiąca). Wyjęcie wkładki zapewni dziecku więcej miejsca.
W celu wyjęcia wkładki (5) najpierw należy odpiąć materiałowe
ochraniacze pasów naramiennych. Następnie wyjmujemy wkładkę i
nakładamy z powrotem ochraniacze na pasy naramienne.
63

6109
8
7
64
11
UTILISATION DU HARNAIS
NOTE! Assurez-vous que l’appui-tête est correctement verrouillé
sur une position avant d’utiliser le siège.
NOTE! Assurez-vous que le siège ne contient pas de jouets ou
d’objets durs.
• Réglez les sangles d’épaules (6) en actionnant le bouton central
de réglage (7) tout en les tirant.
NOTE! Toujours tirer sur le harnais (6) et non sur les protèges
harnais (8).
• Ouvrez la boucle de la ceinture (9) en appuyant fermement sur
le bouton rouge.
NOTE! Assurez-vous que les sangles (6) ne soient pas vrillées.
• Installez votre enfant dans le siège auto.
• Placez le harnais (6) directement sur les épaules de votre enfant.
• Rassemblez les deux languettes de ceinture (10) verrouillez-les
ensemble en position dans la boucle de ceinture (9) jusqu’au
«CLIC» audible.
• Tirez doucement sur la sangle de réglage central (11) an de
resserrer le harnais (6) jusqu’à ce qu’il épouse le corps de votre
enfant.
NOTE! Pour garantir la protection optimale du siège, les sangles
d’épaules (6) doivent être le plus près possible du corps de l’enfant.

VASTMAKEN MET HET GORDELSYSTEEM ZAPINANIE DZIECKA PASAMI ZINTEGROWANYMI Z
LET OP! De hoofdsteun moet in de juiste stand worden
vergrendeld voordat het autostoeltje in gebruik wordt genomen.
FOTELIKIEM
OSTRZEZENIE! Przed rozpoczęciem korzystania z fotelika
upewnij się, że zagłówek znajduje się w zablokowanej pozycji.
LET OP! In het autostoeltje mogen geen speelgoed en harde
voorwerpen aanwezig zijn.
• Maak de schouderriemen (6) losser door de instellingsknop op
de centrale bediening (7) in te drukken en tegelijkertijd beide
schouderriemen omhoog te trekken.
LET OP! Trek altijd aan de schouderriemen (6) en niet aan de
riempads (8).
• Open het gordelslot (9) door stevig op de rode knop te drukken. • Rozepnij klamrę pasa (9) mocno naciskając czerwony przycisk.
LET OP! De schouderriemen (6) mogen niet gedraaid zitten. OSTRZEZENIE! Upewnij się, że pasy naramienne (6) nie są
• Plaats het kind in het autostoeltje.
• Leg de schouderriemen (6) over de schouders van het kind.
• Plaats beide slottongen (10) tegen elkaar en vergrendel deze in
het gordelslot (9). U moet ze daarbij horen vastklikken.
• Trek bij het centrale gordelslot (11) de schouderriemen
voorzichtig aan (6) tot deze goed op het lichaam van het kind
aansluiten.
LET OP! Het autostoeltje biedt alleen optimale bescherming als de
schouderriemen (6) zo nauw mogelijk op het lichaam aansluiten.
OSTRZEZENIE! Upewnij się, że w foteliku nie znajdują się
zabawki dziecka ani żadne twarde elementy.
• Poluzuj pasy naramienne (6) naciskając przycisk znajdujący się
na centralnym regulatorze (7) i równocześnie pociągnij oba pasy
naramienne w górę.
OSTRZEZENIE! Zawsze pociągaj za pasy naramienne (6), nigdy
za nakładki (8).
poskręcane ani skrzyżowane.
• Posadź dziecko w foteliku.
• Umieść pasy naramienne (6) tuż nad ramionami dziecka.
• Wprowadź dwa zapięcia pasów (9) i wepnij je w klamrę (10).
Usłyszysz wyraźne „KLIKNIĘCIE”.
• Delikatnie i ostrożnie pociągnij centralny pas (11), w celu
ściągnięcia pasów naramiennych (6) jak najbliżej ciała dziecka.
OSTRZEZENIE! W celu zapewnienia maksymalnej ochrony, pasy
naramienne (6) powinny znajdować się jak najbliżej ciała dziecka.
FRNLPL
65

INSTALLER LE SIÈGE AUTO SUR LA BASE
14
16
17
15
Installation de la base
Choisissez la position appropriée dans le véhicule. Si votre
véhicule n´est pas équipé d’une position i-Size, merci de consulter
13
12
21
12
18
66
15
la liste de compatibilité incluse an de vérier si l’installation est
autorisée.
NOTE! les points d’ancrage ISOFIX (12) se composent de deux
pattes métalliques par siège et sont situés entre le dossier et le
siège de la voiture. En cas de doute, consultez le manuel de votre
voiture pour plus d’informations.
• Si les points d’ancrage ISOFIX (12) de votre véhicule sont
diciles d’accès, utilisez les guides ISOFIX fournis (13) qui
se xent sur les points d’ancrage ISOFIX (12) de manière
permanente.
NOTE! N‘entreposez aucun objet sur le plancher de la voiture au
niveau du siège auto.
• Toujours déplier la jambe de force (14) jusqu’à son vérouillage.
• Relâchez le verrouillage des connecteurs ISOFIX (15). Les deux
verrous peuvent être indépendamment réglés. Poussez les deux
boutons (16) et (17) simultanément tout en tirant les connecteurs
ISOFIX de la base jusqu’à la butée.
• Les connecteurs ISOFIX (15) doivent s’enclencher dans les
points d’ancrage ISOFIX (12) avec un clic audible.
• Assurez-vous que la base reste bien en place en essayant de
l’extraire.
• L’indicateur de sécurité vert (18) doit être clairement visible au
niveau des deux boutons de déverrouillage ISOFIX.
• Poussez ensuite la base en direction du dossier jusqu’à ce
qu’elle soit entièrement alignée avec le dossier de la banquette.
NOTE ! Une fois les ISOFIX enclenchés, bougez légèrement la
base d’un côté et de l’autre en la poussant délicatement de façon à
l’ajuster au mieux à la banquette du véhicule.

HET AUTOSTOELTJE OP DE BASIS PLAATSEN MONTAŻ FOTELIKA SAMOCHODOWEGO NA BAZIE
Installatie van de basis MONTAŻ BAZY
Kies de juiste stoel in het voertuig. Als uw voertuig geen stoelen
met i-Size heeft, controleer dan op het meegeleverde overzicht van
voertuigtypes of de installatie is toegestaan.
LET OP! De ISOFIX-ankerpunten (12) zijn twee metalen beugels
per stoel, die geplaatst zijn tussen de rugleuning en zitting van de
auto. Als u twijfelt, lees dan de handleiding van uw auto voor hulp.
• Als de ISOFIX-ankerpunten (12) van uw voertuig lastig
toegankelijk zijn, gebruik dan de meegeleverde ISOFIX-
hulpstukken (13) en bevestig ze permanent op de ISOFIXankerpunten (12).
LET OP! Leg geen voorwerpen in het voetgedeelte aan de
voorkant van het autostoeltje.
• Klap de steunvoet (14) altijd uit tot deze vergrendelt.
• Ontgrendel de ISOFIX-grijparmen (15). Beide vergrendelingen
kunnen afzonderlijk worden versteld. Druk beide knoppen (16)
en (17) gelijktijdig in en trek de ISOFIX-grijparmen uit de basis
tot de eindstop.
• De ISOFIX-grijparmen (15) dienen met een hoorbare KLIK te
vergrendelen op de ISOFIX-ankerpunten (12).
• Zorg dat de basis goed vastzit door te proberen deze uit de
ISOFIX-montagehulpen te trekken.
• De groene veiligheidsindicator (18) moet nu goed zichtbaar zijn
op beide ISOFIX-ontgrendelingsknoppen.
• Duw nu de basis naar de rugleuning toe tot deze volledig aansluit
op die rugleuning.
LET OP! Door de basis zijwaarts te bewegen, wordt de basis met
de rugleuning verder vastgezet.
Wybierz odpowiednie miejsce w samochodzie. Jeśli Twój
samochód nie posiada pozycji siedzącej i-Size, sprawdź załączoną
listę pojazdów.
Ostrzezenie! Łączniki ISOFIX (12) to dwa metalowe elementy
znajdujące się pomiędzy oparciem a siedziskiem kanapy/fotela
samochodowego. Jeśli są jakiekolwiek wątpliwości, skonsultuj je z
samochodową instrukcją obsługi.
• Jeśli w Twoim pojeździe uchwyty ISOFIX (12) są trudnodostępne,
skorzystaj z załączonych prowadnic ISOFIX (13), które możesz
zaczepić na uchwytach ISOFIX na stałe (12).
Ostrzezenie! W miejscu, gdzie rozstawiona będzie noga fotelika
na podłodze samochodowej nie mogą znajdować się żadne
elementy.
• Rozłóż nogę podpierającą fotelik (14) do momentu aż zablokuje
się w pozycji otwartej.
• Zwolnij zamek łączników ISOFIX (15). Obie blokady mogą być
regulowane niezależnie od siebie. Jednocześnie wciśnij przyciski
(16) i (17) i wyciągnij łączniki ISOFIX z bazy.
• Łączniki ISOFIX (15) zablokują sie w punktach styczności z
ISOFIX (12) wyraźnym kliknięciem.
• Upewnij się, że baza jest dobrze zamontowana, próbując ją
wyciągnąć z ISOFIXA.
• Zielony wskaźnik bezpieczeństwa (18) musi być wyraźnie
widoczny.
• Następnie dopchnij bazę fotelika w kierunku oparcia kanapy
samochodowej do momentu aż będzie przylegała.
UWAGA! Poprzez poruszanie bazą na boki, po zamontowaniu,
ustabilizujemy ją.
FRNLPL
67
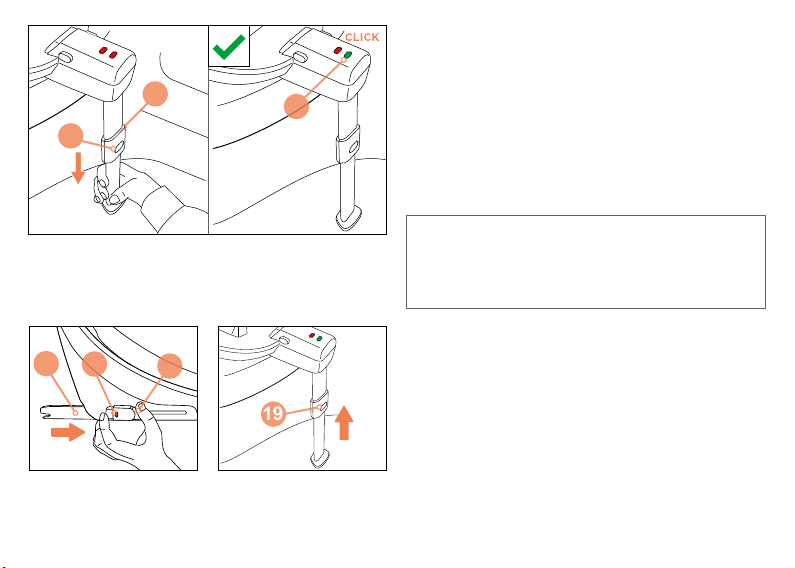
Réglage de la jambe de force
19
Poussez le bouton de réglage (19) vers le haut et appuyez dessus
pour tirer la jambe de force. Tirez sur la jambe de force (14) jusqu’à
ce qu’elle atteigne le plancher du véhicule. Tirer la jambe de force
14
20
19
15
16
68
17
jusqu’à sa prochaine position de vérouillage pour assurer une
absorption optimale des forces. L’indicateur de la jambe de force
(20) situé sur la base doit être VERT et un «clic» caractéristique
doit être audible.
NOTE! Assurez-vous que la base soit toujours bien à plat sur la
banquette du véhicule.
ATTENTION! La jambe de force (14) doit toujours être
!
en contact direct avec le plancher du véhicule. Il ne
doit y avoir aucun objet ni espace entre le plancher du
véhicule et la jambe de force. Si des compartiments de
stockage sont intégrés dans le plancher, vous devez
contacter le constructeur du véhicule.
Retrait de la base
Eectuez les étapes d’installation dans l’ordre inverse.
• Dévérouillez les deux connecteurs ISOFIX (15) en appuyant sur
les boutons (16) et (17) simultanément et les sortir des guides
ISOFIX.
• Repoussez les connecteurs (15) dans leur position d’origine.
• En appuyant sur la poignée de réglage (19) vous pouvez
replacer la jambe de force dans sa position initiale, puis la replier
pour gagner de la place.
DE STEUNVOET AANPASSEN REGULACJA NOGI FOTELIKA
Druk de instellingsknop (19) op de steunvoet in om de steunvoet
uit te trekken. Trek de steunvoet (14) uit tot deze op de bodem
van de auto staat. Trek daarna de steunvoet naar het volgende
vergrendelingsniveau voor optimale krachtengeleiding. In de juiste
stand is de indicator (20) van de steunvoet op de basis GROEN. U
hoort dan ook duidelijk een KLIK.
LET OP! Zorg dat de basis nog steeds vlak op de autostoel staat. OSTRZEZENIE! Upewnij się, że w dalszym ciągu baza spoczywa
BELANGRIJK! De steunvoet (14) moet altijd direct
!
contact maken met de bodem van de auto. Er mogen
geen voorwerpen of ruimten tussen de bodem en de
steunvoet zijn. Als er opbergvakken in de bodem van
het voertuig zijn, dient u contact op te nemen met de
autofabrikant.
De basis verwijderen WYJMOWANIE BAZY
Voer de stappen van de installatie in omgekeerde volgorde uit. Wykonaj czynności instalacyjne w odwrotnej kolejności.
• Ontgrendel beide ISOFIX-grijparmen (15) door de knoppen
(16) en (17) tegelijkertijd in te drukken en trek ze uit de ISOFIX-
montagehulpen.
• Duw de grijparmen (15) terug in hun uitgangspositie.
• Door op de verstelknop (19) te drukken kunt u de steunvoet in de
uitgangspositie terugbrengen en deze terugklappen om ruimte
te besparen.
Naciśnij przycisk (19) i wyciągnij nogę (4) do momentu. Aż
bezpiecznie oprze się o podłogę samochodową. Następnie
wyciągnij stopę tak, aby znalazła oparcie o podłogę. Wskaźnik
nogi fotelika (20) znajdujący się na bazie będzie pokazywał kolor
ZIELONY. Słyszalne będzie charakterystyczne kliknięcie.
płasku na siedzeniu fotela pojazdu.
OSTRZEŻENIE! Noga wspierająca fotelik (14) musi
!
być zawsze oparta o podłogę samochodową. Pomiędzy
nogą wspierającą a podłogą samochodu nie mogą
znajdować się ani żadne przedmioty ani przerwa/brak
styczności z podłożem. Jeśli w podłodze jest schowek
podłogowy, skontaktuj się z producentem samochodu.
• Odblokuj oba złącza ISOFIX (15), jednocześnie naciskając
przyciski (16) i (17), następnie wyciągnij je z prowadnic ISOFIX.
• Wepchnij łączniki (15) do pozycji początkowej.
• Naciskając dźwignię przycisk (19) można odepchnąć wspierającą
nogę do pozycji wyjściowej, a następnie złożyć ją z powrotem,
aby fotelik zajmował mniej miejsca po wyjęciu z samochodu.
FRNLPL
69
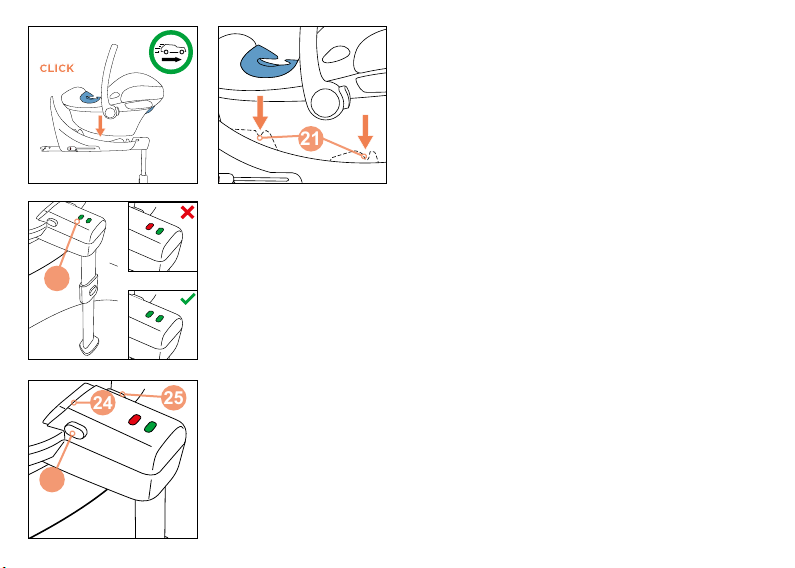
Installer le siège auto sur la base
25
24
21
NOTE! Assurez-vous que la surface de la base ne contient pas
d’objets.
Assurez-vous que la poignée est vérouillée en position A et que
l’enfant est sécurisé avec le harnais intégré. Placez le siège
auto dos à la route sur la base. Assurez vous que les barres de
vérouillage (21) s’emboitent avec un «CLIC» audible. Vériez que
l’indicateur (22) sur la base est VERT. Si l’indicateur n’est pas
VERT, le siège n’est pas correctement vérouillé. Si nécessaire,
renouveler la procédure.
22
Retrait
NOTE! Pour éviter d’endommager votre voiture et le siège
auto, les protections latérales (23) devrait être repliées avant de
retirer le siège (voir la section «AJUSTER LES PROTECTEURS
LATÉRAUX»).
Pressez le bouton de retrait central (24) et l’un des boutons de
retrait sur le côté (25) simultanément pour débloquer le siège de la
base. Inclinez légèrement le siège. L’indicateur (22) de la base est
maintenant ROUGE Vous pouvez maintenant relâcher les boutons
25
70
de déverrouillage (24) et (25) pour soulever le siège de la base.

HET AUTOSTOELTJE OP DE BASIS PLAATSEN MONTAŻ FOTELIKA NA BAZIE
LET OP! Zorg dat het oppervlak van de basis vrij van voorwerpen
is.
Zorg dat de draagbeugel is vergrendeld in de autostand A en
dat het kind is vastgemaakt met behulp van het geïntegreerde
gordelsysteem. Plaats het autostoeltje achterwaarts gericht op de
basis. Zorg dat beide vergrendelingsknoppen (21) met een duidelijk
hoorbare KLIK vergrendelen. Controleer of de basisindicator (22)
op de basis GROEN aangeeft. Als de indicator niet GROEN is,
is het autostoeltje niet goed vergrendeld. Herhaal zo nodig de
procedure.
Verwijderen Wyjmowanie
LET OP! Om beschadiging van uw auto en het autostoeltje
te voorkomen dient de zijbeschermer (23) teruggeduwd te
worden voordat u de stoel verwijdert (zie “AANPASSEN VAN DE
ZIJBESCHERMERS”).
Druk de centrale ontgrendelingsknop (24) en een van de
ontgrendelingsknoppen aan de zijkant (25) tegelijkertijd in
om het autostoeltje van de basis af te halen. Kantel de zitting
iets. De indicator op de basis (22) is nu ROOD. Nu kunt u de
ontgrendelingsknoppen (24) en (25) loslaten en het autostoeltje
van de basis tillen.
OSTRZEZENIE! Upewnij się, że na powierzchni bazy nie znajdują
sie żadne przedmioty.
Upewnij się, że rączka fotelika jest ustawiona w pozycji A oraz, że
dziecko jest zapięte zintegrowanym z fotelikiem pasami. Umieść
fotelik na bazie w pozycji tyłem do kierunku jazdy. Upewnij sie,
że obydwa zamki zostały (21) zapięte. Potwierdzi to słyszalne
kliknięcie. Sprawdź czy wskaźnik na bazie (22) jest ZIELONY.
Jeżeli wskaźnik nie jest ZIELONY oznacza to, że fotelik nie został
poprawnie wpięty. Jeśli zajdzie taka potrzeba, powtórz procedurę.
OSTRZEZENIE! Aby uchronić samochód oraz fotelik
samochodowy przed zniszczeniem, należy zamknąć osłonę boczną
(23) przed wyjęciem fotelika z pojazdu (patrz sekcja „REGULACJA
OSŁONY BOCZNEJ“).
Jednocześnie wciśnij centralny przycisk zwalniający (24)
oraz jeden z przycisków znajdujących się z boku bazy (25), w
celuodpięcia fotelika samochodowego z bazy. Odchyl trochę
fotelik do tyłu. Teraz wskaźnik na bazie (22) powinien wskazywać
CZERWONY. Teraz możesz zwolnić przyciski (24) i (25), aby zdjąć
fotelik samochodowy z bazy.
FRNLPL
71
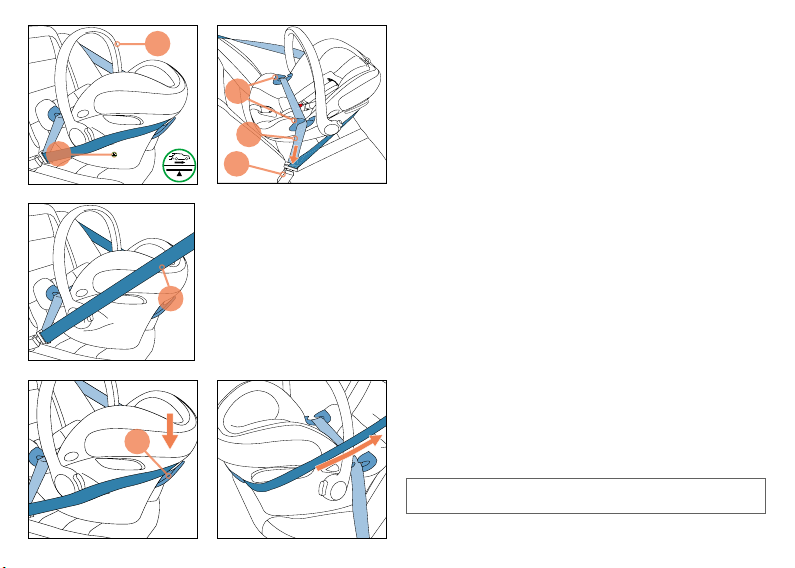
INSTALLATION DU SIÈGE AUTO AVEC LA CEINTURE DE
SECURITÉ
Installation
• Placez la coque dos à la route sur la banquette.
• Assurez-vous que la poignée (1) est verrouillée en position A.
• Assurez-vous que le repère d’installation sur l’autocollant (26)
situé sur le côté du siège est aligné avec le plancher du véhicule.
• Tirez sur la ceinture de sécurité du véhicule et placez-la audessus du siège auto.
• Placez la ceinture ventrale (27) dans les guides de ceinture bleu
(28) sur les deux côtés du siège auto.
• Bouclez la ceinture dans l’encoche prévue à cet eet (29).
• Serrez la ceinture ventrale (27) en tirant sur la ceinture diagonale
(30) vers l’avant du véhicule.
• Tirez la ceinture diagonale (30) derrière le haut du siège auto.
26
1
28
27
29
30
NOTE! Ne pas vriller la ceinture de sécurité.
• La ceinture diagonale (30) doit passer dans le guide arrière
31
72
• bleu (31).
• Serrez la ceinture diagonale (30).
ATTENTION! La ceinture diagonale (30) doit passer
!
dans le guide arrière bleu (31).

HET AUTOSTOELTJE INSTALLEREN MET DE
AUTOGORDEL
Installatie Montaż
• Plaat het autostoeltje achterwaarts gericht op de autostoel.
• Let op dat de draagbeugel (1) is vergrendeld in de autostand A.
• Zorg ervoor dat het installatieteken op de waarschuwingssticker
(26) op de zijkant van het autostoeltje overeenkomt met de stand
van de autovloer.
• Trek de autogordel uit en leid deze over het autostoeltje.
• Plaats de buikriem (27) in de blauwe gordelgeleiders (28) aan
weerszijden van het autostoeltje.
• Steek de gesp in het autogordelslot (29).
• Trek de buikriem (27) aan door de borstriem (30) in de richting
van de voorzijde van de auto te trekken.
• Trek de borstriem (30) achter het hoofdeinde van het autostoeltje
langs.
MONTAŻ FOTELIKA PASAMI BEZPIECZEŃSTWA
• Ustaw fotelik tyłem do kierunku jazdy (stopy dziecka skierowane
są w kierunku oparcia fotela na którym zamontowano fotelik).
• Upewnij się, że rączka fotelika (1) jest zablokowana w pozycji A.
• Upewnij się, że poziomica fotelika znajdująca się na naklejce
(26) jest równoległa do podłogi auta.
• Wyciągnij pas samochodowy i przeciągnij go za fotelikiem.
• Przeprowadź pas biodrowy (27) przez niebieskie prowadnice
(28) po obu stronach fotelika.
• Zapnij pas (29).
• Ściągnij pas barkowy (27) w stronę przodu pojazdu w celu
zaciśnięcia pasa biodrowego (30).
• Przeciągnij pas barkowy (30) za zagłówkiem fotelika.
FRNLPL
LET OP! Zorg ervoor dat de autogordel daarbij niet gedraaid komt
te zitten.
• Leid de borstriem (30) door de achterste blauwe gordelgeleider
(31).
• Trek de borstriem aan (30).
BELANGRIJK! De borstriem (30) moet door de
!
achterste, blauwe gordelgeleider (31).
OSTRZEZENIE! Uważaj, żeby nie poskręcać pasa.
• Przeprowadź poprzeczną część pasa (30) przez niebieską
prowadnicę (31) znajdującą się z tyłu fotelika.
• Ściągnij poprzeczną część pasa (30).
OSTRZEŻENIE! Upewnij się, że pas (30) przechodzi
!
przez niebieską prowadnicę (31).
73

NOTE! Le siège auto peut être utilisé sur tous les sièges du
28
31
véhicule équipés d’une ceinture de sécurité automatique trois
points. Nous recommandons en règle générale d’utiliser le siège
à l’arrière du véhicule. Dans la plupart des cas, votre enfant est
exposé à un risque plus élevé à l’avant.
ATTENTION! Ce siège ne doit pas être utilisé avec
!
une ceinture ventrale deux points. La xation avec une
ceinture deux points pourrait entraîner des blessures
graves ou mortelles à l’enfant en cas d’accident.
ATTENTION! Dans certains cas, la boucle de la
!
ceinture du véhicule est trop longue et atteint les
guides de ceinture bleus de la coque. De ce fait, le
siège auto ne peut pas être xé fermement. Dans ce
cas, choisissez une autre position dans la voiture pour
installer le siège auto. En cas de doute, contactez le
fabricant du siège auto.
Retrait
• Retirez la ceinture de l’encoche bleue à l‘arrière du siège auto
(31).
• Détachez la ceinture de sécurité et passer la ceinture ventrale en
dehors des guides bleus (28).
74

LET OP! Het autostoeltje kan worden gebruikt op alle autostoelen
met een automatische driepuntsgordel. Wij bevelen in de regel aan
het autostoeltje op de achterbank van de auto te plaatsen. In de
meeste gevallen loopt het kind een hoger risico als het autostoeltje
op de passagiersstoel voorin is geplaatst.
BELANGRIJK! Het autostoeltje is niet geschikt voor
!
gebruik met een tweepunts- of heupgordel. Het gebruik
van een tweepuntsgordel kan bij een ongeval ernstig
of dodelijk letsel van het kind tot gevolg hebben.
BELANGRIJK! Mogelijk is het gespgedeelte van
!
de autogordel te lang waardoor het tot bij de
blauwe riemgeleiders van het autostoeltje komt. Dit
betekent dat het autostoeltje niet stevig kan worden
vastgemaakt. Mocht dit het geval zijn, kies dan een
andere autostoel om het autostoeltje op te plaatsen.
Als u twijfelt, neem dan contact op met de fabrikant van
het autostoeltje.
Verwijderen Wyjmowanie fotelika z samochodu
• Haal de autogordel uit de blauwe gordelgeleider aan de
achterzijde (31).
• Maak de autogordel los en haal de buikriem uit de blauwe
gordelgeleiders (28).
OSTRZEZENIE! Fotelik samochodowy może być używany
na wszystkich miejscach wyposażonych w trzypunktowe pasy
bezpieczeństwa. Jako zasadę rekomendujemy korzystanie
z fotelika na tylnych siedzeniach samochodu. W większości
przypadków, Twoje dziecko jest o wiele bardziej narażone będąc
przewożonym z przodu.
OSTRZEŻENIE! Tego fotelika samochodowego
!
nie można zapinać dwupunktowymi pasami
bezpieczeństwa ani wyłącznie biodrowym pasem
bezpieczeństwa. Przypięcie fotelika dwupunktowym
pasem bezpieczeństwa może skutkować poważnymi
obrażeniami a nawet śmiercią w przypadku wypadku.
OSTRZEŻENIE! Może się zdarzyć tak, że zapięcie pasa
!
samochodowego jest za długie i dotyka niebieskiej
prowadnicy w foteliku. Oznacza to, że fotelik nie może
być zapięty ciasno. W takim przypadku należy wybrać
inne siedzenie do montażu fotelika. W razie wątpliwości
należy skontaktować się z producentem fotelika
samochodowego.
• Wyjmij pas samochodowy z niebieskiej prowadnicy znajdującej
się z tyłu fotelika (31).
• Rozepnij klamrę pasa samochodowego i wyjmij pas z niebieskich
prowadnic fotelika (28).
FRNLPL
75

SÉCURISER CORRECTEMENT VOTRE ENFANT
Sécuriser correctement votre enfant
Pour la sécurité de votre enfant, assurez-vous que...
• La têtière est correctement ajustée.
• Les deux parties de la boucle sont verrouillées en place dans la
boucle de ceinture.
• Le harnais s’adapte parfaitement au corps du bébé sans le gêner
et n’est pas vrillé.
• vous tirez sur la ceinture de réglage centrale pour serrer le
harnais jusqu’à ce que celui-ci soit ajusté au corps de votre
enfant.
INSTALLATION CORRECTE DU SIEGE AUTO
NOTE! Le siège auto est exclusivement conçu pour les banquettes
face à la route, équipées d’un système ISOFIX ou de ceintures de
sécurité 3 points répondant à la norme UN R16.
Pour assurer la sécurité de votre enfant, vériez que...
• La coque est xée avec l’enfant dos à la route.
• La coque est utilisée sur le siège passager avant si l’airbag
frontal est bien désactivé.
• Le siège auto est xé sur une base ou avec la ceinture de
sécurité 3 points du véhicule.
76

DE BABY VEILIG IN HET STOELTJE ZETTEN POPRAWNE ZAPIĘCIE DZIECKA W FOTELIKU
Het kind op de juiste wijze vastmaken Poprawne zapięcie dziecka
Om er zeker van te zijn dat het kind veilig in het autostoeltje zit,
controleert u of...
• de hoofdsteun in de juiste stand staat.
• de gordeltongen in het gordelslot vergrendeld zijn.
• de schouderriemen goed aansluiten op het lichaam van het kind
zonder dat het kind daar hinder van ondervindt en niet gedraaid
zitten.
• u aan de centrale verstelriem trekt om de schoudergordels
strakker te maken totdat deze op het lichaam van uw kind
passen.
Correcte installatie van het autostoeltje Poprawny montaż fotelika samochodowego
LET OP! Het autostoeltje is uitsluitend gemaakt voor voorwaarts
gerichte autostoelen die zijn uitgerust met ISOFIX of een
3-puntsgordelsysteem volgens UN R16.
Om er zeker van te zijn dat uw kind veilig in het autostoeltje zit,
controleert u of...
• het autostoeltje zo vastgemaakt is dat het kind achterwaarts
gericht zit.
• het autostoeltje uitsluitend op de passagiersstoel voorin
is geplaatst als er zich geen airbag aan de voorzijde van
de passagiersstoel bevindt die gevaar voor het kind in het
autostoeltje kan opleveren.
• het autostoeltje vastgemaakt is met de autogordel dan wel de
basis (zie “HET AUTOSTOELTJE INSTALLEREN MET DE
AUTOGORDEL” of „HET AUTOSTOELTJE PLAATSEN OP
DE BASIS”).
Przez wzgląd na bezpieczeństwo dziecka, upewnij się czy...
• zagłówek został poprawnie wyregulowany.
• Zapięcia pasów są wpięte w klamrę spinającą pasy.
• pasy naramienne przylegają ścisło do ciała oraz czy pasy nie są
poskręcane.
• naciągasz środkowy pas regulacyjny, aby napiąć pasy barkowe,
aż dopasują się do ciała dziecka.
OSTRZEZENIE! Fotelik samochodowy jest przeznaczony
wyłącznie do montażu na fotelach, które są w pojeździe ustawione
przodem do kierunku jazdy oraz wyposażone w ISOFIX lub w
3-punktowe pasy bezpieczeństwa zgodne z normą UN R16.
Przez wzgląd na bezpieczeństwo dziecka, upewnij się czy...
• dziecko zostało zapięte i siedzi tyłem do kierunku jazdy.
• (w przypadku montażu fotelika na przednim fotelu pasażera)
została wyłączona poduszka powietrzna.
• fotelik został zamontowany na bazie lub przypięty trzypunktowym
pasem bezpieczeństwa (patrz sekcja „MONTAŻ FOTELIKA
SAMOCHODOWEGO ZA POMOCĄ PASA BEZPIECZEŃSTWA”
lub „MONTAŻ FOTELIKA SAMOCHODOWEGO NA BAZIE”).
FRNLPL
77

RETRAIT DE LA HOUSSE
8
34
5
35
36
78
33
Retrait
La housse se compose de 5 parties : 1 housse de siège (33),
1 housse de têtière (34), 2 protèges-harnais (8) et 1 réducteur
nouveau-né (5). Pour retirer la housse, veuillez suivre la procédure
suivante:
• Desserrer la boucle de ceinture.
• Retirer les deux protecteurs d’épaules (8) du harnais.
• S’il est toujours utilisé, retirer le réducteur nouveau-né (5) du
harnais.
• Retirer les bretelles du harnais de la housse (34).
• Retirer la housse de la têtière en passant par au dessus.
• Retirer le protège entre-jambe (35) de la boucle.
• Retirer les deux boutons pression (36) situés sur le côté de la
coque et retirer la housse (33) autour de la bordure de la coque.
ATTENTION! La coque ne doit en aucun cas être
!
utilisée sans la housse.
NOTE! Seules les housses originales CYBEX Aton B i-Size
peuvent être utilisées.
Remettre la housse
NOTE! Assurez-vous de ne pas vriller ou mélanger les sangles
du harnais.
Suivre les étapes décrites ci-dessus dans l’ordre inverse an de
replacer la housse.

DE BEKLEDING VERWIJDEREN ZDEJMOWANIE TAPICERKI
Verwijderen Zdjemowanie
De bekleding bestaat uit zes onderdelen: 1 zittinghoes (33), 1
hoofdsteunhoes (34), 2 schouderpads (8) en 1 inlegkussen voor
pasgeborenen (5). U kunt deze als volgt verwijderen:
• Open het gordelslot.
• Verwijder beide schouderpads (8) van de riem.
• Als het inlegkussen voor pasgeborenen (5) nog wordt gebruikt,
haal dat dan eerst van de schouderriemen.
• Haal de schouderriemen met de gespen uit de hoofdsteunhoes
(34).
• Trek de hoofdsteunhoes (34) omhoog, van de hoofdsteun af.
• Trek de gesp door de gordelgesppad (35).
• Maak beide drukknopen (36) los die zich aan de zijkant van de
zitting bevinden en trek de zittinghoes (33) los van de rand.
Tapicerka składka się z 5 części: 1 części osłaniającej skorupę
fotelika (33), 1 tapicerki zagłówka (34), 2 ochraniaczy pasów
naramiennych (8) i jedna wkładka niemowlęca (5). Aby zdjąć
postępuje jak poniżej:
• Odepnij klamrę pasów.
• Zdejmij obie nakładki naramienne (8) z pasów.
• Jeżeli jeszcze używasz wkładki dla noworodka (5) to przeciągnij
ją przez pasy.
• Przeciągnij pasy naramienne oraz klamry przez tapicerkę
zagłówka (34).
• Przeciągnij tapicerkę zagłówka (34) ku górze.
• Przeciągnij klamrę pasów przez materiałową osłonę (35).
• Undo both double-press buttons (36), which are located on the
side of the shell and pull o the shell cover (33) around the shell
edging.
FRNLPL
BELANGRIJK! Het autostoeltje mag nooit worden
!
gebruikt zonder bekleding.
LET OP! Gebruik uitsluitend de originele CYBEX Aton B i-Size-
bekleding.
De bekleding vastmaken
LET OP! Zorg daarbij dat de schouderriemen niet gedraaid komen
te zitten of verkeerd om worden bevestigd.
Volg de bovenstaande stappen in omgekeerde volgorde om de
bekleding weer vast te maken.
OSTRZEŻENIE! Fotelika nie wolno używać bez
!
tapicerki.
OSTRZEZENIE! Używaj wyłącznie orygonalnej tapicerki
przeznaczonej do fotelika CYBEX Aton B i-Size.
Zakładanie tapicerki
OSTRZEZENIE! Upewnij sie, że pasy fotelika nie są poskręcane.
Ponów kroki opisane powyżej w odwrotnej kolejności, aby
ponownie założyć tapickę.
79
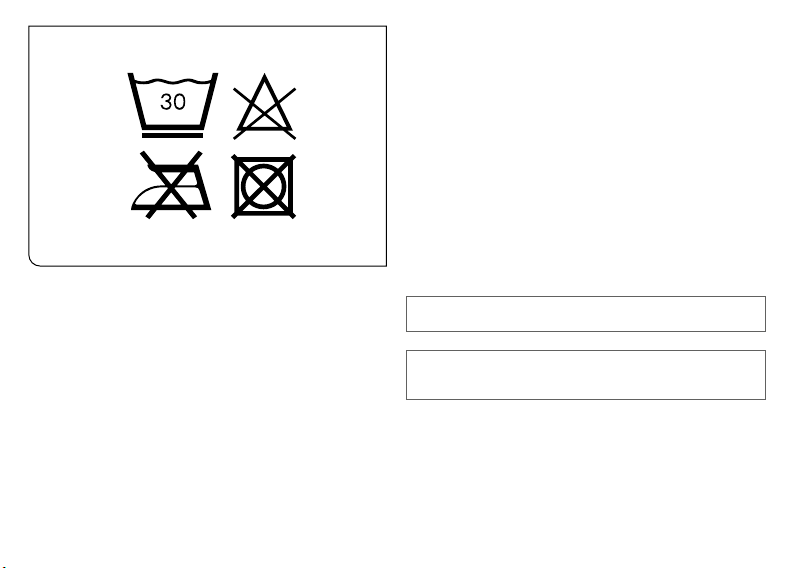
NETTOYAGE
Il est important d’utiliser uniquement une housse originale, partie
intégrante du siège auto. Vous pouvez obtenir des housses
supplémentaires auprès de votre revendeur.
NOTE! Lavez la housse avant la première utilisation. Les
housses sont lavables en machine à 30°C maximum,
programme délicat. Si vous lavez à température plus élevée,
le tissu peut être endommagé. Veuillez laver la housse
séparément et ne jamais la passer au sèche-linge! Ne pas
sécher directement au soleil! Les parties plastiques peuvent
être nettoyées avec un détergent doux et de l’eau tiède.
ATTENTION! N’utilisez jamais de détergents chimiques
!
ou d’agents blanchissants!
ATTENTION! Le système de harnais intégré ne peut
!
pas être démonté du siège. Ne pas retirer les pièces du
système de harnais.
80

REINIGING CZYSZCZENIE
Het is van belang alleen een originele zittinghoes te gebruiken,
omdat de hoes essentieel is voor het functioneren. U kunt losse
hoezen bij uw verkooppunt kopen.
LET OP! Was de zittinghoes voordat u deze voor de eerste keer
gaat gebruiken. De zittinghoezen zijn wasbaar op maximaal 30° C
met een jnwasprogramma. Als u op een hogere temperatuur wast,
kan de stof van de hoes zijn kleur verliezen. Was de hoes apart en
doe deze nooit in de droger! Laat de hoes ook niet drogen in de
zon! De kunststof onderdelen kunnen worden schoongemaakt met
een zacht schoonmaakmiddel en warm water.
Tapicerka jest istotną częścią fotelika samochodowego i ma
istotny wpływ na bezpieczeństwo. Dlatego ważne jest, aby używać
wyłącznie oryginalnej tapicerki przeznaczonej do tego modelu
fotelika. Dodatkowy pokrowiec można zakupić w sklepie, w którym
dokonano zakupu fotelika.
OSTRZEZENIE! Przed pierwszym użyciem tapicerkę należy
wyprać. Pokrowiec można uprać w pralce, maksymalnie w
temperaturze 30°C, delikatny cykl prania. Piorąc pokrowiec
w wyższej temperaturze, narażasz go na utratę koloru.
Pokrowiec należy prać osobno. Nigdy nie susz pokrowca przy
pomocy suszarki elektrycznej do ubrań. Nie susz pokrowca na
bezpośrednim słońcu! Plastikowe elementy można czyścić przy
użyciu delikatnego środka czyszczącego i ciepłej wody.
FRNLPL
BELANGRIJK! Gebruik nooit chemische
!
schoonmaakmiddelen of bleekmiddel!
BELANGRIJK! Het geïntegreerde gordelsysteem kan
!
niet uit het babystoeltje worden verwijderd. Verwijder
geen onderdelen van het gordelsysteem.
OSTRZEŻENIE! Nie stosować chemicznych środków
!
do czyszczenia ani wybielaczy!
OSTRZEŻENIE! Zintegrowane z fotelikiem szelki
!
bezpieczeństwa nie mogą być wyjmowane z fotelika.
Nie wyjmuj części pasów fotelika.
81

ENTRETIEN DU PRODUIT
De façon à garantir la meilleure protection à votre enfant, merci de
vous assurer des points suivants :
• Toutes les parties du siège auto doivent être examinées
régulièrement pour déceler d’éventuels dégâts.
• Toutes les pièces mécaniques doivent fonctionner sans
problème.
• Il est essentiel que le siège auto ne soit pas endommagé par des
coups de portière ou par le rail des sièges de la voiture.
NOTE! Il est conseillé d’acheter une housse supplémentaire lors
de l’achat d’un siège auto de sorte que le siège puisse continuer à
être utilisé même lorsque la housse doit être lavée ou séchée.
82

ONDERHOUD PIELĘGNACJA PRODUKTU
Om er zeker van te zijn dat het autostoeltje optimale bescherming
biedt, moet u op het volgende letten:
• Alle belangrijke onderdelen van het autostoeltje dienen
regelmatig op beschadigingen te worden gecontroleerd.
• Alle mechanische onderdelen dienen goed te functioneren.
• Het autostoeltje mag absoluut niet klem zitten tussen harde
voorwerpen, zoals een autoportier of stoelrail, omdat het
daardoor beschadigd kan raken.
Aby zagwarantować maksymalne bezpieczeństwo swojemu
dziecku, zwracaj uwagę na następujące rzeczy:
• Wszystkie ważne części fotelika powinny być regularnie
sprawdzane.
• Części mechaniczne powinny działać bez zarzutu.
• Upewnij się, że fotelik nie jest zakleszczony między twardymi
elementami takimi jak drzwi samochodu, szyny siedzeń itp., które
mogłyby go uszkodzić.
FRNLPL
LET OP! Het is aan te raden een extra hoes voor het autostoeltje
te kopen, zodat u het autostoeltje kunt blijven gebruiken als de
originele hoes wordt gewassen en moet drogen.
OSTRZEZENIE! Zalecamy zakup drugiej tapicerki fotelika. Dzięki
temu, gdy jedna tapicerka będzie w praniu, Twoje dziecko nadal
będzie mogło korzystać z fotelika.
83
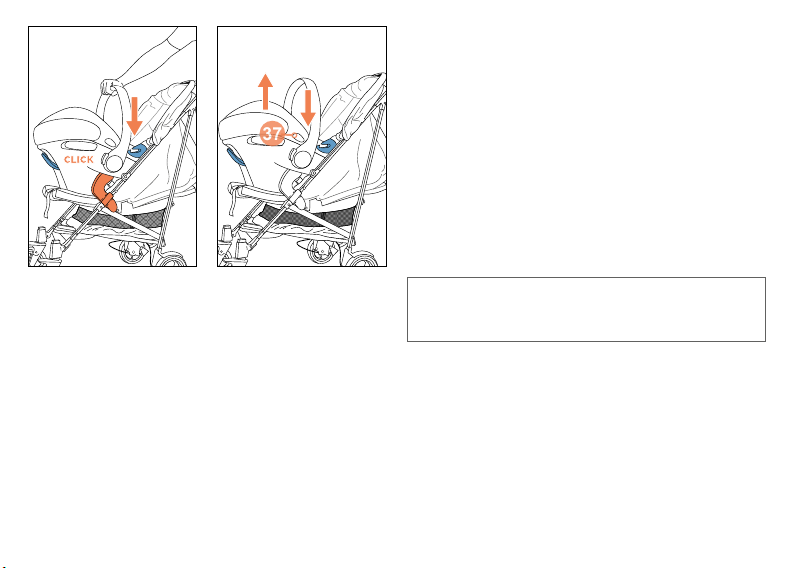
TRAVEL SYSTEM
37
Suivez le mode d’emploi de votre poussette!
Vous pouvez xer la coque sur toutes les poussettes approuvées.
Clipser la coque sur l’adaptateur homologué avec l’enfant installé
vers le parent. Assurez-vous que la coque se verrouille de manière
audible sur les deux côtés. Toujours vérier que la coque est bien
connectée fermement à la poussette. Pour déverrouiller, appuyer
et maintenir les deux boutons de déverrouillage (37) sur la coque
et lever le siège.
NOTE! Veillez à toujours bien attacher votre bébé dans le siège
auto, même à l’extérieur de la voiture.
EN CAS D´ACCIDENT
ATTENTION! Un accident peut causer au siège auto
!
des dommages invisibles à l’oeil nu. Veuillez remplacer
le siège après un accident. En cas de doute, contactez
votre revendeur.
INFORMATIONS PRODUIT
Si vous avez des questions, contactez d’abord votre revendeur.
Les informations suivantes sont nécessaires :
• Numéro de série (voir sticker sous le siège auto)
• Marque, Type et modèle du véhicule ainsi que la position dans
l’habitacle où est habituellement installé le siège auto
• Poids, âge et taille de l’enfant
Pour plus d’informations sur nos produits, consultez notre site web
www.cybex-online.com.
84

REISSYSTEEM SYSTEM PODRÓŻNY CYBEX
Volg de handleiding voor uw buggy!
U kunt het autostoeltje bevestigen op elke goedgekeurde buggy.
Klik het autostoeltje vast op de goedgekeurde adapter, waarbij
de richting zodanig is dat het kind naar de ouder kijkt. Zorg dat
het autostoeltje aan weerszijden hoorbaar vergrendeld wordt.
Controleer altijd of het autostoeltje stevig op de buggy is bevestigd.
Om het autostoeltje van de buggy te verwijderen houdt u beide
ontgrendelingsknoppen (37) van het autostoeltje ingedrukt en tilt u
het stoeltje omhoog.
LET OP! Maak je kind altijd vast in de baby autostoel, zelfs buiten
de auto.
NA EEN ONGEVAL
BELANGRIJK! Een ongeval kan schade aan het
!
autostoeltje veroorzaken die niet voor het blote oog
zichtbaar is. Vervang het stoeltje onmiddellijk na een
ongeval. Als u twijfelt, neem dan contact op met het
verkooppunt of de fabrikant.
PRODUCTINFORMATIE INFORMACJA PRODUKTOWA
Als u vragen hebt, neem dan eerst contact op met uw verkooppunt.
Zorg daarbij dat u de volgende gegevens bij de hand hebt:
• Serienummer (zie sticker op de onderzijde van het autostoeltje)
• Merk en model van het voertuig en de plaats in de auto waar het
autostoeltje wordt gebruikt
• Gewicht, leeftijd en lengte van het kind
Nadere informatie over onze producten is te vinden op www.cybexonline.com.
Sprawdź instrukcję obsługi Twojego wózka!
Fotelik samochodowy można zamontować do każdego
zatwierdzonego wózka.
Fotelik zamontuj przy pomocy zatwierdzonych adapterów przodem
do rodzica. Upewnij się, że fotelik jest poprawnie przypięty.
Usłyszysz kliknięcia. Zawsze sprawdzaj czy fotelik jest pewnie
przymocowany do stelaża wózka. W celu wypięcia fotelika,
przytrzymaj jednocześnie oba przyciski zwalniające (37) i podnieś
fotelik do góry.
OSTRZEZENIE! Dziecko zawsze musi być przypięte pasami do
fotelika, nawet poza samochodem.
CO ZROBIĆ Z FOTELIKIEM, KTÓRY BRAŁ UDZIAŁ W
WYPADKU?
OSTRZEŻENIE! W trakcie wypadku fotelik może
!
doznać uszkodzeń, które nie będą widoczne na
pierwszy rzut oka. Prosimy wymienić fotelik na nowy.
W razie wątpliwości skontaktuj się ze sprzedawcą lub
producentem.
Jeśli masz jakieś pytania, w pierwszej kolejności skontaktuj się ze
sklepem, w którym dokonano zakupu. Przed rozmową przygotuj
następujące informacje:
• numery seryjny (patrz naklejka na foteliku samochodowym)
• marka i model pojazdu oraz miejsce na którym jest używany
fotelik
• waga, wiek i wzrost dziecka
Szczegółowe informacje o naszych produktach znajdują się na
stronie: www.cybex-online.com.
FRNLPL
85

DURÉE DE VIE DU PRODUIT
Ce siège auto a été conçu pour satisfaire ses fonctions initiales
pendant une durée de vie maximale de 7 ans. L’usure progressive
de la matière plastique, causée par exemple par l’exposition au
soleil (UV), peut provoquer une légère détérioration des propriétés
du produit. Le siège auto pouvant être exposé à des variations
de température et autres désagréments, merci de suivre les
instructions ci-dessous:
• Si le véhicule est exposé à la lumière directe du soleil pendant
une période prolongée, le siège auto doit être retiré du véhicule
ou recouvert d’un linge clair.
• Vériez régulièrement que les pièces en plastique et en métal
du siège ne présentent aucun dommage ni aucune altération
de forme ou de couleur Si vous constatez un changement
quelconque, le siège doit être détruit ou faire l’objet d’une
vérication par le fabricant, voire être remplacé par celui-ci.
• Les changements de couleur, surtout la décoloration, sont
parfaitement normaux lors de l’utilisation du siège dans un
véhicule, et n’en aectent pas l’ecacité.
86

LEVENSDUUR VAN HET PRODUCT CYKL ŻYCIA PRODUKTU
Dit autostoeltje is zo ontworpen dat het zijn bedoelde functies
gedurende de maximale levensduur van het product van 7 jaar
kan vervullen. Door geleidelijke slijtage van kunststof onderdelen,
bijvoorbeeld door blootstelling aan zonlicht (UV), kunnen de
producteigenschappen enigszins worden aangetast. Omdat grote
temperatuurverschillen en andere onvoorziene omstandigheden
normaal zijn in voertuigen, dient u met de volgende aspecten
rekening te houden:
• Als het voertuig gedurende langere tijd in direct zonlicht staat,
moet het autostoeltje uit de auto worden verwijderd dan wel met
een lichte doek worden afgedekt.
• Controleer regelmatig alle kunststof en metalen onderdelen
van het stoeltje op schade, vervorming of verkleuring. Als u
veranderingen constateert aan het autostoeltje, moet u het
wegdoen of laten controleren en mogelijk laten vervangen door
de fabrikant.
• Verkleuring van de bekledingsstof, met name verbleken, is
normaal bij gebruik in een auto en vermindert het functioneren
van het stoeltje niet.
Fotelik został zaprojektowany w sposób, który pozwala na
bezpieczne korzystanie z niego przez siedem lat. W związku z
tym, że plastikowe części z czasem się zużywają, np. z powodu
ekspozycji na słońce, cechy produktu mogą się nieznacznie
zmieniać. Jako że fotelik może być narażony na duże wahania
temperatur podczas jego eksplatacji w samochodzie oraz inne
nieprzewidziane sytuacje, należy stosować się do poniższych
zaleceń:
• Jeśli samochód będzie zaparkowany w bezpośrednim słońcu
przez dłuższy czas, powinno się przykryć fotelik samochodowy
materiałem lub wyjąć z samochodu.
• Regularnie sprawdzaj, czy plastikowe elementy fotelika nie są
uszkodzone lub czy nie zmienił się ich kształt lub kolor. Przy
stwierdzeniu jakichkolwiek zmian, należy skonsultować się ze
sprzedawcą. Może zajść potrzeba utylizacji lub zakupu nowego
fotelika.
• Zmiany w wyglądzie tapicerki, w szczególności blaknięcie
kolorów, nie są wadą wyrobu, ale normalnym efektem
eksploatacji.
FRNLPL
87

RECYCLAGE
Pour des raisons environnementales et écologiques, nous vous
demandons d’évacuer emballages et pièces du siège en n de
vie, selon les normes en vigueur dans votre pays. L’élimination
des déchets est diérentes selon les autorités locales. An
d’assurer que le siège auto est mis au rebut conformément à la
réglementation, vérier avec l’agence d’enlèvement des déchets
de votre région ou les autorités locales. Toujours respecter les
consignes d’élimination des déchets de votre pays.
ATTENTION! Tenir les matériaux d’emballage en
!
plastique hors de portée de votre enfant: risque
d’asphyxie!
88
VERWIJDERING UTYLIZACJA
Ter bescherming van het milieu vragen wij de gebruiker
afval te scheiden en aan het begin (verpakking) en einde
(productonderdelen) van de levensduur van het autostoeltje te
verwijderen. Afvalverwijdering vindt op verschillende manieren
plaats, afhankelijk van de lokale verordeningen die op dat gebied
gelden. Om te zorgen dat u het autostoeltje conform de geldende
regelgeving verwijdert, kunt het best contact opnemen met uw
lokale afvalverwerkingsbedrijf of de gemeente. Neem in elk geval
de afvalregelgeving van uw land in acht.
Chcąc chronić środowisko, prosimy aby zutylizowali Państwo
opakowanie oraz fotelik i jego elementy po zakończeniu
użytkowania produktu. Przepisy regulujące sposoby utylizacji mogą
się różnić w zależności od kraju. Skontaktuj się z lokalną rmą
zajmującą się gospodarką odpadami, aby we właściwy sposób
zutylizować fotelik. Zawsze stosuj się do przepisów dotyczących
postępowania z odpadami w swoim kraju. Zawsze stosuj się do
przepisów dotyczących postępowania z odpadami w swoim kraju.
FRNLPL
BELANGRIJK! Houd plastic verpakkingsmateriaal
!
buiten het bereik van kinderen: bij dit materiaal bestaat
het risico van verstikking!
OSTRZEŻENIE! Plastikowe opakowanie trzymaj poza
!
zasięgiem dziecka: grozi uduszeniem!
89

GARANTIE
La garantie ci-dessous s’applique uniquement dans le pays où ce
produit a été initialement vendu par un détaillant à un client.
1. La garantie couvre tous les défauts de fabrication et de
matériaux, qui existaient au moment de l’achat ou survenus
dans les trois (3) ans suivant l’achat initial auprès d’un détaillant
par un consommateur (la garantie du fabricant). Vous devez
vérier sans délai à réception que le produit est complet et
qu’il ne présente aucun défaut de fabrication ni aucun défaut
matériel. Vous devez toujours conserver votre preuve d’achat.
2. En cas de défaut, arrêtez immédiatement d’utiliser le produit.
Pour toute réclamation dans le cadre de la garantie, le produit
doit être retourné au détaillant auprès duquel il a été acheté
propre et complet accompagné de l’original de la preuve d’achat
(ticket de caisse ou facture). Veuillez ne pas rendre ou expédier
le produit directement au fabricant.
3. La garantie ne couvre pas les dommages provoqués par une
mauvaise utilisation, des inuences extérieures (eau, feu,
accidents, etc.), l’usure normale ou un problème résultant d’une
utilisation non conforme au manuel d’utilisation. La garantie
ne s’applique pas si des réparations ou modications ont été
eectuées par des personnes non-autorisées ou si des pièces
et accessoires employés ne sont pas d’origine.
4. La présente garantie ne saurait en aucun cas invalider ou limiter
les droits du consommateur ou les droits de recours contre le
revendeur sur la base dune infraction au contrat d’achat tel
qu’autorisé par la législation en vigueur.
90

GARANTIE GWARANCJA
Deze garantie is uitsluitend van toepassing in het land waar dit
product oorspronkelijk door een verkooppunt is verkocht aan een
klant.
1. De garantie dekt alle fabricage- en materiaalfouten die bestaan
of zichtbaar worden op de aankoopdatum of zichtbaar worden
binnen een periode van drie (3) jaar na de datum van aankoop
bij het verkooppunt dat het product oorspronkelijk aan een
consument heeft verkocht (fabrieksgarantie). U dient het product
onmiddellijk op de aankoopdatum of onmiddellijk na ontvangst
te controleren op compleetheid en fabrieks- of materiaalfouten.
Bewaar altijd uw gedateerde aankoopbewijs.
2. In geval van een defect dient u het gebruik van het product te
staken. Om voor garantie in aanmerking te komen, dient u het
product schoon en compleet terug te brengen of te sturen naar
het verkooppunt dat het oorspronkelijk aan u heeft verkocht en
een origineel aankoopbewijs (kassabon of factuur) te overleggen.
Stuur of breng het product niet rechtstreeks naar de fabrikant.
3. Deze garantie dekt geen schade veroorzaakt door verkeerd
gebruik, omgevingsfactoren (zoals water, brand, ongevallen)
of normale slijtage of nalatigheid bij het opvolgen van de
instructies in de handleiding. De garantie geldt niet als er
aanpassingen of onderhoudswerkzaamheden zijn uitgevoerd
door onbevoegde personen of als er niet-originele onderdelen
en accessoires zijn gebruikt.
4. De wettelijke rechten van de consument, inclusief vorderingen
uit onrechtmatige daad en vorderingen inzake contractbreuk die
de koper kan hebben jegens de verkoper of fabrikant van het
product worden niet beïnvloed door deze garantie.
Niniejsza gwarancja obowiązuje wyłącznie w kraju, w którym
dokonano sprzedaży produktu.
1. Niniejsza gwarancja obowiązuje wyłącznie w kraju, w którym
produkt został po raz pierwszy sprzedany klientowi przez sklep
detaliczny. Gwarancja obejmuje wszelkie wady materiałowe i
produkcyjne istniejące w momencie zakupu czy wykryte w ciągu
trzech (3) lat od daty zakupu produktu w sklepie detalicznym
przez pierwszego właściciela (gwarancja producenta).
Prosimy o sprawdzenie produktu pod kątem jego kompletności
lub jakichkolwiek wad w chwili jego zakupu. W przypadku
sprzedaży wysyłkowej - natychmiast po jego otrzymaniu.
Zachowaj dowód zakupu.
2. W przypadku stwierdzenia wady należy zaprzestać użytkowania
produktu. Reklamowany w ramach gwarancji produkt powinien
zostać dostarczony czysty i kompletny wraz z oryginałem
dowodu zakupu (paragon lub faktura) do sklepu, w którym
został kupiony. Prosimy nie wysyłać produktu bezpośrednio do
producenta.
3. Gwarancja nie obejmuje uszkodzeń wynikających z
niewłaściwego użytkowania, czynników zewnętrznych
(woda, ogień itp.) lub standardowego zużycia wynikającego
z eksploatacji. Gwarancja nie obowiązuje również w
przypadku, gdy produkt był użytkowany niezgodnie z
instrukcją użytkowania, jeśli był naprawiany lub modykowany
przez nieuprawnione osoby oraz, gdy użyto w tym celu
nieoryginalnych części i akcesoriów.
4. Niniejsza gwarancja nie wyłącza, nie ogranicza ani
nie zawiesza uprawnień kupującego wynikających z
niezgodności towaru z umową konsumencką.
FRNLPL
91

Approved for CYBEX
Base M
129 - 000013
UN Regulation
No. 129/00
ATON B i-Size
i-Size Universal ISOFI X
45-87cm
max. 13 kg
1
CYBEX GmbH
Riedingerstr. 18, 95448 Bayreuth
Germany
92
HOMOLOGIZÁCIÓ
Aton B i-Size – hordozó
UN R 129
Size: 45-87 cm
Súly: 13 kg-ig
HOMOLOGACE
Aton B i-Size – dětská autosedačka
UN R 129
Velikost: 45-87 cm
Váha: až do 13 kg
HOMOLOGÁCIA
Aton B i-Size – detská autosedačka
UN R 129
Veľkosť: 45-87 cm
Váha: až do 13 kg
KEDVES VÁSÁRLÓ!
Köszönjük, hogy az Aton B i-Size ülést választotta. A gyermekülés
fejlesztése során a elsősorban a biztonsági, a kényelemi
szempontokat vettük gyelembe és arra törekedtünk, hogy
termékünk felhasználóbarát legyen. A termék gyárátsa során
speciális minőség-ellenőrzést alkalmaztunk, megfelel a
legszigorúbb biztonsági követelményeknek.
FIGYELMEZTETÉS! Gyermeke megfelelő védelme
!
érdekében lényeges, hogy a jelen útmutatóban leírtak
szerint szerelje be és használja az ülést.
FIGYELEM! Kérjük, mindig tartsa kéznél a használati útmutatót és
tárolja az erre a célra készült helyen az ülés alatt.
FIGYELEM! Az országonként eltérő igények miatt (pl. színes
címkézés az ülésen) a termék külső megjelenése eltérhet. Ez
azonban nem érinti a termék hibátlan működését.

VÁŽENÝ ZÁKAZNÍKU! VÁŽENÝ ZÁKAZNÍK!
Děkujeme Vám za pořízení autosedačky Aton B i-Size. Ujišťujeme
vás, že jsme se při jejím vývoji soustředili především na
bezpečnost, pohodlí a snadné používání. Produkt se vyrábí
pod speciálním kvalitativním dohledem a splňuje ty nejpřísnější
bezpečnostní požadavky.
Ďakujeme Vám za obstaranie autosedačky Aton B i-Size.
Uisťujeme vás, že sme sa pri jej vývoji sústredili predovšetkým na
bezpečnosť, pohodlie a jednoduché používanie. Produkt sa vyrába
pod špeciálnym kvalitatívnym dohľadom a spĺňa tie najprísnejšie
bezpečnostné požiadavky.
VAROVÁNÍ! Pro řádnou ochranu vašeho dítěte je
!
nezbytné instalovat a používat dětskou autosedačku
dle pokynů v tomto návodu.
UPOZORNĚNÍ! Prosíme, mějte návod k použití vždy po ruce
a uschovejte jej do příslušného prostoru na spodní straně
autosedačky.
UPOZORNĚNÍ! Z důvodu odlišných požadavků v jednotlivých
zemích (např. barevné štítky na autosedačce) se mohou části
produktu vizuálně lišit. To ovšem nijak neovlivňuje správnou
funkčnost produktu.
VAROVANIE! Pre riadnu ochranu vášho dieťaťa je
!
nevyhnutné inštalovať a používať detskú autosedačku
podľa pokynov v tomto návode.
UPOZORNENIE! Prosíme, majte návod na použitie vždy po
ruke a uschovajte ho do príslušného priestoru na spodnej strane
autosedačky.
UPOZORNENIE! Z dôvodu odlišných požiadaviek v jednotlivých
krajinách (napr. farebné štítky na autosedačke) sa môžu časti
produktu vizuálne líšiť. To však nijako neovplyvňuje správnu
funkčnosť produktu.
HUCZSK
93

HU TARTALOM
RÖVID TÁJÉKOZTATÓ ............................................................................3
A JÁRMŰ VÉDELME ..............................................................................94
A HELYES POZÍCIÓ A JÁRMŰBEN ......................................................94
BIZTONSÁG AZ AUTÓBAN ...................................................................96
A GYERMEK BIZTONSÁGA ..................................................................98
A HORDOZÓKAR BEÁLLÍTÁSA ........................................................ 100
A NAPTETŐ BEÁLLÍTÁSA .................................................................. 100
BEÁLLÍTÁS A TEST MÉRETÉSHEZ ................................................. 102
BEKÖTÉS ÖVRENDSZERREL .......................................................... 104
A HORDOZÓ RÖGZÍTÉSE BÁZISTALPPAL .................................... 106
A GYERMEKÜLÉS BESZERELÉSE A JÁRMŰ BIZTONSÁGI
ÖVÉVEL. ...............................................................................................112
A GYERMEK HELYES BEKÖTÉSESE ...............................................116
A HUZAT ELTÁVOLÍTÁSA ...................................................................118
TISZTÍTÁS ............................................................................................ 120
KARBANTARTÁS ................................................................................. 122
TRAVEL SYSTEM ................................................................................ 124
MI A TEENDŐ BALESET UTÁN? ....................................................... 124
TERMÉKINFORMÁCIÓ ....................................................................... 124
A TERMÉK ÉLETTARTAMA ................................................................ 126
MEGSEMMISÍTÉS ............................................................................... 128
JÓTÁLLÁS ............................................................................................ 130
94

CZ OBSAH SK OBSAH
ZKRÁCENÝ NÁVOD .................................................................................3
OCHRANA VOZIDLA ..............................................................................95
SPRÁVNÉ UMÍSTĚNÍ VE VOZIDLE .....................................................95
BEZPEČNOST V AUTĚ ..........................................................................97
BEZPEČÍ PRO DÍTĚ ...............................................................................99
NASTAVENÍ MADLA NA NOŠENÍ ......................................................101
NASTAVENÍ SLUNEČNÍ STŘÍŠKY .................................................... 101
NASTAVENÍ DLE VELIKOSTI TĚLA .................................................. 103
ZAJIŠTĚNÍ SYSTÉMEM PÁSŮ .......................................................... 105
POUŽÍVÁNÍ DĚTSKÉ AUTOSEDAČKY SE ZÁKLADNOU ............. 107
MONTÁŽ DĚTSKÉ AUTOSEDAČKY
S BEZPEČNOSTNÍM PÁSEM ............................................................ 113
ZAJIŠTĚNÍ DÍTĚTE .............................................................................. 117
SUNDÁNÍ POTAHU ..............................................................................119
ČIŠTĚNÍ ................................................................................................ 121
PÉČE O PRODUKT ............................................................................. 123
CESTOVNÍ SYSTÉM ........................................................................... 125
CO DĚLAT PO NEHODĚ .................................................................... 125
PRODUKTOVÉ INFORMACE ............................................................ 125
ŽIVOTNOST PRODUKTU ................................................................... 127
LIKVIDACE ........................................................................................... 129
ZÁRUKA ................................................................................................ 131
STRUČNÝ NÁVOD ...................................................................................3
OCHRANA VOZIDLA ..............................................................................95
SPRÁVNE UMIESTNENIE VO VOZIDLE ............................................95
BEZPEČNOSŤ V AUTE ..........................................................................97
BEZPEČIE PRE DIEŤA ..........................................................................99
NASTAVENIE MADLA NA NOSENIE .................................................101
NASTAVENIE SLNEČNÉ STRIEŠKY ................................................ 101
NASTAVENIE PODĽA VEĽKOSTI TELA ........................................... 103
ZAISTENIE SYSTÉMOM PÁSOV ...................................................... 105
POUŽÍVANIE DETSKÉ AUTOSEDAČKY SO ZÁKLADŇOU ........... 107
MONTÁŽ DETSKÉ AUTOSEDAČKY S BEZPEČNOSTNÝM
PÁSOM ..................................................................................................113
ZAISTENIE DIEŤAŤA ...........................................................................117
ODOBRATIE POŤAHU .........................................................................119
ČISTENIE .............................................................................................. 121
STAROSTLIVOSŤ O PRODUKT ........................................................ 123
CESTOVNÝ SYSTÉM ......................................................................... 125
ČO ROBIŤ PO NEHODE ..................................................................... 125
PRODUKTOVÉ INFORMÁCIE ........................................................... 125
ŽIVOTNOSŤ PRODUKTU ................................................................... 127
LIKVIDÁCIA .......................................................................................... 129
ZÁRUKA ................................................................................................ 131
HUCZSK
95

A JÁRMŰ VÉDELME
A gyermekülés használata során a nom anyagokból (pl. velúr,
bőr stb.) készült járműüléseken a használat nyomai vagy
elszíneződések jelentekzhetnek. Ezt elkerülheti, ha pl. egy takarót
vagy törölközőt tesz a gyermekülés alá. Ezzel kapcsolatban ld
a tisztításra vonatkozó utasításokat. Fontos, hogy kövesse az
utasításokat már az első használat előtt.
A HELYES POZÍCIÓ A JÁRMŰBEN
Ez egy „i-Size“ biztonsági gyermekülés. Megfelel a
UN R 129 szabványnak, használható „i-Size kompatibilis“
járműüléseken, melyeket a jármű gyártója erre alkalmasnak jelöl a
jármű használati útmutatójában. Ha az Ön járművében nincs i-Size
üléspozíció, ellenőrizze a mellékelt típuslistában vagy a www.
cybex-online.com oldalon, hogy megengedett-e a beszerelés.
FIGYELMEZETÉS! Sem az i-Size gyermekülés, sem
!
az i-Size rögzítőtalp nem kombinálható és használható
más rendszerekkel. Ha bármit megváltoztatnak a
terméken, a garancia érvényét veszti.
Vásárlás előtt mindig ellenőrizze, hogy az Ön járművébe
megfelelően beszerelhető-e az ülés. A helyes beszerelés vagy az
ISOFIXes i-Size rögzítőtalp rendszerrel, vagy 3-pontos biztonsági
övrendszerrel lehetséges.
96
OCHRANA VOZIDLA OCHRANA VOZIDLA
Na sedadlech z citlivých materiálů (např. velur, kůže apod.) se po
používání dětských autosedaček mohou objevit stopy opotřebování
a/nebo ztráta barvy. K předejití tohoto problému můžete pod
autosedačku vložit např. deku nebo ručník. V souvislosti s tím si
prosíme pročtěte také naše pokyny pro čištění. Je důležité podle
nich postupovat ještě před prvním použitím dětské autosedačky.
SPRÁVNÉ UMÍSTĚNÍ VE VOZIDLE SPRÁVNE UMIESTNENIE VO VOZIDLE
Toto je „i-Size“ dětský zádržný systém. Dle UN R 129 je schválený
pro použití na „i-Size kompatibilních“ sedadlech, která jsou
výrobcem vozidla označena v jeho uživatelské příručce. Pokud
není vaše vozidlo vybaveno i-Size sedadlem, prosíme, nahlédněte
do přiloženého seznamu vozidel nebo na www.cybex-online.com a
zkontrolujte, zda je instalace autosedačky možná.
Na sedadlách z citlivých materiálov (napr. velúr, koža apod.) sa po
používanie detských sedačiek môžu objaviť stopy opotrebovania
a/alebo strata farby. Aby sa predišlo tomuto problému môžete pod
autosedačku vložiť napr. deku alebo uterák. V súvislosti s tým si
prosíme prečítajte tiež naše pokyny pre čistenie. Je dôležité podľa
nich postupovať ešte pred prvým použitím detskej autosedačky.
Toto je „i-Size“ detský zadržiavací systém. Podľa UN R 129 je
schválený pre použitie na „i-Size kompatibilných“ sedadlách, ktoré
sú označené výrobcom vozidla v jeho užívateľskej príručke. Ak nie
je vaša vozidlo vybavené i-Size sedadlom, prosíme, nahliadnite do
priloženého zoznamu vozidiel alebo na www.cybex-online.com a
skontrolujte, či je inštalácia autosedačky možná.
HUCZSK
VAROVÁNÍ! i-Size dětská autosedačka ani i-Size
!
základna se nesmí kombinovat a používat s jinými
systémy. Při jakékoliv změně zaniká záruka.
Před nákupem i-Size dětské autosedačky vždy zkontrolujte, zda
ji lze řádně nainstalovat do vašeho vozidla. Řádnou instalaci lze
provést pomocí i-Size základny, systému ISOFIX nebo použitím
3bodového bezpečnostního pásu ve vozidle.
VAROVANIE! i-Size detská autosedačka ani i-Size
!
základňa sa nesmú kombinovať a používať s inými
systémami. Pri akejkoľvek zmene zaniká záruka.
Pred nákupom i-Size detské autosedačky vždy skontrolujte, či ju
možno riadne nainštalovať do vášho vozidla. Riadnu inštaláciu
možno vykonať pomocou i-Size základne, systému ISOFIX alebo
použitím 3-bodového bezpečnostného pása vo vozidle.
97
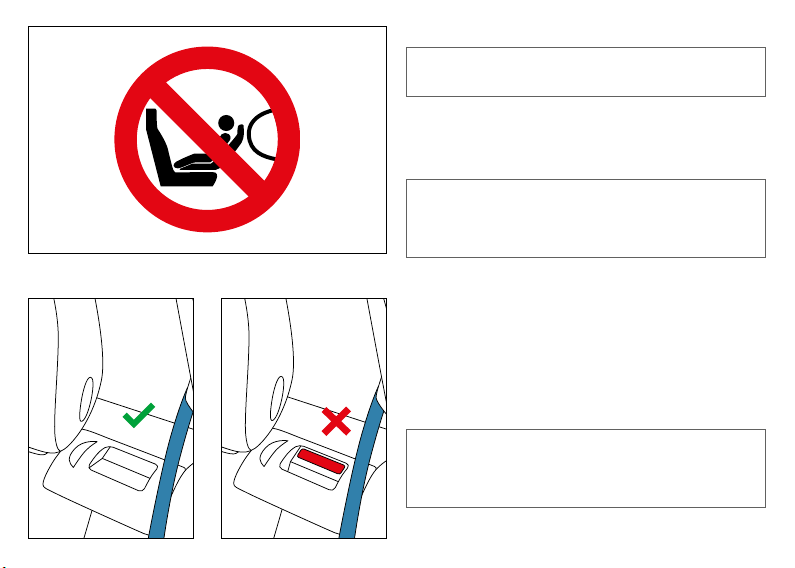
BIZTONSÁG AZ AUTÓBAN
FIGYELMEZTETÉS! Soha ne használja a gyermekülést
!
olyan járműülésen, amelynek légzsákja be van
kapcsolva. Ez nem vonatkozik az oldalsó légzsákokra.
FIGYELEM! A nagy méretű elülső légzsákok robbanásszerűen
nyílnak ki és súlyos sérüléseket vagy akár halaált okozhatnak a
gyermeknek.
FIGYELMEZTETÉS! A hordozót és a talpat mindig
!
rögzíteni kell a járműben, akkor is, amikor épp nem
használják őket. Vészfékezés vagy baleset esetén egy
rögzítetlen gyermekülés az Ön vagy utasai sérülését
okozhatja.
Minden utas lehető legnagyobb biztonsága érdekében
gondoskodjon róla, hogy…
• a járműben lévő dönthető háttámlák függőlegesen rögzítve
legyenek.
• ha a gyermekülést az első utasülésre rögzíti, állítsa a jármű
ülését a leghátsó pozícióba.
• megfelelően rögzítsen minden olyan tárgyat, ami baleste esetén
sérülést okozhat.
• a jármű minden utasa legyen bekötve.
FIGYELMEZTETÉS! A gyermeket SOHA ne tartsa az
!
ölében utazás közben. Az ütközés esetén ható erők
sokkal nagyobb annál, hogy bárki is meg tudná tartani
a gyermeket. Soha ne kösse be magát és a gyermeket
ugyanazzal a biztonsági övvel.
98
BEZPEČNOST V AUTĚ BEZPEČNOSŤ V AUTE
VAROVÁNÍ! Nikdy nepoužívejte autosedačku na
!
sedadle s aktivovaným předním airbagem. To neplatí
pro tzv. boční airbagy.
VAROVANIE! Nikdy nepoužívajte autosedačku na
!
sedadle s aktivovaným predným airbagom. To neplatí
pre tzv. bočné airbagy.
UPOZORNĚNÍ! Prudké nafouknutí objemného předního airbagu
může dítěti způsobit vážná zranění nebo smrt.
VAROVÁNÍ! Dětská autosedačka i základna musí být
!
ve vozidle vždy řádně zajištěná a to i ve chvílích, kdy
se nepoužívá. V případě nouzového zabrždění nebo
nehody může nezajištěná autosedačka zranit vás nebo
ostatní cestující.
Pro zajištění nejvyšší možné ochrany pro všechny cestující se
ujistěte, že...
• sklápěcí opěrky zad ve vozidle jsou zajištěné ve vzpřímené
pozici.
• při instalaci dětské autosedačky na přední sedadlo spolujezdce,
je sedadlo v co nejzazší pozici.
• jste řádně zajistili všechny předměty, které by při nehodě mohly
způsobit zranění.
• jsou všichni pasažéři ve vozidle připoutaní.
VAROVÁNÍ! NIKDY nemějte dítě ve vozidle na
!
klíně. Síly při nárazu jsou příliš velké pro udržení
dítěte. Nikdy nezajišťujte sebe a vaše dítě stejným
bezpečnostním pásem.
UPOZORNENIE! Prudké nafúknutie objemného predného airbagu
môže dieťaťu spôsobiť vážne zranenia alebo smrť.
VAROVANIE! Detská autosedačka aj základňa musí byť
!
vo vozidle vždy riadne zaistená a to aj vo chvíľach, keď
sa nepoužíva. V prípade núdzového zabrzdenia alebo
nehody môže nezaistená autosedačka zraniť vás alebo
ostatných cestujúcich.
Pre zaistenie najvyššej možnej ochrany pre všetkých cestujúcich
sa uistite, že...
• sklápacie opierky chrbta vo vozidle sú zaistené vo vzpriamenej
polohe.
• pri inštalácii detskej autosedačky na predné sedadlo spolujazdca,
je sedadlo v čo najneskorší pozícii.
• ste riadne zaistili všetky predmety, ktoré by pri nehode mohli
spôsobiť zranenie.
• sú všetci pasažieri vo vozidle pripútaní.
VAROVANIE! NIKDY nemajte dieťa vo vozidle na
!
kolenách. Sily pri náraze sú príliš veľké pre udržanie
dieťaťa. Nikdy nezaisťujte seba a vaše dieťa rovnakým
bezpečnostným pásom.
HUCZSK
99
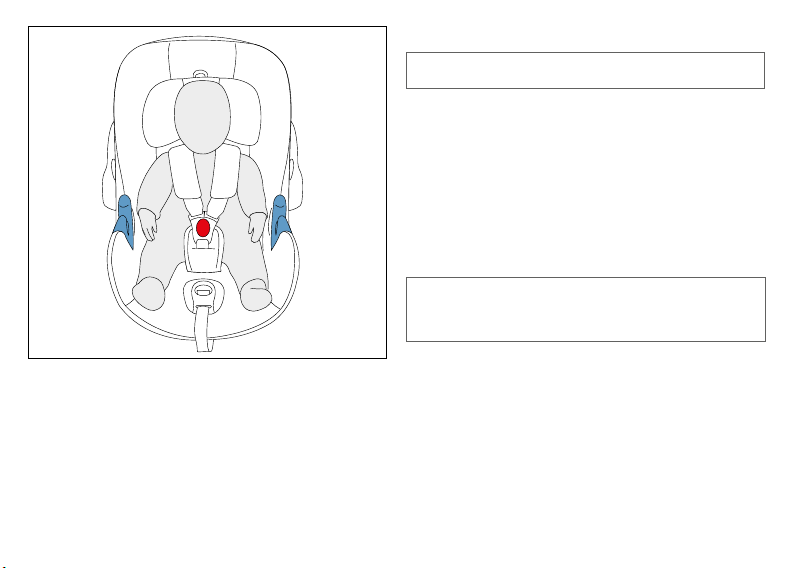
100
A GYERMEK BIZTONSÁGA
FIGYELMEZTETÉS! Mindig kösse be gyermekét a
!
beépített biztonsági övvel.
FIGYELEM! Mindig gyeljen a gyermekre, soha nem veszítse
szem elől!
FIGYELEM! Kérjük, soha nem hagyja gyermekét felügyelet nélkül
az autóban.
Amilyen gyakran csak lehet, vegye ki gyermekét a hordozóból,
hogy tehermentesítse a gerincét. Emiatt hosszabb utazások során
többször tartson pihenőt. Arról is gondoskodjon, hogy a gyermek
akkor se töltsön túl sok időt a hordozóban, ha nem az autóban
használják.
FIGYELMEZTETÉS! A hordozó műanyag részei
!
felmelegednek a napon. Ez égési sérüléseket okozhat.
Védje gyermekét és a hordozót a intenzív napsütéstől
(pl. helyezzen világos ruhát a hordozóra).
 Loading...