

Page 1
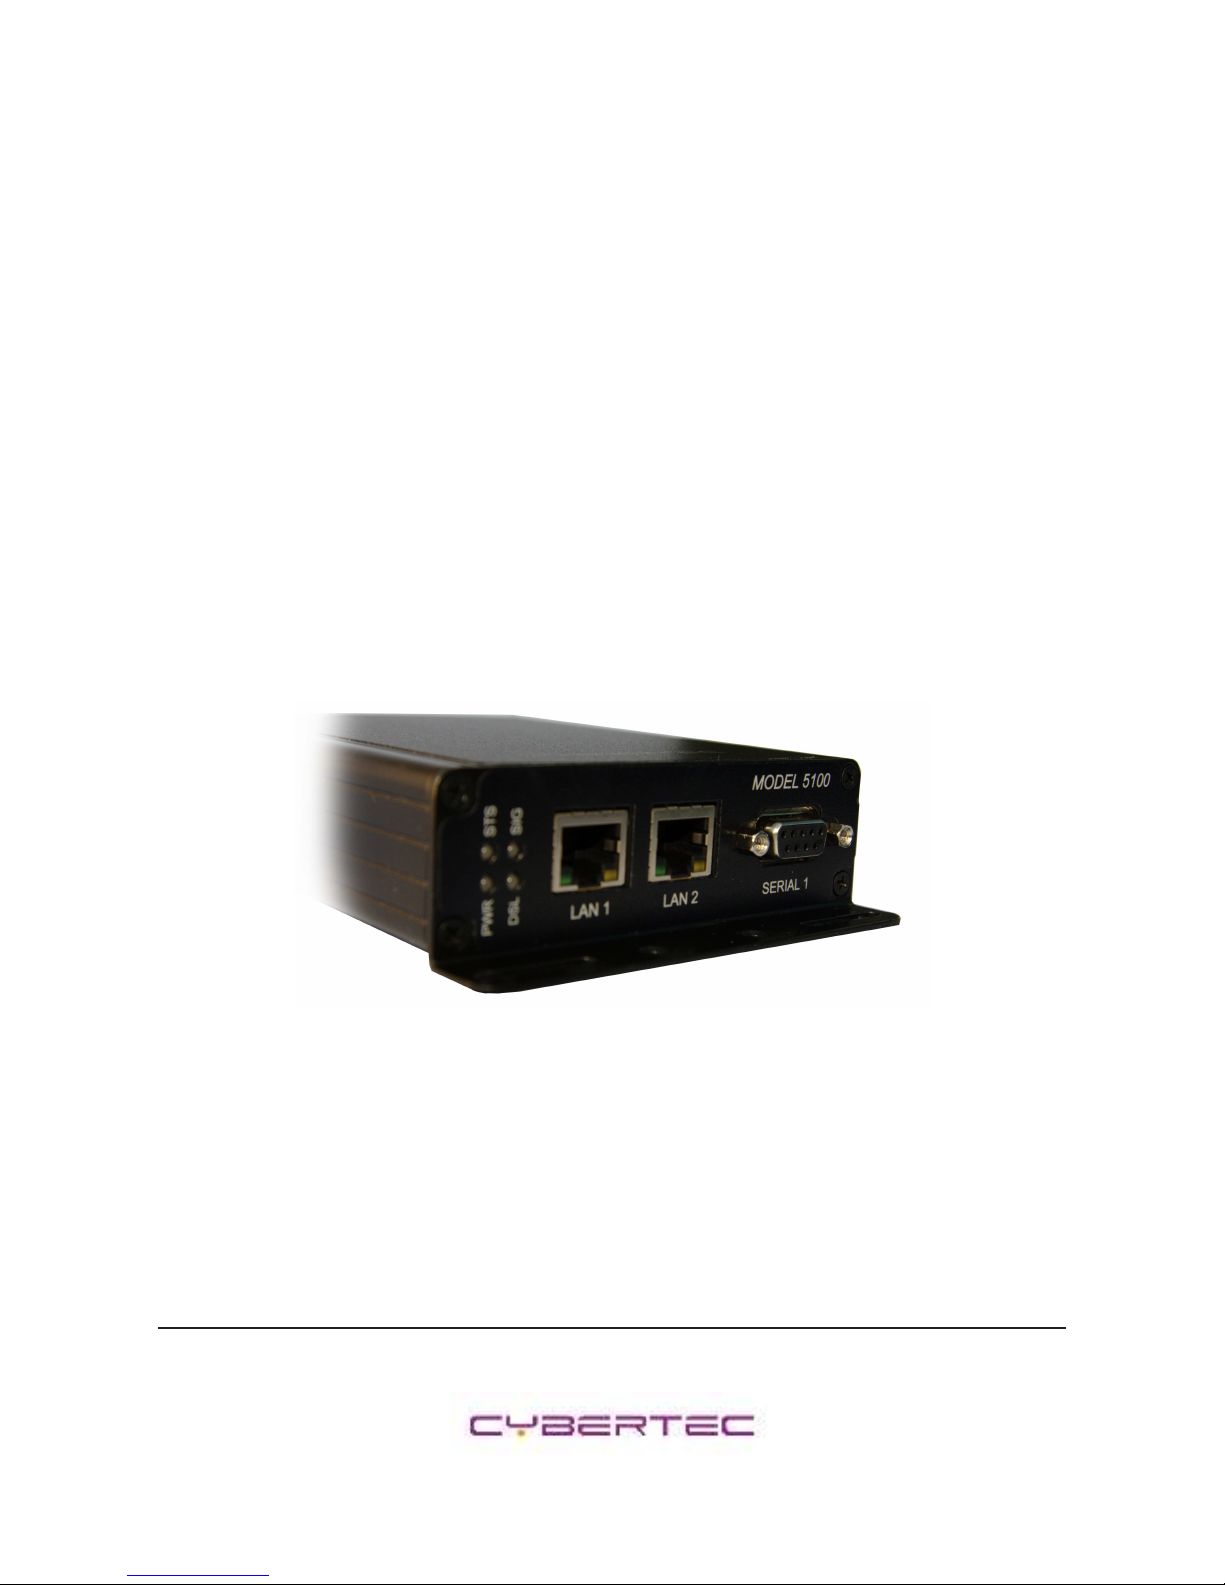
Series 5000
ADSL Modem / Router
Quick Start Guide
Document Number: 0013-001-000172
Version: 1.0 (22 October, 2009)
Page 2

Cybertec Pty Limited
Copyrightc 2009
Document: 0013-001-000172
Series 5000 Quick Start Guide
Version: 1.0
22 October, 2009
Documentation Control
Generation Date: March 10, 2010
Copyrightc 2009 Cybertec Pty Limited
All rights Reserved.
No part of this publication may be reproduced, stored in a retrieval system, or transmitted, in any form or by any means,
electronic, mechanical, photocopying, recording, or otherwise, without the prior written permission of Cybertec Pty
Limited.
Cybertec Pty Limited has intellectual property rights covering subject matter in this document. Except as expressly
provided in any written license agreement from Cybertec Pty Limited, the furnishing of this document does not give you
any license to this intellectual property.
Legal Information
The contents ofthis document are provided “as is”. Except as required by applicable law,no warranties of any kind, either
express or implied, including, but not limited to, the implied warranties of merchantability and fitness for a particular
purpose, are made in relation to the accuracy and reliability or contents of this document. Cybertec Pty Ltd reserves the
right to revise this document or withdraw it at any time without prior notice.
Under no circumstances shall Cybertec Pty Ltd be responsible for any loss of data or income or any special, incidental,
and consequential or indirect damages howsoevercaused.
More information about Cybertec can be found at the following Internet address: http://www.cybertec.com.au
Page 1 of 18
Page 3

Cybertec Pty Limited
Copyrightc 2009
Document: 0013-001-000172
Series 5000 Quick Start Guide
Version: 1.0
22 October, 2009
Contents
1 Introduction 3
2 Safety 3
3 Care Recommendations 3
4 Indicators and Interfaces 4
4.1 Model 5100 . . . . . . . . . . . . . . . . . . . . . . . . . . . . . . . . . . . . . . . . . . . . . . . . . . 4
4.2 Indicators . . . . . . . . . . . . . . . . . . . . . . . . . . . . . . . . . . . . . . . . . . . . . . . . . . . 4
4.3 Ethernet . . . . . . . . . . . . . . . . . . . . . . . . . . . . . . . . . . . . . . . . . . . . . . . . . . . . 6
4.4 Modem / DCE Serial Port . . . . . . . . . . . . . . . . . . . . . . . . . . . . . . . . . . . . . . . . . . . 6
4.5 Factory Default Reset Switch . . . . . . . . . . . . . . . . . . . . . . . . . . . . . . . . . . . . . . . . . 7
5 Installation 8
5.1 Panel Mounting . . . . . . . . . . . . . . . . . . . . . . . . . . . . . . . . . . . . . . . . . . . . . . . . 8
5.2 DIN Rail Mounting . . . . . . . . . . . . . . . . . . . . . . . . . . . . . . . . . . . . . . . . . . . . . . 8
5.3 ADSL Line . . . . . . . . . . . . . . . . . . . . . . . . . . . . . . . . . . . . . . . . . . . . . . . . . . 9
5.4 Power Supply . . . . . . . . . . . . . . . . . . . . . . . . . . . . . . . . . . . . . . . . . . . . . . . . . 9
5.5 Functional Earth . . . . . . . . . . . . . . . . . . . . . . . . . . . . . . . . . . . . . . . . . . . . . . . . 9
6 Accessing and Using the Web Interface 10
6.1 Windows PC Network Settings . . . . . . . . . . . . . . . . . . . . . . . . . . . . . . . . . . . . . . . . 10
6.2 Accessing the Series 5000 Web Server . . . . . . . . . . . . . . . . . . . . . . . . . . . . . . . . . . . . 11
7 Basic Configuration 13
7.1 Configure the ADSL interface . . . . . . . . . . . . . . . . . . . . . . . . . . . . . . . . . . . . . . . . 13
7.2 Configure the LAN interface and DHCP Server . . . . . . . . . . . . . . . . . . . . . . . . . . . . . . . 16
7.3 Configure clients to use the Series 5000 . . . . . . . . . . . . . . . . . . . . . . . . . . . . . . . . . . . 17
8 Troubleshooting 18
8.1 Series 5000 does not start. . . . . . . . . . . . . . . . . . . . . . . . . . . . . . . . . . . . . . . . . . . 18
8.2 Cannot connect to web pages . . . . . . . . . . . . . . . . . . . . . . . . . . . . . . . . . . . . . . . . . 18
8.3 Network Status Fault . . . . . . . . . . . . . . . . . . . . . . . . . . . . . . . . . . . . . . . . . . . . . 18
8.4 Connection Status Fault . . . . . . . . . . . . . . . . . . . . . . . . . . . . . . . . . . . . . . . . . . . . 18
Page 2 of 18
Page 4
Cybertec Pty Limited
Copyrightc 2009
Document: 0013-001-000172
Series 5000 Quick Start Guide
Version: 1.0
22 October, 2009
1 Introduction
The Cybertec Series 5000 is an ADSL Modem / Router capable of data rates up to 24Mbps download and up to 3 Mbps
upload. The Series 5000 features include stateful inspection firewall and virtual private networks for security, dynamic
and static routing, network management and event reporting.
This guide willprovide an overviewof thefeatures and interfacesof the Series5000. Installation of the unit and connection
to the phone line will be described as well the configuration of the unit for a standard Internet connection. Further
information can be obtained from the Series 5000 User Manual.
Note: The guide assumes that the configuration of the Series 5000 Modem/Router is in the factory default state. If
the modem has been previously configured it may be necessary to perform a configuration reset to return the the
configuration to the default state, prior to configuring the device. The procedure to perform a configuration reset is
described is Section 4.5.
2 Safety
Please observe the general safety precautions outlined in this manual during all phases of
operation and service of the Series 5000 Modem/Router. If you do not comply with these
precautions or with specific safety warnings contained elsewhere in this manual or on the
product itself, you will violate the standards of design, manufacture, and intended use of the
product. Cybertec does not assume any liability for failure to comply with these precautions.
Read this manual completely and make sure it is understood fully before commencing
installation. Check that the intended application does not exceed the safe operating
specifications for this unit. This unit should only be installed by qualified personnel. The power
supply wiring must be sufficiently fused, and if necessary it must be possible to manually
disconnect the unit from the power supply.
3 Care Recommendations
To maintain correct operation of unit and to fulfill the warranty obligations the following care recommendations should
be followed. This unit must not be operated with the covers removed. Do not attempt to disassemble the unit, no user
serviceable parts are contained within the unit. Do not drop, knock or shake the unit, rough handling may cause damage
to internal circuit boards. Do not use harsh chemicals, cleaning solvents or strong detergents to clean the unit. Do not
expose the unit to any kind of liquids (rain, beverages, etc), the unit is not waterproof. Keep the unit within the specified
humidity levels. Do not use or store the unit in dusty, dirty areas, connectors as well as other mechanical part may be
damaged.
Page 3 of 18
Page 5
Cybertec Pty Limited
Copyrightc 2009
Document: 0013-001-000172
Series 5000 Quick Start Guide
Version: 1.0
22 October, 2009
4 Indicators and Interfaces
This section describes the indicators and interfaces of the Series 5000 Modem / Router.
4.1 Model 5100
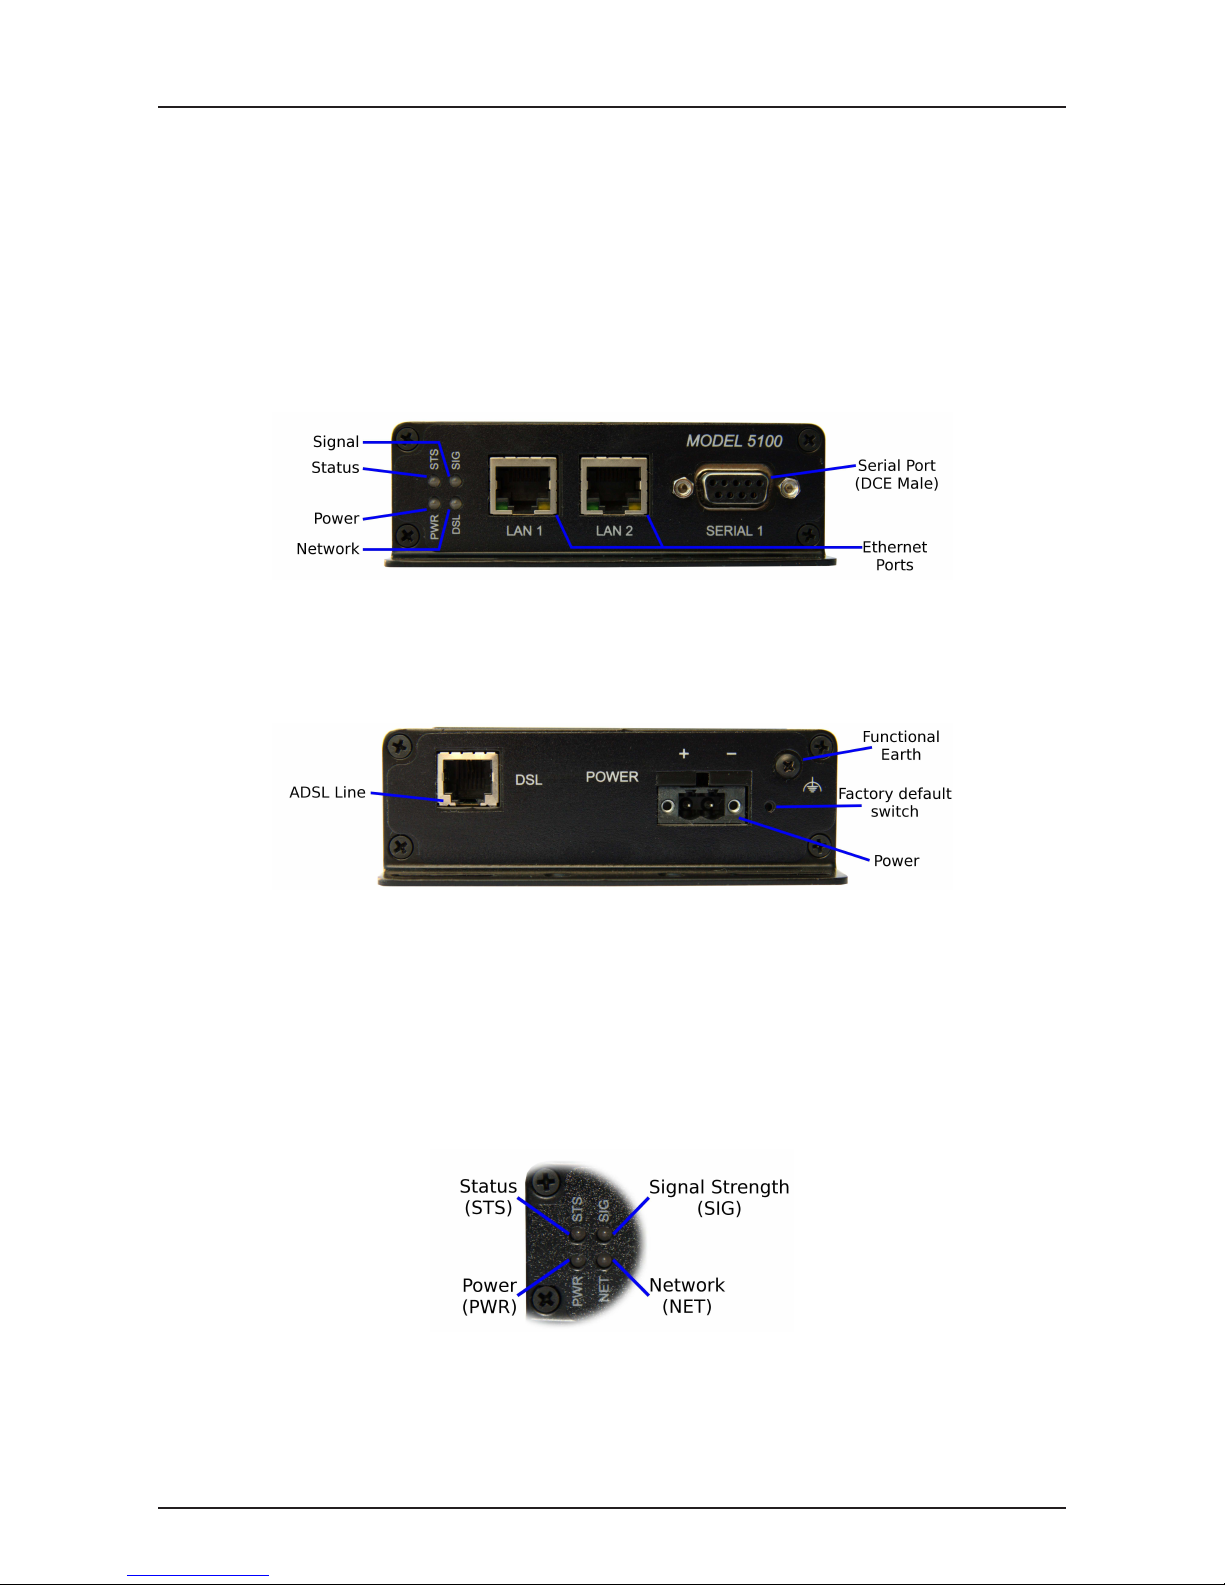
The Ethernet ports, serial port and indicators are located on the front panel as show in figure 1. The rear panel contains
the connectors for power,and ADSL line, as shown in figure 2.
Figure 1: Model 5100 front panel.
Figure 2: Model 5100 rear panel.
4.2 Indicators
The Series 5000 has 4 LED indicators on the front panel of the unit, refer to Figure 3 for the locations.
Figure 3: Front panel indicators
Page 4 of 18
Page 6
Cybertec Pty Limited
Copyrightc 2009
Document: 0013-001-000172
Series 5000 Quick Start Guide
Version: 1.0
22 October, 2009
4.2.1 Power Indicator
The power indicator will light green when power is applied. If the indicator does not light when power is applied check
the power supply voltage and connections, refer to Section 5.4 for details.
4.2.2 Network Indicator
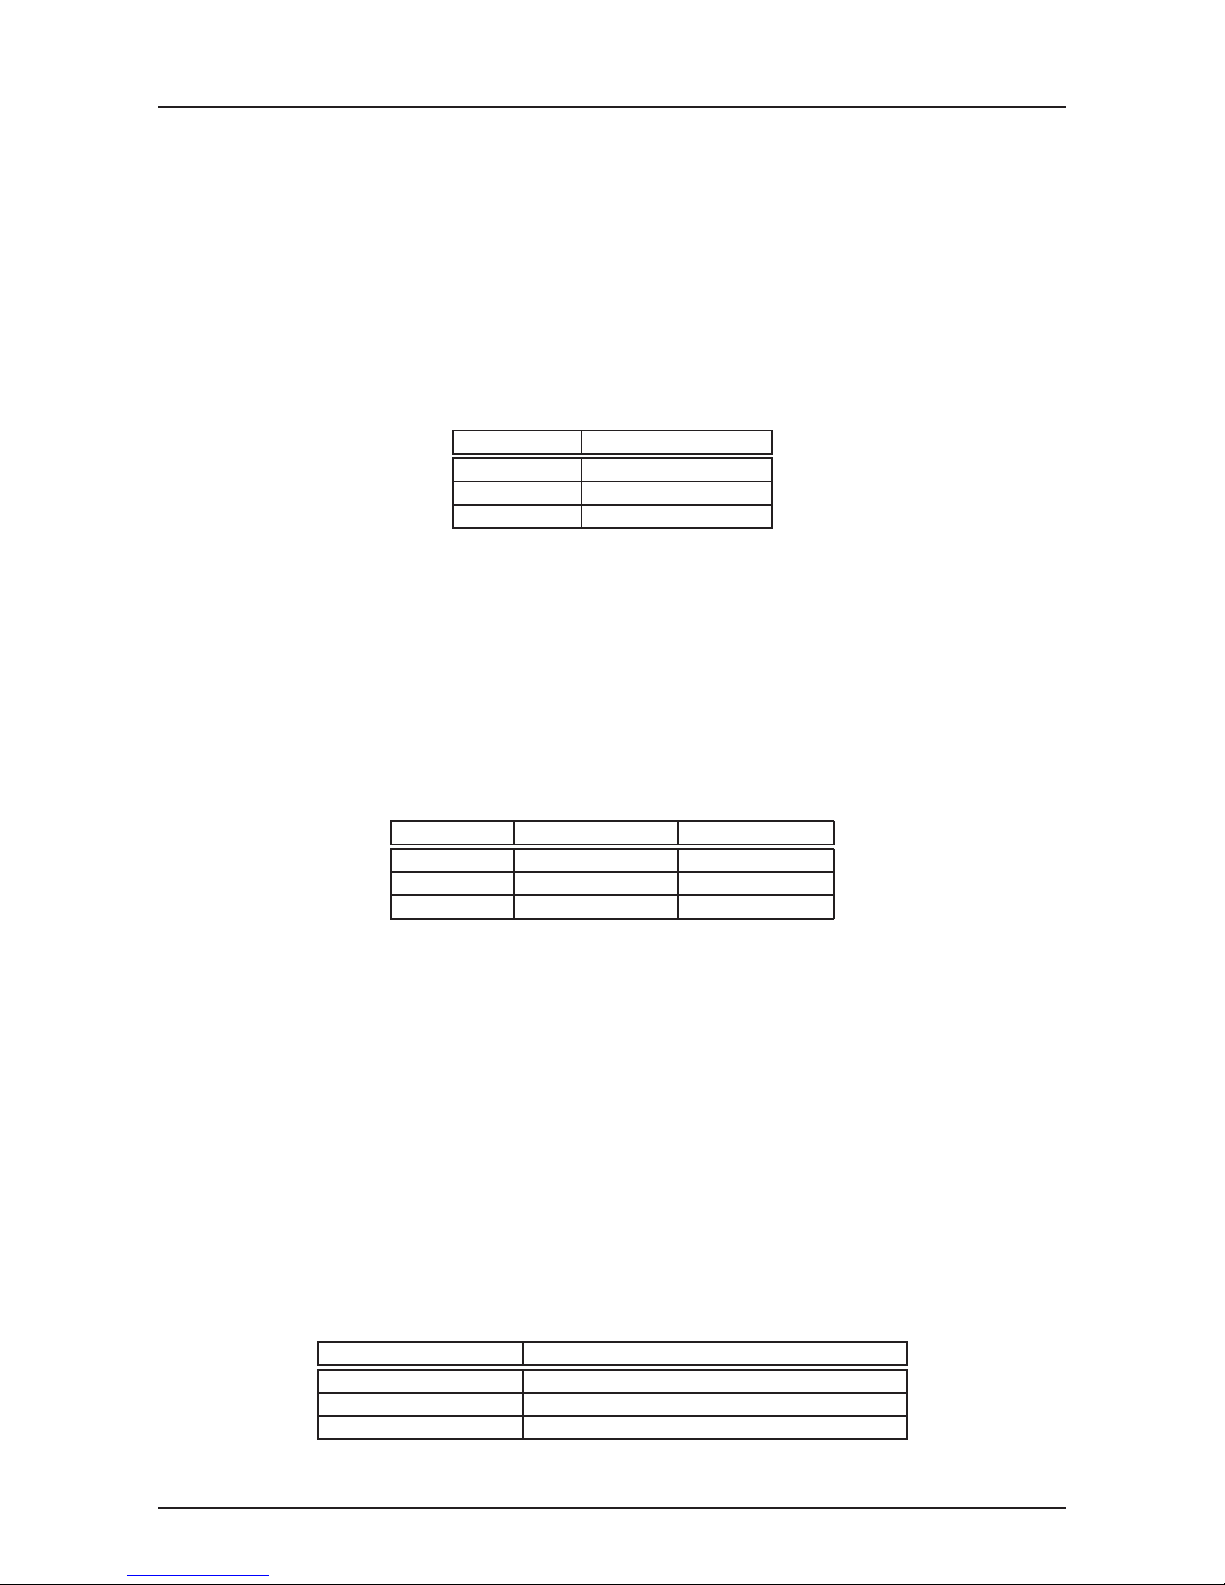
The network indicator reports the status of the connection to the network. When powered up the indicator will be off,
the indicator will then flash green whilst the unit searches for a network, once connected to the network the indicator will
light green. The possible states are shown in Table 1.
Indicator Description
Off Not ready
green flashing Searching for network
green (solid) Locked to network
Table 1: Network Indicator.
4.2.3 Status Indicator
The status indicator reports the health of the unit. In normal operation the indicator will be green, if a fault is detected
either at boot-up or during normal operation the indicator will light red. When the unit is first switched on or is reset the
indicator will first light red, then flash red in sequence with the Signal Strength Indicator (refer to section 4.2.4), this is
normal behaviour during boot-up and does not indicate a fault.
Indicator Boot-up behaviour Normal operation
Red No Fault Fault
Red Flashing No Fault Fault
Green N/A No Fault
Table 2: Status Indicator.
4.2.4 Signal Strength Indicator
The Signal Strength Indicator reports on the state of the ADSL network connection. The ADSL sync speed is indicated
by the number of green flashes of the indicator within an indicator period. Each indicator green flash will be followed by
a short off time, an extended off time indicates the end of the indicator period. So an indicator period starts with a green
flash followed by up to 5 additional flashes, then an extended off time, the cycle will then repeat. The maximum number
of flashes in an indicator period is 6.
The indicator may be red during the extended off time following the green flashes, this indicates an ADSL network
connection fault. The indicator will solid red if an ADSL connection cannot be established.
When the unit is first switched on, or is reset the indicator will first light red, then flash red in sequence with the Status
Indicator (refer to section 4.2.3), this is normal behaviour during boot-up and does not indicate a fault.
Indicator Description
Green Flashing Indication of ADSL line sync speed
Green flashing then Red ADSL Network connection fault
Red Initialisation or ADSL network connection fault
Table 3: Signal Strength Indicator.
Page 5 of 18
Page 7
Cybertec Pty Limited
Copyrightc 2009
Document: 0013-001-000172
Series 5000 Quick Start Guide
Version: 1.0
22 October, 2009
4.3 Ethernet
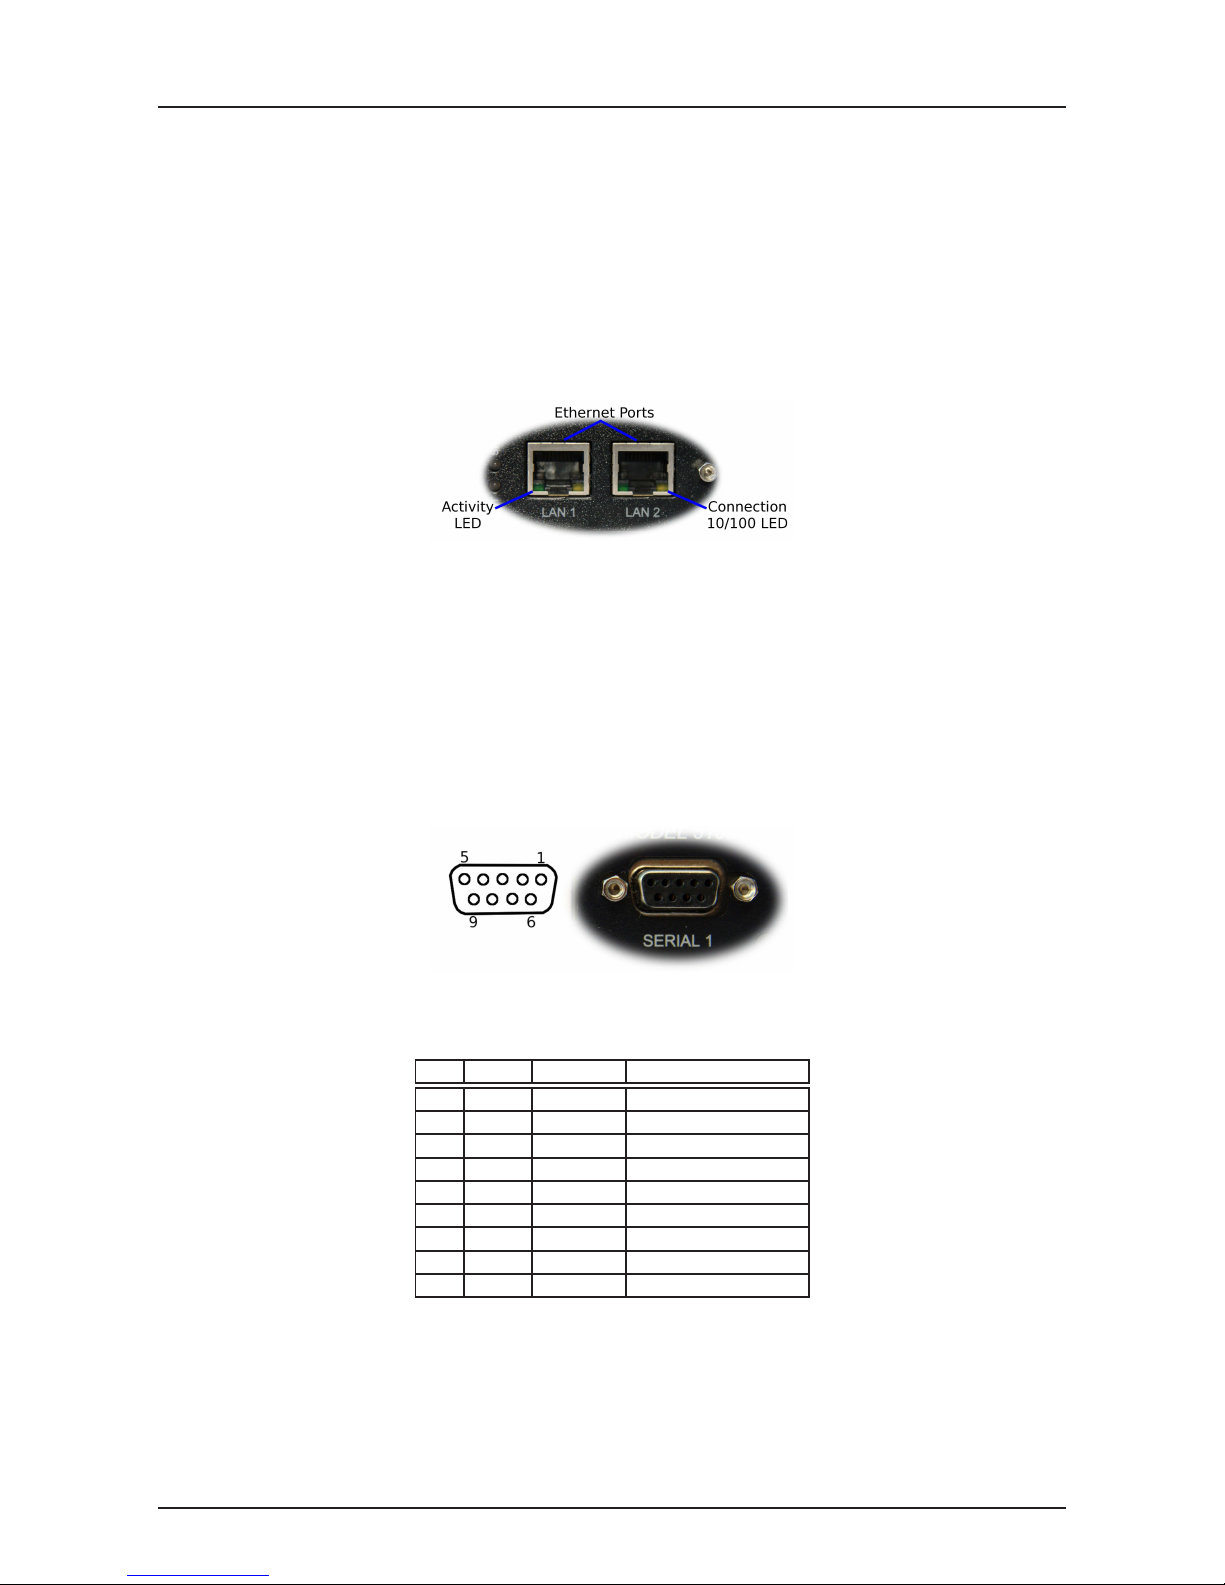
The Ethernet ports are on the front of the unit and are marked LAN 1 and LAN 2, each port has a LED indicating
the connection speed and a LED indicating activity as shown in Figure 4. Both ports are capable of auto-negotiation,
meaning cross-over cables are not required. The Ethernet ports are switched, allowing more than one Ethernet device to
be connected to the unit at one time.
Figure 4: Ethernet ports.
4.4 Modem / DCE Serial Port
The Series 5000 has one Data Communications Equipment (DCE) serial port. The Modem / DCE Serial port is an RS232
level serial port, accessed via the front panel DB9 female connector. Refer to Figure 5 and Table 4 for the connections to
this port.
Figure 5: Modem / DCE Serial port.
Pin Name Direction Description
1 DCD Out Data Carrier Detect
2 RxD Out Receive Data
3 TxD In Transmit Data
4 DTR In Data Terminal Ready
5 SG - Signal Ground
6 DSR Out Data Set Ready
7 RTS IN Request to Send
8 CTS Out Clear to Send
9 RI Out Ring Indicator
Table 4: Modem / DCE Serial port connections.
Page 6 of 18
Page 8
Cybertec Pty Limited
Copyrightc 2009
Document: 0013-001-000172
Series 5000 Quick Start Guide
Version: 1.0
22 October, 2009
4.5 Factory Default Reset Switch
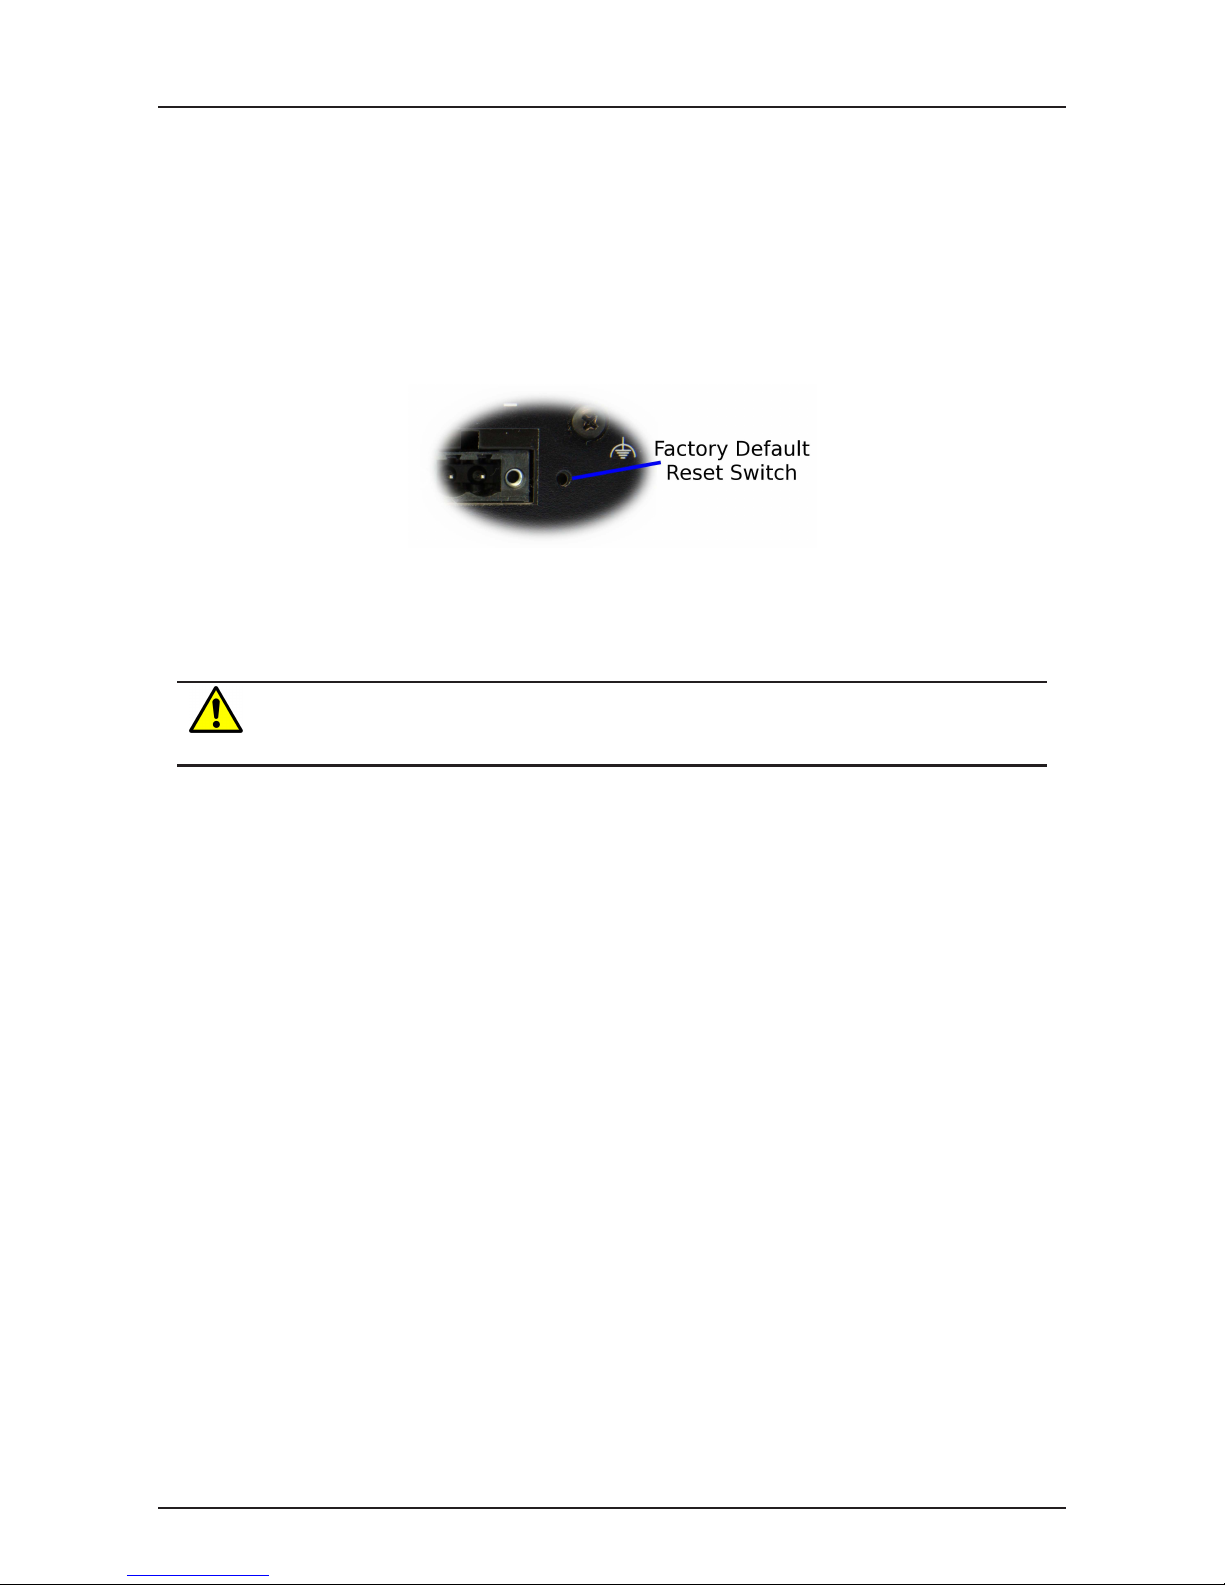
The factory default reset switch is used to restore the configuration of the Series 5000 to the factory defaults. The switch
is accessed through a small hole on the rear of the unit adjacent to the power connector, refer to Figure 6. To reset the
configuration first power down the unit then using a suitable tool depress the factory default reset switch, restore power
to the unit ensuring the switch remains depressed for approximately 5 seconds after power is applied. The status and
signal strength indicators will flash red then green to indicate the configuration has been reset. The modem will re-boot
as normal with the factory default settings.
Figure 6: Factory Default Switch access.
Using the Factory Default Reset Switch will erase all existing configuration settings and restore the
factory default settings. This includes the network connection profile settings APN, user name and
password.
Page 7 of 18
Page 9
Cybertec Pty Limited
Copyrightc 2009
Document: 0013-001-000172
Series 5000 Quick Start Guide
Version: 1.0
22 October, 2009
5 Installation
The steps required to install the Series 5000 Modem / Router are described.
The Series 5000 Modem/Router should be mounted in a clean and dry location, protected from water,
excessive dust, corrosive fumes, extremes of temperature and direct sunlight. The unit uses convection
cooling, allow sufficient ventilation to ensure adequate cooling of the modem.
5.1 Panel Mounting
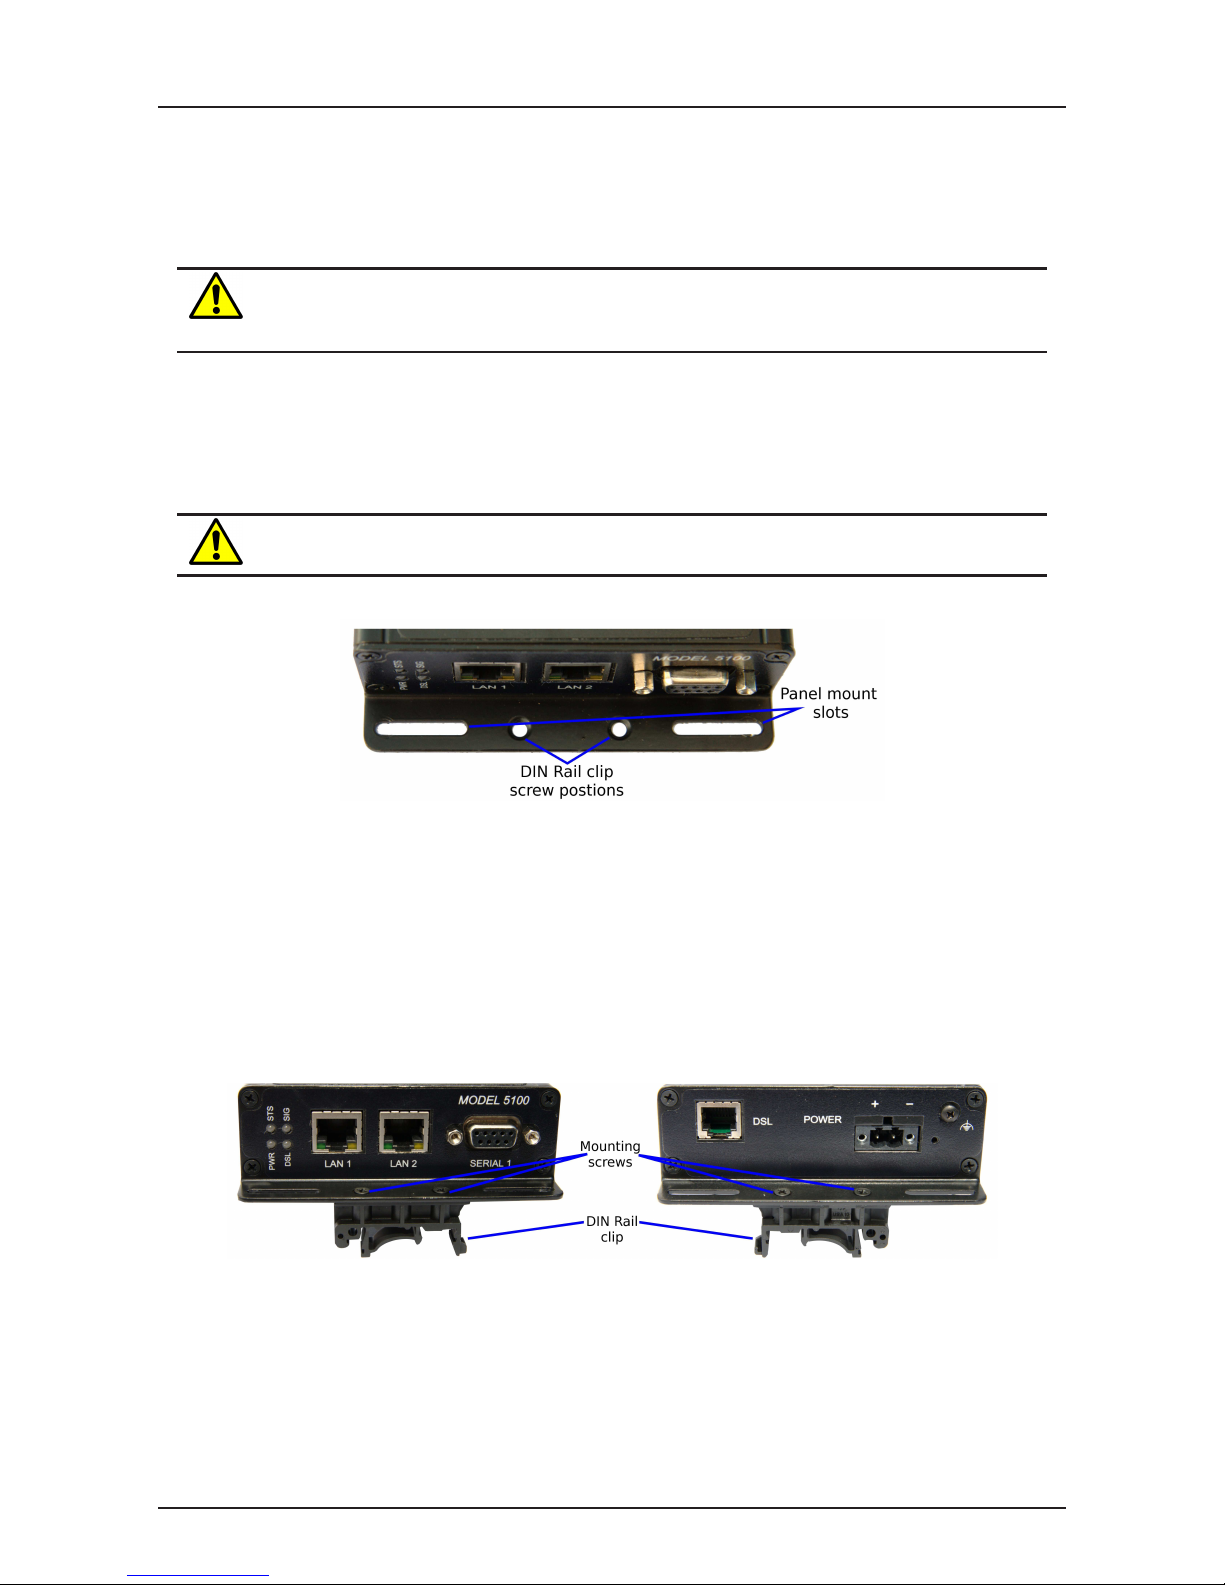
The Series 5000 Modem/Router includes integrated mounting flanges and can be attached to a panel or tray by means of
screws, using the slots shown in figure 7.
Do not drill or file the mounting flanges as this may damage the unit and will void the warranty.
Figure 7: Mounting flange.
5.2 DIN Rail Mounting
The Series 5000 can be DIN rail mounted, using the DIN rail mounting kit supplied. The DIN rail clips should be screwed
to the mounting flanges as shown in figure 8. The DIN rail clips can then be used to attach the Series 5000 to a DIN rail.
Figure 8: DIN Rail mounting.
Page 8 of 18
Page 10
Cybertec Pty Limited
Copyrightc 2009
Document: 0013-001-000172
Series 5000 Quick Start Guide
Version: 1.0
22 October, 2009
5.3 ADSL Line
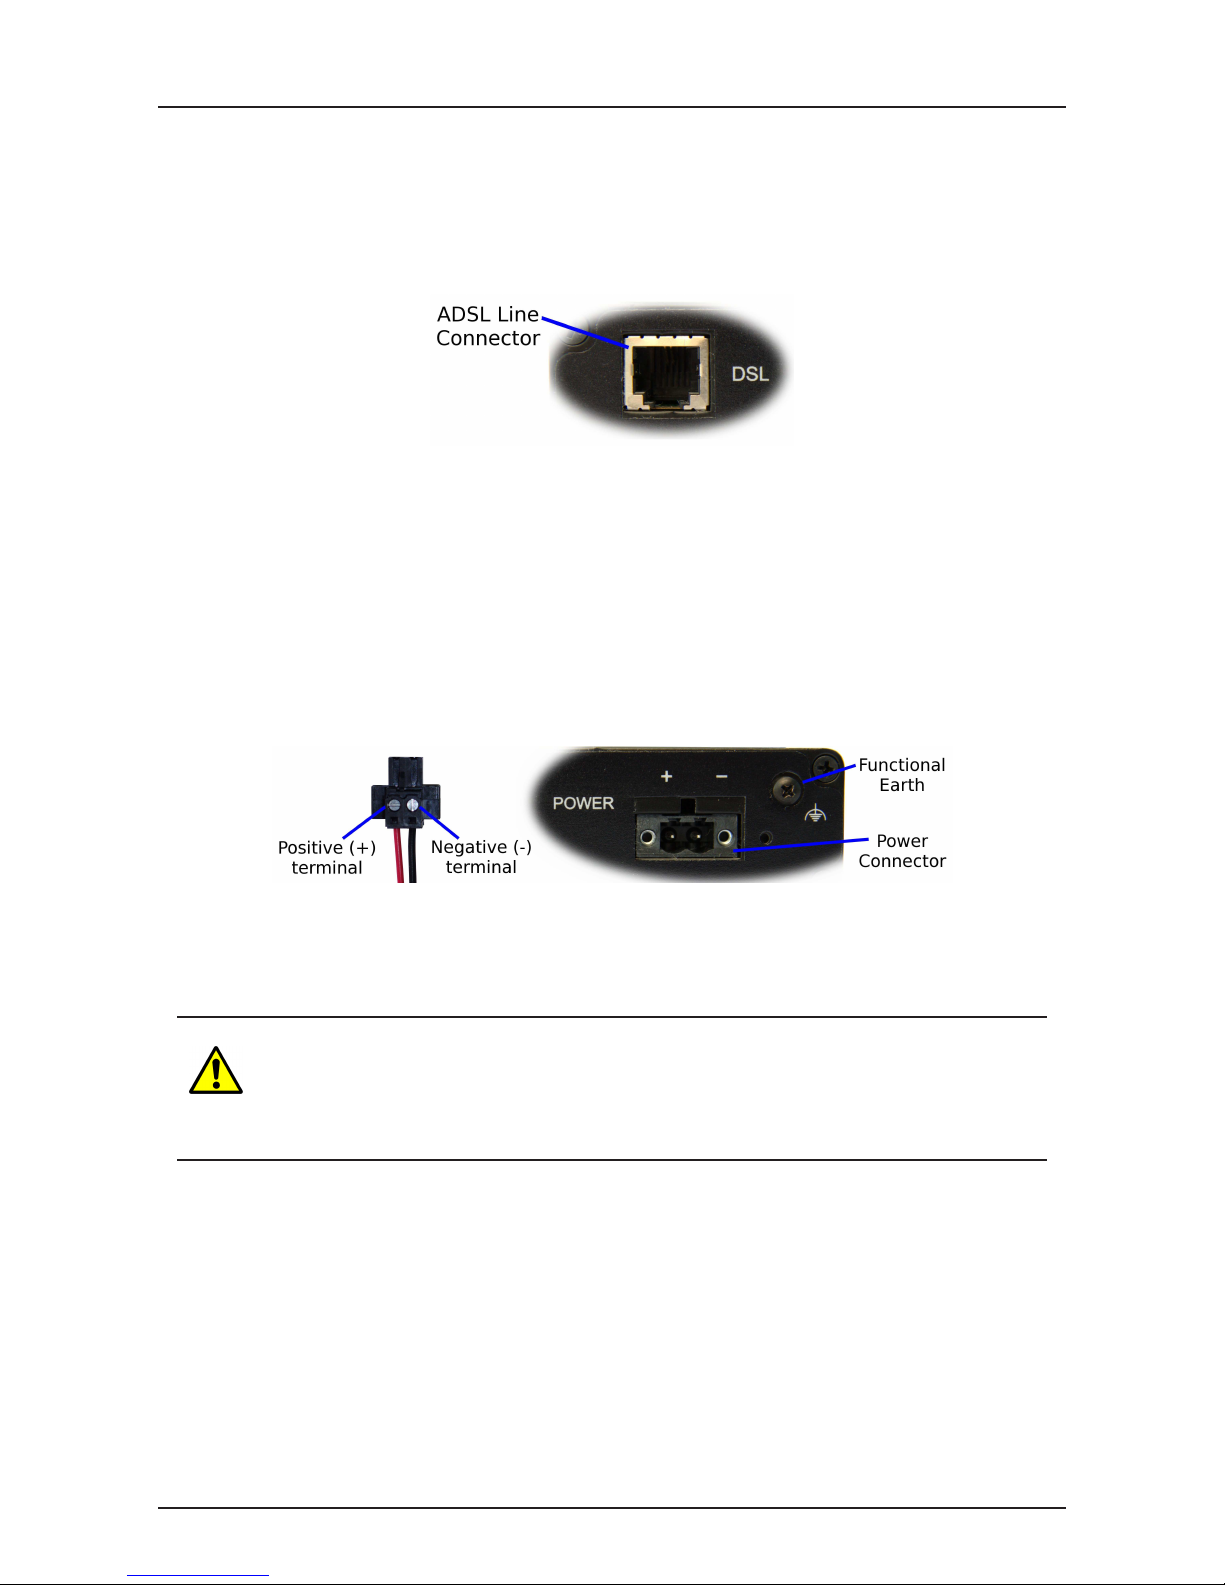
The ADSL line connection is an RJ12 connector located on the rear panel of the unit marked “DSL”. Use the supplied
cable to connect the modem to an ADSL capable connection.
Figure 9: Antenna connected to SMA connector.
5.4 Power Supply
The Series 5000 requires a DC power source in the voltage range of +10VDC to +60VDC. The power connector accepts
a screw terminal plug which should be wired as shown in figure 10 and plugged into the power connector on the rear of
the unit.
Figure 10: Power plug wiring, Power connector and Functional Earth
The Series 5000 is designed to self protect from permanent damage if the voltage exceeds 60VDC or
if reversepolarity is applied. In the case of either event the modem may need to be returned for service.
The Series 5000 may be damaged if there is any potential difference between the Functional Earth,
RS232 signal ground, power (-) input. Before connecting any wiring, ensure all components are
earthed to a common ground point. An external isolator will be required if a positive earth power
supply is used.
5.5 Functional Earth
This equipment is intended to be grounded to comply with emission and immunity requirements. Ensure that the functional earth is connected to earth ground during normal use. Figure 10 shows the location of the Functional earth termination point.
Page 9 of 18
Page 11
Cybertec Pty Limited
Copyrightc 2009
Document: 0013-001-000172
Series 5000 Quick Start Guide
Version: 1.0
22 October, 2009
6 Accessing and Using the Web Interface
All configuration of the Series 5000 modem is performed via the web interface. In order to view the web pages a computer
with a fixed IP address, on the same sub-net as the Series 5000 Modem/Router, will need to be connected to one of the
LAN ports.
• The default IP settings of the Series 5000 Modem / Router are:
◦ IP Address: 10.10.10.10
◦ Netmask: 255.255.255.0
• The recommended IP settings for the PC used to configure the Series 5000 Modem / Router:
◦ IP Address: 10.10.10.20
◦ Netmask: 255.255.255.0
◦ Default Gateway: 10.10.10.10
◦ Primary DNS: 10.10.10.10
Although it is possible to connect the Series 5000 Modem directly to a Local Area Network (LAN) it is
recommend that the network configuration as described in this section be performed prior to doing so.
6.1 Windows PC Network Settings
The following describes how to configure the network settings of a Windows XP PC with the IP settings listed above, so
that it can access the Series 5000 Modem/Router.
This procedure will change the network settings of the Windows PC, if the PC is connected to a
network the connection should be removed before performing the changes. To restore the network
settings of the PC record the current settings at Step 6 in the following procedure, then when the Series
5000 Modem has been configured following the procedure again and use the recorded values at Step 6.
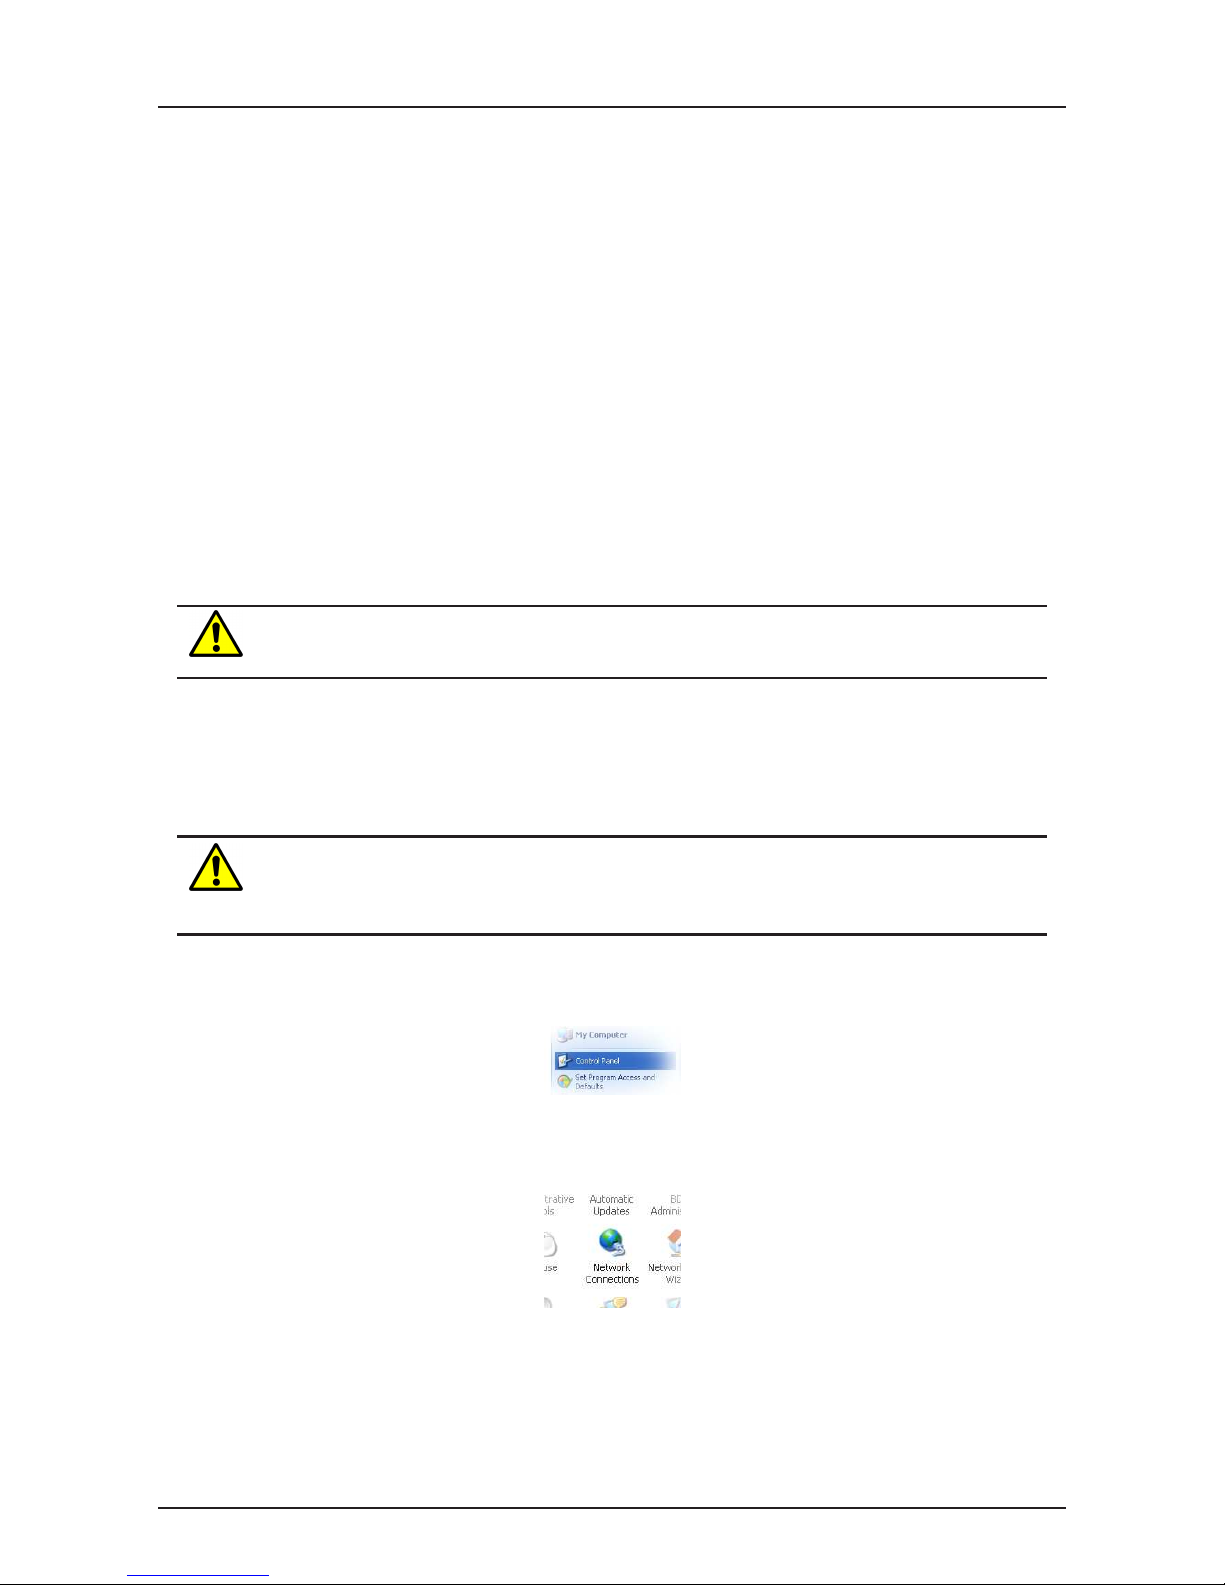
1. Open the Control Panel by selecting Start ⊲ Control Panel.
2. Double click the Network Connections icon.
3. Double click the Network icon.
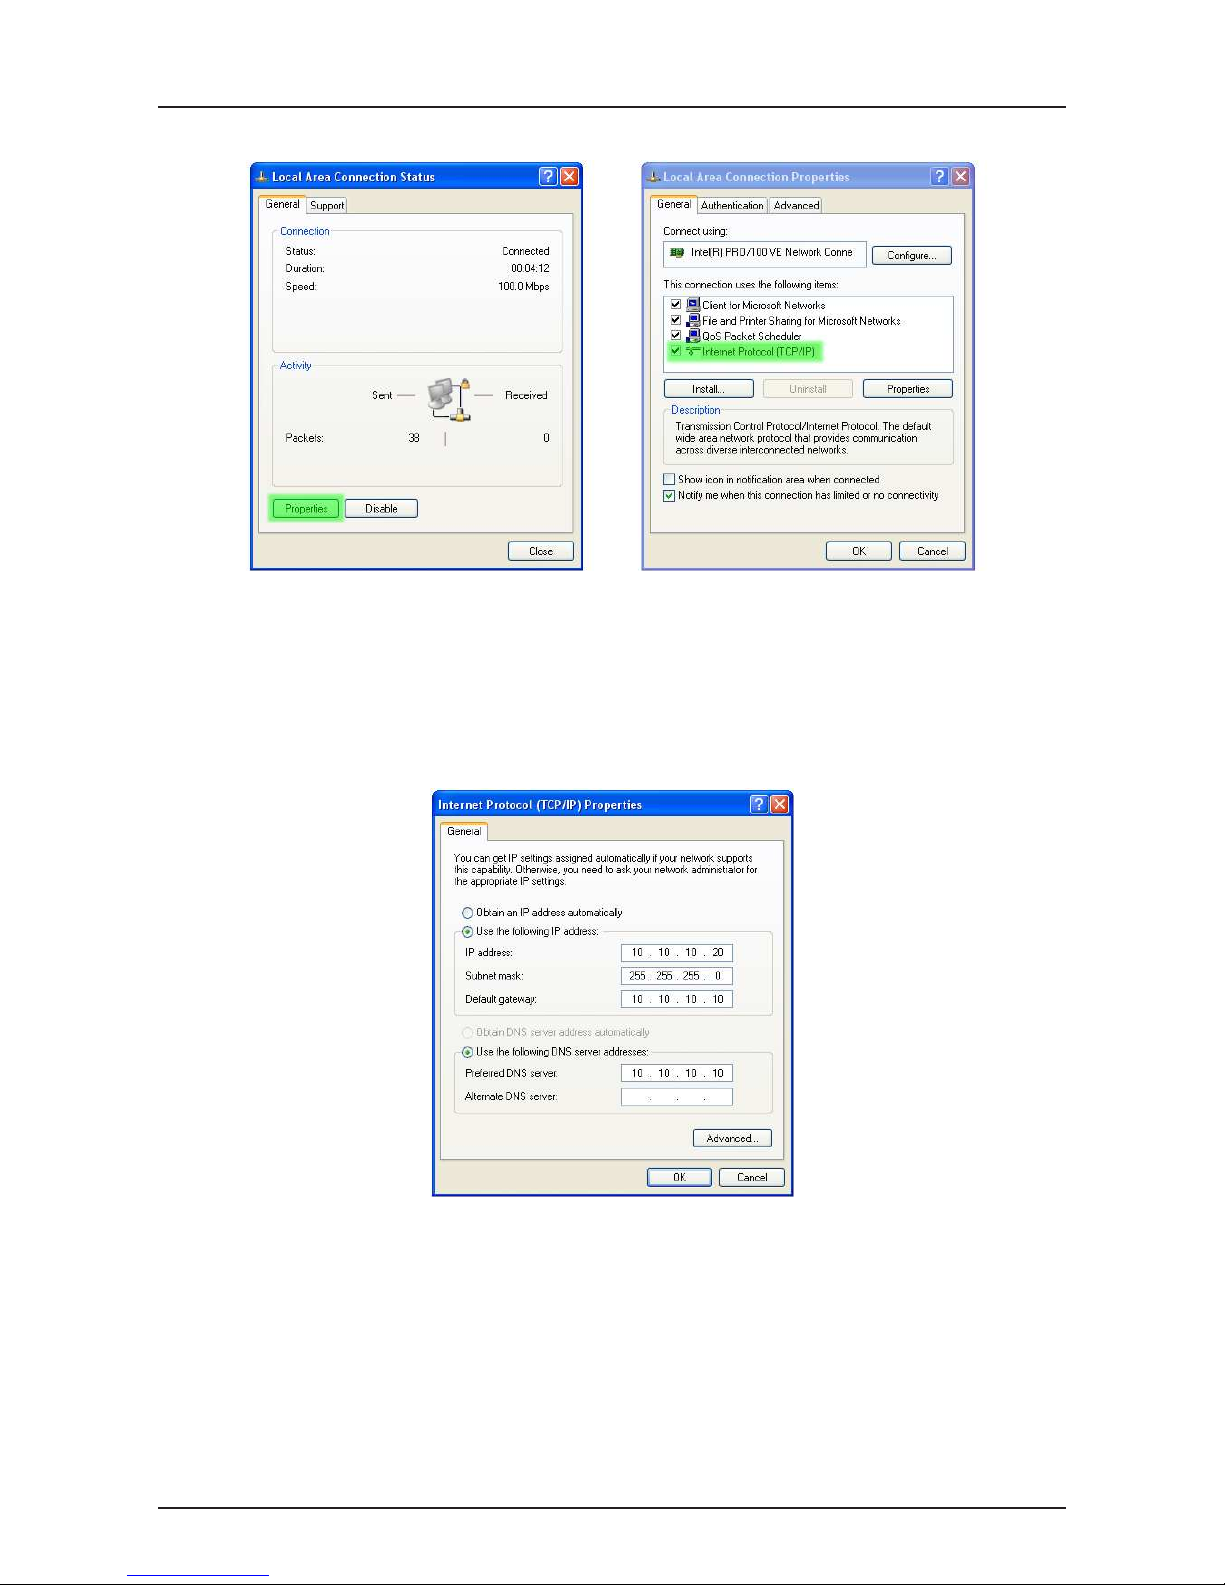
4. The Local Area Connection Status dialog box will be displayed, as shown on the left of Figure 11, click the Prop-
erties button.
Page 10 of 18
Page 12
Cybertec Pty Limited
Copyrightc 2009
Document: 0013-001-000172
Series 5000 Quick Start Guide
Version: 1.0
22 October, 2009
Figure 11: Local Area Connection Status and Properties dialog boxes.
5. The Local Area Connection Properties dialog box, as shown on the right of Figure 11, will be displayed. Click on
Internet Protocol (TCP/IP) to highlight it and then click the Properties button.
6. The Internet Protocol (TCP/IP) Properties dialog box, change the settings to match those shown in Figure 12, and
then click “OK”
Figure 12: Internet Protocol (TCP/IP) Properties dialog box showing the recommended IP settings.
Note: If a web browser was open prior to making the network changes, then it will need to closed and re-started before
attempting to connect to the Series 5000 Modem/Router.
6.2 Accessing the Series 5000 Web Server
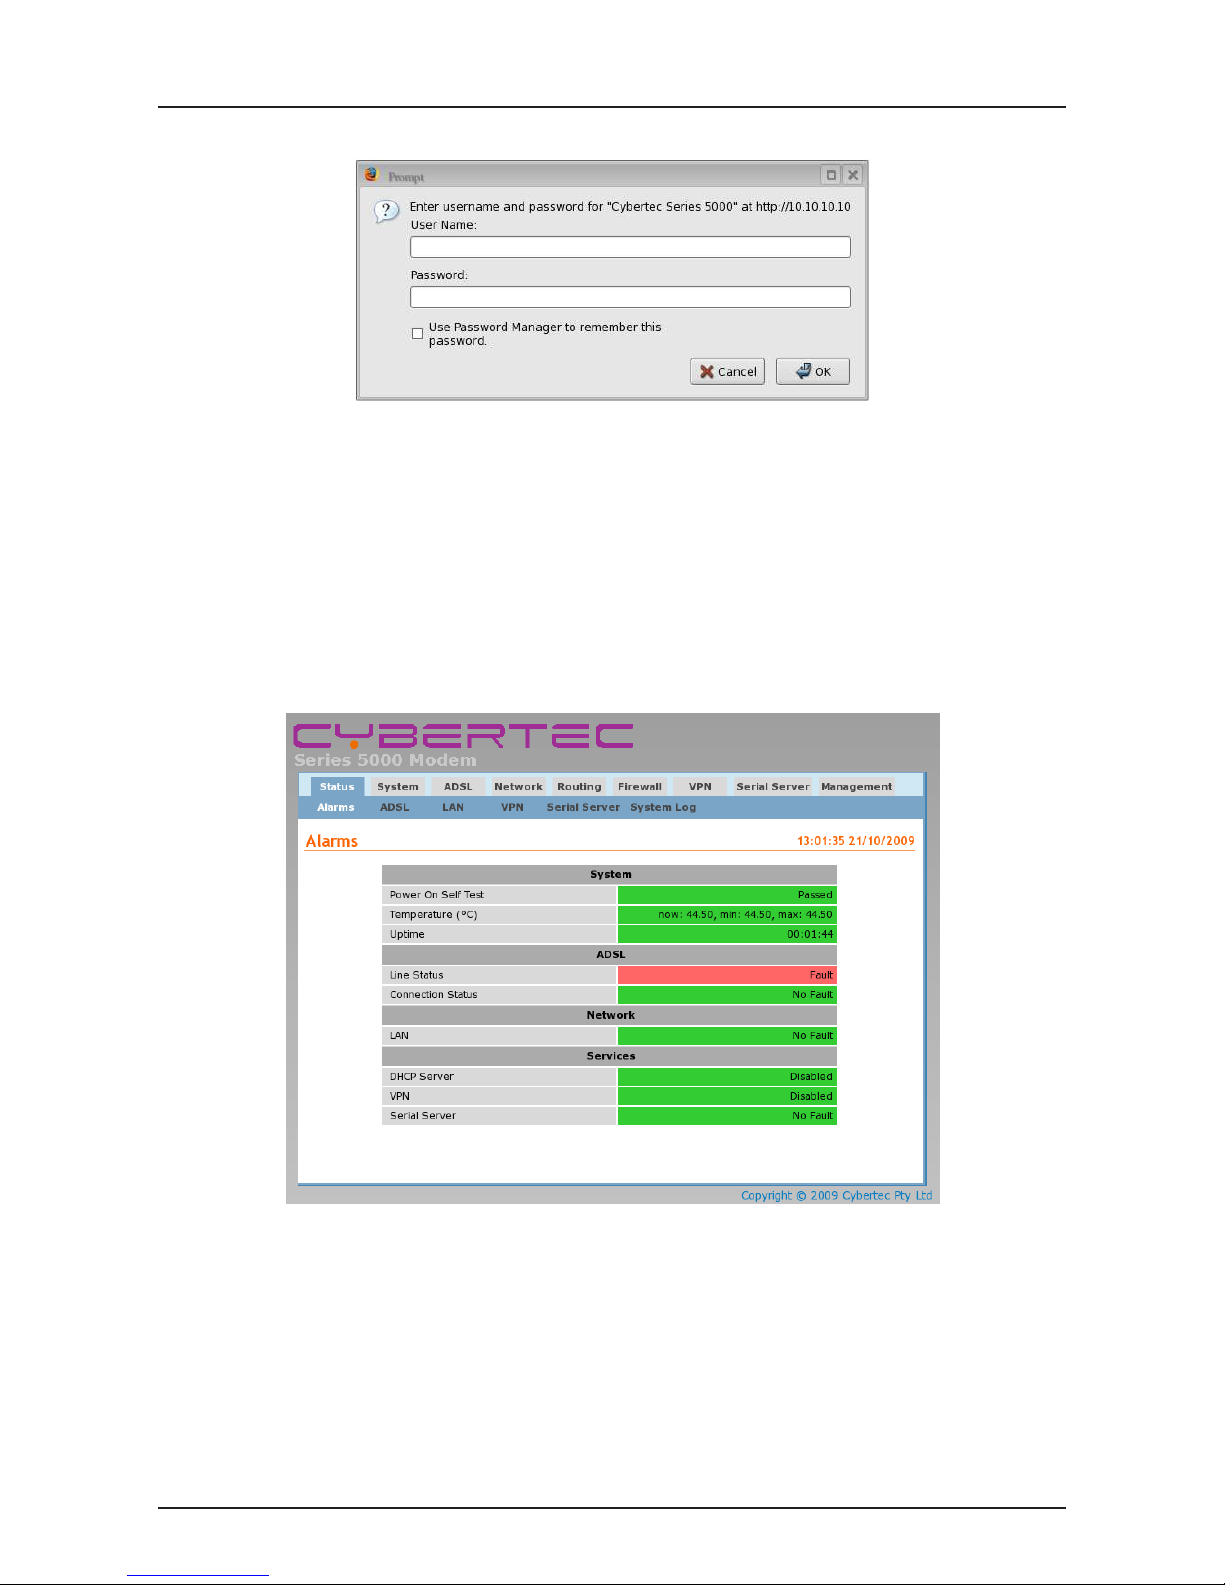
• Open a web browser on the PC and browse to 10.10.10.10 (the default Series 5000, IP address) .
• A login box similar to Figure 13 will pop up. If the box fails to display, re-check the cable connections to the unit
and the IP address settings of the PC.
Page 11 of 18
Page 13
Cybertec Pty Limited
Copyrightc 2009
Document: 0013-001-000172
Series 5000 Quick Start Guide
Version: 1.0
22 October, 2009
Figure 13: Web login box
• Enter the following login details:
◦ User Name: admin
◦ Password: admin
• The Status summary page will be displayed, it will be similar to Figure 14.
Figure 14: Status summary
Note: If the unit is not yet configured it is likely that the Line Status and Connection Status will indicate a fault condition.
Page 12 of 18
Page 14
Cybertec Pty Limited
Copyrightc 2009
Document: 0013-001-000172
Series 5000 Quick Start Guide
Version: 1.0
22 October, 2009
7 Basic Configuration
The section explains the procedure for configuring the Series 5000 to establish an ADSL connection. For details on more
advanced functionality configuration refer to the Series 5000 User Manual.
7.1 Configure the ADSL interface
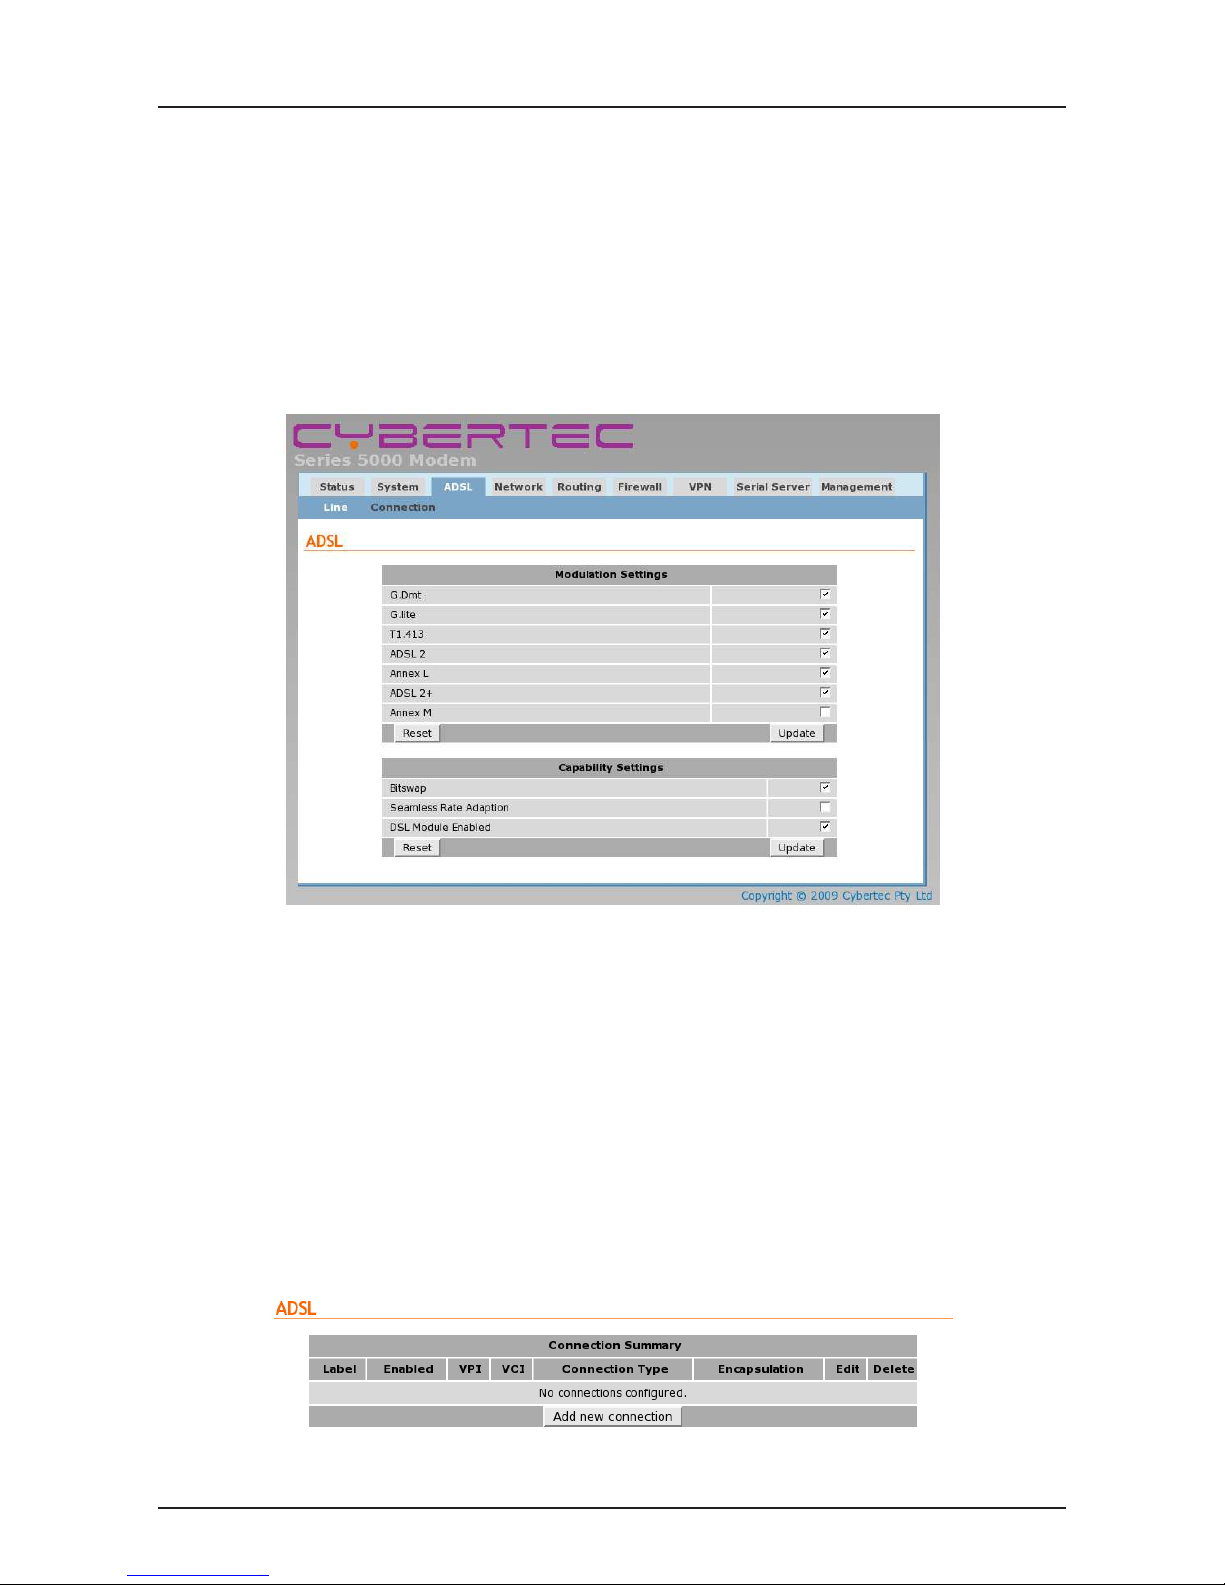
To access the configuration page for the ADSL interface, click on the ADSL tab of the main menu. The ADSL Line
configuration page will be displayed as shown in Figure 15.
Figure 15: ADSL Line configuration.
7.1.1 ADSL Line Configuration
The “ADSL Line Configuration” section contains the settings for the operational mode of the modem. The settings will
depend on the service provider,in general the default settings are adequate.
7.1.2 Adding an ADSL Connection
To access the ADSL connection settings click on the “Connection” tab. The screen shown in Figure 16 will be displayed. The page shows a summary of the ADSL connections. The Series 5000 allows multiple ADSL connections to be
configured although for most applications only one connection is required.
Figure 16: ADSL connection summary.
Page 13 of 18
Page 15
Cybertec Pty Limited
Copyrightc 2009
Document: 0013-001-000172
Series 5000 Quick Start Guide
Version: 1.0
22 October, 2009
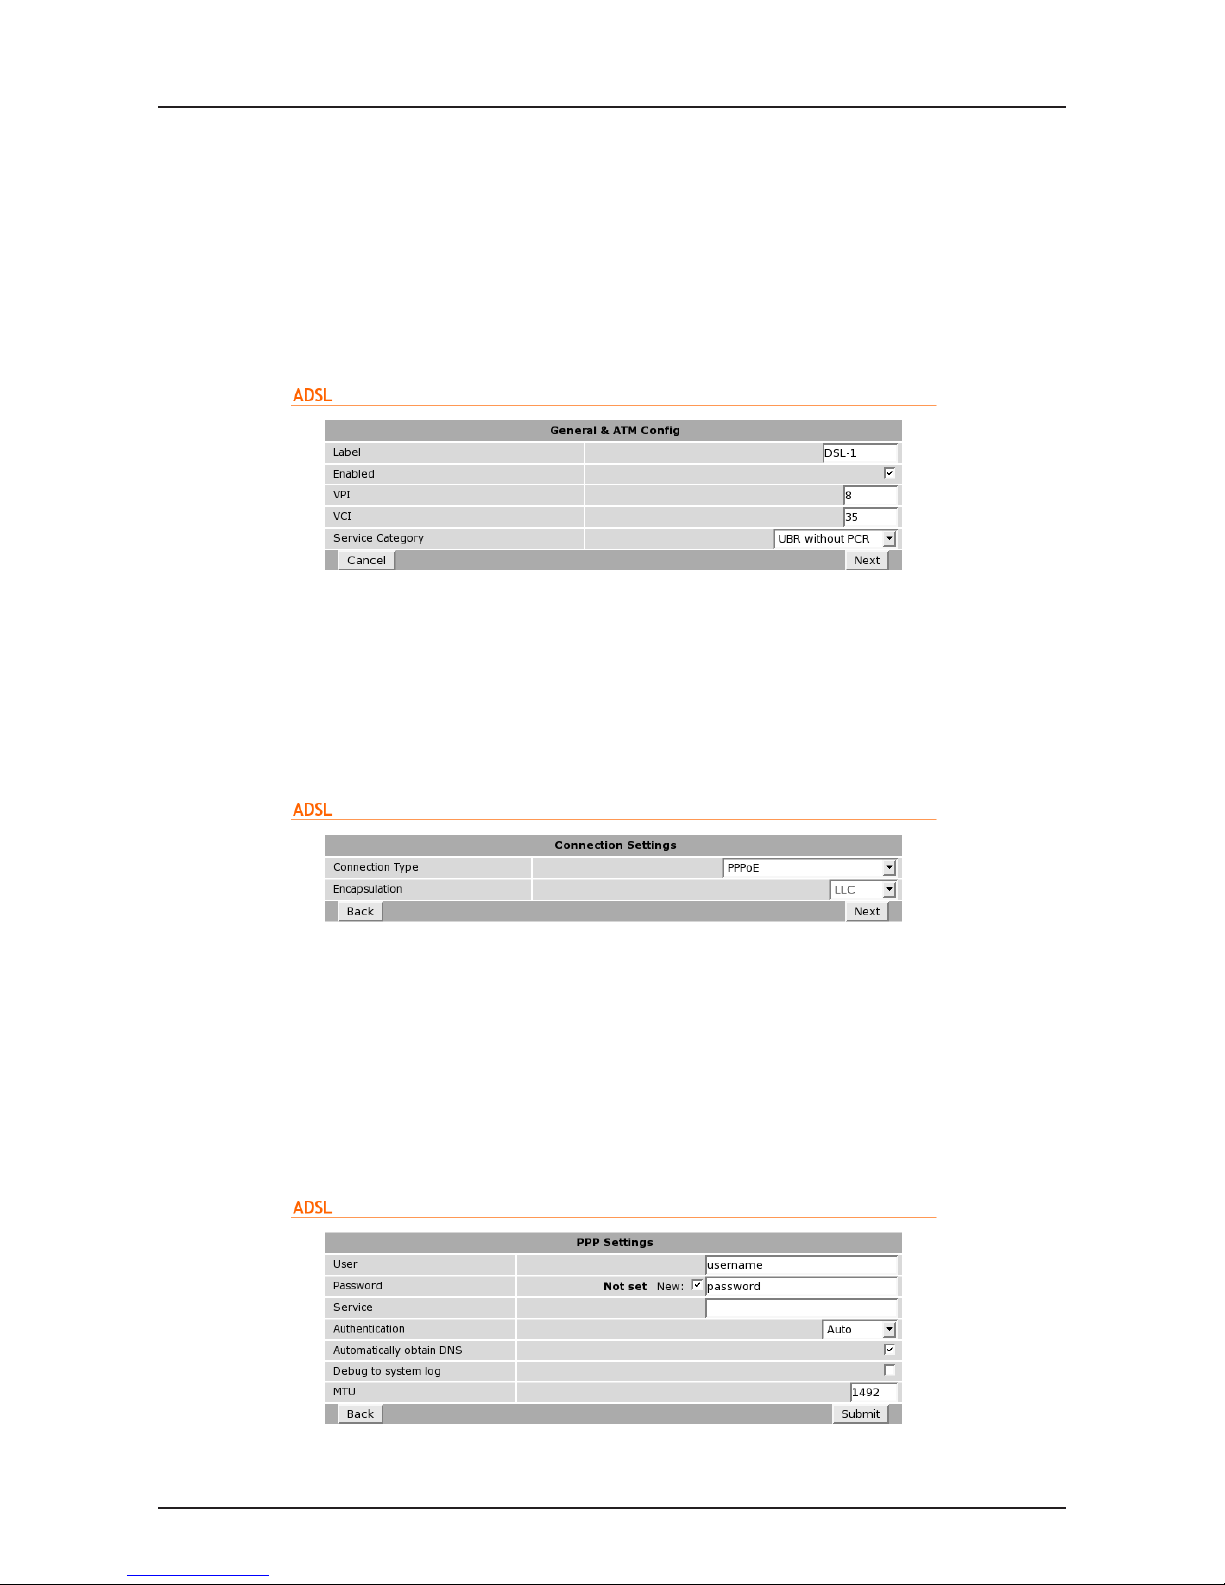
To add an ADSL connection click the “Add new profile” button, the first of 3 configuration pages will be displayed. The
values required will depend on the service provider.
The first page is for general and ATM settings and is shown in Figure 17. The label is used to described the connection
and is for reference only. The Enabled checkbox should be checked to enable the connection. The Virtual Path Identify
(VPI), Virtual Circuit Identifier (VCI) values and the service category type are service provider dependent. The default
values will work with most Australian service providers. Once the values have been entered click Next.
Figure 17: New connection - General and ATM settings
The second page is for the connection settings and is shown in Figure 18. The connection type and encapsulation will be
provided by the service provider. Usually the connection type is PPP over Ethernet (PPPoE) or PPP over ATM (PPPoA)
and the encapsulation is LLC. Click Next to continue.
Figure 18: New connection - Connection settings
The third pages for the Point to Point Protocol (PPP) settings and is shown in Figure 19. The username and password
will be provided by the service provider when the account is established. In order to enter a password click the check-box
marked New, the password can now be entered in the text field. The password is visible as it is being typed so that it can
be checked for errors prior to being set. Once set the password will no longer be visible. The default values are usually
adequate for the other settings.
Figure 19: New connection - PPP settings
Page 14 of 18
Page 16
Cybertec Pty Limited
Copyrightc 2009
Document: 0013-001-000172
Series 5000 Quick Start Guide
Version: 1.0
22 October, 2009
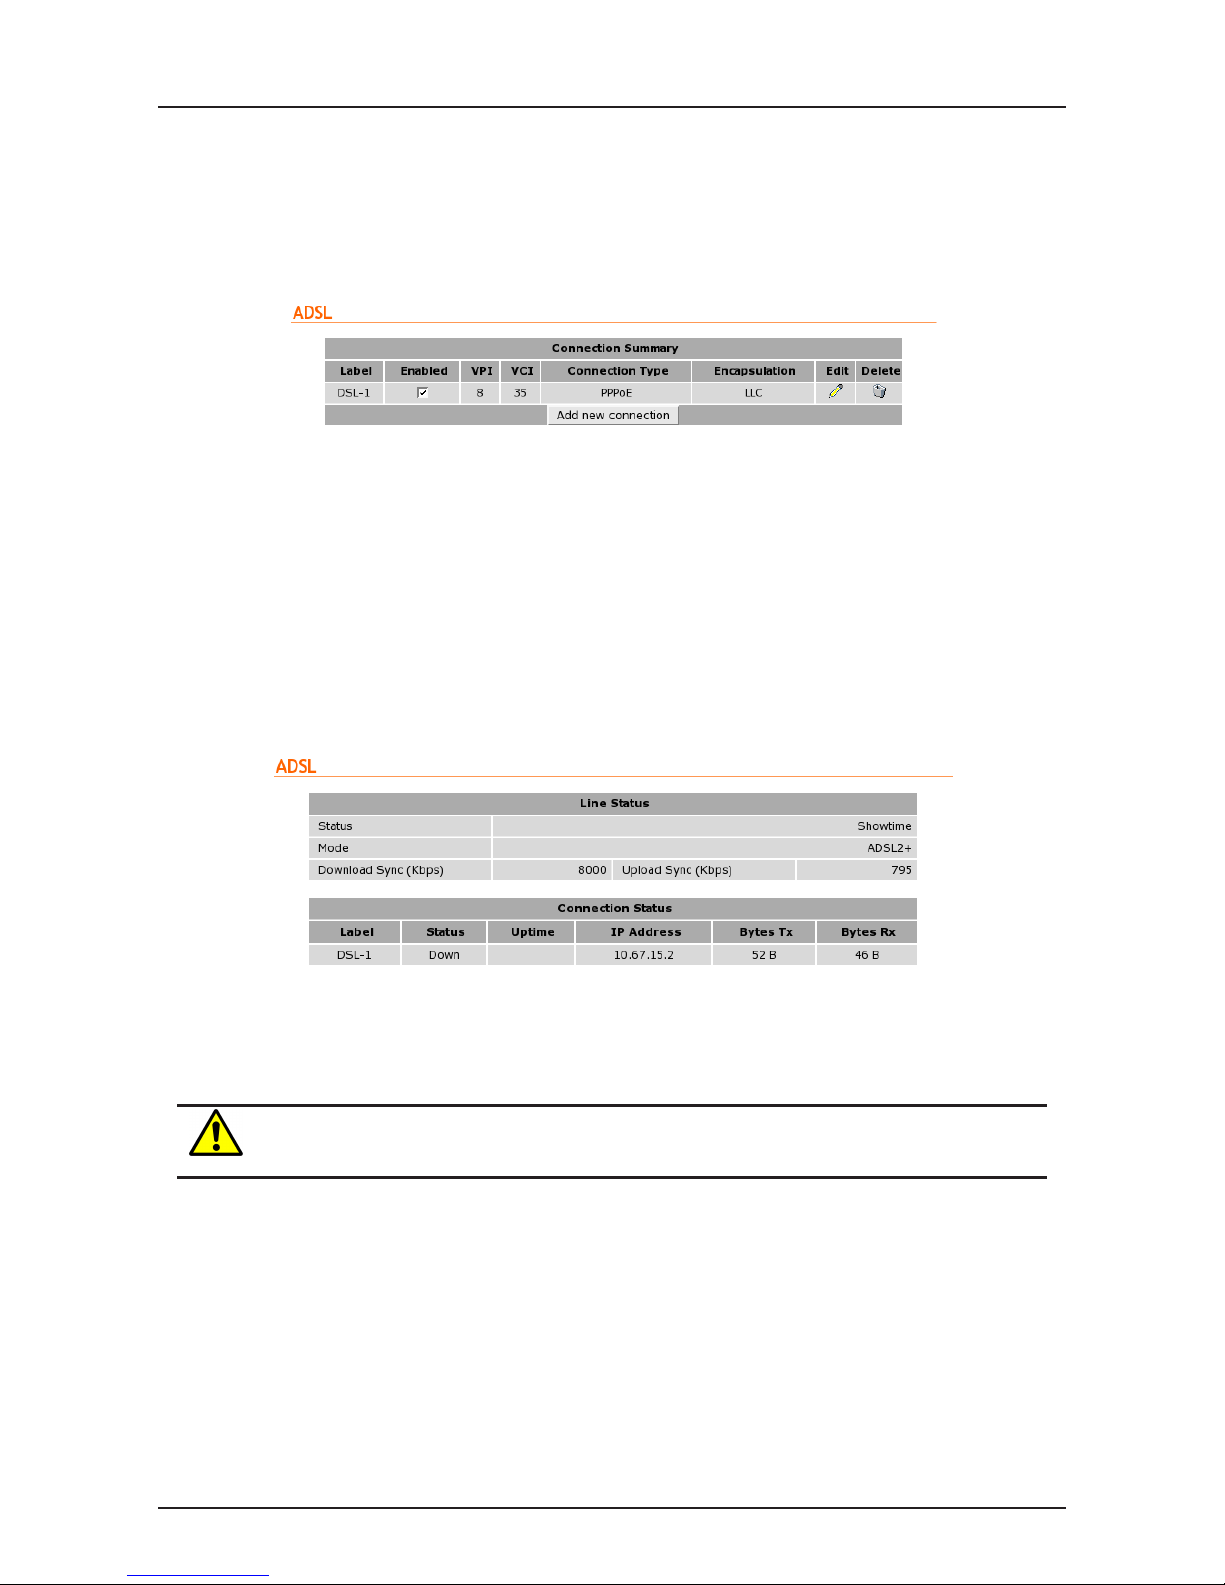
To complete the connection click Submit. The ADSL connection page will again be displayed with the new connection
listed as shown in Figure 20.
Figure 20: Connection summary with new connection shown
7.1.3 Connection Status
To check the status of the connection select “Status” from the top level menu and then select “ADSL” from the second
level menu. The ADSL status page will be displayed. The status of the connection will change as the modem connects
to the network, when connected the status will indicate “Showtime”. To see the value changing the page will need to be
refreshed. Once connected the ADSL status page will look similar to that shown in Figure 21.
Figure 21: ADSL Status showing modem in the connected state.
During initialisation the status may be reported as “Error” while the connection is being established. If
the error persists check the profile settings have been entered correctly. Refer to Section 7.1.2.
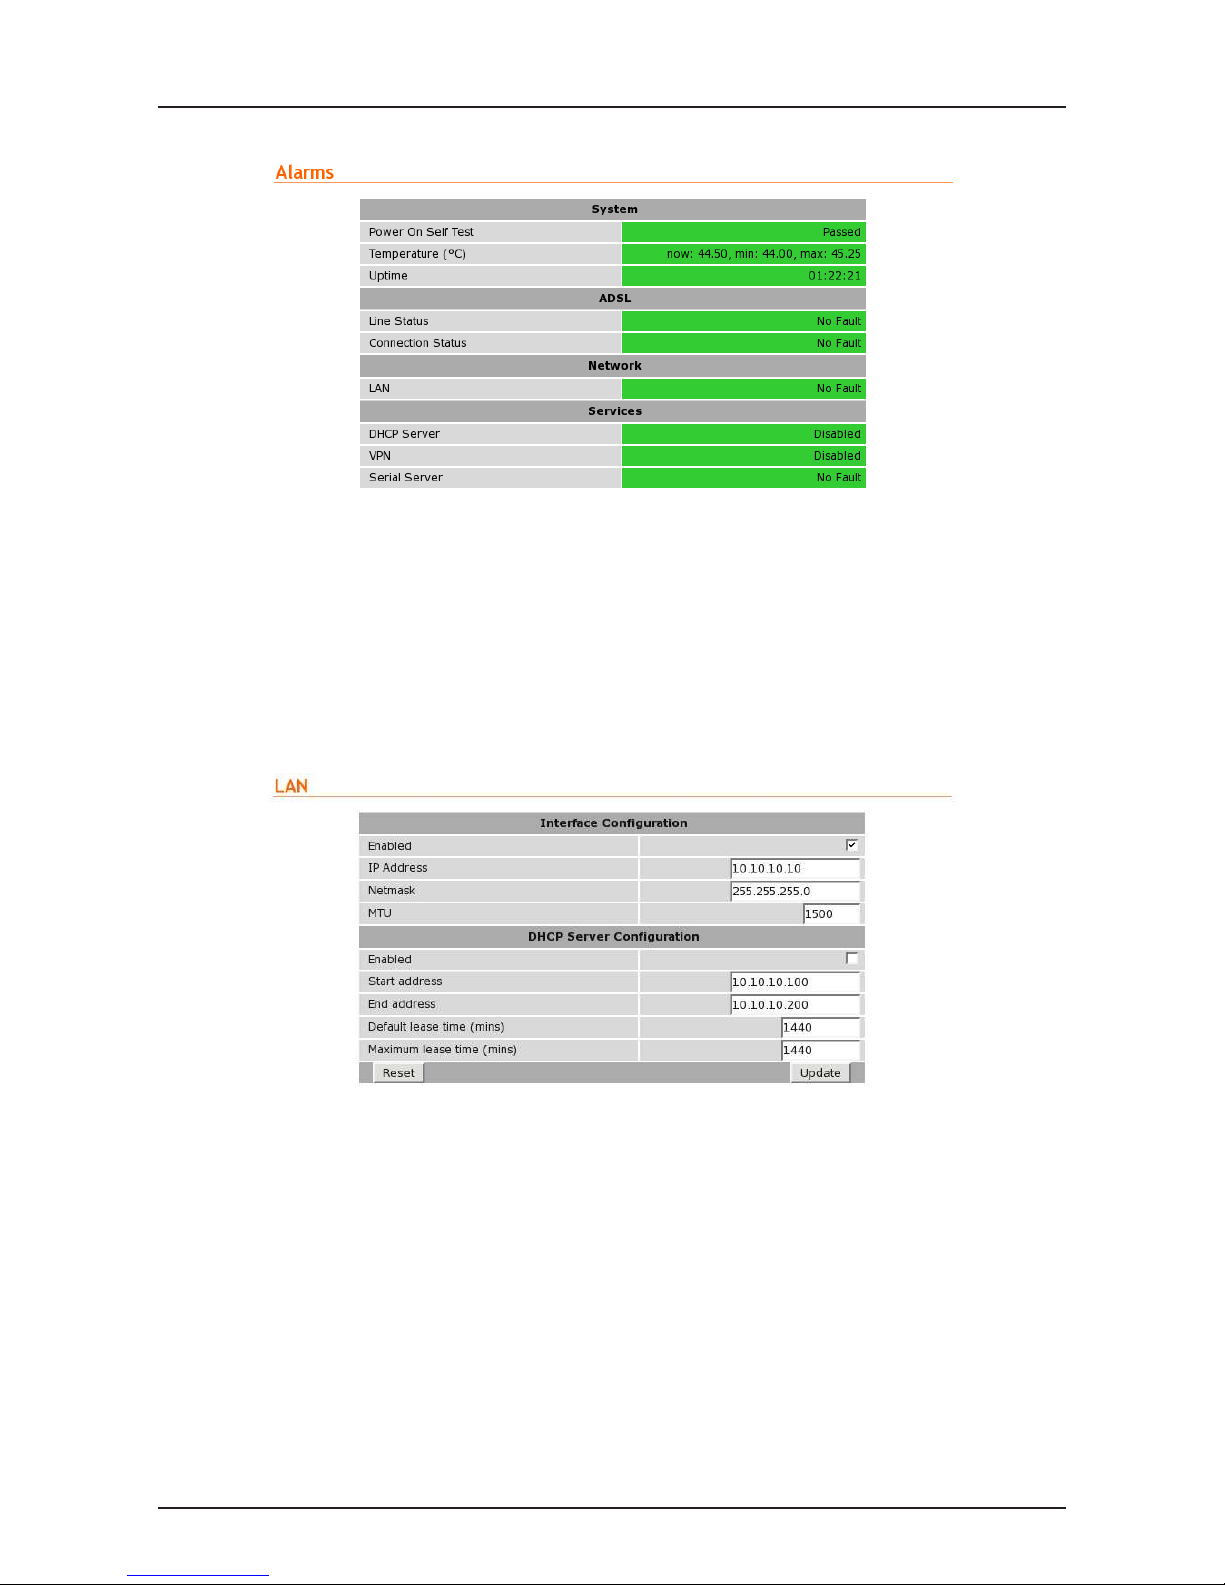
With the ADSL connection established the Status Alarms page should now indicate no faults as shown in Figure 22.
Page 15 of 18
Page 17
Cybertec Pty Limited
Copyrightc 2009
Document: 0013-001-000172
Series 5000 Quick Start Guide
Version: 1.0
22 October, 2009
Figure 22: Status Alarms page.
7.2 Configure the LAN interface and DHCP Server
To access the configuration page for the LAN interface and DHCP Server, select Interfaces from the top level menu the
LAN interface screen similar to that shown in Figure 23 will be shown.
Figure 23: LAN Interface configuration
7.2.1 Setting the IP Address
If it is desired to change the IP address of the LAN port, follow the steps below:
• Enter the new IP address and netmask in the Interface Configuration table.
• Click Update to set the changes. Once the changes have been set, the IP address of the Series 1000 Modem will
change. Enter the new address in the browser on the PC. It will be necessary to login again, following the procedure
described in the previous section.
Page 16 of 18
Page 18
Cybertec Pty Limited
Copyrightc 2009
Document: 0013-001-000172
Series 5000 Quick Start Guide
Version: 1.0
22 October, 2009
7.2.2 Enabling DHCP
The DHCP server allows clients on the local network to be automatically allocated IP addresses from the Series 5000.
DHCP also provides the clients with network settings such as default route and location of DNS servers.
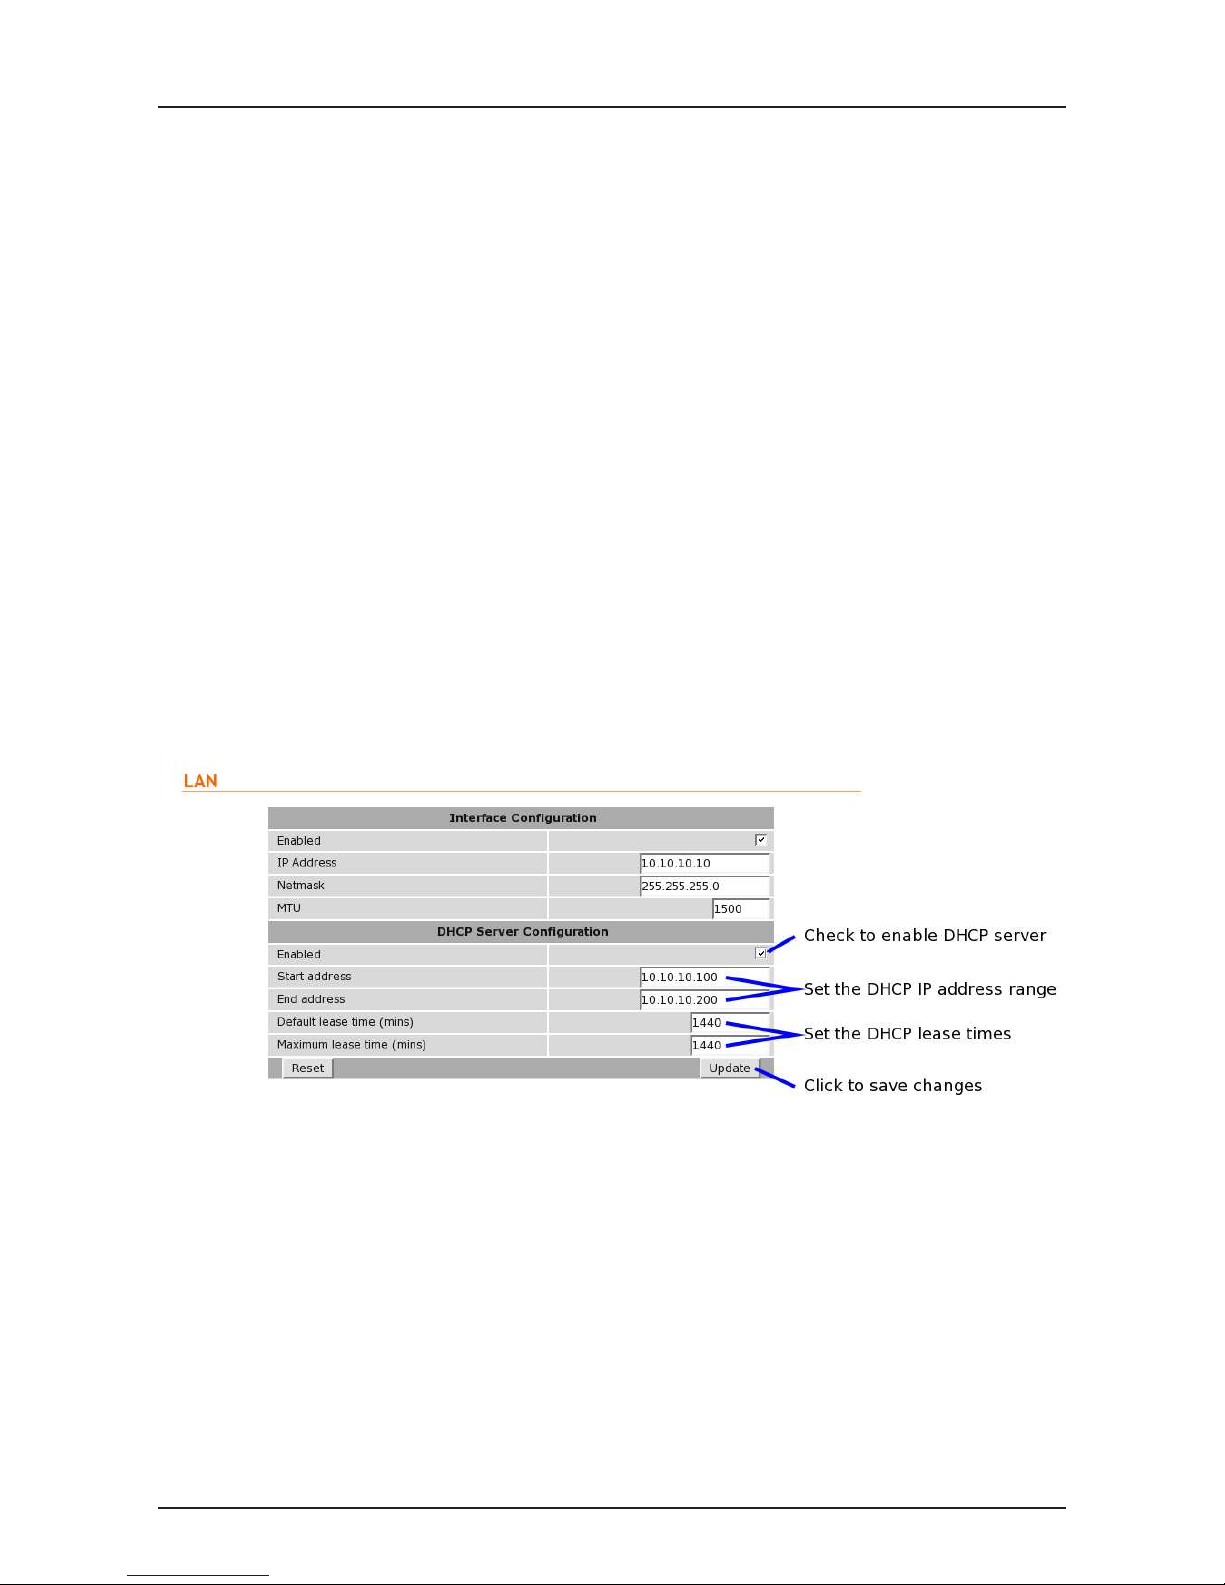
By default the DHCP server is disabled however it has been configured to serve IP addresses in the range 10.10.10.100
through 10.10.10.200, and the Default and Maximum lease times have been set to 1440 minutes. So if these values are
consistent with the network to which the Series 5000 is connected, then the DHCP server can be enabled by setting the
Enabled field to ’Yes’ and clicking the Update button.
If the standard settings are not applicable for the connected network, then refer to Figure 24 and follow the steps below,
to configure the DHCP server:
• Choose a group of available IP addresses on the local network. For example, if the IP address of the Series 5000
is 10.10.10.10 with a netmask of 255.255.255.0, a group chosen could be 10.10.10.100 to 10.10.10.200. This will
provide 101 addresses for clients.
• Under the DHCP Server Configuration table,
◦ Set the Enabled option to Yes.
◦ Enter the first address of the group in the Start Address box.
◦ Enter the last address of the group in the End Address box.
◦ Enter a lease time for the Default Lease time.
◦ Enter a lease time for the Maximum Lease time.
• Click Update to set the changes.
Figure 24: DHCP configuration.
7.3 Configure clients to use the Series 5000
The Series 5000 will act as a gateway for connections destined for the ADSL interface. The default configuration will
provide Network Address Translation and firewalling to protect clients on the local network.
To configure clients to use the Series 5000 as their gateway:
• If the clients have a DHCP address allocated by the Series 5000, they will have learned the necessary settings. No
further configuration is needed.
• If clients have static IP addresses, set their default route and DNS server to the IP address of the Series 5000.
Page 17 of 18
Page 19

Cybertec Pty Limited
Copyrightc 2009
Document: 0013-001-000172
Series 5000 Quick Start Guide
Version: 1.0
22 October, 2009
8 Troubleshooting
The following is a list a potential problems and possible causes. If after the checking through the list a problem persists
refer to the Series 5000 User Manual for further information.
8.1 Series 5000 does not start.
• Check the power indicator (Refer to Section 4.2.1) is lit green. If not check the power supply is the correct voltage
and the connector is wired correctly. Refer to section 5.4.
• Check the front panel indicators for a fault condition, particularly the Status indicator. Refer to Section 4.2.
8.2 Cannot connect to web pages
• Check the Ethernet cabling between the PC and the Series 5000 and check that the connection LED on the Series
5000 Ethernet port is lit. Refer to Section 4.3.
• Check the IP address settings of the computer have been set correctly. Refer to section 6.
• The IP address of the Series 5000 Modem/Router may have been changed from the default value. If this is the case
then:
◦ Make sure the IP address settings of the computer are correct for the IP address chosen and the correct IP
address has been entered in the web browser,or
◦ If the IP Address of the Series 5000 Modem/Router is not know then a factory reset will reset the IP address
to the default value. Refer to section 4.5 for details.
• The password may have been changed from the default, if the new password is not know then a factory reset will
set the password to the default. Refer to section 4.5 for details.
8.3 Network Status Fault
Check the ADSL Status page for a list of possible faults.
8.3.1 Network Registration Fault
• Check that the ADSL line has been installed correctly. Refer to Section 5.3.
• Check that the ADSL connection details have been entered correctly. Refer to section 7.1.2.
8.4 Connection Status Fault
8.4.1 Status Disabled
• Check that the Connection State is set to enabled in the connection profile. Refer to Section 7.1.2
• Check the profile settings, Username and password have been set correctly. Refer to section 7.1.2.
Page 18 of 18
Page 20

Cybertec Pty Limited
ABN 72 062 978 474
Unit 11, 41-43 Higginbotham Road
Gladesville NSW 2111
Australia
Phone: +612 9807 5911
Fax: +612 9807 2258
www.cybertec.com.au
 Loading...