

Page 1

Gigaset USB Stick 108 / deutsch / A31008-M1038-R101-1-7643 / qig_usbstick108_front.fm /
Schablone 2004_12_27
Page 2

Gigaset USB Stick 108 / deutsch / A31008-M1038-R101-1-7643 / qig_usbstick108_front.fm /
Federal Communication Commission Interference Statement
This equipment has been tested and found to comply with the limits for a Class B digital device,
pursuant to Part 15 of the FCC Rules. These limits are designed to provide reasonable protection
against harmful interference in a residential installation. This equipment generates, uses and can
radiate radio frequency energy and, if not installed and used in accordance with the instructions, may
cause harmful interference to radio communications. However, there is no guarantee that interference
will not occur in a particular installation. If this equipment does cause harmful interference to radio or
television reception, which can be determined by turning the equipment off and on, the user is
encouraged to try to correct the interference by one of the following measures:
-•Reorient or relocate the receiving antenna.
-•Increase the separation between the equipment and receiver.
-•Connect the equipment into an outlet on a circuit different from that
to which the receiver is connected.
-•Consult the dealer or an experienced radio/TV technician for help.
This device complies with Part 15 of the FCC Rules. Operation is subject to the following two conditions:
(1) This device may not cause harmful interference, and (2) this device must accept any interference
received, including interference that may cause undesired operation.
FCC Caution: Any changes or modifications not expressly approved by the party responsible for
compliance could void the user's authority to operate this equipment.
IMPORTANT NOTE:
FCC Radiation Exposure Statement:
This equipment complies with FCC radiation exposure limits set forth for an uncontrolled environment.
End users must follow the specific operating instructions for satisfying RF exposure compliance.
This transmitter must not be co-located or operating in conjunction with any other antenna or
transmitter.
IEEE 802.11b or 802.11g operation of this product in the U.S.A. is firmware-limited to channels 1
through 11.
This equipment has been SAR-evaluated for use in notebooks with side slot configuration.
II
Schablone 2004_12_27
Gigaset USB Stick 108
Page 3

Gigaset USB Stick 108 / deutsch / A31008-M1038-R101-1-7643 / qig_usbstick108IVZ.fm /
Content
Security . . . . . . . . . . . . . . . . . . . . . . . . . . . . . . . . . . . . . . . . . . . . . . . . . . . . . . . 3
Kurzbedienungsanleitung . . . . . . . . . . . . . . . . . . . . . . . . . . . . . . . . . . . . . . . 5
Quick Start Guide . . . . . . . . . . . . . . . . . . . . . . . . . . . . . . . . . . . . . . . . . . . . . 11
Pikaohje . . . . . . . . . . . . . . . . . . . . . . . . . . . . . . . . . . . . . . . . . . . . . . . . . . . . . 17
Guide d’installation rapide . . . . . . . . . . . . . . . . . . . . . . . . . . . . . . . . . . . . . . 23
Guida rapida . . . . . . . . . . . . . . . . . . . . . . . . . . . . . . . . . . . . . . . . . . . . . . . . . 31
Schablone 2004_12_27
Beknopte installatiehandleiding . . . . . . . . . . . . . . . . . . . . . . . . . . . . . . . . . 39
1Gigaset USB Stick 108
Page 4

Gigaset USB Stick 108 / deutsch / A31008-M1038-R101-1-7643 / qig_usbstick108IVZ.fm /
Industry Canada Statement
Operation is subject to the following two conditions:
1) this device may not cause interference and
2) this device must accept any interference, including interference that may cause undesired
operation of the device
IMPORTANT NOTE:
IC Radiation Exposure Statement:
This equipment complies with Canada radiation exposure limits set forth for uncontrolled
environments. This transmitter must not be co-located or operating in conjunction with any other
antenna or transmitter.
2
Gigaset USB Stick 108
Schablone 2004_12_27
Page 5

Gigaset USB Stick 108 / deutsch / A31008-M1038-R101-7643 / security.fm / 24.05.2005
Security
Säkerhetsanvisningar
u Gigaset USB Stick 108 kan påverka funktionen hos medicinsk utrustning.
På den utförliga bruksanvisningen på CD-ROM-skivan hittar du information om
hur du använder enheten på ett säkrare sätt.
Schablone 2004_12_27
Sikkerhetsanvisninger
u Gigaset USB Stick 108 kan påvirke driften av medisinske apparater.
Du finner opplysninger om sikker bruk i den utførlige bruksanvisningen på CDROM.
Sikkerhedsanvisninger
u Gigaset USB Stick 108 kan påvirke medicinsk udstyrs funktion.
Oplysninger om sikker brug finder du i den komplette betjeningsvejledning på
cd-rom.
3Gigaset USB Stick 108
Page 6

Gigaset USB Stick 108 / deutsch / A31008-M1038-R101-7643 / security.fm / 24.05.2005
4
Gigaset USB Stick 108
Indicaciones de seguridad
u Gigaset USB Stick 108 puede afectar el funcionamiento de equipos médicos.
En las instrucciones de uso completas incluidas en el CD-ROM encontrará las
indicaciones para un uso seguro.
Indicações de segurança
u O Gigaset USB Stick 108 pode afectar o funcionamento de equipamentos
Schablone 2004_12_27
médicos.
Par obter informação sobre o funcionamento seguro, consulte o manual de
instruções detalhado no CD-ROM.
Page 7

Gigaset USB Stick 108 / deutsch / A31008-M1038-R101-1-7643 / qig_usbstick108.fm /
Kurzbedienungsanleitung
Diese Kurzbedienungsanleitung zeigt Ihnen, wie Sie den Gigaset USB Stick 108
in Betrieb nehmen und über einen Access Point (wie z. B. Gigaset SE551 WLAN
dsl/cable) ins Internet gelangen. Detaillierte Informationen finden Sie in der
Bedienungsanleitung auf der mitgelieferten CD-ROM und im Internet unter
www.siemens
Schablone 2004_12_27
Warenzeichen
Microsoft, Windows 98SE, Windows ME, Windows 2000, und Windows XP sind
registrierte Warenzeichen der Microsoft Corporation.
Super G ist ein registriertes Warenzeichen der Atheros Communications, Inc.
Sicherheitshinweise
u Der Gigaset USB Stick 108 kann den Betrieb von medizinischen Geräten
beeinflussen.
Hinweise zum sicheren Betrieb finden Sie in der ausführlichen Bedienungsanleitung auf CD-ROM.
.com/gigasetusbstick108.
5Gigaset USB Stick 108
Page 8

Gigaset USB Stick 108 / deutsch / A31008-M1038-R101-1-7643 / qig_usbstick108.fm /
6
Gigaset USB Stick 108
Systemanforderungen
Zum Betrieb benötigen Sie:
u einen PC mit mindestens 466 MHz und einem der folgenden Betriebssys-
teme: Windows 98SE, Windows ME, Windows 2000 oder Windows XP
u 64 MB RAM und mindestens 30 MB Festplattenkapazität
u einen freien USB-Anschluss
u ein CD-ROM-Laufwerk oder ein DVD-Laufwerk
Schablone 2004_12_27
Vorgehen bei der Installation
Um den Internetzugang mittels Access Point aufzubauen, gehen Sie wie folgt
vor:
1. Installieren Sie zunächst den Gigaset USB Stick 108 an einem PC.
2. Installieren Sie dann den Access Point. Dies ist in der Bedienungsanleitung
des entsprechenden Geräts beschrieben.
3. Stellen Sie die Verbindung vom Gigaset USB Stick 108 zum Access Point her.
Installation des Gigaset USB Stick 108 an einem PC
Bitte beachten Sie:
u Stecken Sie den Gigaset USB Stick 108 erst dann in eine Buchse Ihres PCs,
wenn Sie von der Installations-Software dazu aufgefordert werden.
u Bei der Installation des Gigaset USB Stick 108 muss die SSID (Service Set ID)
aller kabellosen Netzwerkkomponenten identisch sein.
u Zur Installation benötigen Sie eventuell Administratorrechte auf Ihrem PC.
Page 9

Gigaset USB Stick 108 / deutsch / A31008-M1038-R101-1-7643 / qig_usbstick108.fm /
ì Beenden Sie alle laufenden Programme.
ì Legen Sie die im Lieferumfang enthaltene CD-ROM in das CD-ROM-Laufwerk
Ihres PCs und warten Sie, bis das Startfenster erscheint. Falls das Startfenster
nicht automatisch erscheint, starten Sie die Installation manuell:
– Öffnen Sie den Windows Explorer.
– Wählen Sie das CD-ROM-Laufwerk.
– Doppelklicken Sie auf das Programm start.exe.
Das Fenster zur Sprachauswahl erscheint.
Schablone 2004_12_27
ì Wählen Sie Ihre Sprache.
Es erscheint ein Fenster mit der Übersicht über den Inhalt der CD-ROM.
ì Klicken Sie auf Installation.
Hinweis:
Die Fenster der verschiedenen Windows Betriebssysteme unterscheiden sich
nur wenig voneinander. Die Installation erfolgt, bis auf wenige Mausklicks und
Neustartvorgänge, weitgehend automatisch.
Der InstallShield Wizard erscheint auf dem Bildschirm.
ì Klicken Sie auf Weiter, um die Installation fortzusetzen.
Das Fenster mit der Lizenzvereinbarung wird geöffnet.
ì Wenn Sie mit der Lizenzvereinbarung einverstanden sind, klicken Sie auf Ja.
Im folgenden Fenster wählen Sie das Verzeichnis für die Installationsdateien auf
Ihrem PC.
ì Übernehmen Sie die Voreinstellung oder wählen Sie mittels der Schaltfläche
Durchsuchen ein anderes Verzeichnis und klicken Sie auf Weiter.
7Gigaset USB Stick 108
Page 10

Gigaset USB Stick 108 / deutsch / A31008-M1038-R101-1-7643 / qig_usbstick108.fm /
8
Während der Installation zeigt der InstallShield Wizard im Fenster Setup-Fortschritt, welche Aktion gerade ausgeführt wird, und er zeigt den Fortschritt der
Installation an.
Nach Abschluss dieses Installationsschritts erscheint ein Meldungsfenster, das
Sie dazu auffordert, den Gigaset USB Stick 108 an den PC anzuschließen.
Gigaset USB Stick 108
ì Stecken Sie den Gigaset USB Stick 108 in eine freie USB-Buchse an Ihrem PC.
Nach dem Einstecken des Gigaset USB Stick 108 wird die Installation automatisch fortgesetzt. Es erscheint ein Fenster zur automatischen Hardware-Erken-
Schablone 2004_12_27
nung, um die Treiber für den Gigaset USB Stick 108 zu installieren.
Abhängig von anderen Einstellungen Ihres PCs kann es sein, dass dieses Fenster
bei Ihnen nicht erscheint. Der hier beschriebene Installationsschritt wird dann
automatisch vom System durchgeführt.
Bitte beachten Sie:
Falls Ihr PC mit dem Betriebssystem Windows XP Service Pack 2 ausgestattet
ist, erscheint das Fenster Assistent für das Suchen neuer Hardware. Wählen
Sie hier die Option Nein, diesmal nicht und Klicken Sie auf Weiter.
ì Wählen Sie die Option Software automatisch installieren und klicken Sie
auf Weiter.
Hinweise:
u Unter Windows 2000 / XP: Wenn Sie die Warnung Digitale Signatur nicht
gefunden erhalten, ignorieren Sie die Meldung und fahren Sie mit der
automatischen Installation fort.
Page 11

Gigaset USB Stick 108 / deutsch / A31008-M1038-R101-1-7643 / qig_usbstick108.fm /
u Unter Windows 98 SE / ME: Sie werden eventuell dazu aufgefordert, die
CD mit Ihrem Windows-Betriebssystem einzulegen, um die Treiber-Installation fortzusetzen. Halten Sie diese CD also bereit oder geben sie den
Pfadnamen an, unter dem gegebenenfalls die Windows-Installationsdateien auf Ihrem PC gesichert sind.
u Starten Sie bitte Ihren PC neu, falls Sie dazu aufgefordert werden.
Schablone 2004_12_27
Nach der Installation erscheinen abhängig von Ihrem Betriebssystem ein oder
zwei Fenster, die Sie zum Fertigstellen der Installation auffordert.
ì Klicken Sie auf Fertigstellen.
Die Installation wird abgeschlossen. Abhängig von Ihrer Windows-Betriebssystem-Variante werden Sie eventuell noch aufgefordert, Ihren PC neu zu starten.
Installation überprüfen
Wenn die Installation erfolgreich war, steht Ihnen jetzt der Gigaset WLAN Adapter Monitor zur Verfügung. Mit dem Gigaset WLAN Adapter Monitor konfigurieren Sie Ihren Gigaset USB Stick 108 und stellen eine Verbindung zu anderen
Netzwerkadaptern oder zu einem Access Point her.
Der Gigaset WLAN Adapter Monitor wird durch ein Symbol im Info-Bereich der
Taskleiste dargestellt, das Ihnen auch anzeigt, ob bereits eine Verbindung zu
einem Verbindungspartner besteht.
Folgende Anzeigen im Info-Bereich der Taskleiste sind möglich:
9Gigaset USB Stick 108
Kein Symbol:
Software nicht gestartet
Page 12
Gigaset USB Stick 108 / deutsch / A31008-M1038-R101-1-7643 / qig_usbstick108.fm /
10
Versuchen Sie zunächst, den Gigaset WLAN Adapter Monitor manuell zu starten.
Gigaset USB Stick 108
ì Klicken Sie im Startmenü auf Start – Programme – Gigaset USB Stick 108
– Gigaset WLAN Adapter Monitor.
Ist dies nicht möglich, war die Installation fehlerhaft.
ì Deinstallieren Sie die Software.
ì Installieren Sie dann die Software erneut.
Schablone 2004_12_27
Die Anzahl der farbigen Balken im Symbol zeigt die Verbindungsqualität an.
Software vorhanden, rote Kugel oberhalb des Symbols: Gigaset USB Stick 108 nicht eingesteckt
Rotes Kreuz oberhalb des Symbols:
Keine Verbindung zum Verbindungspartner
Grüne Kugel oberhalb des Symbols:
Verbindung aufgebaut
Sicherheitseinstellungen
Standardmäßig sind die Sicherheitseinstellungen deaktiviert. Es wird dringend
empfohlen, die Sicherheitseinstellungen zu aktivieren. Lesen Sie dazu bitte die
ausführliche Bedienungsanleitung auf der CD-ROM.
Bitte beachten Sie:
Voraussetzung für eine erfolgreiche Kommunikation ist, dass alle Verbindungspartner eines WLANs identische Sicherheitseinstellungen verwenden.
Page 13

Gigaset USB Stick 108 / englisch / A31008-M1038-R101-1-7643 / qig_usbstick108.fm /
Quick Start Guide
This Quick Start Guide shows you how to get started with the
Gigaset USB Stick 108 and get access to the Internet using an Access Point
(such as the Gigaset SE551 WLAN dsl/cable). You will find more detailed
information in the user guide on the supplied CD-ROM and on the Internet
at www.siemens.com/gigasetusbstick108
Schablone 2004_12_2
Trademarks
Microsoft, Windows 98SE, Windows ME, Windows 2000 and Windows XP are
registered trademarks of the Microsoft Corporation.
Super G is a registered trademark of Atheros Communications, Inc.
Safety precautions
u The Gigaset USB Stick 108 can affect medical equipment.
You will find more detailed information about safe operation this in the detailed
user guide on the supplied CD-ROM.
.
11Gigaset USB Stick 108
Page 14
Gigaset USB Stick 108 / englisch / A31008-M1038-R101-1-7643 / qig_usbstick108.fm /
12
Gigaset USB Stick 108
System requirements
For operation, you will require:
u a PC with at least 466 MHz and one of the following operating systems:
Windows 98SE, Windows ME, Windows 2000 or Windows XP,
u 64 MB RAM and at least 30 MB free hard disk space,
u a free USB port,
u a CD-ROM drive or a DVD drive.
Schablone 2004_12_2
Procedure for installation
To establish Internet access using Access Point, proceed as follows:
1. First install the Gigaset USB Stick 108 on a PC.
2. Then install the Access Point. This is described in the user guide for the device
in question.
3. Set up the connection from the Gigaset USB Stick 108 to the Access Point.
Installation of the Gigaset USB Stick 108 on a PC
Please remember:
u Do not insert the Gigaset USB Stick 108 into a spare USB port on your PC
until the installation software prompts you to do so.
u When installing the Gigaset USB Stick 108 , the SSID (Service Set ID) of all
the wireless network components must be identical.
u You may require administrator rights on your PC for the installation proc-
ess.
Page 15

Gigaset USB Stick 108 / englisch / A31008-M1038-R101-1-7643 / qig_usbstick108.fm /
ì Close all running programs.
ì Insert the CD-ROM supplied into the CD-ROM drive of your PC and wait until
the welcome screen appears. If this screen does not appear automatically,
start installation manually:
– Open Windows Explorer.
– Select the CD-ROM drive.
–Double-click start.exe.
The language selection screen appears.
Schablone 2004_12_2
ì Select the language.
You will now see a screen showing the contents of the CD-ROM.
ì Click on Installation.
Note:
The screens for the various Windows operating systems differ only marginally.
Installation is largely automatic, apart from a few mouse clicks and restarts.
The InstallShield Wizard appears.
ì Click on Next to continue installation.
The licence agreement screen now appears.
ì If you accept the terms of the licence agreement, click on Yes.
In the next screen, choose the directory for the installation files on your PC.
ì Accept the default setting or select another directory using the Browse but-
ton and click on Next.
13Gigaset USB Stick 108
Page 16

Gigaset USB Stick 108 / englisch / A31008-M1038-R101-1-7643 / qig_usbstick108.fm /
14
During installation, the InstallShield Wizard uses the Setup progress screen to
show which action is being carried out, and the progress is also displayed.
After this stage of installation is completed, a message appears prompting you
to connect the Gigaset USB Stick 108 to your PC.
Gigaset USB Stick 108
ì Now insert the Gigaset USB Stick 108 in a free USB port on your PC.
After the Gigaset USB Stick 108 has been plugged in, installation automatically
continues. A window appears for automatic hardware detection in order to
install the driver for the Gigaset USB Stick 108.
Schablone 2004_12_2
Depending on the other settings of your PC, this window may not appear. The
installation step described here is then automatically carried out by the system.
Please remember:
If your PC is equipped with the Windows XP operating system Service Pack 2,
the Wizard for looking for new hardware window appears. Select the No,
not at this time option, and click on Next.
ì Select the Install software automatically option, and click on Next.
Notes:
u Windows 2000 / XP: If you see the warning Digital signature not found,
ignore the message and continue with automatic installation.
Page 17

Gigaset USB Stick 108 / englisch / A31008-M1038-R101-1-7643 / qig_usbstick108.fm /
u Windows 98 SE / ME: You may be prompted to insert your Windows
Installation CD to continue driver installation. Therefore you should have
this CD handy or enter the path name where the Windows installation files
are stored on your PC.
u Restart your PC if you are prompted to do so.
After installation, one or two windows may appear depending on your operating
Schablone 2004_12_2
system prompting you to complete installation.
ì Click on Finish.
This closes the installation program. Depending on your Windows operating system, you may also be prompted to reboot your PC.
Checking installation
If installation was successful, you can now use the Gigaset WLAN Adapter Monitor. With the Gigaset WLAN Adapter Monitor you can configure your Gigaset
USB Stick 108 and create a connection to other network adapters or an Access
Point.
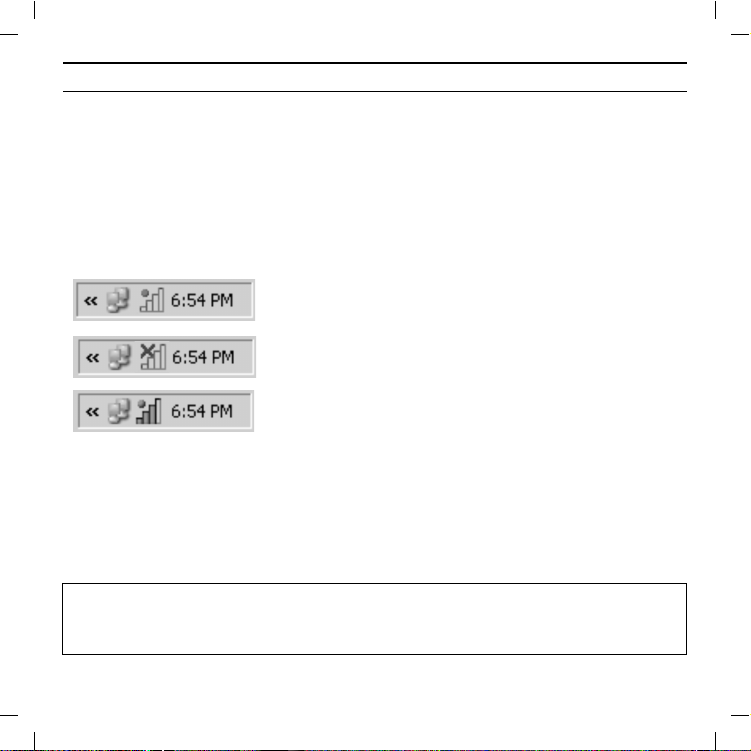
The Gigaset WLAN Adapter Monitor is represented by an icon in the status area
of the taskbar, this icon also shows you if there is already a connection to a connection partner.
The following may be displayed in the status area of the taskbar:
15Gigaset USB Stick 108
No icon:
Software not launched
Page 18

Gigaset USB Stick 108 / englisch / A31008-M1038-R101-1-7643 / qig_usbstick108.fm /
16
First try to open the Gigaset WLAN Adapter Monitor manually.
Gigaset USB Stick 108
ì In the start menu, click on Start – Programs – Gigaset USB Stick 108 –
Gigaset WLAN Adapter Monitor.
If this fails, then something went wrong during installation.
ì Deinstall the software.
ì Then install the software again.
Schablone 2004_12_2
The number of coloured bars in the icon shows the connection quality.
Software available, red ball above the icon:
Gigaset USB Stick 108 not plugged in
Red cross above the icon:
No connection to the connection partner
Green ball above the icon:
Connection established
Security settings
The security settings are deactivated by default. It is strongly recommended that
you activate the security settings. Please refer to the detailed user guide on the
CD-ROM.
Please remember:
Successful communication depends on all the connection partners in a WLAN
using the same security settings.
Page 19

Gigaset USB Stick 108 / deutsch / A31008-M1038-R101-1-7643 / qig_usbstick108.fm /
Pikaohje
Tässä ohjeessa kerrotaan, miten Gigaset USB Stick 108 otetaan käyttöön ja miten
liityntäpisteen (Access Point, esim. Gigaset SE551 WLAN dsl/cable) kautta päästään Internetiin. Lisätietoa löydät mukana toimitetulla CD-levyllä olevasta käyttöohjeesta ja Internet-osoitteesta www.siemens.fi/gigaset
Tuotemerkit
Schablone 2004_12_27
Microsoft, Windows 98SE, Windows ME, Windows 2000 ja Windows XP ovat
Microsoft Corporationin rekisteröityjä tuotemerkkejä.
Super G on Atheros Communications Inc:n rekisteröity tuotemerkki.
Turvaohjeet
u Gigaset USB Stick 108 voi aiheuttaa häiriöitä terveydenhuollossa käytettäviin
laitteisiin.
Lisätietoa laitteen turvallisesta käytöstä löydät CD-ROM-levyllä olevasta käyttöohjeesta.
Järjestelmävaatimukset
Käyttöä varten tarvitaan:
u vähintään 466 MHz:n tietokone, jossa on jokin seuraavista käyttöjärjestel-
mistä: Windows 98SE, Windows ME, Windows 2000 tai Windows XP
u 64 MB RAM ja vähintään 30 MB kiintolevykapasiteettia
u vapaa USB-liitäntä
u CD-ROM-asema tai DVD-asema
.
17Gigaset USB Stick 108
Page 20

Gigaset USB Stick 108 / deutsch / A31008-M1038-R101-1-7643 / qig_usbstick108.fm /
18
Gigaset USB Stick 108
Asennusvaiheet
Rakentaaksesi Internet-yhteyden liityntäpisteen (Access Point) kautta toimi
seuraavasti:
1. Asenna ensin Gigaset USB Stick 108 tietokoneeseen.
2. Asenna sen jälkeen liityntäpiste kyseisen laitteen käyttöohjeen mukaisesti.
3. Muodosta yhteys Gigaset USB Stick 108 -sovittimen ja liityntäpisteen välille.
Schablone 2004_12_27
Gigaset USB Stick 108 -sovittimen asennus
tietokoneeseen
Ota huomioon:
u Kiinnitä Gigaset USB Stick 108 vasta sitten tietokoneen liitinpaikkaan, kun
asennusohjelma kehottaa tekemään niin.
u Gigaset USB Stick 108 -sovittimen asennuksessa kaikilla langattomilla verk-
kokomponenteilla pitää olla sama SSID (Service Set ID).
u Asennusta varten voit tarvita tietokoneesi ylläpito-oikeuksia.
ì Sulje kaikki käynnissä olevat ohjelmat.
ì Laita mukana toimitettu CD-levy tietokoneen CD-asemaan ja odota, kunnes
aloitusikkuna ilmestyy näytölle. Mikäli aloitusikkuna ei tule näkyviin automaattisesti, käynnistä asennusohjelma manuaalisesti:
– Avaa Windows Explorer.
– Valitse CD-asema.
– Kaksoisnapsauta ohjelmaa start.exe.
Page 21

Gigaset USB Stick 108 / deutsch / A31008-M1038-R101-1-7643 / qig_usbstick108.fm /
Näytölle ilmestyy kielenvalintaikkuna.
ì Valitse kieli.
Näytölle ilmestyy ikkuna, jossa näkyy CD-levyn sisältö.
ì Napsauta kohtaa Installation/Asenna.
Huomaa:
Eri Windows-käyttöjärjestelmien ikkunat eroavat toisistaan vain vähän. Asennus tapahtuu, joitakin hiirellä napsautuksia ja uudelleenaloituksia lukuunotta-
Schablone 2004_12_27
matta, pääosin automaattisesti.
Näytölle ilmestyy asennusvelho (InstallShield Wizard).
ì Napsauta Next/Seuraava-painiketta jatkaaksesi asennusta.
Näytölle ilmestyy ikkuna, jossa näkyvät lisenssiehdot.
ì Mikäli hyväksyt lisenssiehdot, napsauta Yes/Kyllä-painiketta.
Seuraavassa ikkunassa valitaan hakemisto, johon asennustiedostot tietokoneessa tallennetaan.
ì Hyväksy ohjelman ehdottama hakemisto tai napsauta Browse/Selaa-paini-
ketta ja valitse toinen hakemisto. Napsauta Next/Seuraava-painiketta.
Asennuksen aikana asennusvelho näyttää Setup Status -ikkunassa, mikä toimenpide kulloinkin on meneillään ja miten asennus etenee.
Tämän asennusvaiheen jälkeen näytölle ilmestyy ikkuna, jossa pyydetään kytkemään Gigaset USB Stick 108 tietokoneeseen.
ì Työnnä Gigaset USB Stick 108 tietokoneen vapaaseen USB-liitinpaikkaan.
Kun Gigaset USB Stick 108 on kytketty tietokoneeseen, asennus jatkuu automaattisesti. Käyttöjärjestelmän automaattinen laitteistontunnistusohjelma
19Gigaset USB Stick 108
Page 22

Gigaset USB Stick 108 / deutsch / A31008-M1038-R101-1-7643 / qig_usbstick108.fm /
20
Gigaset USB Stick 108
aukeaa Gigaset USB Stick 108 -sovittimen ohjainten (ajureiden) asennusta varten.
Tietokoneen muista asetuksista riippuen voi olla, että kyseinen ikkuna ei ilmesty
tietokoneen näytölle. Tällöin järjestelmä suorittaa tässä kuvatun asennusvaiheen automaattisesti.
Ota huomioon:
Mikäli tietokoneen käyttöjärjestelmänä on Windows XP Service Pack 2, näy-
Schablone 2004_12_27
tölle ilmestyy ikkuna Found New Hardware Wizard/Ohjattu uuden laitteis-
ton asennus. Valitse vaihtoehto No, not at this time/Ei, ei tällä kertaa ja napsauta Next/Seuraava-painiketta.
ì Valitse vaihtoehto Install the software automatically/Asenna ohjelmistot
automaattisesti ja napsauta Next/Seuraava-painiketta.
Huomaa:
u Windows 2000/XP: Mikäli näytölle ilmestyy varoitus Digital Signature Not
Found/Digitaalista allekirjoitusta ei löytynyt, älä välitä siitä, vaan jatka
automaattista asennusta.
u Windows 98 SE/ME: Ohjelma voi pyytää sinua laittamaan Windowsin asen-
nus-CD:n CD-asemaan voidakseen jatkaa ohjainten (ajureiden) asennusta.
Pidä siis kyseinen CD-levy valmiiksi esillä tai näppäile polku, jonka alle Windows-asennustiedostot on tallennettu.
u Käynnistä tietokone uudelleen, jos ohjelma pyytää sinua tekemään niin.
Page 23

Gigaset USB Stick 108 / deutsch / A31008-M1038-R101-1-7643 / qig_usbstick108.fm /
Tämän jälkeen näytölle ilmestyy käyttöjärjestelmästä riippuen yksi tai kaksi ikkunaa, joissa pyydetään päättämään asennus.
ì Napsauta kulloinkin Finish/Valmis-painiketta.
Asennus päättyy. Windows-käyttöjärjestelmästä riippuen ohjelma saattaa vielä
pyytää sinua käynnistämään tietokoneen uudelleen.
Asennuksen tarkistaminen
Mikäli asennus onnistui, käytössäsi on nyt Gigaset WLAN Adapter Monitor, jonka
Schablone 2004_12_27
avulla voit konfiguroida Gigaset USB Stick 108 -sovittimen ja muodostaa yhteyden muihin verkkosovittimiin tai liityntäpisteeseen.
Gigaset WLAN Adapter Monitor näkyy tehtäväpalkissa olevana kuvakkeena, joka
ilmaisee mm., onko johonkin laitteeseen jo muodostettu yhteys.
Mahdolliset näytöt:
Ei kuvaketta:
Ohjelma ei ole käynnistynyt.
Yritä ensin käynnistää Gigaset WLAN Adapter Monitor manuaalisesti.
ì Valitse käynnistysvalikossa Start/Käynnistä – Programs/Ohjelmat – Giga-
set USB Stick 108 – Gigaset WLAN Adapter Monitor.
Mikäli tämä ei onnistu, asennus on epäonnistunut.
ì Poista ohjelman asennus.
ì Asenna ohjelma uudelleen.
21Gigaset USB Stick 108
Page 24

Gigaset USB Stick 108 / deutsch / A31008-M1038-R101-1-7643 / qig_usbstick108.fm /
22
Ohjelma asennettu, punainen ympyrä kuvakkeen
yläpuolella: Gigaset USB Stick 108 -sovitinta ei ole
kytketty.
Punainen rasti kuvakkeen yläpuolella:
Ei yhteyttä toiseen laitteeseen.
Vihreä ympyrä kuvakkeen yläpuolella:
Schablone 2004_12_27
Kuvakkeen värillisten palkkien lukumäärä kuvastaa yhteyden laatua.
Yhteys muodostunut.
Gigaset USB Stick 108
Tietoturva-asetukset
Tehdasasetuksena tietoturva-asetukset on kytketty pois päältä. Kehotamme
aktivoimaan tietoturva-asetukset heti. Lue ohjeet CD-ROM-levyllä olevasta käyttöohjeesta.
Ota huomioon:
Edellytys onnistuneelle kommunikoinnille on, että kaikissa langattomaan lähiverkkoon (WLAN) kuuluvissa laitteissa on samat tietoturva-asetukset.
Page 25

Gigaset USB Stick 108 / französisch / A31008-M1038-R101-1-7643 / qig_usbstick108_FR.fm /
Guide d’installation rapide
Ce guide d'installation rapide a pour but de vous aider à installer le
Gigaset USB Stick 108 et le raccorder à un point d'accès (tel que le
Gigaset SE551 WLAN dsl/cable) pour accéder à Internet. Pour de plus amples
informations, se référer au manuel d'utilisation disponible sur le CD-Rom fourni,
ou consulter l'adresse Internet
www.siemens.com/gigasetusbstick108
Schablone 2004_12_27
Marques déposées
Microsoft, Windows 98 SE, Windows ME, Windows 2000 et Windows XP sont
des marques déposées de Microsoft Corporation.
Super G est une marque déposée de Atheros Communications, Inc.
Consignes de sécurité
u Le Gigaset USB Stick 54 Gigaset USB Stick 108 peut perturber le fonctionne-
ment des équipements médicaux.
Vous trouverez des consignes sur la sécurité dans le manuel d'utilisation détaillé
et sur le CD-Rom.
.
23Gigaset USB Stick 108
Page 26

Gigaset USB Stick 108 / französisch / A31008-M1038-R101-1-7643 / qig_usbstick108_FR.fm /
24
Gigaset USB Stick 108
Configuration requise
Les éléments suivants sont requis :
u un PC 466 MHz utilisant l'un des systèmes d'exploitation suivants :
Windows 98SE, Windows ME, Windows 2000 ou Windows XP,
u 64 Mo de mémoire vive et au moins 30 Mo d'espace disque,
u un port USB libre,
u un lecteur de CD-Rom ou de DVD.
Schablone 2004_12_27
Procédure d'installation
La procédure de connexion à Internet via un point d'accès est la suivante :
1. Installez pour commencer le Gigaset USB Stick 108 sur un PC.
2. Installez ensuite le point d'accès. Cette opération est décrite dans le manuel
d'utilisation de l'appareil correspondant.
3. Raccordez le Gigaset USB Stick 108 au point d'accès.
Page 27

Gigaset USB Stick 108 / französisch / A31008-M1038-R101-1-7643 / qig_usbstick108_FR.fm /
Installation du Gigaset USB Stick 108 sur un PC
À noter :
u Ne jamais raccorder le Gigaset USB Stick 108 à votre PC avant d'avoir ins-
tallé le logiciel qui vous indiquera à quel moment le raccorder.
u Lors de l'installation du Gigaset USB Stick 108, ne pas oublier que le
SSID (Service Set ID) doit être identique sur tous les composants du réseau
Schablone 2004_12_27
sans fil.
u Vous devrez peut-être disposer des droits d'administrateur sur votre ordi-
nateur pour réaliser l'installation.
ì Quittez tous les programmes en cours d'exécution.
ì Insérez le CD-Rom fourni dans le lecteur de votre PC et attendez l'affichage
de la page d'accueil. Dans le cas où celle-ci n'apparaîtrait pas automatiquement, démarrer l'installation manuellement :
–Ouvrez l'Explorateur Windows.
– Sélectionnez le lecteur de CD-Rom.
– Double-cliquez sur le programme start.exe.
La fenêtre de sélection de la langue doit apparaître.
ì Sélectionnez la langue voulue.
Un nouvel écran vous propose le contenu du CD-Rom.
ì Cliquez sur Installation.
25Gigaset USB Stick 108
Page 28

Gigaset USB Stick 108 / französisch / A31008-M1038-R101-1-7643 / qig_usbstick108_FR.fm /
26
Remarque :
Les boîtes de dialogue peuvent être légèrement différentes d'un système
d'exploitation à l'autre. À quelques clics ou redémarrages près, l'installation
est pratiquement automatique.
L’Assistant Installation apparaît sur l’écran.
Gigaset USB Stick 108
ì Cliquez sur Suivant pour poursuivre l'installation.
Schablone 2004_12_27
La boîte de dialogue avec l’accord de licence s’ouvre.
ì Si vous acceptez l’accord de licence, cliquez sur Oui.
Sélectionnez dans la boîte de dialogue suivante le répertoire d'installation des
fichiers sur votre PC.
ì Validez le répertoire défini par défaut ou sélectionnez un autre répertoire en
cliquant sur le bouton Parcourir puis cliquez sur Suivant.
Lors de la procédure d'installation, l'Assistant InstallShield indique dans la boîte
de dialogue Progression de l'installation quelle est l'action qui est exécutée et
affiche la progression de l'installation.
Au terme de cette étape, une nouvelle boîte s'affiche vous demandant de raccorder le Gigaset USB Stick 108 à votre PC.
ì Insérez le connecteur du Gigaset USB Stick 108 dans un port USB libre de
votre PC.
Dès l'insertion du Gigaset USB Stick 108, l'installation se poursuit automatiquement. La boîte de dialogue de reconnaissance automatique du matériel s'affiche
pour permettre l'installation des pilotes du Gigaset USB Stick 108.
Page 29

Gigaset USB Stick 108 / französisch / A31008-M1038-R101-1-7643 / qig_usbstick108_FR.fm /
Selon le PC et ses autres paramètres, l'étape suivante peut ne pas apparaître et
l'installation se poursuivre automatiquement. L'étape d'installation décrite ici est
automatiquement exécutée par le système.
À noter :
Si votre ordinateur est équipé du système d'exploitation Windows XP Service
Pack 2, la fenêtre Assistant Ajout de nouveau matériel détecté s'affiche.
Sélectionnez l'option Non, pas pour cette fois, puis cliquez sur Suivant.
Schablone 2004_12_27
ì Sélectionnez l'option Installation automatique du programme et cliquez
sur Suivant.
Remarques :
u Sous Windows 2000 / XP : si le message d'avertissement Signature
numérique introuvable apparaît, ignorez-le et continuez la procédure
d'installation automatique.
u Sous Windows 98 SE / ME : vous pouvez éventuellement obtenir un
message vous demandant d'insérer votre CD Windows afin de poursuivre
l'installation des pilotes. Vous devez donc préparer ce CD ou spécifier le
chemin sous lequel les fichiers d'installation de Windows se trouvent sur
votre PC.
u Redémarrez votre ordinateur lorsque cela vous est demandé.
27Gigaset USB Stick 108
Page 30

Gigaset USB Stick 108 / französisch / A31008-M1038-R101-1-7643 / qig_usbstick108_FR.fm /
28
À la fin de l'installation, cliquez sur le ou les bouton(s) Terminer proposé(s).
Gigaset USB Stick 108
ì Cliquez sur Terminer.
L’installation est terminée. En fonction de la version de Windows utilisée, vous
pouvez être invité à redémarrer votre ordinateur.
Vérification de l’installation
Au terme de l’installation, vous avez accès aux fonctionnalités du moniteur de
l’adaptateur Gigaset WLAN. Le moniteur de l’adaptateur Gigaset WLAN vous per-
Schablone 2004_12_27
met de configurer votre Gigaset USB Stick 108 et d’établir une connexion avec
les autres adaptateurs réseau ou avec un point d’accès.
Cet outil est représenté dans la zone Info de la barre des tâches par une icône
indiquant également s’il existe déjà une connexion avec un autre utilisateur.
La zone Info de la barre des tâches permet d’afficher les informations suivantes :
Pas d’icône :
Le programme n’est pas lancé
Essayez tout d’abord de lancer manuellement l'outil Gigaset WLAN Adapter
Monitor.
ì Cliquez dans le menu Démarrer sur Démarrer – Programmes –
Gigaset USB Stick 108 – Gigaset WLAN Adapter Monitor.
Si cette opération n’est pas possible, cela signifie que l’installation a échoué.
ì Désinstallez le programme.
ì Redémarrez ensuite l'installation.
Page 31

Gigaset USB Stick 108 / französisch / A31008-M1038-R101-1-7643 / qig_usbstick108_FR.fm /
Le logiciel est présent, une boule rouge apparaît audessus de l’icône :
Le Gigaset USB Stick 108 n'est pas connecté au PC
Une croix rouge apparaît au-dessus de l’icône :
Aucune connexion réseau
Une boule verte apparaît au-dessus de l’icône :
Schablone 2004_12_27
Le nombre de barres colorées visibles sur l'icône indique la qualité de la connexion.
La connexion est établie
Réglages de sécurité
Les options de sécurité sont désactivées par défaut. Nous vous recommandons
vivement d'activer les réglages de sécurité. Veuillez consulter le manuel d'utilisation détaillé disponible sur le CD-Rom pour plus de détails.
À noter :
Pour que la communication puisse se dérouler normalement, il est nécessaire
que tous les participants d’un réseau sans fil utilisent les mêmes paramètres de
sécurité.
29Gigaset USB Stick 108
Page 32

Gigaset USB Stick 108 / französisch / A31008-M1038-R101-1-7643 / qig_usbstick108_FR.fm /
Schablone 2004_12_27
30
Gigaset USB Stick 108
Page 33

Gigaset USB Stick 108 / italienisch / A31008-M1031-R101-1-4N43 / qig_usbstick108.fm /
Guida rapida
La presente guida rapida illustra come azionare il Gigaset USB Stick 108 ed
entrare e navigare in Internet tramite un Access Point (come p.es. Gigaset SE551
dsl/cable). Informazioni dettagliate sono disponibili nelle istruzioni per l’uso in
formato elettronico contenute nel CD-ROM fornito con il prodotto, e in Internet
all’indirizzo
www.siemens.com/gigasetusbstick108
Schablone 2004_12_27
Marchi di fabbrica
Microsoft, Windows 98SE, Windows ME, Windows 2000, Windows XP e Internet
Explorer sono marchi registrati della Microsoft Corporation.
Super G è un marchio registrato di Atheros Communications, Inc.
Avvertenze di sicurezza
u Il Gigaset USB Stick 108 può creare interferenze con le apparecchiature medi-
che.
Indicazioni per un funzionamento sicuro sono contenute nella guida dettagliata
su CD-ROM.
.
31Gigaset USB Stick 108
Page 34

Gigaset USB Stick 108 / italienisch / A31008-M1031-R101-1-4N43 / qig_usbstick108.fm /
32
Gigaset USB Stick 108
Requisiti del sistema
Per il funzionamento sono necessari:
u un PC con almeno 466 MHz e uno dei seguenti sistemi operativi:
Windows 98SE, Windows ME, Windows 2000 oppure Windows XP
u 64 MB RAM e almeno 30 MB di spazio su disco fisso
u una porta USB disponibile
u un’unità CD-ROM o un'unità DVD
Schablone 2004_12_27
Procedura di installazione
La procedura per stabilire un accesso a Internet tramite Access Point è la
seguente:
1. Prima di tutto installare il Gigaset USB Stick 108 in un PC.
2. Successivamente, installare l’access point. La procedura è descritta nelle
relative istruzioni.
3. Creare la connessione dal Gigaset USB Stick 108 all’access point.
Page 35

Gigaset USB Stick 108 / italienisch / A31008-M1031-R101-1-4N43 / qig_usbstick108.fm /
Istallazione del Gigaset USB Stick 108 su un PC
Nota:
u Inserire la spina del cavo USB nella presa del PC solo quando richiesto dal
software di installazione
u Durante l'installazione del Gigaset USB Stick 108 l'SSID (Service Set ID) di
tutti i componenti wireless deve essere identico.
u Per effettuare l'installazione occorre disporre dei diritti di amministratore
Schablone 2004_12_27
sul PC.
ì Chiudere tutti i programmi in corso.
ì Inserire il CD-ROM nel PC e attendere che compaia la finestra di avvio. Se la
finestra di avvio non dovesse comparire automaticamente, avviare l’installazione manualmente:
– Aprire Windows Explorer.
– Selezionare l’unità CD-ROM.
– Fare doppio clic su start.exe.
Compare la finestra di selezione della lingua.
ì Selezionare la lingua desiderata.
Compare una finestra con la descrizione generale del contenuto del CD-ROM.
ì Fare clic su Installazione.
Nota:
Le finestre dei diversi sistemi operativi sono leggermente diverse l’una
dall’altra. L’installazione avviene automaticamente, ad eccezione di alcuni clic
del mouse e delle eventuali procedure di riavvio.
33Gigaset USB Stick 108
Page 36

Gigaset USB Stick 108 / italienisch / A31008-M1031-R101-1-4N43 / qig_usbstick108.fm /
34
Sullo schermo compare l’assistente InstallShield.
Gigaset USB Stick 108
ì Fare clic su Avanti, per continuare il processo di installazione.
Si apre la finestra con le condizioni di licenza.
ì Per accettare le condizioni di licenza, fare clic su Sì.
Nella finestra che appare, selezionare la directory per i file di installazione sul PC.
ì Accettare la directory predefinita oppure, utilizzando il pulsante Sfoglia,
selezionare un'altra cartella e fare clic su Avanti.
Schablone 2004_12_27
Nel corso dell’installazione, l’assistente Wizard visualizza nella finestra
Setup_Status il tipo di azione eseguita ed il grado di avanzamento del processo
di installazione.
Terminata questa fase di installazione, compare una finestra di avviso che invita
a collegare il Gigaset USB Stick 108 al PC.
ì Inserire il connettore in una porta USB libera del PC.
Dopo il collegamento del cavo USB l’installazione continua automaticamente. Si
apre la funzione di riconoscimento automatico dell’hardware del sistema operativo che consente di installare i driver del Gigaset USB Stick 108.
Nota:
Se sul PC è presente il sistema operativo Windows XP Service Pack 2, apparirà
l'assistente per la ricerca di nuovo hardware. Selezionare l'opzione Questa
volta no e fare clic su Avanti.
In base alle impostazioni del PC, viene visualizzata una finestra di dialogo.
Qualora la finestra non dovesse comparire, significa che le seguenti fasi
dell'installazione vengono eseguite automaticamente dal sistema.
Page 37

Gigaset USB Stick 108 / italienisch / A31008-M1031-R101-1-4N43 / qig_usbstick108.fm /
ì Scegliere l’opzione Installa automaticamente il software e fare clic su
Avanti.
Nota:
u In Windows 2000 / XP: se il sistema vi informerà di non aver trovato
la firma digitale, ignorare il messaggio e continuare con l'installazione
automatica.
u In Windows 98SE / ME: per proseguire con il processo di installazione dei
Schablone 2004_12_27
driver, viene eventualmente richiesto di inserire il CD di installazione di
Windows. Tenere questo CD a portata di mano o inserire il nome del percorso nel quale sono stati eventualmente salvati i file di installazione di
Windows nel proprio PC.
u Se richiesto, riavviare il PC.
u Se nel proprio PC fossero presenti file più recenti, rispondere in maniera
affermativa alla richiesta di mantenerli, selezionando SI.
Dopo l'installazione, in base al sistema operativo vengono visualizzate una o due
finestre che invitano a concludere l'installazione.
ì Fare clic su Fine.
L'installazione viene conclusa e il PC viene riavviato.
35Gigaset USB Stick 108
Page 38

Gigaset USB Stick 108 / italienisch / A31008-M1031-R101-1-4N43 / qig_usbstick108.fm /
36
Gigaset USB Stick 108
Verifica dell’installazione
Se l’installazione è stata eseguita correttamente, è ora disponibile il Gigaset
WLAN Adapter Monitor. Il Gigaset WLAN Adapter Monitor consente di configurare il proprio Gigaset USB Stick 108 e di impostare una connessione con gli altri
adattatori di rete o un access point.
Il Gigaset WLAN Adapter Monitor viene rappresentato da un simbolo presente
nell’area informazioni della barra delle applicazioni e indica se esiste già una connessione
Schablone 2004_12_27
Nell’area informazioni della barra delle applicazioni possono comparire i
seguenti simboli:
Nessun simbolo:
ü
Se il software non viene avviato, avviare il Gigaset WLAN Adapter Monitor
manualmente.
ì Fare clic su menu Start - Programmi - Gigaset USB Stick 108 - Gigaset
WLAN Adapter Monitor.
Se non fosse possibile, significa che l’installazione non è stata eseguita correttamente.
ì Rimuovere il software.
ì Installare nuovamente il software.
Software non avviato
Page 39

Gigaset USB Stick 108 / italienisch / A31008-M1031-R101-1-4N43 / qig_usbstick108.fm /
Se il software è presente e sopra il simbolo compare un pallino rosso:
Gigaset USB Stick 108 non collegato
Croce rossa sopra il simbolo:
Nessun collegamento alla rete
Pallino verde sopra il simbolo:
Schablone 2004_12_27
Il numero di barre colorate nel simbolo indica la qualità della connessione.
Il collegamento è stato stabilito
Impostazioni sicurezza
Normalmente le impostazioni di sicurezza sono disattivate. Si consiglia vivamente di attivarle! A questo proposito, leggere la guida dettagliata contenuta
nel CD-ROM allegato.
Nota:
La condizione per una comunicazione con esito positivo è che tutti i partecipanti a una WLAN abbiano impostazioni di sicurezza identiche.
37Gigaset USB Stick 108
Page 40

Gigaset USB Stick 108 / italienisch / A31008-M1031-R101-1-4N43 / qig_usbstick108.fm /
Schablone 2004_12_27
38
Gigaset USB Stick 108
Page 41

Gigaset USB Stick 108 / NDL / A31008-M1038-R101-1-7643 / qig_usbstick108.fm / 24.05.2005
Beknopte installatiehandleiding
In deze beknopte installatiehandleiding leest u hoe de Gigaset USB Stick 108 in
gebruik neemt en via een access point (bijv. Gigaset SE551 WLAN dsl/cable) toegang krijgt tot het internet. Gedetailleerde informatie vindt u in de gebruiksaanwijzing op de meegeleverde CD-ROM en op het internet onder
www.siemens.nl/gigaset
Snelzoeker” en drukt u vervolgens op “Ga”.
Schablone 2004_12_27
Handelsmerken
Microsoft, Windows 98SE, Windows ME, Windows 2000 en Windows XP zijn
geregistreerde handelsmerken van Microsoft Corporation.
Super G is een geregistreerd handelsmerk van Atheros Communications, Inc.
Veiligheidsvoorschriften
u De Gigaset USB Stick 108 kan de werking van medische apparaten
beïnvloeden.
Aanwijzingen voor veilig gebruik vindt u in de uitgebreide gebruiksaanwijzing
op de CD.
. Op deze site selecteert u het product in de “Product
39Gigaset USB Stick 108
Page 42

Gigaset USB Stick 108 / NDL / A31008-M1038-R101-1-7643 / qig_usbstick108.fm / 24.05.2005
40
Gigaset USB Stick 108
Systeemvereisten
Om het apparaat te gebruiken heeft u nodig:
u een PC met minstens 466MHz en een van de volgende besturingssystemen:
Windows 98SE, Windows ME, Windows 2000 of Windows XP
u 64MB RAM en minimaal 30MB vrije ruimte op de harde schijf
u een vrije USB-poort
u een CD-ROM-station of een DVD-station.
Schablone 2004_12_27
Werkwijze bij de installatie
U gaat als volgt te werk om toegang tot het internet tot stand te brengen via een
access point:
1. Installeer eerst de Gigaset USB Stick 108 op een PC.
2. Installeer vervolgens het access point. Dit wordt in de installatiehandleiding
van het desbetreffende apparaat beschreven.
3. Breng de verbinding van de Gigaset USB Stick 108 met het access point tot
stand.
Installatie van de Gigaset USB Stick 108 op een PC
Let op het volgende:
u Steek de Gigaset USB Stick 108 pas in een bus van de PC als dit wordt
gevraagd door de installatiesoftware.
u Bij de installatie van de Gigaset USB Stick 108 moet de SSID (Service Set ID)
van alle draadloze componenten van het netwerk identiek zijn.
u Het is mogelijk dat u beheerdersrechten op uw PC nodig heeft.
Page 43

Gigaset USB Stick 108 / NDL / A31008-M1038-R101-1-7643 / qig_usbstick108.fm / 24.05.2005
ì Sluit alle actieve toepassingen.
ì Plaats de meegeleverde CD in het CD-ROM-station van de PC en wacht tot het
beginvenster verschijnt. Als het beginvenster niet automatisch verschijnt,
start u de installatie handmatig:
– Open Windows Verkenner.
– Selecteer het CD-ROM-station.
– Dubbelklik op het programma start.exe.
Het venster voor de taalkeuze wordt dan weergegeven.
Schablone 2004_12_27
ì Kies uw taal.
Er wordt een venster weergegeven met informatie over de inhoud van de CD.
ì Klik op Installatie.
Opmerking:
De vensters van de verschillende Windows-besturingssystemen verschillen
slechts weinig van elkaar. De installatie verloopt grotendeels automatisch.
U hoeft alleen enkele keren met de muis te klikken en de PC opnieuw op te
starten.
De wizard InstallShield wordt weergegeven op het scherm.
ì Klik op Volgende om de installatie voort te zetten.
Het venster met de licentieovereenkomst wordt geopend.
ì Als u de licentieovereenkomst accepteert, klikt u op Ja.
In het volgende venster kiest u de map voor de installatiebestanden op uw PC.
ì Accepteer de voorgestelde map of klik op de knop Bladeren om een andere
map te zoeken, en klik op Volgende.
41Gigaset USB Stick 108
Page 44

Gigaset USB Stick 108 / NDL / A31008-M1038-R101-1-7643 / qig_usbstick108.fm / 24.05.2005
42
Tijdens de installatie geeft de wizard InstallShield in het venster Configuratiestatus aan welke handeling momenteel wordt uitgevoerd en hoe ver de instal-
latie is gevorderd.
Na het voltooien van deze installatiestap verschijnt een berichtvenster waarin u
wordt gevraagd de Gigaset USB Stick 108 aan te sluiten op de PC.
Gigaset USB Stick 108
ì Steek de Gigaset USB Stick 108 stekker in een vrije USB-poort op de PC.
Na het insteken van de Gigaset USB Stick 108 wordt de installatie automatisch
voortgezet. Er verschijnt een venster voor automatische hardwaredetectie om
Schablone 2004_12_27
de stuurprogramma’s voor de Gigaset USB Stick 108 te installeren.
Afhankelijk van andere instellingen van de PC is het mogelijk dat dit venster niet
verschijnt op uw PC. De hier beschreven installatiestap wordt dan automatisch
uitgevoerd.
Let op het volgende:
Als het besturingssysteem Windows XP Service Pack 2 is geïnstalleerd op uw
PC, verschijnt het venster Wizard nieuwe hardware gevonden. Kies de optie
Ik wil zelf kiezen (geavanceerd) en klik op Volgende.
ì Kies de optie Software automatisch installeren en klik op Volgende.
Aanwijzingen:
u In Windows 2000 / XP: Als u de waarschuwing Kan digitale handtekening
niet vinden krijgt, negeert u deze melding en gaat u verder met de auto-
matische installatie.
Page 45

Gigaset USB Stick 108 / NDL / A31008-M1038-R101-1-7643 / qig_usbstick108.fm / 24.05.2005
u In Windows 98SE / ME: Mogelijk krijgt u het verzoek de installatie-CD van
het Windows-besturingssysteem te plaatsen om de installatie van het
stuurprogramma voort te zetten. Houd deze CD gereed of geef een pad op
waaronder eventueel de Windows-installatiebestanden op uw PC zijn
opgeslagen.
u Start de PC opnieuw op als dit wordt gevraagd.
Schablone 2004_12_27
Na de installatie verschijnen, afhankelijk van het besturingssysteem, een of
twee vensters waarin u wordt gevraagd de installatie te voltooien.
ì Klik op Voltooien.
De installatie wordt afgesloten. Afhankelijk van de versie van het Windowsbesturingssysteem wordt u eventueel nog gevraagd om de PC opnieuw op te
starten.
Installatie controleren
Als de installatie is succesvol wast, kunt u nu de Gigaset WLAN Adapter Monitor
gebruiken. Met de Gigaset WLAN Adapter Monitor configureert u de Gigaset USB
Stick 108 en brengt u een verbinding tot stand met andere netwerkadapters of
een access point.
De Gigaset WLAN Adapter Monitor wordt door een pictogram in de taakbalk
weergegeven, dat tegelijkertijd aangeeft of al een verbinding met een verbindingspartner bestaat.
De volgende indicaties in het infogebied van de taakbalk zijn mogelijk:
Geen pictogram:
Software niet gestart
43Gigaset USB Stick 108
Page 46

Gigaset USB Stick 108 / NDL / A31008-M1038-R101-1-7643 / qig_usbstick108.fm / 24.05.2005
44
Probeer eerst de Gigaset WLAN Adapter Monitor handmatig te starten.
Gigaset USB Stick 108
ì Klik in het menu Start op Start – Programma’s – Gigaset USB Stick 108
– Gigaset WLAN Adapter Monitor.
Als dit niet mogelijk is, is de installatie niet correct verlopen.
ì Maak de installatie van de software dan ongedaan.
ì Installeer de software vervolgens opnieuw.
Schablone 2004_12_27
Het aantal gekleurde balkjes in het pictogram geeft de kwaliteit van de verbinding weer.
Software beschikbaar, rode bal boven het pictogram:
Gigaset USB Stick 108 niet ingestoken
Rood kruis boven het pictogram:
Geen verbinding met de verbindingspartner
Groene bal boven het pictogram:
Verbinding tot stand gebracht
Beveiliging
Standaard is de beveiliging gedeactiveerd. Het wordt dringend aangeraden de
beveiliging te activeren. Lees hiervoor de uitgebreide gebruiksaanwijzing op
de CD.
Let op het volgende:
Voor succesvolle communicatie moeten alle verbindingspartners van een
WLAN dezelfde beveiligingsinstellingen gebruiken.
Page 47

Gigaset USB Stick 108 / NDL / A31008-M1038-R101-1-7643 / qig_usbstick108.fm / 24.05.2005
Schablone 2004_12_27
45Gigaset USB Stick 108
Page 48

Gigaset USB Stick 108 / deutsch / A31008-M1038-R101-1-7643 / qig_usbstick108_back.fm /
Schablone 2004_12_27
Issued by
Siemens Communications
Haidenauplatz 1
D-81667 Munich
© Siemens AG 2005
All rights reserved. Subject to availability.
Rights of modification reserved.
Siemens Aktiengesellschaft
www.siemens.com/gigaset
No.: A31008-M1038-R101-1-7643
 Loading...