

Page 1
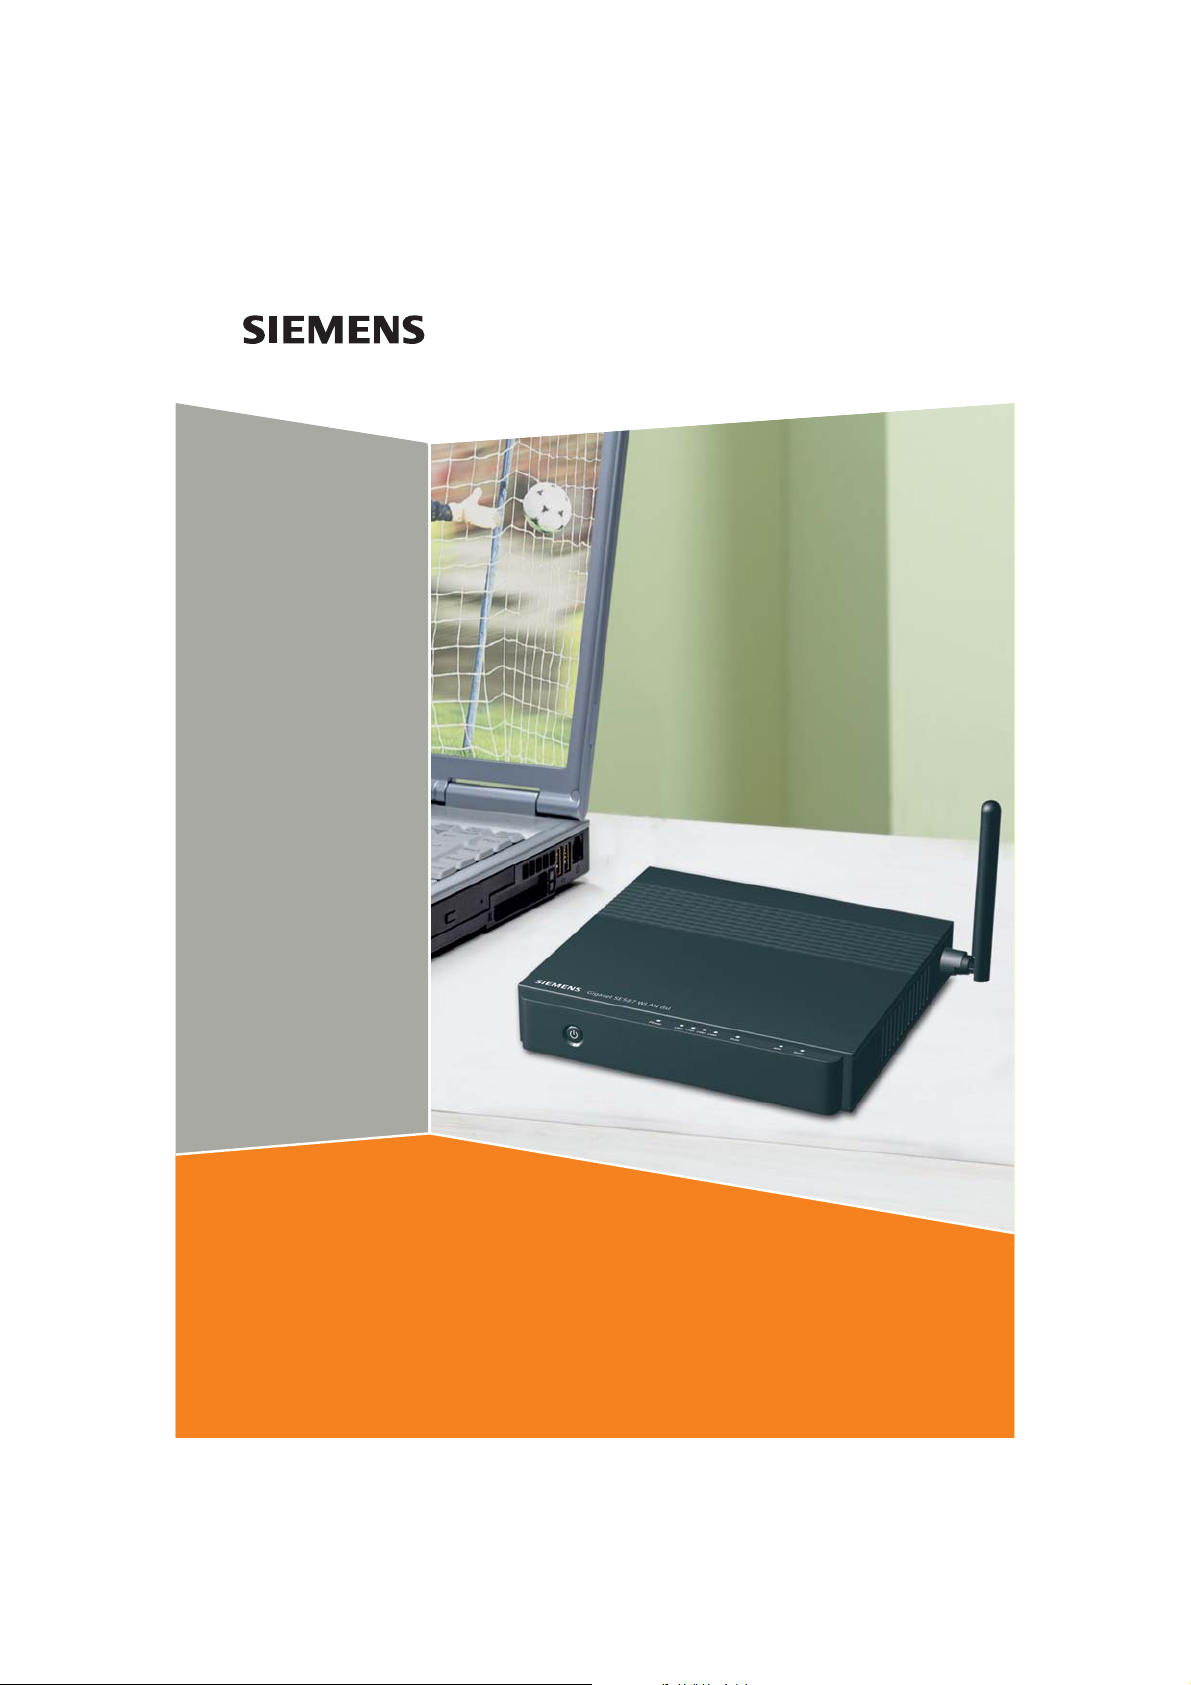
Gigaset
SE587 WLAN dsl
Gigaset
Page 2

2
Page 3

Contents
Contents
The Gigaset SE587 WLAN dsl . . . . . . . . . . . . . . . . . . 6
The device . . . . . . . . . . . . . . . . . . . . . . . . . . . . . . . . . . . . . . . . . . . . . . . . . . . . . . . . . . .7
Front Panel . . . . . . . . . . . . . . . . . . . . . . . . . . . . . . . . . . . . . . . . . . . . . . . . . . . . . . . . 7
Back Panel . . . . . . . . . . . . . . . . . . . . . . . . . . . . . . . . . . . . . . . . . . . . . . . . . . . . . . . . 7
LED displays . . . . . . . . . . . . . . . . . . . . . . . . . . . . . . . . . . . . . . . . . . . . . . . . . . . . . . . 8
Features and applications . . . . . . . . . . . . . . . . . . . . . . . . . . . . . . . . . . . . . . . . . . . . . . . 9
First steps . . . . . . . . . . . . . . . . . . . . . . . . . . . . . . . . . 11
System requirements . . . . . . . . . . . . . . . . . . . . . . . . . . . . . . . . . . . . . . . . . . . . . . . . . . 11
Connecting and activating the Gigaset SE587 WLAN dsl . . . . . . . . . . . . . . . . . . . . . . 11
Overview of the installation steps . . . . . . . . . . . . . . . . . . . . . . . . . . . . . . . . . . . . . 12
Connecting to the splitter data port . . . . . . . . . . . . . . . . . . . . . . . . . . . . . . . . . . . 13
Connecting to the PC . . . . . . . . . . . . . . . . . . . . . . . . . . . . . . . . . . . . . . . . . . . . . . . 13
Connecting to the mains power supply . . . . . . . . . . . . . . . . . . . . . . . . . . . . . . . . . 14
Connecting wireless to the PC . . . . . . . . . . . . . . . . . . . . . . . . . . . . . . . . . . . . . . . . 15
Checking the operating state . . . . . . . . . . . . . . . . . . . . . . . . . . . . . . . . . . . . . . . . . 16
Configuring the local network . . . . . . . . . . . . . . . . . . . . . . . . . . . . . . . . . . . . . . . . . . . 16
Configuring the Gigaset SE587 WLAN dsl . . . . . . . . . . . . . . . . . . . . . . . . . . . . . . . . . . 17
The user interface . . . . . . . . . . . . . . . . . . . . . . . . . . 18
Starting the user interface . . . . . . . . . . . . . . . . . . . . . . . . . . . . . . . . . . . . . . . . . . . . . . 18
User interface functions . . . . . . . . . . . . . . . . . . . . . . . . . . . . . . . . . . . . . . . . . . . . . . . 19
Elements in the user interface . . . . . . . . . . . . . . . . . . . . . . . . . . . . . . . . . . . . . . . . . . . 20
Status information . . . . . . . . . . . . . . . . . . . . . . . . . . 20
DSL Status . . . . . . . . . . . . . . . . . . . . . . . . . . . . . . . . . . . . . . . . . . . . . . . . . . . . . . . . . . 20
Internet . . . . . . . . . . . . . . . . . . . . . . . . . . . . . . . . . . . . . . . . . . . . . . . . . . . . . . . . . . . .21
Internet Status . . . . . . . . . . . . . . . . . . . . . . . . . . . . . . . . . . . . . . . . . . . . . . . . . . . . 21
PVC Connection . . . . . . . . . . . . . . . . . . . . . . . . . . . . . . . . . . . . . . . . . . . . . . . . . . . 21
Local Network . . . . . . . . . . . . . . . . . . . . . . . . . . . . . . . . . . . . . . . . . . . . . . . . . . . . . . . 22
Wireless Network . . . . . . . . . . . . . . . . . . . . . . . . . . . . . . . . . . . . . . . . . . . . . . . . . . . . . 22
Device . . . . . . . . . . . . . . . . . . . . . . . . . . . . . . . . . . . . . . . . . . . . . . . . . . . . . . . . . . . . . .23
Basic configuration . . . . . . . . . . . . . . . . . . . . . . . . . 24
Basic Setup . . . . . . . . . . . . . . . . . . . . . . . . . . . . . . . . . . . . . . . . . . . . . . . . . . . . . . . . . . 24
LAN configuration . . . . . . . . . . . . . . . . . . . . . . . . . . . . . . . . . . . . . . . . . . . . . . . . . . . . 26
Advanced configuration . . . . . . . . . . . . . . . . . . . . . 29
Wireless Settings . . . . . . . . . . . . . . . . . . . . . . . . . . . . . . . . . . . . . . . . . . . . . . . . . . . . . 29
Basic Wireless Settings . . . . . . . . . . . . . . . . . . . . . . . . . . . . . . . . . . . . . . . . . . . . . . 29
Wireless Security . . . . . . . . . . . . . . . . . . . . . . . . . . . . . . . . . . . . . . . . . . . . . . . . . . 31
Security . . . . . . . . . . . . . . . . . . . . . . . . . . . . . . . . . . . . . . . . . . . . . . . . . . . . . . . . . . . .33
Access Restrictions . . . . . . . . . . . . . . . . . . . . . . . . . . . . . . . . . . . . . . . . . . . . . . . . . . . . 34
3
Page 4

Contents
Applications and Gaming . . . . . . . . . . . . . . . . . . . . . . . . . . . . . . . . . . . . . . . . . . . . . . 36
Port Forwarding . . . . . . . . . . . . . . . . . . . . . . . . . . . . . . . . . . . . . . . . . . . . . . . . . . . 37
DMZ . . . . . . . . . . . . . . . . . . . . . . . . . . . . . . . . . . . . . . . . . . . . . . . . . . . . . . . . . . . . 38
Administration . . . . . . . . . . . . . . . . . . . . . . . . . . . . . 39
Management . . . . . . . . . . . . . . . . . . . . . . . . . . . . . . . . . . . . . . . . . . . . . . . . . . . . . . . . 39
Log . . . . . . . . . . . . . . . . . . . . . . . . . . . . . . . . . . . . . . . . . . . . . . . . . . . . . . . . . . . . . . . . 41
Factory Defaults . . . . . . . . . . . . . . . . . . . . . . . . . . . . . . . . . . . . . . . . . . . . . . . . . . . . . . 42
Firmware Upgrade . . . . . . . . . . . . . . . . . . . . . . . . . . . . . . . . . . . . . . . . . . . . . . . . . . . . 43
Configuration Management . . . . . . . . . . . . . . . . . . . . . . . . . . . . . . . . . . . . . . . . . . . . 44
Local network configuration . . . . . . . . . . . . . . . . . 45
IP addresses . . . . . . . . . . . . . . . . . . . . . . . . . . . . . . . . . . . . . . . . . . . . . . . . . . . . . . . . . 45
Computer names and workgroups . . . . . . . . . . . . . . . . . . . . . . . . . . . . . . . . . . . . . . . 46
Setting up a wireless network . . . . . . . . . . . . . . . . . . . . . . . . . . . . . . . . . . . . . . . . . . . 47
Windows XP . . . . . . . . . . . . . . . . . . . . . . . . . . . . . . . . . . . . . . . . . . . . . . . . . . . . . . 47
Windows Vista . . . . . . . . . . . . . . . . . . . . . . . . . . . . . . . . . . . . . . . . . . . . . . . . . . . . 48
Mac OS X . . . . . . . . . . . . . . . . . . . . . . . . . . . . . . . . . . . . . . . . . . . . . . . . . . . . . . . . 50
Network configuration with Windows Vista . . . . . . . . . . . . . . . . . . . . . . . . . . . . . . . . 51
Showing networks . . . . . . . . . . . . . . . . . . . . . . . . . . . . . . . . . . . . . . . . . . . . . . . . . 51
Changing the settings for IP addresses . . . . . . . . . . . . . . . . . . . . . . . . . . . . . . . . . 52
Selecting a computer name and workgroup . . . . . . . . . . . . . . . . . . . . . . . . . . . . . 54
Network configuration with Windows XP . . . . . . . . . . . . . . . . . . . . . . . . . . . . . . . . . . 55
Showing networks . . . . . . . . . . . . . . . . . . . . . . . . . . . . . . . . . . . . . . . . . . . . . . . . . 55
Changing the settings for IP addresses . . . . . . . . . . . . . . . . . . . . . . . . . . . . . . . . . 56
Selecting a computer name and workgroup . . . . . . . . . . . . . . . . . . . . . . . . . . . . . 58
Network configuration with Windows 2000 . . . . . . . . . . . . . . . . . . . . . . . . . . . . . . . . 58
Showing networks . . . . . . . . . . . . . . . . . . . . . . . . . . . . . . . . . . . . . . . . . . . . . . . . . 58
Changing the settings for IP addresses . . . . . . . . . . . . . . . . . . . . . . . . . . . . . . . . . 59
Selecting a computer name and workgroup . . . . . . . . . . . . . . . . . . . . . . . . . . . . . 61
Network configuration with Windows 98, SE, ME . . . . . . . . . . . . . . . . . . . . . . . . . . . 61
Setting up a PC as a client for Microsoft networks . . . . . . . . . . . . . . . . . . . . . . . . 61
Selecting a computer name and workgroup . . . . . . . . . . . . . . . . . . . . . . . . . . . . . 62
Installing the TCP/IP protocol . . . . . . . . . . . . . . . . . . . . . . . . . . . . . . . . . . . . . . . . . 63
Making TCP/IP settings . . . . . . . . . . . . . . . . . . . . . . . . . . . . . . . . . . . . . . . . . . . . . . 64
Network configuration with Mac OS X . . . . . . . . . . . . . . . . . . . . . . . . . . . . . . . . . . . . 67
Showing networks . . . . . . . . . . . . . . . . . . . . . . . . . . . . . . . . . . . . . . . . . . . . . . . . . 67
Changing the settings for IP addresses . . . . . . . . . . . . . . . . . . . . . . . . . . . . . . . . . 68
Selecting a computer name . . . . . . . . . . . . . . . . . . . . . . . . . . . . . . . . . . . . . . . . . . 69
Synchronising TCP/IP settings . . . . . . . . . . . . . . . . . . . . . . . . . . . . . . . . . . . . . . . . . . . 70
Windows Vista, Windows XP, Windows 2000 . . . . . . . . . . . . . . . . . . . . . . . . . . . . 70
Windows 98 SE, ME . . . . . . . . . . . . . . . . . . . . . . . . . . . . . . . . . . . . . . . . . . . . . . . . 71
Mac OS X . . . . . . . . . . . . . . . . . . . . . . . . . . . . . . . . . . . . . . . . . . . . . . . . . . . . . . . . 73
Checking the connection to the Gigaset SE587 WLAN dsl . . . . . . . . . . . . . . . . . . . . . 74
Establishing the IP and MAC addresses in the network . . . . . . . . . . . . . . . . . . . . . . . . 75
4
Page 5

Contents
Appendix . . . . . . . . . . . . . . . . . . . . . . . . . . . . . . . . . . 77
Troubleshooting . . . . . . . . . . . . . . . . . . . . . . . . . . . . . . . . . . . . . . . . . . . . . . . . . . . . . . 77
Specifications . . . . . . . . . . . . . . . . . . . . . . . . . . . . . . . . . . . . . . . . . . . . . . . . . . . . . . . . 80
Glossary . . . . . . . . . . . . . . . . . . . . . . . . . . . . . . . . . . 81
Index . . . . . . . . . . . . . . . . . . . . . . . . . . . . . . . . . . . . . 94
5
Page 6

The Gigaset SE587 WLAN dsl
The Gigaset SE587 WLAN dsl
The Siemens Gigaset SE587 WLAN dsl is a powerful but easy-to-use communications
device for connecting your PCs or local area network (LAN) to the Internet (via ADSL) or
for connecting a set-top box to watch IPTV. The Gigaset SE587 WLAN dsl contains an
integrated ADSL modem enabling you to access the Internet easily.
You can connect your PCs wirelessly to the Gigaset SE587 WLAN dsl and create a wireless local area network (WLAN). For network security, wireless transmission is encrypted
by default using the WPA standard.
The Gigaset SE587 WLAN dsl allows several users to access the Internet simultaneously.
A single user account can be shared if your Internet service provider permits this. If you
want to surf the Internet and watch IPTV at the lowest possible cost, the Gigaset SE587
WLAN dsl is a convenient and simple solution.
The Gigaset SE587 WLAN dsl has an extensive range of functions but remains simple to
use. It can be configured and operational within a few minutes.
6
Page 7
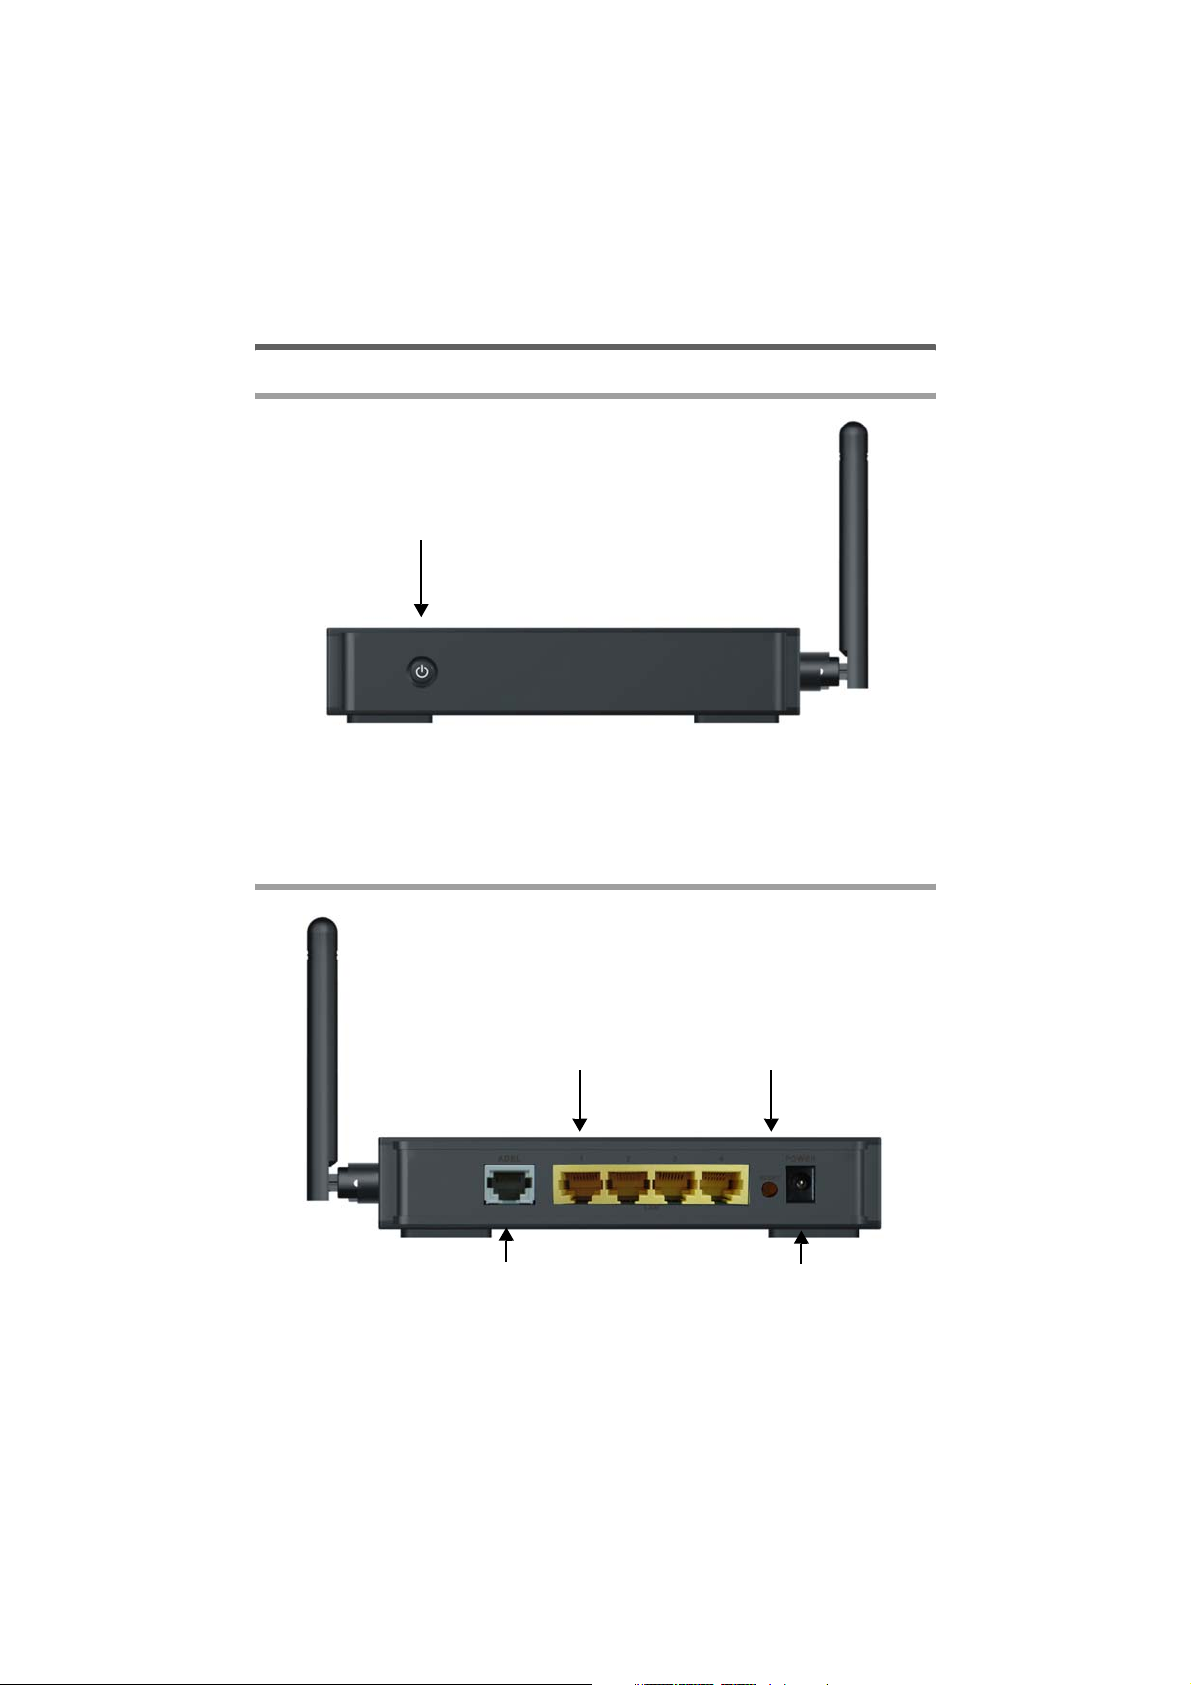
The Gigaset SE587 WLAN dsl
The device
Front Panel
Power switch on / switch off
Bottom
The label on the bottom of the device shows the serial number and the wireless security
settings (SSID and WPA key), if the security settings are preset.
Back Panel
10/100 Mbps switch sockets for
connecting PCs, set-top boxes
or other Ethernet devices
Socket for connecting the integrated
modem to the ADSL port of the splitter
Reset button
Socket for the
power supply unit
7
Page 8
The Gigaset SE587 WLAN dsl
Reset Button
Reboot function (software reset): Press the button for longer than 1 second but less
than 5 seconds to reboot the device. This does not affect the configuration settings.
Reset function (returns to factory settings): Press and hold the button for at least
5 seconds to return all settings to the factory settings.
Warning: This will clear all the configuration settings you have made since the initial
startup. Do not perform this action without first consulting the hotline of your Internet
service provider.
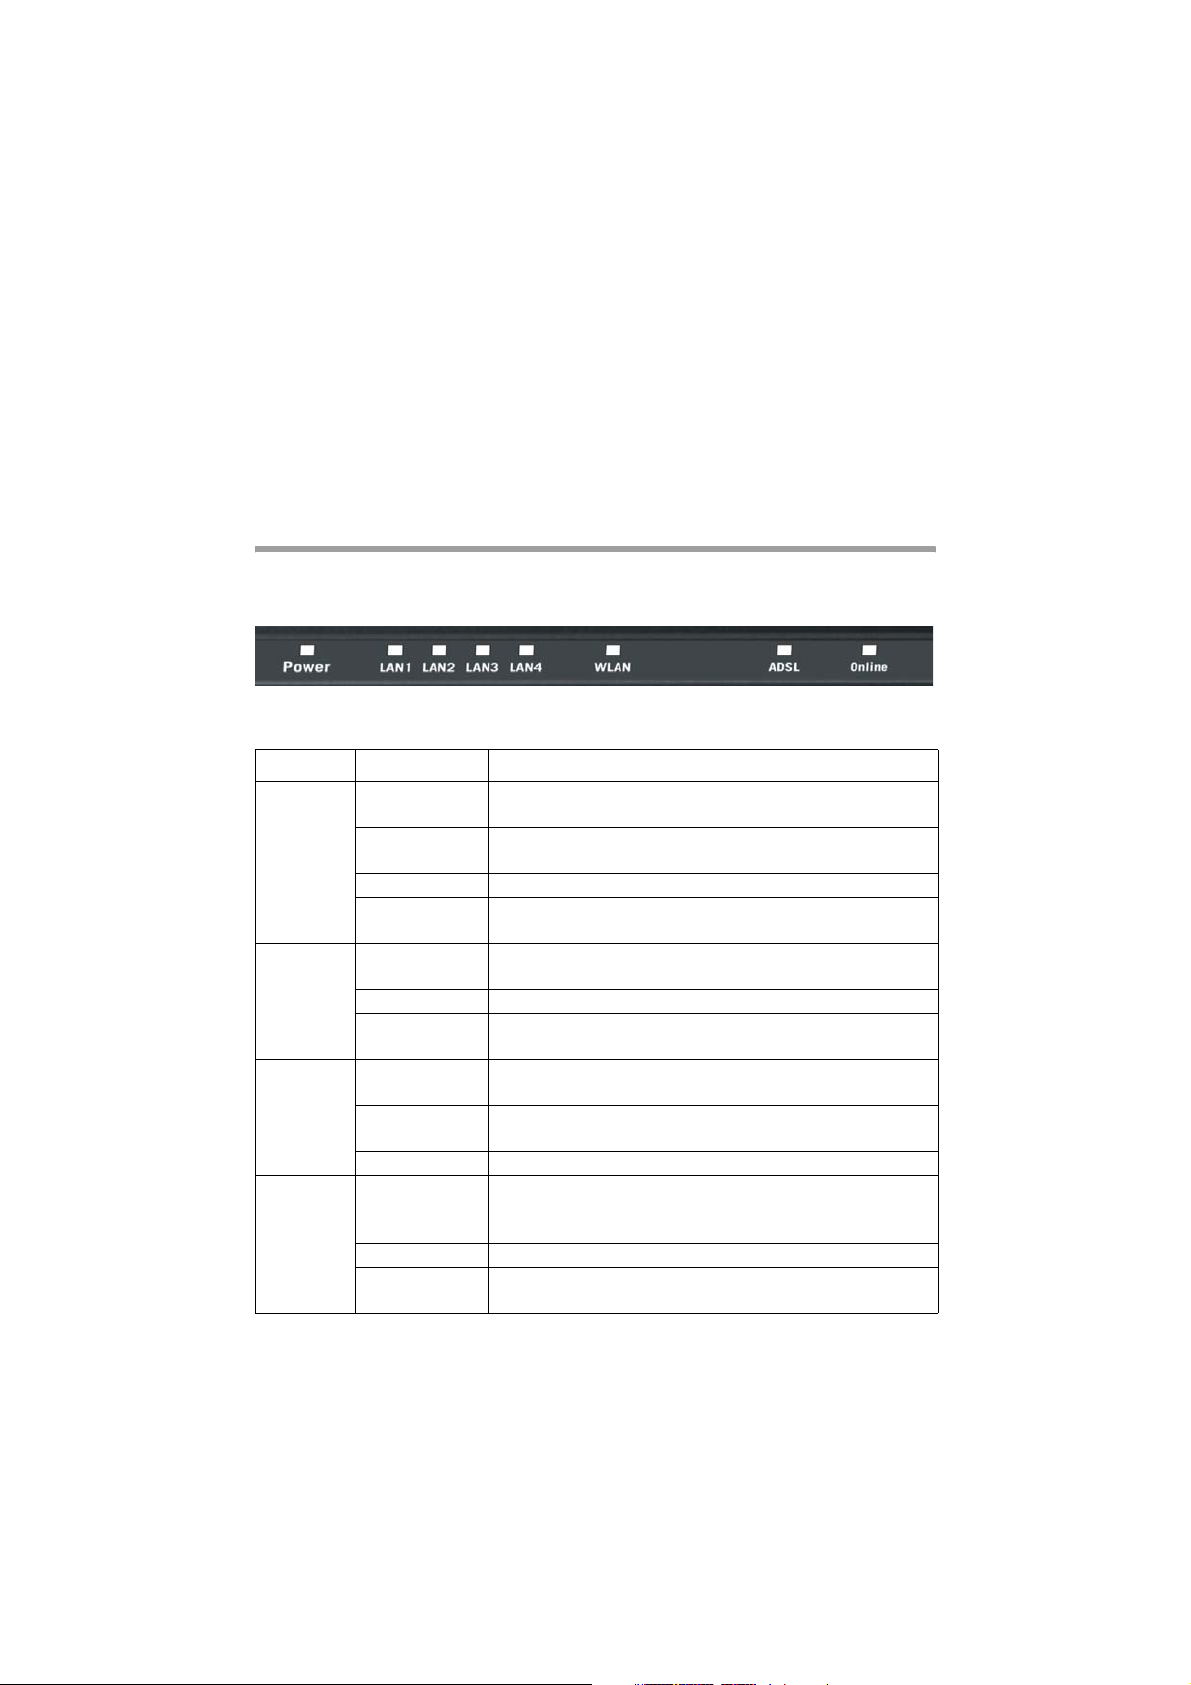
LED displays
The upper side of the device has LED displays that show the operating state and simplify
installation and troubleshooting in the network.
The LEDs show the following:
LED State Status
The device is powered on and has been booted successfully.
System is booting.
The device cannot be booted or a malfunction has been
detected.
A device is connected to the relevant LAN port and a
connection has been established.
There is no device connected or the connected device is
powered off.
The wireless interface is activated, no data transmission
at present.
The device is transmitting or receiving data on the wireless interface.
The device is connected to the ADSL port of the splitter
and the ADSL connection has been synchronised successfully.
There is no connection to the ADSL port of the splitter or
the ADSL connection cannot be synchronised.
Power
LAN1 –
LAN4
WLAN
ADSL
On (green)
Flashing
(green)
Off The device is powered off.
On (red)
On
Flashing The LAN port is transmitting or receiving data (traffic).
Off
On
Flashing
Off The wireless interface is deactivated.
On
Flashing The ADSL connection is being synchronised.
Off
8
Page 9

The Gigaset SE587 WLAN dsl
LED State Status
On (green) A connection to the Internet has been established. *)
Flashing
Online
*) If the Internet session is dropped due to an idle timeout, the light will remain green
as long as a DSL connection is still present.
(green)
Off There is no Internet connection.
On (red)
The device is transmitting or receiving data from or to
the Internet.
Device attempted to establish an Internet connection
and failed.
Features and applications
The Gigaset SE587 WLAN dsl's wide range of features makes it ideal for a large number
of applications:
Internet access
The Gigaset SE587 WLAN dsl allows several users access to the Internet simultaneously.
u Since many ADSL providers permit communication with end users via the PPPoA or
PPPoE protocol, the Gigaset SE587 WLAN dsl has an integrated client for this proto-
cols. It is therefore no longer necessary to install these services on your PC.
u The Gigaset SE587 WLAN dsl supports shared Internet access for up to 253 users.
This means several users in your network can surf the Internet simultaneously, all
using the same Internet account.
u The Gigaset SE587 WLAN dsl allows the connection of a set-top box which enables
you to watch Internet television (IPTV).
9
Page 10

The Gigaset SE587 WLAN dsl
Setting up a local area network
The Gigaset SE587 WLAN dsl offers the following possibilities:
u Up to four devices (PCs, a Hub or Switch) connected via Ethernet ports with a trans-
mission speed of 10 or 100 Mbps (with automatic recognition).
u Up to 253 mobile terminals connected via a wireless interface with a transmission
speed of up to 54 Mbps. It complies with IEEE 802.11g standard and can work with
all products that satisfy WLAN Standard IEEE 802.11b or 802.11g.
u Using the Gigaset SE587 WLAN dsl makes it easy to set up a network at home or in
small offices. For example, users can exchange data in the network.
u The Gigaset SE587 WLAN dsl supports DHCP for dynamic IP configuration of the
local area network and DNS for domain name mapping.
Security functions
The Gigaset SE587 WLAN dsl offers comprehensive security measures:
u Firewall protection against unauthorized access from the Internet
With the firewall, the Gigaset SE587 WLAN dsl offers comprehensive protection
against hacker attacks.
u Network Address Translation (NAT)
All PCs in the local area network use the Public IP address of the Gigaset SE587 WLAN
dsl for their Internet connections, which makes them 'invisible' on the Internet. The
Gigaset SE587 WLAN dsl only allows access from the Internet if this has been
requested from within the local area network.
u DMZ (Exposed Host)
This allows you to release one PC in your local area network for unlimited access
from the Internet. Note that in this case your local area network will no longer be
adequately protected against Internet attacks.
u Service filtering and domain blocking
The Gigaset SE587 WLAN dsl can filter Internet access. Here you determine which
PCs may access which Internet services.
Additionally you can disable access to certain Internet domains (URL blocking).
u Encryption for the wireless network
To protect your wireless LAN against unauthorized access or to make data illegible
to unauthorized parties the Gigaset SE587 WLAN dsl is delivered with the encryption
methods WPA2-PSK/WPA-PSK (WPA with pre-shared key) and WEP (see page 32).
Trademarks
Microsoft, Windows Vista, Windows XP, Windows 2000 and Internet Explorer are
registered trademarks of Microsoft Corporation.
Mac OS X is a registered trademark of Appel Inc.
Mozilla Firefox is a registered trademark of the Mozilla Organization.
10
Page 11

First steps
First steps
System requirements
You require the following components to operate your Gigaset SE587 WLAN dsl:
u A PC with
– an 802.11g or 802.11b compatible wireless Network adapter.
Note:
An 802.11b-compatible network adapter has a maximum transmission speed
of 11 Mbps. An 802.11g-compatible network adapter has a maximum transmission speed of 54 Mbps.
–or an Ethernet port (10Base-T or 100Base-TX)
u A Web browser such as Microsoft Internet Explorer V 6.0 or higher or Mozilla Firefox
V 1.0 or higher for configuring your Gigaset SE587 WLAN dsl.
u To access the Internet you require
– a DSL port (splitter),
– the access data for your Internet service provider.
Note:
We recommend you use a PC with the Windows Vista or Windows XP operating system
because only then are all system requirements for using the device fulfilled.
Connecting and activating the Gigaset SE587 WLAN dsl
The Gigaset SE587 WLAN dsl can be set up in any suitable location in the home or office.
You do not need any special wiring. However, you should comply with the following
guidelines:
u Operate the Gigaset SE587 WLAN dsl only indoors within a temperature range of
0 to +40 °C. Do not position the Gigaset SE587 WLAN dsl near sources of heat. Do
not cover the ventilation slots. High temperatures can damage the device.
u A mains socket for 100–240VAC and a connection socket for the splitter or LAN must
be available in the place where you set up the Gigaset SE587 WLAN dsl.
u Position the Gigaset SE587 WLAN dsl so that it cannot fall down. Position the Gigaset
SE587 WLAN dsl on a non-slip surface.
u Do not place the Gigaset SE587 WLAN dsl on any furniture surface that could be
affected by the heat from the device.
u Lay the cables so that nobody can trip over them. You should not cover the cables
with anything.
Please remember:
Network connections (LAN) via cables may only be set up with the Gigaset SE587
WLAN dsl within enclosed rooms.
11
Page 12

First steps
Overview of the installation steps
1. First install an Ethernet network card or a wireless Network adapter in the PCs you
want to connect to the Gigaset SE587 WLAN dsl. The installation is described in the
user guides for these products.
2. Then make the necessary connections (PCs, splitter) on the Gigaset SE587 WLAN dsl
and activate the device (page 11).
3. Before the PCs can communicate with the Gigaset SE587 WLAN dsl and with each
other in a local network, you may have to change your network settings (page 16).
Configure these network settings on one PC first so that it can establish a connec-
tion to the Gigaset SE587 WLAN dsl. You can then use this PC to configure the de-
vice. To find out how to do this, refer to the chapter "Local network configuration"
on page 45.
4. Then configure the Gigaset SE587 WLAN dsl to activate the device's Internet access
(refer to the section "Basic configuration" on page 24). To do this you will need the
access data for your Internet service provider.
If you want to connect more PCs to the Gigaset SE587 WLAN dsl, configure their network settings and set up the local area network accordingly (refer to the chapter "Local
network configuration" on page 45).
If you wish to use other functions of the Gigaset SE587 WLAN dsl, use the other functions of the user interface (see "The user interface" on page 18).
For experienced users
The default settings for the Gigaset SE587 WLAN dsl are:
– IP address: 192.168.254.254
– Subnet mask: 255.255.255.0
– Wireless: Disabled
– SSID: Refer to the bottom of the device.
Caution: By default there is no encryption active. Please be sure to make your network
secure. You will find information about this in the section entitled "Wireless Security"
on page 31.
12
Page 13

ì
ì
First steps
Connecting to the splitter data port
Connect the DSL port (grey) on the Gigaset SE587 WLAN dsl to the ADSL socket on
the splitter. To do this, use the DSL cable supplied (grey).
Splitter
DSL cable
Connecting to the PC
You can connect wired PCs to your Gigaset SE587 WLAN dsl to create a local area network (LAN).
First connect just one PC to the Gigaset SE587 WLAN dsl. You can then carry out the
general configuration. You can connect further PCs later on.
Connect one of the LAN ports (1 – 4, yellow) on the Gigaset SE587 WLAN dsl to the
Ethernet network card in your PC. To do this, use the other LAN cable supplied
(CAT5, yellow).
LAN cable
13
Page 14

ì
ì
ì
First steps
Connecting to the mains power supply
Only use the power supply unit that comes with the device. Using the wrong
power supply unit may damage the device.
W
Wireless is OFF by default, to enable wireless follow the procedure "Wireless Settings" on page 29 of this user manual.
Connect the power adapter cable to the POWER socket on the Gigaset SE587 WLAN
dsl.
Plug the power adapter into a mains socket.
Switch on the device.
Power switch on / switch off
The Gigaset SE587 WLAN dsl is now switched on and ready for operation.
14
Page 15

ì
First steps
Connecting wireless to the PC
A wireless connection is made using a wireless network adapter that must be installed
in your PC. This can be an 802.11g or 802.11b-compatible wireless network adapter.
Owing to the superior range and the high data throughput, we recommend that you use
the Gigaset PC Card 54 or the Gigaset USB Adapter 54.
A wireless network is defined by assigning an identical SSID to all the devices.
You should therefore enter the SSID for the Gigaset SE587 WLAN dsl in your network
adapter configuration. For the default SSID for the Gigaset SE587 WLAN dsl refer to
the bottom of the device.
If you use a wireless network adapter from the Gigaset range, enter the SSID using
the Gigaset WLAN Adapter Monitor.
If the correct SSID has been entered in your PC's wireless network adapter, the wireless
link will be established automatically.
Wireless LAN
adapter
By default there is no encryption active. Please be sure to make your
!
network secure. You will find information about this in the section
entitled "Wireless Security" on page 31.
15
Page 16

First steps
Checking the operating state
Your Gigaset SE587 WLAN dsl is now ready for use. The LED displays on the front panel
of the Gigaset SE587 WLAN dsl provide information about the operating state (see
page 8).
When the device is ready for use, the LEDs light up as follows:
u The Power LED on the front lights up.
u The ADSL LED flashes to indicate that the DSL connection is being synchronised.
Once this process is complete, the ADSL LED lights up permanently.
u The LAN LEDs light up if a device is connected to the corresponding LAN port.
u The WLAN LED lights up indicating that the wireless interface is activated.
If this is not the case, refer to the section entitled "Troubleshooting" on page 77.
Configuring the local network
In order to communicate via the Gigaset SE587 WLAN dsl, the network configuration
may have to be set up correctly on the connected PCs.
This usually occurs automatically with
u Windows Vista (32 and 64)
u Windows XP
u Windows 2000 or
u Mac OS X
operating systems provided you have not made any changes to the standard settings for
the network configuration.
With Windows 98 SE or ME initial network configuration may be necessary.
If you require information on how to configure computers correctly for working in a
Local Network (LAN) or in a Wireless Local Access Network (WLAN), please refer to the
chapter "Local network configuration" on page 45
16
Page 17

First steps
Configuring the Gigaset SE587 WLAN dsl
You can now make the basic settings for Internet access using the browser-based configuration user interface of the Gigaset SE587 WLAN dsl which can be operated via your
Internet browser (page 24).
In addition, the user interface provides detailed status information on operation and
configuration and offers helpful administration options. These are described in the
chapters "Status information" on page 20 and "Administration" on page 39.
i
Important operation information
If you operate a SIP phone on your Gigaset SE587 WLAN dsl please mind that it will
maintain the Internet connection even if it is in stand-by mode. This can result in
high connection charges if you are on a time-based or volume-based tariff. In this
case it is recommended to use a flat-rate tariff.
.
We recommend to perform the basic configuration using a PC which is
connected via cable.
17
Page 18
The user interface
ì
ì
ì
ì
The user interface
You can now use the browser-based user interface for the configuration of the Gigaset
SE587 WLAN dsl or to get information on the configuration and operation. As Internet
browser we recommend Microsoft Internet Explorer V 6.0 or higher, or Mozilla Firefox
V 1.0 or higher.
Note:
To start the configuration environment, you may need to deactivate the HTTP proxy
for your browser.
If you use Window Vista or Windows XP Service Pack 2, you will need to configure the
popup blocker.
If you use a firewall, it must allow connection to the Gigaset SE587 WLAN dsl. For
details, refer to the user guide for your firewall. If necessary deactivate the firewall
while you configure your Gigaset SE587 WLAN dsl.
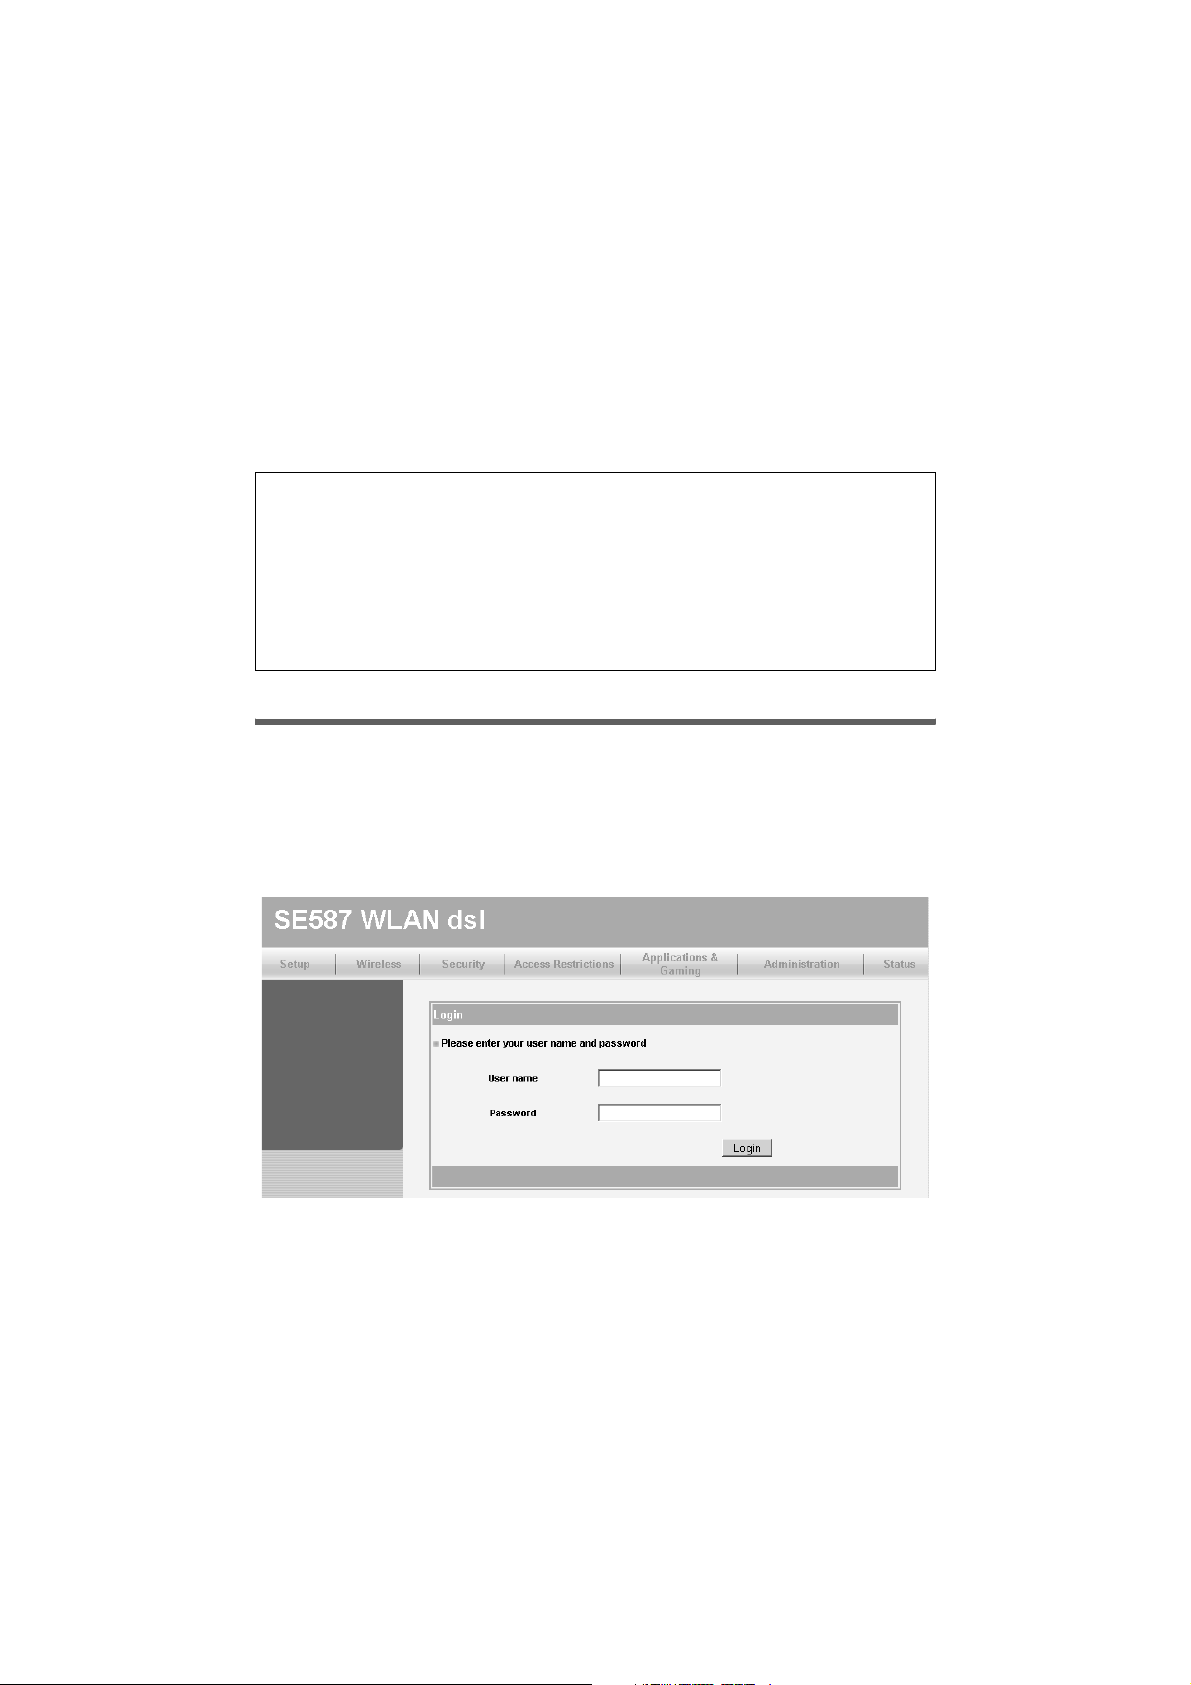
Starting the user interface
To access the user interface of the Gigaset SE587 WLAN dsl:
Start your Internet browser.
Enter the IP address of the Gigaset SE587 WLAN dsl in the browser's address field:
http://192.168.254.254
The login screen appears.
The predefined user ID is admin. For your security the configuration program is protected with a password. The default password generally required is admin.
Enter the password.
Click Login.
The user interface is opened displaying the Status pages first (see page 20).
18
Page 19

The user interface
The configuration program ends automatically if no entry is made within a time period
of 10 minutes.
Note:
u For security reasons you should change the predefined password at a later stage.
u You can set up more user IDs and assign passwords via the user interface.
For information on how to set up new user IDs and change the predefined password
see section "Management" on page 39.
User interface functions
The user interface provides the following menus:
Status You can view information about the configuration and status
of the Gigaset SE587 WLAN dsl in this menu. This is
described from page 20 onwards.
Setup Use this menu to make the settings required for connecting
to the Internet. You can also make settings for your local network. This is described from page 24 onwards.
Wireless This menu allows you to set up your wireless network. You
can make the basic settings (e.g. SSID and channel) and set
up encryption for wireless traffic. This is described from
page 29 onwards.
Security Here you can enable or disable the firewall of your Gigaset
SE587 WLAN dsl. This is described on page 33.
Access Restrictions You can restrict the access to the Internet for specific PCs and
for specific services. This is described from page 34 onwards.
Applications & Gaming This menu allows you to configure the NAT firewall of the
device. In particular port forwarding and DMZ can be configured (see page 36).
Administration The Gigaset SE587 WLAN dsl user interface provides several
helpful functions for administering your device. This is
described from page 39 onwards.
19
Page 20

Status information
ì
ì
Elements in the user interface
The user interface screens contain the following buttons:
Transfers the settings you have made to the Gigaset SE587
WLAN dsl configuration.
Deletes all the entries on a screen since the last time you
clicked Save Settings.
Click the help link to display explanations about the current
user interface screen.
Other buttons may be displayed depending on the function in question. These are
explained in the relevant sections.
Status information
Information about configuration and the status of the Gigaset SE587 WLAN dsl is displayed in the Status menu of the user interface.
Detailed information is available on the following status screens:
u DSL Status
u Internet
u Local Network
u Wireless Network
u Device
The Status pages are updated automatically at regular intervals.
DSL Status
You will find detailed information about the status and operation of the device’s DSL
connection on the DSL Status screen in the Status menu.
This page shows whether the DSL connection has been established successfully. The
DSL connection is active if the parameter Status has the value ON (green coloured).
The additional information provided on this screen is highly technical and can be used
by service personnel for a detailed analysis and trouble shooting in the case of an error.
In the Status menu, select DSL Status.
Click Refresh to refresh this screen and update the displayed data.
20
Page 21

ì
ì
Status information
Internet
The Internet page shows information about the configuration of the Internet connection(s).
In the Status menu, select Internet.
Internet Status
PVC Connection Select the virtual connection (PVC), for which the following
information should be displayed. Three PVCs have been
configured. Modification of the factory configuration for
these PVCs can result in loss of service (see page 25).
Internet Connection
Type
The following information is only displayed for PPPoE/PPPoE connections.
IP Address Public IP address currently assigned to the device.
Subnet Mask Subnet mask used in the public network.
MTU Maximum Transmission Unit allowed for data transmission in
PPPoE Auto connect Indicates if the connection is established automatically (true)
Access concentrator Name of the PPPoE server.
Primary DNS Server IP address of the assigned DNS server.
Secondary DNS Server IP address of the alternate DNS server, if available.
Connection type of the selected connection (see page 25).
the network.
or not (false).
PVC Connection
QoS (Quality of Service) ATM Traffic Class used.
Pcr Rate (Peak Cell Rate) Maximum rate at which the sender can send
cells over the virtual connection.
Scr Rate (Sustained Cell Rate) Maximum average rate at which cells
can be sent over the virtual connection.
VCI (Virtual Channel Identifier) Channel and destination that ATM
traffic will use.
VPI (Virtual Path Identifier) Path and destination that ATM traffic
will use.
Click Refresh to refresh this screen and update the displayed data.
21
Page 22

ì
ì
ì
Status information
Local Network
The Local Network page shows information about the local network settings.
In the Status menu, select Local Network.
MAC Address Local MAC address of the device’s LAN interface.
IP Address Local IP address of the device.
LAN Subnet Mask Subnet mask used in the local network.
DHCP Server Shows if the DHCP server of the device is enabled or disabled.
Start IP Address First IP address in the IP range which can be assigned to a
client by the DHCP server.
End IP Range Last IP address in the IP range which can be assigned to a client
by the DHCP server.
The ARP Table shows the clients which are currently connected to the router via the
LAN interface.
The following information is displayed:
– IP Address
–MAC Address
– Interface (name of the LAN interface)
– Static (indicates whether the IP address of the client is static or dynamic)
The DHCP Server Active IP/MAC Table shows the clients in the network that currently
have been assigned an IP address by the Gigaset SE587 WLAN dsl DHCP server. The following information is displayed for each client:
– IP Address
–MAC Address
– Lease Time(Sec) (remainig time before the DHCP server will assign a new IP
address)
– Host Name
Click Refresh to refresh this screen and update the displayed data.
Wireless Network
The Wireless page shows information about the wireless network settings.
In the Status menu, select Wireless.
Status Show the status of the wireless network (ON/OFF).
Authentication Security mode used for encryption (see page 31).
Encryption Encryption method used.
MAC Address MAC address of the device’s wireless interface.
Mode Wireless network mode set for data transmission
(see page 29)
22
Page 23

ì
ì
ì
Status information
SSID Wireless network ID (see page 29).
Allowed Channels Channels which are allowed for wireless communication
Current Channel Radio channel that is currently being used for data transfer in
the wireless network.
Transmit Rate Transmission rate currently set.
Max Frame Burst Maximum time, in microseconds, that the device transmits
IEEE 802.11g wireless traffic only.
RTS Threshold RTS (Ready to send) Threshold defines the latency between
the message "Ready to send" and the sending of the next data
packet.
Click Refresh to refresh this screen and update the displayed data.
Device
You will find the most important device data on the Device screen in the Status menu.
In the Status menu, select Device:
Firmware Version Firmware version currently installed on your device.
System Time System time for your device.
System Uptime Your device's operating time since the last time the system
was started in the format HH:MM:SS.
Click Refresh to refresh this screen and update the displayed data.
23
Page 24

Basic configuration
ì
Basic configuration
The Setup menu contains all the functions required for setting up your device for connection to the Internet and for establishing your local network.
Basic Setup Set up the Internet connection for one or more virtual connections
(see below).
Local Network Define the basic settings for the local network and configure the
DHCP server (see page 24).
Basic Setup
The Basic Setup page shows the current Internet configuration of your device. In order
to grant access to the Internet to users in your local network, the Internet connection on
your device must be set up correctly.
Note:
The access data is saved in the Gigaset SE587 WLAN dsl during configuration. If the
device is passed on to someone else for any reason, you should always first restore the
factory settings (page 42). Otherwise, unauthorized persons may use your Internet
access at your expense.
The device’s configuration user interface allows you to configure your Internet connections. All the settings you make here must coincide with the features your Internet serv-
ice provider makes available to you. False information can lead to problems with your
Internet connection. You need your Internet service provider's access data and technical
information for the configuration. You will find the access data you require in the documentation you received from your Internet service provider. The configuration details
are not described in this document.
In the Setup menu, select Basic Setup.
24
Page 25
Basic configuration
ì
ì
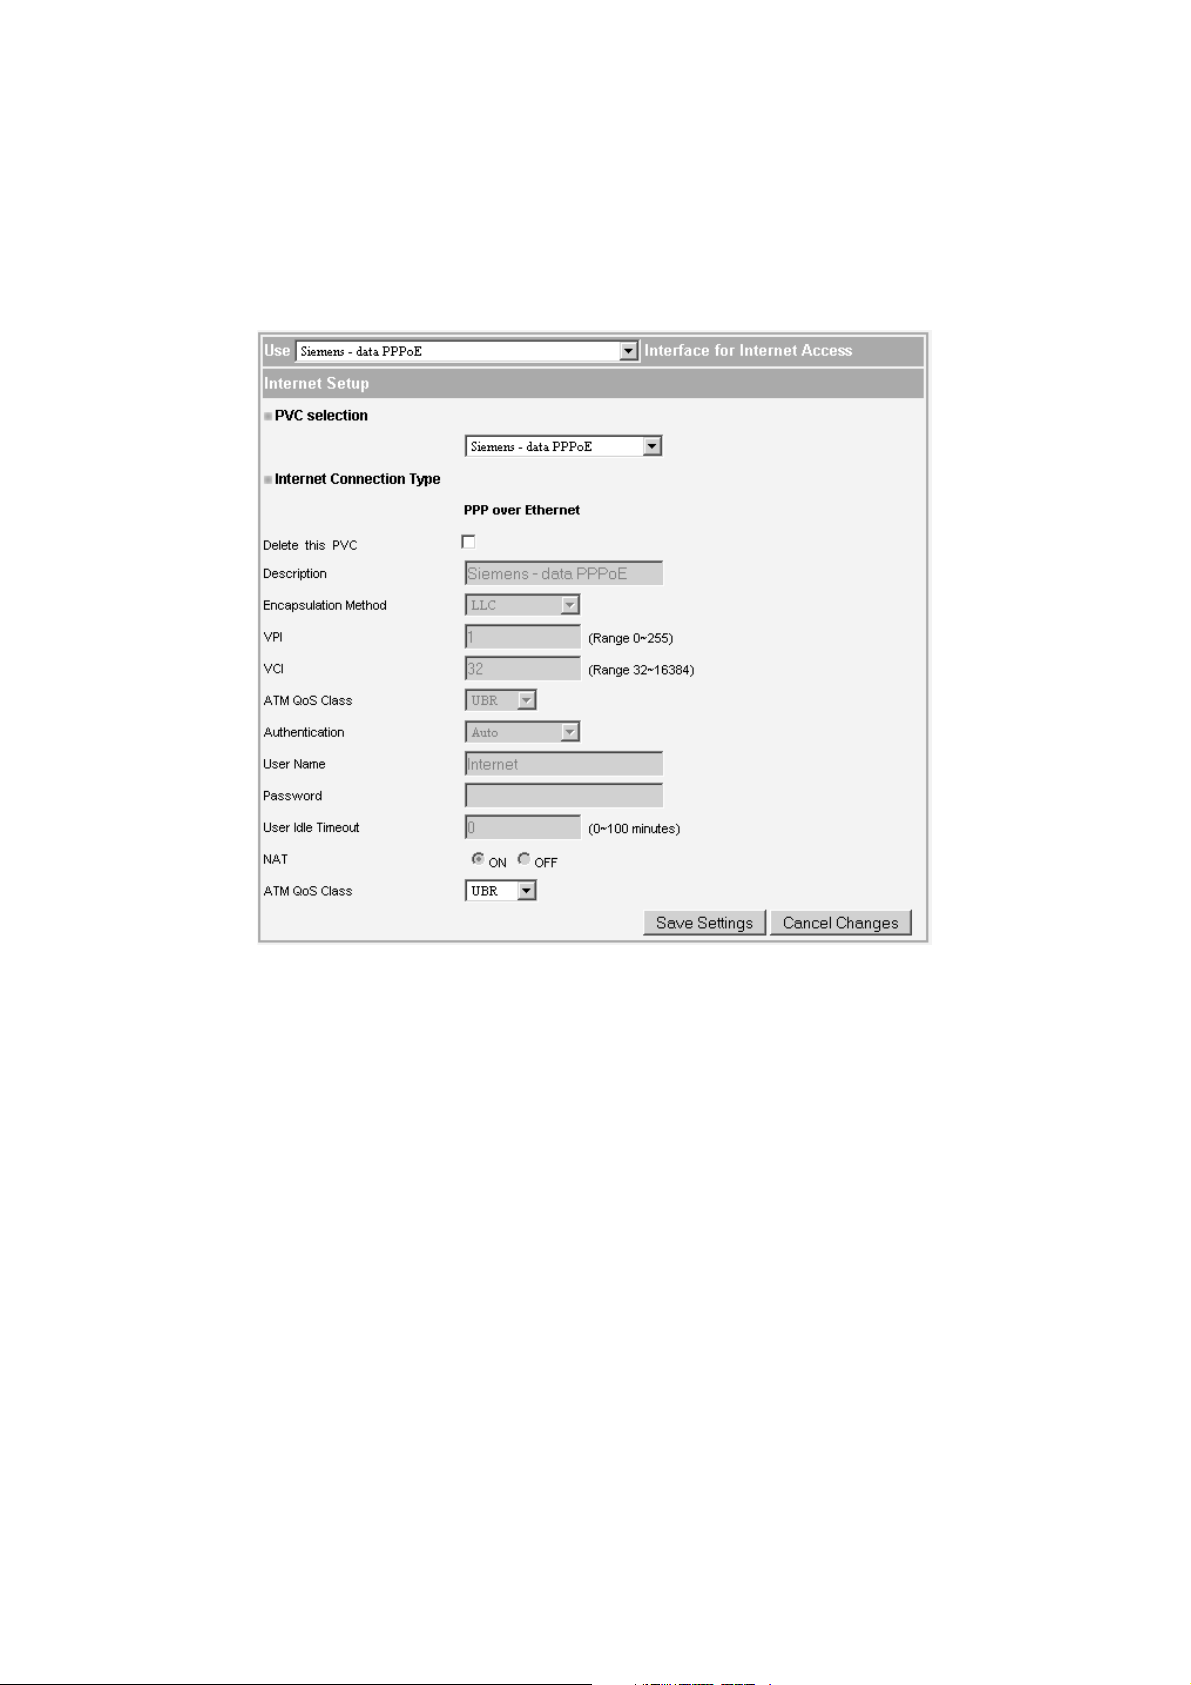
PVC selection
The Gigaset SE587 WLAN dsl allows you to configure different virtual connections
(called PVC) which can share the same physical connection (DSL) at the same time. For
each connection the access data of your Internet service provider is required.
If a PVC is configured it cannot be changed. If required, you can change the User name
and the associated Password for the connection.
To display the configuration of a PVC choose the desired PVC from the PVC selection
option menu.
To delete a configured PVC select Delete this PVC and click Save Settings.
If more than on PVC is configured the Use ... Interface for Internet Access is shown on
the top of the page. You can then choose which interface should be used to connect to
the Internet.
25
Page 26
Basic configuration
ì
ì
ì
ì
ì
Configuring connections
You can configure a PPPoA or PPPoE connection or a Bridge connection according to the
RFC 2684.
If you want to configure an additonal connection, select empty from the PVC selec-
tion option menu.
You have to specify the Internet Connection Type, so that the Gigaset SE587 WLAN
dsl works correctly with your ISP's equipment.
Enter the data required according to the Internet Connection Type you have cho-
sen.
Click Save Settings to apply your settings.
LAN configuration
You can use the LAN configuration to change the IP address of the Gigaset SE587 WLAN
dsl and configure the DHCP server.
In the Setup menu, select Local Network.
26
Page 27

ì
ì
ì
Basic configuration
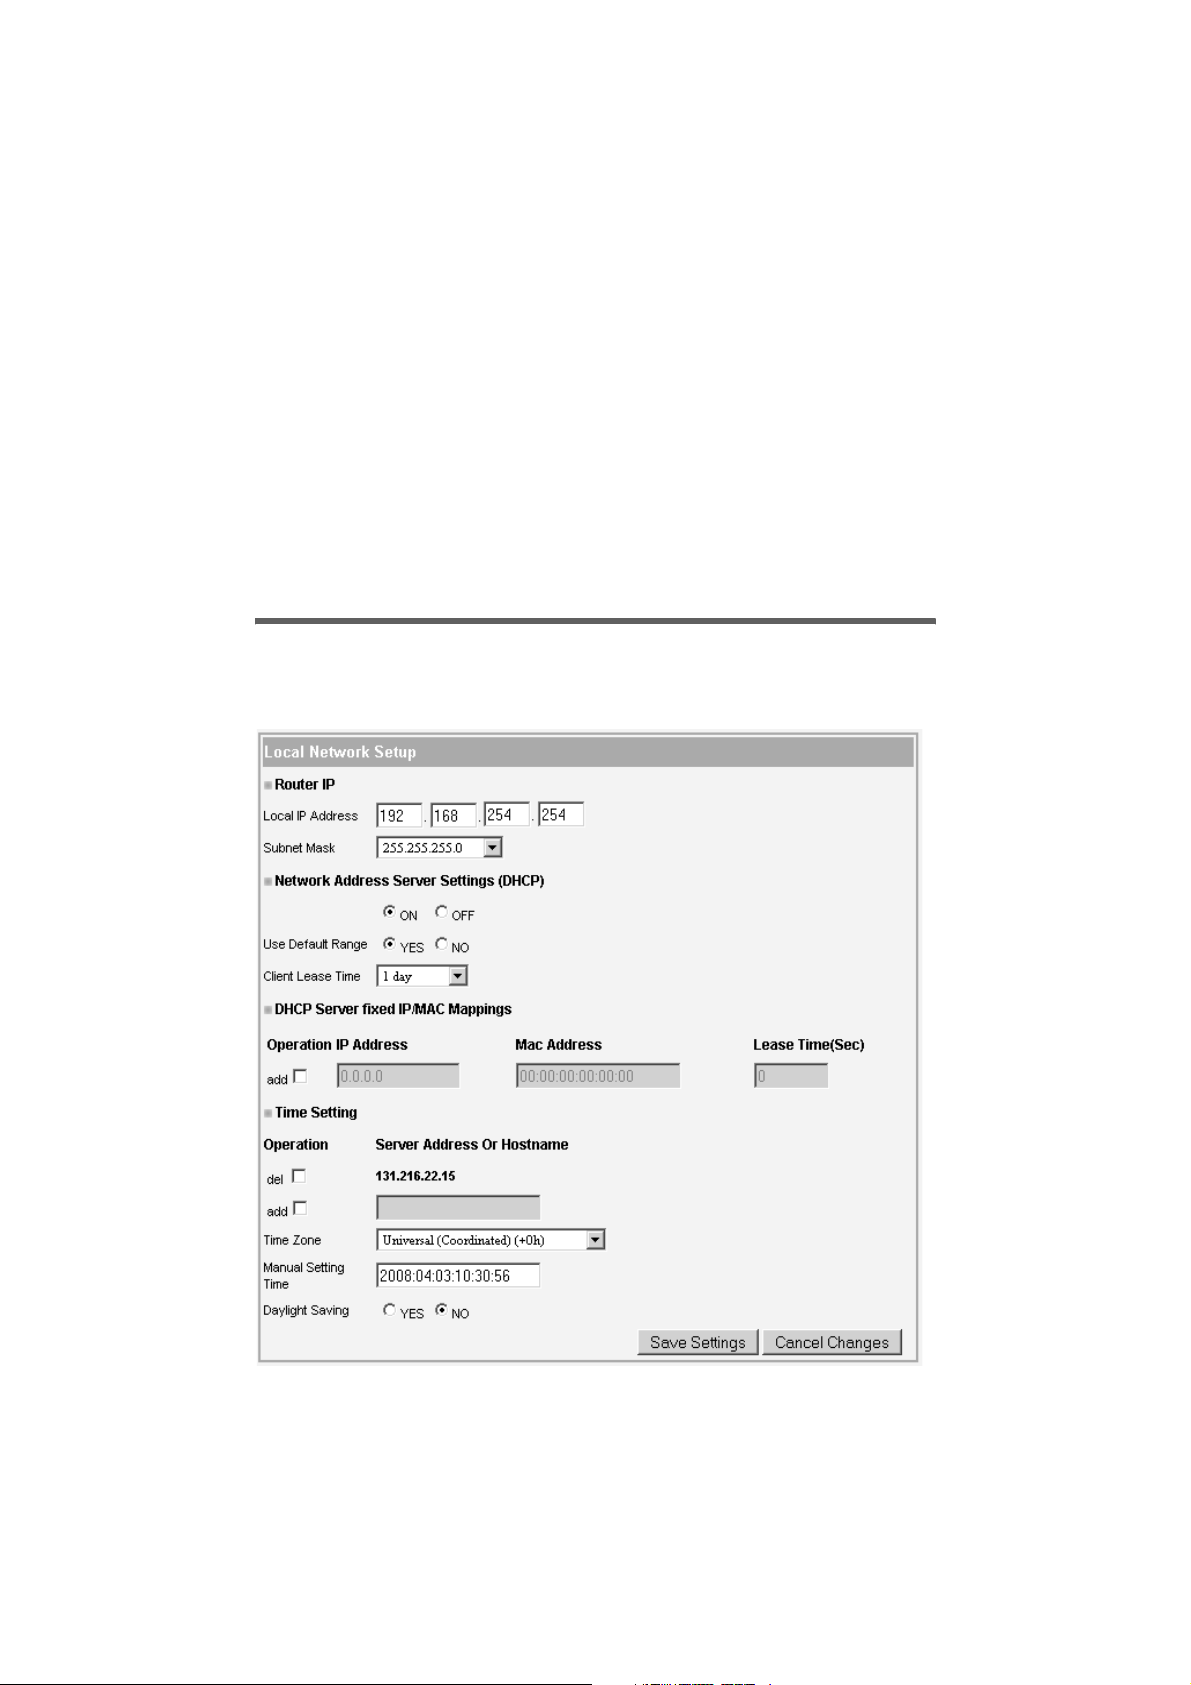
Defining the private IP address for the Gigaset SE587 WLAN dsl
On this screen you can change the device's Private IP address. The preset IP address is
192.168.254.254. This is the address under which the device can be reached in the local
network. It can be freely assigned from the block of available addresses. The IP address
under which the Gigaset SE587 WLAN dsl can be reached from outside is assigned by
your Internet service provider. The default Subnet mask for the local network administered by the Gigaset SE587 WLAN dsl is 255.255.255.0.
If you want to assign a different IP address to the Gigaset SE587 WLAN dsl, enter
your chosen IP address in the fields next to Local IP Address.
Make sure you note which subnet mask is set when assigning the IP address. If you
are retaining the default subnet mask, the first three parts of the IP address must be
identical for all network components (including routers).
We recommend using an address from a block that is reserved for private use. This
address block is 192.168.1.1 to 192.168.254.254.
Adjust the Subnet Mask if necessary.
The Subnet mask specifies how many address parts of the IP address must be iden-
tical for all network components (including routers).
Note:
u You can only change the last part of the subnet mask at the moment (even if fur-
ther parts are displayed as editable).
u New settings can only be made after the Gigaset SE587 WLAN dsl has been
rebooted. If necessary reconfigure the IP address on your PC (including one that
is statically assigned) so that it matches the new configuration.
Configuring the DHCP server
The Gigaset SE587 WLAN dsl has a DHCP server for which the factory setting is active.
Consequently, the IP addresses of the PCs are automatically assigned by the Gigaset
SE587 WLAN dsl.
Note:
u If the DHCP server for the Gigaset SE587 WLAN dsl is activated, you can configure
the network setting on the PC so that the option Obtain an IP address automatically is set up. For further information, refer to the section "Local network config-
uration" on page 45.
u If you deactivate the DHCP server, you will have to assign a static IP address for the
PCs that use the network settings.
To activate the DHCP server, select ON.
If the DHCP server is active, you can define the IP address range the DHCP server should
use for assigning IP addresses to the clients.
27
Page 28

Basic configuration
ì
ì
ì
ì
ì
ì
ì
ì
ì
ì
ì
ì
ì
ì
Select YES for Use Default Range if you want the device to assign IP addresses in
the range 1-254 (if the router’s IP address is 192.168.254.254 the addresses from
192.198.254.1 - 192.198.254.253 are used).
Select NO for Use Default Range and define the range of IP addresses the Gigaset
SE587 WLAN dsl should use to automatically assign IP addresses to the PCs. Define
the Start IP Address and the End IP Address.
The lease time indicates how long the client may use the allocated IP configuration
before the DHCP server can assign a new IP address. Choose a value from the Client
Lease Time option menu.
DHCP Server fixed IP/MAC Mappings
Even if you have activated the DHCP server, you can still assign a static IP address to individual PCs (e.g. when setting up these PCs for NAT functions).
Select the add box to activate the fields in a row to create a new entry.
Enter the IP Address you wish to assign to the PC.
Enter the MAC Address of the PC to which you want to assign a static IP address.
Enter a specific lease time in seconds for the PC in the Lease Time(Sec) field.
Select the del box to delete the entry from the list.
Time Setting
For operating your Gigaset SE587 WLAN dsl, you should set a time server, select the
time zone or set the time and date manually.
If a time server is available in your network select the add box and enter the IP
address or host name of the time server in the Server Address Or Hostname field.
Select the del box to delete an entry from the list.
Select the Time Zone for your location from the list.
If you want to enter date and time manually use the Manual Setting Time field.
Enter the value in the format: YYYY:MM:DD:HH:MM:SS.
Enable or disable the Daylight Saving option depending on your location.
Click Save Settings to apply all your settings on this page.
28
Page 29
ì
ì
ì
Advanced configuration
Advanced configuration
Wireless Settings
If you have implemented wireless PC communication via the Gigaset SE587 WLAN dsl,
you should improve the security of your wireless network via the Wireless menu. You
can carry out the following functions:
Basic Wireless Settings Activate or deactivate the wireless module of the device
and specify basic settings for your wireless network, for
example SSID or Wireless Channel (see below).
Wireless Security Set up Encryption for wireless transmissions (see page 31).
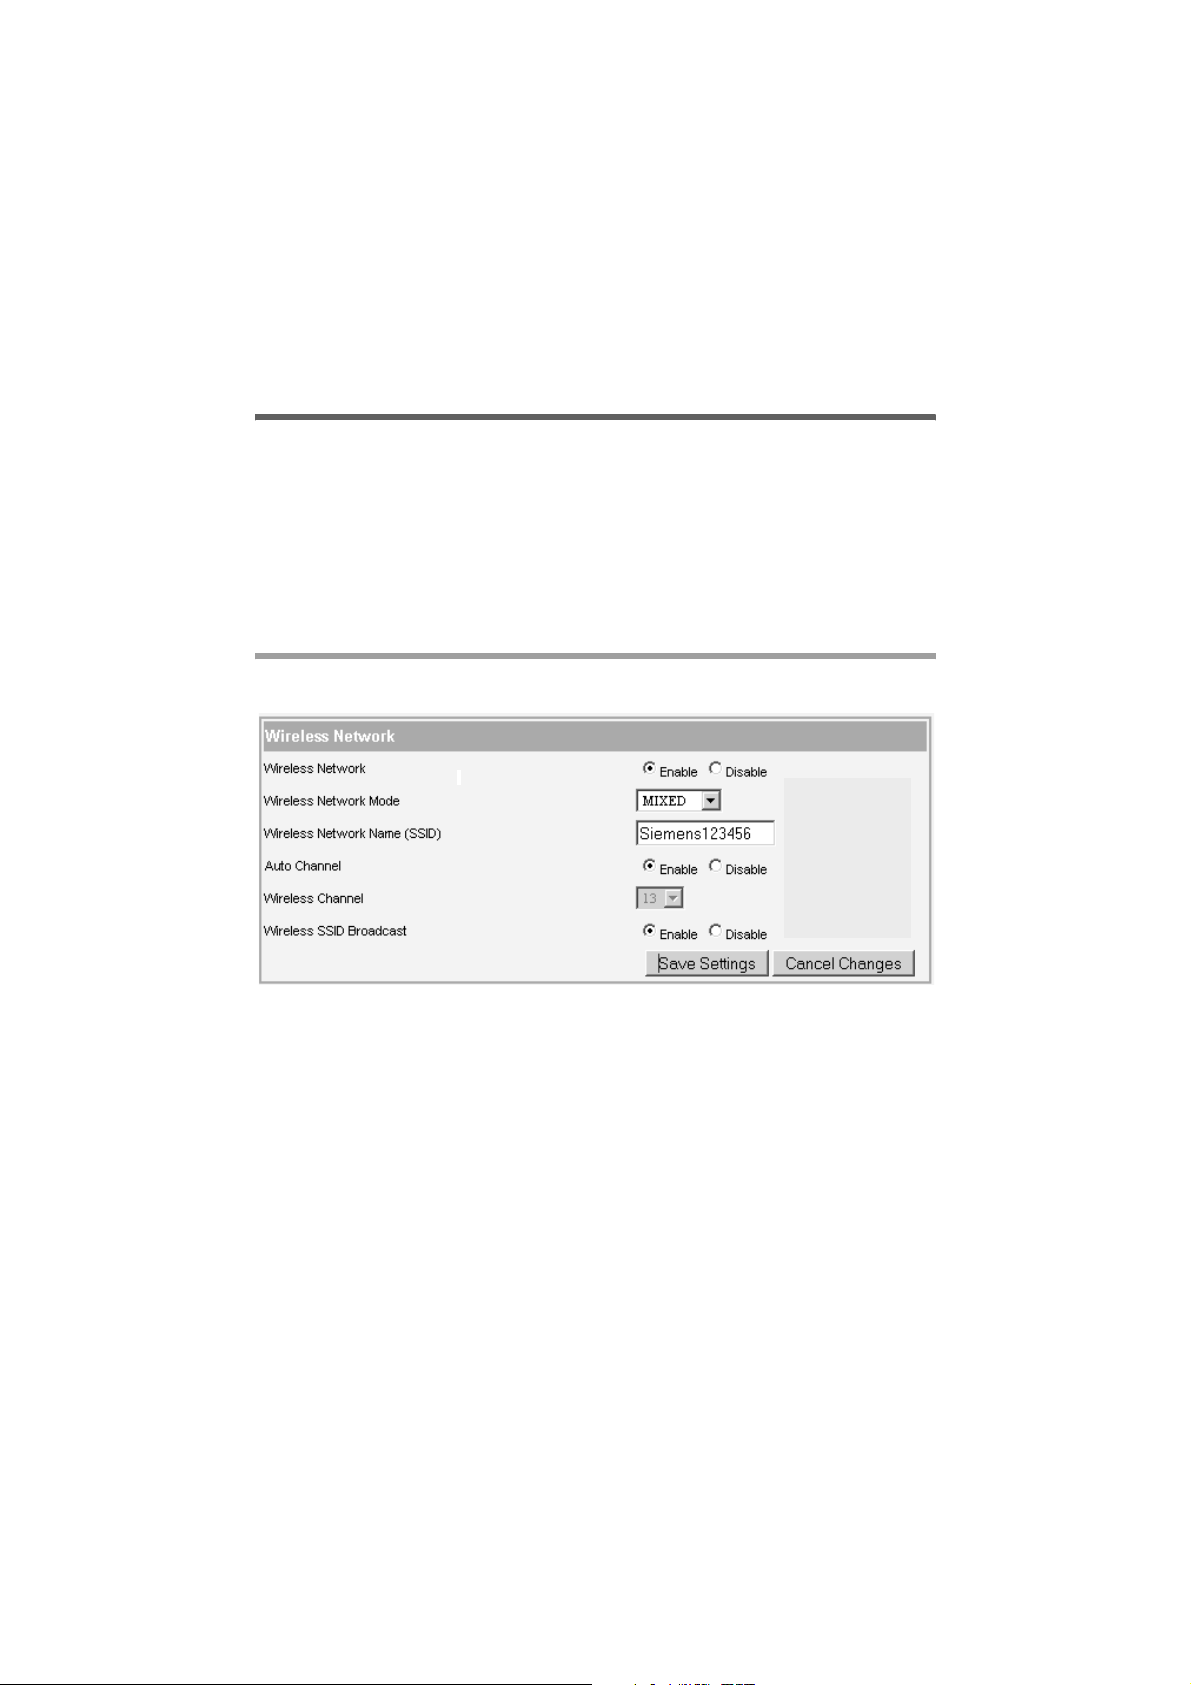
Basic Wireless Settings
In the Wireless menu, select Basic Wireless Settings.
Note to US model
owner: To comply
with US FCC
regulation, the
country selection
function has been
completely removed
from all US models.
The above function is
for non-US models
only.
Select Enable for the Wireless Network (default setting is disabled).
Devices can only log in wirelessly if the wireless module of the Gigaset SE587 WLAN dsl
is activated.
You can now make the settings for the wireless network.
Wireless Network Mode
Your Gigaset SE587 WLAN dsl provides wireless data transfer according to the IEEE
802.11 standard. The IEEE 802.11g standard permits data transfer up to 54 Mbit/s and
the IEEE 802.11b standard up to 11 Mbit/s. Choose G only to ensure the best possible
data transfer rates in your network. To operate clients with older wireless network
adapters in your network, select MIXED. If you only operate IEEE 802.11b clients in your
network choose B only.
Select the required Wireless Network Mode for your wireless network.
29
Page 30

ì
ì
ì
ì
ì
Advanced configuration
Wireless Network Name (SSID)
For the wireless network components to be able to communicate with one another, they
must use the same SSID (Service Set Identifier).
You can change the preset SSID if required and for security reasons you can deactivate
SSID broadcast.
Enter a character string of your choice. The SSID is case-sensitive. It can contain up
to 32 characters. Use a combination of letters, digits and special characters.
Note:
The connection to the wireless network adapters will be interrupted until you have
connected them with the new SSID.
Wireless Channel
All clients in the network use the same radio channel for wireless data transfer.
The channel is selected automatically by default (Auto Channel is enabled). If required,
you can choose manually between various channels, depending on your current location.
To choose the channel manually:
Disable the Auto Channel option.
Select the Wireless Channel for your wireless network.
Wireless SSID Broadcast
If this option is enabled (default setting), the Gigaset SE587 WLAN dsl will send the SSID
in all data transfers and the SSID of the Gigaset SE587 WLAN dsl will be displayed on PCs
that have a wireless network adapter. In this case, hackers could use the SSID to detect
your network.
If you deactivate Wireless SSID Broadcast, the SSID of the Gigaset SE587 WLAN dsl will
not be displayed. This increases protection against unauthorized access to your wireless
network. Make a note of the SSID. You will need it to log on to the PC.
Select Disable to deactivate Wireless SSID Broadcast.
Click Save Settings to apply all your settings on this page.
30
Page 31

Advanced configuration
ì
ì
ì
ì
ì
Wireless Security
For your security data transmission in your wireless network should be encrypted to
ensure that access to your wireless network is only granted to authenticated clients.
Note:
If you change the encryption, wirelessly connected clients are disconnected until you
update the security setting on the wireless network adapters again.
The following security mechanisms are available:
u WPA-PSK/WPA2-PSK (WiFi-Protected Access)
u WEP encryption (Wired Equivalent Privacy)
WPA-PSK (WPA with pre-shared key) offers greater security than WEP. You should therefore select WPA-PSK encryption if it is supported by all components in your wireless network. WPA-PSK is an efficient method for protecting wireless networks. Dynamic keys,
based on the AES (WPA2-PSK) or TKIP (WPA-PSK), offer increased security.
In the Wireless menu, select Wireless Security.
Select the desired encryption method from the Security Mode option menu.
WPA-PSK/WPA2-PSK Select this option for WPA-PSK or WPA2-PSK encryption.
WEP Select this option for WEP encryption.
Disabled Select this option if you want to deactivate the encryption
of the wireless data transmission. It is not recommended to
deactivate encryption.
WPA-PSK and WPA2-PSK
Select WPA-PSK/WPA2-PSK from the Security Mode option menu.
Enter a key in the WPA Shared Key field (up to 32 characters). Use a combination of
letters, digits and special characters.
Note:
Make a note of the key that you have entered. You will need this information to configure the wireless network adapters properly.
Click Save Settings to apply your settings.
31
Page 32

ì
ì
ì
ì
ì
ì
Advanced configuration
WEP encryption
If WPA is not supported by all components in your wireless network, we recommend
that you activate WEP Encryption on the components.
You can choose either the standard 64-bit key or the more robust 128-bit key. The keys
are generated in hexadecimal format. You must use the same keys for encryption and
decryption for the Gigaset SE587 WLAN dsl and all your wireless network adapters.
Select WEP from the Security Mode option menu.
Select 64 bit or 128 bit from the Key Length option menu.
If you don’t use an authentication server in your network keep the value Open Sys-
tem for the parameter Authentication Type. Otherwise choose Shared Key.
You can enter up to four keys manually or generate them automatically by means of a
passphrase.
Generating keys by means of a Passphrase
Enter a Passphrase (up to 32 characters).
Click Generate to create the keys.
Generating keys manually
Enter up to four keys in fields Key 1 to Key 4.
– With a 64-bit encryption depth, the key is 10 characters long.
An example of a valid key: 12-34-56-7A-BC
– With a 128-bit encryption depth, the key is 26 characters long.
An example of a valid key: 23-45-67-AB-C8-91-23-45-DE-F1-23-45-67
Allowed characters are 0-9 and A-F.
32
Page 33

ì
ì
ì
ì
ì
Advanced configuration
Select one of the four keys as the Default Transmit Key. This is the key which should
currently be used for encryption.
Note:
u It is very important that you make a note of the key(s) that have been entered or
generated. You will need this information to configure the wireless network adapters properly.
u When you have concluded the configuration you must change the WEP encryption
in the wireless network adapters for the connected PCs in the same way, as they
will not otherwise be given access to the wireless network of the Gigaset SE587
WLAN dsl.
Click Save Settings to apply your settings.
Security
The firewall functions of the Gigaset SE587 WLAN dsl include various security functions
for the local network. They are activated by default and configured in the factory. If you
want to deactivate the firewall, carry out the following steps:
In the Security menu, select Firewall.
Select the OFF option.
Click Save Settings to apply your settings.
33
Page 34

ì
Advanced configuration
Access Restrictions
The Access Restrictions function allows you to define rules for blocking access to the
Internet for various services and for one or more PCs. You can permit or block access to
URLs at certain times.
In the Access Restrictions menu, select Internet Access.
34
Page 35

ì
ì
ì
ì
ì
ì
ì
Advanced configuration
IP Filters
In the IP filter list you can add the PCs for which access should be restricted.
Select the add box to activate the fields in a row to create a new entry.
In the Host IP Address field, enter the IP address of the respective PC. How to find
out the IP addresses of the individual PCs is described in chapter "Local network con-
figuration" on page 45.
From the Direction option menu, select the kind of communication to which the
restriction should apply:
inbound Internet access is restricted to outgoing data traffic.
outbound Internet access is restricted to incoming data traffic.
both Both incoming and outgoing data traffic with the Internet are
restricted.
Select the del box to delete an entry from the list.
Port Filters
In the port filter list you can define ports or port ranges to restrict the access of specific
Internet services. Each Internet service uses a specific port for communication. The following table shows some important port numbers of Internet services:
Internet service Protocol Port number
FTP TCP 21
ssh / pcAnywhere TCP 22
Tel net TC P 23
SMTP TCP 25
TFTP TCP 53
HTTP TCP 80
POP3 TCP 110
NNTP TCP 119
HTTPS TCP 443
T.120 TCP 1503
H.323/Q931 TCP 1720
DNS UDP 53
NTP UDP 123
RealServer / QuickTime UDP 7070
Select the Modify box to activate the fields in a row. You can change the values if
required.
Select the Protocol used by the service(s) and enter the Start Port and the End Port
of the port range to be restricted. To specify one specific service with one port
number enter the same port number in the Start Port and the End Port field.
From the Inbound Deny and Outbound Deny option menus choose if the rule
should apply to incoming and/or outgoing traffic.
35
Page 36

ì
ì
ì
ì
ì
ì
Advanced configuration
URL Filters
The URL filter allows you to block or allow access to specific Internet domains.
Select the add box to activate the fields in a row to create a new entry.
Enter the URL of the domain to be blocked or allowed in the Domain Filter field. The
domain is blocked or allowed including all subdomains.
In the Start Time(hh:mm:ss) and End Time(hh:mm:ss) fields you can define a time
period for which the domain filter should apply.
Use the Rule For All Above option to specify if the domains entered in the list should
be blocked or allowed. If you select Allow only the domains contained in the list can
be accessed from the users of your network. If you select Deny only the domains
contained in the list are blocked. All other domains can be accessed.
Select the del box to delete an entry from the list.
Click Save Settings to apply all your settings on this page.
Applications and Gaming
The Gigaset SE587 WLAN dsl comes equipped with the NAT (Network Address Translation) function. With address mapping, several users in the local network can access the
Internet via one or more public IP addresses. All the local IP addresses are assigned to
the router's public IP address by default.
One of the characteristics of NAT is that data from the Internet is not allowed into the
local network unless it has been explicitly requested by one of the PCs in the network.
Most Internet applications can run behind the NAT firewall without any problems. For
example, if you request Internet pages or send and receive e-mails, the request for data
from the Internet comes from a PC in the local network and so the router allows the data
through. The router opens precisely one port for the application. A port in this context
is an internal PC address, via which the data is exchanged between the Internet and a
client on a PC in the local network. Communicating via a port is subject to the rules of a
particular protocol (TCP or UDP).
If an external application tries to send a call to a PC in the local network, the router will
block it. There is no open port via which the data could enter the local network.
Some applications, such as games on the Internet, require several links, i.e. several ports
so that the players can communicate with each other. In addition, these applications
must also be permitted to send requests from other users on the Internet to users in the
local network. These applications cannot run if Network Address Translation (NAT) has
been activated.
Using port forwarding (the forwarding of requests to particular ports) the router is
forced to send requests from the Internet for a certain service, for example a game, to
the appropriate port(s) on the PC on which the game is running.
When the Gigaset SE587 WLAN dsl is supplied, the NAT function is activated, i.e. all IP
addresses of PCs in the local network are converted to the router's public IP address
when accessing the Internet.
36
Page 37

Advanced configuration
ì
ì
ì
ì
ì
ì
ì
ì
ì
ì
You can use the NAT settings to configure the Gigaset SE587 WLAN dsl to carry out the
following tasks:
u Set up the Gigaset SE587 WLAN dsl as a virtual server by configuring Port Forward-
ing (see below).
u Open the NAT firewall for a selected PC (page 38).
Port Forwarding
If you configure Port Forwarding, the Gigaset SE587 WLAN dsl outwardly assumes the
role of the server. It receives requests from remote users under its public IP address and
automatically redirects them to local PCs. The private IP addresses of the servers on the
local network remain protected.
Internet services are addressed via defined port numbers. The Gigaset SE587 WLAN dsl
needs a mapping table of the port numbers to redirect the service requests to the servers that actually provide the service.
In the Applications & Gaming menu, select Port Forwarding.
You can choose a service from a list of predefined applications or create an entry manually.
Select the add box to activate the fields in a row to create a new entry.
If more than one interface is configured select the Interface for which the port for-
warding should apply from the option menu.
Select the required application from the Predefined Applications list.
Enter the IP address of the PC that provides the service in the Local IP field. How to
determine the IP addresses of the individual PCs is described in chapter "Local net-
work configuration" on page 45.
If the application you require is not in the list, you must manually enter the relevant data
on the screen:
Select the add box to activate the fields in a row to create a new entry.
If more than one interface is configured select the Interface for which the port for-
warding should apply from the option menu.
Select the protocol for the service you are providing from the Protocol list.
Under Public Port, enter the port number of the service you are providing.
In the Local Port field, enter the internal port number to which service requests are
to be forwarded.
37
Page 38

ì
ì
ì
ì
ì
ì
ì
ì
ì
Advanced configuration
Enter the IP address of the PC that provides the service in the Local IP field. How to
find out the IP addresses of the individual PCs is described in chapter "Local network
configuration" on page 45.
Example: The Web server has been configured to react to requests on port 8080. However, the requests from web sites enter the Web server via port 80 (standard value). If
you add the PC to the forwarding table and define port 80 as the public port and port
8080 as an internal port, all requests from the Internet are diverted to the service with
the port number 80 on the Web server of the PC you have defined with port 8080.
Select the del box to delete an entry.
Click Save Settings to apply your settings.
DMZ
You can set up a client in your local network to be a so-called "exposed host" (DMZ). Your
device will then forward all incoming data traffic from the Internet to this client. You can
then, for example, operate your own Web server on one of the clients in your local network and make it accessible to Internet users.
As the exposed host, the local client is directly visible to the Internet and therefore particularly vulnerable to attacks (e.g. hacker attacks). Only activate this function if it is
absolutely necessary (e.g. to operate a Web server) and other functions (e.g. port forwarding) are not adequate. In this case you should take appropriate measures for the
clients concerned.
Note:
Only one PC per public IP address (interface) can be set up as a DMZ.
In the Applications & Gaming menu, select: DMZ
Select the add box to activate the fields in a row to create a new entry.
If more than one interface is configured select the Interface for which the DMZ
should apply from the option menu.
Enter the IP address of the PC that is to be enabled as DMZ in the Current Host IP
field.
Select the del box to delete an entry.
Click Save Settings to apply your settings.
38
Page 39

Administration
ì
Administration
The Gigaset SE587 WLAN dsl user interface includes several helpful functions for administering your device.
Management provides functions to enable or restrict access to the
configuration user interface (see below).
Log displays logged information about the operation (page 41).
Factory Defaults allows you to reset the Gigaset SE587 WLAN dsl to the
factory settings (page 42).
Firmware Upgrade allows you to update the firmware of the device (page 43).
Config Management offers functions to back up and, if necessary, restore the
configuration data of your device (page 44).
Management
Your Gigaset SE587 WLAN dsl allows you to restrict access to the device’s configuration
to specific local or remote users.
In the Administration menu, select Management.
39
Page 40

ì
ì
ì
ì
ì
ì
ì
ì
ì
Administration
Authentication
To access the configuration user interface of your Gigaset SE587 WLAN dsl users must
login with a user ID and an assigned password. The existing user IDs are shown in the
authentication list. You can change the preset password for the default user admin
here.
Creating a new user ID
To create a new user click on Add New User.
Enter a Username and a Password for the new user.
Enter a Comment which makes it easier to identify the user.
Click on Create User to create the new entry.
The new user is shown in the list.
Editing an existing user entry
IIn order to change the password or the comment for a user use the Edit User function.
In the row of the respective user, click on Edit User.
Change the desired property.
Click on Save Settings to apply your changes.
Deleting an existing user ID
In order to delete a user ID from the list.
In the row of the respective user, click on Edit User.
Click on Delete User.
The user ID is removed from the authentication list.
40
Page 41

ì
ì
ì
ì
ì
Administration
Remote Management
You can decide if remote access to the configuration user interface of your Gigaset
SE587 WLAN dsl is to be enabled or not. It is disabled by default.
The port number a remote user will have to enter in the browser’s address bar for remote
management is 80. This means that, if the router’s public IP address is for example
12.34.56.78, the user will have to type http://12.34.56.78:80 into the browser's address
bar to access the user interface of the Gigaset SE587 WLAN dsl.
To enable remote access, if disabled, click on Enable.
To disable remote access, if enabled, click on Disable.
The action is executed immediately.
UPnP IGD (Universal Plug and Play)
UPnP allows devices to offer their own network services and automatically use services
offered in the network. UPnP IGD (Internet Gateway Device) comes with a solution for
routers which support NAT (Network Address Translation, see page 36). NAT traversal
for UPnP enables UPnP packages to pass through a router or firewall without problems
and without user interaction.
Enable or disable the UPnP IGD feature.
Click Save Settings to save and apply all the changes on this page.
Log
During operation important events and information about how the device functions
and possible problems are logged. The Log page displays the logged information.
In the Administration menu, select Log.
41
Page 42

Administration
ì
ì
ì
ì
ì
Specify which information is to be displayed from the option menu. You can choose
between the following levels:
All events All events are displayed.
Configuration errors Only configuration errors are displayed.
Syslog messages All events contained in the system log are displayed.
Click Refresh to display the desired information.
Click Clear to remove logged information from the screen and delete it from the
device's memory.
Factory Defaults
You can reset the Gigaset SE587 WLAN dsl to the factory settings. You should do this
only if you want to make the device available to others or exchange it through the
dealer. In this case unauthorized persons could use the Internet access data at your
expense.
W
In the Administration menu, select Factory Defaults.
Select Reset to factory default settings and click Reset.
A window will appear prompting you to confirm the procedure.
Note:
If the Gigaset SE587 WLAN dsl is not operating correctly, you can reboot it by switching it off and restarting it. It should then be ready for use again.
Please bear in mind that when the device is fully reset, all configuration settings are
returned to the factory settings. This means that you will have to completely reconfigure the Gigaset SE587 WLAN dsl.
Do not perform this action without first consulting your Internet service
provider’s hotline.
42
Page 43

Administration
ì
ì
ì
Firmware Upgrade
If your Internet service provider releases a new version of the firmware, you can update
the firmware of the Gigaset SE587 WLAN dsl. To do this you must first download the
new firmware onto your PC.
In the Administration menu, select Firmware Upgrade.
In the text field, enter the file with the new firmware that you have downloaded
from the Internet or click Browse to search for the file in your PC's file system.
Click Upgrade. The firmware will now be updated.
Do not switch off the Gigaset SE587 WLAN dsl during the updating
W
After a successful update, the device is automatically rebooted. The login screen is displayed again.
To see whether the upgrade procedure was completed successfully, check the current
software version displayed on the Device page in the Status menu (page 23).
procedure and do not interrupt the power supply. Switching off the
device can make it unusable. The update can take several minutes.
43
Page 44

ì
ì
ì
ì
ì
ì
ì
Administration
Configuration Management
When the Gigaset SE587 WLAN dsl has been configured, it is recommended that you
back up the settings. This means you can restore the settings at any time if they are accidentally deleted or overwritten.
In the Administration menu, select: Config Management.
Backing up configuration data
Click Backup to start saving.
You can then set the location in which the backup file is to be saved in a file selection
window.
Select a local directory on your PC where you want to save the configuration file and
enter a file name.
Click Save.
The current configuration data is now saved in the specified file.
Restoring the saved configuration
In the text field, enter the file with the saved configuration or click Browse to search
for the file in your PC's file system.
In the file system, select the backup file that you want to use to restore the configu-
ration.
Click Restore.
The configuration will now be updated.
44
Page 45

Local network configuration
Local network configuration
Modern computers running Windows Vista, Windows XP, Windows 2000 or Mac OS X
operating systems are usually already configured on delivery to operate without difficulty in a wired local network (Ethernet/LAN) or wireless network (WLAN). The connection to a router or access point is established automatically in this case.
Note:
You can check whether your PC already has a connection to a router or access point
by simply entering the ping command at the command prompt of your Windows
operating system or at the Terminal of your Mac OS X. Please refer to Section "Checking the connection to the Gigaset SE587 WLAN dsl" on page 74 for further details.
If there is no connection to a Gigaset SE587 WLAN dsl as yet, you may need to adapt the
network settings on the computer.
u You have to define the network name and the encryption on the computer for a
wireless connection (see page 47).
u Network addresses (IP addresses) are normally assigned automatically. To change
the default settings of your operating system for assigning IP addresses, you have to
change the TCP/IP settings. You will find further information about this topic in the
Section "IP addresses" after a short introduction. The TCP/IP settings for the various
operating system variants are then described from page 51 onwards.
u If you are still using Windows 98, you will need to install TCP/IP and set up a network
on the PC if your PC has not been operated previously in a network (see page 61).
IP addresses
Every PC in the network must have a unique network address, referred to as the IP
address, so that it can be accessed by and differentiated from the other components in
the network.
Your Gigaset SE587 WLAN dsl is equipped with a DHCP server, which performs the
addressing in the network independently. This means that the IP addresses are automatically assigned to the computers (dynamic IP addresses).
Under normal circumstances you therefore do not have to do anything because the
Obtain an IP address automatically (Using DHCP for Mac OS X) option is set when the
network is set up.
It is advisable in some cases, however, to assign static IP addresses, for example if you
wish to run a wireless network in ad-hoc mode or want to make PC services available on
the Internet. In this case, you have to change the network settings of the PCs and configure static IP addresses.
45
Page 46

Local network configuration
Information on assigning static IP addresses
You define the private IP addresses for the computers in your local network yourself.
Addresses from an address block reserved for private use should be used. This is the
address block
192.168.1.1 - 192.168.254.254
Example:
PC 1: 192.168.1.2
PC 2: 192.168.1.3 etc.
Please remember:
The IP addresses you can assign also depend on the subnet mask for your network.
The subnet mask used limits the IP addresses that can be assigned as it determines
how many parts of the IP address of a network represent the network number and
how many the computer number.
255.255.255.0 is normally used in a private network as the subnet mask. This means
the first three parts of the IP address form the network number and the final part can
be used for assigning computer numbers. The first three parts of the IP address of all
network components are therefore always the same. In the case of subnet mask
255.255.0.0, the first two address parts would have to be identical.
An example of subnet mask 255.255.255.0 is given below.
For example, this is correct:
Address of access point: 192.168.1.1
Computer 1: 192.168.1.12
Computer 2: 192.168.1.60 ...
This is incorrect:
Address of access point: 192.168.1.1
Computer 1: 192.168.2.2
Computer 2: 192.168.3.3
Computer names and workgroups
When your network is being set up, your computer is assigned a name. This is carried
out when the operating system is installed (with the exception of Windows 98), i.e. your
computer already has a computer name when it is delivered. The computer name is the
name under which your computer is displayed in the network view.
You can change the computer name, if desired.
Windows operating systems
When your network is set up, your PC is assigned to a workgroup. This is carried out
when the operating system is installed (with the exception of Windows 98), i.e. your PC
has already been assigned by default to a standard working group (usually WORKGROUP). The workgroup includes a number of PCs that belong to a network and can
share common resources, such as printers and files. You can change the workgroup to
which your PC has been assigned.
46
Page 47

Local network configuration
ì
ì
ì
ì
ì
ì
Setting up a wireless network
A wireless network connection is made using a wireless adapter that must be installed
on your computer. You may first have to connect a wireless adapter to your notebook or
your computer. For example, this can be a Gigaset USB Adapter, a Gigaset USB Stick or a
Gigaset PC Card, but also a different IEEE 802.11n, 802.11g or 802.11b-compatible
wireless adapter. If you are using this type of wireless adapter, you can set up the connection to the wireless network using the relevant software. Instructions for this can be
found in the user manual for your wireless adapter.
Most modern notebooks already have a wireless adapter fitted when delivered. In this
case, you should use the tools provided by the operating system to connect the PC, notebook or Mac to the wireless network.
We explain below how to connect a PC or notebook to a wireless network using
Windows XP SP2, Windows Vista and Mac OS X.
To set up the connection, you need the network name (SSID) of your wireless network
and the key defined on the Gigaset SE587 WLAN dsl for encrypting wireless data traffic.
Carry out the following steps:
Start your notebook or your computer. Make sure your wireless adapter is switched
on. Notebooks generally have a switch for this purpose as well as an LED as a func-
tion display.
Windows XP
If Windows XP receives signals of wireless networks in the current environment this will be indicated by the symbol for the wireless network connection
in the status area of the taskbar.
Right-click the icon in this case and choose the Show available wireless networks
option.
If the icon for the wireless network connection is not displayed, you could also proceed
as follows:
Choose Start - Control Panel - Network Connections - Wireless Network Connec-
tions
Or
Double-click the Network Environment icon on the desktop.
Click Show network connections in the column on the left.
Double-click the Wireless Network Connections icon.
The list of available and visible wireless networks (WLANs) is displayed (see page 48).
47
Page 48

ì
ì
ì
ì
ì
ì
ì
ì
Local network configuration
Windows Vista
Click the network symbol in the status area of the taskbar to display the
wireless networks in the current environment.
Click Connect or disconnect.
A list of all available wired and wireless networks (WLANs) is displayed (see page 48).
Note:
The automatic wireless configuration service must be started so that Windows can
display and manage wireless networks. If nothing is displayed on your PC despite
there being wireless networks within range, check whether the service is started and
start it if necessary.
Windows Vista:
Click Start – Control Panel – System and Maintenance – Administrative Tools.
Double-click Services.
Check whether the Automatic WLAN Configuration service is started and start it
if necessary by clicking Start in the column on the left.
Windows XP:
Click Start - Control Panel.
Click Administrative Tools and then Services.
Check whether the service Wireless Zero Configuration is started and start it if
necessary by clicking Start in the column on the left.
Network list
All wireless networks that can be seen at the current location appear in the network list.
If the SSIDs of the wireless networks are set to invisible they are not displayed.
Windows shows the status of each wireless network graphically and provides information on the signal strength, the network name and whether security settings were made
for the respective network.
48
Page 49

Local network configuration
ì
ì
ì
An example for Windows Vista is given below.
To sign your computer on to your own wireless network, double-click the name
(SSID) of your network.
If encryption is defined on the Gigaset SE587 WLAN dsl, you will be asked to type in the
key entered there (WEP key or Pre-Shared Key).
Enter the appropriate key.
Click Connect.
The wireless connection is established automatically.
49
Page 50

ì
ì
ì
ì
ì
Local network configuration
Mac OS X
If Mac OS X receives signals of wireless networks in the current environment
this will be indicated by the symbol for the wireless network connection in the
status area of the menu bar.
If Mac OS X sees wireless networks without security settings in the current environment,
a message appears after booting the computer stating that you can connect your computer to an open network. Even if your router has no security settings in the default
mode, you should avoid working with an unsecured wireless network. First carry out the
security settings of your router.
Click the symbol for the wireless network connection in the status area of the menu
bar.
A list opens showing all wireless networks available in the second section.
Note:
AirPort (WLAN) must be activated so that Mac OS X can display and manage wireless
networks. If nothing is displayed on your Mac despite there being wireless networks
within range, check whether AirPort is activated and activate it if necessary.
You can find this setting in the first section of the list for the wireless networks. If
AirPort is deactivated, click the option AirPort: On.
Network list
All wireless networks that can be seen at the current location appear in the network list.
If the SSIDs of the wireless networks are set to invisible they are not displayed.
To sign your computer on to your own wireless network, click the name (SSID) of
your network.
If encryption is defined on the Gigaset SE587 WLAN dsl, you will be asked to type in the
key entered there (e. g. WEP key or Pre-Shared Key).
Enter the appropriate key.
Click Connect.
The wireless connection is established automatically.
50
Page 51

Local network configuration
ì
ì
Network configuration with Windows Vista
Showing networks
You can view the available networks by clicking the icon on the taskbar.
Click the icon.
Networks that are currently connected are displayed.
Click Network and Sharing Center.
51
Page 52

ì
ì
ì
Local network configuration
An overview of your PC's network connections are displayed in the Network and Sharing
Center. You can start all actions for your network configuration from here.
Changing the settings for IP addresses
The IP addressing settings can be checked and modified as follows:
Click View status next to the network connection used to connect your PC to the
Gigaset SE587 WLAN dsl.
Click Properties.
Choose the entry Internet Protocol Version 4 (TCP/IPv4) and click Properties
again.
52
Page 53

Local network configuration
ì
ì
ì
ì
ì
ì
ì
ì
ì
Obtaining an IP address automatically
If the DHCP server of your router/access point is active and the PC is to obtain its IP
address automatically, the Obtain an IP address automatically and Obtain DNS
server address automatically options must be activated.
Check whether these options are selected and mark them if necessary.
Click OK and close the following windows with OK to save your network configura-
tion.
Assigning an IP address statically
If the DHCP server of your router/access point is not active or the PC is to be assigned a
static IP address for other reasons, the following settings must be made:
Select the option Use the following IP address.
Enter the IP address for the PC in the IP address field.
Enter the subnet mask to be used in your network in the Subnet mask field. You can
check these settings if necessary in the LAN configuration for your router/access
point.
Enter the IP address for the router/access point in the Default gateway field.
Select the option Use the following DNS server addresses.
Enter the IP address for the router/access point in the Preferred DNS server field.
Click OK and then Close to close all windows.
53
Page 54

ì
ì
ì
ì
ì
ì
ì
ì
Local network configuration
Selecting a computer name and workgroup
Your PC is assigned a name during installation and assigned to the default workgroup
WORKGROUP. To change the name or the workgroup assignment, you have to:
Click Start - Control Panel – System and Maintenance.
Click the entry Show computer name under System.
The name of the PC and its workgroup are displayed in the window.
Click Change settings.
You can enter a description for the PC in the Computer description field on the
Computer Name tab. You do not have to fill in this field however.
Click Change.
Enter the name the PC is to appear under in the network. This name must be unique
within the network.
Enter a name for the workgroup to which the PC is to be assigned. This name must
be identical on all PCs for the same workgroup.
Click OK.
54
Page 55

ì
ì
Local network configuration
Network configuration with Windows XP
Note:
The names of the menu items may differ slightly from one version of Windows XP to
another. However, the configuration settings described below generally apply.
Showing networks
Click Start – Control Panel and select Network Connections or
Click the network icon in the status area of the taskbar.
The configured networks are displayed.
55
Page 56

ì
ì
ì
Local network configuration
Changing the settings for IP addresses
The IP addressing settings can be checked and modified as follows:
Double-click the wireless network or local area connection used to connect your PC
to the Gigaset SE587 WLAN dsl.
The status window for the connection is opened.
Click Properties.
Select Internet Protocol (TCP/IP) and click Properties.
56
Page 57

Local network configuration
ì
ì
ì
ì
ì
ì
ì
ì
ì
Obtaining an IP address automatically
If the DHCP server of your router/access point is active and the PC is to obtain its IP
address automatically, the Obtain an IP address automatically and Obtain DNS
server address automatically options must be activated.
Check whether these options are selected and mark them if necessary.
Click OK and close the following windows with OK to save your network configura-
tion.
Assigning an IP address statically
If the DHCP server of your router/access point is not active or the PC is to be assigned a
static IP address for other reasons, the following settings must be made:
Select the option Use the following IP address.
Enter the IP address for the PC in the IP address field.
Enter the subnet mask to be used in your network in the Subnet mask field. You can
check these settings if necessary in the LAN configuration for your router/access
point.
Enter the IP address for the router/access point in the Default gateway field.
Select the option Use the following DNS server addresses.
Enter the IP address for the router/access point in the Preferred DNS server field.
Click OK and then Close to close all windows.
57
Page 58

ì
ì
ì
ì
ì
ì
ì
ì
ì
Local network configuration
Selecting a computer name and workgroup
Your PC is assigned a name during installation and assigned to the default workgroup
WORKGROUP. To change the name or the workgroup assignment, you have to:
Click Start - Control Panel – System.
Select the Computer Name tab.
The name of the PC and its workgroup are displayed in the window.
You can enter a description for the PC in the Computer description field on the
Computer Name tab. You do not have to fill in this field however.
Click Change.
Enter the name the PC is to appear under in the network. This name must be unique
within the network.
Enter a name for the workgroup to which the PC is to be assigned. This name must
be identical on all PCs for the same workgroup.
Click OK.
Network configuration with Windows 2000
Showing networks
Click Start – Settings – Control Panel.
Double-click the Network and Dial-up Connections icon.
All available networks are displayed.
58
Page 59

ì
ì
ì
Local network configuration
Changing the settings for IP addresses
The IP addressing settings can be checked and modified as follows:
Double-click the wireless network or local area connection used to connect your PC
to the Gigaset SE587 WLAN dsl.
The status window for the connection is opened.
Click Properties.
Select Internet Protocol (TCP/IP) and click Properties.
59
Page 60

Local network configuration
ì
ì
ì
ì
ì
ì
ì
ì
ì
Obtaining an IP address automatically
If the DHCP server of your router/access point is active and the PC is to obtain its IP
address automatically, the Obtain an IP address automatically and Obtain DNS
server address automatically options must be activated.
Check whether these options are selected and mark them if necessary.
Click OK and close the following windows with OK to save your network configura-
tion.
Assigning an IP address statically
If the DHCP server of your router/access point is not active or the PC is to be assigned a
static IP address for other reasons, the following settings must be made:
Select the option Use the following IP address.
Enter the IP address for the PC in the IP address field.
Enter the subnet mask to be used in your network in the Subnet mask field. You can
check these settings if necessary in the LAN configuration for your router/access
point.
Enter the IP address for the router/access point in the Default gateway field.
Select the option Use the following DNS server addresses.
Enter the IP address for the router/access point in the Preferred DNS server field.
Click OK and then Close to close all windows.
60
Page 61

Local network configuration
ì
ì
ì
ì
ì
ì
ì
ì
ì
Selecting a computer name and workgroup
Your PC is assigned a name during installation and assigned to the default workgroup
WORKGROUP. To change the name or the workgroup assignment, you have to:
Click Start – Settings – Control Panel – System.
Select the Network Identification tab and click Properties.
In the Computer Name field, enter the name the PC is to appear under in the net-
work. This name must be unique within the network.
In the Workgroup field, enter a name for the workgroup. This name must be the
same for all the PCs in the network.
Confirm this with OK.
Network configuration with Windows 98, SE, ME
To integrate a PC with Windows 98 SE or ME into a local network, you have to carry out
the following steps:
1. Set up the PC as a client for Microsoft networks (see below).
2. Select computer names and workgroup (see page 62).
3. Install the TCP/IP protocol (see page 63).
4. Make TCP/IP protocol settings (see page 64).
5. Synchronise the TCP/IP settings with the Gigaset SE587 WLAN dsl (see page 71).
Have your Windows Installation CD to hand. You may be prompted to insert it.
Setting up a PC as a client for Microsoft networks
Before the PCs in your network can work together, you have to configure them as clients
of a Microsoft network. This is done as follows:
Click Start – Settings – Control Panel.
Double-click the Network icon and then open the Configuration tab in the Net-
work window.
Check whether the list of components contains the entry Client for Microsoft
Networks.
If it is not there click Add.
61
Page 62

ì
ì
ì
ì
ì
ì
Local network configuration
Select Client as the network component type and click Add.
Under Manufacturers select Microsoft and under Network Clients select Client
for Microsoft Networks.
Confirm this with OK.
Selecting a computer name and workgroup
You now have to specify a name for the PC and assign it to a workgroup.
In the Network window, change from the Configuration tab to Identification.
In the Computer Name field, enter the name the PC is to appear under in the net-
work. This name must be unique within the network.
In the Workgroup field, enter a name for the workgroup. This name must be the
same for all the PCs in the network.
The Computer Description field can be left blank.
62
Page 63

ì
ì
ì
ì
ì
Local network configuration
Installing the TCP/IP protocol
The TCP/IP protocol ensures that the PCs in the network can communicate with each
other. You must first install this protocol for the network adapter that establishes the
connection with the Gigaset SE587 WLAN dsl.
In the Network window, change from the Identification tab to Configuration.
In the Network window, check that there is a TCP/IP -> entry for your network card
or network adapter in the list of components. If, for example, you are using a Gigaset
PC Card 108 as the wireless network adapter, the list must contain the entry TCP/IP
-> Siemens Gigaset PC Card 108.
If the entry does not exist, click Add.
.
Select Protocol as the network component type and click Add.
Under Manufacturers select Microsoft and under Network Protocols select TCP/IP,
and click OK to confirm.
63
Page 64

ì
ì
ì
ì
Local network configuration
Making TCP/IP settings
The TCP/IP protocol requires certain settings, which you should now make so that it can
function smoothly.
In the Network window, change to the Configuration tab.
Select the TCP/IP entry for your network card.
Click Properties.
Open the IP Address tab.
64
Page 65

ì
ì
ì
ì
ì
ì
Local network configuration
Obtaining an IP address automatically
If Obtain an IP address automatically has been activated, your PC is already con-
figured for DHCP. Click Cancel and close the following windows with OK to start
your network configuration.
You may be prompted to insert your Windows installation CD. Follow the instruc-
tions in the installation procedure.
Once the copying procedure is completed, you will be prompted to reboot your sys-
tem.
Click Yes. The PC will then be shut down and rebooted.
If Obtain an IP address automatically has not been activated, activate this option
now.
Open the Gateway tab and remove any entries in the Installed gateways list.
Open the DNS Configuration tab.
Select Disable DNS.
65
Page 66

ì
ì
ì
ì
ì
ì
ì
ì
ì
ì
ì
ì
ì
Local network configuration
Click OK.
Finish the network configuration with OK.
You may be prompted to insert your Windows installation CD. Follow the instruc-
tions in the installation procedure.
Once the copying procedure is completed, you will be prompted to reboot your sys-
tem.
Click Yes. The PC will then be shut down and rebooted.
Assigning an IP address statically
If the DHCP server of your router/access point is not active or the PC is to be assigned a
static IP address for other reasons, the following settings must be made:
Select the option Specify an IP address on the IP Address tab.
Enter the IP address for the PC in the IP Address field.
Enter the subnet mask to be used in your network in the Subnet Mask field. You can
check these settings if necessary in the LAN configuration for your router/access
point.
Open the Gateway tab and enter the IP address of the router/access point in the
New gateway field or choose this, if available, from the Installed gateways list.
Open the DNS Configuration tab.
Select Enable DNS.
Enter the IP address for the router/access point in the DNS Server Search Order field
and click Add.
Click OK.
Finish the network configuration with OK.
You may be prompted to insert your Windows installation CD. Follow the instruc-
tions in the installation procedure.
Once the copying procedure is completed, you will be prompted to reboot your sys-
tem.
Click Yes. The PC will then be shut down and rebooted.
66
Page 67

ì
ì
Local network configuration
Network configuration with Mac OS X
Showing networks
To configure your network click the apple icon on the left side of the menu bar
and choose System Preferences.
Choose Network.
Choose from the list Show the option AirPort, if your Mac is connected wirelessly to
the network and choose the option Built-in Ethernet if your Mac is connected via
cable.
You can start all actions for your network configuration from here.
67
Page 68

ì
ì
Local network configuration
Changing the settings for IP addresses
The IP addressing settings can be checked and modified as follows:
Obtaining an IP address automatically
If the DHCP server of your router/access point is active and your Mac is to obtain its IP
address automatically, you must choose the option DHCP from the Configure IPv4 list.
Check whether this option is selected and select it if necessary.
Click Apply Now to save your network configuration.
68
Page 69

ì
ì
ì
ì
ì
ì
ì
ì
ì
ì
ì
ì
ì
Local network configuration
Assigning an IP address statically
If the DHCP server of your router/access point is not active or your Mac is to be assigned
a static IP address for other reasons, the following settings must be made:
Select the tab TCP/IP.
Choose the option Manually from the Configure IPv4 list.
Enter the IP address for your Mac in the IP Address field.
Enter the subnet mask to be used in your network in the Subnet Mask field. You can
check these settings if necessary in the LAN configuration for your router/access
point.
Enter the IP address for the router/access point in the Router field.
Select the option Use the following DNS server addresses.
Enter the IP address for the router/access point in the DNS Servers field.
Click Apply Now.
Selecting a computer name
Your Mac is assigned a name during installation. To change the name assignment, you
have to:
Click the Apple icon on the left side of the menu bar and choose
System Preferences.
Click Sharing.
The name of your Mac is shown is the Computer Name field.
Click Edit.
Enter the name the Mac is to appear under in the network. This name must be
unique within the network.
Click OK.
69
Page 70

ì
ì
ì
ì
ì
ì
ì
Local network configuration
Synchronising TCP/IP settings
If you have made changes to the network configuration on your computer or have connected it to a different Gigaset SE587 WLAN dsl, you may have to release the old TCP/IP
settings and synchronise them with the settings for your router/access point. The software for your wireless adapter normally provides synchronisation functions. If this is not
the case, you can use the following Windows operating system resources.
Windows Vista, Windows XP, Windows 2000
Open the Windows command prompt. From the Start menu of the Windows taskbar,
click Start – All Programs – Accessories – Command Prompt.
In the Command Prompt window, enter the
ipconfig /release command and press the ENTER key.
Information for Windows Vista:
Windows Vista requires more advanced rights to execute this command (even if your
user account has administrator rights). Carry out the following steps:
Click Start.
Enter Command prompt in the search box.
Right-click Command Prompt in the result list and select Run as administrator.
If prompted to enter the administrator password or a confirmation, then do this.
The command prompt is opened and you can execute the command.
Then enter the ipconfig /renew command and press the ENTER key.
70
Page 71

Local network configuration
ì
ì
ì
If the default IP address of the router/access point (192.168.254.254) was not changed,
the IP address should now read 192.168.254.x (with x being a number between 1 and
253). The Subnet Mask must always be the same as that set on the Gigaset SE587
WLAN dsl (normally 255.255.255.0) and the Default Gateway must have the IP
address of the router/access point (192.168.254.254). These values confirm that your
Gigaset SE587 WLAN dsl is working.
Enter exit and press the Enter key to close the Command Prompt window.
Windows 98 SE, ME
Click Start – Run.
Enter WINIPCFG and click OK.
There may be a slight delay before the IP Configuration window appears.
71
Page 72

Local network configuration
ì
ì
ì
Select your network adapter from the selection list.
Click Release and then Renew.
If the default IP address of the router/access point (192.168.254.254) was not changed,
the IP address should now read 192.168.254.x (with x being a number between 1 and
253). The Subnet Mask must always be the same as that set on the Gigaset SE587
WLAN dsl (normally 255.255.255.0) and the Default Gateway must have the IP
address of the router/access point (192.168.254.254). These values confirm that your
Gigaset SE587 WLAN dsl is working.
Click OK to close the IP Configuration window.
72
Page 73

ì
ì
ì
ì
ì
Local network configuration
Mac OS X
Click the Apple icon on the left side of the menu bar and choose System
Preferences.
Choose Network.
Choose from the list Show the option AirPort, if your Mac is connected wirelessly to
the network and choose the option Built-in Ethernet if your Mac is connected via
cable.
Select the tab TCP/IP.
Click the option Renew DHCP Lease.
If the default IP address of the router/access point (192.168.254.254) was not changed,
the IP address should now read 192.168.254.x (with x being a number between 1 and
253). The Subnet Mask must always be the same as that set on the Gigaset SE587
WLAN dsl (normally 255.255.255.0) and the Router must have the IP address of the
router/access point (192.168.254.254). These values confirm that your Gigaset SE587
WLAN dsl is working.
73
Page 74

ì
ì
ì
Local network configuration
Checking the connection to the Gigaset SE587 WLAN dsl
Once the network has been set up on your computer, you can check whether the computer is correctly connected to the Gigaset SE587 WLAN dsl. This can be done as follows:
Windows operating systems
Open Command Prompt. To do this click
Start – All Programs – Accessories – Command Prompt.
Mac OS X
Open the Termi nal. Then open a Finder window and open Applications. Choose
the folder Utilities and double-click the Terminal.
The ping command
Enter the command ping 192.168.254.254.
Please remember:
If the IP address of the router/access point has been changed, enter the new IP
address.
The ping command sends data packets to the Gigaset SE587 WLAN dsl with the specified IP address and checks whether the router responds. If this is the case, the command
shows statistics about the connection, for example how many data packets were sent,
how many received, how long the transfer took, etc. If you can see this information,
then the connection to the router is functioning correctly.
If the command does not return any statistics, but ends with a timeout, this means that
the components cannot communicate with each other. Check the following points:
1. Is the Ethernet cable between the Gigaset SE587 WLAN dsl and the PC properly con-
nected or is there a wireless connection via a wireless network adapter?
The LED display for the LAN connections on the Gigaset SE587 WLAN dsl and link
display for the network card in your PC must be illuminated. For wireless connec-
tions, the WLAN monitor on your PC must display connection information.
2. Has TCP/IP been properly configured on your PC?
If the Gigaset SE587 WLAN dsl has the IP address 192.168.254.254, your PC's IP
address must be between 192.168.254.1 and 192.168.254.253. The default gate-
way must have the address 192.168.254.254.
If you can successfully address the Gigaset SE587 WLAN dsl with the ping command,
then the PC has been configured correctly.
Please remember:
If the command does not end with a timeout, press the key combination Crtl-C.
74
Page 75

ì
ì
ì
ì
ì
ì
ì
ì
ì
ì
Local network configuration
Establishing the IP and MAC addresses in the network
You will need the IP address or the MAC address of the relevant computers for some of
the settings.
The MAC address (Media Access Control) is used for the globally unique identification of
a network adapter. It comprises six parts (hex digits), e. g. 00-90-96-34-00-1A. With
many components, you will find the MAC address on the nameplate of the device.
Windows Vista
This is how you determine the IP and MAC address of PCs:
Click the network icon in the taskbar .
Click Network and Sharing Center.
Click View status next to the network connection used to connect your PC to the
Gigaset SE587 WLAN dsl.
Click Details.
You will find the IP address next to IPv4 IP Address and the MAC address next to the
entry Physical Address.
Windows XP SP2
This is how you determine the IP and MAC address of PCs:
Click Start – Control Panel – Network Connections to view the current network
connections.
Double-click the network connection used to connect your PC to the Gigaset SE587
WLAN dsl.
Open the Support tab in the Local Area Connection Status window.
Click Details.
You will find the MAC address next to the entry Physical Address.
Windows XP, Windows 2000, Windows 98 SE/ME
If you are using older Windows systems, you can determine the IP and MAC address by
entering the ipconfig command at the command prompt.
Open Command Prompt. To do this click
Start – All Programs – Accessories – Command Prompt.
In the Command Prompt window, enter the
ipconfig /all command and press the ENTER key.
You will find the MAC address next to the entry Physical Address under the network
adapter used to connect your PC to the Gigaset SE587 WLAN dsl.
75
Page 76

ì
ì
ì
ì
ì
Local network configuration
Mac OS X
This is how you determine the IP and MAC address of Macs:
Click the Apple icon on the left side of the menu bar .
Click System Preferences.
Click Network.
Choose from the list Show the option Built-in Ethernet if your Mac is connected to
the network by wire. Select the tab TCP/IP. You will find the IP Address in the IP
Address field. To identify the Mac Address select the tab Ethernet. You will find the
Mac Address in the Ethernet ID field.
Choose from the list Show the option AirPort, if your Mac is connected to the net-
work wirelessly. Select the tab TCP/IP. You will find the IP Address in the IP Address
field. To identify the Mac Address select the tab AirPort. You will find the Mac
Address in the AiPort ID field.
76
Page 77

Appendix
ì
ì
ì
ì
ì
ì
ì
ì
ì
Appendix
Troubleshooting
This section describes common problems and their solutions. The Gigaset SE587 WLAN
dsl is easy to monitor thanks to its LED displays. Problems can be quickly identified. If
you cannot solve connection problems after checking the LED displays, please consult
the other sections shown in the following table.
Symptom Possible cause and remedial actions
Power lamp does not
light up.
The LAN LED for a connected device does not
light up.
You cannot connect to
the Internet.
No power supply.
Check whether the power adapter is connected to the
Gigaset SE587 WLAN dsl and a power outlet.
Check whether the power outlet and the power adapter
are working correctly. If the power adapter is not working properly, contact your Interenet service provider’s
service.
No LAN connection.
Make sure that the connected device is switched on.
Check whether the Ethernet cable is plugged in.
Check that you are using the right cable type (CAT5) and
that the cable is not too long (<100 m).
Check that the network card on the connected device
and the cable connections are not defective. If necessary, replace a defective network card or cable.
Use the Windows device manager (My Computer –
Properties) to check whether the network card is functioning. If you see a red cross or a question mark, then
the driver may not have been installed or there is a
resource conflict. Follow the Windows instructions to
remedy the problem.
Make sure that you have entered the access data supplied by your Internet service provider correctly.
There may be a problem at the service provider end. Get
in touch with your Internet service provider.
77
Page 78

Appendix
ì
ì
ì
ì
ì
ì
Symptom Possible cause and remedial actions
You cannot open a connection from a wireless
device to the Gigaset
SE587 WLAN dsl.
The Gigaset SE587
WLAN dsl or other PCs
cannot be reached by a
PC in the connected
LAN with a ping command.
The wireless network adapter is not using the correct SSID.
Connect the wireless clients to the wireless network
with the correct SSID.
Encryption is possibly enabled on the Gigaset SE587 WLAN
dsl but not on the wireless network adapter, or it is not using
the correct key, or it is using another type of encryption.
Activate the same encryption on the network adapter
with the correct key (see page 31).
If you do not know the key, you will have to reset the
Gigaset SE587 WLAN dsl (see page 7).
Warning: Please bear in mind that this will return all the
configuration settings to the factory settings.
The Wireless Network function is deactivated.
Check whether the Wireless Network function is deactivated and, if so, activate it (see page 29).
The PC does not have a wireless connection.
Use the Windows device manager (My Computer –
Properties) to check whether the network connection is
functioning. If you see a red cross or a question mark,
then the driver may not have been installed or there is a
resource conflict. Follow the Windows instructions to
remedy the problem.
Make sure that the network is configured correctly on all
the PCs in the local network.
Check that the IP addresses have been correctly configured. In most cases you can use the DHCP function of
the Gigaset SE587 WLAN dsl to assign dynamic
addresses to the PCs in the LAN. In this case, you must
configure the TCP/IP settings of all the PCs so that they
obtain their IP address automatically.
If you configure the IP addresses in the LAN manually,
remember to use subnet mask 255.255.255.x. This
means that the first three parts of the IP address on each
PC and the Gigaset SE587 WLAN dsl must be identical.
The device must also be configured as DNS server.
Detailed information on network configuration can be
found from page 45 onwards.
78
Page 79

ì
ì
ì
ì
ì
ì
ì
ì
ì
ì
ì
ì
ì
ì
ì
Symptom Possible cause and remedial actions
No connection to the
Gigaset SE587 WLAN
dsl's configuration
interface.
Password forgotten or
lost
You cannot access a
resource (drive or
printer) on another PC.
The transmission rate is
too low. For example,
there are pixel errors
with video streaming.
Use the ping command to check whether you can
establish a network connection to the Gigaset SE587
WLAN dsl.
Check the network cable between the PC you want to
use to manage the device and the Gigaset SE587 WLAN
dsl.
If the PC you want to use is in the router's local network,
make sure that you are using the correct IP address
administration (see above).
If the PC you want to use is not in the router's local network, it must be authorized via Remote Management.
Reset the Gigaset SE587 WLAN dsl (see page 8).
Warning: Please bear in mind that this will return all the
configuration settings to the factory settings.
Make sure that the network is configured correctly on all
the PCs in the local network and that the PCs all belong
to the same workgroup.
Check whether the resource has been released on the
PC in question and whether you have the necessary
access rights.
Printing: Check whether the printer has been set up as a
network printer.
Radio data transmission depends on the operating environment, for example the building stock or the influence of other devices in the vicinity that transmit in the
2.4-GHz frequency range.
Arrange your wireless devices closer together.
Change the antenna direction.
Position the device elsewhere.
Switch off other radio sources in the vicinity. They may
interfere with data transmission.
Choose a different channel.
Check to see if the problem also arises with a different
type of encryption.
Appendix
79
Page 80

Appendix
Specifications
Interfaces
1 DSL modem RJ11, ITU G.992.5, Annex A
4 LAN RJ45, 10Base-T/100Base-TX, Autosensing, MDI/MDIX
WLAN IEEE 802.11g
Wireless properties
Frequency range 2,400 to 2,484 GHz ISM band
Number of channels 13
Transmission rate IEEE 802.11b: up to 11 Mbps
IEEE 802.11g: up to 54 Mbps
Range approx. 50 m indoors, up to 300 m outdoors
Operating environment
Temperature Operating temperature 0 to 40°C
Storage temperature -20 to 70°C
Humidity 5% to 90% (non condensing)
LED displays
Compliance with security conditions and regulations
Software
Power
Internet (activity, status)
WLAN (activity, wireless)
ADSL (ADSL connection, synchronisation)
LAN1... LAN4 (connection to PC or set-top box, activity,
wired)
CE, EN60950
Browser-based configuration environment
PPPoA, IPoEoA
DHCP server and client
NAT, Port Forwarding, DMZ
Firewall, prevention of hacker attacks
URL filtering,
WPA2-PSK/WPA-PSK encryption
WEP encryption
80
Page 81

Glossary
Glossary
Access point
An access point, such as the Gigaset SE587 WLAN dsl, is the centre of a wireless local
network (WLAN). It handles the connection of the wireless linked network components
and regulates data traffic in the wireless network. The access point also serves as an
interface to other networks, for example an existing Ethernet LAN or via a modem to the
Internet. The operating mode of wireless networks with an access point is called
Infrastructure mode.
Ad-hoc mode
Ad-hoc mode describes wireless local networks (WLANs) in which the network components set up a spontaneous network without an Access point, for example several Notebooks in a conference. All the network components are peers. They must have a wireless Network adapter.
ADSL
Asymmetric Digital Subscriber Line (ADSL) and ADSL 2+ are special types of DSL data
transfer technology.
AES
Advanced Encryption Standard
AES is an encryption system published as a standard in October 2000 by the National
Institute of Standards and Technology (NIST). It is used for WPA encryption. A distinction
is made between the three AES variants AES-128, AES-192 and AES-256 on the basis of
the key length.
Auto connect
Auto connect means that applications such as Web browser, Messenger and E-mail
automatically open an Internet connection when they are launched. This can lead to
high charges if you are not using a Flat rate. To avoid this, you can select the manual
connection option on the Gigaset SE587 WLAN dsl.
Bridge
A bridge connects several network segments to form a joint network, for example to
make a TCP/IP network. The segments can have different physical characteristics, for
example different cabling as with Ethernet and wireless LANs. Linking individual seg-
ments via bridges allows local networks of practically unlimited size.
See also: Switch, Hub, Router, Gateway
Broadcast
A broadcast is a data packet not directed to a particular recipient but to all the network
components in the network. The Gigaset SE587 WLAN dsl does not pass on broadcast
packets; they always remain within the local network (LAN) it administers.
81
Page 82

Glossary
BSSID
Basic Service Set ID
BSSID permits unique differentiation of one wireless network (WLAN) from another. In
Infrastructure mode, the BSSID is the MAC address of the Access point. In wireless net-
works in Ad-hoc mode, the BSSID is the MAC address of any one of the participants.
Client
A client is an application that requests a service from a server. For example, an HTTP client on a PC in a local network requests data, i.e. Web pages from an HTTP server on the
Internet. Frequently the network component (e.g. the PC) on which the client applica-
tion is running is also called a client.
DHCP
Dynamic Host Configuration Protocol
DHCP handles the automatic assignment of IP addresses to network components. It was
developed because of the complexity involved in defining IP addresses in large networks
– especially the Internet – as participants frequently move, drop out or new ones join.
A DHCP server automatically assigns the connected network components (DHCP Cli-
ents) Dynamic IP addresses from a defined IP pool range thus saving a great deal of con-
figuration work. In addition, the address blocks can be used more effectively: Since not
all participants are on the network at the same time, the same IP address can be
assigned to different network components in succession as and when required.
The Gigaset SE587 WLAN dsl includes a DHCP server and uses it to assign IP addresses
automatically to PCs in the local network. You can specify that the IP addresses for certain PCs are never changed.
DHCP server
See DHCP
DMZ
Demilitarised Zone
DMZ describes a part of a network that is outside the Firewall. A DMZ is set up, as it
were, between a network you want to protect (e.g. a LAN) and a non-secure network
(e.g. the Internet). A DMZ is useful if you want to offer Server services on the Internet
that are not to be run from behind the firewall for security reasons, or if Internet applications do not work correctly behind a firewall. A DMZ permits unrestricted access from
the Internet to only one or a few network components, while the other network components remain secure behind the firewall.
82
Page 83

Glossary
DNS
Domain Name System
DNS permits the assignment of IP addresses to computers or Domain names that are
easier to remember. A DNS server must administer this information for each LAN with
an Internet connection. As soon as a page on the Internet is called up, the browser
obtains the corresponding IP address from the DNS server so that it can establish the
connection.
On the Internet, the assignment of domain names to IP addresses follows a hierarchical
system. A local PC only knows the address of the local name server. This in turn knows
all the addresses of the PCs in the local network and the superordinate name servers,
which again know addresses of the next superordinate name servers.
DNS server
See DNS
Domain name
The domain name is the reference to one or more Web servers on the Internet. The
domain name is mapped via the DNS service to the corresponding IP address.
DoS attack
Denial of Service
A DoS attack is a particular form of hacker attack directed at computers and networks
with a connection to the Internet. The aim is not so much to steal data but to paralyse
the computer or network so severely that the network resources are no longer available.
A typical hacker attack involves making a remote computer announce that it is acting for
the paralysed computer, for example, and receive the data intended for you.
DSL
Digital Subscriber Line
DSL is a data transfer technique in which a connection to the Internet can be run at high
speed over normal telephone lines. A DSL connection is provided by an Internet service
provider. It requires a DSL modem.
Dynamic IP address
A dynamic IP address is assigned to a network component automatically by DHCP. This
means that the IP address of a network component can change with every login or at
certain intervals.
See also: Static IP address
83
Page 84

Glossary
DynDNS
Dynamic DNS
The assignment of Domain names and IP addresses is handled by the Domain Name
Service (DNS). This service is now enhanced with so-called Dynamic DNS (DynDNS) for
Dynamic IP addresses. This enables the use of a network component with a dynamic IP
address as a Server on the Internet. DynDNS ensures that a service can always be
addressed on the Internet under the same domain name regardless of the current IP
address.
Encryption
Encryption protects confidential information against unauthorized access. With an
encryption system, data packets can be sent securely over a network. The Gigaset SE587
WLAN dsl offers WEP encryption and WPA for secure data transfer over wireless networks.
Ethernet
Ethernet is a network technology for local networks (LANs) defined by the IEEE as standard IEEE 802.3. Ethernet uses a base-band cable with a transfer rate of 10 or 100 Mbps
or 1 Gbps.
Firewall
Firewalls are used by network operators as protection against unauthorized external
access. This involves a whole bundle of hardware and software actions and technologies
that monitor and control the data flow between the private network to be protected and
an unprotected network such as the Internet.
See also: NAT
Flat rate
Flat rate is a particular billing system for Internet connections. The Internet service pro-
vider charges a monthly fee regardless of the duration and number of logins.
FTP (File Transfer Protocol)
FTP is a protocol for exchanging files on the Internet. You can use it, for example, to offer
files for downloading or to receive files from other users.
Full duplex
Data transfer mode in which data can be sent and received at the same time.
See also: Half duplex
Gateway
A gateway is a device for connecting networks with completely different architectures
(addressing, protocols, application interfaces etc.). Although it is not totally correct, the
term is also used as a synonym for Router.
Global IP address
See Public IP address
84
Page 85

Glossary
Half duplex
Operating mode for data transmission. Only one side can send and/or receive data at
the same time.
See also: Full duplex
HTTP proxy
An HTTP proxy is a Server that network components use for their Internet traffic. All
requests are sent via the proxy.
Hub
A hub connects several network components in a star-topology network by sending all
the data it receives from one network component to all the other network components.
See also: Switch, Bridge, Router, Gateway
IEEE
Institute of Electrical and Electronic Engineers
The IEEE is an international body for defining network standards, especially for standardising LAN technologies, transfer protocols, data transfer speeds and wiring.
IEEE 802.11
IEEE 802.11 is a standard for wireless LANs operating in the 2.4 GHz or 5 GHz band. In
the so-called Infrastructure mode, terminals can be connected to a base station (Access
point) or they can connect with each other spontaneously (Ad-hoc mode).
IGMP
Internet Group Management Protocol
IGMP is an Internet Protocol that enables an Internet computer to inform neighbouring
routers that it is a member of a multicast group. With multicasting, a computer can send
content on the Internet to several other computers that have registered an interest in
the first computer's content. Multicasting can, for example, be used for multimedia programs for media streaming to recipients that have set up multicast group membership.
Infrastructure mode
Infrastructure mode is a way of operating wireless local networks (WLANs) in which an
Access point handles the data traffic. Network components cannot establish a direct
connection with each other as is the case in Ad-hoc mode.
85
Page 86

Glossary
Internet
The Internet is a wide-area network (WAN) linking several million users around the
world. A number of Protocols have been created for exchanging data, and these are
known collectively as TCP/IP protocol stack. All participants on the Internet can be identified by an IP address. Servers are addressed by Domain names (e.g. siemens.com).
Domain names are assigned to IP addresses by the Domain Name Service (DNS).
These are some of the main Internet services:
u Electronic mail (e-mail)
u The World Wide Web (WWW)
u File transfer (FTP)
u Discussion forums (Usenet / Newsgroups)
Internet service provider
An Internet service provider offers access to the Internet for a fee.
IP
Internet protocol
The IP Protocol is one of the TCP/IP protocols. It is responsible for addressing parties in a
network using IP addresses and routes data from the sender to the recipient. It decides
the paths along which the data packets travel from the sender to the recipient in a complex network (routing).
IP address
The IP address is the unique network-wide address of a network component in a network based on the TCP/IP protocols (e.g. in a local area network (LAN) or on the Inter-
net). The IP address has four parts (each with up to three-position digit sequences) sep-
arated by full stops (e.g. 192.168.1.1). The IP address comprises the network number
and the computer number. Depending on the Subnet mask, one, two or three parts
form the network number; the remainder form the computer number. You can find out
the IP address of your PC using the ipconfig command.
IP addresses can be assigned manually (see Static IP address) or automatically (see
Dynamic IP address).
On the Internet Domain names are normally used instead of IP addresses. The DNS is
used to assign domain names to IP addresses.
The Gigaset SE587 WLAN dsl has a Private IP address and a Public IP address.
IPoA
IP over ATM
IP pool range
The Gigaset SE587 WLAN dsl's IP address pool defines a range of IP addresses that the
router's DHCP server can use to assign Dynamic IP addresses.
86
Page 87

Glossary
ISP
See Internet service provider
LAN
Local network
A local area network (or local network) links network components so that they can
exchange data and share resources. The physical range is restricted to a particular area
(a site). As a rule the users and operators are identical. A local network can be connected
to other local networks or to a wide-area network (WAN) such as the Internet.
With the Gigaset SE587 WLAN dsl you can set up a wired local Ethernet network and a
wireless IEEE 802.11g standard network (WLAN).
Local IP address
See Private IP address
MAC address
Media Access Control
The MAC address is used for the globally unique identification of Network adapters. It
comprises six parts (hexadecimal numbers), e.g. 00-90-96-34-00-1A. The MAC address
is assigned by the network adapter manufacturer and should not be changed.
Mbps
Million bits per second
Specification of the transfer speed in a network.
MER
MAC Encapsulated Routing
MRU
Maximum Receive Unit
The MRU defines the maximum user data volume within a data packet.
MTU
Maximum Transmission Unit
The MTU defines the maximum length of a data packet that can be carried over the network at any one time.
87
Page 88

Glossary
NAT
Network Address Translation
NAT is a method for converting IP addresses (Private IP addresses) within a network into
one or several Public IP addresses on the Internet. With NAT, several network compo-
nents in a LAN can share the router's public IP address to connect to the Internet. The
network components of the local network are hidden behind the router's IP address registered on the Internet. Because of this security function, NAT is frequently used as part
of the Firewall of a network. If you want to make services on a PC in the local network
available on the Internet despite NAT, you can configure the Gigaset SE587 WLAN dsl as
a Virtual server.
Network
A network is a group of devices connected in wired or wireless mode so that they can
share resources such as data and peripherals. A general distinction is made between
local networks (LANs) and wide-area networks (WANs).
Network adapter
The network adapter is the hardware device that creates the connection between a network component and a local network. The connection can be wired or wireless. An Ethernet network card is an example of a wired network adapter. The Gigaset PC Card 108
and the Gigaset USB Adapter 108 are examples of wireless network adapters.
A network adapter has a unique address, the MAC address.
Public IP address
The public IP address (also known as the global IP address) is a network component's
address on the Internet. It is assigned by the Internet service provider. Devices that cre-
ate a link from a LAN to the Internet, such as the Gigaset SE587 WLAN dsl, have a public
and a Private IP address.
Port
Data is exchanged between two applications in a network across a port. The port
number addresses an application within a network component. The combination of IP
address/port number uniquely identifies the recipient or sender of a data packet within
a network. Some applications (e.g. Internet services such as HTTP or FTP) work with
fixed port numbers; others are allocated a free port number whenever they need one.
Port forwarding
In port forwarding, the Gigaset SE587 WLAN dsl directs data packets from the Internet
that are addressed to a particular Port to the corresponding port of the appropriate network component. This enables servers within the local network to offer services on the
Internet without them needing a Public IP address.
See also: Virtual server
88
Page 89

Glossary
PPPoA
Point-to-Point Protocol over ATM
PPPoA is a Protocol for connecting network components in a local Ethernet network to
the Internet via an ATM network.
PPPoE
Point-to-Point Protocol over Ethernet
PPPoE is a Protocol for connecting network components in a local Ethernet network to
the Internet via a modem.
Private IP address
The private IP address (also known as the local IP address) is a network component's
address within the local network (LAN). The network operator can assign any address
he or she wants. Devices that act as a link from a local network, such as the Gigaset
SE587 WLAN dsl, have a private and a Public IP address.
Protocol
A protocol describes the agreements for communicating in a network. It contains rules
for opening, administering and closing a connection, as well as in relation to data formats, time frames and possible troubleshooting. Communication between two applications requires different protocols at various levels, for example the TCP/IP protocols for
the Internet.
PVC
Permanent Virtual Circuit
A permanent virtual circuit is a logical connection in an ATM network. Multiple PVCs can
share the same physical connection at the same time.
Radio network
See WLAN
Rekey interval
The rekey interval is the period after which new keys are automatically generated for
data encryption with WPA-PSK.
Remote management
Remote management refers to the ability to manage a network from a network component that is actually outside the local network (LAN).
Repeater
A repeater extends the range of a wireless local network by relaying data from the
Access point to additional PCs or Network adapters.
89
Page 90

Glossary
Roaming
Roaming extends the range of a wireless LAN by using several Access points that use the
same SSID and the same radio channel and are linked via Ethernet. The PCs in the net-
work can switch dynamically between several access points without losing the existing
network connection.
Router
A router directs data packets from one local network (LAN) to another via the fastest
route. A router makes it possible to connect networks that have different network technologies. For example, it can link a local network with Ethernet or WLAN technology to
the Internet.
See also: Bridge, Switch, Hub, Gateway
Server
A server makes a service available to other network components (Clients). The term
"server" is often used to refer to a computer or PC. However, it can also mean an application that provides a particular service such as DNS, Web server, file server or print
server.
SMTP
Simple Mail Transfer Protocol
The SMTP Protocol is part of the TCP/IP protocol family. It governs the exchange of electronic mail on the Internet. Your Internet service provider provides you with access to an
SMTP server.
SNMP
Simple Network Management Protocol
The SNMP Protocol is part of the TCP/IP protocol family. It provides a simple procedure
for administering the network based on a system of shared information for management data and network management messages (known as traps) and reports the occurrence of events within the monitored network (e.g. an alarm message or notification of
configuration changes).
SSID
Service Set Identifier
The SSID is used to identify the stations in a wireless network (WLAN). All wireless network components with the same SSID form a common network. The SSID can be
assigned by the network operator.
Static IP address
A static IP address is assigned to a network component manually during network configuration. Unlike the Dynamic IP address, a static (fixed) IP address never changes.
Subnet
A subnet divides a network into smaller units.
90
Page 91

Glossary
Subnet mask
The subnet mask determines how many parts of IP addresses of a network represent the
network number and how many parts the computer number.
If the subnet mask is in a network that is administered by the Gigaset SE587 WLAN dsl,
for example 255.255.255.0, the first three parts of the IP address form the network
number and only the final part can be used for assigning host numbers. The first three
parts of the IP address of all network components are therefore always the same in this
case.
Switch
A switch, like a Hub, is an element used to link different network segments or components. Unlike a hub however, the switch has its own intelligence that enables it to forward packets to only the subnet or network component for which they are intended.
See also: Bridge, Hub, Router, Gateway
TCP
Transmission Control Protocol
The TCP Protocol is part of the TCP/IP protocol family. TCP handles data transport
between communication partners (applications). TCP is a session-based transfer protocol, i.e. it sets up, monitors and terminates a connection for transferring data.
See also: UDP
TCP/IP
Protocol family on which the Internet is based. IP forms the basis for every computer-to-
computer connection. TCP provides applications with a reliable transmission link in the
form of a continuous data stream. TCP/IP is the basis on which services such as WWW,
Mail and News are built. There are other protocols as well.
TKIP
Temporal Key Integrity Protocol
TKIP is a security protocol used for data Encryption in wireless networks. It is used for
WPA encryption. It was designed to correct deficiencies in the older Wired Equivalent
Privacy (WEP) standard. For this reason TKIP provides per-packet key mixing, a message
integrity check, and a rekeying mechanism. TKIP ensures that every data packet is sent
with its own unique encryption key.
UDP
User Datagram Protocol
UDP is a Protocol of the TCP/IP protocol family that handles data transport between two
communication partners (applications). Unlike TCP, UDP is a non-session based protocol. It does not establish a fixed connection. The recipient is responsible for making sure
the data is received. The sender is not notified about whether it is received or not.
91
Page 92

Glossary
UPnP
Universal Plug and Play
UPnP technology is used for the spontaneous linking of home or small office networks.
Devices that support UPnP carry out their network configuration automatically once
they are connected to a network. They also provide their own services or use services of
other devices in the network automatically.
URL
Universal Resource Locator
Globally unique address of a domain on the Internet.
VCI
Virtual Channel Identifier
Part of an address in an ATM network.
Virtual server
A virtual Server provides a service on the Internet that does not run on itself, but on
another network component. The Gigaset SE587 WLAN dsl can be configured as a virtual server. It will then direct incoming calls for a service via Port forwarding directly to
the appropriate Port of the network component in question.
VLAN
Virtual Local Area Network
A VLAN is a virtual local network within a physical network. A widely disseminated technical implementation of VLANs is defined partially in the Standard IEEE 802.1Q. VLAN
allows preferred forwarding of voice data, for example. This functionality is important
for VoIP (IP telephony). This also means that phone calls can be made without interruption within a restricted bandwidth.
VPI
Virtual Path Identifier
Part of an address in an ATM network.
WAN
Wide Area Network
A WAN is a wide area network that is not restricted physically to a particular area, for
example the Internet. A WAN is run by one or more public providers to enable private
access. You access the Internet via an Internet service provider.
Web server
See Server
92
Page 93

Glossary
WEP
Wired Equivalent Privacy
WEP is a security protocol defined in the IEEE 802.11 standard. It is used to protect wireless transmissions in a WLAN against unauthorized access through Encryption of the
data transmitted.
WLAN
Wireless LAN
Wireless LANs enable network components to communicate with a network using radio
waves as the transport medium. A wireless LAN can be connected as an extension to a
wired LAN or it can form the basis for a new network. The basic element of a wireless
network is the cell. This is the area where the wireless communication takes place. A
WLAN can be operated in Ad-hoc mode or Infrastructure mode.
WLAN is currently specified in Standard IEEE 802.11. The Gigaset SE587 WLAN dsl complies with Standard 802.11g.
WPA
WPA is a new standard-conformant solution for greater security in wireless networks.
WPA is meant to replace the existing WEP standard (Wired Equivalent Privacy) and offers
more reliable encryption and authentication methods.
WPA-PSK
WPA Pre-shared Key
Variant of WPA data encryption in which new keys are automatically generated at regular intervals by means of a keyword (pre-shared key). The key is updated after defined
periods (Rekey interval).
93
Page 94

Index
Index
Numerics
10/100 Mbps switch port. . . . . . . . . . . 7
128-bit key
64-bit key
802.11b
802.11g
. . . . . . . . . . . . . . . . . . . . 32
. . . . . . . . . . . . . . . . . . . . . 32
. . . . . . . . . . . . . . . . . . . . . . 47
. . . . . . . . . . . . . . . . . . . . . . 47
A
Access point . . . . . . . . . . . . . . . . . . . 81
Access restriction
Address block for IP addresses
Ad-hoc mode. . . . . . . . . . . . . . . . . . . 81
Administration
. . . . . . . . . . . . . . . . . . . . . . . 6, 81
ADSL
. . . . . . . . . . . . . . . . . . . . . . . . . 7
port
ADSL modem, integrated. . . . . . . . . . . 6
. . . . . . . . . . . . . . . . . . . . . . . 31, 81
AES
Authentication
Auto connect. . . . . . . . . . . . . . . . . . . 81
. . . . . . . . . . . . . . . . 34
. . . 27, 46
. . . . . . . . . . . . . . . . . . 39
. . . . . . . . . . . . . . . . . 40
B
Back panel. . . . . . . . . . . . . . . . . . . . . . 7
Backing up configuration data
Backup . . . . . . . . . . . . . . . . . . . . . . . 44
Basic Setup
Bridge
Broadcast
Browser see Internet browser
BSSID
Buttons . . . . . . . . . . . . . . . . . . . . . . . 20
. . . . . . . . . . . . . . . . . . . . 24
. . . . . . . . . . . . . . . . . . . . . . . . 81
. . . . . . . . . . . . . . . . . . 30, 81
. . . . . . . . . . . . . . . . . . . . . . . . . 82
. . . . . . 44
C
Channel. . . . . . . . . . . . . . . . . . . . . . . 30
. . . . . . . . . . . . . . . . . . . . . . . . 82
Client
Command
ipconfig . . . . . . . . . . . . . . . . . . . . . 70
. . . . . . . . . . . . . . . . . . . . . . . . 74
ping
Computer name . . . . . . . . . . . . . . . . 46
Configuration . . . . . . . . . . . . . . . . . . 18
Configuration data
backing up
restoring . . . . . . . . . . . . . . . . . . . . 44
Configuration file
. . . . . . . . . . . . . . . . . . . 44
. . . . . . . . . . . . . . . 44
Connecting to mains power supply
Connecting to splitter. . . . . . . . . . . . . 13
Connecting to the PC
via LAN
via USB . . . . . . . . . . . . . . . . . . . . . . 13
Connection
checking the connection to the
statistics
virtual
. . . . . . . . . . . . . . . . . . . . . . 13
router/access point
. . . . . . . . . . . 74
. . . . . . . . . . . . . . . . . . . . . 74
. . . . . . . . . . . . . . . . . . . . . . . 25
. . . 14
D
Defining a computer name
Mac OS X
Windows 2000
Windows 98
Windows Vista . . . . . . . . . . . . . . . . 54
Windows XP
Defining a workgroup
Windows 2000
Windows 98
Windows Vista
Windows XP
Device, status
DHCP
DHCP server . . . . . . . . . . . . . . 26, 45, 82
configuring. . . . . . . . . . . . . . . . . . . 27
Digital Subscriber Line see DSL
Displaying the operating state
Displaying wireless networks
Mac OS X
Windows Vista
Windows XP . . . . . . . . . . . . . . . . . . 47
DMZ
DNS . . . . . . . . . . . . . . . . . . . . . . . . . . 83
DNS configuration
Windows 2000
Windows 98 . . . . . . . . . . . . . . . . . . 65
Windows Vista . . . . . . . . . . . . . . . . 53
Windows XP
DNS server . . . . . . . . . . . . . . . . . . . . . 83
Domain blocking
Domain name
Domain Name Service see DNS
. . . . . . . . . . . . . . . . . . . . 69
. . . . . . . . . . . . . . . . 61
. . . . . . . . . . . . . . . . . . 62
. . . . . . . . . . . . . . . . . . 58
. . . . . . . . . . . . . . . . 61
. . . . . . . . . . . . . . . . . . 62
. . . . . . . . . . . . . . . . 54
. . . . . . . . . . . . . . . . . . 58
. . . . . . . . . . . . . . . . . . . 23
. . . . . . . . . . . . . . . . . . . . . . 45, 82
. . . . . . 16
. . . . . . . . . . . . . . . . . . . . 50
. . . . . . . . . . . . . . . . 48
. . . . . . . . . . . . . . . . . . . . 10, 38, 82
. . . . . . . . . . . . . . . . 60
. . . . . . . . . . . . . . . . . . 57
. . . . . . . . . . . . . . . . 10
. . . . . . . . . . . . . . . . . . 83
94
Page 95

Index
DoS attack. . . . . . . . . . . . . . . . . . . . . 83
. . . . . . . . . . . . . . . . . . . . . . . . . . 83
DSL
Dynamic DNS see DynDNS
Dynamic Host Configuration Protocol,
see DHCP
Dynamic IP address
DynDNS
. . . . . . . . . . . . . . . . . . . . . . . 84
. . . . . . . . . . . . . . 83
E
Encryption. . . . . . . . . . . . . . . . . . 10, 84
. . . . . . . . . . . . . . . . . . . . . . . . 32
WEP
WPA-PSK/WPA2-PSK
Entering the gateway
Mac OS X
Windows 2000 . . . . . . . . . . . . . . . . 60
Windows 98
Windows Vista
Windows XP
Entering the subnet mask
Mac OS X
Windows 2000
Windows 98 . . . . . . . . . . . . . . . . . . 66
Windows Vista
Windows XP
Ethernet . . . . . . . . . . . . . . . . 10, 45, 84
transmission speed
. . . . . . . . . . . . . . . . . . . . 69
. . . . . . . . . . . . . . . . . . . . 69
. . . . . . . . . . . . 31
. . . . . . . . . . . . . . . . . . 66
. . . . . . . . . . . . . . . . 53
. . . . . . . . . . . . . . . . . . 57
. . . . . . . . . . . . . . . . 60
. . . . . . . . . . . . . . . . 53
. . . . . . . . . . . . . . . . . . 57
. . . . . . . . . . . . . 10
F
Features . . . . . . . . . . . . . . . . . . . . . . . 9
Filter
IP
. . . . . . . . . . . . . . . . . . . . . . . . . . 35
. . . . . . . . . . . . . . . . . . . . . . . . 35
port
ULR . . . . . . . . . . . . . . . . . . . . . . . . 36
Firewall . . . . . . . . . . . . . . . . . . . . 10, 84
enabling or disabling
Firmware
upgrade . . . . . . . . . . . . . . . . . . . . . 43
Flat rate
FTP, port number. . . . . . . . . . . . . . . . 35
Full duplex. . . . . . . . . . . . . . . . . . . . . 84
. . . . . . . . . . . . . . . . . . . . . . . 84
. . . . . . . . . . . 33
G
Gateway . . . . . . . . . . . . . . . . . . . 65, 84
Gigaset SX76x WLAN dsl
default settings
Global IP address see Public IP address
. . . . . . . . . . . . . . . 12
H
H.323, port number . . . . . . . . . . . . . . 35
Hacker attack
Half duplex
Hexadecimal key . . . . . . . . . . . . . . . . 32
HTTP proxy. . . . . . . . . . . . . . . . . . . . . 85
HTTP, port number
HTTPS, port number
Hub . . . . . . . . . . . . . . . . . . . . . . . . . . 85
. . . . . . . . . . . . . . . . 10, 83
. . . . . . . . . . . . . . . . . . . . 85
. . . . . . . . . . . . . . . 35
. . . . . . . . . . . . . . 35
I
Idle time. . . . . . . . . . . . . . . . . . . . . . . 19
. . . . . . . . . . . . . . . . . . . . . . . . . . 85
IEEE
Infrastructure mode . . . . . . . . . . . . . . 85
Installation
connecting to the PC
Installing TCP/IP protocol
Windows 98
Institute of Electrical and Electronic
Engineers see IEEE
Internet
access
access restriction
configuring access . . . . . . . . . . . . . 24
status
Internet access
Internet browser . . . . . . . . . . . . . . . . 17
Internet connection
changing configuration
setting up
Internet Explorer . . . . . . . . . . . . . . . . 11
Internet protocol see IP protocol
Internet service provider
IP address. . . . . . . . . . . . . 18, 26, 45, 86
address block
assigning automatically . . . . . . 26, 45
assigning static . . . . . . . . . . . . . . . . 28
assigning statically
defining . . . . . . . . . . . . . . . . . . . . . 75
defining for the router . . . . . . . . . . 27
dynamic
private . . . . . . . . . . . . . . . . . . . 46, 89
public . . . . . . . . . . . . . . . . . . . . . . . 88
static
IP address block for DHCP. . . . . . . . . . 28
IP address pool. . . . . . . . . . . . . . . . . . 86
. . . . . . . . . . . . . . . . . . 63
. . . . . . . . . . . . . . . . . . . . . . . 86
. . . . . . . . . . . . . . . . . . . . . . . . 6
. . . . . . . . . . . . . . . . . . . . . . . 21
. . . . . . . . . . . . . . . . . . . 6
. . . . . . . . . . . . . . . . . . . . 24
. . . . . . . . . . . . . . . . . . . . . 83
. . . . . . . . . . . . . . . . . . . . . . . 90
. . . . . . . . . . . . 13
. . . . . . . . . . . . . . 34
. . . . . . . . . . 24
. . . . . . . . . . 86
. . . . . . . . . . . . . . 27, 46
. . . . . . . . . . 27, 45
95
Page 96

Index
IP address, assigning statically
Mac OS X
Windows 2000 . . . . . . . . . . . . . . . . 60
Windows 98
Windows Vista
Windows XP . . . . . . . . . . . . . . . . . . 57
IP filter
IP protocol
ipconfig / release
ipconfig /all . . . . . . . . . . . . . . . . . . . . 75
ipconfig /renew
. . . . . . . . . . . . . . . . . . . . . . . . . . 86
IPoA
. . . . . . . . . . . . . . . . . . . . 69
. . . . . . . . . . . . . . . . . . 66
. . . . . . . . . . . . . . . . 53
. . . . . . . . . . . . . . . . . . . . . . . . 35
. . . . . . . . . . . . . . . . . . . . . 86
. . . . . . . . . . . . . . . . 70
. . . . . . . . . . . . . . . . . 70
K
Key length
. . . . . . . . . . . . . . . . . . . . . . 32
128 bit
. . . . . . . . . . . . . . . . . . . . . . . 32
64 bit
L
LAN. . . . . . . . . . . . . . . . . . . . . . . . . . 87
configuration . . . . . . . . . . . . . . . . . 26
. . . . . . . . . . . . . . . . . . . . . . . . . 7
port
. . . . . . . . . . . . . . . . . . . . . . . 22
status
LED
behaviour after initial connection
LED displays
Local area network see LAN
Local IP address see Private IP address
Logging
Login screen
. . . . . . . . . . . . . . . . . . 8, 16
. . . . . . . . . . . . . . . . . . . . . . . 41
. . . . . . . . . . . . . . . . . . . 18
. . 16
M
MAC address . . . . . . . . . . . . . . . . 75, 87
determining
Mac computer, defining a name
MAC Encapsulated Routing see MER
Maximum Receive Unit see MRU
Maximum Transmission Unit see MTU
. . . . . . . . . . . . . . . . . . . . . . . . . 87
Mbps
. . . . . . . . . . . . . . . . . . . . . . . . . . 87
MER
Mozilla Firefox . . . . . . . . . . . . . . . . . . 11
MRU . . . . . . . . . . . . . . . . . . . . . . . . . 87
. . . . . . . . . . . . . . . . . . . . . . . . . 87
MTU
. . . . . . . . . . . . . . . . . . 75
. . . . 69
N
NAT. . . . . . . . . . . . . . . . . . . . . . . 36, 88
DMZ. . . . . . . . . . . . . . . . . . . . . . . . 38
port forwarding
Network
Network adapter . . . . . . . . . . . . . . . . 88
Network Address Translation
Network configuration
. . . . . . . . . . . . . . . . . . . . . . . 88
Mac OS X . . . . . . . . . . . . . . . . . . . . 67
Windows 2000
Windows 98
Windows Vista
Windows XP . . . . . . . . . . . . . . . . . . 55
. . . . . . . . . . . . . . . 36
. 10, 36, 88
. . . . . . . . . . . . 16
. . . . . . . . . . . . . . . . 58
. . . . . . . . . . . . . . . . . . 61
. . . . . . . . . . . . . . . . 51
O
Obtaining an IP address automatically
Mac OS X
Windows 2000 . . . . . . . . . . . . . . . . 60
Windows 98
Windows Vista
Windows XP
Opening the command prompt . . 74, 75
Operating state
. . . . . . . . . . . . . . . . . . . . 68
. . . . . . . . . . . . . . . . . . 65
. . . . . . . . . . . . . . . . 53
. . . . . . . . . . . . . . . . . . 57
. . . . . . . . . . . . . . . . . . 8
P
Passphrase . . . . . . . . . . . . . . . . . . . . . 32
Password
of configuration user interface
of user ID
PC
defining a name (Windows 2000)
defining a name (Windows 98)
defining a name (Windows Vista)
defining a name (Windows XP) . . . . 58
Permanent Virtual Circuit see PVC
Ping command
Point-to-Point Protocol over ATM
see PPPoA
Point-to-Point Protocol over Ethernet
see PPPoE
POP3, port number
Port . . . . . . . . . . . . . . . . . . . . . . . . . . 88
ADSL modem . . . . . . . . . . . . . . . . . . 7
LAN
Port filter . . . . . . . . . . . . . . . . . . . . . . 35
Port forwarding . . . . . . . . . . . . . . 36, 88
configuring
Port number. . . . . . . . . . . . . . . . . 37, 88
mapping . . . . . . . . . . . . . . . . . . . . . 37
Port numbers of Internet services
. . . . . . . . . . . . . . . . . . . . 40
. . . . . . . . . . . . . . . . . . 74
. . . . . . . . . . . . . . 35
. . . . . . . . . . . . . . . . . . . . . . . . . 7
. . . . . . . . . . . . . . . . . . . 37
. . . . 18
. . 61
. . . . 62
. . 54
. . . . 36
96
Page 97

Index
Power supply unit . . . . . . . . . . . . . . . 14
. . . . . . . . . . . . . . . . . . . . . . . . 89
PPPoA
PPPoE . . . . . . . . . . . . . . . . . . . . . . . . 89
Predefined application
Pre-shared key
Private IP address. . . . . . . . . . . . . . . . 89
Problem solving
Protocol
Public IP address
PVC . . . . . . . . . . . . . . . . . . . . . . . 25, 89
selection
. . . . . . . . . . . . 31, 49, 50
. . . . . . . . . . . . . . . . . . . . . . . 89
. . . . . . . . . . . . . . . . . . . . 25
. . . . . . . . . . . . 37
. . . . . . . . . . . . . . . . . 77
. . . . . . . . . . . . . . . . 88
R
Radio network . . . . . . . . . . . . . . . . . . 93
Radio settings . . . . . . . . . . . . . . . . . . 29
. . . . . . . . . . . . . . . . . . . . . . . . . 8
Reboot
Releasing TCP/IP settings
Remote management
Remote mangement . . . . . . . . . . . . . 41
. . . . . . . . . . . . . . . . . . . . . . . . . . 8
Reset
Reset button
Restore . . . . . . . . . . . . . . . . . . . . . . . 44
Roaming
Router
IP address. . . . . . . . . . . . . . . . . . . . 26
. . . . . . . . . . . . . . . . . . . . 8
. . . . . . . . . . . . . . . . . . . . . . 90
. . . . . . . . . . . . . . . . . . . . . . . . 90
. . . . . . . . . . 70
. . . . . . . . . . . . 89
S
Security . . . . . . . . . . . . . . . . . . . . . . . 10
. . . . . . . . . . . . . . . . . . . . . . 33
firewall
wireless
Server . . . . . . . . . . . . . . . . . . . . . . . . 90
virtual
Service filtering . . . . . . . . . . . . . . . . . 10
Service Set Identifier see SSID
Setting up a network client
Setting up a WLAN connection . . . . . 47
Setup menu
Showing networks
Mac OS X . . . . . . . . . . . . . . . . . . . . 67
Windows 2000
Windows Vista . . . . . . . . . . . . . . . . 51
Windows XP . . . . . . . . . . . . . . . . . . 55
Simple Mail Transfer Protocol see SMTP
Simple Network Management Protocol
SMTP
. . . . . . . . . . . . . . . . . . . . . 31
. . . . . . . . . . . . . . . . . . . . . . 92
(Windows 98)
. . . . . . . . . . . . . . . 62
. . . . . . . . . . . . . . . . . . . . 24
. . . . . . . . . . . . . . . . 58
see SNMP
. . . . . . . . . . . . . . . . . . . . . . . . . 90
SMTP, port number
. . . . . . . . . . . . . . . . . . . . . . . . . 90
SNMP
Splitter. . . . . . . . . . . . . . . . . . . . . . . . 13
SSID
. . . . . . . . . . . . . . . . . 15, 49, 50, 90
concealed
visible . . . . . . . . . . . . . . . . . . . . . . . 30
SSID broadcast
Static IP address
Status
. . . . . . . . . . . . . . . . . . . . . . . 23
device
Internet
local area network
wireless network
Status information
Subnet
Subnet mask . . . . . . . . . . . . . . . . 46, 91
defining
Summer time
Switch
System. . . . . . . . . . . . . . . . . . . . . . . . 11
System log
System management
System requirements . . . . . . . . . . . . . 11
. . . . . . . . . . . . . . . . . . . . . 21
. . . . . . . . . . . . . . . . . . . . . . . . 90
. . . . . . . . . . . . . . . . . . . . . 27
. . . . . . . . . . . . . . . . . . . . . . . . 91
. . . . . . . . . . . . . . . . . . . . . 41
. . . . . . . . . . . . . . 35
. . . . . . . . . . . . . . . . . . . . 30
. . . . . . . . . . . . . . . . . . 30
. . . . . . . . . . . . . . . . . 90
. . . . . . . . . . . . . 22
. . . . . . . . . . . . . . . 22
. . . . . . . . . . . . . . . 20
. . . . . . . . . . . . . . . . . . . 28
. . . . . . . . . . . . . 39
T
TCP . . . . . . . . . . . . . . . . . . . . . . . . . . 91
. . . . . . . . . . . . . . . . . . . . . . . . . 91
TCP/IP
TCP/IP settings
Mac OS X
synchronising with router
Windows 2000
Windows 98 . . . . . . . . . . . . . . . . . . 64
Windows Vista
Windows XP . . . . . . . . . . . . . . . . . . 56
Telnet, port number
Time server
Time setting. . . . . . . . . . . . . . . . . . . . 28
TKIP . . . . . . . . . . . . . . . . . . . . . . . 31, 91
Tra demarks
Transmission Control Protocol see TCP
Transmission speed
in the Ethernet LAN
in wireless LAN . . . . . . . . . . . . . . . . 10
. . . . . . . . . . . . . . . . . . . . 68
. . . . . . . . 70
. . . . . . . . . . . . . . . . 59
. . . . . . . . . . . . . . . . 52
. . . . . . . . . . . . . . 35
. . . . . . . . . . . . . . . . . . . . 28
. . . . . . . . . . . . . . . . . . . . 10
. . . . . . . . . . . . . . 87
. . . . . . . . . . . . 10
U
UDP . . . . . . . . . . . . . . . . . . . . . . . . . . 91
Universal Plug and Play see UPnP
97
Page 98

Index
Universal Resource Locator see URL
. . . . . . . . . . . . . . . . . . . . . . 41, 92
UPnP
URL . . . . . . . . . . . . . . . . . . . . . . . . . . 92
URL filter
User Datagram Protocol see UDP
User ID
User interface
. . . . . . . . . . . . . . . . . . . . . . 36
creating
deleting
editing
elements
functions
idle time
starting
. . . . . . . . . . . . . . . . . . . . . 40
. . . . . . . . . . . . . . . . . . . . . 40
. . . . . . . . . . . . . . . . . . . . . . 40
. . . . . . . . . . . . . . . . . . . . 20
. . . . . . . . . . . . . . . . . . . . 19
. . . . . . . . . . . . . . . . . . . . . 19
. . . . . . . . . . . . . . . . . . . . . 18
V
VCI . . . . . . . . . . . . . . . . . . . . . . . . . . 92
Virtual Channel Identifier see VCI
Virtual connection
configuring
Virtual Path Identifier see VPI
Virtual server
. . . . . . . . . . . . . . . . . . . . . . . . . . . 92
VPI
. . . . . . . . . . . . . . . . . . 25
. . . . . . . . . . . . . . . . 37, 92
W
WAN . . . . . . . . . . . . . . . . . . . . . . . . . 92
WEP
. . . . . . . . . . . . . . . . . . . . . . . 32, 93
WEP key
Wide Area Network see WAN
WINIPCFG. . . . . . . . . . . . . . . . . . . . . . 71
Wired Equivalent Privacy see WEP
Wireless cell
Wireless LAN see WLAN
Wireless network mode
Wireless security
Wireless settings
WLAN
WLAN adapter
Workgroup
WPA
WPA2-PSK
WPA-PSK
. . . . . . . . . . . . . . . . . . . . 49, 50
. . . . . . . . . . . . . . . . . . . . 93
. . . . . . . . . . . 29
. . . . . . . . . . . . . . . . . 31
. . . . . . . . . . . . . . . . 29
. . . . . . . . . . . . . . . . . . . 10, 45, 93
. . . . . . . . . . . . . . . . . . . . . . . 22
status
transmission speed . . . . . . . . . . . . . 10
. . . . . . . . . . . . . . . . . . 47
. . . . . . . . . . . . . . . . . . . . . 46
. . . . . . . . . . . . . . . . . . . . . . . . . . 93
pre-shared key . . . . . . . . . . . . . . . . 93
. . . . . . . . . . . . . . . . . . . . . 31
. . . . . . . . . . . . . . . . . . . . . . 31
Warning Statement
This device complies with RSS-210 of the Industry Canada Rules. Operation is
subject to the following two conditions:
1) this device may not cause interference and
2) this device must accept any interference, including interference that may cause
undesired operation of the device
IMPORTANT NOTE:
IC Radiation Exposure Statement:
This equipment complies with IC radiation exposure limits set forth for an uncontrolled
environment. This equipment should be installed and operated with minimum
distance 20cm between the radiator & your body.
98
Page 99

This equipment has been tested and found to comply with the limits for a Class B digital device,
r
r
r
Federal Communication Commission Interference Statement
pursuant to Part 15 of the FCC Rules. These limits are designed to provide reasonable protection
against harmful interference in a residential installation. This equipment generates, uses and can
radiate radio frequency energy and, if not installed and used in accordance with the instructions, may
cause harmful interference to radio communications. However, there is no guarantee that interference
will not occur in a particular installation. If this equipment does cause harmful interference to radio o
television reception, which can be determined by turning the equipment off and on, the user is
encouraged to try to correct the interference by one of the following measures:
- Reorient or relocate the receiving antenna.
- Increase the separation between the equipment and receiver.
- Connect the equipment into an outlet on a circuit different from that
to which the receiver is connected.
- Consult the dealer or an experienced radio/TV technician for help.
This device complies with Part 15 of the FCC Rules. Operation is subject to the following two
conditions: (1) This device may not cause harmful interference, and (2) this device must accept any
interference received, including interference that may cause undesired operation.
FCC Caution: Any changes or modifications not expressly approved by the party responsible fo
compliance could void the user's authority to operate this equipment.
IEEE 802.11b or 802.11g operation of this product in the U.S.A. is firmware-limited to channels 1
through 11.
IMPORTANT NOTE:
FCC Radiation Exposure Statement:
This equipment complies with FCC radiation exposure limits set forth for an uncontrolled environment.
This equipment should be installed and operated with minimum distance 20cm between the radiator &
your body.
This transmitter must not be co-located or operating in conjunction with any other antenna o
transmitter.
The availability of some specific channels and/or operational frequency bands are country dependent
and are firmware programmed at the factory to match the intended destination. The firmware setting is
not accessible by the end user.
Issued by
Siemens Home and Offi ce Communication Devices GmbH & Co. KG
Schlavenhorst 66
D-46395 Bocholt
© Siemens Home and Offi ce Communication Devices GmbH & Co. KG 2008
All rights reserved. Subject to availability.
Rights of modifi cation reserved.
A31008-N1083-R371-1x-7619
www.siemens.com/gigaset
 Loading...