

Page 1

MW600-B-LO Wireless 802. 11b/g wireless PCI-E Adapter Card
MW600-B-LO
Wireless 802. 11b/g wireless PCI-E Adapter Card
User Manual
Rev 1.0
Page 2

MW600-B-LO Wireless 802. 11b/g wireless PCI-E Adapter Card
Federal Communication Commission Interference Statement
This equipment has been tested and found to comply with the limits for a Class
B digital device, pursuant to Part 15 of the FCC Rules. These limits are
designed to provide reasonable protection against harmful interference in a
residential installation. This equipment generates, uses and can radiate radio
frequency energy and, if not installed and used in accordance with the
instructions, may cause harmful interference to radio communications.
However, there is no guarantee that interference will not occur in a particular
installation. If this equipment does cause harmful interference to radio or
television reception, which can be determined by turning the equipment off and
on, the user is encouraged to try to correct the interference by one of the
following measures:
- Reorient or relocate the receiving antenna.
- Increase the separation between the equipment and receiver.
- Connect the equipment into an outlet on a circuit different from that
to which the receiver is connected.
- Consult the dealer or an experienced radio/TV technician for help.
FCC Caution: Any changes or modifications not expressly approved by the
party responsible for compliance could void the user's authority to operate this
equipment.
This device complies with Part 15 of the FCC Rules. Operation is subject to the
following two conditions: (1) This device may not cause harmful interference,
and (2) this device must accept any interference received, including
interference that may cause undesired operation.
IMPORTANT NOTE:
FCC Radiation Exposure Statement:
This equipment complies with FCC radiation exposure limits set forth for an
uncontrolled environment. This equipment should be installed and operated with
minimum distance 20cm between the radiator & your body.
This transmitter must not be co-located or operating in conjunction with any
other antenna or transmitter.
IEEE 802.11b or 802.11g operation of this product in the U.S.A. is firmware-limited to
channels 1 through 11.
2
Page 3

MW600-B-LO Wireless 802. 11b/g wireless PCI-E Adapter Card
Manual Information To the End
User
The OEM integrator has to be aware not to provide information to the end
user regarding how to install or remove this RF module in the user’s
manual of the end product which integrates this module.
The end user manual shall include all required regulatory information/warning
as show in this manual.
USERS MANUAL OF THE END PRODUCT:
In the users manual of the end product, the end user has to be informed to
keep at least 20cm separation with the antenna while this end product is
installed and operated. The end user has to be informed that the FCC
radio-frequency exposure guidelines for an uncontrolled environment can be
satisfied. The end user has to also be informed that any changes or
modifications not expressly approved by the manufacturer could void the
user's authority to operate this equipment.
The FCC part 15.19 statement below has to also be available in the
manual:
This device complies with Part 15 of FCC rules. Operation is subject to the
following two conditions: (1) this device may not cause harmful interference
and (2) this device must accept any interference received, including
interference that may cause undesired operation.
LABEL OF THE END PRODUCT:
The final end product must be labeled in a visible area with the following "
Contains TX FCC ID: N89-MW600BLO ".
This device is intended only for OEM integrators under the following
conditions:
1) The antenna must be installed such that 20 cm is maintained between the
antenna and users, and
2) The transmitter module may not be co-located with any other transmitter
3
Page 4

MW600-B-LO Wireless 802. 11b/g wireless PCI-E Adapter Card
or antenna,
3) For all products market in US, OEM has to limit the operation channels in
CH1 to CH1 1 for 2.4G band by supplied firmware programming tool. OEM shall
not supply any tool or info to the end-user regarding to Regulatory Domain
change.
As long as 3 conditions above are met, further transmitter test will not be
required. However, the OEM integrator is still responsible for testing their
end-product for any additional compliance requirements required with this
module installed (for example, digital device emissions, PC peripheral
requirements, etc.).
IMPORTANT NOTE: In the event that these conditions can not be met
(for
example certain laptop configurations or co-location with another transmitter),
then the FCC authorization is no longer considered valid and the FCC ID can
not be used on the final product. In these circumstances, the OEM integrator
will be responsible for re-evaluating the end product (including the transmitter)
and obtaining a separate FCC authorization.
Manual Information To the End User
The OEM integrator has to be aware not to provide information to the
end user regarding how to install or remove this RF module in the
user’s manual of the end product which integrates this module.
The end user manual shall include all required regulatory information/warning
as show in this manual.
4
Page 5

MW600-B-LO Wireless 802. 11b/g wireless PCI-E Adapter Card
Important Information
Please read the information below before using the W M600-B-LO 1 1b/g wirele ss PCI- Express
card on your system.
What’s New
The latest generation PCI (Peripheral Component Interconnect) bus architecture called PCI
Express, uses a 2.5- GHz serial Input/Output structure for higher bandwidth and better
scalability than its previous architectures. .
Features
• PCI Express PCIe interface.
• X1-lane 2.5Gbps PCI Express host interface, Low profile
• IEEE 802.11g compliant.
• Backward compatible with IEEE 802.11b standard.
• Delivers data rate up to 54 Mbps.
• LED for Link and Activity
• External detachable antenna
• 801.11g: Dynamically shifts between 54, 48, 36, 24, 18, 12, 9 and 6 Mbps network
speed, based on signal strength, for maximum availability and reliability of
connection.
• 802.11b: Dynamically shifts between 11M, 5.5M, 2M, and 1 Mbps network speed,
based on signal strength, for maximum availability and reliability of connection.
• Allows users move between Access Points without resetting their connection
reconfiguration.
• Supports most popular operating systems: Window 2000/ME/XP/Vista. Linux
(TBD).
• Ensures great security by providing the 64/128bits Wired Equivalent Privacy (WEP)
defined in the IEEE 802.11 standard.
• WEP, WEP2, WPA Personal, WPA2 Personal, WMM, WMM-PS (UA-PSE), TKIP-
support. AES hardware acceleration.
• 802.11i standards support
• Meets PCI Power Management Interface version 1.1 (ACPI)
System Hardware Requirements
5
Page 6

MW600-B-LO Wireless 802. 11b/g wireless PCI-E Adapter Card
Before Using the WM600-B-LO, check to be sure your system meets the following minimum
requirements:
z Available PCI-Express card slot
z 64 MB of System Memory
z 150 MHz or faster processor
z The most recent BIOS version for your system
Hardware Driver Compatability
To ensure optimal performance, it is recommended that you download the latest hardware
drivers for all your particular adapters from the manufacturer's web site.
It is recommended that you install the latest Service Packs and/or Hot Fixes from Microsoft
prior to installing WM600-B-LO PCI-Express Card Software. Refer to the Release Notes for
the latest list of Service Packs and/or Hot Fixes that are required.
LED Indicators
The WM600-B-LO features two LED indicators:
2 LED (One is orange, another is green)
z Orange: still orange after power on.
z Green: blinking slowly when link with AP and blinking quickly when have data
transfers
Introduction
Overview of the Product
The adapter gives you the flexibility to install your PC in the most convenient location available,
without the cost of running network cables.
The adapter's auto-sensing capability allows high packet transfer rate of up to 54Mbps for
maximum throughput, or dynamic range shifting to lower speeds due to distance or
operating limitations in an environment with a lot of electromagnetic interference. It can
also interoperate with all 11Mbps wireless products. Your wireless communications are
protected by up to 152-bit WEP and WPA encryption for high security.
Features
6
Page 7

MW600-B-LO Wireless 802. 11b/g wireless PCI-E Adapter Card
Complies with IEEE802.11g, IEEE802.11b standards, Supports WPA/WPA2 data
security, authentication, TKIP/AES encryption, 64/128/152-bit WEP encryption
Supports 54/48/36/24/18/12/9/6Mbp s or 11/5.5/3/2/1Mbps wirele ss LAN data transfer
rates. Provide 32-bit PCI E interface. Supports Ad-Hoc and Infrastructure modes
Supports roaming between access points when co nfigured in Infrastructure mode Ease to
configure and provides monitoring information. Supports Windows 98SE, Me, 2000, XP,
Vista Detachable reverse SMA connector antenna.
Wireless Configuration methods
You can configure connections to wireless networks, known as wireless profiles, for a
computer running Windows Vista with the following methods:
Connect to a network
•
This is the principal method by which individual users will configure connections to
wireless networks.
Group Policy
•
Network administrators can use Group Policy settings in an Active Directory®
directory service environment to centrally configure and deploy wireless network
settings and automatically configure domain member computers.
The following section describes in detail how to connect to a wireless network using the
Connect to a network
The Connect to a network dialog box
You can access the
including the following:
By clicking
•
dialog box in Windows Vista.
Connect to a network
Start
dialog box
, and then
dialog box from many locations in Windows Vista,
Connect to
from the Windows Vista desktop
From the
•
From the
•
in the Network Connections folder
The following figure shows the
7
Manage wireless connections
Connect/Disconnect
Connect to a network
context menu option of a wireless network adapter
dialog box
dialog box.
Page 8
MW600-B-LO Wireless 802. 11b/g wireless PCI-E Adapter Card
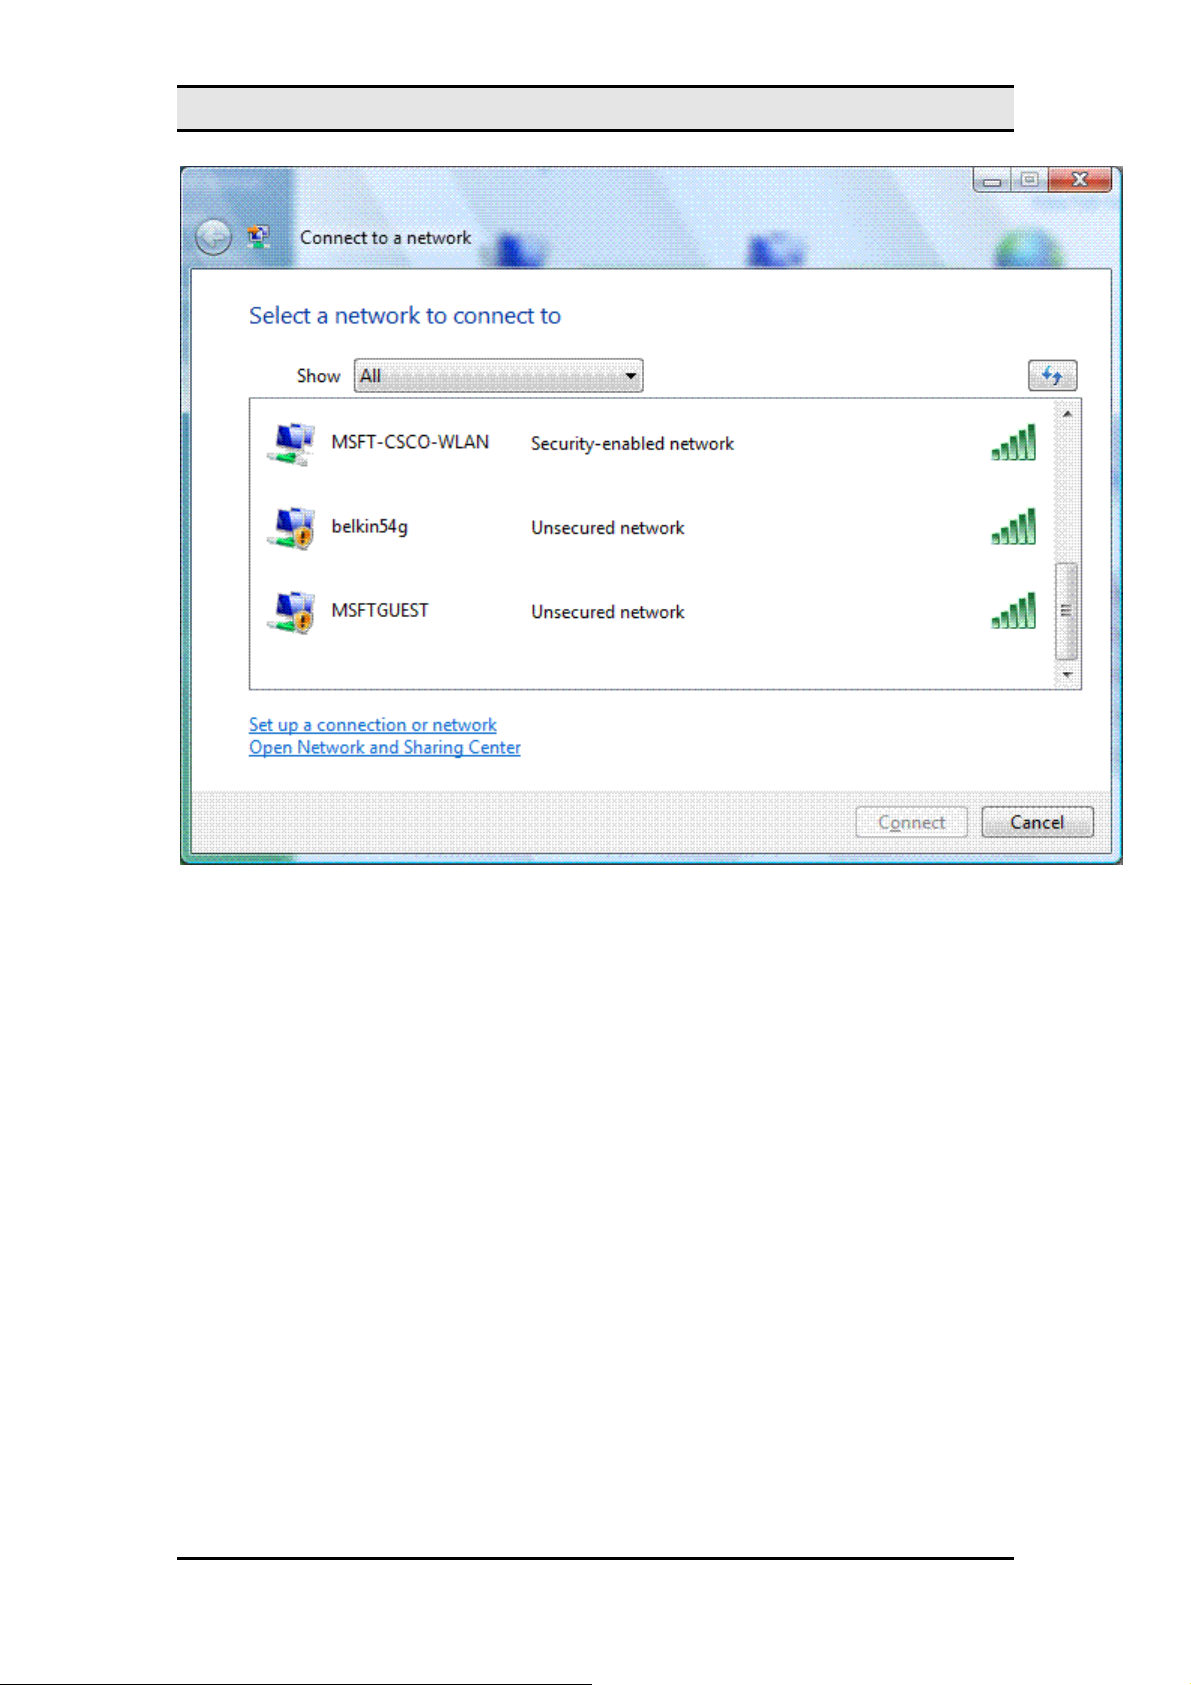
The new
network
Connect to a network
dialog box in Windows XP with Service Pack 2 (SP2). This new dialog also supports
dialog box is a redesigned version of the
Choose a wireless
virtual private network (VPN) and dial-up connections (including Connection Ma nager and
Point-to-Point Protocol over Ethernet [PPPoE]).
In
By default,
, you can select the following:
Show
Wireless, dial-up, and VPN connections.
All
•
Wireless
•
Dial-up and VPN
•
All
Only wireless connections.
is selected and the list of networks consists of wirel ess networks that have b een
Only dial-up and VPN connections.
detected and dial-up and VPN connections that have been configured. A non-b ro adcast
network appears in the list with the name "Unnamed Network." The list of available networks is
subject to the allowed wireless networks configured through Group Policy or the command line
and the types of wireless networks being detected, such as infrastructure mode or ad hoc
mode networks.
z
Infrastructure mode: PC use wireless to connect to Router then to the internet
8
Page 9

MW600-B-LO Wireless 802. 11b/g wireless PCI-E Adapter Card
Ad Hoc mode: PC use wireless to connect to each otherb
Ad Hoc
To connect to a wireless network that is listed in the
double-click the network name or click the network name and then click
non-broadcast network, you will be prompted to type the wireless network name. If the
connection attempt is not successful, use Windows Network Diagnostics to diagnose the
problem and suggest a solution.
If the wireless network you want to connect to is not listed, click
network
9
. Windows Vista displays the following page.
Connect to a network
Set up a connection or
dialog box,
Connect
. For a
Page 10
MW600-B-LO Wireless 802. 11b/g wireless PCI-E Adapter Card
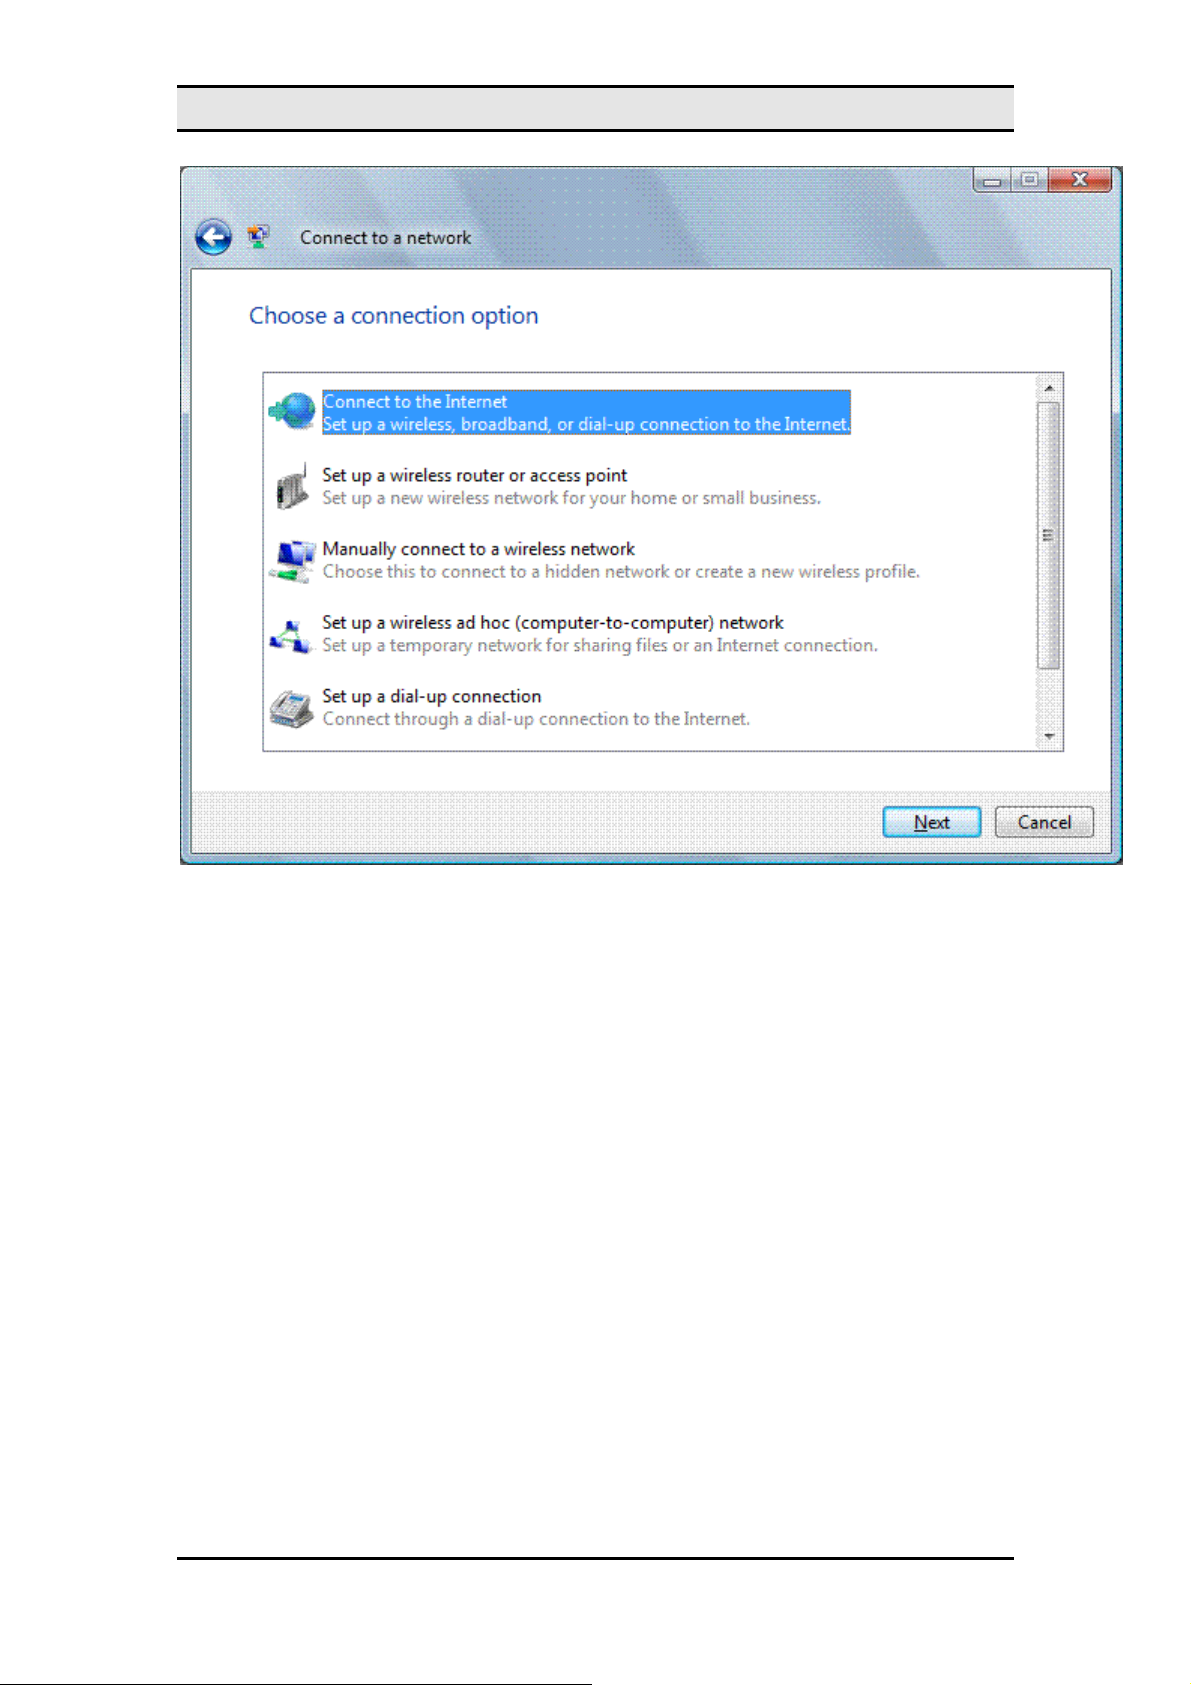
On the
The
Select a connection option
Connect to the Internet
•
Set up a wireless router or access point
•
Manually connect to a wireless network
•
Set up a wireless ad hoc (computer-to-computer) network
•
Set up a dial-up connection
•
Connect to a workplace
•
Choose a connection option
page, you can select the following:
dialog box is a central location to configure wireless,
dial-up, and VPN connections and is a consolidation of the Create a New Connection an d
Wireless Network Setup wizards in Windows XP with SP2.
To manually configure the wireless settings for a wireless network, click
a wireless network
, and then click
. Windows Vista displays the following page.
Next
Manually connect to
10
Page 11
MW600-B-LO Wireless 802. 11b/g wireless PCI-E Adapter Card
If the Manually connect to a wireless network option is not present in the
Note
connection option
dialog box, make sure that your wireless network adapter appears in the
Choose a
Network Connections folder as a wireless connection and is enabled. If your wireless network
adapter appears in the Network Connections folder as a wired connection, ensure that you
have installed the latest driver for your adapter that is designed for Windows Vista.
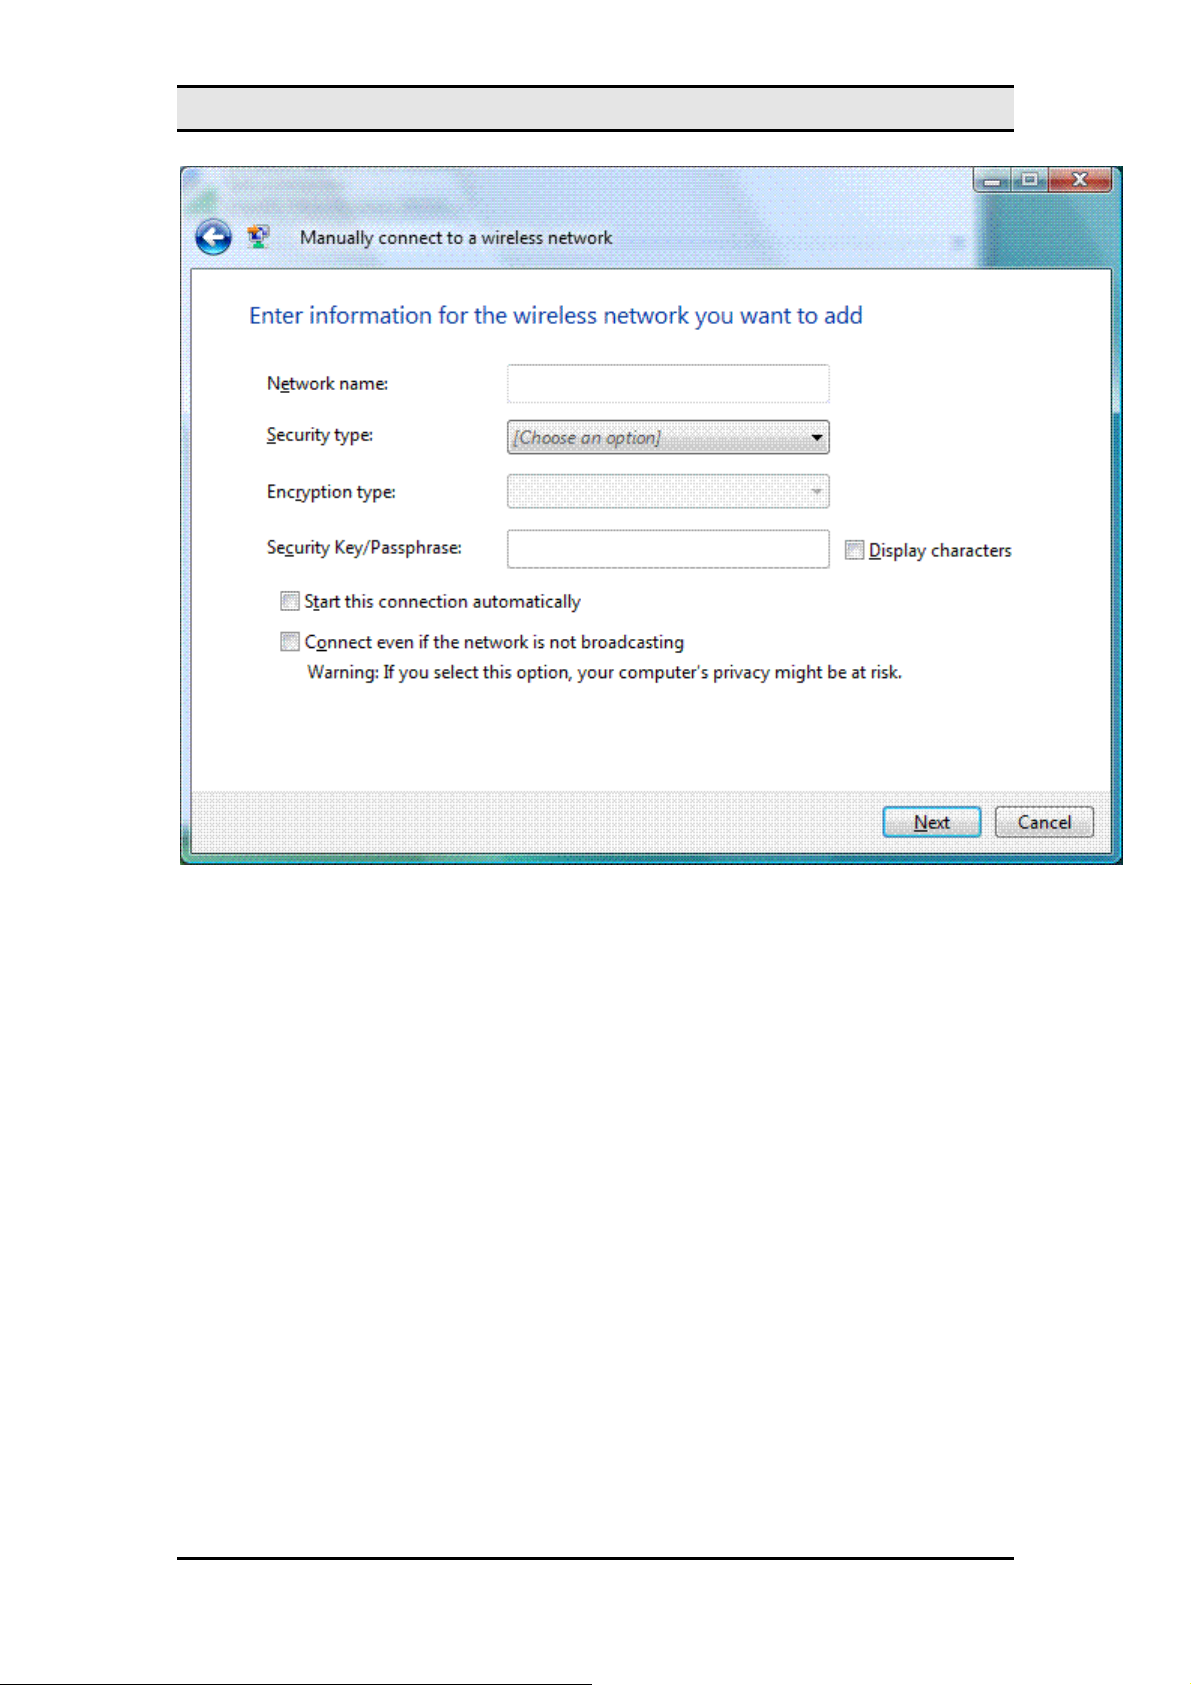
On the
Enter information for the wireless network you want to add
page, configure the
following:
Network name
•
Security type
•
Type the name of the wireless network.
Select the method used to authenticate a connection to the wireless
network. The choices are the following:
No authentication (Open)
•
•
•
Open system authentication with Wired Equivalent Privacy (WEP).
WEP
WPA2-Personal
Wi-Fi Protected Access 2 (WPA2) with a preshared key
Open system authentication with no encryption.
(also known as a passphrase).
WPA-Personal
•
Wi-Fi Protected Access (WPA) with a preshared key.
11
Page 12

MW600-B-LO Wireless 802. 11b/g wireless PCI-E Adapter Card
WPA2-Enterprise
•
WPA-Enterprise
•
802.1x
•
IEEE 802.1X authentication with WEP (also known as dynamic WEP).
WPA2 with IEEE 802.1X authentication.
WPA with IEEE 802.1X authentication.
The choices listed depend on the capabilities of your wireless network adapter
that are reported to Windows.
The shared key authentication method is not listed. Microsoft strongly
discourages its use because it provides weak security for y our wireless network.
To configure shared key authentication, select
and then select
Shared
from the
Security
No authentication (Open)
tab in the properties of the wireless
network (described later in this article).
Encryption type
•
Select the method used to encrypt data frames sent over the
wireless network. The choices depend on the selected se curity type.
When the
•
None
No authentication (Open)
.
security type is selected, you can select
here
When the
•
When the
•
When the
•
WPA-Enterprise
security type is selected, you can select
WEP
802.1x
security type is selected, you can select
WEP
WEP
.
WPA2-Personal, WPA2-Enterprise, WPA-Personal
security types are selected, you can select
TKIP
.
,
.
The choices listed depend on the capabilities of your wireless network adapter
that are reported to Windows.
Security Key/Passphrase
•
type), the WPA preshared key (if you selected the
or the WPA2 preshared key (if you selected the
For the
WPA2-Enterprise, WPA-Enterprise
Type the WEP key (if you selected the
WPA-Personal
WPA2-Personal
, and
802.1x
security types, the
WEP
security type),
security type).
security key is determined automatically when Windows Vista performs wireless
authentication.
Display characters
•
Security Key/Passphrase
Specifies whether you want to view the value typed in
.
security
Start this connection automatically
•
Specifies whether Windows Vista will
automatically connect to this wireless network. If you clear this checkbox, you must
manually connect to the wireless network from the
Connect to a network
dialog
box.
12
Page 13

MW600-B-LO Wireless 802. 11b/g wireless PCI-E Adapter Card
Connect even if the network is not broadcasting
•
should attempt to connect even if the wireless network is not broadcasting its name.
This will cause Windows Vista to send Probe Request frames to locate the
wireless network. These probe request frames can be used by malicious users to
determine the name of the non-broadcast network. For more information about the
privacy issues of non-broadcast networks, see Non-broadcast Wireless Networks
with Microsoft Windows.
When you click
, Windows Vista displays the following page.
Next
Specifies whether Windows
To connect to the wireless network that you just created, click
double-click the newly created wireless network in the
Connect to a network
Connect to
To configure the properties of the wireless network you have just created, click
connection settings
. Windows Vista displays the following dialog box.
, and then
dialog box.
Change
13
Page 14

MW600-B-LO Wireless 802. 11b/g wireless PCI-E Adapter Card
From the
(either
Access point
Connection
tab, you can view the wireless network's name, SSID, and network type
for infrastructure mode networks or
mode networks). You can also configure the following:
Connect automatically when this network is in range
•
Connect to a more preferred network if available
•
Specifies whether Windows Vista will automatically disconnect from this wireless
network if a more preferred wireless network comes within range.
Connect even if the network is not broadcasting
•
The following figure shows the
Security
tab.
Computer-to-computer
for ad hoc
14
Page 15
MW600-B-LO Wireless 802. 11b/g wireless PCI-E Adapter Card
On the
Security
No authentication (Open)
•
Shared
•
tab, you can specify the following security types:
Shared key authentication. The
Security
tab is the only location where you can
configure shared key authentication because its use is highly discouraged.
WPA2-Personal
•
WPA-Personal
•
WPA2-Enterprise
•
WPA-Enterprise
•
802.1x
•
Based on the selected security type, you can configure either a net work security key or spe cify
and configure a network authentication method. If you specify
WPA-Enterprise
,
15
Page 16

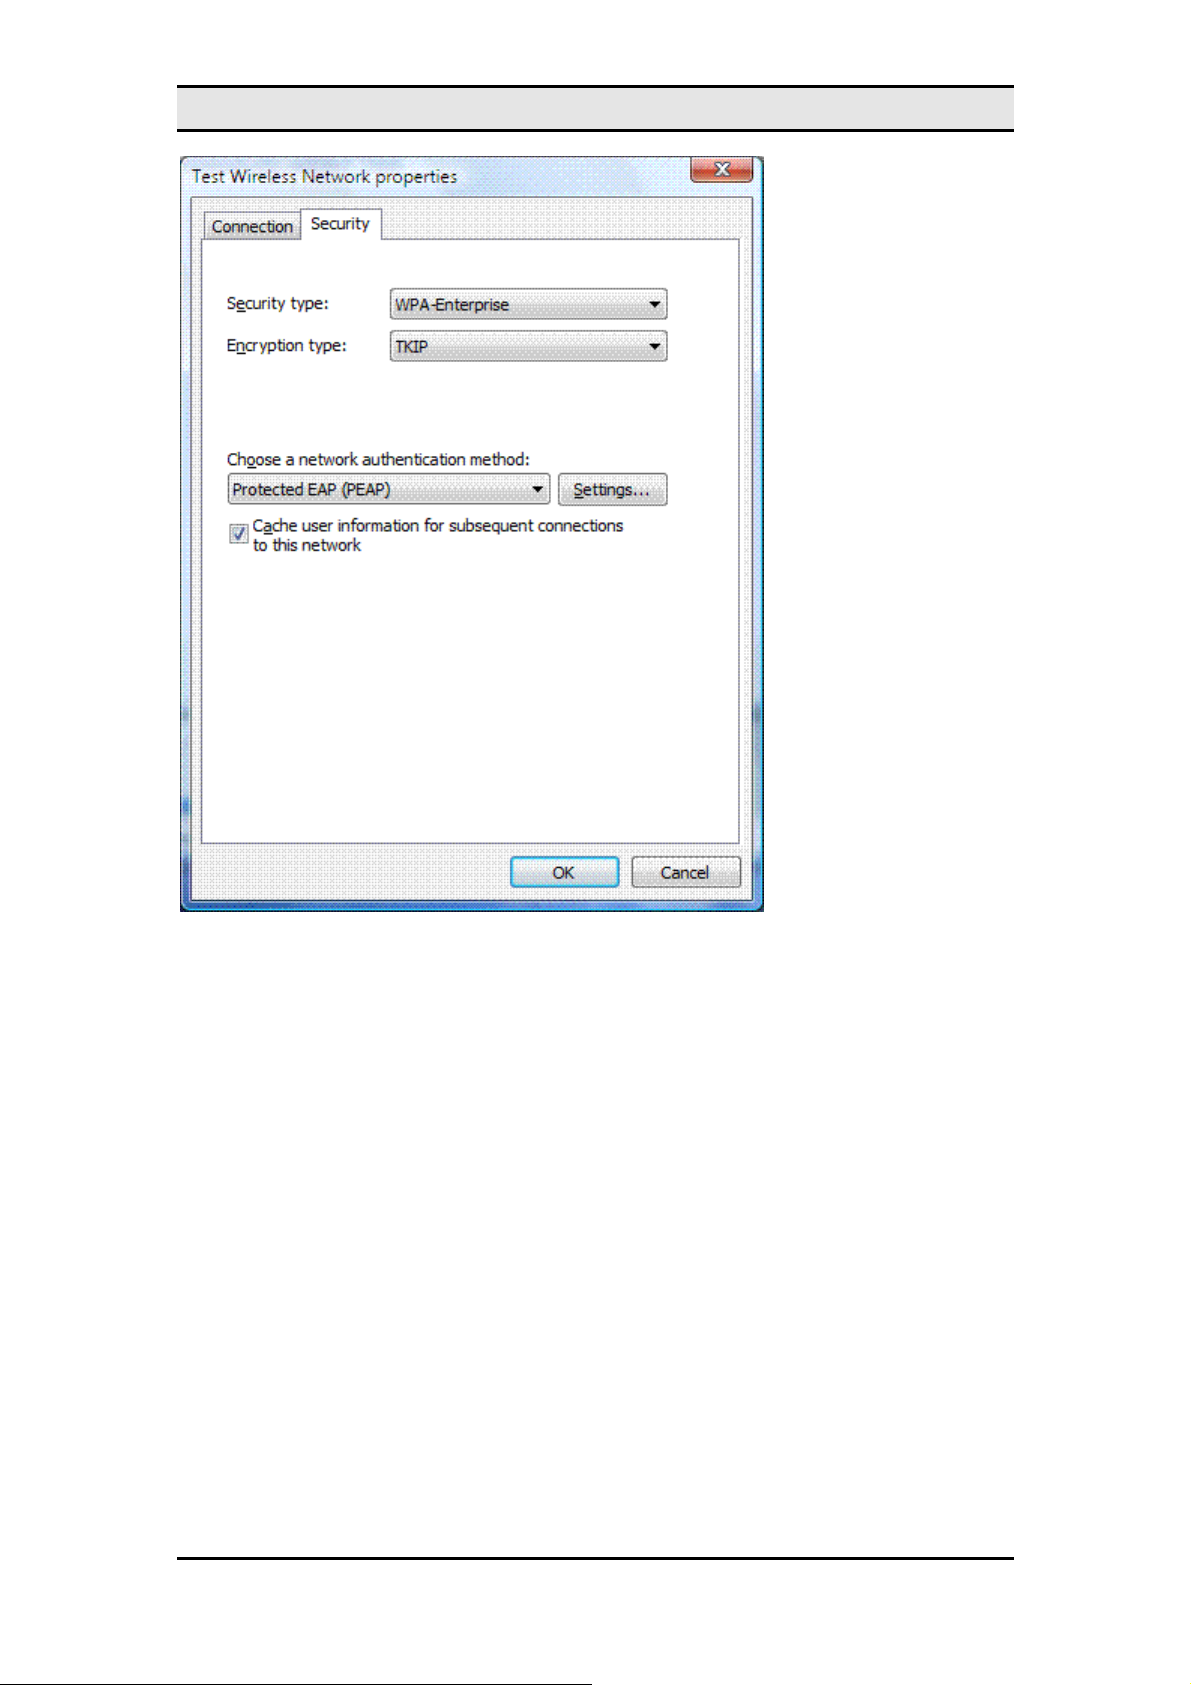
MW600-B-LO Wireless 802. 11b/g wireless PCI-E Adapter Card
WPA2-Enterprise
, or
802.1x
as your security type, you must configure the following (as
shown in the previous figure):
Choose a network authentication method
•
Protocol (EAP) method and click
Cache user information for subsequent connections to this network
•
Settings
Select an Extensible Authentication
to configure the EAP type as needed.
that when the user logs off, the user credential data is removed from the registry.
The result is that when the next user logs on, they will be prompted for their
credentials (such as user name and password).
If you specify the use of
authentication (Open)
WPA-Personal
or
Shared
or
WPA2-Personal
as your security type or
as your security type with WEP as your encryption type,
you must configure a network security key, as shown in the following figure.
Specifies
No
You do not need to configure a network security key for the WPA2-Enterprise, WPA-Enterprise,
and 802.1X security types because the key is determined automatically when Windows Vista
performs wireless authentication.
16
Page 17

MW600-B-LO Wireless 802. 11b/g wireless PCI-E Adapter Card
After you have configured your wireless networks, you can manage them from the
Wireless Networks
dialog box. To display the
Manage Wireless Networks
dialog box, do the
following:
1. Click Start, right-click
2. In the task list of the
networks
.
Network
Network and Sharing Center
, and then click
Properties
dialog box, click
.
Manage wireless
The following figure shows an example.
Manage
From the Manage Wireless Networks dialog box, you can add a new wi reless network, remove
a selected wireless network, obtain the properties of the wireless network adapter, and choose
the type of profile to assign to new wireless networks (applies to all users or the current user).
To view or modify the properties of an existing wireless network, double-click the wireless
network name.
17
Page 18

MW600-B-LO Wireless 802. 11b/g wireless PCI-E Adapter Card
Appendix A
Specifications
Product Name
Interface PCI Express® Rev 1.1, X1-lane 2.5Gbps PCIe Motherboard Slot
Network Standard IEEE802.11g/b COMPLIANT
Data Rate 54Mbps, automatic fallback to 48, 36, 24,18,12,9 and 6 Mbps
Modulation
Operating Frequency 2.412 ~ 2.462 GHz: North America
Operating Channels
RF Output Power
Antenna
Wireless 802. 11b/g wireless PCI-E Adapter Card
802.11g---- 54, 48, 36,24,18,12,9,6Mbps (OFDM)
802.11b---- CCK (11Mbps, 5.5Mbps), DQPSK (2Mbps), DBPSK
(1Mbps)
2.412 ~ 2.472 GHz: Europe ETSI
2.412 ~ 2.477 GHz: Japan
2.4GHz: 1~11 for N. America, 1~13 for Europe (ETSI), 1-14 for
Japan
14 ± 1.5 dBm (54Mbps, OFDM, typical)
16 ± 1.5 dBm (11Mbps, CCK, QPSK, BPSK, typical)
External Dipole (detachable, Gain: 2dBi) with a mating the RP-SMA
connector on the bracket.
2 LED, one orange color another one is green color
Orange color LED:
Solid light: Indicates wireless LAN enabled and connect.
LED Indicators
Coverage Area
18
Green color LED:
Slow Flashing: Indicates wireless LAN search AP
Fast Flashing: WiFi traffic.
Indoor: 802.11b: 50M@11Mbps
802.11g: 30M@54Mbps
Outdoor: 802.11b: 350M@11Mbps
802.11g: 100M@54Mbps
Page 19

MW600-B-LO Wireless 802. 11b/g wireless PCI-E Adapter Card
-70 dBm @ 54M (OFDM, 10% PER)
Receiver Sensitivity
-87 dBm @ 6M (OFDM, 10% PER)
-84 dBm @ 11M (CCK, 8% PER)
TX power consumption: <480 mA
Power Consumption
RX power consumption: <470 mA
WEP Support 64/128 bit encryption
Microsoft Windows XP,
Support OS
Vista premium/basic English/Chinese version.
Operating
0 to 60 ℃
Temperature
Humidity 20% to 95% Non-condensing
Dimensions (mm) (W) 19mm × (D) 167.65mm × (H) 68.9mm
Weight (g) 50 without antenna and cable (TBD)
Voltage 3.3V +/- 5%
19
 Loading...