

Caution: Investigational device. Limited by Federal law to investigational use.
March 2014
CONTROLLED COPY CREATED: 3/21/2014 4:59:41 PM
1

Table of Contents – ProGuardianRESTTMSystem User Manual
Section Page
1. Introduction 4
2. Understanding Your ProGuardian System 4
2.1System Components 4
3. Intended Use 5
4. Cautions 5
5. Contraindications – Use Restrictions and Limits 6
6. Before You Start Using Your ProGuardian System 6
6.1Explanation of Symbols 7
6.2Cleaning, Storage, and Handling 8
7. Setting Up Your ProGuardian System 9
7.1Hub Setup 9
7.2Setup Wizard for Hub Software 12
7.2.1How to Enter Information on the Hub 13
7.2.2Starting the Setup Wizard 13
7.3Begin Seizure Monitoring 14
7.3.1Preparation 15
7.3.2Sensor Patch Setup 16
7.3.3Patch and Sensor Application 18
8. Responding to Seizure Notifications 20
8.1Confirmingor Denying a Seizure Notification 21
8.2Adjusting Seizure Notification Sensitivity 21
9. Pausing or Stopping Monitoring 22
9.1Pausing and Resuming Seizure Monitoring 22
9.2Turning Seizure Monitoring Off 23
10. Replacing the Patch 25
11. Using the Hub Software 26
11.1Home Screen 26
11.1.1How to Lock the Hub 26
11.2Sensor 27
11.3SeizureLog 27
11.3.1Navigating the Seizure Log 28
11.3.2Adding Seizures to the Log 28
11.3.3Removing Seizures from the Log 28
CONTROLLED COPY CREATED: 3/21/2014 4:59:41 PM
2

Section Page
11.4Reports Menu 29
11.4.1Create a Report 30
11.5System Status 30
11.5.1Connectivity Tab 31
11.5.2Sensor Tab 31
11.5.3Hub Tab 32
11.6Settings Menu 33
11.6.1Seizure Detection Settings 33
11.6.2Sound Settings 35
11.6.3Display Settings 36
11.6.4Date and Time Settings 37
11.6.4.1Changing Date and Time 37
11.6.4.2Date and Time Formats 37
11.6.5Patient Profile 38
11.6.6Account Information 38
11.7Help Menu 39
11.7.1ProGuardian App Setup Wizard 39
11.7.2About 40
11.7.3Contact Us 40
11.7.4Administrator Access 40
12. The ProGuardian App 40
12.1ProGuardian App Setup Wizard 41
12.2Wi-Fi Network Changes and Registering New Devices 45
12.3Receiving Notifications on Your Mobile Device 46
12.4Adjusting Your Mobile Device Sound Settings 47
12.5Configuring App Sound Settings 48
12.6Discontinuing Use of the ProGuardianApp 48
13. Troubleshooting 49
13.1Sensor Reset 49
13.2Common Error Messages 50
13.3Replacing a Lost or Damaged Sensor or Hub 55
14. System Specifications 55
15. FCC Compliance Statement 56
16. Contact Us 57
CONTROLLED COPY CREATED: 3/21/2014 4:59:41 PM
3
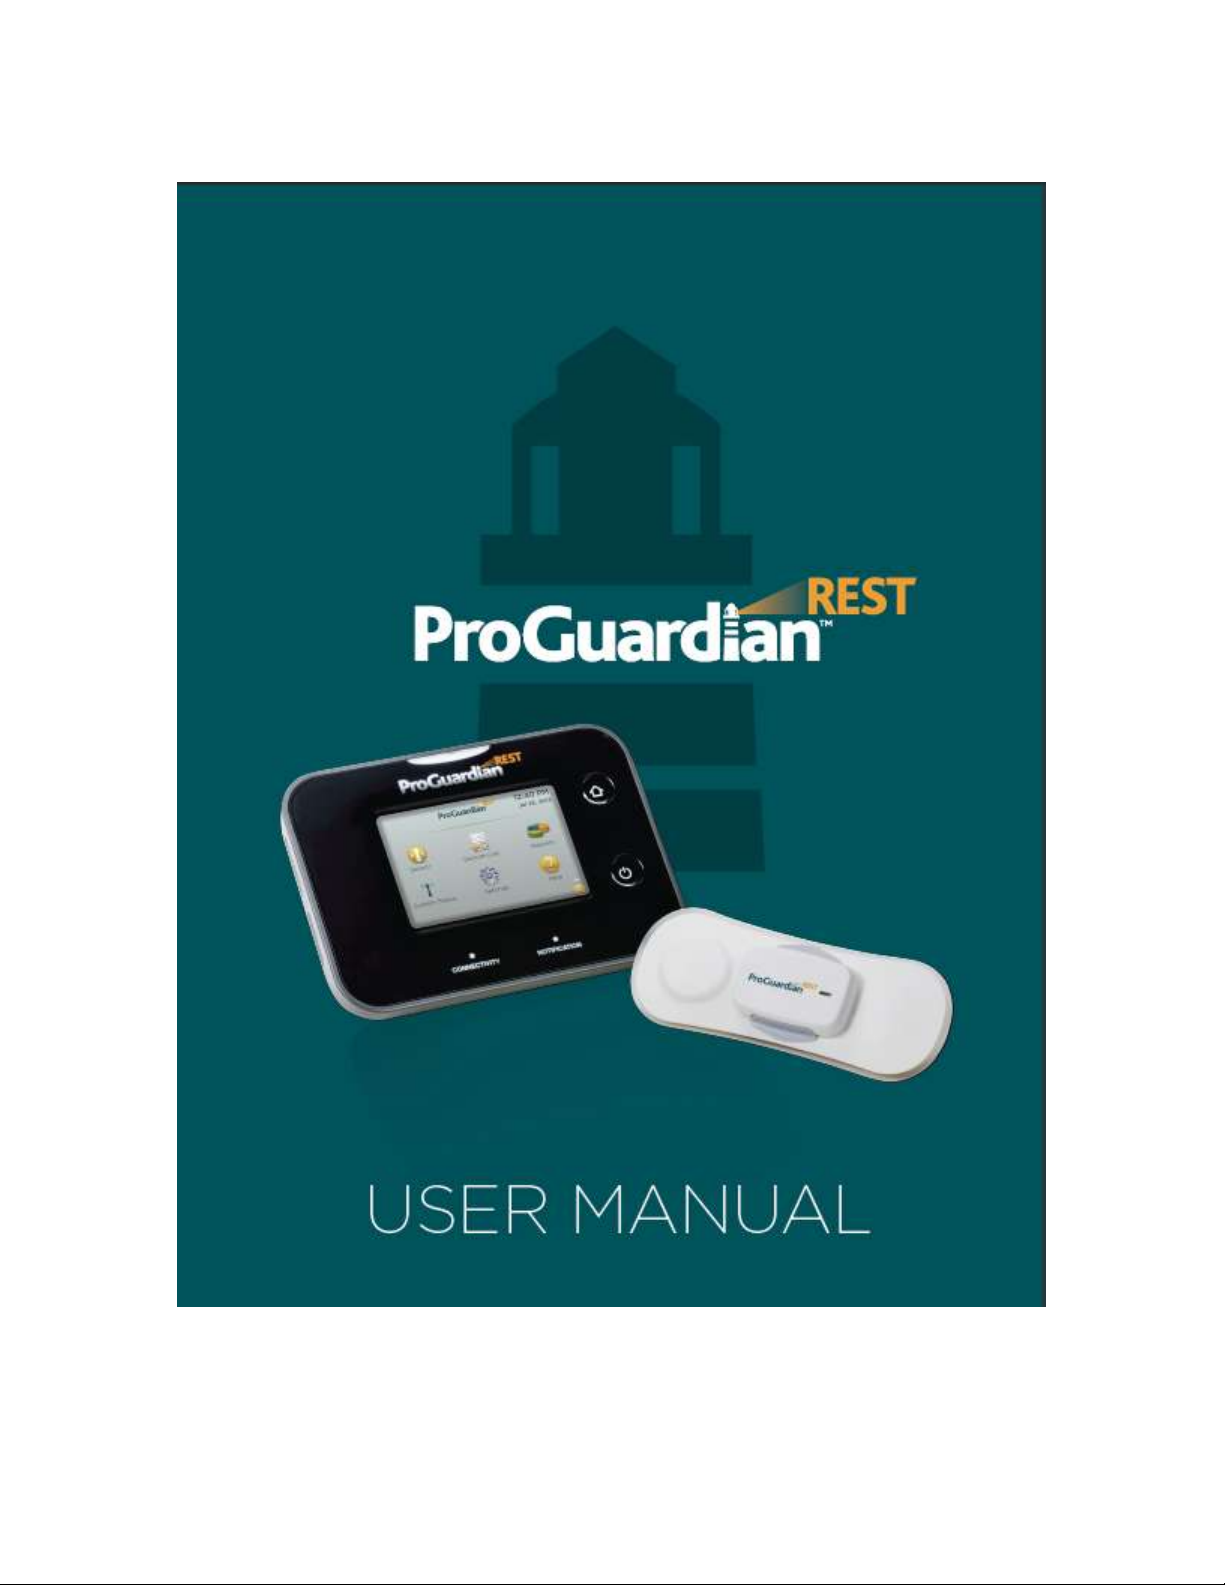
What it is.
What it looks like.
What it does.
Hub with power cordand
country specific adaptor(s)
(PG1100)
Provides a notification
when a potential seizure
is detected.
Seizures that are
confirmed by youare
stored in the seizure log.
Patches
(PG1200)
(Single use, disposable)
(30, individuallypackaged)
Adheres theSensor to the
body while sleeping.
1. Introduction
The ProGuardian System is used to sense changes in heart rate ormovement during periods of sleep in
people with epilepsy. Whena potential seizure is detected, the ProGuardian System sends out an audiovisual notification.
When you—the Caregiver—confirm these notifications, the System compiles them into summary
reports. The reportsallowyouto track seizure activity over time and can be used when talking to your
health care provider.
While helpful in detecting potential seizure activity, the ProGuardian System is not intended to replace
Caregiver supervision or prescribed healthcare. The ProGuardian System is an informational tool that
may help you enhance your efforts in managing your loved one’s epilepsy.
2. Understanding Your ProGuardian System
Your ProGuardian System comes with the components listed below. If anything is missing or damaged,
contact your Customer Care Service Center (refer to Contact Us section of this manual).
2.1. System Components
These items are included in your ProGuardian System kit:
CONTROLLED COPY CREATED: 3/21/2014 4:59:41 PM
4
What it is.
What it looks like.
What it does.
Sensor
(PG1000)
(Body worn)
Collects heart rate and
movementinformation
while sleeping.
ProGuardian Application
(Accessory)
Can be downloaded from
www.ProGuardianSystem.com
Receives notifications on
an Android mobile
devicewhile away from
the Hub (active when
connected to home Wi-Fi
Network).
USB Flash Drive
(Picture may not represent actual item)
Transferssummary
reports from the Hub.
No component of the ProGuardian System is provided sterile, or made with natural rubber latex.For
additional information about the System, please see Section 14,System Specifications.
3. Intended Use
The ProGuardian System is a monitoring device for people with epilepsy five years of age and over. The
system aids in detecting, notifying, and recording potential seizures during periods of sleep.It is capable
of detecting seizures that are accompanied by changes in heart rate or movement.
4. Cautions
Follow these Cautions to avoid the possibility of harm to the user or damage to the device.
CONTROLLED COPY CREATED: 3/21/2014 4:59:41 PM
The ProGuardian System will not detect all seizures and is not intended as a life-saving device.
Talk to your healthcare provider (HCP) immediately if you have any concerns or if the condition
of the person with epilepsy worsens.
5

Do not rely on the seizure notification feature for delivery of life sustaining medical treatment,
such as administration of rescue medication.
If the Hub loses power, the System may miss seizure detections.
If you experience symptoms of skin irritation or allergic reaction such as redness or swelling with
the use of the Patch, remove immediately. If symptoms do not improve or get worse after
removal of the Patch, please consult your healthcare provider.
The ProGuardian System should not be used while undergoing any diagnostic medical
procedures, such as MRI or X-Ray.
The ProGuardian System should not be used in an oxygen rich environment (e.g., oxygen tent,
hyperbaric chamber).
The ProGuardian System should not be used on an airplane.
The ProGuardian System includes radio frequency technology. For complete FCC compliance
information please see Section 15.
Do not drop the Sensor or Hub. Doing so may damage the ProGuardian System.
Only use the power cord supplied with the Hub.Failing to do so can damage the System and
present a fire hazard.
Only use ProGuardian Patches. Other types of Patches will not work with your System.
Do not expose the Patch to fire or heat sources, as it contains a battery that could explode.
Do not expose the Hub, Sensor, and Patch, to water or any other liquid. Doing so may damage
the ProGuardian System.
Dispose of the lithium coin cell battery in the Patch in accordance with local regulations.
5. Contraindications – Use Restrictions and Limits
The ProGuardian System should not be used on anyone who is:
Under 5 yearsof age
Implanted with a cardiac management device (e.g., cardiac defibrillator, pacemaker)
6. Before You Start Using Your ProGuardian System
Read this manual.
To use the System correctly and be most comfortable using it, you need to understand how
it works and be familiar with its screen displays and system features.
Inspect each componentof the System.
If you see any damage to any system components or if you are missing any component, call
your Customer Care Service Center immediately.
CONTROLLED COPY CREATED: 3/21/2014 4:59:41 PM
6
Symbol
Description
Notice for reader to pay special attention to details that follow
Serial number (located on both the Hub and Sensor)
Storage temperature ranges
Batch code (located on patch packaging)
Date of manufacture
Consult Directions for Use
Provides helpful usage tips and guidelines
Complete the Setup Wizard.
You must complete the Setup Wizard before using the ProGuardian System for the first
time. The settings you put into the system are critical for providing accurate and useful
information.
Note:The date and time must be entered correctly in order for seizures to be accurately
recorded in the seizure log.
Understand what the System does.
The ProGuardian System is used to sense changes in heartrate or movement and to
notifyyouof potential seizure activity. The system is not intended to replace supervisionand
should not be expected to detect all types of seizures.
6.1. Explanation of Symbols
The symbols below are used in the manual, in other package labeling, or on the product components
forthe ProGuardian System.
CONTROLLED COPY CREATED: 3/21/2014 4:59:41 PM
7
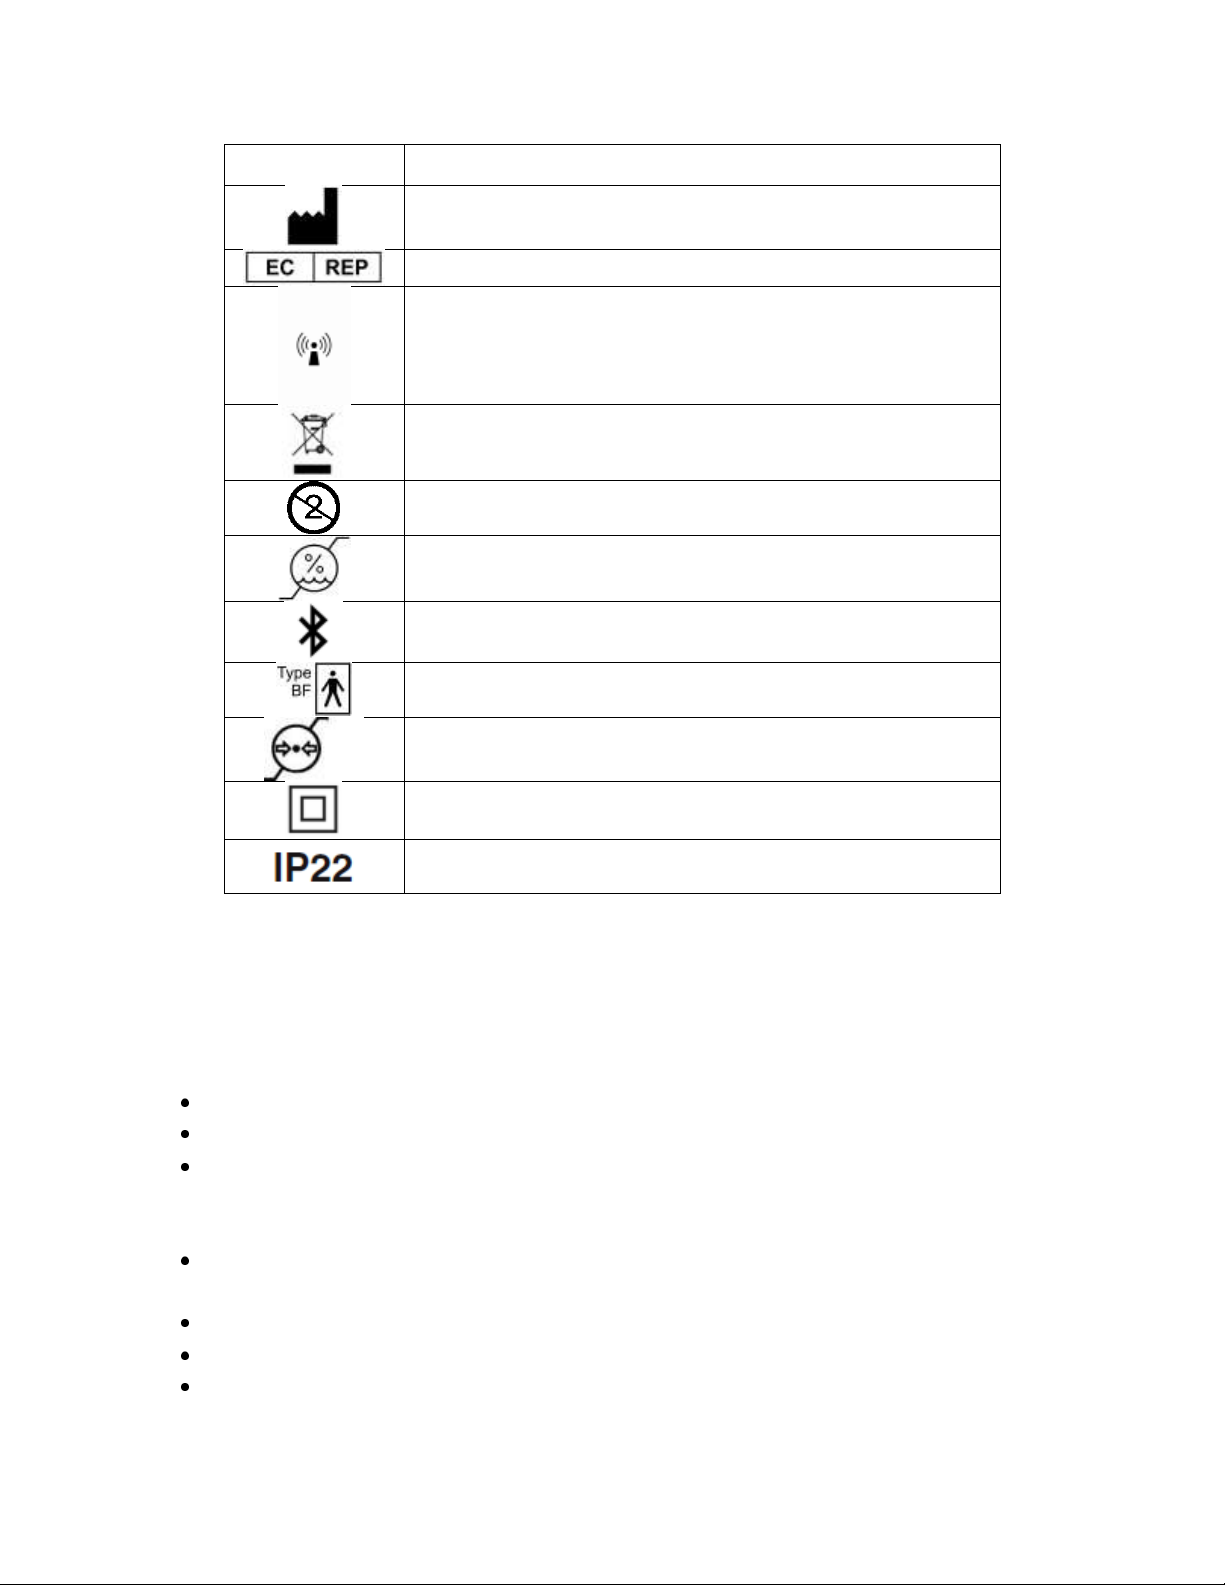
Symbol
Description
Manufactured by
Authorized Representative
RF-enabled
Do not put in regular trash. Requires special disposal.
Single Use
Storage humidity limitation
Bluetooth-enabled
Type BF medical device
Storage and use atmospheric pressure limitation
Class 2 medical device
Ingress protection ratingfor allowable exposure to moisture and
dust
6.2. Cleaning, Storage, and Handling
As with any device, proper storing and handling guidelines should be followed to ensure the
ProGuardian System operates most effectively. Follow the guidelines listed below.
When handling the ProGuardian System, make sureyou have dry, clean hands.
Do not exposethe Hub, Sensor, and Patchto water or any other liquid.
Operate the System in temperatures ranging 5- 40°C (41- 104°F) and 15-93% relative humidity.
When not in use, the System can be stored in temperatures ranging -25 - 70°C (-13 -158°F) and
15- 93% relative humidity.
Each Patch contains a small battery. Dispose used patches in compliance with local regulations
for lithium coin cell batteries.
Do not cover the Hub, as this could result in over-heating.
Do not place the Hub near equipment that generates heat.
Use a soft damp cloth to clean the Hub display and Sensor. Do not use harsh chemicals or
abrasives.
CONTROLLED COPY CREATED: 3/21/2014 4:59:41 PM
8
Do not open individual Patches until needed. Doing so may cause the adhesive to be less
effective.
If you need to dispose of the Sensor or the Hub, please return the device back to Cyberonics.
7. Setting Up Your ProGuardian System
This section instructs you on how to set up the Hub and Sensor so you can begin using your system. The
ProGuardian System also works with an optional ProGuardian App thatcan be activated during initial
setupor configured at a later time (see Section 12, “The ProGuardian App”for more details).
To begin using your ProGuardian System,set up the following parts of the system:
Hub
Hub Software
Sensor and Patch
7.1. Hub Setup
The Hub is where you enter and receive information. When set up with an active Sensor, it provides
anotification when a potential seizure is detected. Confirmed seizures are stored in the seizurelog.
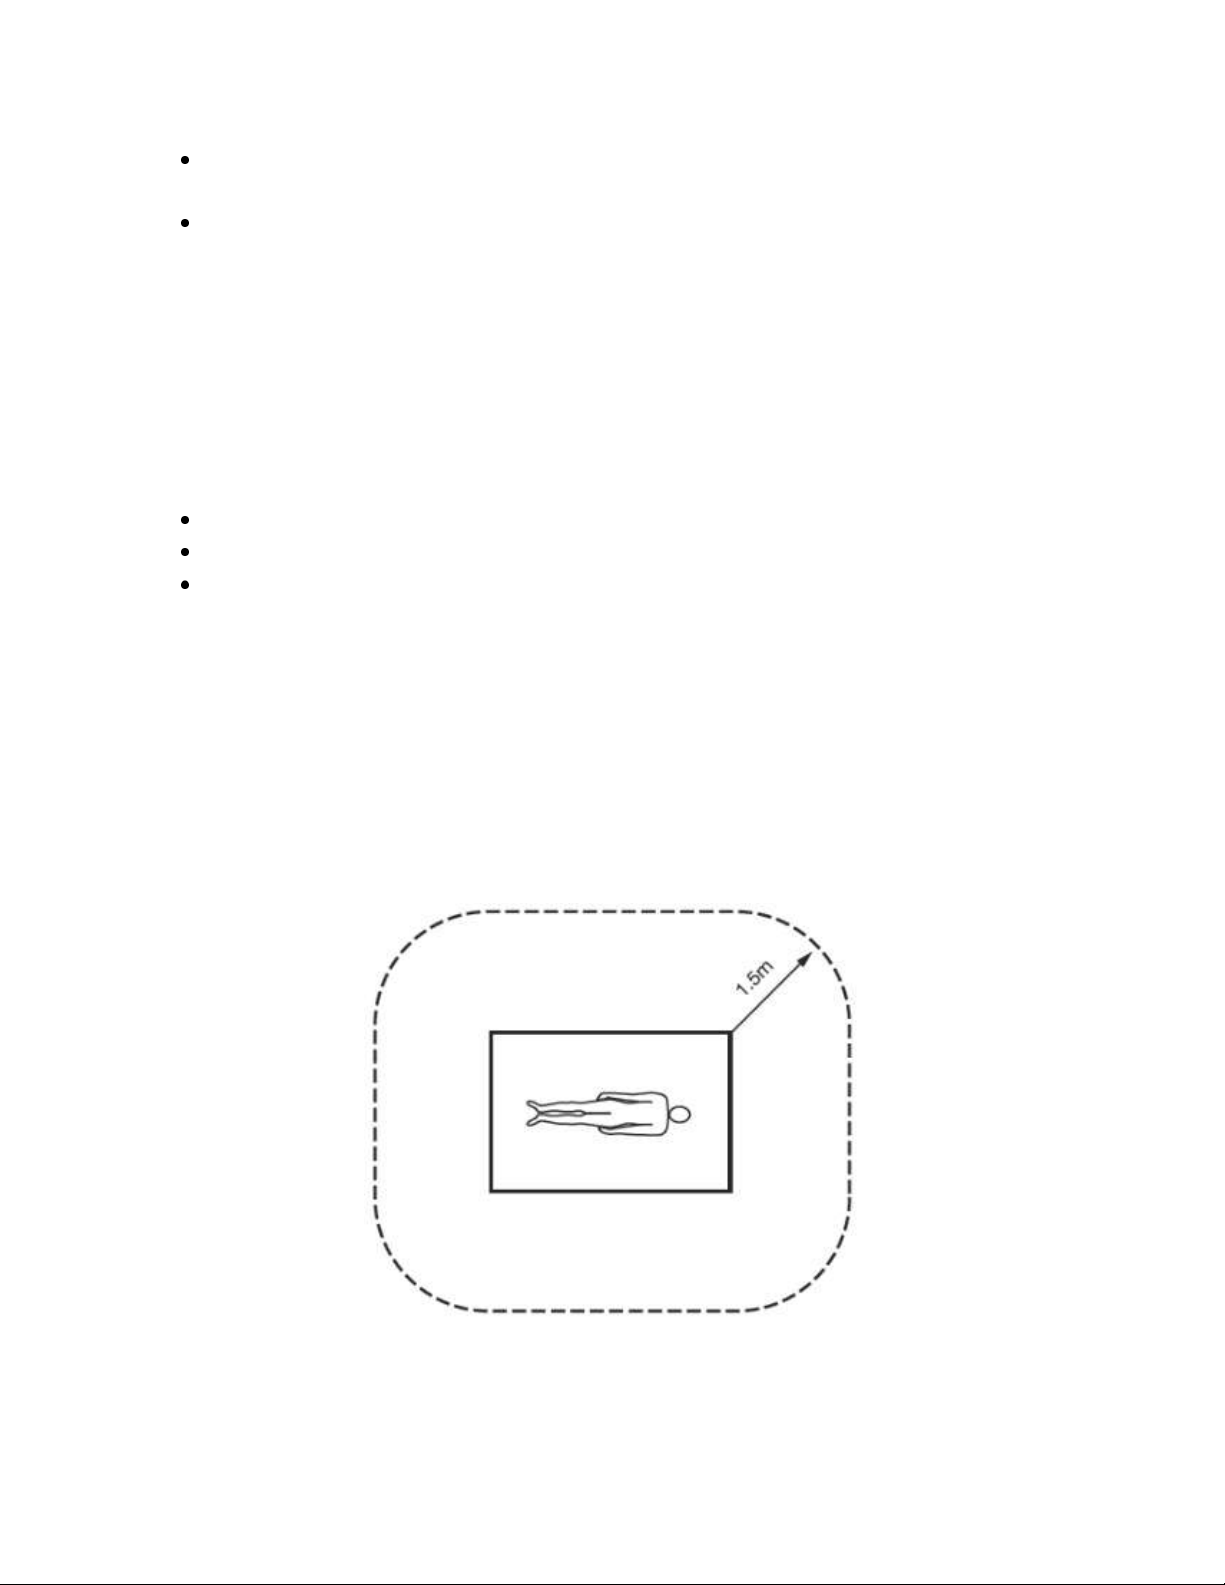
Follow the steps below to set up the Hub. The Hub must be placed at least 5 feet (1.5 meters) away
from the sensor wearer’s support system (such as a bed or couch) when he or she is sleeping (Figure 1).
Figure 1: Hub Placement
1. Become familiar with the buttons and LED locations on the Hub (see Figure 2, Figure 3, and
Figure 4).
CONTROLLED COPY CREATED: 3/21/2014 4:59:41 PM
9
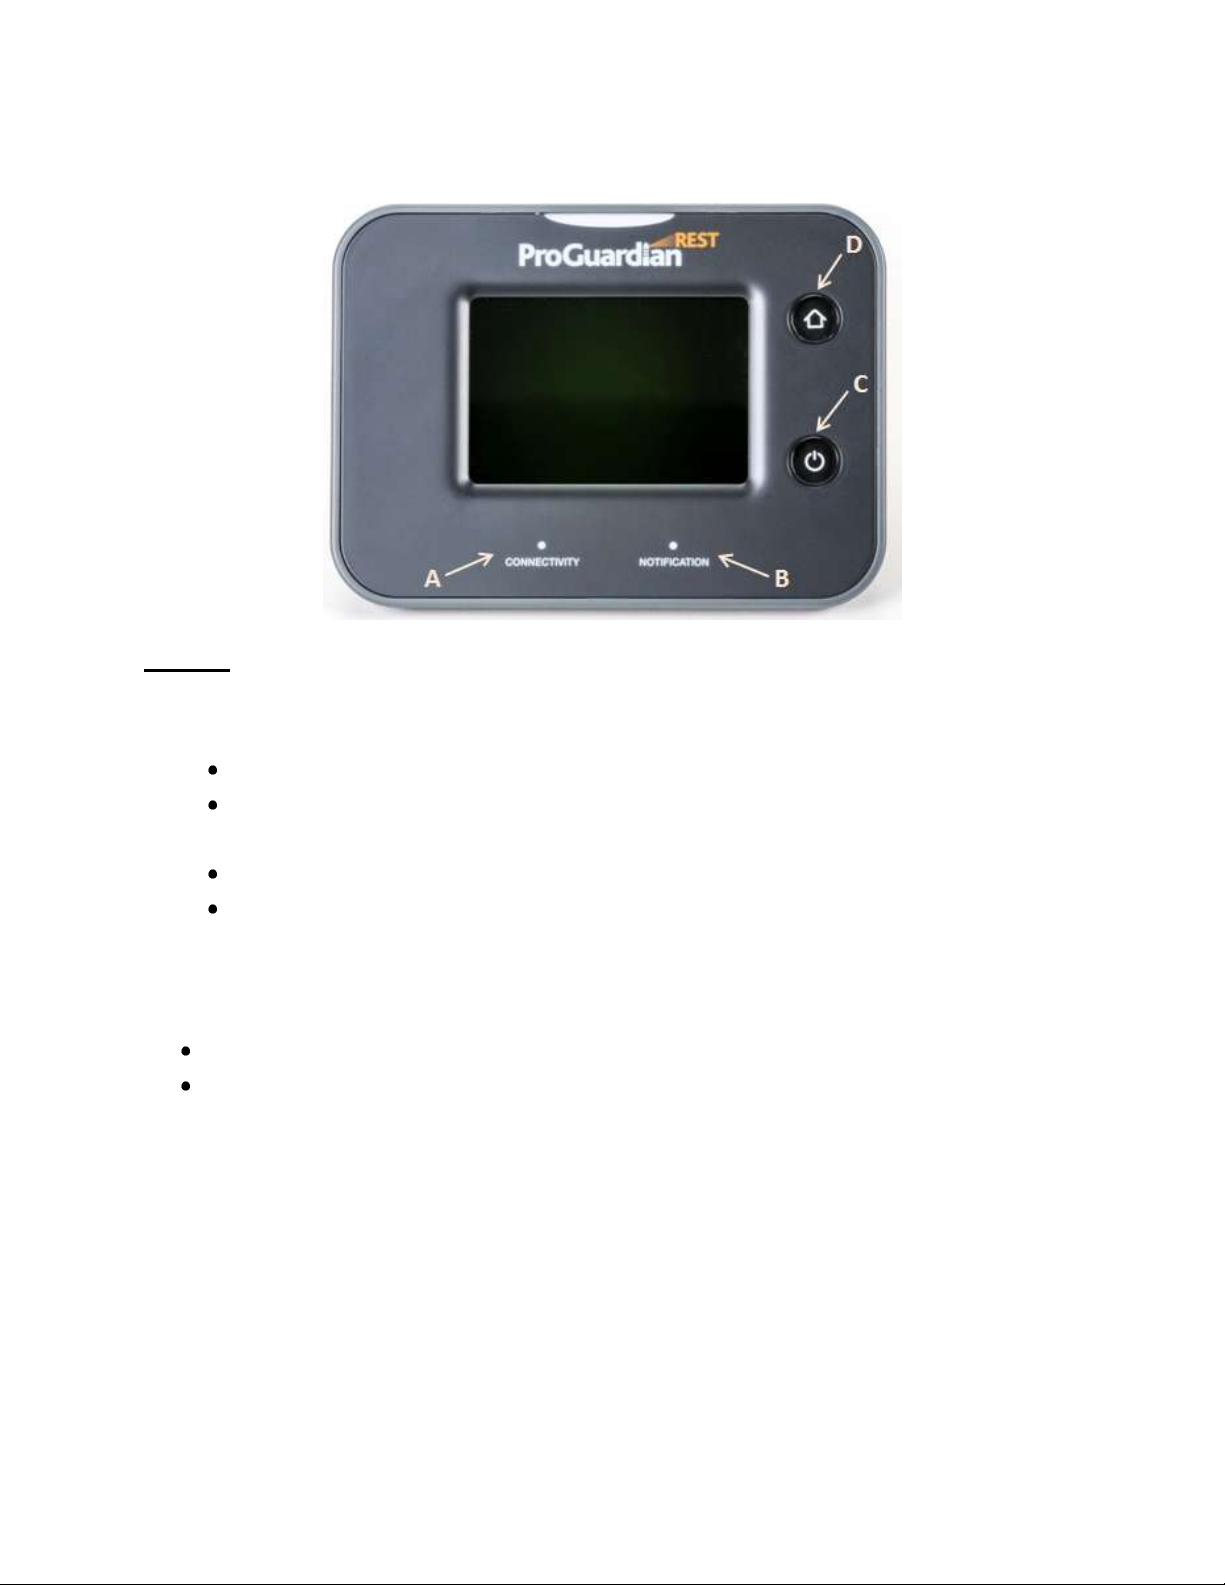
Figure 2: Hub Front
Figure 2:
A -Connectivity LED – Provides a visual indicator for the System connectivity:
Blue: No connectivity issues exist while connected to the Sensor.
Solid amber: Either the Hub-to-Sensor or Hub-to-ProGuardian App communication is
disrupted (when enabled).
Flashing amber: During Sensor setup or anytime the System is paused.
Not lit: When the neither the sensor nor the Caregiver App are registered or
connected.
B – Notification LED – Provides a visual indicator for notifications:
Flashing amber:Indicates pending seizure or system notifications.
Solid amber:A system notification has not been resolved after warning message has
been dismissed.
C – Power Button – Press and hold to turn Hub ON or OFF. Blue when the Hub is turned ON.
Tap button to turn screen ON and OFF while system is still active.
D – Home Button – Press to return to the Home Screen from any software screen.
CONTROLLED COPY CREATED: 3/21/2014 4:59:41 PM
10
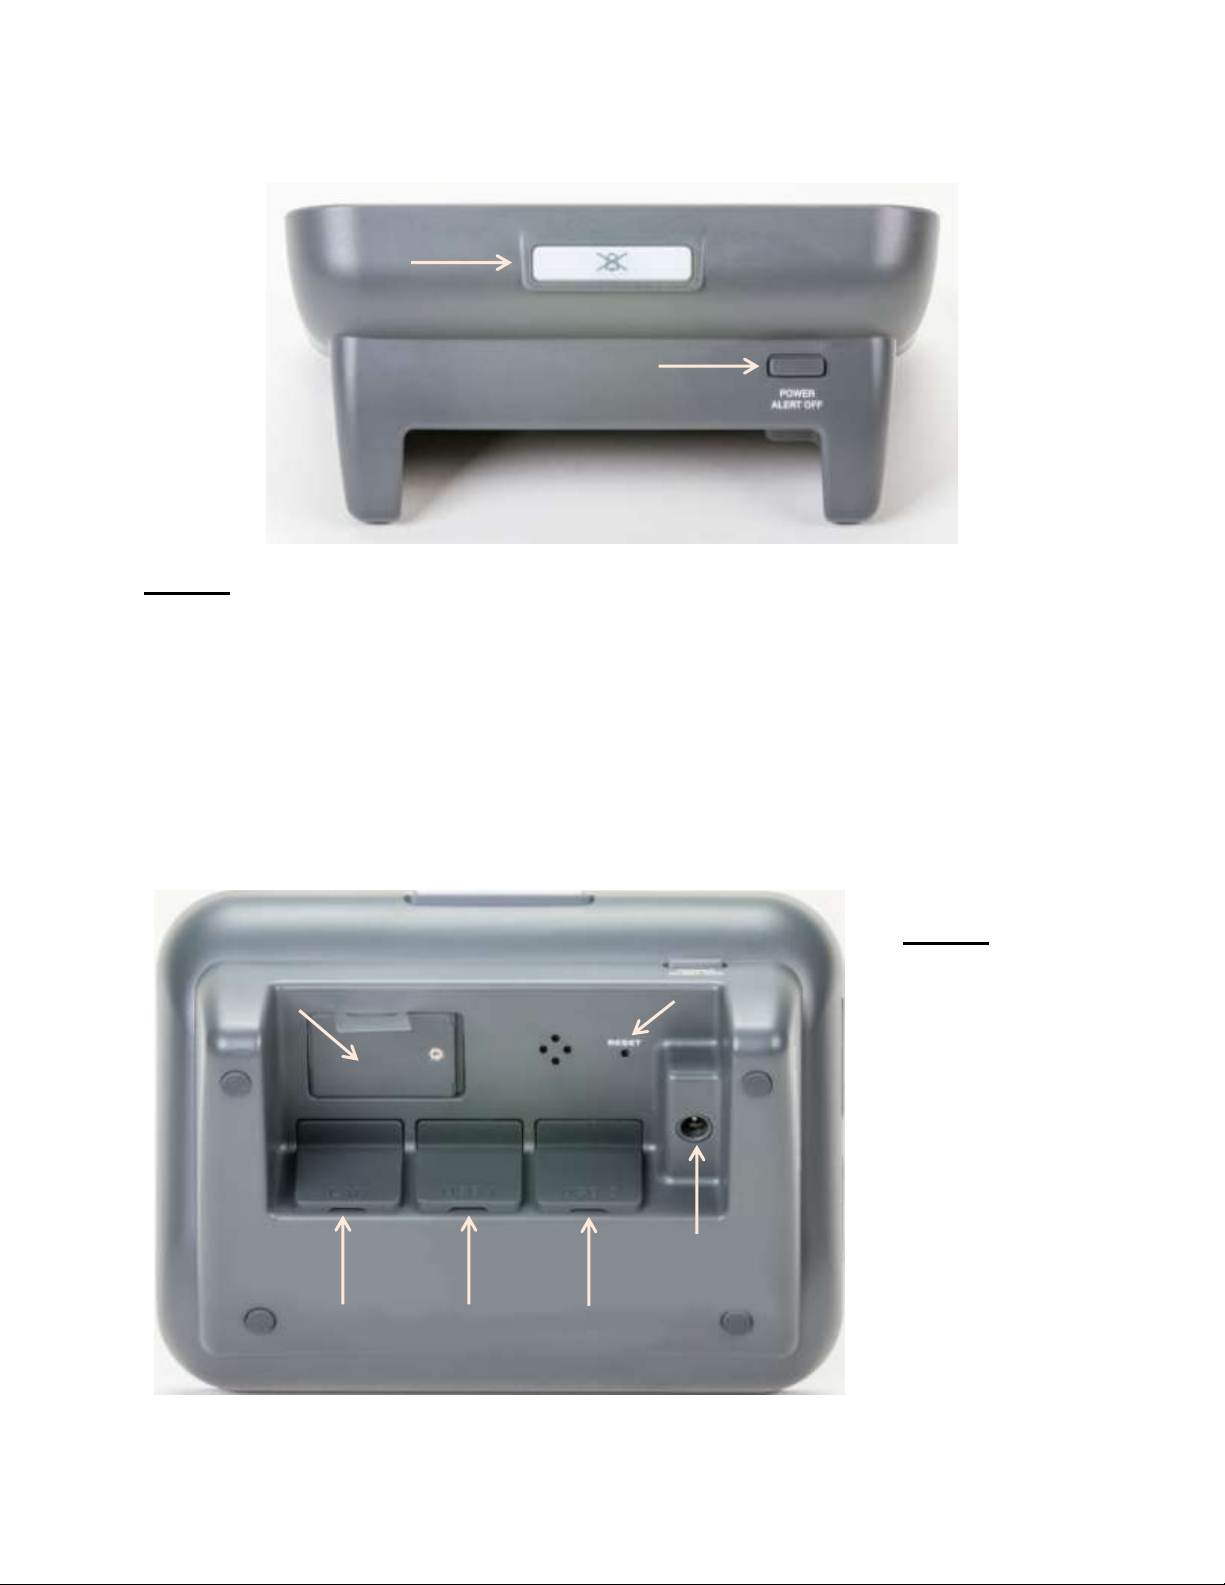
Figure 4: Hub Bottom
Figure 4:
A –Power Alert
Battery
B – Hub Reset
C – AC Plug
D – USB-2 Port*
E – USB-1 Port
F – LAN*
*Not active
A B A E F D C
B
Figure 3: Hub Back
Figure 3:
A –Silence Button – Flashes amber to provide a visual indicator of a pending seizure
notification. Press to silence audio during seizure notifications. You must tap Confirm or
Deny on the touchscreen to dismiss the notification displayed on the Hub.
B –Power Alert Off – The Hub provides an alert if the wall outlet is disconnected or if it loses
power for any reason while turned ON. This button silences the alert.
CONTROLLED COPY CREATED: 3/21/2014 4:59:41 PM
11
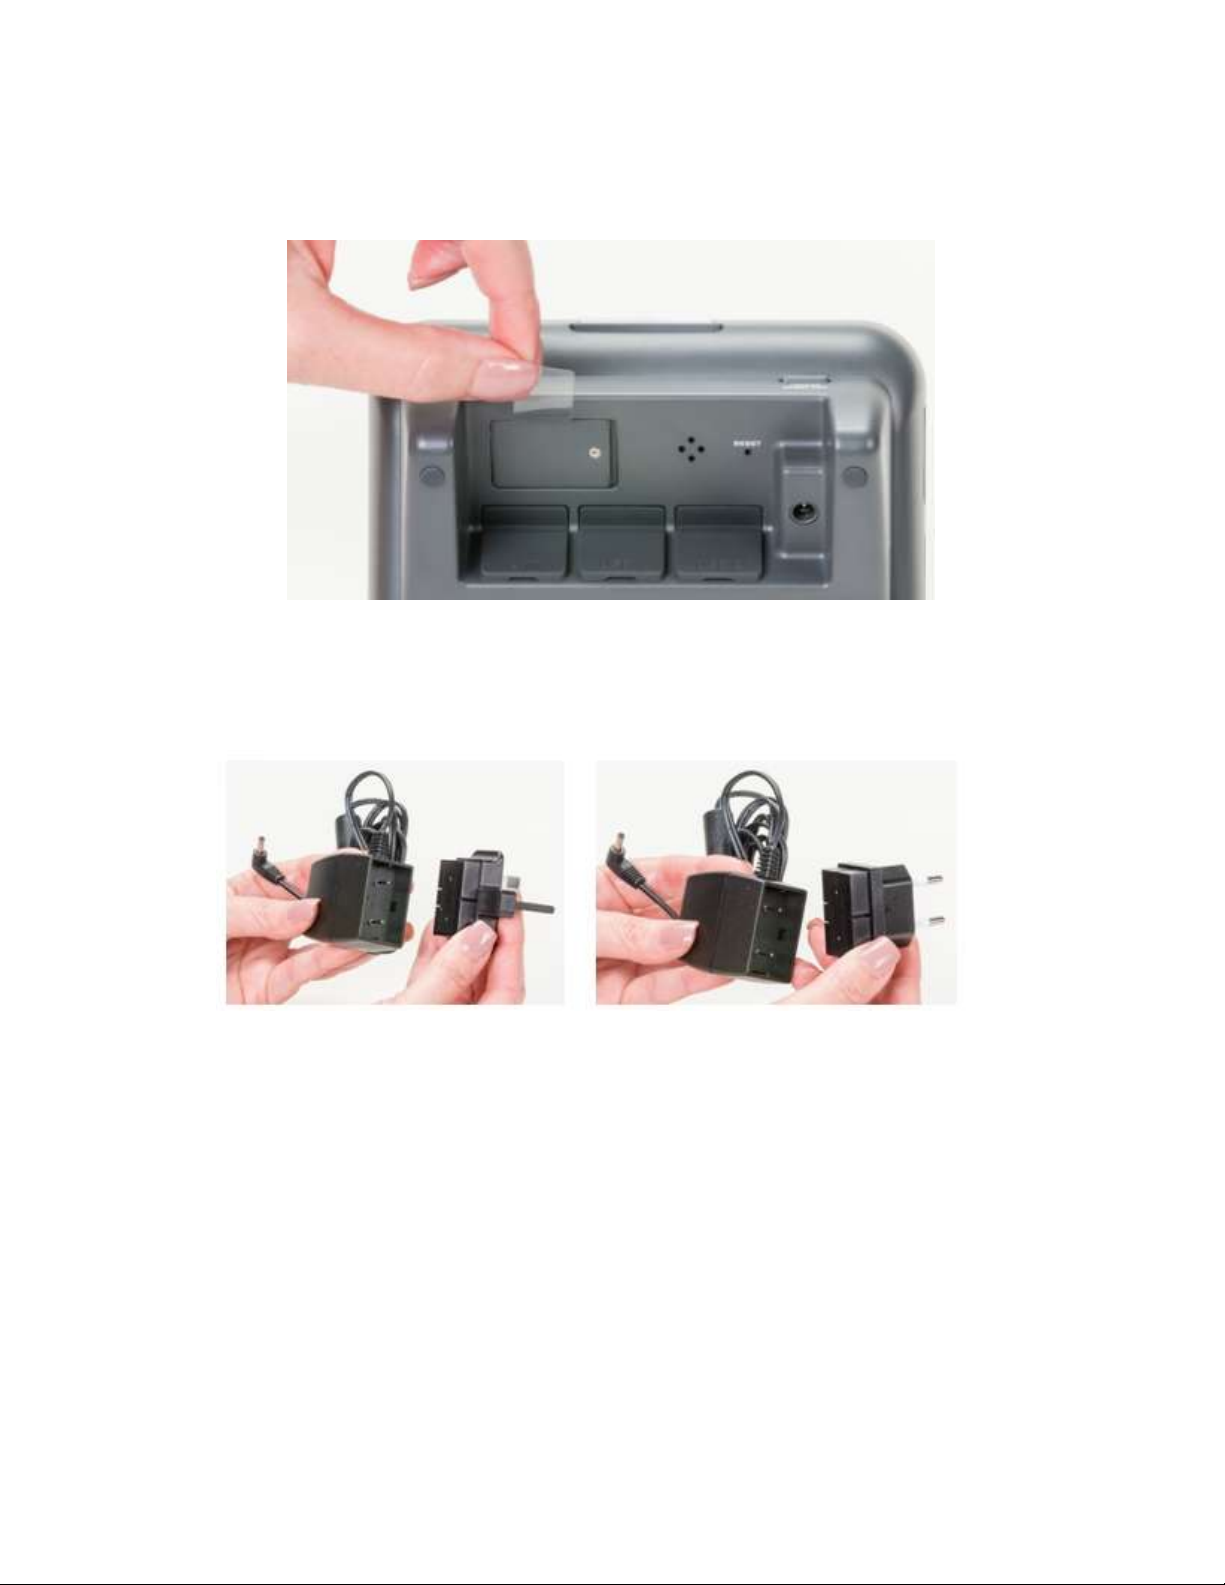
2. If this is your first time using the System, remove tab from the power alert battery compartment
(see Figure 5).
Figure 5: Remove Tab
3. If required, assemble the AC adaptor with the appropriate plug tip (seeFigure 6).
Figure 6: Assemble AC Adaptor
4. Connect the power cordinto the back of the Hub, and then plug into a wall outlet.
5. The Hub will automatically turn on, display the Cyberonics’logo, and start the ProGuardian
software.
7.2. Setup Wizard for Hub Software
The Setup Wizard guidesyou through the registration and initial setup of the Hub software. Follow the
on-screen instructions andenter the requested information.
CONTROLLED COPY CREATED: 3/21/2014 4:59:41 PM
12
Option
Description
Pop-up Menu
Tap a setting field to view a pop-up menu of available options.
Tap an option to select it.
Text Field
Tap the empty text field to pull up an on-screen keyboard.
7.2.1. How to Enter Information on the Hub
Use the following methods to enter information as prompted by the Setup Wizard and during normal
use of theHub software.
7.2.2. Starting the Setup Wizard
To start the Setup Wizard, follow the on-screen instructions listed below.
1. If you have not already accepted the Terms of Service, read the agreement and press the
“Accept” button. You must accept the Terms of Service before using the ProGuardian System.
2. Press the “Next” button to begin system setup (Settings & Registration).
3. Select the preferred date and time format by selecting a field and using the Pop-up menu. Press
the “Continue” button after making your selections.
You may select the order in which day, month, and year is displayed and recorded by
the System.
You may choose either 12 or 24 hour clock format.
4. Enter the correct local date and time. These settings must be accurate so that when seizure
detections are added to the log, the date and time information is correct.
a. To set the date, tap the current date.
b. Adjust the date by using the “+” and “-” buttons, or by using the on screen keyboard to
type into the year, month, or day fields.
c. Press “Ok” when finished.
d. To set the time, tap the currently displayed time setting.
e. Adjust the time by using the “+”and “-” buttons, or by using the on screen keyboard to
type into the hour and minute fields. AM and PM can be selectedby tapping the field
(when appropriate based on selected time display format).
f. Press “Ok” when finished.
g. Press “Continue” after both the time and date are set.
Note:To adjust these settings at a later time refer to the “SETTINGS MENU” section.
CONTROLLED COPY CREATED: 3/21/2014 4:59:41 PM
13

5. Enter the sensor wearer’s name and date of birth by tapping the text field and using the on-
screen keyboard or popup menus. This information will be included on reports created by the
System. Press “Continue” when finished.
6. Create a password and a security question used to recover your password should you forget it.
All entries can be completed by tapping the text field and using the on-screen keyboard or
popup menus. Press “Continue” when finished.
a. Passwords are case sensitive (upper and lower case letters are checked) and must
consist of numbers, letters, or symbols (no spaces allowed). They must be at least 5
characters long.
b. The security answer is not case sensitive.
c. To adjust these settings at a later time, refer to the “SETTINGS MENU” section.
7. “Settings and Registration” is complete, press “Next” to proceed.
8. (OPTIONAL)
You can setup the ProGuardian App at this time; or, you can later access the ProGuardian App
Setup Wizard from the Home Screen Help menu.
a. The ProGuardian App is an optional mobile applicationthat can be loaded on anAndroid
smart phone.
b. The application allows receipt of seizure notifications from the Hub on your mobile
device when in range of your home Wi-FiNetwork.
c. Refer to the “The ProGuardian Mobile Application” section for more details.
You have successfully completed the Hub software Setup Wizard.
When ready to begin seizure monitoring, complete the steps listed in “Begin Seizure Monitoring”.
7.3. Begin Seizure Monitoring
The Sensor is a body-worn device that collects heart rate and movementinformation. The Patch is a
single-use, disposable adhesive stripthat connects to the Sensor and adheres to thebody.The Patch has
gel components that allow the Sensor to detect a heart rate. It is important that the Patch is in full
contact with the skin to give accurate information to the Sensor and Hub.
The System is intended for seizure monitoring during sleep, andPatches may be worn for up to 12 hours
before replacement is necessary.
CONTROLLED COPY CREATED: 3/21/2014 4:59:41 PM
14
7.3.1. Preparation
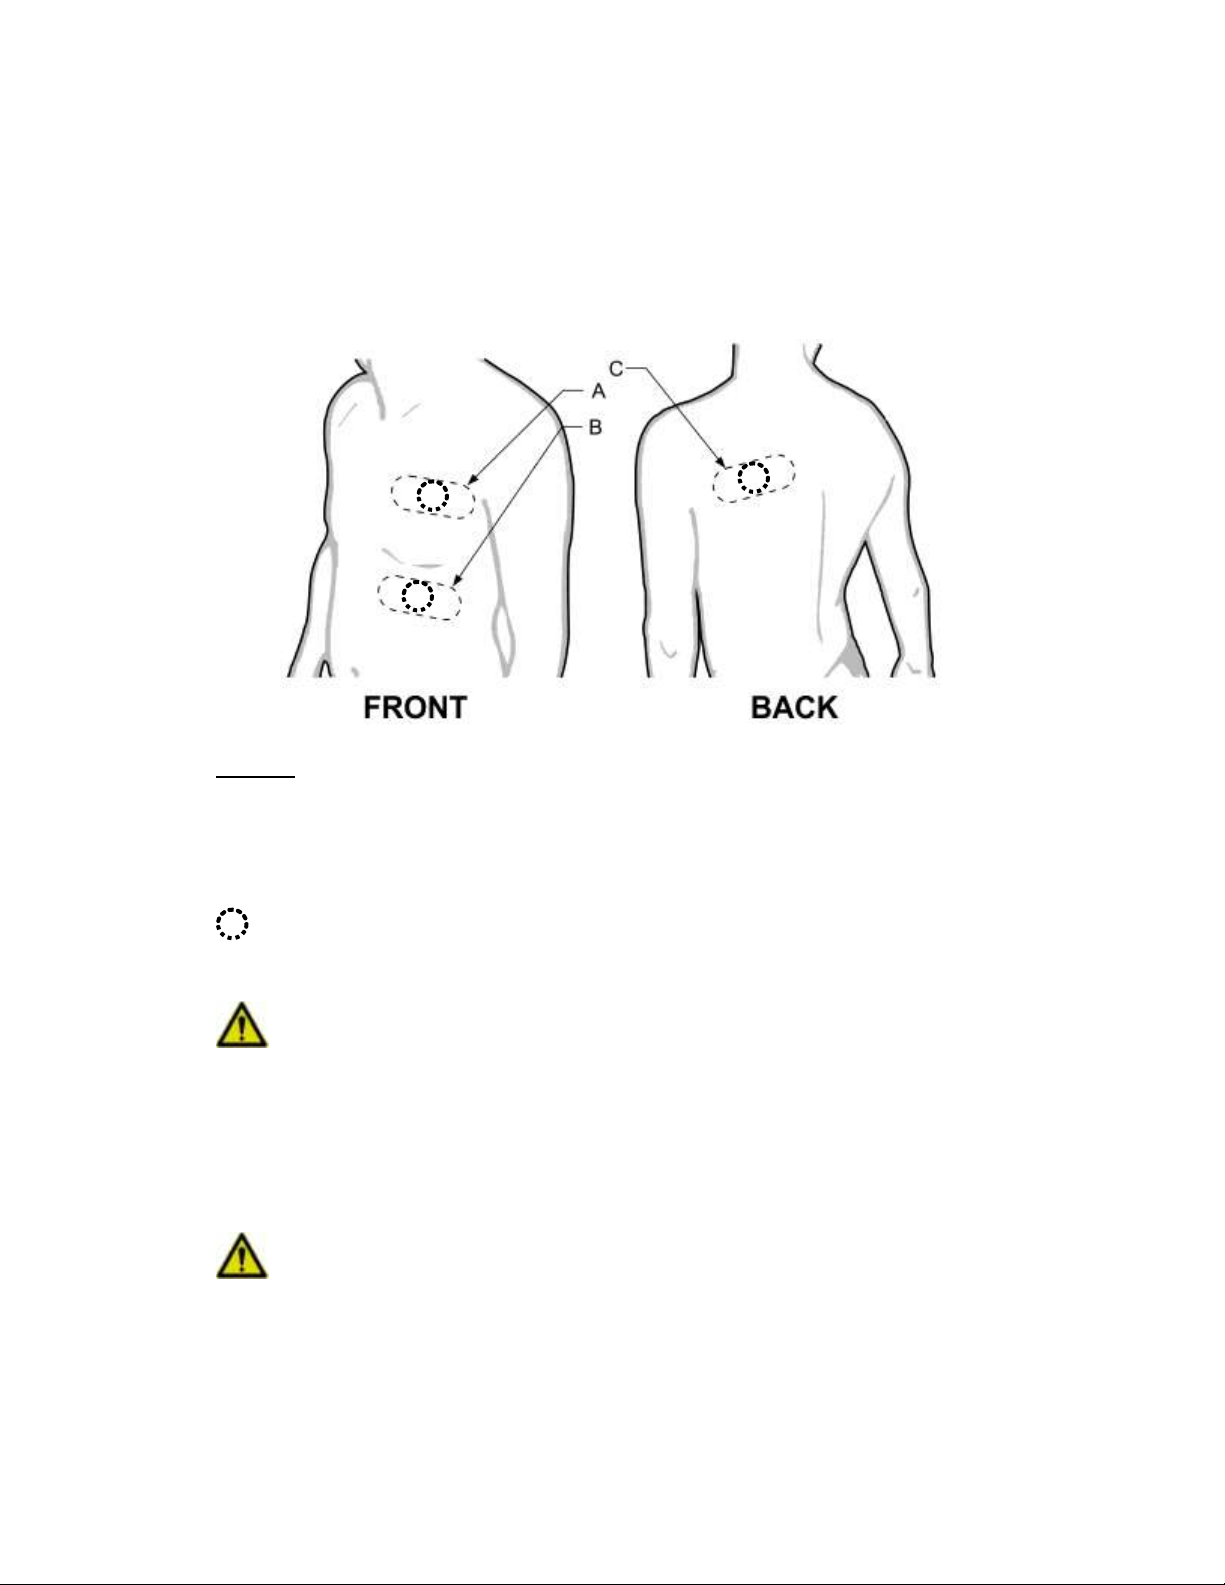
The assembled Sensor and Patch should be worn in one of the following locations on the body (Figure
7):
Figure 7: Areas for Skin Preparation
Figure 7:
A - Left chest (Preferred position)
B –Lower Left rib cage
C - Left back – directly below the shoulder blade (Least preferred position)
*Positions of Patch can be rotated by any degree; however, ensure center of Patch (indicated by
) is placed as shown on diagram.
Caution: For people with the implantable VNS Therapy® System, the ProGuardian Sensor
should only be placed on the lower rib cage or on the back.
To ensure the sensor has fullcontact with the body, prepare the skin by following the steps below.
1. Trim any excess hair from the chosen location using scissors or electric clippers.
Caution: Do not use a razor, as this can cause skin irritation.
2. Clean the area with soap and water to remove oils or lotion.
3. Dry the area thoroughly.
CONTROLLED COPY CREATED: 3/21/2014 4:59:41 PM
15
Caution:The Patch should not be applied to cuts, abrasions, sun burns, rashes, or any
other type of abnormal skin condition. Applying the Patch to skin that is damaged may result in
discomfort, pain, or worsening of the skin condition.
Note:Change the Patch location on a regular basis (nightlyor as needed) to prevent skin
irritation.
Note:Use soap and water to remove residue from a previous Patch.
7.3.2. Sensor Patch Setup
1. Confirm that the Hub is displaying the Home Screen(Figure 8).The Sensor icon on the Home
Screen will begray (disabled) until the System is ready to detect seizures.
Caution: If the Sensor icon is yellow (enabled), then the system was not turned off from
the Hub Home Screen at the end of the last use period. To prevent connection problems, press
the Sensor icon, then select “Off” before proceeding to Step 2 (see “Pausing or Stopping
Monitoring” for more details).
Figure 8: Hub Home Screen (Sensor Inactive)
2. Locate yourSensorand remove asingle disposable Patch from its packaging (Figure 9).
Note:Do not peel the liner away from the Patchadhesive. You will be instructed to expose
the adhesive at a later step before application to the body.
CONTROLLED COPY CREATED: 3/21/2014 4:59:41 PM
16
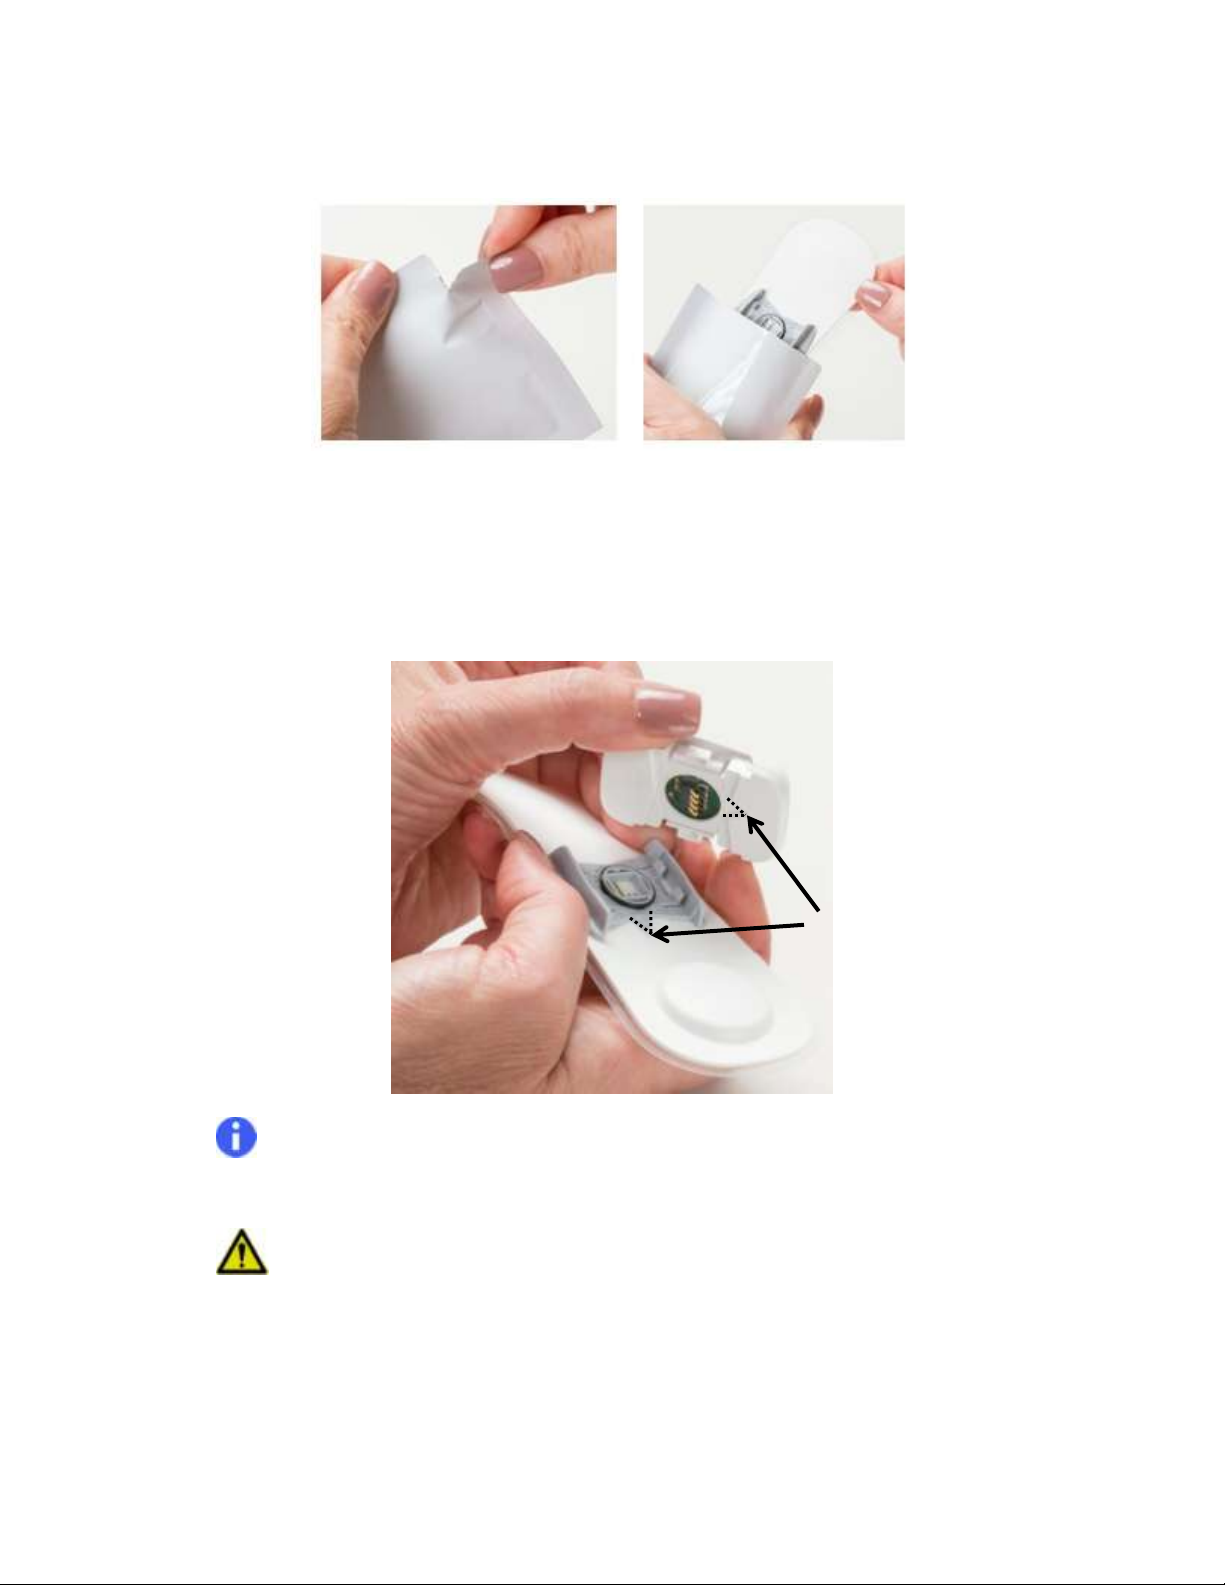
Figure 9: Open and Remove Patch from Packaging
3. Align the triangle on the plastic Patch connector with the triangle notch on theunderside of the
Sensor (Figure 10).
Figure 10: Align Triangles on Sensor and Patch
Note:The Sensor and Patch can only be connected when properlyaligned. The triangle
notch on the Sensor and triangle on the Patch must face the same direction.
Caution:If moisture is present on or near the back of the Sensor or the contacts of the
Patch, do not assemble. Doing so can permanently damage the System. Dry the parts using a
soft cloth, paper towel, or cotton swab before proceeding.
4. Apply firm pressure to the top and bottom of the Sensor to snap the Patch and Sensor
together(Figure 11). Ensure all four corners of Sensor snap into place.
CONTROLLED COPY CREATED: 3/21/2014 4:59:41 PM
17
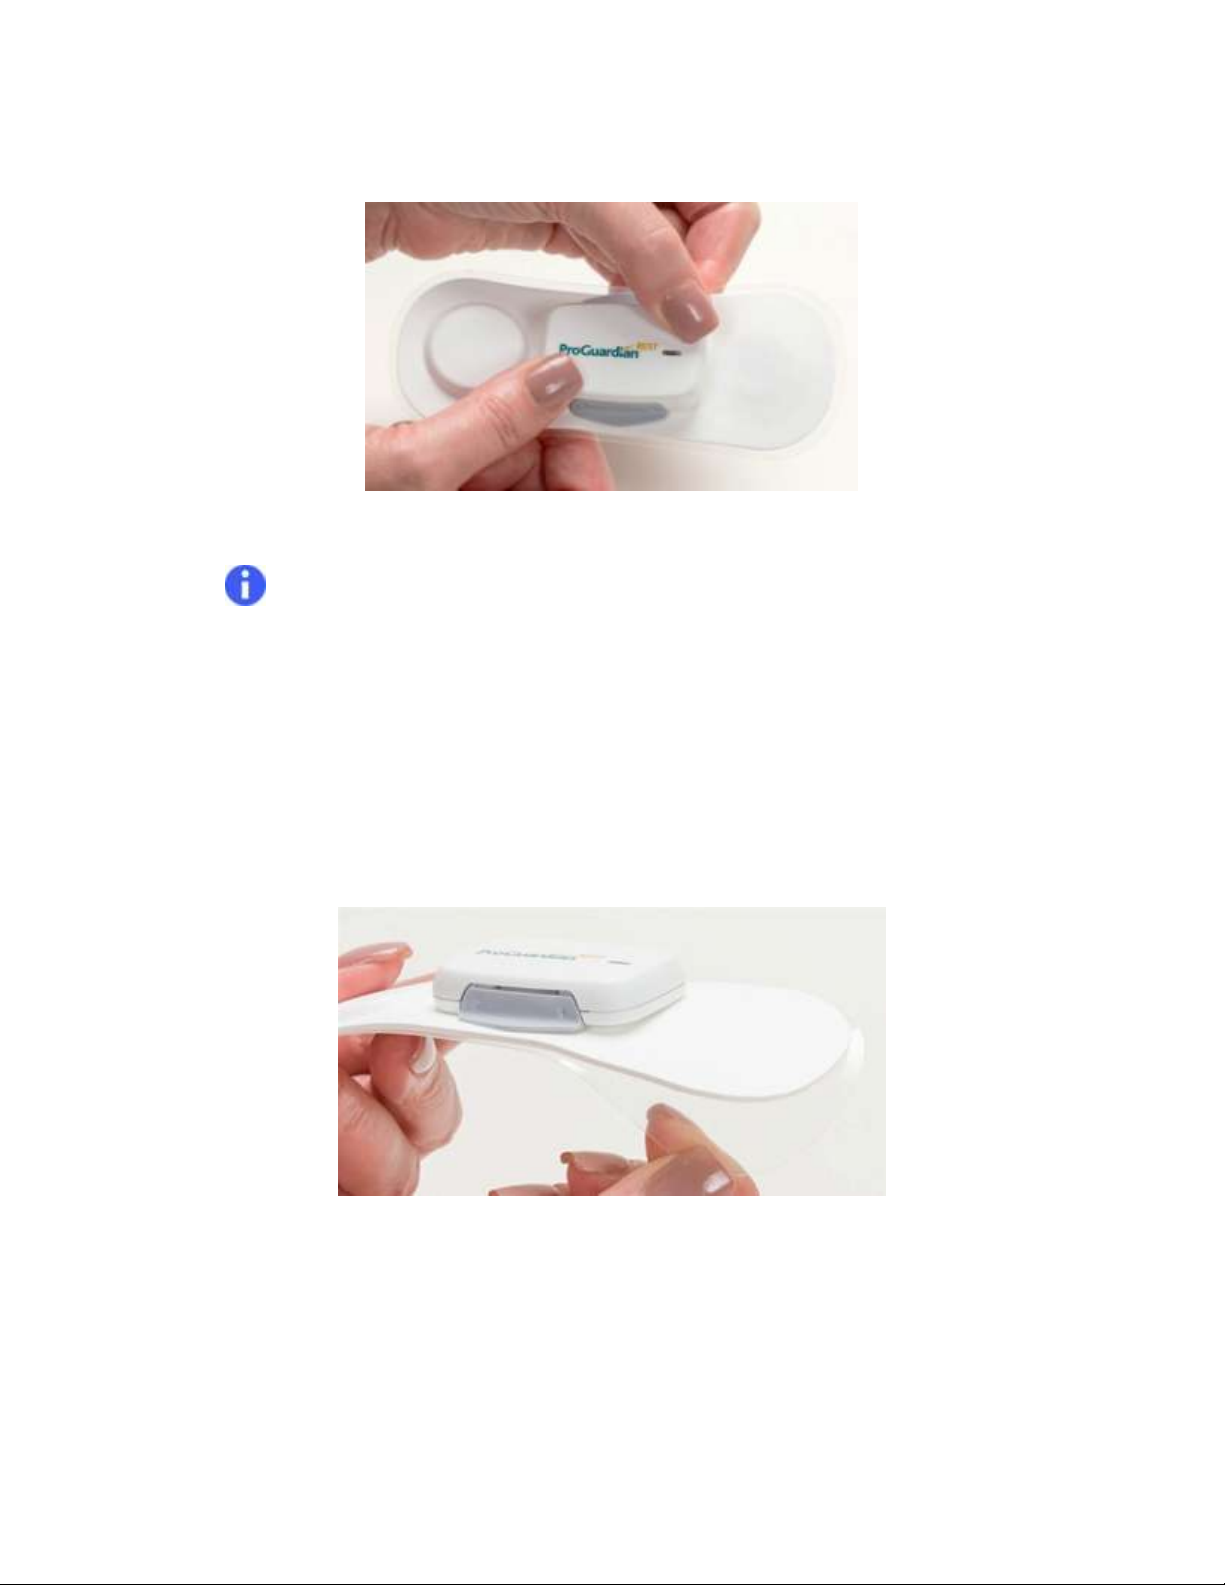
Figure 11: Put Sensor and Patch Together
Note:The Sensor’s light blinks green for 10 seconds upon successful connection of the
Sensor and Patch. When you see this, proceed to the next section (Patch and Sensor
Application).If the Sensor LED is red, refer to the Troubleshooting section.
7.3.3. Patch and Sensor Application
1. Remove the protective liner from the Patch and place on the bodywithin 5 minutesafter
connecting the Patch and Sensor(Figure 12).
Figure 12: Remove Patch Liner
2. Apply the assembled Sensor and Patch. The assembled Sensor and Patch should be worn in one
of the following locations on the body (Figure 13):
CONTROLLED COPY CREATED: 3/21/2014 4:59:41 PM
18

Figure 13: Acceptable Application Locations
Figure 13:
A - Left chest (Preferred position)
B – Lower Left rib cage
C - Left back – directly below the shoulder blade (Least preferred position)
*Positions of Patch can be rotated by any degree; however, ensure center of Patch (indicated by
) is placed as shown on diagram.
Caution:For people with the implantable VNS Therapy System, the ProGuardian Sensor
should only be placed on the lower rib cage or on the back.
3. You will see a “Starting…” message on the Hub Home Screen as the Sensor is establishing
communication with the Hub(Figure 14). Once the Sensor has made a connection with the Hub,
the Sensor icon on the Hub turns yellow.
Figure 14: Establishing Communication
CONTROLLED COPY CREATED: 3/21/2014 4:59:41 PM
19

Note: The sensor will send an error message if no heartbeat is detected, so it is important
to place it on the body within 5 minutes after attachment to the patch.
4. The Sensor will collect heart rate data (Sensor LED blinks amber during this time) to complete
the setup process.
a. If setup is successful, the sensor’s light will blink green for 30 seconds. At this time, the
Hub displays a message that the “System is ready to detect seizures” (Figure 15).
TheSensor’s lightwill turn off for the remainder of the monitoring period.
Figure 15: Setup Complete
b. The Hub will provide a system notification to alert the user if any problems occur
thatcould prevent seizure detection. Follow on-screen troubleshooting steps or consult
Section 13.2 of this manual if this occurs.
Congratulations! Your System is now monitoring for seizures.
8. Responding to Seizure Notifications
Based on changes in the heart rate or motion, the system provides a notification to the Hub when it
detects potential seizure activity.Each seizure notification requires your confirmation, and only
confirmed seizures will be added to the Seizure Log.
When a potential seizure is detected, the NOTIFICATIONindicator flashes amberand the Hub sounds an
audible notification.
Note: The audible notification can be turned offby pressing the silence button( ) on
backside of the Hub.
CONTROLLED COPY CREATED: 3/21/2014 4:59:41 PM
20

Figure 16: Sample Cardiac-Based
Seizure Notification
Figure 17: Sample Motion-Based
Seizure Notification
On the Hub screen, a dialog shows the time and date of the potential seizure detection. The screen
shows if the detection was due to motion or a heart rate change,as well asthe current sensitivity
setting(Figure 16 and Figure 17).
8.1. Confirmingor Denying a Seizure Notification
On the touch screen, press either YESor NO.
If YES is selected, the seizure will be added to the seizure log. The software opens the seizure
log and displays all confirmed seizure events from the past monthof system use (refer to Using
the Hub Software section).
If NO is selected, the software returns to the previously displayed screen.
Note: The timestamp of the seizure that gets logged in the Seizure Log is the time of your
confirmation, not the initial notification time.
Seizure monitoringwill resume as soon as either YESor NOis selected. If a response is not provided after
10 minutes, the System resumes monitoring and the notification remains on the Hub screen (until a new
seizure notification occurs). Seizures can be manually added or deleted from the log at any time (see
“Adding Seizures to the Log” or “Removing Seizures from the Log” for more details).
8.2. Adjusting Seizure Notification Sensitivity
If the System is providing too many or too few notifications, the system sensitivity can be changed for
heart rate and/or motion(see “Seizure Detection Settings” for more details).
CONTROLLED COPY CREATED: 3/21/2014 4:59:41 PM
21

9. Pausing or Stopping Monitoring
There are two options when you would like to stop seizure monitoring:
1. PAUSE – You would like to temporarily stop (then resume) the seizure monitoring, keeping the
Sensor and Patch attached to the body.
2. OFF – Youwould like to discontinue (stop) seizure monitoring and remove the Sensor and Patch.
If this option is selected, the System will only resume seizure monitoring after a new Patch is
assembled to the Sensor.
9.1. Pausing and Resuming Seizure Monitoring
After you have attached the Sensor and Patch, you may want to pause the seizure monitoring. This may
be because the sensor wearer:
is not ready to go to sleep.
wants or needs to get up from bed for a short time.
is awake and needs comforting.
To pause, then resume the seizure monitoring, follow these steps:
1. Press Sensor on the Hubhome screen (Figure 18).
Figure 18: Hub Home Screen (Sensor Active)
The following screen appears (Figure 19):
CONTROLLED COPY CREATED: 3/21/2014 4:59:41 PM
22

Figure 19: Pause/Turn off Sensor
2. Press Pause.
The following screen appears (Figure 20):
Figure 20: Resume Sensor
The system is not monitoring seizures, and Hub software navigation will not be possible until
seizure monitoring is resumed.
3. When you are ready to resume seizure monitoring, press Resume. The software will then return
to the Home Screen (Figure 18).
Congratulations! The system is once again monitoring for seizures.
9.2. Turning Seizure Monitoring Off
There are two reasons to turn off the seizure monitoring and remove the Sensor and Patch.
The sensor wearer is at the end of the sleep period.
You are instructed by the Hub to turn off the seizure monitoring for troubleshooting
purposes.
Toturn off seizure monitoring,follow the steps below:
CONTROLLED COPY CREATED: 3/21/2014 4:59:41 PM
23

1. Press Sensor on the Hubhome screen(Figure 18).
2. Press Off (Figure 19).
The Hub will then display the Home Screen, and the Sensor button will be gray (disabled)(Figure 8).
3. Remove the Sensor and Patchtogether, as one assembly.
Note:Use care when removing the Patch. For easiest removal,slowly peel Patch from the skin
with one hand while pushing down on the skin near the edge of the Patch with the other hand.
4. Lower the latches on both sides of the Sensor to expose the Sensor release button (Figure 21).
Figure 21: Lower Latches
5. Useyour thumb and index finger to squeeze thetwo release buttons located on opposite sides of the
Sensor(Figure 22). This releases the Sensor from the Patch.
Figure 22: Release Sensor
6. Store the Sensor for future use.
Caution:Do not store or temporarily place the Sensor on any surface that could be wet (e.g.
the bathroom or kitchen counter). The pins on the back of the Sensor can trap moisture and can
result in System damage if assembled with a Patch while wet. If moisture is present,dry with a soft
cloth, paper towel, or cotton swab.
CONTROLLED COPY CREATED: 3/21/2014 4:59:41 PM
24

Figure 23: Cut Patch
Figure 24: Tear Opening
Figure 25: Remove Battery
7. The Patch contains a lithium coin cell battery that must be removed prior to disposal.Disposeof the
batteryin compliance with local regulations.
Removal of the battery should be performed as follows:
Find the end of the Patch where the coin cell is located (there is a bump in the white top
cover) - If the backing is sticky, you may fold the patch in half.
Using a pair of scissors, cut a small slit in the top cover (white foam material) near the base
of the battery in the location shown (Figure 23).
Tear an opening in the top cover large enough to grab the battery (Figure 24).
Hold the battery between the thumb and finger of one hand and the rest of the Patch
between the thumb and finger of the other and pull in opposite directions (Figure 25).
The battery and two metal tabs that connect the battery to the Patch will release from the
Patch
The Patch can then be disposed.
Caution:Do not expose the Patches to fire or heat sources as they contain a battery thatcould
explode.
10. Replacing the Patch
The Patch is designed for single-use and overnight wear only.
CONTROLLED COPY CREATED: 3/21/2014 4:59:41 PM
You should replace the Patchfor any of the following:
You are starting a new sleep monitoring period
The Sensor and Patch separate during use
The Patch does not adhere to the skin
You receive a System Notification that indicates that Patch replacement is necessary
25

To replace the Patch:
1. Turn off the Sensor from the Hub Home Screen and remove Sensor and Patch from body (if
necessary) as described in “Turning Seizure Monitoring Off”.
Caution: If Sensor was not turned off using the touchscreen button on the Hub Home
Screen, complete steps 1 and 2 in “Turning Seizure Monitoring Off.” Failure to do so will result
in a communication error when the Sensor attempts to connect with the Hub at the beginning
of the next monitoring period.
2. Complete the steps as described in “Beginning Seizure Monitoring - Sensor and Patch Setup.”
11. Using the Hub Software
The following sections provide further detail about the Hub software and related System features.
11.1. Home Screen
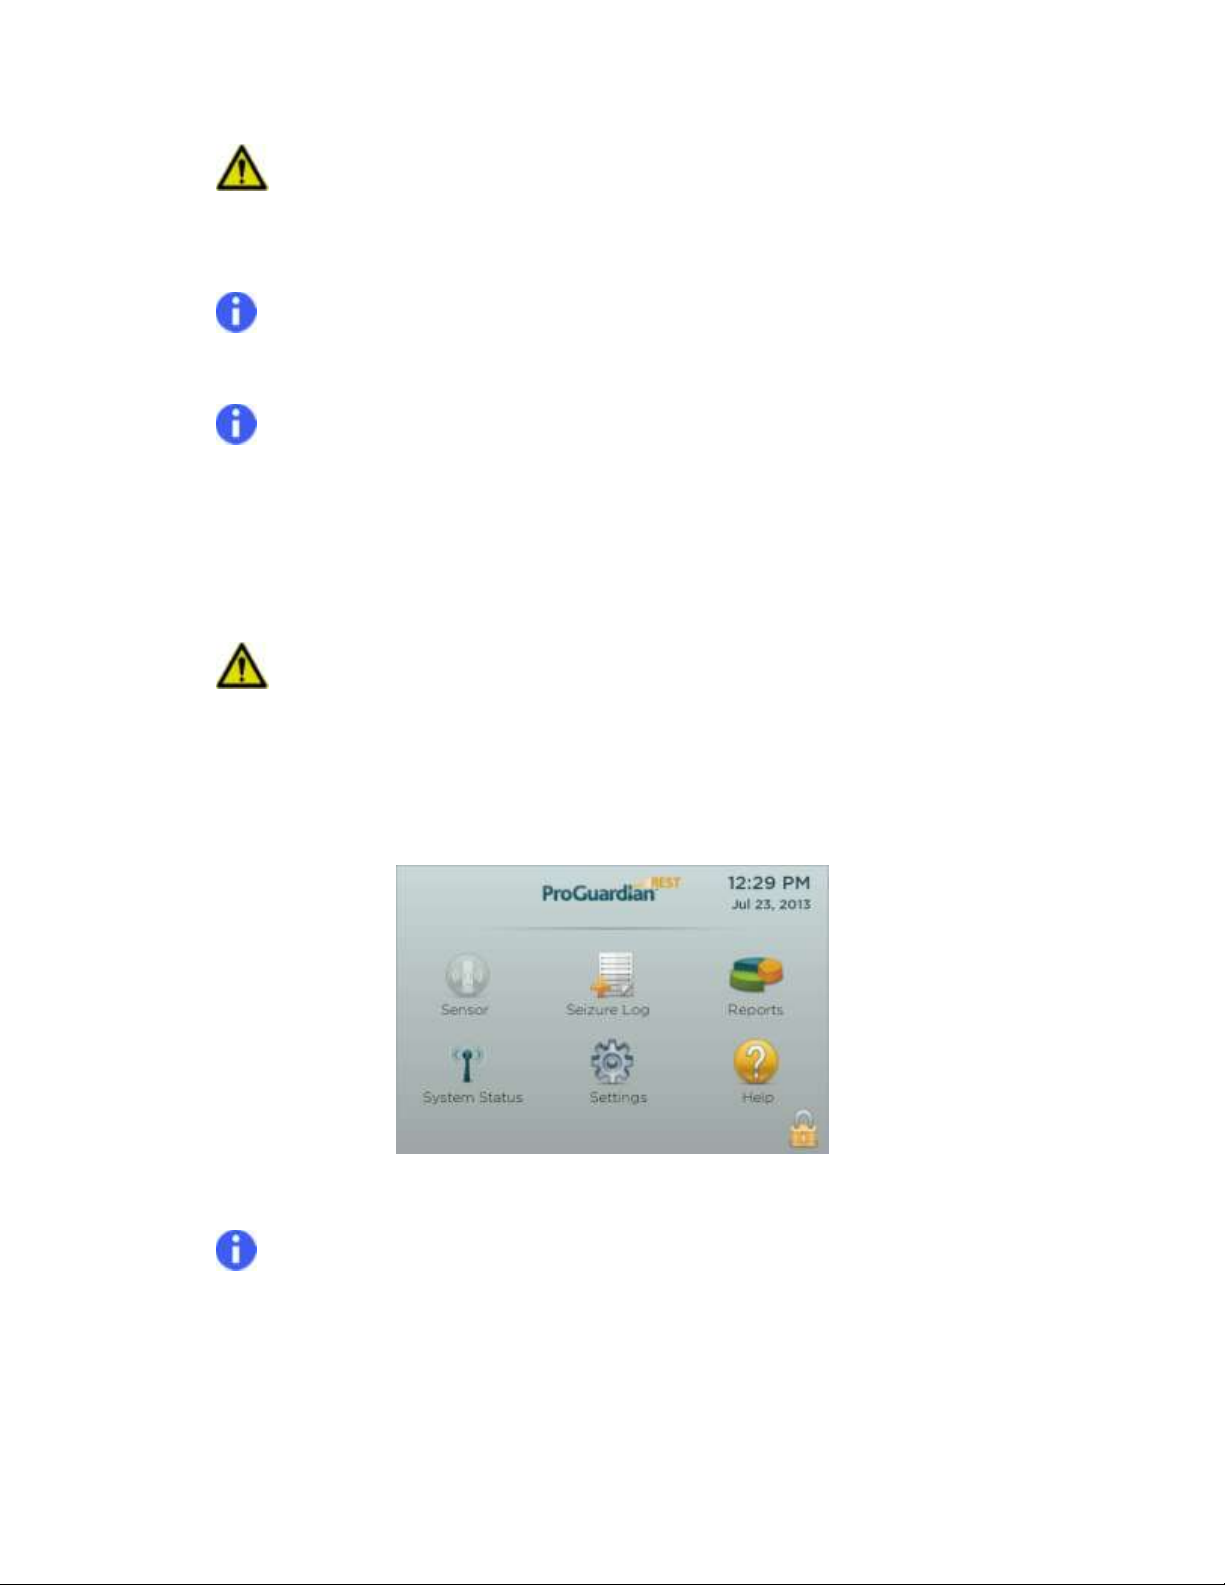
Once you complete the Setup Wizard, the software will display the Home screen.
There are six navigation options on the Home screen:
Sensor
Seizure Log
Reports
System Status
Settings
Help
The features and options for each menu item are detailed in subsequent sections of the User Manual.
From any Hubmenu, press the arrow at the upper left corner ( ) to return to the previous screen.
Except during initial setup,you can navigate directly to the Home screen at any time by pressing the
physical “Home” buttonon the Hub (see Figure 2).
11.1.1. How to Lock the Hub
To prevent inadvertent setting changes, the User may wish to lock the Hub software. To do so, pressthe
lock icon ( )in the lower right corner of the Home Screen.
CONTROLLED COPY CREATED: 3/21/2014 4:59:41 PM
26

When the Hub is locked:
None of the Home Screen options areavailable.
Youcan only confirm or deny Seizure Notificationsand receive System Notifications.
Your password (defined during Setup Wizard) is required to unlock the Hub, to freely
navigate the software and change settings.
Note:If you forget your password, follow on-screen instructions to reset the password
using the security question. Refer to the Troubleshooting section for more help.
11.2. Sensor
This button is used to temporarily pause or discontinue (stop) seizure monitoring.See “Pausing or
Stopping Monitoring” for more details.
11.3. SeizureLog
The system detects and notifies you of potential seizure activity based on changesin heart rate
ormovement.
Once confirmed, these seizures are maintained in an electronic log, which you can review at any
time(Figure 26). The log is intended to help you track the frequency and trendsin seizure activity. Also, it
can be shared with your healthcare provider (see “Generating and Exporting Reports” for more details).
Figure 26: Sample Seizure Log
The log contains confirmed and manually entered seizures. See “Acknowledging Seizure Notifications”
for more details.
Each seizurein the log contains the following information:
The time and date of the seizure
CONTROLLED COPY CREATED: 3/21/2014 4:59:41 PM
27

An icon in the Status column that indicates whether the seizure was detected by the System
andConfirmed ( ) or manually entered( ).
For System detected seizures, an icon in the Attribute column indicates whether the detection
was due to a heart rate change ( ) or motion ( ). If the seizure was manually entered by
the user, N/A will appear.
11.3.1. Navigating the Seizure Log
Seizures are grouped by date. To scroll through the log, touch the screen and drag the page up or down.
Pressing the Time header changes the sorting to show the most recent seizure at either the top or
bottom of the list.
11.3.2. Adding Seizures to the Log
The ProGuardian System is capable of detecting many, but not all seizures. For example, if a seizure is
not associated with a heart rate change or a detectable change in motion, it will not automatically be
detected by the ProGuardian System. An additional feature is the ability to expand the use of the
ProGuardianseizure log bymanually recording seizures experienced outside of active monitoring. In
these cases, you can manually add seizures to the log by selecting the plus icon ( ) at the upper right
corner of the Seizure Log screen. This opens the Add New Seizure dialog where youcan supply the date
and time of the event(Figure 27).
Figure 27: Add New Seizure
11.3.3. Removing Seizures from the Log
Seizures can be removed from the log by changing their status, using the steps below.
CONTROLLED COPY CREATED: 3/21/2014 4:59:41 PM
28

Figure 28: Modify System-Detected Seizures
Figure 29: Manually-Entered Seizures
1. Simply touch the status icon ( or ) for any individual seizure and a pop-up dialog
screen appears.
2. Make the desired change and then press Save.
Use this procedure to:
Correct the status of any previously "Confirmed" entry.
Delete a manually entered seizure event.
The dialog screen options for seizures detected by the System (Figure 28) or those manually entered
(Figure 29) are shown below.
Note:Selecting “Denied” or “Delete” permanently removes the seizure from the log.
11.4. Reports Menu
Select the Reports option from the Home Screen to display the seizure counts from the past week,
month, and year(Figure 30).
Figure 30: Sample Seizure Report
CONTROLLED COPY CREATED: 3/21/2014 4:59:41 PM
29

The seizure information is updated every time you enter this screen and provides a summary of
the seizure log.
From this screen,you can create a reportthatcan be shared withyour healthcare provider.
Note: There may be a delay of several minutes to generate the report if there are a large number
of seizure records.
11.4.1. Create a Report
To create a report, follow the steps below.
1. Navigate to the reports screen.
2. Insert the USB flash drive (supplied with the System) into the Hub (USB-1 Port, see Figure 4).
3. Press the export button“Export Icon” located in the upper right ( ).
The systemcreates a .pdf file on the USB flash drive with a title containing “ProG Report”
and the date and time when the report was created.
The USB flash drivecan be removed from the Hub as soon as the “Export Complete”
message is displayed(Figure 31).
Figure 31: Export Complete
The reportcan be viewed on any computer with Adobe Acrobat Reader (free download
at http://get.adobe.com/reader/)
Note: It may take up to 20 minutes to export the report if there are a large number of seizure
records.
11.5. System Status
Select the System Status option from the Home Screen to verify wireless connections between the
ProGuardian System components.
CONTROLLED COPY CREATED: 3/21/2014 4:59:41 PM
30

There are three tabs at the top of the screen that provide useful information when troubleshooting:
Connectivity
Sensor
Hub
11.5.1. Connectivity Tab
The Connectivity tab screen (Figure 32) displays the connection status between the Hub and Sensor
(needed for seizure detection), and the Hub with the ProGuardian App (needed to send notifications to
a mobile device).The time and date of connections are shown to help you verify that System was
working throughout the night time use period.
Green bars indicate active connections thatare working. Red bars indicate a disconnection. Refer to onscreen troubleshooting provided by the Hub, or the “Troubleshooting” section of the manual to fix a
disconnection.
Figure 32: System Status – Connectivity Tab
11.5.2. Sensor Tab
The sensor tab screen (Figure 33) indicates if the System is appropriately detecting heart rate (“ECG
Status”) and other software details thatmaybe needed for troubleshooting. These details include:
ECG Status: Displays “Ok” during normal operation and “No Signal” when troubleshooting is
required.
Software Version: Shows the current software version loaded on the Sensor
Firmware Version: Provides additional software information which may be requested during
troubleshooting.
Hardware Version: Provides details related to manufactured components inside the Sensor
Serial Number: A unique number used to identify your Sensor
Model Number:Product type identifier
CONTROLLED COPY CREATED: 3/21/2014 4:59:41 PM
31

Figure 33: System Status – Sensor Tab
11.5.3. Hub Tab
The Hub tab screen(Figure 34)provides the status of several items related to normal system operation.
These items include:
Network SSID (“Wi-Fi Network Name”):
This field shows the status of the Hub connection with the home wireless (Wi-Fi) network.
When connected, this fielddisplays the home network name, but otherwise will display “Not
Connected.”
The Hub must be connected to the home network in order to use the ProGuardian App.
To connect to a network and setup the ProGuardian App, accessthe Help menu from the
HubHome Screen or refer to Section 12, The ProGuardian App, for more information.
Power Alert Battery Status:
The Hub contains a backup battery (CR2032 lithium coin cell), which sounds an audible notification if the
Hub loses power while powered on and in use. The audio alertis meant to notify the user when seizure
detection is not possible.
“Good” indicates that the battery does not need replacement.
When “Replace Hub Power Alert Battery” is displayed, refer to Troubleshooting instructions to
install a new battery.
Software Version:
This is the current software version loaded on the Hub.
MAC Address:
This is information that may be required by some home networks to establish Wi-Fi connection with the
Hub.
CONTROLLED COPY CREATED: 3/21/2014 4:59:41 PM
32

Figure 34: System Status – Hub Tab
11.6. Settings Menu
The Settings Menu allows you to configure various device settings and notification preferences (Figure
35). Selecting the Settings navigation option from the Home Screen opens the following submenu.
Touch the Hub screen and scroll to view all options.
Figure 35: Settings Menu
11.6.1. Seizure Detection Settings
It is recommended that you configure the seizure detection settings to give the best results for the
sensor wearer. The System identifies changes in heart rate or motion as potential seizures events.
Note:Changes can only be made during system use while the Sensor is actively monitoring.
Note: The default for both sensitivity settings is 4 (range 1-7).
CONTROLLED COPY CREATED: 3/21/2014 4:59:41 PM
33

Getting the Best Results for the Sensor Wearer:
1. Use the device with default seizure detection settings at 4 until you are comfortable evaluating
if the System is giving you too few or too many seizure notifications.
2. If you are getting too few or too many seizure notifications, adjust the seizure detection
settings.
Adjusting the seizure detection settings:
1. Select “Seizure Detection” on the Settings menu.
2. Choose a number to increase or decrease the sensitivity for motion or heart rate.
Higher numbers (5, 6, or 7) make the system more sensitive, and increase the chance of a
seizure notification.
Lower numbers (1, 2, or 3) make the system less sensitive, and decrease the chance of a
seizure notification.
Note: To help you determine the best setting, both sensitivity controls display the number
of associated “Denied” detections since the last sensitivity setting change (Figure 36).
3. Press Save.
Figure 36: Configuring Seizure Detection Settings
What if I feel seizures are being under-reported?
1. Increase the sensitivity settings for both the heart rate and motion controls by selecting a
higher number.
2. Press Save and the Hub will program the Sensor.
3. Use the ProGuardian System for a few nights and then repeat these steps as needed. Once
the System begins detecting seizures, it can be determined which signals (motion and/or
heart rate change) are associated with the sensor wearer’s type of seizure.
CONTROLLED COPY CREATED: 3/21/2014 4:59:41 PM
34

Note: While increasing sensitivity may improve the chance of detecting seizure activity, it may
also give morefalse notifications. Only you can decide what is best for your individual situation.
What if I feel seizures are being over-reported?
1. Decrease either the “Heartbeat Sensitivity” or “Motion Sensitivity” setting by selecting a lower
number. To determine which setting to change, you may select the setting with the greater number
of “Denied” potential seizure detections (Figure 36).
2. Press Save and the Hub will program the Sensor.
3. Use the ProGuardian System for a few nights and then repeat these steps as needed.
Note:Cyberonics recommends trying the new setting until additional seizures or notifications not
associated to a seizureoccur, and then repeating the process as needed.
Note:Changes can only be made during system use while the Sensor is in range of the Hub.
11.6.2. Sound Settings
1. To adjust the Hub volume, touch the displayed Volume Level number (adjustable between 1 and
7) and drag the slide control(Figure 37). The default volume level is 5 and the maximum volume
level is 7.
Figure 37: Sound Settings
2. Press the play button ( )to the right of “Test volume level” andcheck the volume level by
producing a test Seizure Notification. To stop the audio test, press the stop button.
CONTROLLED COPY CREATED: 3/21/2014 4:59:41 PM
35

If the ProGuardian App is setup, and the mobile device is within range, the Hub volume can be muted.
To mute (or unmute) the hub, tap the picture of the speaker.
If the ProGuardian App is not in use or loses Wi-Fi connection, the Hub may not be muted. If muted, the
Hub volume will automatically turn on when the ProGuardian App Wi-Fi connection is disconnected and
turn off when the App Wi-Fi connection is restored. This is a software feature intended to prevent
missed seizure notifications.
11.6.3. Display Settings
Display Settings allow you to change screen brightness, screen off timeout, and auto-lock timeout
(Figure 38).
Figure 38: Display Settings
To adjust screen brightness, touch the displayed value (adjustable between 10 and 100 percent) and
touch and drag the slide control. A hundredpercent is the maximum screen brightness. If you want the
screen dark with system active, simply tap the power button on the front of Hub.
The screen will automatically dim after 10 minutes of inactivity (default setting).This time period can be
adjusted by tapping the “Screen Off Timeout” and selecting the desired time from the pop-up menu (1,
2, 10, 20, or 30 minutes, or “Never Turn Off”).Touch any portion of the screen to resume normal screen
brightness.
The Auto-Lock timeout is set to “Never Lock” by default. If you prefer the Hub to require your password
after a period of inactivity,you can change this value to 1, 2, 10, 20, or 30 minutes.
Note:Auto-Lock timeout is a convenience feature. You may always lock the Hub manually by
following the instructions in Section 11.1.1, How to Lock the Hub.
CONTROLLED COPY CREATED: 3/21/2014 4:59:41 PM
36

11.6.4. Date and Time Settings
Date and Time Settings allow you to change the current date and time, as well as the display format
(Figure 39).
Figure 39: Date and Time Settings
11.6.4.1. Changing Date and Time
Because the seizure log time stamps are only accurate when the Hub is set correctly, it is important to
set an accurate date and time. Follow the steps below to set the time and date.
Set the Date
1. Tap the currently displayed setting and a popup dialog appears.
2. Adjust the values as needed using the + or - buttons.
3. Press Ok.
Set the Time
1. Tap the currently displayed setting and a popup dialog appears.
2. Adjust the values as needed using the + or – buttons. If 12-hour format was selected, AM and
PM can be selectedby tapping the field.
3. Press Ok.
Note: The system will not automatically update for daylight saving time.
11.6.4.2. Date and Time Formats
1. The date can be adjusted for various international formats. To adjust, tap the currently
displayed format and select the preferred format from the popup menu.
2. The time can be displayed in 12- or 24-hour format. To adjust, tap the currently displayed
format and select the preferred format from the popup menu.
CONTROLLED COPY CREATED: 3/21/2014 4:59:41 PM
37

Note: Date and time format changes will not be reflected in the clock and calendar displays until
“Save” is pressed.
11.6.5. Patient Profile
The profile for the person with epilepsyis setup during the initial Setup Wizard. To make any correction
to the name or date of birth,you can tap the relevant field(s) and use the on-screen keyboard or popup
menus(Figure 40). Note that the information included in this profile is printed on each exported
ProGuardian report for the convenience of the healthcare provider.
Note:If the Sensor will be used on a new person, contact your Customer Care Service Center for
assistance resetting the seizure log and System.
Figure 40: Patient Profile
11.6.6. Account Information
The account information is setup during the initial Setup Wizard.
From this screen (Figure 41),you can changeyourpassword or security question and answer.
Figure 41: Account Information
CONTROLLED COPY CREATED: 3/21/2014 4:59:41 PM
38

The password is required to unlock the Hub if it is locked manually from the Home Screen (see
“Home Screen” section) or if the Auto-Lock timeout expires (see “Display settings” section).
If youforget yourpassword, it can be reset by providing the correct answer to the security
question.
To change your password or your security question:
1. Tap on the lock iconnext to Change password or Change security question.
2. Enter your information by tapping the field and using the on screen keyboard.
3. Press Save to set the information in the system.
Note:
Passwords are case sensitive (upper and lower case letters are checked)
They must be at least 5 characters long, and can contain numbers, letters, or symbols (no
spaces allowed).
The security answer is not case sensitive (the software will not differentiate between upper and
lower case letters).
11.7. Help Menu
The Help Menu allows you to setup or reconfigure the ProGuardian App and access troubleshooting.
Select the Help navigation option from the Home Screen to open the following submenu(Figure 42).
Figure 42: Help Menu
11.7.1. ProGuardian App Setup Wizard
For details on the setup process and instructions on App usage, seeSection 12, “The ProGuardian App”.
CONTROLLED COPY CREATED: 3/21/2014 4:59:41 PM
39

11.7.2. About
This section lists the Hub Software version information and copyright details.
11.7.3. Contact Us
This section provides the manufacturer contact information. If the ProGuardian System User Manual is
ever lost, a replacement can be downloaded from www.ProGuardianSystem.com.
11.7.4. Administrator Access
Administrator level access is used to perform advanced troubleshooting. This can be necessary if both
the Hub password and the answer to the security question have been forgotten. Have the Hub available
and contact your CustomerCare ServiceCenter for assistance.
12. The ProGuardian App
(optional mobile device application)
This is an optionalfeature of the System that is not needed for standard seizure monitoring.
The ProGuardian App is free software that connects the ProGuardian System with an Androidmobile
device. This extends the operating range of the ProGuardian System by allowing a user to remotely
receiveseizure and system notifications from the Hub, while connected to a home Wi-Fi Network.
To use this optional feature, you need:
A secure home Wi-Fi network (No internet connection required)
An Android mobile device* with the ProGuardian App successfully installed
* To use the ProGuardian App your mobile device must have:
o Android operating system 2.3.x or 4.2.x
o Minimum 480x800pixel resolution
Note:Internet connection is only required for downloadingthe ProGuardian App. However,
having internet enabled on your home Wi-Fi network will improve the speed of the Hub searching
for available mobile device(s).
CONTROLLED COPY CREATED: 3/21/2014 4:59:41 PM
40

Note:Due to complexity of different mobile device/Wi-Fi configurations, the Hub may not be
able to connect with all mobile devices that meet the minimum requirements for the Caregiver App.
Note: To prevent missing notifications due to low battery on the mobile device, it is
recommended that you keep the mobile device charged when the ProGuardian App is in use.
12.1. ProGuardian App Setup Wizard
Use the Setup Wizard in the following situations:
ProGuardian App for the first-time setup
Anytime changes are made to the home Wi-Fi network, or if the Hub is being used in a new
location with a different network
To register a new mobile device to receive Hub notifications
Note:You can only have one mobile device at a time registered with the System.
To unregister an existing mobile device and stop delivery of Hub notifications
Follow the steps below to setup the ProGuardian App.
1. Press Help on the Hub Home Screen, and then press Go to launch the ProGuardian App Setup
Wizard (Figure 43).
Figure 43: ProGuardian App Wizard (Hub)
The wizard instructs you to perform the following steps on your mobile device:
CONTROLLED COPY CREATED: 3/21/2014 4:59:41 PM
41

From your mobile device, download the free ProGuardian Mobile Application from
www.ProGuardianSystem.com.
After the application installation is complete, the Terms of Service Agreement will display on
the mobile device. Read and accept this agreement to continue.
The ProGuardian App opens on your mobile device (Figure 44).
Enable your Wi-Fi settings on your mobile device and connect to your home’s Wi-Fi
Network. Consult your mobile device user’s manual, if needed.
Note: If this is the first time you are setting up the app, the system status bar indicates that
the Hub and mobile device are not yet connected (shown by a red bar). Text on the screen
states “Mobile Device Not Ready”.
Figure 44: ProGuardian App Screen (Mobile Device – Not Set Up)
2. Next, continueProGuardian App Setupby completing the ProGuardian App Setup Wizard on the
Hub. Connect the Hub to the home Wi-Fi network by selecting the network name from the list
of options detected by the Hub.
a. You will be asked to supply the Wi-Fi Network password if your home network issecurity
enabled.
b. When the Hub is successfully connected to the network, a green checkmark will appear
to the left of the network name. Press Continue to proceed to the next step.
CONTROLLED COPY CREATED: 3/21/2014 4:59:41 PM
42

Note:The mobile device and the Hubmust be connected to the same Wi-Fi network to receive
notifications on the mobile device.
“Continue” can only be selected after successful connection to a Wi-Fi Network (Figure 45).
Figure 45: Connecting to Wi-Fi (Hub)
3. Select the mobile device that you would like to receive Hub notifications by tapping the name
from the displayed list (Figure 46). If you don’t see your device at first, you may select the
“refresh” button ( ) to search again. It may take several minutes to find available devices.
Figure 46: Connect to Mobile Device (Hub)
a. The list includes all devices that have an open ProGuardian App on the same Wi-Fi
network as the Hub.
b. If you do not know your device name, refer to Section 12.5, “Configuring App Sound
Settings”.
CONTROLLED COPY CREATED: 3/21/2014 4:59:41 PM
43

c. When the Hub has successfully registered the mobile device, a green checkmarkwill
appear to the left of the device name.
d. Press Continue toproceed to the next step.
Note:“Continue” can only be selected after successful connection to a Wi-Fi Network.
4. The ProGuardian App setup is now complete. The App displays the text “Mobile device ready to
receive notifications.”
5. Press “Send test notification to device” to check function and verify that your mobile device
sound is turned on (Figure 47). If your mobile device is muted or set to vibrate, the ProGuardian
App will not produce audio for notifications.
Figure 47: ProGuardian App Registration Complete (Hub)
6. Press Exit to Home Screen to close the wizard on the Hub. Your ProGuardian App screen should
have a green line between the Hub ( ) and the mobile device App ( )(Figure 48).
CONTROLLED COPY CREATED: 3/21/2014 4:59:41 PM
44

Figure 48: ProGuardian App Screen (Mobile Device – Setup Complete)
Congratulations! Your ProGuardian App is now ready for use.
12.2. Wi-Fi Network Changes and Registering New Devices
If changes are made to the home Wi-Fi network, or if you wish to use the System in a new location with
a different network, repeat the steps in “ProGuardian App Setup Wizard.” Remember to connect your
mobile device to the same Wi-Fi network as the Hub.
To register a new mobile device to receive Hub notifications, complete steps 1-2 of “ProGuardian App
Setup Wizard.” When you reach step 3,tap the name of the new mobile device.
The list includes all devices that have an open ProGuardian App on the same Wi-Fi network as
the Hub.
If you do not know your device name, refer to Section 12.5, “Configuring App Sound Settings”.
After selecting the new device, a dialog will ask you to confirm the change (Figure 49), since only
one mobile device may be registered at a time.
CONTROLLED COPY CREATED: 3/21/2014 4:59:41 PM
45

Figure 49: Registering New Mobile Device
Tap Yes to confirm the change. When the hub has successfully registered the mobile device, a
green checkmarkwill appear to the left of the device name.
Press Continue to proceed and then complete the remaining steps in “ProGuardian App Setup
Wizard.”
12.3. Receiving Notifications on Your Mobile Device
When the mobile device is connected to the home Wi-Fi network, it displays System Status similar to the
Hub (refer to System Menu section).
Green bars indicate active, working connections.
Red bars indicate a disconnection.
Mobile Device in Range
When the ProGuardian App is open and the mobile device is in range of the home Wi-Fi and connected
to the Hub, the ProGuardian App receives seizure and system notifications from the Hub(Figure 50 and
Figure 51). Please note the following:
Notifications are displayed on both the Hub and the ProGuardian App. Pressing Okon the
ProGuardian App only dismisses the notification on the mobile device, but does not affect the
notification on the Hub or the Hub audioif that volume is enabled.
Seizure notifications can only be confirmed and added to the seizure log from the Hub
touchscreen.
Note: Mobile device settings can interfere with ProGuardian App audio. If the mobile
device is muted or set to vibrate, the ProGuardian App will not deliver audio through the mobile
device speakers.
CONTROLLED COPY CREATED: 3/21/2014 4:59:41 PM
46

Figure 50: Sample Seizure Notification
Figure 51: Sample System Notification
Mobile Device NOT in Range
If the mobile device leaves the range of the Home Wi-Fi network:
The ProGuardian App will NOT receive seizure notifications. (Notifications will only occur at the
Hub.)
The ProGuardian App will provide an audible notification and display a message that it is not in
range.
If the Hub volume is muted, the audio will be restored until the mobile device reconnects with
the home Wi-Fi.
The connection status between the Hub and Sensor will be displayed as unknown (gray bar) on
the mobile device.
12.4. Adjusting Your Mobile Device Sound Settings
Cyberonics recommends that your mobile device sound is ALWAYS enabled (turned on) while using the
ProGuardian App.
Note:Switching a phone to vibrate mode will prevent an audio seizure notification, even if the
ProGuardian App setting menu is set to ON.
CONTROLLED COPY CREATED: 3/21/2014 4:59:41 PM
47

12.5. Configuring App Sound Settings
The ProGuardian App sound can be configured by selecting the gear ( ) located at the top left corner
of the ProGuardian App screen (on the mobile device). This opens the App settings menu(Figure 52).
If the audio on the Hub is enabled, the user has the option of disabling ProGuardian App sound on the
mobile device. You may turn the App sound on or off by tapping on either end of the sound control. The
setting menu also lists the mobile device model and MAC address, which are needed when completing
the app setup wizard.
Figure 52: ProGuardian App Settings Menu
12.6. Discontinuing Use of the ProGuardianApp
To disconnect or unregister an existing mobile device and stop delivery of Hub notifications:
1. Press Help on the Hub Home Screen.
2. PressGoto launch the ProGuardian App Setup Wizard.
3. PressContinue until you reach the mobile device registration screen.
4. On the mobile device registration screen, press the red Xto the right of the currently registered
mobile device (Figure 53).
CONTROLLED COPY CREATED: 3/21/2014 4:59:41 PM
48

Figure 53: Remove Mobile Device
5. Press Yes to confirm that you would like the Hub to forget the device (Figure 54).
Figure 54: Forget Device Confirmation
On the mobile device registration screen, you will not see a green checkmarknext to any
devices.
6. Press Exit to return to the Hub Home Screen.
13. Troubleshooting
Please refer to this section if you encounter any issues while using your ProGuardian System.
13.1. Sensor Reset
A sensor reset may be performed if you feel that the Sensor is not operating correctly. You should
always turn off the Sensor from the Hub before attempting a sensor reset. To perform the reset, press
and hold the reset button on the sensor (Figure 55)with a pin-point instrument (e.g. a paper clip, ball-
CONTROLLED COPY CREATED: 3/21/2014 4:59:41 PM
49

If you encounter:
To fix the issue:
Hub Notifications and Error Messages
Hub displays: Sensor Communication
Try the following, in the suggested order until
resolved:
1) Move the Sensor-wearer closer to the Hub.
Wait 30 seconds and re-check connectivity.
2) Press Off on the Sensor icon and wait 30
seconds. If Sensor icon remains grayed-out,
perform Sensor reset,and wait another 30
seconds to check connectivity.
3) Press Off on the Sensor icon, replace the Patch,
and retry setup.
Hub displays: ProGuardian App Communication
Try the following, in the suggested order until
resolved:
1) Return the mobile device to the Wi-Fi Network
range
2) Check that the ProGuardian App was
downloaded onto the mobile device and is open
3) Check that the mobile device and Hub are both
connected to the same Wi-Fi network
4) Run the ProGuardian App setup wizard under
the Help menuon the Hub
Reset button
point pen) until the sensor LED flashes green. Note that the sensor must be attached to the Patch while
a reset is being performed.
Figure 55: Sensor Reset Button Location
13.2. Common Error Messages
Follow the instructions in the table below to resolve issues with your system:
CONTROLLED COPY CREATED: 3/21/2014 4:59:41 PM
50

If you encounter:
To fix the issue:
Hub displays: Replace Hub Power Alert Battery
First:
1) Verify that the plastic tab has been pulled out
from the power alert battery cover. If not, pull
out plastic tab to resolve issue.
Otherwise, complete each of the following steps:
2) Power down and unplug the Hub
3) Turn the Hub over and use a small Phillips head
screw driver (e.g. one that’s used for eye
glasses) to remove the power alert battery
cover
4) Remove the CR2032 lithium coin cell battery
5) Replace the battery with the positive terminal
facing away from the Hub
6) Replace the power alert battery cover and
secure with the set screw
7) Plug the Hub AC adapter into the wall outlet
8) The Hub will automatically start the
ProGuardian software, and you can resume use
of the System
Hub displays: ECG check fail
Try the following in the suggested order until
resolved:
1) Press Off on the Sensor icon. Verify that the
Sensor/Patch assembly is fully secured and
perform a reset on the Sensor.
2) Press Off on the Sensor icon. Replace the Patch
and retry at same body location.
3) Press Off on the Sensor icon. Replace Patch and
place the Sensor on a different body
location/orientation.
Hub displays: Error Writing to USB or Exported
Files are Empty (0kb)
(when attempting to export reports)
The USB flash drive must be connected to the Hub
in order to export reports:
1) Check that USB flash drive is properly inserted
and retry.
2) Check that there is sufficient memory available
on the USB flash drive (using a computer). If the
exported file size is 0kb, the USB flash drive is
likely full. Delete or move files from the USB
flash drive and retry the export.
CONTROLLED COPY CREATED: 3/21/2014 4:59:41 PM
51

If you encounter:
To fix the issue:
Audio Alerts
The Hub has lost AC power and is providing an
audio alert
The “silence button” on the top of the Hub will
NOT silence this type of alert.
Press the “Power Alert Off” button located on the
back of the base (see Figure 3 in section 7.1) to
silence the alert.
Note: The System cannot be used for seizure
detection until AC power is restored.
The Hub does not produce any audio during
system or seizure notifications
From the Home Screen, select Settings. Choose
the Sound submenu. Make sure Mute is not
enabled, and follow the instructions in Section
11.6.2to adjust and test the volume level.
Mute cannot be enabled from the Setting menu
(Sound submenu).
The system only permits muting Hub audio when:
The ProGuardian App is installed and in
use on a mobile device, and
The registered mobile device is within
range and connected to the Home Wi-Fi
Network
To setup the ProGuardian App, run the
ProGuardian App setup wizard under the Help
menuon the Hub.
Other audio issues
Go to the Sound submenu and make sure that the
test audio sound is not playing (press the stop icon
if it is playing). Make sure that you’ve entered and
saved the desired audio settings under the Sound
submenu. If you still have problems, power off the
Hub and restart.
Hub Screen
The Hub touch screen is not responsive,or
software is frozen, has forced shut down or
otherwise displays abnormal behavior.
Try to go back to the Hub Home screen and repeat
the desired action if possible.
If the Hub is completely frozen, has forced shut
down, or otherwise appear to be in a non-stable
state, use a pin-point instrument (e.g. a paperclip)
to press the reset button on the Hub.
If the Hub does not resume normal function, a
replacement may be needed. Contact the
Customer Care Service Center.
CONTROLLED COPY CREATED: 3/21/2014 4:59:41 PM
52

If you encounter:
To fix the issue:
Sensor LED
Steady red LED from the Sensor
Perform a Sensor reset.
If the Sensor shows a red LED after reset, a
replacement sensor may be needed. Contact the
Customer Care Service Center.
Hub LED
The Hub “Connectivity” LED is solid Amber
Hub-to-Sensor or Hub-to-ProGuardian App
communication is disrupted. From the Home
Screen, select “System Status” and view the status
bar to determine source of the connection issue.
To resolve an issue with Sensor to Hub
connectivity, refer to troubleshooting for “Sensor
Communication” listed above.
To resolve an issue with Hub to ProGuardian App
connectivity, refer to troubleshooting for
“ProGuardian App Communication” listed above.
The Hub “Connectivity” LED is flashing Amber
This indicates that System setup has not been
completed, or that the System has been Paused
(temporarily not monitoring seizures).
Refer to sections 7.1and 7.2 to complete
setup and begin using your System
To resume your System from a previous
Pause, follow the directions provided in
Section9.1
CONTROLLED COPY CREATED: 3/21/2014 4:59:41 PM
53

If you encounter:
To fix the issue:
The Hub “Notification” LED is solid Amber
A system notification was dismissed, but the issue
has not been resolved.
From the Home Screen, select “System Status” and
review each tab below:
Connectivity: If a red line is shown
between the Sensor and Hub, refer to
“Sensor Communication” troubleshooting.
If a red line is shown between the Hub and
ProGuardian App, refer to “ProGuardian
App Communication” troubleshooting.
Sensor: If “No Signal” is displayed for ECG
status, refer to “ECG check fail”
troubleshooting.
Hub: If “Not Connected” is displayed in the
Network SSID field, the ProGuardian App
setup wizard must be completed prior to
use of the App. If “Replace Hub Power
Alert Battery” is shown, refer to the
troubleshooting section with the same
name in the earlier section.
The Hub “notification” LED is flashing Amber
A seizure or system notification is currently in
progress.
Attend to the sensor wearer to assess
potential seizure activity.
Follow on-screen troubleshooting for
system notifications.
LED doesn’t light up when it should, or lights up
when it shouldn’t
Wait 5 minutes and see if the problem resolves by
itself. If not, turn off any active connection with
the Sensor and/or the Caregiver App, and restart
the Hub. The Hub will resume normal LED behavior
when you connect it back to the Sensor and/or
Caregiver App again.
Caregiver App
Cannot connectthe Hub or mobile device to Home
Wi-Fi
Verify that you’re in the broadcasting range of the
home Wi-Fi network. In the ProGuardian App
Setup Wizard, forget any registered Wi-Fi
network/mobile devices and restart the wizard.
Verify that the caps lock on the on-screen
keyboard is off and you’re entering the Wi-Fi
password correctly.
CONTROLLED COPY CREATED: 3/21/2014 4:59:41 PM
54

If you encounter:
To fix the issue:
Hub cannot find available mobile devices
Verify that the Caregiver App is properly installed
on the mobile device and is open. Verify that the
mobile device is connected to the same home
Wi-Fi network as the Hub. In the ProGuardian App
Setup Wizard, forget any previously registered
mobile devices and then retry scanning. If still
having problems, restart the ProGuardian App
Setup Wizard.
Caregiver App disconnects with Hub when mobile
device is idle
Change the Wi-Fi policy of your mobile device to
“Never sleep” when idle. You may need to consult
the directions for use from the manufacturer of
your mobile device on how to access the Wi-Fi
policy.
Timestamp on Caregiver App notifications are off
by 1 day compared to timestamps from the Hub
notifications
This is a known issue in the software and no action
is needed. Always refer to the Hub for the correct
notification time.
Any other problems with the ProGuardian App
Setup Wizard
Exit the ProGuardian App Setup Wizard and
restart. If still having problems, restart the Hub
and retry the ProGuardian App Setup Wizard. If
problem persists, contact the Customer Care
Service Center.
HUB
SENSOR
PATCH
Dimensions (Nominal)
147 mm x 105 mm x 74 mm
131 mm x 48 mm x 14 mm (Sensor and Patch)
Weight (Nominal)
300 g
40 g (Sensor and Patch)
Display size
3.5"
N/A
N/A
Display type
TFT. Color LCD
N/A
N/A
Display resolution
480x320 pixels
N/A
N/A
Wi-Fi
802.11b/g compatible
N/A
N/A
Bluetooth
BLE 4.0gy
BLE 4.0
N/A
Ports
USB 1: USB 2.0 Type A Host Port
USB 2: USB 2.0 mini-USB OTG Port
LAN: 10/100Mbps RJ-45 Ethernet Port
N/A
N/A
13.3. Replacing a Lost or Damaged Sensor or Hub
If a Sensor or Hub is lost or damaged, a replacement component can be purchased from Cyberonics.
Once you receive the replacement Sensor or Hub, follow the setup steps in Section7, Setting Up Your
ProGuardian System, of the manual.
14. System Specifications
CONTROLLED COPY CREATED: 3/21/2014 4:59:41 PM
55

HUB
SENSOR
PATCH
Audio Buzzer
0-85 dB
N/A
N/A
Power Loss Alert
Battery
Primary Cell, Lithium CR2032
N/A
N/A
Power Supply
Class II Equipment
100 VAC to 240 VAC
50HZ/60HZ
Primary Cell, Lithium CR2032
(Battery for the Sensor is located in the Patch)
Operating Conditions
Temperature
+5°C to +40°C
Relative Humidity
15% to 93%
Atmospheric Pressure
525mmHg to 795mmHg
Communication
Distance
Sensor and Hub communicates up to 30 feet apart across a single wall or floor. Actual performance
may vary pending environmental conditions.
Service Life
2 years
2 years
12 hours
Storage Conditions
Temperature
-25°C to +70°C
Relative Humidity
15% to 93%
Atmospheric Pressure
525mmHg to 795mmHg
15. FCC Compliance Statement
This device complies with part 15 of the FCC Rules. Operation is subject to the following two conditions:
(1) This device may not cause harmful interference, and (2) this device must accept any interference
received, including interference that may cause undesired operation.
This equipment has been tested and found to comply with the limits for a Class B digital device,
pursuant to part 15 of the FCC Rules. These limits are designed to provide reasonable protection against
harmful interference in a residential installation. This equipment generates, uses and can radiate radio
frequency energy and, if not installed and used in accordance with the instructions, may cause harmful
interference to radio communications. However, there is no guarantee that interference will not occur
in a particular installation. If this equipment does cause harmful interference to radio or television
reception, which can be determined by turning the equipment off and on, the user is encouraged to try
to correct the interference by one or more of the following measures:
Reorient or relocate the receiving antenna.
Increase the separation between the equipment and receiver.
Connect the equipment into an outlet on a circuit different from that to which the receiver is
connected.
Consult the dealer or an experienced radio/TV technician for help.
CONTROLLED COPY CREATED: 3/21/2014 4:59:41 PM
56

This equipment complies with FCC radiation exposure limits set forth for an uncontrolled environment.
This transmitter must not be co-located or operating in conjunction with any other antenna or
transmitter, except in accordance with FCC multi-transmitter product procedures.
Changes or modifications not expressly approved by the party responsible for compliance could void the
user's authority to operate the equipment.
16. Contact Us
Cyberonics Europe
Airport Plaza, Kyoto Building
Leonardo Da Vincilaan 19
B-1831 Diegem, Belgium
Cyberonics USA
100 Cyberonics Blvd.
Houston, Texas 77058
Toll-Free Customer Care Service Center Helpline:
1-800-986-4702
CONTROLLED COPY CREATED: 3/21/2014 4:59:41 PM
57

CONTROLLED COPY CREATED: 3/21/2014 4:59:41 PM
58
 Loading...