

Cyberoam NetGenie SOHO N300 User Manual
User Guide
User Guide
Version 1.0- 13/08/2014
11000172-20140623-NG12AO

User Guide
Table of Contents
Preface ................................................................................................................... 5
Part 1: Deploy your NetGenie .................................................................................. 7
Introduction ............................................................................................................. 7
Know your NetGenie ...................................................................................................................... 8
Defaults .......................................................................................................................................... 8
Surf using NetGenie ............................................................................................... 9
Getting your NetGenie Ready ........................................................................................................ 9
Identify your Internet Setup ............................................................................................................ 9
Network Configuration Wizard ...................................................................................................... 12
Access Internet ............................................................................................................................. 21
Part 2: Internet Controls ........................................................................................ 22
Access NetGenie .......................................................................................................................... 22
Set System Time .......................................................................................................................... 23
Add User ....................................................................................................................................... 24
User Internet Access .................................................................................................................... 28
Part 3: What can NetGenie do for you? ............................................................... 30
Registration .................................................................................................................................. 30
Why do I need to register my appliance and how do I do it? .......................................... 30
Can I use my existing Cyberoam Customer Account credentials for NetGenie Customer
Portal? ............................................................................................................................. 31
Internet Access ............................................................................................................................. 31
Is it mandatory to create a user in NetGenie in order to access Internet? ...................... 31
How can I access and configure my NetGenie appliance? ............................................. 31
I want to apply different levels of Internet restrictions to different users as per their role
and requirement in my organization, how can I do so? .................................................. 31
Will all of the organization employees receive authentication page every time they try to
access Internet through NetGenie? ................................................................................ 32
Do I need to manually add each website, which I want to be allowed for my employees?
......................................................................................................................................... 32
What is NGsense? .......................................................................................................... 32
OR ............................................................................................................................................ 32
Does NetGenie support HTTPS based Web and Application Filtering? ......................... 32
How can I customize Website category access for a specific user? ............................... 33
I want to allow my employees accessing game sites after office hours. What should I
do? ................................................................................................................................... 35
How can I apply time-based Internet access? ................................................................ 35
I’m receiving “Blocked Website” message when I try to access www.google.com through
NetGenie. Is there any way one can allow access to the blocked website(s) from the
authentication page? ....................................................................................................... 36
I want to know the categorization for a Website. Is there any way to know the same
using NetGenie? .............................................................................................................. 37
I want to allow only Yahoo Messenger to my employee ‘A’, that too in the evening
between6 and 9. I also want to block any other chat messengers, what should I do? ... 38
I am not able to access the Internet using my smart phone, why? ................................. 40
I want to allow or block some websites for all users; do I need to individually configure
this setting for each and every user? .............................................................................. 41
Is there any way to allow/block websites globally? ......................................................... 41
Does NetGenie allow users access to uncategorized websites? .................................... 41

User Guide
How can I block users from accessing the websites which are not categorized by
NetGenie? ....................................................................................................................... 41
What if one of my employees forgets their password? ................................................... 42
I am a traveler and use USB modem to get Internet access; can NetGenie ensure me
safe Internet?................................................................................................................... 42
My ISP has given me an IP address, where do I need to specify the same in NetGenie?
42
How do I deal with websites that have not been categorized by NetGenie? .................. 42
I want to ensure that Internet is accessible to an employee ‘A’ only during work hours,
i.e., from 10 am to 7 pm. How do I do that? .................................................................... 44
Device Whitelisting ....................................................................................................................... 46
How do I make sure that every time I login using my laptop, I do not have to see the
authentication page? ....................................................................................................... 46
I do not want to authenticate every time I try to access the Internet using NetGenie.
What should I do? ........................................................................................................... 46
System .......................................................................................................................................... 47
How do I change my NetGenie administrator password? ............................................... 47
How can I view system and security status of my NetGenie Appliance?........................ 47
Internet access through my NetGenie appliance has stopped. What should I do? ........ 48
Networking .................................................................................................................................... 49
How many computers or devices can be connected wirelessly to NetGenie at the same
time? ................................................................................................................................ 49
How do I know that my NetGenie is having Internet connection? ................................... 49
How can I verify that my NetGenie appliance is Wi-Fi enabled? .................................... 49
How can I wirelessly connect my laptop to NetGenie? ................................................... 51
Can I insert my telephone cable directly to my NetGenie appliance to access Internet?51
I do not want others to see my network due to security reasons. Is there any way to hide
visibility of my network to wireless users? ....................................................................... 51
Can I change the name of my Network? ......................................................................... 52
Can I configure multiple Wireless Networks (SSID) in my NetGenie appliance? ........... 52
Can I bind a particular user with a Wireless Network (SSID)? ........................................ 53
Security ......................................................................................................................................... 54
What is the frequency of Intrusion Prevention / Application Control signature updates? 54
Can I manually update Intrusion Prevention / Application Control signature database? 54
What is the use of Diagnostic Tools? .............................................................................. 54
Upgrade, Back-up, Restore .......................................................................................................... 59
How can I check availability of upgrade(s) available for my NetGenie appliance? ......... 59
How can I upgrade my NetGenie firmware version?....................................................... 59
Can I save my current NetGenie configuration for future use i.e. in case of system crash
or change in settings? ..................................................................................................... 62
I have done some configuration changes yesterday and now my system is not working
properly, I do have configuration back-up I took a few days back. What should I do to
restore my NetGenie settings: ......................................................................................... 63
How to restore configuration back-up in NetGenie appliance? ....................................... 63
How can I restore Factory Default Configuration? .......................................................... 64
Logs and Reports ......................................................................................................................... 65
I want to find out which websites are being accessed by my employees in my absence.
How can I check it? ......................................................................................................... 65
I want to find out which applications are being accessed by my employees in my
absence. How can I do so? ............................................................................................. 65
Can I have visibility of users who are accessing Internet through NetGenie? ................ 66
How can I view details of Intrusion attempts detected by NetGenie? ............................. 67

User Guide
I have set time as per my local time zone but why is NetGenie still not showing it? ...... 67
Can I send NetGenie logs to third party server? ............................................................. 68
Is there any way to turn off NetGenie’s logging feature? ................................................ 68
Remote Management ................................................................................................................... 69
Can I remotely manage my NetGenie appliance(s)? ...................................................... 69
Can I use my existing Customer ID and Password to login to NCMS? Or do I have to
create a new one? ........................................................................................................... 70
Can I make changes to my NetGenie appliance from NCMS? ....................................... 70
What is Internet Watch List? ........................................................................................... 70
Can I send NetGenie’s logs to third party server? .......................................................... 70
Is there any way to turn off NetGenie’s logging feature? ................................................ 71
Does NetGenie support management over TR-069?...................................................... 71
Some Advanced Configuration ..................................................................................................... 72
How can I make sure that if any user remains inactive for more than 10 minutes, he/she
gets logged off? ............................................................................................................... 72
The Parental Controls that I have applied are not working properly. What can be the
reason? ............................................................................................................................ 73
What does NetGenie offer under Intrusion Prevention System? .................................... 73
What is Port Forwarding? How can I configure port forwarding in NetGenie? ............... 73
How to port-forward HTTP traffic to an internally hosted web-server? ........................... 74
Can I access NetGenie over Internet? ............................................................................ 76
Is there any single page from where I can get the complete network overview? ........... 77
I want to change the default IP Address of my NetGenie appliance, can I do it? ........... 78
I want to allow all TCP traffic passing through port 80, can I do so? .............................. 78
I wish to configure VPN in NetGenie, how can I do that? ............................................... 80

User Guide
Preface
Welcome to Cyberoam NetGenie SOHO User Guide for ADSL2+ Appliances.
Intended Audience
This guide is intended for small and home office users with basic Internet knowledge.
Guide Organization
This guide gives you information about the administration of Cyberoam NetGenie Secure Internet
appliance while helping you manage and customize NetGenie to meet your personalized Internet
safety requirements.
This guide is organized in three parts:
Part 1 – Deploy your NetGenie
Part 2 – Protect your Organization
Part 3 – What can NetGenie do for you?
User Guide
Typographic Conventions
All contents in this guide including text or screenshots follow the given list of conventions
Item
Convention
Example
Part titles
Bold and
shaded font
typeface
Internet Controls
Topic titles
Shaded font
typeface
Introduction
Subtitles
Bold & Black
typeface
Notation conventions
Navigation link
Normal
typeface
Internet Controls Device Whitelisting
it means, to open the required page click on Internet Controls
then on Device Whitelisting
Notes and
Prerequisites
Bold typeface
between black
borders
Note

User Guide
Part 1: Deploy your NetGenie
Introduction
NetGenie works as a wireless Unified Threat Management (UTM) appliance for Small Offices, Home
Offices. It creates a Wi-Fi zone along with the benefits of Stateful Inspection Firewall, VPN, Intrusion
Prevention System, 3G Ready and Internet Controls over websites and applications – all this in your
Wireless Router! Share Internet connection with your office users over desktops, laptops, handheld
devices like iPad, iPhone and more –at the same time!
NetGenie’s pre-configured security settings offer protection from unauthorized outsiders. Protect all
devices used to connect to the Internet – laptops, desktops, iPhone, iPad, and more – from and
hackers. Control user access to harmful and unproductive websites and applications like adult sites,
job portals, sports sites Facebook, Skype, Yahoo Messenger and more to enhance security and
productivity in your office.
After unboxing your NetGenie, ensure that you have all these components available:
1. NetGenie Wireless Base Unit - NG12AO
2. Two (2) detachable Wi-Fi Antennas
3. RJ-45 Ethernet Cable
4. Telephone Cable i.e. RJ-11 Cable
5. Multi-Country Power Adapter
6. External Splitter
7. USB Broadband Extension Cable
8. Quick Start Guide
Please contact your vendor immediately if you find anything missing.
User Guide
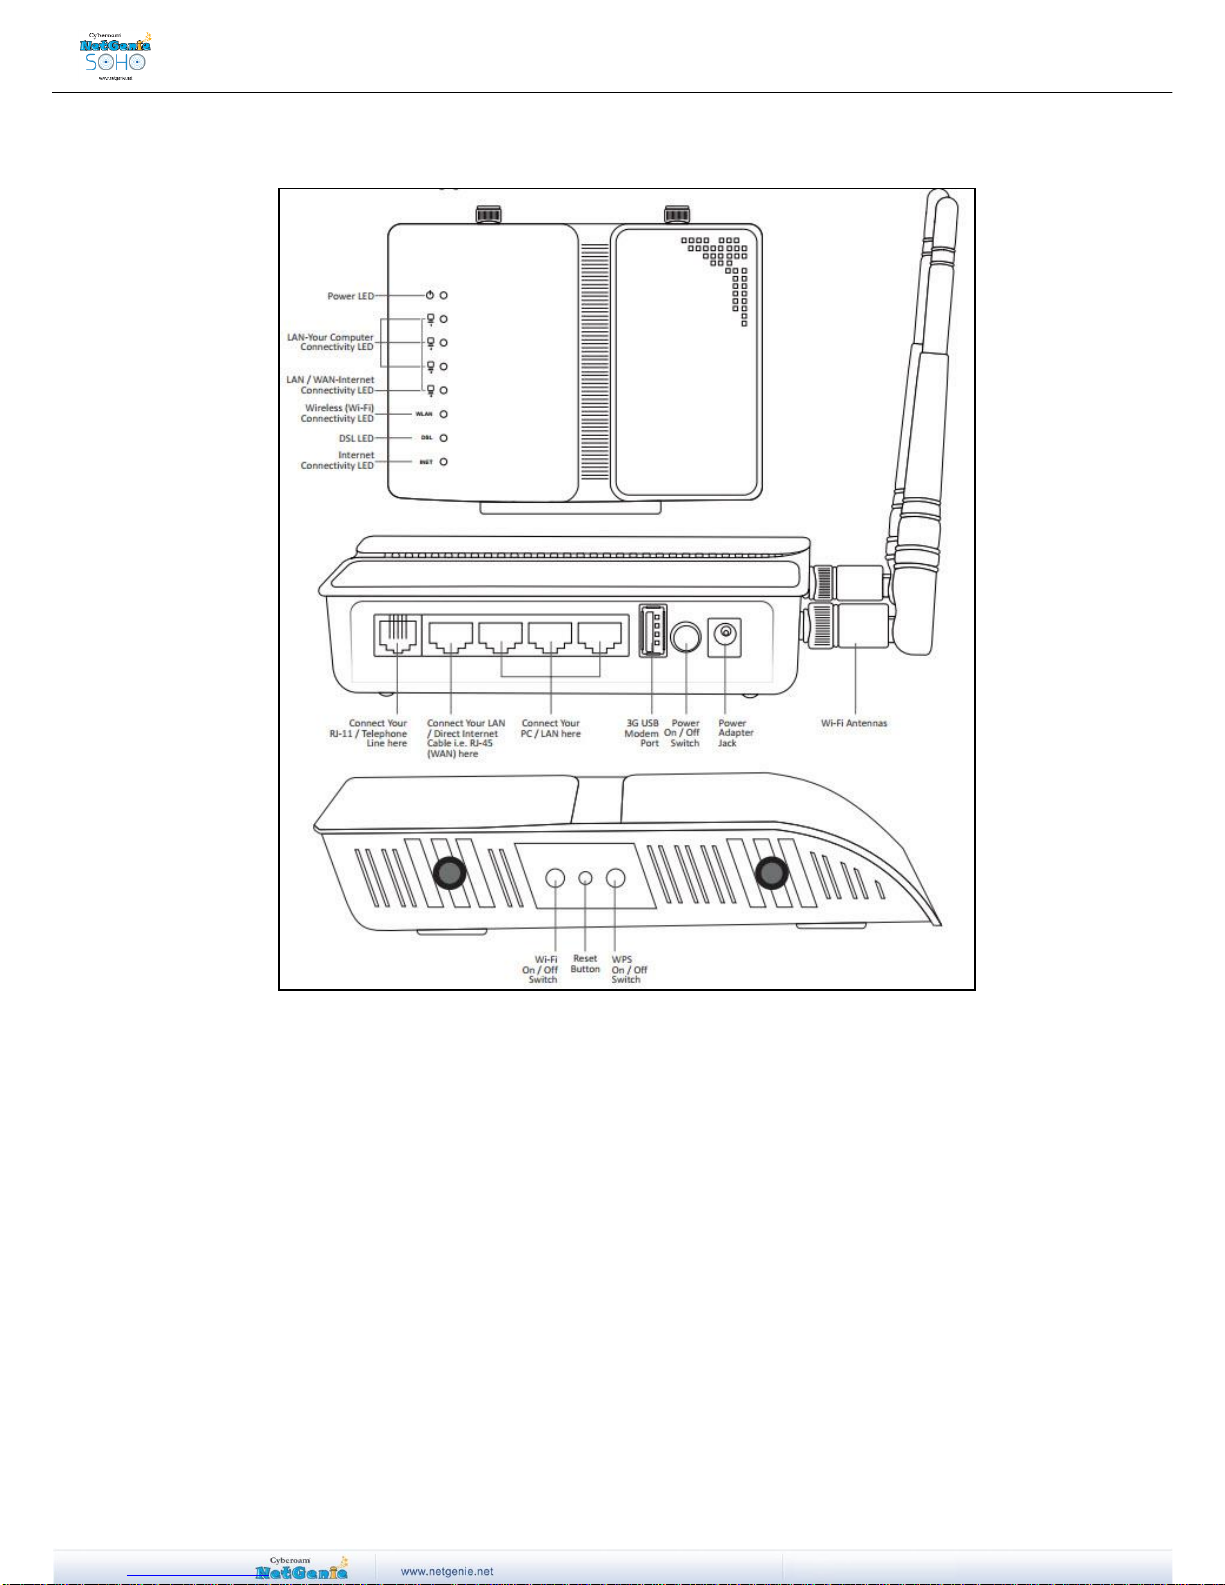
Know your NetGenie
Defaults
Default IP Address to access NetGenie: http://10.1.1.1
Default Username: admin
Default Password: admin
Appliance Reset Button: To reset appliance to factory default settings, keep the reset button pressed
for 5 seconds. While doing so, all past upgrades and configurations will be lost.
User Guide
Surf using NetGenie
Prerequisites:
Internet connectivity through a DSL/Cable modem/Direct Internet Cable with RJ45 (Ethernet)
connection or 3G USB Modem.
At least one computer with an installed network interface adapter/wireless network adapter.
Internet browser.
Getting your NetGenie Ready
Before you begin surfing the Internet through NetGenie, you first need to assemble the appliance.
1. Look out for a sticker at the bottom of the appliance containing the default wireless network
name, technically known as SSID and a pass key specific for your appliance.
2. Plug one end of the power adapter into the socket on the back of the NetGenie Base Unit and
the other end into the nearest main socket.
3. Before you access the Internet through NetGenie, make sure the power is switched on. The
Power LED on the front panel should turn green.
Note:
SSID and pass key pre-secure your wireless network from any unauthorized access attempts.
Please note down your pass key for future reference.
Identify your Internet Setup
Depending on your network set-up, you can connect NetGenie to the Internet by referring to any of
the following scenarios:
1. Secure Internet Connectivity through ADSL
2. Secure Internet Connectivity through Direct Cable
3. Secure Internet Connectivity using 3G USB Modem
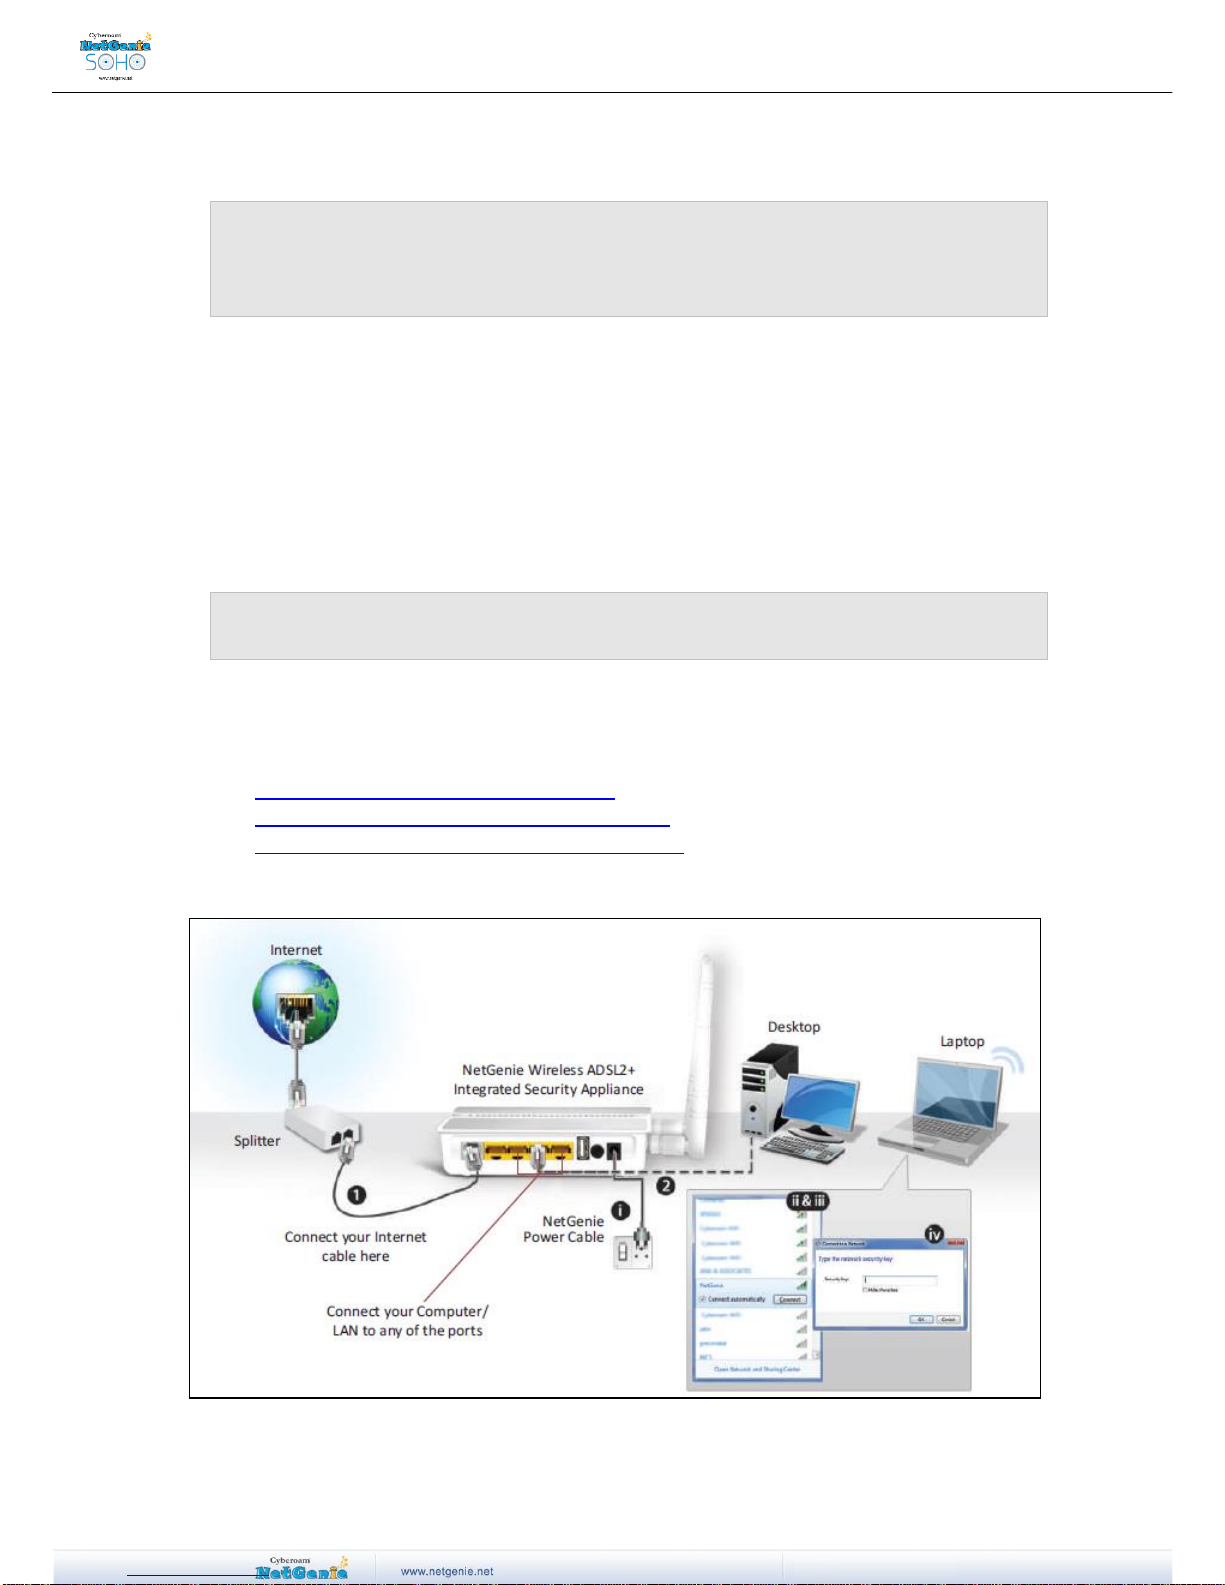
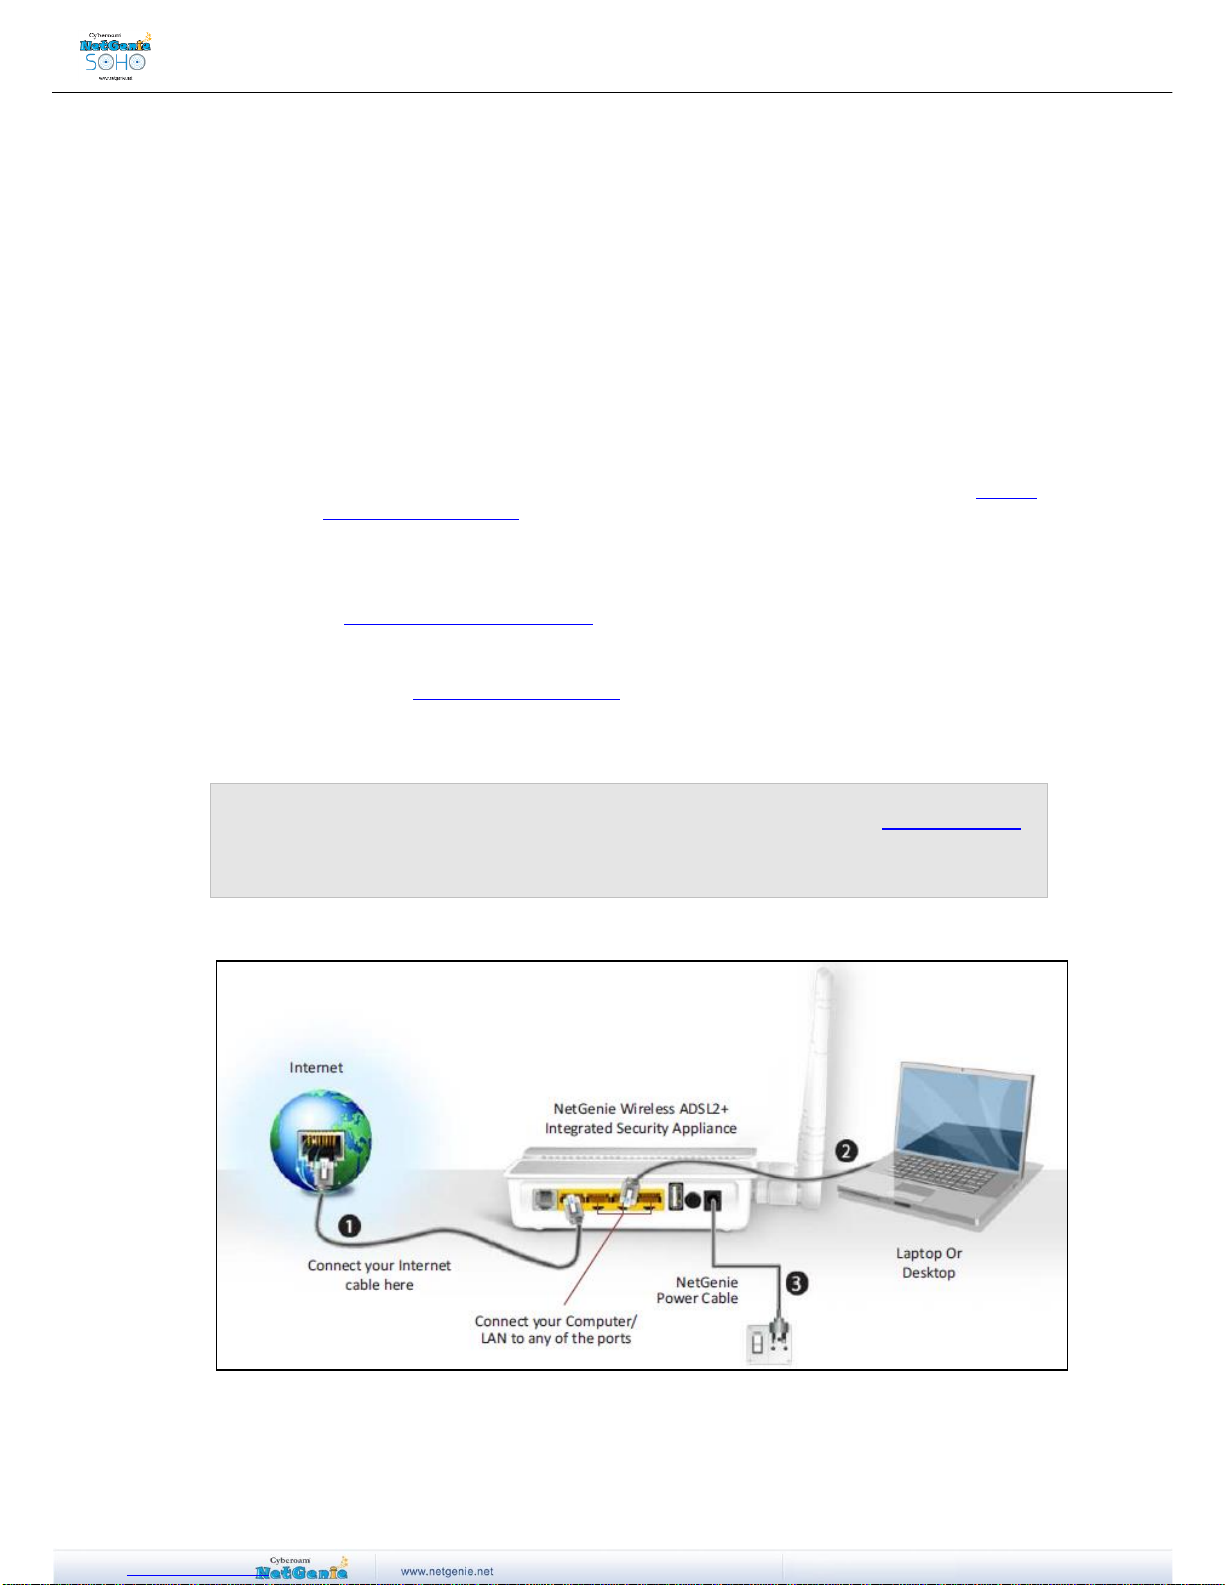
Scenario 1 - Secure Internet Connectivity through ADSL
Screen- Connectivity through ADSL
User Guide
1. Unplug the existing telephone broadband wire from your DSL/Cable Modem and plug it into the
NetGenie socket labeled as “DSL”.
2. Use the RJ-45 Ethernet cable provided with the NetGenie appliance to connect your computer
to any of the “LAN” NetGenie sockets and switch-on the NetGenie appliance.
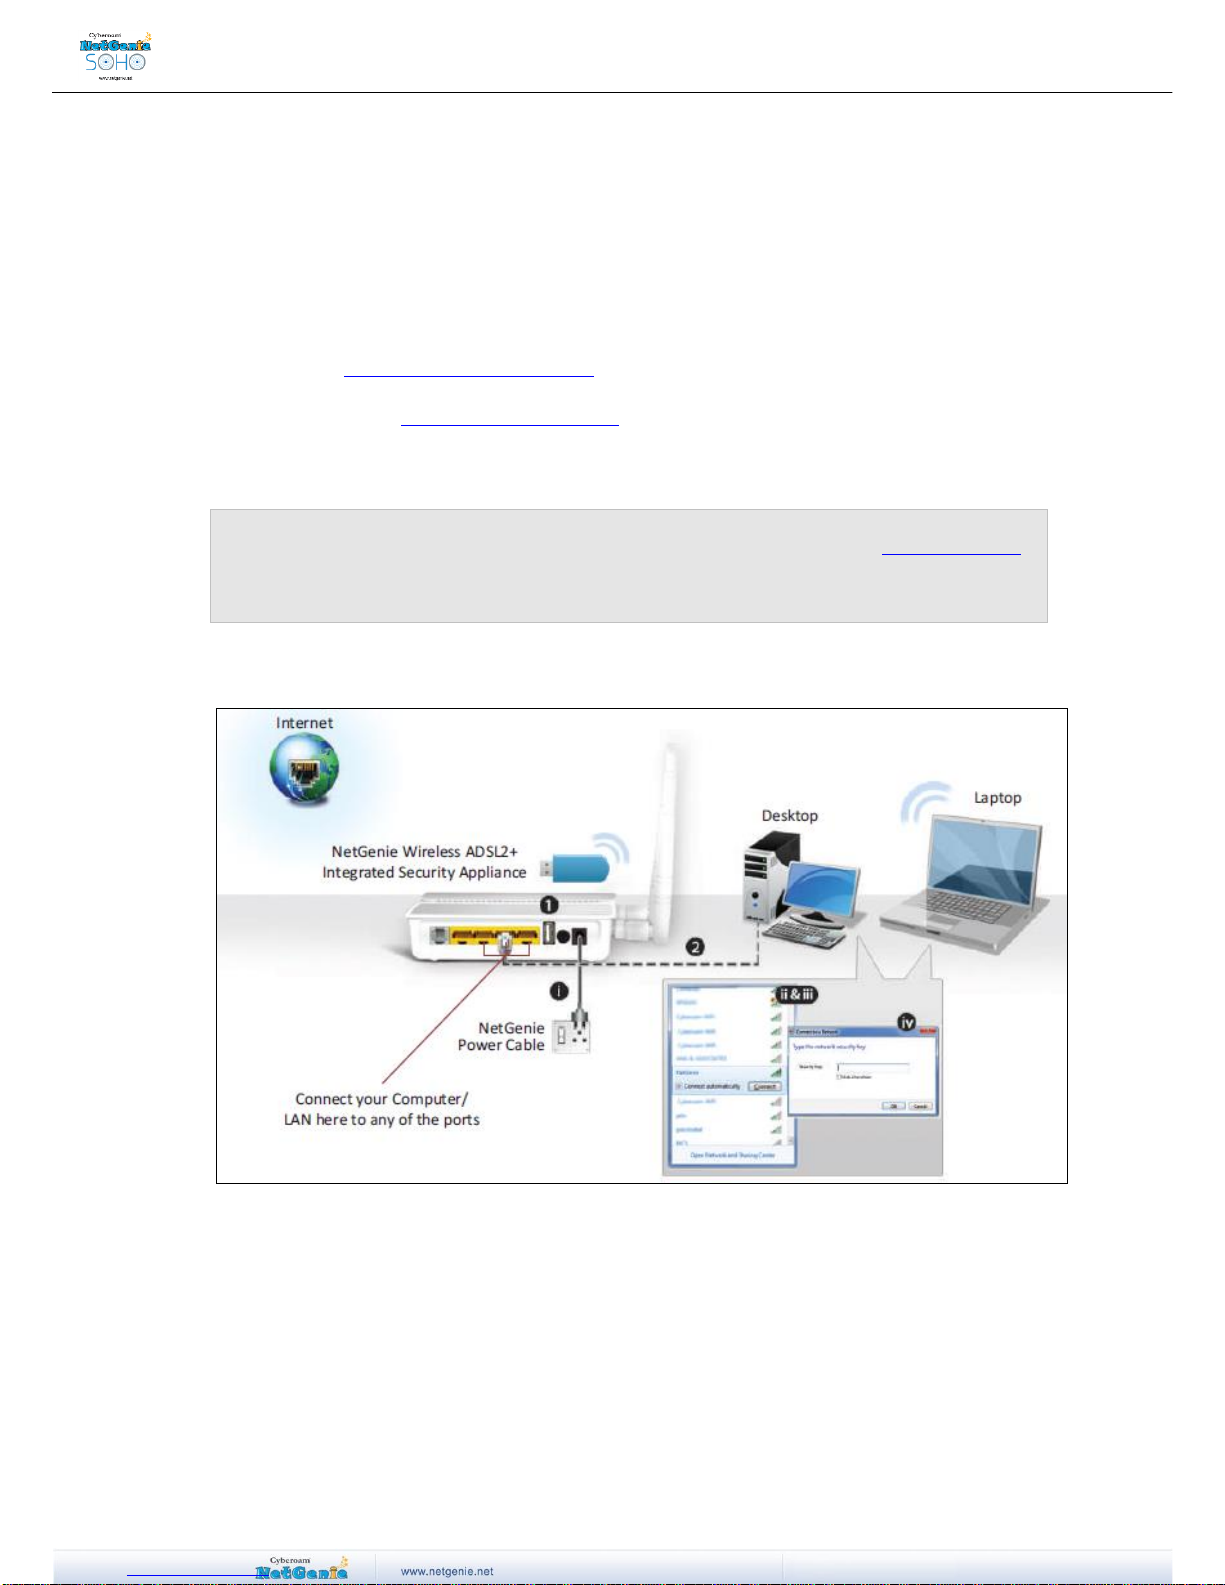
OR
I. Switch-on your NetGenie appliance. Wait till the “Power” LED and “DSL” LED turns
green and for the “WLAN/WPS” LED to turn green and stabilize.
II. Start your laptop. Make sure that your Wireless Network Adapter is enabled. Your
laptop will auto detect the wireless network (SSID) named “NetGenie - XXXX”
(XXXX- alpha numeric characters).
III. Click the Network icon in computer's system tray (bottom-right of your screen) from
where you can view available wireless networks. Select “NetGenie - XXXX”.
IV. After selecting “NetGenie - XXXX”, you will be asked to enter the exact Security/Pass
Key printed on the sticker at the back of your appliance(Please refer to Getting
your NetGenie Ready section).
3. Open your browser and go to the default IP Address i.e. https://10.1.1.1 to access NetGenie
Web Admin Console. Use the default User Name and Password i.e. ‘admin’ to log in.
4. You need to configure network settings to connect to the Internet. You can either run the
NetGenie ‘Network Configuration Wizard’ or configure the settings manually through NetGenie
user interface.
5. Once you finish configuring necessary network settings, you can start surfing the Internet. You
will be served with NetGenie Splash Screen.
Your computer is now secured with the Quick Security feature automatically turned on.
Note:
To configure role-appropriate Internet access for your employees, refer the Internet Controls
section.
If you are unable to connect to the Internet after following above procedure, please revert to
your original setup and visit NetGenie’s support section at www.netgenie.net.
Scenario 2 - Secure Internet Connectivity through Direct Cable
Screen- Connectivity through Direct Cable
User Guide
1. Unplug the Internet cable that connects to your computer and plug it into the “ETH 4”
NetGenie socket..
2. Use the RJ-45 Ethernet cable provided with the NetGenie appliance to connect your computer
to any of the “LAN” NetGenie sockets.
3. Switch-on your NetGenie appliance. Wait till the Power LED and “WAN” LED turns green and
for “LAN” LED to turn green and remain steady.
4. Open your browser and go to the default IP Address i.e. http://10.1.1.1 to access NetGenie
Web Admin Console. Use the default User Name and Password i.e. ‘admin’ to login.
5. You need to configure network settings to connect to the Internet. You can either run the
NetGenie ‘Network Configuration Wizard’ or configure the settings manually.
6. Once you finish configuring necessary network settings, start surfing the Internet, you will
be served with ‘NetGenie Splash Screen’.
Your computer is now secured with the Quick Security feature automatically turned on.
Note:
To configure role-appropriate Internet access for your employees, refer the Internet Controls
section.
If you are unable to connect to the Internet after following above procedure, please revert to
your original setup and visit NetGenie’s support section at www.netgenie.net.
Scenario 3 - Secure Internet Connectivity using 3G USB Modem
Screen- Connectivity through 3G USB Modem
1. Plug a USB modem in the slot provided in the NetGenie appliance.
2. Use the RJ-45 Ethernet cable provided with the NetGenie appliance to connect your computer
to any of the “LAN” NetGenie sockets and switch on the NetGenie appliance.
OR
I. Switch-on the NetGenie appliance. If you are connecting to the Internet over Wi-Fi,
start your laptop.
II. Make sure your Wireless Network Adapter is enabled. Your laptop will auto detect the
wireless network (SSID) named “NetGenie - XXXX” (XXXX- alpha numeric
User Guide
characters).
III. Click the network icon in computer's system tray (bottom-right of your screen) and
Select “NetGenie - XXXX”.
IV. After selecting “NetGenie - XXXX”, you will be asked to enter the exact Security/Pass
Key printed on the sticker at the back of your appliance.
3. Enter the IP Address: http://10.1.1.1 in the address bar. Use the default User Name and
Password i.e. ‘admin’ to login.
4. Go to Network Settings Internet.
5. Select USB Modem and fill up the required details. Refer Configuring 3G USB Modem section
for the same. Once the valid details are entered and configurations are applied, NetGenie will
automatically connect to the Internet.
6. Open your browser and start surfing the Internet, you will be served with ‘NetGenie Splash
Screen’.
Your computer is now secured with the Quick Security feature automatically turned on.
Note:
To configure role-appropriate Internet access for your employees, refer the Internet Controls
section.
If you are unable to connect to the Internet after following above procedure, please revert to
your original setup and visit NetGenie’s support section at www.netgenie.net.
Network Configuration Wizard
In case of Scenario1 & Scenario 2, the wizard will help you configure network settings to connect to
the Internet.
1. Enter http://10.1.1.1 in your browser's address bar where you type in URLs of various websites
such as www.google.com.
2. Next, you will come across the following Admin Screen. Use the default User Name and
Password i.e. ‘admin’ to log in and click ‘Login’.
3. To access the Network Configuration Wizard, go to Network Settings and click ‘Launch Network
Configuration Wizard’.
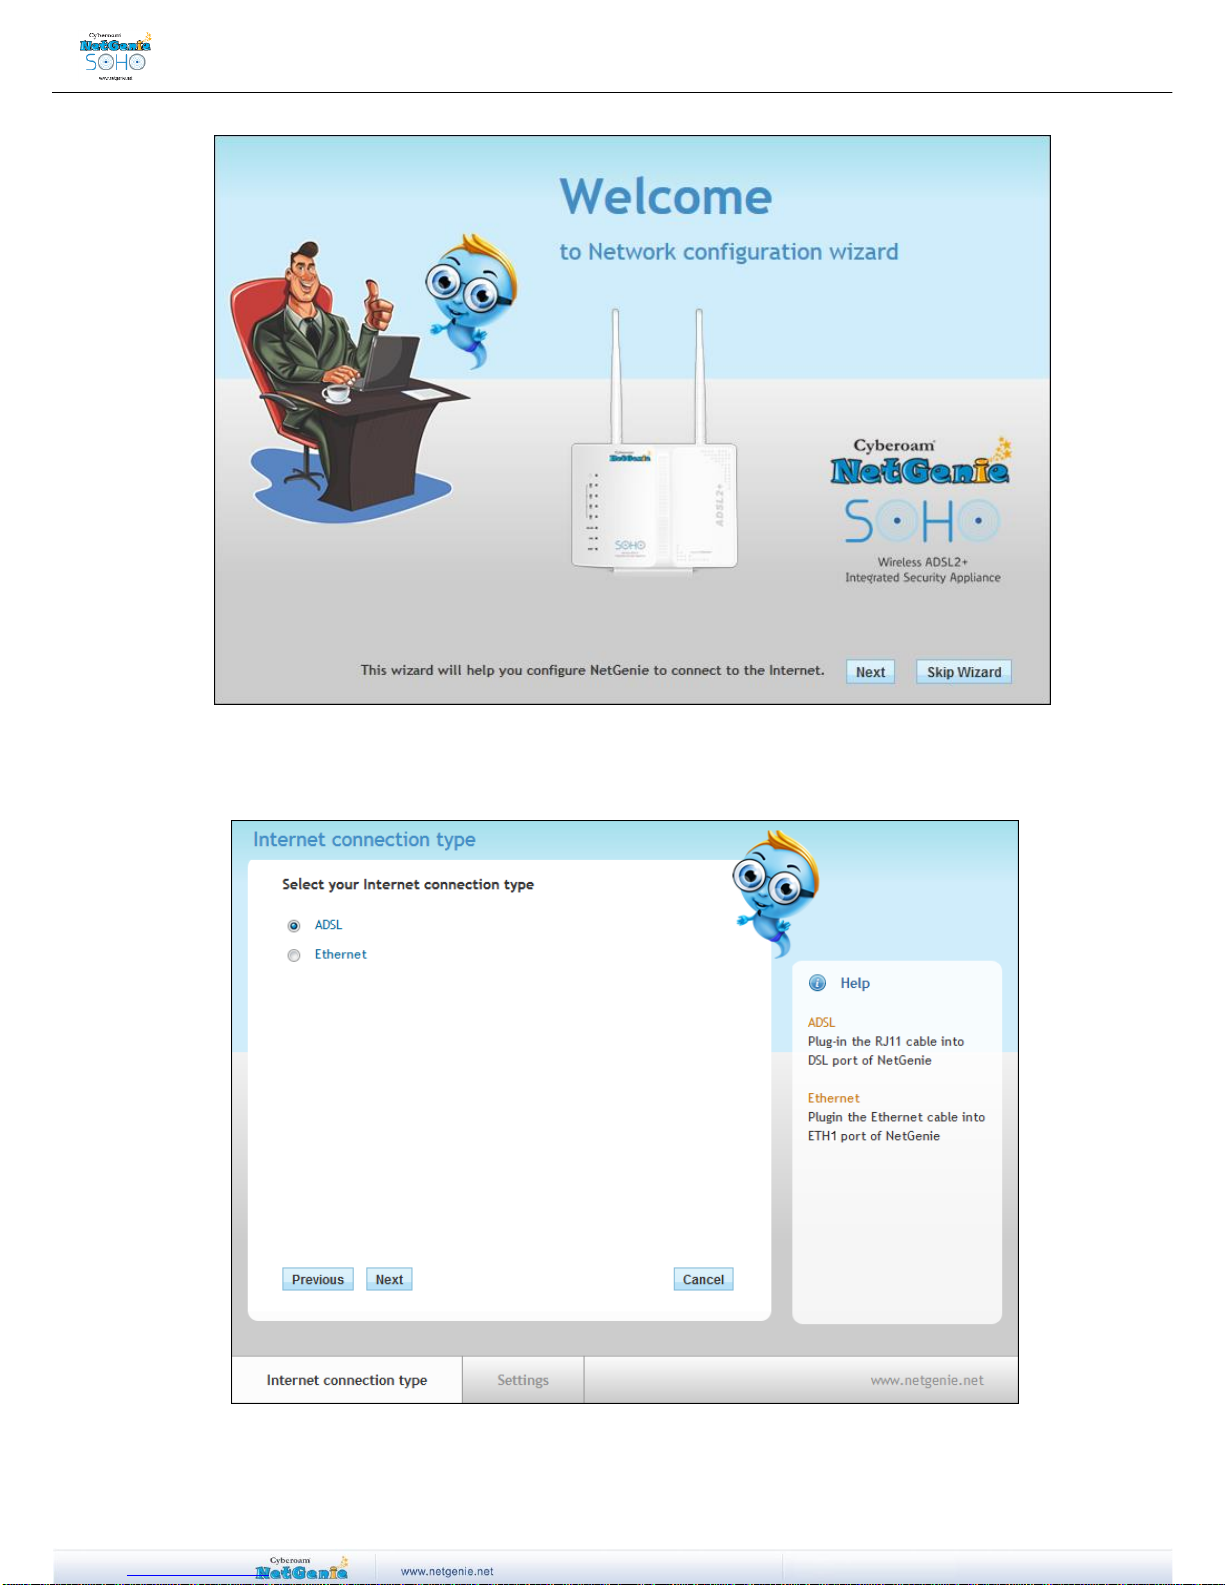
User Guide
4. Click ‘Next’ to continue or ‘Skip Wizard’ to configure the network settings manually.
5. Select your Internet connection type i.e. ADSL or Ethernet. Click ‘Next’ to continue.
User Guide
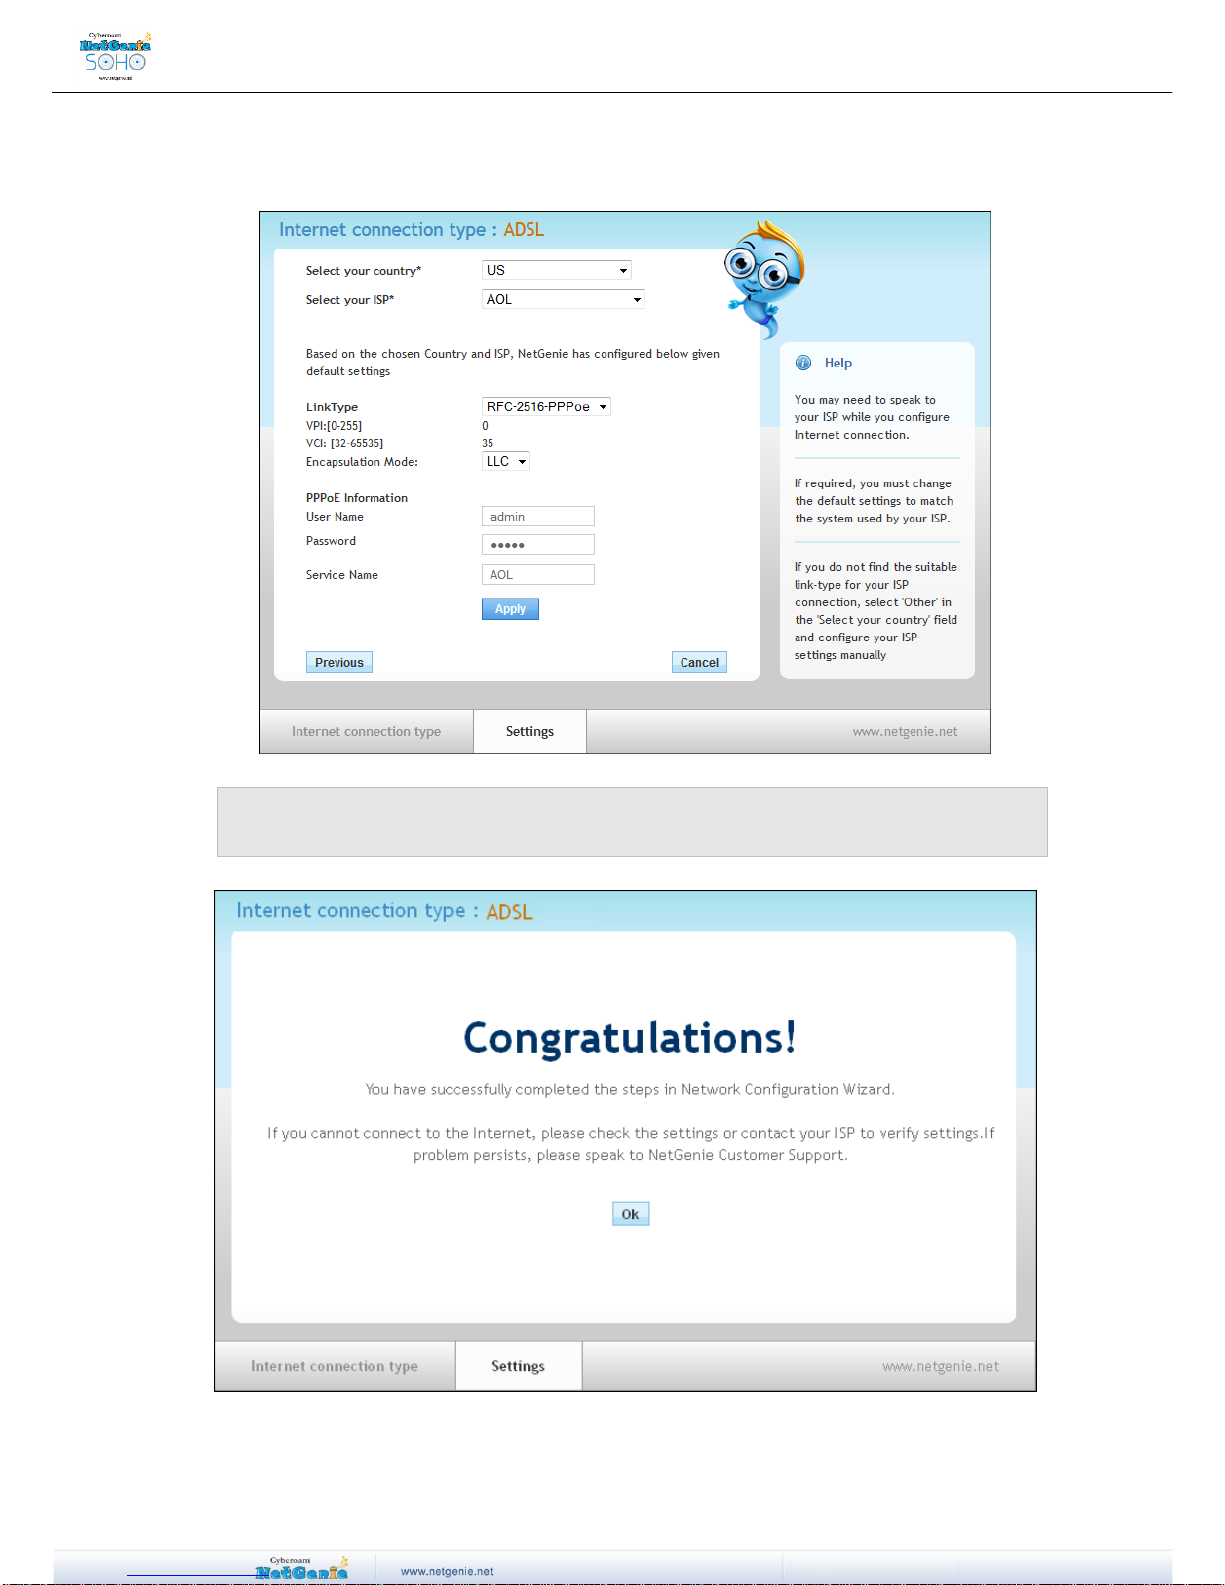
6. Select your country and ISP from the list. Enter Username and Password as provided by your
ISP.
Note:
In case your ISP provides IP over DHCP, you may need not to provide any User Name and
Password to connect to the Internet.
You can now start surfing the Internet. Click ‘Ok’ to exit the wizard.
User Guide
Note:
Above screen shots are for ADSL connection type only. In case of Ethernet, click ‘Next’
after selecting Ethernet as your Internet connection type and NetGenie will
automatically connect to the Internet.
However for Ethernet connection type with a static IP Address, you need to configure the
Network settings manually through the NetGenie user interface.
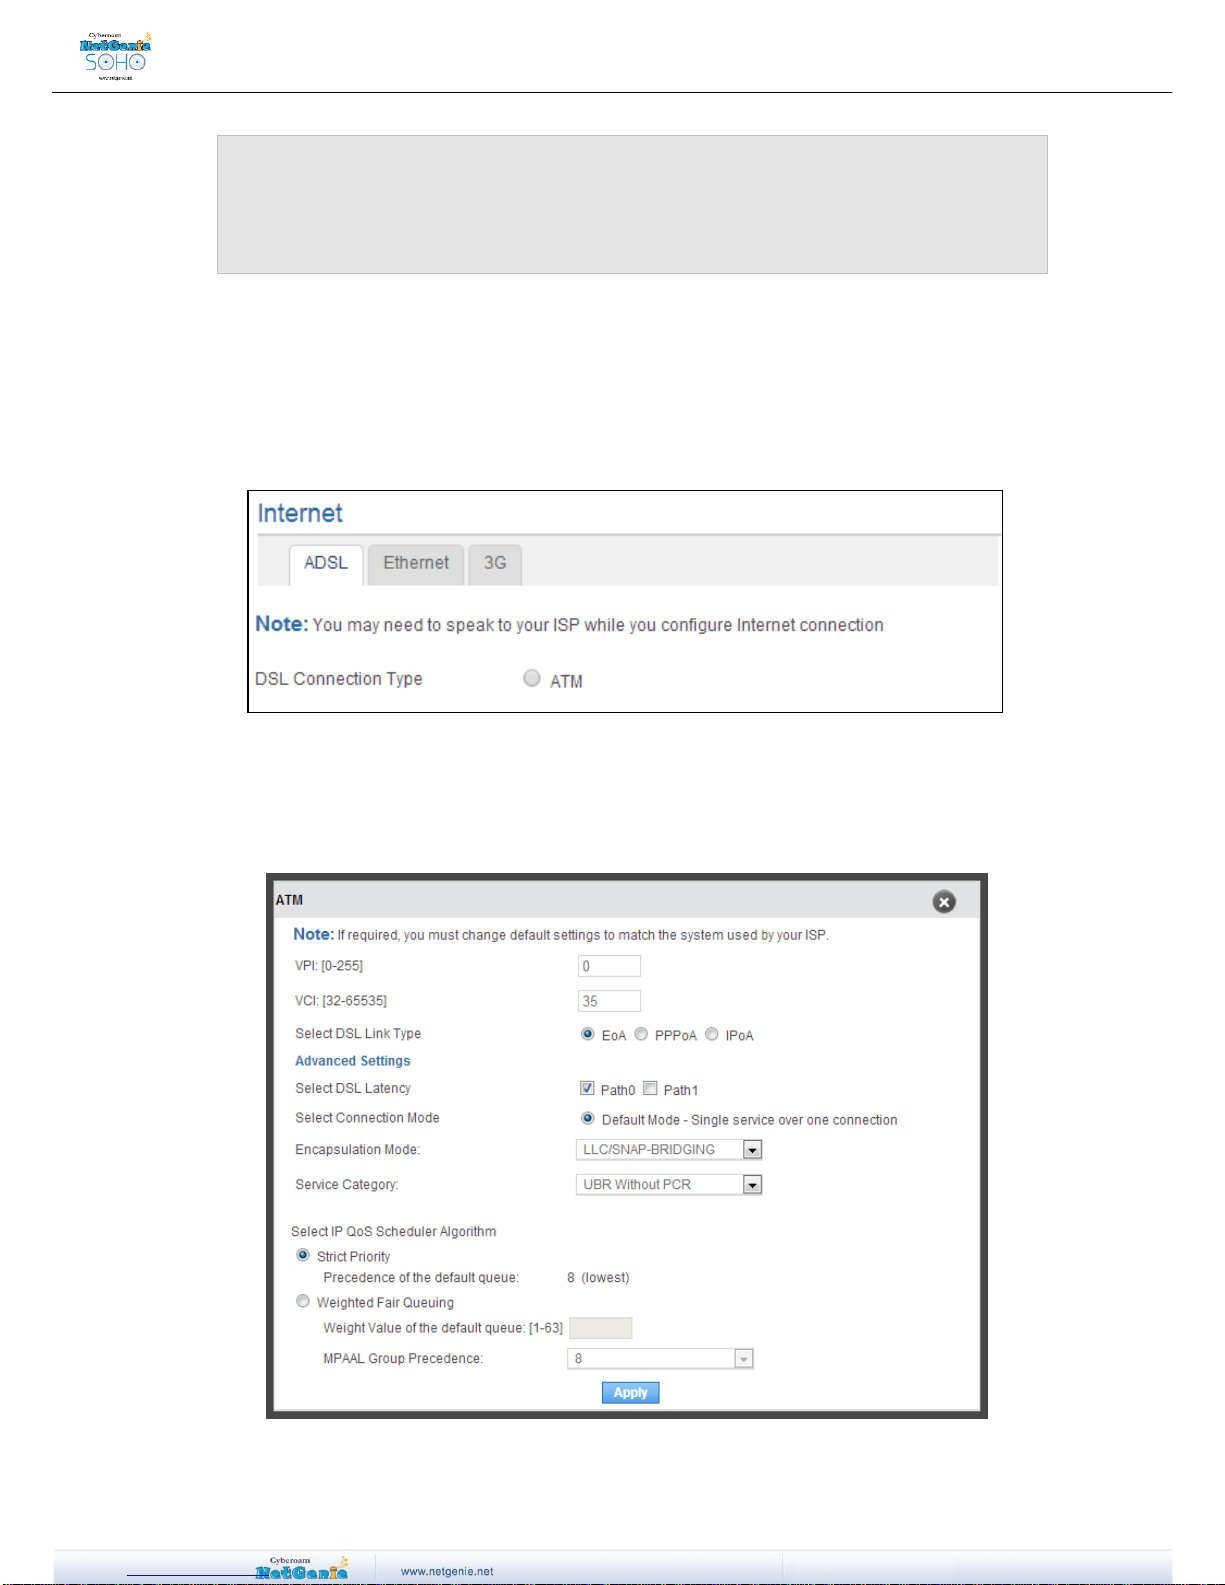
Configuring ADSL
You need to configure VDSL/ADSL settings to connect to the Internet using your Telephone
broadband wire i.e. DSL cable, in case you have not already configured the same through NetGenie
Network Configuration Wizard.
Go to Network Settings Internet VDSL/ADSL to configure the DSL settings.
Select ATM as the DSL connection type.
After selecting the DSL connection type, you need to create ATM by filling in the required details.
Create ATM
Screen - Create ATM
User Guide
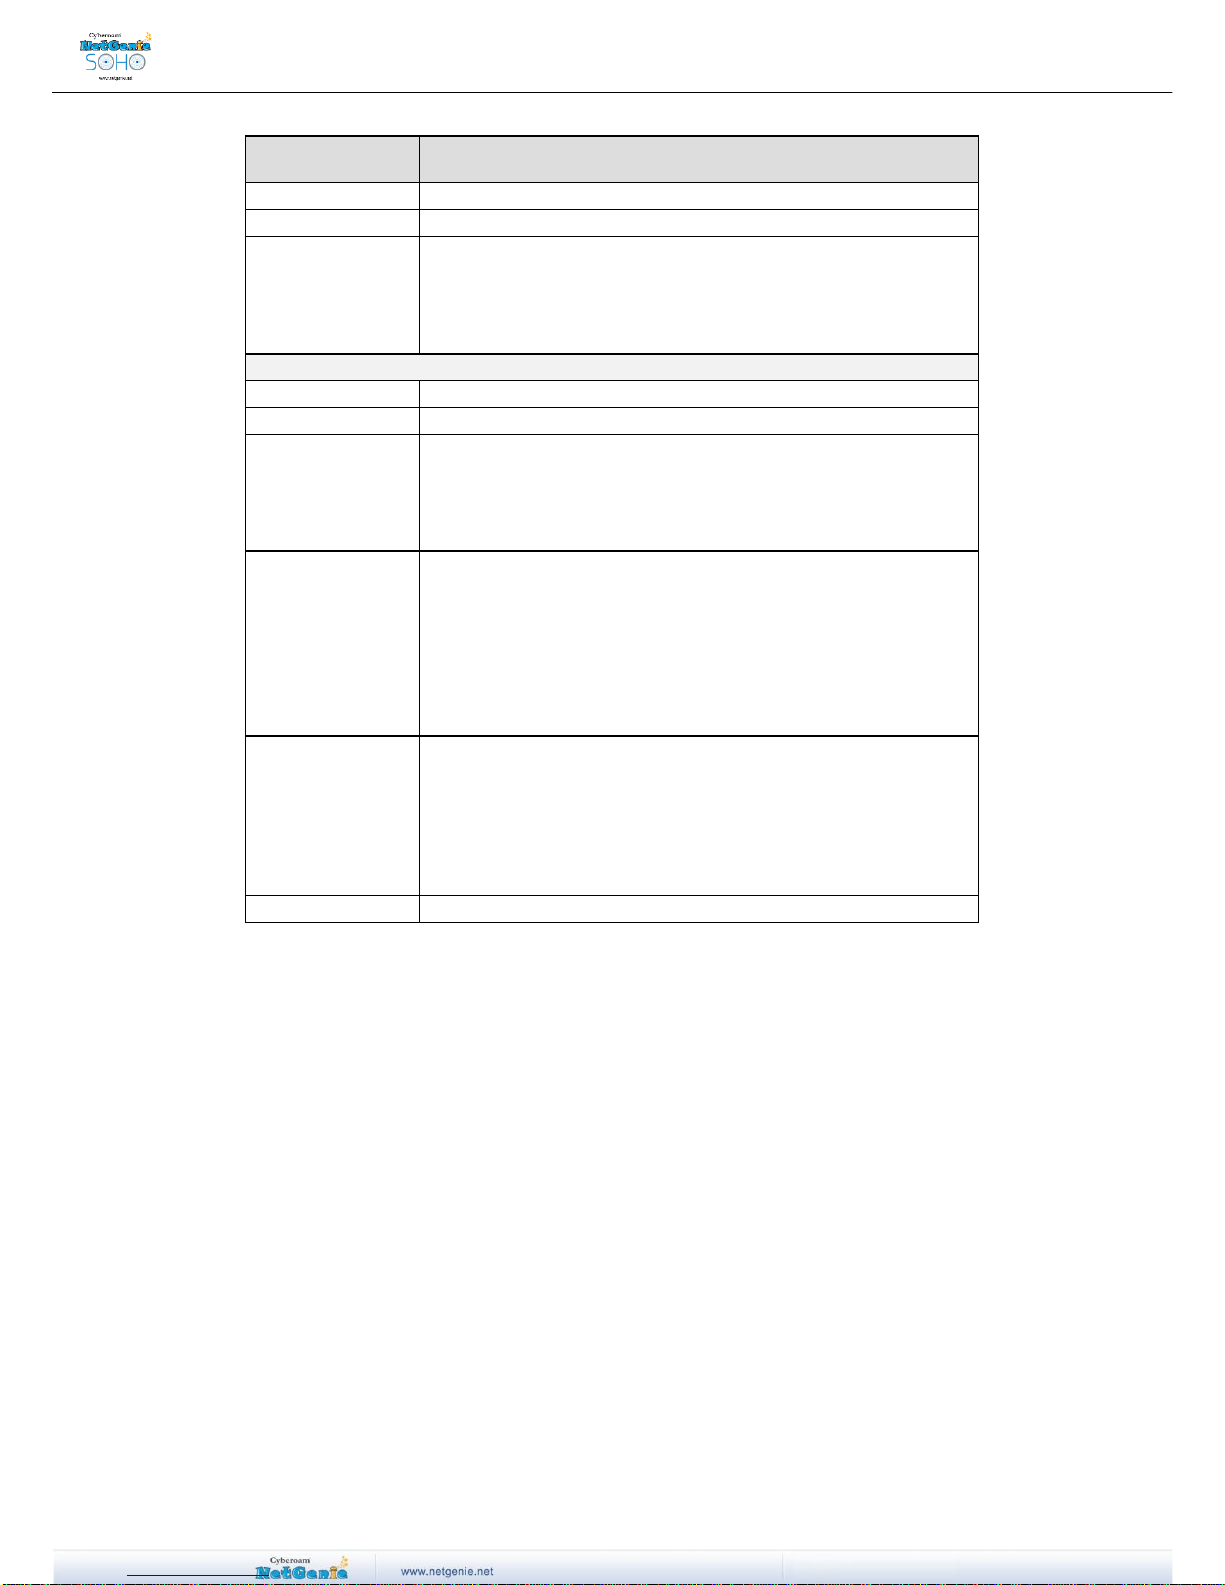
Screen Elements
Description
VPI
Specify VPI (Virtual Path Identifier) as provided by your ISP.
VCI
Specify VCI (Virtual Channel Identifier) as provided by your ISP.
DSL Link Type
Select the DSL Link Type as provided by your ISP. Available
Options:
EoA
PPPoA
IPoA
Advanced Settings
DSL Latency
Select the DSL Latency as provided by your ISP.
Connection Mode
Displays the default Connection Mode.
Encapsulation
Mode
Select the Encapsulation Mode as provided by your ISP.
Available options:
LLC/SNAP-BRIDGING
VC/MUX
Service Category
Select the Service Category as provided by your ISP.
Available Options:
UBR without PCR
UBR with PCR
CBR
Non Realtime VBR
Realtime VBR
Select IP QoS
Scheduler
Algorithm
Select the QoS Scheduler Algorithm.
Available Options:
Strict Priority
Weighted Fair Queuing - Specify the “Weight Value of the
default queue” from 1 to 63 and select the “MPAAL Group
Precedence” from the list.
Apply
Click to save changes.
Table - Create ATM Screen Elements
Configuring PPPoE
PPPoE (Point-to-Point Protocol over Ethernet) is used when you dial up to connect to the Internet
through a broadband connection. This section is only relevant to you if need to dial up the Internet
from your machine.
(You will need your Username and Password for connecting to the Internet. Please contact
your ISP if you have lost them.)
Go to Network Settings Internet Ethernet, select Internet connection type as PPPoE
and fill up the required details.
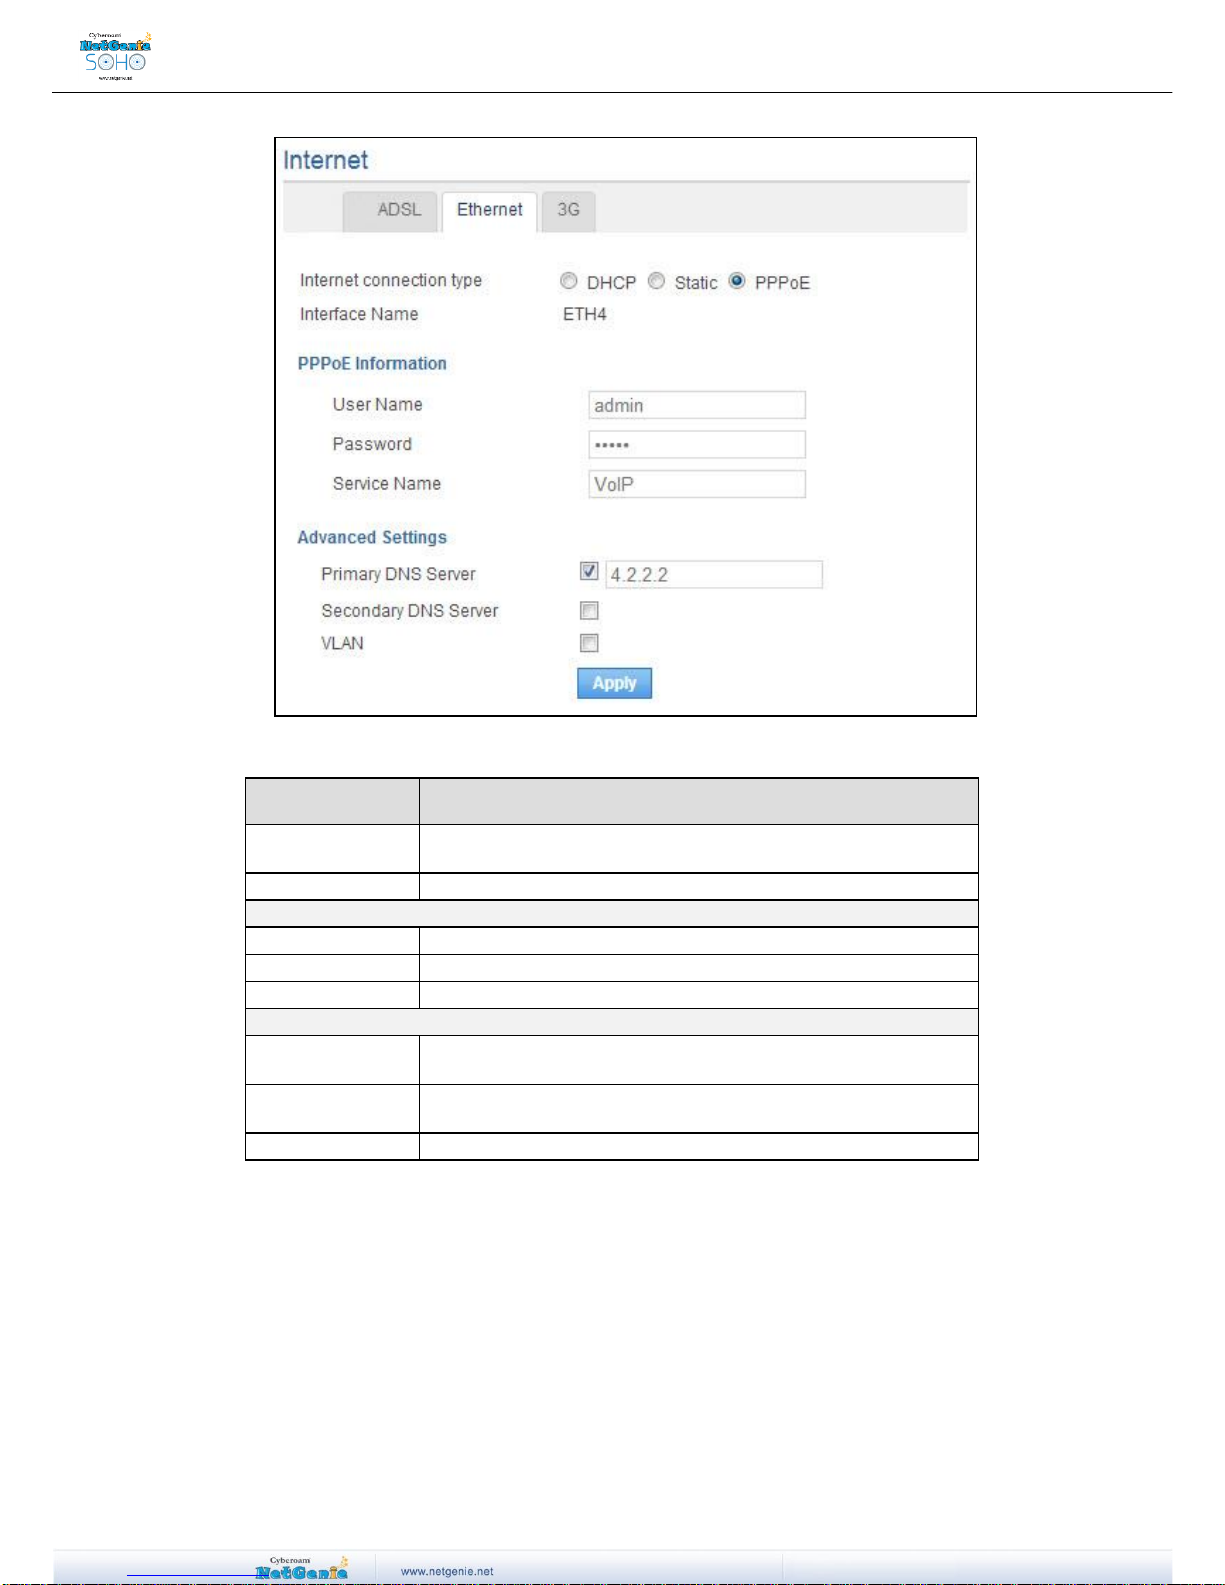
User Guide
Screen- Configure PPPoE
Screen Elements
Description
Internet
Connection Type
PPPoE
Interface Name
ETH 4
PPPoE Information
Username
Specify username provided by your ISP.
Password
Specify password.
Service Name
Specify the name of service provided by Service Provider.
Advanced Settings
Primary DNS
Server
Specify IP Address of primary DNS server.
Secondary DNS
Server
Specify IP Address of secondary DNS server.
Apply
Click to save changes.
Table - Configure PPPoE Screen Elements
Configuring 3G USB Modem
You need to configure USB modem when you connect to the Internet through a data/fax/voice
modem.
Go to Network Settings Internet 3G. Select Internet connection type as USB and fill
up the required details.

User Guide
Screen- Configure 3G USB Modem
Screen Elements
Description
Wireless Modem Information
USB Modem
Status
Status of USB modem. Possible status:
Plugged
Unplugged
USB Modem
Signal Strength
Signal strength of plugged USB modem.
Country
Select the Country.
Service Provider
Select the service provider name
Service Name
Specify name of the service if required.
Dial Number
Dial number of the selected service provider.
Authentication
Select the checkbox if you want to enable authentication for your
USB modem.
Username
Specify the username if you have enabled authentication for your
USB modem.
Password
Specify password.
Pincode
Specify the pin code of your area.
Init String
Specify initialization string for your USB modem, if required.
Advanced Settings

User Guide
Primary DNS
Server
Specify IP Address of the primary DNS server.
Secondary DNS
Server
Specify IP Address of the secondary DNS server.
Apply
Click to save changes.
Table- Configure 3G USB Modem Screen Elements
Configuring Static Internet Connection
You need to configure static Internet connection if your ISP has assigned an IP Address to your
network.
Go to Network Settings Internet Ethernet. Select the Internet connection type as
“Static” and fill up the required details.
Screen- Configure Static Internet Connection
User Guide
Screen Elements
Description
Internet
Connection Type
Static
Interface Name
ETH 4
IP Address
IP Address
Specify IP Address provided by your ISP.
Subnet Mask
Specify subnet mask of your network.
Gateway
Specify gateway IP Address for your network.
Advanced Settings
Primary DNS
Server
Specify IP Address of primary DNS server.
Secondary DNS
Server
Specify IP Address of secondary DNS server.
Apply
Click to save changes.
Table- Configure Static Internet Connection Screen Elements

User Guide
Access Internet
Congratulations!!! If you are reading this, it means you have installed NetGenie successfully.
Now simply open a new browser window and enter any website URL, you want to visit in the address
bar. A Splash Page, as shown below, is displayed.
NetGenie Splash Screen
Screen- Splash Page
This introductory splash screen gives an overview of NetGenie features along with multiple
options. The user can
Click 'Learn more about NetGenie's Security' button to read detailed information regarding
security features offered by NetGenie.
Click 'Continue Surfing' to skip this page.
Click 'Learn Why NetGenie' to know benefits of NetGenie over other available products.
Click 'Customer Portal' to access customer portal of NetGenie. Customer portal allows the user
to register the appliance in order to avail support.
Click 'Administrator Login' to access NetGenie appliance.
Click check-box against 'Do not show this page again’ to avoid this page at every DHCP IP
lease.
Note:
This splash screen is not displayed if
Any user is created in NetGenie
Any device is whitelisted by NetGenie
The user surfs Internet using any mobile device or smart device like apple TV, Xbox etc.
Enjoy safe surfing with NetGenie.
User Guide
Part 2: Internet Controls
This section describes how to access and configure NetGenie security features to ensure threat free
Web surfing for your entire organization. It contains the following sub-sections:
Access NetGenie
Set System Time
Add User
User Internet Access
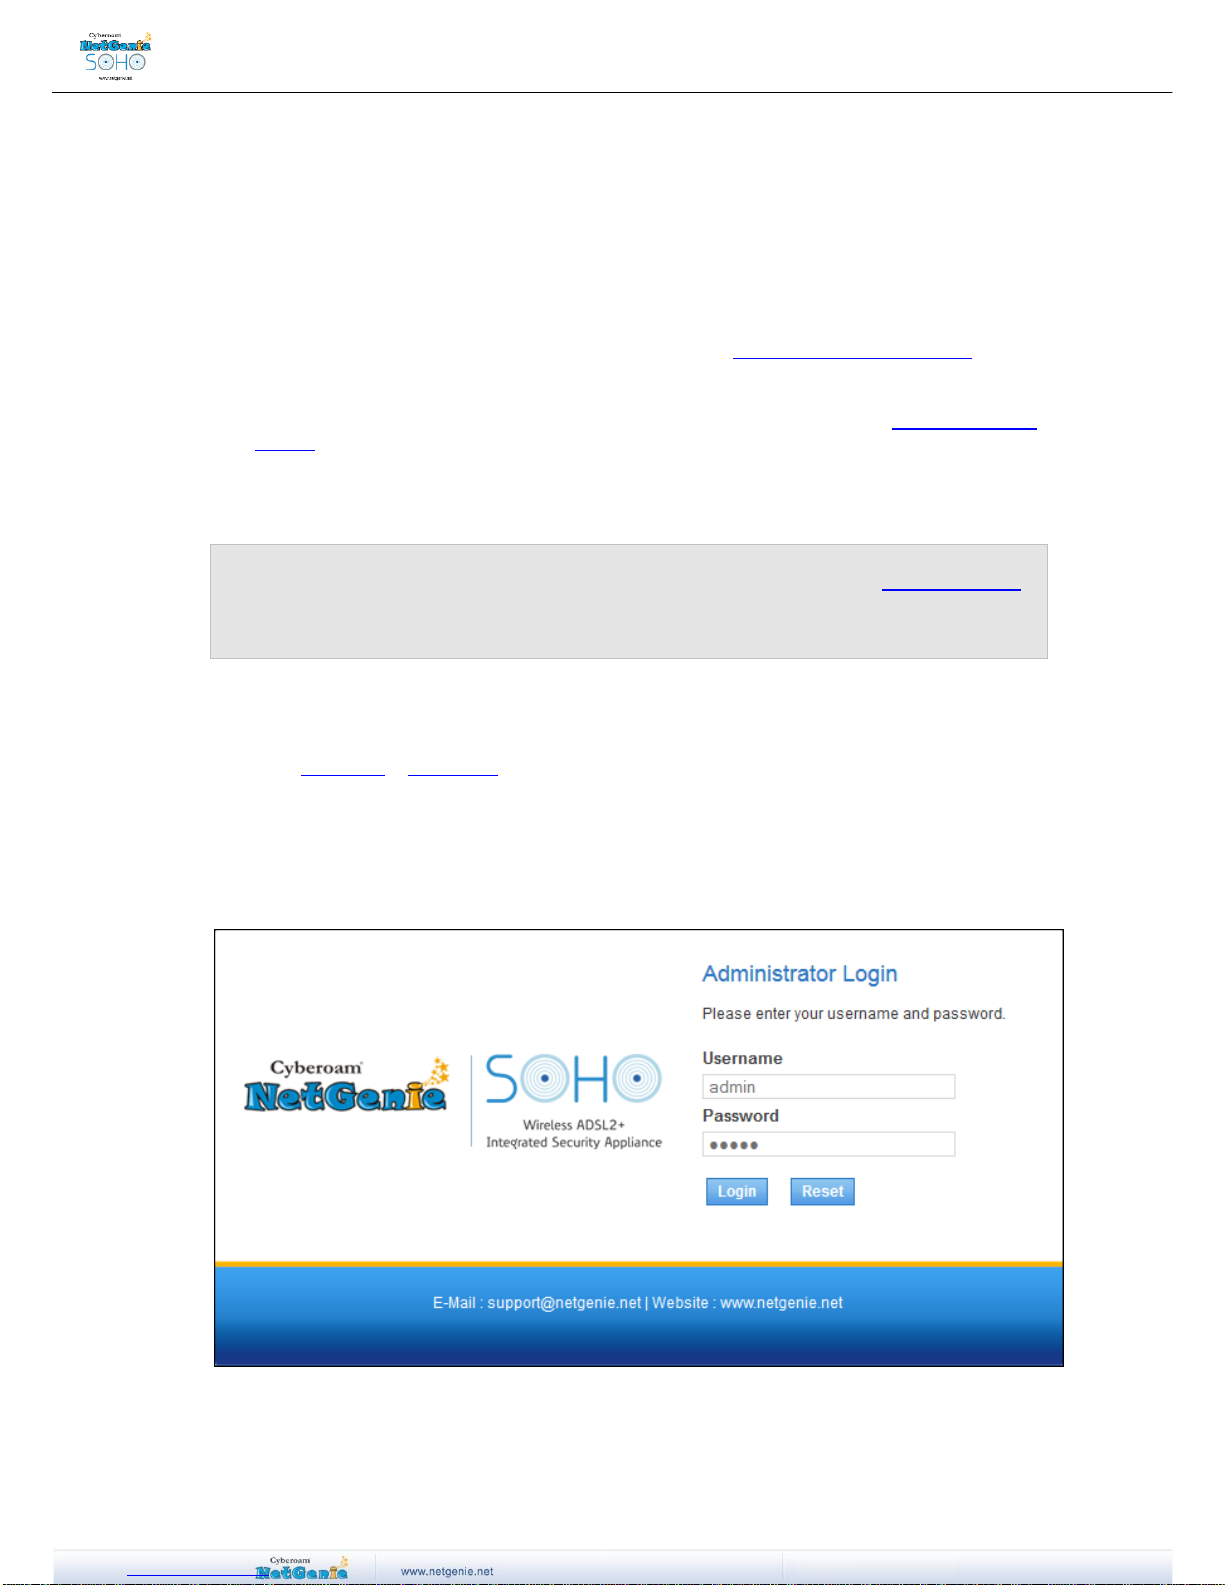
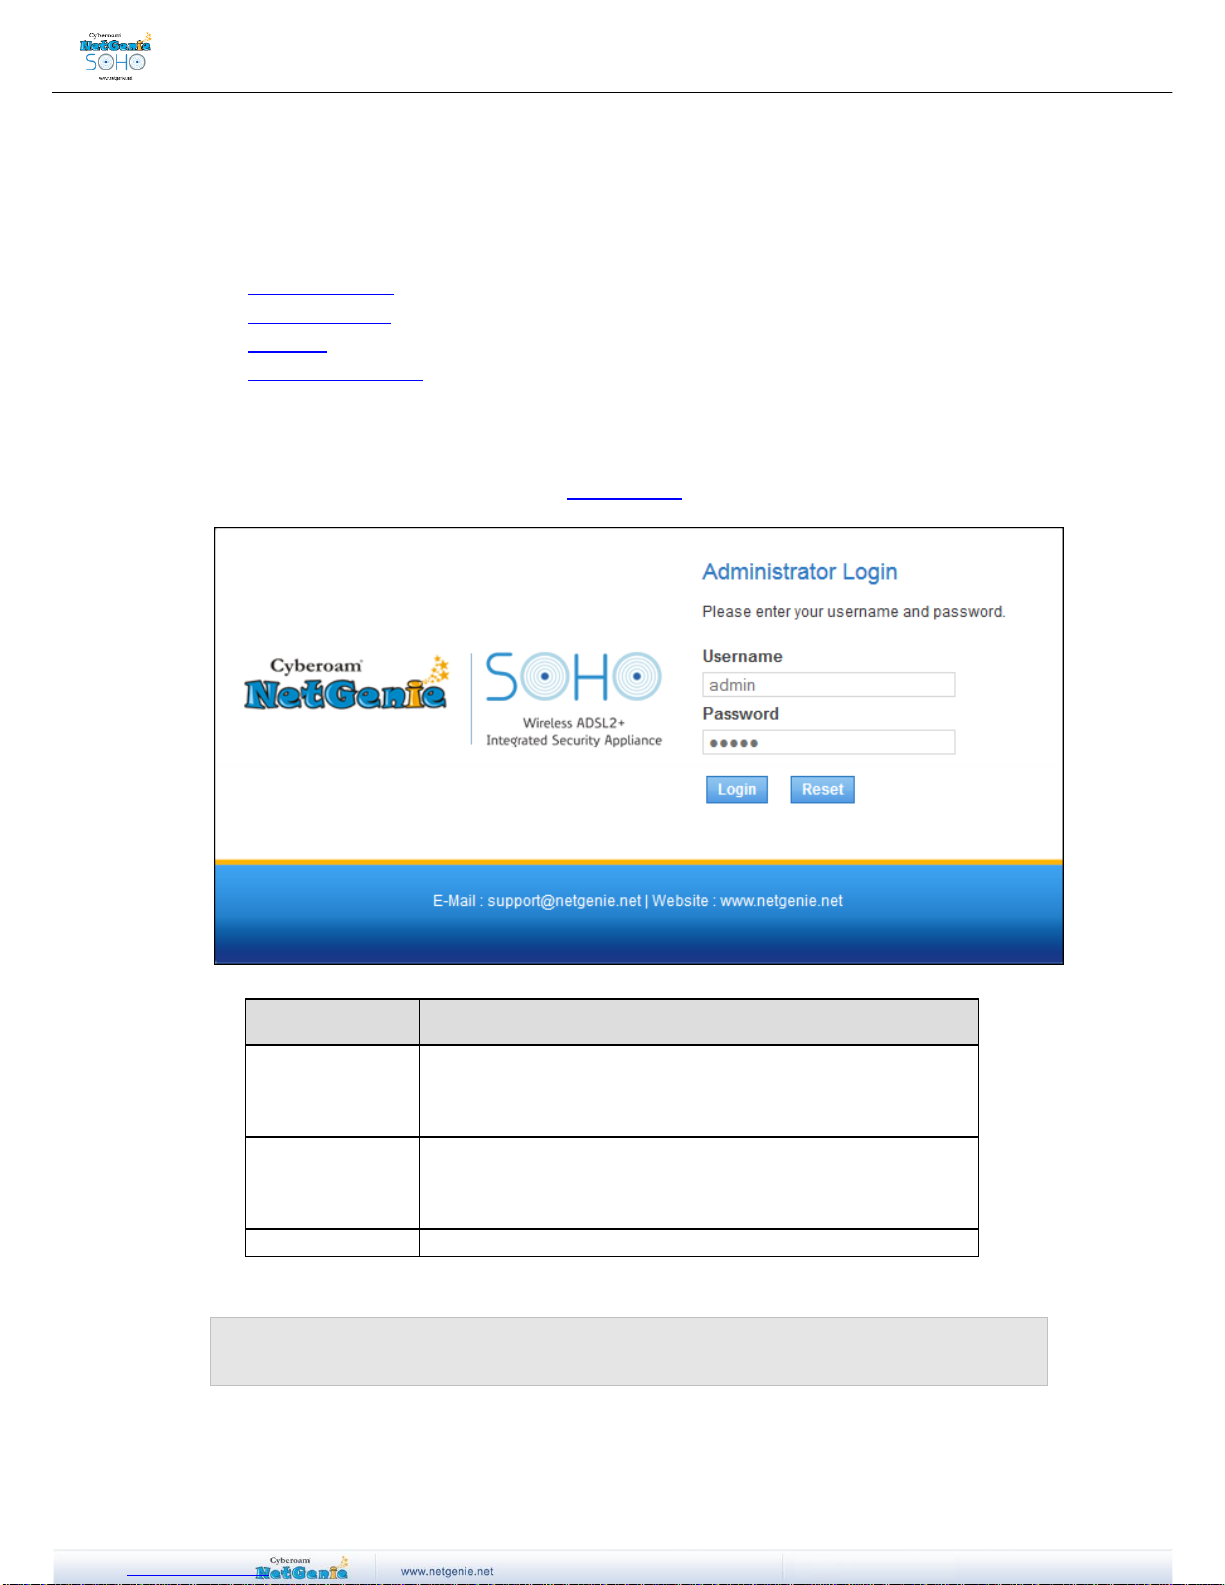
Access NetGenie
After successful deployment, NetGenie needs to be configured to enable Internet controls.
To Access NetGenie, enter the IP Address http://10.1.1.1 in address bar or click “Administrator Login
at the Splash Page. Log in using default username ‘admin’ and password ‘admin’.
Screen –Login
Screen Elements
Description
Username
Specify user login name.
If you are logging in for the first time after deployment, please use
default username ‘admin’.
Password
Specify password.
If you are logging in for the first time after deployment, please use
default password ‘admin’.
Log in button
Click to login into NetGenie
Table – Login screen elements
Note:
It is recommended to change admin password of NetGenie as soon as you log in. This is a
preventive measure to avoid unauthorized use of NetGenie.
User Guide
Log out procedure
To avoid unauthorized users from accessing NetGenie, log out after you have finished working. This
will end your session and mark your exit from NetGenie.
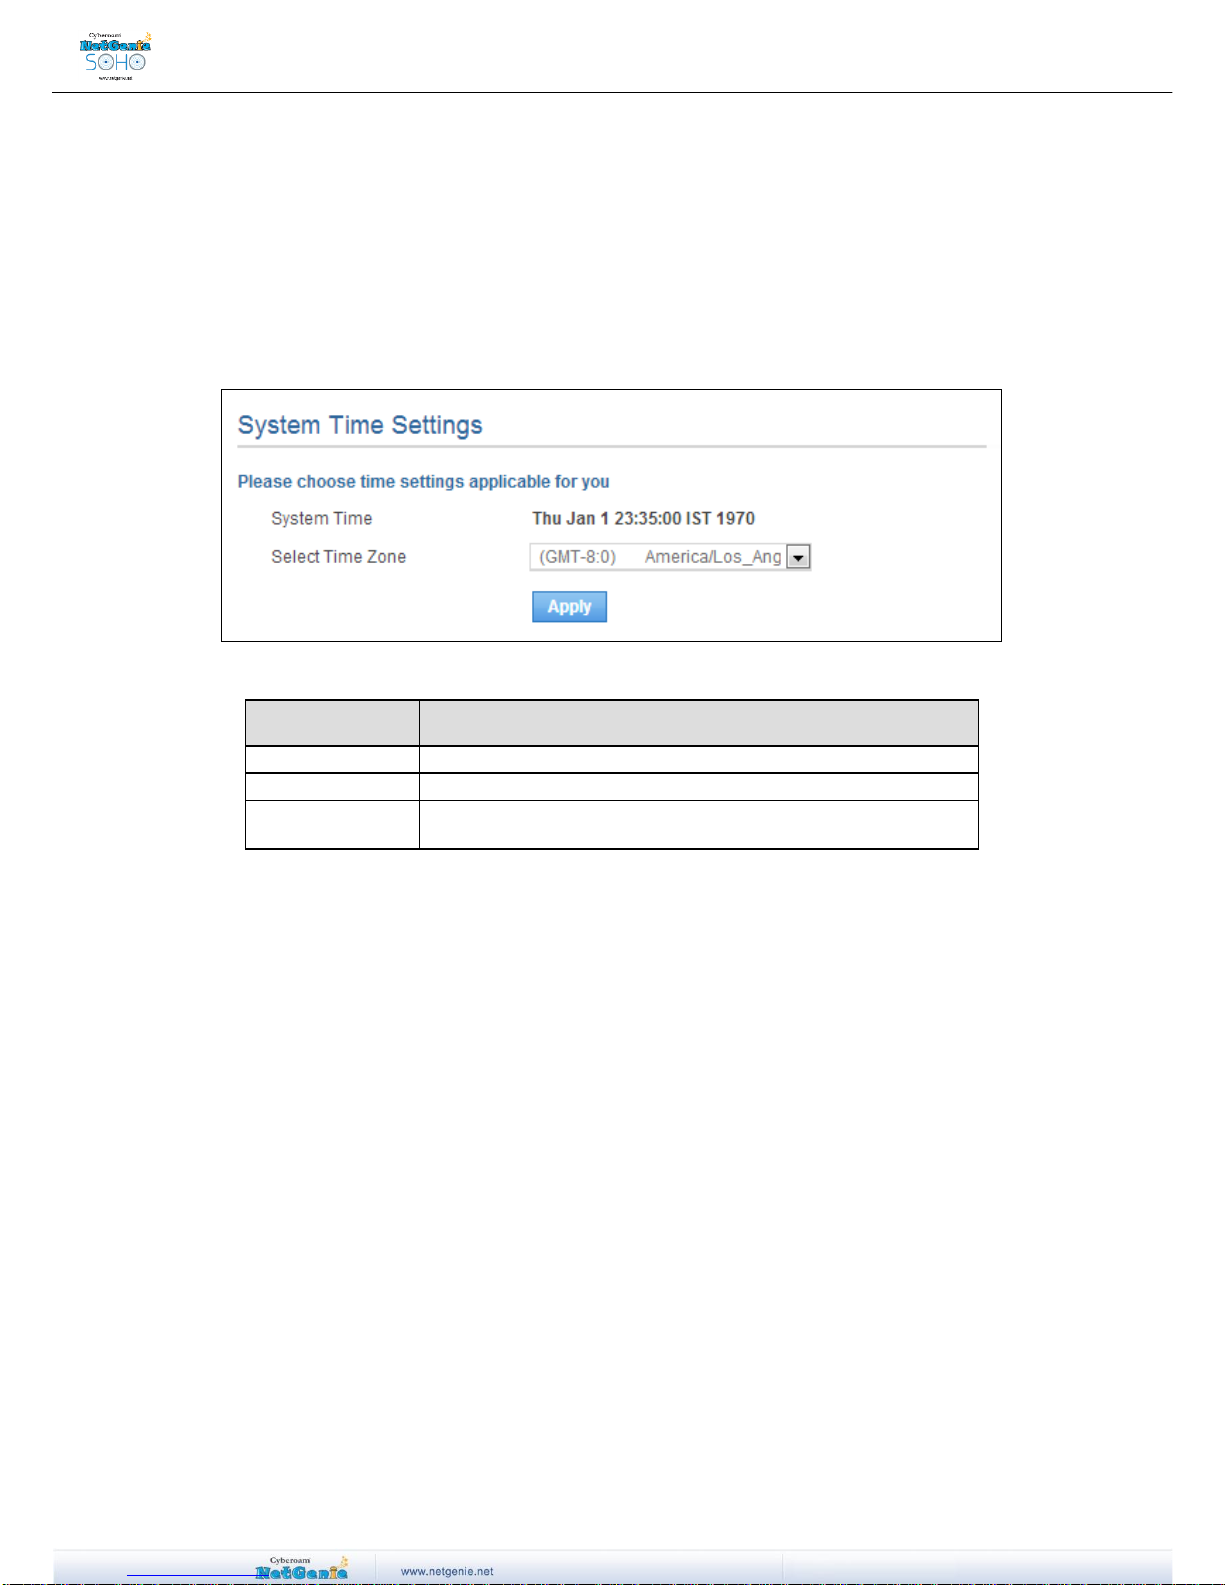
Set System Time
You need to update your local time zone in order to prepare time schedules for accessing the Internet
and generating time-based reports.
Go to System Time to update your time zone.
Screen – System Time Settings
Screen Elements
Description
System Time
Displays NetGenie’s current time
Select Time Zone
Selects local time zone from drop down menu
Enable NTP
Client
Checks to enable NTP (Network Client Protocol) client
Table – System Time Settings screen elements
User Guide
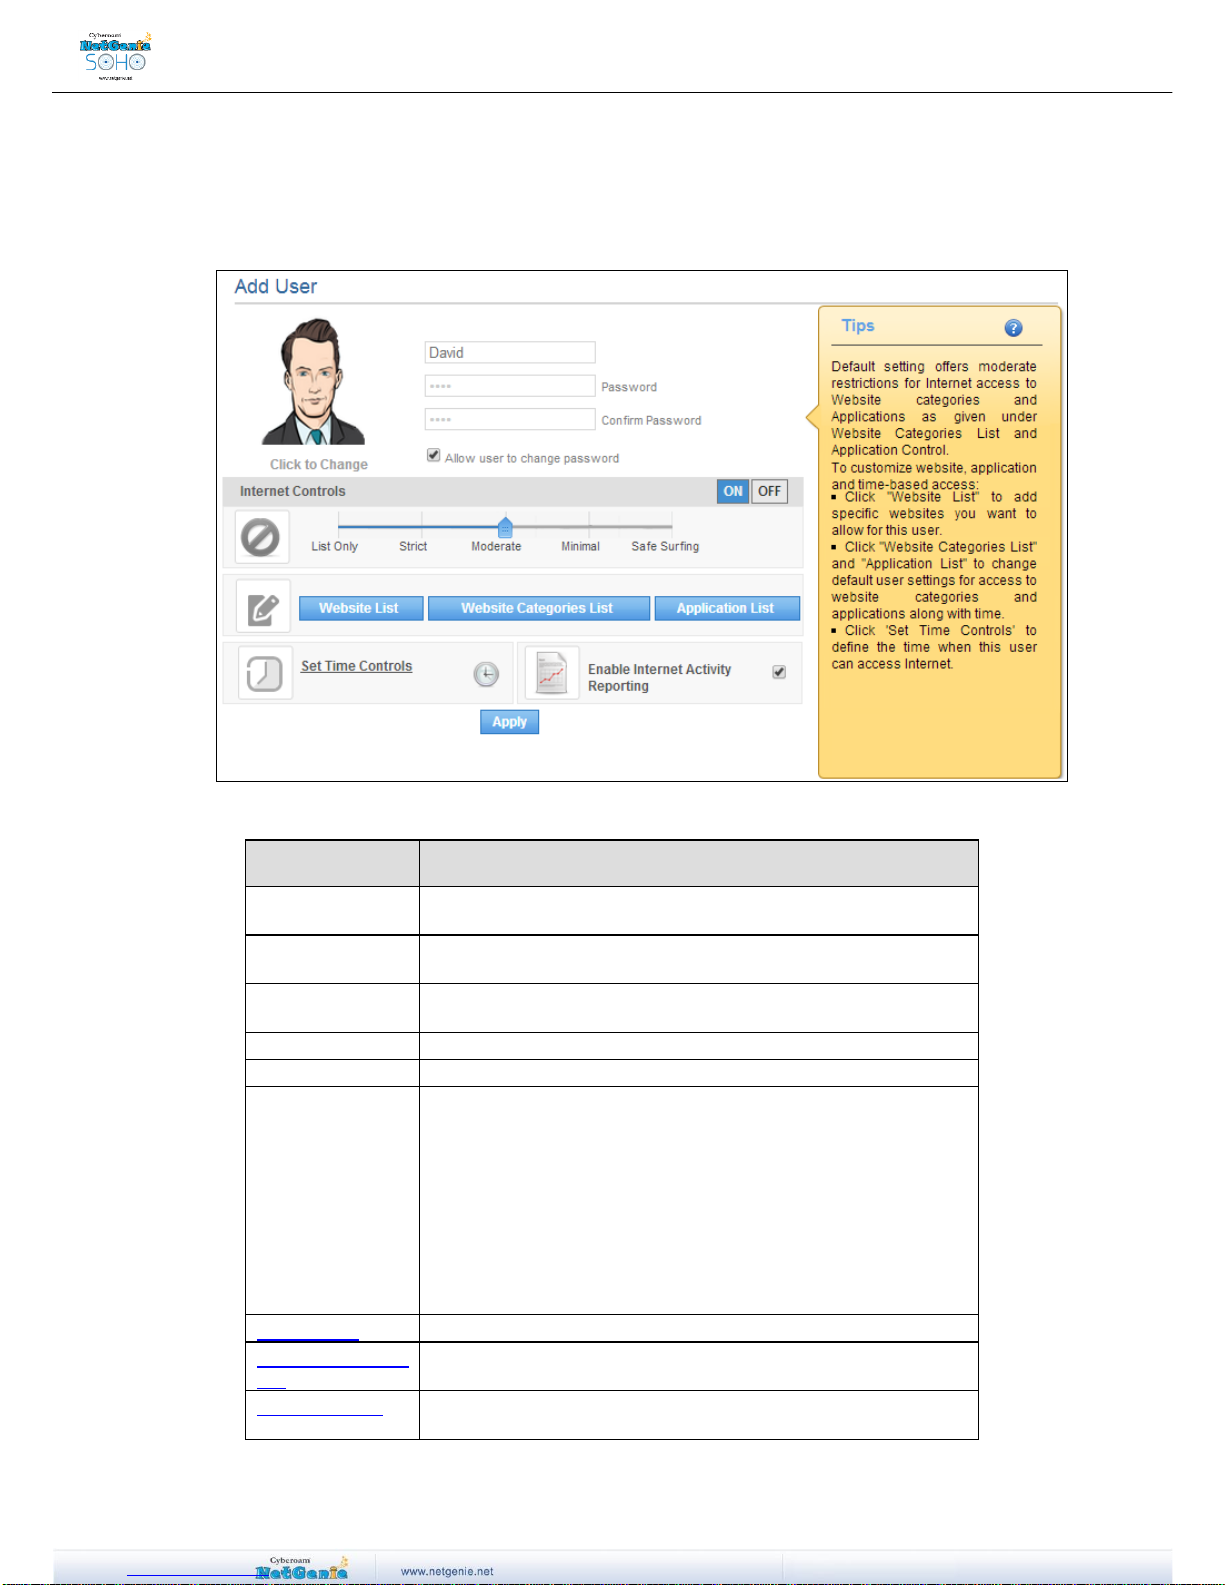
Add User
You need to add your organization users in order to give role and requirement appropriate Internet
access to them. Go to Internet Controls Add User.
Screen – Add User
Screen Elements
Description
Username
Specify the name of the individual for whom you wish to
customize Internet access.
Password
Specify a password. Re-enter your password in the Confirm
Password field.
Allow user to
change password
Enable the checkbox to allow the user to change his/her
password.
Image icon
Click to change the picture for a user
Internet Controls
Click ON to enable Internet Controls.
Internet
Restriction Slider
bar
Drag the slider bar to reflect the appropriate Internet control for
any of your organization user. This selection will block any
websites and applications deemed inappropriate for them.
Available options:
List Only
Strict
Moderate
Minimal
Safe Surfing
Website List
Click to allow or block any specific website(s) for the user.
Website Category
List
Click to view and customize access to specific web categories for
the user.
Application List
Click to view and customize access to specific applications for the
user.
User Guide
Set Time Controls
Click to set the time when the user would be allowed internet
access.
Enable Internet
Activity Reporting
Click to log and report Internet activities for a user.
Apply
Click to save the changes.
Tips
Displays help text to configure the user settings.
Table – System Time Settings screen elements
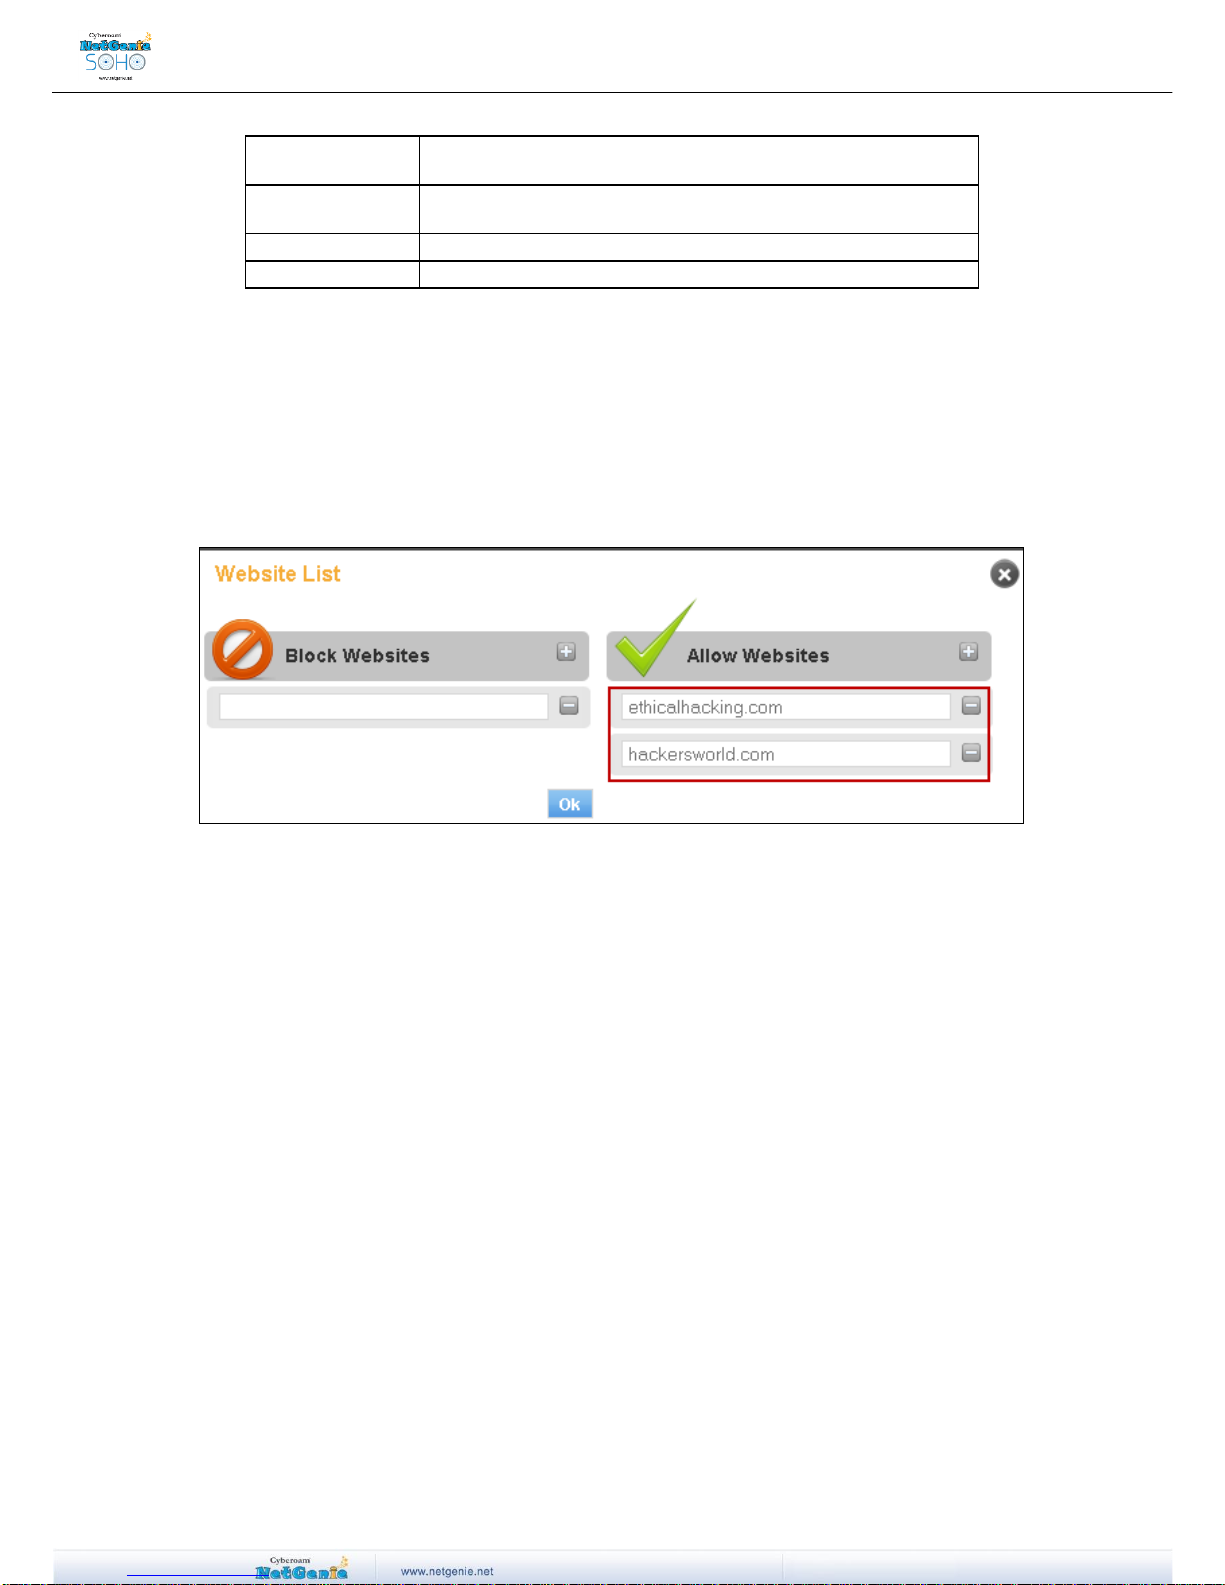
Website List
Enter one or more websites to be allowed or blocked for the user and click OK to save the changes.
This section is used to customize NetGenie Web protection for the specific user.
E.g.
Your IT administrator shows interest in visiting a particular computer security forum, which is blocked
as per the Internet access settings. You can override these settings to allow access to that particular
website using Website List.
Screen – Website List
 Loading...