

Cyberoam Netgenie NG11E Quick Start Manual
QUICK START GUIDE
NG11E Appliance
NG11E
Document Version: PL NG11E-12/13/2010
Parental
Controls
Hack Safe
Anti-Virus
Any-Device
Connectivity
Plug n Surf
http://netgenie.cyberoam.com
NetGenie isfurnished under theterms of Elitecore'sEnd User licenseagreement, which isavailable in this
Quick Start Guide from page 8. By using this Appliance, it shall be presumed that you have read the said
license andyou agreeto be boundby theterms and conditionsof thesame.
Powered by
Secure Wireless Router for
Safe Internet Surfing for Your Family
USA Toll Free 877-777-0368
India Toll Free 1-800-301-00013
Reach us at:
netgenie.cyberoam.com
sales@cyberoam.com
support@cyberoam.com
Unpack Your New NetGenie…
What you will also need…
Key Parameters
NetGenie : The Appliance
Step1 :
Step2 :
Step3 :
Step4 :
1.
2.
!
!
!
2
2
2
2
2
2
3
4
6
7
8
Getting your NetGenie Ready
Enabling Parental Protection and Control
Identify, Set up and Connect to the Internet 3
Secure Internet Connectivity through ADSL/Cable Modem 4
Secure Internet Connectivity through Direct Cable
Secure Internet Connectivity over WiFi 5
6
Scenarios - ‘How to connect NetGenie’
NetGenie's Family Protection
-
-
-
Front panel
Back panel
Logging on to NetGenie
Adding your family members
Beginning Surfing
Deleting Users
Scenario 1
Scenario 2
Scenario 3
Quick Reference
NG11E
2
1
3
Page
no.
Section
no.
Know your NetGenie
Connecting to the Internet
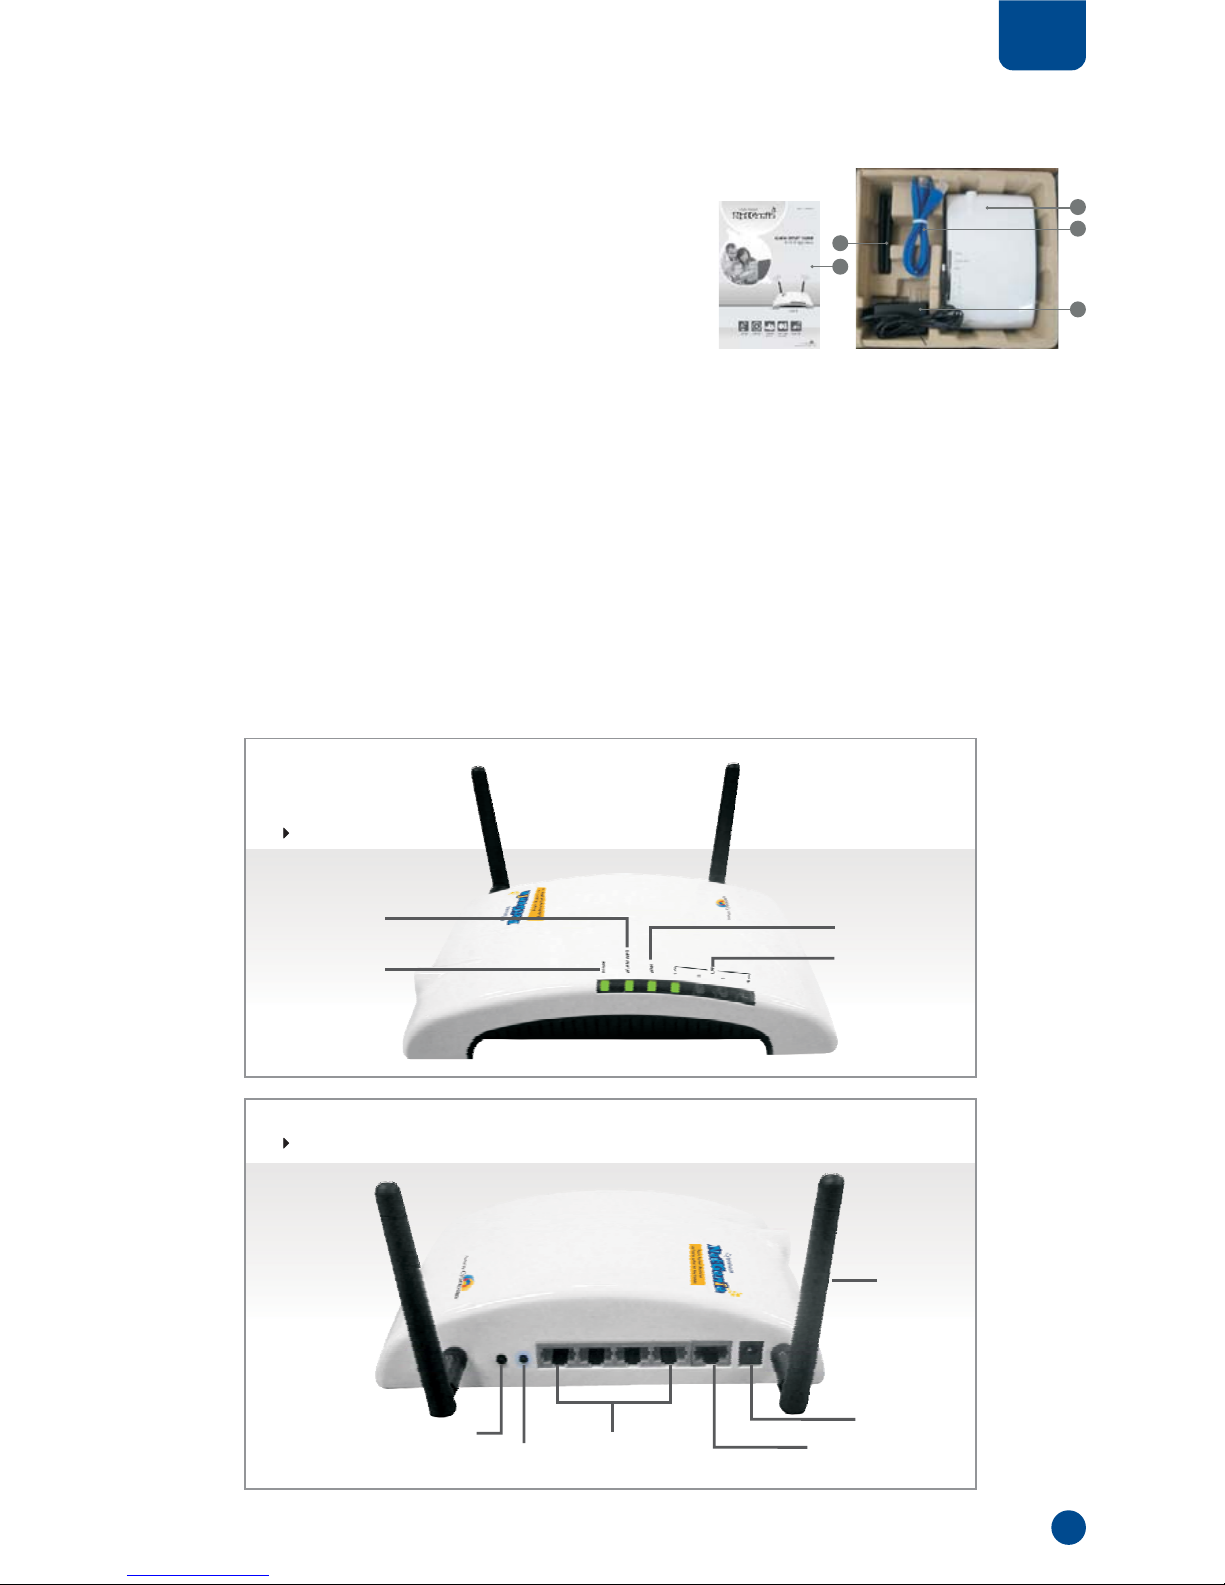
Unpack Your New NetGenie …
Congratulations on your purchase of NetGenie Secure
Home Appliance. When you open the box, you will find
the following components:
1. NetGenie Wireless Base Unit - NG11E
2. Two (2) Detachable WiFi Antennas
3. One RJ-45 Ethernet Cable
4. One Power Adapter
5. Quick Start Guide
Please contact the vendor from whom you purchased
this appliance if anything is missing.
1
2
Section
1
3
2
4
5
What you will also need…
Key Parameters
Netgenie : The Appliance
1. Internet connectivity through a DSL/Cable modem/Direct Internet Cable with RJ45 (Ethernet)
connection.
2. At least one computer with an installed network interface adapter/wireless network adapter.
3. Any Internet Browser to surf the Internet.
Default IP address to access NetGenie: http://10.1.1.1
Default User Name: admin
Default Password: admin
WAN / Internet
Connectivity LED
LAN / Your
Computer
Connectivity LED
Power LED
Wireless (WiFi)
Connectivity LED
Front Side
WiFi
Antennas
Power
Adapter Jack
Connect your PC/
Machine / LAN Here
Reset
Switch
WiFi On / Off
Switch
Connect Your
Internet / WAN Here
Back Side

Getting your NetGenie Ready
Identify, Set up and Connect to the Internet
Before you start accessing the Internet through NetGenie, you must assemble the appliance first.
1. Screw in the detachable Wi-Fi antennas in their respectivejacks provided inthe back panel.
2. Look out for the sticker at the bottom of the appliance containing the default wireless network name,
technically known as SSID and the pass key. These pre-secure your wireless network from any unauthorized
access. Please retain your pass key for future use.
3. Plug the powersupply into thesocket on theback of theNetGenie Base Unit.
4. Plug the powersupply into thenearest mains socket.
5. Before you access the Internet through NetGenie, make sure the socket has been switched on. This will turn
green the Power LED on the front panel.
Depending on your home network set-up, you can connect NetGenie to the Internet according to the following
scenarios:
3
2
Section
Phone Line → ADSL Cable Modem
→ PC / Laptop, refer/Scenario 1
Phone Line → ADSL Cable Modem which is also your
WiFi access point → PC / Laptop, refer/Scenario 3
Phone Line → ADSL Cable Modem → WiFi access point
→ PC / Laptop, refer/Scenario 3
Direct Cable → PC / Laptop,
refer Scenario 2
Note : If you are dialing out of your machine/ laptop (PPPoE) to connect to the Internet, please refer the
support section at http://netgenie.cyberoam.com.
Internet
Desktop Computer
Internet
Internet
Internet
ADSL/Cable Modem
+ Wireless Router
ADSL/Cable Modem
ADSL/Cable Modem
Laptop
Laptop
Desktop Computer
Desktop Computer
Wifi Router
Desktop Computer
Modem
Power
Cable
Modem
Power
Cable
Power
Cable
Modem
Power
Cable
 Loading...