

Page 1
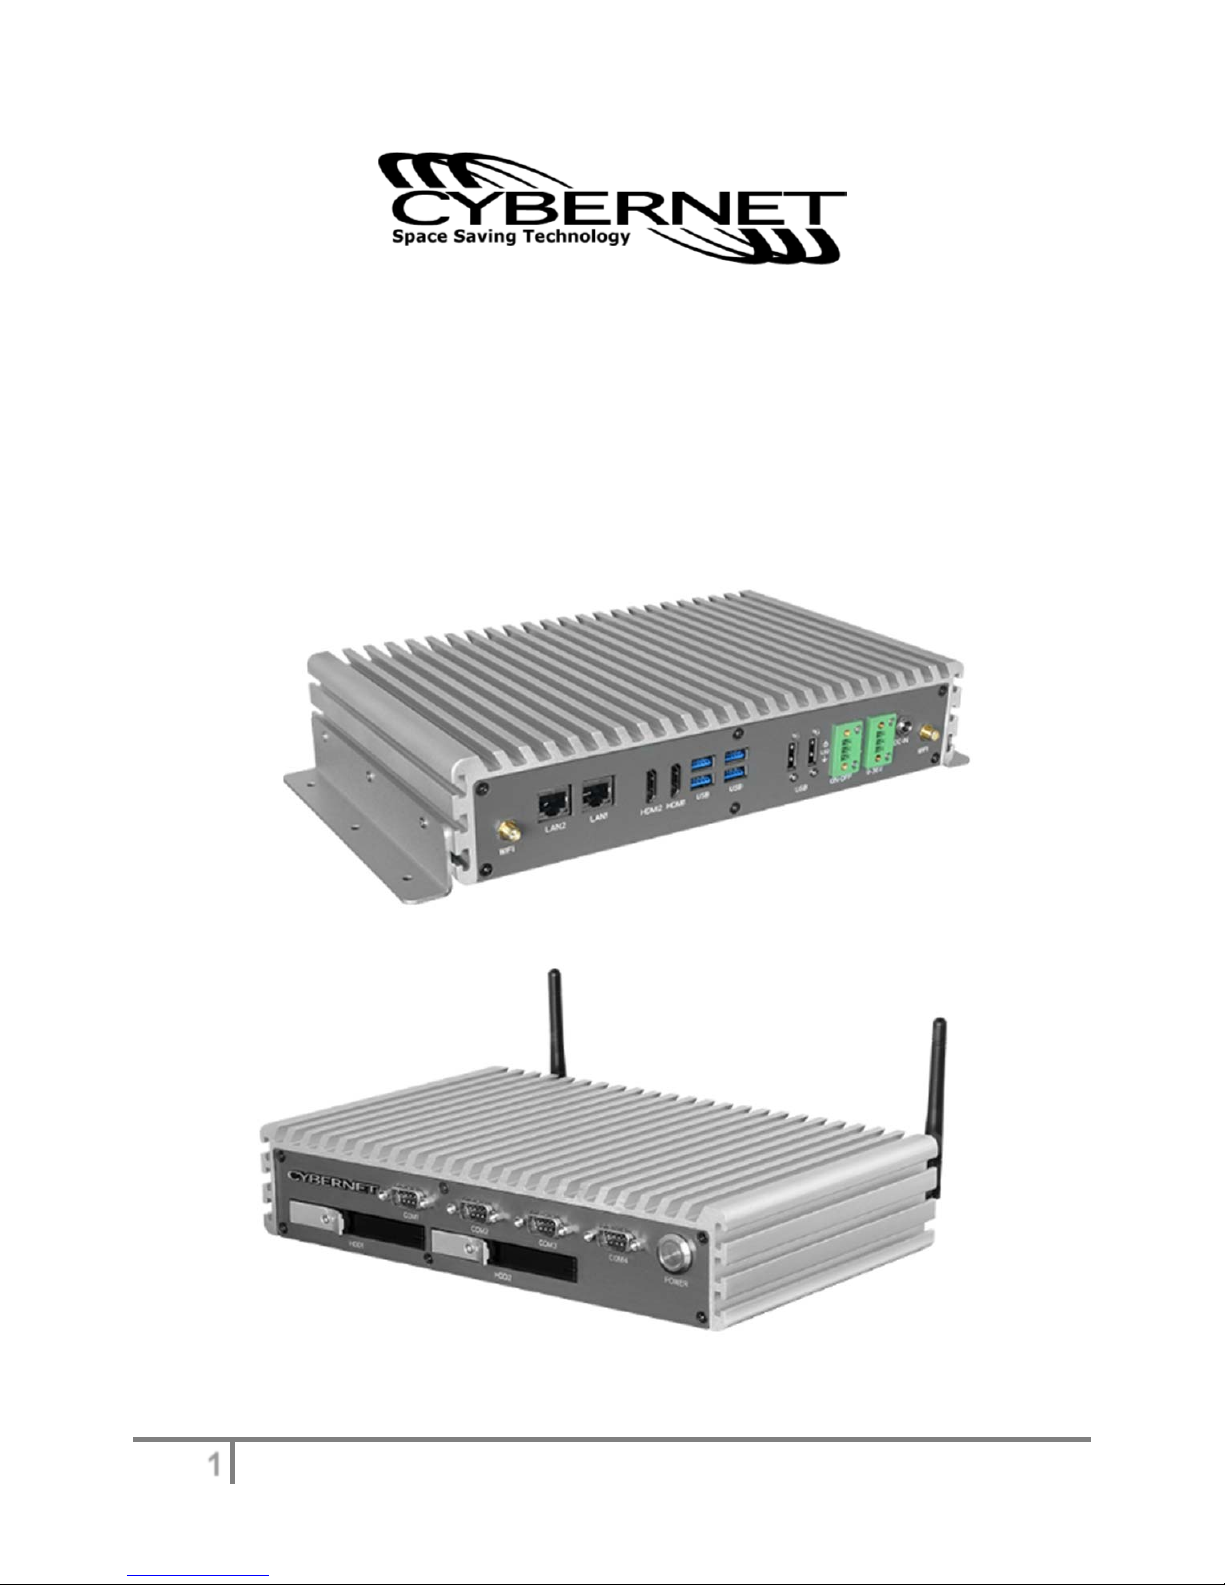
IPC-R2ix
User Manual
1
Page 2

Declaration of Conformity
This equipment has been tested and found to comply with the limits for a Class A
FCC
provide reasonable protection against harmful interference when the equipment
is operated in a commercial environment. This equipment generates, uses and
can radiate radio frequency energy and, if not installed and used in accordance
with the instruction manual, may cause harmful interference to radio
communications. Operation of this equipment in a residential area is likely to
cause harmful interference in which case the user will be require to correct the
interference at his own expense.
Notice 1 The changes or modifications not expressly approved by the party
Notice 2 Shielded interface cables and/or A.C. power cord, if any, must be used in order to
digital device, pursuant to part 15 of the FCC Rules. These limits are designed to
responsible for compliance could void the user's authority to operate the
equipment.
comply with the emission limits.
The product(s) described in this manual complies with all applicable European
CE
Union (CE) directives if it has a CE marking. For computer systems to remain CE
compliant, only CE-compliant parts may be used. Maintaining CE compliance
also requires proper cable and cabling techniques.
Trademarks
All trademarks are the properties of their respective owners.
Intel® is a registered trademarks of Intel Corporation.
PS/2 and OS®/2 are registered trademarks of International Business Machines Corporation.
Windows® 7/Vista/XP/NT/2000/98/95 are registered trademarks of Microsoft Corporation.
Netware® is a registered trademark of Novell, Inc.
Award® is a registered trademark of Phoenix Technologies Ltd.
AMI® is a registered trademark of American Megatrends Inc
2
Page 3

Safety Instructions
1. Always read the safety instructions carefully.
2. Keep this equipment away from humidity.
3. Lay this equipment on a reliable flat surface before setting it up.
4. Confirm the voltage of the power source and adjust accordingly to 110/220V
before connecting the equipment to the power inlet.
5. Place the power cord in such a way that it cannot be stepped on. Do not
place anything over the power cord.
6. Always unplug the Power Cord before inserting any add-on card or module.
7. All cautions and warnings on the equipment should be noted.
8. Never pour any liquid into the opening. This will cause damage and/or electrical
shock.
9. Do not disable the protective grounding pin from the plug. The equipment must be
connected to a grounded main socket/outlet.
10. When installing the coaxial cable to the TV Tuner, it is necessary to ensure that the metal
shield is reliably connected to a protective earthing system of the building. Cable
distribution systems should be grounded (earthed) in accordance with ANSI/NF PA 70,
the National Electrical Code (NEC ), in particular, Section 820.93, Grounding of Outer
Conductive Shield of a Coaxial Cable.
11. If any of the following situations arise, have the equipment checked by authorized
service personnel:
The power cord or plug is damaged.
Liquid has penetrated into the equipment.
The equipment has been exposed to moisture.
The equipment has not worked well or you cannot get it working according to
the User's Guide.
The equipment has been dropped and damaged.
The equipment has obvious signs of breakage.
12. Do not attempt to remove or upgrade any components by yourself, any installation or
modification should be conducted by service personnel.
DO NOT LEAVE THIS EQUIPMENT IN AN UNCONDITIONED ENVIRONMENT WITH
A STORAGE TEMPERATURE ABOVE 85° C (185°F). IT MAY DAMAGE THE
EQUIPMENT.
CAUTION: Danger of explosion if battery is incorrectly replaced. Replace only with the same
or equivalent type recommended by the manufacturer.
3
Page 4
WEEE Statement
(Waste Electrical and Electronic Equipment)
The WEEE directive places an obligation on EU-based manufacturers, distributors, retailers and
importers to take-back electronics products at the end of their useful life. A sister Directive,
ROHS (Restriction of Hazardous Substances) compliments the WEEE Directive by banning the
presence of specific hazardous substances in the products at the design phase. The WEEE
Directive covers products imported into the EU as of August 13, 2005. EU-based
manufacturers, distributors, retailers and importers are obliged to finance the costs of recovery
from municipal collection points, reuse, and recycling of specified percentages per the WEEE
requirements.
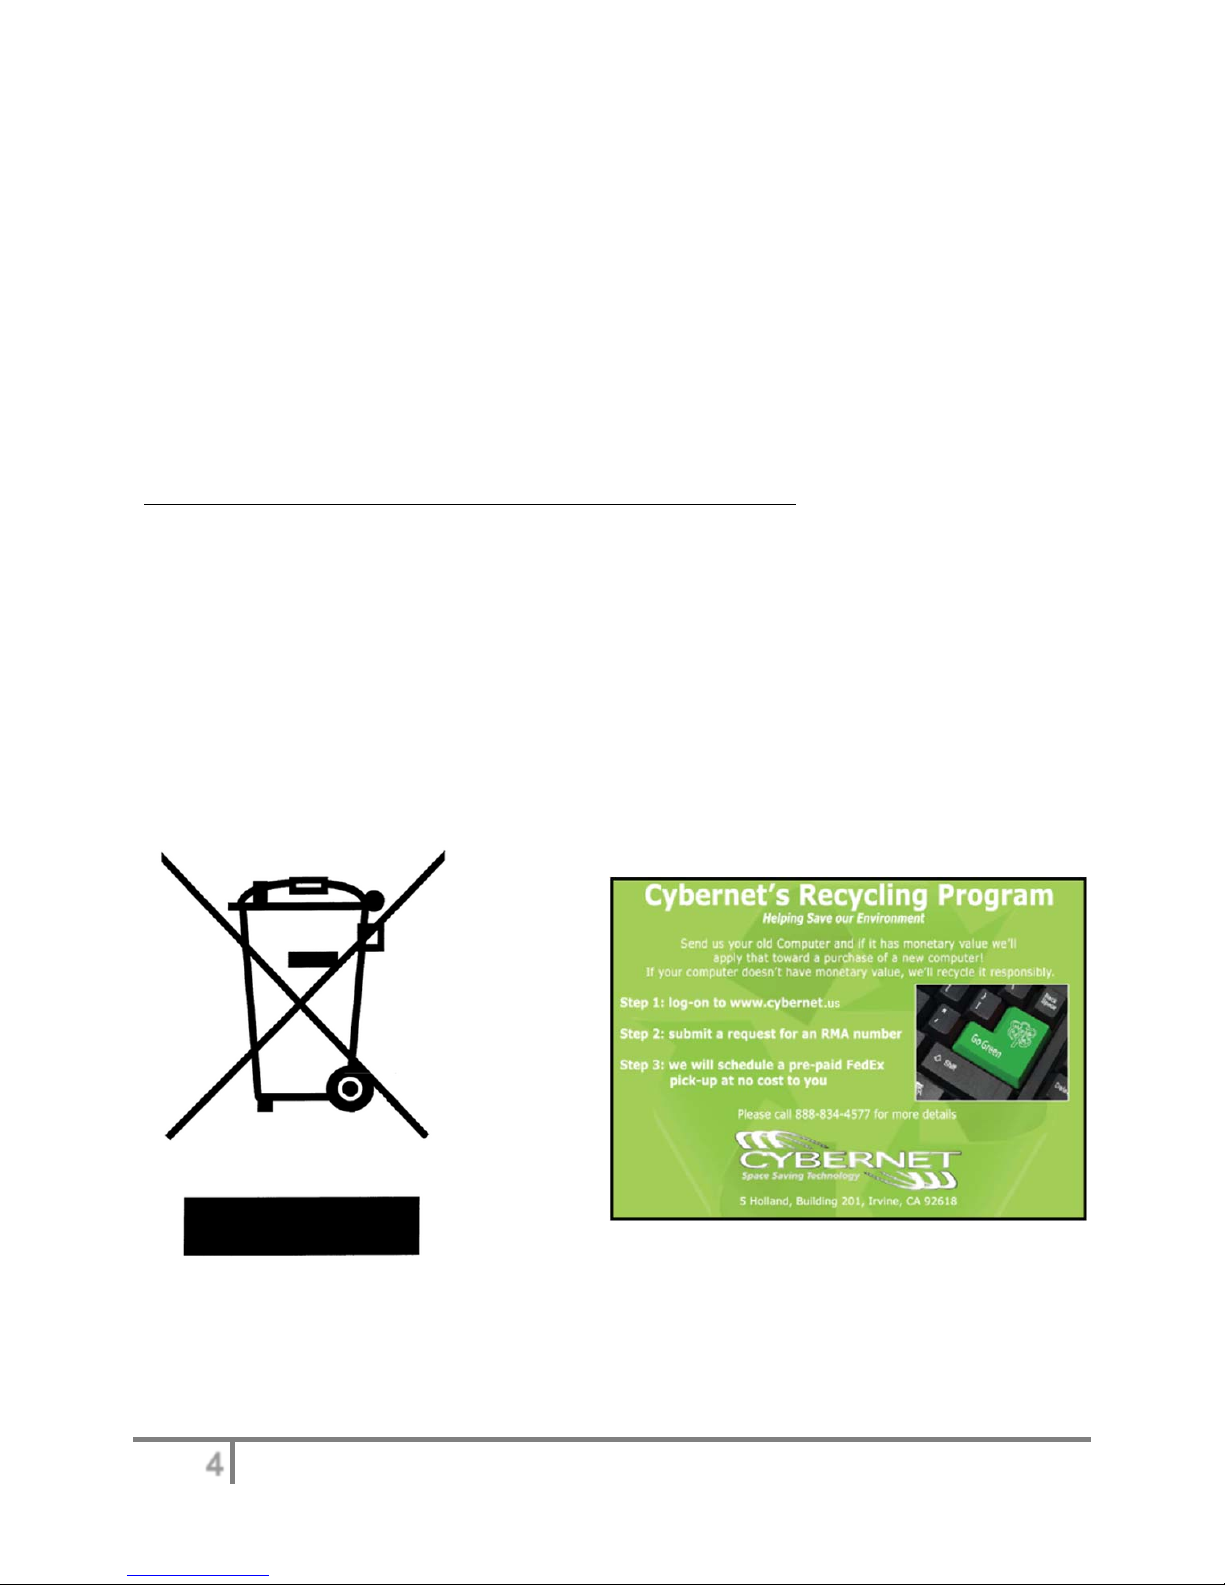
Instructions for disposal of WEEE by Users in the European Union
The symbol shown below is on the product or on its packaging, which indicates that this
product must not be disposed of with other waste. Instead, it is the user’s responsibility to
dispose of their waste equipment by handing it over to a designated collection point for the
recycling of waste electrical and electronic equipment. The separate collection and recycling of
your waste equipment at the time of disposal will help to conserve natural resources and ensure
that it is recycled in a manner that protects human health and the environment. For mor e
information about where you can drop off your waste equipment for recycling, please contact
your local city office, your household waste disposal service or where you purchased the
product.
4
Page 5

Introduction
Congratulations for purchasing the IPC-R2ix. The IPC-R Series is your best Slim
Rugged PC choice. With the fantastic appearance and small form factor, it can easily be set
rd
anywhere. The feature packed platform powered by cutting- edge 4
i7 Processor (4M cache, up to 3.3GHz) not only increasing power efficiency as much as 25%
also integrates Intel ® HD 5000 graphics and extremely low thermal design power at 15W
providing as enhanced reliability, safety and shock resistance for fan-less operation required
environments.
Gen Intel® Quad-Core™
IPC-R2ix Series Specifications
Processor Support
BGA type for Intel® CoreTM i7-4650/i5-4300U, Haswell ULT Quad/Dual core MCP processor
Memory Support
DDR3L 1333/1600 MHz, Max 8GB. 1x 204-pin SO-DIMM Sockets
BIOS
AMI Flash BIOS supports booting from HDD, PXE, LAN and USB device.
Video & Graphics
Intel GMA HD/Intel Clear Video HD Technology
Built-in support for 1080p HD video playback, HDMI 1.4a & Blu-ray 3D support
Supports Microsoft® DirectX 11, Shader Model 5.0 and OpenGL 3.0.
DVMT allocated as needed from 128MB to 1.70GB
2x HDMI Supports HDMI 1.4a, supported with Level Shift, resolution up to 4096x2304 (1 x
HDMI)
LVDS Dual Channel 24-bit 1920 x 1200 Max.
Networking
LAN1 Realtek RTL8111G Gigabit LAN, Wake on LAN, PXE Support
LAN2 Intel®I218LM (4300U SKU) Gigabit LAN, Wake on LAN, PXE Support
5
Page 6

Storage
2 Front Panel Accessible 2.5” HDD SATAIII 6 Gbps with Key Locks
1 mSATA SATAIII 6Gbps (the use of mSATA will eliminate the use of mPCIe slot).
Wall Mount
Support Wall-mount by Ear Mounting Bracket.
Expansion Slots
1 x mini-PCIe (Full size): PCIe+USB and shared with mSATA
1 x mini-PCIe (Haif size): PCIe+USB
2 x internal 10-pin (internal USB 2.0) Connector
Internal Port
1 Internal USB 2.0 (Internal USB Dual Port)
1 GPIO
I/O Panel
1 x DC/IN port support 9~36V input
2 x 3-pin Terminal Block for DC-IN: V+, V-, Frame Ground, Power switch
4 x COM, COM1/COM2 supports RS-232/485/422, All COM support 5V/12V output selection
by jumper setting.
4 x USB 3.0
2 x USB 2.0
2 x RJ-45 GIGA LAN
1 Power button with LED
Optional
1 x Trusted Platform Module (TPM) Infineon SLB9635, LPC interface (factory option).
Watchdog Timer: Reset 1 to 255 sec/min Per Step
HW Monitor: Temperature/Voltages Auto Throttling Control when CPU Overheats
Power Input Voltage
DC-IN 9~36V
Power Input
1 mini DIN, One 4-pin Terminal Block for DC-IN: V+, V-, Frame Ground
6
Page 7

Power Supply
65 Watt Power Adapter, AC Input: 100~240V AC, 1.5A, 50-60Hz.
DC Output: 19V, 3.42A
Dimensions
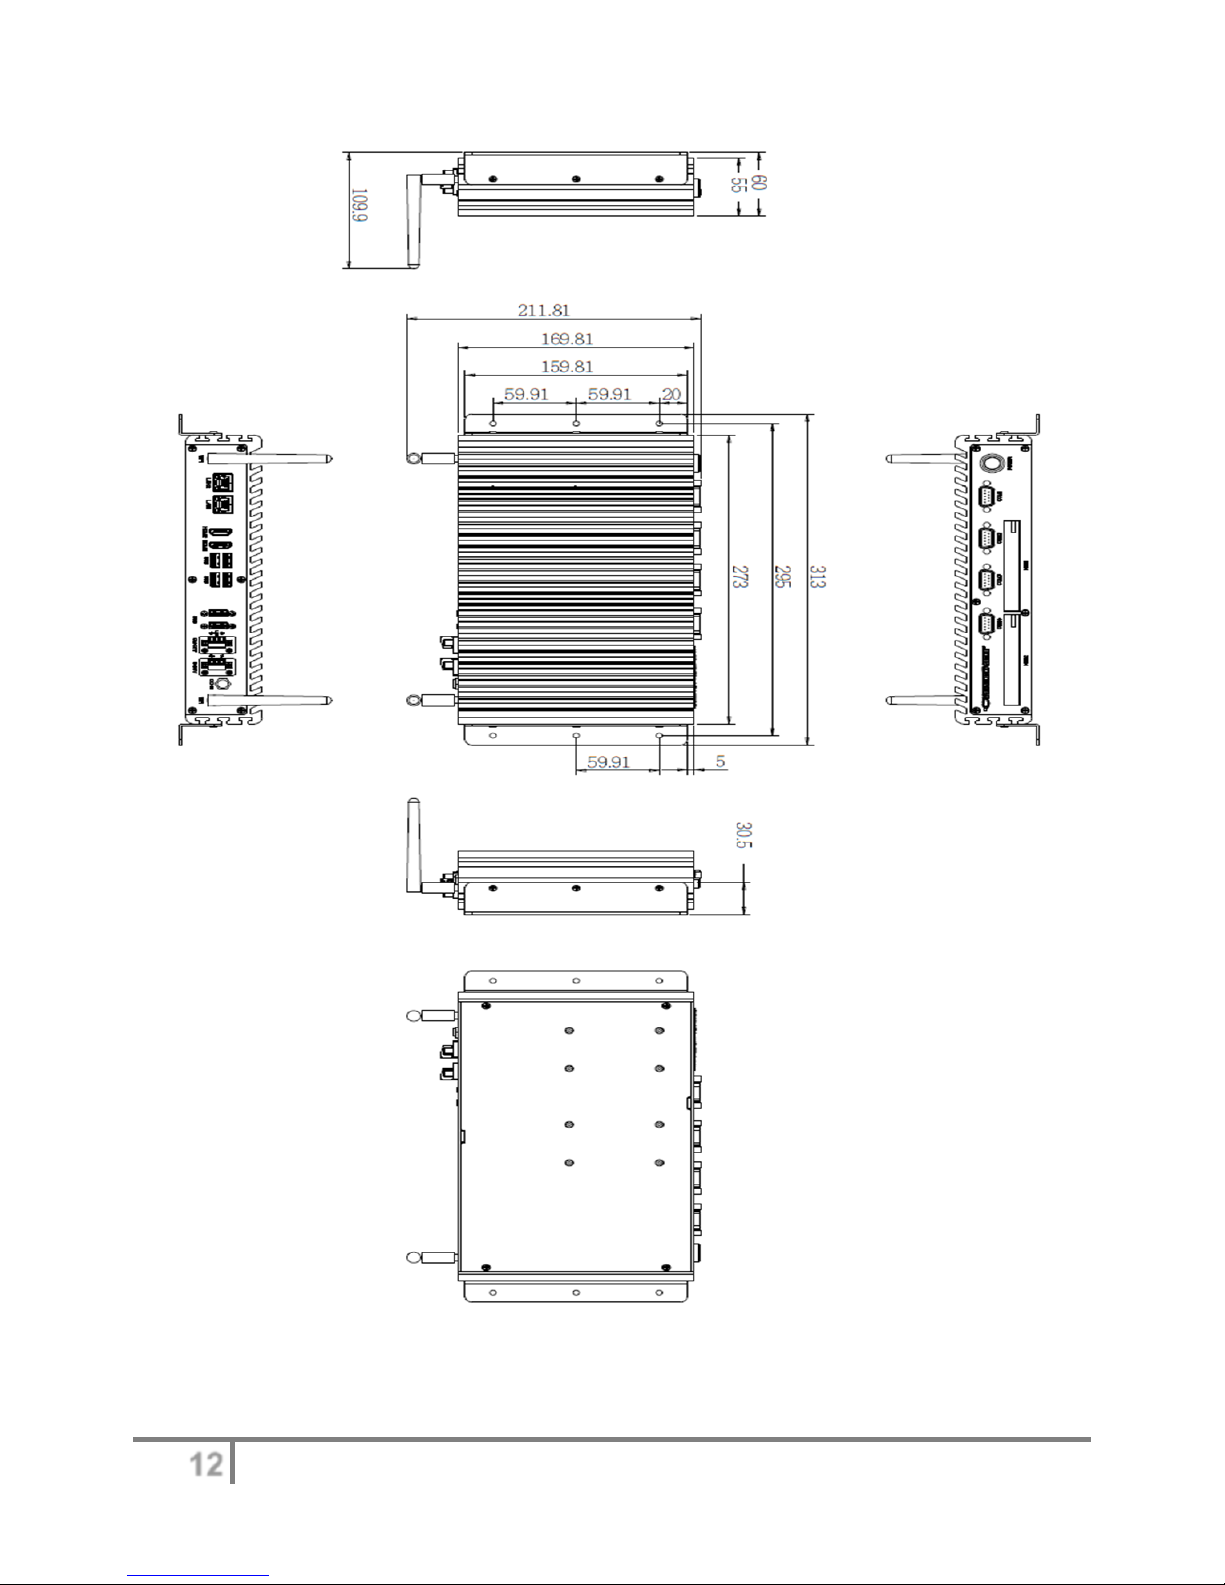
273mm (L) x 109mm (W) x 55mm (H) (10.7” x 4.3” x 2.17”) without mounting ear.
Weight
2.8 kg (6 lb)
Operating Environment
-20⁰C to 70⁰C (-13⁰F to 157⁰F)
Storage Temperature
-40⁰ to 85⁰C (-40⁰F to 185⁰F)
Humidity
10% to 95% Non –condensing
Relative Humidity
95% at 70⁰C
Vibration
Rational: 5Grms @5~500 Hz according to IEC68-2-64
Shock
Operating, 50 Grms, Half-sine 11 ms Duration (w / SSD, According to IEC60068-2-27)
Certification
FCC, CE, RoHS, EN5015
7
Page 8
Power Management
Power management of IPC-R2ix has the potential to save significant amounts of electricity as
well as deliver environment benefits.
To be energy efficient, turn off your display or set your IPC-R2ix to sleep mode after a period of
user inactivity.
Power Management in Windows OS
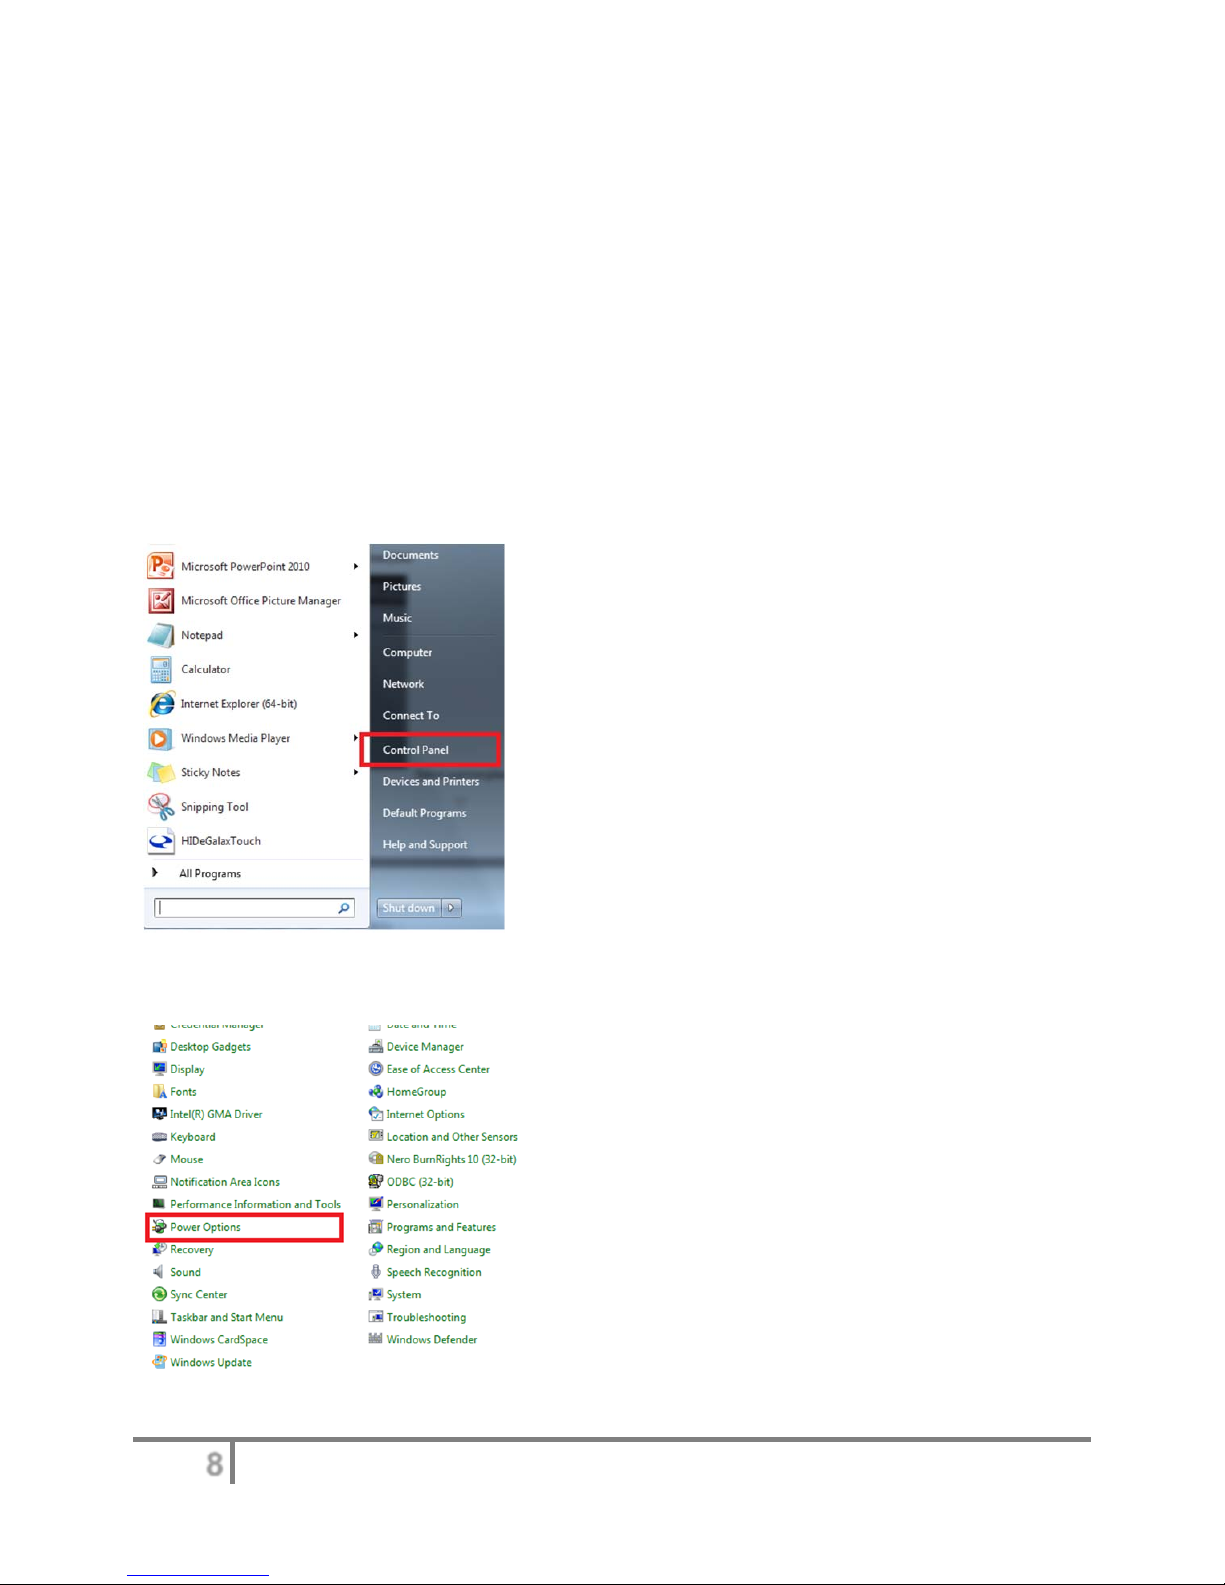
[Power Options] in Windows OS allow you to control the power management features of your
display and hard drive. Go to [Start] > [Control Panel].
Then click on the [Power Options] link.
8
Page 9
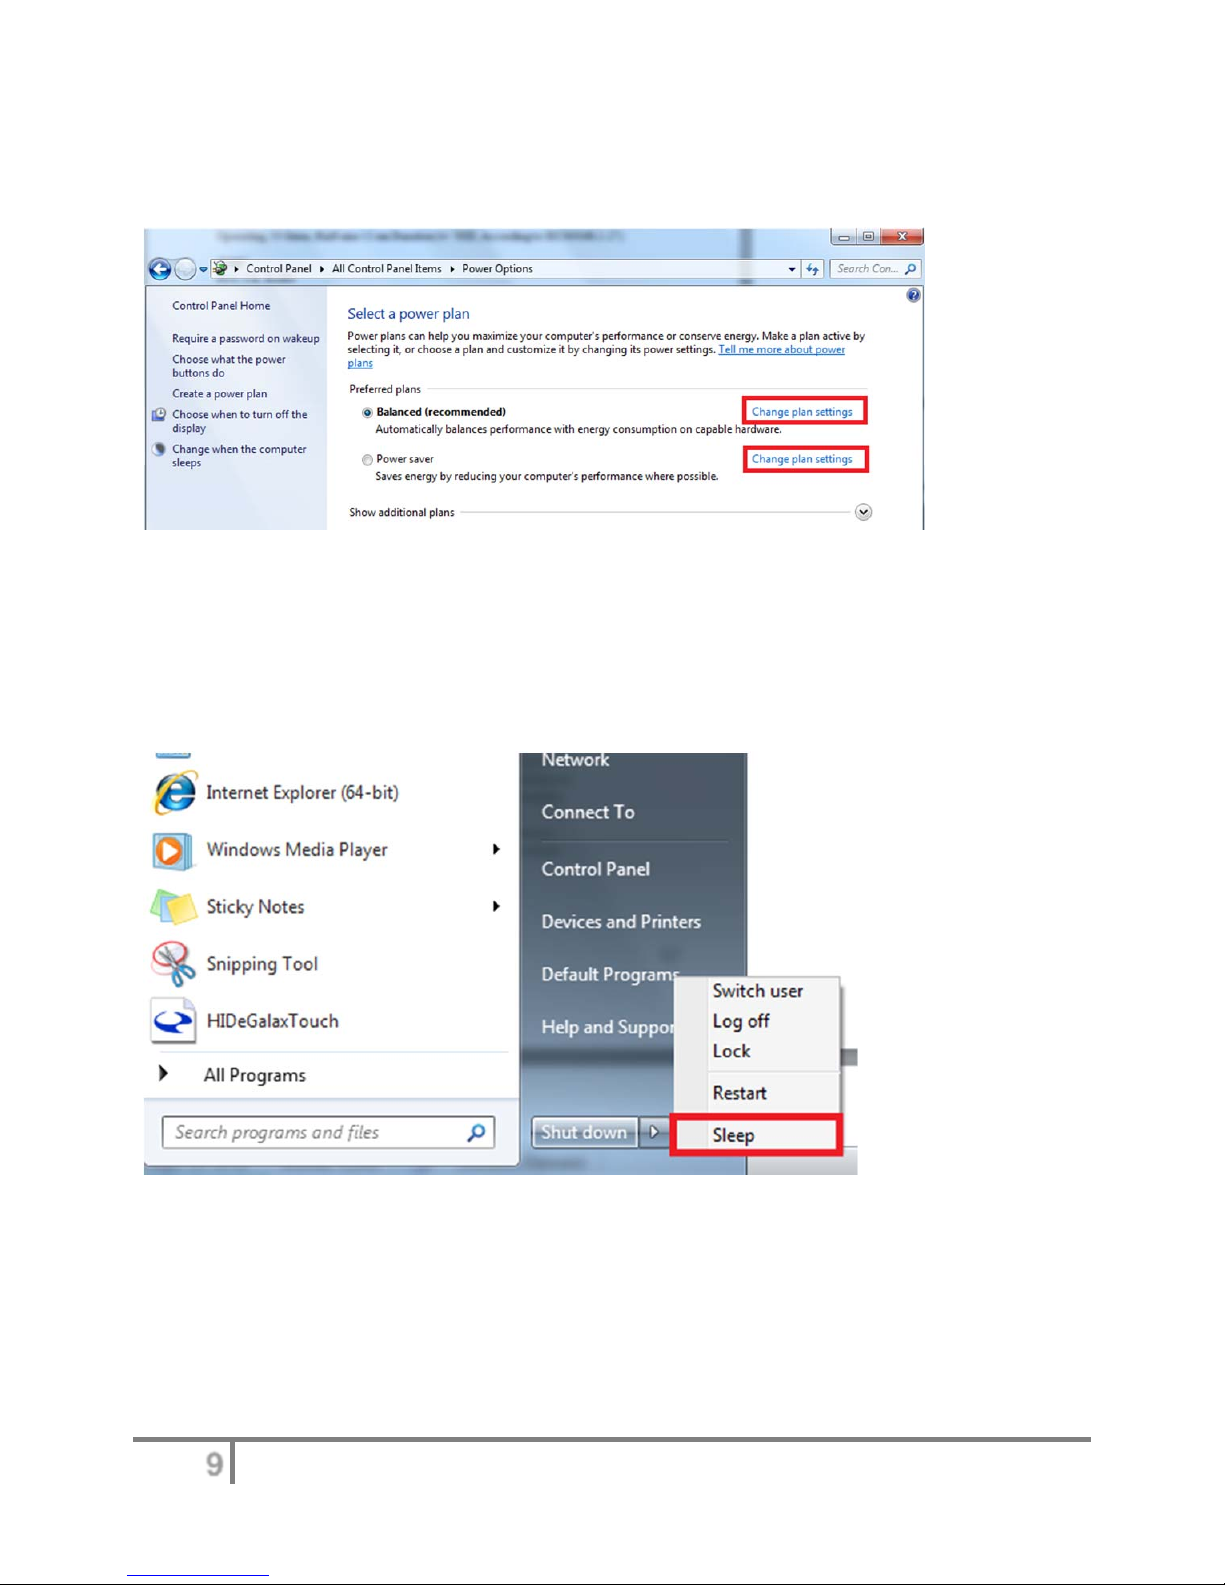
Select a power plan that suits your personal needs. You may also fine-tune the settings by
clicking [Change plan settings].
The Shut Down IPC-R2ix Menu presents the options of Sleep (S3) & Shut Down
(S5) for rapid and easy management of your system power.
9
Page 10

Power Management through ENERGY STAR qualified Monitors (Optional)
The power management feature allows the IPC-R2ix to initiate a low-power or “Sleep” mode
after a period of user inactivity. When used with an external ENERGY STAR qualified Monitor,
this feature also supports similar power management features of the monitor. To take advantage
of these potential energy saving, the power management feature can be set to behave in the
following ways when the system is operating on AC power:
Turn off the display after 15 minutes.
Initiate Sleep after 30 minutes.
Waking the System Up
The IPC-R2ix shall be able to wake up from power saving mode in response to a command from
any of the following:
the power button,
the network (Wake on LAN),
the mouse
the keyboard
Energy Saving Tips:
Tune the settings in Power Options under Windows OS to optimize your IPC-R2ix’s
power management.
Install power saving software to manage your PC’s energy consumption.
Always disconnect the AC power cord or switch the wall socket off if your IPC-R2ix
would be left unused for a certain time to achieve zero energy consumption.
10
Page 11

IPC-R2ix Mechanical Dimension
Figure1:Overview
11
Page 12
12
Page 13
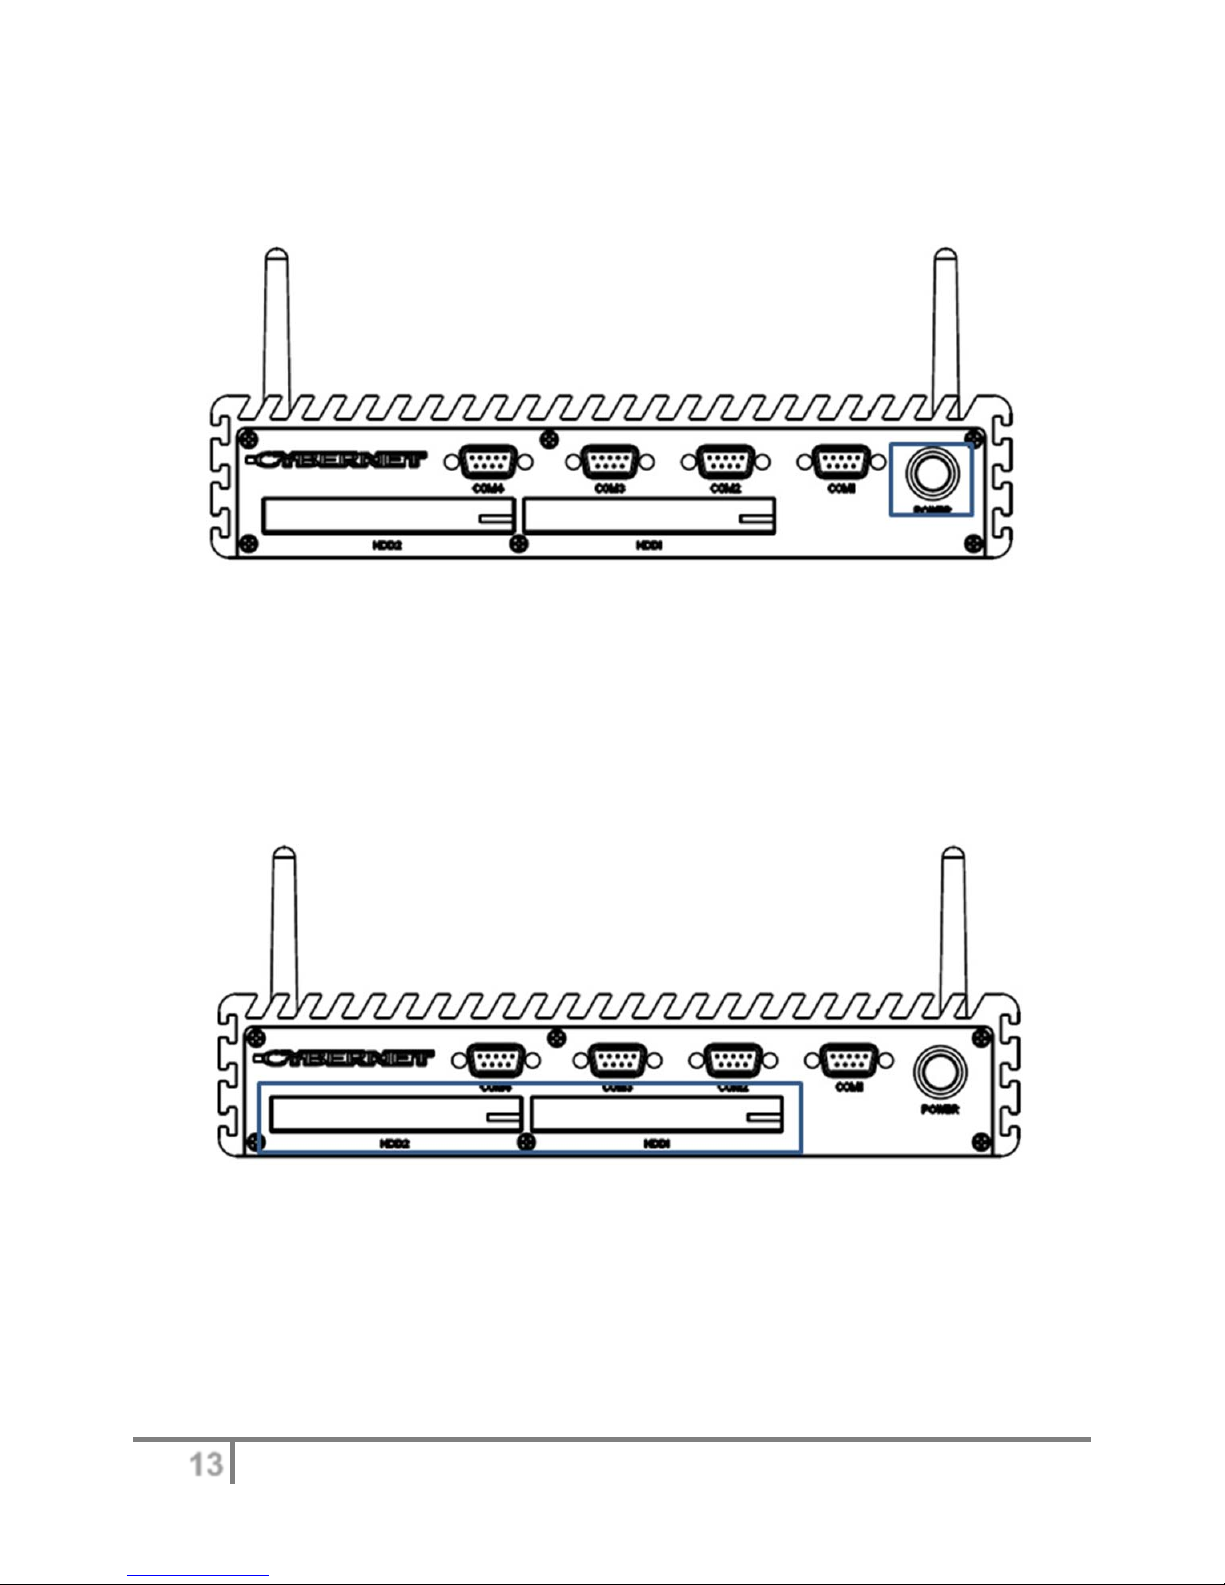
Figure2:FrontPanelI/Oview(Powerbutton)
There is a power button to switch on the System. The same button also switches off the System
when pressed for more than 4 seconds. There is a power LED around this power button to light
up a solid blue when the System is running. This LED will blink when in Sleep mode.
Figure3:FrontPanelI/Oview(HDD)
The IPC-R2ix is designed with easy access 2.5 inch SATAII HDD bays, which can be
locked. The picture on the left indicates the HDD1 bay. The HDD2 bay, with operating
system support, allows for hot swapping the hard drive, as long as data is not being
written to or read from the drive.
13
Page 14
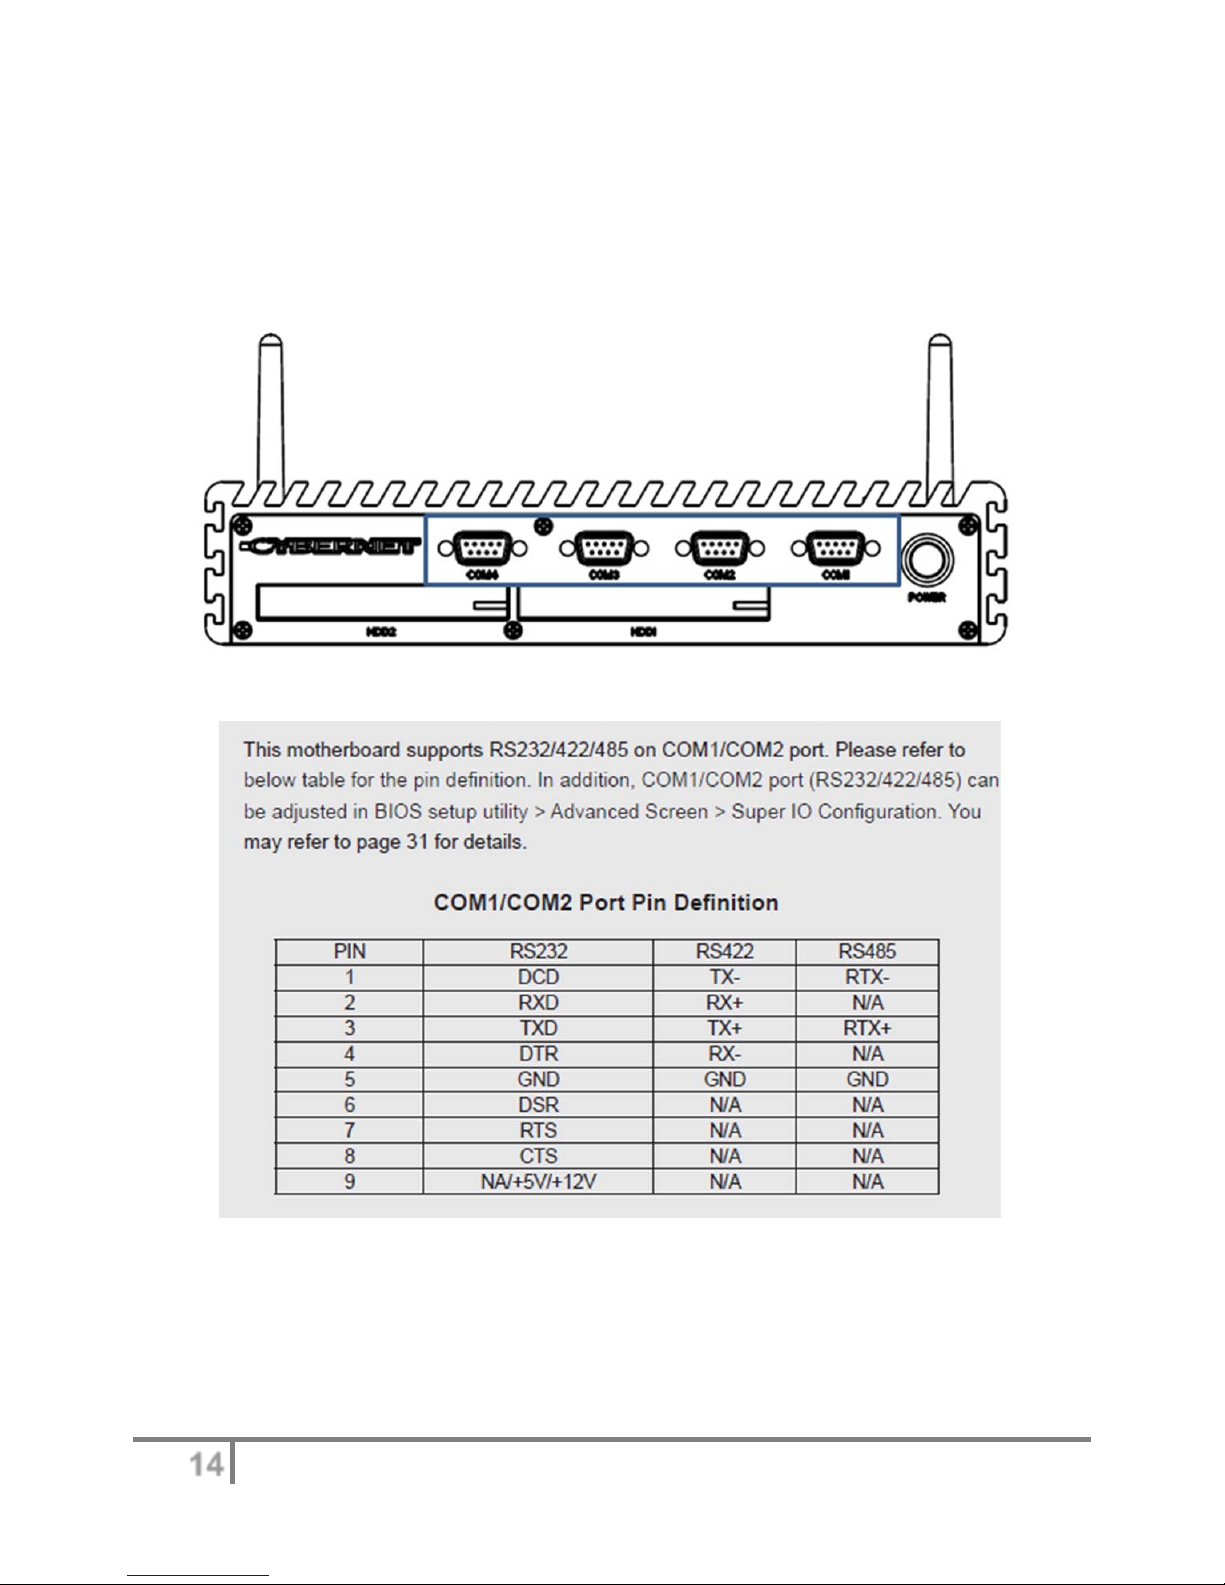
Figure4:FrontPanelI/Oview(HDD)
COM1/2 support RS-232/422/485, COM3, COM4 support RS-232 only.
14
Page 15
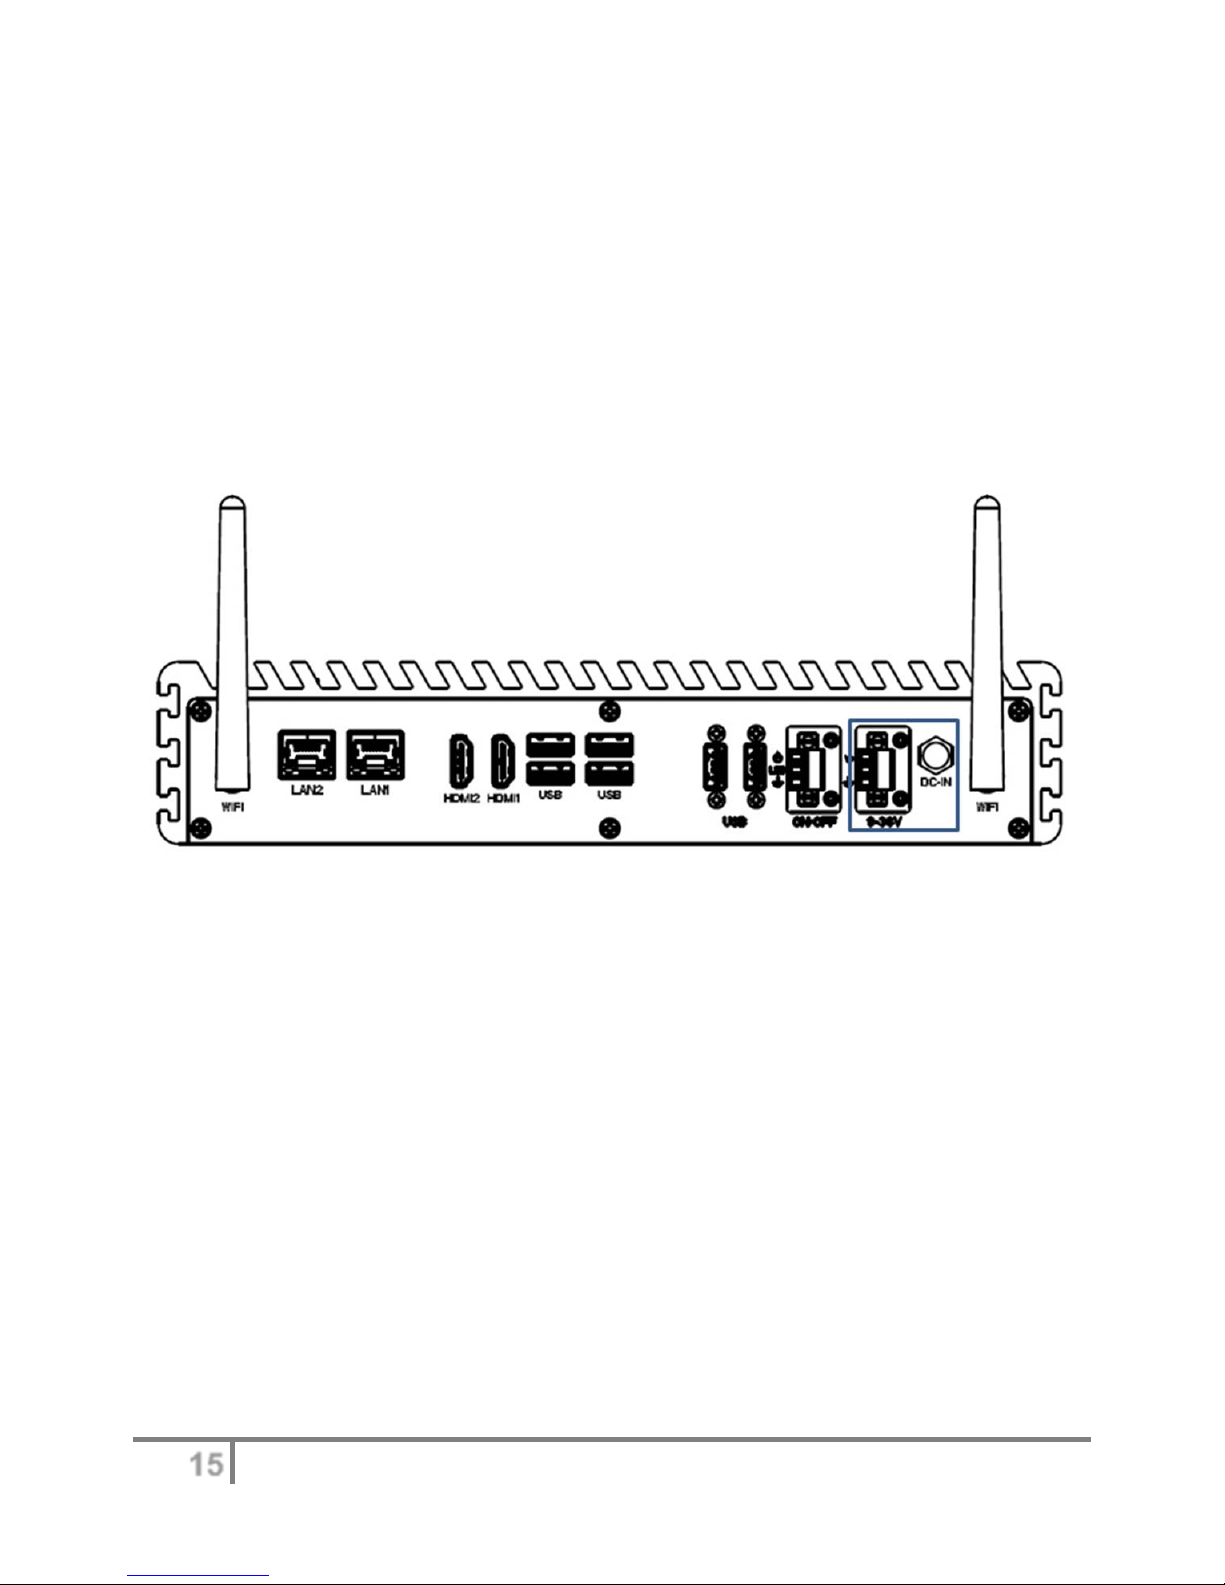
Figure5:BackPanelI/Oview(DC‐IN)
TheIPC‐R2ixseriesoffers9to36VDCpowerinputusingstandardnotebookDCJackØ
5.5mmx2.5mmand3PINPitch=3.81mmterminalblockconnectorfromtheexternal
PSU.
Figure6:BackPanelI/Oview(Power
‐Switch)
15
Page 16
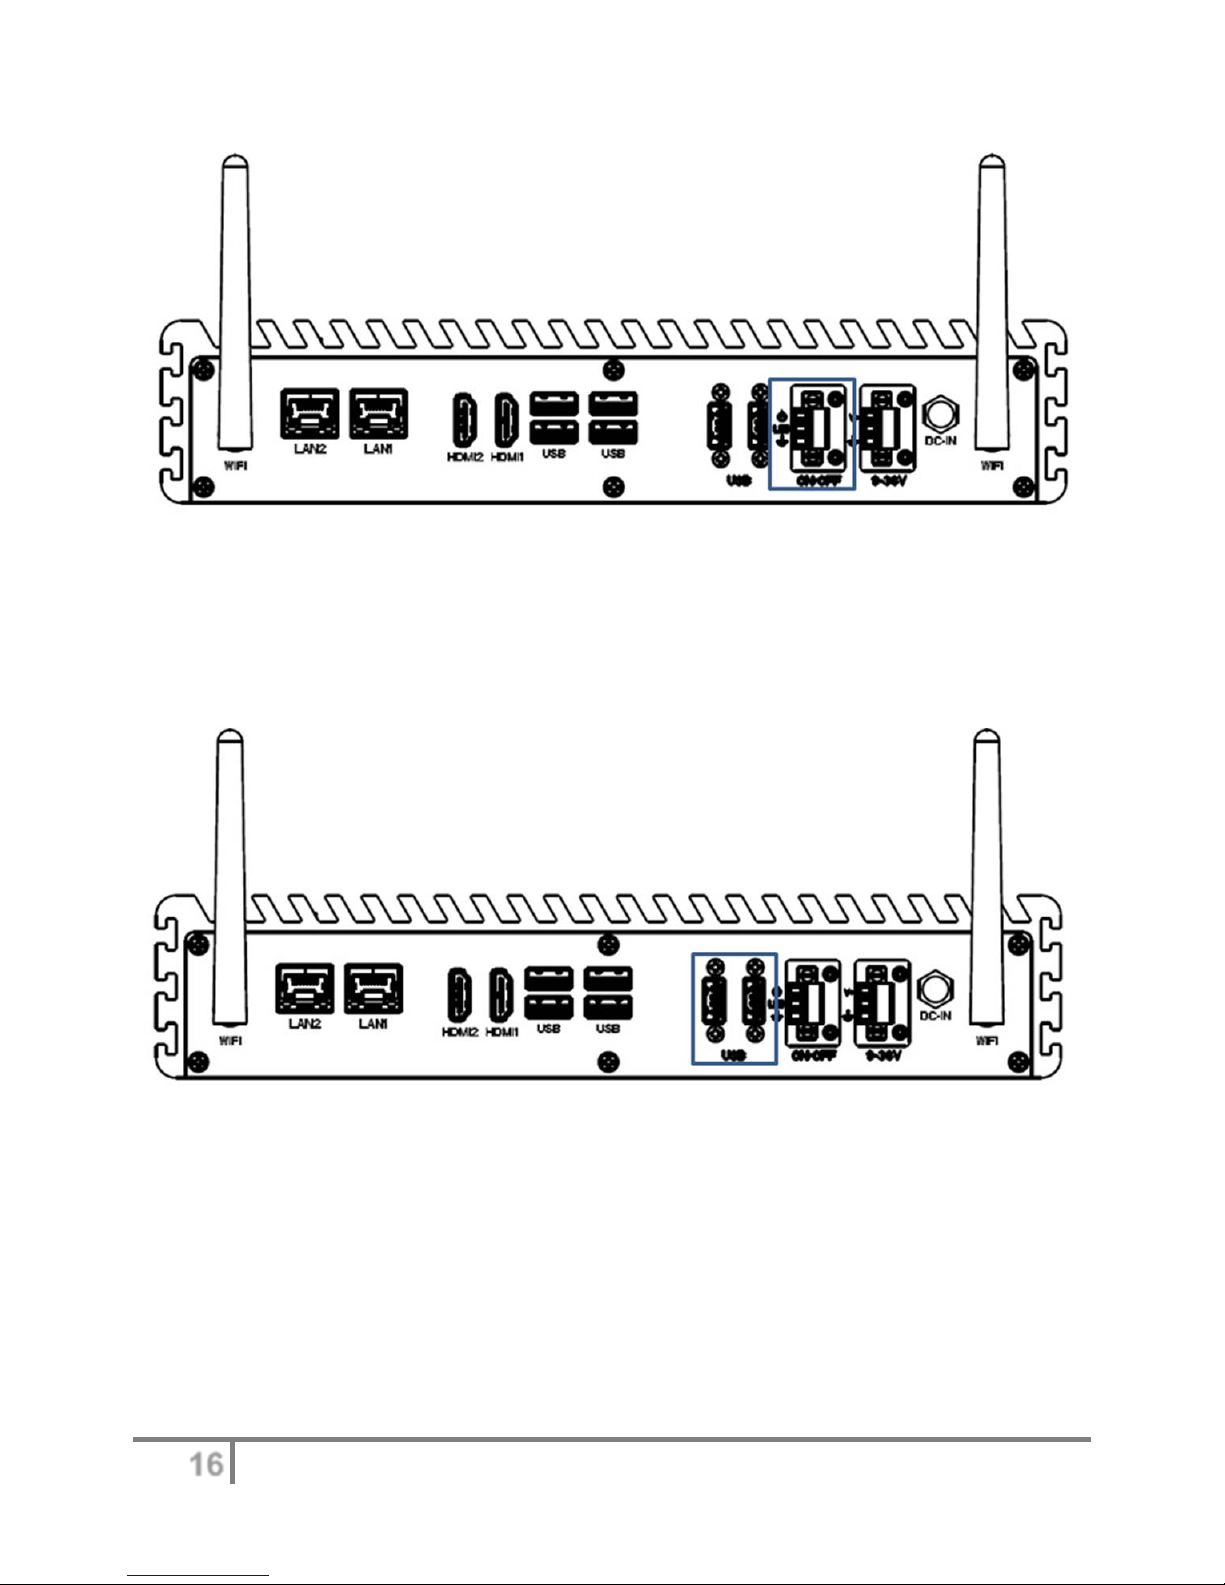
The IPC-R2ix series offers terminal block to control power on-off with LED function.
Figure7:BackPanelI/Oview(USB2.0)
The IPC-R2ix series comes with two USB 2.0 hosts on the back panel. The USB interface
supports Plug and Play, which enables the user to connect or disconnect a device whenever the
user want, without turning off the system. The hosts can be used for an external flash disk or
hard drive for storing large amounts of data. The user can also use these USB hosts to connect to
a keyboard or a mouse.
16
Page 17
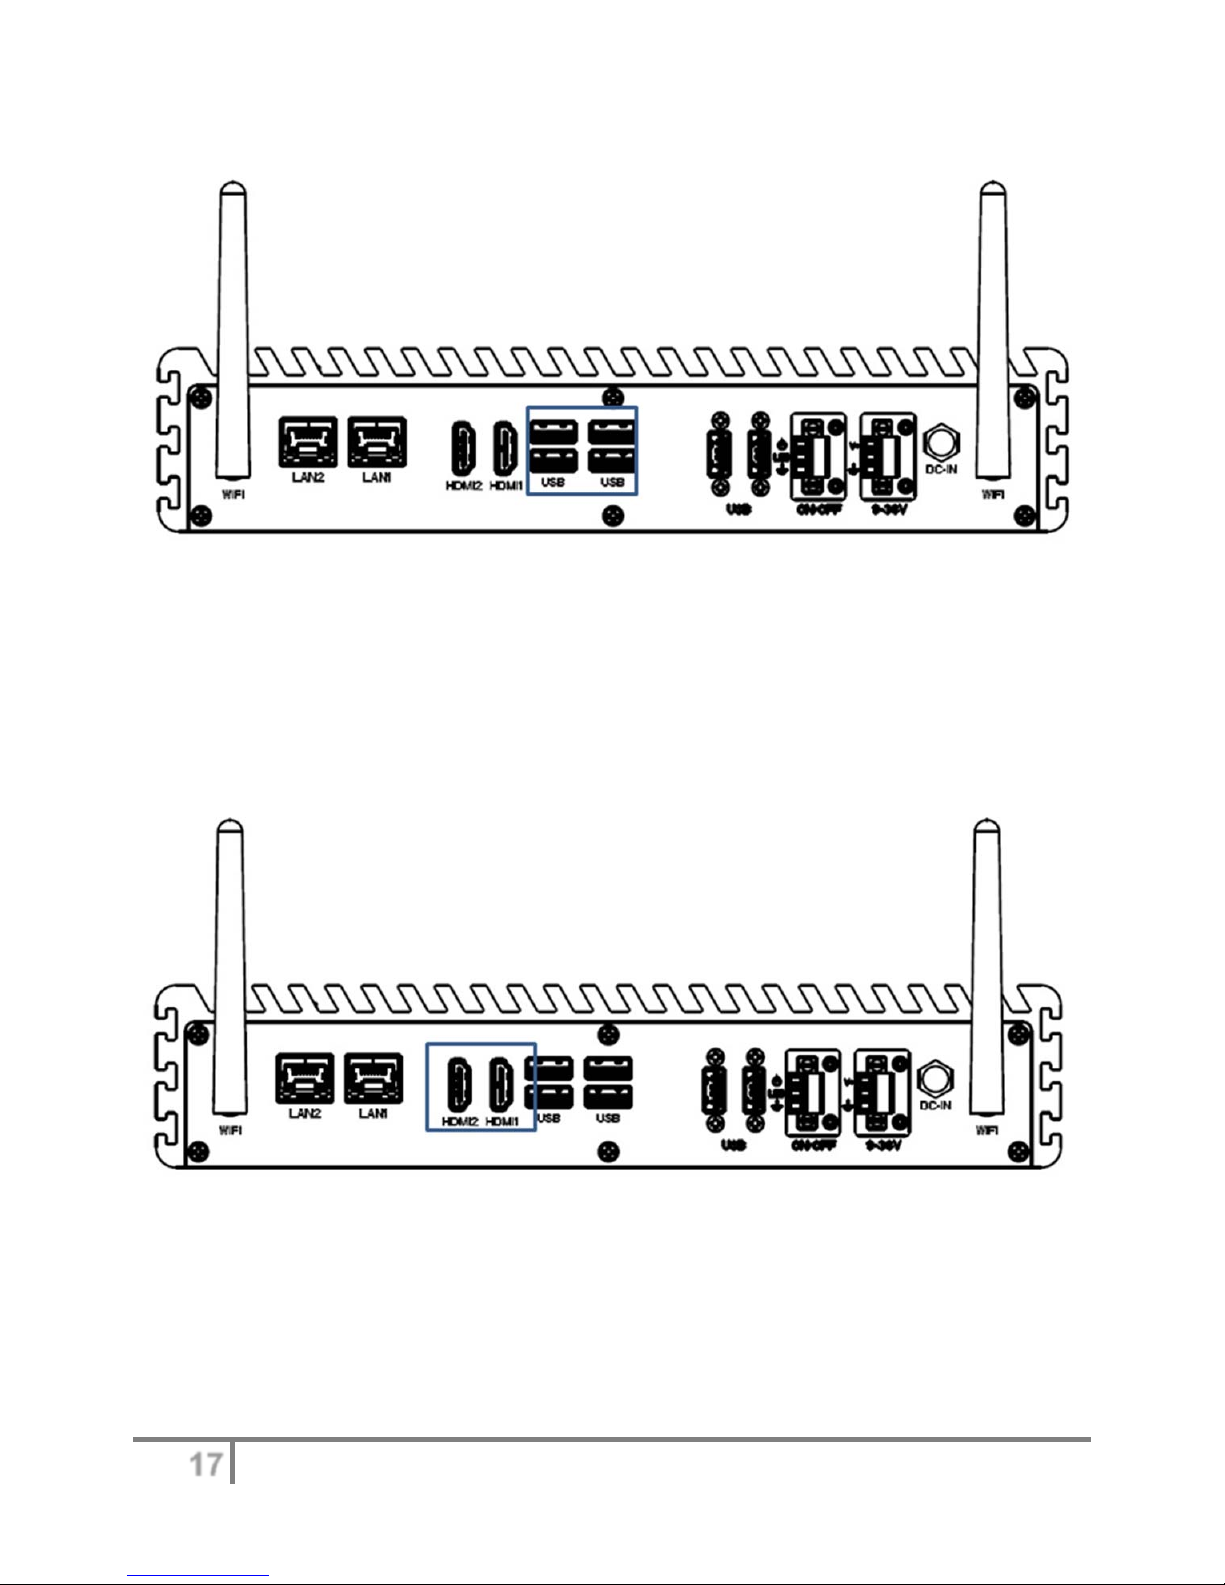
Figure8:BackPanelI/Oview(USB3.0)
The IPC-R2ix series comes with four USB 3.0 hosts on the back panel. The USB interface
supports Plug and Play, which enables the user to connect or disconnect a device whenever the
user want, without turning off the system. The hosts can be used for an external flash disk or
hard drive for storing large amounts of data. The user can also use these USB hosts to connect to
a keyboard or a mouse.
Figure9:BackPanelI/Oview(HDMI)
The IPC-R2ix series comes with two HDMI1.4a, resolution up to 4096x2304
Figure10:BackPanelI/Oview(LAN)
17
Page 18
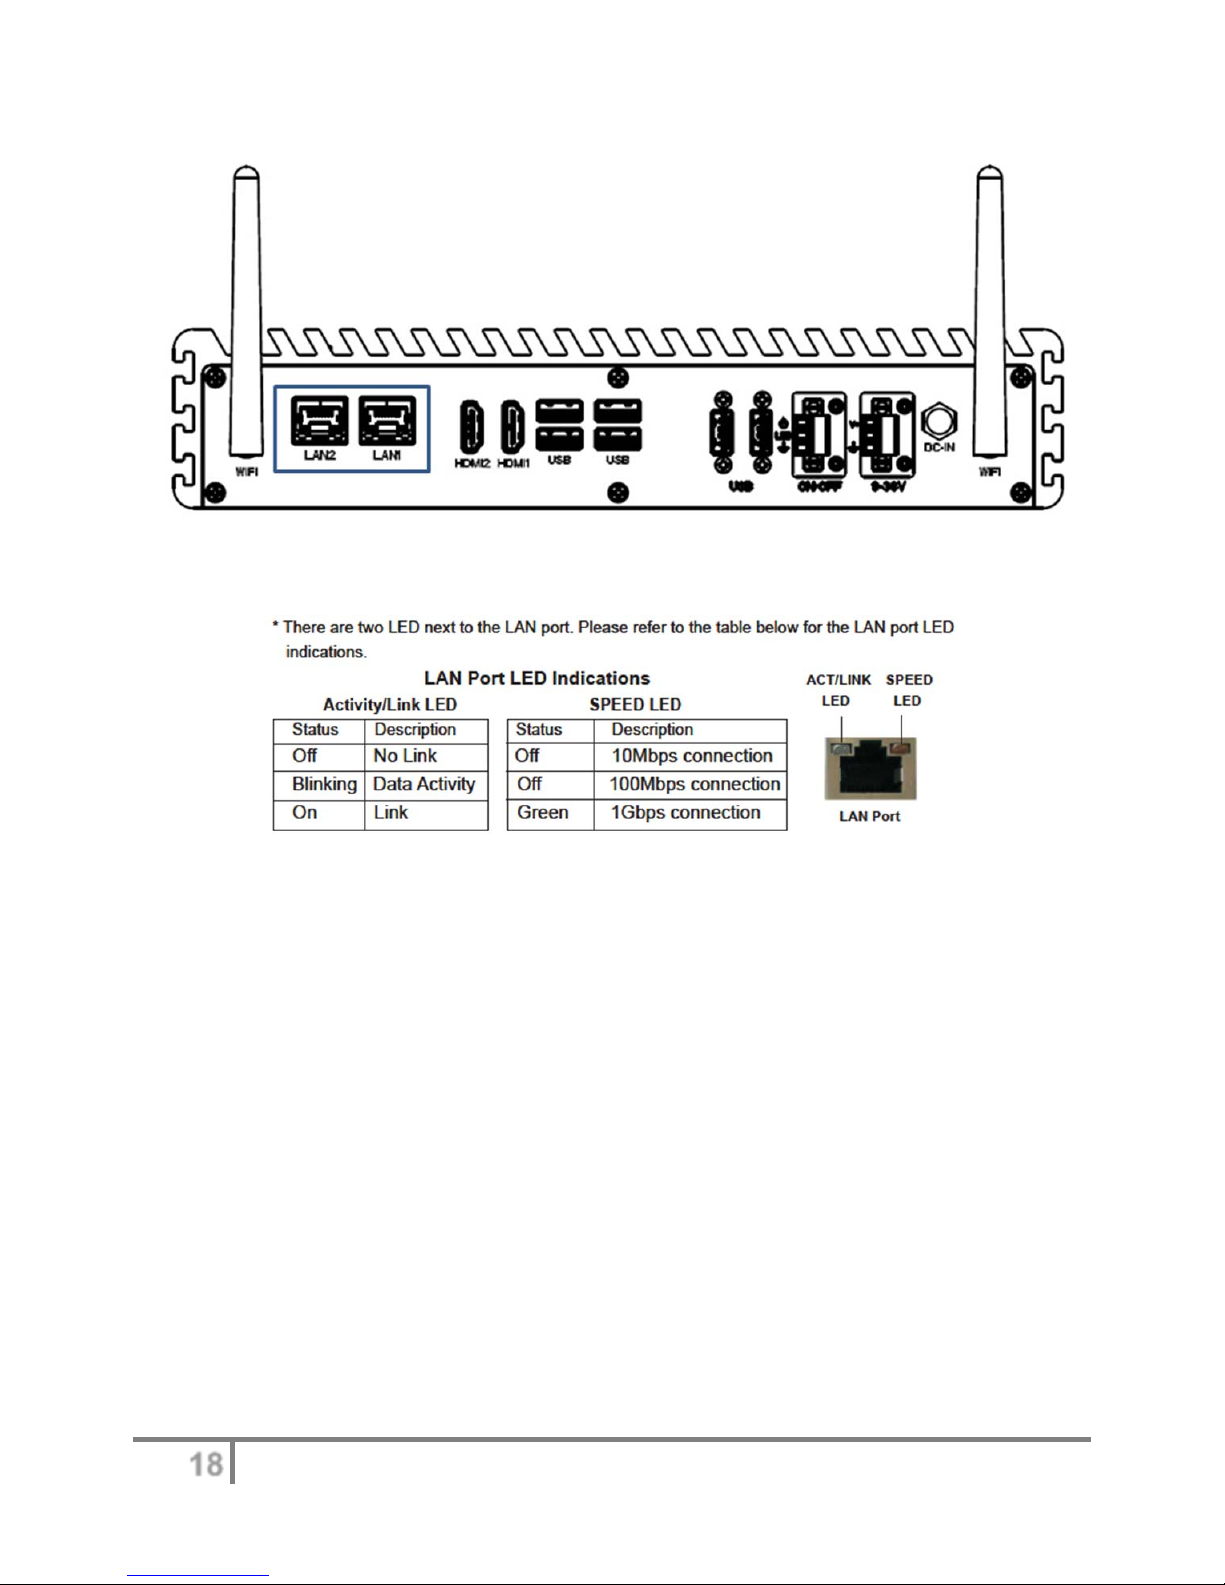
LAN2: Realtek RTL8111G GIGA LAN support PXE, Wake on LAN.
LAN1: Intel®I218LM GIGA LAN support PXE, Wake on LAN, AMT
IPC-R2ix BIOS introduction
This section explains how to use the UEFI SETUP UTILITY to conigure your system. The UEFI
chip on the motherboard stores the UEFI SETUP UTILITY. You may run the UEFI SETUP
UTILITY when you start up the computer. Please press <F2> or <Del> during the Power-OnSelf-Test (POST) to enter the UEFI SETUP UTILITY, otherwise, POST will continue with its
test routines.
If you wish to enter the UEFI SETUP UTILITY after POST, restart the system by pressing <Ctl>
+ <Alt> + <Delete>, or by pressing the reset button on the system chassis. You may also restart
by turning the system off and then back on.
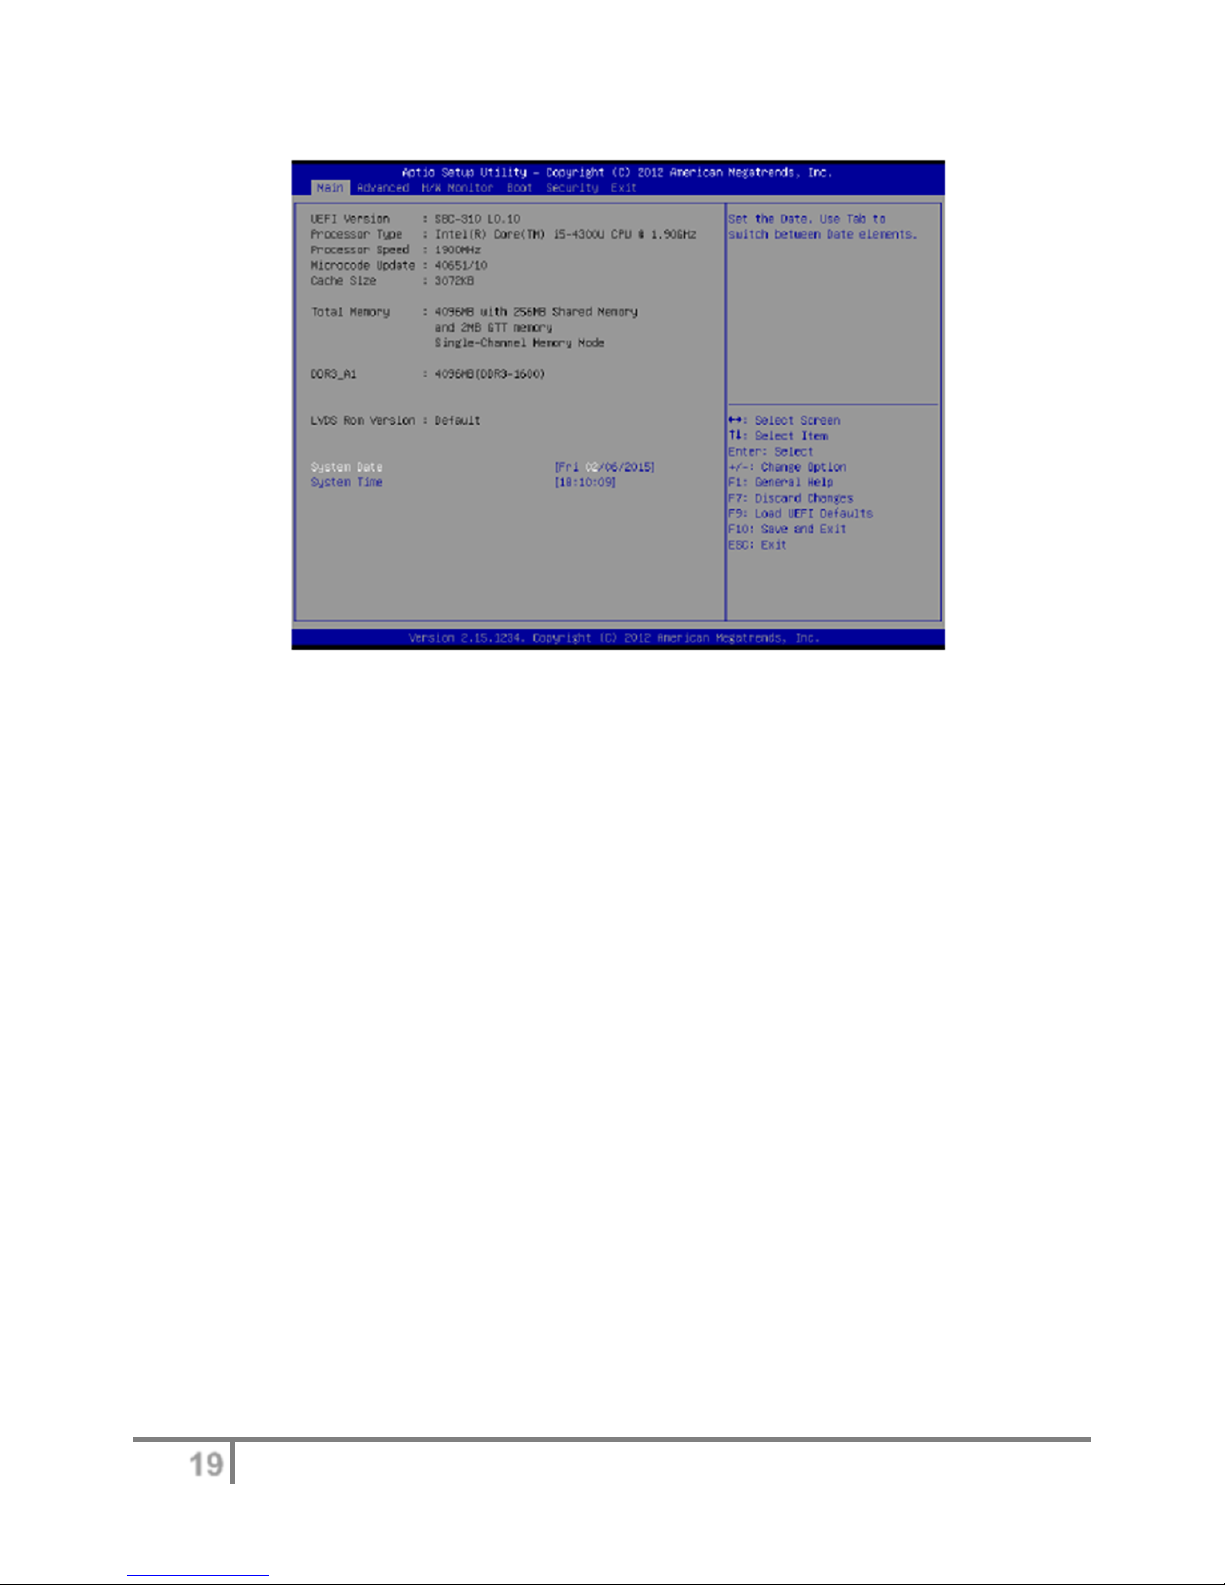
Main Screen
When you enter the UEFI SETUP UTILITY, the Main screen will appear and display the system
overview.
18
Page 19
Advanced Screen
In this section, you may set the configurations for the following items: CPU Configuration,
Chipset Configuration, Storage Configuration, Intel(R) Rapid Start Technology, AMT
Configuration, Super IO Configuration, ACPI Configuration, USB Configuration and Voltage
Configuration.
19
Page 20
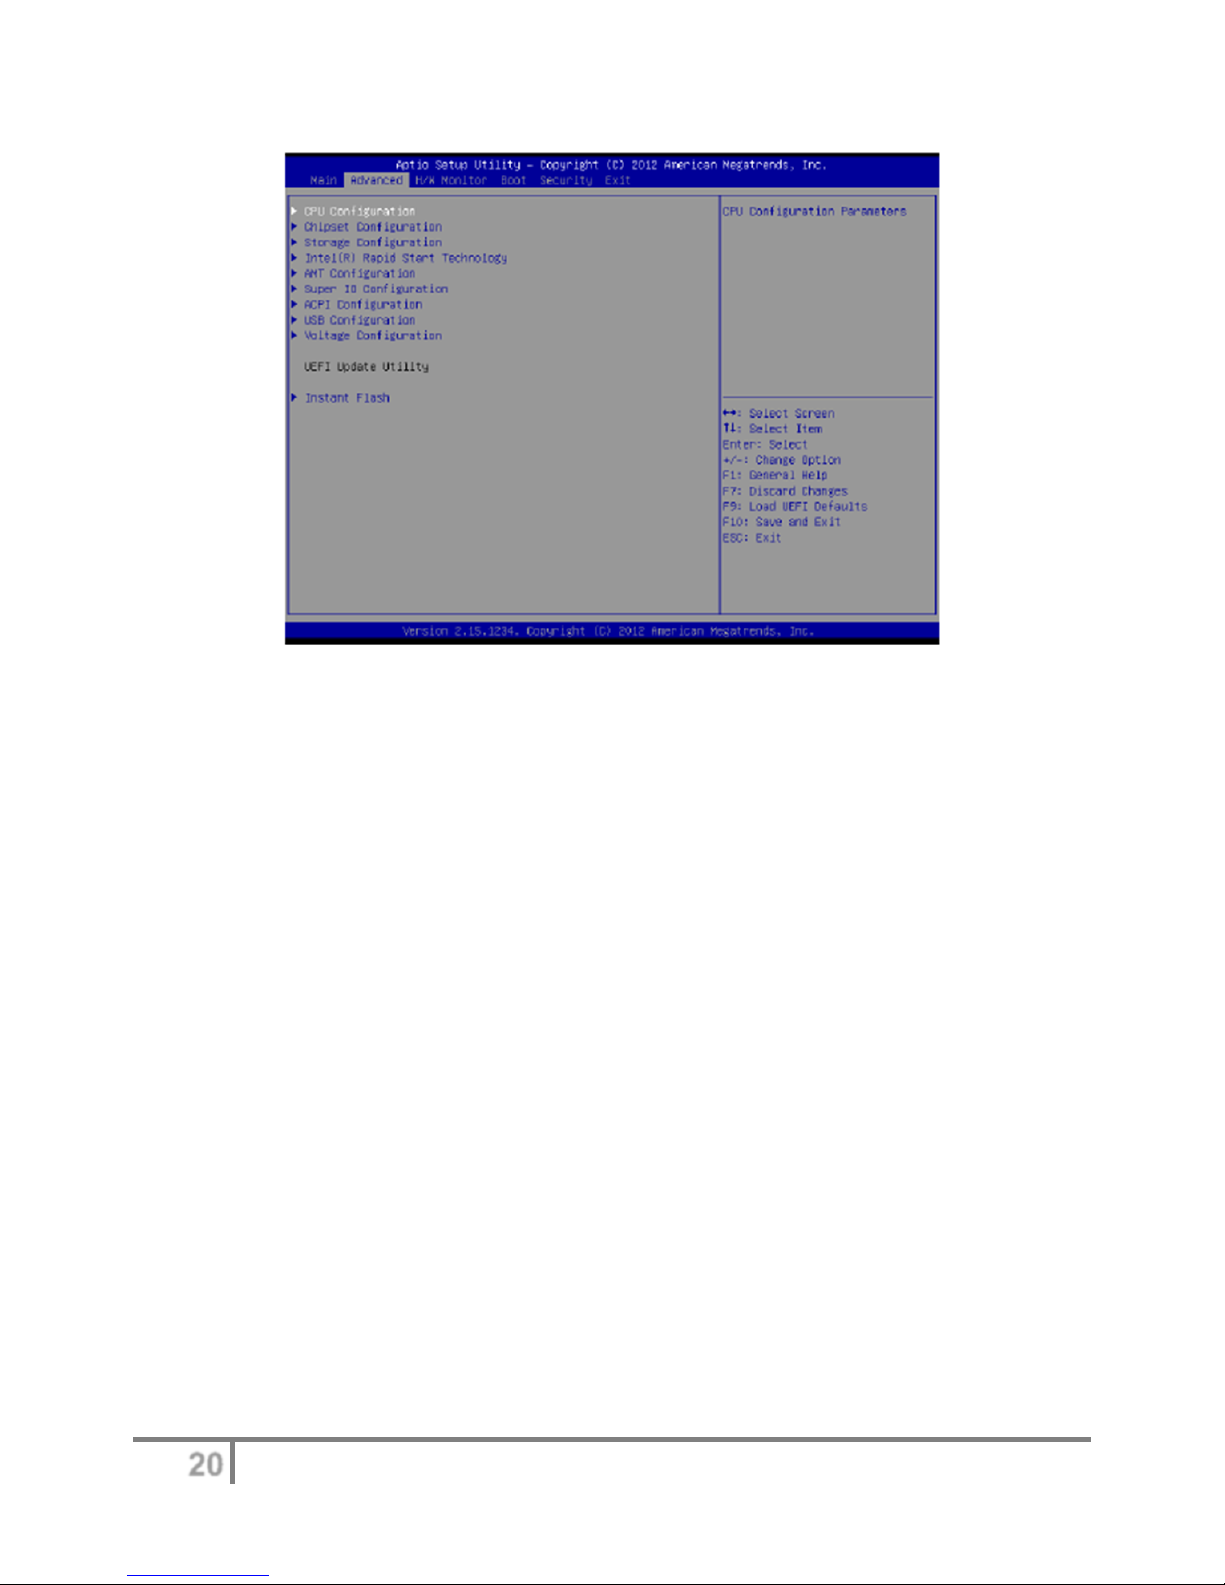
Instant Flash
Instant Flash is a UEFI lash utility embedded in Flash ROM. This convenient UEFI update tool
allows you to update system UEFI without entering operating systems first like MS-DOS or
Windows®. Just launch this tool and save the new UEFI file to your USB lash drive, floppy disk
or hard drive, then you can update your UEFI only in a few clicks without preparing an
additional floppy diskette or other complicated lash utility. Please be noted that the USB lash
drive or hard drive must use FAT32/16/12 file system. If you execute Instant Flash utility, the
utility will show the UEFI files and their respective information. Select the proper UEFI file to
update your UEFI, and reboot your system after UEFI update process completes.
CPU Configuration
Intel Hyper Threading Technology
To enable this feature, a computer system with an Intel processor that supports HyperThreading technology and an operating system that includes optimization for this technology,
such as Microsoft® Windows® 7 / 8 is required. Set to [Enabled] if using Microsoft®
Windows® 7, 8, or Linux kernel version 2.4.18 or higher. This option will be hidden if the
20
Page 21

installed CPU does not support Hyper-Threading technology.
Active Processor Cores
Select the number of cores to enable in each processor package.
CPU C States Support
Enable CPU C States Support for power saving. It is recommended to keep C3, C6 and C7
all enabled for better power saving.
Enhanced Halt State (C1E)
Enable Enhanced Halt State (C1E) for lower power consumption.
CPU C3 State Support
Enable C3 sleep state for lower power consumption.
CPU C6 State Support
Enable C6 deep sleep state for lower power consumption.
CPU C7 State Support
Enable C7 deep sleep state for lower power consumption.
Package C State Support
Enable CPU, PCIe, Memory, Graphics C State Support for power saving.
Intel SpeedStep Technology
Intel SpeedStep technology is Intel’s new power saving technology. Processors can switch
between multiple frequencies and voltage points to enable power saving. The default value is
[Enabled]. Configuration options:
[Enabled] and [Disabled]. If you install Windows® 7 / 8 and want to enable this function, please
set this item to [Enabled]. This item will be hidden if the current CPU does not support Intel
SpeedStep technology.
Intel Turbo Boost Technology
Use this item to enable or disable Intel Turbo Boost Mode Technology. Turbo Boost Mode
allows processor cores to run faster than marked frequency in specific conditions. The default
value is [Enabled].
CPU Thermal Throttling
21
Page 22

You may select [Enabled] to enable CPU internal thermal control mechanism to keep the
CPU from overheating.
No-Execute Memory Protection
No-Execution (NX) Memory Protection Technology is an enhancement to the IA-32 Intel
Architecture. An IA-32 processor with “No Execute (NX) Memory Protection” can prevent data
pages from being used by malicious software to execute codes. This option will be hidden if the
current CPU does not support No-Excute Memory Protection.
Intel Virtualization Technology
When this option is set to [Enabled], a VMM (Virtual Machine Architecture) can utilize the
additional hardware capabilities provided by Vanderpool Technology. This option will be hidden
if the installed CPU does not support Intel Virtualization Technology.
Hardware Prefetcher
Use this item to turn on/off the MLC streamer prefetcher.
Adjacent Cache Line Prefetch
Use this item to turn on/off prefetching of adjacent cache lines.
Chipset configuration
22
Page 23
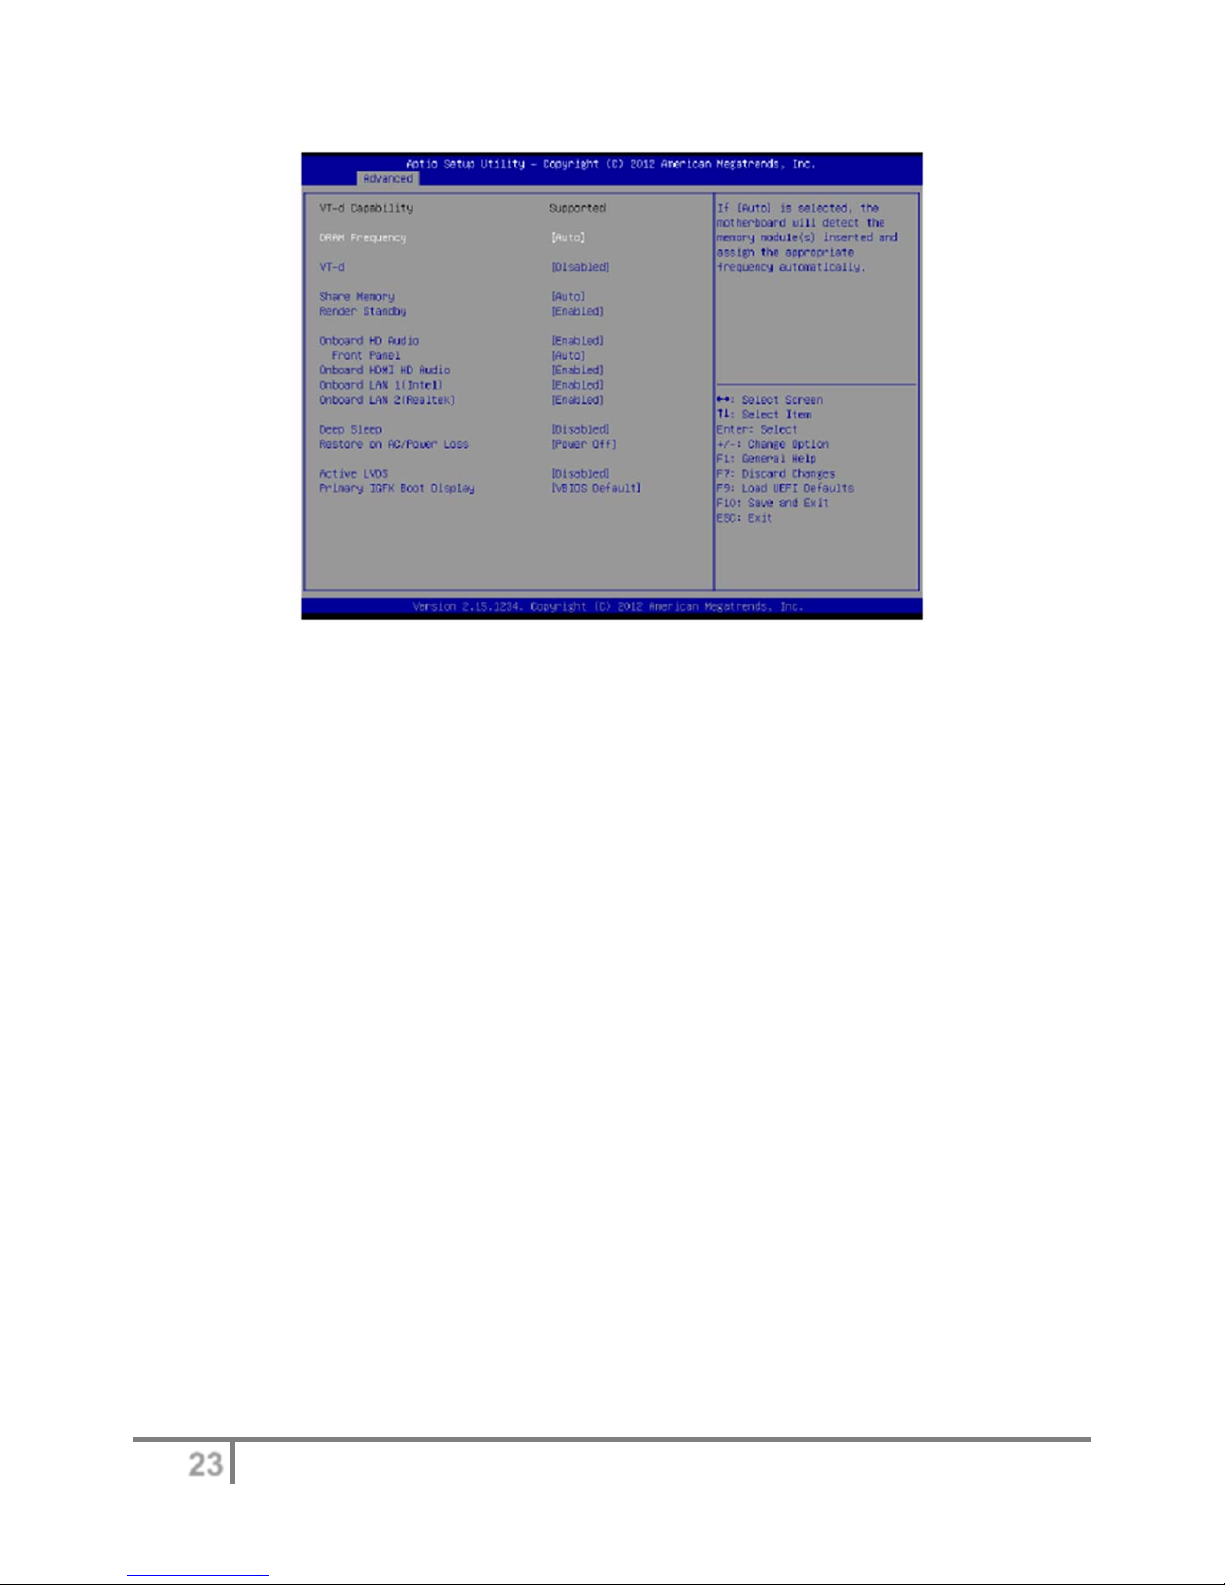
DRAM Frequency
If [Auto] is selected, the motherboard will detect the memory module(s) inserted and assign
the appropriate frequency automatically.
VT-d
Intel® Virtualization Technology for Directed I/O helps your virtual machine monitor better
utilize hardware by improving application compatibility and reliability, and providing additional
levels of manageability, security, isolation, and I/O performance.
Share Memory
Configure the size of memory that is allocated to the integrated graphics processor when the
system boots up.
Render Standby
Use this to enable or disable Render Standby by Internal Graphics Device. The default value
is [Enabled].
Onboard HD Audio
Select [Auto], [Enabled] or [Disabled] fo r the onboard HD Audio fea ture. If you select [Auto].
Front Panel
Select [Auto] or [Disabled] for the onboard HD Audio Front Panel.
Onboard HDMI HD Audio
This allows you to enable or disable the Onboard HDMI HD Audio feature.
Onboard LAN 1 (Intel)
This allows you to enable or disable the Onboard LAN 1 feature.
Onboard LAN 2 (Realtek)
This allows you to enable or disable the Onboard LAN 2 feature.
Deep Sleep
Mobile platforms support Deep S4/S5 in DC only and desktop platforms support Deep S4/S5
in AC only. The default value is [Disabled].
Restore on AC/Power Loss
23
Page 24
This allows you to set the power state after an unexpected AC/power loss. If [Power Off] is
selected, the AC/power remains off when the power recovers. If [Power On] is selected, the
AC/power resumes and the system starts to boot up when the power recovers. If [LAST STATE]
is
selected, the AC/power restores to the last power state when the power recovers.
Active LVDS
Use this to enable or disable the LVDS. The default value is [Enabled].
Primary IGFX Boot Display
Use this to select primary internal graphics boot display. The default value is [VBIOS Default].
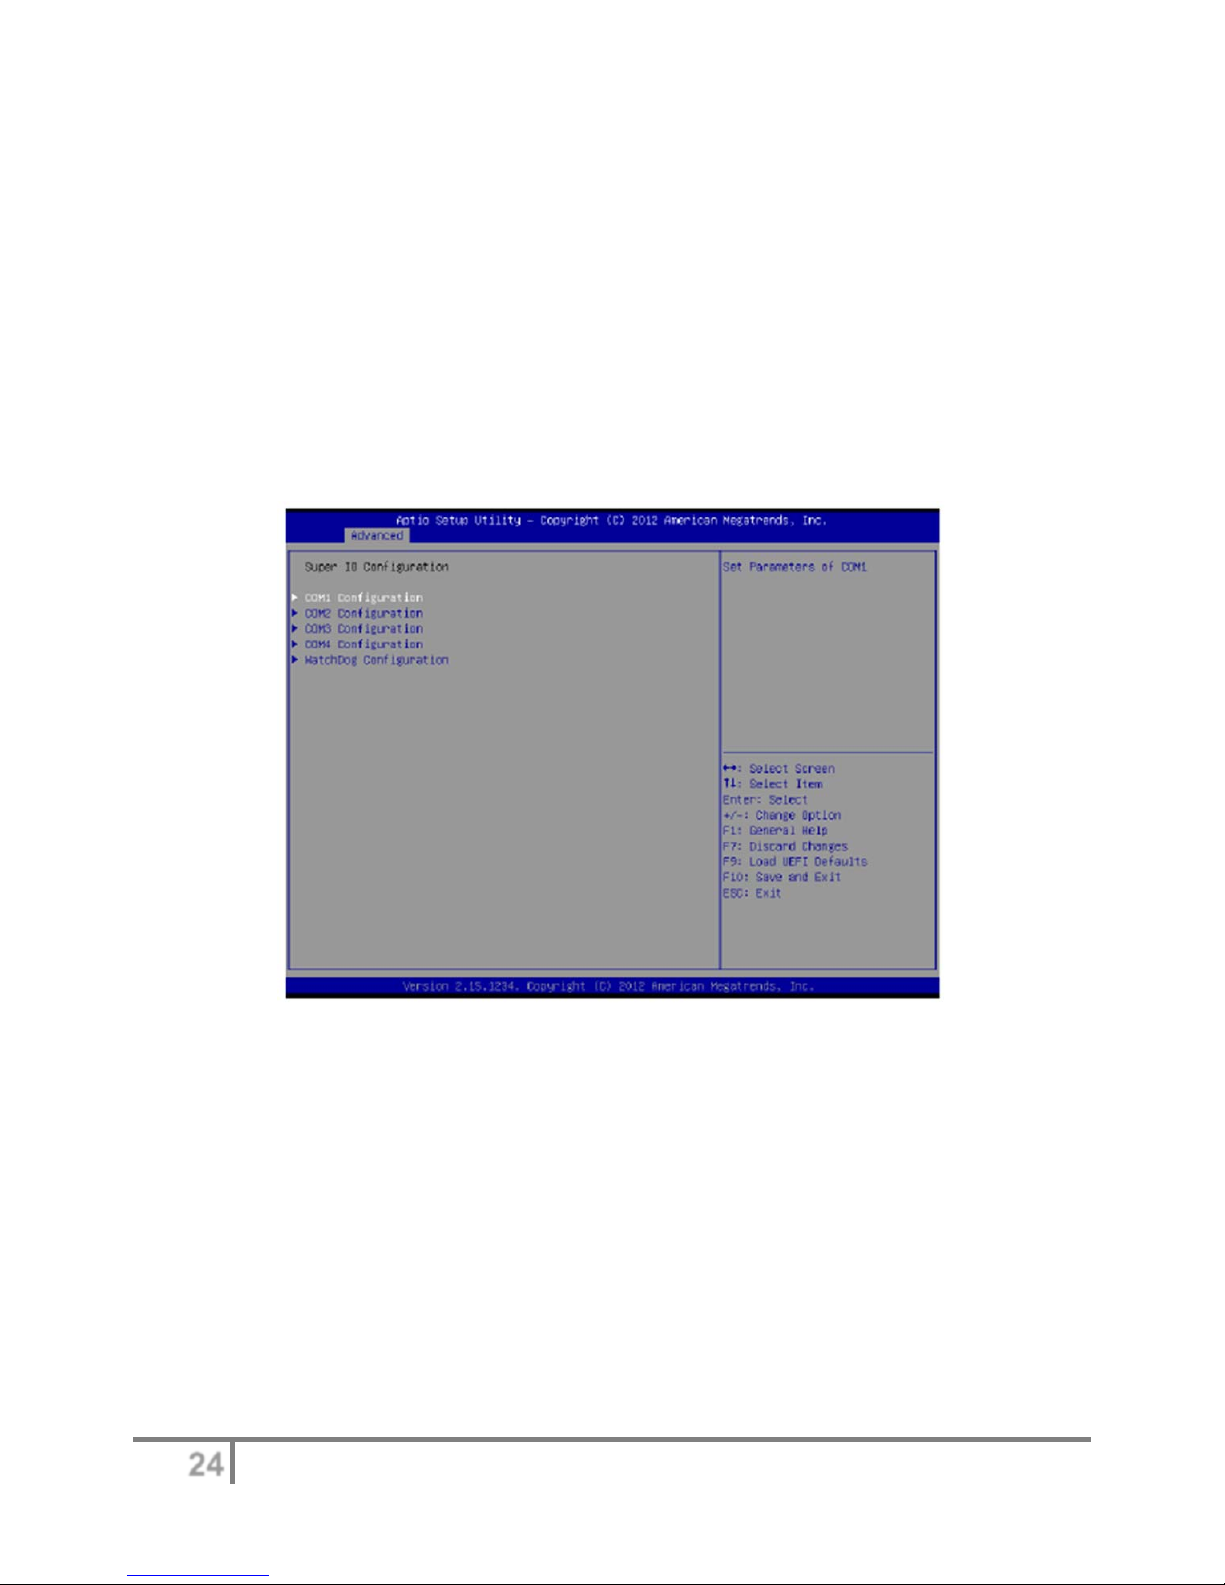
Super IO configuration
COM1 configuration
Use this to set parameters of COM1. Select COM1 port type: [RS232], [RS422] or [RS485].
COM2 configuration
Use this to set parameters of COM2. Select COM2 port type: [RS232], [RS422] or [RS485].
COM3 configuration
Use this to set parameters of COM3.
COM4 configuration
Use this to set parameters of COM4.
WDT Timeout Reset
This allows users to enable/disable the Watch Dog Timer timeout to reset system. The default
value is [Disabled].
24
Page 25
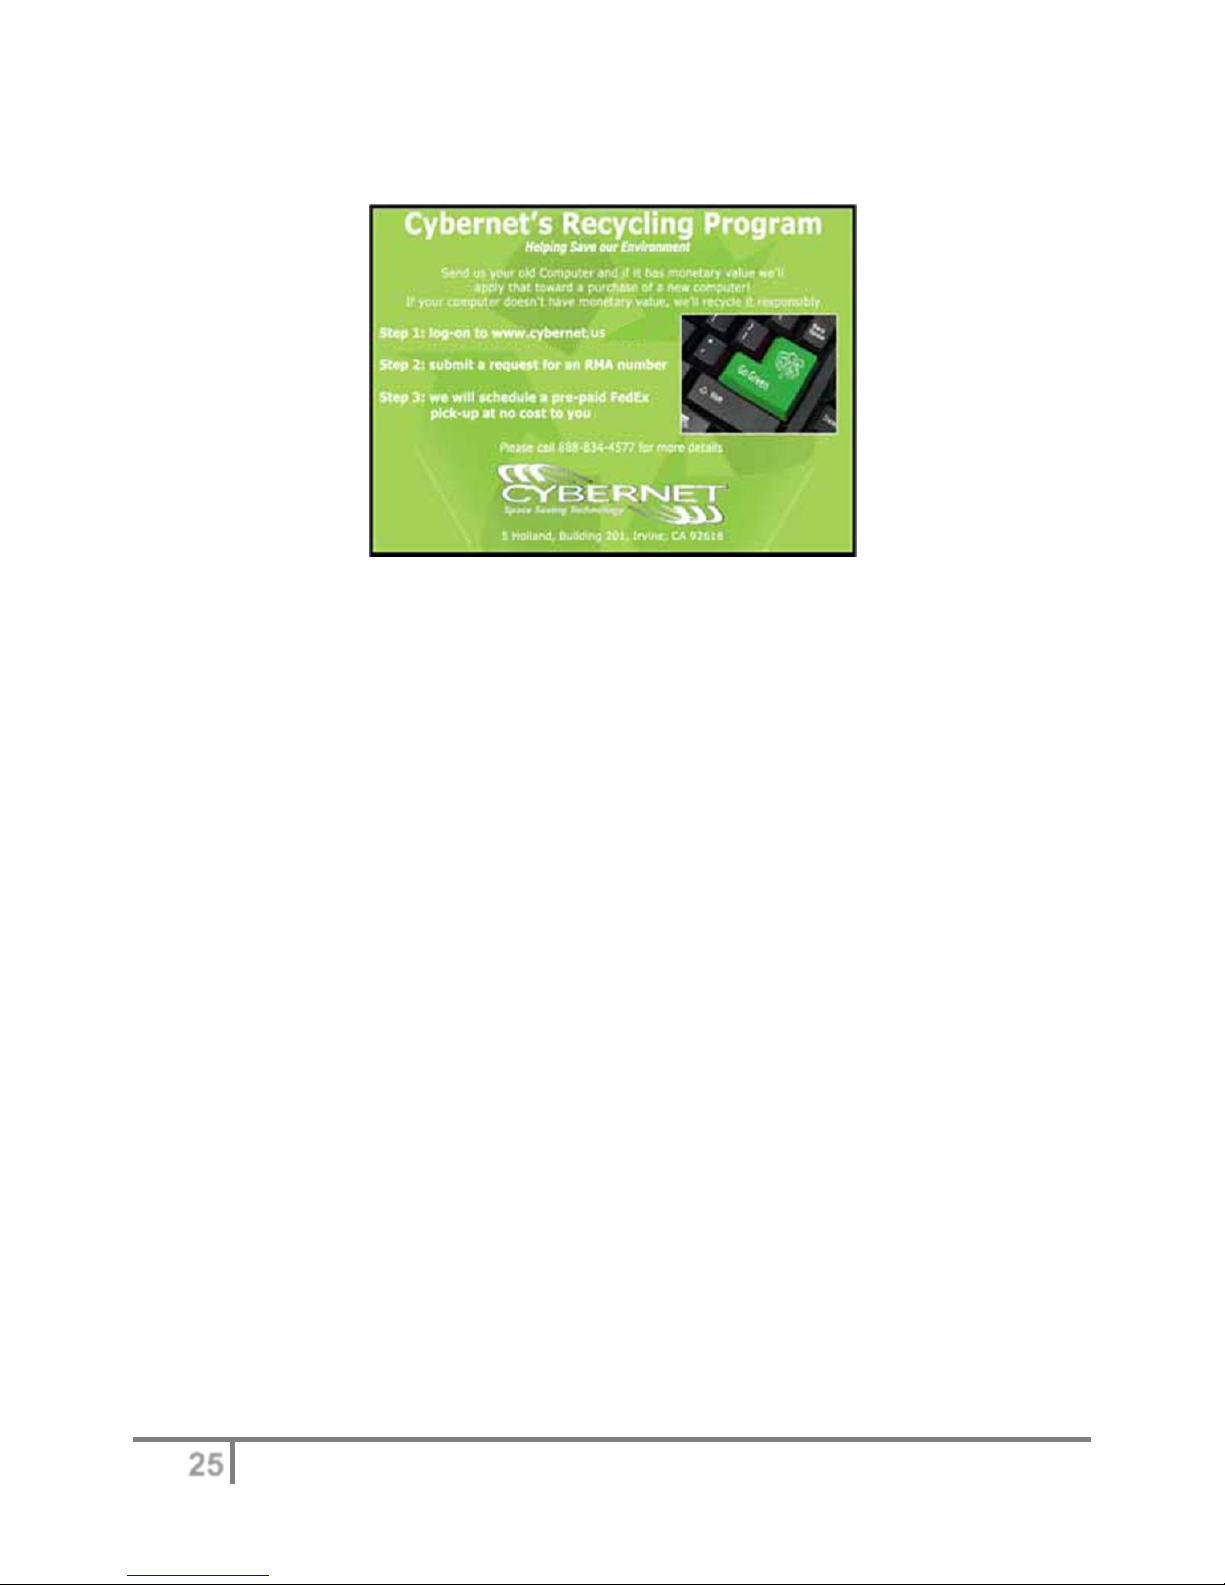
Cybernet e-recycling SOP
Cybernet has an e-recycling program that is very easy to use. Just follow the steps
explained below or go to our website at www.cybernet.us
1. Request an RMA via phone, email or support request.
2. We will arrange a call tag to have the product picked up. Just have it packed and
ready to ship.
We do the rest!
25
 Loading...