

CyberGuard SnapGear, SnapGear SME530, SnapGear SME550, SnapGear SME570, SnapGear SME575 User Manual

SnapGear Firewall VPN Appliance
User Manual
Revision 1.9.1
March 12, 2004
SnapGear – A CyberGuard Company
7984 South Welby Park Drive #101
Salt Lake City, Utah 84084
Email: support@snapgear.com
Web: www.snapgear.com

Contents
1. Introduction.............................................................................................. 1
SnapGear Gateway Appliances ........................................................................... 1
SnapGear PCI Appliances ...................................................................................2
Document Conventions................................................................ ........................4
Your SnapGear Gateway Appliance.....................................................................5
SnapGear Gateway Appliance Features................................ ..............................8
Your SnapGear PCI Appliance.............................................................................9
SnapGear PCI Appliance Features....................................................................10
2. Getting Started................................................................ ....................... 11
SnapGear Gateway Appliances ......................................................................... 11
Set up a PC to Connect to the SnapGear Management Console.......................11
Set up the SnapGear Appliance’s Password and LAN Connection Settings....... 14
Set up the SnapGear Appliance’s Internet Connection Settings.........................17
Set up the PCs on your LAN to Access the Internet........................................... 18
SnapGear PCI Appliances .................................................................................22
Install your SnapGear Appliance in a Spare PCI Slot .........................................22
Install the Network Driver on your PC................................................................22
Set up your PC to Connect to the SnapGear Management Console..................22
Set up the SnapGear Appliance’s Password and Network Connection Settings.24
Disabling the Reset Button on your SnapGear PCI Appliance............................29
3. Network Connections................................ ............................................ 30
Connections.......................................................................................................30
LAN.................................................................................................................... 31
Internet...............................................................................................................32
Internet Connection Methods.............................................................................33
COM/Modem......................................................................................................36
DMZ................................................................ ...................................................38
Services on the DMZ Network ............................................................................38
Load Balancing................................................................................................ ..39
Internet Failover................................ .................................................................40
Routes ...............................................................................................................42
Advanced...........................................................................................................43
QoS Traffic Shaping...........................................................................................47

4. Dialin Setup ............................................................................................ 48
Dialin Setup ................................ .......................................................................49
Dialin User Accounts..........................................................................................51
Remote User Configuration................................ ................................................54
5. DHCP Server ........................................................................................... 60
DHCP Server Configuration............................................................................... 60
DHCP Proxy ...................................................................................................... 64
6. Firewall................................ .................................................................... 65
Incoming Access................................................................................................65
SnapGear Web Server....................................................................................... 67
Packet Filtering................................................................................................ ..70
NAT ................................................................ ...................................................74
Rules .................................................................................................................77
Access Control and Content Filtering.................................................................78
7. Intrusion Detection ................................................................................86
Basic Intrusion Detection and Blocking..............................................................88
Advanced Intrusion Detection............................................................................90
8. Web Cache.............................................................................................. 95
Web Cache Setup..............................................................................................96
Network Shares .................................................................................................97
Peers ...............................................................................................................100
Set up LAN PCs to Use the Web Cache ..........................................................100
9. Virtual Private Networking...................................................................101
PPTP Client Setup...........................................................................................102
PPTP Server Setup................................................................ ..........................104
IPSec Setup................................ .....................................................................115
Configuring the Branch Office SnapGear Appliance.........................................115
Configuring the Headquarters SnapGear Appliance.........................................129
Tunnel List.......................................................................................................133
NAT Traversal Support................................ ....................................................137
Dynamic DNS Support.....................................................................................137
Certificate Management...................................................................................138
Troubleshooting...............................................................................................144
GRE................................................................................................ .................148
L2TP ................................................................................................................154

10. System ................................................................................................ .. 156
Date and Time .................................................................................................156
Users ...............................................................................................................158
Diagnostics................................................................................................ ......161
Advanced.........................................................................................................163
Technical Support............................................................................................166
Appendix A – IP Address Ranges...............................................................167
Appendix B – Terminology................................ .......................................... 168
Appendix C – System Log ...........................................................................175
Access Logging................................................................................................175
Creating Custom Log Rules .............................................................................177
Rate Limiting....................................................................................................180
Administrative Access Logging ................................ ........................................180
Boot Log Messages .........................................................................................181

Introduction
1
1. Introduction
This chapter provides an overview of your SnapGear appliance’s features and
capabilities, and explains how to install and configure your SnapGear appliance.
This manual describes how to take advantage of the features of your SnapGear
appliance, including setting up network connection s, a secure firewall and a VPN. It also
describes how to set up the SnapGear appliance on your existing or new network using
the SnapGear Management Console web administration pages.
SnapGear Gateway Appliances
The SnapGear gateway appliance range (SME530, SME550, SME570, SME575)
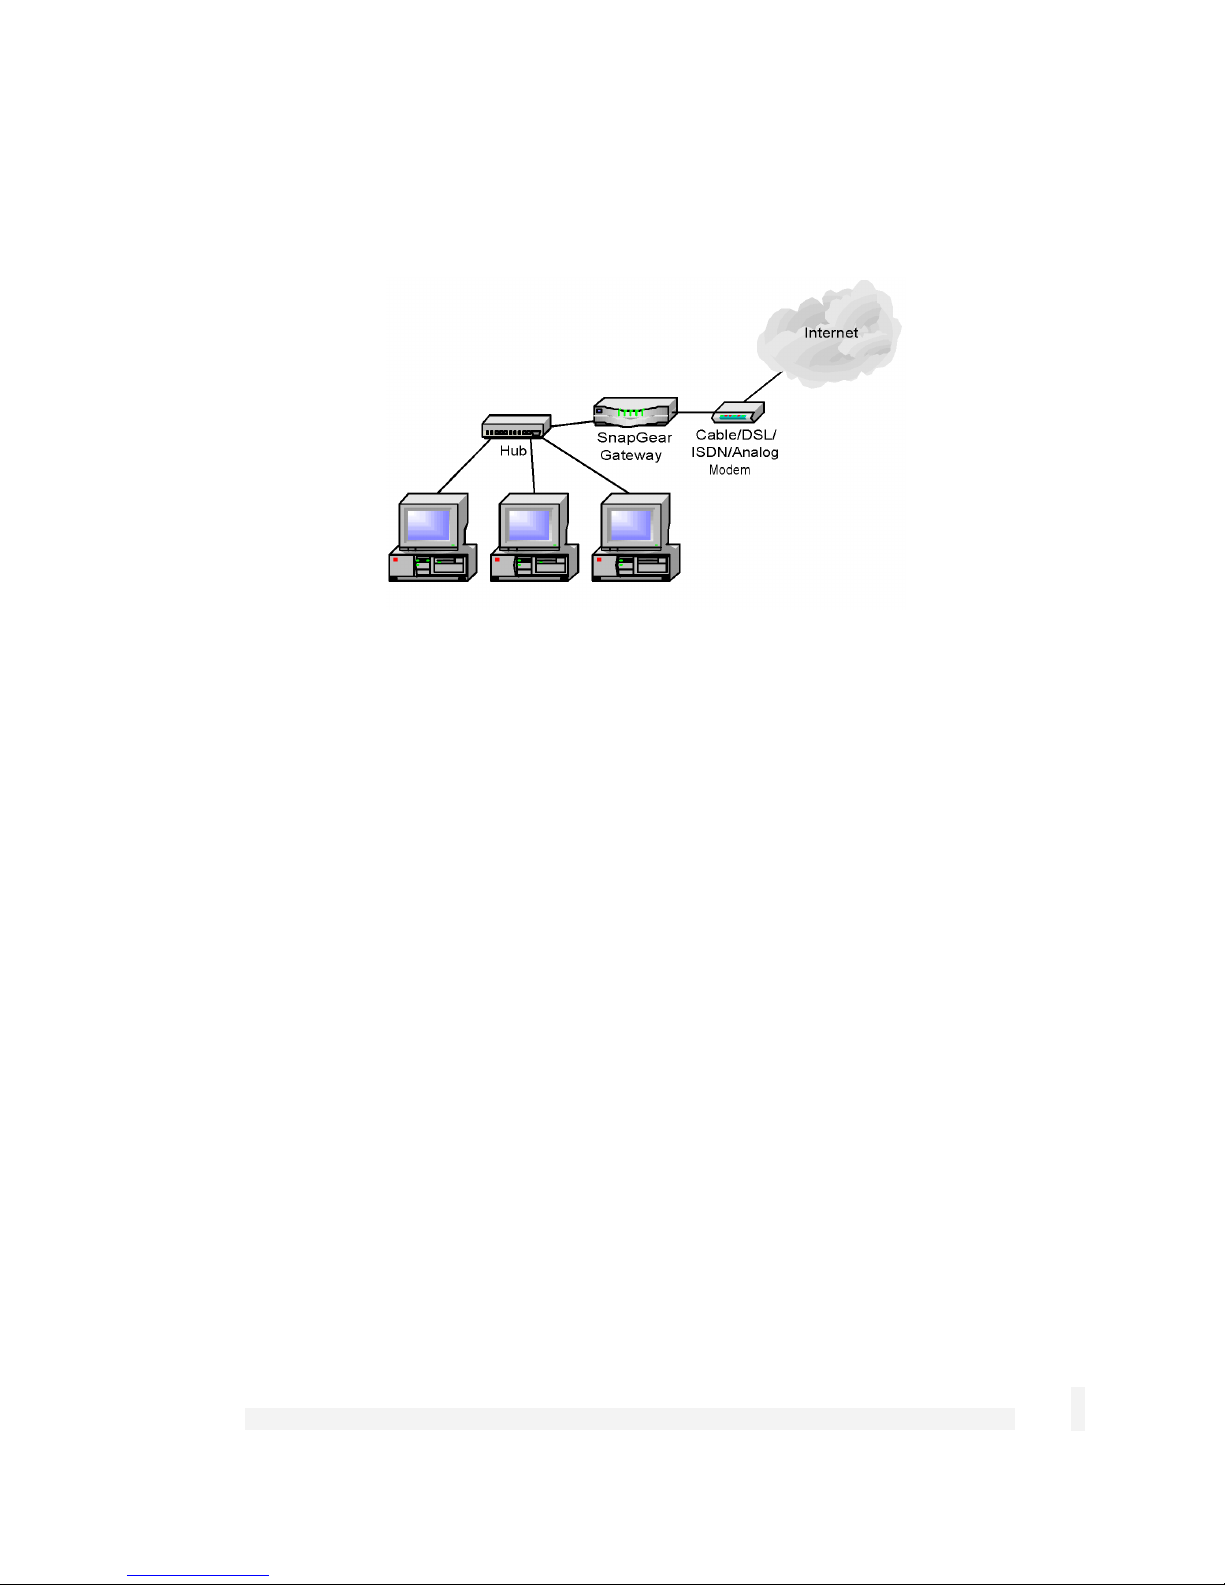
enables your office LAN to share a single, secure Internet connection.
The SnapGear appliance provides Internet security and privacy of communications for
small and medium enterprises. It simply and securely connects your office to the
Internet, and with its robust stateful firewall, shields your computers from outside threats.
The SnapGear appliance checks and filters data packets to prevent unauthorized
intruders gaining access.
The SnapGear appliance’s NAT/masquerading firewall means that although computers
on your office network can see and access resources on the Internet, all outsiders see is
the SnapGear gateway appliance’s external address.
SnapGear appliance models SME570 and SME575 have an additional Ethernet port that
may be configured as a physically separate DMZ to host servers accessible to the
outside world, in order to further secure your local network. Alternatively, it may be
configured as a second Internet connection to perform network load balancing.
The SnapGear appliance provides you with a Virtual Private Network (VPN) server. A
VPN enables remote workers or branch offices to securely access your company network
to send and receive data at a very low cost. With the SnapGear appliance, you can
remotely access your office network securely using the Internet. The SnapGear
appliance can also connect to external VPNs as a client.
Introduction
2
The following figure shows how your SnapGear appliance interconnects.
Figure 1-1
SnapGear PCI Appliances
The SnapGear PCI appliance (PCI630, PCI635) is a hardware-based firewall and VPN
server embedded in a 10/100 Ethernet PCI network interface card (NIC). It is installed
into the host PC like a regular NIC, providing a transparent firewall to shield the host PC
from malicious Internet traffic, and VPN services to allow secure remote access to the
host PC.
This appliance is recommended for:
• Security conscious businesses that wish to separate firewall and VPN issues from
server/desktop operating systems.
• Businesses that wish to eliminate the "soft center".
• For environments where the integrity of the host server operating environment
cannot be controlled or trusted.
Unlike SnapGear gateway appliances, a single SnapGear PCI appliance it is not intended
as a means for your entire office LAN to be connected to, and shielded from, the Internet.
Installing a SnapGear appliance in each network connected PC gives it its own
independently manageable, enterprise-grade VPN server and firewall, running in isolation
from the host operating system.

Introduction
3
This approach offers an increased measure of protection against internal threats as well
as conventional Internet security concerns. You can update, configure and monitor the
firewall and VPN connectivity of a workstation or server from any web browser. In the
event of a breach, you have complete control over individual PCs' access policies
independent of the host PC's operating system, even if the system has been subverted
and is denying normal administrator access.
All network filtering and what can be CPU intensive cryptographic processing is handled
entirely by the SnapGear appliance. This has the advantage over the traditional
approach of a host-based personal software firewall and VPN services of not taxing the
host PC's resources.
Bridged mode
By default, the SnapGear PCI appliance operates in bridged mode. This is distinctly
different from the NAT/masquerading behavior of the SnapGear gateway appliance
range.
In bridged mode, the SnapGear appliance uses two IP addresses. Note that these
addresses are both in the same range as the LAN, as no NAT/masquerading is being
performed (see the chapter entitled Firewall for more information).
One IP address is used to manage the SnapGear appliance via the SnapGear
management console web administration pages.
The other is the host PC's IP address, configurable through the host operating system
identical to a regular NIC. This is the IP address that other PCs on the LAN see. It
should be dynamically (DHCP) or statically configured to use the same gateway, DNS,
etc. settings as a regular PC on the LAN.
It is possible to configure the SnapGear appliance to run in NAT mode. This is discussed
in the chapter entitled Network Connections.
Secure by default
By default, the SnapGear appliance runs a fully secured stateful firewall. This means
from the PC that it is plugged into, most network resources are freely accessible.
However, any services that the PC provides, such as file shares or web services (e.g. IIS)
will not be visible to the general office LAN without further configuration of the SnapGear
appliance. For details on how services on the host PC can be made available to the
general office LAN, see the section Allowing individual ports in bridged mode at the end
of the chapter entitled Firewall.

Introduction
4
Document Conventions
This document uses different fonts and typefaces to show specific actions.
Warning/Note
Text like this highlights important issues.
Bold text in procedures indicates text that you type, or the name of a screen object (e.g.
a menu or button).
Introduction
5
Your SnapGear Gateway Appliance
SnapGear gateway appliances include:
• SME530
• SME550
• SME570
• SME575
The following items are included with your SnapGear gateway appliance:
• Power adaptor
• Installation CD
• Printed Quick Install guide
• Cabling including
o 1 normal straight through UTP cable (blue color)
o 1 crossover UTP cable (either gray or red color)
Front panel LEDs
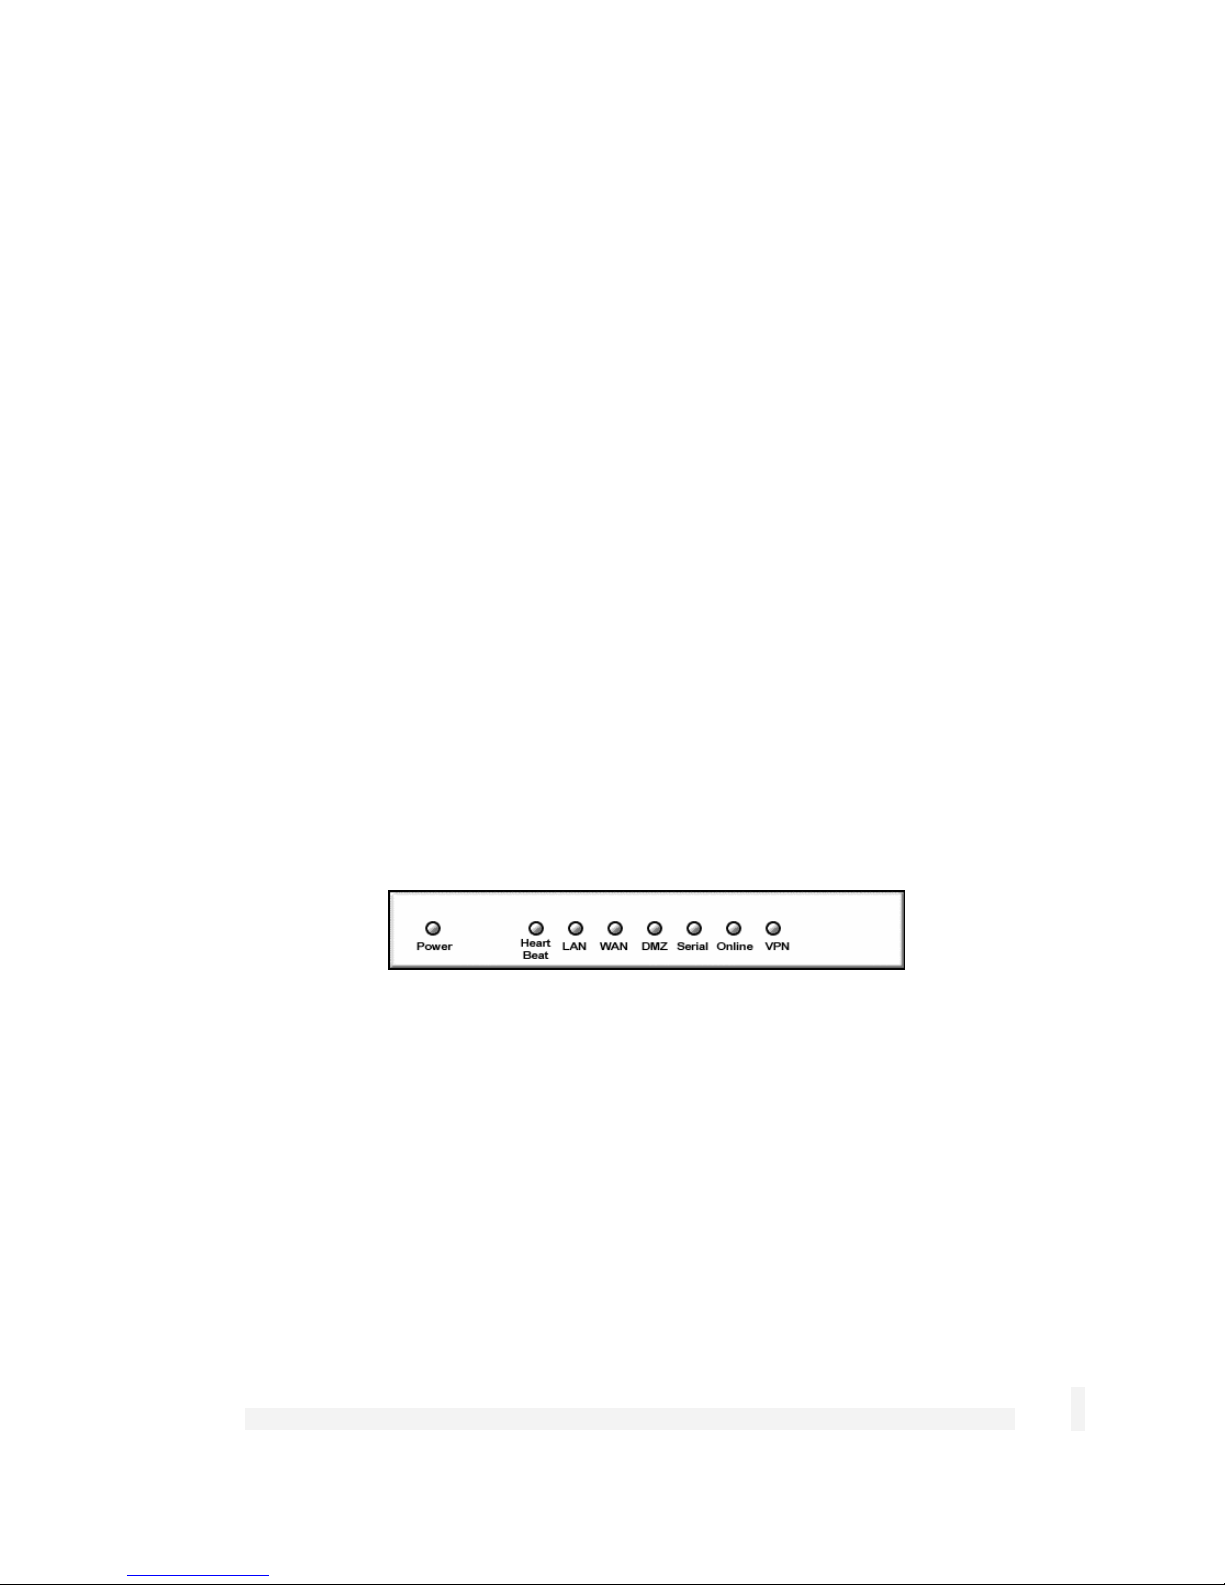
The front and rear panels contain LEDs indicating status. An example of the front panel
LEDs are illustrated in the following figure and detailed in the following table.
Figure 1-2

Introduction
6
Note
Not all the LEDs described below are present on all SnapGear appliance models. Also,
labels vary from model to model.
Label Activity Description
Power
On Power is supplied to the SnapGear appliance
Flashing The SnapGear appliance is operating correctly
Heart Beat
On If this LED is on and not flashing, an operating error
has occurred
LAN Activity
Flashing Network traffic on the LAN network interface
WAN Activity
Flashing Network traffic on the Internet network interface
DMZ Activity
Flashing Network traffic on the DMZ network interface
Serial Activity
Flashing For either of the SnapGear appliance COM ports,
these LEDs indicate receive and transmit data
Online
On An Internet connection has been established
VPN
On Virtual Private Networking is enabled

Introduction
7
Rear panel
The rear panel contains the connector ports for the LAN, Internet, modem (COM1) and
possibly DMZ (SME570, SME575 only) as well as LAN status LEDs, Internet status
LEDs, the reset button and power inlet.
The lower LAN/Internet status LED indicates the link condition, where a cable is
connected correctly to another device . The upper LED indicates network activity.

Introduction
8
SnapGear Gateway Appliance Features
Internet link features
• 10/100baseT Ethernet port ( Internet/WAN) that connects to the Internet using a
cable or ADSL modem
• Serial port to attach an external modem or ISDN TA
• Front panel serial status LEDs (for TX /RX)
• Online status LEDs (for Internet/VPN)
• Rear panel Ethernet link and activity status LEDs
LAN link features
• 10/100BaseT LAN port to connect to the local Ethernet network
• Rear panel Ethernet link and activity status LEDs
DMZ link features (SME570, SME575 only)
• 10/100BaseT DMZ port
• Real panel Ethernet link and activity status LEDs
Dialin connection features
• An external modem may be attached via serial port for dial-in connections
Enviromental features
• External power adaptor (voltage/current depend s on individual model)
• Front panel operating status LEDs: Power, Heart Beat
• Operating temperature between 0° C and 40° C
• Storage temperature between -20° C and 70° C
• Humidity between 0 to 95% (non-condensing)
Introduction
9
Your SnapGear PCI Appliance
SnapGear PCI appliances include:
• PCI630
• PCI635
The following items are included with your SnapGear PCI appliance:
• Installation CD
• Printed Quick Install guide
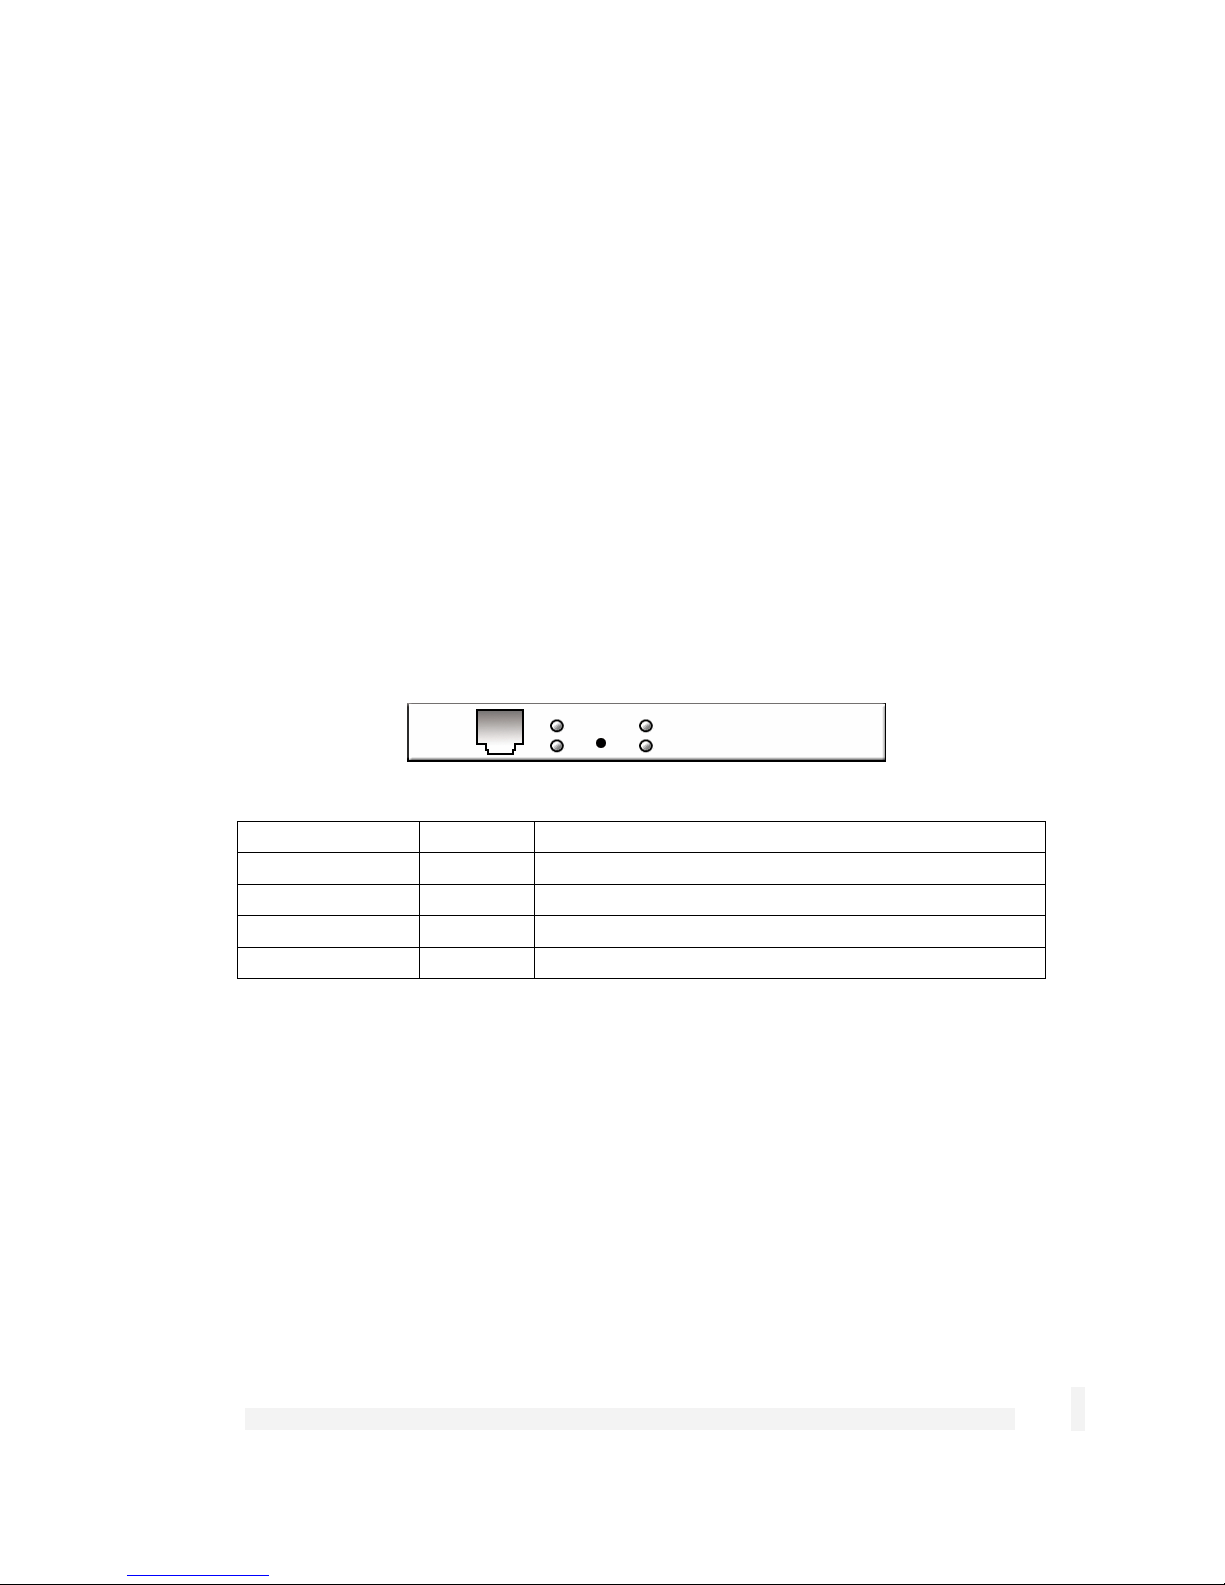
LEDs
The rear panel contains LEDs indicating status. The two LEDs closest to the network
port are network activity (upper) and network link (lower). The two other LEDs are power
(upper) and heart beat (lower).
Figure 1-3
Label Activity Description
Power
On Power is supplied to the SnapGear appliance.
Heart beat
Flashing The SnapGear appliance is operating correctly.
Network activity
Flashing Data is being transmitted or received.
Network link
On The SnapGear appliance is attached to the network.

Introduction
10
SnapGear PCI Appliance Features
Network link features
• 10/100baseT Ethernet port that connects to the LAN (or Internet using a cable or
ADSL modem)
• Ethernet LEDs (link, activity)
Environmental features
• Status LEDs: Power, Heart Beat
• Operating temperature between 0° C and 40° C
• Storage temperature between -20° C and 70° C
• Humidity between 0 to 95% (non-condensing)

Getting Started
11
2. Getting Started
This chapter provides step-by-step instructions for installing your SnapGear appliance
into your netw ork and connecting to the Internet. This is a slightly more detailed version
of the printed Quick Install Guide that shipped with your SnapGear appliance.
These instructions assume you have a PC running Microsoft Windows (95/98/Me/
2000/XP for SnapGear gateway appliances , 2000/XP only for SnapGear PCI appliances).
If you are installing a SnapGear gateway appliance, you must have an Ethernet network
interface card installed. You may need to be logged in with administrator privileges.
Instructions are not given for other operating systems – refer to your operating system
documentation on how to configure your PCs ’ network settings using the examples given
for Windows PCs as a guide.
Installing your SnapGear appliance into a well-planned network is easy. However,
network planning is outside the scope of this manual. Please take the time to plan your
network before installing your SnapGear appliance.
If you are setting up a SnapGear gateway appliance (SME530, SME550, SME570,
SME575) proceed to SnapGear gateway appliances below. If you are setting up a
SnapGear PCI appliance (PCI630, PCI635), proceed to SnapGear PCI appliances
towards the end of this chapter.
SnapGear Gateway Appliances
Set up a PC to Connect to the SnapGear Management Console
The SnapGear appliance ships with initial, static IP settings of:
IP address: 192.168.0.1
Subnet mask: 255.255.255.0
Note
The Internet/WAN and DMZ interfaces are by default inactive, i.e. there are no network
services such as DHCP in operation, and no IP address is configured.

Getting Started
12
The SnapGear appliance’s LAN interface will always be initially reachable at 192.168.0.1.
If you attach your SnapGear unit directly to a LAN with an existing DHCP server before
performing the initial setup steps described below, the LAN interface will automatically
obtain an additional address.
In this case, it will be reachable at both 192.168.0.1 and the address assigned by your
LAN DHCP server. The address you use when navigating to the unit (as described Set
up the SnapGear appliance's password and LAN connection settings) will be used as the
SnapGear unit’s LAN interface address and the other will be discarded.
Your SnapGear appliance will need an IP address suitable for your LAN before it is
connected. You may choose to use the SnapGear appliance’s initial network settings as
a basis for your LAN settings.
Connect the supplied power adapter to the SnapGear appliance.
Connect the SnapGear appliance’s LAN Ethernet port directly to your PC’s network
interface card using the crossover cable (red or gray).
Note
If you wish to use the SnapGear appliance’s initial network settings as a basis for your
LAN settings, you may connect it directly to your LAN hub using the straight through
Ethernet cable (blue).
Before doing so, it is critical that you ensure there are no other devices on the LAN
with an address of 192.168.0.1.
Next, you must modify your PC’s network settings to enable it to communicate with the
SnapGear appliance.
Click Start -> Settings -> Control Panel and double click Network Connections (or in
95/98/Me, double click Network).
Right click on Local Area Connection and select Properties.
Getting Started
13
Note
If there is more than one existing network connection, select the one corresponding to the
network interface card to which the SnapGear appliance is attached.
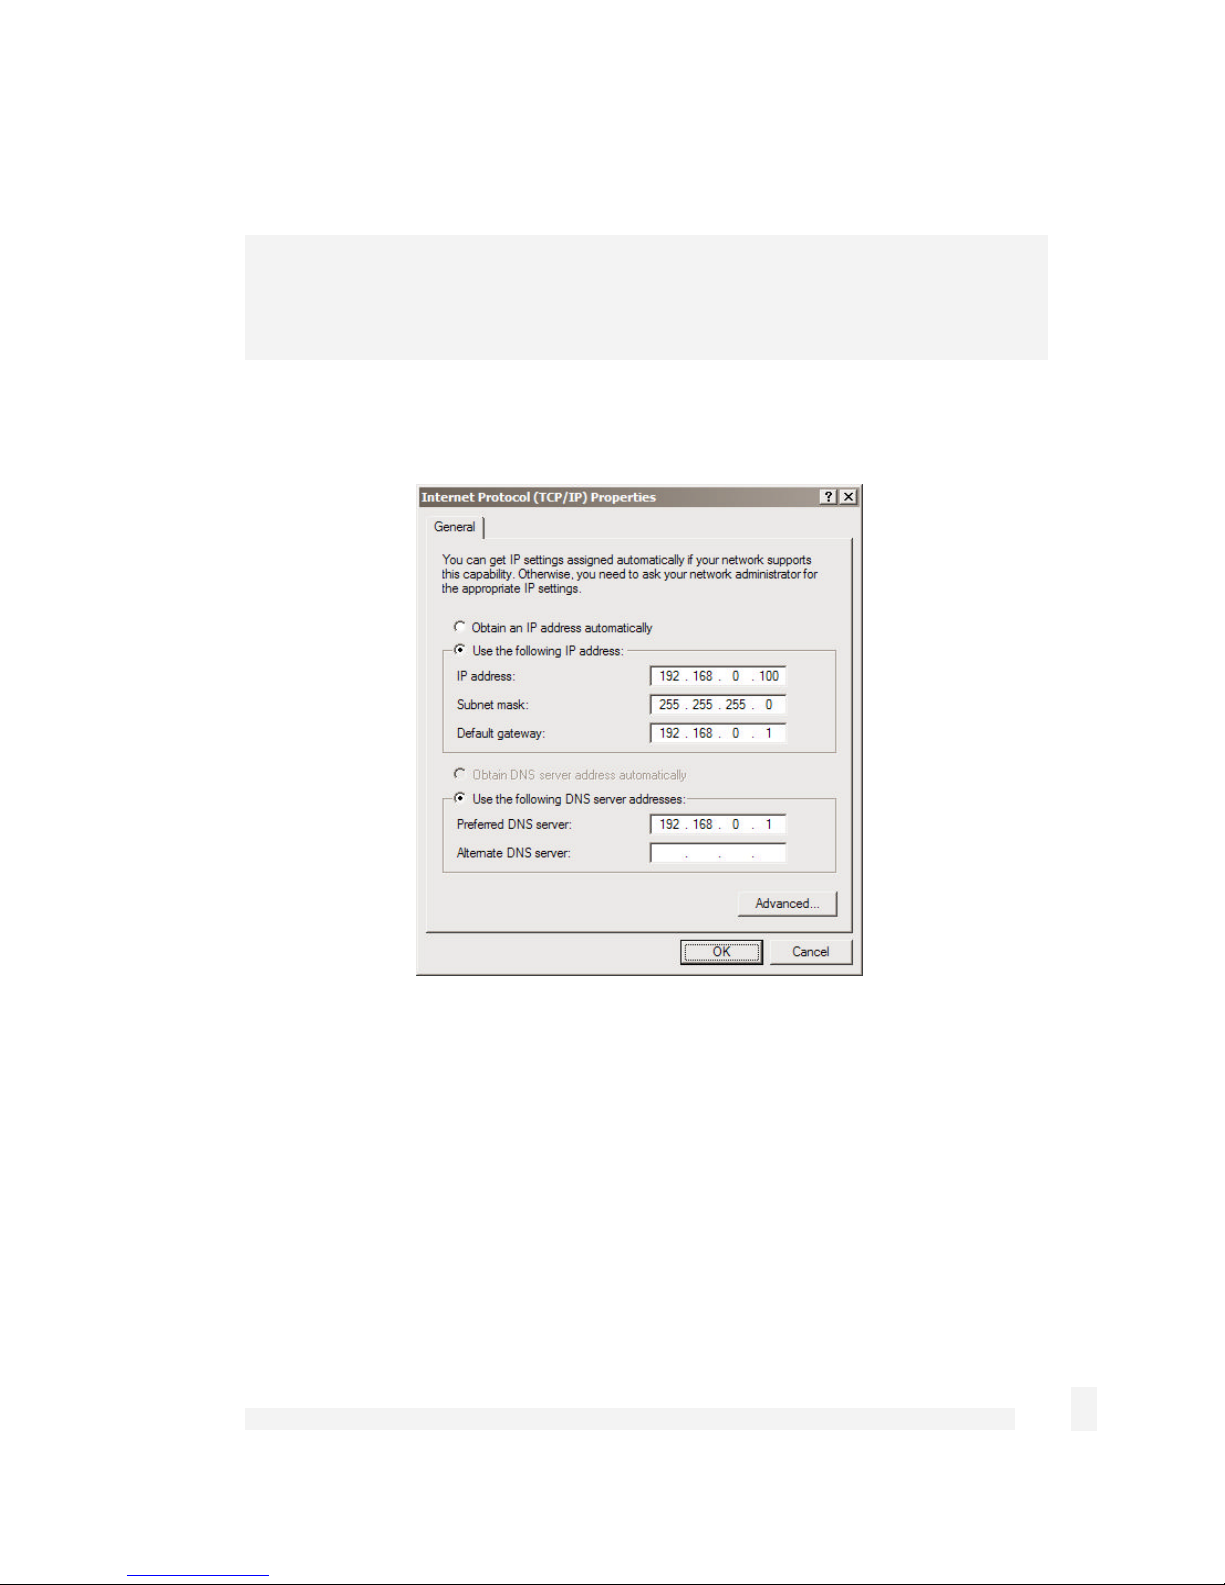
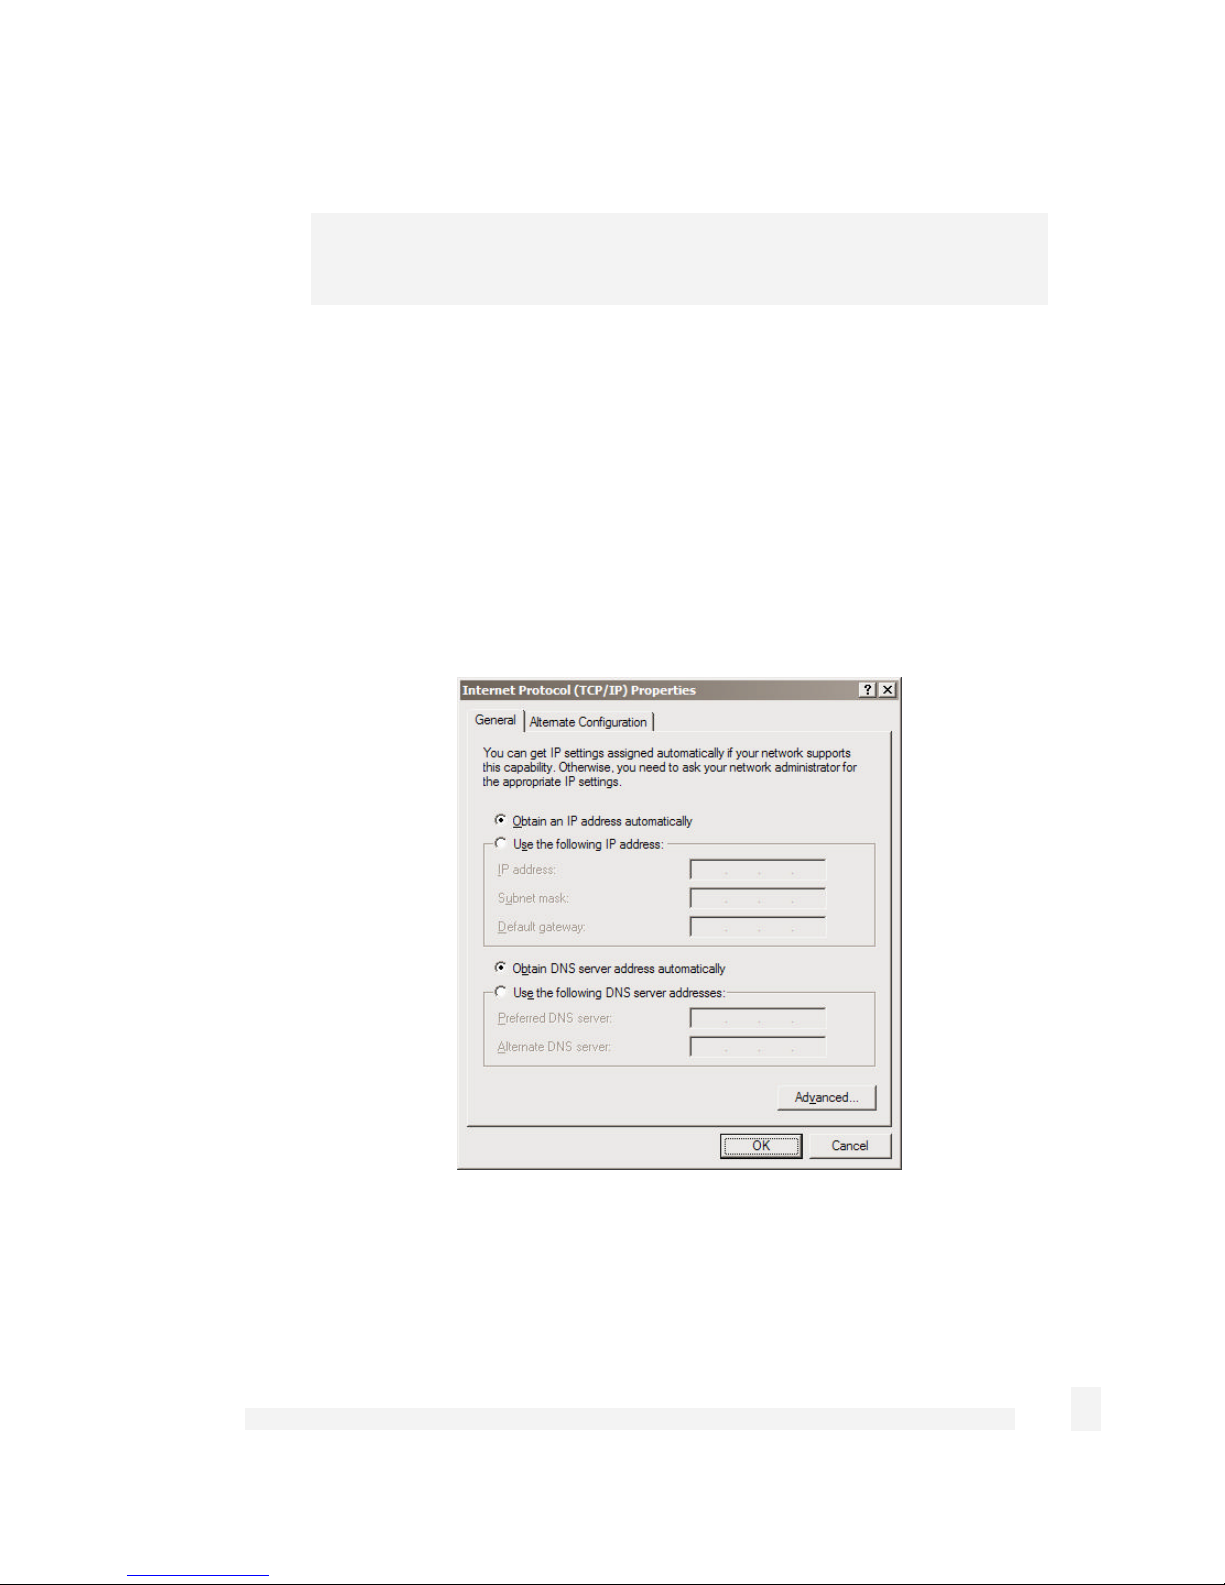
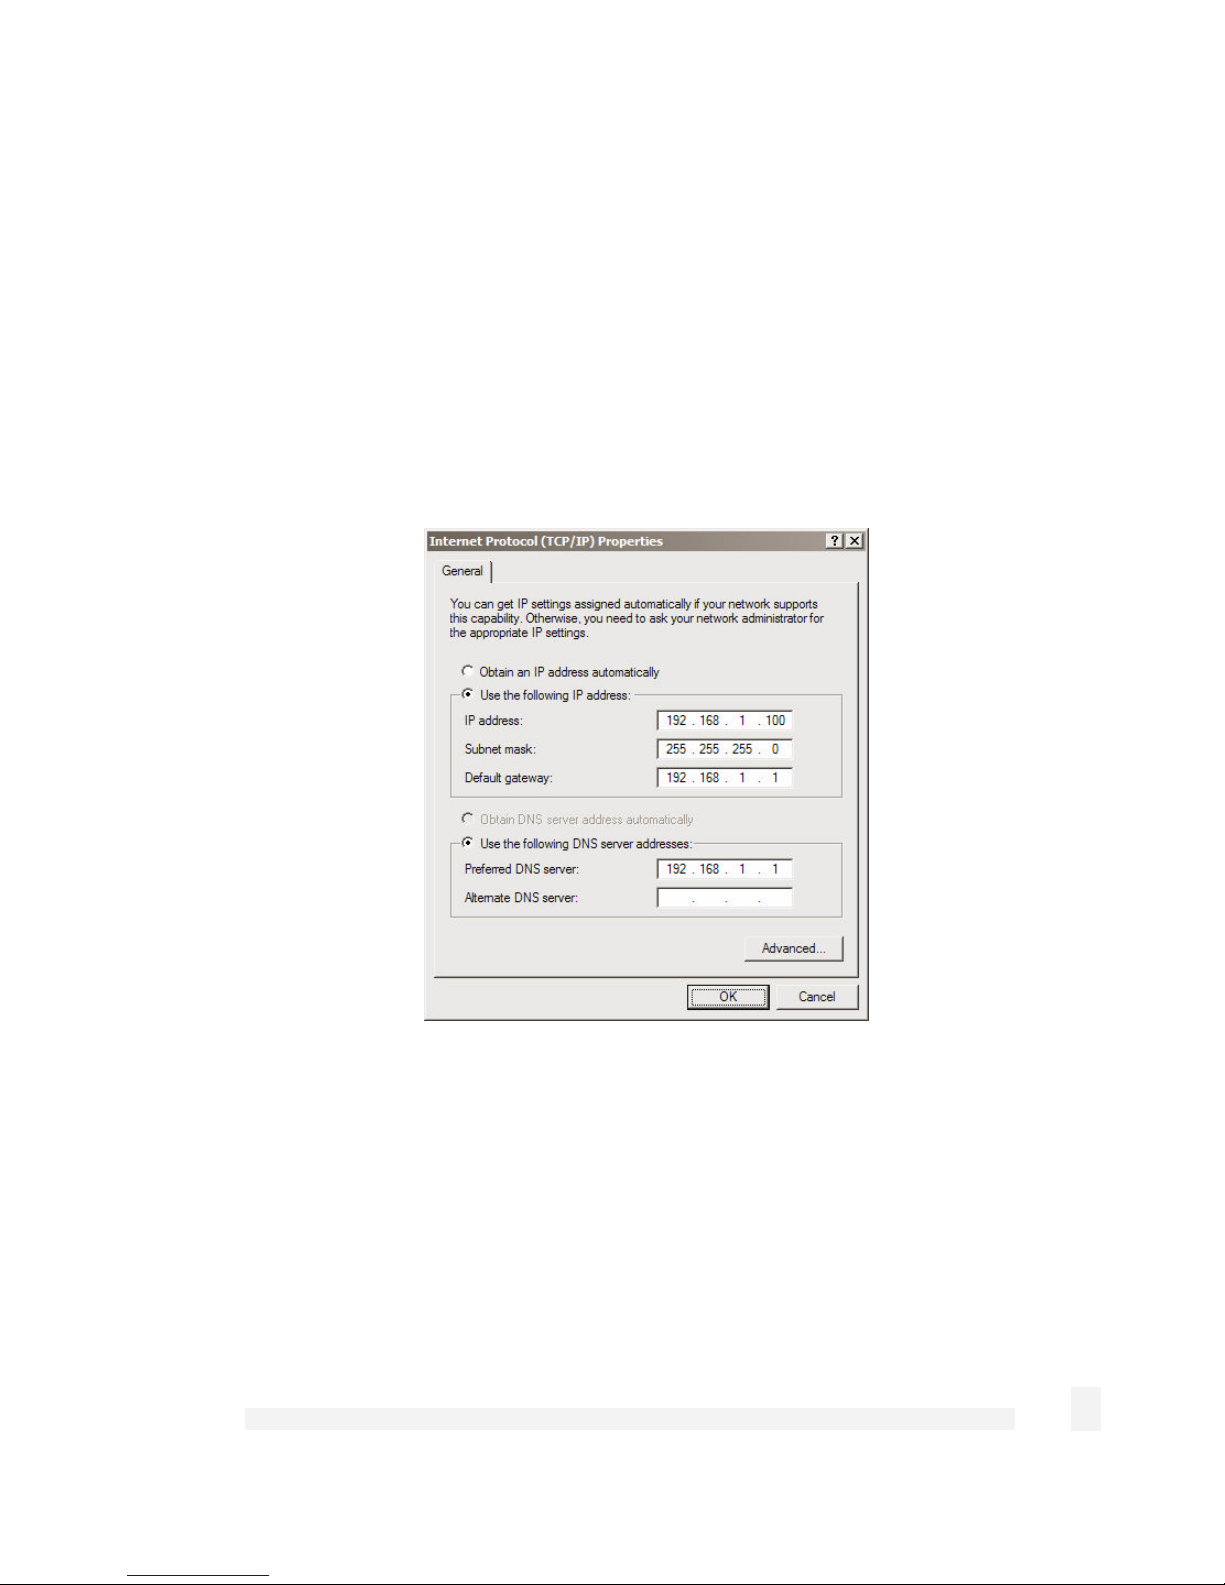
Select Internet Protocol (TCP/IP) and click Properties (or in 95/98/Me, TCP/IP ->
your network card name if there are multiple entries) and click Properties.
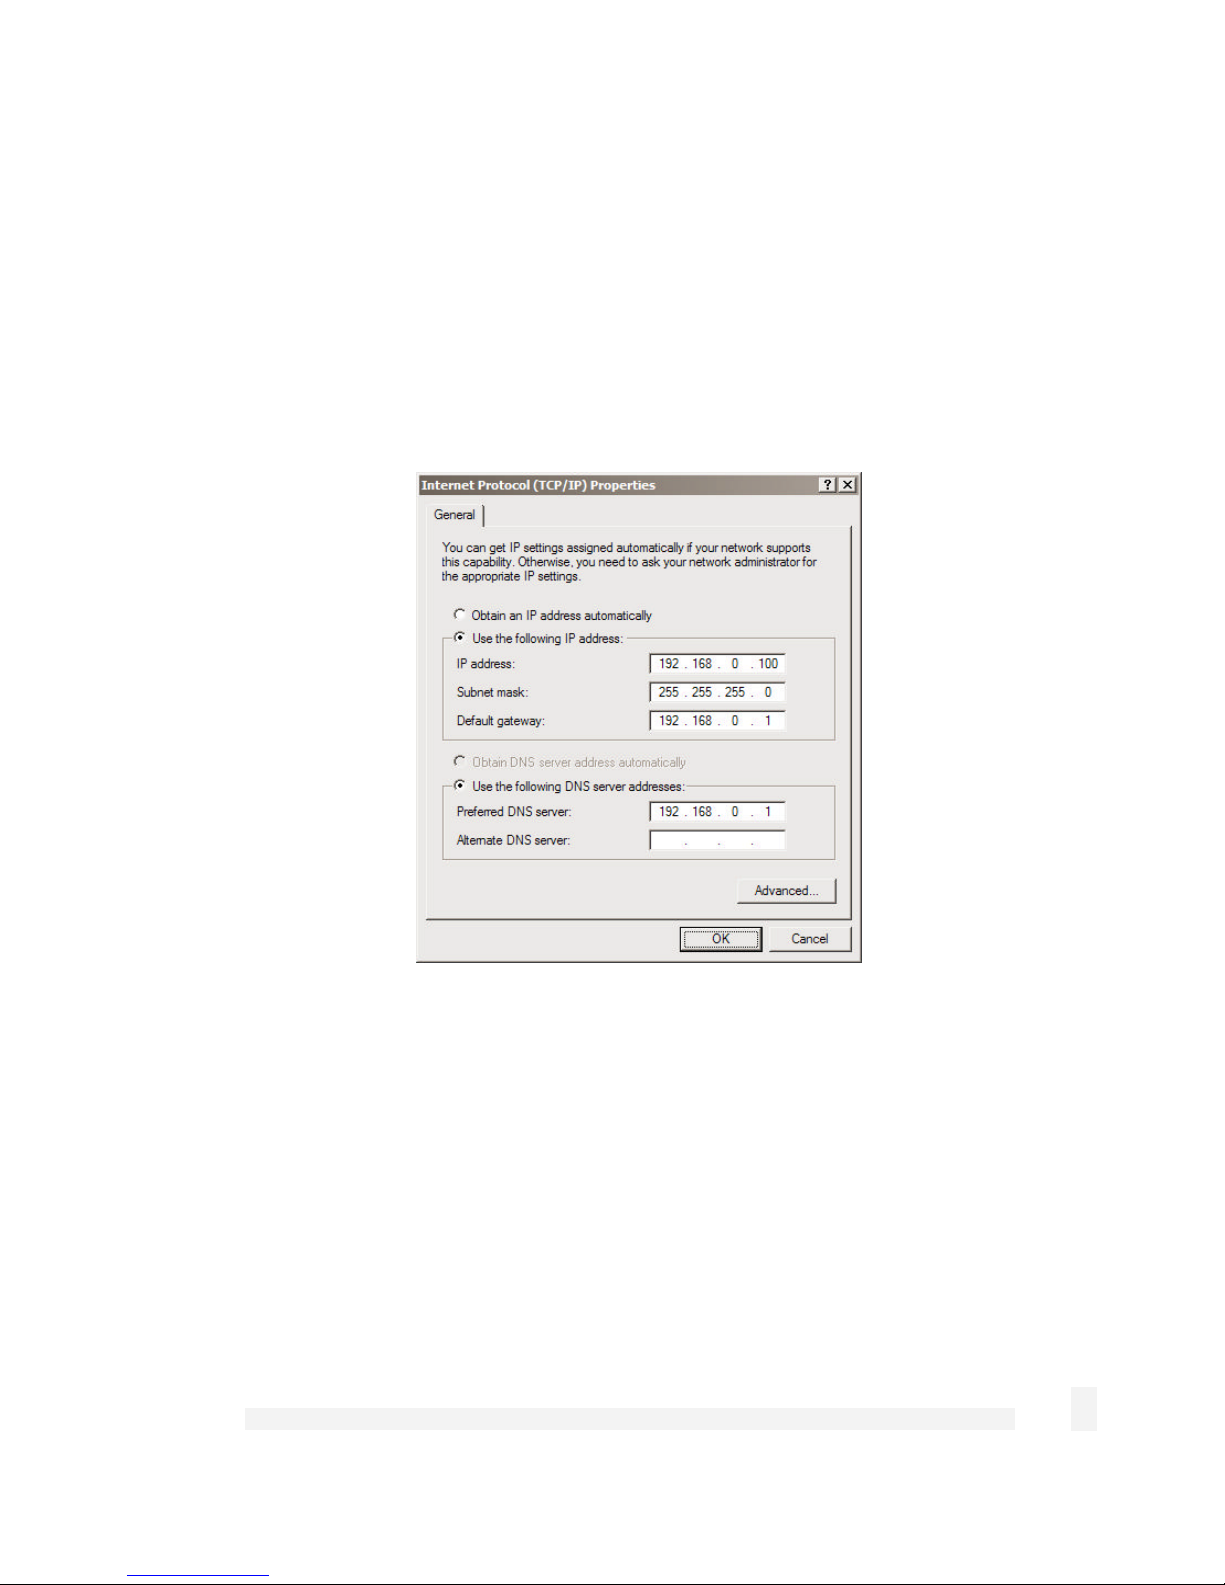
Figure 2-1
Select Use the following IP address and enter the following details:
IP address: 192.168.0.100
Subnet mask: 255.255.255.0
Default gateway: 192.168.0.1
Select Use the following DNS server addresses and enter:
Preferred DNS server: 192.168.0.1
Getting Started
14
Note
If you wish to retain your existing IP settings for this network connection, click Advanced
and Add the secondary IP address of 192.168.0.100, subnet mask 255.255.255.0.
Set up the SnapGear Appliance’s Password and LAN Connection
Settings
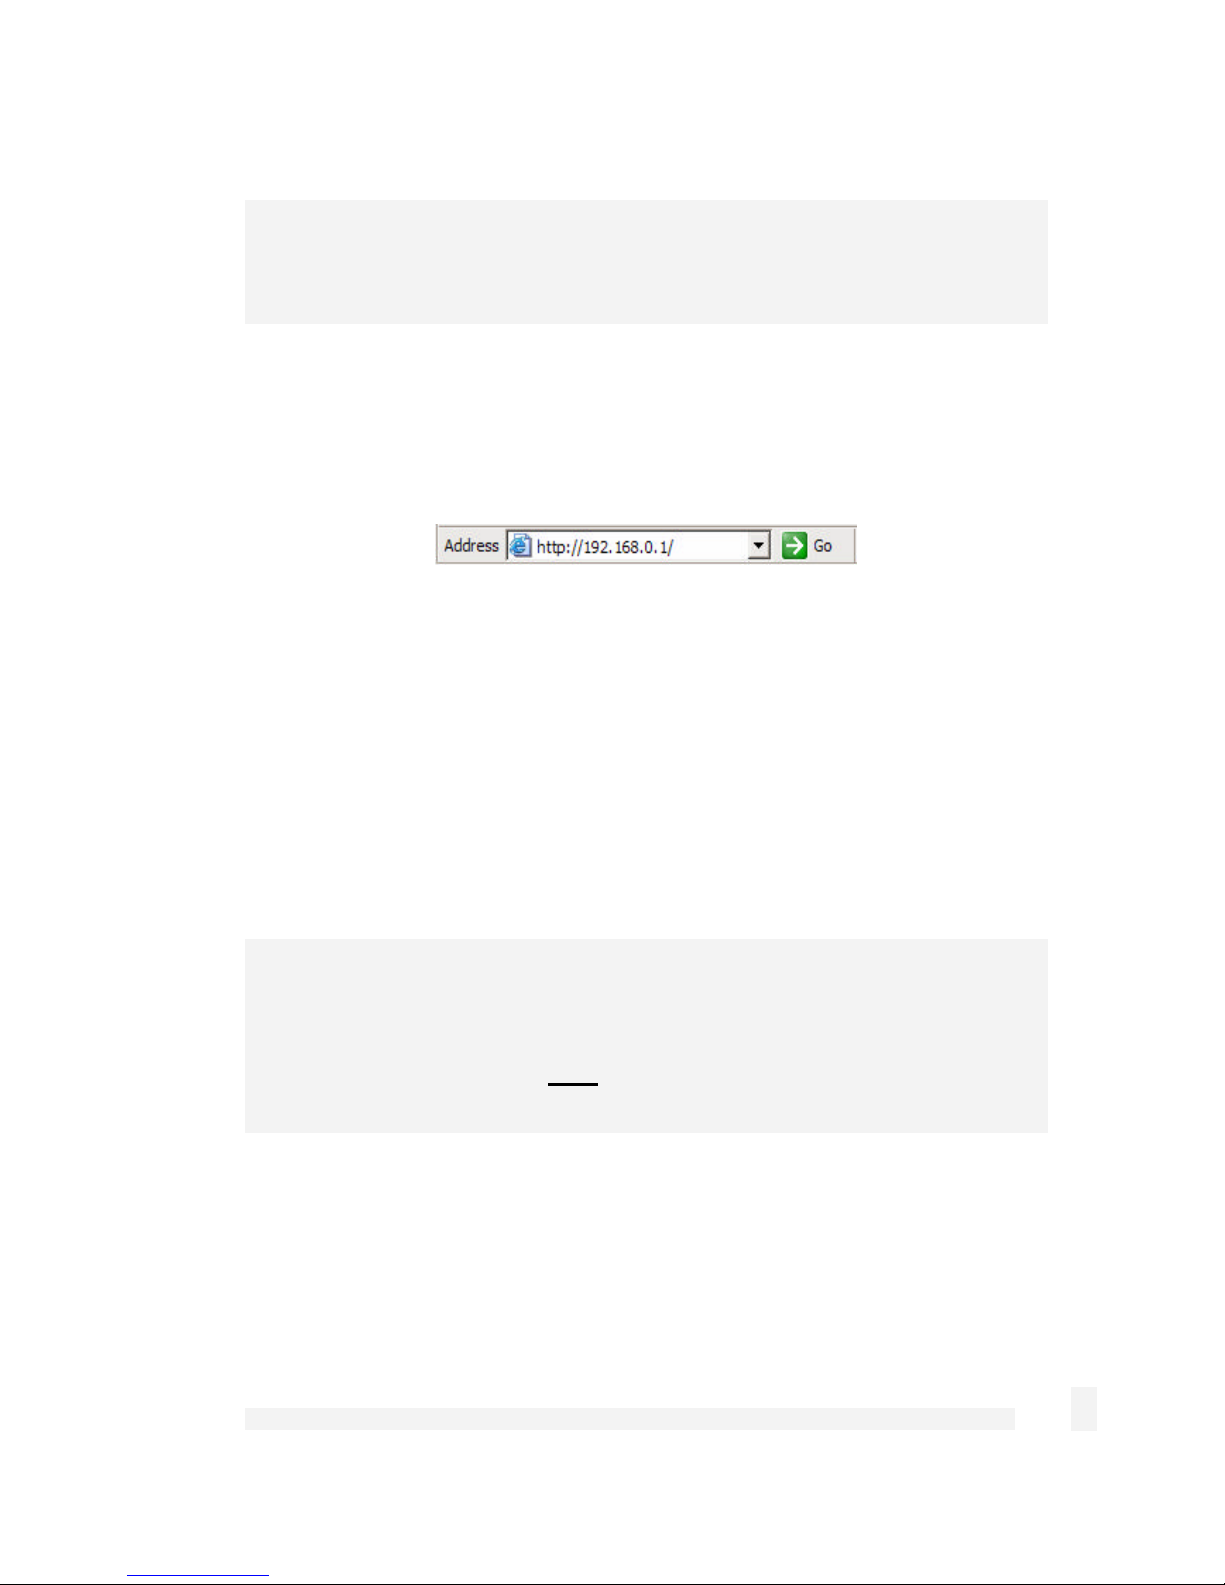
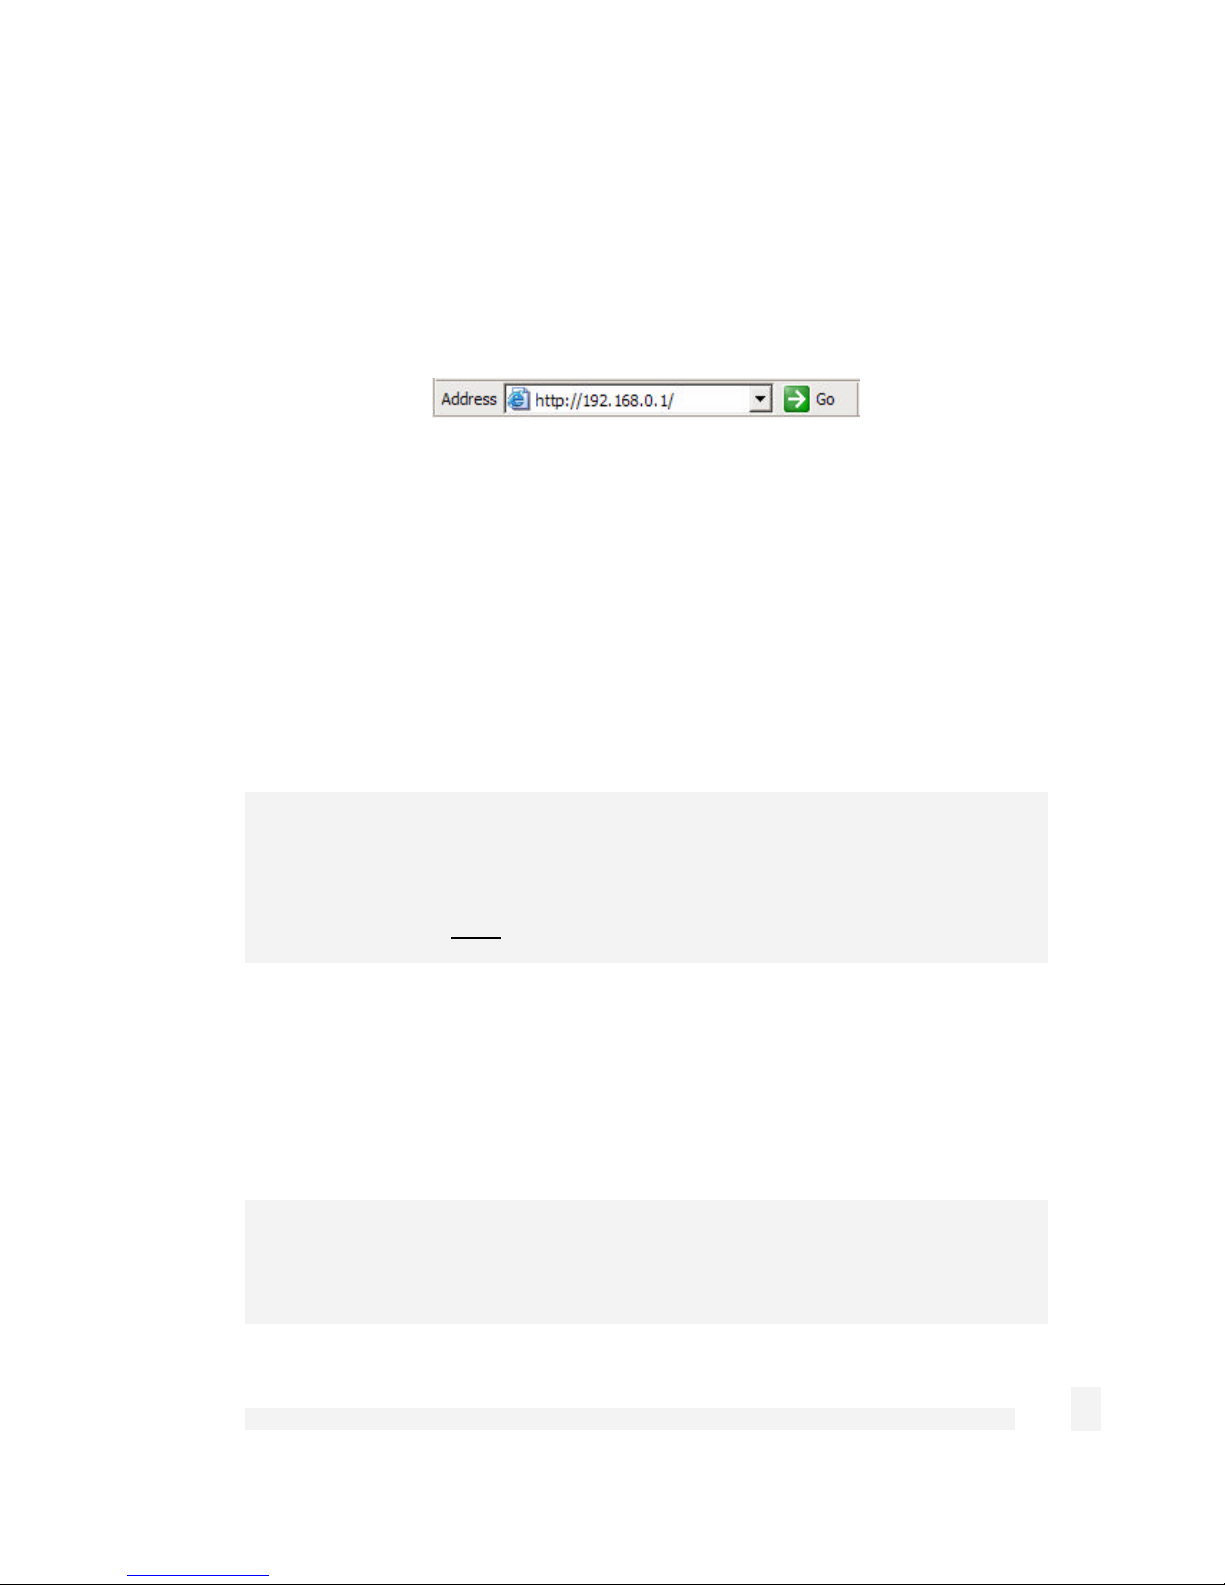
Launch Internet Explorer (or your preferred web browser) and navigate to 192.168.0.1.
Figure 2-2
The SnapGear Management Console will display.
Select Quick Setup Wizard from the center of the page.
You will be prompted to log in. Enter the initial user name and password for your
SnapGear appliance:
User name: root
Password: default
Note
If you are unable to connect to the Management Console at 192.168.0.1, or the initial
username and password are not accepted, press the black Reset/Erase button on the
SnapGear appliance’s rear panel twice, wait 20 – 30 seconds, and try again. Pressing
this button twice within 2 seconds returns the SnapGear appliance to its factory default
settings.
Enter and confirm a password for your SnapGear appliance. This is the password for the
user root, the main administrative user account on the SnapGear appliance. It is
therefore important that you choose a password that is hard to guess, and keep it safe.
The new password will take effect immediately, and you will be prompted to enter it when
completing the next step.
Getting Started
15
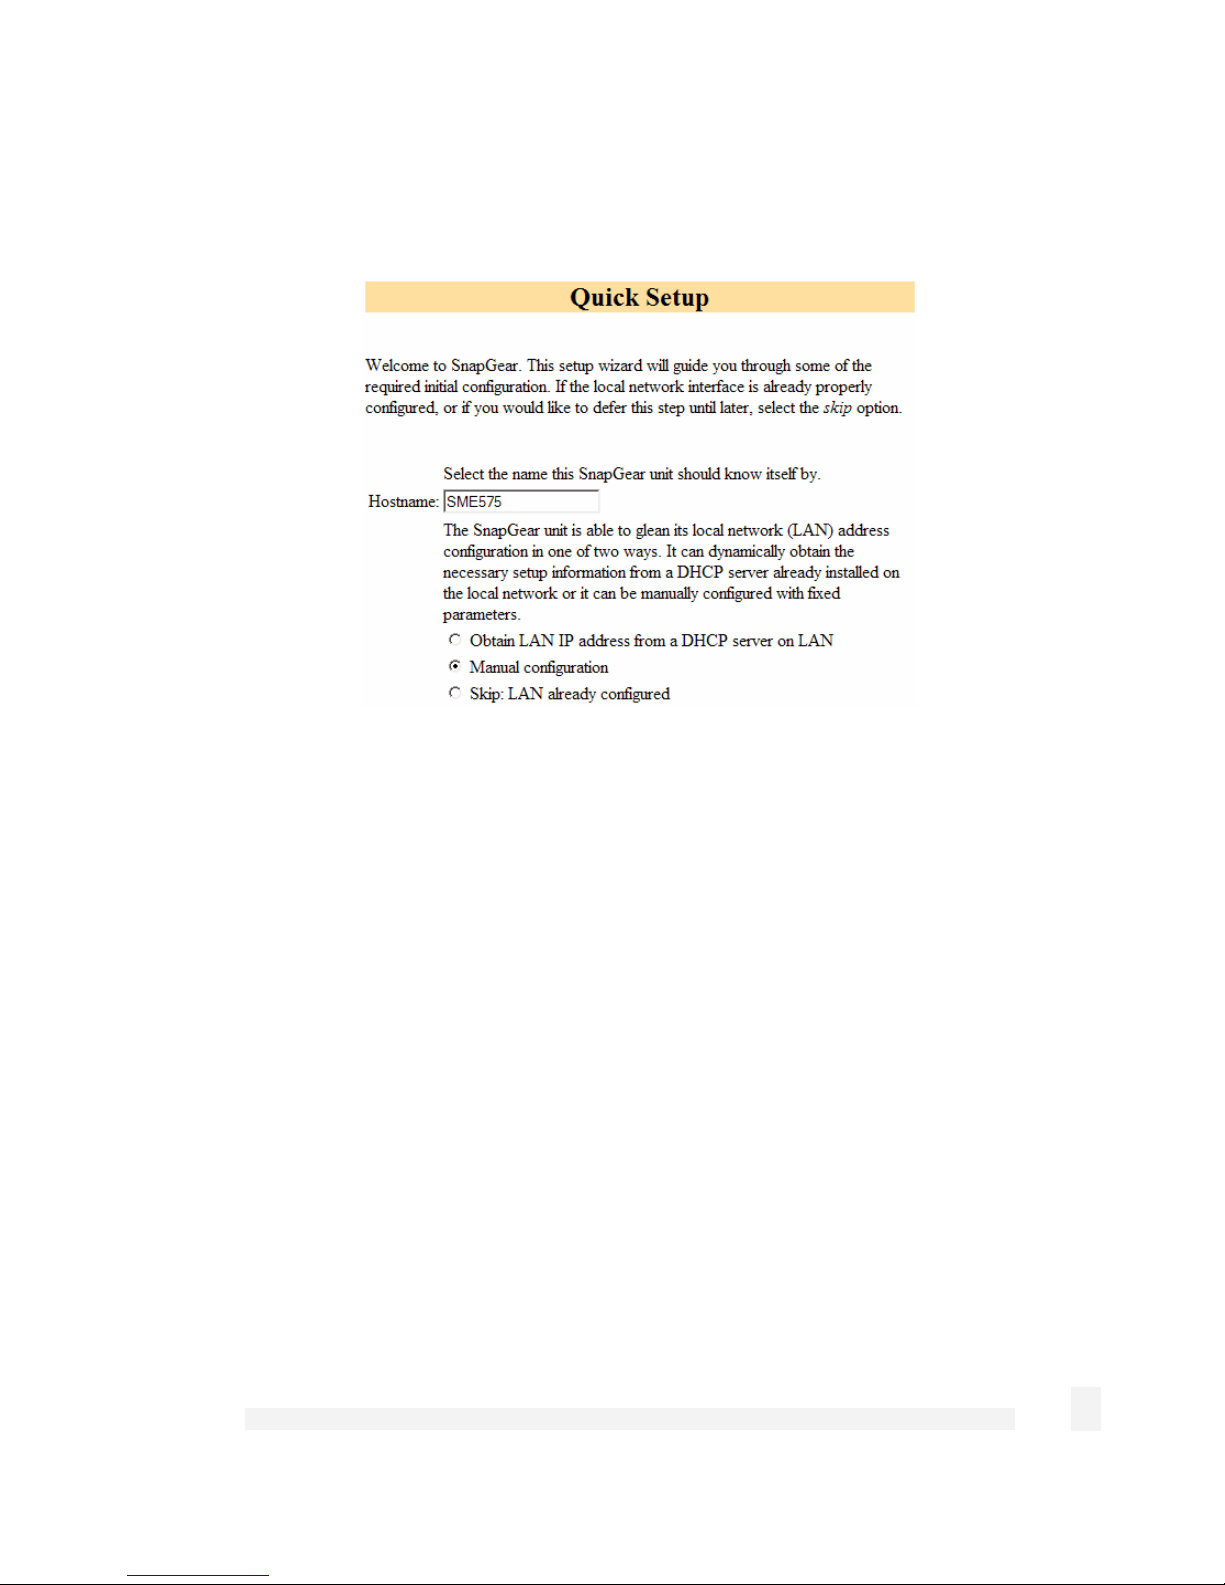
The Quick Setup Wizard will display.
Figure 2-3
Hostname: You may change the name the SnapGear appliance knows itself by. This is
not generally necessary.
Manual configuration: Select this to manually specify your SnapGear appliance’s LAN
connection settings.
Skip: LAN already configured: Select this if you wish to use the SnapGear appliance’s
initial network settings (IP address 192.168.0.1 and subnet mask 255.255.255.0) as a
basis for your LAN settings. You may skip to the next step.
Obtain LAN IP address from a DHCP server on LAN (not generally recommended):
Select this if you have an existing DHCP server that you wish to have automatically
configure your SnapGear appliance’s LAN connection settings. You may skip to the next
step.
Click Next.
Getting Started
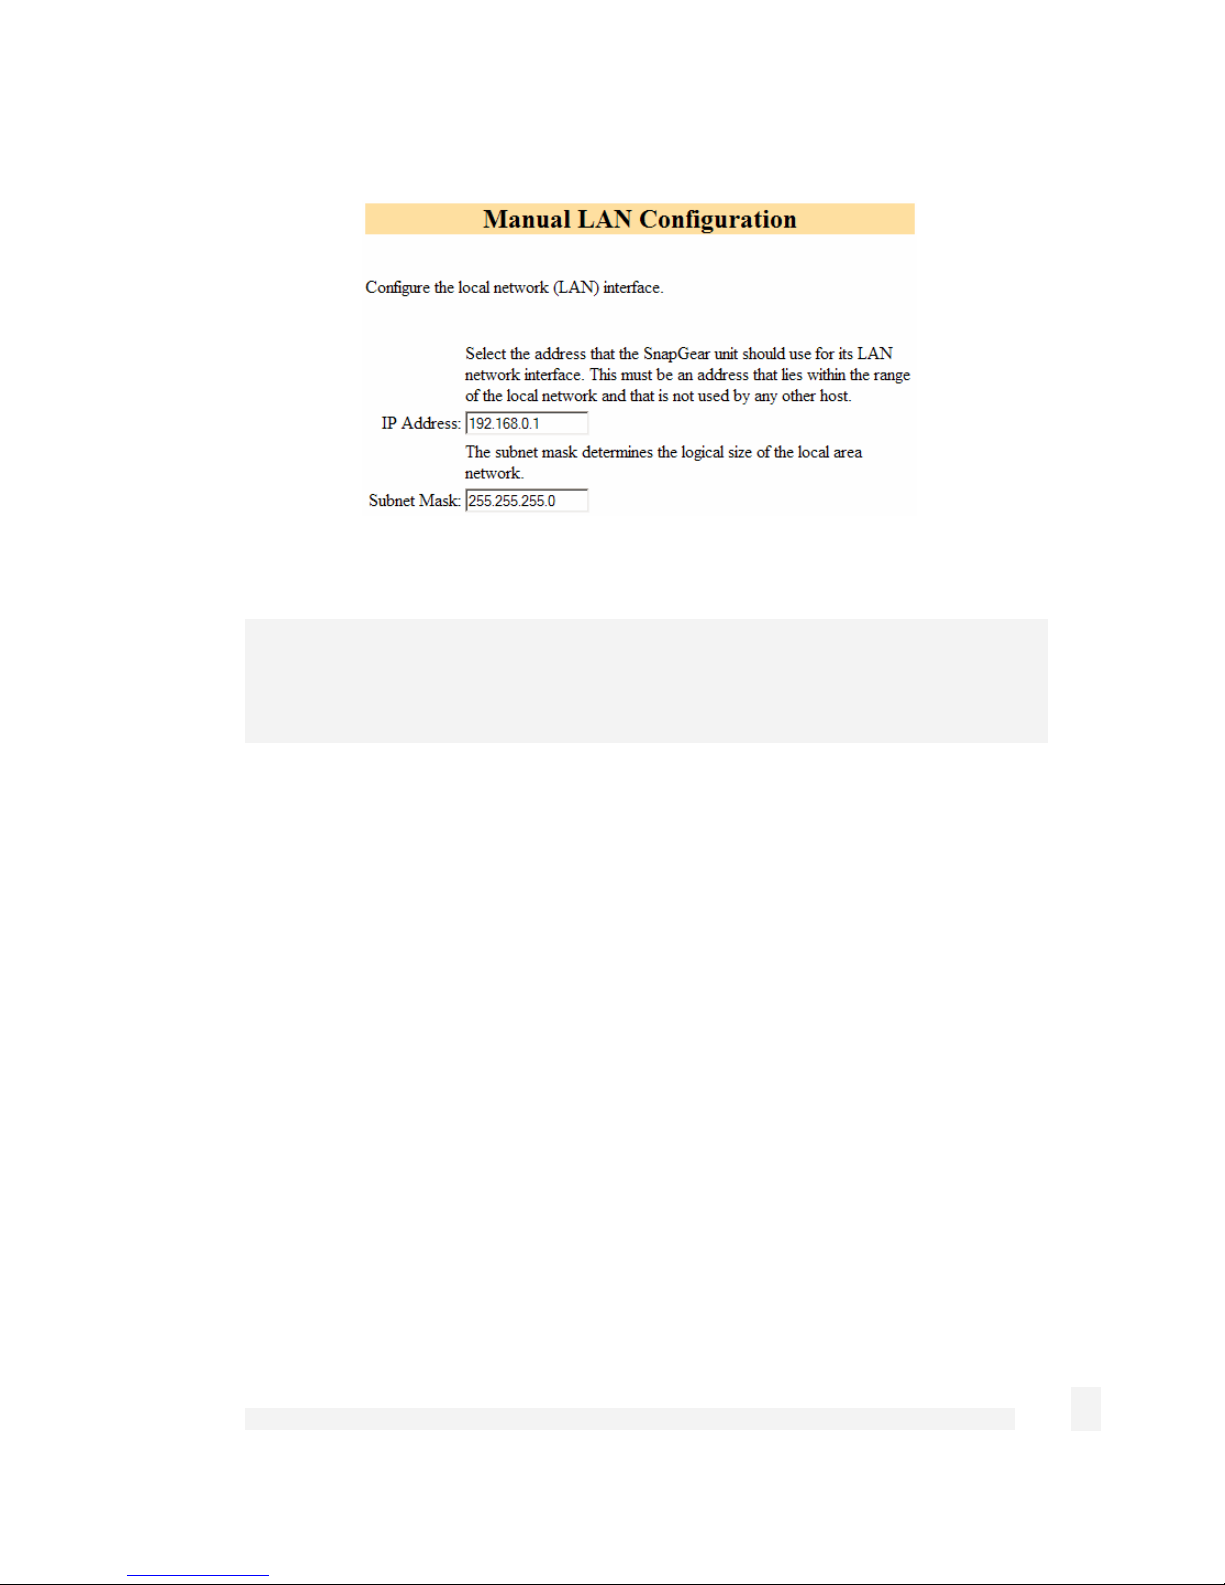
16
Figure 2-4
Note
This page will only display if you previously selected Manual configuration. Otherwise
skip to the next step.
Enter an IP address and Subnet mask for your SnapGear appliance’s LAN connection.
You may choose to use the SnapGear appliance’s initial network settings if you are sure
no other PC or network device already has the address of 192.168.0.1.
The IP address will later be used as the gateway address for the PCs on your LAN. To
gain access through this gateway, the PCs on your LAN must have an IP address within
the bounds of the subnet described by the SnapGear appliance’s IP address and subnet
mask (e.g. using the SnapGear appliance’s initial network settings, 192.168.0.2 –
192.168.0.254).
Take note of this IP address and subnet mask, as you will need them later on.
Click Next to set up your SnapGear appliance’s Internet connection settings and connect
to the Internet.
Getting Started
17
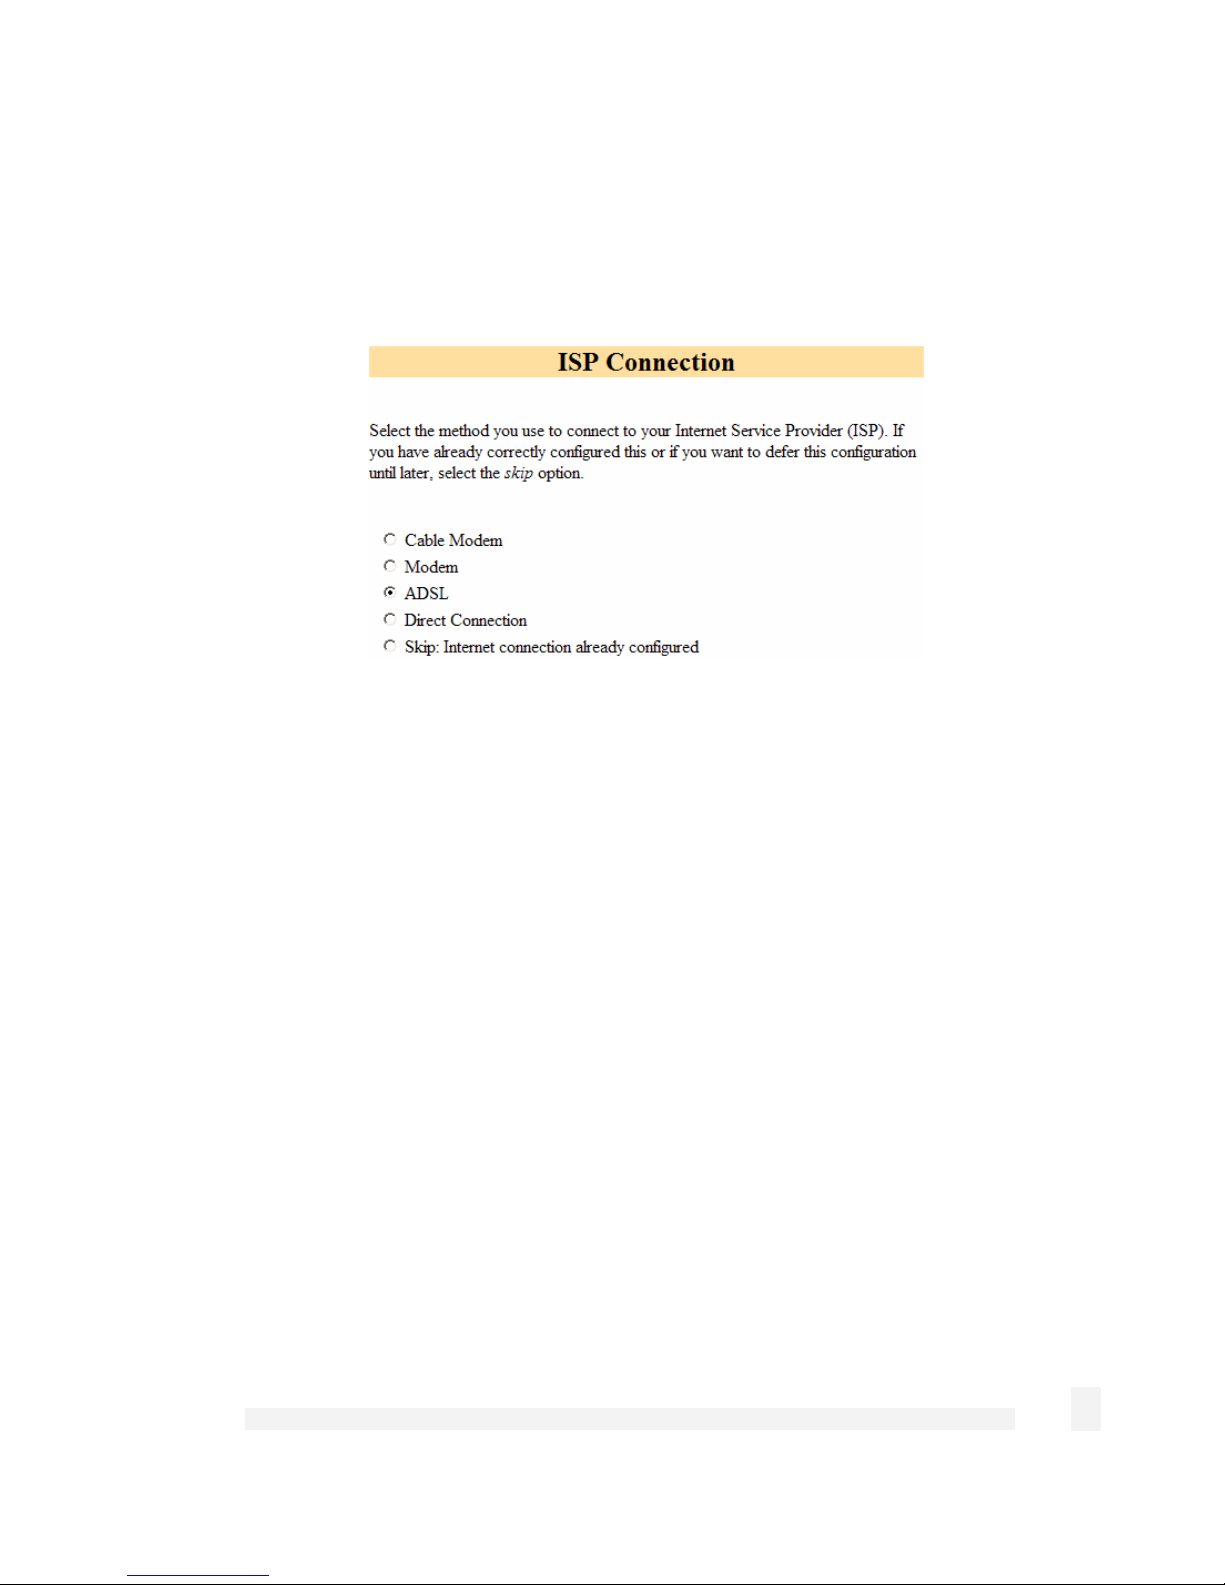
Set up the SnapGear Appliance’s Internet Connection Settings
Select your Internet connection type and click Next.
Figure 2-5
Cable modem
If connecting using a cable modem, select the appropriate ISP. Choose Generic cable
modem provider if unsure.
Analog modem
If connecting using a regular analog modem, enter the details provided by your ISP.
DSL modem
If connecting using an ADSL modem, select Auto detect ADSL connection type and
enter the details provided by your ISP. If auto detection fails and you are unsure of your
ADSL connection type, contact your ISP.
Direct connection
If you have a direct connection to the Internet (e.g. a leased line), enter the IP settings
provided by your ISP.

Getting Started
18
Note
For detailed help for each of these options, please refer to the the chapter entitled
Network Connections.
Once the SnapGear appliance’s Internet connection has been set up, click Next, select
Reboot and click Next again.
Set up the PCs on your LAN to Access the Internet
Note
If you have changed the SnapGear appliance’s LAN connection settings, it may become
uncontactable at this point. This step describes how to set up the PCs on your network
to access the SnapGear appliance and the Internet.
If you haven’t already, connect your SnapGear appliance’s LAN Ethernet port directly to
your LAN hub using the straight through Ethernet cable (blue).
To access the Internet, the PCs on your network must all be set up to use the SnapGear
appliance as their default gateway. This can be done a number of different ways
depending on how your LAN is set up.
If your LAN has a DHCP server already, proceed to LAN with a DHCP server.
If your LAN does not have a DHCP server, proceed to LAN with no DHCP server.
If you are not sure, you probably want LAN with no DHCP server.
LAN with a DHCP server
Add a lease to your existing DHCP server to reserve the IP address you chose in STEP 3
for the SnapGear appliance’s LAN connection.
If you chose to set the SnapGear appliance’s LAN connection settings using Manual
configuration, you may simply remove this address from the pool of available
addresses.

Getting Started
19
Enter this same IP address as the gateway IP address to be handed out by the DHCP
server.
Enter this same IP address as the DNS server IP address to be handed out by the DHCP
server.
Restart all the PCs on the network (this will reset their gateway and DNS addresses).
Note
The purpose of restarting the computers is to force them to gain a new DHCP lease.
Alternatively you can use a utility such as ipconfig to release then renew a lease, or
disable and re-enable the network connection.
LAN with no DHCP server
A DHCP server allows PCs to automatically obtain network settings when they start up.
If your network does not have a DHCP server, you may either manually set up each PC
on your network, or set up the SnapGear appliance's DHCP server.
Note
If you only have several PCs, we suggest manually setting up your network. If you have
more PCs, enabling the SnapGear appliance’s DHCP server is more scalable.
To manually set up each Windows PC on your network:
Click Start -> Settings -> Control Panel and double click Network
Connections (or in 95/98/Me, double click Network).
If presented with multiple connections, right click on Local Area Connection (or
appropriate network connection) and select Properties.
Select Internet Protocol (TCP/IP) and click Properties (or in 95/98/Me, TCP/IP
-> [your network card name] if there are multiple entries ).
Enter the following details:

Getting Started
20
IP address is an IP address that is part of the same subnet range as the
SnapGear appliance’s LAN connection (e.g. if using the default settings,
192.168.0.2 – 192.168.0.254).
• Subnet mask is the subnet mask of the SnapGear appliance’s LAN
connection.
• Default gateway is the IP address of the SnapGear appliance’s LAN
connection.
• Preferred DNS server is the IP address of the SnapGear appliance’s LAN
connection.
Click OK (or in 95/98/Me, Add then OK, reboot the PC if prompted to do so).
Perform these steps for each PC on your network.
You are now finished.
Alternatively, to activate your SnapGear appliance's DHCP server:
Launch Internet Explorer (or your preferred web browser) and navigate to the IP
address of the SnapGear appliance’s LAN connection.
The SnapGear Management Console will display.
Select DHCP Server from the Networking menu.
Click Add Server and configure the DHCP server with the following details:
• Gateway Address is the IP address of the SnapGear appliance’s LAN
connection, or leave it blank.
• DNS Address is the IP address of the SnapGear appliance’s LAN
connection, or leave it blank.
• WINS Address (optional) is the IP address of any existing WINS server
on your LAN.
• Default Lease Time and Maximum Lease Time should generally be left
at their default values.
• Initial Dynamic IP Address Range is a range of free IP addresses on
your LAN’s subnet for the SnapGear appliance to hand out to PCs on your
LAN.
Getting Started
21
Note
For a detailed description of configuring DHCP Server Settings, please ref er to
the User Manual.
Each PC on your LAN must now be set up to use DHCP. For each PC on your
LAN:
Click Start -> Settings -> Control Panel and double click Network
Connections (or in 95/98/Me, double click Network).
If presented with multiple connections, right click on Local Area Connection (or
appropriate network connection) and select Properties.
Select Internet Protocol (TCP/IP) and click Properties (or in 95/98/Me, TCP/IP
-> [your network card name] if there are multiple entries ) and click Properties
(in 95/98/Me, you may also have to click the IP Address tab).
Figure 2-6
Check Obtain an IP address automatically, check Obtain DNS server address
automatically and click OK (in 95/98/Me, reboot the PC if prompted to do so).
You are now finished.

Getting Started
22
SnapGear PCI Appliances
Install your SnapGear Appliance in a Spare PCI Slot
Power off your PC and remove its cover. Select an unused PCI slot and insert the
SnapGear appliance , then power on your PC.
Install the Network Driver on your PC
The SnapGear appliance will be automatically detected and have the appropriate driver
installed when Windows starts up. It will be detected as a Realtek RTL8139-series Fast
Ethernet Adapter.
Note
You can check that a new network adapter has been installed under Windows 2000/XP
by clicking Start, Settings, Network and Dialup Connections, Local Area Connection
(possibly followed by a number), Properties and ensure the adapter is listed in the
Connect using field.
Set up your PC to Connect to the SnapGear Management
Console
Note
The following steps assume you want to set up the SnapGear appliance in bridged mode,
so that it sits between your PC and the LAN transparently filtering network traffic. If you
want to set up the SnapGear appliance for NAT mode or to connect directly to your ISP,
refer to the chapter entitled Network Connections.
The SnapGear appliance ships with initial, static IP settings of:
IP address: 192.168.0.1
Subnet mask: 255.255.255.0
Your SnapGear appliance will to have its network settings set appropriately for your LAN
before it is connected.
Getting Started
23
Next, you must modify your PC’s network settings to enable it to communicate with the
SnapGear appliance.
Click Start -> Settings -> Control Panel and double click Network Connections.
Right click on Local Area Connection (or appropriate network connection for the newly
installed PCI appliance) and select Properties.
Select Internet Protocol (TCP/IP) and click Properties.
Figure 2-7
Select Use the following IP address and enter the following details:
IP address: 192.168.0.100
Subnet mask: 255.255.255.0
Default gateway: 192.168.0.1
Select Use the following DNS server addresses and enter:
Preferred DNS server: 192.168.0.1
Getting Started
24
Set up the SnapGear Appliance’s Password and Network
Connection Settings
Launch Internet Explorer (or your preferred web browser) and navigate to 192.168.0.1.
Figure 2-8
The SnapGear Management Console will display.
Select Network Setup under Networking in the left hand menu.
You will be prompted to log in. Enter the initial user name and password for your
SnapGear appliance:
User name: root
Password: default
Note
If you are unable to connect to the Management Console at 192. 168.0.1, or the initial
username and password are not accepted, press the Reset button on the SnapGear
appliance’s rear panel twice, wait 20 – 30 seconds, and try again. Pressing this button
twice within two seconds returns the SnapGear appliance to its factory default settings.
Enter and confirm a password for your SnapGear appliance. This is the password for the
user root, the main administrative user account on the SnapGear appliance. It is
therefore important that you choose a password that is hard to guess, and keep it safe.
The new password will take effect immediately, and you will be prompted to enter it when
completing the next step.
Note
The purpose of this step is to configure the IP address for the SnapGear Management
Console. For convenience, this will generally be a free IP address on your LAN.
Getting Started
25
The Network Setup Connections page will display.
Locate the Bridge / br0 port and select Edit current settings under Configuration.
If your LAN has an active DHCP server, you may set up your SnapGear appliance and
PC for auto-configuration. Otherwise you must manually set up your SnapGear
appliance’s and PC’s network settings.
To manually set up your SnapGear appliance’s and PC’s network settings:
Before continuing, ensure you have two free IP addresses that are part of the subnet
range of your LAN, as well as your LAN’s subnet mask and DNS server address and
gateway address used by PCs on your LAN.
Note
Please contact your network administrator if you are unsure of any of these settings.
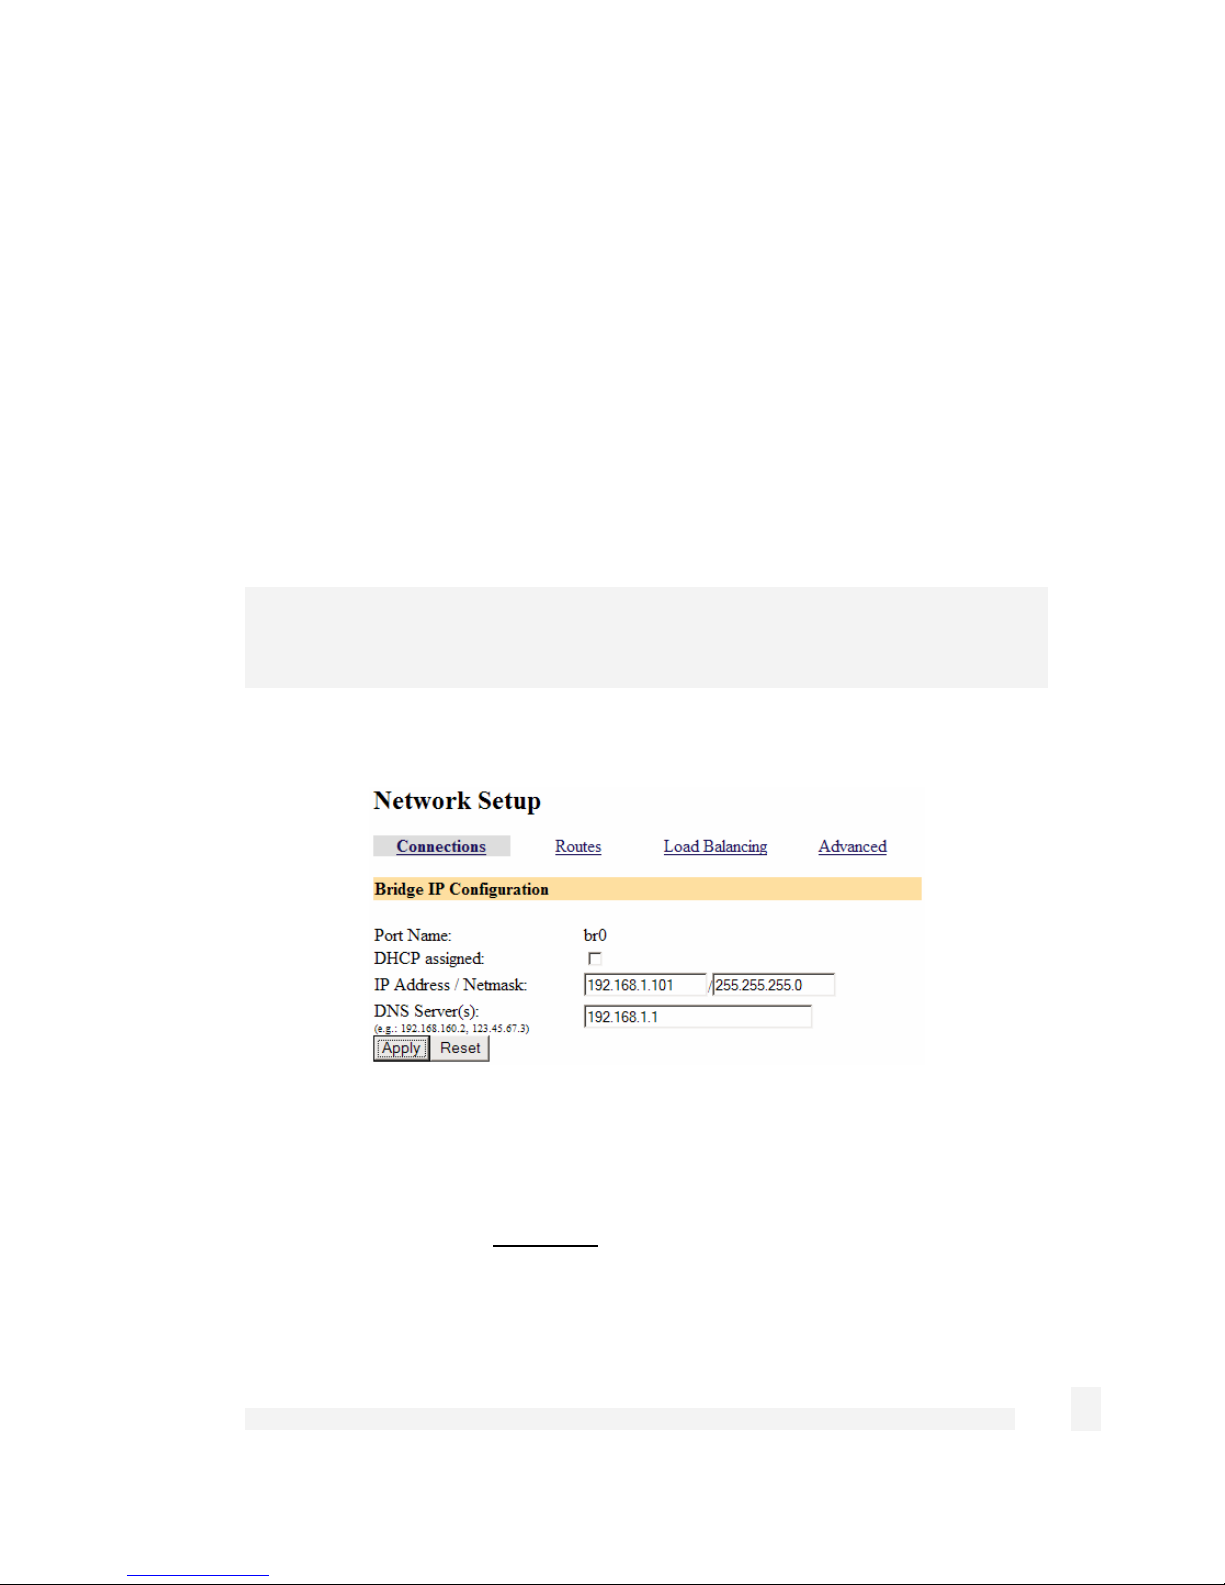
The first IP address will be used by the SnapGear Management Console.
Figure 2-9
Enter this IP address and the subnet mask for your LAN into the IP Address / Netmask
fields on the SnapGear Management Console’s Bridge IP Configuration page.
Ensure DHCP assigned is unchecked.
You may also enter one or more DNS Server(s) to be used by the SnapGear appliance,
not your PC, for Internet name resolution.
Getting Started
26
Click Apply and Reboot.
Next, configure your PC with the second IP address in the same manner you would as if
it were connected directly to the LAN.
Click Start -> Settings -> Control Panel and double click Network Connections.
Right click on Local Area Connection (or appropriate network connection for the newly
installed PCI appliance) and select Properties.
Select Internet Protocol (TCP/IP) and click Properties.
Figure 2-10
Enter the following details:
• IP address the second free IP addresses that is part of the subnet range of your
LAN.
• Subnet mask is the subnet mask of your LAN.
• Default gateway is the IP address of your LAN’s default gateway.
 Loading...