

CyberGuard SG300, SG530, SG550, SG565, SG570 User Manual
...
CyberGuard SG
User Manual
CyberGuard
7984 South Welby Park Drive #101
Salt Lake City, Utah 84084
Email: support@cyberguard.com.au
Web: www.cyberguard.com
Revision 3.1.2
December 20th, 2005

Contents
1. Introduction...............................................................................................1
CyberGuard SG Gateway Appliances (SG3xx, SG5xx Series).............................1
CyberGuard SG Rack Mount Appliances (SG7xx Series).....................................4
CyberGuard SG PCI Appliances (SG6xx Series)..................................................7
Document Conventions .......................................................................................10
2. Getting Started........................................................................................11
CyberGuard SG Gateway Appliance Quick Setup ..............................................12
CyberGuard SG Rack Mount Appliance Quick Setup .........................................12
CyberGuard SG PCI Appliance Quick Setup.......................................................23
The CyberGuard SG Management Console........................................................41
3. Network Setup.........................................................................................43
Configuring Connections .....................................................................................43
Multifunction vs. Fixed-function Ports ..................................................................44
Direct Connection ................................................................................................46
ADSL ...................................................................................................................49
Cable Modem ......................................................................................................54
Dialout and ISDN.................................................................................................55
Dialin....................................................................................................................56
Failover, Load Balancing and High Availability....................................................61
Internet Failover...................................................................................................63
Internet Load Balancing.......................................................................................67
High Availability ...................................................................................................69
DMZ Network.......................................................................................................72
Guest Network.....................................................................................................74
Wireless...............................................................................................................76
Bridging................................................................................................................87
VLANs..................................................................................................................91
Port Based VLANs...............................................................................................93
GRE Tunnels .......................................................................................................97
Routes ...............................................................................................................101
System...............................................................................................................109
DNS...................................................................................................................110

DHCP Server.....................................................................................................111
Web Cache........................................................................................................116
QoS Traffic Shaping ..........................................................................................123
IPv6....................................................................................................................125
4. Firewall ..................................................................................................126
Incoming Access................................................................................................126
Web Server........................................................................................................128
Customizing the Firewall....................................................................................130
Definitions..........................................................................................................131
Packet Filtering..................................................................................................134
Network Address Translation (NAT)..................................................................137
Connection Tracking..........................................................................................149
Intrusion Detection.............................................................................................150
Basic Intrusion Detection and Blocking (IDB)....................................................151
Advanced Intrusion Detection and Prevention (Snort and IPS).........................154
Access Control and Content Filtering................................................................157
Antivirus.............................................................................................................169
5. Virtual Private Networking...................................................................180
PPTP and L2TP.................................................................................................181
PPTP VPN Server .............................................................................................181
L2TP VPN Server ..............................................................................................189
PPTP and L2TP VPN Client ..............................................................................196
IPSec.................................................................................................................198
Set Up the Branch Office...................................................................................199
Configuring the Headquarters............................................................................211
Tunnel List .........................................................................................................214
NAT Traversal Support......................................................................................217
Dynamic DNS Support.......................................................................................217
Certificate Management.....................................................................................217
IPSec Troubleshooting ......................................................................................222
Port Tunnels ......................................................................................................225
6. USB........................................................................................................229
USB Mass Storage Devices ..............................................................................229
USB Printers......................................................................................................236

Printer Troubleshooting .....................................................................................242
USB Network Devices and Modems..................................................................243
7. System...................................................................................................244
Date and Time ...................................................................................................244
Backup/Restore Configuration...........................................................................245
Users .................................................................................................................248
Management......................................................................................................252
Diagnostics ........................................................................................................255
Advanced...........................................................................................................256
Reboot and Reset..............................................................................................259
Flash upgrade....................................................................................................260
Configuration Files.............................................................................................262
Support..............................................................................................................263
Appendix A – Terminology...........................................................................265
Appendix B – System Log............................................................................272
Access Logging .................................................................................................272
Creating Custom Log Rules...............................................................................274
Rate Limiting......................................................................................................277
Administrative Access Logging..........................................................................278
Boot Log Messages...........................................................................................278
Appendix C – Firmware Upgrade Practices and Precautions...................279
Appendix D – Recovering From a Failed Upgrade .....................................281

1. Introduction
This manual describes the features and capabilities of your CyberGuard SG appliance,
and provides you with instructions on how to best take advantage of them.
This includes setting up network connections (in the chapter entitled Network
Connections), tailoring the firewall to your network (Firewall), and establishing a virtual
private network (Virtual Private Networking). It also guides you through setting up the
CyberGuard SG appliance on your existing or new network using the web management
console (Getting Started).
This chapter provides a high level overview to familiarize you with your CyberGuard SG
appliance’s features and capabilities.
CyberGuard SG Gateway Appliances (SG3xx, SG5xx Series)
Note
The CyberGuard SG gateway appliance range includes models SG300, SG530, SG550,
SG560, SG565, SG570, SG575 and SG580.
The CyberGuard SG gateway appliance range provides Internet
security and privacy of communications for small and medium
enterprises, and branch offices. It simply and securely connects
your office to the Internet, and with its robust stateful firewall,
shields your computers from external threats.
With the CyberGuard SG appliance’s masquerading firewall, hosts on your LAN (local
area network) can see and access resources on the Internet, but all outsiders see is the
CyberGuard SG appliance’s external address.
You may tailor your CyberGuard SG appliance to disallow access from your LAN to
specific Internet sites or categories of content, give priority to specific types of network
traffic, and allow controlled access to your LAN from the outside world. You may also
choose to enable intrusion detection and prevention services on your CyberGuard SG
appliance, to further bolster the security of your local network.
Introduction
1
The SG565, SG560, SG570, SG575 and SG580 may also connect to a DMZ
(demilitarized zone) network. A DMZ is a separate local network typically used to host
servers accessible to the outside world. It is separated both physically and by the
firewall, in order to shield your LAN from external traffic.
The CyberGuard SG appliance allows you to establish a virtual private network (VPN). A
VPN enables remote workers or branch offices to connect securely to your LAN over the
public Internet. The CyberGuard SG appliance can also connect to external VPNs as a
client. The SG550, SG560, SG565, SG570, SG575 and SG580 utilize onboard
cryptographic acceleration to ensure excellent VPN throughput.
The CyberGuard SG appliance may be configured with multiple Internet connections.
These auxiliary connections may be kept on stand-by should the primary connection
become unavailable, or maintained concurrently with the primary connection for
spreading network load.
The SG565, SG570, SG575 and SG580 incorporate a powerful web proxy cache to
improve web page response time and reduce link loads. It is designed to integrate
seamlessly with upstream proxy caches provided by ISPs.
Front panel LEDs
The front and rear panels contain LEDs indicating status. An example of the front panel
LEDs are illustrated in the following figure and detailed in the following table.
Note
Not all the LEDs described below are present on all CyberGuard SG appliance models.
Labels vary from model to model.
Label Activity Description
Power
On Power is supplied to the CyberGuard SG
appliance
Heart Beat
Flashing The CyberGuard SG appliance is operating
correctly
On If this LED is on and not flashing, an operating
error has occurredError! Reference source not
found.
LAN Activity
Introduction
Flashing Network traffic on the LAN network interface
2

WAN Activity
Flashing Network traffic on the Internet network interface
WLAN
DMZ Activity
Serial
Activity
HA
Flashing Network traffic on the Wireless network interface
Flashing Network traffic on the DMZ network interface
Flashing For either of the CyberGuard SG appliance COM
ports, these LEDs indicate receive and transmit
data
On The CyberGuard SG appliance has switched to a
backup device
Online
VPN
Online
On An Internet connection has been established
On Virtual private networking is enabled
On An Internet connection has been established
Note
If Heart Beat does not begin flashing shortly after power is supplied, refer to Appendix D,
Recovering From a Failed Upgrade.
Rear panel
The rear panel contains Ethernet and serial ports, the Reset/Erase button and power
inlet. If network status LEDs are present, the lower or left LED indicates the link
condition, where a cable is connected correctly to another device and the upper or right
LED indicates network activity.
Specifications
Internet link
• 10/100baseT Ethernet
• Serial (for dial-up/ISDN)
• Front panel serial status LEDs (for TX/RX)
• Online status LEDs (for Internet/VPN)
• Rear panel Ethernet link and activity status LEDs
Introduction
3

Local network link
• 10/100BaseT LAN port (SG530, SG550)
• 10/100BaseT 4 port LAN switch (SG300)
• 10/100BaseT DMZ port (SG570, SG575)
• 10/100BaseT 4 port VLAN-capable switch (SG560, SG565, SG580)
• Rear panel Ethernet link and activity status LEDs
Enviromental
• External power adaptor (voltage/current depends on individual model)
• Front panel operating status LEDs: Power, Heart Beat
• Operating temperature between 0° C and 40° C
• Storage temperature between -20° C and 70° C
• Humidity between 0 to 95% (non-condensing)
CyberGuard SG Rack Mount Appliances (SG7xx Series)
Note
The CyberGuard SG rack mount appliance range includes models SG710 and SG710+.
The CyberGuard SG7xx series is the flagship of CyberGuard’s
SG family. It features multi-megabit throughput, rackoptimized form factor, two fast Ethernet ports and two 4 port
fast Ethernet switches as standard, and the option for two
additional gigabit ports (SG710+).
In addition to providing all of the features described in CyberGuard SG Gateway
Appliances earlier in this chapter, it equips central sites to securely connect hundreds of
mobile employees and branch offices.
Introduction
4

Front panel LEDs
The front panel contains LEDs indicating status. An example of the front panel LEDs are
illustrated in the following figure and detailed in the following table.
Label Activity Description
Note
If H/B does not begin flashing 20 – 30 seconds after power is supplied, refer to Appendix
E, Recovering From a Failed Upgrade.
Front panel
Power
H/B (Heart
Beat)
Failover
High Avail
Online
On Power is supplied to the CyberGuard SG
appliance
Flashing The CyberGuard SG appliance is operating
correctly
On If this LED is on and not flashing, an operating
error has occurredError! Reference source not
found.
On The CyberGuard SG appliance has switched to
the backup Internet connection
On The CyberGuard SG appliance has switched to a
backup device
On An Internet connection has been established
The front panel contains two 10/100 Ethernet four port switches (A and B), two 10/100
Ethernet ports (C and D) and analog/ISDN modem (Serial) as well as operating status
LEDs and the configuration reset button (Erase).
On the front panel Ethernet ports, the right hand LED indicates the link condition, where a
cable is connected correctly to another device. The left hand LED indicates network
activity.
Introduction
5

Rear panel
The rear panel contains a power switch and a power inlet for an IEC power cable.
Additionally, the SG710+ has two gigabit Ethernet ports (E and F).
Specifications
Internet link
• Two 10/100baseT Ethernet ports (C, D)
• Two GbE ports (E, F – SG710+ only)
• Serial port
• Online status LEDs (Online, Failover)
• Ethernet link and activity status LEDs
LAN/DMZ link
• Two 10/100BaseT 4 port LAN switches
• Ethernet link and activity status LEDs
Enviromental
• Front panel operating status LEDs: Power, H/B
• Operating temperature between 0° C and 40° C
• Storage temperature between -20° C and 70° C
• Humidity between 0 to 95% (non-condensing)
Introduction
6

CyberGuard SG PCI Appliances (SG6xx Series)
Note
The CyberGuard SG PCI appliance range includes models SG630 and SG635.
The CyberGuard SG PCI appliance is a hardware based
firewall and VPN server embedded in a 10/100 Ethernet PCI
network interface card (NIC). It is installed into the host PC
like a regular NIC, providing a transparent firewall to shield
the host PC from malicious Internet traffic, and VPN services
to allow secure remote access to the host PC.
Unlike other CyberGuard SG gateway and rack mount appliances, a single CyberGuard
SG PCI appliance is not intended as a means for your entire office LAN to be connected
to, and shielded from, the Internet. Installing a CyberGuard SG PCI appliance in each
network connected PC gives it its own independently manageable, enterprise-grade VPN
server and firewall, running in isolation from the host operating system.
This approach offers an increased measure of protection against internal threats as well
as conventional Internet security concerns. You can update, configure and monitor the
firewall and VPN connectivity of a workstation or server from any web browser. In the
event of a breach, you have complete control over access to the host PC independent of
its operating system, even if the host PC has been subverted and is denying normal
administrator access.
All network filtering and CPU intensive cryptographic processing is handled entirely by
the CyberGuard SG appliance. This has the advantage over the traditional approach of
using a host-based personal software firewall and VPN service by not taxing the host
PC's resources.
Bridged mode
By default, the CyberGuard SG PCI appliance operates in bridged mode. This is
distinctly different from the masquerading behavior of CyberGuard SG gateway and rack
mount appliances.
In bridged mode, the CyberGuard SG PCI appliance uses two IP addresses. Note that
these addresses are both in the same subnet as the LAN, as no masquerading is being
performed (refer to the Masquerading section of the chapter entitled Firewall for further
details).
Introduction
7
One IP address is used to manage the CyberGuard SG appliance via the web
management console.
The other is the host PC's IP address, which is configurable through the host operating
system, identically to a regular NIC. This is the IP address that other PCs on the LAN
see. It should be dynamically (DHCP) or statically configured to use the same gateway,
DNS, etc. settings as a regular PC on the LAN.
Note
It is possible to configure the CyberGuard SG PCI appliance to run in masquerading
mode. This is discussed in the chapter entitled Firewall.
Secure by default
By default, all CyberGuard SG appliances run a fully secured stateful firewall. This
means from the PC that it is plugged into, most network resources are freely accessible.
However, any services that the PC provides, such as file shares or web services (e.g. IIS)
are not be accessible by other hosts on your LAN without further configuration of the
CyberGuard SG appliance. This is accomplished using packet filter rules, for details refer
to the Packet Filtering section of the chapter entitled Firewall.
LEDs
The rear panel contains LEDs indicating status. The two LEDs closest to the network
port are network activity (upper) and network link (lower). The two other LEDs are power
(upper) and heart beat (lower).
Introduction
8
Location Activity Description
Top right
(Power)
Bottom right
(Heart beat)
Top left
(Network
activity)
Bottom left
(Network
link)
Note
If Heart beat does not begin flashing shortly after power is supplied, refer to Appendix D,
Recovering From a Failed Upgrade.
Specifications
On Power is supplied to the CyberGuard SG
appliance (top right).
Flashing The CyberGuard SG appliance is operating
correctly (bottom right).
Flashing Data is being transmitted or received (top left).
On The CyberGuard SG appliance is attached to the
network
Network link
• 10/100baseT Ethernet port
• Ethernet LEDs (link, activity)
Environmental
• Status LEDs: Power, Heart Beat
• Operating temperature between 0° C and 40° C
• Storage temperature between -20° C and 70° C
• Humidity between 0 to 95% (non-condensing)
Introduction
9

Document Conventions
This document uses different fonts and typefaces to show specific actions.
Warning/Note
Text like this highlights important issues.
Bold text in procedures indicates text that you type, or the name of a screen object (e.g.
a menu or button).
Introduction
10

2. Getting Started
This chapter provides step-by-step instructions for installing your CyberGuard SG
appliance. These instructions are identical to those in the printed Quick Install Guide that
shipped with your CyberGuard SG appliance.
Upon completing the steps in this chapter, your
CyberGuard SG gateway or rack mount appliance
is installed in a network configuration similar that
depicted in the figure to the right. If you are
setting up a CyberGuard SG PCI appliance, upon
completing the steps in this chapter, your host PC
is connected securely to your existing LAN.
These instructions assume you have a PC
running Microsoft Windows (95/98/Me/2000/XP
for CyberGuard SG gateway and rack mount
appliances, 2000/XP only for CyberGuard SG PCI
appliances). If you are installing a CyberGuard SG gateway or rack mount appliance,
you must have an Ethernet network interface card installed. You may need to be logged
in with administrator privileges.
Instructions are not given for other operating systems; refer to your operating system
documentation on how to configure your PCs’ network settings using the examples given
for Windows PCs as a guide.
Note
Installing your CyberGuard SG appliance into a well-planned network is easy. However,
network planning is outside the scope of this manual. Please take the time to plan your
network before installing your CyberGuard SG appliance.
• If you are setting up a CyberGuard SG gateway appliance (SG3xx, SG5xx series)
proceed to CyberGuard SG Gateway Appliance Quick Setup.
• If you are setting up a CyberGuard SG rack mount appliance (SG7xx series) proceed
to CyberGuard SG Rack Mount Appliance Quick Setup.
• If you are setting up a CyberGuard SG PCI appliance (SG6xx series), proceed to
CyberGuard SG PCI Appliance Quick Setup.
Getting Started
11

CyberGuard SG Gateway Appliance Quick Setup
Unpack the CyberGuard SG appliance
Check that the following items are included with your CyberGuard SG appliance:
Power adapter
CyberGuard SG CD
Network cable
On the rear panel of the CyberGuard SG appliance you will see network, serial and
possibly USB ports, a Reset/Erase button, and a power inlet.
The front panel of the CyberGuard SG appliance contains activity LEDs (lights) that vary
slightly between models. These provide information on the operating status of the
CyberGuard SG appliance.
Note
Power is ON when power is applied (use only the power adapter packaged with the unit).
System/Heart Beat/TST flashes when the CyberGuard SG appliance is running.
Initially, all appliance models except for the SG300 also have all other front panel LEDs
flashing.
If these LEDs do not behave in this manner before your CyberGuard SG appliance is
attached to the network, perform a factory reset. Press the black Reset/Erase button on
rear panel twice within two seconds to restore factory default settings. If the LEDs are
still not flashing after 30 seconds, you may need to contact customer support.
Set up a single PC to connect to the CyberGuard SG appliance
The CyberGuard SG appliance ships with initial network settings of:
LAN IP address: 192.168.0.1
Getting Started
12

LAN subnet mask: 255.255.255.0
The CyberGuard SG appliance needs an IP address suitable for your LAN before it is
connected. You may choose to use the CyberGuard SG appliance’s initial network
settings above as a basis for your LAN settings.
Connect the supplied power adapter to the CyberGuard SG appliance.
If you are setting up the SG300, attach your PC’s network interface card directly to
any network port on its LAN switch using the supplied network cable.
If you are setting up the SG560, SG565 or SG580, attach your PC’s network interface
card directly any network port on switch A (A1 – A4) using the supplied network
cable.
Otherwise, connect the CyberGuard SG appliance’s LAN network port directly to your
PC’s network interface card using the supplied network cable.
Note
At this point, if you attach the CyberGuard SG appliance directly to a LAN with an existing
DHCP server, or a PC running a DHCP service, it will automatically obtain an additional
address. The CyberGuard SG appliance will still be reachable at 192.168.0.1.
However, we strongly recommend that you do not connect the CyberGuard SG appliance
to your LAN until instructed to do so by this guide.
All other network ports are by default inactive, i.e. they are not running any network
services such as DHCP, and they are not configured with an IP address.
Next, modify your PC’s network settings to enable it to communicate with the
CyberGuard SG appliance.
Click Start -> (Settings ->) Control Panel and double click Network Connections (or in
95/98/Me, double click Network).
Right click on Local Area Connection and select Properties.
Getting Started
13
Note
If there is more than one existing network connection, select the one corresponding to the
network interface card to which the CyberGuard SG appliance is attached.
Select Internet Protocol (TCP/IP) and click Properties (or in 95/98/Me, TCP/IP -> your
network card name if there are multiple entries) and click Properties.
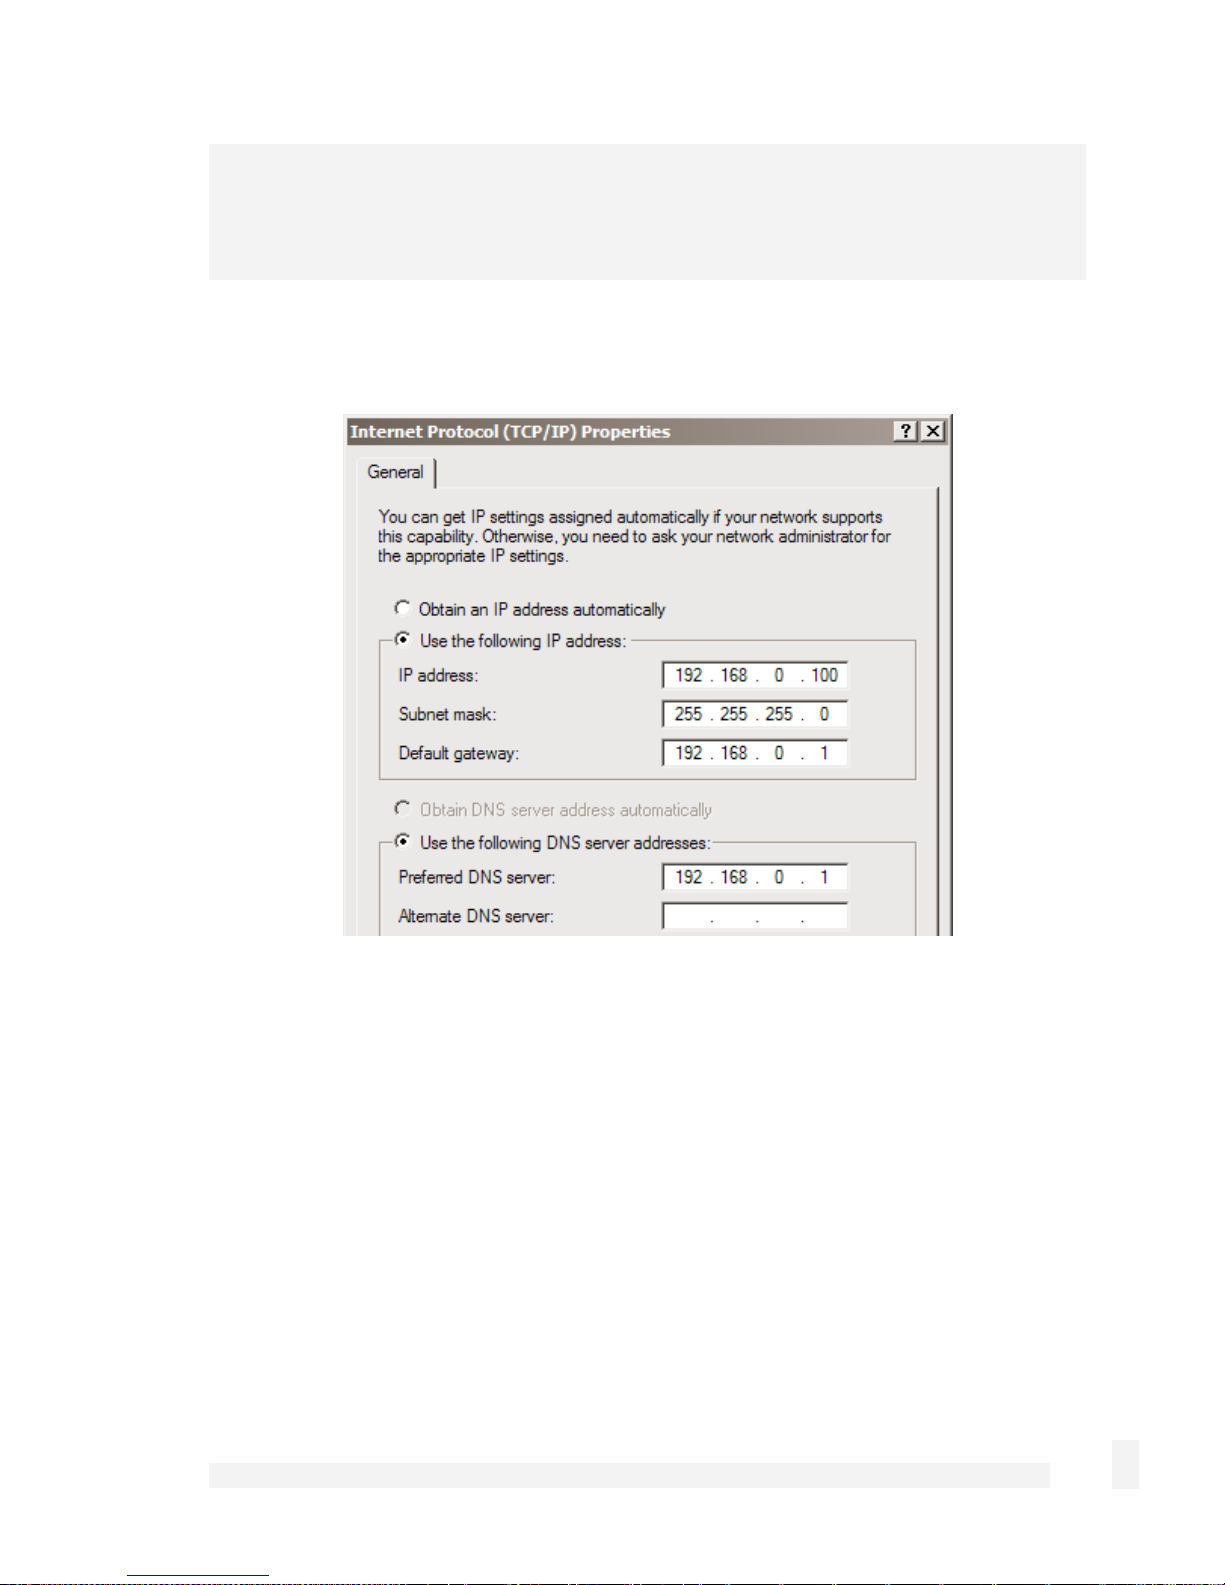
Select Use the following IP address and enter the following details:
IP address: 192.168.0.100
Subnet mask: 255.255.255.0
Default gateway: 192.168.0.1
Select Use the following DNS server addresses and enter:
Preferred DNS server: 192.168.0.1
Getting Started
14
Note
If you wish to retain your existing IP settings for this network connection, click Advanced
and Add the secondary IP address of 192.168.0.100, subnet mask 255.255.255.0.
Set up the CyberGuard SG appliance’s password and LAN connection settings
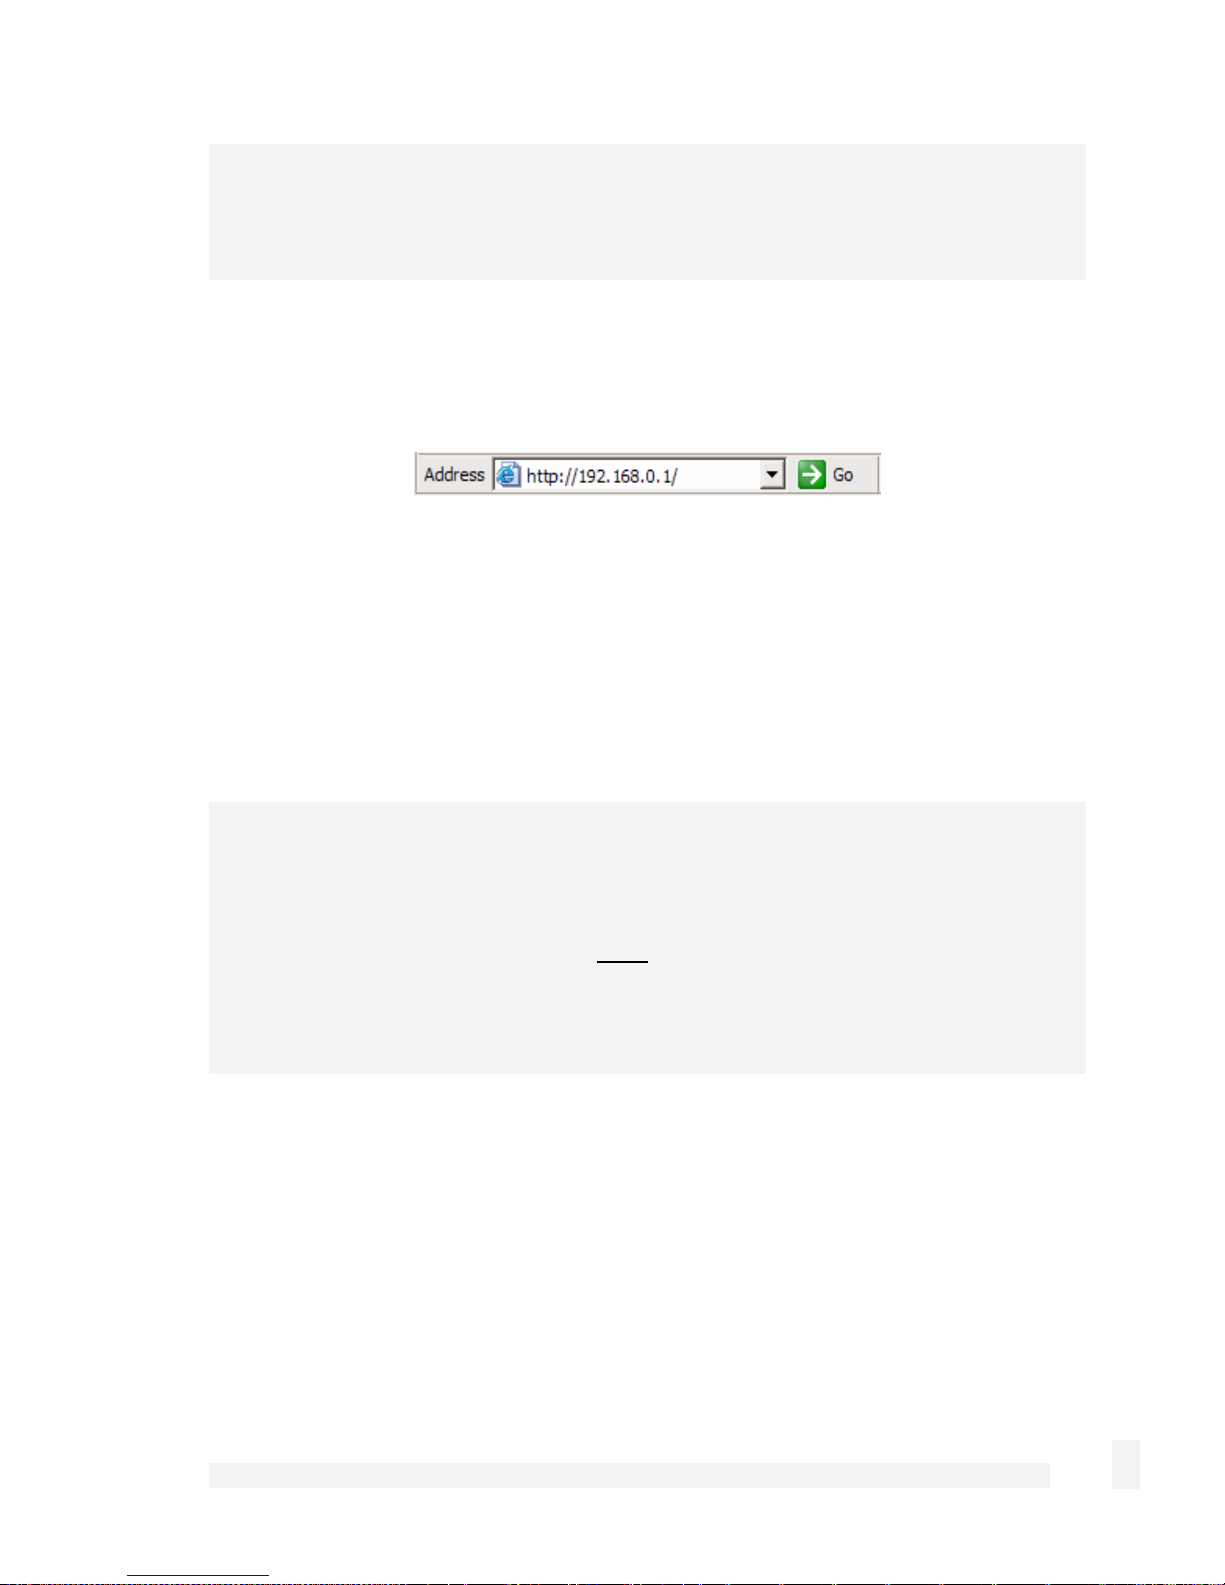
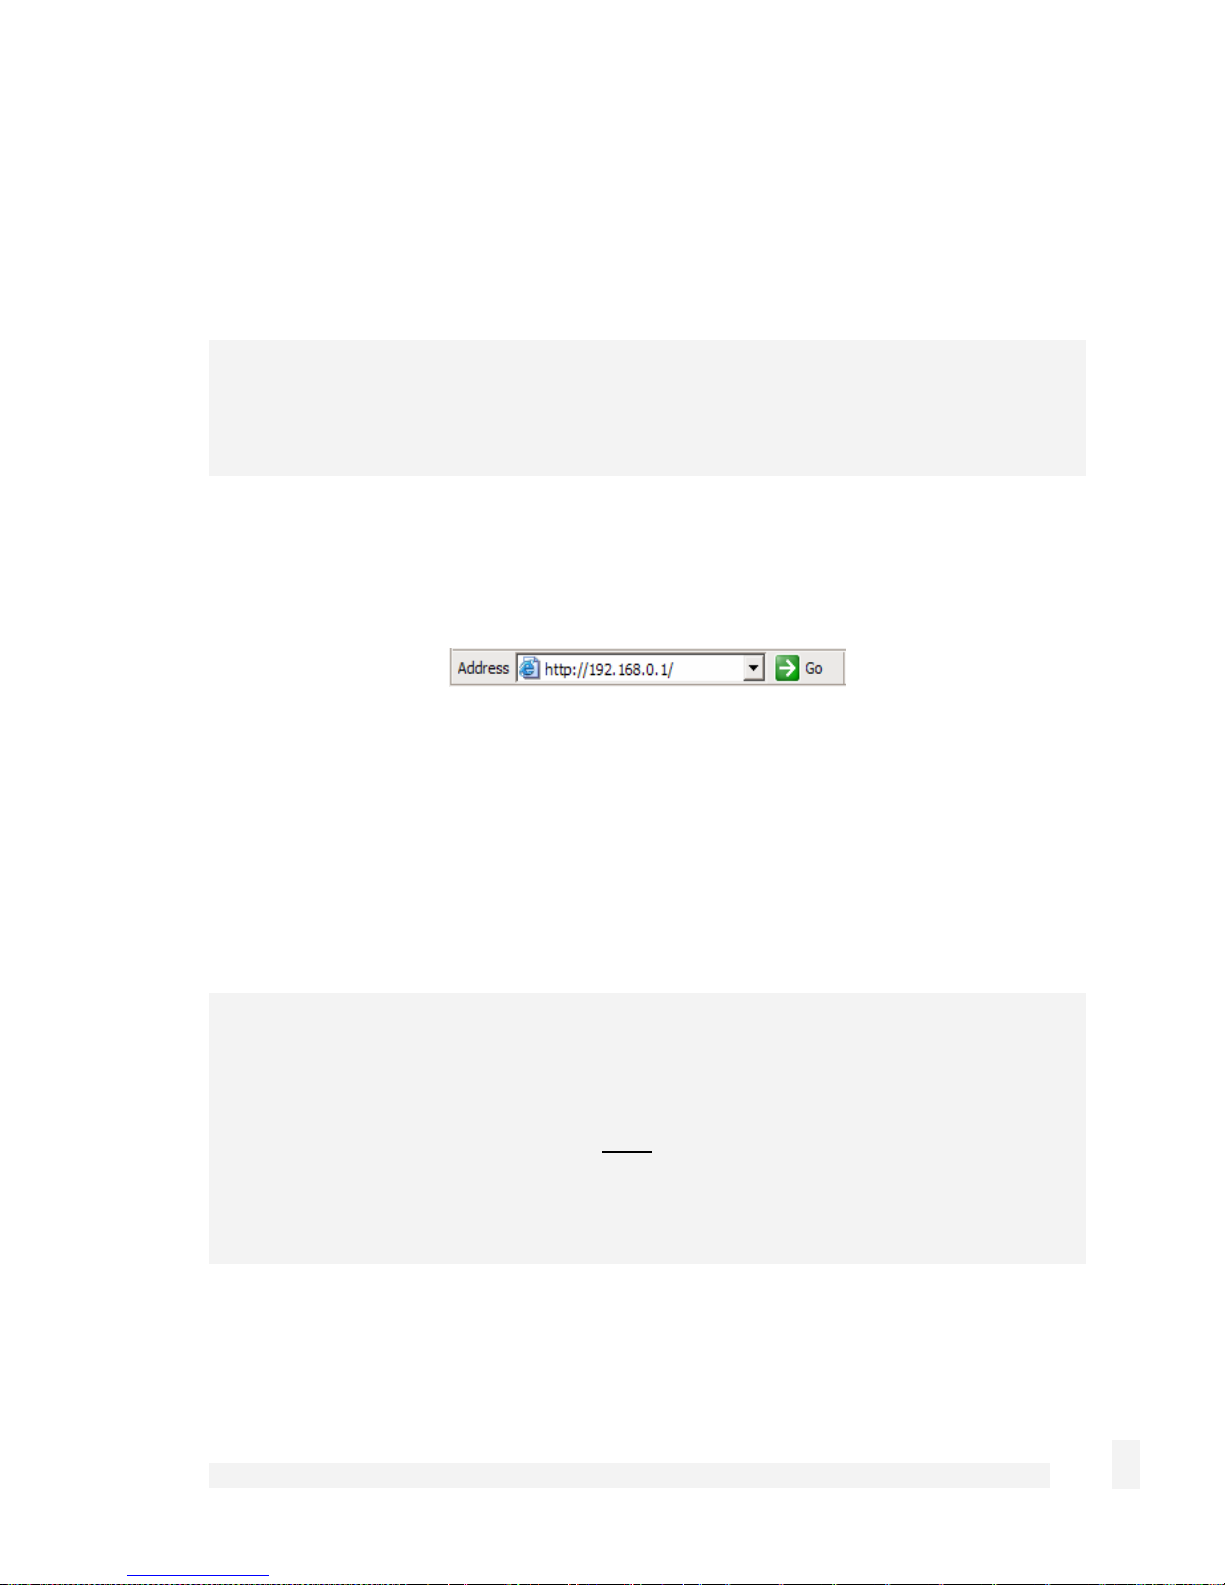
Launch your web browser and navigate to 192.168.0.1.
Select Quick Setup Wizard from the center of the page.
A log in prompt is displayed. Enter the initial user name and password for the
CyberGuard SG appliance:
User name: root
Password: default
Note
If you are unable to browse to the CyberGuard SG appliance at 192.168.0.1, or the initial
username and password are not accepted, press the black Reset/Erase button on the
CyberGuard SG appliance’s rear panel twice, wait 20 – 30 seconds, then try again.
Pressing Reset/Erase twice within 2 seconds resets the CyberGuard SG appliance to its
factory default settings.
Enter and confirm a password for your CyberGuard SG appliance. This is the password
for the user root, the main administrative user account on the CyberGuard SG appliance.
It is therefore important that you choose a password that is hard to guess, and keep it
safe.
Getting Started
15
Note
The new password takes effect immediately. You are prompted to enter it when
completing the next step.
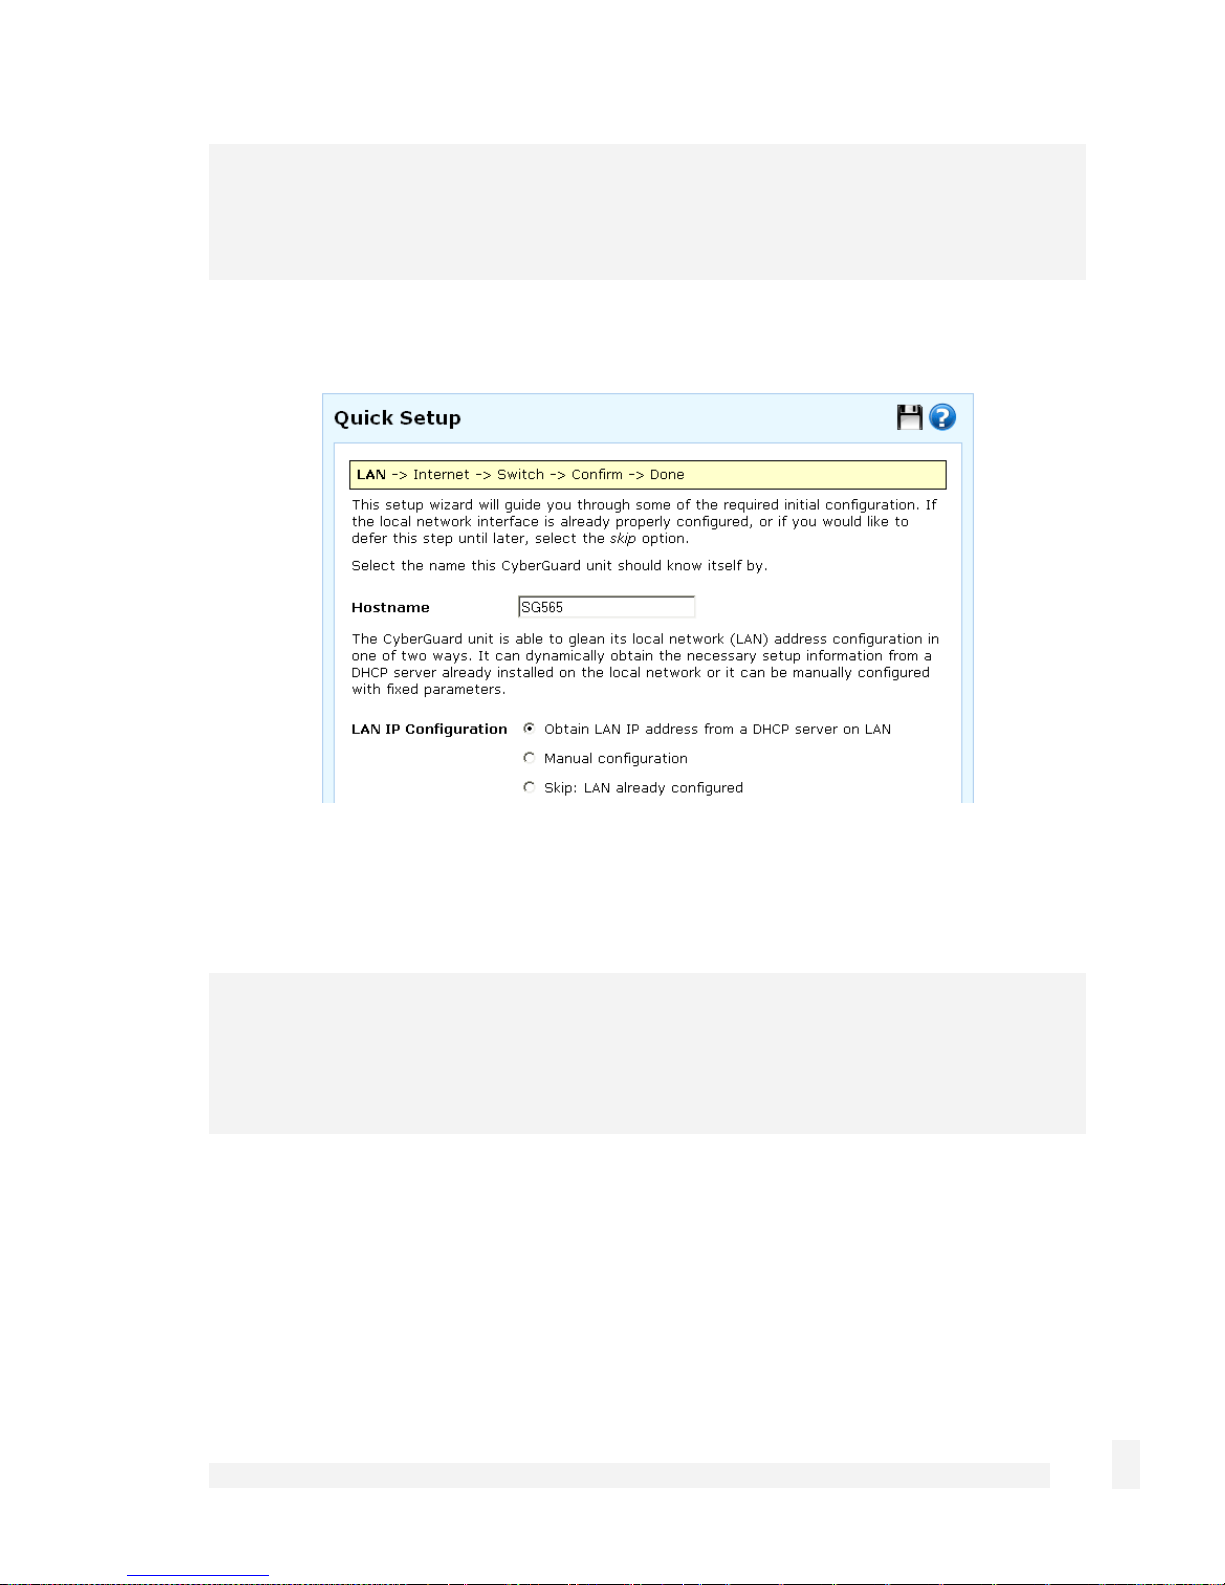
The quick setup wizard is displayed.
Changing the Hostname is not typically necessary.
Select how you would like to set up your LAN connection then click Next.
Note
You must select Manual configuration in order to enable the CyberGuard SG
appliance’s built-in DHCP server. The CyberGuard SG appliance’s DHCP server
automatically configures the network settings of PCs and other hosts on your LAN.
Changes to the CyberGuard SG appliance’s LAN configuration do not take effect until the
quick setup wizard has completed.
Select Manual configuration to manually specify the CyberGuard SG appliance’s
LAN connection settings (recommended).
Getting Started
16
Select Skip: LAN already configured if you wish to use the CyberGuard SG
appliance’s initial network settings (IP address 192.168.0.1 and subnet mask
255.255.255.0) as a basis for your LAN settings, and you do not wish to use the
CyberGuard SG appliance’s built-in DHCP server. Skip to the next step.
You may choose to Obtain LAN IP address from a DHCP server on LAN if you
have an existing DHCP server, and wish to rely on it to automatically configure the
CyberGuard SG appliance’s LAN connection settings (not recommended). Skip to the
next step.
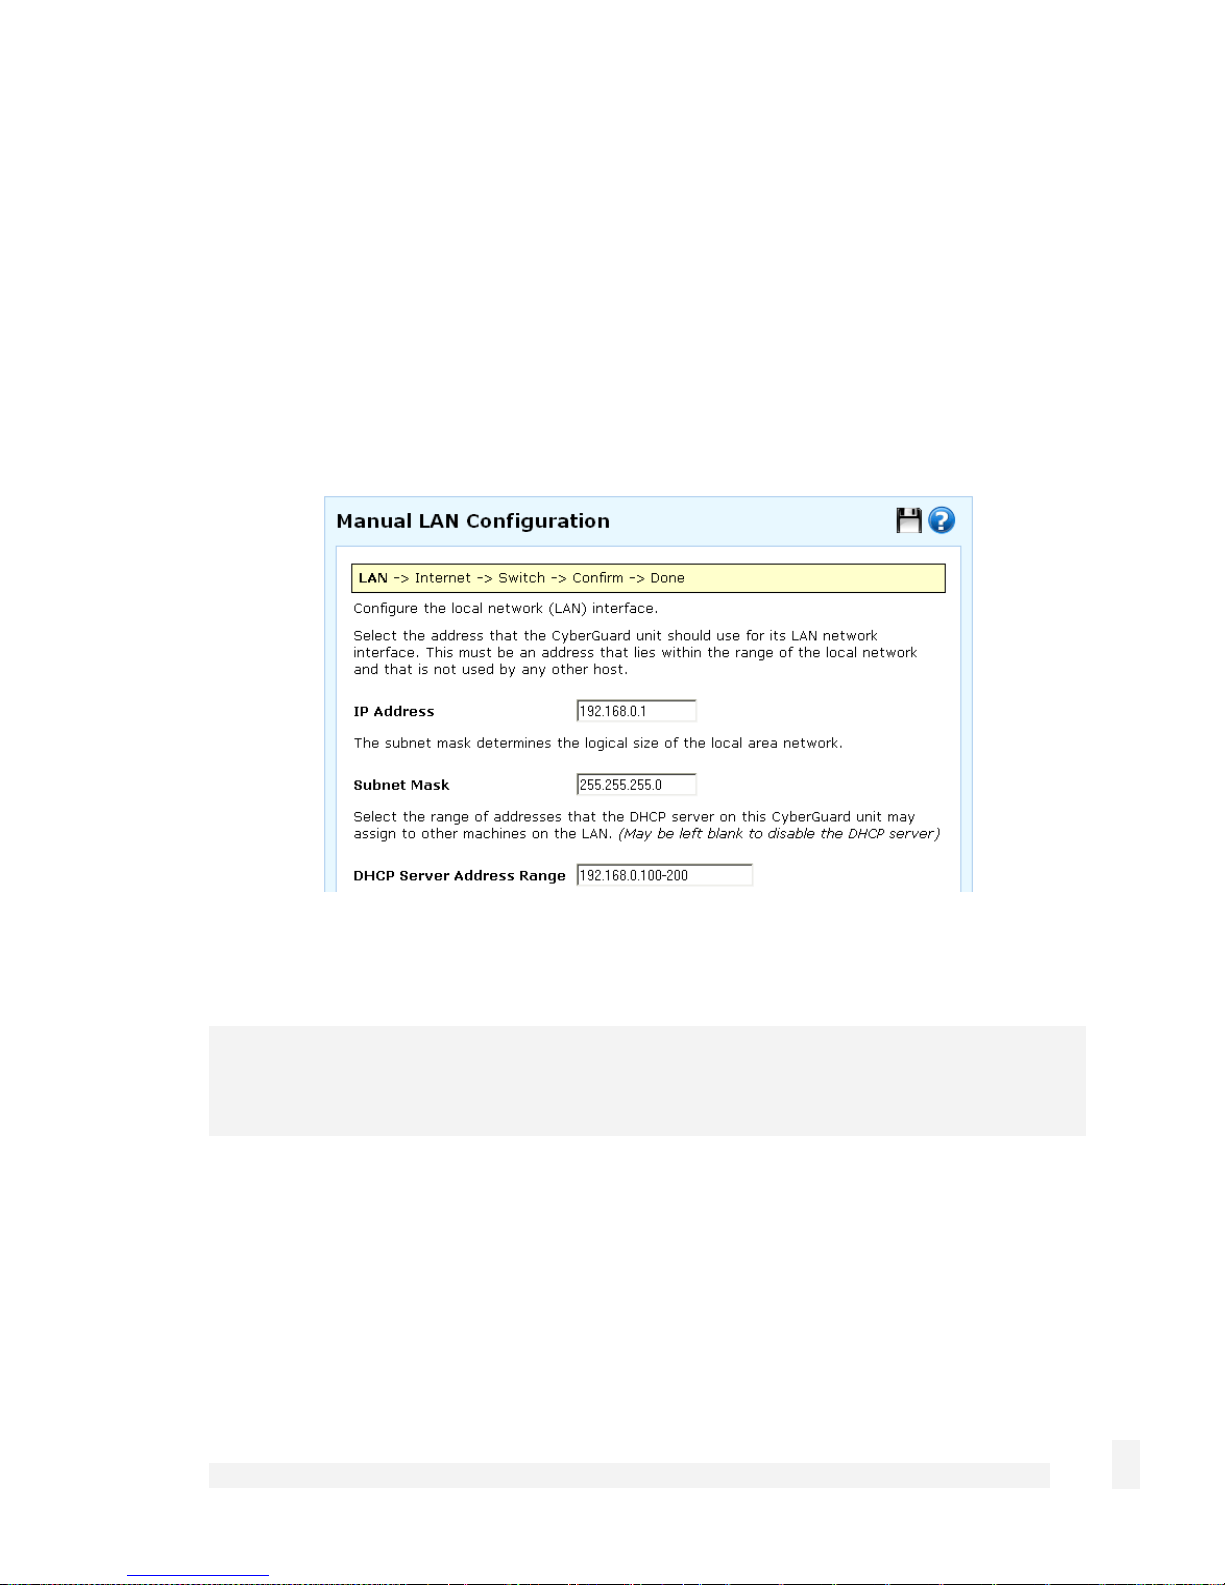
If you selected Manual configuration, some additional information is required.
Otherwise, skip to the next step.
Enter an IP address and Subnet Mask for the CyberGuard SG appliance’s LAN
connection.
Note
Take note of this IP address and subnet mask, as you will need them later on.
To enable the CyberGuard SG appliance’s built-in DHCP server, enter a range of
addresses to hand out in DHCP Server Address Range. PCs and other hosts on your
LAN that are set to automatically obtain network settings are assigned an address from
this range, and instructed to use the CyberGuard SG appliance as their gateway to the
Internet and as their DNS server for Internet domain name resolution.
Click Next.
Getting Started
17
Set up the CyberGuard SG appliance’s Internet connection settings
First, attach the CyberGuard SG appliance to your modem device or Internet connection
medium. If necessary, give the modem device some time to power up.
Select your Internet connection type and click Next. The options displayed differ
depending on the connection type selected.
If you are connecting using a Cable Modem, select your ISP, or Generic Cable
Modem Provider if yours does not appear.
If you are connecting using an analog (dialup) Modem, enter the details provided by
your ISP.
If you are connecting using an ADSL modem, select Auto detect ADSL connection
type, click Next, then enter the details provided by your ISP. If auto detection fails,
you must manually select your ADSL connection type – if you are unsure of this,
contact your ISP.
If you have a Direct Connection to the Internet (e.g. a leased line), enter the IP
settings provided by your ISP.
Note
For detailed help for each of these options, please refer to the user manual on the
CyberGuard SG CD (\doc\UserManual.pdf).
After entering the appropriate details, click Next.
Getting Started
18
Set up the CyberGuard SG appliance’s switch
Note
This page will only display if you are setting up the SG560, SG565 or SG580. Otherwise
skip to the next step.
By default, the CyberGuard SG appliance’s switch A behaves as a conventional
switching hub. However, it may be configured so that each port behaves as if it were
physically separate from the others.
Select a configuration for the CyberGuard SG appliance’s switch then click Next.
Select 1 LAN Port, 3 Isolated Ports if you require multiple network segments, such
as a DMZ, guest network or second LAN, or if you want to use multiple broadband
Internet connections for Internet load balancing or Internet failover. Port A1 is used
as the primary LAN connection.
Note
For instructions on setting up multiple network segments and Internet connections,
please refer to the next chapter of this manual.
Otherwise, select 4 LAN Ports.
Getting Started
19

Connect the CyberGuard SG appliance to your LAN
Review your configuration changes. Once you are satisfied, click Finish to activate the
new configuration.
Note
If you have changed the CyberGuard SG appliance’s LAN connection settings, it may
become uncontactable at this point. This step describes how to set up the PCs on your
network to access the CyberGuard SG appliance and the Internet.
Connect the CyberGuard SG appliance to your LAN if you haven’t already done so.
If you are setting up the SG300, connect PCs and/or your LAN hub directly to its LAN
switch.
If you are setting up the SG560, SG565 or SG580 and have configured its switch as 4
LAN Ports, connect PCs and/or your LAN hub directly to switch A.
If you are setting up the SG560, SG565 or SG580 and have configured its switch as 1
LAN Port, 3 Isolated Ports, connect port A1 directly to your LAN hub.
Otherwise, connect the LAN port directly to your LAN hub.
Set up your LAN to access the Internet
To access the Internet, each PC on your LAN must be assigned an appropriate IP
address, and have the CyberGuard SG appliance’s LAN IP address designated as its
gateway and as its DNS server.
A DHCP server allows PCs to automatically obtain these network settings when they start
up. If your network does not have a DHCP server, you may either manually set up each
PC on your network, or set up the CyberGuard SG appliance's DHCP server.
To use the CyberGuard SG appliance’s built-in DHCP server (recommended),
proceed to Automatic configuration of your LAN.
If your LAN already has a DHCP server that you will use instead of the CyberGuard
SG appliance’s built-in DHCP server, proceed to Automatic configuration of your LAN
using an existing DHCP server.
Getting Started
20
If you do not want to use a DHCP server, proceed to Manual configuration of your
LAN.
Automatic configuration of your LAN
By selecting Manual Configuration for the CyberGuard SG appliance’s LAN connection,
and supplying DHCP Server Address Range, the CyberGuard SG appliance’s DHCP
server is already set up and running.
Each PC on your LAN must now be set up to automatically obtain network settings.
Click Start -> (Settings ->) Control Panel and double click Network Connections (or in
95/98/Me, double click Network).
If presented with multiple connections, right click on Local Area Connection (or
appropriate network connection) and select Properties.
Select Internet Protocol (TCP/IP) and click Properties (or in 95/98/Me, TCP/IP -> [your
network card name] if there are multiple entries) and click Properties (in 95/98/Me, you
may also have to click the IP Address tab).
Check Obtain an IP address automatically, check Obtain DNS server address
automatically and click OK (in 95/98/Me, reboot the PC if prompted to do so).
Getting Started
21

Quick setup is now complete.
Automatic configuration of your LAN using an existing DHCP server
If you chose to have the CyberGuard SG appliance Obtain LAN IP address from a
DHCP server on LAN, It is strongly recommended that you add a lease to your
existing DHCP server to reserve the IP address you chose for the CyberGuard SG
appliance’s LAN connection.
If you chose to set the CyberGuard SG appliance’s LAN connection settings using
Manual configuration, you may simply remove this address from the pool of
available addresses.
Enter this same IP address as the gateway IP address to be handed out by the existing
DHCP server.
Enter this same IP address as the DNS server IP address to be handed out by the DHCP
server.
Ensure all PCs on the network are set up to automatically obtain network configuration as
per Automatic configuration of your LAN, then restart them.
Note
The purpose of restarting the computers is to force them to update their automatically
configured network settings. Alternatively you can use a utility such as ipconfig to
release then renew the DHCP lease, or disable and re-enable the network connection.
Quick setup is now complete.
Manual configuration of your LAN
Click Start -> (Settings ->) Control Panel and double click Network Connections (or in
95/98/Me, double click Network).
If presented with multiple connections, right click on Local Area Connection (or
appropriate network connection) and select Properties.
Select Internet Protocol (TCP/IP) and click Properties (or in 95/98/Me, TCP/IP -> [your
network card name] if there are multiple entries).
Getting Started
22

Enter the following details:
IP address is an IP address that is part of the same subnet range as the CyberGuard
SG appliance’s LAN connection (if using the default settings, 192.168.0.2 –
192.168.0.254).
Subnet mask is the subnet mask of the CyberGuard SG appliance’s LAN connection
(if using the default settings, 255.255.255.0).
Default gateway is the IP address of the CyberGuard SG appliance’s LAN
connection (if using the default settings, 192.168.0.1).
Preferred DNS server is the IP address of the CyberGuard SG appliance’s LAN
connection (if using the default settings, 192.168.0.1).
Click OK (or in 95/98/Me, Add then OK, reboot the PC if prompted to do so).
Perform these steps for each PC on your network.
Quick setup is now complete.
CyberGuard SG Rack Mount Appliance Quick Setup
Unpack the CyberGuard SG appliance
Check that the following items are included with your CyberGuard SG appliance:
Power cable
CyberGuard SG CD
Network cable
The front panel of the CyberGuard SG appliance has two 4- port network switches (A and
B), two network ports (C and D), a serial port, status LEDs and Erase button.
The rear panel of the CyberGuard SG appliance has a power inlet and power switch.
Note
Additionally, the SG710+ has two gigabit network ports on the rear panel (E and F).
Getting Started
23

The status LEDs on the front panel provide information on the operating status of the
CyberGuard SG appliance.
Note
Power is ON when power is applied. H/B (heart beat) flashes when the CyberGuard SG
appliance is running. Each of the network ports has two LEDs indicating link, activity and
speed. In its factory default state, the four status LEDs next to Power flash.
If these LEDs do not behave in this manner before your CyberGuard SG appliance is
attached to the network, perform a factory reset. Press the black Erase button on front
panel twice within two seconds to restore factory default settings. If the LEDs are still not
flashing after 30 seconds, you may need to contact customer support.
Set up a single PC to connect to the CyberGuard SG appliance
The CyberGuard SG appliance ships with initial network settings of:
LAN IP address: 192.168.0.1
LAN subnet mask: 255.255.255.0
The CyberGuard SG appliance needs an IP address suitable for your LAN before it is
connected. You may choose to use the CyberGuard SG appliance’s initial network
settings above as a basis for your LAN settings.
Note
Initial configuration is performed through a port on network switch A (A1 – A4). If you
attach A1 – A4 directly to a LAN with an existing DHCP server, or a PC running a DHCP
service, it will automatically obtain an additional address. The CyberGuard SG appliance
will still be reachable at 192.168.0.1.
However, we strongly recommend that you do not connect the CyberGuard SG appliance
to your LAN until instructed to do so by this guide.
All other network ports are by default inactive, i.e. they are not running any network
services such as DHCP, and they are not configured with an IP address.
Getting Started
24
Connect the supplied power cable to the power inlet on the rear panel of the CyberGuard
SG appliance and turn on the rear panel power switch.
Connect one of the ports of network switch A (A1 – A4) directly to your PC’s network
interface card using the supplied network cable.
Next, modify your PC’s network settings to enable it to communicate with the
CyberGuard SG appliance.
Click Start -> (Settings ->) Control Panel and double click Network Connections (or in
95/98/Me, double click Network).
Right click on Local Area Connection and select Properties.
Note
If there is more than one existing network connection, select the one corresponding to the
network interface card to which the CyberGuard SG appliance is attached.
Select Internet Protocol (TCP/IP) and click Properties (or in 95/98/Me, TCP/IP -> your
network card name if there are multiple entries) and click Properties.
Select Use the following IP address and enter the following details:
IP address: 192.168.0.100
Subnet mask: 255.255.255.0
Getting Started
25
Default gateway: 192.168.0.1
Select Use the following DNS server addresses and enter:
Preferred DNS server: 192.168.0.1
Note
If you wish to retain your existing IP settings for this network connection, click Advanced
and Add the secondary IP address of 192.168.0.100, subnet mask 255.255.255.0.
Set up the CyberGuard SG appliance’s password and LAN connection settings
Launch your web browser and navigate to 192.168.0.1.
Select Quick Setup Wizard from the center of the page.
A log in prompt is displayed. Enter the initial user name and password for the
CyberGuard SG appliance:
User name: root
Password: default
Note
If you are unable to browse to the CyberGuard SG appliance at 192.168.0.1, or the initial
username and password are not accepted, press the black Erase button on the
CyberGuard SG appliance’s front panel twice, wait 20 – 30 seconds, then try again.
Pressing Erase twice within 2 seconds resets the CyberGuard SG appliance to its factory
default settings.
Getting Started
26
 Loading...